

Page 1

GPS PET SITTER
TRACKER GPS ANIMAUX
GPS Pet Sitter
BB8298
Bigben Interactive FRANCE
Rue de la voyette CRT2 - 59814
LESQUIN Cedex
Page 2
THOMSON Pet Sitter
Thank you for purchasing this THOMSON product. In case of a malfunction please refer to the support information at
the end of this manual. We highly appreciate any feedback which helps us to improve our products. Please keep this
instruction manual for future reference.
WARRANTY
This product bearing the THOMSON trademark, is guaranteed by the manufacturer for a period of 1 year from the date of
purchase, and will, during this period, be replaced with the same or a similar model, at our option, free of charge if there
is a defect due to faulty material or workmanship. This guarantee does not cover defects arising from accidental damage,
misuse or wear and tear and is available only to the original purchaser of the product. This does not aff ect your statutory
rights.
CONTENTS OF THE PACKAGE
• Pet Sitter
• Collar clamp
• Charging cable
• Quick start manual
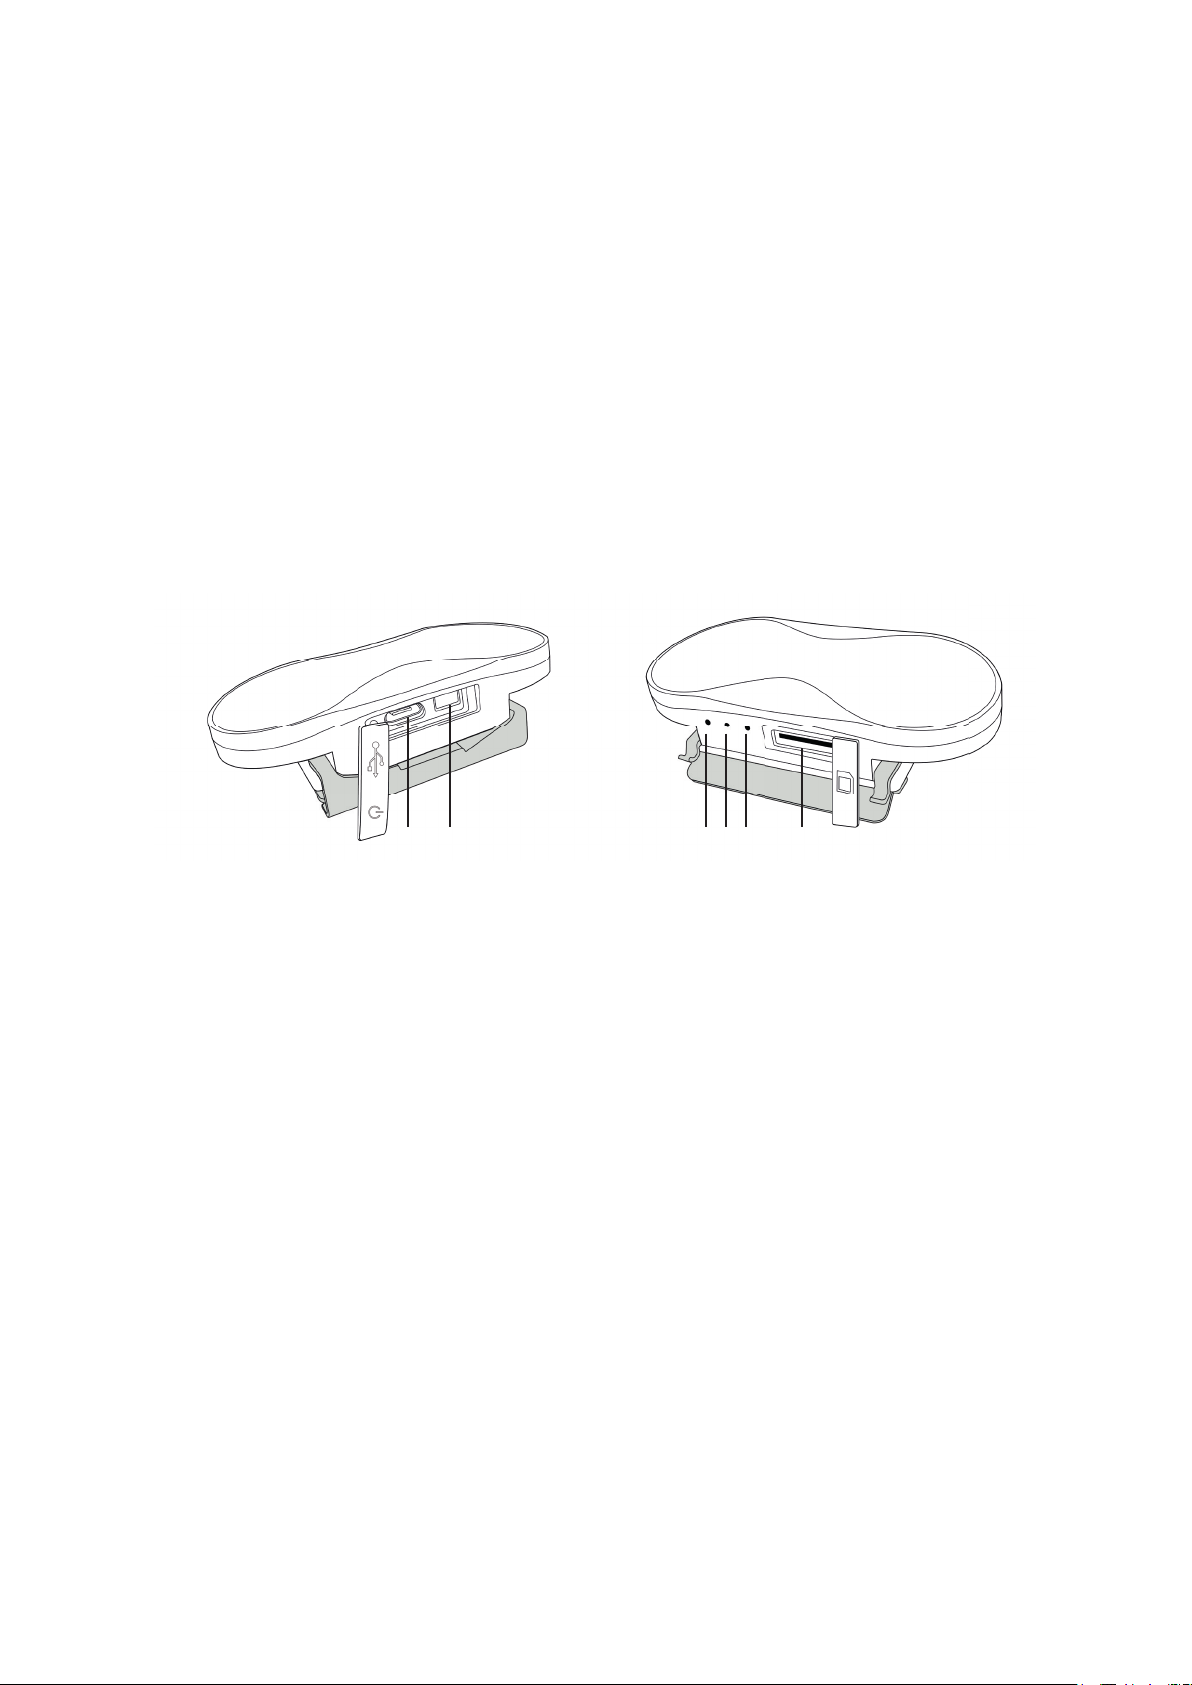
PET SITTER ELEMENTS
Fig.1 Fig.2
1 2 3 4 5 6
01. Micro USB slot for charging and rmware updates
02. Power button
03. Status LED (Green), GPS signal
Blinking – Frequency of blinking depends on the tracking frequency set in the app.
Solid – Searching for signal
04. Status LED (blue), GSM network signal
Blinking every 10 secs – Connected to GSM network
Solid – Searching for GSM signal
05. Status LED (red), Battery charge
06. Micro SIM card slot
CHARGING YOUR PET SITTER
Your THOMSON Pet Sitter features a built-in rechargeable battery. To charge it, you need to use the charging cable which
has been supplied with the device. Plug the USB connector into an AC adaptor (maximum rating 1A output) with a USB
socket (e.g. the one which came with your smartphone) or directly in to the USB socket of your computer. Remove the
silicone cover on the pet sitter and plug in the Micro USB plug into the socket.
NOTE: Please note that the pet sitter needs to be charged using the supplied cable as most other USB cables will not t.
INSTALLING A SIM CARD
Your THOMSON Pet Sitter relies on the GPS functionalities of modern mobile devices. In order for these to work it
requires a Micro SIM card to be inserted. To do this open the silicone cover next to the three LEDs and insert the SIM card
with the golden contacts facing towards the coloured plastic top of the Pet Sitter. If inserted correctly, the card will lock
into the slot. For removal, simply push it again and pull it out.
Make sure the SIM card, which you intend to use, does not require a PIN code to work, since the Pet Sitter will not
function correctly.
2
Page 3
In the next step you will have to set the APN details for your SIM card. To do this please refer to the section “APN
SETTINGS” later in the instructions.
Now turn on the Pet Sitter. After a short time the Blue LED will be lit and if connection to the GSM network has been
successful, it should start slowly blinking.
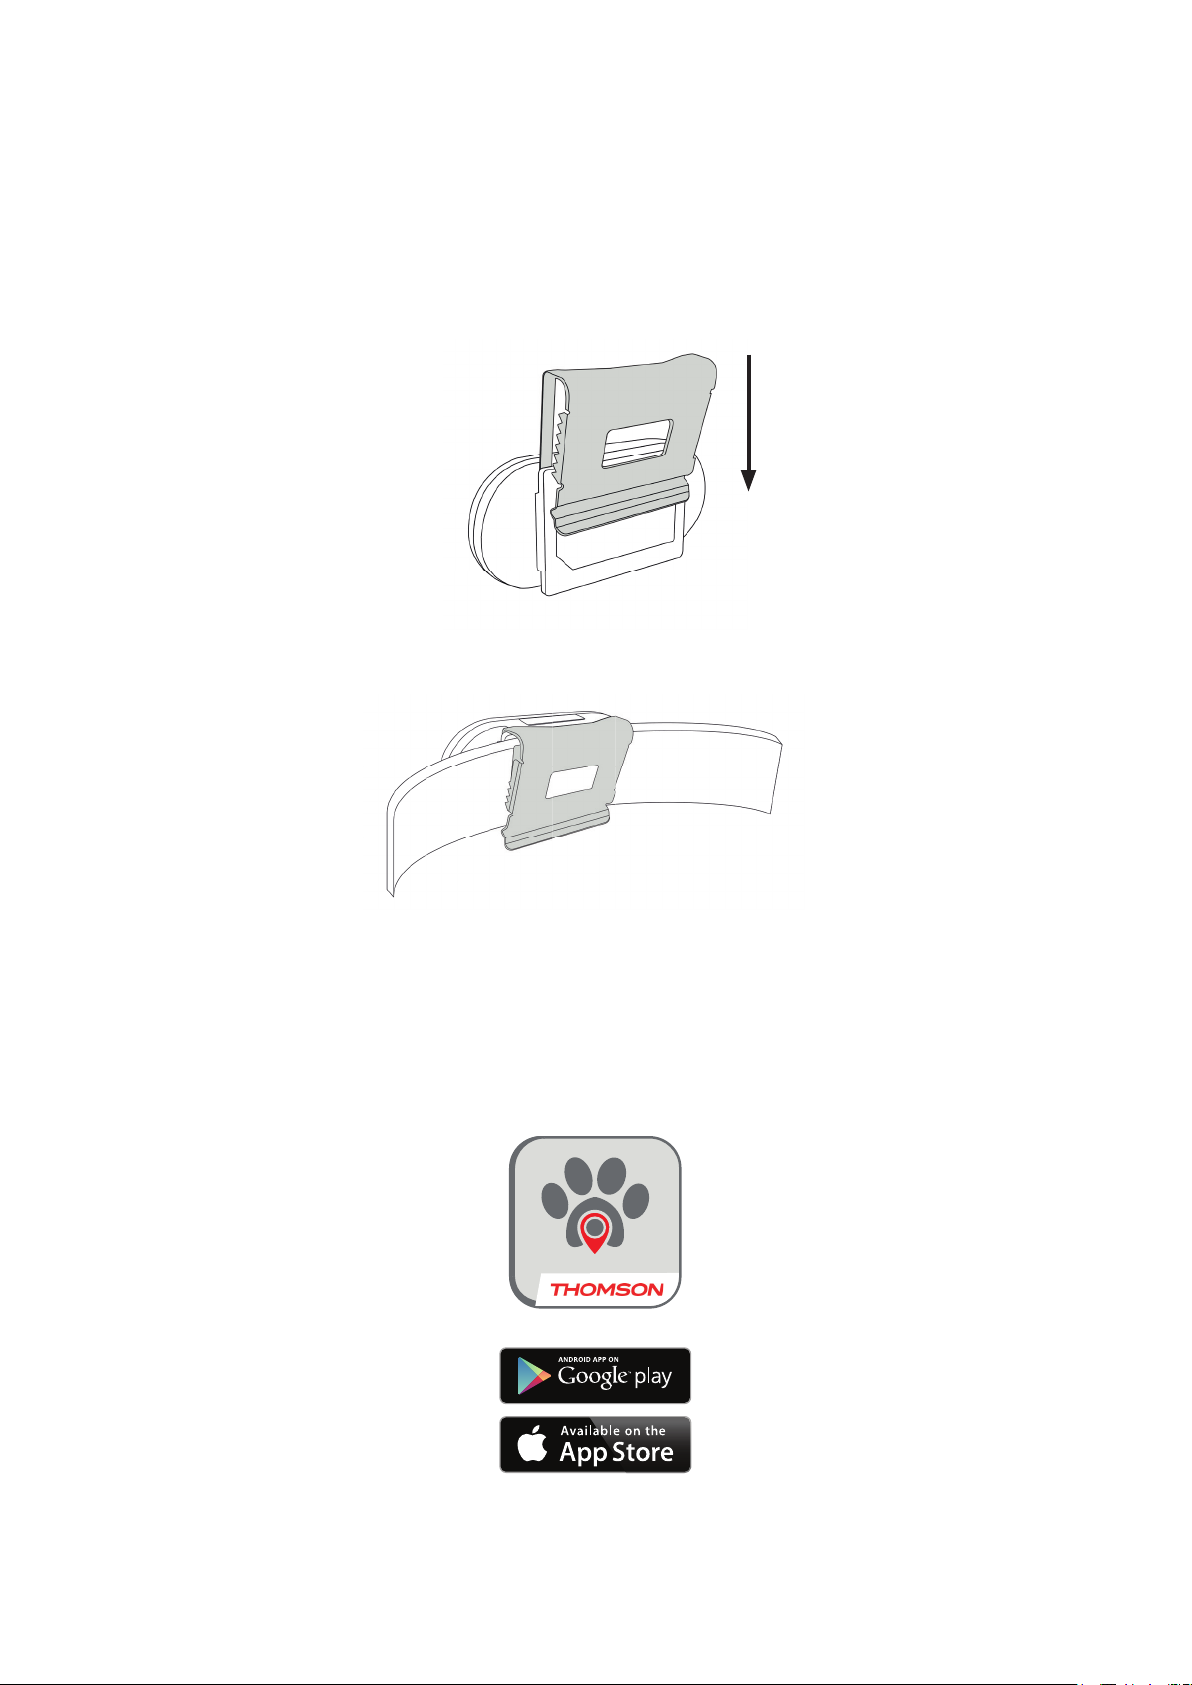
ATTACHING THE DEVICE
To attach the Pet Sitter to the collar of your pet, you will need to use the clamp provided.
• Slide the two clips into the guide rails of the Pet Sitter with the LED’s facing upwards. Make sure they are rmly
snapped in place to prevent the device from becoming loose and falling off .
Fig.3
• Now slide the Pet Sitter over the collar and ensure it is secure.
Fig.4
NOTE: When the clamp is xed to a thick collar, it will adjust to the thickness. You will need to adjust it manually to secure
a tight t, if it needs to be attached to a thinner collar afterwards. This is due to the fact that the metal clamp is rigid.
PET SITTER APP
Installing the Pet Sitter application
Look for the “THOMSON Pet Sitter” app in the Apple store/Google Play store and download it to your mobile device.
Registering an account
For your Pet Sitter to work you will need to register an account rst. This is required so you can use your mobile phone to
connect to the THOMSON server that the Pet Sitter is sending its data to. The rst time you open the app or when you’ve
logged out of your account, you will see the login screen which allows for registering new accounts as well.
3
Page 4
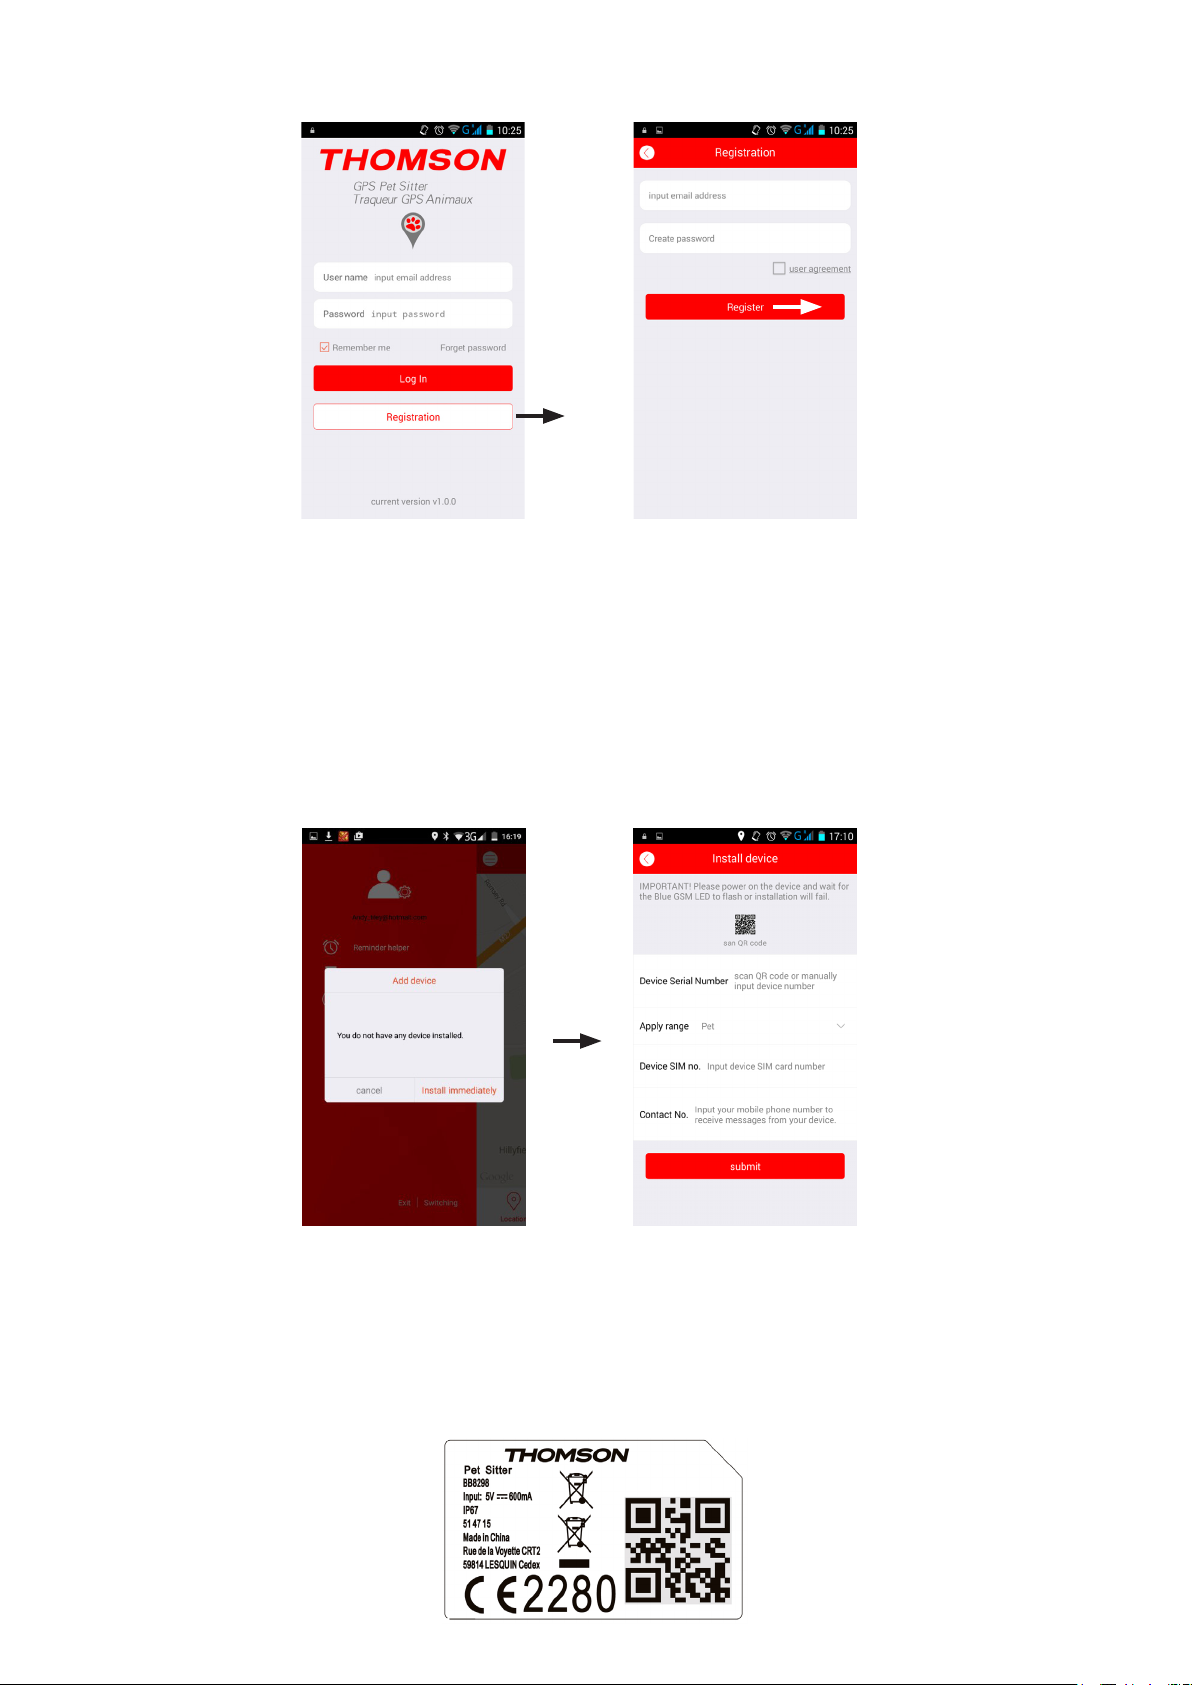
After clicking on “Registration” you will see the registration screen, where you need to enter your email address and
password. Please ensure that you also read and agree to the user agreement.
Fig.5 Fig.6
Send the registration details by clicking “Register”. An email will be sent to the specied address, which you need to
conrm to nish the registration process.
If you cannot read the email message sent, please make sure your email service is set to read the HTML format.
Alternatively, use a common email service that uses this format like Hotmail or Gmail.
Note: the product comes with 2 years of positioning service.
Registering the Pet Sitter device
In the next step you will need to register your pet sitter device to your account. For the rst installation the app will ask
you to add a new device. Select “Install Immediately” so you can install a new device.
Fig.7 Fig.8
Note: In order for the following steps to work the Pet Sitter needs to be fully charged and turned on. You’ll also require a
functional network connection (indicated by the ashing Blue light), which means a SIM card needs to be inserted rst.
Firstly, enter the serial number of your Pet Sitter either manually or by scanning the QR code on the back of the device.
Then input the phone number of the SIM card which has been inserted in the Pets Sitter where is says “Device SIM no.”
And nally enter your mobile phone number so you can receive information and data directly to the app.
Click on submit and your device will be paired to your app.
Fig.9
4
Page 5
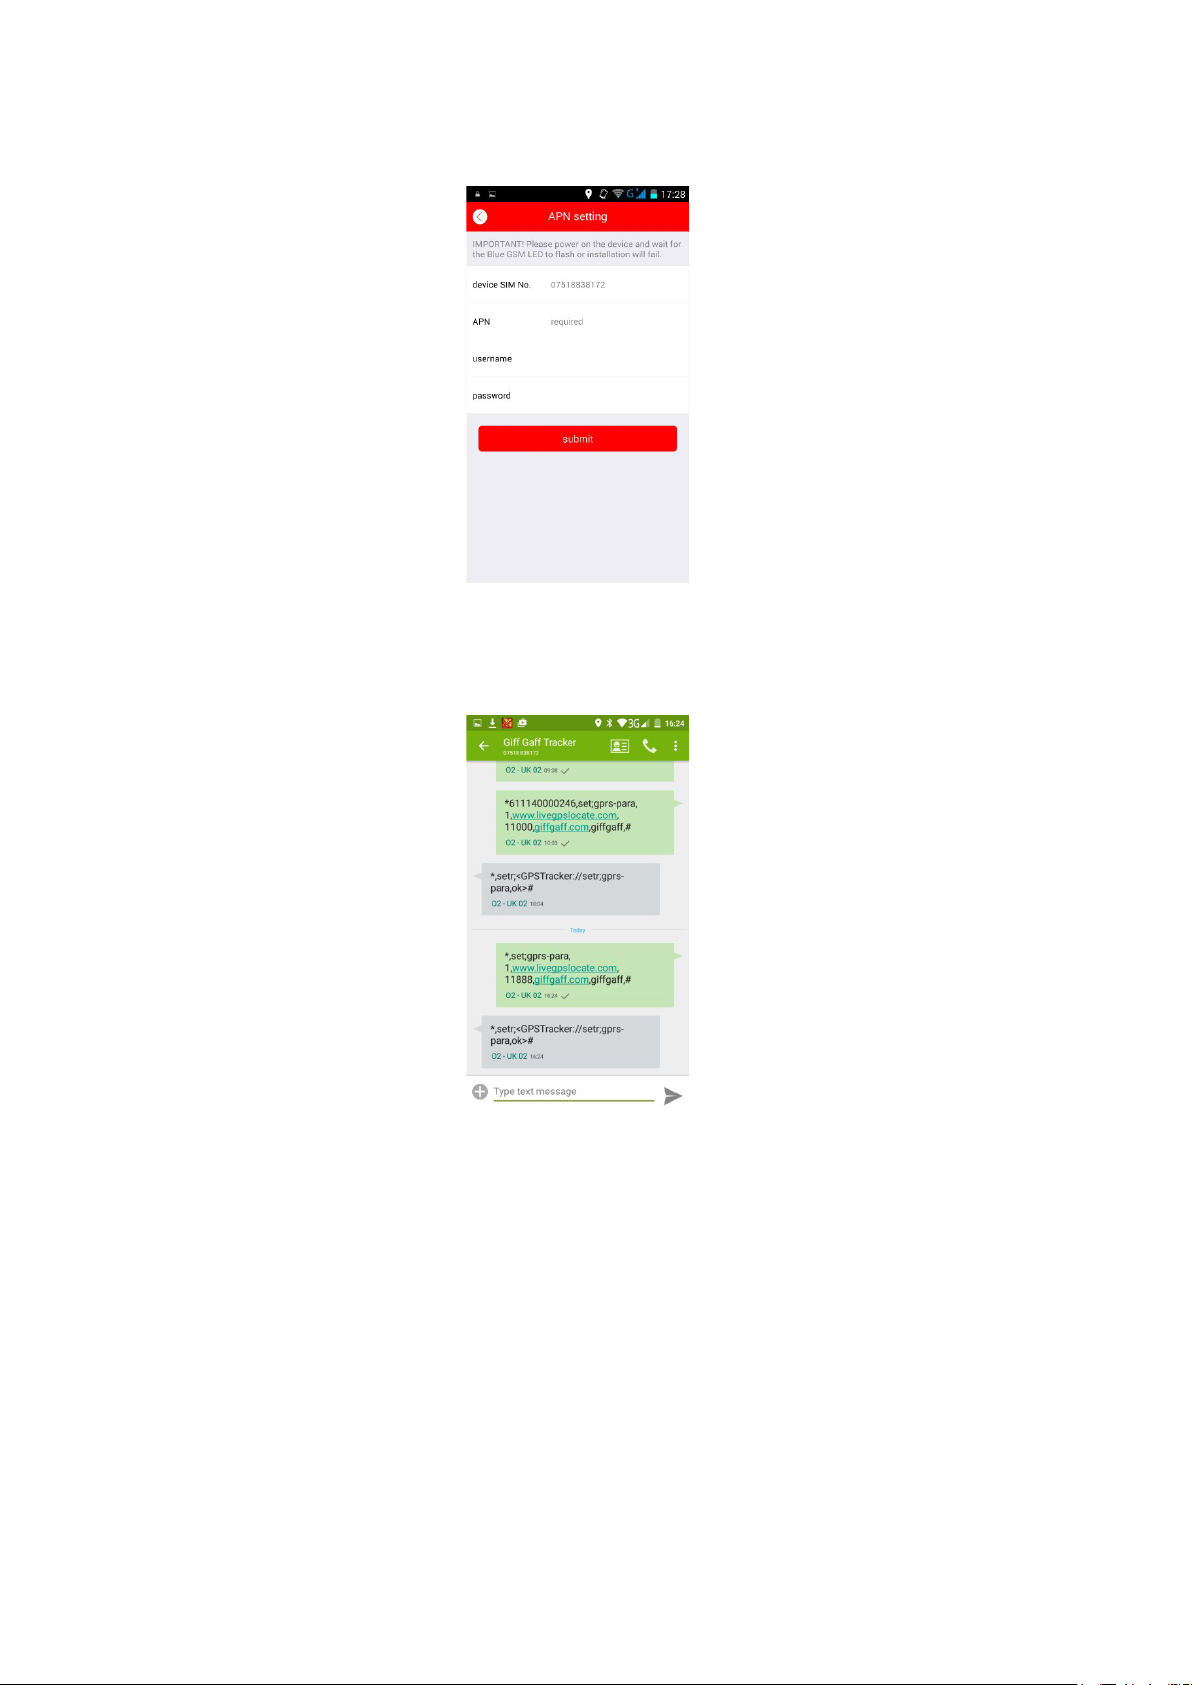
APN settings
In order for your Pet Sitter to gain access to the GSM network you will have to set the APN details (phone number of the
SIM card inserted, APN name and if necessary username and password) for the provider of your SIM card. If you’re unsure
about these, please visit the website of your provider for more detailed information or search elsewhere online
Fig.10
When you have successfully entered the APN details, the app will send an SMS message to the tracker and you will
receive a message back to conrm is has worked.
Exit the SMS message screen and return to the app.
Fig.11
5
Page 6
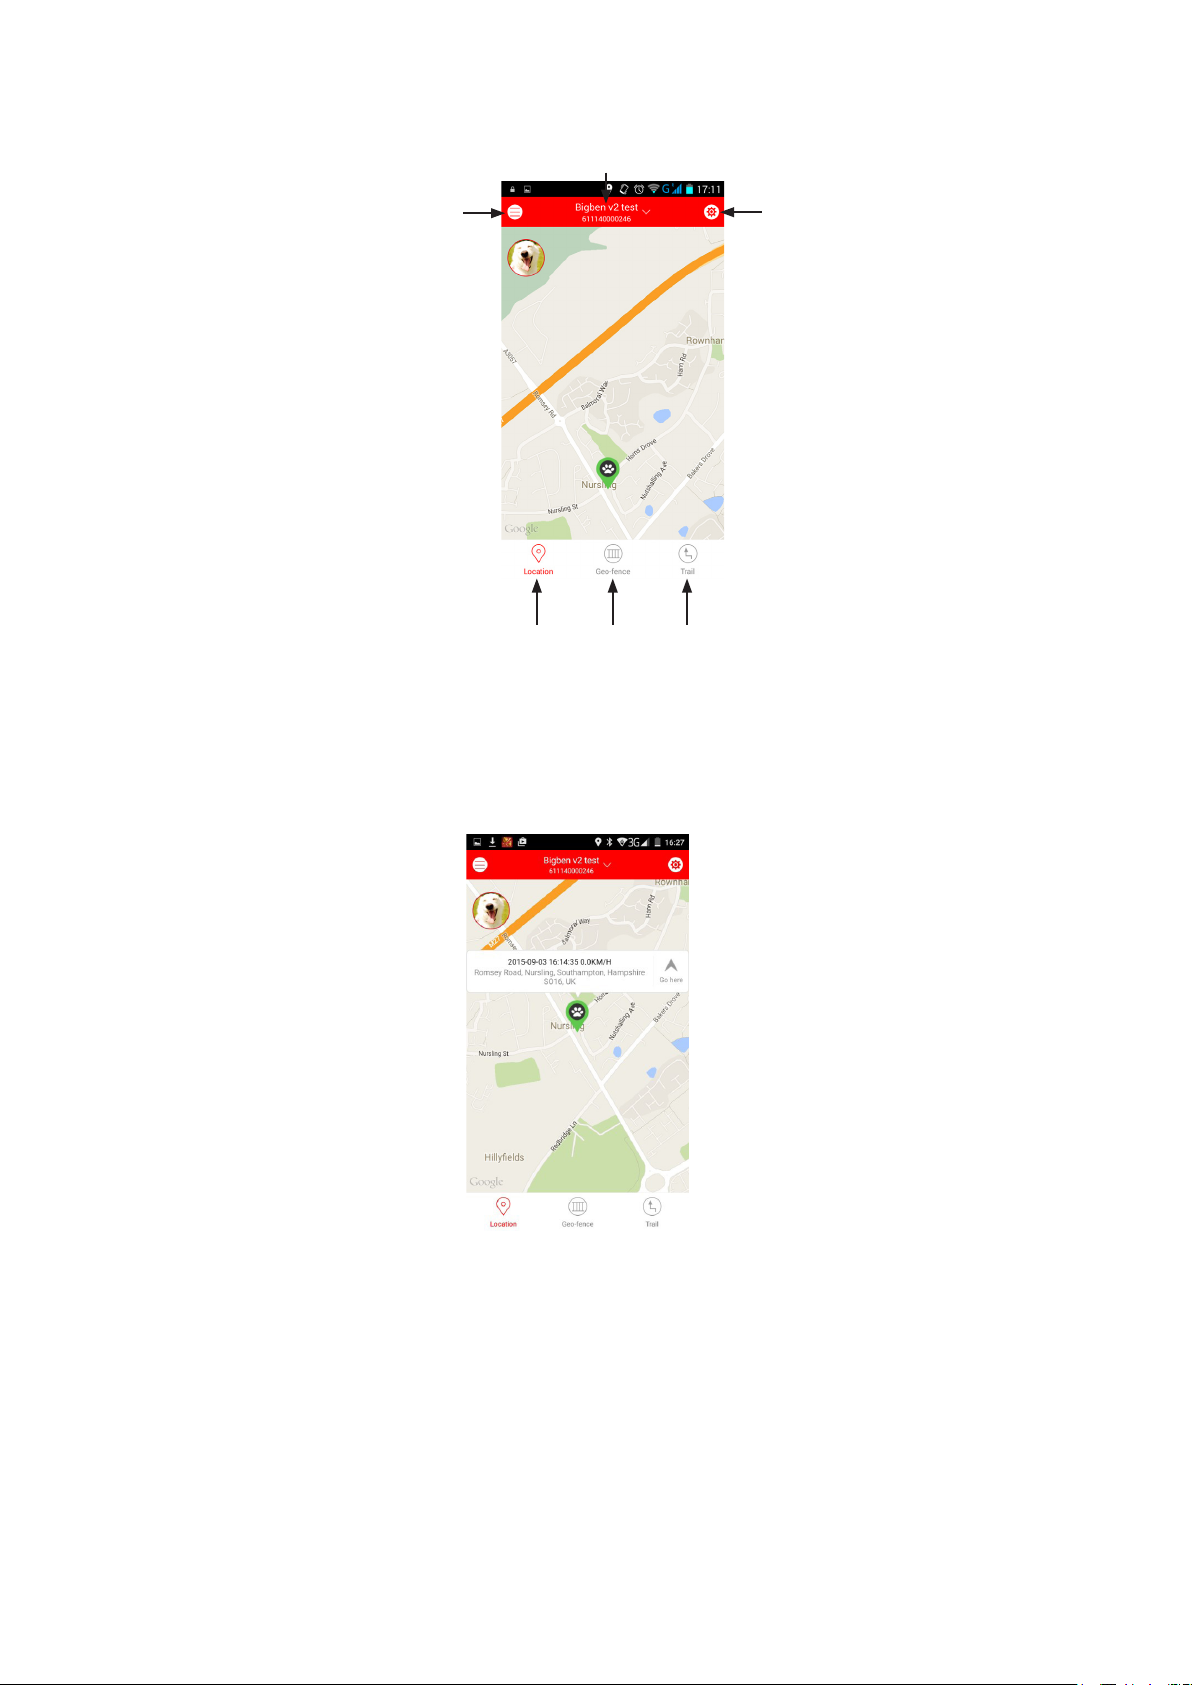
THE MAIN SCREEN
After logging in you will see the main screen. Here you can see the current position of the Pet Sitter on the map and have
access to all the functions of the app. These are as follows:
Selecting / Adding device
Fig.12
Account options
Settings
Current
location
Geo-fence
options
Path history of
the tracking
device
LOCATION
Click on this option to show the current location of the tracker. This will also show the date, time and address. If you click
on the ‘Go Here’ option you can get full directions to the location, just like using a sat-nav device.
Fig.13
GEO-FENCE
A “Geo-Fence” is a virtual boundary for a zone which the Pet Sitter is not supposed to leave. For example if you use the
Pet Sitter device on your pet, you could set up a geo-fence around your house or property to get an alert if your pet
leaves the area.
To set up a geo-fence, you rst need to dene the center of the geo-fence zone. Then you set the radius for the fence to
surround this point. You can dene the center in two ways:
- Simply point to the center by selecting it on the map you see in the screen.
- By pressing the pencil icon in lower right of the screen, you can manually enter an address for the map to go to.
- To dene the radius of the geo-fence, use the slider at the bottom of the page. You can set the fence from 50M to
500M.
- After dening both center and radius, hit nish to complete the setup. Now you will receive notications if the Pet Sitter
leaves this dened area.
6
Page 7
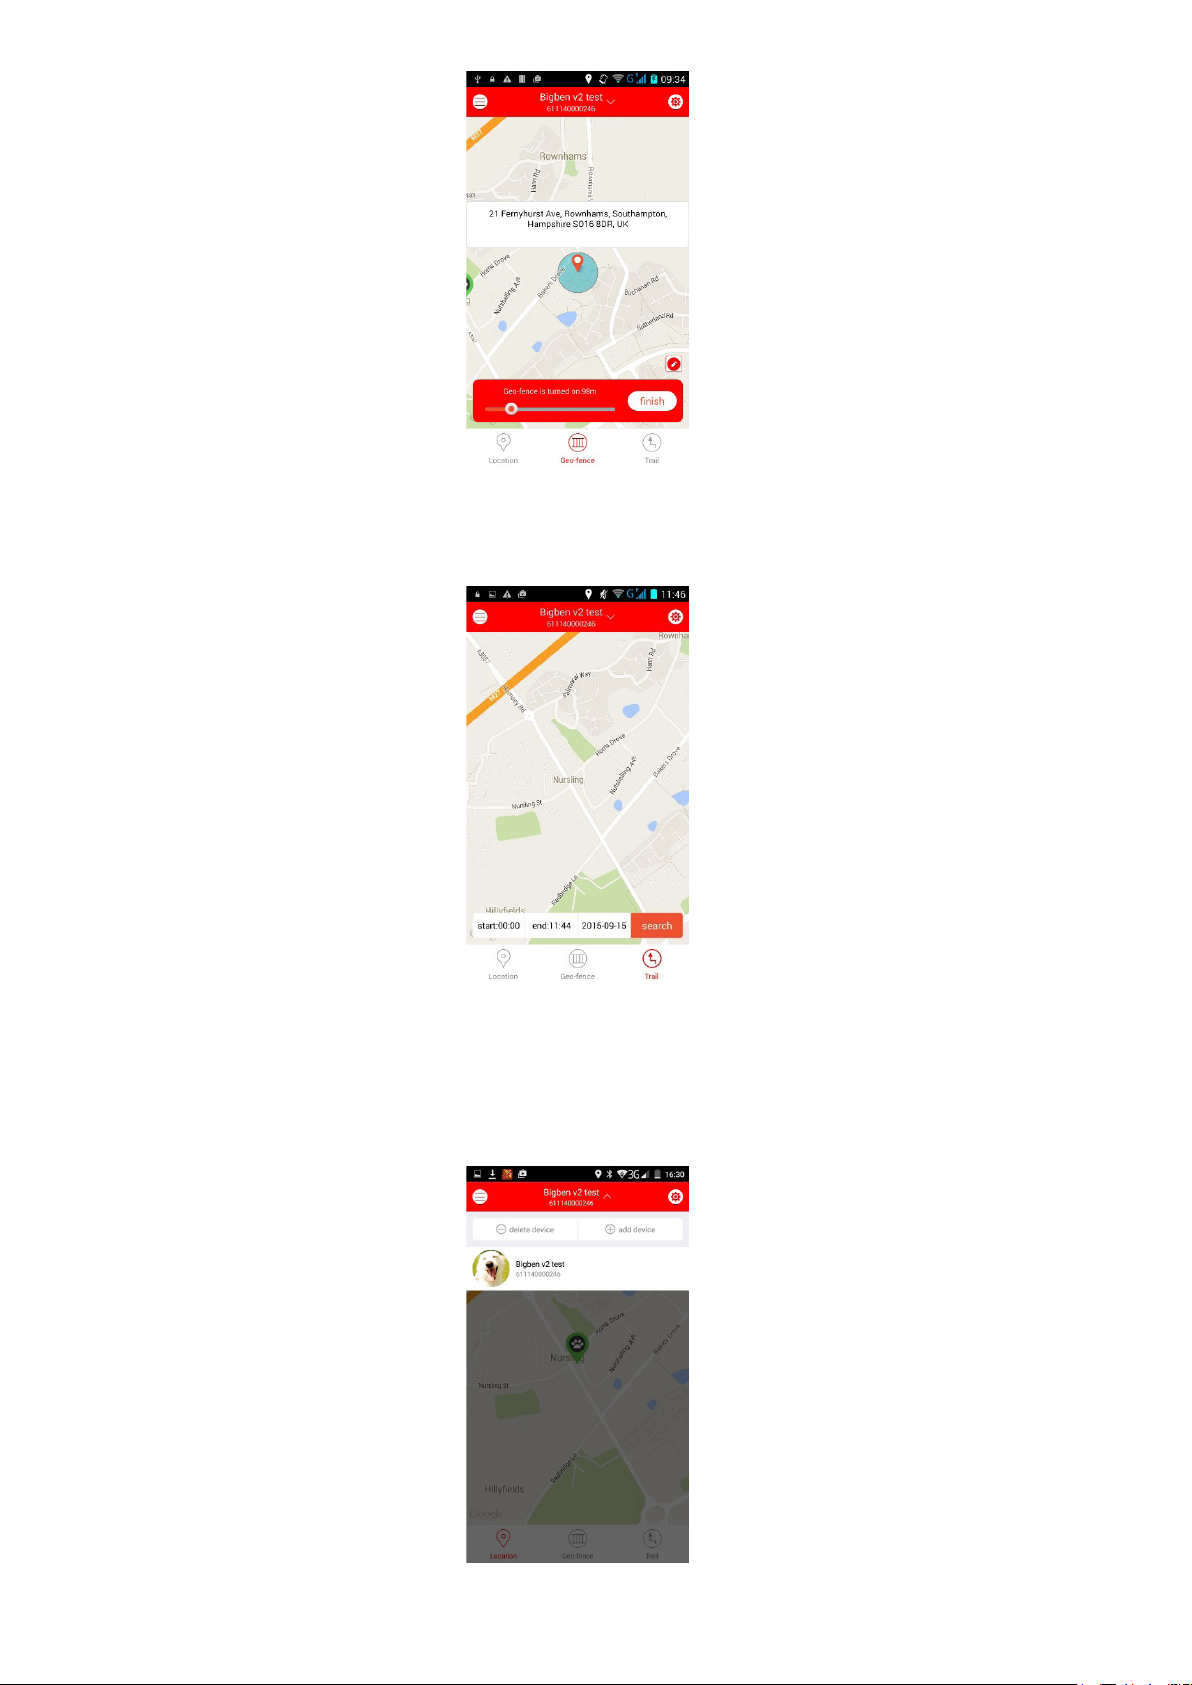
Fig.14
TRAIL
This function allows for following the path of the Pet Sitter for any specic date and time. Simply enter the date and the
times for start and end in the menu on the lower side of the screen, to see the trail for this given time.
Fig.15
ADDING ADDITIONAL TRACKERS
If you have more than one tracker you can add it to the same account.
Simply click on the name in the top centre of the map screen and then click on the Add Device option and then follow
the same procedure when you installed the rst device.
You can also delete any device from this page.
Fig.16
7
Page 8

ACCOUNT OPTIONS
• By clicking on the icon on top left of the page you can see the list of devices which are linked to your account and
those which you’ve been granted authorization for.
• “Account details” holds all the information for your pet, which is especially useful if you want to use more than one
device with your account. You can also enter further information about your pet and a photo.
Here you can also setup up to 3 phone numbers which will receive an SMS alert message, in case the tracker leaves
a previously setup geo-fence or the battery is low. Please note that for international phone number, the appropriate
country code needs to be used in front of the regular number.
• To see the history of past alerts (e.g. Geo-Fence) click on “Alerts”.
• “Authorize account” lets you grant access to the Pet Sitter to other users, for example family members. You can
register up to 3 additional mail addresses. They will all need to have the same app installed on their mobile device
• With “Exit | Change Account” you can close the app and log out of it, to log in with a diff erent account.
Fig.17
SETTINGS
• “APN settings” lets you set the details for your mobile network, for more details see the next section
• “Location frequency” determines how often the Pet Sitter will send a signal to the server to update its position.
NOTE: A higher frequency will deplete the battery faster.
• “Alarm push settings” turn on/off the alarms for the device leaving the geo-fence or if its battery is depleted
• “Timezone settings” lets you determine your location
• “Reset” will set back all your entered information to the default factory settings
• “Reminder mode” lets you determine if alarms are indicated by your phones sound, vibration or both
• “Help” leads you to the THOMSON support page, where you can nd help in case of any problems and the full
instructions.
• “Check update” will look for an updated version for both your app and the trackers rmware
• “About” shows information about the brand THOMSON
Fig.18
8
Page 9

COMMON APN DETAILS
If you are using any of the following operators you can use these APN details during installation.
OPERATOR APN USER NAME PASSWORD
SFR websfr blank blank
Orange Orange.fr orange orange
Bouygues Telecom mmsbouygtel.com blank blank
Free Free blank blank
Please ensure that you input the details correctly. Any errors may result in the product not functioning.
TROUBLESHOOTING
01. The tracker will not appear on the map
• Ensure you have followed the full registration process including the email conrmation.
• Check that the APN details have been input correctly and you have received an SMS reply.
• Make sure the tracker is switched on and the Blue and Green LEDs are slowly ashing. Note that you will only get a
ashing green LED for a GPS signal if the tracker is outdoors
02. I’m not receiving any notications or messages.
• Make sure you have sucient credit on your sim card.
• Ensure you have the push alert settings switched on in the settings.
• Make sure the Tracker is switched on and has power.
03. The time displayed of the tracker position is not correct
• Select the correct time zone for your location in the settings
04. The tracker is not providing it position very often.
• Change the location frequency in the settings to a shorter time.
05. The battery is running out too soon.
• Change the location frequency to a longer time.
RECYCLING
This symbol on the product or on its packaging indicates that this product shall not be treated as household
waste. Instead it should be taken to an applicable collection point for the recycling of electrical and electronic
equipment. By ensuring that this equipment is disposed of correctly you will help prevent potential negative
consequences for the environment and human health, which could otherwise be caused by inappropriate waste
handling of this product. The recycling of materials will help to conserve natural resources.
For more information please contact your local council or waste disposal service.
IMPORTANT SAFEGUARDS & PRECAUTIONS
• Do not disassemble; there are no serviceable parts inside.
• Do not use if the equipment is damaged.
• For external cleaning, use a soft, clean, damp cloth only.
• Use of detergents may damage the cabinet nish.
• Only use the cables that are supplied with this equipment.
9
Page 10

TECHNICAL SPECIFICATION
Dimensions (L x W x H): 75mm x 34mm x 7mm Charging current: ~600mA
Weight: 40g Charge duration: ~2h
Positional accuracy: 15m Endurance time: ~Up to 72h (battery life depends on GPS
tracking frequency)
Battery: 3.7V ~ 4.2V, 500mAh Li-Polymer Waterproof rating: IP67
Standby current: ~200mA
CUSTOMER SUPPORT:
For UK support contact: support@bigben.fr
LEGAL LINES:
iOS® and iPhone® are trademarks of Apple Inc., registered in the U.S. and other countries. Android™ and Google Play™
are trademarks of Google Inc. All other trademarks are the property of their respective owners.
10
Page 11

Country MCC MNC Network APN User Name Password bands
Albania 276 02 Vodafone Twa NULL NULL 900/1800
Argentina CTI internet.ctimovil.
com.ar
Argentina 722 10 Movistar internet.gprs.unifon.
com.ar
internet.unifon wap wap 850 /1900
Argentina 722 34 Personal gprs.personal.com [mobile number] adgj 850 /1900
Australia 505 02 Optus internet NULL NULL 900/1800
Australia 505 01 Telstra telstra.internet NULL NULL 900/1800
Australia Telstra
(data bundles) telstra.datapack [blank] Telstra Telstra
Australia Telstra
(pay by time) telstra.pcpack [blank] Telstra Telstra
Australia Three 3netaccess a a a
Australia 505 03 Vodafone vnternet.au NULL NULL 900/1800
Austria Drei drei.at guest guest guest
Austria Max Online gprsinternet GPRS [blank] [blank]
Austria Max Online
(Business) business.gprsinternet GPRS [blank] [blank]
Austria Max Online
(Metro) gprsmetro GPRS [blank] [blank]
Austria 232 01 Mobilkom A1 a1.net ppp@a1plus.at ppp 900/1800
Austria OneNet web.one.at web web web
Austria 232 07 tele.ring 07 web web@telering.at web 1800
Azerbaijan 400 01 Azercell 01 internet NULL NULL 900/1800
Bangladesh 470 01 Grameen Phone gpinternet NULL NULL 900
Belarus 257 01 VELCOM 01 web.velcom.by
unlim.velcom.by web
unlim web
unlim web
unlim
Belgium 206 10 Mobistar
(personal) internet.be mobistar mobistar 900/1800
Belgium Mobistar
(business) web.pro.be mobistar mobistar mobistar
Belgium Orange orangeinternet guest guest guest
Belgium 206 01 Proximus
(Internet) internet.proximus.be NULL NULL 900/1800
Belgium Proximus
(intranet) intraprox.be guest guest guest
Botswana 652 01 Mascom Wireless internet.mascom NULL NULL 900
Brazil 724 05 Claro claro.com.br claro claro claro
Brazil 724 16/24 Oi gprs.oi.com.br NULL NULL 900/1800
Brazil Oi (WAP) wapgprs.oi.com.br oiwap oioioi oioioi
Brazil 724 02/03/04 TIM tim.br tim tim 900/1800
Brazil Velox wap.telcel.com iesgprs iesgprs2002 iesgprs2002
Bulgaria 284 05 GloBul internet.globul.bg globul NULL 900/1800
Bulgaria 284 01 M-Tel mms-gprs.mtel.bg mtel mtel 900/1800
Cameroon 624 01 MTN Cameroon INTERNET NULL NULL 900
Canada 302 KORE Wireless apn.
zerogravitywireless
.com
Canada 302 370 Microcell
(Fido) internet.do.ca do do 850/1800
Canada 302 720 Rogers AT&T internet.com wapuser1 wap 850/1800
Chile 730 01 Entel PCS imovil.entelpcs.cl entelpcs entelpcs 1900
Chile 730 02 Telefonica
Movil web.tmovil.cl web web 850/1800
guest guest
NULL NULL [blank]
11
Page 12

China 460 00/02/07 China Mobile
00/02/07
China 460 01/06 China Unicom [none] NULL NULL 900/1800
Croatia 219 01 T-Mobile web.htgpr 38591 38591 900/1800
Croatia 219 10 VIPNET START gprs0.vipnet.hr 38591 38591 900/1800
Croatia VIPNET PRO gprs5.vipnet.hr 38591 38591 38591
Croatia VIPNET 3G 3g.vip.hr 38591 38591 38591
Colombia 732 102/123 Movistar internet.movistar.
Congo Vodacom vodanet vodalive [blank] 1800
Costa Rica 712 01 IceCelular icecelular NULL NULL 1800
Czech
Republic 230
Cesky Mobil
(contract) internet NULL NULL guest
Czech
Republic
Cesky Mobil
(CM Prepay) cinternet guest guest guest
Czech
Republic 230 02 Telefonica
(contract) internet NULL NULL 900/1800
Czech
Republic
Telefonica
(Go) gointernet guest guest guest
Czech
Republic 230 03 Vodafone
(contract) internet NULL NULL 900/1800
Czech
Republic
Vodafone
(pre-pay) ointernet guest guest guest
Czech
Republic 230 01 T-Mobile internet.t-mobile.cz NULL NULL 1800/1900
Denmark 3 [none] guest guest guest
Denmark Orange web.orange.dk guest guest guest
Denmark Sonofon [none] guest guest guest
Denmark 238 01 TDC internet NULL NULL 900/1800
Dominican
Republic
Orange orangenet.com.do guest guest guest
Egypt 602 02 Click Vodafone internet.vodafone.net internet internet 900/1800
Egypt 602 01 MobiNil mobinilweb NULL NULL 900/1800
Estonia 248 01 EMT internet.emt.ee NULL NULL 900/1800
Estonia RLE internet guest guest guest
Finland 244 03 Dna internet NULL NULL 1800
Finland 244 05 Elisa
(Radiolinja) internet rlnet internet 900/1800
Finland Saunalahti internet.saunalahti guest guest
Finland 244 91 internet NULL NULL 900/1800
Finland Song internet.song. song@internet songnet
France 208 208 20/21 ebouygtel.com NULL NULL 900/1800
France Bouygues
(B2Bouygtel) b2bouygtel.com guest guest guest
France 208 00/01/02 Orange
(contract) orange.fr orange orange 900/1800
France Orange MIB orange-mib mportail mib mib
France Orange
cmnet NULL NULL 900/1800
movistar movistar 850/1800
com.co
12
Page 13

Mobicarte orange-acte orange orange orange
France France SFR 10 websfr NULL NULL 900/1800
Germany 262 02 D2 Vodafone web.vodafone.de NULL NULL 900/1800
Germany 262 03 E-Plus internet.eplus.de eplus gprs 900/1800
Germany O2 (3G) surfo2 guest guest guest
Germany 262 07/08/11 O2 (GPRS) internet NULL NULL 900/1800
Germany Quam quam.de quam quam quam
Germany 262 01/06 T-Mobile D1 internet.t-mobile internet.t-d1.de t-mobile 900/1800
Ghana Areeba
(formerly
Spacefon)
Greece 202 01 Cosmote internet NULL NULL 900/1800
Greece Telestet gnet.b-online.gr MSISDN, e.g.
3093XXXXXXX 24680 24680
Greece TIM gint.b-online.gr web web web
Greece 202 05 Vodafone internet.vodafone.gr NULL NULL 900/1800
Guatemala 704 02 Comcel 02 Wap.tigo.gt Wap Wap 850/1800
Guatemala PCS Digital ideasalo guest guest guest
Guyana 738 02 GT&T Cellink Plus wap.cellinkgy.com test test 900
Hong Kong 454 10 New World internet NULL NULL 1800
Hong Kong 454 15 Orange web.orangehk.com NULL NULL
Hong Kong 454 12 People Internet /peoples.net NULL NULL 850/1800
Hong Kong 454 06/17 SmarTone Internet/smartone NULL NULL 850/1800
Hong Kong 454 19 Sunday internet NULL NULL 900/1800
Hong Kong 454 03/04 Three web-g.three.com.hk NULL NULL 900/1800
Hungary 216 01 Pannon
(normal) net NULL NULL 900/1800
Hungary Pannon
(at rate) netx guest guest guest
Hungary Pannon
(compressed) snet guest guest guest
Hungary 216 30 T-Mobile
(subscription) internet NULL NULL 900/1800
Hungary T-Mobile
(non-sub.) internet wap Wap Wap
Hungary T-Mobile
(MMS) mms-westel mms [supplied] [supplied]
Hungary
(contract)
(compr.) internet.vodafone.net NULL NULL 900/1800
Hungary Vodafone
(contract)
(un-comp.) standardnet.vodafone.
Hungary Vodafone
(pre-pay)
(comp.) vitamax.internet.
Hungary Vodafone
(pre-pay)
(un-comp.) vitamax.snet.vodafone.
India 404 02/03/31/49 AirTel airtelgprs.com NULL NULL 900
India 404 21/27/43/44 BPL bplgprs.com bplmobile NULL 900/1800
India 404 51-66 BSNL celloneportal NULL NULL 900/1800
India 404 13 Hutch
(normal) www NULL NULL 900
India Hutch
internet.spacefon.com guest guest guest
216 70 Vodafone
guest guest guest
net
guest guest guest
vodafone.net
guest guest guest
net
13
Page 14

(Gujarat) web guest guest guest
India 404 04 Idea Cellular internet NULL NULL 850/1800
India MTNL Mumbai mmsmtnlmum mtnl mtnl123 mtnl123
India 404 68/69 MTNL Mumbai
(Plan 2) gprsmtnlmum mtnl mtnl123 900/1900
Indonesia 510 11 Excelcomindo www.xlgprs.net xlgprs proxl 900
Indonesia 510 21 IM3 www.indosat-m3.net
wap.indosat-m3.
net
Indonesia 510 01 Indosat 01
(Matrix) satelindogprs.com
indosatgprs NULL NULL 900/1800
Indonesia 510 10 Telkomsel 10 internet
telkomsel wap wap123 900/1800
Ireland 272 03 Meteor 03 isp.mymeteor.ie my meteor 900/1800
Ireland 272 02 Digifone O2
(contract) open.internet gprs gprs 900/1800
Ireland O2
(pre-pay) pp.internet gprs gprs gprs
Ireland 272 01 Vodafone
(contract) isp.vodafone.ie vodafone vodafone 900/1800
Ireland Vodafone
(pre-pay) live.vodafone.com vodafone vodafone vodafone
Israel 425 02 Cellcom internetg NULL NULL 850/1800
Israel MTC-Vodafone apn01 guest guest guest
Israel 425 01 Orange orangeinternet NULL NULL 900/1800
Italy 222 98 Blu INTERNET NULL NULL 1800
Italy H3G tre.it guest guest guest
Italy 222 01 TIM ibox.tim.it NULL NULL 900/1800
Italy 222 10 Vodafone
(Omnitel) web.omnitel.it NULL NULL 900/1800
Italy 222 88 Wind internet.wind
internet.wind.biz Wind Wind 1800
Jamaica 338 180 Cable & Wireless wap NULL NULL 850/1900
Jamaica 338 50 Digicel web.digiceljamaica.
Japan 440 Vodafone
(J-Phone) vodafone ai@vodafone vodafone 900/1800
Jersey (See UK)
Kazakhstan 401 01 Beeline internet.beeline.kz internet.beeline NULL 900/1800
Kenya 639 02 Safaricom web.safaricom.com web web 900/1800
Laos 457 02 ETL etlnet NULL NULL 900/1800
Latvia 247 01 LMT internet.lmt.lv NULL NULL 900/1800
Latvia 247 02 Tele2 internet.tele2.lv gprs internet 900/1800
Lebannon 415 32/33/34/35 Cellis FTML internet.ftml.com.lb plugged plugged 900
Lebannon 415 03 MTC Touch gprs.mtctouch.com.lb NULL NULL 900
Lithuania 246 02 Bite GSM banga NULL NULL 900/1800
Lithuania 246 01 Omnitel
(contract) gprs.omnitel.net NULL NULL 900/1800
Lithuania Omnitel
(no contract) gprs.startas.lt omni omni omni
Luxembourg
Luxembourg 270 77 Tango internet tango tango 900/1800
Luxembourg VOXmobile vox.lu guest guest guest
Macau 455 01 CTM ctm-mobile NULL NULL 900/1800
Macau Macau Hutchison
Telecom (Internet) web.hutchisonmacau.
gprs im3 900/1800
wapuser wap03jam 900/1800
com
270 01 LUXGSM web.pt.lu NULL NULL 900/1800
hutchison 1234 1234
com
14
Page 15

Macau Macau Hutchison
Telecom (MMS) mms.hutchisonmacau.
Malaysia 502 10 DIGI diginet NULL NULL
Malaysia 502 13 Celcom celcom.net.my NULL NULL 900/1800
Malaysia 502 12 Maxis 2G
(contract) internet.gprs.maxis NULL NULL 900/1800
Malaysia Maxis 3G
(contract) unet maxis wap wap
Malaysia Maxis
(pre-pay) net maxis net net
Malaysia 502 17 Timecel timenett.com.my
(timenet.com.my?) NULL NULL 900/1800
Malaysia 502 13 TM Touch internet NULL NULL
Malta 278 278 21 Go Mobile
(contract) gosurng NULL NULL
Malta Go Mobile
(pre-pay) rtgsurng guest guest guest
Mexico 334 20 Telcel internet.itelcel.com webgprs webgprs2002 900/1800
Moldavia 259 02 Moldcell internet gprs gprs 900
Morocco 604 604 01 Maroc Telecom iam wac 1987 900
Morocco 604 00 Medi Telecom wap.meditel.ma MEDIWAP MEDIWAP 900/1800
Netherlands 204 08/10 KPN Mobile internet KPN gprs 900/1800
Netherlands O2 internet guest guest guest
Netherlands 204 16/20 T-Mobile (Ben)
active internet NULL NULL
Netherlands 204 12 Telfort internet telfortnl password 900/1800
Netherlands 204 04 Vodafone
(normal) web.vodafone.nl vodafone vodafone 900/1800
Netherlands Vodafone
(business) oce.vodafone.nl vodafone vodafone vodafone
New Zealand 530 01 Vodafone
(unrestricted) internet NULL NULL
New Zealand Vodafone
(restricted) www.vodafone.net.nz guest guest guest
Nicaragua 710 Alo Pcs internet.ideasalo.ni internet internet
Nigeria 621 50 Globacom glosecure wap wap 900/1800
Nigeria 621 30 MTN Nigeria web.gprs.mtnnigeria.
Nigeria 621 60 ETISALAT etisalat NULL NULL 900/1800
Nigeria Vmobile wap.vmobile wap wap wap
Nigeria Zain internet.ng.zain.com internet internet internet
Nigeria 621 20 Airtel internet.ng.airtel.com
wap wap
Norway 621 02 Netcom internet.netcom.no netcom netcom 900/1800
Norway TalkMore (same as Netcom)
Norway 621 01 Telenor Mobil
(Vodafone) Internet
internet.vodafone.
net
Pakistan 410 03 UFone ufone.internet ufone ufone 900/1800
Panama 714 01 Cable & Wireless apn01.cwpanama.
Paraguy 744 CTI internet.ctimovil.
Peru 716 10 Claro (TIM) tim.pe tim tulibertad
Philippines 515 02 Globe Telecoms
(Web) internet.globe.com.ph globe globe
Philippines Globe Telecoms
(WAP) www.globe.com.ph globe globe globe
com
NULL NULL
hutchison 1234 1234
web web 900/1800
net
xxx xxx 850
com.pa
ctigprs ctigprs999
com.py
15
Page 16

Philippines 515 03 Smart internet witsductoor banonoy
Philippines 515 05 Sun Cellular minternet NULL NULL
Poland 260 02 ERA erainternet erainternet erainternet
Poland Heyah heyah.pl heyah heyah
Poland 260 03 Orange internet internet internet
Poland 260 01 Polkomtel www.plusgsm.pl NULL NULL
Portugal 268 03 Optimus internet NULL NULL 900
Portugal 268 06 TMN internet NULL NULL 900/1800
Portugal 268 01 Vodafone
(Telecel) internet.vodafone.pt NULL NULL 850
Russia 250 28 BeeLine internet.beeline.ru beeline beeline
Romania 226 01 Connex
(Vodafone) internet.connex.ro internet.connex.ro connex
Romania 226 10 Orange internet NULL NULL
Russia 250 02 Megafon
internet NULL NULL
Russia Megafon
(kvk) internet.kvk guest guest guest
Russia Megafon
(ltmsk) internet.ltmsk guest guest guest
Russia Megafon
(Moscow) internet.msk gdata gdata gdata
Russia Megafon
(mc) internet.mc guest guest guest
Russia Megafon
(NWGSM) internet.nw guest guest guest
Russia Megafon
(Siberia) internet.sib guest guest guest
Russia Megafon
(UGSM) internet.ugsm guest guest guest
Russia Megafon
(usi) internet.usi.ru guest guest guest
Russia Megafon
(Volga) internet.volga guest guest guest
Russia 250 35 Motiv
(uses BeeLine) internet.beeline.ru beeline beeline 900
Russia 250 01 MTS internet.mts.ru
internet.kuban mts mts 900/1800
Russia 250 03 NCC internet ncc NULL 900
Russia 250 16 NTC internet.ntc NULL NULL 900/1800
Russia 250 92 PrimTel internet.primtel.ru NULL NULL 900
Saint Lucia 358 110 Cable & Wireless internet NULL NULL
Saint Vincent &
the Grenadines 360 070
Digicel wap.digiceloecs.com wapoecs wap03oecs
Saudi Arabia 420 01 STC jawalnet.com.sa NULL NULL
Senegal
608 02 Tigo wap.sentelgsm.com NULL NULL 900/1800
Serbia-
Montenegro 220 01 Mobtel Srbija internet mobtel gprs 850
Serbia-
Montenegro 220 03
Telekom Srbija gprsinternet mts 064
Serbia-
Montenegro Telekom Srbija
(WAP service) gprswap mts 064 064
Singapore 525 03 M1 mobilenet NULL NULL
Singapore 525 02 SingTel internet NULL NULL
16
Page 17

Singapore 525 05 Starhub shwapint NULL NULL 900/1800
Slovakia 231 02 Eurotel internet NULL NULL 900
Slovakia Globtel internet guest guest guest
Slovakia 231 01 Orange internet jusernejm pasvord 900/1800
Slovenia 293 41 Mobitel
(Internet) internet mobitel internet 900/1800
Slovenia Mobitel
(Internet Pro) internetpro mobitel internet internet
Slovenia 293 40 Simobil [none] NULL NULL 900
South Africa 655 07 Cell-C internet NULL NULL 850
South Africa 655 10 MTN internet NULL NULL 900/1800
South Africa 655 01 Vodacom internet NULL NULL 850
South Africa Virgin Mobile vdata guest guest guest
Spain 214 03 Amena internet CLIENTE AMENA 900/1800
Spain 214 07 Telefonica
(Movistar) movistar.es movistar movistar 900
Sri Lanka 413 02 Dialog GSM
(contract) www.dialogsl.com NULL NULL 900/1800
Sri Lanka Dialog GSM
(pre-pay) ppwap guest guest guest
Sri Lanka 634 01 Mobitel isp NULL NULL
Spain 214 01 Vodafone
(Airtel) airtelnet.es vodafone vodafone 900/1800
Sweden 240 07 Tele2, Comviq isplnk1.swip.net gprs internet 900
Sweden Tele2 (3G) internet.tele2.se wap wap wap
Sweden 240 08 Telenor
(GPRS) internet.vodafone.net NULL NULL 900/1800
Sweden Telenor
(3G) services.vodafone.net guest guest guest
Sweden 240 01 Telia online.telia.se NULL NULL 850
Sweden Tre (3G) data.tre.se void void void
Switzerland 228 03 Orange internet NULL NULL
Switzerland 228 02 Sunrise internet internet internet 900/1800
Switzerland 228 01 Swisscom gprs.swisscom.ch NULL NULL
Taiwan 466 11 Chunghwa
Telecom emome or
internet NULL NULL 900/1800
Taiwan 466 01 Far EasTone fetnet01 NULL NULL
Taiwan 466 88 KG Telecom internet NULL NULL
Taiwan Taiwan Cellular internet guest guest guest
Thailand 520 01 AIS internet ais ais
Thailand 520 18 DTA C www.dtac.co.th NULL NULL
Turkey 286 04 Aycell aycell NULL NULL
Turkey 286 02 Telsim telsim telsim telsim 900/1800
Turkey 286 01 Türkcell internet gprs gprs
UAE 424 02 Etisalat mnet mnet mnet
UK 3 three.co.uk guest guest guest
UK 234 50 Jersey
Telecom pepper abc abc
UK 234 02 O2
(contract) mobile.o2.co.uk web password 900/1800
UK UK O2
(contract)
-faster- mobile.o2.co.uk faster password
UK O2
(pre-pay) payandgo.o2.co.uk payandgo payandgo payandgo
UK 234 33/34 Orange (Pay Monthly) orangeinternet user pass
UK Orange
17
Page 18

(Pay and Go) orangewap Multimedia Orange Orange
UK 234 30 T-Mobile general.t-mobile.uk user pass 900/1800
UK 234 31/32 Virgin Mobile goto.virginmobile.com user NULL 900/1800
UK 234 15 Vodafone
(contract) internet web webs
UK Vodafone
(pre-pay) pp.vodafone.co.uk wap wap wap
Ukraine Djuice www.djuice.com.ua igprs igprs igprs
Ukraine Jeans www.jeans.ua guest guest guest
Ukraine 255 03 Kyivstar www.kyivstar.net igprs internet
Ukraine Mobi-GSM internet.urs guest guest guest
Ukraine 255 01 UMC 01 www.umc.ua NULL NULL
Uruguay 748 01/03 ANCEL gprs.ancel NULL NULL
Uruguay 748 10 CTI internet.ctimovil.
com.uy
Uruguay 748 07 Movistar webapn.movistar.
com.uy
USA Cingular
(ex AT&T) proxy guest guest guest
USA Cingular
(With acceleration) ISP.CINGULAR ISPDA@
CINGULARGPRS
.COM CINGULAR1 CINGULAR1
USA Cingular
(NO acceleration) ISP.CINGULAR ISP@
CINGULARGPRS
.COM CINGULAR1 CINGULAR1
USA 310 41 Cingular
(non-contract) WAP.CINGULAR WAP@
CINGULARGPRS
.COM CINGULAR1 900/1800
USA T-Mobile (Internet) internet2.voicestream.
com
USA T-Mobile (VPN) internet3.voicestream.
com
USA 310 26 T-Mobile
(non-contract) wap.voicestream.com NULL NULL 900/1800
Uzbekistan 434 07 Uzdunrobita net.urd.uz user pass
Venezuela 734 02 Digitel TIM gprsweb.digitel.ve NULL NULL
ctiweb ctiweb999
movistar movistar
guest guest guest
guest guest guest
18
Page 19

www.bigben.eu
 Loading...