

Page 1

Hob
353 Series
User Manual
for use in GB, FR, DE, NL, ES, IT, SI,
SE, NO, DK, PT, FI, AT, CH, IE, BE, LU
Page 2

DECLARATION OF CONFORMITY
We: THETFORD Ltd
Address: Unit 6 Brookfields Way, Manvers, Rotherham, S63 5DL
Telephone: (+44) (0) 844 997 1960. Fax: (+44) (0) 844 997 1961
Declare that
Product Types; Domestic build-in gas hobs
Model Number/Description; SHB353XX Series LPG Hobs and SCU353XXX Series LPG
Combination Hobs
Satisfies the essential requirements of the Gas Appliances Directive 2009/142/EC and is
manufactured in accordance with the harmonised European standards:
Satisfies the essential requirements of the Electro Magnetic Compatibility Directive
2004/108/EC as amended by 93/68/EEC and is manufactured in accordance with the
harmonised European standards:
EN 30-1-1: 2008+A1:2010 & A2 2010 + A3:2013
EN 30-2-1: 1998+A1:2003+A2:2005
We also declare that the production of each specific model will be in conformity with the
type as described in the EC type-examination certificate:
CE 613330 Issued by BSI
We also declare that the production of each specific model will be in conformity with the
type as described in Test Report(s):
TR/14/293, Issued by BSI
Name : S.P. Cordeille
Title/Position : Chief Executive Officer
Place & Date of Issue : Rotherham, 24 October 2014
Signature :
Page 3

Index
ENGLISH 2
FRANÇAIS 12
SVENSKA 22
ESPAÑOL 32
DANSK 42
DEUTSCH 52
NEDERLANDS 62
ITALIANO 72
PORTUGUÊS 82
NORSK 92
SUOMI 102
SLOVENŠČINA 112
Page 4

EN
Original User Manual
Contents
1 Introduction............................................................................................................................................................ 2
2 Symbols...................................................................................................................................................................2
3 Safety....................................................................................................................................................................... 3
4 Main components.................................................................................................................................................5
5 Before use...............................................................................................................................................................5
6 Use of the burners................................................................................................................................................6
7 Use of the sink...................................................................................................................................................... 6
8 Safe cooking...........................................................................................................................................................7
9 Maintenance and cleaning.................................................................................................................................7
10 Gas leaks.................................................................................................................................................................8
11 Trouble shooting................................................................................................................................................... 8
12 Servicing..................................................................................................................................................................9
13 Putting in storage..................................................................................................................................................9
14 Technical specifications...................................................................................................................................10
15 Questions..............................................................................................................................................................10
16 Warranty................................................................................................................................................................10
1. Introduction
This is the user manual for your Thetford hob. Read the safety instructions and information on use
and maintenance of the hob carefully before continuing. This will enable you to use the hob safely
and efficiently. Retain this manual for future reference.
2. Symbols
Key to symbols:
Warning. Risk of injury and/or damage.
Caution. Hot surface. Risk of injury and/or damage.
Attention. Important information.
2
Page 5
Note. Information.
3. Safety
Use the appliance for cooking only and not for
anything else, for example room heating. This can
lead to carbon monoxide poisoning and overheating
of the hob. The manufacturer cannot be held liable
for damage resulting from improper use or incorrect
setting of the controls.
The use of this gas cooking appliance results in
the production of heat, moisture and products of
combustion in the room in which it is installed.
Ensure the room has sufficient ventilation when the
appliance is in use. During prolonged use, additional
ventilation may be needed by opening a window or
increasing the extraction force of the hood.
This appliance may be used by children aged 8
years or older and persons with reduced physical,
sensory or mental capabilities and/or lack of
experience and knowledge only if they are
supervised or have been given instructions on
the safe use of this appliance and understand the
potential hazards.
EN
The burners and pan supports are hot during and
after use. Allow all parts to cool before touching
them, as this can cause serious injury.
Never extinguish a cooking fire with water. Turn
the burner off and cover the flame with a lid or a fire
blanket.
3
Page 6
Keep children younger than 8 years away from the
appliance, except under constant supervision.
Do not allow children to play with the appliance.
Do not allow children to clean or maintain this
equipment unattended.
Use only parts supplied by the manufacturer.
Do not change or adjust anything on the appliance,
unless the change is authorised by the manufacturer
or its representative.
Do not store items on the cooking surface.
Do not shut the glass lid when the burners are lit or
still warm.
4
Page 7
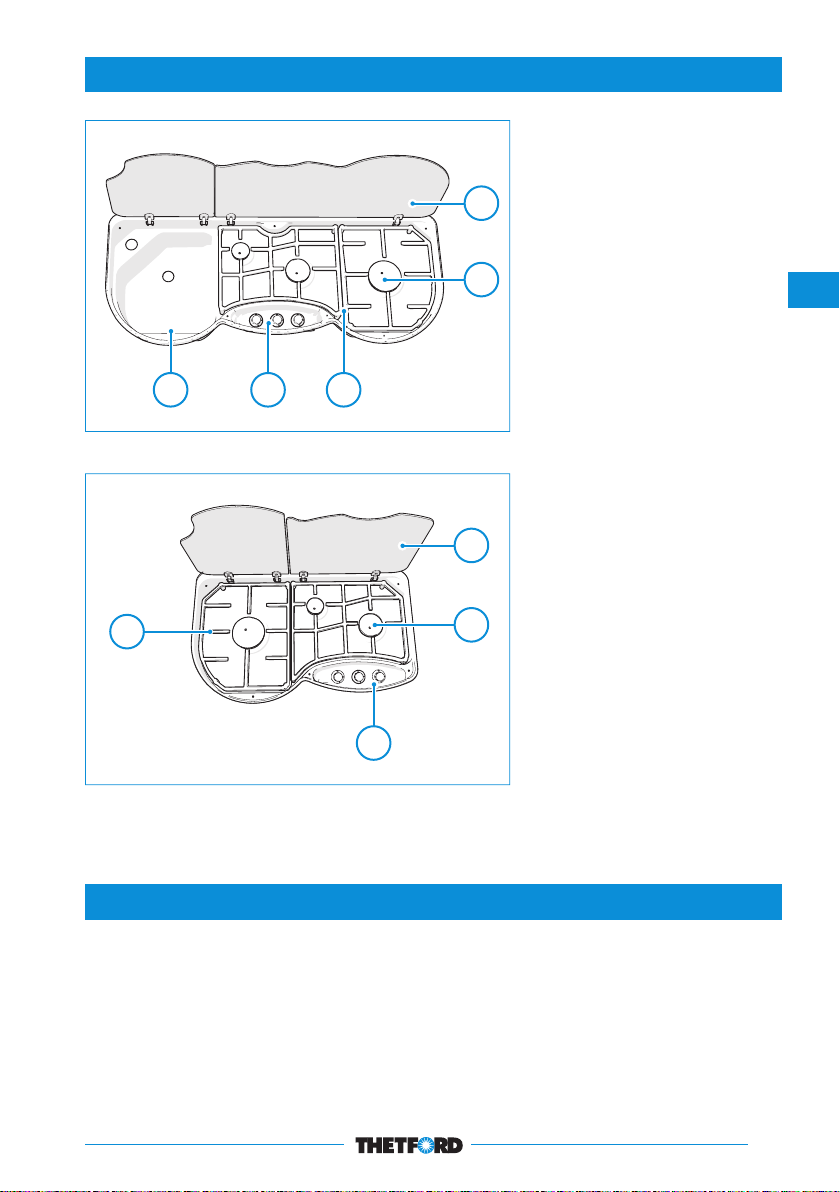
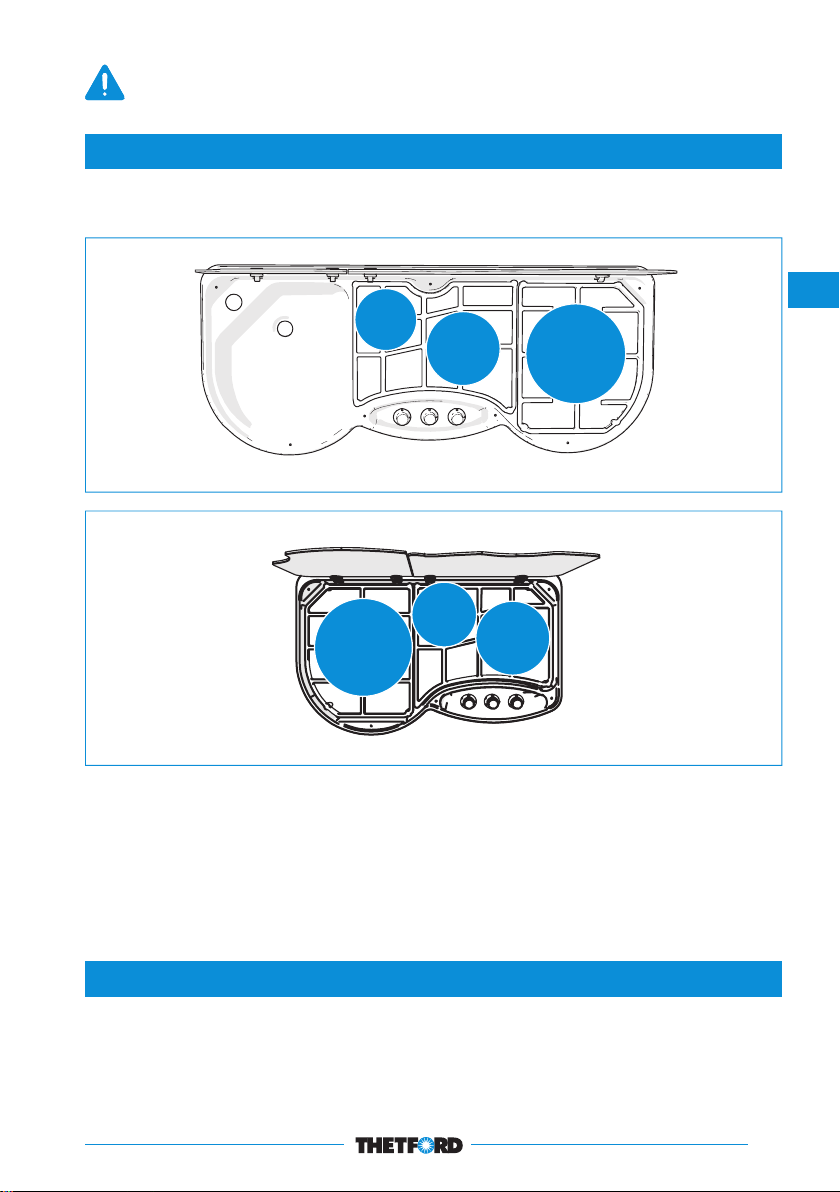
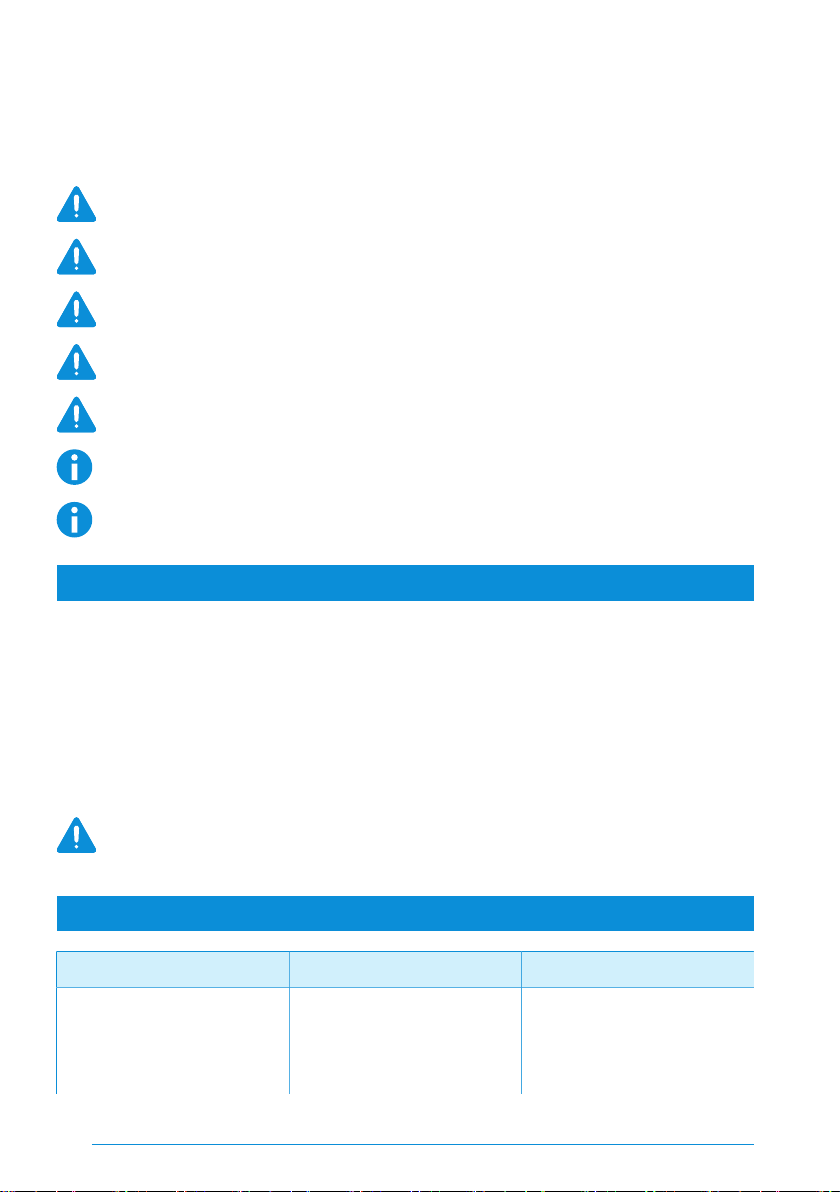
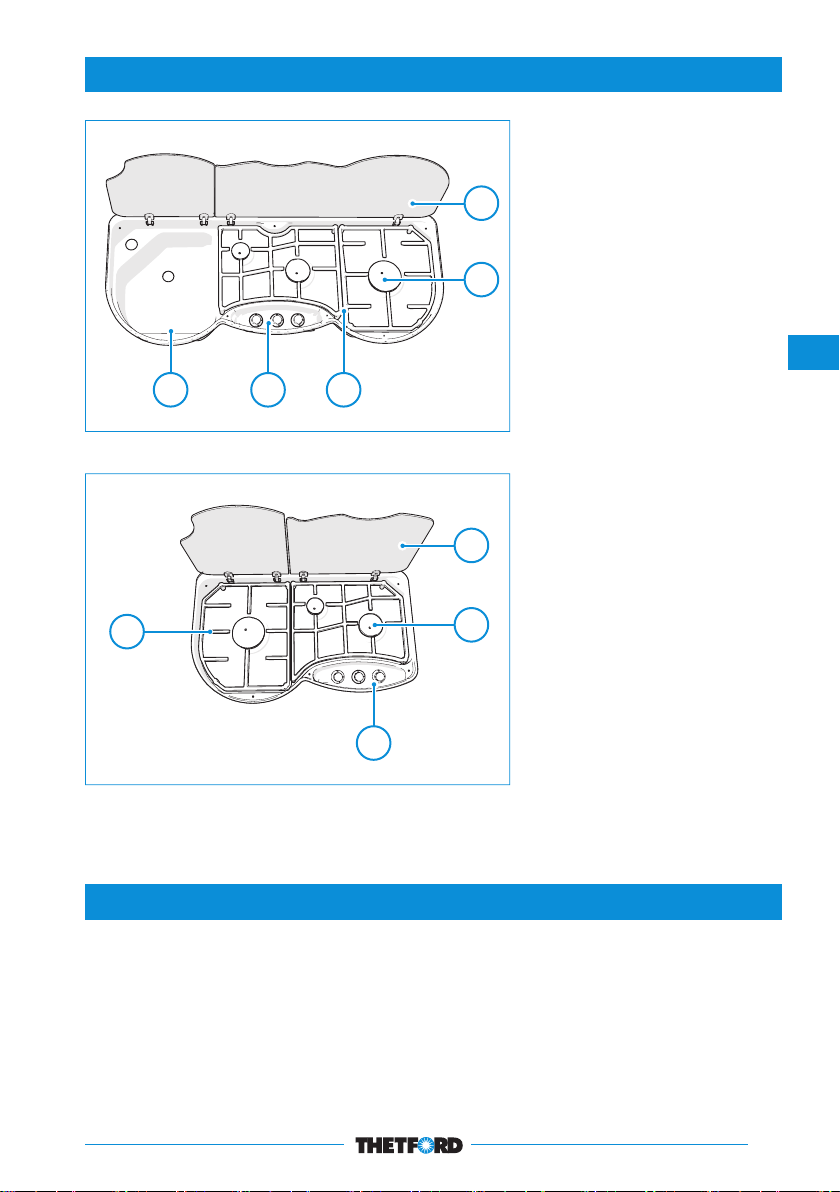
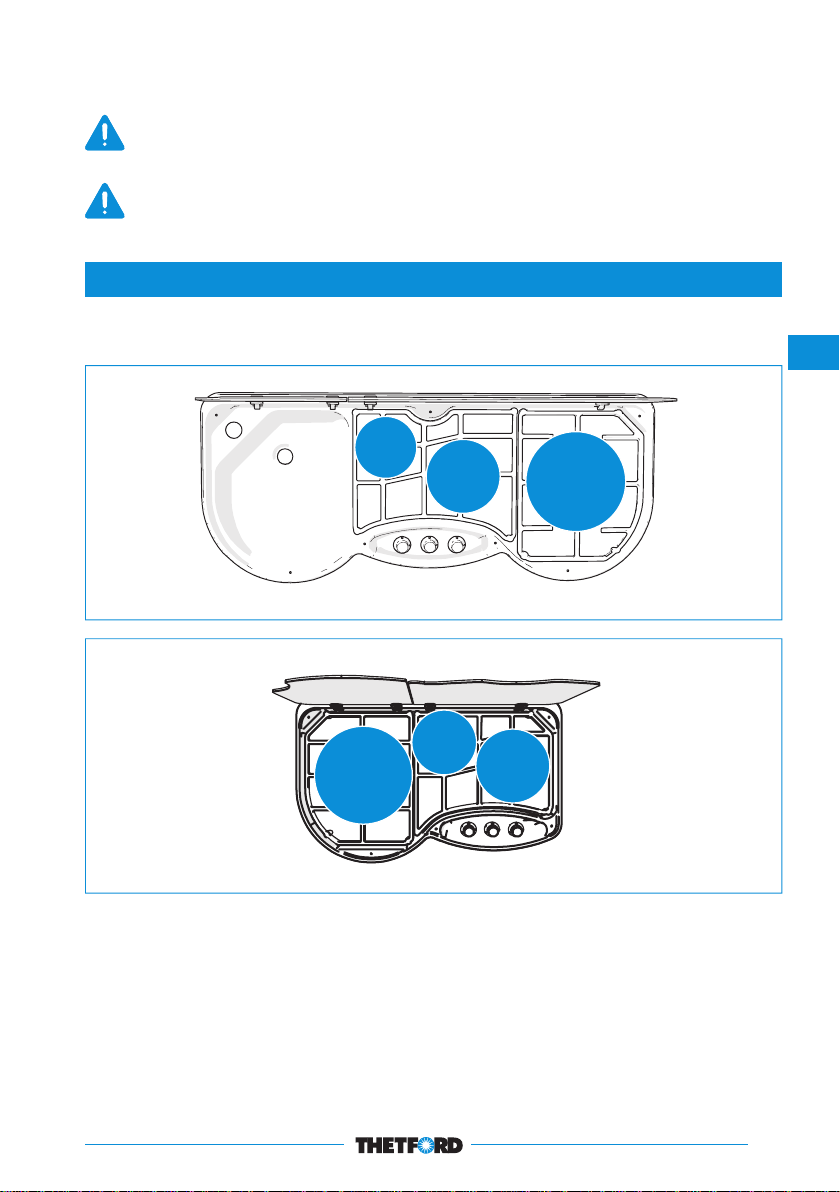
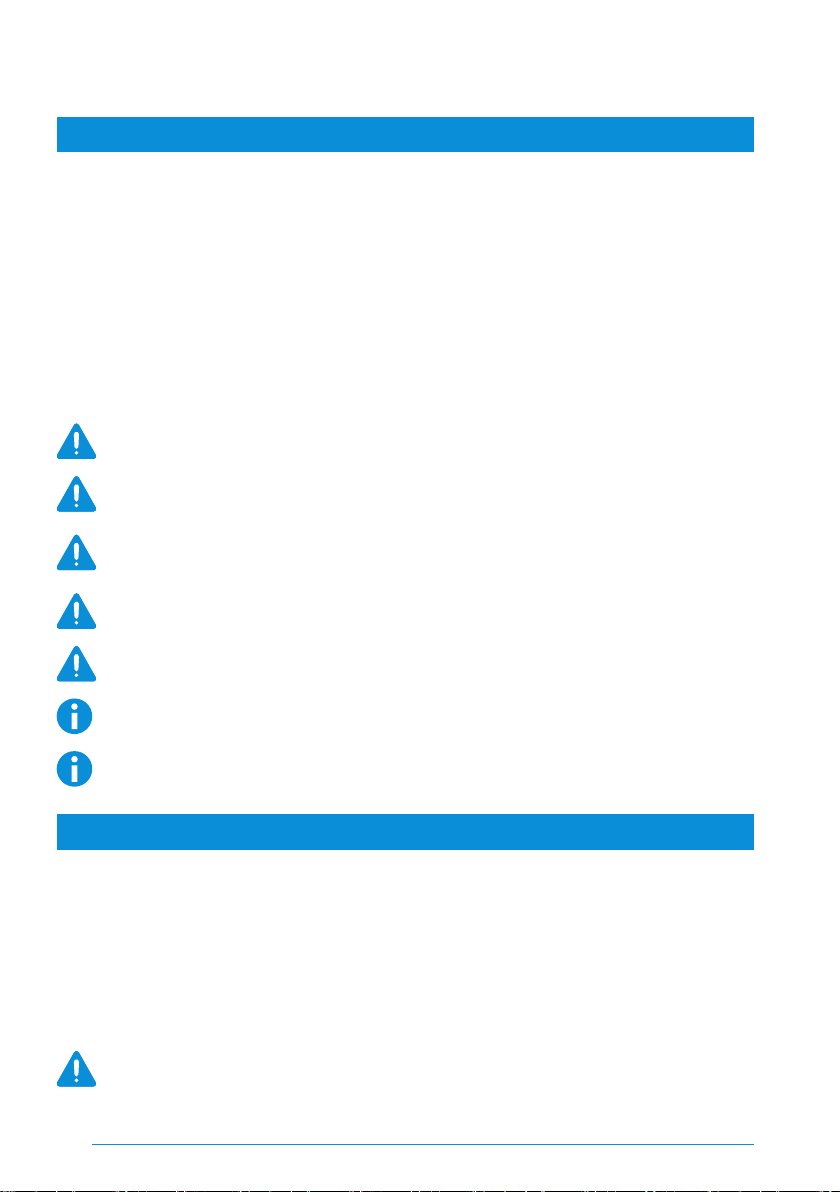
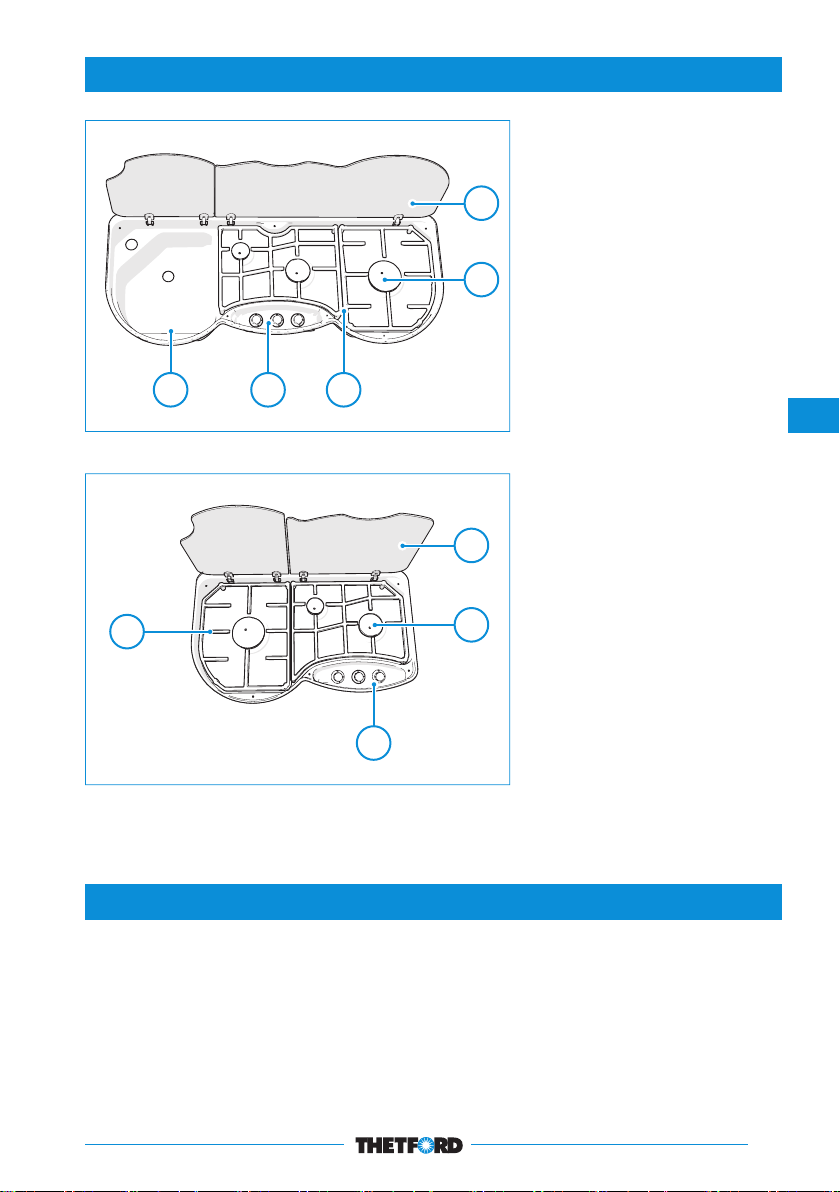
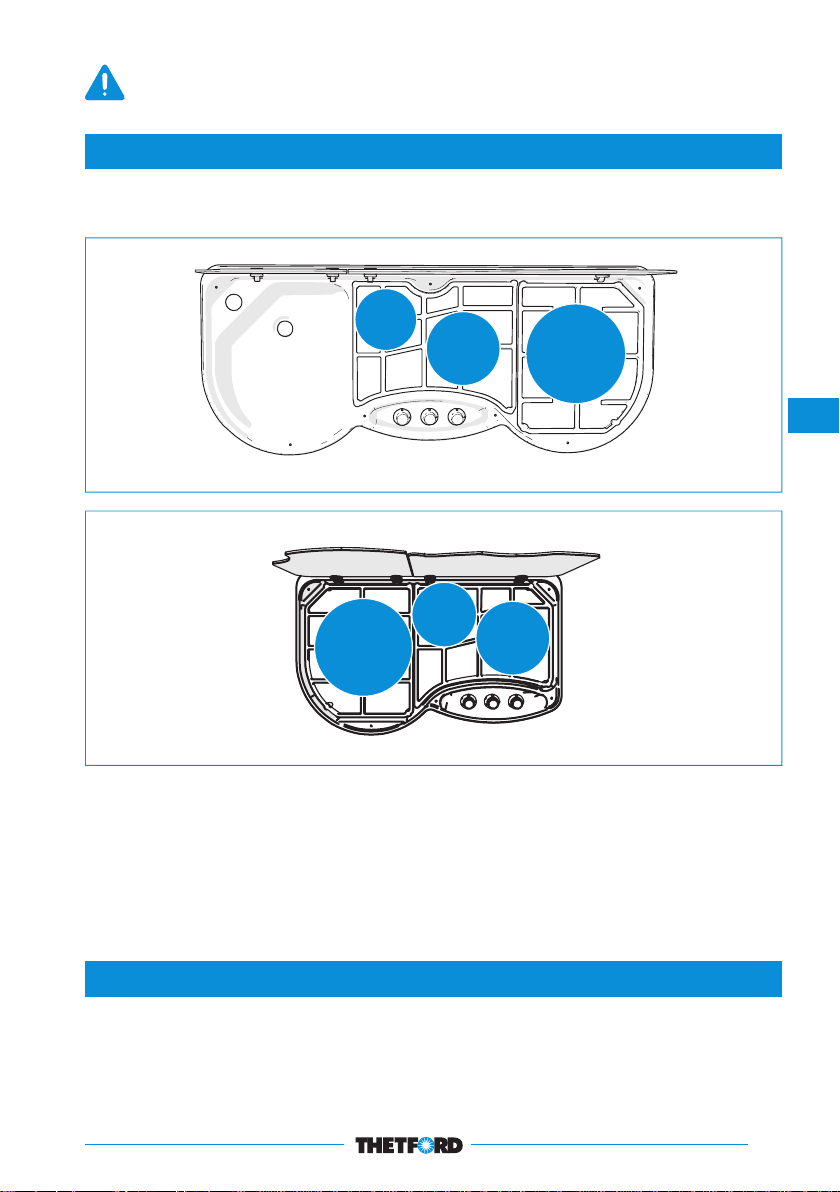
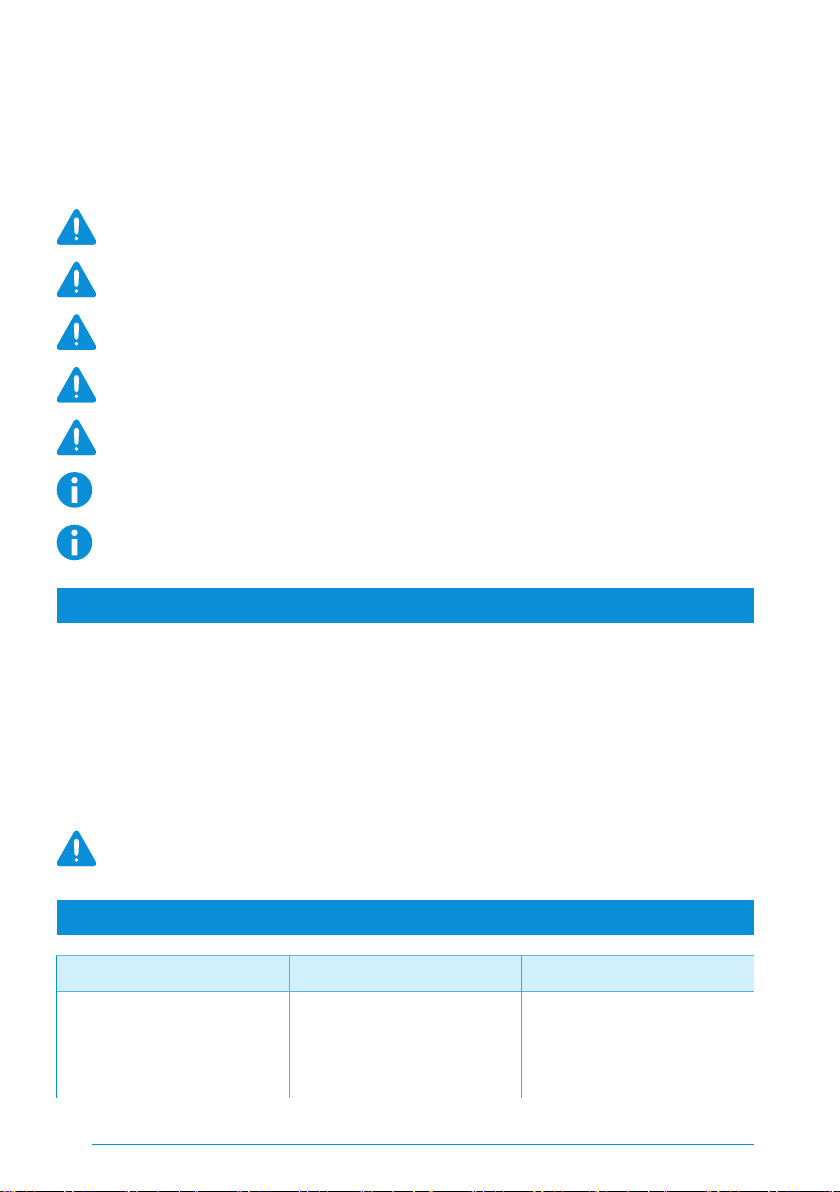
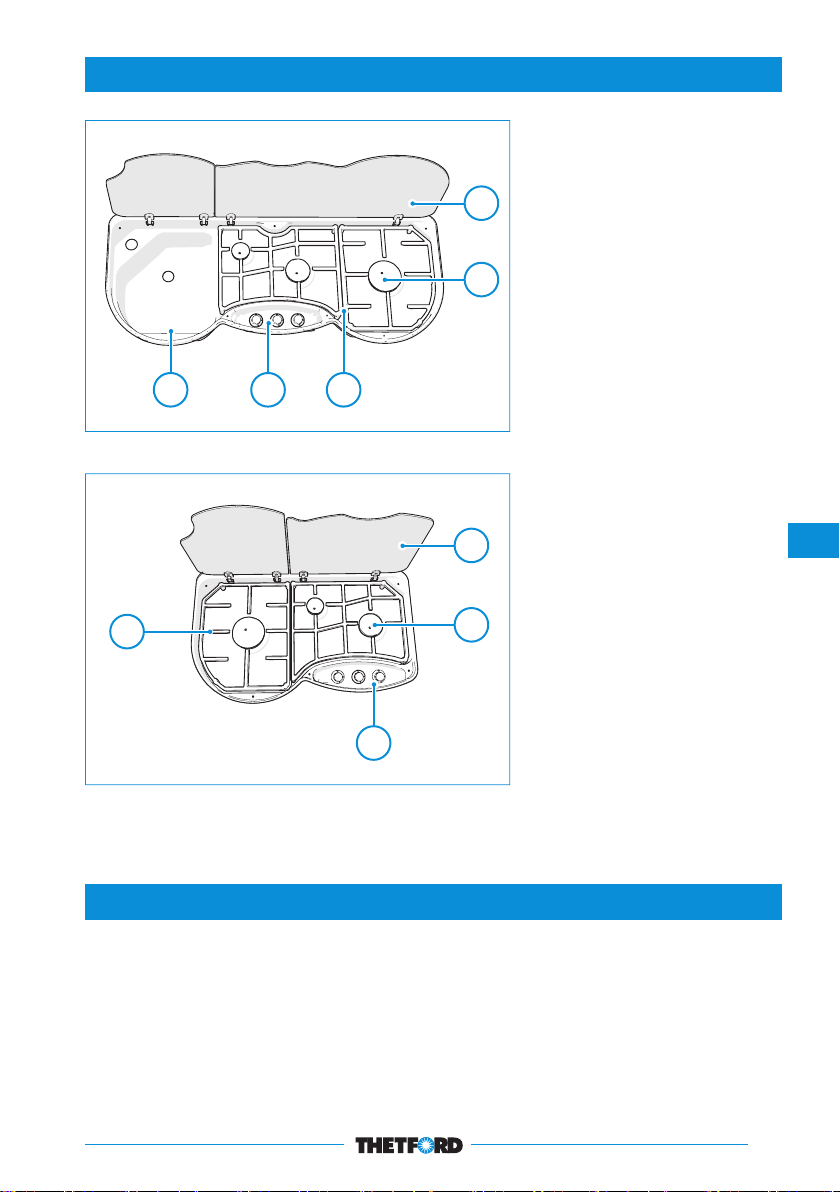
4. Main components
1
2
345
SCU353
1
2
4
3
SHB353
1. Glass lids
2. Burners
3. Pan supports
4. Control panel
5. Sink
EN
1. Glass lids
2. Burners
3. Control panel
4. Pan supports
The types of burners may vary depending on the type of appliance. Refer to Table 1: Burner
specifications on page 10 for further details.
5. Before use
Before using the appliance:
■
Ensure that all packaging materials have been removed;
■
Clean the appliance with warm water and household detergent and dry carefully with a soft
cloth;
■
Ensure that the pan supports are positioned properly;
■
Ensure that the gas supply is connected and turned on;
5
Page 8
■
Ensure that the appliance is connected to the 12V DC battery (for ignition models only);
■
Ignite the burners and let them burn to expel odours and vapours first.
Only use LPG (Liquefied Petroleum Gas). The appliance operates on propane or butane.
Propane is preferred over butane, because butane provides poor performance at an
ambient temperature below 10°C and cannot be used at an ambient temperature below
5°C.
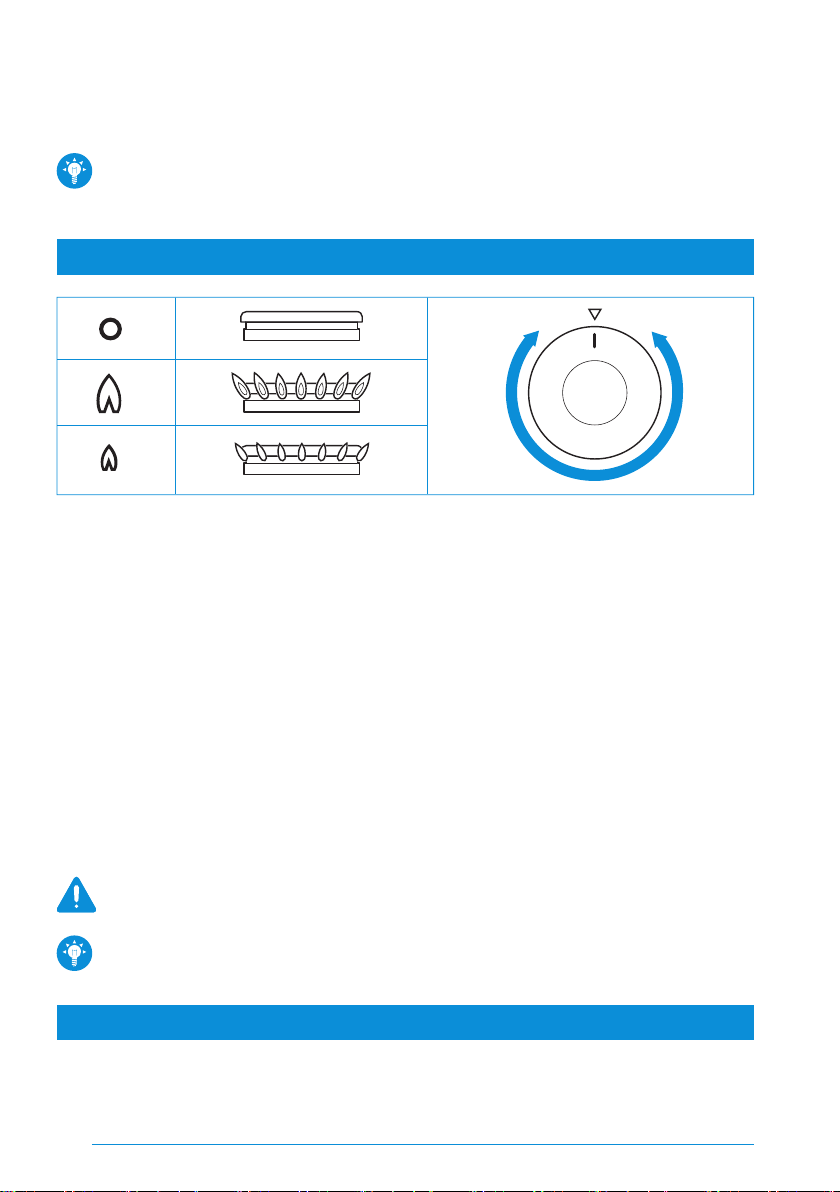
6. Use of the burners
For the exact location of the control knobs see Main components on page 5.
Turning on:
■
Push and turn the control knob;
■
Turn the control anti-clockwise to the full rate position;
-
The automatic burner ignition sparks and lights.
-
For non-ignition models hold a lit match or gas match to the burners.
■
Keep the control knob pressed for about 10-15 seconds and then release it;
■
Adjust the height of the flame.
Turning off:
■
Turn the control knob clockwise to the 0 position to turn off the burner.
If the burner accidentally extinguishes turn the control knob to the 0 position and wait at
least 1 minute before re-igniting the burner.
If the burner has not lit within 15 seconds turn the control knob back to the 0 position
and release it. Wait at least 1 minute and repeat the steps above to turn on the appliance.
7. Use of the sink
■
Open the glass lid;
■
Turn on the tap to tap water;
■
Turn off the tap to turn the water off.
Beware that burners do not get wet by water from the tap or sink. Wet burners burn
irregularly and can go out.
6
Page 9
Hard water or soft water may leave a brown or white film in the sink. Dry the sink after
use with a soft cloth to avoid this. Clean the sink well at least once a week with a cloth and
household detergent.
8. Safe cooking
■
Do not allow cooking vessels to overlap the edges of the appliance - use the correct sizes of
pans and position them centrally over the burners;
SCU353
Ø 100 -
SHB353
140mm
Ø 150 280mm
Ø 120 200mm
Ø 100 140mm
Ø 120 200mm
Ø 150 280mm
EN
■
Ensure that there is at least a 10mm gap between the pans and the edges of the hob;
■
Turn the pans so that the handles do not overhang the front of the appliance;
■
Ensure that the flame heats the bottom of the pan, not the sides;
■
Do not leave the hob unattended when in use;
■
Do not use the appliance whilst the vehicle is moving;
■
Turn the control knobs back to the 0 position after cooking;
■
Keep the hob clean and prevent accumulation of grease and food scraps.
9. Maintenance and cleaning
Thetford recommends an annual inspection service by an approved service centre. Between annual
servicing clean the hob regularly after use:
7
Page 10
■
Always remove any spills or contamination immediately after use with soap and hot water.
Towel dry the surface with a soft cloth.
■
Use a non-abrasive multi-purpose cream cleaner and a nylon scourer pad to clean more
stubborn dirt or grease.
■
Use a proprietary stainless steel cleaner or polish to remove superficial surface scratching.
Always clean in the direction of the brushed finish and not across the grain.
Do not use abrasive cleaners, metal scouring pads or hard brushes. They could damage
the hob.
Do not leave wet cloths, cleaning pads, residues of food or cleaning products or other dirt
to dry on the surface. It can cause pitting, marking or even rusting.
If you clean the burner rings, ensure that the holes are not clogged.
Cleaning agents containing bleach should not be left in contact with stainless steel.
The control knobs can be removed for cleaning. The knobs are easy to replace.
Mineral content in water (such as Iron or Lime scale) can affect the appearance of the
metal.
10. Gas leaks
As soon as you smell gas:
■
Ensure that all burners are turned off;
■
Extinguish all naked lights and do not smoke;
■
Shut off the gas supply at the gas bottle immediately;
■
Do not use electrical switches;
■
Open all doors and windows.
LPG is heavier than air. Escaping gas accumulates at lower levels. By following the
strong, unpleasant smell of gas, you can determine where the leak is located. To
investigate where it is exactly, use a special leak detection spray. Never use an open
flame to find the leak!
11. Trouble shooting
Problem Possible cause Solution
Burners don’t burn or burn
unevenly
8
Gas bottle is empty
Gas tap is closed
Burner caps are not correctly
positioned
Fill bottle
Open tap
Allow caps to cool, then reposition them
Page 11
Problem Possible cause Solution
Burners are wet or clogged Dry or clean burners
Automatic ignition does not
spark
Control knobs do not function Knobs are mounted incorrectly Install knobs correctly
If you cannot solve a problem, contact the authorised local Service Centre or Thetford
Customer Service in your country.
12V DC battery is discharged
Connections are loose
Ignition points are wet or dirty
Charge battery
Secure connections
Dry or clean ignition points
12. Servicing
All servicing must be carried out by an approved competent person. Before any service work is
started the appliance should have been left to cool and be disconnected from both the gas and
electrical supplies. After each service the appliance must be checked for gas soundness.
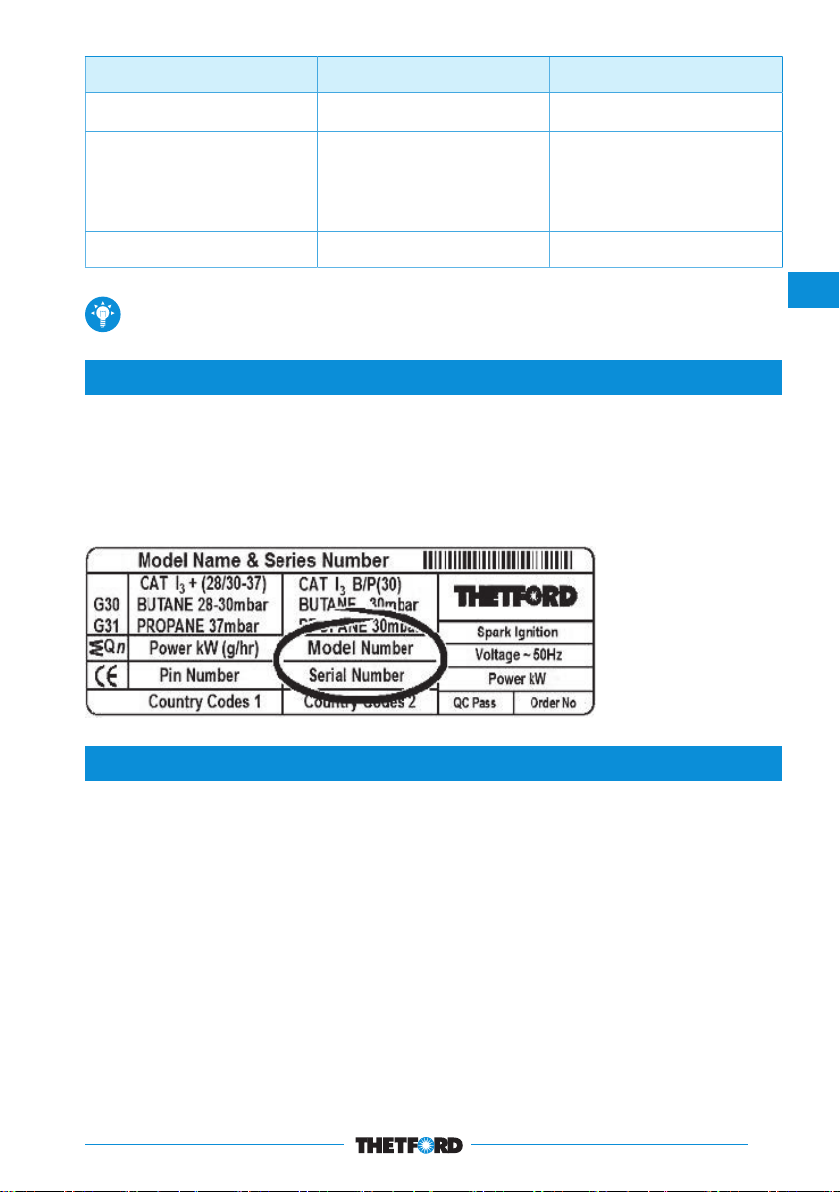
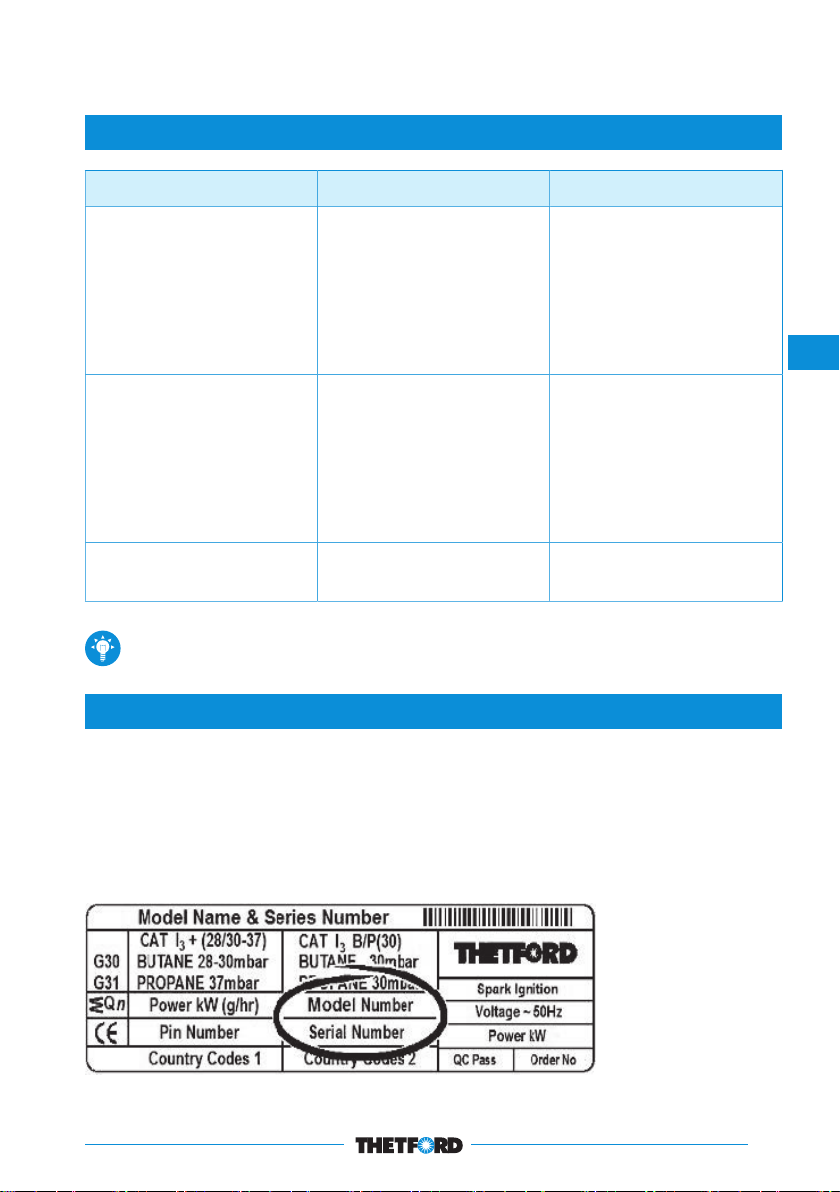
For service, please contact your authorised local Service Centre giving details of the model and
serial number on the data badge plus date of purchase.
EN
13. Putting in storage
■
Close the gas valve at the gas bottle;
■
Disconnect the battery;
■
Ensure that all control knobs are in the 0 position;
■
Wipe the appliance clean and dry;
■
Close the glass lids.
9
Page 12
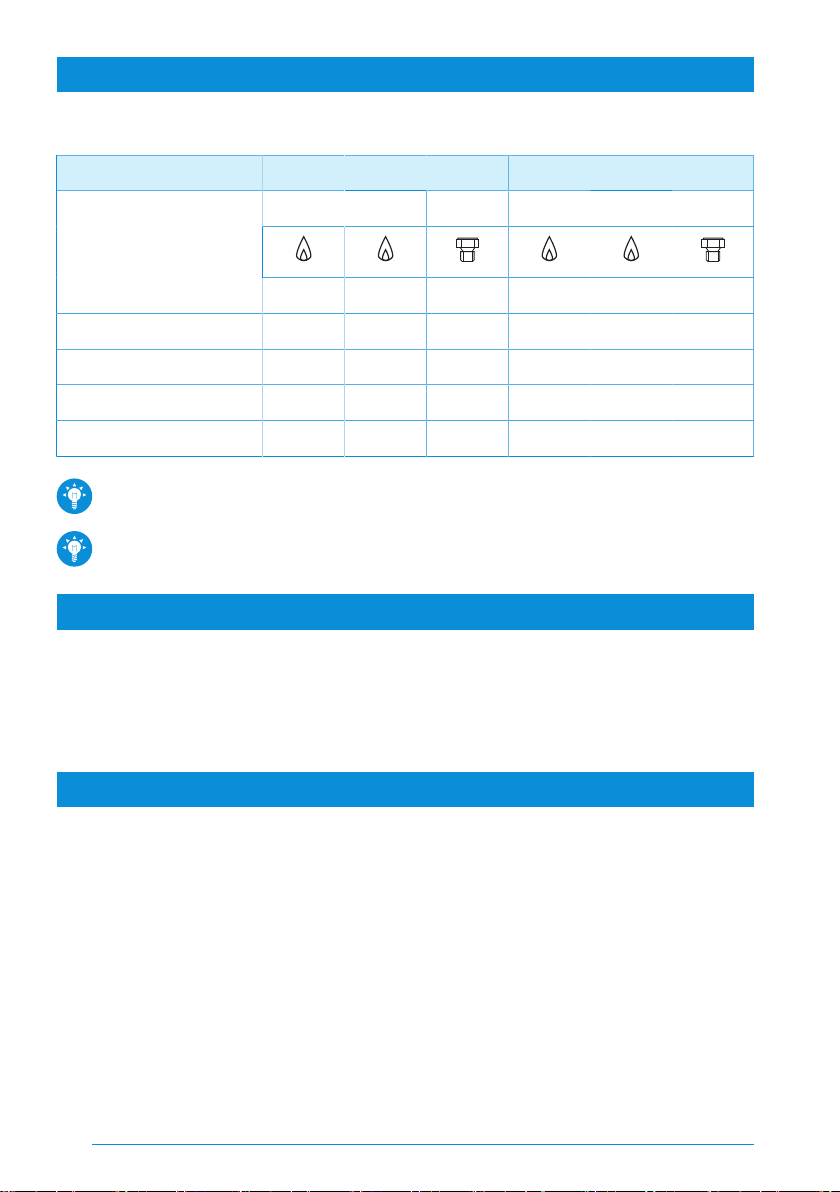
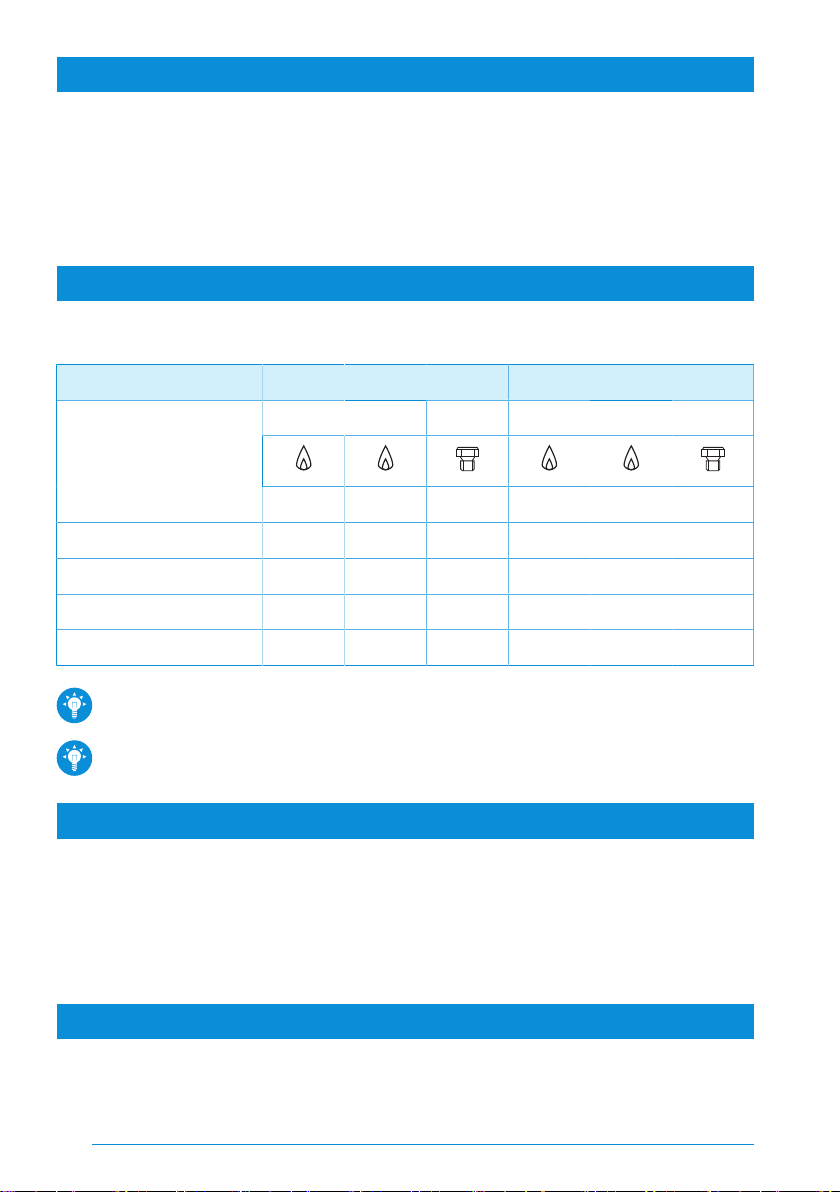
14. Technical specifications
Table 1: Burner specifications
SHB353 SCU353
Gas input Injector Gas input Injector
kW g/hr mm kW g/hr mm
Auxiliary Burner 1.0 72 0.52 1.0 72 0.52
Semi-Rapid Burner 1.5 107 0.61 1.5 107 0.61
Rapid Burner 2.5 179 0.77 2.5 179 0.77
Total 5.0 358 5.0 358
This appliance is suitable for use with LPG (Liquefied Petroleum Gas) and should not be
used on any other gas.
This appliance must be earthed.
15. Questions
If you have questions about the hob, parts, accessories or authorised services:
■
Visit www.thetford-europe.com
■
If you cannot solve a problem, contact the authorised local Service Centre or Thetford Customer
Service in your country.
16. Warranty
Thetford BV offers the end users of its products a three-year warranty. In the case of malfunction
within the warranty period, Thetford will replace or repair the product. In this situation, the costs of
replacement, labour costs for the replacement of defective components and/or the costs of the parts
themselves will be paid for by Thetford.
Purchased spare parts carry a one-year warranty. Any fitting and/or labour costs are not covered by
warranty.
1. To submit a claim under this warranty, the user must take the product to an authorised Thetford
Service Partner. The claim will be assessed there.
2. Components replaced during repair under warranty become the property of Thetford.
3. This warranty does not prejudice current consumer protection laws.
4. This warranty is not valid in the case of products that are used for commercial purposes.
10
Page 13

5. Warranty claims falling into one of the following categories will not be honoured:
■
The product has been improperly used or the instructions in the manual have not been
followed;
■
The product has not been installed in accordance with the instructions;
■
Modifications have been made to the product;
■
The product has been repaired but not by an authorised Thetford Service Partner;
■
The serial number or product code has been tampered with or removed;
■
The product has been damaged by misuse.
EN
11
Page 14

FR
Traduction du manuel d'utilisation original
Table des matières
1 Introduction..........................................................................................................................................................12
2 Symboles..............................................................................................................................................................12
3 Sécurité................................................................................................................................................................. 13
4 Composants principaux....................................................................................................................................15
5 Avant utilisation..................................................................................................................................................15
6 Utilisation des brûleurs....................................................................................................................................16
7 Utilisation de l'évier...........................................................................................................................................16
8 Cuisson en toute sécurité............................................................................................................................... 17
9 Entretien et nettoyage......................................................................................................................................18
10 Fuites de gaz.......................................................................................................................................................18
11 Dépannage........................................................................................................................................................... 19
12 Entretien................................................................................................................................................................19
13 Stockage................................................................................................................................................................20
14 Caractéristiques techniques...........................................................................................................................20
15 Questions..............................................................................................................................................................20
16 Garantie.................................................................................................................................................................20
1. Introduction
Ce manuel est destiné à l’utilisation de votre plaque de cuisson Thetford. Lire les informations
relatives à l'utilisation et à l'entretien de la plaque de cuisson ainsi que les instructions de sécurité
avant de poursuivre. Ce manuel garantit une utilisation sécurisée et optimisée de la plaque de
cuisson. Conserver ce manuel afin de pouvoir vous y référer ultérieurement.
2. Symboles
Légende des symboles :
Mise en garde. Risque de blessures et/ou de dommages.
Attention. Surface chaude. Risque de blessures et/ou de dommages.
Attention. Informations importantes.
12
Page 15
Remarque. Informations.
3. Sécurité
Utiliser l'appareil uniquement pour la cuisson
d'aliments et rien d'autre (p. ex. chauffage de la
pièce). Cela pourrait entraîner une intoxication
au monoxyde de carbone et une surchauffe de
la plaque de cuisson. Le fabricant ne peut être
tenu responsable d'un dommage résultant d'une
mauvaise utilisation ou d'un mauvais réglage des
boutons.
L'utilisation de cet appareil de cuisson au gaz
entraîne la production de chaleur, d'humidité et de
produits de combustion dans la pièce où celui-ci
est installé. Veiller à ce que la pièce dispose d'une
aération suffisante lorsque l'appareil est utilisé.
Lors d'une utilisation prolongée, une ventilation
supplémentaire peut être nécessaire. Pour ce faire,
ouvrir une fenêtre ou augmenter la puissance
d'extraction de la hotte.
FR
Cet appareil peut être utilisé par des enfants de
8 ans et plus, et par des personnes souffrant
de capacités physiques, sensorielles ou
mentales réduites manquant d’expérience et de
connaissances nécessaires, uniquement si ceuxci sont supervisés ou ont reçu des instructions
concernant la sécurité d’utilisation de l'appareil et en
comprennent les risques encourus.
Les brûleurs et les grilles sont chauds pendant et
après l'utilisation. Laisser toutes les parties refroidir
13
Page 16
avant de les toucher afin d'éviter tout risque de
blessure grave.
Ne jamais essayer d'éteindre un feu de cuisson
avec de l'eau. Éteindre le brûleur et couvrir la flamme
avec un couvercle ou une couverture anti-feu.
Tenir les enfants de moins de 8 ans à distance
de l'appareil, sauf s'ils sont sous une surveillance
constante.
Ne pas laisser des enfants jouer avec l'appareil.
Le nettoyage et l’entretien de l’appareil ne doivent
pas être effectués par des enfants sans surveillance.
Utiliser uniquement des pièces fournies par le
fabricant.
Ne pas modifier ou régler quoi que ce soit sur
l'appareil, à moins que le changement ne soit
autorisé par le fabricant ou son représentant.
14
Ne pas ranger des objets sur la surface de cuisson.
Ne pas fermer le couvercle en verre lorsque les
brûleurs sont allumés ou encore chauds.
Page 17
4. Composants principaux
1
2
345
SCU353
1
2
4
3
SHB353
1. Couvercles en verre
2. Brûleurs
3. Grilles
4. Panneau de commande
5. Évier
FR
1. Couvercles en verre
2. Brûleurs
3. Panneau de commande
4. Grilles
Les types de brûleurs peuvent varier en fonction du type d'appareil. Voir Tableau 2: Caractéristiques
des brûleurs à la page 20 pour plus d'informations.
5. Avant utilisation
Avant d'utiliser l'appareil :
■
S'assurer que tous les matériaux d'emballage ont été enlevés.
■
Nettoyer l'appareil avec de l'eau chaude et un détergent ménager, et l'essuyer soigneusement à
l'aide d'un chiffon doux.
■
S'assurer que les grilles sont placées correctement.
■
S'assurer que l'alimentation en gaz est raccordée et ouverte.
15
Page 18
■
S'assurer que l'appareil est connecté à la batterie 12 VCC (pour les modèles à allumage
électronique uniquement).
■
Allumer les brûleurs et, dans un premier temps, les laisser dégager tous les résidus d’usine.
Utiliser uniquement du GPL (gaz de pétrole liquéfiés). L'appareil fonctionne au propane
ou au butane. Le propane est préférable au butane, car les performances de ce dernier
sont insuffisantes à des températures ambiantes inférieures à 10 °C et il ne peut pas être
utilisé au-dessous de 5 °C.
6. Utilisation des brûleurs
Pour l'emplacement des boutons de commande, voir Composants principaux à la page 15
Mise en marche :
■
Appuyer sur le bouton de commande en le tournant.
■
Tourner le bouton de commande dans le sens inverse des aiguilles d’une montre jusqu'au débit
maximum.
-
L'allumage automatique des brûleurs émet une étincelle et s'allume.
-
Pour les modèles sans allumage, tenir une allumette enflammée ou un allume-gaz près des
brûleurs.
■
Maintenir le bouton de commande enfoncé pendant 10 à 15 secondes environ, puis le relâcher.
■
Régler l'intensité de la flamme.
Arrêt :
■
Tourner le bouton de commande dans le sens des aiguilles d’une montre jusqu’à la position 0
pour arrêter le brûleur.
En cas d'extinction accidentelle du brûleur, tourner le bouton de commande sur la
position 0 et attendre au moins une minute avant de rallumer le brûleur.
Si après 15 secondes, le brûleur ne s'est pas allumé, remettre le bouton de commande
sur la position 0 et le relâcher. Attendre au moins 1 minute avant de répéter les étapes de
mise en marche de l'appareil ci-dessus.
7. Utilisation de l'évier
■
Ouvrir le couvercle en verre.
16
Page 19
■
Ouvrir le robinet d'eau.
■
Fermer le robinet pour couper l'eau.
Veiller à ne pas mouiller les brûleurs avec de l'eau provenant du robinet ou de l'évier. Des
brûleurs mouillés fonctionnent de manière irrégulière et peuvent s'arrêter.
L'eau dure ou douce peut laisser un film marron ou blanc sur l'évier. Pour éviter
ces traces, essuyer l’évier avec un chiffon doux après chaque utilisation. Nettoyer
soigneusement l'évier une fois par semaine à l'aide d'un chiffon et de d’un détergent
ménager.
8. Cuisson en toute sécurité
■
Ne pas laisser les ustensiles de cuisson dépasser des bords de l'appareil. Utiliser des
casseroles du bon diamètre et les centrer au-dessus des brûleurs.
SCU353
Ø 100 140mm
Ø 120 200mm
Ø 150 280mm
FR
SHB353
Ø 100 -
Ø 150 -
280mm
■
Garantir la présence d'un espace d'au moins 10 mm entre les casseroles et les bords de la
140mm
Ø 120 200mm
plaque de cuisson.
■
Tourner les casseroles de sorte que les manches ne dépassent pas de l'avant de l'appareil.
■
S'assurer que la flamme chauffe le fond et non les côtés de la casserole.
■
Ne jamais laisser la plaque de cuisson sans surveillance en cours d'utilisation.
■
Ne pas utiliser l'appareil lorsque le véhicule se déplace.
■
Remettre les boutons de commande sur la position 0 après la cuisson.
17
Page 20
■
Maintenir la plaque de cuisson propre et éviter toute accumulation de graisse et de résidus
alimentaires.
9. Entretien et nettoyage
Thetford recommande de faire appel à un centre de service agréé pour procéder à un entretien
annuel. Entre deux entretiens annuels, nettoyer la plaque de cuisson régulièrement après chaque
utilisation :
■
Toujours retirer tout débordement ou tout ce qui présente un risque de contamination
immédiatement après utilisation avec du savon et de l'eau chaude. Essuyer la surface à l'aide
d'un chiffon doux.
■
Utiliser un nettoyant crème multi-usages non abrasif et une éponge en nylon humide pour
nettoyer les saletés et les graisses les plus tenaces.
■
Utiliser un nettoyant ou du polish spécifique pour les surfaces en acier inoxydable pour enlever
les rayures superficielles.
Toujours nettoyer dans le sens de la finition brossé et non pas dans le sens contraire du
grain.
Ne pas utiliser de nettoyants abrasifs, d'éponges à récurer en métal ni de brosses dures.
Ils pourraient endommager la plaque de cuisson.
Ne pas mettre de tissus humides, d'éponges, de restes de nourriture, de produits de
nettoyage ou d'autres saletés à sécher sur la surface. Cela peut être source de corrosion
ou de rouille, ou peut laisser des marques.
Lors du nettoyage des chapeaux de brûleurs, s'assurer que les trous ne sont pas
bouchés.
Les produits nettoyants contenant de la javel ne doivent pas entrer en contact avec
l'acier inoxydable.
Les boutons de commande peuvent être retirés pour le nettoyage. Les boutons sont
faciles à remettre en place.
Les matières minérales présentes dans l'eau (telles que le fer ou le calcaire) peuvent
affecter l'apparence du métal.
10. Fuites de gaz
En cas d'odeur de gaz :
■
S'assurer que tous les brûleurs sont éteints.
■
Éteindre toutes les flammes nues et ne pas fumer.
■
Fermer immédiatement l'alimentation en gaz sur la bouteille de gaz.
■
Ne pas utiliser d'interrupteurs électriques.
■
Ouvrir toutes les portes et fenêtres.
Le GPL est plus lourd que l'air. Le gaz qui s'échappe s'accumule au ras du sol. L’odeur
forte et désagréable du gaz permet d’identifier approximativement la zone où se trouve la
18
Page 21
fuite. Pour trouver son emplacement précis, utiliser une bombe aérosol de détection de
fuite. Ne jamais utiliser une flamme nue pour détecter la fuite !
11. Dépannage
Problème Cause possible Solution
Les brûleurs ne fonctionnent
pas ou pas uniformément
L'allumage automatique ne
crée pas d'étincelles
Les boutons de commande ne
fonctionnent pas
S'il n'est pas possible de résoudre un problème, contacter le centre de service agréé
local ou le service clients Thetford du pays concerné.
La bouteille de gaz est vide
Le robinet de gaz est fermé
Les chapeaux des brûleurs ne
sont pas placés correctement
Les brûleurs sont humides ou
encrassés
La batterie 12 VCC est
déchargée
Les raccords sont desserrés
L’alimentation est débranchée
Les points d'allumage sont
humides ou sales.
Les boutons ne sont pas
montés correctement
Changer la bouteille
Ouvrir le robinet
Laisser refroidir les chapeaux
des brûleurs, puis les replacer
Essuyer ou nettoyer les
brûleurs
Charger la batterie
Vérifier les branchements
Essuyer ou nettoyer les points
d'allumage
Installer les boutons
correctement
12. Entretien
Toutes les interventions sur l'appareil doivent être effectuées exclusivement par une personne
compétente et agréée pour cette opération. Avant de commencer tout travail d'entretien, il faut
laisser refroidir l'appareil et le débrancher de l'alimentation en gaz et électrique. Après chaque
entretien, il faut procéder à une vérification du circuit gaz de l'appareil.
Si vous souhaitez procéder à un entretien, contacter votre centre de service agréé en indiquant le
modèle et le numéro de série présents sur la plaque signalétique, ainsi que la date d'achat.
FR
19
Page 22
13. Stockage
■
Fermer le robinet de gaz sur la bouteille de gaz.
■
Débrancher la batterie.
■
S'assurer que tous les boutons de commande sont sur la position 0.
■
Nettoyer et essuyer l’appareil.
■
Fermer les couvercles en verre.
14. Caractéristiques techniques
Tableau 2: Caractéristiques des brûleurs
SHB353 SCU353
Alimentation en gaz Injecteur Alimentation en gaz Injecteur
KW g/h mm KW g/h mm
Brûleur auxiliaire 1,0 72 0,52 1,0 72 0,52
Brûleur semi rapide 1,5 107 0,61 1,5 107 0,61
Brûleur rapide 2,5 179 0,77 2,5 179 0,77
Total 5,0 358 5,0 358
Cet appareil a été conçu pour une utilisation avec des gaz de pétrole liquéfiés (GPL) et ne
doit pas être utilisé avec d'autres gaz.
Cet appareil doit être mis à la terre.
15. Questions
Si vous avez des questions concernant la plaque de cuisson, les pièces détachées, les accessoires
ou les centres de service agréés :
■
Voir www.thetford-europe.com
■
S'il n'est pas possible de résoudre un problème, contacter le centre de service agréé local ou le
service clients Thetford du pays concerné.
16. Garantie
Thetford BV offre aux utilisateurs de ses produits une garantie de trois ans. En cas de
dysfonctionnement durant la période de garantie, Thetford s'engage à remplacer ou à réparer le
20
Page 23

produit. Dans ce cas, la main d’œuvre et les frais de remplacement des composants défectueux et/
ou le coût des pièces elles-mêmes seront pris en charge par Thetford.
Les pièces détachées achetées sont garanties un an. Les frais de pose et/ou de main-d'œuvre ne
sont pas couverts par la garantie.
1. Pour soumettre une demande pendant la garantie, l'utilisateur doit emmener le produit chez son
revendeur ou dans un centre de service agréé Thetford. La demande sera alors examinée sur
place.
2. Les composants remplacés lors de la réparation dans le cadre de la garantie deviennent la
propriété de Thetford.
3. Cette garantie ne porte pas préjudice aux lois en vigueur sur la protection du consommateur.
4. Cette garantie n'est pas valable si les produits sont utilisés à des fins commerciales.
5. Les demandes de garantie entrant dans l'une de ces catégories ne seront pas acceptées :
■
Le produit n'a pas été utilisé correctement ou les instructions fournies dans le manuel n'ont
pas été suivies.
■
Le produit n'a pas été installé conformément aux instructions.
■
Des modifications ont été apportées au produit.
■
Le produit a été réparé par un technicien non agréé par Thetford.
■
Le numéro de série ou le code produit a été modifié ou effacé.
■
Le produit a été endommagé suite à une mauvaise utilisation.
FR
21
Page 24

SV
Översättning av original bruksanvisning
Innehåll
1 Inledning...............................................................................................................................................................22
2 Symboler...............................................................................................................................................................22
3 Säkerhet................................................................................................................................................................23
4 Huvudkomponenter...........................................................................................................................................25
5 Före användning.................................................................................................................................................25
6 Använda brännarna........................................................................................................................................... 26
7 Använda diskhon................................................................................................................................................26
8 Säker matlagning............................................................................................................................................... 27
9 Underhållning och rengöring.......................................................................................................................... 27
10 Gasläckage...........................................................................................................................................................28
11 Felsökning............................................................................................................................................................28
12 Service...................................................................................................................................................................29
13 Förvara...................................................................................................................................................................29
14 Tekniska specifikationer..................................................................................................................................30
15 Frågor.....................................................................................................................................................................30
16 Garanti................................................................................................................................................................... 30
1. Inledning
Det här är bruksanvisningen till din Thetford-häll. Läs säkerhetsanvisningarna och information
om användning och underhåll av hällen innan du fortsätter. Då kan du använda hällen säkert och
effektivt. Behåll den här bruksanvisningen för framtida referens.
2. Symboler
Förklaring till symboler:
Varning. Risk för skada på person och/eller föremål.
Var försiktig. Het yta. Risk för skada på person och/eller föremål.
Var uppmärksam. Viktig information.
22
Page 25
Obs! Information.
3. Säkerhet
Använd endast apparaten för matlagning och inget
annat, till exempel för att värma upp rummet. Det
kan leda till kolmonoxidförgiftning och att hällen
överhettas. Tillverkaren kan inte hållas ansvarig för
skador som uppstår vid felaktig användning eller
felaktiga inställningar av vreden.
Användningen av den här gasspishällen resulterar i
produktion av värme, fukt och förbränningsprodukter
i rummet där den är installerad. Säkerställ att
rummet har tillräcklig ventilation när apparaten
används. Vid användning under en längre tid kan
ytterligare ventilation behövas. Öppna då ett fönster
eller öka utsugsfläktens styrka.
Denna apparat får endast användas av barn från
8 år och uppåt, personer med nedsatt fysisk,
sensorisk eller mental förmåga och/eller brist på
erfarenhet och kunskap om de övervakas eller har
fått anvisningar om säker användning av apparaten
och förstår de möjliga riskerna.
Brännarna och gallren är heta under och efter
användning. Låt alla delar svalna innan du vidrör
dem, annars kan allvarliga skador uppstå.
Släck aldrig en matlagningseld med vatten. Stäng
av apparaten och täck lågan med ett lock eller en
brandfilt.
SV
23
Page 26
Håll barn under 8 år borta från apparaten, såvida de
inte övervakas hela tiden.
Låt inte barn leka med apparaten.
Låt inte barn rengöra eller underhålla utrustningen
oövervakade.
Använd endast delar som tillhandahålls av
tillverkaren.
Ändra eller justera inte något på apparaten, såvida
inte ändringen har godkänts av tillverkaren eller en
representant för tillverkaren.
Förvara inte föremål på spishällen.
Stäng inte glaslocket när brännarna är tända eller
fortfarande är varma.
24
Page 27
4. Huvudkomponenter
1
2
345
SCU353
1
2
4
3
SHB353
1. Glaslock
2. Brännare
3. Galler
4. Kontrollpanel
5. Diskho
SV
1. Glaslock
2. Brännare
3. Kontrollpanel
4. Galler
Typerna av brännare kan variera beroende på typ av apparat. Se Tabell 3: Specifikationer för
brännare på sidan 30 för ytterligare uppgifter.
5. Före användning
Före du använder apparaten:
■
Säkerställ att allt förpackningsmaterial har tagits bort.
■
Rengör apparaten med varmt vatten och hushållsrengöringsmedel och torka noggrant med en
mjuk trasa.
■
Säkerställ att gallren sitter korrekt.
■
Säkerställ att gasförsörjningen är ansluten och igång.
25
Page 28
■
Säkerställ att apparaten är ansluten till ett 12 V likströmsbatteri (endast för modeller med
tändning).
■
Tänd brännarna och låt dem brinna en stund för att bli av med odörer och ångor först.
Använd endast gasol (LPG). Apparaten används med propan eller butan. Propan föredras
framför butan, eftersom butan har dålig funktionsförmåga vid omgivningstemperaturer
under 10°C och inte kan användas vid omgivningstemperaturer under 5°C.
6. Använda brännarna
För vredens exakta plats se Huvudkomponenter på sidan 25.
Sätta på:
■
Tryck in och vrid vredet.
■
Vrid vredet moturs till det högsta läget.
-
Den automatiska brännartändaren skapar en gnista och tänder.
-
På modeller utan tändare ska du hålla en tänd tändsticka eller gaständare mot brännarna.
■
Håll vredet intryckt i ungefär 10–15 sekunder och släpp det sedan.
■
Justera lågans höjd.
Stänga av:
■
Vrid vredet medurs till läget 0 för att stänga av brännaren.
Om brännaren oavsiktligt slocknar ska du vrida vredet till läget 0 och vänta minst 1 minut
innan du tänder brännaren igen.
Om brännaren inte har tänts inom 15 sekunder ska du vrida tillbaka vredet till läget 0
och släppa det. Vänta minst 1 minut och upprepa sedan stegen ovan för att sätta på
apparaten.
7. Använda diskhon
■
Öppna glaslocket.
■
Vrid på kranen för att sätta på vattnet.
■
Vrid på kranen för att stänga av vattnet.
Se till så att brännarna inte blir våta av vattnet från kranen eller diskhon. Våta brännare
brinner oregelbundet och kan slockna.
26
Page 29
Hårt eller mjukt vatten kan lämna en brun eller vit avlagring i hon. Torka hon torr efter
användning med en mjuk trasa för att undvika detta. Rengör hon ordentligt minst en gång
i veckan med en trasa och hushållsrengöringsmedel.
8. Säker matlagning
■
Låt inte kokkärl sticka ut över kanterna på apparaten – använd rätt storlekar på kastruller och
placera dem mitt över brännarna.
SCU353
Ø 100 -
SHB353
140mm
Ø 150 280mm
Ø 120 200mm
Ø 100 140mm
Ø 120 200mm
Ø 150 280mm
SV
■
Se till att det är minst 10 mm mellanrum mellan kastrullerna och hällens kant.
■
Vrid kastrullerna så att handtagen inte sticker ut över apparatens främre kant.
■
Se till att lågorna värmer botten på kastrullen och inte sidorna.
■
Lämna inte hällen utan uppsikt när den används.
■
Använd inte apparaten medan fordonet är i rörelse.
■
Vrid tillbaka vreden till läget 0 efter användning.
■
Håll hällen ren och undvik att fett och matrester samlas.
9. Underhållning och rengöring
Thetford rekommenderar att produkten inspekteras årligen av ett godkänt servicecenter. Mellan de
årliga servicetillfällena ska du rengöra hällen regelbundet efter användning:
27
Page 30
■
Ta alltid bort spill eller smuts omedelbart efter användning med tvål och varmt vatten. Torka ytan
torr med en mjuk trasa.
■
Använd ett allrengöringsmedel som inte repar och en nylonsvamp för att ta bort mer envist
smuts eller fett.
■
Använd tillverkarens rengöringsmedel för rostfritt stål eller polermedel för att ta bort ytliga repor
på ytan.
Rengör alltid i samma riktning som den borstade ytan och inte på tvärs.
Använd inte repande rengöringsmedel, stålskrubb eller hårda borstar. De kan skada
hällen.
Låt inte våta trasor, rengöringssvampar, matrester eller rengöringsmedel eller annan
smuts torka fast på ytan. Det kan orsaka gropar, märken eller till och med rost.
Om du rengör brännarringarna ska du se till att hålen inte täpps igen.
Rengöringsmedel som innehåller blekmedel ska inte lämnas på ytan i rostfritt stål.
Vreden kan tas bort vid rengöring. De kan lätt sättas tillbaka.
Mineraler lösta i vatten (som järn eller kalk) kan påverka metallens utseende.
10. Gasläckage
Så fort du känner lukten av gas ska du:
■
se till att alla brännare är avstängda
■
släcka alla öppna lågor och inte röka
■
omedelbart stänga av gasförsörjningen på gasflaskan
■
inte använda elektriska strömbrytare
■
öppna alla dörrar och fönster.
Gasol är tyngre än luft. Läckt gas ansamlas på låg höjd. Om du följer den starka,
obehagliga gaslukten kan du fastställa var läckaget är. Använd en läcksöksprej för att
hitta exakt var läckaget finns. Använd aldrig en öppen låga för att hitta läckaget!
11. Felsökning
Problem Möjlig orsak Lösning
Brännarna bränner inte eller
bränner ojämnt
28
Gasflaskan är tom
Gaskranen är stängd
Brännarlocken sitter inte
korrekt
Fyll på flaska
Öppna kranen
Låt locken svalna och placera
dem korrekt
Page 31

Problem Möjlig orsak Lösning
Brännarna är våta eller
igensatta
Torka eller rengör brännarna
Automattändningen avger
ingen gnista
Vreden fungerar inte Vreden har satts fast på fel sätt Sätt fast vreden på rätt sätt
Om du inte kan lösa ett problem ska du kontakta det lokala, auktoriserade servicecentret
eller Thetfords kundtjänst i ditt land.
12 V-batteriet har laddats ur
Anslutningarna är lösa
Tändpunkterna är våta eller
smutsiga
Ladda batteriet
Sätt fast anslutningarna
Torka eller rengör
tändpunkterna
12. Service
Service får endast utföras av en godkänd och behörig person. Innan någon service påbörjas
måste apparaten lämnas att svalna och kopplas bort från både gas- och elförsörjning. Efter varje
servicetillfälle ska apparaten kontrolleras med avseende på gasens felfrihet.
Kontakta ditt lokala servicecenter för service och uppge information om modell- och serienummer
från märkplåten samt inköpsdatum.
SV
13. Förvara
■
Stäng gasventilen på gasflaskan.
■
Koppla från batteriet.
■
Se till att alla vred är i läget 0.
■
Torka apparaten ren och torr.
■
Stäng glaslocken.
29
Page 32

14. Tekniska specifikationer
Tabell 3: Specifikationer för brännare
SHB353 SCU353
Gasinlopp Injektor Gasinlopp Injektor
KW g/tim mm KW g/tim mm
Hjälpbrännare 1,0 72 0,52 1,0 72 0,52
Halvsnabb brännare 1,5 107 0,61 1,5 107 0,61
Snabb brännare 2,5 179 0,77 2,5 179 0,77
Totalt 5,0 358 5,0 358
Denna apparat är lämplig för användning med gasol (LPG) och ska inte användas med
någon annan gas.
Denna apparat måste jordas.
15. Frågor
Om du har frågor om hällen, delar, tillbehör eller auktoriserade tjänster ska du
■
besöka www.thetford-europe.com
■
Om du inte kan lösa ett problem ska du kontakta det lokala, auktoriserade servicecentret eller
Thetfords kundtjänst i ditt land.
16. Garanti
Thetford BV ger slutanvändare av produkten tre års garanti. Om det uppstår något fel på produkten
under garantiperioden kommer Thetford att ersätta eller laga produkten. I en sådan situation står
Thetford för kostnaderna för utbyte, arbetskostnader för utbyte av de defekta delarna och/eller
kostnaderna för själva delarna.
Köpta reservdelar har ett års garanti. Kostnader för tillpassning och/eller arbete täcks inte av
garantin.
1. För att göra anspråk på garantin måste användaren ta produkten till en auktoriserad Thetfordservicepartner. Anspråket bedöms där.
2. Delar som byts ut vid reparationer under garantin blir Thetfords egendom.
3. Den här garantin påverkar inte aktuella konsumentskyddslagar.
4. Den här garantin gäller inte om produkterna används för kommersiella syften.
30
Page 33

5. Garantianspråk som faller inom någon av följande kategorier godkänns inte:
■
Produkten har använts inkorrekt eller anvisningarna i manualen har inte följts.
■
Produkten har inte monterats enligt anvisningarna.
■
Modifieringar har gjorts på produkten.
■
Produkten har reparerats men inte av en auktoriserad Thetford-servicepartner.
■
Serienumret eller produktkoden har ändrats eller tagits bort.
■
Produkten har skadats av felaktig användning.
SV
31
Page 34

ES
Traducción del manual de usuario original
Índice general
1 Introducción.........................................................................................................................................................32
2 Símbolos............................................................................................................................................................... 32
3 Seguridad..............................................................................................................................................................33
4 Componentes principales................................................................................................................................35
5 Antes de usar...................................................................................................................................................... 35
6 Uso de los quemadores...................................................................................................................................36
7 Uso del fregadero...............................................................................................................................................36
8 Cocinar con seguridad......................................................................................................................................37
9 Mantenimiento y limpieza...............................................................................................................................38
10 Fugas de gas....................................................................................................................................................... 38
11 Solución de problemas.....................................................................................................................................39
12 Revisión.................................................................................................................................................................39
13 Almacenamiento.................................................................................................................................................40
14 Especificaciones técnicas...............................................................................................................................40
15 Preguntas..............................................................................................................................................................40
16 Garantía.................................................................................................................................................................40
1. Introducción
Este es el manual del usuario para su placa de cocina de Thetford. Lea atentamente las
instrucciones de seguridad y la información sobre el uso y mantenimiento de la placa de cocina
antes de continuar. Esto le permitirá utilizar la placa de cocina con seguridad y eficacia. Conserve
este manual para su consulta en el futuro.
2. Símbolos
Explicación de los símbolos utilizados:
Advertencia. Riesgo de lesiones o daños.
Precaución. Superficie caliente. Riesgo de lesiones o daños.
Atención. Información importante.
32
Page 35

Nota. Información.
3. Seguridad
Utilice el aparato solamente para cocinar y no para
otra cosa, tal como a modo de calefacción. Esto
podría producir una intoxicación con monóxido de
carbono y el sobrecalentamiento de la placa de
cocina. El fabricante no se hace responsable de los
daños resultantes de un uso indebido o un ajuste
incorrecto de los mandos.
El uso de esta placa de cocina de gas aporta
calor, humedad y productos de la combustión a la
habitación en la que está instalada. Compruebe que
la habitación tiene una ventilación adecuada cuando
el aparato esté en uso. Durante un uso prolongado,
podría precisarse ventilación adicional abriendo una
ventana o aumentando la fuerza de extracción de la
campana.
ES
Este aparato solo podrá ser utilizado por niños
mayores de 8 años, personas con capacidades
físicas, sensoriales o mentales reducidas y/o falta
de experiencia y conocimiento si se les supervisa
o reciben instrucciones relativas al uso del aparato
de una manera segura y entienden los riesgos que
implica.
Los quemadores y los soportes de recipientes
de cocina están calientes durante y después del
uso. Deje que todas las piezas se enfríen antes de
tocarlas, ya que esto podría causar lesiones graves.
33
Page 36

Nunca apague con agua un fuego de cocina. Apague
el quemador y cubra la llama con una tapa o manta
ignífuga.
Mantenga a los niños menores de 8 años alejados
del aparato, excepto bajo supervisión constante.
No permita que los niños jueguen con el aparato.
No permita que los niños limpien o realicen el
mantenimiento del equipo sin supervisión.
Utilice solo piezas suministradas por el fabricante.
No cambie ni ajuste nada en el aparato, a menos
que el cambio está autorizado por el fabricante o su
representante.
No almacene artículos sobre la superficie de
cocinar.
34
No cierre la tapa de cristal cuando los quemadores
estén encendidos o sigan calientes.
Page 37

4. Componentes principales
1
2
345
SCU353
1
2
4
3
SHB353
1. Tapas de cristal
2. Quemadores
3. Soportes de recipientes de
cocina
4. Panel de control
5. Fregadero
1. Tapas de cristal
2. Quemadores
3. Panel de control
4. Soportes de recipientes de
cocina
Los tipos de quemadores pueden variar dependiendo del tipo de aparato. Consulte Tabla 4:
Especificaciones del quemador en la página 40 para obtener más información.
5. Antes de usar
Antes de usar el aparato:
■
Asegúrese de retirar todos los materiales de embalaje;
■
Limpie el aparato con agua tibia y detergente del hogar y seque cuidadosamente con un paño
suave;
■
Asegúrese de que los soportes de los recipientes de cocina están colocados correctamente;
■
Compruebe que el suministro de gas está conectado y abierto;
ES
35
Page 38

■
Asegúrese de que el aparato esté conectado a la batería de 12 V CC (solo en el caso de modelos
de encendido automático);
■
Encienda los quemadores y déjelos arder para expulsar los olores y vapores.
Utilice únicamente GLP (gas licuado de petróleo). El aparato funciona con propano o
butano. Se prefiere el propano al butano, ya que el butano tiene peor rendimiento a una
temperatura ambiente inferior a 10° C y no puede utilizarse a una temperatura ambiente
inferior a 5° C.
6. Uso de los quemadores
Para la ubicación exacta de los mandos consulte Componentes principales en la página 35.
Encender:
■
Presione y gire el mando;
■
Gire el mando hacia la izquierda hasta la posición de plena abertura;
-
El encendido automático del quemador produce una chispa para encender el gas.
-
En el caso de los modelos sin encendido automático sostenga una cerilla encendida sobre
los quemadores.
■
Mantenga presionado el mando durante unos 10-15 segundos y luego suéltelo;
■
Ajuste la altura de la llama.
Apagar:
■
Gire el mando a la derecha a la posición 0 después de apagar el quemador.
Si el quemador se apaga inintencionadamente gire el mando a la posición 0 y espere al
menos 1 minuto antes de volver a encender el quemador.
Si no se ha encendido el quemador en menos de 15 segundos, gire el mando de vuelta
a la posición 0 y suéltelo. Espere al menos 1 minuto y repita los pasos anteriores para
encender el aparato.
7. Uso del fregadero
■
Abra la tapa de cristal;
■
Abra el grifo para que salga agua;
■
Cierre el grifo para que no salga agua.
36
Page 39

Tenga cuidado para que los quemadores no se mojen con el agua del grifo o fregadero.
Los quemadores mojados queman con irregularidad y pueden apagarse.
El agua dura o agua blanda puede dejar una película marrón o blanca en el fregadero.
Seque el fregadero con un paño suave para evitarlo. Limpie el fregadero bien por lo
menos una vez a la semana con un paño y un detergente doméstico.
8. Cocinar con seguridad
■
No permita que los recipientes de cocina sobrepasen los bordes del aparato –utilice los
tamaños correctos de recipientes y colóquelos centrados sobre los quemadores;
SCU353
Ø 100 140mm
SHB353
Ø 120 200mm
Ø 150 280mm
ES
Ø 100 -
Ø 150 -
280mm
■
Compruebe que haya un hueco de por lo menos 10 mm entre los recipientes de cocina y los
140mm
Ø 120 200mm
bordes de la placa de cocina;
■
Gire los recipientes de cocina para que los mangos no sobresalgan por delante del aparato;
■
Asegúrese de que la llama calienta el fondo del recipiente de cocina, no los lados;
■
No deje la placa de cocina desatendida durante su funcionamiento;
■
No utilice el aparato mientras el vehículo se esté moviendo;
■
Gire los mandos a la posición 0 después de cocinar;
■
Mantenga limpia la placa de cocina y evite la acumulación de grasa y restos de comida.
37
Page 40

9. Mantenimiento y limpieza
Thetford recomienda un servicio de revisión anual en un centro de servicio autorizado. Entre
revisiones anuales limpie la placa de cocina regularmente después de su uso:
■
Siempre retire con agua caliente y jabón cualquier derrame o contaminación inmediatamente
después de su uso. Seque la superficie con un paño suave.
■
Use una crema de limpieza multiuso no abrasiva y un estropajo de nailon para limpiar la
suciedad o grasa más incrustada.
■
Use un producto limpiador o abrillantador de acero inoxidable para quitar las marcas
superficiales.
Limpie siempre en la dirección del acabado y no contra el grano.
No use limpiadores abrasivos, estropajos de metal ni cepillos duros. Podrían dañar la
placa de cocina.
No deje paños húmedos, estropajos, residuos de alimentos, productos de limpieza
ni otra suciedad que se seque sobre la superficie. Puede causar picaduras, marcas o
incluso oxidación.
Si limpia los anillos de los quemadores, compruebe que los orificios no estén obstruidos.
Los productos de limpieza que contengan lejía no deben dejarse en contacto con el
acero inoxidable.
Los mandos se pueden quitar para su limpieza. Los mandos son fáciles de reemplazar.
El contenido de minerales en el agua (como hierro o cal) puede estropear el aspecto del
metal.
10. Fugas de gas
En cuanto huela a gas:
■
Compruebe que todos los quemadores estén apagados;
■
Apague todas las luces incandescentes y no fume;
■
Apague el suministro de gas de la botella de gas inmediatamente;
■
No use interruptores eléctricos;
■
Abra todas las puertas y ventanas.
El gas GLP es más pesado que el aire. El gas de una fuga se acumula en los niveles
inferiores. Siguiendo el fuerte y desagradable olor a gas, puede determinar dónde se
encuentra la fuga. Para investigar dónde está exactamente, utilice un vaporizador de
detección de fugas especial. ¡Nunca use una llama abierta para encontrar la fuga!
38
Page 41

11. Solución de problemas
Problema Posible causa Solución
Los quemadores no queman o
queman irregularmente
El encendido automático no
produce chispa
Los mandos no funcionan Los mandos están montados
Si no puede resolver un problema, comuníquese con el centro de servicio autorizado
local o el servicio al cliente de Thetford de su país.
La botella de gas está vacía
El paso de gas está cerrado
Las tapas de los quemadores
no están colocadas
correctamente
Los quemadores están
húmedos u obstruidos
La batería de 12 V CC está
descargada
Las conexiones están sueltas
Los puntos de encendido están
mojados o sucios
incorrectamente
Llene la botella
Abra el paso
Deje que las tapas se enfríen y
luego colóquelas
Seque o limpie los quemadores
Cargue la batería
Afiance las conexiones
Seque o limpie los puntos de
encendido
Monte los mandos
correctamente
12. Revisión
Toda revisión deberá ser realizada por una persona autorizada y competente. Antes de iniciar
cualquier trabajo de revisión del aparato hay que dejar que se enfríe y desconectar el gas y el
suministro eléctrico. Después de cada revisión del aparato deberá hacerse una prueba de buen
funcionamiento del gas.
Para la revisión, póngase en contacto con su centro de servicio autorizado local indicando los datos
del modelo y el número de serie de la placa de características, además de la fecha de compra.
ES
39
Page 42

13. Almacenamiento
■
Cierre la válvula de la botella de gas;
■
Desconecte la batería;
■
Compruebe que todos los mandos están en la posición 0;
■
Deje el aparato limpio y seco;
■
Cierre las tapas de cristal.
14. Especificaciones técnicas
Tabla 4: Especificaciones del quemador
SHB353 SCU353
Entrada de gas Inyector Entrada de gas Inyector
kW g/h mm kW g/h mm
Quemador auxiliar 1,0 72 0,52 1,0 72 0,52
Quemador semirrápido 1,5 107 0,61 1,5 107 0,61
Quemador rápido 2,5 179 0,77 2,5 179 0,77
Total 5,0 358 5,0 358
Este aparato es apto para uso con GLP (gas licuado de petróleo) y no debe utilizarse con
ningún otro gas.
Este aparato debe estar conectado a tierra.
15. Preguntas
Si tiene preguntas sobre la placa de cocina, piezas, accesorios o servicios autorizados:
■
Visite www.thetford-europe.com
■
Si no puede resolver un problema, comuníquese con el centro de servicio autorizado local o el
servicio al cliente de Thetford de su país.
16. Garantía
Thetford BV ofrece a los usuarios finales de sus productos una garantía de tres años. En el caso
de funcionamiento defectuoso dentro del periodo de garantía, Thetford reemplazará o reparará
40
Page 43

el producto. En esta situación, los costes de sustitución y de mano de obra para el reemplazo de
componentes defectuosos o el coste de las piezas correrán a cargo de Thetford.
Las piezas de repuesto adquiridas tienen una garantía de un año. Todo accesorio o los costes de
mano de obra no están cubiertos por la garantía.
1. Para presentar una reclamación bajo esta garantía, el usuario debe llevar el producto a un
servicio técnico autorizado de Thetford. Allí evaluarán la reclamación.
2. Los componentes reemplazados durante la reparación bajo garantía pasarán a ser propiedad de
Thetford.
3. Esta garantía no actuará en perjuicio de la legislación vigente de protección del consumidor.
4. Esta garantía no es válida en el caso de productos usados para fines comerciales.
5. No se aceptarán bajo garantía las reclamaciones de una de las siguientes categorías:
■
El producto ha sido utilizado incorrectamente o no se han seguido las instrucciones del
manual;
■
El producto no haya sido instalado según las instrucciones;
■
Se han realizado modificaciones en el producto;
■
El producto ha sido reparado, pero no por un servicio técnico autorizado de Thetford;
■
El número de serie o código de producto ha sido alterado o eliminado;
■
El producto ha sido dañado por un uso indebido.
ES
41
Page 44

DK
Oversættelse af den originale brugervejledning
Indhold
1 Indledning.............................................................................................................................................................42
2 Symboler...............................................................................................................................................................42
3 Sikkerhed..............................................................................................................................................................43
4 Hovedkomponenter...........................................................................................................................................45
5 Før brug.................................................................................................................................................................45
6 Brugen af brænderne........................................................................................................................................46
7 Brug af vasken....................................................................................................................................................46
8 Sikker madlavning............................................................................................................................................. 47
9 Vedligeholdelse og rengøring.........................................................................................................................47
10 Gaslækager.......................................................................................................................................................... 48
11 Fejlfinding.............................................................................................................................................................48
12 Serviceeftersyn...................................................................................................................................................49
13 Klargøring til opbevaring..................................................................................................................................49
14 Tekniske specifikationer..................................................................................................................................50
15 Spørgsmål.............................................................................................................................................................50
16 Garanti................................................................................................................................................................... 50
1. Indledning
Dette er brugervejledningen til din Thetford-kogeplade. Læs sikkerhedsinstruktionerne og
oplysningerne om brug og vedligeholdelse af kogepladen omhyggeligt, før du går videre. Så kan du
bruge kogepladen på sikker og effektiv vis. Gem brugervejledningen til senere henvisning.
2. Symboler
Tegnforklaring til symboler:
Advarsel. Risiko for personskade og/eller beskadigelse.
Forsigtig. Varm overflade. Risiko for personskade og/eller beskadigelse.
Vigtigt. Vigtige oplysninger.
42
Page 45

Bemærk. Oplysninger.
3. Sikkerhed
Brug kun apparatet til madlavning og ikke noget
andet, f.eks. opvarmning af rum. Det kan medføre
kulilteforgiftning og overophedning af kogepladen.
Producenten kan ikke holdes ansvarlig for skader,
der følger af uegnet brug eller ukorrekt indstilling af
betjeningsknapperne.
Brugen af dette gasmadlavningsapparat genererer
varme, fugt og forbrændingsprodukter i det rum, det
er installeret i. Sørg for, at rummet har tilstrækkelig
ventilation, når apparatet bruges. Under længere
tids brug kan yderligere udluftning blive nødvendig
ved at åbne et vindue eller øge emhættens
udsugningsevne.
Dette apparat må kun bruges af børn over 8 år og
personer med reducerede fysiske, følelsesmæssige
eller mentale evner og/eller mangel på erfaring og
viden, hvis de er under opsyn eller har modtaget
vejledning i brugen af apparatet på en sikker måde
og forstår de involverede farer.
DK
Brænderne og ristene er brandvarme under og efter
brug. Lad alle dele køle af, før der røres ved dem, da
de kan forårsage alvorlig personskade.
Sluk aldrig en madlavningsbrand med vand. Sluk
for brænderen, og dæk flammerne med et låg eller
brandtæppe.
43
Page 46

Hold børn under 8 år væk fra apparatet, medmindre
de er under konstant opsyn.
Børn må ikke lege med apparatet.
Børn må ikke rengøre eller vedligeholde apparatet
uden opsyn.
Brug kun dele, der leveres af producenten.
Intet på apparatet må ændres eller justeres,
medmindre ændringen er godkendt af producenten
eller dennes repræsentant.
Opbevar ikke genstande på madlavningsoverfladen.
Luk ikke glaslåget, når brænderne er tændte eller
stadig er varme.
44
Page 47
4. Hovedkomponenter
1
2
345
SCU353
1
2
4
3
SHB353
1. Glaslåg
2. Brændere
3. Riste
4. Betjeningspanel
5. Vask
1. Glaslåg
2. Brændere
3. Betjeningspanel
4. Riste
DK
Typen af brændere kan variere afhængigt af typen af apparat. Se Tabel 5: Brænderspecifikationer på
side 50 for flere oplysninger.
5. Før brug
Før apparatet tages i brug:
■
Sørg for, at al emballage er fjernet.
■
Rengør apparatet med varmt vand og husholdningsrengøringsmiddel, og tør det omhyggeligt af
med en blød klud.
■
Sørg for, at ristene sidder korrekt.
■
Sørg for, at gasforsyningen er tilsluttet og tændt.
45
Page 48

■
Sørg for, at apparatet er tilsluttet 12 V DC-batteriet (gælder kun tændingsmodeller).
■
Tænd brænderne, og lad dem brænde for at fjerne lugte og dampe først.
Brug kun LPG (flydende petroleumsgas). Apparatet fungerer med propan eller
butan. Propan foretrækkes frem for butan, da butan giver ringe resultater ved en
omgivelsestemperatur på under 10 °C og ikke kan bruges ved en omgivelsestemperatur
under 5 °C.
6. Brugen af brænderne
Du kan se betjeningsknappernes præcise placering under Hovedkomponenter på side 45.
Tænd:
■
Tryk ind på og drej betjeningsknappen.
■
Drej knappen mod uret til positionen kraftig.
-
Den automatiske brændertænding gnistrer og tænder.
-
Modeller uden tænding – hold en strøget tændstik eller gastænder mod brænderne.
■
Hold betjeningsknappen inde i cirka 10-15 sekunder, og slip den så.
■
Juster flammens højde.
Sluk:
■
Drej betjeningsknappen med uret til 0-positionen for at slukke for brænderen.
Hvis brænderen utilsigtet går ud, drej betjeningsknappen til 0-positionen, og vent mindst
1 minut, før du tænder for brænderen igen.
Hvis brænderen ikke tændes inden for 15 sekunder, drej betjeningsknappen tilbage til
0-positionen, og slip den. Vent mindst 1 minut, og gentag trinene ovenfor for at tænde for
apparatet.
7. Brug af vasken
■
Åbn glaslåget.
■
Tænd for hanen for at tappe vand.
■
Sluk for hanen for at slukke for vandet.
Sørg for, at brænderne ikke bliver våde af vand fra hanen eller vasken. Våde brændere
brænder uregelmæssigt og kan gå ud.
46
Page 49

Hårdt vand eller blødt vand kan efterlade en brun eller hvid film i vasken. Tør vasken af
med en blød klud efter brug for at forhindre dette. Rengør vasken grundigt mindst én gang
om ugen med en klud og husholdningsrengøringsmiddel.
8. Sikker madlavning
■
Sørg for, at kogegrej ikke stikker ud over apparatets kanter – brug gryder i korrekt størrelse, og
placér dem centralt over brænderne.
SCU353
Ø 100 -
SHB353
140mm
Ø 150 280mm
Ø 120 200mm
Ø 100 140mm
Ø 120 200mm
Ø 150 280mm
DK
■
Sørg for, at der er et mellemrum på mindst 10 mm mellem gryderne og kogepladens kanter.
■
Drej gryderne således, at håndtagene ikke hænger over fronten af apparatet.
■
Sørg for, at flammen opvarmer bunden af gryden, ikke siderne.
■
Lad ikke kogepladen være uden opsyn, når den er i brug.
■
Brug ikke apparatet, når køretøjet er i bevægelse.
■
Drej betjeningsknapperne tilbage til 0-positionen efter madlavning.
■
Hold kogepladen ren, og undgå ophobning af fedt og madrester.
9. Vedligeholdelse og rengøring
Thetford anbefaler en årlig inspektionsservice af et godkendt servicecenter. Mellem det årlige
serviceeftersyn rengøres kogepladen regelmæssigt efter brug:
47
Page 50

■
Fjern altid spildrester eller forurening øjeblikkeligt efter brug med varmt vand og sæbe. Tør
overfladen med en blød klud.
■
Brug et ikke-slibende universalt flydende rengøringsmiddel og en nylonskuresvamp til at fjerne
genstridig snavs eller fedt.
■
Brug et virksomhedsspecifikt rustfrit stålrensemiddel eller pudsemiddel til at fjerne overfladiske
ridser.
Rengør altid i retningen af den børstede finish og ikke på tværs af strukturen.
Brug ikke slibende rengøringsmidler, metalskuresvampe eller hårde børster. De kan
beskadige kogepladen.
Lad ikke våde klude, rengøringssvampe, madrester, rengøringsmiddelrester eller anden
snavs tørre ind på overfladen. Det kan forårsage pitting, mærker eller rustdannelse.
Hvis du rengør brænderringene, skal du sørge for, at hullerne ikke blokeres.
Rengøringsmidler, der indeholder blegemiddel, bør straks tørres af rustfrit stål.
Betjeningsknapperne kan fjernes før rengøring. Knapperne sættes let på igen.
Vands mineralindhold (som jern eller kalk) kan påvirke metals udseende.
10. Gaslækager
Så snart du lugter gas:
■
Sørg for, at alle brændere er slukket.
■
Sluk al åben ild, og ryg ikke.
■
Sluk øjeblikkeligt for gasforsyningen på gasflasken.
■
Brug ikke elektriske kontakter.
■
Åbn alle døre og vinduer.
LPG er tungere end luft. Udsivende gas samler sig ved jorden. Ved at følge den
stærke, ubehagelige gaslugt kan du finde frem til, hvor lækagen er. Brug en speciel
lækagedetekteringsspray til at undersøge helt præcist, hvor den er. Brug aldrig åben ild til
at finde lækagen!
11. Fejlfinding
Problem Mulig årsag Løsning
Brændere brænder ikke eller
brænder ujævnt
48
Gasflasken er tom
Gashanen er lukket
Fyld flasken
Åbn hanen
Page 51

Problem Mulig årsag Løsning
Brænderdæksler sidder ikke
korrekt
Brændere er våde eller
tilstoppede
Lad dækslerne køle af, og sæt
dem på igen
Tør eller rengør brændere
Automatisk tænding gnistrer
ikke
Betjeningsknapperne virker
ikke
Hvis du ikke kan løse et problem, skal du kontakte det godkendte lokale servicecenter
eller Thetford Kundeservice i dit land.
12 V DC-batteriet er afladet
Tilslutningerne er løse
Tændingspunkterne er våde
eller tilsmudsede
Knapperne er monteret forkert Monter knapperne korrekt
Oplad batteriet
Fastgør tilslutningerne
Tør eller rengør
tændingspunkterne
12. Serviceeftersyn
Alle serviceeftersyn skal udføres af en godkendt og kvalificeret person. Inden serviceeftersynet
påbegyndes, skal apparatet køles ned og afbrydes fra både gas- og elforsyning. Efter hvert
serviceeftersyn skal apparatet undersøges for gasfunktionsdygtighed.
For serviceeftersyn skal du kontakte dit lokale servicecenter og oplyse detaljer om modellen og
serienummeret fra dataskiltet samt købsdatoen.
DK
13. Klargøring til opbevaring
■
Luk gasventilen på gasflasken.
■
Frakobl batteriet.
■
Sørg for, at alle betjeningsknapper er i 0-positionen.
■
Tør apparatet rent og tørt.
■
Luk glaslågene.
49
Page 52

14. Tekniske specifikationer
Tabel 5: Brænderspecifikationer
SHB353 SCU353
Gasindgang Dyse Gasindgang Dyse
KW g/t mm KW g/t mm
Hjælpebrænder 1,0 72 0,52 1,0 72 0,52
Halvhurtig brænder 1,5 107 0,61 1,5 107 0,61
Hurtig brænder 2,5 179 0,77 2,5 179 0,77
Total 5,0 358 5,0 358
Dette apparat er egnet til brug med LPG (flydende petroleumsgas) og bør ikke bruges
med nogen anden gas.
Dette apparat skal jordforbindes.
15. Spørgsmål
Hvis du har spørgsmål til kogepladen, dele, tilbehør eller godkendte serviceydelser:
■
Gå ind på www.thetford-europe.com
■
Hvis du ikke kan løse et problem, skal du kontakte det godkendte lokale servicecenter eller
Thetford Kundeservice i dit land.
16. Garanti
Thetford BV tilbyder slutbrugere af deres produkter en treårig garanti. Thetford udskifter eller
reparerer produktet, hvis der opstår funktionsfejl i løbet af garantiperioden. I en sådan situation
betaler Thetford omkostningerne ved udskiftning, arbejdslønnen til udskiftning af defekte
komponenter og/eller omkostningerne ved selve delene.
Købte reservedele er dækket af en etårig garanti. Eventuelle monteringsomkostninger og/eller
arbejdsløn dækkes ikke af garantien.
1. Brugeren skal indlevere produktet hos en autoriseret Thetford Servicepartner for at gøre et krav
gældende i henhold til garantien. Kravet vil blive vurderet dér.
2. Komponenter, der udskiftes under garantien, bliver Thetfords ejendom.
3. Denne garanti påvirker ikke gældende forbrugerbeskyttelseslove.
4. Denne garanti er ikke gyldig i tilfælde af produkter, der bruges til kommercielle formål.
50
Page 53

5. Garantikrav, der falder ind under en af følgende kategorier, vil ikke blive indfriet.
■
Produktet er blevet brugt forkert, eller instruktionerne i vejledningen er ikke blevet fulgt.
■
Produktet er ikke blevet installeret i overensstemmelse med instruktionerne.
■
Der er foretaget ændringer på produktet.
■
Produktet er blevet repareret, men ikke af en autoriseret Thetford Servicepartner.
■
Der er pillet ved serienummeret eller produktkoden, eller de er blevet fjernet.
■
Produktet er beskadiget af misbrug.
DK
51
Page 54

DE
Übersetzung des Original-Benutzerhandbuchs
Inhalt
1 Einführung............................................................................................................................................................52
2 Symbole................................................................................................................................................................52
3 Sicherheit..............................................................................................................................................................53
4 Hauptbestandteile............................................................................................................................................. 55
5 Vor der Verwendung.......................................................................................................................................... 56
6 Verwendung der Brenner.................................................................................................................................56
7 Verwendung des Spülbeckens.......................................................................................................................57
8 Sicheres Kochen.................................................................................................................................................57
9 Wartung und Reinigung....................................................................................................................................58
10 Gaslecks................................................................................................................................................................59
11 Fehlerbehebung..................................................................................................................................................59
12 Instandhaltung....................................................................................................................................................60
13 Lagerung...............................................................................................................................................................60
14 Technische Spezifikationen............................................................................................................................60
15 Fragen....................................................................................................................................................................61
16 Garantie.................................................................................................................................................................61
1. Einführung
Dies ist das Benutzerhandbuch für Ihren Thetford-Herd. Lesen Sie die Sicherheitsanweisungen
und Informationen zur Nutzung und Wartung des Herdes sorgfältig durch, bevor Sie das Gerät in
Betrieb nehmen. Auf diese Weise stellen Sie sicher, dass Sie den Herd sicher und effizient nutzen.
Bewahren Sie dieses Handbuch auf, um zu einem späteren Zeitpunkt darauf zurückgreifen zu
können.
2. Symbole
Symbolschlüssel:
Warnhinweis. Gefahr von Verletzungen und / oder Schäden.
Vorsicht. Heiße Oberfläche. Gefahr von Verletzungen und / oder Schäden.
52
Page 55

Achtung. Wichtige Informationen.
Hinweis. Informationen.
3. Sicherheit
Benutzen Sie das Gerät ausschließlich zum
Kochen und zu keinem anderen Zweck wie
z. B. zur Raumbeheizung. Dies kann zu einer
Kohlenmonoxidvergiftung und einer Überhitzung
des Herdes führen. Der Hersteller haftet nicht für
Schäden, die durch unsachgemäßen Gebrauch
oder eine falsche Einstellung der Bedienelemente
entstehen.
Die Verwendung dieses Gaskochgeräts führt in dem
Raum, in dem es installiert ist, zur Entstehung von
Hitze, Feuchtigkeit und Verbrennungsprodukten.
Achten Sie darauf, dass der Raum ausreichend
belüftet ist, wenn das Gerät in Betrieb ist. Bei
längerem Gebrauch kann eine zusätzliche Belüftung
erforderlich sein, indem Sie beispielsweise ein
Fenster öffnen oder die Auszugskraft der Haube
verstärken.
DE
Kindern ab einem Alter von 8 Jahren und Personen
mit eingeschränkten physischen, sensorischen
oder geistigen Fähigkeiten und / oder mangelnder
Erfahrung bzw. fehlendem Wissen dürfen das Gerät
nur verwenden, wenn sie beaufsichtigt werden oder
Anweisungen bezüglich der sicheren Nutzung des
Geräts erhalten haben und die mit der Benutzung
verbundenen Gefahren kennen.
53
Page 56

Die Brenner und Topfauflagen sind während
und nach dem Betrieb heiß. Lassen Sie alle Teile
abkühlen, bevor Sie sie berühren, da dies ansonsten
zu schweren Verletzungen führen kann.
Löschen Sie offene Flammen nicht mit Wasser.
Schalten Sie den Brenner aus und bedecken
Sie die Flammen mit einem Deckel oder einer
Feuerlöschdecke.
Halten Sie Kinder, die jünger als 8 Jahre sind, von
dem Gerät fern, es sei denn, sie befinden sich unter
ständiger Aufsicht.
Lassen Sie Kinder nicht mit dem Gerät spielen.
Lassen Sie Kinder dieses Gerät nicht reinigen, und
lassen Sie es nicht unbeaufsichtigt.
Verwenden Sie ausschließlich die vom Hersteller
gelieferten Teile.
54
Nehmen Sie an dem Gerät keine Änderungen oder
Anpassungen vor, es sei denn, die Änderung wurde
von dem Hersteller oder dessen Vertreter genehmigt.
Bewahren Sie keine Gegenstände auf der
Kochfläche auf.
Page 57

Schließen Sie nicht den Glasdeckel, wenn die
Brenner in Betrieb oder noch warm sind.
4. Hauptbestandteile
SCU353
SHB353
1. Glasdeckel
2. Brenner
3. Topfauflagen
1
4. Bedienfeld
5. Spülbecken
2
DE
345
1. Glasdeckel
2. Brenner
1
4
2
3. Bedienfeld
4. Topfauflagen
3
55
Page 58

Die Brennerarten können je nach Art des Gerätes variieren. Tabelle 6: Technische Spezifikationen
des Brenners auf Seite 60 können Sie weitere Einzelheiten entnehmen.
5. Vor der Verwendung
Bevor Sie das Gerät verwenden:
■
Stellen Sie sicher, dass alle Verpackungsmaterialien entfernt wurden.
■
Reinigen Sie das Gerät mit warmem Wasser und Haushaltsreiniger, und trocknen Sie es
vorsichtig mit einem weichen Tuch.
■
Stellen Sie sicher, dass die Topfauflagen richtig positioniert sind.
■
Stellen Sie sicher, dass die Gaszufuhr angeschlossen und geöffnet ist.
■
Stellen Sie sicher, dass das Gerät an die 12 -V-DC-Batterie angeschlossen ist (nur bei Modellen
mit Zündung).
■
Entzünden Sie die Brenner, und lassen Sie sie brennen, um zunächst Gerüche und Dämpfe zu
entfernen.
Verwenden Sie ausschließlich Flüssiggas. Das Gerät kann mit Propan oder Butan
betrieben werden. Es wird empfohlen, Propan statt Butan zu verwenden, da Butan bei
einer Umgebungstemperatur von unter 10 °C nur eine schwache Leistung bietet und bei
einer Umgebungstemperatur von unter 5 °C nicht verwendet werden kann.
6. Verwendung der Brenner
Die genaue Position der Bedienknöpfe können Sie Hauptbestandteile auf Seite 55 entnehmen.
Einschalten:
■
Drücken und drehen Sie den Bedienknopf.
■
Drehen Sie den Knopf gegen den Uhrzeigersinn in die Position Hochflamme.
-
Die automatische Funkenzündung entzündet sich und leuchtet.
-
Halten Sie bei Modellen ohne Zündung ein brennendes Streichholz oder einen Gasanzünder
an die Brenner.
■
Halten Sie den Bedienknopf für ca. 10-15 Sekunden gedrückt, und lassen Sie ihn anschließend
los.
■
Stellen Sie die Höhe der Flamme ein.
56
Page 59

Ausschalten:
■
Drehen Sie den Bedienknopf im Uhrzeigersinn in die Position 0, um den Brenner auszuschalten.
Wenn der Brenner unbeabsichtigt ausgeht, drehen Sie den Bedienknopf in die Position 0,
und warten Sie mindestens 1 Minute, bevor Sie den Brenner erneut entzünden.
Wenn sich der Brenner nicht innerhalb von 15 Sekunden entzündet, drehen Sie den
Bedienknopf zurück in die Position 0, und lassen Sie ihn los. Warten Sie mindestens 1
Minute, und wiederholen Sie anschließend die oben beschriebenen Schritte, um das
Gerät einzuschalten.
7. Verwendung des Spülbeckens
■
Öffnen Sie den Glasdeckel.
■
Drehen Sie den Wasserhahn auf, um Wasser in das Becken zu lassen.
■
Drehen Sie den Wasserhahn zu, um das Wasser abzustellen.
Achten Sie darauf, dass die Brenner durch Wasser aus dem Hahn oder dem Spülbecken
nicht nass werden. Feuchte Brenner brennen unregelmäßig und können ausgehen.
Hartes oder weiches Wasser kann im Spülbecken einen braunen oder weißen Film
hinterlassen. Trocknen Sie das Spülbecken nach dem Gebrauch mit einem weichen Tuch,
um dies zu vermeiden. Reinigen Sie das Spülbecken mindestens einmal in der Woche
gründlich mit einem Tuch und Haushaltsreiniger.
8. Sicheres Kochen
■
Achten Sie darauf, dass Kochgefäße nicht über die Ecken des Geräts hinausragen – verwenden
Sie Töpfe der richtigen Größe und stellen Sie sie mittig über die Brenner.
SCU353
DE
Ø 100 140mm
Ø 120 200mm
Ø 150 280mm
57
Page 60

SHB353
Ø 100 -
Ø 150 -
280mm
■
Achten Sie darauf, dass zwischen den Töpfen und den Rändern des Kochfeldes ein
140mm
Ø 120 200mm
Mindestabstand von 10 mm ist.
■
Drehen Sie die Töpfe, sodass die Griffe nicht über die Vorderseite des Geräts hinausragen.
■
Stellen Sie sicher, dass die Flamme den Boden des Topfes erhitzt und nicht die Seiten.
■
Lassen Sie den Herd nicht unbeaufsichtigt, wenn Sie ihn benutzen.
■
Verwenden Sie das Gerät nicht während der Fahrt.
■
Drehen Sie die Bedienknöpfe nach dem Kochen wieder in die Position 0.
■
Halten Sie das Kochfeld sauber, und vermeiden Sie, dass sich Fett und Speisereste ansammeln.
9. Wartung und Reinigung
Thetford empfiehlt, bei einer zugelassenen Servicestelle eine jährliche Inspektion durchführen zu
lassen. Zwischen den jährlichen Wartungen sollten Sie den Herd nach jedem Gebrauch auf folgende
Weise reinigen:
■
Entfernen Sie nach jedem Gebrauch Spritzer oder Verunreinigungen mit Seife und heißem
Wasser. Trocknen Sie die Oberfläche mit einem weichen Tuch.
■
Verwenden Sie eine nicht scheuernde Mehrzweck-Reinigungsmilch und einen NylonScheuerschwamm, um hartnäckigere Schmutz- oder Fettreste zu entfernen.
■
Verwenden Sie einen geeigneten Edelstahlreiniger oder eine Edelstahlpolitur, um oberflächliche
Kratzer auf der Oberfläche zu entfernen.
58
Reinigen Sie stets in Richtung der gebürsteten Oberfläche und nicht quer zur Faser.
Verwenden Sie keine Scheuermittel, Scheuerschwämme aus Metall oder harte Bürsten,
da sie das Kochfeld beschädigen können.
Lassen Sie keine nassen Tücher, Reinigungspads, Rückstände von Speisen oder
Reinigungsmitteln oder andere Schmutzrückstände auf der Oberfläche antrocknen, da
dies zu Lochfraß, Flecken oder sogar Rostbildung führen kann.
Stellen Sie beim Reinigen der Brennerringe sicher, dass die Löcher nicht verstopft sind.
Bleichmittel enthaltende Reinigungsmittel dürfen nicht in Kontakt mit Edelstahl
kommen.
Page 61

Die Bedienknöpfe können zur Reinigung entfernt werden. Die Knöpfe sind leicht wieder
anzubringen.
Der Mineralgehalt im Wasser (wie z. B. Eisen oder Kalk) kann das Erscheinungsbild von
Metall beeinträchtigen.
10. Gaslecks
Sobald Sie Gas riechen, sollten Sie Folgendes tun:
■
sicherstellen, dass alle Brenner ausgeschaltet sind;
■
alle offenen Flammen löschen und nicht rauchen;
■
die Gaszufuhr an der Gasflasche sofort unterbrechen;
■
keine elektrischen Schalter verwenden;
■
alle Türen und Fenster öffnen.
Flüssiggas ist schwerer als Luft. Austretendes Gas sammelt sich im unteren Bereich
des Raums. Wenn Sie dem starken, unangenehmen Geruch von Gas folgen, können Sie
bestimmen, wo sich das Leck befindet. Um zu untersuchen, wo genau sich das Leck
befindet ist, verwenden Sie ein spezielles Lecksuch-Spray. Verwenden Sie niemals eine
offene Flamme, um das Leck zu finden!
11. Fehlerbehebung
Problem Mögliche Ursache Lösung
Die Brenner brennen nicht oder
ungleichmäßig.
Die automatische Zündung
erzeugt keine Funken.
Die Bedienknöpfe
funktionieren nicht.
Wenn Sie ein Problem nicht lösen können, kontaktieren Sie bitte eine autorisierte örtliche
Servicestelle oder den Kundendienst von Thetford in Ihrem Land.
Die Gasflasche ist leer.
Der Gashahn ist geschlossen.
Die Brennerdeckel sind nicht
korrekt positioniert.
Die Brenner sind nass oder
verstopft.
Die 12-V-DC-Batterie ist leer.
Die Anschlüsse sind lose.
Die Zündpunkte sind nass oder
verunreinigt.
Die Knöpfe sind falsch
angebracht.
Füllen Sie die Flasche auf.
Öffnen Sie den Hahn.
Lassen Sie die Deckel
abkühlen, und positionieren
Sie sie erneut.
Trocknen oder reinigen Sie die
Brenner.
Laden Sie die Batterie auf.
Schließen Sie die Anschlüsse
fest an.
Trocknen oder reinigen Sie die
Zündpunkte.
Bringen Sie die Knöpfe richtig
an.
DE
59
Page 62

12. Instandhaltung
Alle Instandhaltungsarbeiten müssen von einem zugelassenen Fachmann ausgeführt werden.
Vor Beginn der Instandhaltungsarbeiten muss das Gerät abkühlen und von der Gas- und
Stromversorgung getrennt werden. Nach allen Instandhaltungsarbeiten muss das Gerät auf
Gasdichtheit geprüft werden.
Für Instandhaltungsarbeiten wenden Sie sich bitte an Ihre autorisierte Servicestelle vor Ort unter
Angabe der Modell- und Seriennummer auf dem Leistungsschild sowie des Kaufdatums.
13. Lagerung
■
Schließen Sie das Gasventil an der Gasflasche.
■
Trennen Sie die Batterie.
■
Stellen Sie sicher, dass sich alle Bedienknöpfe in der Position 0 befinden.
■
Wischen Sie das Gerät sauber und trocken.
■
Schließen Sie die Glasdeckel.
14. Technische Spezifikationen
Tabelle 6: Technische Spezifikationen des Brenners
SHB353 SCU353
Gaszufuhr Düse Gaszufuhr Düse
kW g/hr mm kW g/hr mm
Sparbrenner 1,0 72 0,52 1,0 72 0,52
Normalbrenner 1,5 107 0,61 1,5 107 0,61
Schnellbrenner 2,5 179 0,77 2,5 179 0,77
Gesamt 5,0 358 5,0 358
60
Page 63

Dieses Gerät ist für die Verwendung von Flüssiggas geeignet und sollte mit keinem
anderen Gas betrieben werden.
Dieses Gerät muss geerdet werden.
15. Fragen
Wenn Sie Fragen zum Herd, zu Teilen, Zubehör oder den autorisierten Servicestellen haben,
■
besuchen Sie bitte www.thetford-europe.com.
■
Wenn Sie ein Problem nicht lösen können, kontaktieren Sie bitte eine autorisierte örtliche
Servicestelle oder den Kundendienst von Thetford in Ihrem Land.
16. Garantie
Thetford BV bietet den Endnutzern seiner Produkte eine Garantie von drei Jahren. Wenn während
des Garantiezeitraums ein Defekt auftritt, wird Thetford das Produkt ersetzen oder reparieren. In
diesem Fall werden die Kosten für den Austausch, die Arbeitskosten für den Austausch defekter
Komponenten und / oder die Kosten der Teile selbst von Thetford übernommen.
Erworbene Ersatzteile haben eine einjährige Garantie. Die Garantie deckt keine Montage- und / oder
Arbeitskosten ab.
1. Um einen Anspruch unter dieser Garantie geltend zu machen, muss der Nutzer das Produkt zu
einem autorisierten Servicepartner von Thetford bringen, bei dem der Anspruch geprüft wird.
2. Im Rahmen der Garantie ausgetauschte Komponenten gehen in das Eigentum von Thetford
über.
3. Geltende Verbraucherschutzgesetze bleiben von dieser Garantie unberührt.
4. Diese Garantie gilt nicht für Produkte, die für kommerzielle Zwecke verwendet werden.
5. In den folgenden Fällen werden Garantieansprüche nicht anerkannt:
■
Das Produkt wurde unsachgemäß verwendet, oder die in dem Handbuch beschriebenen
Anweisungen wurden nicht befolgt.
■
Das Produkt wurde nicht in Übereinstimmung mit den Anweisungen installiert.
■
An dem Produkt wurden Änderungen vorgenommen.
■
Das Produkt wurde von einem nicht autorisierten Servicepartner von Thetford repariert.
■
Die Seriennummer oder der Produktcode wurde manipuliert oder entfernt.
■
Das Produkt wurde aufgrund einer missbräuchlichen Verwendung beschädigt.
DE
61
Page 64

NL
Vertaling van de originele gebruikershandleiding
Inhoud
1 Inleiding.................................................................................................................................................................62
2 Symbolen..............................................................................................................................................................62
3 Veiligheid.............................................................................................................................................................. 63
4 Belangrijkste onderdelen.................................................................................................................................65
5 Voor gebruik.........................................................................................................................................................65
6 De branders gebruiken.....................................................................................................................................66
7 De gootsteen gebruiken...................................................................................................................................66
8 Veilig koken..........................................................................................................................................................67
9 Onderhoud en reiniging....................................................................................................................................68
10 Gaslekken.............................................................................................................................................................68
11 Probleemoplossing............................................................................................................................................69
12 Onderhoudswerkzaamheden..........................................................................................................................69
13 Opslag....................................................................................................................................................................70
14 Technische specificaties..................................................................................................................................70
15 Vragen....................................................................................................................................................................70
16 Garantie.................................................................................................................................................................70
1. Inleiding
Dit is de gebruikershandleiding voor uw Thetford-kookplaat. Lees de veiligheidsinstructies en de
informatie over het gebruik en onderhoud van uw kookplaat zorgvuldig door voordat u het apparaat
gaat gebruiken. Zo kunt u de kookplaat veilig en efficiënt gebruiken. Bewaar deze handleiding zodat
u deze later nog eens kunt raadplegen.
2. Symbolen
Legenda:
Waarschuwing. Risico op letsel en/of beschadigingen.
Pas op. Warm oppervlak. Risico op letsel en/of beschadigingen.
Let op. Belangrijke informatie.
62
Page 65

Opmerking. Informatie.
3. Veiligheid
Dit apparaat is uitsluitend bedoeld om mee te
koken en niet voor andere doeleinden, zoals het
verwarmen van een ruimte. Dit kan leiden tot
koolmonoxidevergiftiging en oververhitting van
de kookplaat. De fabrikant is niet aansprakelijk
voor schade die ontstaat door onjuist gebruik of de
onjuiste instelling van de bedieningsknoppen.
Tijdens het gebruik van deze gaskookplaat nemen
de temperatuur, het vochtgehalte en de hoeveelheid
verbrandingsgassen in de betreffende ruimte toe.
Zorg daarom tijdens het gebruik van het apparaat
voor voldoende ventilatie. Bij langdurig gebruik van
de kookplaat moet de ruimte mogelijk extra worden
geventileerd. Zet bijvoorbeeld een raam open of zet
de afzuigkap op een hogere stand.
NL
Kinderen vanaf 8 jaar, mensen met een fysieke,
zintuigelijke of geestelijke beperking en/of mensen
met beperkte kennis van en/of ervaring met het
gebruik van apparatuur mogen het apparaat
uitsluitend gebruiken onder toezicht of wanneer
zij zijn geïnformeerd over het veilige gebruik en de
veiligheidsrisico's.
De branders en pannendragers zijn heet tijdens en
na het gebruik. Laat onderdelen afkoelen voordat u
deze aanraakt om ernstig letsel te voorkomen.
63
Page 66

Gebruik nooit water om brandende olie of brandend
vet te blussen. Draai de brander uit en doof de
vlammen met een deksel of blusdeken.
Houd kinderen jonger dan 8 jaar tijdens het gebruik
uit de buurt van het apparaat, tenzij er continu
toezicht is.
Laat kinderen nooit met het apparaat spelen.
Laat kinderen nooit het apparaat reinigen of
onderhouden, tenzij er toezicht is.
Gebruik uitsluitend originele onderdelen van de
fabrikant.
Het apparaat mag niet worden gewijzigd of
aangepast, tenzij dit is goedgekeurd door de
fabrikant of een bevoegde vertegenwoordiger.
Leg nooit voorwerpen op de kookplaat.
64
Sluit de glasplaat nooit wanneer de branders
branden of nog warm zijn.
Page 67

4. Belangrijkste onderdelen
1
2
345
SCU353
1
2
4
3
SHB353
1. Glasplaten
2. Branders
3. Pannendragers
4. Bedieningsknoppen
5. Gootsteen
1. Glasplaten
2. Branders
3. Bedieningsknoppen
4. Pannendragers
Brandertypes kunnen variëren afhankelijk van het type apparaat. Raadpleeg Tabel 7:
Branderspecificaties op pagina 70 voor meer informatie.
5. Voor gebruik
Voordat u het apparaat voor het eerst gebruikt:
■
Controleer of alle verpakkingsmaterialen zijn verwijderd;
■
Reinig het apparaat met warm water en een reinigingsmiddel en droog het voorzichtig af met
een zachte doek;
■
Controleer of de pannendragers goed zijn geplaatst;
■
Controleer of de gastoevoer is aangesloten en of de gaskraan is opengedraaid;
NL
65
Page 68

■
Controleer of het apparaat is aangesloten op de 12V-gelijkstroombatterij (alleen voor modellen
met vonkontsteking);
■
Ontsteek de branders en laat ze branden om geurtjes en dampen te elimineren.
Gebruik uitsluitend LPG (Liquefied Petroleum Gas). Dit apparaat is geschikt voor
zowel propaan als butaan. Propaan heeft de voorkeur ten opzichte van butaan.
Bij het gebruik van butaan werkt het apparaat namelijk minder goed wanneer de
omgevingstemperatuur lager is dan 10°C en kan het apparaat niet worden gebruikt
wanneer de omgevingstemperatuur lager is dan 5 °C.
6. De branders gebruiken
Raadpleeg Belangrijkste onderdelen op pagina 65 voor de exacte locatie van de
bedieningsknoppen.
Inschakelen:
■
Druk de bedieningsknop in en draai hem om;
■
Draai de bedieningsknop volledig linksom naar de hoogste stand;
-
De brander wordt aangestoken door de automatische vonkontsteking.
-
Bij modellen zonder vonkontsteking houdt u een lucifer of gasaansteker bij de brander om
hem aan te steken.
■
Houd de bedieningsknop gedurende 10 tot 15 seconden ingedrukt en laat hem dan los;
■
Pas de hoogte van de vlam aan.
Uitschakelen:
■
Draai de bedieningsknop rechtsom naar stand 0 om de brander uit te schakelen.
Wanneer de brander per ongeluk uitgaat, draaide bedieningsknop naar stand 0 en wacht
ten minste 1 minuut voordat u de brander weer aansteekt.
Wanneer de brander niet binnen 15 seconden ontsteekt, draaide knop terug naar stand 0
en laat hem los. Wacht ten minste 1 minuut en herhaal de bovenstaande stappen om de
brander in te schakelen.
7. De gootsteen gebruiken
■
Open de glasplaat;
■
Draai de kraan open om water te pakken;
66
Page 69

■
Draai de kraan weer dicht.
Let op dat er geen water uit de kraan of gootsteen op de branders terechtkomt. Natte
branders branden onregelmatig en kunnen uitgaan.
Hard of zacht water kan bruine of witte aanslag in de gootsteen veroorzaken. Droog de
gootsteen na gebruik met een zachte doek om dit te voorkomen. Reinig de gootsteen ten
minste één keer per week met een doek en reinigingsmiddel.
8. Veilig koken
■
Pannen mogen niet over de rand van het apparaat steken. Gebruik uitsluitend pannen met de
juiste afmetingen en plaats ze midden op de brander;
SCU353
Ø 100 140mm
SHB353
Ø 120 200mm
Ø 150 280mm
Ø 100 -
Ø 150 -
280mm
■
Zorg ervoor dat de afstand tussen de pannen en de randen van de kookplaat minimaal 10 mm
140mm
Ø 120 200mm
bedraagt;
■
Zet pannen zo op de branders dat de handvatten niet uitsteken aan de voorzijde van het
apparaat;
■
Zorg ervoor dat de vlammen alleen de onderkant van de pan verwarmen en niet de zijkanten;
■
Laat de kookplaat nooit onbeheerd wanneer hij in gebruik is;
■
Gebruik het apparaat nooit tijdens het rijden;
■
Draai de bedieningsknoppen na het koken altijd terug naar stand 0;
■
Houd de kookplaat schoon en voorkom dat vet en etensresten zich ophopen.
NL
67
Page 70

9. Onderhoud en reiniging
Thetford raadt aan om het apparaat jaarlijks te laten inspecteren door een erkend servicecentrum.
Reinig daarnaast de kookplaat regelmatig na gebruik:
■
Verwijder etensresten en ander vuil direct na gebruik met zeep en warm water. Droog het
oppervlak met een zachte doek.
■
Gebruik een niet-schurende multireiniger en een nylon schuurspons om hardnekkig vuil en vet
te verwijderen.
■
Gebruik een speciaal rvs-reinigingsmiddel of -poetsmiddel om oppervlakkige krassen in het
oppervlak te verwijderen.
Wrijf altijd in de richting van de geborstelde afwerking en nooit er tegenin.
Gebruik geen schurende reinigingsmiddelen, staalwol of harde borstels, omdat deze de
kookplaat kunnen beschadigen.
Laat natte doeken, schuursponzen, reinigingsmiddelen, etensresten of ander vuil niet op
het oppervlak liggen en/of opdrogen. Dit kan putjes, aanslag en zelfs roest veroorzaken.
Zorg er bij het reinigen van de branderringen voor dat de openingen niet geblokkeerd
raken.
Reinigingsmiddelen met bleek mogen niet in aanraking komen met het roestvrijstalen
oppervlak.
De bedieningsknoppen kunnen worden verwijderd om ze te reinigen, en eenvoudig weer
worden teruggeplaatst.
Mineralen in het water (zoals ijzer en kalk) kunnen het metalen oppervlak aantasten.
10. Gaslekken
Wanneer u een gaslucht ruikt:
■
Controleer of alle branders zijn uitgeschakeld;
■
Doof alle niet afgeschermde ontstekingsbronnen, inclusief sigaretten, sigaren en pijpen;
■
Sluit direct de gastoevoer bij de gasfles af;
■
Gebruik geen elektrische schakelaars;
■
Zet alle deuren en ramen open.
LPG is zwaarder dan lucht, waardoor het ontsnapte gas zich op het laagste punt zal
verzamelen. Door de onprettige en overheersende geur van gas te volgen, kan de locatie
van een lek worden opgespoord. Gebruik een lekdetectiespray om de exacte locatie van
het lek op te sporen. Gebruik nooit open vuur om gaslekken op te sporen!
68
Page 71

11. Probleemoplossing
Probleem Mogelijke oorzaak Oplossing
Branders branden niet of
onregelmatig
De automatische
vonkontsteking werkt niet
De bedieningsknoppen werken
niet
Als u het probleem niet zelf kunt oplossen, neem dan contact op met het erkende, lokale
servicecentrum of de Thetford-klantenservice in uw land.
De gasfles is leeg
De gaskraan is dichtgedraaid
De branderdeksels zijn niet
juist aangebracht
De branders zijn nat of verstopt
De 12V-gelijkstroombatterij is
leeg
Er zijn losse aansluitingen
Het ontstekingsmechanisme is
nat of vuil
De knoppen zijn onjuist
aangebracht
Vul de gasfles
Draai de kraan open
Laat de deksels afkoelen en
breng ze juist aan
Droog of reinig de branders
Laad de batterij op
Bevestig de aansluitingen
Droog of reinig het
ontstekingsmechanisme
Breng de knoppen op de juiste
wijze aan
12. Onderhoudswerkzaamheden
Onderhoudswerkzaamheden mogen uitsluitend worden uitgevoerd door bevoegde en deskundige
personen. Laat het apparaat afkoelen en koppel de gasaansluiting en elektrische aansluitingen
los alvorens onderhoudswerkzaamheden aan het apparaat uit te voeren. Na elke onderhoudsbeurt
moet het apparaat worden gecontroleerd op eventuele gaslekken.
Neem contact op met uw erkende, lokale servicecentrum voor het uitvoeren van
onderhoudswerkzaamheden. Vermeld daarbij het model- en serienummer dat op het typeplaatje
staat en de aankoopdatum.
NL
69
Page 72

13. Opslag
■
Draai de gaskraan van de gasfles dicht;
■
Koppel de accu los;
■
Zorg ervoor dat alle bedieningsknoppen in stand 0 zijn gedraaid;
■
Reinig de kookplaat en droog hem af;
■
Sluit de glasplaten.
14. Technische specificaties
Tabel 7: Branderspecificaties
SHB353 SCU353
Gastoevoer Injector Gastoevoer Injector
kW g/uur mm kW g/uur mm
Hulpbrander 1,0 72 0,52 1,0 72 0,52
Semi-snelle brander 1,5 107 0,61 1,5 107 0,61
Snelle brander 2,5 179 0,77 2,5 179 0,77
Totaal 5,0 358 5,0 358
Dit apparaat is uitsluitend geschikt voor LPG (Liquefied Petroleum Gas). Gebruik nooit
een ander type gas.
Dit apparaat moet altijd worden geaard.
15. Vragen
Ga voor vragen over de kookplaat, onderdelen, accessoires of erkende servicecentra naar
■
www.thetford-europe.com
■
Als u het probleem niet zelf kunt oplossen, neem dan contact op met het erkende
servicecentrum of de Thetford-klantenservice in uw land.
16. Garantie
Thetford B.V. biedt de eindgebruikers van haar producten drie jaar garantie. In geval van een defect
binnen de garantieperiode zal Thetford het product vervangen of repareren. In dit geval zijn de
70
Page 73

kosten voor de vervanging, het arbeidsloon voor vervanging van defecte onderdelen en/of de kosten
van de onderdelen voor rekening van Thetford.
Voor gekochte reserveonderdelen geldt een garantie van één jaar. Kosten voor montage en
arbeidsloon vallen niet onder de garantie.
1. Om aanspraak op deze garantie te kunnen maken, moet de gebruiker het product naar een door
Thetford erkend servicecentrum brengen. Hier zal de claim worden beoordeeld.
2. Onderdelen die tijdens de reparatie onder garantie worden vervangen, worden eigendom van
Thetford.
3. De geldende consumentenwetgeving wordt door deze garantie onverlet gelaten.
4. Deze garantie is niet van toepassing op producten die voor commerciële doeleinden worden
gebruikt.
5. Garantieclaims die in een van onderstaande categorieën vallen, worden niet in behandeling
genomen:
■
Het product is op oneigenlijke wijze gebruikt of de instructies in de handleiding zijn niet
opgevolgd;
■
Het product is niet volgens de instructies geïnstalleerd;
■
Er zijn veranderingen aan het product aangebracht;
■
Het product is gerepareerd, maar niet door een servicecentrum dat door Thetford is erkend;
■
Het serienummer of de productcode is gewijzigd of verwijderd;
■
Het product is beschadigd door onjuist of ondeskundig gebruik.
71
NL
Page 74

IT
Traduzione del manuale d’uso originale
Contenuti
1 Introduzione.........................................................................................................................................................72
2 Simboli...................................................................................................................................................................72
3 Sicurezza...............................................................................................................................................................73
4 Componenti principali.......................................................................................................................................75
5 Prima dell’utilizzo...............................................................................................................................................75
6 Uso dei bruciatori...............................................................................................................................................76
7 Uso del lavello.....................................................................................................................................................76
8 Cucinare in sicurezza........................................................................................................................................77
9 Manutenzione e pulizia....................................................................................................................................78
10 Perdite di gas.......................................................................................................................................................78
11 Risoluzione dei problemi.................................................................................................................................79
12 Manutenzione......................................................................................................................................................79
13 Stoccaggio dell’apparecchio........................................................................................................................... 79
14 Caratteristiche tecniche................................................................................................................................... 80
15 Domande...............................................................................................................................................................80
16 Garanzia................................................................................................................................................................ 80
1. Introduzione
Questo è il manuale d’uso per il piano cottura Thetford. Leggere attentamente le istruzioni per la
sicurezza e le informazioni di utilizzo e manutenzione prima di continuare. In tal modo è possibile
utilizzare il piano cottura in modo sicuro ed efficiente. Conservare questo manuale per riferimento
futuro.
2. Simboli
Legenda dei simboli:
Avvertenza. Rischio di lesioni e/o danni.
Cautela. Superficie calda. Rischio di lesioni e/o danni.
Attenzione. Informazioni importanti.
72
Page 75

Nota. Informazioni.
3. Sicurezza
Utilizzare l’apparecchio esclusivamente per
cucinare e non per altri usi, per esempio riscaldare
l’ambiente. Questo potrebbe causare avvelenamento
da monossido di carbonio e il surriscaldamento del
piano di cottura. Il produttore non è responsabile
per danni derivanti da un uso improprio o da
un’impostazione non corretta dei comandi.
L'uso di questo apparecchio per la cottura a gas
provoca la produzione di calore, umidità e prodotti di
combustione nel locale in cui è installato. Accertarsi
di provvedere ventilazione suciente nella stanza
quando l’apparecchio è in funzione. In caso di uso
prolungato, provvedere ad un’ulteriore ventilazione
aprendo una finestra o aumentando la forza di
aspirazione della cappa.
Questo apparecchio può essere utilizzato da
bambini a partire dagli 8 anni di età, da persone con
ridotte capacità fisiche, sensoriali o mentali e/o con
mancanza di esperienza e conoscenza dello stesso
soltanto se gli stessi sono soggetti a supervisione o
sono stati istruiti sull'uso dell'attrezzatura in modo
sicuro e ne comprendono i rischi.
I bruciatori e i supporti pentole sono caldi durante
e dopo l’uso. Lasciar rareddare tutti i componenti
prima di toccarli per evitare gravi lesioni.
IT
73
Page 76

Non spegnere mai un incendio da cottura con acqua.
Spegnere l'apparecchio e coprire le fiamme con un
coperchio o una coperta antincendio.
Tenere i bambini di età inferiore a 8 anni
lontano dall’apparecchio, eccetto sotto costante
supervisione.
Non consentire ai bambini di giocare con
l'apparecchio.
Non consentire ai bambini di pulire o eseguire la
manutenzione dell’apparecchio senza supervisione.
Utilizzare esclusivamente i componenti forniti dal
produttore.
Non eettuare alcuna modifica o regolazione
dell’apparecchio, salvo non sia autorizzata dal
produttore o suo rappresentante.
74
Non conservare oggetti sulla superficie di cottura.
Non chiudere il coperchio in vetro quando i
bruciatori sono accesi o ancora caldi.
Page 77

4. Componenti principali
1
2
345
SCU353
1
2
4
3
SHB353
1. Coperchio in vetro
2. Bruciatori
3. Poggia pentole
4. Pannello di controllo
5. Lavello
1. Coperchio in vetro
2. Bruciatori
3. Pannello di controllo
4. Poggia pentole
I tipi di bruciatore possono variare in base al tipo di apparecchio. Per ulteriori dettagli, vedere Tabella
8: Caratteristiche dei bruciatori a pagina 80.
5. Prima dell’utilizzo
Prima di utilizzare l’apparecchio:
■
Assicurarsi che tutti i materiali di imballaggio siano stati rimossi
■
Pulire l’apparecchio con acqua calda e detergente domestico e asciugare attentamente con un
panno morbido
■
Assicurarsi che i supporti per le pentole siano correttamente posizionati
■
Assicurarsi che l’alimentazione del gas sia collegata e attivata
IT
75
Page 78

■
Assicurarsi che l’apparecchio sia collegato alla batteria da 12VDC (solo per modelli con
accensione)
■
Accendere i bruciatori e lasciarli funzionare per espellere gli odori e i vapori.
Utilizzare esclusivamente GPL (gas di petrolio liquefatto). L’apparecchio può funzionare
a propano o butano. Il propano è preferibile rispetto al butano, in quanto quest’ultimo
ha uno scarso rendimento a temperature ambiente inferiori ai 10 °C e non può essere
utilizzato a una temperatura ambiente inferiore a 5 °C.
6. Uso dei bruciatori
Per l’ubicazione esatta delle manopole di controllo vedere Componenti principali a pagina 75.
Accensione:
■
Premere e ruotare la manopola di controllo.
■
Ruotare in senso antiorario fino alla posizione di massima apertura.
-
L’accenditore automatico genera una scintilla per l’accensione.
-
Per i modelli senza accensione elettrica tenere un fiammifero acceso o un accendino a gas
vicino ai bruciatori.
■
Tenere la manopola di controllo premuta per circa 10-15 secondi quindi rilasciarla.
■
Regolare l’altezza della fiamma.
Spegnimento:
■
Per spegnere il bruciatore ruotare la manopola di controllo in posizione 0.
Se il bruciatore si spegne accidentalmente, ruotare la manopola di controllo in posizione
0 e attendere almeno 1 minuto prima di riaccendere il bruciatore.
Se il bruciatore non si accende entro 15 secondi, riportare la manopola di controllo in
posizione 0 e rilasciarla. Attendere almeno 1 minuto quindi ripetere le operazioni sopra
indicate per accendere l’apparecchio.
7. Uso del lavello
■
Aprire il coperchio in vetro.
■
Aprire il rubinetto dell’acqua.
■
Chiudere il rubinetto dell’acqua.
76
Page 79

Prestare attenzione a non bagnare i bruciatori con l’acqua del rubinetto o del lavello. I
bruciatori bagnati possono funzionare in modo irregolare e spegnersi.
Acqua dura o dolce può lasciare una pellicola marrone o bianca nel lavello. Per evitare
questo inconveniente, asciugare il lavello con un panno morbido. Pulire a fondo il lavello
con un panno e detergente per uso domestico almeno una volta alla settimana.
8. Cucinare in sicurezza
■
Evitare che i recipienti utilizzati per la cottura si sovrappongano ai bordi dell'apparecchio:
utilizzare pentole di dimensioni corrette e posizionarle al centro sopra i bruciatori.
SCU353
Ø 100 140mm
SHB353
Ø 120 200mm
Ø 150 280mm
Ø 100 -
Ø 150 -
280mm
■
Accertarsi di lasciare almeno 10 mm di spazio tra le pentole e i bordi del piano cottura.
■
Girare le pentole in modo che i manici non sporgano dalla parte anteriore dell’apparecchio.
■
Accertarsi che la fiamma scaldi il fondo della pentola e non i lati.
■
Non lasciare il piano cottura incustodito durante l'uso.
■
Non utilizzare il piano cottura con il veicolo in movimento.
■
Al termine della cottura, riportare le manopole di controllo in posizione 0.
■
Tenere il piano cottura pulito ed evitare l’accumulo di grasso e residui di alimenti.
140mm
Ø 120 200mm
IT
77
Page 80

9. Manutenzione e pulizia
Thetford raccomanda una ispezione di controllo annuale da parte di un centro di assistenza
autorizzato. Tra gli intervalli di manutenzione annuale, pulire regolarmente il piano di cottura dopo
l’uso:
■
Rimuovere sempre eventuali versamenti o contaminazioni immediatamente dopo l’uso con
acqua calda e sapone. Asciugare la superficie con un panno morbido.
■
Utilizzare una crema detergente multiuso non abrasiva e una spugna in nylon per pulire lo
sporco più ostinato o il grasso.
■
Utilizzare un detergente o lucidante per acciaio inossidabile brevettato per rimuovere i gra
superficiali.
Pulire sempre nel senso della satinatura e non trasversalmente alla venatura.
Non utilizzare detergenti abrasivi, spugne abrasive metalliche o spazzole dure.
Potrebbero danneggiare il piano di cottura.
Non lasciare asciugare sulla superficie panni umidi, tamponi detergenti, residui di
alimenti o di prodotti per la pulizia o altra sporcizia. Possono causare corrosione,
marcature o persino ruggine.
Se si puliscono gli anelli dei bruciatori, assicurarsi che i fori non siano ostruiti.
Detergenti contenenti candeggina non devono essere lasciati a contatto con l’acciaio
inossidabile.
Le manopole di controllo possono essere rimosse per la pulizia. Le manopole sono
facilmente riposizionabili.
Il contenuto minerale nell’acqua (come ferro o calcare) può pregiudicare l’aspetto del
metallo.
10. Perdite di gas
Non appena si percepisce odore di gas:
■
Assicurarsi che tutti i bruciatori siano spenti
■
Spegnere tutte le fiamme libere e non fumare
■
Chiudere immediatamente l’alimentazione del gas dalla bombola
■
Non utilizzare accendini elettrici
■
Aprire tutte le porte e tutte le finestre.
Il GPL è più pesante dell’aria. Le fughe di gas si accumulano a livelli inferiori. Seguendo
l’odore forte e spiacevole di gas, è possibile determinare l’ubicazione della perdita. Per
individuarne esattamente la posizione, utilizzare uno speciale spray rilevatore di fughe.
Mai utilizzare fiamme libere per individuare la fuga!
78
Page 81

11. Risoluzione dei problemi
Problema Causa possibile Soluzione
I bruciatori non funzionano o
funzionano parzialmente
L'accensione automatica non
genera la scintilla
Le manopole di controllo non
funzionano
Se il problema non può essere risolto, contattare il Centro di assistenza autorizzato o
l’Assistenza clienti Thetford locale.
Bombola del gas vuota
Rubinetto del gas chiuso
Spartifiamma non
correttamente posizionati
Bruciatori umidi od ostruiti
Batteria 12VDC scarica
Collegamenti allentati
Punti di accensione umidi o
sporchi
Le manopole non sono
montate correttamente
Riempire la bombola
Aprire il rubinetto
Lasciar rareddare gli
spartifiamma, quindi
riposizionarli
Asciugare o pulire i bruciatori
Caricare la batteria
Fissare i collegamenti
Asciugare o pulire i punti di
accensione
Montare correttamente le
manopole
12. Manutenzione
Tutti gli interventi di manutenzione devono essere eseguiti da personale autorizzato e competente.
Prima di iniziare qualsiasi intervento di manutenzione, l'apparecchio deve essere lasciato
rareddare e deve essere scollegato sia dall'alimentazione del gas che da quella elettrica. Dopo ogni
intervento di manutenzione, l'apparecchio deve essere testato per assicurare la tenuta a gas.
Per assistenza, contattare il proprio Centro di assistenza locale autorizzato fornendo i dettagli del
modello e il numero di serie riportati sulla targhetta identificativa, nonché la data di acquisto.
IT
13. Stoccaggio dell’apparecchio
■
Chiudere la valvola del gas sulla bombola.
79
Page 82

■
Scollegare la batteria.
■
Accertarsi che tutte le manopole di controllo siano in posizione 0.
■
Pulire l’apparecchio con un panno e asciugare.
■
Chiudere i coperchi in vetro.
14. Caratteristiche tecniche
Tabella 8: Caratteristiche dei bruciatori
SHB353 SCU353
Ingresso gas Iniettore Ingresso gas Iniettore
KW g/hr mm KW g/hr mm
Bruciatore ausiliario 1,0 72 0,52 1,0 72 0,52
Bruciatore semi-rapido 1,5 107 0,61 1,5 107 0,61
Bruciatore rapido 2,5 179 0,77 2,5 179 0,77
Totale 5,0 358 5,0 358
Questo apparecchio è adatto per l’utilizzo con GPL (gas di petrolio liquefatto) e non deve
essere utilizzato con altro gas.
Questo apparecchio deve essere collegato a terra.
15. Domande
Per eventuali domande relative al piano di cottura, ai componenti, agli accessori o all’assistenza
autorizzata:
■
Visitare il sito www.thetford-europe.com
■
Se il problema non può essere risolto, contattare il Centro di assistenza autorizzato o
l’Assistenza clienti Thetford locale.
16. Garanzia
Thetford BV ore agli utilizzatori finali dei propri prodotti una garanzia di tre anni. In caso di anomalia
durante il periodo di garanzia, Thetford sostituirà o riparerà il prodotto. In queste condizioni, il
costo della sostituzione, i costi di manodopera per la sostituzione dei componenti difettosi e/o i
componenti stessi saranno a carico di Thetford.
80
Page 83

Le parti di ricambio acquistate hanno una garanzia di un anno. Eventuali costi di montaggio e/o
manodopera non sono coperti dalla garanzia.
1. Per inoltrare una richiesta di rimborso ai sensi della presente garanzia, l’utente deve portare il
prodotto a un centro di assistenza autorizzato Thetford. La richiesta di rimborso sarà valutata in
tale sede.
2. I componenti sostituiti durante la riparazione in garanzia diventano di proprietà di Thetford.
3. La presente garanzia non condiziona le leggi di tutela dei consumatori in vigore.
4. La presente garanzia non è valida in caso di prodotti utilizzati per fini commerciali.
5. Le richieste di rimborso in garanzia rientranti in una delle seguenti categorie non saranno
considerate:
■
Prodotto non utilizzato correttamente o mancato rispetto delle istruzioni del manuale.
■
Prodotto non installato in conformità alle istruzioni.
■
Modifiche al prodotto.
■
Prodotto riparato ma non da un centro di assistenza autorizzato Thetford.
■
Numero di serie o codice prodotto manomesso o rimosso.
■
Prodotto danneggiato a causa di uso improprio.
81
IT
Page 84

PT
Tradução do manual do utilizador original
Índice
1 Introdução............................................................................................................................................................ 82
2 Símbolos............................................................................................................................................................... 82
3 Segurança.............................................................................................................................................................83
4 Componentes principais.................................................................................................................................. 85
5 Antes da utilização............................................................................................................................................ 85
6 Utilização dos queimadores........................................................................................................................... 86
7 Utilizar o lava-louça...........................................................................................................................................86
8 Cozinhar de forma segura............................................................................................................................... 87
9 Manutenção e limpeza.....................................................................................................................................88
10 Fugas de gás....................................................................................................................................................... 88
11 Resolução de problemas.................................................................................................................................89
12 Manutenção......................................................................................................................................................... 89
13 Armazenar.............................................................................................................................................................90
14 Especificações técnicas...................................................................................................................................90
15 Questões...............................................................................................................................................................90
16 Garantia.................................................................................................................................................................90
1. Introdução
Este é o manual de utilizador para a sua placa Thetford. Leia atentamente as instruções de
segurança e informações sobre a utilização e manutenção da placa antes de a utilizar. Tal irá
permitir-lhe utilizar a placa de forma segura e eficiente. Conserve este manual para referência
futura.
2. Símbolos
Legenda dos símbolos:
Aviso. Risco de lesões e/ou danos.
Cuidado. Superfície quente. Risco de lesões e/ou danos.
Atenção. Informação importante.
82
Page 85

Nota. Informação.
3. Segurança
Utilize o aparelho apenas para cozinhar e não para
outros fins como, por exemplo, o aquecimento de
espaços. Tal poderá provocar o envenenamento
por monóxido de carbono e o sobreaquecimento da
placa. O fabricante não poderá ser responsabilizado
por danos resultantes de utilização indevida ou
configuração incorreta dos botões de controlo.
A utilização deste fogão a gás aumenta o nível de
calor, a humidade e os produtos de combustão do
espaço no qual se encontra instalado. Certifique-se
de que o espaço tem ventilação suficiente quando o
aparelho está a ser utilizado. Em caso de utilização
prolongada, poderá ser necessária ventilação
adicional mediante a abertura de uma janela ou o
aumento da força de sucção do exaustor.
Este aparelho poderá ser utilizado por crianças com
8 ou mais anos de idade, pessoas com capacidades
físicas, sensoriais ou mentais reduzidas e/ou falta
de experiência e conhecimento na condição de
que sejam supervisionadas ou tenham recebido
instruções sobre a utilização deste aparelho com
segurança e compreendido os potenciais perigos.
Os queimadores e as grelhas de suporte estão
quentes durante e após a sua utilização. Permita que
todas as peças arrefeçam antes de lhes tocar dado
que podem causar ferimentos graves.
83
PT
Page 86

Nunca apague um incêndio de cozinha com água.
Desligue o queimador e cubra as chamas com uma
tampa ou manta antifogo.
Mantenha as crianças com idade inferior a 8 anos
afastadas do aparelho, exceto sob supervisão
permanente.
Não permita que crianças brinquem com o aparelho.
Não permita que crianças limpem ou reparem este
aparelho sem vigilância.
Utilize apenas peças fornecidas pelo fabricante.
Não substitua nem ajuste nada no aparelho, exceto
se a substituição for autorizada pelo fabricante ou
respetivo representante.
Não armazene artigos sobre a superfície de cozinha.
84
Não feche a tampa de vidro quando os queimadores
estiverem acesos ou ainda quentes.
Page 87

4. Componentes principais
1
2
345
SCU353
1
2
4
3
SHB353
1. Tampas de vidro
2. Queimadores
3. Grelhas de suporte
4. Painel de controlo
5. Lava-louça
1. Tampas de vidro
2. Queimadores
3. Painel de controlo
4. Grelhas de suporte
Os tipos de queimadores podem variar, dependendo do tipo de equipamento. Consulte Tabela 9:
Especificações do queimador na página 90 para obter mais informações.
5. Antes da utilização
Antes de utilizar o aparelho:
■
Certifique-se de que todos os materiais de embalamento foram removidos;
■
Limpe o aparelho com água quente e detergente de uso doméstico e seque-o cuidadosamente
com um pano macio;
■
Certifique-se de que as grelhas de suporte estão corretamente posicionadas;
■
Certifique-se de que a fonte de gás está ligada e aberta;
PT
85
Page 88

■
Certifique-se de que o aparelho está ligado à bateria de 12 V CC (apenas para modelos de
ignição);
■
Acenda os queimadores e deixe-os queimar para eliminar todos os odores e vapores primeiro.
Utilize somente GPL (Gás de Petróleo Liquefeito). O aparelho opera com gás propano ou
butano. O propano é preferido em relação ao butano porque o butano proporciona um
mau desempenho em temperaturas ambientes inferiores a 10 ºC e não pode ser utilizado
em temperaturas ambientes inferiores a 5 ºC.
6. Utilização dos queimadores
Para obter a localização exata dos botões de controlo, consulte Componentes principais na página
85.
Para acender:
■
Pressione e gire o botão de controlo;
■
Gire o botão de controlo no sentido contrário ao dos ponteiros do relógio até à posição de
potência máxima;
-
A ignição automática do queimador faz faísca e acende.
-
Para modelos de não ignição, aproxime um fósforo ou isqueiro do queimador.
■
Mantenha o botão de controlo pressionado durante cerca de 10-15 segundos e depois solte-o;
■
Ajuste a altura da chama.
Para desligar:
■
Gire o botão de controlo no sentido dos ponteiros do relógio até à posição 0 para desligar o
queimador.
Se o queimador apagar acidentalmente, gire o botão de controlo até à posição 0 e
aguarde pelo menos 1 minuto antes de voltar a acendê-lo.
Se o queimador não acender dentro de 15 segundos, gire o botão de controlo de volta
para a posição 0 e solte-o. Aguarde pelo menos 1 minuto e repita os passos indicados
acima para acender o aparelho.
7. Utilizar o lava-louça
■
Abra a tampa de vidro;
86
Page 89

■
Abra a torneira da água;
■
Feche a torneira da água.
Tenha cuidado para que os queimadores não fiquem molhados com a água da torneira
ou do lava-louça. Os queimadores molhados queimam de forma irregular e podem sair.
A água dura ou a água doce poderá deixar uma película castanha ou branca no lavalouça. Para evitá-la, seque o lava-louça após utilização com um pano macio. Limpe
bem o lava-louça pelo menos uma vez por semana com um pano e detergente de uso
doméstico.
8. Cozinhar de forma segura
■
Não permita que as panelas ultrapassem as extremidades do equipamento – utilize os
tamanhos de panelas corretos e coloque-as numa posição central sobre os queimadores;
SCU353
Ø 100 140mm
Ø 120 200mm
Ø 150 280mm
SHB353
Ø 100 -
Ø 150 -
280mm
■
Certifique-se de que existe pelo menos um intervalo de 10 mm entre as panelas e as
140mm
Ø 120 200mm
extremidades da placa;
■
Gire as panelas de forma a que as pegas não fiquem suspensas sobre a parte frontal do
aparelho;
■
Certifique-se de que a chama atinge a parte inferior da panela e não os lados;
■
Não deixe a placa sem vigilância quando estiver a ser utilizada;
■
Não utilize o aparelho quando o veículo estiver em movimento;
■
Gire os botões de controlo de volta para a posição 0 após cozinhar;
PT
87
Page 90

■
Mantenha a placa limpa e evite a acumulação de gordura e restos de comida.
9. Manutenção e limpeza
A Thetford recomenda a realização de um serviço de inspeção anual por um centro de assistência
aprovado. Entre as manutenções anuais, limpe a placa regularmente após a sua utilização:
■
Remova sempre todos os derrames ou contaminações imediatamente após a utilização com
sabão e água quente. Seque a superfície com um pano macio.
■
Utilize um produto de limpeza multiusos não abrasivo e um esfregão de nylon para limpar
gordura ou sujidade mais difícil.
■
Utilize um produto de limpeza ou de polimento de aço inoxidável patenteado para remover
arranhões superficiais da superfície.
Limpe sempre no sentido do acabamento polido e não em sentido transversal.
Não utilize produtos de limpeza abrasivos, esfregões metálicos ou escovas duras. Estes
poderão danificar a placa.
Não permita que panos molhados, esfregões de limpeza, resíduos de comida ou
produtos de limpeza ou outras sujidades sequem sobre a superfície. Tal poderá provocar
corrosão, marcas ou até ferrugem.
Se limpar os bicos dos queimadores, certifique-se de que os orifícios não ficam
obstruídos.
Os produtos de limpeza com lixívia não deverão entrar em contacto com o aço
inoxidável.
Os botões de controlo podem ser removidos para limpeza. Os botões são fáceis de
substituir.
O conteúdo mineral na água (tal como Ferro ou Calcário) poderá afetar o aspeto do metal.
10. Fugas de gás
Quando notar um cheiro de gás:
■
Certifique-se de que todos os queimadores estão desligados;
■
Apague todas as chamas vivas e não fume;
■
Desligue imediatamente a fonte de alimentação da garrafa de gás;
■
Não utilize interruptores elétricos;
■
Abra todas as portas e janelas.
O GPL é mais pesado do que o ar. O gás que tiver escapado acumula-se ao nível do chão.
Seguindo o cheiro forte e desagradável do gás, poderá determinar a localização da fuga.
Para investigar a sua localização exata, utilize um spray especial de deteção de fugas.
Nunca utilize uma chama viva para encontrar uma fuga!
88
Page 91

11. Resolução de problemas
Problema Causa possível Solução
Os queimadores não queimam
ou queimam de forma desigual
A ignição automática não
acende
Os botões de controlo não
funcionam
Se não conseguir resolver um problema, contacte o Centro de assistência autorizado
local ou o Serviço de Apoio ao Cliente da Thetford no seu país.
A garrafa de gás está vazia
A torneira de gás está fechada
As tampas dos queimadores
não estão corretamente
posicionadas
Os queimadores estão
molhados ou obstruídos
A bateria de 12 V CC está
descarregada
As ligações estão soltas
Os pontos de ignição estão
molhados ou sujos
Os botões estão montados
incorretamente
Encha a garrafa
Abra a torneira
Deixe as tampas arrefecerem e
depois reposicione-as
Seque ou limpe os
queimadores
Carregue a bateria
Fixe as ligações
Seque ou limpe os pontos de
ignição
Instale os botões corretamente
12. Manutenção
Todos os serviços de manutenção deverão ser realizados por uma pessoa competente aprovada.
Antes de iniciar qualquer serviço de manutenção, o equipamento terá de arrefecer e ser desligado
das fontes de gás e de energia elétrica. Após todo o serviço de manutenção, o funcionamento do gás
terá de ser verificado.
Para serviços de manutenção, contacte o seu Centro de assistência autorizado local, fornecendo o
modelo e o número de série que constam da etiqueta de dados, bem como a data da aquisição.
PT
89
Page 92
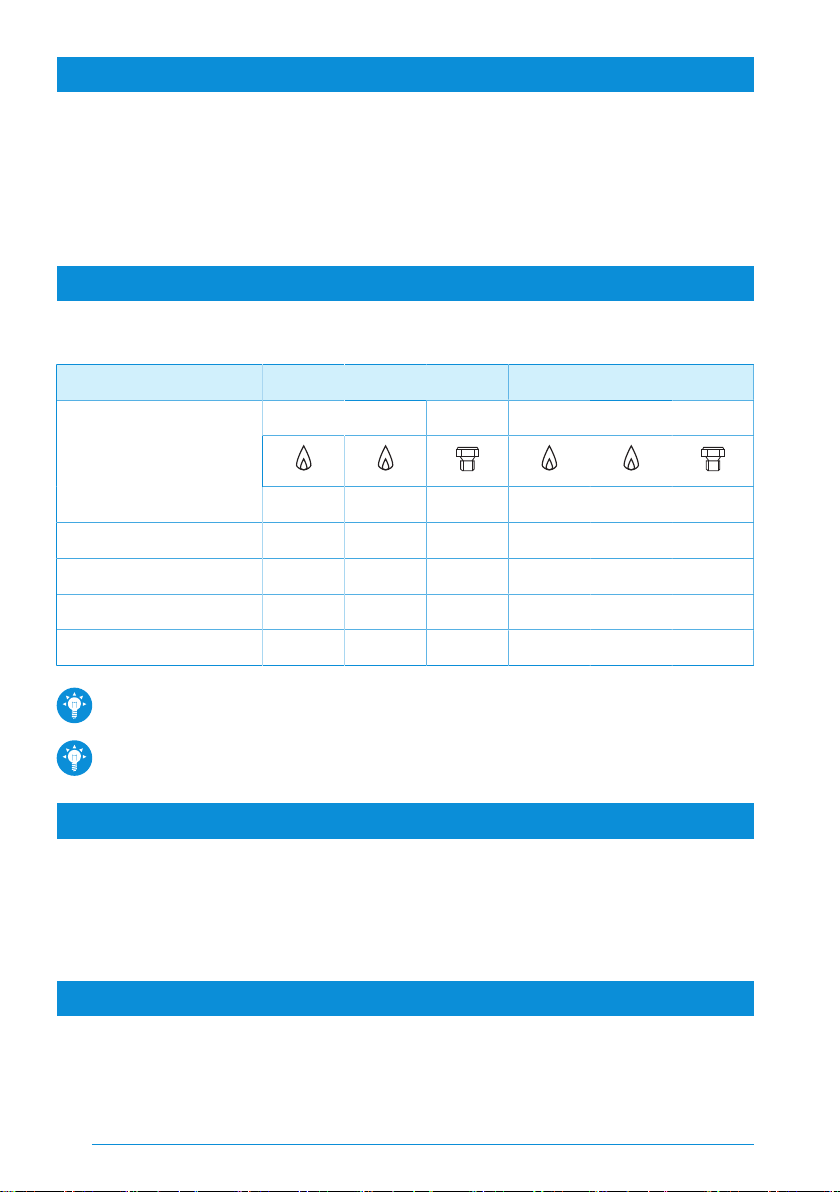
13. Armazenar
■
Feche a válvula de gás da garrafa de gás;
■
Desligue a bateria;
■
Certifique-se de que todos os botões de controlo estão na posição 0;
■
Limpe o equipamento, deixando-o limpo e seco;
■
Feche as tampas de vidro.
14. Especificações técnicas
Tabela 9: Especificações do queimador
SHB353 SCU353
Entrada de gás Injetor Entrada de gás Injetor
KW g/h mm KW g/h mm
Queimador auxiliar 1,0 72 0,52 1,0 72 0,52
Queimador semirrápido 1,5 107 0,61 1,5 107 0,61
Queimador rápido 2,5 179 0,77 2,5 179 0,77
Total 5,0 358 5,0 358
Este equipamento pode ser utilizado com GPL (Gás de Petróleo Liquefeito) e não deverá
ser utilizado com outro gás.
Este equipamento deverá estar ligado à terra.
15. Questões
Se tiver alguma questão sobre a placa, peças, acessórios ou serviços autorizados:
■
Visite www.thetford-europe.com
■
Se não conseguir resolver um problema, contacte o Centro de assistência autorizado local ou o
Serviço de Apoio ao Cliente da Thetford no seu país.
16. Garantia
A Thetford BV oferece aos utilizadores finais dos seus produtos uma garantia de três anos. Em caso
de avaria dentro do período de garantia, a Thetford irá substituir ou reparar o produto. Nesse caso, os
90
Page 93

custos de substituição, custos de mão-de-obra para a substituição de componentes com defeito e/
ou custos das próprias peças serão pagos pela Thetford.
As peças sobresselentes adquiridas têm garantia de um ano. Todos os custos de montagem e/ou
trabalho não estão abrangidos pela garantia.
1. Para apresentar uma reclamação no âmbito desta garantia, o utilizador deverá levar o produto a
um Serviço parceiro de assistência da Thetford. A reclamação será avaliada lá.
2. Os componentes substituídos durante a reparação sob garantia tornam-se propriedade da
Thetford.
3. Esta garantia não prejudica as atuais leis de proteção do cliente.
4. Esta garantia não é válida no caso de produtos que são utilizados para fins comerciais.
5. Não serão aceites as reclamações de garantia que se enquadrem numa das seguintes
categorias:
■
O produto foi utilizado indevidamente ou as instruções no manual não foram respeitadas;
■
O produto não foi instalado de acordo com as instruções;
■
Foram efetuadas modificações ao produto;
■
O produto foi reparado mas não por um Serviço parceiro de assistência da Thetford;
■
O número de série ou código do produto foi adulterado ou removido;
■
O produto foi danificado devido a utilização indevida.
91
PT
Page 94

NO
Oversettelse av den originale brukerhåndboken
Innhold
1 Introduksjon.........................................................................................................................................................92
2 Symboler...............................................................................................................................................................92
3 Sikkerhet...............................................................................................................................................................93
4 Hovedkomponenter...........................................................................................................................................95
5 Før bruk.................................................................................................................................................................95
6 Bruke brennerne.................................................................................................................................................96
7 Bruke vasken.......................................................................................................................................................96
8 Sikker matlaging.................................................................................................................................................97
9 Vedlikehold og rengjøring................................................................................................................................97
10 Gasslekkasjer...................................................................................................................................................... 98
11 Feilsøking..............................................................................................................................................................98
12 Utføring av service.............................................................................................................................................99
13 Lagre apparatet...................................................................................................................................................99
14 Tekniske spesifikasjoner...............................................................................................................................100
15 Spørsmål............................................................................................................................................................ 100
16 Garanti.................................................................................................................................................................100
1. Introduksjon
Dette er brukerhåndboken for din Thetford-komfyr. Les sikkerhetsinstruksjonene og informasjonen
om bruk og vedlikehold av komfyren nøye før du fortsetter. Dette gjør deg i stand til å bruke
komfyren på en sikker og eektiv måte. Ta vare på denne håndboken for fremtidig referanse.
2. Symboler
Symbolforklaringer:
Advarsel. Risiko for personskade og/eller skade på eiendom.
Forsiktig. Varm overflate. Risiko for personskade og/eller skade på eiendom.
NB. Viktig informasjon.
92
Page 95

Merk. Informasjon.
3. Sikkerhet
Apparatet skal kun brukes til matlaging, og ikke til
andre formål som f.eks. oppvarming av rommet.
Dette kan føre til kullosforgiftning og overoppheting
av komfyren. Produsenten kan ikke holdes ansvarlig
for skader som oppstår som følge av uegnet bruk
eller uriktig innstilling av kontrollene.
Bruk av denne gasskomfyren produserer varme,
fuktighet og biprodukter fra forbrenningsprosesser
i rommet der den er installert. Påse at rommet har
tilstrekkelig ventilasjon når apparatet er i bruk.
Ved lengre tids bruk kan ytterligere ventilasjon
være nødvendig ved å åpne et vindu eller skru opp
ventilatoren.
Barn fra 8 år og oppover og personer med reduserte
fysiske, sensoriske eller mentale evner og/eller
manglende erfaring og kunnskap kan kun bruke
dette apparatet dersom de holdes under oppsyn
eller har fått instruksjoner om sikker bruk av
apparatet og forstår de potensielle farene.
Brennerne og grytestøttene er varme under og etter
bruk. La alle deler kjøle seg ned før du rører dem,
ellers kan det oppstå alvorlige personskader.
Du må aldri forsøke å slukke en komfyrbrann med
vann. Slå av brenneren og dekk til flammene med et
lokk eller et brannteppe.
NO
93
Page 96

Barn under 8 år skal holdes unna apparatet, med
mindre de holdes under konstant oppsyn.
Ikke la barn leke med apparatet.
Ikke la barn rengjøre eller vedlikeholde dette
utstyret uten oppsyn.
Bruk kun deler som leveres fra produsenten.
Du må ikke endre eller justere noe på apparatet,
med mindre endringen er autorisert av produsenten
eller dennes representant.
Ikke oppbevar gjenstander på kokeplaten.
Ikke lukk glasslokket når brennerne er tent eller
fortsatt er varme.
94
Page 97

4. Hovedkomponenter
1
2
345
SCU353
1
2
4
3
SHB353
1. Glasslokk
2. Brennere
3. Grytestøtter
4. Kontrollpanel
5. Vask
1. Glasslokk
2. Brennere
3. Kontrollpanel
4. Grytestøtter
Typene av brennere kan variere avhengig av typen apparat. Se Tabell 10: Brennerspesifikasjoner på
side 100 for flere detaljer.
5. Før bruk
Før du bruker apparatet:
■
Påse at all emballasje har blitt fjernet.
■
Rengjør apparatet med varmt vann og et husholdningsvaskemiddel, og tørk godt med en myk
klut.
■
Påse at grytestøttene er riktig plassert.
■
Påse at gasstilførselen er koblet til og slått på.
NO
95
Page 98

■
Påse at apparatet er koblet til 12 V likestrømsbatteriet (kun for modeller med tenning).
■
Tenn brennerne og la dem brenne for å fordrive lukt og damp.
Bruk kun LPG (våtgass). Apparatet drives med propan eller butan. Propan er å foretrekke
over butan, da butan yter dårlig ved en omgivelsestemperatur under 10 °C og ikke kan
brukes dersom omgivelsestemperaturen er under 5 °C.
6. Bruke brennerne
For styreknottenes eksakte plassering, se Hovedkomponenter på side 95.
Slå på:
■
Trykk inn og vri styreknotten.
■
Vri knotten mot klokken til den høyeste innstillingen.
-
Den automatiske brennertenningen slår gnister og tennes.
-
For modeller uten tenning, hold en tent fyrstikk eller gassfyrstikk mot brennerne.
■
Trykk inn styreknotten i 10–15 sekunder og slipp den.
■
Juster flammehøyden.
Slå av:
■
Vri styreknotten med klokken til 0-posisjonen for å slå av brenneren.
Hvis brenneren slukkes ved et uhell, vri styreknotten til 0-posisjonen og vent i minst 1
minutt før du tenner brenneren på nytt.
Hvis brenneren ikke har blitt antent innen 15 sekunder, vri styreknotten tilbake til
0-posisjonen og slipp den. Vent i minst 1 minutt og gjenta trinnene ovenfor for å slå
apparatet på.
7. Bruke vasken
■
Åpne glasslokket.
■
Skru på kranen for å tappe vann.
■
Skru av kranen for å stanse vanntilførselen.
Pass på at brennerne ikke blir våte av vann fra kranen eller vasken. Våte brennere
brenner uregelmessig og kan slukkes.
96
Page 99

Hardt eller bløtt vann kan etterlate seg et brunt eller hvitt belegg i vasken. Tørk av vasken
etter bruk med en myk klut for å unngå dette. Rengjør vasken godt minst én gang i uken
med en klut og et husholdningsvaskemiddel.
8. Sikker matlaging
■
Kokeredskapene må ikke overlappe kantene på apparatet. Bruk gryter med riktig størrelse, og
still dem midt på brennerne.
SCU353
Ø 100 -
SHB353
140mm
Ø 150 280mm
Ø 120 200mm
Ø 100 140mm
Ø 120 200mm
Ø 150 280mm
■
Påse at det er minst 10 mm mellomrom mellom grytene og kantene av komfyren.
■
Snu grytene slik at håndtakene ikke henger over den fremre kanten av apparatet.
■
Påse at flammen varmer opp bunnen av gryten, ikke sidene.
■
Ikke la komfyren bli stående uten tilsyn når den er i bruk.
■
Ikke bruk apparatet mens kjøretøyet er i bevegelse.
■
Vri styreknottene tilbake til 0-stillingen etter matlagingen.
■
Hold komfyren ren og pass på at det ikke samler seg opp fett og matrester.
9. Vedlikehold og rengjøring
Thetford anbefaler en årlig inspeksjonsservice av et godkjent servicesenter. Mellom årlige
servicekontroller skal komfyren rengjøres jevnlig etter bruk:
NO
97
Page 100

■
Søl eller smuss skal alltid fjernes umiddelbart etter bruk med såpe og varmt vann. Tørk av
overflaten med en myk klut.
■
Bruk en ikke-slipende universalrengjøringskrem og en skuresvamp i nylon for å rengjøre mer
gjenstridig skitt eller fett.
■
Bruk et patentert rengjøringsmiddel eller pussemiddel for rustfritt stål for å fjerne mindre
skraper i overflaten.
Rengjør alltid i retning med den børstede overflaten, og ikke mot fibrene.
Bruk ikke slipende rengjøringsmidler, skuresvamper i metall eller harde børster. De kan
skade komfyren.
Ikke la våte kluter, rengjøringssvamper, rester av mat eller rengjøringsprodukter eller
annet smuss tørke på overflaten. Det kan forårsake punkttæring, merker eller rust.
Hvis du rengjør brennerringene, må du passe på at hullene ikke blir tilstoppet.
Rengjøringsmidler som inneholder blekemidler, bør ikke brukes på rustfritt stål.
Styreknottene kan tas av for rengjøring. Knottene er lette å sette på igjen.
Mineralinnhold i vann (slik som jern eller kalk) kan påvirke metallets utseende.
10. Gasslekkasjer
Så snart du kjenner lukten av gass:
■
Påse at alle brennere er slått av.
■
Slukk alle åpne flammer, og la være å røyke.
■
Slå av gasstilførselen fra gassflasken umiddelbart.
■
Ikke bruk strømbrytere.
■
Åpne alle dører og vinduer.
LPG er tyngre enn luft. Gass som lekker ut, samler seg opp på et lavere nivå. Du kan finne
ut hvor lekkasjen har oppstått ved å følge den sterke, ubehagelige lukten av gass. Bruk en
spesiell lekkasjepåvisningsspray for å finne ut nøyaktig hvor lekkasjen er. Bruk aldri en
åpen flamme for å finne lekkasjen!
11. Feilsøking
Problem Mulig årsak Løsning
Brennerne brenner ikke, eller
de brenner ujevnt
98
Gassflasken er tom
Gasskranen er stengt
Fyll på flasken
Åpne kranen
 Loading...