

Page 1

TI-Navigator™
Reference Guide
Page 2

Important Information
Texas Instruments makes no warranty, either express or implied,
including but not limited to any implied warranties of merchantability
and fitness for a particular purpose, regarding any programs or book
materials and makes such materials available solely on an "as-is" basis. In
no event shall Texas Instruments be liable to anyone for special,
collateral, incidental, or consequential damages in connection with or
arising out of the purchase or use of these materials, and the sole and
exclusive liability of Texas Instruments, regardless of the form of action,
shall not exceed the purchase price of this product. Moreover, Texas
Instruments shall not be liable for any claim of any kind whatsoever
against the use of these materials by any other party.
Copyright © 2006 Texas Instruments Incorporated.
Microsoft® and Windows® are trademarks of their owners.
ii
Page 3

Contents
Important Information................................................................... ii
3 Getting started with TI-Navigator....................................1
Starting TI-Navigator™ on your computer................................... 1
The TI-Navigator computer home screen ..................................... 2
TI-Navigator computer tools.......................................................... 7
Creating and managing your teacher account............................. 8
Using calculator screen options................................................... 11
Logging in to TI-Navigator on your calculator ........................... 12
Logging in to TI-Navigator (student instruction) ....................... 13
The TI-Navigator calculator home screen ................................... 15
TI-Navigator calculator tools ....................................................... 15
4 Managing classes.............................................................17
Creating classes............................................................................. 17
Selecting a class ............................................................................ 19
Beginning and ending class sessions........................................... 20
Changing the class view............................................................... 20
Removing items from the Class Record....................................... 23
Removing classes .......................................................................... 24
5 Managing student accounts ...........................................25
Adding students to classes........................................................... 25
Checking student login status ..................................................... 27
Arranging the seating chart ........................................................ 27
Sorting student information........................................................ 28
Using the Student Portfolio view................................................ 29
Resetting student passwords....................................................... 32
Changing the classes of a student............................................... 34
Changing student names and identifiers.................................... 36
Moving a student to another class.............................................. 37
Copying a student to another class............................................. 38
Removing a student from a class................................................. 38
6 Exchanging files with students ......................................41
Sending files ................................................................................. 41
Sending files (student instruction) .............................................. 46
Collecting files .............................................................................. 48
Receiving files (student instruction)............................................ 50
Deleting files from calculators..................................................... 51
Checking the status of file transfers ........................................... 53
Canceling file transfers ................................................................ 54
iii
Page 4

Finding transferred files...............................................................55
Changing the unprompted file location .....................................55
Viewing file properties.................................................................56
7 Running interactive activities ........................................ 59
Introduction to the Activity Center tool .....................................59
Configuring activities ...................................................................68
Changing the graph window settings......................................... 79
Saving and loading activity settings ........................................... 90
Starting and managing activities.................................................91
Creating and adding activity data...............................................94
Contributing activity data (student instruction)....................... 102
Plotting activity data .................................................................. 113
Editing activity data....................................................................120
Saving and loading activity data ...............................................121
Deleting activity data .................................................................124
Viewing activity data..................................................................126
Viewing Frequency Plots ............................................................ 128
Showing and hiding activity data.............................................. 130
Highlighting activity data ..........................................................134
Sorting activity data ...................................................................136
8 Polling students ............................................................ 141
The Quick Poll tool window and tabs .......................................141
Opening the Quick Poll tool ......................................................143
Polling your students..................................................................144
Stopping polls .............................................................................145
Pausing polls ...............................................................................145
Resuming paused polls............................................................... 146
Responding to polls (student instruction).................................146
Sending poll results to students.................................................148
Saving polls ................................................................................. 148
Viewing poll results ....................................................................148
Sorting poll data.........................................................................150
Showing and hiding display names...........................................150
Viewing previous polls ...............................................................150
Closing the Quick Poll tool.........................................................151
9 Capturing calculator screens........................................ 153
Capturing calculator screens......................................................153
Viewing Captured Screens .........................................................154
Saving captured screens .............................................................155
Refreshing captured screens ......................................................156
Showing and hiding display names...........................................157
iv
Page 5

10 LearningCheck™ Creator ............................................159
LearningCheck™ Creator Main Window................................. 160
Creating a new document ......................................................... 162
Specifying document properties ............................................... 162
Adding questions ...................................................................... 165
Adding specific question types.................................................. 166
Creating a question with a pull-down blank............................ 171
Editing Presentation Sequence.................................................. 175
Adding questions from the Item Bank..................................... 178
Saving a document .................................................................... 181
Adding special characters to text ............................................. 183
Adding topics and keywords .................................................... 185
Working with documents .......................................................... 185
Printing a Report ........................................................................ 193
Working with Images ................................................................ 195
Previewing a document ............................................................. 203
Sending documents to calculators ............................................ 204
Sending a document to a classroom network.......................... 206
Troubleshooting LearningCheck Creator.................................. 207
11 The Class Analysis Tool................................................211
Getting started ........................................................................... 211
Creating a new class analysis..................................................... 211
Interrupting file transfers .......................................................... 215
Opening a saved analysis........................................................... 218
Viewing a slide show of the analysis......................................... 225
Glossary of terms used in Class Analysis.................................... 246
12 Installing Apps and OS files ........................................249
Opening the App and OS Transfer tool .................................... 249
Adding files to the transfer list ................................................. 250
Selecting and unselecting files to send..................................... 251
Removing files from the transfer list ........................................ 251
Installing Apps or OS files.......................................................... 252
Closing the App and OS Transfer tool....................................... 252
13 Troubleshooting ..........................................................255
Frequently-asked questions....................................................... 255
System requirements.................................................................. 263
Error messages............................................................................ 264
14 Glossary........................................................................267
Terms ........................................................................................... 267
File types ..................................................................................... 270
v
Page 6

15 Legal Information ....................................................... 273
Texas Instruments Support and Service ..................................... 273
TI-Navigator™ 3.x License Agreement 274
TI LearningCheck 3.x License Agreement..................................286
Privacy Policy...............................................................................294
vi
Page 7

Getting started with TI-Navigator
The TI-Navigator™ classroom learning system provides the hardware and
software tools you need to set up a wireless classroom network.
TI-Navigator lets you:
• Create and manage classes on the classroom network.
• Transfer files between your computer or calculator and your
students’ calculators.
• Monitor your students with screen captures and polling.
• Perform various interactive activities with your students to enhance
your lessons.
• Use different tools to create, distribute, and analyze educational
content.
• Install TI Graphing Calculator Applications (Apps) on your students’
calculators.
TI-Navigator has two main components that make it work:
• TI-Navigator computer software. The TI-Navigator computer
software contains the tools and options you need to run your
wireless classroom network.
• TI-Navigator calculator software. The TI-Navigator calculator
software contains the tools you and your students need to exchange
information with each other through the TI-Navigator network.
This section provides basic information about TI-Navigator, including
information on both the computer software and the calculator software.
Starting TI-Navigator™ on your computer
You can start the TI-Navigator™ classroom learning system from your
computer’s start menu.
To start TI-Navigator on your computer
f Click
Getting started with TI-Navigator 1
Start > Programs > TI Tools > TI-Navigator > TI-Navigator™.
The TI-Navigator computer home screen opens.
Note: If you have not used TI-Navigator before, a prompt opens
asking if you want to set up your classroom. You can choose to set up
your classroom or continue on to the TI-Navigator computer home
screen.
Page 8
Note: Make sure that the network indicator at the bottom of the screen
indicates that the TI-Navigator network is available. If it is not available,
this indicates an error. (See “Troubleshooting” on page 255.)
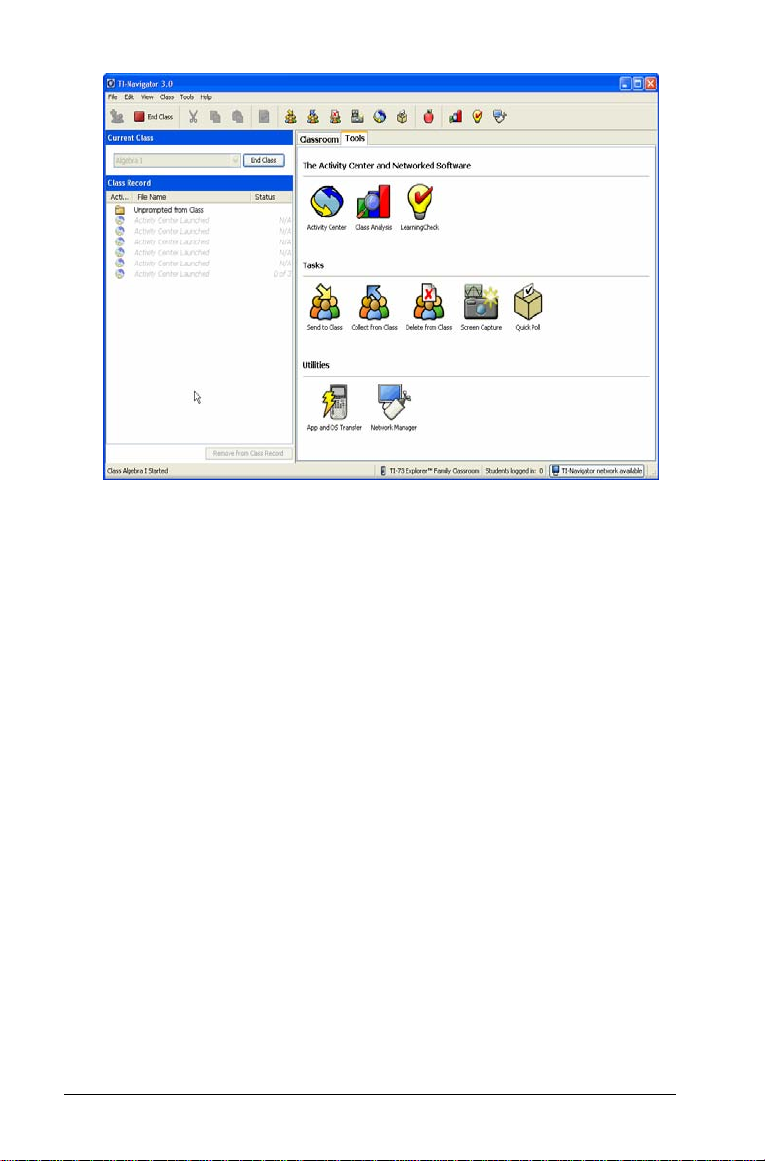
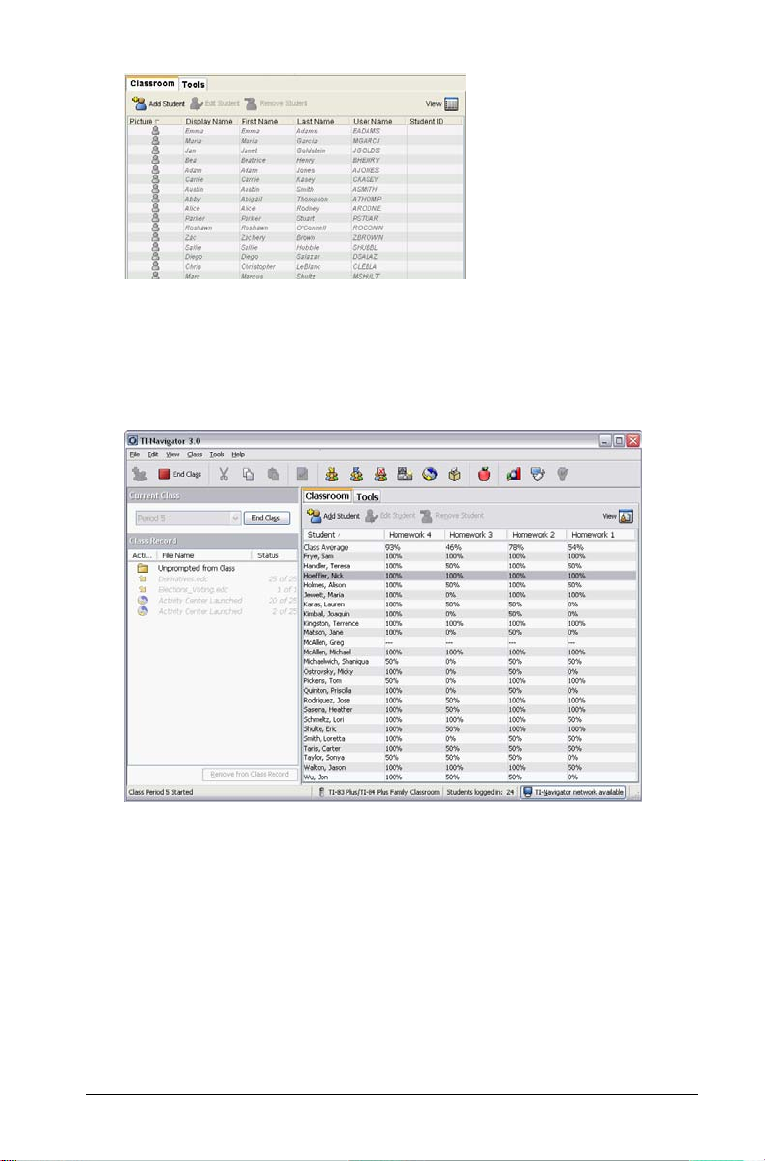
The TI-Navigator computer home screen
The TI-Navigator computer home screen provides the tools and options
you need to run TI-Navigator. Below you can see an example of the
TI-Navigator computer home screen with its main parts labeled.
Following the TI-Navigator computer home screen, you can find detailed
explanations of each labeled part.
2 Getting started with TI-Navigator
Page 9
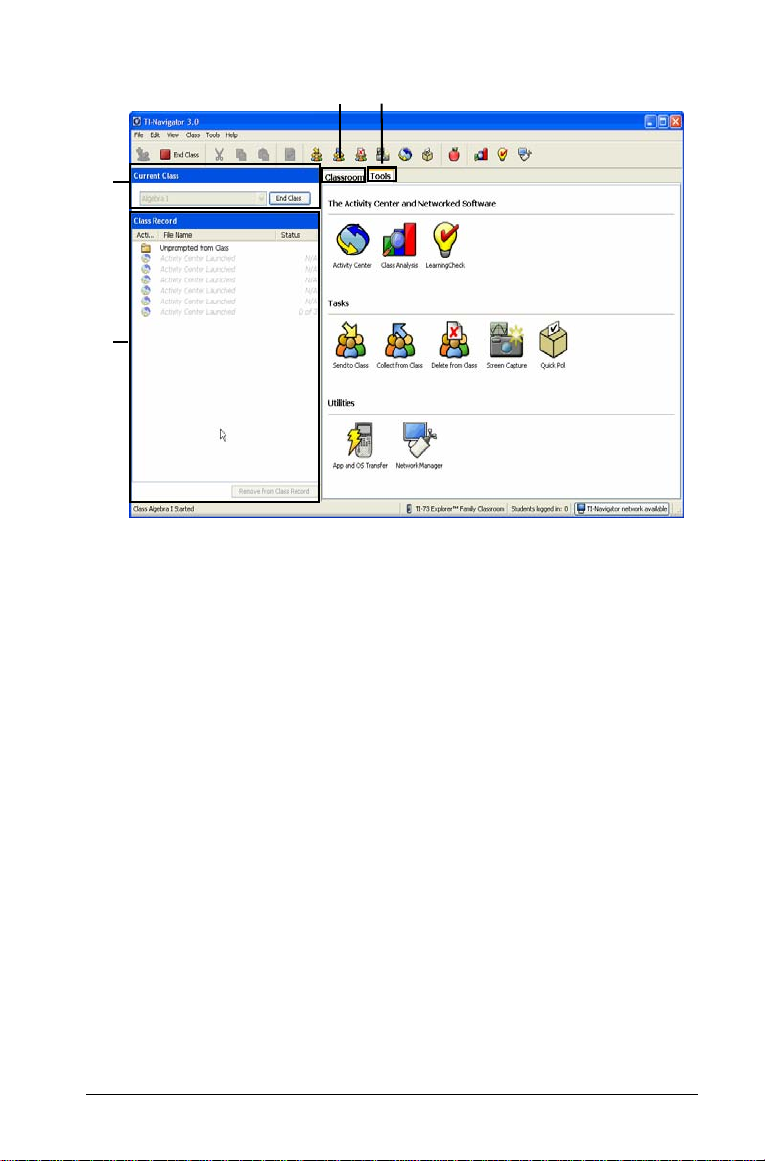
Ì
Í
Ê Classroom tab
Tools tab
Ë
Ì Current Class
Í Class Record
ÊË
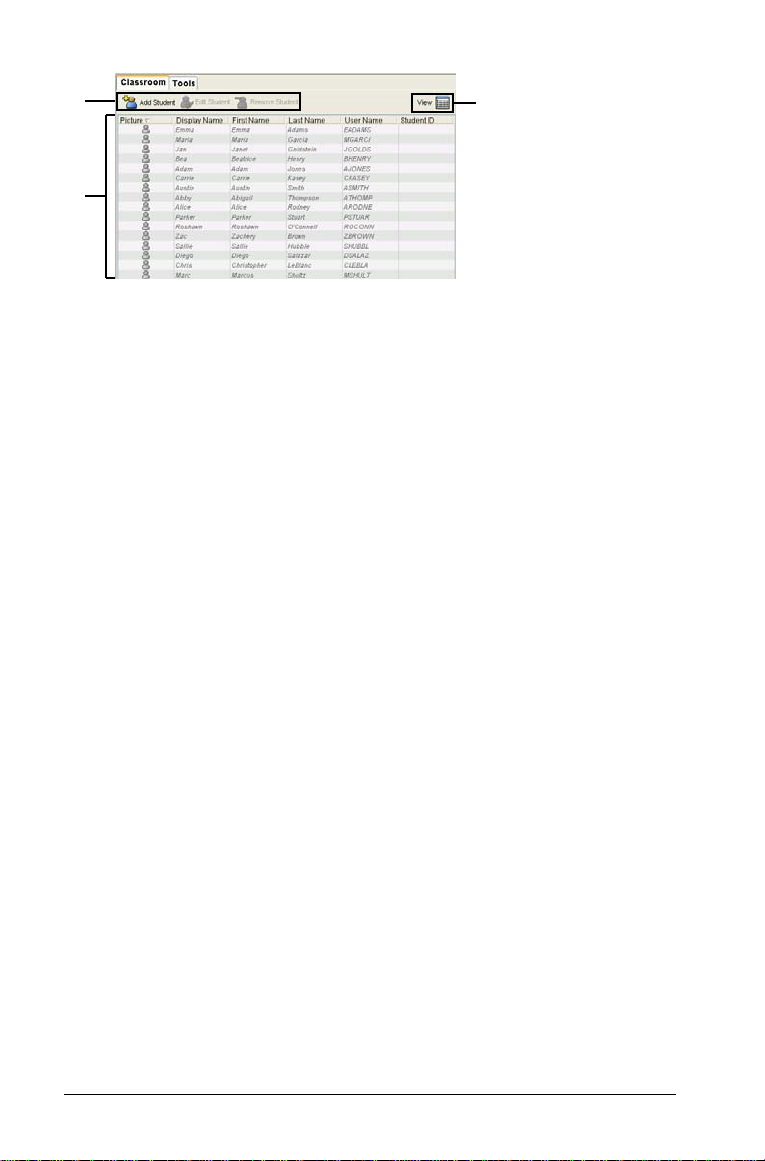
Classroom tab
In the Classroom tab, you can view the students in the selected class and
add, remove, or edit students. The Classroom tab has three views, the
Seating Chart, Student List and Student Portfolio views. In the Seating
Chart view, you can view your students by their display name and an
icon. In the Student List view, you can view your students listed in a table
with some of their account information. The Student Portfolio view
displays student names and the scores for every assignment. Below you
can see an example of the Classroom tab with its main parts labeled.
Note: The example below shows the Classroom tab in Student List view.
Getting started with TI-Navigator 3
Page 10
Ê
Ì
Ë
Ê Classroom toolbar. Lets you add, edit, and remove students.
Student roster. 1) Seating Chart view - Shows students listed with
Ë
display names and student icons. The Seating Chart view lets you arrange
your students in the Classroom tab like they are seated in your classroom.
(See “Arranging the seating chart” on page 27.)
2) Student List view - Shows students listed in a table with some of their
account information. The Student List view lets you sort students by
display name, first name, last name, user name, and student ID. (See
“Sorting student information” on page 28.)
3) Student Portfolio View - Displays students listed in a table with scores
associated with each assignment that you have included in the Student
Portfolio.
View selector. Lets you toggle between the Seating Chart view and
Ì
the Student List view.
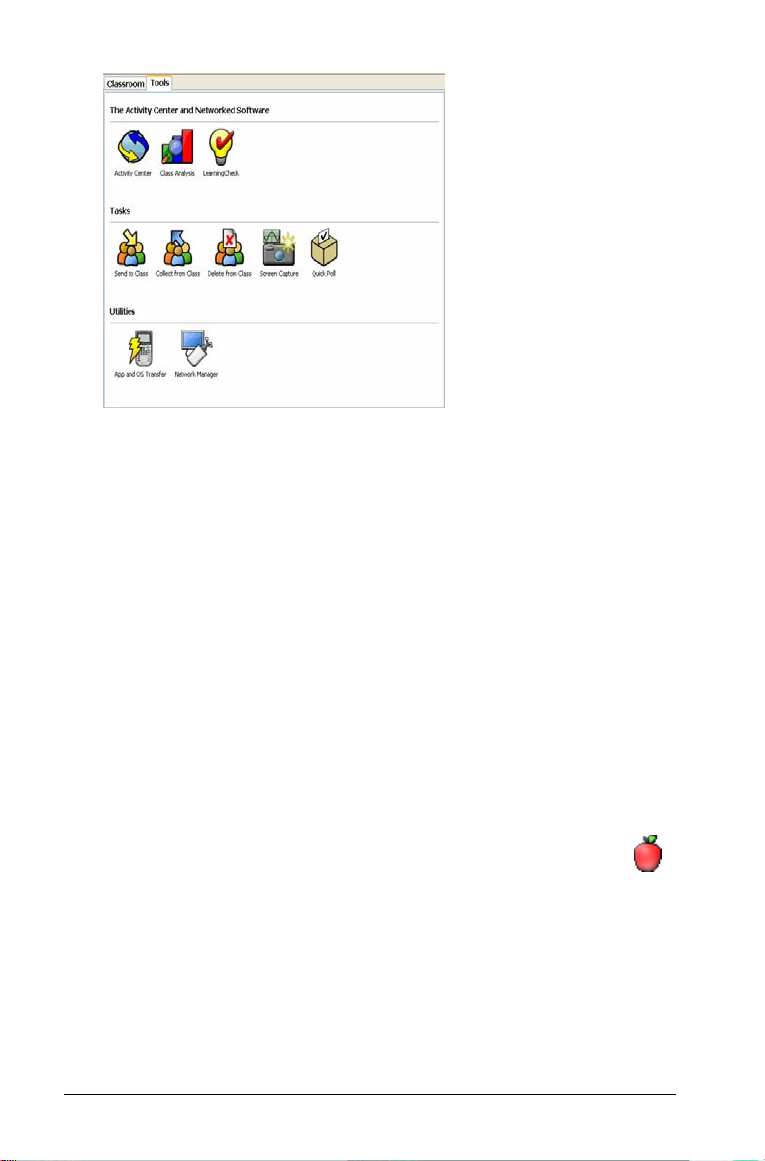
Tools tab
The Tools tab contains three main sections, including The Activity Center
and Networked Software, Tasks, and Utilities. Each section contains icons
that link to a particular tool in the TI-Navigator software.
4 Getting started with TI-Navigator
Page 11
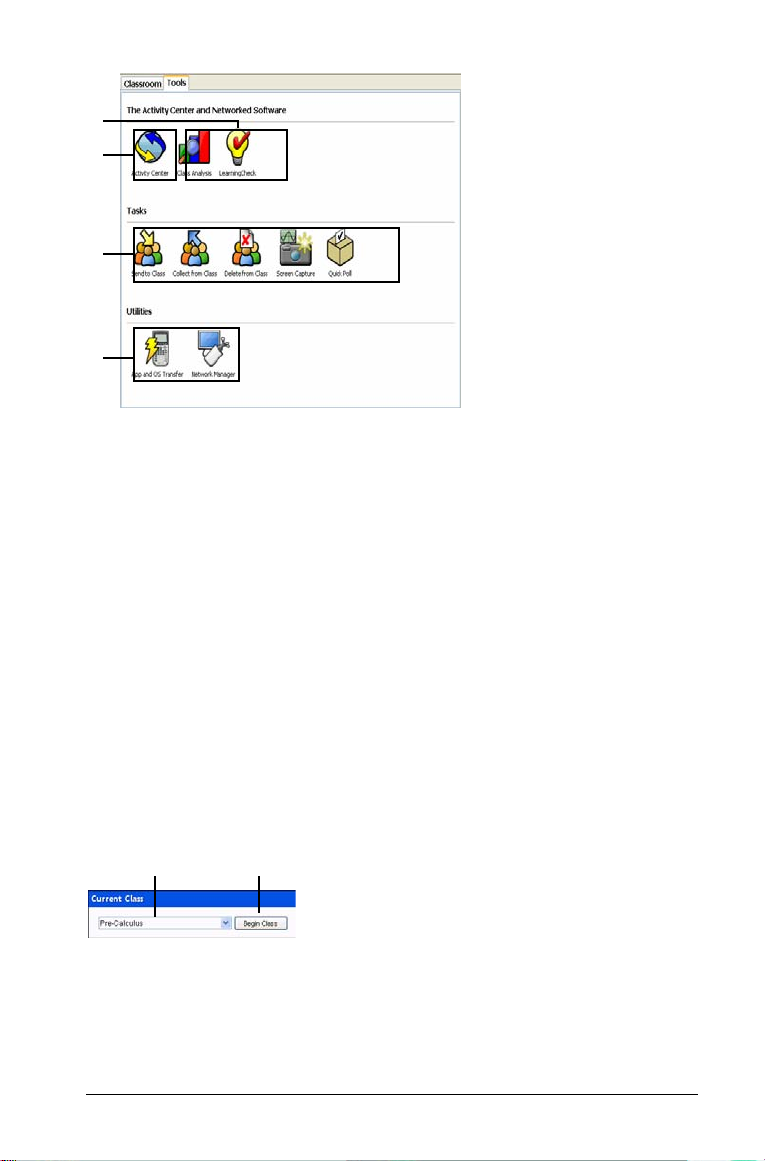
Ê
Ê
Ë
Ì
Í
Ê Networked software icons. Icons that let you launch the TI Computer
Applications (Apps) that you can use with the TI-Navigator software,
including Class Analysis and LearningCheck. You must have these Apps
installed on your computer in order to launch them from TI-Navigator.
Activity Center icon. Icon that launches the Activity Center tool, a TI-
Ë
Navigator tool you can use to create and run interactive activities with
your class.
Tasks icons. Icons that launch task tools in the TI-Navigator software,
Ì
including Send to class, Collect from class, Delete from class, the Screen
Capture tool, and the Quick Poll tool.
Utilities icons. Icons that launch utilities in the TI-Navigator software,
Í
including the App and OS Transfer tool and Network Manager.
Current Class
Current Class lets you select classes you have created, as well as begin and
end class sessions for the selected class. Below you can see an example of
the Current Class with its main parts labeled.
Ë
Class list. A drop-down list where you can select a class from the ones
Ê
you have created. The Class list is disabled when you have a class session
running.
Begin/End Class button. Button that lets you begin or end a class
Ë
session.
Getting started with TI-Navigator 5
Page 12
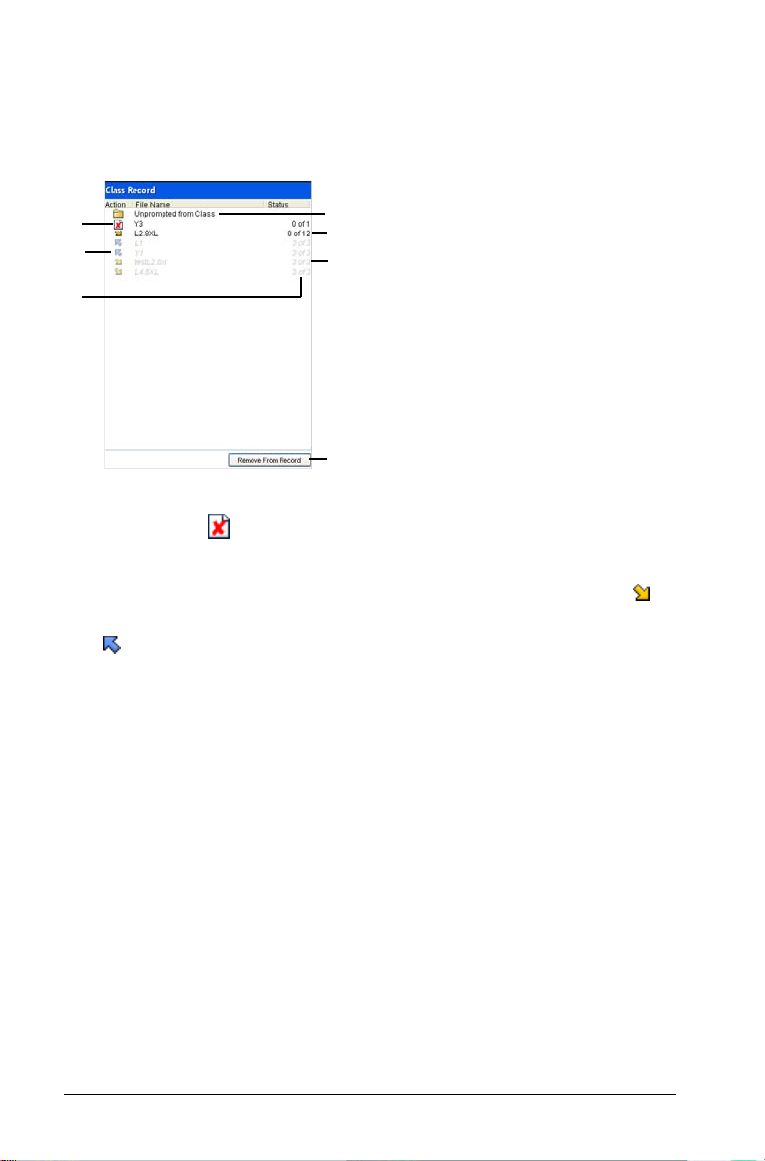
Class Record
The Class Record contains both the current and historical activity for the
selected class. Below you can see an example of the Class Record with its
main parts labeled.
Ê
Ë
Í
Î
Ï
Ì
Ð
Ê File deletion. The deletion of a file from your students’ calculators,
indicated by the symbol.
Ë
File transfer. The transfer of files between your computer and your
students’ calculators. Arrows beside files indicate file transfers. The
symbol indicates transfers from your computer to your class’s calculators.
The symbol indicates transfers from your class’s calculators to your
computer. File transfers remain current until all students receive the file,
you stop the transfer, or you end the class session.
Ì
Status. The progress of an action. For example, “23 of 25” indicates
that 23 out of 25 students have received a file.
Unprompted from Class folder. A folder that contains the files
Í
students have sent to you that were not part of a collect action.
Î
Current action. An action (for example, send) that is still active.
Historic action. An action (for example, send) that is inactive. Historic
Ï
actions are disabled.
Ð
Remove From Record button. Button that lets you remove selected
historic or active actions from the Class Record. You can remove a single
action or multiple actions. (See “Removing items from the Class Record”
on page 23.)
6 Getting started with TI-Navigator
Page 13

TI-Navigator computer tools
The TI-Navigator™ classroom learning system contains tools that you can
use to interact with your students from your computer. Some of the tools
are part of TI-Navigator, while other tools are optional. This section
describes different tools you can use in TI-Navigator, as well as how to
launch them.
The TI-Navigator computer tools
Activity Center – Contains various activities you can use to interact with
your students during your lessons. With the Activity Center tool, you can
run interactive activities with your class involving lists, graphs, points,
and equations.
App and OS Transfer – Lets you install TI Graphing Calculator
Applications (Apps) on your students’ calculators.
Class Analysis – Lets you collect and analyze answers to assignments, as
well as use a slide show to review the results with your students. Class
Analysis is an optional tool. If you do not install it, then you cannot
launch it in TI-Navigator.
LearningCheck Creator – Lets you create assignments to run on TI
calculators and send the assignments to your students.
Network Manager – Lets you activate access points and hubs and
resolve network problems.
Quick Poll – Lets you send polls to your students and receive their poll
responses.
Screen Capture – Lets you capture your students’ calculator screens and
display them on your computer.
To launch TI-Navigator computer tools
1. Click View > Tools or click the Tool s tab.
The Tools tab opens.
Getting started with TI-Navigator 7
Page 14
2. If the tool you want to launch is inactive, begin the class session. (See
“Beginning and ending class sessions” on page 20.)
3. Click the icon of the tool you want to launch.
Note: You can also launch many of these tools from the Tools menu.
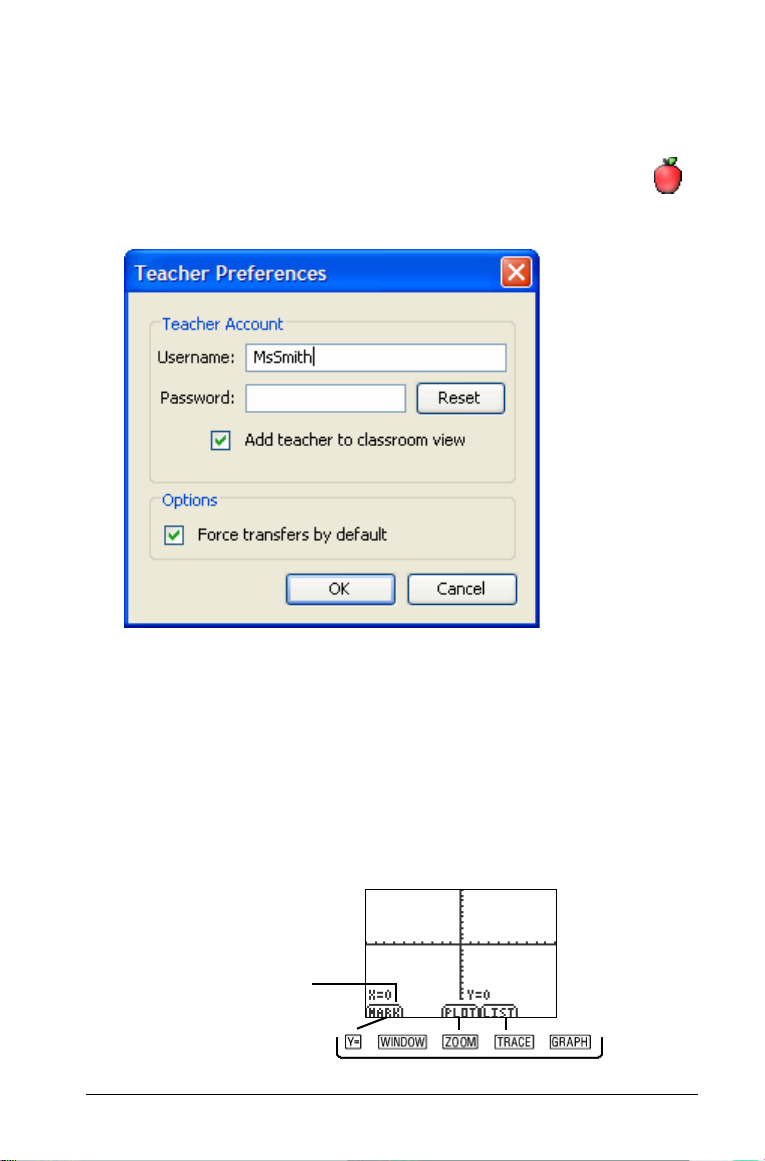
Creating and managing your teacher account
You can create your teacher account in the Teacher Preferences section of
the TI-Navigator™ classroom learning system. Your teacher account lets
you log in to the TI-Navigator network from your calculator. (See
“Logging in to TI-Navigator on your calculator” on page 12.) After you
create your teacher account, you can later change your password or your
user name.
To create your teacher account
1. If you have a class session running, end it. (See “Beginning and
ending class sessions” on page 20.)
2. Click
8 Getting started with TI-Navigator
Tools > Teacher Preferences or click Teacher Preferences .
The Teacher Preferences dialog box opens.
Page 15
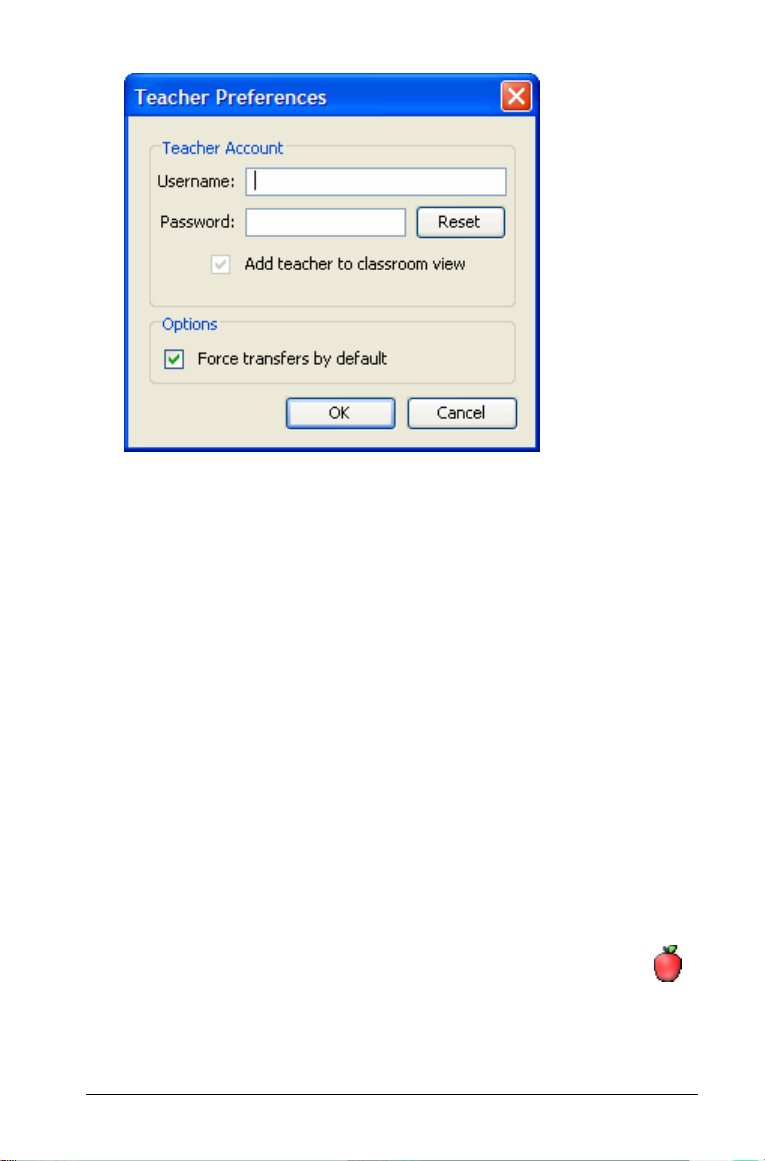
3. Enter a user name.
4. Enter a password.
5. Select or deselect the preference for the teacher icon to appear in
the classroom view.
If you select this preferebce, the teacher icon will appear in the
classroom view, and you will be included as a recipient in Send to
Class, Collect from Class and Delete from Class operations. The
teacher calculator screen will be included in screen captures of the
class.
6. Select or deselect the option for transfers to be forced by default.
If you select this option, all file transfers will be forced to student
calculators, unless you specifically deselect the option for a given file
transfer.
7. Click
OK.
To change the password of your teacher account
1. Make sure you are not logged in to the TI-Navigator network on
your calculator.
2. Click
Tools > Teacher Preferences or click Teacher Preferences .
The Teacher Preferences dialog box opens.
Getting started with TI-Navigator 9
Page 16
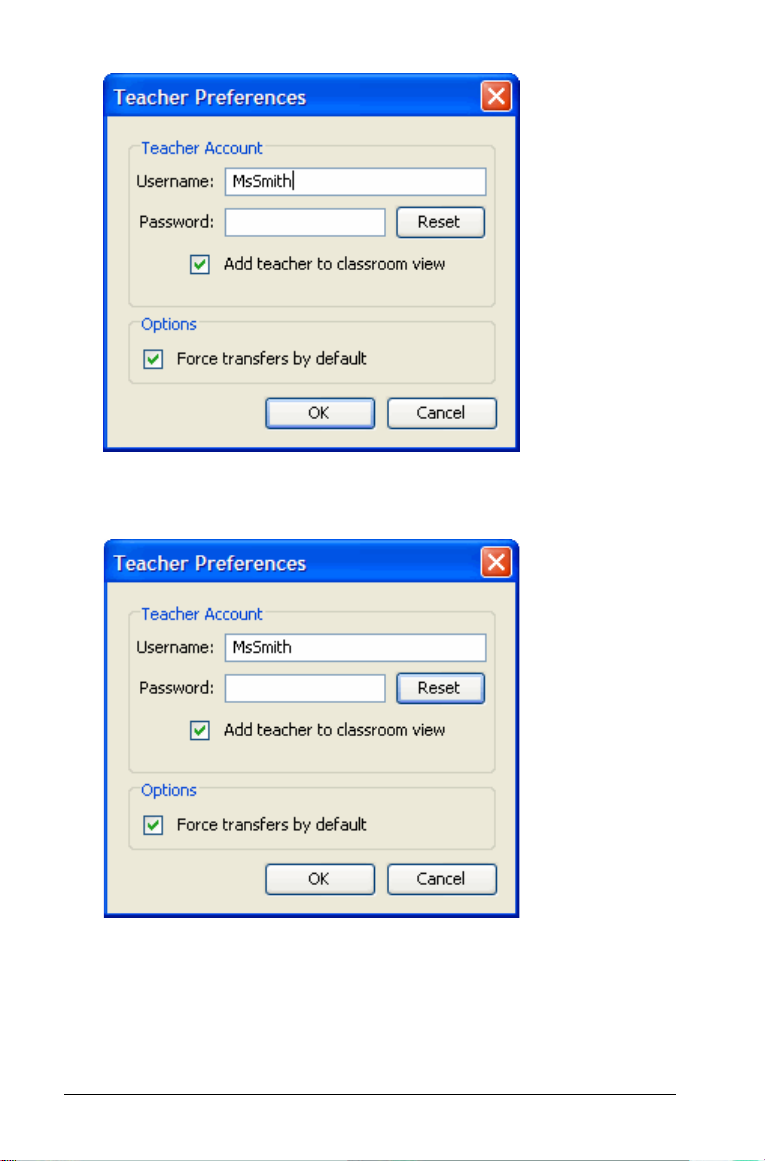
3. Click Reset.
TI-Navigator clears the current password.
4. Enter a new password.
5. Click
OK.
10 Getting started with TI-Navigator
Page 17
To change the user name of your teacher account
1. Make sure you are not logged in to the TI-Navigator network on
your calculator.
2. Click
Tools > Teacher Preferences or click Teacher Preferences .
The Teacher Preferences dialog box opens.
3. Enter a new user name.
4. Click
OK.
Using calculator screen options
The TI-Navigator™ classroom learning system has a number of options
you and your students can use from your calculator screens. To select an
option defined at the bottom of the calculator screen (such as
associated with the o key), press the graph key directly below the
option.
Mark
Press a key to select one of these
options. For example, press
to select Mark.
Getting started with TI-Navigator 11
o
Page 18
Logging in to TI-Navigator on your calculator
The TI-Navigator™ classroom learning system uses both your computer
and your students’ calculators. Your computer and your students’
calculators communicate through the TI-Navigator network. You do not
have to log in to the TI-Navigator network on your computer to
communicate with your students. However, if you plan to participate
from your calculator during the TI-Navigator class session, then you must
also log in to the TI-Navigator network from your calculator.
Before you log in
Create your teacher account in Teacher Preferences. (See “Creating and
managing your teacher account” on page 8.)
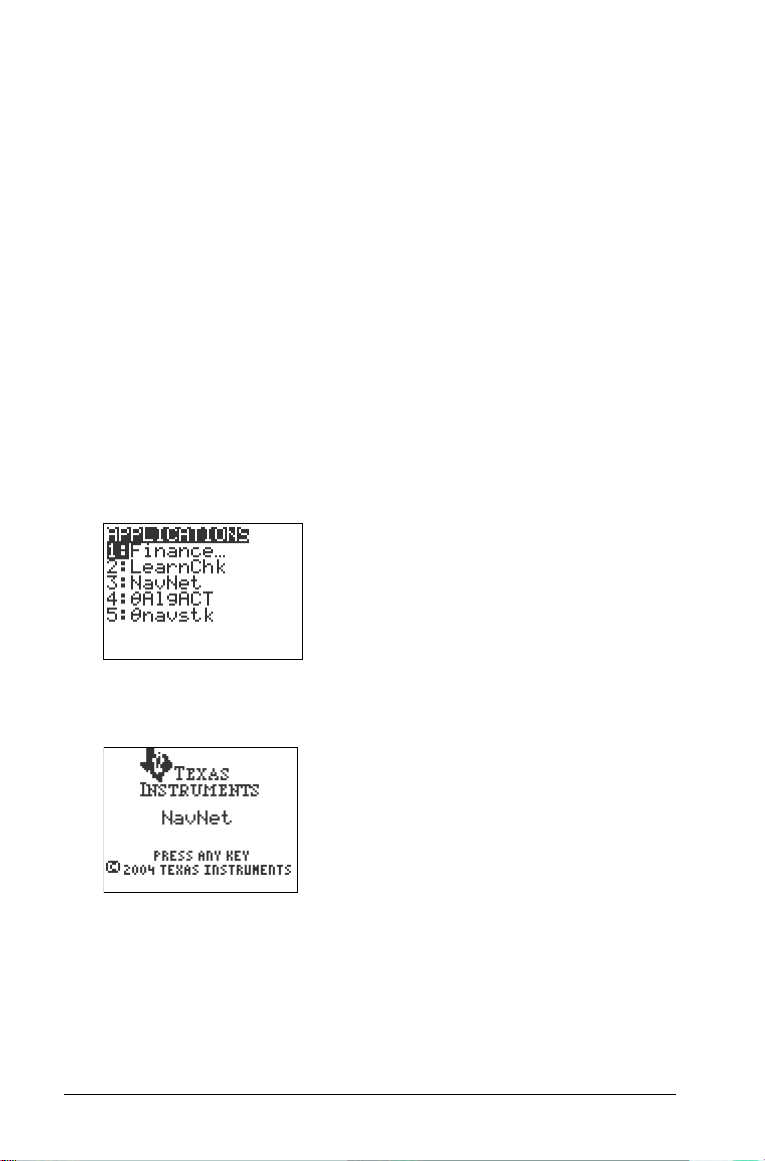
To log in to the TI-Navigator network
1. If you have not already done so, begin the class session on your
computer. (See “Beginning and ending class sessions” on page 20.)
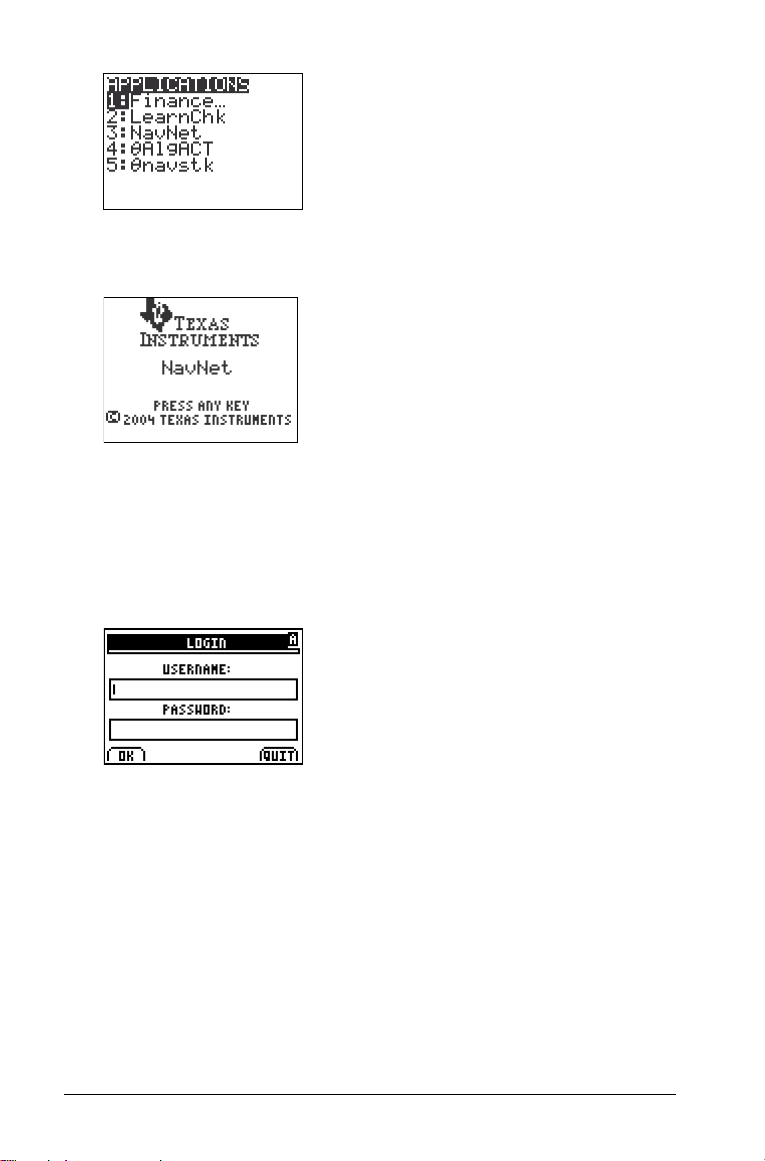
2. On your calculator, press Apps.
The Applications menu opens.
3. Select NavNet from the list of applications.
The NavNet screen opens.
4. Press any key on your calculator.
The Login screen opens.
12 Getting started with TI-Navigator
Page 19
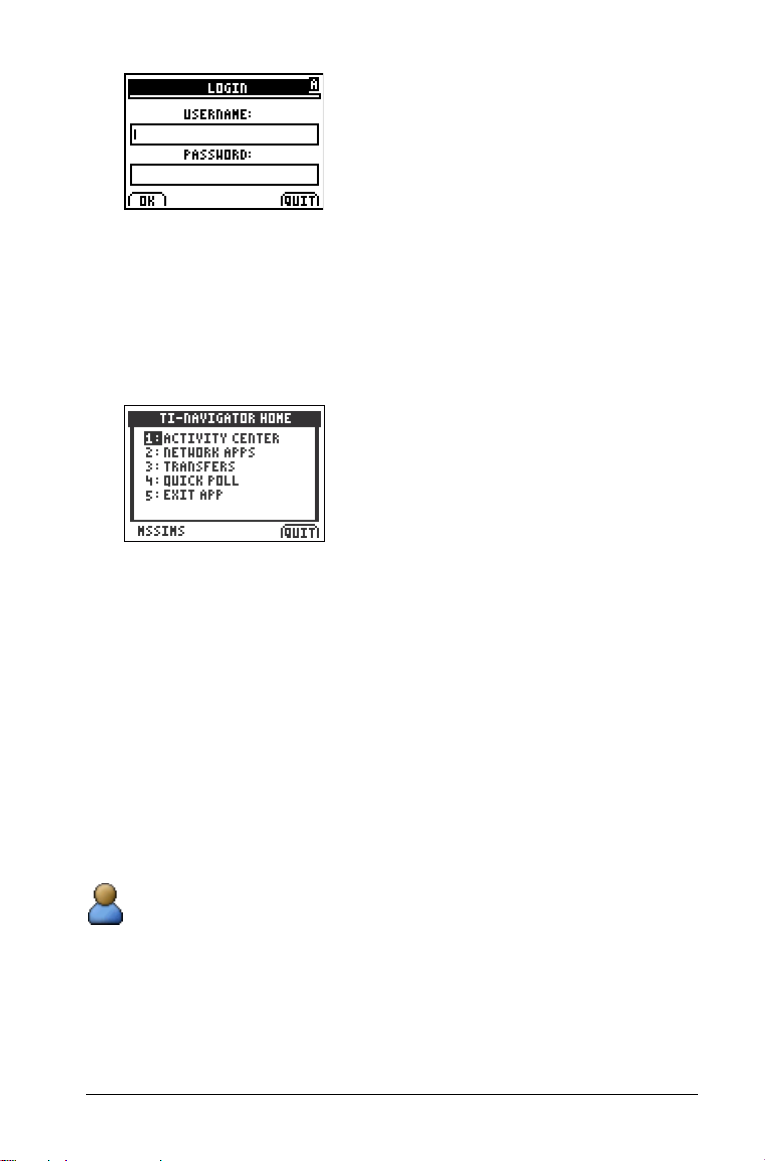
5. Enter your user name and password.
Note: TI-73 users, press -t to type text characters.
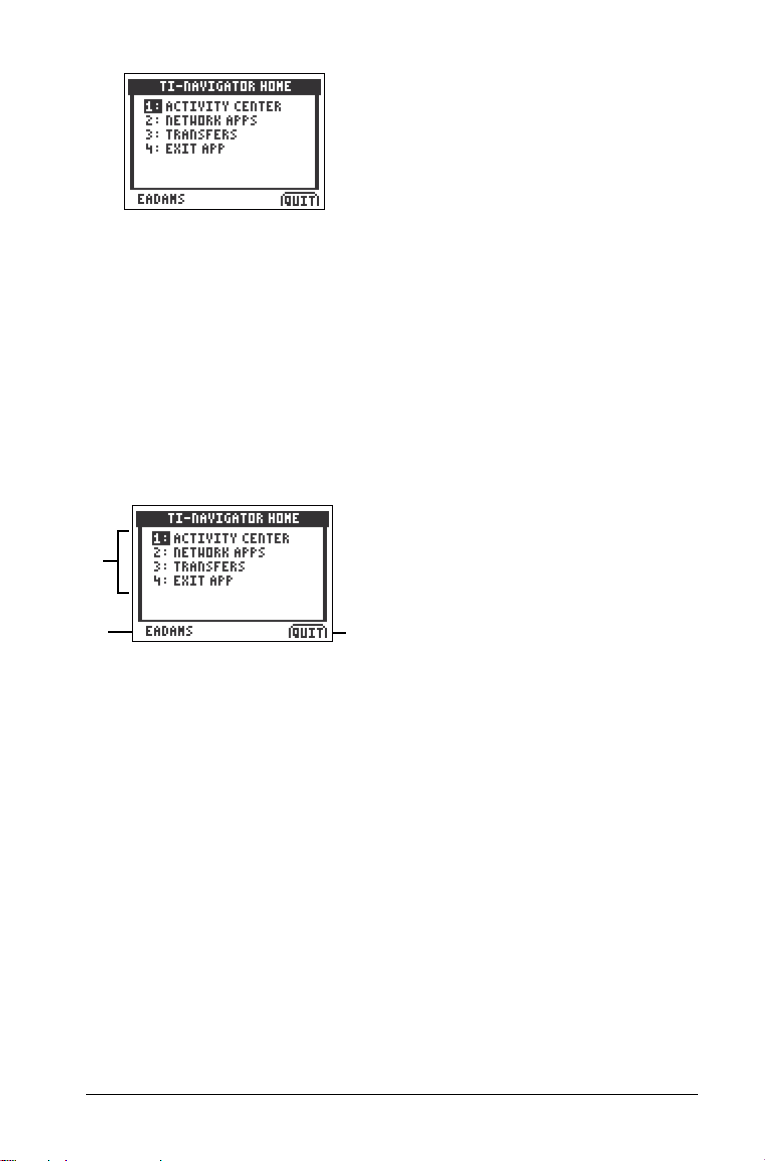
6. Select OK.
The TI-Navigator Home screen opens. From the TI-Navigator Home
screen, you can use the TI-Navigator activities, network apps, quick
poll tool, and transfer capabilities.
Logging in to TI-Navigator (student instruction)
Your computer and your students’ calculators communicate through the
TI-Navigator™ network. In order for you and your students to
communicate using this network, your students must log in to the
network from their calculators. Below you can find instructions you can
use to tell your students how to log in to the TI-Navigator network.
Before your students log in
• Create your students’ accounts. (See “Adding students to classes” on
page 25.)
• Provide your students with their user names and, if necessary, their
passwords.
Student Point of View: The steps below are from the student’s
point of view.
To log in to the TI-Navigator network
1. On your calculator, press Apps.
The Applications menu opens.
Getting started with TI-Navigator 13
Page 20
2. Select NavNet from the list of applications.
The NavNet screen opens.
Note: If you attempt to log in to a class using a calculator other than
the type of calculator that is being used for the class, you will receive
an error message. (For example, you cannot log in to a class designed
for the TI-73 Explorer using a TI-84 Plus Silver Edition.)
3. Press any key on your calculator.
The Login screen opens.
4. Enter your user name and password.
Note: If you do not know your user name or password, ask your
teacher.
5. Select
OK.
The TI-Navigator Home screen opens. From the TI-Navigator Home
screen, you can use the TI-Navigator activities, network apps, and
transfer capabilities.
14 Getting started with TI-Navigator
Page 21
The TI-Navigator calculator home screen
In the TI-Navigator™ classroom learning system, the home screen on the
calculator provides the tools your students need to interact with you
using the TI-Navigator network. You can also use the TI-Navigator
calculator home screen to interact with your students. Below you can see
an example of the TI-Navigator calculator home screen with its main
parts labeled.
Note: The calculator home screen shown below is from a student’s
calculator. When you log in to your calculator using your teacher
account, your calculator has additional options.
Ê
Ë
Ê Task menu. Contains a list of the tasks you and your students can
perform on your calculators. The task menu on your teacher calculator
contains a Quick Poll task not shown in this picture.
Ë
User name. The name of the student logged in to the TI-Navigator
network.
Task bar. Contains the Quit option. To select the Quit option, you must
Ì
press the calculator key underneath it.
Ì
TI-Navigator calculator tools
The TI-Navigator™ classroom learning system contains several calculator
tools that you and your students can use from the NavNet App on your
calculators. This section describes the different tools both you and your
students can use, as well as how to launch them.
Getting started with TI-Navigator 15
Page 22

The TI-Navigator calculator tools
Activity Center – Lets you and your students participate in the activities
that you send during the Activity Center tool’s sessions.
Network Apps – Lets you and your students open installed TI Graphing
Calculator Software Applications (Apps) that can connect to the TINavigator network.
Quick Poll – Lets you send polls to your students from your calculator.
This option is only available on your (the teacher’s) calculator.
Transfers – Lets you and your students exchange files with each other.
To launch TI-Navigator calculator tools
1. If you have not already done so, begin the class session. (See
“Beginning and ending class sessions” on page 20.)
2. Log in to your calculator. (See “Logging in to TI-Navigator on your
calculator” on page 12.)
3. Press the number of the calculator tool you want to launch.
16 Getting started with TI-Navigator
Page 23
Managing classes
The TI-Navigator™ classroom learning system typically includes one or
more classes. In order to use TI-Navigator, you need to create and use
classes for each class period that you teach. This section contains the
information you need to create and effectively manage your classes.
Creating classes
When you start using the TI-Navigator™ classroom learning system, one
of the first things you should do is create your classes. Make sure you
create a class for each of the class periods you plan to teach with TINavigator.
To create classes
1. If you have a class session running, end it. (See “Beginning and
ending class sessions” on page 20.)
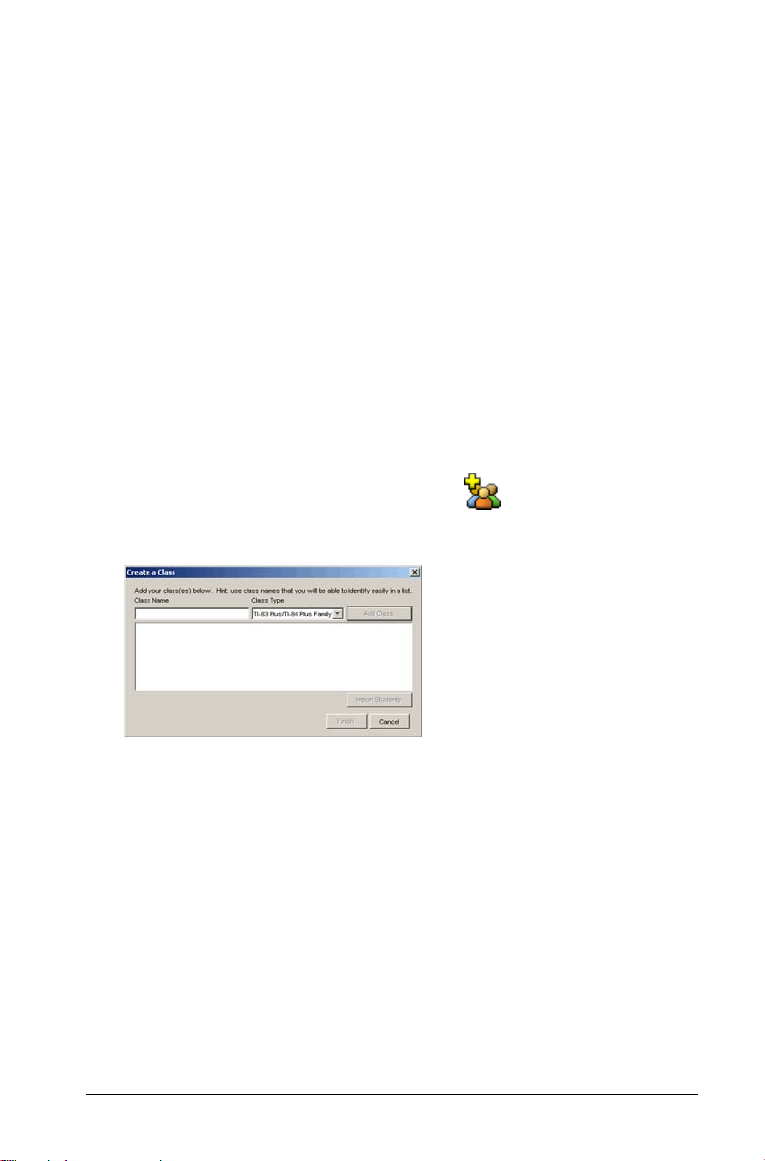
2. Click File > Add Class or click Add Class .
The Create a Class dialog box opens.
3. Enter a class name.
4. Select a class type.
5. Click
Managing classes 17
Add Class.
Note: Once you select a class type and add the class, the class created
will only work with the device type specified.
The new class appears in the Create a Class dialog box.
Page 24

6. (Optional) Import students into the class:
a) Click the class.
b) Click
Import Students.
The Open dialog box opens.
c) Select the file that contains the students you want to
import.
Note: The file can be a CSV file or comma/tab delimited text
file.
d) Click Open.
The Import Status dialog box opens telling you how many
students TI-Navigator successfully imported.
e) (Optional) If some students did not import successfully, click
View Details to determine the problem.
18 Managing classes
Page 25
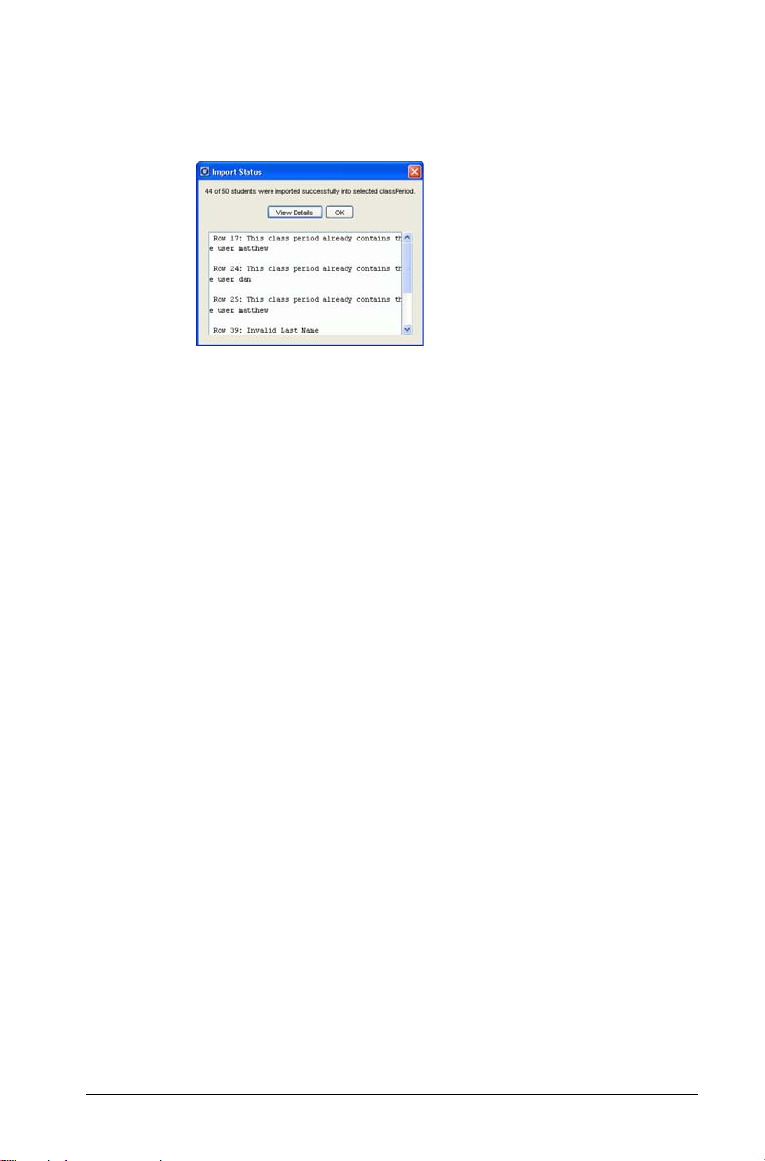
The details of the import open in the Import Status dialog
box.
f) Click
Note: For more information on importing student data from a file,
see the TI-Navigator software tour “Importing Students.pdf” on your
installation CD.
7. If you need to create another class, repeat steps 3 - 5.
8. Click Finish.
OK.
Selecting a class
You can create many classes in the TI-Navigator™ classroom learning
system. To view or start a class, you must select it from a list of the classes
in the Current Class section of the TI-Navigator computer home screen.
To select a class
1. If you have a class session running, end it. (See “Beginning and
ending class sessions” on page 20.)
2. Click File > Select Class.
A list of classes opens.
3. Click the class you want.
TI-Navigator displays the information for the selected class.
Note: You can view and edit information in the selected class,
however, you cannot perform any network activities until you begin
the class. (See “Beginning and ending class sessions” on page 20.)
Managing classes 19
Page 26

Beginning and ending class sessions
A class session is the period when the TI-Navigator™ classroom learning
system is active for a specific class. While a class session is running, you
can perform TI-Navigator’s communications functions with the selected
class. You cannot use TI-Navigator to interact with your class until you
begin a class session, and you cannot begin another class in TI-Navigator
until you end the current one.
To begin class sessions
1. If you have a class session running, end it.
2. From the Current Class drop-down list, select the class you want to
begin.
3. Click
File > Begin Class or click Begin Class .
To end class sessions
f Click
File > End Class or click End Class .
Changing the class view
In the Classroom tab, you can view the selected class in either the Student
List view or the Seating Chart view. The Student List view shows your
students in a table that contains their display names, first name, last
name, user name, and student ID. The Seating Chart view shows your
students as student icons with display names. You can change the class
view at any time.
To change class view to Student List
1. Click the Classroom tab.
The Classroom tab opens.
Note: The contents of the Classroom tab vary depending on the
selected class and view.
20 Managing classes
Page 27

2. In the menu, click View > Classroom > Student List.
-or-
In the Classroom tab, click
View > Student List.
The Classroom tab changes the class view to Student List.
To change the class view to Seating Chart
1. Click the Classroom tab.
The Classroom tab opens.
Note: The contents of the Classroom tab vary depending on the
selected class and view.
Managing classes 21
Page 28
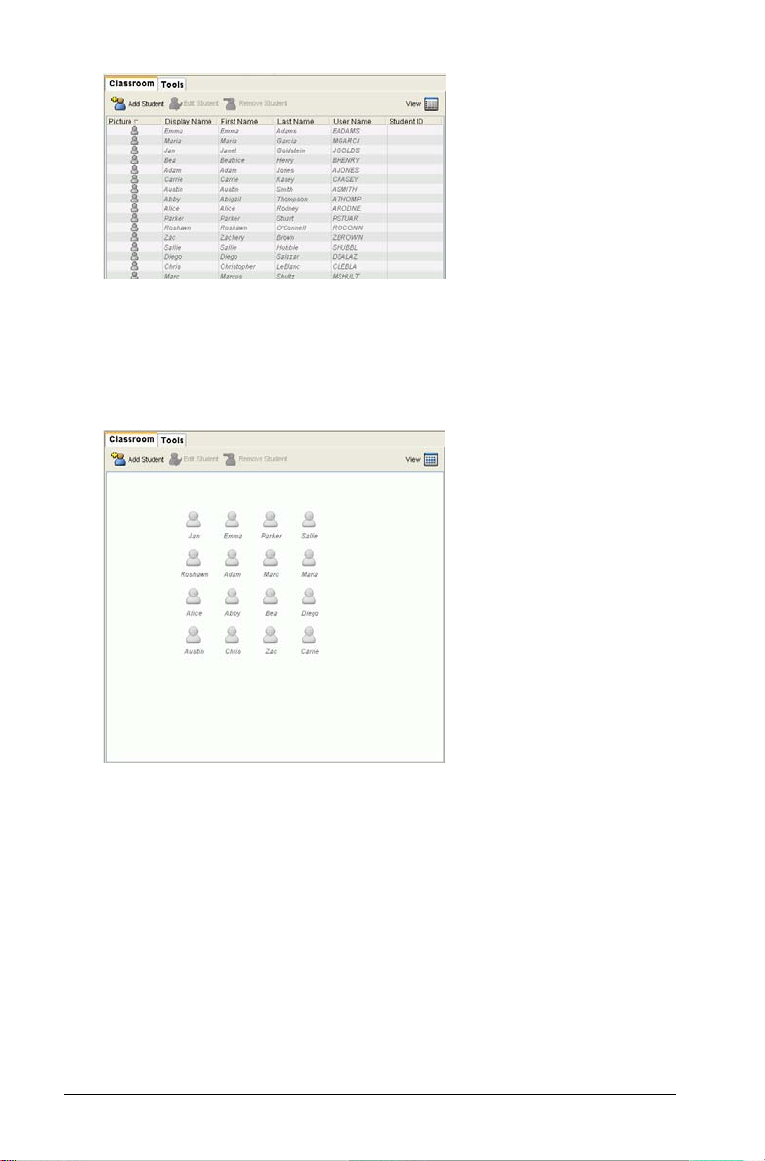
2. In the menu, click View > Classroom > Seating Chart.
-or-
In the Classroom tab, click
View > Seating Chart.
The Classroom tab changes the class view to Seating Chart.
To change the class view to Student Portfolio
1. Click the Classroom tab.
The Classroom tab opens.
Note: The contents of the Classroom tab vary depending on the
selected class and view.
22 Managing classes
Page 29
2. In the menu, click View > Classroom > Student Portfolio.
-or-
In the Classroom tab, click
The Classroom tab changes the class view to Student Portfolio.
View > Student Portfolio.
Removing items from the Class Record
The Class Record maintains a list of all of the actions you have performed
in your class. (See “Class Record” on page 6.) Items remain in this list until
you remove the items or you remove the class. You can remove items
from the Class Record at any time.
To remove items from the Class Record
1. In the Class Record, click the item you want to remove.
TI-Navigator highlights the selected item in the Class Record.
Managing classes 23
Page 30

2. Click Edit > Remove From Record or click Remove From Record.
Note: If you are removing an item that is still in progress, the
Remove From Record dialog box opens asking if you are sure you
want to remove the item. Click Remove.
Removing classes
If you have a class you no longer need, you can remove it from the TINavigator™ classroom learning system. When you remove a class, TINavigator removes the class from the software and removes the file on
the hard drive that correspond to that class. If you have students who are
not part of any other classes, the software removes those students from
the software as well.
Note: You cannot undo the removal of a class.
To remove classes
1. If you have a class session running, end it. (See “Beginning and
ending class sessions” on page 20.)
2. From the Current Class drop-down list, select the class you want to
remove.
TI-Navigator shows the selected class in the Current Class field.
3. Click
4. Click
24 Managing classes
File > Remove Class.
TI-Navigator asks if you are sure you want to remove the class.
Remove.
Page 31

Managing student accounts
The TI-Navigator™ classroom learning system typically contains many
student accounts associated with one or more classes. Each of your
students must have an account to access TI-Navigator on their calculators.
This section contains information on creating and managing your
students’ accounts.
Adding students to classes
Once you create your classes, you will want to add students to them. You
can add students to your classes at any time.
Note: The instructions below explain how to add students once you
create a class. You can also add students when you create a class by
importing them. (See “Creating classes” on page 17.)
To add students to classes
1. Select the class to which you want to add the students. (See
“Selecting a class” on page 19.)
Note: If you have a class session running, you must end it to select
the class. (See “Beginning and ending class sessions” on page 20.)
2. Click
3. Enter the student’s first name.
4. Enter the student’s last name.
5. Enter a user name.
6. If you want your student to create their own password, select
Managing student accounts 25
Class > Add Student or click Add Student .
The Add Student dialog box opens.
Note: The user name you choose must be unique. It cannot exist in
the current class or any other class.
Student Chooses.
Page 32

-or-
If you want to create a password for your student, select the blank
password entry box and enter a new password.
7. (Optional) Enter a display name.
Note: If you leave the display name blank, TI-Navigator uses the
student’s first name as the display name.
8. (Optional) Enter a student ID.
9. (Optional) Assign the student to other classes:
a) Click
Assign Classes.
The Assign Classes dialog box opens.
b) Select the check boxes of the student’s classes.
c) Clear the check boxes of the classes to which the student
does not belong.
d) Click
10. If you need to add another student, click
OK.
Add Next Student and
repeat steps 3 - 9.
11. Click Finish.
26 Managing student accounts
Page 33

Checking student login status
The TI-Navigator™ classroom learning system lets you view the your
students’ login status from the Classroom tab. The color of the icon by
your students’ display names indicates their login status as well as the
class status:
Icon Class status Student status
Class session not started. N/A
Class session started. Student not logged in.
Class session started. Student logged in.
Your students can also have an App exited status that is not indicated in
the TI-Navigator window. The App exited status occurs when students
exit the NavNet App on their calculators but are still logged in to the TINavigator network. While students are in an App exited state, they can
only receive forced actions and respond to screen shot requests. They
cannot participate in any other TI-Navigator action until they open the
NavNet App again.
Arranging the seating chart
Initially, the Classroom tab arranges the students in the Seating Chart
view in the order that you added them. However, you can rearrange the
students so that they have the same seating arrangement in the
Classroom tab as they do in your actual classroom. You can rearrange the
seating chart at any time.
To arrange students in the seating chart
1. Select the students’ class. (See “Selecting a class” on page 19.)
Note: If you have a class session running, you must end it to select
the class. (See “Beginning and ending class sessions” on page 20.)
2. In the menu, click View > Classroom > Seating Chart.
The Classroom tab opens displaying your class in the Seating Chart
view.
Managing student accounts 27
Page 34

3. Within the Classroom tab, drag each student’s icon to the location
that you want.
The TI-Navigator software moves the student icons to the new
locations.
Note: Do not place one student’s icon on top of another students’
icon. If you do this, you will only be able to see one of the student’s
icons.
Sorting student information
The Student List view in the Classroom tab shows the information for
students in the selected class. It includes your students’ display names,
first names, last names, user names, and student IDs. In the Student List
view, you can sort your students’ information by each of these categories.
The TI-Navigator™ classroom learning system sorts the information
alphabetically from A-Z or Z-A and numerically from 1-9 or 9-1. You can
sort student information at any time.
To sort student information
1. Select the class that contains the student information you want to
sort. (See “Selecting a class” on page 19.)
Note: If you have a class session running, you must end it to select
the class. (See “Beginning and ending class sessions” on page 20.)
2. In the menu, click View > Classroom > Student List.
The Classroom tab opens displaying the Student List view.
28 Managing student accounts
Page 35

3. Click the column title of the list you want to sort.
TI-Navigator sorts the selected list.
4. If you want to sort the selected information in the opposite order,
click the column title again.
Using the Student Portfolio view
The Student Portfolio view in the Classroom tab displays a list of students
in the selected class with the scores they have received for each
assignment included in the Student Portfolio. The class average for each
assignment displays on the top line of the portfolio.
To view the Student Portfolio
1. Select the class that contains the student portfolio you want to view.
(See “Selecting a class” on page 19.)
Note: If you have a class session running, you must end it to select
the class. (See “Beginning and ending class sessions” on page 20.)
2. In the menu, click View > Classroom > Student Portfolio.
The Classroom tab opens displaying the Student Portfolio view.
Managing student accounts 29
Page 36

To view student information
f Double-click the student name to view and change student
properties.
Sorting information in the portfolio view
1. Click the column title of the list you want to sort.
TI-Navigator sorts the selected list.
2. If you want to sort the selected information in the opposite order,
click the column title again.
To add a student to the portfolio view
1. Click to add a student to the portfolio view.
The student properties dialog box displays.
2. Complete the student information and click OK.
The student is added to the portfolio view.
To add or remove students from the portfolio view
1. Click to select the name of the student you wish to add to to the
portfolio view.
2. Click to remove the student.
30 Managing student accounts
Page 37

A dialog box displays to confirm that you want to remove the
student.
3. Click OK.
The student is removed from the portfolio view.
Note: Removing the student from the portfolio view does not
remove the student from the class.
To view assignment details
f Click the assignment name and right-click to open and view
the .caf file.
To include an assignment in the Student Portfolio
1. Locate the Class Analysis (.caf) file that includes the assignment you
want to display in the Student Portfolio view.
2. Copy or save the .caf file to the Student Portfolio directory for the
class.
To view the location of the Student Portfolio files
1. Select Class > Properties
The Class Properties dialog box displays the location of the Student
Portfolio files.
To change the location of the Student Portfolio files
1. Select Class > Properties
The Class Properties dialog box appears.
Managing student accounts 31
Page 38

2. Click Change next to the Student Portfolio File Location text field,
and navigate to the directory where you want to store the Student
Portfolio files.
3. Click
OK to change the file location.
Resetting student passwords
The TI-Navigator™ classroom learning system maintains the privacy of
your students’ passwords. Because of this, you cannot retrieve passwords
for your students if they forget them. However, if necessary you can reset
your students’ passwords. You can reset passwords for all of the students
in a class or for individual students.
Note: You cannot reset the passwords of students who are currently
logged in to the TI-Navigator network.
To reset passwords for all students in a class
1. Select the students’ class. (See “Selecting a class” on page 19.)
Note: If you have a class session running, you must end it to select
the class. (See “Beginning and ending class sessions” on page 20.)
2. Click the Classroom tab.
The Classroom tab opens.
3. Click a student in the class.
4. Click
5. Click Class > Reset Password(s).
32 Managing student accounts
Edit > Select All.
TI-Navigator selects all of the students in the class.
The Confirm Reset Passwords dialog box opens.
Page 39

6. Click OK.
7. The next time your students log in, instruct them to enter passwords
of their choosing.
To reset student passwords for individual students
1. Select a class of the student whose password you want to reset. (See
“Selecting a class” on page 19.)
Note: If you have a class session running, you must end it to select
the class. (See “Beginning and ending class sessions” on page 20.)
2. Click the Classroom tab.
The Classroom tab opens.
Note: The contents of the Classroom tab vary depending on the
selected class and view.
3. Click the student you want to edit.
4. Click
Class > Edit Student or click Edit Student .
The Student Properties dialog box opens.
Managing student accounts 33
Page 40

5. Click Reset.
6. If you want the student to create his or her own password, select
Student Chooses.
-or-
If you want to create a specific password for the student, select the
blank password entry box and enter a new password.
7. Click
8. The next time the student logs in:
OK.
TI-Navigator resets the student’s password.
• If you selected Student Chooses, instruct the student to enter a
password of his or her choosing.
• If you created a password for the student, tell the student the
new password.
Changing the classes of a student
Occasionally your students may move to a different class, or they may
take more than one of your classes. The TI-Navigator™ classroom
learning system lets you change your students’ classes when necessary.
Note: You cannot change the classes of students who are logged in to
the TI-Navigator network.
To change a student’s classes
1. Select a class to which the student belongs. (See “Selecting a class”
on page 19.)
Note: If you have a class session running, you must end it to select
the class. (See “Beginning and ending class sessions” on page 20.)
2. Click the Classroom tab.
34 Managing student accounts
Page 41

The Classroom tab opens.
Note: The contents of the Classroom tab vary depending on the
selected class and view.
3. Click the student you want to edit.
4. Click
Class > Edit Student or click Edit Student .
The Student Properties dialog box opens.
5. Click Assign Classes.
The Assign Classes dialog box opens.
6. Select the check boxes of the student’s classes.
Managing student accounts 35
Page 42

7. Clear the check boxes of the classes to which the student does not
belong.
8. Click OK.
9. In the Student Properties dialog box, click OK.
Changing student names and identifiers
After you add your students, you may find that you need to change one
of their names or identifiers. In the TI-Navigator™ classroom learning
system, there are five different names and identifiers associated with
your students, including:
• First name
•Last name
• User name
• Display name
• Student ID
This section covers how to change any of these types of names and
identifiers.
Note: You cannot change the account information of students who are
logged in to the TI-Navigator network.
To change a student’s names or identifiers
1. Select a class to which the student belongs. (See “Selecting a class”
on page 19.)
Note: If you have a class session running, you must end it to select
the class. (See “Beginning and ending class sessions” on page 20.)
2. Click the Classroom tab.
The Classroom tab opens.
Note: The contents of the Classroom tab vary depending on the
selected class and view.
3. Click the student you want to edit.
36 Managing student accounts
Page 43

4. Click Class > Edit Student or click Edit Student .
The Student Properties dialog box opens.
5. Click the field of the name or identifier you want to change.
6. Make the necessary changes.
7. Repeat steps 5 and 6 for any other names or identifiers you want to
change.
8. Click
OK.
Moving a student to another class
If any of your students move to a different class, you can move them
within the TI-Navigator™ classroom learning system as well.
Note: You cannot move students who are logged in to the TI-Navigator
network.
To move a student
1. Select a class to which the student belongs. (See “Selecting a class”
on page 19.)
Note: If you have a class session running, you must end it to select
the class. (See “Beginning and ending class sessions” on page 20.)
2. Click the student you want to move.
3. Click
4. From the Current Class drop-down list, select the class where you
Managing student accounts 37
Edit > Cut or click Cut .
TI-Navigator removes the student from the class and places his or her
student account information on the Clipboard.
want to move the student.
Page 44

5. Click Edit > Paste or click Paste .
TI-Navigator moves the student to the selected class.
Copying a student to another class
When you have students in more than one of your classes, you may find
it convenient to simply copy them from one class to another. Copying
students saves you the time of entering all of their information again.
Note: You cannot copy students who are logged in to the TI-Navigator
network.
To copy a student
1. Select a class to which the student belongs. (See “Selecting a class”
on page 19.)
Note: If you have a class session running, you must end it to select
the class. (See “Beginning and ending class sessions” on page 20.)
2. Click the student you want to copy.
3. Click Edit > Copy or click Copy .
The TI-Navigator™ classroom learning system copies the student
onto the Clipboard.
4. From the Current Class drop-down list, select the class to which you
want to copy the student.
5. Click
Edit > Paste or click Paste .
The TI-Navigator software copies the student to the selected class.
Removing a student from a class
As necessary, you can remove students from your classes. When you
remove students, the TI-Navigator™ classroom learning system only
removes them from the selected class. If the students are in other classes,
then they remain in those classes.
Notes:
• You cannot remove students who are logged in to the TI-Navigator
network.
• You cannot undo the removal of students.
38 Managing student accounts
Page 45

To remove a student from a class
1. Select the class from which you want to remove the student. (See
“Selecting a class” on page 19.)
Note: If you have a class session running, you must end it to select
the class. (See “Beginning and ending class sessions” on page 20.)
2. Click the Classroom tab.
The Classroom tab opens.
Note: The contents of the Classroom tab vary depending on the
selected class and view.
3. Click the student you want to remove.
4. Click
Class > Remove Student or click Remove Student .
The TI-Navigator software asks if you are sure you want to remove
the student.
5. Click
Yes.
The TI-Navigator software removes the student.
Managing student accounts 39
Page 46

40 Managing student accounts
Page 47

Exchanging files with students
The TI-Navigator™ classroom learning system lets you exchange
information with the students in your classes. From TI-Navigator, you can
send files to your students and collect files from your students, as well as
delete files from your students’ calculators. Your students can send files
to you and receive files from you. This section covers the different ways
to work with files in TI-Navigator, and includes both instructions for you
to use and instructions for you to give your students.
Sending files
You can send calculator-compatible files (such as lists and EDC files) to
your students’ calculators from your computer or your calculator.
Choosing the location that you want to send files from depends on the
location of your files and the number of choices you want about where
you send the files. If you choose to send the files from your calculator,
then you send files to your whole class forced. When you send files from
your computer, you have two choices that are not available when you
send from your calculator. You can:
• Send files to your whole class, members of the class currently logged
in, or to individual students.
• Send files forced or unforced. If you send files unforced, students
must receive the files from the transfers screen. If you force send the
files, the students’ calculators receive the files immediately.
All the files you collect, acquire, or send from a calculator contain a
setting in their file properties that specifies where the file came from on
the calculator (RAM or Archive). By default, the TI-Navigator software
uses the file’s settings to determine where to send the file. For example,
if you collected a file from a calculator’s RAM, when you send the file the
TI-Navigator software will send it to RAM. However, if you send the file
from your computer, then you can select where the TI-Navigator
software sends the file by changing the file’s settings in Windows.
You can find the following instructions below:
• To change file settings in Windows
• To send files from your computer
• To send files from your calculator
To change file settings in Windows
1. In Windows®, navigate to the location of the file and click it.
2. Click
Exchanging files with students 41
File > Properties.
Page 48

The Properties dialog box opens.
3. Click the TI File Properties tab.
The TI File Properties tab opens.
4. At the bottom of the dialog box, click the area of calculator memory
where you want the TI-Navigator software to send the file.
5. Click
OK.
To send files from your computer
1. If you have not already done so, begin the class session. (See
“Beginning and ending class sessions” on page 20.)
2. Click
42 Exchanging files with students
Tools > Send to class or click Send to class .
Page 49

The Select file(s) to send dialog box opens.
Note: The default file filter is set according to the class type (TI-73 or
TI-83). Only appropriate file types will be sent.
3. Navigate to the file you want to send and click it.
Note: You can also drag and drop files from a Windows Explorer window
onto the Navigator window to send files.
4. Click Next.
The Select student(s) dialog box opens.
5. Select the student(s) to whom you want to send the file:
• To send the file to the whole class, click
Class . To send the
file only to class members who are currently logged in, check the
Logged in Students only checkbox.
Exchanging files with students 43
Page 50

• To send the file to an individual student, click Students and
then click the student.
Note: If you had any students selected in the Classroom tab, the TI-
Navigator software already has them selected.
6. If you want your students’ calculators to receive the file immediately,
click Force send to students now.
7. Click Finish.
If you force sent the file, the TI-Navigator™ classroom learning
system transfers the file from your computer to the selected
students’ calculators. If the students are not logged in, the TINavigator software transfers the file upon log in.
If you sent the files unforced, students can receive the file from the
transfer screen after they log in to their calculators.(See “Receiving
files (student instruction)” on page 50.)
The file transfer appears in the Class Record.
Once students receive the file, they can open it on their calculators.
To send files from your calculator
1. If you have not already done so, begin the class session. (See
“Beginning and ending class sessions” on page 20.)
2. On your calculator, log in to the TI-Navigator network. (See “Logging
in to TI-Navigator on your calculator” on page 12.)
3. From the TI-Navigator calculator home screen, select
The Transfers screen opens.
3: TRANSFERS.
4. Select
1: SEND TO CLASS.
The Send Var screen opens.
44 Exchanging files with students
Page 51

Note: The list of valid items to transfer varies according to device
type.
5. Navigate to the file type you want to send and press
Enter.
The Send Var Selection screen opens.
Note: The Send Var Selection screen varies depending on the option
you choose and the files on your calculator.
6. Navigate to the file you want to send and press
Enter.
A check mark appears next to the file.
7. Repeat step 6 for each file you want to send.
8. Select
Send.
The Transfers Complete screen opens after the TI-Navigator software
sends the file(s) to the calculators of all of the students in your class.
Exchanging files with students 45
Page 52

The file transfer appears in the Class Record when you view the TINavigator software on your computer.
After your students log in to the TI-Navigator network, they can
receive the file from their transfer screen. Once they receive the file,
they can open it on their calculators.
Sending files (student instruction)
Your students may send files to you both during and outside of a
collection. Students can manually send files to you when you perform an
unforced collection. Students can send files to you outside a collection
(unprompted) at any time during a class session. Below you can find
instructions you can use to tell your students how to send files during a
collection and how to send files unprompted.
Student Point of View: The steps below are from the student’s
point of view.
To send files during collections
1. If you have not already done so, log in to the TI-Navigator network.
(See “Logging in to TI-Navigator (student instruction)” on page 13.)
2. Select 3: TRANSFERS.
The Transfers screen opens.
3. Select
1: AUTO SEND/RECEV.
The TI-Navigator™ classroom learning system searches for the
requested files and then uploads them to your teacher’s computer.
To send files outside of collections
1. If you have not already done so, log in to the TI-Navigator network.
(See “Logging in to TI-Navigator (student instruction)” on page 13.)
46 Exchanging files with students
Page 53

2. Select 3: TRANSFERS.
The Transfers screen opens.
3. Select
2: SEND TO TEACHER.
The Send Var screen opens.
Note: The list of valid items to transfer varies by device type.
4. Navigate to the file type you want to send and press
Enter.
The Send Var Selection screen opens.
Note: The contents of the Send Var Selection screen vary depending
on the option you choose and the files on your calculator.
5. Navigate to the file you want to send and press Enter.
A check mark appears next to the file.
6. Repeat step 5 for each file you want to send.
7. Select
Exchanging files with students 47
SEND.
Page 54

The TI-Navigator software sends the file(s) to your teacher’s
computer and notifies you when the transfer is complete.
Collecting files
You can collect calculator-compatible files (such as lists, matrices, and
EDC files) from your students’ calculators to your computer. You can have
a forced or unforced file collection. When you collect files unforced,
students must send the files from their transfers screen. When you force
collect files, the students’ calculators send the files immediately. You also
have the option of deleting the collected files from your students’
calculators.
To collect files
1. If you have not already done so, begin the class session. (See
“Beginning and ending class sessions” on page 20.)
2. Click
3. If you want a file already listed in the dialog box, navigate to the file
48 Exchanging files with students
Tools > Collect from class or click Collect from class .
The Select file(s) to collect dialog box opens.
Note: Only valid items for the class type are displayed.
you want to collect and click it.
Page 55

-or-
If you want a custom file not in the dialog box:
a) Click
CUSTOM.
The options for custom files open.
b) Enter the file name.
c) From the drop-down list, select the file type.
d) Click
Add.
4. Click Next.
The Select student(s) dialog box opens.
5. Select the student(s) from whom you want to collect the file:
• To collect the file from the whole class, click
• To collect the file from an individual student, click
Class .
Students
and then click the student.
Note: If you had any students selected in the Classroom tab, the TI-
Navigator software already has them selected.
6. If you want to force collect the file, select Force collect from
students now
.
7. If you want to remove the file from the students’ calculators after
you collect it, select Delete from device after collecting.
Exchanging files with students 49
Page 56

8. Click Next.
The Select collect folder dialog box opens.
9. Navigate to the collect folder you want and click it.
10. Click
Finish.
If you force collected the file, the TI-Navigator™ classroom learning
system collects the files from the selected students’ calculators to
your computer.
If you collect the file unforced, students can send you the file from
the transfer screen after they log in to their calculators. (See
“Sending files (student instruction)” on page 46.)
The file transfer appears in the Class Record.
Receiving files (student instruction)
If you do not force send files to your students, then they must manually
receive the files on their calculators. Below you can find instructions you
can use to tell them how to receive the files.
Student Point of View: The steps below are from the student’s
point of view.
50 Exchanging files with students
Page 57

To receive files
1. If you have not already done so, log in to the TI-Navigator network.
(See “Logging in to TI-Navigator (student instruction)” on page 13.)
The TI-Navigator Home screen opens.
2. Select
3. Select
3: TRANSFERS.
The Transfers screen opens.
1: AUTO SEND/RECV.
The TI-Navigator™ classroom learning system searches for sent files
and then downloads them to your calculator.
Deleting files from calculators
When necessary, you can delete files from your students’ calculators. You
can have a forced or unforced file deletion. If your file deletion is
unforced, students must delete the files from their Transfers screen using
Auto Send/Recv. If you force delete the files, the software immediately
deletes the files from your students’ calculators.
To delete files from calculators
1. If you have not already done so, begin the class session. (See
“Beginning and ending class sessions” on page 20.)
2. Click
Exchanging files with students 51
Tools > Delete from class or click Delete from class .
The Select file(s) to delete dialog box opens.
Note: Only valid items for the class type are displayed.
Page 58

3. If you want to delete file already listed in the dialog box, navigate to
the file you want to collect and click it.
-or-
If you want delete a custom file not in the dialog box:
a) Click
CUSTOM.
The options for custom files open.
b) Enter the file name.
c) From the drop-down list, select the file type.
d) Click Add.
4. Click Next.
The Select student(s) dialog box opens.
52 Exchanging files with students
Page 59

5. Select the student(s) whose files you want to delete:
• To delete the file from the whole class’s calculators, click Class
.
• To delete the file from an individual student’s calculator, click
Students and then click the student.
Note: If you had any students selected in the Classroom tab, the TI-
Navigator software already has them selected.
6. If you want to force delete the file, click Force delete from students
.
now
7. Click Finish.
If you force deleted the file, the TI-Navigator™ classroom learning
system deletes the file from your students’ calculators.
If you deleted the file unforced, students can delete the file from the
transfer screen (Auto Send/Recv) after they log in to their calculators.
The file deletion appears in the Class Record.
Checking the status of file transfers
When you are sending or collecting files, you may want to check to see
which of your students have received or sent their files.
Exchanging files with students 53
Page 60

To check the status of file transfers
1. Click the Classroom tab.
The Classroom tab opens.
Note: The contents of the Classroom tab vary depending on the
selected class and view.
2. In the Class Record, click the file whose status you want to check.
TI-Navigator indicates the status of your students as follows:
• A green background indicates that students have
sent/received the file.
• A yellow background indicates that a student received
the collect or delete action, but they do not have the file on
their calculator.
• A red background indicates that students have not yet
sent/received/deleted the file.
Note: You can also see the file transfer status in the file’s Properties
dialog box. (See “Viewing file properties” on page 56.)
Canceling file transfers
If you change your mind about a file transfer, you can cancel the transfer
in the Class Record. Canceling file transfers stops the TI-Navigator™
classroom learning system from transferring more files. Any files TINavigator transfers before you cancel remain on the students’
calculators.
54 Exchanging files with students
Page 61

To cancel file transfers
1. In the Class Record, click the file whose transfer you want to cancel.
2. Click Edit > Remove From Class Record or click Remove From Class
Record
TI-Navigator asks if you’re sure you want to remove the action.
3. Click
TI-Navigator stops the file transfer and removes the file from the
Class Record list.
.
Remove.
Finding transferred files
You can find the locations of both collected and unprompted files on
your computer, as well as files that you have sent to your class.
To find transferred files
1. In the Class Record, click the file you want to open.
2. Click Edit > Open Location.
A Windows Explorer dialog box opens to the location of the file.
Changing the unprompted file location
By default, the TI-Navigator™ classroom learning system stores
unprompted files in My Documents\My TI-Navigator\[Class Name]\Collect.
You can change the default location of the unprompted files when
necessary.
To change the unprompted file location
1. If you have a class session running, end it. (See “Beginning and
ending class sessions” on page 20.)
2. Select the class whose default file location you want to change.
3. Click
Exchanging files with students 55
Class > Class Properties.
Page 62

The Class Properties dialog box opens.
4. Click
5. Navigate to the location you want as the default.
6. Click
7. In the Class Properties dialog box, click
Change.
The Select Directory dialog box opens.
Select Directory.
The Select Directory window closes.
OK.
TI-Navigator changes the location where it saves unprompted files to
the one you have selected.
Viewing file properties
Each file that you send or collect has a set of properties that you can
view. These properties include the file’s name, size, date sent, and status.
You can view the file properties at any time.
To view file properties in TI-Navigator
1. Select the class with the file in its the Class Record. (See “Selecting a
class” on page 19.)
Note: If you have a class session running, you must end it to select
the class. (See “Beginning and ending class sessions” on page 20.)
2. Click the file.
56 Exchanging files with students
Page 63

3. Click Edit > Record Item Properties or click Record Item Properties
.
The Properties dialog box opens displaying the file’s properties.
Exchanging files with students 57
Page 64

58 Exchanging files with students
Page 65

Running interactive activities
The Activity Center tool in the TI-Navigator™ classroom learning system
lets you run interactive activities with your students. With the Activity
Center tool, you can teach your students about lists, graphs, and
equations. You and your students can create and exchange activity data
such as lists, plots, and equations. Once you have all of the activity data
you need, you can use the Activity Center tool window to examine the
data with your class. This section contains the information you need to
know to use the Activity Center tool in your classroom.
Introduction to the Activity Center tool
You can run all of your activities in the Activity Center tool. The Activity
Center tool lets you set up and use interactive activities with your
students during your lessons. Below you can find some basic information
on the Activity Center tool, including:
• The Activity Center tool window and tabs
• Opening the Activity Center tool
• Closing the Activity Center tool
The Activity Center tool window and tabs
The Activity Center window has several sets of controls and five tabs that
you can use to run and view your activities. Below you can find the:
• Activity Center window
• List tab
•List - Graph tab
• Graph tab
• Graph - Equation tab
•Equation tab
• Numberline Activity window (for the TI-73 Explorer™ Family)
• Visual Fractions Activity window (For the TI-73 Explorer™ Family)
The parts of the window and tabs are labeled with explanations of each
part.
Running interactive activities 59
Page 66

Activity Center window
Ê
Ë
Ì
Í
Í
Ê Activity controls. Controls that let you configure, start, pause, and
stop your activities.
Ë
Quick Poll launcher. A button that lets you launch the Quick Poll tool
from the Activity Center tool.
Window controls. Controls that let you alter the Activity Center tool
Ì
window.
Graph controls. Controls that let you set the graph window properties,
Í
including axes, axis labels, grid lines, point selection, pan and zoom.
Í
Activity data tabs. Tabs that provide different views of Activity Center
tool data, including graphical, symbolic (equation), and numeric (list)
views.
60 Running interactive activities
Page 67

List tab
Ê
Ë
Ì
Ê
Create new list button. A button that opens the Create New Lists
dialog box where you can create new lists.
Data entry fields. Fields where you can enter list or point data for the
Ë
data set. Use the and buttons to enter fractions.
Ì
Data set table. Table that shows data sets of lists or points.
Running interactive activities 61
Page 68

List - Graph tab
ÌË
Ê
Ê
Í
Î
Ï
Ð
Ñ
Ê Create new list button. A button that opens the Create New Lists
dialog box where you can create new lists.
Ê
Frequency Plots button. Click this button to display a frequency plot
for a selected data set.
Graph controls. Controls that let you set the graph window properties,
Ë
including axes, axis labels, grid lines, point selection, pan and zoom.
Plot configuration button. Button that opens the Plot configuration
Ì
window, where you can configure plots for the data sets.
Í
Data set list. Drop-down list where you can select the data set you
want to display.
Plot controls. Controls that let you select plots and turn plots on or off.
Î
Ï
Data set table. Table that shows data sets of lists or points.
Point controls. Controls that let you show or hide points.
Ð
Graph window panning control. Control that lets you pan the graph
Ñ
window. There are four controls in the List - Graph tab that let you pan
the graph window up, down, right, and left.
62 Running interactive activities
Page 69

Graph tab
Ê
Ë
Ê Graph controls. Controls that let you set the graph window properties,
including axes, axis labels, grid lines, point selection, pan and zoom.
Ë
Graph window panning control. Control that lets you pan the graph
window. There are four controls in the List - Graph tab that let you pan
the graph window up, down, right, and left.
Running interactive activities 63
Page 70

Graph - Equation tab
ÌÊË
Í
Î
Ê
Graph controls. Controls that let you set the graph window properties,
including axes, axis labels, grid lines, point selection, pan and zoom.
Graph window panning control. Control that lets you pan the graph
Ë
window. There are four controls in the Graph - Equation tab that let you
pan the graph window up, down, right, and left.
Equation gallery. The list of equations, shown with their color and the
Ì
display name of their creator.
Í
Equation entry field. Field where you can enter new equations. Use
the and buttons to enter fractions.
Equation controls. Controls that let you show or hide equations.
Î
64 Running interactive activities
Page 71

Equation tab
ÊË
Ì
Í
Î
Ê Equation entry field. Field where you can enter new equations. Use
the and buttons to enter fractions.
Ë
Table of values. Table where you can find the Y values of selected
equations.
Equation gallery. The list of equations, shown with their color and the
Ì
display name of their creator.
Equation controls. Controls that let you show or hide equations.
Í
What-if table. Table where you can find the Y value of up to three X
Î
values of your choice.
Running interactive activities 65
Page 72

Numberline Activity window (for the TI-73 Explorer™ Family)
Ê
Ë
Ì
Î
Í
Ê Guide. Click and drag to move the guide to highlight selected points
on the number line. If you hold the Ctrl key while dragging the guide, it
will snap to the endpoints of the selected vectors.
Student inputs. Points and vectors submitted by students display here.
Ë
Number line. Specify the min and max vaules using the entry field at
Ì
either endpoint.
Step Size. When the step size is in fraction form, the cursor value of
Í
the guide will display in fraction form.
Î
Student answers. Displays the vectors and/or answers supplied by
students.
Show/Hide buttons. Click a student’s name and click show or hide to
Ï
determine whether or not that student’s answers display on the screen.
Ï
66 Running interactive activities
Page 73

Visual Fractions Activity window (For the TI-73 Explorer™ Family)
Ê
Ì
Í
Ê Visual representation of student responses. Use the scrollbar to
display responses that do not fit on the screen.
Student input table. Numeric values of student responses. You can
Ë
change the display of the table to be decimal, fraction or percentage.
Ë
Î
Ì
Number line. Displays student responses. Use the dropdown menu
below to change the display mode.
Display mode. Determines how the number line and student response
Í
table display student responses. Specify Decimal, Fraction or Percentage.
Show/Hide buttons. Click a student’s name and click show or hide to
Î
determine whether or not that student’s answers display on the screen.
Opening the Activity Center tool
You can open the Activity Center tool from the home screen of the
TI-Navigator™ classroom learning system.
To open the Activity Center tool
1. If you have not already done so, begin the class session. (See
“Beginning and ending class sessions” on page 20.)
2. Click
Running interactive activities 67
Tools > Activity Center or click Activity Center .
Page 74

The Activity Center tool window opens.
Closing the Activity Center tool
You can close the Activity Center tool from its window.
To close the Activity Center tool
f Click
File > Close or click Close .
Configuring activities
The Activity Center tool lets students contribute three kinds of
mathematical data, including points, equations, and lists. You must
configure the options for each of these types of data before you collect
the data from your students. This section provides information on:
• Configuring equation options for activities
• Configuring point options for activities
• Configuring list options for activities
• Configuring form options for activities
• Configuring number line options for activities
• Configuring visual estimation options for activities
68 Running interactive activities
Page 75

Configuring equation options for activities
Before you collect equations from your students, you need to configure
the equation options for the activity. Below you can find instructions for
configuring the equation options.
To configure equation options
1. If you have an activity running, stop it. (See “Stopping an activity”
on page 96.)
2. From the Contribute drop-down list, select Equations.
3. Click Configure.
The Configure Calculators for Activity dialog box opens.
4. Select or enter the number of equations you want each of your
students to send.
Note: The maximum number of equations is limited to four for TI-73
classes.
5. Select or clear the
Let students view graphs of equations check
box.
Note: If you select this option, students can view graphs of their
equations on their calculators.
6. Select or clear the Let students resubmit equations check box.
Note: If you select this option, students can change and resend their
equations.
Running interactive activities 69
Page 76

7. Select or clear the Send current graph contents as background
check box.
Note: If you select this option, when you start the activity the
Activity Center tool sends the current foreground image of your
graph screen to your students’ calculators as a background image.
8. Select the equations with which you want your students to start.
9. If you selected Equations Below, enter the equations in the provided
area.
10. Click OK.
Note: If you want your students to have specific graph window settings,
you should also set up the graph window settings before you start the
activity. When you start the activity, the Activity Center tool sends the
graph window settings to your students’ calculators. (See “Changing the
graph window settings” on page 82.)
Configuring point options for activities
Before you collect points from your students, you need to configure the
point options for the activity. Below you can find instructions for
configuring the point options.
To configure point options
1. If you have an activity running, stop it. (See “Stopping an activity”
on page 96.)
2. From the Contribute drop-down list, select Points.
3. Click Configure.
The Configure Calculators for Activity dialog box opens.
70 Running interactive activities
Page 77

4. Select or enter the number of points you want each of your students
to submit.
5. Select or enter the name for the X list.
6. Select or enter the name for the Y list.
7. Select or clear the
Note: If you select this option, students can view the coordinate
Display coordinates check box.
points of their cursor at the bottom of their calculator screens.
8. Select or clear the Let students resubmit points check box.
Note: If you select this option, students can change and resend their
points.
Running interactive activities 71
Page 78

9. Select or clear the Send current graph contents as background
check box.
Note: If you select this option, when you start the activity the
Activity Center tool sends the current foreground image of your
graph screen to your students’ calculators as a background image.
10. Select Step size
Note: The Step size must be greater than zero, but less than or equal
to .25 of the window range.
11. Select Starting point
Note: By default, the starting point is 0,0.
12. Select how you want students to submit their points.
13. Click
Note: If you want your students to have specific graph window settings,
OK.
you should also set up the graph window settings before you start the
activity. When you start the activity, the Activity Center tool sends the
graph window settings to your students’ calculators. (See “Changing the
graph window settings” on page 82.)
Configuring list options for activities
Before you collect lists from your students, you need to configure the list
options for the activity. When you configure the list options, you can
configure them for data sets or for independent lists. Configuring the list
options for data sets lets you plot the data, while configuring the list
options for independent lists does not. Below you can find instructions
for configuring the options of both of these types of lists.
To configure list options for data sets
1. If you have an activity running, stop it. (See “Stopping an activity”
on page 96.)
2. In the Contribute drop-down list, select
3. Click
Configure.
The Configure Calculators for Activity dialog box opens.
Notes:
• If you do not have any lists in the Activity Center tool, the Create
New Lists dialog box opens. This lets you define the names of
the lists that store the data collected from your students. You
must define the names of the lists to establish where the Activity
Center tool stores the data collected from your students. (See
“Creating lists” on page 97.)
72 Running interactive activities
Lists.
Page 79

• The contents of the Configure Calculators for Activity dialog box
vary depending on which main settings you select (Choose from
Data Sets or Choose from independent lists).
4. (Optional) Click
Create New Lists and create new lists. (See
“Creating lists” on page 97.)
5. Select Choose from Data Sets.
6. From the data set drop-down list, select the data set where you want
to add the collected data.
7. (Optional) Configure the plots:
a) Click Configure Plots.
The Plot Options dialog box opens.
b) Next to the plot symbol that you want, select the lists for
your X and Y values.
Running interactive activities 73
Page 80

c) Select the Plot on device check box.
Note: Selecting this option makes the plot available for
viewing on your students’ calculators.
d) If you want to configure another plot, repeat steps b - c.
e) Click
Note: If you do not configure the plot here, then your students
OK.
cannot view the plot on their calculators.
8. Select or clear the Let students resubmit lists check box.
Note: If you choose this option, students can change and resend
their lists.
9. Select the lists containing the source data with which you want your
students to start.
10. Click
Note: If you want your students to have specific graph window settings,
OK.
you should also set up the graph window settings before you start the
activity. When you start the activity, the Activity Center tool sends the
graph window settings to your students’ calculators. (See “Changing the
graph window settings” on page 82.)
To configure list options for independent lists
1. If you have an activity running, stop it. (See “Stopping an activity”
on page 96.)
2. In the Contribute drop-down list, select Lists.
3. Click
Configure.
The Configure Calculators for Activity dialog box opens.
Notes:
• If you do not have any lists in the Activity Center tool, the Create
New Lists dialog box opens. This lets you define the names of
the lists that store the data collected from your students. You
must define the names of the lists to establish where the Activity
Center tool stores the data collected from your students. (See
“Creating lists” on page 97.)
• The contents of the Configure Calculators for Activity dialog box
vary depending on which main settings you select (Choose from
Data Sets or Choose from independent lists).
74 Running interactive activities
Page 81

4. Select Choose from independent lists.
5. Select the number of lists you want your students to submit.
6. From the drop-down lists, select the lists where you want to add the
collected data.
7. Select or clear the
Note: If you select this option, students can view their data plotted
Let students view sequence plots check box.
as sequences on their calculators.
8. Select or clear the Let students resubmit lists check box.
Note: If you select this option, students can change and resend their
lists.
9. Select the lists containing the source data with which you want your
students to start.
10. Click
Note: If you want your students to have specific graph window settings,
OK.
you should also set up the graph window settings before you start the
activity. When you start the activity, the Activity Center tool sends the
graph window settings to your students’ calculators. (See “Changing the
graph window settings” on page 82.)
Configuring form options for activities
1. If you have an activity running, stop it. (See “Stopping an activity”
on page 96.)
2. In the Contribute drop-down list, select Form.
Running interactive activities 75
Page 82

3. Click Configure.
The Configure Calculators for Activity dialog box opens.
4. From the drop-down list, select the number of pages (data sets) each
student will contribute.
5. From the drop-down list, select the number of inputs per page.
6. Default values are suggested for Input and Destination list names. To
change the default values, click inside the text field and enter the
input names and destination list names for the form.
7. Select whether students submit data all at once, or one at a time.
If you select All at once, nothing will be submitted until a student
has completed all of the data sets. If you select One at a time, each
page of data (data set) will be sent when the student completes it.
Configuring number line options for activities
1. If you have an activity running, stop it. (See “Stopping an activity”
on page 96.)
2. In the Contribute drop-down list, select Numberline.
3. Click Configure.
76 Running interactive activities
Page 83

The Configure Calculators for Activity dialog box opens.
4. Enter the expression or value that will display on student calculators
in the Prompt field.
5. Use the dropdown to select the number of marks that students will
be allowed to submit (maximum of four).
6. Check whether or not students will be allowed to resubmit marks.
7. Check whether or not students will be allowed to view the cursor
location value.
8. Select whether student marks will submit number line vectors, or
points on the number line.
9. Click
OK to continue.
Configuring visual estimation options for activities
1. If you have an activity running, stop it. (See “Stopping an activity”
on page 96.)
2. In the Contribute drop-down list, select Visual Fractions.
3. Click
Running interactive activities 77
Configure.
The Configure Calculators for Activity dialog box opens.
Page 84

4. Enter the text for the prompt that will display on student calculators
(up to 20 characters).
5. Select the shape for student input. Possible values include:
– Shaded Circle
– Shaded Rectangle
– Shaded Square
– Shaded Triangle
– Shaded Hexagon
– Shaded Pentagon
Shaded shapes prompt the student to shade in a certain
percentage of the shape. Shading occurs from bottom to top, as
if the student were filling a glass except in the case of the
Shaded Circle, where the studen will shade the circle in a
clockwise motion starting at the top center.
– Divided Rectangle
– Divided Circle
The Divided Rectangle allows you to specify the number of
divisions by defining the height and width for the rectangle. The
width can be any number of squares between 1and 23. The
height can be any number of squares between 1and 13.
The Divided Circle allows you to specify the number of divisions
by defining the number of wedges. The number of wedges can
be between 1and 24.
6. If you have chosen a Divided Rectangle, enter a value for width (1-
23).
78 Running interactive activities
Page 85

7. If you have chosen a Divided Rectangle, enter a value for height (1-
12).
8. If you have chosen a Divided Circle, enter a value for number of
wedges (max 12).
9. Check whether or not to allow students to resubmit estimates.
10. Click OK to continue.
Changing the graph window settings
When you use the graph in the Activity Center tool, you may need to
make the graph window look different from its default appearance.
There are a number of ways you can change the graph window’s
appearance, including:
• Changing the graph window scale
• Changing the X and Y graph window ranges
• Turning graph window attributes on and off
• Creating axis labels
• Zooming in and out on the graph window
• Zooming to fit data sets (Zoom Stat)
• Making the grid of the graph window square (Zoom Square)
• Panning the graph window
• Changing the graphing pen color and width for equations
• Changing the appearance of students’ cursors
• Adding and removing background images for the graph window
Changing the graph window scale
When necessary, you can change the graph window’s scale. This controls
the spacing of the tic marks on the axes and the spacing of the grid lines.
You can change both the X scale and the Y scale.
Note: By default, both the X and the Y scale are 1.
To change the graph window scale
1. Click Edit > Edit Window Settings or click Edit Window Settings
.
The Window Settings dialog box opens.
Running interactive activities 79
Page 86

2. Click the X Scale box and enter a new setting.
3. Press the tab key to move to the Y Scale box and enter a new setting.
4. Click
OK.
The Activity Center tool applies the new X and Y scale settings to the
graph.
Changing the X and Y graph window ranges
The X and Y graph limits control the range of X and Y values that the
graph window shows. You can change the X and Y graph window ranges
as necessary.
Notes:
• By default, the X and Y graph window ranges are X Min = -10, X Max
= 10, Y Min = -10, Y Max = 10.
• The X and Y graph window ranges are sent to your students’
calculators when you start activities.
To change X and Y graph window ranges
1. Click Edit > Edit Window Settings or click Edit Window Settings
.
The Window Settings dialog box opens.
80 Running interactive activities
Page 87

2. Click the X Min box and enter a new X minimum setting.
3. Press the tab key to move to the X Max box and enter a new X
maximum setting.
4. Press the tab key to move to the Y Min box and enter a new Y
minimum setting.
5. Press the tab key to move to the Y Max box and enter a new Y
maximum setting.
6. Click OK.
The Activity Center tool applies the new X and Y graph window
ranges to the graph.
Turning graph window attributes on and off
If you want to, you can turn different attributes of the graph window on
and off. You can turn on and off the axes, grid, coordinates, and axis
labels.
Notes:
• By default, the axes and coordinates are turned on, while the grid
and axis labels are turned off.
• The axis labels are sent to your students’ calculators when you start
activities.
To turn the axes on or off
1. Click Edit > Edit Window Settings or click Edit Window Settings
.
The Window Settings dialog box opens.
Running interactive activities 81
Page 88

2. Select or clear the Axes check box.
3. Click OK.
If you selected the Axes check box, the Activity Center tool turns the
axes on.
If you cleared the Axes check box, the Activity Center tool turns the
axes off.
To turn the grid on or off
1. Click Edit > Edit Window Settings or click Edit Window Settings
.
The Window Settings dialog box opens.
2. Select or clear the
Grid check box.
3. Click OK.
82 Running interactive activities
Page 89

If you selected the Grid check box, the Activity Center tool turns the
grid on.
If you cleared the Grid check box, the Activity Center tool turns the
grid off.
To turn coordinates on or off
1. Click Edit > Edit Window Settings or click Edit Window Settings
.
The Window Settings dialog box opens.
2. Select or clear the
3. Click OK.
If you selected the Coords check box, the Activity Center tool turns
the coordinates on.
If you cleared the Coords check box, the Activity Center tool turns
the coordinates off.
Coords check box.
To turn the axis labels on or off
1. Click Edit > Edit Window Settings or click Edit Window Settings
.
The Window Settings dialog box opens.
Running interactive activities 83
Page 90

2. Select or clear the Axis Labels check box.
3. Click OK.
If you selected the Axis Labels check box, the Activity Center tool
turns the axis labels on.
If you cleared the Axis Labels check box, the Activity Center tool
turns the axis labels off.
Creating axis labels
By default, the X and Y axes in your graph window do not have labels. If
you need labels for your graph window, you can create them in the
Window Settings dialog box.
To create axis labels
1. Click Edit > Edit Window Settings or click Edit Window Settings
.
The Window Settings dialog box opens.
84 Running interactive activities
Page 91

2. Click the X Label box and enter a name for the X axis label.
3. Click the Y Label box and enter a name for the Y axis label.
4. Click
OK.
The labels appear on the graph window.
Zooming in and out on the graph window
On the graph window in the Activity Center tool, you can zoom in, zoom
out, or set the zoom to the standard window range.
Note: You can also zoom to fit data plots (Zoom Stat) or to make the grid
appear square (Zoom Square). (See “Zooming to fit data sets (Zoom
Stat)” on page 85.) and (See “Making the grid of the graph window
square (Zoom Square)” on page 86.)
To zoom in on the graph window
f Click
View > Zoom In or click Zoom In .
To zoom out on the graph window
f Click
View > Zoom Out or click Zoom Out .
To zoom to the standard window settings
f Click
View > Zoom Standard or click Zoom Standard .
Zooming to fit data sets (Zoom Stat)
You can use the Zoom Stat option in the Activity Center tool to zoom to
fit all visible data sets.
Running interactive activities 85
Page 92

To zoom to fit data sets
f Click
View > Zoom Stat or click Zoom Stat .
Making the grid of the graph window square (Zoom Square)
As on the calculator, when the graph window is set to the default, the
grid appears rectangular. The Activity Center tool lets you make the grid
of the graph window square.
To make the grid of the graph window square
f Click
View > Zoom Square or click Zoom Square .
Zoom mode
You can also control the zoom of the graph window using the Zoom
button and your mouse.
1. Click
2. Move the cursor over the graph area. The cursor becomes a
3. Click and hold at any point in the graph control area. Move the
4. Press and hold the Ctrl key to unlink the axes. Move the cursor left or
Zoom .
magnifying glass to indicate that you are in zoom mode.
cursor up to zoom in. Move the cursor down to zoom out.
right to zoom the X axis. Move the cursor up or down to zoom the Y
axis.
Panning the graph window
If you want to view locations on your graph window that you cannot see,
you can pan the graph window up, down, right, and left.
To pan up
1. Click the List - Graph tab, Graph tab, or Graph - Equation tab.
The selected tab opens.
2. Click
3. Repeat step 2 until you reach the graph window position you want.
Pan Up .
To pan down
1. Click the List - Graph tab, Graph tab, or Graph - Equation tab.
The selected tab opens.
86 Running interactive activities
Page 93

2. Click Pan Down .
3. Repeat step 2 until you reach the graph window position you want.
To pan right
1. Click the List - Graph tab, Graph tab, or Graph - Equation tab.
The selected tab opens.
2. Click
3. Repeat step 2 until you reach the graph window position you want.
Pan Right .
To pan left
1. Click the List - Graph tab, Graph tab, or Graph - Equation tab.
The selected tab opens.
2. Click
3. Repeat step 2 until you reach the graph window position you want.
Pan Left .
Pan mode
You can also control the view of the graph window using the Pan button
and your mouse.
1. Click Pan .
2. Move the cursor over the graph area. The cursor becomes a hand.
3. Click and hold a point in the graph window. Drag the cursor to a
new location. The screen updates as you pan the graph.
Changing the graphing pen color and width for equations
When you use the graph window as part of your lesson, you may want to
emphasize certain equations that appear in that space. In the Activity
Center tool, you have the option of changing the color and/or width of
the graphing pen. You can change these attributes under the Graph -
Equation tab or the Equation tab. When you change the graphing pen
color and width for an equation line under one tab, the Activity Center
tool changes makes the changes under all tabs with the graph window.
To change the graphing pen color
1. Click the Graph - Equation tab or the Equation tab.
The selected tab opens.
Running interactive activities 87
Page 94

2. In the equation gallery, click the white/colored box next to the
graphed equation’s name.
The Graphing Pen Attributes dialog box opens.
3. In the Pen Color color palette, click the color you want.
4. Click OK.
To change the graphing pen width
1. Click the Graph - Equation tab or the Equation tab.
The selected tab opens.
2. In the equation gallery, click the white/colored box next to the
graphed equation’s name.
The Graphing Pen Attributes dialog box opens.
3. From the Pen Width drop-down list, select the width you want.
4. Click
88 Running interactive activities
OK.
Page 95

Changing the appearance of students’ cursors
When your students submit points one at a time, the Activity Center tool
graph shows their cursors in the graph window. To help students identify
themselves in the graph window, you can have the Activity Center tool
individualize the students’ cursors using different shapes and colors.
Note: The Activity Center tool automatically assigns the shapes and
colors.
To individualize students’ cursors
f Click
View > Individualize Student Cursors.
Adding and removing background images for the graph window
The Activity Center tool lets you add a background image to the graph
window. If you decide you do not want the background image, you can
remove it at any time.
To add a background image to the graph window
1. Click File > Load > Load Background Image.
The Load Background Image dialog box opens.
2. Navigate to the image file you want to add and click it.
Note: You can select GIF, PNG, BMP, JPEG, and TI (*.83i, *.89i, *.9xi,
*.v2i) image files.
3. Click Load.
The selected image appears in the Activity Center tool’s graph.
Removing a background image from the graph window
f Click
Running interactive activities 89
File > Remove Background Image.
Page 96

Saving and loading activity settings
Once you set up your activities and change the graph window settings to
suit your needs, you may want to save these settings. After you save the
activity settings, you can then load them into the Activity Center tool.
Saving and later loading your activity settings can save you time when
you use activities with your class. This section covers:
• Saving activity settings
• Loading activity settings
Saving activity settings
When you save activity settings, the Activity Center tool saves all of the
activity data configurations and window settings. Saving your activities
settings can help in lesson planning, letting you set up the Activity Center
tool for your classes before they begin.
To save activity settings
1. Configure the activity options. (See “Configuring activities” on
page 71.)
2. Click File > Save > Save Activity Settings.
The Save Settings dialog box opens.
3. Navigate to the location where you want to save the activity settings
file.
4. Enter a file name.
5. Click
90 Running interactive activities
Save.
Page 97

Loading activity settings
You can load saved activity settings into the Activity Center tool
whenever you are ready to use them. Loading saved activity settings can
help you quickly get an activity started with your class.
To load activity settings
1. Click File > Load > Load Activity Settings.
The Load Settings dialog box opens.
2. Navigate to the file you want to load and click it.
3. Click
Open.
The Activity Center tool loads the activity settings.
Note: The maximum number of equations that a student can
contribute is limited to four for TI-73 classes. If you save activity
settings from a TI-83 classroom with Contribute Equations set to
more than four equations, and then load those saved settings into a
TI-73 class, you will receive the alert below.
Starting and managing activities
You can use the controls in the Activity Center tool to start and manage
your activities during a class session. This section contains the
information you need to run your activities, including:
• Starting an activity
• Pausing an activity
Running interactive activities 91
Page 98

• Resuming a paused activity
• Stopping an activity
Starting an activity
Starting an activity involves two steps. First, you must start the activity in
the Activity Center tool to make it available for your students. Once you
start the activity in the Activity Center tool, your students can then join in
the activity from their calculators. Below you can find instructions on
both starting the activity in the Activity Center tool and instructing
students on joining the activity from their calculators.
To start activities in the Activity Center tool
1. If you have not already done so, configure the activity or load saved
activity settings. (See “Configuring activities” on page 71.)or (See
“Loading activity settings” on page 94.)
2. From the Contribute drop-down list, select the type of data you want
to collect from your students.
3. Click
File > Start Activity or click Start Activity .
To instruct students on joining activities
Once you start an activity in the Activity Center tool, your students can
join the activity from their calculators. You can use the following
instructions to instruct your students on how to join an activity you have
started.
Note: As the teacher, you can also use the steps below to join the activity
from your calculator. When you join an activity from your calculator, you
participate in a student role.
Student Point of View: The steps below are from the student’s
point of view.
1. If you have not already done so, log in to your calculator. (See
“Logging in to TI-Navigator (student instruction)” on page 13.)
2. On the TI-Navigator™ Home screen, select
If your teacher has already started the activity, then the Activity
Center tool opens on your calculator.
If the teacher has not yet started the activity, then the message
“Waiting for teacher” appears. The Activity Center tool opens when
your teacher starts it on his or her computer.
1: Activity Center.
92 Running interactive activities
Page 99

Pausing an activity
You may want to temporarily pause an activity during a lesson to provide
instruction or discuss the activity with your students. Pausing your activity
temporarily stops the activity on your students’ calculators, letting you
get your students’ attention.
To pause an activity
f Click
File > Pause Activity or click Pause Activity .
The activity pauses. Students receive the message “Activity
Paused” on their calculators and cannot use the activity on
their calculators.
Resuming a paused activity
After you pause your activity, you can resume it whenever you are ready
to continue.
To resume a paused activity
f Click
File > Resume Activity or click Resume Activity .
The activity resumes. The “Activity Paused” message no
longer appears on your students’ calculators. Students can
again contribute data to the Activity Center tool.
Stopping an activity
You can stop an activity at any time. When you stop an activity, the
Activity Center tool considers the activity complete and you cannot
resume it without starting the activity over again. If you plan to resume
the activity, then you should pause it instead of stopping it. After you
stop an activity, you can then reconfigure the data options or select a
different kind of data for the activity.
To stop an activity
f Click
File > Stop Activity or click Stop Activity .
The current activity stops. Your students receive the message
“Activity Stopped” on their calculators.
Note: If you are done with the Activity Center tool and want
your students to return to the calculator home screen, tell
them to press
Running interactive activities 93
y 5.
Page 100

Creating and adding activity data
In the Activity Center tool, you can manually create and add the basic
types of activity data that your students can contribute. This section
provides information about creating and adding activity data in the
Activity Center tool, including:
• Entering fractions in Activity Center
• Creating lists
• Adding data to existing lists
• Creating points
• Creating Y= and X= equations
• Creating lists of class points (student instruction)
• Creating tables of values for an equation
Note: Although “Creating lists of class points” provides instructions for
your students, you can also use these instructions yourself to create lists
of class points from your calculator.
Entering fractions in Activity Center
The and keys have the same function in Activity Center as
they do on the TI-73 Explorer.
The key is pressed between the unit and the fraction. The
key is pressed between the numerator and the denominator.
For example, the number 5 1/2 is entered by typing 5 1 2.
The number 3/4 is typed as 3 4.
Creating lists
You can create lists directly from the List tab, List - Graph tab, and the
Configure Calculators for Activity dialog box (list version).
To create lists
1. Click the List tab or the List - Graph tab.
Note: If you are in the Configure Calculators for Activity dialog box,
you can skip this step.
2. Click
94 Running interactive activities
Create New Lists .
The Create New Lists dialog box opens.
 Loading...