


English
TI.GRAPH LINK
FOR THE MACINTOSH
2
®
CONDENSED GUIDEBOOK
Guidebook developed by:
Texas Instruments Instructional Communications
Note:
This guidebook applies to the TI graphing
calculators and accessories described on page 3. Graphic
screens in this guidebook were captured from the TI-86
and TI-89. Screens from other products may be slightly
different.
é
Apple®, Macintosh®, Macintosh Drag-n-Drop® are registered
trademarks, and TeachText
Apple Computer, Inc.
PostScript® is a registered trademark of Adobe Systems, Inc.
© 1999 by Texas Instruments Incorporated. All Rights Reserved.
™
and SimpleText™ are trademarks of

Table of Contents
Contents
Getting Started with TI-GRAPH LINK 2 for Macintosh....... 3
Which Calculators are Compatible?.................................. 3
Support for CBRè Accessory ............................................ 3
System Requirements ......................................................... 3
Connecting the TI-GRAPH LINK Cable............................ 4
Installing the TI-GRAPH LINK Software.......................... 4
-
Starting and Exiting TI
Opening a Connection to Your Calculator ....................... 5
Beginning a New Program ...................................................... 6
Creating a New Program File............................................. 6
Selecting a Keyword from the Function List ................... 7
Getting, Printing, and Saving Calculator LCD Screens........ 8
Using Group Windows........................................................... 10
Copying Objects from the Calculator to the Macintosh .... 11
Sending Objects from the Macintosh to the Calculator .... 13
Opening, Editing, and Printing Calculator Objects............ 14
Editing an Object Directly on the Calculator...................... 15
Working with Lab Reports .................................................... 16
Transferring a Lab Report from the Calculator
to the Macintosh............................................................. 16
Viewing the Lab Report .................................................... 17
Editing the Lab Report...................................................... 18
Printing the Lab Report .................................................... 18
Setting Preferences................................................................ 19
Selecting the Default Calculator and the
Default Communication Port........................................ 19
Connecting Automatically at Startup.............................. 19
Setting Print Headers Preference.................................... 20
Setting the Sorting Preference......................................... 20
Setting the Resolution of a Captured Screen ................. 20
Working with Backups .......................................................... 21
Backing Up a Calculator................................................... 21
Reloading a Backup .......................................................... 21
Support and Service Information......................................... 22
Product Support ................................................................ 22
Product Service ................................................................. 22
Other TI Products and Services....................................... 22
Warranty Information............................................................ 23
Customers in the U.S. and Canada Only......................... 23
All Customers outside the U.S. and Canada................... 23
GRAPH LINK............................... 4
ENG-2 TI-GRAPH LINK 2 for Macintosh

Getting Started with TI-GRAPH LINK 2 for Macintosh
Which
Calculators are
Compatible?
Support for
CBRè
Accessory
System
Requirements
TI-GRAPH LINK 2 for Macintosh is compatible with all TI
graphing calculators that have an input/output port, with
the following exceptions. The TI-82 and TI-85 are not
compatible.
When new graphing calculators with I/O ports are released
by TI, the TI-GRAPH LINK software will be updated to
support those calculators.
To see which calculators are compatible with your version
of the TI-GRAPH LINK software, open the
Connection
menu. If your calculator is not listed in the menu, check
the TI web site at:
http://www.ti.com/calc/docs/link.htm
for updated TI-GRAPH LINK software.
You can also use TI-GRAPH LINK 2 to open a connection
to the CBRè (Computer-Based Ranger) accessory,
available separately.
However, you cannot open a connection to the CBLè
(Computer-Based Laboratory) accessory.
The Macintosh used to run TI-GRAPH LINK 2 must meet
the following hardware and software requirements.
• Macintosh Plus running System 7.1 or better.
• 4 MB of available RAM.
Note: You will not be able to drag items to or from the
Finder
or other applications on systems running any
Macintosh operating system versions earlier than 7.5.
However,
Add
Save Selection
and
commands in the
File
menu allow this functionality.
TI-GRAPH LINK 2 for Macintosh ENG-3

Connecting the
TI-GRAPH LINK
Cable
The TI-GRAPH LINK hardware connects to the Macintosh
via the modem port or printer port of the computer, and to
the input/output port of the calculator.
1. Connect one end of the 8-pin to 25-pin adapter cable to
the Macintosh modem port or printer port on the rear
of the unit.
2. Connect the gray TI-GRAPH LINK cable to the 25-pin
end of the 8-pin to 25-pin adapter cable.
3. Insert the other end of the TI-GRAPH LINK cable into
the port on the calculator.
Important: The TI-GRAPH LINK cable must be
connected and the calculator turned on before getting
screens, and sending and receiving files. Push in all
connectors firmly.
Installing the
TI-GRAPH LINK
Software
Note: If you
download
TI-GRAPH LINK
from the TI web
site (page 3), see
the web for
installation
instructions.
Starting and
Exiting
TI-GRAPH LINK
If the software is on: Then:
3½-inch diskette
1. Insert the diskette into the
Macintosh.
You may want to copy
the diskette and use
the copy.
2. Open the diskette and doubleclick the
Installer
icon.
CD-ROM If your Macintosh is set for
Autostart, the installation
program starts when you insert
the CD.
Otherwise, open the CD and open
the folder for
Select the appropriate calculator
and language, and then
click the
TI-GRAPH LINK.
Installer
icon.
double-
All necessary files are installed on your hard drive,
including custom fonts used by the application.
On the Macintosh, open the
double-click the icon for the application. The
LINK
menu bar is displayed.
To close
• Open the
TI-GRAPH LINK
File
menu, and then click
TI-GRAPH LINK
:
Quit
folder and
TI-GRAPH
.
– or –
• Press
“
+Q on the Macintosh keyboard.
ENG-4 TI-GRAPH LINK 2 for Macintosh
Opening a
Connection to
Your Calculator
Tip: To connect to
a calculator
automatically at
startup and to use
the Quick-
Connect feature,
see page 19.
screen
The
used to get (capture) a
calculator screen.
object is
By default, you must manually open a connection between
the Macintosh and your calculator.
1. Make sure the
TI-GRAPH LINK
cable is connected to the
calculator (page 4) and the calculator is turned on
before starting
2. Start
TI-GRAPH LINK.
3. Open the
TI-GRAPH LINK
Connection
menu, and select your calculator
.
model (or the CBRè accessory).
4. Select the port to which the
connected, and click
Connect
TI-GRAPH LINK
.
is
• If any errors occur, follow the instructions on the
resulting screen.
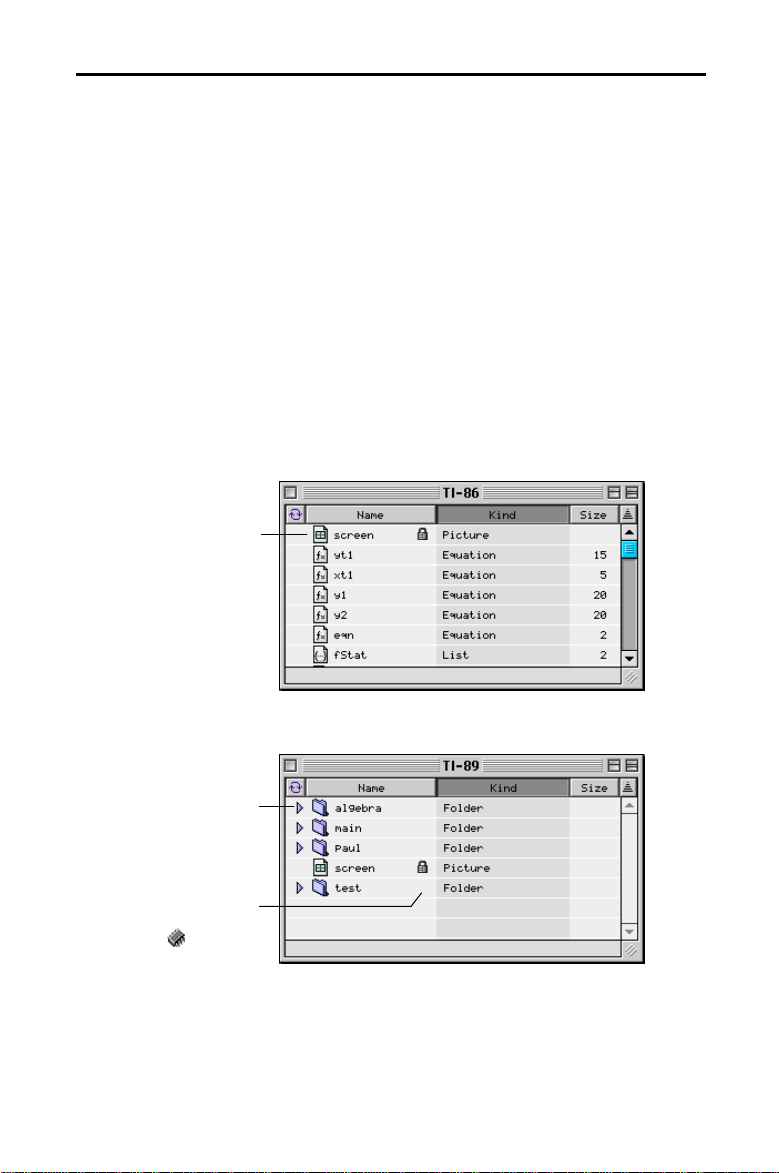
• If the connection is successful, a calculator window
lists the objects on the calculator.
Click here to show or
hide the contents of
For calculators that
variable,
beside the archived
the folder.
let you archive a
is shown
variables.
For calculators such as the TI-89 that use folders,
the window shows the folders.
Click
Name, Kind
, or
Size
to change how the objects
are sorted.
TI-GRAPH LINK 2 for Macintosh ENG-5
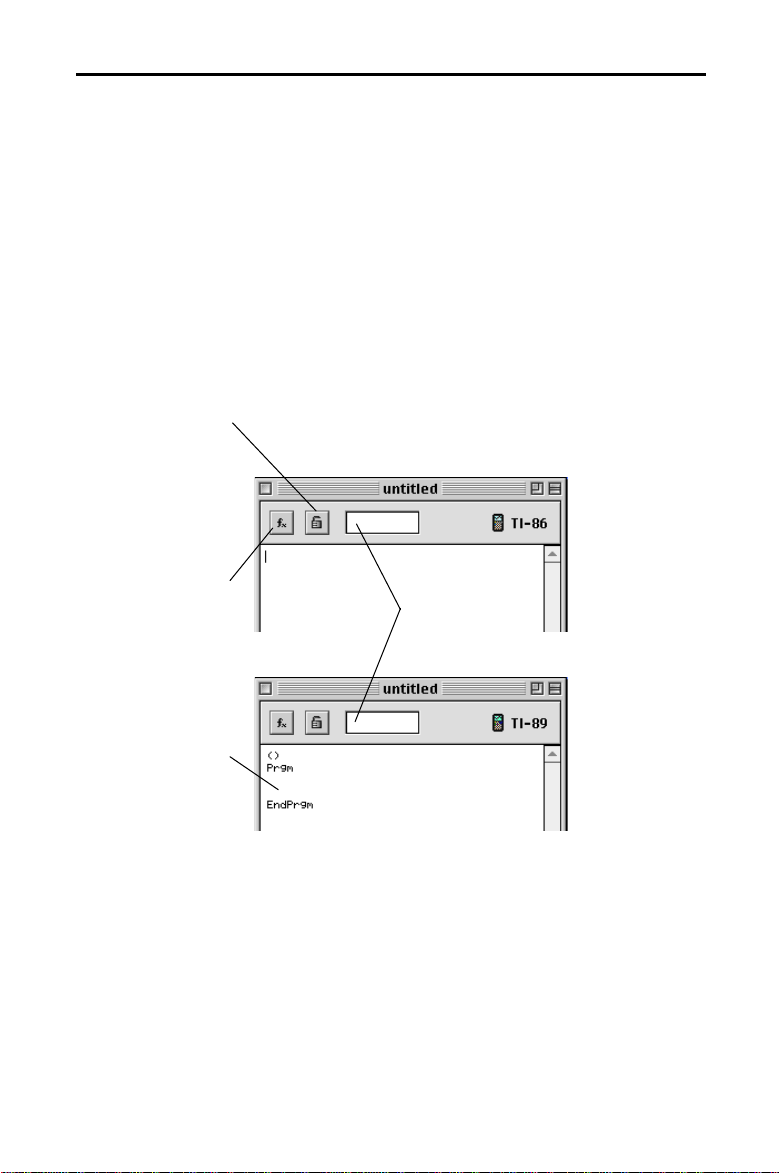
Beginning a New Program
Creating a New
Program File
To lock a program
so it can be edited
on a Macintosh but
not
on a calculator,
click to make this
icon appear locked.
To unlock, click
keyword from a
menu, click here
again.
To select a
programming
(page 7).
1. Open the
File
menu, and then click
New
. A New
Window dialog box is displayed.
2. If necessary, click the triangle to the left of your
calculator model to display a list of objects (Program,
Group, etc.).
3. Select
Program
, and then click OK. A new Edit window
is displayed.
4. In the box at the top of the window, type the program
name as you want it listed on the calculator.
• If you leave the name blank, a default name will be
used.
• If you use a name that is invalid on the calculator, an
error will occur when you save the program. For
example, you cannot name a program
Type the
program name
– or –
here.
cos
.
For calculators
such as the TI-89,
a program template
is inserted
automatically.
5. In the program edit window, type the program.
For detailed information about creating and editing
programs, see the guidebook for your calculator.
ENG-6 TI-GRAPH LINK 2 for Macintosh
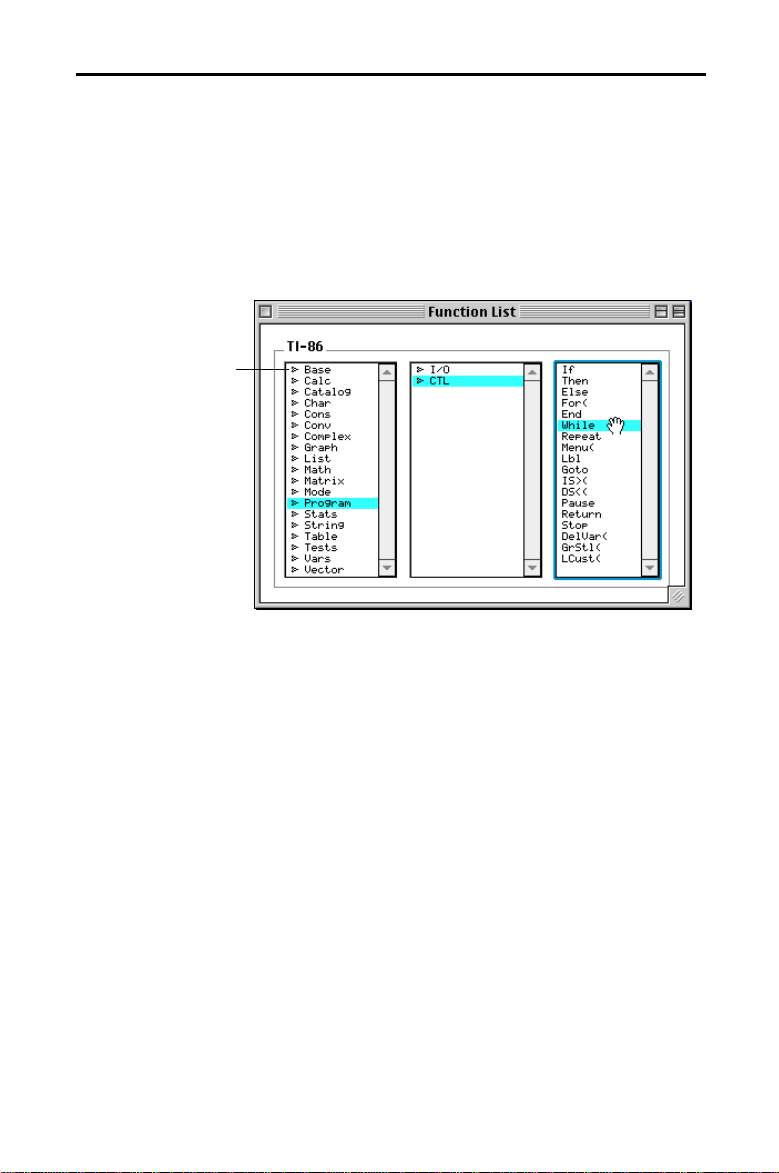
Selecting a
Keyword from
the Function
List
If you click an item
marked with a
triangle, its
associated items
are listed in the
next pane to the
To select a programming keyword from a menu:
1. In the Edit window, click the [fx] button to display the
Function List window.
2. Click a category in the left pane. The items associated
with the selection are listed in the center pane. If
necessary, click an item in the center pane to display its
associated items in the right pane.
right.
3. Click on the desired item and drag it to the Edit
window.
TI-GRAPH LINK 2 for Macintosh ENG-7

Getting, Printing, and Saving Calculator LCD Screens
s
Getting a
Calculator
Screen
Note: After you
capture a screen,
Get Screen
the
menu item change
Refresh
to
Printing a
Captured
Screen
Saving a
Screen as a File
Tip: Drag the
screen
the calculator
window to the
desktop to create a
clipping file with a
default name.
.
object from
To get (capture) a screen:
1. Open a calculator connection (page 5).
2. On the calculator, display the screen that you want to
capture.
3. On the Macintosh, select the calculator window and
either:
• Open the
(or press “
Window
L
).
+
menu, and then click
Get Screen
– or –
• In the calculator window, double-click the
screen
object.
The screen is displayed in a picture viewing window. To
capture a new screen, open the
Refresh
L
(“
) or click the circular icon in the picture
+
Window
menu and click
viewing window.
To print a captured calculator screen to a printer
connected to your Macintosh:
1. Get a calculator screen as described above.
2. Open the
File
menu, and then click
Print
to open the
Print dialog box.
Print
3. Click
.
To save a calculator screen on the Macintosh:
1. Get a calculator screen as described above.
2. Open the
File
menu, and then click
Save As
.
3. Click the appropriate radio button to select the file
format in which the screen will be saved.
Macintosh PICT format
calculator PIC format (default)
4. Enter a file name in place of the default name.
5. Select the folder in which to save the file, and then
Save
click
.
ENG-8 TI-GRAPH LINK 2 for Macintosh

Copying a
Captured
Screen
To select the whole
picture without a
border, double-click.
To select the whole
picture with a border,
double-click.
To copy and paste a captured screen:
1. Get a calculator screen as described on page 8.
2. Select the part of the picture that you want to copy.
To deselect a
selection, click in
Setting the
Screen Size
(Resolution)
for Printing
To select a portion, click in the
this area.
You can also open the
window (cursor changes to a
cross-hair), drag, and release.
Click the border buttons once to
add or remove a border.
Edit
menu and click
(or press “+A) to select the whole picture. Click the
border buttons once to add or remove a border.
3. Copy the selection to the clipboard and paste it to an
application, drag it to an application that supports
Macintosh Drag-and-Drop, or drag it to the desktop.
Many desktop publishing and graphic applications use
resolution (dots per inch, dpi) to determine the printed
size of a captured screen. To set the resolution, see
page 20.
Select All
TI-GRAPH LINK 2 for Macintosh ENG-9
Using Group Windows
Why Use a
Group
Window?
Creating a
Group Window
Note: You cannot
save an empty
group window.
, or
Name
Size
to
Tip: Click
Kind
change how the
objects are sorted.
By creating a group window on the Macintosh, you can
store multiple calculator objects in one convenient
location. The group window is saved as a file on the
Macintosh, but you can open it and view or manipulate the
objects within it the same as you would a folder. You can
create one or more group windows as necessary.
From TI-GRAPH LINK:
1. Open the
File
menu and click
New
.
2. In the New Window, if necessary, click the triangle to
the left of your calculator model to display a list of
objects (Program, Group, etc.).
Group
3. Select
from the list, and then click OK. An
untitled group window appears.
4. Place the desired objects into the group window.
• Drag objects from a calculator window to the group
window, or from one group window to another. You
can also copy and paste objects.
• To remove an object from the group, highlight the
object and then press the
Delete
key or drag the
object to the Trash icon. To restore objects from the
trash, drag them back to the group window.
5. Select the group window. To save it as a file on the
Macintosh, open the
File
menu and click
Save
(or click the window’s close box).
,
or
Close
Note: To open,
edit, or print an
object saved in a
group window, see
page 14.
ENG-10 TI-GRAPH LINK 2 for Macintosh

g
g
Copying Objects from the Calculator to the Macintosh
Procedure
Tip: To select
multiple objects,
use “+click for
separated objects
Shift
or
+click for
contiguous objects.
Important: To stop
a transfer, click
Cancel
on the
Macintosh dialog
box. Do NOT press
the calculator’s
button.
ON
1. Open a calculator connection (page 5).
2. In the calculator window, select one or more objects.
• If your calculator uses folders (page 5), open the
applicable folders as necessary.
• Use the
Name, Kind
, and
Size
buttons to control the
order in which objects are sorted.
3. Drag the selected objects to the desktop, any folder on
the desktop, or an open group window (page 10) or
previously saved group window file.
drag and drop y1 and
y2
When dropped on the desktop or a
folder on the Macintosh, y1 and
are copied as separate files, with
file name extensions that indicate
the calculator model and data type.
y2
TI-GRAPH LINK 2 for Macintosh ENG-11
When dropped on a
on the Macintosh, y1 and y2 are
copied to the
roup window
roup.
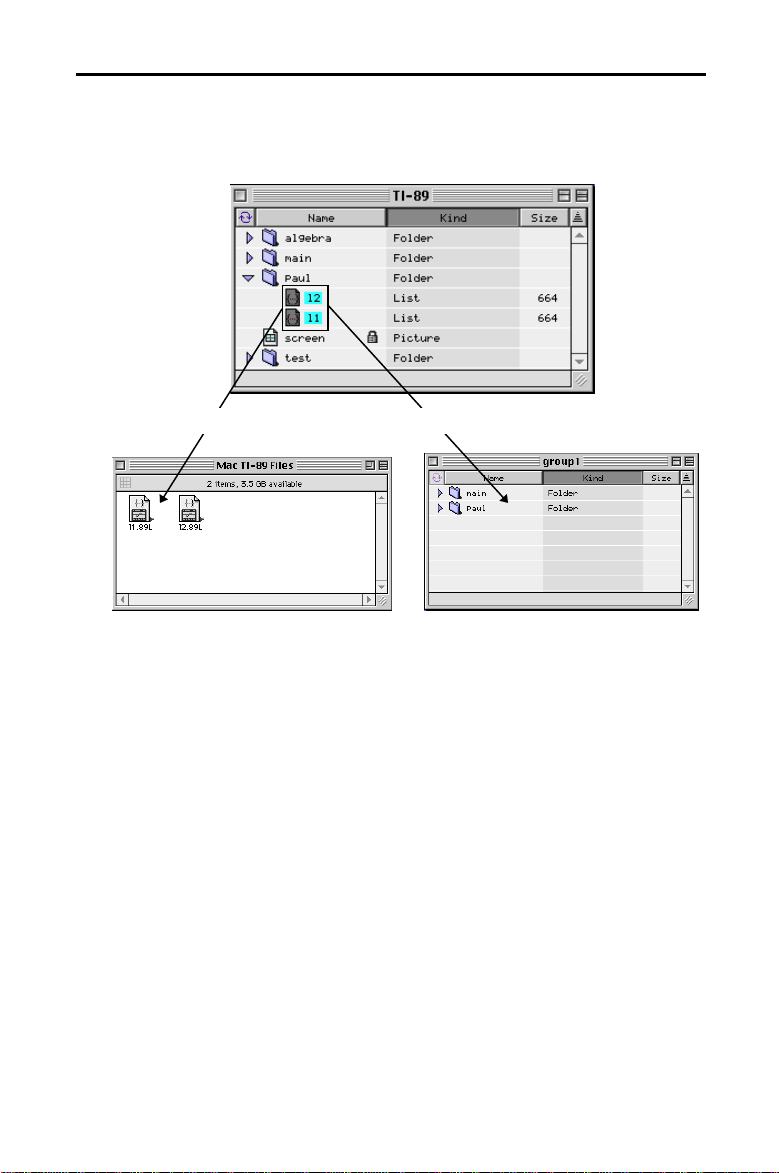
g
Tip: To copy all
objects in a folder,
you can drag the
folder itself.
For calculators that use folders, open the applicable folder
to select objects within it. For example:
drag and drop l1 and l2 from the
When dropped on the desktop or a
folder on the Macintosh, l1 and
are copied as separate files, with
appropriate file name extensions.
If You Cannot
Drag and Drop
Dragging and dropping files is not supported in Macintosh
operating system versions prior to 7.5. Instead, you can:
1. Select one or more objects in the calculator window.
2. Open the
3. Select a location on the Macintosh.
4. Click
When at least two objects are selected, they are placed in a
group window file on the Macintosh. To see the contents
of a group window file, double-click it.
Save
paul
l2
menu and click
File
.
folder
When dropped on a
on the Macintosh, the
created automatically and l1 and
are copied into it.
Save Selection
roup window
paul
folder is
.
l2
ENG-12 TI-GRAPH LINK 2 for Macintosh

Sending Objects from the Macintosh to the Calculator
Procedure
Note: When you
send new objects
to a calculator that
uses folders, the
objects are placed
in the main folder.
Important: To stop
a transfer, click
Cancel
in the
Macintosh dialog
box. Do NOT press
the calculator’s
button.
ON
To send objects from a Macintosh to a calculator:
1. Open a calculator connection (page 5).
2. Select the objects to send.
• To send all objects in a group window, select the
group window file itself or open the group window
and select all of the objects. You can also select
multiple group window files.
• To send one or more particular objects, select only
those objects.
3. Drag the selected objects and/or files to the calculator
window.
If an object from the Macintosh has the same name as an
existing object on the calculator, a dialog box prompts
you to:
• Click
Replace All
to replace all the files with
conflicting names.
• Click
Skip
to skip the current file that has a
conflicting name and continue sending any other
files. (If there are more files with conflicting names,
you can view and skip them one at a time.)
• Click
• Click
Cancel
to cancel the sending operation.
OK
to replace the file displayed in the dialog
box. (If there are no other files with conflicting
names, all the files will be sent automatically. If
there are other files with conflicting names, you can
view and replace them one at a time.)
If You Cannot
Drag and Drop
Dragging and dropping files is not supported in Macintosh
operating system versions prior to 7.5. Instead, you can:
1. Make the calculator th
2. Open the File menu, and then click Add
3. Select th
the Macintosh, and click Open.
e calculator objects t
e active window.
.
hat you want to send from
TI-GRAPH LINK 2 for Macintosh ENG-13

Opening, Editing, and Printing Calculator Objects
Opening and
Editing a
Calculator
Object
Printing
Calculator
Objects
To open a calculator object that is saved on the Macintosh:
1. Open the calculator window or the folder that contains
the calculator object.
2. Double-click the object to open an Edit window.
3. If the object contains text (such as in a program, list,
etc.), you can edit the contents.
If you edit the file, it is saved back to its source when you
close the Edit window. You are prompted to replace
(overwrite), rename, or cancel without saving the file.
File
You can also save the file by opening the
selecting
Save
or
Save As
.
menu and
To print the contents of an object displayed in an Edit
window, open the
File
menu and click
resulting Print dialog box, click
Print
.
Print
. In the
ENG-14 TI-GRAPH LINK 2 for Macintosh

Editing an Object Directly on the Calculator
Procedure
Note: If your
calculator uses
folders, see page 5.
Tip: To change
how objects are
sorted, click
Kind
, or
Size
Name
.
You can use Macintosh to edit an object directly on the
calculator, without copying it to the Macintosh.
You can edit objects such as programs, lists, and matrices,
but not objects such as equations, GDBs, and Window
ranges.
1. Open a calculator connection (page 5).
,
2. In the calculator window, double-click the object name
to open an Edit window. For example:
You
cannot
edit an
equation.
3. When you are done, open the
Close
or
(or click the close box) to save the object
back to the calculator.
TI-GRAPH LINK 2 for Macintosh ENG-15
File
menu and click
Save

Working with Lab Reports
TI-GRAPH LINK allows you to transfer lab reports from
the calculator to the Macintosh and then view, edit, and
print them. Before you start the following procedures,
make sure you have your lab report (a
Print
all the
For instructions creating a lab report and inserting
objects, see the calculator guidebook.
objects, if any, saved on your calculator.
Text
variable) with
Print
Transferring a
Lab Report
from the
Calculator to
the Macintosh
Note: To view the
contents of a
folder, click the
triangle symbol to
the left of the
folder.
Note: To see what
Print
objects your
report contains,
double-click the
Text
variable.
To transfer a lab report from the calculator to the
Macintosh:
1. Open a calculator connection (page 5).
File
2. With the calculator window active, open the
New
then select
.
menu,
3. Select the calculator (the default calculator is selected
Report
automatically) and double-click
.
You will see a
new Report
window that
looks similar
to the
calculator
window.
4. With both the calculator and the Report windows open,
Text
drag the report, which is a
calculator window to the
variable, from the
main
folder in the Report
window.
Print
5. Drag all the
Text
variable), if any, from the calculator window to the
main
folder in the Report window.
objects referred to in the report (the
ENG-16 TI-GRAPH LINK 2 for Macintosh

Important: When
you work with
multiple windows
click on the window
you want to
switch to.
Lab reports
are
variables.
6. Click the Report window to make it active.
7. Open the
File
menu and click
Save
, or
Save As
specify the location on the Macintosh where you want
Save
to save the transferred report, and click
.
Text
. Then
Viewing the Lab
Report
Note: The report
Print
with the
objects in it can
only be viewed in
the View window.
Tip: As necessary,
use the scroll bars
or resize the
window to view the
entire lab report.
Print
objects in the
View window
To view the transferred lab report:
1. Locate the Report file and make it active.
• If you have been working with the Report window,
skip this step.
• Otherwise, find the Report file in the location where
you saved it, and then open it.
2. Double-click the
Text
object in the Report window. A
View window appears.
TI-GRAPH LINK 2 for Macintosh ENG-17

Editing the Lab
Report
Tip: As necessary,
use the scroll bars
or resize the
window to view the
entire lab report.
Print
objects in the
Edit window
To edit the lab report:
1. Close the View window. (The View window displays the
Print
report with all the
window lists the
objects in it; the Report
Text
variable and the
Print
objects,
like a directory.)
Text
2. Drag the
variable from the Report window to the
desktop, and double-click the resulting icon to open an
Edit window.
Note: The
variable can only
be edited in the
Edit window or on
the calculator.
Text
3. Make the changes.
File
4. Open the
menu, click
window.
5. Drag the icon back to the Report window and replace
Text
the old
variable with the new one.
6. If you want to view the edited report, double-click the
Text
variable in the Report window.
Printing the Lab
Report
To print the lab report from the Macintosh:
1. Open a View window for the report you want to print
(page 17).
File
2. Open the
menu and click
3. Select your printer and click
If you want to print headers on your lab report, see
page 20.
ENG-18 TI-GRAPH LINK 2 for Macintosh
Save
, and close the Edit
Print
.
Print
.

Setting Preferences
Selecting the
Default
Calculator and
the Default
Communication
Port
Connecting
Automatically
at Startup
Note: To open a
calculator
connection at any
time (using the
default calculator
and the default
communicaiton
port), use the
Quick-Connect
feature. Press
K
“
.
+
Using the
Preferences
feature, you can select settings for
your TI-GRAPH LINK environment.
To select the default calculator and the default
communication port:
Edit
1. Open the
menu and click
2. From the drop-down list, select
3. In the
Default Calculator
Preferences
General
.
.
Drop-down
list
line, select the model that you
want to set as the default.
4. In the
Default Comm Port
line, select the port that you
want to set as the default.
OK
5. Click
.
To set TI-GRAPH LINK so that a calculator connection
opens automatically when you start TI-GRAPH LINK:
Edit
1. Open the
menu and click
2. From the drop-down list, select
3. Select
Open Connection to Default Calculator
OK
click
.
Preferences
Startup
.
.
and
If the default selections do not match the connected
calculator or the communication port you are using, a
Connection Failure
error will occur at startup.
TI-GRAPH LINK 2 for Macintosh ENG-19
Setting Print
Headers
Preference
You can set a default that will print headers on lab reports
and other documents that you print from your Macintosh
using TI-GRAPH LINK.
Print Headers
To set
1. Open the
Edit
2. From the drop-down list, select
Print Page Headers
preference:
menu, then select
, and click OK.
Preferences
Printing Extras
.
, click
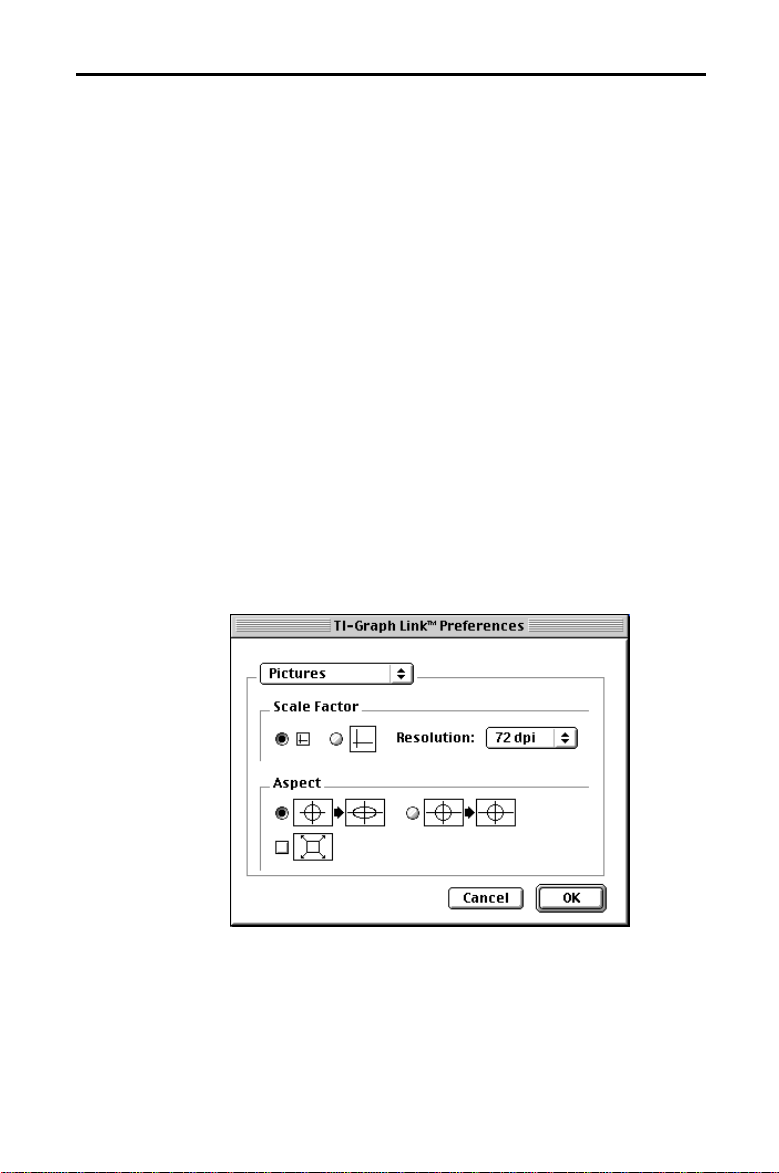
Setting the
Sorting
Preference
Setting the
Resolution of a
Captured
Screen
For example: If a
captured screen is
72 pixels tall, a
resolution of 72 dpi
makes the picture
1 inch tall. A
resolution of
144 dpi makes the
same screen
1/2 inch tall.
To set the sorting (
1. Open the
click
View by
OK
2. In the
View by
Edit
menu and click
line, select
.
) preference:
Preferences
Name, Kind
, or
.
Size
, and
Resolution does not affect how a screen is displayed in
TI-GRAPH LINK. However, many desktop publishing and
graphic applications use resolution (dots per inch, dpi) to
set the size of the screen when printed.
Before capturing a screen, open the
Preferences
, select
Pictures
Edit
menu, click
from the drop-down list, and
then select the resolution.
ENG-20 TI-GRAPH LINK 2 for Macintosh

Working with Backups
Backing Up a
Calculator
Tip: Open the
menu and click
Select All
complete backup.
Reloading a
Backup
Edit
for a
To back up a calculator’s contents:
1. Open a calculator connection (page 5).
2. Create a group window on the Macintosh (page 10).
3. In the calculator window, select the objects (and/or
folders) that you want to backup.
4. Drag the objects to the group window (page 11).
By using a group window file, the backed up objects are
stored in one convenient location.
To reload a group window file that contains backed up
objects, see page 13.
TI-GRAPH LINK 2 for Macintosh ENG-21

Support and Service Information
Product
Support
Product Service
Customers in the U.S., Canada, Puerto Rico, and the
Virgin Islands
For general questions, contact Texas Instruments
Customer Support:
phone:
e-mail:
1.800.TI.CARES (1.800.842.2737)
ti-cares@ti.com
For technical questions, call the Programming Assistance
Group of Customer Support:
phone:
Customers outside the U.S., Canada, Puerto Rico, and
the Virgin Islands
1.972.917.8324
Contact TI by e-mail or visit the TI calculator home page
on the World Wide Web.
e-mail:
internet:
Customers in the U.S. and Canada Only
ti-cares@ti.com
www.ti.com/calc
Always contact Texas Instruments Customer Support
before returning a product for service.
Customers outside the U.S. and Canada
Refer to the leaflet enclosed with this product or contact
your local Texas Instruments retailer/distributor.
Other TI
Products and
Services
Visit the TI calculator home page on the World Wide Web.
www.ti.com/calc
ENG-22 TI-GRAPH LINK 2 for Macintosh

Warranty Information
Customers in
the U.S. and
Canada Only
One-Year Limited Warranty for Commercial Electronic
Product
This Texas Instruments electronic product warranty extends only
to the original purchaser and user of the product.
Warranty Duration.
is warranted to the original purchaser for a period of one (1) year
from the original purchase date.
Warranty Coverage.
is warranted against defective materials and construction.
WARRANTY IS VOID IF THE PRODUCT HAS BEEN DAMAGED
BY ACCIDENT OR UNREASONABLE USE, NEGLECT,
IMPROPER SERVICE, OR OTHER CAUSES NOT ARISING OUT
OF DEFECTS IN MATERIALS OR CONSTRUCTION.
Warranty Disclaimers.
OUT OF THIS SALE, INCLUDING BUT NOT LIMITED TO THE
IMPLIED WARRANTIES OF MERCHANTABILITY AND
FITNESS FOR A PARTICULAR PURPOSE, ARE LIMITED IN
DURATION TO THE ABOVE ONE-YEAR PERIOD. TEXAS
INSTRUMENTS SHALL NOT BE LIABLE FOR LOSS OF USE
OF THE PRODUCT OR OTHER INCIDENTAL OR
CONSEQUENTIAL COSTS, EXPENSES, OR DAMAGES
INCURRED BY THE CONSUMER OR ANY OTHER USER.
Some states/provinces do not allow the exclusion or limitation of
implied warranties or consequential damages, so the above
limitations or exclusions may not apply to you.
Legal Remedies.
and you may also have other rights that vary from state to state or
province to province.
Warranty Performance.
period, your defective product will be either repaired or replaced
with a reconditioned model of an equivalent quality (at TI’s
option) when the product is returned, postage prepaid, to Texas
Instruments Service Facility. The warranty of the repaired or
replacement unit will continue for the warranty of the original unit
or six (6) months, whichever is longer. Other than the postage
requirement, no charge will be made for such repair and/or
replacement. TI strongly recommends that you insure the product
for value prior to mailing.
This Texas Instruments electronic product
This Texas Instruments electronic product
THIS
ANY IMPLIED WARRANTIES ARISING
This warranty gives you specific legal rights,
During the above one (1) year warranty
All Customers
outside the U.S.
and Canada
For information about the length and terms of the
warranty, refer to your package and/or to the warranty
statement enclosed with this product, or contact your
local Texas Instruments retailer/distributor.
TI-GRAPH LINK 2 for Macintosh ENG-23
 Loading...