


Sputnik Installation and Configuration Guide
1 |
Contents |
|
2 |
Introduction............................................................................................................................................ |
2 |
3 |
Installing Sputnik (Local Linux Machine)............................................................................................... |
2 |
4 |
Sputnik Operation ................................................................................................................................. |
2 |
5 |
Creating an Amazon EC2 instance for Sputnik..................................................................................... |
3 |
6 |
Configuring your EC2 Instance‟s Security Settings .............................................................................. |
7 |
7 |
Installing Sputnik (EC2)......................................................................................................................... |
9 |
Version 2.0 May „12 © Teradek, LLC 2012. All rights reserved.
Page | 1
2 Introduction
Sputnik is Teradek‟s interface between Bond and your streaming destination. Sputnik is designed to run on a Linux computer either in the cloud (using Amazon‟s EC2 services) or on a local server with a single, publically addressable TCP port. For Amazon EC2 configuration, start with Creating an Amazon EC2 instance for Sputnik, page 3.
3Installing Sputnik (Local Linux Machine)
1.Download the Sputnik RPM file. This package contains the Sputnik binaries and configuration files.
2.Open your file browser and navigate to the directory containing the Sputnik RPM.
3.Double click to open your package manager and follow prompts to install Sputnik.
4.You will be prompted for an administrator password to complete the installation.
Note: As of Sputnik version 1.0, the following Linux distributions have been tested:
Fedora 13
Fedora 14
Fedora 15
Amazon Linux 2011
Enterprise Linux 6 (CentOS 6)
Debian (Stable)
4Sputnik Operation
1.To start Sputnik: sudo service sputnik start
2.To stop Sputnik: sudo service sputnik stop
3.To restart Sputnik: sudo service sputnik restart
4.Sputnik Dashboard: Access the sputnik dashboard by entering Sputnik‟s IP address (or host name) and web server port in your browser. For example, if Sputnik‟s IP address is
192.168.1.200 and it is using the default web server port (1957), access the dashboard by entering „http://192.168.1.200:1957‟ in your web
browser.
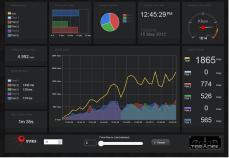
The Sputnik Dashboard displays statistics and information about connected modems‟ throughput, round trip delay, and data usage. In addition, Sputnik‟s buffer statistics and uptime are displayed. A restart button is also present on the Dashboard.
Version 2.0 May „12 © Teradek, LLC 2012. All rights reserved.
Page | 2

5.Sputnik log file location: /var/log/sputnik.log (to view Sputnik‟s output while it is running, use „tail –f /var/log/sputnik.log‟)
6.Sputnik configuration file location: /etc/sputnik.conf
i.Sputnik‟s configuration file contains two options – listening port and web server port. Sputnik must be restarted after any changes are made to the configuration.
ii.Listening Port: Default is 5111. This option allows you to specify the TCP port that Sputnik uses to listen for connections from Bond devices.
iii.Web Server Port: Default is 1957. This option specifies the port to be used by the web server running Sputnik‟s dashboard.
5Creating an Amazon EC2 instance for Sputnik
1.go to: https://console.aws.amazon.com/s3/home
2.Log in to your account, or sign up if you have not done so already.
3.Click the „Amazon EC2‟ tab.
4.Select the appropriate Region on the left navigation pane.
5.Set up a new Security Group if you have not done so already. See Configuring your EC2
Instance‟s Security Settings, page 7 for details.
6.Select „Instances‟ in the navigation pane.
7.Click the large „Launch Instance‟ button.
Version 2.0 May „12 © Teradek, LLC 2012. All rights reserved.
Page | 3
 Loading...