


OPERATING INSTRUCTIONS
ИНСТРУКЦИИ ПО ЭКСПЛУАТАЦИИ
UŽIVATELSKÁ PŘÍRUČKA
POUŽÍVATEĽSKÁ PRÍRUČKA
ИНСТРУКЦИИ ЗА ЕКСПЛОАТАЦИЯ
INSTRUCŢIUNI DE OPERARE
NAVODILA ZA UPRAVLJANJE
ΟΔΗΓΙΕΣ ΧΡΗΣΗΣ
COLOUR TELEVISION WITH REMOTE CONTROL
ЦВЕТНОЙ ТЕЛЕВИЗОР С ДИСТАНЦИОННЫМ ПУЛЬТОМ УПРАВЛЕНИЯ
BAREVNÝ TELEVIZOR S DÁLKOVÝM OVLÁDÁNÍM
FAREBNÝ TELEVÍZOR S DIAĽKOVÝM OVLÁDAČOM
ЦВЕТЕН ТЕЛВИЗОР С ДИСТАНЦИОННО УПРАВЛЕНИЕ
TELEVIZOR COLOR CU TELECOMANDĂ
BARVNI TELEVIZOR Z DALJINSKIM UPRAVLJANJEM
ΕΓΧΡΩΜΗ ΤΗΛΕΟΡΑΣΗ ΜΕ ΤΗΛΕΧΕΙΡΙΣΤΗΡΙΟ
English - 1 -
Safety Information .................................................. 1
Features ................................................................. 2
Specication ........................................................... 2
Remote Control RC 1912 (depending on the
model)..................................................................... 3
Remote Control RC 4800 (depending on the
model)..................................................................... 4
Remote Control RC 4800 (depending on the
model)..................................................................... 4
Remote Control RC 4875 (depending on the
model)..................................................................... 5
TV and Operating Buttons (depending on the
model)..................................................................... 7
Power Connection .................................................. 7
Antenna Connection ............................................... 7
Environmental Information...................................... 7
First Time Installation (depending on the model).... 8
Media Playback via USB Input ............................... 9
General TV Operation ...........................................11
Troubleshooting & Tips ......................................... 12
Connectivity Functions (depending on the model) 12
Supported File Formats for USB Mode ................ 16
Contents
Safety Information
Don’t operate your TV in extreme ambient
conditions as this may cause damage to your TV.
CAUTION
RISK OF ELECTRIC SHOCK
DO NOT OPEN
CAUTION: TO REDUCE THE RISK OF ELECTRIC SHOCK DO
NOT REMOVE COVER (OR BACK).
NO USER-SERVICEABLE PARTS INSIDE. REFER
SERVICING TO QUALIFIED SERVICE PERSONNEL.
Note: Follow the on screen instructions for operating
the related features.
In extreme weather (storms, lightning) and long
inactivity periods (going on holiday) disconnect
the TV set from the mains. The mains plug is
used to disconnect TV set from the mains and
therefore it must remain readily operable.
This sign is present wherever there is very
important information on operation and
maintenance of the appliance in the literature
accompanying it.
IMPORTANT - Please read these
instructions fully before installing or
operating
WARNING: Never let people (including
children) with reduced physical, sensory or
mental capabilities or lack of experience and / or
knowledge use electrical devices unsupervised.
•For ventilation purposes, leave a free space of at
least 10 cm all around the set.
•Do not block ventilation holes.
•Do not place the TV on sloping or unstable surfaces,
the TV may tip over.
•Use this device in moderate climates.
•The power cord plug should be easily accessible. Do
not place the TV, furniture, etc. on the power cord.
Adamagedpowercord/plugcancausereorgive
you an electric shock. Handle the power cord by the
plug, do not unplug the TV by pulling the power cord.
Never touch the power cord/plug with wet hands
as this could cause a short circuit or electric shock.
Never make a knot in the power cord or tie it with
other cords. When damaged it must be replaced,
thisshouldonlybedonebyqualiedpersonnel.
•Do not use this TV in a humid or damp environment.
Do not expose the TV to liquids. In case the cabinet
contacts any liquids unplug the TV immediately
andhaveitcheckedbyqualiedpersonnelbefore
operating it any further.
•Do not expose the TV to direct sunlight,
openamesorplaceitnearintenseheat
sources such as electric heaters.
•Listening in excessive volumes from earphones and
headphones may cause hearing loss.
•Ensurethatno opename sources,such
as lit candles, are placed on top of the TV.
•To prevent injuries, this TV must be securely
attached to a wall by carefully following the
instructions (if the option is available).
•Occasionally, a few non-active pixels may appear
onthescreenasaxedblue,greenorredpoint.
Please note that this does not affect the performance
of your product. Take care not to scratch the screen
withngernailsorotherhardobjects.
•Before cleaning, unplug the TV from the wall socket.
Only use a soft, dry cloth while cleaning.
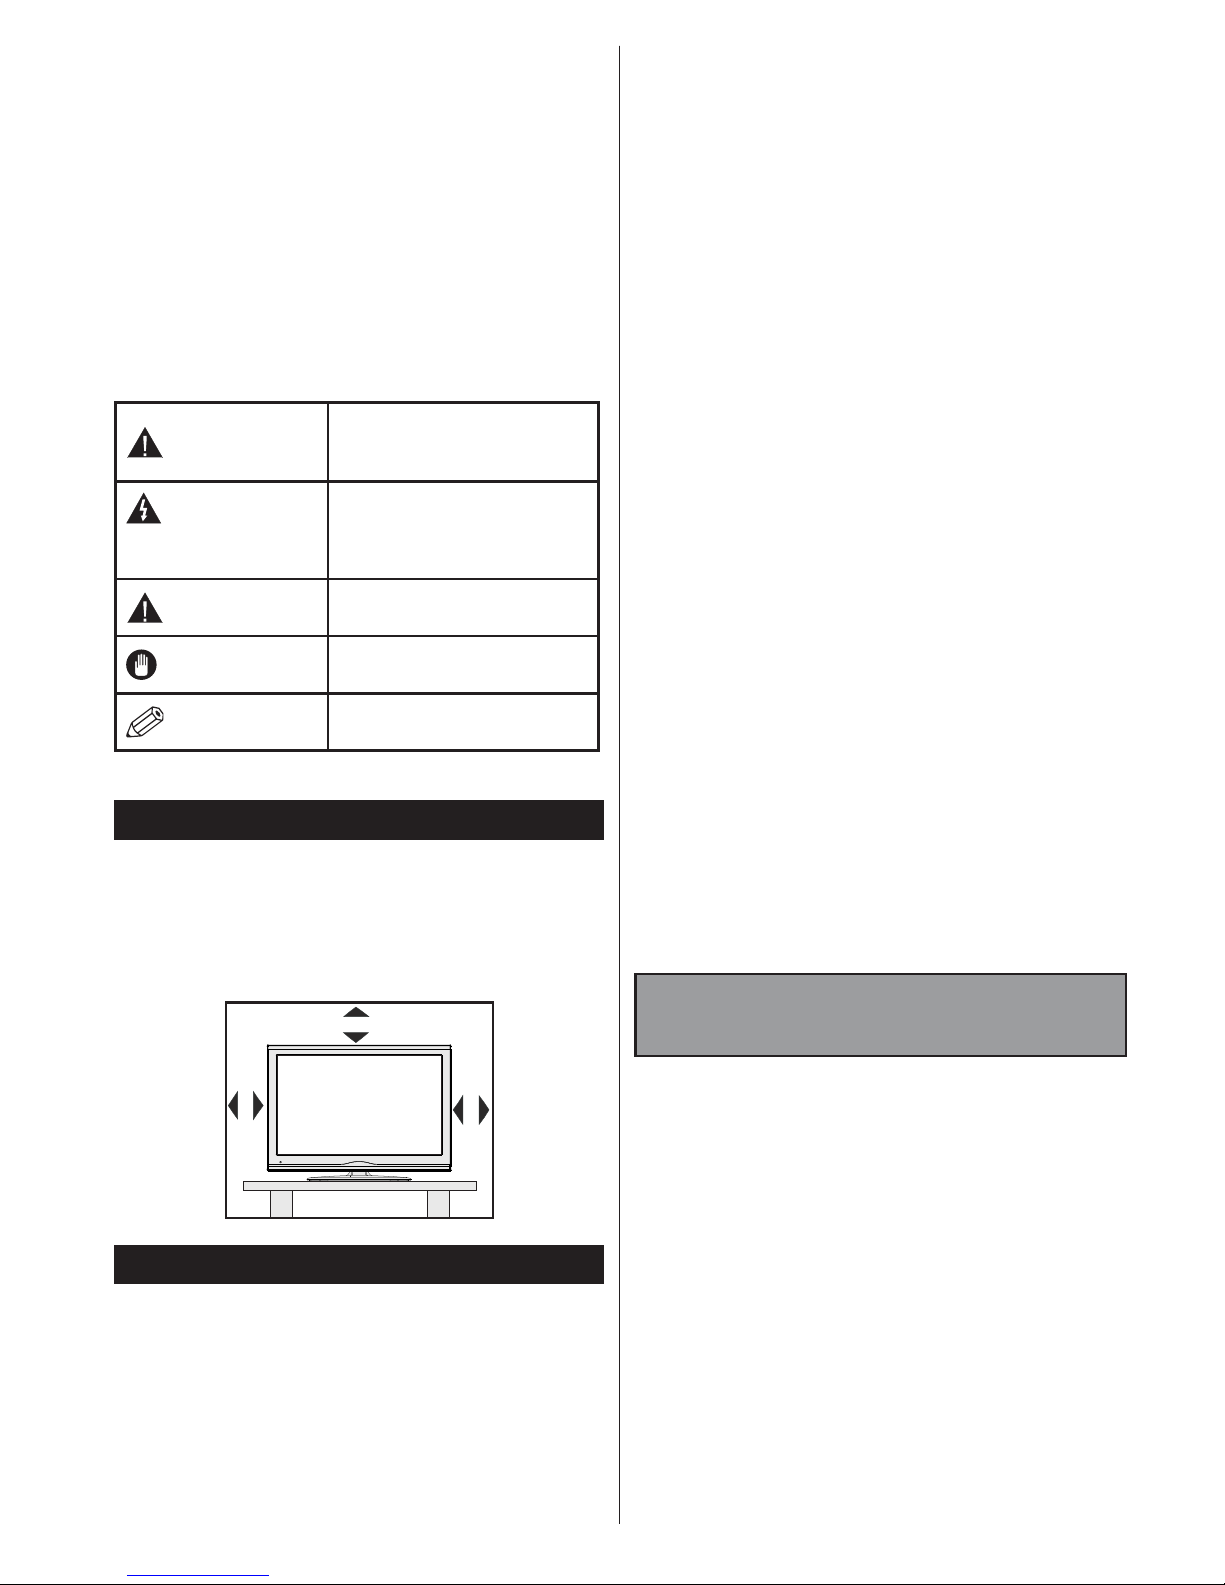
Warning
Serious injury or death risk
Risk of electric shock
Dangerous voltage risk
Caution
Injury or property damage risk
Important
Operating the system correctly
Notice
Additional notes marked

English - 2 -
Preparation
For ventilation, leave a free space of at least 10 cm
all around the set. To prevent any fault and unsafe
situations, please do not place any objects on top of the
set. Use this device in moderate climates.
10 cm
10 cm
10 cm
Features
•Remote controlled colour TV
•Fully integrated digital terrestrial/cable/satellite TV
(DVB-T-T2/C/S-S2) (depends on model)
•HDMI inputs to connect other devices with HDMI
sockets
•USB input
•OSD menu system
•Scart socket for external devices (such as DVD
Players, PVR, video games, etc.)
•Stereo sound system
•Teletext
•Headphone connection
•Automatic programming system
•Manual tuning
•Automatic power down after up to eight hours.
•Sleep timer
•Child lock
•Automatic sound mute when no transmission.
•NTSC playback
•AVL (Automatic Volume Limiting)
•PLL (Frequency Search)
•PC input
•Game Mode
•Picture off function
•Programme recording
•Programme timeshifting
•Pixellence
•Ethernet (LAN) for Internet connectivity and service
•802.11n WIFI Support, built in or via USB dongle
•DLNA
Functions and features may vary in
accordance with the model.
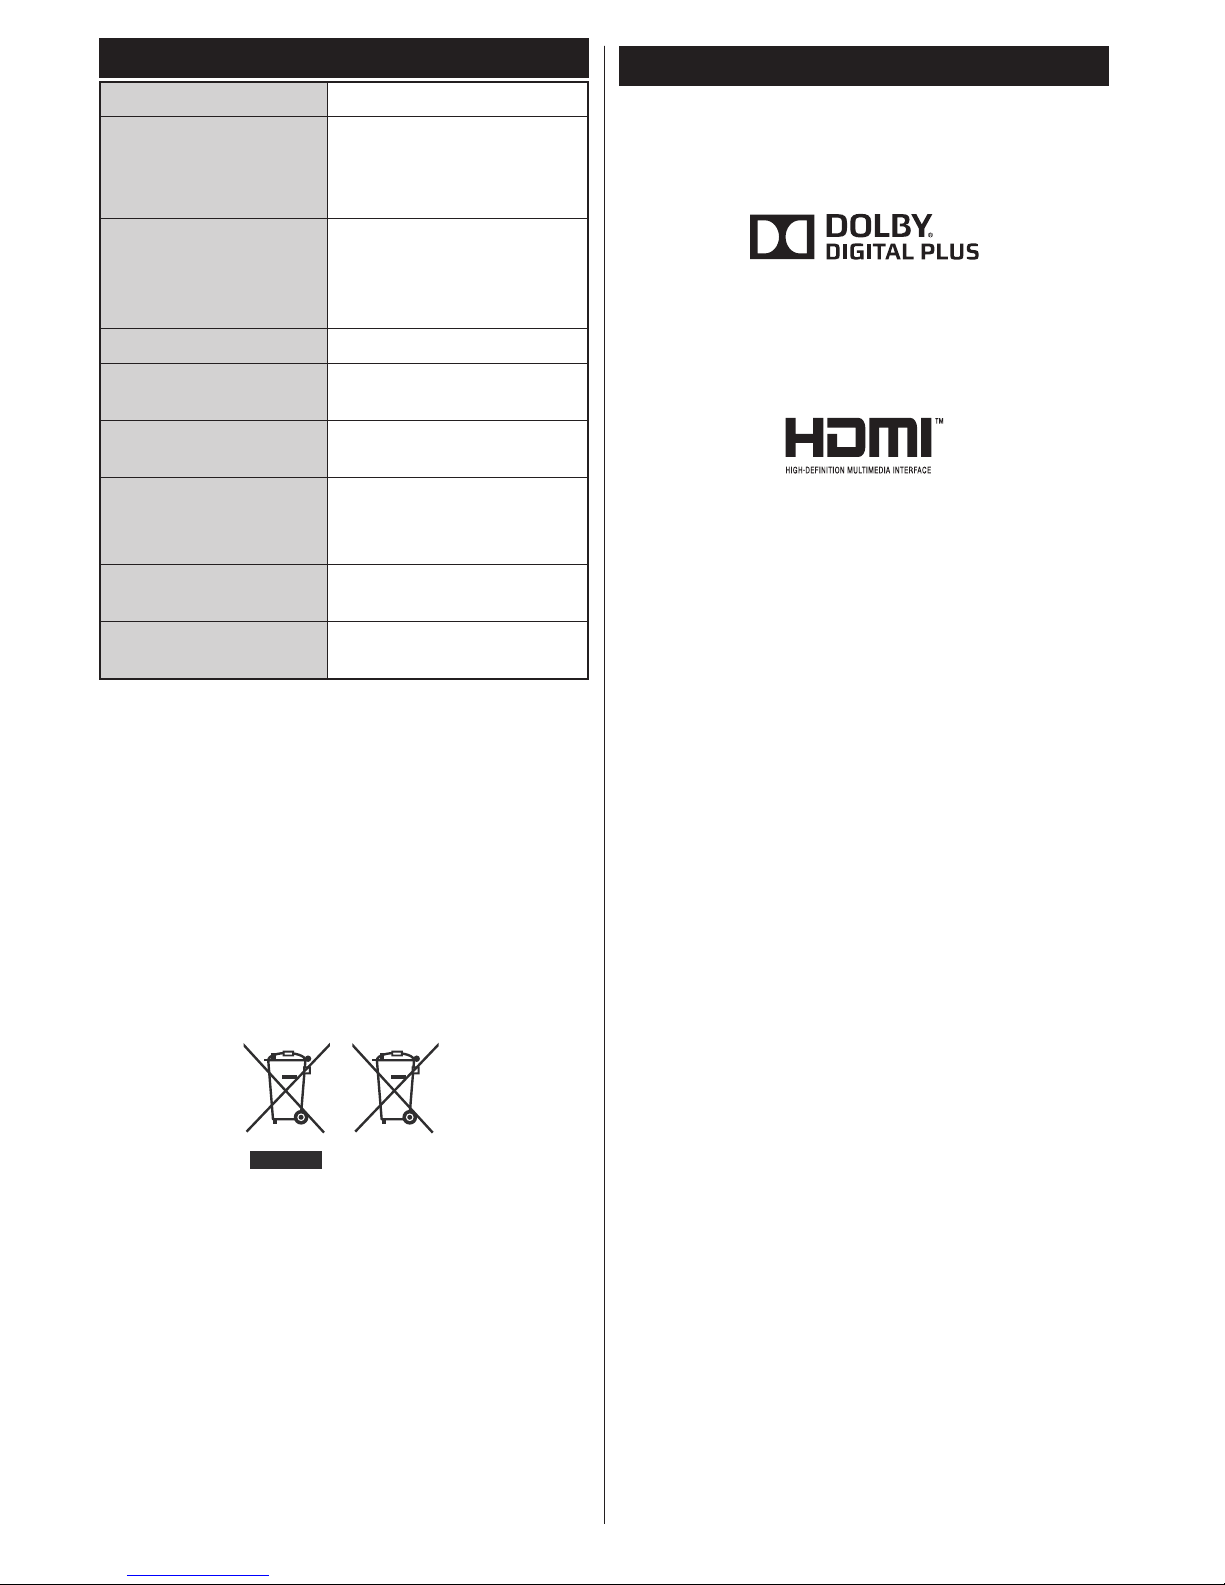
Specication
TV Broadcasting PAL BG/I/DK/LL’
Receiving Channels
VHF (BAND I/III) - UHF
(BAND U) - HYPERBAND
Number of Preset
Channels
1000 (without satellite)
10000 (with satellite)
Channel Indicator On Screen Display
RF Aerial Input 75 Ohm (unbalanced)
Operating Voltage 220-240V AC, 50Hz.
Audio
German Nicam
SRS TruSurround (depends
on model)
Power Consumption (W) Refer to back cover label
Operation temperature
and operation humidity
0ºC up to 40ºC, 85%
humidity max
Information for Users on Disposal of Old
Equipment and Batteries
[European Union only]
Equipment bearing these symbols should not be
disposed as general household waste.
You should look for appropriate recycling facilities and
systems for the disposal of these products.
Notice: The sign Pb below the symbol for batteries
indicates that this battery contains lead.
Products
Battery
Notication
TRADEMARK ACKNOWLEDGMENT
Manufactured under license from Dolby Laboratories.
Dolby and the double-D symbol are trademarks of
Dolby Laboratories.
The terms HDMI and High-Definition Multimedia
Interface, and the HDMI Logo are trademarks or
registered trademarks of HDMI Licensing LLC in the
United States and other countries.

English - 3 -
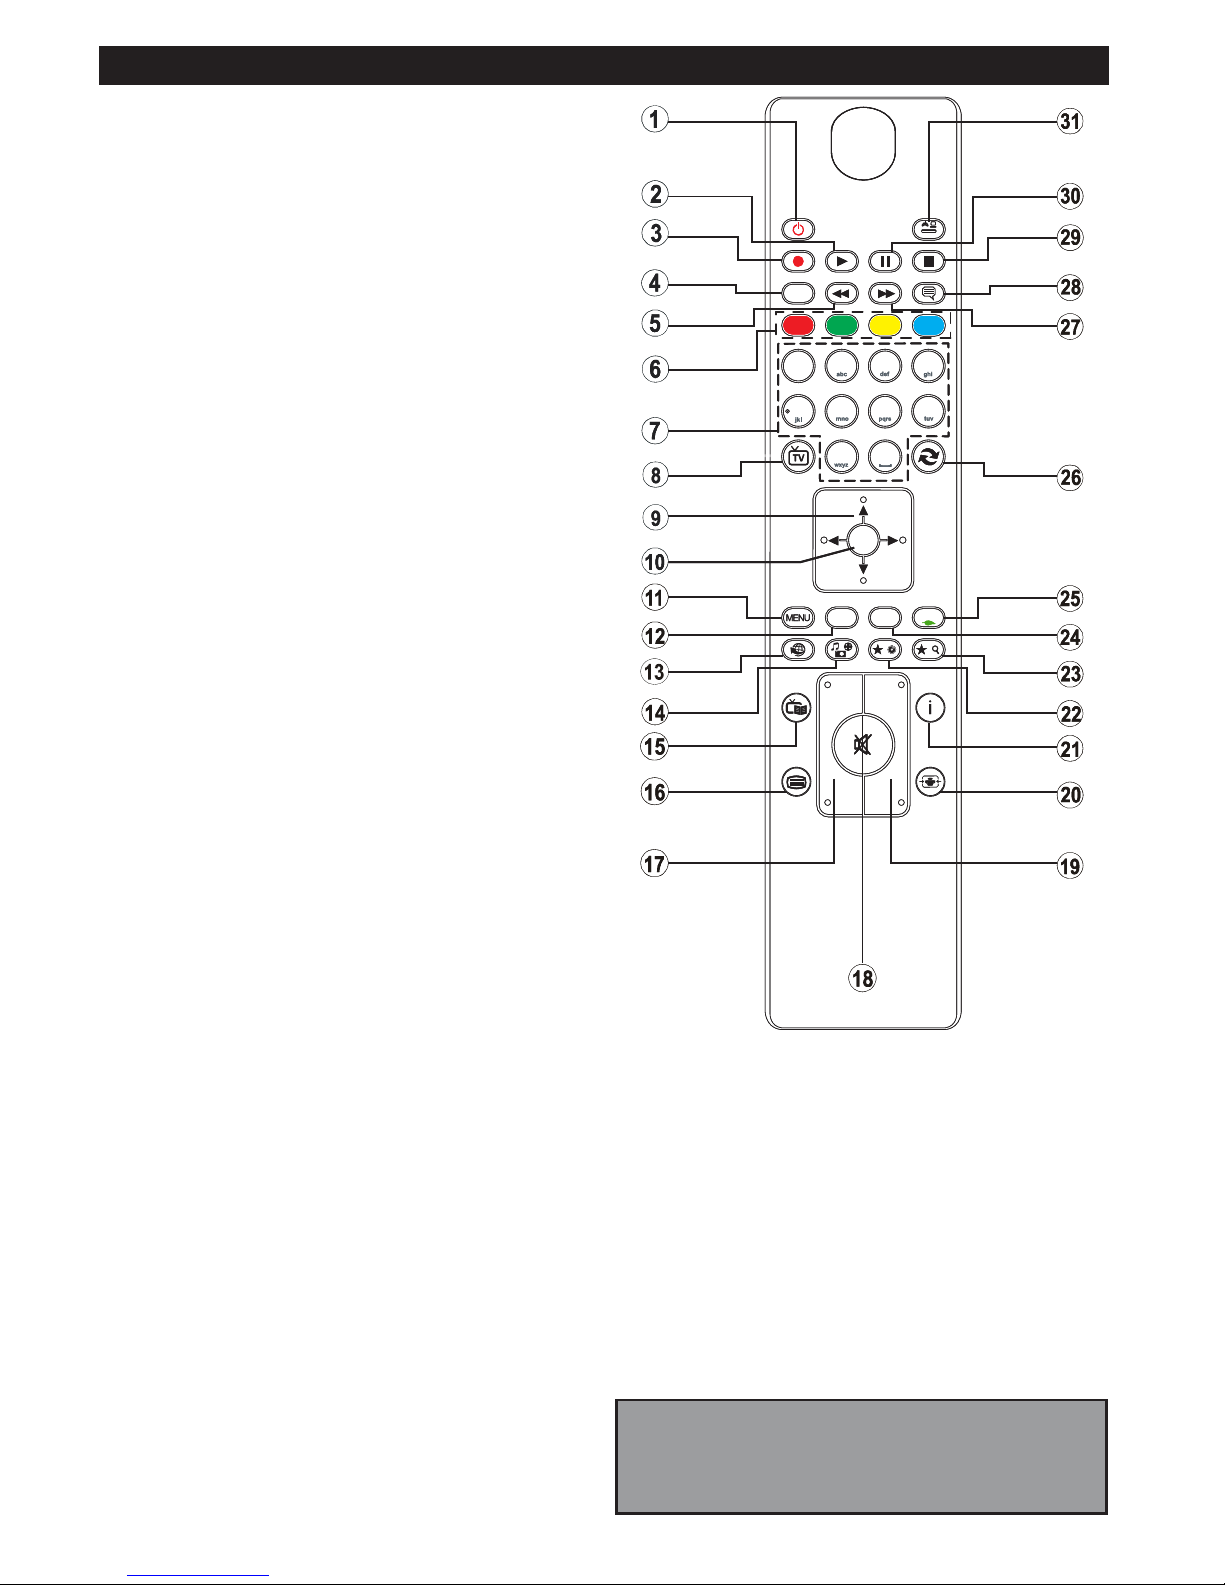
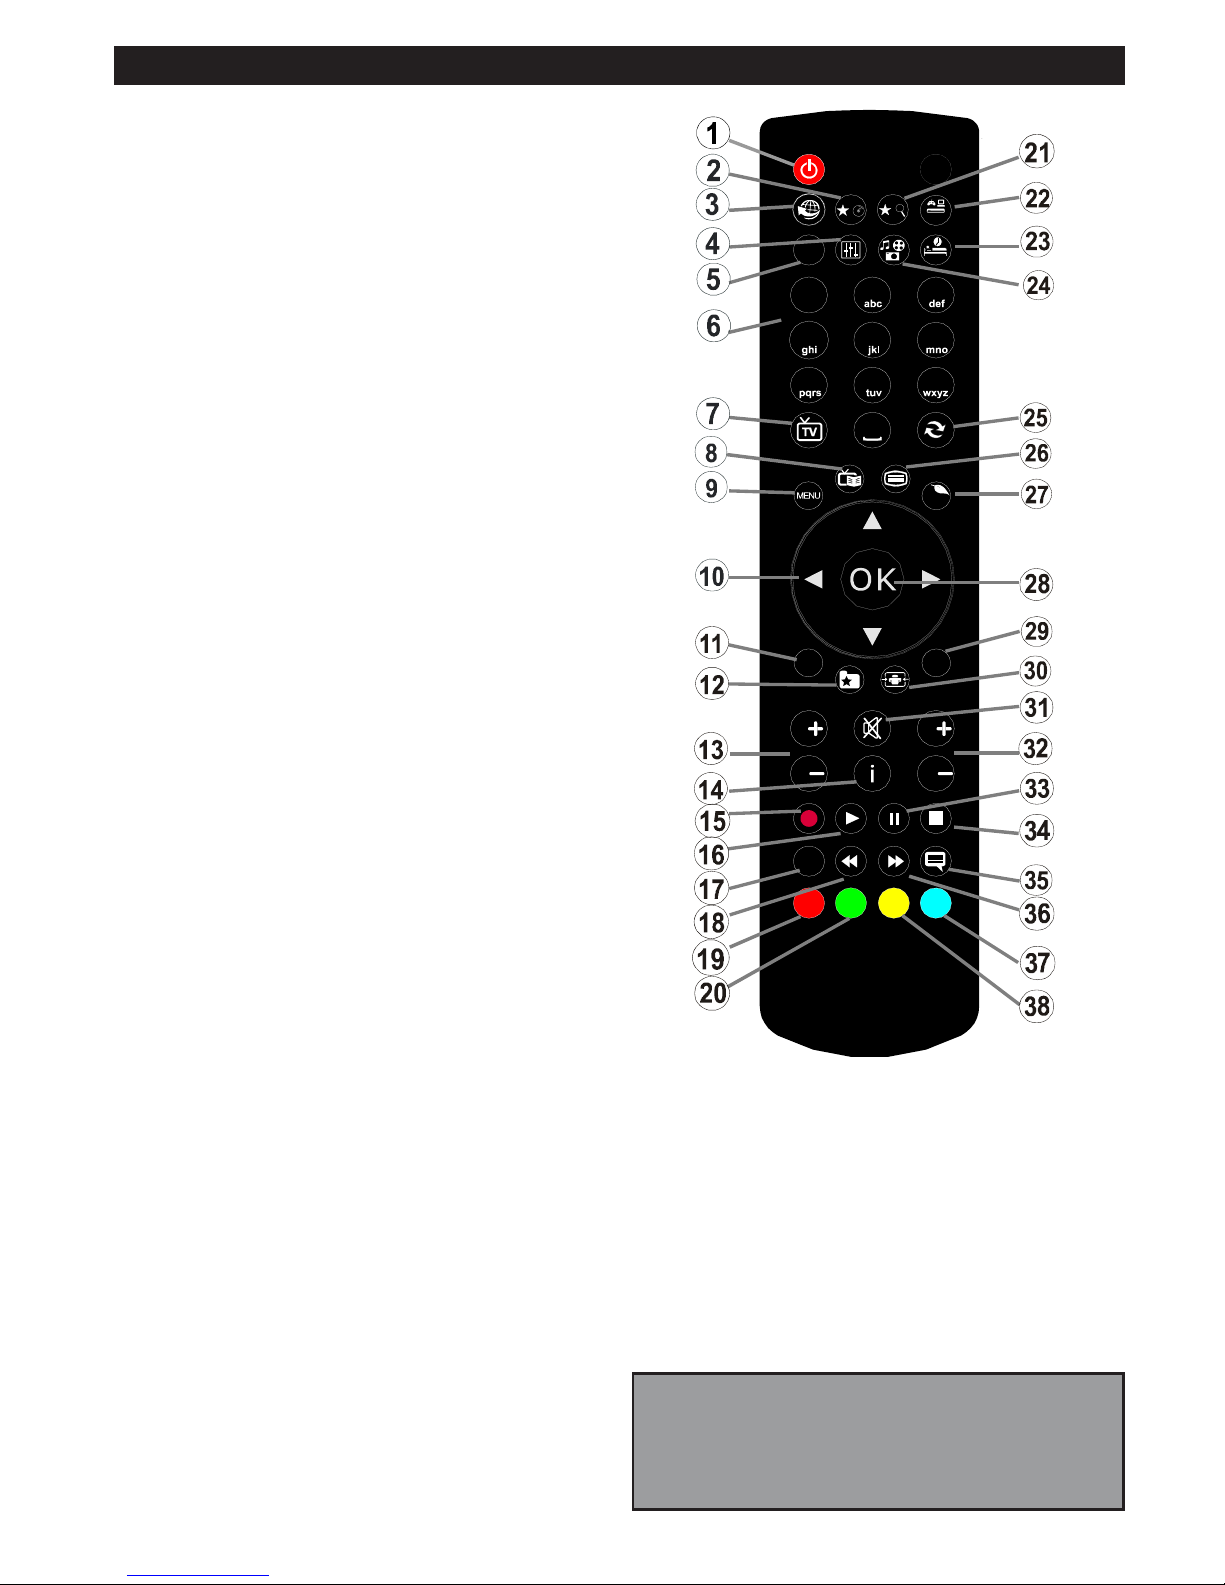
Remote Control RC 1912 (depending on the model)
Note: Functional button indications on some menu
screens may vary in accordance with the remote
control of your TV. Follow the button functions
located at the bottom of the screen.
1. Standby: Switches On / Off the TV
2. My button 1 (*)
3. Internet: Opens the portal page, where you can reach
many web based applications
4. Equalizer: Changes equalizer modes
5. Presets: Selects the picture mode; cycles many display
options
6. Numeric buttons: Switches the channel, enters a
number or a letter in the text box on the screen.
7. TV: Displays channel list / Switches among broadcast
types / Switches to TV Source
8. EPG (Electronic programme guide): Displays the
electronic programme guide
9. Menu: Displays TV menu
10. Navigation buttons: Helps navigate menus, content etc.
and displays the subpages in TXT mode when pressed
Right or Left
11. Back/Return: Returns to previous screen, opens index
page (in TXT mode)
12. Favourites:Displaysuserspeciedfavouritechannels
13. Volume +/-
14. Info: Displays information about on-screen content,
shows hidden information (reveal - in TXT mode)
15. Record: Records programmes
16. Play: Starts to play selected media
17. Language: Switches between sound modes (analogue
TV), displays and changes audio/subtitle language
(digital TV, where available)
18. Rapid reverse: Moves frames backwards in media such
as movies
19. Red button
20. Green button
21. My button 2 (*)
22. Source: Shows all available broadcast and content
sources
23. Sleep: Sets your TV to shut down automatically
24. Media browser: Opens the media browsing screen
25. Swap: Quickly cycles between previous and current
channels or sources
26. Text: Displays teletext (where available), press again to
superimpose the teletext over a normal broadcast picture
(mix)
27. Quick Menu: Displays a list of menus for quick access
28. OK: Conrmsuserselections,holdsthepage(inTXT
mode), views channel list (DTV mode)
29. Exit: Closes and exits from displayed menus or returns
to previous screen
30. Screen: Changes the aspect ratio of the screen
31. Mute: Completely turns off the volume of the TV
32. Programme + / -
33. Pause: Pauses the media being played, starts timeshift
recording
34. Stop: Stops the media being played
35. Subtitles: Turns subtitles on and off (where available)
36. Rapid advance: Moves frames forward in media such
as movies
37. Blue button
38. Yellow button
.
ZOOM
REPEAT
LANG.
12
3
4
56
7
8
9
0
V
P
EXIT
BACK
Q.
MENU
.,/@
V
P
SOURCE
1
/2/
PRESETS
(*) MY BUTTON 1 & MY BUTTON 2:
These buttons may have default functions depending on
the model. However you can set a special function to these
buttonsby pressingon them forve seconds whenon a
desiredsourceorchannel.Aconrmation message will be
displayed on the screen. Now the selected MY BUTTON is
associated with the selected function.
Note that if you perform First Time Installation, MY BUTTON
1&2 will return to their default function.
English - 4 -
4
7
8
9
P+
P-
V+
V-
1
.,/@
2
3
5
6
0
OK
Q.MENU
EXIT
BACK
LANG.
SOURCE
2
/
1
/
Remote Control RC 4800 (depending on the model)
1. Standby: Switches On / Off the TV
2. Play: Starts to play selected media
3. Record: Records programmes
4. Language: Switches between sound modes (analogue
TV), displays and changes audio/subtitle language
(digital TV, where available)
5. Rapid reverse: Moves frames backwards in media such
as movies
6. Colored buttons: Follow the on-screen instructions for
coloured button functions
7. Numeric buttons: Switches the channel, enters a
number or a letter in the text box on the screen.
8. TV: Displays channel list / Switches among broadcast
types / Switches to TV Source
9. Navigation buttons: Helps navigate menus, content etc.
and displays the subpages in TXT mode when pressed
Right or Left
10. OK: Conrmsuserselections,holdsthepage(inTXT
mode), views channel list (DTV mode)
11. Menu: Displays TV menu
12. Back/Return: Returns to previous screen, opens index
page (in TXT mode)
13. Internet: Opens the portal page, where you can reach
many web based applications
14. Media browser: Opens the media browsing screen
15. EPG (Electronic programme guide): Displays the
electronic programme guide
16. Text: Displays teletext (where available), press again to
superimpose the teletext over a normal broadcast picture
(mix)
17. Volume +/-
18. Mute: Completely turns off the volume of the TV
19. Programme + / -
20. Screen: Changes the aspect ratio of the screen
21. Info: Displays information about on-screen content,
shows hidden information (reveal - in TXT mode)
22. My button 1 (*)
23. My button 2 (*)
24. Exit: Closes and exits from displayed menus or returns
to previous screen
25. Quick Menu: Displays a list of menus for quick access
26. Swap: Quickly cycles between previous and current
channels or sources
27. Rapid advance: Moves frames forward in media such
as movies
28. Subtitles: Turns subtitles on and off (where available)
29. Stop: Stops the media being played
30. Pause: Pauses the media being played, starts timeshift
recording
31. Source: Shows all available broadcast and content
sources
Note: Functional button indications on some menu
screens may vary in accordance with the remote
control of your TV. Follow the button functions
located at the bottom of the screen.
(*) MY BUTTON 1 & MY BUTTON 2:
These buttons may have default functions depending on
the model. However you can set a special function to these
buttonsbypressingonthemforvesecondswhenona
desiredsourceorchannel.Aconrmationmessagewillbe
displayed on the screen. Now the selected MY BUTTON is
associated with the selected function.
Note that if you perform First Time Installation, MY
BUTTON 1&2 will return to their default function.

English - 5 -
Remote Control RC 4875 (depending on the model)
Note: Functional button indications on some menu
screens may vary in accordance with the remote
control of your TV. Follow the button functions
located at the bottom of the screen.
1. Standby: Switches On / Off the TV
2. Numeric buttons: Switches the channel, enters
a number or a letter in the text box on the
screen.
3. TV: Displays channel list / Switches among
broadcast types / Switches to TV Source
4. Mute: Completely turns off the volume of the TV
5. Volume +/-
6. Menu: Displays TV menu
7. Navigation buttons: Helps navigate menus,
content etc. and displays the subpages in TXT
mode when pressed Right or Left
8. OK: Conrmsuserselections,holdsthepage(in
TXT mode), views channel list (DTV mode)
9. Back/Return: Returns to previous screen,
opens index page (in TXT mode)
10. Media browser: Opens the media browsing
screen
11. Info: Displays information about on-screen
content, shows hidden information (reveal - in
TXT mode)
12. My button 1 (*)
13. Coloured Buttons: Follow the on-screen
instructions for coloured button functions
14. Language: Switches between sound modes
(analogue TV), displays and changes audio/
subtitle language (digital TV, where available)
15. Subtitles: Turns subtitles on and off (where
available)
16. Rapid reverse: Moves frames backwards in
media such as movies
17. Record: Records programmes (optional)
18. Play: Starts to play selected media
19. Stop: Stops the media being played
20. Rapid advance: Moves frames forward in media
such as movies
21. Pause: Pauses the media being played, starts
timeshift recording
22. Screen: Changes the aspect ratio of the screen
23. Text: Displays teletext (where available), press
again to superimpose the teletext over a normal
broadcast picture (mix)
24. My button 2 (*)
25. EPG (Electronic programme guide): Displays
the electronic programme guide
26. Exit: Closes and exits from displayed menus or
returns to previous screen
27. Quick Menu: Displays a list of menus for quick
access
28. Internet: Opens the portal page, where you can
reach many web based applications
29. Programme +/-
30. Swap: Quickly cycles between previous and
current channels or sources
31. Source: Shows all available broadcast and
content sources
(*) MY BUTTON 1 & MY BUTTON 2:
These buttons may have default functions depending on
the model. However you can set a special function to these
buttonsbypressingonthemforvesecondswhenona
desiredsourceorchannel.Aconrmationmessagewillbe
displayed on the screen. Now the selected MY BUTTON is
associated with the selected function.
Note that if you perform First Time Installation, MY
BUTTON 1&2 will return to their default function.
English - 6 -
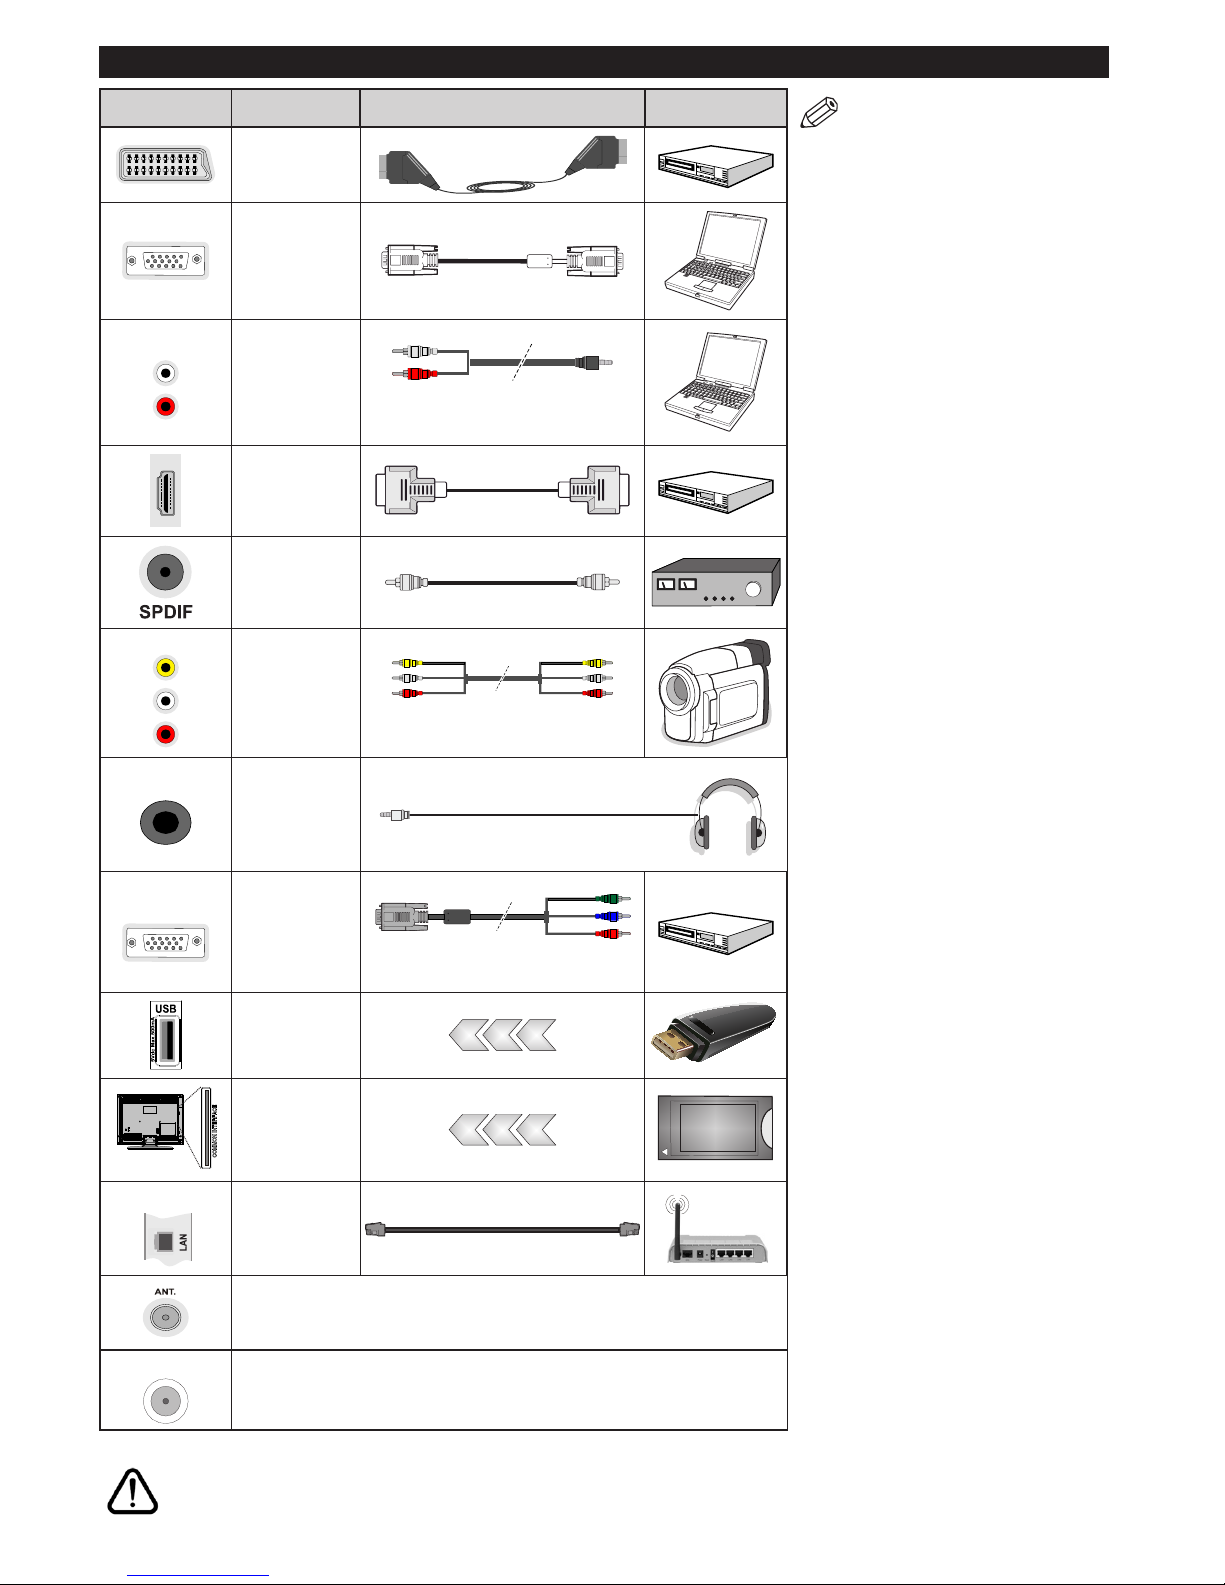
Connections
NOTE: When connecting a
device via the YPbPr or Side
AV inputs, you must use the
connection cables to enable
connection. See the illustrations
on the left side. | You can
use YPbPr to VGA cable (not
supplied) to enable YPbPr signal
via VGA input. | You cannot use
VGA and YPbPr at the same time.
| To enable PC/YPbPr audio, you
will need to connect the side
audio inputs with a PC/YPbPr
audio cable’s (not supplied)
RED and WHITE jacks. | If an
external device is connected via
the SCART socket, the TV will
automatically switch to AV mode.|
When receiving DTV channels
(Mpeg4 H.264) or while in Media
Browser mode, output will not be
available via the scart socket. |
When using the wall mounting
kit (available from third party
in the market, if not supplied),
we recommend that you plug all
your cables into the back of the
TV before mounting on the wall.
| Insert or remove the CI module
only when the TV is SWITCHED
OFF. You should refer to the
module instruction manual for
details of the settings. | The/Each
USB input of your TV supports
devices up to 500mA. Connecting
devices that have current value
above 500mA may damage your
TV. | By connecting an HDMI cable
to your TV, you have to use only a
shielded HDMI cable to guarantee
a sufficient immunity against
parasitic frequency radiation.
If you want to connect a device to the TV, make sure that both the TV and the device are turned off before making
any connection. After the connection is done, you can turn on the units and use them.
Connector Type Cables Device
Scart
Connection
(back)
VGA
Connection
(back)
SIDE AV
PC/YPbPr
Audio
Connection
(side)
PC/YPbPr Audio
Cables
(not supplied)
HDMI
Connection
(back)
SPDIF
(Coaxial Out)
Connection
(back)
SIDE AV
Side AV
(Audio/Video)
Connection
(side)
Side AV Connection
Cable ( not supplied)
HEADPHONE
Headphone
Connection
(side)
YPBPR
YPbPr Video
Connection
(back)
PC to YPbPr Connection
Cable (not supplied)
USB
Connection
(side)
CI
Connection
(side)
CAM
module
LAN
Ethernet
Connection
(back)
LAN / Ethernet Cable
RF Input connects to an aerial or cable system. (depends on model)
SAT
Satellite (LNB) Input connects your TV to a satellite system. (depends on model)
English - 7 -
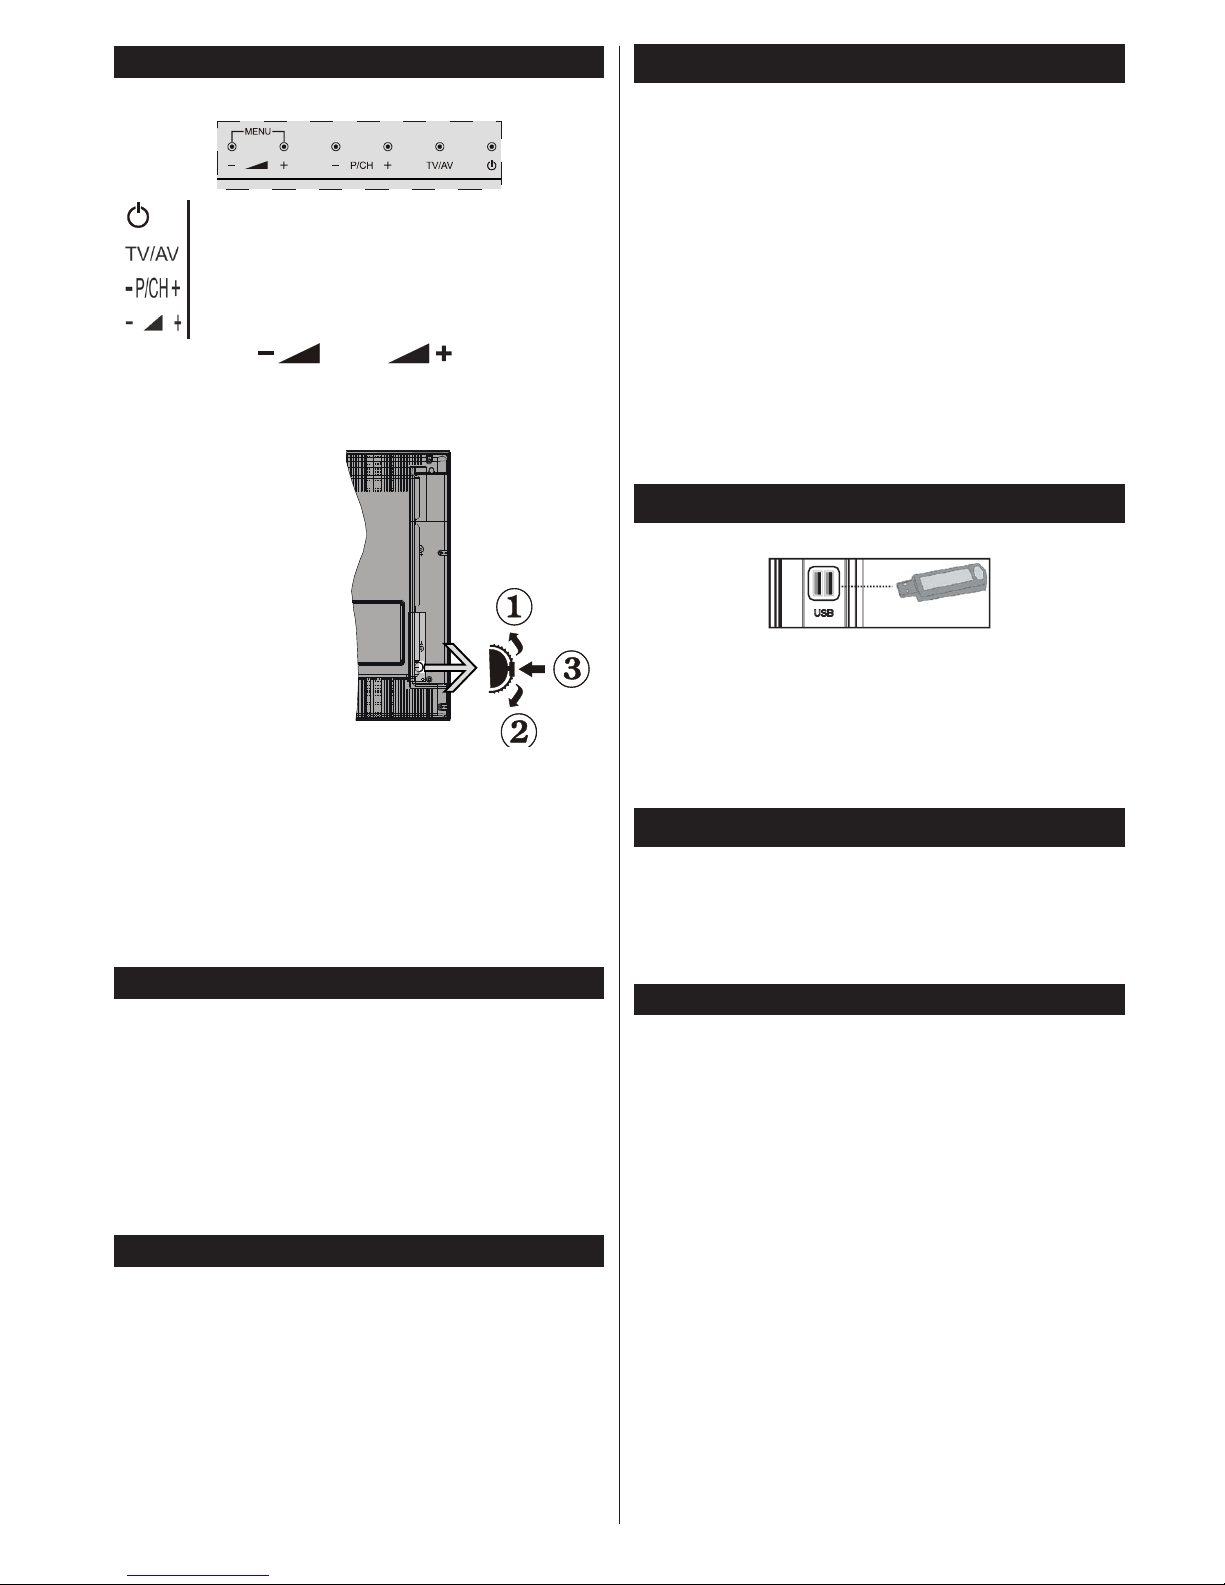
TV and Operating Buttons (depending on the model)
Standby/On
Source
Programme +/-
Volume +/-
Note: Press “ ” and “ ” buttons at the
same time to view main menu.
-or-
1. Up direction
2. Down direction
3. Programme/
Volume / AV
/ Standby-On
selection switch
Note: You can move
the switch, upward or
downward to change
the volume. If you want
to change channels,
press the middle of the switch once (Position 3)
and then move upward or downward. If you press
the middle of the switch once more, source OSD
will be displayed. If you press the middle of the
switch and hold about a few seconds, the TV will
switch to standby mode. Main menu OSD cannot
be displayed via control buttons.
Power Connection
After unpacking, allow the TV set to reach the ambient
room temperature before you connect the set to the
mains.
Power Cable Connection:
IMPORTANT: The TV set is designed to operate on
220-240V AC, 50 Hz socket.
Plug the power cable to the mains socket outlet. Leave
at least 10mm space around the TV set.
Antenna Connection
Connect the aerial or cable TV plug to the AERIAL
INPUT (ANT) socket or satellite plug to the SATELLITE
INPUT (LNB) socket located on the back of the TV.
Satellite and Cable connection are dependent on
the model.
USB Connection
You can connect USB devices to your TV by using
the USB inputs of the TV. This feature allows you to
display/playJPG,MP3andvideolesstoredinaUSB
stick. It is possible that certain types of USB devices
(e.g. MP3 Players) may not be compatible with this
TV. You shouldback upyourles beforemaking
any connections to the TV set in order to avoid any
possible data loss. Note that manufacturer will not be
responsibleforanyledamageordataloss.Donot
pulloutUSBmodulewhileplayingale.
CAUTION: Quickly plugging and unplugging USB
devices, is a very hazardous operation. Especially,
do not repeatedly quickly plug and unplug the drive.
This may cause physical damage to the USB player
and especially the USB device itself.
Side View Usb Memory
Second USB is optional, depending on the model.
IMPORTANT: The TV should be switched off while
plugging or unplugging a USB device. Plug your USB
devices to the USB input of the TV. You can connect a
usb device to your TV by using the USB input of the TV.
Note: It is possible certain types of hard disk drives are
not supported.
Installing the Batteries to the Remote
Insert two AAA/R3 or equivalent type batteries inside.
Remove the battery from remote control handset when
it is not to be used for a long period. Otherwise it can
be damaged due to any leakage of batteries. Remote
range is approximately 7m/23ft
Environmental Information
This television is designed to be environment friendly.
To reduce energy consumption, you can follow these
steps:
If you set the Power Save Mode to Eco, the TV will
switch to energy-saving mode. The Power Save
Mode settings can be found in the ‘Picture’ section
of the System Menu. Note that some picture settings
will be unavailable to be changed.
If pressed Right button, “Screen will be off in 15
seconds.” message will be displayed on the screen.
Select PROCEED and press OK to turn the screen
off immediately. If you don’t press any button, the
screen will be off in 15 seconds. Press any button on
the remote or on the TV to turn the screen on again.
If you disable Power Save Mode, picture mode will
be automatically set to Dynamic.
When the TV is not in use, please switch off or
disconnect the TV from the mains plug. This will also
reduce energy consumption.

English - 8 -
Switching On/Off (depending on the model)
To Switch the TV On
•Connect the power cord to the 220-240V AC, 50 Hz.
•Then the standby LED lights up.
To switch on the TV from standby mode either:
•Press the Standby button, Programme +/- or a
numeric button on the remote control.
Control buttons on the TV (depending on model)
•Press the Standby button or Programme +/- button
on the TV. The TV will then switch on.
-or-
•Press and hold the middle of the control switch on
the left side of the TV until the TV comes on from
standby. The TV will then switch on.
To Switch the TV Off (depending on model)
•Press the Standby button on the remote control or
press the Standby button on the TV or press and
hold the control switch on the TV until shut down,
so the TV switches into standby mode (depends on
the model).
•To power down the TV completely, unplug the
power cord from the mains socket.
Note: When the TV is switched into standby mode,
standby LED can blink to indicate that features such as
Standby Search, Over Air Download or Timer is active.
The LED can also blink when you switch on the TV from
standby mode.
First Time Installation (depending on the model)
When turned on for the first time, the language
selection screen is displayed. Select the desired
language and press OK.
On the next screen, set your preferences using the
navigationbuttonsandwhen nished,pressOK to
continue.
Notes
• Depending on the Country selection you may be asked to
setandconrmaPINatthispoint.TheselectedPINcannot
be 0000. You have to enter it if you are asked to enter a
PINforanymenuoperationlater.
You can activate Store Mode option at this point.
ThisoptionwillcongureyourTV’ssettingsforbest
display quality and the supported features of the TV
will be displayed on the top of the screen as a info
banner. This option is intended only for store use. It is
recommended to select Home Mode for home use. If
Store Modeisselected,aconrmationscreenwillbe
displayed. Select YES to proceed. This option will be
available in More menu and can be turned off/on later.
Press OK button on the remote control to continue
and a message will be displayed next, asking whether
you want to do network settings. Select Yes and the
Network Settings menu will be displayed. Please
refer to Connectivitysectiontocongureawiredora
wireless connection. After the settings are completed
press OK button to continue.
Aerial Installation
If you select Aerial option from the search type selection
screen, the television will search for digital terrestrial
TV broadcasts. After all the available stations are
stored, the Edit Channel List will be displayed on
the screen.
Press Menu button to quit Edit Channel List and
watch TV.
Cable Installation (depends on model)
If you select Cable option and press OK button on the
remotecontrol,aconrmationscreenwillbedisplayed.
Select YES and press OK to proceed. To cancel
operation, select NO and press OK. You can select
frequency ranges from next screen. Enter the frequency
range manually by using the numeric buttons. When
nished,pressOK button to start automatic search.
Note: Searching duration will change depending on
the selected search step.
Satellite Installation (depends on model)
If you select Satellite option from the search
type selection screen, you can set a satellite and
watch satellite channels. When you select satellite
installation, Antenna Type menu will be displayed.
You can select Antenna type as Direct, Unicable or
DiSEqC switch by using “ ” or “ ” buttons.
Direct: If you have a single receiver and a direct
satellite dish, select this antenna type. After selecting
Direct, another menu screen will be displayed.
Select an available satellite and press OK to scan
for services. If wanted, the default LNB frequency
values for the selected satellite can be edited before
starting the search. The frequency values can be
entered in two ways:
4. The high band value should be “0” and the low
band value should be entered.
5. The high and low band values should be the
same, so this value can be used in search. But
this value cannot be “0”.
These are the standard single LNB search
requirements.
Unicable: If you have multiple receivers and a
unicable system, select this antenna type. Press OK to
continue.Conguresettingsbyfollowinginstructions
on the screen. Press OK to scan for services.
DiSEqC switch: If you have multiple satellite dishes
and a DiSEqC switch, select this antenna type. After
selecting DiSEqC switch, another menu screen will
be displayed. You can set four DiSEqC options (if
available). Press GREEN button to scan all satellites
or press YELLOW button to scan only the highlighted
satellite. To save and exit press OK button.
English - 9 -
While the search continues a message will appear,
asking whether you want to sort channels according
to the LCN(*). Select Yes and press OK toconrm.
(*)LCNistheLogicalChannelNumbersystemthat
organizes available broadcasts in accordance with a
recognizable channel number sequence (if available).
Note:DonotturnofftheTVwhileinitializingrsttime
installation. Note that,some optionsmay notbe
available depending on the country selection.
Media Playback via USB Input
You can connect 2.5” and 3.5” inch (hdd with external
power supply) external hard disk drives or USB
memory stick to your TV by using the USB inputs
of the TV.
IMPORTANT!Backupthelesonyourstoragedevices
before connecting them to the TV. Manufacturer will
notberesponsibleforanyledamageordataloss.
Certain types of USB devices (e.g. MP3 Players)
or USB hard disk drives/memory sticks may not be
compatible with this TV. The TV supports FAT32
and NTFS disk formatting but recording will not be
available with NTFS formatted disks.
While formatting USB hard drives which have
more than 1TB (Tera Byte) storage space you may
experience some problems in the formatting process.
Wait a little while before each plugging and unplugging
astheplayermaystillbereadingles.Failuretodo
so may cause physical damage to the USB player
and the USB device itself. Do not pull out your drive
whileplayingale.
You can use USB hubs with your TV’s USB inputs.
External power supplied USB hubs are recommended
in such a case.
It is recommended to use the TV’s USB input(s)
directly, if you are going to connect a USB hard disk.
Note:WhenviewingimagelestheMediaBrowser
menucanonlydisplay1000imagelesstoredonthe
connected USB device.
Timeshift Recording
Press Pause button while watching a broadcast to
activate timeshifting mode. In timeshifting mode, the
programme is paused and simultaneously recorded
to the connected USB disk.
Press Play button again to resume the paused
programme from where you stopped. Press the Stop
button to stop timeshift recording and return to the
live broadcast.
Timeshift cannot be used while in radio mode.
You cannot use the timeshift fast reverse feature
before advancing the playback with the fast forward
option.
Instant Recording
Press Record button to start recording an event
instantly while watching a programme. You can
press Record button on the remote control again to
record the next event on the EPG. In this case, an
OSD will be displayed, indicating the programmed
events for recording. Press Stop button to cancel
instant recording.
You can not switch broadcasts or view the media
browser during the recording mode. While recording
a programme or during the timeshifting, a warning
message appears on the screen if your USB device
speedisnotsufcient.
Media Browser Menu
You canplay photo,music andmovie lesstored
on a USB disk by connecting it to your TV. Connect
a USB disk to one of the USB inputs located on the
side of the TV. Pressing the Menu button while in
the Media Browser mode will access the Picture,
Sound and Settings menu options. Pressing the
Menu button again will exit from this screen. You
can set your Media Browser preferences by using
the Settings Menu.
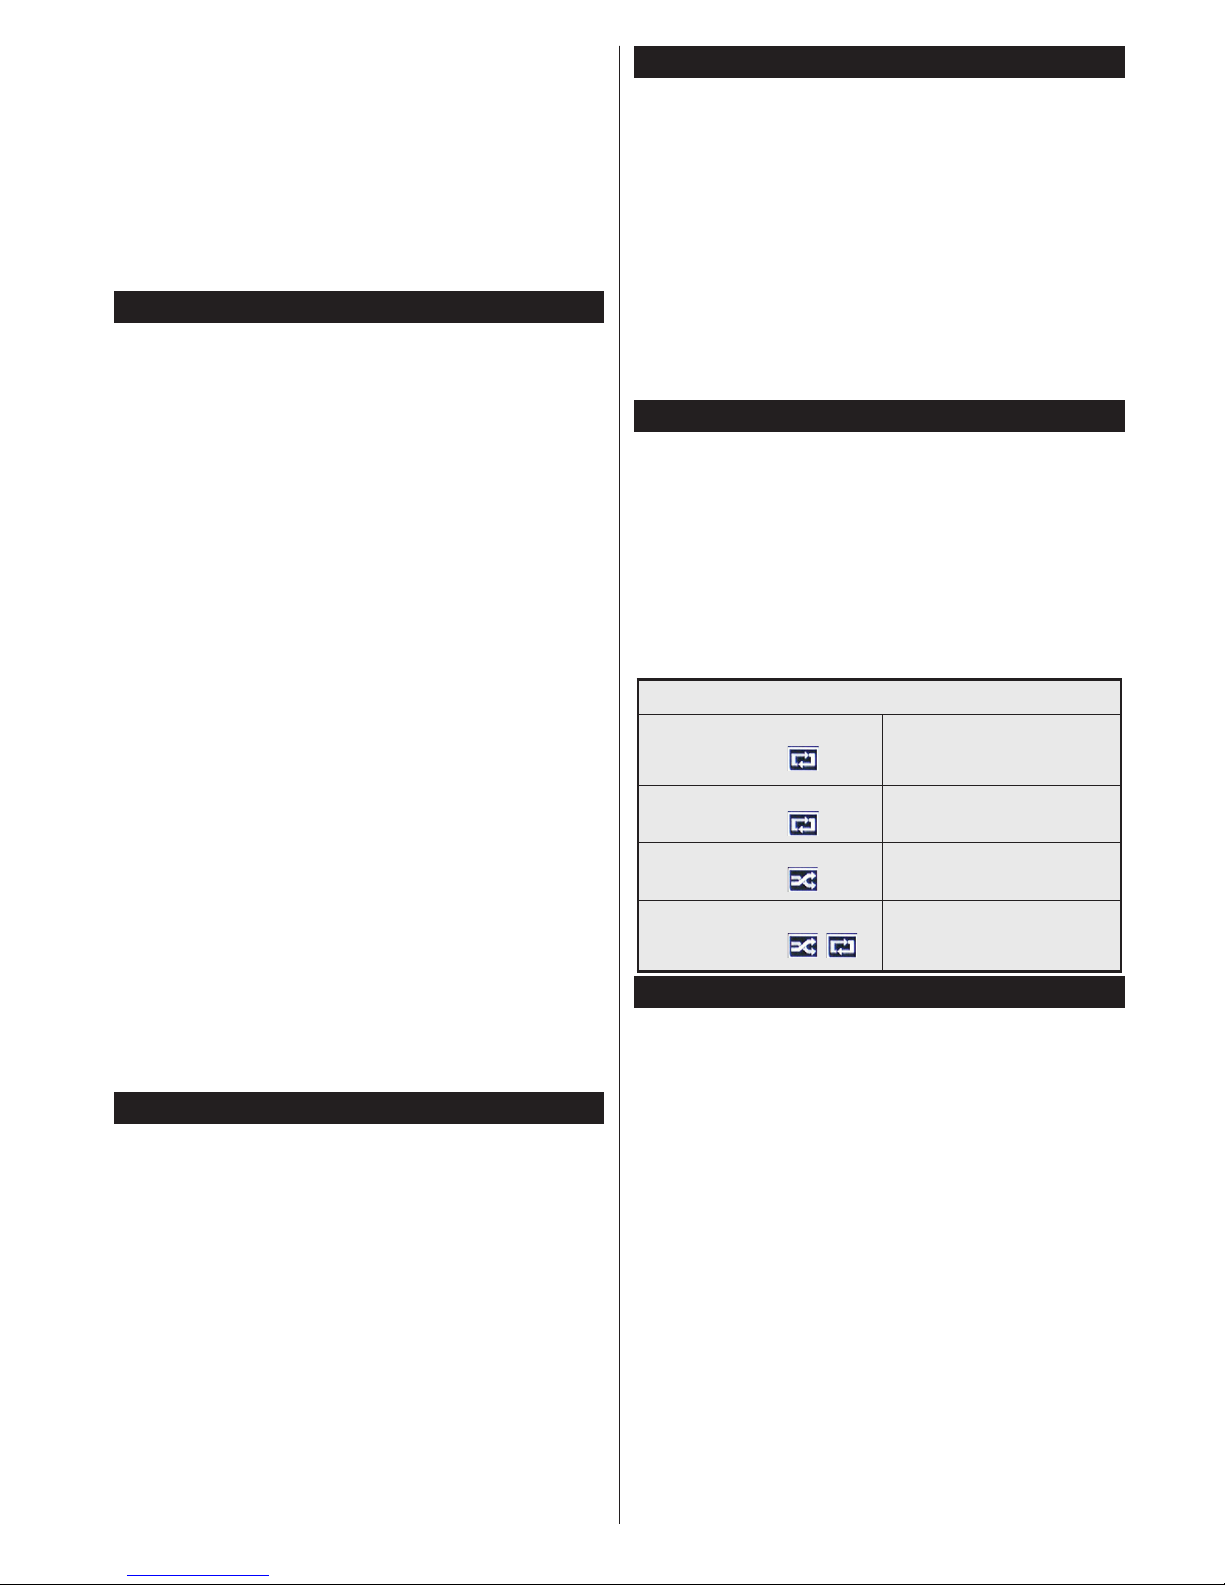
Loop/Shufe Mode Operation
Start playback with the Play
button and activate
Alllesinthelistwillbe
continuously played in original
order
Start playback with the OK
button and activate
Thesamelewillbeplayed
continuously (repeat)
Start playback with the Play
button and activate
Alllesinthelistwillbe
played once in random order
Start playback with the Play
button and activate ,
Alllesinthelistwillbe
continuously played in the
same random order.
Recording a Programme
IMPORTANT: When using a new USB hard disk drive,
itisrecommendedthatyourstformatthediskusing
your TV’s “Format Disk” option.
Torecorda programme,youshould rstconnecta
USB disk to your TV while the TV is switched off. You
should then switch on the TV to enable the recording
feature.
To use recording your USB drive should have 2 GB
free space and be USB 2.0 compatible. If the USB
drive is not compatible an error message will be
displayed.
To record long duration programmes such as movies,
it is recommended to use USB Hard disk drives
(HDD’s).
Recorded programmes are saved into the connected
USB disk. If desired, you can store/copy recordings
ontoa computer;however, theseleswill notbe
available to be played on a computer. You can play
the recordings only via your TV.

English - 10 -
Lip Sync delay may occur during the timeshifting.
Radio record is supported. The TV can record
programmes up to ten hours.
Recorded programmes are split into 4GB partitions.
If the writing speed of the connected USB disk is not
sufcient,therecordingmayfailandthetimeshifting
feature may not be available.
It is recommended to use USB hard disk drives for
recording HD programmes.
Do not plug out the USB/HDD during a recording. This
may harm the connected USB/HDD.
If the AC cord is unplugged while there is an active
USB-recording timer setting, it will be cancelled.
Multipartition support is available. A maximum of two
differentpartitionsaresupported.Therstpartitionof
the USB disk is used for PVR ready features. It also
must be formatted as the primary partition to be used
for the PVR ready features.
Some stream packets may not be recorded because
of signal problems, as a result sometimes videos may
freeze during playback.
Record, Play, Pause, Display (for PlayListDialog) keys
can not be used when teletext is on. If a recording starts
from timer when teletext is on, teletext is automatically
turned off. Also teletext usage is disabled when there
is an ongoing recording or playback.
Watching Recorded Programmes
Select Recordings from the Media Browser menu.
Select a recorded item from the list (if previously
recorded). Press the OK button to view the Play
Options. Select an option then press OK button.
Note:Viewingmainmenuandmenuitemswillnotbe
available during the playback.
Press the Stop button to stop a playback and return
to the Recordings.
Slow Forward
If you press Pause button while watching recorded
programmes, the slow forward feature will be
available. You can use Rapid advance button to
slow forward. Pressing Rapid advance button
consecutively will change slow forwarding speed.
RecordingConguration
Select the Recording Congurationitem in the
System>Settings menuto conguretherecording
settings.
Format Disk: You can use the Format Disk feature
for formatting the connected USB disk. Your pin is
required to use the Format Disk feature.
Note: DefaultPINcanbesetto0000 or 1234. If you have
denedthe PIN(isrequesteddepending onthecountry
selection) during the First Time Installation usethe PIN
thatyouhavedened.
IMPORTANT: Formatting your USB drive will erase
ALLthedataonitandit’slesystemwillbeconverted
toFAT32.Inmostcasesoperationerrorswillbexed
after a format but you will lose ALL your data.
If “USB disk writing speed too slow to record” message
is displayed on the screen while starting a recording,
try restarting the recording. If you still get the same
error, it is possible that your USB disk does not meet
the speed requirements. Try connecting another
USB disk.
CEC and CEC RC Passthrough (depending on the model)
This function allows to control the CEC-enabled
devices, that are connected through HDMI ports by
using the remote control of the TV.
The CEC option in the System>Settings>More menu
should be set as Enabledatrst.PresstheSource
button and select the HDMI input of the connected
CEC device from the Source List menu. When new
CEC source device is connected, it will be listed
in source menu with its own name instead of the
connected HDMI ports name(such as DVD Player,
Recorder 1 etc.).
The TV remote is automatically able to perform the
main functions after the connected HDMI source has
been selected.
To terminate this operation and control the TV via
the remote again, press and hold the “0-Zero” button
on the remote control for 3 seconds. Or press Quick
Menu button on the remote, highlight the CEC RC
Passthrough and set as Off by pressing Left or Right
button. This feature can also be enabled or disabled
under the System>Settings>More menu.
The TV supports also ARC(Audio Return Channel)
feature. This feature is an audio link meant to replace
other cables between the TV and the audio system
(A/V receiver or speaker system).
When ARC is active, TV does not mute its other audio
outputs automatically. So you need to decrease TV
volume to zero manually, if you want to hear audio
from connected audio device only (same as other
optical or co-axial digital audio outputs). If you want
to change connected device’s volume level, you
should select that device from the source list. In that
case volume control keys are directed to connected
audio device.
System Audio Control
AllowsanAudioAmplier/Receivertobeusedwith
the TV. The volume can be controlled using the
remote control of the TV. To activate this feature set
the Speakers option in the System>Settings>More
menu as Amplier. The TV speakers will be muted
and the sound of the watched source will be provided
from the connected sound system.
Note: The audio device should support System Audio Control
feature and CEC option should be set as Enabled.

English - 11 -
E-Manual (depending on the model)
You cannd instructionsfor yourTV’sfeaturesin
the E-Manual.
To use E-Manual, press to the Info button while main
menu is displayed on the screen.
By using the navigation buttons select a desired
category. Every category includes different topics.
Select a topic and press OK to read instructions.
To close the E-Manual screen press the Exit button.
Note: The contents of the E-Manual may vary
according to the model.
General TV Operation
Using the Channel List
The TV sorts all stored stations in the Channel List.
You can edit this channel list, set favourites or set
active stations to be listed by using the Channel
List options.
ConguringParentalSettings
To prohibit viewing of certain programmes, channels
and menus can be locked by using the parental
control system.
To display parental lock menu options, the PIN number
should be entered. After coding the correct PIN
number, Parental Settings menu will be displayed.
Menu Lock: Menu lock setting enables or disables
the menu access.
Maturity Lock: If this option is set, TV gets the
maturity information from the broadcast and if this
maturity level is disabled, disables access to the
broadcast.
Note:IfthecountryoptionintheFirstTimeInstallation
is set as France, Italy or Austria, Maturity Lock’s value
will be set to 18 as default.
Child Lock: When Child Lock is set, the TV can only
be controlled by the remote control. In this case the
control panel buttons will not work.
Set PIN:DenesanewPINnumber.
Note:DefaultPINcanbesetto0000or1234.Ifyou
havedenedthePIN(isrequesteddependingonthe
country selection) during the First Time Installation use
thePINthatyouhavedened.
Some options may not be available depending on the
country selection in the First Time Installation.
Electronic Programme Guide (EPG)
Some channels send information about their
broadcast schedules. Press the Epg button to view
the EPG menu.
Red button (Prev Day): Displays the programmes
of previous day.
Green button (Next day): Displays the programmes
of the next day.
Yellow button (Zoom): Press the Yellow button to
see events in a wider time interval.
Blue button (Filter): Viewslteringoptions.
SUBTTL: Press Subtitles button to view Select
Genre menu. Using this feature, you can search the
programme guide database in accordance with the
genre. Info available in the programme guide will be
searched and results matching your criteria will be
highlighted.
Info button: Displays detailed information about
selected programmes.
Numeric Buttons (Jump): Jumps to the preferred
channel directly via numeric buttons.
OK: Displays programme options.
Text button (Search): Displays Guide Search menu.
Swap button (Now): Displays current event of the
highlighted channel.
Record button: The TV will start to record the
selected programme. You can press again to stop
the recording.
IMPORTANT:ConnectaUSBdisktoyourTVwhile
the TV is switched off. You should then switch on the
TV to enable the recording feature.
Note:Switchingtoadifferentbroadcastorsourceis
not available during a recording.
Programme Options
In EPG menu, press the OK button to open the Event
Options menu.
Select Channel: In EPG menu, using this option, you
can switch to the selected channel.
Record / Delete Record Timer: After you have
selected a programme in the EPG menu, press the
OK button. Select the Record option and press the
OK button. After this operation, a recording will be
scheduled for the selected programme.
To cancel an already set recording, highlight that
programme and press the OK button and select
the option Delete Rec. Timer. The recording will be
cancelled.
Note: It is not possible to record two channels at the
same time.
Set Timer / Delete Timer: After you have selected
a programme in the EPG menu, press the OK button.
Select the Set Timer on Event option and press the OK
button. You can set a timer for future programmes. To
cancel an already set timer, highlight that programme
and press the OK button. Then select Delete Timer
option. The timer will be cancelled.
Software Upgrade
YourTViscapableofndingandupdatingautomatically
via the broadcast signal or via Internet.
Software upgrade search via user interface
On the main menu select System>Settings and then
More. Navigate to Software Upgrade and press OK
button. In Upgrade Options menu select Scan for
upgrade and press OK button to check for a new
software upgrade.
English - 12 -
If a new upgrade is found, it starts to download
the upgrade. After the download is completed
confirm the question asking about rebooting the
TV by pressing the OK to continue with the reboot
operation.
3 AM search and upgrade mode
Your TV will search for new upgrades at 3:00 o’clock if
Automatic scanning option in the Upgrade Options
menu is Enabled and if the TV is connected to an
aerial signal or to Internet. If a new software is found
and downloaded successfully, it will be installed at
the next power on.
Note: Do not unplug the power cord while led is
blinking during the reboot process. If the TV fails
to come on after the upgrade, unplug, wait for two
minutes then plug it back in.
Troubleshooting & Tips
Tv will not turn on
Make sure the power cord is plugged in securely to
wall outlet. Check if batteries are exhausted. Press
the Power button on the TV.
Poor picture
•Check if you have selected the correct TV system.
•Low signal level can cause picture distortion. Please
check antenna access.
•Check if you have entered the correct channel
frequency if you have done manual tuning.
•The picture quality may degrade when two devices
are connected to the TV at the same time. In such
a case, disconnect one of the devices.
No picture
•This means your TV is not receiving any transmission.
Make sure the correct source has been selected.
•Is the antenna connected properly?
•Is the antenna cable damaged?
•Are suitable plugs used to connect the antenna?
•If you are in doubt, consult your dealer.
No sound
•Check if the TV is muted. Press the Mute button or
increase the volume to check.
•Sound may be coming from only one speaker. Check
the balance settings from sound menu.
Remote control - no operation
•The batteries may be exhausted. Replace the
batteries.
Input sources - can not be selected
•If you cannot select an input source, it is possible
that no device is connected. If not;
•Check the AV cables and connections if you have
tried to connect a device.
Recording unavailable
Torecorda programme,youshould rstconnecta
USB disk to your TV while the TV is switched off.
You should then switch on the TV to enable recording
feature. If you cannot record, try switching off the TV
and then re-inserting the USB device.
USB is too slow
If a “USB disk writing speed too slow to record”
message is displayed on the screen while starting a
recording, try restarting the recording. If you still get
the same error, it is possible that your USB disk does
not meet the speed requirements. Try connecting
another USB disk.
Connectivity Functions (depending on the model)
Connecting TV to a Home Network
Connectivity feature allows the TV to connect to the
home network wired or wirelessly. You can use this
networking system to connect to the Internet Portal
or toaccess photo, video andaudio les thatare
stored on a media server connected to the network
and play/display them on the TV.
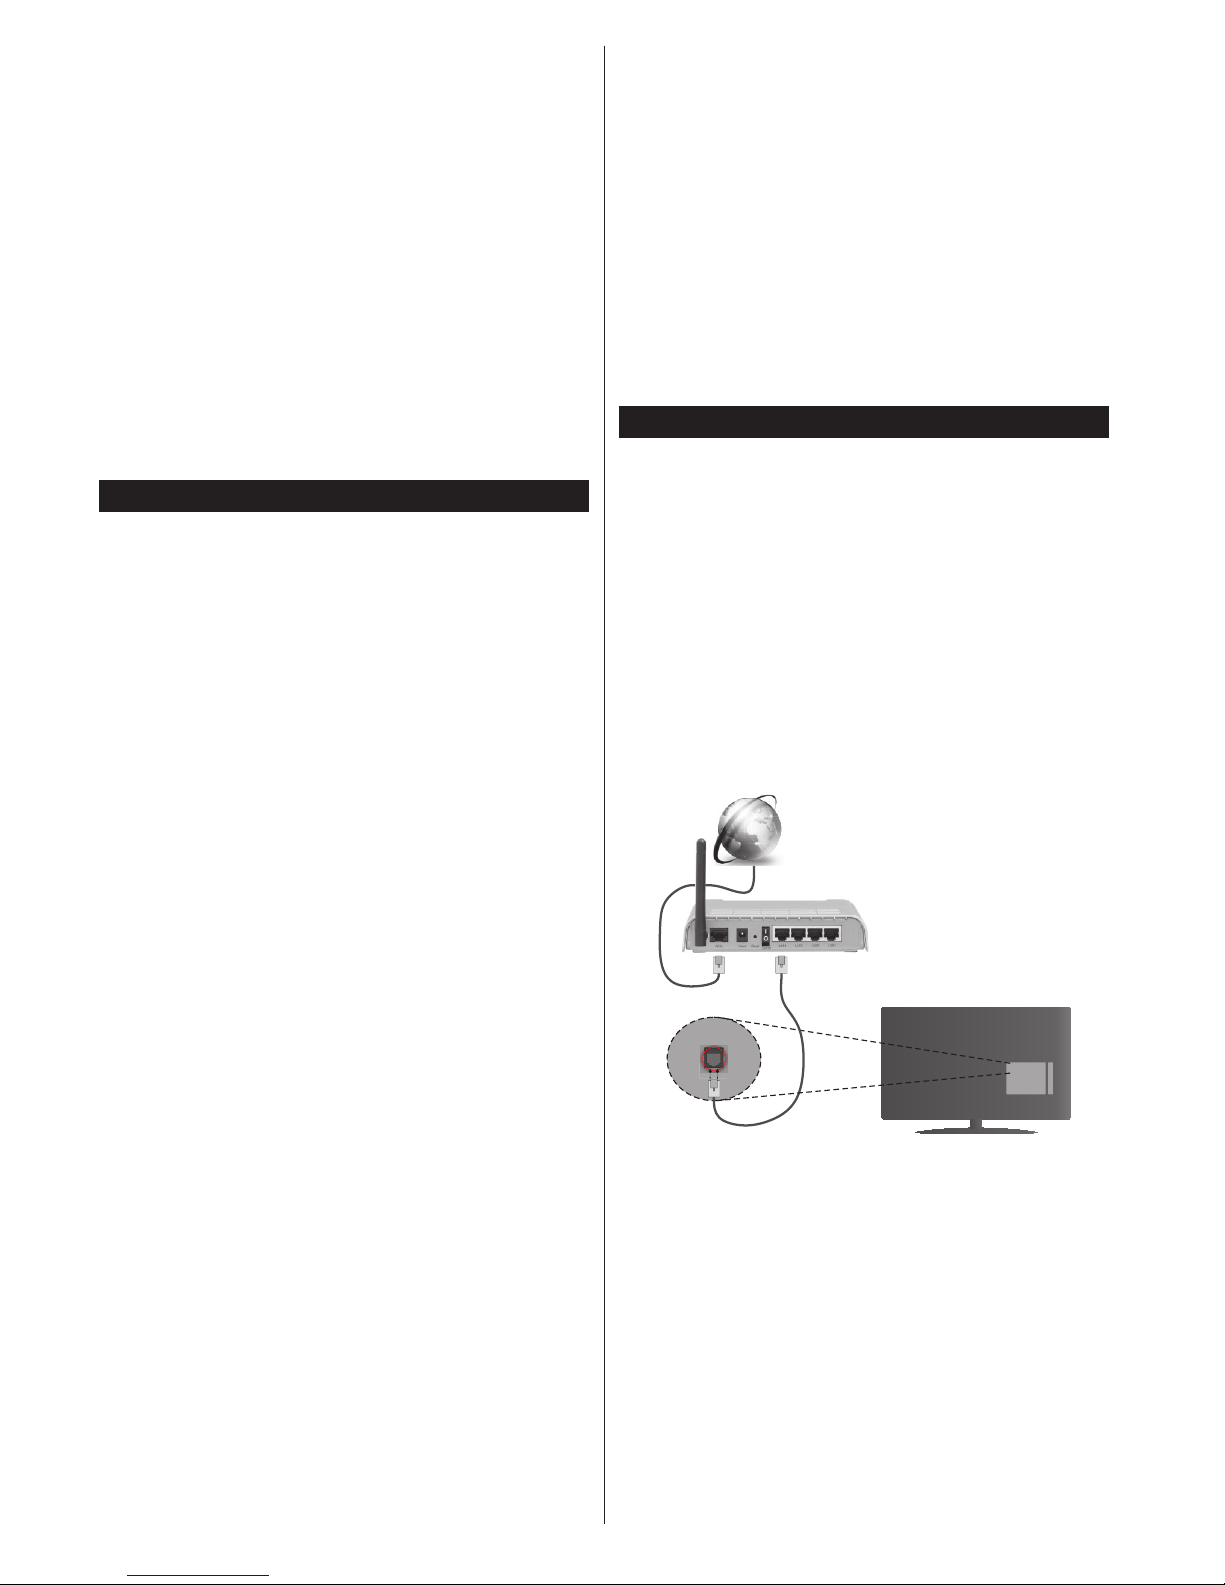
Wired connection
Connect the TV to the modem/router via a LAN
cable (not supplied). Select Network Type as
Wired Device in Network Settings menu. Highlight
Network, press Left or Right button and set as
Enabled to connect.
Broadband ISP
connection
LAN (ethernet)
cable
LAN input on the rear
side of the TV
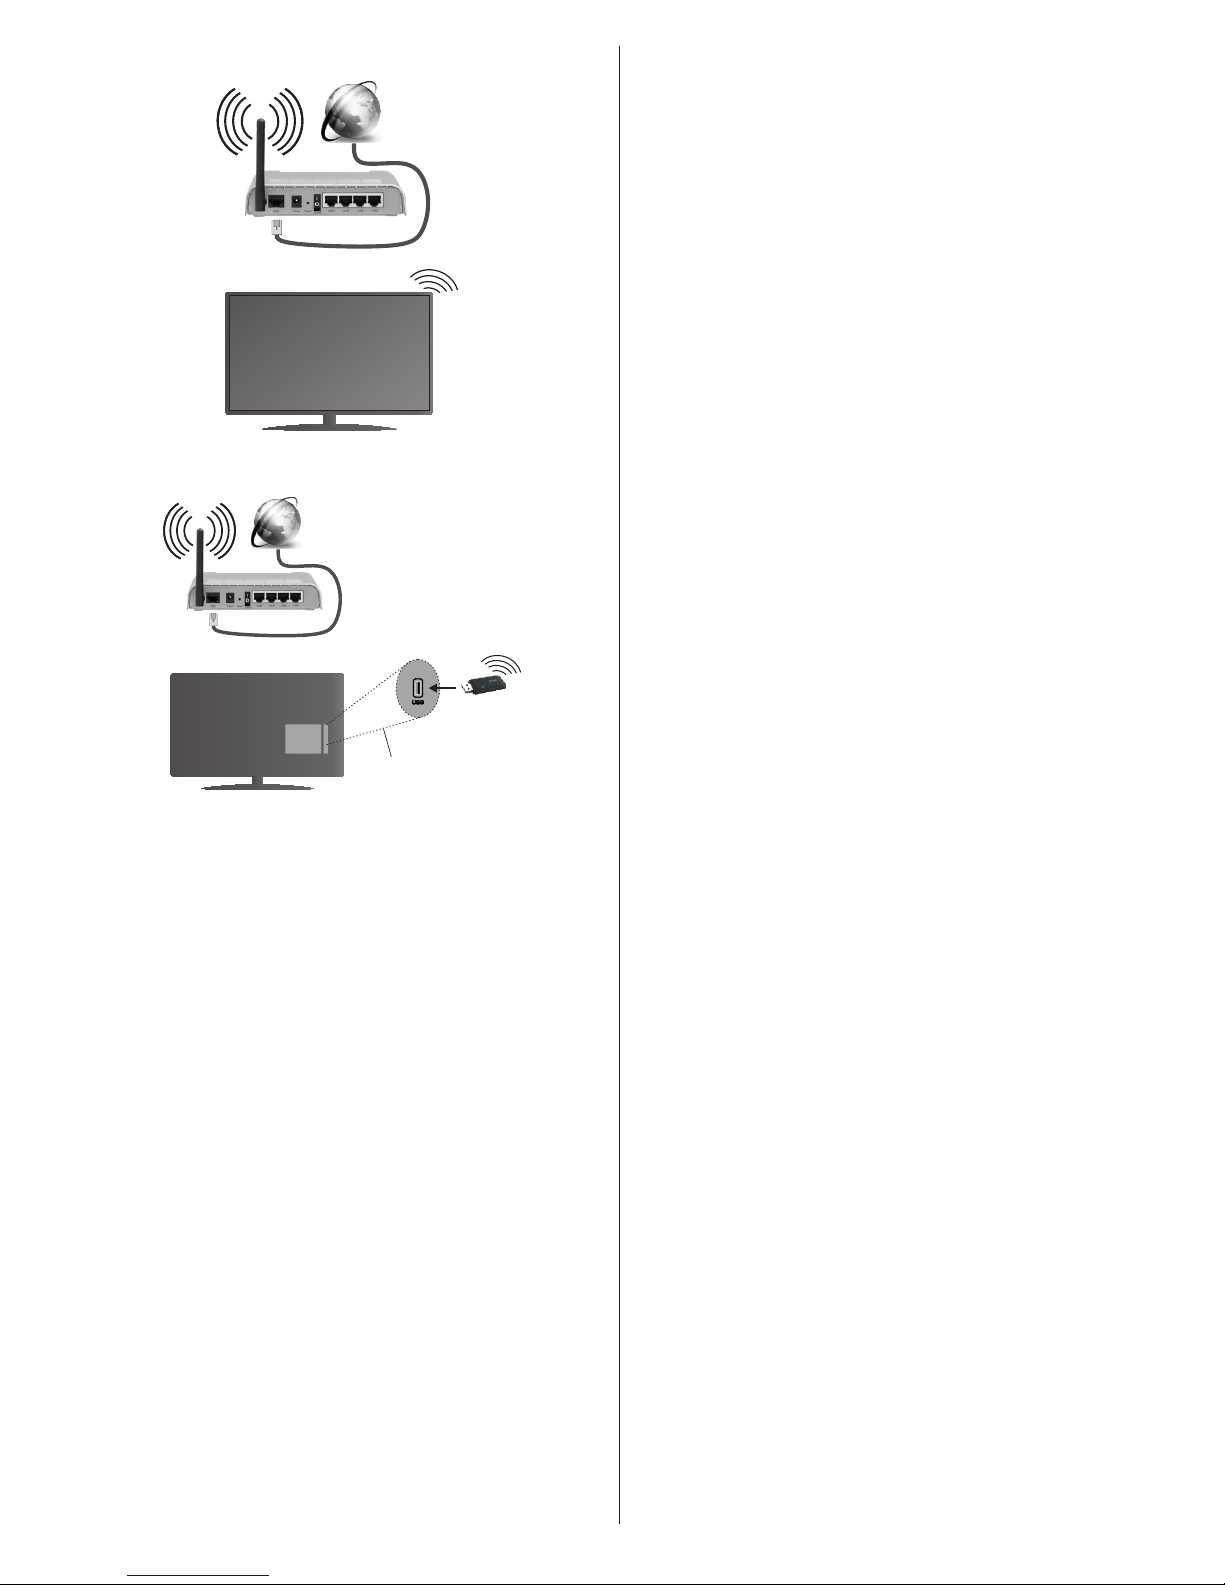
Wireless connection
IMPORTANT:IfyourTVdoes nothavebuilt-in wi
feature, “Veezy 200” USB dongle is required to use
wireless network features.
To connect the TV to the home network wirelessly
just select Network Type as Wireless Device in
Network Settings menu. Highlight Network, press
Left or Right button and set as Enabled to connect.
The TV will search for available networks. Select
the desired network and press OK. The TV has a
built-in WLAN system and has no need for additional
devices to connect to a wireless network.
English - 13 -
For models with built-in WLAN system:
Broadband
ISP
connection
TV (Built-In WLAN system)
For models without built-in WLAN system:
Broadband
ISP
connection
Wireless LAN
adaptor
USB inputs
on the rear left
side of the TV
About Using Connectivity Feature
PC/HDD/Media Player or any other devices that are
DLNA 1.5 compatible should be used with wired
connection for higher playback quality.
Install Nero Media Home software (http://www.nero.
com/mediahome-tv) to your PC to use it as a media
server.
Formodelswithoutbuilt-inwisystem,connectthe
wireless adaptor to one of the USB inputs of the TV.
While using the wireless connection type, consider
that the TV cannot connect to the networks with
hidden SSID.
ConguringNetworkSettings
Your TV’s network settings include wired and wireless
connection options. If you are connecting the TV via
ethernet input, select Network Type as Wired Device.
Select Wireless Device option if you are going to
connect the TV to your network wirelessly.
After selecting Network Type highlight Network,
press Left or Right button and set as Enabled to
connect.
You can press YELLOW button to scan available
networks for wireless connection. Afterwards, a list of
networks will be displayed. Select your network from
the list and press OK.
If the selected network is protected with a password,
key in the correct code. You can also use virtual
keyboard to enter the password.
Wait until the IP the address is shown on the screen.
This means that the connection is now established.
To disconnect from a network, you should highlight
Network, press Left or Right button and set as
Disabled.
Information On Menu Items
Network Type: Network type can be selected as
Wired or Wireless device, in accordance with the active
connection to the TV set.
Network: Highlight Network. Press Left or Right
buttons and set as Enabled to enable the connection.
Conguration Status: This section displays the
status of the connection.
IP Address: If an active connection is available, the IP
address will be displayed on this section. If you want
tocongureIPaddresspreferences,pressGREEN
button and switch to the advanced mode.
Connecting to your mobile device via WiFi
If your mobile device has WiFi feature, you can
connect it to your TV via a router, in order to access
the content in your device. For this, your mobile device
must have an appropriate sharing software.
Connect your mobile device to the router/modem and
then activate the sharing software on your mobile
device.Then,selectlesthatyouwanttosharewith
your TV.
If the connection is established correctly, you will be
abletoaccessthesharedlesfromyourmobiledevice
via the Media Browser of your TV.
Enter the Media Browser menu and the playback
device selection OSD will be displayed. Select your
mobile device and press the OK button to continue.
If available, you can download a virtual remote
controller application from the server of your mobile
device application provider. You can control the TV via
your wireless handheld device using this application.
To do this enable the Virtual Remote feature from the
System>Settings>More menu by pressing Left or
Right button. Connect the TV and the mobile device
to the same network and start the application.
Note:Thisfeaturemaynotbesupportedonallmobile
devices.
Using DLNA Network Service
The DLNA standard allows you to view and play
photos, music and videos stored in a DLNA compliant
media server connected to your home network.
Install Nero Media Home software (for PC’s or
laptops) or appropriate sharing software (for other
devices)

English - 14 -
The DLNA function cannot be used if the server
programme is not installed onto your PC. Prepare your
PC with the provided Nero Media Home programme.
Install the propriate application onto your mobile
device.
Enable Media Renderer feature
Press MENU button. Select System>Settings and
press OK. Highlight Media Renderer and set as
Enabled.
Connect to a Wired or Wireless Network
See the previous chapters for detailed information.
Play Shared Files via Media Browser
Select Media Browser from the main menu and press
OK. The Media browser will then be displayed.
DLNA support is only available in Folder mode. To
enable folder mode, select to the Settings tab in the
main media browser menu and press OK. Highlight
View Style and set as to Folder. Press the BACK
button to go to upper menu. Select the desired media
type and press OK.
Ifsharingcongurationsaresetproperly,thedevice
selection OSD will be displayed after selecting the
desired media type. Select media server or network
that you want to connect and press OK.
Subtitlelesdonotworkifyouwatchvideosfromyour
network through DLNA.
You can connect only one television with DLNA to
the same network. If a problem occurs with the DLNA
network, please switch your television off at the wall
socket and back on again. Trick mode and jump are
not supported with the DLNA function.
There may be some PC’s which may not be able to
utilize the DLNA function due to administrator and
security settings (such as business PC’s).
Internet Portal
Portal feature adds your TV a feature that allows you
to connect to a server on the Internet and view the
content provided by this server over your Internet
connection. Portal feature allows you to view the
music, video, clip or web content with defined
shortcuts. Whether you can view this content without
interruption depends on the connection speed
provided by your internet service provider.
Press “Internet” button on the remote to open internet
portal page. You will see icons of the available
applications and services on the portal screen. Use
the navigaiton buttons on your remote to select the
desired one. You may view the desired content by
pressing OK after selecting. Press BACK/RETURN
button to return back to the previous screen or EXIT
to quit internet portal mode
Note:Possibleapplicationdependentproblemsmay
be caused by the content service provider.
Portal service content and the interface may be
changed at any time without prior notice.
Open Browser
Open Browser function is one of the applications on
the portal that provides access to internet. Select the
internet browser logo on the portal page and press
OKtolaunchthebrowser.Logosofcertainpredened
websites will be displayed. You can select one of them
for quick access or enter the URL-address of a website
in the address bar on the top of the screen. To perform
searches on the internet enter a keyword in the adress
dialog box and move the cursor to search icon using
the navigation buttons on the remote and press OK
Smart Center
Smart Center is a mobile application running on iOS
and Android platforms. With your tablet or phone,
you can easily stream your favourite live shows and
programmes from your smart TV using its FollowMe
TV technology. Also; you can launch your portal
applications, use your tablet as a remote control for
yourTVandsharemediales.
To use Smart Center features, connections have to be
done properly. Make sure the TV and mobile device
are connected to the same network.
For FollowMe TV and media sharing features Media
Renderer option in the System>Settings>More
menu of your TV should be enabled.
Download the appropriate Smart Center application
onto your mobile device from the application store on
the web and launch it to start to use.
Note: Being able to use all functions of this application
depends on the features of your TV.
English - 15 -
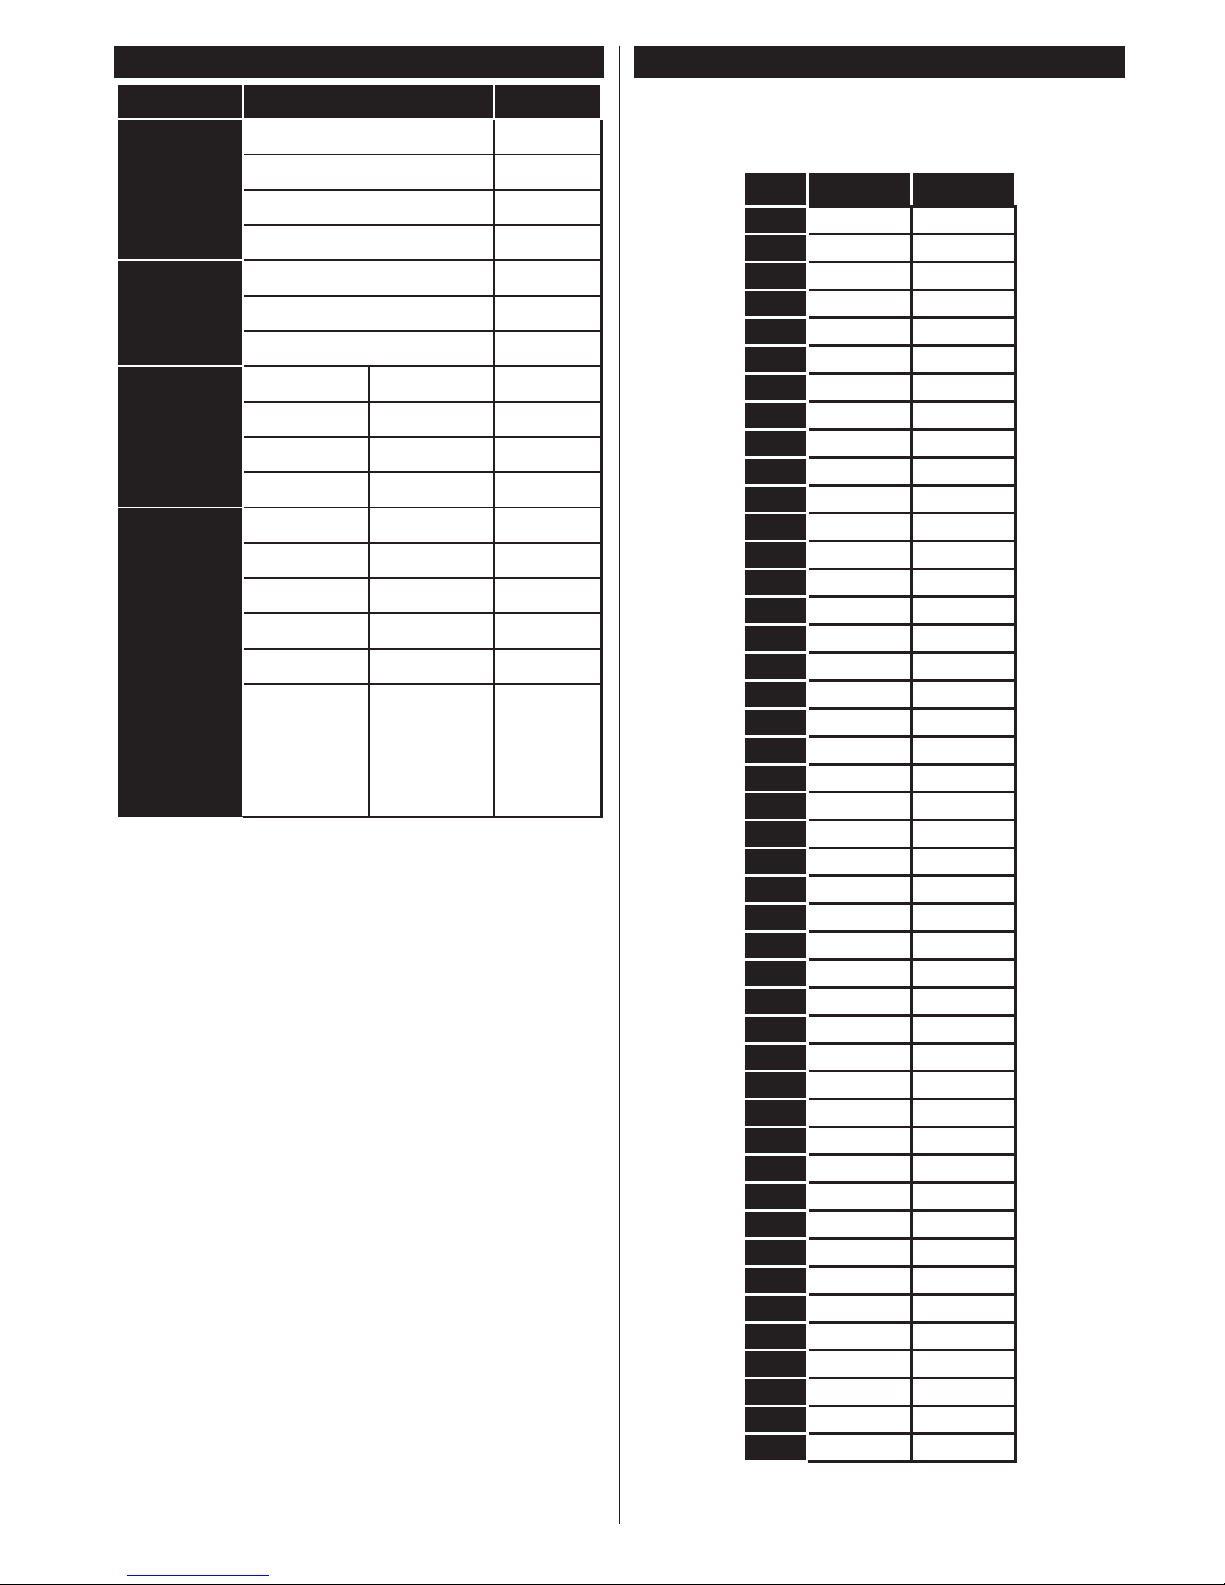
AV and HDMI Signal Compatibility
Source
Supported Signals
Available
EXT
(SCART)
PAL 50/60 O
NTSC 60 O
RGB 50/60 O
SECAM O
Side AV
PAL 50/60 O
NTSC 60 O
SECAM O
YPbPr
480i, 480p 60Hz O
576i, 576p 50Hz O
720p 50Hz,60Hz O
1080i 50Hz,60Hz O
HDMI
480i 60Hz O
480p 60Hz O
576i, 576p 50Hz O
720p 50Hz,60Hz O
1080i 50Hz,60Hz O
1080p
24Hz,
25Hz,
30Hz,
50Hz,
60Hz
O
(X: Not Available, O: Available)
In some cases a signal on the TV may not be displayed
properly. The problem may be an inconsistency with
standards from the source equipment (DVD, Set-top
box, etc. ). If you do experience such a problem please
contact your dealer and also the manufacturer of the
source equipment.
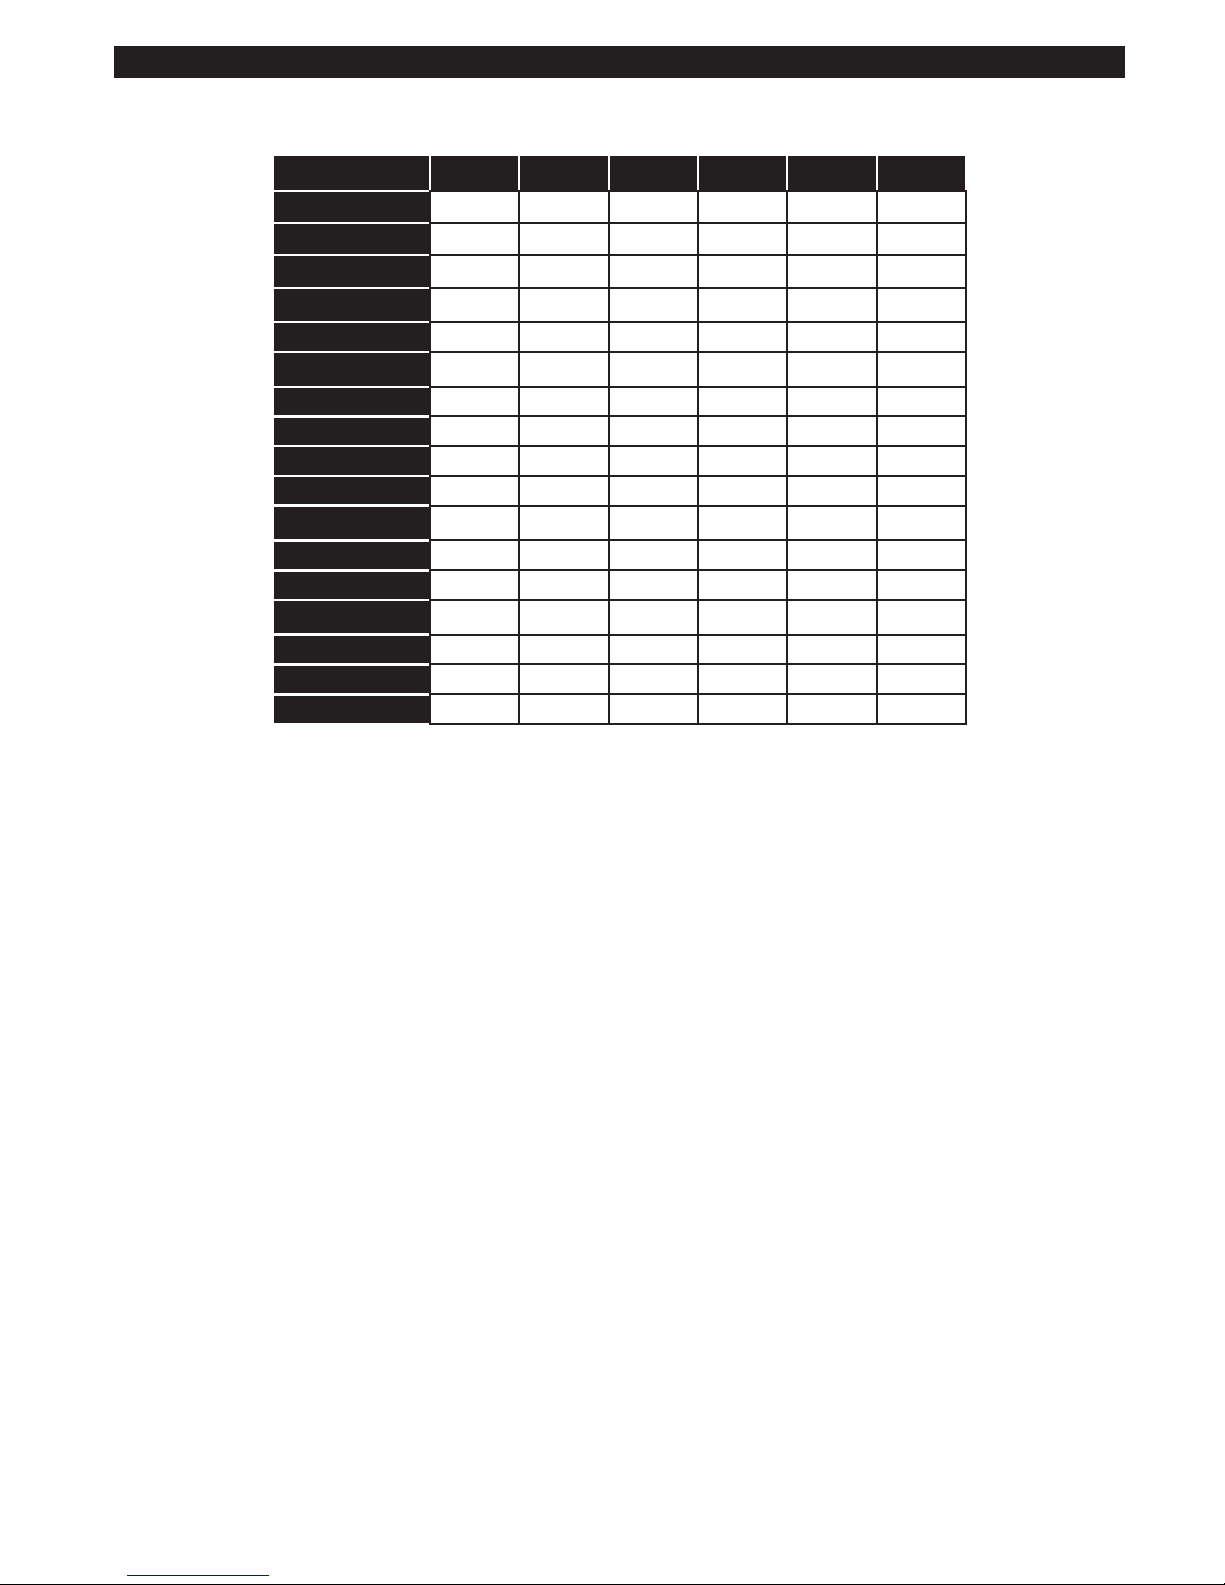
PC Typical Display Modes
The following table is an illustration of some of the
typical video display modes. Your TV may not support
all resolutions.
Index Resolution Frequency
1
640x350 85Hz
2
640x400 70Hz
3
640x400 85Hz
4
640x480 60Hz
5
640x480 66Hz
6
640x480 72Hz
7
640x480 75Hz
8
640x480 85Hz
9
800x600 56Hz
10
800x600 60Hz
11
800x600 70Hz
12
800x600 72Hz
13
800x600 75Hz
14
800x600 85Hz
15
832x624 75Hz
16
1024x768 60Hz
17
1024x768 66Hz
18
1024x768 70Hz
19
1024x768 72Hz
20
1024x768 75Hz
21
1024x768 85Hz
22
1152x864 60Hz
23
1152x864 70Hz
24
1152x864 75Hz
25
1152x864 85Hz
26
1152x870 75Hz
27
1280x768 60Hz
28
1360x768 60Hz
29
1280x768 75Hz
30
1280x768 85Hz
31
1280x960 60Hz
32
1280x960 75Hz
33
1280x960 85Hz
34
1280x1024 60Hz
35
1280x1024 75Hz
36
1280x1024 85Hz
37
1400x1050 60Hz
38
1400x1050 75Hz
39
1400x1050 85Hz
40
1440x900 60Hz
41
1440x900 75Hz
42
1600x1200 60Hz
43
1680x1050 60Hz
44
1920x1080 60Hz
45
1920x1200 60Hz

English - 16 -
Supported File Formats for USB Mode
Media Extension Format Notes
Video .dat, .mpg,
.mpeg
Mpeg1-2 1080P@30fps, 50Mbit/sec
.ts, .trp,
.tp, .m2ts
MPEG2 , H.264,
VC1, AVS, MVC
H.264:1080Px2@25fps, 1080P@50fps MVC:1080P@ 24fps Other: 1080P@30fps 50Mbit/sec
.vob MPEG2 1080P@30fps 50Mbit/sec
.mkv MPEG1-2-4,
H.264
H.264:1080Px2@25fps, 1080P@ 50fps, 1080P@30fps, 50Mbit/sec
.mp4,
.mov
MPEG4, XviD,
H.264
H.264:1080Px2@25fps, 1080P@ 50fps, 1080P@30fps, 50Mbit/sec
.avi MPEG2-4, Xvid,
H.264
H.264:1080Px2@25fps, 1080P@ 50fps, 1080P@30fps, 50Mbit/sec
.a,.v H.264, Sorenson
H.263
H.264:1080Px2@25fps, 1080P@50fps, 1080P@30fps, 40Mbit/sec
.3gp MPEG4, H.264 1920x1080@30P 20Mbit/sec
.asf, .wmv VC1 1080P@30fps, 50Mbit/sec
Audio .mp3 MPEG1/2 Layer
1/2/3 (MP3)
Layer1: 32Kbps ~ 448Kbps (Bit rate) / 16KHz ~ 48KHz (Sampling rate)
Layer2: 8Kbps ~ 384Kbps (Bit rate) / 16KHz ~ 48KHz (Sampling rate)
Layer3: 8Kbps ~ 320Kbps (Bit rate) / 16KHz ~ 48KHz (Sampling rate)
.wav LPCM
.WMA/
ASF
WMA, WMA Pro WMA: 128bps ~ 320Kbps (Bit rate) / 8KHz ~ 48Khz (Sampling rate)
WMA Pro: < 768kbps (Bit rate) / ~ 96KHz (Sampling rate)
.m4a/ .aac AAC, HEAAC Free Format (Bit rate) / 8KHz ~ 48KHz (Sampling rate)
.pcm PCM 8Kbps ~ 320Kbps (Bit rate) / 16KHz ~ 48KHz (Sampling rate)
(works
only with
video
les)
AC3 32Kbps ~ 640Kbps (Bit rate) / 32KHz, 44.1KHz, 48KHz (Sampling rate)
EAC3 32Kbps ~ 6 Mbps (Bit rate) / 32KHz, 44.1KHz, 48KHz (Sampling rate)
LPCM 64Kbps ~ 1.5Mbps (Bit rate) / 8KHz ~ 48Khz (Sampling rate)
IMA-ADPCM/
MS-ADPCM
384Kbps (Bit rate) / 8KHz ~ 48Khz (Sampling rate)
G711 A/mu-law 64~128Kbps (Bit rate) / 8KHz (Sampling rate)
Picture
.jpeg, .jpg
Baseline Resolution(WxH): 15360x8640, 4147200 bytes
Progressive Resolution(WxH): 1024x768, 6291456 bytes
.png
non-interlace Resolution(WxH): 9600x6400, 3840000 bytes
interlace
Resolution(WxH): 1200x800, 3840000 bytes
.bmp
Resolution(WxH): 9600x6400, 3840000 bytes
Subtitle
.sub - Sub1, Sub2, Sub3
.srt -
English - 17 -
Supported DVI Resolutions
When connecting devices to your TV’s connectors by using DVI converter cable(DVI to HDMI cable - not
supplied), you can refer to the following resolution information.
56Hz 60Hz 66Hz 70Hz 72Hz 75Hz
640x400
þ
640x480
þ þ þ þ
800x600
þ þ þ þ þ
832x624
þ
1024x768
þ þ þ þ þ
1152x864
þ þ þ
1152x870
þ
1280x768
þ þ
1360x768
þ
1280x960
þ þ
1280x1024
þ þ
1400x1050
þ þ
1440x900
þ þ
1600x1200
þ
1680x1050
þ
1920x1080
þ
1920x1200
þ
Русский - 18 -
Техника безопасности ........................................ 18
Функции ............................................................... 19
Технические характеристики.............................. 20
Пульт дистанционного управления RC 1912 (В
зависимости от модели) ..................................... 21
Пульт дистанционного управления RC 4800 (В
зависимости от модели) ..................................... 22
Пульт дистанционного управления RC 4875 (В
зависимости от модели) ..................................... 23
Телевизор и кнопки управления (в зависимости
от модели) ........................................................... 25
Подключение электропитания ........................... 25
Подключение антенны ........................................ 25
Информация об охране окружающей среды .... 26
Первая установка спутниковой антенны (в
зависимости от модели) ..................................... 26
Воспроизведение медиа-файлов через вход
USB ...................................................................... 27
Общее управление телевизором ...................... 30
Поиск и устранение неисправностей и
рекомендации ..................................................... 31
Функции подключения (в зависимости от
модели) ................................................................ 32
Поддерживаемые форматы файлов для режима
USB ...................................................................... 36
Поддерживаемые разрешения DVI ................... 37
Содержание
Техника безопасности
Использование телевизора в экстремальных
условиях может вызвать поломку телевизора.
ВНИМАНИЕ
ОПАСНОСТЬ ПОРАЖЕНИЯ
ЭЛЕКТРИЧЕСКИМ ТОКОМ
НЕ ОТКРЫВАТЬ
ВНИМАНИЕ: В ЦЕЛЯХ СНИЖЕНИЯ РИСКА ПОРАЖЕНИЯ
ЭЛЕКТРИЧЕСКИМ ТОКОМ НЕ СНИМАЙТЕ
ЗАДНЮЮ КРЫШКУ(ИЛИ ЗАДНЮЮ ПАНЕЛЬ).
ВНУТРИ НЕТ ДЕТАЛЕЙ, ТРЕБУЮЩИХ
ОБСЛУЖИВАНИЯ СО СТОРОНЫ ПОЛЬЗОВАТЕЛЯ.
ТЕХНИЧЕСКОЕ ОБСЛУЖИВАНИЕ ДОЛЖНО
ОСУЩЕСТВЛЯТЬСЯ КВАЛИФИЦИРОВАННЫМ
ПЕРСОНАЛОМ СЕРВИСНОГО ЦЕНТРА.
Примечание: для использования
соответствующих функций следуйте
инструкциям на экране
В случае неблагоприятных погодных условий
(ливней, грозы) и отсутствия на время отпуска
или долгих периодов неиспользования
телевизора отключайте телевизор от сети
питания. Штепсельная вилка используется
для отключения телевизора от электрической
сети, поэтому она должна быть всегда
исправной.
Этот символ присутствует в литературе,
входящей в комплект поставки, в случае
наличия важной информации относительно
эксплуатации и обслуживания телевизора.
ВАЖНО - Перед установкой
или эксплуатацией данного
оборудования ознакомьтесь с
настоящим руководством.
ПРЕДУПРЕЖДЕНИЕ: Лицам с физическими,
сенсорными или умственным нарушениями,
детям, а также лицам, не имеющим
достаточного опыта и/или знаний, следует
пользоваться электрооборудованием только
под присмотром.
• Для целей вентиляции оставьте, минимум, 10 см
свободного места вокруг телевизора.
• НЕ перекрывайте вентиляционные отверстия.
• НЕ помещайте телевизор на наклонные или
неустойчивые поверхности - телевизор может
опрокинуться.
• Используйте данное устройство в умеренных
климатических условиях.
• Доступ к штепсельной вилке не должен быть
затруднен. НЕ ставьте телевизор, мебель и
т.п. на шнур питания. Повреждение шнура
питания/вилки может привести к возгоранию
или поражению электрическим током. При
выключении прибора из розетки тяните за вилку;
НЕ тяните за шнур питания. Не прикасайтесь к
шнуру питания / вилке влажными руками, так как
это может привести к короткому замыканию или
поражению электрическим током. Не допускайте
образования узлов на шнуре и его переплетения
с другими шнурами. При повреждении шнур
должен быть заменен. Замена должна
производиться только квалифицированными
рабочими.
• НЕ используйте данный телевизор во влажном
месте. Не допускайте попадания на телевизор
жидкостей. Если внутрь корпуса устройства попал
посторонний предмет или жидкость, отключите
телевизор от сети и прекратите эксплуатацию
телевизора до прихода квалифицированного
специалиста.
• Не устанавливайте устройство в месте,
подверженном воздействию прямых
солнечных лучей, около источников.
• Чрезмерное давление звукового
излучения из наушников может вызвать потерю
слуха.
• Не ставьте на телевизор источники
открытого огня, например, зажженные
свечи.
Русский - 19 -
• Для предотвращения травм телевизор
необходимо надежно прикрепить к стене в
соответствии с инструкциями по настенному
монтажу (если данная опция доступна).
• На экране может случайно появиться несколько
неактивных пикселей в виде фиксированной
синей, зеленой или красной точки. Это не
оказывает влияния на работу устройства. Будьте
осторожны, чтобы не поцарапать экран ногтями
или другими твердыми предметами.
• Перед проведением очистки, отключите
телевизор от электрической сети. Во время
чистки используйте только мягкую сухую ткань.
Предупреждение.
Риск получения тяжких
телесных повреждений или
летального исхода.
Опасность
поражения
электрическим током
Опасность высокого
напряжения.
Внимание
Риск получения травм или
повреждения имущества
Важно
Правильная работа с
системой
Примечание
Отмечены дополнительные
примечания
Подготовка
Для целей вентиляции оставьте, минимум, 10
см свободного места вокруг телевизора. Для
предотвращения сбоев и опасных ситуаций не
ставьте ничего на телевизор. Используйте данное
устройство в умеренных климатических условиях.
10 cm
10 cm
10 cm
Функции
• Цветной телевизор управляется при помощи
пульта дистанционного управления
• Встроенное цифровое/кабельное/спутниковое
телевидение (DVB-T-T2/C/S-S2) (зависит от
модели)
• Входы HDMI для подключения других устройств
в разъемы HDMI
• Вход USB
• Система меню OSD
• Гнездо Scart для внешних устройств (таких, как
DVD-плееры, PVR, видеоигры и т.д.).
• Звуковая стереосистема
• Телетекст
• Разъем для наушников
• Система автоматического программирования
• Ручная настройка
• Автоматическое отключение после
определенного периода работы - до восьми
часов.
• Таймер спящего режима
• Замок от детей
• Автоматическое отключение звука при отсутствии
сигнала.
• Воспроизведение в стандарте NTSC
• AVL (автоматическое ограничение уровня
громкости)
• PLL (поиск частоты)
• PC-вход
• Режим Игра
• Функция отключения изображения
• Запись программы
• Сдвиг программы по времени
• Pixellence
• Ethernet (ЛВС) для подключения к Интернету и
обслуживания.
• Поддержка WIFI 802.11n , встроенный или через
аппаратный ключ USB
• Стандарт домашней сети DLNA.
Функции могут различаться в
зависимости от модели.
Русский - 20 -
Технические характеристики
ТЕЛЕВЕЩАНИЕ PAL BG/I/DK/LL’
Прием каналов
VHF (ДИАПАЗОН I/
III) - UHF (ДИАПАЗОН
U) - ГИПЕРЧАСТОТНЫЙ
ДИАПАЗОН
Количество
предварительно
заданных каналов
1000 (без спутниковой
антенны)
10000 (со спутниковой
антенной)
Индикатор каналов Отображение на экране
Радиочастотный
Антенный Вход
75 Ом
(несбалансированный)
Рабочее напряжение
220-240 В переменного
тока, 50 Гц.
Аудио
Немецкий Nicam.
SRS TruSurround (в
зависимости от модели)
Потребляемая
мощность (Вт)
См. этикетку на задней
обложке.
Рабочая температура
и влажность
от 0ºC до 40ºC, 85%
влажности макс.
Информация для пользователей по утилизации
старого оборудования и батареек
[Только для стран Европейского Союза]
Оборудование, на которое они нанесены, нельзя
выбрасывать вместе с обычными бытовыми
отходами.
Воспользуйтесь соответствующими системами
или средствами для утилизации данных изделий.
Примечание: Значок Pb под символом на
батарейках означает, что данная батарейка
содержит свинец.
Изделие
Батарея
Уведомление
ПРИЗНАНИЕ ТОРГОВОЙ МАРКИ
Произведено по лицензии Dolby Laboratories.
“Dolby” и двойной символ D являются торговыми
марками компании «Dolby Laboratories».
HDMI, логотип HDMI и High-Denition Multimedia
Interface, а также HDMI Logo являются торговыми
марками или зарегистрированными марками
компании HDMI Licensing LLC в США и других
странах.
Русский - 21 -
Пульт дистанционного управления RC 1912 (В зависимости от модели)
Примечание: Кнопки функций на некоторых
экранных меню могут различаться в зависимости
от пульта дистанционного управления
телевизора. Пользуйтесь кнопками функций,
расположенными внизу экрана.
1. Режим ожидания: Включение/выключение
телевизора
2. Моя кнопка 1 (*)
3. Интернет: Откройте страницу портала, где вы
сможете найти любые веб-приложения.
4. Эквалайзер: Изменение режимов эквалайзера
5. Настройки: Выбирает режим изображения;
периодически повторяет многочисленные опции
дисплея
6. Цифровые кнопки: Переключение канала, ввод
цифры или буквы в текстовом окне на экране.
7. Телевизор: Отображение списка каналов /
Переключение между типами телевещания /
Переключение на источник телевидения
8. EPG (Электронная программа передач):
Отображение электронной программы передач
9. Меню: Отображение меню телевизора.
10. Навигационные кнопки: Помогает перемещаться
по меню, контенту и т.д. и отображает подстраницы в
режиме TXT при нажатии кнопки Вправо или Влево.
11. Назад / Возврат: Возврат к предыдущему экрану,
открывание страницы указателя (в режиме TXT)
12. Любимые каналы: Отображение любимых каналов,
указанных пользователем
13. Громкость +/-
14. Info: Отображение информации о контенте,
показываемом на экране (раскрытие информации - в
режиме TXT)
15. Запись: Запись программ
16. Воспроизведение: Начинает воспроизводить
выбранные медиа-файлы
17. Язык: Переключает режимы звука (аналоговое
телевидение), отображает и изменяет язык аудио/
субтитров (цифровое телевидение, при наличии)
18. Быстрая перемотка назад: Перематывает кадры
назад в медиа-файлах, например, в фильмах
19. Красная кнопка
20. Зеленая кнопка
21. Моя кнопка 2 (*)
22. Источник: Показывает все доступные станции
вещания и источники контента
23. Спящий режим: Программирует телевизор на
автоматическое отключение
24. Медиа браузер: Открывает экран медиа-браузера
25. Перестановка каналов: Поочередное включение
предыдущих и текущих каналов или источников
26. Текст: Отображает телетекст (при наличии), нажмите
еще раз для наложения телетекста на обычное
телевизионное изображение (смешанный режим).
27. Быстрое меню: Отображает список меню для
быстрого доступа
28. OK: Подтверждение выбора пользователя,
удерживание страницы (в режиме TXT), просмотр
списка каналов (режим DTV)
29. Выход : Закрывание отображаемых меню и выход из
них либо возврат к предыдущему экрану
30. Экран: Изменяет соотношение сторон экрана
31. Без звука: Полностью отключает громкость
телевизора
32. Программа + / -
33. Пауза: Приостанавливает воспроизведение медиа-
файлов, начинает запись со смещением по времени
34. Stop: Прекращает воспроизведение медиа-файлов
35. Субтитры: Включение и выключение субтитров (при
наличии)
36. Быстрая перемотка вперед: Перематывает кадры
вперед в медиа-файлах, например, в фильмах
37. Синяя кнопка
38. Желтая кнопка
.
ZOOM
REPEAT
LANG.
12
3
4
56
7
8
9
0
V
P
EXIT
BACK
Q.
MENU
.,/@
V
P
SOURCE
1
/2/
PRESETS
(*) НАСТРАИВАЕМАЯ КНОПКА МОЯ
КНОПКА 1 и МОЯ КНОПКА 2:
Эти функции могут выполнять функции по умолчанию,
в зависимости от модели. Однако вы можете задать
определенную функцию для этих кнопок, удерживая их
нажатыми в течение 5 секунд на желаемом канале или
ссылке. На экране появится сообщение подтверждения.
Теперь МОЯ КНОПКА ассоциирована с выбранной
функцией.
Обратите внимание, что при выполнении первой
установки МОЯ КНОПКА 1 и 2 вернется к функции,
установленной по умолчанию.
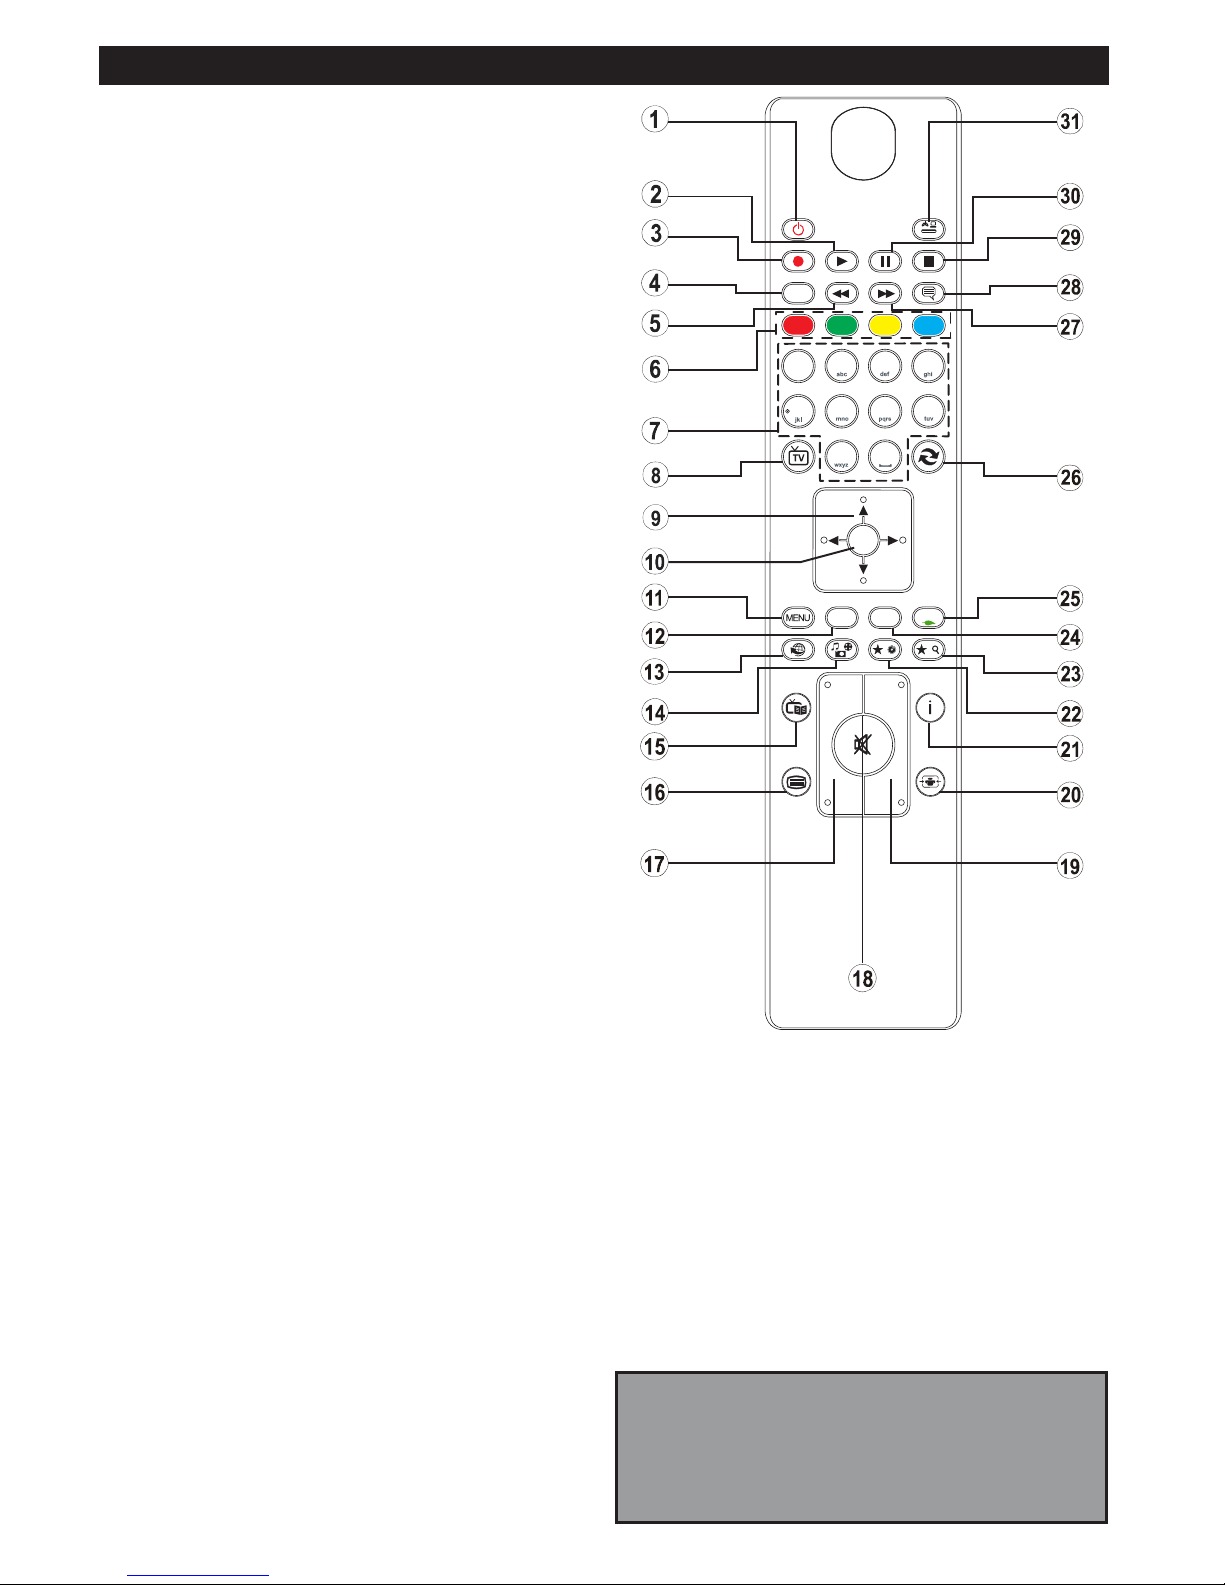
Русский - 22 -
4
7
8
9
P+
P-
V+
V-
1
.,/@
2
3
5
6
0
OK
Q.MENU
EXIT
BACK
LANG.
SOURCE
2
/
1
/
Пульт дистанционного управления RC 4800 (В зависимости от модели)
1. Режим ожидания: Включение/выключение
телевизора
2. Воспроизведение: Начинает воспроизводить
выбранные медиа-файлы
3. Запись: Запись программ
4. Язык: Переключает режимы звука (аналоговое
телевидение), отображает и изменяет язык аудио/
субтитров (цифровое телевидение, при наличии)
5. Быстрая перемотка назад: Перематывает кадры
назад в медиа-файлах, например, в фильмах
6. Цветные кнопки Выполните инструкции на экране
для использования цветных кнопок
7. Цифровые кнопки: Переключение канала, ввод
цифры или буквы в текстовом окне на экране.
8. Телевизор: Отображение списка каналов /
Переключение между типами телевещания /
Переключение на источник телевидения
9. Навигационные кнопки: Помогает перемещаться
по меню, контенту и т.д. и отображает подстраницы в
режиме TXT при нажатии кнопки Вправо или Влево.
10. OK: Подтверждение выбора пользователя,
удерживание страницы (в режиме TXT), просмотр
списка каналов (режим DTV)
11. Меню: Отображение меню телевизора.
12. Назад / Возврат: Возврат к предыдущему экрану,
открывание страницы указателя (в режиме TXT)
13. Интернет: Откройте страницу портала, где вы
сможете найти любые веб-приложения.
14. Медиа браузер: Открывает экран медиа-браузера
15. EPG (Электронная программа передач):
Отображение электронной программы передач
16. Текст: Отображает телетекст (при наличии), нажмите
еще раз для наложения телетекста на обычное
телевизионное изображение (смешанный режим).
17. Громкость +/-
18. Без звука: Полностью отключает громкость
телевизора
19. Программа + / -
20. Экран: Изменяет соотношение сторон экрана
21. Info: Отображение информации о контенте,
показываемом на экране (раскрытие информации - в
режиме TXT)
22. Моя кнопка 1 (*)
23. Моя кнопка 2 (*)
24. Выход: Закрывание отображаемых меню и выход из
них либо возврат к предыдущему экрану
25. Быстрое меню: Отображает список меню для
быстрого доступа
26. Перестановка каналов: Поочередное включение
предыдущих и текущих каналов или источников
27. Быстрая перемотка вперед: Перематывает кадры
вперед в медиа-файлах, например, в фильмах
28. Субтитры: Включение и выключение субтитров (при
наличии)
29. Stop: Прекращает воспроизведение медиа-файлов
30. Пауза: Приостанавливает воспроизведение медиа-
файлов, начинает запись со смещением по времени
31. Источник: Показывает все доступные станции
вещания и источники контента
Примечание: Кнопки функций на некоторых
экранных меню могут различаться в зависимости
от пульта дистанционного управления
телевизора. Пользуйтесь кнопками функций,
расположенными внизу экрана.
(*) НАСТРАИВАЕМАЯ КНОПКА МОЯ
КНОПКА 1 и МОЯ КНОПКА 2:
Эти функции могут выполнять функции по умолчанию,
в зависимости от модели. Однако вы можете задать
определенную функцию для этих кнопок, удерживая их
нажатыми в течение 5 секунд на желаемом канале или
ссылке. На экране появится сообщение подтверждения.
Теперь МОЯ КНОПКА ассоциирована с выбранной
функцией.
Обратите внимание, что при выполнении первой
установки МОЯ КНОПКА 1 и 2 вернется к функции,
установленной по умолчанию.
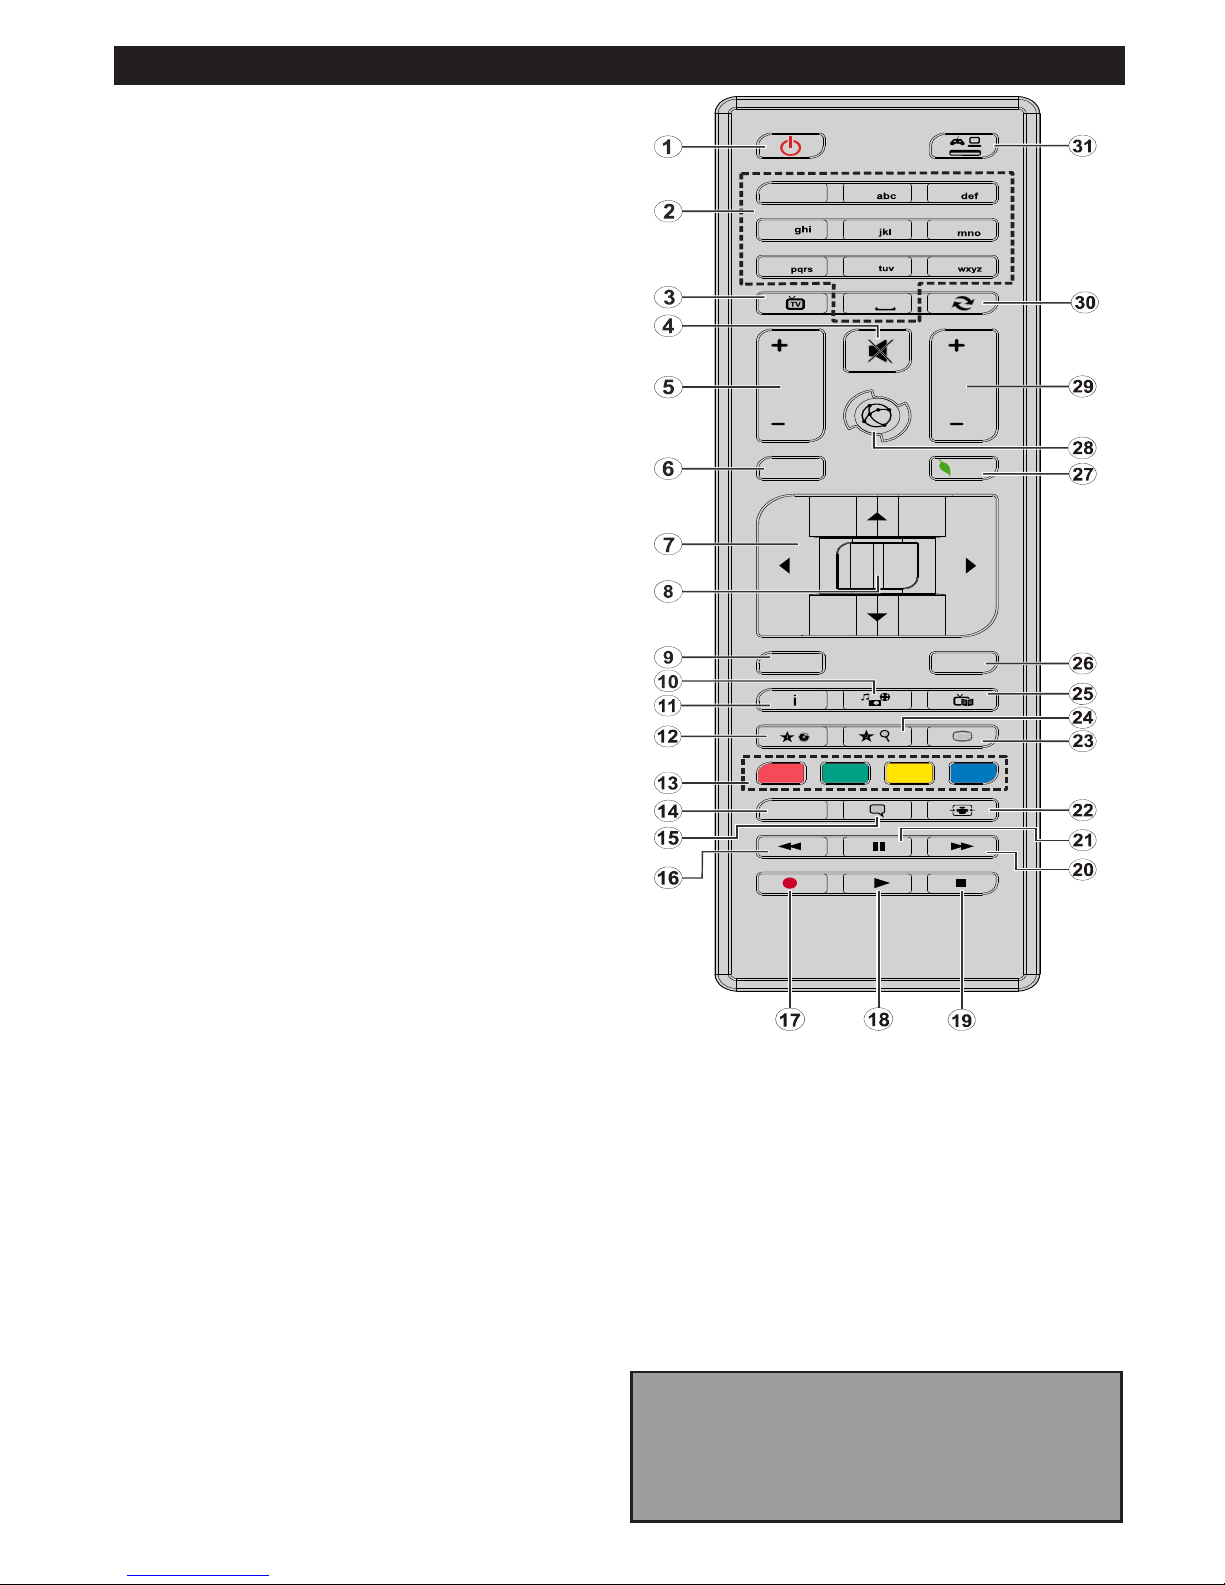
Русский - 23 -
1
2
3
4
5
6
0
LANG.
BACK
MENU
OK
EXIT
Q.MENU
/
V
/
V
P
P
7 8
9
.,/@
Пульт дистанционного управления RC 4875 (В зависимости от модели)
Примечание: Кнопки функций на некоторых
экранных меню могут различаться в зависимости
от пульта дистанционного управления
телевизора. Пользуйтесь кнопками функций,
расположенными внизу экрана.
1. Режим ожидания: Включение/выключение
телевизора
2. Цифровые кнопки: Переключение канала, ввод
цифры или буквы в текстовом окне на экране.
3. Телевизор: Отображение списка каналов /
Переключение между типами телевещания /
Переключение на источник телевидения
4. Без звука: Полностью отключает громкость
телевизора
5. Громкость +/-
6. Меню: Отображение меню телевизора.
7. Навигационные кнопки: Помогает перемещаться
по меню, контенту и т.д. и отображает подстраницы
в режиме TXT при нажатии кнопки Right (Вправо) или
Left (Влево)
8. OK : Подтверждение выбора пользователя,
удерживание страницы (в режиме TXT), просмотр
списка каналов (режим DTV)
9. Назад / Возврат: Возврат к предыдущему экрану,
открывание страницы указателя (в режиме TXT)
10. Медиа браузер (Media browser): Открывает экран
медиа-браузера
11. Информация : Отображение информации о контенте,
показываемом на экране (раскрытие информации - в
режиме TXT)
12. Моя кнопка 1 (*)
13. Цветные кнопки: Выполните инструкции на экране
для использования цветных кнопок
14. Язык: Переключает режимы звука (аналоговое
телевидение), отображает и изменяет язык аудио/
субтитров (цифровое телевидение, при наличии)
15. Субтитры: Включение и выключение субтитров (при
наличии)
16. Быстрая перемотка назад (Rapid reverse):
Перематывает кадры назад в медиа-файлах,
например, в фильмах
17. Запись (Record): Запись программ (необязательный)
18. Воспроизведение: Начинает воспроизводить
выбранные медиа-файлы
19. Стоп: Прекращает воспроизведение медиа-файлов
20. Быстрая перемотка вперед (Rapid advance):
Перематывает кадры вперед в медиа-файлах,
например, в фильмах
21. Пауза: Приостанавливает воспроизведение медиафайлов, начинает запись со смещением по времени
22. Экран: Изменяет соотношение сторон экрана
23. Текст: Отображает телетекст (при наличии), нажмите
еще раз для наложения телетекста на обычное
телевизионное изображение (смешанный режим).
24. Моя кнопка 2 (*)
25. EPG (Электронная программа передач):
Отображение электронной программы передач
26. Выход (Exit): Закрывание отображаемых меню и
выход из них либо возврат к предыдущему экрану
27. Быстрое меню: Отображает список меню для
быстрого доступа
28. Интернет: Откройте страницу портала, где вы
сможете найти любые веб-приложения.
29. Программа + / -
30. Перестановка каналов (Swap): Поочередное
включение предыдущих и текущих каналов или
источников
31. Источник: Показывает все доступные станции
вещания и источники контента
(*) НАСТРАИВАЕМАЯ КНОПКА МОЯ
КНОПКА 1 и МОЯ КНОПКА 2:
Эти функции могут выполнять функции по умолчанию,
в зависимости от модели. Однако вы можете задать
определенную функцию для этих кнопок, удерживая их
нажатыми в течение 5 секунд на желаемом канале или
ссылке. На экране появится сообщение подтверждения.
Теперь МОЯ КНОПКА ассоциирована с выбранной
функцией.
Обратите внимание, что при выполнении первой
установки МОЯ КНОПКА 1 и 2 вернется к функции,
установленной по умолчанию.
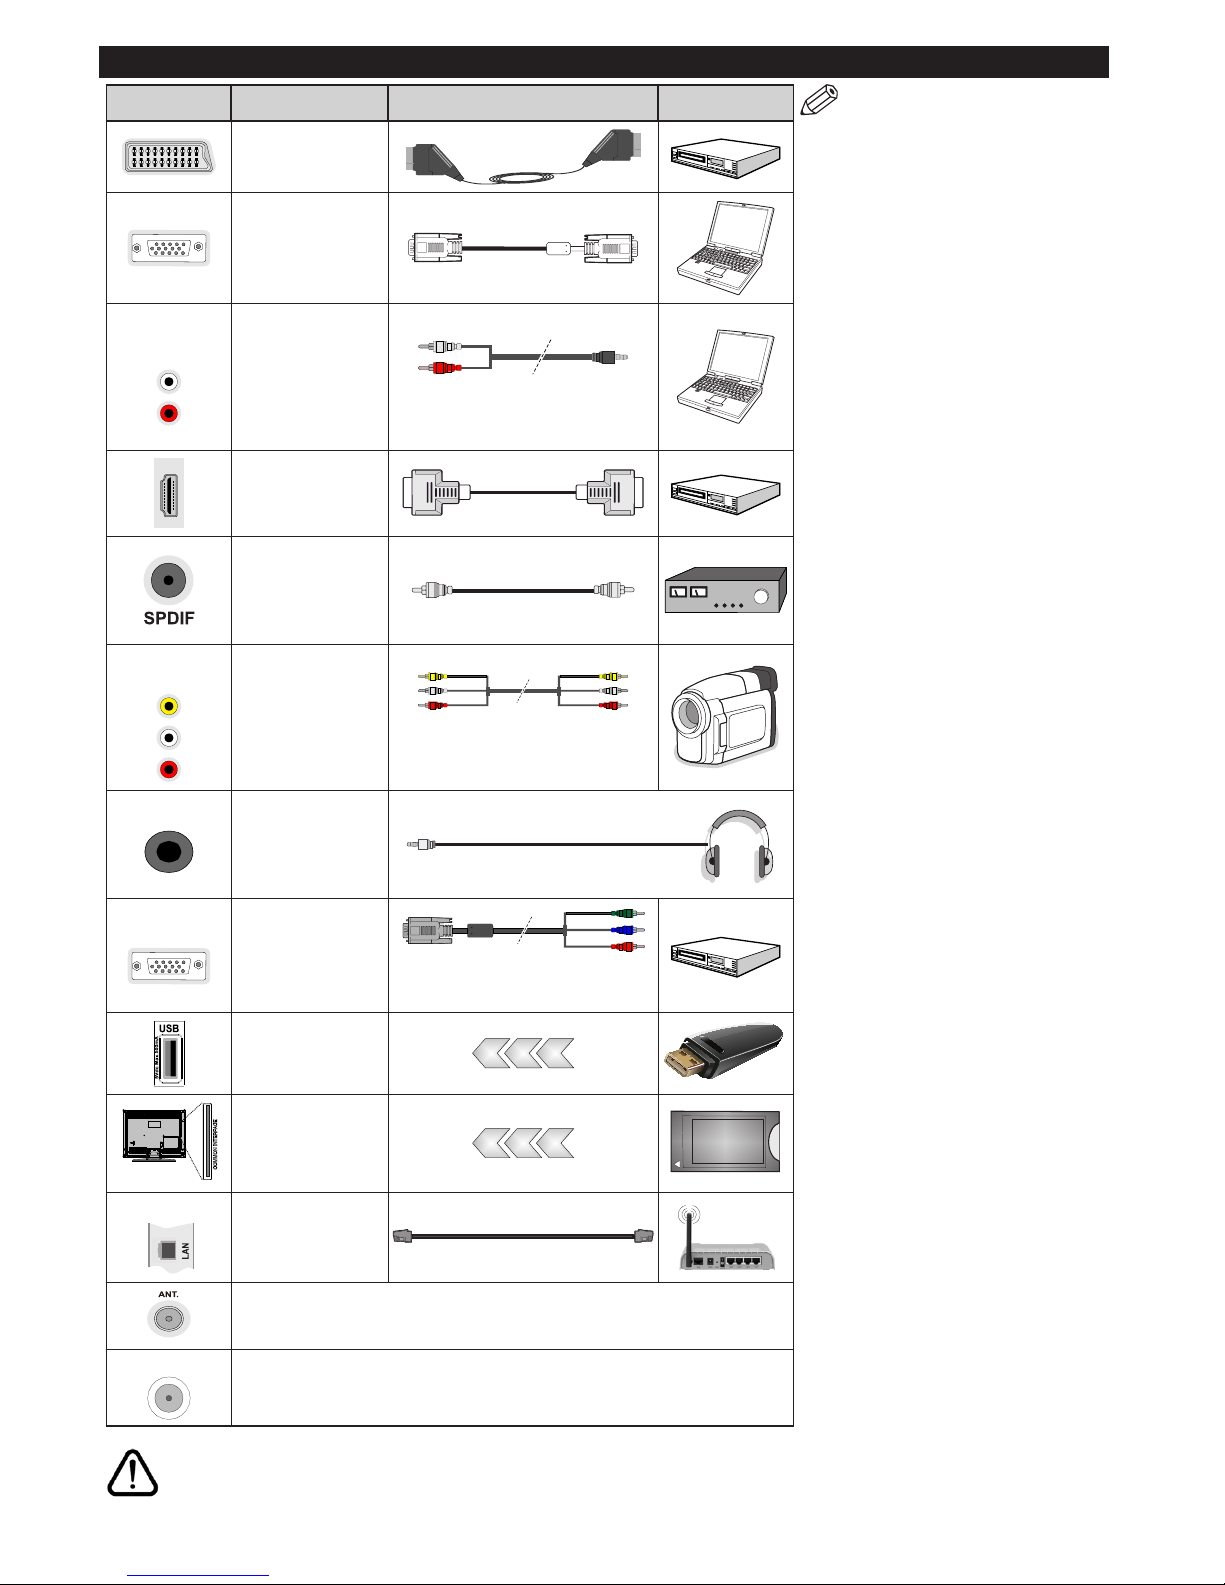
Русский - 24 -
Разъемы
ПРИМЕЧАНИЕ:
При подключении
устройства через YPbPr
или боковые входы AV,
необходимо использовать
соединительные кабели,
чтобы подключение было
возможным. См. рисунки на
левой стороне. Для подключения
сигнала YPbPr через вход VGA
можно использовать кабель
"YPbPr - VGA" (не поставляется).
Нельзя использовать VGA
и YPbPr одновременно. Для
воспроизведения звука PC/
YPbPr используйте необходимо
подключить в боковые звуковые
входы БЕЛЫЙ и КРАСНЫЙ
разъемы звукового кабеля PC/
YPbPr (не поставляется). | Если
внешнее устройство подключено
через разъем SCART, телевизор
автоматически перейдет в режим
AV.| При приеме каналов цифрового
ТВ (Mpeg4 H.264) или в режиме
работы с программой Media
Browser разъем SCART не будет
обеспечивать вывод сигнала. |
При использовании комплекта
для настенного крепления
(возможно приобретение у
третьих лиц на рынке, если он
не поставляется), перед началом
монтажа на стену рекомендуется
подключить все кабели в
заднюю панель телевизора. |
Вставка или удаление модуля CI
осуществляется, только если
телевизор ВЫКЛЮЧЕН. Для
получения подробной информации
о настройках ознакомьтесь с
руководством по модулю. |
Каждый USB-вход поддерживает
устройства до 500 милиампер.
Подключение устройств, значение
тока в которых выше 500 мА,
может привести к повреждению
телевизора. | При подключении
HDMI-кабеля к телевизору
необходимо использовать
только экранированный кабель
HDMI, чтобы беспечить
достаточную сопротивляемость
паразитическому влиятиню
помех..
Если вы хотите подключить к телевизору устройство, убедитесь, что телевизор и устройство отключены
непосредственно перед выполнением подключения. После завершения пдключения вы можете включить оба
устройства и использьвать их.
Разъем Òèï Провода Устройство
Соединение
Scart
(сзади)
Соединение
VGA
(сзади)
БОКОВОЙ
AV
Разъем для
звука
ПК / YPbPr
(сбоку)
Аудио-кабели
PC/YPbPR (не
прилагаются)
Соединение
HDMI
(сзади)
Разъем
SPDIF
(коаксиальный
выход)
(сзади)
БОКОВОЙ
AV
Боковой разъем
AV
(аудио/видео)
(сбоку)
Соединительный
кабель для бокового
разъема AV (не
входит в комплект
поставки)
НАУШНИКИ
Разъем для
наушников
(сбоку)
YPBPR
Разъем для
компонентного
видео YPbPr
(сзади)
Соединительный
кабель ПК к YPbPr (не
прилагается)
Разъем
USB
(сбоку)
Разъем
CI
(сбоку)
CAM
module
LAN
Разъем
Ethernet
(сзади)
Кабель LAN / Ethernet
Вход RF подсоединяется к антенне или к кабелю системы кабельного
телевидения. (В зависимости от модели.)
SAT
Вход для спутниковой антенны (LNB) используется для подключения телевизора
к спутниковой системе. (В зависимости от модели.)
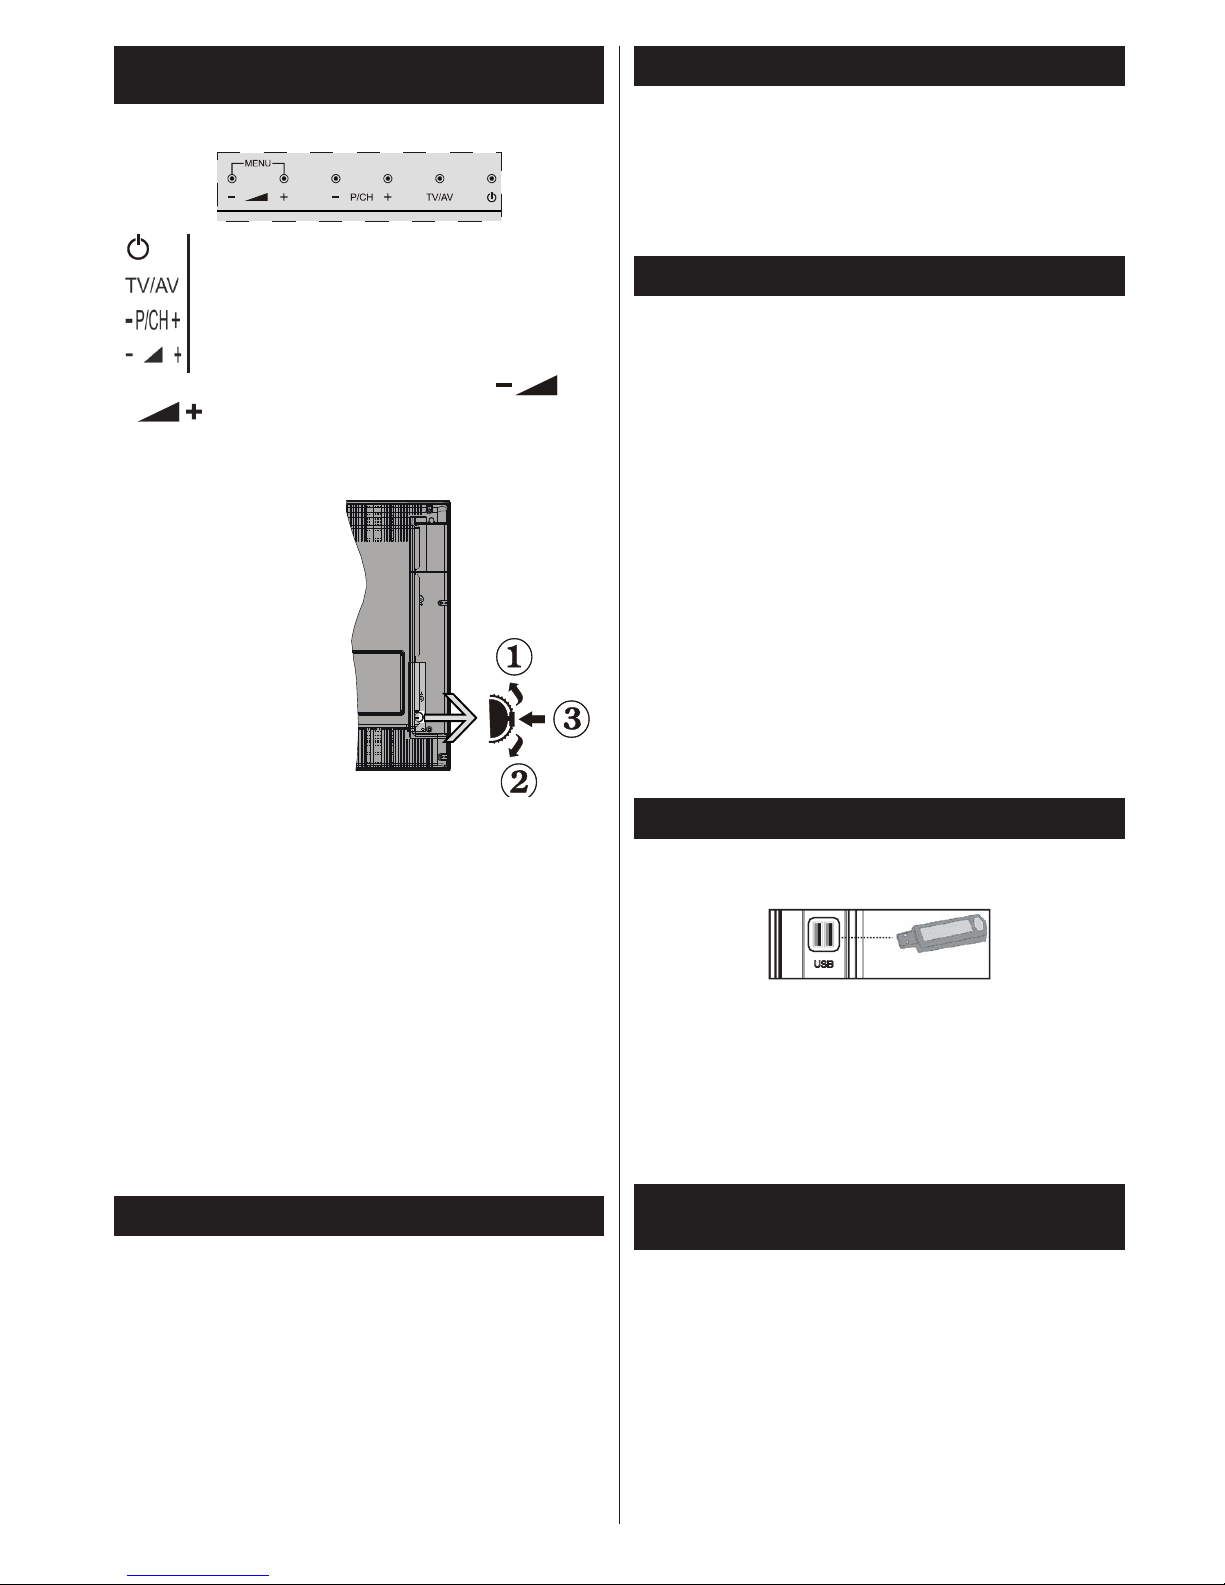
Русский - 25 -
Телевизор и кнопки управления (в зависимости
от модели)
Режим ожидания/Вкл.
Источник
Программа +/-
Громкость +/-
Примечание: Нажмите кнопку “ ” и
“ ” одновременно для просмотра
главного меню.
или
1. Вверх
2. Вниз
3. Переключатель Программа/
Громкость/AV/Режим ожидания – Вкл.
Примечание:
Для изменения громкости можно
переместить переключатель вверх или вниз.
Для изменения канала нажмите середину
переключателя один раз (Положение 3), а
затем переместите вверх или вниз. Если
нажать середину переключателя еще раз,
отобразится источник OSD. Если нажать
середину переключателя и удерживать
несколько секунд, телевизор переключится
в режим ожидания. Главное меню OSD не
может быть отображено с помощью кнопок
управления.
Подключение электропитания
После распаковки необходимо дать телевизору
нагреться до комнатной температуры и только
потом подключать к электрической сети.
Подключение кабеля питания:
ВАЖНО: Телевизор рассчитан на работу от
электросети с напряжением 220-240В переменного
тока и частотой 50 Гц.
Вставьте шнур питания в розетку сети. Оставьте
пространство минимум 10 мм вокруг телевизора.
Подключение антенны
Подключите штепсель антенны или кабельного
телевидения к гнезду для антенны (AERIAL
INPUT (ANT.), находящемуся на задней панели
телевизора.
Наличие соединений для спутникового и
кабельного телевидения зависит от модели.
Подключение через USB
С помощью USB-входа на телевизоре к нему
можно подключать USB-устройства. Эта функция
позволяет просматривать/проигрывать файлы
JPG, видео и MP3, сохраненные на устройстве
памяти USB. Некоторые виды USB-устройств
(например, МР3-плейеры) могут оказаться
не совместимыми с данным телевизором.
Необходимо выполнить резервное копирование
файлов перед любыми подключениями к
телевизору во избежание возможной потери
данных. Следует отметить, что производитель не
несет ответственности за повреждение файлов
или утерю данных. Не извлекайте USB-модуль
во время проигрывания файла.
ВНИМАНИЕ: Быстрая вставка и извлечение
устройств USB – крайне опасная операция.
Избегайте частого подключения и отключения
устройства. Это может повредить USB-плеер и
непосредственно устройство USB.
Боковая сторона - память USB
Второй разъем USB является опцией в
зависимости от модели.
ВАЖНО: Телевизор следует отключать при
вставке или извлечении USB-устройства. Вставьте
устройство USB в USB-вход телевизора. С
помощью USB-входа на телевизоре к нему можно
подключать USB-устройства.
Примечание: Возможно, что некоторые типы
жестких дисков не поддерживаются.
Установка батареек в пульт дистанционного
управления
Вставьте две батарейки типа AAA/R3 или
аналогичные. Если ПДУ не будет использоваться
в течение длительного времени, извлеките из
него батарейки. В противном случае он может
быть поврежден в результате протечки батареек.
Дистанция работы ПДУ составляет примерно
7м/23 фута.

Русский - 26 -
Информация об охране окружающей среды
Данный телевизор разработан как изделие,
которое является экологически благоприятным.
Для снижения энергопотребления необходимо
выполнить следующие шаги:
установить «режим энергосбережения» в
состояние Eco, то телевизор переключится в
режим энергосбережения. Настройки режима
энергосбережиня можно найти в разделе
Изображение главного меню. Следует отметить,
что изменение некоторых настроек изображения
будет недоступно.
Если нажата кнопка «Вправо», появится
сообщение“Экран отключится на 15 секунд».
Выберите ПРОДОЛЖИТЬ и нажмите OK, чтобы
выключить телевизор Если не будет нажата какаялибо кнопка, экран отключится через 15 секунд.
Нажмите любую кнопку на пульте дистанционного
управления телевизора, чтобы включить экран
снова. Если отключить режим Power Save
Mode (Режим энергосбережения), режим Picture
(Изображение) автоматически переключится на
Dynamic (Динамический).
Когда телевизор не используется, выключайте
его или отключайте из розетки. Это уменьшит
потребление энергии.
Выключение/выключение телевизора (в
зависимости от модели)
Включение телевизора.
• Подключите сетевой шнур к сети электропитания
с параметрами 220-240 В переменного тока,
частота 50 Гц.
• Должен загореться светодиодный индикатор
режима ожидания.
Выведите телевизор из режима ожидания любым
из способов:
• Нажмите кнопку Режим ожидания, Программа
+/- или числовую кнопку на пульте дистанционного
управления.
Кнопки управления на телевизоре (в
зависимости от модели)
• Нажмите на телевизоре кнопку Режим ожидания
или Программа +/-. Телевизор включится.
или
• Нажмите и удерживайте в левой части
телевизора, пока он не перейдет в режим
ожидания. Телевизор включится.
Выключение телевизора (в зависимости от
модели)
• Нажмите кнопку Режим ожидания на пульте
дистанционного управления или кнопку Режим
ожидания на телевизоре либо удерживайте
нажатым выключатель на телевизоре, чтобы
переключить телевизор в режим ожидания (в
зависимости от модели).
• Для полного отключения питания телевизора,
отключите сетевой шнур из розетки.
Примечание: При переключении телевизора в
режим ожидания индикатор режима ожидания
может мигать, показывая активность таких
функций как Поиск в режиме ожидания, Загрузка
по беспроводной связи или Таймер. Светодиод
может мигать при включении телевизора из
режима ожидания.
Первая установка спутниковой антенны (в
зависимости от модели)
При первом включении появляется меню выбора
языка. Выберите необходимый язык и нажмите
на кнопку OK.
На следующей экранной странице установите
первичные настройки, используя навигационные
кнопки, и нажмите OK по мере завершения.
Примечание: В зависимости от выбора Страны,
на этом этапе может запрашиваться ввод и
подтверждение ПИН-кода. Выбранный ПИН-код не
может являться 0000. Необходимо ввести его, если
потребуется ввод ПИН-кода для любых операций с
меню позже.
На данном этапе вы можете включить опцию
Магазинный режим. Данная опция будет
использоваться для конфигурации настроек
телевизора для обеспечения наилучшего качества
изображения, и поддерживаемые функции
телевизора будут отображаться на верхней части
экрана в качестве информационного баннера.
Эта опция предназначена для использования
в магазине. Для домашнего использования
рекомендуется выбирать Домашний режим. Если
выбран Магазинный режим, отобразится экран
подтверждения. Выберите ДА, чтобы продолжить.
Эта опция будет доступна меню More («Больше»)
и может быть выключена/включена позже.
Нажмите кнопку ОК на пульте дистанционного
управления для продолжения настройки, и
на экране появится сообщение с запросом
о намерении продолжать настройку сети.
Выберите "Да", и отобразится меню "Настройки
сети". Для выполнения настройки проводного и
беспроводного соединения ссылайтесь на раздел
«Подключение». После завершения настроек
нажмите кнопку OK, чтобы продолжить.
установка воздушной антенны
Если на экране типа поиска выбрана опция
антенны, то будет выполняться поиск цифровых
станций эфирного вещания. После сохранения
всех имеющихся станций на экране появится
список каналов.

Русский - 27 -
Нажмите кнопку Menu, чтобы выйти из меню
"Редактирование списка каналов" и начать
просмотр телевизора.
Монтаж кабеля (в зависимости от
модели)
Выберите опцию CABLE и нажмите кнопку OK
на пульте дистанционного управления, после
этого отобразится сообщение о подтверждении.
Выберите Да и нажмите OK для продолжения. Для
отмены операции выберите НЕТ и нажмите ОК.
На следующем экране можно выбирать частотные
диапазоны. Вы можете ввести диапазон частот
вручную, пользуясь кнопками с цифрами. После
окончания нажмите кнопку ОК, чтобы начать
автоматический поиск.
Примечание: Продолжительность поиска будет
изменена, в зависимости от выбранного шага
поиска.
Монтаж спутниковой антенны (в
зависимости от модели)
При выборе опции Спутниковая антенна из меню
Тип поиска вы сможете установить спутниковую
антенну и осуществлять просмотр спутниковых
каналов. С помощью кнопок “ ” или “ ” можно
выбрать тип антенны Direct (активная антенна),
однокабельная антенна или переключатель
DiSEqC.
Прямой: Выберите этот тип антенны, если у вас
один ресивер и спутниковая тарелка прямого
приема. После выбора опции "Прямой" появится
другое экранное меню. Выберите доступный
спутниковый канал или нажмите ОК для поиска
услуг. В случае необходимости значения частоты
LNB по умолчанию для выбранной спутниковой
антенны могут быть изменены перед началом
поиска. Значения частоты могут быть введены
двумя способами:
4. Значение верхнего диапазона должно быть
«0», и должно быть введено значение нижнего
диапазона.
5. Значения верхнего и нижнего диапазона
должны быть одинаковыми, чтобы данное
значение могло использоваться в поиске. Но
это значение не может составлять «0».
Существуют стандартные требования к поиску
одного LNB.
Однокабельный: Если у вас несколько ресиверов
и однокабельная система, выберите тип антенны.
Нажмите OK, чтобы продолжить настройку.
Задайте настройки, следуя отображаемым на
экране инструкциям. Нажмите ОК для поиска услуг.
Переключатель DiSEqC: Выберите этот тип
антенны, если у вас несколько спутниковых
тарелок и переключатель DiSEqC. После выбора
опции переключатель DiSEqC появится другое
экранное меню. Можно установить четыре опции
DiSEqC (при их наличии). Нажмите ЗЕЛЕНУЮ
кнопку для сканирования всех спутников или
нажмите ЖЕЛТУЮ кнопку для сканирования
только выделенных спутников. Для сохранения
настройки нажмите кнопку OK.
По мере того, как поиск продолжится, появится
сообщение с запросом, хотите ли вы отсортировать
каналы в соответствии с LCN (*). Выберите Да и
нажмите OK для подтверждения .
(*) LCN – это система номеров логических
каналов, которая организует доступные
программы вещания в соответствии с
распознаваемой последовательностью каналов
(при наличии).
Примечание: Не выключайте телевизор, когда
инициализирована первая установка. Следует
отметить, что некоторые опции могут быть
недоступными, в зависимости от страны.
Воспроизведение медиа-файлов через вход
USB
USB-диск с параметрами 2.5 и 3.5 дюймов(жесткий
диск с внешним питанием) или USB-стик можно
подключать к USB-входам телевизора.
ВАЖНО: Перед выполнением любого подключения
к телевизору создайте резервные копии файлов.
Производитель не несет ответственности
за повреждение файлов или утерю данных.
Некоторые виды USB-устройств (например,
МР3-плееры) могут оказаться не совместимыми
с данным телевизором. Телевизор поддерживает
форматирование дисков в формате FAT32 и NTFS,
но запись на диски в формате NTFS невозможна.
В процессе форматирования жесткого диска
USB с емкостью 1TB (терабайт) или более могут
возникнуть проблемы.
Перед каждый включением и отключением
необходимо выждать некоторое время, так как
плеер все еще может осуществлять считывание
файлов. В противном случае может иметь место
повреждение USB-плеера и непосредственно
устройства USB. Не извлекайте диск во время
проигрывания файла.
Вы можете использовать USB-хабы через USBвходы телевизора. В таком случае рекомендутся
использование USB-хабов со внешним питанием.
Рекомендуется использовать USB-вход (-ы)
телевизора напрямую, если нужно подключение
жесткого диска USB.
Примечание: При просмотре файлов с
изображениями меню обозревателя мультимедиа
может отображать только 1000 файлов с
изображениями, сохраненных на подключенном
USB-устройстве.

Русский - 28 -
Запись со сдвигом по времени
Запись со смещением по времени В режиме
сдвига по времени передача приостанавливается
и одновременно записывается на подключенный
диск USB.
Повторно нажмите кнопку Воспроизведение,
для завершения приостановленной программы.
Нажмите кнопку Стоп, для выключения записи
со смещением по времени и возврата к прямой
трансляции.
Режим сдвига по времени нельзя использовать,
находясь в режиме радио.
Вы не можете использовать функцию быстрого
перехода назад при смещении по времени перед
ускорением воспроизведения с помощью опции
быстрого продвижения вперед.
Одновременная запись
Нажмите кнопку Запись, чтобы начать
запись передачи одновременно с просмотром
программы. Для записи следующей передачи
в электронной программе передач EPG можно
еще раз нажать кнопку Запись на пульте
дистанционного управления. В этом случае на
экране отобразится следующая передача, запись
которой запрограммирована. Нажмите кнопку
Стоп для отмены постоянной записи.
Вы не можете переключаться на другие станции
телевещания или просматривать обозреватель
мультимедиа в режиме записи. Во время записи
программы или при смещении по времени на экране
появится предупреждающее сообщение, если
скорость USB-накопителя будет недостаточной.
Меню медиа браузера
Можно воспроизводить фото и музыкальные
файлы и файлы с фильмами, сохраненные
на USB-диске, путем подключения диска к
телевизору. Подключите USB-диск к одному из
входных USB-разъемов, находящихся на боковой
панели телевизора. При нажатии кнопки MENU в
режиме Медиа-браузера будет обеспечен доступ
к опциям меню Изображение, Звук и Настройки.
При повторном нажатии кнопки MENU будет
иметь место выход из данного экрана. Настройки
"медиа - браузера" можно установить с помощью
диалогового окна "Настройки".
Включение режима "Цикл/Перемешивание"
Начните воспроизведение с
помощью кнопки
Воспроизведение, и
активируйте
Все файлы в списке будут
постоянно воспроизводиться
в первоначальном порядке.
Начните воспроизведение с
помощью кнопки ОК и
активируйте
Будет постоянно
воспроизводиться один и тот
же файл (повтор)
Начните воспроизведение с
помощью кнопки
Воспроизведение, и
активируйте
Все файлы в списке будут
воспроизводиться один раз
вразброс.
Начните воспроизведение с
помощью кнопки
Воспроизведение, и
активируйте ,
Все файлы в списке будут
постоянно воспроизводиться
в том же произвольном
порядке.
Запись программ
ВАЖНО: При использовании нового жесткого диска
USB рекомендуется сначала отформатировать диск
с помощью опции устройства "отформатировать
диск".
Для записи программы сначала необходимо
подключить USB-диск к телевизору. Телевизор
в это время должен быть выключен. Затем
необходимо включить телевизор, чтобы функция
записи стала доступна.
Для осуществления записи объем свободной
памяти на вашем USB-диске должен составлять
2 Гб, и он должен быть совместим с USB 2.0. Если
USB-диск не является совместимым, отобразится
сообщение об ошибке.
Для записи длинных программ (например,
кинофильмов) рекомендуется использовать
накопители на жестком диске USB (НЖД).
Записываемые программы сохраняются на
подключенный USB-диск. По желанию записи
можно сохранить или скопировать на компьютер;
однако, воспроизведение этих файлов на
компьютере будет невозможно. Воспроизведение
записей возможно только на телевизоре.
При отложенном просмотре может наблюдаться
задержка синхронизации аудио и видео потоков
(Lip Sync). Запись радио не поддерживается.
Телевизор может записывать программы
продолжительностью до 10 часов.
Записанные передачи разбиваются на части
объемом по 4 Гб.
Если у подключенного диска скорость записи не
достаточна, возможен сбой записи, а функция
сдвига по времени может оказаться недоступной.
Для записи программ высокой четкости
рекомендуется использовать жесткие диски USB.
Нельзя вынимать диск USB/HDD во время
выполнения записи. Это может повредить
подключенное устройство USB/HDD.
Если сетевой шнур будет извлечен из розетки,
когда будет установлен таймер активной USBзаписи, запись будет отменена.
Осуществляется поддержка нескольких разделов.
Поддерживаются максимум два разных раздела.
Первый раздел USB диска используется для
функций PVR. Для использования под функции
PVR ready он должен быть отформатирован как
главный раздел.

Русский - 29 -
Некоторые пакетированные потоки могут не
записаться из-за проблем с сигналом, поэтому
во время проигрывания видео может иногда
останавливаться.
Кнопки "Запись", "Воспроизведение", "Пауза",
"Отображение" не могут использоваться при
включенном телетексте. Если запись начинается
по сигналу таймера при включенном телетексте,
телетекст будет автоматически отключен.
Использование телетекста отключается во время
записи или воспроизведения.
Просмотр записанных программ
Выберите "Записи" в меню "Обозреватель
мультимедиа". Выберите запись из списка (если
запись сделана ранее). Нажмите кнопку OK, чтобы
отобразить Опции воспроизведения. Выберите
опцию и нажмите кнопку ОК.
Примечание: Во время воспроизведения
просмотр главного меню и позиций меню будет
не доступен.
Нажмите кнопку Стоп для выключения
воспроизведения и вернитесь к меню "Записи".
Замедленное воспроизведение
При нажатии кнопки "ПАУЗА" во время
просмотра записанных программ станет доступна
функция "Замедленное воспроизведение".
Функция приводится в действие с помощью
кнопки "Ускоренная перемотка вперед".
Последовательные нажатия кнопки "Ускоренная
перемотка вперед" изменяют скорость перемотки.
Конфигурация записи
Выберите элемент «Recording Conguration» в
меню Settings для конфигурации настроек записи.
Форматирование диска: Вы можете использовать
функцию Формат диска для форматирования
присоединенного диска USB. Для использования
функции «форматирование диска» необходимо
ввесуи Ваш пин-код.
Примечание: ПИН-кодом по умолчанию является 0000
или 1234. Если вы установили ПИН-код (требуется
в зависимости от выбора страны) во время Первой
установки , используйте данный ПИН-код.
ВАЖНО: В результате форматирования USB-диска
будут удалены ВСЕ данные, сохраненные на нем,
и его файловая система будет преобразована в
формат FAT32. В большинстве случаев ошибки
работы будут иправлены после форматирования,
но вы потеряете ВСЕ ваши данные.
Если во время начала записи на экране появилось
сообщение «слишком медленная скорость записи
USB-диска», попробуйте начать запись еще раз.
Если данная ошибка не исчезает, возможно,
ваш USB-диск не соответствует требованиям по
скорости. Попробуйте подключить другой диск.
CEC and CEC RC Passthrough (в зависимости
от модели)
Эта функция позволяет управлять с помощью
пульта дистанционного управления телевизора
устройствами, поддерживающими CEC, которые
подключены в разъемы HDMI.
Опция CEC в меню «Система > Настройки >
Больше» сначала должна быть установлена
как «Вкл.» Нажмите на кнопку Источник и
выберите вход HDMI подключенного устройства
CEC из меню Список источников. Когда будет
подключено устройство источника CEC, оно будет
отображаться в меню источника с собственным
названием вместо подключенных разъемов HDMI
(DVD-плеер, Записывающее устройство 1 и т.д.).
Пульт дистанционного управления автоматически
сможет выполнять основные функции после того,
как будет выбран источник HDMI.
Для завершения данной операции и
дальнейшего управления телевизором через
пульт дистанционного управления нажмите
и удерживайте в течение 3 секунд на пульте
дистанционного управления кнопку «0-ноль». Либо
нажмите на пульте дистанционного управления
кнопку быстрое меню, выберите CEC RC
Passthrough и установите Выкл.с помощью
кнопки Влево или Вправо. Эта функция также
может быть включена или отключена с помощью
меню «Система > Настройки > Больше».
Данный телевизор также поддерживает функцию
ARC (Реверсивный звуковой канал/Audio Return
Channel). Эта функция является звуковым звеном,
предназначенным для замены других кабелей
между телевизором и аудио-системой (приемник
A/V или акустическая система).
Когда будет включена функция ARC, в телевизоре
не будет автоматически включен режим «без
звука» для других звуковых выводов. Необходимо
будет уменьшить громкотсь телевизора до нуля
вручную, если вы захотите слушать аудио только
с подключенного аудио-устройства (так же, как и
с других оптических или коаксиальных цифровых
аудио-выводов). Если вы захотите изменить
громкость подключенного устройства, необходимо
будет выбрать данное устройство из списка
источников. В этом случае кнопки управления
громкостью сопряжены с подключенным аудиоустройством.
Звуковое управление системой
Допускается использование с телевизором
звукового усилителя/ресивера. Управление
громкостью может осуществляться с помощью
пульта дистанционного управления телевизора.
Для включения данной функции установите
опцию «Громкоговорители» в меню «Система
 Loading...