

Page 1

MANUAL ADDENDUM
M200EU
NOy CONVERTER OPTION
Teledyne Advanced Pollution Instrumentation
9480 Carroll Park Dr.
San Diego, CA 92121-5201
TOLL-FREE: 800-324-5190
FAX: 858-657-9818
TEL: 858-657-9800
E-MAIL:
WEB SITE: www.teledyne-api.com
05386
Copyright 2006 API Inc. 10 October 2006
api-sales@teledyne.com
REV. A
Page 2
Model 200EU-NOy Option Manual Addendum
SAFETY MESSAGES
Your safety and the safety of others is very important. We have provided many important safety
messages in this manual. Please read these messages carefully.
A safety message alerts you to potential hazards that could hurt you or others. Each safety message is
associated with a safety alert symbol. These symbols are found in the manual and inside the
instrument. The definition of these symbols is described below:
General Warning/Caution: Refer to the instructions for details on the specific danger.
Hot Surface Warning
Electrical Shock Hazard
Technician Symbol: All operations marked with this symbol are to be performed by
qualified maintenance personnel only.
Electrical Ground: This symbol inside the instrument marks the central safety grounding
point for the instrument.
CAUTION
The analyzer should only be used for the purpose and in the manner
described in this manual.
If you use the analyzer in a manner other than that for which it was
intended, unpredictable behavior could ensue with possibly hazardous
consequences.
05386 Rev. A 2
Page 3

Model 200EU-NOy Option Manual Addendum
Table of Contents
SAFETY MESSAGES
Table of Contents
List of Figures
List of Tables
1.0 GETTING STARTED
1.1 Unpacking
1.2 Electrical and Pneumatic Connections
1.3 Initial Operation
2.0 SPECIFICATIONS, WARRANTY
2.1 Specifications
2.2 Warranty
3.0 THE M501Y NOY CONVERTER
3.1 Principle of Operation
4.0 CALIBRATION AND ZERO/SPAN CHECKS
4.1 Calibration or Cal Check Procedure
5.0 MAINTENANCE
5.1 Maintenance Schedule
5.2 Replacing the Sample Particulate Filter
5.3 Check Bypass Flow Rates
5.4 Replacing the Converter
5.5 Pneumatic Line Inspection
5.6 Leak Check Procedure
6.0 TROUBLESHOOTING, ADJUSTMENTS
6.0.1 General Troubleshooting Hints
05386 Rev. A 3
Page 4

Model 200EU-NOy Option Manual Addendum
6.1 Operation Verification - M501Y Diagnostic Techniques
6.1.1 Pneumatic System
6.1.2 Leak Check
6.1.3 Bypass Pump Diagnostic Procedures
6.1.4 Electrical Fault Isolation
6.2 Setting the Converter Temperature
6.1.4 Temperature Controller Setup
7.0 M501Y SPARE PARTS LIST
05386 Rev. A 4
Page 5

Model 200EU-NOy Option Manual Addendum
List of Figures
FIGURE 1.1 - REAR PANEL PNEUMATIC CONNECTIONS.................................................................................8
FIGURE 5.1 - REPLACING THE PARTICULATE FILTER...................................................................................21
FIGURE 5.2 - CONVERTER ASSEMBLY...............................................................................................................23
FIGURE 5.3- PNEUMATICS DIAGRAM (STANDARD AND Z/S OPTION)....................................................... 25
FIGURE 5.4: PNEUMATIC DIAGRAM (OPT 86 OPTION)...................................................................................26
FIGURE 6.1 – ELECTRICAL DIAGRAM................................................................................................................32
05386 Rev. A 5
Page 6

Model 200EU-NOy Option Manual Addendum
List of Tables
TABLE 2.1 - FINAL TEST AND CALIBRATION VALUES
TABLE 4.1 - MANUAL ZERO CALIBRATION PROCEDURE - ZERO GAS THRU SAMPLE PORT
TABLE 4.2 - ENTER EXPECTED SPAN GAS CONCENTRATIONS PROCEDURE
TABLE 4.3 - SPAN CALIBRATION PROCEDURE
TABLE 5.1- PREVENTATIVE MAINTENANCE CALENDAR
TABLE 6.1 – TEMPERATURE CONTROLLER PROGRAMMING GUIDE
05386 Rev. A 6
Page 7
Model 200EU-NOy Option Manual Addendum
1.0 Getting Started
The M501Y has been designed to operate with the M200EU low level NOx analyzer.
1.1 Unpacking
1. The M200EU with NOy Option comes in three boxes.
• The M200EU analyzer
• The Bypass Pump Chassis
• The External Converter and umbilical cable assembly
2. Verify that there is no apparent shipping damage. If damage has occurred please advise shipper
first, then API.
To avoid personal injury, always use two persons to lift and
carry the Model 501 Pump Pack Chassis.
CAUTION
3. Before operation of the M200EU, remove the shipping screws as shown in the M200E/EU Manual.
4. Please check the voltage and frequency label on the rear panel of the instrument for compatibility
with the local power before plugging in the M501Y.
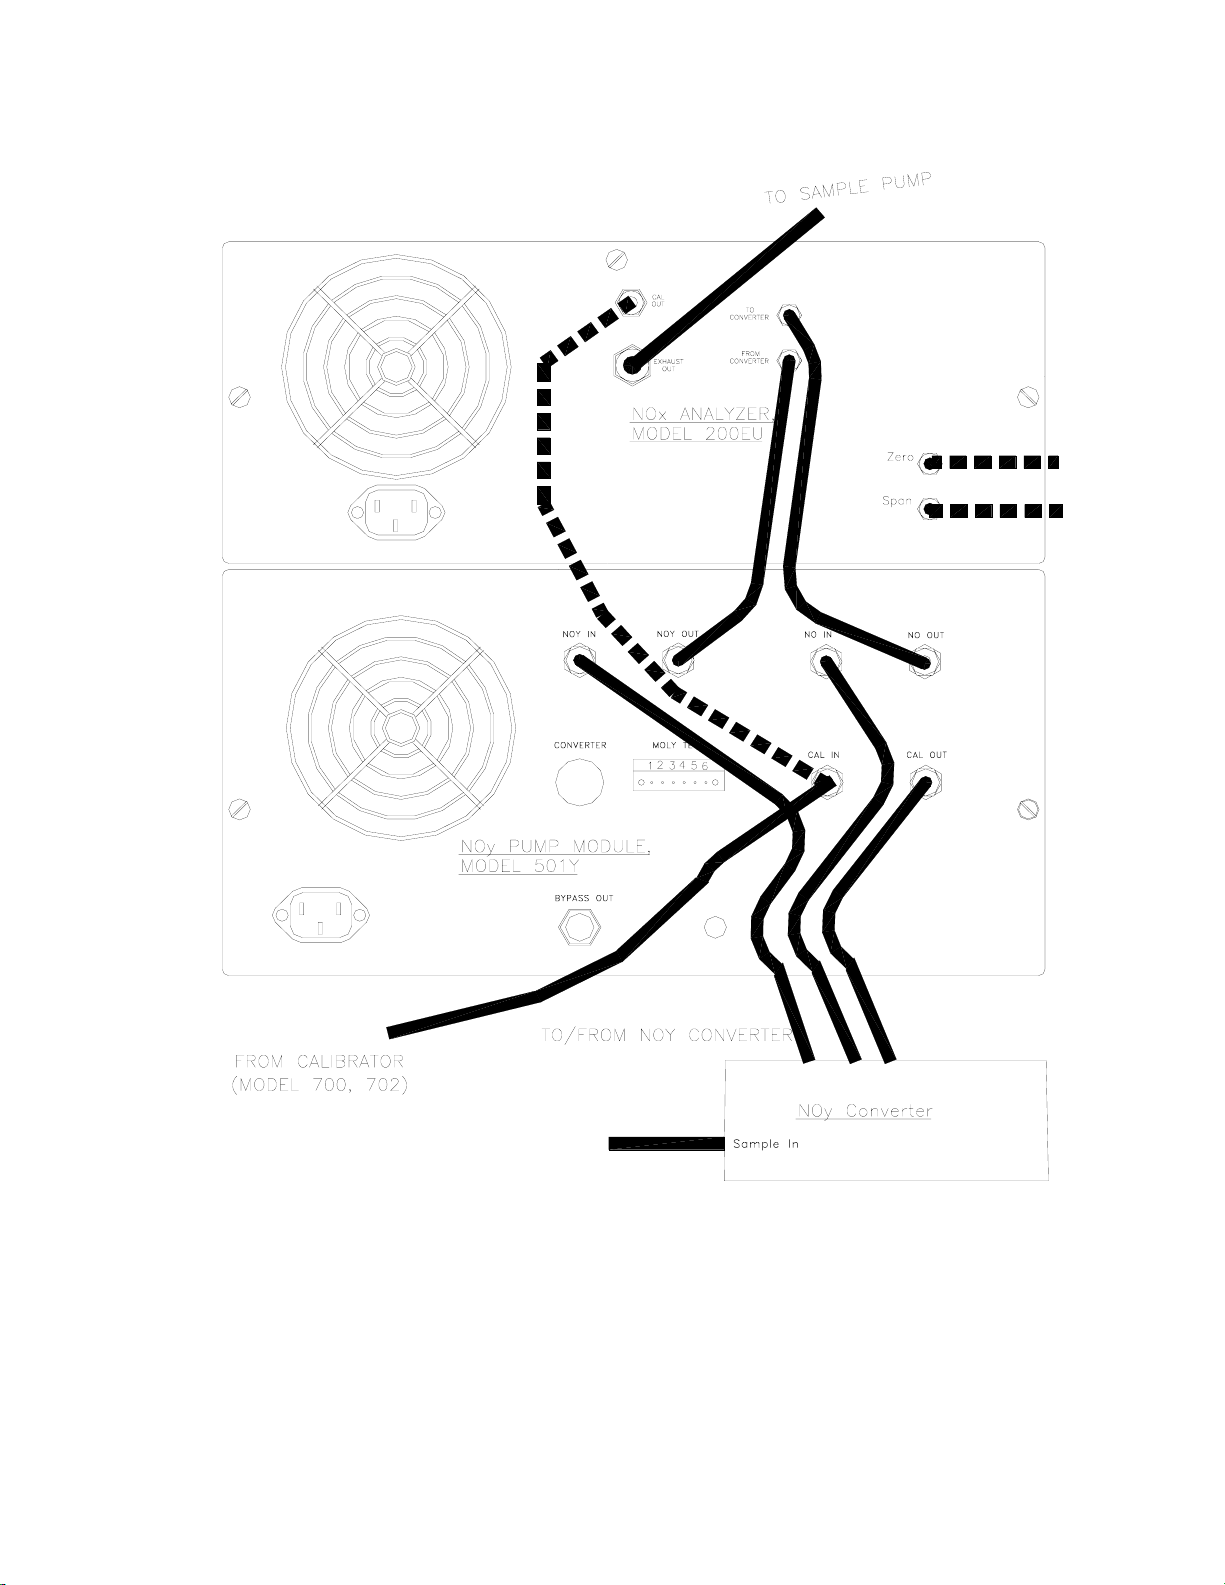
1.2 Electrical and Pneumatic Connections
1. Mount the converter on a suitable mast outside of the enclosure.
2. Route the umbilical cable assembly into the shelter.
3. Locate the M200EU and M501Y Bypass Pump Chassis in close proximity, preferably mounting
one over the other in a 19” rack.
4. Connect the electrical/pneumatic cable fittings to the rear of the Bypass Pump Chassis. Use the
tags on each tube and Figure 1.1 to match up the correct tube with the rear panel bulkhead fitting.
Please note that the dashed lines show optional Zero/Span Valve configuration connections.
5. Connect the 7-pin power and signal cable to the connector on the rear of the Bypass Pump Chassis.
6. Connect the power cord to the correct line voltage.
WARNING
• Lethal voltages are present inside case
• Do not operate with cover off during normal operation
05386 Rev. A 7
• Before operation, check for correct input voltage and frequency.
• Do not operate without proper chassis grounding
• Do not defeat the ground wire on power plug
• Turn off power before disconnecting electrical subassemblies
Page 8
Model 200EU-NOy Option Manual Addendum
Figure 1.1 - Rear Panel Pneumatic Connections
05386 Rev. A 8
Page 9

Model 200EU-NOy Option Manual Addendum
1.3 Initial Operation
1. After confirming proper supply voltage, turn on the instrument power. If you are unfamiliar with
the M200EU with NOy Option, we recommend that you read the overview in Section 3 before
proceeding.
2. The power indicator light and display should immediately light, in addition the bypass pump
should start up. The M501Y requires about 30 minutes for the converter to come up to
temperature.
3. While the converter is coming up to temperature, the M200EU should be powered-up also. Follow
the instructions in the M200E/EU Manual to confirm proper operation of that instrument. Note: It
will take 30 minutes for the ozone generator to start up in the M200EU. During that time the
instrument will not respond to span gas.
4. After 30 min, the display on the Bypass Pump Chassis should read 315
converter is up to temperature.
5. Proceed to Section 4 of this manual to do a zero/span check.
Table 2.1 - Final Test and Calibration Values
Test Values Observed Value Units Nominal Range
o
C, indicating that the
CONVERTER TEMP oC
BYPASS FLOW – NO CHANNEL CC/MIN
BYPASS FLOW – NOx CHANNEL CC/MIN 1100 ± 200
Converter Serial # __________________________
Date _______________________ Technician __________________________
315 ±7
1100 ± 200
05386 Rev. A 9
Page 10

Model 200EU-NOy Option Manual Addendum
2.0 Specifications, Warranty
2.1 Specifications
Converter Remotely mounted molybdenum converter with temperature
controller in a NEMA – 4 enclosure.
Converter Temperature
Tube/Electrical Cable
Assembly
Power, Bypass Pump
Assembly
Power, Converter Assembly 120V~ 50/60 Hz, 60 watts
Converter Efficiency >96% for NO2
Weight, Bypass Pump
Assembly
Weight, Remote
Converter
Bypass Pump Chassis
Dimensions HxWxD
Remote Converter Assy
Dimensions HxWxD
Environmental Installation Category (Over-voltage Category) II
Bypass Flowrate
Cal gas Flowrate
Analog output Converter temp analog output. 3.15 VDC = 315oC
315oC ± 7oC with read-out on front panel of bypass pump
chassis.
Up to 50 feet (15 m) maximum length
120V~ 60 Hz, 230V~ 50 Hz 360 watts
35 lbs (16 kg)
30 lbs (11 kg)
9" x17" x23.6" (23cm x 43cm x 61cm)
12"x19"x7" (31cm x 48cm x 18cm)
Pollution Degree 2
1100 cc/min ± 20%, each channel
4000 cc/min (approx.)
05386 Rev. A 10
Page 11

Model 200EU-NOy Option Manual Addendum
2.2 Warranty
ADVANCED POLLUTION INSTRUMENTATION, INC.
02024c
Prior to shipment, API equipment is thoroughly inspected and tested. Should equipment failure occur, API assures
its customers that prompt service and support will be available.
COVERAGE
After the warranty period and throughout the equipment lifetime, API stands ready to provide on-site or in-plant
service at reasonable rates similar to those of other manufacturers in the industry. All maintenance and the first level
of field troubleshooting are to be performed by the customer.
NON-API MANUFACTURED EQUIPMENT
Equipment provided but not manufactured by API is warranted and will be repaired to the extent and according to
the current terms and conditions of the respective equipment manufacturers warranty.
GENERAL
API warrants each Product manufactured by API to be free from defects in material and workmanship under normal
use and service for a period of one year from the date of delivery. All replacement parts and repairs are warranted for
90 days after the purchase.
If a Product fails to conform to its specifications within the warranty period, API shall correct such defect by, in
API's discretion, repairing or replacing such defective Product or refunding the purchase price of such Product.
The warranties set forth in this section shall be of no force or effect with respect to any Product:
(i) that has been altered or subjected to misuse, negligence or accident, or (ii) that has been used in any manner other
than in accordance with the instruction provided by API or (iii) not properly maintained.
THE WARRANTIES SET FORTH IN THIS SECTION AND THE REMEDIES THEREFORE ARE EXCLUSIVE
AND IN LIEU OF ANY IMPLIED WARRANTIES OF MERCHANTABILITY, FITNESS FOR PARTICULAR
PURPOSE OR OTHER WARRANTY OF QUALITY, WHETHER EXPRESSED OR IMPLIED. THE
REMEDIES SET FORTH IN THIS SECTION ARE THE EXCLUSIVE REMEDIES FOR BREACH OF ANY
WARRANTY CONTAINED HEREIN. API SHALL NOT BE LIABLE FOR ANY INCIDENTAL OR
CONSEQUENTIAL DAMAGES ARISING OUT OF OR RELATED TO THIS AGREEMENT OF API'S
PERFORMANCE HEREUNDER, WHETHER FOR BREACH OF WARRANTY OR OTHERWISE.
TERMS AND CONDITIONS
All units or components returned to API should be properly packed for handling and returned freight prepaid to
the nearest designated Service Center. After the repair, the equipment will be returned, freight prepaid.
05386 Rev. A 11
Page 12

Model 200EU-NOy Option Manual Addendum
3.0 The M501Y NOy Converter
3.1 Principle of Operation
The API Model 200EU with NOy Option is designed to measure the concentration of NO, NO2, and
other compounds that are too unstable to be measured when taken in through the normal ambient air
sample inlet system. Please refer to the M200EU manual supplied with this system for a general
discussion of the operation of a NOx analyzer. The suite of compounds known collectively as NOy is
composed of roughly 30 compounds. There is some disagreement over whether certain compounds
should be on the list. The NOy measurement is generally done in conjunction with a standard NOx
measurement, with the difference between the two being the concentration of the unstable compounds,
sometimes referred to as NOz.
The system is composed of 3 modules:
• The M200EU, without a moly converter
• A Bypass pump chassis containing:
• Bypass pump
• Flow control
• Sample filtration
• Moly temperature control
• Pneumatic provisions for calibration
• An externally mounted molybdenum converter
The M200EU w/NOy Option system allows the converter to be mounted at the sample inlet point.
This configuration provides minimal time delay between the sample inlet port and the remotely
mounted molybdenum converter. Minimizing the transit time between the sample inlet and converter
enables the conversion of labile components of NOy. The equation for the conversion is:
3 NO
+ Mo ---> 3 NO + MoO
Y
315
o
C
3
05386 Rev. A 12
Page 13

Model 200EU-NOy Option Manual Addendum
4.0 CALIBRATION AND ZERO/SPAN CHECKS
Unlike most NOx analyzers, the M200EU with the NOy option does not have a sample inlet port on
the rear panel of the 200EU. The sample port is located on the External Converter; therefore zero/span
calibration is different than a normal NOx instrument.
Follow the steps in the M200E/EU manual to:
a. Enter the expected NO and NOx span gas concentrations in the M200EU.
b. Do the zero calibration procedure
c. Do the span calibration procedure
The analyzer always routes the zero/span gas through the external converter. In
standard configuration, the calibration gas needs to be input at the “Cal in” port of the
M501 Pump pack. When Zero/Span valve option is installed, zero and span gases are
to be provided at the 200EU zero and span ports. In all cases, the calibration gas
delivered must be under a small amount of pressure (2-5 psig) to overcome the
resistance of the hoses. Also, there must be no venting of the zero or span gas to
atmosphere.
Calibration gas must be provided for both the bypass system and the 200EU analyzer.
Flow requirements are 1.1 LPM for NO bypass, 1.1 LPM for NOx bypass and 1 LPM for
the M200EU. Calibration gas flow must be in sufficient excess (~4 LPM) to prevent any
ambient air from entering the sample port on the pole.
The maximum 50 ft length of tubing between the Bypass Pump Module and the remote moly converter
has been proven to generate too much backpressure for some brands of calibrators. Experience to date
is that while NO calibration is correct, GPT can be incorrect due to errors in dilution of the ozone.
We strongly recommend that SPAN CALIBRATION be done with NO span gas. SPAN CHECKS can
be done with either NO only, NO2 only or a mixture of NO and NO2 (GPT).
Zero air used for all calibration procedures, including GPT, should have <1 ppt NO and NO2, less than
1 ppt of major interferents such as SO2, NH3, hydrocarbons and a dew point of -5
calibration gasses should be from a reliable supplier, since the quality of the tank concentration values
ultimately determines the accuracy of the analyzer.
o
C or less. The
NOTE
The M200EU with the NOy Option does NOT have
equivalency approval, and may not be used for EPA
monitoring.
05386 Rev. A 13
Page 14

Model 200EU-NOy Option Manual Addendum
4.1 Calibration or Cal Check Procedure
The calibration of the instrument can be checked or adjusted using gas introduced through the
calibration port on the Bypass Pump Module. The calibration gas is routed to a TEE near the sample
inlet port on the remote converter assembly.
Since the zero gas concentration is defined as 0 ppb, it is not necessary to enter the expected zero
value. Table 4.1 details the zero calibration procedure.
Table 4.1 - Manual Zero Calibration Procedure - Zero Gas Thru Sample Port
Step
Number
1. Press CAL The M200EU enters the calibrate mode and the adaptive
2. Wait 10 min Wait for reading to stabilize at zero value.
3. Press ZERO If you change your mind after pressing ZERO, you can
4. Press ENTR Pressing ENTR actually changes the calculation
5. Press EXIT M200EU returns to sampling. Immediately after
Action Comment
filter is activated. This allows the instrument to respond
rapidly to concentration changes regardless of their
magnitude.
still press EXIT here without zeroing the instrument.
equations.
calibration, data is not added to the DAS averages.
05386 Rev. A 14
Page 15

Model 200EU-NOy Option Manual Addendum
N
p
Enter the expected NOx and NO span gas concentrations:
Table 4.2 - Enter Expected Span Gas Concentrations Procedure
Step
Number
1. Press
CAL-CONC-NOX
2. Press ENTR ENTR stores the expected NOx span value.
3. Press
CAL-CONC-NO
4. Press ENTR Pressing ENTR stores the NO span value and returns the
5. Press
EXIT
If desired, compensation for converter efficiency (CE) can be included in the NOx concentration
calculation. Prior to calibration, the converter efficiency should either be set to 1.0 or determined per
the procedure in the M200E/EU manual.
Action Comment
This key sequence causes the M200EU to prompt for the
expected NOx concentration.
Enter the NOx span concentration value by pressing the
key under each digit until the expected value is set.
ow enter the expected NO span concentration as in step
one.
rompt to the CONC menu.
Returns instrument to SAMPLE mode.
05386 Rev. A 15
Page 16

Model 200EU-NOy Option Manual Addendum
N
Table 4.3 - Span Calibration Procedure
Step
Number
1. Press CAL The M200EU enters the calibrate mode and the adaptive
2. Wait 10 min Wait for reading to stabilize at span value.
3. Press SPAN If you change your mind after pressing SPAN, you can
4. Press ENTR Pressing ENTR actually changes the calculation
5. Press EXIT M200EU returns to sampling. Immediately after
Action Comment
filter is activated. This allows the instrument to respond
rapidly to concentration changes regardless of their
magnitude.
still press EXIT here without spanning the instrument.
equations and causes the instrument to read the NO and
Ox span concentrations.
calibration, data is not added to the DAS averages.
05386 Rev. A 16
Page 17

Model 200EU-NOy Option Manual Addendum
5.0 Maintenance
5.1 Maintenance Schedule
See Table 5.1 below.
05386 Rev. A 17
Page 18

Page 19

Model 200EU-NOy Option Manual Addendum
Table 5.1- Preventative Maintenance Calendar
Item Maintenance Interval
Zero/Span Calibration Annually or after maintenance or repairs
Zero/Span Checks Daily
Particulate Filter Weekly as needed
Ozone Flow Check every year and replace o’ring and
orifice in reaction cell
OzoneDryer Filter-DFU Replace every year
Sample Flow Check every 2 months
Converter Check efficiency every 2 months
Pneumatic Lines Check every 3 months
Factory Calibration Calibrate each year or after repairs
Leak Check Check every 6 months
Replace bypass flow orifices Every year / as needed
Rebuildy bypass pump Every year
05386 Rev. A 19
Page 20

Model 200EU-NOy Option Manual Addendum
5.2 Replacing the Sample Particulate Filter
The particulate filter should be inspected often for signs of plugging or contamination. It is also
common for dirt particles to cause instrument drift, and affect accuracy.
To check and change the filter:
1. Fold down the Bypass Pump Module front panel.
2. Locate the filter on the left side of the analyzer front panel. See Figure 5.1 for an
exploded view of the filter assembly.
3. Visually inspect the filter through the glass window.
4. If the filter appears dirty, unscrew the hold-down ring, remove the Teflon o-ring and then
the filter.
5. Replace the filter, being careful that the element is fully seated in the bottom of the
holder. Replace the Teflon o-ring, then screw on the hold-down ring and hand tighten.
NOTE:
Handle the wetted surfaces as little as possible and clean with cloth prior to assembly
05386 Rev. A 20
Page 21

Model 200EU-NOy Option Manual Addendum
Figure 5.1 - Replacing the Particulate Filter
05386 Rev. A 21
Page 22

Model 200EU-NOy Option Manual Addendum
5.3 Check Bypass Flow Rates
The external sample pump is capable of maintaining the cell pressure at less than 5.0 "Hg-A. If a
higher pressure is noted, the pump may need servicing. Check the pump and pneumatic system
for leaks or rebuild pump. The ozone scrubber is integrated into the converter case inside the
instrument.
See Figure 1.1 for component locations.
5.4 Replacing the Converter
The heater, thermocouple, and converter assembly is designed to be replaced as a single unit.
Check Figure 5.2 for component location.
1. Turn off the power to the M501Y at the chassis front panel
2. Allow the converter to cool.
CAUTION!
The converter operates at 315°C. Severe burns can result if
not enough time is allowed for the assembly to cool. Do not
handle assembly until it is at room temperature.
3. Disconnect the gas fittings and power cable from the can.
4. Remove the entire assembly from the NEMA chassis.
A. Remove the pneumatic fittings.
B. Remove the converter assembly from the chassis by loosening the 4 captive
screws that secures the assembly to the chassis.
5. Remove bottom bracket and re-attach it to the replacement converter assembly.
6. Install the assembly back into the analyzer.
7. Re-attach the electrical and pneumatic fittings. Leak check the assembly when
completed. 8. Turn the power back on. The insulation can emit a burnt odor for the first 24
hours, this is normal. Allow the converter to burn-in for 24 hours, then re-calibrate the
instrument.
05386 Rev. A 22
Page 23

Model 200EU-NOy Option Manual Addendum
Figure 5.2 - Converter Assembly
05386 Rev. A 23
Page 24

Model 200EU-NOy Option Manual Addendum
5.5 Pneumatic Line Inspection
Particulate matter in the pneumatic lines will affect both flow rate and response time. It is
important that the pneumatic system be periodically inspected and thoroughly cleaned if
necessary. Clean by disassembling and passing methanol through three times. Dry with nitrogen
or clean zero air.
Also inspect all pneumatic lines for cracks and abrasion on a regular basis. Replace as
necessary.
05386 Rev. A 24
Page 25

Model 200EU-NOy Option Manual Addendum
Figure 5.3- Pneumatics diagram (standard and Z/S
option)
05386 Rev. A 25
Page 26

Model 200EU-NOy Option Manual Addendum
Figure 5.4: Pneumatic diagram (OPT 86 option)
5.6 Leak Check Procedure
05386 Rev. A 26
Page 27

Model 200EU-NOy Option Manual Addendum
If a leak checker is not available, it is possible to leak check the instrument using the M501Y's
pump plus a shut-off valve.
1. Turn off instrument power and pump power.
2. Cap the sample inlet port, ozone generator air inlet, and zero/span inlets (if Z/S valve
option present).
3. Insert a shut-off valve between the sample pump and the vacuum manifold at the rear of
the instrument.
4. Turn on the sample pump and set the TEST function to RCEL, which measures the
reaction cell pressure. Close the shutoff valve and monitor the cell pressure. The
pressure should not drop more than 1"Hg(.5psi) in 5 minutes. If there is a leak, it is not
possible by this method to tell where it is located. You can locate the leak by using a
pressure leak checker described below.
If you have a leak checker:
1. Turn off instrument power and pump power.
2. Disconnect pump at rear panel. Cap the sample inlet port, ozone generator air inlet, and
zero air inlet (if Z/S valve option present) and connect the leak checker to the exhaust
port.
CAUTION: PRESSURE MUST BE LESS THAN 15 PSI.
3. Pressurize system and check for leaks by watching overall pressure. The pressure should
not drop more than 1"Hg (.5psi) in 5 minutes.
If the instrument fails the pressure test, each fitting needs to be leak checked to find the location.
Be careful that the system is always pressurized so as not to draw soap solution into the
plumbing system. Make sure you dry off any accumulated bubble solution.
The Sensor module can be leak checked as a unit using a 1/8" tubing fitting on top of the
assembly. The same rules as above apply.
05386 Rev. A 27
Page 28

Model 200EU-NOy Option Manual Addendum
6.0 Troubleshooting, Adjustments
NOTE
This section of the manual contains information on diagnosing and repairing converter
performance problems.
This Section provides troubleshooting procedures that address problems to the board level. For
component level troubleshooting, consult the schematics for the appropriate board in the
Appendix.
6.0.1 General Troubleshooting Hints
THE OPERATIONS OUTLINED IN THIS CHAPTER ARE TO BE
PERFORMED BY QUALIFIED MAINTENANCE PERSONNEL
ONLY!
1. Think of the M501Y as two sections:
A. Section 1 - Pneumatics - Over 50% of all instrument problems are traced to leaks
in the M200EU, pump assembly, pole mounted converter assembly, sample filter,
or zero/span gas delivery system (calibrator). Suspect a leak first.
B. Section 2 - Electronics – converter temp control board or DC power supply for
the converter temperature readout.
2. Incorrect span gas concentration - this could come either from the calibrator or entering
the expected span gas concentration in the M501Y incorrectly.
3. If the instrument does not respond to span gas, check troubleshooting section in the
M200E/EU manual.
The above should get you started in diagnosing and repairing the most common faults. If these
reasons have been eliminated, the next thing to do is a Factory Calibration covered in
M200E/EU manual. If difficulties persist, contact our service department. The 800 telephone
number is on the cover page of this manual.
6.1 Operation Verification - M501Y Diagnostic Techniques
6.1.1 Pneumatic System
The pneumatic system is diagramed in Figure 5.3.
6.1.2 Leak Check
Refer to Section 5.6 for the leak check procedure.
05386 Rev. A 28
Page 29

Model 200EU-NOy Option Manual Addendum
6.1.3 Bypass Pump Diagnostic Procedures
The bypass pump is capable of maintaining a total bypass flowrate of 4 lpm. If flow checks
indicate a fall off in bypass flow, the pump may need servicing. Check the pump, inlet fittings,
and analyzer for leaks first. If other causes have been eliminated, rebuild the pump.
6.1.4 Electrical Fault Isolation
115 VAC is supplied to:
1. The bypass pump.
2. The +5 volt switcher supply.
3. The input power to the converter temperature controller.
Use Figure 6.1 to check the 115 VAC supply voltage to each of these components.
The switcher supply produces 5 VDC to power the front panel display. Use Figure 6.1 to check
the 5 VDC supply voltage to the display.
The converter temperature is controlled by the 002560100 assembly in the NEMA chassis. The
00257 schematic is located at the back of this manual.
The converter temperature controller produces ±15 VDC to power the controller logic. The
OPTO ISOLATOR component switches the 115VAC to the heater. Check the heater element
for continuity. The DS1 LED is on when power is applied to the heater. Check for appropriate
voltages. The temperature is sensed by a thermocouple attached to TB1. Typical thermocouple
voltage at the 315
linearizes the output of the thermocouple. The output of pin 8 on U1 is 1/100 of the temperature.
In other words 3.15 VDC represents 315
o
C setpoint is about 16 mV. U1 provides cold junction compensation and
o
C.
6.2 Setting the Converter Temperature
A front panel-mounted programmable controller maintains the temperature of the remote
molybdenum converter. By pressing the PV/SV button in the lower left corner of the controller,
you can see the Present Value (actual temperature) or the Set Value (temperature set point). The
temperature and PID control parameters have been set at the factory and no further adjustment
should be necessary. Should you need to adjust the temperature, follow these steps:
1. Select SV with the PV/SV button,
2. Press the "up-arrow" under the digit you want to change,
3. (the digit will flash),
4. Press the "up-arrow" under the digit or the "down-arrow" at the left to scroll
the digit to the desired value,
5. Repeat for the other two digits,
6. Press the ENTER button.
Select
05386 Rev. A 29
PV with the PV/SV button to observe the actual temperature.
Page 30

Model 200EU-NOy Option Manual Addendum
6.1.4 Temperature Controller Setup
The temperature controller has been programmed at the factory and should not need to be altered
under normal usage.
Indications that would require re-programming are:
• Failure / replacement of controller
• Replacement of thermocouple element
• Controller’s loss of PID parameters leading to instability of the temp setpoint.
In the event that the control parameters are changed or in the event that a new controller is
installed, it must be reprogrammed to suit the thermal characteristics of the instrument. The
controller includes an Autotuning feature, which can be used to properly set the PID factors. To
start Autotune procedure:
• Press Sel until A7 (AT) is displayed
• Press Data until value = 1 (enable Autotune)
• While Autotuning, the decimal point will blink.
• NOTE: During the procedure, it is normal for the temp to overshoot up to 100°C.
• When the decimal point LED turns off, Autotune is complete. No further adjustment
should be necessary.
Table 6.1 – Temperature Controller Programming Guide
PRESS DISPLAY ACTION
SEL X2
DATA
SEL
DATA
SEL
DATA
SEL
DATA
SEL
SEL
SEL
DATA
SEL
SEL END RETURNS TO SV. SET TO 315 (315oC SET VALUE)
P PROP BAND
i INTEGRAL
d DERIVATIVE TIME
7C CYCLE TIME
30 DEFAULT
HYS HYSTERESIS
5rr RAMP RATE
A7 AUTOTUNE
LOC LOCK
DO NOT SET THE TEMPERATURE (SV) HIGHER THAN 320oC.
UP/DOWN SET TO 5.0 (ENTER)
SET TO 50
SET TO 5
SET TO 15 (FOR FAST SYSTEM)
SET TO 0.3
SET TO 0
SET TO 1 = ON
0 = OPEN 1 = LOCKED
2 = SV ONLY OPEN
NOTE:
05386 Rev. A 30
Page 31

Model 200EU-NOy Option Manual Addendum
SECONDARY MENU (The fixed characteristics of the system).
PRESS DISPLAY ACTION
SEL HOLD TILL p-n1
SEL HOLD TILL p-n2
SEL
SEL
SEL
SEL
SEL
SEL
SEL
SEL
SEL
SEL
SEL
SEL
SEL
SEL
p-dF DIGITAL FILTER
P-SL LOWER LIMIT
P-SU UPPER LIMIT
P-Ab ALARM
P-An HYTERESIS
P-dP PROG DECIMAL
P-48 COLD JUNCTION
r5 RAMP TO SET POINT
PVOF PROCESS OFFSET
SVOF SET POINT OFFS
P-F
P-n1
HOLD TILL P
SCROLL TO A7
SV SET VALUE
SET TO 0 – REVERSE ACTION
SET TO 2 = TYPE J THERMOCOUPLE
SET TO 5
DEFAULT = 32
SET TO 350 (350ºC)
NONE
NONE
SET TO 0
SET TO 2 (TYPE J)
LEAVE AT 0
LEAVE AT 0
LEAVE AT 0
SET TO 0 (0 = oC, 1 = oF)
SET TO 1 (AUTOTUNE )
SHOULD BE 315°C
05386 Rev. A 31
Page 32

Model 200EU-NOy Option Manual Addendum
Figure 6.1 – Electrical Diagram
05386 Rev. A 32
Page 33

Model 200EU-NOy Option Manual Addendum
7.0 M501Y Spare Parts List
Note: Use of replacement parts other than those supplied by API may result in noncompliance with European Standard EN 61010-1.
PART NO. DESCRIPTION
00094-4 ORIFICE, 4 MIL 80 CC, O3 FLOW Rx CELL
00094-10 ORIFICE, 13 MIL 1100 CC, Rx CELL
01630-04 SAMPLE FILTER ASSY
02315 SENSOR ASSY, M501Y, EXCHANGE
01872 WELDED CONVERTER W/ O3 KILLER
02293A OPERATORS MANUAL FOR M501Y
01357 THERMOCOUPLE ASSY
02317 M501Y EXPENDABLES KIT
02318 M501Y LEVEL 1 SPARES KIT
00969 FILTER, TFE, 47 mm Quantity 100
00969-1 FILTER, TFE, 47 mm Quantity 25
02230 DC POWER SUPPLY BOARD
PS004
01086 STATUS/TEMP BOARD
00728 DVM DISPLAY
01198 ASSY, THERMOCOUPLE
01236 FAN, BYPASS PUMP CHASSIS
01314 FAN, PMT COOLER
FL001 SINTERED FILTER
FL003 FILTER, DFU
01068 HEATER, CONVERTER
HW020 SPRING, FLOW CONTROL
HW036 TFE THREAD TAPE (48 FT)
HW037 TIE, CABLE
OR058 O-RING, SAMPLE FILTER
01631 RETAINING RING, SAMPLE FILTER
OR034 O-RING, FITTING
PU028 SAMPLE PUMP,M501Y
PU030 SAMPLE PUMP REBUILD KIT
5, ±15 VDC, SWITCHING POWER SUPPLY
05386 Rev. A 33
 Loading...