

Page 1

User Manual
TDS2MEM
Storage Memory and
Communications Module
071-1262-00
This document set supports English, Français, Deutsch,
Italiano, Español, Português, 한국어 , ᣣᧄ⺆ ,
ㅔԧЁ᭛ , ᧯խ֮ , and Русский
This document supports firmware version FV:v6.00
and above.
www.tektronix.com
Page 2

Copyright © Tektronix, Inc. All rights reserved.
Tektronix products are covered by U.S and foreigh patents, issued and
pending. Information in this publication supercedes that in all previously
published material. Specifications and price change privileges reserved.
Tektronix, Inc., P.O. Box 500, Beaverton, OR 97223
TEKTRONIX and TEK are registered trademarks of Tektronix, Inc.
CompactFlash is a registered trademark of the CompactFlash Association.
Page 3

WARRANTY SUMMARY
TDS2MEM
Tektronix warrants that the products that it manufactures and sells will be free from
defects in materials and workmanship for a period of three (3) years from the date of
shipment from an authorized Tektronix distributor. If a product or CRT proves defective
within the respective period, Tektronix will provide repair or replacement as described in
the complete warranty statement.
To arrange for service or obtain a copy of the complete warranty statement, please contact your nearest Tektronix sales and service office.
EXCEPT AS PROVIDED IN THIS SUMMARY OR THE APPLICABLE WARRANTY
STATEMENT, TEKTRONIX MAKES NO WARRANTY OF ANY KIND, EXPRESS
OR IMPLIED, INCLUDING WITHOUT LIMITATION THE IMPLIED WARRANTIES OF MERCHANTABILITY AND FITNESS FOR A PARTICULAR PURPOSE.
IN NO EVENT SHALL TEKTRONIX BE LIABLE FOR INDIRECT, SPECIAL OR
CONSEQUENTIAL DAMAGES.
Page 4

WARRANTY
CompactFlash Card and CompactFlash Reader
Tektronix warrants that the parts, assemblies and supplies ("products") that it manufactures and sells will be free from defects in materials and workmanship for a period of
three (3) months from the date of shipment. If a product proves defective during this warranty period, Tektronix, at its option, either will repair the defective product without
charge for parts and labor, or will provide a replacement in exchange for the defective
product.
In order to obtain service under this warranty, Customer must notify Tektronix of the
defect before the expiration of the warranty period and make suitable arrangements for
the performance of service. Customer shall be responsible for packaging and shipping
the defective product to the service center designated by Tektronix, with shipping
charges prepaid. Tektronix shall pay for the return of the product to Customer if the shipment is to a location within the country in which the Tektronix service center is located.
Customer shall be responsible for paying all shipping charges, duties, taxes, and any
other charges for products returned to any other locations.
This warranty shall not apply to any defect, failure or damage caused by improper use or
improper or inadequate maintenance and care. Tektronix shall not be obligated to furnish
service under this warranty a) to repair damage resulting from attempts by personnel
other than Tektronix representatives to install, repair or service the product; b) to repair
damage resulting from improper use or connection to incompatible equipment; c) to
repair any damage or malfunction caused by the use of non-Tektronix supplies; or d) to
service a product that has been modified or integrated with other products when the
effect of such modification or integration increases the time or difficulty of servicing the
product.
THIS WARRANTY IS GIVEN BY TEKTRONIX IN LIEU OF ANY OTHER
WARRANTIES, EXPRESS OR IMPLIED. TEKTRONIX AND ITS VENDORS
DISCLAIM ANY IMPLIED WARRANTIES OF MERCHANTABILITY OR FITNESS FOR A PARTICULAR PURPOSE. TEKTRONIX' RESPONSIBILITY TO
REPAIR OR REPLACE DEFECTIVE PRODUCTS IS THE SOLE AND EXCLUSIVE REMEDY PROVIDED TO THE CUSTOMER FOR BREACH OF THIS
WARRANTY. TEKTRONIX AND ITS VENDORS WILL NOT BE LIABLE FOR
ANY INDIRECT, SPECIAL, INCIDENTAL, OR CONSEQUENTIAL DAMAGES
IRRESPECTIVE OF WHETHER TEKTRONIX OR THE VENDOR HAS
ADVANCE NOTICE OF THE POSSIBILITY OF SUCH DAMAGES.
Page 5

General Safety Summary
Review the following safety precautions to avoid injury and prevent
damage to this product or any products connected to it.
To avoid potential hazards, use this product only as specified.
Only qualified personnel should perform service procedures.
To Avoid Fire or Personal Injury
Ground the Product. This product is indirectly grounded through the
grounding conductor of the mainframe power cord. To avoid electric
shock, the grounding conductor must be connected to earth ground.
Before making connections to the input or output terminals of the
product, ensure that the product is properly grounded.
Observe All Terminal Ratings. To avoid fire or shock hazard, observe all
ratings and markings on the product. Consult the product manual for
further ratings information before making connections to the product.
The common terminal is at ground potential. Do not connect the
common terminal to elevated voltages.
Do Not Operate Without Covers. Do not operate this product with covers
or panels removed.
Avoid Exposed Circuitry. Do not touch exposed connections and
components when power is present.
Do Not Operate With Suspected Failures. If you suspect there is damage
to this product, have it inspected by qualified service personnel.
Do Not Operate in Wet/Damp Conditions.
Do Not Operate in an Explosive Atmosphere.
Keep Product Surfaces Clean and Dry.
TDS2MEM User Manual i
Page 6
General Safety Summary
Symbols and Terms
Terms in This Manual. These terms may appear in this manual:
WARNING. Warning statements identify conditions or practices that
could result in injury or loss of life.
CAUTION. Caution statements identify conditions or practices that
could result in damage to this product or other property.
Terms on the Product. These terms may appear on the product:
DANGER indicates an injury hazard immediately accessible as you
read the marking.
WARNING indicates an injury hazard not immediately accessible as
you read the marking.
CAUTION indicates a hazard to property including the product.
Symbols on the Product. These symbols may appear on the product:
CAUTION
Refer to Manual
Protective Ground
(Earth) Terminal
Battery Recycling
This product contains a non-replaceable Lithium battery. Please
dispose of the battery properly according to your local regulations.
ii TDS2MEM User Manual
Page 7

Contacting Tektronix
Phone: 1-800-833-9200*
Address Tektronix, Inc.
Department or name (if known)
14200 SW Karl Braun Drive
P.O. Box 500
Beaverton, OR 97077
USA
Website www.tektronix.com
Sales
Support
Service
Support
Technical
Support
* This phone number is toll free in North America. After office hours,
please leave a voice mail message.
Outside North America, contact a Tektronix sales office or distributor;
see the Tektronix web site for a list of offices.
1-800-833-9200, select option 1*
1-800-833-9200, select option 1*
Email: techsupport@tektronix.com
1-800-833-9200, select option 3*
6:00 a.m. - 5:00 p.m. Pacific time
TDS2MEM User Manual iii
Page 8

Contacting Tektronix
iv TDS2MEM User Manual
Page 9

Using the TDS2MEM Storage Memory and Communications Module
The TDS2MEM Storage Memory and Communications module adds
removable Type 1 CompactFlash (CF) card storage memory, RS-232
remote programming capability, and RS-232 and Centronics printer
output connectivity to your TDS1000- or TDS2000-Series
oscilloscope.
NOTE. This module is not compatible with TDS200-Series
oscilloscopes.
Installing the Module
See the TDS200-, TDS1000- and TDS2000-Series Extension Module
Installation sheet for module installation instructions. The following
illustration identifies the TDS2MEM module output ports.
Centronics Port
Centronics Port
TDS2MEM User Manual 1
Page 10
Using the TDS2MEM Storage Memory and Communications Module
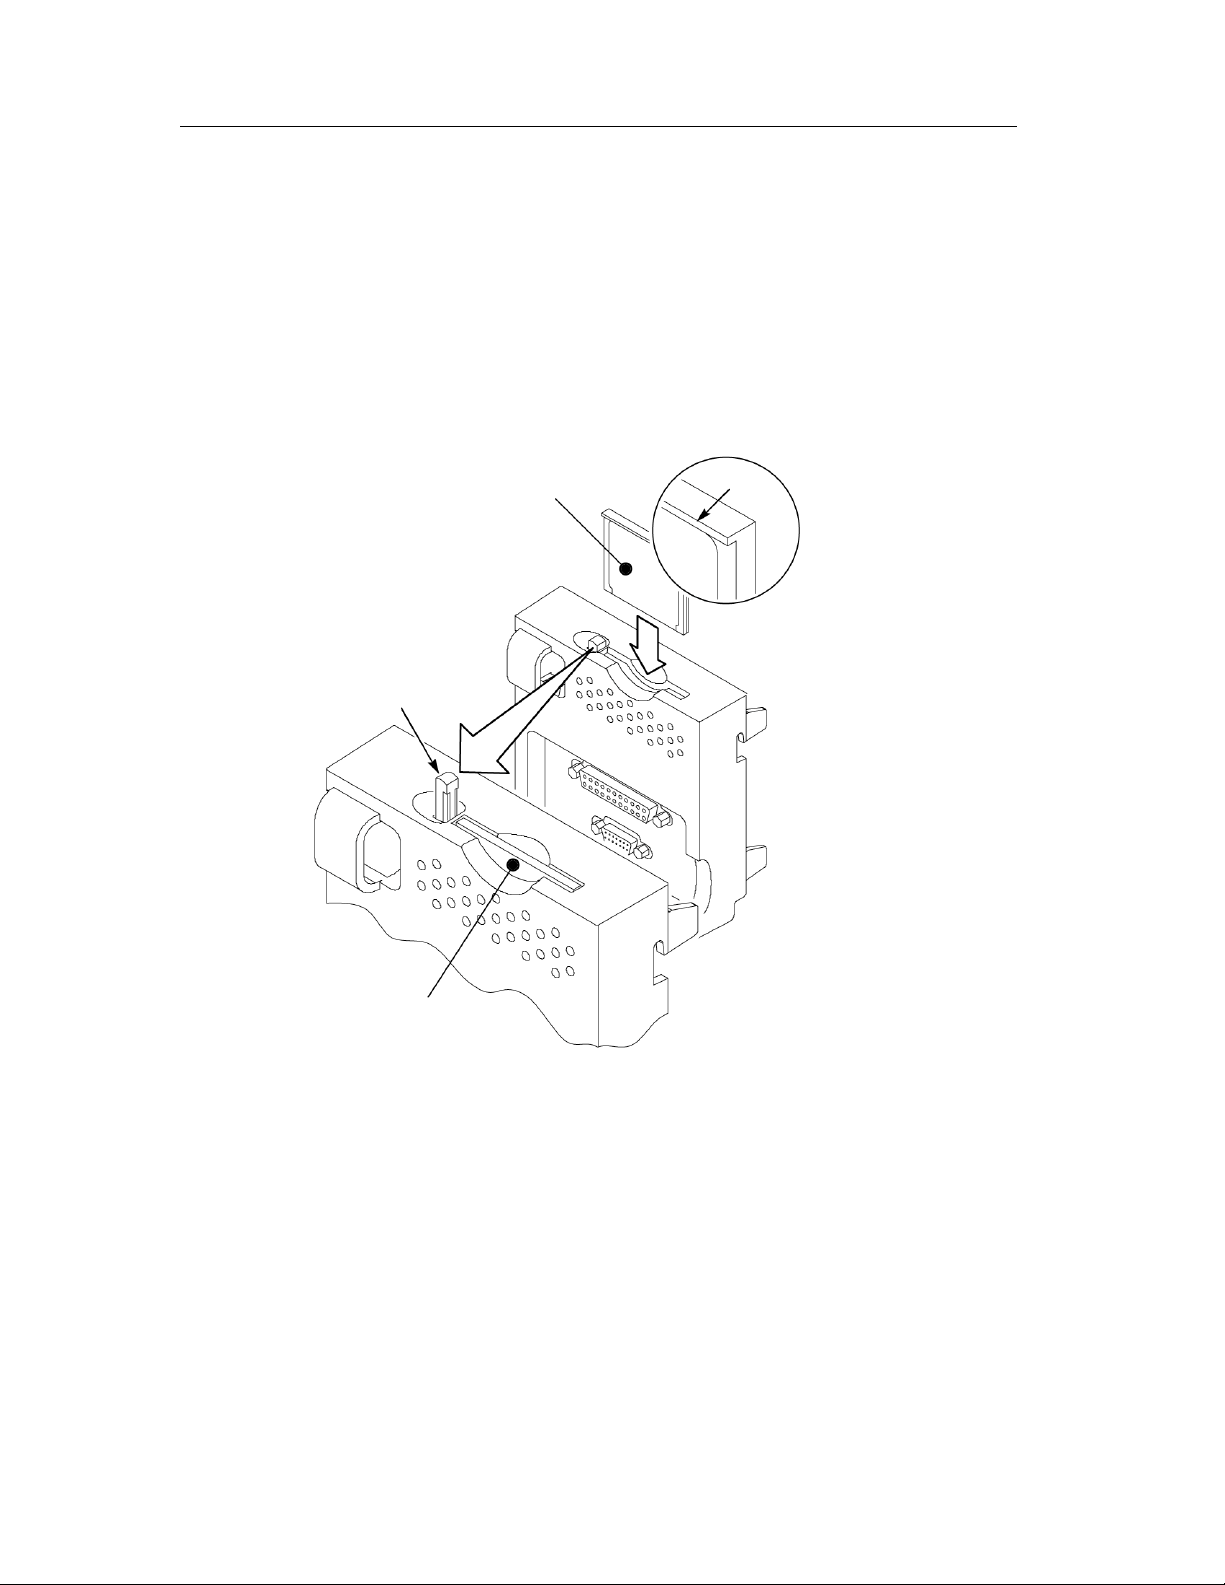
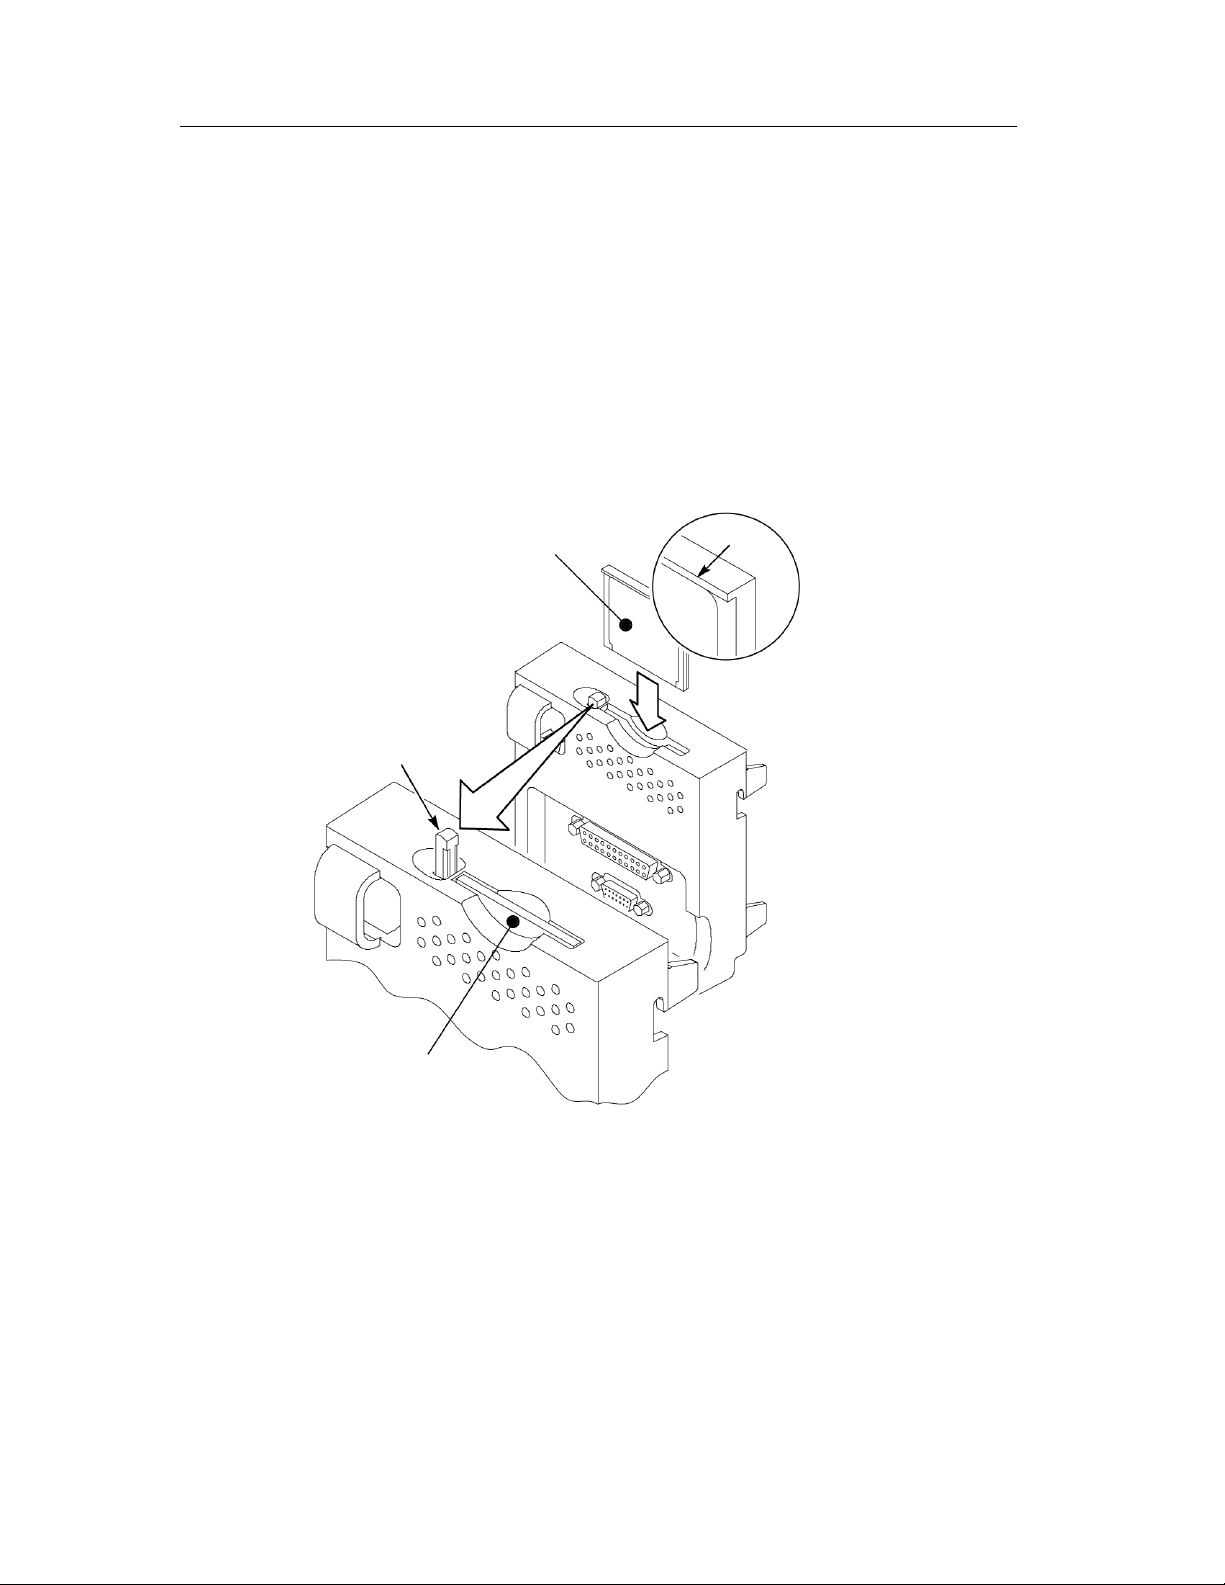
Installing and Removing the CompactFlash Card
Insert a Type 1 CompactFlash card into the slot until the card is flush
with the module case, as shown below. The CF card is keyed to be
inserted only one way. If the CF card does not easily slide into place,
remove and correctly reinsert it.
Back side of card
Eject button
Card
Lip
To remove the CompactFlash card, push and release the eject button
until the button fully extends, then push the eject button again to
release the CF card from the slot. Pull the CF card out of the
module slot.
2 TDS2MEM User Manual
Page 11

Using the TDS2MEM Storage Memory and Communications Module
CompactFlash Card Initial Read Time
The TDS2MEM reads a CF card's internal structure every time you
insert a CF card. The time to complete the read depends on the size of
the CF card and how it was formatted. To significantly shorten the
initial read time of 64 MB and larger CF cards used in the TDS2MEM
module, format the CF card using the TDS2MEM format function
(UTILITY
File Utilities Format).
Formatting a CompactFlash Card
1. Insert a CF card into the module.
2. Push the UTILITY front panel button.
3. Select the File Utilities menu option.
4. Select the More menu option to display menu page 2.
5. Select the Format menu option.
6. Select the Yes menu option to format the CF card. Formatting
deletes all data on the CF card.
CompactFlash Card Capacities
The following are the approximate number of files, by type, that you
can store per 1 MB of CF card memory.
5 Save All operations (see Saving Information Using the PRINT
Button on page 5)
16 screen image files (actual capacity depends on the selected
image format) (see Saving a Screen Image to a File on page 7)
TDS2MEM User Manual 3
Page 12

Using the TDS2MEM Storage Memory and Communications Module
250 oscilloscope setting (.set) files (see Saving Oscilloscope
Settings on page 8)
18 waveform (.csv) files (see Saving Waveform Files on page 9)
File Management Conventions
The oscilloscope checks for available space on the CompactFlash
card before writing files, and displays a warning message if there
is not enough memory for the files you are writing.
The term folder as used in this manual refers to a directory location
on the CF card.
The default file save or recall location is the current folder.
The root folder is A:\.
The oscilloscope resets the current folder to A:\ when powering on
the instrument, or when inserting a CF card after the oscilloscope
is powered on.
File names can have one to eight characters, followed by a period,
followed with an extension of one to three characters.
Long file names created on PC operating systems are displayed
using the operating system's shortened file name.
File names are upper case.
4 TDS2MEM User Manual
Page 13

Using the TDS2MEM Storage Memory and Communications Module
Saving Information Using the PRINT Button
You use the Save All menu (SAVE/RECALL Action = Save All) to
set the PRINT button to do one of three functions:
Automatically save oscilloscope information to multiple files in a
folder.
Save the screen image to a file.
Print the screen image to the current printer port.
Settings or
Options
Submenus Comments
Print Button Saves All To
Files
Sets the print button to save all active
oscilloscope information (waveforms,
screen image, settings) to files in a new
subfolder in the current CF card folder.
See Saves All to Files on page 6.
Saves Image To
FIle
Sets the print button to send the screen
image to a file on the CF card.
Prints Sets the print button to send the screen
image to the current printer port.
Select Folder Lists the contents of the current CF card
folder and displays the following menu
items.
Change Folder See Managing Files and Folders on
New Folder
page 14.
Back Returns to the Save All menu.
About
Displays the help text for this task.
Save All
TDS2MEM User Manual 5
Page 14

Using the TDS2MEM Storage Memory and Communications Module
Key Points
Saves All To Files. Setting the Print Button to Saves All To Files is a
fast and easy way to save all of the current oscilloscope information
to files with a single button push. Pushing the PRINT button creates a
new folder and saves the following information in separate files in that
new folder, using the current instrument and file format settings, as
listed in the following table:
Source File name
CH(x) FnnnnCHx.CSV, where nnnn is an automatically-
generated number, and x is the channel number.
MATH FnnnnMTH.CSV
Ref(x) FnnnnRFx.CSV, where x is the reference memory letter.
Screen Image FnnnnTEK.???, where ??? is the current Save Image file
format.
Settings FnnnnTEK.SET
.CSV Files. CSV (comma-separated value) files contain ASCII text
string that lists the time (relative to the trigger) and voltage values for
each of the 2500 waveform data points. You can import .csv files into
many spreadsheet and math analysis applications.
Screen Image Files. You can import screen image files into many
spreadsheet and word processing applications. The type of image file
you can import depends on you application.
.SET files. SET files contain an ASCII text string listing of the
oscilloscope settings.
6 TDS2MEM User Manual
Page 15

Using the TDS2MEM Storage Memory and Communications Module
Saving a Screen Image to a File
You use the Save Image menu (SAVE/RECALL Action = Save
Image) to save the oscilloscope screen image to a default file named
TEKnnnn.???, where .??? is the specified graphics file format. You
can import screen image files into many spreadsheet and word
processing applications.
Settings or
Options
Submenus Comments
File Format BMP, PCX,
TIFF, RLE,
EPSIMAGE
About Saving
Images
Select Folder Lists the contents of the current CF card
Change Folder See Managing Files and Folders on
Layout Select portrait or landscape image
Ink Saver
On, Off
New Folder See Managing Files and Folders on
Save filename Saves the screen image to the
Sets the screen image graphics file
format.
Displays the help text for this task.
folder and displays the following menu
items.
page 14.
layout.
Toggles Ink Saver mode On or Off (color
models only).
page 14.
automatically generated file name in the
current CF card folder.
TDS2MEM User Manual 7
Page 16

Using the TDS2MEM Storage Memory and Communications Module
Saving Oscilloscope Settings
You use the Save Setup menu (SAVE/RECALL Action = Save
Setup) to save the current oscilloscope settings to file name
TEKnnnn.SET in the specified folder or in nonvolatile setup memory.
A setting file contains an ASCII text string that lists the oscilloscope
settings.
Settings or
Options
Save To Setup Specifies saving the current oscilloscope
Submenus Comments
settings to nonvolatile setup memory
File Specifies to save the current
oscilloscope settings to a file on the CF
card.
Setup 1 to 10 Specifies the nonvolatile setup memory
location.
Select Folder Lists the contents of the current CF card
folder and displays the following menu
items.
Change Folder See Managing Files and Folders on
page 14.
New Folder Returns to the Save All menu.
Save Saves the settings to the specified setup
memory location.
filename Saves the settings to the automatically
generated file name in the current CF
card folder.
8 TDS2MEM User Manual
Page 17

Using the TDS2MEM Storage Memory and Communications Module
Saving Waveform Files
You use the Save Wfm menu (SAVE/RECALL Action = Save
Wfm) to save the specified waveform to file name TEKnnnn.CSV, or
to reference memory. The module saves waveform data to files as
comma-separated values (.csv format), which is an ASCII text string
that lists the time (relative to the trigger) and voltage values for each
of the 2500 waveform data points. You can import .csv files into many
spreadsheet and math analysis applications.
Settings or
Options
Save To File Specifies to save the source waveform
Submenus Comments
Ref Specifies to save the source waveform
data to a file on the CF card.
data in reference memory.
Source CH(x), Ref(x),
MATH
Save To Ref(x) Specifies the reference memory location
Select Folder Lists the contents of the current CF card
Change Folder See Managing Files and Folders on
New Folder
Save Saves the waveform to the specified
filename Saves the waveform data to the
Specifies which source waveform to
save.
in which to save the source waveform.
folder and displays the following menu
items.
page 14.
reference memory.
automatically generated file name in the
current CF card folder.
TDS2MEM User Manual 9
Page 18

Using the TDS2MEM Storage Memory and Communications Module
Recalling Oscilloscope Settings
You use the Recall Setup menu (SAVE/RECALL Action = Recall
Setup) to load oscilloscope setup information from a file or memory
location.
Settings or
Options
Recall From Setup Specifies to recall oscilloscope settings
Setup 1 to 10 Specifies the nonvolatile memory
Submenus Comments
from nonvolatile memory.
File Specifies to recall oscilloscope settings
from a file on the CF card.
location from which to recall oscilloscope
settings.
Select Folder Lists the contents of the current CF card
folder from which to select a file, and
displays the following menu item.
Change Folder See Managing Files and Folders on
page 14.
Recall Recalls the settings from nonvolatile
memory.
filename Recalls the settings from the specified
CF card file.
10 TDS2MEM User Manual
Page 19
Using the TDS2MEM Storage Memory and Communications Module
Recalling Waveform Files
You use the Recall Wfm menu (SAVE/RECALL Action = Recall
Wfm) to load waveform data from a CF card file into the specified
reference memory location.
Settings or
Options
To Ref(x) Specifies the reference memory location
Submenus Comments
Change Folder See Managing Files and Folders on
in which to load the waveform data.
Lists the contents of the current CF card
folder from which to select a file, and
displays the following menu items.
page 14.
To
Ref(x)
Recall filename Loads the waveform data from the
Displaying Reference Waveforms
You use the Display Refs menu (SAVE/RECALL Action = Display
Refs) to toggle on or off display of the specified reference memory
waveform.
Settings or
Options
Ref(x) On, Off) Toggles on or off display of the specified
Submenus Comments
Specifies the reference memory location
in which to load the waveform data.
specified file into reference memory.
reference memory waveform.
TDS2MEM User Manual 11
Page 20

Using the TDS2MEM Storage Memory and Communications Module
Setting the Printer Options
You use the Printer Setup menu (UTILITY Options Printer Setup)
to configure the printer file format and port settings.
Options Settings or Submenus Comments
Print Button See page 5 for information
on the Print Button settings.
Print Port Centronics, RS-232 Communication port used to
connect the oscilloscope to a
printer.
Printer Format Thinkjet, Deskjet, Laser Jet,
Bubble Jet, Epson Dot,
DPU411, DPU412,
DPU3445, Epson C60,
Epson C80, BMP, PCX,
TIFF, RLE, EPSIMAGE
File Format BMP, PCX, TIFF, RLE,
EPSIMAGE
Layout Portrait, Landscape Printer output orientation.
Ink Saver On, Off Toggles On or off printing the
Abort Printing Stops sending screen data to
Type of printer connected to
the communication port. This
menu option is active when
the Print Button is set to
Prints.
Type of graphics image file
format. This menu option is
active when the Print Button
is set to Saves Image to
Files.
screen as a black image on a
white background. Only
available in TDS2000-Series
oscilloscopes.
the printer.
12 TDS2MEM User Manual
Page 21

Using the TDS2MEM Storage Memory and Communications Module
Setting the Date and Time
You use the Set Date and Time menu (UTILITY Options Set Date
and Time) to set the module clock date and time. The module uses this
information to time stamp files written to the card. The module
contains a built-in non-replaceable battery to maintain the clock
settings.
Options Settings Comments
Set Date and
Time
Cancel Closes the menu and returns to the
Key Points
Seasonal Time Changes. The module clock/calendar does not
automatically adjust for seasonal time changes. The module does
adjust for Leap years.
Moves the field selection highlight up or
down through the list. Use the TRIGGER
LEVEL knob to change the value of the
selected field.
Updates the module with the specified
date and time settings.
previous menu without saving any
changes.
TDS2MEM User Manual 13
Page 22

Using the TDS2MEM Storage Memory and Communications Module
Managing Files and Folders
You use the File Utilities function (UTILITY File Utilities) to do
the following:
List the contents of the current folder.
Select a file or folder.
Navigate to other folders.
Create, rename, and delete files and folders.
Format the CompactFlash card.
Options Comments
Change Folder Navigates to the selected CF card folder. Use the
HORIZONTAL POSITION knob to select a file or folder, then
push the Change Folder menu option to navigate to the
selected folder.
To return to the previous folder, select the UP folder item and
push the Change Folder menu option.
New Folder Creates a new CF card folder at the current folder location,
named NEW_FOL, and displays the file Rename menu for
changing the default name.
Delete
(filename/folder)
Deletes the selected file name or folder. A folder must be
empty before you can delete it.
Confirm Delete Displays after pressing Delete, to confirm a file delete action.
Pressing any button or knob other than Confirm Delete
cancels the file delete action.
Rename Displays the Rename screen to rename a folder or file; see
Renaming Files and Folders on page 15.
14 TDS2MEM User Manual
Page 23
Using the TDS2MEM Storage Memory and Communications Module
Options Settings Comments
Format Yes, No Formats the CompactFlash card.
Renaming Files and Folders
You use the Rename screen (UTILITY File Utilities Rename) to
change the names of files and folders on the CompactFlash card.
Settings or
Options
Submenus Comments
Formatting deletes all data on the CF
card.
Enter Character A - Z
0 - 9
_ .
Backspace Changes the menu button 1 option to the
Delete
Character
Clear Name Changes the menu button 1 option to Clear
Enters the highlighted alphanumeric
character at the current Name field cursor
position.
Use the HORIZONTAL POSITION knob to
select an alphanumeric character or the
Backspace, Delete Character, or Clear
Name functions.
Backspace function. Deletes the character
to the left of the highlighted character in the
Name field.
Changes the menu button 1 option to the
Delete Character function. Deletes the
highlighted character from the Name field.
Name. Deletes all characters from the
Name field.
TDS2MEM User Manual 15
Page 24

Using the TDS2MEM Storage Memory and Communications Module
Settings or
Options
Submenus Comments
OK Changes the folder of file name to that
Cancel Cancels the rename action (does not
Moves the Name field cursor left or right by
one position.
shown in the Name field.
change the folder or file name) and returns
to the previous menu.
Using Programming Commands through the RS-232 Port
See the TDS2CMA Communications Module section in the TDS1000-
and TDS2000-Series Digital Storage Oscilloscope User Manual for
information on controlling the TDS2MEM or the oscilloscope
functions through the RS-232 port. See the TDS1000- and
TDS2000-Series Digital Storage Oscilloscope Programmer Manual
(Tektronix part number 071-1075-01 or later) for command syntax
information.
Using the CompactFlash Card Reader
Refer to the included CF card reader documentation to install,
configure, and use the CF card reader on your PC's USB port. You
may need to install USB drivers to use the CF card reader.
Tektronix warrants the included CF card and CF card reader for three
(3) months. Refer to the front of this document for specific warranty
information. Please contact the respective manufacturers of these
items for warranty or service support after the three-month Tektronix
warranty period.
16 TDS2MEM User Manual
Page 25

Manuel utilisateur
Module de
communication à mémoire
TDS2MEM
071-1262-00
Ce document s’applique aux versions de firmware
FV:v6.00 et supérieures.
www.tektronix.com
Page 26

Copyright © Tektronix, Inc. Tous droits réservés.
Les produits Tektronix sont protégés par des brevets américains et étrangers
déjà déposés et en cours d’obtention. Les informations contenues dans ce
document remplacent celles publiées précédemment. Les spécifications et les
prix peuvent être modifiés.
Tektronix, Inc., P.O. Box 500, Beaverton, OR 97077, Etats-Unis
TEKTRONIX et TEK sont des marques déposées de Tektronix, Inc.
CompactFlash est une marque déposée de CompactFlash Association.
Page 27

RESUME DE LA GARANTIE
TDS2MEM
Tektronix garantit les produits qu’elle fabrique et commercialise contre tout défaut de
matériau ou vice de fabrication pendant une période de trois (3) ans, à compter de la date
d’expédition par un distributeur Tektronix agréé. Si un produit ou un tube cathodique se
révèle défectueux pendant cette période, Tektronix s’engage à procéder, soit à la
réparation, soit au remplacement du produit, comme il est décrit dans le texte intégral de
la garantie.
Pour faire effectuer une réparation ou obtenir un exemplaire intégral de la garantie,
veuillez contacter le bureau de vente et le service après-vente Tektronix le plus proche.
HORMIS CE QUI EST CONTENU DANS CE RESUME OU DANS LE DOCUMENT
DE GARANTIE APPLICABLE, TEKTRONIX REFUTE TOUTE GARANTIE,
EXPLICITE OU IMPLICITE, Y COMPRIS ET SANS LIMITATION LES
GARANTIES IMPLICITES D’APTITUDE A LA COMMERCIALISATION OU
D’ADEQUATION A UNE UTILISATION SPECIFIQUE. EN AUCUN CAS,
TEKTRONIX NE POURRA ETRE TENU RESPONSABLE DE DOMMAGES
INDIRECTS, SPECIAUX OU CONSECUTIFS.
Page 28

GARANTIE
Carte CompactFlash et lecteur CompactFlash
Tektronix garantit les composants, ensembles et pièces (« produit ») qu’elle fabrique et
commercialise contre tout défaut de matériau ou vice de fabrication pendant une période
de trois (3) mois, à compter de la date d’expédition. Si un des produits Tektronix se
révèle défectueux pendant sa période de garantie, Tektronix peut au choix réparer le
produit en question en prenant à sa charge les frais de main-d’œuvre et de pièces, soit
fournir un produit de remplacement en échange de celui défectueux.
Pour pouvoir prétendre à la garantie, le client doit notifier à Tektronix le défaut avant
l’expiration de la période de garantie et effectuer les démarches correspondantes. Il
appartient au client d’emballer et d’expédier le produit défectueux au centre de réparation
indiqué par Tektronix, avec les frais d’expédition prépayés. Tektronix prendra à sa charge
la réexpédition du produit au client si le destinataire se trouve dans le pays où le centre de
réparation Tektronix est implanté. Tous les frais d’expédition, droits, taxes et autres frais
afférents à la réexpédition du produit dans un autre lieu sont à la charge du client.
Cette garantie est caduque en cas de défaillance, de panne ou de dommage provoqué par
un usage impropre ou un défaut de soin ou de maintenance. Tektronix n’est pas contraint
d’assurer les réparations sous garantie dans les cas suivants : a) réparations résultant de
dommages provoqués par du personnel non mandaté par Tektronix qui a installé, réparé
ou entretenu le produit ; b) réparations résultant d’une utilisation impropre ou d’un
raccordement à des équipements incompatibles ; c) réparation des dommages ou
dysfonctionnements résultant de l’utilisation de pièces non fournies par Tektronix ; ou
d) entretien d’un produit modifié ou intégré à d’autres produits, rendant ainsi le produit
plus difficile à entretenir ou augmentant la périodicité des entretiens.
CETTE GARANTIE EST ACCORDEE PAR TEKTRONIX, A L’EXCEPTION
DE TOUTES LES AUTRES GARANTIES, IMPLICITES OU EXPLICITES.
TEKTRONIX ET SES FOURNISSEURS NE DONNENT AUCUNE GARANTIE
IMPLICITE QUANT A LA QUALITE MARCHANDE OU A L’ADEQUATION
DU PRODUIT POUR DES USAGES PARTICULIERS. LE SEUL RECOURS DU
CLIENT EN CAS DE VIOLATION DE CETTE GARANTIE EST D’EXIGER DE
TEKTRONIX QU’IL REPARE OU REMPLACE LE PRODUIT DEFECTUEUX.
TEKTRONIX ET SES FOURNISSEURS NE POURRONT PAR CONSEQUENT
PAS ETRE TENUS RESPONSABLES DES DOMMAGES INDIRECTS,
SPECIAUX OU CONSECUTIFS, MEME S’ILS SONT INFORMES AU
PREALABLE DE L’EVENTUALITE DES DOMMAGES EN QUESTION.
Page 29

Consignes générales de sécurité
Veuillez lire attentivement les précautions et consignes de sécurité
suivantes afin d’éviter de vous blesser ou de risquer d’endommager ce
produit et ceux qui lui sont reliés.
Pour écarter tout danger, utilisez uniquement ce produit dans les
conditions spécifiées.
Seul le personnel qualifié doit être autorisé à effectuer les
opérations d’entretien.
Pour éviter les incendies et les dommages corporels
Mettez le produit à la terre. Ce produit est indirectement raccordé à la
terre au moyen du fil de masse du cordon d’alimentation du châssis.
Pour éviter tout choc électrique, le fil de masse doit être connecté à
une prise de terre. Avant de procéder aux branchements des terminaux
d’entrée et de sortie du produit, veillez à ce que celui-ci soit
correctement mis à la terre.
Respectez toutes les valeurs nominales des terminaux. Pour éviter tout
risque d’incendie ou de choc électrique, respectez toutes les limites et
indications nominales du produit. Consultez le manuel livré avec le
produit où figurent toutes les informations complémentaires avant de
procéder au branchement du produit.
Le terminal commun est au potentiel de la terre. Ne le connectez pas
à une tension trop élevée.
Ne mettez pas l’appareil en service sans ses capots. Ne mettez pas
l’appareil en service si ses capots ou panneaux ont été retirés.
Evitez tout circuit exposé. Ne touchez à aucun branchement ou
composant exposé quand l’appareil est sous tension.
Ne pas utiliser cas de défaillances suspectes. En cas de doute sur le bon
état de ce matériel, faites-le inspecter par un technicien qualifié.
Ne pas utiliser dans un environnement humide.
Ne pas utiliser dans un environnement explosif.
Maintenez les surfaces du produit propres et sèches.
Manuel utilisateur du TDS2MEM i
Page 30
Consignes générales de sécurité
Symboles et termes
Termes apparaissant dans ce manuel. Les mentions suivantes peuvent
figurer dans ce manuel :
AVERTISSEMENT : Les avertissements identifient des conditions
ou des interventions pouvant entraîner des blessures graves
ou mortelles.
ATTENTION : Les mises en garde identifient les conditions
ou les actions susceptibles d’endommager le matériel ou
d’autres équipements.
Mentions figurant sur le produit. Les mentions suivantes peuvent figurer
sur le produit :
DANGER indique un risque de blessure immédiate à la lecture de
l’étiquette.
AVERTISSEMENT indique un risque de blessure non immédiate à la
lecture de l’étiquette.
PRECAUTION indique un risque de dommage de propriété, y
compris du produit.
Symboles figurant sur le produit. Les symboles suivants peuvent figurer
sur le produit :
MISE EN GARDE
Reportez-vous
au manuel
Terminaison
à la terre
Recyclage de la batterie
Ce produit contient une batterie au Lithium non remplaçable. Veuillez
mettre au rebut la batterie conformément à la réglementation locale.
ii Manuel utilisateur du TDS2MEM
Page 31

Pour contacter Tektronix
Téléphone 1-800-833-9200*
Adresse Tektronix, Inc.
Service ou nom (si connu)
14200 SW Karl Braun Drive
P.O. Box 500
Beaverton, OR 97077
USA
Site Web www.tektronix.com
Service
commercial
Service
clientèle
Assistance
technique
* Ce numéro de téléphone est gratuit en Amérique du Nord. En dehors
des heures de bureau, veuillez laisser un message vocal.
En dehors de l’Amérique du Nord, contactez un bureau de vente ou
un distributeur Tektronix ; pour obtenir la liste des bureaux,
consultez le site Web Tektronix.
1-800-833-9200, sélectionnez l’option 1*
1-800-833-9200, sélectionnez l’option 1*
E-mail : techsupport@tektronix.com
1-800-833-9200, sélectionnez l’option 3*
de 6 heures à 17 heures, fuseau horaire Pacifique
Manuel utilisateur du TDS2MEM iii
Page 32

Pour contacter Tektronix
iv Manuel utilisateur du TDS2MEM
Page 33

Utilisation du module de communication à mémoire TDS2MEM
Le module de communication à mémoire TDS2MEM est doté d’une
mémoire par carte CompactFlash (CF) Type 1 amovible, d’une
fonctionnalité de programmation à distance RS-232, et d’un
connecteur de sortie d’imprimante RS-232 et Centronics permettant
une connexion à votre oscilloscope série TDS1000- ou TDS2000.
REMARQUE : Ce module n’est pas compatible avec les
oscilloscopes série TDS200.
Installation du module
Pour obtenir les instructions d’installation du module, reportez-vous à
la fiche Installation du module d’extension de communication série
DS200-, TDS1000- et TDS2000. L’illustration suivante identifie les
ports de sortie du module TDS2MEM.
port Centronics
port RS-232
Manuel utilisateur du TDS2MEM 1
Page 34

Utilisation du module de communication à mémoire TDS2MEM
Installation et retrait de la carte CompactFlash
Insérez la carte CompactFlash Type 1 dans la fente jusqu’à ce quelle
soit au même niveau que le boîtier du module, comme illustré
ci-après. La carte CF est protégée pour n’être insérée que dans un
sens. Si la carte CF ne rentre pas facilement dans son logement,
retirez-la puis réinsérez-la correctement.
Côté arrière de la carte
Bouton d’éjection
Carte CF
Lèvre
Pour retirer la carte CompactFlash, pressez et relâchez le bouton
d’éjection jusqu’à sa butée, puis appuyez de nouveau sur le bouton
d’éjection pour retirer la carte CF de son logement. Retirez la carte CF
de la fente du module.
2 Manuel utilisateur du TDS2MEM
Page 35

Utilisation du module de communication à mémoire TDS2MEM
Temps de lecture initial de la carte CompactFlash
Le module TDS2MEM lit la structure interne d’une carte CF à chaque
insertion. Le temps de lecture dépend de la taille de la carte et de son
formatage. Pour réduire considérablement le temps de lecture initial
des cartes CF de 64 Mo et des modèles de plus grande capacité utilisés
dans le module TDS2MEM, formatez-les à l’aide de la fonction de
formatage du TDS2MEM (UTILITAIRE
Utilitaires Fichiers
Format).
Formatage d’une carte CompactFlash
1. Insérez une carte CF dans le module.
2. Appuyez sur le bouton UTILITAIRE situé sur la face avant.
3. Sélectionnez l’option de menu Utilitaires Fichiers.
4. Sélectionnez l’option de menu Suite pour afficher la page 2
du menu.
5. Sélectionnez l’option de menu Format.
6. Sélectionnez l’option de menu Oui pour formater la carte CF.
Cette opération supprime toutes les données figurant sur la
carte CF.
Capacités d’une carte CompactFlash
Voici le nombre approximatif de fichiers, par type, que vous pouvez
stocker dans 1 Mo de mémoire sur la carte CF :
5 opérations de sauvegarde intégrale (reportez-vous à la section
Sauvegarde d’informations à l’aide du bouton PRINT
(IMPRIMER) en page 5)
16 fichiers d’images d’écran (la capacité réelle dépend du format
d’image sélectionné) (reportez-vous à la section Sauvegarde
d’une image d’écran dans un fichier en page 7)
Manuel utilisateur du TDS2MEM 3
Page 36

Utilisation du module de communication à mémoire TDS2MEM
250 fichiers de réglage (.set) de l’oscilloscope (reportez-vous à la
section Sauvegarde des réglages de l’oscilloscope en page 8)
18 fichiers de signal (.csv) (reportez-vous à la section Sauvegarde
des fichiers de signal en page 9)
Conventions de gestion des fichiers
L’oscilloscope vérifie l’espace disponible sur la carte
CompactFlash avant d’écrire les fichiers, puis affiche un message
d’avertissement s’il n’y a pas assez de mémoire pour les fichiers
que vous écrivez.
Le terme dossier utilisé dans ce manuel fait référence à un
répertoire sur la carte CF.
L’emplacement de sauvegarde ou de rappel des fichiers par défaut
est le dossier courant.
Le dossier racine est A:\.
L’oscilloscope réinitialise le dossier courant sur A:\ lorsque vous
allumez l’appareil ou lorsque vous insérez une carte CF après la
mise sous tension de l’oscilloscope.
Les noms de fichier peuvent contenir de un à huit caractères suivis
d’un point, puis une extension contenant de un à trois caractères.
Les noms de fichier longs créés sur des systèmes d’exploitation
pour PC sont affichés avec le nom de fichier raccourci du
système d’exploitation.
Les noms de fichier sont en majuscules.
4 Manuel utilisateur du TDS2MEM
Page 37

Utilisation du module de communication à mémoire TDS2MEM
Sauvegarde d’informations à l’aide du bouton PRINT (IMPRIMER).
Vous devez utiliser le menu Sauveg. tot. (SAUV./RAP Action =
Sauveg. tot.) pour que le bouton PRINT (IMPRIMER) exécute une
des trois fonctions suivantes :
Sauvegarder automatiquement les informations de l’oscilloscope
dans plusieurs fichiers d’un dossier.
Sauvegarder l’image d’écran dans un fichier.
Imprimer l’image d’écran via le port d’imprimante courant.
Réglages ou
Options
sous-menus Commentaires
Bouton Print
(Imprimer)
Sélection
Dossier
Sauvegarde tout Définit le bouton d’impression afin qu’il
sauvegarde toutes les informations
actives de l’oscilloscope (signaux, image
d’écran, réglages) dans des fichiers
stockés dans un nouveau sous-dossier
du dossier courant de la carte CF. Voir
Sauvegarde tout en page 1-6.
Sauvegarde
image
Imprime vers Définit le bouton d’impression afin qu’il
Modif. Dossier Reportez-vous à la section Gestion des
Nouv. Dossier
Retour Revient au menu Sauveg. tot.
Définit le bouton d’impression afin qu’il
envoie l’image d’écran vers un fichier sur
la carte CF.
envoie l’image d’écran vers le port
d’imprimante courant.
Répertorie le contenu du dossier courant
de la carte CF et affiche les options de
menu suivantes :
fichiers et des dossiers en page 14.
À propos de
Sauvegarde
totale
Affiche le texte d’aide correspondant à
cette tâche.
Manuel utilisateur du TDS2MEM 5
Page 38

Utilisation du module de communication à mémoire TDS2MEM
Informations importantes
Sauvegarde tout. Le fait de définir le bouton d’impression avec cette
option permet de sauvegarder facilement et rapidement, par une
simple pression de bouton, toutes les informations actuelles de
l’oscilloscope. En appuyant sur le bouton PRINT (IMPRIMER),
vous créez un nouveau dossier et y sauvegardez les informations
suivantes dans des fichiers distincts, à partir des réglages d’appareil et
des paramètres de format de fichier actifs, tels que définis dans le
tableau suivant :
Source Nom de fichier
CH(x) FnnnnCHx.CSV, nnnn étant un nombre généré
automatiquement, et x correspondant au numéro de la voie.
MATH FnnnnMTH.CSV
Ref(x) FnnnnRFx.CSV, x correspondant à la lettre de la mémoire
de référence.
Image à l’écran FnnnnTEK.???, ??? représentant le format de fichier
courant de l’image sauvegardée.
Réglages FnnnnTEK.SET
Fichiers .CSV. Les fichiers .CSV (valeurs séparées par des virgules)
contiennent une chaîne de texte ASCII indiquant le temps (par rapport
au déclenchement) et les valeurs de voltage de chacun des
2 500 points de données de signal. Vous pouvez importer les
fichiers .csv dans un grand nombre de tableurs et d’applications
d’analyse mathématique.
Fichiers d’image d’écran. Vous pouvez importer les fichiers d’image
d’écran dans un grand nombre de tableurs et d’applications de
traitement de texte. Le type du fichier image que vous importez
dépend de votre application.
Fichiers .SET. Les fichiers SET contiennent une chaîne de texte ASCII
indiquant les réglages de l’oscilloscope.
6 Manuel utilisateur du TDS2MEM
Page 39

Utilisation du module de communication à mémoire TDS2MEM
Sauvegarde d’une image d’écran dans un fichier
Vous devez utiliser le menu Sauvegarde image
(SAUV./RAP
l’image d’écran de l’oscilloscope dans un fichier par défaut portant le
nom TEKnnnn.???, .??? représentant le format du fichier graphique
défini. Vous pouvez importer les fichiers d’image d’écran dans un
grand nombre de tableurs et d’applications de traitement de texte.
Options
Action = Sauvegarde image) pour sauvegarder
Réglages ou
sous-menus Commentaires
Format
de fichier
À propos de
Sauvegarde
Images
Sélection
Dossier
Mise en
mémoire
BMP, PCX,
TIFF, RLE,
EPSIMAGE
Modif. Dossier Reportez-vous à la section Gestion des
Présentation Permet de sélectionner une présentation
Economie
d’encre
Act., Désact.
Nouv. Dossier Reportez-vous à la section Gestion des
nom de fichier Sauvegarde l’image d’écran dans le
Définit le format du fichier graphique de
l’image à l’écran.
Affiche le texte d’aide correspondant à
cette tâche.
Répertorie le contenu du dossier courant
de la carte CF et affiche les options de
menu suivantes :
fichiers et des dossiers en page 14.
d’image de type portrait ou paysage.
Permet de basculer le mode Economie
d’encre sur Activé ou Désactivé
(modèles couleur uniquement).
fichiers et des dossiers en page 14.
fichier généré automatiquement dans le
dossier courant de la carte CF.
Manuel utilisateur du TDS2MEM 7
Page 40

Utilisation du module de communication à mémoire TDS2MEM
Sauvegarde des réglages de l’oscilloscope
Vous devez utiliser le menu Sauvegarde config. (SAUV./RAP
Action = Sauv. config.) pour sauvegarder les réglages courants de
l’oscilloscope dans un fichier TEKnnnn.SET stocké dans le dossier
indiqué ou dans la mémoire de réglage non volatile. Un fichier de
réglage contient une chaîne de texte ASCII indiquant les réglages de
l’oscilloscope.
Réglages ou
Options
sous-menus Commentaires
Sauvegarde
vers
Mémoire Config. 1 à 10 Indique l’emplacement de la mémoire de
Sélection
Dossier
Mise en
mémoire
Mémoire Config. Indique que les réglages courants de
l’oscilloscope doivent être sauvegardés
dans la mémoire de réglage non volatile.
Fichier Indique que les réglages courants de
l’oscilloscope doivent être sauvegardés
dans un fichier sur la carte CF.
réglage non volatile.
Répertorie le contenu du dossier courant
de la carte CF et affiche les options de
menu suivantes :
Modif. Dossier Reportez-vous à la section Gestion des
fichiers et des dossiers en page 14.
Nouv. Dossier Revient au menu Sauveg. tot.
Sauvegarde les réglages dans
l’emplacement indiqué pour la mémoire
de réglage.
nom de fichier Sauvegarde les réglages dans le fichier
généré automatiquement dans le dossier
courant de la carte CF.
8 Manuel utilisateur du TDS2MEM
Page 41

Utilisation du module de communication à mémoire TDS2MEM
Sauvegarde des fichiers de signal
Vous devez utiliser le menu Sauveg. signal (SAUV./RAP Action =
Sauveg. signal) pour sauvegarder le signal défini dans un fichier
TEKnnnn.CSV ou dans la mémoire de référence. Le module
sauvegarde les données de signal dans des fichiers au format CSV
(valeurs séparées par des virgules), qui correspondent à une chaîne de
texte ASCII indiquant le temps (par rapport au déclenchement) et les
valeurs de tension de chacun des 2 500 points de données de signal.
Vous pouvez importer les fichiers .csv dans un grand nombre de
tableurs et d’applications d’analyse mathématique.
Réglages ou
Options
sous-menus Commentaires
Sauvegarde
vers
Source CH(x), Réf(x),
Sauvegarde
vers
Sélection
Dossier
Mise en
mémoire
Fichier Indique que les données du signal
Réf Indique que les données du signal
MATH
Réf(x) Indique l’emplacement de mémoire de
Modif. Dossier Reportez-vous à la section Gestion des
Nouv. Dossier
source doivent être sauvegardées dans
un fichier sur la carte CF.
source doivent être sauvegardées dans
la mémoire de référence.
Indique le signal source à sauvegarder.
référence dans lequel le signal source
doit être sauvegardé.
Répertorie le contenu du dossier courant
de la carte CF et affiche les options de
menu suivantes :
fichiers et des dossiers en page 14.
Sauvegarde le signal dans la mémoire
de référence spécifiée.
nom de fichier Sauvegarde les données du signal dans
le fichier généré automatiquement dans
le dossier courant de la carte CF.
Manuel utilisateur du TDS2MEM 9
Page 42

Utilisation du module de communication à mémoire TDS2MEM
Rappel des réglages de l’oscilloscope
Vous devez utiliser le menu Rappel config. (SAUV./RAP Action =
Rappel conf.) pour charger les informations de configuration de
l’oscilloscope à partir d’un fichier ou d’un emplacement de mémoire.
Réglages ou
Options
Rappel de Mémoire Config. Indique que les réglages de
Mémoire Config. 1 à 10 Indique l’emplacement de mémoire non
sous-menus Commentaires
l’oscilloscope doivent être rappelés à
partir de la mémoire non volatile.
Fichier Indique que les réglages de
l’oscilloscope doivent être rappelés à
partir d’un fichier sur la carte CF.
volatile à partir duquel les réglages de
l’oscilloscope doivent être rappelés.
Sélection
Dossier
Modif. Dossier Reportez-vous à la section Gestion des
Rappel Rappelle les réglages à partir de la
nom de fichier Rappelle les réglages à partir du fichier
Répertorie le contenu du dossier courant
de la carte CF à partir duquel un fichier
doit être sélectionné, et affiche les
options de menu suivantes :
fichiers et des dossiers en page 14.
mémoire non volatile.
de carte CF spécifié.
10 Manuel utilisateur du TDS2MEM
Page 43

Utilisation du module de communication à mémoire TDS2MEM
Rappel des fichiers de signal
Vous devez utiliser le menu Rappel signal (SAUV./RAP Action =
Rappel Signal) pour charger les données du signal à partir d’un
fichier de la carte CF figurant dans l’emplacement de mémoire de
référence spécifié.
Réglages ou
Options
Vers Réf(x) Indique l’emplacement de mémoire de
sous-menus Commentaires
référence dans lequel les données du
signal doivent être chargées.
Sélection
Dossier
Modif. Dossier Reportez-vous à la section Gestion des
Vers
Réf (x)
Rappel nom de fichier Charge les données du signal à partir
Répertorie le contenu du dossier courant
de la carte CF à partir duquel un fichier
doit être sélectionné, et affiche les
options de menu suivantes :
fichiers et des dossiers en page 14.
Indique l’emplacement de mémoire de
référence dans lequel les données du
signal doivent être chargées.
du fichier spécifié dans la mémoire
de référence.
Affichage des signaux de référence
Vous devez utiliser le menu Affich. réfs. (SAUV./RAP Action =
Affich. réfs.) pour activer ou désactiver l’affichage du signal de
mémoire de référence spécifié.
Réglages ou
Options
Réf(x) Act., Désact. Active ou désactive l’affichage du signal
sous-menus Commentaires
de mémoire de référence spécifié.
Manuel utilisateur du TDS2MEM 11
Page 44

Utilisation du module de communication à mémoire TDS2MEM
Configuration des options d’impression
Vous devez utiliser le menu Configuration imprimante (UTILITAIRE
Options Configuration imprimante) pour configurer le format de
fichier de l’imprimante et les paramètres de port.
Options Réglages ou sous-menus Commentaires
Bouton Print
(Imprimer)
Port imprim. Centronics, RS232 Port de communication utilisé
Format
d’imprimante
Format de fichier BMP, PCX, TIFF, RLE,
Présentation Portrait, Paysage Orientation de la sortie papier
Thinkjet, Deskjet, Laser Jet,
Bubble Jet, Epson Dot,
DPU411, DPU412,
DPU3445, Epson C60,
Epson C80, BMP, PCX,
TIFF, RLE, EPSIMAGE
EPSIMAGE
Pour plus d’informations sur
les réglages du bouton Print
(Imprimer), reportez-vous à la
page 5.
pour connecter l’oscilloscope
à une imprimante.
Type d’imprimante connectée
au port de communication.
Cette option de menu est
active lorsque le bouton Impr.
est réglé sur Imprime vers.
Type de format du fichier
image. Cette option de
menu est active lorsque le
bouton Impr. est réglé sur
Imprime vers.
de l’imprimante.
Economie
d’encre*
Suspendre
impression
Act., Désact. Active ou désactive
l’impression de l’écran sous
forme d’une image noire sur
fond blanc. Uniquement
disponible sur les
oscilloscopes série TDS2000.
Interrompt l’envoi des
données affichées à l’écran
vers l’imprimante.
12 Manuel utilisateur du TDS2MEM
Page 45

Utilisation du module de communication à mémoire TDS2MEM
Réglage de la date et de l’heure
Vous devez utiliser le menu Régler date et heure (UTILITAIRE
Options
module. Le module utilise ces informations pour horodater les fichiers
écrits sur la carte. Il contient une batterie intégrée non remplaçable qui
permet de conserver les réglages de l’horloge.
Options Réglages Commentaires
Régler date et heure) pour régler la date et l’heure du
Régler date
et heure
Annuler Ferme le menu et revient au menu
Informations importantes
Changements d’heure saisonniers. L’horloge/le calendrier du module
ne s’ajuste pas automatiquement en fonction des changements
d’heure saisonniers. Il s’ajuste pour les années bissextiles.
Déplace la mise en surbrillance de
sélection du champ vers le haut ou vers
le bas dans la liste. Utilisez le bouton
NIVEAU DÉCLENCHEMENT pour
modifier la valeur du champ sélectionné.
Met à jour le module avec les réglages
de date et d’heure spécifiés.
précédent sans sauvegarder les
modifications.
Manuel utilisateur du TDS2MEM 13
Page 46

Utilisation du module de communication à mémoire TDS2MEM
Gestion des fichiers et des dossiers
Vous devez utiliser la fonction Utilitaires Fichiers (UTILITAIRE
Utilitaires Fichiers) pour effectuer les opérations suivantes :
Répertorier le contenu du dossier courant.
Sélectionner un fichier ou un dossier.
Accéder à d’autres dossiers.
Créer, renommer et supprimer des fichiers et des dossiers.
Formater la carte CompactFlash.
Options Commentaires
Modif. Dossier Permet d’accéder au dossier sélectionné sur la carte CF.
Utilisez le bouton HORIZONTAL POSITION pour sélectionner
un fichier ou un dossier, puis appuyez sur l’option de menu
Modif. Dossier pour accéder au dossier sélectionné.
Pour revenir au dossier précédent, sélectionnez l’option
de dossier Précédent et appuyez sur l’option de menu
Modif. Dossier.
Nouv. Dossier Crée un nouveau dossier intitulé NEW_FOL dans le dossier
courant de la carte CF et affiche le menu de modification du
nom de fichier afin de changer le nom par défaut.
Supprimer
(nom de
Supprime le nom de fichier ou le dossier sélectionné. Un
dossier doit être vide pour pouvoir être supprimé.
fichier/dossier)
Confirmer
Suppression
S’affiche après avoir appuyé sur Supprimer afin de confirmer
l’action de suppression d’un fichier. Si vous appuyez sur un
bouton autre que Confirmer Suppression, l’action de
suppression du fichier sera annulée.
Renommer Affiche l’écran Renommer dans lequel vous pouvez
renommer un dossier ou un fichier ; reportez-vous à la
section Modification du nom des fichiers et des dossiers en
page 15.
14 Manuel utilisateur du TDS2MEM
Page 47

Utilisation du module de communication à mémoire TDS2MEM
Options Réglages Commentaires
Format Oui,
Non
Formate la carte CompactFlash. Cette
opération supprime toutes les données
sur la carte CF.
Modification du nom des fichiers et des dossiers
Vous devez utiliser l’écran Renommer (UTILITAIRE Utilitaires
Fichiers
figurant sur la carte CompactFlash.
Options
Entrer
Caractère
Renommer) pour modifier les noms de fichiers et dossiers
Réglages ou
sous-menus Commentaires
A - Z
0 - 9
_ .
Permet de saisir le caractère
alphanumérique mis en surbrillance au
niveau de la position du curseur dans le
champ Nom courant.
Utilisez le bouton HORIZONTAL
POSITION pour sélectionner un caractère
alphanumérique, ou utilisez les fonctions
Retour arr., Supprimer caract. ou
Effacer nom.
Retour arr. Modifie l’option du bouton de menu 1 en lui
affectant la fonction Retour arr. Supprime le
caractère situé à gauche du caractère mis
en surbrillance dans le champ Nom.
Supprimer
caractère
Effacer nom Modifie l’option du bouton de menu 1 en lui
Modifie l’option du bouton de menu 1 en lui
affectant la fonction Supprimer caractère.
Supprime du champ Nom le caractère mis
en surbrillance.
affectant la fonction Effacer nom. Supprime
tous les caractères du champ Nom.
Manuel utilisateur du TDS2MEM 15
Page 48

Utilisation du module de communication à mémoire TDS2MEM
Réglages ou
Options
sous-menus Commentaires
OK Modifie le nom du dossier ou du fichier
Annuler Annule l’action de changement de nom (ne
Déplace d’une unité vers la gauche ou la
droite le curseur du champ Nom.
en lui attribuant le nom indiqué dans le
champ Nom.
modifie pas le nom du dossier ou du fichier)
et revient au menu précédent.
Utilisation des commandes de programmation via le port RS-232
Pour plus d’informations sur le contrôle de l’oscilloscope TDS2MEM
ou de ses fonctions par l’intermédiaire du port RS-232, reportez-vous
à la section Module de communication TDS2CMA du Manuel
utilisateur de l’oscilloscope à mémoire numérique
TDS1000/TDS2000. Pour plus d’informations sur la syntaxe des
commandes, reportez-vous au Manuel du programmation de
l’oscilloscope à mémoire numérique TDS1000/TDS2000 (numéro de
référence Tektronix 071-1075-01 ou version ultérieure).
Utilisation du lecteur de cartes CompactFlash
Pour installer, configurer et utiliser le lecteur de cartes CF sur le port
USB de votre ordinateur, reportez-vous à la documentation jointe
relative au lecteur de cartes CompactFlash. Vous devrez peut-être
installer les pilotes USB pour utiliser le lecteur de cartes CF.
Tektronix garantit pendant trois (3) mois la carte et le lecteur de cartes
CompactFlash fournis. Pour obtenir des informations spécifiques sur
la garantie, reportez-vous aux premières pages de cette
documentation. Après la période de garantie de trois mois offerte par
Tektronix, contactez les fabricants respectifs de ces appareils pour la
garantie ou le service après-vente.
16 Manuel utilisateur du TDS2MEM
Page 49

Benutzerhandbuch
TDS2MEM
Datenspeicher- und
Kommunikationsmodul
071-1262-00
Dieses Dokument unterstützt Firmware der Version 6.00
und höher.
www.tektronix.com
Page 50

Copyright © Tektronix Inc. Alle Rechte vorbehalten.
Tektronix-Produkte sind durch erteilte und angemeldete US- und
Auslandspatente geschützt. Die Informationen in dieser Broschüre machen
Angaben in allen früheren Unterlagen hinfällig. Änderungen der
Spezifikationen und der Preisgestaltung vorbehalten.
Tektronix Inc., P.O. Box 500, Beaverton, OR 97077, USA
TEKTRONIX und TEK sind eingetragene Warenzeichen der Tektronix, Inc.
CompactFlash ist ein eingetragenes Warenzeichen der
CompactFlash Association.
Page 51

GARANTIEHINWEIS
TDS2MEM
Tektronix leistet auf Produkte aus eigener Fertigung und eigenem Vertrieb Garantie
gegen Mängel in Werkstoffen und Herstellung für eine Dauer von drei (3) Jahren ab
Datum der Auslieferung von einem Tektronix-Vertragshändler. Falls sich ein Produkt
oder eine Röhre innerhalb dieser Frist als mangelhaft erweist, übernimmt Tektronix die
Reparatur oder leistet Ersatz gemäß der Angabe in der vollständigen Garantieerklärung.
Zur Inanspruchnahme unseres Kundendienstes oder zur Übersendung der vollständigen
Garantieerklärung bitten wir um Anforderung beim nächstgelegenen Tektronix
Verkaufs- und Kundendienstbüro.
AUSSERHALB DER ANGABEN IN DIESEM HINWEIS ODER IN DER
ENTSPRECHENDEN GARANTIEERKLÄRUNG ÜBERNIMMT TEKTRONIX
KEINERLEI DIREKTE ODER INDIREKTE GARANTIE JEGLICHER ART, DAZU
GEHÖREN, JEDOCH NICHT AUSSCHLIESSLICH, IMPLIZITE GARANTIEN ZUR
VERTRIEBSFÄHIGKEIT UND DER EIGNUNG FÜR EINEN BESTIMMTEN
ZWECK. TEKTRONIX HAFTET KEINESFALLS FÜR INDIREKTE, BESONDERE
ODER NACHFOLGENDE SCHÄDEN.
Page 52

GARANTIE
CompactFlash-Karte und CompactFlash-Kartenleser
Tektronix garantiert, dass die von ihr hergestellten und verkauften Teile, Baugruppen
und Betriebsmittel („Produkte“) für einen Zeitraum von drei (3) Monaten ab
Versanddatum keine Material- und Qualitätsfehler aufweisen. Wenn eines dieser Produkt
innerhalb dieser Garantiezeit Fehler aufweist, steht es Tektronix frei, das fehlerhafte
Produkt kostenlos zu reparieren oder einen Ersatz dafür zur Verfügung zu stellen.
Um mit dieser Garantie Kundendienst zu erhalten, muss der Kunde Tektronix über den
Fehler vor Ablauf der Garantiezeit informieren und passende Vorkehrungen für die
Durchführung des Kundendienstes treffen. Der Kunde ist für die Verpackung und den
Versand des fehlerhaften Produkts an die Service-Stelle von Tektronix verantwortlich,
die Versandgebühren müssen im Voraus bezahlt sein. Tektronix übernimmt die Kosten
der Rücksendung des Produkts an den Kunden, wenn sich die Versandadresse innerhalb
des Landes der Tektronix Service-Stelle befindet. Der Kunde übernimmt alle
Versandkosten, Fracht- und Zollgebühren sowie sonstige Kosten für die Rücksendung
des Produkts an eine andere Adresse.
Diese Garantie tritt nicht in Kraft, wenn Fehler, Versagen oder Schaden auf die falsche
Verwendung oder unsachgemäße und falsche Wartung oder Pflege zurückzuführen sind.
Tektronix muss keinen Kundendienst leisten, wenn a) ein Schaden behoben werden soll,
der durch die Installation, Reparatur oder Wartung des Produkts von anderem Personal
als Tektronix-Vertretern verursacht wurde; b) ein Schaden behoben werden soll, der auf
die unsachgemäße Verwendung oder den Anschluss an inkompatible Geräte
zurückzuführen ist; c) Schäden oder Fehler behoben werden sollen, die auf die
Verwendung von Komponenten zurückzuführen sind, die nicht von Tektronix stammen;
oder d) wenn ein Produkt gewartet werden soll, an dem Änderungen vorgenommen
wurden oder das in andere Produkte integriert wurde, so dass dadurch die aufzuwendende
Zeit für den Kundendienst oder die Schwierigkeit der Produktwartung erhöht wird.
DIESE GARANTIE WIRD VON TEKTRONIX ANSTELLE ANDERER
AUSDRÜCKLICHER ODER IMPLIZITER GARANTIEN GEGEBEN.
TEKTRONIX UND SEINE HÄNDLER SCHLIESSEN AUSDRÜCKLICH ALLE
ANSPRÜCHE AUS DER HANDELBARKEIT ODER DER EINSETZBARKEIT
FÜR EINEN BESTIMMTEN ZWECK AUS. FÜR TEKTRONIX BESTEHT DIE
EINZIGE UND AUSSCHLIESSLICHE VERPFLICHTUNG DIESER
GARANTIE DARIN, FEHLERHAFTE PRODUKTE FÜR DEN KUNDEN ZU
REPARIEREN ODER ZU ERSETZEN. TEKTRONIX UND SEINE HÄNDLER
ÜBERNEHMEN KEINERLEI HAFTUNG FÜR DIREKTE, INDIREKTE,
BESONDERE UND FOLGESCHÄDEN, UNABHÄNGIG DAVON, OB
TEKTRONIX ODER DER HÄNDLER VON DER MÖGLICHKEIT SOLCHER
SCHÄDEN IM VORAUS UNTERRICHTET IST.
Page 53

Allgemeine Sicherheitshinweise
Beachten Sie die folgenden Sicherheitshinweise zum Schutz vor
Verletzungen und zur Verhinderung von Schäden an diesem Gerät
oder an damit verbundenen Geräten.
Verwenden Sie dieses Gerät nur gemäß der Spezifikation, um jede
mögliche Gefährdung auszuschließen.
Wartungsarbeiten sind nur von qualifiziertem Personal durchzuführen.
Verhütung von Bränden und Verletzungen
Erden Sie das Produkt. Das Gerät ist über den Netzkabelschutzleiter
des Grundgeräts indirekt geerdet. Zur Verhinderung eines
Stromschlags muss der Schutzleiter mit der Stromnetzerdung
verbunden sein. Vergewissern Sie sich, dass eine geeignete Erdung
besteht, bevor Sie Verbindungen zu den Eingangs- oder
Ausgangsanschlüssen des Geräts herstellen.
Prüfen Sie alle Angaben zu den Anschlüssen. Beachten Sie zur
Verhütung von Bränden oder Stromschlägen die Kenndatenangaben
und Kennzeichnungen am Gerät. Lesen Sie die entsprechenden
Angaben im Gerätehandbuch, bevor Sie das Gerät anschließen.
Die allgemeine Anschlussklemme liegt auf Erdpotential. Schließen
Sie diese Klemme nicht an höhere Spannungen an.
Nicht ohne Abdeckungen betreiben. Nehmen Sie das Gerät nicht in
Betrieb, wenn Abdeckungen oder Gehäuseteile entfernt sind.
Vermeiden Sie offenliegende Kabel und Anschlüsse. Berühren Sie
keine freiliegenden Anschlüsse oder Bauteile, wenn diese unter
Spannung stehen.
Bei Verdacht auf Funktionsfehler nicht betreiben. Wenn Sie vermuten,
dass das Gerät beschädigt ist, lassen Sie es von qualifiziertem
Wartungspersonal überprüfen.
Nicht bei hoher Feuchtigkeit oder Nässe betreiben.
Nicht in explosionsgefährdeter Atmosphäre betreiben.
Sorgen Sie für saubere und trockene Produktoberflächen.
Benutzerhandbuch für TDS2MEM i
Page 54

Allgemeine Sicherheitshinweise
Symbole und Begriffe
Begriffe in diesem Handbuch. In diesem Handbuch werden die
folgenden Begriffe verwendet:
WARNUNG! Warnungen weisen auf Bedingungen
oder Verfahrensweisen hin, die eine Verletzungs- oder
Lebensgefahr darstellen.
VORSICHT! Vorsichtshinweise machen auf Bedingungen oder
Verfahrensweisen aufmerksam, die zu Schäden am Gerät oder zu
sonstigen Sachschäden führen können.
Begriffe auf dem Produkt. Am Gerät sind eventuell die folgenden
Begriffe zu sehen:
DANGER weist auf eine Verletzungsgefahr hin, die mit der
entsprechenden Hinweisstelle unmittelbar in Verbindung steht.
WARNING weist auf eine Verletzungsgefahr hin, die nicht
unmittelbar mit der entsprechenden Hinweisstelle in Verbindung steht.
CAUTION weist auf mögliche Sach- oder Geräteschäden hin.
Symbole am Gerät. Am Gerät sind eventuell die folgenden Symbole
zu sehen:
VORSICHT
Beachten Sie die
Hinweise im Handbuch.
Schutzleiteran-
schluss (Erde)
Wiederverwerten der Batterie
Dieses Produkt enthält eine nicht austauschbare Lithiumbatterie.
Entsorgen Sie diese Batterie gemäß der gültigen
Entsorgungsvorschriften.
ii Benutzerhandbuch für TDS2MEM
Page 55

Tektronix-Kontaktinformationen
Telefonnummer 1-800-833-9200*
Adresse Tektronix Inc.
Abteilung oder Name (sofern bekannt)
14200 SW Karl Braun Drive
P. O . B o x 50 0
Beaverton, OR 97077
USA
Website www.tektronix.com
VertriebsSupport
ServiceSupport
Technischer
Support
* Diese Rufnummer ist nur in Nordamerika gebührenfrei.
Außerhalb der Bürostunden können Sie eine Nachricht auf dem
Anrufbeantworter hinterlassen.
Außerhalb Nordamerikas wenden Sie sich bitte an ein Tektronix
Verkaufsbüro oder einen unserer Distributoren. Eine Liste der Büros
finden Sie auf der Tektronix Website.
1-800-833-9200, wählen Sie Option 1*
1-800-833-9200, wählen Sie Option 1*
E-Mail: techsupport@tektronix.com
1-800-833-9200, wählen Sie Option 3*
6:00 – 17:00 (Pazifische Zeitzone)
Benutzerhandbuch für TDS2MEM iii
Page 56

Tektronix-Kontaktinformationen
iv Benutzerhandbuch für TDS2MEM
Page 57

Verwendung des Datenspeicher- und Kommunikationsmoduls TDS2MEM
Das Datenspeicher- und Kommunikationsmodul TDS2MEM für
Oszilloskope der Serie TDS1000 bzw. TDS2000 bietet zusätzlichen
entnehmbaren Speicherplatz auf CompactFlash-Karten (CF-Karten)
des Typs 1, eine Fernprogrammierfunktion über RS-232 sowie den
Anschluss an einen Drucker über die RS-232- oder
Centronics-Schnittstelle.
HINWEIS: Dieses Modul ist mit Oszilloskopen der Serie TDS200
nicht kompatibel.
Installation des Moduls
Installationshinweise für das Modul finden Sie unter Installation des
Erweiterungsmoduls für die Serie TDS200-, TDS1000- und TDS2000.
In folgender Abbildung sehen Sie die Ausgangsanschlüsse des
TDS2MEM-Moduls.
Centronics-Schnittstelle
RS-232-Schnittstelle
Benutzerhandbuch für TDS2MEM 1
Page 58
Verwendung des Datenspeicher- und Kommunikationsmoduls TDS2MEM
Einstecken und Entnehmen der CompactFlash-Karte
Stecken Sie eine CompactFlash-Karte vom Typ 1 wie in unten
stehender Abbildung gezeigt so in den Schlitz, dass die Karte bündig
mit dem Modulgehäuse abschließt. Die CompactFlash-Karte ist so
gestaltet, dass sie nur in eine Richtung eingesteckt werden kann. Falls
sie sich nicht mühelos einstecken lässt, nehmen Sie sie heraus und
stecken sie richtig herum ein.
Rückseite der Karte
Ausschubtaste
CF-Karte
Lippe
Zum Entnehmen der CompactFlash-Karte Ausschubtaste drücken
und loslassen, bis die Taste die volle Größe hat, dann Ausschubtaste
erneut drücken, damit die CF-Karte aus dem Schlitz freigegeben wird.
Ziehen Sie die CF-Karte aus dem Kartenschlitz des Moduls.
2 Benutzerhandbuch für TDS2MEM
Page 59

Verwendung des Datenspeicher- und Kommunikationsmoduls TDS2MEM
Ursprüngliche Lesedauer von CompactFlash-Karten
Die interne Struktur einer CF-Karte wird bei jedem Einstecken in
das Modul TDS2MEM gelesen. Die Zeit bis zum Abschluss des
Lesevorgangs hängt von der Kartengröße und -formatierung ab.
Zur Beschleunigung der ursprünglichen Lesedauer von CF-Karten
mit 64 MB und mehr, die im Modul TDS2MEM verwendet werden,
formatieren Sie die Karte mit der TDS2MEM-Formatfunktion
(DIENSTPGM.
Datei Dienstprogr. Formatieren).
Formatierung einer CompactFlash-Karte
1. Legen Sie eine CF-Karte in das Modul ein.
2. Drücken Sie die Taste DIENSTPGM. auf dem
vorderen Bedienfeld.
3. Wählen Sie die Menüoption Datei Dienstprogr..
4. Wählen Sie die Menüoption Weiter aus, um auf Seite 2 des
Menüs zu gelangen.
5. Wählen Sie die Menüoption Formatieren.
6. Wählen Sie Ja, um die CF-Karte zu formatieren. Durch die
Formatierung werden sämtliche Daten auf der CF-Karte gelöscht.
Kapazität der CompactFlash-Karte
Die folgenden Angaben beziehen sich auf die Anzahl der Dateien, die
je nach Dateityp pro 1 MB CF-Kartenspeicherplatz gespeichert
werden können:
5 Alle speichern-Aktionen (siehe Datenspeicherung mit der Taste
DRUCKEN auf Seite 5)
16 Bilddateien (die tatsächliche Speicherkapazität hängt vom
ausgewählten Bildformat ab) (siehe Bildschirmdarstellung als
Datei speichern auf Seite 7)
Benutzerhandbuch für TDS2MEM 3
Page 60

Verwendung des Datenspeicher- und Kommunikationsmoduls TDS2MEM
250 Dateien mit Oszilloskopeinstellungen (.set) (siehe
Oszilloskopeinstellungen speichern auf Seite 8)
18 Signaldateien (.csv) (siehe Signaldateien speichern auf Seite 9)
Konventionen für die Dateiverwaltung
Der verfügbare Speicherplatz auf der CompactFlash-Karte wird
vom Oszilloskop geprüft, bevor Dateien geschrieben werden.
Falls nicht mehr genügend Speicherplatz zum Speichern der
Dateien vorhanden ist, wird eine Warnmeldung angezeigt.
Der in diesem Handbuch gebrauchte Begriff „Verzeichnis“ steht
für einen Verzeichnisort auf der CF-Karte.
Das aktuelle Verzeichnis ist das zum Speichern oder Abrufen von
Dateien verwendete Standardverzeichnis.
Das Stammverzeichnis ist A:\.
Beim Einschalten des Oszilloskops oder Einstecken einer
CF-Karte nach dem Einschalten des Oszilloskops wird das
aktuelle Verzeichnis vom Oszilloskop auf A:\ zurückgesetzt.
Dateinamen können bis zu acht Zeichen, gefolgt von einem Punkt
und der Dateinamenerweiterung mit bis zu drei Zeichen, enthalten.
Vom Betriebssystem des PC erstellte lange Dateinamen werden
mit dem vom Betriebssystem gekürzten Dateinamen angezeigt.
Die Dateinamen werden in Großbuchstaben angegeben.
4 Benutzerhandbuch für TDS2MEM
Page 61

Verwendung des Datenspeicher- und Kommunikationsmoduls TDS2MEM
Datenspeicherung mit der Taste DRUCKEN
Verwenden Sie das Menü Alle speichern (SPEICHERN/ABRUFEN
Aktion = Alle speichern), um die Taste DRUCKEN auf die
Durchführung einer der folgenden drei Funktionen einzustellen:
Automatisches Abspeichern von Oszilloskopdaten in mehreren
Dateien eines Verzeichnisses.
Abspeichern des Bildschirminhalts als Datei.
Ausdrucken des Bildschirminhalts über die eingestellte
Druckerschnittstelle.
Einstellungen
Optionen
oder Untermenüs Anmerkung
Ta s te
DRUCKEN
Verzeichnis
auswählen
Speichert alles Stellt die Taste DRUCKEN so ein, dass
alle aktiven Oszilloskopdaten (Signale,
Bildschirminhalt, Einstellungen) als
Dateien in einem neuen Unterverzeichnis
des aktuellen CF-Karten-Verzeichnisses
gespeichert werden. Siehe Speichert
alles auf Seite 6.
Bild speichern Stellt die Taste DRUCKEN so ein, dass
der Bildschirminhalt des Oszilloskops als
Datei auf der CF-Karte gespeichert wird.
Druckt Stellt die Taste DRUCKEN so ein, dass
der Bildschirminhalt an die eingestellte
Druckerschnittstelle geschickt wird.
Listet den Inhalt des aktuellen
CF-Karten-Verzeichnisses auf und zeigt
die folgenden Menüoptionen an.
Verzeichnis
wechseln
Neues Verzeichnis
Siehe Verwalten von Dateien und
Verzeichnissen auf Seite 14.
Zurück Bringt Sie zurück zum Menü
Alles speichern.
Info
Alles speichern
Zeigt den Hilfetext zu dieser Aufgabe an.
Benutzerhandbuch für TDS2MEM 5
Page 62

Verwendung des Datenspeicher- und Kommunikationsmoduls TDS2MEM
Wichtige Punkte
Speichert alles. Durch Einstellen der Taste DRUCKEN auf Speichert
alles können Sie sämtliche Oszilloskopdaten auf schnelle und einfache
Weise mit nur einem Tastendruck als Datei abspeichern. Wenn Sie die
Taste DRUCKEN betätigen, wird ein neues Verzeichnis erstellt, in
dem die folgenden Daten in Form von einzelnen Dateien gespeichert
werden. Dabei werden die in der folgenden Tabelle aufgeführten
aktuellen Oszilloskop- und Dateiformateinstellungen verwendet:
Quelle Dateiname
CH(x) FnnnnCHx.CSV, wobei nnnn eine automatisch erzeugte
Ziffer ist und x für die Kanalnummer steht.
MATH FnnnnMTH.CSV
Ref(x) FnnnnRFx.CSV, wobei es sich bei x um den Buchstaben
des Referenzspeichers handelt.
Bildschirm-
darstellung
Einstellungen FnnnnTEK.SET
.CSV-Dateien. .CSV-Dateien (durch Komma getrennter Wert)
FnnnnTEK.???, wobei ??? das aktuelle Dateiformat zum
Speichern von Bilddateien ist.
enthalten ASCII-Textzeichenfolgen, in denen die Zeit (in Bezug auf
den Trigger) sowie die Spannungswerte für jeden der 2500
Signaldatenpunkte aufgeführt sind. CSV-Dateien (.csv) können in
zahlreiche Tabellenkalkulationen und mathematische
Analyseprogramme importiert und dort weiterverarbeitet werden.
Bildschirmdarstellungsdateien. Diese Bilddateien können in zahlreiche
Tabellenkalkulationen und Textverarbeitungsprogramme importiert
werden. Die Art der Bilddatei, die importiert werden kann, hängt vom
verwendeten Programm ab.
.SET-Dateien. SET-Dateien enthalten ASCII-Textzeichenfolgen mit
Oszilloskopeinstellungen.
6 Benutzerhandbuch für TDS2MEM
Page 63

Verwendung des Datenspeicher- und Kommunikationsmoduls TDS2MEM
Abspeichern des Bildschirminhalts als Datei
Verwenden Sie das Menü Bild speichern (SPEICHERN/ABRUFEN
Aktion = Bild speichern), um den Oszilloskopbildschirm in eine
Standarddatei namens TEKnnnn.??? zu speichern, wobei .??? für
das eingestellte Bilddateiformat steht. Bilddateien können in
zahlreiche Tabellenkalkulationen und Textverarbeitungsprogramme
importiert werden.
Einstellungen
Optionen
oder Untermenüs Anmerkung
Dateiformat BMP, PCX, TIFF,
RLE, EPSIMAGE
Info Bilder
speichern
Verzeichnis
auswählen
Verzeichnis
wechseln
Format Hier wird das Format des
Ink Saver
Ein, Aus
Neues Verzeichnis Siehe Verwalten von Dateien und
Speichern Dateiname Speichert den Bildschirminhalt unter
Stellt das Dateiformat der
Bildschirmdateien ein.
Zeigt den Hilfetext zu dieser Aufgabe an.
Listet den Inhalt des aktuellen
CF-Karten-Verzeichnisses auf und zeigt
die folgenden Menüoptionen an.
Siehe Verwalten von Dateien und
Verzeichnissen auf Seite 14.
Bildschirminhalts eingestellt, entweder
Quer- oder Hochformat.
Schaltet den Tintensparmodus ein bzw.
aus (nur bei Farbdruckern verfügbar).
Verzeichnissen auf Seite 14.
einem automatisch erzeugten
Dateinamen im aktuellen Verzeichnis
der CF-Karte.
Benutzerhandbuch für TDS2MEM 7
Page 64

Verwendung des Datenspeicher- und Kommunikationsmoduls TDS2MEM
Oszilloskopeinstellungen speichern
Verwenden Sie das Menü Setup speichern (SPEICHERN/ABRUFEN
Aktion = Setup speichern), um die aktuellen Oszilloskopeinstellungen
unter dem Dateinamen TEKnnnn.SET im angegebenen Verzeichnis
oder im nichtflüchtigen Setup-Speicher zu speichern. Die
Einstellungsdatei enthält ASCII-Textzeichenfolgen mit den
Oszilloskopeinstellungen.
Einstellungen
Optionen
Speichern in Setup Legt fest, dass die aktuellen
oder Untermenüs Anmerkung
Oszilloskopeinstellungen im
nichtflüchtigen Setup-Speicher
gespeichert werden.
Datei Speichert die aktuellen
Oszilloskopeinstellungen als
Datei auf der CF-Karte.
Setup 1 bis 10 Sichert die Daten im nicht-flüchtigen
Setup-Speicher.
Verzeichnis
auswählen
Verzeichnis
wechseln
Neues Verzeichnis Bringt Sie zurück zum Menü
Speichern Sichert die Einstellungen am
Dateiname Speichert die Einstellungen unter einem
Listet den Inhalt des aktuellen
CF-Karten-Verzeichnisses auf und zeigt
die folgenden Menüoptionen an.
Siehe Verwalten von Dateien und
Verzeichnissen auf Seite 14.
Alles speichern.
angegebenen Setup-Speicherort.
automatisch erzeugten Dateinamen im
aktuellen Verzeichnis der CF-Karte.
8 Benutzerhandbuch für TDS2MEM
Page 65

Verwendung des Datenspeicher- und Kommunikationsmoduls TDS2MEM
Signaldateien speichern
Verwenden Sie das Menü Sig. speichern (SPEICHERN/ABRUFEN
Aktion = Sig. speichern), um das ausgewählte Signal als
TEKnnnn.CSV-Datei oder im Referenzspeicher zu speichern.
Signaldaten werden vom Modul als Dateien im .csv-Format (durch
Komma getrennte Werte) gespeichert. Hierbei handelt es sich um eine
ASCII-Textzeichenfolge, in der die Zeit (in Bezug auf den Trigger)
sowie die Spannungswerte für jeden der 2500 Signaldatenpunkte
aufgeführt ist. CSV-Dateien (.csv) können in zahlreiche
Tabellenkalkulationen und mathematische Analyseprogramme
importiert und dort weiterverarbeitet werden.
Einstellungen
Optionen
oder Untermenüs Anmerkung
Speichern in Datei Speichert die Quellensignaldaten als
Datei auf der CF-Karte.
Ref Speichert die Quellensignaldaten im
Referenzspeicher.
Quelle CH(x), Ref(x),
MATH
Speichern in Ref(x) Bestimmt den Speicherort im
Verzeichnis
auswählen
Verzeichnis
wechseln
Neues Verzeichnis
Speichern Speichert das Signal im angegebenen
Dateiname Speichert die Signaldaten unter dem
Legt fest, welches Quellensignal
gespeichert werden soll.
Referenzspeicher, an dem das
Quellensignal abgelegt wird.
Listet den Inhalt des aktuellen
CF-Karten-Verzeichnisses auf und zeigt
die folgenden Menüoptionen an.
Siehe Verwalten von Dateien und
Verzeichnissen auf Seite 14.
Referenzspeicher.
automatisch erzeugten Dateinamen im
aktuellen Verzeichnis der CF-Karte.
Benutzerhandbuch für TDS2MEM 9
Page 66

Verwendung des Datenspeicher- und Kommunikationsmoduls TDS2MEM
Oszilloskopeinstellungen abrufen
Verwenden Sie das Menü Setup abrufen (SPEICHERN/ABRUFEN
Aktion = Setup abrufen), um die Daten für die Oszilloskopeinstellung
von einer Datei oder von einem Speicherort abzurufen.
Einstellungen
Optionen
Abrufen von Setup Ruft Oszilloskopeinstellungen aus dem
Setup 1 bis 10 Gibt den nicht-flüchtigen Speicherort an,
oder Untermenüs Anmerkung
nicht-flüchtigen Speicher ab.
Datei Legt fest, dass die Oszilloskop-
einstellungen von einer Datei auf der
CF-Karte abgerufen werden.
von dem die Oszilloskopeinstellungen
abgerufen werden.
Verzeichnis
auswählen
Verzeichnis
wechseln
Abrufen Ruft die Einstellungen aus dem
Dateiname Ruft die Einstellungen aus der
Listet den Inhalt des aktuellen
CF-Karten-Verzeichnisses auf, aus dem
eine Datei ausgewählt werden kann, und
zeigt die folgende Menüoption an.
Siehe Verwalten von Dateien und
Verzeichnissen auf Seite 14.
nicht-flüchtigen Speicher ab.
angegebenen Datei auf der CF-Karte ab.
10 Benutzerhandbuch für TDS2MEM
Page 67

Verwendung des Datenspeicher- und Kommunikationsmoduls TDS2MEM
Signaldateien abrufen
Verwenden Sie das Menü Sig. abrufen (SPEICHERN/ABRUFEN
Aktion = Sig. abrufen), um Signaldaten von einer CF-Karten-Datei in
den angegebenen Referenzspeicher zu laden.
Einstellungen
Optionen
In Ref(x) Bestimmt den Speicherort im
oder Untermenüs Anmerkung
Referenzspeicher, in den die Signaldaten
geladen werden.
Verzeichnis
auswählen
Verzeichnis
wechseln
In
Ref(x)
Abrufen Dateiname Lädt die Signaldaten von der
Referenzsignale anzeigen
Verwenden Sie das Menü Ref. anzeigen (SPEICHERN/ABRUFEN
Aktion = Ref. anzeigen), um die Anzeige des angegebenen
Referenzspeichersignals ein- bzw. auszuschalten.
Listet den Inhalt des aktuellen
CF-Karten-Verzeichnisses auf, aus dem
eine Datei ausgewählt werden kann, und
zeigt die folgenden Menüoptionen an.
Siehe Verwalten von Dateien und
Verzeichnissen auf Seite 14.
Bestimmt den Speicherort im
Referenzspeicher, in den die Signaldaten
geladen werden.
angegebenen Datei in den
Referenzspeicher.
Einstellungen
Optionen
Ref(x) Ein, Aus Schaltet die Anzeige des angegebenen
oder Untermenüs Anmerkung
Referenzspeichersignals ein oder aus.
Benutzerhandbuch für TDS2MEM 11
Page 68

Verwendung des Datenspeicher- und Kommunikationsmoduls TDS2MEM
Druckeroptionen einstellen
Verwenden Sie das Menü Drucker einrichten (DIENSTPGM.
Optionen
Anschlusseinstellungen für den Drucker festzulegen.
Optionen
Taste Drucken Auf Seite 5 finden Sie weitere
Drucker einrichten), um das Dateiformat und die
Einstellungen oder
Untermenüs Anmerkung
Informationen zum Einstellen
der Taste DRUCKEN.
Druckeranschluss
Druckerformat Thinkjet, Deskjet, Laser Jet,
Dateiformat BMP, PCX, TIFF, RLE,
Format Hochformat, Querformat Legt die Seitenausrichtung
Ink Saver* Ein, Aus Schaltet die
Centronics, RS-232 Die zum Anschluss des
Oszilloskops an einen
Drucker verwendete
Kommunikationsschnittstelle.
Druckertyp, der an die
Bubble Jet, Epson Dot,
DPU411, DPU412,
DPU3445, Epson C60,
Epson C80, BMP, PCX, TIFF,
RLE, EPSIMAGE
EPSIMAGE
Kommunikationsschnittstelle
angeschlossen wird. Diese
Menüoption ist aktiv, wenn die
Taste DRUCKEN auf Druckt
eingestellt wurde.
Gibt an, welches
Bilddateiformat verwendet
wird. Diese Menüoption ist
aktiv, wenn die Taste
DRUCKEN auf Bild speichern
eingestellt wurde.
des bedruckten Mediums fest.
Tintensparfunktion ein oder
aus, mit der der
Oszilloskopbildschirm als
schwarzes Bild auf weißem
Hintergrund gedruckt wird.
Nur bei Oszilloskopen der
Serie TDS2000 verfügbar.
Druckvorgang
abbrechen
Die Datenübertragung an den
Drucker wird abgebrochen.
12 Benutzerhandbuch für TDS2MEM
Page 69

Verwendung des Datenspeicher- und Kommunikationsmoduls TDS2MEM
Datum und Uhrzeit einstellen
Verwenden Sie das Menü Datum und Uhrzeit einstellen
(DIENSTPGM.
Datum und die Uhrzeit des Moduls einzustellen. Diese Angaben
werden vom Modul zur Zeitmarkierung der auf der Karte
gespeicherten Dateien genutzt. Das Modul enthält eine eingebaute,
nicht austauschbare Batterie zur Speicherung der Uhreinstellung.
Optionen Einstellungen Anmerkung
Optionen Datum und Uhrzeit einstellen), um das
Datum und Uhrzeit
einstellen
Abbrechen Schließt das Menü und kehrt zum
Wichtige Punkte
Jahreszeitbedingte Zeitänderungen. Bei jahreszeitbedingten
Zeitänderungen werden Uhr und Kalender des Moduls nicht
automatisch umgestellt. Schaltjahre allerdings werden berücksichtigt.
Bewegt die Markierung zur Auswahl von
Feldern nach oben bzw. unten durch die
Liste. Drehen Sie den Knopf
TRIGGERPEGEL, um den Wert des
ausgewählten Feldes zu ändern.
Das Modul wird mit den angegebenen
Datums- und Uhrzeiteinstellungen
aktualisiert.
vorherigen Menü zurück, ohne die
vorgenommenen Änderungen
zu speichern.
Benutzerhandbuch für TDS2MEM 13
Page 70

Verwendung des Datenspeicher- und Kommunikationsmoduls TDS2MEM
Verwalten von Dateien und Verzeichnissen
Verwenden Sie das Menü Datei Dienstprogr. (DIENSTPGM. Datei
Dienstprogr.), um folgende Aktionen durchzuführen:
Den Inhalt des aktuellen Verzeichnisses auflisten.
Eine Datei oder ein Verzeichnis auswählen.
In andere Verzeichnisse zu gelangen.
Dateien und Verzeichnisse erstellen, umbenennen und löschen.
Die CompactFlash-Karte formatieren.
Optionen Anmerkung
Verzeichnis
wechseln
Bringt Sie zu dem ausgewählten Verzeichnis auf der CF-Karte.
Zur Auswahl einer Datei oder eines Verzeichnisses verwenden
Sie den Drehknopf HORIZONTAL POSITION und drücken
anschließend die Menüoption Verzeichnis wechseln, um zum
ausgewählten Verzeichnis zu gelangen.
Um wieder in das vorherige Verzeichnis zurückzukehren, wählen
Sie das übergeordnete Verzeichnis an und drücken die
Menüoption Verzeichnis wechseln.
Neues
Verzeichnis
Erstellt am aktuellen Verzeichnisort der CF-Karte ein neues
Verzeichnis namens NEW_FOL, und zeigt das Menü
Umbenennen zum Ändern des Standardnamens an.
Löschen
(Dateiname/
Löscht die gewählte Datei bzw. das angegebene Verzeichnis.
Das Verzeichnis muss leer sein, damit es gelöscht werden kann.
Verzeichnis)
Löschen
bestätigen
Diese Meldung erscheint nach Betätigung der Taste Löschen,
um den Löschvorgang zu bestätigen. Falls eine andere Taste
oder ein anderer Knopf gedrückt wird als Löschen bestätigen,
wird der Löschvorgang abgebrochen.
Umbenennen Ruft den Umbenennungsbildschirm auf, in dem Verzeichnisse
oder Dateien umbenannt werden können; siehe Umbenennen
von Dateien und Verzeichnissen auf Seite 15.
14 Benutzerhandbuch für TDS2MEM
Page 71

Verwendung des Datenspeicher- und Kommunikationsmoduls TDS2MEM
Optionen Einstellungen Anmerkung
Formatieren Ja,
Nein
Formatiert die CompactFlash-Karte. Durch
die Formatierung werden sämtliche Daten
auf der Karte gelöscht.
Umbenennen von Dateien und Verzeichnissen
Verwenden Sie den Bildschirm Umbenennen (DIENSTPGM. Datei
Dienstprogr.
Verzeichnissen auf der CompactFlash-Karte zu ändern.
Optionen
Zeichen
eingeben
Umbenennen), um die Namen von Dateien und
Einstellungen
oder Untermenüs Anmerkung
A - Z
0 - 9
_ .
Gibt das markierte alphanumerische Zeichen
an der Cursorposition des aktuellen
Namensfeldes ein.
Verwenden Sie den Drehknopf
HORIZONTAL POSITION, um ein
alphanumerisches Zeichen einzugeben oder
die Funktion Rücktaste, Zeichen löschen
oder Namen löschen auszuwählen.
Rücktaste Die Option der Menütaste 1 wird auf die
Rücktastenfunktion umgestellt. Dadurch wird
das Zeichen links neben dem markierten
Zeichen im Namensfeld gelöscht.
Zeichen
löschen
Namen löschen Die Option der Menütaste 1 wird auf die
Die Option der Menütaste 1 wird auf die
Funktion Zeichen löschen umgestellt. Das
markierte Zeichen wird aus dem
Namensfeld gelöscht.
Funktion Namen löschen umgestellt.
Alle Zeichen werden aus dem
Namensfeld gelöscht.
Benutzerhandbuch für TDS2MEM 15
Page 72

Verwendung des Datenspeicher- und Kommunikationsmoduls TDS2MEM
Einstellungen
Optionen
oder Untermenüs Anmerkung
OK Ändert den Namen des Verzeichnisses oder
Abbrechen Die Umbenennungsaktion wird abgebrochen
Bewegt den Cursor im Namensfeld jeweils
um eine Position nach links oder rechts.
der Datei auf den im Namensfeld
angegebenen Namen.
(d.h. der Name des Verzeichnisses oder der
Datei wird beibehalten), und Sie gelangen
zurück ins vorherige Menü.
Verwendung von Programmierbefehlen über die RS-232-Schnittstelle
Informationen zur Steuerung der TDS2MEM- oder
Oszilloskopfunktionen über RS-232 finden Sie im Kapitel
Kommunikationsmodul TDS2CMA im Benutzerhandbuch für das
Digitalspeicher-Oszilloskop der Serie TDS1000 bzw. TDS2000.
Informationen zur Befehlssyntax finden Sie in der
Programmieranleitung des Digitalspeicher-Oszilloskops TDS1000
bzw. TDS2000 (Tektronix-Teilenummer 071-1075-01 oder höher).
Verwendung des CompactFlash-Kartenlesers
Zur Installation, Konfiguration und Verwendung des CF-Kartenlesers
am USB-Anschluss Ihres PCs schlagen Sie bitte in der mitgelieferten
Dokumentation für den CF-Kartenleser nach. Um den CF-Kartenleser
zu benutzen, müssen gegebenenfalls USB-Treiber installiert werden.
Tektronix gewährt eine Garantie von drei (3) Monaten auf die
beigefügte CF-Karte und den CF-Kartenleser. Konkrete
Garantiehinweise finden Sie auf der Vorderseite dieses Dokuments.
Nach Ablauf der dreimonatigen Tektronix-Garantiezeit wenden Sie
sich für Garantie oder Service-Support bitte an den jeweiligen
Hersteller dieser Artikel.
16 Benutzerhandbuch für TDS2MEM
Page 73

Manuale dell’utente
Modulo di comunicazione
e di memoria di archiviazione
TDS2MEM
071-1262-00
Questo documento supporta il firmware versione FV:v6.00
e successivo.
www.tektronix.com
Page 74

Copyright © Tektronix, Inc. Tutti i diritti riservati.
I prodotti Tektronix sono coperti dai brevetti statunitensi e stranieri, concessi
e in corso di concessione. Le informazioni contenute in questa pubblicazione
sostituiscono quelle contenute nel materiale pubblicato in precedenza.
L’azienda si riserva il diritto di modificare le specifiche e i prezzi.
Tektronix, Inc., P.O. Box 500, Beaverton, OR 97077, USA
TEKTRONIX e TEK sono marchi registrati di Tektronix, Inc.
CompactFlash è un marchio registrato di CompactFlash Association.
Page 75

RIEPILOGO DELLA GARANZIA
TDS2MEM
Tektronix garantisce che quanto produce e vende non presenterà difetti nei materiali e
nella fabbricazione per un periodo di tre (3) anni dalla data di spedizione da parte di un
distributore Tektronix autorizzato. Se un prodotto o un CRT (tubo a raggi catodici) si
rivela difettoso prima della suddetta scadenza, Tektronix provvederà alla riparazione o
alla sostituzione secondo quanto descritto nel testo completo della garanzia.
Per ottenere assistenza o una copia del testo completo della garanzia, contattare l’ufficio
vendite o il centro di servizio Tektronix più vicino.
SALVO QUANTO ENUNCIATO IN QUESTO RIEPILOGO O NEL TESTO
COMPLETO DELLA GARANZIA, TEKTRONIX NON CONCEDE GARANZIA DI
ALCUN TIPO, ESPLICITA O IMPLICITA, INCLUDENDO, A TITOLO PURAMENTE ESEMPLIFICATIVO, LE GARANZIE IMPLICITE DI COMMERCIABILITÀ O
IDONEITÀ AD UNO SCOPO PARTICOLARE. IN NESSUN CASO, TEKTRONIX
POTRÀ ESSERE RITENUTA RESPONSABILE DI DANNI CONSEQUENZIALI,
SPECIALI O INDIRETTI.
Page 76

GARANZIA
Scheda CompactFlash e lettore CompactFlash
Tektronix garantisce che le parti, gli assemblaggi e le forniture (“prodotti”) prodotti e
venduti non presenteranno difetti nei materiali e nella fabbricazione per un periodo di
tre (3) mesi dalla data di spedizione. Se un prodotto risulta essere difettoso durante il
periodo di garanzia, Tektronix può, a suo arbitrio, riparare il prodotto difettoso senza
addebitare alcun costo per le parti o la manodopera oppure sostituirlo interamente.
Per richiedere assistenza nel periodo di garanzia, il Cliente deve rendere noto il difetto
a Tektronix prima della scadenza del periodo di garanzia ed effettuare le opportune
operazioni per consentire l’esecuzione delle operazioni di servizio. Il Cliente è
responsabile dell’imballaggio e della spedizione del prodotto difettoso al centro servizi
indicato da Tektronix, con spese di spedizione prepagate. Tektronix pagherà le spese per
la restituzione del prodotto al Cliente se la spedizione deve essere effettuata all’interno
del paese in cui è situato il centro di servizio Tektronix. Al Cliente verranno addebitate le
spese di spedizione, le imposte, le tasse e ogni altra spesa relativa ai prodotti restituiti in
ogni altra località.
Questa garanzia non copre i difetti, i guasti o i danni causati da un uso improprio o da una
manutenzione inadeguata. Tektronix non è obbligato a fornire assistenza sotto questa
garanzia a) per riparare danni risultanti dal tentativo di installare, riparare o fornire
servizio al prodotto da parte di personale non Tektronix; b) per riparare i danni risultanti
da un uso improprio o dalla connessione ad apparecchiature non compatibili; c) per
riparare danni o malfunzionamenti causati dall’utilizzo di forniture non Tektronix oppure
d) per un prodotto che è stato modificato o integrato ad altri prodotti qualora il risultato
di tali modifiche o integrazioni aumenti il tempo o la difficoltà nel fornire tale assistenza.
QUESTA GARANZIA VIENE FORNITA DA TEKTRONIX IN SOSTITUZIONE
DI OGNI ALTRA GARANZIA, ESPLICITA O IMPLICITA. TEKTRONIX E I
SUOI FORNITORI ESCLUDONO QUALSIASI GARANZIA IMPLICITA DI
COMMERCIABILITÀ O IDONEITÀ AD UNO SCOPO PARTICOLARE. LA
RESPONSABILITÀ DI TEKTRONIX DI RIPARARE O SOSTITUIRE I
PRODOTTI DIFETTOSI È L’UNICO ED ESCLUSIVO RIMEDIO FORNITO AL
CLIENTE PER LA VIOLAZIONE DI QUESTA GARANZIA. TEKTRONIX E I
SUOI FORNITORI NON SONO RITENUTI RESPONSABILI DI DANNI
INDIRETTI, SPECIALI, ACCIDENTALI O CONSEQUENZIALI A
PRESCINDERE DAL FATTO CHE TEKTRONIX O IL FORNITORE ABBIA
RESO NOTA ANTICIPATAMENTE LA POSSIBILITÀ DI TALI DANNI.
Page 77

Norme di sicurezza generali
Leggere le seguenti norme di sicurezza generali per evitare lesioni
personali e prevenire danni al prodotto o ad eventuali altri prodotti ad
esso connessi.
Per evitare possibili danni, utilizzare questo prodotto unicamente nel
modo in cui viene specificato.
Solo il personale qualificato è autorizzato ad eseguire le procedure
di manutenzione.
Prevenzioni degli incendi o lesioni personali
Messa a terra del prodotto. Questo prodotto utilizza indirettamente il
conduttore di messa a terra del cavo di alimentazione del mainframe.
Per evitare scosse elettriche, il conduttore di messa a terra deve essere
connesso alla presa di terra. Prima di connettere i terminali di entrata
o uscita del prodotto, accertarsi che il prodotto sia connesso a terra nel
modo corretto.
Osservare i valori del terminale. Per evitare incendi o scosse elettriche,
osservare i valori e i contrassegni apposti sul prodotto. Consultare il
manuale del prodotto per ulteriori informazioni prima di effettuare la
connessione al prodotto.
Il terminale comune è a potenziale di massa. Non connettere il
terminale comune a tensioni elevate.
Non mettere in funzione il prodotto senza i coperchi. Non mettere in
funzione il prodotto se i coperchi o i pannelli sono stati rimossi.
Evitare di toccare i circuiti esposti. Non toccare le connessioni e i
componenti esposti in presenza di corrente.
Non utilizzare il prodotto se si sospetta la presenza di malfunzionamenti.
Se si sospetta la presenza di un malfunzionamento, richiedere
l’intervento di personale di assistenza qualificato.
Non mettere in funzione il prodotto in presenza di acqua o umidità.
Non mettere in funzione il prodotto in un’atmosfera esplosiva.
Mantenere le superfici del prodotto asciutte e pulite.
Manuale dell’utente del modulo TDS2MEM i
Page 78
Norme di sicurezza generali
Simboli e termini
Termini utilizzati in questo manuale. Nel manuale possono essere
utilizzati i termini di seguito elencati:
AVVERTIMENTO. I messaggi di avvertimento identificano
condizioni o operazioni che possono provocare lesioni o danni letali.
ATTENZIONE. I messaggi di cautela identificano condizioni o
operazioni che possono provocare danni al prodotto o ad
altre proprietà.
Termini riportati sul prodotto. Sul prodotto possono essere riportati i
seguenti termini:
DANGER indica un rischio di lesioni imminente nel momento in cui
si legge tale messaggio.
WARNING indica un rischio di lesioni non imminente nel momento
in cui si legge tale messaggio.
CAUTION indica un rischio per la proprietà, incluso il prodotto.
Simboli presenti sul prodotto. Sul prodotto possono essere presenti i
simboli di seguito elencati:
ATTENZIONE
Consultare il manuale
Terminale protezione
messa a terra
Riciclaggio delle batterie
Questo prodotto contiene una batteria al litio non sostituibile. Smaltire
la batteria attenendosi alle normative locali.
ii Manuale dell’utente del modulo TDS2MEM
Page 79

Contattare Tektronix
Telefono 1-800-833-9200*
Indirizzo Tektronix, Inc.
Ufficio o nominativo (se conosciuto)
14200 SW Karl Braun Drive
P.O. Box 500
Beaverton, OR 97077
USA
Sito Web www.tektronix.com
Assistenza
vendite
Servizio di
assistenza
Assistenza
tecnica
* Nel Nord America questo è un numero verde. Lasciare un messaggio
qualora si telefoni dopo l’orario di ufficio.
Per i clienti residenti al di fuori del Nord America, contattare un
ufficio vendite o un distributore Tektronix; consultare il sito Web di
Tektronix per avere un elenco degli uffici a cui rivolgersi.
1-800-833-9200, scegliere l’opzione 1*
1-800-833-9200, scegliere l’opzione 1*
Email: techsupport@tektronix.com
1-800-833-9200, selezionare l’opzione 3*
dalle 6.00 alle 17.00, ora del Pacifico
Manuale dell’utente del modulo TDS2MEM iii
Page 80

Contattare Tektronix
iv Manuale dell’utente del modulo TDS2MEM
Page 81

Utilizzo del modulo di comunicazione e di memoria di archiviazione TDS2MEM
Il modulo di comunicazione e di memoria di archiviazione
TDS2MEM fornisce all’oscilloscopio serie TDS1000 o TDS2000
schede di memoria CompactFlash (CF) tipo 1 rimovibile, funzionalità
di programmazione a distanza RS-232 e connettività di uscita per
stampanti RS-232 e Centronics.
NOTA. Questo modulo non è compatibile con gli oscilloscopi
serie TDS200.
Installazione del modulo
Per istruzioni relative all’installazione del modulo, vedere la scheda
TDS200-, TDS1000- and TDS2000-Series Extension Module
Installation (Installazione del modulo di estensione TDS200,
TDS1000 e TDS2000). Nella figura seguente sono illustrate le porte di
uscita del modulo TDS2MEM.
Porta Centronics
Porta RS-232
Manuale dell’utente del modulo TDS2MEM 1
Page 82

Utilizzo del modulo di comunicazione e di memoria di archiviazione TDS2MEM
Installazione e rimozione della scheda CompactFlash
Inserire una scheda CompactFlash tipo 1 nello slot e farla aderire al
telaio del modulo, come illustrato di seguito. La scheda CF può essere
inserita in un solo modo. Se non scorre facilmente in posizione,
rimuoverla e reinserirla correttamente.
Retro della scheda
Pulsante
di espulsione
Scheda CF
Bordo
Per rimuovere la scheda CompactFlash, premere e rilasciare il
pulsante di espulsione finché questo non si estende completamente,
quindi premerlo nuovamente per estrarre la scheda CF dallo slot.
Estrarre la scheda CF dallo slot del modulo.
2 Manuale dell’utente del modulo TDS2MEM
Page 83

Utilizzo del modulo di comunicazione e di memoria di archiviazione TDS2MEM
Tempo di lettura iniziale della scheda CompactFlash
Il modulo TDS2MEM legge la struttura interna di una scheda CF ogni
volta che viene inserita una scheda CF. Il tempo necessario per
completare la lettura dipende dalle dimensioni della scheda CF e dal
modo in cui è stata formattata. Per ridurre in modo considerevole il
tempo di lettura iniziale delle schede CF da 64 MB o di dimensioni
maggiori utilizzate nel modulo TDS2MEM, formattare la scheda
CF mediante la funzione di formattazione TDS2MEM
(UTILITY
Utility Formato).
Formattazione di una scheda CompactFlash
1. Inserire una scheda CF nel modulo.
2. Premere il pulsante UTILITY del pannello anteriore.
3. Selezionare l’opzione di menu Utility.
4. Selezionare l’opzione di menu Altro per visualizzare la seconda
pagina dei menu.
5. Selezionare l’opzione di menu Formato.
6. Selezionare l’opzione di menu Sì per formattare la scheda CF.
La formattazione comporta l’eliminazione di tutti i dati presenti
sulla scheda CF.
Capacità della scheda CompactFlash
Di seguito è indicato il numero approssimativo di file, per tipo,
memorizzabile per 1 MB di memoria della scheda CF.
5 operazioni Salva tutto. Vedere Salvataggio di informazioni
mediante il pulsante STAMPA a pagina 5.
16 file di immagine dello schermo (la capacità effettiva dipende
dal formato delle immagini selezionato). Vedere Salvataggio su
file di un’immagine dello schermo a pagina 7.
Manuale dell’utente del modulo TDS2MEM 3
Page 84

Utilizzo del modulo di comunicazione e di memoria di archiviazione TDS2MEM
250 file di impostazioni dell’oscilloscopio (set). Vedere
Salvataggio delle impostazioni dell’oscilloscopio a pagina 8.
18 file di forma d’onda (csv). Vedere Salvataggio di file di forma
d’onda a pagina 9.
Convenzioni relative alla gestione dei file
Prima di scrivere file, l’oscilloscopio calcola lo spazio disponibile
sulla scheda CompactFlash, quindi visualizza un messaggio di
avvertimento se la memoria disponibile non è sufficiente.
Il termine cartella, così come impiegato in questo manuale, fa
riferimento a un percorso di directory sulla scheda CF.
La cartella corrente è data dal percorso predefinito da cui si
richiamano o in cui si salvano i file.
La cartella principale è A:\.
L’oscilloscopio reimposta la cartella corrente su A:\ quando viene
acceso lo strumento o quando viene inserita una scheda CF dopo
l’accensione dell’oscilloscopio.
I nomi dei file possono contenere da uno a otto caratteri massimo
seguiti da un punto e presentano un’estensione composta da uno a
tre caratteri.
I nomi di file lunghi creati su sistemi operativi per PC vengono
visualizzati con il nome di file abbreviato del sistema operativo.
I nomi dei file sono riportati in lettere maiuscole.
4 Manuale dell’utente del modulo TDS2MEM
Page 85

Utilizzo del modulo di comunicazione e di memoria di archiviazione TDS2MEM
Salvataggio di informazioni mediante il pulsante STAMPA
Utilizzare il menu Salva tutto (SALVA/RICHIAMA Azione =
Salva tutto) per impostare il pulsante STAMPA per l’esecuzione di
una delle tre funzioni elencate di seguito:
Salvataggio automatico delle informazioni relative
all’oscilloscopio su più file in una cartella.
Salvataggio su file dell’immagine dello schermo.
Stampa dell’immagine dello schermo sulla porta della
stampante corrente.
Impostazioni o
Opzioni
sottomenu Commenti
Pulsante Stampa Salva tutto su file Il pulsante Stampa salva tutte le
informazioni attive relative
all’oscilloscopio (forme d’onda, immagine
dello schermo, impostazioni) su file
contenuti in una nuova sottocartella della
cartella corrente della scheda CF. Vedere
Salva tutto su file a pagina 6.
Salva immagine
su file
Stampante Il pulsante Stampa invia l’immagine
Seleziona
cartella
Modifica cartella Vedere Gestione di file e cartelle a
Nuova cartella
Indietro Torna al menu Salva tutto.
Il pulsante Stampa invia l’immagine
dello schermo a un file presente sulla
scheda CF.
dello schermo alla porta della
stampante corrente.
Elenca il contenuto della cartella corrente
della scheda CF e visualizza gli elementi
di menu elencati di seguito.
pagina 14.
Info su
Salva tutto
Visualizza il testo della Guida relativo a
questa operazione.
Manuale dell’utente del modulo TDS2MEM 5
Page 86

Utilizzo del modulo di comunicazione e di memoria di archiviazione TDS2MEM
Punti chiave
Salva tutto su file. L’impostazione del pulsante Stampa su Salva tutto
su file è un modo semplice e rapido di salvare su file tutte le
informazioni correnti relative all’oscilloscopio con la pressione di un
solo pulsante. Premendo il pulsante STAMPA si crea una nuova
cartella e si salvano le seguenti informazioni in file separati in questa
nuova cartella utilizzando le impostazioni correnti relative allo
strumento e al formato dei file, come elencato nella seguente tabella:
Sorgente Nome file
CH(x) FnnnnCHx.CSV, dove nnnn è un numero generato
automaticamente e x è il numero di canale.
MATEM. FnnnnMTH.CSV
Ref(x) FnnnnRFx.CSV, dove x è la lettera della memoria di
riferimento.
Immagine
dello schermo
Impostazioni FnnnnTEK.SET
File CSV. I file .CSV (file delimitati da virgole) contengono una stringa
FnnnnTEK.???, dove ??? è il formato di file corrente per
Salva immagine.
di testo ASCII che elenca i valori di tempo (relativo al trigger) e di
tensione per ognuno dei 2500 punti dati della forma d’onda.
È possibile importare file csv in molte applicazioni di analisi
matematica e di foglio di calcolo.
File di immagine dello schermo. È possibile importare file di immagine
dello schermo in molte applicazioni di elaborazione di testo e di foglio
di calcolo. Il tipo di file di immagine che è possibile importare
dipende dall’applicazione in uso.
File SET. I file SET contengono una stringa di testo ASCII che elenca
le impostazioni dell’oscilloscopio.
6 Manuale dell’utente del modulo TDS2MEM
Page 87

Utilizzo del modulo di comunicazione e di memoria di archiviazione TDS2MEM
Salvataggio su file di un’immagine dello schermo
Utilizzare il menu Salva immagine (SALVA/RICHIAMA Azione =
Salva immagine) per salvare l’immagine dello schermo
dell’oscilloscopio in un file predefinito denominato TEKnnnn.???,
dove .??? è il formato del file di immagine specificato. È possibile
importare file di immagine dello schermo in molte applicazioni di
elaborazione di testo e di foglio di calcolo.
Impostazioni o
Opzioni
sottomenu Commenti
Formato file BMP, PCX,
TIFF, RLE,
EPSIMAGE
Info sul
salvataggio
delle immagini
Seleziona
cartella
Modifica cartella Vedere Gestione di file e cartelle a
Orientamento Selezionare l’orientamento verticale o
Risparmio di
inchiostro
On, Off
Nuova cartella Vedere Gestione di file e cartelle a
Salva nome file Salva l’immagine dello schermo nel
Imposta il formato del file dell’immagine
dello schermo.
Visualizza il testo della Guida relativo a
questa operazione.
Elenca il contenuto della cartella
corrente della scheda CF e visualizza gli
elementi di menu elencati di seguito.
pagina 14.
orizzontale per l’immagine.
Consente di attivare e disattivare la
modalità Risparmio di inchiostro (solo
per i modelli a colori).
pagina 14.
nome del file generato automaticamente
nella cartella corrente della scheda CF.
Manuale dell’utente del modulo TDS2MEM 7
Page 88

Utilizzo del modulo di comunicazione e di memoria di archiviazione TDS2MEM
Salvataggio delle impostazioni dell’oscilloscopio
Utilizzare il menu Salva set up (SALVA/RICHIAMA Azione =
Salva set up) per salvare le impostazioni correnti dell’oscilloscopio
nel file denominato TEKnnnn.SET nella cartella specificata o nella
memoria non volatile delle impostazioni. Un file di impostazioni
contiene una stringa di testo ASCII che elenca le impostazioni
dell’oscilloscopio.
Impostazioni o
Opzioni
Salva in Memoria di set upSpecifica il salvataggio delle impostazioni
sottomenu Commenti
correnti dell’oscilloscopio nella memoria
non volatile delle impostazioni.
File Specifica il salvataggio delle impostazioni
correnti dell’oscilloscopio in un file
sulla scheda CF.
Memoria di
set up
Seleziona
cartella
Salva Salva le impostazioni nella posizione
Da 1 a 10 Specifica la posizione della memoria non
volatile delle impostazioni.
Elenca il contenuto della cartella corrente
della scheda CF e visualizza gli elementi
di menu elencati di seguito.
Modifica cartella Vedere Gestione di file e cartelle a
pagina 14.
Nuova cartella Torna al menu Salva tutto.
specificata della memoria
delle impostazioni.
nome file Salva le impostazioni nel nome del file
generato automaticamente nella cartella
corrente della scheda CF.
8 Manuale dell’utente del modulo TDS2MEM
Page 89

Utilizzo del modulo di comunicazione e di memoria di archiviazione TDS2MEM
Salvataggio di file di forma d’onda
Utilizzare il menu Sal. f. d’onda (SALVA/RICHIAMA Azione =
Sal. f.d’onda) per salvare la forma d’onda specificata nel file
denominato TEKnnnn.CSV o nella memoria di riferimento. I dati
della forma d’onda vengono salvati in file con valori separati da
virgola (formato csv), vale a dire una stringa di testo ASCII in cui sono
elencati i valori di tempo (relativo al trigger) e di tensione per ognuno
dei 2500 punti dati della forma d’onda. È possibile importare file csv
in molte applicazioni di analisi matematica e di foglio di calcolo.
Impostazioni o
Opzioni
Salva in File Salva i dati di forma d’onda sorgente in
sottomenu Commenti
un file sulla scheda CF.
Ref Salva i dati di forma d’onda sorgente
nella memoria di riferimento.
Sorgente CH(x), Ref(x),
MATEM.
Salva in Ref(x) Specifica la posizione della memoria
Seleziona
cartella
Modifica cartella Vedere Gestione di file e cartelle
Nuova cartella
Salva Salva la forma d’onda nella memoria di
nome file Salva i dati della forma d’onda nel nome
Specifica quale forma d’onda
sorgente salvare.
di riferimento in cui salvare la forma
d’onda sorgente.
Elenca il contenuto della cartella
corrente della scheda CF e visualizza gli
elementi di menu elencati di seguito.
a pagina 14.
riferimento specificata.
del file generato automaticamente nella
cartella corrente della scheda CF.
Manuale dell’utente del modulo TDS2MEM 9
Page 90

Utilizzo del modulo di comunicazione e di memoria di archiviazione TDS2MEM
Richiamo delle impostazioni dell’oscilloscopio
Utilizzare il menu Richiama set up (SALVA/RICHIAMA Azione =
Richiama set up) per caricare le informazioni di impostazione
dell’oscilloscopio da un file o dalla memoria.
Impostazioni o
Opzioni
sottomenu Commenti
Richiama da Memoria di
set up
File Richiama le impostazioni dell’oscilloscopio
Memoria di
set up
Seleziona
cartella
Richiama Richiama le impostazioni dalla memoria
Da 1 a 10 Specifica la posizione della memoria non
Modifica cartella Vedere Gestione di file e cartelle a
nome file Richiama le impostazioni dal file
Richiama le impostazioni dell’oscilloscopio
dalla memoria non volatile.
da un file sulla scheda CF.
volatile da cui richiamare le impostazioni
dell’oscilloscopio.
Elenca il contenuto della cartella corrente
della scheda CF da cui selezionare un file
e visualizza l’elemento di menu riportato
di seguito.
pagina 14.
non volatile.
specificato della scheda CF.
10 Manuale dell’utente del modulo TDS2MEM
Page 91

Utilizzo del modulo di comunicazione e di memoria di archiviazione TDS2MEM
Richiamo di file di forma d’onda
Utilizzare il menu Ric. f. d’onda (SALVA/RICHIAMA Azione =
Ric. f. d’onda) per caricare i dati di forma d’onda da un file della
scheda CF nella posizione della memoria di riferimento specificata.
Impostazioni o
Opzioni
In Ref(x) Specifica la posizione della memoria
sottomenu Commenti
di riferimento in cui caricare i dati di
forma d’onda.
Seleziona
cartella
Modifica cartella Vedere Gestione di file e cartelle a
In
Ref(x)
Richiama nome file Carica i dati di forma d’onda dal file
Elenca il contenuto della cartella
corrente della scheda CF da cui
selezionare un file e visualizza gli
elementi di menu riportati di seguito.
pagina 14.
Specifica la posizione della memoria
di riferimento in cui caricare i dati di
forma d’onda.
specificato nella memoria di riferimento.
Visualizzazione di forme d’onda di riferimento
Utilizzare il menu Visualizza Ref. (SALVA/RICHIAMA Azione =
Visualizza Ref.) per attivare o disattivare la visualizzazione della
forma d’onda della memoria di riferimento specificata.
Impostazioni o
Opzioni
Ref(x) On, Off Attiva o disattiva la visualizzazione della
sottomenu Commenti
forma d’onda specificata della memoria
di riferimento.
Manuale dell’utente del modulo TDS2MEM 11
Page 92

Utilizzo del modulo di comunicazione e di memoria di archiviazione TDS2MEM
Impostazione delle opzioni della stampante
Utilizzare il menu Imposta stampante (UTILITY Opzioni
Imposta stampante) per configurare le impostazioni della porta e il
formato di file della stampante.
Opzioni Impostazioni o sottomenu Commenti
Pulsante Stampa Per informazioni sulle
impostazioni del pulsante
Stampa, andare a pagina 5.
Porta di stampa Centronics, RS-232 Porta di comunicazione
utilizzata per collegare
l’oscilloscopio a
una stampante.
Formato
stampante
Formato file BMP, PCX, TIFF, RLE,
Orientamento Verticale, Orizzontale Orientamento di stampa.
Risparmio
di inchiostro*
Annulla stampa Interrompe l’invio dei dati dello
Thinkjet, Deskjet, Laser Jet,
Bubble Jet, Epson Dot,
DPU411, DPU412,
DPU3445, Epson C60,
Epson C80, BMP, PCX, TIFF,
RLE, EPSIMAGE
EPSIMAGE
On, Off Attiva o disattiva la stampa
Tipo di stampante collegato
alla porta di comunicazione.
Questa opzione di menu è
attiva se il pulsante Stampa è
impostato su Stampante.
Tipo di formato del file di
immagine. Questa opzione di
menu è attiva se il pulsante
Stampa è impostato su Salva
immagine su file.
dello schermo come
immagine nera su sfondo
bianco. Disponibile solo negli
oscilloscopi serie TDS2000.
schermo alla stampante.
12 Manuale dell’utente del modulo TDS2MEM
Page 93

Utilizzo del modulo di comunicazione e di memoria di archiviazione TDS2MEM
Impostazione di data e ora
Utilizzare il menu Imposta data e ora (UTILITY Opzioni Imposta
data e ora) per impostare la data e l’ora del clock del modulo. Queste
informazioni vengono utilizzate per marcare i file scritti sulla scheda
con data e ora. Il modulo contiene una batteria incorporata non
sostituibile per conservare le impostazioni del clock.
Opzioni Impostazioni Commenti
Imposta data
e ora
Annulla Chiude il menu e torna a quello
Punti chiave
Variazioni dell’ora stagionali. Il calendario e il clock del modulo non si
adattano automaticamente alle variazioni dell’ora stagionali. Il
modulo rileva invece gli anni bisestili.
Sposta il campo selezionato evidenziato
verso il basso o verso l’alto nell’elenco.
Utilizzare la manopola LIVELLO DI
TRIGGER per modificare il valore del
campo selezionato.
Aggiorna il modulo con le impostazioni di
data e ora specificate.
precedente senza salvare le modifiche.
Manuale dell’utente del modulo TDS2MEM 13
Page 94

Utilizzo del modulo di comunicazione e di memoria di archiviazione TDS2MEM
Gestione di file e cartelle
Utilizzare la funzione Utility (UTILITY Utility) per eseguire le
operazioni elencate di seguito:
Elencare il contenuto della cartella corrente.
Selezionare un file o una cartella.
Accedere ad altre cartelle.
Creare, rinominare ed eliminare file e cartelle.
Formattare la scheda CompactFlash.
Opzioni Commenti
Modifica cartella Consente di spostarsi alla cartella selezionata della scheda
CF. Utilizzare la manopola POSIZIONE ORIZZONTALE per
selezionare un file o una cartella, quindi scegliere l’opzione di
menu Modifica cartella per spostarsi alla cartella selezionata.
Per tornare alla cartella precedente, selezionare la cartella
superiore e scegliere l’opzione di menu Modifica cartella.
Nuova cartella Consente di creare una nuova cartella denominata NEW_FOL
nella scheda CF nella posizione corrente e di visualizzare il
menu Rinomina per modificare il nome predefinito.
Elimina (nome
file/cartella)
Conferma
eliminazione
Consente di eliminare la cartella o il nome file selezionato. È
necessario che le cartelle siano vuote per poterle eliminare.
Dopo aver premuto Elimina, richiede di confermare
l’operazione di eliminazione del file. Premere un pulsante o
una manopola qualsiasi, tranne Conferma eliminazione, per
annullare l’operazione di eliminazione del file.
Rinomina Consente di visualizzare la schermata Rinomina in cui
rinominare una cartella o un file. Vedere Ridenominazione di
file e cartelle a pagina 15.
14 Manuale dell’utente del modulo TDS2MEM
Page 95
Utilizzo del modulo di comunicazione e di memoria di archiviazione TDS2MEM
Opzioni Impostazioni Commenti
Formato Sì,
No
Ridenominazione di file e cartelle
Utilizzare la schermata Rinomina (UTILITY Utility Rinomina)
per modificare i nomi di file e cartelle presenti sulla scheda
CompactFlash.
Impostazioni
Opzioni
Inserisci
carattere
o sottomenu Commenti
Dalla A alla Z
Da 0 a 9
_ .
Consente di immettere il carattere
alfanumerico evidenziato nella posizione
corrente del cursore nel campo Nome.
Utilizzare la manopola POSIZIONE
ORIZZONTALE per selezionare un carattere
alfanumerico oppure le funzioni Backspace,
Cancella carattere o Cancella nome.
Formatta la scheda CompactFlash. La
formattazione comporta l’eliminazione di
tutti i dati presenti sulla scheda CF.
Backspace Per l’opzione 1 del pulsante di menu viene
impostata la funzione Backspace. Consente
di eliminare il carattere a sinistra di quello
evidenziato nel campo Nome.
Cancella
carattere
Cancella nome Per l’opzione 1 del pulsante di menu viene
Per l’opzione 1 del pulsante di menu viene
impostata la funzione Cancella carattere.
Consente di cancellare il carattere
evidenziato dal campo Nome.
impostata la funzione Cancella nome.
Consente di cancellare tutti i caratteri dal
campo Nome.
Manuale dell’utente del modulo TDS2MEM 15
Page 96

Utilizzo del modulo di comunicazione e di memoria di archiviazione TDS2MEM
Impostazioni
Opzioni
o sottomenu Commenti
OK Il nome del file o della cartella viene
Annulla Consente di annullare l’operazione di
Consente di spostare il cursore nel campo
Nome a sinistra o a destra di una posizione.
modificato in quello indicato nel
campo Nome.
ridenominazione (il nome del file o della
cartella non viene modificato) e di tornare al
menu precedente.
Utilizzo dei comandi di programmazione attraverso la porta RS-232
Vedere la sezione Modulo di comunicazione TDS2CMA nel Manuale
dell’utente dell’oscilloscopio a memoria digitale della serie
TDS1000/TDS2000 per informazioni sul controllo del modulo
TDS2MEM o delle funzioni dell’oscilloscopio attraverso la porta
RS-232. Vedere il Manuale di programmazione dell’oscilloscopio a
memoria digitale della serie TDS1000/TDS2000 (numero di
matricola Tektronix 071-1075-01 o successivo) per informazioni sulla
sintassi dei comandi.
Utilizzo del lettore di schede CompactFlash
Fare riferimento alla documentazione allegata al lettore di schede CF
per installare, configurare e utilizzare il lettore di schede CF sulla
porta USB del PC. Per utilizzare il lettore di schede CF potrebbe
essere necessario installare i driver USB.
La garanzia Tektronix relativa al lettore di schede CF e alla scheda CF
inclusa è valida per un periodo di tre (3) mesi. Per informazioni
specifiche sulla garanzia, andare all’inizio di questo documento.
Contattare i rispettivi produttori per informazioni sulla garanzia o sul
servizio di assistenza dopo la scadenza della garanzia Tektronix.
16 Manuale dell’utente del modulo TDS2MEM
Page 97

Manual del usuario
Módulo de memoria
de almacenamiento y
comunicaciones TDS2MEM
071-1262-00
Este documento admite la versión de firmware FV:v6.00
y superior.
www.tektronix.com
Page 98

Copyright © Tektronix, Inc. Reservados todos los derechos.
Los productos Tektronix están protegidos por patentes de EE.UU. y de
otros países, emitidas y pendientes. La información contenida en esta
publicación anula la información contenida en cualquier material publicado
con antelación. Se reservan los derechos de cambios en el precio y en
las especificaciones.
Tektronix, Inc., P.O. Box 500, Beaverton, OR 97077, EE.UU.
TEKTRONIX y TEK son marcas comerciales registradas de Tektronix, Inc.
CompactFlash es una marca registrada de CompactFlash Association.
Page 99

RESUMEN DE LA GARANTÍA
TDS2MEM
Tektronix garantiza que los productos que fabrica y vende están libres de defectos de
material y de mano de obra por un período de tres (3) años a partir de la fecha de envío
por parte de un distribuidor autorizado de Tektronix. Si el producto o el tubo TRC
resultara ser defectuoso durante dicho periodo de garantía, Tektronix reparará el
producto o lo sustituirá tal y como se describe en la declaración completa de garantía.
Para obtener asistencia o una copia de la declaración completa de garantía, póngase en
contacto con la oficina de ventas y servicio de Tektronix más cercana.
SALVO POR LO PREVISTO EN ESTE RESUMEN O EN LA DECLARACIÓN DE
GARANTÍA RELEVANTE, TEKTRONIX NO OFRECE GARANTÍA DE NINGÚN
TIPO, NI EXPRESA NI IMPLÍCITA, INCLUYENDO SIN LIMITACIONES LAS
GARANTÍAS IMPLÍCITAS DE COMERCIABILIDAD E IDONEIDAD PARA FINES
CONCRETOS. TEKTRONIX NO SERÁ, EN NINGÚN CASO, RESPONSABLE POR
DAÑOS INDIRECTOS, ESPECIALES O CONSECUENCIALES.
Page 100

GARANTÍA
Tarjeta CompactFlash y lector de CompactFlash
Tektronix garantiza que las piezas, los componentes y los suministros (“productos”) que
fabrica y vende estarán libres de defectos en el material y mano de obra por un período
de tres (3) meses a partir de la fecha de envío. Si el producto resultase defectuoso durante
este periodo de garantía, Tektronix, a su elección, reparará el producto defectuoso sin
cargo en piezas o mano de obra, o bien sustituirá el producto defectuoso.
Para obtener el servicio previsto por esta garantía, el cliente debe notificar a Tektronix el
defecto antes de la expiración del periodo de garantía y disponer lo necesario para llevar
a cabo el servicio. El cliente se hará cargo de los gastos de empaquetado y envío del
producto defectuoso al centro de asistencia designado por Tektronix, con los gastos de
envío pagados con antelación. Tektronix pagará la devolución del producto al cliente si el
envío está en una localidad situada en el país donde se encuentre el centro de servicio de
Tektronix. El cliente se hará responsable del pago de todos los cargos debidos a envíos,
aranceles, impuestos y cualquier otro cargo ocasionado por el envío de productos a otras
localidades.
Esta garantía no se aplicará a ningún defecto o daño provocado por el uso inadecuado o
por el mantenimiento y cuidados inadecuados o impropios del producto. Tektronix no
tendrá la obligación de ofrecer los servicios de esta garantía a) para reparar daños
provocados por los intentos de personal ajeno a los representantes de Tektronix de
instalar, reparar o prestar servicio para este producto; b) para reparar daños resultantes
del uso o conexión impropia a equipos no compatibles; c) para reparar cualquier daño o
mal funcionamiento causado por el uso de repuestos que no sean de Tektronix ; o d) para
prestar servicio en un producto que haya sido modificado o integrado con otros
productos cuando el efecto de tal modificación o integración aumente el tiempo
necesario o la dificultad para prestar servicio a este producto.
TEKTRONIX EMITE ESTA GARANTÍA EN LUGAR DE CUALQUIER OTRA
GARANTÍA, EXPRESA O IMPLÍCITA. TEKTRONIX Y SUS VENDEDORES
RECHAZAN CUALQUIER GARANTÍA IMPLÍCITA DE MERCANTIBILIDAD
O IDONEIDAD PARA UN USO CONCRETO. LA RESPONSABILIDAD DE
TEKTRONIX EN LA REPARACIÓN O SUSTITUCIÓN DE PRODUCTOS
DEFECTUOSOS ES EL ÚNICO Y EXCLUSIVO REMEDIO PROPORCIONADO
AL CLIENTE EN EL INCUMPLIMIENTO DE ESTA GARANTÍA. TEKTRONIX
Y SUS VENDEDORES NO SERÁN RESPONSABLES DE CUALQUIER DAÑO,
INDIRECTO, ESPECIAL, INCIDENTAL O CONSECUENCIAL, CON
INDEPENDENCIA DE SI TEKTRONIX O EL VENDEDOR CONOCÍAN
PREVIAMENTE LA POSIBILIDAD DE TALES DAÑOS.
 Loading...