

Page 1

INSTRUCTION MANUAL
Automatic Drum Washing Machine
LSE-1200 S
0020505090C
Page 2
Content
Specification
Pre-usage
Part Names ………………………………1
Precaution……………….2-4
Installation………………5-6
Control Panel ……..7-8
Display Screen …………….….9
Using Process
Program Setting…..10-11
Preparation…………………………….….12
Washing Methods……………………...13-14
Flexible Applications ………15
Laundry Operation Illustrations……….….16
Other Functions ……………..17
Repair and Maintenance
Maintenance………………..18-19
ITEM
Power Source
Maximal Working Current Ampere (A)
Tap Water Pressure Megapascal(Mpa)
Waterproof Degree
Washing Power Watts (W)
Spining Power Watts (W)
Rating Laundry Quantity Kilogram (kg)
Velocity Revolutions /minute(r/min)
Washing Procedure
Drying Power Watts (W)
Water Heating Power Watts (W)
External Dimension(H*D*W Millimeter(mm))
Weight Kilogram (kg)
MODEL
LSE-1200 S
220-240V~/50H
10
0.03≤P≤1
IPX4 IPX4
350
550
6
1200
11
1800
850×600×595
88
Z
LSE-1000 S
220-240V~/50H
10
0.03≤P≤1
350
450
6
1000
11
10001000
1800
850×600×595
88
Z
Trouble-shooting……………….….20
Wiring Circuit …………….…21
Codes on Display Screen………………….22
Specification…………..……23
23
Page 3
Codes on Display Screen
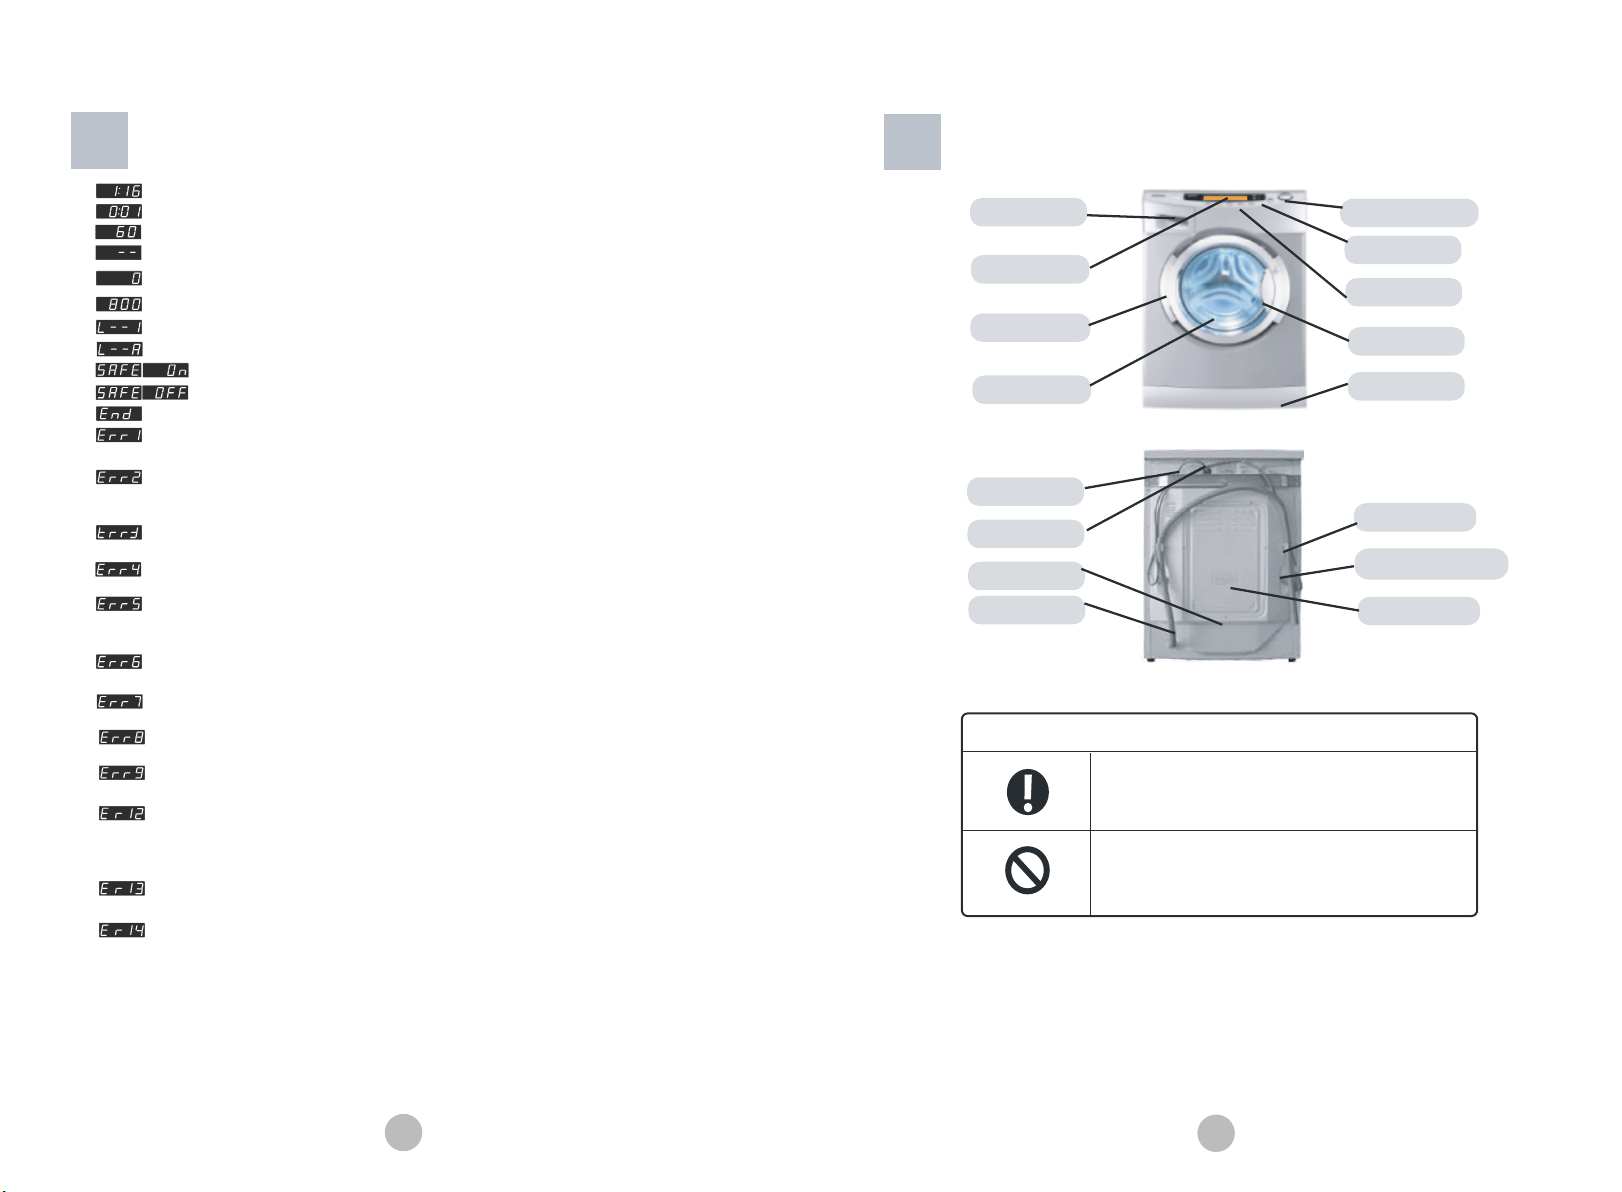
Part names
Detergent distribution drawer
Display
Door
Glass
Power cable
Screws for rear
panel
Drainage hose
Earth terminal
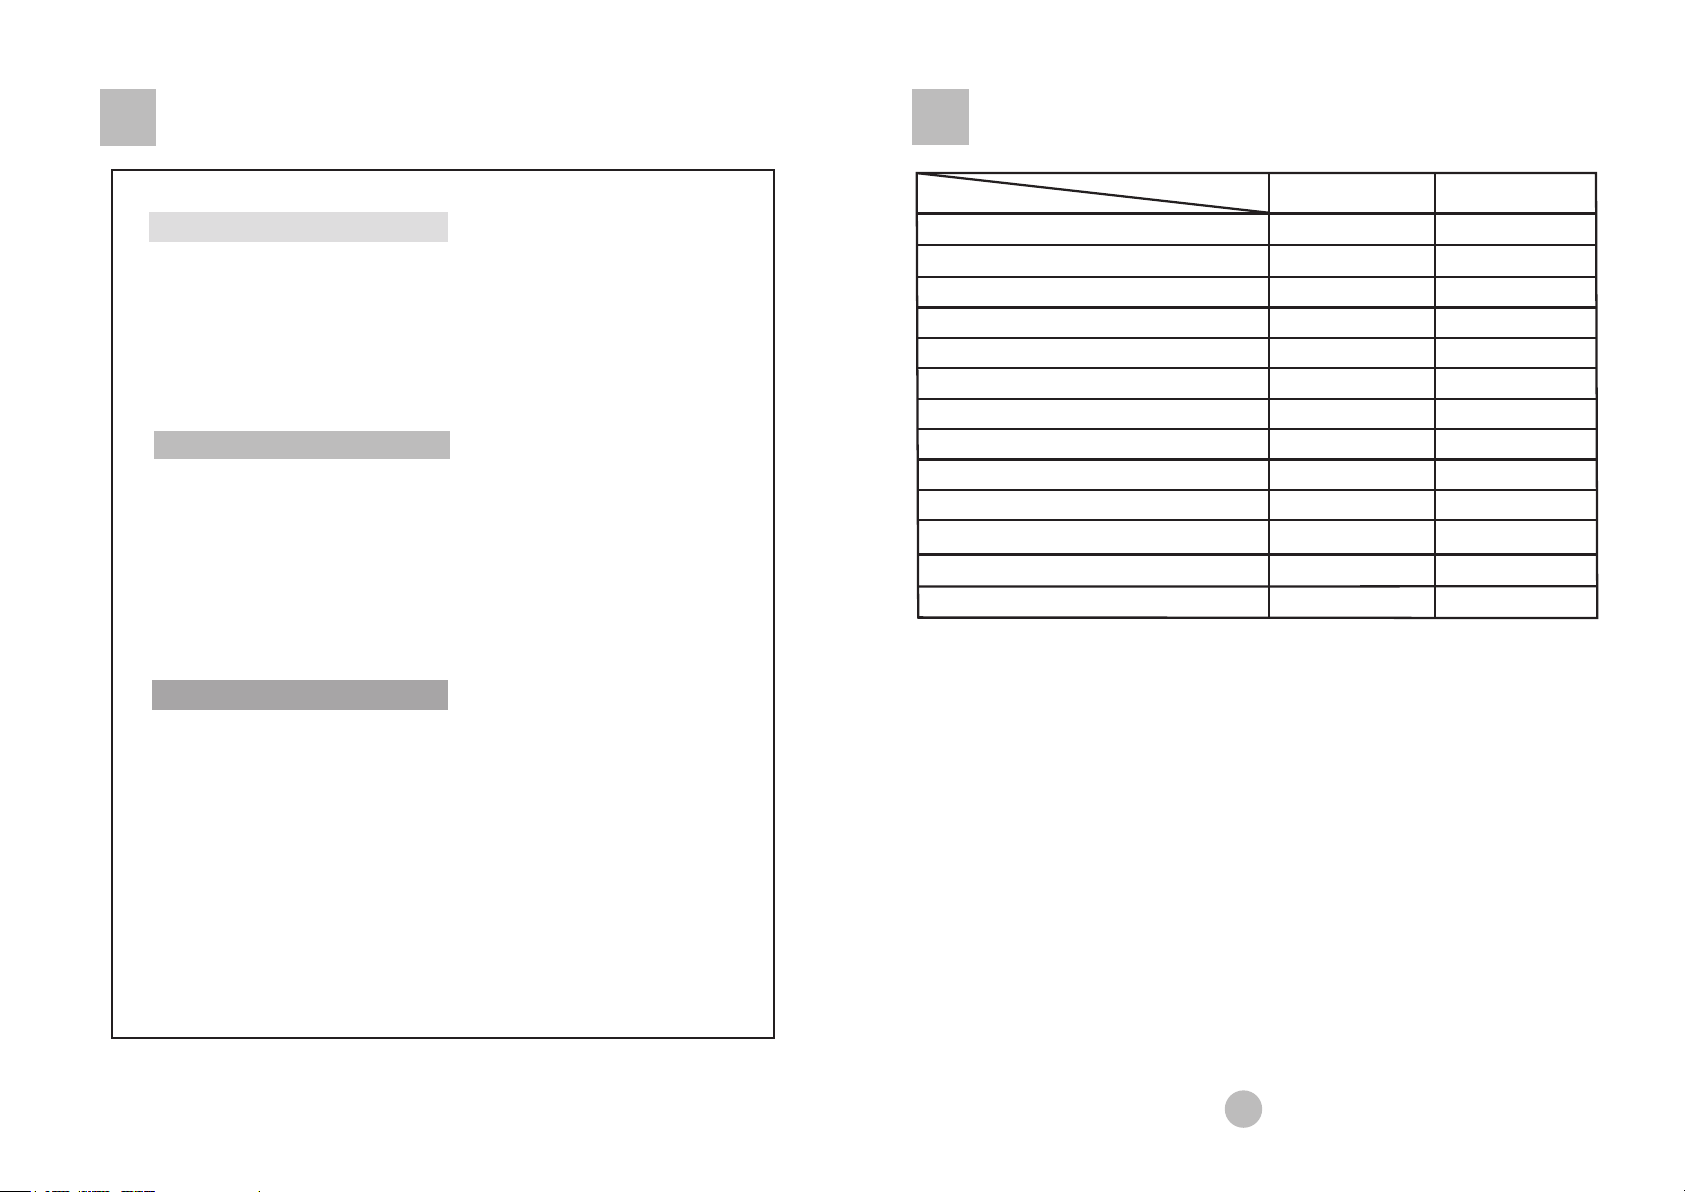
Remaining time 1 hour and 16 minutes
Remaining time 1 minute
Setting washing temperature at 60
Setting washing without heating process
Setting no Spin process
Setting dehydration revolutions 800r/min
Code for manual selection of weight, when clothes are less than 1kg
Code for manual selection of weight, when clothes are almost full of the roller
Procedure is entirely finished
Failure information: locking door function abnormity
Processing mode: reclose the door, if there is still any alarm, please contact service people
Failure information: draining malfunction
Processing mode: rinse the filter of draining pump, examine whether the drainpipe
is blocked if there is still any alarm, please contact service people.
Failure information: temperature pickup malfuntion
Processing mode: please contact the service people.
Failure information: fuser malfunction (display after procedure operation)
Processing mode: please contact the service people.
Failure information: water intake abnormity
Processing mode: check whether the water hydraulic pressure is too low or water
supply is cut off. Please contact the service people.
Failure information: dehumidification and heating abnormity.
Processing mode: Please contact the service people.
Failure information: superabundant spume in the roller or motor failure
Processing mode: inflow water and vent the spume or please contact the service people.
Failure information: drying temperature sensor malfunction
Processing mode: Please contact the service people.
Failure information: waterlevel sensor malfunction
Processing mode: Please contact the service people.
Failure information: drying waterlevel sensor abnormity
Processing mode: check whether the clothes is dried or not, and whether there is water
in the roller,Dry it again after the dehumidifying process. If there is still any alarm, please
contact the service people.
Failure information: The door is not properly closed after the activation of the procedure
Processing mode: Reclose the door. If there is still any alarm, please contact the service people.
Failure information: when spined, clothes is unevenly distributed
Processing mode: Quiver and scatter the clothes to make it even. If there is still any
alarm, please contact the service people
Start-up keyboard locking function
Cancel keyboard locking function
Programme selector
Control panel
Function button
Door handle
Skirting
Hose clip
Bolts for transport
Rear panel
Caution and Warning Symbols
For your safety, any instructions in this manual with this "Warning"
sign shall be strictly followed.
For your safety and to prevent damages to the washing machine,
any instructions in this manual with this "Stop" sign shall be strictly
followed.
This diagram may vary slightly with the layout of the washing machine you have just purchased
due to technical improvements.
22
1
Page 4
Precaution
7. Do not allow children play with the packing materials after unpacking.
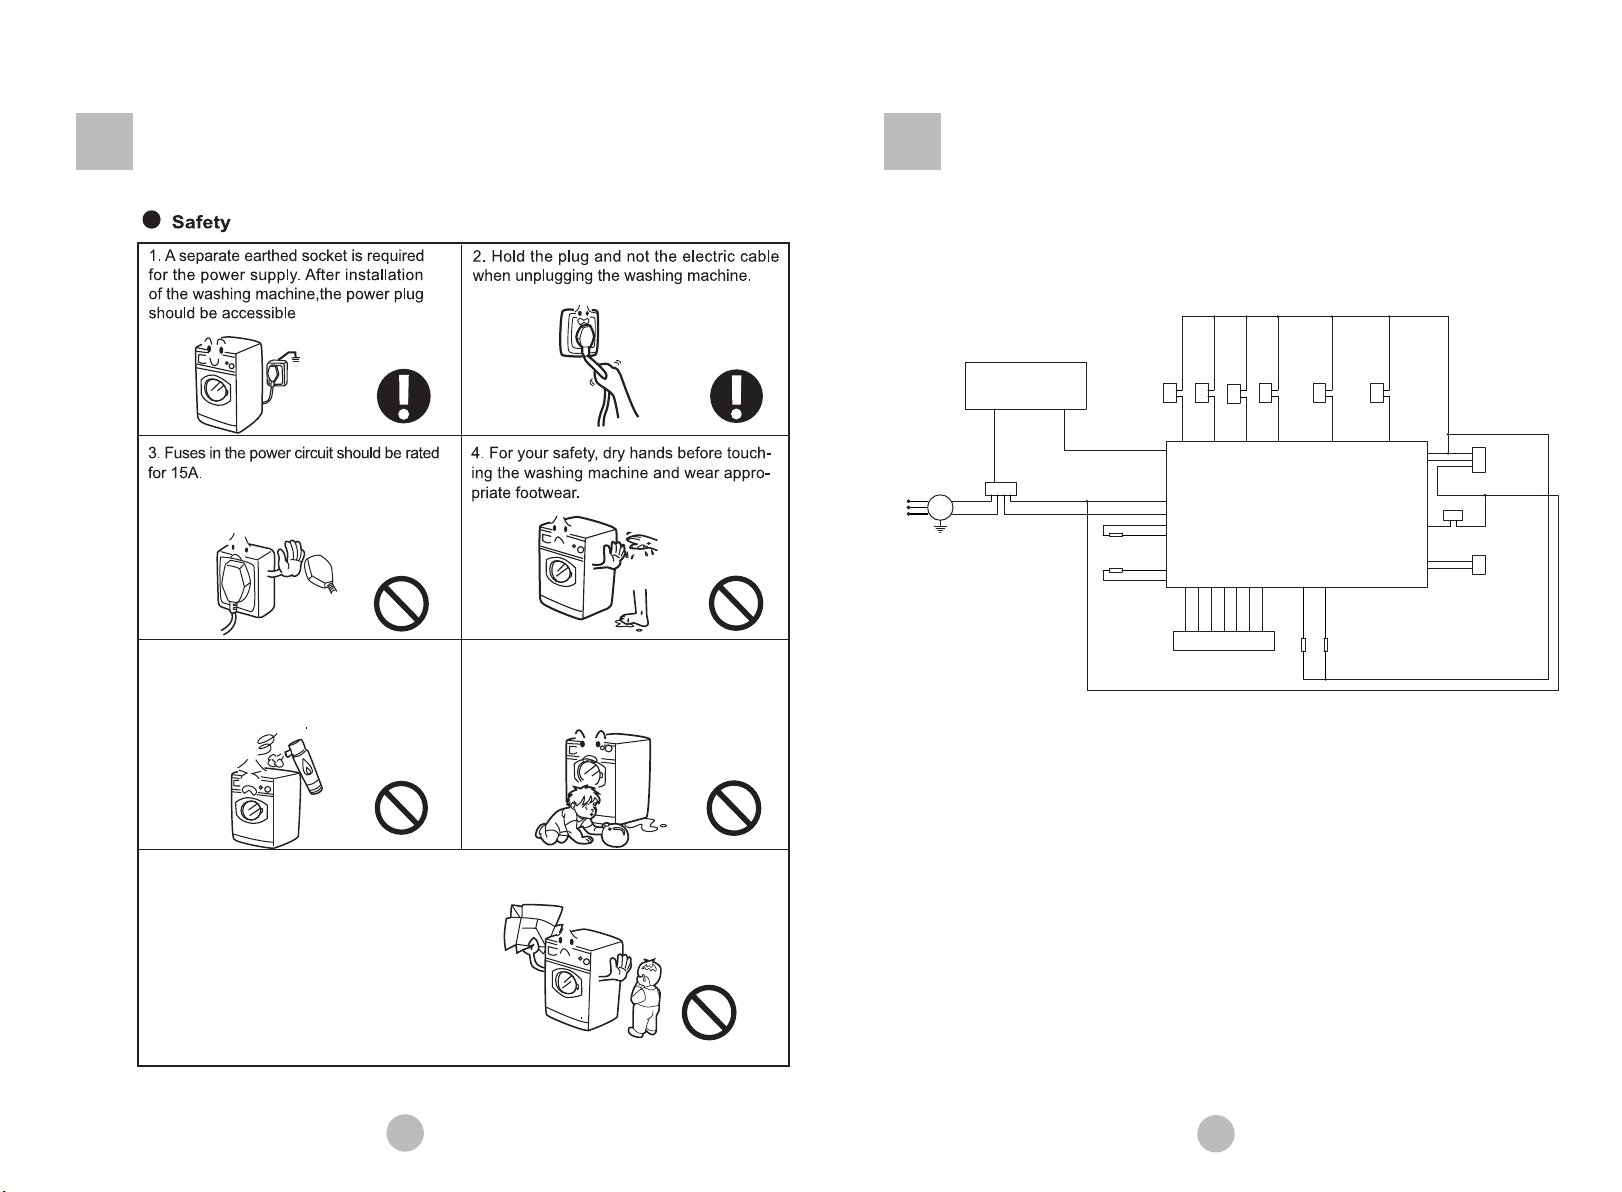
Wiring Circuit
.
The power cable must be replaced
by a qualifed engineer; if not, please
consult the Service Center.
5. Do not use inflammable detergents or
dry-cleaning agents. Do not use inflammable
spray containers in close vicinity to the
washing machine. In the event of gas leaks,
remove the washing machine plug and do not
connect.
6. The door of the washing machine will
become very hot during the water-heating
process. Avoid contact with the door during
the heating process. For safety, keep children
away from the washing machine.
N'
Water supply
Solenoid Valve
Water supply
Solenoid Valve
Water supply
VFD
Program Selector
123
Filter
L
G
N
4
L
N
N
L
Heating Temperature Sensor
Drying Temperature Sensor
2
1
JB1
X1
JB9
VCC
JB6
JC5
JC4
X4
JA1
Solenoid Valve
2
2
1
1
JB2
JB3
JA2
JA3
JA4
JA5
JA6
JA7
Motor
Drain Pump
Water supply
Solenoid Valve
2
2
1
1
JB4
PCB
JB10
Heater
N
Drying Fan
2
1
JB5
JB8
JC1
JB7
Drying Switch
JC6
JC2
JC3
JB11
Drying Heater125
X3
N'
1
2
3
1
2
1
Pressure Switch
2
1-
MRC
2-
MRL
3-
MRN
2
21
Page 5

precaution
8. The washing machine must not be installed
outside or in a very humid areaas drops of
water may form on electricalcomponents,
If drops of water have splashed on the
warming on the washing machine,leave it
dry before use.
10. Keep away from heat sources and direct sunlight to prevent plastic and rubber
components from aging.
●Use
1. Before starting the wash programme,
ensure that the washing machine is
correctly connected to the water supply. In
the event of water leakage, turn off the
water supply and reconnect, or call the
Service Center.
2. Keep the door slightly open when the
washing machine is not being used. Never
cover the machine with a plastic sheet.
3
Page 6

Precaution
The following problems are not always caused by faults, Before calling the Service
Center, please
check to see if the faults can be self-corrected.
Problem
Possible cause
l
Poor connection to power supply
l
Power failure
l
Door is not properly closed (Err 1)
l
The machine is not switched on
.
l
Water tap is not turned on
l
Water pressure is less than 0.05Mpa
l
The inlet hose is kinked
l
Water supply failure
l
The program knob is not properly set
l
The door is not properly closed
The machine is draining while is
being filled
l
The height of the drainage hose is below 80cm (it
should be within 80-100cm)
Drainage failure
l
Drainage hose is blocked
l
Drainage hose end is below 100cm above the floor
level
l
The filter is blocked
Strong vibration during spinning
l
Not all packing bolts have been removed
l
Washing machine is located on an uneven surface or is
not level
l
Machine load is over 6kg.
Operation stops before completion
of a wash cycle
l
Water or electricity failure
l
Washing machine is in a soaking cycle
l
Washing machine gives an error message.
Excessive foam in the drum, which
is spilled to the distribution drawer
l
The detergent is not a low-foaming type
l
Excessive use of detergent
Trouble-shooting
3.Do not place heavy objects or container
with water on the washing machine,so as to
4. Do not wash articles containing
polystyrene or similar elastic materials.
prevent deformation of the flat surface and
plastic parts.
5. Before washing, do up zippers and ensure
that buttons are securely fastened. Place
small items, such as socks,belts,etc. in a
small washing bag or a pillow-case . To
protect the washing machine, do not wash
garments containing wire parts.
7. The door is fitted with a self-lock device
and can not be opened until 2-3 minutes
after the end of the programme.You are not
recommended not to force the door open
before the programme end. Do not open the
door if the water level is above the lower
part of the door.
9.For appliances with type Y attachment,the
intructions shall contain the substance of the
following.
If the supply cord is damaged,it must be
replaced by the manufacturer,its service
agent or similarly qualifled persons in order
to avoid a hazard.
6.Do not open the detergent drawing
during the wash cycle.
8. At the end of the wash cycle, turn off the
water supply to prevent water leakage, unplug the washing machine and thoroughly
clean the trim so as not to dirty the laundry
in the next wash cycle.
10.The installation instructions shall state
that the appliance is to be connected to the
water mains using new hose-sets and that
the old should not be used.
For washing machines with ventilation
openings in the base,that a carpet must not
obstruct the openings.
4
The washing machine does not start
Washing machine cannot be filled
with water
20
Page 7

Maintenance
5. Rinse intake pipe joint and the inlet valve gauze filter
frequently in case foreign substances in water blocks
the water pipe connection.
6. Reinstall the shakeproof components that are dismantled when moving
the house(including bolt,gum sleeve,shakeproof cell type basin,etc.)
according to the following direction. Tighten the inner components in
case they are shaken and destroyed.
Installation
Remove all the packing materials (including the
●
EPS base)to prevent vibration during use, as
shown in the right picture.Upon opening of the
package, water drops may be seen on the plastic
bag and the porthole. This is normal phenomenon
resulting from water test in the factory.
●
Check attachments and materials with reference to the following
Name
Qty
Model
LSE-1200 S
Operation
manual
1
Quality
certificate
Water
hose
1 2
Drainage
holder
1
Warrantly
card
1
Plastic
plugs
3
Plastic plugs
Quality certificate
Drainage holder
Water hose
Fig
. 1
Warrantly card
Operation
manual
Dismantlethe cover plate
in the back and take down
3 splash shield plastic plugs.
Fit on the shakeproof
cell type steel,and insert
the packaging screw.
Tighten the packaging
screw with a spanner.
Fix the rubber sleeving to
the packaging screw from
the interior of the rear cover plate.
Screw tight the rear cover plate.
7. When the equipment has not been used for a long time,
disconnect the power supply and turn off the tap. Keep the
door of the machine open to let out the smell. If the machine
is not in use temporarily, keep the door slightly open.
19
●
Dismantle the packing bolts as shown in Fig. 2.
The packing bolts are designed for clamping anti-vibration components
inside of the washing machine during the transportation process.
Before use:
1. Remove the back plate;
2. Remove the three packing bolts on the back plate and take out the
rubber hose;
3. Replace the back plate;
4. Fill the holes left by the packing bolts with plastic plugs.
(Attention: The packing bolts and rubber hose should be kept in a safe
place for later use)
Adjusting the washing machine
●
There are adjustable feet under the bottom of the washing machine. Before
use, the washing machine should be adjusted, as shown in Fig. 3, so that it
is level.
5
Fig.2
Fig.3
Page 8

Maintenance
18
图1
图3
图2
图4
Page 9

Other functions
1. Power off memory function: In case there is power breakdown or the plug
accidentally falls out of the outlet when the machine is in operation, this
machine can memorize the running of the program so that it continues with
its work after the resume of power.
Installation
1. Place the threaded end of the water inlet hose on
the water inlet valve connector. threaded end of
2. The machine can memorize the preset condition of precious washing, which
means it can memorize the habit of the user in washing clothes. You can just
press the button "start/pause" to begin washing or re-set the program before
operating.
3. keyboard-locking function
2. Check that the connection is correct by
tightening the threaded end on the connector.
water inlet valve connector
Positioning the drainage hose
After starting the program, press the buttons "reserve" and "start/pause" at
one time for about 3seconds and the keyboard-locking function is started up.
In this condition, pressing any other function keys or turning any knobs,
resulting in suggestive sound, won't change the program. Press the buttons
"reserve" and "start/pause" at one time again for about 3seconds and the
keyboard-locking function is closed.
4. Cancel the program or choose another program as well as other accessional
functions when the machine is in operation (the keyboard-locking function closed)
A. Turn the program knot to the position of turning off, and the program
automatically stops; turn the knot again to choose new program.
· The free end must be at a height of between 80 and 100 cm. The drainage hose must be
fastened on the rear panel with the retaining clip.
· Fix the drainage hose in the correct position with the support supplied.
It is inadvisable to lengthen the hose; if necessary, contact the Service
Centre. The extension must not exceed 250 cm in length (an overlong
extension could cause the water to drain while the washing machine is
still loading). The diameter of the extension hose must be the same as
that of the original drainage hose.
Note: the free end must not be immersed in water. Connect the
drainage hose securely in order to prevent leakage.
B. If some accessional functions need to be chosen when the program is at work,
press the button "start/pause". After choosing the accessional functions press
the same button again.
Note: Refer to the program setting guide for information concerning functions
attachable to different programs.
Connection of power supply
5. After the completion of the whole program, this machine provides a short piece
of enjoyable music, reminding you of the finish of the washing process. Just open
the door of the machine to take out your clean clothes.
Check the following items before connection to the power supply.
· whether the socket is able to support the washing machine’s maximum load (the socket
and the power cable must be able to support a maximum current of no less than 15A).
· whether the mains voltage conforms to the required value.
· if the power socket to which the washing machine is connected is not the same as the plug,
replace it with a suitable one; alternatively, consult a specialised engineer or the Service
Centre for a suitable socket. The washing machine must be correctly earthed.
· the supplementary earth cable is not necessary if the power socket is earthed.
· the supplementary earth cable is installed at the top of the rear panel of the washing
machine and earthed if the power supply socket has no earth connection.
Note: do not connect the supplementary earth cable to the water hose or heating pipe.
17
6
Page 10

Control Panel
Control Panel (LSE-1200 S)
2
9
K
A Program knob
By turning this knob, it is possible to select the desired program
Refer to "Program Guide" to select the Program .The program
selector knob is at the same time a power swith; when the knob is
.
at " ", the washing machine is off; when the knob is in the other 11
positions, the washing machine is on.
B Temperature button
By pressing and holding down this button, it is possible to select the desired washing temperature ( ,
30, 40 60, 90°C). Refer to "Program Guide" to Select the maximum temperature of each program.
When seledcted, the temperature is displayed in the digital display area on the screen.
Caution: Cold wash is selected when the symbol " " is displayed in the temperature display area .
C Speed button
By pressing and holding down this button, it is possible to select the desired spin speed (0, 400,
600, 800, MAX). Refer to the “Program Guide” to choose the maximum speed of each program.
When selected, the speed value is displayed inthe digital display area of the
screen.
Caution: the washing machine does not spin when the number “0” is displayed in the speed
display area of the screen. The washing machine spins at 1200 rpm when “MAX” is displayed in
the speed display area of the screen.
D Start / Pause button
When the electric cable of the washing machine is plugged in and a program is selected, after
the washing temperature, spinning speed and other required functions are set, lightly press
this button, operation will start. During a wash cycle, press this buttonlightly, operation will
pause. Press it again to resume operation.
Note: After operation is suspended, the washing temperature, spinning speed and other functions
can be reset. After that, press the Start/Pause button to continue operation.
E Economic
Press the key and manually select different programs a nd power-saving and water-seaving fea-
ture based on the volume of load.
Laundry Operation Illustration
Illistration of the washing operation process with "cotton" as an
example
1.Joint the intake pipe and the drain pipe,switch the program button
to the position of closedown indication,and plug in the pin.
2.Open the door of the washing machine,trim up the cotton clothing that require
washing and put them into the cylindrical washer evenly.
3.Draw out the detergent dispensing package,put proper amount of detergent into the case2.If it is
needed to be softened,proper amount of liquid soften erorpliancy agent can be poured into the
softening room3.Notice that the volume should not above the position of “MAX” on the stopper
of the softening case.Then close the dispensing package.If the clothing are sodirty that need
pre-washing,proper amount of detergent can be put into case1 at the same time.
4.Choosing the washing temperature,rotation rate of dehydration and additional function.
①If the heating temperature needs to be adjusted,you can press the temperature-choosing
button before start-up and choose proper heating temperature. The currently set temperature
will be presented in the digital display area and temperature display area of the display screen.
②If the rotation rate of dehydration need stobe adjusted,you can press the rate-choosing button
before start-up and choose rotation rate of dehydration.Thecurrently setrotation rate of dehydration
will be presented in the digital display area and temperature display area of the display screen.
③you can select the button of the automatic catch manually,and will be presented on the
digital display area of the display screen.If the button is being pressed with in 2 seconds you can
choose a proper code of clothing weight from to cyclically,the currently set clothing
weight will be presented in the digital display area,if any other codes or buttons will not be
chosen with in 5 seconds,the currently set clothing weight will be carried on.
④If you need the drying function you can press the drying button and the icon of drying will be
lighted on the display screen.
⑤If you need the ultra-clean rinsing function you can press the ultra-clean rinsing button and the
icon of ultra-clean rinsing will be lighted on the display screen.
⑥If you need the prewashing function you can press the prewashing button and the icon of
prewashing will be lighted on the display screen.
⑦If you need to set the washing time previously,you can press the reservation button,the
pre-engaging state of will be lighted in the digital display area of the display screen.Every
pressing of the reservation button will increase there servation time by 30 minutes(0—24hours).
If the reservation time is 4 hours, will be presented on the display screen,according to the
above set time 1:34,and 2 hours and 26 minutes later the program will start up,and finish it 4 hours later.
5.Press the Start/Pause button to start the washing process,meanwhile the left time will be
presented in the digital display area(there are towspots in the middle of the left time glittering),
the current heating temperature will be presented on the heating indication stripa ccordingly.30
seconds later the locking icon on the display screen will glitter which indicates that the door has
been locked and the program will be carry on.
6.When in the process of heating,the locking icon on the display screen will extinguish,the door
will be unlocked and can be opened at any time.When the inner temperature of the roller
reaches 55℃ or above the door will be locked to prevent accidental scald when opening the
door.When the inner temperature of the roller is below 55℃ the door will be unlocked.
7. will be presented on the display screen when the program is over,after a short noticing sound
the locking icon will extinguish indicates that the washing process is finished.Now you can switch
the program button to the position of close down,open the door,take put the clothing,and atlastd
is connect the water and electricity power.The laundry operation process is finished.Prompt:the
rate,temperature and function key scan be reselected and reset during some phases of the
processing of the program.
Notice:1.When the program has been started up,please don’t switch the program button as best
as you can,lest it will impact the processing program.You can also press down the
program knob.2.The left time on the display screen is just for reference,because of the
factors such as the temperature of the intake water,the heating temperature and the
equilibrium condition of the clothing when is being dehydrated,it is normal phenomenath
at the presented left time has been adjusted(increased or decreased)during some of the
washing processes.
(The other processes resemble with this)
7
16
Page 11

Flexible Applications
Control Panel
Saving water,electric power and detergent is not only good for
environment protection but also good for saving the disbursements.
If you wash many clothes together,please separate the clothes that are easy to lose color.
For some extremely dirty clothes,please pre-wash them before put them together with the other.
For some clothes that are not very dirty,you can relevantly reduce the volume of
detergent or choose the fast-washing program.
Choosing proper temperature:only choose the temperature above 60℃ in the Room
of the clothes are too dirty.
Using softener:the clothes will be soft for ironing and can save your time.
Adding the clothing amendment can not only make the clothes soft but also can
eliminate electrostatic bonding so that the clothes are prone to be ironed.
This machine consists of recyclable materials,in order to protect environment,when
discard it please help dispose properly or recycle and reuseit.
Using properamount of detergent:don’t use over much detergent;otherwise it will not
only cause environmental pollution but also difficulties in rinsing.
Drying
It depends on the texture of the clothes that whether can be dried or not.
Before the process of drying please make sure the water valve has been turned on,
and make sure the water is cold.
The dehydrated clothes should be taken out from the roller,untangled and put into the
roller again before the process of separate drying.
In order to ensure the effect of drying,please dry the clothes after dehydrating process.
If too many clothes were put into the roller for drying,the drying effect will be impacted
and further more the clothes are prone to be wrinkled.
For the large piece of clothes,it is better to put into the roller less than two pieces once.
The following table indicates different drying times for different kinds and quantities of
the clothes.You can choose the correspondent drying program according to the
weight of the clothes and your expected degree of drying;when the drying process is
finished the whole program will close automatically.
Weight
Set drying program
Drying
Ironing
Anti-virus
Notice:If the quantity of the clothes exceeds the standard volume or mix with the other
clothes when washed,it will take a longer drying time(left time will cease to change).If
it is not dried sufficiently you can use the spin program for another drying process.
Degree of dryingLeft time(min)
Totally drying
Totally drying or ready for ironing
Anti-virus program
for dry clothes
F drying button
Press this button and the drying icon of the display screen brightens.When the
program finally comes to the drying process,the drying icon twinkles,indicating the
start of the drying program.If you want to cancel the program,press the start/pause
button before the program comes to the end of the drying process.Press the drying
button again and the drying function is canceled while the drying icon extinguishes.
G super-clean rinse button
Press this button and the super-clean rinse icon of the display screen brightens.Before
the program comes to the softening process,the machine will automatically add one
more rinse program.At the same time the super-clean rinse icon twinkles until the
super-clean rinse program comes to an end.The program continues until the end.
H pre-washing button
In room dirty clothes are to be washed,press down this button before the start of the program and
the pre-washing icon of the display screenbrightens.After starting the washing machine,the pre washing program is the first to be operated.At this time the pre-washing icon twinkles and there is
water inflow in room1of detergent-dispersing package.At the end of the pre-washing program,the
pre-washing icon extinguishes and other programs begin to operate.
I Reservation button
Press down the reservation button when needed before the program starts.The default time is 9
hours.Each time the button is pressed the default time increases by30minutes.If the button is
pressed continuously,the default time can be accumulated.It cycles from 0 hour to 24 hours until
you stop pressing the button.After setting the reservation time,the reservation icon brightens and it
won’t extinguish until the end of the reservation program.The reservation time includes the period
from the operation of the program till it send.Therefore,the preset reservation time should be at
least longer than the time span of the operation of the program,orelse the program won’t perform
the reservation function and goes directly to the washing process.
J Display screen
The remaining time of the washing process,the set temperature and speed,the additional functions
as well as the warning message are to be shown on the display screen.For details please refer to
the introduction of the display screen.
K Detergent-dispersing package
Open the detergent-dispersing package and you will see 3 little rooms fordetergent:
Room1:If pre-washing function is needed,put detergent in this room.Otherwise,
no detergent should be put in here.
Room2:When washing in the first 6 programs,put detergent in this room whether
a pre-washing program is needed or not.
Room3:Put some softener,conditioner or spice in this room to soften or do other treatment to ward
the clothes.
D+1 Keyboard lock button
After starting the program,press down the reservation button and the start/pause button
simultaneously for 3 seconds and the keyboard lock function will be started.At this time the digital
area shows “SAFEON”.Press the buttons again for 3 seconds and the function is canceled.And the
digital area shows “SAFEOFF”.This function is set for fear of outside intrusion in the operation of
the program.For example,if children press the functional or program buttons out of curiosity,it will
do affect the washing program or even interrupt the program.
Note:if the keyboard lock is started when the program is in operation,the keyboard lock function
will be canceled automatically at the end of the program when it shows “End”.
Note:In the washing process,if the keyboard lock is not started,turn the program button to the off
position of the machine and the current program will be canceled.Turn the program button again to
choose a new program.
15
8
Page 12

Display Screen
The content of the displayscreen
30
spin speed indicator
temp.
temp. indicator
load
load indicator
content of program
off
cotton
anti-virus
ironing
drying
spin
rinse
1.Digital display area:The time the machine is turnedon,it shows the set time,such as ,
it also shows the current heating temperature and the dehydrating speed,such as ,it
tells the remaining time when the program is in operation.Choose the code manually,like
.When adjusting the reservation time,it tells the value such as ;When the key
board lock is chosen,it tells while it shows when the keyboard lock is
canceled.When there is any warning,it shows the malfunction code ,At the end of
the program,it shows
2.Speed(rpm):The current value twinkles and remains bright after the program is started
3.Dehydrating indication stripe:It remains bright before the program is started and after that in
the process of dehydrating the set values change in accordance with the dehydrating speed.
4.Temperature(℃):The current value twinkles and remains bright after the start up of the
program.
5.Temperature indication stripe:It remains bright before the program is started and after that in the
process of heating the set values change in accordance with the change of temperature
6.Clothes quantity and quantity indication stripe:.the stripe remains bright and the current
value twinkles.After the start up of the program,the current value and the corresponding
stripe remain bright.
7.Reservation icon:It brightens when the reservation button is pressed or the reservation
time is adjusted.It twinkles when ther eservation program is in operation and extinguishes
at the beginning of the washing program.
8.Pre-washing icon:It brightens when the pre-washing program is chosen,twinkles when the
pre-washing program is in operation and extinguishes at the end of the program.
9.Super-clean rinse icon:It brightens when the super-clean rinse program is chosen,twinkles
when the program is in operation and extinguishes at the end of the program.The super clean rinse function can be set before the start of the program or by pressing start/pause
button before the program comes to the rinse process.
10.Drying icon:It brightens when the drying button is pressed,twinkles when the drying
program is in operation and extinguishes at the end of the program.The drying function can
be set before the start of the program or by pressing start/pause button before the program
comes to the end of the dehydrating process.
11.Lock icon:It brightens when the door is locked after the start of the machine.Only when it
extinguishes can the door be opened.
12.Warning icon:It brightens together with the malfunction code after some malfunction
occurs.In no cases except that does it brightens.
2
9
sport quick silk
digital display area warning
synthetic cashmere
delay
prewash extra rinse drying door lock
spin speed
Washing Methods
4. Set the washing temperature and spin speed
If you don’t need heating,press the temperature-choosing key to the “ ”position.If
you need heating choose proper washing temperature according to your requirement.
If you don’t need spin,press the speed choosing key to the “0” position.If you need
spin,choose proper spin speed according to your requirement.Refer the heating
temperature and spin speed to the program setting guide table according different
kind of clothes.It is suggested use there commend data.
5. Choosing additional function keys
You can choose additional function keys according to your requirement and refer to
the introduction of control panel functions and the program setting guide table.If you
want to select the sorting step of clothes quantity,please press the eco key and make
choice between .
6. Washing
Press the Start/Pause key,the washing machine will carry on the set program
automatically.
7. End of the washing process
When the selected washing program finished,the washing machine will cease working
automatically.When is presented on the display screen,you can switch the
program button to the close down position,open the door and take out the clothes shut
the water valve and unplug the attaching pin.
Suggestion: after washing please take out the clothes immediately.It is prone to cause
wrinkles if the clothes stay in the roller too long.
9
14
Page 13

Washing Methods
Program Setting
1.
Laundry loading Open the door, put in
the laundry inside. Close the door tightly.
Notes:1) When using the washing
machine the first time, let it run unloaded for one program to prevent
● Overalls
the laundry from being tainted by
●
oil or dirty water from the washing
machine.
Blended fabric
clothes
(appr 800g)
2) Do not overload the washing
machine.
2. Adding detergent Slide out the detergent drawer and put the right amount of
● Sark (appr
300g)
● Jackets
(cotton appr
1000g)
(cotton
appr 800g)
Load Reference
●
●
Woolen blankets
(appr 2000g)
● Jeans
(appr 800g)
● Ladies pajamas
(appr 200g)
● Vest
(cotton
appr 300g)
●
Briefs (blended fabrics appr
70g)
● Socks
(blended fabrics
appr 50g)
Bed sheets
(cotton appr 800g)
detergent and softening agent into the corresponding compartments, depending on the
wash cycle. Push the drawer back in gently.
Note: 1) For pre-washing program,detergent should be added to both compartments 1
and 2.Compartment 2 allows only solid detergents. For other programs ,do not add
detergent to compartment 1.
2) Do not overuse softener; otherwise, it will damage the artificial fibers.
program setting mode
cotton
synthetic
cashmere
silk
quickwash
sport
rinse
spin
drying
ironing
anti-virus
recommended
laundry
cotton
fabric
fsat-colour
fiber
cashmere
silk
slightly-soiled
textiles
cotton
synthetic
cotton
synthetic
cotton
synthetic
cotton
synthetic
cotton
synthetic
cotton
synthetic
temperature
range
suggested
temperature
speed range
(rpm)
suggested
speed
-- ,30,40,
60,90
--,30,40,60
--,30,40
--,30,40
--
--
--,30,40
--,30,40,60
Used for drying the cotton or synthetic cloth.
Used for drying the cotton or synthetic cloth.The
cloth dried needs to be ironed.
Used for getting rid of the smell and virus.
3. Selecting the program Select the program best suited to the type of fabric so you get
the best washing results. There are instructions on the handle of the detergent
distribution drawer. Turn the program knob clockwise to select the program you want.
13
off
The power is off
Note:
The time that program needs differing from the time shown on the screen because of the
differences in water pressure,drainage condition,cloth texture,quality and equilibrium condition,
water quality,temperature and surrounding temperature,etc..
The remaining time of the drying process would suddenly reduce or stays at a certain value for
a long time in accordance with the texture and the quantity of the clothes.
10
Page 14

Program Setting
Preparation
Program setting mode
cotton
synthetic
cashmere
silk
quickwash
sport
rinse
spin
drying
ironing
anti-virus
off
additional functions attachable to the program
extra
pre-
delay
wash
The power is off
rinse
drying eco
Usage of detergent
1.Power supply
Plug in the power supply 220-240 V~/50HZ
3.Detergent selection
Only special low foam detergent should
be used in automatic drum washing
mashine,form blended or wool fabrics
special deter-gent should ne used.dry
clearning solvent should not be used
such as trichhloroethy-lene or alike
(caution :load the required amount of
detergent only).
2.Water supply
Turn on the tap ensure that the water in clear.
Caution:Before staring the washing machine turn on the water
faucet to ensure the water faucet and the water inlet hose are
connected correctly and do not leak
4.Laundry treatment
Sort out clothes according to type and extent of dirt.There are
three types of clothes:cotton,synthetical and woolen (silk) fabrics.
Separate white clothes from colored.If whites and coloreds
are combimed for one load,make sure the coloreds are colorfast
-Clothing with frayed edges or yams should be put in a wash
bag or special bag before washing
-repair damged clothing,lose buttons or damaged zips
and hooks before washing.
-Bed sheets and table ware should be loosely loaded and not
folded.
○means softener,conditioner or spice can be added when necessary.
★means detergent must be added.×means softener,conditioner or spice can not be added.
√means the functions that can be chosen and operated by this program.
-means functions that can not be chosen by this program.
Note:
1)If the pre-washing function is added,detergent must be put into Room1 of the detergent dispersing package.
2)When the laundry load is on 4.MAX,drying function can not be chosen.
3)For some special clothes such as wool fabric,please check if it can be washed in the
machine or if there is special requirement for the temperature.
11
5.Wash load
Type
Max load
This washing mashine is for househould use and designed
for mechanically washable clothes.When washing,separate
unwashable clothes with reference to clothes labels.
Cotton fabrics Synthetic fabrics Wool/cashmare/silk fabrics
6kg 3kg 3kg
12
 Loading...