

Page 1

User Manual
LP8 410 VR01/
EN
LP8 410 INOX VR01
www.teka.com
Page 2

Dear Customer,
Please carefully read t his manual before using the
dishwasher, it will help you to use and maintain the
dishwasher properly.
Keep it to refer to it at a later date .
Pass it on to any subsequent o wn er of the appliance.
This manual contains sec ti ons on safety Instructions,
Operating I ns tr uc ti on s, I nsta ll ation Inst ru ctio ns and
Tro ubleshooting Tips, etc.
To review the section on t ro ub lesh oo ti ng Tips
will help you to solve some common problems
by you rself .
If you can no t s ol ve the problems by yourself ,
plea se ask for the help of professional t echn ic ia ns .
Control Panel...................... .......... .... ...... .... .....3
Dishwasher Features.................................... ...3
A Wat er So ften er....... .... .. .. ...... ........ ........ ..... 4、
B Loading the Salt into the Soften er........... ......5、
C Fill the Rin se Aid Dispenser.........................5、
D Function of D et ergent .................................6、
Atte ntio n befor e or after lo adin g the Dishwas her
Ba skets............. ...... .... ........ .. .... .. .... .. ...... .. ... 9
Loading t he upper Ba sket................ ...............10
Lo ading t he Lower Ba sk et.... .. .. ........ .. .. ........ .. .10
Cu tlery Baske t. .. .... .. .... .. .... .. .... ...... ...... ...... .. 10
Was h C ycle Tabl e.. .... .. .. .. ...... .. .. ........ .. ...........11
Turning on the A ppliance............ ........ .... .... .... 12
Ch ange the program. .......... ............................12
At the en d of the Wash Cy cle... .. .. ...... .. ...... .. ....12
The man ufacturer, fo llow in g a policy o f constant
developm en t an d u pd ating of the pr od uct, may
make modificatio ns without giving prior no ti ce.
This user m an ual shall also be g ot from the
manufacturer or responsible vendor.
Filtering S ystem.. .. .... .. .. .. ...... .. .. ........ .. .......... .13
Caring for the D ishwas he r.... .. .. .. ...... .. .. ........ .. .14
Posi tioning the Applian ce.. ...... ...... .. .... .. ...... .. .15
About Pow er Connection........ ........ ........ .. ...... 15
Wat er Co nnection... ...... .. ........ .......................16
Start of dishw ashe r.... .. .. .. .. .. .... .. .. .. .. .. .... .. .... .. 17
Before calling fo r service.................... .... .... .... .18
Error cod es. .... .. .. .. .... .... .. .. .. ............ .............. 19
Technical inf ormation.. .. .. .. .. .. .. .. .. .. .................20
Page 3

When using your dishwasher,
follow the precautions listed below:
This appliance is intended to be used in household
and similar applications such as:
-staff kitchen areas in shops, offices and other
working environments;
-farm houses;
-by clients in hotels, motels and other residential type
environments;
-bed and breakfast type environments.
This appliance can be used by children aged from 8
years and above and persons with reduced physical,
sensory or mental capabilities or lack of experience
and knowledge if they have been given supervision
or instruction concerning use of the appliance in a
safe way and understand the hazards involved.
Children shall not play with the appliance. Cleaning
and user maintenance shall not be made by children
without supervision. For EN60335-1
( )
This appliance is not intended for use by persons
(including children )with reduced physical, sensory
or mental capabilities, or lack of experience and
knowledge ,unless they have been given supervision
or instruction concerning use of the appliance by a
person responsible for their safety. For IEC60335-1
( )
This appliance is for indoor use only, for household
use only.
To protect against the risk of electrical shock, do not
immerse the unit, cord or plug in water or other liquid.
Please unplug before cleaning and maintenance the
appliance .
Use a soft cloth moisten with mild soap, and then use
a dry cloth to wipe it again.
Page 4

This appliance must be earthed. In the event of a
malfunction or breakdown, earthing will reduce the risk
of anelectric shock by providing a path of least
resistance of electric current. This appliance is equipped
with a cord having an equipment-earthing conductor
and a grounding plug.
The plug must be plugged into an appropriate outlet that
is installed and earthed in accordance with all local
codes and ordinances.
Improper connection of the equipment-earthing
conductor can result in the risk of an electric shock.
Check with a qualified electrician or service
representative if you are in doubt whether the appliance
is properly grounded.
Do not modify the plug provided with the appliance;
If it does not fit the outlet.
Have a proper outlet installed by a qualified electrician.
Do not abuse, sit on, or stand on the door or dish rack of
the dishwasher.
Do not operate your dishwasher unless all enclosure
panels are properly in place.
Open the door very carefully if the dishwasher is
operating, there is a risk of water squirting out.
Do not place any heavy objects on or stand on the door
when it is open. The appliance could tip forward.
When loading items to be washed:
1) Locate sharp items so that they are not likely to
damage the door seal;
Page 5

2) Warning: Knives and other utensils with sharp points
must be loaded in the basket with their points down or
placed in a horizontal position.
Check that the detergent powder is empty after
completion of the wash cycle.
Do not wash plastic items unless they are marked
dishwasher safe or the equivalent.
For plastic items n
recommendations.
Use only detergent and rinse additives designed for
an automatic dishwasher.
Never use soap, laundry detergent, or hand washing
detergent in your dishwasher.
Children should be supervised to ensure that they do not
play with the appliance.
The door should not be left open, since this could increase
the risk of tripping.
If the supply cord is damaged, it must be replaced by the
manufacturer or its service agent or a similarly qualified
person in order to avoid a hazard.
During installation, the power supply must not be
ot so marked,
check the manufacturer's
excessively or dangerously bent or flattened.
Do not tamper with controls.
The appliance is to be connected to the water mains using
new hose sets and that old hose-sets should not be reused.
The maximum number of place settings to be washed
is 9.
The maximum permissible inlet water pressure is 1MPa.
The minimum permissible inlet water pressure is 0.04MPa.
Page 6

Dispose of the dishwasher packaging material
correctly.
All packaging materials can be recycled.
Plastic parts are marked with the standard
international abbreviations:
PE for polyethylene, e.g. sheet wrapping material
PS for polystyrene, e.g. padding material
POM polyoxymethylene, e.g. plastic clips
PP polypropylene, e.g. Salt filler
ABS Acrylonitrile Butadiene Styrene, e.g. Control
Panel .
Packaging material could be dangerous for children!
For disposing of package and the appliance please
go to a recycling centre. Therefore cut off the power
supply cable and make the door closing device
unusable.
Cardboard packaging is manufactured from recycled
paper and should be disposed in the waste paper
collection for recycling.
By ensuring this product is disposed of correctly, you
will help prevent potential negative consequences
for the environment and human health, which could
otherwise be caused by inappropriate waste handling
of this product.
For more detailed information about recycling of this
product, please contact your local city office and your
household waste disposal service.
DISPOSAL: Do not dispose this product as unsorted
municipal waste. Collection of such waste separately
for special treatment is necessary.
Page 7

Page 8
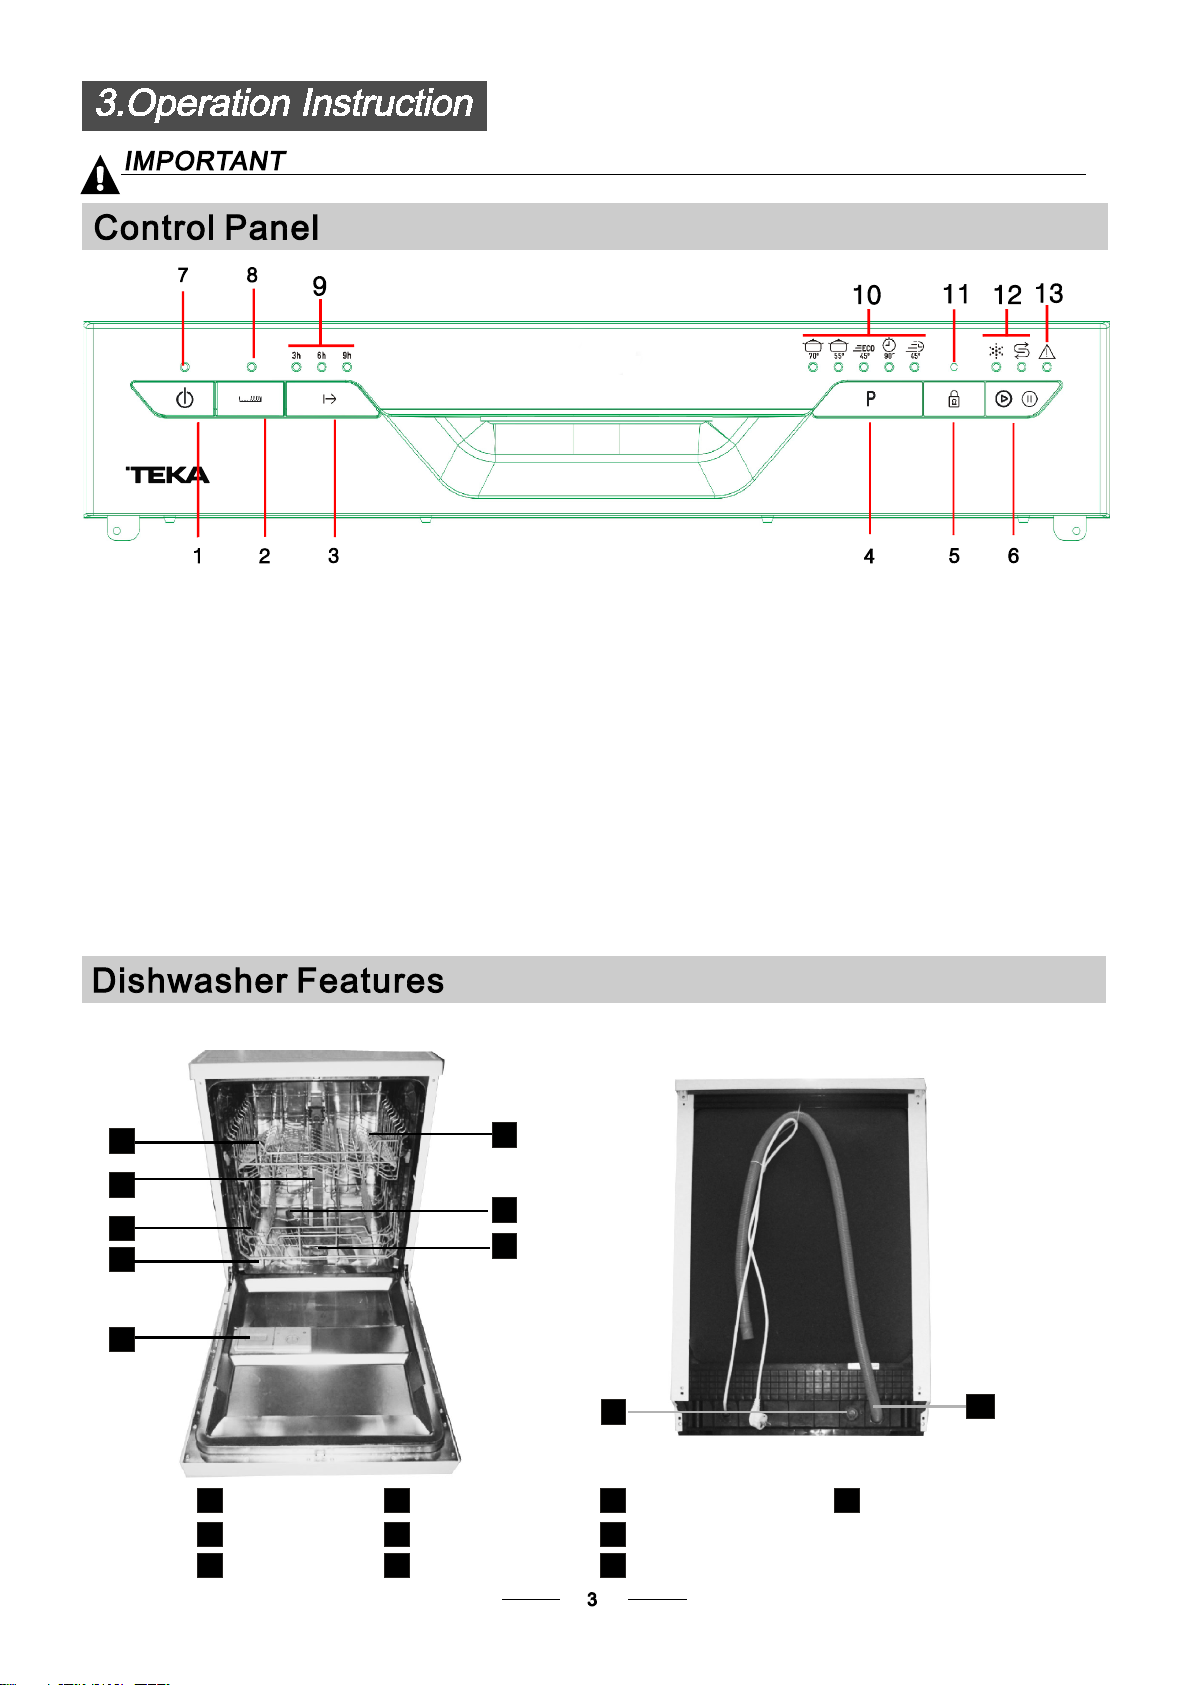
To get the best performance fro m your dishwasher, read al l opera ti ng instruct ions
be fore u sing it for the first time.
1---On /Off Button
2---Ha lf load functions Button: To select Half load
functions. (With this Half load function you can
only use it when you ha ve only about or less than
6 place setting dish wave, an d you will see less
water a nd energy consumption , ca n only be used with
Intensive, Normal, ECO,Glass an d 9 0 min .)
3---De lay B ut to n
4---Pr ogram B ut to n
5---Ch ild l oc k B utton
Front vi ew
1
6
6---
Start /Pause But to n: To start th e s el ec te d
washing p ro gr am or pause the wash in g p ro gr am
when the ma ch in e i s working.
7---Power indicator
8---Ha lf load indicator
9---De lay ind ic ator s: to show t he delay time
(3h/6h /9 h )
10---Pro gram indicator s
11--- Child l ock i nd icat or s
12---Sal t an d rin se aid warning li ght
13---Wa te r faucet indicator
Back Vie w
2
7
3
4
8
5
10
Upper Ba sket
1
Inner pi pe
2
Lower Ba sket
3
Salt Container
4
Di spens er
5
Cu p Shelf
6
9
Spray arms
7
Fi lter assemb ly
8
In le t pi pe c on ne ctor
9
10
Drain pipe
Page 9

Before using your dishwasher for th e first time:
A. Set the water so ft ener
B. Add 1. 5K g dis hw as her s alt and t hen f ul l f ill the sal t c on ta in er with water
C. Fill the ri ns e a id di spenser
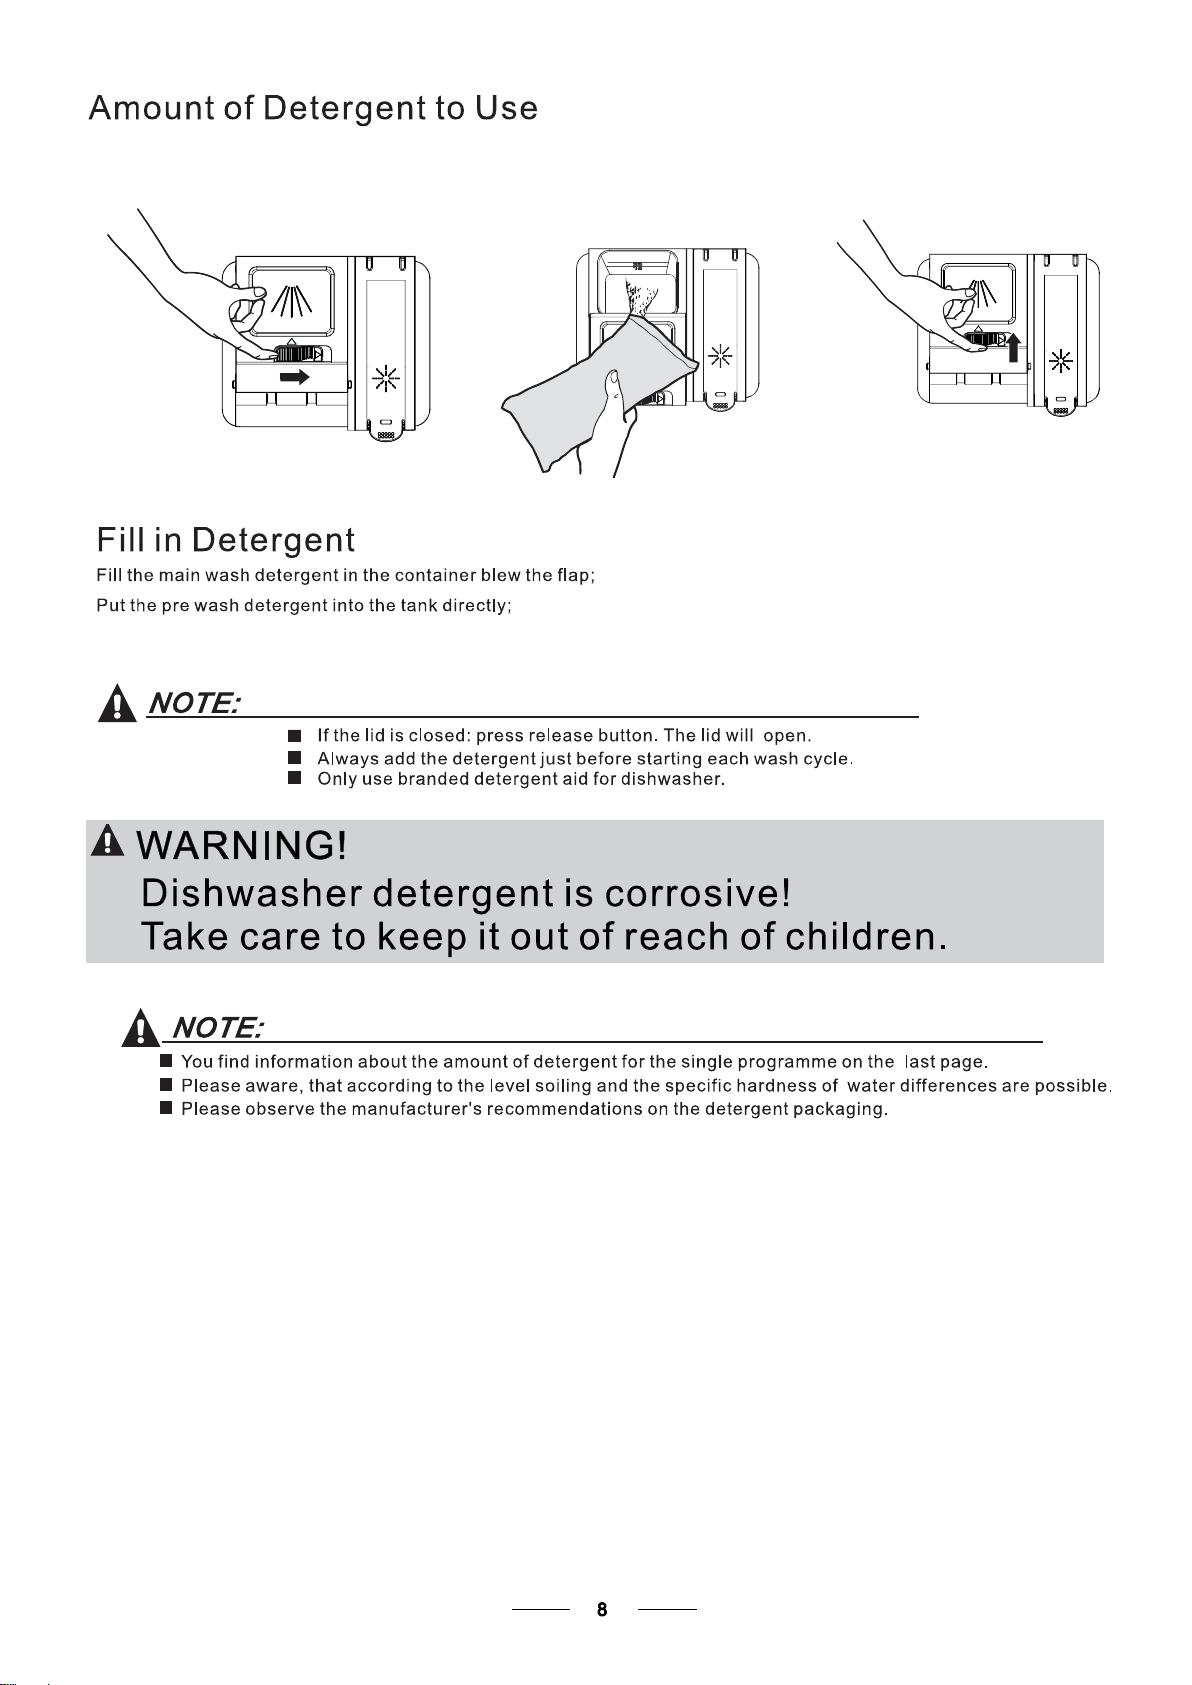
D. Fill in detergent
The w at er softener must be set manually, using th e water hardnes s d ia l.
The w at er softener is desig ned t o r em ov e m iner al s and s al ts from the water, whic h w ould have
a detrime nt al or adverse effe ct on t he operation of the ap plia nc e.
The hig he r t he content of these minerals a nd salts, the harder your water is.
The sof te ne r s ho uld be adjusted according to the ha rd ne ss of the wate r i n y our a rea. Your local Water Authority
can adv is e y ou on the hardness of the water in your area.
Adjusting Salt Consumption
The dis hw as her i s d esigned to allow for adju st me nt in the amount of salt consumed based on the ha rdness of
the w at er used. Th is is intended to optim is e a nd cust omise th e l ev el o f sa lt consumption.
Please follow the steps belo w f or adjustment i n s al t c on sumption.
1. S wi tch o n t he appliance;
2. P re ss the Start/Pause button for more than 5 se cond s to start th e water
soft ener set model within 60seconds af te r the app li ance was
switched on;
3. P re ss the button to select the proper set according to
your local envi ro nment, the se ts will change i n t he following
sequence : H 1- >H 2- >H 3- >H 4- >H5->H6;
4. P re ss the On/O ff b ut to n o r no operation fo r 5 sec on ds to end the se t u p model.
Start/Pause
WATER HARDN ESS
dH
6- 11
18 -22 31-40 22-28 3.1- 4. 0
23-34 4.1-6.0
35 -55 61-98 43-69 6.1- 9. 8
fH
0~ 90~5 0~ 0.94
10-20
21-3012-17 2.1-3.0
41-60
Clark e
0~6
7-14
15-21
29-42
mm ol/l
1.0-2.0
Selec to r Po sition
H1( Rap id Lig ht b right)
H2(90 Min )Light bright
H3( Ra pid )、90 M in Lig ht b right
H4(EC O )Li ght bri gh t
H5(EC O Rapi d Li gh t bright)、
H6(EC O 90 Mi n Light b ri ght)、
Sa lt consum ptio n
(gram /c ycle)
0
9
12
20
30
60
dH =1 .25 Clarke=1.78 fH=0. 178m mol/l1
DH: German de gree
fH: French degree
Clar k: British degr ee
The manufactory setting: H3(EN 50 24 2)
Contac t y ou r local water board for i nformati on on the ha rdne ss of your water supp ly.
If your model doe s not have any water softener, you ma y skip t his section.
WATER SOFTENER
The hardn ess of the water varies from place to place. If hard w ater is used in the di sh wash er, deposits will
form on the dishes and utensi ls .
The app li an ce is equipped with a sp ec ial softener that use s a salt container sp ec if ic ally designed to e limi na te
lime and minerals from the water.
Page 10
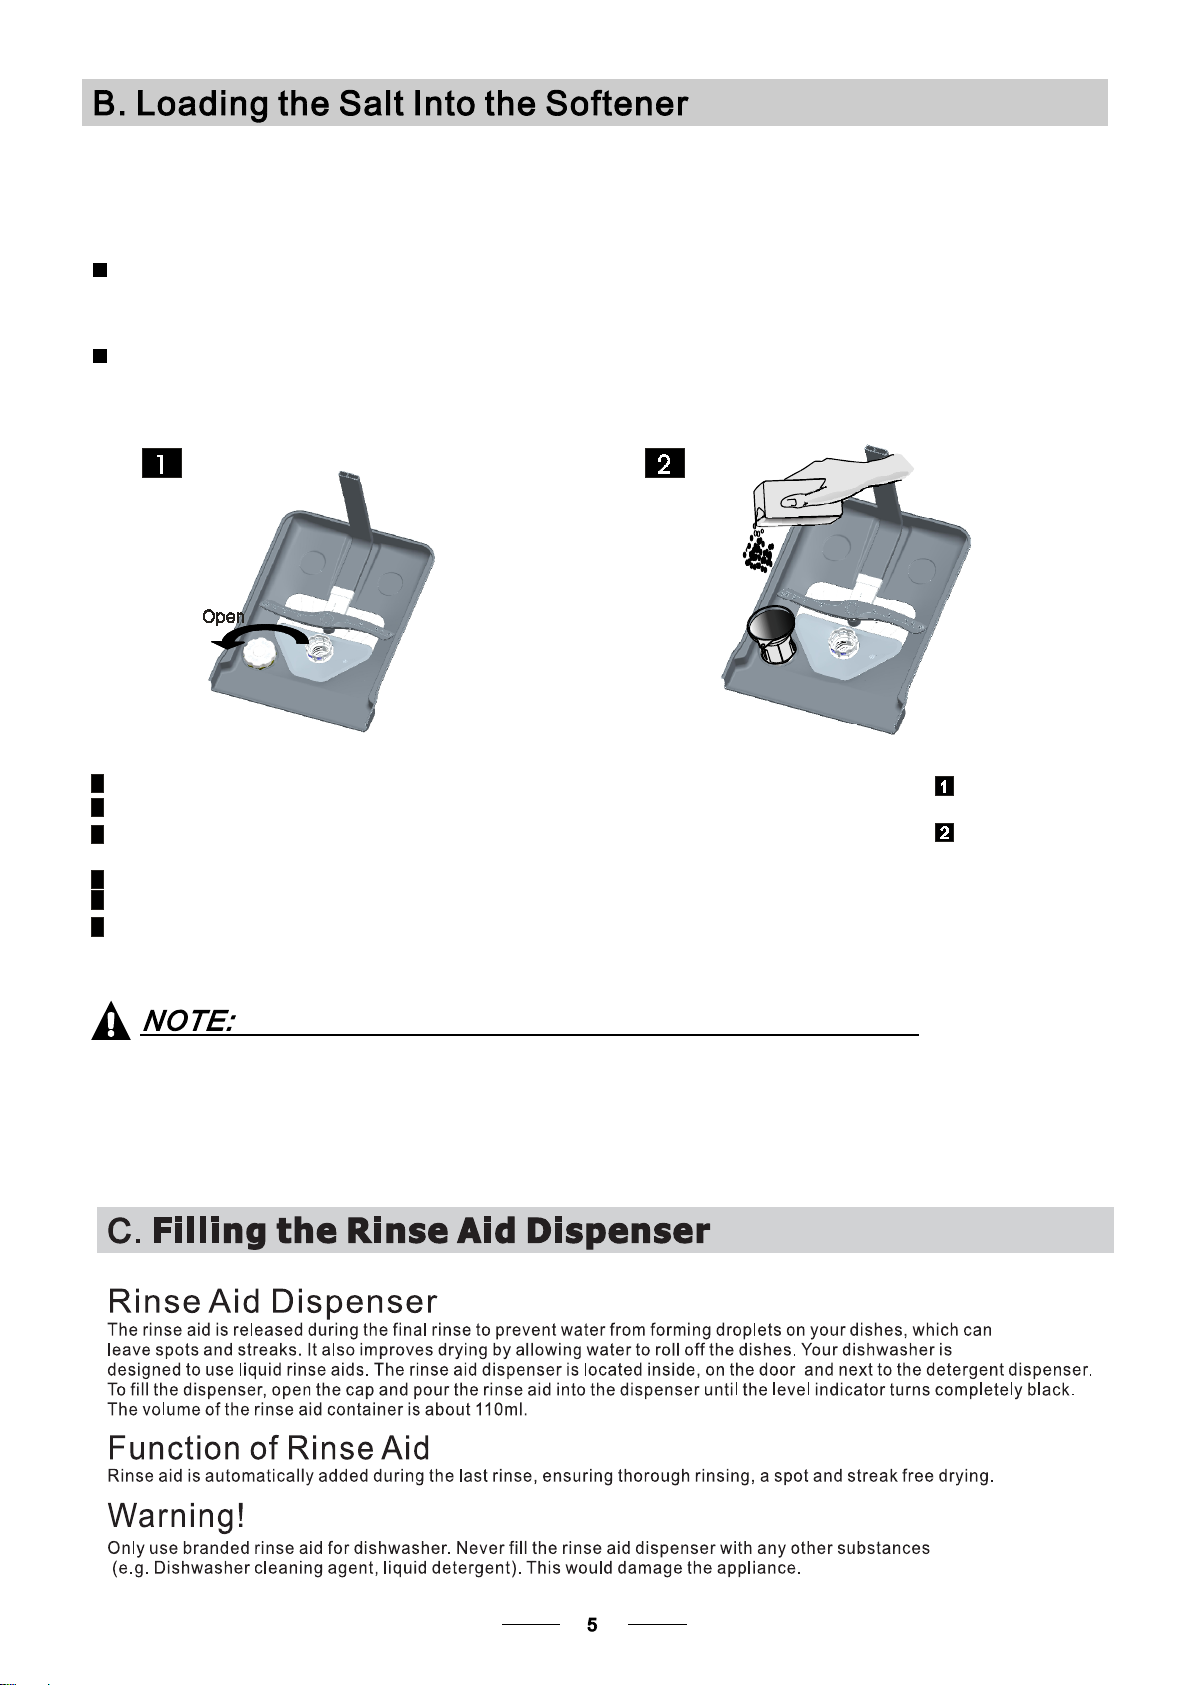
Always us e t he sal t inten de d for use with dishwasher.
The sal t c on tainer is loc at ed beneath the lower b aske t and s hould b e f il le d a s e xplained
in the follow ing:
Attention!
Only use salt sp ecifically designed for the use in dishwashers! Every othe r ty pe of
salt not specifically designed for the us e i n a dis hwasher, e sp ec iall y table sal t, will
da ma ge the water so ften er. In case of damages caused by the us e of unsuitable
salt the manufacturer does not give any warranty nor is liable for any da mages caused .
Only fill wit h s alt j us t befor e st ar ting one of th e co mple te washing progra ms.
Th is will prevent any gr ains of s alt or salty wat er, which may have been spilled,
re main in g on the bo ttom of the machine for any peri od of time, wh ich may c au se
corr osio n.
A After the lower b aske t has b een r em oved , unscrew and remove the cap from the salt container.
B Place the e nd of the fu nnel (supplie d) into the ho le and introduce a bout 1. 5kg of dishwas he r sal t.
Full fi ll the salt container with water,It is norma l for a sm all a moun t of wate r t o come out of the
C
salt c ontainer.
D After fill ing t he co ntainer , screw the cap tightly back clockwise.
E The salt warning light will stop being after th e salt container ha s been fill ed with salt.
F Im mediately a fter fill in g the salt into the sa lt container, a washing program should be started
prog ra m Otherwis e the filter system, pump or other im portant pa rt s of the machine ma y be damaged
by sal ty water. This is out o f w arra nty.
).
1. Th e salt co ntainer must only be refilled when the salt warning light in the cont ro l pa nel comes on.
Depending on how well t he salt dissolves, t he salt warning light ma y still be on eve n though t he
salt container is filled.
If there is no salt warning light in the control pa ne l ( fo r s ome Models ), you c an estimate when to f ill
the sal t into the softe ne r b y the c ycle s t ha t t he dishwasher h as run.
2. If the re are sp il ls of t he salt, a s oak or a ra pi d p ro gr am shoul d be r un to remove the excessive sa lt.
(We suggest to us e a s hort
Page 11
Page 12
Page 13
Page 14
Consider buying utensils which are id en ti fied as dishwasher-proof.
Use a mild detergent that is described as 'kind to dishes'. If necessary, seek further
information from t he detergent manufacturers.
For particu lar i te ms, s el ec t a progr am with as low a te mp eratur e as possible.
To pr ev en t damage, do n ot take glass and cu tler y out of the dishwasher immediately
after the programme has ende d.
Are not suitable Are of limited suitability
Cutlery w it h w oo de n, ho rn c hina or
mo ther-of- pearl h an dl es
Plas tic i tems that are not he at re sist ant
Older c utlery with glued parts that are not
temperature r es is ta nt
Bonded cutlery items or dishes
Pewter or copper items
Crysta l gla ss
Steel items subject to rusting
Wooden plat ters
Item s m ade f ro m s yn th etic fibres
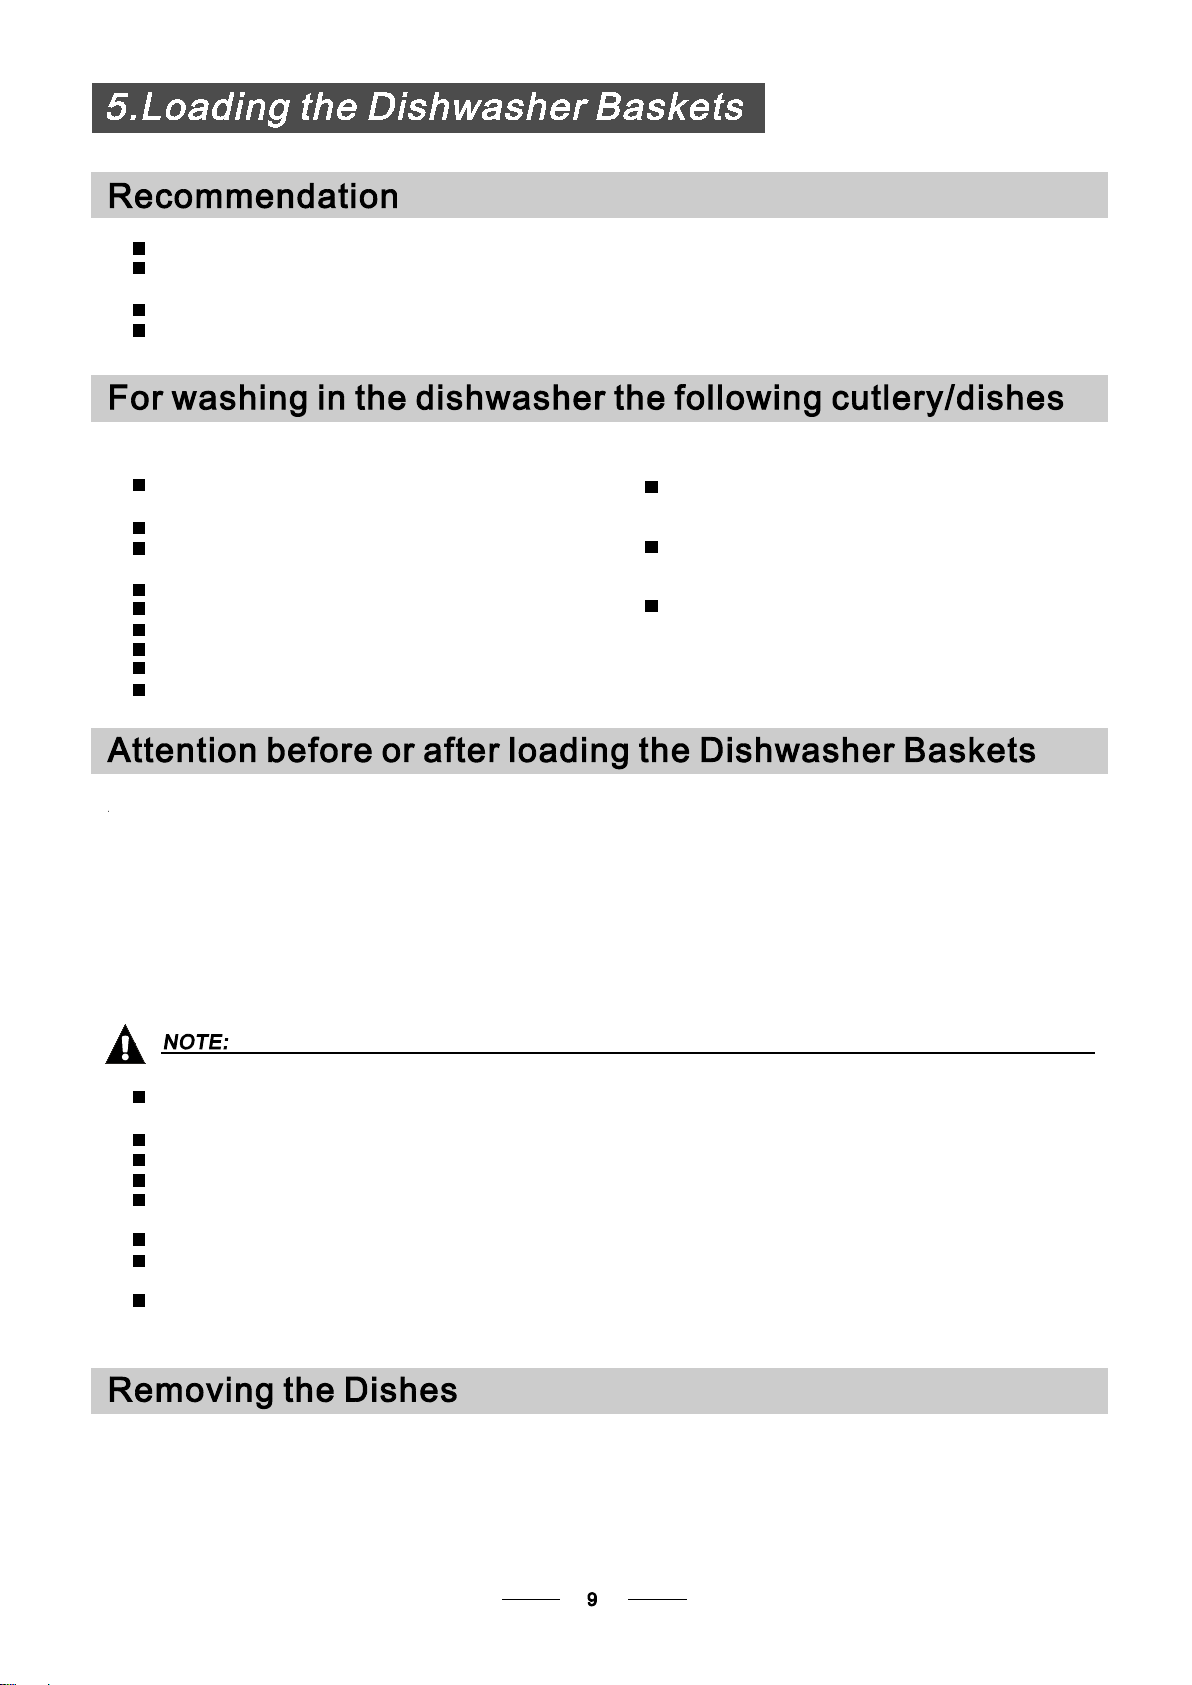
(For best performance of the di sh wa sh er, follow these loading guidelines.
Features and ap pearance of baskets an d cutlery baske ts may vary from your model.)
Some types of gl asses can b ecom e
dull after a large num be r o f w as hes
Silv er and al uminum parts ha ve a
tendency to discolour during washing
Glazed patterns may fade if machine
washed frequently
Scrape off any large amounts of leftover food. So ften remnants of burnt food in pans.
It is not necessary to rinse the dish es under running wate r.
Plac e o bj ects in the dishwasher in following way:
1.Items such as cups, glasses, pots/pans, etc. are faced downwards.
2.Curve d i te ms , o r ones with recesses, should be loa de d a slant so that water can ru n o ff.
3.All utensils are stacked se cu re ly and can no t tip over.
4.All utensils are placed in the way that the spray arms can ro tate freely during washing.
Very sma ll items should not be wa shed in the di shwa sh er as they c ou ld easily fall out of the basket.
Load hollow items such as cups, glasses, pan s e tc . W it h the ope ning facing downwards so that
water c anno t c ol le ct in the co ntai ne r or a de ep base.
Di shes and items of cutlery must not li e i nsid e one a no th er, or cover each other.
To av oid d amag e to glasses, they must not touch.
Load large items wh ich a re most difficult to clean into the lower ba sk et .
The upper basket is designed t o hold more delicate and lighter di shware such as gla sses, c offee
and t ea cups
Long bladed knives stored i n a n upright positio n a re a potential ha zard!
Long and/or sharp items of cutler y su ch as carving knives must be positioned
horizo nt al ly in the upper ba sk et .
Please do not overload your dishwasher. This is important for go od results and fo r
reas on able consumption of energy.
To prev en t w at er dripping from the upper basket into the lo we r basket, w e recommend tha t y ou
em pty t he lower basket first an d t hen t he upper ba sket .
Page 15
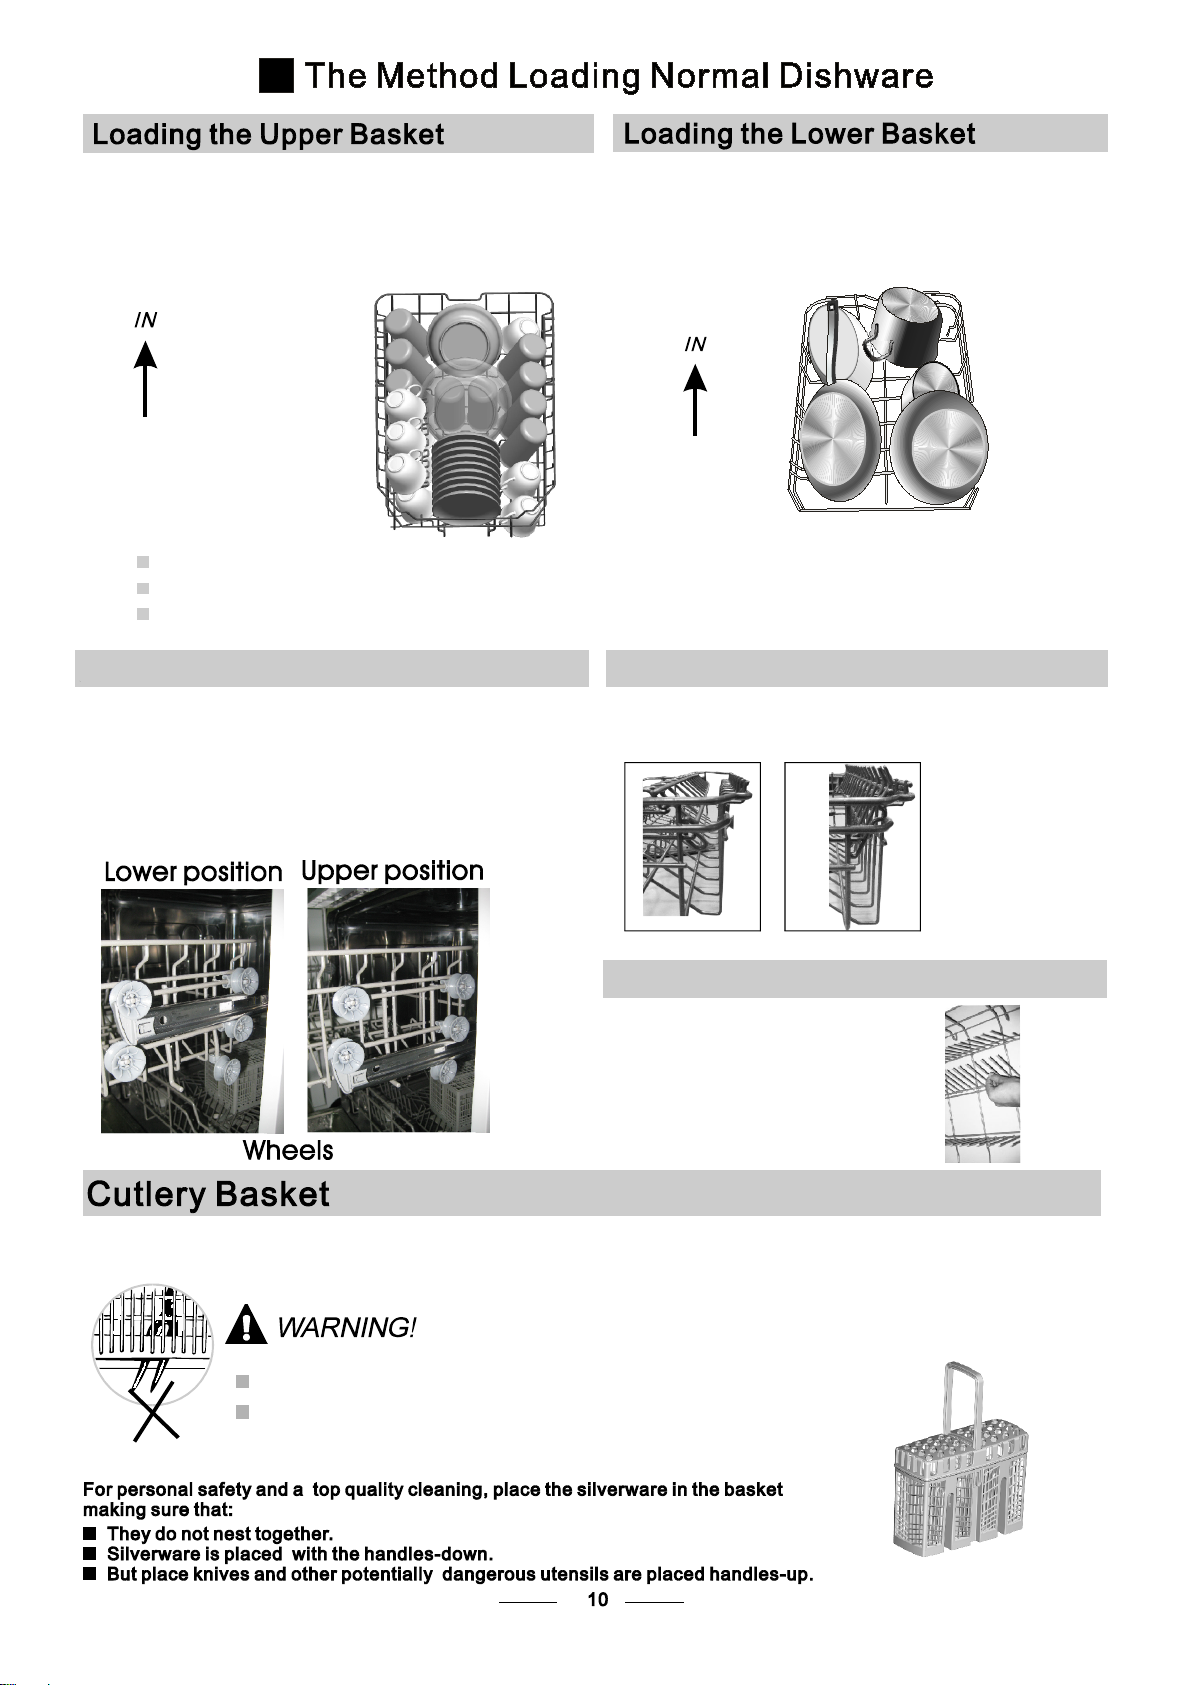
The upper basket is designed t o hold more delicate
and lig ht er dishware such as gla sses , coffee and
tea cup s a nd saucers, as well a s p lates, small bo wls
and sha llow pans (as long as they are not to o d ir ty ).
Posi tion the di shes a nd cookware so that t hey w il l
not get moved by the sp ra y o f water.
Please be reminded that:
Pots, servi ng bowls, etc, mus t alway s b e placed top down .
Deep pots should be s lanted to allow water to flow out.
The B ottom B as ke t features folding sp ikes so tha t l ar ge r or more pots and pans can be loaded.
We sugges t th at you pl ace large ite ms and the most
difficult to clean items ar e to be placed into the lower
basket: suc h a s p ot s, pans, lids, se rv ing dishes and
bowls, as shown in the figu re below. It is preferable to
place servi ng dishes and lids on the side of the ra ck s
in order to avoid blocking the rotation of the top spray
arm.
Adjusting the Upper Basket
The hei gh t o f t he upper bask et can be adjusted in order to
crea te more space for large u te nsil s b oth for the upper
/lower basket. The hei gh t o f t he upper bask et can be
adjusted by pla ci ng the whee ls on different he ight of the
rails. Long items, serving cutlery, salad serve rs and knives
should be placed on the shelf so that they d o not obstruct
the r otatio n o f t he spray arms..
Folding back the cup shelives
Fo r b et ter s tack ing of pots and pans,
the s pi kes can be folded down as
sh ow in the picture righ t.
Folding Spikes of Lower Basket
For b etter s ta ck in g o f po ts and pa ns,
the spi kes c an be folded down a s
show in the picture righ t.
Cutlery s ho ul d b e placed in the cutlery bask et with the handles at the bottom. If the rack has si de baskets, the
spoons should be loaded separat el y i nto t he appropriate slots, especially long u te nsil s s ho uld be placed in the
horizontal position at the front of the upper bask et as shown in the picture.
Do not let any item extend through the bottom.
Always load sharp utensils with the sharp
point down!
Page 16
( )
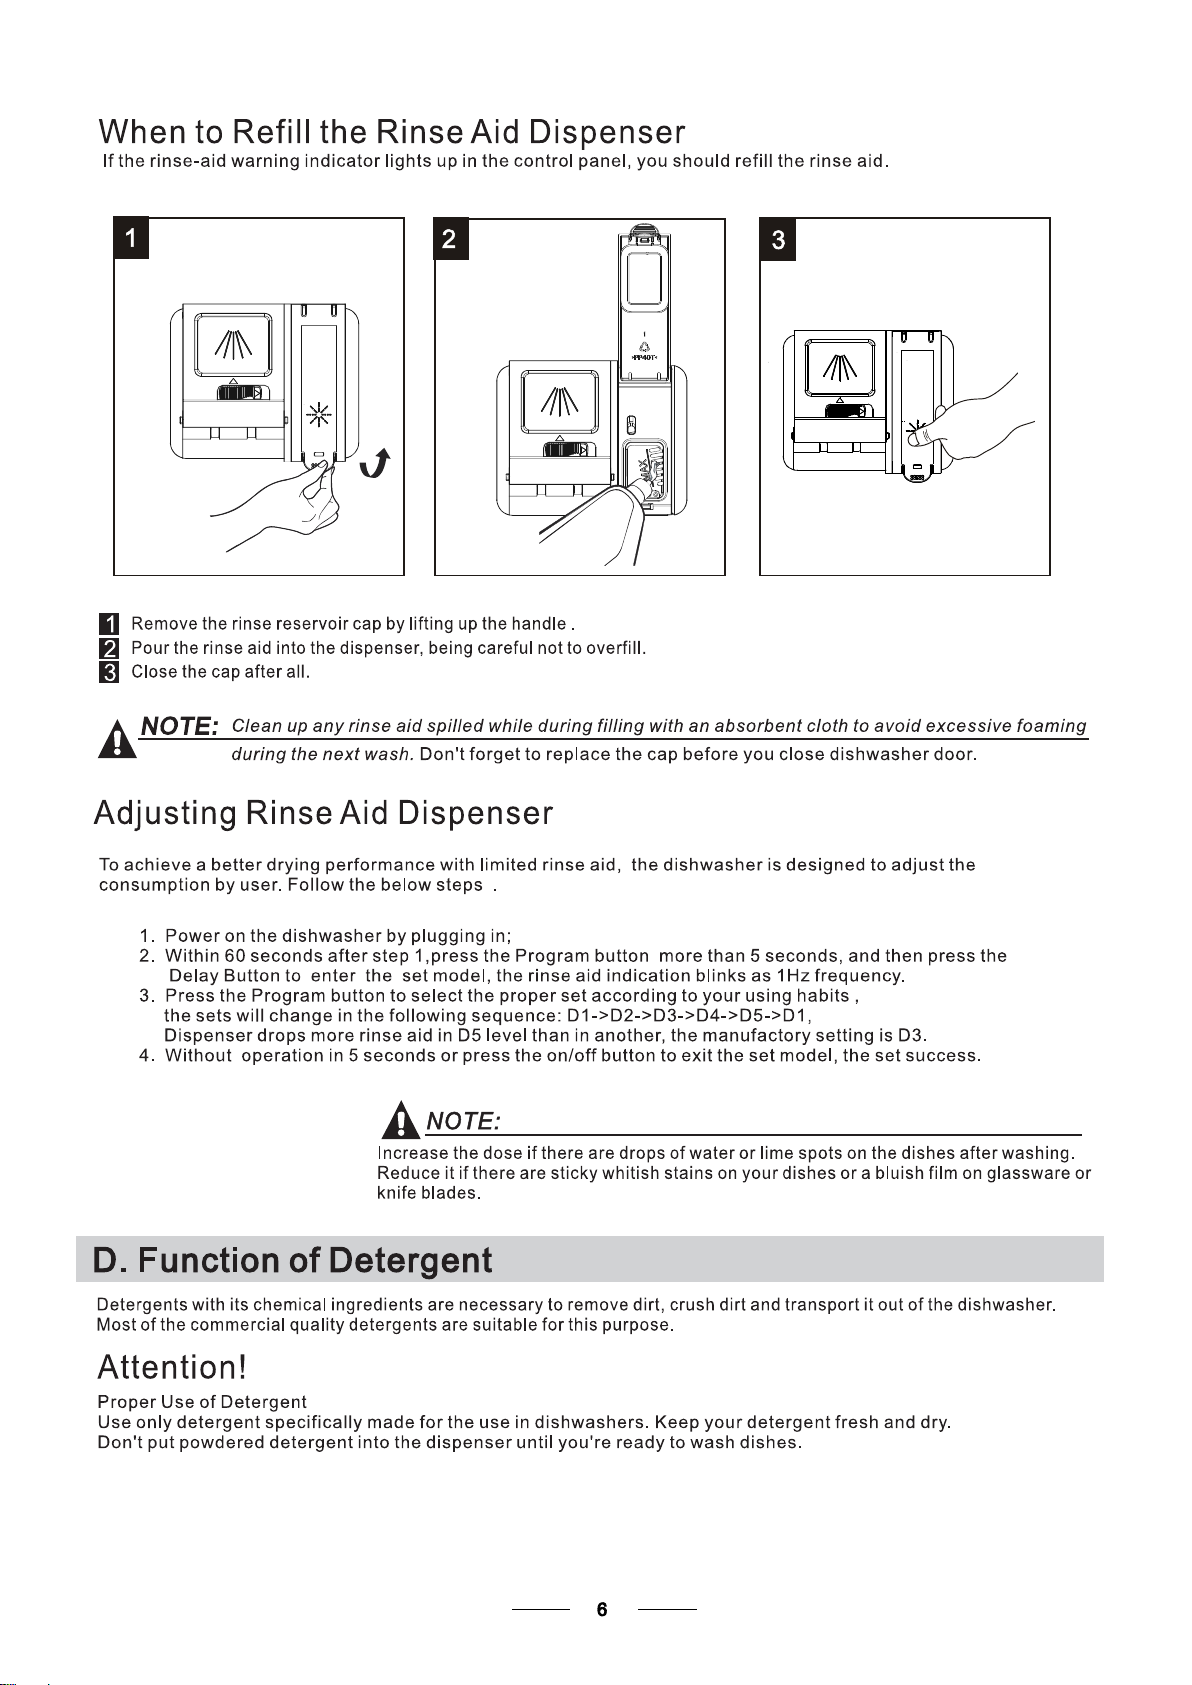
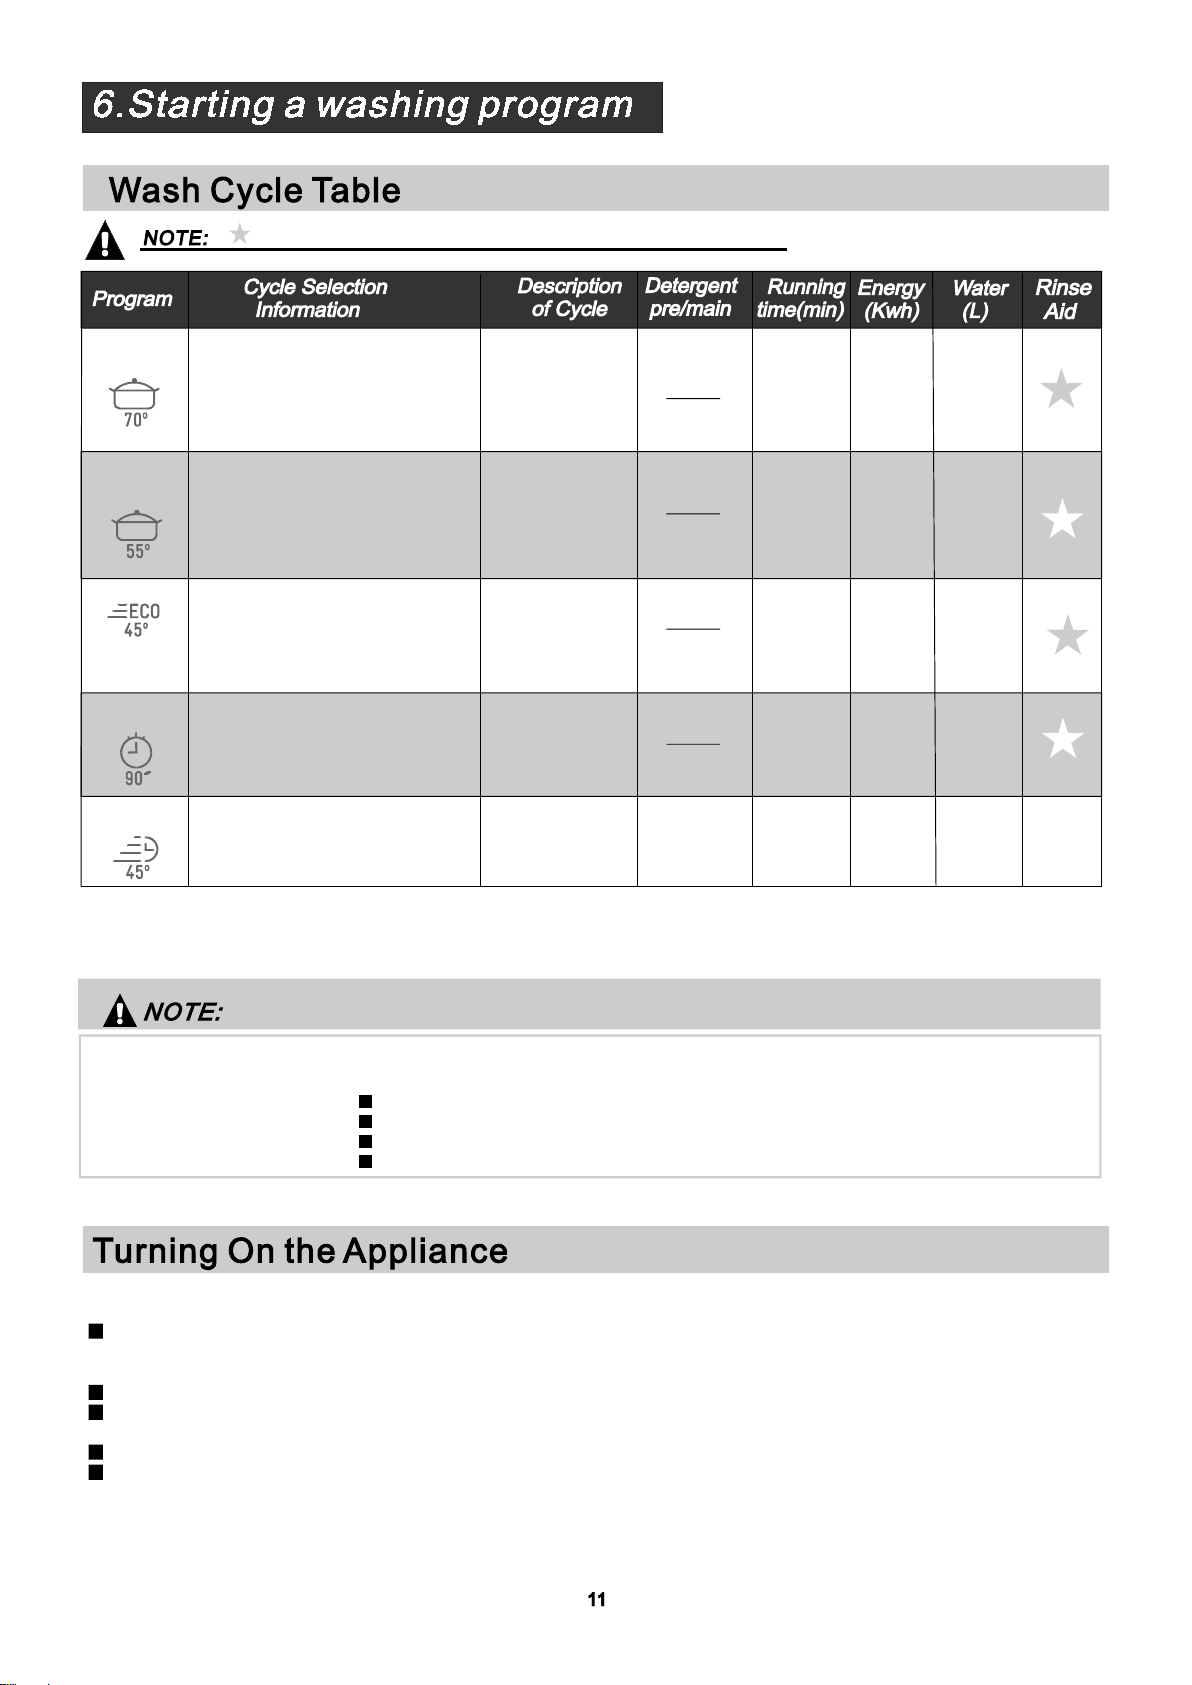
Me ans: n eed to fill rin se into the R inse-Aid Dispenser.
Intensive
No rmal
(*E N 50 242 )
90 mi n
Rapi d
For h eavi es t s oi led crockery,
and nor mall y soiled pots
pans dishes etc with dried
、
、
on soiling.
For n or ma ll y soile d loads,
such as , plat es ,gla sses
pots
and lig htly soiled pans.
Th is i s standard programme, it is
suitable to clea n norm ally soiled
ta bleware and it is th e most effic ie nt
pr og ramme in terms of it s combined
en er gy a nd w ater consumpti on fo r
th at t yp e of ta blew are.
For l ightly soiled loads that
do not need excelle nt drying
efficiency.
A shor ter w as h f or light ly soiled
loads a nd quick wash.
Pr ew ash 50
Wash 60
( ℃)
( ℃)
Rinse
Rinse
Rinse 70
( ℃)
Drying
Prew ash(45 )
Wash (55 )
℃
℃
Rinse
Rinse (65 )
℃
Drying
Prew ash
Was h (45 )
Rinse(65 )
℃
℃
Drying
Was h(65 )
℃
Rinse
Rinse (65 )
℃
Drying
Wash (45 )
Ri nse (50 )
Ri nse (55 )
℃
℃
℃
5/ 22g
(1 piece)
5/ 22g
(1 piece)
5/ 22g
(1 piece)
27 g
(1 piece)
20g
165
17 5
190
90
30
1.4
1.1
0. 69
1.15
0.7
16 .5
13
9
11.5
10
*E N 5 0242 : This programme is the te st cycle. The information fo r comparabil ity t es t
in accordance with EN 50242, as fol lo ws :
Capacity: 9 setting
Posi tion Upper bask et : upper w he el s on rails
Rins e a id setting: 6
PI:0.49w;Po:0.45w
Starting a cycle wa sh
Dr aw out the lowe r a nd upper bask et, load the dishes and push them back.
1
It is commended to load the lower ba sket first, then the upper one (see the section entitled
Load in g t he Dishwasher ).
“ ”
Pour in the dete rgent (see the se ctio n entitled Salt, Detergent and Rinse Aid ).
2
Insert the plug into t he socket. Th e power supply is 220-240 VAC /50 HZ, the s pe cifi ca tion
3
“ ”
of the sock et is 10A 250VAC. Make sure that the wa ter su pply is turned on to ful l p re ss ur e.
Close the door, press the On /Off bu tton, an d t he light will turn o n.
4
Tur n t he program but to n , the wash program wi ll be changed as follo ws direction:
5
On/Off
Intensive->N ormal>ECO-> 90 min->Rapid;
If a program is selected, the re sponse light will light. Th en press the S ta rt /P au se button, the
dishwasher begins t o start.
Page 17
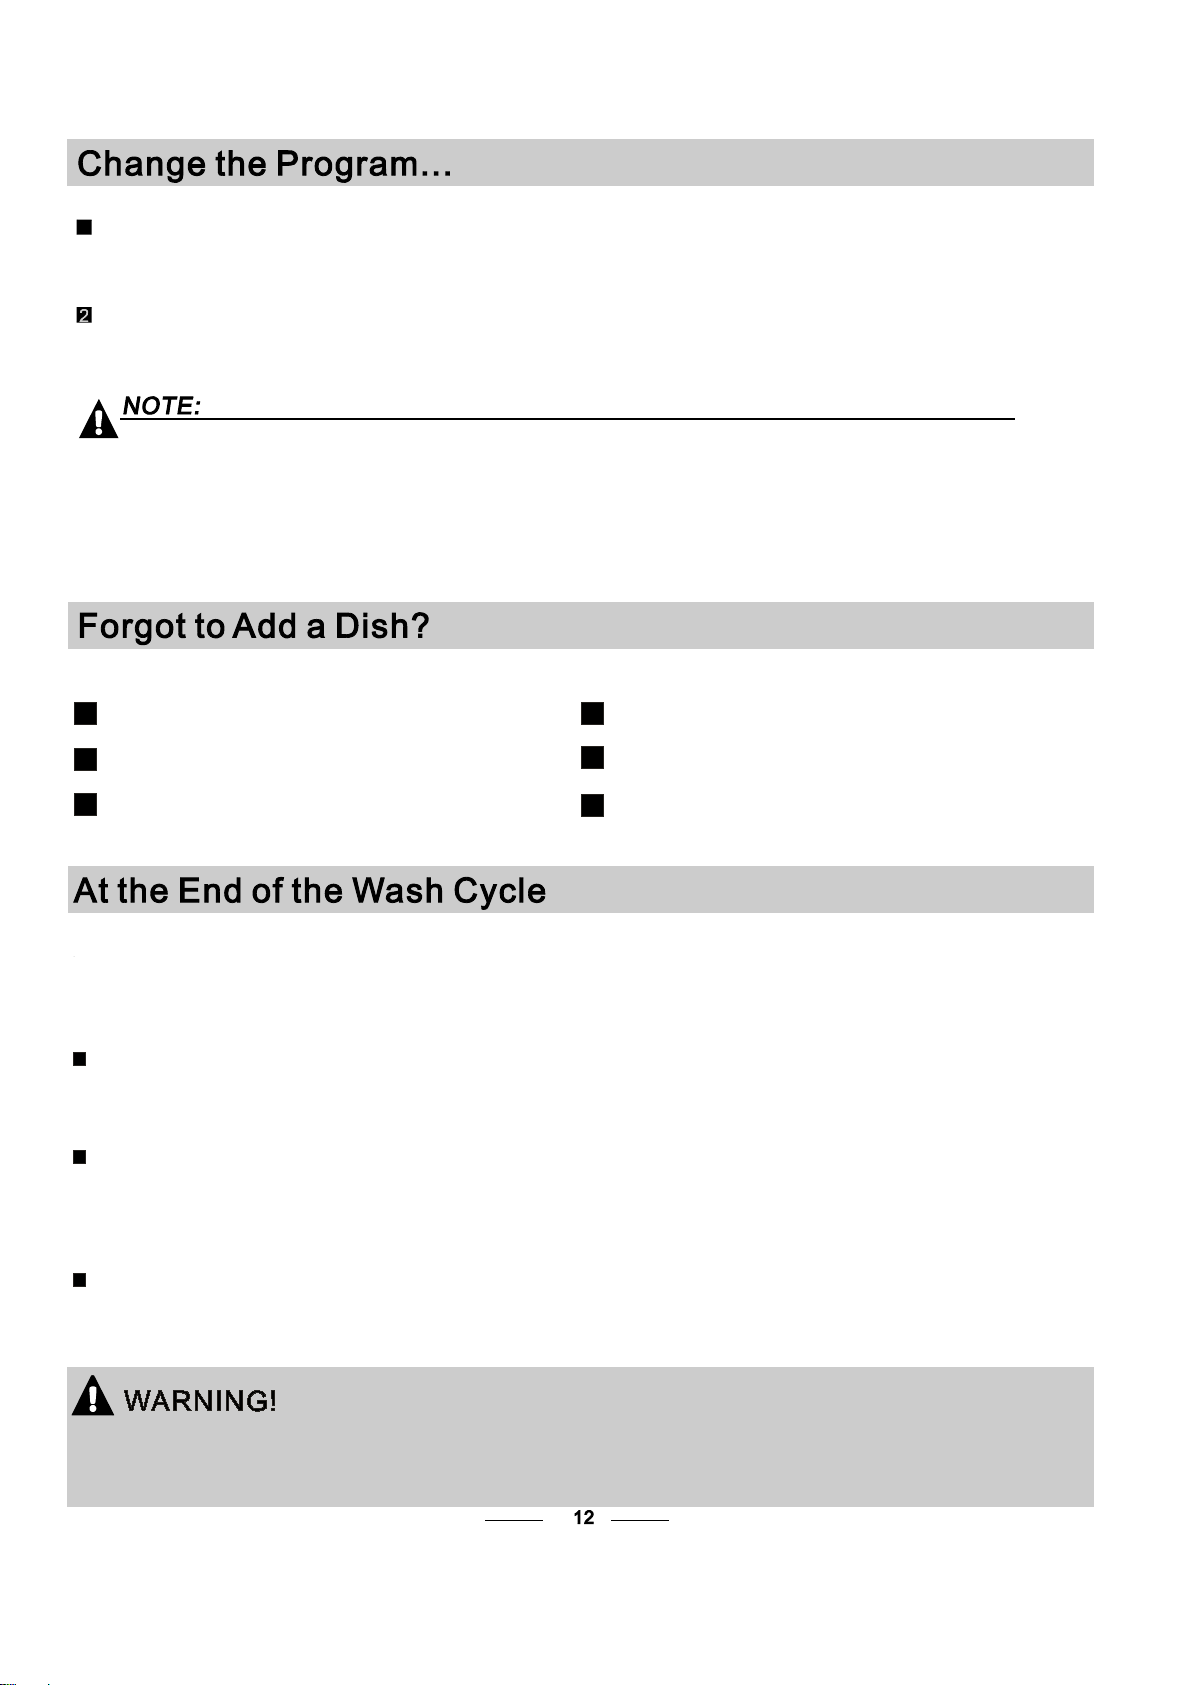
Premise:
A cycle tha t is underway can only be modified if it has only been running for a shor t t im e. Otherwise , the
1
detergent may have already been released, and th e app li an ce may have already drained the wash wate r.
If this is the case, th e deter gent dispense r must be refilled (see t he s ec ti on e ntitle d " Loading the
Detergent " ).
Pr ess the S tart/Pause button
3s then you can change the program to the desired cycl e s et ting (see the section e nt itled " Sta rting a wash
cycle. . ." ) .
, the machine will be in standby state, press th e program button more th an
If y ou ope n the door , the machine will pause. The program light will
during a wash cycle
stop blinking and the buzze r will mooing ever y minute unles s you close the doo r . A ft er
you close the door ,the machine w ill keep on working af ter 10 seconds.
If your model has broken remember funct ion, t he machine will go o n to fin ish the selected
program .after the power cut
A forgotten dish can be added any time before the detergent cup opens.
Press the Start/Pause Button to stop the washing.
1 4
Open the door a little .
2
After the spray arms stop working, you can open the door
3
completely.
When the wo rking cycle has finished, the bu zzer of the dishwasher will sound for 8 s ec onds , th en stop. Turn off
the appli ance using the Po we r s wi tch button, shu t o ff the wa te r s up pl y and o pen t he door of the dishwasher.
Wai t for a few mi nutes befo re unloading the di sh wa sher to avoid handling the dishes and ut en sils while they
are still hot and mo re susceptible to breakage. They will also dry better.
Add forgotten dishes.
Close the door
5
Press the , the dishwasher will run
6
after 10 seconds.
Start/Pause Button
Switch Off the Dishwasher
The program light is on but is not blinking, on ly in t hi s c as e the program me has ende d.
1.Switch off th e di shwash er by pressing the On/Off button.
2.Turn off t he water tap!
Open the door carefully.
Hot d ishe s a re sensitive to knocks. The dis he s s houl d theref or e b e a ll ow ed to cool down a ro und 15 minutes
before removing from the appliance.
Open the di shwash er's door, leave it ajar and wait a few mi nu te s b efore r em oving th e d is hes. In this w ay they
will be cooler and the dr yi ng will be imp ro ved.
Unloading the dishwasher
It is normal that the dishwasher is wet inside.
Empty the lower basket first an d t he n the upp er one. This will avoid water dr ippi ng from the upper Bask et onto
the dis he s i n t he lower one.
It is dangerous to open the door when washing,
because the hot water may scald you.
Page 18
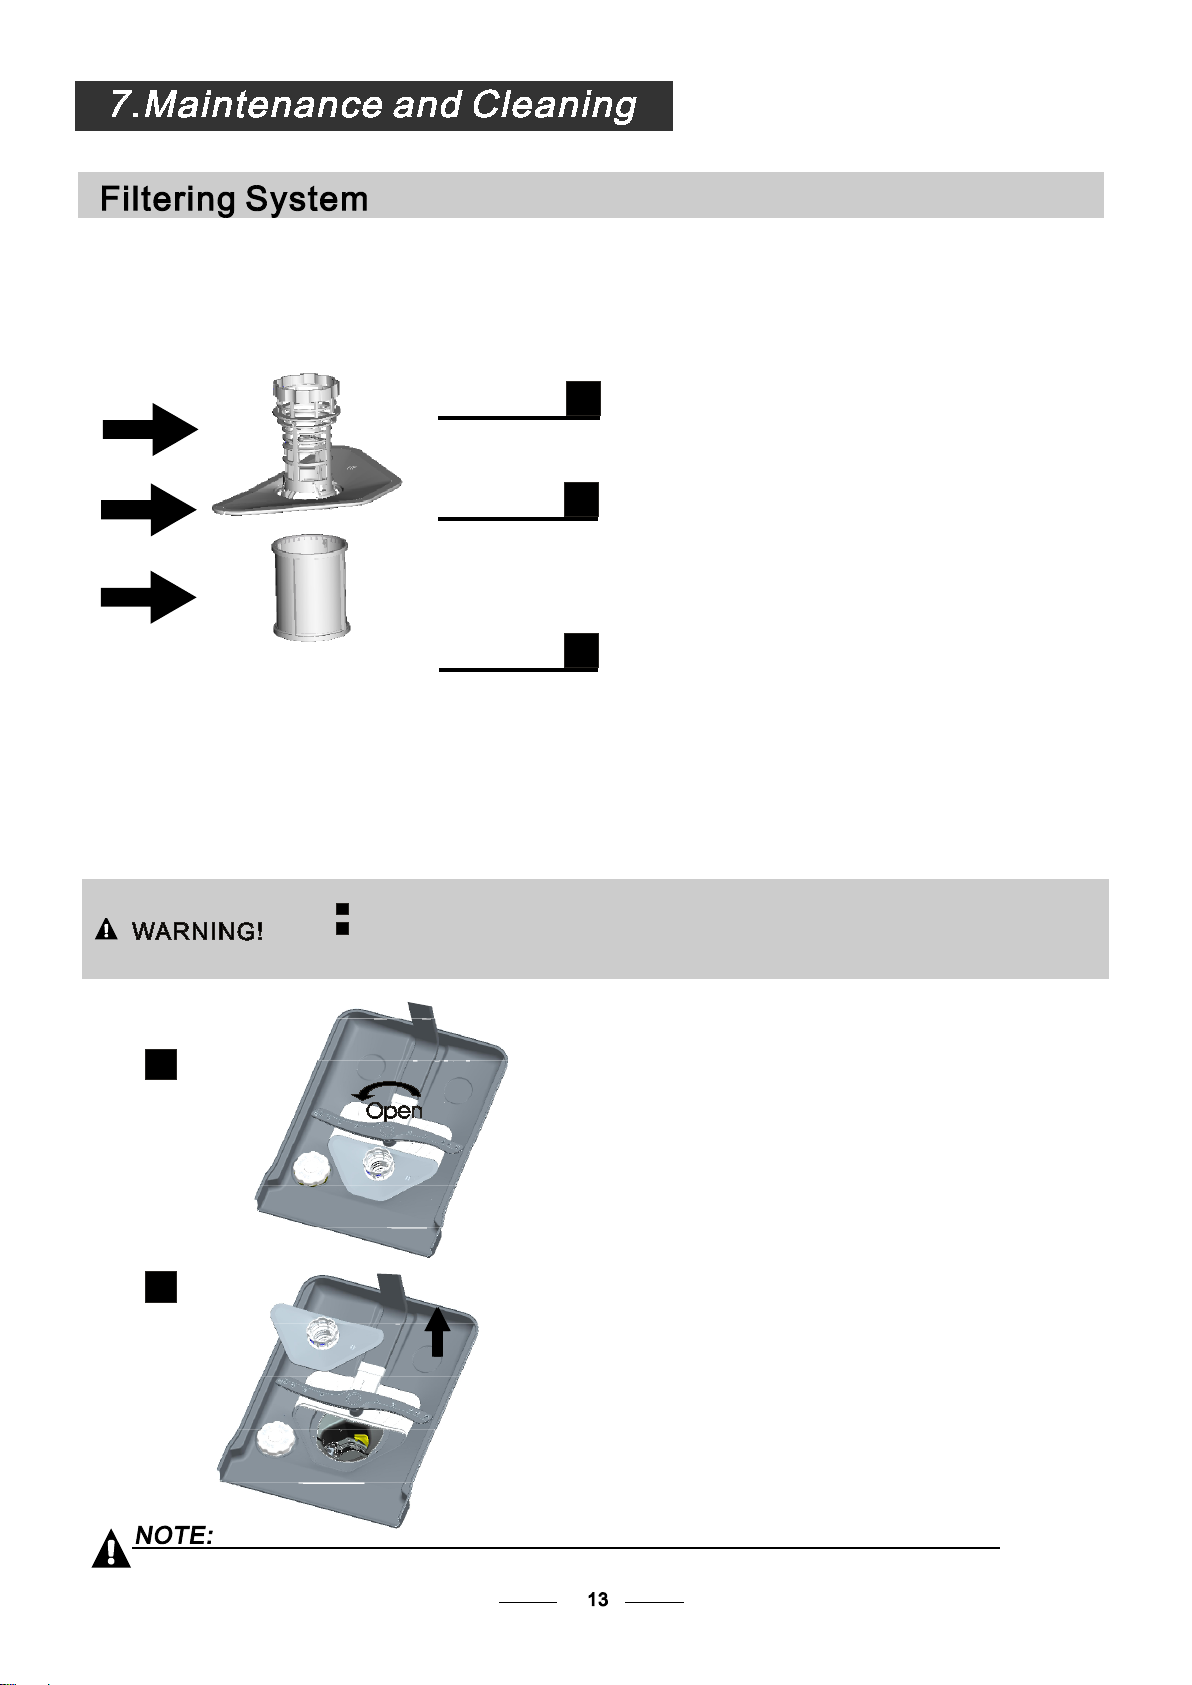
The filte r p re ve nt s l arger remnants of food or oth er objects from getting in side the pump.
The r esid ue s m ay block the fi lt er, in this cas e t he y m ust be removed.
The filte r sys te m consists of a coar se filter,a flat (Main filter)
And a microfilter(Fine filter).
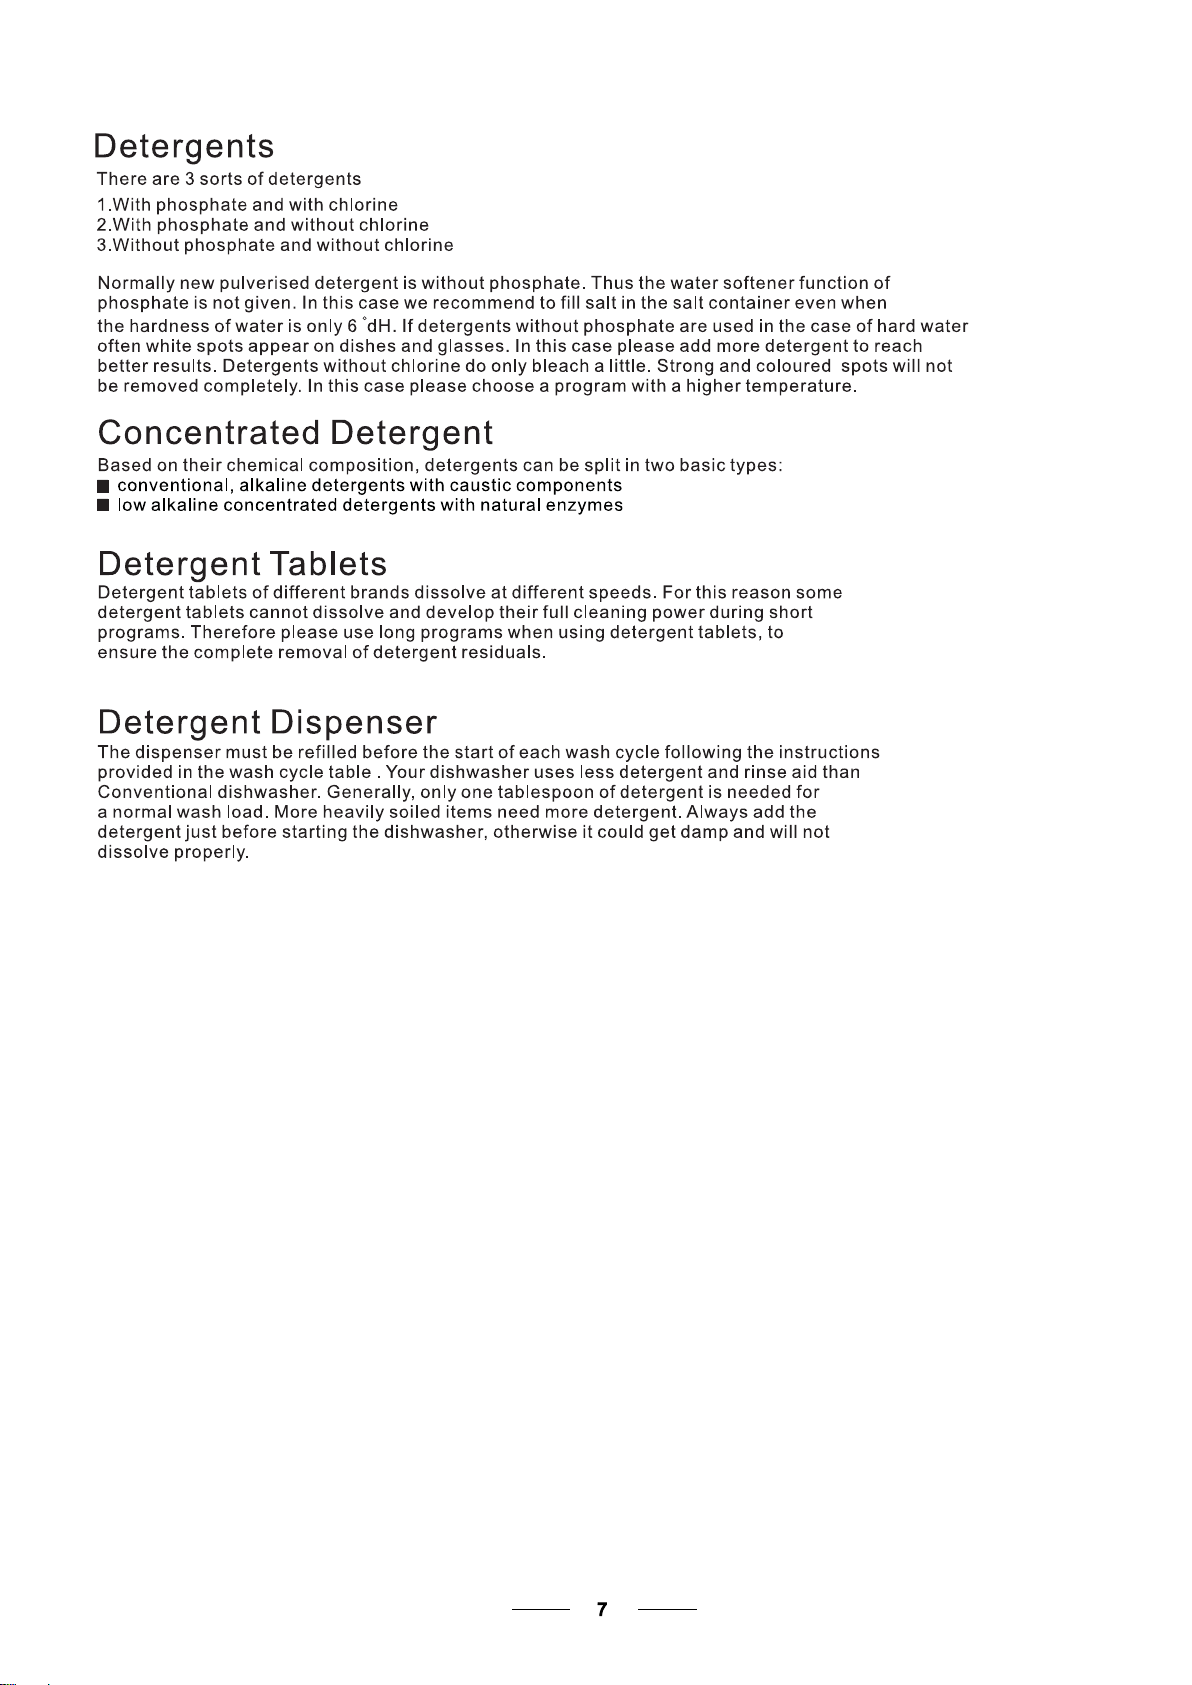
1
2
3
2
1
3
Main filte r
Food and so il particles tr apped i n t hi s filter are pu lver ized by a
special jet on the lower spra y a rm and washed down to drain.
Coarse filter
Larger items, such as pieces of b ones or glass, tha t c ou ld block
the drain are trapped in the coarse filter. To remove the it em s
caught by the fi lter, gently squeeze the tap on t he top of this
filter and li ft out.
Fine filter
This filter holds soil and food residues in t he sump area and
prevents it from being deposited on th e d ishes du ri ng wash cycle.
Filter assembly
The filte r e fficiently
For b est p er fo rm an ce an d re sults, the filt er must be cleaned regularly. this reason, it is a good idea to
remo ve the larger food particles tr ap pe d in the fi lt er after each wash cycle by rinsing th e semi circ ul ar filter and
cup und er running water. To r emove the fil te r device, pull the cup hand le in the up ward direction.
removes food parti cl es from the wash water, allowing it to be recycled during t he cycle.
For
The dis hw as he r m ust never b e used without the filters .
Impr oper replacement of the fi lt er may re duce the pe rf ormanc e leve l o f t he appliance
and dam age d ishe s a nd utensils.
2
1
St ep 1 Turn th e filter in anti-clockwise direction,:
Step 2 lift the filter assy up:
When following this procedure from step1 to step 2, the filter system will be removed;
when following it from Step 2 to Step 1, the filter system will be installed.
Page 19
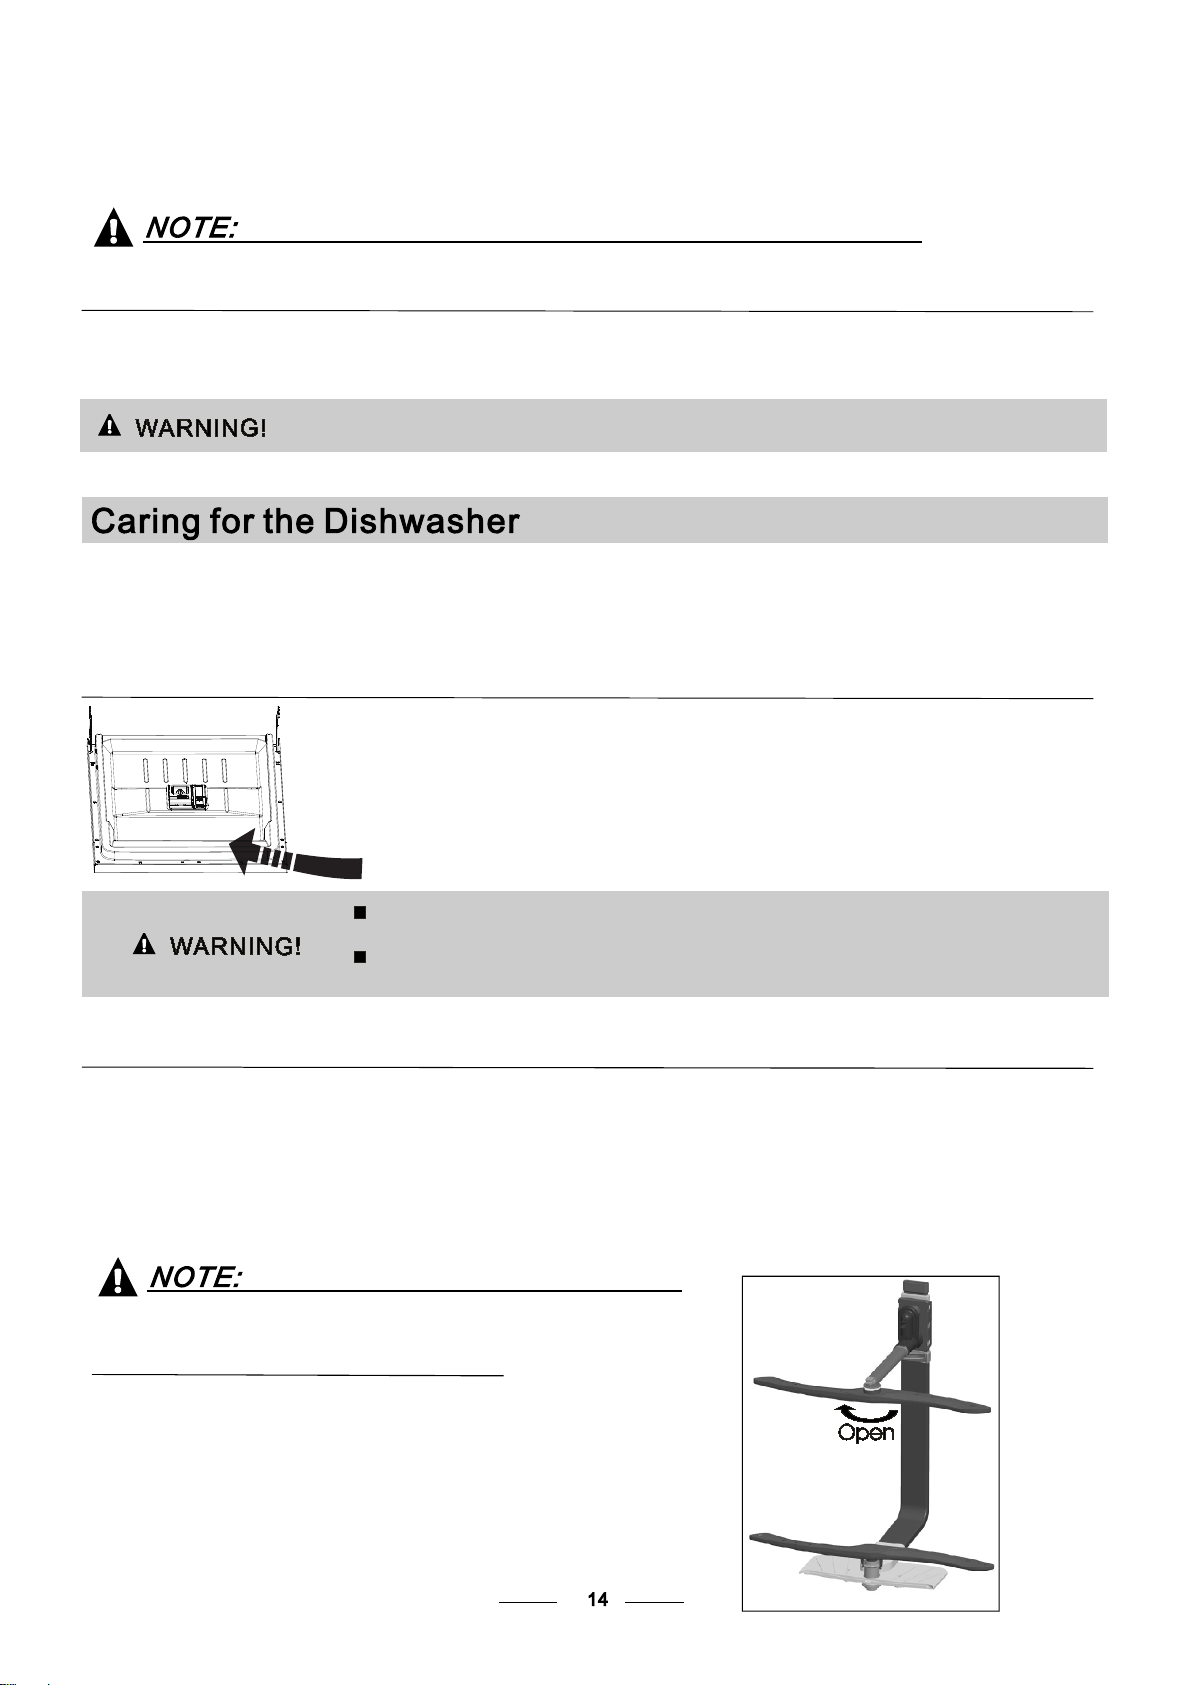
Remarks:
- I nspect the filters fo r blocking after ev ery time the dish wa sher has be en used.
- By u ns cr ew ing the coars e f il te r, y ou can re mo ve the filter system. Remove any food remnants and
clean the filters under runn in g w ater.
The entire filter assembly should be cleaned once a week.
Cleaning the Filter
To cl ean t he coarse filter and the fine filter, use a c leaning br ush. Reassemble the filter parts as shown in the figures
on the last page and reinsert the entire assembly in the dishwasher, positioning it in its se at an d pr essi ng downwards.
When cle an ing the fil ters, don 't kno ck on the m. Otherwise, th e filters could be
contorted and the per formanc e of the dishwasher c ould be decreased.
The con tr ol panel can be cleaned by using a l ight ly dampened cloth.
After c lean in g, make sure to d ry it thoroughly.
For t he exterior, use a good appliance polish wax.
Never use sharp objects, scouring pads or harsh cleaners on any part of the dish washer.
Cleaning the Door
To cl ean t he edge around t he door, you should use on ly a soft warm, damp cloth.
To av oid p en etra tion of wat er into the door lock and el ectrical components, do not
use a spray cleaner of any kind.
Never use a spray cl eane r t o c lean the door panel as it may da ma ge the door lock
and ele ct ri ca l components.
Abrasi ve agents or som e p ap er towels should not be used because of the risk of
scratchi ng or leaving spots on the stainles s s teel s ur face .
Protect Against Freezing
please take frost protection measures on the dishwasher in winter. Every fter washing cy cles ,
please operate as follows
1.Cut off the ele ctrica l power to the dishwasher.
2.Turn off t he water supply and disc onne ct the wate r i nlet pipe from t he water valve.
3.Drain the wa ter from the in let pipe and wa te r va lve. (Use a pan to gather the water)
4.Rec onnect the water inlet p ipe t o the water valve.
5.Rem ove t he filter at the bottom of the tub an d u se a sponge to soak up water in the sump.
:
If your dishwasher cannot work b ec au se of the ice,
please contact pr ofes si on al service pe rson s.
time a
Cleaning the Spray Arms
It is necessary to clean th e spray arms r eg ul ar ly fo r hard
water che mi ca ls will c log t he spray arm jets and bearings.
To remo ve the upper spray a rm , h old the nut, rotate the arm
clockwis e t o r emov e i t.
To remo ve the lower sp ra y a rm , p ul l o ut the sp ra y a rm upward.
Was h the a rms i n s oapy and warm water an d use a soft brush to
clean t he jets. Replace th em after rinsing th em thoroughly.
Page 20
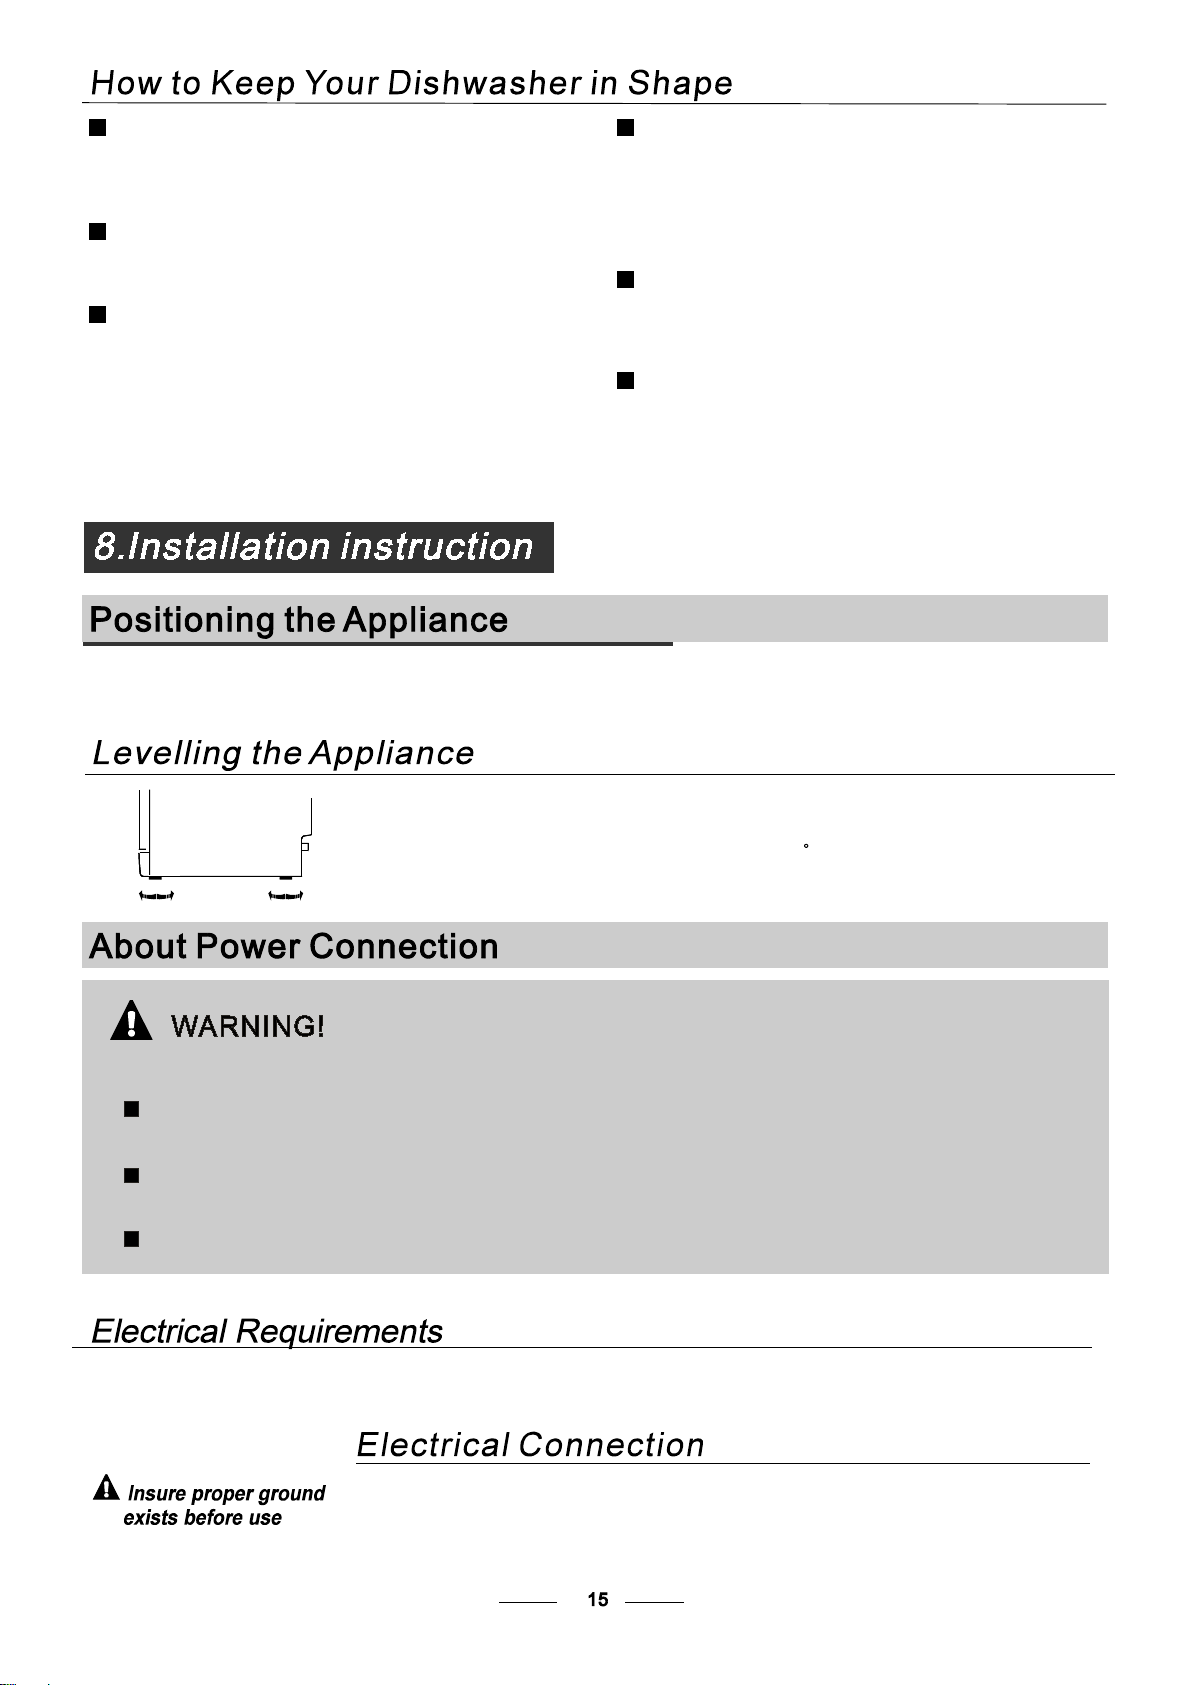
After Every Wash
After e very wash, turn off t he water supp ly to the
applianc e a nd leave the do or slightly open so t ha t
mo isture and odours are not t ra pp ed insi de.
Remove the Plug
Before cleaning or performing mai nt en ance , always
remo ve the pl ug from the so ck et .
No Solvents o r Abrasive Cleaning
To cl ean t he exterior and rubber parts of the dishwasher,
do not use solven ts or abrasive cleanin g products .
Only use a clot h with w ar m s oapy water.
To remo ve spots or stains from the surface of the
inte ri or, use a cloth d am pe ne d w it h wa te r an a litt le
vinegar, o r a cleaning produ ct made s pe ci fi call y for
dishwasher s.
Posi tion the ap plianc e in the de sired location. The back should rest against th e wall behind it, an d the sides,
along the adjacent cabinets or walls . The dishwasher is equipped with water supply and drai n hoses that can
be positioned either to the right or the left sides to facilitate proper installation.
When not in Use for a LongTi me
It is r ec om me nd that you run a wash cycle wi th the
dishwash er empty an d then remove the plug from the
sock et , t urn off the water su pply and leav e t he door of
the a pp liance slightly open. Th is will help the door
seals to last longer and prevent odou rs f ro m f or ming
within the appliance.
Movin g the Appliance
If the ap plia nce must be moved, try to keep it in the
ve rtical position. If absolutely necessary, it can be
position ed on its back.
Seals
One o f the factors that cause od ours to fo rm i n t he
dishwasher is food that remains trapped in the seals.
Periodic cleaning with a damp sponge will prevent this
from occurring.
Once the appliance is positioned for levelling, the height of the dish washer
ma y b e a lt er ed via adjust me nt of the sc rewing level of the feet. In any ca se,
the app li ance should not be inclined more tha n 2 .
For personal safety:
Do not use an extension cord or an adapter plug
with this appliance.
Do not, under any circumstances, cut or remove the
earthing
Connection from the power cord.
Please look at the rating label to know the rating voltage and conn ect t he dishwasher to the appropriate po we r s up pl y.
Use the required fuse 10 amp, time d elay fuse or circu it breaker re comm ende d a nd provide se pa ra te circuit serving
only this appliance.
Ensu re the vo ltage and f re quen cy of the power be ing corresponds to
those o n t he rating pla te . O nly insert the plug into an electrica l s oc ke t which is e ar thed
proper ly. If the electrical socke t to which the ap pliance must be connected is not
approp ri ate f or the plug , replac e the socket, rather than using a adap tors or the like as
they could cause over he at ing and burns.
Page 21
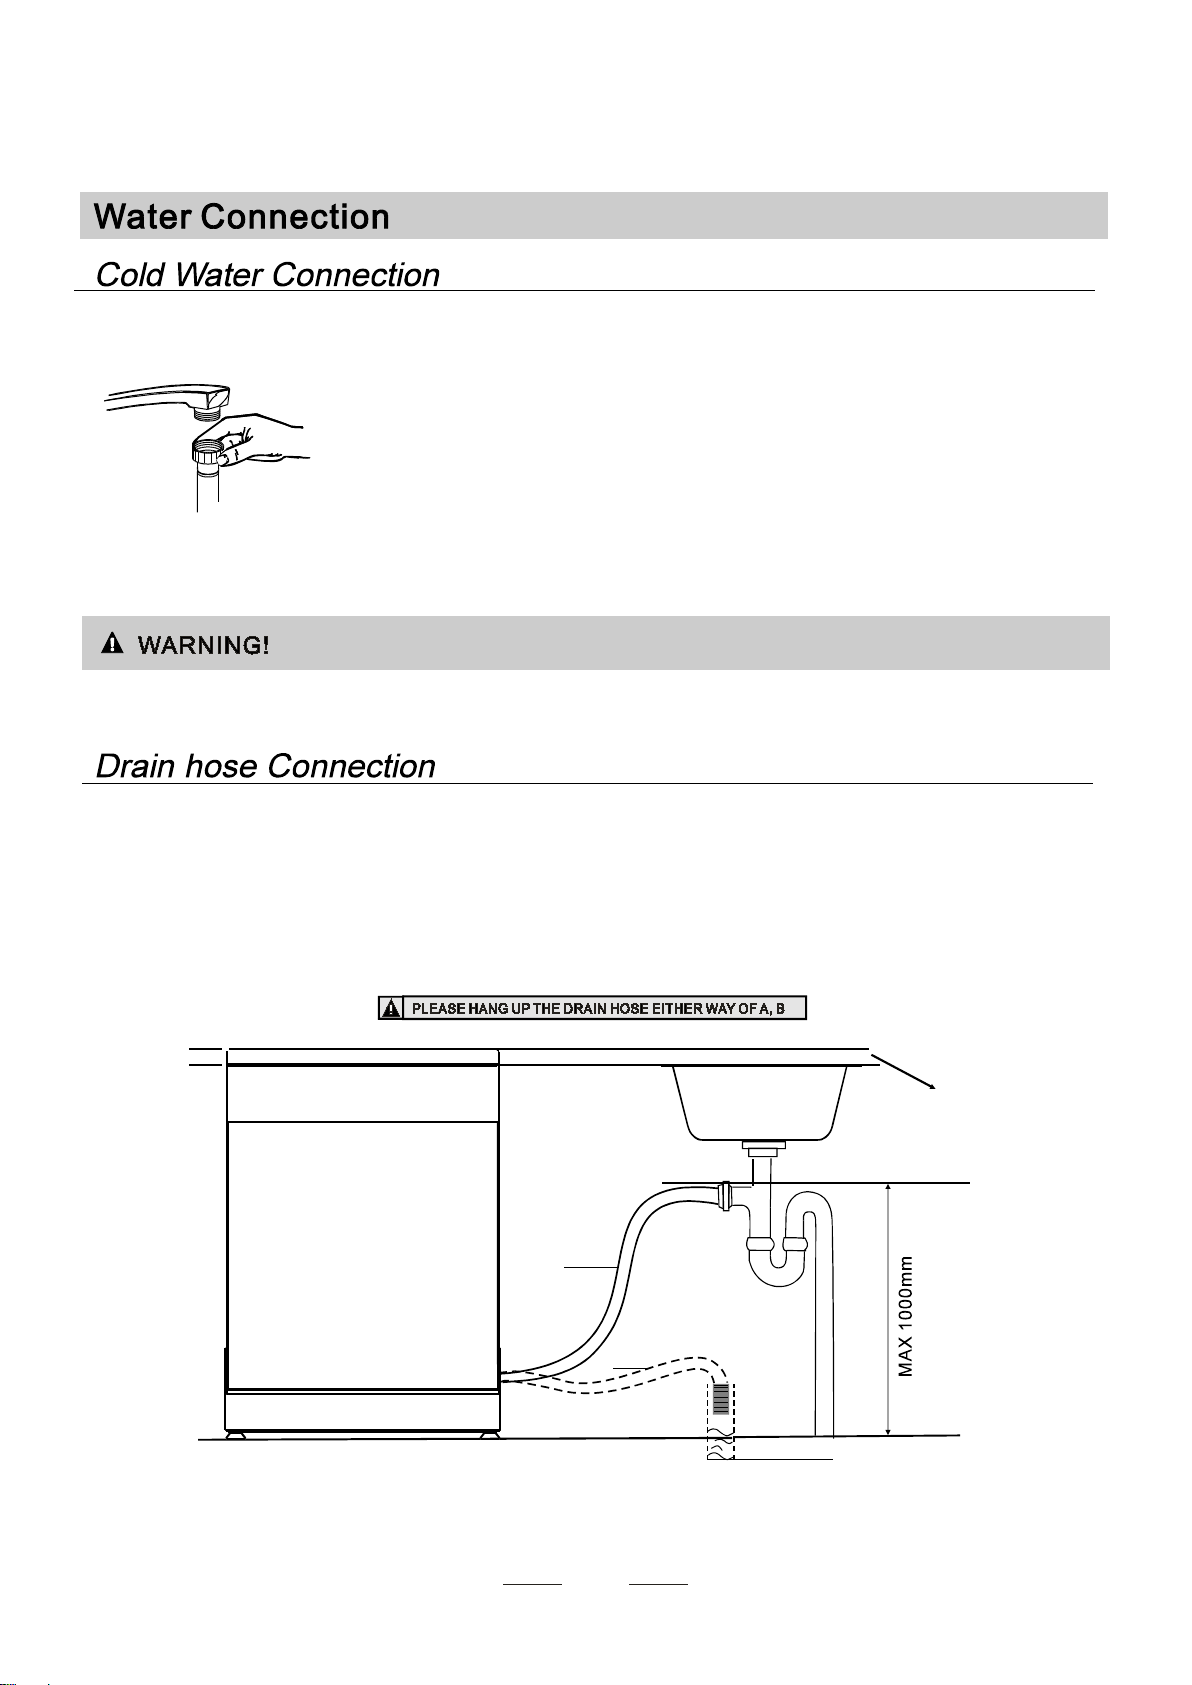
Connec t the cold water supply hose t o a threaded 3/4(inch) conn ector and m ak e s ur e
that it is fastened tightly in place.
If the wa te r pipes are new or have n ot be en used for an extended period of time, let th e
water run to make sure that the water is clear. This precaution is needed to avoid the
risk of the wa te r inlet to be b lock ed and da ma ge the appliance.
Please close the hydrant after using.
Insert the drain hose into a drain pi pe with a minimum di am eter of 4 0mm, or let it run in to the sink, ma ki ng sure to
avoid b endi ng or crimping i t. The top o f t he hose must be l es s than 1000mm.
Front
NOTE
The top of the hose
must be less than
1000mm.
Drain pipe
Counter
A
B
φ 40mm
16
Page 22
How to Drain Excess Water From Hoses
If the sink is 100 0 h ig he r f ro m the flo or, the excess water in hoses cannot be drained directly
into the si nk . I t will be necessary to drain excess water fr om hoses into a bo wl or suitable
container t hat i s h eld outsid e a nd lower than the sink .
Water Outlet
Connec t the water drain hose . The drain ho se must be cor re ct ly fitted to avoid water leaks.
Ensu re that the water drai n h os e i s n ot kinked or squashed.
Extension Hose
If you need a drain hose extensi on, m ake s ur e to use a s imil ar drain ho se.
It must be no longer t han 4 metres; otherwise th e c le an ing effect of the di shwash er could be reduced.
Syphon Connection
The w aste connection must b e at a height less tha n 1 00 0 mm (maximum) fr om the b ottom of the dish.
The w at er drain hose should be fixed .
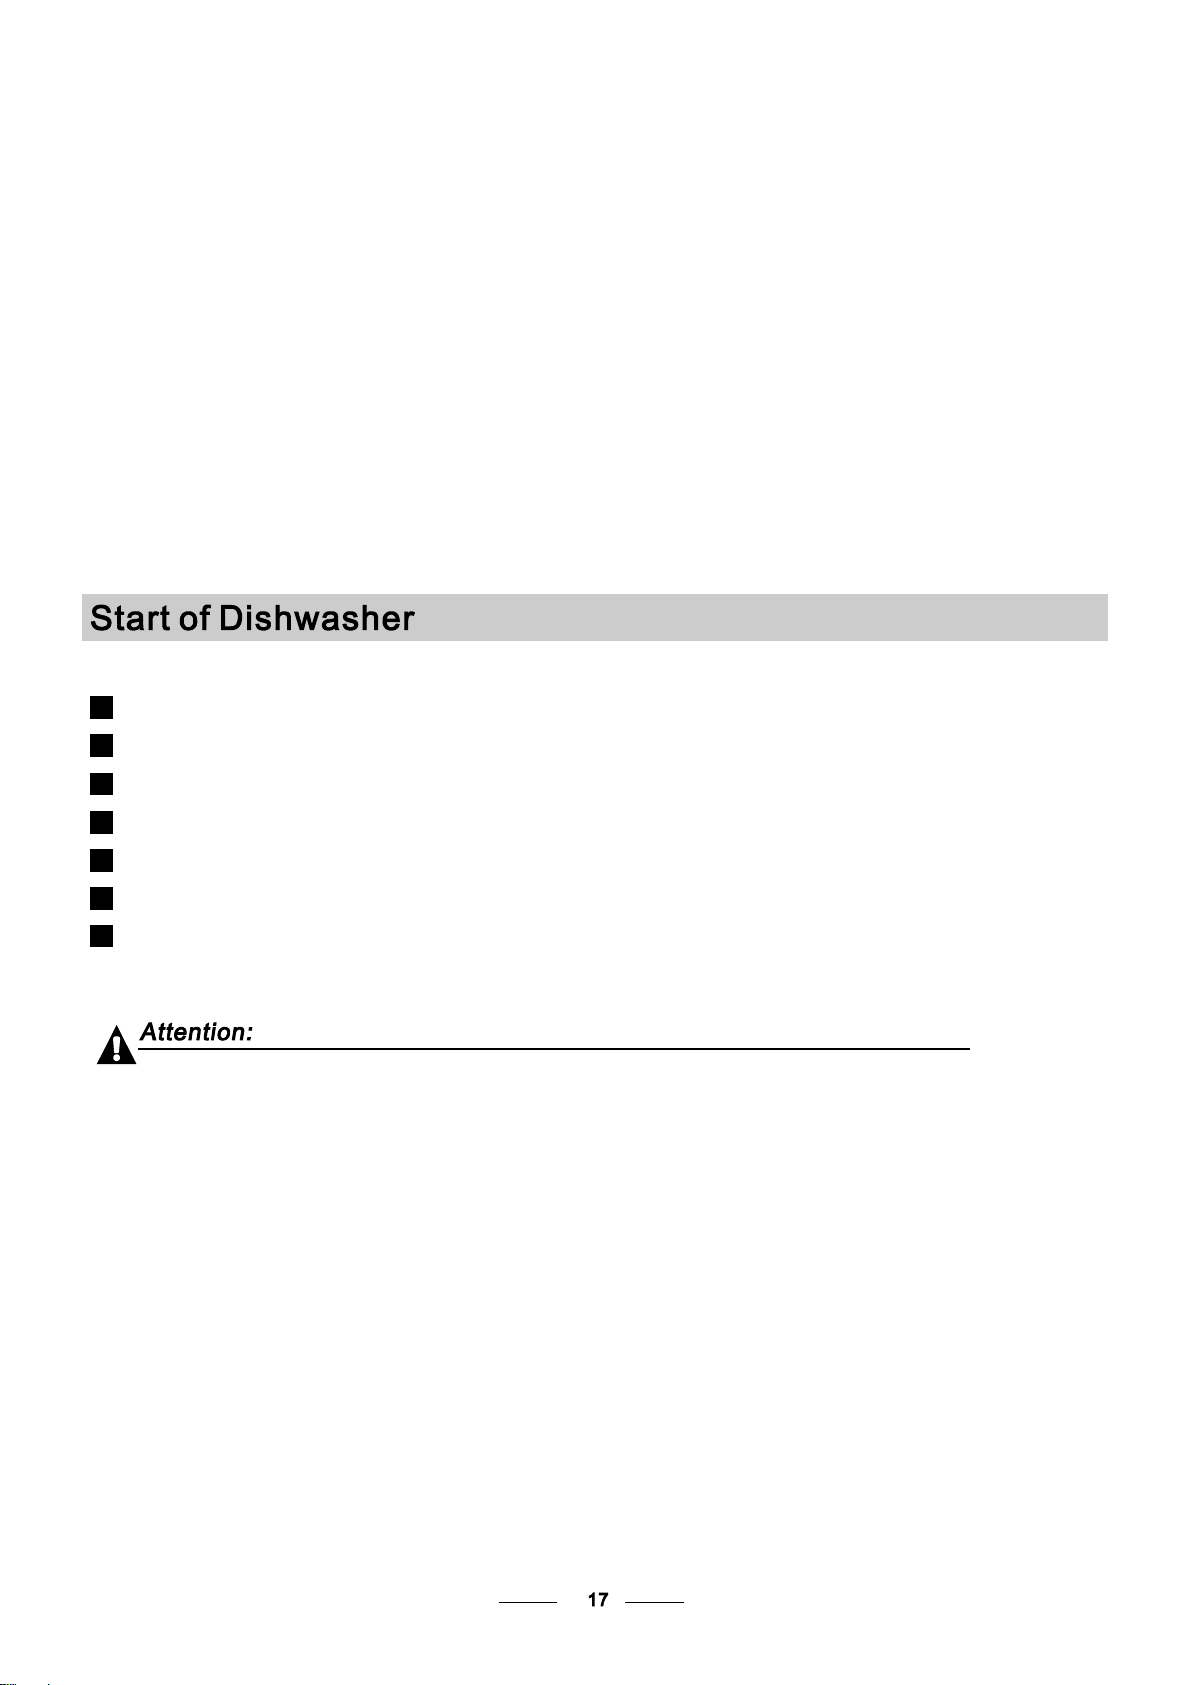
The following things should be checked before starting the dishwasher.
The dish washer is level and fixed properly
1
The inlet valve is open
2
Fill hose connections are fully tightened and not leaking
3
The wires are tightly connected
4
The power is switched on
5
The inlet and drain hoses are knotted
6
All packing materials and printings should be taken out from the dishwasher
7
After installation, please make sure to keep this manual.
The content of this manual is very h elp ful to the users.
Page 23
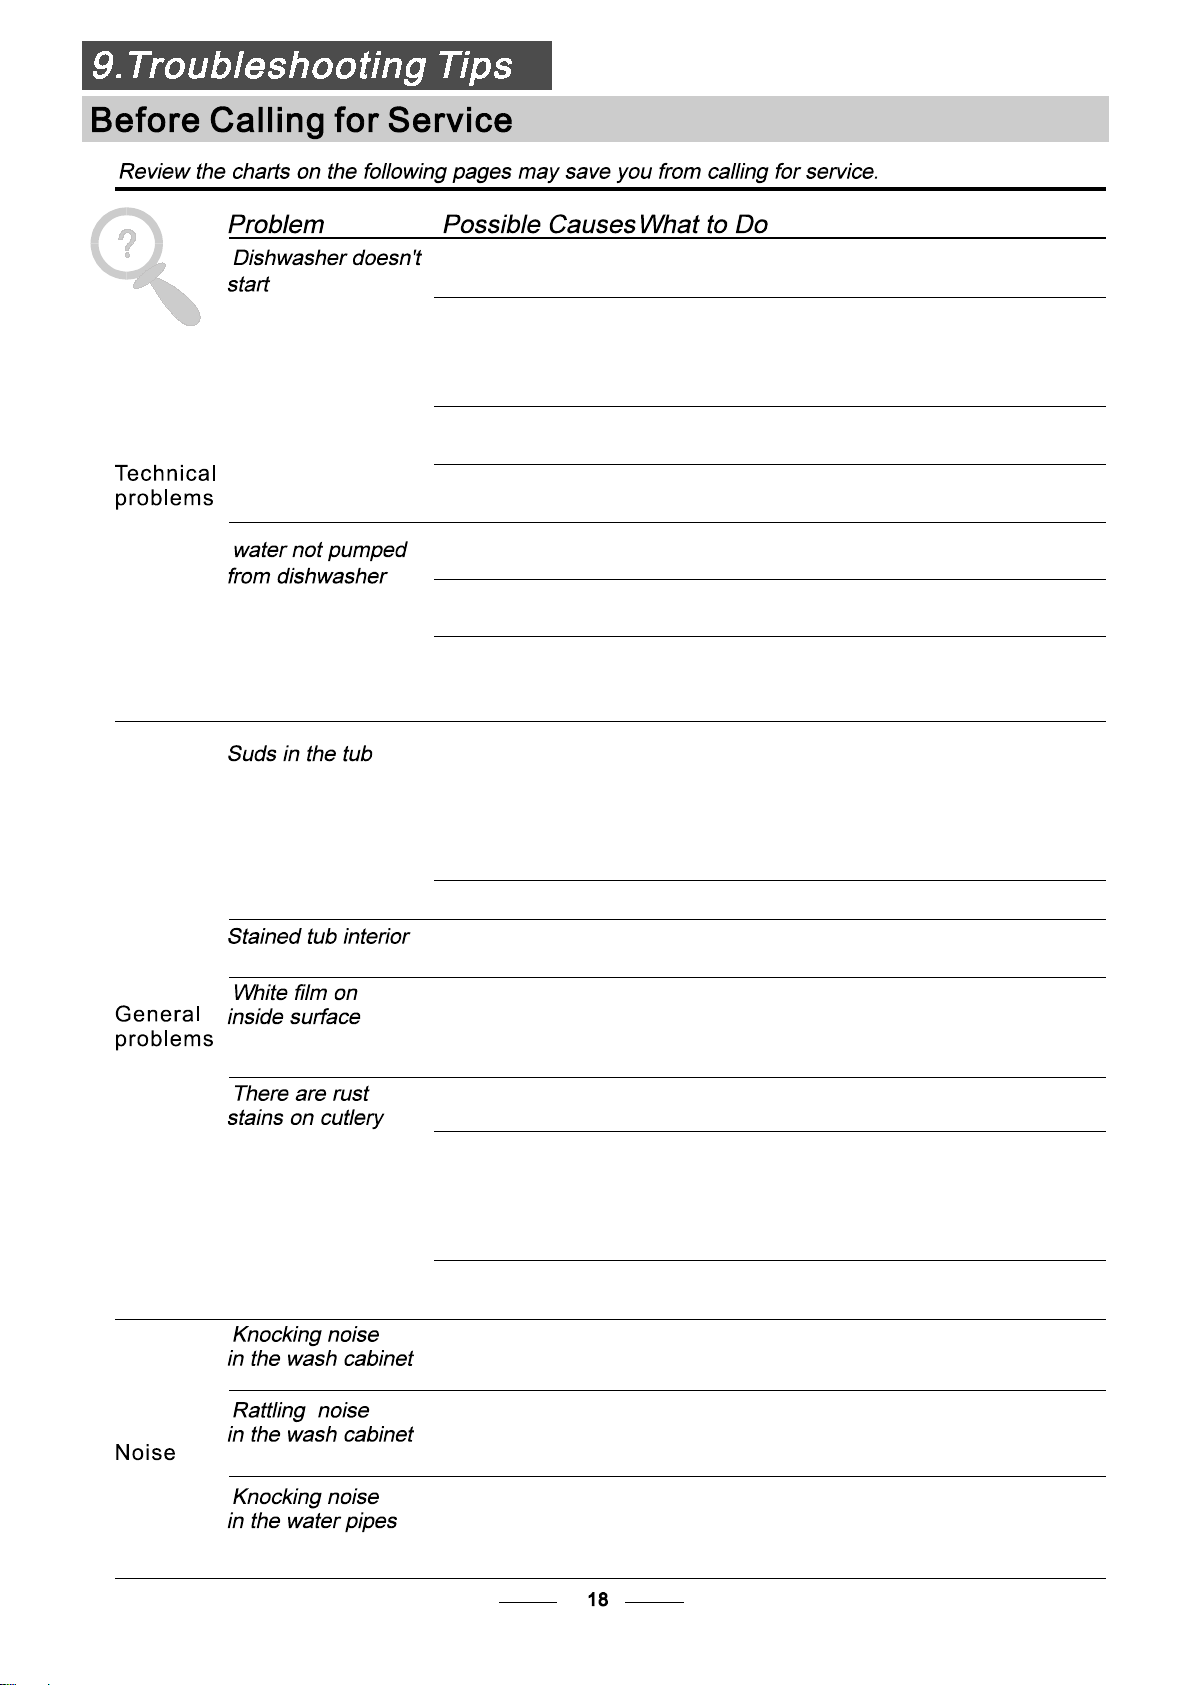
Fuse blown, or the
circuit breaker acted
Replace fuse or reset circuit breaker. Remove any other
appliances sharing the same circuit with the dishwasher
Power supply is not
turned on
Water pressure is low
Door of dishwasher
not properly closed.
Kink in drain hose
Filter clogged
Kitchen sink clogged
Improper detergent
Spilled rinse-aid
Make sure the dishwasher is turned on and the door is
closed securely.
Make sure the power cord is properly plugged into the
wall socket.
Check that the water supply is connected properly and
the water is turned on.
Make sure to close the door properly and latch it.
Check drain hose.
Check the coarse filter
(see section titled )" Cleaning The Filter "
Check the kitchen sink to make sure it is draining well.
If the problem is the kitchen sink not draining ,you may
need a plumber rather than a serviceman for dishwashers.
Use only the special dishwasher detergent to avoid suds.
If this occurs, open the dishwasher and let suds evaporate.
Add 1 gallon of cold water to the tub. Close and latch the
dishwasher, then select any cycle. Dishwasher will drain
out the water at the first step.Open the door after draining
is stop and check if the suds is disappeared.
Repeat if necessary.
Always wipe up rinse-aid spills immediately.
Detergent with
colourant was used
Hard water minerals
The affected items are
not corrosion resistant.
A programme was not
run after dishwasher
salt was added.
Traces of salt have
gotten into the wash cycle.
The lid of the softer
is loose
A sp ay arm is
r
knocking against
an item in a basket
Items of crockery
are loose in the
wash cabinet
This may be caused
by on-site installation
or the cross-section of
the piping.
Make sure that the detergent is the one without
colourant.
To clean the interior, use a damp sponge with
dishwasher detergent and wear rubber gloves.
Never use any other cleaner than dishwasher
detergent for the risk of foaming or suds.
Always run the quick wash programme .
without any crockery in the dishwasher and
without selecting the Turbo function (if present),
after adding dishwasher salt.
Check the lid .Ensure the fix is fine.
Interrupt the programme, and rearrange the items
which are obstructing the sp ay arm.r
Interrupt the programme,
and rearrange the items of crockery.
This has no influence on the dishwasher function.
if in doubt, contact a suitably qualified plumber.
Page 24
The dishes were not
loaded correctly.
See notes in " Loading the Dishwasher Baskets ".
The programme was
not powerful enough.
Not enough detergent
was dispensed.
Items are blocking
the path of sp ay arms.r
The filter combination
in the base of wash
cabinet is not clean or
is not correctly fitted.
This may cause
the sp ay arm jets
r
to get blocked.
Combination of soft
water and too much
detergent.
Aluminum utensils
have rubbed against
dishes.
Dishes block
detergent cups.
Improper loading
Too little rinse-aid
Select a more intensive programme.
See" Wash Cycle Table ."
Use more detergent, or change your detergent.
Rearrange the items so that the sp ay can rotate freely.r
Clean and/or fit the filter combination correctly.
Clean the sp ay arm jets. See "Cleaning the Spray
Arms".
Use less detergent if you have soft water and select
a shortest cycle to wash the glassware and to get
them clean.
Use a mild abrasive cleaner to eliminate those marks.
Re-loading the dishes properly.
Load the dishwasher as suggested in the directions.
Increase the amount of rinse-aid/refill the rinse-aid
dispenser.
r
Dishes are removed
too soon
Wrong program
has been selected
Use of cutlery with
a low-quality coating
Do not empty your dishwasher immediately after
washing. Open the door slightly so that the steam can
escape. Begin unloading the dishwasher only once t
he dishes are barely warm to the touch. Empty the low
basket first. This prevents water form dropping off
dishes in the upper basket.
In short program the washing temperature is lower.
This also lowers cleaning performance. Choose
a program with a long washing time.
Water drainage is more difficult with these items.
Cutlery or dishes of this type are not suitable for
washing in the dishwasher.
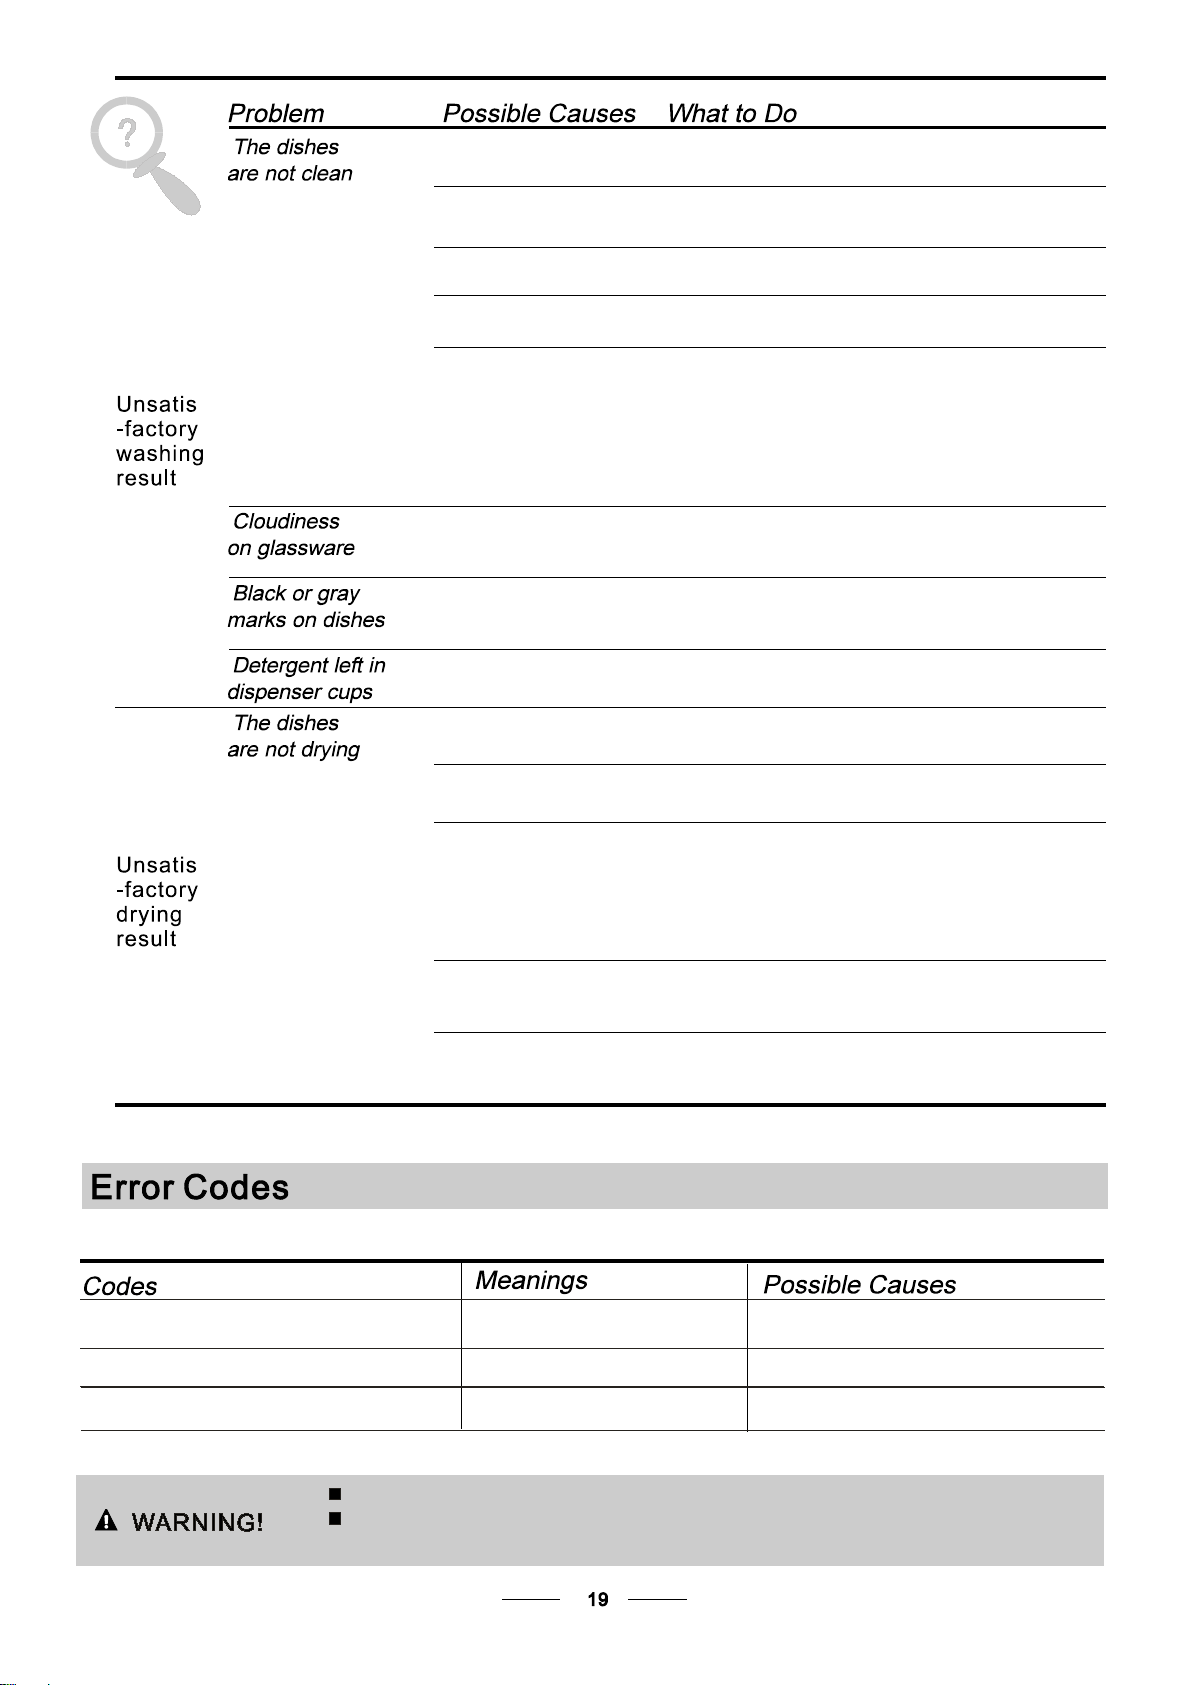
When some malfunctions come on, the appliance will display error codes to warn you:
The R apid ligh t flicker f leet ly
The E CO li ght flicke r f leet ly
The 90 min a nd Rapid li gh ts fli cker fleet ly
Longer inlet time.
Overflow.
Not reaching required temperature.
Faucets is not opened, or water intake is
restricted,or water pressure is too low.
Some element of dishwasher leaks .
Malfunction of heating element .
If overflow occurs, turn off the main water supply before calling a service.
If there is water in the base pan because of an overfill or small leak,
the water should be removed before restarting the dishwasher.
Page 25
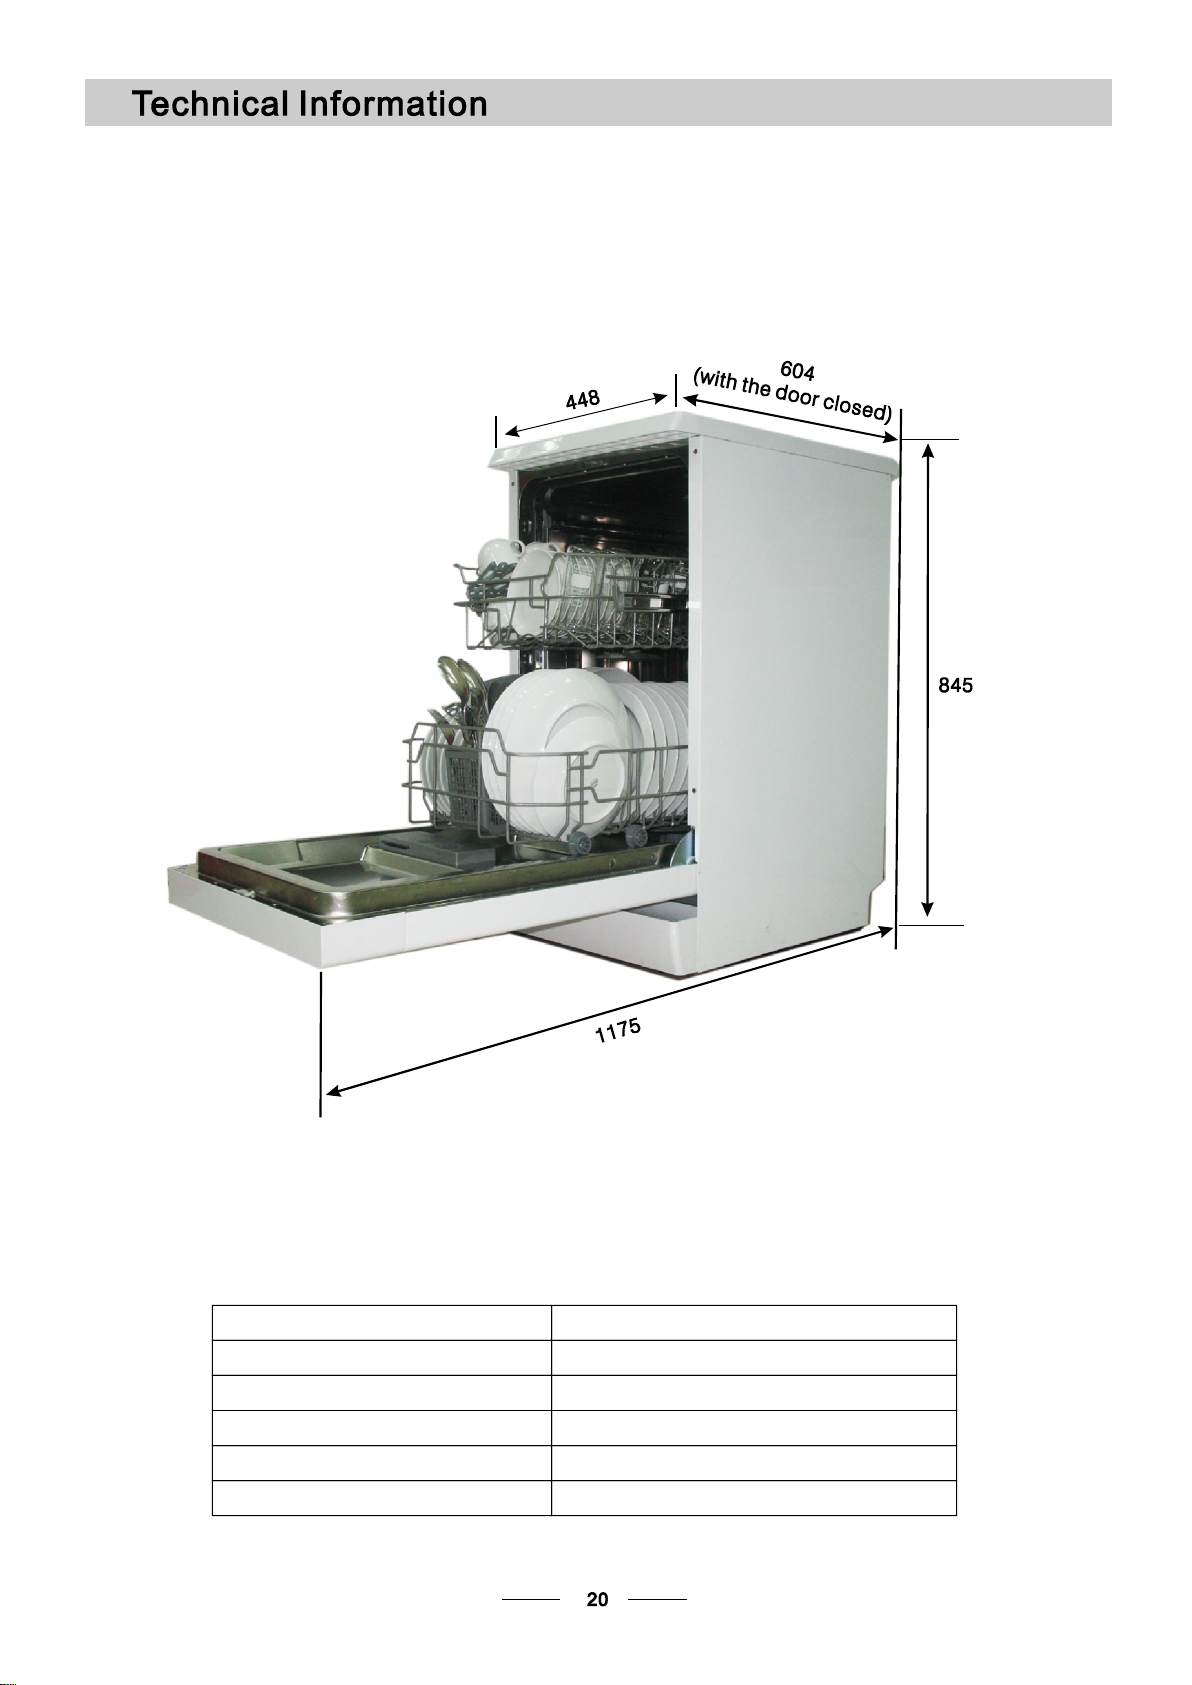
Height : 845mm
Width : 448 mm
Depth : 604mm
(with the doo r closed)
Water pressure: 0.04-1.0MPa
Power supply: see rating label
Capacity: 9 place settings
Page 26
Page 27
Technical Data Sheet
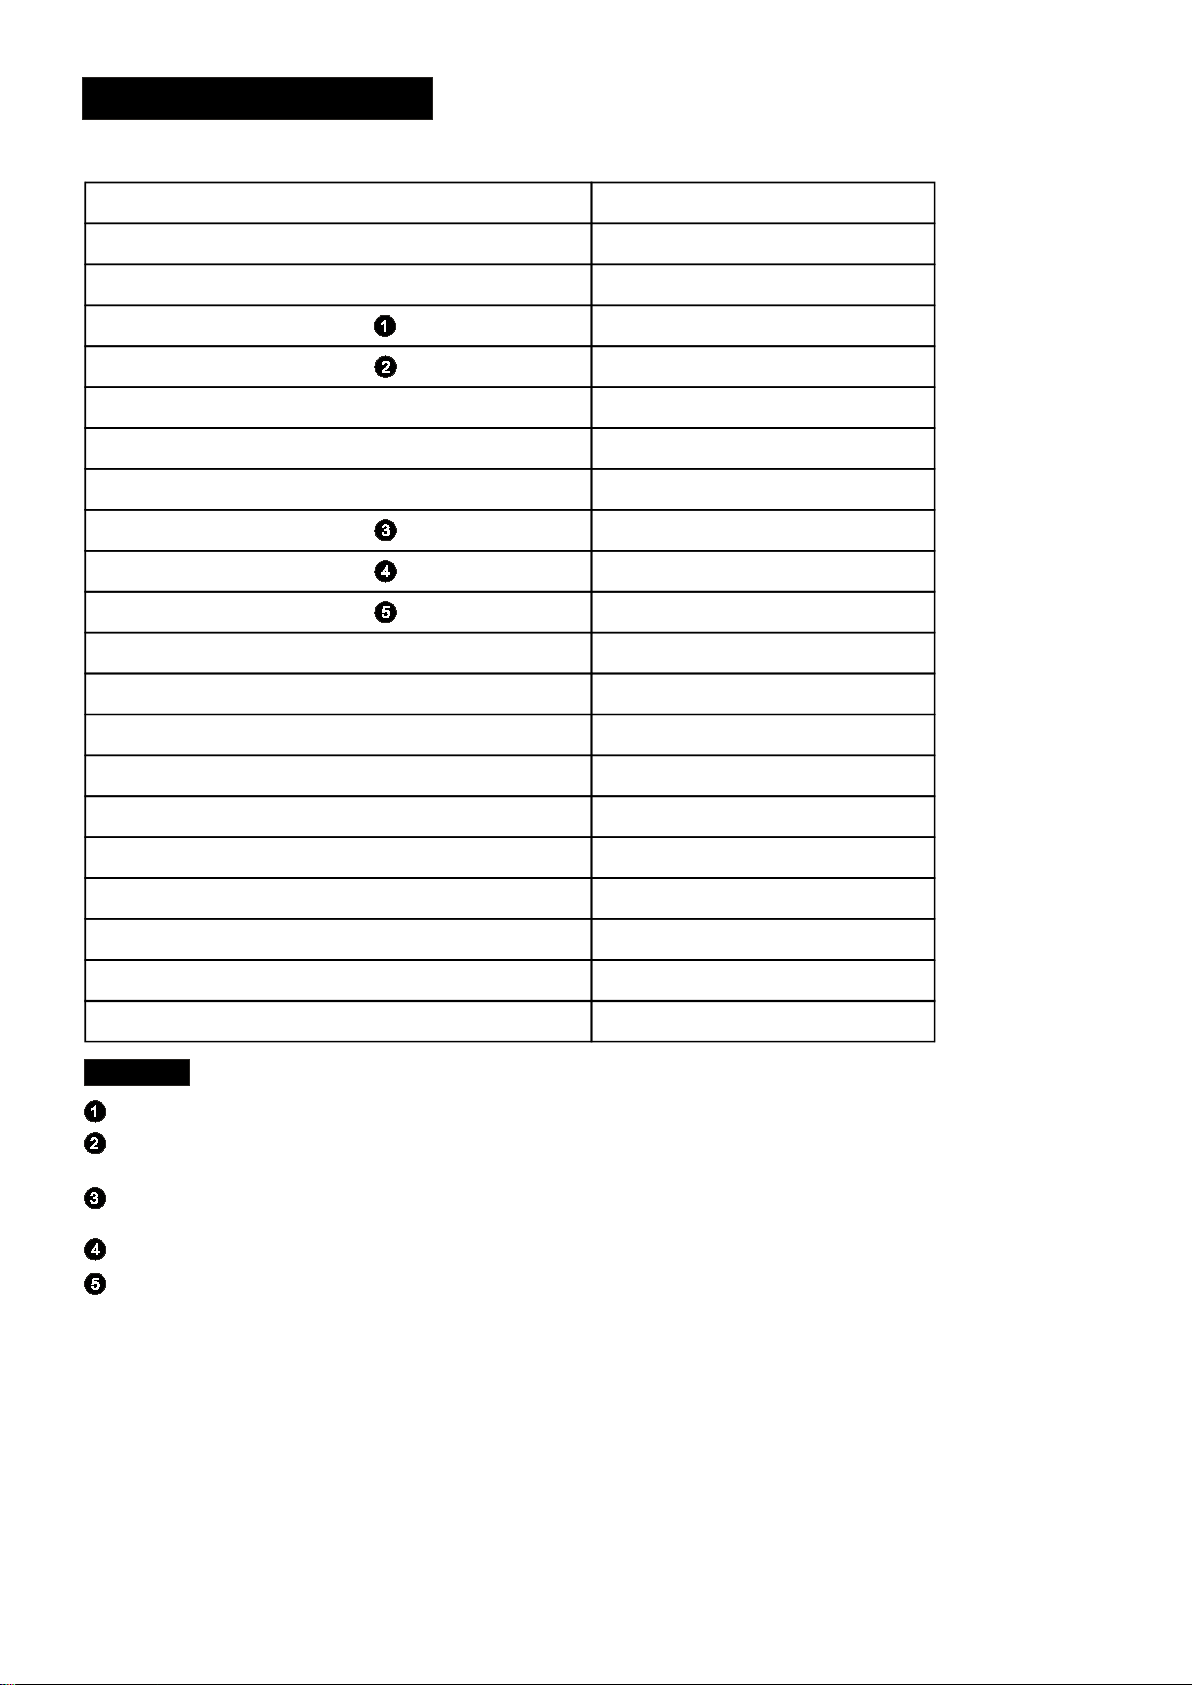
Sheet of h ou se ho ld dishwasher a ccordi ng to EU D irective 1059/2010:
Ma nufactur er
Type / Description
Standa rd place settings
Energy effici ency class
Annual energy consumption
Energy consumption of the st anda rd cleaning cycle
Power c on su mp tion of off-mode
Power c on su mp tion of left-on mode
Annual water consumption
Drying effici ency class
Standa rd cleaning cycle
Program durat io n o f the stand ar d c le anin g cycle
Noise lev el
Mo unting
Could be b ui ld -i n
TEKA
LP8 410 VR01/LP8 410 INOX VR01
9
A++
197 kWh
0.69 kWh
0.45 W
0.49 W
2520 litre
A
EC O 4 5℃
190 min
49dB(A) re 1 pW
Free standing
Yes
Height
Width
Depth ( wi th connectors)
Power c on su mp tion
Rated vol ta ge / frequency
Wat er pressure (flow pr es sure) 0.4-10 bar = 0.04-1 Mpa
NOTE:
A + + + (hig hest effi ci en cy) to D (l owest efficiency)
Energy consumption 19 7 kWh per ye ar, based on 280 st an dard cleaning cycles using cold water fill and
the con sump ti on of the low po we r modes. Actua l ene rg y c onsu mption will dep en d o n how the appliance is used.
Wat er consumption 2 52 0 li tr e p er year, based on 280 standard cleaning cycles. Actual water consumption
will depend on how the ap pl ia nc e i s used .
A (h ighest efficiency) to G (lowest efficiency)
This program is suitable for cl ea ning soiled norma ll y s oile d tableware a nd that it is the
mo st effi cient programme i n t er ms of its comb in ed energy and water consum ption for
that type of tableware.
The device meets the E ur op ea n st an da rd s an d th e di rectives in the current version at delivery(If the version number is
not in conformity wi th t he l at es t st an da rd s, p le as e re fer to the latest version number. ):
- LVD 2014/35/EU
- EMC 2014/30/EU
- ERP 2009/125/EC
“ ”
“ ”
84.5 cm
44.8 cm
60.4 cm
1760 -2 100 W
AC 220-240 V / 5 0 Hz
The above values have b een m easu re d i n accordance with standards under sp ec if ie d operating condi ti ons.
Result s m ay vary greatly according to quantity and pollution of the di shes , water hardnes s,
am ount of detergent, etc.
The man ua l i s b ased on the Eu ro pe an Unio n's st andards a nd rules.
Page 28
Page 29

www.teka.com
Asped mos eriatius sit atet hicil et velit
 Loading...