

Page 1
www.tefal.com
EN
TR
ES
PT
EL
AR
FA
User's Guide - Kullanım Kılavuzu - Guía del usuario
Manual de instruções - Οδηγός χρήσης
œ∞Oq «ùß∑FLU‰ - œß∑u¸«∞FLq ØU¸°d
Page 2
A
B
H
J
N
O
C
D
E
F
G
I
K
L
M
Page 3

Fig 1 Fig 2 Fig 3
CLICK
Fig 4 Fig 5
1
3
2
3
Fig 6
Fig 7 Fig 8 Fig 9
Fig 10 Fig 11 Fig 12
Fig 13 Fig 14
Page 4

1
Important safety information
For your safety, this appliance complies with applicable standards and regulations:
- Pressure vessel directive
- Materials in contact with food
• This appliance is designed for domestic use.
• Take time to read all of the instructions and always refer back to the “User's Guide”.
• Just like for any other cooking appliance, always pay close attention to it, especially during
use in the presence of children.
• Never place your pressure cooker in a hot oven.
• Always bevery careful whenmoving your pressurecooker underpressure.Never touch hot surfaces. Use the handles and knobs. Use gloves where necessary.
• Never use your pressure cooker for any purpose other than the one it was designed for.
• Your pressure cooker cooks under pressure. Scalding injuries may result from unsuitable use.
Always make sure that the pressure cooker is properly closed before starting to use it. Refer
to the “Closing” heading.
• Always make sure that the operating valve is in the open (pressurereleased) position before
attempting to open your pressure cooker.
• Neverforceyour pressure cooker open. Alwaysmake sure that thepressureinsideithasdropped. Refer to the “Safety” heading.
• Neveruseyour pressure cooker without any liquid in itfor thiswill seriously damage it. Always
make sure that there is enough liquid in it during cooking.
• Use heat source(s) that are compatible with your pressure cooker, in line with the instructions for use.
• Never fill your pressure cooker more than two-thirds full (the maximum mark).
• For food that expands during cooking, like rice or dried vegetables or fruit sauces, ... never fill
your pressure cooker more than half full.
• After cooking meat with a superficial outer skin (e.g. tongue…) that may expand with the
pressure, never stab themeat whiletheskin looksswollen underpressurefor you may be scalded. We recommend that you pierce the meat before cooking.
• For paste-like food (e.g. split peas, rhubarb…), the pressure cooker should be slightly shaken
prior to opening to ensure that these foods do not spray out.
• Always make sure that the operating and safety valves are not blocked before use. Refer to
the “Before cooking” heading.
• Never use your pressure cooker to deep fry using oil under pressure.
• Never take any action on the safety systems other than that which is described in the instructions for cleaning and maintenance.
• Onlyuse TEFAL genuinesparesdesigned for your model of appliance. This especially means
only using a model cooker body and lid.
• Alcohol vapour isinflammable. Bringalcohol tothe boil some two minutesbefore puttingthe
lid on. Watch over your appliance when making alcohol based recipes.
• Never use yourpressure cooker to store acid or salty foods prior to and after cooking for this
may damage your pressure cooker body.
Keep these instructions
Page 5
2
EN
TR
ES
PT
EL
AR
FA
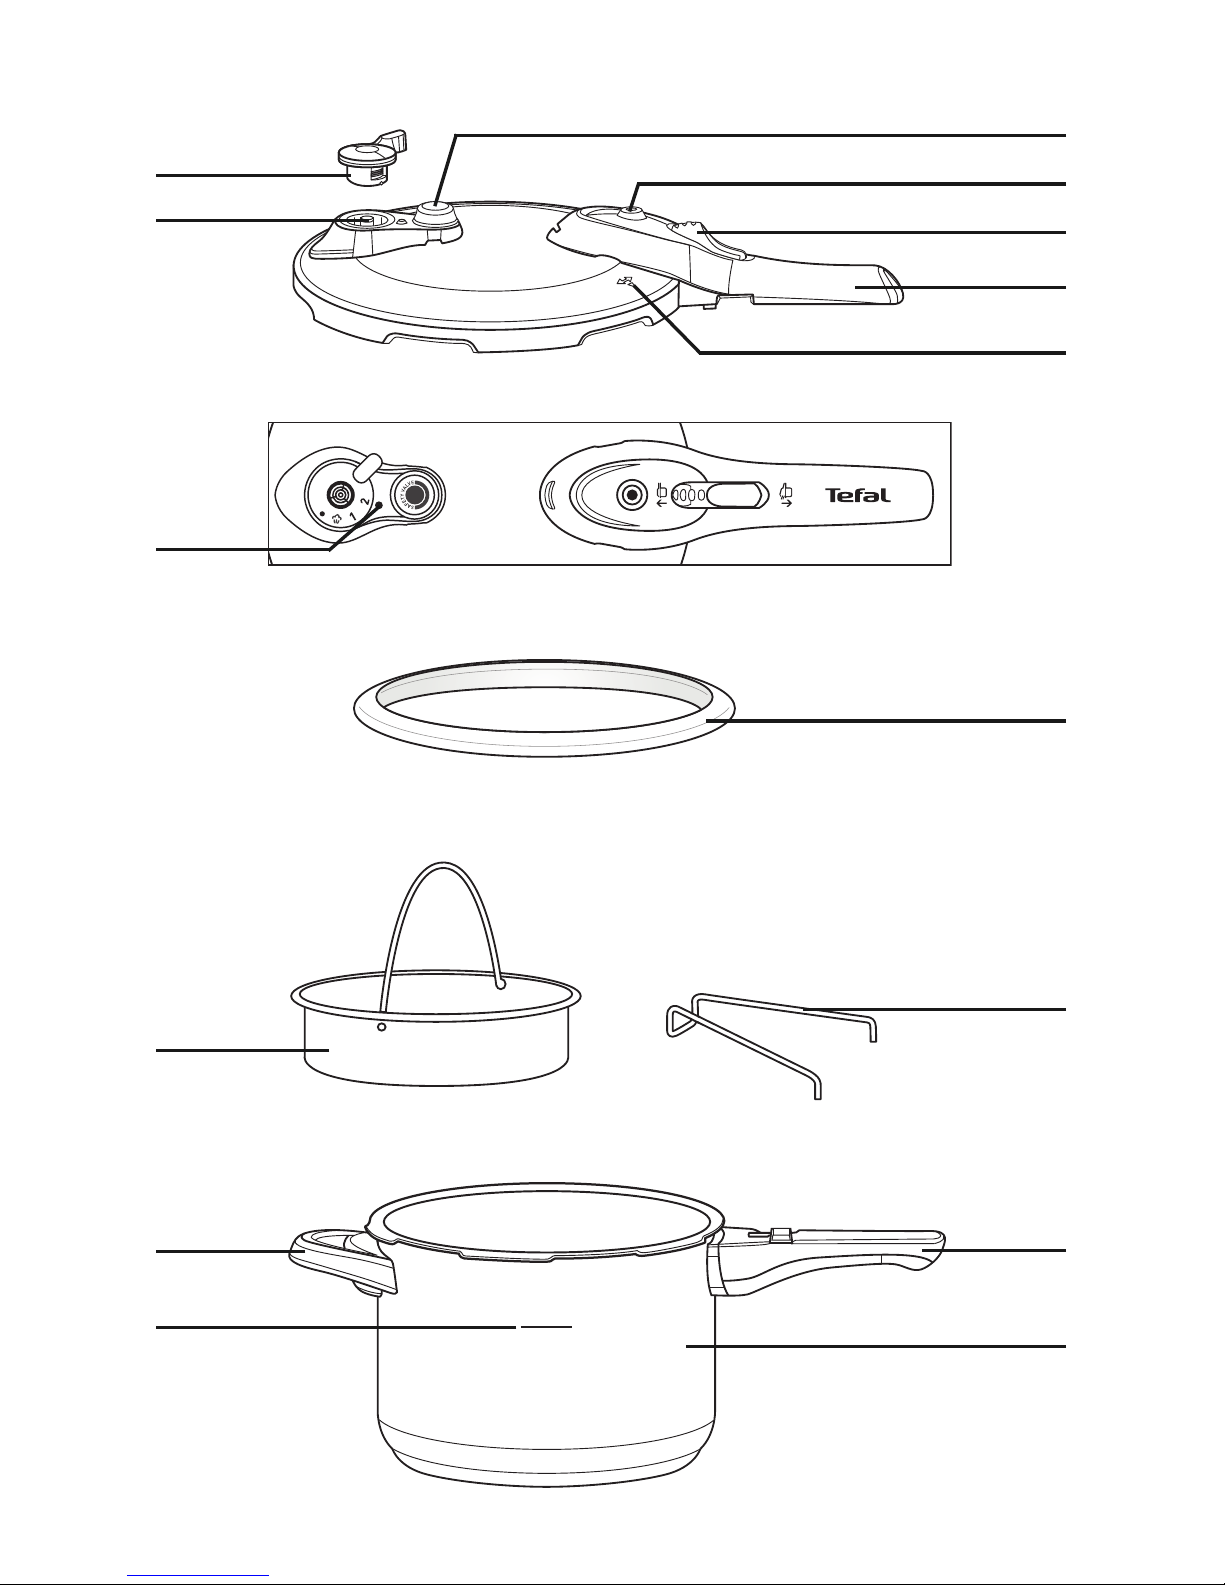
A - Operating valve
B - Operating valve seat
C - Safety valve
D - Pressure indicator
E - Opening button
F - Long lid handle
G - Lid positioning mark
H - Operating valve positioning mark
I - Lid seal
J - Steaming basket
K - Steaming basket support
L - Long pressure cooker body handle
M- Pressure cooker body
N - Short pressure cooker handle
O - Maximum filling mark
Characteristics
Pressure cooker base diameter - model references
Standards information:
Upper operating pressure limit: 80 kPa (12 psi).
Maximum safety pressure limit: 170 kPa (25 psi).
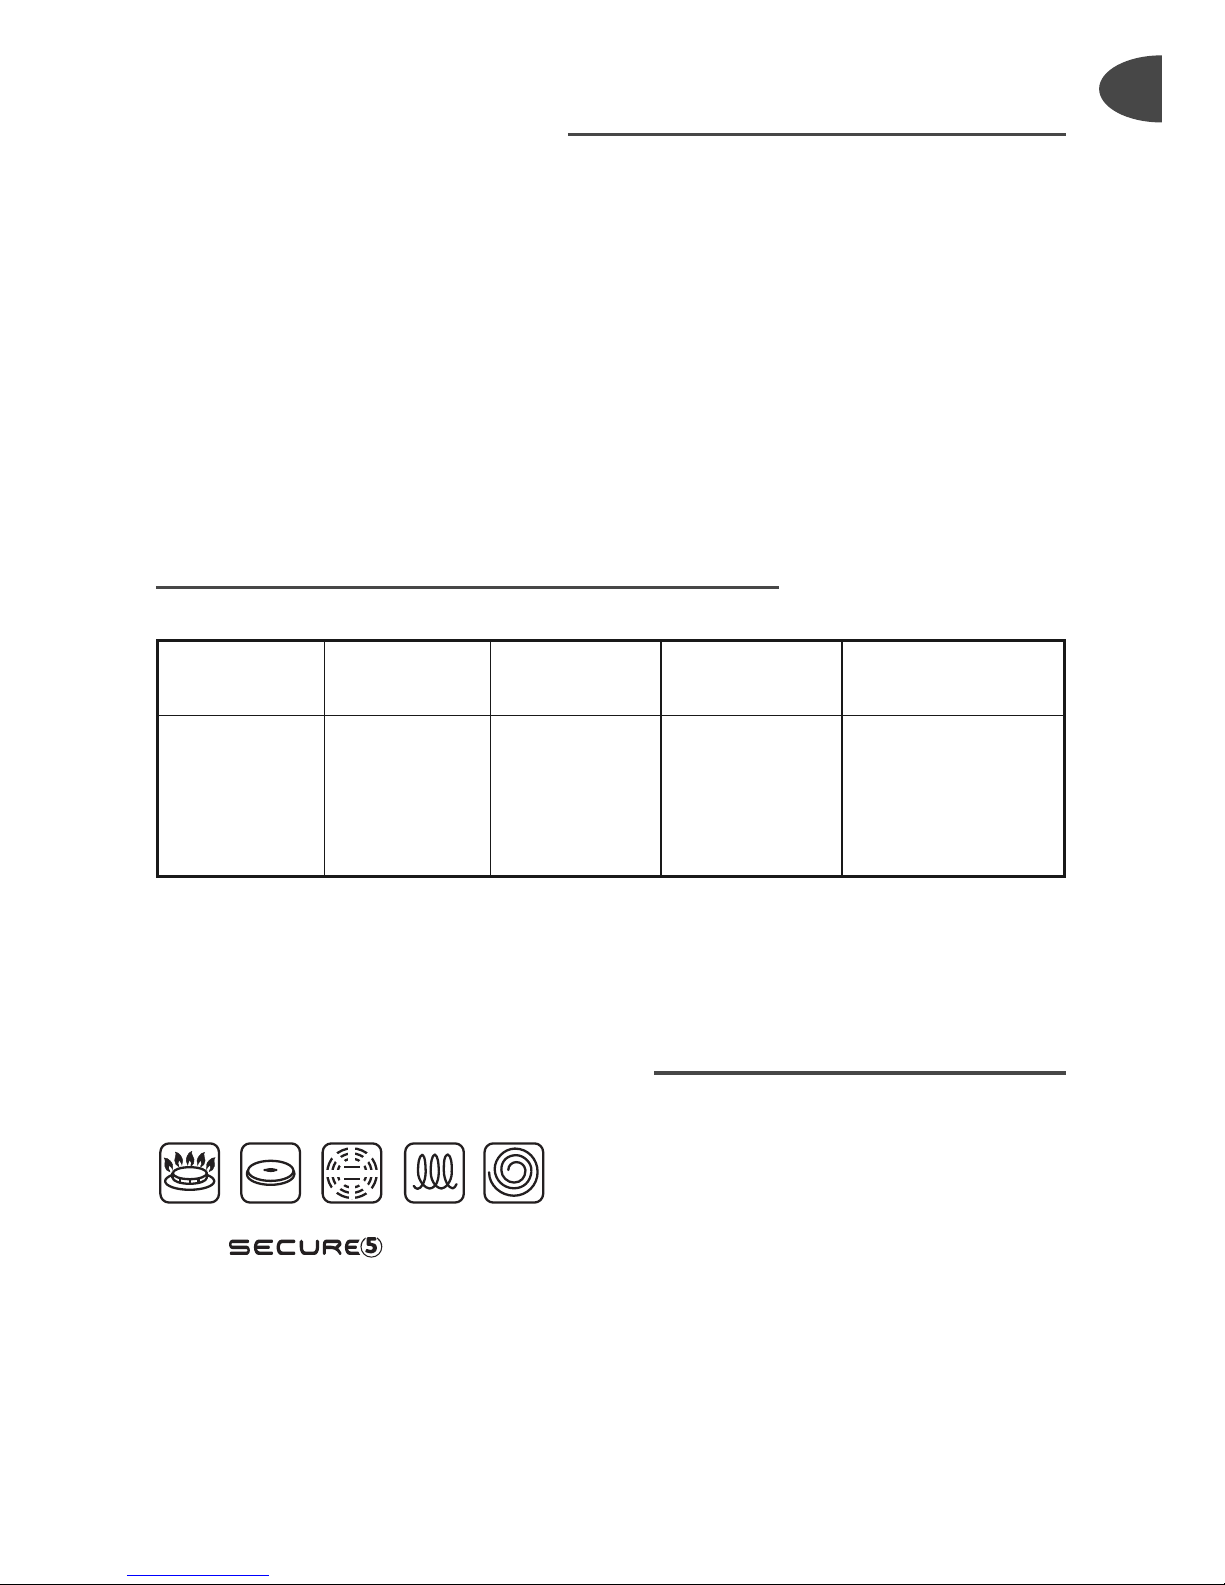
Compatible heat sources
• The pressure cooker can be used on all
heat sources, except on Aga cookers.
• When using an electric hob or induction, make sure that
the size of the hot plate does not exceed the size of the
pressure cooker base.
• On a ceramic or halogen hob, always make sure that the
pressure cooker base is clean and dry.
• On a gas hob, the flame should not lick past the diameter
of the pressure cooker base.
Total
capacity*
Capacity
Cooker
diameter
Base
diameter
Stainless steel
model
4.8 L 4 L 22 cm 19 cm P25042
7.0 L 6 L 22 cm 19 cm P25007
7.8 L 7 L 22 cm 19 cm P25008
GAS SOLID
HOTPLATE
CERAMIC
or
HALOGEN
INDUCTION
ELECTRIC
HOTPLATE
Description diagram
* : Product capacity with the lid in position.
Page 6
3
TEFAL accessories
• The following pressure cooker accessories
are available from shops:
• To replace other parts or have repairs performed, please
call on your local TEFAL Approved Service Centre.
• Only use TEFAL genuine parts designed for your product
model.
Use
Opening
• Using your thumb, pull on the opening knob (E) and
move it back to the - Fig 1
Hold the long pressure cooker handle (L) with your
left hand, while turning the long lid handle (F) anticlockwise with your right hand, until it opens - Fig
2.
Then lift the lid off.
Closing
• Place the lid down flat on the pressure cooker taking care
to line up the triangles on the lid and the pressure cooker
handle - Fig 3
• Turn the lid to the left until it stops - Fig 3
• Push the opening knob (E) to move it to the position
- Fig 4
Minimum filling
• Always pour a minimum amount of liquid of at least
250 ml (two glasses) into the pressure cooker.
For steaming
• At least 75O ml (6 glasses) of water must be poured in.
• Place the basket (J) onto the support (K) provided for this
purpose - Fig 5
Accessory Reference number
Seal X2010003
• Food placed in the
steaming basket must
not touch the pressure cooker lid.
Page 7
4
EN
TR
ES
PT
EL
AR
FA
Maximum filling
• Never fill your pressure cooker more than two-thirds full
(maximum mark)
- Fig 6
For some food
• For food that expands during cooking, like rice or dried vegetables or stewed fruit...never fill your pressure cooker
more than half full
- Fig 6
Using the operating valve (A)
To cook delicate food and vegetables
• Move the on the valve (A) opposite the mark (H).
Pressure operates at 7lb (7 psi).
To cook meat and frozen foods
• Move the on the valve (A) opposite the mark (H).
Pressure operates at 12 lb (12 psi)
To release steam
• Move the on the valve (A) opposite the mark (H).
To remove the operating valve
• Let the appliance cool down before removing the valve (A).
• Press down on the valve and turn it to align its position
with the mark (H)
- Fig 7
• Remove the valve.
To refit the operating valve
• Place the operating valve in place taking care to align it
with the mark (H).
• Press the valve then turn it until the desired position is
reached.
Using for the first time
• Fill the pressure cooker to the two-thirds mark (the maximum mark) with water.
• Place the basket support (K) in the bottom of the pressure
cooker and place the basket (J) on top of it.
• Close the pressure cooker.
• Move the operating valve (A) to position .
• Place the pressure cooker on a heat source set to maximum power.
• Once steam starts to escape from the valve, turn the heat
down and set a timer for 20 minutes.
Page 8
5
• Once the 20 minutes are up, turn off the heat.
• Turn the operating valve (A) to position
• Once thepressure indicator(D) drops back: your pressure cooker is no longer under pressure.
• Open the pressure cooker.
• Rinse the pressure cooker with water and dry it.
• Note: The presence of stains on the inside of the pressure
cooker base has no effect on the quality of the metal. This
is simply a scale deposit. To remove these deposits, you
can use a scouring pad and some diluted vinegar.
Before cooking
• Before each use of the pressure cooker, always remove the
valve (A) (Refer to the “Using the operating valve” heading)
and visually check that the operating valve seat (B) is not
blocked. If necessary, clean it with a toothpick
- Fig 8
• Check that the safety valve (C) can move: Refer to the
“Cleaning and maintenance” heading.
• Fit the operating valve (A) and select the position or
.
• Always make sure that the pressure cooker is properly clo-
sed before starting to heat it. The opening button (E) must
be in the position.
• Place the pressure cooker on a heat source set to maximum power.
During cooking
• Once the operating valve (A) starts to continually release
steam and a regular hissing sound can be heard, cooking has
started. Reduce the heat setting.
• Set a timer for the cooking time stated in your recipe.
• Once the cooking time is up, turn off the heat.
Page 9

6
EN
TR
ES
PT
EL
AR
FA
Finishing cooking
To release the steam
• Once the heat is turned off, you have two options:
• Slow pressure release: gradually turn the operating valve
(A) to the position. Make sure that the cooker is posi-
tioned so that the steam is directed away from you. Once
the pressure indicator (D) drops down: your pressure cooker is no longer under pressure. This is used for stews, vegetables, meat joints and fish dishes.
•
Fast pressure release: place your pressure cooker under
cold running water, directing the flow onto the metal part
of the lid. Once the pressure indicator (D) drops down:
your pressure cooker is no longer under pressure. Turn the
operating valve (A) to the position. This is used for
soups, rice, pasta, milk puddings, egg custards, cake and
pudding mixes, recipes containing rice or pasta and recipes with a high liquid content. If in doubt, use the fast
pressure release method.
• Now you can open it.
Cleaning and maintenance
Cleaning the pressure cooker
• For best appliance operation, be sure to follow these cleaning and maintenance recommendations every time the
pressure cooker is used.
• Always wash the pressure cooker after use with warm
water with a little washing up liquid added. Do the same
for the basket.
• Never use bleach or chlorine products.
• Never overheat the pressure cooker body when it is empty.
To clean the inside of the pressure cooker
• Clean it with a scouring pad and washing up liquid.
• If the inside of the stainless steel cooker shows iridescent reflections, clean it with vinegar.
To clean the outside of the pressure cooker
• Clean it with a sponge and washing up liquid.
To clean the lid
• Wash the lid under a gentle stream of running warm water
using a sponge and washing up liquid.
To clean the lid seal
• After using the pressure cooker, always clean the seal (I)
and its groove.
• To refit the seal, refer to the drawings
- Fig 9 - 10
To clean the operating valve (A)
• Remove the operating valve (A): Refer to the “Using the
operating valve” heading.
• Clean the operating valve (A) under running tap water
-
Fig 11
If food or liquid starts to
spray out from from the
valve while you are releasing thesteam,turn it
back to position and
switch off the heat, wait
a few minutes and then
graduallyturn theoperating valve to the position, making sure
nothing else spurts out.
You can wash the pressure cooker body and
the basket in a dishwasher.
Never wash the lid in a
dishwasher.
For a longer pressure
cooker life: do not overheat your pressure cooker pan when it is
empty.
Browning and scratching that may appear
following long periods
of use are normal and
will not affect the performance of the pressure cooker
Page 10

7
To clean the operating valve seat located in the lid
• Remove the valve (A).
• Visually inspect the seat and the steam release pipe in
daylight to make sure that it is round and clear. If necessary, clean it with a Toothpick - Fig 8
To clean the safety valve (C)
• Clean the part of the safety valve located inside the lid by
placing it under running water.
• Check that it works properly by lightly pressing on the plunger which should move without difficulty - Fig 12
To replace your pressure cooker seal
• Replace your pressure cooker seal every year.
• Replace your pressure cooker seal if it shows any signs of
splitting or damage.
• Always use a TEFAL genuine seal that matches your model
of pressure cooker.
To store your pressure cooker
• Turn the lid over and place it on the pressure cooker body.
Safety
Your pressure cooker is provided with a number of safety mechanisms:
• Closure safety:
- If the appliance is not properly closed, the pressure indicator cannot rise and therefore the pressure cooker
will never come up to pressure.
• Opening safety:
- While the pressure cooker is under pressure, the opening knob cannot be activated. Never force the pressure cooker open. Never tamper with the pressure
indicator. Always make sure that the pressure inside
the pressure cooker has been released.
• Two excess pressure safety features:
- First feature: the safety valve (C) releases pressure and
the steam will escape horizontally from the top of the lid
- Fig 13
- Second feature: the seal (I) lets steam escape vertically
from the side of the lid - Fig 14
If one of the two excess pressure safety systems is triggered:
• Turn off the heat.
• Allow the pressure cooker to cool down completely.
• Open it.
• Check and clean the operating valve (A), the operating
valve seat and pipe (B), the safety valve (C) and the seal
(I).
Never use a cutting or
pointed object to do
this, you can use a cotton bud.
Always have your pressure cooker checked by
a TEFAL Approved Service Centre after ten
years of use.
Page 11

8
EN
TR
ES
PT
EL
AR
FA
Recommendations for use
1 - The steam is very hot when it leaves the operating valve.
2 - As soon as the pressure indicator rises, you can no longer
open your pressure cooker.
3 - Just like for any other cooking appliance, always pay close
attention to it, especially during use in the presence of
children. Never leave unattended whilst in use.
4 - Beware of the horizontal steam jet.
5 - To move the pressure cooker, always use both of the
handles.
6 - Never leave food in your pressure cooker.
7 - Never use bleach or chlorine products for they could affect
the quality of the stainless steel.
8 - Never wash the lid in the dishwasher. Never leave the lid to
soak in water.
9 - Replace the seal every year.
10 - A pressure cooker may only be cleaned when cold and
when empty.
11 - Always have your pressure cooker checked by a TEFAL
Approved Service Centre after ten years of use.
Guarantee
• Your new TEFAL pressure cooker comes with a ten-year
guarantee for use under the conditions set out in these ins-
tructions. This guarantee covers:
- Any defects relating to the metal structure of the pressure
cooker body,
- Any premature deterioration of the metal base.
• For other parts, a one year parts and labour guarantee
is provided (except where applicable law in your own country states otherwise). This guarantee covers any defects or
manufacturing faults.
• The contractual guarantee cover is provided only on pre-
sentation of a valid proof of purchase which shows the
date of purchase.
• The guarantee cover excludes:
• The normal life of the seal, pressure control valve or locking
indicator seal is limited. These parts are excluded from the
guarantee and will require periodic renewal.
• Any damage consecutive to a failure to follow the major
recommendations made or due to negligent use, especially:
- Dropping, falls, bangs or knocks, placing in an oven…
- Washing the lid in the dishwasher.
• Only TEFAL Approved Service Centres are authorised to
provide service under guarantee.
• Please call the Helpline number below for the address of
your nearest TEFAL Approved Service Centre.
Page 12
9
TEFAL and your Frequently Asked Questions
Problems Recommendations
If the pressure cooker has
heated up under pressure
with no liquid inside:
• Have your pressure cooker inspected by a TEFAL
Approved Service Centre.
If the pressure indicator
did not rise and nothing
escapes from the valve
during cooking:
• This is normal for the first few minutes.
• If the problem persists, check that:
- There is enough heat, if not, turn up the heat.
- The amount of liquid in the pressure cooker is
adequate.
- The operating valve is set to or .
- The pressure cooker is properly closed and the
opening button is in the position.
- The lid seal has not
perished.
If the pressure indicator
has risen but still nothing
escapes from the valve
during cooking:
• This is normal for the first few minutes.
• If the problem persists, place your appliance under cold
water. Then open it.
• Clean the operating valve and the valve seat -
Fig 8
and check that the safety valve can be pushed in
without difficulty -
Fig 12.
If steam escapes from
around the lid, check:
• That the lid is properly closed and the opening button is
in the position.
• The seal is correctly fitted into the lid.
• That the seal is in good condition, and if necessary, re-
place it.
• That the lid, the seal, its seat in the lid, the safety valve
and the operating valve are clean.
• That the rim of the pressure cooker body is in good
condition and not damaged.
If food has burnt on the
bottom of the pressure
cooker:
• Leave the pressure cooker to soak for a while before
washing.
• Never use bleach or chlorine products.
If you cannot open the
lid:
• Check that the pressure indicator is down.
• If not: release pressure and if necessary cool the
pressure cooker under a stream of cold water.
If food is not cooked or
has burnt, check:
• The cooking time.
• The heat level.
• Whether the operating valve was in the right position.
• The amount of liquid.
Page 13
10
EN
TR
ES
PT
EL
AR
FA
Regulation markings
Marking Location
Manufacturer's identification or trademark Lid handle
Year and batch of manufacture Inside the lid
Model reference
Operating pressure (PF)
Max. safety pressure (PS)
Capacity
On the outside of the pressure
cooker body
Page 14

11
Preparation
Cooking
FRESH PRODUCE
Valve position
1
FROZEN PRODUCE
Valve position
2
Steam= cookedinthe steambasket
Immersion= cookeddirectlyinwater
RICE : never fill more than half full including liquid as rice froths and boils up during
cooking. Use 225g rice and 1.75 litre water from a boiling kettle.
Meat - Fish
Artichoke Whole
- steam
18 min.
- immersion
15 min.
Asparagus - immersion
5 min.
Beetroot, red Peel after cooking - steam
20-30 min
dependingonsize
Broccoli Florets - steam
3 min. 3 min.
Brussels sprouts - steam
7 min. 5 min. - immersion
Cabbage, green
sliced - steam
6 min.
leaves - steam
7 min.
Carrots sliced - steam
7 min. 5 min.
Cauliflower Florets - immersion
3 min. 4 min.
Celery 5-cm pieces
- steam
6 min.
- immersion
10 min.
Courgettes 2.5-cm slices
- steam
6
1/2
min. 9 min
- immersion
2 min.
Endives - steam
12 min.
Green beans Whole or sliced - steam
8 min. 9 min.
Green lentils
(dried pulses)
- immersion
10 min.
Leek 5-cm slices - steam
2
1/2
min.
Mushrooms
sliced - steam
1 min. 5 min.
whole - immersion
1
1/2
min.
Peas - steam
1
1/2
min. 4 min.
Potatoes (such as King
Edwards)
quartered
- steam
12 min.
- immersion
6 min.
Pumpkin (mashed) pieces - immersion
8 min.
Rice
(Long grain white)
see note below
- immersion
7 min.
Spinach
- steam
5 min. 8 min.
- immersion
3 min.
Split peas
(dried pulses)
- immersion
14 min.
Turnips 2.5-cm cubes
- steam
7 min.
- immersion
6 min.
Table of cooking times
These cooking timesareapproximate andmayneed slightadjustment accordingto personaltaste.
Vegetables
Weight
FRESH PRODUCE
Valve position 2
FROZEN PRODUCE
Valve position 2
Beef 1 kg (topside) 40 min (medium)* 1 hr (medium)*
Chicken 1.2 kg (whole) 27 min Do not cook from frozen
Lamb 1.3 kg (half leg) 50 min (medium)* 1hr 10 min (1kg halfleg-medium)*
Monkfish 0.6 kg (fillets) 4 min 6 min
Pork 1 kg (leg joint) 35 min Do not cook from frozen
Salmon 0.6 kg (4 steaks) 6 min 8 min
Tuna 0.6 kg (4 steaks) 7 min 9 min
* Cook for an additional 5 minutes for well done meat.
Page 15

12
EN
TR
ES
PT
EL
AR
FA
Güvenliğiniz için
Güvenliğiniz için bu ürün geçerli kural ve yönetmeliklere uygundur :
- Basınç altındaki Donanımlar Yönergesi
- Besinlerle temas eden malzemeler
• Bu ürün ev içinde kullanılmak üzere tasarlanmıştır.
•
Tüm talimatları okumak için zaman ayırınız ve her zaman « Kullanım Kılavuzu »na başvurunuz.
•
Tüm pişirme ürünlerinde olduğu gibi, düdüklü tencerenizi, özellikle çocukların yanında,
sürekli gözlem altında kullanınız.
•
Düdüklü tencereyi ısıtılmış fırına koymayınız.
•
Basınç altındaki düdüklü tencerenizi bir yerden bir yere dikkatle götürünüz. Sıcak kısımlara
dokunmayınız. Tutacak ve düğmeleri kullanınız. Gerekirse eldiven kullanınız.
•
Düdüklü tencerenizi kullanım amacı dışında bir amaçla kullanmayınız.
•
Düdüklü tencereniz basınç altında pişirmektedir. Uygunsuz kullanımdan dolayı haşlanma
yaralanmaları meydana gelebilir. Düdüklü tencerenizi kullanmadan önce iyice kapatıldığından emin olunuz. “Kapatma”paragrafını okuyunuz.
•
Düdüklü tencerenizi açmadan önce, supabın basınçsız konumda olduğundan emin olunuz.
•
Düdüklü tencerenizi hiçbir zaman zorla açmayınız. İç basıncın iyice azalmış olduğundan
emin olunuz. Bakınız “güvenlik”paragrafı.
•
Düdüklü tencerenizi hiçbir zaman içinde sıvı olmadan kullanmayınız, bu ciddi zarar verir.
Pişme sırasında yeterince sıvı olduğundan emin olunuz.
•
Kullanım talimatlarına uygun ısı kaynakları kullanınız.
•
Düdüklü tencerenizi 2/3’ den fazla doldurmayınız (azami doldurma işareti).
•
Pirinç, kurutulmuş sebzeler, veya kompostolar gibi pişirme sırasında genleşen besinler için,
…düdüklü tencerenizin kapasitesinin yarısından fazlasını doldurmayınız.
•
Basıncın etkisi altında şişme riski bulunan derileri olan etleri (örneğin sığır dili) pişirdikten
sonra, deri şişkin göründüğü sürece eti delmeyiniz ; çıkabilecek buharla yanma tehlikesi
vardır. Eti pişirmeden önce delmenizi tavsiye ederiz.
•
Hamurumsu gıdalarda (kırık bezelye, ravent...), bu gıdaların içeride saçılmaması için açmadan evvel düdüklü tencereyi hafifçe sallayınız.
•
Her kullanımdan önce supapların tıkalı olmadığını kontrol ediniz.“Pişirmeden önce”paragrafını okuyunuz.
•
Düdüklü tencerenizi basınç altında yağla kızartmak için kullanmayınız.
•
Temizlik ve bakım talimatları dışında güvenlik sistemlerine müdahalede bulunmayınız.
•
Sadece modelinize uygun TEFAL parçalarını kullanınız. Özellikle SECURE 5’e uygun bir
tencere ve kapak kullanınız.
•
Alkol buharı tutuşur. Kapağı kapatmadan evvel yaklaşık 2 dakika kaynatınız. Alkollü tarifler kullanırken düdüklü tencerenizi dikkatle kullanınız.
•
Tencerenizin kabını pişirmeden evvel ve sonra düdüklü tencerenizi asitli veya tuzlu besinler saklamak için kullanmayınız.
Bu talimatları saklayınız
Page 16
13
A
- Supap
B
- Supap tüpü
C
- Emniyet supapı
D
- Basınç göstergesi
E -
Açma mandalı
F -
Uzun kapak sapı
G - Kapak yerleştirme işareti
H
- Supap yerleştirme işareti
I
- Kapak contası
J
- Buhar sepeti
K
- Buhar sepeti desteği
L
- Uzun tencere sapı
M
- Kap
N
- Kısa tencere sapı
O - Azami doldurma işareti
Özellikler
Düdüklü tencere alt çapı -referanslar
Kural :
Üst çalışma basıncı : 80 kPa.
Azami emniyet basıncı : 170 kPa.
Uyumlu ısı kaynakları
•
Düdüklü tencere indüksiyon dahil
aşağıdaki tüm ısıtma yöntemleriyle kullanılır
•
Elektrikli plaka ve indüksiyon üzerinde, düdüklü tencere
altına eşit veya daha küçük bir plaka kullanınız.
•
Seramik cam ile kullanırken, tencerenin dibinin temiz ve
parlak olduğundan emin olunuz.
•
Gaz üstünde, alev tencerenin çapını aşmamalıdır.
Kapasite Ø Kap Ø Alt Inox modeli
4 L 22 cm 19 cm P25042
6 L 22 cm 19 cm P25007
7 L 22 cm 19 cm P25008
GAZ PLAKA
ELEKTRİKLİ
SERAMİKCAM
HALOJEN
INDÜKSIYON
SPİRAL
ELEKTRİK
Açıklayıcı şema
Page 17
14
EN
TR
ES
PT
EL
AR
FA
TEFAL Aksesuarları
•
Düdüklü tencerenin piyasada bulunan aksesuarları şunlardır
:
•
Diğer parçaların değiştirilmesi veya onarılması için TEFAL
Yetkili Servis Merkezlerine başvurunuz.
•
Sadece modelinize uygun orijinal TEFAL parçaları kullanınız.
Kullanım
Açma
•
Başparmağınızın yardımıyla açma mandalını
çekiniz
(E)
ve
- Resim 1
konumuna getiriniz.
Sol elinizle tencerenin
(L)
uzun sapını tutarken, sağ
elinizle
(F)
kapağının uzun sapını saatin ters yö-
nünde açılıncaya kadar çevirini -
Resim
2. Daha
sonra kapağı kaldırınız.
Kapatma
• Kapağı, kapak üçgenleri ile tencere üçgenleri üst üste gelecek şekilde, düzgün bir şekilde yerleştiriniz
- Resim 3
• Kapağı sola doğrudayanmayerine kadar çeviriniz
- Resim 3
• Açma mandalını (E) konuma itiniz - Resim 4
Asgari doldurma
•
Her zaman en az 25 cl’ye eşit (2 bardak) miktarda sıvı koyunuz.
Buharda pişirmek için
•
En az 75 cl (6 bardak ) doldurulmalıdır.
•
(J) sepetinizi bu amaç için öngörülen (K) desteğine yerleştiriniz.
- Resim 5
Aksesuar Referans
Conta X2010003
•
Buhar sepetine konulan besinler hiç bir
zaman düdüklü tencere kapağı ile temas
etmemelidir.
Page 18
15
Azami doldurma
•
Düdüklü tencerenizi hiç bir zaman tencerenin 2/3’ünden
fazla doldurmayınız (maksimum doldurma işareti) -
Resim 6
Bazı besinlerde
•
Pişirme sırasında genleşen besinler için, örneğin pirinç, kurutulmuş sebzeler veya kompostolar…, düdüklü tencerenizin kapasitesinin yarısından fazlasını doldurmayınız -
Resim 6
Supapın kullanımı (A)
Hassas besinler ve sebzeleri pişirmek için
•
Supap (A) piktogramını (H) işaretine karşı getiriniz.
Etler ve donmuş gıdaları pişirmek için
•
Supap (A) piktogramını (H) işaretine karşı getiriniz.
Buharı çıkarmak için
•
Supap (A) piktogramını (H) işaretine karşı getiriniz.
Supabı çıkarmak için
•
Supabı
(A)
çıkarmadan önce tencerenin soğumasını be-
kleyiniz.
•
Supap üzerine bastırınız ve (H) işareti aynı konuma getirmek için çeviriniz
- Resim 7
•
Supabı çekiniz.
Supabı tekrar yerine koymak için
•
Supabı
(H)
işareti ile aynı konuma getiriniz.
•
Supaba bastırınız ve istediğiniz
konuma kadar çeviriniz.
İlk Kullanım
•
Tencerenin 2/3’üne kadar su doldurunuz. (azami doldurma
işareti)
•
Sepet desteğini (K) kabın dibine yerleştirip, üzerine de sepeti (J) yerleştiriniz.
•
Düdüklütencerenin kapağını kapatınız
•
Supabı (A) üzerine yerleştiriniz .
•
Düdüklü tencereyi azami sıcaklığa ayarlanmış bir ısı
kaynağına yerleştiriniz.
Page 19

16
EN
TR
ES
PT
EL
AR
FA
•
Supaptan buhar çıkmaya başlayınca, ısı kaynağını biraz
kısınız ve 20 dakika bekleyiniz.
•
20 dakika geçtikten sonra, ısı kaynağını söndürünüz.
•
Supap (A)’yı konumuna kadar çeviriniz .
•
Basınç göstergesi (D) tekrar indiğinde :
düdüklü tencereniz artık basınç altında değildir.
•
Düdüklü tencereyi açınız.
•
Düdüklü tencereyi suyla temizleyiniz ve kurutunuz.
•
Not : Kabın içten alt tarafında oluşan lekeler, metal kalitesini
azaltmaz. Bunlar kireç tortusudur. Bunları yok etmek için,
biraz sulandırılmış sirke ve bez ile ovalayınız.
Pişirmeden önce
•
Her kullanımdan önce (A) supabını çekiniz (“Supabın kullanılması” paragrafını okuyunuz), gözle ve gün ışığı altında
supap tüpünün (B) tıkalı olmadığına emin olunuz. , ihtiyaç
olursa, bir kürdanla temizleyiniz
- Resim 8
•
Emniyetsupabının
(C)
hareketli olduğuna emin olunuz : “te-
mizlik ve bakım ”paragrafını okuyunuz.
•
(A)supabını yerine koyunuzve konumunu seçiniz veya .
•
Kullanmadan önce düdüklü tencerenin uygun bir şekilde
kapatıldığından emin olunuz.
•
Düdüklü tencereyi maksimuma ayarlanmış bir ısı kaynağı
üzerine yerleştiriniz.
Pişirme sırasında
•
Supap (A) düzenli (PSCHHHT) sesiyle beraber, sürekli buhar
çıkardığında, pişirme başlar, ısı kaynağını kısınız.
•
Tarifte belirtilen pişirme süresini hesaplayınız.
•
Pişirme süresi sonunda, ısı kaynağını söndürünüz.
Page 20
17
Pişirme sonu
Buharı boşaltmak için
•
Isı kaynağı söndürülünce, iki seçeneğiniz vardır :
•
Yavaş basınç azaltma :
(A) supabını konumuna kadar
çeviriniz. Basınç göstergesi (D) tekrar indiğinde : düdüklü
tencereniz artık basınç altında değildir.
•
Hızlı basınç azaltma :
düdüklü tencerenizi soğuk su
musluğunun altına yerleştiriniz. Basınç göstergesi (D) tekrar
indiğinde : düdüklü tencereniz artık basınç altında değildir.
(A) supabını konumuna kadar çeviriniz.
•
Artık açabilirsiniz.
Temizlik ve bakım
Düdüklü tencere
• Tencerenizin görevini iyi yapabilmesi için her kullanımdan
sonra bu temizlik ve bakım önerilerini uygulamaya dikkat
ediniz.
• Her kullanımdan sonra düdüklü tencereyi bulaşık sabunu
katılmış ılık suyla yıkayınız. Aynı şekilde sepeti de yıkayınız.
• Çamaşır suyu veya klorlu ürünler kullanmayınız.
• Tencere kabınız boş iken fazla ısıtmayınız.
Tencere kabını temizlemek için
• Bir ovalama bezi ve bulaşık sabunuyla yıkayınız.
• Eğer, paslanmaz çelik tencere kabınızın içinde lekeler varsa,
sirkeyle siliniz.
Tencere kabının dışını temizlemek için
• Bir sünger ve bulaşık sabunu ile yıkayınız.
kapağı temizlemek için
• Kapağı ılık bir su, sünger ve bulaşık sabunu ile yıkayınız.
Kapağın contasını temizlemek için
• Her pişirmeden sonra, conta ve yerini temizleyiniz (I).
• Contayı tekrar yerine yerleştirmek için,
- Resim 9 - 10’a
başvurunuz.
Supabı temizlemek için (A)
• Supabı geri çekiniz(A) : “Supabın kullanımı paragrafını
okuyunuz”.
• Musluk suyu altında supabı
(A)
temizleyiniz - Resim 11
Basınçdüşürme sırasında
anormal bir buhar
fışkırması olursa, selektörü , daha yavaş bir
şekilde basıncı tekrar
düşürünüz.
Tencere kabını ve sepeti
bulaşıkmakinesine koyabilirsiniz.
Kapağı bulaşık makinesine koymayınız.
Düdüklü tencerenizin
kalitesini dahauzun süre
korumak için: tencere
kabınızı boş durumda
aşırı ısıtmayınız.
Uzun bir kullanımdan
sonra oluşankararma ve
çizgiler normaldir, uygunsuz bir durum
oluşturmaz.
Page 21

18
EN
TR
ES
PT
EL
AR
FA
Kapağın içinde bulunan supap tüpünü temizlemek için
•
Supap(A) çıkarınız.
•
Gözle ve gün ışığında buhar salınım tüpünün açık ve yuvarlak olduğunu kontrol ediniz. Gerekirse, kürdan ile temizleyiniz -
Resim 8
Emniyet supabını (C) temizlemek için
•
Emniyet supabının kapağın içinde bulunan kısmını suyun
altında tutarak temizleyiniz.
• Kolaycaiçeriye gömülmesigereken kapağınahafifçe bastırarak iyi çalışıp, çalışmadığını kontrol ediniz
- Resim 12
Düdüklü tencerenin contasını değiştirmek için
• Düdüklü tencerenizin contasını senedebir kez değiştiriniz.
•
Düdüklü tencerenizin contasında kesik varsa, değiştiriniz.
•
Her zaman modelinize uygun orijinal bir TEFAL conta alınız.
Düdüklü tencerenizi kaldırmak için
•
Kapağı kabın içine ters çeviriniz.
Emniyet
Düdüklü tencerenizde çok sayıda emniyet tertibatı vardır :
•
Kapatma emniyeti :
- Eğer ürün düzgün kapatılmazsa, basınç göstergesi yükselemez ve böylece düdüklü tencere basıncı yükselmez.
•
Açma emniyeti :
- Düdüklü tencere basınç altında ise, açma mandalı harekete geçirilemez. Düdüklü tencereyi asla zorla açmayınız. Özellikle basınç göstergesi ile oynamayınız. İç
basıncın düştüğünden emin olunuz.
•
Aşırı basınçta iki emniyet :
- Birinci tertibat : emniyet supabı
(C)
basıncı serbest
bırakır ve buhar kapağın üzerinden yatay olarak çıkar -
Resim 13
- İkinci tertibat : conta buharı(I)kapağın kenarından dikey
olarak salmaktadır - Resim 14
Fazla basınç emniyet sistemlerinden biri harekete geçerse :
•
Isı kaynağını durdurunuz.
•
Düdüklü tencerenin tamamen soğumasını bekleyiniz.
•
Açınız.
•
Supap (A)’yı, buhar salınım tüpünü (B), emniyet supabını
(C) ve contayı (I) kontrol edip, temizleyiniz .
Bu işlemi yapmak için
hiçbir zaman sivri veya
kesici alet kullanmayınız.
Düdüklü tencerenizi 10
yıl kullanımdan sonra
TEFAL Onaylı Servis
Merkezi’nde denetime
tabi tutturmak zorunludur.
Page 22

19
Kullanım önerileri
1 - Supaptan çıktığında buhar çok sıcaktır.
2 - Basınç göstergesi yükselince, artık düdüklü tencereyi
açamazsınız.
3 - Bütün pişirme aletlerinde olduğu gibi, eğer düdüklü
tencereyi çocukların bulunduğu yerde kullanıyorsanız, sıkı
bir denetim uygulayınız.
4 - Buhar fışkırmasına dikkat ediniz.
5 - Düdüklü tencereyi hareket ettirmek için, kabın iki
tutacağını kullanınız.
6 - Düdüklü tencerenizde gıda bırakmayınız.
7 - Paslanmaz çelik kalitesini değiştirebilecek, çamaşır suyu
veya klorlu ürünleri hiç bir zaman kullanmayınız.
8 - Kapağı bulaşık makinesindeyıkamayınız.. Kapağı suda
bırakmayınız.
9 - Contayı yılda bir kez değiştiriniz.
10 - Düdüklü tencereniz soğuk ve boşken temizlenmelidir.
11 - Düdüklü tencerenizi 10 yıl kullandıktan sonra bir TEFAL
Onaylı Servis Merkezi’nde kontrol ettirmeniz zorunludur.
Garanti
• Kullanım kılavuzunda öngörülen kullanım çerçevesinde,
yeni TEFAL düdüklü tencerenizin kabı 10 yıl boyunca
aşağıdakilere karşı garantilidir :
- Tencere kabınızın metal yapısına bağlı hertürlü kusur ,
- Temeldeki metalin vaktinden önce her türlü bozulması,
• Diğerparçalarda, parça ve işçilik garantisi, her türlü ima-
lat hata ve ayıbına karşı 1 yıldır (ülkenize özgü mevzuat
hariç).
• İşbu sözleşmesel garanti alış tarihini taşıyan kasa fişi
veya fatura ibrazı ile geçerli olacaktır.
• Bu garantilere şunlar dahil değildir :
• Önemli önlemlere uyulmaması veya özensiz kullanım sonu-
cunda oluşan bozulmalar, özellikle :
- Darbeler, düşmeler, fırına koymalar, ...
- Kapağın bulaşık makinesine konulması.
• İşbu garanti sadece TEFAL Onaylı Servis Merkezleri’nde kul-
lanılır.
• Size en yakın TEFAL Onaylı Servis Merkezi’nin numarasını
aramanızı rica ederiz.
Page 23
20
EN
TR
ES
PT
EL
AR
FA
TEFAL sorularınızı cevaplıyor
Sorunlar, Öneriler
Eğer düdüklü tencere
içinde sıvı yokken basınç
altında ısıtılırsa:
•
Düdüklü tencerenizi TEFAL Onaylı Servis Merkezi’nde kontrol ettiriniz.
Eğer basınç göstergesi
yükselmemişse ve pişirme
sırasında supaptan hiçbir
salınım yoksa:
•
Bu ilk dakikalarda normaldir.
•
Eğer bu durum devam ederse, şunları kontrol ediniz :
- Isı kaynağı yeterince güçlüdür, aksi takdirde arttırınız.
- Tenceredeki sıvı miktarı yeterlidir.
- Supap üzerinde veya yerleştirilmiştir.
- Düdüklü tencere düzgün kapatılmıştır.
- Kabın contası veya kenarı bozulmamıştır.
Eğer basınç göstergesi
yükselmişse ve pişirme
sırasında supaptan hiçbir
salınım yoksa:
• Bu ilk dakikalarda normaldir.
• Eğer bu durum devam ederse,
• Aleti soğuk su altına koyunuz. Sonra açınız.
• Supap ve tüpünü temizleyiniz - Resim 8 ve emniyet supabı
• kapacının kolaylıkla daldırıldığını kontrol ediniz – Resim 12
Kapak etrafında buhar
salınıyorsa, şunları kontrol
ediniz :
• Kapak iyi kapatılmıştır.
• Kapak contasının konumu.
• Contanın durumu. Gerekirse değiştiriniz.
• Kapak, conta ve kapak içindeki conta barınağının, em-
niyet supabının ve supabın temizliği.
• Tencere kenarının durumu.
Düdüklü tenceredeki
besinler yanmışsa
• Yıkamadan önce tencereyi birkaç zaman suda bırakınız.
• Hiçbir zaman çamaşır suyu veya klorlu ürün kullan-
mayınız.
Kapağı açamıyorsanız :
•
Basınç göstergesinin düşük konumda olduğunu kontrol
ediniz.
•
Aksi takdirde : basıncı düşürünüz, gerekirse düdüklü
tencereyi akan soğuk su ile soğutunuz.
Eğer besinler pişmemişse
veya yanmışsa, şunları
kontrol ediniz :
• Pişirme süresi.
• Isı kaynağının gücü.
• Supabın iyi işlev görmesi.
• Sıvı miktarı
.
Page 24

21
İlave yazılar
Yazı Yerin belirtilmesi
İmalatçı veya ticari marka kimliği Kapak tutacağı.
İmalat yıl ve partisi Kapağın içinde.
Model
Çalışma basıncı (PF)
Azami emniyet basıncı (PS)
Kapasite
Kabın dış taraftan altında
Page 25

22
EN
TR
ES
PT
EL
AR
FA
Pişirme süreleri tablosu
Sebzeler
Pişirme
TAZE
Supap konumu
1
DONMUŞ
Supap konumu
2
* Buhar sepetindeki besin
** Sudaki besin
Etler - Balıklar
TAZE
Supap konumu 2
DONMUŞ
Supap konumu 2
Kuzu (but 1,3 Kg) 25 dak.
35 dak.
Sığır(kızarmış 1 Kg) 10 dak.
28 dak.
Lota balığı (fileto 0,6 Kg) 4 dak.
6 dak.
Domuz (kızarmış 1 Kg) 25 dak.
45 dak.
Piliç (tüm 1,2 Kg) 20 dak.
45 dak.
Somon (4 dilim 0,6 Kg) 6 dak.
8 dak.
Ton (4 dilim 0,6 Kg) 7 dak.
9 dak.
Enginar
- buhar* 18 dak.
- sıvı ile** 15 dak.
Kuşkonmaz
- sıvı ile 5 dak.
Kırmızı pancar
- buhar 20 - 30 dak.
Buğday
(kurusebze)
- sıvı ile 15 dak.
Brokoli
- buhar 3 dak. 3 dak.
Havuç
dilim - buhar 7 dak. 5 dak.
Kereviz
- buhar 6 dak.
- sıvı ile 10 dak.
Mantar
doğranmış - buhar 1 dak. 5 dak.
tüm - sıvı ile 1 dak. 30
Yeşil lahana
doğranmış - buhar 6 dak.
soyulmuş - buhar 7 dak.
Brüksel lahanası
- buhar 7 dak. 5 dak. - sıvı ile batırma
Karnabahar
- sıvı ile 3 dak. 4 dak.
Kabak
- buhar 6 dak. 30 9 dak
- sıvı ile 2 dak.
Hindiba
- buhar 12 dak.
Ispanak
- buhar 5 dak. 8 dak.
- sıvı ile 3 dak.
Yeşil fasulye
- buhar 8 dak. 9 dak.
Kuru fasulye
- sıvı ile 20 dak.
Yeşil mercimek
(kurusebze)
- sıvı ile 10 dak.
Şalgam
- buhar 7 dak.
- sıvı ile 6 dak.
Bezelye
- buhar 1 dak. 30 4 dak
Pırasa dilim
- buhar 2 dak. 30
Balkabağı (püre)
- sıvı ile 8 dak.
Patates parçaları (4’e bölünmüş)
- buhar
12 dak.
- sıvı ile 6 dak.
Kırık bezelye
(kurusebze)
- sıvı ile
1 4 dak.
Pirinç
(kurusebze)
- sıvı ile
7 dak.
Page 26

23
Precauciones importantes
Por su seguridad, este aparato cumple las normas y reglamentaciones aplicables:
- Directiva de Equipos a Presión
- Materiales en contacto con los alimentos
• Este aparato se ha diseñado para un uso doméstico.
• Lea detenidamente todas las instrucciones y diríjase siempre a la “Guía del usuario”.
• Como para cualquier aparato de cocción, mantenga una estrecha vigilancia, sobre todo
si utiliza la olla a presión cerca de niños.
• No introduzca la olla a presión en un horno caliente.
• Desplace la olla a presión con la máxima precaución. No toque las superficies calientes.
Utilice las asas y botones. Utilice guantes, si fuera necesario.
• No utilice la olla para otro fin que no sea para el que se ha diseñado.
• La olla cuece a presión. Si no la utiliza adecuadamente, podría quemarse debido a que el
agua está hirviendo. Asegúrese de que la olla estácorrectamente cerrada antes de ponerla
en marcha. Ver párrafo “Cierre”.
• Asegúrese de que la válvula está en posición de descompresión antes de abrir la olla.
• Nunca abra la olla a la fuerza. Asegúrese que la presión interior ha disminuido. Ver párrafo “seguridad”.
• Nunca utilice la olla sin líquido, esto la dañaría gravemente. Asegúrese que siempre hay
suficiente líquido durante la cocción.
• Utilice la(s) fuente(s) de calor compatible(s), conforme a las instrucciones de uso.
• No llene la olla más de 2/3 (señal de llenado máximo).
• Para los alimentos que se dilatan durante la cocción, como el arroz, las legumbres deshidratadas, o las compotas,... no llene la olla más de la mitad de su capacidad.
• Después de cocer carne con una piel superficial ( ej. lengua de ternera…),ésta podría hincharse bajo el efecto de la presión, no agujerear o picar la carne mientras la piel presente
un aspecto inflado; podría quemarse. Le recomendamos que pique o agujeree la carne
antes de la cocción.
• En el caso de alimentos pastosos (garbanzos, ruibarbo…), debe sacudir ligeramente la
olla para que estos alimentos no salpiquen hacia fuera.
• Compruebe que las válvulas no están obstruidas antes de cada uso. Ver párrafo “antesde
la cocción”.
• No utilice la olla para freír a presión con aceite.
• No intervenga en los sistemas de seguridad, más allá de las instrucciones de limpieza y
mantenimiento.
• Sólo utilice piezas originales TEFAL adecuadas a su modelo. En especial, utilice una cuba
y una tapa .
• Los vapores de alcohol son inflamables. Lleve a ebullición aproximadamente 2 minutos
antes de poner la tapa. Supervise el aparato cuando prepare recetas a base de alcohol.
• No utilice la ollapara almacenaralimentos ácidos o salados antes y después de la cocción,
podría dañar la cuba..
Conserve estas instrucciones
Page 27

24
EN
TR
ES
PT
EL
AR
FA
A - Válvula de funcionamiento
B - Conducto de válvula de funciona-
miento
C - Válvula de seguridad
D - Indicador de presencia de presión
E - Botón de apertura
F - Asa larga de la tapa
G - Señal de posición de la tapa
H - Señal de posición de la válvula de fun-
cionamiento
I - Junta de la tapa
J - Cestillo
K - Soporte del cestillo
L - Asa largo de la cuba
M- Cuba
N - Asa corta de la cuba
O - Señal de llenado máximo
Características
Diámetro del fondo de la olla - referencias
Información sobre normativas:
Presión superior de funcionamiento: 80 kPa.
Presión máxima de seguridad: 170 kPa.
Fuentes de calor compatibles
• La olla se puede utilizar en todas las
fuentes de calor, inclusive la inducción.
• Sobre placa eléctrica e inducción, use una placa con un diámetro igual al del fondo de la olla.
• Sobre placa vitrocerámica, asegúrese de que el fondo de
la cuba está limpio.
• Sobre gas, la llama no debe sobrepasar el diámetro de la
cuba.
Capacidad Ø Cuba Ø Fondo
Modelo de acero
inoxidable
4 L 22 cm 19 cm P25042
6 L 22 cm 19 cm P25007
7 L 22 cm 19 cm P25008
GAS PLACA
ELÉCTRICA
VITROCERÁMICA
HALÓGENO
RADIANTE
INDUCCIÓN
ELECTRICIDAD
ESPIRAL
Esquema descriptivo
Page 28

25
Accesorios TEFAL
• Los accesorios de la olla que podrá encontrar en las tiendas, son:
• Para el cambio de otras piezas o reparaciones, llame al Servicio Técnico Autorizado TEFAL.
• Sólo utilice piezas originales TEFAL adecuadas a su modelo.
Utilización
Apertura
• Con el pulgar, tire del botón de apertura (E) y llévelo a
la posición - Fig 1
Mientras con la mano izquierda sujeta el asa largo de
la cuba (L), gire con la mano derecha el asa largo de
la tapa (F) en el sentido inverso de las agujas de un
reloj, hasta su apertura - Fig 2. Y a continuación, retire la tapa.
Cierre
• Coloque la tapa en plano sobre la cuba alineando los triángulos de la tapa y del asa de la cuba - Fig 3
• Gire la tapa hacia la izquierda hasta el tope - Fig 3
• Empuje el botón de apertura (E) hacia la posición - Fig
4
Llenado mínimo
• Introduzca siempre una cantidad mínima de líquido, al
menos igual a 25 cl (2 vasos).
Para una cocción vapor
• El llenado debe ser al menos igual a 75 cl (6 vasos).
• Coloque el cestillo (J) en el soporte (K) previsto a este
efecto - Fig 5
Accesorio Referencia
Junta X2010003
• Los alimentos que
están en el cestillo
no deben estar en
contacto con la tapa
de la olla.
Page 29

26
EN
TR
ES
PT
EL
AR
FA
Llenado máximo
• Nunca llene la olla más de 2/3 de la altura de la cuba (señal
de llenado máximo) - Fig 6
Para algunos alimentos
• Para los alimentos que se dilatan durante la cocción, como
el arroz, las legumbres deshidratadas, o las compotas..., no
llene la olla más de la mitad de su capacidad - Fig 6
Utilización de la válvula de funcionamiento (A)
Para cocer alimentos delicados y verduras
• Coloque el símbolo o pictograma de la válvula (A) en
frente de la señal (H).
Para cocer carne y alimentos congelados
• Coloque el símbolo o pictograma de la válvula (A) en
frente de la señal (H).
Para liberar el vapor
• Coloque el símbolo o pictograma de la válvula (A) en
frente de la señal (H).
Para retirar la válvula de funcionamiento
• Deje enfriar el aparto antes de retirar la válvula (A).
• Presione sobre la válvula y gírela para alinear la posición
con la señal (H)
- Fig 7
• Retire la válvula.
Para colocar de nuevo la válvula de funcionamiento
• Coloque la válvula de funcionamiento alineándola
con la señal (H).
• Presione sobre la válvula y gire hasta la posición deseada.
Primera utilización
• Llene de agua 2/3 de la cuba. (señal de llenado máximo).
• Coloque el soporte del cestillo (K) en el fondo de la cuba y
deposite el cestillo (J) encima.
• Cierre la olla.
• Coloque la válvula de funcionamiento
(A)
en .
• Coloque la olla sobre una fuente de calor ajustada a su potencia máxima.
Page 30

27
• Cuando el vapor comienza a salir por la válvula, disminuya
la fuente de calor y cuente 20 min.
• Cuando los 20 min. hayan transcurrido, apague la fuente
de calor.
• Gire la válvula de funcionamiento (A) hasta la posición
• Cuando el indicador de presencia de vapor (D) baje: la olla
ya no tiene presión.
• Abra la olla.
• Aclare la olla con agua y séquela.
• Nota: la aparición de manchas en el fondo interno de la
cuba, no altera en nada la calidad del metal. Se trata de
depósitos calcáreos. Para eliminarlos, puede utilizar un estropajo con un poco de vinagre diluido.
Antes de la cocción
• Antes de cada utilización, retire la válvula (A) (ver párrafo
“Utilización de la válvula de funcionamiento”) y compruebe a la luz del día que el conducto de la válvula de
funcionamiento (B) no está obstruido. Si fuera necesario,
límpielo con un palillo de dientes - Fig 8
• Compruebe que la válvula de seguridad (C) es móvil: ver
párrafo “limpieza y mantenimiento”.
• Coloque la válvula de funcionamiento (A) y seleccione la
posición o.
• Asegúrese que la olla está correctamente cerrada antes
de ponerla en marcha.
• Coloque la olla sobre una fuente de calor ajustada a su
potencia máxima.
Durante la cocción
• Cuando la válvula de funcionamiento (A) deja salir el vapor
de manera continua, emitiendo un sonido regular
(PSCHHHT), la cocción comienza, disminuya la fuente de
calor.
• Cuente el tiempo de cocción indicado en su receta.
• Cuando el tiempo de cocción termina, apague la fuente
de calor.
Page 31

28
EN
TR
ES
PT
EL
AR
FA
Fin de la cocción
Para liberar el vapor
• Una vez que la fuente de calor esté apagada, tiene dos
posibilidades:
• Descompresión lenta: gire la válvula de funcionamiento
(A) hasta la posición . Cuando el indicador de presen-
cia de presión (D) baje: su olla ya no tiene presión.
•
Descompresión rápida: coloque la olla debajo de un
grifo de agua fría. Cuando el indicador de presencia de
presión (D) baje: la olla ya no tiene presión. Gire la válvula
de funcionamiento (A) hasta la posición .
• Puede abrirla.
Limpieza y mantenimiento
Limpieza de la olla
• Para el buen funcionamiento del aparato, por favor, respete estas recomendaciones de limpieza y mantenimiento
después de cada uso.
• Lave la olla después de cada utilización con agua tibia y un
detergente para vajillas. Repita la operación para el cestillo.
• No utilice lejía o productos clorados.
• No ponga a calentar la cuba cuando esté vacía.
Para limpiar el interior de la cuba
• Lave con estropajo y detergente para vajillas.
• Si el interior de la cuba de acero inoxidable presenta reflejos
irisados, límpielo con vinagre.
Para limpiar el exterior de la cuba
• Lave con una esponja y producto lavavajillas.
Para limpiar la tapa
• Lave la tapa con un chorro de agua tibia con una esponja
y producto lavavajillas.
Para limpiar la junta de la tapa
• Después de cada cocción, limpie la junta (I) y su compartimento.
• Para volver a colocar la junta, observe los dibujos
- Fig 9 -
10
Para limpiar la válvula de funcionamiento (A)
• Retire la válvula de funcionamiento (A): ver párrafo “Utilización de la válvula de funcionamiento”.
• Limpie la válvula de funcionamiento (A) debajo del chorrode
agua del grifo
- Fig 11
Si durante la descompresión, observa salpicaduras anormales:
coloque el selector en
posición y descomprima lentamente, asegurándose que ya no
salpica.
Puede meter la cuba y
el cestillo al lavavajillas.
No introduzca la tapa
en el lavavajillas.
Para conservar por más
tiempo las cualidades
de la olla: no ponga a
calentar la cuba cuando
está vacía.
El ennegrecimiento y
las ralladuras que pueden aparecer después
de una larga utilización
no suponen ningún inconveniente.
Page 32

29
Para limpiar el conducto de la válvula de funcionamiento
situada dentro de la tapa
• Retire la válvula (A).
• Controle a la luz del día que el conducto de evacuación del
vapor está desatascado y redondo. Si fuera necesario, límpielo con un palillo de dientes -
Fig 8
Para limpiar la válvula de seguridad (C)
• Limpie la parte de la válvula de seguridad situada dentro
de la tapa, pasándola por agua.
• Compruebe que el funcionamiento es correcto, presionando ligeramente sobre la válvula que debe hundirse sin
dificultad
- Fig 12
Para cambiar la junta de la olla
• Cambie la junta de la olla todos los años.
• Cambie la junta de la olla si presentara algún corte.
• Utilice siempre una junta original TEFAL, adecuada a su
modelo.
Para guardar la olla
• Déle la vuelta a la tapa sobre la cuba.
Seguridad
Laolla a presiónestá equipada convarios sistemasdeseguridad:
• Sistema de seguridad para el cierre:
- Si el aparato no está correctamente cerrado, el indicador de presencia de presión no puede subir y por lo
tanto la olla no puede tener presión.
• Sistema de seguridad para la apertura:
- Si la olla está bajo presión, el botón de apertura no
puede accionarse. Nunca abra la olla a la fuerza. Sobre
todo, no fuerce el indicador de presencia de presión.
Asegúrese que la presión interior ha disminuido.
• Dos sistemas de seguridad para el exceso de presión:
- Primer sistema: la válvula de seguridad (C) libera la presión y el vapor sale horizontalmente por encima de la
tapa
- Fig 13
- Segundo sistema: la junta (I) deja salir el vapor verticalmente por el borde de la tapa
- Fig 14
Si uno de los sistemas de seguridad par el exceso de
presión se activa:
• Apague la fuente de calor.
• Deje enfriar por completo la olla.
• Abra.
• Compruebe y limpie la válvula de funcionamiento (A), el
conducto de evacuación de vapor (B), la válvula de seguridad (C) y la junta (I).
Nunca utilice objetos
cortantes o puntiagudos para realizar esta
operación.
Es necesario revisar la
olla en un Servicio Técnico Autorizado TEFAL
después de 10 años de
utilización.
Page 33

30
EN
TR
ES
PT
EL
AR
FA
Recomendaciones de uso
1 - El vapor está muy caliente cuando sale por la válvula de
funcionamiento.
2 - Cuando el indicador de presencia de presión suba, ya no
puede abrir la olla.
3 - Como para cualquier aparato de cocción, realice una
estrecha vigilancia si utiliza la olla cerca de niños.
4 - Atención al chorro de vapor.
5 - Para desplazar la olla, utilice las asas de la cuba
6 - No almacene alimentos en la olla.
7 - Nunca utilice lejía o productos clorados que pudieran
alterar la calidad del acero inoxidable.
8 - No introduzca la tapa en el lavavajillas. No deje la tapa en
remojo.
9 - Cambie la junta todos los años.
10 - La limpieza de la olla debe realizarse en frío y con el
aparato vacío.
11 - Debe revisar la olla en un Servicio Técnico Autorizado
TEFAL después de 10 años de utilización.
Garantía
• En el marco de la utilización recomendada por el modo de
empleo, la cuba de la nueva olla a presión TEFAL está ga-
rantizada por 10 años contra:
- Cualquier defecto relacionado con la estructura metálica
de la cuba,
- Cualquier deterioro prematuro del metal de base.
• Para las otras piezas, la garantía para piezas y mano de
obra, es de 1 año (excepto legislación específica de su
país), frente a cualquier defecto o vicio de fabricación.
• Esta garantía contractual será adquirida tras la presen-
tación del ticket de caja o factura con la fecha de compra.
• Estas garantías excluyen:
• Los deterioros consecutivos ocasionados por no respetar
las precauciones importantes o utilizaciones negligentes,
especialmente:
- Golpes, caídas, introducción en el horno,…
- Introducción de la tapa en el lavavajillas.
• Solamente, los Servicios Técnicos Autorizados TEFAL están
habilitados para que se beneficie de esta garantía.
• Por favor, llame al número Azur para la dirección del Servicio Técnico Autorizado TEFAL más próximo a su domicilio.-
Page 34

31
TEFAL responde a sus preguntas
Problemas Recomendaciones
Si la olla se ha calentado a
presión sin líquido dentro:
• Lleve la olla a revisar a un Servicio Técnico Autorizado
TEFAL.
Si el indicador de
presencia de presión no
ha subido y no sale nada
por la válvula durante la
cocción:
• Esto en normal durante los primeros minutos.
• Si el fenómeno continua, compruebe que:
- La fuente de calor es bastante fuerte, si no
auméntela.
- La cantidad de líquido en la cuba es suficiente.
- La válvula de funcionamiento está colocada en o .
- La olla está bien cerrada.
- La junta o el borde de la cuba no están deteriorados.
Si el indicador de
presencia de presión ha
subido y no sale nada por
la válvula durante la
cocción:
• Esto es normal durante los primeros minutos.
• Si el fenómeno continúa,
• Pase el aparato por agua fría. A continuación, abra.
• Limpie la válvula de funcionamiento y el conducto de
la válvula de funcionamiento -
Fig 8 y compruebe que
la válvula de seguridad se hunde sin dificultad -
Fig 12
Si el vapor se escapa
alrededor de la tapa,
compruebe:
• Si la tapa está cerrada correctamente.
• La posición de la junta de la tapa.
• El buen estado de la junta, si fuera necesario, cámbiela.
• La limpieza de la tapa, de la junta y de su compartimento en la tapa, de la válvula de seguridad y de la válvula de funcionamiento.
• El buen estado del borde de la cuba.
Si se han quemado
alimentos en la olla:
• Deje la cuba en remojo durante algún tiempo antes de
lavarla.
• Nunca utilice lejía o productos clorados.
Si no puede abrir la tapa: • Compruebe que el indicador de presencia de presión
está bajado.
• Si no: descomprima, si fuera necesario, enfríe la olla
bajo un chorro de agua fría.
Si los alimentos no se han
cocido o si se han
quemado, compruebe:
• El tiempo de cocción.
• La potencia de la fuente de calor.
• Si la posición de la válvula de funcionamiento es
correcta.
• La cantidad de líquido.
Page 35

32
EN
TR
ES
PT
EL
AR
FA
Marcados o etiquetajes reglamentarios
Marcado Localización
Identificación del fabricante o marca
comercial
Asa de la tapa.
Año y lote de fabricación Dentro de la tapa.
Referencia modelo
Presión de funcionamiento (PF)
Presión máxima de seguridad (PS)
Capacidad
En el fondo externo de la cuba.
Page 36

33
Tabla de los tiempos de cocción
Verduras
Cocción
FRESCOS
Posición de la válvula
1
CONGELADOS
Posición de la válvula
2
Alcachofas - Vapor*
18 min.
- inmersión**
15 min.
Espárragos - inmersión
5 min.
Remolacha - Vapor
20 - 30 min.
Trigo (cereales) - inmersión
15 min.
Brócoli - Vapor
3 min. 3 min.
Zanahorias Rodajas - Vapor
7 min. 5 min.
Apio - Vapor
6 min.
- inmersión
10 min.
Champiñones Laminados - Vapor
1 min. 5 min.
enteros - inmersión
1 min. 30
Repollo Laminado - Vapor
6 min.
deshojado - Vapor
7 min.
Coles de Bruselas - Vapor
7 min. 5 min. - immersion
Coliflor - inmersión
3 min. 4 min.
Calabacines - Vapor
6 min. 30 9 min
- inmersión
2 min.
Endivias - Vapor
12 min.
Espinacas - Vapor
5 min. 8 min.
- inmersión
3 min.
Judías verdes - Vapor
8 min. 9 min.
Judías semi secas - inmersión
20 min.
Lentejasverdes (legumbre) - inmersión
10 min.
Nabos - Vapor
7 min.
- inmersión
6 min.
Guisantes - Vapor
1 min. 30 4 min
Puerros rodajas - Vapor
2 min. 30
Calabaza (puré) - inmersión
8 min.
Patatas en cuartos - Vapor
12 min.
- inmersión
6 min.
Garbanzos (legumbre) - inmersión
14 min.
Arroz (legumbre) - inmersión
7 min.
*Alimento en el cestillo
** Alimento en el agua
Carne - Pescado
FRESCOS
Posición de la válvula 2
CONGELADOS
Posición de la válvula 2
Cordero (pierna 1,3 Kg) 25 min
35 min
Ternera (rôti 1 Kg) 10 min
28 min
Rape (filetes 0,6 Kg) 4 min
6 min.
Cerdo (rollo 1 Kg) 25 min
45 min
Pollo (entero 1,2 Kg) 20 min
45 min.
Salmón(4 rodajas 0,6 Kg) 6 min
8 min.
Atún (4 filetes 0,6 Kg) 7 min
9 min.
Page 37

34
EN
TR
ES
PT
EL
AR
FA
Precauções importantes
Para a sua segurança, este aparelho está em conformidade com as normas e regulamentos
aplicáveis:
- Directiva dos Equipamentos sob Pressão
- Materiais em contacto com os alimentos
• Este aparelho foi concebido apenas para uso doméstico.
• Leia atentamente o manual de instruções antes da primeira utilização e guarde-o para futuras utilizações.
• Talcomo sucede comqualqueraparelhode cozedura, utilize a panela de pressãosempre sob
vigilância, especialmente na proximidade de crianças.
• Não coloque a panela de pressão num forno aquecido.
• Desloque a panela de pressão, quando sob pressão, com um cuidado extremo. Não toque
nas superfícies quentes. Utilize as pegas e botões. Utilize luvas de cozinha, se necessário.
• Não utilize a panela de pressão para qualquer outro objectivo senão aquele para o qual se
destina.
• A sua panela de pressão coze sob pressão. Uma utilização inadequada pode causar ferimentos por queimaduras. Certifique-se que a panela de pressão está convenientemente
fechada antes de a colocar a funcionar. Ver parágrafo “Fecho”.
• Certifique-se que a válvula está na posição de descompressão antes de abrir a panela de
pressão.
• Nunca force a abertura da panela de pressão. Certifique-se que a pressão interna baixou.
Ver parágrafo “Segurança”.
• Nunca utilize a panela de pressão sem líquido no interior por forma a evitar danos graves.
Certifique-se que há sempre líquido suficiente durante a cozedura.
• Utilize a(s) fonte(s) de calor compatível(eis), em conformidade com as instruções de utilização.
• Não encha a panela de pressão acima dos 2/3 (marca máxima de enchimento).
• Para os alimentos que se dilatam durante a cozedura, como arroz, legumes desidratados,
compotas, etc., não encha a panela de pressão acima de metade da sua capacidade.
• Após a cozedura de carnes com pele superficial (por ex., língua de vaca), que pode inchar
sob o efeito da pressão, não pique a carne enquantoa peleapresentar um aspectoinchado;
por forma a evitar queimaduras. Aconselhamo-lo a picar a carne antes da cozedura.
• No caso de alimentos pastosos (ervilhas, ruibarbo, etc.), a panela de pressão deve ser ligeiramente abanada antes da abertura para que estes alimentos não colem no exterior.
• Verifiquese as válvulas não estão obstruídasantes de cada utilização. Ver parágrafo “Antes
da cozedura”.
• Não utilize a panela de pressão para fritar sob pressão com óleo.
• Não intervenha nos sistemas de segurança além das instruções de limpeza e de manutenção.
• Utilize apenas peças de origem TEFAL que correspondam ao seu modelo. Mais especificamente, utilize uma cuba e uma tampa .
• Os vapores de álcool são inflamáveis.
Deixe ferver durante cerca de 2 minutos antes de colocar a tampa.Vigie o aparelho no caso
de receitas à base de álcool.
• Não utilize a panela de pressãopara guardaralimentos ácidos ou salgados antesou depois
da cozedura, por forma a não danificar a cuba.
Guarde estas instruções para futuras utilizações.
Page 38

35
A - Válvula de funcionamento
B - Conduta da válvula de funciona-
mento
C - Válvula de segurança
D - Indicador de presença de pressão
E - Botão de abertura
F - Pega longa da tampa
G - Marca de posicionamento da tampa
H - Marca de posicionamento da válvula
de funcionamento
I - Junta da tampa
J - Cesto de vapor
K - Suporte do cesto de vapor
L - Pega longa da cuba
M- Cuba
N - Pega curta da cuba
O - Marca máxima de enchimento
Características
Diâmetro do fundo da panela de pressão – referências
Informações normativas:
Pressão superior de funcionamento: 80 kPa.
Pressão máxima de segurança: 170 kPa.
Fontes de calor compatíveis
• A panela de pressão é compatível com
todas as fontes de calor, incluindo indução.
• Com placa eléctrica e indução, utilize uma placa de diâmetro igual ou inferior ao do fundo da panela de pressão.
• Com mesa de vitrocerâmica, certifique-se que o fundo da
cuba está limpo e sem sujidade.
• Com gás, a chama não deve ultrapassar o diâmetro da
cuba.
Capacidade Ø Cuba Ø Fundo Modelo inox
4 L 22 cm 19 cm P25042
6 L 22 cm 19 cm P25007
7 L 22 cm 19 cm P25008
GÁS PLACA
ELÉCTRICA
VITROCERÂMICA
HALOGÉNIO
RADIANTE
INDUÇÃO
ÉLECTRICIDADE
ESPIRAL
Esquema descritivo
Page 39

36
EN
TR
ES
PT
EL
AR
FA
Acessórios TEFAL
• Os acessórios da panela de pressão disponíveis no mercado são:
• Para substituição de outras peças ou reparações, contacte
os Serviços de Assistência Técnica Autorizados TEFAL.
• Utilize apenas peças de origem TEFAL que correspondam
ao seu modelo.
Utilização
Abertura
• Com a ajuda do polegar, puxe o botão de abertura (E) e
para a posição
- Fig 1
Com a mão esquerda a segurar na pega longa da cuba
(L), rode com a mão direita a pega longa da tampa (F) no
sentido contrário ao dos ponteiros do relógio, até à abertura
- Fig 2. Depois, levante a tampa.
Fecho
• Coloque a tampa direita sobre a cuba, alinhando os triângulos da tampa e da pega da cuba
- Fig 3
• Rode a tampa para a esquerda até encaixar - Fig 3
• Empurre o botão de abertura (E) para a posição - Fig 4
Enchimento mínimo
• Coloque sempre uma quantidade mínima de líquido, pelo
menos igual a 25 cl (2 copos).
Para uma cozedura a vapor
• O enchimento deve ser pelo menos igual a 75 cl (6 copos).
• Coloque o cesto (J) no suporte (K) previsto para este
efeito.
- Fig 5
Acessório Referência
Junta X2010003
• Os alimentos coloca-
dos no cesto de
vapor não devem
tocar na tampa da
panela de pressão.
Page 40

37
Enchimento máximo
• Nunca encha a panela de pressão acima de 2/3 da altura da
cuba (marca máxima de enchimento)
- Fig 6
Para determinados alimentos
• Para os alimentos que se dilatam durante a cozedura,
como arroz, legumes desidratados, compotas, etc., não
encha a panela de pressão acima de metade da sua capacidade
- Fig 6
Utilização da válvula de funcionamento (A)
Para cozer alimentos delicados e legumes
•
Posicione o pictograma
da válvula (A) diante da
marca (H).
Para cozer carnes e alimentos ultracongelados
• Posicione o pictograma da válvula (A) diante da
marca (H).
Para libertar vapor
• Posicione o pictograma da válvula (A) diante da
marca (H).
Para retirar a válvula de funcionamento
• Deixe arrefecer o aparelho antes de retirar a válvula (A).
• Carregue na válvula e rode-a para alinhar a posição
com a marca (H)
- Fig 7
• Retire a válvula.
Para colocar de novo a válvula de funcionamento
• Coloque a válvula de funcionamento alinhando com
a marca (H).
• Carregue na válvula e rode até à posição pretendida.
Primeira utilização
• Encha 2/3 da cuba com água (marca máxima de enchimento).
• Coloque o suporte do cesto (K) no fundo da cuba e em seguida o cesto (J) por cima.
• Feche a panela de pressão.
• Coloque a válvula de funcionamento (A) em .
• Coloque a panela de pressão sobre uma fonte de calor
ajustada para a potência máxima.
Page 41

38
EN
TR
ES
PT
EL
AR
FA
• Assim que começar a sair vapor pela válvula, reduza a
fonte de calor e conte 20 minutos.
• Decorridos os 20 minutos, desligue a fonte de calor.
• Rode a válvula de funcionamento (A) até à posição .
• Assim que o indicador de presença de pressão (D) voltar a
descer: a panela de pressão já não está sob pressão.
• Abra a panela de pressão.
• Passe a panela de pressão por água e seque-a.
• Nota: o aparecimento de manchas no fundo interior da
cuba não altera em nada a qualidade do metal. São depósitos de calcário. Para os eliminar, pode utilizar um esfregão palha-de-aço com um pouco de vinagre diluído.
Antes da cozedura
• Antes de cada utilização, retire a válvula (A) (ver parágrafo
“Utilização da válvula de funcionamento”) e verifique visualmente se a conduta da válvula de funcionamento (B)
não está obstruída. Se necessário, limpe-a com um palito
- Fig 8
• Verifique se a válvula de segurança (C) se move: ver pará-
grafo “Limpeza e manutenção”.
• Coloque a válvula de funcionamento (A) e seleccione a
posição ou .
• Certifique-se que a panela de pressão está devidamente
fechada antes de a colocar a funcionar.
• Coloque a panela de pressão sobre uma fonte de calor
ajustada para a potência máxima.
Durante a cozedura
• Quando a válvula de funcionamento (A) deixa sair vapor de
forma contínua, através da emissão de um som constante
(PSCHHHT), inicia-se a cozedura. Reduza a fonte de calor.
• Conte o tempo de cozedura indicado na receita.
• Decorrido o tempo de cozedura, desligue a fonte de calor.
Page 42

39
Fim da cozedura
Para libertar vapor
• Uma vez a fonte de calor desligada, tem duas possibilidades:
• Descompressão lenta: rode a válvula de funcionamento
(A) até à posição . Assim que o indicador de presença
de pressão (D) voltar a baixar: a panela de pressão deixa
de estar sob pressão.
•
Descompressão rápida: coloque a panela de pressão
sob uma torneira de água fria. Assim que o indicador de
presença de pressão (D) voltar a baixar: a panela de pressão deixa de estar sob pressão. Rode a válvula de funcionamento (A) até à posição .
• Pode abri-la.
Limpeza e manutenção
Limpeza da panela de pressão
• Para o funcionamento adequado do aparelho, respeite
estas recomendações de limpeza e de manutenção após
cada utilização.
• Lave a panela de pressão após cada utilização com água
morna e detergente para a loiça. Proceda da mesma forma
com o cesto.
• Não utilize lixívia nem produtos com cloro.
• Não aqueça excessivamente a cuba quando estiver vazia.
Para limpar o interior da cuba
• Lave com esfregão palha-de-aço e detergente para a loiça.
• Se o interior da cuba em inox apresentar reflexos irisados,
limpe-a com vinagre.
Para limpar o exterior da cuba
• Lave com uma esponja e detergente para a loiça.
Para limpar a tampa
• Lave a tampa sob um fio de água morna com uma esponja e detergente para a loiça.
Para limpar a junta da tampa
• Após cada cozedura, limpe a junta (I) e o respectivo compartimento.
• Para voltar a colocar a junta, consulte os desenhos
- Fig 9
- 10
Para limpar a válvula de funcionamento (A)
• Retire a válvula de funcionamento (A): ver parágrafo “Utilisation da válvula de funcionamento”.
• Limpe a válvula de funcionamento (A) debaixo da torneira
- Fig 11
Se observar salpicos fora
do comum no decorrer
dadescompressão: volte
a colocar o selector na
posição e descomprima de novo lentamente, certificando-se
da inexistência de salpicos.
Pode lavar a cuba e o
cesto na máquina de
lavar loiça.
Não lave a tampa na
máquina de lavar loiça.
Para conservar durante
mais tempo as qualidades da sua panela de
pressão: não aqueça excessivamente a cuba
quando estiver vazia.
O escurecimento e os
riscos que podem aparecer na sequência de
uma utilização prolongada não têm qualquer
inconveniente.
Page 43

40
EN
TR
ES
PT
EL
AR
FA
Para limpar a conduta da válvula de funcionamento
situada no interior da tampa
• Retire a válvula (A).
• Verifique visualmente e regularmente se a conduta de libertação do vapor está desobstruída e não deformada. Se
necessário, limpe-a com um palito - Fig 8
Para limpar a válvula de segurança (C)
• Limpe a parte da válvula de segurança situada no interior
da tampa e passe-a por água.
• Verifique o seu funcionamento adequado carregando ao
de leve na válvula, que deverá ir para baixo sem dificuldade
- Fig 12
Para substituir a junta da panela de pressão
• Substitua a junta da panela de pressão todos os anos.
• Substitua a junta da panela de pressão se esta apresentar
um corte.
• Utilize sempre uma junta de origem TEFAL correspondente
ao seu modelo.
Para arrumar a panela de pressão
• Volte a colcar a tampa na cuba.
Segurança
A sua panela de pressão encontra-se equipada com vários
dispositivos de segurança:
• Segurança no fecho:
- Se a panela não for correctamente fechada, o indicador
de presença de pressão não poderá subir e, consequentemente, a panela de pressão não entrará sob pressão.
• Segurança na abertura:
- Se a panela de pressão estiver sob pressão, o botão de
abertura não pode ser accionado. Nunca force a abertura da panela de pressão. Acima de tudo, não exerça
força sobre o indicador de presença de pressão. Certifique-se que a pressão interna voltou a baixar.
• Duas seguranças para a sobrepressão:
- Primeiro dispositivo: a válvula de segurança (C) liberta
a pressão e sai vapor na horizontal, pela parte de cima
da tampa
- Fig 13
- Segundo dispositivo: a junta (I) deixa sair vapor na vertical, pelo rebordo da tampa
- Fig 14
Se um dos sistemas de segurança para a sobrepressão for
accionado:
• Desligue a fonte de calor.
• Deixe arrefecer a panela de pressão por completo.
• Abra-a.
• Inspeccione e limpe a válvula de funcionamento (A), a
conduta de libertação do vapor (B), a válvula de segurança
(C) e a junta (I).
Nunca utilize objectos
cortantes ou pontiagudos para efectuar esta
operação.
A sua panela de pressão
tem de ser inspeccionada obrigatoriamente
por um Serviço de Assistência Técnica Autorizado TEFAL após 10
anosdeutilização.
Page 44

41
Recomendações de utilização
1 - O vapor encontra-se extremamente quente quando sai da
válvula de funcionamento.
2 - Logo que o indicador de presença de pressão sobe, deixará
de poder abrir a panela de pressão.
3 - Como aconselhado com qualquer aparelho de cozedura,
utilize a panela de pressão com máxima vigilância,
especialmente na proximidade de crianças.
4 - Preste atenção ao jacto de vapor.
5 - Para deslocar a panela de pressão, sirva-se das duas pegas
da cuba.
6 - Não deixe alimentos na panela de pressão.
7 - Nunca utilize lixívia nem produtos com cloro, que poderão
alterar a qualidade do aço inoxidável.
8 - Não lave a tampa na máquina da louça. Não deixe a
tampa mergulhada em água.
9 - Substitua a junta todos os anos.
10 - A limpeza da panela de pressão tem de ser
obrigatoriamente efectuada a frio, com o aparelho vazio.
11 - A sua panela de pressão tem de ser obrigatoriamente
inspeccionada por um Serviço de Assistência Técnica
Autorizado TEFAL após 10 anos de utilização.
Garantia
• No âmbito da utilização recomendada pelas instruções de
utilização, a cuba da sua nova panela de pressão TEFAL
tem uma garantia de 10 anos contra:
- Qualquer defeito ligado à estrutura metálica da cuba,
- Qualquer degradação prematura do metal da base.
• Nas outras peças, a garantia da execução e mão-de-obra
é de 2 anos (salvo legislação específica do seu país), contra
qualquer defeito ou vício de fabrico.
• Esta garantia contratual será adquirida mediante apre-
sentação do talão de compra ou factura com indicação
da data de compra.
• Estas garantias excluem:
• Os danos na sequência da inobservância de precauções im-
portantes ou usos negligentes, nomeadamente:
- Choques, quedas, utilização no forno, etc.
- Lavagem da tampa na máquina de lavar loiça.
• Apenas os Serviços de Assistência Técnica autorizados
TEFAL têm competência para o fazer beneficiar desta garantia.
• Contacte o Clube Consumidor Tefal para obter qualquer in-
formação sobre os Serviços de Assistência Técnica autorizados Tefal.
Page 45

42
EN
TR
ES
PT
EL
AR
FA
A TEFAL responde às suas dúvidas
Problemas Recomendações
Se a panela de pressão
aqueceu sob pressão sem
líquido no interior:
• Solicite a inspecção da sua panela de pressão por um
Serviço de Assistência Técnica Autorizado TEFAL.
Se o indicador de
presença de pressão não
subiu e não sai nada pela
válvula durante a
cozedura:
• Isto é normal durante os primeiros minutos.
• No caso de persistência do fenómeno, verifique se:
- A fonte de calor é suficientemente forte, caso
contrário aumente-a.
- A quantidade de líquido na cuba é suficiente.
- A válvula de funcionamento está posicionada em
ou .
- A panela de pressão está devidamente fechada.
- A junta ou a borda da cuba não estão danificadas.
Se o indicador de
presença de pressão
subiu e não sai nada pela
válvula durante a
cozedura:
• Isto é normal durante os primeiros minutos.
• No caso de persistência do fenómeno:
- Passe o aparelho por água fria. Depois abra-o.
- Limpe a válvula de funcionamento e a conduta da
válvula de funcionamento -
Fig. 8 e verifique se
consegue empurrar a tampa da válvula de segurança
sem dificuldade -
Fig. 12
Se ocorrer fuga de vapor
à volta da tampa,
verifique:
• O fecho adequado da tampa.
• O posicionamento da junta da tampa.
• O bom estado da junta, se necessário, substitua-a.
• A limpeza da tampa, da junta e do respectivo alojamento na tampa, da válvula de segurança e da válvula
de funcionamento.
• O bom estado do bordo da cuba.
Se os alimentos
queimarem na panela de
pressão:
• Deixe a cuba mergulhada em água durante algum
tempo antes de a lavar.
• Nunca utilize lixívia nem produtos com cloro.
Se não conseguir abrir a
tampa:
• Verifique se o indicador de presença de pressão está na
posição baixa.
• Caso contrário: descomprima a panela, se necessário,
arrefeça-a sob um jacto de água fria.
Se os alimentos não
ficaram cozidos ou
queimados, verifique:
• O tempo de cozedura.
• A potência da fonte de calor.
• O posicionamento adequado da válvula de
funcionamento.
• A quantidade de líquido.
Page 46

43
Marcações regulamentares
Marcação Localização
Identificação do fabricante ou marca comercial
Pega da tampa
Ano e lote de fabrico No interior da tampa
Referência do modelo
Pressão de funcionamento (PF)
Pressão máxima de segurança (PS)
Capacidade
No fundo externo da cuba.
Page 47

44
EN
TR
ES
PT
EL
AR
FA
Tabela dos tempos de cozedura
Legumes
Cozedura
FRESCOS
Posição da válvula
1
ULTRACONGELADOS
Posição da válvula
2
* Alimento no cesto de vapor
** Alimento em água
Carnes - Peixes
FRESCOS
Posição da válvula 2
ULTRACONGELADOS
Posição da válvula 2
Atum (4 bifes 0,6 kg) 7 min
9 min.
Cabrito (perna 1,3 kg) 25 min
35 min
Frango (inteiro 1,2 kg) 20 min
45 min.
Porco (carne assada 1 kg) 25 min
45 min
Salmão (4 postas 0,6 kg) 6 min
8 min.
Tamboril (filetes 0,6 kg) 4 min
6 min.
Vaca (carne assada 1 kg) 10 min
28 min
Abóbora (puré)
- imersão 8 min.
Aipo
- vapor 6 min.
- imersão 10 min.
Alcachofras
- vapor* 18 min.
- imersão** 15 min.
Alho-francês
Rodelas - vapor 2 min. 30
Arroz (leg. secos)
- imersão 7 min.
Batatas em
quartos
- vapor 12 min.
- imersão 6 min.
Beterraba-vermelha
- vapor 20 - 30 min.
Brócolos
- vapor 3 min. 3 min.
Cenouras
rodelas - vapor 7 min. 5 min.
Cogumelos
laminados - vapor 1 min. 5 min.
Inteiros - imersão 1 min. 30
Couve-de-Bruxelas
- vapor 7 min. 5 min. - immersion
Couve-flor
- imersão 3 min. 4 min.
Couve-frisada
picada - vapor 6 min.
desfolhada - vapor 7 min.
Curgetes
- vapor 6 min. 30 9 min
- imersão 2 min.
Endívias
- vapor 12 min.
Ervilhas
- vapor 1 min. 30 4 min
Ervilhas secas (leg. secos)
- imersão 14 min.
Espargos
- imersão 5 min.
Espinafres
- vapor 5 min. 8 min.
- imersão 3 min.
Feijão semi-seco
- imersão 20 min.
Feijão-verde
- vapor 8 min. 9 min.
Lentilhas verdes (leg. secos)
- imersão 10 min.
Nabos
- vapor 7 min.
- imersão 6 min.
Trigo (leg. secos)
- imersão 15 min.
Page 48

45
Σημαντικές προφυλάξεις
Για την ασφάλειά σας, η παρούσα συσκευή έχει κατασκευαστεί σύμφωνα με τα εφαρμοστέα
πρότυπα και κανονισμούς:
- Οδηγία περί εξοπλισμού υπό πίεση
- Υλικά σε επαφή με τροφές
•
Η παρούσα συσκευή προορίζεται για οικιακή χρήση.
•
Αφιερώστε χρόνο για να διαβάσετε όλες τις οδηγίες και να ανατρέχετε πάντα στον “Οδηγό
χρήσης”.
•
Όπως ισχύει για όλες τις συσκευές μαγειρέματος, βεβαιωθείτε ότι υπάρχει στενή επίβλεψη κατά
τη χρήση της χύτρας, ιδίως εάν βρίσκονται στον χώρο παιδιά.
•
Μην τοποθετείτε τη χύτρα μέσα σε ζεστό φούρνο.
•
Να μετακινείτε τη χύτρα υπό πίεση με τη μέγιστη προσοχή. Μην αγγίζετε τις ζεστές επιφάνειες.
Να χρησιμοποιείτε τις λαβές και τα κουμπιά. Χρησιμοποιήστε γάντια κουζίνας εάν χρειαστεί.
•
Να χρησιμοποιείτε τη χύτρα αποκλειστικά για τον σκοπό που προορίζεται.
•
Η χύτρα ψήνει υπό πίεση. Η ακατάλληλη χρήση μπορεί να προκαλέσει τραυματισμό από
ζεμάτισμα. Βεβαιωθείτε ότι η χύτρα είναι καλά κλεισμένη πριν τη θέσετε σε λειτουργία. Δείτε την
παράγραφο“Κλείσιμο”.
•
Βεβαιωθείτε ότι η βαλβίδα είναι σε θέση αποσυμπίεσης προτού ανοίξετε τη χύτρα.
•
Μην ανοίγετε ποτέ τη χύτρα με βία. Βεβαιωθείτε ότι η εσωτερική πίεση έχει υποχωρήσει. Δείτε
την παράγραφο“Ασφάλεια”.
•
Ποτέ μη χρησιμοποιείτε τη χύτρα χωρίς υγρό διότικάτιτέτοιο μπορεί να της προκαλέσει σοβαρές
βλάβες. Να φροντίζετε πάντοτε να υπάρχει αρκετό υγρό κατά το μαγείρεμα.
•
Να χρησιμοποιείτε μία ή περισσότερες συμβατές πηγές θερμότητας, σύμφωνα με τις οδηγίες
χρήσης.
•
Μη γεμίζετε τη χύτρα περισσότερο από τα 2/3 της χωρητικότητάς της (ένδειξη μέγιστης
πλήρωσης).
•
Για τρόφιμα που διαστέλλονται κατά το μαγείρεμα, όπως το ρύζι, τα αφυδατωμένα λαχανικά ή τις
κομπόστες, μη γεμίζετε τη χύτρα ταχύτητας πάνω από το ήμισυ της χωρητικότητάς της.
•
Μετά από το μαγείρεμα κρεάτων που έχουν επιφανειακόδέρμα (π.χ.βοδινή γλώσσα…),το οποίο
ενδέχεται να διογκωθεί υπό πίεση, μην τρυπήσετε το κρέας εάν το δέρμα φαίνεται διογκωμένο.
Υπάρχει κίνδυνος πρόκλησης εγκαύματος. Σας συνιστούμε να τρυπάτε το κρέας πριν από το
μαγείρεμα.
•
Για πηχτά τρόφιμα (φάβα, ραβέντι…), πρέπει να κουνήσετε ελαφρώς τη χύτρα πριν από το
άνοιγμα για να μην πεταχτεί η τροφή προς τα έξω.
•
Βεβαιωθείτε ότι δεν παρεμποδίζονται οι βαλβίδες πριν από κάθε χρήση. Δείτε την παράγραφο
“Πριν από το μαγείρεμα”.
•
Μη χρησιμοποιείτε τη χύτρα για να τηγανίσετε υπό πίεση με λάδι.
•
Μην παρεμβαίνετε στα συστήματα ασφαλείας πέρα από τις οδηγίες καθαρισμού και συντήρησης.
•
Να χρησιμοποιείτε αποκλειστικά γνήσια ανταλλακτικά της TEFAL που είναι κατάλληλα για το
μοντέλο σας. Ειδικότερα, να χρησιμοποιείτε κάδο και καπάκι .
•
Οι ατμοί από οινοπνευματώδη ποτά είναι εύφλεκτοι. Αφήστε τη χύτρα να φθάσει σε βρασμό για
περίπου 2 λεπτά πριν τοποθετήσετε το καπάκι. Να επιβλέπετε τη συσκευή κατά την προετοιμασία συνταγών που περιέχουν αλκοόλ.
•
Μη χρησιμοποιείτε τη χύτρα για να αποθηκεύετε όξινα ή αλατισμένα τρόφιμα πριν και μετά από
το μαγείρεμα, υπάρχει κίνδυνος πρόκλησης φθοράς στον κάδο.
Φυλάξτε τις παρούσες οδηγίες
Page 49

46
EN
TR
ES
PT
EL
AR
FA
A
- Βαλβίδα λειτουργίας
B
- Σωλήνας βαλβίδας λειτουργίας
C
- Βαλβίδα ασφαλείας
D
- Ένδειξη παρουσίας πίεσης
E
- Κουμπί ανοίγματος
F
- Μακριά λαβή καπακιού
G - Ένδειξη τοποθέτησης καπακιού
H
- Ένδειξη τοποθέτησης βαλβίδας λειτουργίας
I
- Σύνδεσμος στεγανοποίησης καπακιού
J
- Καλάθι ατμού
K
- Βάση καλαθιού ατμού
L
- Μακριά λαβή κάδου
M
- Κάδος
N
- Κοντή λαβή κάδου
O - Ένδειξη μέγιστης πλήρωσης
Χαρακτηριστικά
Διάμετρος του πυθμένα της χύτρας -παραπομπές
Κανονιστικές πληροφορίες:
Ανώτατη πίεση λειτουργίας: 80 kPa.
Μέγιστη πίεση ασφαλείας: 170 kPa.
Συμβατές πηγές θερμότητας
•
Η χύτρα χρησιμοποιείται για όλους τους
τρόπους ζεστάματος συμπεριλαμβανομένης της επαγωγής.
•
Εάν θέλετε να χρησιμοποιήσετε ηλεκτρική ή επαγωγική εστία,
φροντίστε η διάμετρός της να είναι ίση ή μικρότερη από αυτήν
του πυθμένα της χύτρας.
•
Όταν χρησιμοποιείτε τη χύτρα πάνω σε υαλοκεραμική εστία,
βεβαιωθείτε ότι ο πυθμένας του κάδου είναι κατάλληλος και
καθαρός.
•
Επάνω σε εστία γκαζιού, η φλόγα δεν πρέπει να υπερβαίνει τη
διάμετρο του κάδου.
Χωρητι-
κότητα
Διάμετρος
κάδου
Διάμετρος
πυθμένα
Ανοξείδωτο μοντέλο
4 λ. 22 εκατ. 19 cm P25042
6 λ. 22 εκατ. 19 cm P25007
7 λ. 22 εκατ. 19 cm P25008
ΑΕΡΙΟ ΗΛΕΚΤΡΙΚΗ ΕΣΤΙΑ ΥΑΛΟΚΕΡΑΜΙΚΗ
ΑΛΟΓΟΝΟΥ
ΑΚΤΙΝΟΒΟΛΙΑΣ
ΕΠΑΓΩΓΙΚΗ
ΗΛΕΚΤΡΙΚΗ
ΕΣΤΙΑ ΣΠΙΡΑΛ
Περιγραφικό διάγραμμα
Page 50

47
Εξαρτήματα TEFAL
•
Τα εξαρτήματα για τη χύτρα που διατίθενται
στα εμπορικά καταστήματα είναι τα εξής:
•
Για την αντικατάσταση άλλων εξαρτημάτων ή επισκευές,
επικοινωνήστε με ένα εξουσιοδοτημένο κέντρο σέρβις τηςTEFAL.
•
Να χρησιμοποιείτε αποκλειστικά γνήσια ανταλλακτικά της TEFAL
που είναι κατάλληλα για το μοντέλο σας.
Χρήση
Άνοιγμα
•
Ωθήστε προς τα πίσω το κουμπί ανοίγματος
(E)
με τον
αντίχειρά σας έως τη θέση -
Εικ 1
Κρατήστε με το αριστερό σας χέρι τη μακριά λαβή του
κάδου
(L)
και περιστρέψτε με το δεξί σας χέρι τη μακριά
λαβή του καπακιού
(F)
αριστερόστροφα έως ότου ανοίξει
-
Εικ 2
. Στη συνέχεια, αφαιρέστε το καπάκι.
Κλείσιμο
•
Τοποθετήστε το καπάκι σε επίπεδη θέση πάνω στον κάδο
ευθυγραμμίζοντας τα τρίγωνα του καπακιού με τη λαβή του
κάδου
-
Εικ 3
•
Περιστρέψτε το καπάκι προς τα αριστερά έως το τέλος
- Εικ 3
• Π
ιέστε το κουμπί ανοίγματος
(E)
στη θέση
-
Εικ 4
Ελάχιστη πλήρωση
•
Να τοποθετείτε πάντα μια ελάχιστη ποσότητα υγρού τουλάχιστον ίση με 25 cl (2 ποτήρια)
.
Για μαγείρεμα στον ατμό
•
Η πλήρωση πρέπει να είναι τουλάχιστον ίση με 75 cl (6 ποτήρια).
•
Τοποθετήστε το καλάθι
(J)
πάνω στη βάση
(K)
που προβλέ-
πεται για τον σκοπό αυτόν
- Εικ 5
Εξάρτημα Κωδικός
Σύνδεσμος στεγανοποίησης X2010003
•
Τα τρόφιμα που
τοποθετούνται μέσα
στο καλάθι ατμού δεν
πρέπει να αγγίζουν το
καπάκι της χύτρας.
Page 51

48
EN
TR
ES
PT
EL
AR
FA
Μέγιστη πλήρωση
•
Ποτέ μη γεμίζετε τη χύτρα πάνω από τα 2/3 του ύψους του
κάδου (ένδειξη μέγιστης πλήρωσης)
- Εικ 6
Για ορισμένες τροφές
•
Για τρόφιμα που διαστέλλονται κατά το μαγείρεμα, όπως το ρύζι,
τα αφυδατωμένα λαχανικά ή οι κομπόστες…, μη γεμίζετε τη
χύτρα πάνω από το ήμισυ της χωρητικότητάς της
- Εικ 6
Χρήση της βαλβίδας λειτουργίας (A)
Για μαγείρεμα ευπαθών τροφών και λαχανικών
•
Τοποθετήστε το εικονόγραμμα της βαλβίδας
(A)
αντίκρυ
στην ένδειξη
(H)
.
Για μαγείρεμα κρέατος και κατεψυγμένων τροφών
•
Τοποθετήστε το εικονόγραμμα της βαλβίδας
(A)
αντίκρυ
στην ένδειξη
(H)
.
Για απελευθέρωση του ατμού
•
Τοποθετήστε το εικονόγραμμα της βαλβίδας
(A)
αντίκρυ
στην ένδειξη
(H)
.
Για αφαίρεση της βαλβίδας λειτουργίας
•
Αφήστε τη συσκευή να κρυώσει προτού αφαιρέσετε τη βαλβίδα
(A)
.
•
Πατήστε τη βαλβίδα και περιστρέψτε τη για να ευθυγραμμιστεί η
θέση με την ένδειξη
(H)
-
Εικ 7
•
Αφαιρέστε τη βαλβίδα.
Για εκ νέου τοποθέτηση της βαλβίδας λειτουργίας
•
Τοποθετήστε τη βαλβίδα λειτουργίας ευθυγραμμίζοντας τη
θέση με την ένδειξη
(H).
•
Πιέστε τη βαλβίδα λειτουργίας και κατόπιν περιστρέψτε τη έως
την επιθυμητή θέση.
Πρώτη χρήση
•
Γεμίστε με νερό έως τα 2/3 του κάδου. (ένδειξη μέγιστης πλήρωσης)
•
Τοποθετήστε τη βάση του καλαθιού
(K)
στον πυθμένα του κάδου
και εναποθέστε το καλάθι
(J)
πάνω στη βάση.
•
Κλείστε τη χύτρα.
•
Τοποθετήστε τη βαλβίδα λειτουργίας
(A)
στο
.
•
Τοποθετήστε τη χύτρα πάνω σε μια πηγή
θερμότητας την οποία έχετε ρυθμίσει στη μέγιστη ένταση.
Page 52

49
•
Όταν αρχίσει να διαφεύγει ο ατμός από τη βαλβίδα, μειώστε
την ένταση της πηγής θερμότητας και αφήστε να περάσουν
20 λεπτά.
•
Μετά από 20 λεπτά, απενεργοποιήστε την πηγή θερμότητας.
•
Περιστρέψτε τη βαλβίδα λειτουργίας
(A)
έως τη θέση
.
•
Όταν πέσει η ένδειξη παρουσίας πίεσης
(D)
: η χύτρα
δεν είναι πλέον υπό πίεση.
•
Ανοίξτε τη χύτρα.
•
Ξεπλύνετε τη χύτρα με νερό και στεγνώστε την.
•
Σημείωση: η εμφάνιση κηλίδων στον εσωτερικό πυθμένα του
κάδου δεν αλλοιώνουν σε καμία περίπτωση την ποιότητα του
μετάλλου. Αποτελούν κατάλοιπα αλάτων. Για να τα απομακρύνετε, μπορείτε να χρησιμοποιήσετε ένα σύρμα κουζίναςμε λίγο αραιωμένο ξύδι.
Πριν από το μαγείρεμα
•
Πριν από κάθε μαγείρεμα, να αφαιρείτε τη βαλβίδα
(A)
(δείτε την
παράγραφο “Χρήση της βαλβίδας λειτουργίας”) και να
βεβαιώνεστε οπτικά και τακτικά ότι ο σωλήνας της βαλβίδας
λειτουργίας
(B)
δεν έχει φράξει. Αν χρειαστεί, καθαρίστε τον με
μια οδοντόβουρτσα
- Εικ 8
•
Βεβαιωθείτε ότι δεν εμποδίζεται η κίνηση της βαλβίδας
λειτουργίας
(C)
: δείτε την παράγραφο “Καθαρισμός και
συντήρηση”.
•
Τοποθετήστε στη θέση της τη βαλβίδα λειτουργίας
(A)
και
επιλέξτε τη θέση
ή
.
•
Βεβαιωθείτε ότι η χύτρα είναι καλά κλεισμένη πριν τη θέσετε σε
λειτουργία
.
•
Τοποθετήστε τη χύτρα πάνω σε μια πηγή θερμότητας την
οποία έχετε ρυθμίσει στη μέγιστη ένταση.
Κατά το μαγείρεμα
•
Όταν η βαλβίδα λειτουργίας
(A)
επιτρέπειτη διαφυγήτου ατμού
με συνεχόμενο τρόπο, εκπέμποντας έναν συνεχή ήχο (ΠΣΣΣΤ),
αρχίζει τομαγείρεμα, μειώστετηνέντασητηςπηγήςθερμότητας.
•
Αρχίστε να μετράτε αντίστροφα τον χρόνο ψησίματος που
υποδεικνύεται στη συνταγή σας.
•
Όταν παρέλθει ο χρόνος ψησίματος, απενεργοποιήστε την πηγή
θερμότητας.
Page 53

50
EN
TR
ES
PT
EL
AR
FA
Τέλος μαγειρέματος
Για απελευθέρωση του ατμού
•
Μόλις απενεργοποιήσετε την πηγή θερμότητας, έχετε δύο επιλογές:
•
Αργή αποσυμπίεση:
περιστρέψτε τη βαλβίδα λειτουργίας
(A)
έως τη θέση . Όταν πέσει η ένδειξη παρουσίας πίεσης
(D)
: η
χύτρα δεν είναι πλέον υπό πίεση.
•
Γρήγορη αποσυμπίεση:
τοποθετήστε τη χύτρα κάτω από
κρύο νερό βρύσης. Όταν πέσει η ένδειξη παρουσίας πίεσης
(D)
:
η χύτρα δεν είναι πλέον υπό πίεση. Περιστρέψτε τη βαλβίδα
λειτουργίας
(A)
έως τη θέση .
•
Τώρα μπορείτε να την ανοίξετε
.
Καθαρισμός και συντήρηση
Καθαρισμός της χύτρας
•
Για την καλή λειτουργία της συσκευής σας, πρέπει να τηρείτε τις
παρούσες συστάσεις καθαρισμού και συντήρησης μετά από κάθε
χρήση.
•
Να πλένετε τη χύτρα μετά από κάθε χρήση με χλιαρό νερό όπου
έχετε προσθέσει απορρυπαντικό πιάτων. Κάντε το ίδιο και για το
καλάθι.
•
Μηχρησιμοποιείτευποχλωριώδεςνάτριοήχλωριωμένα προϊόντα.
•
Μη υπερθερμαίνετε τον κάδο όταν είναι άδειος.
Για καθαρισμό του εσωτερικού του κάδου
•
Πλύνετέ το με σύρμα κουζίνας και απορρυπαντικό πιάτων.
•
Αν το εσωτερικό του ανοξείδωτου κάδου παρουσιάζει ιριδίζουσες ανακλάσεις, καθαρίστε το με ξύδι.
Για καθαρισμό του εξωτερικού του κάδου
•
Πλύνετέ το με ένα σφουγγαράκι και απορρυπαντικό πιάτων.
Για καθαρισμό του καπακιού
•
Πλύνετε το καπάκι κάτω από τρεχούμενο χλιαρό νερό με ένα
σφουγγαράκι και απορρυπαντικό πιάτων.
Γιακαθαρισμότουσυνδέσμουστεγανοποίησης τουκαπακιού
•
Μετά από κάθε μαγείρεμα, καθαρίστε τον σύνδεσμο στεγανοποίησης
(I)
και την υποδοχή του.
•
Για την επανατοποθέτηση του συνδέσμου στεγανοποίησης,ανατρέξτε στα σχέδια
-
Εικ. 9 - 10
Για καθαρισμό της βαλβίδας λειτουργίας (A)
•
Αφαιρέστε τη βαλβίδα λειτουργίας
(A)
: δείτε την παράγραφο
“Χρήση της βαλβίδας λειτουργίας”.
•
Καθαρίστε τη βαλβίδα λειτουργίας
(A)
κάτω από νερό της
βρύσης
- Εικ 11
Για καθαρισμό του σωλήνα της βαλβίδας λειτουργίας που
βρίσκεται στο εσωτερικό του καπακιού
•
Αφαιρέστε τη βαλβίδα
(A)
.
Εάν κατά την αποσυμπίεση
παρατηρήσετε αφύσικες
εκτινάξεις: γυρίστε πάλι τον
διακόπτη στη θέση και
κατόπιν αφήστε να
εκτελεστεί πάλι η
αποσυμπίεση αργά
διασφαλίζοντας ότι δεν
γίνονταιπια εκτινάξεις.
Μπορείτε να βάλετε τον
κάδο και το καλάθι στο
πλυντήριο πιάτων.
Μην πλένετε το καπάκι
στο πλυντήριο πιάτων.
Για να διατηρήσετε για
μεγαλύτερο χρονικό διάστημα τα χαρακτηριστικά
της χύτρας σας: μην υπερθερμαίνετε τον κάδο όταν
είναι άδειος.
Το μαύρισμα και οι
χαρακιές που μπορεί να
εμφανιστούν μετά από
μακρά χρήση δεν
αποτελούν πρόβλημα.
Page 54

51
•
Να ελέγχετε οπτικά και τακτικά ότι ο σωλήνας εκκένωσης
ατμού δεν έχει φράξει και ότι είναι στρογγυλός. Αν χρειαστεί,
καθαρίστε τον με μια οδοντόβουρτσα
- Εικ 8
Για καθαρισμό της βαλβίδας ασφαλείας (C)
•
Καθαρίστε το μέρος της βαλβίδας ασφαλείας που βρίσκεται
στο εσωτερικό του καπακιού με τρεχούμενο νερό.
•
Επαληθεύστε την καλή λειτουργία της πατώντας ελαφρώς το
κλαπέτο, το οποίο θα πρέπει να υποχωρήσει χωρίς δυσκολία
-
Εικ 12
Γιααντικατάστασητου συνδέσμουστεγανοποίησης τηςχύτρας
•
Αντικαταστήστε τον σύνδεσμο στεγανοποίησης της χύτρας μία
φορά ανά έτος.
•
Αντικαταστήστε τον σύνδεσμο στεγανοποίησης της χύτρας
αν έχει κοπεί.
•
Να αγοράζετε πάντα γνήσιους συνδέσμους στεγανοποίησης
TEFAL που είναι κατάλληλοι για το μοντέλο σας.
Για φύλαξη της χύτρας σας
•
Περιστρέψτε το καπάκι πάνω στον κάδο.
Ασφάλεια
Η χύτρα ταχύτητάς σας διαθέτει πολλαπλές διατάξεις ασφαλείας:
•
Ασφάλεια στο κλείσιμο:
-
Εάν η συσκευή δεν έχει κλείσει σωστά, η ένδειξη παρουσίας
πίεσης δεν μπορεί να ανέβει και αυτό δεν επιτρέπει την
αύξηση της πίεσης στη χύτρα.
•
Ασφάλεια στο άνοιγμα:
-
Εάν η χύτρα βρίσκεται υπό πίεση, το κουμπί ανοίγματος δεν
μπορείνα ενεργοποιηθεί. Μην ανοίγετε ποτέ τη χύτρα με βία.
Μην προβαίνετε σε οποιαδήποτε ενέργεια εάν η ένδειξη
παρουσίας πίεσης δείχνει ότι υπάρχει πίεση. Βεβαιωθείτε ότι
η εσωτερική πίεση έχει υποχωρήσει.
•
Δύο ασφάλειες για την υπερπίεση:
-
Πρώτη διάταξη ασφαλείας: η βαλβίδα ασφαλείας
(C)
απελευθερώνει την πίεση και διαφεύγει ατμός οριζοντίως
πάνω στο καπάκι
- Εικ 13
-
Δεύτερη διάταξη ασφαλείας: ο σύνδεσμος στεγανοποίησης
(I)
επιτρέπει στον ατμό να διαφύγει καθέτως από το χείλος του
καπακιού
- Εικ 14
Εάν ένα από τα συστήματα ασφαλείας για την υπερπίεση
ενεργοποιηθεί:
•
Απενεργοποιήστε την πηγή θερμότητας.
•
Αφήστε τη χύτρα να κρυώσει εντελώς.
•
Ανοίξτε τη χύτρα.
•
Ελέγξτε και καθαρίστε τη βαλβίδα λειτουργίας
(A)
, τον σωλήνα
εκκένωσης ατμού
(B)
, τη βαλβίδα ασφαλείας
(C)
και τον
σύνδεσμο στεγανοποίησης
(I)
.
Μη χρησιμοποιείτε ποτέ
αιχμηρό ή κοφτερό αντικείμενο για τον χειρισμό
αυτόν.
Πρέπει οπωσδήποτε να
μεταφέρετε τη χύτρα σας
προς έλεγχο σε ένα
εξουσιοδοτημένο κέντρο
σέρβις της TEFAL μετά
από κάθε 10 χρόνια
χρήσης.
Page 55

52
EN
TR
ES
PT
EL
AR
FA
Συμβουλές χρήσης
1 - Ο ατμός είναι υπερβολικά ζεστός όταν βγαίνει από τη βαλβίδα
λειτουργίας.
2 - Όταν αρχίσει να ανεβαίνει η ένδειξη παρουσίας πίεσης, δεν
μπορείτε πλέον να ανοίξετε τη χύτρα.
3 - Όπως ισχύει για όλες τις συσκευές μαγειρέματος, βεβαιωθείτε
ότι υπάρχει στενή επίβλεψη κατά τη χρήση της χύτρας εάν
βρίσκονται στον χώρο παιδιά.
4 - Να είστε προσεκτικοί κατά τις εκτινάξεις ατμού.
5 - Για να μετακινήσετε τη χύτρα, κρατήστε τη από τις δύο λαβές
του κάδου.
6 - Μην αφήνετε τις τροφές για μεγάλο χρονικό διάστημα μέσα
στη χύτρα.
7 - Ποτέ μη χρησιμοποιείτε υποχλωριώδες νάτριο ή χλωριωμένα
προϊόντα, γιατί μπορεί να αλλοιωθεί η ποιότητα του
ανοξείδωτου χάλυβα.
8 - Μην πλένετε το καπάκι στο πλυντήριο πιάτων. Μην αφήνετε το
καπάκι να μουλιάσει σε νερό.
9 - Αντικαταστήστε τον σύνδεσμο στεγανοποίησης μία φορά ανά
έτος.
10 - Ο καθαρισμός της χύτρας γίνεται αποκλειστικά αφού έχει
κρυώσει και είναι άδεια.
11 - Πρέπει οπωσδήποτε να μεταφέρετε τη χύτρα σας προς έλεγχο
σε ένα εξουσιοδοτημένο κέντρο σέρβις της TEFAL μετά από
κάθε 10 χρόνια χρήσης.
Εγγύηση
•
Σύμφωνα με την προοριζόμενη χρήση όπως αυτή προβλέπεται
στο εγχειρίδιο χρήσης, ο κάδος της νέας σας χύτρας ταχύτητας
TEFAL καλύπτεται με εγγύηση 10 ετών για τα εξής:
-
Οποιοδήποτε σφάλμα αφορά τη μεταλλική δομή του κάδου,
-
Οποιαδήποτε πρόωρη φθορά του μετάλλου της βάσης.
•
Ως προς τα άλλα μέρη, η εγγύηση για τα ανταλλακτικάκαι
το κόστος εργασίας ισχύει για 1 έτος
(εκτός αν ισχύει ειδική
νομοθεσία στη χώρα σας), σχετικά με κάθε βλάβη ή ελάττωμα
κατασκευής.
•
Ησυμβατικήαυτήεγγύησηαποκτάταικατόπινπαρουσίασης
τηςταμειακής απόδειξης ή τιμολογίουπου αποδεικνύει την
ημερομηνίααγοράς.
•
Οι παρούσες εγγυήσεις δεν περιλαμβάνουν:
•
Τις φθορές που έχουν προκληθεί από τη μη τήρηση σημαντικών
προφυλάξεων ή από ακατάλληλες χρήσεις, όπως:
-
Χτυπήματα, πτώσεις, τοποθέτηση στον φούρνο, …
- Πλύσιμο του καπακιού στο πλυντήριο πιάτων.
•
Μπορείτε να χρησιμοποιήσετε την εγγύηση μόνο στα εξουσιοδοτημένα κέντρα σέρβις της TEFAL.
•
Μπορείτε να καλέσετε τον αριθμό +30 210-63 71 000 για να μάθετε τη διεύθυνση του πλησιέστερου εξουσιοδοτημένου κέντρου
σέρβις της TEFAL.
Page 56

53
Η TEFAL απαντά στις ερωτήσεις σας
Προβλήματα, Συστάσεις
Αν η χύτρα ζεσταθεί υπό
πίεση χωρίς υγρό στο
εσωτερικό της:
•
Παραδώστε τη χύτρα για έλεγχο σε ένα εξουσιοδοτημένο κέντρο σέρβις της TEFAL.
Εάν δεν ανεβαίνει η ένδειξη
παρουσίας πίεσης και δεν
διαφεύγει τίποτε από τη
βαλβίδα κατά τη διάρκεια
του μαγειρέματος:
•
Αυτό είναι φυσιολογικό κατά τα πρώτα λεπτά.
•
Εάν το φαινόμενο επιμένει, βεβαιωθείτε ότι:
- Η ένταση της πηγής θερμότητας είναι αρκετά ισχυρή, εάν
όχι αυξήστε την.
- Η ποσότητα υγρού μέσα στον κάδο είναι επαρκής.
- Η βαλβίδα λειτουργίας είναι στη θέση ή
.
- Η χύτρα είναι καλά κλεισμένη.
- Ο σύνδεσμος στεγανοποίησης ή το χείλος του κάδου δεν
έχουν φθαρεί.
Εάν ανεβαίνει η ένδειξη
παρουσίας πίεσης και δεν
διαφεύγει τίποτε από τη
βαλβίδα κατά τη διάρκεια
του μαγειρέματος:
•
Αυτό είναι φυσιολογικό κατά τα πρώτα λεπτά.
•
Αν το φαινόμενο επιμένει:
•
Βρέξτε τη χύτρα με κρύο νερό. Κατόπιν, ανοίξτε την.
•
Καθαρίστε τη βαλβίδα λειτουργίας και τον σωλήνα της βαλβίδας λειτουργίας
- Εικ. 8
και βεβαιωθείτε ότι το κλαπέτο της
βαλβίδας ασφαλείας υποχωρεί χωρίς δυσκολία
- Εικ. 12
Εάν ο ατμός διαφεύγει γύρω
από το καπάκι, ελέγξτε εάν:
•
Το καπάκι έχει κλείσει καλά.
•
Ο σύνδεσμος στεγανοποίησης είναι σωστά τοποθετημένος
στο καπάκι.
•
Ο σύνδεσμος στεγανοποίησης είναι σε καλή κατάσταση, και
εάν χρειαστεί, αντικαταστήστε τον.
•
Το καπάκι, ο σύνδεσμος στεγανοποίησης και η υποδοχή του
μέσα στο καπάκι, η βαλβίδα ασφαλείας και η βαλβίδα λειτουργίας είναι καθαρά.
•
Το χείλος του κάδου βρίσκεται σε καλή κατάσταση.
Εάν οι τροφές κάηκαν μέσα
στη χύτρα:
•
Αφήστε τον κάδο να μουλιάσει για λίγη ώρα προτού τον
πλύνετε.
•
Ποτέ μη χρησιμοποιείτε υποχλωριώδες νάτριο ή χλωριωμένα
προϊόντα.
Εάν δεν μπορείτε να
ανοίξετε το καπάκι:
•
Ελέγξτε εάν η ένδειξη παρουσίας πίεσης είναι σε χαμηλή θέση.
•
Αν όχι: αποσυμπιέστε, και αν χρειαστεί, αφήστε τη χύτρα να
κρυώσει κρατώντας την κάτω από κρύο νερό.
Page 57

54
EN
TR
ES
PT
EL
AR
FA
Κανονιστικές σημάνσεις
Σήμανση Θέση
Αναγνωριστικό κατασκευαστή ή εμπορικής ονομασίας
Λαβή καπακιού.
Έτος και παρτίδα κατασκευής Στο εσωτερικό του καπακιού.
Κωδικός μοντέλου
Πίεση λειτουργίας (ΠΛ)
Μέγιστη πίεση ασφαλείας (ΠΑ)
Χωρητικότητα
Στον εξωτερικό πυθμένα του κάδου.
Προβλήματα, Συστάσεις
Αν η χύτρα ζεσταθεί υπό
πίεση χωρίς υγρό στο
εσωτερικό της:
•
Παραδώστε τη χύτρα για έλεγχο σε ένα εξουσιοδοτημένο
κέντρο σέρβις της TEFAL.
•
Εάν δεν ανεβαίνει η ένδειξη παρουσίας πίεσης και δεν
διαφεύγει τίποτε από τη βαλβίδα κατά τη διάρκεια του
μαγειρέματος:
•
Αυτό είναι φυσιολογικό κατά τα πρώτα λεπτά.
•
Εάν το φαινόμενο επιμένει, βεβαιωθείτε ότι:
Page 58

55
Πίνακας χρόνων μαγειρέματος
Λαχανικά
Μαγείρεμα
ΦΡΕΣΚΑ
Θέσητηςβαλβίδας
1
ΚΑΤΕΨΥΓΜΕΝΑ
Θέσητηςβαλβίδας
2
* Τροφή στο καλάθι ατμού
** Τροφή στο νερό
Κρέας - Ψάρι
ΦΡΕΣΚΟ
Θέση της βαλβίδας 2
ΚΑΤΕΨΥΓΜΕΝΟ
Θέση της βαλβίδας 2
Αρνί (πόδι 1,3 κιλά) 25 λεπτά
35
λεπτά
Βοδινό (ψητό 1 κιλό) 10 λεπτά
28
λεπτά
Κοτόπουλου (ολόκληρο 1,2 κιλά) 20 λεπτά
45
λεπτά
Παχύχελο (φιλέτα 0,6 κιλά) 4 λεπτά
6
λεπτά
Σολομός (4 φέτες 0,6 κιλά) 6 λεπτά
8
λεπτά
Τόνος (4 φιλέτα 0,6 κιλά) 7 λεπτά
9
λεπτά
Χοιρινό (ψητό 1 κιλό) 25 λεπτά
45
λεπτά
Αγκινάρες
- ατμός*
18 λεπτά
- βύθιση**
15 λεπτά
Αντίδια
- ατμός
12 λεπτά
Αρακάς
- ατμός
1½ λεπτό 4 λεπτά
Γογγύλια
- ατμός
7 λεπτά
- βύθιση
6 λεπτά
Καρότα ροδέλες
- ατμός
7 λεπτά 5 λεπτά
Κόκκινα παντζάρια
- ατμός
20 - 30 λεπτά
Κολοκυθάκια
- ατμός
6½ λεπτά 9 λεπτά
- βύθιση
2 λεπτά
Κολοκύθα (πολτός)
- βύθιση
8 λεπτά
Κουνουπίδι
- βύθιση
3 λεπτά 4 λεπτά
Λαχανάκια Βρυξελλών
- ατμός
7 λεπτά 5 λεπτά - βύθιση
Μανιτάρια ψιλοκομμένα
- ατμός
1 λεπτό 5 λεπτά
ολόκληρα
- βύθιση
1½ λεπτό
Μπρόκολα
- ατμός
3 λεπτά 3 λεπτά
Πατάτες σε τέταρτα
- ατμός
12 λεπτά
- βύθιση
6 λεπτά
Πράσα σε ροδέλες
- ατμός
2½ λεπτά
Πράσινα φασολάκια
- ατμός
8 λεπτά 9 λεπτά
Πράσινες φακές (ξηρά όσπρια)
- βύθιση
10 λεπτά
Πράσινο λάχανο ψιλοκομμένο
- ατμός
6 λεπτά
σε φύλλα
- βύθιση
7 λεπτά
Ρύζι (ξηρά όσπρια)
- βύθιση
7 λεπτά
Σέλινο
- ατμός
6 λεπτά
- βύθιση
10 λεπτά
Σιτάρι (ξηρά όσπρια)
- βύθιση
15 λεπτά
Σπανάκι
- ατμός
5 λεπτά 8 λεπτά
- βύθιση
3 λεπτά
Σπαράγγια
- βύθιση
5 λεπτά
Φάβα (ξηρά όσπρια)
- βύθιση
14 λεπτά
Φασόλια ξηρά
- βύθιση
20 λεπτά
Page 59

56
EN
TR
ES
PT
EL
AR
FA
∞∫u Ë√ßLU„
±Ô∏KÒπW
±uÆl «∞BLUÂ
©U“§W
±uÆl «∞BLUÂ
82 œÆOIW01 œÆUzo´πq (¸Ëß∑u1 ØKZ)
54 œÆOIW02 œÆOIWœ§Uà (ØU±KW2,1 ØKZ)
53 œÆOIW52 œÆOIWîdË· (≠ªc3,1 ØKZ
6 œÆUzo4 œÆUzoßLp ±u≤p(≠OKOt 6,0ØKZ)
8 œÆUzo6 œÆUzoßKLuÊ (4ß∑Op 6,0ØKZ)
9 œÆUzo7 œÆUzo¢u≤U (4ß∑Op 6,0ØKZ)
©FUÂ ±Ô∏KÒZ
±uÆl «∞BLUÂ
©FUÂ ©U“Ã
±uÆl «∞BLUÂ
«∞DNw
8 œÆUzo5 œÆUzo- °ªU¸
ß∂U≤a
3 œÆUzo-¨Ld
41 œÆOIW-¨Ld°U“ô¡ (±πHHW)
7 œÆUzo- °ªU¸
«∞KHX
6 œÆUzo-¨Ld
51 œÆOIW-¨Ld•∂u» ÆL` (§U·)
02 œÆOIW-¨Ld
•∂u» ÆL` (≤Bn
§U·)
* ≠w ßKÒW «∞∂ªU¸
** °U∞LU¡
Page 60

57
©FUÂ ±Ô∏KÒZ
±uÆl «∞BLUÂ
©FUÂ ©U“Ã
±uÆl «∞BLUÂ
«∞DNw
81 ϮOIW
- °ªU¸*
√¸{w ®uØw
51 ϮOIW
-¨Ld**
02 - 03 œÆOIW-¨Ld
«∞NKOuÊ
02 - 03 œÆOIW- °ªU¸
«∞∂Mπd «_•Ld
3 œÆUzo3 œÆUzo- °ªU¸
°dËØKw
5 œÆUzo - ¨Ld7 œÆUzo- °ªU¸
«∞Jd≤V
6 œÆUzo- °ªU¸
±ÔIDÒl
±KHu· , √îCd
7 œÆUzo- °ªU¸
√˸«‚
5 œÆUzo7 œÆUzo- °ªU¸
§e¸
4 œÆUzo3 œÆUzo-¨Ld
Æd≤∂Oj
6 œÆUzo- °ªU¸
Ød≠f
01 œÆUzo-¨Ld
9 œÆUzo03: 6 œÆUzo- °ªU¸
Øußv
2 œÆOIW-¨Ld
21 œÆOIW- °ªU¸
≥Mb°U¡
9 œÆUzo8 œÆUzo- °ªU¸
≠UÅu∞OU îCd«¡
01 œÆUzo-¨Ld
´b” √îCd
03: 2 œÆOIW- °ªU¸
±ÔIDÒl
ØdÒ«À
5 œÆUzo1 œÆOIW- °ªU¸
±ÔIDÒl
≠Dd
03:1 œÆOIW-¨Ld
ØU±q
4 œÆUzo03:1 œÆOIW- °ªU¸
°U“ô¡
21 œÆOIW- °ªU¸
±JF∂U‹
°DU©f
6 œÆUzo-¨Ld
8 œÆUzo-¨Ld
ÆdŸ (±NdË”)
7 œÆUzo-¨Ld
√¸“ (§U·)
§bˉ √ËÆU‹ «∞DNw
«∞ªÔCU¸
* ≠w ßKÒW «∞∂ªU¸
** °U∞LU¡
Page 61

58
EN
TR
ES
PT
EL
AR
FA
´ö±U‹ ¢MEOLOW
«∞LuÆl«∞Fö±W
±I∂i «∞GDU¡«∞∑Fd¥n ´s «∞LÔBMÒl √Ë «∞Fö±W «∞∑πU¸¥W
œ«îq «∞LI∂ißMW «∞BMl √Ë œ≠FW «ù≤∑UÃ
≥OJq ©Mπd… «∞CGj ±s «∞ªU¸Ã
±d§l «∞Luœ¥q
«∞CGj «∞∑AGOKw (FP)
«∞∫b «_ÆBv ∞KCGj «ü±s (SP)
«∞ºFW
Page 62

59
«∞∫q«∞LAJKW
> «´d÷ ©Mπd… «∞CGj ´Kv ±dØe îb±W ¢OHU‰ «∞LÔF∑Lb≈–« ¢FdÒ{X ©Mπd… «∞CGj
∞K∑ºªOs œËÊ Ë§uœ √Í
≤uŸ ±s «∞ºu«zq °b«îKNU :
> ≥c« √±d ©∂OFw ≠w «∞bÆUzo «_Ë∞v ±s «ùß∑FLU‰
> ≈–« «ß∑LdÒ‹ ≥cÁ «∞∫U∞W ©u¥öÎ, ¢QØb √Ê :
- «∞∫d«¸… ØU≠OW, ≈–« ØU≤X «∞∫d«¸… ±MªHCW, «¸≠FNU.
- ØLOW «∞ºu«zq ≠w ©Mπd… «∞CGj ØU≠OW.
- ÅLU «∞∑AGOq ±∏∂ÒX ´Kv «∞LuÆl √Ë
- ©Mπd… «∞CGj ±IHKW ¢LU±UÎ
- •KIW ±Ml «∞∑ºÒd» ¨Od ¢U∞HW
≈–« ∞r ¥d¢Hl ±R®Òd «∞CGj
Ë∞r ¥ªdà «∞∂ªU¸ ±s
«∞BLUÂ √£MU¡ «∞DNw :
> ≥c« √±d ©∂OFw ≠w «∞bÆUzo «_Ë∞v ±s «ùß∑FLU‰
> ≈–« «ß∑LdÒ‹ ≥cÁ «∞∫U∞W ©u¥öÎ,
> {l ©Mπd… «∞CGj ¢∫X «∞LU¡ «∞∂U¸œ. £r «≠∑∫NU.
> ≤EÒn ÅLÒU «∞∑AGOq ËÆU´b¢t - ®Jq 8, Ë¢QØb °QÊ ÅLU «_±UÊ ¥LJs
¢∫d¥Jt œËÊ √¥W ÅFu°W
- ®Jq 21.
≈–« «¸¢Hl ±R®Òd «∞CGj ,
˱U “«‰ «∞∂ªU¸ ô ¥ªdà ±s
«∞BLUÂ √£MU¡ «∞DNw:
> √Ê «∞GDU¡ ±IHq °S•JUÂ
> √Ê •KIW ±Ml «∞∑ºdÒ» ≠w ±uÆFNU «∞B∫O`.
> √Ê •KIW ±Ml «∞∑ºdÒ» ≠w •U∞W §Ob…, ¥πV «ß∑∂b«∞NU ≈–« •JLX «∞Cd˸….
> √Ê «∞GDU¡ , •KIW ±Ml «∞∑ºdÒ», ÆU´b… ÅLÒU «∞∑AGOq ≠w «∞GDU¡, ÅLUÂ
«_±UÊ, ËÅLÒUÂ «∞∑AGOq ≤EOHW ¢LU±UÎ.
> √Ê §u«≤V ©Mπd… «∞CGj ßKOLW Ë≠w •U∞W §Ob….
≈–« °b√ «∞∂ªU¸ ¥∑ºdÒ» ´s
§u«≤V «∞GDU¡ :
> «¢d„ ©Mπd… «∞CGj ≠w «∞LU¡ ∞H∑d… Æ∂q ¢MEOHNU
> ô ¢º∑FLq ±u«œ «∞∑∂OOi √Ë «∞JKu¸¥s.
≈–« «•∑d‚ «∞DFUÂ ≠w ÆFd
©Mπd… «∞CGj
> ¢QØb √Ê ±R®d «∞CGj ±MªHi
> ≈–« ∞r ¥Js ≠w ±MªHCUÎ : •d¸ «∞CGj , Ë°dÒœ ©Mπd… «∞CGj ≠w •U∞W
«∞Cd˸… ¢∫X ¢OU¸ ±U¡ °U¸œ
≈–« ∞r ¥Js °Uß∑DU´∑p ≠∑`
«∞GDU¡ :
> ËÆX «∞DNw
> ±º∑uÈ «∞∫d«¸…
> ≈–« ØUÊ ÅLÒUÂ «∞∑AGOq ≠w ≠w ±uÆFt «∞B∫O`.
> ØLOÒW «∞ºu«zq «∞Lu§uœ… ≠w ©Mπd… «∞CGj.
≈–« ∞r ¥∑r ©Nw «∞DFU , √Ë
«Ê «∞DFUÂ Æb «•∑d‚, ¢QØb
±s :
> ¢Ô∑d„ ©Mπd… «∞CGj ∞∑ÔMIl ≠w «∞LU¡ ∞H∑d… Æ∂q ¢MEOHNU.
> ô ¢º∑FLq ±u«œ «∞∑∂OOi √Ë «∞JKu¸¥s.
≈–« «•∑d‚ «∞DFUÂ ≠w
©Mπd… «∞CGj :
¢OHU‰ ¢ÔπOV ´Kv √ßµK∑p «_Ø∏d ®Ou´UÎ.
Page 63

60
EN
TR
ES
PT
EL
AR
FA
≤BUz` Ë≈¸®Uœ«‹ «ùß∑FLU‰
1- ¥JuÊ «∞∂ªU¸ ®b¥b «∞∫d«¸… ´Mb îd˧t ±s ÅLU «∞∑AGOq
2- °Lπdœ √Ê ¥d¢Hl ±R®d «∞CGj, ∞s ¥Fb °S±JU≤p ≠∑` ©Mπd… «∞CGj .
3- ±∏KNU ±∏q √Í ©Mπd… {Gj √îdÈ, ¥πV ±d«Æ∂∑NU œ«zLUÎ, îBuÅUÎ √£MU¡
«ß∑FLU∞NU °∫Cu¸ «_©HU‰.
4- ¥Ôd§v «∞∫d’ ±s «∞MHY «∞∂ªU¸Í.
5- ∞∑∫d¥p √Ë ≤Iq ©Mπd… «∞CGj , «•LKNU œ«zLUÎ ±s ±I∂CONU.
6- ô ¢∑d„ «∞DFU œ«îq ©Mπd… «∞CGj.
7- ô ¢º∑FLq ±u«œ «∞∑∂OOi √Ë «∞JKu¸¥s _≤NU ¢R£d ßK∂OUÎ ´Kv §uœ…
«ùß∑U≤Kf ß∑Oq.
8- ô ¢Gºq «∞GDU¡ ≠w §öÒ¥W «∞B∫uÊ. ô ¢∑d„ «∞GDU¡ ±MIu´UÎ ≠w «∞LU¡.
9- «ß∑∂b‰ •KIW ±Ml «∞∑ºd» ßMu¥UÎ.
01- ¥∑r ¢MEOn ©Mπd… «∞CGj ≠Ij ´Mb±U ¢JuÊ °U¸œ… Ë´Mb±U ¢JuÊ ≠U¸¨W.
11- «´d÷ ©Mπd… «∞CGj ´Kv ±dØe îb±W ±F∑Lb ±s ¢OHU‰ °Fb ´Ad
ßMu«‹ ±s «ùß∑FLU‰.
«∞CLU≤W
• ¢∑L∑l ©Mπd… «∞CGj «∞∑w ∞b¥p °FAd ßMu«‹ {LU≤W {Ls «ùß∑FLU‰
«∞cÍ ¥∑IOÒb °U∞∑FKOLU‹ Ë«ù¸®Uœ«‹ «∞Ld≠IW. Ë¢ÔGDw ≥cÁ «∞CLU≤W :
- √¥W ´Ou» ≤U¢πW ´s ¢dØO∂W «∞LFbÊ ≠w ≥OJq ©Mπd… «∞CGj.
- √¥W ´Ou» ±∑IbÒ±W ≠w ±FbÊ «∞IU´b….
• ∞∂IOW «_§e«¡, {LU≤WßMW Ë«•b…, ¢ALq «∞Ob «∞FU±KW (°Uß∑∏MU¡±U ¥∑FU¸÷
±l Æu«≤Os «∞∂Kb •OY ¢IOr). ¢ÔGDw ≥cÁ «∞CLU≤W √¥W ´Ou» ¢BMOFOW.
• ¥ºdÍ ±HFu‰ ≥cÁ «∞CLU≤W ´Mb ≈°d«“ ≠U¢u¸… ®d«¡ «∞LM∑Z Ë´KONU ¢U¸¥a
«∞Ad«¡.
• ¥Ôº∑∏Mv ±s «∞CLU≤W ±U ¥Kw :-
• √Í ´DV ¥M∑Z ´s ´b «¢∂UŸ«∞MBUz` Ë«ù¸®Uœ«‹ «∞Ld≠IW√Ë «∞FDV«∞M∑U¢Z
´s ßu¡ «ùß∑FLU‰ , îBuÅUÎ :
- ßIu◊ «∞LM∑Z √¸{UÎ, «∞Bb±U‹ «∞Ab¥b…, √Ë Ë{Ft ≠w «∞HdÊ ...
- ¨ºq «∞GDU¡ ≠w §öÒ¥W «∞B∫uÊ.
• ≈Ê ±dØe îb±W¢OHU‰ «∞LF∑Lb∞t «∞∫o≠w ¢Ib¥r «∞ªb±W îö‰ ≠∑d… «∞CLU≤W.
• ¥d§v «ù¢BU‰ °U∞dÆr «∞LπU≤w ∞K∫Bu‰ ´Kv ´Mu«Ê ±dØe îb±W ¢OHU‰
«∞LF∑Lb .
Page 64

61
• «≠Bq ÅLÒUÂ «∞∑AGOq (A).
• ¢QØb °U∞FOs «∞Lπdœ… Ë≠w {u¡ «∞MNU¸ √Ê ÆU´b… «∞BLU ˫≤∂u» ¢Bd¥n
«∞∂ªU¸ ≤EOHUÊ. ¥LJs ¢MEOHNLU °u«ßDW ´uœ ¢ºKOp «_ßMUÊ ´Mb «∞Cd¸…
- ®Jq 8.
∞∑MEOn ÅLUÂ «_±UÊ (C)
• ¥ÔMEÒn «∞πe¡ «∞b«îKw ±s ÅLU «_±UÊ «∞Lu§uœ œ«îq «∞GDU¡ ¢∫X ±OUÁ
§U¸¥W .
• ¢QØb √Ê «∞BLÒU ¥FLq °JHU¡… °U∞CGj ÆKOöÎ ´Kv «∞J∂ÒU” «∞cÍ ¥πV √Ê
¥∑∫d„ œËÊ √¥W ÅFu°W - ®Jq 21.
ùß∑∂b«‰ •KIW ±Ml «∞∑ºd» ≠w ©Mπd… «∞CGj
• ¥πV «ß∑∂b«‰ •KIW ±Ml «∞∑ºd» ±d… Ë«•b… ßMu¥UÎ.
• ¥πV «ß∑∂b«‰ •KIW ±Ml «∞∑ºd» ´Mb ±ö•EW √Í ´ö±W ¢b‰ ´Kv ¢KHNU √Ë
¢LeÆNU.
• «ß∑FLq ≠Ij ÆDl ¨OU¸ ¢OHU‰ «_ÅKOW ∞Luœ¥q ©Mπd… «∞CGj «∞∑w ∞b¥p.
∞∑ªe¥s ©Mπd… «∞CGj
• «ÆKV «∞GDU¡ ¸√ßUÎ ´Kv ´IV Ë{Ft ≠u‚ ≥OJq «∞DMπd…
«∞ºö±W
¥∑u≠d ≠w ©Mπd… «∞CGj «∞∑w ∞b¥p ´bœ«Î ±s √≤ELW «∞ºö±W «∞LOJU≤OJOW.
• ßö±W «ùÆHU‰ :
- ≈–« ∞r ¢Js ©Mπd… «∞CGj ±IHKW °S•JUÂ, ≠SÊ ±R®Òd «∞CGj
ô¥LJMt «ù¸¢HUŸ, Ë°c∞p ∞s ¢∑LJs «∞DMπd… ±s «•∑∂U” «∞CGj.
• ßö±W «∞H∑` :
-´Mb±U ¢JuÊ «∞DMπd… ¢∫X «∞CGj, ≠SÊ ´Id… «∞H∑` ∞s ¥LJs
¢∫d¥JNU. ô ¢Ô∫Uˉ ≠∑` ©Mπd… «∞CGj °U∞Iu… . ô ¢∫Uˉ ≠∑`
±R®d «∞CGj °U∞Iu… . ¢QØb Æ∂q –∞p œ«zLUÎ √Ê «∞CGj Æb ¢r
¢Bd¥Ht ±s œ«îq ©Mπd… «∞CGj .
• îUÅO∑UÊ ≈{U≠O∑UÊ ∞Kºö±W
-«∞ªUÅOW «_Ë∞v : ¥ÔBdÒ· ÅLU «_±UÊ (C) «∞CGj Ë«∞∂ªU¸
°AJq «≠Iw ±s ÆLÒW «∞GDU¡
- ®Jq 31.
- «∞ªUÅOW «∞∏U≤OW : ¢ÔBdÒ· •KIW ±Ml «∞∑ºd» (I) «∞∂ªU¸ °AJq
´LuœÍ ±s §u«≤V «∞GDU¡
- ®Jq 41
≈–« ¢uÆn √•b √≤ELW «∞ºö±W √Ë Øö≥LU ´s «∞FLq :
• √©Hv¡ «∞LBb¸ «∞∫d«¸Í
• «¢d„ ©Mπd… «∞CGj ∞∑∂dœ ¢LU±UÎ
• «≠∑` ©Mπd… «∞CGj
• «≠∫h Ë≤EÒn ÅLÒU «∞∑AGOq (A), ÅLÒU ¢Bd¥n «∞∂ªU¸ (B), ÅLÒUÂ
«_±UÊ (C), Ë•KIW ±Ml «∞∑ºd» (I).
ô ¢º∑FLq ¬∞W •Uœ… √Ë ∞FLq
–∞p
«´d÷ ©Mπd… «∞CGj ´Kv
±dØe îb±W ±F∑Lb ±s ¢OHU‰
°Fb ´Ad ßMu«‹ ±s
«ùß∑FLU‰.
Page 65

62
EN
TR
ES
PT
EL
AR
FA
«ù≤∑NU¡ ±s «∞DNw
∞∑Bd¥n «∞∂ªU¸
• °Lπdœ ≈©HU¡ «∞LBb¸ «∞∫d«¸Í , ¥JuÊ ∞b¥p îOU¸¥s :
• ¢Bd¥n °Dw¡ ∞KCGj : {l ÅLUÂ «∞∑AGOq (A) ≠w «∞LuÆl .
°LπdÒœ √Ê ¥MªHi ±R®Òd «∞CGj (D) : ≠SÊ ©Mπd… «∞CGj Æb √Å∂∫X
îU∞OW ±s «∞CGj .
• ¢Bd¥n ßd¥l ∞KCGj : {l ©Mπd… «∞CGj ¢∫X ¢OÒU¸ ±U¡ °U¸œ. °LπdÒœ
√Ê ¥MªHi ±R®Òd «∞CGj (D) :≠SÊ ©Mπd… «∞CGj Æb√Å∂∫X îU∞OW ±s
«∞CGj . {l ÅLUÂ «∞∑AGOq (A) ≠w «∞LuÆl .
• ¥LJMp «üÊ ≠∑` ©Mπd… «∞CGj .
«∞∑MEOn Ë«∞BOU≤W
¢MEOn ©Mπd… «∞CGj
• ∞K∫Bu‰ ´Kv √≠Cq «∞M∑UzZ ´Mb ¢AGOq ≥c« «∞LM∑Z , ¥d§v «¢∂UŸ ≥cÁ
«∞MBUz` Ë«ù¸®Uœ«‹ ≠w «∞∑MEOn Ë«∞BOU≤W ≠w Øq ±d… ¢Ôº∑FLLq ≠ONU
©Mπd… «∞CGj ≥cÁ.
• «¨ºq ©Mπd… «∞CGj œ«zLUÎ °Fb Øq «ß∑FLU‰ °U∞LU¡ «∞b«≠v¡ ±ÔCU≠UÎ «∞Ot
«∞IKOq ±s ßUzq ¢MEOn «∞B∫uÊ. «≠Fq ≤Hf «∞Aw¡ °U∞Mº∂W ∞KºKÒW.
• ô ¢º∑FLq ±u«œ «∞∑∂OOi √Ë ±M∑πU‹ «∞JKu¸¥s.
• ô ¢ÔFdÒ÷ ©Mπd… «∞CGj ∞K∑ºªOs «∞LHd◊ ´Mb±U ¢JuÊ ≠U¸¨W.
∞∑MEOn «∞πe¡ «∞b«îKw ∞DMπd… «∞CGj
• ¢ÔMEÒn °u«ßDW «ßHMπW ±Fb≤OW Ë«∞IKOq ±s ßUzq ¢MEOn «∞B∫uÊ.
• ≈–« ØUÊ «∞πe¡ «∞b«îKw «ùß∑U≤Kf ß∑Oq ±s ©Mπd… «∞CGj ¥FJf ¢IeÒ•UÎ
∞u≤OUÎ, ≤EÒHNU °u«ßDW «∞ªqÒ.
∞∑MEOn «∞πe¡ «∞b«îKw ±s ©Mπd… «∞CGj .
• ¢ÔMEÒn °u«ßDW «ßHMπW ±l «∞IKOq ±s ßUzq ¢MEOn «∞B∫uÊ.
∞∑MEOn «∞GDU¡
• ¥ÔGºq «∞GDU¡ ¢∫X ¢OU¸ ±U¡ œ«≠v¡ ±l «ß∑FLU‰ «ßHMπW Ë«∞IKOq ±s ßUzq
¢MEOn «∞B∫uÊ.
∞∑MEOn •KIW ±Ml «∞∑ºdÒ» ≠w «∞GDU¡
• °Fb «ß∑FLU‰ ©Mπd… «∞CGj, ¥πV ¢MEOn •KIW ±Ml «∞∑ºdÒ» (I) ±l
≤∑u¡¬¢NU.
• ù´Uœ… ¢dØOV •KIW ±Ml «∞∑ºdÒ» ¥Ôd§v «∞Fuœ… «∞v «∞dßr «∞∑u{O∫w -
®Jq 9-01
∞∑MEOn ÅLÒUÂ «∞∑AGOq (A)
• «≤eŸ ÅLÒU «∞∑AGOq (A) : ¥d§v «∞Fuœ… «∞v ≠Id… "«ß∑FLU‰ ÅLÒUÂ
«∞∑AGOq".
• ¥ÔMEÒn ÅLÒUÂ «∞∑AGOq (A) ¢∫X ¢OU¸ ±OUÁ «∞BM∂u¸ - ®Jq 11
∞∑MEOn ÆU´b… ÅLU «∞∑AGOq «∞Lu§uœ… ´Kv «∞GDU¡ :
≈–« ô•EX îdËÃ «∞d–«–
°AJq ¨Od ©∂OFw √£MU¡
«∞CGj : √´b ¢dØOV
«∞BLUÂ ≠w ±uÆFt £r «°b√
°∑Bd¥n«∞CGj±d… £U≤OW ±l
«∞∫d’ Ë«∞∑QØb √Ê «∞d–«– Æb
«≤∑Nv.
¥LJMp √Ê ¢Gºq ≥OJq ©Mπd…
«∞CGj Ë ßKÒW «∞∂ªU¸ ≠w
§öÒ¥W «∞B∫uÊ.
ô ¢Gºq «∞GDU¡ ¬°b«Î ≠w
§öÒ¥W «∞B∫uÊ.
∞Jw ¢bËÂ ©Mπd… «∞CGj
©u¥öÎ : ô ¢ÔFdÒ{NU ∞K∑ºªOs
«∞LHd◊ ´Mb±U ¢JuÊ ≠U¸¨W.
«∞KDªU‹ «∞∂MOÒW «∞KuÊ Ë
«∞ªbË‘ «∞∂ºODW ≥w ≤∑OπW
∞FU±q «∞∑IUœÂ °Uùß∑FLU‰
Ë∞OºX °LAJKW .
Page 66

63
• ´Mb±U ¥∂b√ «∞∂ªU¸ °U∞ªdËà ±s «∞BLÒUÂ, ≈îHi «∞∫d«¸…, Ë£∂ÒX «∞LRÆX
´Kv 02 œÆOIW.
• °Fb «≤ICU¡ «∞‡ 02 œÆOIW, «©Hv¡ «∞LBb¸ «∞∫d«¸Í.
• {l ÅLUÂ «∞∑AGOq (A) ≠w «∞LuÆl .
• ´Mb±U ¥MªHi ±R®Òd «∞CGj (D) : ≠SÊ ©Mπd… «∞CGj Æb √Å∂∫X îU∞OW
±s «∞CGj .
• «≠∑` ¨DU¡ ©Mπd… «∞CGj .
• «¨ºq ©Mπd… «∞CGj °U∞LU¡ , ˧HHNU.
• ±ö•EW : «∞KDªU‹«∞Lu§uœ… ´Kv ÆU´b… ©Mπd…«∞CGj±s «∞MU•OW«∞b«îKOW
, ô ¢R£Òd ßK∂UÎ ´Kv §uœ… «∞LFbÊ . ≠Nc« ≤uŸ ±s «∞∑JKÒf «∞∂ºOj . ù“«∞W
≥cÁ «∞KDªU‹ , «ß∑FLq «ßHMπW ±Fb≤OW √Ë «∞IKOq ±s «∞ªq «∞LÔªHn.
Æ∂q «∞DNw
• Æ∂q «ß∑FLU‰ ©Mπd… «∞CGj , «≤eŸ ÅLU «∞∑AGOq (A) œ«zLUÎ (¥Ôd§v
±d«§FW ≠Id… ("«ß∑FLU‰ ÅLU «∞∑AGOq"), Ë¢QØb °U∞MEd °QÊ ÆU´b¢t (B)
¨Od ±ºbËœ… . ¥LJs ¢MEOn «∞IU´b… °u«ßDW ´uœ ¢ºKOp «_ßMUÊ ´Mb
«∞Cd¸…
- ®Jq 8.
• ¢QØb °QÊ ÅLÒU «_±UÊ (C) ÆUœ¸ ´Kv «∞∫dØW °ºNu∞W : (¥Ôd§v ±d«§FW
≠Id… " «∞∑MEOn Ë«∞BOU≤W").
• ¸ØÒV ÅLU «∞∑AGOq (A) Ë«î∑d √•b «∞LuÆFOs √Ë .
• ¥Ôd§v «∞∑QØb œ«zLUÎ °QÊ ©Mπd… «∞CGj ±IHKW °AJq Å∫O` Æ∂q «∞∂b¡
°∑ºªOMNU.
• {l ©Mπd… «∞CGj ´Kv ±Bb¸ •d«¸Í ±∏∂ÒX ´Kv «∞b¸§W «∞IBuÈ.
√£MU¡ «∞DNw
• °LπdÒœ √Ê ¥∂b√ ÅLU «∞∑AGOq (A) °∑Bd¥n «∞∂ªU¸ °Uß∑Ld«¸, Ë¥∂b√
°SÅb«¸ Åu‹ «∞MHY °U≤∑EUÂ, ¥JuÊ «∞DNw Æb °b√ . «îHi «∞∫d«¸….
• «{∂j «∞LRÆX •ºV «∞uÆX «∞LÔAU¸ «∞Ot ≠w ËÅHW «∞DNw.
• ´Mb «≤∑NU¡ ËÆX «∞DNw , «©Hv¡ «∞LBb¸ «∞∫d«¸Í.
Page 67

64
EN
TR
ES
PT
EL
AR
FA
«∞∑F∂µW ∞K∫b «_ÆBv
• ô ¢ÔF∂v¡ ©Mπd… «∞CGj °QØ∏d ±s £K∏w ßF∑NU (´ö±W «∞∫b «_ÆBv) -
®Jq 6
∞∂Fi √ÅMU· «∞DFUÂ
• °U∞Mº∂W ∞KDFU «∞w ¥∑Lbœ √£MU¡ «∞DNw, ±∏q «_¸“ √Ë «∞ªÔCU¸ «∞LÔπHÒHW, √Ë
ÅKBW«∞Hu«ØNW .. ô ¢Lú ©Mπd… «∞∂ªU¸°QØ∏d ±s ≤Bn •πLNU
. - ®Jq
6
«ß∑FLU‰ ÅLUÂ «∞∑AGOq (A)
∞DNw «∞DFU «∞ªHOn Ë «∞ªCU¸
• •dÒ„ Åu¸… «∞Lu§uœ… ´Kv «∞BLU (A) ∞∑B∂` ´Kv îj Ë«•b ±l
«∞Fö±W (H).
∞DNw «∞K∫u ˫∞DFU «∞LÔ∏KÒZ
• •dÒ„ Åu¸… «∞Lu§uœ… ´Kv «∞BLU (A) ∞∑B∂` ´Kv îj Ë«•b ±l
«∞Fö±W (H).
∞∑Bd¥n «∞∂ªU¸
• •dÒ„ Åu¸… «∞Lu§uœ… ´Kv «∞BLU (A) ∞∑B∂` ´Kv îj Ë«•b ±l
«∞Fö±W (H).
∞d≠l ÅLÒUÂ «∞∑AGOq
• «¢d„ «∞LM∑Z ∞Jw ¥∂dœ ¢LU±UÎ Æ∂q ¸≠l «∞BLU (A)
• «{Gj ´Kv «∞BLUÂ Ë•dÒØt ∞Jw ∞OB∂` ≠w ±IU°q «∞Fö±W (H) -
®Jq 7
• «¸≠l «∞BLU «üÊ.
ù´Uœ… ¢dØOV ÅLÒU «∞∑AGOq
• {l«∞BLUÂ≠w ±JU≤t «•d’´Kv ¥JuÊ ´Kvîj Ë«•b ±l«∞Fö±W(H)
• «{Gj ´Kv «∞BLU ˕dÒØt ∞Jw ¥Bq «∞v «∞LuÆl «∞cÍ ¢d¨∂t.
«ùß∑FLU‰ ∞KLd… «_Ë∞v
• «ßJV ≠w ©Mπd… «∞CGj «∞∫b «_œ≤v ±s «∞ºu«zq, ±U ¥FUœ‰ 52 ßM∑q (Øu°UÊ).
• {l ∫U±KW ßKÒW «∞∂ªU¸ (K) ≠w ÆFd ©Mπd… «∞CGj, Ë{l «∞ºKÒW (J) ≠uÆNU.
• «¨Ko ©Mπd… «∞∂ªU¸.
• {l ÅLÒUÂ «∞∑AGOq (A) ≠w «∞LuÆl .
• {l ©Mπd… «∞CGj ≠u‚ ±Bb¸ ∞K∫d«¸… ±∏∂ÒX ´Kv √´Kv œ¸§W.
• ´Mb±U ¥∂b√ «∞∂ªU¸ °U∞ªdËà ±s «∞BLÒUÂ, ¢ÔªHn «∞∫d«¸… Ë ¥ÔC∂j «∞LRÆÒX ´Kv 02 œÆOIW
Page 68

65
±ÔK∫IU‹ ¢OHU‰
• ¢∑u≠d «∞LK∫IU‹ «∞∑U∞OW ∞DMπd… «∞CGj ≠w «∞L∫ö‹
«∞∑πU¸¥W : -
• ùß∑∂b«‰ ÆDl ¨OU¸ √îdÈ, √Ë _´LU‰ «∞∑BKO` , ¥d§v «ù¢BU‰ °LdØd
îb±W ¢OHU‰ «∞L∫Kw «∞LF∑Lb.
• «ß∑FLq ≠Ij ÆDl ¨OU¸ ¢OHU‰ «_ÅKOW «∞LÔBLLW îBOBUÎ ∞KLM∑Z «∞cÍ
∞b¥p.
«ùß∑FLU‰
«∞H∑`
• °Uß∑FLU‰ «ù°NUÂ, «ß∫V ±I∂i «∞H∑` (E) Ë•dÒØt «∞v «∞ªKn «∞v
«∞LuÆl -
®Jq 1. «•Lq «∞LI∂i «∞Du¥q ∞DMπd… «∞CGj (L)
°Ob„ «∞OºdÈ °OMLU ¢Ô∫d„ °Ob„ «∞OLMv «∞LI∂i «∞Du¥q ∞KGDU¡ (F) °U¢πUÁ
´IU¸» «∞ºU´W , «∞v √Ê ¢H∑` -
®Jq 2 , £r «¸≠l «∞GDU¡.
«ù¨ö‚
• {l «∞GDU¡ ´Kv ©Mπd… «∞CGj ±l «∞∫d’ ´Kv ¢u«≠o «∞L∏K∏U‹ «∞BGOd…
≠w «∞GDU¡ ´Kv ±∏Oö¢NU ≠w «∞DMπd…. -
®Jq 3
• •dÒ„ «∞GDU¡ °U¢πUÁ «∞OºU¸ «∞v √Ê ¥∑uÆn. - ®Jq 3
• «{Gj ´Kv ±I∂i «∞GDU¡ (E)∞∑∫d¥Jt «∞v «∞LuÆl - ®Jq 4.
«∞∑F∂µW ∞K∫b «_œ≤v
• «ßJV ≠w ©Mπd… «∞CGj «∞∫b «_œ≤v ±s «∞ºu«zq, ±U ¥FUœ‰ 52 ßM∑q
(Øu°UÊ)
∞K∂ªU¸
• ¥πV √Ê ¥ÔºJV ≠w «∞DMπd… ±U ô ¥Iq ´s 57 ßM∑q ±U¡ (√Í ±U ¥ÔFUœ‰ 6
√Øu«» ¢Id¥∂UÎ)
• ¢u{l ßKÒW «∞∂ªU¸ (J) ´Kv «∞∫U±KW (K) «∞LÔªBBW ∞Nc« «∞Gd÷. -
®Jq 5
¸Ær «∞Ld§l
«∞LÔK∫o
X2010003
•KIW ±Ml «∞∑ºdÒ»
• «∞DFUÂ «∞cÍ ¥u{l ≠w
ßKÒW «∞∂ªU¸ , ¥πV √Ê ô
¥ö±f ¨DU¡ ©Mπd…
«∞∂ªU¸
.
Page 69

66
EN
TR
ES
PT
EL
AR
FA
A - ÅLUÂ «∞∑AGOq
B - ÆU´b… ÅLÒUÂ «∞∑AGOq
C - ÅLUÂ «_±UÊ
D - ±R®Òd «∞CGj
E - “¸ «∞H∑`
F - ±I∂i ©u¥q ∞KGDU¡
G- ´ö±W ±uÆl «∞GDU¡
H - ´ö±W ±uÆl ÅLÒUÂ «∞∑AGOq
I- •KIW «∞GDU¡ ∞LMl «∞∑ºdÒ»
J - ßKÒW «∞∂ªU¸
K - ±I∂i ßKÒW «∞∂ªU¸
L - ±I∂i ©u¥q ∞NOJq ©Mπd… «∞BGj
M- ≥OJq ©Mπd… «∞CGj
N - ±I∂i ÆBOd ∞DMπd… «∞BGj
O- ´ö±W «∞∫b «_ÆBv ∞K∑F∂µW
«∞Lu«ÅHU‹
±IOU” ÆDd ÆU´b… ©Mπd… «∞CGj - ±d§l «∞Luœ¥q
±FKu±U‹ ´s «∞LFU¥Od
•bËœ {Gj «∞∑AGOq «∞FKuÍ : 08 ØOKu°UßJU‰
•bËœ «∞∫b «_ÆBv ∞KCGj «ü±s : 071 ØOKu°UßJU‰
±uœ¥q ß∑U≤KfÆDd «∞IU´b…ÆDd «∞DMπd…«∞ºFW«∞ºFW ù§LU∞OW
*
24052P
71 ßM∑r22 ßM∑r4 ∞∑d8.4 ∞∑d
70052P
71 ßM∑r22 ßM∑r6 ∞∑d0.7 ∞∑d
800052P
71 ßM∑r22 ßM∑r7 ∞∑d8.7 ∞∑d
ËÅn √§e«¡ «∞LM∑Z
«∞LBUœ¸ «∞∫d«¸¥W «∞L∑u«≠IW
> ¥LJs «ß∑FLU‰ ©Mπd… «∞CGj ´Kv §LOl «∞LBUœ¸
«∞∫d«¸¥W °LU ≠ONU «∞∫∏ÒOW.
> ´Mb «ß∑FLU‰ ±uÆb ØNd°Uzw √Ë ßªÒUÊ ØNd°Uzw , ¥Ôd§v «∞∑QØb °QÊ •πr
∞u•U‹ «∞∑ºªOs ô ¥e¥b ´s •πr ÆU´b… ©Mπd… «∞CGj.
> ´Kv ߪÒUÊ «∞ºOd«±Op, ¢QØb œ«zLUΰQÊ ÆU´b¢t ≤EOHW ¢LU±UÎ.
> ´Kv ±uÆb «∞GU“, ¥πV √Ê ô ¥∑FbÈ «∞KNV ÆDd ÆU´b… ©Mπd… «∞CGj.
¬UÒ ±u®b ¯Nd¡Uzw ³OKu¤Os ŨFU«w ¥Yñ
§»ñUæ ¯Nd¡Uzw
* «∞ºFW «∞IBuÈ
Page 70

67
±FKu±U‹ ≥U±W ∞Kºö±W
±s √§q ßö±∑p, ¥ªCl ≥c« «∞LM∑Z ∞KIu«≤Os Ë«∞LFU¥Od «∞∑U∞OW :
- Æu«≤Os «∞CGj «∞L∑FKIW °QË«≤w «∞DNw
- «∞Lu«œ «∞∑w ∞NU «¢BU‰ ±∂U®d °U∞DFUÂ
> ÅÔLÒr ≥c« «∞LM∑Z ∞ûß∑FLU‰ «∞LMe∞w ≠Ij.
> ¥Ôd§v Æd«¡… §LOl «ù¸®Uœ«‹ «∞Ld≠IW °∑LFÒs, Ë«ß∑Fs œ«zLUÎ °b∞Oq «ùß∑FLU‰.
> ±Ó∏ÓKt ±∏q √Í §NU“ ¬îd ∞KDNw , ¥πV ≈´DU¡Á ƺDU ±s «ù≤∑∂UÁ Ë«∞FMU¥W œ«zLU , îBuÅUÎ √£MU¡ «ùß∑FLU‰
°∫Cu¸ «ù©HU‰.
> ô ¢Cl ©Mπd… «∞CGj «°b«Î ≠w ≠dÊ ßUîs
> ¥πV «∞∫d’ œ«zLUÎ ´Mb ¢∫d¥p √Ë •Lq ©Mπd… «∞CGj . ô ¢KLf «_ßD` «∞LFb≤OW «∞ºUîMW, «ß∑FLq
«∞LIU°i ≠Ij . «ß∑FLq «∞IHÒU“«‹ ´Mb «∞Cd˸….
> ô ¢º∑FLq ©Mπd… «∞CGj _Í ´Lq ¬îd ¨Od «∞cÍ ÅÔLÒLX ±s √§Kt.
> ©Mπd… «∞CGj ≥cÁ ¢FLq ¢∫X «∞CGj . «ùÅU°W °∫dË‚ «∞∂ªU¸ ≥w ≤∑OπW ∞ºu¡ «ùß∑FLU‰. ¥d§v œ«zLUÎ
«∞∑QØb ±s √Ê ©Mπd… «∞CGj ±ÔGKIW °S•JU Æ∂q ≈ß∑FLU∞NU. ¥Ôd§v «∞Fuœ… «∞v ´Mu«Ê "«ù¨ö‚".
> ¥Ôd§v «∞∑QØb œ«zLUÎ °QÊ ÅLÒU «∞∑AGOq ≠w ±uÆl ¢Bd¥n «∞∂ªU¸ (desaeler erusserp) Æ∂q ±∫UË∞W
≠∑` «∞DMπd… .
> ô ¢Ô∫Uˉ ≠∑` ©Mπd… «∞CGj °U∞Iu…. ¥πV «∞∑QØb °QÊ «∞CGj ≠w œ«îKNU Æb «≤ªHi ¢LU±UÎ. ¥Ôd§v «∞Fuœ… «∞v
´Mu«Ê "«∞ºö±W".
> ô ¢º∑FLq ©Mπd… «∞CGj œËÊ Ë§uœ √Í ≤uŸ ±s √≤u«Ÿ «∞ºu«zq ≠w œ«îKNU, _Ê –∞p ¥RœÍ «∞v ≈´DU°NU.
¥Ôd§v «∞∑QØb œ«zLUÎ °QÊ ≠w œ«îq ©Mπd… «∞CGj «∞JLOW «∞JU≠OW ±s «∞ºu«zq √£MU¡ «ß∑FLU∞NU.
> «ß∑FLq ±Bb¸«Î (±BUœ¸) •d«¸¥UÎ ±MUß∂UÎ ∞DMπd… «∞CGj, Ë°∫ºV ≈¸®Uœ«‹ «ùß∑FLU‰.
> ô ¢Lú ©Mπd… «∞CGj °QØ∏d ±s £K∏w •πLNU (´ö±W «∞∫b «_ÆBv).
> °U∞Mº∂W ∞KDFU «∞cÍ ¥∑Lbœ √£MU¡ «∞DNw, ±∏q «_¸“ √Ë «∞ªÔCU¸ «∞LÔπHÒHW, √Ë ÅKBW «∞Hu«ØNW .. ô ¢Lú ©Mπd…
«∞∂ªU¸ °QØ∏d ±s ≤Bn •πLNU.
> °Fb ©Nw «∞K∫u –«‹ «∞πKb… «∞ºLOJW (±∏q «∞KºUÊ..), Æb ¢∑Lbœ ¢∫X ´U±q «∞CGj, ≠ö ¢IAd «∞πKb… «∞∑w
¢∂bË ßNKW «∞∑IAOd ¢∫X «∞CGj , _≤NU Æb ¢º∂V «ù•∑d«‚ °U∞∂ªU¸. ≤MB` °FLq ®Iu‚ ∞NcÁ «∞Mu´OW ±s
«∞K∫u Æ∂q «∞∂b¡ °DNONU.
> °U∞Mº∂W ∞KDFU «∞FπOMw (±∏q : «∞∫LÒh, «∞d«Ë≤b - ±s «∞HBOKW «∞∂DU©OW) , ¥πV √Ê ¢ÔNeÒ «∞DMπd… ÆKOöÎ ÆÔ∂Oq
≠∑∫NU ∞K∑QØb °QÊ «∞DFUÂ ∞s ¥Du· ´Mb «∞H∑`.
> ¥Ôd§v «∞∑QØb œ«zLUÎ °QÊ ÅLU «∞∑AGOq ËÅLU «_±UÊ ¨Od ±ºbËœ¥s Æ∂q «ùß∑FLU‰. ¥Ôd§v «∞Fuœ… «∞v ´Mu«Ê
"Æ∂q «∞DNw".
> ô ¢º∑FLq ©Mπd… «∞CGj √°b«Î ∞KIKw °Uß∑FLU‰ «∞e¥X ¢∫X «∞CGj .
> ¥πV √Ê °I∑Bd ¢bîKp °Q≤ELW «∞ºö±W «∞LuÅu≠W ≠w «ù¸®Uœ«‹ ´Kv «∞∑MEOn Ë«∞BOU≤W ≠Ij.
> «ß∑FLq ≠Ij ÆDl ¨OU¸ ¢OHU‰ «_ÅKOW ∞Luœ¥q «∞LM∑Z «∞cÍ ¢LKJt. Ë–∞p ¥FMw ≠Ij «ß∑FLU‰ ≥OJq ˨DU¡
«∞D∂UŒ .
> ô ¢º∑FLq ©Mπd… «∞CGj ∞∑ªe¥s «∞DFU «∞∫U±i √Ë «∞LU∞` Æ∂q √Ë °Fb «∞DNw _Ê –∞p Æb ¥Ô∑Kn ≥OJKNU
«∞b«îKw.
¥Ôd§v «∞L∫U≠EW ´Kv ≥cÁ «ù¸®Uœ«‹
Page 71

68
EN
TR
ES
PT
EL
AR
FA
Page 72

69
Page 73

70
EN
TR
ES
PT
EL
AR
FA
Page 74

71
Page 75

72
EN
TR
ES
PT
EL
AR
FA
Page 76

73
Page 77

74
EN
TR
ES
PT
EL
AR
FA
Page 78

75
Page 79

76
EN
TR
ES
PT
EL
AR
FA
Page 80

77
Page 81

78
EN
TR
ES
PT
EL
AR
FA
Page 82

Réf. INSB2 • 10/2009 • Subject to modifications
ESPACE GRAPHIQUE
EN p. 1
TR p. 12
ES p. 23
PT p. 34
EL p. 45
AR p. 67
FA p. 68
 Loading...