

Page 1

EN
Multicook & Grains
NL
Page 2

3
A - Steam basket
B - Soaking basket
C - Rice and grains measuring cup
D - Measuring cup for water
E - Spatula
F - Inner lid
G - Micro pressure valve
H - Condensation collector
I - Power cord
J - Carry handle
K - Removable inner bowl
L - Lid opening button
A
B
C
D
E
F
G
H
K
L
I
J
Page 3

MENU LIST
CONTROL PANEL DESCRIPTION
1 . Menu button
2. Temperature / Timer button
3. My recipes button
4. Cancel button
5. «
-
» decrease button
6. OK button
7. « + » increase button
8. On/Off button
9. Delayed Start button
10. Keep Warm button
11. Reheat button
12. LCD Screen
1
2
3
4
5 6 7
8
9
10
11
12
4
Page 4
EN
5
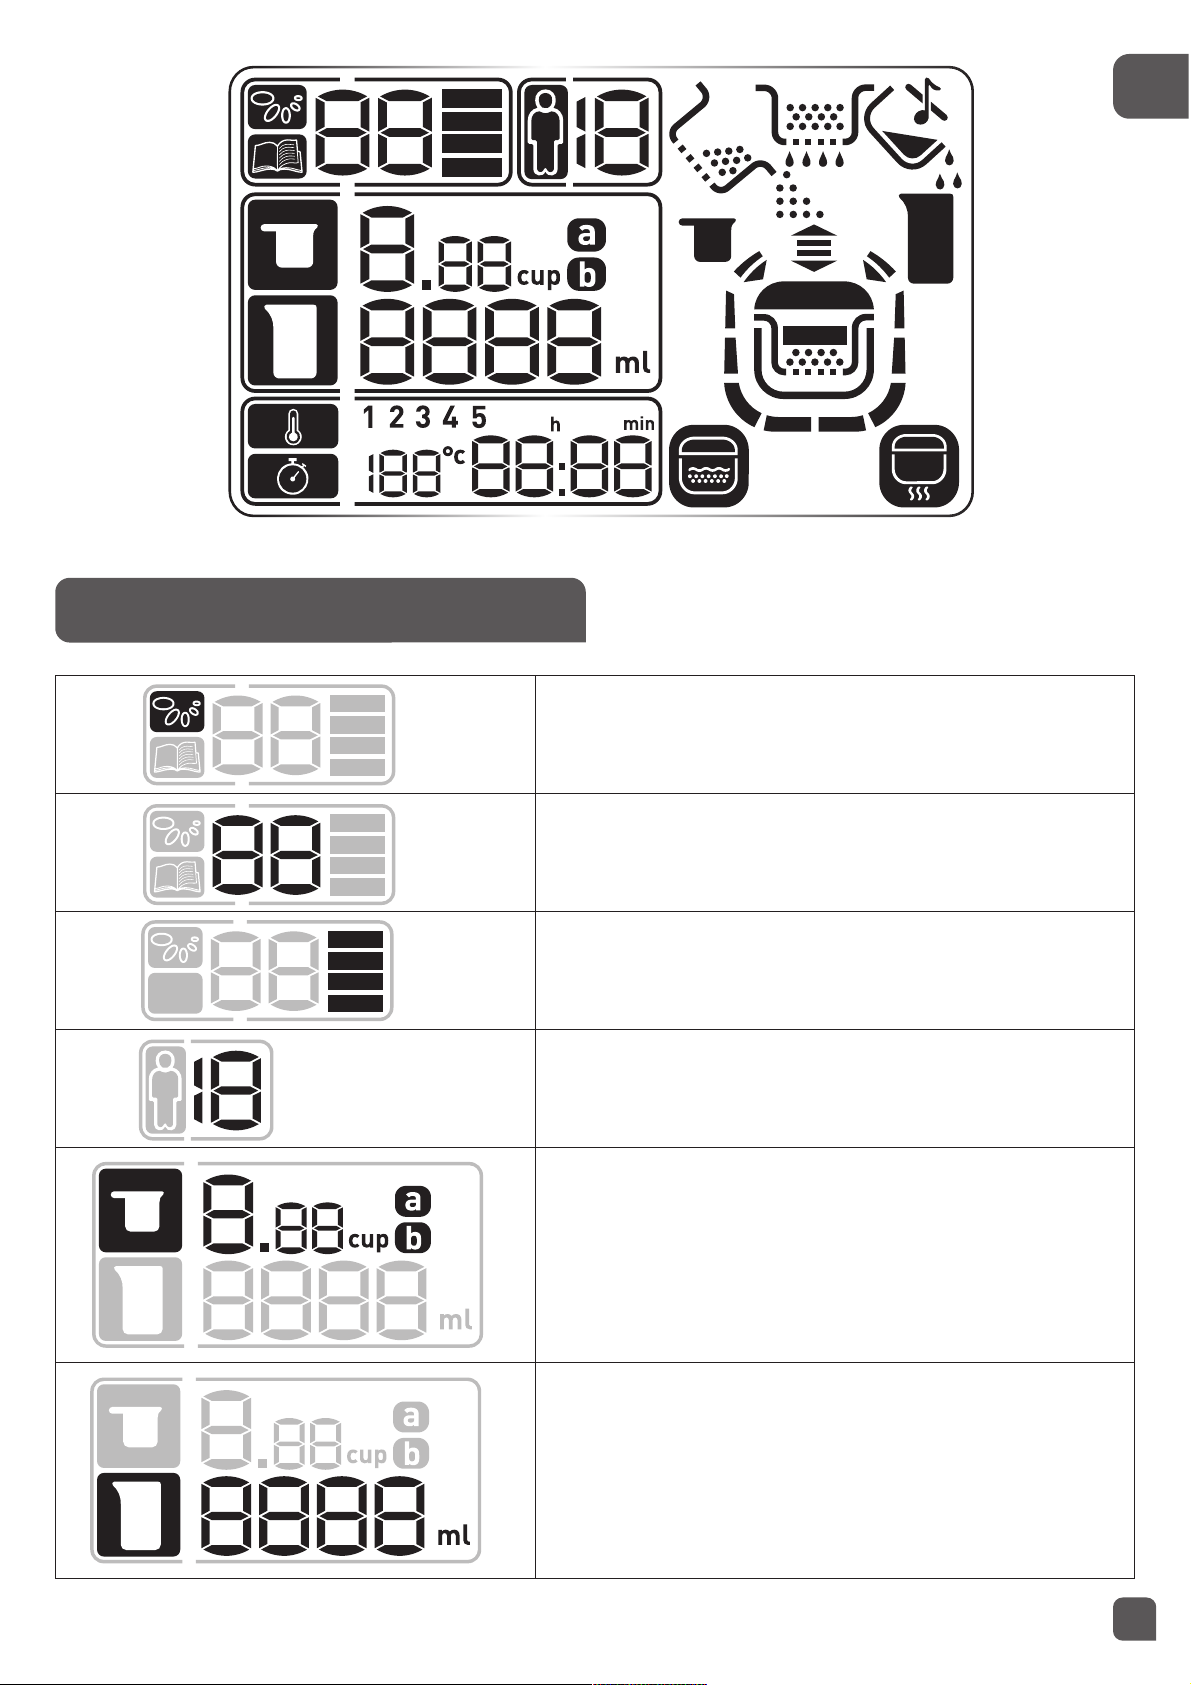
Nutrition Menu
Program number
Texture
Number of servings
Number of rice or grain measuring cups
Quantity of water (measured using water measuring cup)
NUTRITION MENU
Page 5

6
Multicook menu
Program number
Time setting
Temperature setting
Cooking mode
Automatic cooking mode
Soaking mode
Cooking mode
Automatic cooking mode
MULTICOOK MENU
Page 6

EN
• Read and follow the instructions for use. Keep them safe.
• This appliance is not intended to be operated by means of an external
timer or a separate remote control system.
• This appliance can be used by children aged from 8 years and above
if they have been given supervision or instruction concerning use of
the appliance in a safe way and if they understand the hazards
involved.Cleaning and user maintenance shall not be made by
children unless they are older than 8 years and supervised. Keep the
appliance and its cord out of reach of children aged less than 8 years.
• Appliances can be used by persons with reduced physical, sensory or
mental capabilities or lack of experience and knowledge if they have
been given supervision or instruction concerning use of the appliance
in a safe way and understand the hazards involved.
• Children shall not play with the appliance.
• This appliance is not intended for use by persons (including children) with
reduced physical, sensory or mental capabilities, or lack of experience and
knowledge, unless they have been given supervision or instruction
concerning use of the appliance by a person responsible for their safety.
• Children should be supervised to ensure that they do not play with the
appliance.
• As this appliance is for household use only, it is not intended for use in
the following applications and the guarantee will not apply for:
− Staff kitchen areas in shops, offices and other working environments
− Farm houses
− By clients in hotels, motels and other residential type environments
−Bed and breakfast type environments
IMPORTANT SAFEGUARDS
SAFETY INSTRUCTIONS
7
Page 7

• If the power cord is damaged, it must be replaced by a special cord or
unit available from an authorised service centre.
• The appliance must not be immersed in water or any other liquid
• Use a damp cloth or sponge with washing-up liquid to clean the
accessories and parts in contact with food. Rinse with a damp cloth or
sponge. Dry accessories and parts in contact with food with a dry cloth.
• If the symbol is marked on the appliance, this symbol means
“Caution: surfaces may become hot during use”.
• Caution: the surface of the heating element is subject to residual heat
after use.
• Caution: risk of injury due to improper use of the appliance.
• Caution: your appliance has a removable power cord, do not spill liquid
on the connector.
• Always unplug the appliance:
− immediately after use
− when moving it
− prior to any cleaning or maintenance
− if it fails to function correctly
• Do not leave the appliance unattended whilst in operation.
• Burns can occur by touching the hot surface of the appliance,
the hot water, steam or the food.
• During cooking, the appliance gives out heat and steam.
Keep face and hands away.
• The door or the outer surface may get hot when the appliance is operating.
• Do not get face and hands close to the steam outlet. Do not obstruct
the steam outlet.
• For any problems or queries please contact our Customer Relations
Team or consult our web site.
• The appliance can be used up to an altitude of 4000 m.
8
Page 8

• For your safety, this appliance complies with the safety regulations and directives in effect at the
time of manufacture (Low-voltage Directive, Electromagnetic Compatibility, Food Contact
Materials Regulations, Environment…).
• Check that the power supply voltage corresponds to that shown on the appliance (alternating
current).
• Given the diverse standards in effect, if the appliance is used in a country other than that in which
it is purchased, have it checked by an approved service centre.
Connecting to the power supply
• Do not use the appliance if:
− the appliance or the cord is damaged.
− the appliance has fallen or shows visible damage or does not work properly.
− In the event of the above, the appliance must be sent to an approved Service Centre.
Do not take the appliance apart yourself.
• Do not let the power cord hang where children may reach it.
• Do not leave the power cord close to or in contact with sources of heat or sharp edges.
• Always plug the appliance into an earthed socket.
• Do not use an extension lead. If you accept liability for doing so, only use an extension
lead which is in good condition, has an earthed plug and is suited to the power of the
appliance.
• Do not unplug the appliance by pulling on the cord.
Using
• Use a flat, stable, heat-resistant work surface away from any water splashes.
• Do not allow the base of the appliance to come into contact with water or any other liquid.
• Never try to operate the appliance when the bowl is empty or without the bowl.
• The control panel buttons must be allowed to operate freely.
• Do not remove the bowl while the appliance is working.
• Do not put the appliance directly onto a hot surface, or any other source of heat or flame, as it will
cause a failure or danger.
• The bowl and the heating plate should be in direct contact. Any object or food inserted between
these two parts would interfere with the correct operation and may damage the appliance.
• Do not place the appliance or bowl near a heat source or in a hot oven, as serious damage could
result.
• Do not put any food or water into the appliance until the bowl is in place.
• Respect the levels indicated in the recipes.
• Should any part of your appliance catch fire, do not attempt to put it out with water. To smother
9
EN
Page 9

the flames use a damp tea towel.
• Any intervention should only be made by an approved service centre with original spare parts.
Protect the environment
• Your appliance has been designed to run for many years. However, when you decide to replace it,
remember to think about how you can contribute to protecting the environment.
10
Protect the environment
Your appliance contains a number of materials that may be recovered or recycled.
Leave it at a local civic waste collection point.
Page 10

BEFORE THE FIRST USE
Unpack the appliance
Remove the appliance from the packaging and unpack all the accessories and printed documents.
Open the lid by pushing the button on the housing.
Read the Instructions and carefully follow the operation method.
Clean the appliance:
Remove the bowl, inner lid (fig 1 and fig 2) and the pressure valve (fig 5).
Clean the bowl, the valve and the inner lid with a sponge.
Wipe the outside of the appliance and the lid with a damp cloth.
Dry off carefully.
Put all the elements back in their original position. Place inner lid back into position, lining up the grooves (fig
3) and gently press lid back into place (fig 4). Check the condensation collector is is fitted. Fit the detachable
cord into the socket on the cooker base.
•
Carefully wipe the outside of the bowl (especially the bottom). Make sure that there are no foreign residues
or liquid underneath the bowl and on the heating element
•
Place the bowl into the appliance, making sure that it is correctly positioned
•
Make sure that the inner lid is correctly in position.
•
Close the lid and press down until a “click” is heard.
•
Install the power cord into the socket of the multicooker base and then plug into the power outlet.
•
The default program is 01-White rice.
•
Do not touch the heating element when the product is plugged in or after cooking. Do not carry the
product while in use or just after cooking.
•
This appliance is only intended for indoor use.
•
Oven gloves must be used when handling the bowl and baskets when hot.
•
It is recommended to remove the bowl and the soaking basket at the same to wait for the steam to
disperse before separating the bowl and soaking basket.
•
The soaking basket and the steam basket must only be used for the function they are designed for.
•
Do not block the steam vents during cooking.
•
Do not use the bowl outisde the appliance (on the gas, on the heating plate, in an oven ...).
•
Do not use metal utensils to stir the food in the bowl.
•
The condensation collector must be emptied after each cooking.
•
Do not use this appliance for deep frying.
Never place your hand on the steam vent during cooking, as there is a danger of burns
Only use the inner pot provided with the appliance.
Do not pour water or put ingredients in the appliance without the bowl inside.
The maximum quantity of water + ingredients should not exceed the “MAX” mark inside the bowl
If you want to cancel the "beep" sound, press buttons together for 5 seconds. The pictogram
USING YOUR APPLIANCE
11
EN
1
2
3
4
5
7
6
9
10
11
8
Page 11

To cancel a cooking program currently in use, press button for 5 seconds. You can also cancel a
program by a long press on the "Cancel" button.
To cancel a current setting, press "Cancel" button.
N° program Program Texture Automatic Manual
Approximate
soaking time
Approximate
cooking time
Number of servings
(min/max)
1 White rice
Nutri + 1 40 – 50 min
2 – 12
Quick 1 20 – 30 min
Normal 1 30 – 40 min
Soft 1 40 – 50 min
2 Brown rice
Nutri + 1 1 h – 1 h 10 min
2 – 12
Quick 1 40 – 50 min
Normal 1 50 min – 1 h
Soft 1 50 min – 1 h
3 Chickpeas Nutri + 1
1 h 40 min
50 min – 1 h 2 – 6
4 Quinoa
Nutri + 1 2 h 20 min – 2 h 30 min
2 – 8Quick 1 20 – 30 min
Normal 1 20 – 30 min
5 Lentils
Nutri + 1 50 min – 1 h
2 – 10Quick 1 40min - 50min
Soft 1 1 h – 1 h10 min
6 Dried beans
Nutri + 1 50 min 1h 30 min - 1 h 40 min
2 – 6
Normal 1 50 min 2 h 15 min - 2 h 30min
7 Baby Porridge
1 (4 - 6 months*) 1 20 – 30 min
2
2 (7 – 9 months) 1 1 h – 1 h 10 min
3 (10 – 12 months) 1 50 min – 1 h
4 (13 – 14 months) 1 40 – 50 min
8
Brown Rice
+ Green Lentils
Nutri + 1
1 h 20 min –
1 h 30 min
2 – 8
TOTAL NO. OF PROGRAMS 22
appears. Note that the start and end cooking beeps can not be cancelled.
To reactivate the beep, press again button for 5 seconds. The pictogram disappears.
The setting is kept in the memory.
If you leave your finger on and buttons, it allows you to increase or decrease the parameters quickly.
The buttons are only activated when the lid is closed.
The buttons cannot be adjusted if you are wearing oven gloves.
You can turn off your applicance by pressing button for 5 seconds, it sounds a long beep.
To reactivate your appliance press on any button.
NUTRITION MENU
The "Nutrition menu" is an automatic cooking mode. You can also adjust the cooking mode for different textures of food
and the number of servings (min/max), refer to the table below.
12
* For the UK only: follow your UK health professionals advice on what age and
type of food to introduce solids to your baby, which is usually from 6 months.
Page 12

EN
13
31
2
64 5
Choose the number of the
required program by
pressing the and
buttons. Validate by
pressing .
Choose the desired texture
by pressing and
buttons. Validate by
pressing .
Choose the number of
servings by pressing
and buttons. Validate by
pressing .
The picto flashes on the
screen. It indicates quantity of
rice, quinoa or lentils (number
of cups) to pour in the bowl.
Once you have poured them in
the bowl, close the lid and
validate by pressing .
The picto flickers on the
screen. It indicates the
quantity of cold water to add.
Use the measuring cup for
water provided with the
appliance to measure the
water quantity.
The picto appears on the
screen, it indicates that you
have to close the lid and the
Delayed start button
flashes. You can start the
cooking immediately or
delay the start (see the
Delayed Start section for
instructions). Press button
to start the cooking
immediately. The appliance
sounds a long beep to
indicate the beginning of
the cooking.
The appliance enters into
automatic cooking: the picto
, and appear on
the screen.
The picto disappears before
the end of cooking, the appliance
sounds 2 beeps and the screen
displays the remaining cooking
time. This time can differ
according to the choosen
program and the desired texture.
At the end of the cooking, the
appliance sounds 3 beeps and
enters into keep warm (the keep
warm button illuminates).
White rice (01) / Brown rice (02) / Quinoa (04) / Lentils (05)
7
Note: Water quantities for
rice cooking can be adjust
depending on your taste: add
a little extra water for fluffier
rice and a little less water for
firmer rice.
Page 13

Chickpeas (03)
3
The appliance indicates that
you need to put the soaking
basket in the bowl. The picto
flashes on the screen.
The picto flashes on the
screen. It indicates the
quantity of dried chickpeas
(number of cups) to pour in the
bowl. Once you have poured
them in the bowl, close the lid
and validate by pressing .
The picto flashes on the
screen. It indicates the
quantity of cold water to add.
Use the measuring cup for
water provided with the
appliance to measure the
water quantity. Close the lid
and validate by pressing .
21
Choose the number of the
program by pressing the
and . buttons. Validate by
pressing .
Choose the number of servings
by pressing and .
buttons. Validate by pressing
.
4
5
Press once you have put in
the soaking basket.
Once you have drained the
soaking water and well rinsed
the chickpeas under running
water, place the soaking
basket into the bowl to begin
the cooking phase.
6
The appliance sounds a long
beep to indicate the beginning of
the cooking. The appliance
enters into automatic soaking:
the picto , and
appear on the screen.
At the end of soaking time, the
appliance sounds 2 beeps and
the picto below flashes. This
indicates that you have to drain
the soaking water.
14
Page 14

15
EN
Beans (06)
31
2
Choose the number of the
program by pressing the
and buttons. Validate by
pressing .
Choose the desired texture
by pressing and
buttons. Validate by
pressing .
Choose the number of
servings by pressing
and buttons. Validate by
pressing .
87
The appliance indicates the
quantity of water to add in the
bowl. Press to start the
cooking phase.
Note: The condensation
collector must be emptied
between the 2 steps (soaking
and cooking) to avoid
overflow during the last
cooking.
The picto appears on the
screen, it indicates that you
have to close the lid and the
Delayed start button flashes.
You can start the cooking
immediately or delay the start
(see the Delayed Start section
for instructions)..
Press button to start the
cooking immediatly. The
appliance sounds a long beep
to indicate the beginning of
the cooking.
The appliance enters into
automatic cooking: the picto
, and and appear
on the screen.
The picto disappears
before the end of cooking,
the appliance sounds 2
beeps and the screen
displays the remaining
cooking time . This time can
differ according to the
choosen program and the
desired texture.
At the end of the cooking,
the appliance sounds 3
beeps and enters into keep
warm (the keep warm
button illuminates).
Note: The Beans program (06) is suitable for cooking dried beans such as red kidney beans, cannellini
beans, black beans, etc.
Page 15

16
Once you have drained the
soaking water and well rinse
the beans under running
water. Place the soaking
basket into the bowl to begin
the cooking phase.
4
The appliance indicates that
you need to put the soaking
basket in the bowl. The picto
flashes on the screen.
Press once you have put
in the soaking basket.
The picto flashes on the
screen. It indicates the
quantity of dried beans
(number of cups) to pour in the
bowl. Once you have poured
them in the bowl, close the lid
and validate by pressing .
5
The picto flashes on the
screen. It indicates the
quantity of cold water to add.
Use the measuring cup
provided with the appliance
to measure the required
water quantity. Close the lid
and validate by pressing .
6
7
The appliance sounds a long
beep to indicate the beginning of
the cooking.
The appliance enters into
automatic soaking: the picto
, and appear on
the screen.
At the end of soaking time, the
appliance sounds 2 beeps and
the picto below flashes. This
indicates that you have to drain
the soaking water.
Page 16

EN
17
Baby Porridge (07)
1
Choose the number of the
program by pressing the
and buttons. Validate by
pressing .
2
Ch o os e th e n u m be r
corresponding to the age of
your baby by pressing
and buttons. Validate by
pressing .
1 => 4 to 6 months
(see note below)
2 => 7 to 9 months
3 => 10 to 12 months
4 => 13 to 14 months
3
The appliance enters into
automatic cooking: the
choosen program number, the
picto , and appear
on the screen.
The picto , disappears
before the end of cooking, the
appliance sounds 2 beeps and
the screen displays the remaining
cooking time. This time can
differ according the choosen
program and the desired texture.
At the end of the cooking, the
appliance sounds several beeps
and enters into keep warm (the
keep warm button illuminates).
98
The appliance indicates the
quantity of water to add to the
bowl . Press to start the
cooking phase.
Note: The condensation
collector must be emptied
between the 2 steps (soaking
and cooking) to avoid
overflow during the last
cooking.
The picto appears on the
screen, it indicates that you
have to close the lid and the
Delayed start button
flashes. You can start the
cooking immediately or
delay the start (see the
Delayed Start section for
instructions). Press button
to start the cooking
immediately. The appliance
sounds a long beep to
indicate the beginning of
the cooking.
The appliance enters into
automatic cooking: the
picto , and appear
on the screen.
The picto disappears
before the end of cooking,
the appliance sounds 2
beeps and the screen
displays the remaining
cooking time . This time can
differ according the choosen
program and the desired
texture.
At the end of the cooking,
the appliance sounds 3
beeps and enters into keep
warm (the keep warm
button illuminates).
For the UK only: follow your UK
health professionals advice on what
age and type of food to introduce
solids to your baby.
Page 17

18
Brown Rice + Green Lentils (08)
21
Choose the number of the
program by pressing the
and buttons. Validate by
pressing .
Choose the number of
servings by pressing
and buttons. Validate by
pressing .
3
The appliance indicates:
a) the brown rice quantity
(number of cups) to pour in the
bowl. Once you have poured
your brown rice in the bowl,
close the lid and validate by
pressing .
b) the green lentils quantity
(number of cups) to pour in the
bowl. Once you have poured your
green lentils in the bowl, close the
lid and validate by pressing .
4
The picto flashes on the
screen. It indicates the
quantity of cold water to add.
Use the measuring cup
provided to measure the
required water quantity. Close
the lid and validate by pressing
.
5
The picto appears on the
screen, it indicates that you
have to close the lid and the
Delayed start button
flashes. You can start the
cooking immediately or
delay the start (see the
Delayed Start section for the
instructions). Press button
to start the cooking
immediately. The appliance
sounds a long beep to
indicate the beginning of
the cooking.
6
The appliance sounds a long
beep to indicate the beginning of
the cooking.
The appliance enters into
automatic soaking: the picto
, and appear on
the screen.
The picto disappears
before the end of cooking, the
appliance sounds 2 beeps and
the screen displays the remaining
cooking time . This time can
differ according to the choosen
program and the desired texture.
At the end of the cooking, the
appliance sounds 3 beeps and
enters into keep warm (the keep
warm button illuminates).
Page 18

EN
19
N°
program
Programs Automatic
Manual
(adjust
temp.
setting)
Temperature (°C) Cooking Time
Delayed
Start
Default Range Default Range
9 Pilaf / Risotto 1 Automatic Automatic Automatic Automatic *
10 Steam 1 Automatic Automatic 30 min 5 min – 3 h *
11 Slow Cook 3 100°C 80°C – 100°C 1 h 30 min 5 min – 9 h *
12 Browning 13 160°C 100°C – 160°C 20 min 5 min – 1 h 30
13 Pasta 1 Automatic Automatic 8 min 3 min – 1 h
14 Bake 13 145°C 100°C – 160°C 40 min 5 min – 4 h *
15 Soup 1 Automatic Automatic 40 min 5 min – 3 h *
16 Bread Rising 2 40°C 30°C – 40°C 30 min 5 min – 9 h
17 Dessert 13 140°C 100°C – 160°C 45 min 5min – 2 h *
18 Cream Cheese 2 Automatic Automatic 2 h 30 min – 4 h
19 Yogurt 1 Automatic Automatic 8 h 1 h – 24 h
20 Jam 1 Automatic Automatic 30 min 5 min – 2 h *
Reheat 2 100°C 80°C – 100°C 20 min 5 min – 1 h *
Keep warm 1 75°C
_ _ _
*
My Recipes 5 100°C
40°C – 100°C
30 min
1 min – 9 h
*
105°C – 160°C 1 min – 2 h
Programs 7 53
TOTAL NO. MULTICOOK
PROGRAMS
60
MULTICOOK MENU
Page 19

20
Risotto/Pilaf (09)
Steam (10) / Slow Cook (11) / Browning (12) / Bake (14) /
Cream Cheese (18) / Yogurt (19) / Jam (20)
Soup (15) / Bread rising (16) / Dessert (17) /
1
Choose the number of the
program by pressing the
and buttons. Validate by
pressing .
2
The picto appears on the
screen, you can add your
ingredients. Close the lid. Then
press button. The Delayed
start button flickers. flashes. You
can start the cooking
immediately or delay the start
(see the section Delayed Start
for the instructions).
instructions) or immediatly.
Press button to start the
cooking immediately.
3
The appliance enters into
automatic cooking: the picto
, and appear on
the screen.
At the end of the cooking, the
appliance sounds 3 beeps and
enters into keep warm (the keep
warm button illuminates).
1
2
3
Choose the number of the
program by pressing the
and buttons. Validate by
pressing .
The default cooking time
appears on the secreen. You
can adjust the time by pressing
the button. Then press
and buttons to
adjust the time. Validate by
pressing .
For some programs, you can
adjust the temperature (refer to
the table) but do it before setting
the time. Press the button
and adjust the desired
temperature by pressing
and buttons. Validate by
pressing . Then set the
time setting as explained before.
Page 20

21
The picto appears on the
screen, you can add the
ingredients. Then press
button. The Delayed start
button flashes. You can start
the cooking immediately or
delay the start, but only for
the programs mentioned in
the table (see the Delayed
Start section for the
instructions). Press button
to start the cooking
immediately.
Milk
What milk should you use?
All our recipes (unless otherwise
stated) are prepared using
cow’s milk. You can use plant
milk such as soya milk. As well as
sheep or goat’s milk but, in this
case, the firmness of the yogurt
may vary depending on the milk
used. Raw milk or long-life milks
and all the milks described
below are suitable for your
appliance:
• Long-life sterilised milk: UHT
whole milk results in firmer
yogurt. Using semi-skimmed
milk will result
in less firm yogurt. However, you
can use semi-skimmed milk and
dissolve 2 - 5 tablespoons of
dried skimmed milk powder per
1 litre of milk to give a thicker
consistency.
• Pasteurised milk:
Whole milk give a more creamy
yogurt with a little bit of skin on
the top. Semi-skimmed and
The appliance sounds a long
beep to indicate the beginning
of the cooking. The picto
appears on the screen. The
remaining time and
temperature (when available)
appear on the screen too.
For all these functions except
Browning and Jam, the picto
appears on the screen. It
indicates that the lid should be
closed.
4
For Browning and Jam, the
picto appears on the screen,
it indicates that the lid must
remain open.
At the end of the cooking, the
appliance sounds 3 beeps and
enters into keep warm (the
keep warm button illuminates).
Warning: For Jam program
the lid must be open. Do
not cook more than 500g
of fruits.
5
EN
CHOICE OF INGREDIENTS FOR YOGURT
skimmed milk will result in a
fluid consistency yogurt.
Pasteurised milk still contains
some heat-resistant germs not
eliminated by pasteurisation. It
must be boiled first, cooled to
hand-hot (36 C) and then
strained through a fine sieve to
remove any skin, before making
yogurt. For a thicker consistency
yogurt, before boiling the milk
add 2 to 5 tablespoon dried
skimmed milk powder per 1 litre
of milk.
• Untreated milk (farm milk):
It is essential this type of milk
is boiled for a long time and it
is dangerous not to do this.
After boiling let it cool down to
36 C before making yogurt the
sieve to remove the skin. Using
yogurt made form untreated
farm milk as a culture starter is
not recommend..
• Powdered milk:
Using skimmed milk powder
reconstituted with water will
result in very creamy yogurt.
Follow the manufacturer's,
instructions on reconstitution.
The ferment
Use one of the following
ferments:
- One small pot (100 g - 150 g)
shop-bought natural yogurts
with the longest expiry date
possible; your yogurt will
therefore contain more active
ferment for a firmer yogurt.
- From a freeze-dried ferment.
In this case, follow the
activation time specified on the
ferment
instructions. You can find these
ferments in supermarkets,
pharmacies and in certain
health product stores. (For the
UK: Freeze dried ferment is only
available online and in some
health food shops)
- From one of your recently
prepared yogurt – this must be
natural and recently prepared.
This is called culturing. After five
culturing processes, the yogurt
Page 21

22
The appliance enters into
cooking mode. The picto,
and appear on the screen.
The set cooking time appears
Step 1: Water boiling
The picto , and
appear on the screen.
When the boiling temperature is
reached, the appliance sounds
two beepsevery 10 seconds until
you open the lid and add the
pasta. You can proceed to the
second step.
3
2
3
1
Choose the number of
the program by pressing the
and buttons. Validate
by pressing .
Note: You have 2 steps for
this mode water boiling
and Pasta cooking.
1
You have the possibility to
change the time of the Pasta
cooking. Press the button.
Then press and buttons to
adjust your time. Close the lid.
Validate by pressing . Then you
begin step 1.
2
Pasta (13)
Step 2: Pasta cooking
Open the lid and add the pasta
into the boiling water.
Once you have put your pasta
in the bowl press to begin the
cooking mode.
To avoid overflow, the lid
should remain open for this
step.
4
on the screen and starts to
countdown.
At the end of the cooking, the
appliance sounds 3 beeps.
There is no keep warm for
this function.
• Once the yogurt heating
process is finished, the yogurt
should be cooled completely,
covered with cling film or lid and
placed in a refrigerator for at
used loses active ferments and
therefore risks giving a less firm
consistency. You then need to
start again using a shopbought
yogurt or freeze-dried ferment.
If you have boiled the milk,
wait until it has reached room
temperature before adding
the ferment.
Too high a heat may destroy
the properties of your ferment.
Fermentation time
• Your yogurt will need between
6 and 12 hours of fermentation,
depending on the basic
ingredients and the result you
are after.
least 4 hours or preferably
longer. They can be kept max 7
days in refrigerator. Yogurts with
jam or additional ingredients will
keep up to 3 days.
A clear liquid (whey) may form
on top of the yogurt and this is
best stirred back in. Alternatively,
you can pour it off.
Sweet
Fluid
Acidic
Firm
6h 7h 8h 9h 10h 11h 12h
Page 22

23
You have the possibility to
store 5 favourite settings in the
memory. You can set an
existing menu or your own
parameters (time and
temperature).
Press button.
The number 1 flashes, press
to enter into the first
recipe setting.
MY RECIPES
Choice of an existing cooking program
1
2
The screen displays the default
menu and also the default
temperature and cooking time
if you want to make your own
adjustments to the setting.
You can change the menu
number by pressing
and and to choose
the desired program.
You can change the time
and temperature (refer to
the tables to check if
adjustment is possible for
the selected program) by
pressing button and
adjust by pressing and
buttons. Once you have set
your adjustments, press
to start your recipe.
Choice of setting your own parameters
1
The number 1 flashes, press
to enter into the first
recipe setting.
2
The screen displays the
default menu, temperature
and time. To set your own
parameters, press . The
number of the menu
disappears and you can
change the temperature
and time by pressing
and buttons. Once you
have set your adjustments,
press to start your recipe.
Note: you can change the
"My recipes" number by
pressing and buttons.
EN
Page 23

24
This function is intended to only reheat cooked food.
Press button. The lights of , and are flickering.
The default cooking temperature and time appear on the screen . If you want to change these parameters,
press button and adjust by pressing and buttons to change the temperature.
Note: You have only 2 temperatures for Reheat 80°C and 100°C.
When you have changed the temperature, press . You can adjust the cooking time by pressing and buttons.
Once you have adjusted the parameters, press to start reheat function.
The appliance sounds a long beep to indicate the beginning of the cooking. The light illuminates.
The picto appears on the screen. The remaining time appears on the screen.
At the end of the cooking, the appliance sounds 3 beeps and enters into keep warm (the keep warm button
illuminates).
CAUTION
Cold food should not exceed 1/2 of the cooker bowl's volume. Too much food cannot be thoroughly
heated. For small quantities of food, repeated use of the reheat program may lead to burnt food and a
hard layer at the base of the bowl.
It is recommended not to reheat porridge or oatmeal , or it may become thick and paste like in
consistency.
It is recommended to stir the food during reheating in order to have a more homogeneous temperature.
Never use the reheat function to defrost food.
Never use the reheat function to reheat frozen food.
• You can select the keep warm function manually.
Press button, the light flashes green. Then press button to validate.
The appliance sounds a long beep to indicate the begining of keep warm and the light illuminates.
The keep warm time appears on the screen.
• To cancel the keep warm, press button for 5 seconds. You can also cancel the keep warm function by a
long press on the "Cancel" button.
• You can remove the automatic keep warm only for the next programmed cooking.
To cancel the automatic keep warm, press button for 5 seconds. The appliance sounds a long beep and the
green light on button disappears. If you want to restore the automatic keep warm, press the button
again for 5 seconds. The green light turns on.
Note: Never use this function to defrost food.
• To use the delayed start function, choose a cooking program and the cooking time first. Once you have
REHEAT FUNCTION
KEEP WARM FUNCTION
DELAYED START FUNCTION
Page 24

• Ensure the appliance is unplugged and completely cooled down before cleaning and maintenance.
• It is strongly advised to clean the appliance after each use as directed below.
• The bowl, the inner lid, the cups and the spatula are dishwasher safe .
Bowl, steam basket, soaking basket and inner lid
• Remove the bowl from the appliance. Clean the bowl, steam basket, soaking basket and inner lid with warm
water, washing up liquid and a sponge.
• Scouring powders and metal scourers are not recommended.
• If food has stuck to the inside of the cooking bowl, you may put water in the bowl to soak the food residue
before washing.
• Dry the bowl carefully
Taking care of the bowl
For the bowl, carefully follow the instructions below:
• Do not cut food in the cooking bowl.
• Make sure you put the bowl back into the appliance after use.
• Use the spoon provided or a wooden spoon and not a metal utensils to avoid damaging the bowl surface
• To avoid any risk of corrosion, do not pour vinegar into the bowl.
• The colour of the bowl surface may change after using for the first time or after multiple uses. This change
in colour is due to the action of steam and water and does not have any effect on the use of the appliance,
nor is it dangerous for your health, it is perfectly safe to continue using it.
Cleaning the micro pressure valve
• When cleaning the micro-pressure valve, remove it from the lid –and open it by rotating
in the direction “open” (see diagrams page 11). After cleaning it, wipe it dry and place it back within the lid
Cleaning and care of the other parts of the appliance
• Clean the outside of the appliance, the inside of the lid and the cord with a damp cloth and wipe dry.
• Do not use abrasive products.
• Do not use water to clean the interior of the appliance body as it could damage the heat sensor.
• Remove the inner lid after each use to avoid the smell of strong foods lingering in the appliance. Clean in
warm water and washing up liquid.
CLEANING AND MAINTENANCE
choosen these parameters and before you start your cooking the light flashes.
Then, press the button the cooking time flickers on the screen. For
the automatic cooking program, it is the default cooking that appears on the screen. Set the desired preset
time by pressing and buttons.
This setting time is including the cooking time.
EN
25
Page 25

TECHNICAL TROUBLESHOOTING GUIDE
Problem Causes Solutions
Control panel lights
off and no heating.
Appliance not plugged in.
Check the power cord is plugged in at the socket
and on at the mains. Check the power cord is firmly
pushed into the base of the appliance.
Control panel lights
off and heating.
Problem with the connection
of the indicator light or indicator light is
damaged.
Send to an authorised service centre for repair.
Steam leakage
during using.
Lid is badly closed.
Open and close the lid again.
If the problem persists, send to an authorised
service centre for repair.
Micro pressure valve not well
positioned or assembled incorrectly.
Stop cooking and unplug the appliance.
Check the valve is assembled correctly (two parts
locked together) and well positioned in it's seating.
Lid or micro pressure valve
gasket is damaged.
Send to an authorised service centre for repair.
The inner lid is incorrectly positioned.
Remove and insert the inner lid in correct position,
re-start cooking.
Rice half cooked or
overcooked.
Too much or not enough water
compared to rice quantity.
Refer to recipe book for correct water quantity.
Change type or brand of rice used.
Rice half cooked. Insufficiently simmered.
Incorrect quantity of water used. See recipe book
for water quantities.
Always add water to the cooking bowl after
adding the rice.
Automatic keep warm fails (no keep
warm mode after cooking
program or appliance stays on
cooking program).
The keep warm program has accidentally
been cancelled by the user when
setting the appliance (see section
"Keep Warm Function" page 24)
Read the section "Keep Warm Function" in the
instructions. The automatic keep warm does
not operate with programs Yogurt, Cream
cheese, Dessert and Pasta.
If the problem persists send to an authorised
service centre for repair.
E0
The temperature sensor on the lid is
damaged.
Send to an authorised service centre.
E1
The temperature sensor under the bowl is
damaged.
Stop the appliance and restart the program.
If the problem continues, please send to an
authorised service centre for repair.
E3 Missing bowl or empty bowl.
Put the inner bowl inside the appliance then
unplug and re-connect the appliance to the
mains. Next restart the program.
Note: If the inner bowl is deformed, do not use it anymore and get a replacement from an
authorised service centre.
26
Page 26

A - Stoommandje
B - Weekmandje
C - Maatbeker
D - Maatbeker voor water
E - Spatel
F - Binnendeksel
G - Stoomklep
H - Collector
I - Netsnoer
J - Draaggreep
K - Uitneembare kuip
L - Openingsknop
van het deksel
A
B
C
D
E
F
G
H
K
L
I
J
27
NL
Page 27

28
Menu Voeding
Programmanummer
Textuur
Aantal personen
Aantal koppen van de graansoort
Hoeveelheid water
MENU VOEDING
Page 28

29
Menu Multicook
Programmanummer
Tijdsinstelling
Temperatuursinstelling
Stand Bereiding
Stand Automatische bereiding
Weken
Stand Bereiding
Stand Automatische bereiding
MENU MULTICOOK
NL
Page 29

30
MENULIJST
BESCHRIJVING VAN HET INVOERVELD
1. Knop Menu
2. Knop Temperatuur / Tijd
3. Knop Mijn recepten
4. Knop Annuleren
5. Knop “-“
6. OK-knop
7. Knop “+”
8. Aan/uit-knop
9. Knop Uitgestelde start
10. Knop Warm houden
11. Knop Opwarmen
12. LCD-scherm
1
2
3
4
5 6 7
8
9
10
11
12
Page 30

NL
• Lees deze instructies aandachtig en houd ze zorgvuldig bij.
• Dit apparaat is niet ontworpen om in werking te worden gesteld door
middel van een externe timer of een aparte afstandsbediening.
• Dit apparaat mag worden gebruikt door kinderen vanaf 8 jaar en
ouder, indien dit gebeurt onder toezicht of als zij van tevoren
instructies hebben ontvangen betreffende het veilige gebruik van het
apparaat en als zij de mogelijke gevaren kennen. Het apparaat mag
niet worden gereinigd of onderhouden door kinderen, tenzij ze ouder
zijn dan 8 jaar en onder toezicht staan. Houd het apparaat en het
netsnoer buiten bereik van kinderen jonger dan 8 jaar.
• Dit apparaat mag worden gebruikt door personen met een beperkt
fysiek, zintuiglijk of mentaal vermogen of door personen die niet over
de nodige ervaring of kennis beschikken, indien dit gebeurt onder
toezicht of als zij van tevoren instructies hebben ontvangen
betreffende het veilige gebruik van het apparaat en als zij de mogelijke
gevaren kennen.
• Kinderen mogen het apparaat niet gebruiken als speelgoed.
• Dit apparaat is niet geschikt om gebruikt te worden door personen
(met inbegrip van kinderen) met beperkte fysieke, zintuiglijke of
mentale capaciteiten of personen zonder ervaring of kennis, behalve
indien ze via een persoon die verantwoordelijk is voor hun veiligheid
onder toezicht staan 8 of voorafgaand instructies kregen over het
VEILIGHEIDSADVIEZEN
VEILIGHEIDSADVIEZEN
31
Page 31

32
gebruik van het apparaat.
• Kinderen moeten onder toezicht worden gehouden om ervoor te
zorgen dat ze niet met het apparaat spelen.
• Uw apparaat is uitsluitend bedoeld om gebruikt te worden voor
huishoudelijk gebruik.
• Deze is niet ontworpen voor een gebruik in de volgende gevallen,
waarvoor de garantie niet geldig is:
_
in kleinschalige personeelskeukens in winkels, kantoren en andere
arbeidsomgevingen,
_
door gasten van hotels, motels of andere verblijfsvormen.
• Indien uw apparaat voorzien is van een verwijderbaar snoer:
Indien het netsnoer beschadigd is, moet deze vervangen worden door
een kabel of een speciale set die verkrijgbaar is bij de fabrikant of de
afdeling onderdelen.
• Indien uw apparaat voorzien is van een vast snoer: Indien het
snoer van dit apparaat beschadigd is, moet dit door de fabrikant, zijn
technische dienst of een persoon met gelijkwaardige kwalificatie
vervangen worden om gevaar te vermijden.
• U mag het apparaat niet onderdompelen.
• Gebruik een vochtige doek of spons met een beetje afwasmiddel om
de accessoires en onderdelen te reinigen die met levensmiddelen in
contact komen. Spoel af met een vochtige doek of spons. Droog de
accessoires en onderdelen die met levensmiddelen in contact komen
af met een droge doek.
• Het -symbool op het toestel (indien aanwezig op het toestel)
Page 32

33
betekent het volgende: "Pas op: oppervlakken kunnen tijdens gebruik
heet worden".
• Pas op: het oppervlak van het verwarmingselement is ook na
gebruik nog eventjes warm.
• Pas op: bij onjuist gebruik van het toestel kunt u verwond raken.
• Pas op: mors geen vloeistoffen op het verbindingsstuk indien uw
toestel een verwijderbaar snoer heeft.
• Ontkoppel het apparaat steeds:
_
meteen na gebruik,
_
om het te verplaatsen,
_
voor elk onderhoud of elke schoonmaakbeurt,
_
als het niet meer correct functioneert.
• Tijdens het gebruik van een verwarmend elektrisch apparaat kunnen
de hoge temperaturen tot brandwonden leiden. Raak de zichtbare
metalen delen niet aan.
• Tijdens het koken geeft het apparaat warmte en stoom af. Houd uw
handen en hoofd uit de buurt. Plaats geen vochtige doek op het
buitendeksel.
• Met problemen kunt u contact opnemen met de klantenservice of via
het internetadres: www.tefal.nl.
• Het toestel kan worden gebruikt tot een hoogte van 4000 m.
• Voor uw veiligheid voldoet dit apparaat aan de toepasselijke normen en regleme
nten(laagspanningsrichtlijnen, elektromagnetische compatibiliteit, materialen in contact metde
voedingsmiddelen, omgeving, …).
• Controleer of de spanning van het net overeenstemt met deze aangegeven op het apparaat
(wisselstroom).
NL
Page 33

34
• Rekening houdend met de diversiteit van de geldende normen moet het apparaat indien het
gebruikt wordt in een ander land dan dat van aankoop nagekeken worden door een erkend
servicestation.
Aansluiting
• Ontkoppel het apparaat nooit door aan het snoer te trekken. Gebruik het apparaat niet
indien:
_
het apparaat zelf of het snoer defect is,
_
het apparaat gevallen is en zichtbare schade of storingen in de werking vertoont. In dit
geval dient het apparaat naar het dichtbijzijnste erkende servicecentrum gestuurd te
worden om elk gevaar uit te sluiten. Demonteer het apparaat nooit zelf.
• Nooit het snoer laten hangen.
• Sluit het apparaat altijd aan op een geaard stopcontact.
• Gebruik geen verlengsnoer. Als men er de verantwoordelijkheid voor neemt, mag men
enkel een verlengsnoer in goede staat gebruiken dat geaard is en aangepast aan het
vermogen van het apparaat.
Werking
• Gebruik een stabiel, vlak werkoppervlak, beschermd tegen waterspatten.
• Probeer het apparaat nooit te laten werken met een leeg bakje of zonder bakje.
• De kookstand moet altijd bereikbaar zijn voor gebruik. Forceer deze niet en blokkeer hem niet door
een willekeurig voorwerp van buiten.
• Nooit de binnenpan verwijderen wanneer het apparaat werkt.
• Nooit de binnenpan rechtstreeks op open vuur of een andere hittebron zetten.
• De binnenpan en de verwarmingsplaat moeten direct met elkaar in contact komen. Het gebruik van
een beschadigde binnenpan of van een voorwerp of voedsel tussen deze twee elementen zou tot
schade kunnen leiden.
• Plaats het apparaat niet vlakbij een warmtebron of in een warme oven, het kan daardoor ernstig
beschadigd raken.
• Doe geen vloeistof of etenswaren in het apparaat wanneer de binnenpan niet op zijn plaats zit.
• Neem de in de recepten aangegeven niveaus in acht.
• Probeer bij brand de vlammen nooit te blussen met water. Doof de vlammen met een vochtige
doek.
• Dit apparaat is bestemd voor huishoudelijk gebruik, in geval van bedrijfsmatig gebruik of een
Page 34

35
Laten we meewerken aan de bescherming van het milieu!
Uw apparaat bevat talrijke waardevolle of recycleerbare materialen.
Breng ze naar een inzamelpunt voor verwerking.
gebruik waarvoor het apparaat niet geschikt is, of dat niet overeenkomt met de gebruiksaanwijzing
kan de aansprakelijkheid van de fabrikant niet in het geding zijn en is de garantie niet geldig.
Milieubescherming
• Uw apparaat is ontworpen om jarenlang van te genieten. Indien u echter zou overwegen om uw
apparaat te vervangen, denk dan zeker aan de bijdrage die u kunt leveren aan de bescherming van
ons milieu.
• Voordat u uw apparaat weggooit, moet de batterij van de timer worden verwijderd en afgeleverd
in een gespecialiseerd inzamelcentrum of een erkend servicecentrum (naargelang het model).
• De erkende Servicecentra nemen uw gebruikte apparaten terug en zullen ze op een
milieuvriendelijke manier vernietigen.
NL
Page 35

36
VOOR HET EERSTE GEBRUIK
Uitpakken
Haal het apparaat uit de verpakking en pak alle accessoires en documenten uit.
Open het deksel met een druk op de knop vooraan op het apparaat.
Lees de gebruiksaanwijzing en volg de instructies nauwgezet op.
Reiniging van het apparaat:
Verwijder de kuip, het binnendeksel (fig 1 en fig 2) en de stoomklep (fig 5).
Maak de kuip, de stoomklep en het binnendeksel schoon met een spons.
Maak het deksel en de buitenkant van het apparaat schoon met een vochtige doek. Droog zorgvuldig af.
Plaats alle onderdelen terug in hun oorspronkelijke positie. Zet het binnendeksel weer op zijn plaats door de
gleufjes op de juiste plaats te zetten (fig 3) en er zachtjes op te drukken (fig 4). Bevestig het afneembare
netsnoer aan het stopcontact onderaan het apparaat.
•
Veeg de kuip aan de buitenkant zorgvuldig schoon (vooral de bodem). Zorg ervoor dat er onder de kuip en
op het verwarmingselement geen etensrestjes of vloeistof blijven zitten.
•
Plaats de kuip correct in het apparaat.
•
Ga na of het binnendeksel goed vastzit.
•
Sluit het deksel en druk het naar beneden totdat je een "klik" hoort.
•
Bevestig het netsnoer aan het stopcontact van de multicooker en koppel het aan een wandcontactdoos.
•
Het standaardprogramma is 01 - Witte rijst.
•
Raak het verwarmingselement nooit aan wanneer het apparaat aan het stroomnet gekoppeld is of na een
bereiding.
•
Verplaats het apparaat niet tijdens gebruik of meteen na de bereiding.
•
Dit apparaat is uitsluitend bedoeld voor gebruik binnenshuis.
•
Trek altijd handschoenen aan om de kuip en de mandjes te hanteren als ze warm zijn.
•
Aanbevolen wordt om de kuip en het weekmandje tegelijkertijd te verwijderen en te wachten tot de stoom
is opgetrokken voordat je de kuip en het stoommandje uit elkaar haalt.
•
Het stoommandje en het weekmandje mogen alleen worden gebruikt voor de functies waarvoor ze
bedoeld zijn.
•
Sluit de stoomopeningen niet af tijdens gebruik.
•
Gebruik de kuip alleen maar in het apparaat (dus niet op een gasvuur, een kookplaat of in de oven ...)
•
Gebruik geen metalen keukengerei om de voedingswaren in de kuip te vermengen.
•
Na elke bereiding moet de collector leeg zijn.
•
Je mag niet frituren met dit apparaat.
•
Raak in geen geval de stoomopeningen aan tijdens de bereiding, want dan zou je je kunnen verbranden.
•
Gebruik alleen de kuip die bij het apparaat geleverd is.
•
Giet geen water in het apparaat en doe er geen ingrediënten in als de kuip zich niet in het apparaat
bevindt.
•
De hoeveelheid water + ingrediënten mag nooit hoger komen dan het streepje “MAX” aan de
binnenkant van de kuip.
GEBRUIKSADVIES
1
2
3
4
5
7
6
9
10
11
8
Page 36

Programma
nummer
Programma's Textuur Automatisch Manueel
Weektijd -
bij benadering
Bereidingstijd -
bij benadering
Aantal
personen
(min/max)
1 Witte rijst
Nutri + 1 40 – 50 min.
2 – 12
Snel 1 20 – 30 min.
Normaal 1 30 – 40 min.
Zacht 1 40 – 50 min.
2 Bruine rijst
Nutri + 1 1 uur - 1 uur 10 min.
2 – 12
Snel 1 40 – 50 min.
Normaal 1 50 min. - 1 uur
Zacht 1 50 min. - 1 uur
3 Kikkererwten Nutri + 1 1 uur 40 min. 50 min. - 1 uur 2 – 6
4 Quinoa
Nutri + 1 2 uur 20 min. - 2 uur 30 min.
2 – 8Snel 1 20 – 30 min.
Normaal 1 30 – 40 min.
5 Linzen
Nutri + 1 50 min. - 1 uur
2 – 10Snel 1 40 - 50 min.
Zacht 1 1 uur - 1 uur 10 min.
6 Bonen
Nutri + 1 50 min. 1 uur 30 min. - 1 uur 40 min.
2 – 6
Normaal 1 50 min. 2 uur 15 min. - 2 uur 30 min.
7 Babyvoeding
1 (4-6 maanden) 1 20 – 30 min.
2
2 (7-9 maanden) 1 1 uur - 1 uur 10 min.
3 (10-12 maanden) 1 50 min. - 1 uur
4 (13-14 maanden) 1 40 – 50 min.
8
Bruine rijst +
groene linzen
Nutri + 1 1 uur 20 min. - 1 uur 30 min. 2 – 8
TOTAAL STAND VOEDING 22
Als je het geluid wilt uitschakelen, moet je 5 seconden op de knop drukken. Je ziet dan het pictogram .
De geluiden die het begin en einde van de bereiding aangeven kunt je niet uitschakelen.
Als je het geluid opnieuw wilt inschakelen, moet je nogmaals 5 seconden op de knop drukken.
Het pictogram verdwijnt dan. De instellingen blijven in het geheugen opgeslagen.
Als je op de knoppen en blijft drukken, kun je de instellingen sneller verhogen of verlagen.
•
Je kunt die knoppen niet gebruiken als je handschoenen draagt.
Ze worden alleen ingeschakeld als het deksel correct gesloten is.
Je kunt je apparaat uitschakelen door 5 seconden op de knop te drukken. Je hoort dan een langgerekte
bieptoon. Je kunt je apparaat weer inschakelen door op eender welke knop te drukken.
•
Om een bereiding die bezig is te stoppen, druk je 5 seconden op de knop . Je kunt een programma ook
annuleren door langdurig op de knop "Annuleren" te drukken.
•
een instelling te annuleren, druk je op de knop "Annuleren".
MENU VOEDING
De bereidingswijzen van “Menu Voeding” zijn de automatische bereidingswijzen. Het apparaat geeft de verschillende
stappen van de bereiding aan. In onderstaande tabel vind je de verschillende mogelijke texturen en het aantal personen
(min/max).
37
NL
Page 37

38
31
2
64 5
Kies het programmanummer
door op de knoppen en
te drukken. Bevestig door op
te drukken.
Kies de gewenste textuur door
op de knoppen en te
drukken. Bevestig door op
te drukken.
Kies het aantal personen door
op de knoppen en te
drukken. Bevestig door op te
drukken.
Het pictogram knippert op het
scherm. Het geeft de hoeveelheid
van de graansoort aan (het aantal
koppen) die je in de kuip moet
gieten. Wanneer je de ingrediënten
in de kuip hebt gegoten, laat je de
kuip zakken en bevestig je door te
drukken op .
Het pictogram knippert op het
scherm. Het geeft aan hoeveel
water je moet toevoegen. Gebruik
de meegeleverde maatbeker om
de correcte hoeveelheid water toe
te voegen. Wanneer je het water in
de kuip hebt gegoten, laat je het
deksel zakken en bevestig je door
te drukken op "pictogram .
Het pictogram verschijnt op
het scherm en geeft aan dat je
het deksel moet dichtdoen. De
knop Uitgestelde start knippert.
Je kunt de bereiding meteen of
uitgesteld starten (zie het
hoofdstuk Uitgestelde start voor
instructies). Druk op de knop
om je bereiding meteen te
starten. Je hoort een lange
bieptoon die aangeeft dat de
bereiding start.
Het apparaat schakelt
automatisch in de stand
Automatische bereiding: de
pictogrammen ,
en verschijnen op het scherm.
Het pictogram verdwijnt
voor het einde van de bereiding, het
apparaat laat 2 bieptonen horen en
de resterende bereidingstijd
verschijnt op het scherm. Die tijd
varieert afhankelijk van het gekozen
programma en de gewenste
textuur.
Op het einde van de bereiding, laat
het apparaat drie geluiden horen
en schakelt het automatisch in de
stand Warm houden (het
controlelampje gaat branden).
Witte rijst (01) / Bruine rijst (02) / Quinoa (04) / Linzen (05)
7
Opm.: de hoeveelheid water
voor de bereiding van rijst kan
worden aangepast aan je
smaak: gebruik wat meer
water voor klevende rijst en
minder water voor beetgare
rijst.
Page 38

39
3
Het apparaat geeft aan dat je
het weekmandje in de kuip
moet plaatsen.
Het pictogram knippert op
het scherm.
Het pictogram knippert
op het scherm. Het geeft de
hoeveelheid ingrediënten aan
(het aantal koppen) die je in de
kuip moet gieten. Wanneer je
de ingrediënten in de kuip hebt
gegoten, laat je het deksel
zakken en bevestig je door te
drukken op .
Het pictogram knippert op
het scherm. Het geeft aan
hoeveel water je moet
toevoegen. Gebruik de
meegeleverde maatbeker om
de correcte hoeveelheid water
toe te voegen. Doe het deksel
dicht en bevestig met een druk
op .
Kikkererwten (03)
21
Kies het programmanummer
door op de knoppen en
te drukken. Bevestig door
op te drukken.
Kies het aantal personen
door op de knoppen en
te drukken. Bevestig door op
te drukken.
4
5
Druk op nadat je het
weekmandje geplaatst hebt.
Nadat je het weekwater hebt
weggegoten, zet je het
weekmandje opnieuw in de
kuip en kun je met de
bereiding beginnen.
6
Je hoort een lange bieptoon die
aangeeft dat de bereiding start.
Het apparaat begint de
ingrediënten automatisch te
weken: de pictogrammen
, en verschijnen
op het scherm.
Op het einde van de weektijd,
hoor je het apparaat
tweemaal biepen en begint
onderstaand pictogram te
knipperen. Het geeft aan dat
je het weekwater moet
weggieten.
NL
Page 39

40
87
Het apparaat geeft aan
hoeveel water je moet
toevoegen. Druk op om de
bereiding te starten.
Het pictogram verschijnt
op het scherm en geeft aan
dat je het deksel moet
dichtdoen. De knop
Uitgestelde start knippert. Je
kunt de bereiding meteen of
uitgesteld starten (zie het
hoofdstuk Uitgestelde start
voor instructies).
Druk op de knop om je
bereiding meteen te starten. Je
hoort een lange bieptoon die
aangeeft dat de bereiding
start.
Het apparaat begint de
ingrediënten automatisch te
bereiden: de pictogramme
, en verschijnen
op het scherm.
Het pictogram
verdwijnt voor het einde van
de bereiding, het apparaat
laat 2 bieptonen horen en
de resterende bereidingstijd
verschijnt op het scherm.
Die tijd varieert afhankelijk
van het gekozen programma
en de gewenste textuur.
Op het einde van de
bereiding, laat het apparaat
drie geluiden horen en
schakelt het automatisch in
de stand Warm houden (het
controlelampje gaat branden).
Bonen (06)
31
2
Kies het programmanummer
door op de knoppen en
te drukken. Bevestig door
op te drukken.
Kies de gewenste textuur
door op de knoppen en
. te drukken. Bevestig
door op te drukken.
Kies het aantal personen
door op de knoppen en
te drukken. Bevestig door op
te drukken.
Page 40

41
4
Het apparaat geeft aan dat je
het weekmandje in de kuip
moet plaatsen.
Het pictogram knippert op
het scherm.
Het pictogram knippert op
het scherm. Het geeft de
hoeveelheid ingrediënten aan
(het aantal koppen) die je in de
kuip moet gieten. Wanneer je
de ingrediënten in de kuip hebt
gegoten, laat je het deksel
zakken en bevestig je door te
drukken op .
5
Het pictogram knippert op
het scherm. Het geeft aan
hoeveel water je moet
toevoegen. Gebruik de
meegeleverde maatbeker om
de correcte hoeveelheid water
toe te voegen. Doe het deksel
dicht en bevestig met een druk
op .
6
8
L’appareil vous indique la
quantité d’eau à ajouter.
Appuyer sur pour commencer
la phase de cuisson.
Druk op nadat je het
weekmandje geplaatst hebt.
Nadat je het weekwater hebt
weggegoten, zet je het
weekmandje opnieuw in de
kuip en kun je met de
bereiding beginnen.
7
Je hoort een lange bieptoon
die aangeeft dat de bereiding
start. Het apparaat begint de
ingrediënten automatisch te
weken: de pictogrammen
, en verschijnen
op het scherm.
Op het einde van de weektijd,
hoor je het apparaat
tweemaal biepen en begint
onderstaand pictogram te
knipperen. Het geeft aan dat
je het weekwater moet
weggieten.
Note: Le collecteur doit être
vidé entre les 2 étapes
(trempage et cuisson) pour
éviter des débordements lors
de la dernière étape de
cuisson.
NL
Page 41

42
9
Het pictogram verschijnt
op het scherm en geeft aan
dat je het deksel moet
dichtdoen. De knop
Uitgestelde start knippert. Je
resterende bereidingstijd
verschijnt op het scherm.
Die tijd varieert afhankelijk
van het gekozen programma
en de gewenste textuur.
Op het einde van de bereiding,
laat het apparaat drie
geluiden horen en schakelt het
automatisch in de stand Warm
houden (het controlelampje
gaat branden).
Babyvoeding (07)
1
Kies het programmanummer
door op de knoppen en
te drukken. Bevestig door
op te drukken.
2
Ki e s he t nu m m e r da t
ov e r e e n s t e m t m et d e
le ef t i j d v a n j e ba by d oo r
op d e kno ppe n en te
drukken. Bevestig door op
te drukken.
1 => 4 tot 6 maanden
2 => 7 tot 9 maanden
3 => 10 tot 12 maanden
4 => 13 tot 14 maanden
3
Het apparaat begint de
ingrediënten automatisch te
bereiden: de pictogrammen
, en verschijnen op
het scherm.
Het pictogram verdwijnt
voor het einde van de bereiding,
het apparaat laat 2 biepen
horen en de resterende
bereidingstijd verschijnt op het
scherm. Die tijd varieert
afhankelijk van het gekozen
programma en de gewenste
textuur. Op het einde van de
bereiding laat het apparaat
enkele geluiden horen en
schakelt het automatisch in de
stand Warm houden (het
lampje gaat branden).
kunt de bereiding meteen of
uitgesteld starten (zie het
hoofdstuk Uitgestelde start
voor instructies). Druk op de
knop om je bereiding
meteen te starten. Je hoort
een lange bieptoon die
aangeeft dat de bereiding
start.
Het apparaat begint de
ingrediënten automatisch te
bereiden: de pictogrammen
, en verschijnen
op het scherm.
Het pictogram
verdwijnt voor het einde van
de bereiding, het apparaat
laat 2 biepen horen en de
Page 42

Bruine rijst + groene linzen (08)
21
Kies het programmanummer
door op de knoppen en .
te drukken. Bevestig door op
te drukken.
Kies het aantal personen door op
de knoppen en . te drukken.
Bevestig door op te drukken.
3
4
Het pictogram knippert op het
scherm. Het geeft aan hoeveel
water je moet toevoegen. Gebruik
de meegeleverde maatbeker om
de correcte hoeveelheid water toe
te voegen. Doe het deksel dicht en
bevestig met een druk op .
5
Het pictogram verschijnt op
het scherm en geeft aan dat je het
deksel moet dichtdoen. De knop
Uitgestelde start knippert. Je kunt
de bereiding meteen of uitgesteld
starten (zie het hoofdstuk
Uitgestelde start voor instructies).
Druk op de knop om je
bereiding meteen te starten. Je
hoort een lange bieptoon die
aangeeft dat de bereiding start.
6
Je hoort een lange bieptoon die
aangeeft dat de bereiding start.
Het apparaat begint de ingrediënten
automatisch te bereiden: de
pictogrammen , en
verschijnen op het scherm.
Het pictogram verdwijnt voor
het einde van de bereiding, het
apparaat laat 2 biepen horen en de
resterende bereidingstijd verschijnt
op het scherm. Die tijd varieert
afhankelijk van het gekozen
programma en de gewenste textuur.
Op het einde van de bereiding, laat
het apparaat drie geluiden horen en
schakelt het automatisch in de
stand Warm houden (het
controlelampje gaat branden).
43
Het apparaat geeft aan:
a)de hoeveelheid bruine rijst (aantal
koppen) die je in de kuip moet
gieten. Wanneer je de ingrediënten
in de kuip hebt gegoten, doet je het
deksel dicht en bevestig je door te
drukken op .
b) de hoeveelheid linzen (aantal
koppen) die je in de kuip moet
gieten. Wanneer je de ingrediënten
in de kuip hebt gegoten, doe je het
deksel dicht en bevestig je door te
drukken op .
NL
Page 43

44
Programma
nummer
Programma's Automatisch Manueel
Temperatuur (°C) Bereidingstijd
Start
uitges-
teld
Standaard
Regelbare
temperatuur
Standaard Regelbare tijd
9
Witte rijst Pilav /
Risotto
1 Automatisch Automatisch Automatisch Automatisch *
10 Stoom 1 Automatisch Automatisch 30 min. 5 min. – 3 uur *
11 Stoofpot 3 100°C 80°C – 100°C 1 uur 30 min. 5 min. – 9 uur *
12 Wok/Bakken 13 160°C 100°C – 160°C 20 min.
5 min. – 1 uur
30
13 Pasta 1 Automatisch Automatisch 8 min. 3 min. – 1 uur
14 Oven 13 145°C 100°C – 160°C 40 min. 5 min. – 4 uur *
15 Soep 1 Automatisch Automatisch 40 min. 5 min. – 3 uur *
16 Gistdeeg 2 40°C 30°C – 40°C 30 min. 5 min. – 9 uur
17 Nagerechten 13 140°C 100°C – 160°C 45 min. 5 min. – 2 uur *
18 Verse kaas 2 Automatisch Automatisch 2 uur 30 min. – 4 uur
19 Yoghurt 1 Automatisch Automatisch 8 uur 1 uur – 24 uur
20 Confituur 1 Automatisch Automatisch 30 min. 5 min. – 2 uur *
Opwarmen 2 100°C 80°C – 100°C 20 min. 5 min. – 1 uur *
Warm houden 1 75°C
_ _ _
*
Mijn recepten 5 100°C
40°C – 100°C
30 min.
1 min. – 9 uur
*
105°C – 160°C 1 min. – 2 uur
Programma's 7 53
TOTAAL STAND MULTICOOK 60
MENU MULTICOOK
Page 44

45
Pilav / Risotto (09)
Stoom (10) / Stoofpot (11) / Wok-Bakken (12) / Oven (14) / Soep (15) /
Gistdeeg (16) / Dessert (17) / Verse kaas (18) / Yoghurt (19) /
Confituur (20)
1
Kies het programmanummer
door op de knoppen en
. te drukken. Bevestig
door op te drukken.
2
Het pictogram verschijnt op
het scherm, je kunt je
ingrediënten toevoegen. Druk
vervolgens op de knop . De
knop Uitgestelde start knippert.
Je kunt de bereiding meteen
starten. Voor de in de tabel
aangegeven functies kun je de
bereiding ook uitgesteld starten
(zie het hoofdstuk Uitgestelde
start voor instructies). Druk op de
knop om je bereiding
meteen te starten.
3
Het apparaat begint de
ingrediënten automatisch te
bereiden: de pictogrammen
, en verschijnen
op het scherm.
Op het einde van de bereiding
laat het apparaat drie
geluiden horen en schakelt het
automatisch in de stand Warm
houden (het controlelampje
gaat branden).
1 2 3
Kies het programmanummer
door op de knoppen en
. te drukken. Bevestig
door op te drukken.
De standaardtijd is op het
scherm te zien. Je kunt de tijd
aanpassen door te drukken op
.
Voor bepaalde functies kun je
vóór de bereidingstijd de
temperatuur aanpassen (zie
tabel). Druk op de knop en
stel de gewenste
temperatuur in met de knoppen
en .
Bevestig door op . te drukken.
Stel vervolgens de tijd in zoals
eerder werd uitgelegd.
Vervolgens druk je op de
knoppen en om de
bereidingstijd te regelen.
Bevestig door op te drukken.
NL
Page 45

46
Het pictogram verschijnt op
het scherm, je kunt je
ingrediënten toevoegen. Druk
vervolgens op de knop. De knop
Uitgestelde start knippert. Je
kunt de bereiding meteen
starten. Voor de in de tabel
aangegeven functies kun je de
bereiding ook uitgesteld starten
(zie het hoofdstuk Uitgestelde
start voor instructies). Druk op
de knop om je bereiding
meteen te starten.
Je hoort een lange bieptoon die
aangeeft dat de bereiding start.
Het pictogram om je
bereiding meteen te starten.
Je hoort een lange bieptoon
die aangeeft dat de bereiding
start. Het pictogram
verschijnt op het scherm. De
resterende bereidingstijd en de
temperatuur (wanneer die
beschikbaar is) zijn eveneens
op het scherm te zien.
Voor alle functies, behalve voor
Wok/Bakken en Confituur, is
het pictogram te zien op
het scherm. Het geeft aan dat
het deksel gesloten moet
blijven.
4
Voor de functies Wok/Bakken en
Confituur verschijnt het
pictogram op het scherm. het
geeft aan dat het deksel open
moet blijven. Op het einde van
de bereiding laat het apparaat
drie geluiden horen en schakelt
het automatisch in de stand
Warm houden (het
controlelampje gaat branden).
Opm.: voor de functie
Confituur moet het deksel
open blijven. Kook nooit meer
dan 500 g vruchten.
5
De melk
Welke melk moet ik
gebruiken?
Al onze recepten zijn op
basis van koemelk, tenzij
anders is vermeld. Het is
mogelijk andere soorten
melk te gebruiken
(bijvoorbeeld geiten- of
schapenmelk, sojamelk of
andere plantaardige
melksoorten), maar de
yoghurt kan dan dunner of
dikker zijn - dat hangt af van
de gebruikte melk. Je kunt
rauwe melk, lang houdbare
melk en alle hieronder
beschreven soorten melk
gebruiken in je apparaat:
• Lang houdbare
gesteriliseerde melk:
Volle melk UHT geeft
steviger yoghurt. Halfvolle
melk geeft minder stevige
yoghurt. Je kunt ook
halfvolle melk gebruiken en
daar een of twee
KEUZE VAN INGREDIËNTEN VOOR YOGHURT
eetlepels melkpoeder aan
toevoegen.
• Gepasteuriseerde melk:
deze melk maakt je yoghurt
romiger, met een dun
velletje erop.
• Rauwe melk
(boerderijmelk):
deze melk moet je vooraf
koken. Bovendien wordt
aanbevolen om ze lang te
laten doorkoken. Het zou
gevaarlijk zijn om dit soort
melk te gebruiken zonder ze
vooraf te koken. Laat de
melk vervolgens afkoelen
voordat je ze in het apparaat
giet. Yoghurt bereiden op
basis van rauwe melk wordt
niet aanbevolen.
• Melkpoeder:
hiermee krijg je heel romige
yoghurt. Houd je altijd aan
de aanwijzingen op de
verpakking.
Kies volle melk, bij voorkeur
lang houdende UHT melk.
Als je verse (rauwe) melk of
niet-gepasteuriseerde melk
gebruikt, moet je die eerst
laten koken, vervolgens
laten afkoelen en het vel
verwijderen.
Rijsmiddel
Voor yoghurt
Het rijsmiddel kan zijn:
- Natuuryoghurt die je in de
winkel koopt, met een
vervaldatum die zo ver
mogelijk in de toekomst ligt,
dan zal je yoghurt vaster zijn
en meer actieve rijsmiddelen
bevatten.
- Een gevriesdroogd
rijsmiddel. Houd je in dat
geval aan de werkingsduur
die is aangegeven op de
gebruiksaanwijzing van het
rijsmiddel. Je vindt deze
rijsmiddelen in de
supermarkt, de apotheek of
Page 46

47
Stap 1: water koken
De pictogrammen ,
en verschijnen
op het scherm.
Wanneer de kooktemperatuur
bereikt is, biept het apparaat
tweemaal om de 10 seconden
totdat je het deksel opent en de
pasta toevoegt. Je kunt dan
overgaan naar stap 2.
2
3
1
Kies het
programmanummer door op
de knoppen en te
drukken. Bevestig door op
te drukken.
Opm.: er zijn 2 stappen in
deze bereiding, water koken
en de bereiding van de pasta.
Je kunt de kooktijd van de
pasta aanpassen. Druk op de
knop .
Vervolgens druk je op de knoppen
en om de bereidingstijd te
regelen. Sluit het deksel. Bevestig
door op . te drukken. Je begint
nu met stap 1.
Pasta (13)
Stap 2: de pasta koken
Open het deksel en doe de
pasta in de kuip.
Nadat je de pasta in de kuip
hebt gedaan, druk je op om
de bereidingstijd te starten.
Om overkoken te voorkomen,
moet het deksel tijdens deze
stap open blijven.
Op het einde van de
bereidingstijd, biept het
apparaat drie keer.
Bij deze functie wordt het
gerecht niet warm gehouden.
Het apparaat schakelt naar de
stand Bereiding. De
pictogrammen en
verschijnen op het scherm.
De bereidingstijd is op het
scherm te zien en begint af te
tellen.
de dieetwinkel.
- Een onlangs bereide
yoghurt – dit moet een zo
recent mogelijke
natuuryoghurt zijn. Dit
procedé wordt de cultuur
genoemd.
Als je de melk hebt laten koken,
moet je wachten totdat de
melk tot op kamertemperatuur
is afgekoeld voordat je het
rijsmiddel toevoegt.
Bij te hoge temperaturen
kunnen de eigenschappen van
het rijsmiddel verloren gaan.
Fermentatietijd
• De fermentatie van de
yoghurt neemt 6 tot 12
uur in beslag, afhankelijk
van de gebruikte
basisingrediënten en van het
gewenste resultaat.
Zacht
Vloeibaar
Zuur
Stevig
6 uur 7 uur 8 uur 9 uur 10 uur 11 uur 12 uur
• Na afloop van de bereiding zet je de yoghurt ten minste 4 uur in de koelkast. Verbruik hem binnen de 7
dagen.
1 2 3
4
NL
Page 47

48
Kies een bestaand menu
Je kunt het programmanummer
wijzigen door te drukken op de
knoppen en en om
het gewenste programma te
kiezen. Je kunt de tijd en
temperatuur wijzigen (als die
voorhanden zijn, zie tabel) door
te drukken op en ze
instellen door te drukken op
de knoppen en . Nadat je
je instellingen hebt ingevoerd,
druk je op om je recept te
starten.
Keuze van eigen instellingen
1
Het nummer 1 knippert, druk op
om toegang te krijgen tot het
eerste receptenprogramma.
2
Het scherm geeft het
standaardmenu, de
standaardtemperatuur en bereidingstijd weer. Om je eigen
instellingen in te voeren, druk je
op . Het menunummer
verdwijnt en je kunt je
temperatuur en tijd wijzigen
door te drukken op de
knoppen en . Nadat je je
instellingen hebt ingevoerd, druk
je op om je recept te starten.
Opm.: je kunt het nummer van
"Mijn recepten" wijzigen door
te drukken op de knoppen en .
Je kunt 5 instellingen opslaan in
het geheugen. Je kunt een
bestaand menu anders
instellen of je kunt je eigen
instellingen (tijd en
temperatuur) opslaan. Druk op
de knop .
Het nummer 1 knippert, druk
op om toegang te krijgen tot
het eerste receptenprogramma.
MIJN RECEPTEN
1
2
Het scherm geeft het
standaardmenu weer evenals
de standaardtemperatuur en bereidingstijd als je je eigen
instellingen wilt invoeren.
Page 48

49
• Je kunt de functie Warm houden manueel kiezen.
Druk op de knop , het groene lampje knippert. Druk vervolgens op de knop om te bevestigen.
Het apparaat laat een lange bieptoon horen die aangeeft dat het warm houden nu begint en het
controlelampje gaat branden.
De warmhoudtijd wordt op het scherm weergegeven.
• Je kunt de functie Warm houden automatisch uitschakelen, maar alleen voor de volgende bereiding.
• Om de functie Warm houden uit te schakelen, druk je 5 seconden op de knop Je kunt de functie Warm
houden ook uitschakelen door lang te drukken op de knop "Annuleren”.
Om de functie Warm houden te annuleren, druk je 5 seconden op de knop .
Het apparaat laat een lange bieptoon horen en het groene lampje van knop gaat uit. Om de functie Warm houden uit
te schakelen, druk je 5 seconden op de knop Het groene lampje gaat branden.
Aanbeveling: om de optimale smaak van je bereidingen te garanderen wordt aanbevolen om ze niet langer dan
12 uur warm te houden.
Opm.: gebruik de functie Opwarmen nooit om voedingswaren te ontdooien.
OPWARMINGSFUNCTIE
WARM HOUDEN
FUNCTIE UITGESTELDE START
Deze functie dient alleen om reeds bereide gerechten op te warmen.
Druk op de knop . De lampjes van de knoppen , en knipperen.
De standaardtemperatuur en bereidingstijd verschijnen op het scherm. Als je deze instellingen wenst te wijzigen, moet je
op de knop en vervolgens op de knoppen en drukken om de temperatuur aan te passen.
Opm.: voor de functie Opwarmen zijn er maar 2 temperaturen mogelijk, 80 en 100°C.
Nadat je de temperatuur gewijzigd hebt, druk je op je kunt de bereidingstijd instellen door te drukken op de knoppen en .
Nadat je je instellingen hebt ingevoerd, druk je op om de opwarming te starten.
Het apparaat laat een lange bieptoon horen. Dit geeft aan dat de opwarming gestart is. Het
controlelampje gaat branden.
Het pictogram verschijnt op het scherm. De resterende tijd is op het scherm te zien.
Op het einde van de opwarming, biept het apparaat drie keer en schakelt het naar de stand Warm houden (het
controlelampje gaat branden).
OPGELET
Het apparaat mag voor niet meer dan de helft met koude ingrediënten zijn gevuld. Als er te veel
ingrediënten zijn, kunnen ze niet correct worden opgewarmd. Door herhaaldelijk de stand
Opwarmen te gebruiken voor heel weinig ingrediënten, bestaat het risico dat de ingrediënten verbranden
en dat ze aanbakken op de bodem van de kuip.
Aanbevolen wordt om geen dikke havermoutpap op te warmen omdat die papperig kan worden.
Aanbevolen wordt om de ingrediënten tijdens het opwarmen goed door te roeren om een homogenere
temperatuur te krijgen.
Gebruik de functie Opwarmen nooit om voedingswaren te ontdooien.
Gebruik de functie Opwarmen nooit om diepvriesproducten op te warmen.
• Om de functie Uitgestelde start te gebruiken, moet je eerst een menu en bereidingstijd kiezen.
Nadat je deze instellingen gekozen hebt en voordat je met de bereiding begint, knippert het controlelampje .
Druk vervolgens op de knop , de bereidingstijd knippert op het scherm. Voor programma's met
automatische bereidingstijd wordt op het scherm de standaardbereidingstijd weergegeven.
Kies de uitgestelde-starttijd door te drukken op de knoppen en .
Deze geprogrammeerde tijd omvat de bereidingstijd.
NL
Page 49

50
• Zorg ervoor dat de multicooker uitgeschakeld en volledig afgekoeld is voordat je hem schoonmaakt en onderhoudt.
• Het wordt sterk aanbevolen om het apparaat na elk gebruik te reinigen met een spons.
• De kuip, het binnendeksel, de maatbekers en de spatel mogen in de vaatwasser.
Kuip, stoommandje, weekmandje en binnendeksel
• Haal de kuip uit het apparaat. Reinig de kuip, het stoommandje, het weekmandje en het binnendeksel met
warm water, een vloeibaar afwasmiddel en een spons.
• Schuurpoeder en ijzersponsen worden niet aanbevolen.
• Als er voedselresten kleven aan de bodem van de kuip, kun je water in de kuip gieten en ze losweken voordat
je de kuip afwast.
• Droog de kuip vervolgens zorgvuldig af.
Onderhoud van de kuip
Voor de kuip moet je zorgvuldig de volgende instructies opvolgen:
• De kwaliteit van de kuip kan maar worden behouden, als je ingrediënten niet snijdt als ze zich reeds in de
kuip bevinden.
• Zorg ervoor dat je de kuip altijd terugplaatst in de rijstkoker.
• Gebruik de meegeleverde plastic lepel of een houten lepel, geen metalen lepel want die zou het
kuipoppervlak kunnen beschadigen.
• Giet nooit azijn in de kuip want daardoor zou die kunnen gaan roesten.
• De kleur van het kuipoppervlak kan veranderen nadat je de kuip in gebruik hebt genomen en na langdurig
gebruik. Dat kleurverschil is het gevolg van de opgewekte stoom en van het watergebruik en is niet schadelijk
voor je rijstkoker of voor je gezondheid. Je kunt het apparaat veilig verder blijven gebruiken.
Reiniging van de stoomklep
• Verwijder de stoomklep van het deksel, open ze door ze te draaien in de richting die is aangegeven met de
vermelding "openen". Nu kun je ze schoonmaken. Na reiniging, goed afdrogen en terug op het deksel plaatsen.
Reiniging en onderhoud van de andere onderdelen van het apparaat
• Maak de buitenkant van de multicooker, de binnenkant van het deksel en het snoer schoon met een vochtige
doek. Droog vervolgens af.
• Gebruik geen schuurmiddel.
• Gebruik geen water om de binnenkant van het apparaat te reinigen want dat zou de warmtesensor kunnen
beschadigen.
• Verwijder het binnendeksel na elk gebruik om het apparaat te verluchten en te voorkomen dat er
voedselgeurtjes in het apparaat blijven zitten. Maak het schoon met warm water en een vloeibaar
afwasmiddel.
REINIGING EN ONDERHOUD
Page 50

51
TECHNISCHE PROBLEMEN OPLOSSEN
Beschrijving van het probleem Oorzaken Oplossingen
Een controlelampje is uitgegaan en het
apparaat warmt niet op.
Het apparaat is niet aangesloten op het
stroomnet.
Steek de stekker in het stopcontact Als de
controlelampjes nog altijd niet branden en het
apparaat nog steeds niet opwarmt, verzend het
apparaat dan naar een erkende reparateur.
Een controlelampje is uitgegaan maar
het apparaat warmt wel op.
Probleem met de verbinding van een
controlelampje, of het controlelampje zelf is
beschadigd.
Verzend het apparaat naar een erkende reparateur.
De stoom ontsnapt
tijdens de bereiding.
Het deksel gaat niet goed dicht.
Open het deksel en doe het weer dicht. Als het
probleem zich blijft voordoen, moet je het apparaat
naar een erkende reparateur verzenden.
De microveiligheidsklep is niet goed
geplaatst.
Beëindig de bereiding (haal de stekker van het
apparaat uit het stopcontact) en controleer of
de klep volledig is (de twee onderdelen moeten met
elkaar vergrendeld zijn) en of ze correct geplaatst is.
Het deksel of de koppeling van de
microveiligheidsklep is beschadigd.
Verzend het apparaat naar een erkende reparateur.
Het binnendeksel is niet goed geplaatst.
Verwijder het binnendeksel en breng het opnieuw
aan in de correcte positie. Start de bereiding
opnieuw op.
De rijst is maar halfgekookt of de
bereiding ervan duurt veel te lang.
Er is te veel of te weinig water gebruikt in
verhouding tot de hoeveelheid rijst.
Raadpleeg de tabel om te kijken hoeveel water
er nodig is.
De rijst is maar halfgekookt of de
bereiding ervan duurt veel te lang.
Hij is niet gaar genoeg.
Onjuiste hoeveelheid water: raadpleeg het receptenboekje
om te kijken hoeveel water er nodig is. Doe altijd eerst de
rijst in de kuip en voeg daarna pas water toe.
De automatische functie Warm
houden werkt niet (het apparaat
warmt niet op of blijft in de stand
Bereiding staan).
De functie Warm houden is per ongeluk
uitgeschakeld tijdens de instelling van het
apparaat (zie hoofdstuk Functie Warm
houden)
Raadpleeg het hoofdstuk Functie Warm houden van
de gebruiksaanwijzing. De automatische functie
Warm houden is niet beschikbaar voor de functies
Yoghurt, Verse kaas, Dessert en Pasta. Als het
probleem zich blijft voordoen, moet je het apparaat
naar een erkende reparateur verzenden.
E0
De sensor op het hogere circuit staat open
of er heeft zich een kortsluiting voorgedaan.
Verzend het apparaat naar
een erkende reparateur.
E1
De sensor op het lagere circuit staat open of
er heeft zich een kortsluiting voorgedaan.
Schakel het apparaat uit en start het programma
opnieuw op. Als het probleem zich blijft voordoen,
moet je het apparaat naar een erkende reparateur
verzenden.
E3
De kuip staat niet op haar plaats of ze is
leeg.
Zet de kuip in het apparaat, haal de stekker uit het
stopcontact, steek de stekker opnieuw in het
stopcontact en schakel het apparaat terug in om
het programma weer op te starten.
Opmerking: als de binnenkuip vervormd is, mag je ze niet langer gebruiken en moet je een ander
exemplaar vragen bij een erkende reparateur.
NL
Page 51

www.tefal.com
Ref. NC00139322 - 12/2016
 Loading...