

Page 1
1800133082/03 - 48/14
1800133082-03 IS8300 _110x154 24/11/14 11:34 Page1
Page 2
EN
FR
TH
MS
ZH
AR
RU
UK
TR
IS8300
8
4
6
9
2
2
2
1800133082-03 IS8300 _110x154 24/11/14 11:34 Page2
Page 3
1
2
3*
8
4
5
6
18
19
9
17
21
20
22
7
10
11
12
16
13
14
15
* EN Depending on model / FR Selon modèle / TH
แตกต่างกันไปในแต่ละรุ่น
/ MS Mengikut model / ZH 根據型號而
定
/ AR / RU В зависимости от модели / UK
Залежно від моделі
/ TR modele göre değişir
•ºV «∞Luœ¥q
1800133082-03 IS8300 _110x154 24/11/14 11:34 Page3
Page 4
23*
25*
27*
28*
29*
30*
24*
* EN Depending on model / FR Selon modèle / TH
แตกต่างกันไปในแต่ละรุ่น
/ MS Mengikut model / ZH 根據型號而
定
/ AR / RU В зависимости от модели / UK
Залежно від моделі
/ TR modele göre değişir
•ºV «∞Luœ¥q
26*
1800133082-03 IS8300 _110x154 24/11/14 11:34 Page4
Page 5
34
31 3332
35
36
* EN Depending on model / FR Selon modèle / TH
แตกต่างกันไปในแต่ละรุ่น
/ MS Mengikut model / ZH 根據型號而
定
/ AR / RU В зависимости от модели / UK
Залежно від моделі
/ TR modele göre değişir
•ºV «∞Luœ¥q
1800133082-03 IS8300 _110x154 24/11/14 11:34 Page5
Page 6
1800133082-03 IS8300 _110x154 24/11/14 11:34 Page6
Page 7
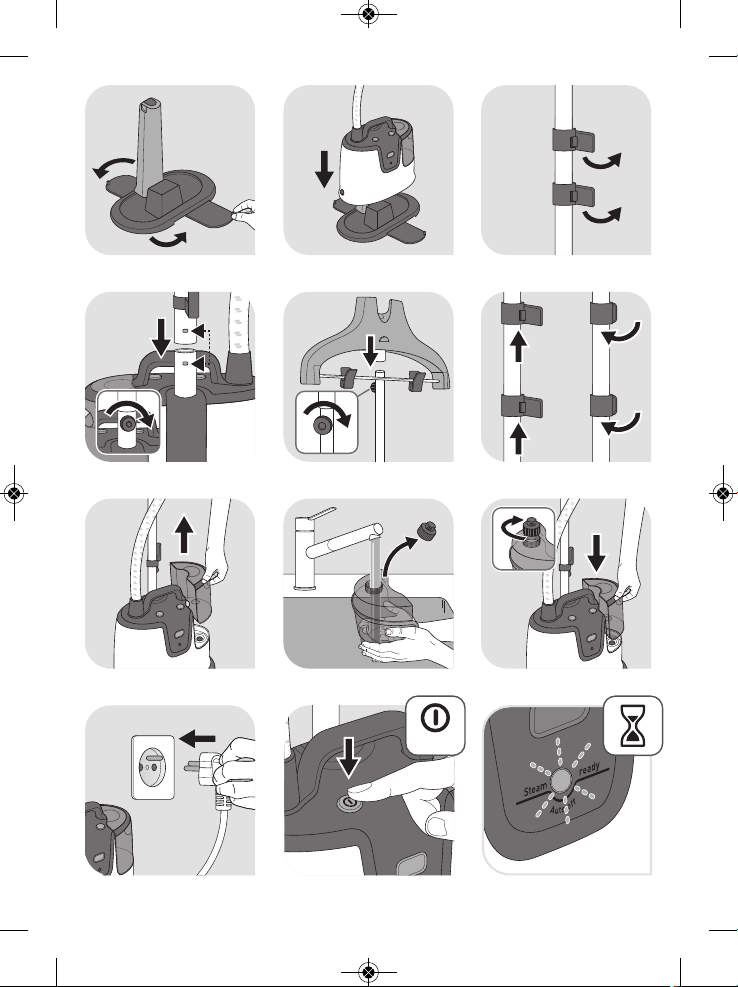
fig. 1 fig. 2
CLICK
fig. 3
fig. 5
2
111
fig. 4
1
2
fig. 6
1 2
fig. 7
fig. 8 fig. 9
2
1
fig. 10
fig. 12
ON
fig. 11
1800133082-03 IS8300 _110x154 24/11/14 11:34 Page1
Page 8
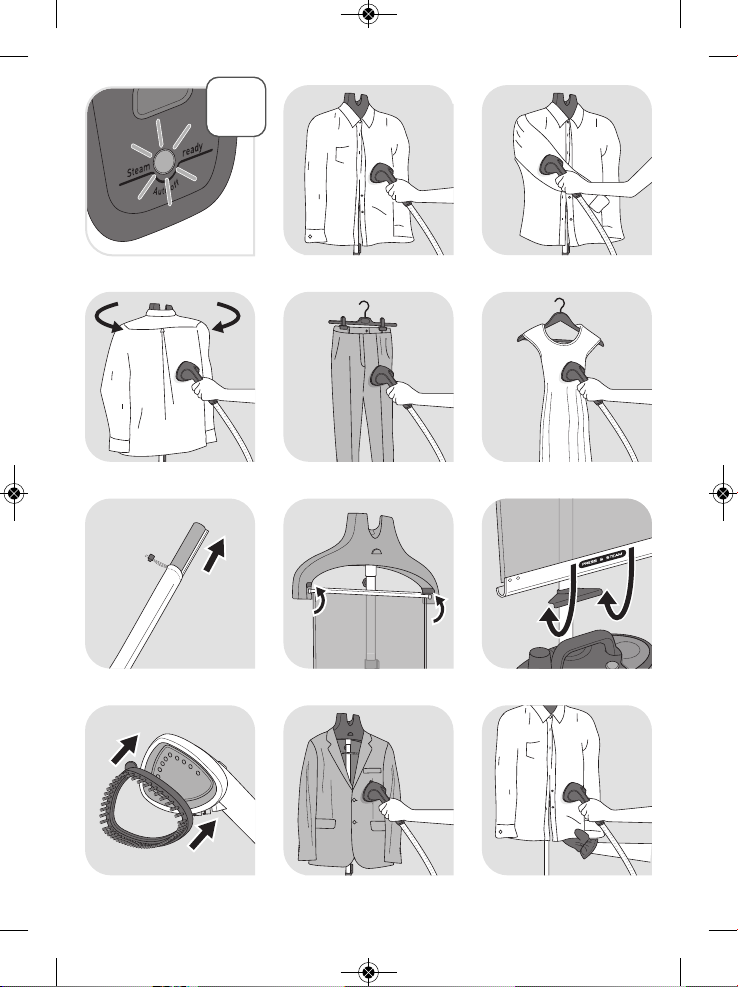
fig. 14 fig. 15
fig. 16
fig. 17 fig. 18
fig. 19
fig. 20 fig. 21
fig. 22
fig. 23 fig. 24
fig. 13
OK
1800133082-03 IS8300 _110x154 24/11/14 11:34 Page2
Page 9
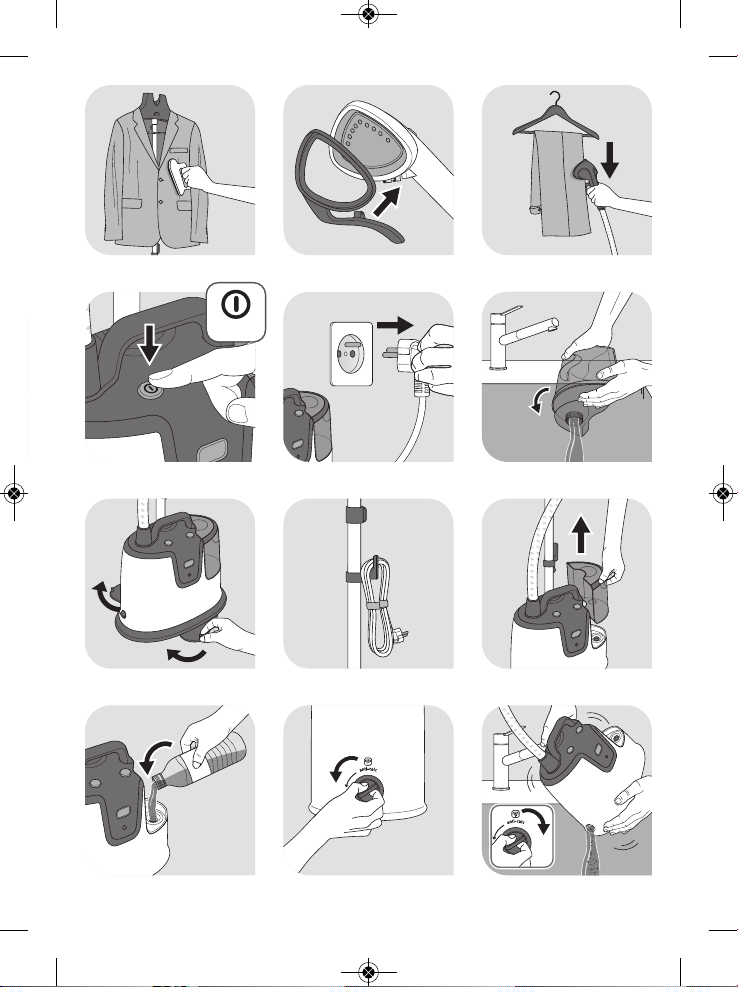
fig. 25 fig. 26 fig. 27
fig. 28
fig. 29
fig. 31
fig. 30
fig. 32
fig. 33
fig. 34
0.5 L
fig. 36
2
111
fig. 35
OFF
1800133082-03 IS8300 _110x154 24/11/14 11:34 Page3
Page 10
8
SAFETY INSTRUCTIONS
Please read these instructions carefully before first use
and keep them in a safe place.
• Never leave the appliance unattended whilst connected to
the power supply, even if for a few moments, especially
where children are present.
• Always unplug your appliance: before filling, or rinsing the
water tank, before cleaning it, after each use.
• Care should be taken when using the appliance due to the
emission of steam.
• This appliance is not intended to be used by persons
(including children) with reduced or impaired physical,
sensory or mental capacities or persons lacking appropriate
knowledge or experience, unless a person responsible for
their safety provides either supervision or appropriate
instructions concerning use of the appliance prior to its use.
• This appliance can be used by children aged from 8 years
and above and persons with reduced physical, sensory or
mental capabilities or lack of experience and knowledge if
they have been given supervision or instruction concerning
use of the appliance in a safe way and understand the
hazards involved.
• Children must be supervised to ensure that they do not play
with the appliance.
• Cleaning and user maintenance shall not be made by
children without supervision.
• The appliance must not be used if it has fallen to the floor,
shows evident of damaged, leaks or fails to function
correctly. Never dismantle your appliance. To avoid any
danger, have it inspected in an approved service centre.
IMPORTANT
RECOMMENDATIONS
1800133082-03 IS8300 _110x154 24/11/14 11:34 Page8
Page 11
9
EN
• This product has been designed for domestic and indoor use only. Any
commercial use, inappropriate use or failure to comply with the instructions, the
manufacturer accepts no responsibility and the guarantee will not apply.
• This is a floor appliance, never carry it while in use.
• This appliance is designed to function on AC current only. Before using it for the
first time, check that your mains supply voltage matches that indicated on the
appliance data plate.
• Any connection error will invalidate your guarantee.
• Always plug the appliance into a socket outlet with an earth connection.
• Given the diverse standards in effect, if the appliance is used in a country other
than that in which it is purchased, have it checked by an Approved Service Centre.
• Always keep the hose and nozzle elevated above the water tank.
• For your safety, this appliance conforms to the applicable standards and
regulations (Low Voltage, Electromagnetic Compatibility, and Environmental
Directives).
• The surfaces which are marked or close to with this sign are very hot during
the use of the appliance. Do not touch these surfaces before the appliance has
cooled down.
• To reduce the risk of contact with hot water or steam emitting from steam vents,
check the appliance before each use by holding it away from your body and
operating.
• Steam only in an up and down vertical motion. Never use the steam head in a
horizontal position or tilt into a backward position, this may result in hot water
discharge.
• To reduce the risk of electric shock, do not immerse the appliance or the steam
head in water or any other liquids.
• The appliance should always be switched «OFF» before plugging or unplugging
from socket outlet. Never pull the cord to disconnect it from the socket outlet,
instead grasp the plug and pull to disconnect.
• Do not allow the cord to touch hot surfaces. After each use, unplug and let the
appliance cool down completely before storing it away. Loop the cord loosely
around the appliance when storing.
• Never place the appliance or its power cord near, or allow to come into contact
with, sources of heat or sharp edges.
• Do not fasten the hose during operation. Scalding may occur if the hose adapter
is removed while using the appliance.
• Do not attempt to hang up the unit using the hose.
• The use of accessory attachments other than those provided by Tefal is not
recommended and may result in fire, electric shock or personal injury.
1800133082-03 IS8300 _110x154 24/11/14 11:34 Page9
Page 12

10
• Use caution when changing accessories or attachments, as they may contain hot
water from condensation. Ensure the attachments are cooled off to avoid contact
with hot water.
• Burns could occur from touching hot parts, hot water or steam. Use care when
you empty a steam appliance. There may be hot water in the tank or from the
inside the appliance.
• Do not direct steam at people, animals or steam clothes while they are being worn.
• Do not cut or attempt to extend the steam hose.
• If you are using a main extension lead, ensure that it is correctly rated to the
required amperage with an earthed socket, and fully extended.
• Unwind the power cord fully before use and inspect the appliance and power cord
for signs of wear or damage prior to connecting to the power supply.
• Any intervention other than normal cleaning and maintenance by the customer
must be performed by an Approved Service Centre.
• Never drop or insert any object into any opening or hose.
• The glove should be only used with this garment steamer (*dependingon model).
The manufacturer accepts no responsibility for anyinappropriate use.
• Remove all packaging materials, stickers and accessories from inside and outside
of the appliance.
• Inspect the appliance and power cord for signs of wear or damage prior to
connecting to the power supply.
• Do not use your appliance if it does not operate correctly, if it has been damaged
or if the power cord or plug is damaged. To maintain safety, these parts must be
replaced by an Approved Service Centre.
• Any intervention other than normal cleaning and maintenance by the customer
must be performed by an Approved Service Centre.
• This unit is for indoor use only.
• Unwind the power cord fully before use and inspect the appliance and power cord
for signs of wear or damage prior to connecting to the power supply.
ENVIRONMENT PROTECTION FIRST!
i Your appliance contains valuable materials which can be recovered or recycled.
‹ Leave it at a local civic waste collection point.
1800133082-03 IS8300 _110x154 24/11/14 11:34 Page10
Page 13
11
EN
1 • Garment steamer assembly
Pole assembly
1. Pull and rotate the 2 stability legs until you hear a "click" sound. (fig. 1)
2. Unscrew the pole’s fastening screw on the base of the pole.
3. Hold the pole such that the electrical cord hook is at the back. Check that the 2 pole clips
are unlocked. (fig. 3)
4. Insert the pole into the base by pressing downwards until the holes of the pole and base are
at the same level, so that you can put the screw back. If the holes are not aligned, check that
the clips of the pole are well and truly unlocked. (fig. 4)
5. Screw the pole fastening screw back in as far as it will go so that the pole is firmly fixed to
the base.
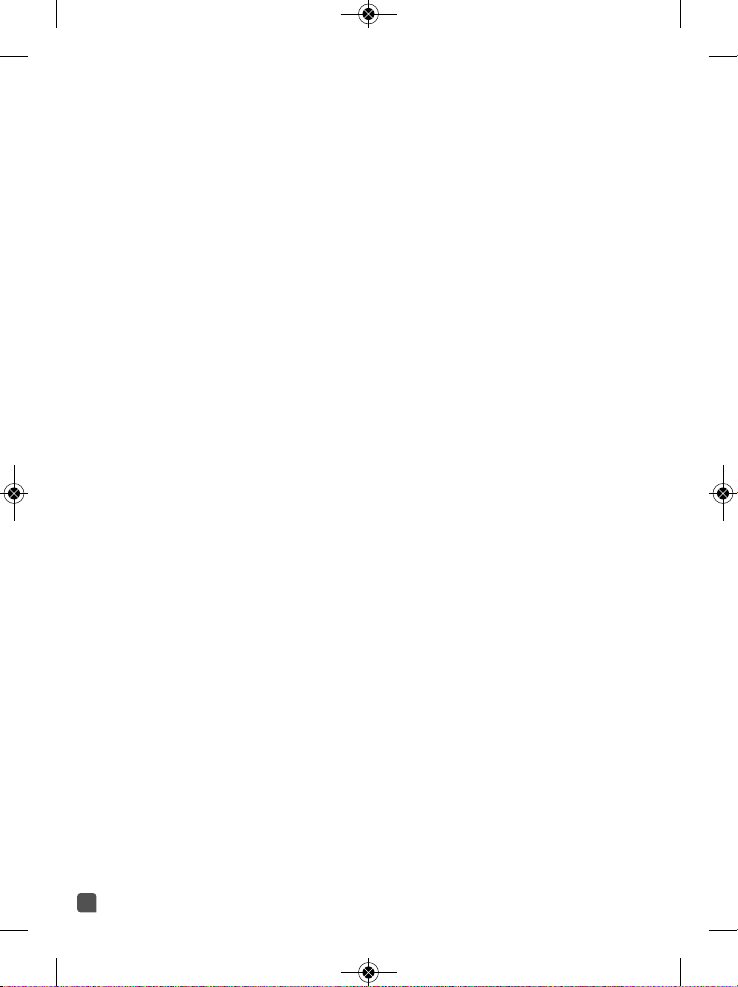
6. Adjust the pole to its maximum height by sliding it upwards. Make sure the 3 segments of
the pole are fully extended then lock the 2 clips. (fig 6)
Integrated Hanger assembly
1. Unscrew the hanger fastening screw at the bottom of the hanger.
2. Hold the hanger such that the hanger holder is on the same side as the appliance control
panel.
3. Insert vertically the hanger on the top of the pole. The holes at the bottom of the hanger
and in the pole should be at the same level. (fig. 5)
4. Put the screw back and screw in as far as it will go so that the hanger is firmly fixed to the
pole.
5. Install the steam head on top of the integrated hanger.
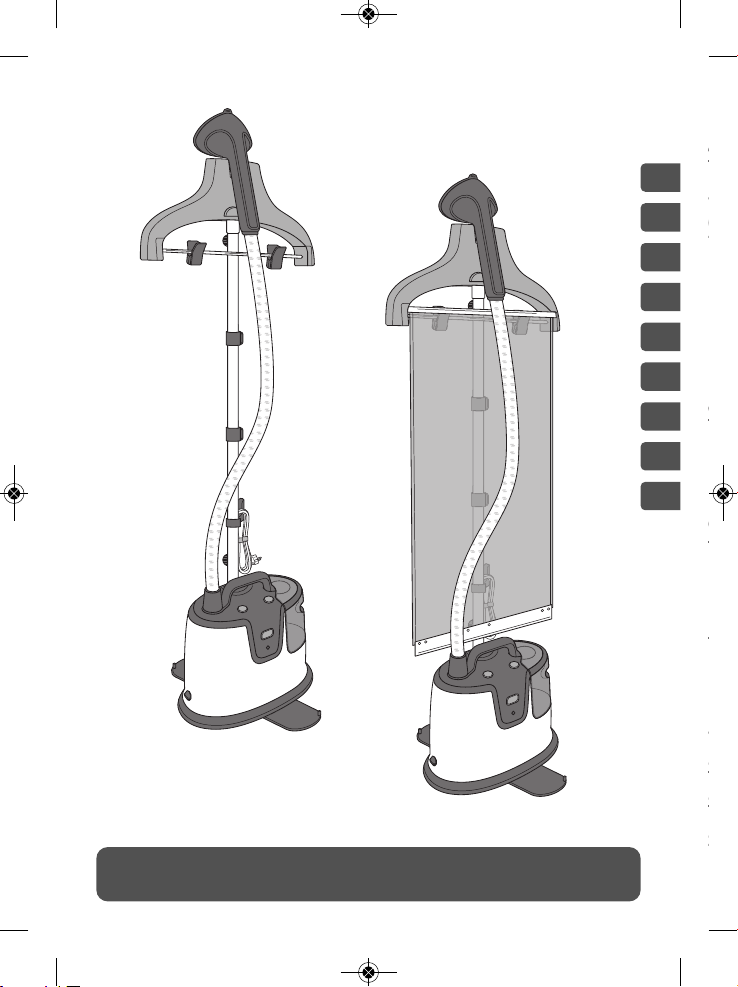
DESCRIPTION
1. Steam head
2. Integrated hanger
3. Trouser clips*
4. Steam head hook
5. Hanger holder
6. Hanger fastening screw
7. Pole locking clips
8. Telescopic pole
9. Steam hose
10. Electrical cord hook
11. Electrical cord
12. Transport handle
13. Water tank handle
14. Removable water tank
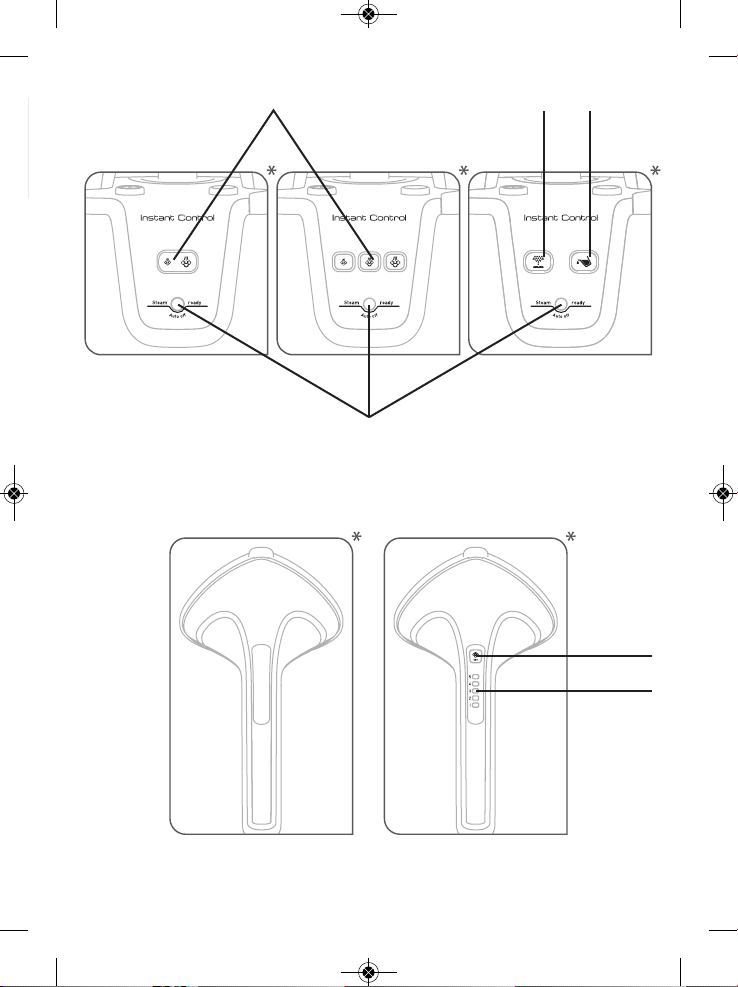
15. Control panel
16. Stability leg (x2)
17. Pole fastening screw
18. Base unlocking button
19. ON/OFF switch
20. Appliance
21. "Anti calc" cap
22. Base
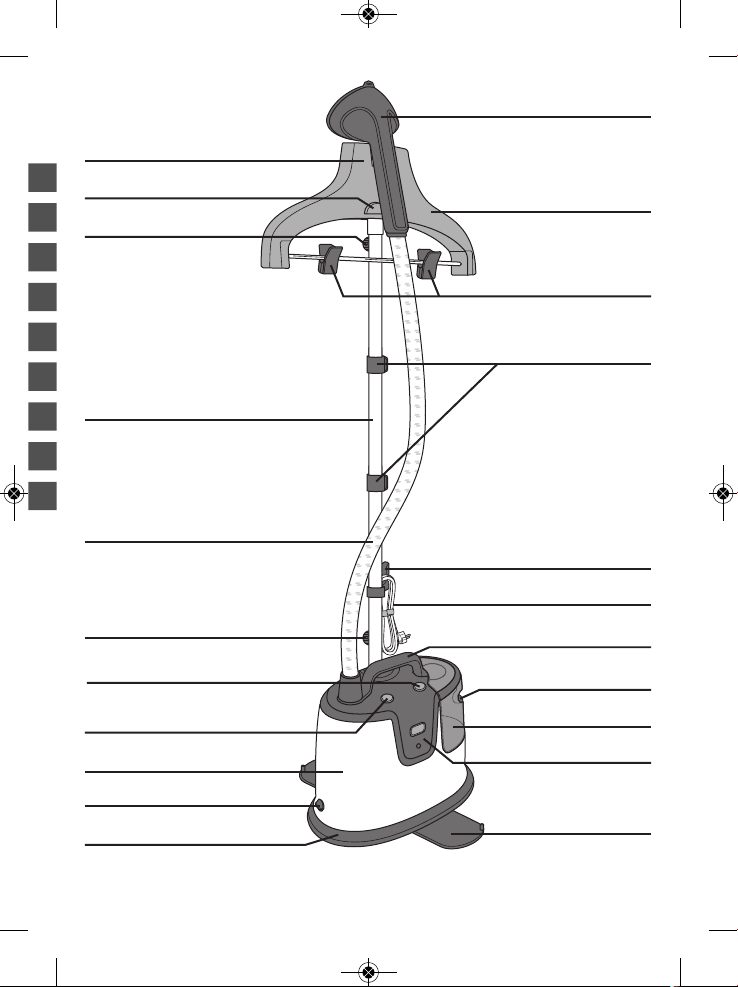
23. Press & Steam vertical support*
24. Press & Steam pouch*
25. Press & Steam locking handle*
26. Press & Steam locking hook*
27. Glove*
28. Fabric brush*
29. Lint pad*
30. Crease attachment*
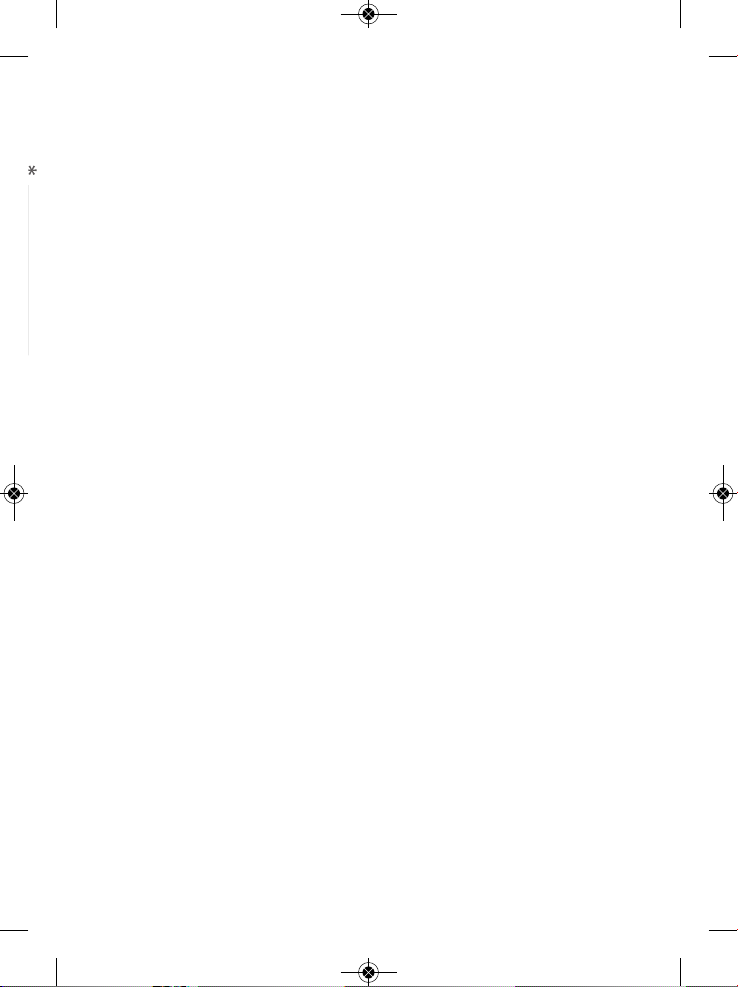
31. Variable steam settings*
32. "Anti calc" indicator*
33. Empty tank indicator*
34. Steam ready indicator / auto off indicator
35. Variable steam setting button*
36. Steam level indicator*
BEFORE USE
* depending on model
1800133082-03 IS8300 _110x154 24/11/14 11:34 Page11
Page 14

Y
T
Y
t
12
2 • Filling the water tank
• Ensure that the steamer is unplugged. Remove the water tank from the base of the appliance
by pulling the handle upwards (fig. 7). Unscrew the tank cap and fill the tank. (fig. 8)
• The steamer must be used with TAP WATER. If the water in your area is hard, we recommend
that you mix half tap water and half distilled water, which reduces the hardness.
• After screwing back the water tank cap, turn the tank down and hold it by the handle. Check out
that no water is leaking through the cap.
• Place vertically the water tank back on the appliance (fig. 9)
1 • Setting up
• Only operate the steamer on a floor clear of any materials which may obstruct the base of the
steamer (flat and horizontal surface). Do not obstruct the openings on the lower part of the
appliance. This device should not be used on very thick carpets or rugs.
• Undo the Velcro
TM
strip and completely unwind the electrical cord.
• Plug in to power socket. (fig.10)
• Switch on by pressing the ON/OFF button located on top of the appliance. (fig. 11) The steam
ready indicator will flash approximately for 45 seconds then the light is fixed: your appliance is
ready to use with maximum steam output. (fig. 12-13)
• The appliance device will begin producing steam after approximately 30 seconds.
2 • Using the appliance
• Hang the garments on the integrated hanger or on separated hanger which may be suspended
on the hanger holder.
• To steam trousers, we recommend that you also use the support with clips*.
• Grasp the steam head with the steam vents pointing away from you.
• Start steaming by brushing material lightly following the grain of the garment fabric.
• Start at the top of the garment and gradually move downward.
• Always use the steam head in a vertical position.
• Always hang the steam head in an upright position on the steam head hook when not in use.
IMPORTANT: Your product is designed to operate using untreated tap water. If your water is
very hard (check with your local water authority) it is possible to mix untreated tap water with
store-bought distilled water in the following proportions 50% untreated tap water with 50%
distilled water. Heat concentrates the elements contained in water during evaporation. The
types of water listed below may contain organic waste, mineral or chemical elements that can
cause spitting, brown staining or premature wear of the appliance: water from clothes dryers,
scented or softened water, water from refrigerators, batteries, air conditioners, rain water,
boiled, filtered or bottled water. These types of water should not be used. Only use store bought
distilled water as advised above.
USE
Warning: Never steam a garment while it is being worn.
The flexible hose and the end of the steam head can become extremely hot during
use. This is perfectly normal. Be careful and avoid any prolonged contact.
Always be careful not to touch the hot steam.
* depending on model
1800133082-03 IS8300 _110x154 24/11/14 11:34 Page12
Page 15
13
EN
• During use, the hose may make a gurgling noise. This is a normal occurrence due to
condensation. If the appliance begins to gurgle, rest the steam head on its support for a
few moments in order to direct the condensation into the appliance once again.
• During use, some water drips may appear on the telescopic pole. This is also a normal
occurrence due to condensation.
Steam setting*
Your appliance is fitted with 2 to 5 steam settings that you can set according to the fabric you
are steaming, from delicate to thick ones.
• Models with 2 settings: set by successively pressing the steam setting button on the
appliance's control panel.
• Models with 3 settings: set by pressing on one of the buttons on the appliance's control
panel.
• Models with 4 or 5 settings in the steam handle: set by successively pressing on the "SET"
button located on the steam handle. The light indicators will show the steam level selected.
Empty tank detector*
This appliance is equipped with an empty tank detector. When the water tank is empty, the
light indicator on the appliance's control panel will blink to alert you to fill the water tank. Turn
off the appliance and fill the water tank.
Electronic auto off*
Your appliance is fitted with an “auto-off” system which places it on standby once the water
tank has been empty for more than 10 minutes.
• The "Auto off" indicator on the control panel flashes slowly to indicate that the appliance is
on standby.
• To reactivate the appliance: fill the water tank and select the desired steam level on
Tips for better results with your garment steamer
• We recommend checking the garment care label for manufacturer recommendations before
steaming. We also recommend testing the garment and effect on the garment on an
unobtrusive area such as an inner seam.
• Button up the shirt’s collar to prevent them slipping on the hanger during steaming (fig.14).
• Gently press steamer brush into fabric while making slow passes.
• Avoid direct contact between the steam head and silk or velvet.
• Some garments are smoothed more easily on the reverse side.
• Heavy fabrics may need to be steamed for longer.
• If you are using the steam head at a position close to the ground, raise the hose frequently in
order to avoid the formation of condensation. A gurgling noise may be heard if the flexible
hose is pinched.
• If no steam is produced, if a gurgling sound is heard or if water is dripping through the holes
of the steam head, raise the steam hose occasionally to remove condensation inside the hose.
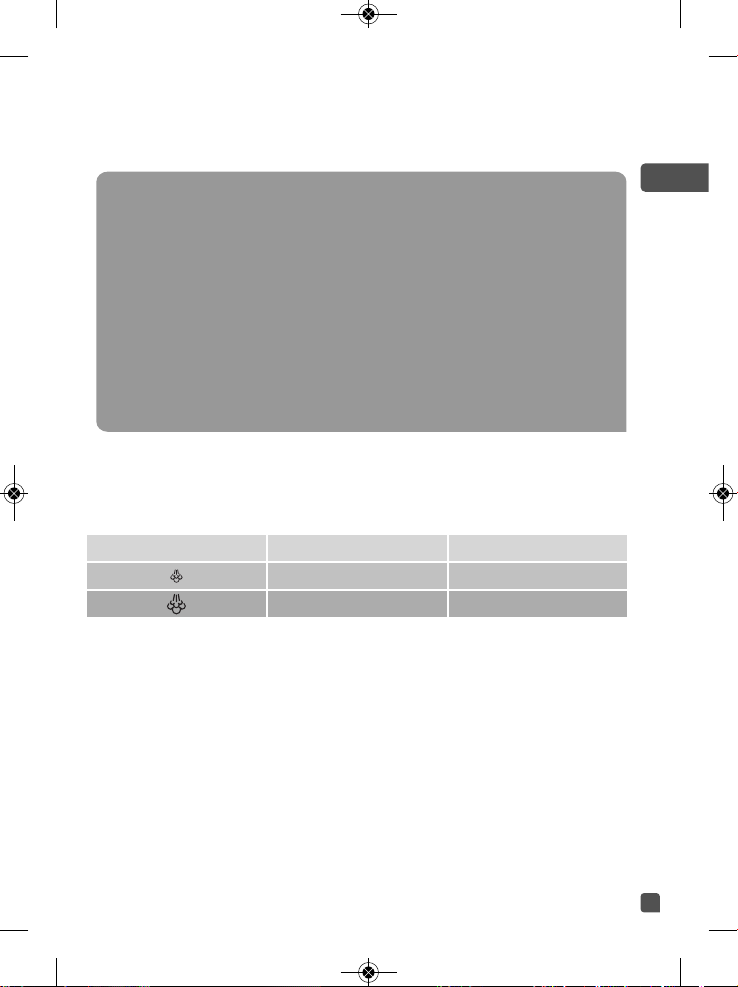
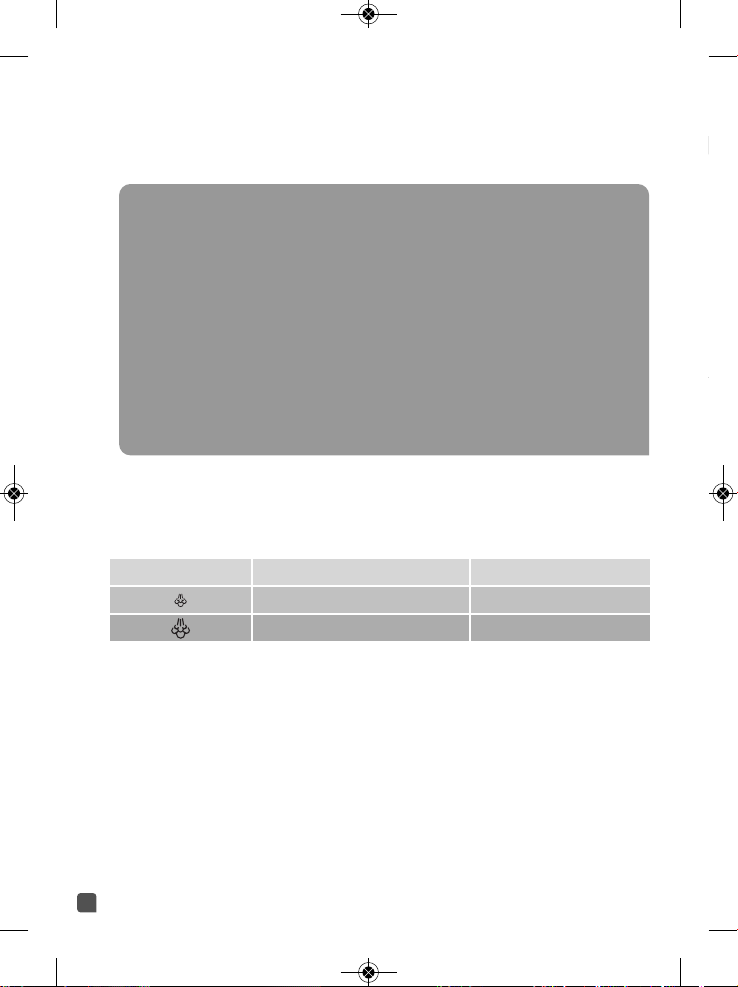
LIGHT COLOR STEAM OUTPUT
Orange Mini
Green Maxi
* depending on model
1800133082-03 IS8300 _110x154 24/11/14 11:34 Page13
Page 16
14
appliance's control panel or steam handle (depending on model).
1 • Press & Steam vertical support*
Assembly:
• Remove the Press & Steam vertical support from its pouch. (fig. 19)
• Make sure the telescopic pole is fully extended.
• Hold the Press & Steam vertical support such as the handle is located downward and its
"Press & Steam" logo is in front.
• Insert the upper part inside the integrated hanger, then pull down slightly until hooking the
handle on the Press & Steam vertical support hook located on the pole. (fig. 20-21)
• The Press & Steam vertical support helps keep the garment in place while steaming.
• When steaming a shirt, begin with steaming the sleeves. Get hold of one sleeve and cross it
over the garment using the Press & Steam for vertical support.
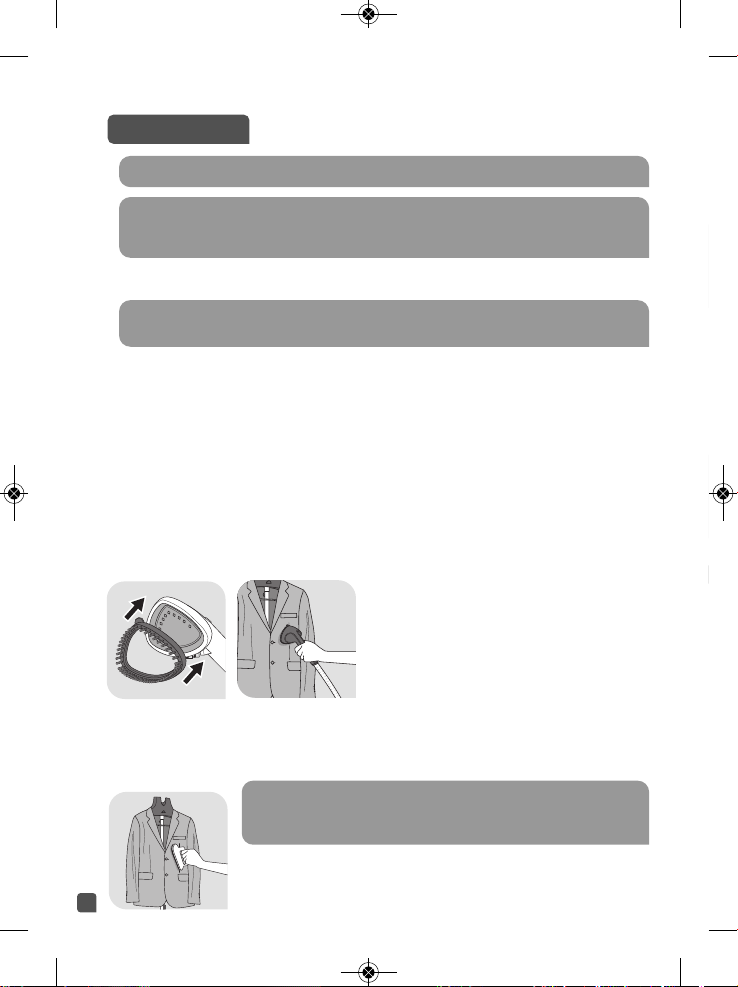
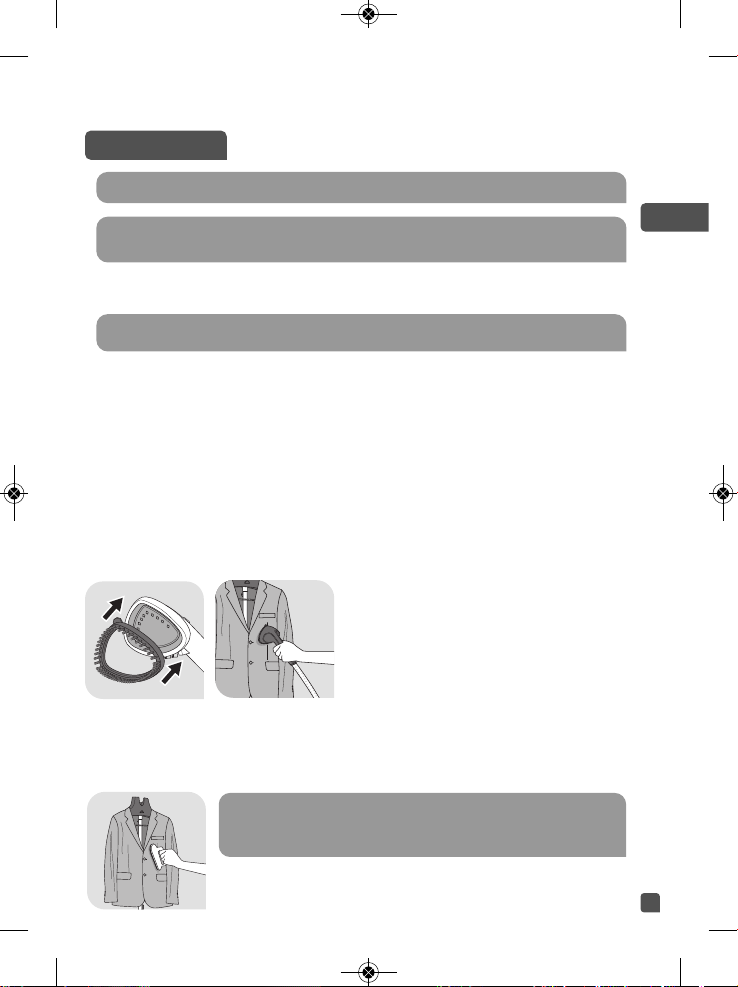
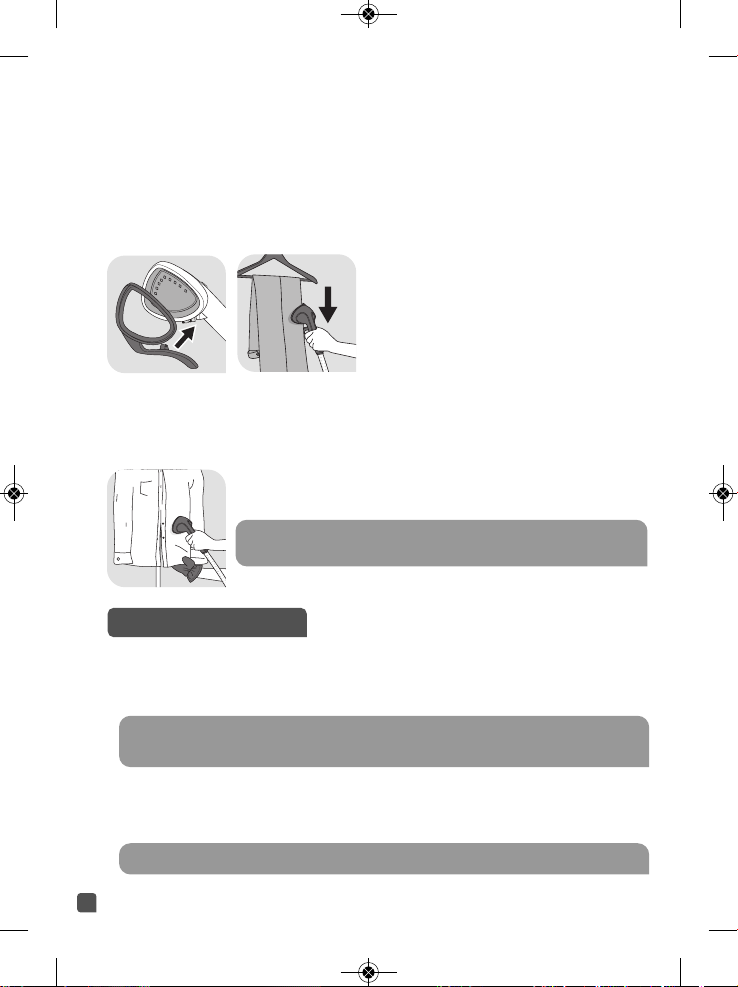
2 • Fabric brush*
The fabric brush opens the weave of the fabrics
for better steam penetration.
• Attach the fabric brush to the steam head by
lining up the bottom of the brush with the
bottom of the steam head. Gently push the top
of the brush onto the steam head until it clicks
into place. (fig. 22)
• Gently brush the area to be steamed following
the grain or nap of the fabric. (fig. 23)
• Remove the fabric brush once unit is unplugged and completely cool. Remove it by pressing
on the release tab on top of brush while pulling it forward.
3 • Lint pad*
The lint pad removes hair, lint and animal fur for a professional finish.
ACCESSORIES
Be sure the unit is unplugged and completely cool before attaching accessories.
Before using an accessory, check the manufacturer recommendations.
It is also recommended that you carry out a test on part of the fabric which cannot
be seen.
The Press & Steam system set in the hanger provides a vertical support while
steaming, to help remove "creases" more easily and efficiently.
The lint pad is a separate accessory and cannot be attached to
the steam head.You can use the lint pad independently from the
steamer.
* depending on model
1800133082-03 IS8300 _110x154 24/11/14 11:34 Page14
Page 17
15
EN
• To use the lint pad, slowly brush the clothing with the grain or nap of the fabric. (fig. 25)
• The pad can be cleaned by brushing it in the opposite direction. We recommend cleaning the
pad on an old cloth that can be discarded.
• We recommend to use the lint pad before steaming your clothes for perfect results.
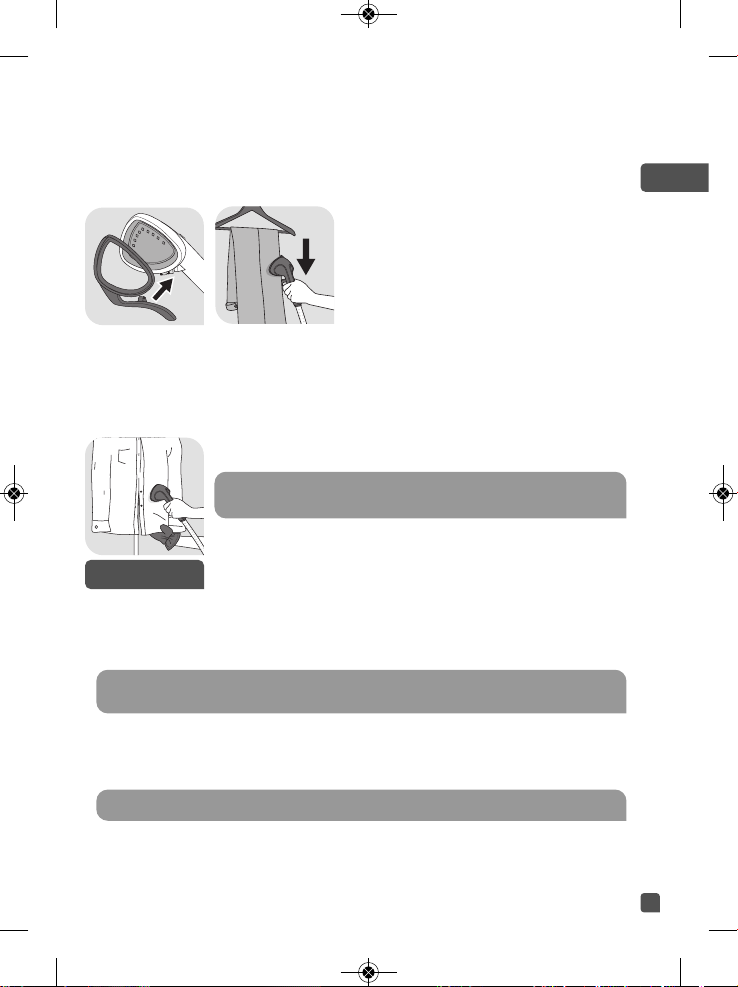
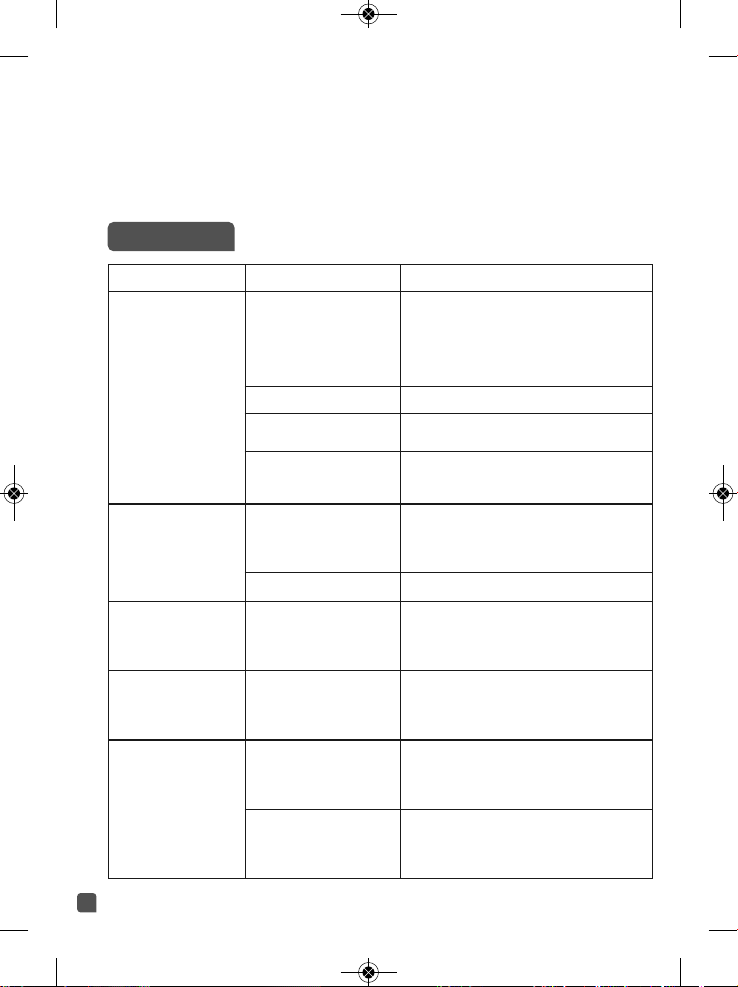
4 • Crease attachment*
• Remove the fabric brush. Completely slide the
hook of the accessory into the slot located in the
lower part of the steam head. (fig. 26)
• Push on the handle to open the crease
attachment.
• Place the garment between the crease
attachment and steam head.
• Release the handle.
• Starting at the top of the garment, move the crease
attachment in a downwards motion. (fig. 27)
• Once the unit is unplugged and completely cooled down, remove the crease attachment by
sliding it off of the steam head.
5 • Glove*
• The glove protects your free hand from the steam during use.
• To use the glove, put it on the hand you use to hold or pull the garment.
(fig. 24)
• Switch off the appliance by pressing the ON/OFF button. (fig. 28)
• The light indicators on the control panel will go off, and you can then unplug the appliance.
(fig. 29)
• Hang the steam head in an upright position on the hook steam head.
• Empty and rinse the water tank each time before storage in order to flush out any scale
particles. (fig. 30)
• Loosely wind up the electrical cord and close with the Velcro™ strip, then hang it on the cord
hook on the pole. (fig. 32)
1 • Transport
• Push back the 2 stability legs until locked in the appliance base. (fig. 31)
• You can transport your appliance by lifting it up by the telescopic pole or by the appliance's
The glove should be only used with this garment steamer and not
for other purpose. Do not wash or iron the glove.
AFTER USE
Warning: never remove the Press & Steam accessory for storage before it has completely
dried. Always roll the Press & Steam vertical support for storage. Do not crease it.
Warning: Never touch the steam head until it has cooled down completely.
* depending on model
1800133082-03 IS8300 _110x154 24/11/14 11:34 Page15
Page 18
16
handle.
2 • Maintenance and cleaning
Cleaning
• Clean the main unit with a damp cloth.
• Clean the Press & Steam fabric with a damp cloth or non abrasive sponge.
Do not use any cleaning products such as soap or detergents.
Easy descaling
• To maintain maximum performance, your steamer must be descaled.
The time between descaling operations depends on the appliance use. The appliance must
be descaled at least once a year or after 30 hours of use.
• For models with "Anti calc" indicator*:
- To extend the life of your appliance and prevent the scaling, your appliance is fitted with an
orange "Anti-calc” light that flashes on the control panel when you need to drain the
appliance.
- If the orange “Anti-calc” warning light flashes, you can continue steaming normally but
remember to rinse the boiler before you use it again.
• To carry out a descaling operation, follow these steps:
- Ensure that the appliance has cooled down completely (2 hours minimum).
- Separate the appliance from the base, using the base unlocking button.
- Remove the steam head from the steam head hook. Remove also the electrical cord from the
electrical cord hook.
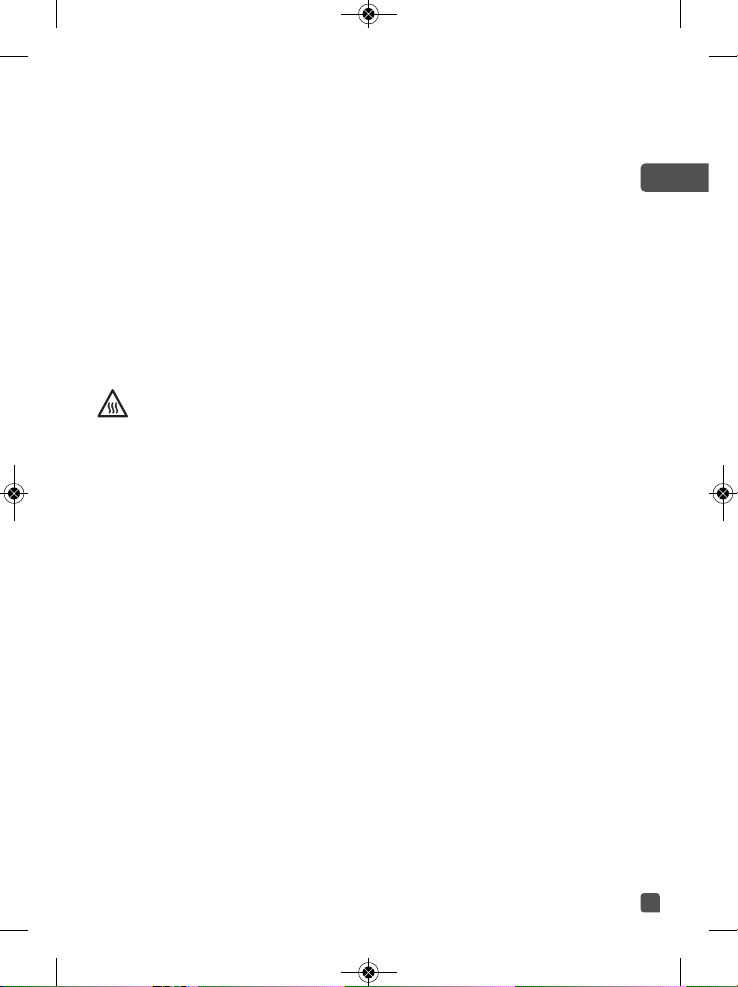
- Take out the water tank (fig. 33).
- Place the appliance flat on the edge of your sink.
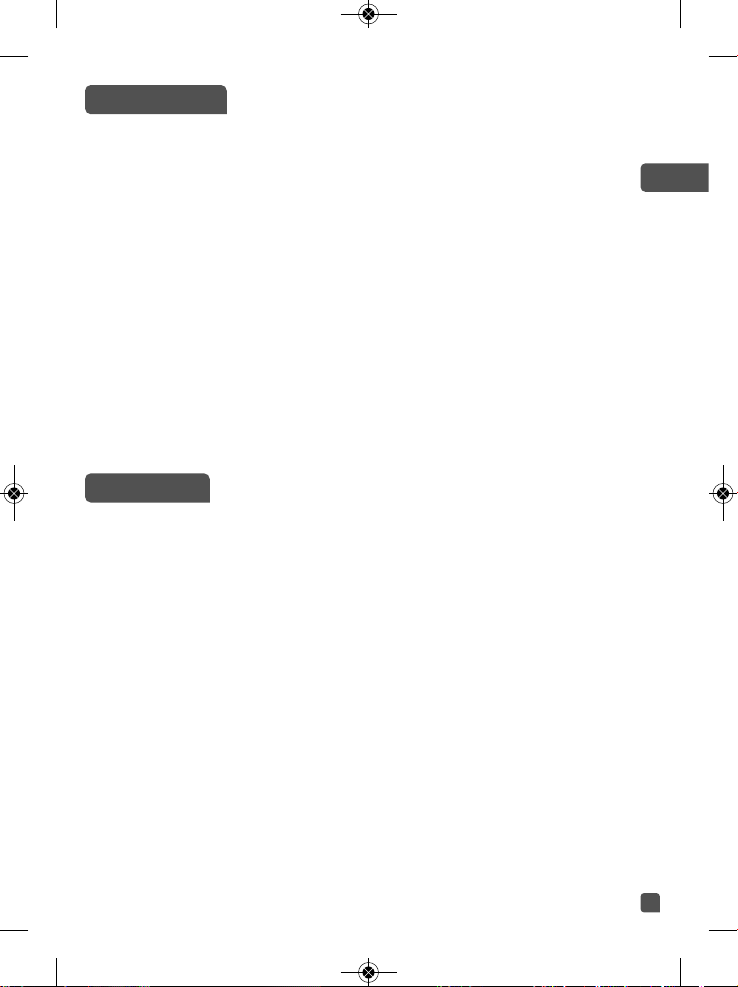
- Fill ½ litre of fresh water directly in the water inlet location located on the appliance, allowing
water to fill the boiler (fig. 34). Pay attention not to overflow.
- Unscrew the "Anti calc" cap by turning it anti clockwise (fig. 35).
- Holding the appliance in a tilted position, help the scale particles to flow out with the water
by soft movements (fig. 36).
- Insert the "Anti calc" cap and screw it back.
- Repeat above procedure as many times as needed to remove all the scale particles.
- For models with "Anti calc" indicator*: the next time you use your garment steamer, press the
"Anti calc" button for 5 sec on the control panel to turn off the indicator.
CAUTION:
Do not attempt to lift up or transport the appliance holding the integrated hanger.
Always make sure the appliance and the pole are firmly fixed to the base before
lifting up the appliance (see assembly instructions).
Do not use any descaling substances (vinegar, industrial descaling products, etc.)
when rinsing the appliance: they could damage it.
Before emptying your appliance, it must always be left to cool for 2 hours to avoid any
risks of scalding.
Warning: Never try to separate the hose from the appliance.
Make sure to avoid any shock on the steam head during descaling operation.
* depending on model
1800133082-03 IS8300 _110x154 24/11/14 11:34 Page16
Page 19
17
EN
• Do not fill the boiler by the steam head holes or by the "Anti calc" draining outlet!
• Never immerse the steam head in water or any other liquid!
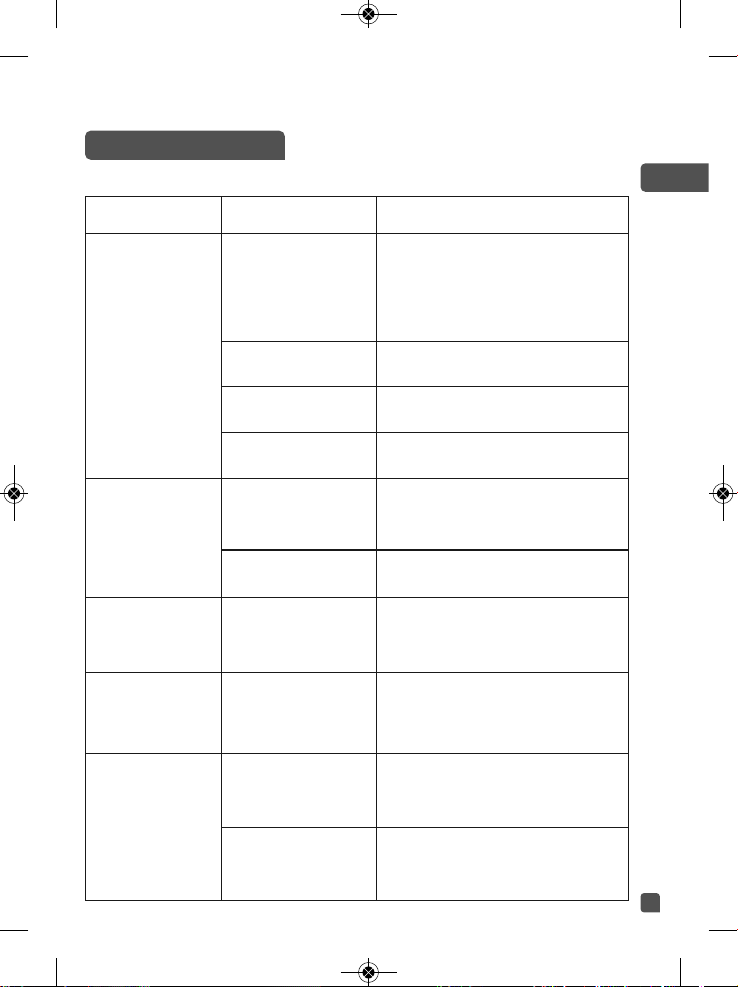
TROUBLESHOOTING
The steam flow is low. Your steamer has a build-
up of scale because it has
not been rinsed out
regularly.
See descaling process.
The hose has been
obstructed.
Check that the hose is not bent or twisted.
Water runs through the
holes of the steam
head.
There is condensation in
the hose.
Never use the steamer in the horizontal
position. Hold the hose vertically
outstretched and wait for the condensed
water to return to the steamer.
The steamer takes a
long time to heat
and/or ejects white
particles.
Your steamer has a buildup of scale because it has
not been descaled
regularly.
See descaling process.
The Press & Steam
accessory is crooked.
The Press & Steam
accessory has not been
installed properly.
Install again the Press & Steam accessory
inside the integrated hanger.
Make sure it is well hooked, following the
instructions.
The Press & Steam
accessory has not been
rolled properly.
Make sure the Press & Steam accessory is
always dry then rolled with care when stored.
Do not crease it for storage.
Problems Possible causes Solutions
There is no steam. The appliance has not
been switched on.
Check that the appliance has been plugged
in correctly. Press the On/Off button, the
indicator light located at the front of the
appliance will come on.
The appliance will begin producing steam
after approximately 30 seconds.
The hose has been
obstructed.
Check that the hose is not bent or twisted.
There is no water left in
the water tank.
Switch off the appliance and fill the water
tank.
The auto off system is
activated.
To reactivate the appliance: fill the water
tank and select the desired steam level.
1800133082-03 IS8300 _110x154 24/11/14 11:34 Page17
Page 20
18
If you have any further problems or queries please contact the Customer
Relations Helpline - see details at the end of this leaflet.
The Press & Steam
accessory detaches
while in use.
The Press & Steam
accessory was not locked
correctly in the hook.
Make sure the Press & Steam accessory
handle is firmly locked in the hook. It should
not be moving horizontally or vertically.
Make sure the 3 segments of the pole are
fully extended and that the 2 clips are firmly
locked.
The hose makes a
gurgling noise.
You are using the steam
head in a position close
to the ground and some
condensation occurs in
the hose.
Raise the hose frequently during use and
adjust the pole to its maximum height in
order to avoid the formation of
condensation.
Water is overflowing
from water tank.
You are using the steam
head in a position close
to the ground and some
condensation occurs in
the hose.
Raise the hose frequently during use and
adjust the pole to its maximum height in
order to avoid the formation of
condensation.
The orange "Anti calc"
light is flashing.
You did not press the "Anti
calc" restart button after
your descaling operation.
Press the "Anti calc" restart button located
on the control panel.
Steam escapes from
the "Anti calc" cap.
The "Anti calc" cap has not
been tightened correctly.
Tighten the "Anti calc" cap after having let
the appliance cool down for 2 hours.
The "Anti calc" cap is
damaged.
Contact an Approved Service Centre (see
contact information at the end of this page).
1800133082-03 IS8300 _110x154 24/11/14 11:34 Page18
Page 21
19
FR
CONSIGNES DE SÉCURITÉ
Veuillez lire attentivement les instructions qui
suivent avant la première utilisation et
conservez-les dans un endroit sûr.
• Ne laissez jamais l'appareil branché à la source
d'alimentation sans surveillance, même pendant
quelques instants, surtout en présence des enfants.
• Pensez à toujours débrancher votre appareil : avant
de remplir ou de rincer le réservoir d'eau, avant de
le nettoyer, après chaque utilisation.
• Il faut rester vigilant lors de l'utilisation de
l'appareil en raison d'émission de la vapeur.
• Cet appareil n’est pas prévu pour être utilisé par
des personnes (y compris les enfants) dont les
capacités physiques, sensorielles ou mentales sont
réduites, ou des personnes dénuées d’expérience
ou de connaissance, sauf si elles ont pu bénéficier,
par l’intermédiaire d’une personne responsable de
leur sécurité, d’une surveillance ou d’instructions
préalables concernant l’utilisation de l’appareil.
• Cet appareil peut être utilisé par des enfants âgés
de 8 ans et plus et des personnes ayant des
capacités physiques, sensorielles ou mentales
réduites ou un manque d'expérience et de
connaissances, s'ils ont reçu un encadrement ou
des instructions concernant l'utilisation de
l'appareil en toute sécurité et comprennent les
risques encourus.
1800133082-03 IS8300 _110x154 24/11/14 11:34 Page19
Page 22
20
• Il convient de surveiller les enfants pour s'assurer
qu'ils ne jouent pas avec l'appareil.
• Les enfants ne doivent ni nettoyer l’appareil ni
s'occuper de son entretien sans surveillance.
• L'appareil ne doit pas être utilisé s'il est tombé,
comporte des traces de dommages, de fuites ou ne
fonctionne pas correctement. Ne démontez jamais
votre appareil. Pour éviter tout danger, faites-le
examiner par un centre service agréé.
RECOMMANDATIONS
IMPORTANTES
• Ce produit a été conçu pour un usage domestique en intérieur
uniquement. En cas d’utilisation commerciale, inappropriée ou non
conforme au mode d’emploi, le fabricant décline toute responsabilité
et la garantie ne s’applique pas.
• Il s'agit d'un appareil qui repose au sol et qui ne doit pas être transporté
lorsqu'il est utilisé.
• Veillez à toujours garder le tuyau et la tête vapeur élevés au-dessus du
réservoir d'eau.
• Pour votre sécurité, cet appareil est conforme aux normes et
réglementations (basse tension, compatibilité électromagnétique, et
aux directives environnementales en vigueur).
• La température des surfaces portant le marquage ou des surfaces
autour du marquage est très élevée pendant l'utilisation de l'appareil.
Ne touchez pas ces surfaces avant que l'appareil n'ait refroidi.
• Pour réduire le risque de contact avec de l'eau chaude ou de la vapeur
émise par les trous de sortie de vapeur, faites fonctionner l'appareil
avant chaque utilisation en le tenant éloigné de vous.
• Ne défroissez que dans un mouvement vertical de haut en bas. Veillez
à ne jamais utiliser la tête vapeur de manière horizontale ou à l’incliner
vers l’arrière, afin d’éviter toute projection d’eau chaude.
• Pour réduire le risque de choc électrique, ne pas immerger l'appareil ou
la tête de vapeur dans de l'eau ou dans d'autres liquides.
1800133082-03 IS8300 _110x154 24/11/14 11:34 Page20
Page 23
21
FR
• L'appareil doit toujours être éteint avant de le brancher ou de le
débrancher. Ne jamais tirer sur le cordon pour le débrancher de la prise
de courant mais saisir la fiche et tirer pour le débrancher.
• Laissez l'appareil refroidir complètement avant de le ranger.
• Ne laissez pas le cordon d'alimentation en contact avec des arêtes vives
ou des surfaces chaudes.
• Ne pas attacher le tuyau en cours de fonctionnement. Au risque de se
brûler, ne jamais retirer l'adaptateur de tuyau pendant l'utilisation de
l'appareil.
• Ne pas essayer d'accrocher l'appareil lorsque vous utilisez le tuyau.
• L'utilisation d'accessoires étrangers qui ne sont pas fournis par TEFAL
n'est pas recommandée et peut entraîner des incendies, des chocs
électriques ou des blessures corporelles.
• Soyez prudent lors du changement d'accessoires ou d'équipements car
ils peuvent contenir de l'eau chaude du à la condensation. Assurez-vous
que les accessoires aient refroidis afin d'éviter tout contact avec de l'eau
chaude.
• Des brûlures peuvent être occasionnées au contact des pièces chaudes,
de l'eau chaude ou de la vapeur. Soyez prudent lorsque vous videz un
appareil à vapeur. Le réservoir ou l'intérieur de l'appareil peuvent
contenir de l'eau chaude.
• Ne pas diriger la vapeur sur des personnes, des animaux ou des
vêtements lorsqu'ils sont portés.
• Ne pas couper ou tenter de prolonger le tuyau de vapeur.
• Si vous utilisez une rallonge, vérifiez qu'elle est adaptée à l'intensité de
courant avec une prise de terre et qu'elle est entièrement dépliée.
• N’insérez ou ne laissez tomber aucun objet dans les orifices ou le tuyau
de l’appareil.
• Le gant (selon le modèle) doit être utilisé uniquement avec ce
défroisseur. Le fabricant décline toute responsabilité en cas de tout
usage inapproprié.
PRIORITÉ À LA PROTECTION DE L'ENVIRONNEMENT!
i Votre appareil contient de nombreux matériaux qui peuvent être récupérés ou
recyclés.
‹ Déposez-le dans un point municipal de collecte des déchets.
1800133082-03 IS8300 _110x154 24/11/14 11:34 Page21
Page 24
22
1 • Assemblage du défroisseur vapeur
Assemblage des mâts
1. Tirez et faites pivoter les deux pieds de support jusqu'à ce que vous entendiez un « clic ».
(schéma 1)
2. Dévissez la vis de fixation du mât située sur la base de celui-ci.
3. Maintenir le mât de telle sorte que le crochet pour cordon électrique soit situé à l'arrière.
Vérifiez que les deux clips des mâts soient déverrouillés. (schéma 3)
4. Insérez le mât dans la base en exerçant une pression vers le bas jusqu'à ce que les trous du
mât et la base soient au même niveau, de sorte que vous puissiez remettre la vis. Si les trous
ne sont pas alignés, vérifiez que les clips du mât soient déverrouillés. (schéma 4)
5. Vissez la vis de fixation du mât autant que possible de sorte que le mât soit fermement fixé
à la base.
6. Réglez le mât à sa hauteur maximale en le faisant glisser vers le haut. Assurez-vous que les 3
segments du mât soient entièrement dépliés, puis verrouillez les deux clips. (schéma 6)
Assemblage du cintre intégré
1. Dévissez la vis de fixation située en bas du cintre.
2. Maintenez le cintre de telle sorte que l'accroche cintre soit placé du même côté que le
panneau de commande de l'appareil.
3. Insérez verticalement le cintre sur la partie supérieure du mât. Les trous dans la partie
inférieure du cintre et du mât doivent être au même niveau. (schéma 5)
4. Vissez la vis de fixation du mât autant que possible de sorte que le cintre soit fermement fixé
à la base.
5. Installez la tête vapeur au-dessus du cintre intégré.
DESCRIPTION
1. Tête vapeur
2. Cintre intégré
3. Pince pour pantalons*
4. Crochet pour la tête vapeur
5. Accroche cintre
6. Vis de fixation du cintre
7. Clips de verrouillage du mât
8. Mât télescopique
9. Tuyau vapeur
10. Crochet pour cordon électrique
11. Cordon électrique
12. Poignée de transport
13. Poignée de réservoir d'eau
14. Réservoir d’eau amovible
15. Panneau de commande
16. Pieds (x2)
17. Vis de fixation du mât
18. Bouton de déverrouillage de la base
19. Bouton Marche/Arrêt
20. Appareil
21. Bouchon « Anti-calc »
22. Base
23. Support vertical Press & Steam*
24. Housse Press & Steam*
25. Poignée de verrouillage Press & Steam*
26. Crochet de verrouillage Press & Steam*
27. Gant*
28. Brosse à tissus*
29. Brosse anti-peluche*
30. Pince pour plis de pantalons*
31. Réglage de vapeur*
32. Voyant « Anti-calc »*
33. Voyant réservoir vide*
34. Voyant vapeur prête / arrêt automatique
35. Commande du débit vapeur*
36. Indicateur du niveau de vapeur*
INSTRUCTIONS AVANT UTILISATION
* Selon modèle
1800133082-03 IS8300 _110x154 24/11/14 11:34 Page22
Page 25

23
FR
2 • Remplissage du réservoir d'eau
• Assurez-vous que l'appareil est débranché. Retirez le réservoir d'eau de la base de l'appareil
en tirant sur la poignée vers le haut (schéma 7). Dévissez le bouchon du réservoir et
remplissez-le réservoir. (schéma 8)
• Utilisez l'EAU DU ROBINET. Si dans votre région l'eau est dure, nous vous recommandons
de mélanger, une moitié d'eau du robinet et une moitié d'eau déminéralisée pour réduire
la dureté.
• Après avoir revissé le bouchon du réservoir d'eau, retournez le réservoir et maintenez-le par
la poignée. Vérifiez que l'eau ne coule pas à travers le bouchon.
• Placez verticalement le réservoir d'eau sur l'appareil. (schéma 9)
1 • Mise en place
• Faites fonctionner le défroisseur uniquement sur un sol dégagé de tous objets qui peuvent
obstruer la base (surface plane et horizontale). Ne pas obstruer les orifices de la partie inférieure
de l'appareil. L'appareil ne doit pas être utilisé sur les tapis ou moquettes très épaisses.
• Desserrez la bande Velcro
TM
et dépliez complètement le cordon électrique.
• Branchez-le à la prise d'alimentation. (schéma 10)
• Allumez-le en appuyant sur le bouton marche/arrêt situé sur le dessus de l'appareil. (schéma
1) Le voyant vapeur prête clignote pendant environ 45 secondes, puis devient fixe : l'appareil
est prêt à l'emploi et le débit de la vapeur est au niveau maximal. (schéma 12-13)
• L'appareil commencera à produire de la vapeur après environ 30 secondes.
2 • Utilisation de l'appareil
• Suspendez les vêtements sur le cintre intégré ou sur un cintre séparé qui peut être suspendu
sur l'accroche cintre.
• Pour défroisser les pantalons, nous vous recommandons d'utiliser également le support avec
pinces*.
• Saisissez la tête vapeur en prenant soin de diriger les orifices de diffusion de vapeur à
l'opposé de vous.
• Commencez à brosser légèrement le tissu dans le sens des fibres.
• Commencez par le haut du vêtement en descendant progressivement vers le bas.
• Utilisez toujours la tête de vapeur en position verticale.
• Accrochez toujours la tête de vapeur en position verticale sur le crochet prévu à cet effet
lorsque vous n'utilisez pas l'appareil.
IMPORTANT : Ne jamais utiliser d'eau qui contienne des additifs (amidon, parfum, substances
aromatiques, adoucissant, etc.) dans le défroisseur. De tels additifs peuvent affecter les
propriétés de la vapeur d'eau et conduire à la formation de dépôts.
UTILISATION
Avertissement : Ne jamais utiliser le défroisseur sur un vêtement porté.
Le tuyau flexible et l'extrémité de la tête vapeur peuvent devenir extrêmement chauds pendant
l'utilisation. Ceci est parfaitement normal. Soyez prudent et évitez tout contact prolongé.
Veillez à ne jamais toucher la vapeur chaude.
* Selon modèle
1800133082-03 IS8300 _110x154 24/11/14 11:34 Page23
Page 26
A
24
• Pendant l'utilisation, le tuyau peut produire un bruit de gargouillement. Il s'agit d'un
phénomène normal dû à la condensation. Si l'appareil commence à gargouiller, reposez la
tête de vapeur sur son support pendant quelques instants afin de diriger à nouveau la
condensation dans l'appareil.
• Lors de l'utilisation, des gouttes d'eau peuvent apparaître sur le mât télescopique. Il s'agit
également d'un phénomène normal dû à la condensation.
Réglage de la vapeur*
Votre appareil dispose de 2 à 5 niveaux de vapeur que vous pouvez régler selon la nature du
tissu, allant de délicat à épais.
• Modèles avec 2 niveaux de vapeur : vous pouvez régler l'appareil en appuyant successivement
sur le bouton de réglage de la vapeur sur le panneau de commande de l'appareil.
• Modèles avec 3 niveaux de vapeur : vous pouvez régler l'appareil en appuyant sur l'un des
boutons de réglage sur le panneau de commande de l'appareil.
• Modèles avec 4 ou 5 niveaux de vapeur dans la poignée vapeur : vous pouvez régler l'appareil
en appuyant successivement sur le bouton « SET » situé sur la poignée vapeur. Les voyants
indiquent le niveau de vapeur sélectionné.
Détecteur de réservoir vide*
Cet appareil est équipé d'un détecteur de réservoir vide. Lorsque le réservoir d'eau est vide, le
voyant sur le panneau de commande de l'appareil clignote pour vous avertir qu'il faut remplir
le réservoir d'eau. Éteignez l'appareil et remplissez le réservoir d'eau.
Système électronique d'arrêt automatique*
Votre appareil est équipé d'un système d'arrêt automatique qui met l'appareil en veille une
fois que le réservoir d'eau est vide pendant plus de 10 minutes.
• L'indicateur d'arrêt automatique sur le panneau de commande clignote lentement pour
indiquer que l'appareil est en veille.
Conseils pour un résultat optimal avec votre défroisseur
• Nous vous recommandons de vérifier l'étiquette d'entretien des vêtements pour les
recommandations du fabricant avant le défroissage Nous vous recommandons également de
faire un test sur une partie du vêtement, par exemple sur une couture intérieure.
• Boutonnez le col de la chemise pour éviter que celle-ci ne glisse sur le cintre pendant le
défroissage.
• Appuyez doucement sur la brosse à tissu en la faisant passer lentement sur le vêtement.
• Évitez le contact direct entre la tête de vapeur et la soie ou le velours.
• Certains vêtements sont plus faciles à défroisser à l'envers.
• Le temps de défroisssage des tissus épais peut être plus long.
• Afin d'éviter la formation de la condensation lorsque vous utilisez la tête de vapeur à une
hauteur proche du sol, pensez à soulever le tuyau fréquemment. Un bruit de gargouillement
peut être perceptible si le tuyau flexible est plié.
•
Si l'appareil ne produit pas de vapeur, si un bruit de gargouillement se fait entendre ou si de
l'eau coule à travers les orifices de la tête de vapeur, soulevez le tuyau de vapeur de temps en
temps pour enlever la condensation accumulée à l'intérieur.
COULEUR DU VOYANT LUMINEUX NIVEAU DE VAPEUR
Orange Mini
Vert Maxi
* Selon modèle
1800133082-03 IS8300 _110x154 24/11/14 11:34 Page24
Page 27
25
FR
• Pour réactiver l'appareil : remplir le réservoir d'eau et sélectionnez le niveau de vapeur souhaité
sur le panneau de commande de l'appareil ou sur la poignée vapeur (selon le modèle).
1 • Support vertical Press & Steam*
Assemblage :
• Retirez le support vertical Press & Steam de sa housse. (schéma 19)
• Assurez-vous que le mât télescopique soit entièrement déployé.
• Tenez le support vertical Press & Steam de manière à diriger la poignée vers le bas et de
positionner le logo « Press & Steam » à l'avant.
• Insérez la partie supérieure à l'intérieur du cintre intégré, puis tirez légèrement vers le bas
jusqu'à ce que la poignée s'accroche sur le crochet de verrouillage Press & Steam situé sur le
mât. (schéma 20-21)
• Le support vertical Press & Steam permet de garder le vêtement en place pendant le défroissage.
• Lorsque vous défroissez une chemise, commencez par les manches. Faites passer une manche
devant le vêtement, en biais, en utilisant le support vertical Press & Steam.
2 • Brosse à tissus*
La brosse à tissus écarte les fibres des tissus pour
une meilleure pénétration de la vapeur.
• Fixez la brosse à tissus sur la tête vapeur en
alignant la partie inférieure de la brosse avec la
partie inférieure de la tête. Appuyez doucement sur
le haut de la brosse pour l'enfoncer sur la tête
vapeur jusqu'à ce qu'elle s'enclenche. (schéma 22)
• Brossez doucement la zone à traiter en suivant le
sens ou le grain du tissu. (schéma 23)
• Retirez la brosse à tissus une fois l'appareil débranché et complètement refroidi. Retirez-la en
appuyant sur la languette au-dessus de la brosse tout en tirant vers l'avant.
3 • Brosse anti-peluches*
ACCESSOIRES
Assurez-vous que l'appareil est débranché et complètement froid avant de fixer les accessoires.
Avant d'utiliser un accessoire, vérifiez les recommandations du fabricant.
Il est également recommandé d'effectuer un test surune partie dissimulée du tissu.
Le système Press & Steam fixé dans le cintre fournit un support vertical pendant le défroissage,
permettant d'éliminer les plis de manière plus facile et plus efficace.
La brosse anti-peluches est un accessoire séparé qui ne peut pas
être fixé sur la tête vapeur. Vous pouvez l'utiliser
indépendamment de l'appareil.
* Selon modèle
1800133082-03 IS8300 _110x154 24/11/14 11:34 Page25
Page 28
26
La brosse anti-peluches enlève les cheveux, les peluches et les poils d'animaux pour un fini
professionnel !
• La brosse anti-peluches s'utilise en brossant doucement les vêtements en suivant le sens ou
le grain du tissu. (schéma 25)
• Elle peut être nettoyée par brossage dans le sens opposé. Nous vous recommandons de
nettoyer la brosse avec un vieux chiffon qui peut ensuite être jeté.
• Nous vous recommandons d'utiliser la brosse anti-peluche avant le défroissage de vos
vêtements pour un résultat parfait.
4 • Pince pour plis de pantalon*
• Retirez la brosse à tissus. Faites coulisser le crochet
de l'accessoire dans la rainure située dans la
partie inférieure de la tête vapeur. (schéma 26)
• Appuyez sur la poignée pour ouvrir l'accessoire
pour pli.
• Placez le vêtement entre la pince à pli et la tête
vapeur.
• Relâchez la poignée.
• En partant du haut du vêtement, déplacez l'accessoire à pli vers le bas. (schéma 27)
• Une fois l'appareil débranché et complètement refroidi, retirez l'accessoire à pli en le faisant
glisser sur la tête vapeur.
5 • Gant*
• Le gant protège votre main libre de la vapeur lors de l'utilisation.
• Pour utiliser le gant, le mettre sur la main que vous utilisez pour tenir ou
tirer sur le vêtement. (schéma 24)
• Éteignez l'appareil en appuyant sur le bouton marche/arrêt. (schéma 28)
• Les indicateurs lumineux sur le panneau de contrôle s'éteignent, vous pouvez alors débrancher
l'appareil. (schéma 29)
• Accrochez la tête vapeur en position verticale sur le crochet.
• Afin d'éliminer les particules de calcaire, videz et rincez le réservoir d'eau à chaque fois avant
de le ranger. (schéma 30)
• Enroulez sans serrer le cordon électrique et l'attacher avec la bande Velcro™, puis accrochezle sur le crochet prévu à cet effet sur le mât. (schéma 32)
Le gant doit être utilisé uniquement avec ce défroisseur et non à
d'autres fins. Ne pas laver ou repasser le gant.
APRÈS UTILISATION
Attention: ne retirez jamais l'accessoire Press & Steam pour le ranger avant qu'il ne soit
complètement sec. Avant de le ranger, enroulez toujours le support vertical Press &
Steam. Ne le pliez pas.
Avertissement : Ne jamais toucher la tête vapeur avant qu'elle n'ait complètement refroidie.
* Selon modèle
1800133082-03 IS8300 _110x154 24/11/14 11:34 Page26
Page 29

27
FR
1 • Transport
• Repoussez les deux pieds de stabilité jusqu'au verrouillage dans la base de l'appareil. (schéma
31)
• Vous pouvez transporter votre appareil en le soulevant par le mât télescopique ou par la
poignée de l'appareil.
2 • Entretien et nettoyage
Nettoyage
• Nettoyez l'unité principale avec un chiffon humide.
• Nettoyez le tissu du Press & Steam avec un chiffon humide ou une éponge non abrasive. Ne
pas utiliser de produits de nettoyage tels que du savon ou des détergents.
Détartrage facile
• Pour préserver une performance optimale, votre défroisseur doit être détartré. La fréquence
de détartrage dépend de l'utilisation de l'appareil. L'appareil doit être détartré au moins une
fois par an ou après 30 heures d'utilisation.
• Pour les modèles avec indicateur « Anti calc »
- Pour prolonger la vie de votre appareil et empêcher le dépôt de tartre, l'appareil est équipé
d'un voyant « Anti calc » orange qui clignote sur le panneau de commande lorsque vous avez
besoin de détartrer l'appareil.
- Si le voyant « Anti calc » clignote, vous pouvez continuer le défroissage normalement mais
n'oubliez pas de rincer la chaudière avant de l'utiliser à nouveau.
• Pour mener à bien une opération de détartrage, procédez comme suit :
- Assurez-vous que l'appareil ait complètement refroidi (2 heures minimum).
- Séparez l'appareil de la base, en utilisant le bouton de déverrouillage.
- Enlevez la tête vapeur de son crochet. Enlevez également le cordon électrique de son crochet.
- Retirez le réservoir d'eau (schéma 33).
- Placez l'appareil sur une surface plane sur le rebord de l'évier.
- Remplissez-le d'un demi-litre d'eau directement à l'emplacement d'entrée d'eau situé sur
l'appareil, afin de remplir la chaudière (schéma 34). Faites attention à ne pas déborder.
- Dévissez le bouchon « Anti calc » en le tournant dans le sens contraire de l'aiguille d'une
montre (schéma 35).
- Tenez l'appareil en position inclinée, faites des mouvements lents pour permettre d'éliminer
les particules de calcaire avec l'eau (schéma 36).
- Remettez le bouchon « Anti calc » et revissez.
- Répétez la procédure autant de fois que nécessaire pour éliminer toutes les particules de calcaire.
Ne tentez pas de soulever ou de transporter l'appareil en le tenant par le cintre
intégré. Assurez-vous toujours que l'appareil et le mât soient solidement fixés à la
base avant de soulever l'appareil (voir les instructions de montage).
Ne pas utiliser de substances de détartrage (vinaigre, produits détartrants industriels,
etc.) lors du rinçage de l'appareil : elles pourraient l'endommager.
Avant de vider votre appareil, il faut toujours le laisser refroidir pendant 2 heures pour
éviter les risques de brûlures.
Avertissement : Ne jamais essayer de séparer le tuyau de l'appareil.
Assurez vous d'éviter les chocs sur la tête vapeur pendant l'opération de détartrage.
* Selon modèle
1800133082-03 IS8300 _110x154 24/11/14 11:34 Page27
Page 30
28
- Pour les modèles avec indicateur « Anti calc »* : la prochaine fois que vous utilisez votre
défroisseur pour vêtements, appuyez sur le bouton « Anti calc » pendant 5 secondes sur le
panneau de commande pour éteindre le voyant lumineux.
ATTENTION :
• Ne pas remplir la chaudière par les orifices de la tête vapeur ou l'orifice de vidange de
l'« Anti calc » !
• Ne jamais plonger la tête vapeur dans l'eau !
DÉPANNAGE
* Selon modèle
Le débit de vapeur est
faible.
Le tartre s'est accumulé
dans votre appareil à
vapeur car il n'a pas été
rincé régulièrement.
Voir la procédure de détartrage.
Le tuyau est obstrué. Vérifiez que le tuyau n'est pas plié ou tordu.
L'eau coule à travers
les orifices de la tête de
vapeur.
Il y a de la condensation
dans le tuyau.
Ne jamais utiliser la vapeur dans la position
horizontale. Maintenez le tuyau tendu en
position verticale et attendez que l'eau
condensée se redirige dans l'appareil.
L'appareil est long à
chauffer et/ou des
particules blanches se
dégagent de celui-ci.
Le tartre s'est accumulé
dans votre appareil à
vapeur car il n'a pas été
détartré régulièrement.
Voir la procédure de détartrage.
L'accessoire Press &
Steam est tordu.
L'accessoire Press & Steam
n'a pas été correctement
fixé.
Installez à nouveau l'accessoire Press &
Steam à l'intérieur du cintre intégré.
Assurez-vous qu'il est bien accroché, en
suivant les instructions.
L'accessoire Press & Steam
n'a pas été correctement
roulé.
Assurez-vous que l'accessoire Press & Steam
est toujours sec puis enroulez-le avec
précaution pour le ranger. Ne le pliez pas
pour le ranger.
Problèmes Causes possibles Solutions
L'appareil ne produit
pas de vapeur.
L'appareil n'est pas mis
sous tension.
Vérifiez que l'appareil est branché
correctement à une prise. Appuyez sur le
bouton Marche/Arrêt, le voyant situé à
l'avant de l'appareil va s'allumer. L'appareil
commence à produire de la vapeur après
environ 30 secondes.
Le tuyau est obstrué. Vérifiez que le tuyau n'est pas plié ou tordu.
Le réservoir d'eau est vide. Éteignez l'appareil et remplissez le réservoir
d'eau.
Le système d'arrêt
automatique est activé.
Pour réactiver l'appareil : remplir le réservoir
d'eau et sélectionner le niveau de vapeur
souhaité.
1800133082-03 IS8300 _110x154 24/11/14 11:34 Page28
Page 31

29
FR
* Selon modèle
Si la cause du problème ne peut être établie, veuillez demander l'assistance
d'un centre de service agréé www.tefal.com
Le tuyau génère un
bruit de
gargouillement.
Vous utilisez la tête vapeur
dans une position proche
du sol et de la
condensation se produit
dans le tuyau.
Soulevez le tuyau fréquemment pendant
l'utilisation et réglez le mât à sa hauteur
maximale, afin d'éviter la formation de la
condensation.
L'eau déborde du
réservoir d'eau.
Vous utilisez la tête dans
une position proche du sol
et de la condensation se
produit dans le tuyau.
Soulevez le tuyau fréquemment pendant
l'utilisation et réglez le mât à sa hauteur
maximale, afin d'éviter la formation de la
condensation.
Le voyant orange « Anti
calc » clignote.
Vous n'avez pas appuyé
sur le bouton de
redémarrage « Anti calc »
après l'opération de
détartrage.
Appuyez sur le bouton de redémarrage «
Anti calc » situé sur le panneau de
commande.
De la vapeur s'échappe
par le bouchon « Anticalc ».
Le bouchon « Anti-calc »
n'a pas été correctement
serré.
Serrez le bouchon « Anti-calc » après avoir
laissé refroidir l'appareil pendant 2 heures.
Le bouchon « anti-calc »
est endommagé.
Contactez le centre de service agréé (voir les
coordonnées à la fin de cette page).
L'accessoire Press &
Steam se détache
pendant l'utilisation.
L'accessoire Press & Steam
n'a pas été accroché
correctement sur le
crochet.
Assurez-vous que la poignée de l'accessoire
Press & Steam est fermement accrochée
dans le crochet. Elle ne doit pas se déplacer
horizontalement ou verticalement. Assurezvous que les 3 segments du mât soient
entièrement déployés et que les deux clips
soient solidement fermés.
1800133082-03 IS8300 _110x154 24/11/14 11:34 Page29
Page 32

คู่มือการใช้งานเพื่อความปลอดภัย
กรุณาอ่านคู่มือการใช้งานต่อไปนี้อย่างละเอียดก่อน
การใช้งานครั้งแรกและเก็บเอาไว้ในที่ปลอดภัย
• ในขณะที่เสียบไฟอยู่
ห้ามปล่อยเครื่องใช้ไฟฟ้าทิ้งไว้โดยไม่ได้ตั้งใจ
แม้ว่าจะเป็นเพียงเวลาชั่วครู่ก็ตาม
โดยเฉพาะอย่างยิ่งในบริเวณที่มีเด็กอยู่ใกล้ ๆ
• ให้ถอดปลั๊กเครื่องใช้ไฟฟ้าเสมอ: ก่อนการเติม
หรือเทน้ำลงในแท้งค์น้ำ,
ก่อนการทำความสะอาดแท้งค์น้ำ,
หลังจากการใช้งานทุกครั้ง
• ควรใส่ใจและระมัดระวังเมื่อใช้เครื่องใช้ไฟฟ้า
เพราะเครื่องมีการปล่อยไอน้ำออกมา
• เครื่องใช้นี้ไม่ได้สร้างขึ้นเพื่อให้บุคคล (รวมทั้งเด็กเล็ก)
ที่มีสภาพร่างกายไม่แข็งแรงหรือสภาพจิตใจไม่ปกติ
หรือขาดประสบการณ์และความรู้ความเข้าใจนำอุปกรณ์นี้
ไปใช้งาน
เว้นแต่จะอยู่ในการควบคุมดูแลหรือได้รับคำแนะนำในกา
รใช้งานโดยผู้ที่รับผิดขอบในด้านความปลอดภัย
• เครื่องใช้ไฟฟ้านี้สามารถใช้ได้โดยเด็กอายุ 8
ปีขึ้นไปซึ่งมีข้อจำกัดทางร่างกาย
ประสาทสัมผัสหรือสภาพจิต
หรือขาดประสบการณ์และความรู้ในการใช้งานหากมีคนก
ำกับดูแลหรือให้คำแนะนำในการใช้เครื่องอย่างปลอดภัยแ
ละรับทราบอันตรายที่เกี่ยวข้อง
30
1800133082-03 IS8300 _110x154 24/11/14 11:34 Page30
Page 33

TH
• ควรดูแลเด็กอย่างใกล้ชิดเพื่อให้แน่ใจว่าเด็กจะ
ไม่เล่นเครื่องใช้ไฟฟ้านี้
• ห้ามทำความสะอาดและดูแลรักษาโดยเด็กที่ไม่มีคน
กำกับดูแล
• ห้ามใช้เครื่องใช้ไฟฟ้านี้ หากเครื่องตกลงพื้น,
มีร่องรอยของความเสียหาย, รั่ว, หรือทำงานได้ไม่ถูกต้อง
อย่าถอดแยกชิ้นส่วนเครื่องเอง
เพื่อหลีกเลี่ยงความเสียหายใด
ให้ศูนย์บริการที่ได้รับอนุญาตอย่างถูกต้องตรวจสอบ
เครื่องใช้ไฟฟ้า
คำแนะนำที่สำคัญ
• ผลิตภัณฑ์นี้ได้รับการออกแบบเพื่อใช้ภายในครัวเรือนและภายในบ้าน
เท่านั้น ผู้ผลิตไม่รับผิดชอบใดๆ ทั้งสิ้น และการรับประกันจะเป็นโมฆะ
หากมีการใช้งานเพื่อการค้า การใช้งานที่ไม่เหมาะสม
หรือการไม่ปฏิบัติตามคู่มือการใช้งาน
• เครื่องใช้ไฟฟ้านี้เป็นเครื่องใช้ไฟฟ้าสำหรับวางลงบนพื้น
ห้ามเคลื่อนย้ายเครื่องในขณะที่กำลังใช้งาน
• รักษาให้สายส่งไอน้ำและหัวพ่นไอน้ำอยู่เหนือแท้งค์น้ำเสมอ
• เพื่อความปลอดภัย อุปกรณ์นี้ได้มาตรฐานและเป็นไปตามข้อบังคับ
(ประกาศว่าด้วยแรงดันไฟฟ้าต่ำ ความเข้ากันได้ของแม่เหล็กไฟฟ้า
และสิ่งแวดล้อม)
• พื้นผิว ที่ได้ทำเครื่องหมายไว้ หรืออยู่ใกล้กับสัญลักษณ์นี้
จะมีความร้อนมากในระหว่างการใช้เครื่องใช้ไฟฟ้า
อย่าสัมผัสพื้นผิวเหล่านี้ก่อนที่เครื่องใช้ไฟฟ้าจะเย็นลง
• เพื่อลดความเสี่ยงในการสัมผัสกับน้ำร้อนหรือไอน้ำ
ที่ออกมาจากท่อไอน้ำให้ตรวจสอบเครื่องใช้ไฟฟ้าก่อนใช้งานทุกครั้งโดย
ถือเครื่องให้ห่างตัวขณะใช้งาน
• จะมีไอน้ำเกิดขึ้นเมื่อมีการเคลื่อนที่ขึ้นลงเท่านั้น
ห้ามใช้หัวไอน้ำในแนวนอนหรือเอียงไปด้านหลัง
31
1800133082-03 IS8300 _110x154 24/11/14 11:34 Page31
Page 34

32
4
4
เพราะอาจทำให้น้ำร้อนไหลออกมาได้
• เพื่อลดความเสี่ยงในการเกิดไฟฟ้าช็อต อย่าจุ่มเครื่องใช้ไฟฟ้าลงในน้ำ
หรือจุ่มหัวไอน้ำลงในน้ำหรือของเหลวใด ๆ
• ต้องปิดเครื่องใช้ไฟฟ้าก่อนเสียบปลั๊กหรือถอดปลั๊ก
ห้ามถอดปลั๊กของเครื่องใช้ไฟฟ้าออกจากเต้ารับโดยการดึงที่สายไฟ
ให้จับที่ปลั๊กแล้วดึงเพื่อถอดปลั๊ก
• ปล่อยให้เครื่องเย็นสนิทก่อนเก็บเข้าที่
• อย่าปล่อยให้สายไฟพาดกับขอบหรือมุมที่มีความคม หรือพื้นผิวที่มีความร้อน
• อย่ายึดสายส่งไอน้ำแน่นในระหว่างใช้งาน อาจถูกลวกได้
หากอะแดปเตอร์ของสายส่งไอน้ำถูกถอดออกในขณะที่กำลังใช้เครื่อง
• อย่าพยายามแขวนตัวเครื่องด้วยสายส่งไอน้ำ
• ไม่ควรใช้อุปกรณ์อื่นที่ทีฟาวล์ไม่รองรับและไม่แนะนำให้ใช้
เนื่องจากอาจทำให้เกิดไฟไหม้ ไฟฟ้าช็อต หรืออาจได้รับบาดเจ็บ
• ใช้ความระมัดระวังเมื่อเปลี่ยนอุปกรณ์หรือสิ่งที่แนบมา
เพราะว่าอาจจะมีน้ำร้อนที่เกิดจากการควบแน่นได้
ตรวจสอบให้แน่ใจว่าอุปกรณ์ต่าง ๆ เย็นสนิทแล้ว
เพื่อหลีกเลี่ยงการสัมผัสน้ำร้อน
• อาจเกิดรอยไหม้ได้เนื่องจากสัมผัสกับชิ้นส่วนที่ร้อน น้ำร้อน หรือไอน้ำ
ระมัดระวังขณะที่เอาน้ำออกจากเครื่อง อาจมีน้ำร้อนอยู่ในถังเก็บน้ำ
หรืออยู่ด้านในเครื่องได้
• อย่าให้ไอน้ำหันตรงไปทางคน สัตว์ หรือพ่นไอน้ำในขณะที่กำลังสวมใส่เสื้อผ้า
• อย่าตัดหรือพยายามต่อสายส่งไอน้ำ
• หากคุณใช้สายต่อหลัก
ตรวจสอบให้แน่ใจว่ามีอัตรากระแสไฟที่ตรงกับจำนวนแอมป์ที่จำเป็น
พร้อมด้วยสายดินและการต่อโดยสมบูรณ์
• อย่าปล่อยหรือสอดวัตถุใด ๆ เข้าไปในการเปิดหรือสายส่งไอน้ำ
• ควรใช้ถุงมือกับเครื่องรีดไอน้ำถนอมผ้าเท่านั้น (*แตกต่างกันไปในแต่ละรุ่น)
ผู้ผลิตไม่รับผิดชอบใด ๆ ต่อการใช้ที่ไม่เหมาะสม
ห่วงใยในสิ่งแวดล้อม!
i เครื่องใช้ไฟฟ้าของคุณประกอบด้วยวัสดุที่สามารถแปรสภาพหรือนำกลับมาใช้
ใหม่ได้
‹ ให้นำส่งที่ศูนย์จัดเก็บขยะเทศบาลในท้องถิ่นของคุณ
1800133082-03 IS8300 _110x154 24/11/14 11:34 Page32
Page 35

33
TH
1•การประกอบเครื่องรีดไอน้ำถนอมผ้า
การประกอบเสา
1. ดึงและหมุนขารับน้ำหนัก (x2) ออกจนกระทั่งคุณได้ยินเสียง "คลิ๊ก"
(รูปที่ 1)
2. ถอดสกรูตัวยึดเสาที่ฐานของเสา
3. จับเสาดังกล่าวไว้จนที่ยึดสายไฟไปอย่ด้านหลัง ตรวจสอบคลิปเสียบเสาทั้ง 2 เสาว่าปลดล็อคแล้ว
(รูปที่ 3)
4. ใส่เสาเข้าไปในฐาน ด้วยการกดลงไปด้านล่างจนกระทั่งรูของเสาและฐานอยู่ในระดับเดียวกัน
เพื่อให้คุณสามารถยึดสกรูไปด้านหลังได้ หากรูไม่อยู่ตามแนว
ให้ตรวจสอบคลิปของเสาว่าแน่นและปลดล็อคจริง ๆ หรือไม่ (รูปที่ 4)
5. ใส่สกรูกลับเข้าไปและหมุนสกรูให้ลึกสุดเท่าที่จะทำได้ เพื่อให้เสายึดติดกับฐานอย่างแน่นหนา
6. ปรับเสาให้มีระดับสูงสุดด้วยการเลื่อนขึ้น ตรวจสอบให้แน่ใจว่า เสาทั้ง 3 ส่วนได้ต่อกันโดยสมบูรณ์
จากนั้นล็อคคลิปทั้ง 2 ตัว (รูปที่ 6)
การประกอบที่แขวนผ้าแบบเบ็ดเสร็จ
1. ถอดสกรูที่ยึดไม้แขวนเสื้อที่ด้านล่างของไม้แขวนเสื้อ
2. จับที่ยึดไม้แขวนเสื้อไว้จนตัวยึดไม้แขวนเสื้ออยู่ในด้านเดียวกันกับแผงควบคุม
3. ใส่ไม้แขวนเสื้อตามแนวตั้งที่ด้านบนสุดของเสา รูด้านล่างของไม้แขวนเสื้อ
และรูในเสาควรอยู่ในระดับเดียวกัน (รูปที่ 5)
4. ใส่สกรูกลับเข้าไปและหมุนสกรูให้ลึกสุดเท่าที่จะทำได้ เพื่อให้ไม้แขวนยึดติดกับเสาอย่างแน่นหนา
5. ใส่หัวพ่นไอน้ำไว้ที่ส่วนบนสุดของที่แขวนผ้าแบบเบ็ดเสร็จ
คำอธิบาย
1. หัวพ่นไอน้ำ
2. ที่แขวนผ้าแบบเบ็ดเสร็จ
3. คลิปหนีบผ้า*
4. ที่แขวนหัวพ่นไอน้ำ
5. ที่ยึดไม้แขวนเสื้อ
6. สกรูยึดไม้แขวนเสื้อ
7. คลิปสำหรับล็อคเสา
8. เสาสำหรับแขวนรีด
9. สายส่งไอน้ำ
10. ที่แขวนสายไฟ
11. สายไฟ
12. ด้ามจับเพื่อเคลื่อนย้าย
13. หูจับของแท้งค์น้ำ
14. แท้งค์น้ำที่สามารถถอดได้
15. แผงควบคุม
16. ขารับน้ำหนัก (x2)
17. สกรูยึดเสา
18. ลูกบิดปลดล็อคฐาน
19. สวิตช์เปิด/ปิด
20. เครื่องใช้ไฟฟ้า
21. ฝาปิด "การล้างตะกรัน"
22. ฐาน ไทย
23. แผ่นช่วยการรีด & การพ่นไอน้ำตามแนวตั้ง*
24. กระเป๋าสำหรับแผ่นช่วยการรีด & การพ่นไอน้ำ*
25. หูจับสำหรับล็อคแผ่นช่วยการรีด & การพ่นไอน้ำ*
26. ตะขอยึดสำหรับแผ่นช่วยการรีด & การพ่นไอน้ำ*
27. ถุงมือ*
28. แปรงรีดผ้า*
29. แผ่นกำจัดเศษบนผ้า*
30. อุปกรณ์เสริมสำหรับจับรอยจีบ*
31. การตั้งค่าการพ่นไอน้ำที่เปลี่ยนแปลงได้
32. ไฟบอกสถานะ "การล้างตะกรัน
(Anti calc)"
33. ไฟบอกสถานะน้ำหมด
34. ไฟบอกสถานะความพร้อมของไอน้ำ/
ปิดโดยอัตโนมัติ
35. ปุ่มการตั้งค่าการพ่นไอน้ำที่เปลี่ยนแปลงได้*
36. ไฟบอกสถานะระดับของไอน้ำ
ก่อนการใช้งาน
*
แตกต่างกันไปในแต่ละรุ่น
1800133082-03 IS8300 _110x154 24/11/14 11:34 Page33
Page 36

34
ไ
2•การเติมน้ำในแท้งค์น้ำ
• ตรวจสอบให้แน่ใจว่าถอดปลั๊กของเครื่องพ่นไอน้ำแล้ว เอาแท้งค์น้ำออกจากฐานของเครื่องใช้ไฟฟ้า
ด้วยการดึงที่หูจับแล้วยกขึ้น (รูปที่ 7) ถอดสกรูของฝาถังแล้วใส่น้ำ (รูปที่ 8)
• เครื่องพ่นไอน้ำจะต้องใช้กับน้ำประปา หากน้ำในบริเวณพื้นที่ของคุณเป็นน้ำกระด้าง
เราแนะนำให้คุณเติมน้ำประปาเข้าไปครึ่งหนึ่งและน้ำกลั่นอีกครึ่งหนึ่ง ซึ่งจะช่วยลดความกระด้าง
• หลังจากใส่ฝาปิดถังน้ำเข้าไป ให้หมุนแท้งค์น้ำลงแล้วถือด้วยหูจับ ตรวจสอบว่าไม่มีน้ำรั่วผ่านฝาออกมา
• วางแท้งค์น้ำตามแนวตั้งที่ด้านหลังของเครื่องใช้ไฟฟ้า(รูปที่ 9)
1•การตั้งค่า
• ใช้เครื่องพ่นไอน้ำบนพื้นที่สะอาดไม่มีวัตถุใด ๆ
ที่อาจขัดขวางฐานของเครื่องพ่นไอน้ำที่เรียบและมีพื้นผิวตามแนวนอน
อย่าขวางการเปิดส่วนที่ต่ำกว่าของเครื่อง อุปกรณ์นี้ไม่ควรใช้บนพรมหรือพรมหนา
• ปลดตีนตุ๊กแก และคลายสายไฟออกทั้งหมด
• เสียบปลั๊กเข้าไปในช่องเสียบไฟ (รูปที่ 10)
• เปิดเครื่องด้วยการกดปุ่ม เปิด/ปิด ที่ตั้งอยู่ด้านบนสุดของเครื่อง (รูปที่ 11)
ไฟบอกสถานะความพร้อมของไอน้ำ จะกระพริบเป็นเวลาประมาณ 45 วินาที จากนั้นไฟจะติด
หมายความว่า เครื่องใช้ไฟฟ้าพร้อมพ่นไอน้ำในระดับสูงสุด (รูปที่ 12 - 13)
• อุปกรณ์เครื่องใช้ไฟฟ้าจะเริ่มผลิตไอน้ำหลังจากเวลาผ่านไปประมาณ 30 วินาที
2.การเปิดใช้งานเครื่องใช้ไฟฟ้า
• แขวนผ้าไว้ที่ที่แขวนผ้าแบบเบ็ดเสร็จ หรือที่แขวนที่แยกต่างหาก ซึ่งอาจแขวนไว้บนที่ยึดไม้แขวนเสื้อ
• สำหรับการพ่นไอน้ำใส่กางเกง เราแนะนำให้คุณใช้แผ่นช่วยที่มีคลิป
• จับหัวพ่นไอน้ำโดยให้ลมของไอน้ำชี้ห่างออกจากตัวของคุณ
• เริ่มพ่นไอน้ำ ด้วยการใช้แปรงปัดวัตถุเบา ๆ ตามลายเนื้อผ้า
• เริ่มที่ด้านบนสุดของผ้าแล้วค่อย ๆ เลื่อนลงมาด้านล่าง
• ให้ใช้หัวพ่นไอน้ำในลักษณะตั้งเสมอ
• เมื่อไม่ใช้งาน ให้แขวนหัวพ่นไอน้ำไว้บนที่แขวนหัวพ่นไอน้ำในลักษณะที่ตั้งขึ้นเสมอ
• ในระหว่างการใช้งาน สายอาจทำให้เกิดเสียงดังโกรกกราก
สิ่งนี้ถือเป็นเรื่องปกติอันเนื่องมาจากการควบแน่น หากอุปกรณ์เริ่มส่งเสียงดังโกรกกราก
สิ่งสำคัญ:ห้ามใช้น้ำที่มีส่วนผสมของสารเติมแต่ง(แป้ง,น้ำหอม,สารที่มีกลิ่นหอม,น้ำยาปรับผ้านุ่ม
ฯลฯ)ใส่เข้าไปในเครื่องพ่นไอน้ำสารเติมแต่งเหล่านี้สามารถกลายเป็นคุณสมบัติของไอน้ำและนำไปสู่
การก่อตัวของสิ่งสะสม
การใช้งาน
คำเตือน:อย่าพ่นไอน้ำใส่เสื้อผ้าในขณะที่กำลังสวมใส่อยู่บนตัว
สายส่งไอน้ำที่มีความยืดหยุ่นและตอนปลายของหัวพ่นไอน้ำ อาจมีความร้อนสูงในระหว่างการใช้งาน
สิ่งนี้ถือเป็นเรื่องปกติอย่างที่สุดจงระมัดระวังและหลีกเลี่ยงการสัมผัสเป็นเวลานาน
จงระวังไม่ให้สัมผัสหัวพ่นไอน้ำที่ร้อนเสมอ
* แตกต่างกันไปในแต่ละรุ่น
1800133082-03 IS8300 _110x154 24/11/14 11:34 Page34
Page 37

35
TH
ให้พักหัวพ่นไอน้ำไว้ในที่แขวนหัวพ่นไอน้ำสักครู่ เพื่อให้มีการควบแน่นเข้าไปในอุปกรณ์โดยตรงอีกครั้ง
• ในระหว่างการใช้งาน อาจเกิดหยดน้ำขึ้นบนเสา สิ่งนี้ยังถือเป็นเรื่องปกติอันเนื่องมาจากการควบแน่น
การตั้งค่าไอน้ำ*
เครื่องใช้ไฟฟ้าของคุณติดตั้งอุปกรณ์ที่เหมาะสมสำหรับการตั้งค่าไอน้ำตั้งแต่ 2 ถึง 5 ค่า
ซึ่งคุณสามารถตั้งค่าตามเนื้อผ้าที่คุณกำลังพ่นไอน้ำ ตั้งแต่ผ้าบอบบางไปจนถึงผ้าหนา
• รุ่นที่มีการตั้งค่า 2 ค่า: ให้ตั้งค่าโดยการกดที่ปุ่มตั้งค่าไอน้ำ ซึ่งอยู่บนแผงควบคุมของเครื่องใช้อย่างต่อเนื่อง
• รุ่นที่มีการตั้งค่า 3 ค่า: ให้ตั้งค่าโดยการกดปุ่มใดปุ่มหนึ่งบนแผงควบคุมของเครื่องใช้อย่างต่อเนื่อง
• รุ่นที่มีการตั้งค่า 4 หรือ 5 ค่าในหูจับพ่นไอน้ำ: ให้ตั้งค่าโดยการกดที่ปุ่ม "ตั้งค่า (SET)"
ซึ่งอยู่หูจับพ่นไอน้ำอย่างต่อเนื่อง ไฟบอกสถานะจะแสดงระดับไอน้ำที่ได้เลือกไว้
ตัวตรวจจับสถานะน้ำหมด*
เครื่องใช้ไฟฟ้านี้มาพร้อมกับตัวตรวจจับสถานะน้ำหมด เมื่อถังน้ำไม่มีน้ำ
ไฟบอกสถานะบนแผงควบคุมของเครื่องใช้ไฟฟ้าจะกระพริบ เพื่อเตือนคุณให้เติมน้ำลงในถังน้ำ
ปิดเครื่องใช้ไฟฟ้าแล้วเติมน้ำลงในแท้งค์น้ำ
ปิดไฟอัตโนมัติ*
เครื่องใช้ไฟฟ้าของคุณติดตั้งระบบ "ปิดไฟอัตโนมัติ" ที่เหมาะสม ซึ่งจะทำให้เครื่องอยู่ในตำแหน่งสแตนด์บาย
เมื่อแท้งค์น้ำแห้งเป็นเวลามากกว่า 10 นาที
• ไฟบอกสถานะ "ปิดไฟอัตโนมัติ" บนแผงควบคุมกระพริบช้า ๆ
เพื่อบอกว่าเครื่องใช้ไฟฟ้าอยู่ในตำแหน่งสแตนด์บาย
• สำหรับการเปิดใช้งานเครื่องอีกครั้ง ให้เติมน้ำลงในแท้งค์น้ำ
เคล็ดลับสำหรับผลลัพธ์ที่ดียิ่งกว่าด้วยเครื่องรีดไอน้ำถนอมผ้าของคุณ
•เราขอแนะนำให้คุณตรวจสอบป้ายบอกวิธีการซักที่ติดไว้ที่เสื้อผ้า
เพื่อดูคำแนะนำจากผู้ผลิตก่อนการพ่นไอน้ำ
เรายังคงแนะนำให้ทดสอบเสื้อผ้าและผลของเสื้อผ้าในบริเวณที่ไม่เปิดเผยเช่นตะเข็บด้านใน
•ยกปกเสื้อเชิ้ตขึ้นเพื่อป้องกันการไหลลื่นไปจากไม้แขวนในขณะที่กำลังพ่นไอน้ำ
•กดแปรงพ่นไอน้ำเข้าไปที่เนื้อผ้าเบาๆในขณะที่ค่อยๆลากผ่าน
•หลีกเลี่ยงการสัมผัสหัวพ่นไอน้ำกับผ้าไหมหรือผ้ากำมะหยี่โดยตรง
•เสื้อผ้าบางชิ้นอาจรีดให้เรียบได้ง่ายกว่าหากรีดด้านใน
•เนื้อผ้าที่หนาอาจจำเป็นต้องใช้เวลาในการพ่นไอน้ำที่นานขึ้น
•หากคุณใช้หัวพ่นไอน้ำในตำแหน่งที่ติดกับพื้นให้ยกสายส่งไอน้ำขึ้นบ่อยๆ
เพื่อหลีกเลี่ยงการเกิดปฏิกิริยาการควบแน่นอาจได้ยินเสียงดังโกรกกรากหากสายส่งไอน้ำที่ยึดหยุ่นถูกบีบ
•หากไม่มีการสร้างไอน้ำหรือหากยังได้ยินเสียงดังโกรกกรากหรือหากมีน้ำหยดลงในรูของหัวพ่นไอน้ำ
ให้ยกสายส่งไอน้ำบ่อยๆเพื่อเอาการควบแน่นภายในสายส่งไอน้ำออก
สีอ่อน ไอน้ำที่ออกมา
ส้ม เล็ก
เขียว สูงสุด
* แตกต่างกันไปในแต่ละรุ่น
1800133082-03 IS8300 _110x154 24/11/14 11:34 Page35
Page 38

36
แล้วเลือกระดับไอน้ำที่ต้องการจากแผงควบคุมของเครื่องใช้ไฟฟ้า หรือหูจับพ่นไอน้ำ
(แตกต่างกันไปในแต่ละรุ่น)
1•แผ่นช่วยการรีด&การพ่นไอน้ำตามแนวตั้ง*
การประกอบ:
• การเอาแผ่นช่วยการรีด & การพ่นไอน้ำตามแนวตั้งออกจากกระเป๋า (รูปที่ 19)
• ตรวจสอบให้แน่ใจว่าเสาได้ยืดสุดแล้ว
• จับอุปกรณ์เสริมของแผ่นช่วยการรีด & การพ่นไอน้ำตามแนวตั้ง* เช่น หูจับที่ติดตั้งในลักษณะต่ำลง
จากนั้นโลโก้ "การรีด & การพ่นไอน้ำ" จะอยู่ด้านหน้า
• สอดอะไหล่ด้านบนเข้าไปในที่ที่แขวนผ้าแบบเบ็ดเสร็จ จากนั้นดึงลงเบา ๆ
จนกระทั่งเกี่ยวหูจับของแผ่นช่วยการรีด & การพ่นไอน้ำตามแนวตั้ง* ให้ล็อคที่เสา (รูปที่ 20 - 21)
• แผ่นช่วยการรีด & การพ่นไอน้ำตามแนวตั้ง* จะช่วยรักษาเนื้อผ้าให้เข้าที่ในระหว่างการพ่นไอน้ำ
• เมื่อพ่นไอน้ำใส่เสื้อเชิ้ต ให้เริ่มด้วยการพ่นไอน้ำใส่แขนเสื้อ ถือแขนเสื้อไว้ข้างหนึ่ง
แล้วพ่นไอน้ำข้ามเสื้อผ้าด้วยการใช้แผ่นช่วยการรีด & การพ่นไอน้ำตามแนวตั้ง
2•แปรงรีดผ้า*
แปรงรีดผ้าจะเปิดการถักทอของเสื้อผ้าเพื่อการเจาะลึกของ
ไอน้ำที่ดียิ่งขึ้น
• ประกอบแปรงรีดผ้าเข้ากับหัวพ่นไอน้ำ
โดยให้ด้านล่างของแปรงอยู่ในแนวเดียวกันกับหัวพ่นไอ
น้ำ ค่อย ๆ
ดันส่วนบนสุดของแปรงเข้าไปในหัวพ่นไอน้ำจนกระทั่งค
ลิ๊กเข้าไปในที่ (รูปที่ 22)
• แปรงบริเวณที่ต้องการพ่นไอน้ำเบา โดยแปรงตามลายผ้า
หรือชั้นผ้า (รูปที่ 23)
• เอาแปรงรีดผ้าออกเมื่อถอดปลั๊กเครื่องใช้ไฟฟ้าและเครื่องเย็นสนิทแล้ว เอาออกด้วยการกดบนแถบปล่อย
ซึ่งอยู่ด้านบนสุดของแปรงในขณะที่ดึงไปข้างหน้า
อุปกรณ์เสริม
ตรวจสอบให้แน่ใจว่าถอดปลั๊กและเครื่องเย็นสนิทแล้วก่อนการติดตั้งอุปกรณ์เสริมใดๆ
ก่อนการใช้งานอุปกรณ์เสริมตรวจสอบคำแนะนำจากผู้ผลิตก่อน
นอกจากนี้ยังแนะนำให้คุณดำเนินการทดสอบในส่วนเนื้อผ้าซึ่งไม่สามารถมองเห็นได้
ระบบการรีด & การพ่นไอน้ำที่ตั้งไว้ที่ที่แขวน จะช่วยสนับสนุนการรีดตามแนวตั้งในขณะที่กำลังพ่นไอน้ำ
เพื่อช่วยกำจัดรอยยับได้อย่างง่ายดายและมีประสิทธิภาพ
* แตกต่างกันไปในแต่ละรุ่น
1800133082-03 IS8300 _110x154 24/11/14 11:34 Page36
Page 39

37
TH
3•แผ่นกำจัดเศษบนผ้า*
แผ่นกำจัดเศษบนผ้าจะกำจัดเศษผม, เศษผง และขนสัตว์สำหรับผลลัพธ์แบบมืออาชีพ
• สำหรับการใช้แผ่นกำจัดเศษบนผ้า ให้แปรงบนเสื้อผ้าช้า ๆ ตามลายผ้าหรือชั้นผ้า (รูปที่ 25)
• แผ่นกำจัดเศษบนผ้าสามารถทำความสะอาดได้ด้วยการแปรงไปในทิศทางตรงกันข้าม
เราแนะนำให้ทำความสะอาดแผ่นกำจัดเศษบนผ้าบนผ้าเก่า เพื่อว่าสามารถทิ้งผ้าได้
• เราแนะนำให้ใช้แผ่นกำจัดเศษบนผ้า ก่อนการพ่นไอน้ำลงบนเสื้อผ้าของคุณเพื่อผลลัพธ์ที่สมบูรณ์แบบ
4•อุปกรณ์เสริมสำหรับจับรอยจีบ*
• เอาแปรงรีดผ้าออก
เลื่อนที่ยึดของอุปกรณ์เข้าไปในสล็อตที่ตั้งอยู่ในส่วนที่อ
ยู่ต่ำกว่าหัวพ่นไอน้ำให้แน่น (รูปที่ 26)
• กดที่หูจับเพื่อเปิดอุปกรณ์เสริมสำหรับจับรอยจีบ
• วางผ้าลงระหว่างอุปกรณ์เสริมสำหรับจับรอยจีบและ
หัวพ่นไอน้ำ
• การปล่อยหูจับ
• เริ่มที่ด้านบนของเสื้อผ้า เคลื่อนอุปกรณ์เสริมสำหรับจับรอยจีบในลักษณะต่ำลง (รูปที่ 27)
• เมื่อถอดปลั๊กและเครื่องเย็นสนิทแล้ว
ให้ถอดอุปกรณ์เสริมสำหรับจับรอยจีบด้วยการเลื่อนออกจากหัวพ่นไอน้ำ
5•ถุงมือ*
• ถุงมือช่วยปกป้องมือเปล่าของคุณจากไอน้ำในระหว่างการใช้
• สำหรับการใช้ถุงมือ ให้สวมถุงมือข้างที่คุณจับหรือดึงเสื้อผ้า (รูปที่ 24)
• ปิดเครื่องใช้ด้วยการกดที่ปุ่ม เปิด/ปิด (รูปที่ 28)
• ไฟแสดงสถานะที่แผงควบคุม จะดับลง จากนั้นคุณสามารถถอดปลั๊กเครื่องใช้ไฟฟ้าได้ (รูปที่ 29)
• ให้แขวนหัวพ่นไอน้ำไว้บนที่แขวนหัวพ่นไอน้ำในลักษณะที่ตั้งขึ้น
ควรใช้ถุงมือสำหรับเครื่องรีดไอน้ำถนอมผ้าเครื่องนี้เท่านั้น
และไม่ควรใช้เพื่อจุดประสงค์อื่นอย่าซักหรือรีดถุงมือ
หลังการใช้งาน
แผ่นกำจัดเศษบนผ้าเป็นอุปกรณ์เสริมที่แยกต่างหาก
และไม่สามารถติดเข้ากับหัวพ่นไอน้ำได้
คุณสามารถใช้แผ่นกำจัดเศษบนผ้าได้อย่างเป็นอิสระจากการพ่นไอน้ำ
คำเตือนในการเก็บอย่าเคลื่อนย้ายอุปกรณ์เสริมสำหรับการรีด&การพ่นไอน้ำก่อนที่จะแห้งสนิทเมื่อเก็บ
ให้ม้วนแผ่นช่วยการรีด&การพ่นไอน้ำตามแนวตั้งเสมออย่าพับ
* แตกต่างกันไปในแต่ละรุ่น
1800133082-03 IS8300 _110x154 24/11/14 11:34 Page37
Page 40

38
• เทน้ำออกจากแท้งค์น้ำจนหมดทุกครั้งก่อนเก็บ เพื่อเป็นการล้างอนุภาคของหินปูน (รูปที่ 30)
• คลายสายไฟแบบหลวม ๆ แล้วพันสายด้วยตีนตุ๊กแก จากนั้นแขวนไว้กับที่แขวนสายไฟบนเสา (รูปที่ 32)
1•การขนย้าย
• ดันขารับน้ำหนักท้ัง 2 ขาไปด้านหลังจนกระทั่งล็อคในฐานของเครื่องใช้ไฟฟ้า (รูปที่ 31)
• คุณสามารถขนย้ายเครื่องใช้ไฟฟ้าของคุณได้ ด้วยการยกเสาขึ้น หรือด้วยการจับที่หูจับ
2•การซ่อมบำรุงและการทำความสะอาด
การทำความสะอาด
• ทำความสะอาดตัวเครื่องด้วยผ้าชุบน้ำบิดหมาด
• ทำความสะอาดผ้าสำหรับช่วยการรีด & การพ่นไอน้ำ ด้วยผ้าชุบน้ำบิดหมด หรือฟองน้ำที่ไม่มีสารกัดกร่อน
อย่าใช้ผลิตภัณฑ์ทำความสะอาดใด ๆ เช่น สบู่ หรือผงซักฟอก
การกำจัดหินปูนที่ง่ายดาย
• เพื่อรักษาประสิทธิภาพในการทำงานให้ได้สูงสุด เครื่องพ่นไอน้ำของคุณต้องกำจัดหินปูน
โดยระยะเวลาระหว่างการดำเนินการกำจัดหินปูน จะขึ้นอยู่กับการใช้เครื่อง
เครื่องใช้ไฟฟ้าควรมีการกำจัดหินปูนออกอย่างน้อยปีละครั้ง หรือหลังจากใช้งานไป 30 ชั่วโมง
• สำหรับรุ่นที่มีไฟบอกสถานะ"การล้างตะกรัน(Anticalc)"
- สำหรับการยึดอายุใช้งานเครื่องใช้ไฟฟ้าของคุณและป้องกันการเกิดหินปูน
เครื่องใช้ไฟฟ้าของคุณจะติดตั้งไฟบอกสถานะ "การล้างตะกรัน (Anti calc)" เป็นสีส้ม
ซึ่งกระพริบอยู่บนแผงควบคุมเมื่อคุณจำเป็นต้องปล่อยน้ำทิ้งออกจากเครื่องใช้ไฟฟ้า
- หากไฟบอกสถานะ "การล้างตะกรัน (Anti calc)" เป็นสีส้ม กระพริบเตือน
คุณสามารถพ่นไอน้ำได้ตามปกติ แต่จำไว้ว่าให้เทน้ำออกจากหม้อต้มก่อนการใช้งานอีกครั้ง
•สำหรับการดำเนินการกำจัดหินปูนให้ทำตามขั้นตอนเหล่านี้
- ตรวจสอบให้แน่ใจว่าเครื่องใช้ไฟฟ้าเย็นสนิทแล้ว (อย่างน้อย 2 ชั่วโมง)
- แยกเครื่องใช้ไฟฟ้าออกจากฐาน โดยการใช้ปุ่มปลดล็อค
- เอาหัวพ่นไอน้ำออกจากตะขอเกี่ยวหัวพ่นไอน้ำ เอาสายไฟออกจากที่แขวนสายไฟ
- เอาแท้งค์น้ำออก (รูปที่ 33)
- วางเครื่องใช้ไฟฟ้าบนขอบที่ราบเรียบของอ่างของคุณ
- เติมน้ำสะอาด ½ ลิตร ตรงเข้าไปในตำแหน่งช่องน้ำที่ตั้งอยู่บนเครื่องใช้ไฟฟ้า ช่วยให้น้ำเข้าไปเติมในหม้อน้ำ
คำเตือน:อย่าสัมผัสหัวพ่นไอน้ำจนกว่าจะเย็นสนิท
อย่าพยายายกหรือขนย้ายที่แขวนผ้าแบบเบ็ดเสร็จ
ตรวจสอบให้แน่ใจเสมอว่าเครื่องใช้ไฟฟ้าและเสาติดตั้งไว้อย่างมั่นคงก่อนที่จะยกเครื่องใช้ไฟฟ้า
(ดูคู่มือการใช้งานในการประกอบ)
เมื่อเทน้ำออกจากเครื่องใช้ไฟฟ้าห้ามใช้สารกำจัดหินปูน(น้ำส้มสายชู,
ผลิตภัณฑ์สำหรับการกำจัดหินปูนในอุตสาหกรรมฯลฯ)เพราะสารดังกล่าวอาจทำลายเครื่องได้
ก่อนที่จะเทน้ำออกจากเครื่องจะต้องทิ้งเครื่องไว้ให้เย็นสนิทเป็นเวลาประมาณ2ชั่วโมง
เพื่อหลีกเลี่ยงความเสี่ยงในการสร้างหินปูน
คำเตือน:อย่าพยายามแยกสายออกจากเครื่อง
ตรวจสอบให้แน่ใจว่าได้หลีกเลี่ยงการกระแทกใดๆบนหัวพ่นไอน้ำในระหว่างการดำเนินการกำจัดหินปูน
* แตกต่างกันไปในแต่ละรุ่น
1800133082-03 IS8300 _110x154 24/11/14 11:34 Page38
Page 41

39
TH
(รูปที่ 34) ใส่ใจไม่ให้น้ำล้น
- ถอดฝา "การล้างตะกรัน (Anti calc)" ด้วยการหมุนทวนเข็มนาฬิกา (รูปที่ 35)
- จับเครื่องใช้ไฟฟ้าในตำแหน่งที่เอียง
เพื่อช่วยให้อนุภาคของหินปูนไหลออกไปกับน้ำด้วยการเคลื่อนไหวแบบนุ่มนวล (รูปที่ 36)
- ใส่ฝา "การล้างตะกรัน (Anti calc)" แล้วใส่สกรูยึด
- ทำซ้ำขั้นตอนด้านบนหลาย ๆ ครั้งตามความจำเป็นเพื่อเอาอนุภาคของหินปูนออก
- สำหรับรุ่นที่มีไฟบอกสถานะ “การล้างตะกรัน (Anti calc)”*
ครั้งต่อไปที่คุณใช้เครื่องรีดไอน้ำถนอมผ้าให้กดปุ่ม “การล้างตะกรัน(Anti calc)” ไว้ 5
วินาทีที่แผงควบคุมเพื่อปิดไฟ
คำเตือน:
•อย่าเติมหม้อน้ำผ่านทางรูของหัวพ่อไอน้ำหรือผ่านท่อปล่อยน้ำทิ้งของ"การล้างตะกรัน(Anticalc)"
•ห้ามจุ่มหัวพ่นไอน้ำลงไปในน้ำ!
การแก้ไขปัญหาเบื้องต้น
มีไอน้ำออกมาน้อย เครื่องพ่นไอน้ำของคุณกำลังสร้
างหินปูนเพราะว่าไม่ได้เทน้ำออ
กจนหมดเป็นประจำ
ดูขั้นตอนในการกำจัดหินปูน
สายส่งไอน้ำมีสิ่งกีดขวาง ตรวจสอบว่าสายไม่หักงอ หรือบิดเบี้ยว
มีน้ำไหลผ่านรูของหัวพ่นไอ
น้ำ
มีการควบแน่นภายในสาย อย่าใช้หัวพ่นไอน้ำในแนวนอน
ถือสายยืดออกในแนวตั้ง
แล้วคอยจนกระทั่งน้ำที่ควบแน่นไหลกลับเข้าไปในหั
วพ่นไอน้ำ
ปัญหา สาเหตุที่อาจเป็นไปได้ วิธีแก้ไข
ไม่มีไอน้ำ ยังไม่ได้เปิดเครื่อง ให้ตรวจสอบว่าได้เสียบปลั๊กเครื่องดูดฝุ่นได้อย่างถูกต้
องหรือไม่ กดปุ่ม เปิด/ปิด
ไฟบอกสถานะที่ด้านหน้าของเครื่องจะติด
เครื่องใช้ไฟฟ้าจะเริ่มสร้างไอน้ำหลังจากเวลาประมาณ
45 วินาที
สายส่งไอน้ำมีสิ่งกีดขวาง ตรวจสอบว่าสายไม่หักงอ หรือบิดเบี้ยว
ไม่มีน้ำเหลืออยู่ในแท้งค์น้ำ ปิดเครื่องแล้วเติมน้ำลงไปในแท้งค์น้ำ
ระบบปิดโดยอัตโนมัติเริ่มทำงาน เปิดใช้งานเครื่องใช้ไฟฟ้าอีกครั้ง
ให้เติมน้ำลงในแท้งค์น้ำแล้วเลือกระดับไอน้ำที่ต้องกา
ร
หัวพ่นไอน้ำใช้เวลานานกว่า
จะร้อน และ/หรือ
ปล่อยอนุภาคสีขาว
เครื่องพ่นไอน้ำของคุณกำลังสร้
างหินปูนเพราะว่าไม่ได้กำจัดหิน
ปูนเป็นประจำ
ดูขั้นตอนในการกำจัดหินปูน
1800133082-03 IS8300 _110x154 24/11/14 11:34 Page39
Page 42

40
ไฟสีส้มของ
"การล้างตะกรัน (Anti
calc)" กำลังกระพริบ
คุณไม่ได้กดปุ่มรีสตาร์ท
"การล้างตะกรัน (Anti
calc)"หลังจากการทำการกำจัด
หินปูนออกจากหม้อต้มของคุณ
กดปุ่มรีสตาร์ท "การล้างตะกรัน (Anti calc)"
ที่ตั้งไว้ที่แผงควบคุม
ไอน้ำที่หลุดออกมาจากฝา
"การล้างตะกรัน (Anti
calc)"
ฝา "การล้างตะกรัน (Anti
calc)"
ไม่ได้หมุนให้แน่นอย่างถูกต้อง
คลายฝา "การล้างตะกรัน (Anti calc)"
หลังจากที่ปล่อยให้เครื่องใช้เย็นลงเป็นเวลา 2 ชั่วโมง
ฝา "การล้างตะกรัน (Anti
calc)" ถูกทำให้เสียหาย
ติดต่อศูนย์บริการที่ได้รับอนุญาตอย่างถูกต้อง
(ดูรายละเอียดการติดต่อที่ด้านล่างของหน้านี้)
น้ำกำลังล้นจากแท้งค์น้ำ คุณกำลังใช้หัวพ่นไอน้ำในตำแห
น่งที่ติดกับพื้นดิน
และอาจเกิดการควบแน่นขึ้นใน
สาย
ยกสายขึ้นบ่อย ๆ ในระหว่างการใช้งาน
และปรับเสาให้มีระดับสูงสุด
เพื่อหลีกเลี่ยงการเกิดปฏิกิริยาการควบแน่น
สายมีเสียงดังโกรกกราก คุณกำลังใช้หัวพ่นไอน้ำในตำแห
น่งที่ติดกับพื้นดิน
และอาจเกิดการควบแน่นขึ้นใน
สาย
ยกสายขึ้นบ่อย ๆ ในระหว่างการใช้งาน
และปรับเสาให้มีระดับสูงสุด
เพื่อหลีกเลี่ยงการเกิดปฏิกิริยาการควบแน่น
หากยังไม่สามารถหาสาเหตุของปัญหาได้
ให้ขอความช่วยเหลือจากศูนย์บริการที่ได้รับอนุญาตอย่างถูกต้อง www.tefal.com
อุปกรณ์เสริมสำหรับการรีด
&
การพ่นไอน้ำหลุดออกมาใน
ระหว่างการใช้งาน
อุปกรณ์เสริมสำหรับการรีด &
การพ่นไอน้ำไม่ล็อคติดแน่นอยู่
กับที่แขวนอย่างถูกต้อง
ตรวจสอบให้แน่ใจว่าหูจับอุปกรณ์เสริมสำหรับการรีด &
การพ่นไอน้ำล็อคอย่างแน่นหนาอยู่กับที่แขวน
ไม่ควรเคลื่อนตามแนวนอนหรือแนวตั้ง
ตรวจสอบให้แน่ใจว่าทั้ง 3
ส่วนของเสาได้ขยายอย่างเต็มที่ และจากนั้นใช้คลิปทั้ง
2 ตัวล็อคไว้อย่างแน่นหนา
อุปกรณ์เสริมสำหรับการรีด
& การพ่นไอน้ำงอ
ไม่ได้ติดตั้งผ้าสำหรับช่วยการรีด
& การพ่นไอน้ำอย่างเหมาะสม
ติดตั้งอุปกรณ์เสริมสำหรับการรีด &
การพ่นไอน้ำเข้าไปกับที่แขวนผ้าแบบเบ็ดเสร็จอีกครั้ง
ตรวจสอบให้แน่ใจว่าเกี่ยวไว้อย่างดี
ให้ทำตามคู่มือการใช้งานต่อไปนี้
ไม่ได้ม้วนผ้าสำหรับช่วยการรีด
& การพ่นไอน้ำอย่างเหมาะสม
ตรวจสอบให้แน่ใจว่าหูจับอุปกรณ์เสริมสำหรับการรีด
& การพ่นไอน้ำแห้งเสมอ
จากนั้นให้ม้วนอย่างใส่ใจเมื่อเก็บ เมื่อเก็บ อย่าพับ
1800133082-03 IS8300 _110x154 24/11/14 11:34 Page40
Page 43

41
MS
ARAHAN KESELAMATAN
Sila baca arahan berikut dengan teliti sebelum
penggunaan kali pertama dan simpan di
tempat yang selamat.
• Jangan biarkan perkakas tanpa pengawasan jika
disambung dengan sumber tenaga, walaupun
untuk masa yang singkat, khasnya dalam
kehadiran kanak-kanak.
• Sentiasa cabutkan perkakas daripada soket
elektrik: sebelum mengisi dengan air, atau semasa
dibilas, sebelum pembersihan dan selepas
digunakan.
• Berhati-hati semasa menggunakan perkakas
disebabkan penghasilan stim panas.
• Perkakas ini tidak sepatutnya digunakan oleh
orang (termasuk kanak-kanak) dengan keadaan
fizikal, deria atau keadaan mental yang kurang,
atau yang kurang berpengalaman dan
berpengetahuan, kecuali jika mereka diawasi atau
diberi arahan mengenai penggunaan perkakas ini
oleh orang yang bertanggungjawab atas
keselamatan mereka.
• Perkakas ini boleh digunakan oleh kanak-kanak
yang berumur lebih daripada 8 tahun serta orang
yang mempunyai keadaan fizikal, deria atau
mental yang berkurangan, atau yang kurang
berpengalaman dan berpengetahuan, hanya jika
1800133082-03 IS8300 _110x154 24/11/14 11:34 Page41
Page 44

42
mereka diawasi atau diberi arahan mengenai
penggunaan perkakas ini mengikut cara yang
selamat dan jika mereka memahami segala
bahaya yang berkenaan.
• Kanak-kanak mesti diawasi supaya mereka tidak
bermain dengan perkakas.
• Pembersihan dan penyelarasan tidak boleh
dijalankan oleh kanak-kanak tanpa pengawasan.
• Perkakas ini tidak boleh digunakan jika terjatuh
atas lantai, rosak, terbocor atau gagal berfungsi
dengan betul. Jangan buka perkakas. Untuk
mengelakkan bahaya, sila hantar ke pusat
perkhidmatan yang diluluskan.
CADANGAN PENTING
• Produk ini telah direka untuk kegunaan domestik di dalam rumah sahaja.
Bagi sebarang penggunaan komersial, penggunaan yang tidak sesuai
atau penggunaan yang tidak mematuhi arahan, pengilang tidak akan
bertanggungjawab dan jaminan tidak akan diberikan.
• Perkakas ini khas untuk digunakan di atas lantai, jangan naikkan
daripada lantai semasa digunakan.
• Sentiasa pastikan hos dan muncung berada di atas tangki air.
• Untuk keselamatan anda, perkakas ini mematuhi piawaian dan
peraturan-peraturan yang sepatutnya (Voltan Rendah, Keserasian
Elektromagnetik dan Arahan Alam Sekitar).
• Permukaan-permukaan yang mempunyai tanda ini atau
permukaan-permukaan yang berhampiran akan menjadi sangat panas
semasa perkakas digunakan. Jangan sentuh permukaan-permukaan ini
sebelum perkakas menyejuk.
• Untuk mengurangkan risiko tersentuh air atau stim panas daripada
bolong stim, periksa perkakas sebelum digunakan dengan memegang
perkakas berjauhan daripada badan anda dan kemudian menghidupkan
perkakas terserbut.
1800133082-03 IS8300 _110x154 24/11/14 11:34 Page42
Page 45

43
MS
• Stimkan pakaian dengan menggerakkan alat stim ke atas dan ke bawah
secara menegak. Jangan menggunakan alat stim dalam kedudukan
mendatar atau terbalik, ini boleh menyebabkan pelepasan air panas.
• Untuk mengurangkan risiko kejutan elektrik, jangan rendamkan
perkakas dalam air atau cecair lain.
• Perkakas hendaklah sentiasa ditutup sebelum memasang atau
mencabut plag dari soket. Jangan sekali-kali tarik kabel untuk
memutuskan sambungan daripada soket, tetapi memegang dan
kemudian cabut plag untuk memutuskannya.
• Biarkan perkakas menyejuk dengan sepenuhnya sebelum disimpan.
• Jangan biarkan kabel menyentuh permukaan panas.
• Jangan ikatkan hos semasa penggunaan. Kulit tangan anda mungkin
melecur jika adapter hos ditanggalkan semasa perkakas digunakan.
• Jangan cuba menggantung perkakas dengan menggunakan hos.
• Penggunaan aksesori lain selain daripada yang dibekalkan oleh Tefal
tidak digalakkan dan mungkin akan mengakibatkan kebakaran, kejutan
elektrik atau kecederaan.
• Berhati-hati ketika menanggal dan menyambungkan bahagianbahagian perkakas, disebabkan mungkin terdapat air panas daripada
pengewapan. Pastikan semua bahagian telah sejuk untuk mengelakkan
daripada terkena air panas.
• Luka bakar mungkin boleh terjadi jika mereka tersentuh logam panas,
air panas atau wap air. Berhati-hati semasa mengkosongkan perkakas
stim. Mungkin terdapat air panas di dalam tangki atau di dalam perkakas.
• Jangan halakan stim pada orang atau haiwan, atau menggunakan alat
stim ke atas pakaian yang sedang dipakai oleh orang.
• Jangan cuba potong atau menambahkan panjang hos stim.
• Jika anda menggunakan kabel sambungan, pastikan bahawa kabel
sambungan tersebut dibumikan dan dihulurkan dengan sepenuhnya.
• Jangan masukkan sebarang objek ke dalam bukaan atau hos perkakas.
• Sarung tangan hanya boleh digunakan dengan alat stim pakaian ini
(*berdasarkan model). Pihak pengilang tidak akan bertanggungjawab
ke atas penggunaan yang salah.
LINDUNGI ALAM SEKITAR KITA!
i Perkakas anda mengandungi bahan-bahan bernilai yang boleh dikitar semula.
‹ Semasa melupuskan perkakas lama, bawa perkakas ke pusat pungutan sampah
sivik.
1800133082-03 IS8300 _110x154 24/11/14 11:34 Page43
Page 46

44
1 • Pemasangan alat stim pakaian
Pemasangan tiang
1. Tarik dan pusingkan kedua-dua kaki sokongan sehingga menengar bunyi "Klik". (gambarajah 1)
2. Buka skru pengunci tiang pada bahagian bawah tiang.
3. Pegang tiang supaya pemegang kabel berada di sebelah belakang. Pastikan kedua-dua klip tiang
dibuka. (gambarajah 3)
4. Masukkan tiang ke dalam bahagian bawah dengan menekan ke arah bawah sehingga kedua-dua
lubang tiang dan bahagian bawah berada pada ketinggian yang sama, supaya skru dapat masuk balik
ke dalam lubang skru. Jika lubang-lubang tidak selaras, periksa supaya klip tiang berada dalam keadaan
yang baik dan telah dibuka dengan betul. (gambarajah 4)
5. Ketatkan skru tiang dengan baik supaya tiang akan dipasang dengan betul pada bahagian bawahnya.
6. Selaraskan tiang kepada ketinggian maksimum dengan menggelongsorkan ke atas. Pastikan 3 segmen
tiang dihulurkan dengan sepenuhnya dan kemudian kuncikan kedua-dua klip. (gambarajah 6)
Pemasangan Penyangkut Pakaian
1. Buka skru pengunci tiang pada bahagian bawah tiang.
2. Pegang tiang supaya pemegang kabel berada di sebelah sama dengan panel kawalan perkakas.
3. Letakkan penyangkut secara menegak pada bahagian atas tiang. Lubang-lubang pada bahagian
bawah penyangkut dan tiang sepatutnya berada pada paras yang sama. (gambarajah 5)
4. Letakkan skru semula dan ketatkan skru dengan baik supaya penyangkut akan dipasang dengan betul
pada tiang.
5. Pasangkan kepala alat stim di atas penyangkut.
PENERANGAN
1. Kepala alat stim
2. Penyangkut pakaian
3. Klip seluar*
4. Cangkuk untuk kepala alat stim
5. Pemegang penyangkut
6. Skru pengunci tiang
7. Klip untuk menguncikan tiang
8. Tiang teleskopik
9. Penghubung hos stim
10. Pemegang kabel elektrik
11. Kabel elektrik
12. Pemegang pengangkutan
13. Pemegang tangki air
14. Tangki air yang boleh ditanggalkan
15. Panel kawalan
16. Kaki sokongan (x2)
17. Skru pengunci tiang
18. Tombol untuk melonggarkan dasar tiang
19. Suis BUKA/TUTUP
20. Perkakas
21. Penutup "Anti calc"
22. Dasar
23. Penyokong menegak untuk penekanan dan
penstiman*
24. Kantung untuk penekanan dan penstiman*
25. Pemegang boleh kunci untuk penekanan
dan penstiman*
26. Cangkuk pengunci untuk penekanan dan
penstiman*
27. Sarung tangan*
28. Berus kain*
29. Lint pad*
30. Penghilang kedutan*
31. Penyelarasan stim*
32. Penunjuk "Anti calc"*
33. Penunjuk tangki kosong*
34. Penunjuk stim sudah mencukupi /
penunjuk auto off
35. Butang penyelarasan stim*
36. Penunjuk aras stim*
SEBELUM PENGGUNAAN
* * Mengikut model
1800133082-03 IS8300 _110x154 24/11/14 11:34 Page44
Page 47

45
MS
2 • Mengisikan tangki air
• Pastikan alat stim dicabut daripada sumber elektrik. Tanggalkan tangki air daripada bahagian bawah
perkakas dengan menarik pemegang ke atas (gambarajah 7). Buka penutup tangki dan isikan dengan
air. (gambarajah 8).
• Alat stim mesti diisikan dengan AIR PAIP. Jika air di kawasan anda merupakan air keras kami
mencadangkan bahawa campuran separuh air paip dan separuh air suling digunakan untuk
mengurangkan kekerasan air.
• Selepas menutupkan penutup, pusingkan tangki ke bawah dan pegang pemegang tangki. Pastikan
tiada air yang menitis keluar melalui penutup.
• Letakkan tangki kembali secara menegak pada perkakas (gambarajah 9).
1 • Penyelerasan
• Hanya jalankan alat stim di atas lantai yang bebas daripada benda-benda yang mungkin boleh
menghalang bahagian bawah perkakas (permukaan mesti mendatar). Jangan letak halangan pada
bukaan-bukaan di bahagian bawah perkakas. Perkakas ini tidak boleh digunakan atas permaidani
yang tebal.
• Buka jalur Velcro dan hulurkan kabel elektrik.
• Plag ke dalam soket elektrik. (gambarajah 10)
• Buka perkakas dengan menekan rakap di hadapan perkakas. (gambarajah 11) Penunjuk stim bersedia
akan berkelip lebih kurang 45 saat kemudian lampu akan tetap bernyala: perkakas anda sudah sedia
untuk digunakan dengan stim maksimum. (gambarajah 12-13)
• Perkakas akan mula mengeluarkan stim selepas kira-kira 30 saat.
2 • Menggunakan perkakas
• Gantung pakaian daripada penyangkut perkakas atau penyangkut lain yang dapat digantung
daripada cangkuk pada batang penyangkut.
• Untuk stimkan seluar, kami mencadangkan pengguna menggunakan sokongan yang berklip.*
• Pegang kepala alat stim supaya bolong stim menjauhi diri anda.
• Mulakan proses stim dengan memberuskan kain secara perlahan-lahan dan mengikut arah lajur
benang.
• Mula daripada bahagian atas pakaian dan secara perlahan-lahan gerakkan perkakas ke bawah.
• Selalu gunakan alat stim dalam kedudukan menegak.
• Sentiasa gantungkan kepala alat stim dalam kedudukan menegak pada cangkuk penyangkut semasa
disimpan.
PENTING: Jangan menggunakan air yang mengandungi bahan aditif (kanji, air wangi, bahanbahan aromatik, pelembut, dll.) di dalam alat stim. Bahan-bahan seperti ini boleh memberi
kesan terhadap stim dan menyebabkan deposit kejadian.
PENGGUNAAN
Amaran: Jangan stimkan pakaian yang sedang dipakai.
Hos dan bahagian hujung kepala stim boleh menjadi sangat panas semasa digunakan. Keadaaan
ini adalah normal. Berhati-hati dan elak daripada menyentuh bahagian-bahagian tersebut.
Pastikan anda tidak menyentuh stim panas.
* Mengikut model
1800133082-03 IS8300 _110x154 24/11/14 11:34 Page45
Page 48

46
• Semasa beroperasi, hos mungkin mengeluarkan bunyi deguk-deguk. Hal ini adalah normal dan
adalah disebabkan oleh pemeluwapan air. Jika perkakas mula berdeguk, rehatkan kepala alat stim
pada sokongan untuk beberapa ketika untuk menyalurkan pemeluwapan ke dalam perkakas semula.
• Semasa digunakan, titisan air mungkin akan terbentuk pada tiang teleskopik. Hal ini adalah normal
dan adalah disebabkan oleh pemeluwapan air.
Penyelarasan stim*
Perkakas anda mempunyai antara 2 hingga 5 penyelarasan stim yang boleh disetkan berdasarkan jenis
fabrik yang distimkan, daripada kain halus kepada yang tebal.
• Model-model dengan 2 jenis penyelarasan: setkan dengan menekan butang penyelarasan stim pada
panel kawalan perkakas secara berturut-turut.
• Model-model dengan 3 jenis penyelarasan: setkan dengan menekan butang penyelarasan stim pada
panel kawalan perkakas.
• Model-model dengan 4 atau 5 jenis penyelarasan: setkan dengan menekan butang "SET" pada pemegang
stim perkakas secara berturut-turut. Lampu penunjuk akan menunjukkan aras stim yang dipilih.
Pengesan tangki kosong*
Perkakas ini dilengkapi dengan pengesan tangki kosong. Jika tangki air sudah kosong, lampu penunjuk
pada panel kawalan perkakas akan berkelip-kelip untuk memberitahu bahawa tangki air mesti diisikan.
Tutup perkakas dan isikan tangki air.
Auto off elektronik
Perkakas anda dilengkapi dengan sistem "auto-off" yang akan mengaktifkan mod "standby" sekiranya
tangki air telah kosong selama lebih daripada 10 minit.
• Penunjuk "auto off" pada panel kawalan akan berkelip-kelip secara perlahan-lahan untuk menunjukkan
bahawa perkakas berada dalam mod "standby".
• Untuk menghidupkan perkakas semula: isikan tangki air dan pilih aras stim yang dikehendaki pada
panel kawalan perkakas atau pemegang stim (mengikut model).
Tip-tip untuk menggunakan alat penstim pakaian dengan lebih baik
• Kami mencadangkan bahawa label penjagaan pakaian diperiksa supaya cadangan
pengeluar diketahui sebelum proses penstiman dimulakan. Kami juga mengesyorkan
supaya anda terlebih dahulu menguji pakaian dan kekuatan warna pada bahagianbahagian pakaian yang tidak dapat dilihat seperti jahitan dalaman.
• Butangkan kolar baju untuk mengelakkan daripada tergelincir daripada penyangkut
semasa penstiman.
• Tekan berus alat stim pada kain secara perlahan-lahan.
• Jangan biarkan kepala alat stim bersentuhan dengan kain sutera atau baldu.
• Sesetengah pakaian lebih senang dilicinkan jika diterbalikkan.
• Kain yang lebih tebal mungkin perlu distimkan untuk jangka masa yang lebih panjang.
• Jika anda menggunakan kepala alat stim pada kedudukan yang rapat dengan bumi,
naikkan hos dengan kerap untuk mengelakkan pembentukan pemeluwapan. Bunyi
degukan boleh kedengaran jika paip fleksibel dicubit.
• Jika tiada stim dihasilkan, jika bunyi degukan kedengaran atau jika air menitis melalui
lubang-lubang kepala alat stim, naikkan hos stim dengan segera untuk mengeluarkan
pemeluwapan dalaman.
WARNA CERAH KELUARAN STIM
Oren Mini
Hijau Maxi
* Mengikut model
1800133082-03 IS8300 _110x154 24/11/14 11:34 Page46
Page 49

47
MS
1 • Penyokong menegak untuk penekanan dan penstiman*
Pemasangan:
• Tanggalkan penyokong menegak Penekanan dan Penstiman daripada kantung* (gambarajah 19)
• Pastikan tiang teleskopik dihulurkan dengan sepenuhnya.
• Pegang aksesori penyokong menegak Penekanan dan Penstiman* supaya pemegang berada ke bawah
dan logo "Press and Steam" berada di hadapan.
• Masukkan bahagian atas ke dalam penyangkut, kemudian tarik ke bawah sehingga pemegang
disangkut pada tempat mengunci penyokong menegak Penekanan dan Penstiman* pada tiang.
(gambarajah 20-21)
• Menekan pada penyokong menegak Penekanan dan Penstiman* akan memnyebabkan pakaian berada
di tempat yang sama semasa penstiman.
• Bila baju kemeja distimkan, mulakan dengan menstim lengan. Pengang salah satu lengan dan lipatkan
ke arah badan baju kemeja dengan menggunakan penyokong menegak Penekanan dan Penstiman.
2 • Berus kain*
Penggunaan berus kain akan melonggarkan kain untuk
membolehkan penembusan stim yang lebih baik.
•
Pasangkan berus kain ke kepala stim dengan
menyelaraskan bahagian bawah berus dengan bahagian
bawah kepala alat stim. Tekan bahagian atas berus secara
perlahan-lahan ke atas kepala alat stim sehingga
memasuki tempatnya dengan bunyi klik. (gambarajah 22)
•
Secara perlahan-lahan beruskan bahagian pakaian yang
perlu distimkan mengikut arah tenunan kain.
(gambarajah 23)
• Tanggalkan berus kain sekiranya unit dicabut daripada soket dan dibiarkan menyejuk. Tanggalkan berus
kain dengan menekan tab di atas berus semasa menarik ke hadapan.
3 • Lint pad*
Pastikan plag unit dicabut daripada sumber tenaga dan unit dibiarkan menyejuk dengan
sepenuhnya sebelum aksesori dipasangkan.
Sebelum menggunakan aksesori, baca cadangan pengeluar.
Kami mencadang bahawa anda menguji perkakas terlebih dahulu ke atas sebahagian
daripada kain atau pakaian yang tidak kelihatan.
Set sistem Penekanan dan Penstiman pada penyangkut membolehkan sokongan menegak
semasa penstiman untuk menolong menghilangkan kedutan dengan lebih senang dan
efisyen.
AKSESORI
Lint pad merupakan aksesori berasingan dan tidak boleh dipasangkan
pada kepala stim. Anda boleh menggunakan lint pad secara
berasingan daripada perkakas.
* Mengikut model
1800133082-03 IS8300 _110x154 24/11/14 11:34 Page47
Page 50

48
Lint pad menanggalkan rambut, lint dan bulu haiwan untuk memberikan permukaan yang cantik.
• Untuk menggunakan lint pad, beruskan pakaian secara perlahan-lahan mengikut arah tenunan kain.
(gambarajah 25)
• Pad boleh dibersihkan dengan memberus dalam arah yang bertentangan. Kami mencadangkan
bahawa pad dibersihkan dengan menggunakan kain lama yang boleh dibuang selepas digunakan.
• Kami mencadangkan bahawa pad dibersihkan dengan menggunakan kain lama yang boleh dibuang
selepas digunakan.
4 • Penghilang kedutan*
•
Tanggalkan berus kain. Gelongsorkan cangkuk aksesori
dengan sepenuhnya ke dalam slot yang terletak di
bahagian bawah kepala alat stim. (gambarajah 26)
• Tekan pemegang untuk membuka alat penghilang
kedutan.
• Letakkan pakaian di antara alat penghilang kedutan
dan kepala alat stim.
• Lepaskan pemegang.
• Mulai daripada bahagian atas pakaian, gerakkan penghilang kedutan ke arah bawah. (gambarajah 27)
• Sekiranya unit dicabutkan daripada soket dan telah menjadi sejuk, tanggalkan penghilang kedutan
dengan menggelongsorkan daripada kepala alat stim.
5 • Sarung tangan*
• Sarung tangan melindungi tangan anda daripada stim semasa perkakas digunakan.
• Untuk menggunakan sarung tangan, pakaikan sarung tangan pada tangan anda
yang memegang atau menarik pakaian. (gambarajah 24)
• Tutup perkakas dengan menekan butang ON/OFF. (gambarajah 28)
• Lampu penunjuk akan menghilang dan kemudian perkakas boleh dicabutkan daripada sumber elektrik.
(gambarajah 29)
• Gantungkan kepala alat stim dalam kedudukan menegak pada kepala cangkuk penyangkut.
• Kosongkan dan bilas tangki air setiap kali sebelum penstoran untuk menanggalkan kotoran.
(gambarajah 30)
• Gulungkan kabel elektrik secara longgar dan ikat dengan jalur Velcro, kemudian gantung daripada clip
pada tiang. (gambarajah 32)
Sarung tangan hanya boleh digunakan dengan alat stim pakaian ini dan
bukan untuk tujuan lain. Jangan mencuci atau seterikakan sarung tangan.
SELEPAS PENGGUNAAN
Amaran: jangan menanggalkan aksesori Penekanan dan Penstiman untuk disimpan sebelum
perkakas dikeringkan dengan sepenuhnya. Sentiasa gulungkan penyokong menegak Penekanan
dan Penstiman untuk disimpan. Jangan membuat kedutan.
Amaran: Jangan sentuh kepala stim sehingga sudah menyejuk dengan sepenuhnya.
* * Mengikut model
1800133082-03 IS8300 _110x154 24/11/14 11:34 Page48
Page 51

49
MS
1 • Pengangkutan
• Pusingkan kedua-dua kaki sokongan sehingga dikunci pada dasar perkakas.. (gambarajah 31)
• Anda boleh mengangkut perkakas anda dengan memegang tiang teleskopik atau melalui pemegang
perkakas.
2 • Penyelarasan dan pembersihan
Pembersihan
• Bersihkan unit utama dengan menggunakan sehelai kain basah.
• Bersihkan kain Penekanan dan Penstiman dengan kain basah atau span. Jangan menggunakan produk
pembersihan seperti sabun atau detergen.
Descaling secara mudah
• Untuk memastikan prestasi maksimum, alat stim mesti dibersihkan. Jangka masa antara operasi
pembersihan kerak (descaling) bergantung kepada kekerapan perkakas digunakan. Perkakas mesti
dibersihkan (descaled) sekali setahun atau selepas penggunaan selama 30 jam.
• Untuk model-model dengan penunjuk "Anti calc"*
- Untuk memanjangkan hayat perkakas anda dan mengelakkan pembentukan kerak, perkakas anda
dilengkapkan dengan lampu "Anti-calc" oren yang bernyala pada panel kawalan apabila anda perlu
mengalirkan air daripada perkakas.
- Jika lampu amaran oren "A-calc" berkelip-kelip, anda boleh sambung pentiman secara biasa tetapi ingat
supaya membilas boiler sebelum digunakan semula.
• Untuk menjalankan operasi pembersihan kerak, ikuti langkah-langkah berikut:
- Pastikan perkakas telah menyejuk sepenuhnya (2 jam minimum).
- Letakkan perkakas pada dasar, dengan menggunakan butang buka kunci.
- Tanggalkan kepala stim daripada cangkuk kepala stim. Tanggalkan kabel elektrik daripada cangkuk.
- Keluarkan tangki air (gambarajah 33).
- Letakkan perkakas secara rata pada sisi singki.
- Isikan tangki air dengan ½ litre air bersih dari salur masuk air, lalu membolehkan air mengisi boiler
(gambarajah 34). Pastikan tidak melimpah.
- Buka "Anti calc" dengan memusingkannya pada arah lawan jam (gambarajah 35).
- Pegang perkakas dalam keadaan, condong, membantu pertakikan-kecuali partikel sisik dengan
menggunakan (gambarajah 36).
- Letakkan "Anti calc" dan tutup dan skrew kembali.
- Ulangi langkah di atas sebanyak mana kali yang diperlukan sehingga semua kekotoran telah
dikeluarkan.
Jangan menggunakan sebarang bahan menghakis (cuka, produk komersial, dll.) apabila
mencuci produk: perkakas mungkin akan rosak.
Sebelum perkakas dikosongkan, perkakas mesti sentiasa dibiar menyejuk selama 2 jam
untuk mengelakkan sebarang risiko tangan melecur.
Amaran: jangan cuba memisahkan hos daripada perkakas.
Pastikan tiada sebarang kejutan pada kepala stim semasa operasi descaling.
Jangan cuba mengangkut atau menggerakkan perkakas dengan menarik hos. Sentiasa
pastikan perkakas dan tiang adalah dipasangkan pada dasar sebelum perkakas diangkat
(sila lihat arahan pemasangan)..
* Mengikut model
1800133082-03 IS8300 _110x154 24/11/14 11:34 Page49
Page 52

50
- Untuk model-model dengan penunjuk anti-calc*: kali kemudian anda menggunakan perkakas pernstim
baju, tekan butang "Anti-calc" selama 5 saat untuk menutup penujuk tersebut.
AMARAN:
• Jangan isikan boiler dengan menggunakan lubang kepala alat stim atau dengan menggunakan
"Anti calc" pada ternet !
• Jangan rendamkan kepala alat stim dalam air!
PENYELESAIAN MASALAH
Aliran wap adalah
rendah.
Steamer anda mempunyai
kotoran kerana rumah tidak
dibersihkan selama 30
tahun.
Sila rujuk kepada proses descaling
Hos tersumbat Pastikan hos tidak bengkok atau berpintal.
Air mengalir melalui
lubang-lubang di kepala
alat stim.
Terdapat pemeluwapan di
dalam hos.
Jangan menggunakan alat stim dalam
kedudukan mengufuk. Pegang hos secara
menegak dan tunggu sehingga air
memeluwap kembali ke alat stim.
Alat stim mengambil
masa yang lama untuk
memanas dan/atau
mengeluarkan partikel
putih.
Perkakas anda
mengandungi b¬anyak
kerak kerana tidak
dibersihkan (descaled)
dengan kerap.
Sila rujuk kepada proses descaling
Penyokong menegak
untuk penekanan dan
penstiman*
Penyokong menegak untuk
penekanan dan penstiman*
Pasangkan kepala alat stim di atas penyangkut.
Pastikan alat dipasangkan dengan baik.
Fabrik Press and Steam tidak
digulungkan dengan baik.
Pastikan aksesori Penekanan dan Penstiman
sentiasa kering. Jangan membuat kedutan,
semsa penstoran.
Masalah-masalah
Sebab-sebab yang
mungkin
Penyelesaian
Tiada stim Perkakas belum dibuka. Pastikan perkakas diplagkan dengan betul.
Seterusnya, tekan butang Buka/Tutup, lampu
penunjuk pada bahagian hadapan perkak as
akan bernyala. Perkakas akan mula
mengeluarkan stim selepas kira-kira 45 saat.
Hos tersumbat Pastikan hos tidak bengkok atau berpintal.
Tangki air sudah kehabisan
air.
Tutup perkakas dan isikan tangk i air.
Sistem auto off elektronik
diaktifkan.
Untuk menghidupkan perkakas semula: isikan
tangki air dan pilih aras stim yang dikehendaki
pada panel kawalan perkak as atau pemegang
stim (mengikut model).
* * Mengikut model
1800133082-03 IS8300 _110x154 24/11/14 11:34 Page50
Page 53

Lampu oren "Anti-calc"
sedang berkelip-kelip.
Anda tidak menekan butang
nyah-scale 'Anti calc"
Tekan butang semula 'Anti calc" pada panel
kawalan.
Stim akan terkeluar
daripada topi "Anti calc".
Topi "Anti calc" tidak
dipasang dengan betul.
Ketatkan topi "Anti calc" selepas perkakas
menyejuk dalam masa 2 jam.
"Penutup" Anti calc telah
rosak.
Sila hubungi Pusat Servis yang diluluskan.
51
MS
Aksesory Penyokong
dan Steam boleh
ditanggalkan semasa
digunakan.
Aksesory Penyokong dan
Steam boleh ditanggalkan
semasa digunakan.
Aksesory Penyokong dan Steam tidak boleh
ditanggalkan semasa digunakan. Perkak as ini
tidak boleh digunakan atas permaidani yang
tebal. Pastikan 3 segmen tiang dihulurkan
dengan sepenuhnya dan kemudian kuncikan
kedua-dua klip.
Hos mengeluarkan
bunyi deguk-deguk.
Anda menggunakan kepala
stim dalam kedudukan yang
rapat dengan bumi dan
pemeluwapan terbentuk
dalam hos.
Naikkan hos dengan kerap semasa digunakan
dan selaraskan tiang ke ketinggian maksimum
untuk mengelakkan pembentukan
pemeluwapan.
Jika sebab masalah tidak dapat ditentukan, dapatkan pertolongan Pusat Science yang
TEFAL, dapatkan bantuan Pusat Perkhidmatan yang diluluskan www.tefal.com
* Mengikut model
Air melimpah keluar
daripada tangki air.
Anda menggunakan kepala
stim dalam kedudukan yang
rapat dengan bumi dan
pemeluwapan terbentuk
dalam hos.
Naikkan hos dengan kerap semasa digunakan
dan selaraskan tiang ke ketinggian maksimum
untuk mengelakkan pembentukan
pemeluwapan.
1800133082-03 IS8300 _110x154 24/11/14 11:34 Page51
Page 54

52
安全指引
首次使用前,請細閱這些指引,並存放在安全
地方。
• 在產品仍連接電源時,不可離開,使產品無
人看管。尤其是有兒童在場時,即使短暫離
開也不可以。
• 時常謹記把產品電源拔除:入水、或沖洗水
箱前、清潔前、或每次使用後。
• 使用產品時應小心謹慎,因為產品會噴出蒸
汽。
• 本電器不是供身心障礙或缺乏經驗與知識的
人員 (包括兒童) 使用,除非由負責其安全的
人員監督或指導如何使用本電器。
• 此產品可由8歲或以上兒童、身心或感官弱能
的人士,或欠缺經驗及知識者使用,但必須
有足夠監督或指導,確保他們知道如何安全
地使用本產品,並瞭解當中涉及的風險。
• 兒童必須於成人指導下使用,請勿讓兒童將
本產品當作玩具。
• 不應讓兒童在沒有監督下,進行清潔或保養
工作。
• 若有以下情況下切勿使用本產品:曾跌在地
上,有明顯損壞,出現滲漏或無法正常運作。
1800133082-03 IS8300 _110x154 24/11/14 11:34 Page52
Page 55

53
ZH
切勿拆開本產品。為免發生危險,請在認可
的服務中心進行檢查。
重要建議
• 此產品設計只作家居及室內使用。若作任何商業用途,不適當使用
或不遵照使用指引,製造商不會承擔任何責任,保用亦將無效。
• 本產品為為座地設計,使用期間不可移動。
• 經常保持喉管及噴頭位置高於水箱。
• 為確保你的安全,此電器用品完全符合有關的標準與規定(低電壓、
電磁兼容性、環保指令)。
• 印有此標誌的表面或其鄰近位置,在使用產品期間會非常燙熱。
在產品冷卻前,切勿接觸這些表面。
• 為減低接觸熱水或從蒸氣口噴出的蒸氣之機會,請於每次使用前檢
查產品,並在運作時使產品與身體保持適當距離。
• 使用時只可垂直上下移動。請勿將蒸氣頭置於水平位置使用,或向
後傾,否則可能令熱水噴出。
• 為減低觸電風險,切勿將產品浸入水中,或將蒸氣頭放入水中或其
他液體中。
• 接上或拔除電源前,必須確保產品已關掉。切勿只拉電線來拔除電
源,必須手執插頭,將其拔離電源插座。
• 執拾前必須先讓電器完全冷卻。
• 請勿讓電線接觸鋒利或燙熱的表面。
• 請勿在使用期間抓緊喉管。在使用產品期間移除喉管接駁可能會引
致燙傷。
• 切勿嘗試使用喉管把整件電器吊起。
• 不建議使用非特福TEFAL供應之其他配件,否則有可能引致火警、
觸電或身體受傷。
• 更換配件或附件時請格外小心,因為當中可能會有蒸氣凝結成的熱
水。確保附件已經冷卻,以免接觸熱水。
• 接觸燙熱部件、熱水或蒸氣都可引致燙傷。清空蒸氣產品時應小心。
1800133082-03 IS8300 _110x154 24/11/14 11:34 Page53
Page 56

4
4
54
水箱或產品內可能會存有熱水。
• 切勿直接把蒸氣噴向人、動物,或穿著衣服期間直接熨衣。
• 切勿剪斷或嘗試加長蒸氣喉管。
• 若使用拖板,請確保所需電流正確配對,並有接地插座及足夠長度
的電線。
• 所有開口或喉管不可投入任何物件
• 手套只適用於本蒸氣掛熨機(*視乎型號而定)。製造商不會因任何不
當使用而負上責任。
環保為先!
i 您的電器含有寶貴的可回收或循環利用物料。
‹ 請將其棄置於當地市政廢物回收站。
*
1800133082-03 IS8300 _110x154 24/11/14 11:34 Page54
Page 57

55
ZH
1 • 衣物蒸氣掛熨機裝配
支柱裝配
1. 拉出並旋轉兩條穩定支架,直至聽到喀嚓聲。(圖1)
2. 扭鬆支柱底部的固定螺絲。
3. 抓住支柱,電線勾向後。檢查確保兩個支柱扣都打開。(圖 3)
4. 將支柱插入底座,直至支柱與底座的插孔重疊,以致可以裝回螺絲。若插孔無法對齊,
請檢查支柱夾沒有問題,並確實沒有鎖上。(圖 4)
5. 裝回支柱固定螺絲,盡量扭緊,讓支柱穩定於底座。
6. 將支柱向上滑動,調校至最高高度。確保支柱 3 段都完全伸展,然後鎖上兩個夾。(圖
6)
綜合衣架裝配
1. 扭開衣架底部的衣架固定螺絲。
2. 手執衣架,衣架應與產品控制板位於同一方向。
3. 於支柱頂部垂直插入衣架。衣架底部與支柱之插孔應重疊。(圖5)
4. 裝回固定螺絲,盡量扭緊,讓衣架穩定裝於支柱。
5. 將蒸氣噴頭裝在綜合衣架頂部。
描述
1. 蒸氣頭
2. 綜合衣架
3. 褲夾*
4. 蒸氣噴頭勾
5. 衣架掛勾
6. 衣架固定螺絲
7. 支柱上鎖夾
8. 伸縮式支柱
9. 蒸氣喉管
10. 電線勾
11. 電線
12. 移動手柄
13. 水箱把手
14. 可拆卸水箱
15. 控制板
16. 穩定腳架 (x2)
17. 支柱固定螺絲
18. 底座解鎖旋鈕
19. 開/關制
20. 產品
21. "防鈣化" 蓋
22. 底座 ZH
23. 一掛熨衣物承托簾*
24. 一掛熨衣物儲存袋*
25. 一掛熨衣物鎖定把手*
26. 一掛熨衣物鎖定勾*
27. 手套*
28. 纖維刷*
29. 絨毛刷*
30. 摺痕附件*
31. 可調校蒸氣設定*
32. "防鈣化" 指示燈*
33. 水箱乾水指示燈*
34. 蒸氣就緒指示燈 / 自動關機指示燈
35. 可調校蒸氣設定按鈕*
36. 蒸氣級數指示燈*
使用前
* 根據型號而定
1800133082-03 IS8300 _110x154 24/11/14 11:34 Page55
Page 58

56
2 • 水箱裝水
• 確保蒸氣掛熨機沒有接上電源。將手柄向上拉,將水箱抽離產品底座。 (圖7).扭開水
箱蓋,裝水。(圖8)
• 此蒸氣掛熨機必須使用自來水。若你所在地方的自來水屬硬水,則建議你混合用一半
自來水,一半蒸餾水,便可以減低水的硬度。
• 扭回水箱蓋後,將水箱反轉,提著手柄。檢查確保水箱蓋沒有滲漏。
• 將水箱垂直裝回產品上(圖9)
1 • 安裝
• 蒸氣掛熨機只適宜在平地上使用,地上不應有任何雜物影響蒸氣掛熨機底座不能平放
在水平表面。請勿阻塞產品下半部的開口處。請勿將產品用於非常厚的地氈或毛毯上。
• 放開 VelcroTM帶,並完全拉出電線。
• 將插頭插入電源插座。(圖10)
• 按位於產品頂部的開/關 (ON/OFF)按鈕啟動。(圖11)蒸氣就緒指示燈會閃動約 45 秒,
然後會長亮:你的電器產品已就緒,可輸出最大量蒸氣。(圖12-13)
• 產品會約 30 秒後會開始產生蒸氣。
2 • 使用產品
• 將衣物掛在綜合衣架上,或用其他衣架懸掛在衣架掛勾上。
• 熨褲時,建議同時用夾支撐*。
• 執起蒸氣噴頭,不要將蒸氣出口指向自己。
• 開始掛熨,先順著衣物纖維紋理輕輕刷物料。
• 從衣物頂部開始,慢慢向下移。
• 時常將蒸氣噴頭保持於垂直位置使用。
• 當不使用時,經常保持蒸氣噴頭於直立位置,掛於蒸氣噴頭掛勾上。
• 使用時,喉管可能會發出 咯咯聲。這是冷凝 的正常現象。若裝 置開始發出咯咯聲,
把蒸氣噴頭掛於支撐架上一會,以讓凝結的水珠再次導入裝置。
• 使用時,可伸縮支柱可能會出現水滴。這亦是冷凝的正常現象。
重要資訊:請勿將有添加物(澱粉、香水、香味劑、柔順劑等) 的水用於此蒸氣掛熨機
。這些添加物會影響蒸氣的特性,導致沉積物形成。
使用
警告:絕不可把衣物穿著在身上掛熨。
彈性喉管及蒸氣噴頭尾部在使用時,溫度可能極高。 這是正常現象請小心使用,並
避免任何過長時間的接觸。
謹記小心不要接觸灼熱蒸氣。
* * 根據型號而定
1800133082-03 IS8300 _110x154 24/11/14 11:34 Page56
Page 59

57
ZH
蒸氣設定*
本產品設有 2 至 5 種蒸氣設定,你可按照要掛熨的纖維選擇,從易受損的,到厚重的。
• 只有兩種設定的型號:接連按產品控制板上的蒸氣設定按鈕,就可以選擇。
• 有3種設定的型號:按產品控制板上的其中一個按鈕選擇。
• 蒸氣手柄有4或5種設定的型號:連續按蒸氣手柄上的設定 "SET" 按鈕選擇。指示燈會顯
示所選擇的蒸氣量。
水箱乾水偵測器*
此產品設有水箱乾水偵測器。當水箱沒有水,產品控制板的指示燈會閃動,提醒你要加
水。關掉裝置,然後加水入水箱。
電子自動關機*
裝置設有 “自動關機” 系統。當水箱乾水超過10 分鐘,使會將裝置轉為備用狀態。
• 控制板上的 “自動關機”指示會慢慢閃動,顯示裝置正在備用狀態。
• 要重新啟動裝置:加水入水箱,然後於裝置控制板或蒸氣手柄(視乎型號)選擇蒸氣量。
衣物蒸氣掛熨機達更佳效果之使用提示
• 建議掛熨前,先查看衣物護理標籤,瞭解製造商建議。亦建議先於不顯眼位置,
例如內縫邊,先進行測試,清楚效果。
• 扣好頸部鈕釦,以防止衣物在掛熨期間滑落。
• 把掛熨機刷輕力按在纖維上,慢慢移動。
• 避免蒸氣噴頭與絲或絨直接接觸。
• 部分衣物反面會較易熨。
• 厚重的纖維掛熨時間可能需要較長。
• 若你在接近地面位置使用蒸氣噴頭,應經常拉高喉管,以免水點形成。若喉管被
扭,可能會發出咯咯聲。
• 若沒有蒸氣產生,聽到咯咯聲,或水從蒸氣噴頭滴出,應間中舉高蒸氣噴頭,以
去除喉內的水點。
淺色 蒸氣輸出
橙色 迷你
綠色 最大
配件
加上配件前,請確定裝置已拔掉電源及完全冷卻。
使用配件前,請先查看製造商建議。
另外亦建議在隱閉位置先進行測試。
* 根據型號而定
1800133082-03 IS8300 _110x154 24/11/14 11:34 Page57
Page 60

4
58
1 • 掛熨衣物承托簾*
裝配:
• 從袋中取出掛熨衣物承托簾。(圖19)
• 確保伸縮支柱完全伸展。
• 掛熨衣物承托簾* 配件手柄向下, "壓熨" 標誌在前方。
• 將頂部插入綜合衣架,然後稍向下拉,直至掛熨衣物承托簾*的手柄扣好在支柱上。(圖
20-21)
• 掛熨衣物承托簾* 在掛熨期間有助固定衣物位置。
• 蒸熨裇衫時,應先從衫袖開始。執住一邊衫袖,使用掛熨衣物承托簾,把袖覆蓋在衣物
上。
2 • 纖維刷*
纖維刷有助解開纏在一起的纖維,加強蒸氣穿
透力。
• 將纖 維刷連接到蒸氣噴頭上,只須把刷的底
部接上蒸氣噴頭的底部。輕輕把刷的頂部按
在蒸氣噴頭上,直至卡好在適當位置。(圖22)
• 順著纖維的紋路或絨毛輕掃要掛熨的位置 。
(圖23)
• 當裝置電源拔掉,並完全冷卻後,隨即拆下纖維刷。按著刷上的釋出鍵,同時向前拉,
便能拆下。
3 • 絨毛刷*
絨毛刷可去除毛髮、絨碎、動物毛,令效果更專業。
• 使用絨毛刷,可以順著纖維的紋理及絨毛慢慢刷衣物。(圖25)
• 以反方向刷便可清潔絨毛刷。建議用可棄置的舊布清潔絨毛刷。
• 要獲得完美效果,建議於掛熨衣服前,先使用絨毛刷。
扣在衣架的掛熨衣物承托簾為掛熨提供直立支架,幫助更容易及有效地去除皺摺。
絨毛刷是獨立配件,不能安裝在蒸氣噴頭上,可以獨立使用。
* * 根據型號而定
1800133082-03 IS8300 _110x154 24/11/14 11:34 Page58
Page 61

59
ZH
4 • 摺痕附件*
• 拆除 纖維刷。把配件的勾完全滑入蒸氣噴頭
下面的坑中。(圖26)
• 推手柄打開摺痕附件。
• 把衣物放於摺痕附件與蒸氣噴頭之間。
• 放開手柄。
• 從衣物頂部開始,把摺痕附件向下移。(圖27)
• 當裝置電源拔掉,並完全冷卻後,隨即拆下摺痕附件。
5 • 手套*
• 手套用來保護你沒有執住蒸氣噴頭的手免被蒸氣所傷。
• 使用手套,戴在負責提著或整理衣物的手上。(圖24)
• 按關/關 ON/OFF 按鈕關掉裝置。(圖28)
• 控制板的指示燈會熄滅,你就可以拔掉裝置的電源。 (圖29)
• 將蒸氣噴頭直立地掛在蒸氣噴頭掛勾上。
• 每次收藏前應倒清水箱內的水及過水,以沖走水鏽粒子。(圖30)
• 寬鬆地捲起電線,蓋上Velcro 帶,然後掛在支柱上的電線勾上。(圖32)
1 • 移動運送
• 將兩條穩定支架推入裝置底座,直至鎖好。(圖31)
• 要移動裝置,你可以提起可伸縮支柱或執著裝置的手柄。
手套只供配合此蒸氣掛熨機使用,而非作其他用途。請勿清洗或
熨平手套。
使用後
警告:裝 置未 完全乾 透前 ,切勿拆除 掛熨 配件收 藏。 經常把掛熨 衣物 承托簾 捲起
收藏。 切 勿屈摺。
警告:蒸氣噴頭未完全冷卻前,切勿觸摸。
不可執住綜合衣架提起或移動此裝置。提起裝置前,經常確保裝置與支柱都緊接著底
座 (參閱裝配指引)。
* 根據型號而定
1800133082-03 IS8300 _110x154 24/11/14 11:34 Page59
Page 62

60
2 • 保養及清潔
清潔
• 用濕布清潔裝置主體部分。
• 用濕布或不刮花的海棉清潔掛熨物料。請勿使用任何清潔劑,如肥皂或洗潔精。
輕易除鏽
• 為保持最佳效能,裝置必須進行除鏽。除鏽應隔多久進行一次,視乎使用量而定。裝置
必須至少每年或使用30小時後除鏽一次。
• 有 "防鈣化" 指示燈*之型號:
- 為延長裝置的壽命及防止鏽漬,裝置配有橙色 "防鈣化” 燈,當你需要清空裝置時,此
燈就會閃動。
- 若橙色 “防鈣化” 警告燈閃動,你仍可以繼續正常掛熨,但請謹記下次使用之前,必
須清洗鍋爐。
• 要進行除鏽程序,請依照以下步驟:
- 確保裝置完全冷卻 (最少 2 小時)。
- 使用解鎖按鈕,將裝置與底座分離。
- 從蒸氣噴頭掛勾上移走蒸氣噴頭。亦將電線從電線勾上取下。
- 取出水箱 (圖33).
- 將裝置平放於洗手盤邊緣。
- 直接將 ½ 公升淡水裝入裝置的入水口位置,讓水注滿鍋爐l(圖34)。注意不要滿瀉。
- 以反時針方向扭開 "防鈣化" 蓋 (圖35)。
- 將裝置傾斜,輕搖裝置讓水鏽粒子隨水慢慢流出 (圖36)。
- 插入 "防鈣化" 蓋,並再扭緊。
- 重覆以上步驟多次,直至所有水鏽粒子清除。
- 對於有 "防鈣化" 指示燈的型號*:下次再使用蒸氣掛熨機時,按控制板上的 "防鈣化" 按
鈕5秒,就可關掉指示燈。
警告:
• 不可經由蒸氣噴頭孔或 "防鈣化" 去水口來注水入鍋爐!
• 切勿將蒸氣噴頭浸入水中!
切勿使用任何除鏽劑 (醋、工業用除鏽產品等) 來清洗裝置:這些物品會損壞裝置。
清空裝置前,必須讓裝置冷卻 2 小時,以免燙傷。
警告:不可嘗試從裝置拆下喉管。
除鏽期間須確保蒸氣噴頭不受震盪。
* * 根據型號而定
1800133082-03 IS8300 _110x154 24/11/14 11:34 Page60
Page 63

61
ZH
解決疑難
蒸氣量低。 鍋爐積聚水鏽,因為沒
有按時清洗。
參閱除鏽程序。
喉管有阻塞。 檢查喉管,確保沒有屈摺或扭曲。
水從蒸氣噴頭孔流出。喉管內有水凝結。 切勿以水平位置使用蒸氣掛熨機。垂直
拉起喉管,等待凝結的水回流到鍋爐。
鍋爐需要很長時間才
能加熱,並/或噴出
白色粒子。
鍋爐積聚水鏽,因為沒
有按時清洗。
參閱除鏽程序。
掛熨配件灣曲。 掛熨物料沒有正確裝置。 重新將掛熨配件裝入綜合衣架內。
確保其勾好,依照指引。
掛熨物料沒有正確捲起。經常確保掛熨配件吹乾後小心捲起收藏。
切勿將其屈摺收藏。
問題 可能原因 解決方法
沒有蒸氣。 裝置未啟動。 檢查裝置是否已正確地接上電源。按開/
關 On/Off 按鈕,位於裝置前方的指示
燈會亮起。裝置會在大約 45 秒後產生
蒸氣。
喉管有阻塞。 檢查喉管,確保沒有屈摺或扭曲。
水箱沒有水。 關掉裝置,加水入水箱。
自動關機系統啟動。 要重新啟動裝置:加水入水箱,然後選
擇蒸氣量。
掛熨配件在使用時分離。掛熨配件沒有正確鎖定
於勾上。
確保掛熨配件手柄緊扣在勾上。不應水
平或垂直移動。確保支柱的 3 段都完全
伸展,並且兩個夾都緊鎖。
喉管發出咯咯聲。 你可能於接近地面位置
使用蒸氣噴頭,喉管內
出現凝結現象。
使用時經常舉高喉管,並調校支柱至最
高,以免水點形成。
* 根據型號而定
1800133082-03 IS8300 _110x154 24/11/14 11:34 Page61
Page 64

62
水從水箱溢出。 你可能於接近地面位置
使用蒸氣噴頭,喉管內
出現凝結現象。
使用時經常舉高喉管,並調校支柱至最
高,以免水點形成。
橙色 "防鈣化" 燈閃動。你可能在除鏽過程後,
沒有按 "防鈣化" 重新啟
動按鈕。
按控制板上的 "防鈣化" 重新啟動按鈕。
蒸氣從 "防鈣化" 蓋漏出。"防鈣化"蓋未有正確地
扭緊。
讓裝置冷卻2 小時後,扭緊 "防鈣化"蓋。
"防鈣化" 蓋有損壞。 聯絡認可服務中心 (參閱本頁底部的聯
絡資料)。
若無法找出引致問題的原因,可尋求認可服務中心協助www.tefal.com
* 根據型號而定
1800133082-03 IS8300 _110x154 24/11/14 11:34 Page62
Page 65

63
AR
«∞LÔAJKW
«∞º∂V «∞LÔ∫∑Lq
«∞∫q
±
ÔK
∫
o
"
{
G
j
Ë
°
ª
U
¸
"
¥
M
H
B
q
√
£
M
U
¡
«
ù
ß
∑
F
L
U
‰
.
«
∞
ª
d
©
u
Â
¥
B
b
¸
√
Å
u
«
‹
¨
d
¨
d
…
.
«
∞
L
U
¡
¥
H
O
i
±
s
î
e
«
Ê
«
∞
L
U
¡
«
∞
L
R
®
d
«
∞
C
u
z
w
«
∞
∂
d
¢
I
U
∞
w
"
c
l
a
c
i
t
n
A
"
¥
u
±
i
.
«
∞
∂
ª
U
¸
¥
∑
º
d
»
±
s
ß
b
«
œ
…
"
c
lac
it
nA"
∞r ¥∑r ≈ÆHU‰ ±ÔK∫o "{Gj
Ë°ªU¸" °AJq Å∫O` ≠w
«∞FöÆW
_≤p ¢º∑FLq ¸√” «∞∂ªU¸
Æd¥∂UÎ ±s «_¸÷, ËÆb
¢d«ØLX °Fi «∞∑J∏OHU‹ ≠w
«∞ªd©uÂ.
_≤p ¢º∑FLq ¸√” «∞∂ªU¸
Æd¥∂UÎ ±s «_¸÷, ËÆb
¢d«ØLX °Fi «∞∑J∏OHU‹ ≠w
«∞ªd©uÂ.
∞s ¥∑r «∞CGj ´Kv “¸ ≈´Uœ…
¢AGOq "cla c itnA" °Fb
´LKOW ≈“«∞W «∞∑JKf.
∞r ¥∑r ¢∏∂OX Ë≈¨ö‚ ßb«œ…
"clac itnA".
ßb«œ… "clac itnA" ¢U∞HW
¢QØb °QÊ ±I∂i ±ÔK∫o "{Gj Ë°ªU¸" Æb ¢r
¢∏∂O∑t °S•JU ≠w «∞FöÆW. ¥πV √Ê ¥∑∫d„ «≠IOUÎ
√Ë ´Luœ¥UÎ. ¥Ôd§w «∞∑QØb °QÊ «ÆºU «∞FLuœ
«∞∏ö£W ±ÔLbœ… «∞v ¬îd≥U, Ë√Ê «∞LA∂JOs ±IHKOs
°S•JUÂ.
«¸≠l «∞ªd©u ¢Jd«¸«Î √£MU¡ «ùß∑FLU‰ Ë «{∂j
«∞FLuœ «∞v «ÆBv «¸¢HUŸ ±LJs ∞Jw ¢∑πMÒV
¢d«Ør «∞∑J∏On.
«¸≠l «∞ªd©u ¢Jd«¸«Î √£MU¡ «ùß∑FLU‰ Ë «{∂j
«∞FLuœ «∞v «ÆBv «¸¢HUŸ ±LJs ∞Jw ¢∑πMÒV
¢d«Ør «∞∑J∏On.
«{Gj ´Kv “¸ ≈´Uœ… ¢AGOq "clac itnA"
«∞Lu§uœ ´Kv ∞u•W «∞∑∫Jr
¥Ôd§v ¢∏∂OX Ë≈ÆHU‰ ßb«œ… "
clac itnA" °Fb
√Ê ¥∂dœ «∞LM∑Z ¢LU±UÎ , Ë∞Lb… ô ¢Iq ´s
«∞ºU´∑Os.
¥Ôd§v «ù¢BU‰ °LdØe îb±W ±F∑Lb («≤Ed
¢HUÅOq «ù¢BUô‹ ≠w ≤NU¥W ≥cÁ «∞BH∫W)
1800133082-03 IS8300 _110x154 24/11/14 11:34 Page63
Page 66

64
¢∫c¥d :
>
ô ¢Lú «∞Ld§q °u«ßDW ≠∑∫U‹ ¸√” «∞∂ªU¸, √Ë ±s îö‰ ±ªU¸Ã "clac itnA" «∞LÔFb… ∞K∑BHOW!
> ô ¢GLd ¸√” «∞∂ªU¸ °U∞LU¡ √°b«Î.!
«ß∑JAU· «_´DU‰
«∞LÔAJKW
«∞º∂V «∞LÔ∫∑Lq
«∞∫q
ô
¥
u
§
b
°
ª
U
¸
«
≤
ª
H
U
÷
±
º
∑
u
È
¢
b
≠
o
«
∞
∂
ª
U
¸
«
∞
L
U
¡
¥
∑
º
d
»
±
s
î
ö
‰
≠
∑
∫
U
‹
¸
√
”
«
∞
∂
ª
U
¸
.
¥
º
∑
G
d
‚
«
∞L
u
∞b
Ë
Æ
∑
U
Î
©
u
¥
ö
Î
∞O
º
ª
s
Ë
/
√
Ë
¢
ª
d
Ã
±
M
t
°
I
U
¥
U
°
O
C
U
¡
«
∞Ku
Ê
.
±
ÔK
∫
o
"
{
G
j
Ë
°
ª
U
¸
"
≠
O
t
«
´
u
§
U
Ã
∞r ¥u{l «∞LÔM∑Z ≠w •U∞W
«∞∑AGOq
«∞ªd©u «∞LdÊ ±ºbËœ
∞r ¥Fb ¥u§b ±U¡ ≠w îe«Ê
«∞LU¡
¢r ¢HFOq ≤EUÂ «ùÆHU‰
«_Ë¢u±U¢OJw
¢d«Ør «∞∑JKf ≠w «∞LM∑Z _≤t
ô ¥ÔGºq Ë¥ÔMEÒn °U≤∑EUÂ.
«∞ªd©u «∞LdÊ ±ºbËœ
¥u§b ¢J∏On ∞K∂ªU¸ œ«îq
«∞ªd©uÂ
¢d«Ør «∞∑JKf ≠w «∞LM∑Z _≤t
ô ¥ÔGºq Ë¥ÔMEÒn °U≤∑EUÂ.
∞r ¥ÔdØV ±K∫o "{Gj
Ë°ªU¸" §Ob«Î ≠w «∞FöÒÆW
∞r ¥∑r ∞n ±K∫o "{Gj
Ë°ªU¸" °AJq §Ob
¢QØb °QÊ «∞LM∑Z ±uÅu‰ °U∞∑OU¸ «∞JNd°Uzw
°AJq Å∫O`. «{Gj ´Kv ±H∑UÕ
"¢AGOq/≈¥IU·", «∞LR®d «∞Cuzw «∞Lu§uœ ≠w
±Ib±W «∞LM∑Z ßu· ¥ÔCU¡. ßO∂b√ «∞LM∑Z °∑u∞Ob
«∞∂ªU¸ °Fb •u«‰ Í54 £U≤OW
¢QØb °QÊ «∞ªd©u «∞LdÊ ∞Of ±∏MOUÎ Ë√≤t ≠w
Ë{l ¥ºL` °Ld˸ «∞∂ªU¸.
√ËÆn ¢AGOq «∞LM∑Z , Ë«±ú «∞ªe«Ê °U∞LU¡.
ù´Uœ… ¢AGOq «∞LM∑Z : «±ú «∞ªe«Ê °U∞LU¡ Ë
«î∑d ±º∑uÈ «∞∂ªU¸ «∞cÍ ¢d¨V.
¥Ôd§v «∞Fuœ… «∞v ≠Id… ≈“«∞W «∞∑JKf
¢QØb °QÊ «∞ªd©u «∞LdÊ ∞Of ±∏MOUÎ Ë√≤t ≠w
Ë{l ¥ºL` °Ld˸ «∞∂ªU¸.
ô ¢º∑FLq «∞∂ªU¸ ≠w «∞u{l «_≠Iw . «•Lq
«∞ªd©u ´Luœ¥UÎ °FOb«Î ´s «∞ILU‘ Ë«≤∑Ed «∞v
√Ê ¥Fuœ «∞LU¡ «∞LÔJ∏Òn «∞v «∞Lu∞b £U≤OW.
¥Ôd§v «∞Fuœ… «∞v ≠Id… ≈“«∞W «∞∑JKf
«´b ¢dØOV ±K∫o "{Gj Ë°ªU¸" ≠w «∞FöÆW
«∞Lb±πW
¢QØb °Q≤NU ±ÔFKIW §Ob«Î, •ºV «ù¸®Uœ«‹
«∞u«¸œ….
¥Ôd§v «∞∑QØb œ«zLUÎ °QÊ ±K∫o "{Gj Ë°ªU¸"
§U· ˱KHu· °FMU¥W √£MU¡ «∞∑ªe¥s. ô ¢b´W
¥∑Fd÷ ∞K∑πFOb.
1800133082-03 IS8300 _110x154 24/11/14 11:34 Page64
Page 67

65
AR
> ¥LJMp ≤Iq «∞LM∑Z °d≠Ft °u«ßDW «∞FLuœ «∞∑KºJu°w √Ë °u«ßDW ±I∂i «∞LM∑Z ≤Hºt.
ô ¢Ô∫Uˉ •Lq «∞LM∑Z ∞û≤∑IU‰ °t °u«ßDW «∞FöÆW «∞Lb±πW. ¥Ôd§w «∞∑QØb Ë«∞∫d’ œ«zLUÎ √Ê «∞FLuœ ±Ô∏∂ÒX
°AJq §Ob ´Kv «∞IU´b… Æ∂q ¸≠l «∞LM∑Z ±s ±JU≤t. («≤Ed ≈¸®Uœ«‹ «∞∑dØOV).
2 > «∞∑MEOn Ë«∞BOU≤W
«∞∑MEOn
> ¢ÔMEÒn «∞u•b… «∞dzOºOW ±s «∞LM∑Z °u«ßDW ÆDFW ÆLU‘ ¸©∂W.
> ¢ÔMEn ÆLU®W «∞LK∫o "{Gj Ë°ªU¸" °IDFW ÆLU‘ ¸©∂W √Ë «ßHMπW ¨Od ±Fb≤OW. ô ¢º∑FLq ±u«œ «∞∑MEOn
±∏q «∞BU°uÊ Ë«∞LDNd«‹.
ô ¢º∑FLq √¥W ±u«œ ¢MEOn ØU®DW (îq, ±u«œ ¢MEOn ÅMU´OW, «∞a..) ´Mb ¨ºq «∞LM∑Z: ≠Ib ¥RœÍ –∞p
«∞v ≈¢ö≠t.
Æ∂q ¢Hd¥m «∞LM∑Z, ¥πV √Ê ¥Ô∑d„ ∞Jw ¥∂dœ ∞Lb… ô ¢Iq ´s ßU´∑Os ∞Jw ¢∑πMÒV îDd «ùÅU°W °U∞∫dË‚.
≈“«∞W «∞∑JKf °ºNu∞W
¢∫c¥d : ô ¢∫U‰ ≠Bq «∞ªd©u ´s «∞LM∑Z.
¥Ôd§v «∞∫d’ ´Kv «∞∫HUÿ ´Kv ¸√” «∞∂ªU¸ °FOb«Î ´s «∞Bb±U‹ «∞FMOHW √£MU¡ ´LKOW ≈“«∞W «∞∑JKf.
> ∞KL∫U≠EW ´Kv ≠FU∞OW «∞LM∑Z «∞IBuÈ, ¥πV ≈Ê ¥ÔMEÒn ±u∞b «∞∂ªU¸ œ«zLUÎ ±s §e¥µU‹ «∞∑JKf. «∞H∑d… °Os
´LKOU‹ «∞∑MEOn ±s «∞∑JKf ¢F∑Lb ´Kv ≤u´OW «∞LU¡ «∞LÔº∑FLq, Ë´Kv ≤º∂W «ß∑FLU‰ «∞LM∑Z. ¥πV ¢MEOn
«∞LM∑Z ±s «∞∑JKf ±d… Ë«•b… ßMu¥UÎ ´Kv «_Æq, √Ë °Fb 03 ±d… ±s «ùß∑FLU‰.
> ∞KLuœ¥ö‹ «∞LÔeËÒœ… °LR®d "clac itnA"
- ù©U∞W ´Ld «∞LM∑Z ˱Ml «∞∑JKf ´Mt, ≠SÊ ≥c« «∞LM∑Z Æb “ÔËÒœ °LR®d {uzw "clac itnA" °d¢IU∞w «∞KuÊ
¥u±i ´Kv ∞u•W «∞∑∫Jr ´Mb±U ¥B∂` «∞LM∑Z °∫U§W «∞v «∞∑Hd¥m.
- ≠w •U‰ °b√ «∞LR®d «∞Cuzw «∞∂d¢IU∞w "clac itnA" °U∞u±Oi, ¥LJMp ±∑U°FW «∞Jw °AJq ©∂OFw , Ë∞Js
¢cØd √Ê ¢Gºq «∞Ld§q Æ∂q «ùß∑FLU‰ ≠w «∞Ld… «∞∏U≤OW.
> ∞KIOU °FLKOW «∞∑MEOn ±s «∞∑JKf, ¥Ôd§v «¢∂UŸ «∞ªDu«‹ «∞∑U∞OW :
- ¢QØb √ËôÎ √Ê «∞LM∑Z Æb °dœ ¢LU±UÎ (ßU´∑Os ´Kv «_Æq).
- «≠Bq «∞LM∑Z ´s «∞IU´b…, °Uß∑FLU‰ “¸ «∞∑∫d¥d.
- «≠Bq ¸√” «∞∂ªU¸ ´s ´öÆW ¸√” «∞∂ªU¸ . «≠Bq «¥CUÎ «∞ºKp «∞JNd°Uzw ±s ´öÆW «∞ºKp «∞JNd°Uzw.
- √îdà îe«Ê «∞LU¡ («∞AJq 33).
- {l «∞LM∑Z ±M∂ºDUÎ ´Kv •U≠W «∞LGºKW.
- «±ú «∞ªe«Ê °MBn ∞∑d ±s «∞LU¡ «∞DU“à ±∂U®d… ±s îö‰ «∞H∑∫W «∞Lu§uœ… ≠w «∞LM∑Z , °∫OY ¢ºL`
∞KLU¡ √Ê ¢Lú «∞Ld§q (®Jq 43). «•d’ √Ê ô ¢DHu «∞LU¡ «∞v «∞ªU¸Ã.
- •d¸ ßb«œ… "clac itnA" °Sœ«¸¢NU ´Jf «¢πUÁ ´IU¸» «∞ºU´W. («∞AJq 53).
«•Lq «∞LM∑Z °u{l ±Uzq, ∞Jw ¢ºU´b °IU¥U «∞∑JKf «∞ªdËà ±l ¢OU¸ «∞LU¡ «∞ªU¸Ã ±l °Fi «ù≥∑e«“«‹
«∞ªHOHW (®Jq 63).
- «¸§l ßb«œ… «∞∑JKf «∞v ±JU≤NU Ë √œ¸≥U °S¢πUÁ ´IU¸» «∞ºU´W ùÆHU∞NU.
- Ød¸ «∞ªDu«‹ «∞LcØu¸… ´b… ±d«‹ Ë•ºV «∞∫U§W ∞CLUÊ îdËà §LOl °IU¥U «∞∑JKf.
- ∞KLuœ¥ö‹ «∞LeËœ… °LR®d "clac itnA" : ´Mb «ß∑FLU‰ ±u∞b «∞∂ªU¸, ≠w «∞Ld… «∞∏U≤OW, «{Gj ´Kv “¸
"clac itnA" ´Kv ∞u•W «∞∑∫Jr ∞Lb… 5 ∏u«Ê ∞Jw ¢∑LJs ±s ≈©HU¡ «∞LR®d «∞Cuzw.
*•ºV «∞Luœ¥q
1800133082-03 IS8300 _110x154 24/11/14 11:34 Page65
Page 68

66
*•ºV «∞Luœ¥q
ËßUœ… «∞u°d ¢K∑Ij «∞AFd, «∞u°d, Ë ≠d«¡ «∞∫Ou«≤U‹ ∞KuÅu‰ «∞v «∞∫d≠OW ≠w «∞Jw.
> ùß∑FLU‰ ËßUœ… «∞u°d, ¢ÔLd¸ ØU∞Hd®U… ´Kv «∞∏OU» °∂Dv¡ ù“«∞W «∞e¨V «∞BUœ¸ ´s «∞∏OU» («∞AJq 52)..
> ¥LJs ¢MEOn ËßUœ… «∞u°d °U∞Hd®U… °∑∫d¥JNU °Uù¢πUÁ «∞LFUØf. ≤MB` °∑MEOn ËßUœ… «∞u°d ´Kv ÆDFW
ÆLU‘ Æb¥LW ¥LJs «ùß∑GMU¡ ´MNU.
> ≤MB` °Uß∑FLU‰ ËßUœ… «∞u°d Æ∂q ¢Fd¥i «∞ILU‘ ∞K∂ªU¸ ∞K∫Bu‰ ´Kv ≤∑UzZ ±∏U∞OW.
> «≤eŸ ≠d®U… «∞ILU‘. «“∞Z ´öÆW «∞LK∫o •∑v ¬îd≥U
≠w «∞H∑∫W «∞Lu§uœ… ≠w «∞πe¡ «∞ºHKw ±s ¸√” «∞∂ªU¸
(«∞AJq 62).
> «œ≠l «∞LI∂i ∞Jw ¢H∑` «∞LK∫o.
> {l «∞ILU‘ °Os ±K∫o «∞∑πU´Ob Ë ¸√” «∞∂ªU¸.
> •d¸ «∞LI∂i.
4 > ±ÔK∫o «∞∑πU´Ob*
> «°b√ ±s ©d· «∞ILU‘ «∞FKuÍ, •d„ ±∫Ko «∞∑πU´Ob °∫dØW £U°∑W ≤∫u «_ßHq («∞AJq 72).
> °Fb √Ê ¥ÔHBq «∞LM∑Z ´s «∞∑OU¸ «∞JNd°Uzw Ë ¥∂dœ ¢LU±UÎ, «“∞Z ±K∫o «∞∑πU´Ob ´s ¸√” «∞∂ªU¸.
> «∞IHU“«‹ ¢∫Lw ¥b¥p ±s «∞∂ªU¸ √£MU¡ «ùß∑FLU‰.
> ùß∑FLU‰ «∞IHU“«‹, ¢ÔK∂f ≠w «∞Ob «∞∑w ¢º∑FLKNU ≠w •Lq √Ë §c» «∞ILU‘
«∞AJq 42).
5 > «∞IHU“«‹*
> «ËÆn ¢AGOq «∞πNU“ °u«ßDW «∞CGj ´Kv “¸ "¢AGOq/≈¥IU·" («∞AJq 82).
> ßOÔDHQ «∞LR®d «∞Cuzw ∞K∑AGOq, Ë¥LJMp °Fb –∞p ≠Bq «∞LM∑Z ´s «∞∑OU¸ «∞JNd°Uzw («∞AJq 92)
> ´KÒo ¸√” «∞∂ªU¸ ¸√ßUÎ ´Kv ´IV ´Kv ´öÆW ¸√” «∞∂ªU¸.
>
«≠d⁄ îe«Ê «∞LU¡ Ë«¨ºKt ≠w Øq ±d… Æ∂q ¢ªe¥s «∞LM∑Z ∞K∑ªKh ±s √¥W °IU¥U ±s ±ÔªKHU‹ «∞∑JKf («∞AJq 03).
> ∞n «∞ºKp «∞JNd°Uzw °AJq ≠CHU÷, £r «ÆHq ´KOt °U∞Ad¥DW «∞öÅIW, £s ´KÒIt °U∞LA∂p ´Kv «∞FLuœ.
(«∞AJq 23)
¢Ôº∑FLq «∞IHU“«‹ ≠Ij ±l ≥cÁ «∞LJu«… «∞ªU¸¥W Ë∞Of _Í ¨d÷ ¬îd. ô ¢Gºq
«∞IHU“«‹ Ë ô ¢Ju¥NU.
°Fb «ùß∑FLU‰
¢∫c¥d : ô ¢MeŸ «∞LK∫o "maetS & sserP" ∞∑ªe¥Mt Æ∂q √Ê ¥πn ¢LU±UÎ. ∞n ±ÔK∫o «∞LºU´b…
«∞FLuœ¥W "maetS & sserP" œ«zLUÎ Æ∂q ¢ªe¥Mt. ô ¢ÔπFÒbÁ.
¢∫c¥d : ô ¢KLf ¸√” «∞∂ªU¸ Æ∂q √Ê ¥∂dœ ¢LU±U
1 > ≤Iq «∞LM∑Z
> «œ≠l «∞dØOe¢Os «∞πU≤∂O∑Os «∞v œ«îq «∞LM∑Z «∞v √Ê ¢ºLl Åu‹ ≈ÆHU∞NU±U («∞AJq 13).
1800133082-03 IS8300 _110x154 24/11/14 11:34 Page66
Page 69

67
AR
> ù´Uœ… ¢HFOq «∞LM∑Z : «±ú «∞ªe«Ê °U∞LU¡, Ë«î∑d ±º∑uÈ «∞∂ªU¸ «∞cÍ ¢d¥b ´Kv ∞u•W «∞∑∫Jr √Ë ´Kv
±I∂i «∞∂ªU¸ (•ºV «∞Luœ¥q).
1 > «∞LºU´b… «∞FLuœ¥W "{Gj Ë°ªU¸" *
«
∞
L
K
∫
I
U
‹
¥Ôd§v «∞∑QØb °QÊ «∞LM∑Z ±MHBq ´s «∞∑OU¸ «∞JNd°Uzw Ë √≤t °U¸œ ¢LU±UÎ Æ∂q ¢dØOV √•b «∞LK∫IU‹.
Æ∂q «ß∑FLU‰ «∞LK∫o, ¥Ôd§v «∞∑QØb ±s ¢uÅOU‹ «∞LÔBMÒl. ØLU ≤uÅw √¥CUÎ «∞IOU °FLq «î∑∂U¸ ÅGOd
´Kv §e¡ ±s «∞ILU‘ «∞GOd ™U≥d ∞KFOUÊ.
√œ«… «∞LºU´b… «∞FLuœ¥W "maetS & sserP" ≠w «∞FöÆW ≤EU ¥u≠d ∞p «∞LºU´b… √£MU¡ ´LKOW «∞Jw
°U∞∂ªU¸, Ë¥ºU´b √¥CUÎ ´Kv ≈“«∞W «∞∑πU´Ob °ºNu∞W Ë≠FU∞OW √Ø∏d .
«∞∑dØOV :
> «îdà ±ÔK∫o «∞LºU´b… «∞FLuœ¥W "maetS & sserP" ±s •IO∂∑NU («∞AJq 91).
> ¥Ôd§v «∞∑QØb °QÊ «∞FLuœ «∞∑KºJu°w ±ÔLbœ «∞v ¬îdÁ.
> «•Lq ±ÔK∫o «∞LºU´b… «∞FLuœ¥W °∫OY ¥JuÊ «∞LI∂i «∞v «_ßHq Ë ®FU¸ "maetS & sserP" «∞v «_±UÂ.
> √œîq «∞Dd· «∞FKuÍ ≠w «∞FöÆW «∞Lb±πW, £r «ß∫V «∞v «_ßHq °FMU¥W «∞v √Ê ¥LJs ¢FKOo ±I∂i «∞LK∫o
"maetS & sserP" ´Kv «∞LA∂p «∞Lu§uœ ´Kv «∞FLuœ («∞AJq 12-02).
>
±ÔK∫o «∞LºU´b… «∞FLuœ¥W "maetS & sserP" ¥ÔºU´b ´Kv ≈°IU¡ «∞∏OU» £U°∑W ≠w ±JU≤NU √£MU¡ ´LKOW «∞Jw °U∞∂ªU¸.
> ´Mb Øw «∞ILOh °U∞OªU¸, «°b√ √ËôÎ °U_ØLUÂ. «±ºp √•b «∞JLÒOs ˱d¸ ≠u‚ «∞ILU‘ °Uß∑FLU‰ ±ÔK∫o
«∞LºU´b… «∞FLuœ¥W "maetS & sserP".
> ¢ÔMeŸ ≠d®U… «∞ILU‘ °Fb √Ê ¥ÔHBq «∞LM∑Z ´s «∞∑OU¸ «∞JNd°Uzw Ë°Fb √Ê ¥∂dœ ¢LU±UÎ. «≤e´NU °u«ßDW «∞CGj
´Kv «∞KºUÊ ≠w √´Kv «∞Hd®U… ±l «∞º∫V.
3 > ËßUœ… «∞u°d*
2 > ≠d®U… «∞ILU‘*
≠d®U… «∞ILU‘ ¢H∑` ≤ºOZ «∞ILU‘ ∞Obîq «∞∂ªU¸ ±s
îö∞t °AJq √´Lo.
> ¢dØÒV ≠d®U… «∞ILU‘ ≠w ¸√” «∞∂ªU¸ °u{l «ßHKNU
´Kv ≤Hf «∞ªj ±l «ßHq ¸√” «∞∂ªU¸. «œ≠l °KDn
¸√” «∞Hd®U… ≠w ¸√” «∞∂ªU¸ «∞v √Ê ¢Qîc ±u{FNU
«∞B∫O`, Ë¢ºLl Åu‹ "ØKOp" («∞AJq 22).
> ±d¸ «∞Hd®U… °KDn ´Kv «∞LºU•W «∞∑w ¢d¥b ØONU
°U∞∂ªU¸ Ë«¢∂UŸ «∞∏MOU‹ ≠w «∞ILU‘ («∞AJq 32).
ËßUœ… «∞u°d ≥w ±ÔK∫o ±Ôº∑Iq ô ¥LJs ¢dØO∂t °d√” «∞∂ªU¸ . ¥LJMp «ß∑FLU‰
ËßUœ… «∞u°d °AJq ±º∑Iq ´s ±u∞b «∞∂ªU¸.
*•ºV «∞Luœ¥q
1800133082-03 IS8300 _110x154 24/11/14 11:34 Page67
Page 70

68
*•ºV «∞Luœ¥q
> √£MU¡ «ùß∑FLU‰, Æb ¥Bb¸ ´s «_≤∂u» Åu‹ {πOZ. ≥c« √±d ©∂OFw Ë≥u °º∂V «∞∑J∏On œ«îq «_≤∂u».
≈–« Åb¸ ≥c« «∞Bu‹ ´s «∞LM∑Z, ¥Ôd§v Ë{l ¸√” «∞∂ªU¸ ´Kv «∞FöÆW «∞ªUÅW °t ∞∂Cl ∞∫EU‹ ∞Jw
¥∑r ≈´Uœ… ¢u§Ot «∞∑J∏On «∞v œ«îq «∞LM∑Z.
>
√£MU¡ «ùß∑FLU‰, Æb ¢ENd °Cl ÆDd«‹ ±s «∞LU¡ ´Kv «∞FLuœ «∞∑KºJu°w. ≥c« «¥CUÎ √±d ©∂OFw °º∂V «∞∑J∏On.
≤BUz` ∞K∫Bu‰ ´Kv √≠Cq «∞≤∑UzZ
±s §NU“ Øw «∞Lö°f ´Kv «∞∂ªU¸
> ≤MB` °Ld«§FW «∞∑FKOLU‹ «∞Lu§uœ… ´Kv «∞LKBo «∞BUœ¸ ´s ±ÔBMÒl «∞ILU‘ Æ∂q «∞LCw °FLKOW
«∞∂ªU¸. ØLU ≤MB` «¥CUÎ °S§d«¡ ≈î∑∂U¸ ∞KILU‘ Ë¢Q£Od «∞∂ªU¸ ´KOt ´Kv ±MDIW ¨Od ™U≥d… ±s «∞ILU‘
±∏q «∞∫U®OU‹ «∞b«îKOW.
> ¢ÔIHq ¥UÆW «∞ILOh ∞Jw ô ¥Me∞o ´s «∞FöÆW √£MU¡ «∞Jw.
> «{Gj °KDn °Hd®U… «∞∂ªU¸ ´Kv «∞ILU‘ °U∞uÆX «∞cÍ ¢Iu ≠Ot °∑Ld¥d«‹ °DOµW ´Kv «∞ILU‘.
> ¢πMÒV ËÅu‰ ¸√” «∞∂ªU¸ «∞v «∞ILU‘ ±s «∞∫d¥d √Ë «∞LªLq.
> ¢JuÊ °Fi √≤u«Ÿ «∞ILU‘ √ßNq ≠w «∞Jw ´Kv «∞πU≤V «∞b«îKw.
> «∞ILU‘ «∞∏IOq Æb ¥∫∑Uà «∞v ËÆX «©u‰ ≠w «∞Jw ´Kv «∞∂ªU¸.
> ≈–« ØMX ¢º∑FLq ¸√” «∞∂ªU¸ ≠w ±uÆl Æd¥V ±s «_¸÷, «¸≠l «∞ªd©u °Uß∑Ld«¸ ∞Jw ¢∑πMÒV •bËÀ
«∞∑J∏On. Æb ¥ÔºLl Åu‹ ¨d¨d… ≈–« ¢Fd÷ «∞ªd©u «∞LdÊ ∞û≤ºb«œ.
> ≈–« ¢uÆn «∞∂ªU¸ ´s «∞ªdËÃ, √Ë ßÔLl Åu‹ ¨d¨d… , √Ë ≈–« ô•EX ¢ºdÒ» ±s £Iu» , «¸≠l îd©uÂ
«∞∂ªU¸ ±s •Os üîd ù“«∞W «∞∑J∏On ±s œ«îKt.
{u«°j «∞∂ªU¸*
“ÔËÒœ ≥c« «∞LM∑Z °Mu´Os «∞v 5 «≤u«Ÿ ±s {u«°j «∞∂ªU¸ «∞∑w °u«ßD∑NU ¥LJMp {∂j «∞∂ªU¸ •ºV ≤u´OW
«∞ILU‘ «∞LÔFb ∞KJw, ±s «∞ILU‘ «∞ªHOn ∞GU¥W «∞ILU‘ «∞ºLOp.
> «∞Luœ¥ö‹ «∞LÔeËÒœ… °Mu´Os ±s {u«°j «∞∂ªU¸ : ¥∑r «∞C∂j °U∞CGj «∞L∑u«∞w ´Kv “¸ {∂j «∞∂ªU¸ ≠w
∞u•W «∞∑∫Jr ≠w «∞LM∑Z.
∞uÊ «∞Cu¡îdËà «∞∂ªU¸
°d¢IU∞w •b «œ≤v
√îCd•b «ÆBv
> «∞Luœ¥ö‹ «∞LÔeËÒœ… °∏ö£W √≤u«Ÿ ±s «∞Cu«°j : ¥∑r «∞C∂j °U∞CGj ´Kv √•b √“¸ {∂j «∞∂ªU¸ ≠w ∞u•W
«∞∑∫Jr ≠w «∞LM∑Z.
> «∞Luœ¥ö‹ «∞LÔeËÒœ… °Q¸°FW «∞v 5 √≤u«Ÿ ±s «∞Cu«°j ≠w ±I∂i «∞∂ªU¸ : ¥∑r «∞C∂j °U∞CGj «∞L∑u«∞w
´Kv «∞e¸ "TES" «∞Lu§uœ ≠w ±I∂i «∞∂ªU¸. ß∑ENd «∞LR®d«‹ ±º∑uÈ «∞∂ªU¸ «∞cÍ ¢r «î∑OU¸Á.
±Ôº∑JAn ≠d«⁄ îe«Ê «∞LU¡ *
“ÔËÒœ ≥c« «∞LM∑Z °LR®d ∞Hd«⁄ îe«Ê «∞LU¡. ´Mb±U ¥Hd⁄ «∞ªe«Ê ±s «∞LU¡, ¥∂b√ «∞LR®d «∞Cuzw °U∞u±Oi
´Kv ∞u•W «∞∑∫Jr ¢∫c¥d«Î ù´Uœ… ¢F∂µW îe«Ê «∞LU¡ . √ËÆn «∞LM∑Z ´s «∞∑AGOq, Ë«±ú «∞ªe«Ê °U∞LU¡.
«ù¥IU· «ù∞J∑dË≤w «_Ë¢u±U¢OJw*
“ÔËÒœ ≥c« «∞LM∑Z °MEU "≈¥IU· √Ë¢u±U¢OJw" «∞cÍ ¥Cl «∞LM∑Z ≠w Ë{FOW «∞∑uÆn «∞Ld•Kw °Fb ´Ad œÆUzo
±s ≠d«⁄ «∞ªe«Ê.
> ±R®d ≤EU "«ù¥IU· «_Ë¢u±U¢OJw" «∞Lu§uœ ´Kv ∞u•W «∞∑∫Jr ¥∂b√ °U∞u±Oi °∂Dv¡ ∞û®U¸… °QÊ «∞LM∑Z
«Å∂` ≠w Ë{FOW «∞∑uÆn «∞Ld•Kw.
1800133082-03 IS8300 _110x154 24/11/14 11:34 Page68
Page 71

69
AR
*•ºV «∞Luœ¥q
2 > ¢F∂µW îe«Ê «∞LU¡
≥
----
U : ô ¢º∑FLq «∞LU¡ «∞cÍ ¥∫∑uÍ ´Kv ≈{U≠U‹ (≤AU¡, ´Du¸, ±u«œ –«‹ ≤JNU‹, ±ÔKOÒMU‹ «∞ILU‘,
«∞a) ≠w ±u∞Òb «∞∂ªU¸. ±∏q ≥cÁ «ù{U≠U‹ ¥LJMNU √Ê ¢Ôº∂V ¢Q£Od«‹ ßK∂OW ´Kv îu«’ «∞∂ªU¸ Ë¢RœÍ ≠w
«∞MNU¥W «∞v ¢d«Ør «∞∑JKÒf.
> ¢QØb √Ëô √Ê «∞Lu∞b ±MHBq ´s «∞∑OU¸ «∞JNd°Uzw. «≠Bq îe«Ê «∞LU¡ ´s ÆU´b… «∞LM∑Z °u«ßDW ß∫V
«∞LI∂i «∞v «_´Kv («∞AJq
7). ≠p °d¨w ¨DU¡ «∞ªe«Ê Ë«±úÁ °U∞LU¡ («∞AJq 8).
> ¥πV √Ê ¢º∑FLq ≠w ±u∞b «∞∂ªU¸ ±U¡ «∞BM∂u¸. ≠S–« ØUÊ «∞LU¡ ≠w ±MDI∑p £IOöÎ, ≤MB` °Leà «∞LU¡ «∞∏IOq
°MBn ØLO∑t ±s «∞LU¡ «∞LIDd, «∞cÍ ¥ªHn ≥c« «∞∏Iq.
>
°Fb √Ê ¢ÔIHq ¨DU¡ îe«Ê «∞LU¡, «œ¸ «∞ªe«Ê Ë«•LKt ±s «∞LI∂i. ¥Ôd§v «∞∑QØb √Ê ô ¥u§b ¢ºd» ∞KLU¡ ±s «∞GDU¡.
> √¸§l îe«Ê «∞LU¡ ´Luœ¥UÎ ´Kv «∞LM∑Z («∞AJq 9).
¢∫c¥d : ô ¢Ôu§Òt «∞∂ªU¸ ∞Jw «∞∏OU» √£MU¡ «¸¢b«zNU.
1 > «∞C∂j
> ¥Ôd§v ¢AGOq ≥c« «∞LM∑Z ´Kv √¸{OW ±s «∞∂ö◊ îU∞OW ±s √¥W ±HdË®U‹ Æb ¢ºb ±MU≠c ÆU´b… ±u∞b «∞∂ªU¸
«∞Nu«zOW (ßD` «≠Iw ±º∑uÌ). ô ¢ºb ±MU≠c «∞LM∑Z ≠w «∞πe¡ «∞ºHKw. ¥πV √Ê ô ¥Ôº∑FLq ≥c« «∞LM∑Z ≠u‚
ßπUœ ßLOp √Ë °ºU◊ ßLOp.
> ≠p «∞Ad¥DW «∞öÅIW orcleV Ë•d¸ «∞ºKp «∞JNd°Uzw ´s ¬îdÁ.
> √ËÅq «∞LM∑Z «∞v «∞∑OU¸ «∞JNd°Uzw («∞AJq 01(
> ®GÒq «∞LM∑Z °U∞CGj ´Kv “¸ "«∞∑AGOq/«ù¥IU·" «∞Lu§uœ ≠w √´Kv «∞LM∑Z («∞AJq 11(. ßu· ¥u±i
«∞LR®d «∞Cuzw ∞πNu“¥W «∞∂ªU¸ ∞Lb… 54 £U≤OW ¢Id¥∂UÎ, £r ¥º∑Id «∞Cu¡ £U°∑UÎ: «∞LM∑Z Æb «Å∂` §U≥e«Î
∞ûß∑FLU‰ °U∞∫b «_ÆBv ±s «∞MHY «∞∂ªU¸Í («∞AJq 21- 31).
> ßO∂b√ «∞LM∑Z °∑u∞Ob «∞∂ªU¸ °Fb •u«∞w 06 £U≤OW ¢Id¥∂UÎ.
«
ù
ß
∑
F
L
U
‰
«_≤∂u» «∞LdÊ °Uù{U≠W «∞v ©d· ¸√” «∞∂ªU¸ ¥LJs √Ê ¥Ju≤U ßUîMOs §b«Î √£MU¡ «ùß∑FLU‰. ≥c« √±d
©∂OFw. ¥Ôd§v «∞∫d’ Ë¢πMÒV ∞LºNLU.
2 > «ß∑FLU‰ «∞LM∑Z
> ´KÒo «∞ILU‘ ´Kv «∞FöÆW «∞Lb±πW √Ë ´Kv ´öÒÆW îU¸§OW «îdÈ ¥LJs ¢FKOINU ´Kv ´Luœ «∞FöÆW «∞Lb±πW.
> ∞JwÒ «∞ºd«Ë¥q °U∞∂ªU¸, ≤MB` √Ê ¢º∑FLq «¥CUÎ «∞b´U±W ±l «∞LAU°p.
> «•Lq ¸√” «∞∂ªU¸ Ë ±ªdà «∞∂ªU¸ °FOb«Î ´Mp.
> «°b√ °∑Ld¥d «∞Hd®U… °KDn ´Kv «∞ILU‘ °U¢∂UŸ «∞∏MOW «∞Lu§uœ… ´Kv «∞ILU‘.
> «°b√ ±s √´Kv «∞ILU‘ °U∞∑∫d„ ¢b¸¥πOUÎ ≤∫u «_ßHq.
> «ß∑FLq ¸√” «∞∂ªU¸ œ«zLUÎ ≠w «∞u{FOW «∞FLuœ¥W.
¥Ôd§v «∞∫d’ œ«zLUÎ √Ê ô ¢KLf «∞∂ªU¸ «∞ºUîs
> ¥Ôd§v «ù°IU¡ ´Kv ¸√” «∞∂ªU¸ ≠w «∞LuÆl «∞FKuÍ ´Kv «∞FöÆW ´Mb±U ô ¥JuÊ ÆOb «ùß∑FLU‰.
*•ºV «∞Luœ¥q
1800133082-03 IS8300 _110x154 24/11/14 11:34 Page69
Page 72

70
1 ¸√” «∞∂ªU¸
2 ´öÒÆW ±Ôb±πW
3 ±A∂p ∞Kºd«Ë¥q
4 ´öÆW ¸√” «∞∂ªU¸
5 •U±KW «∞FöÒÆW
6 °d¨w ∞∑∏∂OX «∞FöÒÆW
7 ±AU°p ùÆHU‰ «∞FLuœ
8 ´Luœ ¢KºJu°w
9 îd©u «∞∂ªU¸
01 ´öÆW «∞ºKp «∞JNd°Uzw
11 «∞ºKp «∞JNd°Uzw
21 ±I∂i ∞K∫Lq
31 ±I∂i îe«Ê «∞LU¡
41 îe«Ê ±U¡ ÆU°q ∞KHBq
51 ∞u•W «∞∑∫Jr
61 ¸ØUze £U°∑W (*2)
71 °d¨w ∞∑∏∂OX «∞FLuœ
81 ∞ºUÊ ¢∫d¥d «∞IU´b…
91 ±H∑UÕ "¢AGOq/≈¥IU·"
02 «∞πNU“
12 ßb«œ… "{b «∞∑JKf"
22 ÆU´b…
32 ±ºU´b… ´Luœ¥W "maetS & sserP"
42 ËßUœ… "maetS & sserP"
52 ±I∂i ÆU°q ∞ûÆHU‰ "maetS & sserP"
62 ´öÆW ÆU°KW ∞KIHq "maetS & sserP"
72 ÆHU“«‹
82 ≠d®U… ±s «∞ILU‘ «∞BMU´w
92 ËßUœ… ù“«∞W ∞Ku°d
03 ±K∫o «∞∑πU´Ob
13 {∂j ¢GOOd «∞∂ªU¸
23 ±R®d "{b «∞∑JKf"
33 ±R®d ≠d«⁄ îe«Ê «∞LU¡
43 ±R®d §Nu“¥W «∞∂ªU¸/±R®d «∞∑uÆn «_Ë¢u±U¢OJw
53 “¸ {∂j ¢GOOd «∞∂ªU¸
63 ±R®d ±º∑uÈ «∞∂ªU¸
ËÅn √§e«¡ «∞LM∑Z
Æ∂q «ùß∑FLU‰
1 > ¢dØOV ±u∞Òb «∞∂ªU¸
¢dØOV «∞FLuœ Ë«∞FöÆU‹
1- «ß∫V Ë√œ¸ «∞dØOe¢Os «∞∏U°∑∑Os «∞v √Ê ¢ºLl Åu‹ "ØKOp" («∞AJq 1).
2- •d¸ «∞∂d¨w «∞cÍ ¥∏∂X «∞FLuœ ´Kv ÆU´b… «∞FLuœ.
3- «•Lq «∞FLuœ °∫OY ¢JuÊ •U±KW «∞ºKp «∞JNd°Uzw «∞v «∞ªKn. ¢QØb √Ê «∞LA∂JOs ´Kv «∞FLuœ ¨Od
±IHK∑Os («∞AJq 3).
4- «œîq «∞FLuœ ≠w «∞IU´b… °U∞CGj ÆKOöÎ «∞v «_ßHq «∞v √Ê ¢B∂` ≠∑∫U‹ «∞FLuœ Ë«∞IU´b… ´Kv ≤Hf
«∞Lº∑uÈ, •OY ¥LJMp «üÊ Ë{l «∞∂d¨w ≠w ±JU≤t. ≈–« ØU≤X «∞H∑∫U‹ ´Kv ¨Od «∞Lº∑uÈ, ¢QØb °QÊ
±AU°p «∞FLuœ ¨Od ±IHKW («®Jq 4).
5- «ÆHq °d¨w ¢∏∂OX «∞FLuœ °Ib¸ ±U ¢º∑DOl °O∫Y ¥∏∂X «∞FLuœ ´Kv «∞IU´b….
6 -«{∂j ©u‰ «∞FLuœ Ë«ß∫∂t «∞v «_´Kv «∞v «ÆBv ±U ¥LJs. ¢QØb °QÊ «ÆºU «∞FLuœ «∞∏ö£W Æb ßÔ∫∂X
«¥CUÎ _ÆBv ±U ¥LJs, £r «ÆHq «∞LA∂JOs (®Jq 6).
¢dØOV «∞FöÒÆW «∞Lb±πW
1- •d¸ «∞∂d¨w «∞LÔ∏∂ÒX ∞KFöÒÆW ´Mb «ßHq «∞FöÆW
2- «•Lq «∞FöÒÆW °∫OY ¢JuÊ •U±KW «∞FöÆW ´Kv ≤Hf «∞ªj ±l ∞u•W «∞∑∫Jr ≠w «∞LM∑Z.
3- «œîq «∞FöÆW ´Luœ¥UÎ ≠w √´Kv «∞FLuœ. ¥πV √Ê ¢B∂` «∞H∑∫U‹ «∞Lu§uœ… ≠w «ßHq «∞FöÆW Ë«∞FLuœ
´Kv ≤Hf «∞Lº∑uÈ (®Jq 5).
4- «¸§l ¢∏∂OX «∞∂d¨w °U∞Ib¸ «∞cÍ ¥M∑Nw ´MbÁ, °∫OY ¢JuÊ «∞FöÆW ±Ô∏∂Ò∑W °S•JU ´Kv «∞FLuœ .
5- ¸ØÒV ¸√” «∞∂ªU¸ ≠w √´Kv «∞FöÆW «∞Lb±πW
.
*•ºV «∞Luœ¥q
1800133082-03 IS8300 _110x154 24/11/14 11:34 Page70
Page 73

71
AR
Ëô °QÍ ≤uŸ ¬îd ±s «∞ºu«zq.
> ¥πV √Ê ¥JuÊ «∞LM∑Z ≠w Ë{FOW «∞∑uÆn ´s «∞∑AGOq Æ∂q ¢uÅOKt °U∞∑OU¸ √Ë
Æ∂q ≠BKt ´Mt. ô ¢º∫V «∞ºKp «∞JNd°Uzw °U∞Iu… ∞HBq «∞LM∑Z ´s «∞∑OU¸,
°q ¥πV ß∫V «∞IU°f ∞HBKt ´s «∞∑OU¸.
> ¥Ôd§v ¢d„ «∞LM∑Z ∞O∂dœ ¢LU±UÎ Æ∂q √Ê ¢CFt §U≤∂UÎ.
> ô ¢bŸ «∞ºKp «∞JNd°Uzw ¥Ld ≠u‚ •U≠W •Uœ… √Ë ≠u‚ «ßD` ßUîMW.
> ô ¢FIb «∞ªd©u √Ë ¢d°Dt √£MU¡ «∞∑AGOq. Æb ¢BU» «∞∫dË‚ ≠OLU ∞u «≤HBq
«∞LÔNU¥v¡ «∞∑U°l ∞Kªd©u √£MU¡ «ß∑FLU‰ «∞LM∑Z.
> ô ¢
∫U
ˉ ô ¢∫Uˉ ¢FKOo «∞u•b… °Uß∑FLU‰ «∞ªd©uÂ.
> ô ≤uÅw °Uß∑FLU‰ «∞LK∫IU‹ «∞Gd¥∂W ´s «∞LM∑Z √Ë «∞∑w ∞r ¢Ôd≠INU LAFET
±Ft, ≠Ib ¢JuÊ ≤∑OπW –∞p «ù•∑d«‚, «∞BFIW «∞JNd°UzOW √Ë «∞Cd¸ ∞KLº∑FLq.
> ¥Ôd§v ¢uîw «∞∫d’ √£MU¡ ¢GOOd «∞LK∫IU‹, ≠Ib ¢JuÊ ¢∫∑uÍ ´Kv «∞LU¡
«∞ºUîs ≤∑OπW ¢J∏n «∞∂ªU¸. ¢QØb √ËôÎ °QÊ «∞LK∫IU‹ °U¸œ… ∞Jw ¢∑πMÒV
«ùÅU°W °U∞LU¡ «∞ºUîs.
> Æb ¢∫bÀ ≈ÅU°U‹ °U∞∫dË‚ ±s ∞Lf «_§e«¡ «∞ºUîMW, «∞LU¡ «∞ºUîs √Ë
«∞∂ªU¸. ¥Ôd§v ¢uîw «∞∫d’ ´Mb ¢Hd¥m ≥c« «∞LM∑Z «∞∂ªU¸Í. ≠Ls «∞L∫∑Lq
˧uœ «∞LU¡ «∞ºUîs ≠w îe«Ê «∞LU¡ √Ë ≠w œ«îq «∞LM∑Z ≤Hºt.
>
ô ¢u§Òt «∞∂ªU¸ ≤U•OW «_®ªU’, √Ë ≤U•OW «∞∫Ou«≤U‹, Ëô ¢u§t «∞∂ªU¸
≤∫u «∞Lö°f √£MU¡ «¸¢b«zNU.
>
ô ¢Ô∫Uˉ ÆDl √Ë ¢Du¥q îd©u «∞∂ªU¸.
>
≠w •U‰ ≈ß∑FLU‰ ËÅKt ØNd°UzOW, ¥Ôd§v «∞∑QØb °Q≤NU ÆUœ¸… ´Kv √Ê ¢∑∫Lq «∞Iu…
«∞JNd°UzOW «∞∑w ¥∑DK∂NU «∞LM∑Z Ë√Ê ¢JuÊ ±R¸Ò{W Ë ßKJNU «∞JNd°Uzw ±ÔLbœ.
>
¥Ôd§v «∞∫d’ ´Kv √Ê ¢bîq √Í ®w¡ ≠w ≠∑∫U‹ «∞LM∑Z Ëô ≠w îd©uÂ
«∞∂ªU¸.
>
«∞IHU“«‹ ¥πV ≠Ij «ß∑FLU∞NU ≠w ±u∞Òb «∞∂ªU¸ ≥c« (*•ºV «∞Luœ¥q).
∞s ¢∑∫Lq «∞AdØW «∞LÔBMÒFW √¥W ±ºRË∞OW ≠w •U‰ «ùß∑FLU‰ «∞ªU©v¡.
i
‹
¥∫∑uÍ ≥c« «∞LÔM∑Z ´Kv ±u«œ ÆOÒLW ÅMU´OUΠ˥LJs ≈´Uœ… ¢BMOFNU √Ë ¢BKO∫NU.
√Ëœ´NU ≠w ±d«Øe ¢πLOl «∞LNLö‹ «∞LÔª∑BW.
•LU¥W «∞∂OµW √Ëô Î !
1800133082-03 IS8300 _110x154 24/11/14 11:34 Page71
Page 74

72
> ô ¥ÔºL` ∞ú©HU‰ «∞IOU °Q´LU‰ «∞∑MEOn Ë«∞BOU≤W ∞KLM∑Z
°bËÊ ±d«Æ∂∑Nr.
> ¥πV «ù±∑MUŸ ´s «ß∑FLU‰ «∞LM∑Z ≈–« ßIj √¸{UÎ, √Ë ≈–
« ™Nd‹ ´KOt ´ö±U‹ «∞FDV, ±∏q «∞∑ºd» √Ë ≈–« ∞r ¥Fb
¥RœÍ Ë™UzHt °U∞JHU¡… «∞LF∑Uœ…. ô ¢∫Uˉ ¢HJOp «∞LM∑Z
°MHºp. ¥Ôd§v ´d{t ´Kv ±dØe îb±W ±F∑Lb ¢πM∂UÎ _Í
îDd ±∫∑Lq.
¢uÅOU‹ ≥U±W
> ÅÔLr ≥c« «∞LM∑Z ∞ûß∑FLU‰ «∞LMe∞w ≠Ij , Ëœ«îq «∞LMe‰ °U∞∑∫b¥b. ≠w •U‰
√Í «ß∑FLU‰ ¢πU¸Í √Ë ≈•∑d«≠w √Ë ô ¥∑Ho ±l «ù¸®Uœ«‹ «∞Ld≠IW Ë¥M∑Z ´Mt
´DV ≠w «∞LM∑Z, ∞s ¢JuÊ «∞AdØW «∞LÔBMÒFW ±ºRË∞W ´Mt, Ë°U∞∑U∞w ¢ºIj
«∞CLU≤W ´s «∞LM∑Z.
> ¥ÔAGÒq ≥c« «∞LM∑Z ´Mb±U ¥JuÊ ´Kv «_¸÷, ô ¢∫LKt ´Mb±U ¥JuÊ ÆOb
«∞∑AGOq.
> ¥Ôd§v «∞∫HUÿ ´Kv «∞ªd©u ˫∞HuÒ≥W ±d¢HFOs ≠u‚ ±º∑uÈ îe«Ê «∞LU¡.
> ±s √§q ßö±∑p, ¥ªCl ≥c« «∞LM∑Z ∞KLFU ¥Od «∞∑IMOW ËÆu«≤Os «∞ºö±W
«∞ºU¸¥W «∞LHFu‰. (ÆU≤uÊ «∞∑OU¸ «∞LMªHi, ÆU≤uÊ «∞∑u«≠IOW
«∞JNd˱GMU©OºOW, ÆU≤uÊ «∞∂OµW).
> √ßD` «∞LM∑Z «∞∑w ¢∫Lq ≥c« «∞AFU¸ Ë«_§e«¡ «∞Id¥∂W ±MNU ¢JuÊ
ßUîMW §b«Î ´Mb±U ¥JuÊ «∞LM∑Z ÆOb «ùß∑FLU‰. ¥Ôd§w ´b ∞Lf ≥cÁ «_ßD`
Æ∂q √Ê ¥∂dœ «∞LM∑Z ¢LU±UÎ.
> ∞K∫b ±s îDd «∞∑Fd÷ ∞KLU¡ «∞ºUîs √Ë «∞∂ªU¸ «∞LM∂FY ±s ≠∑∫U‹ «∞∂ªU¸,
¥Ôd§v «∞∑∫Io ±s «∞LM∑Z Æ∂q Øq «ß∑FLU‰ °∫Lq ¸√” «∞∂ªU¸ °FOb«Î ´s
§ºLp ´Mb «∞∑AGOq.
> ¥πV √Ê ¥JuÊ «∞Jw °U∞ªU¸ °AJq ´LuœÍ °∫dØU‹ ±s «_´Kv «∞v «_ßHq.
ô ¢º∑FLq ¸√” «∞∂ªU¸ ≠w «ù¢πUÁ «_≠Iw √Ë ±UzöÎ «∞v «∞LuÆl «∞ªKHw, –
∞p ßORœÍ «∞v îdËà «∞LU¡ «∞ºUîs.
> ∞K∫b ±s «ùÅU°W °U∞BFIW «∞JNd°UzOW, ô ¢GLd «∞LM∑Z √Ë ¸√” «∞∂ªU¸ °U∞LU¡
1800133082-03 IS8300 _110x154 24/11/14 11:34 Page72
Page 75

73
AR
≈¸®Uœ«‹ ±s √§q «∞ºö±W
¥Ôd§v Æd«¡… ≥cÁ «ù¸®Uœ«‹ °FMU¥W Æ∂q «ß∑FLU‰
«∞LM∑Z ∞KLd… «_Ë∞v, ØLU ¥Ôd§v «ù•∑HUÿ °NcÁ
«ù¸®Uœ«‹ ≠w ±JUÊ ¬±s.
> ô ¢∑d„ «∞LM∑Z ±s ¨Od ±d«Æ∂W ´Mb±U ¥JuÊ ±uÅuôÎ °U∞∑OU¸
«∞JNd°Uzw, •∑v Ë∞u ∞∂Cl œÆUzo, îBuÅUÎ √£MU¡ ¢u«§b
«_©HU‰.
> «≠Bq «∞LM∑Z œ«zLUÎ ´s «∞∑OU¸ «∞JNd°Uzw: Æ∂q ¢F∂µW «∞LU¡,
√Ë ¨ºq «∞ªe«Ê, Æ∂q «∞∑MEOn, Ë°Fb Øq «ß∑FLU‰.
> ¥Ôd§v √îc «∞∫ODW Ë«∞∫c¸ ´Mb «ß∑FLU‰ ≥c« «∞LM∑` ≤Ed«
ù≤∂FUÀ «∞∂ªU¸.
> «|s œß∑~UÁ °d«È «ß∑HUœÁ ¢ußj «≠d«œ ( «“ §LKt ØuœØUÊ
) °U ≤U¢u«≤v §ºLv, •ºv |U –≥Mv , |U ´b ˧uœ ¢πd°t
Ë œ«≤g œ¸ ≤Ed Öd≠∑t ≤AbÁ, ±~d «|MJt ¢∫X ≤EU¸‹ °U®Mb
|U œß∑u¸ «∞FLq ±d°u◊ °t «ß∑HUœÁ «“ œß∑~UÁ ¢ußj
±ºµu‰ «|LMv °t ¬≤NU œ«œÁ ®bÁ °U®b.
> ¥ÔºL` ∞ú©HU‰ ±Ls ≥r ≠u‚ «∞∏U±MW ±s ´Ld≥r «ß∑FLU‰
≥c« «∞LM∑Z, √Ë «_®ªU’ «∞c¥s ô ¥∑L∑FuÊ °Ib¸«‹
§ºb¥W, √Ë •ºOW √Ë ´IKOW, √Ë ∞b¥Nr ≤Ih ≠w «∞ª∂d…
Ë«∞LFd≠W ≈–« ¢u≠d‹ ∞Nr «∞Ld«Æ∂W Ë“ÔËҜ˫ °U∞LFKu±U‹
«∞L∑FKIW °Uß∑FLU‰ «∞LM∑Z °Dd¥IW ¬±MW, Ë«œ¸Øu« «_îDU¸
«∞JU±MW ≠w •U‰ «ùß∑FLU‰ «∞ªU©v¡.
> ¥πV ±d«Æ∂W «_©HU‰ ∞CLUÊ ´b ÆOU±Nr °U∞KFV °U∞LM∑Z.
1800133082-03 IS8300 _110x154 24/11/14 11:34 Page73
Page 76

знают о возможной опасности.
• Следите, чтобы дети не играли с прибором.
• Очистка и обслуживание не должны проводиться
детьми без присмотра.
• Устройство нельзя использовать, после того как оно
упало на пол, имеет явные признаки повреждения,
протекания или нарушения правильного
функционирования. Запрещается разбирать прибор.
Во избежание опасности, отнесите его на проверку в
авторизованный сервисный центр.
ВАЖНЫЕ РЕКОМЕНДАЦИИ
• Прибор предназначен исключительно для бытового использования внутри
помещений. Производитель не несет ответственности, и гарантия не
распространяется на случаи коммерческого и несоответствующего
использования, а также на случаи несоблюдения инструкции.
• Это напольный прибор, запрещается переносить его во время работы.
• Всегда удерживайте шланг и насадку выше бачка с водой.
• Для вашей безопасности данное устройство соответствует действующим
стандартам и нормативам (Директивам по охране окружающей среды,
электромагнитной совместимости и вопросам качества низковольтных
электротехнических изделий).
• Поверхности, обозначенные данным знаком или находящиеся рядом,
очень нагреваются во время использования устройства. Не прикасайтесь к
данным поверхностям до полного охлаждения устройства.
• Чтобы снизить риск контакта с горячей водой или паром, выходящим через
паровые отверстия, проверяйте прибор перед каждым использованием, держа
его на безопасном расстоянии от тела.
• Отпаривайте только в вертикальном направлении, движениям вверх-вниз. Не
держите паровое сопло в горизонтальном положении и не наклоняйте его
обратной стороной вперед, так как это может привести к выливанию горячей
воды.
• Для снижения риска поражения электрическим током не погружайте прибор
или паровое сопло в воду и прочие жидкости.
74
ПРАВИЛА ТЕХНИКИ
БЕЗОПАСНОСТИ
Перед первым использованием прибора
внимательно прочтите данную инструкцию и
сохраните ее в надежном месте.
• Не оставляйте включенный прибор без присмотра даже
на короткое время, особенно там, где находятся дети.
• Всегда отключайте прибор: перед наполнением или
промывкой бачка для воды, перед его чисткой и после
каждого использования.
• Следует проявлять осторожность при работе с
прибором в связи с выходом горячего пара.
• Данный прибор не предназначен для использования
лицами (включая детей) с ограниченными
физическими, сенсорными или умственными
способностями, а также лицами с недостаточным
опытом и знаниями в области использования данного
прибора, за исключением тех случаев, когда им
помогает лицо, ответственное за их безопасность,
которое присматривает за ними и предоставляет им
предварительные инструкции по использованию
прибора.
• Прибор не предназначен для использования детьми
младше 8 лет, лицами с ограниченными физическими,
сенсорными или умственными способностями, а
также при отсутствии опыта или знаний. Эти лица
могут пользоваться прибором при условии, что они
находятся под наблюдением или
проинструктированы об использовании прибора и
1800133082-03 IS8300 _110x154 24/11/14 11:34 Page74
Page 77

75
RU
знают о возможной опасности.
• Следите, чтобы дети не играли с прибором.
• Очистка и обслуживание не должны проводиться
детьми без присмотра.
• Устройство нельзя использовать, после того как оно
упало на пол, имеет явные признаки повреждения,
протекания или нарушения правильного
функционирования. Запрещается разбирать прибор.
Во избежание опасности, отнесите его на проверку в
авторизованный сервисный центр.
ВАЖНЫЕ РЕКОМЕНДАЦИИ
• Прибор предназначен исключительно для бытового использования внутри
помещений. Производитель не несет ответственности, и гарантия не
распространяется на случаи коммерческого и несоответствующего
использования, а также на случаи несоблюдения инструкции.
• Это напольный прибор, запрещается переносить его во время работы.
• Всегда удерживайте шланг и насадку выше бачка с водой.
• Для вашей безопасности данное устройство соответствует действующим
стандартам и нормативам (Директивам по охране окружающей среды,
электромагнитной совместимости и вопросам качества низковольтных
электротехнических изделий).
• Поверхности, обозначенные данным знаком или находящиеся рядом,
очень нагреваются во время использования устройства. Не прикасайтесь к
данным поверхностям до полного охлаждения устройства.
• Чтобы снизить риск контакта с горячей водой или паром, выходящим через
паровые отверстия, проверяйте прибор перед каждым использованием, держа
его на безопасном расстоянии от тела.
• Отпаривайте только в вертикальном направлении, движениям вверх-вниз. Не
держите паровое сопло в горизонтальном положении и не наклоняйте его
обратной стороной вперед, так как это может привести к выливанию горячей
воды.
• Для снижения риска поражения электрическим током не погружайте прибор
или паровое сопло в воду и прочие жидкости.
1800133082-03 IS8300 _110x154 24/11/14 11:34 Page75
Page 78

1 • Сборка отпаривателя для одежды
Сборка стойки
1. Потяните и поворачивайте 2 ножки прибора, пока не услышите звук щелчка. (рис. 1)
2. Отвинтите зажимной винт у основания стойки.
3. Держите стойку таким образом, чтобы держатель шнура находился сзади. Убедитесь, что 2
блокирующих зажима не закрыты. (рис. 3)
4. Вставьте стойку в основание, немного надавив на нее, чтобы отверстия стойки и основания
были на одном уровне, после чего установите винт обратно. Если отверстия не совпали,
убедитесь, что зажимы стойки в порядке и разблокированы. (рис. 4)
5. Закрутите зажимной винт стойки обратно, чтобы она была плотно закреплена в основании.
6. Раздвиньте стойку до максимальной высоты. Убедитесь, что 3 сегмента стойки полностью
выдвинуты, затем заблокируйте 2 зажима. (Рис. 6.)
Сборка встроенных плечиков
1. Отвинтите зажимной винт, располагающийся в нижней части плечиков.
2. Держите плечики таким образом, чтобы держатель находился на стороне панели управления
прибора.
3. Вставьте плечики вертикально в верхнюю часть стойки. Отверстия в нижней части плечиков и
стойки должны совпасть. (рис. 5)
4. Закрутите зажимной винт плечиков обратно, чтобы они были плотно закреплены со стойкой.
5. Установите паровое сопло на верхнюю часть плечиков.
ОПИСАНИЕ
1.
Паровое сопло
2.
Встроенные плечики
3.
Зажимы для брюк*
4.
Крючок для парового сопла
5.
Держатель плечиков
6.
Зажимной винт для плечиков
7.
Блокирующие зажимы
8.
Телескопическая стойка
9.
Паровой шланг
10.
Крючок для электрического шнура
11.
Электрический шнур
12.
Транспортировочная ручка
13.
Ручка бачка для воды
14.
Съемный бачок для воды
15.
Панель управления
16.
Ножка (x2)
17.
Зажимной винт стойки
18.
Кнопка разблокировки основания
19.
Переключатель ВКЛ/ВЫКЛ
ПЕРЕД ИСПОЛЬЗОВАНИЕМ
76
• Перед включением и отключением из сети прибор всегда должен быть
выключен. Не выдергивайте вилку из розетки, держась за шнур. Для
отсоединения от сети тяните за саму вилку.
• Дайте прибору остыть, прежде чем убрать его на хранение.
• Избегайте контакта шнура питания с острыми краями или горячими
поверхностями.
• Не закрепляйте шланг во время работы. Снятие держателя шланга во время
работы может привести к сильным ожогам.
• Не пытайтесь повесить прибор за шланг.
• Не рекомендуется использование принадлежностей, не поставляемых TEFAL,
это может привести к возгоранию, поражению электрическим током или
травме.
• Соблюдайте осторожность при смене насадок и принадлежностей, так как в
них может находиться горячий конденсат. Во избежание контакта с горячей
водой, убедитесь, что насадки охлаждены.
• При контакте с горячими деталями, горячей водой или паром можно получить
ожог. Будьте осторожны при опорожнении парового устройства. В резервуаре
или с внутренней стороны прибора может быть горячая вода.
• Не направляйте струю пара на людей, животных или одежду для отпаривания,
когда она на них надета.
• Не обрезайте и не пытайтесь удлинить паровой шланг.
• При использовании электроудлинителя убедитесь, что он рассчитан на
необходимую силу тока, имеет розетку с заземлением и полностью
распрямлен.
• Не вставляйте посторонние предметы в какие бы то ни было отверстия или
шланг.
• Рукавица должна использоваться исключительно с данным отпаривателем для
одежды (*в зависимости от модели). Производитель не несет какой бы то ни
было ответственности за ненадлежащее использование
НА ПЕРВОМ МЕСТЕ ЗАБОТА ОБ ОКРУЖАЮЩЕЙ СРЕДЕ!
i Прибор содержит большое количество материалов, пригодных к повторному исполь-
зованию или переработке.
‹ По окончании срока службы прибора сдайте его в пункт приема для последующей пе-
реработки.
*В зависимости от модели
1800133082-03 IS8300 _110x154 24/11/14 11:34 Page76
Page 79

77
RU
1 • Сборка отпаривателя для одежды
Сборка стойки
1. Потяните и поворачивайте 2 ножки прибора, пока не услышите звук щелчка. (рис. 1)
2. Отвинтите зажимной винт у основания стойки.
3. Держите стойку таким образом, чтобы держатель шнура находился сзади. Убедитесь, что 2
блокирующих зажима не закрыты. (рис. 3)
4. Вставьте стойку в основание, немного надавив на нее, чтобы отверстия стойки и основания
были на одном уровне, после чего установите винт обратно. Если отверстия не совпали,
убедитесь, что зажимы стойки в порядке и разблокированы. (рис. 4)
5. Закрутите зажимной винт стойки обратно, чтобы она была плотно закреплена в основании.
6. Раздвиньте стойку до максимальной высоты. Убедитесь, что 3 сегмента стойки полностью
выдвинуты, затем заблокируйте 2 зажима. (Рис. 6.)
Сборка встроенных плечиков
1. Отвинтите зажимной винт, располагающийся в нижней части плечиков.
2. Держите плечики таким образом, чтобы держатель находился на стороне панели управления
прибора.
3. Вставьте плечики вертикально в верхнюю часть стойки. Отверстия в нижней части плечиков и
стойки должны совпасть. (рис. 5)
4. Закрутите зажимной винт плечиков обратно, чтобы они были плотно закреплены со стойкой.
5. Установите паровое сопло на верхнюю часть плечиков.
ОПИСАНИЕ
1.
Паровое сопло
2.
Встроенные плечики
3.
Зажимы для брюк*
4.
Крючок для парового сопла
5.
Держатель плечиков
6.
Зажимной винт для плечиков
7.
Блокирующие зажимы
8.
Телескопическая стойка
9.
Паровой шланг
10.
Крючок для электрического шнура
11.
Электрический шнур
12.
Транспортировочная ручка
13.
Ручка бачка для воды
14.
Съемный бачок для воды
15.
Панель управления
16.
Ножка (x2)
17.
Зажимной винт стойки
18.
Кнопка разблокировки основания
19.
Переключатель ВКЛ/ВЫКЛ
20.
Электроприбор
21.
Насадка Anti calc
22.
Основание
23.
Вертикальная стойка Press & Steam*
24.
Мешок Press & Steam*
25.
Ручка блокировки Press & Steam*
26.
Крючок блокировки Press & Steam*
27.
Рукавица*
28.
Щетка для ткани*
29.
Щетка с мелковорсистой подушечкой*
30.
Насадка для удаления складок*
31.
Различные настройки подачи пара*
32.
Индикатор Anti calc“
33.
Индикатор пустого бачка
34.
Индикатор готовности пара/индикатор
автоматического выключения
35.
Кнопка настройки подачи пара*
36. Индикатор уровня пара*
ПЕРЕД ИСПОЛЬЗОВАНИЕМ
*В зависимости от модели
1800133082-03 IS8300 _110x154 24/11/14 11:34 Page77
Page 80

объясняющееся образованием конденсата. Если прибор начинает булькать, повесьте
паровое сопло на стойку на несколько секунд, чтобы направить образовавшийся конденсат
обратно в прибор.
• Во время использования на телескопической стойке могут появляться капли воды. Это также
нормальное явление, объясняющееся образованием конденсата.
Настройки подачи пара*
Ваш прибор имеет от 2 до 5 настроек подачи пара, устанавливаемых в зависимости от типа ткани
- от деликатной до толстой и грубой.
• Модели с 2 настройками: выполните настройку, последовательно нажимая на кнопку
настройки подачи пара на панели управления прибора.
• Модели с 3 настройками: выполните настройку, нажимая на одну из кнопок на панели
управления прибора.
• Модели с 4 или 5 настройками на паровой ручке: выполните настройку, нажимая на кнопку SET,
расположенную на паровой ручке. Световые индикаторы помогут определить выбранный
уровень пара.
Датчик определения пустого бачка*
Данный прибор оснащен датчиком определения пустого бачка. Когда бачок для воды пуст,
световой индикатор на панели управления прибора начнет мигать, чтобы предупредить Вас о
том, что необходимо наполнить бачок для воды. Выключите прибор и налейте воду в бачок.
Электронное автоматическое отключение*
Ваш прибор оснащен системой автоматического отключения, переводящей его в режим
ожидания, если бачок для воды остается пустым более 10 минут.
• Если прибор находится в режиме ожидания, индикатор автоматического отключения
медленно мигает на панели управления.
78
2 • Наполнение бачка водой
• Убедитесь, что отпариватель выключен из сети. Снимите бачок для воды с основания
прибора, потянув вверх за ручку. Отвинтите крышку бачка и наполните его водой. (рис. 8)
• Отпариватель следует наполнять ВОДОПРОВОДНОЙ ВОДОЙ. Если вода в вашем районе
жесткая, мы рекомендуем наполовину смешивать ее с дистиллированной водой,
позволяющей снизить жесткость.
• Закрутите крышку бачка для воды и немного наклоните его, придерживая за ручку.
Убедитесь, что вода не вытекает через крышку.
• Вертикально установите бачок для воды на прибор.
1 • Подготовка
• При использовании отпаривателя уберите с пола все предметы, препятствующие
передвижению основания прибора, так как он должен работать на ровной горизонтальной
поверхности. Следите за тем, чтобы отверстия в нижней части прибора не закупоривались.
Данный прибор нельзя использовать на коврах с толстым ворсом.
• Расстегните ленту VelcroTM и полностью размотайте электрический шнур.
• Подключите к розетке. (рис.10)
• Включите, нажав на кнопку ON/OFF, расположенную в верхней части устройства. (рис. 11)
Индикатор готовности отпаривателя будет мигать примерно 45 секунд, затем начинает
гореть постоянно: Прибор готов к эксплуатации с максимальной паропроизводительностью.
(рис. 12-13)
• Прибор начнет производить пар примерно через 30 секунд.
2 • Использование прибора
• Повесьте одежду на встроенные плечики или отдельные плечики, которые можно зацепить
за держатель.
• Для отпаривания брюк мы рекомендуем использовать стойку с зажимами*.
• Возьмите паровое сопло, направляя паровые отверстия от себя.
• Начните отпаривание слегка проглаживая одежду, двигаясь по долевой нити ткани.
• Начните с верхней части одежду, постепенно опускаясь вниз.
• Всегда держите паровое сопло в вертикальном положении.
• После окончания использования отпаривателя всегда вешайте паровое сопло на
специальный крючок в строго вертикальном положении.
• Во время использования шланг может издавать булькающие звуки. Это нормальное явление,
ВНИМАНИЕ! Не используйте для отпаривателя воду с добавками (крахмал,
отдушка, ароматические веще ства, мягчительные средства и т.д.) Такие
добавки могут повлиять на свойства пара и вызвать образование осадка.
ИСПОЛЬЗОВАНИЕ
Предупреждение. Никогда не пытайтесь отпаривать одежду на теле.
Во время использования гибкий шланг и конец парового сопла могут сильно
нагреваться. Это абсолютно нормально. Будьте осторожны и избегайте любого
длительного контакта.
Остерегайтесь контакта с горячим паром.
*В зависимости от модели*В зависимости от модели
1800133082-03 IS8300 _110x154 24/11/14 11:34 Page78
Page 81

79
RU
объясняющееся образованием конденсата. Если прибор начинает булькать, повесьте
паровое сопло на стойку на несколько секунд, чтобы направить образовавшийся конденсат
обратно в прибор.
• Во время использования на телескопической стойке могут появляться капли воды. Это также
нормальное явление, объясняющееся образованием конденсата.
Настройки подачи пара*
Ваш прибор имеет от 2 до 5 настроек подачи пара, устанавливаемых в зависимости от типа ткани
- от деликатной до толстой и грубой.
• Модели с 2 настройками: выполните настройку, последовательно нажимая на кнопку
настройки подачи пара на панели управления прибора.
• Модели с 3 настройками: выполните настройку, нажимая на одну из кнопок на панели
управления прибора.
• Модели с 4 или 5 настройками на паровой ручке: выполните настройку, нажимая на кнопку SET,
расположенную на паровой ручке. Световые индикаторы помогут определить выбранный
уровень пара.
Датчик определения пустого бачка*
Данный прибор оснащен датчиком определения пустого бачка. Когда бачок для воды пуст,
световой индикатор на панели управления прибора начнет мигать, чтобы предупредить Вас о
том, что необходимо наполнить бачок для воды. Выключите прибор и налейте воду в бачок.
Электронное автоматическое отключение*
Ваш прибор оснащен системой автоматического отключения, переводящей его в режим
ожидания, если бачок для воды остается пустым более 10 минут.
• Если прибор находится в режиме ожидания, индикатор автоматического отключения
медленно мигает на панели управления.
Советы и подсказки для достижения наилучшего результата
при работе с Вашим отпаривателем для одежды.
•
Перед отпариванием рекомендуем сверяться с памяткой по уходу за одеждой, на
которой имеются инструкции от производителя. Кроме того для проверки работы
устройства рекомендуем обработать сначала невидимую часть одежды, например,
внутренний шов.
•
Застегивайте пуговицы на воротнике рубашек для предотвращения их
соскальзывания с плечиков во время отпаривания.
•
Медленными движениями аккуратно надавливайте щеткой отпаривателя на ткань.
•
Избегайте прямого контакта парового сопла с шелком или бархатом.
•
Некоторые изделия эффективно отлаживаются с изнанки.
•
Для отпаривания тяжелых тканей может потребоваться больше времени.
•
При работе с нижней частью изделия, расположенной вблизи от пола, как можно
чаще приподнимайте шланг, чтобы избежать образования конденсата. При
сдавливании гибкого шланга можно услышать булькающие звуки.
•
Если пар отсутствует, слышны булькающие звуки или из паровых отверстий капает
вода, поднимите паровое сопло, чтобы удалить конденсат внутри шланга.
ЦВЕТ ИНДИКАТОРА ПАРОПРОИЗВОДИТЕЛЬНОСТЬ
Оранжевый Минимум
Зеленый Максимум
*В зависимости от модели
1800133082-03 IS8300 _110x154 24/11/14 11:34 Page79
Page 82

• Чтобы очистить щетку, проведите ей по ткани в противоположном направлении. Рекомендуем
использовать для этой цели кусок старой ткани, предназначенной на выброс.
• Для получения великолепного результата рекомендуем обрабатывать одежду щеткой с
мелковорсистой подушечкой до отпаривания.
4 • Насадка для удаления складок*
• Начинайте отпаривание с верхней части одежды, постепенно передвигая насадку для
удаления складок вниз. (рис. 27)
• Снимите насадку для удаления складок, немного потянув ее, после того, как прибор будет
выключен из сети и полностью остынет.
5 • Рукавица*
• Нажатием кнопки ON/OFF выключите электроприбор. (рис. 28)
• Погаснут световые индикаторы на панели управления, затем Вы можете отключите прибор от
электросети. (рис. 29)
• Повесьте паровое сопло вертикально на специальный крючок.
• Перед каждой уборкой прибора на хранение сливайте воду и ополаскивайте бачок, чтобы
вымыть все частицы, образующие накипь. (рис. 30)
• Скрутите электрический шнур, не затягивая его, и зафиксируйте лентой Velcro, затем повесьте
на крючок для шнура на стойке. (рис. 32)
1 • Перемещение
• Задвиньте 2 ножки в основание прибора до полной блокировки. (рис. 31)
• Вы можете переносить прибор, подняв его за телескопическую стойку или ручку.
ПО ОКОНЧАНИИ РАБОТЫ
80
• Чтобы снова включить прибор: наполните бачок водой и выберите желаемый уровень пара на
панели управления прибора или паровой ручке (в зависимости от модели).
1 • Вертикальная стойка Press & Steam*
Сборка:
• Извлеките вертикальную стойку Press & Steam из сумки. (рис. 19)
• Убедитесь, что телескопическая стойка полностью раздвинута.
• Держите вертикальную стойку Press & Steam* таким образом, чтобы ручка находилась внизу, а
логотип "Press & Steam" располагался спереди.
• Вставьте верхнюю часть во встроенные плечики, затем немного потяните вниз до зацепления ручки
на Press & Steam с устройством блокировки, находящимся на телескопической стойке. (рис. 20-21)
• Вертикальная стойка Press & Steam* помогает удерживать одежду на месте во время отпаривания.
• При отпаривании рубашки начинайте с рукавов. Возьмите один рукав рубашки и отпарьте его,
используя для опоры вертикальную стойку Press & Steam.
2 • Щетка для ткани*
Щетка для ткани раскрывает переплетение нитей,
способствуя лучшему проникновению пара.
• Закрепите щетку для ткани на паровом сопле,
выровняв нижнюю часть щетки по нижней части
паровой ручки. Слегка надавите на верхнюю часть
щетки до появления характерного щелчка, чтобы
зафиксировать ее на паровом сопле. (рис. 22)
• Аккуратно пройдите щеткой по участку,
намеченному для отпаривания, двигаясь по
долевой нити или ворсу ткани. (рис. 23)
• Снимите щетку для ткани после того, как прибор будет выключен из сети и полностью остынет.
Для этого нажмите на кнопку разблокировки в верхней части щетки и потяните ее вверх.
3 • Щетка с мелковорсистой подушечкой*
Эта щетка позволяет великолепно удалять волоски, ворсинки и шерсть
животных с обрабатываемых изделий.
• При использовании щетки с мелковорсистой подушечкой пройдитесь ей
по одежде, двигаясь по долевой нити или ворсу ткани. (рис. 25)
Убедитесь, что устройство отключено и полностью остыло перед установкой
принадлежностей.
ПРИНАДЛЕЖНОСТИ
Перед использованием принадлежностей просмотрите рекомендации
производителя.
Рекомендуется провести испытание работы прибора на невидимой части изделия.
Система Press & Steam, установленная на плечиках, обеспечивает поддержку одежды при
вертикальном отпаривании, помогая более легко и эффективно разглаживать складки.
Щетка с мелковорсистой подушечкой является отдельной
насадкой и не может быть установлена па паровое сопло.
*В зависимости от модели*В зависимости от модели
1800133082-03 IS8300 _110x154 24/11/14 11:34 Page80
Page 83

81
RU
• Чтобы очистить щетку, проведите ей по ткани в противоположном направлении. Рекомендуем
использовать для этой цели кусок старой ткани, предназначенной на выброс.
• Для получения великолепного результата рекомендуем обрабатывать одежду щеткой с
мелковорсистой подушечкой до отпаривания.
4 • Насадка для удаления складок*
• Снимите щетку для ткани. Полностью сдвиньте
крючок насадки в разъем, расположенный на
нижней части парового сопла. (рис. 26)
• Надавите на ручку, чтобы открыть насадку для
удаления складок.
• Поместите одежду между насадкой и паровым
соплом.
• Отпустите ручку.
• Начинайте отпаривание с верхней части одежды, постепенно передвигая насадку для
удаления складок вниз. (рис. 27)
• Снимите насадку для удаления складок, немного потянув ее, после того, как прибор будет
выключен из сети и полностью остынет.
5 • Рукавица*
• Рукавица защищает свободную руку от пара во время использования
прибора.
• Наденьте рукавицу на руку, которой будете держать одежду во время
отпаривания. (рис. 24)
• Нажатием кнопки ON/OFF выключите электроприбор. (рис. 28)
• Погаснут световые индикаторы на панели управления, затем Вы можете отключите прибор от
электросети. (рис. 29)
• Повесьте паровое сопло вертикально на специальный крючок.
• Перед каждой уборкой прибора на хранение сливайте воду и ополаскивайте бачок, чтобы
вымыть все частицы, образующие накипь. (рис. 30)
• Скрутите электрический шнур, не затягивая его, и зафиксируйте лентой Velcro, затем повесьте
на крючок для шнура на стойке. (рис. 32)
1 • Перемещение
• Задвиньте 2 ножки в основание прибора до полной блокировки. (рис. 31)
• Вы можете переносить прибор, подняв его за телескопическую стойку или ручку.
Рукавица должна использоваться исключительно с данным
отпаривателем для одежды и только в указанных целях. Не
стирайте и не гладьте рукавицу.
ПО ОКОНЧАНИИ РАБОТЫ
Внимание: никогда не снимайте принадлежность Press & Steam для уборки на хранение,
пока она полностью не высохнет. Перед уборкой вертикальной стойки Press & Steam на
хранение сверните ее в рулон. Не сгибайте ее .
Предупреждение: Никогда не прикасайтесь к паровому соплу, пока прибор полностью
не остынет.
*В зависимости от модели
1800133082-03 IS8300 _110x154 24/11/14 11:34 Page81
Page 84

ПОИСК И УСТРАНЕНИЕ НЕИСПРАВНОСТЕЙ
82
2 • Обслуживание и очистка
Чистка
• Очистите основной блок влажной тканью.
• Очистите систему Press & Steam влажной тканью или мягкой губкой. Не используйте чистящие
средства, такие как мыло или другие моющие средства.
Легкое удаление накипи
• Для поддержания максимальной производительности, отпариватель не должен иметь накипи.
Промежуток времени между операциями по удалению накипи зависит от частоты
эксплуатации прибора. Прибор необходимо чистить от накипи по крайней мере один раз в год
или после 30 часов эксплуатации.
• Для моделей с индикатором Anti calc*:
- Чтобы продлить срок службы Вашего прибора и предотвратить образование накипи, Ваш
отпариватель оснащен оранжевым индикатором Anti-calc, который начинает мигать на панели
управления, когда из прибора нужно слить воду.
- Если оранжевый индикатор Anti-calc мигает, Вы можете продолжить отпаривание в обычном
режиме, но должны помнить о необходимости ополоснуть бойлер перед следующим
использованием прибора.
• Для очищения прибора от накипи выполняйте следующие действия:
- Убедитесь, что прибор полностью остыл (минимум 2 часа ).
- Снимите прибор с основания при помощи кнопки разблокировки.
- Снимите паровое сопло с крючка. Также снимите электрический шнур со специального крючка
на стойке.
- Снимите бачок для воды (рис. 33).
- Поставьте прибор, не наклоняя его, на край раковины.
- Налейте ½ литра пресной воды непосредственно в отверстие для залива воды на приборе,
позволяя ей заполнить бойлер (рис. 34). Следите, чтобы вода не перелилась через край.
- Открутите крышку Anti calc, повернув ее против часовой стрелки (рис. 35).
- Удерживая прибор в наклонном положении, аккуратными движениями вымойте частицы,
образующие накипь (рис. 36).
- Вставьте крышку Anti calc и закрутите ее.
- Повторяйте указанную процедуру несколько раз, пока не будут удалены все частицы накипи.
- Для моделей с индикатором "Anti-calc": в следующий раз используя отпариватель, нажмите на 5
секунд кнопку"Anti-calc"на панели управления, чтобы выключить настройку.
ВНИМАНИЕ!
• Не наполняйте бойлер водой через паровое сопло или сливные отверстия Anti calc!
• Запрещается погружать паровое сопло в воду.
Не пытайтесь переносить прибор за встроенные плечики. Перед поднятием убедитесь,
что прибор и стойка хорошо закреплены в основании (см. указания по сборке).
Не используйте вещества для удаления накипи (уксус, промышленные продукты для
удаления накипи, т.д.) при промывке прибора: они могут повредить его.
Перед опорожнением прибора он должен остыть в течение 2 часов, чтобы избежать
риска ожогов.
Предупреждение: Не пытайтесь снять шланг с прибора.
Во время удаления накипи старайтесь не ударять паровое сопло.
*В зависимости от модели*В зависимости от модели
1800133082-03 IS8300 _110x154 24/11/14 11:34 Page82
Page 85

83
RU
ПОИСК И УСТРАНЕНИЕ НЕИСПРАВНОСТЕЙ
Подача пара очень
мала.
Ваш бойлер покрыт
накипью, потому что Вы
не промывали его
регулярно.
Смотрите процедуру удаления накипи.
Нарушена проходимость
шланга.
Убедитесь, что шланг не запутан и не
скручен.
Через отверстия в
паровом сопле течет
вода.
В шланге образовался
конденсат.
Никогда не используйте отпариватель в
горизонтальном положении. Подержите
шланг строго вертикально и подождите,
пока конденсат вернется в отпариватель.
Отпариватель долго
нагревается и/или
выбрасывает белые
частицы.
Отпариватель покрыт
налетом, так как не
подвергался
регулярному очищению
от накипи.
Смотрите процедуру удаления накипи.
Принадлежность Press
& Steam согнута.
Ткань принадлежности
Press & Steam была
установлена
неправильно.
Установите повторно принадлежность
Press & Steam на встроенные плечики.
Убедитесь, что она зацеплена правильно в
соответствие с инструкцией.
Ткань принадлежности
Press & Steam была
неправильно свернута в
рулон.
Проверяйте, чтобы принадлежность Press
& Steam была полностью выс ушена перед
скручиванием в рулон для уборки на
хранение. Не сгибайте ее для уборки на
хранение.
Проблемы
Возможные
причины
Решения
Нет пара. Прибор не включен. Убедитесь, что прибор правильно
подключен к сети. Нажмите кнопку
Вкл./Выкл., загорится индикаторная лампа,
расположенная на передней панели
прибора. Прибор начнет производить пар
примерно через 45 секунд.
Нарушена проходимость
шланга.
Убедитесь, что шланг не запутан и не
скручен.
В бачке нет воды. Вык лючите прибор и налейте воду в
бачок.
Активирована система
автоматического
отключения.
Для повторного включения прибора:
налейте воду в бачок и выберите
желаемый уровень пара.
*В зависимости от модели
1800133082-03 IS8300 _110x154 24/11/14 11:34 Page83
Page 86

84
Если установить причину проблемы не представляется возможным, обратитесь за
помощью в авторизованный сервисный центр www.tefal.com
Отпариватели для одежды Tefal IS83xxxx
Изготовлено в Китае для холдинга “GROUPE SEB”, France
(Groupe SEB, Chemin du Petit Bois Les 4 M - BP 172 69134 Ecully Cedex France)
Груп СЕБ, Шмэн дю Пти Буа Ле 4 М – БП 17269134 Экюли Седекс Франс
Официальный представитель, импрортёр - ЗАО “Группа СЕБ-Восток”
125171, г. Москва, Ленинградское ш., д. 16А, стр. 3 тел. 213-32-32
Информация о сертификации:
• Сертификат соответствия № ТС RU C-FR.АГ27.B.00637
• Срок действия с 31.10.2014 по 30.10.2019
• Выдан ОС ООО «ИНТЕРС ТАНДАРТ»
Соответствуют требованиям:
• ТР ТС 004/2011 "О безопасности низковольтного оборудования", утв.
Решением КТС от 16.08.
2011г. №768.
• ТР ТС 020/2011 "Электромагнитная совместимость технических средств", утв.
Решением
КТС от 09.12.2011г. №879.
Срок службы изделия 2 года с даты продажи в условиях эксплуатации и хранения
при температуре от 0°С до 40 °С
Принадлежность Press &
Steam отходит во время
использования.
Принадлежность Press &
Steam не была зацеплена
должным образом за
крючок.
Убедитесь, что ручка принадлежности Press &
Steam хорошо зацеплена за крючок. Она не
должна двигаться в вертикальном и
горизонтальном направлении. Убедитесь, что
3 сегмента стойки полностью выдвинуты, а 2
зажима заблокированы.
Шланг издает
булькающие звуки.
Вы работаете с паровым
соплом слишком близко от
пола, и в шланге образуется
конденсат.
Чаще поднимайте шланг во время
использования и установите стойку на
максимальную высоту, чтобы избежать
образования конденсата.
Вода переливается из
бачка.
Вы работаете с паровым
соплом слишком близко от
пола, и в шланге образуется
конденсат.
Чаще поднимайте шланг во время
использования и установите стойку на
максимальную высоту, чтобы избежать
образования конденсата.
Мигает оранжевый
индикатор Anti calc.
Вы не нажали кнопку
перезапуска Anti calc после
проведения процедуры
удаления накипи.
Нажмите кнопку перезапуска Anti calc на
панели управления прибора.
Из-под крышки Anti calc
выходит пар.
Крышка Anti calc не
затянута должным образом.
Затяните крышку Anti calc, после того как
прибор полностью оствнет (2 часа).
Крышка Anti calc
повреждена.
Обратитесь в авторизованный сервисный
центр (см. контактную информацию в конце
этой страницы).
1800133082-03 IS8300 _110x154 24/11/14 11:34 Page84
Page 87

85
UK
ІНСТРУКЦІЯ З ТЕХНІКИ
БЕЗПЕКИ
Будь ласка, уважно прочитайте цю інструкцію
перед першим використанням та збережіть її у
надійному місці.
• Не залишайте прилад увімкненим або підключеним
до електромережі без нагляду, навіть на кілька
секунд, особливо якщо поруч є діти.
• Завжди від'єднуйте прилад від електричної мережі
перед заповненням або ополіскуванням
резервуара, перед очищенням приладу та після
кожного використання.
• Під час користування приладом слід бути
обережним у зв'язку з викидами пари.
• Даний прилад не призначений для використання
особами (в тому числі дітьми) з обмеженими
фізичними, сенсорними і розумовими здібностями,
а також людьми з недостатнім досвідом і знаннями в
галузі використання даного приладу за
виключенням випадків, коли їм допомагає особа,
відповідальна за їх безпеку, яка наглядає за ними,
або надає їм попередні інструкції щодо
використання приладу.
• Приладом можуть користуватись діти старші 8 років,
люди з обмеженими фізичними, сенсорними та
розумовими здібностями, а також люди, що не мають
відповідного досвіду та знань, але лише під наглядом
або після отримання інструкцій щодо безпечної
1800133082-03 IS8300 _110x154 24/11/14 11:34 Page85
Page 88

• Перед під'єднанням або від'єднанням приладу завжди вимикайте
прилад. Від'єднуючи прилад від мережі, ніколи не тягніть за шнур,
замість цього візьміться за вилку та потягніть її.
• Перш, ніж прибрати прилад, дайте йому повністю охолонути.
• Слідкуйте за тим, щоб шнур живлення не торкався гострих кромок
або гарячих поверхонь.
• Не фіксуйте шланг під час роботи. Від'єднання шлангу під час
використання приладу може призвести до ошпарювання.
• Не підіймайте прилад за шланг.
• Рекомендовано використовувати тільки насадки фірми TEFAL,
оскільки використання інших насадок може призвести до пожежі,
удару електричним струмом або отримання телесних ушкоджень.
• При зміні насадок будьте обережні, оскільки внаслідок конденсації
пари на них може залишатися гаряча вода. Щоб запобігти контакту
з гарячою водою, дайте насадкам охолонути.
• Торкання гарячих деталей, контакт з гарячою водою або парою може
призвести до опіків. Будьте обережні, зливаючи випарювач. У
резервуарі або всередині приладу може залишатися гаряча вода.
• Не слід направляти струм пари на людей та тварин, ніколи не
прасуйте одяг безпосередньо на людині.
• Забороняється вкорочувати або подовжувати паровий шланг.
• Якщо використовується електричний подовжувач, переконайтеся,
що він розрахований на потрібний струм, має заземлення та
повністю розмотаний.
• Забороняється вставляти або кидати будь-які предмети в отвори та
паровий шланг.
• Цим відпарювачем слід користуватися тільки в рукавичці (* залежно
від моделі). Виробник не несе відповідальності за неналежне
використання приладу.
ПІКЛУЙТЕСЯ ПРО НАВКОЛИШНЄ СЕРЕДОВИЩЕ!
86
експлуатації даного пристрою і розуміння
небезпеки.
• Слідкуйте за тим, щоб діти не гралися з приладом.
• Очищення та обслуговування не повинно
проводитися дітьми без нагляду.
• Не використовуйте прилад, якщо він падав на
підлогу, пошкоджений, протікає або не працює
належним чином. Ніколи не розбирайте прилад.
Щоб уникнути небезпеки, перевірте прилад в
авторизованому центрі технічного обслуговування.
ВАЖЛИВІ РЕКОМЕНДАЦІЇ
• Цей прилад призначений виключно для побутового використання у
приміщенні. У випадку комерційного використання, неправильного
використання або недотримання інструкцій з використання
виробник не нестиме відповідальності, і гарантія не буде дійсною.
• Це підлоговий прилад, не підіймайте його під час використання.
• Шланг та головка відпарювача повинні завжди знаходитися вище
резервуару.
• Для вашої безпеки, цей прилад відповідає діючим стандартам і
нормам (Директивам щодо низьковольтних пристроїв, щодо
електромагнітної сумісності та охорони навколишнього
середовища).
• Поверхні, що позначені цим знаком або знаходяться поруч з
ним, сильно нагріваються під час використання приладу. Не
торкайтеся цих поверхонь до повного охолодження приладу.
• Щоб зменшити ризик контакту з гарячою водою або парою,
перевіряйте прилад перед кожним використанням, направляючи
його від себе.
• Відпарюйте тільки вертикальними рухами вгору та вниз. Ніколи не
тримайте головку відпарювача горизонтально та на відхиляйте її
назад, щоб уникнути бризок.
• Щоб зменшити ризик удару електричним струмом, не занурюйте
прилад або головку відпарювача у воду або іншу рідину.
1800133082-03 IS8300 _110x154 24/11/14 11:34 Page86
Page 89

87
UK
• Перед під'єднанням або від'єднанням приладу завжди вимикайте
прилад. Від'єднуючи прилад від мережі, ніколи не тягніть за шнур,
замість цього візьміться за вилку та потягніть її.
• Перш, ніж прибрати прилад, дайте йому повністю охолонути.
• Слідкуйте за тим, щоб шнур живлення не торкався гострих кромок
або гарячих поверхонь.
• Не фіксуйте шланг під час роботи. Від'єднання шлангу під час
використання приладу може призвести до ошпарювання.
• Не підіймайте прилад за шланг.
• Рекомендовано використовувати тільки насадки фірми TEFAL,
оскільки використання інших насадок може призвести до пожежі,
удару електричним струмом або отримання телесних ушкоджень.
• При зміні насадок будьте обережні, оскільки внаслідок конденсації
пари на них може залишатися гаряча вода. Щоб запобігти контакту
з гарячою водою, дайте насадкам охолонути.
• Торкання гарячих деталей, контакт з гарячою водою або парою може
призвести до опіків. Будьте обережні, зливаючи випарювач. У
резервуарі або всередині приладу може залишатися гаряча вода.
• Не слід направляти струм пари на людей та тварин, ніколи не
прасуйте одяг безпосередньо на людині.
• Забороняється вкорочувати або подовжувати паровий шланг.
• Якщо використовується електричний подовжувач, переконайтеся,
що він розрахований на потрібний струм, має заземлення та
повністю розмотаний.
• Забороняється вставляти або кидати будь-які предмети в отвори та
паровий шланг.
• Цим відпарювачем слід користуватися тільки в рукавичці (* залежно
від моделі). Виробник не несе відповідальності за неналежне
використання приладу.
ПІКЛУЙТЕСЯ ПРО НАВКОЛИШНЄ СЕРЕДОВИЩЕ!
i Ваш пристрій містить цінні матеріали, що підля гають ути лізації чи повтор-
ному використанню.
‹ Здайте їх в місцевий пу нкт прийому вторинної сировини.
1800133082-03 IS8300 _110x154 24/11/14 11:34 Page87
Page 90

2 • Наповнення бачка для води
• Переконайтеся, що прилад від'єднаний від мережі. Зніміть бачок для води з корпусу
приладу, потягнувши його догори (мал. 7). Відкрутіть кришку бачка та наповніть бачок
(мал. 8).
• Використовуйте для відпарювання воду з під крану. Якщо вода у вашому регіоні дуже
жорстка, ми рекомендуємо змішувати воду з під крану з такою ж кількістю
дистильованої води, що зменшить її жорсткість.
• Закрутивши кришку бачка, переверніть його, взявши за ручку. Переконайтеся в тому,
що вода не витікає через кришку.
• Вставте бачок вертикально в прилад (мал. 9).
1 • Налаштування
• Використовуйте відпарювач тільки на рівній горизонтальній підлозі, на якій немає
ніяких предметів, що мож уть заважати на лежному встановленню основи. Не
перекривайте отвори у нижній частині приладу. Забороняється використовувати
прилад на килимах з високим ворсом.
• Розстебніть застібку-«липучку» та повністю розмотайте електричний шнур.
• Вставте вилку приладу у розетку (мал. 10).
• Увімкніть прилад, натиснувши кнопку вмикання/вимикання, що розташована зверху
(мал. 11). Індикатор «пара готова» блиматиме приблизно 45 секунд, після чого
засвітиться постійно: прилад готовий до використання з максимальним
пароутворенням (мал. 12-13).
• Прилад починає утворювати пару приблизно через 30 секунд.
2 • Використання приладу
• Підвісьте одяг на вбудовані плічка або на окремих плічках на скобу для плічок.
• Для відпарювання штанів рекомендуємо користуватися опорою з затискачами*.
• Візьміть головку відпарювача, тримаючи її отворами для пари від себе.
• Почніть відпарювання, гладячи тканину без зусиль вздовж основи.
• Почніть з верхнього краю одягу і повільно пересувайтеся донизу.
• Завжди тримайте головку відпарювача у вертикальному положенні.
• Коли ви не використовуєте головку відпарювача, завжди вішайте її у вертикальному
положенні у проріз у плечиках.
ВИКОРИСТАННЯ
88
1 • Складання відпарювача
Монтаж опори
1. Потягніть та поверніть дві додаткові опори до клацання. (мал. 1).
2. Викрутіть гвинт фіксації стійки в корпусі.
3. Візьміть стійку так, щоб скоба для шнура знаходилася позаду. Переконайтеся в тому, що
два затискача стійки розтиснені (мал. 3).
4. Вставте стійку в корпус, натискаючи її донизу до тих пір, поки отвори стійки та корпуса
не опиняться на одному рівні, щоб можна було вставити гвинт. Якщо отвори не
співпадають, перевірте, чи добре розтиснені затискачі стійки (мал. 4).
5. Закрутіть гвинт фіксації стійки до кінця, щоб стійка була надійно закріплена на корпусі.
6. Розкладіть стійку на максимальну висоту, пересуваючи її вверх. Переконайтеся, що всі
три сегменти стійки повністю витягнуті, тоді затисніть два затискачі (мал. 6).
Монтаж плечиков
1. Викрутіть фіксуючий гвинт у нижній частині плечиков.
2. Візьміть вбудовані плечики так, щоб скоба для плічок знаходилася з тієї ж сторони, що
і панель управління приладом.
3. Насадіть плечики вертикально на верхню частину стійки. Отвір у нижній частині
плечиков повинен співпасти з отвором стійки (мал. 5).
4. Вкрутіть фіксуючий гвинт до кінця, щоб плечики були надійно закріплені на стійці.
5. Розташуйте головку відпарювача зверху на вбудованих плечиках.
ОПИС
1.
Головка відпарювача
2.
Вбудовані плечики
3.
Затискачі для штанів*
4.
Тримач головки відпарювача
5.
Скоба для плечиков
6.
Гвинт фіксації плечиков
7.
Затискачі фіксації опори
8.
Телескопічна опора
9.
Паровий шланг
10.
Скоба для електричного шнура
11.
Електричний шнур
12.
Ручка для транспортування
13.
Ручка бачка для води
14.
Знімний бачок для води
15.
Панель управління
16.
Додаткова опора (2 шт.)
17.
Гвинт фіксації опори
18.
Кнопка від'єднання основи
19.
Кнопка вмикання/вимикання
20.
Прилад
21.
Ковпачок для видалення накипу
22.
Основа
23.
Вертикальна опора для прасування*
24.
Мішечок для зберігання опори для
прасування*
25.
Ручка для фіксації*
26.
Скоба для фіксації*
27.
Рукавичка*
28.
Насадка-щітка для тканини*
29.
Щітка для видалення ворсу*
30.
Насадка для прасування складок*
31.
Різні налаштування пари*
32.
Індикатор утворення накипу «Anti calc»*
33.
Індикатор порожнього бачка*
34.
Індикатор «Steam ready / auto off»
(Автоматичне вимкнення / пара готова)
35.
Кнопка налаштування пари*
36.
Індикатор рівня пари*
ПЕРЕД ВИКОРИСТАННЯМ
* залежно від моделі* залежно від моделі
1800133082-03 IS8300 _110x154 24/11/14 11:34 Page88
Page 91

89
UK
2 • Наповнення бачка для води
• Переконайтеся, що прилад від'єднаний від мережі. Зніміть бачок для води з корпусу
приладу, потягнувши його догори (мал. 7). Відкрутіть кришку бачка та наповніть бачок
(мал. 8).
• Використовуйте для відпарювання воду з під крану. Якщо вода у вашому регіоні дуже
жорстка, ми рекомендуємо змішувати воду з під крану з такою ж кількістю
дистильованої води, що зменшить її жорсткість.
• Закрутивши кришку бачка, переверніть його, взявши за ручку. Переконайтеся в тому,
що вода не витікає через кришку.
• Вставте бачок вертикально в прилад (мал. 9).
1 • Налаштування
• Використовуйте відпарювач тільки на рівній горизонтальній підлозі, на якій немає
ніяких предметів, що мож уть заважати на лежному встановленню основи. Не
перекривайте отвори у нижній частині приладу. Забороняється використовувати
прилад на килимах з високим ворсом.
• Розстебніть застібку-«липучку» та повністю розмотайте електричний шнур.
• Вставте вилку приладу у розетку (мал. 10).
• Увімкніть прилад, натиснувши кнопку вмикання/вимикання, що розташована зверху
(мал. 11). Індикатор «пара готова» блиматиме приблизно 45 секунд, після чого
засвітиться постійно: прилад готовий до використання з максимальним
пароутворенням (мал. 12-13).
• Прилад починає утворювати пару приблизно через 30 секунд.
2 • Використання приладу
• Підвісьте одяг на вбудовані плічка або на окремих плічках на скобу для плічок.
• Для відпарювання штанів рекомендуємо користуватися опорою з затискачами*.
• Візьміть головку відпарювача, тримаючи її отворами для пари від себе.
• Почніть відпарювання, гладячи тканину без зусиль вздовж основи.
• Почніть з верхнього краю одягу і повільно пересувайтеся донизу.
• Завжди тримайте головку відпарювача у вертикальному положенні.
• Коли ви не використовуєте головку відпарювача, завжди вішайте її у вертикальному
положенні у проріз у плечиках.
ВАЖЛИВО: Забороняється використовувати воду з домішками (такими як крохмаль,
ефірна олія, ароматизатори, водопом'якшуючі засоби, тощо) для заповнення бачка
відпарювача. Ці домішки можуть змінити властивості пари та призвести до утворення
осаду.
ВИКОРИСТАННЯ
Попередження! Забороняється прасувати одяг безпосередньо на людині.
Під час використання гнучкий шланг біля головки відпарювача може бути дуже
гарячим. Це цілком нормально. Будьте обережні, уникайте тривалого контакту.
Завжди будьте обережні, щоб не торкнутися гарячої пари.
* залежно від моделі
1800133082-03 IS8300 _110x154 24/11/14 11:34 Page89
Page 92

• Для активації приладу: залийте воду в бачок та виберіть потрібний рівень пари на
панелі управління або на ручці (залежно від моделі).
1 • Вертикальна опора для прасування*
Монтаж:
• Вийміть вертикальну опору для прасування з мішечка (мал. 19).
• Повністю розкладіть телескопічну стійку.
• Візьміть вертикальну опору для прасування* так, щоб ручка знаходилася внизу, а
логотип «Press & Steam» – зпереду.
• Вставте верхню деталь у плечики, потім злегка потягніть ручку опори для прасування*
донизу і зафіксуйте її у скобі, що розташована на стійці (мал. 20-21).
• Вертикальна опора для прасування* допомагає утримувати одяг на місці під час
прасування.
• Прасуючи сорочку, починайте з рукавів. Візьміть один рукав та складіть його поперек
сорочки, користуючись системою для прасування як опорою.
2 • Насадка-щітка для тканини*
• Перш ніж зняти щітку для тканини, від'єднайте прилад від електричної мережі та дайте
йому повністю охолонути. Після цього натисніть кнопку на верхній частині щітки та
потягніть щітку вперед.
3 • Щітка для видалення ворсу*
АКСЕСУАРИ
90
• Під час використання шланг може булькотіти. Це нормальне явище, викликане
конденсацією. Якщо прилад починає булькотіти, підвісьте головку відпарювача на
кронштейн на кілька секунд, щоб конденсат збіг назад до приладу.
• Під час використання на телескопічній стійці можуть з'являтися краплі води. Це також
нормальне явище, викликане конденсацією.
Налаштування пари*
Прилад має від двох до п'яти налаштувань пари для різних типів тканин, від ніжних до
грубих.
•Моделі з двома налаштуваннями: виберіть потрібне, послідовно натискаючи кнопку
налаштування пари на панелі управління приладу.
•Моделі з трьома налаштуваннями: виберіть потрібне, натиснувши одну з кнопок на
панелі управління приладу.
•Моделі з чотирма або п'ятьма налаштуваннями на ручці: виберіть потрібне, послідовно
натискаючи кнопку «SET» на ручці. Індикатори покажуть вибраний рівень
пароутворення.
Датчик порожнього бачка*
Цей прилад обладнано датчиком порожнього бачка. Коли бачок для води порожній,
індикатор на панелі управління приладу блиматиме, попереджуючи про необхідність
наповнення бачка. Вимкніть прилад і залийте воду в бачок.
Електронне автоматичне вимкнення*
Прилад обладнаний системою автоматичного вимкнення, яка переводить його в режим
очікування, коли бачок для води залишається порожнім більше 10 хвилин.
•Індикатор «Auto off» на панелі управління повільно блимає, вказуючи на те, що прилад
знаходиться у режимі очікування.
Поради для більш ефективного використання відпарювача
• Ми радимо перед відпарюванням вивчити етикетку на одязі з рекомендаціями щодо
догляду. Ми також радимо випробувати дію пари на тканину на невидимій частині
одягу, наприклад, на виворітній стороні.
• Застебніть комірець сорочки, щоб вона не сповзала під час відпарювання.
• Злегка натисніть на щітку відпарювача, роблячи повільні рухи.
• Уникайте прямого контакту головки відпарювача з шовком або оксамитом.
• Деякі речі краще прасувати з вивороту.
• Прасування грубіших тканин забирає більше часу.
• Якщо ви використовуєте головку відпарювача біля землі, частіше піднімайте її, щоб
запобігти утворенню конденсату. У разі перетискування шлангу може з'явитися
булькотіння.
• Якщо пара не утворюється, якщо ви чуєте булькотіння або якщо з отворів у головці
відпарювача капає вода, підніміть шланг догори, щоб видалити конденсат.
КОЛІР ІНДИКАТОРА ПАРОУТВОРЕННЯ
Помаранчевий Мінімальне
Зелений Максимальне
* залежно від моделі
1800133082-03 IS8300 _110x154 24/11/14 11:34 Page90
Page 93

91
UK
• Для активації приладу: залийте воду в бачок та виберіть потрібний рівень пари на
панелі управління або на ручці (залежно від моделі).
1 • Вертикальна опора для прасування*
Монтаж:
• Вийміть вертикальну опору для прасування з мішечка (мал. 19).
• Повністю розкладіть телескопічну стійку.
• Візьміть вертикальну опору для прасування* так, щоб ручка знаходилася внизу, а
логотип «Press & Steam» – зпереду.
• Вставте верхню деталь у плечики, потім злегка потягніть ручку опори для прасування*
донизу і зафіксуйте її у скобі, що розташована на стійці (мал. 20-21).
• Вертикальна опора для прасування* допомагає утримувати одяг на місці під час
прасування.
• Прасуючи сорочку, починайте з рукавів. Візьміть один рукав та складіть його поперек
сорочки, користуючись системою для прасування як опорою.
2 • Насадка-щітка для тканини*
Щітка д ля тканини розкриває плетіння,
сприяючи проникненню пари.
• Встановіть щітку для тканини на головку
відпарювача, вирівнявши її нижню частину по
нижній частині головки. Злегка притисніть
щітку зверху до головки, доки вона не стане
на місце (мал. 22).
• Акуратно пройдіться щіткою по наміченій
ділянці тканини, враховуючи фактуру або
напрямок волокон тканини (мал. 23).
• Перш ніж зняти щітку для тканини, від'єднайте прилад від електричної мережі та дайте
йому повністю охолонути. Після цього натисніть кнопку на верхній частині щітки та
потягніть щітку вперед.
3 • Щітка для видалення ворсу*
АКСЕСУАРИ
Перед встановленням аксесуарів обов'язково від'єднайте прилад від мережі та
дайте йому повністю охолонути.
Перед використанням аксесуара ознайомтеся з рекомендаціями виробника.
Також рекомендуємо випробувати аксесуар на непомітній частині одягу.
Система для прасування забезпечує вертикальну опору, що допомагає легше
та ефективніше видаляти складки.
Щітка для видалення ворсу не насаджується на головку
відпарювача. Цей аксесуар можна використовувати окремо
від відпарювача.
* залежно від моделі
1800133082-03 IS8300 _110x154 24/11/14 11:34 Page91
Page 94

2 • Догляд
Очищення
• Протріть основний блок вологою тканиною.
• Протріть тканину опори для прасування вологою тканиною або неабразивною губкою.
Не використовуйте миючі засоби та миючі засоби.
Легке видалення накипу
• Для максимальної продуктивності відпарювач потрібно очищувати від накипу.
Періодичність очищення залежить від використання приладу. Прилад необхідно
очищувати від накипу якнайменше один раз на рік або після 30 годин роботи.
• Для моделей з індикатором «Anti calc»*:
- Щоб подовжити строк служби приладу та запобігти утворенню накипу, прилад
оснащений помаранчевим індикатором «Anti calc» на панелі управління, який починає
блимати , коли необхідна промивка приладу.
- Якщо помаранчевий індикатор «Anti calc» блимає, ви можете продовжувати
відпарювання в звичайному режимі, але не забудьте промити бойлер перед наступним
використанням.
• Для очищання приладу від накипу зробіть наступне:
- Переконайтеся, що прилад повністю охолонув (мінімум 2 години).
- Від'єднайте прилад від основи, натиснувши кнопку від'єднання.
- Зніміть головку відпарювача з плічок. Також зніміть електричний шнур зі скоби для
електричного шнуру.
- Зніміть бачок для води (мал. 33).
- Поставте прилад на край мийки.
- Залийте ½ літра чистої води прямо в отвір для води на приладі, щоб вона заповнила
бойлер (мал. 34). Будьте обережні і не перелийте воду.
- Викрутіть ковпачок для видалення накипу, обертаючи його проти годинникової стрілки
(мал. 35).
- Нахиліть прилад та похитайте його, щоб частки накипу вийшли з водою (мал. 36).
- Накрутіть ковпачок для видалення накипу.
- Повторіть процедуру стільки разів, скільки потрібно для видалення усіх часток накипу.
- Для моделей з індикатором «Anti calc»*: наступного разу, використовуючи відпарювач,
щоб вимкнути індикатор тримайте протягом 5 секунд кнопку індикатора накипу «Anti
calc».
92
Щітка для видалення ворсу видаляє волосинки, ворсинки та шерсть тварин.
• Повільно пройдіть щіткою по одязі, враховуючи напрямок або фактуру тканини (мал. 25).
• Щоб почистити щітку, пройдіть нею по тканині у протилежному напрямку. Для цього
краще скористатися шматком старої тканини, що призначена для викидання.
• Для отримання кращого результату ми рекомендуємо перед відпарюванням
скористуватись щіткою для видалення ворсу.
4 • Насадка для прасування складок*
• Зніміть насадку-щітку для тканини. Повністю
вставте провушину аксесуара у паз,
розташований у нижній частині головки
відпарювача (мал. 26).
• Натисніть ручку, щоб відкрити насадку.
• Помістіть одяг між насадкою та головкою
відпарювача.
• Відпустіть ручку.
• Починаючи зверху, рухайте насадку униз по одязі (мал. 27).
• Від'єднавши прилад від мережі та давши йому повністю охолонути, зніміть насадку з
головки відпарювача.
5 • Рукавичка*
• Рукавичка під час роботи захищає вільну руку від пари.
• Надягніть рукавичку на руку, якою ви тримаєте або розтягуєте
тканину (мал. 24).
• Вимкніть пристрій, натиснувши кнопку увімкнення/вимкнення (мал. 28).
• Індикатор на панелі управління згасне, тоді можна вимкнути прилад з мережі (мал. 29).
• Підвісьте головку відпарювача у вертикальному положенні у проріз у плечиках.
• Перед зберіганням завжди зливайте та промивайте бачок для води, щоб видалити
частки накипу (мал. 30).
• Змотайте електричний шнур без перетискань, скріпіть застібкою-«липучкою» та
зачепіть його за кріплення на стійці (мал. 32).
1 • Транспортування
• Заштовхніть дві додаткові опори, доки вони не зафіксуються в основі (мал. 31).
• Прилад можна транспортувати, піднявши за телескопічну стійку або за ручку.
Рукавичку слід використовувати тільки з відпарювачем, але не для
будь-яких інших цілей. Не слід прати або прасувати рукавичку.
ПІСЛЯ ВИКОРИСТАННЯ
Попередження! Не знімайте опору для прасування, доки вона повністю не висохне.
Зберігайте опору для прасування у скрученому стані. Не складайте її.
Попередження! Ніколи не торкайтеся парової головки, доки вона повністю на охолоне.
* залежно від моделі* залежно від моделі
1800133082-03 IS8300 _110x154 24/11/14 11:34 Page92
Page 95

93
UK
2 • Догляд
Очищення
• Протріть основний блок вологою тканиною.
• Протріть тканину опори для прасування вологою тканиною або неабразивною губкою.
Не використовуйте миючі засоби та миючі засоби.
Легке видалення накипу
• Для максимальної продуктивності відпарювач потрібно очищувати від накипу.
Періодичність очищення залежить від використання приладу. Прилад необхідно
очищувати від накипу якнайменше один раз на рік або після 30 годин роботи.
• Для моделей з індикатором «Anti calc»*:
- Щоб подовжити строк служби приладу та запобігти утворенню накипу, прилад
оснащений помаранчевим індикатором «Anti calc» на панелі управління, який починає
блимати , коли необхідна промивка приладу.
- Якщо помаранчевий індикатор «Anti calc» блимає, ви можете продовжувати
відпарювання в звичайному режимі, але не забудьте промити бойлер перед наступним
використанням.
• Для очищання приладу від накипу зробіть наступне:
- Переконайтеся, що прилад повністю охолонув (мінімум 2 години).
- Від'єднайте прилад від основи, натиснувши кнопку від'єднання.
- Зніміть головку відпарювача з плічок. Також зніміть електричний шнур зі скоби для
електричного шнуру.
- Зніміть бачок для води (мал. 33).
- Поставте прилад на край мийки.
- Залийте ½ літра чистої води прямо в отвір для води на приладі, щоб вона заповнила
бойлер (мал. 34). Будьте обережні і не перелийте воду.
- Викрутіть ковпачок для видалення накипу, обертаючи його проти годинникової стрілки
(мал. 35).
- Нахиліть прилад та похитайте його, щоб частки накипу вийшли з водою (мал. 36).
- Накрутіть ковпачок для видалення накипу.
- Повторіть процедуру стільки разів, скільки потрібно для видалення усіх часток накипу.
- Для моделей з індикатором «Anti calc»*: наступного разу, використовуючи відпарювач,
щоб вимкнути індикатор тримайте протягом 5 секунд кнопку індикатора накипу «Anti
calc».
Не намагайтеся підняти або перенести прилад, тримаючи його за плічка. Перед тим, як
піднімати прилад, завжди перевіряйте, чи надійно стійка закріплена до приладу, а
прилад – до основи (див. вказівки зі складання).
Не використовуйте речовини для видалення накипу (оцет, промислові продукти для
видалення накипу та ін.) для промивки приладу: вони можуть його пошкодити.
Перед спорожненням приладу він повинен охолонути протягом 2 годин, щоб уникнути
ошпарювання.
Попередження! Ніколи не намагайтеся від'єднати шланг від приладу.
Під час очищення від накипу оберігайте головку відпарювача від ударів.
* залежно від моделі
1800133082-03 IS8300 _110x154 24/11/14 11:34 Page93
Page 96

94
ПОПЕРЕДЖЕННЯ:
• Не наповнюйте бойлер через отвори у головці або через зливний отвір!
• Ніколи не занурюйте головку відпарювача у воду
УСУНЕННЯ НЕСПРАВНОСТЕЙ
Відпарювач довго
нагрівається та/або
викидає білі частки.
Пароутворювач покритий
накипом, тому що не був
своєчасно промитий від
накипу.
Дивіться процедуру видалення накипу.
Опора для прасування
зігнута.
Тканина опори для
прасування не була
змонтована належним
чином.
Заново змонтуйте аксесуар для
прасування на вбудованих плічках.
Переконайтеся, що він надійно
зачеплений, дотримуючись вказівок.
Тканина опори для
прасування не була
змотана належним
чином.
Слідкуйте за тим, щоб аксесуар для
прасування завжди був вис ушений та
акуратно змотаний перед зберіганням. Не
складайте його для зберігання.
Несправність Можливі причини Рішення
Немає пари. Пристрій не ввімкнений. Перевірте, чи правильно прилад
під'єднано до мережі. Натисніть кнопку
вмикання/вимикання, індикатор на
передній частині приладу засвітиться.
Прилад почне утворювати пару приблизно
через 45 секунд.
Пара не проходить через
шланг.
Переконайтеся, що шланг не перегнутий
та не перекручений.
У бачку немає води Вимкніть прилад і залийте воду в бачок.
Активована система
автоматичного
вимкнення.
Щоб знову ввімкнути прилад: залийте воду
у бачок та оберіть потрібний рівень пари.
Потік пару слабкий. Пароутворювач покритий
накипом, тому що не був
своєчасно промитий.
Дивіться процедуру видалення накипу.
Пара не проходить через
шланг.
Переконайтеся, що шланг не перегнутий
та не перекручений.
Через отвори в
головці відпарювача
тече вода.
У шлангу утворився
конденсат.
Ніколи не експлуатуйте відпарювач у
горизонтальному положенні. Потримайте
шланг розтягнутим вертикально та
дочекайтеся, доки конденсат повернеться
у пароутворювач.
* залежно від моделі
1800133082-03 IS8300 _110x154 24/11/14 11:34 Page94
Page 97

95
UK
Якщо не вдалося встановити причину несправності, зверніться до
авторизованого центру технічного обслуговування www.tefal.com
Опора для прасування
від'єднується під час
використання.
Опора для прасування не
була належним чином
зачеплена за скобу.
Прослідкуйте за тим, щоб опора для
прасування була надійно зачеплена за
скобу. Вона не повинна рухатись ані у
горизонтальному, ані у вертикальному
напрямку. Прослідкуйте за тим, щоб три
сегменти стійки були повністю висунуті, та
щоб дві затискачі були надійно
зафіксовані.
Шланг булькотить. Ви використовуєте
головку відпарювача біля
землі, і у шлангу
утворюється конденсат.
Частіше підіймайте шланг та витягніть
стійку на повну висоту, щоб запобігти
утворенню конденсату.
Вода виливається з
бачка.
Ви використовуєте
головку відпарювача біля
землі, і у шлангу
утворюється конденсат.
Частіше підіймайте шланг та витягніть
стійку на повну висоту, щоб запобігти
утворенню конденсату.
Помаранчевий
індикатор «Anti calc»
блимає.
Ви не натиснули кнопку
перезапуску індикатора
«Anti calc» після
видалення накипу.
Натисніть кнопку перезапуску «Anti calc»
на панелі управління.
Пара виходить з-під
ковпачка для
видалення накипу.
Ковпачок для видалення
накипу не затягнутий
належним чином.
Дайте приладу охолонути протягом 2
годин та затягніть ковпачок для видалення
накипу.
Ковпачок для видалення
накипу пошкоджений.
Зв'яжіться з авторизованим центром
технічного обслуговування (див. контактну
інформацію у кінці сторінки).
1800133082-03 IS8300 _110x154 24/11/14 11:34 Page95
Page 98

• Temizlik ve bakım, gözetim altında olmayan
çocuklar tarafından yapılmamalıdır.
• Cihaz, yere düşmesi, hasar ya da sızıntı belirtisi
göstermesi ya da düzgün çalışmaması
durumunda kullanılmamalıdır. Cihazınızı hiçbir
zaman sökmeyin. Tehlikeleri önlemek için yetkili
servis merkezinde incelettirin.
• Bu cihaz yalnızca evde ve iç mekanlarda kullanılmak üzere tasarlanmıştır.
Cihazın ticari amaçlarla, uygunsuz veya talimatlara uyulmadan
kullanılması durumunda üretici sorumluluk kabul etmez ve garanti
şartları uygulanmaz.
• Bir zeminde kullanılan bir cihazdır, kullanım sırasında asla taşımayın.
• Hortum ve nozülü her zaman su haznesinin üzerinde yükseltilmiş olarak
tutun.
• Güvenliğiniz için, bu cihaz geçerli standart ve düzenlemelere uygundur
(Düşük Gerilim, Elektromanyetik Uyumluluk ve Çevre Direktifleri).
• Bu işaretle işaretlenen ya da bu işarete yakın yüzeyler cihazın
kullanımı sırasında çok sıcaktır. Cihaz soğumadan bu yüzeylere
dokunmayın.
• Sıcak su ya da buhar deliklerinden çıkan buharla temas riskini azaltmak
için, her kullanım öncesi vücudunuzdan uzak tutarak ve çalıştırarak
cihazı kontrol edin.
• Buhar yalnızca yukarı ve aşağı dikey hareket halindedir. Buhar kafasını
asla yatay bir konumda kullanmayın ya da geriye doğru yatırmayın, aksi
halde sıcak su boşalabilir.
• Elektrik çarpması riskini azaltmak için, cihazı ya da buhar kafasını suya
ya da başka sıvılara batırmayın.
• Cihazın fişi prize takılmadan ya da prizden çıkartılmadan önce daima
kapatılmalıdır. Fişi prizden çıkarırken asla kabloyu çekerek çıkarmayın,
96
GÜVENLİK TALİMATLARI
İlk kez kullanmadan önce talimatları lütfen
dikkatlice okuyun ve güvenli bir yerde saklayın.
• Güç kaynağına bağlıyken, özellikle etrafında
çocukların olması durumunda cihazı birkaç
dakikalığına bile olsa asla gözetimsiz bırakmayın.
• Şu durumlarda cihazınızın fişini mutlaka çekin: Su
haznesini doldurmadan ya da çalkalamadan
önce, temizlemeden önce, her kullanımdan
sonra.
• Buhar emisyonu nedeniyle cihaz kullanılırken
özen gösterilmelidir.
• Bu cihaz fiziksel, duyusal veya zihinsel engeli olan
(erişkin veya çocuk) veya cihaz hakkında hiçbir
tecrube veya bilgisi olmayan şahıslar tarafından,
guvenliklerinden sorumlu bir kişinin gözetimi
altında olmadıkları veya bu kişi tarafından cihazın
kullanımı konusunda eğitilmedikleri takdirde
kullanılmamalıdır.
• Cihazın güvenli şekilde kullanımı ve ihtiva ettiği
riskler konusunda gerekli bilgilendirme ve
gözetim sağlandığı takdirde bu cihaz 8 yaş ve
üzeri çocuklar, fiziksel, duyusal veya zihinsel
engeli bulunan kişiler ya da deneyimsiz veya
bilgisi kısıtlı kişiler tarafından kullanılabilir.
• Cihazla oynamadıklarından emin olmak için,
çocukların gözetim altında tutulması tavsiye
edilir.
TÜRKÇE KULLANMA ve TANITMA KILAVUZU
1800133082-03 IS8300 _110x154 24/11/14 11:34 Page96
Page 99

97
TR
• Temizlik ve bakım, gözetim altında olmayan
çocuklar tarafından yapılmamalıdır.
• Cihaz, yere düşmesi, hasar ya da sızıntı belirtisi
göstermesi ya da düzgün çalışmaması
durumunda kullanılmamalıdır. Cihazınızı hiçbir
zaman sökmeyin. Tehlikeleri önlemek için yetkili
servis merkezinde incelettirin.
ÖNEMLİ TAVSİYELER
• Bu cihaz yalnızca evde ve iç mekanlarda kullanılmak üzere tasarlanmıştır.
Cihazın ticari amaçlarla, uygunsuz veya talimatlara uyulmadan
kullanılması durumunda üretici sorumluluk kabul etmez ve garanti
şartları uygulanmaz.
• Bir zeminde kullanılan bir cihazdır, kullanım sırasında asla taşımayın.
• Hortum ve nozülü her zaman su haznesinin üzerinde yükseltilmiş olarak
tutun.
• Güvenliğiniz için, bu cihaz geçerli standart ve düzenlemelere uygundur
(Düşük Gerilim, Elektromanyetik Uyumluluk ve Çevre Direktifleri).
• Bu işaretle işaretlenen ya da bu işarete yakın yüzeyler cihazın
kullanımı sırasında çok sıcaktır. Cihaz soğumadan bu yüzeylere
dokunmayın.
• Sıcak su ya da buhar deliklerinden çıkan buharla temas riskini azaltmak
için, her kullanım öncesi vücudunuzdan uzak tutarak ve çalıştırarak
cihazı kontrol edin.
• Buhar yalnızca yukarı ve aşağı dikey hareket halindedir. Buhar kafasını
asla yatay bir konumda kullanmayın ya da geriye doğru yatırmayın, aksi
halde sıcak su boşalabilir.
• Elektrik çarpması riskini azaltmak için, cihazı ya da buhar kafasını suya
ya da başka sıvılara batırmayın.
• Cihazın fişi prize takılmadan ya da prizden çıkartılmadan önce daima
kapatılmalıdır. Fişi prizden çıkarırken asla kabloyu çekerek çıkarmayın,
1800133082-03 IS8300 _110x154 24/11/14 11:34 Page97
Page 100

1 • Giysi buhar aleti montajı
Direk montajı
1. 2 sabitleme ayağını bir "klik" sesi duyuncaya kadar çekin ve döndürün. (şek. 1)
2. Direğin tabanı üzerindeki direk bağlama vidasını sökün.
3. Direği kablo tutucu arkada kalacak şekilde tutun. 2 direk klipsinin kilitlerinin açık olup
olmadığını kontrol edin. (şek. 3)
4. Direğin delikleri ve taban aynı seviyeye gelinceye kadar direği aşağı doğru bastırarak tabana
sokun, böylece vidayı tekrar takabilirsiniz. Delikler hizalanmazsa, direğin klipslerinin iyi
durumda olduğunu ve kilitlerinin açık olup olmadığını kontrol edin. (şek. 4)
5. Direk bağlama vidasını direk tabana sağlam bir şekilde sabitlenecek şekilde tekrar vidalayın.
6. Direği yukarı doğru kaydırarak maksimum yüksekliğe ayarlayın. Direğin 3 parçasının
tamamen uzatılmış olduğundan emin olun, ardından 2 klipsi kilitleyin. (şek. 6)
Entegre Askı montajı
1. Askının alt kısmındaki askı bağlama vidasını sökün.
2. Askıyı, askı tutucu cihaz kontrol paneliyle aynı tarafta oluncaya kadar tutun.
3. Askıyı direğin üst tarafına dikey olarak takın. Askının alt tarafındaki ve direkteki delikler aynı
düzeyde olmalıdır. (şek. 5)
4. Vidayı tekrar yerleştirin ve askı direğe sağlam bir şekilde sabitlenecek şekilde vidalayın.
5. Buhar kafasını entegre askının üst tarafına yerleştirin.
AÇIKLAMA
1. Buhar kafası
2. Entegre askı
3. Pantolon klipsleri*
4. Buhar kafası kancası
5. Askı tutucu
6. Askı bağlantı vidası
7. Direk kilitleme klipsleri
8. Teleskopik direk
9. Buhar hortumu
10. Elektrik kablosu kancası
11. Elektrik kablosu
12. Taşıma sapı
13. Su haznesi tutacağı
14. Çıkarılabilir su haznesi
15. Kumanda paneli
16. Sabitleme ayağı (x2)
17. Direk bağlantı vidası
18. Taban kilidini açma düğmesi
KULLANMADAN ÖNCE
98
bunun yerine prizi tutun ve çekerek prizden çıkartın.
• Cihazı kaldırmadan önce soğumaya bırakın.
• Güç kablosunun keskin kenarlar veya sıcak yüzeylerle temas etmesine
izin vermeyin.
• Çalıştırma sırasında hortumu bağlamayın. Cihazı kullanırken hortum
adaptörünün çıkarılması durumunda haşlanabilirsiniz.
• Hortumu kullanırken üniteyi asmaya çalışmayın.
• TEFAL tarafından temin edilmemiş olan yabancı aksesuarların
kullanılması önerilmez ve yangın, elektrik çarpması veya yaralanmalara
neden olabilir.
• Yoğunlaşma nedeniyle sıcak su ihtiva edebilecekleri için aksesuarları
veya bağlantıları değiştirirken dikkatli olun. Sıcak suyla temastan
kaçınmak için bağlantıların soğumuş olduklarından emin olun.
• Sıcak parçalar, sıcak su ya da buharla temas edilmesi yanıklara neden
olabilir. Bir buhar cihazını boşaltırken dikkatli olun. Haznede ya da
cihazın iç kısmında sıcak su olabilir.
• Buharı insanlara, hayvanlara buhar yöneltmeyin veya giyildikleri sırada
kıyafetleri buharlamayın.
• Buhar hortumunu kesmeyin ya da uzatmaya çalışmayın.
• Bir ana uzatma kablosu kullanıyorsanız, topraklanmış soketle istenen
amperaja düzgün bir şekilde derecelenmiş ve tamamen uzatılmış
olduğundan emin olun.
• Herhangi bir açıklığa ya da hortuma herhangi bir nesne düşürmeyin ya
da sokmayın.
• Eldiven yalnızca bu giysi buhar aletiyle birlikte kullanılmalıdır (*modele
göre değişir). Üretici herhangi bir uygunsuz kullanım için hiçbir
sorumluluk kabul etmez.
ÇEVREYİ KORUYUN!
i Cihazınız çok sayıda yeniden üretilebilen veya geri dönüştürülebilen parça içerir.
‹ Atık geri dönüştürme merkezlerine götürün.
* modele göre değişir
1800133082-03 IS8300 _110x154 24/11/14 11:34 Page98
 Loading...