

Page 1
www.tefal.com
EXPRESS COMPACT/
EXPRESS COMPACT
ANTI-CALC*
DE
EN
FR
NL
ES
PT
IT
DA
NO
SV
FI
TR
EL
PL
CS
SK
HU
SL
RU
UK
HR
RO
ET
LT
LV
DE * je nach Modell
EN * depending on model
FR * selon modèle
NL * al naar gelang het model
ES * según el modelo
PT * consoante modelo
IT * a seconda del modello
DA * afhængig af model
NO * avhengig av modell
SV * beroende på modell
FI * mallista riippuen
TR* modele göre
EL * ·Ó¿ÏÔÁ· Ì ÙÔ ÌÔÓÙ¤ÏÔ
PL * zale˝nie od modelu
CS * podle modelu
SK * v závislosti od modelu
HU * modelltŒl függŒen
SL * odvisno od modela
RU * в зависимости от
модели
UK * залежно від моделі
HR * ovisno o modelu
RO * în func—ie de model
T * sõltuvalt mudelist
LV * atbilstoši modelim
LT * pagal modelį
1800129367 GV73XX E0 A11_110x154 01/03/13 09:50 Page2
Page 2
12
12a
12d
12e*
12b
12c
12f
1
2
4
5
6
9
3
7
13*
8
11*
10
10
1800129367 GV73XX E0 A11_110x154 01/03/13 09:50 Page3
Page 3
fig. 1 fig. 2 fig. 3
fig. 4 fig. 5 fig. 6
fig. 7 fig. 8
fig. 9
fig. 10 fig. 11
fig. 12
1800129367 GV73XX E0 A11_110x154 01/03/13 09:50 Page4
Page 4
fig. 13
Fig A
fig. 14
1/4
1/4
Fi
g
B
1800129367 GV73XX E0 A11_110x154 01/03/13 09:50 Page5
Page 5
1800129367 GV73XX E0 A11_110x154 01/03/13 09:50 Page6
Page 6
1
EN
Important recommendations
Safety instructions
• Please read these instructions carefully before first use.
This product has been designed for domestic use only.
Any commercial use, inappropriate use or failure to
comply with the instructions, the manufacturer accepts
no responsibility and the guarantee will not apply.
• Never unplug the appliance by pulling the power cord.
Always unplug your appliance:
- before filling the water tank or rinsing the boiler,
- before cleaning the appliance,
- after each use.
• The appliance must be used and placed on a flat, stable,
heat-resistant surface. When you place the iron on the
iron rest, make sure that the surface on which you place
it is stable.
• This appliance is not intended to be used by persons
(including children) with reduced or impaired physical,
sensory or mental capacities or persons lacking
appropriate knowledge or experience, unless a person
responsible for their safety provides either supervision or
appropriate instructions concerning use of the appliance
prior to its use.
• Children should be supervised to ensure they do not play
with the appliance.
• This appliance may be used by children aged 8 or over
and persons lacking appropriate knowledge or
experience or persons with reduced or impaired
1800129367 GV73XX E0 A11_110x154 01/03/13 09:50 Page1
Page 7

2
physical, sensory or mental capacities provided that
they have been thoroughly instructed regarding use
of the appliance, are supervised, and understand the
risks involved. Children must not be allowed to play
with the appliance. Cleaning and maintenance must
not be carried out by children unless they are aged 8
or over and are supervised. Keep the appliance and
power cord out of the reach of children under 8 years
of age.
• The surfaces of your appliance can reach very high
temperatures when functioning, which may cause burns.
Do not touch the hot surfaces of the appliance
(accessible metal parts and plastic parts adjacent to the
metallic parts).
• Never leave the appliance unattended :
- when it is connected to the mains,
- until it has cooled down (around 1 hour).
• Before rinsing the boiler/rinsing the anti-scale valve
(depending on the model), wait until the appliance is
completely cold and has been unplugged for at least 2
hours before unscrewing the boiler rinse cap/ the scale
collector cover.
• Warning: if the boiler cap or the boiler rinse cap
(depending on the model), is dropped or severely
knocked, have it replaced by an Approved Service Centre,
as it may be damaged.
• When rinsing the boiler, never fill it directly from the
tap.
• The boiler cap mus not be opened during use.
• The appliance must not be used if it has been dropped,
if it has any visible damage, if it leaks, or if it functions
1800129367 GV73XX E0 A11_110x154 01/03/13 09:50 Page2
Page 8

3
abnormally in any way. Do not attempt to dismantle
your appliance: have it examined at a Tefal Approved
Service Centre to avoid any danger.
• Check the electrical power and steam cords for signs of
wear or damage prior to use. If the electrical power cord
or the steam cord is damaged, it must be replaced by
Tefal Approved Service Centre to avoid any danger.
• For your safety, this appliance conforms to all applicable regulations (Low Voltage Directive,
Electromagnetic Compatibility, Environment, etc).
• Your steam generator iron is an electrical appliance: it must be used under normal conditions of use. It is
designed for domestic use only.
• It is equipped with 2 safety systems:
- a pressure release valve designed to avoid excessive pressure. In the event of malfunction, the valve
releases excess steam.
- a thermal fuse to avoid overheating.
• Always plug your steam generator iron:
- into a mains circuit with voltage between 220 V and 240 V (Alternating current only),
- a socket outlet with ab earth connection.
Connecting to the wrong voltage may cause irreparable damage to the appliance and will invalidate your
guarantee.
If you are using a mains extension lead, ensure that it is correctly rated (16A) with an earth connection,
and is fully extended.
• Completely unwind the power cord before plugging into an earthed socket outlet.
• The sole plate of your iron and the iron rest on the base unit can reach extremely high temperatures, and
can cause burns: do not touch them. Never touch the electrical power cords with the sole plate of the
iron.
• Always use a vented/mesh ironing board and be careful of hot steam when roning close to the edges of
the board.
• Your appliance emits steam, which can cause burns. Always handle the iron with care, especially when
ironing vertically. Never direct the steam towards people or animals.
• Never immerse your steam generator iron in water or any other liquid. Never place it under a running tap.
PLEASE RETAIN THIS INSTRUCTION
BOOKLET FOR FUTURE REFERENCE
1800129367 GV73XX E0 A11_110x154 01/03/13 09:50 Page3
Page 9

Locking system for retaining the iron
on the base - Lock system (depending
on model)
• Your steam generator is equipped with a retaining
hoop which locks the iron on its base for easier
transport and storage:
- Locking - fig.1
- Unlocking - fig.2
• To carry your steam generator by the iron handle:
- Place the iron on the iron rest of the generator and
raise the retaining hoop over the iron until it locks
into place (audible click) - fig.1.
- Grasp the handle of the iron to carry your steam
generator - fig.3.
Preparation
What water may be used ?
• Tap water :
Your appliance has been designed to function using
untreated tap water. If your water is very hard, we
recommend you use a mix of 50% untreated tap
water and 50% distilled water available in most
shops.
• Types of water not to use :
Heat concentrates the elements contained in water
during evaporation. The types of water listed below
may contain organic waste, mineral or chemical
elements that can cause spitting, brown staining or
premature wear of the appliance: water from clothes
dryers, scented or softened water, water from
refrigerators, batteries, air conditioners, rain water,
boiled, filtered or bottled water. These types of
water should not be used in your TEFAL iron. Also
only use distilled water as advised above.
• Always remember :
Never use rainwater or water containing additives
(like starch, fragrance or water from domestic
appliances). Such additives can affect the steam
properties and at high temperature, form deposits in
the steam generator chamber which are likely to
stain your washing.
Filling the water tank
• Place your steam generator on a stable, flat heat-
resistant surface.
• We recommend that you use a mesh type ironing
board to allow steam to pass through the
garments for better ironing results and also to
prevent steam venting sideways.
• Check that your appliance is unplugged and open
the flap on the tank.
• Pour in untreated tap water up to the max mark fig.4.
Using your steam generator
The first time the appliance is used, there may be
some fumes and smell but this is not harmful. They
will not affect use and will disappear rapidly.
• Completely unwind the power cord and the steam
cord from its storage space .
• Tilt the locking ring of the iron forwards to release
the safety catch (according to the model).
• Plug in your steam generator to an earthed socket.
• Press on the on / off switch - Fig.14. The green
light (located on the control panel) flashes and the
boiler heats up - fig.9. When the green “steam
ready” light stops flashing (after 2 minutes
approximately), the appliance is ready.
• When starting, and regularly while it is being used,
your steam generator's electric pump injects water
into the boiler. It makes a noise but this is quite
normal. You may also hear a clicking noise which is
the steam valve opening. Again this is normal.
Use
Steam ironing
Do not place the iron on a metal support.When
taking a break from ironing, always place the iron
on the iron rest plate of the unit. It is equipped
with non-slip pads and has been designed to
withstand high temperatures.
• Place the iron's temperature control dial according
to the type of fabric to be ironed (see table below).
• The thermostat light comes on.
Important:
whenever you start using your iron and whenever
you reduce the temperature during use, the iron is
fully ready for use when its thermostat light goes
out and when the green light l ocated on the
control panel stops flashing and remains on.
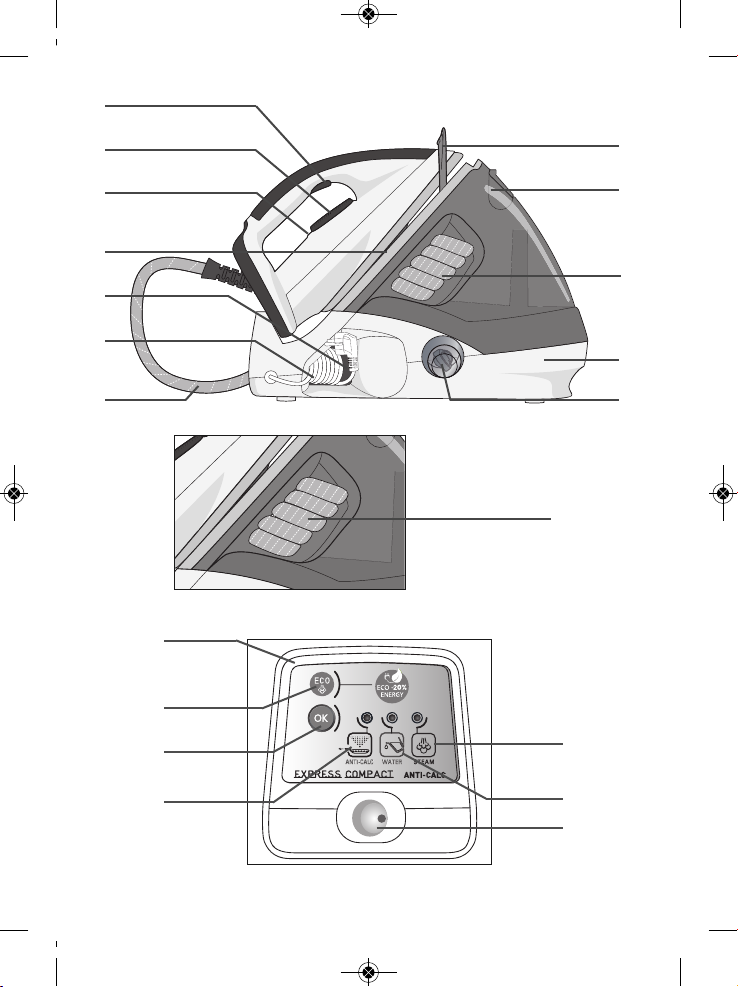
1
. Steam control button
2. Iron temperature adjustment dial
3. Iron thermostat light
4
. Iron rest
5. Power cord storage space
6. Power cord
7. Water tank
8. Steam generator boiler (in the base unit)
9. Iron-base steam cord
10. Steam cord storage compartment
1
1. Scale collector (depending on model)
12. Control panel
a - OK button
b
- “Steam ready” light
c - “water tank e mpty” light
d - “Anti-calc” indicator
e - ECO mode button (depending on model)
f - Illuminated on/off switch
13. Lock-System hoop (depending on model)
Description
80
EN • PLEASE REFER TO SAFETY INSTRUCTIONS AT THE BEGINNING
OF THIS BOOKLET BEFORE USING YOUR APPLIANCE
1800129367 GV73XX E0 A11_110x154 01/03/13 09:50 Page80
Page 10

81
During use, when you increase the temperature of
the iron, you can start ironing immediately.
• While ironing, the light on top of the iron and the
s
team ready light turn on and off, as the
temperature adjusts without interrupting ironing.
• To obtain steam, press on the steam control button
u
nder the iron handle and keep it pressed - fig.5.
The steam will stop when you release the button.
• Always spray starch onto the reverse side of the
fabric to be ironed.
Setting the temperature
To prime the steam circuit, either before using the
iron for the first time, or if you have not used the
steam function for a few minutes, press the steam
control button several times in a row, holding the
iron away from your clothes. This will enable any
cold water to be ejected from the steam circuit.
• Iron temperature setting:
- Start with the fabrics to be ironed at a low
temperature (•) and finish with those which need
higher temperatures (••• or Max).
- Mixed fibre fabric: set the ironing temperature to
the setting for the most delicate fabric.
• If you put your thermostat in the “min” position,
the iron does not become hot.
ECO MODE: Your steam generator iron has an
ECO mode function which uses less power whilst still
guaranteeing a sufficient steam flow for you to iron
your garments properly. In order to use this function,
once the thermostat of your iron has been correctly
set (see table above), press on the ECO mode button
located on the control panel. The ECO mode can be
used on all types of fabrics, nevertheless for very thick
or very creased fabrics, we recommend that you use
the normal steam flow for best results - Fig 13.
Dry ironing
• Do not press the steam control button under the
iron handle.
Vertical steam ironing
Recommendations : for fabrics other than linen or
cotton, hold the iron a few centimetres from the
garment to avoid burning the fabric.
• Set the iron temperature control dial to the MAX
position.
• Hang the garment on a coat hanger and hold the
fabric slightly taut with one hand.
As steam is very hot : never attempt to remove
creases from a garment while it is being worn,
always hang garments on a coat hanger.
•
Holding the iron in a vertical position, tilted slightly
forwards, press repeatedly on the steam control
button - fig.5 (underneath the iron handle) moving
t
he iron from top to bottom - fig.6.
Refilling the water tank
•
When the red "water tank empty" light starts
flashing, it means that you have no more steam fig.11. The water tank is empty.
•
Switch off then unplug the steam generator and
open the flap on the tank.
• Pour in untreated tap water up to the max mark fig.4.
• Reconnect then switch the steam generator on
again by pressing the on/off switch Fig. 14.
Maintenance and cleaning
Cleaning your generator
Before cleaning, ensure your steam generator is
unplugged and that the soleplate and the iron
have cooled down.
• Do not use detergent or descaling products for
cleaning the soleplate base-unit.
• Never hold the iron or the base unit under the tap.
• Regularly clean the soleplate with a damp, nonmetallic washing up pad.
• Clean the plastic parts of the appliance
occasionally with a soft cloth.
Easy descaling of your steam
generator (fig. A)
Do not use any descaling substances (vinegar,
industrial descaling products, etc.) when rinsing
the anti-scale valve : they could damage it.
Before emptying your steam generator, it must
always be left to cool for 2 hours to avoid any
risks of scalding.
To extend the life of your steam generator and avoid
scale on your ironing, your steam generator is
equipped with a built-in scale collector. This valve,
located in the tank, automatically removes the scale
that forms inside.
Operation:
• An orange “anti-scale” light located on the control
panel starts blinking to tell you that the anti-scale
valve needs rinsing.
Important: This operation must not be carried
out unless the steam generator has been
unplugged for at least two hours and has cooled
down completely. To carry out this operation, the
steam generator must be close to a sink as water
may come out of the tank when it is opened.
• Once the steam generator has cooled down
completely, remove the scale collector cover.
• Unscrew the anti-scale valve and remove it from
the housing; it contains the scale that has built up
in the tank .
• To clean the valve properly, just rinse it under
running water to remove the scale it contains .
T YPE DE TISSUS Réglage du bouton de température
L
aine, viscose
Synthétiques, soie
(polyester, acetate, acrylique, polyamide)
RÉGLAGE TEMPÉRATURE ET DÉBIT VAPEUR EN FONCTION DU TYPE DE TISSU À REPASSER :
Lin, coton
TEXTIELSOORT
Linnen, Katoen
Wol, Viscose
Synthetische stoffen, Zijde
(
polyester, acetat, acryl., polyamide)
DE TEMPERATUURREGELAAR EN DE STOOMREGELAAR INSTELLEN OP DE TE STRIJKEN TEXTIELSOORT:
FR
NL
DE
EN
GEWEBEART
Leinen, Baumwolle
Wolle, Viskose
S
ynthetik, Seide
(
polyester, Acetat, Acryl, Polyamid)
STELLEN SIE DEN TEMPERATURSCHALTERDES BÜGELEISENS UND DES BOILERS
AUF DIE ZU BÜGELNDE GEWEBEART EIN
TY
PE OF FABRICS
Linen, cotton
Silk,
Wool, Viscose
Synthetics
(polyester, acetate, acrylic, polyamide)
SETTING THE TEMPERATURE AND STEAM OUTPUT ACCORDING TO TYPE OF FABRIC TO BE IRONED:
M
ATERIÁ L
Len, Bavlna
Vlna
, Hedvábí
, Viskóza
S
yntetika
(
polyesterové,
ace
t
átové, akrylové, polyamidové
látky)
NASTAVTE TEPLOTU A PARNÍ VYKON PODLE TYPU TKANINY, KTERÁ BUDE ŽEHLENA :
T
KANINE
Lan, pamuk
Vuna,
S
vila,
viskoza
SINTETIKA (
Poliester,
Ace
tat, Akril,Poliamid)
POSTAVLJANJE TEMPERATURE I PARE OVISNO O TIPU TKANINE KOJU GLAčATE.
L
ÁTKY
Ĺan, Bavlna
Vlna
, Hodváb
, Viskóza
Syntetika
(z polyesteru, acetátu,
akrylu, nylónu)
NASTAVENIE TEPLOTY A PRIETOKU PARY P
Кип ткани
Лен
Ш
ерсть
Шелк,
Вискоза
Синтетика
Полиэстер,
,
Ацетат,Акрил,
Полиамид
РЕГУЛИРОВКА ТЕМПЕРАТУРЫ В ЗАВИСИМОСТИ ОТ ТИПА ПРОГЛАЖИВАЕМОЙ ТКАНИ:
TIPO DE TEJIDOS
AJUSTE DEL BOTÓN DE TEMPERATURA
Lana, viscosa
Sintéticos, seda
(poliéster, acetato, acrílico, poliamida)
AJUSTE DE LA TEMPERATURA EN FUNCIÓN DEL TIPO DE TEJIDO QUE VAYA A PLANCHAR:
Lino, algodón
ES
TIPO DE TECIDOS
REGULAÇÃO DO BOTÃO DE TEMPERATURA
L
ã, viscose
S
intéticos, seda
(poliéster, acetato, acrílico, poliamida)
R
EGULAÇÃO DA TEMPERATURA EM FUNÇÃO DO TIPO DE TECIDO A ENGOMAR
Linho, algodão
PT
TIPO DI TESSUTO
REGOLAZIONE DELLA MANOPOLA DELLA TEMPERATURA
Lana / Viscosa
Tessuti sintetici / Seta
(poliéster, acetato, acrílico, poliamida)
REGOLAZIONE DELLA TEMPERATURA IN FUNZIONE DEL TIPO DI TESSUTO DA STIRARE:
L
ino / Cotone
IT
VRSTE TKANIN
NASTAVITEV GUMBA ZA TEMPERATURO
Volna, viskoza
Sintetika, svila
(poliester, acetat, akril, poliamid)
N
ASTAVITEV TEMPERATURE IN PARNEGA PRETOKA GLEDE NA VRSTO TKANINE ZA LIKANJE:
Instelling van de temperatuurregelaar van het strijkijzer
Einstellung des temperaturschalters
Setting temperature control
1800129367 GV73XX E0 A11_110x154 01/03/13 09:50 Page81
Page 11

•
If you find that scale is building up on the
collector, from time to time you can leave it to
soak in a container filled with lemon juice or white
v
inegar for around 4 hours. Rinse afterwards under
running water.
• Put the valve back into its housing and screw it in
c
ompletely to keep it watertight.
• Refit the scale collector cover.
• In addition to this regular maintenance, we
recommend complete rinsing of the tank every six
months or after every 25 uses. To do this:
• Check that the steam generator is cold and has
been unplugged for more than 2 hours.
• Place the steam generator on the edge of the sink
and put the iron standing upright alongside it.
• Remove the collector cover and unscrew the scale
collector.
• Hold your steam generator at an angle and use a
jug to fill the boiler with with 1/4 litre of tap water.
• Shake the case for a few seconds then empty it
completely into the sink.
• Fit the collector back in its housing and screw it on
tightly to ensure it is watertight.
• Put the scale collector cover back in place.
The next time you use your iron, press the “OK”
button on the control panel to turn off the orange
“anti-scale” light Fig. 12.
Rinsing the boiler, once a month
(Fig. B)
Before cleaning, ensure your steam generator is
unplugged and that the soleplate and the iron
have cooled down.
• To extend the efficient operating life of your boiler
and avoid scale particles on your linen, your
generator is equipped with an orange “boiler rinse”
warning light that flashes on the control panel
after about 10 uses.
•
If the orange “boiler rinse” warning light flashes,
you can continue ironing normally but remember to
rinse the boiler first the next time that you use it.
• Before proceeding, check that the generator is
c
ool and unplugged for more than 2 hours.
• Place the steam generator on the edge of your
sink, with the iron placed to one side, standing on
i
ts heel.
• Unscrew anti-clockwise a quarter of a turn the
boiler rinse cap.
• Using a coin, gently unscrew the boiler rinse cap.
• Holding the steam generator in a tilted position,
and using a jug, fill the boiler with ¼ litre of
untreated tap water .
• Shake the base unit for a few moments and then
empty it completely into your sink.
• To obtain the best results, we recommend that this
operation is done twice.
• Screw back and tighten up the boiler rinse cap with
a coin.
• Put the boiler rinse cap cover back in place.
• The next time you use the generator hold down
the “OK” button for a few seconds to turn off
the orange light Fig. 12.
Storing your generator
• Warning: do not touch the soleplate while still hot.
• Fold the carrying arm down onto the iron until it
clicks into position, ensuring that your iron is safely
locked onto its housing (depending on model).
• Store the electrical cord in its storage place - fig.7.
• Store the steam cord away in its compartment fig.8.
• Leave the iron (and the iron rest) to cool down for
1 hour before storing it away.
82
Environment protection first !
i
Your appliance contains valuable materials which can be recovered or recycled.
‹ Leave it at a civic waste disposal centre.
1800129367 GV73XX E0 A11_110x154 01/03/13 09:50 Page82
Page 12

83
White streaks come
through the holes in the
soleplate.
Your boiler has a build-up of scale because it
has not been rinsed out regularly.
Rinse out the boiler.
Brown streaks come through
the holes in the soleplate
and stain the linen.
You are using chemical descaling agents or
additives in the water for ironing.
Never add this type of product in the water tank or
in the boiler (see § “for what water may be used”).
Contact an Approved Service Centre.
The soleplate is dirty or
brown and may stain the
linen.
You are ironing at too high a temperature. See our recommendations regarding temperature
control setting.
Your linen is not rinsed sufficiently or you have
ironed a new garment before washing it.
Ensure linen is rinsed thoroughly to remove any
soap deposits or chemicals on new garments
which may be sucked up by the iron.
You are using starch. Always spray starch on the reverse side of the
fabric to be ironed.
There is no steam or there
is little steam.
The water tank is empty (red light is flashing). Fill the tank and press the "OK" button until the
indicator goes out.
The soleplate temperature is set to the
maximum.
The generator is working but steam is very hot and
dry As a consequence, it is less visible.
Steam escapes from the
rinse plug.
The anti-scale valve plug has not been
tightened correctly.
Tighten the anti-calc valve plug correctly.
The anti-scale valve plug is damaged. Contact an Approved Service Centre to order a
new rinse plug seal.
The generator is faulty. Stop using the generator and contact an Approved
Service Centre.
The red “water tank empty”
light is flashing.
The water tank is empty. Press the “OK” button on the control panel until
the warning light goes out.
Steam or water escapes
under the appliance.
The generator is faulty. Stop using the generator and contact a Approved
Service Centre.
While ironing your steam
generator can make a loud
electric pump noise.
The “anti calc” indicator is
flashing.
This is normal and is the pump injecting water
into the boiler, or the steam valve opening.
Your generator requires descaling.
If necessary refill your water tank (see page 3 for
filling the water tank).
Press the “OK” button on the control panel until
the warning light goes out. The next time you use
your iron, press and hold the "OK" button for a few
seconds on the control panel to turn off the
orange "anti-scale" light.
PROBLEMS CAUSES SOLUTIONS
The steam generator does
n
ot switch on or the iron
indicator and ON/OFF
indicator do not switch on.
The appliance is not switched on. Check that your appliance is correctly plugged in
a
nd press the illuminated on/off switch.
W
ater runs out of the holes
in the soleplate.
W
ater has condensed in the pipes because you
are using steam for the first time or you have
n
ot used it for some time.
T
he soleplate is not hot enough.
P
ress on the steam control button away from your
ironing board until the iron produces steam.
W
ait for the thermostat light to go out before
activating the steam button.
Water streaks appear on
the linen.
Your ironing board is saturated with water
because it is not suitable for use with a steam
generator.
Check that your ironing board is suitable. We
recommend that you use a mesh type ironing
board.
A problem with your generator ?
If you have any problems or queries please call our Customer Relations team first for expert help and advice: 0845 602 1454 - UK /
(01) 677 4003 - ROI or consult our website - www.tefal.co.uk
1800129367 GV73XX E0 A11_110x154 01/03/13 09:50 Page83
Page 13

84
1. Dampftaste
2. Temperaturwahlschalter für das
Bügeleisen
3. Temperaturkontrollleuchte des
Bügeleisens
4. Bügeleisenablage
5. Kabelstaufach
6. Netzkabel
7. Wasserbehälter
8. Boiler zur Dampferzeugung (im Inneren
des Gehäuses)
9. Dampfkabel
10. Aufbewahrungsfach des Dampfkabels
11. Kalk-Kollektor (je nach Modell)
12. Bedienungsfeld
a - Wiedereinschalttaste “OK”
b - “Dampfgenerator betriebsbereit”
Kontrollleuchte
c - "Wasserbehälter leer" Kontrollleuchte
d - „Anti-Kalk“ Kontrollleuchte
e - ECO-Taste (je nach Modell)
f - Beleuchteter Ein-/Ausschalter
13. Haltebügel zum Fixieren des
Bügeleisens auf dem Dampfgenerator
(je nach Modell)
Beschreibung
DE • BITTE LESEN SIE DIE SICHERHEITSANWEISUNGEN AM ANFANG
DER BROSCHÜRE, BEVOR SIE IHR GERÄT BENUTZEN.
System zum Fixieren des
Bügeleisens auf dem
Dampfgenerator - “Lock - System”
(je nach Modell)
• Ihr Dampfgenerator ist mit einem
Verriegelungsbügel für das Eisen auf dem
Gehäuse ausgestattet, um den Transport
und das Abstellen zu erleichtern:
- Verriegelung - Abb.1.
- Entriegelung - Abb.2.
• Transport Ihres Dampfgenerators am Griff
des Bügelautomaten:
- stellen Sie das Bügeleisen auf die
Bügeleisenablage des Dampfgenerators, und
klappen Sie den Haltebügel über das
Bügeleisen. Die Verriegelung muss hörbar
einrasten - Abb.1.
- nehmen Sie das Bügeleisen am Griff hoch
und transportieren Sie den Dampfgenerator
auf diese Weise - Abb.3.
Vorbereitung
Welches Wasser verwenden ?
• Leitungswasser:
Ihr Gerät wurde für den
Betrieb mit Leitungswasser entwickelt. Wenn
Ihr Wasser sehr kalkhaltig ist, mischen Sie
50% Leitungswasser mit 50% destilliertem
Wasser aus dem Handel. In einigen
Küstenregionen kann der Salzgehalt Ihres
Wassers hoch sein. Verwenden Sie in diesem
Fall nur destilliertes Wasser.
• Enthärter:
Es gibt mehrere Arten von
Enthärtern und das Wasser der meisten kann
in Ihrer Dampfbügelstation verwendet
werden. Einige Enthärter und vor allem
diejenigen, die chemische Produkte wie Salz
verwenden, können jedoch weiße oder
braune Spuren verursachen. Dies ist vor allem
bei Tischwasserfiltern der Fall.
Wenn Sie diese Art von Problem haben,
empfehlen wir Ihnen, herkömmliches
Leitungswasser oder Wasser aus der Flasche
zu verwenden. Wenn das Wasser
ausgetauscht ist, sind mehrere
Anwendungen erforderlich, um das Problem
zu lösen. Es wird empfohlen, die
Dampffunktion das erste Mal auf Wäsche zu
verwenden, die entsorgt werden kann, um zu
vermeiden, dass Ihre Kleidung beschädigt
wird.
• Beachten Sie:
Verwenden Sie niemals
Regenwasser, Wasser, das Zusatzstoffe
enthält (wie Stärke, Parfüm), oder Wasser
aus Haushaltsgeräten. Solche Zusatzstoffe
können die Eigenschaften des Dampfs
beeinflussen und bei hoher Temperatur in
der Dampfkammer Ablagerungen
verursachen, die zu Flecken auf Ihrer Wäsche
führen können.
Befüllen des Wasserbehälters
• Stellen Sie den Dampfgenerator auf eine
stabile, waagerechte Fläche, die
hitzeunempfindlich ist.
• Vergewissern Sie sich, dass Ihr Gerät
ausgesteckt ist und machen Sie die Klappe
des Wasserbehälters auf.
• Füllen Sie den Behälter mit Wasser - Abb.4.
Dabei nicht die “MAX” Anzeige
überschreiten.
1800129367 GV73XX E0 A11_110x154 01/03/13 09:50 Page84
Page 14

183
EN
DE
FR
NL
ES
PT
IT
DA
NO
SV
FI
TR
EL
PL
CS
SK
HU
SL
RU
UK
HR
RO
ET
LT
LV
1800129367 GV73XX E0 A11_110x154 01/03/13 09:50 Page183
Page 15

184
1800129367 GV73XX E0 A11_110x154 01/03/13 09:50 Page184
Page 16

185
1800129367 GV73XX E0 A11_110x154 01/03/13 09:50 Page185
Page 17

186
1800129367 GV73XX E0 A11_110x154 01/03/13 09:50 Page186
Page 18

187
1800129367 GV73XX E0 A11_110x154 01/03/13 09:50 Page187
Page 19

188
1800129367 GV73XX E0 A11_110x154 01/03/13 09:50 Page188
 Loading...