

Page 1
Operating instructions
TECHNIRADIO
DAB+/UKW clock radio
50
Page 2
2
1
Illustrations
1.1
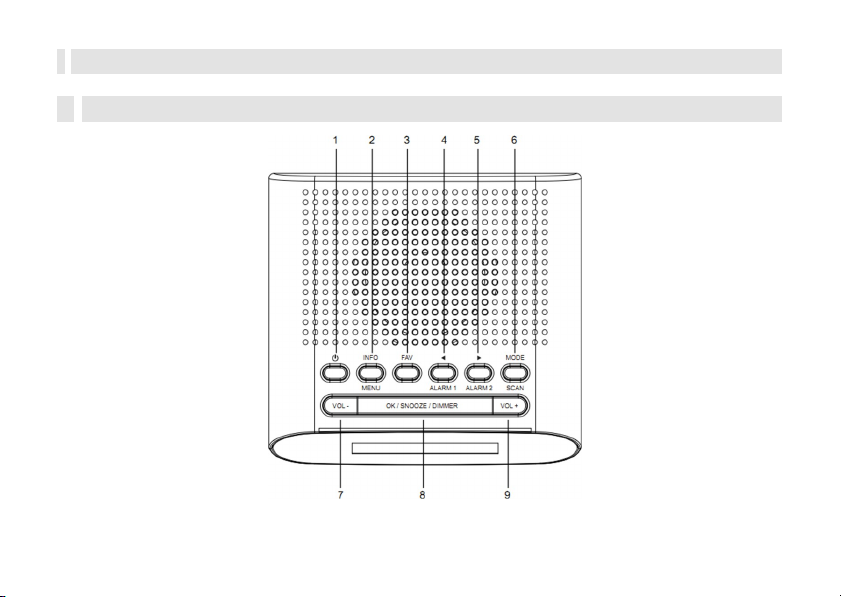
Key assignment
Page 3

3
1
2
On/Standby
INFO/MENU Switch through displays (press briefly), open
menu (press and hold briefly)
3
4
FAV
Favourites memory
Arrow key ◀ (selection of menu items and options/settings)
ALARM 1 (press and hold briefly: set up/activate alarm clock 1)
5
Arrow key ▶ (selection of menu items and options/settings)
ALARM 2 (press and hold briefly: set up/activate alarm clock 2)
6
MODE/SCAN Mode change DAB+ and FM (press briefly),
station search (press and hold briefly)
7
8
9
Volume
quieter
OK/Snooze/DIMMER (activates the snooze function)
Volume
louder
Page 4
4
1.2
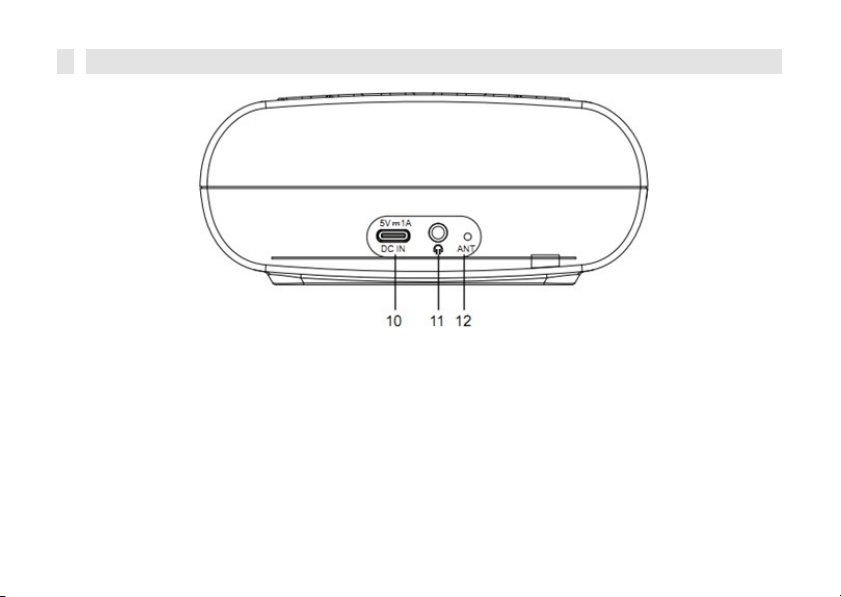
Back
10
11
12
DC-IN 5V, 1A USB-C
Headphone connection
Throwing antenna
Page 5

5
2
Table of contents
1
Figures..........................................................................................2
1.1
Key assignment .................................................................................................2
1.2
Back page..........................................................................................................4
2
Table of contents .........................................................................5
3
Safety instructions .......................................................................9
3.1
Characters and symbols used ...........................................................................9
3.2
Intended use....................................................................................................11
3.3
The target group of these operating instructions .............................................11
3.4
Safe handling of the TECHNIRADIO 50..........................................................11
3.4.1
Legal information .............................................................................................14
3.4.2
Service notes...................................................................................................16
4
Setting up the appliance
5
Description of the TECHNIRADIO 50
5.1
The scope of delivery.......................................................................................20
5.2
The special features of the TECHNIRADIO 50.................................................20
5.3
Preparing the TECHNIRADIO 50 for operation ................................................21
5.3.1
Connecting the power supply unit....................................................................21
5.3.2
Aligning the antenna........................................................................................22
..................................................................
..................................................20
17
Page 6

6
5.3.3
Use headphones .............................................................................................22
5.4
General device functions.................................................................................23
5.4.1
Switch on the device........................................................................................23
5.4.2
Switch off the device ........................................................................................24
5.4.3
Setting the volume...........................................................................................24
5.4.4
Display.............................................................................................................24
6
Menu operation...........................................................................25
7
The DAB+ (digital radio) function
7.1
What is DAB+..................................................................................................26
7.2
DAB+ (digital radio) reception..........................................................................26
7.2.1
Carry out a complete search............................................................................27
7.2.2
Select transmitter.............................................................................................28
7.2.3
Channel order..................................................................................................28
7.2.4
Store DAB+ stations in a favourite memory location.......................................28
7.2.5
Recalling DAB+ stations from a memory location ...........................................29
7.2.6
Overwriting/deleting a programme position memory .......................................29
7.2.7
Manual search.................................................................................................30
7.2.8
Volume adjustment (DRC)...............................................................................30
7.2.9
Delete inactive transmitters .............................................................................31
......................................................26
Page 7

7
8
FM
operation ...............................................................................32
8.1
Switch on FM radio mode................................................................................32
8.2
FM (VHF) reception with RDS information ......................................................32
8.3
Automatic station search .................................................................................33
8.4
Manual station search......................................................................................33
8.5
Search setting..................................................................................................33
8.6
Audio setting....................................................................................................34
8.7
Storing FM stations in a memory location .......................................................34
8.8
Recalling FM stations from a memory location................................................35
8.9
Overwriting/deleting a programme position memory .......................................35
9
System settings..........................................................................36
9.1
Alarm clock ......................................................................................................36
9.1.1
Setting the alarm timer.....................................................................................36
9.1.2
Switch off alarm clock after alarm....................................................................39
9.1.3
Switch off alarm clock......................................................................................39
9.2
Sleep timer.......................................................................................................40
9.3
Time and date settings ....................................................................................40
9.3.1
Set time/date manually....................................................................................40
9.3.2
Time update.....................................................................................................41
9.3.3
Setting the time format.....................................................................................42
9.3.4
Set date format................................................................................................43
Page 8

8
9.4
Display brightness
9.5
Language.........................................................................................................44
9.6
Factory setting .................................................................................................45
9.7
SW version .......................................................................................................46
10
Cleaning......................................................................................47
11
Eliminate
12
Technical
errors
data
........................................................................................
...........................................................................48
...............................................................................
44
49
Page 9
9
3
Safety instructions
3.1
Characters and symbols used
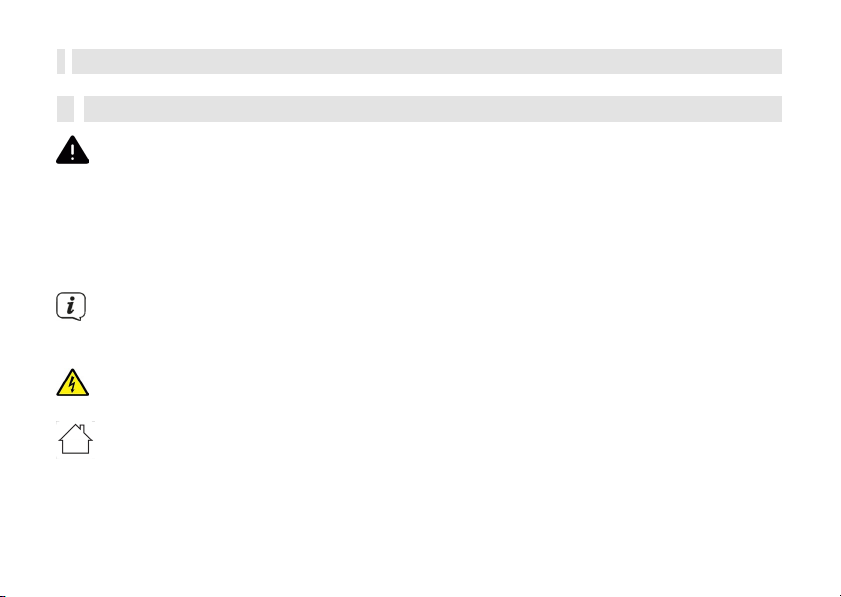
Indicates a safety instruction that can lead to serious injury or death if ignored.
Observe the following signal words:
DANGER - Serious injuries with fatal consequences
WARNING - Serious injuries, possibly fatal
ATTENTION - Injuries
Indicates a note that you must observe to avoid device defects, data
loss/misuse or unintentional operation. It also describes additional
functions for your device.
Warning of electrical voltage. Follow all safety instructions to avoid electric shock.
Never open the appliance.
Indoor use - Appliances with this symbol are only suitable for indoor use.
Page 10
10
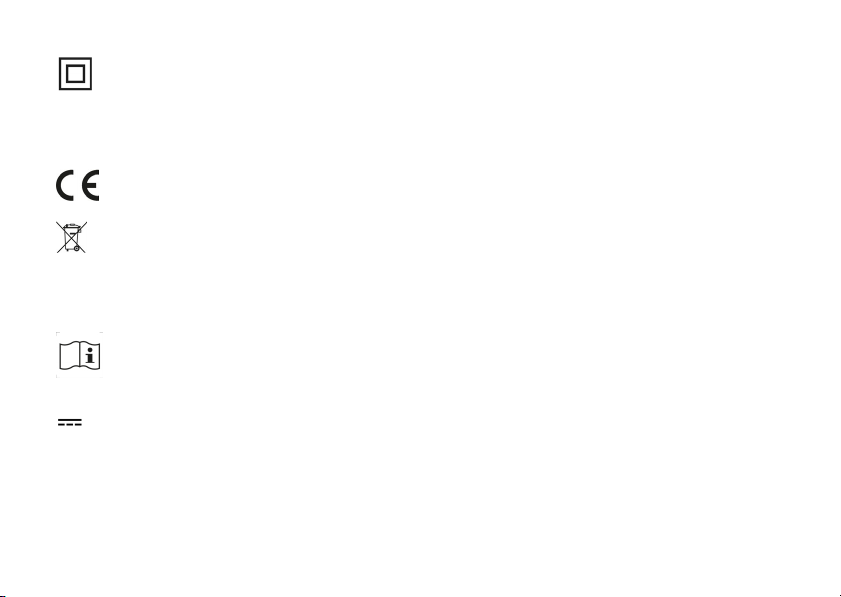
Protection class II - Electrical appliances in protection class II are electrical
appliances with continuous double and/or reinforced insulation and no connection
options for a protective conductor. The housing of an insulated electrical appliance of
protection class II can partially or completely form the additional or reinforced
insulation.
Your appliance bears the CE mark and fulfils all required EU standards.
Electronic devices do not belong in household waste, but must be disposed of
properly in accordance with Directive 2012/19/EU of the European Parliament and
of the Council of 4 July 2012 on waste electrical and electronic equipment
(WEEE). Please dispose of this device at the end of its service life at the
designated public collection points.
Observe all notes and safety instructions in these operating instructions. Keep the
operating instructions in a safe place for future reference. Pass these operating
instructions on to the buyer when selling the appliance.
Direct current symbol. This device is operated with direct current and/or
converts alternating current into direct current.
Page 11
11
3.2
Intended
use
The device is designed for the reception and playback of radio programmes via DAB+
and FM. The device may only be operated with the accessories supplied. Any other use
of these accessories is not permitted. The device is designed for private use and is not
suitable for commercial purposes. Any other use is considered improper use!
3.3
The target group of these operating instructions
The operating instructions are intended for any person who sets up, operates, cleans
or disposes of the appliance.
3.4
Safe handling of the TECHNIRADIO 50
Please observe the following instructions to minimise safety risks, avoid damage to
the appliance and contribute to environmental protection.
Please read all safety instructions carefully and keep them for future reference.
Always follow all warnings and instructions in these operating instructions and on the
back of the appliance.
WARNING!
Never open the device or the power supply unit!
Touching live parts is life-threatening!
Page 12

12
Observe all the following instructions for the intended use of the appliance and to
prevent appliance defects and personal injury.
-
Do not repair the appliance yourself. Repairs may only be carried out by
trained specialists. Please contact our customer service centres.
-
The device may only be operated in the specified ambient conditions.
-
Do not expose the appliance to dripping or splashing water. If water gets into the
appliance, disconnect it from the power supply and contact the service centre
-
Do not expose the appliance to heat sources that heat the appliance in
addition to normal use.
-
In the event of a conspicuous appliance defect, odour or smoke development,
significant malfunctions or damage to the housing, contact Service
immediately.
-
The appliance may only be operated with the mains voltage printed on the rating
plate. Never attempt to operate the appliance with a different voltage. Only use the
original mains adapter supplied.
Page 13

13
-
If the appliance or the power supply unit is damaged, it must not be put into
operation.
-
Do not operate the appliance near bathtubs, showers, swimming pools or
running/splashing water. There is a risk of electric shock and/or device defects.
-
Foreign objects, e.g. needles, coins, etc., must not fall into the interior of the
device. Do not touch the connection contacts with metal objects or your fingers.
This may result in short circuits.
-
This appliance is not intended for u s e by persons (including children) with
reduced physical, sensory or mental capabilities, or lack of experience and/or
knowledge, unless they have been given supervision or instruction concerning use
of the appliance by a person responsible for their safety. Never allow children to
use this appliance unsupervised.
-
Keep films and small parts away from children. Choking hazard!
-
Modifications to the appliance are prohibited.
Page 14
14
3.4.1
Legal
information
Hereby, TechniSat declares that the radio equipment type
TECHNIRADIO 50 is in compliance with Directive 2014/53/EU. The
full text of the EU
Declaration of conformity is available at the following Internet address:
hGp://konf.tsat.de/?ID=24844
Alternatively, you can also find the EU Declaration of Conformity in the
download area
of your product on the TechniSat website
www.technisat.de.
TechniSat is not liable for product damage due to external influences, wear
and tear or improper handling, unauthorised repairs, modifications or
accidents.
Subject to changes, printing errors and mistakes.
Status 09/23.
Copying and reproduction only with the authorisation of the publisher.
The latest version of the operating instructions is available in PDF format in the
download area of the TechniSat website at
www.technisat.de.
Page 15

15
TECHNIRADIO 50 and TechniSat are registered trademarks of:
TechniSat Digital GmbH
Julius-Saxler-Straße 3
D-54550 Daun/Eifel
www.technisat.de
Page 16
16
3.4.2
Service instructions
This product is quality-tested and comes with a statutory warranty period of 24
months from the date of purchase. Please keep the invoice as proof of purchase.
In the event of warranty claims, please contact the dealer of the product.
For questions and information or if there is a problem with this device, please
contact our technical hotline:
Mon. - Fri. 8:00 - 18:00 under Tel.:
03925/9220 1800.
Repair orders can also be applied for directly
online at www.technisat.de/reparatur.
If you need to return the device, please use only the following address:
TechniSat Digital GmbH
Service Centre
Nordstr. 4a
39418 Staßfurt
Page 17
17
4
Setting up the appliance
>
Place the appliance on a firm, secure and horizontal surface.
Ensure good ventilation.
Attention!
>
Do not place the appliance on soft surfaces such as carpets, blankets or near
curtains and wall hangings. The ventilation openings could be covered. This
may interrupt the necessary air circulation. This could possibly lead to an
appliance fire.
>
Do not place the appliance near heat sources such as radiators. Avoid direct
sunlight and locations with an unusually high level of dust.
>
The location must not be
saunas, as condensation
selected
can
damage
in rooms with high humidity, e.g. kitchens or
the appliance. The appliance is intended
for use in a dry environment and in a temperate climate and must not be
exposed to dripping or splashing water.
Page 18

18
>
Please note that the appliance feet may leave coloured marks on certain
furniture surfaces. Use protection between your furniture and the appliance.
>
Keep the TECHNIRADIO 50 away from devices that generate strong
magnetic fields.
>
Do not place any heavy objects on the appliance.
>
If you move the appliance from a cold to a warm environment, moisture may
condense inside the appliance. In this case, wait about an hour before operating
the appliance.
>
Lay the mains cable so that nobody can trip over it.
>
Make sure that the mains cable or power supply unit is always easily accessible
so that you can quickly disconnect the device from the power supply!
>
The socket outlet should be as close as possible to the appliance.
>
To connect to the mains, insert the mains plug fully into the socket.
>
Use a suitable, easily accessible mains connection and avoid using
multiple sockets!
Page 19

19
>
Do not touch the mains plug with wet hands, risk of electric shock!
>
In the event of faults or smoke and odours coming from the housing, pull
the mains plug out of the socket immediately!
>
If the appliance is not to be used for a longer period of time, e.g. before
travelling, unplug the mains plug.
>
Excessive volume, especially for headphones, can lead to hearing damage.
Page 20

20
5
Description of the TECHNIRADIO 50
5.1
The
scope of delivery
Please check that the scope of delivery is complete before commissioning: 1x
TECHNIRADIO 50
1x power supply unit
1x operating instructions
5.2
The special features of the TECHNIRADIO 50
The TECHNIRADIO 50 consists of a DAB+/UKW receiver with the following
functions:
-
-
You can store up to 20 DAB+ and 20 FM stations.
The radio receives on the frequencies FM 87.5-108 MHz (analogue) and
DAB+ 174.9-239.2 MHz (digital).
-
-
The appliance has a time display.
2 programmable alarm times.
Page 21
21
5.3
Preparing the TECHNIRADIO 50 for operation
5.3.1
Connecting the
>
To do this, connect the supplied mains adapter to the socket labelled DC-IN
power supply unit
on the back of the TECHNIRADIO 50. Then connect the mains adapter to
the mains.
Make sure that the operating voltage of the power supply unit matches the local
mains voltage before plugging it into the wall socket.
As this appliance is disconnected from the mains by unplugging the mains
adapter, it is essential that it is easily accessible at all times.
Page 22
22
5.3.2
Align
litter antenna
The number and quality of the stations to be received depends on the reception
conditions at the installation site. Excellent reception can be achieved with the throw
antenna.
The exact alignment of the antenna is important, especially in the fringe
areas of DAB+ reception. On the Internet, for example, you can find
"www.dabplus.de" to quickly find the location of the nearest transmitter mast.
Start the first search at a window in the direction of the transmitter mast. If the
weather is poor, DAB+ reception may only be possible to a limited extent.
Do not touch the antenna during playback of a station.
This can lead to impaired reception and sound dropouts.
5.3.3
Headphones use
hearing protectors!
Do not listen to the radio at high volume via headphones. This can lead to permanent
hearing damage. Before using headphones, adjust the device volume to the minimum
level.
Only use headphones with a 3.5 millimetre jack plug.
Page 23
23
>
Insert the plug of the headphones into the headphone socket on the back of
the device. The sound is now played exclusively via the headphones, the
loudspeaker is muted.
>
If you want to listen via the speakers again, unplug the headset from the
headset socket on the device.
5.4
General device functions
5.4.1
Switch on the
>
First prepare the TECHNIRADIO 50 for operation as described in points 5.3.1
appliance t
and 5.3.2.
>
Press the On/Standby button on the top of the device to switch on the
TECHNIRADIO 50.
After switching on for the first time, you must first set the language.
To do this, use the ◀ or ▶ buttons to select one of the available languages and
confirm your selection by pressing the OK/SNOOZE/ DIMMER button. The device
then automatically performs a complete search in DAB+ mode. During the search,
the display information shows
indicates the progress of the digital radio stations found. Once the station search is
complete, the first DAB+ programme is played.
Page 24

24
5.4.2
Switch off the
>
You can switch the device to standby mode by briefly pressing the
device
On/Standby button. The time is shown on the display. The
You can change the display brightness in standby mode by briefly pressing the
OK/SNOOZE/DIMMER button several times or as described in section 9.4.
5.4.3
Setting the
>
Set the volume using the VOL +/- buttons. The set volume is shown on the
volume
display using a bar chart.
5.4.4
Display
Depending on the selected function or option, the display will show different, channeldependent information. Briefly press the INFO/ MENU button several times to scroll
through the information. The display brightness can be changed using the
OK/SNOOZE/DIMMER button or as described in section 9.4.
Page 25
25
6
Menu operation
Use the menu to access all functions and settings of the TECHNIRADIO
50 Menu navigation is carried out using the INFO/MENU, OK/SNOOZE/DIMMER buttons,
◀ / ▶. The menu is divided into submenus and contains different menu items or
functions that can be activated depending on the mode type (DAB+ or FM). To open
the menu, simply press and hold the INFO/MENU button briefly. To switch to
submenus, first press the ◀ or ▶ buttons to display a submenu
and then press the OK/SNOOZE/DIMMER button to call up the submenu. An asterisk (*)
marks the current selection.
Close menu: The menu closes automatically after a few seconds.
Otherwise, press the INFO/MENU button again.
Settings are only saved when the OK/SNOOZE/DIMMER button is pressed.
saved.
Functions and buttons to be pressed are described in these operating instructions in
feU is shown. Display indications in [square brackets].
Some texts (e.g. menu entries, station information) may be too long to be shown
on the display. After a short time, these will then be displayed as a long text or
abbreviated.
Page 26
26
7
The DAB+ (digital radio) function
7.1
What is DAB+
DAB+ is a new digital format that allows you to listen to crystal-clear sound without noise.
Unlike conventional analogue radio stations, DAB+ broadcasts several stations on the
same frequency. This is called an ensemble or multiplex. An ensemble is made up of the
radio station and several service components or data services, which are broadcast
individually by the radio stations. Information e.g. at www.dabplus.de or
w w w . d a b p l u s . c h .
7.2
DAB+ (digital radio) reception
>
Briefly press the MODE/SCAN button until [DAB+] appears on the display.
When DAB+ is started for the first time, a complete station search is
performed. Once the scan is complete, the first station is played in
alphanumeric order.
Page 27
27
7.2.1
Carry out a complete search
The automatic scan Full scan scans all DAB+ Band III
all stations broadcast in the reception area
>
To perform a complete search, briefly press and hold the MODE/ SCAN button.
.
Alternative:
>
Open the menu by briefly pressing and holding the INFO/MENU button and
select the [Full search] menu item using the ◀ or ▶ buttons. Then briefly
press the OK/SNOOZE/DIMMER button.
During the search, the number of channels found is displayed. At
the end of the search, the first station is displayed in alphanumeric format.
Reproduced in order.
If no station is found, check the antenna and change the installation location if
necessary (point 5.3.2).
channels and thus finds
Page 28
28
7.2.2
Select
>
transmitter
Press the ◀ or ▶ buttons to switch between the available stations. Press the
OK/SNOOZE/DIMMER button to play the station.
7.2.3
Channel order
>
Open the menu by briefly pressing and holding the INFO/MENU button and
select the menu item [Channel range] using the ◀ or ▶ buttons.
Then briefly press the OK/SNOOZE/DIMMER button.
>
Use the ◀ or ▶ buttons to select either provider or alphanumeric.
Press the OK/SNOOZE/DIMMER button to save.
7.2.4
Store DAB+ stations in a favourite memory location
The favourites memory can store up to 20 stations in the DAB+ range.
>
First select the desired channel (see point 7.2.2).
>
To save this station to a memory location, press and hold the FAV button during
playback until [Save Favourite] appears on the display.
>
Then use the ◀ / ▶ buttons to select a memory location 1...20.
Press the OK/SNOOZE/DIMMER button to save.
Page 29
29
>
Repeat this procedure to save additional transmitters.
7.2.5
Recalling DAB+ stations from a memory location
>
To call up a station that you have previously s t o r ed in the favourite memory,
briefly press the FAV button and select a favourite memory (1...20) using the ◀
▶ buttons. Press the OK/SNOOZE/DIMMER button to play the station.
If no station is stored in the selected programme position, [(empty)]
appears in the display.
7.2.6
Overwriting/deleting a programme position memory
>
Simply save a new channel to a favourite memory location as
described.
All memory locations are deleted when the factory settings are called up.
/
Page 30

30
7.2.7
Manual
search
This menu item is used to check the reception channels and can be used to align the
aerial. If the channels found are not yet in the channel list, they will be saved there.
>
Briefly press and hold the INFO/MENU button. Use the ◀ or ▶ buttons to
select the [Manual settings] entry and press the OK/SNOOZE/ DIMMER
button.
>
Use the ◀ or ▶ and OK/SNOOZE/DIMMER buttons to select a channel (5A to
13F). The signal strength is now shown on the display. The antenna can now be
aligned for maximum signal strength.
Transmitters whose signal strength is below the required minimum signal strength
do not transmit a sufficient signal. If necessary, align the antenna as described in
section 5.3.2.
7.2.8
Volume control
(DRC)
The DRC menu item is used to set the compression rate, which compensates for
dynamic fluctuations and the associated volume variations.
>
Briefly press and hold the INFO/MENU button. Use the ◀ buttons to select
or ▶ to select the [DRC] entry and press the OK/SNOOZE/DIMMER button.
Page 31

31
>
Use ◀ or ▶ to select the compression rate:
DRC HIGH
DRC TIEF
DRC OFF
>
Confirm by pressing the OK/SNOOZE/DIMMER button.
7.2.9
Delete inactive transmitters
-High compression
-Low compression
- Compression switched off.
This menu item is used to remove old and no longer receivable channels from the
channel list.
>
Briefly press and hold the INFO/MENU button. Use the ◀ buttons to select
or ▶ to select [Delete] and press the OK/SNOOZE/DIMMER button.
The [Delete inactive] prompt appears, asking whether the inactive transmitters should
be deleted.
>
Use ◀ or ▶ to select the entry [Yes] or [No] and confirm by pressing the
OK/SNOOZE/DIMMER button.
Page 32
32
8
VHF
operation
8.1
Switch on FM radio mode
>
Press the INFO/MENU button to switch to FM mode.
>
The display shows [FM].
When switching on for the first time, the frequency is set to 87.5 MHz.
If you have already set or saved a station, the radio will play the last station set.
The station name appears for RDS stations.
To improve reception, align the antenna (point 5.3.2).
8.2
FM (VHF) reception with RDS information
RDS is a procedure for transmitting additional information via FM stations.
Broadcasters with RDS transmit, for example, their station name or the
Programme type. This is shown on the display. The device can display the RDS information
RT (radio text), PS (station name), PTY (programme type).
Page 33
33
8.3
Automatic
>
Briefly press and hold the MODE/SCAN button to start the station search.
station search
If an FM station with a sufficiently strong signal is found, the
Scan and the station is played. If an RDS station is received,
if applicable, the radio text will appear.
To tune to weaker stations, use the manual station search function.
8.4
Manual
>
station search
Briefly press the ◀ or ▶ buttons several times to set the desired station or
frequency.
The display shows the frequency in steps of 0.05 MHz.
8.5
Search
setting
The sensitivity of the search run can be set in this menu item.
>
Briefly press and hold the INFO/MENU button. Use the buttons to select
◀ or ▶ the [Search setting] entry and press the OK/ SNOOZE/DIMMER button.
the station name and,
Page 34
34
>
Select whether the search should only stop for strong channels [Only
strong sig.] or for all channels (including weak channels) [All
channels].
With the All channels setting, the automatic search stops at every available
channel. This can result in weak stations
8.6
Audio
setting
>
Briefly press and hold the INFO/MENU button. Use the ◀ or ▶ buttons to
being played back
with
select the [Force mono] entry and press the OK/SNOOZE/ DIMMER button.
>
Use ◀ or ▶ to select the entry [Yes] or [No] to play back in stereo (No) or
only in mono sound (Yes) when FM reception is weak.
>
Confirm by pressing the OK/SNOOZE/DIMMER button.
8.7
Store FM stations in a memory location
The programme memory can store up to 20 stations in the FM range.
>
First select the desired channel (see points 8.3, 8.4).
noise.
Page 35
35
>
To save this station to a memory location, press and hold the FAV button during
playback until [Save Favourite] appears on the display.
>
Then use the ◀ / ▶ buttons to select a memory location 1...20.
Press the OK/SNOOZE/DIMMER button to save.
>
Repeat this procedure to save additional transmitters.
8.8
Recalling FM stations from a memory location
>
To call up a station that you have previously s t o r ed in the favourite memory,
briefly press the FAV button and select a favourite memory (1...20) using the ◀
▶ buttons. Press the OK/SNOOZE/DIMMER button to play the station.
If no station is stored in the selected programme position, [(empty)]
appears in the display.
8.9
Overwriting/deleting a programme position memory
>
Simply save a new channel to the respective memory location as described.
All memory locations are deleted when the factory settings are called up.
/
Page 36
36
9
S ystem settings
All settings described in this section apply equally to both DAB+ and FM operation.
>
Briefly press and hold the INFO/MENU button. Use the ◀ or ▶ buttons to
select the [System Conf.] entry and press the OK/SNOOZE/ DIMMER
button.
If the menu is opened in standby mode, this starts directly with the
system configuration.
9.1
Alarm clock
The TECHNIRADIO 50 has 2 programmable alarm times that can be
9.1.1
Setting the
alarm timer
You can only operate the alarm function once the correct time has been set.
After a power failure, you must set the time again. The time c a n b e updated
either manually, via DAB+ or FM. Further information on this can be found under
point 9.3.
set
individually.
Page 37

37
The settings for alarm 1 are now explained as an example. To confirm each setting step
and skip to the next, press the OK/ SNOOZE/DIMMER button. To change an option, press
.
1.
To set the two alarm time memories, press and hold one of the Alarm 1
or Alarm 2 pressed briefly.
Alternative:
>
Open the system configuration (see chapter "9 System settings"), use the ◀ or ▶
buttons to select the [Alarm clock 1] or [Alarm clock 2] entry and press
the OK/SNOOZE/DIMMER button.
>
The display shows [ALARM 1: OFF] (for alarm 1). Use the buttons to select
◀ or ▶ [ALARM 1: ON] and confirm with the OK/SNOOZE/ DIMMER
button.
2.
Alarm clock source: Use the ◀ or ▶ buttons to select the source with which
you would like to be woken up. You can choose between DAB+, FM or an alarm
tone. Confirm your selection with the OK/SNOOZE/ DIMMER button.
>
If you have selected DAB+ or FM, you can then choose whether the last
listened to station or a station previously stored in the favourites memory
should be played.
The alarm signal is to be played back when the alarm is cancelled. Select the
Page 38

38
option and press OK/SNOOZE/DIMMER to move to the next setting.
3.
Then select how ok the alarm should be repeated. The following options
are available:
•
Daily: Every day at the set time
•
Once: One-time execution
•
Weekends: Saturdays and Sundays only
•
Working days: Mondays to Fridays only
4.
Set the date (once if the alarm clock repeats) or the time at which the alarm
clock should start (first the hour, then the minutes). Press
OK/SNOOZE/DIMMER to go to the next setting.
5.
Select the desired alarm tone volume and press the OK/SNOOZE/DIMMER
button for the last time to save the alarm.
>
The alarm timer is set. An alarm clock symbol is shown on the display
in standby mode.
Page 39
39
9.1.2
Switch off alarm clock after alarm
>
Press the On/Standby button to switch off the alarm.
>
Press the OK/SNOOZE/DIMMER button to switch on the snooze function. You
can select the length of the pause between 5, 10, 15 or 30 minutes by repeatedly
pressing OK/SNOOZE/DIMMER. A timer appears on the display with the set
snooze time after which the alarm clock restarts.
The alarm clock symbol is still shown on the display if the
alarm repetition is
set to Daily, Weekend or Working days.
9.1.3
Switch off the
>
Open the alarm clock configuration by briefly pressing and holding the Alarm
alarm clock
1 or Alarm 2 button and select [ALARM 1: OFF] or [ALARM 2: OFF]. Press
the OK/SNOOZE/DIMMER button to save.
Page 40

40
9.2
Sleep
timer
The sleep timer
time
.
>
Open the system configuration (see chapter "9 System settings"), select the
automatically
switches the TECHNIRADIO 50 to
standby
[Sleep] entry using the ◀ or ▶ buttons and press the OK/SNOOZE/DIMMER
button.
>
Use the ◀ or ▶ buttons to select a time after which the TECHNIRADIO 50 should
switch to standby mode. You can choose between Off, 5, 15, 30, 45, 60, 90 and
120 minutes. Press the OK/SNOOZE/ DIMMER button to save. An "S" appears
in the display followed by the remaining time until the device goes into standby
mode.
9.3
Time and date settings
9.3.1
Set time/date manually
Depending on the time update setting (point 9.3.2), you must set the time and date
manually.
>
Open the system configuration (see chapter "9 System settings"), use the ◀ or ▶
buttons to select the [Time setting] entry and press the
OK/SNOOZE/DIMMER button.
after the set
Page 41

41
>
Use the ◀ or ▶ buttons to select the [Time/Date] entry and press
OK/SNOOZE/DIMMER.
>
The first digits (hours) of the time flash and can be changed using the ◀
or ▶ can be changed.
The ▶ button increases the value, the ◀ button decreases the value.
>
Press the OK/SNOOZE/DIMMER button to accept the setting.
>
The next digits (minutes) of the time then flash and can also be changed
as described above.
>
Press the OK/SNOOZE/DIMMER button after each additional setting to skip to
the next setting.
>
Proceed as described above to set the date.
>
After all settings have been made and the OK/SNOOZE/DIMMER button has
been pressed for the last time, [Saved] appears on the display.
9.3.2
Time update
In this submenu, you can specify whether the time should be updated automatically via
DAB+ and FM (FM) or whether you want to enter it manually (point 9.3.1).
Page 42

42
>
Use the ◀ or ▶ buttons to select the [Auto update] entry and press
OK/SNOOZE/DIMMER.
>
Use the ◀ or ▶ buttons to select the following options:
[Update from everyone] (update via DAB+ and FM)
[No update] (time/date must be entered manually, see point 9.3.1).
>
Press the OK/SNOOZE/DIMMER button to accept the setting.
9.3.3
Setting the
time format
You can activate the 12 or 24 hour format in the 12/24 hour submenu.
>
Use the ◀ or ▶ buttons to select the [12/24 hrs] entry and press
OK/SNOOZE/DIMMER.
>
Use the ◀ or ▶ buttons to select one of the following options:
[24 o'clock setting] (for the 24-hour format)
[12 o'clock setting] (for the 12-hour format)
>
Press the OK/SNOOZE/DIMMER button to accept.
Page 43

43
9.3.4
Set
date format
In the Set date format submenu, you can specify the format for displaying the date.
>
Use the ◀ or ▶ buttons to select the [Dat. form. settings] entry and press
OK/SNOOZE/DIMMER.
>
Use the ◀ or ▶ buttons to select one of the following options:
[DD-MM-YYYY] (day, month, year)
[MM-DD-YYYY] (month, day, year)
>
Press the OK/SNOOZE/DIMMER button to accept.
Page 44

44
9.4
Display brightness
You can set the display brightness for both operation and standby.
>
Open the system configuration (see chapter "9 System settings"), select the
[Lighting] entry using the ◀ or ▶ buttons and press the OK/SNOOZE/DIMMER
button.
>
Use the ◀ or ▶ buttons to select one of the following functions:
[Operation] controls the brightness in the normal, switched-on state. Here you can
choose between the brightness levels High, Medium and Low. Use the ◀ or ▶
buttons to select a brightness level and press the OK/SNOOZE/DIMMER button to
save.
[Autodim] adjusts the brightness to the brightness value set under Dimming
level after approx. 5 seconds without operating the device. Furthermore, the
brightness can be changed at any time during normal operation and standby by
briefly pressing the OK/SNOOZE/DIMMER button.
9.5
Language
>
Open the system configuration (see chapter "9 System settings"), select the
[Language] entry using the ◀ or ▶ buttons and press the
OK/SNOOZE/DIMMER button.
Page 45

45
>
Use the ◀ or ▶ buttons to select one of the a v a i l a b l e languages and confirm
your selection by pressing the OK/SNOOZE/ DIMMER button.
9.6
Factory setting
If you change the location of the device, e.g. if you move house, you may no longer be
able to receive the saved channels. In this case, you can delete all saved channels by
resetting to factory settings and then start a new channel search.
>
Open the system configuration (see chapter "9 System settings"), use the ◀ or ▶
buttons to select the [Factory settings] entry and press the
OK/SNOOZE/DIMMER button.
>
Use the ◀ or ▶ buttons to select > [Yes] to perform the factory setting
or > [No] (cancel) and press the OK/SNOOZE/DIMMER button.
All previously saved channels and settings are deleted. The device is now in the
delivery state. Proceed as described in chapter "5.4.1 Switching on the device" to
complete the initial setup.
Page 46

46
9.7
SW version
Under SW version you can query the currently installed SW version.
>
Open the system configuration (see chapter "9 System settings"), use the ◀ or ▶
buttons to select the [System version] entry and press the
OK/SNOOZE/DIMMER button.
>
The currently installed Sokware version is displayed.
Page 47
47
10
Cleaning
To avoid the risk of electric shock, do not clean the appliance with a wet cloth
or under running water. Before cleaning, disconnect the mains adapter and
switch off the appliance!
Do not use scouring pads, scouring powder or solvents such as alcohol or
petrol.
Do not use any of the following substances: Salt water, insecticide ammonia,
chlorinated or acidic solvents (ammonia).
Clean the housing with a soft cloth moistened with water.
Do not use spirits, thinners, etc.; they could damage the surface of the appliance.
Only clean the display with a soft cotton cloth. If necessary, use a cotton cloth
with small amounts of non-alkaline, diluted water- or alcohol-based soapy
water.
Rub the cotton cloth gently over the surface.
Page 48
48
11
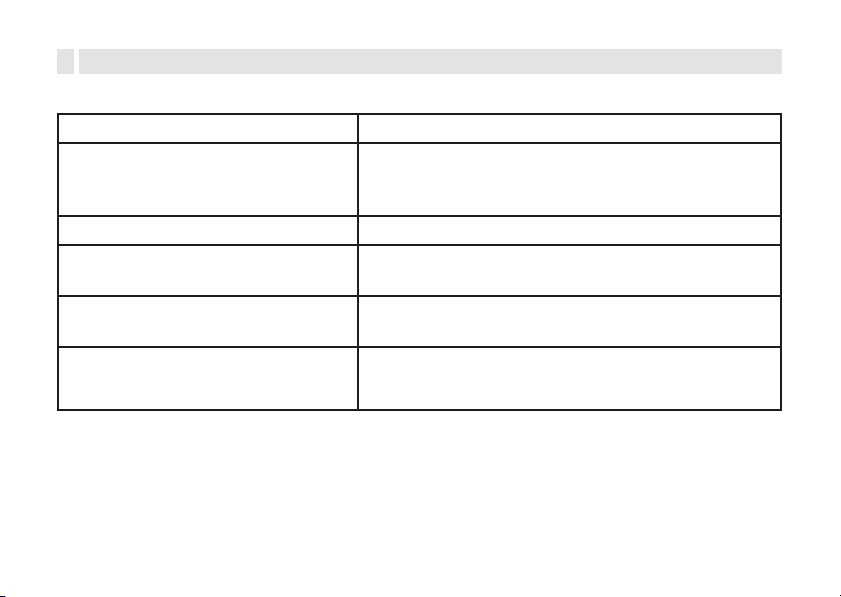
Symptom
Possible
cause/remedy
Device cannot be switched on.
The device is not supplied with power. Connect
the power supply unit correctly to the socket and
to the device.
No sound can be heard.
Increase the volume.
The display does not switch on.
Disconnect the appliance from the mains and
reapply power.
Reception via DAB+/FM is poor.
Change the position of the antenna or the
TECHNIRADIO 50.
Device cannot be operated.
Disconnect the appliance from the mains and
reapply power.
Eliminate
errors
If the device does not work as intended, check it using the following table.
If you a r e still unable to rectify the fault after the checks described, please contact
the technical hotline.
Page 49
49
12
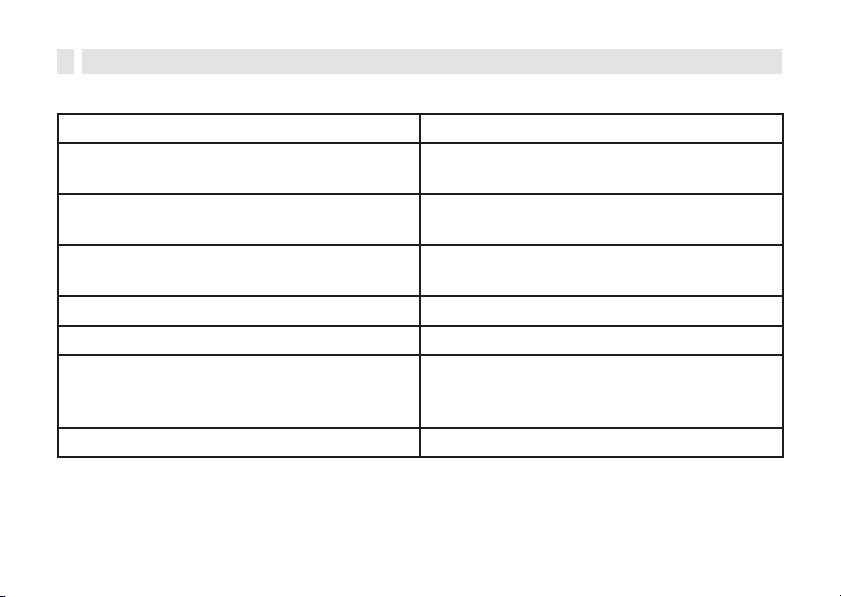
Reception paths
DAB+, FM
Power supply
DC 5 V / 1 A via external USB-C power
supply unit supplied
Frequencies
FM: 87.5-108 MHz
DAB+: Band III 174-240 MHz
Power consumption
in operation max.: 5.9 W
standby: 3.6 W
Audio output power
1x 2 W RMS
Weight
269 g
Operating conditions
Temperature: 0 ~ 40 °C
Relative hatch humidity: 5 ~
90% (non-condensing)
Dimensions (WxHxD)
12.5 cm x 5.3 cm x 11.7 cm
Technical data / manufacturer information
Technical changes and errors excepted.
Page 50
50
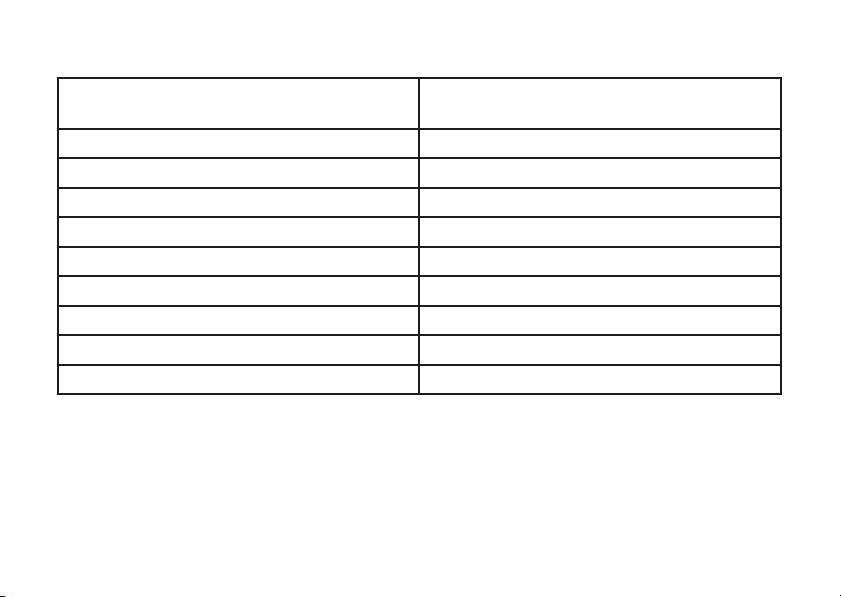
Technical data of the supplied power supply unit
Manufacturer
TechniSat Digital GmbH, Julius-SaxlerStraße 3, D-54550 Daun
Model identifier
AD0600501000EU-TYPE-C
Input voltage
AC 100 - 240 V
Input alternating current frequency
50/60 Hz
Output voltage
DC 5.0 V
Output current
1,0 A
Output power
5,0 W
Consistent efficiency in operation
74,16%
Efficiency at low load (10%)
73%
Power consumption at no load
0,48W
 Loading...