

Page 1

DIGITRADIO 20
Under Cupboard Kitchen Radio
Page 2

CONTENTS
ENGLISH ........................................................................................... 3-20
FRANÇAIS ......................................................................................21-38
ITALIANO ....................................................................................... 39-56
NEDERLANDS ................................................................................57-74
NORSK .............................................................................................75-92
DANSK ........................................................................................... 93-110
POLSKE ........................................................................................ 111-128
ČEŠTINA ..................................................................................... 129-146
SLOVENSKÉ ...............................................................................147-164
2
Page 3

Instruction Manual
DIGITRADIO 20
Under Cupboard Kitchen Radio
EN
FR
IT
NL
NW
DK
PL
CZ
SK
Page 4

1 Important Safety Instructions
1. Read these instructions.
2. Keep these Instructions.
3. Heed all Warnings.
4. Follow all instructions.
5. Do not use the speaker near water.
6. Clean only with dry cloth.
WARNING: TO REDUCE THE RISK OF FIRE OR ELECTRIC SHOCK, DO NOT EXPOSE THIS SPEAKER TO RAIN OR
MOISTURE.
To reduce the risk of electrical shock, fire, etc.:
1. Do not place unit near any heat source such as radiators, heat registers, stoves, or other apparatus
(including amplifiers) that produce heat.
2. Do not block any ventilation openings of unit.
3. The unit shall not be exposed to dripping or splashing and no objects filled with liquids, such as vases,
shall be placed on the unit.
4. Do not place any heavy loads onto the unit, and do not step on it, the load may fall and cause serious
injury to the unit.
5. Please read Rating Labels at the rear of unit for power input and other safety information.
6. This unit is intended to be used only with the power supply provided.
7. Protect the power cord from being walked on or pinched particularly at the plugs, convenience receptacles,
and at any point where they exit from the unit.
8. Never unplug your unit by pulling on the power cord. Always grasp the plug firmly and pull straight out
from the outlet.
4
Page 5

9. Repair or replace all electric service cords that have become frayed or otherwise damaged immediately.
Do not use a cord that shows cracks or abrasion damage along its length, the plug, or the connector end.
10. To prevent fire or shock hazard, do not use this plug with an extension cord or other outlet unless the
blades can be fully inserted to prevent blade exposure.
11. During lightning or raining days, unplug the unit for additional protection during thunderstorms or when
the unit is not used for prolonged periods. This will prevent damage to the unit from lightning and power
surges.
12. Do not aempt to carry out any service work yourself. By opening or removing the cabinet, you may
be exposed to dangerous voltage or other hazards. Any service work should be carried out by qualified
technicians.
13. The normal function of the product may be disturbed by strong Electro-Magnetic Interference. If so,
simply reset the product to resume normal operation by following the instruction manual. In case the
function could not resume, please use the product in other location.
14. The means of disconnecting this apparatus from the mains supply is plug of adaptor. The disconnect
device shall remain readily operable.
15. In the interests of safety and to avoid unnecessary energy consumption, never leave the unit switched
on while unaended for long periods of time, e.g. overnight, while on holiday or while out of the house.
Switch it o and disconnect the mains plug from the mains socket.
EN
FR
IT
NL
NW
DK
PL
CZ
SK
5
Page 6

Content
1 Important Safety Instructions ......................................................................................................................................4
2 Your radio ...........................................................................................................................................................................8
3 Geing Started ...............................................................................................................................................................10
4 DAB Mode ......................................................................................................................................................................... 13
4.1 Selecting another Station ......................................................................................................................................................................13
4.2 Secondary Service.....................................................................................................................................................................................13
4.3 Scanning Stations .................................................................................................................................................................................... 14
4.4 Manual Tune ............................................................................................................................................................................................... 14
4.5 Viewing Station Information ............................................................................................................................................................... 14
4.6 Showing Signal Strength ...................................................................................................................................................................... 14
4.7 Storing Preset Stations ...........................................................................................................................................................................15
4.8 Recalling a Preset Station .....................................................................................................................................................................15
5 FM Mode ........................................................................................................................................................................... 15
5.1 Scan seing ................................................................................................................................................................................................ 16
5.2 Audio Seings ........................................................................................................................................................................................... 16
5.3 Storing Preset Stations .......................................................................................................................................................................... 16
5.4 Recalling a Preset Station .....................................................................................................................................................................17
6 Aux in Mode ..................................................................................................................................................................... 17
7 General Operation .......................................................................................................................................................... 18
7.1 Seing Egg Timer ..................................................................................................................................................................................... 18
7.2 Seing Equaliser ....................................................................................................................................................................................... 18
7.3 Seing Time ................................................................................................................................................................................................ 18
7.4 Seing Backlight....................................................................................................................................................................................... 19
7.5 Seing Language ..................................................................................................................................................................................... 19
6
Page 7

7.6 Factory Reset ............................................................................................................................................................................................. 19
7.7 SW Version ................................................................................................................................................................................................. 20
8 Specification ................................................................................................................................................................... 20
EN
FR
IT
NL
NW
DK
PL
CZ
SK
7
Page 8

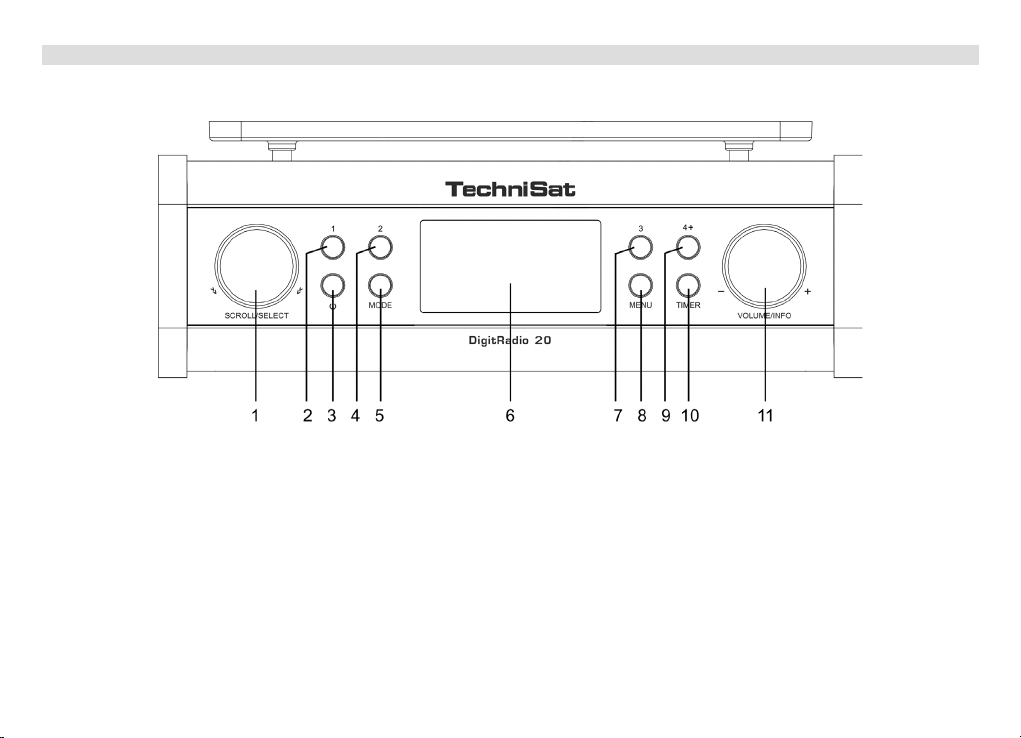
2 Your radio
Front view & Buons
1. SCROLL/SELECT knob Turn to browse options. Press to confirm option.
2. 1 buon Press and hold to directly save preset station 1. Press to directly recall preset station 1.
3. POWER buon Press to switch radio on or standby.
4. 2 buon (Refer to ‘1 buon’)
5. MODE buon Press to switch among
6. Display
7. 3 buon (Refer to ‘1 buon’)
8. MENU buon Press to display or exit menu screen.
9. 4+ buon Press and hold to save preset stations 1-10. Press to recall preset stations 1-10
10. TIMER buon Press to set Egg timer.
11. VOLUME/INFO knob Turn to adjust volume level. Press to browse program information.
8
Page 9

Back view & connectors
1. Antenna socket
2. Headphone socket
3. AUX IN socket
4. DC IN 9V/1000mA socket
EN
FR
IT
NL
NW
DK
PL
CZ
SK
9
Page 10

3 Geing Started
Carefully remove your radio from the box. You may wish to store the packaging for future use.
What you can find inside of your package
> Main unit x 1
> Instruction Manual x 1
> Power adapter x 1
> Fixing plate x 1
> Fixing screws x 5
Positioning your Radio
There are two ways to place your radio - placing on a flat / stable surface or mounting under a cupboard.
Avoid the following locations:
> Where the radio will be exposed to direct sunlight.
> Where the radio will be close to heat radiating sources.
> Where the humidity is high and ventilation is poor.
> Where it is dusty.
> Where it is damp or there is a possibility of water dripping or splashing onto unit.
Place the Unit on a Table
10
Page 11
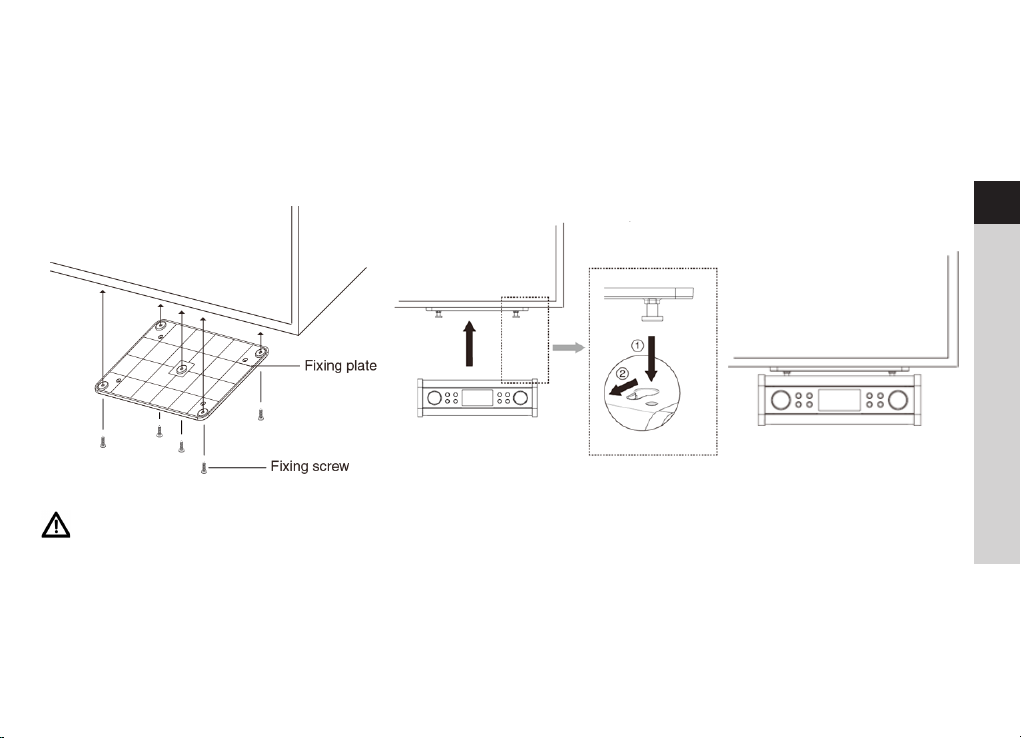
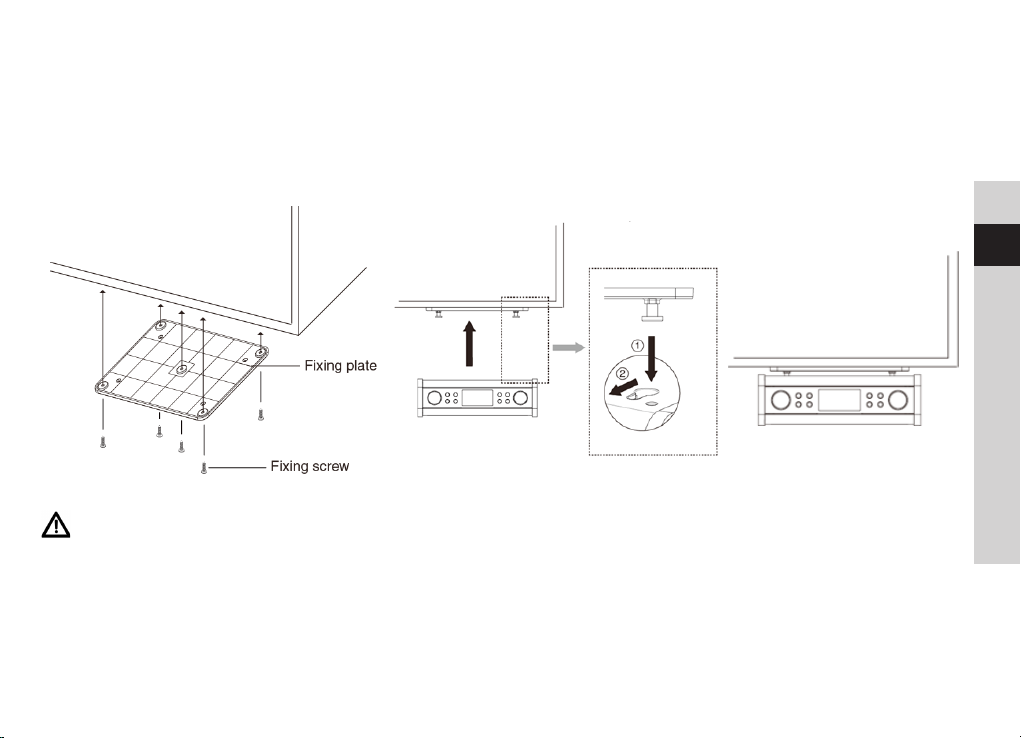
Installing the Unit under a Cupboard
Make sure removing all connections from unit.
1. Install the Fixing plate under cupboard with the supplied Fixing screws. (See Figure 1)
2. Mount the unit to the installed Fixing plate. (See Figure 2 and 3)
Figure 1 Figure 2 Figure 3
Caution
1. Since the unit is heavy, be careful when installing the unit.
2. To reduce the risk of fire, do not place any heating or cooking appliance beneath this unit.
3. Install the unit so that its power cord can be connected directly to a wall outlet. Do not use a converter
or extension cord.
4. Install the unit as far as possible from a source of noise. (for example, refrigerator, microwave oven,
fluorescent lamp, etc.)
EN
FR
IT
NL
NW
DK
PL
CZ
SK
11
Page 12

Installing and Adjusting the Antenna
Extend the antenna and insert to Antenna socket of unit to ensure you receive the best reception possible in both
DAB and FM radio modes. It may be necessary to adjust the position of the radio and /or antenna to achieve the
best signal.
Turning the Unit On/O
Connect the plug at the end of power adapter cable to the DC IN socket of unit. Then insert the power adapter
into the mains socket. The unit will switch on.
Press POWER buon to switch radio to standby mode.
To switch the unit o completely, unplug the power adapter from the mains socket.
Volume Control
While a program is playing, turn VOLUME/INFO knob clockwise or anti-clockwise to adjust volume level.
Using Headphones
Insert headphones fied with a 3.5 mm diameter stereo plug to Headphone socket of unit. Headphones are not
supplied with this radio.
Turn down the volume before connecting headphones. Slowly raise the volume with the headphones on until you
reach your desired level.
Caution: long-term exposure to loud music may cause hearing damage. It is best to avoid extreme volume
when using headphones, especially for extended periods of time.
Automatically Seing the Clock
The clock can be set and updated automatically if is received DAB / FM signals in your location. In order for the
clock to synchronise to the current local time you must leave it on a DAB or FM station for a short period of time.
You can also choose how you would like to keep the clock up to date the DAB or FM radio signals. Press Menu
buon > Time > Auto update.
12
Page 13
4 DAB Mode
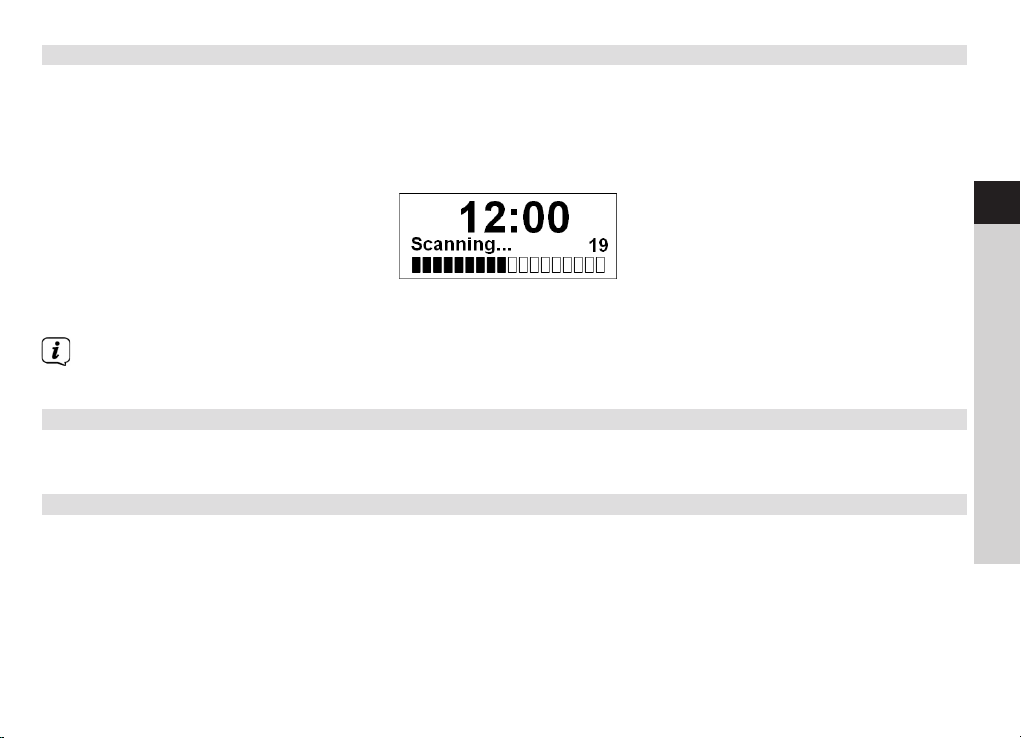
When you turn on the radio it will automatically search and store all the available stations. You should conduct
an additional Full Scan to ensure all stations are picked up and stored. It is also recommended every few months
to run a new scan to pick up any new DAB/DAB+ that may have begun broadcasting aer purchasing your DAB
radio.
1. For initial use, radio will carry out a full scan and store stations list in memory.
2. Once the scanning is completed, the DAB/DAB+ stations will be displayed in alphanumeric order. The first
station in the list will be selected to broadcast.
Note: if no DAB/DAB+ signal is found in your area, it may be necessary to relocate your radio to a
stronger signal area.
EN
FR
IT
NL
NW
4.1 Selecting another Station
While a program is playing, turn SCROLL/SELECT knob to show station list and select the station you want to
play, and then press SCROLL/SELECT knob to confirm.
4.2 Secondary Service
You may see a “>>” symbol aer the name of the station, this indicates that there are secondary services
available to that station. These secondary services contain extra services that are related to the primary station.
E.g. a sports station may want to add extra commentaries. The secondary services are inserted directly aer the
primary station (a “<<” symbol is before the name of the station) in the station list.
To select the secondary station, turn SCROLL/SELECT knob until you find the secondary service you want, and
then press SCROLL/SELECT knob to select it.
When the secondary service ends, the unit will automatically switch back to the primary station.
DK
PL
CZ
SK
13
Page 14

4.3 Scanning Stations
Press MENU buon, turn SCROLL/SELECT knob to select ‘Full scan’, and then press SCROLL/SELECT knob to
automatically scan.
4.4 Manual Tune
This can help you when adjusting your antenna or when adding stations that were missed while auto tuning.
1. Press MENU buon, turn SCROLL/SELECT knob to select ‘Manual tune’, and then press SCROLL/SELECT
knob to confirm, the display will show the channel number and frequency.
2. Turn SCROLL/SELECT knob to step among the channels and then press SCROLL/SELECT knob select the
current channel.
Note: If there is a multiplex corresponding to this channel and frequency, then the display will show a
tuning meter with the signal strength and the multiplex name aer a few seconds.
3. To play the station, first press MENU buon twice to exit manual tune.
4.5 Viewing Station Information
DAB/DAB+ stations broadcast additional information. Press VOLUME/INFO knob on the main unit repeatedly to
view information through Scrolling text, Signal strength, Program Type, Ensemble, Frequency, Signal error, Bitrate,
Codec, Audio format, Time and Date.
4.6 Showing Signal Strength
While you selected signal strength, a signal bar with the strength of the current station will show on the display.
The indicator on the signal bar shows the minimum acceptable signal level.
14
Page 15

Note: Stations with signal strength below the minimum signal level may not provide a steady stream of
audio.
4.7 Storing Preset Stations
Your radio can store up to 10 of your favourite DAB/DAB+ stations as preset stations. This will enable you to
access your favourite stations quickly and easily.
1. While your favorite station is playing, press and hold 4+ buon until display show ‘Preset Store <#:
(Empty)>’.
2. Turn SCROLL/SELECT knob to select among preset numbers 1-10, and then press SCROLL/SELECT knob
to confirm. The display will show ‘Preset # stored’.
3. You can also press and hold 1, 2 or 3 buon to directly save preset station to 1, 2 or 3. The display will
show ‘Preset # stored’.
4.8 Recalling a Preset Station
1. Press 4+ buon to show the saved preset stations.
2. Turn SCROLL/SELECT knob to select the stored preset station you want to play, and then press the
SCROLL/SELECT knob to confirm.
3. The display will show ‘Preset Recall <#: (Empty)>’ if the preset station isn’t allocated.
4. You can also press 1, 2 or 3 buon to directly recall preset station 1, 2 or 3. ‘Preset Recall <#: (Empty)>’
will be shown if the preset station isn’t allocated.
5 FM Mode
Selecting FM Mode
1. Press MODE buon repeatedly to select FM mode.
2. For initial use, it will start at the beginning of the FM frequency range (87.50MHz). Otherwise, the last
listened FM station will be selected.
EN
FR
IT
NL
NW
DK
PL
CZ
SK
15
Page 16

3. To manually scan the FM frequency, while FM frequency shows up, turn SCROLL/SELECT knob clockwise
or anti-clockwise to change the frequency by 0.05MHz per step.
4. To automatically scan, while FM frequency shows up, turn SCROLL/SELECT knob clockwise or
anticlockwise and then SCROLL/SELECT knob, your radio will skip forwards or backwards until it reached
the next available station.
5.1 Scan seing
By default, FM scans stop at any available station. This may result in a poor signal-to-noise ratio (hiss) from weak
stations.
1. To change the scan seings to stop only at stations with good signal strength, press MENU buon, and
then turn SCROLL/SELECT knob to select ‚Scan seing‘, press SCROLL/SELECT knob to confirm.
2. Turn SCROLL/SELECT knob to select ‚Strong stations only‘, and then press SCROLL/SELECT knob to
confirm.
5.2 Audio Seings
By default, all stereo stations are reproduced in stereo. For weak stations, this may result in a poor signal-to-noise
ratio (hiss).
1. To play weak stations in mono, press MENU buon, and then turn SCROLL/SELECT knob to select ‘Audio
seing’, press SCROLL/SELECT knob to confirm.
2. Turn SCROLL/SELECT knob to select ‚Forced mono‘, and then press SCROLL/SELECT knob to confirm.
5.3 Storing Preset Stations
Your radio can store up to 10 of your favourite FM stations. This will enable you to access your favourite stations
quickly and easily.
1. While your favorite station is playing, press and hold 4+ buon until display show ‘Preset Store <#:
(Empty)>’.
2. Turn SCROLL/SELECT knob to select among preset numbers 1-10, and then press SCROLL/SELECT knob to
confirm. The display will show ‘Preset # stored’.
16
Page 17

3. You can also press and hold 1, 2 or 3 buon to directly save preset station to 1, 2 or 3. The display will
show ‘Preset # stored’.
5.4 Recalling a Preset Station
1. Press 4+ buon to show the saved preset stations.
2. Turn SCROLL/SELECT knob to select the stored preset station you want to play, and then press the
SCROLL/SELECT knob to confirm.
3. The display will show ‘Preset Recall <#: (Empty)>’ if the preset station isn’t allocated.
4. You can also press 1, 2 or 3 buon to directly recall preset station 1, 2 or 3. ‘Preset Recall <#: (Empty)>’
will be shown if the preset station isn’t allocated.
6 Aux in Mode
AUX IN allows for quick and easy connection to an MP3 player or other external audio sources.
1. Before connecting to the mains socket, use a 3.5mm audio cable (not supplied) to connect to your
external audio device through the AUX IN socket of unit.
2. Connect power adapter to mains socket, press POWER buon to switch unit on.
3. Press MODE buon repeatedly to select Auxiliary Input mode.
4. In Aux in mode, you may operate your audio device directly for playback features.
5. To gain optimal volume levels, adjusting the output volume level on the audio device as well is
recommended.
Note: the unit will automatically switch to standby mode aer 15 minutes if the source device is
disconnect, switch o or the volume is too close to mute.
EN
FR
IT
NL
NW
DK
PL
CZ
SK
17
Page 18

7 General Operation
7.1 Seing Egg Timer
This feature enables you to set a countdown timer while cooking for enjoying your cooking hour easy.
1. Press TIMER buon to select ‘Egg timer’.
2. Turn SCROLL/SELECT knob to set the cooking time from 1 minute to 99 minutes, and then press SCROLL/
SELECT knob to confirm.
3. The Egg timer will countdown. Press TIMER buon can check the remaining time.
4. Buzzer will be triggered once reached the time. Press TIMER buon to turn buzzer o.
7.2 Seing Equaliser
Select this option to set sound equalization. Each seing will change the tone of the sound from your radio.
1. Press MENU buon, turn SCROLL/SELECT knob to select ‘Equaliser’, and then press SCROLL/SELECT knob
to confirm.
2. Turn SCROLL/SELECT knob to select ‘Treble’ or ‘Bass’, and then press SCROLL/SELECT knob to confirm.
3. Turn SCROLL/SELECT knob to change the value of Treble or Bass among ‘-3’ to ‘+3’, and then press
SCROLL/SELECT to confirm.
7.3 Seing Time
1. Press MENU buon, and then turn SCROLL/SELECT knob to select ‘Time’, press SCROLL/SELECT knob to
confirm.
2. Turn SCROLL/SELECT knob to select options, and then press SCROLL/SELECT knob to confirm the seing.
Set Time/date: Manually set-up both Time and Date
Auto update: ‘Update from Any’, ‘Update from DAB’, ‘Update
from FM’ or ‘No update’
18
Page 19

Set 12/24 hour format: ‘Set 24 hour’ or ‘Set 12 hour’
Set date format: ‘DD-MM-YYYY’ or ‘MM-DD-YYYY‘
3. Then seing time according to your personal preference.
7. 4 Seing Backlight
This feature enables you to adjust the brightness level of display.
1. Press MENU buon, and then turn SCROLL/SELECT knob to select ‘Backlight’, press SCROLL/SELECT
knob to confirm.
2. Turn SCROLL/SELECT knob to select ‘Power on‘ or ‚Standby‘, and then press SCROLL/SELECT knob to
confirm.
3. Turn SCROLL/SELECT knob to select backlight level, and then press SCROLL/SELECT knob to confirm the
seing.
Power on Level 1, Level 2, Level 3, Level 4 or Level 5
Standby Standby O, Level 1, Level 2, Level 3, Level 4 or Level 5
7.5 Seing Language
This feature enables you to change menu language. The default menu language is German.
1. Press MENU buon, and then turn SCROLL/SELECT knob to select ‘Language’, press SCROLL/SELECT
knob to confirm.
2. Turn SCROLL/SELECT knob to select your language, and then press SCROLL/SELECT knob to confirm.
7.6 Factory Reset
Doing a factory reset clears all user defined seing, replacing them with the original default values, so time/date,
DAB station list and preset stations are all lost.
1. Press MENU buon, and then turn SCROLL/SELECT knob to select ‘Factory Reset’, press SCROLL/SELECT
knob to confirm.
EN
FR
IT
NL
NW
DK
PL
CZ
SK
19
Page 20

2. Turn SCROLL/SELECT knob to select ‘YES’, and then press SCROLL/SELECT knob to confirm.
7. 7 SW Version
Press MENU buon, and then turn SCROLL/SELECT knob to select ‘SW version’, press SCROLL/SELECT knob to
confirm. The soware version will show on the display.
8 Specification
Items Specifications
Description: Under Cupboard Kitchen Radio
Frequency Range: FM: 87.5-108 MHz
DAB/DAB+: 174.928-239.200 MHz
Power Requirements: AC Input: 110-240V~, 50-60 Hz
DC Output: 9V, 1000mA
(please use our provided adaptor)
Audio Output Power: 3W rms
Power Consumption: Operation: 9W (Max)
Standby: < 1W
Dimension (W x H x D): 224mm x 72mm x 160mm (not including Fixing plate)
This symbol on the product or in the instructions means that your electrical and electronic equipment should be
disposed at the end of its life separately from your household waste. For more information, please contact the
local authority or your retailer where you purchased the product.
20
Page 21

Mode d'emploi
DIGITRADIO 20
Radio de cuisine suspendue
EN
FR
IT
NL
NW
DK
PL
CZ
SK
Page 22
1 Consignes de sécurité importantes
1. Veuillez lire le présent mode d'emploi.
2. Veuillez conserver le présent mode d'emploi.
3. Veuillez tenir compte de tous les avertissements.
4. Veuillez suivre l'ensemble des instructions.
5. N'utilisez pas le haut-parleur à proximité de l'eau.
6. Neoyez l'appareil uniquement à l'aide d'un chion sec.
AVERTISSEMENT: AFIN DE RÉDUIRE LE RISQUE DE CHOC ÉLECTRIQUE, N'EXPOSEZ PAS LE HAUT-PARLEUR À LA
PLUIE OU À L'HUMIDITÉ.
Afin de réduire le risque de choc électrique, d'incendie, etc. :
1. Ne placez pas l'unité à proximité d'une source de chaleur, comme un radiateur, un registre de chaleur, une
cuisinière ou autres appareils (y compris les amplificateurs) produisant de la chaleur.
2. N'obstruez pas les orifices de ventilation de l'unité.
3. L'unité ne doit pas être exposée aux projections d'eau et aux éclaboussures. Aucun objet contenant du
liquide, comme un vase, ne doit être placé sur l'unité.
4. Ne placez aucun objet lourd sur l'unité et ne marchez pas dessus sous peine d'endommager gravement
l'unité.
5. Veuillez consulter les étiquees apposées à l'arrière de l'unité pour connaître la consommation d'énergie et
autres informations liées à la sécurité.
6. Cee unité est conçue pour être utilisée exclusivement avec l'alimentation fournie.
7. Protégez le cordon d'alimentation afin qu'il ne soit pas piétiné ni pincé, en particulier au niveau des fiches, des
prises femelles et de tout point de sortie de l'unité.
8. Ne débranchez jamais votre unité en tirant sur le cordon d'alimentation. Saisissez toujours la fiche fermement
et tirez-la hors de la prise en la tenant droite.
22
Page 23

9. Réparez ou remplacez immédiatement tous les cordons d'alimentation électrique elochés ou
endommagés. N'utilisez pas un cordon fissuré ou endommagé, que ce soit au niveau du câble, de la prise ou
du connecteur.
10. Afin d'éviter tout risque d'incendie ou de choc électrique, n'utilisez pas cee prise sur une rallonge ou tout
autre dispositif similaire, à moins de pouvoir y insérer l'ensemble des lames de contact afin d'éviter toute
exposition.
11. Les jours d'orage ou de pluie, débranchez l'unité pour plus de sécurité. Débranchez-la également si vous ne
comptez pas l'utiliser pendant un long moment. Cela évitera à l'unité d'être endommagée par la foudre et
les surtensions.
12. N'essayez pas d'eectuer les réparations vous-même. Ouvrir ou retirer le boîtier peut vous exposer à une
tension dangereuse, ainsi qu'à d'autres dangers. Toute réparation doit être eectuée par des techniciens
qualifiés.
13. Le fonctionnement normal du produit peut être perturbé par de puissantes interférences
électromagnétiques. Le cas échéant, réinitialisez tout simplement le produit pour reprendre un
fonctionnement normal, en suivant le présent mode d'emploi. Si la procédure échoue, veuillez déplacer le
produit avant de le réutiliser.
14. Pour débrancher cet appareil du secteur, débranchez la fiche de l'adaptateur. Le dispositif de coupure doit
rester en état de fonctionner.
15. Par souci de sécurité et afin d'éviter toute consommation d'énergie inutile, ne laissez jamais l'unité sous
tension et sans surveillance pendant une période prolongée, par ex. toute une nuit, pendant vos vacances
ou lorsque vous n'êtes pas dans la maison. Meez-la hors tension et débranchez la fiche de la prise secteur.
EN
FR
IT
NL
NW
DK
PL
CZ
SK
23
Page 24

Sommaire
1 Consignes de sécurité importantes ......................................................................................................................... 22
2 Votre radio ...................................................................................................................................................................... 26
3 Pour commencer ........................................................................................................................................................... 28
4 Mode DAB ......................................................................................................................................................................... 31
4.1 Sélection d'une autre station ...............................................................................................................................................................31
4.2 Services secondaires ...............................................................................................................................................................................31
4.3 Recherche de stations ...........................................................................................................................................................................32
4.4 Syntonisation manuelle .........................................................................................................................................................................32
4.5 Achage des informations relatives à la station ......................................................................................................................32
4.6 Achage de la puissance du signal ................................................................................................................................................32
4.7 Mémorisation des stations prédéfinies .......................................................................................................................................... 33
4.8 Recherche d'une station prédéfinie ................................................................................................................................................33
5 Mode FM ...........................................................................................................................................................................33
5.1 Paramètres de recherche ....................................................................................................................................................................34
5.2 Paramètres audio ....................................................................................................................................................................................34
5.3 Mémorisation des stations prédéfinies ..........................................................................................................................................34
5.4 Recherche d'une station prédéfinie ................................................................................................................................................35
6 Mode Entrée Aux. ...........................................................................................................................................................35
7 Fonctionnement général ..............................................................................................................................................36
7.1 Réglage du minuteur de cuisson des œufs ................................................................................................................................36
7.2 Paramétrage de l'égaliseur .................................................................................................................................................................36
7.3 Réglage de l'horloge...............................................................................................................................................................................36
7.4 Réglage du rétroéclairage ...................................................................................................................................................................37
7.5 Réglage de la langue ............................................................................................................................................................................. 37
24
Page 25

7.6 Réinitialisation............................................................................................................................................................................................37
7.7 Version logicielle .......................................................................................................................................................................................38
8 Spécifications ..................................................................................................................................................................38
EN
FR
IT
NL
NW
DK
PL
CZ
SK
25
Page 26
2 Votre radio
Vue de face et touches
1. Bouton SCROLL/SELECT (Défiler/Sélectionner) Tournez pour faire défiler les options. Appuyez pour confirmer une option.
2. Touche 1 Appuyez et maintenez enfoncée pour enregistrer directement la station prédéfinie n° 1. Appuyez pour retrouver
directement la station prédéfinie n° 1.
3. Touche MARCHE/ARRÊT Appuyez pour mere l'unité sous tension ou en veille.
4. Touche 2 (Voir « Touche 1»)
5. Touche MODE Appuyez pour changer de mode.
6. Écran
7. Touche 3 (Voir « Touche 1»)
8. Touche MENU Appuyez pour acher ou quier l'écran de menu.
9. Touche 4+ Appuyez et maintenez enfoncée pour enregistrer directement les stations prédéfinies n° 1 à 10. Appuyez pour
revenir aux stations prédéfinies n° 1 à 10.
10. Touche TIMER (Minuterie) Appuyez pour régler le minuteur de cuisson des œufs.
11. Bouton VOLUME/INFO Tournez pour régler le volume. Appuyez pour acher les informations relatives au programme.
26
Page 27

Vue arrière et connecteurs
1. Prise Antenne
2. Prise casque
3. Prise AUX IN (Entrée Aux.)
4. Prise d'alimentation CC 9 V/1 000 mA
EN
FR
IT
NL
NW
DK
PL
CZ
SK
27
Page 28

3 Pour commencer
Retirez délicatement votre radio de l'emballage en carton. Vous pouvez conserver l'emballage afin de le réutiliser.
Contenu de votre emballage
> 1 unité principale
> 1 mode d'emploi
> 1 adaptateur électrique
> 1 plateau de fixation
> 5 vis de fixation
Positionnement de votre radio
Vous pouvez installer votre radio de deux manières : sur une surface stable/plane ou sous un meuble haut.
Évitez les emplacements suivants :
> À la lumière directe du soleil.
> À proximité de sources de chaleur.
> Dans les lieux où le taux d'humidité est élevé et la circulation d'air mauvaise.
> Dans les endroits poussiéreux.
> Dans les endroits humides où l'eau peut gouer ou éclabousser l'unité.
Installation de l'unité sur une table
28
Page 29
Installation de l'unité sous un meuble haut
Assurez-vous de débrancher entièrement l'unité.
1. Installez la plaque de fixation sous le meuble haut à l'aide des vis de fixation fournies. (Voir la Figure 1)
2. Montez l'unité sur la plaque de fixation installée. (Voir les Figures 2 et 3)
Figure 1 Figure 2 Figure 3
Aention
1. L'unité étant assez lourde, faites preuve de prudence lors de son installation.
2. Afin de réduire le risque d'incendie, ne placez aucun appareil chauant ou de cuisson sous l'unité.
3. Installez l'unité de manière à pouvoir brancher directement son cordon d'alimentation à une prise murale.
N'utilisez pas d'adaptateur ni de rallonge.
4. Installez l'unité aussi loin que possible des sources d'interférences (ex. : réfrigérateur, four à micro-ondes,
lampe fluorescente, etc.).
EN
FR
IT
NL
NW
DK
PL
CZ
SK
29
Page 30

Installation et réglage de l'antenne
Déployez l'antenne et insérez-la dans la prise Antenne située à l'arrière de l'unité afin de garantir une réception
optimale en modes DAB et FM. Il peut être nécessaire d'ajuster le positionnement de la radio et/ou de l'antenne
pour recevoir un signal optimal.
Mise sous/hors tension de l'unité
Branchez la fiche située à l'extrémité du câble de l'adaptateur électrique dans la prise ALIMENTATION CC à
l'arrière de l'unité. Puis, insérez l'adaptateur électrique dans la prise secteur. L'unité s'allume.
Appuyez sur la touche MARCHE/ARRÊT pour passer de la marche à l'état de veille.
Pour mere l'unité complètement hors tension, débranchez l'adaptateur électrique de la prise secteur.
Contrôle du volume
Pendant la diusion d'un programme, tournez le bouton VOLUME/INFO dans le sens des aiguilles d'une montre
ou dans le sens inverse pour régler le volume.
Utilisation d'un casque
Insérez la prise stéréo de 3,5 mm du casque dans la prise Casque de l'unité. Le casque n'est pas fourni avec la radio.
Baissez le volume avant de brancher le casque. Montez progressivement le volume lorsque vous portez le casque,
jusqu'à aeindre le niveau souhaité.
Aention: une exposition prolongée à de la musique trop forte peut provoquer une altération de l'audition.
Il est préférable d'éviter les volumes extrêmes lorsque vous utilisez un casque, en particulier dans le cadre
d'une utilisation prolongée.
Réglage automatique de l'horloge
L'horloge peut être réglée et mise à jour automatiquement si un signal DAB/FM est reçu. Pour que l'horloge se
règle automatiquement en fonction de l'heure locale, vous devez capter une station DAB ou FM pendant un petit
moment. Vous pouvez également choisir comment mere à jour l'horloge en fonction des signaux de radio DAB
ou FM. Appuyez sur la touche Menu > Time > Auto update (Horloge > Mise à jour automatique).
30
Page 31

4 Mode DAB
Lorsque vous allumez la radio, celle-ci lance automatiquement une recherche de toutes les stations disponibles
afin de les mémoriser. Eectuez une recherche complète supplémentaire pour vous assurer que toutes les
stations ont été captées et mémorisées. Nous vous recommandons également d'eectuer une nouvelle
recherche à quelques mois d'intervalle pour capter les nouvelles stations DAB/DAB+ dont la diusion a débuté
après l'achat de votre radio DAB.
1. Lors de sa première utilisation, la radio eectue une recherche complète et enregistre la liste des stations
dans sa mémoire.
EN
FR
IT
2. Une fois la recherche eectuée, les stations DAB/DAB+ s'achent dans l'ordre alphanumérique. La première
station de la liste est sélectionnée.
Remarque : si aucun signal DAB/DAB+ n'est capté dans votre zone, il peut être nécessaire de déplacer la
radio afin de capter un meilleur signal.
4.1 Sélection d'une autre station
Lors de la diusion d'un programme, tournez le bouton SCROLL/SELECT (Défiler/Sélectionner) pour acher
la liste des stations et sélectionner la station à diuser, puis appuyez sur le bouton SCROLL/SELECT (Défiler/
Sélectionner) pour confirmer.
4.2 Services secondaires
Vous pouvez voir s'acher le symbole « >>» après le nom de la station : cela indique que des services
secondaires sont disponibles pour cee station. Ces services secondaires sont des services supplémentaires
associés à la station principale. Par ex., une station relative au sport peut ajouter des commentaires
supplémentaires. Les services secondaires sont ajoutés directement après le nom de la station principale (avec
le symbole « << » placé juste avant) dans la liste des stations.
Pour sélectionner le service secondaire, tournez le bouton SCROLL/SELECT (Défiler/Sélectionner) jusqu'à ce
que vous trouviez le service secondaire de votre choix, puis appuyez sur le bouton SCROLL/SELECT (Défiler/
Sélectionner) pour le sélectionner.
À la fin du service secondaire, l'unité revient automatiquement à la station principale.
NL
NW
DK
PL
CZ
SK
31
Page 32

4.3 Recherche de stations
Appuyez sur la touche MENU, tournez le bouton SCROLL/SELECT (Défiler/Sélectionner) pour sélectionner « Scan »
(Rechercher), puis appuyez sur le bouton SCROLL/SELECT (Défiler/Sélectionner) pour lancer la recherche automatique.
4.4 Syntonisation manuelle
Cee fonction peut vous aider à ajuster votre antenne ou à ajouter des stations ignorées lors de la
syntonisation automatique.
1. Appuyez sur la touche MENU, tournez le bouton SCROLL/SELECT (Défiler/Sélectionner) pour sélectionner «
Manual tune» (Syntonisation manuelle), puis appuyez sur le bouton SCROLL/SELECT (Défiler/Sélectionner)
pour confirmer. L'écran ache le numéro du canal et la fréquence.
2. Tournez le bouton SCROLL/SELECT (Défiler/Sélectionner) pour changer de canal, puis appuyez sur le
bouton SCROLL/SELECT (Défiler/Sélectionner) pour sélectionner le canal actuel.
Remarque : si un multiplex correspond à ce canal et à cee fréquence, alors l'écran ache un syntoniseur,
ainsi que la puissance du signal et le nom du multiplex au bout de quelques secondes.
3. Pour écouter cee station, appuyez tout d'abord deux fois sur la touche MENU pour quier la
syntonisation manuelle.
4.5 Achage des informations relatives à la station
Les stations DAB/DAB+ diusent des informations complémentaires. Appuyez plusieurs fois sur le bouton
VOLUME/INFO de l'unité principale pour acher les informations Scrolling text (Texte défilant), Signal Strength
(Puissance du signal), Program Type (Type de programme), Ensemble, Frequency (Fréquence), Signal Error (Erreur
de signal), Bitrate (Débit), Codec, Audio Format (Format audio), Time (Heure) et Date.
4.6 Achage de la puissance du signal
Après avoir sélectionné Signal Strength (Puissance du signal), une barre indiquant la puissance du signal de la
station actuelle apparaît à l'écran.
L'indicateur de la barre représente le niveau de signal minimum admissible.
32
Page 33

Remarque : les stations dont la puissance du signal est inférieure au niveau minimum peuvent ne pas
être diusées de manière stable.
4.7 Mémorisation des stations prédéfinies
Votre radio peut mémoriser jusqu'à 10 de vos stations DAB/DAB+ préférées (stations prédéfinies). Cela vous
permet d'accéder plus rapidement et facilement à vos stations préférées.
1. Lorsque votre station préférée est en cours de diusion, appuyez et maintenez enfoncée la touche 4+
jusqu'à ce que l'écran ache «Preset Store <#: (Empty)>» (Enregistrer station prédéfinie <# : (vide)>).
2. Tournez le bouton SCROLL/SELECT (Défiler/Sélectionner) pour sélectionner un numéro de station
prédéfinie de 1 à 10, puis appuyez sur le bouton SCROLL/SELECT (Défiler/Sélectionner) pour confirmer.
L'écran ache «Preset # stored» (Station prédéfinie # enregistrée).
3. Vous pouvez également appuyer et maintenir la touche 1, 2 ou 3 enfoncée pour enregistrer directement la
station prédéfinie en position 1, 2 ou 3. L'écran ache «Preset # stored» (Station prédéfinie # enregistrée).
4.8 Recherche d'une station prédéfinie
1. Appuyez sur la touche 4+ pour acher les stations prédéfinies enregistrées.
2. Tournez le bouton SCROLL/SELECT (Défiler/Sélectionner) pour sélectionner la station prédéfinie enregistrée
de votre choix, puis appuyez sur le bouton SCROLL/SELECT (Défiler/Sélectionner) pour confirmer.
3. L'écran ache «Preset Recall <#: (Empty)>» (Retrouver la station prédéfinie <# : (vide)>) si aucune
station prédéfinie n'a été aribuée.
4. Vous pouvez également appuyer sur la touche 1, 2 ou 3 pour retrouver directement la station prédéfinie
en position 1, 2 ou 3. «Preset Recall <#: (Empty)>» (Retrouver la station prédéfinie <# : (vide)>) s'ache
si aucune station prédéfinie n'a été aribuée.
5 Mode FM
Sélection du mode FM
1. Appuyez plusieurs fois sur la touche MODE pour sélectionner le mode FM.
2. Lors de sa première utilisation, la radio démarre au début de la plage de fréquences FM (87,50 MHz).
Sinon, la dernière station FM écoutée sera sélectionnée.
EN
FR
IT
NL
NW
DK
PL
CZ
SK
33
Page 34

3. Pour rechercher manuellement la fréquence FM, lorsque la fréquence FM s'ache, tournez le bouton
SCROLL/SELECT (Défiler/Sélectionner) dans le sens des aiguilles d'une montre ou dans le sens inverse
pour modifier la fréquence par incréments de 0,05MHz.
4. Pour lancer une recherche automatique, lorsque la fréquence FM s'ache, tournez le bouton SCROLL/
SELECT (Défiler/Sélectionner) dans le sens des aiguilles d'une montre ou dans le sens inverse, puis
appuyez sur le bouton SCROLL/SELECT (Défiler/Sélectionner). Votre radio avancera ou reculera sur la plage
de fréquences jusqu'à aeindre la prochaine station disponible.
5.1 Paramètres de recherche
Par défaut, les recherches FM s'interrompent à chaque station disponible. Cela peut entraîner un mauvais rapport
signal-bruit (siement) pour les stations dont le signal est faible.
1. Pour modifier les paramètres de recherche en vue d'une interruption uniquement aux stations dont le
signal est puissant, appuyez sur la touche MENU, tournez le bouton SCROLL/SELECT (Défiler/Sélectionner)
pour sélectionner «Scan seing» (Paramètre de recherche), puis appuyez sur le bouton SCROLL/SELECT
(Défiler/Sélectionner) pour confirmer.
2. Tournez le bouton SCROLL/SELECT (Défiler/Sélectionner) pour sélectionner «Strong stations only» (Stations
puissantes uniquement), puis appuyez sur le bouton SCROLL/SELECT (Défiler/Sélectionner) pour confirmer.
5.2 Paramètres audio
Par défaut, toutes les stations en stéréo sont reproduites en stéréo. Pour les stations dont le signal est plus faible,
cela peut entraîner un mauvais rapport signal-bruit (siement).
1. Pour écouter les stations dont le signal est faible en mono, appuyez sur la touche MENU, tournez le bouton
SCROLL/SELECT (Défiler/Sélectionner) pour sélectionner « Audio Seing » (Paramètres audio), puis
appuyez sur le bouton SCROLL/SELECT (Défiler/Sélectionner) pour confirmer.
2. Tournez le bouton SCROLL/SELECT (Défiler/Sélectionner) pour sélectionner «Forced mono» (Forcer le
mode mono), puis appuyez sur le bouton SCROLL/SELECT (Défiler/Sélectionner) pour confirmer.
5.3 Mémorisation des stations prédéfinies
Votre radio peut mémoriser jusqu'à 10 de vos stations FM préférées. Cela vous permet d'accéder plus rapidement
et facilement à vos stations préférées.
1. Lorsque votre station préférée est en cours de diusion, appuyez et maintenez enfoncée la touche 4+
jusqu'à ce que l'écran ache «Preset Store <#: (Empty)>» (Enregistrer station prédéfinie <# : (vide)>).
34
Page 35

2. Tournez le bouton SCROLL/SELECT (Défiler/Sélectionner) pour sélectionner un numéro de station prédéfinie
de 1 à 10, puis appuyez sur le bouton SCROLL/SELECT (Défiler/Sélectionner) pour confirmer. L'écran ache
«Preset # stored» (Station prédéfinie # enregistrée).
3. Vous pouvez également appuyer et maintenir la touche 1, 2 ou 3 enfoncée pour enregistrer directement la
station prédéfinie en position 1, 2 ou 3. L'écran ache «Preset # stored» (Station prédéfinie # enregistrée).
5.4 Recherche d'une station prédéfinie
1. Appuyez sur la touche 4+ pour acher les stations prédéfinies enregistrées.
2. Tournez le bouton SCROLL/SELECT (Défiler/Sélectionner) pour sélectionner la station prédéfinie enregistrée
de votre choix, puis appuyez sur le bouton SCROLL/SELECT (Défiler/Sélectionner) pour confirmer.
3. L'écran ache «Preset Recall <#: (Empty)>» (Retrouver la station prédéfinie <# : (vide)>) si aucune station
prédéfinie n'a été aribuée.
4. Vous pouvez également appuyer sur la touche 1, 2 ou 3 pour retrouver directement la station prédéfinie
en position 1, 2 ou 3. «Preset Recall <#: (Empty)>» (Retrouver la station prédéfinie <# : (vide)>) s'ache si
aucune station prédéfinie n'a été aribuée.
6 Mode Entrée Aux.
L'entrée AUX IN (Entrée Aux.) permet de connecter rapidement et simplement un lecteur MP3 ou d'autres sources
audio externes.
1. Avant tout branchement au secteur, utilisez un câble audio 3,5 mm (non fourni) pour brancher votre
appareil audio externe via la prise AUX IN (Entrée Aux.) de l'unité.
2. Branchez l'adaptateur électrique au secteur, puis appuyez sur la touche MARCHE/ARRÊT pour mere l'unité
sous tension.
3. Appuyez plusieurs fois sur la touche MODE pour sélectionner le mode Auxiliary Input (Entrée auxiliaire).
4. En mode Entrée aux., vous pouvez utiliser directement votre appareil audio pour contrôler la lecture.
5. Pour un volume optimal, il est recommandé d'ajuster le volume de sortie de l'appareil audio.
EN
FR
IT
NL
NW
DK
PL
CZ
SK
Remarque : l'unité passe automatiquement en veille 15 minutes après que l'appareil source a été débranché,
mis hors tension ou si le volume est trop faible.
35
Page 36

7 Fonctionnement général
7.1 Réglage du minuteur de cuisson des œufs
Cee fonctionnalité vous permet de régler une minuterie tout en cuisinant.
1. Appuyez sur la touche TIMER (Minuterie) pour sélectionner «Egg timer» (Cuisson des œufs).
2. Tournez le bouton SCROLL/SELECT (Défiler/Sélectionner) pour régler la durée de cuisson de 1 à 99
minutes, puis appuyez sur le bouton SCROLL/SELECT (Défiler/Sélectionner) pour confirmer.
3. La minuterie lance le compte à rebours. Appuyez sur la touche TIMER (Minuterie) pour consulter le temps
de cuisson restant.
4. La sonnerie se déclenche une fois le temps écoulé. Appuyez sur la touche TIMER (Minuterie) pour
désactiver la sonnerie.
7.2 Paramétrage de l'égaliseur
Sélectionnez cee option pour ouvrir l'égaliseur. Chaque paramètre modifie le son de votre radio.
1. Appuyez sur la touche MENU, tournez le bouton SCROLL/SELECT (Défiler/Sélectionner) pour sélectionner «
Equaliser » (Égaliseur), puis appuyez sur le bouton SCROLL/SELECT (Défiler/Sélectionner) pour confirmer.
2. Tournez le bouton SCROLL/SELECT (Défiler/Sélectionner) pour sélectionner «Treble » (Aigus) ou «Bass»
(Basses), puis appuyez sur le bouton SCROLL/SELECT (Défiler/Sélectionner) pour confirmer.
3. Tournez le bouton SCROLL/SELECT (Défiler/Sélectionner) pour modifier la valeur des basses ou des aigus
de « -3» à «+3», puis appuyez sur le bouton SCROLL/SELECT (Défiler/Sélectionner) pour confirmer.
7.3 Réglage de l'horloge
1. Appuyez sur la touche MENU, tournez le bouton SCROLL/SELECT (Défiler/Sélectionner) pour sélectionner «
Time » (Heure), puis appuyez sur le bouton SCROLL/SELECT (Défiler/Sélectionner) pour confirmer.
2. Tournez le bouton SCROLL/SELECT (Défiler/Sélectionner) pour sélectionner les options, puis appuyez sur le
bouton SCROLL/SELECT (Défiler/Sélectionner) pour confirmer le réglage.
36
Set Time/date (Régler la date/
l'heure):
Auto update (Mise à jour
automatique):
Réglage manuel de la date et de l'heure
«Update from Any» (Mise à jour depuis n'importe quelle source),
«Update from DAB» (Mise à jour DAB), «Update from FM» (Mise à
jour FM) ou «No update» (Pas de mise à jour)
Page 37

Réglage du format 12/24 heures : « Set 24 hour » (Format 24 heures), «Set 12 hour » (Format 12 heures)
Réglage du format de la date : « DD-MM-YYYY » (JJ-MM-AAAA), « MM-DD-YYYY » (MM-JJ-AAAA)
3. Réglez ensuite l'heure selon vos préférences.
7. 4 Réglage du rétroéclairage
Cee fonctionnalité vous permet d'ajuster le niveau d'intensité de l'écran.
1. Appuyez sur la touche MENU, tournez le bouton SCROLL/SELECT (Défiler/Sélectionner) pour sélectionner
« Backlight» (Rétroéclairage), puis appuyez sur le bouton SCROLL/SELECT (Défiler/Sélectionner) pour confirmer.
2. Tournez le bouton SCROLL/SELECT (Défiler/Sélectionner) pour sélectionner «Power on » (Marche) ou
«Standby» (Veille), puis appuyez sur le bouton SCROLL/SELECT (Défiler/Sélectionner) pour confirmer.
3. Tournez le bouton SCROLL/SELECT (Défiler/Sélectionner) pour sélectionner le niveau de rétroéclairage,
puis appuyez sur le bouton SCROLL/SELECT (Défiler/Sélectionner) pour confirmer le réglage.
Marche Niveau 1, Niveau 2, Niveau 3, Niveau 4 ou Niveau 5
Veille Veille Arrêt, Niveau 1, Niveau 2, Niveau 3, Niveau 4 ou Niveau 5
EN
FR
IT
NL
NW
7.5 Réglage de la langue
Cee fonctionnalité vous permet de changer la langue des menus. La langue par défaut des menus est l'allemand.
1. Appuyez sur la touche MENU, tournez le bouton SCROLL/SELECT (Défiler/Sélectionner) pour sélectionner
« Language » (Langue), puis appuyez sur le bouton SCROLL/SELECT (Défiler/Sélectionner) pour confirmer.
2. Tournez le bouton SCROLL/SELECT (Défiler/Sélectionner) pour sélectionner la langue de votre choix, puis
appuyez sur le bouton SCROLL/SELECT (Défiler/Sélectionner) pour confirmer.
7.6 Réinitialisation
Une réinitialisation eace tous les paramètres définis par l'utilisateur pour les remplacer par les valeurs d'origine
par défaut : l'heure, la date, la liste des stations DAB et les stations prédéfinies sont perdues.
1. Appuyez sur la touche MENU, tournez le bouton SCROLL/SELECT (Défiler/Sélectionner) pour
sélectionner « Factory Reset » (Réinitialisation), puis appuyez sur le bouton SCROLL/SELECT (Défiler/
Sélectionner) pour confirmer.
DK
PL
CZ
SK
37
Page 38

2. Tournez le bouton SCROLL/SELECT (Défiler/Sélectionner) pour sélectionner «YES » (Oui), puis appuyez sur
le bouton SCROLL/SELECT (Défiler/Sélectionner) pour confirmer.
7. 7 Version logicielle
Appuyez sur la touche MENU, tournez le bouton SCROLL/SELECT (Défiler/Sélectionner) pour sélectionner « SW
version » (Version logicielle), puis appuyez sur le bouton SCROLL/SELECT (Défiler/Sélectionner) pour confirmer. La
version du logiciel apparaît à l'écran.
8 Spécifications
Type Spécifications
Description: Radio de cuisine suspendue
Gamme de fréquence : FM: 87,5 - 108 MHz
DAB/DAB+ : 174,928 - 239,200 MHz
Besoins en énergie : Entrée CA : 110 - 240V~, 50 - 60 Hz
Sortie CC : 9V, 1000mA
(veuillez utiliser l'adaptateur fourni)
Puissance de sortie audio : 3W (valeur ecace)
Consommation d'électricité : Fonctionnement : 9W (max.)
Veille : < 1W
Dimensions (l x h x p): 224mm x 72mm x 160mm (hors plaque de fixation)
Ce symbole sur le produit ou dans les instructions signifie que votre équipement électrique et électronique en
fin de vie ne doit pas être éliminé avec les déchets domestiques. Pour plus d'informations, veuillez contacter les
autorités locales ou le commerçant chez lequel vous avez acheté le produit.
38
Page 39

Istruzioni per l'uso
DIGITRADIO 20
Radio da cucina montabile sotto la dispensa
EN
FR
IT
NL
NW
DK
PL
CZ
SK
Page 40

1 Importanti istruzioni di sicurezza
1. Leggere queste istruzioni.
2. Conservare queste istruzioni.
3. Tenere conto di tue le avvertenze.
4. Seguire tue le istruzioni.
5. Non utilizzare l'altoparlante vicino all'acqua.
6. Pulire soltanto con un panno asciuo.
AVVERTENZA: PER LIMITARE IL RISCHIO DI INCENDIO O ELETTROCUZIONE NON ESPORRE QUESTO ALTOPARLANTE
ALLA PIOGGIA O ALL'UMIDITÀ.
Per limitare il rischio di elerocuzione, incendio, ecc.:
1. Non collocare l'apparecchio nelle vicinanze di termosifoni, bocchee o griglie di riscaldamento, stufe o altri
apparati (inclusi gli amplificatori) che generano calore.
2. Non ostruire le aperture di ventilazione dell'apparecchio.
3. Non esporre l'apparecchio a gocciolamenti o schizzi. Nessun oggeo contenente liquidi, come un bicchiere,
deve essere collocato sull'apparecchio.
4. Non collocare oggei pesanti sull'apparecchio e non calpestarlo. Se un oggeo pesante dovesse cadere
sull'apparecchio potrebbe danneggiarlo seriamente.
5. Leggere le etichee poste sul retro dell'apparecchio recanti informazioni sull'alimentazione e sulla sicurezza.
6. Utilizzare l'apparecchio soltanto con l'alimentatore fornito in dotazione.
7. Proteggere il cavo di alimentazione per evitare che venga calpestato o schiacciato, in particolare in
corrispondenza degli spinoi, delle prese di corrente e dei punti di uscita dall'apparecchio.
8. Non scollegare mai l'apparecchio tirando il cavo di alimentazione. Impugnare saldamente la spina ed
estrarla dria dalla presa.
40
Page 41

9. Riparare o sostituire immediatamente ogni cavo elerico logoro o danneggiato. Non utilizzare un cavo
che presenti incrinature o danni da abrasione lungo il corpo, sulla spina o sull'estremità del conneore.
10. Per evitare il rischio di incendi o scosse eleriche, non utilizzare questa spina con una prolunga o altra
presa a meno che non sia possibile inserire completamente gli spinoi senza che restino esposti.
11. Staccare dalla presa in caso di temporale o se l'apparecchio non verrà utilizzato per un periodo
prolungato. In tal modo si eviteranno danni all'apparecchio causati da fulmini o picchi di corrente.
12. Non cercare di riparare autonomamente l'apparecchio. Aprendolo si corre il rischio di esporsi a tensioni
pericolose o altri pericoli. Eventuali interventi che si rendano necessari devono essere eseguiti solo da
personale qualificato.
13. Il normale funzionamento dell'apparecchio può essere disturbato da forti interferenze eleromagnetiche.
In tal caso, è suciente ripristinare l'apparecchio seguendo quanto indicato nelle istruzioni per l'uso. Se
continua a funzionare male, spostare l'apparecchio in un'altra posizione.
14. Per scollegare l'apparecchio dalla presa di corrente estrarre la spina dell'adaatore. Pertanto essa dovrà
essere in una posizione facilmente raggiungibile.
15. Nell'interesse della sicurezza e per evitare un inutile consumo di corrente, non lasciare mai l'apparecchio
acceso incustodito per lunghi periodi di tempo, ad esempio durante la noe o quando si è fuori casa.
Spegnerlo ed estrarre la spina dalla presa di corrente.
EN
FR
IT
NL
NW
DK
PL
CZ
SK
41
Page 42

Indice
1 Importanti istruzioni di sicurezza ............................................................................................................................40
2 La tua radio ..................................................................................................................................................................... 44
3 Per iniziare ...................................................................................................................................................................... 46
4 Modalità DAB .................................................................................................................................................................. 49
4.1 Selezione di un'altra stazione............................................................................................................................................................ 49
4.2 Servizio secondario ................................................................................................................................................................................ 49
4.3 Scansione delle stazioni ........................................................................................................................................................................50
4.4 Sintonizzazione manuale ......................................................................................................................................................................50
4.5 Visualizzazione delle informazioni sulle stazioni .......................................................................................................................50
4.6 Visualizzazione della potenza del segnale ...................................................................................................................................50
4.7 Memorizzazione delle stazioni preselezionate ............................................................................................................................51
4.8 Richiamo di una stazione preselezionata ......................................................................................................................................51
5 Modalità FM ..................................................................................................................................................................... 51
5.1 Scan seing (Impostazioni della scansione) ...............................................................................................................................52
5.2 Impostazioni audio .................................................................................................................................................................................. 52
5.3 Memorizzazione delle stazioni preselezionate ...........................................................................................................................52
5.4 Richiamo di una stazione preselezionata .....................................................................................................................................53
6 Modalità Ingresso ausiliario ........................................................................................................................................53
7 Funzionamento generale ............................................................................................................................................ 54
7.1 Impostazione del timer di coura ....................................................................................................................................................54
7.2 Impostazione dell'equalizzatore ........................................................................................................................................................54
7.3 Impostazione dell'ora .............................................................................................................................................................................54
7.4 Impostazione della retroilluminazione ........................................................................................................................................... 55
7.5 Impostazione della lingua .................................................................................................................................................................... 55
42
Page 43

7.6 Factory Reset (Ripristino delle impostazioni predefinite) .....................................................................................................55
7.7 Versione del soware ............................................................................................................................................................................56
8 Dati tecnici ...................................................................................................................................................................... 56
EN
FR
IT
NL
NW
DK
PL
CZ
SK
43
Page 44

2 La tua radio
Vista anteriore e pulsanti
1. Manopola SCROLL/SELECT (Scorri/Seleziona) Ruotare per scorrere le opzioni. Premere per confermare un'opzione.
2. Pulsante 1 Tenere premuto per salvare direamente la stazione preselezionata 1. Premere per richiamare direamente
3. Pulsante di accensione Premere per accendere la radio o meerla in standby.
4. Pulsante 2 (vedi ‘Pulsante 1’)
5. Pulsante MODE (Modalità) Premere per alternare tra le modalità
6. Display
7. Pulsante 3 (vedi ‘Pulsante 1’)
8. Pulsante MENU Premere per visualizzare la schermata del menu o uscire da essa.
9. Pulsante 4+ Tenere premuto per salvare le stazioni preselezionate 1-10. Premere per richiamare le stazioni
10. Pulsante TIMER Premere per impostare il timer di coura.
11. Manopola VOLUME/INFO Ruotare per regolare il volume. Premere per scorrere le informazioni sul programma.
la stazione preselezionata 1.
preselezionate 1-10
44
Page 45

Vista posteriore e conneori
1. Presa per l'antenna
2. Presa per cue
3. Presa AUX IN (Ingresso ausiliario)
4. Presa DC IN 9 V / 1000 mA
EN
FR
IT
NL
NW
DK
PL
CZ
SK
45
Page 46

3 Per iniziare
Estrarre con cautela la radio dalla scatola. Conservare la confezione per un eventuale uso futuro.
Contenuto della confezione
> 1 apparecchio radio
> 1 istruzioni per l'uso
> 1 adaatore di corrente
> 1 piastra di fissaggio
> 5 viti di fissaggio
Collocazione della radio
Esistono due possibilità: collocarla su una superficie piana e stabile o montarla soo un armadieo della dispensa.
Evitare quanto segue:
> Esposizione alla luce solare direa.
> Vicinanza a fonti di calore.
> Elevata umidità ambientale e scarsa ventilazione.
> Ambienti polverosi.
> Luoghi eccessivamente umidi o con rischio di gocciolamenti o spruzzi d'acqua.
Collocazione dell'apparecchio su un tavolo
46
Page 47

Montaggio dell'apparecchio soo un armadieo
Verificare di aver rimosso tue le connessioni dall'apparecchio.
1. Installare la piastra di fissaggio soo l'armadieo con le apposite viti fornite in dotazione (vedi Figura 1).
2. Montare l'apparecchio sulla piastra di fissaggio installata (vedi Figura 2 e 3)
Figura 1 Figura 2 Figura 3
Precauzione
1. L'apparecchio è pesante: prestare aenzione durante il montaggio.
2. Per limitare il rischio di incendi, non collocare utensili o strumenti di riscaldamento o di coura soo
questo apparecchio.
3. Installare l'apparecchio in modo tale che il cavo elerico possa essere collegato direamente a una
presa elerica. Non utilizzare un convertitore o una prolunga.
4. Installare l'apparecchio il più lontano possibile da fonti di rumore (frigorifero, forno a microonde,
lampada a fluorescenza, ecc.)
EN
FR
IT
NL
NW
DK
PL
CZ
SK
47
Page 48

Montaggio e regolazione dell'antenna
Estrarre l'antenna e inserirla nella presa per l'antenna dell'apparecchio per garantire la migliore ricezione possibile
sia in modalità DAB che in FM. Per ricevere un segnale oimale potrebbe essere necessario modificare la
posizione della radio e/o dell'antenna.
Accensione e spegnimento dell'apparecchio
Collegare il conneore posto all'estremità del cavo adaatore di corrente alla presa DC IN dell'apparecchio. Quindi
inserire la spina dell'adaatore di corrente in una presa di corrente. L'apparecchio si accenderà.
Premere il pulsante di ACCENSIONE per meere la radio in standby.
Per spegnere completamente l'apparecchio scollegare l'adaatore di corrente dalla presa elerica.
Comando Volume
Durante la riproduzione di un programma, ruotare la manopola VOLUME/INFO in senso orario o antiorario per
regolare il volume.
Uso delle cue
Inserire un paio di cue dotate di spinoo stereo da 3,5 mm di diametro nella presa Cue dell'apparecchio. Le
cue non sono fornite in dotazione con la radio.
Diminuire il volume prima di collegare le cue. Una volta indossate le cue aumentare lentamente il volume fino
al livello desiderato.
Precauzione: l'esposizione prolungata alla musica ad alto volume può causare danni all'udito. Si consiglia di
evitare volumi estremi soprauo se si usano le cue a lungo.
Regolazione automatica dell'orologio
L'orologio è regolabile e aggiornabile automaticamente se si ricevono segnali DAB/FM nella posizione in cui
si trova l'apparecchio. Anché l'orologio possa sincronizzarsi con l'ora locale occorre lasciare sintonizzata una
stazione DAB o FM per un breve periodo di tempo. Si può anche scegliere se mantenere aggiornato l'orologio con
i segnali DAB o FM. Premere il pulsante Menu > Time > Auto update (Menu > Ora > Aggiornamento automatico).
48
Page 49

4 Modalità DAB
Quando si accende l'apparecchio, la radio esegue una ricerca automatica e memorizza tue le stazioni
disponibili. Si consiglia di eseguire un'ulteriore scansione completa per garantire che vengano individuate
e memorizzate tue le stazioni. Si consiglia inoltre di eseguire una nuova scansione ogni pochi mesi per
individuare le nuove stazioni DAB/DAB+ che potrebbero avere iniziato a trasmeere dopo l'acquisto della radio.
1. La prima volta la radio eseguirà una scansione completa e archivierà l'elenco delle stazioni nella memoria.
EN
FR
2. Conclusa la scansione, le stazioni DAB/DAB+ verranno visualizzate in ordine alfanumerico. La prima
stazione in elenco sarà selezionata per essere trasmessa.
Nota: se non viene trovato alcun segnale DAB/DAB+ spostare la radio in un ambiente in cui il segnale sia
più potente.
4.1 Selezione di un'altra stazione
Durante la riproduzione di un programma, ruotare la manopola SCROLL/SELECT (Scorri/Seleziona) per
visualizzare l'elenco delle stazioni e selezionare la stazione che si desidera ascoltare, quindi premere la manopola
SCROLL/SELECT (Scorri/Seleziona) per confermare.
4.2 Servizio secondario
Se dopo il nome della stazione compare il simbolo “>>” significa che quella stazione ore dei servizi secondari. Si
traa di servizi aggiuntivi associati alla stazione principale. Ad esempio, una stazione di notizie sportive potrebbe
voler aggiungere dei commenti supplementari. I servizi secondari sono inseriti direamente dopo la stazione
principale (il simbolo “<<” è anteposto al nome della stazione) nell'elenco delle stazioni.
Per selezionare la stazione secondaria, ruotare la manopola SCROLL/SELECT (Scorri/Seleziona) fino a trovare il
servizio secondario desiderato, quindi premere la manopola SCROLL/SELECT (Scorri/Seleziona) per selezionarlo.
Quando il servizio secondario finisce l'apparecchio torna automaticamente alla stazione principale.
IT
NL
NW
DK
PL
CZ
SK
49
Page 50

4.3 Scansione delle stazioni
Premere il pulsante MENU, ruotare la manopola SCROLL/SELECT (Scorri/Seleziona) per selezionare ‘Full scan’ (Scansione
completa), quindi premere la manopola SCROLL/SELECT (Scorri/Seleziona) per eseguire una scansione automatica.
4.4 Sintonizzazione manuale
Questa funzione può essere utile quando si sistema l'antenna o quando si vogliono aggiungere delle stazioni che
non sono state individuate dalla sintonizzazione automatica.
1. Premere il pulsante MENU, ruotare la manopola SCROLL/SELECT (Scorri/Seleziona) per selezionare
‘Manual tune’ (Sintonizzazione manuale), quindi premere la manopola SCROLL/SELECT (Scorri/Seleziona)
per confermare, il display visualizzerà i numeri dei canali e le frequenze.
2. Ruotare la manopola SCROLL/SELECT (Scorri/Seleziona) per passare da un canale all'altro, quindi premere
la manopola SCROLL/SELECT (Scorri/Seleziona) per selezionare il canale aualmente sintonizzato.
Nota: Se a questo canale e frequenza corrisponde un multiplex, il display visualizzerà un misuratore di
sintonia con la potenza del segnale e il nome del multiplex dopo alcuni secondi.
3. Per riprodurre la stazione, premere prima due volte il pulsante MENU per uscire dalla sintonizzazione manuale.
4.5 Visualizzazione delle informazioni sulle stazioni
Le stazioni DAB/DAB+ diondono informazioni supplementari. Premere ripetutamente la manopola VOLUME/INFO
sull'apparecchio per visualizzare le seguenti informazioni in sequenza: Testo scorrevole, Potenza del segnale, Tipo di
programma, Gruppo, Frequenza, Tasso di errore del segnale, Velocità in bit, Codec, Formato audio, Ora e Data.
4.6 Visualizzazione della potenza del segnale
Mentre è selezionata la voce Potenza del segnale, sul display viene visualizzata una barra con la potenza della
stazione aualmente in riproduzione.
L'indicatore sulla barra del segnale evidenzia il livello minimo acceabile del segnale.
50
Page 51

Nota: Le stazioni con una potenza di segnale inferiore al livello minimo non sono in grado di fornire un
flusso audio stabile.
4.7 Memorizzazione delle stazioni preselezionate
La radio può memorizzare fino a 10 stazioni DAB/DAB+ come stazioni preselezionate. Queste preselezioni
consentono di accedere facilmente e rapidamente alle proprie stazioni preferite.
1. Durante la riproduzione di una stazione, tenere premuto il pulsante 4+ finché il display non visualizza
‘Preset Store <#: (Empty)>’ (Memorizzazione preselezione <#:(Vuoto)).
2. Ruotare la manopola SCROLL/SELECT (Scorri/Seleziona) per selezionare tra i numeri di preselezione 1-10,
quindi premere la manopola SCROLL/SELECT (Scorri/Seleziona) per confermare. Sul display compare la
scria ‘Preset # stored’ (Preselezione # memorizzata).
3. È anche possibile tenere premuto il pulsante 1, 2 o 3 per salvare direamente la stazione preselezionata
su 1, 2 o 3. Sul display compare la scria ‘Preset # stored’ (Preselezione # memorizzata).
4.8 Richiamo di una stazione preselezionata
1. Premere il pulsante 4+ per visualizzare le stazioni preselezionate salvate.
2. Ruotare la manopola SCROLL/SELECT (Scorri/Seleziona) per selezionare la stazione preselezionata
memorizzata che si desidera ascoltare, quindi premere la manopola SCROLL/SELECT (Scorri/Seleziona)
per confermare.
3. Sul display compare la scria ‘Preset Recall <#: (Empty)>’ (Richiamo preselezione <#:(Vuoto)) se la
preselezione non è stata assegnata.
4. È anche possibile premere il pulsante 1, 2 o 3 per richiamare direamente la stazione preselezionata
su 1, 2 o 3. Verrà visualizzato ‘Preset Recall <#: (Empty)>’ (Richiamo preselezione <#:(Vuoto)) se la
preselezione non è stata assegnata.
5 Modalità FM
Selezione della modalità FM
1. Premere ripetutamente il pulsante MODALITÀ per selezionare Modalità FM.
2. La prima volta si collocherà all'inizio della gamma di frequenze FM (87.50MHz). Altrimenti verrà
selezionata l'ultima stazione FM ascoltata.
EN
FR
IT
NL
NW
DK
PL
CZ
SK
51
Page 52

3. Per eeuare una scansione manuale della frequenza FM, mentre la frequenza FM è visualizzata ruotare
la manopola SCROLL/SELECT (Scorri/Seleziona) in senso orario o antiorario per cambiare la frequenza a un
ritmo di 0.05MHz per volta.
4. Per eeuare una scansione automatica, mentre la frequenza FM è visualizzata ruotare la manopola
SCROLL/SELECT (Scorri/Seleziona) in senso orario o antiorario, quindi premere la manopola SCROLL/SELECT
(Scorri/Seleziona); la radio salterà in avanti o indietro fino a raggiungere la stazione disponibile successiva.
5.1 Scan seing (Impostazioni della scansione)
Per impostazione predefinita, le scansioni FM si fermano su ogni stazione disponibile. Come risultato il rapporto
segnale-disturbo delle stazioni più deboli sarà scadente e si potrebbe percepire solo un sibilo.
1. Per cambiare le impostazioni e fermare la scansione soltanto sulle stazioni dotate di una buona potenza
di segnale, premere il pulsante MENU, quindi ruotare la manopola SCROLL/SELECT (Scorri/Seleziona) per
selezionare ‚Scan seing‘ (Impostazione scansione), quindi premere la manopola SCROLL/SELECT (Scorri/
Seleziona) per confermare.
2. Ruotare la manopola SCROLL/SELECT (Scorri/Seleziona) per selezionare ‚Strong stations only‘ (Solo
stazioni forti), quindi premere la manopola SCROLL/SELECT (Scorri/Seleziona) per confermare.
5.2 Impostazioni audio
Per impostazione predefinita, la riproduzione di tue le stazioni avviene in stereo. Per le stazioni deboli il risultato
potrebbe essere un sibilo causato dall'inadeguatezza del rapporto segnale-disturbo.
1. Per riprodurre le stazioni deboli in mono, premere il pulsante MENU, ruotare la manopola SCROLL/SELECT
(Scorri/Seleziona) per selezionare ‘Audio seing’ (Impostazione audio), quindi premere la manopola
SCROLL/SELECT (Scorri/Seleziona) per confermare.
2. Ruotare la manopola SCROLL/SELECT (Scorri/Seleziona) per selezionare ‚Forced mono‘ (Mono obbligato),
quindi premere la manopola SCROLL/SELECT (Scorri/Seleziona) per confermare.
5.3 Memorizzazione delle stazioni preselezionate
La radio può memorizzare fino a 10 stazioni FM. Queste preselezioni consentono di accedere facilmente e
rapidamente alle proprie stazioni preferite.
1. Durante la riproduzione di una stazione, tenere premuto il pulsante 4+ finché il display non visualizza
‘Preset Store <#: (Empty)>’ (Memorizzazione preselezione <#:(Vuoto)).
2. Ruotare la manopola SCROLL/SELECT (Scorri/Seleziona) per selezionare tra i numeri di preselezione 1-10,
quindi premere la manopola SCROLL/SELECT (Scorri/Seleziona) per confermare. Sul display compare la
scria ‘Preset # stored’ (Preselezione # memorizzata).
52
Page 53

3. È anche possibile tenere premuto il pulsante 1, 2 o 3 per salvare direamente la stazione preselezionata
su 1, 2 o 3. Sul display compare la scria ‘Preset # stored’ (Preselezione # memorizzata).
5.4 Richiamo di una stazione preselezionata
1. Premere il pulsante 4+ per visualizzare le stazioni preselezionate salvate.
2. Ruotare la manopola SCROLL/SELECT (Scorri/Seleziona) per selezionare la stazione preselezionata
memorizzata che si desidera ascoltare, quindi premere la manopola SCROLL/SELECT (Scorri/Seleziona)
per confermare.
3. Sul display compare la scria ‘Preset Recall <#: (Empty)>’ (Richiamo preselezione <#:(Vuoto)) se la
preselezione non è stata assegnata.
4. È anche possibile premere il pulsante 1, 2 o 3 per richiamare direamente la stazione preselezionata
su 1, 2 o 3. Verrà visualizzato ‘Preset Recall <#: (Empty)>’ (Richiamo preselezione <#:(Vuoto)) se la
preselezione non è stata assegnata.
6 Modalità Ingresso ausiliario
L'ingresso ausiliario consente di collegarsi rapidamente e facilmente a un leore MP3 o ad altre sorgenti audio
esterne.
1. Prima di collegare l'alimentazione elerica, utilizzare un cavo audio da 3,5 mm (non in dotazione) per
collegare il dispositivo audio esterno araverso la presa AUX IN dell'apparecchio.
2. Collegare l'adaatore di corrente alla presa elerica, quindi premere il pulsante di ACCENSIONE per
accendere l'apparecchio.
3. Premere ripetutamente il pulsante MODALITÀ per selezionare la modalità Ingresso ausiliario.
4. Nella modalità Ingresso ausiliario è possibile azionare direamente le funzioni di riproduzione del
dispositivo audio.
5. Per oenere un volume oimale si consiglia di regolare il volume anche sul dispositivo audio.
Nota: l'apparecchio andrà automaticamente in standby dopo 15 minuti se il dispositivo esterno è
scollegato, spento o se il volume è troppo basso.
EN
FR
IT
NL
NW
DK
PL
CZ
SK
53
Page 54

7 Funzionamento generale
7.1 Impostazione del timer di coura
Questa funzione consente di impostare un timer per agevolare il rispeo dei tempi di coura degli alimenti.
1. Premere il pulsante TIMER per selezionare ‘Egg timer’ (Timer coura).
2. Ruotare la manopola SCROLL/SELECT (Scorri/Seleziona) per selezionare un tempo di coura compreso tra
1 minuto e 99 minuti, quindi premere la manopola SCROLL/SELECT (Scorri/Seleziona) per confermare.
3. Il timer di coura incomincerà il conto alla rovescia. Premere il pulsante TIMER per verificare il tempo restante.
4. Allo scadere del tempo impostato suonerà il cicalino. Premere il pulsante TIMER per spegnere il cicalino.
7.2 Impostazione dell'equalizzatore
Selezionare questa opzione per impostare l'equalizzazione dei suoni. Ogni impostazione, se selezionata, cambierà
i toni dell'audio emesso dalla radio.
1. Premere il pulsante MENU, ruotare la manopola SCROLL/SELECT (Scorri/Seleziona) per selezionare
‘Equaliser’ (Equalizzatore), quindi premere la manopola SCROLL/SELECT (Scorri/Seleziona) per confermare.
2. Ruotare la manopola SCROLL/SELECT (Scorri/Seleziona) per selezionare ‘Treble’ (Acuti) o ‘Bass’ (Bassi),
quindi premere la manopola SCROLL/SELECT (Scorri/Seleziona) per confermare.
3. Ruotare la manopola SCROLL/SELECT (Scorri/Seleziona) per cambiare il valore degli Acuti o dei Bassi tra
‘-3’ e ‘+3’, quindi premere la manopola SCROLL/SELECT (Scorri/Seleziona) per confermare.
7.3 Impostazione dell'ora
1. Premere il pulsante MENU, ruotare la manopola SCROLL/SELECT (Scorri/Seleziona) per selezionare ‘Time’
(Ora), quindi premere la manopola SCROLL/SELECT (Scorri/Seleziona) per confermare.
2. Ruotare la manopola SCROLL/SELECT (Scorri/Seleziona) per selezionare le opzioni, quindi premere la
manopola SCROLL/SELECT (Scorri/Seleziona) per confermare l'impostazione.
Imposta Ora/Data: Impostazione manuale dell'ora e della data
Aggiornamento automatico: ‘Update from Any’, ‘Update from DAB’, ‘Update from FM’ o ‘No
update’ (Aggiorna da qualsiasi, Aggiorna da DAB, Aggiorna da
FM, Non aggiornare)
54
Page 55

Impostazione del formato a 12/24 ore: ‘Set 24 hour’ o ‘Set 12 hour’ (Imposta 24 ore, Imposta 12 ore)
Impostazione del formato della data: ‘DD-MM-YYYY’ o ‘MM-DD-YYYY‘ (GG-MM-AAAA, MM-GG-AAAA)
3. Quindi impostare l'ora in base alle proprie preferenze.
7. 4 Impostazione della retroilluminazione
Questa funzione consente di regolare la luminosità del display.
1. Premere il pulsante MENU, ruotare la manopola SCROLL/SELECT (Scorri/Seleziona) per selezionare
‘Backlight’ (Retroilluminazione), quindi premere la manopola SCROLL/SELECT (Scorri/Seleziona) per
confermare.
2. Ruotare la manopola SCROLL/SELECT (Scorri/Seleziona) per selezionare ‘Power on‘ (Accensione) o
‚Standby‘, quindi premere la manopola SCROLL/SELECT (Scorri/Seleziona) per confermare.
3. Ruotare la manopola SCROLL/SELECT (Scorri/Seleziona) per selezionare il livello di retroilluminazione,
quindi premere la manopola SCROLL/SELECT (Scorri/Seleziona) per confermare l'impostazione.
EN
FR
IT
NL
Accensione Livello 1, Livello 2, Livello 3, Livello 4 o Livello 5
Standby Standby O, Livello 1, Livello 2, Livello 3, Livello 4 o Livello 5
7.5 Impostazione della lingua
Questa funzione consente di cambiare la lingua dei menu. La lingua predefinita per i menu è il tedesco.
1. Premere il pulsante MENU, ruotare la manopola SCROLL/SELECT (Scorri/Seleziona) per selezionare
‘Language’ (Lingua), quindi premere la manopola SCROLL/SELECT (Scorri/Seleziona) per confermare.
2. Ruotare la manopola SCROLL/SELECT (Scorri/Seleziona) per selezionare la propria lingua, quindi premere
la manopola SCROLL/SELECT (Scorri/Seleziona) per confermare.
7.6 Factory Reset (Ripristino delle impostazioni predefinite)
Il ripristino delle impostazioni predefinite cancella tue le impostazioni fae dall'utente sostituendole con i valori
predefiniti originali, pertanto si perdono l'ora e la data, l'elenco delle stazioni DAB e le stazioni preselezionate.
1. Premere il pulsante MENU, ruotare la manopola SCROLL/SELECT (Scorri/Seleziona) per selezionare
‘Factory Reset’ (Ripristino impostazioni predefinite), quindi premere la manopola SCROLL/SELECT
(Scorri/Seleziona) per confermare.
NW
DK
PL
CZ
SK
55
Page 56

2. Ruotare la manopola SCROLL/SELECT (Scorri/Seleziona) per selezionare ‘YES’ (Sì), quindi premere la
manopola SCROLL/SELECT (Scorri/Seleziona) per confermare.
7. 7 Versione del soware
Premere il pulsante MENU, ruotare la manopola SCROLL/SELECT (Scorri/Seleziona) per selezionare ‘SW version’
(Versione SW), quindi premere la manopola SCROLL/SELECT (Scorri/Seleziona) per confermare. La versione del
soware verrà visualizzata sul display.
8 Dati tecnici
Voci Dati tecnici
Descrizione: Radio da cucina montabile soo la dispensa
Gamma di frequenza: FM: 87.5-108 MHz
DAB/DAB+: 174.928-239.200 MHz
Requisiti elerici: Ingresso in CA: 110-240 V~, 50-60 Hz
Uscita in CC: 9 V, 1000 mA
(utilizzare l'adaatore fornito in dotazione)
Potenza audio: 3 W rms (valore quadratico medio)
Assorbimento di corrente: Funzionamento: 9 W (Max)
Standby: < 1 W
Dimensioni (Largh. x Alt. x Prof.): 224 mm x 72 mm x 160 mm (piastra di fissaggio esclusa)
Questo simbolo sul prodoo o nelle istruzioni indica che le apparecchiature eleriche ed eleroniche al termine
della loro vita devono essere smaltite separatamente dai rifiuti domestici. Per ulteriori informazioni, rivolgersi
all'autorità locale competente o al rivenditore presso il quale è stato acquistato il prodoo.
56
Page 57

Handleiding
DIGITRADIO 20
Keukenradio voor onder de keukenkast
EN
FR
IT
NL
NW
DK
PL
CZ
SK
Page 58

1 Belangrijke veiligheidsinstructies
1. Lees deze instructies.
2. Bewaar deze instructies.
3. Neem alle waarschuwingen in acht.
4. Volg alle instructies op.
5. Gebruik de luidspreker niet in de buurt van water.
6. Alleen reinigen met een droge doek.
WAARSCHUWING: OM HET GEVAAR VAN BRAND OF EEN ELEKTRISCHE SCHOK TE VERMINDEREN, MOET U DE
LUIDSPREKER NIET BLOOTSTELLEN AAN REGEN OF VOCHT.
Om het risico van elektrische schokken, brand enz. te verminderen:
1. Plaats het apparaat niet in de buurt van warmtebronnen zoals radiatoren, verwarmingselementen,
fornuizen of andere warmte producerende apparaten (inclusief versterkers).
2. De ventilatieopeningen van het apparaat mogen niet worden geblokkeerd.
3. Het apparaat moet niet worden blootgesteld aan druppels of speers en op het apparaat mogen geen
met vloeistof gevulde voorwerpen, zoals vazen, worden geplaatst.
4. Plaats geen zware voorwerpen op het apparaat en stap er niet op, het voorwerp kan vallen en ernstige
schade aan het apparaat veroorzaken.
5. Lees de typeplaatjes aan de achterkant van het apparaat voor stroomingang en andere
veiligheidsinformatie.
6. Dit apparaat dient alleen te worden gebruikt met de meegeleverde stroomvoorziening.
7. Voorkom dat er op het netsnoer wordt gestaan of dat het wordt afgeknepen, vooral bij de stekkers,
stopcontacten en op de punten waar ze uit het apparaat komen.
8. Ontkoppel het apparaat nooit door aan het netsnoer te trekken. Pak de stekker altijd stevig vast en trek
hem recht uit het stopcontact.
58
Page 59

9. Repareer of vervang onmiddellijk alle elektrische snoeren die gerafeld of anderszins beschadigd
zijn. Gebruik geen snoer die barsten of schuurplekken vertoont over de lengte, bij de stekker of het
stekkeruiteinde.
10. Om brand of elektrische schokken te voorkomen, mag deze stekker niet worden gebruikt met een
verlengsnoer of ander stopcontact, tenzij de pinnen volledig kunnen worden ingestoken om blootstelling
van de pinnen te voorkomen.
11. Bij onweer of regen moet het apparaat worden ontkoppeld voor extra bescherming of wanneer het
apparaat voor een langere periode niet wordt gebruikt. Dit voorkomt schade aan het apparaat door
bliksem of spanningspieken.
12. Probeer niet zelf onderhoudswerkzaamheden uit te voeren. Door de kast te openen of te verwijderen,
stelt u zich mogelijk bloot aan hoge spanning of andere gevaren. Alle onderhoudswerkzaamheden
moeten worden uitgevoerd door gekwalificeerde technici.
13. De normale functie van het product kan worden verstoord door sterke elektromagnetische interferentie.
Als dat het geval is, herstel dan eenvoudig het product om de normale werking te hervaen door de
handleiding te volgen. In het geval dat de functie niet kan worden hervat, gebruik dan het product op
een andere locatie.
14. Dit apparaat wordt via de stekker van de adapter losgekoppeld van de voeding. Het ontkoppelde
apparaat dient goed bedienbaar te blijven.
15. Met het oog op de veiligheid en om onnodig stroomverbruik te voorkomen, moet het apparaat nooit
ingeschakeld blijven terwijl deze lang zonder toezicht is, bijv. 's nachts, tijdens vakanties of wanneer
niemand in huis is. Schakel het apparaat uit en haal de stekker uit het stopcontact.
EN
FR
IT
NL
NW
DK
PL
CZ
SK
59
Page 60

Inhoud
1 Belangrijke veiligheidsinstructies .............................................................................................................................58
2 Uw radio ........................................................................................................................................................................... 62
3 Aan de slag ..................................................................................................................................................................... 64
4 DAB-modus ......................................................................................................................................................................67
4.1 Een andere zender selecteren ........................................................................................................................................................... 67
4.2 Ondersteunende dienst ........................................................................................................................................................................67
4.3 Zenders scannen ......................................................................................................................................................................................68
4.4 Handmatig afstemmen .........................................................................................................................................................................68
4.5 Zenderinformatie weergeven .............................................................................................................................................................68
4.6 Signaalsterkte weergeven ....................................................................................................................................................................68
4.7 Voorkeurzenders opslaan ....................................................................................................................................................................69
4.8 Een voorkeurzender oproepen ..........................................................................................................................................................69
5 FM-modus ........................................................................................................................................................................ 69
5.1 Scaninstelling .............................................................................................................................................................................................70
5.2 Audio-instellingen .................................................................................................................................................................................... 70
5.3 Voorkeurzenders opslaan ....................................................................................................................................................................70
5.4 Een voorkeurzender oproepen ...........................................................................................................................................................71
6 AUX In-modus ................................................................................................................................................................. 71
7 Algemene bediening ..................................................................................................................................................... 72
7.1 Kookwekker instellen ..............................................................................................................................................................................72
7.2 Equalizer instellen ....................................................................................................................................................................................72
7.3 Tijd instellen ................................................................................................................................................................................................ 72
7.4 Achtergrondverlichting instellen ....................................................................................................................................................... 73
7.5 Taal instellen ...............................................................................................................................................................................................73
60
Page 61

7.6 Fabrieksinstellingen ................................................................................................................................................................................. 73
7.7 SW-versie ..................................................................................................................................................................................................... 74
8 Specificatie .......................................................................................................................................................................74
EN
FR
IT
NL
NW
DK
PL
CZ
SK
61
Page 62

2 Uw radio
Vooraanzicht & toetsen
1. SCROLL/SELECT-knop Om door de opties te bladeren. Druk erop om opties te bevestigen.
2. Toets 1 Houd deze ingedrukt om direct voorkeurzender 1 op te slaan. Druk erop om voorkeurzender 1 direct op te roepen.
3. POWER-toets Druk erop om de radio in te schakelen of op stand-by te zeen.
4. 2 toets (zie ‘1 toets’)
5. MODE-toets Druk erop om te schakelen tussen
6. Display
7. 3 toets (zie ‘1 toets’)
8. MENU toets Druk erop om het menuscherm weer te geven of af te sluiten.
9. 4+-toets Houd deze ingedrukt om voorkeuzezenders 1-10 op te slaan. Druk erop om voorkeuzezenders 1-10 op te roepen
10. TIMER-toets Druk erop om de kookwekker in te stellen.
11. VOLUME/INFO-toets Draai eraan om het volume aan te passen. Druk erop om te bladeren door programma-informatie.
62
Page 63

Achteraanzicht & aansluitingen
1. Antenneaansluiting
2. Hoofdtelefoonaansluiting
3. AUX IN-aansluiting
4. DC IN 9V/1000mA-aansluiting
EN
FR
IT
NL
NW
DK
PL
CZ
SK
63
Page 64

3 Aan de slag
Haal voorzichtig de radio uit de doos. Mogelijk wilt u de verpakking opslaan voor toekomstig gebruik.
Wat u in de verpakking aantre
> Hoofdapparaat x 1
> Handleiding x 1
> Stroomadapter x 1
> Bevestigingsplaat x 1
> Bevestigingsschroeven x 5
Uw radio positioneren
Er zijn twee manieren om uw radio te plaatsen - plaatsing op een vlakke/stabiele ondergrond of montage onder
een kast.
Vermijd de volgende locaties:
> Waar de radio aan direct zonlicht wordt blootgesteld.
> Waar de radio dicht bij warmtebronnen staat.
> Waar de luchtvochtigheid hoog is en de ventilatie slecht is.
> Waar het stog is.
> Op plaatsen waar het klam is of waar er water op het apparaat kan druppelen of spaen.
Plaats het apparaat op een tafel
64
Page 65

Het apparaat onder een kast installeren
Zorg ervoor dat alle verbindingen van het apparaat worden verwijderd.
1. Monteer de bevestigingsplaat onder een kast met de meegeleverde bevestigingsschroeven. (Zie figuur 1)
2. Monteer het apparaat op de geïnstalleerde bevestigingsplaat. (Zie figuur 2 en 3)
Figuur 1 Figuur 2 Figuur 3
Voorzichtig
1. Wees voorzichtig bij het installeren van het apparaat aangezien het zwaar is.
2. Plaats geen verwarmings- of kooktoestel onder dit apparaat om het risico op brand te verminderen.
3. Installeer het apparaat zodat het netsnoer rechtstreeks kan worden aangesloten op een stopcontact.
Gebruik geen omvormer of verlengsnoer.
4. Installeer het apparaat zo ver mogelijk van een bron van geluidshinder. (bijvoorbeeld koelkast,
magnetron, fluorescerende lamp enz.)
EN
FR
IT
NL
NW
DK
PL
CZ
SK
65
Page 66

Installeren en afstellen van de antenne
Schuif de antenne uit en plaats deze in de Antenne-aansluiting van het apparaat om de best mogelijke ontvangst
te verkrijgen in zowel de DAB- als FM-radiomodus. Het kan nodig zijn om de positie van de radio en/of antenne
aan te passen om het beste signaal te verkrijgen.
Het apparaat in-/uitschakelen
Sluit de stekker aan het eind van de adapterkabel aan op de DC IN-aansluiting van het apparaat. Sluit de
voedingsadapter aan op het stopcontact. Het apparaat wordt ingeschakeld.
Druk op de toets POWER om de radio over te schakelen naar de stand-bymodus.
Om het apparaat volledig uit te schakelen moet u de stroomadapter loskoppelen van het stopcontact.
Volumeregeling
Terwijl er een programma wordt afgespeeld, draait u de toets VOLUME/INFO rechtsom of linksom om het volume
aan te passen.
Hoofdtelefoon gebruiken
Sluit een hoofdtelefoon met een 3,5 mm stereoplug aan op de hoofdtelefoon -aansluiting van het apparaat.
Hoofdtelefoon wordt niet meegeleverd met de radio.
Verlaag het volume alvorens een hoofdtelefoon aan te sluiten. Verhoog het volume van de hoofdtelefoon
langzaam tot u het gewenste niveau hebt bereikt.
Voorzichtig: langdurige blootstelling aan harde muziek kan leiden tot gehoorbeschadiging. Het is het beste
om een extreem volume te vermijden wanneer u een hoofdtelefoon gebruikt, vooral voor langere tijd.
De klok automatisch instellen
De klok kan worden ingesteld en automatisch worden bijgewerkt als DAB/FM-signalen op uw locatie worden
ontvangen. Om de klok te synchroniseren met de lokale tijd moet u de radio even op een DAB- of FM-zender
laten staan. U kunt ook kiezen hoe u wilt dat de klok up-to-date blij met de DAB- of de FM-radiosignalen. Druk
op de toets Menu> Time > Auto update.
66
Page 67

4 DAB-modus
Wanneer u de radio aanzet, zal deze automatisch naar alle beschikbare zenders zoeken en deze opslaan.
U moet daarnaast een volledige scan uitvoeren om ervoor te zorgen dat alle zenders worden opgepakt en
opgeslagen. Ook wordt aanbevolen om elke paar maanden een nieuwe scan uit te voeren om nieuwe DAB/
DAB+-zenders te vinden die kunnen zijn begonnen met uitzenden na de aanschaf van de DAB-radio.
1. Voor het eerste gebruik zal de radio een volledige scan uitvoeren en de radiozenders in het geheugen
opslaan.
2. Als het scannen is voltooid, worden de DAB/DAB+-zenders weergegeven in alfabetische volgorde. De
eerste zender in de lijst wordt geselecteerd om uit te zenden.
Opmerking: als er geen DAB/DAB+-signaal wordt gevonden in uw gebied, moet uw radio worden
verplaatst om een sterker signaal te verkrijgen.
4.1 Een andere zender selecteren
Draai terwijl een programma wordt afgespeeld aan de knop SCROLL/SELECT om de zenderlijst weer te geven
en de zender te selecteren die u wilt weergeven en druk daarna op de knop SCROLL/SELECT om te bevestigen.
4.2 Ondersteunende dienst
Mogelijk ziet u een ">>"-symbool achter de naam van de zender. Dit gee aan dat er ondersteunende diensten
beschikbaar zijn voor die zender. Deze ondersteunende diensten bevaen extra diensten die zijn gerelateerd
aan de primaire zender. Bijvoorbeeld een sportzender hee mogelijk extra commentaar om toe te voegen. De
ondersteunende diensten worden direct na de primaire zender ingevoegd (een "<<"-symbool staat voor de
naam van de zender) in de zenderlijst.
Om de ondersteunende zender te selecteren draait u aan de knop SCROLL/SELECT totdat u de ondersteunde
dienst vindt die u wilt. Druk vervolgens op SCROLL/SELECT om deze te selecteren.
Wanneer de ondersteunende dienst eindigt, zal het apparaat automatisch overschakelen naar de primaire zender.
EN
FR
IT
NL
NW
DK
PL
CZ
SK
67
Page 68

4.3 Zenders scannen
Druk op de toets MENU en draai aan de knop SCROLL/SELECT om ‘Full scan’ te selecteren en druk op de knop
SCROLL/SELECT om automatisch te scannen.
4.4 Handmatig afstemmen
Dit kan u helpen bij het instellen van uw antenne of bij het toevoegen van zenders die zijn overgeslagen bij het
automatisch afstemmen.
1. Druk op de toets MENU en draai aan de knop SCROLL/SELECT om ‘Manual tune’ te selecteren en druk op
de knop SCROLL/SELECT om te bevestigen. Het display toont het kanaalnummer en de frequentie.
2. Draai aan de knop SCROLL/SELECT om van kanaal naar kanaal te gaan en druk vervolgens op SCROLL/
SELECT om het huidige kanaal te selecteren.
Opmerking: Als er een multiplex overeenstemt met dit kanaal en deze frequentie, dan toont het display na
een paar seconden een afstemmingsmeter met de signaalsterkte en de multiplexnaam.
3. Als u de zender wilt afspelen, drukt u eerst tweemaal op de toets MENU om handmatig afstemmen af te sluiten.
4.5 Zenderinformatie weergeven
DAB/DAB+-zenders zenden aanvullende informatie uit. Druk herhaaldelijk op de knop VOLUME/INFO op het
apparaat om informatie te krijgen over scrolltekst, signaalsterkte, soort programma, ensemble, frequentie, foutief
signaal, bitrate, codec, audio-indeling, datum en tijd.
4.6 Signaalsterkte weergeven
Als u signaalsterkte hebt geselecteerd, wordt een signaalbalk met de sterkte van de huidige zender weergegeven
op het display.
De indicator op de signaalbalk toont het minimum aanvaardbare signaalniveau.
68
Page 69

Opmerking: Zenders met een signaalsterkte beneden het minimum signaalniveau bieden wellicht niet een
gestage audiostroom.
4.7 Voorkeurzenders opslaan
De radio kan maximaal 10 van uw favoriete DAB/DAB+-zenders opslaan als voorkeurzenders. Dit gee u snel en
gemakkelijk toegang tot uw favoriete zenders.
1. Terwijl uw favoriete zender wordt afgespeeld, houdt u 4+ toets ingedrukt totdat 'Preset Store <#:
(Empty)>’ (Opslag voorkeuzenummer - leeg) wordt weergegeven.
2. Draai aan de knop SCROLL/SELECT om te kiezen tussen voorkeuzenummers 1-10 en druk daarna op
de knop SCROLL/SELECT om te bevestigen. Het display toont ‘Preset # stored’ (Voorkeuzenummer
opgeslagen).
3. U kunt ook toets 1, 2 of 3 ingedrukt houden om voorkeurzender 1, 2 of 3 rechtstreeks op te slaan. Het
display toont ‘Preset # stored’ (Voorkeuzenummer opgeslagen).
4.8 Een voorkeurzender oproepen
1. Druk op 4+ toets om de opgeslagen voorkeurzenders weer te geven.
2. Draai aan de knop SCROLL/SELECT om de opgeslagen voorkeurzender te selecteren die u wilt
weergeven en druk daarna op de knop SCROLL/SELECT om te bevestigen.
3. Het display toont ‘Preset Recall <#: (Empty)>’ (Voorkeuzezender oproepen - leeg) als de voorkeurzender
niet is toegewezen.
4. U kunt ook toets 1, 2 of 3 indrukken om voorkeurzender 1, 2 of 3 rechtstreeks op te roepen. ‘Preset Recall <#:
(Empty)>’ (Voorkeurzender oproepen - leeg) wordt weergegeven als de voorkeurzender niet is toegewezen.
5 FM-modus
FM-modus selecteren
1. Druk herhaaldelijk op de toets MODE om FM-modus te selecteren.
2. Voor het eerste gebruik wordt gestart bij het begin van het FM-frequentiebereik (87,50MHz). Anders
wordt het laatst beluisterde FM-station geselecteerd.
EN
FR
IT
NL
NW
DK
PL
CZ
SK
69
Page 70

3. Als u handmatig de FM-frequentie wilt scannen terwijl de FM-frequentie wordt weergegeven, draait u de
knop SCROLL/SELECT rechtsom of linksom om de frequentie te veranderen met 0,05MHz per stap.
4. Als u automatisch wilt scannen draait u, terwijl de FM-frequentie wordt weergegeven, de knop SCROLL/
SELECT rechtsom of linksom en daarna drukt u op de knop SCROLL/SELECT waarmee uw radio vooruit of
achteruit gaat naar de volgende beschikbare zender.
5.1 Scaninstelling
Standaard wordt bij FM-scans bij elke beschikbare zender gestopt. Dit kan resulteren in een slechte signaalruisverhouding van zwakke zenders.
1. Als u de scaninstellingen wilt wijzigen om alleen te stoppen bij zenders met een goede signaalsterkte, drukt
u op de toets MENU en daarna draait u aan de knop SCROLL/SELECT om ‘Scan seing’ (scaninstelling) te
selecteren en vervolgens drukt u op de knop ‘SCROLL/SELECT om uw keuze te bevestigen.
2. Draai aan de knop SCROLL/SELECT om ‘Strong stations only’ (Alleen sterke zenders) te selecteren en druk
daarna op de knop SCROLL/SELECT om te bevestigen.
5.2 Audio-instellingen
Standaard worden alle stereozenders weergegeven in stereo. Voor zwakke zenders kan dit resulteren in een
slechte signaal-ruisverhouding.
1. Als u zwakke zenders in mono wilt afspelen drukt u op de toets MENU en daarna draait u aan de knop SCROLL/
SELECT om ‘Audio seing’ (audio-instelling) te selecteren, druk op de knop SCROLL/SELECT om te bevestigen.
2. Draai aan de knop SCROLL/SELECT om ‘Forced mono’ (Geforceerd mono) te selecteren en druk daarna op
de knop SCROLL/SELECT om te bevestigen.
5.3 Voorkeurzenders opslaan
De radio kan maximaal 10 van uw favoriete FM-zenders opslaan. Dit gee u snel en gemakkelijk toegang tot uw
favoriete zenders.
1. Terwijl uw favoriete zender wordt afgespeeld, houdt u 4+ toets ingedrukt totdat 'Preset Store <#:
(Empty)>’ (Voorkeuze opslaan - leeg) wordt weergegeven.
2. Draai aan de knop SCROLL/SELECT om te kiezen tussen voorkeuzenummers 1-10 en druk daarna op de knop
SCROLL/SELECT om te bevestigen. Het display toont ‘Preset # stored’ (Voorkeuzenummer opgeslagen).
70
Page 71

3. U kunt ook toets 1, 2 of 3 ingedrukt houden om voorkeurzender 1, 2 of 3 rechtstreeks op te slaan. Het
display toont ‘Preset # stored’ (Voorkeuzenummer opgeslagen).
5.4 Een voorkeurzender oproepen
1. Druk op 4+ toets om de opgeslagen voorkeurzenders weer te geven.
2. Draai aan de knop SCROLL/SELECT om de opgeslagen voorkeurzender te selecteren die u wilt
weergeven en druk daarna op de knop SCROLL/SELECT om te bevestigen.
3. Het display toont ‘Preset Recall <#: (Empty)>’ (Voorkeuzezender oproepen - leeg) als de voorkeurzender
niet is toegewezen.
4. U kunt ook toets 1, 2 of 3 indrukken om voorkeurzender 1, 2 of 3 rechtstreeks op te roepen. ‘Preset
Recall <#: (Empty)>’ (Voorkeurzender oproepen - leeg) wordt weergegeven als de voorkeurzender niet is
toegewezen.
6 AUX In-modus
Gebruik AUX IN voor een snelle en gemakkelijke verbinding naar een MP3-speler of andere externe
audiobronnen.
1. Voordat u het apparaat aansluit op het stopcontact, gebruikt u een audiokabel van 3,5 mm (niet
meegeleverd) voor aansluiting op uw extern audio-apparaat via de AUX IN-aansluiting van het apparaat.
2. Sluit de netstroomadapter aan op het stopcontact en druk op de toets POWER om het apparaat in te
schakelen.
3. Druk herhaaldelijk op de toets MODE om de modus Auxiliary Input (extra ingang) te selecteren.
4. In de Aux-in-modus kunt u uw audioapparaat rechtstreeks bedienen voor afspeelfuncties.
5. Om optimale volumeniveaus te krijgen wordt aanbevolen ook het uitgangsvolumeniveau op het
audioapparaat aan te passen.
EN
FR
IT
NL
NW
DK
PL
CZ
SK
Opmerking: het apparaat schakelt automatisch over naar de stand-bymodus na 15 minuten als het
bronapparaat wordt losgekoppeld, wordt uitgeschakeld of als het volume te dicht bij dempen is.
71
Page 72

7 Algemene bediening
7.1 Kookwekker instellen
Met deze functie kunt u een aeltimer instellen tijdens het koken om uw kookuur gemakkelijk te maken.
1. Druk op de toets TIMER om de ‘Egg timer’ (kookwekker) te selecteren.
2. Draai aan de knop SCROLL/SELECT om de kooktijd in te stellen tussen 1 en 99 minuten en druk daarna op
de knop SCROLL/SELECT om te bevestigen.
3. De kookwekker gaat aellen. Druk op de toets TIMER om de resterende tijd te controleren.
4. De zoemer wordt geactiveerd zodra de tijd is bereikt. Druk op de toets TIMER om de zoemer uit te zeen.
7.2 Equalizer instellen
Selecteer deze optie om geluidegalisatie in te stellen. Elke instelling verandert de toon van het geluid van uw radio.
1. Druk op de toets MENU en draai aan de knop SCROLL/SELECT om ‘Equaliser’ te selecteren en druk op de
knop SCROLL/SELECT om te bevestigen.
2. Draai aan de knop SCROLL/SELECT om ‘Treble’ of ‘Bass’ te selecteren en druk daarna op de knop
SCROLL/SELECT om te bevestigen.
3. Draai aan de knop SCROLL/SELECT om de waarde van Bass, Treble te wijzigen van ‘-3’ tot ‘+3’ en druk
daarna op SCROLL/SELECT om te bevestigen.
7.3 Tijd instellen
1. Druk op de toets MENU en draai daarna aan de knop SCROLL/SELECT om ‘Time’ te selecteren en druk op
de knop SCROLL/SELECT om te bevestigen.
2. Draai aan de knop SCROLL/SELECT om de opties te selecteren en druk daarna op de knop SCROLL/
SELECT om de instelling te bevestigen.
Tijd/datum instellen: Handmatig instellen tijd en datum
Automatisch bijwerken: ‘Bijwerken vanaf elke’, ‘Bijwerken vanaf DAB’,
‘Bijwerken vanaf FM’ of ‘Niet bijwerken’
72
Page 73

12/24 uur instellen: ‘24 uur instellen’ of ‘12 uur instellen’
Datumnotatie instellen: ‘DD-MM-JJJJ’ of ‘MM-DD-JJJJ‘
3. Vervolgens tijd instellen volgens uw persoonlijke voorkeur.
7. 4 Achtergrondverlichting instellen
Met deze functie kunt u het helderheidsniveau van het display instellen.
1. Druk op de toets MENU en draai daarna aan de knop SCROLL/SELECT om ‘Backlight’
(Achtergrondverlichting) te selecteren en druk op de knop SCROLL/SELECT om te bevestigen.
2. Draai aan de knop SCROLL/SELECT om 'Power On’ of ‘Standby’ te selecteren en druk daarna op de knop
SCROLL/SELECT om te bevestigen.
3. Draai aan de knop SCROLL/SELECT om het niveau van de achtergrondverlichting te selecteren en druk
daarna op de knop SCROLL/SELECT om de instelling te bevestigen.
Power on (Stroom aan) Niveau 1, Niveau 2, Niveau 3, Niveau 4 of Niveau 5
Stand-by Stand-by Uit, Niveau 1, Niveau 2, Niveau 3, Niveau 4 of Niveau 5
EN
FR
IT
NL
NW
7.5 Taal instellen
Met deze functie kunt u de menutaal wijzigen. De standaardmenutaal is Duits.
1. Druk op de toets MENU en draai daarna aan de knop SCROLL/SELECT om ‘Language’ (taal) te selecteren
en druk op de knop SCROLL/SELECT om te bevestigen.
2. Draai aan de knop SCROLL/SELECT om uw taal te selecteren en druk daarna op de knop SCROLL/
SELECT om te bevestigen.
7.6 Fabrieksinstellingen
Door te herstellen naar de fabrieksinstellingen worden alle door de gebruiker gedefinieerde instellingen gewist
en vervangen door de originele standaardwaarden, zodat tijd/datum, DAB-zenderlijst en voorkeurzenders
allemaal verloren gaan.
1. Druk op de toets MENU en draai daarna aan de knop SCROLL/SELECT om ‘Factory Reset’
(Fabrieksinstellingen) te selecteren en druk op de knop SCROLL/SELECT om te bevestigen.
DK
PL
CZ
SK
73
Page 74

2. Draai aan de knop SCROLL/SELECT om ‘YES’ te selecteren en druk daarna op de knop SCROLL/SELECT
om te bevestigen.
7. 7 SW-versie
Druk op de toets MENU en draai daarna aan de knop SCROLL/SELECT om ‘SW version’ (sowareversie) te selecteren
en druk op de knop SCROLL/SELECT om te bevestigen. De sowareversie wordt op het display weergegeven.
8 Specificatie
Items Specificaties
Omschrijving: Keukenradio voor onder de keukenkast
Frequentiegebied: FM: 87.5-108 MHz
DAB/DAB+: 174.928-239.200 MHz
Stroomvereisten: AC-invoer: 110-240V~, 50-60 Hz
DC-uitvoer: 9V, 1000mA
(gebruik de meegeleverde adapter)
Uitgangsvermogen audio: 3W rms
Stroomverbruik: Bediening: 9W (Max)
Stand-by: < 1W
Afmetingen (B x D x H): 224 mm x 72 mm x 160 mm (bevestigingsplaat niet inbegrepen)
Dit symbool op het product of in de gebruiksaanwijzing betekent dat uw elektrische en elektronische apparatuur
aan het einde van zijn levensduur moet worden afgevoerd gescheiden van het huishoudelijk afval. Neem voor
meer informatie contact op met de plaatselijke overheid of uw verkooppunt waar u het product hebt gekocht.
74
Page 75

Brukerveiledning
DIGITRADIO 20
Opphengbar kjøkkenradio
EN
FR
IT
NL
NW
DK
PL
CZ
SK
Page 76

1 Viktige sikkerhetsinstrukser
1. Les disse instruksene.
2. Ta vare på disse instruksene.
3. Ta hensyn til alle advarsler.
4. Følg alle instruksene.
5. Bruk ikke høyaleren i nærheten av vann.
6. Kan bare rengjøres med en tørr klut.
ADVARSEL: FOR Å REDUSERE RISIKOEN FOR BRANN ELLER ELEKTRISK STØT, IKKE UTSETT DENNE HØYTTALEREN
FOR REGN ELLER FUKTIGHET.
For å redusere risikoen for elektrisk støt, brann o.l.:
1. Ikke plasser apparatet i nærheten av varmekilder som radiatorer, varmeovner, komfyrer eller andre
apparater (inkludert forsterkere) som produserer varme.
2. Ikke blokker noen av apparatets ventilasjonsåpninger.
3. Apparatet skal ikke utsees for væskedrypp eller -sprut, og ingen objekter fylt med vann, f.eks. vaser, bør
plasseres på apparatet.
4. Ikke se tunge objekter på apparatet og ikke stå på det, lasten kan falle og føre til alvorlig skade på
apparatet.
5. Se klassifiseringsetikeene på baksiden av apparatet for inngangsstrøm og annen sikkerhetsinformasjon.
6. Apparatet er bare ment å brukes med strømtilførselen som følger med.
7. Besky strømledningen slik at den ikke blir tråkket på eller klemt, spesielt ved støpsler, stikkontakter og der
ledningene kommer ut fra apparatet.
8. Apparatet skal aldri frakobles ved å dra i strømledningen. Ta alltid godt tak i støpselet og dra det re ut av
stikkontakten.
76
Page 77

9. Reparer eller by ut alle strømledninger som er slie eller skadet på annen måte øyeblikkelig. Ikke bruk
ledninger med sprekker eller slitasjeskader langs ledningen, ved støpselet eller ved tilkoblingsenden.
10. For å redusere risikoen for brann og elektrisk støt bør støpselet aldri brukes med en skjøteledning eller en
annen kontakt hvis ikke pinnene på støpselet går helt inn i den, støpselpinnene skal ikke være eksponerte.
11. På dager med lyn, torden eller regn bør apparatet frakobles for bedre beskyelse i løpet av tordenværet,
eller når apparatet ikke brukes over en lengre periode. Dee vil forhindre at apparatet skades av
lynnedslag og overspenning.
12. Ikke forsøk å utføre servicearbeid selv. Hvis du åpner eller erner det ytre dekselet, kan du utsees for
farlig spenning eller andre farer. Alt servicearbeid bør utføres av kvalifiserte teknikere.
13. Sterk elektromagnetisk interferens kan føre til at produktets vanlige funksjoner forstyrres. Hvis dee skulle
skje, kan produktet tilbakestilles til vanlig drismodus ved å følge brukerveiledningen. Hvis funksjonen ikke
gjenopptas, plasser produktet et annet sted før bruk.
14. Apparatet kobles fra strømneet ved å frakoble adapterens støpsel. Det skal være le å komme til for å
koble apparatet fra strømneet.
15. Av sikkerhetsgrunner og for å unngå unødig strømforbruk bør apparatet alltid slås av hvis det ikke vil
være under tilsyn i en lengre periode, f.eks. over naen, i ferier eller når ingen er i huset. Slå det av og
trekk støpselet ut av stikkontakten.
EN
FR
IT
NL
NW
DK
PL
CZ
SK
77
Page 78

Innhold
1 Viktige sikkerhetsinstrukser ........................................................................................................................................76
2 Radioen din ..................................................................................................................................................................... 80
3 Hvordan komme i gang ............................................................................................................................................... 82
4 DAB-modus ......................................................................................................................................................................85
4.1 Å velge en annen stasjon .....................................................................................................................................................................85
4.2 Sekundære tjenester ..............................................................................................................................................................................85
4.3 Å søke eer stasjoner ............................................................................................................................................................................86
4.4 Manuell stasjonsinnstilling ...................................................................................................................................................................86
4.5 Visning av stasjonsinformasjon .........................................................................................................................................................86
4.6 Å vise signalstyrke....................................................................................................................................................................................86
4.7 Å lagre forhåndsinnstilte stasjoner .................................................................................................................................................. 87
4.8 Å få fram en forhåndsinnstilt stasjon .............................................................................................................................................87
5 FM-modus .........................................................................................................................................................................87
5.1 Søkeinnstillinger ........................................................................................................................................................................................88
5.2 Lydinnstillinger...........................................................................................................................................................................................88
5.3 Å lagre forhåndsinnstilte stasjoner ..................................................................................................................................................88
5.4 Å få fram en forhåndsinnstilt stasjon .............................................................................................................................................89
6 «Aux in» («Ekstrainngang»)-modus ..........................................................................................................................89
7 Generell bruk .................................................................................................................................................................. 90
7.1 Innstilling av egguret ............................................................................................................................................................................. 90
7.2 Innstilling av equaliser .......................................................................................................................................................................... 90
7.3 Tidsinnstilling ............................................................................................................................................................................................. 90
7.4 Innstilling av bakgrunnslys ................................................................................................................................................................... 91
7.5 Innstilling av språk ................................................................................................................................................................................... 91
78
Page 79

7.6 Fabrikktilbakestilling («Factory reset») ............................................................................................................................................ 91
7.7 «SW versjon» («Programvareversjon») ............................................................................................................................................92
8 Spesifikasjon ................................................................................................................................................................... 92
EN
FR
IT
NL
NW
DK
PL
CZ
SK
79
Page 80

2 Radioen din
Forside og knapper
1. SCROLL/SELECT («BLA/VELG»)-knapp Vri på knappen for å bla gjennom valgene. Trykk den for å bekree valget.
2. «Knapp 1» Trykk og hold inne for å lagre forhåndsinnstilt stasjon nr. 1 direkte. Trykk for å gå direkte til forhåndsinnstilt
3. AV/PÅ-knapp Trykk for å slå radioen på eller see den i standbymodus.
4. «Knapp 2» (Se veiledning under «Knapp 1»)
5. MODE («MODUS»)-knapp Trykk for bye mellom ulike moduser.
6. Display
7. «Knapp 3» (Se veiledning under «Knapp 1»)
8. MENU («MENY»)-knapp Trykk for å vise eller gå ut av meny-skjermen.
9. «Knapp 4+» Trykk og hold inne for å lagre forhåndsinnstilte stasjoner nr. 1–10. Trykk for å få fram de forhåndsinnstilte
10. TIMER («TIDSUR»)-knapp Trykk for å innstille egguret.
11. VOLUME/INFO («VOLUM/INFO»)-knapp Vri for å justere volumnivået. Trykk for å bla gjennom programinformasjonen.
stasjon nr.1.
stasjonene 1–10.
80
Page 81

Bakside og tilkoblinger
1. Antenneinngang
2. Hodetelefoninngang
3. «AUX IN»-inngang
4. Strøminngang (likestrøm) 9 V/1000 mA-inngang
EN
FR
IT
NL
NW
DK
PL
CZ
SK
81
Page 82

3 Hvordan komme i gang
Ta radioen forsiktig ut av esken. Du ønsker kanskje å lagre forpakningen til fremtidig bruk.
Innhold i forpakningen
> Hovedenhet x 1
> Brukerveiledning x 1
> Strømadapter x 1
> Monteringsplate x 1
> Monteringsskruer x 5
Plassering av radioen
Du kan plassere radioen på to ulike måter – see den på en flat og stabil overflate eller montere den under et
overskap.
Unngå følgende plasseringer:
> Der radioen vil utsees for direkte sollys.
> Der radioen vil være nær kilder til varmestråling.
> Der lufuktigheten er høy og ventilasjonen er dårlig.
> Der det er støvete.
> Der det er fuktig eller der vann kan dryppe eller sprute på apparatet.
Plassering av apparatet på et bord
82
Page 83

Montering av apparatet under et overskap
Sørg for at alle koblinger er ernet fra enheten.
1. Fest monteringsplaten under overskapet med monteringsskruene som følger med. (Se figur 1)
2. Fest apparatet til den installerte monteringsplaten. (Se figur 2 og 3)
Figur 1 Figur 2 Figur 3
Forsiktig
1. Siden apparatet er tungt, vær forsiktig når det monteres.
2. For å redusere risikoen for brann, ikke plasser noen slags varme- eller matlagingsapparater under radioen.
3. Installer radioapparatet slik at strømledningen dens kan kobles direkte til en stikkontakt i veggen. Ikke
bruk noen slags omformere eller skjøteledninger.
4. Monter apparatet så langt som mulig fra kilder til støy og forstyrrende signaler. (F.eks. kjøleskap,
mikrobølgeovn, lysrørslamper o.l.)
EN
FR
IT
NL
NW
DK
PL
CZ
SK
83
Page 84

Installering og justering av antennen
Trekk antennen ut og se den inn i apparatets antenneinngang for å sikre at du får så gode moaksforhold som
mulig i både DAB- og FM-radiomodus. Det kan være nødvendig å justere hvordan radioen og/eller antennen er
plassert for å få best mulig signal.
Å slå apparatet av/på
Koble pluggen i enden av strømadapterledningen til strøminngangen på apparatet. Se dereer strømadapteren
inn i stikkontakten. Apparatet vil slås på.
Trykk på AV/PÅ-knappen for å see radioen i standbymodus.
For å slå av apparatet helt, trekk støpselet på strømadapteren ut fra stikkontakten.
Volumkontroll
Mens et program avspilles, vri VOLUME/INFO («VOLUM/INFO»)-knappen i retning mot eller med klokken for å
justere volumet.
Bruk av hodetelefoner
Plugg inn hodetelefoner med en stereo jackplugg på 3,5 mm i diameter i apparatets hodetelefoninngang.
Hodetelefoner følger ikke med denne radioen.
Skru ned volumet før du kobler til hodetelefoner. Øk volumet sakte mens du har hodetelefonene på, til du når
ønsket lydnivå.
Advarsel: Å utsees for musikk på høyt volum over lang tid, kan føre til hørselsskade. Man bør unngå
ekstremt høyt volum ved bruk av hodetelefoner, spesielt over lengre tid.
Automatisk stilling av klokken
Klokken kan stilles inn og oppdateres automatisk hvis DAB-/FM-signaler moas på stedet. For at klokken
automatisk skal stille seg eer gjeldende lokal tid, må du la en DAB- eller FM-stasjon stå på en liten stund. Du
kan også velge hvordan du vil oppdatere klokken, i henhold til DAB- eller FM-radiosignaler. Press Menu («Meny»)knappen > Time («Tid») > Auto update («Automatisk oppdatering»).
84
Page 85

4 DAB-modus
Når du slår på radioen, vil den automatisk søke eer og lagre alle tilgjengelige stasjoner. Du bør i tillegg gjøre en
komple skanning for å sikre at søket finner og lagrer alle stasjoner. Det anbefales også å kjøre et ny søk med
noen måneders mellomrom, for å finne eventuelle nye DAB-/DAB+-stasjoner som kan ha begynt å kringkaste
programmer eer at du kjøpte DAB-radioen din.
1. Ved første gangs bruk vil radioen utføre en komple skanning og lagre en liste over stasjonene i minnet.
EN
FR
2. Når skanningen er fullført, vil DAB-/DAB+-stasjonene vises i alfanumerisk rekkefølge. Den første stasjonen
på listen vil avspilles.
Merk: Hvis ingen DAB-/DAB+-signaler finnes der du er, kan det være nødvendig å flye radioen til et sted
man får sterkere signaler.
4.1 Å velge en annen stasjon
Mens et program spiller, vri på SCROLL/SELECT («BLA/VELG»)-knappen for å vise stasjonslisten og velge
stasjonen du ønsker å spille, og trykk så på SCROLL/SELECT («BLA/VELG»)-knappen for å bekree.
4.2 Sekundære tjenester
Du kan se symbolet «>>» eer et stasjonsnavn. Dee betyr at sekundære tjenester er tilgjengelige for den
aktuelle stasjonen. Disse sekundære tjenestene er ekstra tjenester i tilknytning til primærstasjonen. F.eks.
kan det være lagt til ekstra kommentarer for en sportsstasjon. De sekundære tjenestene er lagt til re eer
primærstasjonen (symbolet «<<» før stasjonsnavnet) i stasjonslisten.
For å velge den sekundære stasjonen, vri på SCROLL/SELECT («BLA/VELG»)-knappen til du finner den
sekundære tjenesten du ønsker, og trykk så på SCROLL/SELECT («BLA/VELG»)-knappen for å velge den.
Når den sekundære tjenesten avslues, vil enheten automatisk gå tilbake til primærstasjonen.
IT
NL
NW
DK
PL
CZ
SK
85
Page 86

4.3 Å søke eer stasjoner
Trykk på MENU («MENY»)-knappen, vri SCROLL/SELECT («BLA/VELG»)-knappen for å velge «Full scan» («Komple
skanning»), og trykk så på SCROLL/SELECT («BLA/VELG»)-knappen for å utføre en automatisk skanning.
4.4 Manuell stasjonsinnstilling
Denne funksjonen kan være til hjelp når du justerer antennen, eller når du legger til stasjoner som ikke kom med i
det automatiske søket.
1. Trykk på MENU («MENY»)-knappen, vri SCROLL/SELECT («BLA/VELG»)-knappen for å velge «Manual tune»
(«Manuell stasjonsinnstilling»), og trykk så på SCROLL/SELECT («BLA/VELG»)-knappen for å bekree.
Displayet vil vise kanalnummeret og frekvensen.
2. Vri på SCROLL/SELECT («BLA/VELG»)-knappen for å gå gjennom kanalene, og trykk så på SCROLL/SELECT
(«BLA/VELG»)-knappen for å velge den aktuelle kanalen.
Merk: Hvis det finnes et multipleks med den aktuelle kanalen og frekvensen, vil displayet eer et par
sekunder vise en innstillingslinje med signalstyrken og multipleksnavnet.
3. For å spille stasjonen, trykk først på MENU («MENY»)-knappen to ganger for å gå ut av den manuelle
stasjonsinnstillingsfunksjonen.
4.5 Visning av stasjonsinformasjon
DAB- og DAB+-stasjoner kringkaster tilleggsinformasjon. Trykk flere ganger på hovedapparatets VOLUME/INFO
(«VOLUM/INFO»)-knapp for å se informasjon via rulletekst om signalstyrke, programtype, ensemble, frekvens,
signalfeil, bitrate, kodek, lydformat, klokkesle og dato.
4.6 Å vise signalstyrke
Når du velger signalstyrke («Signal strength») vil en signallinje vises i displayet med signalstyrken for den
aktuelle stasjonen.
Indikatoren på signallinjen viser minste akseptable signalnivå.
86
Page 87

Merk: Stasjoner med en signalstyrke under minimumsnivået vil ikke alltid kunne tilby en jevn lydstrøm.
4.7 Å lagre forhåndsinnstilte stasjoner
Radioen din kan lagre opptil 10 av DAB-/DAB+-stasjonene du liker best som forhåndsinnstilte stasjoner. Dee gir
deg rask og enkel tilgang til favoristasjonene dine.
1. Mens favoristasjonen din spiller, trykk og hold inne «4+»-knappen til displayet viser «Preset Store <#:
(Empty)>» («Forhåndsinnstilling nr. <#: (Tom)>»).
2. Vri på SCROLL/SELECT («BLA/VELG»)-knappen for å velge et forhåndsinnstillingsnummer, 1–10, og
trykk så på SCROLL/SELECT («BLA/VELG»)-knappen for å bekree. Displayet vil vise «Preset # stored»
(«Forhåndsinnstilling nr. # lagret»).
3. Du kan også trykke og holde inne knappene 1, 2 eller 3 for å direkte lagre stasjonen på
forhåndsinnstillingsnummer 1, 2 eller 3. Displayet vil vise «Preset # stored» («Forhåndsinnstilling nr. # lagret»).
4.8 Å få fram en forhåndsinnstilt stasjon
1. Trykk på «4+»-knappen for å vise de lagrede forhåndsinnstilte stasjonene.
2. Vri på SCROLL/SELECT («BLA/VELG»)-knappen for å velge den lagrede forhåndsinnstilte stasjonen du vil
høre på, og trykk så på SCROLL/SELECT («BLA/VELG»)-knappen for å bekree.
3. Displayet vil vise «Preset Recall <#: (Empty)>» («Forhåndsinnstilling nr. <#: (Tom)>») hvis ingen stasjon er
lagret på den aktuelle forhåndsinnstillingen.
4. Du kan også trykke knappene 1, 2 eller 3 for å gå direkte til de forhåndsinnstilte stasjonene nr. 1, 2 eller 3.
«Preset Recall <#: (Empty)>» («Forhåndsinnstilling nr. <#: (Tom)>») vil vises hvis ingen stasjon er lagret på
den aktuelle forhåndsinnstillingen.
5 FM-modus
Å velge FM-modus
1. Trykk flere ganger på MODE («MODUS»)-knappen for å velge FM-modus.
2. Ved første gangs bruk vil den starte nederst i FM-frekvensområdet (87,50 MHz). Ellers vil FM-stasjonen
det sist ble lyet til velges.
EN
FR
IT
NL
NW
DK
PL
CZ
SK
87
Page 88

3. For å søke i FM-frekvensen manuelt: Når FM-frekvensen vises, vri SCROLL/SELECT («BLA/VELG»)-knappen i
retning mot eller med klokken, for å endre frekvensen i trinn på 0.05MHz.
4. For automatisk søk: Når FM-frekvensen vises, vri SCROLL/SELECT («BLA/VELG»)-knappen i retning mot
eller med klokken, og trykk så på SCROLL/SELECT («BLA/VELG»)-knappen. Radioen vil skanne forover og
bakover til den finner neste tilgjengelige stasjon.
5.1 Søkeinnstillinger
Som standard stopper FM-skanningen ved alle tilgjengelige stasjoner. Dee kan føre til et dårlig signal-/
støyforhold (susing) fra svake stasjoner.
1. For å endre søkeinnstillingene til å bare stoppe ved stasjoner med god signalstyrke, trykk på MENU
(«MENY»)-knappen, vri på SCROLL/SELECT («BLA/VELG»)-knappen for å velge «Scan seing»
(«Søkeinnstilling»), og trykk så på SCROLL/SELECT («BLA/VELG»)-knappen for å bekree.
2. Vri på SCROLL/SELECT («BLA/VELG»)-knappen for å velge «Strong stations only» («Bare stasjoner med
sterkt signal»), og trykk så på SCROLL/SELECT («BLA/VELG»)-knappen for å bekree valget.
5.2 Lydinnstillinger
Som standard gjengis alle stereostasjoner i stereo. For svake stasjoner kan dee føre til et dårlig signal-/
støyforhold (susing).
1. For å spille av svake stasjoner i mono, trykk på MENU («MENY»)-knappen, vri så på SCROLL/SELECT («BLA/
VELG»)-knappen for å velge «Audio seing» («Lydinnstilling»), og trykk så på SCROLL/SELECT («BLA/
VELG»)-knappen for å bekree.
2. Vri på SCROLL/SELECT («BLA/VELG»)-knappen for å velge «Forced mono» («Tvungen mono»), og trykk så
på SCROLL/SELECT («BLA/VELG»)-knappen for å bekree.
5.3 Å lagre forhåndsinnstilte stasjoner
Radioen din kan lagre opptil 10 av FM-stasjonene du liker best. Dee gir deg rask og enkel tilgang til
favoristasjonene dine.
1. Mens favoristasjonen din spiller, trykk og hold inne «4+»-knappen til displayet viser «Preset Store <#:
(Empty)>» («Forhåndsinnstilling nr. <#: (Tom)>»).
2. Vri på SCROLL/SELECT («BLA/VELG»)-knappen for å velge et forhåndsinnstillingsnummer, 1–10, og
trykk så på SCROLL/SELECT («BLA/VELG»)-knappen for å bekree. Displayet vil vise «Preset # stored»
(«Forhåndsinnstilling nr. # lagret»).
88
Page 89

3. Du kan også trykke og holde inne knappene 1, 2 eller 3 for å direkte lagre stasjonen på
forhåndsinnstillingsnummer 1, 2 eller 3. Displayet vil vise «Preset # stored» («Forhåndsinnstilling nr. # lagret»).
5.4 Å få fram en forhåndsinnstilt stasjon
1. Trykk på «4+»-knappen for å vise de lagrede forhåndsinnstilte stasjonene.
2. Vri på SCROLL/SELECT («BLA/VELG»)-knappen for å velge den lagrede forhåndsinnstilte stasjonen du vil
høre på, og trykk så på SCROLL/SELECT («BLA/VELG»)-knappen for å bekree.
3. Displayet vil vise «Preset Recall <#: (Empty)>» («Forhåndsinnstilling nr. <#: (Tom)>») hvis ingen stasjon er
lagret på den aktuelle forhåndsinnstillingen.
4. Du kan også trykke knappene 1, 2 eller 3 for å gå direkte til de forhåndsinnstilte stasjonene nr. 1, 2 eller 3.
«Preset Recall <#: (Empty)>» («Forhåndsinnstilling nr. <#: (Tom)>») vil vises hvis ingen stasjon er lagret på
den aktuelle forhåndsinnstillingen.
6 «Aux in» («Ekstrainngang»)-modus
En MP3-spiller eller andre eksterne lydkilder kan raskt og enkelt kobles til apparatet via inngangen «AUX IN».
1. Før tilkobling til strømneet, bruk en lydkabel på 3,5 mm (følger ikke med) til å koble den eksterne
lydkilden til «AUX IN»-inngangen på apparatet.
2. Se strømadapteren i stikkontakten og trykk på AV/PÅ -knappen for å slå apparatet på.
3. Trykk flere ganger på MODE («MODUS»)-knappen for å velge «Auxiliary Input» («Ekstrainngang»)-modus.
4. I «Aux in»-modus kan du bruke avspillingsfunksjonene på den andre lydenheten direkte.
5. For å få et best mulig lydnivå anbefales det å også justere utgangsvolumet på lydkilden.
Merk: Apparatet vil automatisk sees i standbymodus eer 15 minuer hvis lydkilden kobles fra, slås av
eller hvis volumet er slå av eller svært lavt.
EN
FR
IT
NL
NW
DK
PL
CZ
SK
89
Page 90

7 Generell bruk
7.1 Innstilling av egguret
Med denne funksjonen kan du stille inn et tidsur med nedtelling mens du lager mat, for å le kunne vite når en
viss tilberedningstid har gå.
1. Trykk på TIMER («TIDSUR»)-knappen for å velge «Egg timer» («Eggur»).
2. Vri på SCROLL/SELECT («BLA/VELG»)-knappen for å stille inn en tilberedningstid fra 1 til 99 minuer, og
trykk så på SCROLL/SELECT («BLA/VELG»)-knappen for å bekree.
3. Egguret vil begynne nedtellingen. Trykk på TIMER («TIDSUR»)-knappen for å sjekke hvor lang tid som er igjen.
4. Et lydsignal vil aktiveres når den innstilte tiden har gå. Trykk på TIMER («TIDSUR»)-knappen for å slå av lydsignalet.
7.2 Innstilling av equaliser
Velg dee alternativet for lydbehandling med equaliser. De ulike innstillingene vil endre klangen på lyden fra radioen.
1. Trykk på MENU («MENY»)-knappen, vri på SCROLL/SELECT («BLA/VELG»)-knappen for å velge «Equaliser»,
og trykk så på SCROLL/SELECT («BLA/VELG»)-knappen for å bekree.
2. Vri på SCROLL/SELECT («BLA/VELG»)-knappen for å velge «Treble» («Diskant») eller «Bass», og trykk så på
SCROLL/SELECT («BLA/VELG»)-knappen for å bekree.
3. Vri på SCROLL/SELECT («BLA/VELG»)-knappen for endre innstillingen av diskant eller bass fra «–3» til «+3»,
og trykk så på SCROLL/SELECT («BLA/VELG»)-knappen for å bekree.
7.3 Tidsinnstilling
1. Trykk på MENU («MENY»)-knappen, vri på SCROLL/SELECT («BLA/VELG»)-knappen for å velge «Time»
(«Tid»), og trykk så på SCROLL/SELECT («BLA/VELG»)-knappen for å bekree.
2. Vri på SCROLL/SELECT («BLA/VELG»)-knappen for å velge alternativ, og trykk så på SCROLL/SELECT
(«BLA/VELG»)-knappen for å bekree innstillingen.
Set Time/date («Still inn klokkesle/dato»): Still inn både klokkesle og dato manuelt
Auto update («Automatisk oppdatering»): «Update from Any» («Oppdater fra alle kilder»), «Update
from DAB» («Oppdater fra DAB»), «Update from FM»
(«Oppdater fra FM») eller «No update» («Ikke oppdater»)
90
Page 91

Innstilling av tidsformat på 12 eller 24 timer: «Set 24 hour» («Bruk 24 timer») eller «Set 12 hour»
(«Bruk 12 timer»)
Innstilling av datoformat: «DD-MM-YYYY» («DD-MM-ÅÅÅÅ») eller «MM-DD-YYYY»
(«MM-DD-ÅÅÅÅ»)
3. Still så inn tiden slik du ønsker.
7. 4 Innstilling av bakgrunnslys
Med denne funksjonen kan du justere lysstyrken på displayet.
1. Trykk på MENU («MENY»)-knappen, vri på SCROLL/SELECT («BLA/VELG»)-knappen for å velge «Backlight»
(«Bakgrunnslys»), og trykk så på SCROLL/SELECT («BLA/VELG»)-knappen for å bekree.
2. Vri på SCROLL/SELECT («BLA/VELG»)-knappen for å velge «Power on» («Full strøm på») eller «Standby»,
og trykk så på SCROLL/SELECT («BLA/VELG»)-knappen for å bekree.
3. Vri på SCROLL/SELECT («BLA/VELG»)-knappen for å velge bakgrunnslysstyrke, og trykk så på SCROLL/
SELECT («BLA/VELG»)-knappen for å bekree innstillingen.
Full strøm på Nivå 1, nivå 2, nivå 3, nivå 4, nivå 5
Standbymodus Standbymodus av, nivå 1, nivå 2, nivå 3, nivå 4, nivå 5
EN
FR
IT
NL
NW
DK
7.5 Innstilling av språk
Med denne funksjonen kan du endre språket i menyene. Standardspråket for menyene er tysk.
1. Trykk på MENU («MENY»)-knappen, vri på SCROLL/SELECT («BLA/VELG»)-knappen for å velge «Language»
(«Språk»), og trykk så på SCROLL/SELECT («BLA/VELG»)-knappen for å bekree.
2. Vri på SCROLL/SELECT («BLA/VELG»)-knappen for å velge ønsket språk, og trykk så på SCROLL/SELECT
(«BLA/VELG»)-knappen for å bekree.
7.6 Fabrikktilbakestilling («Factory reset»)
Ved en fabrikktilbakestilling ernes alle brukerdefinerte innstillinger og blir erstaet med de opprinnelige
standardverdiene, slik at klokkesle/dato, DAB-stasjonsliste og forhåndsinnstilte verdier alle går tapt.
1. Trykk på MENU («MENY»)-knappen, vri på SCROLL/SELECT («BLA/VELG»)-knappen for å velge «Factory
Reset» («Fabrikktilbakestilling»), og trykk så på SCROLL/SELECT («BLA/VELG»)-knappen for å bekree.
PL
CZ
SK
91
Page 92

2. Vri på SCROLL/SELECT («BLA/VELG»)-knappen for å velge «YES» («JA»), og trykk så på SCROLL/SELECT
(«BLA/VELG»)-knappen for å bekree.
7. 7 «SW versjon» («Programvareversjon»)
Trykk på MENU («MENY»)-knappen, vri så på SCROLL/SELECT («BLA/VELG»)-knappen for å velge «SW version»
(«Programvareversjon»), og trykk på SCROLL/SELECT («BLA/VELG»)-knappen for å bekree. Programvareversjonen
vil vises i displayet.
8 Spesifikasjon
Emner Spesifikasjoner
Beskrivelse: Opphengbar kjøkkenradio
Frekvensområde: FM: 87,5 – 108 MHz
DAB/DAB+: 174,928 – 239,200 MHz
Strømkrav: Strømtilførsel (vekselstrøm): 110–240V~, 50–60 Hz
Utgangseekt (likestrøm): 9V, 1000mA
(bruk adapteren som følger med)
Utgangseekt lyd: 3 W RMS
Strømforbruk: I bruk: 9W (maks.)
I standbymodus: < 1W
Dimensjoner (B x H x D): 224mm x 72mm x 160mm (inkluderer ikke monteringsplaten)
Dee symbolet på produktet eller i instruksene betyr at det elektriske og elektroniske utstyret di skal avhendes
på en annen måte enn med vanlig husholdningsavfall ved sluen av sin levetid. For mer informasjon, kontakt
lokale myndigheter eller forhandleren der du kjøpte produktet.
92
Page 93

Betjeningsvejledning
DIGITRADIO 20
Køkkenradio under skab
EN
FR
IT
NL
NW
DK
PL
CZ
SK
Page 94

1 Vigtige sikkerhedsvejledninger
1. Læs disse vejledninger.
2. Gem disse vejledninger.
3. Vær opmærksom på alle advarsler.
4. Følg alle vejledninger.
5. Brug ikke højaleren i nærheden af vand.
6. Rengør kun med en tør klud.
ADVARSEL: FOR AT REDUCERE RISIKOEN FOR BRAND ELLER ELEKTRISK STØD MÅ DENNE HØJTTALER IKKE
UDSÆTTES FOR REGN ELLER FUGT.
Sådan reduceres risikoen for elektrisk stød, brand osv.:
1. Placer ikke enheden i nærheden af en varmekilde, som radiatorer, indblæsningsriste, komfurer eller andre
apparater (inklusive forstærkere), der afgiver varme.
2. Bloker ingen af enhedens ventilationsåbninger.
3. Enheden må ikke udsæes for dryp eller stænk og genstande fyldt med væsker, såsom vaser, må ikke
placeres på enheden.
4. Placer ikke tunge genstande oven på enheden og træd ikke på den. Du kan falde og forårsage alvorlig
skade på enheden.
5. Læs venligst klassificeringsetikeer på bagsiden af enheden for oplysninger om indgangseekt og andre
sikkerhedsoplysninger.
6. Denne enhed er kun beregnet til brug med den medfølgende strømforsyning.
7. Beskyt strømkablet fra at blive trådt på eller klemt især ved stikkene, adaptere og ved ethvert punkt, hvor
de kommer ud af enheden.
8. Aryd aldrig din enhed ved at trække i strømkablet. Hold altid godt fast i stikket, og træk det lige ud af
stikkontakten.
94
Page 95

9. Reparer og udski alle elektriske ledninger, som er blevet flossede eller beskadiget på anden måde. Brug
ikke en ledning med revner eller slidskader langs dets længde, stikket eller enden af stikforbindelsen.
10. For at forhindre brandfare eller risiko for elektrisk stød, må du ikke bruge dee stik med en
forlængerledning eller andre udgange med mindre at benene kan indsæes helt uden at være bloede.
11. På dage med lyn og regn skal du aryde enheden for yderligere beskyelse under tordenstorme, eller
når enheden ikke anvendes over længere perioder. Dee vil forhindre skade på enheden fra lyn og
strømstød.
12. Forsøg ikke selv at udføre servicearbejde. Ved at åbne eller erne kabineet kan du blive udsat for farlig
spænding eller andre farer. Alt servicearbejde skal udføres af kvalificerede teknikere.
13. Produktets normale funktion kan forstyrres af stærk elektromagnetisk interferens. Hvis dee er tilfældet,
skal du blot nulstille produktet for at genoptage normal dri, som beskrevet i betjeningsvejledningen. Hvis
funktionen ikke kunne genoptages, bedes du bruge produktet et andet sted.
14. Denne enhed arydes fra strømforsyningen ved at trække stikket ud. Den arudte enhed vil forblive klart
til betjening.
15. Af sikkerhedsårsager og for at undgå unødvendigt energiforbrug må du aldrig eerlade enheden tændt
uden opsyn over længere perioder, f.eks. i løbet af naen, når du er på ferie eller når du ikke er hjemme.
Sluk det og træk stikket ud af stikkontakten.
EN
FR
IT
NL
NW
DK
PL
CZ
SK
95
Page 96

Indhold
1 Vigtige sikkerhedsvejledninger ................................................................................................................................ 94
2 Din radio .......................................................................................................................................................................... 98
3 Sådan kommer du i gang .......................................................................................................................................... 100
4 DAB-tilstand ...................................................................................................................................................................103
4.1 Sådan vælges en anden kanal.........................................................................................................................................................103
4.2 Sekundær tjeneste ................................................................................................................................................................................103
4.3 Sådan scannes kanaler ....................................................................................................................................................................... 104
4.4 Manuel indstilling .................................................................................................................................................................................. 104
4.5 Sådan vises kanaloplysninger ......................................................................................................................................................... 104
4.6 Sådan vises signalstyrke .................................................................................................................................................................... 104
4.7 Sådan gemmes forudindstillede kanaler ....................................................................................................................................105
4.8 Sådan genkaldes en forudindstillet kanal ..................................................................................................................................105
5 FM-tilstand .................................................................................................................................................................... 105
5.1 Scan seing (Scanningsindstilling) ............................................................................................................................................... 106
5.2 Lydindstillinger ....................................................................................................................................................................................... 106
5.3 Sådan gemmes forudindstillede kanaler ................................................................................................................................... 106
5.4 Sådan genkaldes en forudindstillet kanal ..................................................................................................................................107
6 Aux in-tilstand ...............................................................................................................................................................107
7 Generel dri.................................................................................................................................................................. 108
7.1 Indstilling af æggeur ........................................................................................................................................................................... 108
7.2 Indstilling af Equaliser ......................................................................................................................................................................... 108
7.3 Indstilling af tid ...................................................................................................................................................................................... 108
7.4 Indstilling af baggrundsbelysning ................................................................................................................................................. 109
7.5 Sådan indstilles sprog ......................................................................................................................................................................... 109
96
Page 97

7.6 Factory reset (Fabriksnulstilling) .................................................................................................................................................... 109
7.7 SW-version ................................................................................................................................................................................................ 110
8 Specifikation ..................................................................................................................................................................110
EN
FR
IT
NL
NW
DK
PL
CZ
SK
97
Page 98

2 Din radio
Forside og knapper
1. SCROLL/SELECT (RUL/VÆLG)-knap Drej for at gennemse valgmuligheder. Tryk for at bekræe valgmuligheden.
2. 1 knap Tryk og hold for at gemme forudindstillet kanal 1 direkte. Tryk på knappen for at genkalde forudindstillet kanal
3. POWER-knap Tryk for at tænde for radioen eller sæe den i standby.
4. 2 knap (Se "1 knap")
5. MODE (TILSTAND)-knap Tryk for at skie mellem.
6. Display
7. 3 knap (Se "1 knap")
8. MENU knap Tryk for at vise eller forlade menuskærm.
9. 4+ knap Tryk og hold for at gemme forudindstillede kanaler 1-10. Tryk for at genkalde forudindstillede kanaler 1-10.
10. TIMER-knap Tryk for at indstille æggeuret.
11. VOLUME/INFO-knap Drej for at justere lydstyrken. Tryk for at gennemse programoplysninger.
1 direkte.
98
Page 99

Bagside og stik
1. Antenne indgang
2. Hovedtelefonindgang
3. AUX IN-indgang
4. DC IN 9V/1000mA indgang
EN
FR
IT
NL
NW
DK
PL
CZ
SK
99
Page 100

3 Sådan kommer du i gang
Tag forsigtigt din radio ud af kassen. Du kan vælge at gemme emballagen til brug i fremtiden.
Det finder du i pakken
> Hovedenhed x 1
> Betjeningsvejledning x 1
> Strømforsyning x 1
> Monteringsplade x 1
> Monteringsskruer x 5
Placering af din radio
Der findes to måder at placere din radio – placere den på en flad/stabil overflade eller montere den under et
skab.
Undgå følgende placeringer:
> Hvor radioen vil blive udsat for direkte sollys.
> Hvor radioen er i nærheden af varmekilder.
> Hvor der er høj lufugtighed og dårlig ventilation.
> Hvor det er støvet.
> Hvor det er fugtigt eller der er mulighed for at vand drypper eller sprøjtes på enheden.
Placer apparatet på et bord
100
 Loading...