


OPERATING INSTRUCTIONS ● ISTRUZIONI D'USO NOTICE D’UTILISATION ● BEDIENUNGSANLEITUNG INSTRUCCIONES DE USO ● INSTRUCÇÕES DE FUNCIONAMENTO
MOVABLE AIR CONDITIONER ● CLIMATIZZATORE PORTATILE CLIMATISEUR MOBILE ● MOBILES KLIMAGERÄT ACONDICIONADOR PORTATIL ● AR CONDICIONADO PORTÁTIL
Save these instructions / Conservate queste istruzioni / Conserver cette notice d’utilisation Bewahren Sie bitte diese Bedienungsanleitungen auf / Guardeis estas instrucciones / Guarde estas instruções
EG
I
F
D
E
P
37.4252.009.1 09/2004
|
CONTENTS |
|
|
PRODUCT IDENTIFICATION...................................................................................... |
2 |
|
SIGNALING LAMPS .................................................................................................. |
3 |
|
BEFORE USING THE APPLIANCE............................................................................. |
3 |
|
OPERATION ............................................................................................................... |
4 |
|
USING THE REMOTE CONTROL UNIT..................................................................... |
4 |
EG |
• How to install batteries .............................................................................................. |
4 |
|
• Temperature sensor selector..................................................................................... |
4 |
|
• Operation with the remote control unit....................................................................... |
4 |
|
REMOTE CONTROL UNIT ......................................................................................... |
5 |
|
HOW TO SET THE PRESENT TIME .......................................................................... |
6 |
|
COOLING .................................................................................................................. |
6 |
|
DEHUMIDIFYING (DRY)............................................................................................. |
6 |
|
FAN ONLY................................................................................................................... |
6 |
|
ADJUSTING THE FAN SPEED................................................................................... |
6 |
|
SLEEP MODE.............................................................................................................. |
6 |
|
SETTING THE TIMER................................................................................................. |
7 |
|
SETTING THE AIR FLOW DIRECTION..................................................................... |
8 |
|
HOW TO DISCHARGE THE WATER TANKS ............................................................. |
8 |
|
OPERATION WITHOUT THE REMOTE CONTROL UNIT.......................................... |
9 |
|
TIPS FOR ENERGY SAVING..................................................................................... |
9 |
|
TROUBLESHOOTING............................................................................................... . |
9 |
|
PORTHOLE KIT ........................................................................................................... |
10 |
|
CARE AND CLEANING .............................................................................................. |
10 |
|
ELECTRIC WIRING DIAGRAMS’ SYMBOLS ............................................................ |
11 |
DECLARATION OF CONFORMITY
This product is marked |
as it |
satisfies Directives: |
|
–Low voltage no. 73/23 EEC and 93/68 EEC.
–Electromagnetic compatibility no.
89/336 EEC, 92/31 EEC and 93/68 EEC.
This declaration will become void in case of of misusage and/or non observance though partial of manufacturer's installation and/or operating instructions.
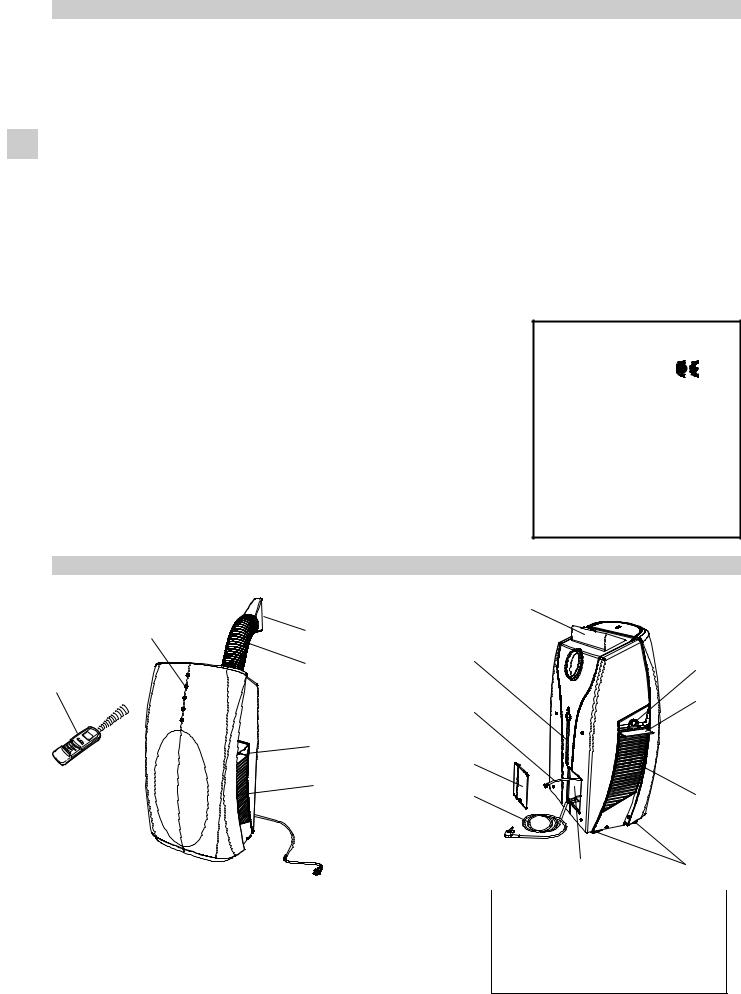
PRODUCT IDENTIFICATION
2 |
15 |
7
14
1
8
13
11
4
9
1. |
Wireless remote control unit |
9. |
Electric cable with plug |
2. |
Signaling lamps |
10. |
Space for cable winding |
3. |
Supply air deflector |
11. |
Cable cover |
4. |
Return air grille (both sides) |
12. |
Transportation wheels |
5. |
Air filter (both sides) |
13. |
Transportation handle |
6. |
Air filter cover |
|
(both sides) |
7. |
Tube for condensate discharge (Main tank) 14. |
Retractile flexible pipe |
|
8. |
Tube for condensate discharge |
15. |
Terminal pipe fitting |
2 |
(Secondary tank) |
|
|
|
|
|
|
3
5
6
4
|
12 |
|
10 |
|
|
|
Operating limits: |
|
Room Temperature: |
Cooling: |
MIN: 16°C D.B. / 14°C W.B. |
MAX: 35°C D.B. / 24°C W.B. Dehumidification: MIN: 16°C D.B / 80% R.H.
MAX: 35°C D.B. / 80% R.H.
SIGNALING LAMPS
1
2
3
4
5
1.Receiver : receives signals transmitted from the remote control.
2.TIMER lamp: This lamp lights up when the system is being controlled by the timer or sleep mode.
3.OPERATION lamp: This lamp lights up during operation.
It blinks once to announce that the remote control signal has been received and stored. It blinks continuously during the protection modes (defrosting, etc.).
4.STANDBY lamp: This lamp lights up when the air conditioner is connected to the power and ready to receive the remote control command.
6
EG
CAUTION
5.Water-level alarm: When the main tank is full, the air conditioner stops automatically and this lamp begins blinking.
6.Operation button (without remote control): Push the button to walk through the OFF and COOL operation modes.
WARNING
The OFF position does not disconnect the power. Use the main power switch to turn off power completely.
BEFORE USING THE APPLIANCE
●Check that the power supply at the location where the air conditioner is going to be used is 220-240V ~ 50Hz .
●Make sure that the electrical installation is suitable to supply continuously current necessary for the air conditioner in addition to that already used by other electric appliances (white goods, lighting). See the max electric input indicated on the name plate positioned on the air conditioner.
●The installation of a double-pole switch, protected by 10 A fuses of the delayed type, upstream the electricity wall socket, is recommended.
●The unit has to be connected according to the local electrical rules.
●Make sure that circuit breakers, fuses, etc, are of sufficient capacity to handle a start-up current of 20 A (generally less then 1 second).
●Do not install the air conditioner where it could be wetted by drops of water (i.e. in laundries).
●Before connecting the air conditioner to a power socket, make sure that the socket is provided with an earth connection in compliance with local codes.
●Never use the power plug as a mean to start or stop the air conditioner: always use the ON/OFF push-button switch on the air conditioner control panel.
●Do not move the air conditioner during operation, turn it off and disconnect the plug from the power supply. Verify and eventually discharge the condensate water, through the discharge tube located on the rear of the unit.
●WARNING! Do not stick anything into the air outlet of the air conditioner. This is very dangerous because the fan is rotating at high speed.
●WARNING!
The air conditioner is provided with a time-guard system, which does not allow re-starting of compressor until after 3 minutes from a previous stop.
●Make sure that there are no obstacles around the unit affecting the free circulation of air. Do not block the air intakes and outlet of the unit with curtains or other. Never put objects on the top of the unit.
●The air conditioner reaches the maximum efficiency at the following conditions: 1-The flexible tube is retracted, without bends and without the outlet nozzle.
2-When you switch on the air conditioner for the first time, set the fan at the LOW speed for at least one hour, then set the HIGH speed.
●The manufacturer assumes no responsibilities if the safety regulations or local codes are not observed.
WARNING
Always unplug the unit from the power socket before moving or cleaning it.
3

OPERATION
COOLING
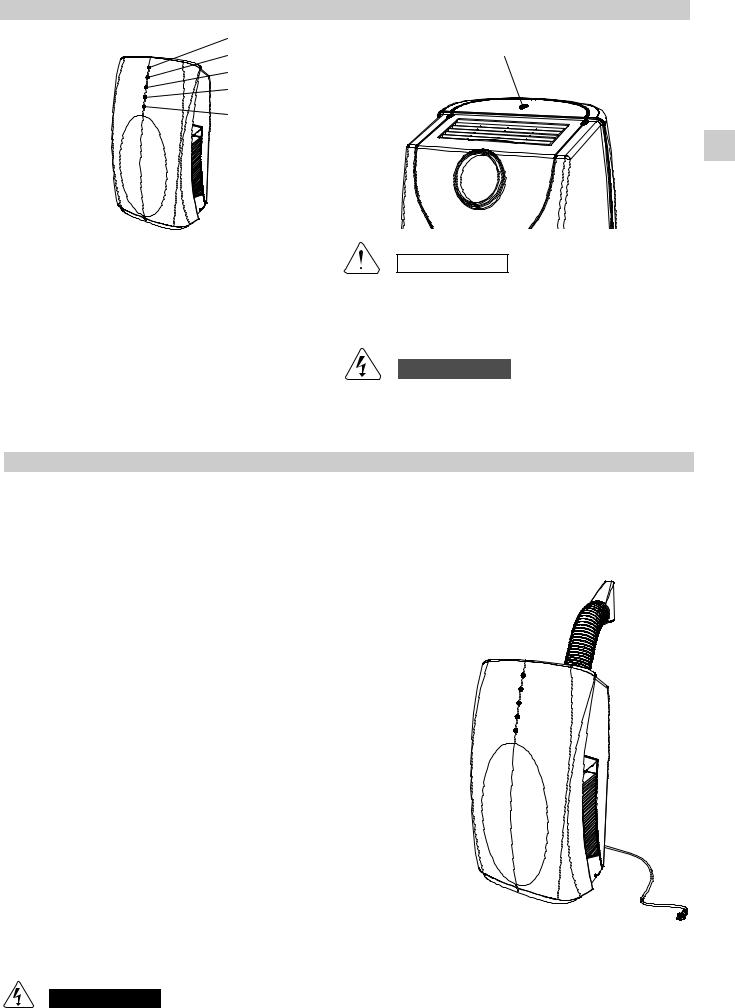
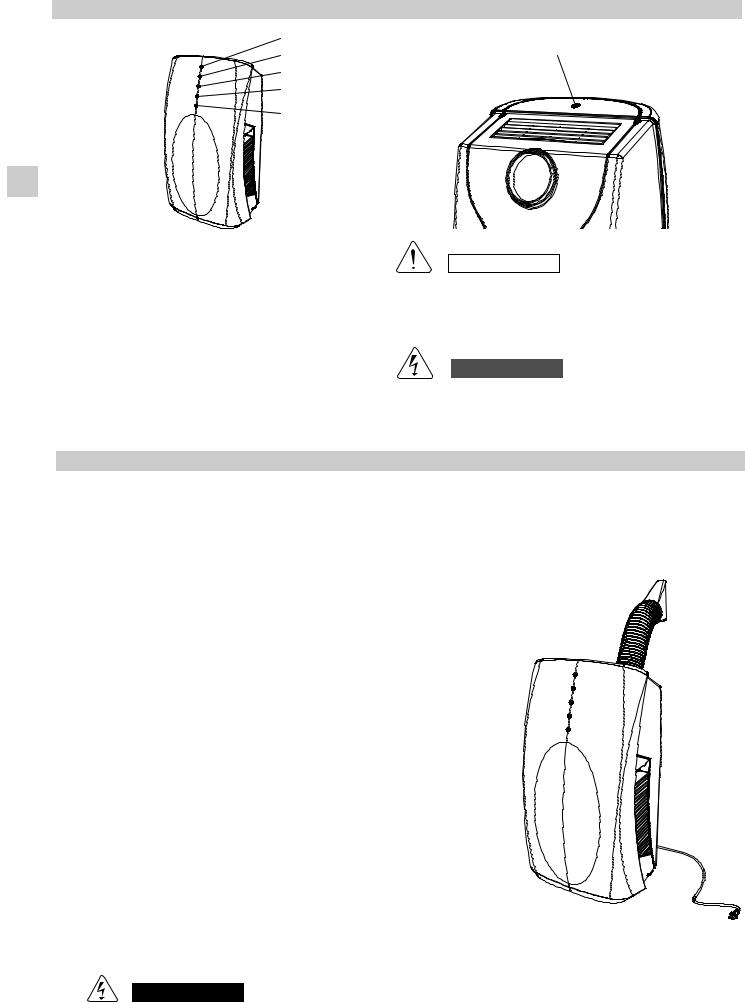
●Place the air conditioner as near as possible to the window. Fit the flexible tube by hooking it to the rear of the unit. Extend the flexible tube just enough to reach the outdoor, passing under the window shutters set ajar.
●In case there is a window sill towards the inside of the room, it might be better to use the supplied outlet nozzle. Insert the nozzle into the free end of the flexible
tube.
|
● |
Open the window and lock one of the shutters. Place the outlet nozzle between the |
|
EG |
|
two shutters, held together with the supplied lace. |
|
● |
Avoid sharp bends or plies of the flexible tube. |
||
|
|||
|
● |
In case of porthole utilise make a 140 mm diameter hole in the window pane. |
DEHUMIDIFICATION (DRY)
When the air conditioner is in the dehumidification mode, it doesn’t cool the room.
When you use the air conditioner in the dehumidification mode, you don’t have to NO! use the flexible tube. For maximum dehumidification efficiency leave the rear
discharge outlet free to discharge directly into the room.
● Remove the flexible tube by grasping it at the attachment point on the air conditioner and twisting it until you release it from the blocking hooks.
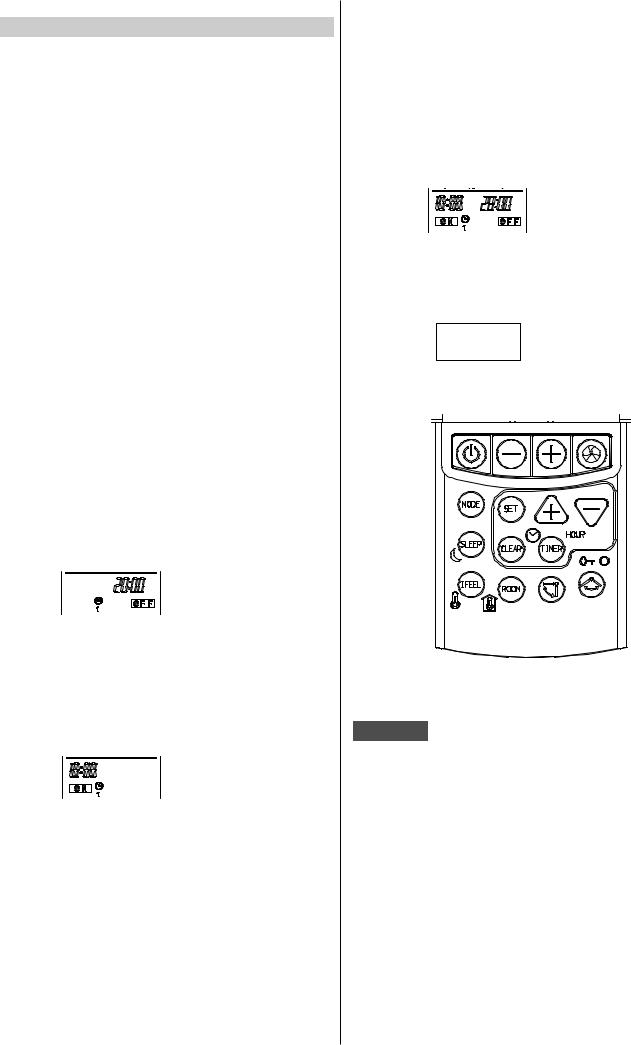
USING THE REMOTE CONTROL UNIT
HOW TO INSTALL BATTERIES
●Remove the lid in the rear part of the remote control unit.
●Insert two AAA alkaline batteries of 1,5 V-DC.
Make sure the batteries point in the direction marked in the battery compartment.
●The batteries last about six months. Depending on how much you use the remote control unit.
Remove the batteries if you do not use the remote control unit for more than one month.
Press the +, -, SET and CLEAR buttons together after batteries replacement.
(This operation allows you to reset correctly all the programs. The remote control unit is to be set up again). Replace the batteries when the remote control unit lamp fails to light, or when the air conditioner does not receive the remote control unit signals.
●The batteries of the remote control contain polluted substances exhausted batteries must be disposed according to the laws in force.
TEMPERATURE SENSOR SELECTOR
●Under normal conditions the room temperature is detected and checked by the temperature sensor placed in the air conditioner.
●Press the remote control I FEEL button to activate the temperature sensor placed in the remote control. This function is designed to provide a personalised environment by transmitting the temperature control command from the location next to you. Therefore, in using this function, the remote control should always be aimed, without obstruction, at the air conditioner.
NOTE
The remote control unit sends the temperature signal to the air
conditioner regularly at two
minute intervals. If the signal from the remote control unit
stops for more than five minutes due to some troubles, the air conditioner will switch to the temperature sensor
which is built into the unit and controls the room temperature. In these cases, the temperature around the remote control unit may differ from the temperature detected in the air conditioner position.
OPERATION WITH THE REMOTE CONTROL UNIT
When using the remote control unit, always point the unit transmitter head directly at the air conditioner receiver.
RECEIVER
TRANSMITTER HEAD
REMOTE CONTROL UNIT
4
REMOTE CONTROL UNIT
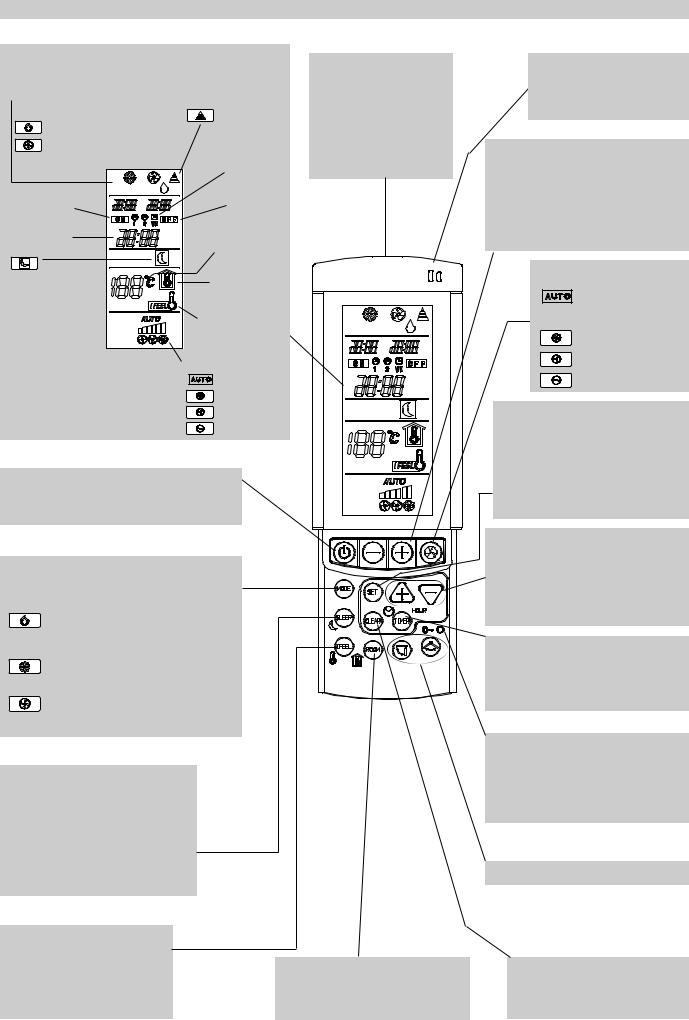
DISPLAY
Information are displayed when the remote control unit is switched on.
Operation Mode
Displayed when data trasmitted
Or remote control unit lock
 Cooling
Dehumidification (dry) |
|
Fan only |
|
|
Shows the |
|
type of timer |
Displayed |
Displayed |
when the |
|
when the timer |
timer off is |
on is set and |
set and |
activated |
activated |
Clock (hours |
Set temperature or |
and minutes) |
room temperature |
Displayed when
Displayed in Sleep |
the temperature |
|
Mode Operation |
||
is the room |
||
|
||
|
temperature |
|
|
Indicate that the air |
TRANSMITTER
When you press the buttons of the remote control unit, the  mark appears on the display to transmit the setting changes to the receiver in the air conditioner.
conditioner is operating in I FEEL mode
Fan speed indication |
Automatic fan |
speed |
High speed |
Medium speed |
Low speed |
ON/OFF OPERATION BUTTON
This button turns the air conditioner ON and OFF.
MODE SELECTOR BUTTON
Press this button to modify the air conditioner mode.
dehumidification (dry)
The air conditioner reduces the humidity in the room.
(cooling)
The air conditioner makes the room cooler.
(fan)
The air conditioner circulate the air.
SLEEP BUTTON
For details, see "Sleep mode".
When you press this button in the COOL or DRY mode, the mark  appears on the display and the microcomputer in the remote control unit will adjust the set temperature to
save energy.
TEMPERATURE SENSOR
SELECTOR
Push IFEEL button to activate the temperature control in the remote control unit. This function provides a more confortable temperature control.
ROOM TEMPERATURE
Push the ROOM button to show the actual room temperature around the remote control.
SENSOR
A temperature sensor inside the remote control unit detects the room temperature.
TEMPERATURE SETTING BUTTONS |
EG |
|
|
|
|
— (cooler)
Press this button to decrease the set temperature.
+ (warmer)
Press this button to increase the set temperature.
FAN SPEED SELECTOR BUTTON
Fan speed is auto matically selected by the microcomputer.
High speed.
Medium speed.
Low speed.
SET BUTTON
Push this button to select the functions:
•set the present time
•set the ON-OFF timer
For detail see “HOW TO SET THE
PRESENT TIME” and “SETTING THE
TIMER”.
TIMER AND PRESENT TIME SETTING BUTTONS
Pushing + or - buttons the setting of the time and timer can be activated. For detail see “HOW TO SET THE PRESENT TIME” and “SETTING THE TIMER”.
TIMER BUTTON (timer setting)
Push the TIMER on the display starts the timer ON and OFF setting procedure.
For detail see “SETTING THE TIMER”.
LOCKING THE REMOTE CONTROL
Pushing this button freezes the last operation setting. When  is activated the remote control will not be able to control the air conditioner. To release the lock status push
  again.
INACTIVATED BUTTONS
TIMER RESET
Push the CLEAR button to cancel all timer setting.
5

HOW TO SET THE PRESENT TIME
1.Press the SET button for five seconds. The time indication alone flashes.
2.Press the + or - buttons until the present time is displayed.
3.Press the SET button to stop the indication flashing.
EG COOLING
NOTE
Verify that the unit is connected to the main power and the STANDBY lamp is light up.
1. Set the MODE selector to COOL  .
.
2.Press the ON/OFF button and switch the air conditioner ON.
3.Press the TEMP. buttons to set the desired temperature (the temperature range is between 30 °C max. and 16 °C min.).
2 |
3 |
4 |
|
1 |
|
THE DISPLAY SHOWS THE
SELECTED TEMPERATURE.
4. Press the FAN SPEED button to select the fan speed.
NOTE
The air conditioner disposes of the condensate water automatically at the HIGH and MEDIUM fan speed, on the contrary at the LOW fan speed the condensate water is collected in the tank.
DEHUMIDIFYING (DRY)
1.Set the MODE selector switch to “DRY”  .
.
2.Press the ON/OFF button and switch the air conditioner ON.
3.Press the TEMP. buttons to set the room temperature (the temperature range is between 30 °C max. and 16 °C min.).
THE DISPLAY SHOWS THE ROOM
TEMPERATURE.
NOTE
●Use DRY operation when you want to reduce the humidity in the room.
●During DRY operation, the fan speed is automatically set to low or stops to prevent overcooling.
●Dry operation is not possible if the indoor temperature is 15 °C or less.
●The humidity of the room (condensate water) will be collected in the internal tank of the air conditioner.
FAN ONLY
If you want to make air circulate without any temperature control, follow these steps:
1.Set the MODE selector switch to “FAN”  .
.
2.Press the ON/OFF button and switch the air conditioner ON.
ADJUSTING THE FAN SPEED
AUTOMATIC |
|
Simply set the FAN SPEED selector to the |
position. |
A microcomputer automatically controls the fan speed when the AUTO mode is selected. When the air conditioner starts operating, the difference between the room temperature and the set temperature is detected by the microcomputer which then automatically switches the fan speed to the most suitable level.
NOTE
In FAN Only mode the fan speed is adjusted automatically as in cooling mode.
WHEN DIFFERENCE BETWEEN
ROOM TEMPERATURE AND SET FAN SPEED TEMPERATURE IS
Cooling and |
2 °C and over |
High |
dehumidifying |
Between 2 and 1 °C |
Medium |
modes: |
Below 1 °C |
Low |
NOTE
The above mentioned data make reference to air conditioner operating when the sensor on the remote control unit is ON. (Refer to temperature sensor selector). If the sensor on the unit is being used then actual operation will slightly differ from that described in the above tables.
MANUAL
If you want to manually adjust speed just set the FAN SPEED selector as desired.
High speed |
Med. speed |
Low speed |
SLEEP MODE
● The SLEEP mode enables you to save energy.
1.Set the MODE selector to cool or dry.
2.Press the SLEEP button.
3.The  mark appears on the display. Press the SLEEP button again to release the SLEEP function.
What does the SLEEP mode mean?
In this mode, the air conditioner will cool or dry the room to the set temperature, and then the thermostat will make the unit pause. After about 1 hour, the air conditioner will automatically reset the set temperature as follows (also refer to graph).
When the room temperature reaches the new set value, the thermostat will cause the unit to pause. After about 1 hour the temperature will be raised by 1°C. This enables you to save energy without sacrificing your comfort.
COOLING AND DEHUMIDIFYING
Setting temperature |
|
Room temperature |
|
1°C |
|
1°C |
|
|
1 hour |
1 hour |
TIME |
6

SETTING THE TIMER
There are four timers that can be selected on the remote control.Two daily timers (designated as T1,T2) ,and two optional weekend timers (designated as WKT1, WKT2) .Each timer can be selected by pressing TIMER button.
The daily timers T1 and T2 can be set for ON and OFF separately for two different time periods.
Timer setting will not change until new setting is input.
The weekend timers WKT1 and WKT2 can be set for ON and OFF separately for two different time periods and they are effective two days only. These timers will be effective on the day of setting and on the day after only.
At 24:00 on the second day, the WK timer will not be effective anymore and the daily timer will be effective again.
WKT1 - effective on the setting day
WKT2 - effective one day after the setting day.
NOTE:
1.During the weekend timer operation, the daily timers will be disabled.
2.The WK timers must be reactivated before every weekend.
A) HOW TO SET THE OFF TIME
1.Press the TIMER button to select the desired timer.
2.Press the SET and CLEAR buttons till the OFF sign blinks.
3.Press the + or - (HOUR) button until the desired value is displayed.
4.Press the SET button to activate the timer.
B) HOW TO SET THE ON TIME
1.Press the TIMER button to select the desired timer.
2.Press the SET button till the ON sign blinks.
3.Press the + or - (HOUR) button until the desired value is displayed.
4.Press the SET and CLEAR buttons to activate the timer.
C)HOW TO SET A PROGRAM FOR DAILY ON/OFF OPERATION (OR VICEVERSA)
1.Press the TIMER button to select the desired timer.
2.Press the SET button till the ON sign blinks.
3.Press the + or - (HOUR) button until the desired value is displayed.
4.Press the SET button again, the OFF sign blinks.
5.Press the + or - (HOUR) button until the desired value is displayed.
6. Press the SET button to activate the timer. |
EG |
D) HOW TO CLEAR THE TIMER
1.Press the TIMER button to select the timer.
2.Press the CLEAR button if you want that every timer operation will be cleared.
NOTE
If the procedure to set the timer is not completed, by pushing the SET button, within 15 seconds the timer operation will be cancelled and the last set-up is restored.
7

SETTING AIR FLOW DIRECTION
To set the air flow direction, seize the deflector blades and pull towards |
Vertical Flow |
Horizontal Flow |
||||
you. |
|
|
|
|
|
|
|
|
|
|
|
|
|
|
|
|
|
|
|
|
|
|
|
|
|
|
|
|
|
|
|
|
|
|
|
|
|
|
|
|
|
|
|
|
|
|
|
|
|
|
|
|
|
|
|
EG
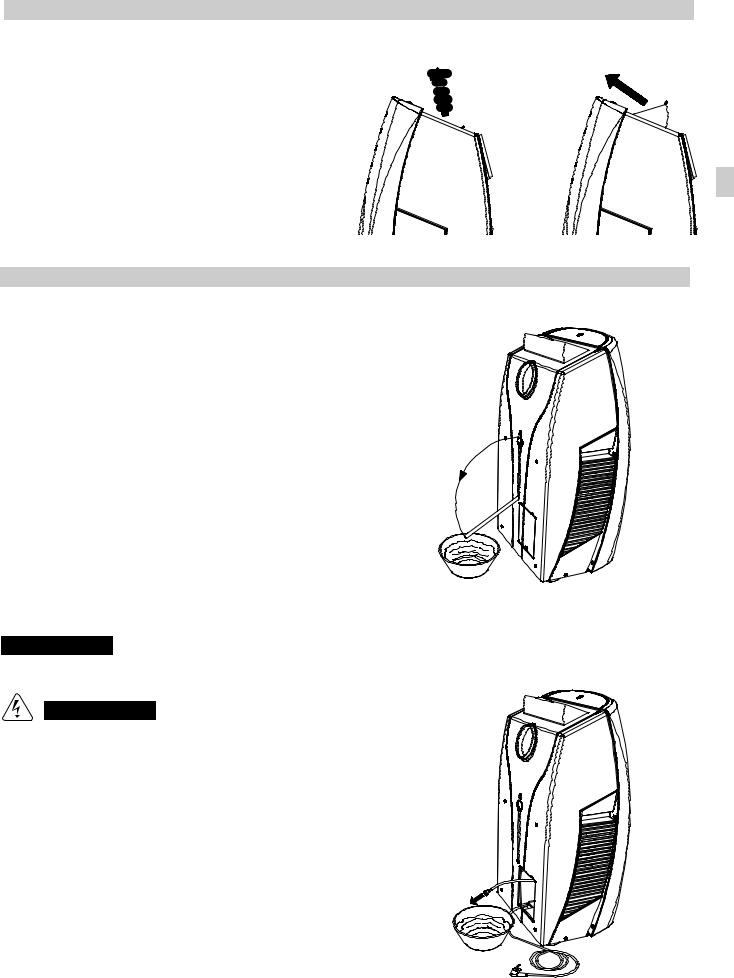
HOW TO DISCHARGE THE WATER TANKS
The air conditioner removes humidity of the air, collecting the condensate into the internal tank. The condensate water can be evacuated through the external discharge tube located on the rear of the unit.
●When the internal tank is full, the air conditioner will automatically stop and the water tank alarm (5) begins flashing.
The tank capacity allows approx. 4 hours operation.
●Verify the presence of water inside the air conditioner, looking at the rear external discharge tube.
●Stop the air conditioner using the remote control unit, then unplug the cable.
●Position a container under the discharge tube.
●Grasp the tube removing it from its seat on the rear of the air conditioner.
●Close with the inch the open end of the tube and, tilting it towards the container, let the condensate water flow.
●At the end of the operations reinsert the discharge tube into
its place.
Every time you move the unit to another room or when you store it, discharge also the condensate water of the secondary tank, through
the tube located inside the space for cable winding.
MAIN TANK
IMPORTANT
At the end of the operation close the tube with its stopper.
WARNING
●Always switch off the air conditioner before unplugging it from the power socket.
●Always unplug the air conditioner before discharging the condensate water collected inside.
SECONDARY TANK
8

OPERATION WITHOUT THE REMOTE CONTROL UNIT
If you have lost the remote control unit or it has troubles, follow the steps below.
1. WHEN THE AIR CONDITIONER IS STOPPED
If you want to turn on the air conditioner push the operation button.
NOTE
The set temperature and fan speed are automatically set at the last selection before stopping.
2. WHEN THE AIR CONDITIONER IS RUNNING
If you want to turn off the air conditioner push the operation button until the OPERATION lamp is turned off.
NOTE
Power failure during operation.
In the event of power failure, the unit will stop. When the power is resumed, the unit will restart automatically after 3 minutes.
OPERATION BUTTON
TIPS FOR ENERGY SAVING
DO NOT:
●Block the air intake and outlet of the unit.
If they are obstructed, the unit will not work well, and may be damaged.
●Let direct sunlight into the room. Use sunshades, blind or curtain.
DO:
●Always try to keep the air filters clean. A clogged filter will impair the performance of the unit.
●To prevent conditioned air from escaping, keep windows, doors and any other openings closed.
●The flexible tube is correctly positioned without any sharp bends nor plies.
●The room temperature is above 16°C for cooling and dehumidification mode.
TROUBLESHOOTING
WARNING
•The use of portable telephones near the air conditioner may cause disturbance to its normal operation and must be avoided. In case abnormal operation is noticed, (OPR operation lamp lights (3) but the air conditioner will not run) to restore normal operation turn-off electric supply for 60 seconds at least, by disconnecting the main switch or the wall plug, then start again the air conditioner.
•The blinking lamp (5) together with the stop of the air conditioner indicate that the main condensate water tank is full.
•If your air conditioner does not work properly, first check the following points before requesting service.
If it still does not work properly, contact your dealer or service
centre.
Trouble: the air conditioner does not run at all.
Possible cause:
1.Power failure.
2.Leakage breaker tripped.
3. Line voltage is too low. |
EG |
4.Operation button is OFF.
5.Batteries in remote control unit have run down.
Remedy:
1.Restore power.
2.Contact service centre.
3.Consult your electrician or dealer.
4.Press the button again.
5.Replace batteries.
Trouble: The air conditioner does not operate and STANDBY lamp flashes (4).
Possible cause:
1. Defective sensor.
Remedy:
1. Contact service centre.
Trouble: TIMER lamp (2) flashes and the air conditioner does not operate.
Possible cause:
1. Trouble in wiring system.
Remedy:
1. Contact service centre.
Trouble: Compressor runs but soon stops.
Possible cause:
1. Obstruction of the air intake grilles.
Remedy:
1. Remove obstruction.
Trouble: Poor cooling performance.
Possible cause:
1.Dirty or clogged air filters.
2.Heat source or many people in room.
3.Doors and/or windows are open.
4.Obstacle near air intake or air discharge port.
5.The set temperature on the remote control unit is too high.
Remedy:
1.Clean air filters to improve airflow.
2.Eliminate heat source if possible.
3.Shut them to keep the heat or cold out.
4.Remove it to ensure good airflow.
5.Set the right temperature on the remote control unit.
Trouble: Clicking sound is heard from the air conditioner.
Possible cause:
1.During operation, any plastic parts may expand or shrink due to a sudden temperature change. In this event, a clicking sound may occur.
Remedy:
1.This is normal, and the sound will disappear when an even temperature is settled.
1
2
3
4
5
9

PORTHOLE KIT
SINGLE GLASS |
DOUBLE GLASS |
NOTE |
|
|
|
NOTE |
|
|
|
|
|
|
|
|
|
|
EG
HOLE |
HOLE |
HOLE |
NOTE
Eliminate one or two membranes, cutting them with the scissors according to the thickness of the glass.
ASSEMBLING
●Make a hole in the window pane.
●Insert the porthole without the
plug.
●Remove the terminal pipe fitting of the warm air outlet from the retractile flexible pipe.
●Bring the air conditioner near
the window and insert the air outlet in the porthole.
If you want to utilise the air conditioner in several rooms, it is possible to buy varies portholes for air discharge separately.
CARE AND CLEANING
WARNING! For safety’s sake, be sure to turn the air conditioner OFF and also disconnect it from the power supply before cleaning it.
1.Cleaning of the Air Filter
The air filter must be checked at least once every two weeks operation. Operation with a dirty filter always causes a lower efficiency of the air conditioner and severe product damage. The filter is located at the back of the intake grille: open horizontally the cover (1), grasp the air filter handle (2) and pull upwards. Repeat the same operation also on the opposite side of the air conditioner. Use a vacuum cleaner to remove light dust. If there is sticky dust on the filter, wash it with lukewarm soapy water, then rinse in clean, cold water and dry it before reinstallation.
2.Cleaning of Casing and Grilles.
To clean the air conditioner, wipe it with a clean soft cloth, lightly moisted. In case it is stained, moisten the cloth with soapy water. Never use solvents or harsh chemicals, nor very hot water. Do not pour water over the air conditioner to clean it: this will damage the internal components and cause an electric shock hazard.
3.Storage.
If you are not going to make use of the air conditioner for a long period, before storing it away clean the air filters and verify that both the internal water tanks are empty. Always store the unit in the vertical position. Do not put heavy objects on top of the unit and protect it with a cloth or a plastic bag.
4.Transport.
Keep the air conditioner in the vertical position during transportation.
5.For your safety care check periodically the conditions of the electric supply cable; the electrical connection of the unit is X type with cable prepared in a special way; in case you should notice any damage due to usage, call the nearest After Sale Service to get the cable replaced.
2
1
NO!
10
INDICE |
|
IL PRODOTTO ............................................................................................................. |
2 |
SEGNALAZIONI .......................................................................................................... |
3 |
PRIMA DI USARE IL CLIMATIZZATORE .................................................................... |
3 |
MODALITÀ D’USO ...................................................................................................... |
4 |
USO DEL TELECOMANDO......................................................................................... |
4 |
• Inserimento delle batterie .......................................................................................... |
4 |
• Selettore del sensore di temperatura ........................................................................ |
4 |
• Funzionamento con il telecomando........................................................................... |
4 |
TELECOMANDO ........................................................................................................ |
5 |
COME REGOLARE L'OROLOGIO ............................................................................. |
6 |
RAFFREDDAMENTO ................................................................................................. |
6 |
DEUMIDIFICAZIONE ................................................................................................... |
6 |
VENTILAZIONE ........................................................................................................... |
6 |
SCELTA VELOCITÀ' VENTILATORE.......................................................................... |
6 |
PROGRAMMA NOTTURNO ........................................................................................ |
6 |
REGOLAZIONE DEL TIMER ....................................................................................... |
7 |
REGOLAZIONE DEL FLUSSO D'ARIA ....................................................................... |
8 |
COME SVUOTARE I SERBATOI CONDENSA ........................................................... |
8 |
FUNZIONAMENTO SENZA TELECOMANDO ............................................................ |
9 |
CONSIGLI PER IL MASSIMO COMFORT ED IL MINIMO CONSUMO ...................... |
9 |
IDENTIFICAZIONE E SOLUZIONE PROBLEMI DI FUNZIONAMENTO .................... |
9 |
KIT OBLÒ..................................................................................................................... |
10 |
MANUTENZIONE E CURA ......................................................................................... |
10 |
SIMBOLI SCHEMI ELETTRICI ................................................................................... |
11 |
I
DICHIARAZIONE DI CONFORMITÀ
Questo prodotto è marcato
in quanto conforme alle Direttive:
–Bassa Tensione n. 73/23 CEE e 93/68 CEE.
–Compatibilità Elettromagnetica n. 89/336 CEE, 92/31 CEE e 93/68
CEE.
Questa dichiarazione sarà nulla nel caso di impiego diverso da quello dichiarato dal Fabbricante e/o di mancata osservanza, anche solo parziale, delle istruzioni d'installazione e/o d'uso.
IL PRODOTTO
|
|
|
3 |
2 |
15 |
|
|
|
14 |
7 |
5 |
|
|
||
1 |
|
|
|
|
|
8 |
6 |
|
|
|
|
|
13 |
|
|
|
|
11 |
|
|
4 |
9 |
|
|
|
4 |
|
|
|
|
12
|
|
|
|
10 |
|
1. |
Telecomando a raggi infrarossi |
9. Cavo elettrico con spina |
Condizioni limite di funzionamento: |
||
2. |
Segnalazioni |
10. |
Alloggiamento cavo |
||
Temperatura interna: |
|||||
3. |
Deflettore mandata aria |
11. |
Sportello cavo elettrico |
||
Raffreddamento:MIN: 16°C B.S. / 14°C B.U. |
|||||
4. |
Griglia aspirazione aria (su entrambi i lati) |
12. |
Ruote trasporto |
||
MAX: 35°C B.S. / 24°C B.U. |
|||||
5. |
Filtro Aria (su entrambi i lati) |
13. |
Maniglia trasporto |
||
Deumidificazione:MIN: 16°C B.S / 80% U.R. |
|||||
6. |
Sportello filtro aria |
|
(su entrambi i lati) |
||
|
MAX: 35°C B.S. / 80% U.R. |
||||
|
|
|
|
||
7.Tubo scarico condensa (serbatoio principale) 14. Tubo flessibile retrattile
8.Tubo scarico condensa (serbatoio secondario) 15. Raccordo terminale scarico aria calda
2
SEGNALAZIONI
1
2
3
4
5
GIG
1.Ricevitore: riceve i segnali inviati dal telecomando.
2.Spia TIMER: si accende quando l’unità è controllata dal timer o dal programma notturno.
3.Spia funzionamento (OPERATION): si accende quando l’unità è in funzione.
Lampeggia una volta per avvisare che il segnale del telecomando é stato ricevuto e memorizzato. Lampeggia continuamente durante le funzioni di protezione (sbrinamento, ecc.).
6
PRECAUZIONE
5.Spia allarme livello acqua: Quando il serbatoio principale è pieno, il climatizzatore si arresta automaticamente e la spia inizia a lampeggiare.
6.Tasto funzionamento (senza telecomando): Premere questo tasto per passare da una funzione all’altra (OFF e COOL).
AVVERTIMENTO
4.Spia attesa (STANDBY): Si accende quando il climatizzatore La posizione OFF non interrompe l’alimentazione elettrica. é collegato alla corrente ed é pronto a ricevere il segnale dal Usate l’interruttore principale per isolare il climatizzatore
telecomando. |
d’aria. |
PRIMA DI USARE IL CLIMATIZZATORE
●Verificare che la tensione monofase di alimentazione nel luogo di utilizzo sia di 220V-240V~ 50Hz.
●Assicuratevi che l'impianto elettrico sia in grado di erogare la corrente di esercizio necessaria per il climatizzatore oltre a quella assorbita normalmente da altre utenze (elettrodomestici, illuminazione). Vedere gli assorbimenti massimi sulla targhetta dati posta sul climatizzatore.
●Si raccomanda l'installazione di un interruttore bipolare, con fusibile di protezione da 10 A del tipo ritardato, a monte della presa d'alimentazione.
●L'allacciamento alla rete elettrica del climatizzatore deve essere eseguito in conformità alle norme d'installazione vigenti.
●Assicuratevi che interruttori automatici e valvole di protezione dell'impianto siano in grado di sopportare una corrente di spunto di 20 A, (normalmente per un tempo inferiore a 1 secondo).
●Evitare di installare il climatizzatore in locali dove potrebbe essere investito da spruzzi d'acqua (es. lavanderie).
●La presa dell'impianto deve essere sempre provvista di messa a terra efficiente.
●Non usare mai la spina come mezzo per arrestare o avviare il climatizzatore: usare sempre il pulsante marcia/arresto sul pannello di comando dell'unità.
●Non movimentate il climatizzatore mentre é in funzione, spegnere e togliere la spina dalla presa di corrente. Controllare ed eventualmente svuotare la condensa, tramite il tubo di scarico posto sul retro.
●PRECAUZIONE! Non inserite oggetti nel climatizzatore. É molto pericoloso perché il ventilatore gira ad alta velocità.
●ATTENZIONE!
Il climatizzatore è dotato di un sistema di protezione del compressore dai sovraccarichi che non consente la partenza del compressore se non sono trascorsi almeno 3 minuti da un precedente arresto.
●Assicurare la libera circolazione dell'aria all'unità. Non ostruire con tendaggi o simili le griglie di aspirazione e quella di mandata. La parte superiore deve essere libera da qualsiasi ostacolo, non depositare oggetti sul climatizzatore.
●L’apparecchio raggiunge le massime prestazioni alle seguenti condizioni: 1- Il tubo flessibile é retratto, senza curve e senza bocchetta di raccordo.
2- Alla prima accensione, far funzionare l’apparecchio per almeno un’ora alla BASSA velocità di ventilazione, poi passare alla ALTA velocità.
●Il costruttore non si assume responsabilità alcuna nel caso in cui le norme di sicurezza e antinfortunistiche non vengano rispettate.
AVVERTIMENTO
1.Prima di eseguire una qualsiasi operazione di spostamento o pulizia, assi-
3 |
curatevi che la spina sia disinserita dalla presa di corrente. |
|

MODALITÁ D'USO
RAFFREDDAMENTO
●Avvicinate il più possibile il climatizzatore alla finestra. Inserite il tubo flessibile agganciandolo, alla parte posteriore del climatizzatore. Estendete il flessibile quanto basta per raggiungere l’esterno passando sotto i battenti accostati della finestra. Accostate la finestra in posizione di minima apertura.
●Se la finestra ha un davanzale verso l’interno può rendersi necessario l’uso
dell’apposito raccordo terminale fornito in dotazione. Inserite il raccordo nell’estremità libera del flessibile.
● Aprite la finestra e bloccate uno dei battenti con la maniglia. Appoggiate il raccordo terminale al battente fisso, accostate l’altro battente della finestra e bloccatelo in posizione usando l’apposito laccio.
● Evitate curve troppo strette o pieghe del tubo flessibile.
I
● Nel caso di utilizzo dell'obló eseguire un foro del diametro di 140 mm nel vetro della finestra.
DEUMIDIFICAZIONE (DRY) |
|
Il climatizzatore non raffredda l’ambiente quando funziona come deumidificatore. |
NO! |
Quando usate l’apparecchio come deumidificatore, non dovete collegare il tubo |
|
flessibile. Per ottenere la massima efficienza di deumidificazione lasciate l’attacco |
|
di scarico posteriore libero di scaricare direttamente in ambiente. |
|
● Scollegate il tubo flessibile afferrandolo in prossimità del punto di attacco |
|
sull’apparecchio e ruotandolo sino a liberarlo dai ganci di bloccaggio. |
|
USO DEL TELECOMANDO
INSERIMENTO DELLE BATTERIE
●Rimuovere il coperchio sul retro del telecomando.
●Inserire due batterie da 1,5 V-DC tipo AAA alcaline. Rispettare la polarità come indicato sul telecomando.
●La durata media delle batterie è di sei mesi e dipende dalla frequenza con cui si usa il telecomando.
Rimuovere le batterie nel caso di lungo inutilizzo del telecomando (oltre un mese).
Premere contemporaneamente i pulsanti +, -, SET e CLEAR dopo aver sostituito le batterie.
(Questa operazione permette di azzerare correttamente tutti i programmi. Il telecomando va nuovamente impostato). Sostituire le batterie quando la spia di trasmissione dati del telecomando non lampeggia oppure quando il condizionatore non risponde ai comandi del telecomando.
●Le batterie del telecomando contengono sostanze inquinanti. Terminata la loro vita utile, devono essere smaltite secondo le vigenti normative.
SELETTORE DEL SENSORE DI TEMPERATURA
●In condizioni normali la temperatura ambiente viene rilevata e controllata dal sensore di temperatura posizionato all’interno del climatizzatore.
●Premere il pulsante I FEEL per attivare il sensore di temperatura posizionato nel telecomando. Questa funzione permette di creare una temperatura ambiente ottimale perché il telecomando trasmette la temperatura dalla posizione in cui vi trovate. Quindi, usando questa funzione, il telecomando deve sempre essere indirizzato verso il climatizzatore.
NOTA
Il |
telecomando |
trasmette il |
|
segnale della |
temperatura |
||
al |
climatizzatore |
d'aria |
|
regolarmente ad intervalli di due minuti. Se il segnale dal
telecomando si arresta per più di cinque minuti a causa di inconvenienti, il climatizzatore d'aria si commuta automaticamente
sul sensore della temperatura, incorporato nel climatizzatore che controlla la temperatura ambiente. In questi casi, la temperatura vicino al telecomando può differire dalla temperatura rilevata nella posizione del climatizzatore d'aria.
FUNZIONAMENTO CON IL TELECOMANDO
Indirizzare il telecomando con la testina del trasmettitore verso il ricevitore posto sul condizionatore d’aria.
RICEVITORE
TESTINA DEL TRASMETTITORE
TELECOMANDO
4

TELECOMANDO
VISORE
Visualizza le informazioni quando il telecomando è acceso.
|
Modo di funzionamento |
Conferma trasmissione dati |
|
|
Raffreddamento |
al climatizzatore o bloccaggio |
|
|
telecomando |
||
|
|
||
|
Deumidificazione |
|
|
|
Ventilazione |
|
|
|
|
Indica i tipi |
|
|
|
di timer |
|
|
|
Timer |
|
|
Timer |
inserito |
|
GIG |
su spento |
||
inserito |
|||
|
su acceso |
Temperatura |
|
|
Orologio (ore |
||
|
impostata o |
||
|
o minuti) |
||
|
temperatura |
||
|
|
||
|
|
ambiente |
|
|
Programma |
Appare se la |
|
|
temperatura |
||
|
notturno |
è la tempe- |
ratura ambiente
Indica che il climatizzatore funziona in modalità I FEEL
Velocità ventilatore


 Automatico
 Alta velocità
 Media velocità
 Bassa velocità
TRASMETTITORE
Quando vengono premuti i pulsanti del telecomando, il simbolo  si accede sul visore per trasmettere i cambiamenti della regolazione al ricevitore del climatizzatore.
PULSANTE ON/OFF (acceso/spento) |
|
|
Il pulsante serve per mettere in funzione o arre- |
|
|
stare il climatizzatore. |
|
|
PULSANTE MODO DI FUNZIONAMENTO |
|
|
Premere questo pulsante per modificare |
|
|
il funzionamento del climatizzatore. |
|
|
(deumidificazione) |
|
|
Il climatizzatore riduce l’umidità dell’aria ambiente. |
|
|
(raffreddamento) |
|
|
Il climatizzatore raffredda l’aria abbassando la |
|
|
temperatura del locale. |
|
|
(ventilazione) |
|
|
Il climatizzatore funziona solo come ventilatore. |
|
|
Pulsante SLEEP |
|
|
(programma notturno) |
|
|
Per i dettagli vedere “Programma not- |
|
|
turno”. |
|
|
Quando si preme questo pulsante |
|
|
nella modalità RAFFREDDAMENTO o |
|
|
DEUMIDIFICAZIONE il segno |
|
|
appare sul visore, e il micropro- |
|
|
cessore del telecomando regolerà la |
|
|
temperatura selezionata per rispar- |
|
|
miare energia. |
|
|
SELETTORE SENSORE DI TEM- |
|
|
PERATURA |
|
|
Premere il pulsante I FEEL per |
TEMPERATURA AMBIENTE |
|
attivare il sensore di temperatura |
||
|
||
posizionato nel telecomando. |
Premere il pulsante ROOM per visualiz- |
|
Questa funzione permette di crea- |
||
zare la temperatura ambiente vicino al |
||
re una temperatura ambiente otti- |
||
male. |
telecomando |
SENSORE
Un sensore di temperatura all’interno del telecomando rileva la temperatura ambiente.
PULSANTI SELEZIONE TEMPERATURA
— (più freddo)
Premere questo pulsante per diminuire la temperatura selezionata.
+ (più caldo)
Premere questo pulsante per aumentare la temperatura selezionata.
PULSANTE FAN SPEED (velocità ventilatore)
La velocità del ventilatore viene scelta automaticamente dal microprocessore.
Alta velocità ventilatore.
Media velocità ventilatore.
Bassa velocità ventilatore.
PULSANTE SET
Premere questo pulsante per selezionare le funzioni:
•impostazione dell’ora
•impostazione del timer ON/OFF
Per dettagli vedere le sezioni “COME REGOLARE L’OROLOGIO” e “REGOLAZIONE DEL TIMER”.
PULSANTI REGOLAZIONE OROLOGIO E IMPOSTAZIONE ORARIO TIMER
Premendo i pulsanti + o - viene attivata l’impostazione dell’ora e del timer. Per dettagli vedere le sezioni “COME REGOLARE L’OROLOGIO” e “REGOLAZIONE DEL TIMER”.
PULSANTE TIMER (impostazione timer)
Premendo il pulsante TIMER sul display viene attivata la procedura per l’impostazione ON/OFF del timer.
Per dettagli vedere esempio “REGOLAZIONE DEL TIMER”.
BLOCCAGGIO TELECOMANDO
Premendo questo pulsante il telecomando si blocca all’ultima impostazione. Quando  è attiva il telecomando non è in grado di controllare il climatizzatore. Per sbloccare il telecomando premere di nuovo
  .
.
PULSANTI INATTIVI
AZZERAMENTO TIMER
Premere il pulsante CLEAR per annullare tutte le impostazioni del timer
5

COME REGOLARE L'OROLOGIO
1.Premere il pulsante SET per cinque secondi. Lampeggia solo l’indicazione dell’ora.
2.Premere i pulsanti + o - finché viene visualizzata l’ora attuale.
3.Premere il pulsante SET e l’indicazione smette di lampeggiare.
RAFFREDDAMENTO
NOTA
Verificare che l’unità sia collegata alla corrente e che la spia STANDBY sia accesa.
1.Premere il pulsante MODE (modo di fun-
zionamento) fino a far apparire sul visore
il simbolo  RAFFREDDAMENTO
.
2.Premere il pulsante ON/OFF e mettere in funzione il climatizzatore.
3.Premere i pulsanti TEMP. per impostare la temperatura desiderata (il campo di regolazione varia tra 30 °C massimo e 16°C minimo).
IL VISORE INDICHERÀ IL
VALORE DELLA TEMPERATURA
SELEZIONATA.
2 |
3 |
4 |
|
1 |
|
4.Premere il pulsante FAN SPEED per impostare la velocità ventilatore.
NOTA
Il climatizzatore provvede a smaltire automaticamente l’acqua di condensa alla ALTA e MEDIA velocità di ventilazione, mentre alla BASSA velocità la condensa viene raccolta nel serbatoio.
DEUMIDIFICAZIONE
1.Premere il pulsante MODE (modo di funzionamento) fino a far apparire sul visore il simbolo  DEUMIDIFICAZIONE.
2.Premere il pulsante ON/OFF e mettere in funzione il climatizzatore.
3.Premere i pulsanti temp. per impostare la temperatura ambiente (il campo di regolazione varia tra 30 °C massimo e 16 °C minimo).
IL VISORE INDICHERÀ IL VALORE DELLA
TEMPERATURA AMBIENTE.
NOTA
●Usare la funzione deumidificazione quando volete ridurre l’umidità dell’aria ambiente.
●Con la funzione deumidificazione impostata, il ventilatore automaticamente gira alla velocità bassa o si ferma per evitare di raffreddare troppo.
●La funzione deumidificazione non può essere attivata quando la temperatura interna è al di sotto di 15 °C.
●L’umidità rimossa dall’ambiente (condensa) sarà raccolta nel serbatoio interno del climatizzatore.
VENTILAZIONE
Se si vuole soltanto far circolare aria nel locale senza modificare la temperatura, operare come segue:
1.Premere il pulsante MODE (modo di funzionamento) fino a far apparire sul visore il simbolo VENTILAZIONE  .
.
2.Premere il pulsante ON/OFF e mettere in funzione il condizionatore.
SCELTA VELOCITÀ VENTILATORE
AUTOMATICO |
|
Impostare |
con il pulsante FAN SPEED. |
Il microprocessore controllerà automaticamente la velocità del ventilatore. Quando il climatizzatore comincia a funzionare il sensore temperatura rileva la differenza tra la temperatura ambiente e la temperatura impostata e la trasmette al microprocessore che automaticamente sceglie la velocità del ventilatore più idonea.
|
|
I |
NOTA |
|
|
|
|
|
In modalità VENTILAZIONE la velocità del ventilatore é regolata automaticamente come in modalità raffreddamento.
DIFFERENZA TRA
TEMPERATURA AMBIENTE VELOCITÁ VENTILATORE E TEMPERATURA IMPOSTATA
Raffreddamento |
2 °C e oltre |
Massima |
e |
Tra 2 e 1 °C |
Media |
deumidificazione |
Meno di 1 °C |
Minima |
NOTA
I valori precisati sulla tabella si riferiscono al funzionamento del condizionatore quando è abilitato il sensore sul telecomando (v. selettore del sensore di temperatura).
I valori precisati variano leggermente nel caso sia abilitato il sensore posizionato nell’unità.
MANUALE
Per regolare manualmente la velocità del ventilatore agire sul pulsante FAN SPEED scegliendo la velocità desiderata:
Alta velocità |
Media velocità |
Bassa velocità |
PROGRAMMA NOTTURNO
●Il programma notturno serve per risparmiare energia elettrica.
1.Premere il pulsante MODE per predisporre il climatizzatore in raffreddamento o deumidificazione.
2.Premere il pulsante SLEEP.
3.Il simbolo  appare sul visore. Per rilasciare il programma premere nuovamente il pulsante SLEEP.
Cos' è il Programma Notturno?
All’inizio il climatizzatore raffredda o deumidifica il locale fino alla temperatura impostata (SET TEMP), quindi si arresta. Dopo circa 1 ora la temperatura impostata viene automaticamente modificata come segue (v. grafico).
Il climatizzatore funziona fino alla nuova temperatura impostata, quindi si arresta. Dopo circa 1 ora la temperatura impostata viene nuovamente aumentata di 1°C . In questo modo si risparmia energia senza pregiudicare il comfort notturno nel locale.
RAFFREDDAMENTO E DEUMIDIFICAZIONE
Temperatura impostata |
|
Temperatura ambiente |
|
1°C |
|
1°C |
|
|
1 ora |
1 ora |
TEMPO |
6
REGOLAZIONE DEL TIMER
Il climatizzatore è dotato di quattro timer che possono essere selezionati col telecomando. Due timer giornalieri (designati come T1,T2) e due timer opzionali per il fine settimana (designati come WKT1, WKT2). Ogni timer può essere selezionato premendo il pulsante TIMER.
I timer T1 e T2 possono essere impostati su ON e OFF separatamente, per due differenti periodi di tempo. Le impostazioni del timer rimarranno invariate finché non saranno inserite nuove impostazioni.
GIG |
I timer per il fine settimana WKT1 e WKT2 possono essere |
|
|
|
impostati su ON e OFF separatamente, per due differenti |
|
periodi di tempo, per due soli giorni consecutivi. Questi timer |
|
saranno validi solo nel giorno dell’impostazione e nel giorno |
|
successivo. |
|
Alle 24:00 del secondo giorno, i timer WK non saranno più vali- |
|
di ed interverranno i timer giornalieri. |
|
WKT1 - effettivo nel giorno dell'impostazione |
|
WKT2 - effettivo il giorno successivo al giorno dell'impostazio- |
|
ne |
NOTA:
1.Durante l'operazione del temporizzatore di fine settimana, i temporizzatori giornalieri saranno disattivati.
2.I temporizzatori WK devono essere riattivati prima di ogni fine settimana.
A) COME REGOLARE L’ORA DI FERMATA (OFF)
1.Premere il pulsante TIMER per selezionare il timer desiderato.
2.Premere i pulsanti SET e CLEAR fino a quando l’indicazione OFF lampeggia.
3.Premere i pulsanti + o - (ORA) finché viene visualizzato il valore desiderato.
4.Premere il pulsante SET per attivare il timer.
B) COME REGOLARE L’ORA DI PARTENZA (ON)
1.Premere il pulsante TIMER per selezionare il timer desiderato.
2.Premere il pulsante SET fino a quando l’indicazione ON lampeggia.
3.Premere i pulsanti + o - (ORA) finché viene visualizzato il valore desiderato.
4.Premere i pulsanti SET e CLEAR per attivare il timer.
C) COME REGOLARE IL PROGRAMMA GIORNALIERO ACCESO/SPENTO (O VICEVERSA)
1.Premere il pulsante TIMER per selezionare il timer desiderato.
2.Premere il pulsante SET fino a quando l’indicazione ON lampeggia.
3.Premere i pulsanti + o - (ORA) finché viene visualizzato il valore desiderato.
4.Premere di nuovo il pulsante SET, il segnale OFF lampeggia.
5.Premere i pulsanti + o - (ORA) finché viene visualizzato il valore desiderato.
6.Premere il pulsante SET per attivare il timer.
D) COME AZZERARE IL TIMER
1.Premere il pulsante TIMER per selezionare il timer.
2.Premere il pulsante CLEAR se volete cancellare tutte le impostazioni del timer.
NOTA
Se la procedura di impostazione del timer non viene completata, entro 15 secondi premendo il pulsante SET, sarà annullata e rimarrà in memoria l’ultima impostazione.
7
REGOLAZIONE DEL FLUSSO D'ARIA
Potete regolare la direzione del flusso dell’aria agendo sul deflettore Mandata verticale Mandata orizzontale posto sulla bocca di mandata aria; afferrate l’aletta del deflettore
e tirate verso di voi per orientare il flusso dell’aria.
I
COME SVUOTARE I SERBATOI CONDENSA
L’umidità asportata viene raccolta nel serbatoio interno e può essere scaricata tramite il tubo esterno sul retro dell’unità.
● Quando il serbatoio interno è pieno, il climatizzatore si arresta automaticamente e la spia serbatoio pieno (5) inizia a lampeggiare. La capacità del serbatoio consente un’autonomia di funzionamento in deumidificazione di circa 4 ore.
●Verificate la presenza d’acqua all’interno dell’apparecchio controllando visivamente il tubo di scarico esterno posto nel retro.
●Arrestate il climatizzatore tramite il telecomando, quindi togliete la spina dalla presa.
●Posizionate un recipiente al di sotto del tubo di scarico.
●Afferrate il tubo estraendolo dalla sede nel retro dell’apparecchio.
●Chiudete con il pollice l’estremità aperta del tubo e inclinandolo verso il recipiente lasciate defluire la condensa.
● Al termine delle operazioni riposizionate il tubo di scarico nell’apposito alloggiamento.
Ogni volta che l’apparecchio deve essere spostato in un altro locale oppure riposto a fine stagione, svuotare anche il serbatoio secondario, tramite l’apposito tubetto situato all’interno dell’alloggiamento cavo elettrico.
SERBATOIO PRINCIPALE
IMPORTANTE
A lavoro ultimato richiudere il tubetto con l’apposito tappo.
AVVERTIMENTO
● Arrestate sempre il climatizzatore prima di togliere la spina dalla presa.
●Staccate sempre la spina prima di scaricare la condensa raccolta all’interno dell’apparecchio.
SERBATOIO SECONDARIO |
8 |
 Loading...