


USER MANUAL
WARRANTY INFORMATION INSIDE. PLEASE READ
www.teac.com.au
IMPORTANT !
DVP1012
PORTABLE LCD DVD PLAYER
Trademark of TEAC Corporation JAPAN

WARRANTY PROCEDURE
v1.5.2: DEC 2011
Please read th e ow n er ’s m anu al caref ul l y and ensure that you have followed the correct installation and operating
procedures.
1. Please read this warranty card.
2. Keep your pur chase r ec eip t t o en abl e you t o pr oc eed qui ckly in th e even t of a Warranty Servic e.
3. If you require Warranty Service, please contact the TEAC Customer Support Hotline at 1300 553 315 for
assistance. Pl eas e ens u re that you h ave th e m odel number, serial number an d purchas e r ec eipt ready when
you call.
Please complete the section below and keep this information for your own records.
Owner’s Name
Owner’s Address
Postcode
Model Name/No. Serial No.
Dealer’s Name
Dealer’s Address
Postcode
Authorised Service Centr es in Major A ustralian Cities
NSW
151 Arthur Street
Homebush West, NSW 2140
Queensland
Unit 1, 320 Curtin Ave West
Eagle Farm, QLD 4009
Western A ust r alia
Unit 2, 50 Pilbara Street
Welshpool, WA 6106
South Australia
11 McInnes Street
Ridleyt on, SA 5008
Victoria
282 Normanby Road
South Mel b our n e, V IC 32 05
Thank you for selecting a TEAC product
.
If you should r equire assist ance with your product regarding its setup
or operati on, or if any difficulties arise, please call us directly for advice
between Monday to Fri day at 8.30AM – 6PM AEST at the
TEAC Customer Support Hotline
1300 553 315
teacservicesupport@awa.com.au
www.teac.com.au

WARRANTY INFORMATION
v1.5.2: DEC 2011
Our g oods com e with guarantees that cannot be excluded under the Australian Consum er Law. You are
entitled to a replacement or refund for a major failure and for compensation for any other reasonably
fo re se eable l os s or damag e. You ar e al s o e n t i t l e d t o h av e the goods repaired or replaced if the goods f ail
to be of acceptable quality and the failure does not amount to a major failure.
Warranty Terms & Conditions
1. TEAC war rant s t hat t his pr oduct is f r ee fr om def ects in mat eri al an d wor km ans hip u nder n ormal dom estic use with
reason able care and skill. Mainten ance and c leaning ( i.e. las er head) is not cover ed by this warrant y. The TEAC
warrant y on l y applies to TEAC products purchased, used and serviced in Australia.
2. The ben efits to t he c onsum er given b y this W arrant y ar e in addit ion to other r ights and r emedies of the c onsum er
under a law in rel at i on t o goods or s er vices to whic h th e w arranty rel ates, b ein g the Austral ian Consu m er Law.
3. Refund or replac emen t via y our r etail er is av ail able f or a peri od of 14 da ys after purch ase f or goods that h ave been
inspected and det ermined t o ha ve a m aj or failure. R efu nd and exch ange is not app licable f or ch an g e of mi nd.
4. Subject to the terms herein, this warran ty effecti vely covers the equip ment as sp ecified i n the Warr anty Periods
Table below from the date of purchase.
TEAC PRODUCT
WARRANTY PERIOD
LED/LCD TV 32” (80 cm) and above
1 Year (In-Home Service/ Pick up Available)*
All other TEAC products
1 Year (Carry-in Service)
5.
Th is s ervice will onl y b e provided as part of this w arranty if all the following conditions ar e met;
In Home Service/Pick up* Service
a) The produc t is in dicated in th e Warranty Period T able.
b) The product is within the warranty period.
c) The product is located within the normal service area of the local TEAC Authorised Service Centre.
If TEAC determines that the product is not repairable on site, TEAC can complete the repair by taking the product to
a TEAC Authorised Service Centre.
Where In-Home service/Pick up* is not available, the purchaser is required to send the product to the nearest TEAC
Author is ed Ser vic e C entr e f or r epair . In this e vent , pr o of of pur ch ase is r equir ed to s upp ort a warr ant y cl aim. Aft er
the rep air, t he pr od uct will be avail abl e for c oll ecti on by or retur n to the pur chas er at a fee upon req uest. TE AC inhome service can be made available at a fee upon request.
Carry-in Service
6. A 12-month replacement warranty is applicable to all Accessories such as Remote, Power Adaptors and Cables.
7. TEAC will ensure to t he best of its ab il it i es th at all req uired parts are mad e avai l ab le for any required s ervice/r ep air.
8. TEAC Aus tralia Pt y Ltd and its Auth orised Servic e Centres will use their best endea vours to c omplete produc t
repairs within a reasonable period based on available resources and workload during the time when service is
request ed an d perform ed.
9. Refurbis hed p arts m ay be us ed to r epair t he prod uct. I n the c ase of a replac ement, the pr oduct may be r eplac ed,
with a ref urbished unit of the s ame type or , if one is unavailab le, a si milar refur bished m odel with equal or b etter
features & specifications.
10. Please b e advised that if th e prod uc t presented f or repair is capab le of r etainin g user-g en erated d at a, the d at a m ay
be lost during servicing. Customers are strongly encouraged to back up all important information/data before
sending the product in for service/repair.
11. Servic e will be pr ovided on ly dur ing norm al busin ess hour s and under saf ety condi tions and circ umstanc es. TEA C
and its aut h or ised ser vice agents can r efuse any r ep ai r if saf ety, i n relati on t o O H &S, bec om es a c oncern t o its s t af f
or author ised service agents ’ p ersonnel.
12. The warranty is void and warranty claims may be refused, subject to the Australian Consumer Law, if:
a) The product was not transported, ins talled, op erated or m aint ained a c c ordin g t o m an uf acturer ins tr uc t ion, or
b) The produc t w as abused, dam ag ed, tamp ered, alt ered or rep aired by any un au thoris ed p ersons, or
c) Product failure is due to accidents during use, installation or transit, power surges, use of defective or
incompat ib le exter nal devic es, exp os ure to abn orm al cond itions suc h as excess iv e temp erat ur es or humi dity, or
entry of liqu ids, obj ects or creatur es in to the produc t.
13. No one is au thoris ed t o ass u m e any liability on b eh alf of TEAC or impose any ob ligati on on it, in connecti on with the
sale of any eq ui p m ent other than as stated in th is w arr an t y and ou t l in ed ab ove.
14. TEAC reserves the right to inspect and verify whether the product is exhibiting a major failure as claimed by
customers/retailers.
15. LCD dead pixel policy, please contact TEAC Customer Support Hotline on 1300 553 315 for assistance.

TABLE OF CONTENTS
1
Safety Information
Safety Precautions
Some Do‟s and Don‟ts On The Safe Use Of Equipment
USB Usage Precautions
2
Introduction
Features
Accessory List
Supported Disc Formats
Disc Care
6
Panel and Remote Operation
Panel Controls
Side Panel Overview
Remote Control
Battery Installation
8
Basic Operation
Using the AC Adaptor
Using the DC Car Charger
Using the Rechargeable Battery
External System Connection
DVD/CD Playback
Using USB Drives and SD/MMC/MS Cards
USB/CARD Multimedia Playback
CD Ripping
DVD Mode Setup
12
Reference
Troubleshooting
Specifications
20

SAFETY INFORMATION
2
Safety Precautions
To achieve the utmost in enjoyment and performance, and in order to become familiar with its
features, please read this manual carefully before attempting to operate this product, this will assure
you years of trouble free performance and listening pleasure.
Please read through the manual carefully before using and retain for future use.
ATTENTION: TO AVOID RISK OF FIRE AND ELECTRIC
SHOCK, DO NOT OPEN THE COVER OF THE UNIT. ANY
MALFUNCTIONS SHOULD BE SERVICED ONLY BY
AUTHORISED PERSONNEL.
WARNING: THERE IS UNINSULATED DANGEROUS
VOLTAGE WITHIN THE PRODUCT ENCLOSURE THAT
MAY BE OF SUFFICIENT MAGNITUDE TO CONSTITUTE
A RISK OF ELECTRIC SHOCK.
NOTE: IMPORTANT OPERATING AND MAINTENANCE
INSTRUCTIONS IN THE LITERATURE ACCOMPANYING
THE APPLIANCE.
THIS MARKING CAN BE FOUND ON THE REAR PANEL
OF THE UNIT. THIS PRODUCT IS CLASSIFIED AS A
CLASS 1 LASER PRODUCT AND DOES NOT EMIT
HAZARDOUS RADIATION OUTSIDE THE UNIT.
Power Lead Protection
1. Please use normal power sources. This unit can be operated on an AC adaptor (included), a
rechargeable battery (included), or a car power adaptor (optional).
2. Make sure that the input voltage of the AC adaptor is in line with the local voltage. Otherwise,
the AC adaptor and unit may be damaged.
3. Do not touch the AC adaptor with wet hands so as to avoid electric shocks.
4. When connecting with the car power (cigarette lighter) adaptor, ensure that the inpur voltage
of the adaptor is identical with the car voltage.
5. Hold the plug to disconnect the AC adaptor. Do not pull on the power cord. The power plug
should be easily accessible at all times.
Important Safety Instructions
1. Cleaning – Unplug this product from the wall outlet before cleaning. Do not use liquid cleaners
or aerosol cleaners. Use a damp cloth for cleaning.
2. Placement – Avoid placing the unit where there is a lot of movement or vibration, such as on
a car dashboard or an unstable shelf.
3. Water and moisture – Do not use this product near water, for example near a bath tub, wash
bowl, kitchen sink, laundry tub, in a wet basement, near a swimming pool or the like. If any
liquid enters the unit, disconnect the power plug immediately and contact the nearest
authorised service centre for examination and repair.

SAFETY INFORMATION
3
4. Ventilation – The product should be used in a well-ventilated area to avoid overheating. The
product should not be placed on the bed or sofa.
5. Servicing – Do not attempt to service this product yourself as opening or removing the cover
may expose you to dangerous voltage or other hazards. Refer all servicing to qualified service
personnel.
6. Disc – Do not use a cracked disc as they will break easily and cause personal injury or
product damage.
7. Heat sources – The product should be kept away from heat sources such as radiators, heat
registers, stoves or other heat-producing products.
8. Magnet sources – Do not place the product next to a magnetic field such as speakers.
9. Headphones – To avoid damage to your hearing caused by loud volume, set the volume level
to its lowest before playback, and then adjust the volume as desired.
10. Condensation – When the unit experiences a rapid temperature change when suddenly
moved from a cold place to a warm one, moisture will condense on the pickup lens and result
in malfunction or playback difficulties. When this happens, remove the disc, connect the
power plug and leave it on for 2-3 hours.
11. Others –
a. Do not watch films while driving to avoid traffic accidents.
b. Pull on the plug when disconnecting the power adaptor. Do not pull the cable.
c. Do not touch the product with wet fingers as it may cause electric shock.
d. Do not gaze at the laser rays as your eyes will be injured.
e. Turn the power off if the unit is not used for a long time instead of leaving it in
Standby Mode.
f. To retain the life of the rechargeable battery, make sure that the unit is turned on
once in a while and charged every 3 months if it is not used for a long time.
CAUTION
Do not expose the unit to direct sunlight, leave the DVD player inside a closed car on
a sunny day, or on other sources of heat such as a TV! This may cause the unit
surface to warp, change colour or become damaged.
After a long period of using the unit, the surface may become hot. This is not a
malfunction, but takes caution against burns.
Charge the rechargeable battery in this unit only with the provided power adaptor.
Stop charging once the battery is fully charged to retain battery strength.

SAFETY INFORMATION
4
Some Do’s and Don’ts on the Safe Use of Equipment
This equipment has been designed and manufactured to meet international safety standards but, like
any electrical equipment, care must be taken if you are to obtain the best results and safety is to be
assured.
DO read the operating instructions before you attempt to use the equipment.
DO ensure that all electrical connections (including the mains plug, extension leads and inter-
connections between the pieces of equipment) are properly made and in accordance with the
manufacturer’s instructions. Switch off and unplug the power before making or changing connections.
DO consult your dealer if you are ever in doubt about the installation, operation or safety of your
equipment.
DON’T remove any fixed cover as this may expose dangerous voltages.
Overheating will cause damage and shorten the life of the equipment.
DON’T allow electrical equipment to be exposed to dripping or splashing, or objects filled with liquids,
such as vases, to be placed on/near the equipment.
DON’T place hot objects or naked flame sources such as lighted candles or nightlights on, or close to
equipment. High temperatures can melt plastic and lead to fires.
DON’T use equipment such as personal stereos or radios so that you are distracted from the
requirements of traffic safety.
DON’T leave equipment switched on when it is unattended unless it is specifically stated that it is
designed for unattended operation. Switch off using the switch on the equipment and make sure that
your family knows how to do this. Special arrangements may need to be made for infirm or
handicapped people.
DON’T continue to operate the equipment if you are in any doubt about if it’s working normally or if it’s
damaged in any way. Switch it off, unplug the mains power and consult your dealer.
ESD Remark: In case of malfunction due to electrostatic discharge just reset the product
(reconnection of mains power may be required) to resume normal operation.

SAFETY INFORMATION
5
USB Usage Precautions
Never turn the unit off or disconnect a USB Storage Device (Flash Drive) when it is being
accessed. Doing so could damage the unit and the connected USB storage device.
Do not use a device that has a maximum current consumption of 100 mA or more.
Do not use a device that has security functions or other special functions.
Do not use a device that is divided into two or more partitions.
A USB hub cannot be used to connect USB devices to this unit.
USB storage devices that can be played on this unit
USB Storage Device (Flash Memory) up to maximum 16GB can be used. Some
high-capacity USB hard disk up to 500GB in FAT32 format can be used.
Some flash memory players that charge from USB terminals cannot be used for
playback.
Hard disk drives, CD/DVD Drives, and other devices connected via USB cannot be
used.
This unit cannot copy or move files.
Playable formats: FAT12, FAT16, FAT32
Depending on the condition of the USB flash drive, this unit might not be able to play
the files on it or skipping might occur.
NTFS, HFS and HFS+ formats are not supported and cannot be used.
Max. number of playable folders: 200
Max. number of playable files: 999
If the USB storage device contains more than 999 files or 200 folders, this unit
cannot play it back correctly.
This unit cannot play files that are larger than 2GB.
Files with variable bit rates might not play correctly.
File information display
The display of this unit can only show single-byte letters and numbers.
If the file information contains Japanese, Chinese or other double-byte characters,
playback is possible but the name will not be shown correctly.

INTRODUCTION
6
Thank you for choosing TEAC. Please retain this user manual for future reference. If any
assistance is needed, please contact our Customer Support Hotline at 1300 553 315.
Features
1. High resolution colour TFT LCD full screen display
2. Super electronic shock resistance (3 seconds for DVD, 10 seconds for CD/VCD
and 90 seconds for MP3)
3. Compatible with most DVD, SVCD, VCD, CD, MP3, AVI discs
4. Built-in super power polymer lithium battery for up to 2-3 hours of continuous play
5. Built-in DOLBY decoder supporting AVI video decoding
6. USB 2.0 port for playback and CD ripping
7. SD/MS/MMC card slot for playback
8. Full function remote control
9. Regulated power supply adaptor for AC100V-240V
10. Personalised adjustable TFT display
11. Video output to connect to TV at home
12. Sleek design that fits right into your modern lifestyle
Accessory List
Composite AV Cable
Remote Control
User Manual
Power Adaptor
Earphones
Remote Control
Battery x2
Car Adaptor
DVD/
SD/USB
DISPLAY
MUTE
1 2 3
TITLE
5 6 7
9 0
10+
REPEATRETURN
AUDIO
A-B
SETUP
PBC
MENU
VOL+
ENTER VOL-
MODE GOTO ZOOM
4
8
ANGLE
PROGRAM
DVP1012
STANDBY
SUBTITLE
CD RIPPING
USER MANUAL
WARRANTY INFORMATION INSIDE. PLEASE READ
www.teac.com.au
IMPORTANT !
DVP1012
PORTABLE DVD PLAYER
Trademark of TEAC Corporation JAPAN
Carry Bag

INTRODUCTION
7
Supported Disc Formats
Disc Type
Content
Size
Video DVD
Audio + Video
12cm/8cm
DVDR/RW
Audio + Video
12cm/8cm
Video CD/ Super VCD
Audio + Video
12cm/8cm
Audio CD
Audio
12cm/8cm
JPEG
Video (Photo)
12cm/8cm
Picture CD
Video (Photo)
12cm/8cm
CDR/RW
Audio + Video
12cm/8cm
NOTE:
Disc types not mentioned above cannot be used.
Playback on some discs such as CD-R, CD-RW, DVDR and DVDRW may require
special instructions from the disc manufacturer. Please refer to operation sheets
enclosed with these discs.
Disc Care
1. Please hold all discs by the edge or the centre hole.
2. Do not touch and do not stick paper or tape on the reflective side of the disc.
3. Do not used damaged, cracked or warped discs to avoid damaging the unit.
4. Fingerprints or stains on discs may weaken the reflected light from discs and affect
the signal quality and in turn, playback performance. Use a clean, soft cloth to clean
discs using an outward motion straight from the centre. If the disc is too dirty, clean it
with a moist soft cloth first, and then a dry soft cloth. Do not use cleaning sprays,
benzene, thinner, antistatic agent or any other solvents as this may damage the
surface of the discs.
5. Please keep discs in their original cases to avoid bending them. Do not store discs
under high temperature, high humidity or in direct sunlight as this will damage the
discs. Please read the instructions on discs labels and packaging carefully.
PANEL AND REMOTE OPERATION
8
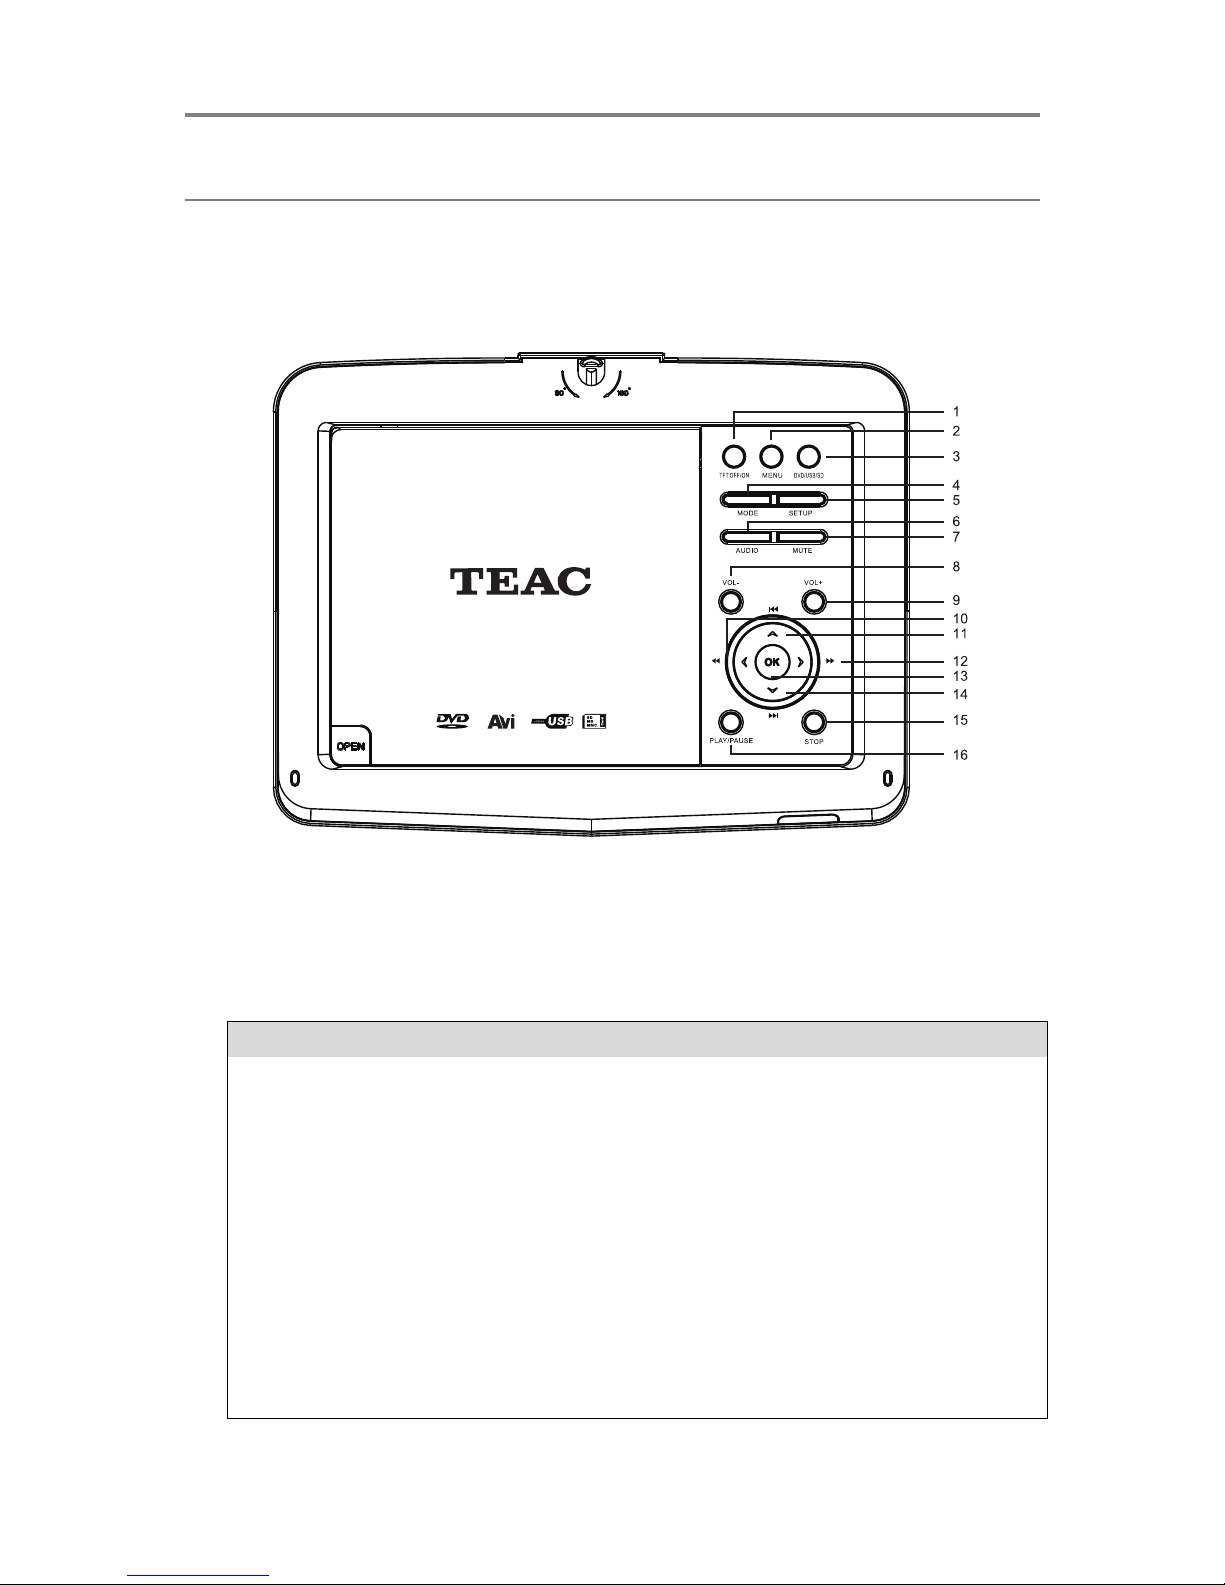
Panel Controls
Button
Function
1. TFT On/Off
Press to turn the LCD screen on or off
2. MENU
In DVD/USB/CARD Mode, press to show the menu for the
TFT display
In AV In Mode, press to enter menu setup
3. DVD/USB/SD
Press to cycle through the following modes: DVD>USB>SD
4. MODE
Press to switch between AV IN Mode
5. SETUP
Press to show the DVD setup menu
6. AUDIO
Press to switch the audio track
7. MUTE
Press to turn sound on and off
8. VOL-
Decrease volume level
PANEL AND REMOTE OPERATION
9
9. VOL+
Increase volume level
10. /
LEFT navigation button
During play back, fast rewind (scan backwards) on the current
track
11. /
UP navigation button
During playback, go to a previous track/chapter
In Menu Setup, return to the previous page
12. /
RIGHT navigation button
Fast forward (scan forwards) on the current track
13. OK
Confirm the selected item
14. /
DOWN navigation button
During playback, go to the next track/chapter
In Menu Setup, go to the next page
15.
Press to stop playback
16.
Play/pause playback
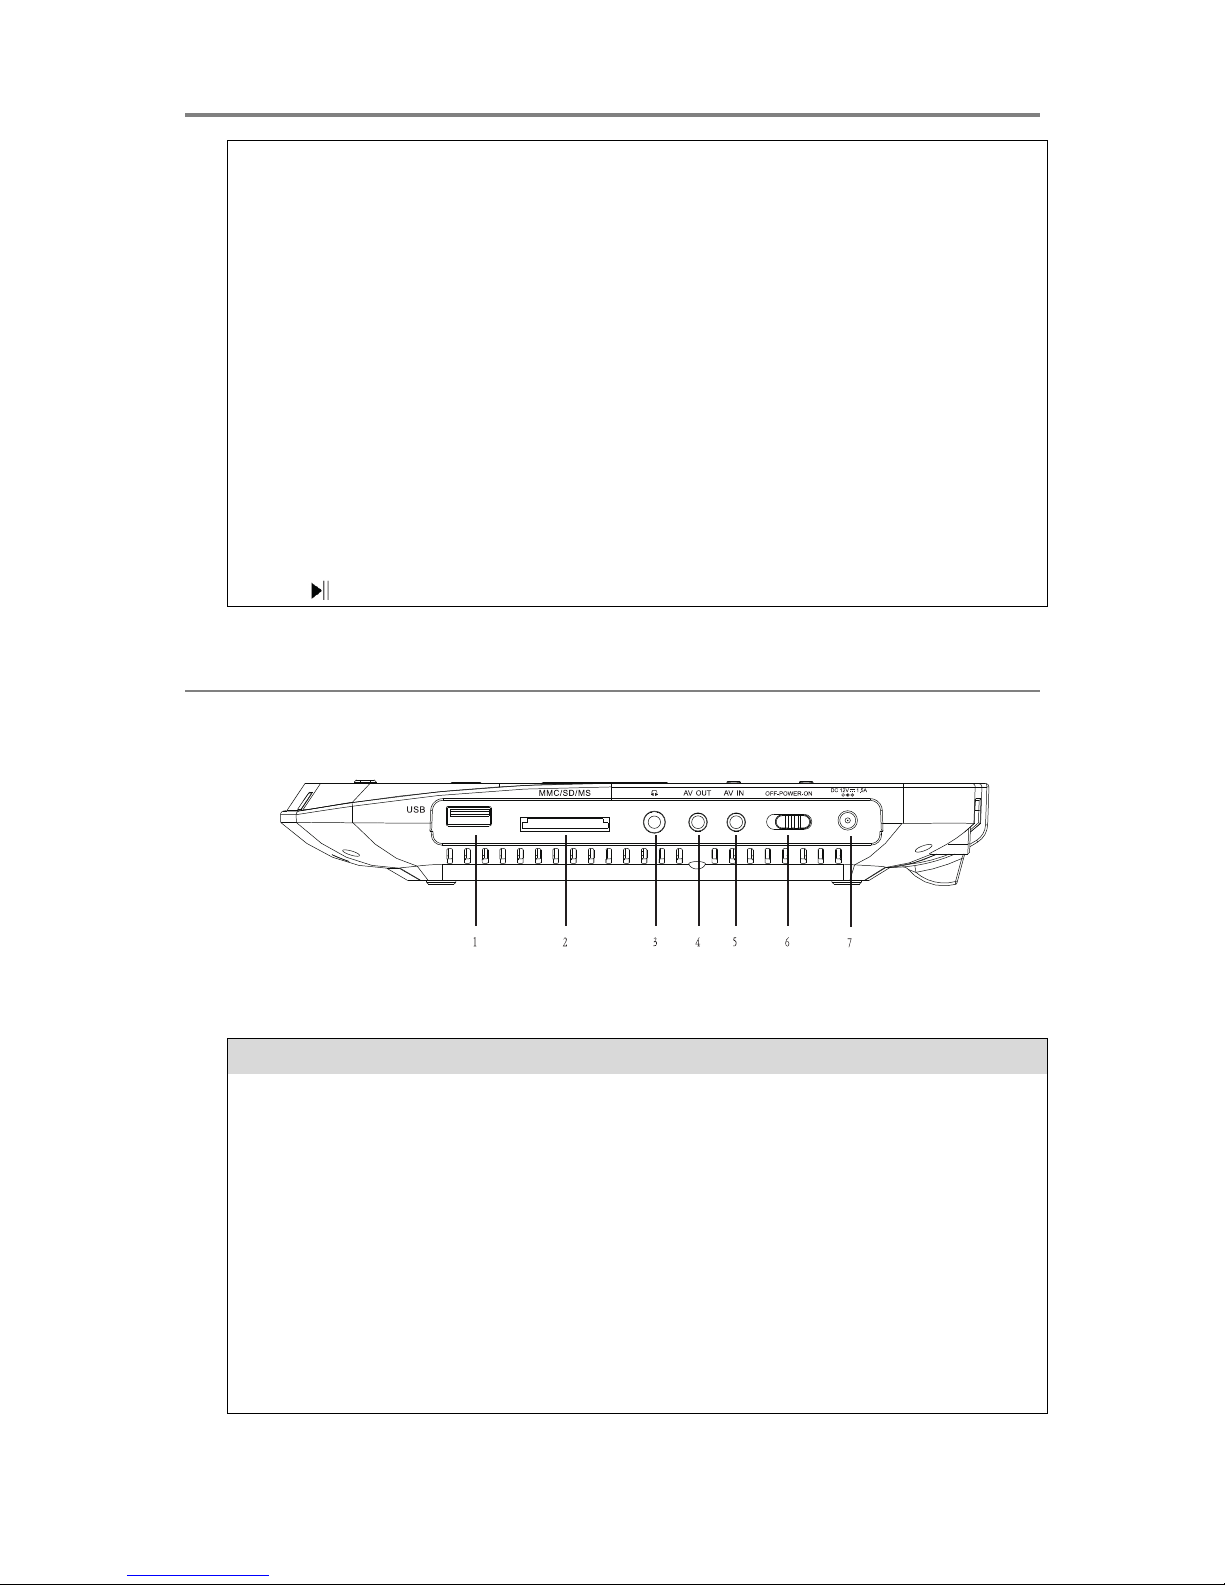
Side Panel Overview
Button
Function
1. USB Port
Connect to a USB device
2. SD/MMC/MS
Socket
Insert a SD/MMC/MS memory card
3. Earphone Jack
Connect earphones/headphones for private listening. The
unit‟s speakers are muted while this jack is in use.
4. AV OUT Jack
AV output terminal to connect external media devices
5. AV IN Jack
AV input terminal to connect external media devices
6. POWER
Turn on/off power to the unit completely.
7. DC Jack
Connect the DC 12V power adaptor to power and charge the
unit
PANEL AND REMOTE OPERATION
10
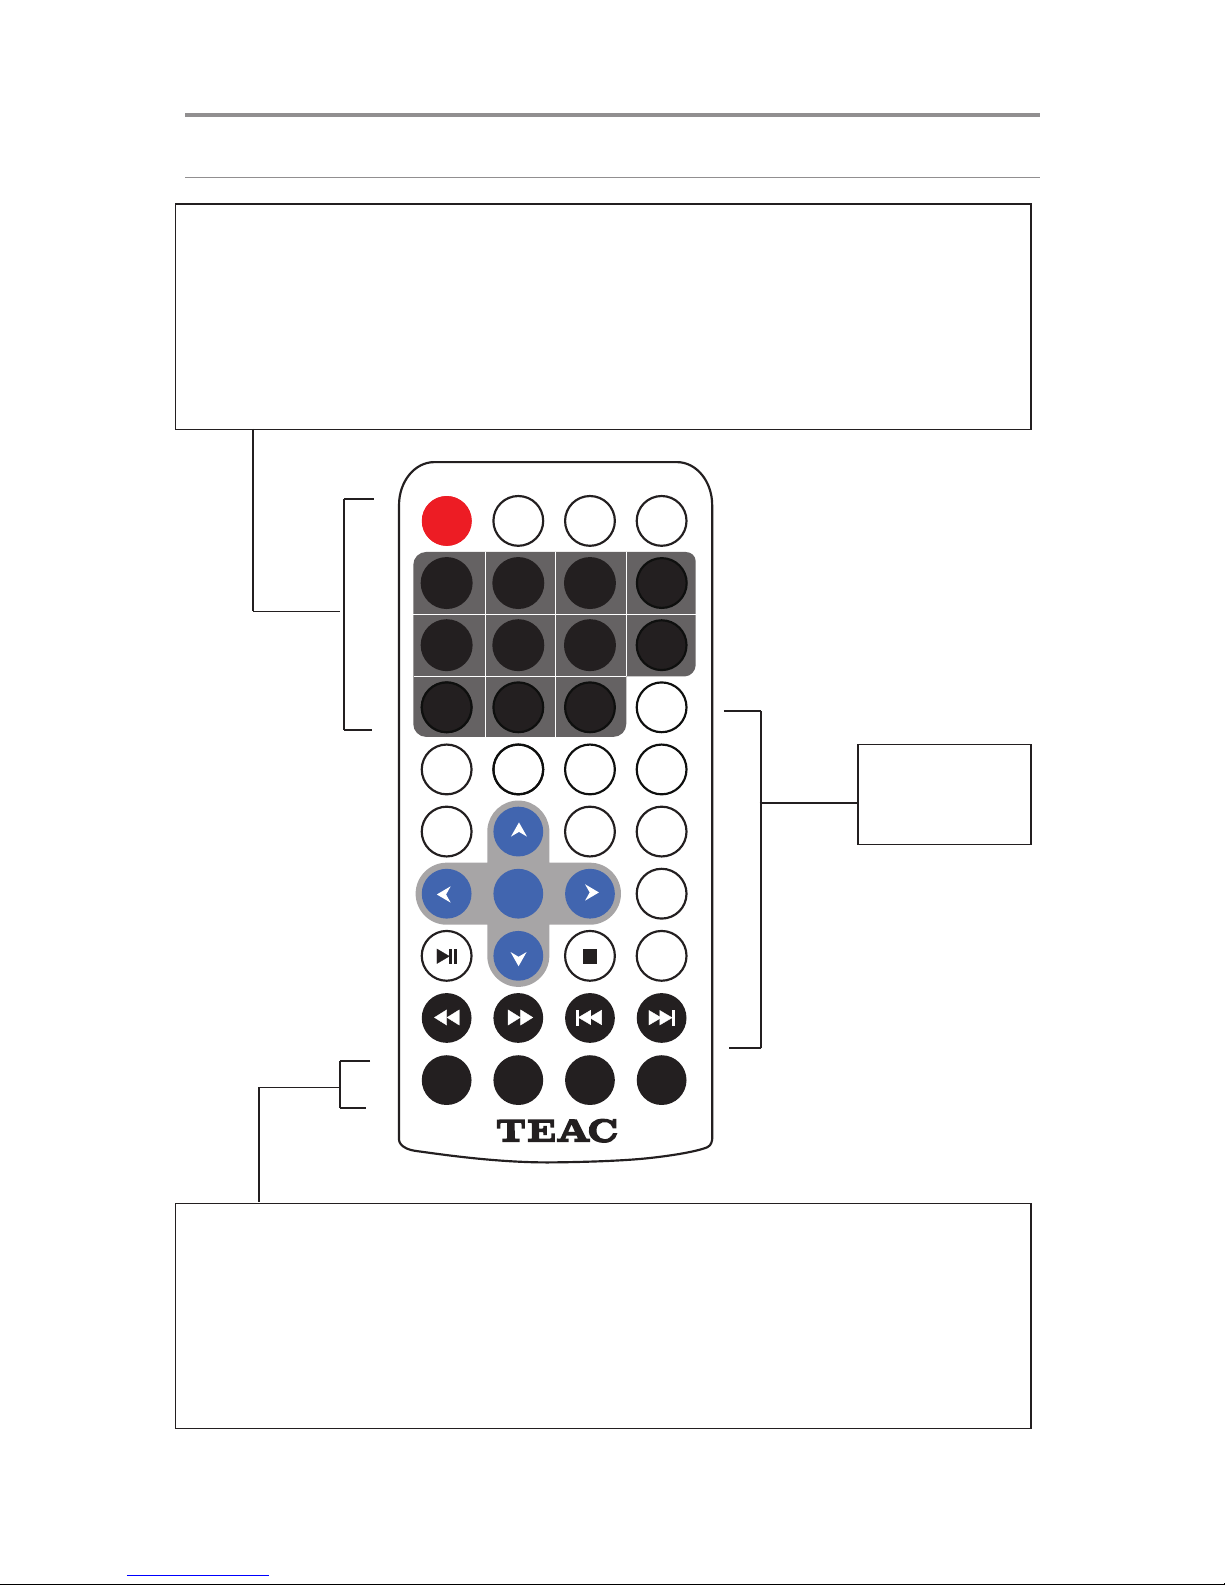
Remote Control
STANDBY: Turns unit on or back to Standby
DVD/SD/USB: Press to cycle through DVD>SD>USB Modes
DISPLAY: Display/hide detailed information about the current played media
MUTE: Turn sound on/off
1-10+: Number buttons for numerical input. For numbers 10 and above, use the 10+
button
MODE: Switch between TV Mode and DVD Mode
ANGLE/PROGRAM: While playback is stopped, press to enter the PROGRAM function.
During DVD playback, press to select from available camera angles. (Depends on
availability on disc)
GOTO: Press to input a specific title/chapter on the DVD to jump to.
ZOOM: Press repeatedly to cycle through different Zoom views.
Please see
next page for
details
DVD/
SD/USB
DISPLAY
MUTE
1 2 3
TITLE
5 6 7
9 0
10+
REPEATRETURN
AUDIO
A-B
SETUP
PBC
MENU
VOL+
ENTER
VOL-
MODE GOTO ZOOM
4
8
ANGLE
PROGRAM
DVP1012
STANDBY
SUBTITLE
CD RIPPIN G

PANEL AND REMOTE OPERATION
11
Battery Installation
1. Open the battery compartment by taking out the battery cover.
2. Insert a 3V battery cell, making sure to match +/- polarities correctly.
3. Close the battery compartment securely.
CAUTION
To prevent damage to the remote control, make sure to install batteries
correctly. Do not mix old and new batteries.
Dispose of batteries safely and appropriately. Contact your local authorities
or dealer for advice on battery disposal.
Keep batteries out of reach of children.
Remove battery if the remote control is not used for a long time.
TITLE: Press to return to disc title menu in DVD mode
RETURN: Return to previous menu.
CD RIPPING/SUBTITLE: In DVD Mode, press to select from available subtitles. During
audio CD playback, press to enter CD Ripping Mode.
REPEAT: Press repeatedly to cycle through available repeat modes
A-B: Use to loop a specific section of the track. Press once during playback to mark Point
A. Press again to mark Point B. Points A-B will start playing in repeat.
SETUP: In DVD mode, press to show DVD Setup Menu.
PBC MENU: Show previous disc menu. With PBC enabled VCDs, press to turn PBC
on/off.
: Menu navigation buttons
ENTER: Press to confirm a menu selection
VOL+/-: Increase/decrease audio level
AUDIO: Select from available audio tracks
: Play/pause playback
: Stop playback
: Fast forward current track
: Fast rewind current track
: Skip back during playback
: Skip forward during playback
*NOTE: These functions (title, subtitle etc) depend on availability of the corresponding
features on the disc. For more information contact the disc manufacturer.

BASIC OPERATION
12
Using the AC Adaptor
Connect the unit to a wall power outlet using the provided AC adaptor. CAUTION: Turn off
the unit before unplugging the AC adaptor to avoid damaging the unit. Make sure the power
supply is turned off before making or changing any cable connections.
1. Insert the AC adaptor into the DC IN jack on the unit.
2. Insert one end of the power supply cable into the input jack of the adaptor and plug
the other end into the wall power outlet.
3. Switch the power on at the wall outlet to start using AC power.
Using the DC Car Adaptor
Connect the unit to power in the car using the DC car adaptor and the car‟s cigarette lighter
receptacle. CAUTION: Make sure the unit is turned off before making or changing any cable
connections.
1. Insert the DC car adaptor into the DC IN jack on the unit.
2. Plug the other end of the adaptor into the car‟s cigarette lighter receptacle.
3. Switch the power on at the wall outlet to start using the power supply from the car.
Using the Rechargeable Battery
Battery specifications:
Output: 7.4V
Capacity: 1800mA/H
Standard charge time: >3 hours
Standard discharge time: >2 hours
Storage temperature: -20°C~45°C
Standard charging temperature: 0°C~45°C
Standard discharging temperature: -20°C~45°C
The battery can be charged via the AC power adaptor or car adaptor. In order to charge the
battery, the unit must be powered off. The rechargeable battery will reach its maximum
performance after a few full charge/use cycles. When the battery is low, the screen may start
to flash. Charge the unit if this happens.
1. Connect the power adaptor to the unit and wall power outlet as described in the
previous section.
2. When charging the battery, the LED indicator will light up in red.
3. When the battery is fully charged, the LED indicator will light up in yellow.
NOTE:
CAUTION: Keep the battery away from sunshine or high temperatures and do not
use it in the car, as this will shorten battery life and capacity and may even cause fire.
Even if the DVD player has not been used for a long time, you should recharge the
battery once every 3 months to retain full use of the battery.

BASIC OPERATION
13
External System Connection
Connect to external output devices like TVs, amplifiers or headphones. Ensure that the
settings
Connecting to TV and Stereo Amplifier
Mini-plug: Connect to the AUDIO/VIDEO OUT jack of the portable DVD player.
Yellow plug: Connect to the VIDEO IN jack of the TV.
Red plug: Connect to the AUDIO IN R jack of the stereo amplifier.
White plug: Connect to the Audio In L jack of the stereo amplifier.
DVD/CD Playback
1. Connect the unit to power and turn it on using the side POWER switch.
2. Open the DVD compartment by pressing the OPEN button.
3. Place the CD or DVD with the printed label facing upwards, then close the tray.
4. Use the playback control buttons to start playback.
5. Adjust the volume to the desired level using the VOL+/- buttons.
Note: If the unit is connected to an external screen such as TV, ensure that the TV is
switched to the correct input mode such as AV Mode.
During DVD/CD playback, the following actions are available.
Pause: Press the button to pause playback. Press again to resume playing.
Stop: Press the button to stop playback.
Forward/Rewind: Press and hold the / buttons to fast forward/rewind. Repeat this
motion to increase the speed. The max speed is 32x. Press PLAY to resume playing.
Previous/Next track: Tap the / buttons for previous/next track.
GOTO: Press the GOTO button and enter a title and chapter number to jump to.
Other functions are available depending on the disc format and content.
Using USB Drives and SD/MMC/MS Cards
This unit supports playback of JPEG, MP3, WMA, XVID and AVI files.
Using USB drives
1. Connect the unit to the power supply and switch the unit on.
2. Insert the USB memory stick into the USB 2.0 port.
3. If there is no disc loaded in the unit, it will auto-detect the USB stick and start to read
and playback compatible media files. Otherwise, press the DVD/USB/SD button to
switch to USB input.
Using SD/MMC/MS Memory Cards
1. Connect the unit to the power supply and switch the unit on.
2. Insert the SD/MMC/MS Memory card into the CARD slot.

BASIC OPERATION
14
3. If there is no disc loaded in the unit, it will auto-detect the memory card and start to
read and playback compatible media files. Otherwise, press the DVD/USB/SD button
to switch to CARD input.
NOTE: If another USB stick/memory card is already inserted, the unit will not auto-detect
the second USB/CARD memory device. Press the DVD/USB/SD button to switch to the
desired source.
USB/CARD Multimedia Playback
Access this feature by entering USB or CARD Mode. To play multimedia files, a
compatible USB device or SD/MMC/MS Card storing compatible media files must be
connected.
NOTE:
This unit only supports USB devices with a FAT32 file system. It will not support
NTFS file systems.
This unit supports XVID, AVI, MP3, WMA and JPEG file playback. However, due to
other variations in file formats, some files may not play even though they are the
supported file types.
Music Playback
1. The music will normally start playing in sequence automatically. Use to navigate
the file list if you wish to play a specific music file.
2. Press OK to start playing a selected music track
3. When the player reaches the end of the file sequence, it will stop playing and display
the welcome logo. Press the button to return to the Multimedia Menu.
During music playback, the following actions are available.
Pause: Press the button to pause playback. Press again to resume playing.
Stop: Press the button to stop playback.
Forward/Rewind: Press and hold the / buttons to fast forward/rewind. Repeat this
motion to increase the speed. The max speed is 32x. Press PLAY to resume playing.
Previous/Next track: Tap the / buttons for previous/next track.
GOTO: Press the GOTO button and enter a specific time to jump to in the current track in
HH:MM:SS format.
Tip: To play specific tracks or a music playlist during the picture slide show start the music
playback first. Then, press RETURN to go to the Multimedia Menu, and navigate to the
image files per the instructions below. The music will continue playing after the picture slide
show starts.
Picture slide show
1. In the file list, use to choose a picture to start the slide show with.
2. Press OK to start the slide show.
During the slide show, the following actions are available.
Pause: Press the button to pause playback. Press again to resume playing.

BASIC OPERATION
15
Stop: Press the button to stop playback.
Previous/Next track: Tap the / buttons for previous/next file.
direction buttons: Rotate the current picture. Note: Some picture CDs may have
design limitations that make this feature unavailable.
ZOOM: Press the ZOOM button on the remote control. 100% will display on the screen.
Press / to zoom in or out. Press ZOOM again to exit Zoom view.
Movie Playback
1. In the file list, use to choose a movie to watch.
2. Press OK to start the movie playback.
During movie playback, the following actions are available.
Pause: Press the PAUSE button to pause playback. Press again or press PLAY to
resume playing.
Stop: Press the STOP button to stop playback. Exiting to the main USB menu or the TV
mode will also stop playback.
Forward/Rewind: Press and hold the / buttons to fast forward/rewind. Repeat this
motion to change fast forward/rewind speeds.
Previous/Next track: Tap the / buttons for previous/next track.
GOTO: Press the GOTO button and enter a specific time to jump to in the current track in
HH:MM:SS format.
Subtitle: Press SUBTITLE to choose subtitles (subject to availability from the movie file)
Programmable Playback
Programme a playlist with a customised track sequence.
1. Press the PROG button to access the playlist setup menu.
2. Key in the desired track numbers into the list in sequence.
3. Use the buttons to select the PLAY option at the bottom of the screen. Press
OK to start playback. Press PROG to exit the playlist setup menu.
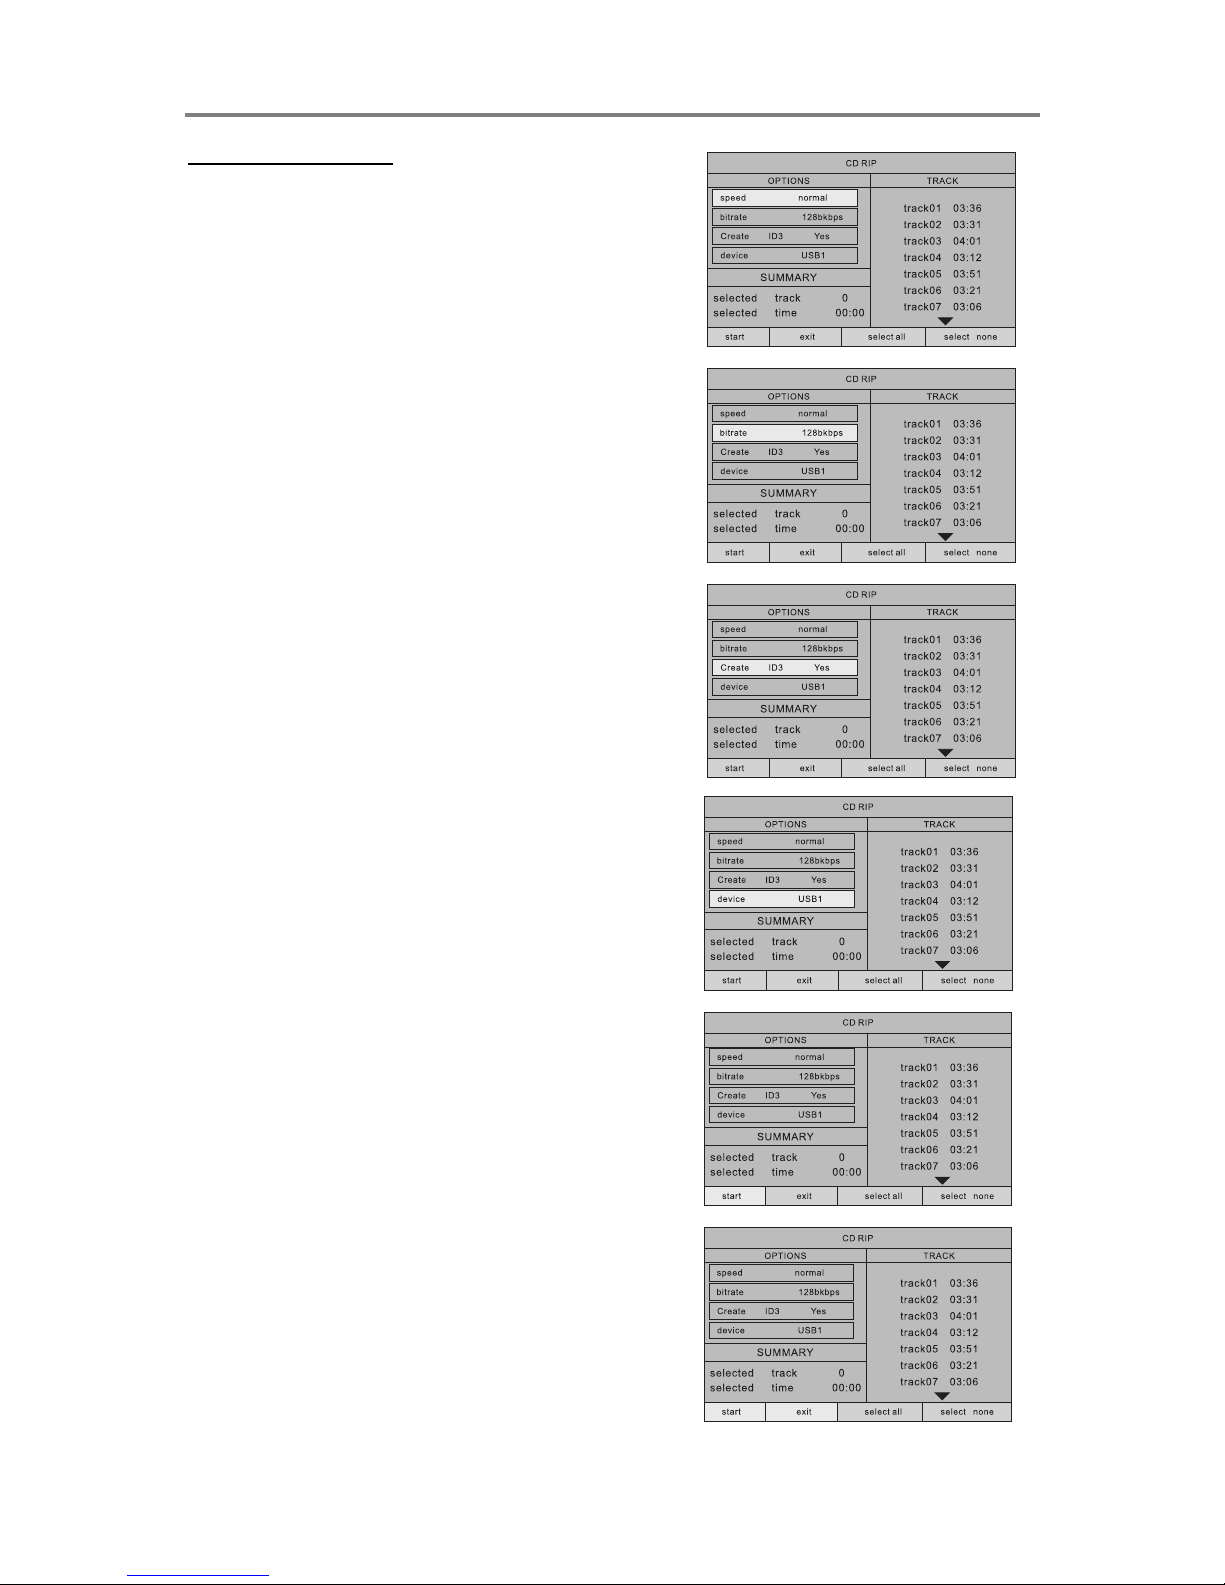
CD Ripping
This unit can record to a connected USB drive or SD/MMS/MC memory card. Use this
function to save music tracks from Audio CDs into MP3 files.
NOTE:
In order to rip, an audio CD must be loaded and a USB drive or SD/MMS/MC
memory card must be connected to the unit.
Ensure that the connected media has enough free memory and is not write-protected.
DO NOT use Hard Disk Drives as they are generally not suitable for recordings with
this unit. We suggest using USB devices up to 32GB and formatted in the FAT32 file
system.
Only use USB2.0 high-speed USB media.
CAUTION: Please note that some Audio CDs are copyright protected and are not
to be copied.
BASIC OPERATION
16
Ripping Music CDs
1. Start in DVD Mode.
2. Load an Audio CD.
3. Connect a compatible USB flash drive.
4. Press the CD RIPPING button to access
the conversion function.
5. Adjust the available options to your
preference (described below).
a. SPEED: ripping speed 1x or 4x
b. BITRATE: higher bitrate for higher
quality, lower bitrate for smaller files.
c. ID3 TAG: Create tag On/Off
d. Device: Select USB or CARD to rip to.
6. In the TRACKS column, select desired
tracks from the list of available tracks
and confirm with the OK button.
7. Select „START‟ to start ripping.
8. When ripping is complete, the unit
returns to the ripping menu. To exit the
menu, select EXIT.

BASIC OPERATION
17
DVD Mode Setup
Press the SETUP button to show this menu. Adjust system and playback settings for this
unit using the Setup Menu. The Setup Menu is divided into tabs showing submenus with
options for different features.
General Setup
Option
Description/Settings
TV Display
Set screen aspect ratios (4:3, 16:9 etc)
Viewing Angle
Enable/disable alternate camera angle viewing. Availability of this
feature depends on the DVD content.
OSD Language
Set the language used in the OSD menu
Caption Lock
Enable/disable alternate subtitle viewing.
Screen Saver
Turn screen saver On/Off. When turned on, the screen saver activates
after the unit is idle for 3 minutes.
Last Memory
Enable/disable memorising of last viewed track position for quick
playback resuming.
Speaker Setup
Option
Description/Settings
Downmix
Set audio output mode

BASIC OPERATION
18
Dolby Digital Setup
Option
Description/Settings
Dual Mono
Adjust Dual Mono/Dynamic audio settings
Dynamic
Adjust dynamic range compression
Video Setup
Option
Description/Settings
Brightness
Set the brightness level.
Contrast
Set the contrast level.
Hue
Set the hue level.
Saturation
Set the saturation level.

BASIC OPERATION
19
DVD Preference Setup
Option
Description/Settings
TV Type
Pal, NTSC, AUTO
Audio Language
Set a preferred track language to activate if the disc has the
corresponding track language available
Subtitle
Language
Set a preferred subtitle language to activate if the disc has the
corresponding subtitle language available
Menu Language
Set a preferred menu language to activate if the disc has the
corresponding menu language available
Parental
Password protect according to rating
Password Setup
Customise password. The default password is “0000”. To change the
password, input the old password once and then the new password
twice.
Default
Reset all settings back to factory default.
Note: If the customised password has been forgotten, use the super password “0000” to
access the password setup option again.

REFERENCE
20
Troubleshooting
If you encounter problems using the DVD player, please refer to the table below for problemsolving measures. If problems persist, please contact the Customer Support Hotline .
Turn off the DVD player immediately if you suspect a malfunction. Unplug the power plug
and check whether the DVD player is unusually warm and if it is emitting smoke.
Problem
Possible cause
Remedy
The DVD player does not
work
Disc cover not closed
Close disc cover
No disc inserted or disc is
inserted wrongly
Insert a disc with the label
facing up
Disc is dirty , warped or
damaged
Clean the disc or use
another disc
Regional code of the player
does not match the regional
code of the DVD (Region 4)
Use DVDs with the
corresponding regional code
Moisture on lens
Remove disc and turn off
DVD player for at least 2
hours
No sound
Device not properly
connected
Check connections and
connect device correctly
DVD sound settings incorrect
Check sound settings and
adjust correctly
Disc is dirty , warped or
damaged
Clean the disc or use
another disc
No picture
LCD screen is turned off or
set in the incorrect video
mode
Turn on the LCD screen
and/or set to the correct
video mode
Device not correctly
connected
Check connections and
connect device correctly
Screen flashing
Battery power is low
Charge the battery
Poor video or audio
quality
Disc is dirty , warped or
damaged
Clean the disc or use
another disc
Repeated playback of a
section
Repeat settings are on
Turn repeat mode off
Disc is dirty , warped or
damaged
Clean the disc or use
another disc
Remote control does not
work
Obstacles between the DVD
player and remote control
Remove obstacles
Remote control not pointed
at the DVD player
Point the remote control
directly at the sensor in front
of the DVD player
Remote control batteries are
installed incorrectly
Check that the batteries are
inserted correctly according
to the +/- polarity markings
Battery too low or completely
damaged
Insert new battery

REFERENCE
21
Specifications
Item
Specification
Power supply
AC100~240V Input DC12V/1.5A Output
Power Consumption
10W
Input
DVD player (supported formats: DVDR/RW, CDR/RW, VCD,
Audio CD, JPEG)
AV 3.5mm input jack
USB 2.0 (supports USB drive max 32 GB, HDD max 500 GB, max
999 files and 250 folders, max file/folder name length of 12 letters)
SD/MMC/MS Card (supports up to 32 GB)
Output
USB 2.0 (supports USB drive max 32 GB)
SD/MMC/MS Card (supports up to 32 GB)
AV 3.5mm output jack
3.5mm headphone jack
LCD Panel
Contrast: 250:1
Screen Aspect Ratio: 16:9
Video signal system
NTSC, PAL
Audio frequency
response
20Hz~20kHz
Audio s/n ratio
50dB
Frequency
Distortion/+Noise
-70dB
Channel Separation
55dB
Dynamic range
85dB
Output levels
Audio: 2Vp-p, Load impedance: 10k
Video: 1.0Vp-p, Load impedance:75k, unbalanced
Negative-polarity output leve: Brightness(Y): 1Vp-p, chromaticity©:
0.28Vp-p, Load impedance:75k
Operating
temperature
0~40°C
Dimensions
Unit: 362 x 200 x 40 mm
Gift box: 380 x 100 x 225 mm
Weight
1.0 kg
2.3 kg
[05CT12]
* Specifications are subject to change without notice.
* Weight and dimensions are approximate.

TEAC CUSTOMER SUPPORT HOTLINE (TCS)
1300 553 315
Between Monday to Friday – AEST 8.30AM to 6PM
 Loading...