

Page 1

DR-60D
Linear PCM Recorder
OWNER’S MANUAL
D01188720A
Page 2
IMPORTANT SAFETY PRECAUTIONS
8
For U.S.A
TO THE USER
This equipment has been tested and found to comply with the
limits for a Class B digital device, pursuant to Part 15 of the FCC
Rules. These limits are designed to provide reasonable protection
against harmful interference in a residential installation. This
equipment generates, uses, and can radiate radio frequency
energy and, if not installed and used in accordance with the
instruction manual, may cause harmful interference to radio
communications. However, there is no guarantee that interference
will not occur in a particular installation. If this equipment does
cause harmful interference to radio or television reception, which
can be determined by turning the equipment off and on, the user
is encouraged to try to correct the interference by one or more of
the following measures.
a) Reorient or relocate the receiving antenna.
b) Increase the separation between the equipment and receiver.
c) Connect the equipment into an outlet on a circuit different
from that to which the receiver is connected.
d) Consult the dealer or an experienced radio/TV technician for
help.
CAUTION
Changes or modifications to this equipment not expressly
approved by TEAC CORPORATION for compliance could void the
user's authority to operate this equipment.
Model Number : DR-60D
Trade Name : TASCAM
Responsible party: TEAC AMERICA, INC.
Address : 7733 Telegraph Road, Montebello, California,
U.S.A.
Telephone number : 1-323-726-0303
This device complies with Part 15 of the FCC Rules. Operation is
subject to the following two conditions: (1) this device may not
cause harmful interference, and (2) this device must accept any
interference received, including interference that may cause
undesired operation.
This appliance has a serial number located on the rear panel.
Please record the model number and serial number and retain
them for your records.
Model number
Serial number
8
For Canada
THIS CLASS B DIGITAL APPARATUS COMPLIES WITH CANADIAN
ICES-003.
CET APPAREIL NUMÉRIQUE DE LA CLASSE B EST CONFORME À LA
NORME NMB-003 DU CANADA.
Declaration of Conformity
TASCAM DR-60D
2
Page 3

IMPORTANT SAFETY INSTRUCTIONS
1 Read these instructions.
2 Keep these instructions.
3 Heed all warnings.
4 Follow all instructions.
5 Do not use this apparatus near water.
6 Clean only with dry cloth.
7 Do not block any ventilation openings. Install in accordance with the
manufacturer's instructions.
8 Do not install near any heat sources such as radiators, heat registers,
stoves, or other apparatus (including amplifiers) that produce heat.
9 Do not defeat the safety purpose of the polarized or grounding-type
plug. A polarized plug has two blades with one wider than the other. A
grounding type plug has two blades and a third grounding prong. The
wide blade or the third prong are provided for your safety. If the provided
plug does not fit into your outlet, consult an electrician for replacement
of the obsolete outlet.
10 Protect the power cord from being walked on or pinched particularly at
plugs, convenience receptacles, and the point where they exit from the
apparatus.
11 Only use attachments/accessories specified by the manufacturer.
12 Use only with the cart, stand, tripod, bracket, or table specified by the
manufacturer, or sold with the apparatus. When a cart is used, use
caution when moving the cart/apparatus combination to avoid injury
from tip-over.
13 Unplug this apparatus during lightning storms or when unused for long
periods of time.
14 Refer all servicing to qualified service personnel. Servicing is required
when the apparatus has been damaged in any way, such as power-supply
cord or plug is damaged, liquid has been spilled or objects have fallen
into the apparatus, the apparatus has been exposed to rain or moisture,
does not operate normally, or has been dropped.
The apparatus draws nominal non-operating power from the AC outlet
•
with its POWER or STANDBY/ON switch not in the ON position.
The mains plug is used as the disconnect device, the disconnect device
•
shall remain readily operable.
Caution should be taken when using earphones or headphones with the
•
product because excessive sound pressure (volume) from earphones or
headphones can cause hearing loss.
If you are experiencing problems with this product, contact TEAC for a
•
service referral. Do not use the product until it has been repaired.
CAUTION
Do not expose this apparatus to drips or splashes.
•
Do not place any objects filled with liquids, such as vases, on the
•
apparatus.
Do not install this apparatus in a confined space such as a book case or
•
similar unit.
The apparatus should be located close enough to the AC outlet so that
•
you can easily grasp the power cord plug at any time.
If the product uses batteries (including a battery pack or
•
installed batteries), they should not be exposed to sunshine, fire
or excessive heat.
WARNING
Products with Class construction are equipped with a power
supply cord that has a grounding plug. The cord of such a product
must be plugged into an AC outlet that has a protective grounding
connection.
TASCAM DR-60D
3
Page 4
Safety Information
Pb, Hg, Cd
8
For European Customers
Disposal of electrical and electronic equipment
(a) All electrical and electronic equipment should be disposed of
separately from the municipal waste stream via designated
collection facilities appointed by the government or the local
authorities.
(b) By disposing of the electrical and electronic equipment
correctly, you will help save valuable resources and prevent
any potential negative effects on human health and the
environment.
(c) Improper disposal of waste equipment can have serious
effects on the environment and human health as a result of the
presence of hazardous substances in electrical and electronic
equipment.
(d) The crossed out wheeled dust bin symbol indicates that
electrical and electronic equipment must be collected and
disposed of separately from household waste.
(e) The return and collection systems are available to the end users.
For more detailed information about disposal of old electrical
and electronic equipment, please contact your city office,
waste disposal service or the shop where you purchased the
equipment.
TASCAM DR-60D
4
Disposal of batteries and/or accumulators
(a) Waste batteries and/or accumulators should be disposed of
separately from the municipal waste stream via designated
collection facilities appointed by the government or the local
authorities.
(b) By disposing of waste batteries and/or accumulators correctly,
you will help save valuable resources and prevent any potential
negative effects on human health and the environment.
(c) Improper disposal of waste batteries and/or accumulators can
have serious effects on the environment and human health as a
result of the presence of hazardous substances in batteries and/
or accumulators.
(d) The crossed out wheeled dust bin symbol indicates that
batteries and/or accumulators must be collected and disposed
of separately from household waste.
If the battery or accumulator contains more than the specified
values of lead (Pb), mercury (Hg), and/or cadmium (Cd) defined
in the Battery Directive (2006/66/EC), then the chemical
symbols for lead (Pb), mercury (Hg) and/or cadmium (Cd) will be
indicated beneath the crossed out wheeled dust bin symbol.
(e) The return and collection systems are available to the end users.
For more detailed information about disposal of waste batteries
and/or accumulators, please contact your city office, waste
disposal service or the shop where you purchased them.
Page 5
Safety Information
Do not carry or store batteries together with small metal objects. The
CAUTIONS ABOUT BATTERIES
This product uses batteries. Misuse of batteries could cause a leak, rupture
or other trouble. Always abide by the following precautions when using
batteries.
Never recharge non-rechargeable batteries. The batteries could rupture or
•
leak, causing fire or injury.
When installing batteries, pay attention to the polarity indications (plus/
•
minus (¥/^) orientation), and install them correctly in the battery
compartment as indicated. Putting them in backward could make the
batteries rupture or leak, causing fire, injury or stains around them.
When you store or dispose batteries, isolate their terminals with insulation
•
tape or something like that to prevent them from contacting other
batteries or metallic objects.
When throwing used batteries away, follow the disposal instructions
•
indicated on the batteries and the local disposal laws.
Do not use batteries other than those specified. Do not mix and use new
•
and old batteries or different types of batteries together. The batteries
could rupture or leak, causing fire, injury or stains around them.
8
For China
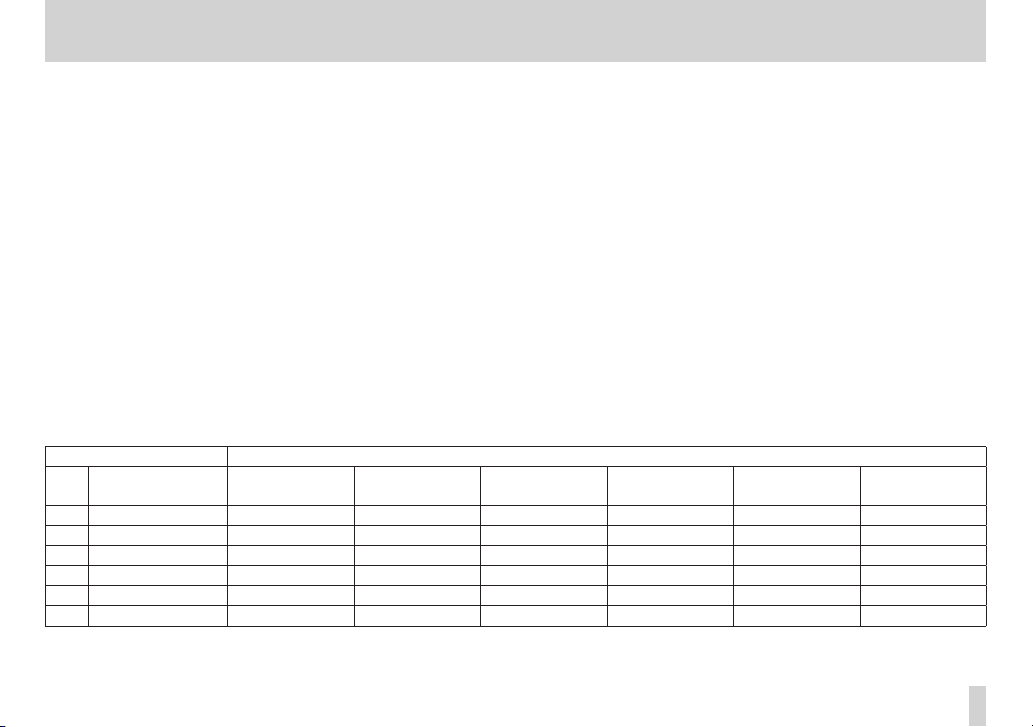
产品有毒有害物质或元素的名称及含量
机种 :DR-60D 有毒有害物质或元素
品名
1 CHASSIS 部份 ○ ○ ○ ○ ○ ○
2 PCB Assy 部份 × ○ ○ ○ ○ ○
3 线材部份 ○ ○ ○ ○ ○ ○
4 附属品部份 × ○ ○ ○ ○ ○
5 SEAL 部份 ○ ○ ○ ○ ○ ○
6 包装部份 ○ ○ ○ ○ ○ ○
○ :表示该有毒有害物质在该部件所有均质材料中的含有量均在 SJ/T11363-2006 标准规定的限量要求以下。
× :表示该有毒有害物质至少在该部件的某一均质材料中的含量超出 SJ/T11363-2006 标准规定的限量要求。
(针对现在代替技术困难的电子部品及合金中的铅 )
铅
(Pb)
汞
(Hg)
•
batteries could short, causing leak, rupture or other trouble.
Do not heat or disassemble batteries. Do not put them in fire or water.
•
Batteries could rupture or leak, causing fire, injury or stains around them.
If the battery fluid leaks, wipe away any fluid on the battery case before
•
inserting new batteries. If the battery fluid gets in an eye, it could cause loss
of eyesight. If fluid does enter an eye, wash it out thoroughly with clean
water without rubbing the eye and then consult a doctor immediately. If
the fluid gets on a person’s body or clothing, it could cause skin injuries or
burns. If this should happen, wash it off with clean water and then consult
a doctor immediately.
The unit power should be off when you install and replace batteries.
•
Remove the batteries if you do not plan to use the unit for a long time.
•
Batteries could rupture or leak, causing fire, injury or stains around them.
If the battery fluid leaks, wipe away any fluid on the battery compartment
before inserting new batteries.
Do not disassemble a battery. The acid inside the battery could harm skin
•
or clothing.
镉
(Cd)
六价铬
(Cr6+)
多溴联苯
(PBB)
TASCAM DR-60D
多溴二苯醚
(PBDE)
5
Page 6

Contents
Quick Start Guide .............................................................. 9
1 – Introduction ............................................................... 13
Features........................................................................................................13
Included items ........................................................................................... 14
Conventions used in this manual ....................................................... 14
Trademarks .................................................................................................15
About SD cards .......................................................................................... 15
Precautions for use..........................................................................16
Precautions for installation .................................................................. 16
Beware of condensation ........................................................................ 16
Cleaning the unit ...................................................................................... 16
User registration ....................................................................................... 16
2 – Names and functions of parts .................................. 17
Front panel ..................................................................................................17
Left side panel ........................................................................................... 20
Right side panel ........................................................................................ 21
Rear panel ...................................................................................................22
Top panel ..................................................................................................... 23
Bottom Panel .............................................................................................23
Home Screen ..............................................................................................24
Recording Screen ..................................................................................... 26
Menu item list ............................................................................................28
Using menus ..............................................................................................29
Basic operation..........................................................................................30
3 – Preparation ................................................................ 32
Powering the unit.....................................................................................32
Power sources ...................................................................................32
Using AA batteries ...........................................................................32
Using an AC adaptor (sold separately) .................................... 33
Using an external battery pack (sold separately) ................ 33
Using USB bus power ..................................................................... 34
Turning the power on and off (putting it in standby) ................35
Starting up the unit .........................................................................35
Shutting down (putting the unit in standby) .......................35
Resume function .............................................................................. 36
Setting the date and time ..................................................................... 36
Inserting and removing SD cards.......................................................37
Inserting the SD card ......................................................................37
Removing the card .......................................................................... 37
SD card write protection switches ............................................ 38
Preparing an SD card for use ............................................................... 39
Camera connection and attachment ...............................................39
Connecting monitors and headphones ..........................................40
Monitoring ..................................................................................................40
Enabling monitoring ......................................................................40
Selecting the monitored signal .................................................. 41
4 – Recording ................................................................... 42
Selecting file format, sampling frequency,
and maximum file size .......................................................................... 42
Preparing the recording inputs .......................................................... 43
Connecting microphones ............................................................ 43
Recording an external device (LINE IN) ..................................44
Setting the input types .................................................................44
Using phantom power ...................................................................45
Using plug-in power .......................................................................46
Adjusting the input level .......................................................................46
Using the limiter .......................................................................................48
TASCAM DR-60D
6
Page 7

Contents
Using the low-cut filter .......................................................................... 49
Overview of recording modes ............................................................ 49
Recording (MONO/STEREO recording) ............................................50
Make recording settings ............................................................... 50
Set where to save the file.............................................................. 51
Starting the recording ................................................................... 51
File names when recording in MONO/STEREO .................... 51
Simultaneously recording two files at different input levels
(DUAL REC) .................................................................................................. 52
Enabling dual recording................................................................52
Starting dual recording ................................................................. 53
Dual recording file names ............................................................ 54
Recording 4 channels .............................................................................54
Making 4-channel recording settings .....................................54
Starting 4-channel recording......................................................55
File names when recording in 4-channel ............................... 56
Recording automatically (AUTO REC) ...............................................56
Creating and changeover to a new file during continued
recording (Track increment).................................................................58
Manual track increment during recording ............................58
Automatic track increment by file size .................................... 58
Mark function ............................................................................................59
Adding marks manually to a recording...................................59
Adding marks automatically to a recording.......................... 59
Moving to a mark position ........................................................... 59
Recording the moment before pushing RECORD (PRE REC) ...60
Delaying the start of recording (REC DELAY) ...............................60
Self-timer function ...................................................................................61
Using the auto tone function .............................................................. 61
Setting auto tone length ....................................................................... 62
Adding slate tones ................................................................................... 62
Recording duration ................................................................................. 63
5 – Working with Files and Folders (BROWSE screen) .64
Screen navigation ....................................................................................64
Icons on the BROWSE screen ............................................................... 65
File operations ...........................................................................................65
Folder operations .....................................................................................66
Creating a new folder .............................................................................67
6 – Playback ..................................................................... 68
Adjusting playback volume .................................................................68
Setting the playback area (AREA) ......................................................68
Selecting a folder for the playback area (1) .................................... 69
Selecting a folder for the playback area (2)....................................70
Selecting files for playback (skip) .......................................................70
Playback .......................................................................................................71
Pausing ................................................................................................71
Stopping ..............................................................................................71
Rewinding and fast-forwarding (search) ............................... 71
Changing the playback position ................................................71
Repeat playback (REPEAT) .................................................................... 71
Moving back a few seconds for replay (jump-back playback) 72
Playback of files recorded using dual recording ..........................72
7 – QUICK button operations ......................................... 73
Features of the QUICK button ............................................................. 73
Opening the quick menu ...................................................................... 74
Closing the quick menu ................................................................ 75
Deleting the selected file (Quick Delete) ........................................75
Dividing the selected file (DIVIDE) .................................................... 75
TASCAM DR-60D
7
Page 8

Contents
Increasing the perceived overall sound pressure to enhance
listenability (Level Alignment) ............................................................ 77
Using the playback equalizer .............................................................. 78
Setting mic input gain with the quick menu ................................. 78
8 – Mixer ........................................................................... 79
Making mixer settings ............................................................................ 79
Using the MS decoder ............................................................................80
Decoding the input sound as you record ..............................80
Decoding the playback sound ...................................................81
MS decoder settings ....................................................................... 81
9 – Connecting with a computer ....................................82
Transferring files to a computer ......................................................... 83
Transferring files from a computer ....................................................83
Disconnecting from a computer ........................................................ 83
10 – Settings and Information ....................................... 84
Viewing Information (INFORMATION) ..............................................84
File information page .....................................................................84
Card information page ..................................................................85
System information page .............................................................85
System Settings and Formatting (SYSTEM) ...................................86
Setting the automatic power saving function ..................... 86
Setting the backlight ......................................................................86
Adjusting the display contrast ....................................................86
Setting the type of AA batteries ................................................86
Setting the phantom power voltage ....................................... 86
Restoring the factory settings .................................................... 87
Using QUICK FORMAT ....................................................................87
Using FULL FORMAT .......................................................................87
Setting the format of file names ........................................................88
TASCAM DR-60D
8
File name format ............................................................................. 88
Setting the WORD item ................................................................. 88
Resetting the number (COUNT) .................................................88
11 – Using the REMOTE jack ........................................... 89
Footswitch (TASCAM RC-3F) ................................................................89
Setting footswitch operation ......................................................89
Using the footswitch ......................................................................90
Remote control (TASCAM RC-10) ........................................................90
Setting the wired remote control .............................................90
Using the wired remote control ................................................ 90
Overview of mode functions ......................................................90
12 – Messages .................................................................. 91
13 – Troubleshooting ...................................................... 94
14 – Specifications .......................................................... 96
Ratings ..........................................................................................................96
Inputs and outputs ..................................................................................96
Analog audio input and output .................................................96
Control input and output ............................................................. 97
Audio performance .................................................................................97
Computer compatibility ........................................................................ 97
Other specifications ................................................................................98
Dimensional drawings ...........................................................................99
Page 9
Quick Start Guide
In this chapter we will try recording and playback with the TASCAM
DR-60D. We will also try using it connected to a digital single-lens
reflex (DSLR) camera.
The default recording format is set to 16-bit/44.1kHz WAV when
shipped from the factory.
Higher-quality files can be produced by changing the recording
format. See “Selecting file format, sampling frequency, and
maximum file size” on page 42 for details.
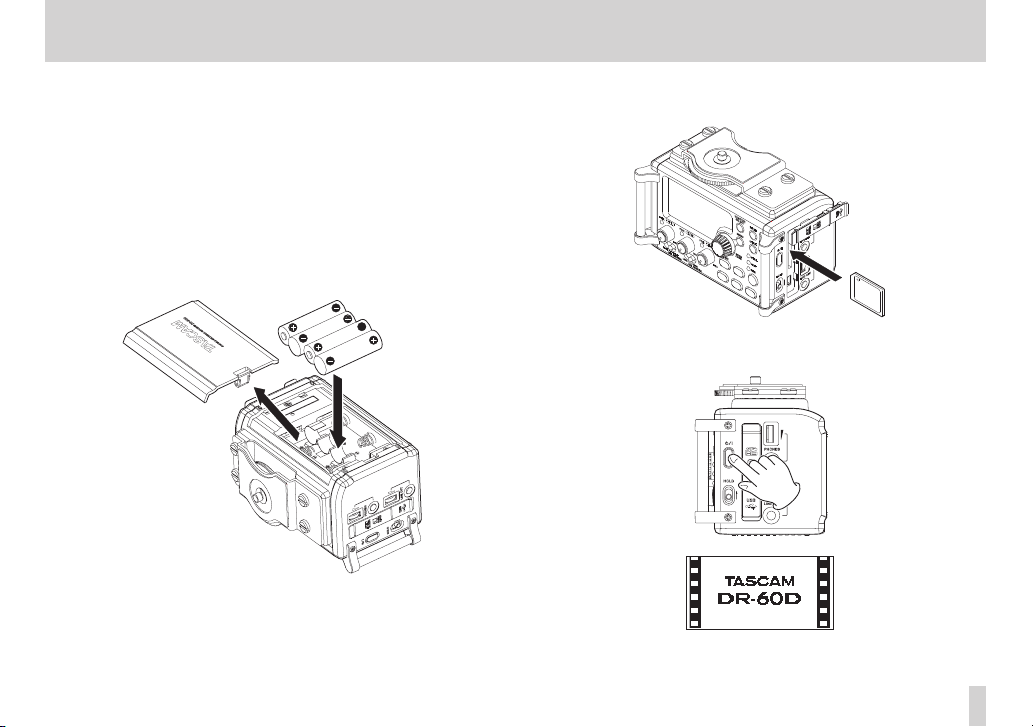
1. Install batteries in the battery compartment on the back
of the unit. Fit them to the ¥ and ^ marks shown in the
compartment.
2. Insert an SD card into the SD card slot on the right side of the
unit.
3. Press and hold the ¤ button on the right side of the unit until
the “
TASCAM DR-60D
” startup screen appears.
Start -Up Screen
TASCAM DR-60D
9
Page 10
Quick Start Guide
Microphones
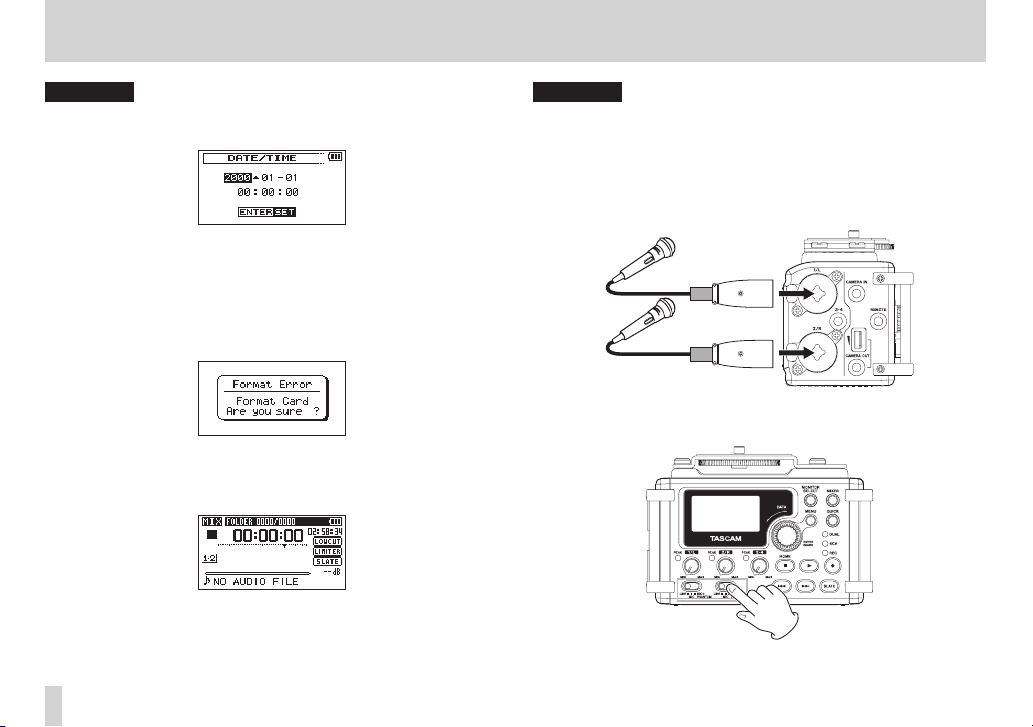
CAUTION
The first time you use the unit, a built-in clock setting screen will
appear. (See “Setting the date and time” on page 36.)
Press the . or / button to move the cursor (highlighted
portion),and turn the DATA dial to set the date and time.
Then press the DATA dial to set.
4. If you insert a new card or card that has been formatted by a
different device, the following confirmation pop-up message
appears.(See “Preparing an SD card for use” on page 39.)
Press the DATA dial to format the card for use with this unit.
After formatting completes, the Home Screen (shown below)
appears.
Home Screen
CAUTION
•
Formatting erases all the data on the SD card.
•
When formatting, use a TASCAM PS-P515U AC adaptor (sold
separately), supply the unit with USB bus power from a computer
or be certain that the batteries have sufficient remaining charge.
5. Connect a microphone to the 1/L connector or 2/R connector
on the left side of the unit.
6. Set the 1/L or 2/R input switch on the front of the unit to MIC or
MIC+PHANTOM. (See “Setting the input types” on page 44.)
TASCAM DR-60D
10
Page 11
Quick Start Guide
r
Headphones
Powered monitor speakers or
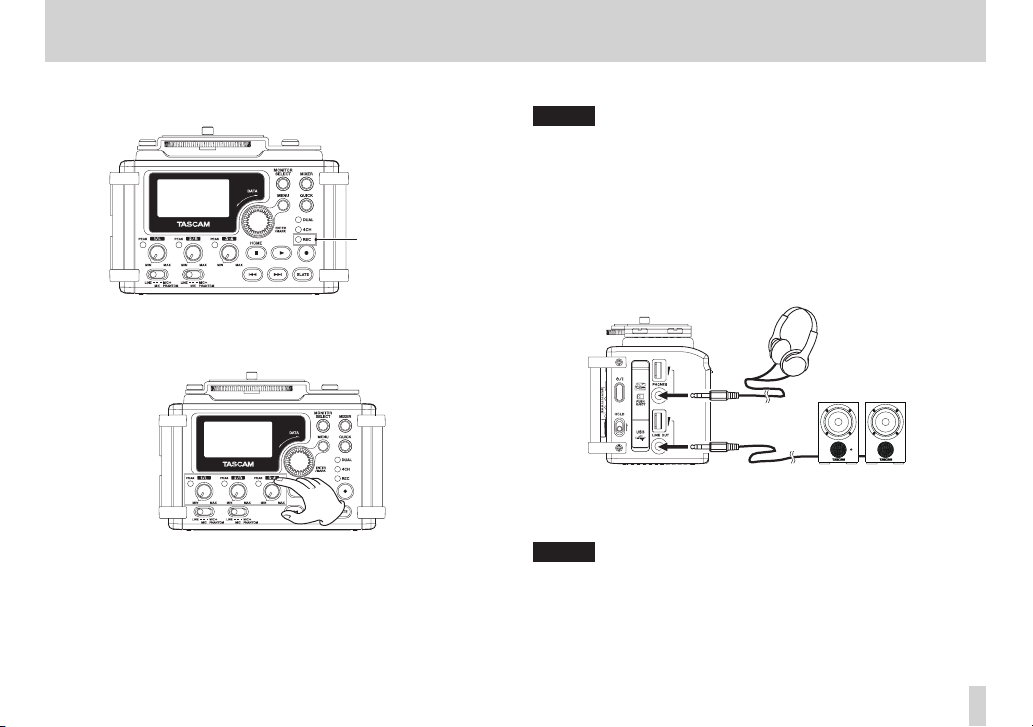
7. Press the RECORD [0] button to switch to recording standby.
The indicator will flash.
RECORD indicato
8. Use the 1/L knob or 2/R knob on the front of the unit to adjust
the input level. (See “Adjusting the input level” on page 46 for
details.)
9. Press the RECORD [0] button to start recording. The indicator
will light during recording.
10. Press the Stop (8) [HOME] button to finish recording.
NOTE
To pause recording, press the RECORD [0] button. Press the
RECORD [0] button again to restart recording in the same file.
11. Press the PLAY [7] button for playback.
To listen with headphones, connect them to the PHONES
jack on the right side of the unit. To listen with an external
monitoring system (powered monitor speakers or an amplifier
and speakers), connect it to the LINE OUT jack on the right side
of the unit. (See “Connecting monitors and headphones” on
page 40.)
amplifer and speakers
12. To adjust the playback volume, use the PHONES or LINE OUT
volume control.
13. Press the Stop (8) [HOME] button to stop playback.
NOTE
If you have made several recordings, use the . or / button
to select the file to play when playing back or stopped and the
Home Screen is displayed.
TASCAM DR-60D
11
Page 12
Quick Start Guide
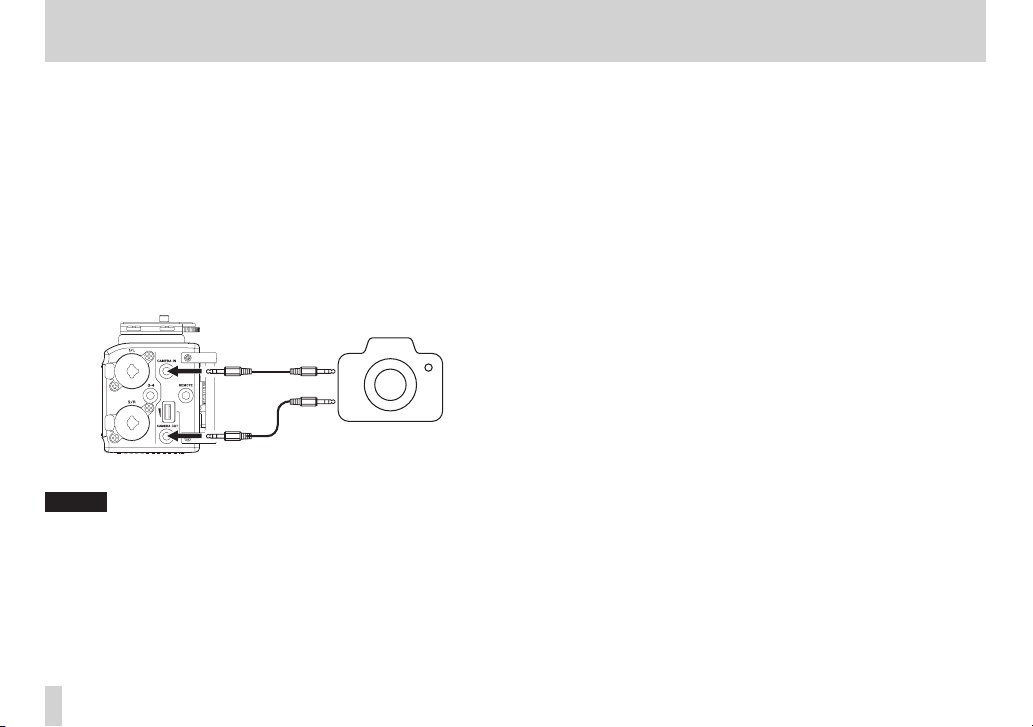
14. You can connect this unit with a DSLR to output sound from this
unit to the camera or to monitor sound from the camera with
this unit. (See “Camera connection and attachment” on page
39.)
Use standard φ3.5mm stereo mini plug cables (sold separately)
to connect them.
If you want to record audio from this unit with a camera,
connect the CAMERA OUT jack on the left side of this unit with
the external mic input on the camera.
If you want to input audio from the camera and monitor it with
this unit, connect the CAMERA IN jack on the left side of this
unit with the audio output jack on the camera.
DSLR camera
Audio output jack
External mic input jack
NOTE
Refer to the camera’s operation manual for information about
the connector on the camera.
15. Use the CAMERA OUT volume control on the left side of the
unit to adjust the level output to the camera.
16. To monitor the camera audio input to this unit using
headphones, turn monitoring on using the
the
REC SETTING
40.)
screen. (See “Enabling monitoring” on page
MONITOR
item on
17. When the Home Screen is open and the recorder is stopped,
paused, in recording standby or recording, press the MONITOR
SELECT button to open a pop-up where you can select which
sound to monitor. Turn the DATA dial and select
(See “Selecting the monitored signal” on page 41.)
CAMERA IN
.
TASCAM DR-60D
12
Page 13

1 – Introduction
Thank you very much for purchasing the TASCAM DR-60D Linear
PCM Recoder. Please read this Owner’s Manual carefully in order to
maximize your use of all the unit’s features. We hope that you will
enjoy using this recorder for many years to come.
After you have finished reading this manual, please keep it in a safe
place for future reference.
You can also download the Owner’s Manual from the TASCAM web
site (http://tascam.com/).
Features
This recorder includes audio inputs and outputs that are suitable
for use with digital single-lens reflex (DSLR) cameras, enabling the
recording of high-quality audio with DSLR video.
•
Compact audio recorder that uses SD/SDHC cards as recording
media
•
TASCAM original High Definition Discrete Architecture (HDDA)
microphone preamps provide high-quality recording inputs
•
In addition to ordinary stereo recording, simultaneous recording
of up to four channels is possible
•
Four channels can be mixed down to two for stereo output
•
Recording levels can be adjusted independently for the 1/L, 2/R
and 3-4 inputs
•
Dual recording function allows two files to be recorded
simultaneously at different levels
•
44.1/48/96 kHz, 16/24-bit, linear PCM (WAV format) recording
possible
•
Broadcast Wave Format (BWF) supported as WAV recording
format
•
XLR mic/line inputs can provide phantom power (+24V/+48V)
TRS mic/line inputs (1/L and 2/R) support +24dBU input when
set to LINE
•
Stereo mini jack input supports mics that require plug-in power,
allowing the input of video mics and other high-output mics
(+10dBV maximum input level)
•
Slate tone functions (automatic/manual) simplify synchronization
of video files when editing
•
CAMERA OUT connector allows the high-quality audio from this
unit to be output to a DSLR camera for recording
•
CAMERA IN connector enables convenient monitoring of audio
from a DSLR camera
•
Auto-record function starts recording automatically when a set
sound input level is detected
•
Mid-side decoding function can be used with MS mics
•
Auto-record function can automatically start and stop recording
at set levels
•
Can start recording a new file automatically when a maximum
file size set in advance is reached without interrupting recording
•
A QUICK button is available for easy access to various functions
•
Track incrementing function allows a recording to be split by
creating a new file when desired
•
Pre-recording (PRE REC) function allows the unit to record the 2
seconds of sound before recording is activated
•
Limitter function is available to reduce the level automatically in
case of excessively large input.
•
Low cut filter conveniently reduces low-frequency noise
•
Self-timer function to start recording after a set period of time.
•
Jump back and play function allows the last several seconds of
the currently played file to be replayed again by simply pressing
a button
TASCAM DR-60D
13
Page 14

1 – Introduction
•
Delay function that eliminates time lags caused by differences in
the distances of two sets of inputs from the sound source
•
DIVIDE function allows files to be split where desired
•
MARK function convenient for moving to specific locations
•
Equalizers function for playback, and level alignment function to
enhance the perceived overall sound pressure
•
File name format can be set to use a user-defined word or the
date
•
Resume function to memorize the playback position before the
unit is turned off (enter standby).
•
φ3.5 mm (1/8”) line/headphones output jack
•
128 x 64 pixel LCD with backlight
•
Mini-B type USB 2.0 port
•
Operates on 4 AA batteries, an AC adaptor (sold separately:
TASCAM PS-P515U), external battery pack (sold separately:
TASCAM BP-6AA)or USB bus power
•
Tripod mounting threads (bottom) and DSLR screw attachment
that allows attachment and removal with a coin (top)
•
Dedicated remote control jack (for use with RC-10 and RC-3F (sold
separately) )
•
HOLD switch to prevent accidental operation
•
Handles on the front left and right sides protect the screen and
can be used to attach a shoulder belt
Included items
This product includes the following items.
Take care when opening the package not to damage the items.
Keep the packing materials for transportation in the future.
Please contact TASCAM if any of these items are missing or have
been damaged during transportation.
• Main unit ...................................................................................................... 1
• USB cable ..................................................................................................... 1
• Warranty card ............................................................................................. 1
• Owner’s Manual (this manual) .............................................................. 1
Conventions used in this manual
In this manual, we use the following conventions:
•
When we refer to buttons, connectors and other parts of this unit
and other equipment, we use a bold font like this: MENU button.
•
When we show messages, for example, that appears on the unit’s
display, the typeface looks like this:
•
SD memory cards are called “SD cards”.
•
We refer to digital single-lens reflex cameras as “DSLR cameras”
or “DSLRs”.
•
Words that appear on the computer display are shown in
quotation marks like this: “DR-60D”
•
Additional information is provided as necessary as tips, notes
and cautions.
TIP
These are tips about how to use the unit.
NOTE
These provide additional explanations and describe special
cases.
CAUTION
Failure to follow these instructions could result in injury, damage
to equipment or lost recording data, for example.
REPEAT
.
TASCAM DR-60D
14
Page 15
1 – Introduction
Trademarks
•
TASCAM is a registered trademark of TEAC Corporation.
•
SDHC Logo is a trademark of SD-3C, LLC.
•
Microsoft, Windows, WindowsXP, Windows Vista, Windows 7
and Windows 8 are either registered trademarks or trademarks
of Microsoft Corporation in the United States and/or other
countries.
•
Apple, Macintosh, iMac, Mac OS and Mac OS X are trademarks of
Apple Inc.
•
Pentium and Intel are trademarks of Intel Corporation in the U.S.
and/or other countries.
•
Other company names, product names and logos in this
document are the trademarks or registered trademarks of their
respective owners.
Any data, including, but not limited to information, described
herein are intended only as illustrations of such data and/or
information and not as the specifications for such data and/
or information. TEAC Corporation disclaims any warranty that
any use of such data and/or information shall be free from
infringement of any third party’s intellectual property rights
or other proprietary rights, and further, assumes no liability of
whatsoever nature in the event of any such infringement, or
arising from or connected with or related to the use of such data
and/or information.
This product is designed to help you record and reproduce
sound works to which you own the copyright, or where you
have obtained permission from the copyright holder or the
rightful licensor. Unless you own the copyright, or have obtained
the appropriate permission from the copyright holder or the
rightful licensor, your unauthorized recording, reproduction
or distribution thereof may result in severe criminal penalties
under copyright laws and international copyright treaties. If
you are uncertain about your rights, contact your legal advisor.
Under no circumstances will TEAC Corporation be responsible
for the consequences of any illegal copying performed using the
recorder.
About SD cards
This unit uses SD cards for recording and playback.
TASCAM DR-60D
15
Page 16

1 – Introduction
You can use 64 MB–2 GB SD cards and 4 GB–32 GB SDHC cards with
this unit.
A list of SD cards that have been confirmed for use with this unit can
be found on the TASCAM website (http://tascam.com/). Please check
this site or contact TASCAM customer support.
Precautions for use
SD cards are delicate media. In order to avoid damaging a card or
the card slot, please take the following precautions when handling
them.
•
Do not leave them in extremely hot or cold places.
•
Do not leave them in extremely humid places.
•
Do not let them get wet.
•
Do not put things on top of them or twist them.
•
Do not hit them.
Precautions for installation
•
The unit’s nominal operating temperature is from 0º to 40º C
(32º–104º F).
•
Do not install in the following types of places. Doing so could
degrade the sound quality or cause malfunctions.
• Places with significant vibrations
• Near windows or other places exposed to direct sunlight
• Near heaters or other extremely hot places
• Extremely cold places
• Places with high humidity or bad ventilation
• Dusty places
• Places directly exposed to rain or other water
•
Do not place this unit on top of a power amplifier or other device
that generates heat.
•
If this unit is placed near a power amplifier or other device with
a large transformer, it could cause that device to hum. If this
occurs, increase the distance between this unit and the other
device.
•
If used nearby, this unit could cause color irregularities on a TV
screen or noise on a radio. If this occurs, increase the distance
between this unit and the other device.
•
This unit might produce noise if a mobile phone or other wireless
device is used nearby to make calls or send or receive signals. If
this occurs, increase the distance between this unit and the other
device or turn off the other device.
Beware of condensation
If the unit is moved from a cold to a warm place, or used immediately after a cold room has been heated or otherwise exposed to a
sudden temperature change, condensation could occur. Should this
happen, leave the unit for one or two hours before turning the unit
on.
Cleaning the unit
To clean the unit, wipe it gently with a soft dry cloth. Do not wipe
with chemical cleaning cloths, paint thinner, ethyl alcohol or other
chemical agents to clean the unit as they could damage the surface.
User registration
See the end of this manual for details about user registration.
TASCAM DR-60D
16
Page 17

2 – Names and functions of parts
Front panel
1 Handles
Attach a strap, for example, here.
2 Display
Shows a variety of information.
3 DATA dial (ENTER/MARK)
Turn to select items and change values on setting screens.
Use also to change the playback position in a file.
Push to confirm selections on setting screens and to answer “YES”
to confirmation pop-up messages.
Press during recording to add a mark manually. (See“Adding
marks manually to a recording” on page 59.)
Press the . or / button while pressing and holding this
dial to move to the previous or next mark, respectively. (See
“Moving to a mark position” on page 59.)
4 MONITOR SELECT button
When not playing back, press to open the monitoring source
selection pop-up menu.
When playing back dual-recorded files, press to switch between
files.
5 MENU button
When the Home Screen or
the
MENU
Screen.
When a setting screen is open, press to move up one level in
the menu. When the
Home Screen.
6 MIXER button
Press this button to open the
When the
the Home Screen.
MIXE R
screen is open, press this button to return to
MIXE R
screen is open, press to open
MENU
Screen is open, press to return to the
MIXE R
screen.
TASCAM DR-60D
17
Page 18
2 – Names and functions of parts
7 QUICK button
Press when the Home Screen,
open to show the quick menu pop-up.
The function to be shown depends on the state of the unit when
the button is pressed.
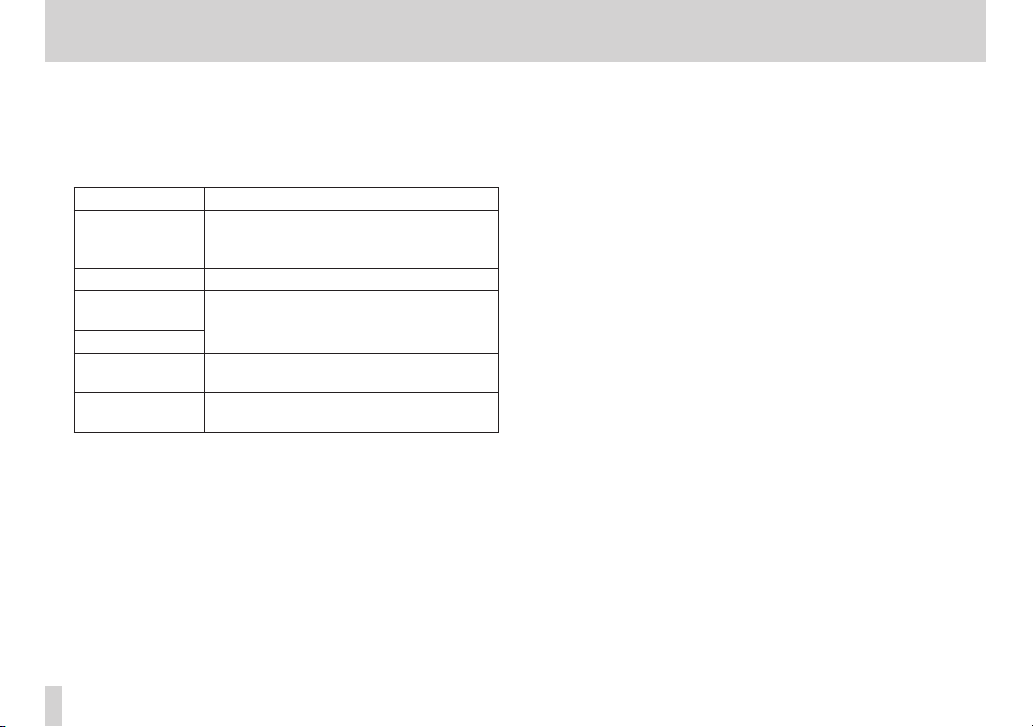
Recorder status Functions shown
Stopped
Playing back Level align and playback EQ functions
Recording
standby
Recording
MIXE R
screen
open
BROWSE
screen
open
8 DUAL indicator
This lights orange when recording in dual recording mode.
9 4CH indicator
This lights orange when recording in 4-channel recording mode.
0 REC indicator
This blinks when in recording standby and lights red when
recording.
BROWSE
screen or
Delete/divide current playback file, level
align, playback EQ and mic input gain
setting functions
Mic input gain setting function
Mic input gain setting function
File/folder operations
MIXE R
screen is
q 1/L knob and PEAK indicator
Use this knob to adjust the input level from the 1/L connector on
the left side of the unit.
The 1/L PEAK indicator lights when the 1/L input level is about
to cause distortion. This also lights if distortion occurs in the
analog circuitry during mic input, but this does not light if
distortion occurs in the analog circuitry during line level input.
(See “Adjusting the input level” on page 46.)
w Input switch (1/L)
Set the input type for the 1/L connector and whether phantom
power is on or off.
e 2/R knob and PEAK indicator
Use this knob to adjust the input level from the 2/R connector
on the left side of the unit.
The 2/R PEAK indicator lights when the 2/R input level is about
to cause distortion. This also lights if distortion occurs in the
analog circuitry during mic input, but this does not light if
distortion occurs in the analog circuitry during line level input.
(See “Adjusting the input level” on page 46.)
r Input switch (2/R)
Set the input type for the 2/R connector and whether phantom
power is on or off.
t 3-4 knob and PEAK indicator
Use to adjust the input level from the 3/4 connector on the left
side of the unit.
The 3-4 PEAK indicator lights when the 3-4 input level is about
to cause distortion.
TASCAM DR-60D
18
Page 19

2 – Names and functions of parts
y . button
During playback or when stopped in the middle of a file, press to
return to the beginning of the file.
When stopped at the beginning of a file, press to skip to the
beginning of the previous file.
Press and hold to search backward.
Press this button while pressing and holding the DATA dial to
return to the previous mark.
On the setting screens, use this button to move the cursor left.
On the
BROWSE
Screen, press this button to move up a level.
u Stop(8) [HOME] button
Press this button during playback to cause the playback to pause
at the current position. Press this button during pause time to
return to the beginning of the playback file.
Press this button during recording or recording standby to cause
the recording to stop.
When any other screen is open, press this button to return to the
Home Screen. Use this button to answer “NO” to a confirmation
message.
i / button
When stopped or playing back, press to skip to the next file.
Press and hold to search forward.
On the setting screens, use this button to move the cursor right.
Press this button while pressing and holding the DATA dial to
move to the next mark.
On the
BROWSE
If a file is selected, the file is loaded and the unit returns to the
Home Screen and stops.
Screen, press this button to move down a level.
o 7 (playback) button
When the Home Screen is displayed and playback is stopped,
press this button to start playback.
During playback, press this button to start jump-back playback.
(See “Moving back a few seconds for replay (jump-back
playback)” on page 72.)
When a file or folder is selected in the
button to return to the Home Screen and play the file or the first
file in the folder from the beginning.
p SLATE button
Press and hold during playback to record a slate stone. (See
“Adding slate tones” on page 62.)
a 0 (record) button
Press when stopped to start recording standby
Press when recording to pause recording (resume recording
standby).
BROWSE
screen, press this
TASCAM DR-60D
19
Page 20
2 – Names and functions of parts
Left side panel
s 1/L connector (XLR/TRS)
These are balanced analog XLR/TRS combo jacks for microphone
and line level inputs.
XLR (1: GND, 2: HOT, 3: COLD)
TRS (Tip: HOT, Ring: COLD, Sleeve: GND)
d 3-4 connector (φ3.5mm stereo mini jack)
This TRS analog input jack can provide plug-in power.
TRS (Tip: HOT, Ring: COLD, Sleeve: GND)
f 2/R connector (XLR/TRS)
These are balanced analog XLR/TRS combo jacks for microphone
and line level inputs.
XLR (1: GND, 2: HOT, 3: COLD)
TRS (Tip: HOT, Ring: COLD, Sleeve: GND)
CAUTION
•
Confirm that phantom power is OFF before connecting a line
level device to a 1/L connector or 2/R connector. If you connect
a line level device while phantom power is being supplied, that
device and this unit could be damaged.
•
When using a condenser microphone, before connecting to and
disconnecting from a 1/L connector or 2/R connector, confirm
that the phantom power for that jack is OFF. If you connect or
disconnect a mic while phantom power is being supplied, that
mic and this unit could be damaged.
•
Do not connect an unbalanced dynamic mic to an XLR connector
when phantom power is being supplied. Doing so could damage
that mic and this unit.
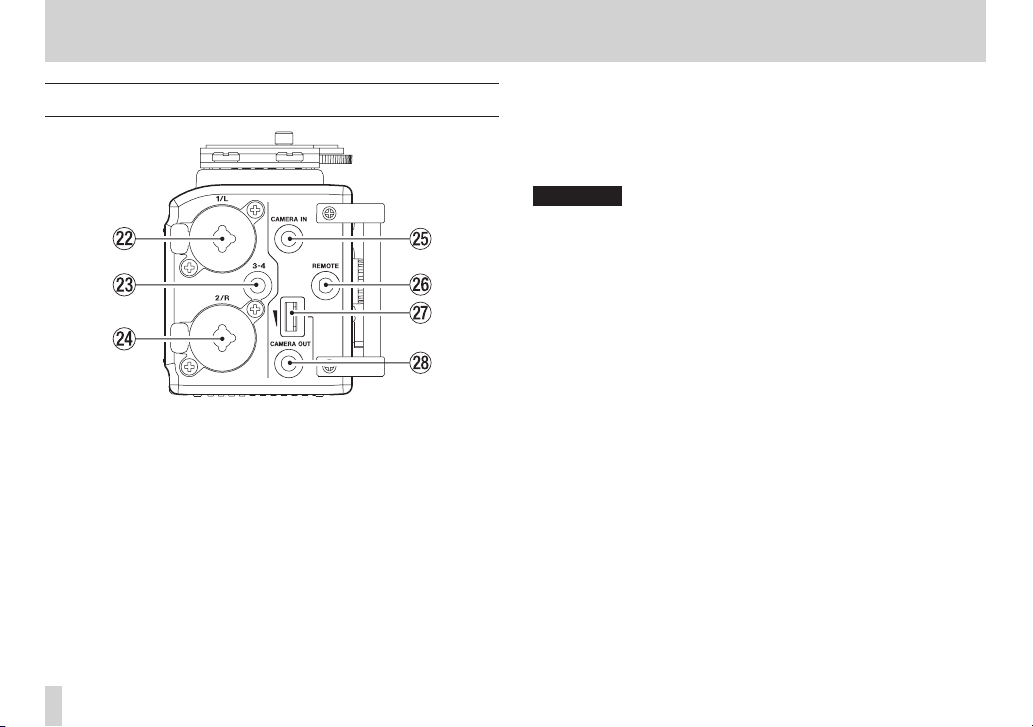
g CAMERA IN connector (φ3.5mm stereo mini jack)
Connect to the audio output of a camera.
Refer to the camera’s operation manual to identify this connector
on the camera. (See “Camera connection and attachment” on
page 39.)
h REMOTE connector (φ2.5mm TRS jack)
Connect a TASCAM RC-3F footswitch or TASCAM RC-10 wired
remote control (both sold separately) here to enable remote
starting and stopping of playback and other functions. (See “11 –
Using the REMOTE jack” on page 89.)
TASCAM DR-60D
20
Page 21
2 – Names and functions of parts
j CAMERA OUT volume control
Use to adjust the volume output from the CAMERA OUT
connector.
k CAMERA OUT connector (φ3.5mm stereo mini jack)
Connect a camera external mic here.
Refer to the camera’s operation manual to identify this connector
on the camera. (See “Camera connection and attachment” on
page 39.)
Right side panel
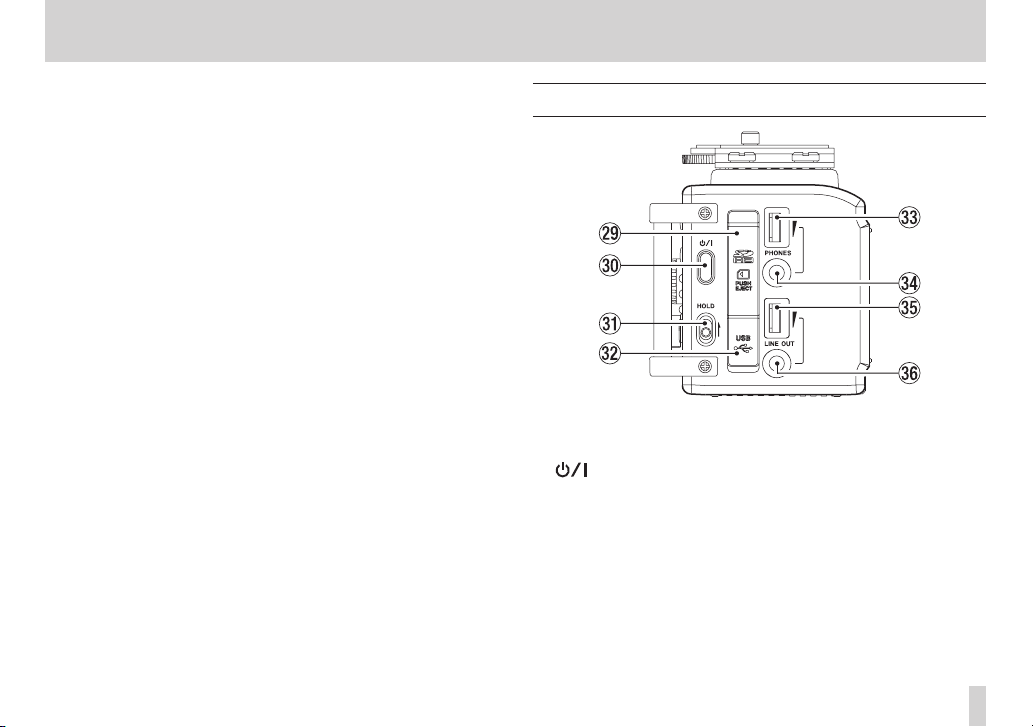
l SD card slot
Insert an SD card here.
; button
Press and hold this button to turn the unit’s power ON or
OFF(Standby). (See “Turning the power on and off (putting it in
standby)” on page 35)
z HOLD switch
Shift to the top end (in the direction of the arrow) to engage the
hold function.
All buttons are inoperative when hold is ON.
TASCAM DR-60D
21
Page 22
2 – Names and functions of parts
x USB port
Use the included USB cable to connect with a computer USB
port. (See “9 – Connecting with a computer” on page 82.)
Power can be supplied through the USB cable provided with the
unit or an AC adaptor (sold separately: TASCAM PS-P515U).
CAUTION
Always connect the recorder directly to a computer. Do not use a
USB hub.
c PHONES volume control
Use to adjust the volume output from the PHONES jack.
v PHONES jack (φ3.5mm stereo mini jack)
Connect stereo headphones to this stereo mini jack.
Use the PHONES control to adjust the volume.
CAUTION
Before connecting headphones, lower the PHONES volume to
the minimum level. Failure to do so could result in a sudden loud
noise that could harm hearing, for example.
b LINE OUT volume control
Use to adjust the volume output from the LINE OUT jack.
n LINE OUT jack (φ3.5mm stereo mini jack)
Use this to connect with the line input jack of an amp or other
equipment.
Use the LINE OUT control to adjust the volume.
TASCAM DR-60D
22
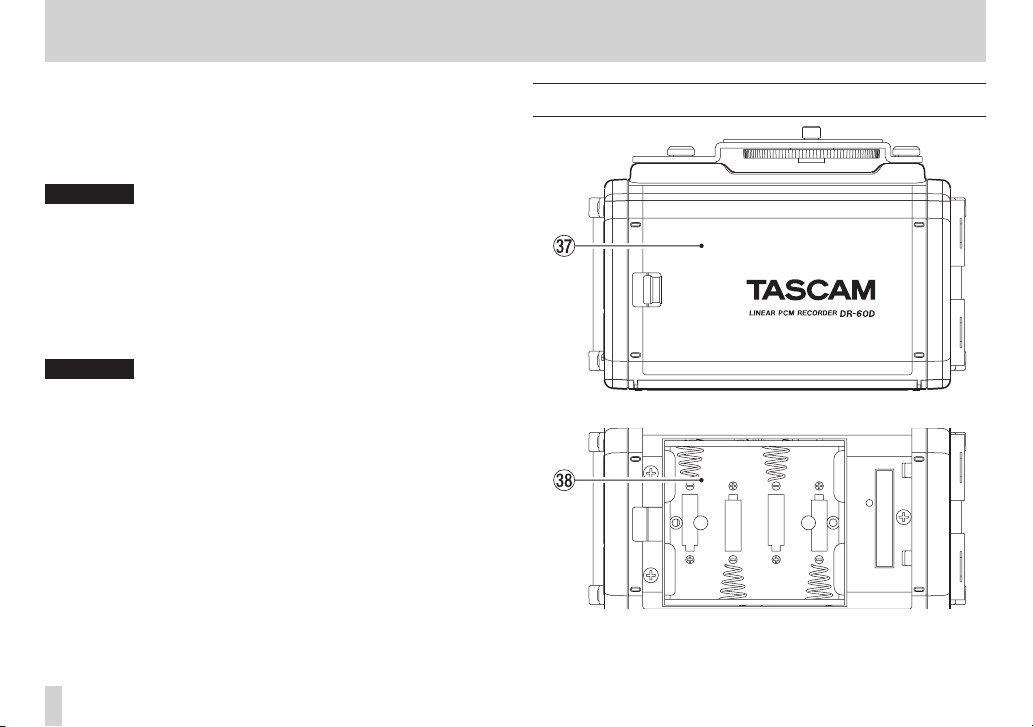
Rear panel
m Battery compartment cover
, Battery compartment
Install batteries (4 AA batteries) in this compartment to power
the unit. (See “Using AA batteries” on page 32.)
Page 23
2 – Names and functions of parts
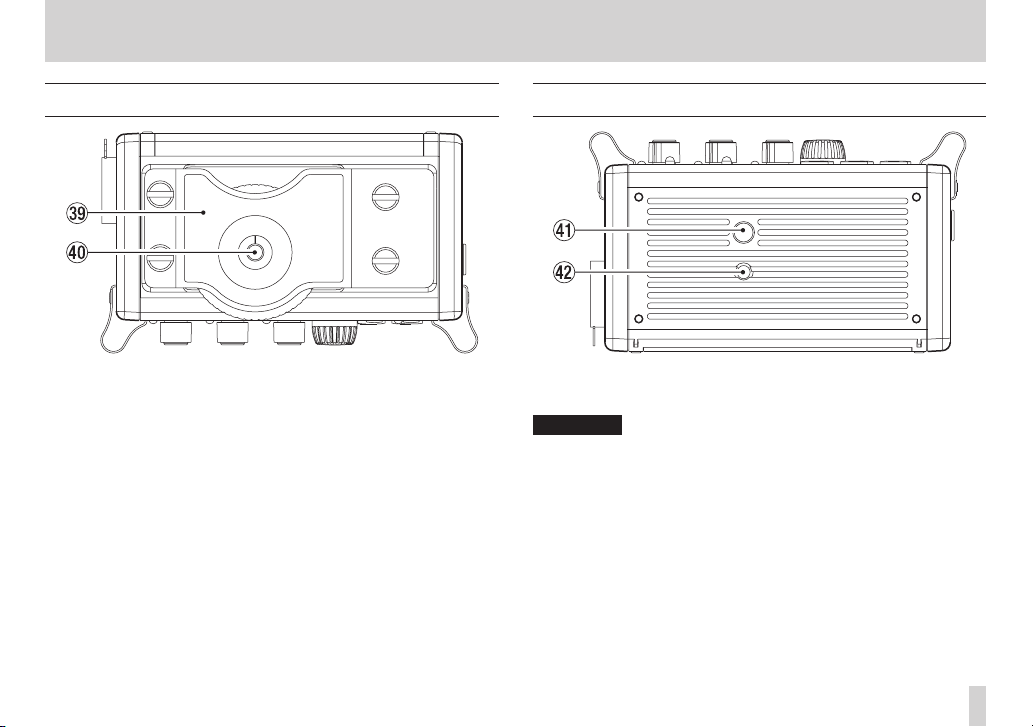
Top panel
. DSLR attachment bracket
Use this bracket, which is preinstalled on the unit, with the DSLR
mounting screw.
If you do not want to use this bracket, use a coin or other tool to
remove the four attachment screws.
/ DSLR mounting screw (1/4-inch)
Use to attach this unit to the bottom of a camera or a rack that
supports camera mounting screws, for example.
Bottom Panel
! Tripod mounting threads (1/4-inch)
Use to attach this unit to a tripod.
CAUTION
•
Tighten the unit securely to the tripod or microphone stand to
prevent it from falling off.
•
Place the tripod or microphone stand on a level surface when
using it with this unit.
•
Some tripods have different screw specifications that make direct
connection impossible. Use a commercially-available adapter
with such tripods.
@ Video camera pin hole
When using a tripod with a pin for video cameras, align this hole
with the pin when attaching the unit to the tripod.
TASCAM DR-60D
23
Page 24
2 – Names and functions of parts
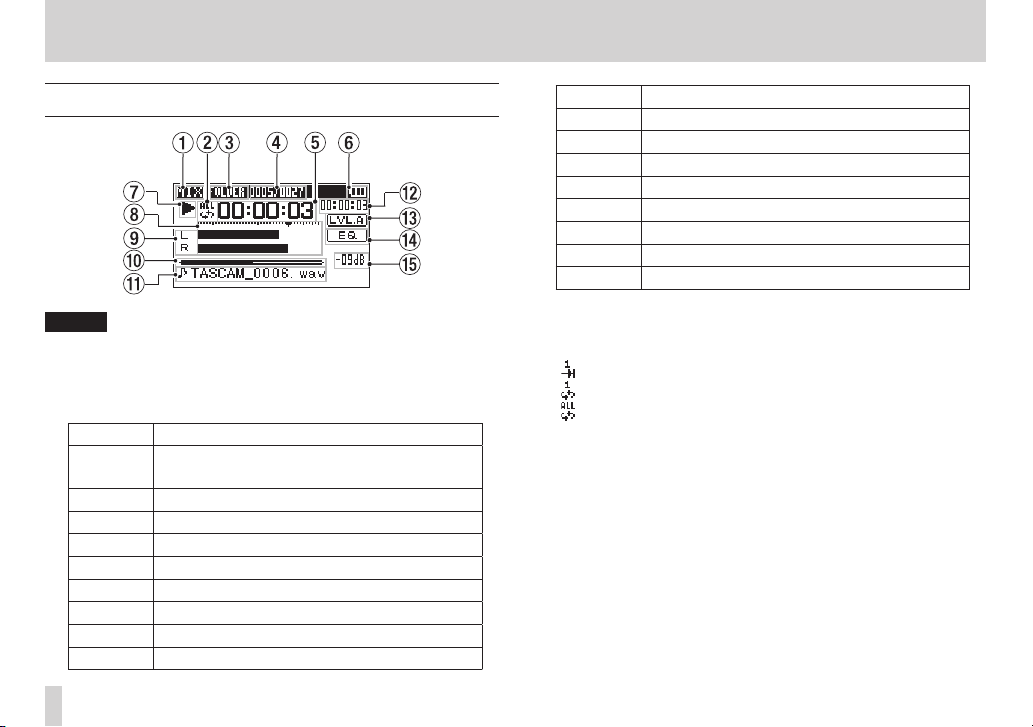
Home Screen
NOTE
When monitoring, some meters, icons and other items will
change to recording screen appearance.
1 Monitoring mode
This shows what audio is now being monitored.
Indicator Meaning
MIX
SUB Dual recording mode sub file
1+2 Mix of channels 1-2
3+4 Mix of channels 3-4
CAM CAMERA IN jack sound input
CH1 Channel 1 sound input
1-M Left channel of dual recording mode main file
1-S Left channel of dual recording mode sub file
CH2 Channel 2 sound input
Mix of channels 1-4,
or dual recording mode main file
Indicator Meaning
2-M Right channel of dual recording mode main file
2-S Right channel of dual recording mode sub file
CH3 Channel 3 sound input
3-M Left channel of dual recording mode main file
3-S Left channel of dual recording mode sub file
CH4 Channel 4 sound input
4-M Right channel of dual recording mode main file
4-S Right channel of dual recording mode sub file
2 Repeat playback setting
One of the following icons appears according to the current
setting.
Single file playback
Single file repeat playback
All file repeat playback
3 Playback area
This shows the current playback file area.
ALL
All files in the MUSIC folder
FOLDER
All files in the selected folder
4 Current playback file number/total number of files
This shows the current file number and total number of files in
the current playback area.
5 Elapsed time
This shows the elapsed time (hours: minutes: seconds) of the
current file.
TASCAM DR-60D
24
Page 25
2 – Names and functions of parts
6 Power supply status
When a battery is being used, a battery icon shows the amount
of power remaining in bars (“ ”, “ ”, “ ”).
The battery is almost dead and the power will soon turn off
(standby) if the icon has no bars “ ”.
When using the PS-P515U AC adaptor (sold separately) or USB
bus power, “ ” appears.
NOTE
Sometimes a
or conducting other demanding operations even when battery
power remains.
7 Recorder operation status
This icon shows the recorder operation status.
Indicator Meaning
8
9
7
,
m
/
.
8 Level meter
These show the levels of the input playback signals.
Battery Low
Stopped
Paused
Playing back
Fast-forwarding
Fast-rewinding
Skipping forward
Skipping backward
warning appears when recording
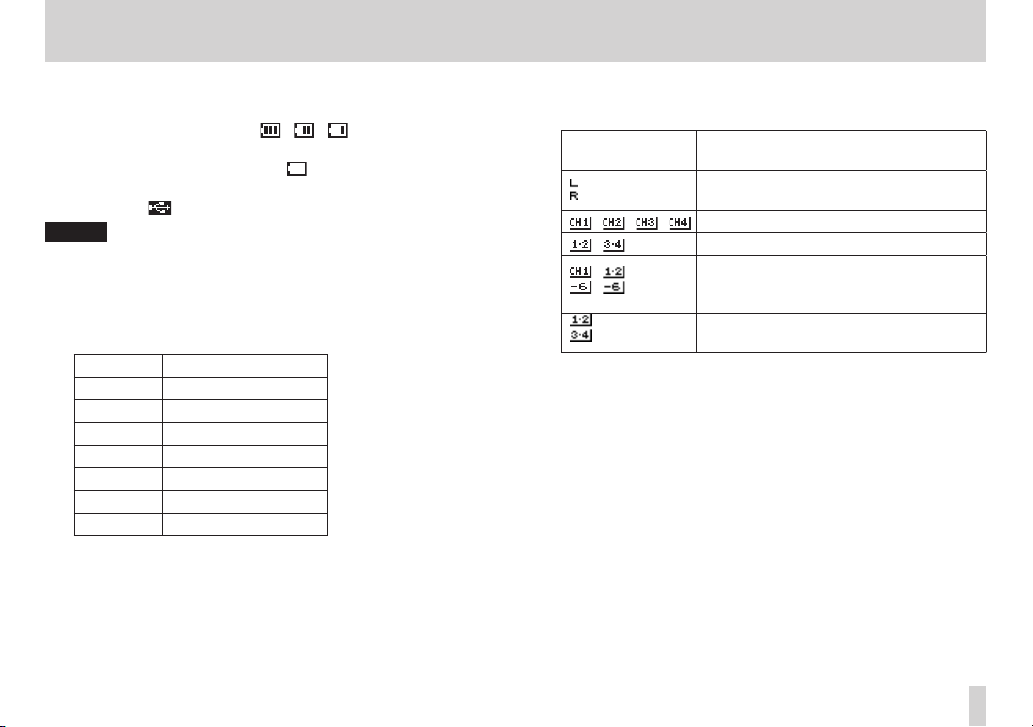
9 Track status display
This icon changes according to the recording mode.
Indicators
(examples)
/ / / Monitoring in MONO mode
/ Monitoring in STEREO mode
/
0 Playback position display
The current playback position is shown by a bar. As playback
progresses, the bar extends to the right.
q File name
This shows the name of the file playing back unless there are
multiple files recorded in 4-channel recording mode or dual
recording mode. In these cases, it shows the project name.
w Remaining time
This shows the remaining time (hours: minutes: seconds) of the
current file.
Meaning
Playing a file recorded in MONO or
STEREO mode
Playing a file recorded in DUAL MONO
or DUAL ST mode or monitoring in these
modes
Playing a file recorded in 4CH mode or
monitoring in this mode
TASCAM DR-60D
25
Page 26
2 – Names and functions of parts
e Level align status
This icon shows whether the level align function is on or off. (See
“Increasing the perceived overall sound pressure to enhance
listenability (Level Alignment)” on page 77.)
Level align function off
Level align function on
r Playback equalizer status
This icon shows whether the playback equalizer is on or off. (See
“Using the playback equalizer” on page 78.)
Playback equalizer off
Playback equalizer on
t Peak value in decibels (dB)
The maximum level that occurs in a fixed period of time is
displayed digitally.
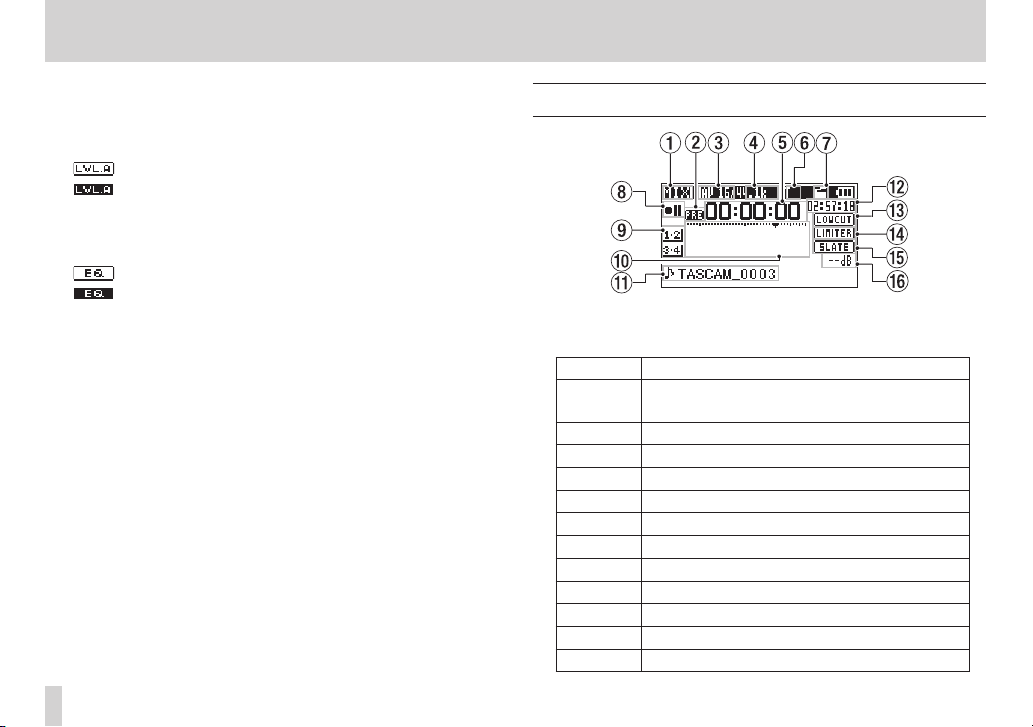
Recording Screen
1 Monitoring mode
This shows what audio is being monitored now.
Indicator Meaning
MIX
SUB Dual recording mode sub file
1+2 Mix of channels 1-2
3+4 Mix of channels 3-4
CAM CAMERA IN jack sound input
CH1 Channel 1 sound input
1-M Left channel of dual recording mode main file
1-S Left channel of dual recording mode sub file
CH2 Channel 2 sound input
2-M Right channel of dual recording mode main file
2-S Right channel of dual recording mode sub file
CH3 Channel 3 sound input
Mix of channels 1-4,
or dual recording mode main file
TASCAM DR-60D
26
Page 27

2 – Names and functions of parts
Indicator Meaning
3-M Left channel of dual recording mode main file
3-S Left channel of dual recording mode sub file
CH4 Channel 4 sound input
4-M Right channel of dual recording mode main file
4-S Right channel of dual recording mode sub file
2 Prerecording or Auto recording function status
“ ” appears when the prerecording function is ON, and in
recording standby.
“ ” appears when the auto recording function is ON, and
recording.
3 Recording format
This shows the file recording format.
WAV16, WAV24, BWF16 or BWF24
4 Recording sampling frequency
This shows the file recording sampling frequency.
44.1kHz, 48kHz or 96kHz
5 Elapsed recording time
The elapsed recording time of the file appears as hours: minutes:
seconds.
6 Number of recording channels
This shows the number of recording channels in the file.
ST or MONO
7 Auto tone function status
This icon shows whether the auto tone function is on or off. (See
“Using the auto tone function” on page 61.)
No icon Auto tone off
Auto tone on
8 Recorder operation status
This icon shows the recorder operation status.
Indicator Meaning
09
0
9 input source
This icon shows the input source.
Indicators
(examples)
0 Recording level meters
These show the levels of the input audio.
The b mark at the –12dB position provides a guide when
adjusting the input levels.
Recording standby or Recording paused
Recording
Self-timer recording activated
Meaning
/ / / Mono recording mode input source
/ Stereo recording mode input source
Dual recording mode input source and
/
gain setting for the second recording (0
to –12)
4-channel recording mode input source
TASCAM DR-60D
27
Page 28
2 – Names and functions of parts
q File name
This shows the file name that is automatically assigned to a
recording file.
This shows the project name when there are multiple files
recorded in 4-channel recording mode or dual recording mode.
w Remaining recording time
The remaining recording time on the SD card is shown in hours:
minutes: seconds according to the recording mode, sampling
frequency and recording format settings.
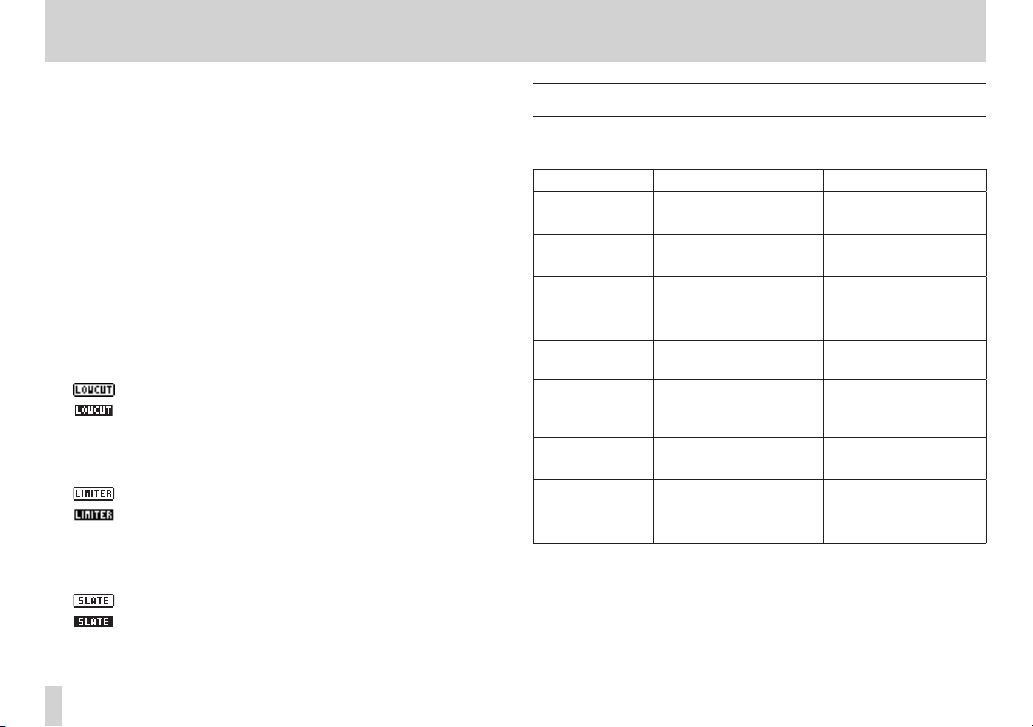
e Low cut filter status
This shows whether the low cut filter is ON/OFF. (See “Using the
low-cut filter” on page 49.)
This icon is shown as light letters on a dark background if the
low-cut filter is set to 40Hz, 80Hz or
2 or channels 3/4.
: Low cut filter off
: Low cut filter on
r Limiter function status
An icon appears if the limiter function setting for channel 1, 2 or
3/4 is set to
: Limiter off
: Limiter on
t SLATE button setting
This shows the SLATE button setting (enable/disabled).
(See “Adding slate tones” on page 62.)
: SLATE button disabled
: SLATE button enabled
y Peak value in decibels (dB)
Peak input level values are shown digitally.
28
MONO
TASCAM DR-60D
or
LINK
. (See “Using the limiter” on page 48.)
120
Hz for channel 1, channel
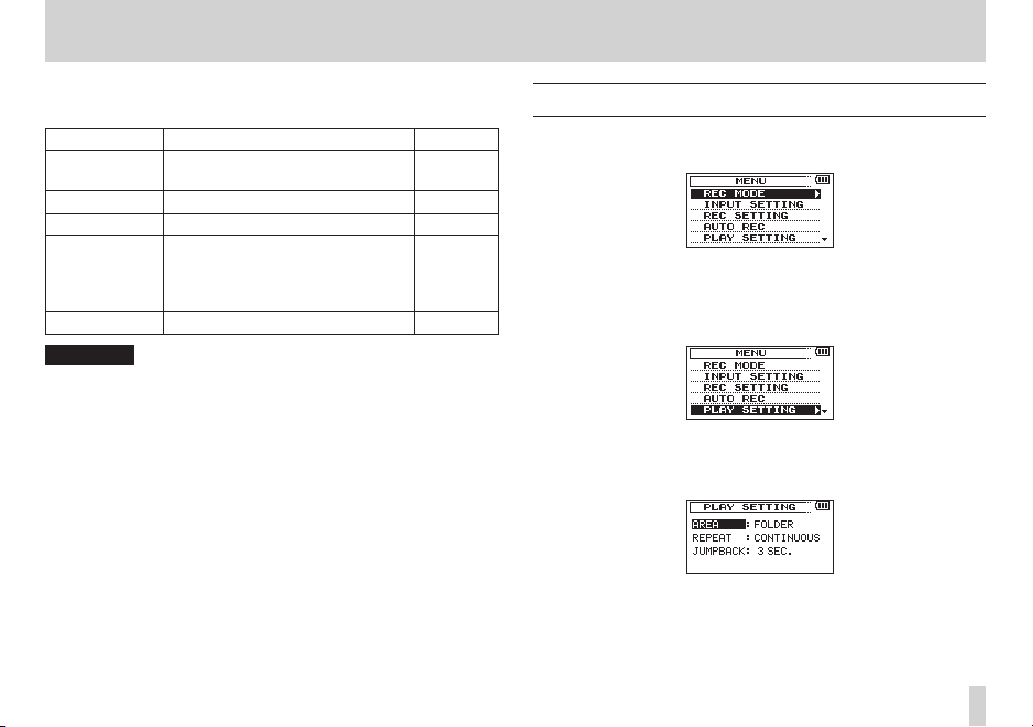
Menu item list
Press the MENU button to open the
menu are as follows.
Menu item Function Pages
REC MODE
INPUT SETTING Make input settings.
REC SETTING
AUTO REC
PLAY SETTING
BROWSE
OTHERS Show submenu items.
Set the recording
source.
Make recording
settings
Make auto recording
settings.
Make play area,
repeat playback and
jump-back settings.
SD card file and folder
operations
MENU
screen. The items in this
page 49, page 50,
page 52, page 54
page 46, page 48,
page 49
page 40, page 42,
page 58, page 60,
page 61, page 62
page 56, page 59
page 68, page 71
page 64, page 69
page 70
page 36, page 46,
page 84, page 88,
page 89
Page 29
The
OTHERS
MENU
Submenu item Function Pages
INFORMATION
FILE NAME File name settings page 88
DATE/TIME Date and time settings page 36
REMOTE
SYSTEM Various system settings page 86
CAUTION
•
When in recording standby or recording, only the
SETTING
•
When recording, the
submenu appears when
screen. The menu items contained are as follows.
Information about the file, SD card,
and system
Settings for the TASCAM RC-3F
footswitch and TASCAM RC-10
wired remote control (both sold
separately)
and
AUTO REC
screens are shown.
AUTO REC
OTHERS
is selected in the
setting cannot be changed.
page 84
page 89,
page 90
INPUT
2 – Names and functions of parts
Using menus
Use the
MENU
screen to make various settings.
1. Press the MENU button to open the
2. Turn the DATA dial to select a menu item (highlighted), and
press the DATA dial or / button to move to various settings
screens.
Example: PLAY SETTING screen
3. Turn the DATA dial to select a menu item (highlighted) to be
set.
Example: AREA is selected.
MENU
screen.
TASCAM DR-60D
29
Page 30
2 – Names and functions of parts
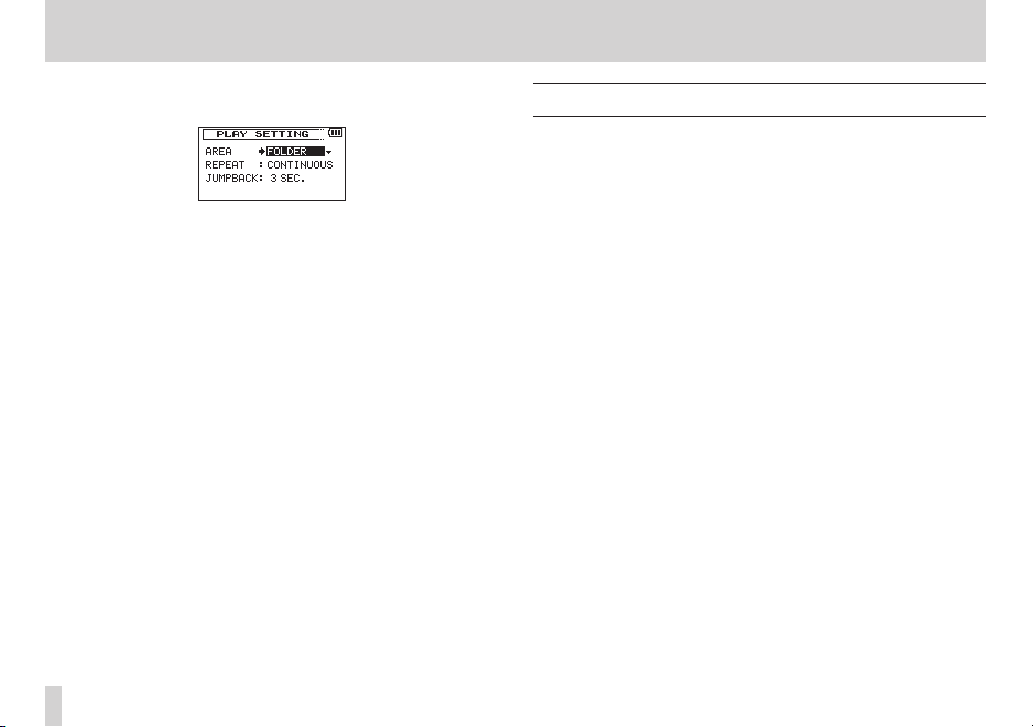
4. Turn the DATA dial or / button to move the cursor to
highlight the value of the setting.
5. Turn the DATA dial to change the setting.
6. Press the DATA dial or . button to set a different item in the
same menu.
This enables you to select a new item. Turn the DATA dial again
to select an item to be set.
7. Repeat step 3 to 6 as necessary to set each item.
8. To open the
the MENU button.
To return to the Home Screen, press the Stop (8) [HOME]
button.
MENU
screen (or
OTHERS
submenu screen), press
Basic operation
Use the following buttons to operate the various screens.
MENU button:
Opens the
Stop (8) [HOME] button:
When any other screen is open, press this to return to the Home
Screen. Use this to answer “NO” to a confirmation message.
DATA dial:
Turn the DATA dial to select items and change values on setting
screens. You can also turn the D ATA dial to change the file
playback position.
Press the DATA dial to confirm items selected on setting screens
and to answer “Yes” to confirmation pop-up messages.
Press the DATA dial during recording to add a mark manually.
(See“Adding marks manually to a recording” on page 59.)
While pressing and holding the data dial, press the . button
to jump to the previous mark or press the / button to jump
to the next mark. (See “Moving to a mark position” on page 59.)
/ button:
Use this to move the cursor (the highlighted area) to the right on
the screen, and to open folders on the
. button:
Use this to move the cursor (the highlighted area) to the left on
the screen, and to close folders on the
MENU
screen.
BROWSE
BROWSE
screen.
screen.
TASCAM DR-60D
30
Page 31

QUICK button:
This opens the quick menu pop-up.
• When stopped: Delete/divide current playback file, level align,
playback EQ and mic input gain setting functions
• During playback: Level align and playback EQ functions
• In recording standby: Mic input gain setting function
• When recording: Mic input gain setting function
• When the BROWSE screen is open: File/folder operations
• When the Mixer screen is open: Mic input gain setting
function
Record (0) button
Opens the
When the
REC MODE
REC MODE
screen.
screen is open, returns to the Home Screen.
MIXER button
Opens the
When the
MIXE R
screen.
MIXE R
screen is open, returns to the Home Screen.
2 – Names and functions of parts
TASCAM DR-60D
31
Page 32

3 – Preparation
Powering the unit
Power sources
DR-60D can operate on four AA batteries, TASCAM PS-P515U AC
adaptor (sold separately) or USB cable provided with the unit (USB
bus power).
Alkaline or Ni-MH batteries can be used.
Using AA batteries
Remove the battery compartment cover on the back of the unit.
Install 4 AA batteries in the compartment with the ¥ and ^ marks
as shown. Then, close the battery compartment cover.
When using AA batteries, set the type of battery in order to
accurately show the amount of power remaining and allow the
unit to accurately determine whether power is available for proper
operation. (See “Setting the type of AA batteries” on page 86.)
CAUTION
•
Manganese dry cell batteries (R6) cannot be used with this unit.
•
This unit cannot recharge Ni-MH batteries. Use a commercially
available recharger.
NOTE
A great amount of power is required to provide phantom power
to a condenser microphone. If you use a condenser microphone
while running the unit on AA batteries (NiMH rechargeable or
alkaline), the operation time will be shortened.
If you need to operate the unit for a long time, use a TASCAM
PS-P515U AC adaptor or TASCAM BP-6AA external battery box
(both sold separately) to power the unit.
TASCAM DR-60D
32
Page 33

3 – Preparation
Using an AC adaptor (sold separately)
Connect the TASCAM PS-P515U AC adaptor (sold separately) and the
USB cable to the USB port of the unit as shown in the illustration.
AC outlet
TASCAM
PS-P515U
(sold separately)
Mini-B USB plug
NOTE
When both batteries are installed and the AC adaptor is
connected, power will be supplied from the AC adaptor.
CAUTION
•
Never use any adaptor other than the designated TASCAM
PS-P515U AC adaptor (sold separately). Use of a different adaptor
could cause malfunction, fire or electric shock.
•
Noise may occur when recording with a microphone if the unit
is too close to the AC adaptor. In such a case, keep sufficient
distance between the AC adaptor and the unit.
Using an external battery pack (sold separately)
Connect a TASCAM BP-6AA external battery pack (designed for use
with this unit and sold separately) to the recorder with the included
USB cable as shown in the illustration. For details, see the BP-6AA
Owner’s Manual.
TASCAM
BP-6AA(soldseparately)
Mini-BUSBplug
CAUTION
The DR-60D cannot detect the remaining battery charge of a
BP-6AA. If you use a BP-6AA to operate the DR-60D without batteries
in the recorder itself, the unit might stop operating suddenly if the
battery pack runs out of charge. In order to avoid problems, put
batteries with sufficient charge into the DR-60D before connecting
and using a BP-6AA.
TASCAM DR-60D
33
Page 34

3 – Preparation
Using USB bus power
Connect the unit to a PC using the attached USB cable as shown in
the illustration.
Computer
USB
Mini-B USB plug
The
USB SELECT
power for power supply or connection with a PC through the USB
cable when USB cable is connected after the unit is turned on or
when the unit is turned on after connecting the USB cable. Turn the
DATA dial to select
power supply from the USB port. The Home Screen will appear.
NOTE
•
Power is supplied from the USB port if the USB cable is connected
to the unit that contains batteries (USB bus power prioritized).
•
The AC adaptor also connects using the USB cable, so set it to BUS
POWER in the same way.
screen appears to choose between USB bus
BUS POWER
and press the DATA dial to select
CAUTION
•
Depending on the USB bus power specifications of the computer,
this unit might not function when connected to the computer by
USB cable. In this case, use a TASCAM PS-P515U AC adaptor (sold
separately) or batteries.
•
This unit does not support computer power conservation and
sleep functions. When powering the unit using the USB bus power
of a computer, always turn such functions off.
TASCAM DR-60D
34
Page 35

3 – Preparation
Turning the power on and off (putting it in standby)
CAUTION
•
The unit goes in standby mode if shut down when the unit is
operating on AC power supplied through the TASCAM PS-P515U
AC adaptor (sold separately), or bus power supplied from a USB
port of a PC.
•
Turn down the volume of the sound system connected to the unit
before starting up or shutting down (standby) the unit.
•
Do not use headphones when starting up or shutting down
(standby) the unit. Otherwise, a large noise would cause damage
to headphones or your ears.
Starting up the unit
To start up the unit from the stopped state, press and hold the ¤
button until
display. The Home Screen appears when the unit starts up.
TASCAM DR-60D
Start -Up Screen Home Screen
(start-up screen) is displayed on the
CAUTION
When the unit is started up for the first time (or when the built-in
clock is reset after being left unused without batteries), the
DA TE/TIME
the date and time. (See “Setting the date and time” on page 36.)
screen appears before the start-up screen to adjust
Shutting down (putting the unit in standby)
Press and hold the ¤ button until
appears on the display.
The power turns off after the unit completes its shutdown (standby)
process.
CAUTION
Always use the ¤ button to shutdown (standby) the unit.
Do not remove the batteries or disconnect the power cable (AC
adaptor TASCAM PS-P515U or USB cable) accidently while the
unit is operating. If you do so, the unit cannot shut down properly
and all recordings, settings and other data will be lost. Lost data
cannot be restored.
LINEAR PCM RECORDER
TASCAM DR-60D
35
Page 36

3 – Preparation
Resume function
The unit has resume function. When started up, the unit is located to
the position (time) where it left off when shut down previously.
If the Playback (7) button is pressed after start-up, the file the
unit was playing when shut down (standby) previously starts to be
played from the position (time) where the unit left off when shut
down.
NOTE
The required data are stored in the SD card. The resume function
does not work if the card is exchanged or formatted.
Setting the date and time
Using its internal clock, this unit remembers the date and time when
a file is recorded.
1. Press the MENU button to open the
2. Turn the DATA dial to select
/ button to open the .
The
OTHERS
screen opens.
MENU
screen.
OTHERS
, and press the DATA dial or
TASCAM DR-60D
36
Page 37

3 – Preparation
3. Turn the DATA dial to select
dial or / button.
The
DA TE/TIME
4. Press the DATA dial or the . and / buttons to move the
cursor, and turn the DATA dial to change the value.
5. Press the MENU button or . button to confirm the change
and return to the
NOTE
You can set the unit to automatically add the date to file names.
(See “Setting the format of file names” on page 88.)
CAUTION
•
The date and time setting can only be maintained for a few
minutes if the battery power becomes low and the unit is not
powered by a TASCAM PS-P515U AC adaptor (sold separately)
or USB cable. When using batteries, replace them before they
completely lose power.
screen opens.
OTHERS
DA TE/TIME
screen.
, and press the DATA
Inserting and removing SD cards
Inserting the SD card
1. Open the SD card slot/USB port cover on the right side of the
unit.
2. Insert the SD Card into the slot as shown in the following illustration until it clicks into place.
Removing the card
1. Open the SD card slot/USB port cover on the right side of the
unit.
TASCAM DR-60D
37
Page 38

3 – Preparation
Unprotected Protected
2. Press the SD card in gently and then release it to allow it to
come out.
CAUTION
•
Do not remove the SD card from the unit during recording,
playback or at other times when it is being accessed.
•
Do not remove the SD card from the unit when it is connected to
a computer by USB.
•
SD cards that meet SD or SDHC standards can be used with this
unit.
•
A list of SD cards that have been confirmed to work with this unit
can be found on our website (http://tascam.com/).
SD card write protection switches
SD cards have protect switches that prevent writing new data to
them.
If you slide the protect switch to the LOCK position, file recording
and editing is not possible. Move the switch to the unlocked
position in order to record, erase and otherwise edit data on the
card.
TASCAM DR-60D
38
Page 39

3 – Preparation
Preparing an SD card for use
In order to use an SD card in this unit, you must format it first.
CAUTION
•
When formatting a card, the unit should be operating on AC
power supplied through the PS-P515U adaptor (sold separately),
USB bus power supplied from a computer, or batteries with sufficient remaining power.
•
Formatting a card erases all the data on it.
1. Confirm that an SD card is installed and turn the power ON.
2. The following confirmation pop-up message appears when
a new card or a card formatted for use with another device is
installed in the unit.
3. Press the DATA dial to start formatting.
4. When formatting ends, the Home Screen opens. You can also
reformat the card in this unit at any time.
Camera connection and attachment
In order to output the sound from this unit to a DSLR camera and
monitor sound from the camera with this unit, you must connect
them with commercially-available φ3.5mm stereo mini plug cables.
1. If you want to record audio from this unit with a camera,
connect the CAMERA OUT jack on the left side of this unit with
the external mic input on the camera.
If you want to input audio from the camera and monitor it with
this unit, connect the CAMERA IN jack on the left side of this
unit with the audio output jack on the camera.
DSLR camera
Audio output jack
External mic input jack
NOTE
Refer to the camera’s operation manual for information about
the connector on the camera.
2. Use the CAMERA OUT volume control on the left side of the
unit to adjust the level output to the camera.
3. To monitor the camera audio input to this unit using
headphones, turn monitoring on using the
the
REC SETTING
40.)
4. To mount the camera on this unit, use the camera attachment
screw on the top of the unit
screen. (See“Enabling monitoring” on page
MONITOR
item on
TASCAM DR-60D
39
Page 40

3 – Preparation
Headphones
Powered monitor speakers or
Connecting monitors and headphones
To listen with headphones, connect them to the PHONES jack.
To listen with an external monitoring system (powered monitor
speakers or an amplifier and speakers), connect it to the LINE OUT
jack.
amplifer and speakers
Monitoring
By enabling the monitoring function, you can monitor the input
signals when the unit is stopped using headphones, for example.
Moreover, by connecting this unit’s CAMERA IN jack with the
camera line output, you can check the sound being recorded by the
camera.
Enabling monitoring
1. Press the MENU button to open the
2. Turn the DATA dial to select
dial or / button to open the
3. Turn the DATA dial to select
or / button.
4. Turn the DATA dial to turn monitoring of the input signal on or
off.
Options:
5. When finished, press the stop (8) [HOME] button to return to
the Home Screen.
OFF, ON
(default value)
MENU
REC SETTING
REC SETTING
MONITOR
, and press the DATA dial
screen.
, and press the DATA
screen.
TASCAM DR-60D
40
Page 41

3 – Preparation
Selecting the monitored signal
1. When the Home Screen is open and the unit is stopped, paused,
in recording standby or recording, press the MONITOR SELECT
button to open a pop-up menu where you can select which
signal to monitor.
Stereo recording mode 4-channel recording mode
2. Turn the DATA dial to select which signal to monitor.
Option Meaning
MIX Monitor a mix of channels 1–4.
MIX Main Monitor the dual recording mode main file.
MIX Sub Monitor the dual recording mode sub file.
CH12 Monitor a mix of channels 1–2.
CH34 Monitor a mix of channels 3–4.
CAMERA IN Monitor the CAMERA IN jack signal.
CH1 Monitor the channel 1 input sound.
CH1 Main
CH1 Sub
CH2 Monitor the channel 2 input sound.
CH2 Main
Monitor the dual recording mode main file left
channel.
Monitor the dual recording mode sub file left
channel.
Monitor the dual recording mode main file
right channel.
Option Meaning
CH2 Sub
CH3 Monitor the channel 3 input sound.
CH3 Main
CH3 Sub
CH4 Monitor the channel 4 input sound.
CH4 Main
CH4 Sub
NOTE
The monitoring options depend on the recording mode setting.
3. When finished selecting the monitoring signal, press the DATA
dial or MONITOR SELECT button to return to the Home Screen.
NOTE
When
CAMERA IN
through the PHONES jack, but the level meters will show the
input sound according to the recording mode.
Monitor the dual recording mode sub file right
channel.
Monitor the dual recording mode main file left
channel.
Monitor the dual recording mode sub file left
channel.
Monitor the dual recording mode main file
right channel.
Monitor the dual recording mode sub file right
channel.
is selected, you can monitor the input sound
TASCAM DR-60D
41
Page 42

4 – Recording
This unit can record sound from external microphones and external
audio devices, including CD players.
The unit can be set to record audio files in WAV or BWF
(44.1/48/96kHz, 16/24-bit) format.
Marks added when recording to Broadcast Wave Format (BWF) can
be used with software that supports this format, for example.
This recorder has five recording modes, including dual recording,
which allows the same input signals to be recorded at two different
levels, and 4-channel recording.
Selecting file format, sampling frequency, and maximum file size
Select the audio file type that you want to record before you start
recording.
1. Press the MENU button to open the
2. Turn the DATA dial to select
dial or / button to open the
MENU
REC SETTING
REC SETTING
screen.
, and press the DATA
screen.
3. Turn the DATA dial to select
/ button.
Set the file format with the Turn the DATA dial to one of the
following options.
Options:
NOTE
BWF is a format created for broadcasting that has the same
sound quality as the standard WAV format. It also uses the same
“.wav” file extension as WAV files. In this manual, we distinguish
these file types by using the terms BWF and WAV.
4. Press the DATA dial or . button to show settings.
5. Turn the DATA dial to select
/ button.
Set the sampling frequency with the Turn the DATA dial to one
of the following options.
Options:
6. Press the DATA dial or . button to show settings.
BWF 16bit, BWF 24bit, WAV 16bit
value),
WAV 24bit
4 4 .1 k
(default value),
FORMAT
, and press the DATA dial or
SAMPLE
, and press the DATA dial or
48k, 96k
.
(default
TASCAM DR-60D
42
Page 43

4 – Recording
Microphones
7. Turn the DATA dial to select
/ button.
Set the maximum file size with the Turn the DATA dial to one of
the following options.
Options:
NOTE
•
If the maximum set file size is exceeded during recording, the unit
will automatically continue recording in a new file.
•
Depending on the file format, the amount of recording time
will differ for the same file size. The amount of recording time is
shown on the right of the setting value (in parentheses).
8. When finished making the setting, press the stop (8) [HOME]
button to return to the Home Screen.
64M, 128M, 256M, 512M, 1G, 2G
SIZE
, and press the DATA dial or
. (default value)
Preparing the recording inputs
Connecting microphones
Connect microphones to this unit’s 1/L , 2/R and/or 3-4 connectors.
Point the mics at the sound source and place the unit in a stable
location where there is little vibration.
Stereo Microphones
TASCAM DR-60D
43
Page 44

4 – Recording
Recording an external device (LINE IN)
Use stereo plug cables to connect to the output of an external audio
device.
Other audio equipment
or external sound source
CAUTION
•
Reduce the output level of the external audio device if the input
sound is distorted even when reducing the input gain level on the
unit.
•
When an external audio device with a fixed output line level is
connected, it would be impossible to control the gain level appropriately because of excessively large input signals. In such cases,
use the headphone jack or other level-controllable output for
connection to the unit.
Setting the input types
Set the 1/L and 2/R input switches on the front of the unit according
to the types of equipment connected to them.
LINE:
Use this setting when connecting line output jacks of external
devices to the analog inputs of this recorder.
MIC:
Use this setting when connecting mics to the recorder.
MIC+PHANTOM:
Use this setting when connecting condenser mics that require
phantom power (+24V or +48V) to the recorder.
When you set it to MIC+PHANTOM, a pop-up message appears
confirming that you want to turn phantom power on. (See “Using
phantom power” on page 45. )
Use the
SYSTEM
“Setting the phantom power voltage” on page 86. )
screen to set the voltage to +24V or +48V. (See
TASCAM DR-60D
44
Page 45

4 – Recording
CAUTION
Depending on this setting, the input level setting range changes.
For this reason, the input level might change greatly when this
setting is changed. Before changing it, you should turn the power
OFF or turn the output level all the way down.
Using phantom power
When stopped, if you change the 1/L or 2/R input switch on the
front of the unit to MIC+PHANTOM, a pop-up message appears
confirming that you want to turn phantom power on.
When the confirmation pop-up message opens, press the DATA dial
to turn phantom power on for the 1/L connector or 2/R connector
and supply phantom power (+24V or +48V) to the connected mic.
To close the confirmation pop-up message without turning
phantom power on, change the input switch to LINE or MIC.
Use the
SYSTEM
“Setting the phantom power voltage” on page 86. )
NOTE
Battery power will be consumed faster when set to +48V than
when set to +24V.
screen to set the voltage to +24V or +48V. (See
CAUTION
•
Confirm that phantom power is OFF before connecting a line
level device to a 1/L connector or 2/R connector. If you connect
a line level device while phantom power is being supplied, that
device and this unit could be damaged.
•
When using a condenser microphone, before connecting to and
disconnecting from a 1/L connector or 2/R connector, confirm
that the phantom power for that jack is OFF. If you connect or
disconnect a mic while phantom power is being supplied, that
mic and this unit could be damaged.
•
Turn phantom power ON only when using a condenser microphone that requires phantom power.
•
Supplying phantom power to some types of ribbon microphones
could break them. Do not supply phantom power to a ribbon
microphone if you are in doubt.
•
When using USB bus power, the unit might not be able to supply
phantom power depending on the computer. In this case, use a
TASCAM PS-P515U AC adaptor (sold separately).
•
Some condenser microphones will not operate when phantom
power is set to +24V.
•
Do not connect or disconnect the AC adaptor when using
phantom power. Doing so could damage this device.
TASCAM DR-60D
45
Page 46

4 – Recording
Using plug-in power
The plug-in power function can be turned on when an external mic
that requires it is connected to the 3-4 jack.
1. Press the MENU button to open the
2. Turn the DATA dial to select
/ button to open the
3. Turn the DATA dial to select
/ button to open the SYSTEM screen.
4. Turn the DATA dial to select
DATA dial or / button.
5. Turn the DATA dial to turn plug-in power ON (default value:
OFF
).
6. When finished making the setting, press the stop (8) [HOME]
button to return to the Home Screen.
CAUTION
•
When connecting a dynamic mic or external mic that has its own
battery, set
could be damaged.
•
When using a mic to record, use headphones for monitoring.
If you use speakers for monitoring, the sound output from the
speakers could be picked up by the mic, resulting in its unwanted
recording or feedback noise.
PLUGIN POWER
OTHERS
to
MENU
screen.
OTHERS
, and press the DATA dial or
screen.
SYSTEM
, and press the DATA dial or
PLUGIN POWER
OFF
. If ON, the connected mic
, and press the
Adjusting the input level
Before starting recording, the input level should be adjusted to
prevent the recorded sounds or signals from being distorted due to
excessively large input signals or from being inaudible due to excessively low input signals compared to noise.
In addition to manual adjustment, the unit has the following three
level adjustment functions: peak reduction, automatic level control,
and limiter. Any of these can be used as required. (See “Using the
limiter” on page 48. )
TIP
In addition to adjusting the INPUT level, try changing the
distance and angle between the microphone and the sound
source. The angle and distance of the microphone can also
change the character of the recorded sound.
1. Press the MENU button to open the
2. Turn the DATA dial to select
DATA dial or / button to open the
3. Turn the DATA dial to set the
the DATA dial or / button.
Ch1 INPUT SETTING screen
MENU
screen.
INPUT SETTING
GAIN
for each channel, and press
, and press the
INPUT SETTING
screen.
TASCAM DR-60D
46
Page 47

4 – Recording
4. Turn the DATA dial to set the mic input gain.
Options:
NOTE
•
Ch3/4
and
•
The
should be set according to the input level.
If you are not sure which setting to use, try
level is too low even after adjustment, return to the
SETTING
to
HIGH
•
The limiter function can be set and changed even during
recording standby and when recording.
5. When finished making the setting, press the stop (8) [HOME]
button to return to the Home Screen.
6. Press the record (0) button to begin recording standby.The
record indicator flashes red and the recording screen appears.
LOW
(default value),
has only two mic input gain options—
HIGH
.
LOW, MID
and
HIGH
settings change the input gain, and
screen and set it to
.
MID, HIGH
MID
. If the level is still too low, set it
LOW
(default value)
LOW
first. If the input
INPUT
7. Use the 1/L, 2/R and 3-4 knobs on the front of the unit to adjust
the input levels.
If the input levels are too high, the peak indicators to the left of
the 1/L, 2/R and 3-4 knobs light red.
A b mark is provided at –12 dB on the level meters. Set the
input level so that the indicator bars move to and fro with this
mark at about the center without causing the 1/L knob, 2/R
knob, 3-4 knob PEAK indicator to light red when the loudest
sounds occur.
CAUTION
During mic input, this lights if distortion occurs in the analog
circuitry. During line level input, this does not light even if
distortion occurs in the analog circuitry.
NOTE
To monitor the sound while adjusting the input levels or
recording, connect headphones to the PHONES jack.
Use the PHONES jack volume control to adjust the monitoring
level. Changing the monitoring volume does not affect the
recorded sound.
8. When finished making the setting, press the stop (8) [HOME]
button to exit recording standby.
TASCAM DR-60D
47
Page 48

4 – Recording
Using the limiter
When the limiter is on, the mic input gain will be adjusted automatically according to the input level to set the recording level so that
distortion does not occur even when loud sounds are input.
1. Press the MENU button to open the
2. Turn the DATA dial to select
DATA dial or / button to open the
3. Turn the DATA dial to select
the DATA dial or / button.
Ch1 INPUT SETTING screen
4. Turn the DATA dial to set the limiter for mic input.
Options Explanation
OFF
(default value)
MONO Limiter on only for selected channel
LINK
5. When finished making the setting, press the stop (8) [HOME]
button to return to the Home Screen.
Limiter off
Limiter on for both selected and linked
channels
MENU
screen.
INPUT SETTING
LIMITE R
INPUT SETTING
for a channel, and press
, and press the
screen.
CAUTION
•
Distortion might occur if the input sound is too loud even when
the limiter is on. In such a case, lower the input level or increase
the distance between the unit and the sound source.
•
During mic input, this lights if distortion occurs in the analog
circuitry. During line level input, this does not light even if
distortion occurs in the analog circuitry.
NOTE
•
The icon appears on the recording screen when the limiter
is on for any channel (when set to
•
The limiter function can be set and changed even during
recording standby and when recording.
•
When you change the 1Ch (2Ch) limiter setting from
LINK
the setting of the other channel will be changed to match,
so a confirmation pop-up message appears.
Pop-up message when changing from
•
The Ch3/4
When set to
has excessive input. When set to
channels in the pair when either has excessive input.
MONO
and
LINK
MONO
, the limiter only affects the channel that
MONO
or
LINK
).
MONO
to
MONO
to
LINK
limiter settings affect both channels.
LINK
, the limiter affects both
TASCAM DR-60D
48
Page 49

4 – Recording
Using the low-cut filter
The low cut filter can reduce noise such as offensive wind noise from
air-conditioners and projectors.
1. Press the MENU button to open the
2. Turn the DATA dial to select
DATA dial or / button to open the
3. Turn the DATA dial to select
the
DATA
dial or / button.
Ch1 INPUT SETTING screen
4. Turn the DATA dial to select the cut off frequency of the low cut
filter for mic input.
Options:
5. When finished making the setting, press the stop (8) [HOME]
button to return to the Home Screen.
CAUTION
•
The low-cut filter cannot be used with line input.
•
Use headphones to monitor when you are recording with a microphone. If you use speakers to monitor, the sound output from the
speakers may also be recorded, causing a poor recording and
even feedback.
NOTE
The low-cut function can be set and changed even during
recording standby and when recording.
OFF
(default value),
MENU
screen.
INPUT SETTING
LOW CUT
INPUT SETTING
for a channel, and press
40Hz, 80Hz, 120Hz
, and press the
screen.
Overview of recording modes
This recorder has five recording modes.
Use the
REC MODE
recording mode.
The settings available are different for each recording mode.
MONO mode
This is a mode for mono recording.
STEREO mode (default value)
This is a mode for stereo recording of two independent left and
right channels.
DUAL MONO mode
This mode uses one input source to create files at two different
input levels (set on
be recorded.
DUAL ST mode
This mode uses one input source to create files that two different
input levels (set on
will be recorded.
4CH mode
This mode records 4 external inputs in two pairs as two stereo
files.
item on the
INPUT SETTING
INPUT SETTING
REC MODE
screen to set the
screen). Two mono files will
screen). Two stereo files
TASCAM DR-60D
49
Page 50

4 – Recording
Recording (MONO/STEREO recording)
Make recording settings
1. Press the MENU button to open the
2. Turn the DATA dial to select
or / button to open the
3. Turn the DATA dial to select
or / button.
4. Turn the DATA dial to set it to
STEREO
).
mono recording stereo recording
5. Press the DATA dial or . button to select the other item.
6. Turn the DATA dial to select
/ button.
TASCAM DR-60D
50
MENU
screen.
REC MODE
REC MODE
REC MODE
MONO
SOURCE
, and press the DATA dial
screen.
, and press the DATA dial
or
STEREO
, and press the DATA dial or
(default value:
7. Turn the DATA dial to select the input source.
REC MODE SOURCE (options) Explanation
CH1 Channel 1 mono recording
MONO
STEREO
8. Press the DATA dial or . button to select the other item.
9. If
REC MODE
decoding.
To use a mid-side mic, turn the DATA dial to select
and press the DATA dial or / button.
10. Turn the DATA dial to set the decoding mode when using a
mid-side mic.
Options Explanation
OFF Record in ordinary stereo mode.
REC
MONITOR
11. When finished making the setting, press the stop (8) [HOME]
button to return to the Home Screen.
CH2 Channel 2 mono recording
CH3 Channel 3 mono recording
CH4 Channel 4 mono recording
CH1/2
CH3/4
is set to
STEREO
Use to decode while recording. Playback is
conducted without decoding.
Record mid-side mic output without decoding for
decoding later. Use this mode to monitor when
recording with a mid-side mic.
Use this also when playing back mid-side files that
were recorded without decoding.
Channel 1 and 2 stereo
recording
Channel 3 and 4 stereo
recording
, you can also set MS mic
MS MODE
,
Page 51

4 – Recording
TASCAM_0001.WAV
Set where to save the file
Set the folder where recorded files are saved.
The created sound file will be saved in the currently selected folder.
For details, see
page 66.
If no setting is made, new recording files are placed in the “MUSIC”
folder.
SELECT
quick menu under “Folder operations” on
Starting the recording
1. Press the record (0) button to begin recording standby.
mono recording stereo recording
The screen shows the recording file name, the input source,
the recording audio file type and sampling frequency. Please
confirm that these are as desired before starting recording.
2. To start recording, press the record (0) button again.
mono recording stereo recording
When recording starts, the indicator lights continuously, and the
display shows the elapsed recording time and the remaining
recording time.
3. Press the stop (8) [HOME] button to end recording and create
the audio file.
To pause recording, press the record (0) button. Press
the record (0) button or play(7) button again to restart
recording in the same file.
If you press the stop (8) [HOME] button after pausing
a recorded audio file up to the moment that you paused
recording is created.
NOTE
To avoid recording of the noise from pressing the record (0)
button, the start of recording is delayed by 0.3 second (fixed)
after the record (0) button is pressed. (REC DELAY)
File names when recording in MONO/STEREO
1: Set with the
2: Recording file base number
WORD
item on the
FILE NAME
screen
TASCAM DR-60D
51
Page 52

4 – Recording
Simultaneously recording two files at different input levels (DUAL REC)
This recorder can simultaneously record a second recording at a
different input level along with the regular recording. For example,
when recording with microphones, you can make an ordinary
recording with the input level set as high as possible and simultaneously record at a slightly lower input level for safety.
Two recorded files (one with higher input level and one with lower
input level) are saved individually
NOTE
Make the input level setting for the ordinary recording in the
usual manner (See “Preparing the recording inputs” on page
43 and “Adjusting the input level” on page 46.).
Enabling dual recording
1. Press the MENU button to open the
2. Turn the DATA dial to select
or / button to open the
3. Turn the DATA dial to select
or / button.
4. Turn the DATA dial to set it to
Dual mono recording Dual stereo recording
5. Press the DATA dial or . button to select the other item.
TASCAM DR-60D
52
MENU
REC MODE
REC MODE
REC MODE
DUAL MONO
screen.
, and press the DATA dial
screen.
, and press the DATA dial
or
DUAL ST
.
6. Turn the DATA dial to select
/ button.
7. Turn the DATA dial to select the input source.
REC MODE SOURCE (options) Explanation
CH1
0dB
CH2
CH3
CH4
CH1/2
CH3/4
to
DUAL
MONO
DUAL
ST
8. Press the DATA dial or . button to select the other item.
9. Turn the DATA dial to select
or / button.
10. Turn the DATA dial to set the input gain level of the other
recording.
Range:
11. Press the D ATA dial or . button to select the other item.
–1 2 d B
(default value:
SOURCE
, and press the DATA dial or
Channel 1 dual mono
recording
Channel 2 dual mono
recording
Channel 3 dual mono
recording
Channel 4 dual mono
recording
Channel 1/2 dual stereo
recording
Channel 3/4 dual stereo
recording
DUAL LVL
, and press the DATA dial
-6dB
)
Page 53

12. If
REC MODE
decoding.
To use a mid-side mic, turn the DATA dial to select
and press the DATA dial or / button.
13. Turn the DATA dial to set the decoding mode when using a
mid-side mic.
Options Explanation
OFF Record in ordinary stereo mode.
REC
MONITOR
14. When finished making the setting, press the MENU button to
return to the MENU screen. Press the DATA dial or . button
to select the other item.
15. Turn the DATA dial to select
DATA dial or / button to open the
is set to
DUAL ST
Use to decode while recording. Playback is
conducted without decoding.
Record mid-side mic output without decoding
for decoding later. Use this mode to monitor
when recording with a mid-side mic.
Use this also when playing back mid-side files
that were recorded without decoding.
, you can also set MS mic
INPUT SETTING
, and press the
INPUT SETTING
MS MODE
screen.
4 – Recording
18. When finished making the setting, press the stop (8) [HOME]
button to return to the Home Screen.
,
Starting dual recording
Press the record (0) button to start dual recording.
During dual recording, the recording screen appears as follows.
Dual mono recording Dual stereo recording
In the input source display area of the recording screen, the input
levels of the current input source and the dual recording are shown.
16. Turn the DATA dial to select
/ button.
17. Turn the DATA dial to set this value according to the distance of
the mic connected to the channel.
Range:
0ms
(default value) to ±
DELAY
, and press the DATA dial or
150ms
(in 1ms increments)
TASCAM DR-60D
53
Page 54

4 – Recording
T
ASCAM_0002S12.WAV
T
Dual recording file names
Dual recording allows two files to be recorded simultaneously. The
name of the second file created by dual recording has
the file name of the ordinary recording.
the input level has been lowered.
ASCAM_0002S34D12.WAV
1: Set with the
2: Recording file base number
3: S is the source file
4: Assigned channels (12 is channels 1/2 and 34 is channels 3/4)
5: This dual recording file was recorded with the input level set to
-12dB. (This would be
at -10dB, for example.)
WORD
item on the
D06
if recorded at -6dB or
DXX
shows the amount that
FILE NAME
screen
DXX
D10
if recorded
added to
Recording 4 channels
You can connect external mics or other equipment to record four
independent channels as two stereo recording files (channels 1/2
and 3/4).
Making 4-channel recording settings
1. Press the MENU button to open the
2. Turn the DATA dial to select
or / button to open the
3. Turn the DATA dial to select
or / button.
4. Turn the DATA dial to select
5. Press the DATA dial or . button to select the other item.
6. Turn the DATA dial to select
or / button.
Set the CH1 and CH2 mic inputs.
Options:
7. Press the DATA dial or . button to select the other item.
8. When using mid-side mics, turn the D ATA dial to select
MODE 1/2
button.
STEREO
(default value),
or
MS MODE 3/4
MENU
screen.
REC MODE
REC MODE
REC MODE
4CH
CH1/2 IN
, and press the DATA dial or /
, and press the DATA dial
screen.
, and press the DATA dial
.
, and press the DATA dial
CH1 MUTE, CH2 MUTE
MS
TASCAM DR-60D
54
Page 55

4 – Recording
9. Turn the DATA dial to set the decoding mode when using a
mid-side mic.
Options Explanation
OFF Record in ordinary stereo mode.
REC
MONITOR
10. When finished making the setting, press the MENU button to
return to the
11. Turn the DATA dial to select
DATA dial or / button to open the INPUT SETTING screen.
12. Turn the DATA dial to select
/ button.
13. Turn the data dial to set the value according to the distance
between mics.
Range:
Use to decode while recording. Playback is
conducted without decoding.
Record mid-side mic output without decoding
for decoding later. Use this mode to monitor
when recording with a mid-side mic.
Use this also when playing back mid-side files
that were recorded without decoding.
MENU
screen.
0ms
(default value) to ±
INPUT SETTING
DELAY
, and press the DATA dial or
150ms
, and press the
(in 1ms increments)
NOTE
•
If the mics (channels 1/2 and channels 3/4) are far apart from
each other, a time delay could occur when recording. Use the
DELAY
•
14. When finished making the setting, press the stop (8) [HOME]
setting to eliminate this time delay when recording.
The
DELAY
standby and when recording.
button to return to the Home Screen.
setting can be changed even during recording
Starting 4-channel recording
1. Press the record (0) button to begin recording standby.
NOTE
Before you start recording you can confirm the recording audio
file format and sampling frequency at the top of the recording
screen, as well as the input sources on the left and the recording
project name beneath the meter bars.
2. Press the record (0) button again to start recording.
TASCAM DR-60D
55
Page 56

4 – Recording
TASCAM_0002S12.WAV
T
File names when recording in 4-channel
In 4-channel recording, a set of two files is created—one for the
external mics connected to channels 1 and 2 and one for the
external device or stereo mic connected to channels 3/4.
ASCAM_0002S34.WAV
1: Set with the WORD item on the
2: Recording file base number
3: S is the source file
4: Assigned channels (12 is channels 1/2 and 34 is channels 3/4)
TASCAM DR-60D
56
FILE NAME
screen
Recording automatically (AUTO REC)
This function allows the unit to respond to input sound levels and
start and pause recording, as well as set marks and create new files,
for example.
1. Press the MENU button to open the
2. Turn the DATA dial to select
or / button to open the
3. Turn the DATA dial to select
/ button.
4. Turn the DATA dial to set the automatic recording mode.
OFF (default value): Off
MARK: Sets marks automatically during recording
PAUSE: Automatically pauses during recording
TRK INC: Automatically creates new files during recording
5. Press the DATA dial or . button to select the other item.
6. Turn the DATA dial to select
dial or / button.
7. Turn the DATA dial to set the start level, which is the level that
the unit recognizes as an input signal.
Options:
8. Press the DATA dial or . button to confirm the setting and
return to item selection.
9. Turn the DATA dial to select
dial or / button.
–6d B, –1 2 d B
(default value),
MENU
screen.
AUTO REC
AUTO REC
MODE
START LEVEL
END LEVEL
, and press the DATA dial
screen.
and press the DATA dial or
, and press the DATA
–2 4 d B, –48dB
, and press the DATA
Page 57

4 – Recording
10. Turn the DATA dial to set the
END LEVEL
, which is the level
that the unit recognizes as no input signal.
Options:
–6d B, –1 2 d B, –2 4 d B
(default value),
–48dB
11. Press the D ATA dial or . button to select the other item.
12. Turn the DATA dial to select
END DELAY
, and press the DATA
dial or / button.
13. Turn the DATA dial to set the
of time after the
Options:
END LEVEL
1sec
–
5sec
END DELAY
, which is the amount
is reached until recording stops.
(default value)
14. When finished making the setting, press the stop (8) [HOME]
button to return to the Home Screen.
15. Press the record (0) button to put the unit into recording
standby.
Recording starts automatically when the input signal exceeds
the
START LEVEL
.
16. The recording mode changes according to the setting of the
MODE.
MARK: The unit adds marks when the input signal level
falls below the
END DELAY
becomes higher than the
END LEVEL
for more than the
time and when the input signal level
START LEVEL
again.
PAUSE: The unit pauses recording (resumes recording
standby) when the input signal level falls below the
END LEVEL
for more than the
END DELAY
time.
TRK INC: The unit pauses recording (resumes recording
standby) when the input signal level falls below the
END LEVEL
for more than the
END DELAY
time.
When the input signal level becomes higher than
the
START LEVEL
again, it starts recording to a
new file.
17. Press the stop (8) [HOME] button to stop automatic recording.
TIP
By using this in combination with the PRE REC function, you can
record events without losing the beginnings of sounds.
CAUTION
•
When the AUTO REC function is on the self-timer function cannot
be used.
•
A new file cannot be created if the total number of folders and
files would exceed 5000.
•
Files shorter than two seconds cannot be created. Moreover, if
the sampling frequency is 96 kHz, files shorter than four seconds
cannot be created.
•
If the name of a newly created file would be the same as that of
an existing file, its number will be increased by one.
NOTE
•
You can also add marks manually. (See “Adding marks manually
to a recording” on page 59. )
•
You can also manually start a new file in the middle of recording.
(See “Adding marks automatically to a recording” on page 59.
)
•
When a new file is created, the number at the end of the filename
is increased by one.
TASCAM DR-60D
57
Page 58

4 – Recording
Creating and changeover to a new file during continued recording (Track increment)
You can manually or automatically split a recording by creating a
new file. (Track increment)
Manual track increment during recording
You can manually split a recording by creating a new file.
1. Press the / button while recording.
NOTE
When new files are created, incremental numbers are added to
the end of each project name.
CAUTION
•
A new file cannot be created if the total number of files and
folders would exceed 5000.
•
Files shorter than two seconds cannot be created. If the sampling
frequency is 96kHz, files shorter than four seconds cannot be
created.
•
If the name of a newly created file would be the same as that of
an existing file, the number will be incremented until the new file
has a unique name.
Automatic track increment by file size
Without pausing recording, a new file can be created automatically
during recording when a file size set in advance is exceeded.
1. Press the MENU button to open the
2. Turn the DATA dial to select
dial or / button to open the
3. Turn the DATA dial to select
/ button.
4. Turn the DATA dial to set the maximum file size at which track
increment takes place, by selecting (highlighting) from the
following:
Options:
5. When finished making the setting, press the stop (8) [HOME]
button to return to the Home Screen.
CAUTION
A new file cannot be created if the total number of files and
folders would exceed 5000.
NOTE
Depending on the file format, the same maximum file size will
have different recording lengths.
64M, 128M, 256M, 512M, 1G, 2G
MENU
screen.
REC SETTING
REC SETTING
SIZE
, and press the DATA dial or
, and press the DATA
screen.
(default value)
TASCAM DR-60D
58
Page 59

4 – Recording
Mark function
Adding marks manually to a recording
You can manually add marks to a recording where you want them.
1. Press the DATA dial while recording to add a mark.
Mark number pull-up appears.
NOTE
•
Mark information is stored in the file with numbers between
01–99
. The maximum number of marks in a file is 99.
•
Marks added to BWF format WAV files by this unit during
recording are stored in the file. These marks can be used when
playing back the file using software or equipment that supports
the BWF format.
Adding marks automatically to a recording
This function allows the unit to add marks automatically using
REC
.
On the
AUTO REC
See “Recording automatically (AUTO REC)” on page 56.
screen, set the
MODE
item to
MARK
.
AUTO
Moving to a mark position
You can move to marks in the currently selected file when stopped
or playing back.
You can use this function to identify points to create shortcuts to the
beginning of songs, for example.
1. Press the . or / button while pressing and holding the
DATA dial during playback or when stopped.
NOTE
You cannot move to a mark in a different file.
TASCAM DR-60D
59
Page 60

4 – Recording
Recording the moment before pushing RECORD (PRE REC)
By using prerecording, when the unit is in recording standby you
can record up to two seconds of the signal input before the record
(0) button is pushed to start recording.(PRE REC)
1. Press the MENU button to open the
2. Turn the DATA dial to select
dial or / button to open the
3. Turn the DATA dial to select
or / button.
4. Turn the DATA dial to turn the pre-recording function ON (default
value:
OFF
).
5. When finished making the setting, press the stop (8) [HOME]
button to return to the Home Screen.
TIP
By using this in combination with the AUTO REC function, you
can record events without losing the beginnings of sounds.
NOTE
•
If recording is started less than two seconds after entering record
standby, the sound since entering recording standby will be
recorded.
•
If you turn the pre-recording function on, turn the recording
delay function off.
MENU
REC SETTING
REC SETTING
PRE REC
, and press the DATA dial
screen.
, and press the DATA
screen.
Delaying the start of recording (REC DELAY)
You can delay the start of recording by about 0.3 seconds (fixed
time) from when you press the record (0) button.
Use this function to avoid recording the sound of pressing the
record (0) button.
1. Press the MENU button to open the
2. Turn the DATA dial to select
dial or / button to open the
3. Turn the DATA dial to select
dial or / button.
4. Turn the DATA dial to set the recording delay function to ON
(default value:
5. When finished making the setting, press the stop (8) [HOME]
button to return to the Home Screen.
NOTE
If you turn the recording delay function on, turn the pre-recording
function off.
OFF
).
MENU
REC SETTING
REC SETTING
REC DELAY
, and press the DATA
screen.
, and press the DATA
screen.
TASCAM DR-60D
60
Page 61

4 – Recording
Self-timer function
Like a camera, the unit has a self-timer to trigger the start of
recording after a set period of time.
1. Press the MENU button to open the
2. Turn the DATA dial to select
dial or / button to open the
3. Turn the DATA dial to select
dial or / button.
4. Turn the DATA dial to set the amount of time until recording
starts.
Options:
5. When finished making the setting, press the stop (8) [HOME]
button to return to the Home Screen.
6. Press the record (0) button to enter recording standby.
The self-timer icon appears in the recorder status screen, and
time is shown on the right.
7. Press the record (0) or play (7) button.
Recording will start after the set time period.
NOTE
•
This function cannot be used when recording is paused in the
middle of recording.
•
Self-timer function is not possible when using the AUTO REC
function.
OFF
(default value),
MENU
REC SETTING
REC SETTING
SELF TIMER
2sec, 10sec
screen.
, and press the DATA
screen.
, and press the DATA
Using the auto tone function
The auto tone function can be used to automatically add a tone at
the beginning and ending of recording.
By connecting the
the audio input of a camera, you can record the same tone in both
files. These tones can be used to align audio and video recordings in
media editing software.
1. Press the MENU button to open the
2. Turn the DATA dial to select
dial or / button to open the
3. Turn the DATA dial to select
dial or / button.
4. Turn the DATA dial to set when the tone signal is inserted.
Options:
5. When finished making the setting, press the stop (8) [HOME]
button to return to the Home Screen.
CAMERA OUT
OFF
(default value),
HE AD +TAIL
jack on the left side of the unit to
MENU
screen.
REC SETTING
REC SETTING
AUTO TONE
HEAD
(both start and of recording)
, and press the DATA
screen.
, and press the DATA
(start of recording only),
TASCAM DR-60D
61
Page 62

4 – Recording
Setting auto tone length
You can set the length of the auto tone.
1. Press the MENU button to open the MENU screen.
2. Turn the DATA dial to select
dial or / button to open the
3. Turn the DATA dial to select
dial or / button.
4. Turn the DATA dial to set the length of the tone.
Options:
5. When finished making the setting, press the stop (8) [HOME]
button to return to the Home Screen.
0.5sec, 1sec
REC SETTING
REC SETTING
TONE SECS
(default value),
, and press the DATA
screen.
, and press the DATA
2sec, 3sec
Adding slate tones
When enabled, you can press the SLATE button on the front of the
unit during recording to add a slate tone whenever you like to the
recording file.
The SLATE button is disabled by default in order to prevent
accidental operation. Follow the procedures below to enable the
SLATE button.
For details about connecting a DSLR camera to this unit, see “Camera
connection and attachment” on page 39.
1. Press the MENU button to open the
2. Turn the DATA dial to select
dial or / button to open the
3. Turn the DATA dial to select
dial or / button.
4. Turn the DATA dial to enable the SLATE button.
Options:
5. When finished making the setting, press the stop (8) [HOME]
button to return to the Home Screen.
NOTE
To prevent accidental operation, the SLATE button will not
function if pressed continuously.
DISABLE
(default value),
MENU
REC SETTING
REC SETTING
SLATE KEY
, and press the DATA
ENABLE
screen.
, and press the DATA
screen.
TASCAM DR-60D
62
Page 63

4 – Recording
Recording duration
The table below shows the maximum recording time on SD/SDHC cards of different capacities for different file formats for recording.
File format (recording setting)
44.1kHz 1:41 3:22 6:44 13:28
WAV/BWF 16bit (STEREO)
WAV/BWF 24bit (STEREO)
p The recording times shown above are estimates. They might differ depending on the SD/SDHC card in use.
p The recording times shown above are not continuous recording times, but rather they are the total possible recording times for the SD/
SDHC card.
p If recorded in mono in WAV files, the maximum recording time will be double the figures above.
p For dual and 4-channel recording in WAV/BWF format, the recording times are about half those shown above.
48kHz 1:33 3:06 6:12 12:24
96kHz 0:46 1:33 3:06 6:12
44.1kHz 1:07 2:15 4:30 9:00
48kHz 1:02 2:04 4:08 8:16
96kHz 0:31 1:02 2:04 4:08
SD/SDHC card capacity (hours:minutes)
1GB 2GB 4GB 8GB
TASCAM DR-60D
63
Page 64

5 – Working with Files and Folders (BROWSE screen)
On the
BROWSE
Folder, which contains the audio files, on the SD card.
TIP
If you connect the DR-60D with a computer by USB, or mount
the SD card on a computer using a card reader or other input,
you can change the folder structure within the
and erase files from the computer as you would the contents of
a hard drive. Furthermore, you can change file names from the
computer.
To open the
MENU screen. Turn the DATA dial to select
DATA dial or / button.
The contents of the folder that contains the file that was selected on
the Home Screen before the
on the display.
screen, you can view the contents of the
BROWSE
Screen, press the MENU button to open the
BROWSE
BROWSE
Screen was opened appears
Screen navigation
On the BROWSE Screen, folders and music files appear in a hierarchical structure much like they would appear on a computer. On the
DR-60D, folders can only be used to two levels.
p Turn the DATA dial to select files and folders.
p When a folder is selected, press the / button to show the
contents of that folder.
Mu sic
MUSIC
Folder
, and press the
p When a file or folder is selected, press the . button to exit
the currently open folder and go to a higher level in the folder
structure.
p When a file or folder is selected, press the QUICK button to
open the quick menu pop-up window.
p When a file is selected, press the DATA dial to return to the
Home Screen and play that file.
This folder that contains this file becomes the current folder, and
new recorded file will be saved in this folder. If the playback area
has been set to
area.
p When a file is selected, press the / button to load that file
and return to the Home Screen.
The folder that contains this file becomes the current folder, and
new recorded files will be saved in this folder. If the playback
area has been set to
playback area.
p When a folder is selected, press the D ATA dial to return to the
Home Screen. The first file in the folder (shown at the top of the
file list) will be played.
This folder becomes the current folder, and new recorded files
will be saved in this folder. Regardless of the previous setting,
the playback area is set to
new playback area.
FOLDER
, this folder becomes the new playback
FOLDER
, this folder becomes the new
FOLDER
, and this folder becomes the
TASCAM DR-60D
64
Page 65

5 – Working with Files and Folders (BROWSE screen)
Icons on the BROWSE screen
The meanings of icons that appear on the BROWSE Screen are as
follows.
Root Music Folder (MUSIC)
The MUSIC Folder is the highest (root) level folder in the
hierarchy shown on the
Audio file
This icon appears before the names of music files.
Plus folder
This icon shows folders that contain subfolders.
Plain folder
This icon shows folders that do not contain subfolders.
Open folder
The contents of the folder marked with this icon currently appear
on this screen.
New folder
Create a new folder.
BROWSE
Screen.
File operations
Select the desired audio file on the
QUICK button to open the quick menu pop-up window shown
below.
Turn the DATA dial to select the item you want from the following
list and press DATA dial to execute it.
INFO
Information (date/time, size) about the selected file appears.
Press the DATA dial again or press the stop (8) [HOME] button
to return to the
BROWSE
screen.
BROWSE
screen, and press the
TASCAM DR-60D
65
Page 66

5 – Working with Files and Folders (BROWSE screen)
DELETE
A message appears to confirm that you want to delete the
selected file.
Press the DATA dial to erase the file and the stop (8) [HOME]
button to cancel the deletion operation.
NOTE
If the currently selected file was recorded using dual-recording or
four-channel recording, both files recorded at that time will be
deleted.
CANCEL
The operation for the selected (highlighted) file is canceled, and
the quick menu is closed.
NOTE
The quick menu can also be closed by pressing the QUICK button.
Folder operations
Select the desired folder on the
QUICK button to open the quick menu pop-up window shown
below.
Turn the DATA dial to select the item you want from the following
list and press the DATA dial to execute it.
SELECT
Returns to the Home Screen and selects the first file in the folder.
Regardless of the previous setting, the playback area is set to
FOLDER
, and this folder becomes the new playback area. When
recording, files are created in this folder.
ALL DEL
A pop-up message appears to confirm that you want to delete
all the files in the selected folder at once.
Press the DATA dial to erase the files or press the stop (8)
[HOME] button to cancel.
NOTE
You cannot erase read-only files and files that are not recognized
by this unit.
BROWSE
screen, and press the
TASCAM DR-60D
66
Page 67

5 – Working with Files and Folders (BROWSE screen)
CANCEL
The operation for the selected (highlighted) file is canceled, and
The quick menu is closed.
NOTE
The quick menu can also be closed by pressing the QUICK button.
Creating a new folder
In the file list,
Select (highlight)
button. A pop-up appears to confirm that you want to create a new
folder.
Press the DATA dial to create a new folder or press the stop (8)
[HOME] button to cancel.
Note that the unit supports only a two-level folder structure, and
accordingly NEW FOLDER does not exist in the second-level folders.
A newly created folder becomes the current one, and new recorded
files are saved in this folder. If the playback area has been set to
FOLDER, this folder becomes the playback area.
NEW FOLDER
NEW FOLDER
appears at the bottom.
, and press the DATA dial or /
TASCAM DR-60D
67
Page 68

6 – Playback
On the Home Screen, you can use the . and / buttons to
select the playback file. The files that you can select are determined
by the playback area setting.
Limiting the playback area makes file selection easier when you
have numerous recorded and copied files on the SD card.
On the
PLAY SETTING
FILES on the SD card or the current FOLDER. You can also use the
BROWSE
Screen to set a folder as the playback area.
NOTE
On the
BROWSE
you can select any file on the SD card that you want.
screen, you can set the play area to ALL
Screen, regardless of the playback area setting,
Adjusting playback volume
Use the PHONES and LINE OUT volume controls to adjust the levels
output from the PHONES and LINE OUT jacks.
Setting the playback area (AREA)
Set the playback area for repeat and ordinary playback on the
SETTING
1. Press the MENU button to open the
2. Turn the DATA dial to select
3. Turn the DATA dial to select
4. Turn the DATA dial to set the playback area.
ALL FILES:
FOLDER (default value):
screen.
MENU
screen.
DATA dial or / button to open the
/ button.
Set the playback area as all files in the Music Folder on the SD
card.
Set the playback area as all the files in the currently selected
folder.
PLAY SETTING
AREA
, and press the DATA dial or
, and press the
PLAY SETTING
screen.
PLAY
TASCAM DR-60D
68
Page 69

6 – Playback
Playback area
5. When finished making the setting, press the stop (8) [HOME]
button to return to the Home Screen.
NOTE
The current playback area setting appears in the upper left of the
Home Screen.
Selecting a folder for the playback area (1)
Regardless of the current playback area, if you select a folder on the
BROWSE
Screen, the playback area changes to the selected folder.
1. Press the MENU button to open the
2. Turn the DATA dial to select
/ button to open the
A file list of the folder that contains the file selected in the Home
Screen is displayed.
3. Use the . or / button to select a folder level, and Turn
the DATA dial to select a folder.
For an explanation of how to use the Browse Screen, see “Screen
navigation” on page 64.
BROWSE
MENU
screen.
BROWSE
, and press the DATA dial or
screen.
4. Press the QUICK button to open the following quick menu
pop-up window.
Turn the DATA dial to select
The display returns to the Home Screen. The first file in the
folder is selected, and the unit is stopped.
Regardless of the previous setting, the playback area is set to
FOLDER
, and this folder becomes the playback area. This folder
becomes the current folder, and new recorded files will be saved
in this folder.
SELECT
, and press the DATA dial.
TASCAM DR-60D
69
Page 70

6 – Playback
Selecting a folder for the playback area (2)
When the playback area is set to
BROWSE
Screen, the folder that contains the selected file becomes
the playback area.
1. Press the MENU button to open the
2. Turn the DATA dial to select
/ button to open the
A file list of the folder that contains the file selected in the Home
Screen is displayed.
3. Use the . or / button to select a folder level, and Turn
the DATA dial to select the folder that contains the file you want
to play.
For an explanation of how to use the
navigation” on page 64.
4. Press the DATA dial or / button.
5. Turn the DATA dial to select the desired file.
FOLDER
BROWSE
BROWSE
, if you select a file on the
MENU
screen.
, and press the DATA dial or
screen.
BROWSE
Screen, see “Screen
6. Press the DATA dial to return to the Home Screen and start
playback of the selected file. This folder becomes the current
folder, and new recorded files will be saved in this folder.
In addition, the folder that contains this file becomes the
playback area regardless of the playback area folder set previously.
Selecting files for playback (skip)
When the Home Screen is open, press the . and / buttons to
select the file for playback.
If you press the . button when the playback position is located
at the middle of a file, it will return to the beginning of that file. If
you press the . button when located at the beginning of a file,
the playback position will skip to the beginning of the previous file.
If you press the / button when located at the beginning of or
middle of a file, the playback position will skip to the beginning of
the next file.
NOTE
•
Only files in the playback area that is currently set can be selected
for playback.
•
The track name, file number and other file information for the
currently playing file appear on the display.
•
The 8 icon appears on the display when playback is stopped at
the beginning of a file, and the 9 icon appears when playback is
stopped in the middle of a file (paused).
•
To change files, press the . or / button as many times as
necessary.
TASCAM DR-60D
70
Page 71

6 – Playback
Playback
When the Home Screen is open and playback is stopped, press the
play (7) button to start playback.
NOTE
•
Files in the playback area can be played.
•
You can also choose files for playback by name on the
screen.
Pausing
When the Home Screen is open and a file is playing back, press the
stop (8) [HOME] button to pause playback at the current position.
Press the play (7) button again to restart playback from that
position.
Stopping
When the Home Screen is open and a file is playing back, press the
stop (8) [HOME] button to pause playback, and press the stop (8)
[HOME] button to return to the beginning of the file.
Rewinding and fast-forwarding (search)
When the Home Screen is open and a file is playing back or stopped,
press and hold the . or / button to rewind or fast-forward
and search the playback file.
NOTE
Press and hold the . or / button to accelerate the search
speed.
BROWSE
Changing the playback position
When the Home Screen is open and playback is stopped or paused,
turn the DATA dial to change the playback position.
Playback will be paused after the position is changed.
Repeat playback (REPEAT)
You can repeatedly playback one file or multiple files within a designated area.
1. Press the MENU button to open the
2. Turn the DATA dial to select
DATA dial or / button to open the
3. Turn the DATA dial to select
/ button.
4. Turn the DATA dial to select a repeat mode.
CONTINUOUS (default value):
All files in the playback area are played in sequence one time.
(This setting is the ordinary playback mode.)
SINGLE:
The selected file is played once without repeating. The icon
appears on the Home Screen.
1 REPEAT:
The current file is played repeatedly. The icon appears on
the Home Screen.
MENU
screen.
PLAY SETTING
REPEAT
, and press the
PLAY SETTING
, and press the DATA dial or
screen.
TASCAM DR-60D
71
Page 72

6 – Playback
ALL REPEAT:
All files in the selected playback area are played back
repeatedly. The icon appears on the Home Screen.
5. When finished making the setting, press the stop (8) [HOME]
button to return to the Home Screen.
Moving back a few seconds for replay (jump-back playback)
Press the play (7) button during playback to move back a few
seconds (adjustable) and restart playback. (Jump-back playback).
If you find a favorite passage of music or lyrics during playback,
press the play (7) button to go back a few seconds and replay that
passage.
The jump-back time is set as a
1. Press the MENU button to open the
2. Turn the DATA dial to select
DATA dial or / button to open the
3. Turn the DATA dial to select
or / button.
4. Turn the DATA dial to set the jumpback time in seconds.
Options:
5. When finished making the setting, press the stop (8) [HOME]
button to return to the Home Screen.
OFF, 1 SE C. – 10 SE C., 20 S EC., 30 S EC.
value:
3sec
JUMPBACK
PLAY SETTING
JUMPBACK
)
setting.
MENU
screen.
, and press the
PLAY SETTING
, and press the DATA dial
screen.
(default
Playback of files recorded using dual recording
When playing back a file that has been made using dual recording,
the track status display is shown as light letters on a dark
background.
Press the MONITOR SELECT button during playback to switch
between monitoring of the two files created using dual recording.
NOTE
Press tte DATA dial to finds the files by the first 11 characters of
file names. If file names are changed, this function will not work.
TASCAM DR-60D
72
Page 73

7 – QUICK button operations
Features of the QUICK button
The QUICK button serves for the following purposes.
p When the Home Screen is open and the unit is stopped or
paused, press this button to open the quick menu pop-up
window where you can delete or divide the current file, use the
level alignment function, which increases the overall sound
pressure, use the playback equalizer and set the mic input gain.
Quick menu when stopped or paused
During playback, the quick menu pop-up window includes level
alignment, playback EQ settings.
When in recording standby or recording, the quick menu
pop-up window includes mic input gain settings.
Quick menu during playback on the Home Screen
p On the
p On the
NOTE
Actions of the QUICK button for different screens and states are as
follows.
Screen State Quick menu contents
Home
Screen
BROWSE
BROWSE
operations for the selected file of folder. (See “File operations”
on page 65 and “Folder operations” on page 66.)
mic input gain settings.
The QUICK button does nothing when the
SETTING
Stop/
Pause
Playback
Recording
Standby/
Recording
screen Operations for the selected file of folder
screen, the quick menu pop-up window includes
MIXE R
screen, the quick menu pop-up window includes
and other setting screens are open.
Delete/divide file, level align, playback
EQ and mic input gain
Level align, playback EQ and mic input
gain
Mic input gain
MENU, OTHERS, REC
TASCAM DR-60D
73
Page 74

7 – QUICK button operations
Screen State Quick menu contents
MENU
screen,
OTHERS
screen,
Other settings screens
MIXE R
screen Mic input gain
No function
Opening the quick menu
When the Home Screen is open, press the QUICK button to open
the quick menu pop-up window.
The contents of this screen depend on the state of the unit at the
time when the QUICK button is pressed.
p When the Home Screen is open and the unit is stopped or
paused, the following functions can be selected.
Quick menu when stopped or paused
DELETE:
The current file can be deleted. (See “Deleting the selected file
(Quick Delete)” on page 75.)
DIVIDE:
The current file can be divided. (See “Dividing the selected file
(DIVIDE)” on page 75.)
LEVEL ALIGN:
The perceived overall sound pressure can be increased to
enhance listenability. (See “Increasing the perceived overall
sound pressure to enhance listenability (Level Alignment)” on
page 77.)
PLAY EQ:
Choose an EQ setting that you like to make the playback
sound better. (See “Using the playback equalizer” on page
78.)
CH1 GAIN, CH2 GAIN, CH34 GAIN:
Use to set the mic input gain for that input. (See “Setting mic
input gain with the quick menu” on page 78.)
p When the Home Screen is open during playback, the level
alignment and playback EQ functions can be selected.
Quick menu during playback on the Home Screen
p When the Home Screen is open in recording standby or when
recording, the quick menu pop-up window includes mic input
gain settings. (See “Setting mic input gain with the quick menu”
on page 78.)
Quick menu when recording or in recording standby
TASCAM DR-60D
74
Page 75

7 – QUICK button operations
Closing the quick menu
Press the QUICK button to close the quick menu pop-up window.
Deleting the selected file (Quick Delete)
The currently selected file can be deleted without using the BROWSE
screen.
1. To delete a file, select it using the . or / button.
2. Open the Quick menu screen by pressing the QUICK button
while the Home Screen is open when stopped.
3. Turn the DATA dial to select
4. Push the DATA dial to open a pop-up message confirming
deletion of the file.
5. Push the DATA dial to delete the file and return to the Home
Screen. Push the stop (8) [HOME] button to cancel deletion
and return to the Home Screen.
NOTE
If the currently selected file was recorded using dual-recording or
four-channel recording, both files recorded at that time will be
deleted.
DELETE
.
Dividing the selected file (DIVIDE)
A recorded file can be divided into two at a specified position.
1. Select a file to be divided using the . or / button or the
BROWSE
screen.
2. While the Home Screen is open when stopped, press the QUICK
button to show the Quick menu screen.
3. Turn the DATA dial to select
4. Press the DATA dial to open the
5. Turn the DATA dial to set the position for file division, and press
the record (0) button.
The following confirmation pop-up message appears.
DIVIDE
DIVIDE
.
screen.
TASCAM DR-60D
75
Page 76

7 – QUICK button operations
6. Press the DATA dial to divide the file and return to the Home
Screen.
Or press the stop (8) [HOME] button to return to the
screen without dividing the file.
NOTE
•
When the
button and set the divide position while playing the file.
•
When the
button for playback, the Stop (8) [HOME] button to pause,
the . button to jump to the beginning of a file and the /
button to jump to the end of a file. You can also turn the DATA
dial to make fine adjustments to the divide position.
•
After dividing a file, two new files with ”a” and ”b” added to the
end of the original file name are created.
(4-channel recording file example)
File names before dividing
TASCAM_0003S12.wav
TASCAM_0003S34.wav
File names after dividing
TASCAM_0003aS12.wav (part before division point)
TASCAM_0003aS34.wav (part before division point)
TASCAM_0003bS12.wav (part after division point)
TASCAM_0003bS34.wav (part after division point)
•
If the currently selected file was made using dual-recording or
four-channel recording, both files recorded at that time will be
divided.
DIVIDE
screen is open, you can press the play (7)
DIVIDE
screen is open, you can use the Play (7)
DIVIDE
CAUTION
•
If the SD card has insufficient open space, division might not be
possible.
•
Division is not possible if the file name would become more than
200 characters long.
•
Division is not possible if a file that already exists has the same
name as the name that would be given to a new file created by
division.
TIP
Add marks during recording at positions where you want to
divide a file. (See “Mark function” on page 59.)
TASCAM DR-60D
76
Page 77

7 – QUICK button operations
Increasing the perceived overall sound pressure to enhance listenability (Level Alignment)
If the playback sound is very small and indiscernible, the perceived
overall sound pressure can be increased to enhance listenability.
(Level Alignment)
1. When the Home Screen is open and the unit is stopped or
playing back, press the QUICK button to open the quick menu
pop-up.
2. Turn the DATA dial to select
When stopped During playback
3. Press the DATA dial to open a pop-up menu where you can turn
the level align function on or off.
LEVEL ALIGN
When stopped
.
4. Turn the DATA dial to select ON, and press the DATA dial to
confirm the setting and return to the Home Screen (default
value: OFF).
When on, the icon appears on the Home Screen during
playback.
When off, the icon appears on the Home Screen during
playback.
NOTE
The level alignment function may not be able to achieve sufficient effect depending on the source of the sound
TASCAM DR-60D
77
Page 78

7 – QUICK button operations
Using the playback equalizer
You can select an equalizer setting that makes playback sound
better to you.
1. When the Home Screen is open and the unit is stopped or
playing back, press the QUICK button to open the quick menu
pop-up.
2. Turn the DATA dial to select
When stopped During playback
3. Press the DATA dial to open a pop-up menu where you can set
the playback equalizer.
4. Turn the DATA dial to select the playback equalizer setting that
you want to use, and press the DATA dial to turn the equalizer
on and return to the home screen (default value: OFF).
When on, the icon appears on the Home Screen during
playback.
When off, the icon appears on the Home Screen during
playback.
PLAY EQ
When stopped
.
Setting mic input gain with the quick menu
1. Press the QUICK button when stopped, paused, in recording
standby or recording on the Home Screen or when the
screen is open to show the quick menu.
2. Turn the DATA dial to select the mic input gain setting for the
desired channel, and press the DATA dial to open the mic input
gain pop-up menu.
3. Turn the DATA dial to select the mic input gain setting, and
press the DATA dial to set it.
4. Press the QUICK button to return to the previous screen.
NOTE
If you change the mic input gain setting using the quick menu,
the
GAIN
item on the
SETTINGS
screen will also be changed.
MIXE R
TASCAM DR-60D
78
Page 79

8 – Mixer
This recorder has a mixer function that allows you to set the stereo
balance and volume level for each channel.
Making mixer settings
1. From the Home Screen, press the MIXER button to open the
MIXE R
screen.
Mono/dual mono mode
Stereo/dual stereo mode
4-channel mode
2. Turn the DATA dial to select the item you want to change.
3. Press the DATA dial to open the setting name and value in a
pop-up window at the top right.
4. Turn the DATA dial to change the setting value.
Item Setting range Operation details
PAN L12–C–R12
LVL 0–100
OFF Record in ordinary stereo mode.
REC
MS
MODE
MON
Adjusts left-right balance
(L12 (left)–C (center)–R12 (right))
Volume level
(0 (min.)–100 (max.))
Use to decode while recording.
Playback is conducted without
decoding.
Record mid-side mic output without
decoding for decoding later. Use this
mode to monitor when recording
with a mid-side mic.
Use this also when playing back
mid-side files that were recorded
without decoding.
TASCAM DR-60D
79
Page 80

8 – Mixer
5. Press the DATA dial to return to the previous screen where you
can select the next setting that you want to adjust.
NOTE
•
The mixer can be used when the unit is stopped, paused, playing
back, in recording standby and recording.
•
Even when the
button to start playback and the stop (8) [HOME] button to
pause playback.
•
If the
MS MODE
REC MODE
•
The
MS MODE
MIXE R
screen is open, you can use the play (7)
item is changed, it will also be changed on the
screen.
cannot be changed when recording.
Using the MS decoder
When using MS mics to record, you have two decoding options.
You can decode the input sound as you record or you can record
as is and decode during playback. The following explanation uses
channels 1 and 2. If the mid-side mics are connected to channels 3
and 4, however, use the same procedures but substitute channels 3
for 1 and 4 for 2.
Decoding the input sound as you record
1. Connect MS mics to the 1/L connector and 2/R connector.
Connect the mid mic to the 1/L connector and the side mic to
the 2/R connector.
Decoding cannot be conducted properly if the mid and side
mics are connected in reverse.
2. On the
NOTE
3. Set
If
REC MODE
ST
or
4CH
If
4CH
is selected on the
not be shown and does not need to be set.
MS MODE
4CH
Is selected on the
to
REC
.
screen, set the
, and set the
to
REC
SOURCE
REC MODE
.
REC MODE
REC MODE
to
CH1/2
screen, the
screen, set
to
.
SOURCE
MS MODE 1/2
STEREO, DUAL
item will
TASCAM DR-60D
80
Page 81

8 – Mixer
4. Start recording to record a decoded MS signal.
NOTE
You can also set the
MS MODE
to
REC
on the
MIXE R
screen.
Decoding the playback sound
1. Select a file that was recorded by MS mics with
OFF
.
2. When the Home Screen is open, press the MIXER button to
open the
3. Set
MIXE R
MS MODE
to
screen.
MON
.
4. Start playback to decode during playback.
MS MODE
set to
MS decoder settings
When the
PAN
width of the sound.
To decode while recording, open the
standby.
To decode the signal during input, set
the signal during playback, set
At 0, mid is 100%. As the number increases, the amount of side
signal increases.
MS MODE
item changes to
on the
MIXE R
WIDE
screen is set to
, which allows you to adjust the stereo
MIXE R
screen during recording
MS MODE
MS MODE
to
MON
to
.
REC
REC
or
Item Setting range Operation details
WIDE 0–100 Adjusts the width of the sound
MON
. To decode
, the
TASCAM DR-60D
81
Page 82

9 – Connecting with a computer
By connecting this unit with a computer using the USB cable, you
can transfer audio files on the SD card in the unit to a computer, as
well as transfer audio files on the computer to the SD card in the
unit.
WAV: 44.1/48/96kHz, 16/24-bit
BWF: 44.1/48/96kHz, 16/24-bit
Computer
USB
Mini-B USB plug
NOTE
•
Instead of using USB to connect the DR-60D and a computer, you
can also conduct the same operations by removing the SD card
from the DR-60D and connecting it directly to a computer that
has a built-in SD card slot or by using a card reader.
•
The file extension used for both WAV and BWF file formats is
“.wav”.
CAUTION
•
When connected by USB and set to
of the recorder are disabled.
•
The unit should be connected directly with the computer instead
of via a USB hub.
STORAGE
, the other functions
When the unit is connected through USB after being turned on, or
when the unit is turned on after being connecting through USB, the
USB SELECT
or data transmission through USB.
Turn the DATA dial to select
to connect the unit with the computer for data transmission. The
message of USB connected appears in the display.
Make sure that the SD card is inserted properly.
NOTE
If the USB cable is connected to the unit when batteries has been
installed, the power is supplied from the USB port (USB bus power
prioritized).
If an SD card is not properly inserted before making the USB
connection,
This unit appears on the computer screen as external volume named
“DR-60D”.
screen appears to choose between bus power supply
STORAGE
Can't Save Data
, and press the DATA dial
appears on the screen.
TASCAM DR-60D
82
Page 83

9 – Connecting with a computer
Transferring files to a computer
1. Click the “DR-60D” drive on the computer screen to show the
“MUSIC” and “UTILITY” folders.
2. Open the “MUSIC” folder and drag and drop the files that you
want to transfer to the computer to destinations of your choice.
Transferring files from a computer
1. Click the “DR-60D” drive on the computer screen to show the
“MUSIC” and “UTILITY” folders.
2. Drag and drop files on the computer that you want to transfer
to the unit to the “MUSIC” folder.
TIP
•
You can manage the “MUSIC” folder from the computer.
•
You can create subfolders in the “MUSIC” folder up to the
second level for use with this unit. The DR-60D cannot recognize
subfolders and audio files on the third level or below.
•
Since you can set the DR-60D to only play the contents of a
specific folder, you can organize files into genres, artists or other
categories as you like.
•
If you name the subfolders and music files, these names will
appear on the Home screen or
BROWSE
screen of this unit.
Disconnecting from a computer
Before disconnecting the USB cable, use the proper procedures for
your computer to unmount the DR-60D (as an external drive). The
power turns off (standby) after disconnecting the USB cable.
See the computer’s operation manual for instructions about how to
unmount an external drive.
TASCAM DR-60D
83
Page 84

10 – Settings and Information
Viewing Information (INFORMATION)
Use the
INFORMATION
about your DR-60D.
1. Press the MENU button to open the
2. Turn the DATA dial to select
/ button to open the
3. Turn the DATA dial to select
DATA dial or / button to open the
INFORMATION
The
INFORMATION
4. Turn the DATA dial to change the open page.
The pages show the following information.
FILE (1/3)
Shows information about the currently loaded file.
CARD (2/3)
Shows the use status of the currently inserted SD card.
SYSTEM (3/3)
Shows the unit’s system setting information and firmware
version.
TASCAM DR-60D
84
Screen to view various types of information
MENU
screen.
OTHERS
OTHERS
screen.
screen contains the following three pages.
, and press the DATA dial or
screen.
INFORMATION
, and press the
FILE (1/3)
page of the
NOTE
If the currently loaded audio file is one of a pair of files created
with dual recording or four-channel recording, there will be two
FILE pages.
File information page
The
FILE (1/3)
selected file.
WAV/BWF
This shows the audio file format.
For both WAV and BWF files, bit length, stereo/mono and
sampling frequency (Hz) are shown.
TITLE
This shows the file name.
DATE
Date of file creation
SIZE
File size
page shows information about the currently
Page 85

10 – Settings and Information
Card information page
The
CA RD (2/3)
SD card.
TOTAL MUSIC
Shows the number of playable files contained by the Music
Folder.
TOTAL FOLDER
Shows the total number of folders in the Music Folder.
TOTAL SIZE
Shows the total SD card capacity.
REMAIN SIZE/USED SIZE
Shows the amount of unused/used capacity on the SD card.
Press the . or / button to switch between
and
USED SIZE
page shows the status of the currently inserted
RE MAIN SIZE
.
System information page
The
SYSTEM (3/3)
system settings and firmware version.
AUTO PWR SAVE
This shows the time set for the automatic power saving function.
BACKLIGHT
Shows the automatic backlight OFF setting.
BATTERY
Shows the battery type options.
System Ver.
Shows the system firmware version.
page shows information about the DR-60D’s
TASCAM DR-60D
85
Page 86

10 – Settings and Information
System Settings and Formatting (SYSTEM)
From the
optimize the device for your use environment and other requirements. You can also initialize the unit and format the SD card.
1. Press the MENU button to open the
2. Turn the DATA dial to select
3. Turn the DATA dial to select
The following settings can be made for the items on the
Use the . or / button and the + or − button to set each
Use the
activity or operation until the unit turns off (enters standby)
automatically.
SYSTEM
Screen, you can change various settings to
MENU
screen.
OTHERS
/ button to open the
/ button to open the
SYSTEM
screen.
item.
OTHERS
SYSTEM
, and press the DATA dial or
screen.
SYSTEM
, and press the DATA dial or
screen.
Setting the automatic power saving function
AUTO PWR SAVE
Options:
OFF
value),
item to set the amount of time without
(automatic power saving is disabled, default
3min, 5min, 10min, 30 min
Setting the backlight
Use
BACKLIGHT
turns OFF after the last operation when powered by the internal
battery.
Options:
to set the time until the backlight automatically
OFF
(turned off), 5
sec, 30 sec, ALWAYS
sec
(factory setting), 10
(always on)
sec, 15
Adjusting the display contrast
Use
CONTRAST
to adjust the display contrast.
Options: 1–20 (factory setting: 5)
Setting the type of AA batteries
Use
BATTERY TYPE
using. This setting is used to show the amount of remaining battery
charge and determine if the unit has enough power for normal
operation.
Values:
to set the type of the AA batteries that you are
ALKAL
(alkaline batteries, default),
metal hydride batteries)
Ni- M H
(nickel-
Setting the phantom power voltage
Use the
PHANTOM VOLT
power supplied when external mics that require it are connected.
Options:
NOTE
Battery power will be consumed faster when set to +48V than
when set to +24V.
item to set the voltage of the phantom
+24V, +48V
(factory setting)
TASCAM DR-60D
86
Page 87

10 – Settings and Information
Restoring the factory settings
Use the
INITIALIZ E
to their factory settings.
1. Turn the DATA dial to select
dial or / button to highlight
2 Press the DATA dial button again to open a confirmation
pop-up window.
3 Press the DATA dial button to initialize the unit. Press Stop (8)
[HOME] button to cancel initialization.
item to restore the various settings of this unit
INITIALIZ E
Exec
, and press the DATA
.
Using QUICK FORMAT
Using
QUICK FORMAT
ically creates new “MUSIC” and “UTILITY” folders as well as the “dr-1.
sys” file that is necessary to use the SD card with the DR-60D.
1. Turn the DATA dial to select
DATA dial or / button to highlight
2 Press the DATA dial button to open a pop-up confirmation
window.
3 Press the DATA dial button to execute the quick formatting, or
press the Stop (8) [HOME] button to cancel formatting.
erases all music files on the card and automat-
QUICK FORMAT
, and press the
Exec
.
Using FULL FORMAT
Use the
FULL FORMAT
Full formatting checks the memory for errors while formatting, so it
takes more time than quick formatting.
Using
FULL FORMAT
cally creates new “MUSIC” and “UTILITY” folders as well as the “dr-1.
sys” file that is necessary to use the SD card with the DR-60D.
1. Turn the DATA dial to select
dial or / button to highlight
2 Press the DATA dial button to open a pop-up confirmation
window.
3 Press the DATA dial button to execute the full formatting, or
press the Stop (8) [HOME] button to cancel formatting.
CAUTION
When formatting a card, the unit should be operating on AC
power supplied through the PS-P515U adapter (sold separately),
USB bus power supplied from a computer, or batteries with sufficient remaining power. If the power fails during formatting, the
formatting may not occur correctly.
item to completely format the SD card.
erases all music files on the card and automati-
FULL FORMAT
Exec
, and press the DATA
.
TASCAM DR-60D
87
Page 88

10 – Settings and Information
Setting the format of file names
You can select the format of names given to files recorded by this
unit.
1. Press the MENU button to open the
2. Turn the DATA dial to select
/ button to open the
3. Turn the DATA dial to select
dial or / button to open the
Use the . or / button and turn the DATA dial to set each
item.
On this screen you can make the following settings for each
item.
OTHERS
MENU
screen.
OTHERS
, and press the DATA dial or
screen.
FILE NAME
, and press the DATA
FILE NAME
screen.
File name format
The
TYPE
item can be set to either
WORD
(default setting) or
DATE
WORD:
When set to
of each file name.
WORD
, a 6-character file name is used as the beginning
Example: TASCAM_0001S12.wav
DATE:
The date is used as the file name (in yymmdd format).
Example: 110101_0000.wav
NOTE
The date is set using the unit’s internal clock. (See “Setting the
date and time” on page 37.)
Setting the WORD item
To set the
cursor, and turn the DATA dial to select the character.
In addition to the alphabet and numbers, the following characters
can be used:
! # $ % & ' ( ) + , - . ; = @ [ ] ^ _ ` { } ~
WORD
item, use the . and / buttons to move the
Resetting the number (COUNT)
Select
COUNT INIT
The next file created after this will have the number “0001” after the
characters set using the
, and press the DATA dial button to execute it.
WORD
item.
.
TASCAM DR-60D
88
Page 89

11 – Using the REMOTE jack
This unit has a REMOTE jack to which you can connect a TASCAM
RC-3F footswitch-type remote control or TASCAM RC-10 wired
remote control (both sold separately) that can be used to operate
the unit.
Footswitch (TASCAM RC-3F)
Footswitch
TASCAM RC-3F
(sold separately)
Setting footswitch operation
Use the
REMOTE
setting screen to make footswitch settings.
1. Press the MENU button to open the
2. Turn the DATA dial to select
/ button to open the
OTHERS
3. Turn the DATA dial to select
/ button to open the
REMOTE
MENU
screen.
OTHERS
, and press the DATA dial or
screen.
REMOTE
, and press the DATA dial or
screen.
4. Turn the DATA dial to select
CONTROLLER
, and press the DATA
dial or / button.
5. Turn the DATA dial to select
6. Use the . button or D ATA dial to select
RC-3F
. (default value:
MODE
, and press the
RC-3F
)
DATA dial or / button.
7. Turn the DATA dial to select
Options:
MODE
PLAY
(default value),
REVIEW
FOOT SW
L C R
MODE
.
RECORD1, RECORD2, RECORD3
PLAY REW PLAY/STOP FWD
RECORD1 STOP REC/PAUSE INC
RECORD2 STOP REC/PAUSE MARK
RECORD3 STOP REC/PAUSE SLATE
REVIEW FLASH
PLAY/STOP
(Play while pressed)
FWD
INC: Track incrementing function
MARK: Mark function
FLASH: Jump-back playback
(All other functions are the same as using the buttons on the
unit.)
8. When finished making the setting, press the Stop (8) [HOME]
button to return to the Home Screen.
,
TASCAM DR-60D
89
Page 90

11 – Using the REMOTE jack
Using the footswitch
Press a pedal on the footswitch to operate the unit. The function of
each pedal corresponds to the assignment shown on the
screen.
REMOTE
Remote control (TASCAM RC-10)
Wired remote
control
TASCAM RC-10
(sold separately)
Setting the wired remote control
Make wired remote control settings on the
1. Press the MENU button to open the
2. Turn the DATA dial to select
/ button to open the
3. Turn the DATA dial to select
/ button to open the
4. Turn the DATA dial to select
dial or / button.
OTHERS
OTHERS
REMOTE
REMOTE
CONTROLLER
REMOTE
screen.
MENU
screen.
, and press the DATA dial or
screen.
, and press the DATA dial or
screen.
, and press the DATA
5. Turn the DATA dial to set
RC-3F
).
6. When finished making the setting, press the Stop (8) [HOME]
button to return to the Home Screen.
CONTROLLER
to
R C-1 0
Using the wired remote control
Press the function buttons (F1 - F4) on the wired remote control to
use the function assigned on the
REMOTE
screen.
Overview of mode functions
MODES
- - - SLATE
Function buttons
F1 F2 F3 F4
Backlight
Always ON/
Backlight
OFF
MonitorSelect +MonitorSelect
(default value:
−
TASCAM DR-60D
90
Page 91

12 – Messages
The following is a list of the popup messages that might appear on the DR-60D under certain conditions. Refer to this list if one of these
popup messages appears and you want to check the meaning or determine a proper response.
Message Meaning and response
File Name ERR
Dup File Name
File Not Found The file either cannot be found or could be damaged. Check the file using a computer.
Non-Supported
Battery Empty The battery is almost out of power. Replace the AA batteries.
MBR Error Init CARD
Format Error
Format CARD
File Not Found
Make Sys File
Invalid SysFile
Make Sys File
Invalid Card
Change Card
The DIVIDE function would cause the file name to exceed 200 characters. The DIVIDE function adds “a” or “b” to the
end of the original file name. Before choosing the DIVIDE function, connect the unit to a computer and edit the file
name to less than 198 characters.
The DIVIDE function would cause the file name to be the same as that of an existing file. The DIVIDE function adds “a“
or “b” to the end of the original file name. Before choosing the DIVIDE function, connect the unit to a computer and
edit the file name.
The audio file is not a supported format. Please see "9 – Connecting with a computer" for file formats that this unit
can use.
The card is not formatted properly or the formatting is broken. Change the card or press the DATA dial when this
message appears to format the card in FAT format.
CAUTION: Execution of FAT formatting erases all data currently on the card.
The FAT formatting of the card is abnormal or broken. This message also appears if you FAT formatted the card
using a computer connected by USB and if a new card is inserted in the unit. Always use the DR-60D to conduct FAT
formatting of cards to be used with it. Change the card or press the DATA dial when this message appears to format
the card in FAT format.
CAUTION: Execution of FAT formatting erases all data currently on the card.
The system file is missing. This unit requires a system file for operation. When this message appears, press the DATA
dial to automatically create a system file.
The system file required to operate this unit is invalid. When this message appears, press the DATA dial to automati-
cally create a system file.
Something might be wrong with the SD card. Change the SD card.
TASCAM DR-60D
91
Page 92

12 – Messages
Message Meaning and response
Write Timeout
Card Full The SD card has no remaining capacity. Erase unnecessary files or move them to your computer to make open space.
Layer too Deep Folders can be created down to two layers. You cannot create a new folder inside the current folder.
Can't Divide The position selected for divide is not suitable (too close to the beginning or end of a file).
Max File Size The file is larger than the designated size.
File Full The total number of folders and files exceeds 5000. Erase unnecessary files or move them to your computer.
Card Error The SD card could not be handled properly. Replace the SD card.
File Protected The file is read only and cannot be erased.
No Card No SD card is in the unit. Install a recordable SD card.
No PB File There is no file that can be played back. The file might be damaged.
No Audio File DIVIDE cannot be executed because there is no audio file.
Writing to the SD card timed out.
Backup files on the SD card to your computer, and format the SD card.
TASCAM DR-60D
92
Page 93

Message Meaning and response
Not Continued
File Error
Can't Save Data
Player Error
Device Error
Writing Failed
Sys Rom Err
Remote Cmd
Remote Rx
System Err 50
System Error 1
System Error 2
System Error 3
System Error 4
System Error 5
System Error 6
System Error 7
System Error 8
System Error 9
If any of these errors occurs, turn the unit’s power off and restart it. If the power cannot be turned off, remove the
batteries, disconnect the TASCAM PS-P515U AC adaptor (sold separately), and/or disconnect the USB cable for bus
power supply. If the error message continues to appear frequently, please contact a TASCAM Customer Support (see
the back cover for details).
12 – Messages
TASCAM DR-60D
93
Page 94

13 – Troubleshooting
If you are having trouble with the operation of this unit, please try the following before seeking repair. If these measures do not solve the
problem, please contact the store where you bought the unit, an authorized distributor or a TASCAM Customer Support (see the back cover
for details).
8
Power will not turn ON.
•
Confirm that the batteries are not dead.
•
Confirm that the batteries are installed with the correct ¥/^
orientation.
•
Confirm that the TASCAM PS-P515U AC adaptor (sold separately)
is firmly connected to both the socket and the unit.
•
Confirm that the USB cable (if used for USB bus power supply) is
firmly connected.
•
Confirm that the USB cable (if used for USB bus power supply) is
not connected via a USB hub.
8
The unit does not function.
•
Confirm that the HOLD switch is not set in the direction of the
arrow.
•
Is the unit connected to a PC with the USB cable? (Is USB
connected shown on the display?)
8
The SD card is not recognized.
•
Confirm that the SD card is inserted completely.
8
Playback does not work.
•
Confirm that the sampling frequency of the WAV file is supported
by this unit.
8
No sound is output.
•
Is the monitoring system connected correctly?
•
Is the volume of the monitoring system minimized?
•
Is the OUTPUT LEVEL setting of the unit minimized?
8
Recording does not work.
•
If you are using an external device, check the connection again.
•
Check the input settings again.
•
Confirm that the input level is not too low.
•
Confirm that the SD card is not full.
•
Confirm that the number of files has not reached the maximum
that the unit can handle.
8
The input level is low.
•
Confirm that the input level setting is not too low.
•
Confirm that the output level of a connected external device is
not too low.
8
The source I am trying to record sounds distorted.
•
Is the input level set too high?
8
The playback sounds unnatural.
•
Check the playback equalizer setting.
•
Is the level align function active?
TASCAM DR-60D
94
Page 95

8
I cannot erase a file.
•
Confirm that you are not trying to erase a file that has been
copied from a computer after being write-protected.
8
This unit’s files do not appear on the computer.
•
Confirm that the unit is connected to the computer using its USB
port.
•
Confirm that USB hubs are not used.
•
Confirm that the unit is not recording or in recording standby
mode.
13 – Troubleshooting
TASCAM DR-60D
95
Page 96

14 – Specifications
Ratings
Recording media
SD card (64MB – 2GB)
SDHC card (4GB – 32GB)
File system
WAV: 44.1/48/96 kHz, 16/24-bit
BWF (Broadcast Wave Format): 44.1/48/96 kHz, 16/24-bit
Number of channels
4 channels (stereo x 2)
Inputs and outputs
Analog audio input and output
1/L connector, 2/R connector (phantom power
supported)
Connector: XLR-3-31 (1: GND, 2: HOT, 3: COLD)
φ6.3mm (1/4”) standard TRS Jack
(Tip: HOT, Ring: COLD, Sleeve: GND)
Input switch set to MIC or MIC+PHANTOM
Input impedance: 2kΩ
Phantom power: 48V±4V(10mA/CH) or 24V±4V(10mA/CH)
Maximum input level: 0dBu
Minimum input level: −72dBu
Mic input gain (input level knob at maximum)
LOW: +11dB
MID: +36dB
HIGH: +52dB
Input switch set to LINE
Input impedance: 10 kΩ or higher
Standard input level: +4 dBu
Maximum input level: +24 dBu
3-4 jack (supports plug-in power)
Connector: φ3.5mm (1/8”) stereo mini jack
Input impedance: 10 kΩ
Maximum input level: +10 dBV
Minimum input level: −50 dBV
Mic input gain (input level knob at maximum)
LOW: +3dB
HIGH: +26dB
CAMERA IN jack
Connector: φ3.5mm (1/8”) stereo mini jack
Input impedance: 10 kΩ
Standard input level: −10 dBV
Maximum input level: +6 dBV
CAMERA OUT jack
Connector: φ3.5mm (1/8”) stereo mini jack
Output impedance: 200 Ω
Standard output level: −50 dBV
Maximum output level: −30 dBV
TASCAM DR-60D
96
Page 97

14 – Specifications
PHONES jack
Connector: φ3.5mm (1/8”) stereo mini jack
Maximum output: 50 mW + 50 mW
LINE OUT jack
Connector: φ3.5mm (1/8”) stereo mini jack
Output impedance: 200 Ω
Standard output level: −10 dBV
Maximum output level: +10 dBV
Note)
Maximum output level: level at which a digital full-scale (0 dBFS)
signal can be input without distorting when you adjust the input
knob
Standard output level: level at which a standard level (–20 dBFS)
signal can be input when you adjust the input knob
Control input and output
USB jack
Connector: USB Mini-B Type
Format: USB 2.0 HIGH SPEED mass storage class
REMOTE jack
Connector: φ2.5mm TRS Jack
Audio performance
Frequency response
20-20kHz +0.5/−2dB
(LINE IN or MIC IN to LINE OUT, Fs44.1k/48kHz, JEITA)
20-40kHz +0.5/−3dB(LINE IN or MIC IN to LINE OUT, Fs96kHz, JEITA)
Distortion
0.02% or less
(LINE IN or MIC IN to LINE OUT, Fs44.1k/48k/96kHz, JEITA)
S/N ratio
92dB or more
(LINE IN or MIC IN to LINE OUT, Fs44.1k/48k/96kHz, JEITA)
Equivalent input noise
–120dBu or more
Note) JEITA: Conforming to JEITA CP-2150
Computer compatibility
For the latest information on compatible operating systems, check
the TASCAM website (http://tascam.com/).
Windows
Pentium 300 MHz or faster
128 MB or more memory
USB port (USB 2.0 recommended)
Macintosh
Power PC, iMac, G3, G4 266MHz or faster
64 MB or more memory
USB port (USB 2.0 recommended)
TASCAM DR-60D
97
Page 98

14 – Specifications
Recommended USB host controller
Intel chipset
Supported operating systems
Windows: Windows XP, Windows Vista, Windows 7,
Windows 8
Macintosh: Mac OS X 10.2 or later
Other specifications
Power
Four AA batteries (Alkaline or Ni-MH)
USB bus power supplied from a computer
AC adaptor (TASCAM PS-P515U, sold separately)
External battery pack designed for this unit (TASCAM BP-6AA, sold
separately)
Power consumption
5.4W(maximum)
Battery operation time (continuous operation)
When using Alkaline batteries (EVOLTA)
Format
Recording 2-channel
44.1kHz/16-bit WAV files
Continuous
operating time
(hours: minutes)
About 2:30
Note
MIC + PHANTOM
(48V) input selected
Recording 2-channel
44.1kHz/16-bit WAV files
When using Ni-MH batteries (eneloop)
Format
Recording 2-channel
44.1kHz/16-bit WAV files
Recording 2-channel
44.1kHz/16-bit WAV files
When using Ni-MH batteries (eneloop pro)
Format
Recording 2-channel
44.1kHz/16-bit WAV files
Recording 2-channel
44.1kHz/16-bit WAV files
About 4:30
Continuous
operating time
(hours: minutes)
About 3:15
About 5:00
Continuous
operating time
(hours: minutes)
About 3:45
About 6:00
MIC input selected
(phantom power
not used)
Note
MIC + PHANTOM
(48V) input selected
MIC input selected
(phantom power
not used)
Note
MIC + PHANTOM
(48V) input selected
MIC input selected
(phantom power
not used)
Continuous operating time when using batteries and a
TASCAM BP-6AA (sold separately)
When using Alkaline batteries (EVOLTA) and BP-6AA (EVOLTA)
Format
Continuous
operating time
(hours: minutes)
Note
TASCAM DR-60D
98
Page 99

14 – Specifications
Recording 2-channel
44.1kHz/16-bit WAV files
Recording 2-channel
44.1kHz/16-bit WAV files
When using NiMH batteries (eneloop) and BP-6AA (eneloop)
Format
Recording 2-channel
44.1kHz/16-bit WAV files
Recording 2-channel
44.1kHz/16-bit WAV files
When using NiMH batteries (eneloop pro) and BP-6AA (eneloop pro)
Format
Recording 2-channel
44.1kHz/16-bit WAV files
Recording 2-channel
44.1kHz/16-bit WAV files
NOTE
When using phantom power, the continuous operating time will
become shorter depending on the microphone used.
About 5:30
About 10:30
Continuous
operating time
(hours: minutes)
About 7:30
About 12:00
Continuous
operating time
(hours: minutes)
About 9:30
About 14:30
MIC + PHANTOM
(48V) input selected
MIC input selected
(phantom power
not used)
Note
MIC + PHANTOM
(48V) input selected
MIC input selected
(phantom power
not used)
Note
MIC + PHANTOM
(48V) input selected
MIC input selected
(phantom power
not used)
Dimensions (W x H x D)
133 x 93.2 x 78mm / 5.24 x 3.67 x 3.07inches (with the top adapter
attached)
Weight
510g / 18(oz) (not including batteries)
Operating temperature range
0 - 40°C (32°F - 104°F)
Dimensional drawings
93.2mm
133mm 78mm
•
Illustrations and other depictions may differ in part from the
actual product.
•
Specifications and external appearance may be changed without
notification to improve the product.
TASCAM DR-60D
99
Page 100

User registration
Customers in the USA, please visit the TASCAM
website (http://tascam.com/) to register as a
DR-60D
TEAC CORPORATION
Phone: +81-42-356-9143 http://tascam.jp/
1-47 Ochiai, Tama-shi, Tokyo 206-8530 Japan
TEAC AMERICA, INC.
Phone: +1-323-726-0303 http://tascam.com/
7733 Telegraph Ro ad, Montebello, California 9064 0 USA
TEAC MEXI CO, S.A . de C.V.
Phone: +52-55-5010-600 0 http://teacmexico.net/
Río Churub usco 364, Colonia De l Carmen, Delega ción Coyoacán, CP 04100, Méx ico DF, México
TEAC UK LIMI TED
Pho ne: +4 4-8 451-302511 http: //tasc am.eu /
Suites 19 & 20, Buildi ng 6, Croxley Green Business Park , Hatters Lane, Watford, Hert fordshire. WD18 8TE, U.K.
TEAC EUROPE G mbH
Phone: +49 -611-71580 http://tascam.eu/
Bahnstrasse 12, 65205 Wiesbaden-Erbenheim, Germany
user online.
Printed in China
 Loading...