

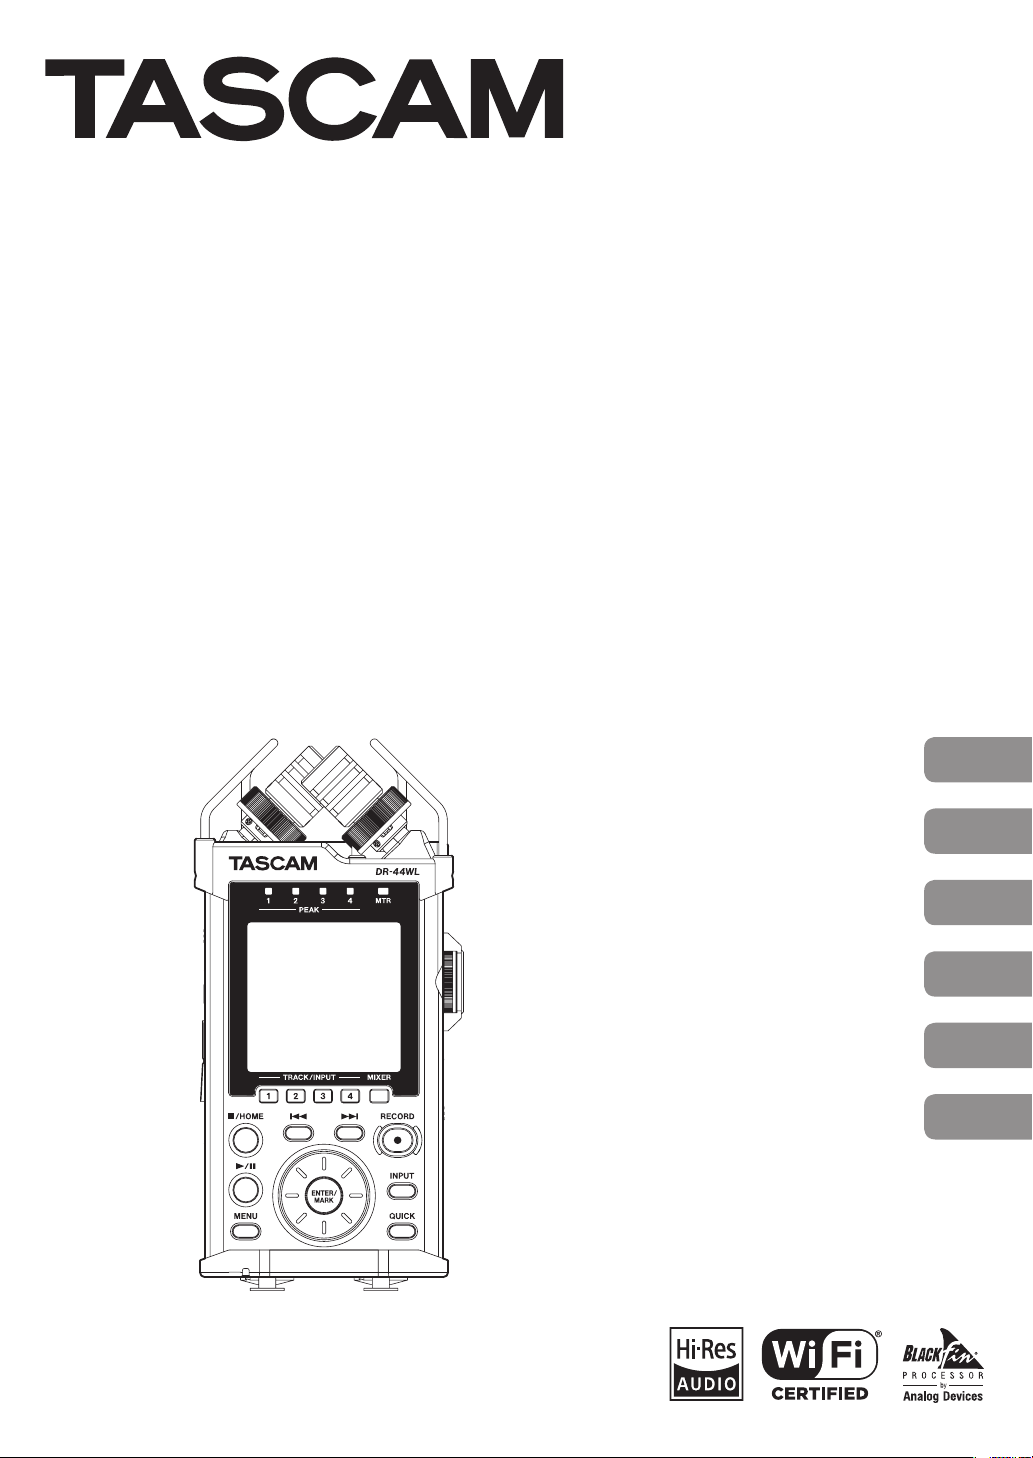
DR-44WL
Linear PCM Recorder
D01234300D
OWNER'S MANUAL
MODE D’EMPLOI
MANUAL DEL USUARIO
BEDIENUNGSANLEITUNG
MANUALE DI ISTRUZIONI
取扱説明書
ENGLISH
FRANÇAIS
ESPAÑOL
DEUTSCH
ITALIANO
日本語
• TASCAM is a trademark of TEAC CORPORATION, registered
in the U.S. and other countries.
• SDXC Logo is a trademark of SD-3C, LLC.
• Supply of this product does not convey a license nor imply any
right to distribute MPEG Layer-3 compliant content created
with this product in revenue-generating broadcast systems
(terrestrial, satellite, cable and/or other distribution channels),
streaming applications (via Internet, intranets and/or other
networks), other content distribution systems (pay-audio or
audio-on-demand applications and the like) or on physical
media (compact discs, digital versatile discs, semiconductor
chips, hard drives, memory cards and the like). An independent
license for such use is required. For details, please visit http://
mp3licensing.com.
• MPEG Layer-3 audio coding technology licensed from
Fraunhofer IIS and Thomson.
• Wi-Fi is a trademark of Wi-Fi Alliance. The Wi-Fi CERTIFIED
Logo is a certification mark of Wi-Fi Alliance.
• Microsoft, Windows and Windows Vista are either registered
trademarks or trademarks of Microsoft Corporation in the
United States and/or other countries.
• Apple, Macintosh, Mac OS and Mac OS X are trademarks of
Apple Inc.
• IOS is a trademark or registered tradmark of Cisco in the U.S.
and other countries and is used under license.
• App Store is a service mark of Apple Inc.
• Google Play and Android are trademarks of Google inc.
• Blackfin® and the Blackfin logo are registered trademarks of
Analog Devices, Inc.
• Other company names, product names and logos in this
document are the trademarks or registered trademarks of
their respective owners.
http://tascam.jp/
〒206-8530 東京都多摩市落合1-47
TEAC AMERICA, INC.
http://tascam.com/
Phone: +1-323-726-0303
1834 Gage Road, Montebello, California 90640 USA
TEAC MEXICO, S.A. de C.V.
http://teacmexico.net/
Phone: +52-55-5010-6000
Río Churubusco 364, Colonia Del Carmen, Delegación
Coyoacán, CP 04100, México DF, México
TEAC UK LIMITED
http://tascam.eu/
Phone: +44-8451-302511
Meridien House, Ground Floor,69 - 71, Clarendon Road,
Watford, Hertfordshire, WD17 1DS, UK
TEAC EUROPE GmbH
http://tascam.eu/
Phone: +49-611-71580
Bahnstrasse 12, 65205 Wiesbaden-Erbenheim, Germany
TEAC SALES & TRADING(SHENZHEN) CO., LTD
http://tascam.cn/
Phone: +86-755-88311561~2
Room 817, Block A, Hailrun Complex, 6021 Shennan Blvd.,
Futian District, Shenzhen 518040, China
TASCAM DR-44WL
2
Owner’s Manual
Pb, Hg, Cd
IMPORTANT SAFETY INSTRUCTIONS
1 Read these instructions.
2 Keep these instructions.
3 Heed all warnings.
4 Follow all instructions.
5 Do not use this apparatus near water.
6 Clean only with dry cloth.
7 Do not block any ventilation openings. Install in
accordance with the manufacturer’s instructions.
8 Do not install near any heat sources such
as radiators, heat registers, stoves, or other
apparatus (including amplifiers) that produce
heat.
9 Do not defeat the safety purpose of the
polarized or grounding-type plug. A polarized
plug has two blades with one wider than the
other. A grounding type plug has two blades
and a third grounding prong. The wide blade or
the third prong are provided for your safety. If
the provided plug does not fit into your outlet,
consult an electrician for replacement of the
obsolete outlet.
10 Protect the power cord from being walked on
or pinched particularly at plugs, convenience
receptacles, and the point where they exit from
the apparatus.
11 Only use attachments/accessories specified by
the manufacturer.
12 Use only with the cart,
stand, tripod, bracket, or
table specified by the
manufacturer, or sold
with the apparatus.
When a cart is used, use
caution when moving the cart/apparatus
combination to avoid injury from tip-over.
13 Unplug this apparatus during lightning storms
or when unused for long periods of time.
14 Refer all servicing to qualified service personnel.
Servicing is required when the apparatus has
been damaged in any way, such as powersupply cord or plug is damaged, liquid has
been spilled or objects have fallen into the
apparatus, the apparatus has been exposed to
rain or moisture, does not operate normally, or
has been dropped.
•
The apparatus draws nominal non-operating
power from the AC outlet with its POWER or
STANDBY/ON switch not in the ON position.
•
The mains plug is used as the disconnect device,
the disconnect device shall remain readily
operable.
•
Caution should be taken when using earphones
or headphones with the product because
excessive sound pressure (volume) from
earphones or headphones can cause hearing loss.
•
If you are experiencing problems with this
product, contact TEAC for a service referral. Do
not use the product until it has been repaired.
WARNING
To prevent possible hearing damage, do not
listen at high volume levels for long periods.
CAUTION
•
Do not expose this apparatus to drips or splashes.
•
Do not place any objects filled with liquids, such
as vases, on the apparatus.
•
Do not install this apparatus in a confined space
such as a book case or similar unit.
•
The apparatus should be located close enough
to the AC outlet so that you can easily grasp the
power cord plug at any time.
•
If the product uses batteries (including a battery
pack or installed batteries), they should not be
exposed to sunshine, fire or excessive heat.
•
CAUTION for products that use replaceable
lithium batteries: there is danger of explosion if
a battery is replaced with an incorrect type of
battery. Replace only with the same or equivalent
type.
CAUTIONS ABOUT BATTERIES
This product uses batteries. Misuse of batteries could
cause a leak, rupture or other trouble. Always abide
by the following precautions when using batteries.
•
Never recharge non-rechargeable batteries. The
batteries could rupture or leak, causing fire or injury.
•
When installing batteries, pay attention to
the polarity indications (plus/minus (¥/^)
orientation), and install them correctly in the
battery compartment as indicated. Putting them
in backward could make the batteries rupture or
leak, causing fire, injury or stains around them.
•
When you store or dispose batteries, isolate their
terminals with insulation tape or something
like that to prevent them from contacting other
batteries or metallic objects.
•
When throwing used batteries away, follow the
disposal instructions indicated on the batteries
and the local disposal laws.
•
Do not use batteries other than those specified.
Do not mix and use new and old batteries or
different types of batteries together. The batteries
could rupture or leak, causing fire, injury or stains
around them.
•
Do not carry or store batteries together with small
metal objects. The batteries could short, causing
leak, rupture or other trouble.
•
Do not heat or disassemble batteries. Do not put
them in fire or water. Batteries could rupture or
leak, causing fire, injury or stains around them.
•
If the battery fluid leaks, wipe away any fluid on
the battery case before inserting new batteries. If
the battery fluid gets in an eye, it could cause loss
of eyesight. If fluid does enter an eye, wash it out
thoroughly with clean water without rubbing the
eye and then consult a doctor immediately. If the
fluid gets on a person’s body or clothing, it could
cause skin injuries or burns. If this should happen,
wash it off with clean water and then consult a
doctor immediately.
•
The unit power should be off when you install
and replace batteries.
•
Remove the batteries if you do not plan to use
the unit for a long time. Batteries could rupture
or leak, causing fire, injury or stains around them.
If the battery fluid leaks, wipe away any fluid on
the battery compartment before inserting new
batteries.
•
Do not disassemble a battery. The acid inside the
battery could harm skin or clothing.
8
For European Customers
Disposal of electrical and electronic
equipment
(a) All electrical and electronic equipment should
be disposed of separately from the municipal
waste stream via designated collection facilities
appointed by the government or the local
authorities.
(b) By disposing of the electrical and electronic
equipment correctly, you will help save valuable
resources and prevent any potential negative
effects on human health and the environment.
(c) Improper disposal of waste equipment can
have serious effects on the environment and
human health as a result of the presence
of hazardous substances in electrical and
electronic equipment.
(d) The crossed out wheeled dust bin
symbol indicates that electrical and
electronic equipment must be
collected and disposed of separately
from household waste.
(e) The return and collection systems
are available to the end users. For more detailed
information about disposal of old electrical and
electronic equipment, please contact your city
office, waste disposal service or the shop where
you purchased the equipment.
Disposal of batteries and/or
accumulators
(a) Waste batteries and/or accumulators should
be disposed of separately from the municipal
waste stream via designated collection facilities
appointed by the government or the local
authorities.
(b) By disposing of waste batteries and/or accumu-
lators correctly, you will help save valuable
resources and prevent any potential negative
effects on human health and the environment.
(c) Improper disposal of waste batteries and/or
accumulators can have serious effects on the
environment and human health as a result
of the presence of hazardous substances in
batteries and/or accumulators.
(d) The crossed out wheeled dust bin
symbol indicates that batteries and/
or accumulators must be collected
and disposed of separately from
household waste.
If the battery or accumulator
contains more than the specified values of lead
(Pb), mercury (Hg), and/or cadmium (Cd)
defined in the Battery Directive (2006/66/EC),
then the chemical symbols for lead (Pb),
mercury (Hg) and/or cadmium (Cd) will be
indicated beneath the crossed out wheeled
dust bin symbol.
(e) The return and collection systems are available
to the end users. For more detailed information
about disposal of waste batteries and/or
accumulators, please contact your city office,
waste disposal service or the shop where you
purchased them.
Wireless equipment precautions
Compliance of radio transmitter and interference
Model for USA
This device complies with Part.15 of FCC Rules.
Operation is subject to the following two conditions:
1) This device may not cause interference, and
2) This device must accept any interference,
including interference that may cause undesired
operation.
Labeling of authorization
FCC ID: YOPGS2100MIP
Model for Canada
Compliance of radio transmitter
This device complies with Industry Canada licenceexempt RSS standard(s). Operation is subject to the
following two conditions: (1) this device may not
cause interference, and (2) this device must accept
any interference, including interference that may
cause undesired operation of the device.
Labeling of authorization
IC ID: 9154A-GS2100MIP
Compliance of interference
This ClassB digital apparatus complies with Canadian
ICES-003.
TASCAM DR-44WL
3

Model for EEA (European Economic
Area)
This equipment complies with the harmonised
standards of DIRECTIVE 1999/5/EC (R&TTE).
Labeling of conformity
CE marking:
CAUTION
Changes or modifications not expressly approved by
the party responsible for compliance could void the
user’s authority to operate the equipment.
CAUTION
Authorization of wireless devices are different in
countries or regions. Please use only in the country
where you purchased the product.
•
Depending on the country, restrictions on the use
of Wi-Fi wireless technology might exist.
Confirm the laws and regulations of the country or
region where you want to use the unit before use.
Radiation Exposure requirements
This equipment meets the regulation, which is
recognized internationally, for the case of human
exposure to radio waves generated by the transmitter.
Based on the following two conditions:
•
End-users and installers must be provided with
antenna installation instructions and transmitter
operating conditions for satisfying RF exposure
compliance.
•
This equipment should be installed and operated
with minimum distance 20 cm (8”) between the
radiator and your body.
8
Statement of compliance
Model for USA
This device complies with FCC radiation exposure
limits set forth for an uncontrolled environment.
Model for Canada
The device meets the exemption from the routine
evaluation limits in section 2.5 of RSS 102 and
compliance with RSS-102 RF exposure, users can
obtain Canadian information on RF exposure and
compliance.
EEA (European Economic Area) model
This equipment complies with EN.62311; Assessment
of electronic and electrical equipment related to
human exposure restrictions for electromagnetic
fields; the harmonised standard of DIRECTIVE
1999/5/EC.
Information for interference (FCC requirements)
This equipment has been tested and found to
comply with the limits for a Class B digital device,
pursuant to Part 15 of the FCC Rules. These limits are
designed to provide reasonable protection against
harmful interference in a residential installation.
This equipment generates, uses, and can radiate
radio frequency energy and, if not installed and
used in accordance with the instructions, may cause
harmful interference to radio communications.
However, there is no guarantee that interference will
not occur in a particular installation.
If this equipment does cause harmful interference to
radio or television reception, which can be determined by turning the equipment off and on, the
user is encouraged to try to correct the interference
by one or more of the following measures.
•
Reorient or relocate the equipment and/or the
receiving antenna.
•
Increase the separation between the equipment
and receiver.
•
Connect the equipment into an outlet on a
circuit different from that to which the receiver is
connected.
•
Consult the dealer or an experienced radio/TV
technician for help.
Declaration of Conformity
Model Number : DR-44WL
Trade Name : TASCAM
Responsible party : TEAC AMERICA, INC.
Address : 1834 Gage Road, Montebello,
Telephone number : 1-323-726-0303
This device complies with Part.15 of FCC Rules.
Operation is subject to the following two
conditions:
1) This device may not cause interference, and
2) This device must accept any interference,
including interference that may cause undesired
operation.
DECLARATION OF CONFORMITY
We, TEAC EUROPE GmbH.
Bahnstrasse 12, 65205 WiesbadenErbenheim, Germany declare
in own responsibility, the TEAC
product described in this manual is in compliance
with the corresponding technical standards.
California, U.S.A.
Contents
IMPORTANT SAFETY INSTRUCTIONS ......................... 3
Wireless equipment precautions ................................ 3
Compliance of radio transmitter and interference
Introduction.........................................................................4
Included items ....................................................................4
Note about the Reference Manual ............................. 4
Radiation Exposure requirements ................................. 4
Information for interference (FCC requirements) ...4
Precautions for placement and use .............................5
Beware of condensation .................................................5
Cleaning the unit ...............................................................5
Using the TEAC Global Site ............................................ 5
User registration ................................................................ 5
Names and Functions of Par ts ......................................5
Top panel .......................................................................................5
Front panel ....................................................................................5
Left side panel.............................................................................5
Right side panel .........................................................................5
Bottom panel...............................................................................5
Home Screen .......................................................................6
Preparation ..........................................................................6
Preparing the power supply ..............................................6
Starting up the unit .................................................................6
Setting the built-in clock .....................................................6
Shutting down ...........................................................................7
Connecting monitoring devices and
headphones .................................................................................7
Basic menu operation procedures ............................. 7
Menu structure...........................................................................7
Recording .............................................................................7
Recording Screen .....................................................................7
Adjusting the input level ..................................................... 8
Set the low- cut filter ...............................................................8
Using the level control function .....................................8
Record .............................................................................................. 8
About the recording standby state ..............................8
Recording menu structure .................................................8
Playback ................................................................................ 9
Playing back recordings .......................................................9
Playback is paused after moving the playback
position. Selecting a file for playback (skipping) .9
Adjusting the playback volume ......................................9
Connecting with a Computer .......................................9
Exchanging files with a computer .................................9
Disconnecting the unit from a computer ................ 9
Settings and Information Display ............................... 9
Turning the built-in speaker off ....................................... 9
System settings ..........................................................................9
Connecting the unit to a smartphone via Wi-Fi ....9
How to obtain and install the dedicated
application (DR CONTROL) .................................................9
Connecting the unit to a smartphone via Wi-Fi
for the first time .........................................................................9
Connecting the unit to a smartphone via Wi-Fi
(second and subsequent times) .................................. 10
Remote control of the unit from a smar tphone 11
File transfer from the unit to a smar tphone..........11
Quick Reference for Using Various Functions ......12
Messages .............................................................................13
Troubleshooting ..............................................................13
Specifications ....................................................................14
Ratings........................................................................................... 14
Inputs and outputs ...............................................................14
Audio performance .............................................................. 14
Recording times...................................................................... 14
Requirements for connected computers .............. 14
Wi-Fi ................................................................................................ 14
General ......................................................................................... 14
Introduction
Thank you very much for purchasing the TASCAM
DR-44WL Linear PCM Recorder.
Before connecting and using this unit, please take
time to read this manual thoroughly to ensure you
understand how to properly set it up and connect
it, as well as the operation of its many useful and
convenient functions. After you have finished
..3
reading this manual, please keep it in a safe place for
future reference.
This product has a Blackfin® 16/32-bit embedded
processor made by Analog Devices, Inc. This
processor controls digital signal processing.
Inclusion of this Blackfin® processor in the product
increases its performance and reduces its power
consumption.
Included items
This product includes the following items.
Take care when opening the package to avoid
damaging the items. Keep the packing materials for
transportation in the future.
Please contact the store where you purchased this
unit if any of these items are missing or have been
damaged during transportation.
•
Main unit ............................................................................... × 1
•
AC adapter (GPE053B) .................................................. × 1
•
microSD card with adapter (in the unit)............× 1
•
USB cable (80 cm) ........................................................... × 1
•
AA alkaline batteries ...................................................... × 4
•
Fur windscreen ..................................................................× 1
•
Mic stand adapter ........................................................... × 1
•
Hot shoe adapter ............................................................. × 1
•
Soft case ................................................................................ × 1
•
Owner’s Manual (this document)
including warranty ......................................................... × 1
Note about the Reference Manual
This Owner’s Manual explains the main functions
of this unit. Please see the Reference Manual for
information about all the unit’s functions.
TASCAM DR-44WL
4
You can also download this Owner’s Manual and the
Reference Manual from the TEAC Global Site (http://
teac-global.com/).
Precautions for placement and use
•
The environmental temperature operating range
of this unit is 0–40°C (32–104°F).
•
Do not install this unit in the following types of
locations. Doing so could degrade the sound
quality and/or cause malfunctions.
Places with significant vibrations
Near windows or other places exposed to
direct sunlight
Near heaters or other extremely hot places
Extremely cold places
Places with bad ventilation or high humidity
Very dusty locations
•
If this unit is placed near a power amplifier or
other device with a large transformer, it could
cause a hum. If this occurs, increase the distance
between this unit and the other device.
•
This unit could cause color irregularities on a TV
screen or noise from a radio if used nearby. If this
occurs, use this unit farther away.
•
This unit might produce noise if a mobile phone
or other wireless device is used nearby to make
calls or send or receive signals. If this occurs,
increase the distance between this unit and those
devices or turn them off.
•
To enable good heat dissipation, do not place
anything on top of this unit.
•
Do not place this unit on top of a power amplifier
or other device that generates heat.
Beware of condensation
If the unit is moved from a cold to a warm place,
or used after a sudden temperature change, there
is a danger of condensation; vapor in the air could
condense on the internal mechanism, making
correct operation impossible. To prevent this, or if
this occurs, let the unit sit for one or two hours at the
new room temperature before using it.
Cleaning the unit
Use a dry soft cloth to wipe the unit clean. Do not
wipe with chemical cleaning cloths, thinner, alcohol
or other chemical agents. Doing so could damage
the surface or cause discoloration.
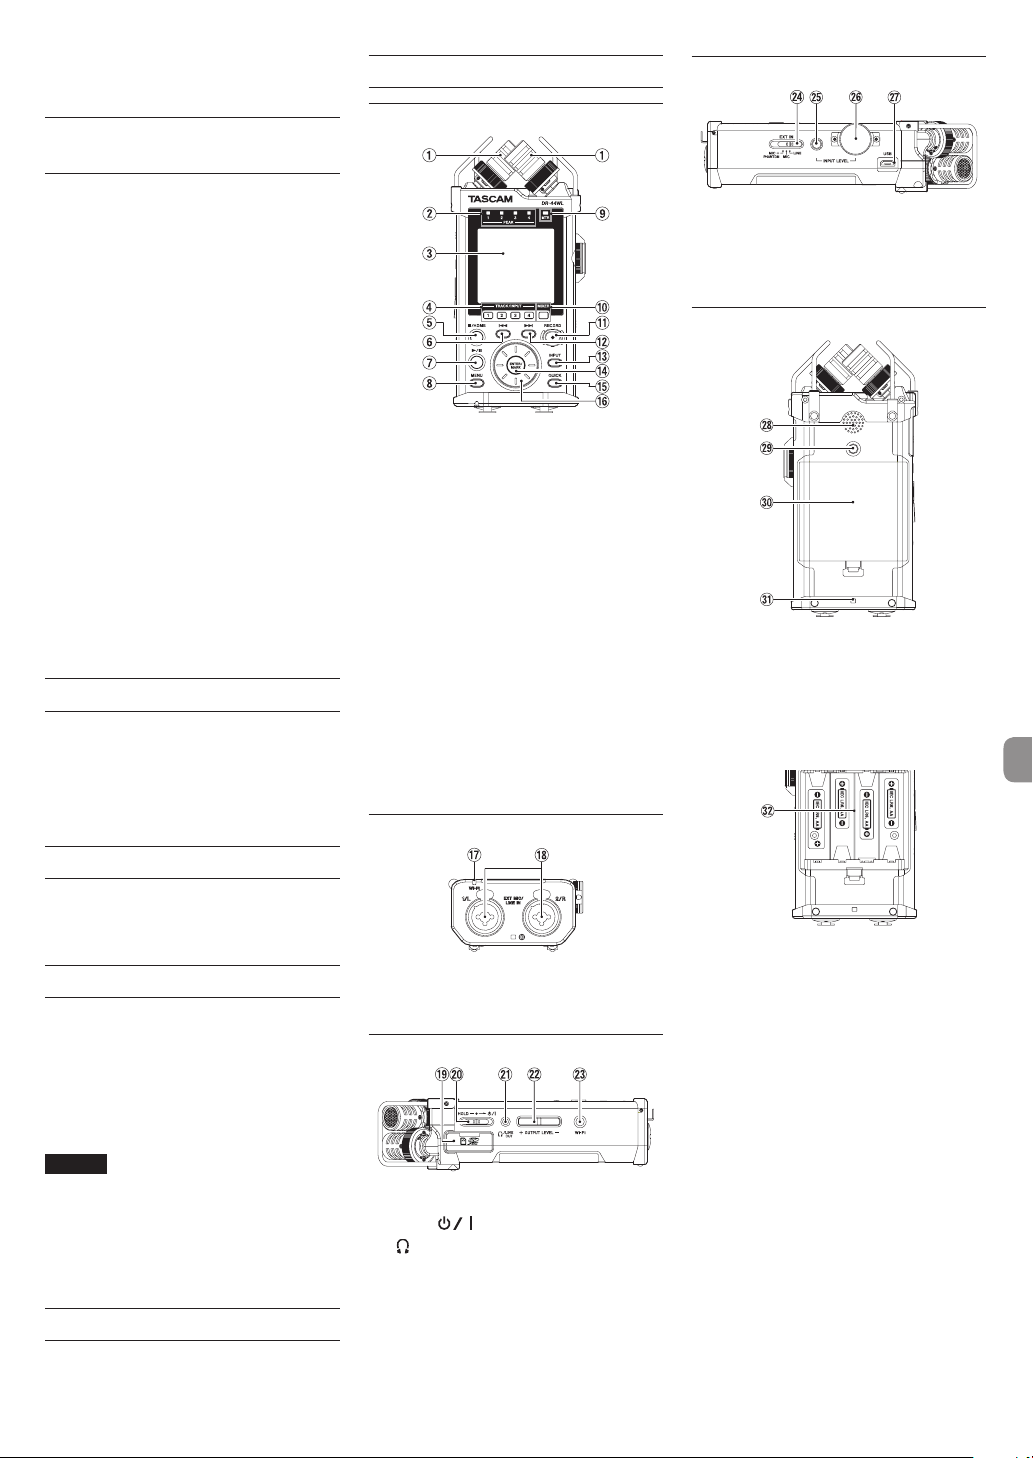
Names and Functions of Parts
Top panel
1 Built-in stereo microphone
2 PEAK indicator
3 Display
4 TRACK/INPUT button
5 8/HOME button
6 . Fast rewind button
7 7/9 button
8 MENU button
9 MTR indicator
0 MIXER button
q RECORD [0] button / REC indicator
w / Fast forward button
e INPUT button
r ENTER/MARK button
t QUICK button
y Wheel
Front panel
Right side panel
f EXT IN switch
g INPUT LEVEL button
h INPUT LEVEL volume
j USB port
Bottom panel
k Built-in mono speaker
l Tripod attachment thread
(1/4 inch)
; Battery compartment cover
z Strap attachment
x Battery compartment
Using the TEAC Global Site
You can download this Owner’s Manual and the
Reference Manual necessary for this unit from the
TEAC Global Site (http://teac-global.com/).
Open the TEAC Global Site (http://teac-global.
1.
com/).
In the TASCAM Downloads section, click the
2.
desired language to open the Downloads
website page for that language.
NOTE
If the desired language does not appear, click
Other Languages.
Click the product name in the “Search by Model
3.
Name” section to open the Downloads page for
that product.
Select and download the Owner’s Manual and
4.
the Reference Manual that are needed.
User registration
Customers in the USA, please visit the TASCAM
website (http://tascam.com/) to register as a user
online.
u Wi-Fi indicator
i EXT MIC/LINE IN 1/L and 2/R terminals
(XLR/TRS)
Left side panel
o SD card slot
p HOLD/ switch
a /LINE OUT jack
s OUTPUT LEVEL button
d Wi-Fi button
TASCAM DR-44WL
5
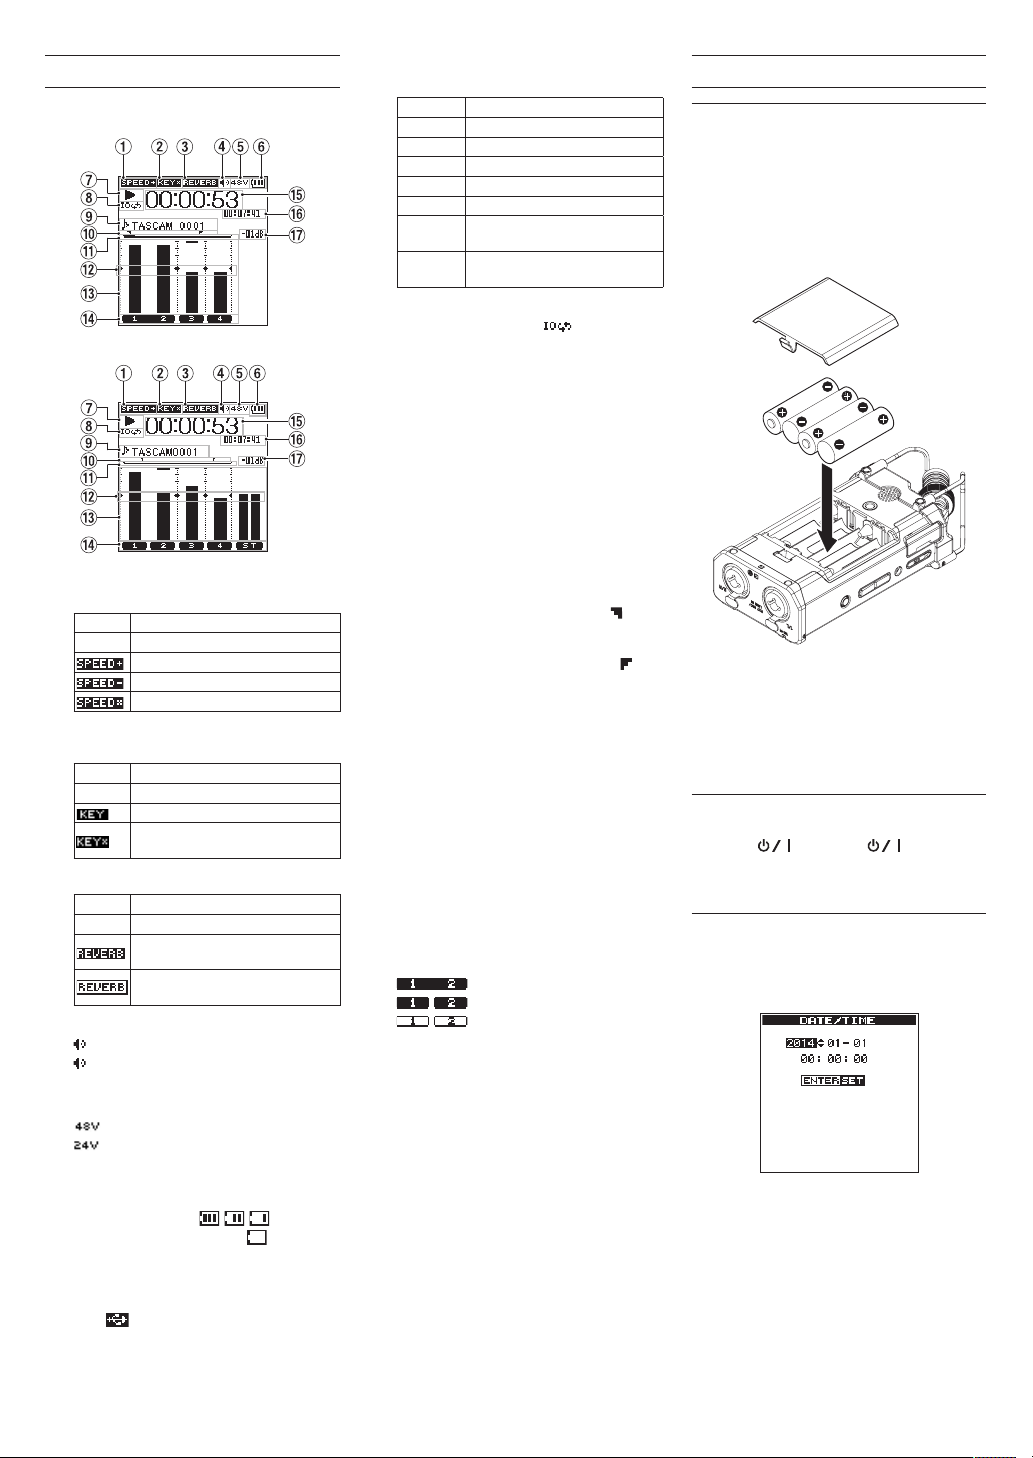
Home Screen
This is the screen that is usually shown when the unit
is stopped.
Home Screen in the 4 CH mode
Home Screen in the MTR mode
1 Playback speed status display
Icon Playback speed
Blank Playback speed not changed
1.1× – 2.0×
0.5× – 0.9×
Playback speed cannot be changed
2 Display of the key control function on/off
status
Icon On/off status
Blank Key control function off
Key control function on
Key control function on
(setting disabled)
3 Display of the reverb on/off status
Icon On/off status
Blank Reverb off
Reverb on
(Recording with the effector on)
Reverb on
(SEND status)
4 Speaker output display
displayed: Speaker output on
not displayed: Speaker output off
5 Phantom power supply display
Blank: No phantom power supply
: 48 V phantom power supplied
: 24 V phantom power supplied
6 Power supply status display
When power is supplied from the batteries, the
battery icon shows the amount of remaining
battery power in bars ( , , ).
When the icon displays no bar, blinks, and
the power subsequently turns off (standby
state) due to dead batteries.
When the dedicated AC adapter (GPE053B)
supplied with the product or USB bus power is
used, is shown.
7 Recorder operation status display
These icons show the recorder operation status.
Indicator Meaning
8
9
7
,
m
/
.
8 Loop playback setting status display
During loop playback, the icon is
displayed.
9 File name/song name display
When the 4CH mode is selected, the name or
tag information of the file being played back is
shown.
When there are multiple files in the 4CH mode,
only the format portion of the file names and
the basic number of the recording files are
displayed.
When the MTR mode is selected, the name of
an opened song is shown.
0 Loop playback IN (starting) and OUT
(ending) points setting state
Shows the IN (starting) and OUT (ending)
points-setting state of loop playback.
When the IN (starting) point is set, the icon is
displayed at the corresponding position on the
playback position-displaying bar.
When the OUT (ending) point is set, the icon
is displayed at the corresponding position on
the playback position-displaying bar.
q Playback position display
The current playback position is shown by a bar.
w Level meter guide display
This is a level meter guide for adjusting the
input and output levels.
It is displayed at the “-12 dB” position on the
scale.
e Level meter
Shows the level of sound being input or played
back.
r File state display
The file state is displayed in different ways,
depending on the type of file to be played
back.
t Elapsed time display
Shows the elapsed time (hours : minutes :
seconds) of the current file.
y Remaining time display
Shows the remaining time (hours : minutes :
seconds) of the current file.
u Peak value displayed in decibel (dB)
Shows in decibels the maximum value of the
playback level in a certain period of time.
Stopped
Paused
Playing back
Fast-forwarding
Fast-rewinding
Skipping to the head of the next
file
Skipping to the head of the
current file or of the preceding file
: Stereo file
: Mono file ×2
: No file is present.
Preparation
Preparing the power supply
Using AA size batteries
Remove the battery compartment cover on the
1.
bottom panel.
Install four AA size batteries with their ¥
2.
and ^ marks as shown in the battery
compartment.
Attach the battery compartment cover.
3.
•
Set the type of batteries to use in the
BATTERY TYPE
DISPLAY
accurately show the amount of remaining power
and allow the unit to accurately determine
whether enough power is available for its proper
operation. (By default, the type is set to
for alkaline batteries.)
Starting up the unit
When the unit is turned off (standby state), slide
the HOLD/ switch in the direction and,
when
TASCAM DR-44WL
displayed, release the switch.
The Home Screen appears when the unit starts up.
Setting the built-in clock
When the unit is started up for the first time (or after
being left without batteries), the
screen appears before the start-up screen to allow
the date and time to be set.
Use the the .// button and the wheel to
enter the date and time, and press the ENTER/
MARK button to set them.
item of the
menu in order for the unit to
POWER/
ALKAL
(start-up screen) is
DATE/TIME
TASCAM DR-44WL
6
Shutting down
While the unit is turned on, slide the HOLD/
switch of the left side panel in the
direction and, when
shutting down
The power turns off in a few seconds.
TASCAM DR-44WL
appears, release the switch.
Connecting monitoring devices and headphones
To listen with headphones, connect them to the /
LINE OUT jack.
To listen with an external monitoring system
(powered monitor speakers or an amplifier and
speakers), connect it to the /LINE OUT jack.
Headphones Powered monitor speakers
or
an amplifier and speakers
Basic menu operation procedures
Press the MENU button to open the
1.
screen.
Use the wheel to select (highlight) one of the
2.
menu items, and then press the ENTER/MARK
button to go to the desired setting screen.
Use the wheel to select (highlight) an item to
3.
set.
Press the ENTER/MARK button or / button
4.
to move the cursor to the right and highlight
the setting value.
Use the wheel to change the setting.
5.
When setting a different item in the same
6.
menu, press the ENTER/MARK button or .
to move the cursor to the left.
Repeat Steps 3. to 6. as necessary to set other
7.
items.
When finished, press the 8/HOME button to
8.
return to the Home Screen.
Menu structure
MENU
MODE
REC SETTING Set for recording
AUTO FUNCTION
BROWSE
(only when the 4CH mode
is selected)
SONG
(only when the MTR mode
is selected)
TOOLS
REVERB Set reverb effects
POWER/DISPLAY
SYSTEM
Select recording or
playback mode
Convenient
functions for
recorded files
Operate files and
folders in the SD
card
Set other convenient
functions
Set the power
supply and the
display
System settings of
the unit
MENU
Recording
Recording Screen
The screen below is shown when the unit is in the
recording standby state or while recording is in
progress.
Recording screen in the 4 CH mode
Recording screen in the MTR mode
1 Display of the DUAL REC function on/off
status (4CH mode only)
No display: DUAL REC function off
: DUAL REC function on
2 Display of reverb on/off status
Icon On/off status
Blank Reverb off
3 Phantom power supply display
Blank: No phantom power supply
4 Recorder operation status display
These icons show the recorder operation status.
Indicator Meaning
09
0
5 Display of the setting status of the PRE REC
or Auto REC function (4CH mode only)
When the PRE REC function is ON, the
icon shown.
When the AUTO REC function is ON, the
icon is shown.
6 File name/song name display
The file name that will automatically be given
to a recorded file is shown.
When there are multiple files in the 4CH mode,
only the format portion of the file names and
the basic number of the recording files are
displayed. When a single file is recorded, its
name is shown.
When the MTR mode is selected, the name of
an opened song is shown.
Reverb on
(Recording with the effector on)
Reverb on
(SEND status)
: 48 V phantom power supplied
: 24 V phantom power supplied
Recording in standby or recording
paused
Recording in progress
TASCAM DR-44WL
7
7 Level meter guide display
This is a level meter guide for adjusting the
input and output levels.
It is displayed at the “−12 dB” position on the
scale.
8 Level meter
Shows the level of sound being input.
While recording in the overdubbing mixing
mode, the level of the mixed input and
playback sounds is shown. The tg mark is
visible at the “−12 dB” position on the scale as a
guide mark for input level adjustment.
9 File status display
The file state is displayed in different ways,
depending on the type of file to be played
back.
0 Elapsed recording time
The elapsed recording time of a recorded file is
shown as hours : minutes : seconds.
q Remaining recording time
The remaining recording time until the selected
maximum file size is reached is shown (hours :
minutes : seconds). If the remaining recording
time on the SD card is less, that will be
displayed instead.
w Peak value in decibels (dB)
The peak value of the input level is shown in
decibels.
: Stereo file
: Mono file ×2
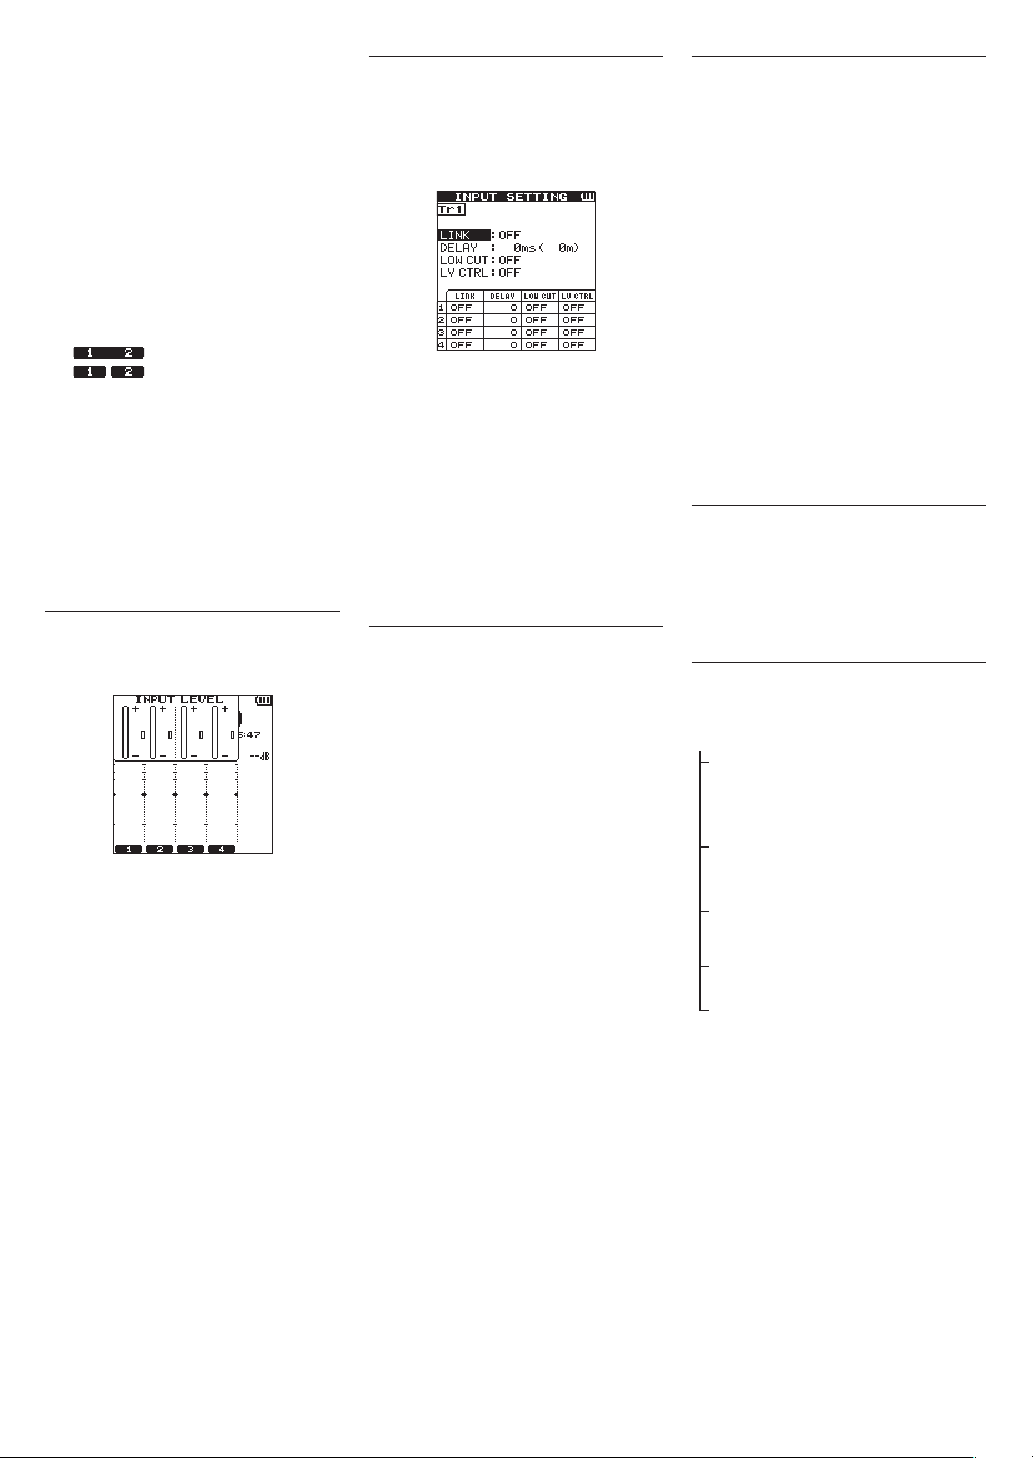
Adjusting the input level
Press the INPUT LEVEL button on the right
1.
side panel to show the
setting screen on the display as a pop-up.
Press the TRACK/INPUT button to select a
2.
channel to adjust the input level for.
Use the INPUT LEVEL volume of the right side
3.
panel to adjust the input level.
When the input sound is too loud, the PEAK
indicator of the top panel is lit in red.
A tg mark is visible at the “-12 dB” position
on the level meter.
Set the input level so that the level changes
near this mark without causing the PEAK
indicator to light in red.
When finished, press the 8/HOME button to
4.
return to the Home Screen.
INPUT LEVEL
Set the low-cut filter
Set the low-cut filter if you want to cut noise and
other sounds at low frequencies. This function can
be used to reduce air-conditioning noise, unpleasant
wind noise, etc.
Press the INPUT button to show the
1.
SETTING
Press the TRACK/INPUT button to select a
2.
channel to set the low-cut filter for.
Use the wheel to select (highlight)
3.
CUT
button or / button to display setting items
as a pop-up.
Use the wheel to set the cut-off frequency of
4.
the low-cut filter for microphone input.
Setting values:
When you press the ENTER/MARK or .
5.
button, the pop-up disappears and the function
is enabled.
As the number (frequency) becomes larger, low
frequencies across a wider band can be cut.
screen on the display.
, and then press the ENTER/MARK
OFF, 40 Hz, 80 Hz
120 Hz, 220 Hz
Using the level control function
You can set the level control function for recording
through a microphone.
Press the INPUT button to show the
1.
SETTING
Press the TRACK/INPUT button to select a
2.
channel to set the level control function for.
Use the wheel to select (highlight)
3.
CTRL
or / button to display setting items as a
pop-up.
When you use the wheel to select (highlight)
4.
the desired function and then press the ENTER/
MARK or . button, the pop-up disappears
and the function is enabled.
PEAK REDUCTION
This function is used to automatically lower the
recording level to a more appropriate one when an
input sound is too loud. You can raise the recording
level manually. This function is useful for recording
music with volume changes that affect the sound
negatively. Even if this function is turned off after it
has been set, the set level is retained.
LIMITER
This function prevents distortion due to sudden and
excessive input. This is useful when you do not want
to change the recording level.
In this mode, you can change the recording level
manually even during recording.
screen on the display.
, and then press the ENTER/MARK
INPUT
LOW
,
INPUT
LEVEL
Record
This recorder can record sounds in two modes: 4CH
and MTR modes.
In the 4CH mode, up to four tracks can be recorded
simultaneously from the built-in microphones and
the external input terminal.
In the MTR mode, sounds can be recorded over an
already recorded file in addition to recording of up
to four tracks.
Press the RECORD [0] button to enter
1.
recording standby.
You can check recorded file names shown on
the display before you start recording.
Press the TRACK/INPUT button to select a
2.
channel for recording.
Press the RECORD [0] button.
3.
Normal recording starts.
Press the 8/HOME button to finish recording.
4.
To pause the recording, press the RECORD
[0] button. When you press the RECORD
[0] button again or press the 7/9 button,
recording in the same file resumes.
When you press the 8/HOME button after
pausing the recording, an audio file of the
sound recorded up to pausing is created.
About the recording standby state
This unit has a recording standby state like that of a
recorder for professional use. In this standby state,
you can perform operations such as configuring
input level settings and then start recording quickly.
In the recording standby state, the REC indicator
blinks and the recording screen is shown.
Recording menu structure
You can configure various settings using the
SETTING
REC SETTING
item on the
FILE FORMAT Set the file format
SAMPLE RATE Set the sampling frequency
PRE REC Set the pre-recording
DUAL REC Set the DUAL REC function
MS MIC Set the MS microphone
MENU
screen.
BWF: 16/24 bit
WAV: 16/24 bit,
MP3: 32 - 320 kbps
44.1 kHz, 48 kHz, 96 kHz
(96 kHz for BWF/WAV only)
function
OFF, ON
MODE, LEVEL/FORMAT
function
MS DECODE, SOURCE
REC
TASCAM DR-44WL
8
Playback
Playing back recordings
While the Home Screen is open and playback is
stopped, press the 7/9 button to start playback.
Pausing
While the Home Screen is open and a track is playing
back, press the 7/9 button to pause playback at
the current position.
Stopping
When you press the 8/HOME button while the
Home Screen is open and a track is playing back,
playback is paused.
If you press the 8/HOME button again, playback
will be stopped at the head of the file.
Fast-rewinding and fast-forwarding
(search)
While the Home Screen is open and a track is
stopped or playing back press and hold the .
or / button to fast-rewind or fast-forward and
search the played-back file.
Moving the playback position
You can move the playback position by turning the
wheel while the Home Screen is open and a track is
stopped or playing back.
Playback is paused after moving the playback position. Selecting a file for playback (skipping)
While the Home Screen is open, press the . or
/ button to select the file that you want to play
back.
If you press the . button at the beginning of
a file playback will skip to the beginning of the
previous file.
If you press the / button at the beginning of or
in the middle of a file playback will skip to the next
file.
Adjusting the playback volume
The volume of sound output through the /LINE
OUT jack can be adjusted by use of the OUTPUT
LEVEL (+/−) button while the Home Screen is open.
Connecting with a Computer
You can transfer audio files on the SD card in the unit
to a computer and also transfer audio files from a
computer to the unit.
Connecting the unit to a computer by USB
Use the included USB cable to connect the unit
1.
to a computer. If the power is off, turn it on.
On the
2.
3.
USB SELECT
STORAGE
button to connect this unit to the computer.
USB connected
display.
When you open Computer in Windows, this
unit shows on the computer screen as an
external drive named “DR-44WL”.
and press the ENTER/MARK
screen, select
will appear on the
Exchanging files with a computer
Click the “DR-44WL” drive on the computer to show
the “MUSIC” and “UTILITY” folders.
To transfer files to the computer, open the “MUSIC”
folder and drag and drop the desired files where you
want them to go.
To transfer files from the computer, drag and drop
the desired audio files on the computer to the
“MUSIC” folder.
Disconnecting the unit from a computer
Before disconnecting the USB cable, follow the
proper procedures for the computer to unmount
this unit.
The power turns off after the unit completes its
shutdown process.
See the computer’s operation manual for instructions about how to unmount an external device.
Settings and Information Display
Turning the built-in speaker off
Set the items
to OFF.
System settings
Use the SYSTEM menu to customize settings for
using the unit. You can also perform operations such
as initializing settings and formatting SD cards.
1.
2.
MENU
w
TOOLS
w
SPEAKER
Select
MENU
w
ENTER/MARK button.
SYSTEM
Configure necessary settings for each function.
and press the
Connecting the unit to a smartphone via Wi-Fi
CAUTION
This product has been designed to be
compliant with rules and regulations in the
sales area, display as needed has been.
This product is used in the country / region of
the following has been approved.
United States, Canada, Europe (EU Member
States), Australia, New Zealand, Japan
In countries other than the above, you might
have to use the WiFi function is limited.
Before using, please check the laws and
regulations of the country.
You can operate this unit by remote control with a
free dedicated application (DR CONTROL). In addition
to transport control operations such as playback and
stop, you can also adjust the input, transfer recorded
files and more via Wi-Fi.
How to obtain and install the dedicated application (DR CONTROL)
Connect your smartphone to the Internet.
1.
If your smartphone is an Android device,
2.
download and install the dedicated application
(DR CONTROL) from Google Play. If it is an iOS
device, download and install from the App
Store.
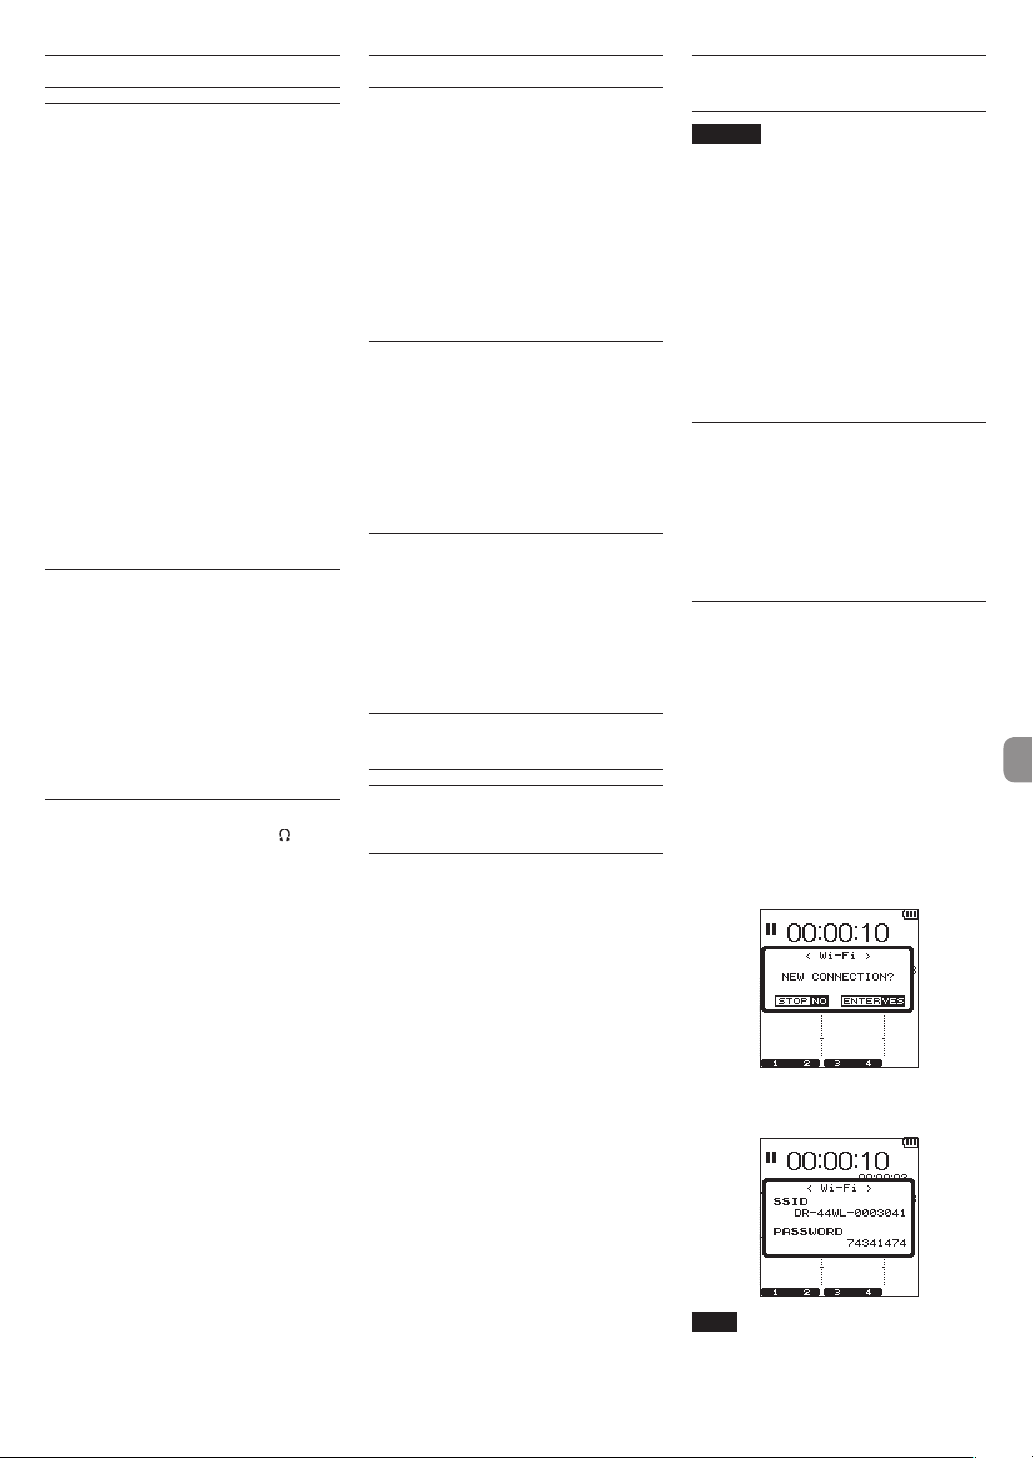
Connecting the unit to a smartphone via Wi-Fi for the first time
You can connect the unit to a smartphone directly
via Wi-Fi. Therefore, you do not need external devices,
such as a router, or a Wi-Fi network environment.
For the connection, you only need the unit and your
smartphone.
While connecting the unit to your smartphone, you
cannot connect the smartphone to an external Wi-Fi
network.
If using and iOS device
Press the Wi-Fi button to make the Wi-Fi
1.
indicator blink.
A pop-up message appears on the display.
You will be making a connection to a new
2.
smartphone, so press the ENTER/MARK button.
“SSID” and “Encryption key” appear on the
3.
display, and then the unit enters the WPS mode
automatically.
NOTE
The WPS mode is the standard for easy
connection between Wi-Fi devices. The unit
employs push buttons for Android devices.
TASCAM DR-44WL
9
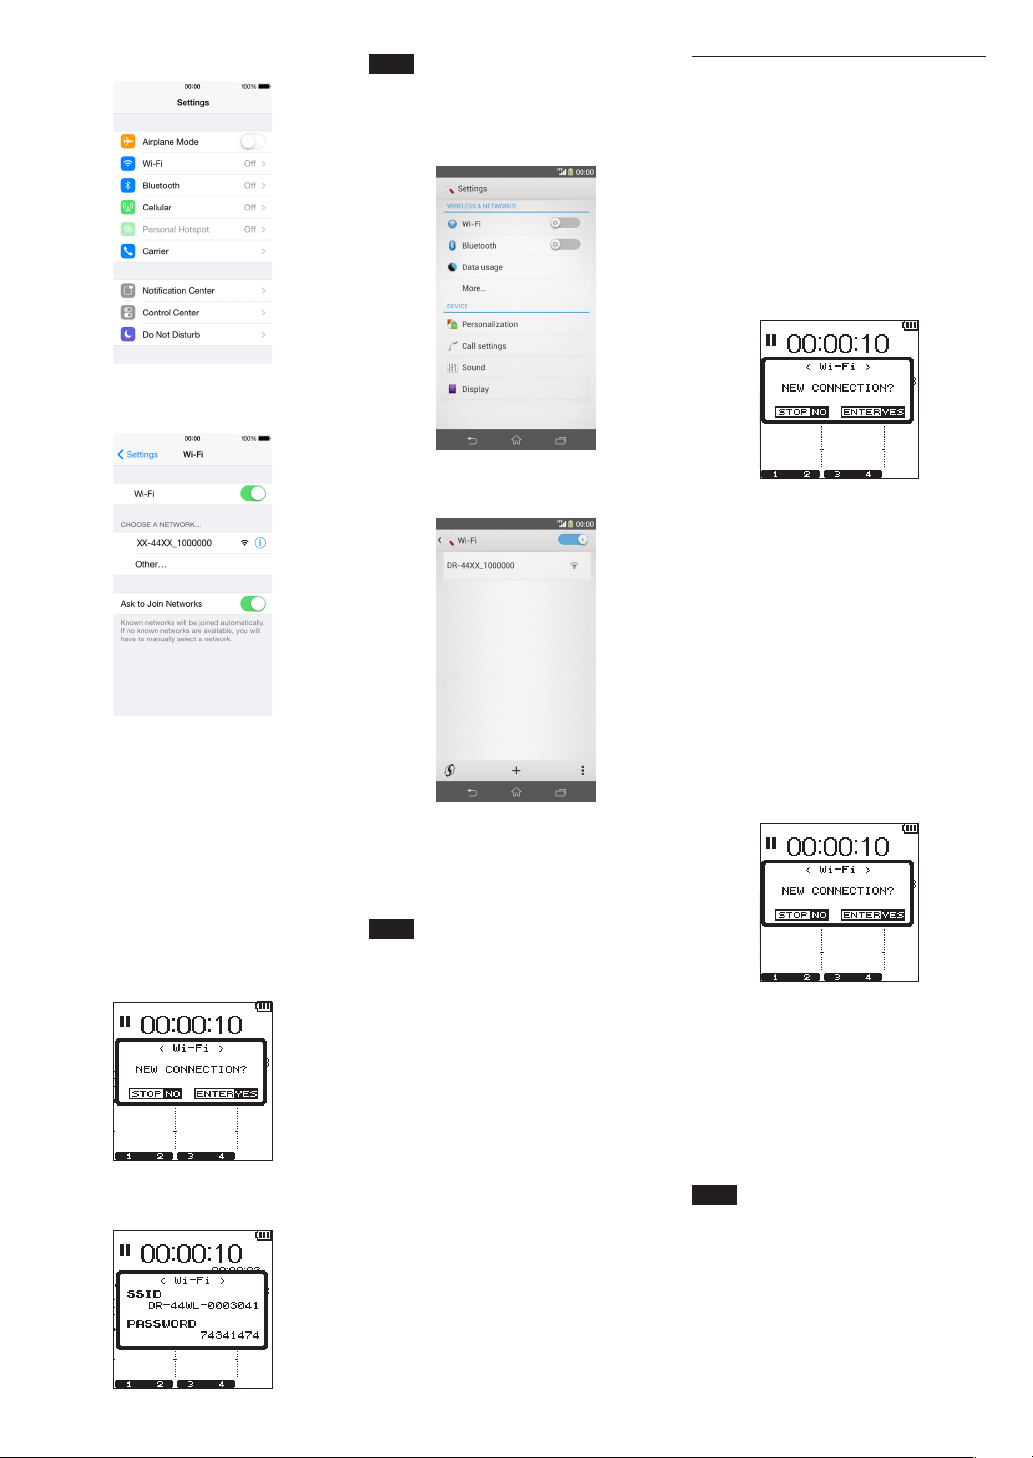
On your iOS device, select “Settings” w “Wi-Fi”.
4.
When you turn on Wi-Fi on your iOS device, a
5.
Wi-Fi device SSID list appears. Select the SSID
shown on the display of the unit.
NOTE
The WPS mode is the standard for easy
connection between Wi-Fi devices. This unit
employs the PIN code system for iOS devices.
On your Android device, select “Settings” w
4.
“Wi-Fi”.
When you turn on Wi-Fi on your Android device,
5.
a Wi-Fi device SSID list appears. Select the SSID
shown on the display of the unit.
Connecting the unit to a smartphone via Wi-Fi (second and
subsequent times)
Once you have connected the unit to your smartphone, you can connect them again in the future
simply by selecting SSID.
If using an iOS device
Press the Wi-Fi button of the unit to make the
1.
Wi-Fi indicator blink.
A pop-up message appears on the display.
You will be making a connection to a previously
2.
connected smartphone, so press the 8/HOME
button.
The pop-up message on the display disappears
3.
and the unit waits for a connection with a
smartphone.
On your iOS device, select “Settings” w “ Wi-Fi”.
4.
When you turn on Wi-Fi on your iOS device, a
5.
Wi-Fi device SSID list appears. Select the SSID
shown on the display of the unit.
A Wi-Fi connection between the unit and
6.
your smartphone is established and the Wi-Fi
indicator is lit.
A password input screen appears on the iOS
6.
device. Enter the encryption key shown on the
display of the unit.
A Wi-Fi connection between the unit and
7.
your smartphone is established and the Wi-Fi
indicator is lit.
If using an Android device
Press the Wi-Fi button to make the Wi-Fi
1.
indicator blink.
A pop-up message appears on the display.
You will be making a connection to a new
2.
smartphone, so press the ENTER/MARK
button.
“SSID” and “Encryption key” appear on the
3.
display, and then the unit enters the WPS mode
automatically.
A password input screen appears on the
6.
Android device. Enter the encryption key
shown on the display of the unit.
A Wi-Fi connection between the unit and
7.
your smartphone is established and the Wi-Fi
indicator is lit.
NOTE
The operation for Android devices explained
above is for smartphones. For details, see
your smartphone’s operation manual.
If using an Android device
Press the Wi-Fi button of the unit to make the
1.
Wi-Fi indicator blink.
A pop-up message appears on the display.
You will be making a connection to a previously
2.
connected smartphone, so press the 8/HOME
button.
The pop-up message on the display disappears
3.
and the unit waits for a connection with a
smartphone.
On your Android device, select “Settings” w
4.
“Wi-Fi” .
When you turn on Wi-Fi on your Android device,
5.
a Wi-Fi device SSID list appears. Select the SSID
shown on the display of the unit.
A Wi-Fi connection between the unit and
6.
your smartphone is established and the Wi-Fi
indicator is lit.
NOTE
The operation for Android devices above is
for smartphones. For details, see your smartphone’s operation manual.
TASCAM DR-44WL
10
Remote control of the unit from a smartphone
Since the dedicated application (DR CONTROL)
has the same display screen as that of the unit, you
can operate the unit by remote control with the
application almost the same way as operating from
the unit. Before using the “DR CONTROL” application,
confirm how to operate the unit. That way, you will
be able to use the application smoothly.
When you have established the Wi-Fi
1.
connection between the unit and your smart-
phone, start the “DR CONTROL” application
installed on your smartphone.
After starting the “DR CONTROL” application, the
2.
following screen appears on your smartphone
and you are able to operate the unit by remote
control.
For a detailed explanation of the “DR CONTROL”
application, see the “DR CONTROL Reference
Manual”, which can be downloaded from the TEAC
Global Site (http://teac-global.com/).
File transfer from the unit to a smartphone
Press the “Browse” button on the “DR CONTROL”
1.
screen.
The file list of the unit appears on the “Browse”
2.
screen. Select a file to transfer.
A file details screen appears. Press the “Copy”
3.
button.
A file copy confirmation screen appears. When
4.
you press the “YES” button, file transfer from the
unit to the smartphone starts.
TASCAM DR-44WL
11
Quick Reference for Using Various Functions
•
Button names are shown as follows: MENU.
•
Instructions are abbreviated. For example, ‘On the Home Screen, press the MENU button, select the “REC SETTING” menu, and then select the “PRE REC” item’
becomes: ‘Home Screen w MENU w
•
Not all operation steps are given for complex operations. For detailed operation procedures, see the Reference Manual.
Category Desired action Function name
Return to the Home Screen
Record
Basic functions
Play back a file
Adjust the playback
volume
Select a file to play back
Change the file format
Set the low-cut filter Low-cut filter function
Adjust the input level
manually
Recording
Adjust the input level
automatically
Simultaneously record two
files at different input levels
Use MS microphone
Attach a mark while
recording
Switch files manually while
Other
recording
features
recording
Configure the settings for
automatic file change
Start recording from
slightly before pressing
RECORD
Check file information
Delete a file
File operation
(only in the
4CH mode)
Delete a file
Delete all files in a folder at
the same time
Divide a file Dividing function
Set the date and time
Check information about
the unit and the card
Change the automatic
power saving function
setting for power supply
Change the backlight
setting
Unit settings
Adjust the display contrast
Set the battery type
Set the voltage value of the
phantom power supply
Restore the unit to its
default settings
Completely format a SD
card
Set the file name format
REC SETTING
Level control function
DUAL REC function
Marking function
Manual track incrementation
Automatic track incrementation
PRE REC function
Automatic power saving
function
Initializing function
formatting function
w
PRE REC
’
Procedure, buttons used and explanation
8/HOME
Return to the Home Screen if you become unsure about how to proceed.
Home Screen w RECORD w RECORD
Recording will start with the current settings used.
Home Screen w 7/9
Plays the file shown (selected).
OUTPUT LEVEL (+/-) button
Adjusts the volume of headphones, speakers, etc.
Home Screen w .//
The browse function is convenient for when there are many files.
Home Screen w MENU w
REC SETTING
w
FILE FORMAT
Specify a file format used for recording from the BWF format, WAV format, etc.
Home Screen w INPUT w
INPUT SETTING
w
LOW CUT
This function removes noise and other sounds at low frequencies. Select the cutoff frequency.
Home screen w INPUT LEVEL button w TRACK/INPUT button w INPUT LEVEL volume
Adjust the recording level by using the level meter guide display.
Home Screen w INPUT w
This function compresses only loud sounds to prevent recording over the maximum input level
without changing the recording level.
Home Screen w MENU w
INPUT SETTING
REC SETTING
w
w
LEVEL CTRL
DUAL REC
Configure the settings for the DUAL REC function.
Home Screen w MENU w
REC SETTING
w
MS MIC
Configure the settings for the MS microphone before using it.
Recording screen w ENTER/MARK
This function attaches a mark to a file that can be used as an index during playback.
Recording screen w /
Use this function when you want to change a file to another and continue recording such as at
the interval between songs.
Home Screen w MENU w
AUTO FUNCTION
w
TRACK INCREMENT
This function automatically changes a file to a different one at the set size.
Home Screen w MENU w
When the unit is slow to change from recording standby to recording state, this function allows
the unit to compensate the delay.
Home Screen w MENU w
REC SETTING
BROWSE
w Wheel w QUICK w
w
PRE REC
INFORMATION
Use this function to check the date of recording, file size, etc.
Home Screen w MENU w
BROWSE
w Wheel w QUICK w
FILE DELETE
You can delete files that you do not need.
Home Screen w QUICK w
DELETE
You can delete files that you do not need.
Home Screen w MENU w
BROWSE
w Wheel w QUICK w
ALL DELETE
You can delete all the files in a folder at the same time.
Home Screen w QUICK w
DIVIDE
Use this function to divide one file into two files.
Home Screen w MENU w
Use this function to set the internal clock, which is used for purposes such as adding the
recording date written to files.
Home Screen w MENU w
Checks information such as the unit firmware version and the amount of remaining space on the
card.
Home Screen w MENU w
SYSTEM
SYSTEM
POWER/DISPLAY
w
DATE/TIME
w
INFORMATION
w
AUTO PWR SAVE
This function automatically turns the unit off when it is not in use.
Home Screen w MENU w
POWER/DISPLAY
w
BACKLIGHT
Changes the display backlight setting.
Home Screen w MENU w
POWER/DISPLAY
w
CONTRAST
Sets the gradation of shading shown on the display.
Home Screen w MENU w
Selects the type of battery being used. This setting affects the accuracy of the remaining battery
power display.
Home Screen w MENU w
Home Screen w MENU w
POWER/DISPLAY
POWER/DISPLAY
SYSTEM
w
w
w
INITIALIZE
BATTERY TYPE
PHANTOM VOLT
Restores all settings to their factory defaults.
Home Screen w MENU w
SYSTEM
w
MEDIA FORMAT
Formats cards.
Home Screen w MENU w
SYSTEM
w
FILE NAME
You can change the characters used in the automatically assigned file names.
TASCAM DR-44WL
12
Messages
The following is a list of pop-up messages.
Refer to this list if one of these pop-up messages appears and you want to check
the meaning or determine the method of dealing with the problem.
Message Meaning and method of dealing with a problem
Battery Empty
Can't Divide
Card Error
Card Full
Current File MP3 MP3 files cannot be divided.
Dup File Name
File Full
File Name ERR
File Not Found
File Not Found
Make Sys File
File Protected
Format Error
Format CARD
Invalid Card
Change Card
Invalid SysFile
Make Sys File
I/O Too Short
Layer too Deep
Max File Size The file is larger than the designated size.
MBR Error Init CARD
No Card A SD card is not set. Insert a recordable SD card.
No PB File
Non-Supported
Switched To Internal
Battery
Write Timeout
If any other errors occur, turn the unit off and restart it.
The batteries are almost out of power. Replace the
batteries.
The selected division point used when DIVIDE was
performed is not appropriate. (It is too close to the
beginning or end of the file.)
The SD card cannot be recognized properly. Change the
card.
The SD card has no remaining capacity. Delete unnecessary files or move them to a computer to make open
space.
A file with the same name as that of a file created by
DIVIDE exists in the same folder. The DIVIDE function adds “a”
or “b” to the end of the file name. Before using the DIVIDE
function, connect the unit to a computer and edit the file
name.
The total number of folders and files exceeded 5000.
Delete unnecessary folders and files or move them to a
computer.
DIVIDE caused the number of characters of a file name to
exceed 200. The DIVIDE function adds “a” or “b” to the end
of the file name. Before using the DIVIDE function, connect
the unit to a computer and edit the file name to less than
198 characters.
The file cannot be found or the file may be damaged.
Check the relevant file.
The system file is missing. This unit requires a system file for
operation. While this message is shown, press the ENTER/
MARK button to create a system file.
The file is read only and cannot be deleted.
The SD card may not formatted properly or it may
be broken. This message also appears if the card was
formatted by use of a computer connected via USB or if an
unformatted card is inserted in the unit.
Always use the DR-44WL to format cards to be used with
it. Change the SD card or press the ENTER/MARK button
while this message is being shown to format the card.
Formatting will erase all the data on the SD card.
Something might be wrong with the SD card. Change the
SD card.
The system file required to operate this unit is invalid. While
this message is shown, press the ENTER/MARK button to
create a new system file.
The IN (starting) point and OUT (ending) point are too
close. Set them with at least 1 second between them.
Folders can be created only up to two layers. You cannot
create a new folder inside this folder.
The SD card may not formatted properly or it may be
broken. Change the SD card or press the ENTER/MARK
button while this message is being shown to format the
card.
Formatting will erase all the data on the SD card.
There is no file that can be played back. The file may be
damaged.
The file format is not supported. See “Connecting the Unit
to a Computer” in the Reference Manual for file formats
that this unit can use.
The power supply has changed from the USB bus power to
the internal batteries.
Writing to the SD card timed out.
Back up files on the SD card to a computer and format the
card.
Troubleshooting
If the unit does not operate properly, conduct the following inspections before
requesting repair. If these measures do not solve the problem, please contact the
store where you bought the unit or TEAC customer support (noted at the end of
this document).
The unit does not turn on.
•
Confirm that the batteries are not dead.
•
Confirm that the batteries are installed in the correct ¥ and ^ orientation.
•
Confirm that the AC adapter (GPE053B) supplied with the unit securely
connected to both the outlet and the USB connector of the unit.
•
When using USB bus power, confirm that the USB cable is securely connected.
•
When using USB bus power, confirm that the USB cable is not connected via a
USB hub.
•
Confirm that the HOLD/ switch is not set to HOLD.
The unit turns off automatically.
•
Confirm that the automatic power saving function is not turned on. (w
“Setting the automatic power saving function” in “Settings and Information
Display” of the Reference Manual)
Since this unit complies with the European Standby Power Regulations
i
(ErP), the automatic power saving function operates regardless of whether
the unit is being powered by an AC adapter or batteries. If you do not want
to use the automatic power saving function, set it to “OFF”. (The factory
default setting is “30 min”.)
The unit does not function.
•
Confirm that the HOLD / switch is not set to HOLD.
•
Confirm that the unit is not connected to a computer by a USB cable. (“USB
connected” is shown on the display.)
The SD card is not recognized.
•
Confirm that the SD card is inserted completely.
The unit will not play back.
•
If you are trying to play back a WAV file, confirm that the sampling frequency is
supported by this unit.
•
If you are trying to play an MP3 file, confirm that the bit rate is supported by
this unit.
No sound is output from the speaker.
•
Confirm that headphones are not connected.
•
Confirm that
•
Check the connection to the monitoring system.
•
Confirm that the volume of the monitoring system is not minimized.
•
Confirm that the OUTPUT LEVEL setting of the unit is not minimized.
No sound is output.
•
Check the connection to the monitoring system.
•
Confirm that the volume of the monitoring system is not minimized.
•
Confirm that the OUTPUT LEVEL setting of the unit is not minimized.
The unit will not record.
•
If you are using an external device, check the connection again.
•
Check the input settings again.
•
Confirm that the input level is not too low.
•
Confirm that the SD card is not full.
•
Confirm that the number of files has not reached the maximum that the unit
can handle.
The input level is low.
•
Confirm that the input level setting is not too low.
•
Confirm that the output level of any connected device is not too low.
Sound recorded is distorted.
•
Confirm that the input level setting is not too high.
•
Confirm that the reverb function is off.
The playback sound sounds unnatural.
•
Confirm that the playback speed has not been changed.
•
Confirm that the playback equalizer is off.
•
Confirm the level alignment function is disabled.
•
Confirm that the reverb function is off.
Files cannot be deleted.
•
Confirm that you are not trying to delete a file that has been copied from a
computer after being write-protected.
SPEAKER
is not set to
OFF
.
TASCAM DR-44WL
13
This unit’s files do not appear on the computer.
•
Confirm that the unit is connected to the computer via its USB port.
•
Confirm that a USB hub is not being used.
•
Confirm that the unit is not recording or in the recording standby state.
The unit cannot be connected to a smartphone or communications between them stops.
•
Confirm that the Wi-Fi device is turned on and Wi-Fi is on.
•
Confirm that the distance between the Wi-Fi device and the unit is not too
large.
Also confirm that there are no walls or obstacles between them.
When a Wi-Fi device is to the rear side of this unit, the unit itself may interrupt
communications.
Change the positions of the Wi-Fi device and the unit.
•
Turn the unit off, and then turn it on again.
•
Delete the registration of “DR-44WL” of the Wi-Fi device and follow the steps in
“Connecting the unit to a smartphone via Wi-Fi”.
Specifications
Ratings
Recording media
SD card (64 MB - 2 GB), SDHC card (4 GB - 32 GB), SDXC card
(64 GB - 128 GB)
Recording/playback formats
BWF: 44.1/48/96 kHz, 16/24 bit
WAV: 44.1/48/96 kHz, 16/24 bit
MP3: 44.1/48 kHz, 32/64/96/128/192/256/320 kbps
Number of channels
4 channels
4CH mode mono: Up to 4 files
i
Stereo: Up to 2 files
Stereo (1 file) + mono (up to 2 files)
MTR mode mono: Up to 4 files
i
Inputs and outputs
EXT MIC/LINE IN jack (can provide phantom power supply)
Connector: XLR-3-31, φ6.3 mm (1/4”) TRS standard jack
/LINE OUT jack
Connector: φ3.5 mm (1/8”) stereo mini jack
Built-in speaker
0.3 W (mono)
USB port
Connector: Micro-B type
Format: USB 2.0 HIGH SPEED mass storage class
Audio performance
Frequency response
20-20 kHz +1/-3 dB (EXT IN to LINE OUT, 44.1 kHz sampling frequency, JEITA)
20-22 kHz +1/-3 dB (EXT IN to LINE OUT, 48 kHz sampling frequency, JEITA)
20-40 kHz +1/-3 dB (EXT IN to LINE OUT, 96 kHz sampling frequency, JEITA)
Distortion
0.05% or less (EXT IN to LINE OUT, 44.1/48/96 kHz sampling frequency, JEITA)
S/N ratio
92 dB or higher (EXT IN to LINE OUT, 44.1/48/96 kHz sampling frequency, JEITA)
Note: JEITA indicates compliance with JEITA CP-2150
Recording times
SDHC card
File format (setting when recording)
WAV/BWF 16 bit (STEREO) 44.1 kHz 6 hours 44 minutes
WAV/BWF 24 bit (STEREO) 96 kHz 2 hours 04 minutes
•
The recording times shown above are estimates. Times may differ depending
on the SD, SDHC, and SDXC cards in use.
•
The recording times shown above are not continuous recording times, but
rather they are the total possible recording times for the SD, SDHC, and SDXC
cards.
•
If recording in mono in the WAV format, the maximum recording time will be
double the figures above.
•
If DUAL REC recording in the WAV/BWF format or 4-channel recording, the
maximum recording time will be half the figures above.
capacity
4 GB
Requirements for connected computers
Check the TEAC Global Site (http://teac-global.com/) for the latest information
about supported operating systems.
Supported operating systems
Windows: Windows XP, Windows Vista, Windows 7, Windows 8 (including 8.1)
Mac: Mac OS X 10.2 or later
Wi-Fi
Wireless standard
Compliant with IEEE 802.11b/g/n (2.4 GHz only)
Wireless communication mode
Simple access point (Limited AP)
Security
WPA2-PSK (WPS2.0-supported)
General
Power supply
4 AA batteries (alkaline or NiMH)
USB bus power from a computer
Dedicated AC adapter (GPE053B supplied with the unit)
Power consumption
2.5 W (maximum)
Battery operation time (continuous operation)
•
Using alkaline batteries (EVOLTA)
Format Operation time Note
Recorded in 2ch WAV, 44.1
kHz, 16 bit
•
Using NiMH batteries (eneloop)
Format Operation time Note
Recorded in 2ch WAV, 44.1
kHz, 16 bit
NOTE
When phantom power supply is used, the operation time may be shorter
depending on the microphone you use.
About 16 hours
About 12 hours
Dimensions
79 × 162.2 × 42.5 mm (W × H × D)
Weight
346 g/251 g (including batteries/not including batteries)
Operating temperature range
0 °C–40 °C
•
Illustrations in this manual may differ in part from the actual product.
•
Specifications and external appearance may be changed without notice to
improve the product.
•
Detailed specifications are provided in the Reference Manual.
When MIC input is selected
(phantom is not used)
When MIC input is selected
(phantom is not used)
TASCAM DR-44WL
14

Mode d'emploi
Pb, Hg, Cd
INSTRUCTIONS DE SÉCURITÉ
IMPORTANTES
1 Lisez ces instructions.
2 Conservez ces instructions.
3 Tenez compte de tous les avertissements.
4 Suivez toutes les instructions.
5 N’utilisez pas cet appareil avec de l’eau à
proximité.
6 Ne nettoyez l’appareil qu’avec un chiffon sec.
7 Ne bloquez aucune ouverture de ventilation.
Installez-le conformément aux instructions du
fabricant.
8 Ne l’installez pas près de sources de chaleur
telles que des radiateurs, bouches de chauffage,
poêles ou autres appareils (y compris des
amplificateurs) dégageant de la chaleur.
9 Ne neutralisez pas la fonction de sécurité de la
fiche polarisée ou de terre. Une fiche polarisée
a deux broches, l’une plus large que l’autre.
Une fiche de terre a deux broches identiques
et une troisième broche pour la mise à la terre.
La broche plus large ou la troisième broche
servent à votre sécurité. Si la fiche fournie n’entre
pas dans votre prise, consultez un électricien
pour le remplacement de la prise obsolète.
10 Évitez de marcher sur le cordon d’alimentation
et de le pincer, en particulier au niveau des
fiches, des prises secteur, et du point de sortie
de l’appareil.
11 N’utilisez que des fixations/accessoires spécifiés
par le fabricant.
12 Utilisez-le uniquement
avec des chariots,
socles, trépieds,
supports ou tables
spécifiés par le fabricant
ou vendus avec
l’appareil. Si un chariot est utilisé, faites
attention à ne pas être blessé par un
renversement lors du déplacement de
l’ensemble chariot/appareil.
13 Débranchez cet appareil en cas d’orage ou de
non utilisation prolongée.
14 Confiez toute réparation à des techniciens
de maintenance qualifiés. Une réparation est
nécessaire si l’appareil a été endommagé d’une
quelconque façon, par exemple si le cordon
ou la fiche d’alimentation est endommagé, si
du liquide a été renversé sur l’appareil ou si
des objets sont tombés dedans, si l’appareil
a été exposé à la pluie ou à l’humidité, s’il ne
fonctionne pas normalement, ou s’il est tombé.
•
L’appareil tire un courant nominal de veille de la
prise secteur quand son interrupteur POWER ou
STANDBY/ON n’est pas en position ON.
•
La fiche secteur est utilisée comme dispositif
de déconnexion et doit donc toujours rester
disponible.
•
Des précautions doivent être prises en cas
d’utilisation d’écouteurs ou d’un casque avec le
produit car une pression sonore excessive (volume
trop fort) dans les écouteurs ou dans le casque
peut causer une perte auditive.
•
Si vous rencontrez des problèmes avec ce produit,
contactez TEAC pour une assistance technique.
N’utilisez pas le produit tant qu’il n’a pas été
réparé.
AVERTISSEMENT
Pour éviter les dommages auditifs, n'écoutez pas
à un volume élevé pendant de longues périodes.
ATTENTION
•
N’exposez pas cet appareil aux gouttes ni aux
éclaboussures.
•
Ne placez pas d’objet rempli de liquide sur
l’appareil, comme par exemple un vase.
•
N’installez pas cet appareil dans un espace
confiné comme une bibliothèque ou un meuble
similaire.
•
L’appareil doit être placé suffisamment près de
la prise de courant pour que vous puissiez à tout
moment attraper facilement la fiche du cordon
d’alimentation.
•
Si le produit utilise des piles/batteries (y compris
un pack de batteries ou des piles installées), elles
ne doivent pas être exposées au soleil, au feu ou à
une chaleur excessive.
•
PRÉCAUTION pour les produits qui utilisent des
batteries remplaçables au lithium: remplacer
une batterie par un modèle incorrect entraîne un
risque d’explosion. Remplacez-les uniquement
par un type identique ou équivalent.
PRÉCAUTIONS CONCERNANT LES
PILES
Ce produit utilise des piles. Le mauvais usage des
piles peut provoquer une fuite, une rupture ou
d’autres problèmes. Respectez toujours les précautions suivantes pour l’emploi de piles.
•
Ne rechargez jamais des piles non rechargeables.
Les piles peuvent se rompre ou fuir, risquant de
causer un incendie ou des blessures.
•
Lors de l’installation des piles, faites attention
aux indications de polarité (orientation plus/
moins (¥/^) et installez-les correctement dans
le compartiment des piles comme indiqué. Les
installer à l’envers peut entraîner la rupture ou la
fuite des piles, source d’incendie, de blessure ou
de dégât autour d’elles.
•
Quand vous rangez ou jetez des piles, isolez
leurs bornes avec de l’adhésif isolant ou avec
un matériau équivalent pour leur éviter d’entrer
en contact avec d’autres piles ou des objets
métalliques.
•
Lorsque vous jetez les piles usagées, suivez les
instructions de mise au rebut indiquées sur
les piles et les lois locales sur l’enlèvement des
ordures.
•
N’utilisez pas d’autres piles que celles spécifiées.
N’utilisez pas en même temps des piles neuves et
usagées, ni des types de piles différents. Les piles
peuvent se rompre ou fuir, risquant de causer
un incendie, des blessures ou des dégâts autour
d’elles.
•
Ne transportez pas et ne conservez pas des piles
en même temps que de petits objets métalliques.
Les piles peut entrer en court-circuit, provoquant
une fuite, une rupture ou d’autres problèmes.
•
Ne chauffez et ne démontez pas les piles. Ne les
jetez pas dans un feu ou dans de l’eau. Les piles
peuvent se rompre ou fuir, risquant de causer
un incendie, des blessures ou des dégâts autour
d’elles.
•
Si le liquide de la pile s’échappe, essuyez tout
liquide répandu dans le boîtier des piles avant
d’insérer de nouvelles piles. Si le liquide d’une
pile touche un œil, il peut entraîner une perte
de la vue. Dans ce cas, rincez abondamment
à l’eau claire sans frotter l’œil et consultez
immédiatement un médecin. Si le liquide touche
le corps ou les vêtements d’une personne, il peut
entraîner des blessures ou brûlures cutanées. Si
cela se produit, rincez abondamment à l’eau claire
puis consultez immédiatement un médecin.
•
L’alimentation de l’unité doit être coupée quand
vous installez ou remplacez des piles.
•
Retirez les piles si vous envisagez de ne pas
utiliser l’unité durant une période prolongée.
Les piles peuvent se rompre ou fuir, risquant de
causer un incendie, des blessures ou des dégâts
autour d’elles. Si le liquide de la pile s’échappe,
essuyez tout liquide répandu dans le boîtier des
piles avant d’insérer de nouvelles piles.
•
Ne démontez pas une pile. L’acide qu’elle contient
peut entraîner des blessures cutanées ou des
dommages aux vêtements.
8
Pour les consommateurs
européens
Mise au rebut des équipements
électriques et électroniques
(a) Tout équipement électrique et électronique
doit être traité séparément de la collecte municipale d’ordures ménagères dans des points de
collecte désignés par le gouvernement ou les
autorités locales.
(b) En vous débarrassant correctement des
équipements électriques et électroniques, vous
contribuerez à la sauvegarde de précieuses
ressources et à la prévention de potentiels
effets négatifs sur la santé humaine et l’environnement.
(c) Le traitement incorrect des déchets d’équi-
pements électriques et électroniques peut
avoir des effets graves sur l’environnement et
la santé humaine en raison de la présence de
substances dangereuses dans les équipements.
(d) Le symbole de poubelle sur roues
barrée d’une croix indique que les
équipements électriques et
électroniques doivent être collectés
et traités séparément des déchets
ménagers.
(e) Des systèmes de retour et de collecte sont
disponibles pour l’utilisateur final. Pour des
informations plus détaillées sur la mise au rebut
des vieux équipements électriques et électroniques, veuillez contacter votre mairie, le service
d’ordures ménagères ou le magasin dans lequel
vous avez acheté l’équipement.
Mise au rebut des piles et/ou
accumulateurs
(a) Les piles et/ou accumulateurs hors d’usage
doivent être traités séparément de la collecte
municipale d’ordures ménagères dans des
points de collecte désignés par le gouvernement ou les autorités locales.
(b) En vous débarrassant correctement des piles
et/ou accumulateurs hors d’usage, vous
contribuerez à la sauvegarde de précieuses
ressources et à la prévention de potentiels
effets négatifs sur la santé humaine et l’environnement.
(c) Le traitement incorrect des piles et/ou accumu-
lateurs hors d’usage peut avoir des effets
graves sur l’environnement et la santé humaine
en raison de la présence de substances
dangereuses.
(d) Le symbole de poubelle sur roues
barrée d’une croix indique que les
piles et/ou accumulateurs doivent
être collectés et traités séparément
des déchets ménagers.
Si la pile ou l’accumulateur contient plus que
les valeurs spécifiées de plomb (Pb), mercure
(Hg) et/ou cadmium (Cd) telles que définies
dans la directive sur les piles (2006/66/CE), alors
les symboles chimiques de ces éléments seront
indiqués sous le symbole de poubelle sur roues
barrée d’une croix.
(e) Des systèmes de retour et de collecte sont
disponibles pour l’utilisateur final. Pour des
informations plus détaillées sur la mise au
rebut des piles et/ou accumulateurs, veuillez
contacter votre mairie, le service d’ordures
ménagères ou le magasin dans lequel vous les
avez achetés.
TASCAM DR-44WL
15
Précautions pour les équipements sans fil
Conformité de l'émetteur radio et interférences
Modèle pour le Canada
Le présent appareil est conforme aux CNR d’Industrie
Canada applicables aux appareils radio exempts de
licence. L’exploitation est autorisée aux deux conditions suivantes : (1) l’appareil ne doit pas produire
de brouillage, et (2) l’utilisateur de l’appareil doit
accepter tout brouillage radioélectrique subi, même
si le brouillage est susceptible d’en compromettre le
fonctionnement.
Étiquetage d’autorisation
IC ID: 9154A-GS2100MIP
Compliance of interference
CET APPAREIL NUMÉRIQUE DE LA CLASSE B EST
CONFORME À LA NORME NMB-003 DU CANADA.
Modèle pour l’EEE
(Espace Économique Européen)
Cet équipement est conforme aux normes harmonisées de la Directive 1999/5/CE (R&TTE).
Étiquetage de conformité
Marquage CE:
ATTENTION
Les changements ou modifications non
expressément approuvés par la partie responsable
de la conformité peuvent invalider le droit de
l'utilisateur à faire fonctionner l'équipement.
ATTENTION
L’autorisation des dispositifs sans fil varie avec les
pays ou régions. Veuillez n’utiliser cet appareil que
dans le pays où il a été acheté.
•
Selon le pays, des restrictions d’usage de la
technologie sans fil Wi-Fi peuvent exister.
Vérifiez avant utilisation les lois et réglementations
en vigueur dans le pays ou la région dans lequel
vous voulez employer l’unité.
Exigences pour l’exposition aux rayonnements
Cet équipement est conforme à la réglementation
reconnue internationalement en matière d’exposition humaine aux ondes radio générées par
l’émetteur.
Les deux conditions suivantes doivent être
respectées:
•
Les utilisateurs et les installateurs doivent recevoir
des instructions concernant l’installation de
l’antenne et les conditions de fonctionnement
de l’émetteur pour répondre à la conformité
d’exposition aux radiofréquences.
•
Cet équipement doit être installé et employé
en maintenant une distance minimale de 20cm
entre l’élément rayonnant et votre corps.
8
Déclaration de conformité
Modèle pour le Canada
Le dispositif rencontre l’exemption des limites
cou-rantes d’évaluation dans la section 2.5 de
CNR-102 et la conformité à l’exposition de CNR-102
rf, utilisateurs peut obtenir l’information canadienne
sur l’exposition et la conformité de rf.
Modèle pour l’EEE
(Espace Économique Européen)
Cet équipement est conforme à la norme EN.62311:
Évaluation des équipements électroniques et
électriques en relation avec les restrictions d’exposition humaine aux champs électromagnétiques; la
norme harmonisée de la Directive 1999/5/CE.
DÉCLARATION DE CONFORMITÉ
Nous, TEAC EUROPE GmbH.
Bahnstrasse 12, 65205 WiesbadenErbenheim, Allemagne, déclarons
sous notre propre responsabilité
que le produit TEAC décrit dans ce mode
d'emploi est conforme aux normes techniques lui
correspondant.
Contents
Introduction.......................................................................16
Éléments fournis ..............................................................16
Note à propos du manuel de référence ..................16
Précautions concernant l’emplacement et l’em-
ploi .........................................................................................16
Précautions pour les équipements sans fil ...........16
Conformité de l'émetteur radio et interférences ....
16
Exigences pour l’exposition aux rayonnements 16
Attention à la condensation ........................................17
Nettoyage de l’unité .......................................................17
Utilisation du site mondial TEAC ...............................17
Nomenclature et fonctions des parties ..................17
Face supérieure ....................................................................... 17
Face avant ................................................................................... 17
Face latérale gauche ............................................................ 17
Face latérale droite ................................................................ 17
Face inférieure ..........................................................................17
Écran d’accueil ..................................................................18
Préparation ........................................................................18
Préparation de l’alimentation ........................................ 18
Allumage de l’unité .............................................................. 18
Réglage de l’horloge intégrée ......................................18
Extinction .................................................................................... 18
Branchement d’appareils d’écoute et d’un
casque ........................................................................................... 19
Procédures d’opération de menu de base ............19
Structure du menu................................................................ 19
Enregistrement .................................................................19
Écran d’enregistrement ..................................................... 19
Réglage du niveau d’entrée ............................................ 19
Réglage du filtre coupe-bas ........................................... 20
Utilisation de la fonction de commande de
niveau ............................................................................................20
Enregistrer .................................................................................. 20
À propos de l’armement d’enregistrement ..........20
Structure de menu d’enregistrement ......................20
Lecture ................................................................................ 20
Lecture des enregistrements .........................................20
La lecture passe en pause après le déplacement
de la position de lecture. Sélection d’un fichier
pour lecture (saut) .................................................................20
Réglage du volume de lecture ..................................... 21
Branchement à un ordinateur ....................................21
Échange de fichiers avec un ordinateur ................. 21
Déconnexion de l’unité d’un ordinateur ................21
Affichage des réglages et informations .................21
Désactivation du haut-parleur intégré .................... 21
Réglages du système .......................................................... 21
Branchement de l’unité à un smartphone par
Wi-Fi ......................................................................................21
Comment obtenir et installer l’application
dédiée (DR CONTROL) ........................................................ 21
Connexion de l’unité à un smartphone via Wi-Fi
pour la première fois ............................................................21
Connexion de l’unité à un smartphone via Wi-Fi
(après la première fois) ....................................................... 22
Commande à distance de l’unité à partir d’un
smartphone ...............................................................................22
Transfert de fichiers de l’unité vers un smart-
phone ............................................................................................22
Référence rapide pour l’emploi des diverses
fonctions ............................................................................ 23
Messages ............................................................................ 24
Guide de dépannage .................................................... 24
Caractéristiques techniques ...................................... 25
Données ...................................................................................... 25
Entrées et sorties ....................................................................25
Performances audio ............................................................. 25
Durées d’enregistrement ..................................................25
Configurations informatiques requises pour les
ordinateurs connectés ....................................................... 26
Wi-Fi ................................................................................................26
Générales .................................................................................... 26
Introduction
Merci beaucoup d’avoir choisi l’enregistreur PCM
linéaire DR-44WL TASCAM.
Avant de connecter et d’utiliser cette unité, veuillez
prendre le temps de lire ce mode d’emploi en totalité
pour vous assurer une bonne compréhension de sa
mise en service et de son branchement, ainsi que du
mode opératoire de ses nombreuses fonctions utiles
et pratiques. Une fois la lecture de ce mode d’emploi
terminée, veillez à le conserver en lieu sûr pour
référence ultérieure.
Ce produit possède un processeur Blackfin®
fabriqué par Analog Devices, Inc.
Éléments fournis
Ce produit est livré avec les éléments suivants.
Ouvrez l’emballage avec soin pour ne pas
endommager ces éléments. Conservez les matériaux
d’emballage pour de futurs transports.
Si un élément quelconque est manquant ou a été
endommagé durant le transport, veuillez contacter
le magasin dans lequel vous avez acheté cette unité.
•
Unité principale ................................................................ × 1
•
Adaptateur secteur (GPE053B) ................................ × 1
•
Carte microSD avec un adaptateur
(dans l'unité) ....................................................................... × 1
•
Câble USB (80 cm) ........................................................... × 1
•
Piles alcalines AA .............................................................. × 4
•
Bonnette en fourrure..................................................... × 1
•
Adaptateur pour pied de micro ............................. × 1
•
Adaptateur griffe .............................................................. × 1
•
Étui souple. .......................................................................... × 1
•
Mode d'emploi (ce document)
incluant la garantie ......................................................... × 1
Note à propos du manuel de référence
Ce mode d’emploi explique les principales fonctions
de cette unité. Veuillez consulter le manuel de
référence pour des informations sur toutes les
fonctions de l’unité.
Vous pouvez aussi télécharger ce mode d’emploi
et le manuel de référence depuis le site mondial de
TEAC (http://teac-global.com/).
Précautions concernant l’emplacement et l’emploi
•
La plage de température de fonctionnement de
cette unité est de 0-40°C.
•
Ne placez pas cette unité dans les types
d’emplacement suivants. Cela pourrait dégrader
la qualité sonore ou causer des mauvais
fonctionnements.
Lieux sujets à des vibrations significatives
Près de fenêtres ou en exposition directe au
soleil
TASCAM DR-44WL
16
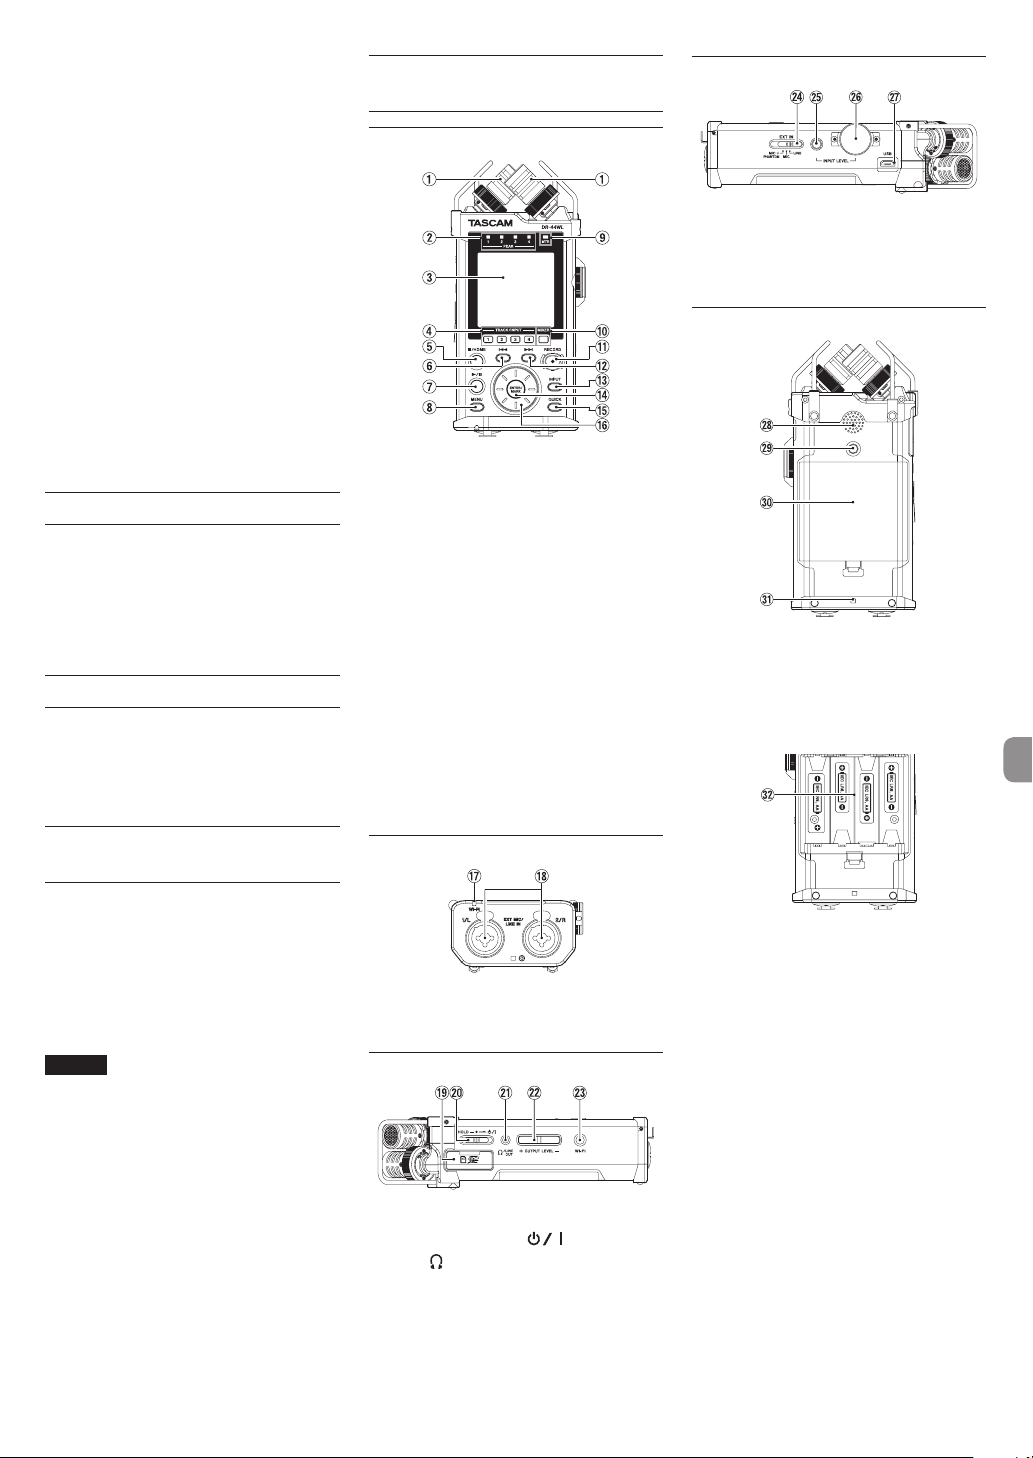
Près de chauffages ou dans des lieux
extrêmement chauds
Lieux extrêmement froids
Lieux mal ventilés ou très humides
Lieux très poussiéreux
•
Si cette unité est placée près d’un amplificateur
de puissance ou d’un autre appareil à gros
transformateur, cela peut entraîner un ronflement.
Dans ce cas, augmentez la distance séparant
cette unité de l’autre appareil.
•
Si on l’utilise à proximité d’un récepteur de
télévision ou de radio, cette unité peut entraîner
des irrégularités de couleur ou des parasites. Si
cela se produit, éloignez l’unité.
•
Cette unité peut produire des parasites si un
téléphone mobile ou autre appareil sans fil est
utilisé à proximité pour passer des appels ou
envoyer ou recevoir des signaux. Dans ce cas,
augmentez la distance entre cette unité et les
autres appareils ou éteignez-les.
•
Pour permettre une bonne dispersion thermique,
ne placez rien sur le dessus cette l’unité.
•
Ne placez pas cette unité sur un amplificateur de
puissance ou un autre appareil générant de la
chaleur.
Attention à la condensation
Si l’unité est déplacée d’un endroit froid à un endroit
chaud, ou utilisée après un changement soudain de
température, il existe un risque de condensation; la
vapeur de l’air peut se condenser sur le mécanisme
interne, empêchant le bon fonctionnement. Pour
empêcher cela ou si cela se produit, laissez l’unité
une ou deux heures à la température de la nouvelle
pièce avant de l’utiliser.
Nettoyage de l’unité
Essuyez l’unité avec un chiffon sec et doux pour
la nettoyer. Ne l’essuyez pas avec des lingettes de
nettoyage contenant des produits chimiques, du
diluant, de l’alcool ou d’autres agents chimiques.
Cela pourrait endommager la surface ou causer une
décoloration.
Utilisation du site mondial TEAC
Vous pouvez télécharger depuis le site mondial TEAC
(http://teac-global.com/) ce mode d’emploi et le
manuel de référence nécessaires à cette unité.
Allez sur le site mondial TEAC (http://
1.
teac-global.com/).
Dans la section TASCAM Downloads
2.
(téléchargements TASCAM), cliquez sur la
langue souhaitée afin d’ouvrir la page de
téléchargement du site web pour cette langue.
NOTE
Si la langue désirée n’apparaît pas, cliquez
sur Other Languages (autres langues).
Cliquez sur le nom du produit dans la section
3.
«Produits» et ouvrez la page «Liens et
téléchargements» de ce produit.
Sélectionnez et téléchargez le mode d’emploi
4.
et le manuel de référence nécessaires.
Nomenclature et fonctions des parties
Face supérieure
1 Microphone stéréo intégré
2 Voyant PEAK
3 Écran
4 Touche TRACK/INPUT
5 Touche 8/HOME
6 . Touche de retour rapide
7 Touche 7/9
8 Touche MENU
9 Voyant MTR
0 Touche MIXER
q Touche RECORD [0] / voyant REC
w Touche / d’avance rapide
e Touche INPUT
r Touche ENTER/MARK
t Touche QUICK
y Molette
Face avant
u Voyant Wi-Fi
i Bornes EXT MIC/LINE IN 1/L et 2/R (XLR/
TRS)
Face latérale gauche
o Fente pour carte SD
p Commutateur HOLD/
a Prise /LINE OUT
s Touche OUTPUT LEVEL
d Touche Wi-Fi
Face latérale droite
f Commutateur EXT IN
g Touche INPUT LEVEL
h Volume INPUT LEVEL
j Port USB
Face inférieure
k Haut-parleur mono intégré
l Fil d’attachement de trépied
; Cache du compartiment de piles
z Attache de dragonne
x Compartiment de piles
TASCAM DR-44WL
17
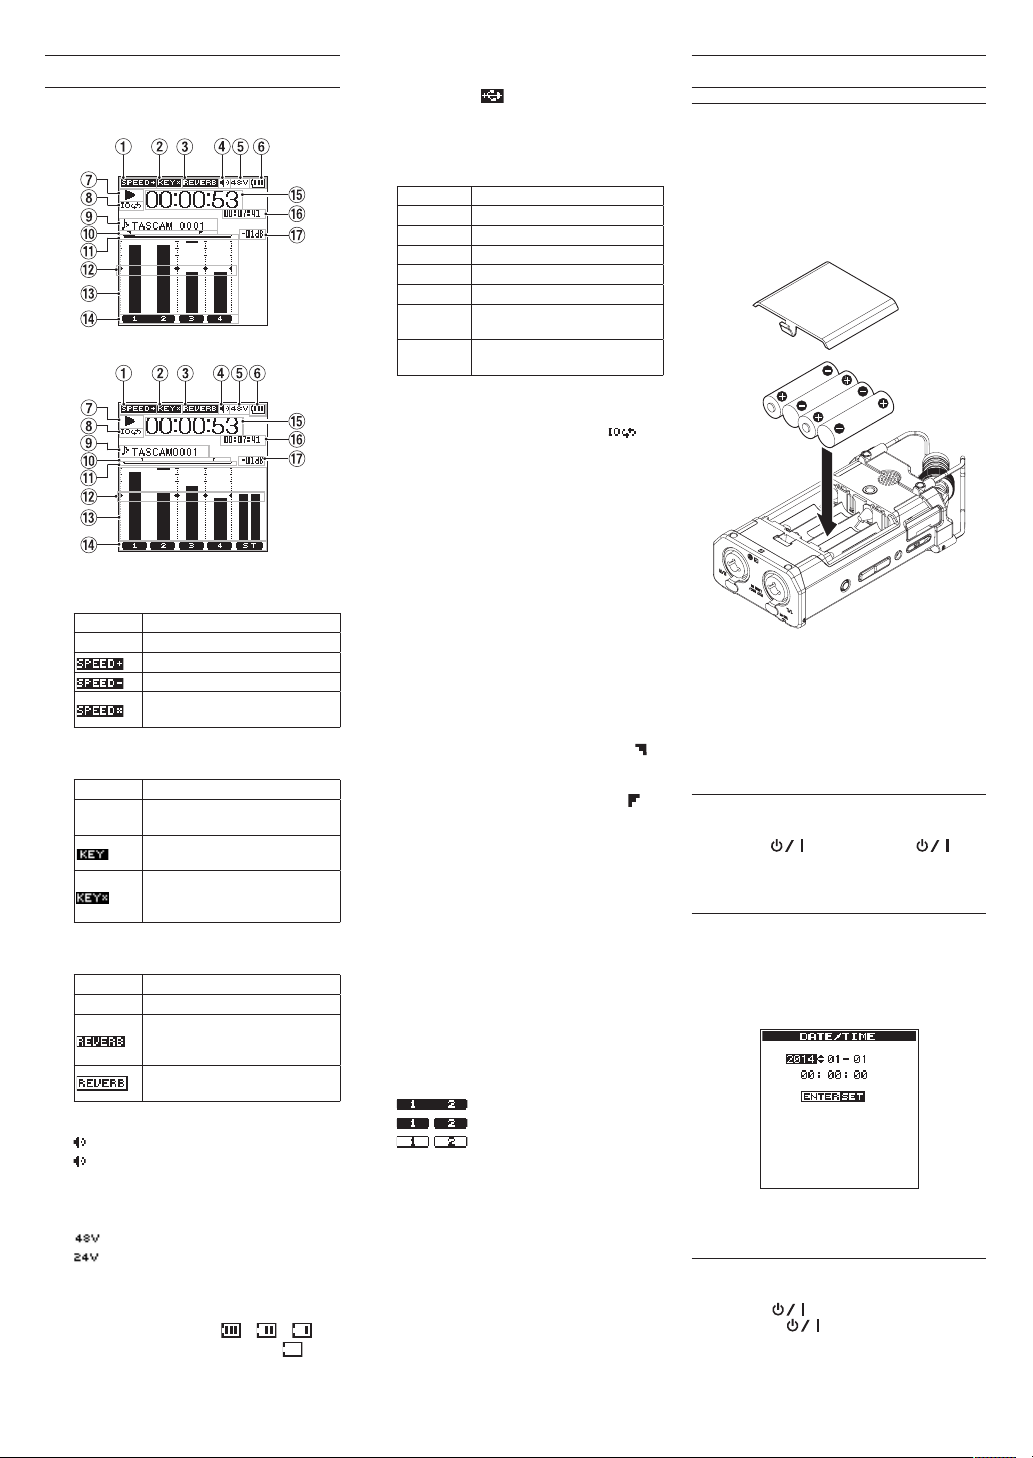
Écran d’accueil
C’est l’écran qui s’affiche habituellement lorsque
l’unité est à l’arrêt.
Écran d’accueil en mode 4 CH
Écran d’accueil en mode MTR
1 Affichage du statut de vitesse de lecture
Icône Vitesse de lecture
Vide Vitesse de lecture inchangée
2 Affichage du statut activé/désactivé de la
fonction de commande de touche
Icône Statut activé/désactivé
Vide
3 Affichage du statut activé/désactivé du
réverbérateur
Icône Statut activé/désactivé
Vide Réverbérateur désactivé
4 Affichage de sortie de haut-parleur
tivée
5 Affichage de l’alimentation fantôme
Vide : Pas d’alimentation fantôme
6 Affichage du statut d’alimentation
Quand l’alimentation est fournie par les piles,
l’icône de pile affiche la quantité de puissance
de pile restante en barres ( , , ).
Quand l’icône n’affiche aucune barre,
clignote et l’appareil s’éteint (veille) car les piles
sont vides.
1,1× – 2,0×
0,5× – 0,9×
La vitesse de lecture ne peut pas
être changée
Fonction de commande de
touche désactivée
Fonction de commande de
touche activée
Fonction de commande de
touche activée
(réglage désactivé)
Réverbérateur activé
(enregistrement avec l’effecteur
activé)
Effecteur intégré activé
(statut SEND)
affiché: Sortie haut-parleur activée
non affiché : Sortie haut-parleur désac-
: Alimentation fantôme 48V fournie
: Alimentation fantôme 24V fournie
Quand l’adaptateur secteur dédié (GPE053B)
fourni avec le produit ou l’alimentation du bus
USB et utilisée, s’affiche.
7 Affichage du statut de fonctionnement de
l’enregistreur
Ces icônes affichent le statut de
fonctionnement de l’enregistreur.
Indicateur Signification
8
9
7
,
m
/
.
8 Affichage du statut du réglage de lecture
en boucle
Pendant la lecture de boucle, l’icône
s’affiche.
9 Affichage du nom du fichier/titre de
morceau
Quand le mode 4CH est sélectionné, le nom ou
les balises d’information du fichier en cours de
lecture sont affichés.
Lorsqu’il existe plusieurs fichiers en mode 4CH,
seule la partie du format des noms de fichiers et
le numéro de base des fichiers d’enregistrement
sont affichés. Quand un fichier unique est
enregistré, son nom est affiché.
Quand le mode MTR est sélectionné, le nom
d’un morceau en cours est affiché.
0 Statut de réglage des points IN (début) et
OUT (fin) de la lecture en boucle.
Affiche le statut de réglage des points IN (début)
et OUT (fin) de la lecture en boucle.
Quand le point IN (début) est réglé, l’icône
s’affiche à l’endroit correspondant sur la barre
d’affichage de position de lecture.
Quand le point OUT (fin) est réglé, l’icône
s’affiche à l’endroit correspondant sur la barre
d’affichage de position de lecture.
q Affichage de la position de lecture
La position de lecture actuelle est indiquée par
une barre.
w Affichage du guide de mesure de niveau
Il s’agit d’un guide de mesure de niveau servant à
régler les niveaux d’entrée et de sortie.
Il est affiché à la position «-12 dB» sur l’échelle.
e Mesure de niveau
Affiche le niveau du son en entrée ou en
lecture.
r Affichage du statut du fichier
Le statut du fichier est affiché de plusieurs
manières, en fonction du type de fichier à lire.
t Affichage du temps écoulé
Affiche le temps écoulé (heures : minutes :
secondes) du fichier actuel.
y Affichage du temps restant
Affiche le temps restant (heures : minutes :
secondes) du fichier actuel.
u Valeur crête affichée en décibels (dB)
Affiche en décibels la valeur maximale du
niveau de lecture à un certain moment.
À l’arrêt
En pause
Lecture
Avance rapide
Retour rapide
Passage au début du prochain
fichier
Passage au début du fichier
actuel ou du fichier précédent
: fichier stéréo
: fichier mono x 2
: Aucun fichier n’est présent.
Préparation
Préparation de l’alimentation
Utilisation de piles AA
Enlevez le cache du compartiment à piles sur la
1.
face inférieure.
Installez 4 piles AA dans le compartiment avec
2.
leurs repères ¥ et ^ comme indiqué.
Fermez le compartiment à piles.
3.
•
Réglez le type de piles à utiliser dans le
paramètre BATTERY TYPE du menu
POWER/DISPLAY afin que l’unité affiche
précisément la quantité de puissance restante
et que l’unité puisse déterminer avec précision
s’il reste suffisamment de puissance pour qu’elle
puisse fonctionner correctement. (Par défaut, ce
paramètre est réglé sur ALKAL correspondant à
des piles alcalines).
Allumage de l’unité
Quand l’unité est à l’arrêt (veille), glissez le commutateur HOLD/ dans la direction de ,
puis, quand TASCAM DR-44WL (écran de
démarrage) s’affiche, relâchez le commutateur.
L’écran d’accueil apparaît quand l’unité démarre.
Réglage de l’horloge intégrée
Quand on allume pour la première fois l’unité (ou
quand elle est restée inutilisée sans piles), l’écran
DATE/TIME
de démarrage pour que la date et l’heure puissent
être réglées.
Utilisez les touches .// et la molette pour
saisir la date et l’heure, puis pressez la touche
ENTER/MARK pour les régler.
(date/heure) apparaît avant l’écran
Extinction
Pendant que l’unité est activée, glissez le commutateur HOLD/ de la face latérale gauche
dans la direction , puis, lorsque
DR-44WL shutting down
relâchez le commutateur.
L’alimentation s’éteint en quelques secondes.
TASCAM
s’affiche,
TASCAM DR-44WL
18
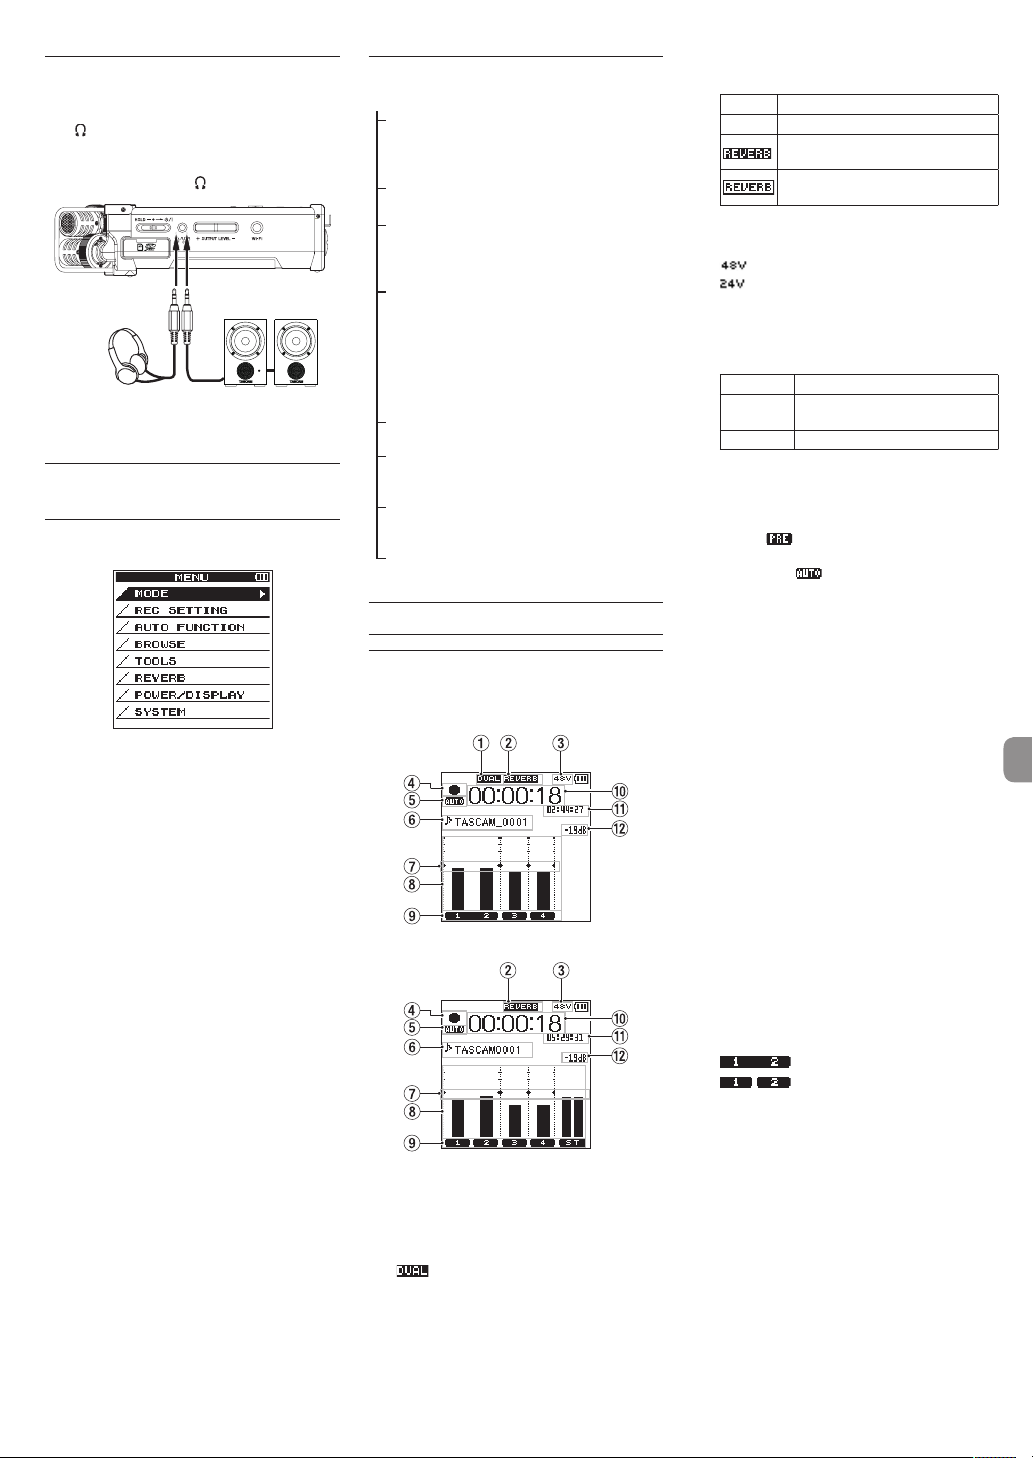
Branchement d’appareils d’écoute et d’un casque
Pour écouter au casque, branchez ce dernier à la
prise /LINE OUT.
Pour écouter avec un système d’écoute externe
(enceintes amplifiées ou amplificateur et enceintes),
branchez celui-ci à la prise /LINE OUT.
Casque Enceintes amplifiées
ou
amplificateur et enceintes
Procédures d’opération de menu de base
Pressez la touche MENU pour ouvrir l’écran
1.
MENU
.
Utilisez la molette pour sélectionner (mettre en
2.
surbrillance) l’un des paramètres de menu, puis
pressez la touche ENTER/MARK pour passer à
l’écran de réglage souhaité.
Utilisez la molette pour sélectionner (mettre en
3.
surbrillance) un paramètre à régler.
Pressez la touche ENTER/MARK ou / pour
4.
déplacer le curseur sur la droite et mettre en
surbrillance la valeur de réglage.
Utilisez la molette pour changer le réglage.
5.
Lorsque vous réglez un autre paramètre dans
6.
le même menu, pressez la touche ENTER/
MARK ou . pour déplacer le curseur vers la
gauche.
Répétez les étapes 3. à 6. si nécessaire pour
7.
régler d’autres paramètres.
Une fois terminé, pressez la touche 8/HOME
8.
pour revenir à l’écran d’accueil.
Structure du menu
MENU
MODE
REC SETTING
AUTO FUNCTION
BROWSE
(uniquement lorsque le
mode 4CH est sélectionné)
SONG
(uniquement lorsque le
mode MTR est sélectionné)
TOOLS
REVERB
POWER/DISPLAY
SYSTEM
Sélectionner le
mode d’enregistrement ou de
lecture
Définir le réglage
d’enregistrement
Fonctions pratiques
pour les fichiers
enregistrés
Opérations sur les
fichiers et dossiers
de la carte SD
Régler d’autres
fonctions pratiques
Réglage des effets
de réverbérateur
Définissez l’alimentation et l’affichage
Réglages système
de l’unité
Enregistrement
Écran d’enregistrement
L’écran ci-dessous est affiché quand l’unité est en
mode d’armement d’enregistrement ou pendant
l’enregistrement.
Écran d’enregistrement en mode 4 CH
Écran d’enregistrement en mode MTR
1 Affichage du statut activé/désactivé
de la fonction DUAL REC (mode 4CH
uniquement)
Pas d’affichage
:
Fonction DUAL REC désactivée
: Fonction DUAL REC activée
2 Affichage du statut activé/désactivé du
réverbérateur
Icône Statut activé/désactivé
Vide Réverbérateur désactivé
Réverbérateur activé
(
enregistrement avec l’effecteur activé
Réverbérateur activé
(statut SEND)
3 Affichage de l’alimentation fantôme
Vide : Pas d’alimentation fantôme
: Alimentation fantôme 48V fournie
: Alimentation fantôme 24V fournie
4 Affichage du statut de fonctionnement de
l’enregistreur
Ces icônes affichent le statut de
fonctionnement de l’enregistreur.
Indicateur Signification
09
0
5 Affichage du statut de réglage de la
fonction PRE REC ou Auto REC (mode 4CH
uniquement)
Lorsque la fonction PRE REC est réglée sur
l’icône s’affiche.
Lorsque la fonction AUTO REC est réglée sur
ON
6 Affichage du nom du fichier/titre de
morceau
Le nom de fichier automatiquement donné au
fichier enregistré est affiché.
Lorsqu’il existe plusieurs fichiers en mode 4CH,
seule la partie du format des noms de fichiers et
le numéro de base des fichiers d’enregistrement
sont affichés. Quand un fichier unique est
enregistré, son nom est affiché.
Quand le mode MTR est sélectionné, le nom
d’un morceau en cours est affiché.
7 Affichage du guide de mesure de niveau
Il s’agit d’un guide de mesure de niveau servant
à régler les niveaux d’entrée et de sortie.
Il est affiché à la position «−12 dB» sur l’échelle.
8 Mesure de niveau
Affiche le niveau du son en entrée.
Pendant l’enregistrement en mode de mixage
de superposition, le niveau de l’entrée mixée et
des sons de lecture est affiché. Le repère tg
est visible à la position «-12 dB» sur l’échelle
comme repère guide pour le réglage du niveau
d’entrée.
9 Affichage du statut du fichier
Le statut du fichier est affiché de plusieurs
manières, en fonction du type de fichier à lire.
0 Temps d’enregistrement écoulé
Le temps d’enregistrement écoulé d’un
fichier enregistré apparaît en heures : minutes
:secondes.
q Temps d’enregistrement restant
Le temps d’enregistrement restant jusqu’à
l’atteinte de la taille de fichier maximale sélectionnée s’affiche (heures : minutes : secondes).
Si le temps d’enregistrement restant sur la carte
SD est inférieur, cela sera affiché à la place.
w Valeur crête en décibels (dB)
La valeur crête du niveau d’entrée est affichée
en décibels.
Enregistrement en mode de veille
ou de pause
Enregistrement en cours
, l’icône s’affiche.
: fichier stéréo
: fichier mono x 2
ON
)
,
TASCAM DR-44WL
19
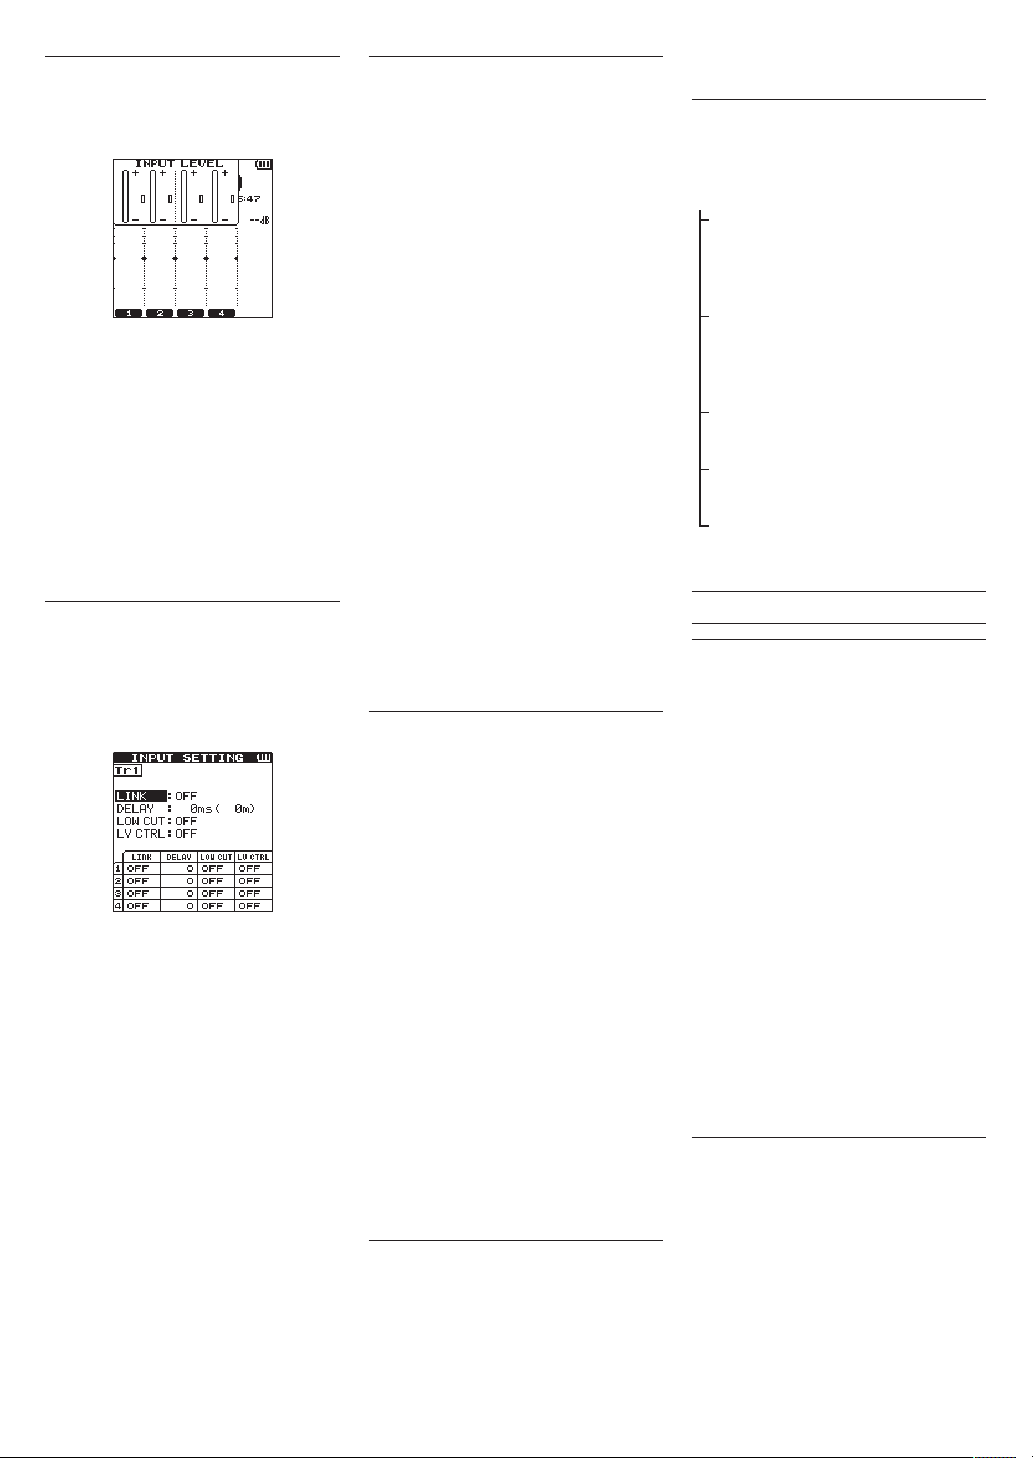
Réglage du niveau d’entrée
Pressez la touche INPUT LEVEL sur la face
1.
latérale droite pour afficher l’écran de réglage
INPUT LEVEL
fenêtre contextuelle.
Pressez la touche TRACK/INPUT pour sélec-
2.
tionner un canal pour lequel ajuster le niveau
d’entrée.
Utilisez le volume INPUT LEVEL de la face
3.
latérale droite pour ajuster le niveau d’entrée.
Quand le son en entrée est trop fort, le voyant
PEAK de la face supérieure s’allume en rouge.
Un repère tg est visible à la position
«-12dB» sur la mesure de niveau.
Réglez le niveau d’entrée pour que les variations de niveau se fassent aux alentours de
ce marqueur sans allumer le voyant PEAK en
rouge.
Une fois terminé, pressez la touche 8/HOME
4.
pour revenir à l’écran d’accueil.
sur l’écran en tant que
Réglage du filtre coupe-bas
Réglez le filtre coupe-bas si vous voulez réduire le
bruit et d’autres sons dans les basses fréquences.
Cette fonction peut par exemple servir à réduire le
bruit de la climatisation et le bruit désagréable du
vent.
Pressez la touche INPUT pour afficher
1.
SETTING
Pressez la touche TRACK/INPUT pour sélec-
2.
tionner un canal pour lequel régler le filtre
coupe-bas.
Utilisez la molette pour sélectionner (mettre
3.
en surbrillance)
touche ENTER/MARK ou / pour afficher les
paramètre de réglage sous forme de message
automatique.
Utilisez la molette pour régler la fréquence de
4.
coupure du filtre coupe bas pour l’entrée de
microphone.
Valeurs de paramètre:
Quand vous pressez la touche ENTER/MARK
5.
ou ., le message disparaît et la fonction est
activée.
Lorsque la valeur (fréquence) augmente, les basses
fréquences sur la bande plus large peuvent être
coupées.
sur l’écran.
LOW CUT
OFF, 40 Hz, 80 Hz, 120 Hz
220 Hz
INPUT
, puis pressez la
Utilisation de la fonction de commande de niveau
Vous pouvez régler la fonction de commande de
niveau pour l’enregistrement au microphone.
Pressez la touche INPUT pour afficher
1.
INPUT SETTING
Pressez la touche TRACK/INPUT pour sélec-
2.
tionner un canal pour lequel régler la fonction
de commande de niveau.
Utilisez la molette pour sélectionner (mettre en
3.
surbrillance)
touche ENTER/MARK ou / pour afficher les
paramètre de réglage sous forme de message
automatique.
Lorsque vous utilisez la molette pour sélec-
4.
tionner (mettre en surbrillance) la fonction
souhaitée, puis que vous pressez la touche
ENTER/MARK ou ., le message disparaît et
la fonction est activée.
PEAK REDUCTION
Cette fonction est utilisée pour abaisser automatiquement le niveau d’enregistrement à un niveau
approprié quand un son en entrée est trop fort. Vous
pouvez élever le niveau d’enregistrement manuellement. Cette fonction est utile pour l’enregistrement
de musique dont les changements de volume
entraînent des dégradations du son. Même si cette
fonction est arrêtée après qu’elle a été réglée, le
niveau réglé est maintenu.
LIMITER
Cette fonction évite la distorsion due à une entrée
soudaine et excessive. C’est utile lorsque vous ne
souhaitez pas changer le niveau d’enregistrement.
Dans ce mode, vous pouvez changer le niveau
d’enregistrement manuellement même pendant
l’enregistrement.
LEVEL CTRL, puis
sur l’écran.
Enregistrer
Cet enregistreur peut enregistrer des sons dans deux
modes: modes 4CH et MTR.
En mode 4CH, jusqu’à quatre pistes peuvent être
enregistrées simultanément à partir des micros
intégrés et de la borne d’entrée externe.
En mode MTR, les sons peuvent être enregistrés par
dessus un fichier déjà enregistré en plus de l’enregistrement de jusqu’à quatre pistes.
Pressez la touche RECORD [0] pour armer
1.
l’enregistrement.
Vous pouvez vérifier les noms des fichiers
enregistrés affichés à l’écran avant de lancer
l’enregistrement.
Pressez la touche TRACK/INPUT pour sélec-
2.
tionner un canal pour l’enregistrement.
Pressez la touche RECORD [0].
3.
L’enregistrement normal démarre.
Pressez la touche 8/HOME pour mettre fin à
4.
l’enregistrement.
Pour faire une pause dans l’enregistrement,
pressez la touche RECORD [0]. Quand vous
pressez de nouveau la touche RECORD[0] ou
,
que vous pressez la touche 7/9, l’enregistrement recommence dans le même fichier.
Quand vous pressez la touche 8/HOME après
avoir effectué une pause dans l’enregistrement,
un fichier audio du son enregistré jusqu’à la
pause est créé.
À propos de l’armement d’enregistrement
Cette unité a une fonction d’armement d’enregistrement comme celle d’un enregistreur professionnel. Dans cet état d’armement d’enregistrement,
vous pouvez effectuer des opérations telles que la
configuration des réglages de niveau d’entrée, puis
lancer rapidement l’enregistrement.
pressez la
En état d’armement d’enregistrement, le voyant REC
clignote et l’écran d’enregistrement s’affiche.
Structure de menu d’enregistrement
Vous pouvez configurer divers réglages à l’aide du
paramètre
REC SETTING
REC SETTING
FILE FORMAT
SAMPLE RATE
PRE REC
DUAL REC
MS MIC
sur l’écran
Réglage du format du fichier
BWF: 16/24 bits,
WAV : 16/24 bits,
MP3 : 32 à 320 kbit/s
Réglage de la fréquence
d’échantillonnage
44,1 kHz, 48 kHz, 96 kHz
(96 kHz pour BWF/WAV
uniquement)
Réglage de la fonction de
pré-enregistrement
OFF, ON
Réglage de la fonction DUAL
REC
MODE, LEVEL/FORMAT
Réglage de la fonction de
micro MS
MS DECODE, SOURCE
MENU
.
Lecture
Lecture des enregistrements
Quand l’écran d’accueil est ouvert et la lecture
arrêtée, pressez les touches 7/9 pour lancer la
lecture.
Mise en pause
Avec l’écran d’accueil ouvert et une piste en lecture,
pressez les touches 7/9 pour mettre en pause la
lecture sur la position actuelle.
Arrêt
Quand vous pressez la touche 8/HOME alors que
l’écran d’accueil est ouvert et qu’une piste est en
cours de lecture, la lecture passe en pause.
Si vous pressez à nouveau la touche 8/HOME, la
lecture sera arrêtée au début du fichier.
Retour et avance rapides (recherche)
Pendant que l’écran d’accueil est ouvert et qu’une
piste est arrêtée ou en cours de lecture, maintenez
la touche . ou / enfoncée pour effectuer un
retour ou une avance rapide et rechercher le fichier
en cours de lecture.
Déplacement de la position de lecture
Vous pouvez déplacer la position de lecture en
faisant tourner la molette tandis que l’écran d’accueil
est ouvert et qu’une piste est arrêtée ou en cours de
lecture.
La lecture passe en pause après le déplacement de la position de lecture. Sélection d’un fichier pour lecture (saut)
Quand l’écran d’accueil est ouvert, sélectionnez le
fichier que vous voulez lire avec la touche . ou
/.
Si vous pressez la touche . pendant que la
lecture est au début d’un fichier, la lecture passe au
début du fichier précédent.
Si vous pressez la touche / pendant que la
lecture est au début ou au milieu d’un fichier, la
lecture passe au fichier suivant.
TASCAM DR-44WL
20
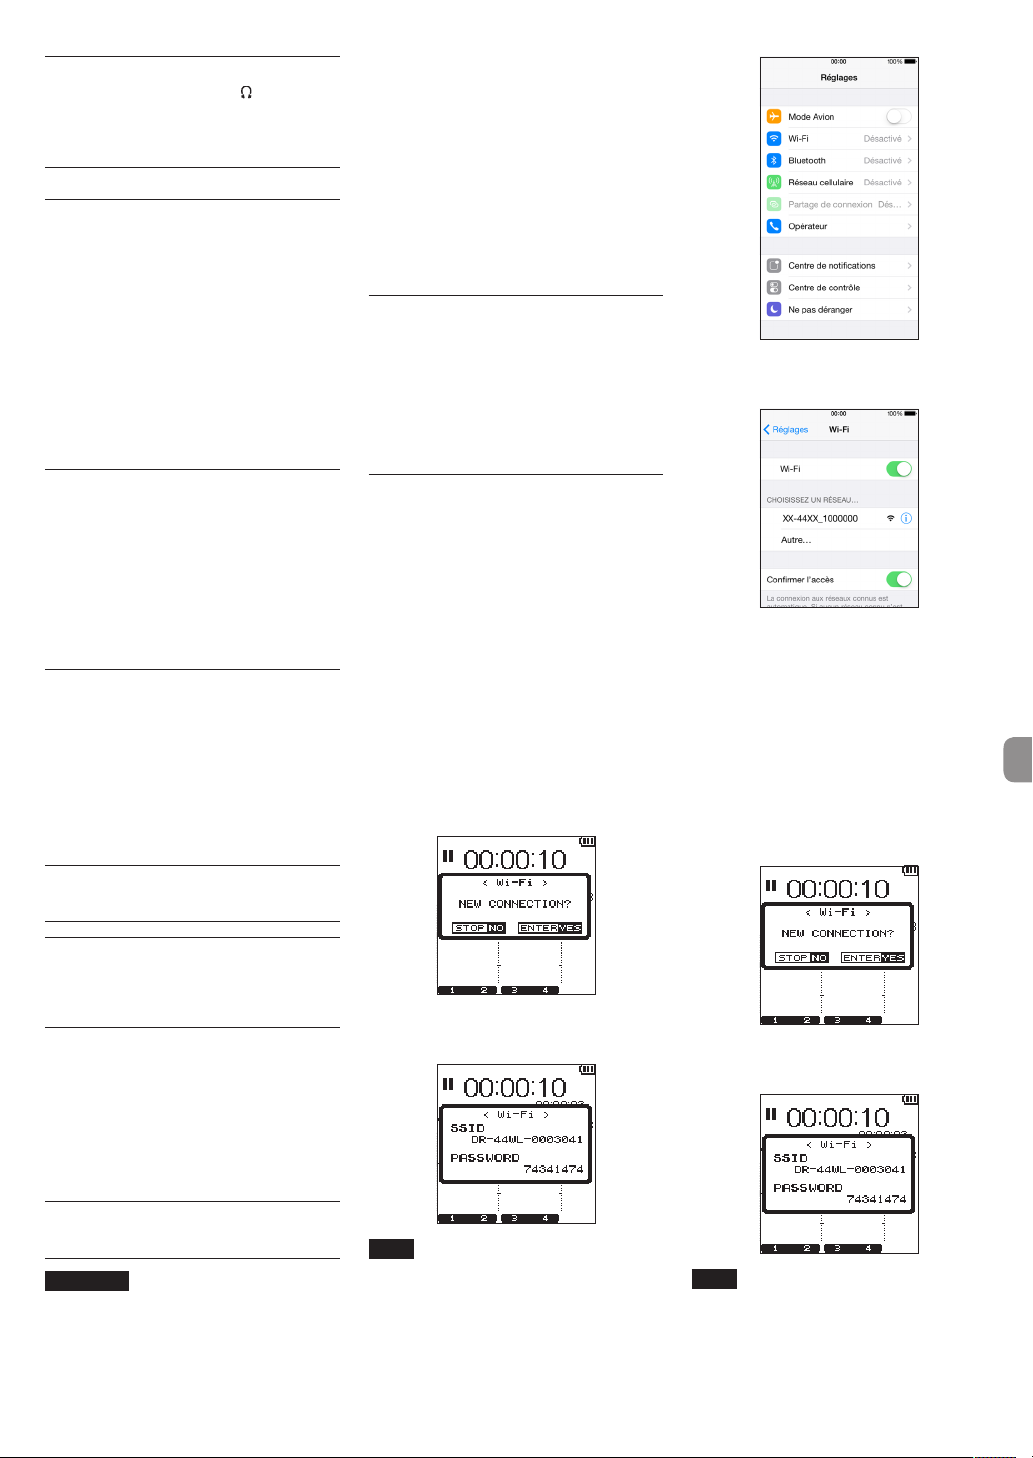
Réglage du volume de lecture
Le volume du son émis par la prise /LINE OUT
peut être ajusté à l’aide de la touche OUTPUT
LEVEL (+/−) pendant que l’écran d’accueil est
ouvert.
Branchement à un ordinateur
Vous pouvez transférer des fichiers audio sur la carte
SD de l’unité vers un ordinateur et d’un ordinateur
vers l’unité.
Branchement de l’unité à un ordinateur par USB
Utilisez le câble USB fourni pour relier l’unité
1.
à un ordinateur. Si l’alimentation est coupée,
rétablissez-la.
Sur l’écran
2.
3.
USB SELECT
STORAGE et pressez la touche ENTER/MARK
pour connecter cette unité à l’ordinateur.
connected
Quand vous ouvrez
Windows, cette unité s’affiche sur l’écran de
l’ordinateur comme un disque externe nommé
«DR-44WL».
s’affiche à l’écran.
Échange de fichiers avec un ordinateur
Cliquez sur le disque «DR-44WL» sur l’ordinateur
pour afficher les dossiers «MUSIC» et «UTILITY».
Pour transférer des fichiers vers l’ordinateur, ouvrez le
dossier «MUSIC» et faites glisser les fichiers désirés
pour les déposer sur les destinations de votre choix.
Pour transférer des fichiers depuis l’ordinateur, faites
glisser les fichiers audio désirés sur votre ordinateur
et déposez-les sur le dossier «MUSIC».
Déconnexion de l’unité d’un ordinateur
Avant de débrancher le câble USB, utilisez les
procédures correctes pour l’ordinateur pour déconnecter cette unité.
L’alimentation se coupe une fois que l’unité a
terminé son processus d’extinction.
Voir le mode d’emploi de l’ordinateur pour des
instructions sur la façon de déconnecter un appareil
externe.
, sélectionnez
ordinateur
USB
dans
États-Unis, Canada, Europe (pays membres
de l’UE), Australie, Nouvelle-Zélande,
Japon
Dans des pays autres que ceux mentionnés
ci-dessus, il est possible que l’utilisation de la
fonction Wi-Fi soit limitée. Avant utilisation,
veuillez vérifier les lois et règlements du pays
en question.
Vous pouvez actionner cette unité par télécommande avec une application dédiée libre (DR
CONTROL). En plus des opérations de commande de
transport, telles que la lecture et l’arrêt, vous pouvez
également ajuster l’entrée, le transfert des fichiers
enregistrés et encore plus via Wi-Fi.
Comment obtenir et installer l’application dédiée (DR CONTROL)
Connectez votre smartphone à Internet.
1.
Si votre smartphone est un appareil Android,
2.
téléchargez et installez l’application dédiée (DR
CONTROL) à partir de Google Play. Si c’est un
appareil iOS, téléchargez et installez à partir de
l’App Store.
Connexion de l’unité à un smartphone via Wi-Fi pour la première
fois
Vous pouvez connecter l’unité à un smartphone
directement via Wi-Fi. Par conséquent, vous n’avez
pas besoin de périphériques externes, tels qu’un
routeur, ou d’un environnement de réseau Wi-Fi.
Pour la connexion, vous avez uniquement besoin de
l’unité et de votre smartphone.
* Lors de la connexion de l’unité à votre smartphone,
vous ne pouvez pas connecter le smartphone à un
réseau Wi-Fi externe.
En cas d’utilisation d’un appareil iOS
Pressez la touche Wi-Fi pour faire clignoter le
1.
voyant Wi-Fi.
Un message s’affiche à l’écran.
Vous allez établir une connexion à un nouveau
2.
smartphone, pressez donc la touche ENTER/
MARK.
Quand vous allumez la Wi-Fi sur votre appareil
5.
iOS, une liste de SSID d’appareils Wi-FI s’affiche.
Sélectionnez le SSID affiché sur l’écran de l’unité.
Un écran de saisie de mot de passe s’affiche
6.
sur l’appareil iOS. Saisissez la clé de chiffrage
indiquée sur l’écran de l’unité.
Une connexion Wi-Fi est établie entre l’unité et
7.
votre smartphone et le voyant Wi-Fi s’allume.
En cas d’utilisation d’un appareil Android
Pressez la touche Wi-Fi pour faire clignoter le
1.
voyant Wi-Fi.
Un message s’affiche à l’écran.
Vous allez établir une connexion à un nouveau
2.
smartphone, pressez donc la touche ENTER/
MARK.
Affichage des réglages et informations
Désactivation du haut-parleur intégré
Réglez les paramètres
SPEAKER
sur
OFF
MENU
.
w
TOOLS
w
Réglages du système
Utilisez le menu SYSTEM pour personnaliser les
réglages d’utilisation de l’unité. Vous pouvez
également effectuer des opérations telles que les
réglages d’initialisation et le formatage des cartes SD.
Sélectionnez
1.
appuyez sur la touche ENTER/MARK.
Configurez les réglages nécessaires pour
2.
chaque fonction.
MENU
w
SYSTEM
puis
Branchement de l’unité à un smartphone par Wi-Fi
ATTENTION
Ce produit a été conçu pour respecter les
règles et règlements en vigueur dans les
zones de commercialisation et d’exposition
choisies.
L’utilisation du produit dans les pays/régions
suivant(e)s a été approuvée.
«SSID» et «Encryption key» apparaissent sur
3.
l’écran, puis l’unité entre automatiquement en
mode WPS.
NOTE
Le mode WPS est la norme pour les
connexions faciles entre les appareils Wi-Fi.
L’unité utilise des boutons poussoirs pour les
appareils Android.
Sur votre appareil iOS, sélectionnez «Réglages»
4.
w «Wi-Fi».
«SSID» et «Encryption key» apparaissent sur
3.
l’écran, puis l’unité entre automatiquement en
mode WPS.
NOTE
Le mode WPS est la norme pour les
connexions faciles entre les appareils Wi-Fi.
Cette unité utilise le système de code PIN
pour les appareils iOS.
Sur votre appareil Android, sélectionnez
4.
«Réglages» w «Wi-Fi».
TASCAM DR-44WL
21
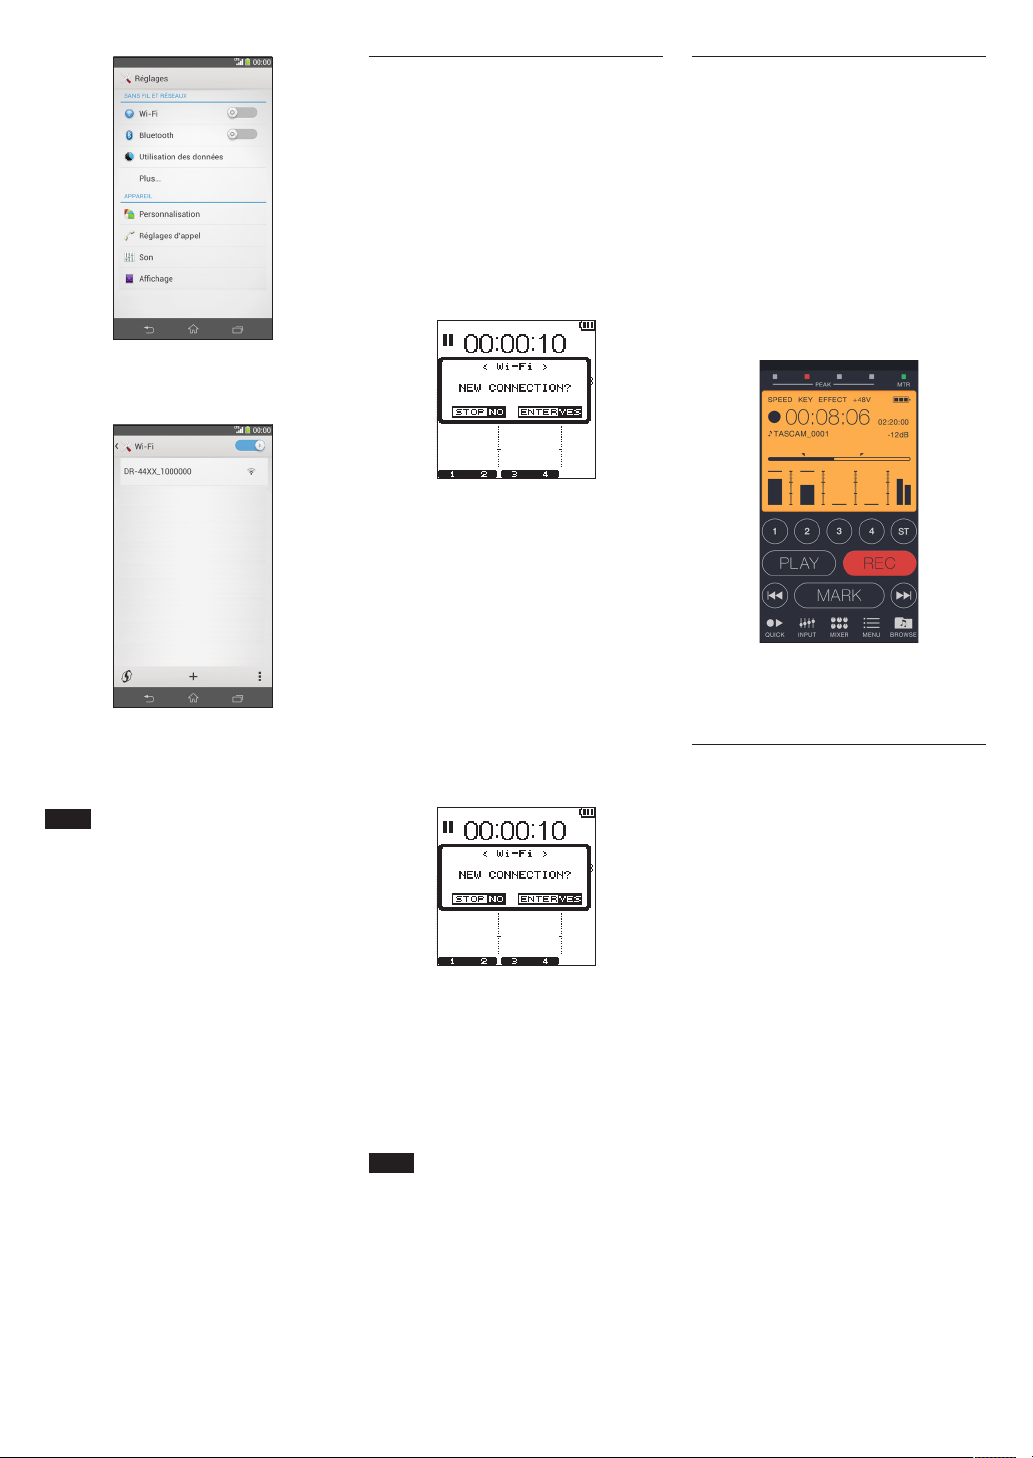
Quand vous allumez la Wi-Fi sur votre appareil
5.
Android, une liste de SSID d’appareils Wi-FI
s’affiche. Sélectionnez le SSID affiché sur l’écran
de l’unité.
Un écran de saisie de mot de passe s’affiche sur
6.
l’appareil Android. Saisissez la clé de chiffrage
indiquée sur l’écran de l’unité.
Une connexion Wi-Fi est établie entre l’unité et
7.
votre smartphone et le voyant Wi-Fi s’allume.
NOTE
Le fonctionnement des appareils Android
expliqué ci-dessus est applicable aux smartphones. Pour de plus amples informations,
reportez-vous au mode d’emploi de votre
smartphone.
Connexion de l’unité à un smartphone via Wi-Fi (après la première fois)
Après avoir connecté l’unité à votre smartphone,
vous pouvez par la suite les connecter de nouveau
simplement en sélectionnant SSID.
En cas d’utilisation d’un appareil iOS
Pressez la touche Wi-Fi de l’unité pour faire
1.
clignoter le voyant Wi-Fi.
Un message s’affiche à l’écran.
Vous allez établir une connexion à un smart-
2.
phone qui a déjà été connecté, pressez donc la
touche 8/HOME.
Le message à l’écran disparaît et l’unité attend
3.
une connexion avec un smartphone.
Sur votre appareil iOS, sélectionnez «Settings»
4.
w «Wi-Fi».
Quand vous allumez la Wi-Fi sur votre appareil
5.
iOS, une liste de SSID d’appareils Wi-FI s’affiche.
Sélectionnez le SSID affiché sur l’écran de l’unité.
Une connexion Wi-Fi est établie entre l’unité et
6.
votre smartphone et le voyant Wi-Fi s’allume.
En cas d’utilisation d’un appareil Android
Pressez la touche Wi-Fi de l’unité pour faire
1.
clignoter le voyant Wi-Fi.
Un message s’affiche à l’écran.
Vous allez établir une connexion à un smart-
2.
phone qui a déjà été connecté, pressez donc la
touche 8/HOME.
Le message à l’écran disparaît et l’unité attend
3.
une connexion avec un smartphone.
Sur votre appareil Android, sélectionnez
4.
«Settings» w «Wi-Fi».
Quand vous allumez la Wi-Fi sur votre appareil
5.
Android, une liste de SSID d’appareils Wi-Fi
s’affiche. Sélectionnez le SSID affiché sur l’écran
de l’unité.
Une connexion Wi-Fi est établie entre l’unité et
6.
votre smartphone et le voyant Wi-Fi s’allume.
NOTE
Le fonctionnement des appareils Android
expliqué ci-dessus est applicable aux smartphones. Pour de plus amples informations,
reportez-vous au mode d’emploi de votre
smartphone.
Commande à distance de l’unité à partir d’un smartphone
Puisque l’application dédiée (DR CONTROL) a le
même écran que celui de l’unité, vous pouvez
commander l’unité à distance avec l’application,
presque de la même manière que lorsque vous
effectuez les commandes à partir de l’unité. Avant
d’utiliser l’application «DR CONTROL», vérifiez
comment utiliser l’unité. De cette façon, vous
pourrez utiliser l’application sans problème.
Après avoir établi la connexion Wi-Fi entre l’unité
1.
et votre smartphone, lancez l’application «DR
CONTROL» installée sur votre smartphone.
Après le lancement de l’application «DR
2.
CONTROL», l’écran suivant s’affiche sur votre
smartphone et vous êtes en mesure de
commander l’unité à distance.
Pour de plus amples informations concernant
l’application «DR CONTROL», reportez-vous au
manuel de référence de DR CONTROL disponible au
téléchargement à partir du site Web TEAC (http://
teac-global.com/).
Transfert de fichiers de l’unité vers un smartphone
Pressez la touche «Browse» sur l’écran «DR
1.
CONTROL».
La liste de fichiers de l’unité s’affiche sur l’écran
2.
«Browse». Sélectionnez un fichier à transférer.
Un écran de détails de fichiers s’affiche. Pressez
3.
la touche «Copy».
Un écran de confirmation de la copie du fichier
4.
apparaît. Lorsque vous pressez la touche «YES»,
le transfert du fichier de l’unité vers le smartphone démarre.
TASCAM DR-44WL
22
Référence rapide pour l’emploi des diverses fonctions
•
Les noms des touches sont indiqués comme suit: MENU.
•
Les instructions sont abrégées. Par exemple, ‘Sur l’écran d’accueil, pressez la touche MENU, sélectionnez le menu «REC SETTING», puis sélectionnez le paramètre
«PRE REC»’ devient: ‘Écran d’accueil w MENU w
•
Toutes les étapes ne sont pas indiquées dans le cas d’opérations complexes. Pour des procédures de fonctionnement détaillées, consultez le manuel de référence.
Catégorie Action souhaitée Nom de fonction Procédures, touches utilisées et explications
Retour à l’écran d’accueil
Enregistrer
Fonctions de
base
Enregistrement
Autres fonctions
d’enregistrement
Opération de
fichier
(uniquement
en mode 4CH)
Réglages de
l’unité
Lire un fichier
Régler le volume de lecture
Sélectionner un fichier à lire
Changer le format de fichier
Réglage du filtre coupe-bas
Régler manuellement le
niveau d’entrée
Régler automatiquement le
niveau d’entrée
Enregistrez simultanément deux fichiers
à différents niveaux d’entrée
Utilisez le micro MS
Ajouter un marqueur
pendant l’enregistrement
Passez manuellement d’un
fichier à l’autre pendant
l’enregistrement
Configurez les réglages pour
le changement de fichier
automatique
L’enregistrement commence à partir de
l’instant précédant le moment où vous
appuyez sur RECORD
Contrôler les informations de
fichier
Supprimer un fichier
Supprimer un fichier
Supprimer d’un coup tous les
fichiers d’un même dossier
Diviser un fichier
Régler la date et l’heure
Vérifier les informations
concernant l’unité et la carte
Changez le réglage de
la fonction d’économie
automatique d’énergie pour
l’alimentation.
Changer le réglage de rétroéclairage
Régler le contraste de l’écran
Indiquer le type de pile
Réglez la valeur de tension de
l’alimentation fantôme
Restaurer les réglages par
défaut de l’unité
Formater complètement une
carte SD
Choisir le format de nom de
fichier
REC SETTING w PRE REC
8/HOME
Retournez à l’écran d’accueil si vous n’êtes pas sûr de ce que vous devez faire.
Écran d’accueil w RECORD w RECORD
L’enregistrement démarrera conformément aux réglages actuels.
Écran d’accueil w 7/9
Lit le fichier affiché (sélectionné).
Touche OUTPUT LEVEL (+/-)
Règle le volume du casque, des enceintes, etc.
Écran d’accueil w .//
La fonction de navigation est pratique quand il y a beaucoup de fichiers.
Écran d’accueil w MENU w
Spécifiez un format de fichier utilisé pour enregistrer à partir du format BWF, du format WAV, etc.
Fonction de filtre
coupe-bas
Fonction de
commande de
niveau
Fonction DUAL REC
Fonction de
marquage
Passage manuel à la
piste suivante
Passage automatique
à la piste suivante
Fonction PRE REC
Fonction de
division
Fonction d’économie automatique
d’énergie
Fonction d’initialisation
fonction de
formatage
Écran d’accueil w INPUT w
Cette fonction supprime le bruit et les autres sons dans les basses fréquences. Sélectionnez la
fréquence de coupure.
Écran d’accueil w touche INPUT LEVEL w touche TRACK/INPUT w volume INPUT LEVEL
Ajustez le niveau d’enregistrement à l’aide de l’écran de guide de mesure de niveau.
Écran d’accueil w INPUT w
Cette fonction ne compresse que les sons forts pour éviter les enregistrements au-dessus du niveau
d’entrée maximum sans changer le niveau d’enregistrement.
Écran d’accueil w MENU w
Configurez les réglages pour la fonction DUAL REC.
Écran d’accueil w MENU w
Configurez les réglages pour le micro MS avant de l’utiliser.
Écran d’enregistrement w ENTER/MARK
Cette fonction ajoute un marqueur au fichier pour servir à l’indexation durant la lecture.
Écran d’enregistrement w /
Utilisez cette fonction quand vous voulez passer d’un fichier à l’autre et continuer d’enregistrer,
comme par exemple au niveau de l’intervalle entre des morceaux.
Écran d’accueil w MENU w
Cette fonction fait automatiquement passer un fichier à un autre de la taille établie.
Écran d’accueil w MENU w
Quand l’unité met longtemps à passer du mode d’armement d’enregistrement au mode d’enregis-
trement, cette fonction permet à l’unité de compenser le retard.
Écran d’accueil w MENU w
Utilisez cette fonction pour vérifier par exemple la date de l’enregistrement et la taille du fichier.
Écran d’accueil w MENU w
Vous pouvez supprimer les fichiers que vous n’avez pas besoin.
Écran d’accueil w QUICK w
Vous pouvez supprimer les fichiers que vous n’avez pas besoin.
Écran d’accueil w MENU w
Vous pouvez supprimer simultanément tous les fichiers d’un même dossier.
Écran d’accueil w QUICK w
Utilisez cette fonction pour diviser un fichier en deux fichiers.
Écran d’accueil w MENU w
Utilisez cette fonction pour régler l’horloge interne qui est utilisée, par exemple, pour ajouter la date
d’enregistrement saisie dans les fichiers.
Écran d’accueil w MENU w
Vérifie les informations telles que la version du micrologiciel de l’unité et la quantité d’espace encore
libre sur la carte.
Écran d’accueil w MENU w
Cette fonction éteint automatiquement l’unité quand elle n’est pas utilisée.
Écran d’accueil w MENU w
Change le réglage de rétroéclairage.
Écran d’accueil w MENU w
Règle la gradation de l’effet d’ombre indiqué sur l’affichage.
Écran d’accueil w MENU w
Sélectionne le type de pile utilisé. Ce réglage affecte la précision de l’affichage de charge restante
des piles.
Écran d’accueil w MENU w
Écran d’accueil w MENU w
Réinitialise tous les réglages à leurs valeurs par défaut.
Écran d’accueil w MENU w
Formate les cartes.
Écran d’accueil w MENU w
Vous pouvez changer les caractères utilisés dans les noms de fichiers automatiquement assignés.
’
REC SETTING w FILE FORMAT
INPUT SETTING w LOW CUT
INPUT SETTING w LEVEL CTRL
REC SETTING w DUAL REC
REC SETTING w MS MIC
AUTO FUNCTION w TRACK INCREMENT
REC SETTING w PRE REC
BROWSE
BROWSE
DELETE
BROWSE
DIVIDE
SYSTEM w DATE/TIME
SYSTEM w INFORMATION
POWER/DISPLAY w AUTO PWR SAVE
POWER/DISPLAY w BACKLIGHT
POWER/DISPLAY w CONTRAST
POWER/DISPLAY w BATTERY TYPE
POWER/DISPLAY w PHANTOM VOLT
SYSTEM w INITIALIZE
SYSTEM w MEDIA FORMAT
SYSTEM w FILE NAME
w Molette w QUICK w
w Molette w QUICK w
w Molette w QUICK w
INFORMATION
FILE DELETE
ALL DELETE
TASCAM DR-44WL
23

Messages
Ce qui suit est une liste de messages automatiques.
Référez-vous à cette liste si l’un de ces messages apparaît et si vous voulez en
connaître la signification ou choisir une réponse appropriée au problème.
Message Signification et mode de résolution d’un problème
Battery Empty Les piles sont quasiment épuisées. Remplacez les piles.
Can't Divide
Card Error
Card Full
Current File MP3 Les fichiers MP3 ne peuvent pas être divisés.
Dup File Name
File Full
File Name ERR
File Not Found
File Not Found
Make Sys File
File Protected Le fichier est en lecture seule et ne peut pas être effacé.
Format Error
Format CARD
Invalid Card
Change Card
Invalid SysFile
Make Sys File
I/O Too Short
Layer too Deep
Max File Size Le fichier est plus grand que la taille indiquée.
MBR Error Init
CARD
No Card
No PB File
Non-Supported
Switched To
Internal Battery
Write Timeout
Si d’autres erreurs surviennent, éteignez l’unité et rallumez-la.
TASCAM DR-44WL
24
Le point sélectionné de division utilisé quand DIVIDE a été
exécuté n’est pas approprié. (Il est trop proche du début ou de
la fin du fichier.)
La carte SD ne peut pas être correctement reconnue. Changez
la carte.
La carte SD n’a plus d’espace libre. Effacez les fichiers inutiles
ou transférez-les sur un ordinateur pour libérer de l’espace.
Un fichier avec le même nom que celui d’un fichier créé par
DIVIDE existe dans le même dossier. La fonction DIVIDE ajoute
«a» ou «b» à la fin du nom de fichier. Avant d’utiliser la
fonction DIVIDE, branchez l’unité à un ordinateur et modifiez le
nom de fichier.
Le nombre total de dossiers et de fichiers a dépassé 5000.
Supprimez les dossiers et les fichiers inutiles ou déplacez-les
vers un ordinateur.
À cause de DIVIDE, le nombre de caractères d’un nom de fichier
a dépassé 200. La fonction DIVIDE ajoute «a» ou «b» à la fin
du nom de fichier. Avant d’utiliser la fonction DIVIDE, branchez
l’unité à un ordinateur et modifiez le nom de fichier pour qu’il
fasse moins de 198 caractères.
Le fichier est introuvable ou endommagé. Vérifiez le fichier
approprié.
Le fichier système est manquant. Cette unité nécessite un
fichier système pour fonctionner. Pendant que ce message est
affiché, pressez la touche ENTER/MARK pour créer un fichier
système.
La carte SD peut ne pas être correctement formatée ou être
endommagée. Ce message apparaît également si la carte a été
formatée avec un ordinateur branché par USB ou si une carte
non formatée est insérée dans l’unité.
Utilisez toujours le DR-44WL pour formater les cartes que
celui-ci doit utiliser. Changez la carte SD ou pressez la touche
ENTER/MARK pendant que ce message est affiché, pour
formater la carte.
Le formatage effacera toutes les données de la carte SD.
Il y a quelque chose d’anormal avec la carte SD. Changez la
carte SD.
Le fichier système requis pour faire fonctionner cette unité n’est
pas valable. Pendant que ce message est affiché, pressez la
touche ENTER/MARK pour créer un nouveau fichier système.
Le point IN (début) et le point OUT (fin) sont trop proches.
Définissez-les de façon à avoir au moins 1 seconde d’écart
entre eux.
Des dossiers peuvent être créés uniquement jusqu’à deux
couches. Vous ne pouvez pas créer un nouveau dossier à
l’intérieur de ce dossier.
La carte SD peut ne pas être correctement formatée ou être
endommagée. Changez la carte SD ou pressez la touche
ENTER/MARK pendant que ce message est affiché, pour
formater la carte.
Le formatage effacera toutes les données de la carte SD.
Aucune carte SD n’est réglée. Insérez une carte SD enregis-
trable.
Il n’y a pas de fichier pouvant être lu. Le fichier est peut-être
endommagé.
Le format de fichier n’est pas pris en charge. Veuillez consulter
«Branchement de l’unité à un ordinateur» dans le manuel de
référence pour connaître les formats de fichiers que cette unité
peut utiliser.
L’alimentation est passée de l’alimentation par bus USB à
l’alimentation par les piles internes.
Le temps dévolu à l’écriture sur la carte SD est dépassé.
Sauvegardez les fichiers de la carte SD sur un ordinateur et
formatez la carte.
Guide de dépannage
Si l’unité ne fonctionne pas correctement, conduisez les inspections suivantes
avant de demander une réparation. Si ces mesures ne résolvent pas le problème,
veuillez contacter le magasin auprès duquel vous avez acheté l’unité ou l’assistance clientèle TEAC (indiquée à la fin de ce document).
L’unité ne s’allume pas.
•
Vérifiez que les piles ne sont pas épuisées.
•
Vérifiez que les piles sont installées selon une orientation ¥ et ^ correcte.
•
Vérifiez que l’adaptateur secteur (GPE053B) fourni avec l’unité est bien branché
à la fois à la prise secteur et à la prise USB de l’unité.
•
Si vous utilisez l’alimentation par le bus USB, vérifiez que le câble USB est
correctement connecté.
•
Si vous utilisez l’alimentation par le bus USB, vérifiez que le câble USB n’est pas
branché via un concentrateur USB.
•
Vérifiez que le commutateur HOLD/ n’est pas réglé sur «HOLD».
L’unité s’éteint automatiquement.
•
Vérifiez que la fonction d’économie automatique d’énergie n’est pas activée.
(w «Réglage de la fonction d’économie automatique d’énergie» dans
«Affichage des réglages et informations» dans le manuel de référence.
Comme cette unité se conforme à la directive européenne ERP sur l’alimen-
i
tation en veille, la fonction d’économie automatique d’énergie fonctionne,
que l’unité soit alimentée par un adaptateur secteur ou par des piles. Si
vous ne désirez pas utiliser la fonction d’économie automatique d’énergie,
réglez-la sur «OFF». (Le réglage par défaut est «30min».)
L’unité ne fonctionne pas.
•
Vérifiez que le commutateur HOLD / n’est pas réglé sur «HOLD».
•
Vérifiez que l’unité n’est pas connectée à un ordinateur via un câble USB. («USB
connected» s’affiche à l’écran.)
La carte SD n’est pas reconnue.
•
Vérifiez que la carte SD est complètement insérée.
L’unité ne lance pas la lecture.
•
Si vous essayez de lire un fichier WAV, vérifiez que sa fréquence
d’échantillonnage est prise en charge par cette unité.
•
Si vous essayez de lire un fichier MP3, vérifiez que son débit binaire est pris en
charge par cette unité.
Aucun son ne sort du haut-parleur.
•
Vérifiez qu’aucun casque n’est raccordé.
•
Vérifiez que «SPEAKER» n’est pas réglé sur OFF.
•
Vérifiez la connexion au système d’écoute.
•
Vérifiez que le volume du système d’écoute n’est pas baissé.
•
Vérifiez que le réglage OUTPUT LEVEL de l’unité n’est pas baissé.
Aucun son n’est produit.
•
Vérifiez la connexion au système d’écoute.
•
Vérifiez que le volume du système d’écoute n’est pas baissé.
•
Vérifiez que le réglage OUTPUT LEVEL de l’unité n’est pas baissé.
L’unité n’enregistre pas.
•
Si vous utilisez un appareil externe, recontrôlez son branchement.
•
Contrôlez à nouveau les réglages d’entrée.
•
Vérifiez que le niveau d’entrée n’est pas trop bas.
•
Vérifiez que la carte SD n’est pas pleine.
•
Vérifiez que le nombre maximal de fichiers pouvant être gérés par cette unité
n’a pas été atteint.
Le niveau d’entrée est faible.
•
Vérifiez que le réglage de niveau d’entrée n’est pas trop bas.
•
Vérifiez que le niveau de sortie de l’appareil connecté n’est pas trop bas.
Le son enregistré est distordu.
•
Vérifiez que le réglage de niveau d’entrée n’est pas trop haut.
•
Vérifiez que la fonction de réverbérateur est désactivée.
Le son lu ne semble pas naturel.
•
Vérifiez que la vitesse de lecture n’a pas été modifiée.
•
Vérifiez que l’égaliseur de lecture est désactivé.
•
Vérifiez que la fonction d’alignement de niveau est désactivée.
•
Vérifiez que la fonction de réverbérateur est désactivée.

Impossible de supprimer les fichiers.
•
Vérifiez que vous n’essayez pas d’effacer un fichier copié depuis un ordinateur
après avoir été protégé en écriture.
Les fichiers de cette unité n’apparaissent pas sur l’ordinateur.
•
Vérifiez que l’unité est connectée à l’ordinateur via son port USB.
•
Vérifiez qu’aucun concentrateur USB n’est utilisé.
•
Vérifiez que l’unité n’est pas en cours d’enregistrement ou armée pour
l’enregistrement.
L’unité ne peut pas être connectée à un smartphone, ou la
communication entre les deux s’arrête.
•
Vérifiez que l’appareil Wi-Fi est sous tension et que le Wi-Fi est activé.
•
Vérifiez que la distance entre l’appareil Wi-Fi et l’unité n’est pas trop grande.
Vérifiez également qu’il n’existe aucun mur ou obstacle entre l’appareil Wi-Fi et
l’unité.
Lorsqu’un appareil Wi-Fi est situé à l’arrière de cette unité, l’unité elle-même
peut interrompre la communication.
Changez l’appareil Wi-Fi et de l’unité de place.
•
Mettez l’unité hors tension, puis mettez-la à nouveau sous tension.
•
Supprimez l’enregistrement de «DR-44WL» de l’appareil Wi-Fi et suivez les
étapes indiquées dans «Branchement de l’unité à un smartphone par Wi-Fi».
Caractéristiques techniques
Données
Supports d’enregistrement
Carte SD (64 Mo - 2 Go), carte SDHC (4 Go - 32 Go),
carte SDXC (64 Go - 128 Go)
Formats d’enregistrement/lecture
BWF : 44,1/48/96 kHz, 16/24bits
WAV : 44,1/48/96 kHz, 16/24bits
MP3 : 44,1/48 kHz, 32/64/96/128/192/256/320 kbit/s
Nombre de canaux
4 canaux
mode 4CH mono : Jusqu’à 4 fichiers
i
Stéréo : Jusqu’à 2 fichiers
Stéréo (1 fichier) + mono (jusqu’à 2 fichiers)
mode MTR mono : Jusqu’à 4 fichiers
i
Entrées et sorties
Prise EXT MIC/LINE IN
(peut fournir une alimentation fantôme)
Connecteur: XLR-3-31, prise TRS standard φ6,3 mm
Prise /LINE OUT
Connecteur: prise stéréo mini φ3,5 mm
Haut-parleur intégré
0,3 W (mono)
Prise USB
Connecteur: Type Micro-B
Format: USB 2.0 HIGH SPEED, classe de périphériques de stockage de masse
Performances audio
Réponse en fréquence
20-20 kHz +1/-3 dB (EXT IN à LINE OUT, F.é. 44,1 kHz, JEITA)
20-22 kHz +1/-3 dB (EXT IN à LINE OUT, F.é. 48 kHz, JEITA)
20-40 kHz +1/-3 dB (EXT IN à LINE OUT, F.é. 96 kHz, JEITA)
Distorsion
0,05% ou moins (EXT IN vers LINE OUT, F.é. 44,1/48/96 kHz, JEITA)
Rapport signal/bruit
92dB ou plus (EXT IN vers LINE OUT, F.é. 44,1/48/96 kHz, JEITA)
Remarque : JEITA indique la conformité avec JEITA CP-2150
Durées d’enregistrement
Format de fichier
(réglage en cours d’enregistrement)
WAV/BWF 16bits (STEREO) 44,1 kHz 6 heures 44 minutes
WAV/BWF 24bits (STEREO) 96 kHz 2 heures 04 minutes
•
Les durées d’enregistrement indiquées ci-dessus sont des estimations. Les
durées peuvent différer en fonction des cartes SD/SDHC/SDXC utilisées.
•
Les durées d’enregistrement indiquées ci-dessus ne sont pas des données
d’enregistrement en continu mais le total pouvant être obtenu en
additionnant les durées d’enregistrement sur les cartes SD/SDHC/SDXC.
•
Si l’enregistrement est effectué en mono au format WAV, le temps
d’enregistrement maximum est le double des valeurs ci-dessus.
•
En cas d’utilisation de DUAL REC dans le format WAV/BWF ou en cas
d’enregistrement à 4 canaux, le temps d’enregistrement maximum est la
moitié des valeurs ci-dessus.
Capacité de
carte SDHC
4 Go
TASCAM DR-44WL
25

Configurations informatiques requises pour les ordinateurs connectés
Consultez le site international TEAC (http://teac-global.com/) pour les informations les plus récentes sur les systèmes d’exploitation pris en charge.
Systèmes d’exploitation acceptés
Windows : Windows XP, Windows Vista, Windows 7,
Macintosh : Mac OS X 10.2 ou ultérieur
Windows 8 (y compris 8.1)
Wi-Fi
Norme sans fil
Conforme à la norme IEEE 802.11b/g/n (2,4 GHz uniquement)
Mode de communication sans fil
Point d’accès simple (PA limité)
Sécurité
WPA2-PSK (prise en charge de WPS2.0)
Générales
Alimentation électrique
4 piles AA (alcalines ou NiMH)
Alimentation par le bus USB d’un ordinateur
Adaptateur secteur dédié (GPE053B fourni avec l’unité)
Consommation électrique
2,5 W (maximum)
Autonomie des piles/batteries (en fonctionnement continu)
•
Avec des piles alcalines (EVOLTA)
Format Autonomie Note
Quand l’entrée MIC est sélecEnregistré en 2ch WAV,
44,1 kHz, 16 bits
•
Avec des batteries NiMH (eneloop)
Format Autonomie Note
Enregistré en 2ch WAV,
44,1 kHz, 16 bits
NOTE
En cas d’utilisation de l’alimentation fantôme, le temps de
fonctionnement peut être plus court en fonction du micro utilisé.
16heures
12heures
Dimensions
79 × 162,2 × 42,5 mm (L × H × P)
Poids
346 g/251 g (piles comprises/piles non comprises)
Plage de température de fonctionnement
0 °C à 40°C
tionnée
Environ
(alimentation fantôme non
utilisée)
Quand l’entrée MIC est sélec-
tionnée
Environ
(alimentation fantôme non
utilisée)
•
Les illustrations de ce mode d’emploi peuvent partiellement différer du
produit réel.
•
Les caractéristiques et l’aspect externe peuvent être changés sans préavis en
vue d’améliorer le produit.
•
Des caractéristiques détaillées sont fournies dans le manuel de référence.
TASCAM DR-44WL
26

Manual de instrucciones
Pb, Hg, Cd
INSTRUCCIONES
IMPORTANTES DE SEGURIDAD
1 Lea estas instrucciones.
2 Conserve estas instrucciones.
3 Cumpla con lo indicado en los avisos.
4 Siga todas las instrucciones.
5 No utilice este aparato cerca del agua.
6 Límpielo solo con un trapo seco.
7 No bloquee ninguna de las ranuras de
ventilación. Instale este aparato de acuerdo con
las instrucciones del fabricante.
8 No instale este aparato cerca de fuentes de
calor como radiadores, calentadores, hornos u
otros aparatos (incluyendo amplificadores) que
produzcan calor.
9 No elimine el sistema de seguridad que supone
el enchufe polarizado o con toma de tierra. Un
enchufe polarizado tiene dos bornes, uno más
ancho que el otro. Uno con toma de tierra tiene
dos bornes iguales y una tercera lámina para la
conexión a tierra. El borne ancho o la lámina se
incluyen para su seguridad. Si el enchufe que
venga con la unidad no encaja en su salida de
corriente, haga que un electricista cambie su
salida anticuada.
10 Evite que el cable de corriente quede de forma
que pueda ser pisado o quedar retorcido o
aplastado, especialmente en los enchufes,
receptáculos o en el punto en el que salen del
aparato.
11 Use solo accesorios / complementos
especificados por el fabricante.
12 Utilice este aparato solo
con un soporte, trípode
o bastidor especificado
por el fabricante o que
se venda con el propio
aparato. Cuando utilice
un bastidor con ruedas, tenga cuidado al mover
la combinación de aparato/bastidor para evitar
que vuelque y puedan producirse daños.
13 Desconecte este aparato de la corriente durante
las tormentas eléctricas o cuando no lo vaya a
usar durante un periodo de tiempo largo.
14 Dirija cualquier posible reparación solo al
servicio técnico oficial. Este aparato deberá
ser reparado si se ha dañado de alguna forma,
como por ejemplo si el cable de corriente o el
enchufe están rotos, si ha sido derramado algún
líquido sobre la unidad o algún objeto ha sido
introducido en ella, si ha quedado expuesto
a la lluvia o la humedad, si no funciona
normalmente o si ha caído al suelo en algún
momento.
•
Este aparato recibe corriente nominal no
operativa de la salida de corriente AC aun cuando
su interruptor POWER o STANDBY/ON no esté en
la posición ON.
•
Dado que el cable de alimentación es el sistema
de desconexión de esta unidad debe ubicarla de
forma que siempre pueda acceder a él.
•
Tenga cuidado al usar auriculares de cualquier
tipo con este aparato dado que una presión
sonora excesiva en los auriculares puede
producirle daños auditivos.
•
Si detecta cualquier tipo de problema mientras
utiliza este aparato, póngase en contacto con
TEAC para informar de ello y hacer que la unidad
sea revisada o reparada. No utilice de nuevo
la unidad hasta que no haya sido verificada/
reparada.
ADVERTENCIA
Para evitar daños en los oídos, no escuche a altos
niveles de volumen durante mucho tiempo.
PRECAUCIÓN
•
No permita que este aparato quede expuesto a
salpicaduras de ningún tipo.
•
No coloque objetos que contengan líquidos,
como jarrones, encima de este aparato.
•
No instale este aparato encastrado en una librería
o mueble similar.
•
El aparato debe estar colocado lo suficientemente
cerca de la salida de corriente como para poder
acceder al enchufe en cualquier momento.
•
Si este aparato utiliza pilas (incluyendo baterías
fijas o recambiables), no permita que queden
expuestas a la luz solar, fuego o un nivel excesivo
de calor.
•
ATENCIÓN con los productos que utilicen baterías
de litio recambiables: existe el riesgo de explosión
en caso de sustituir la batería por otra de un tipo
incorrecto. Sustitúyala solo por una idéntica o de
tipo equivalente.
PRECAUCIONES RELATIVAS A LAS
PILAS
Este aparato utiliza pilas. Un mal uso de las mismas
puede dar lugar a fugas, roturas y otros problemas.
Tenga en cuenta siempre estas precauciones al usar
las pilas.
•
Nunca trate de recargar pilas no recargables. Las
pilas podrían romperse o tener fugas, dando lugar
a daños.
•
A la hora de instalar la pilas, ponga mucha
atención a las indicaciones de polaridad (símbolos
(¥/^) más/menos) e instálelas correctamente
dentro del compartimento para las pilas
siguiendo las indicaciones. El colocar las pilas al
revés puede dar lugar a roturas o fugas en las
pilas, lo que podría producir averías, incendios o
daños.
•
A la hora de guardar o eliminar pilas, aísle sus
terminales con cinta aislante o similar para evitar
que entren en contacto con otras pilas u objetos
metálicos.
•
A la hora de deshacerse de las pilas, siga las
instrucciones de eliminación indicadas en las
propias pilas o que estén en vigor en su ciudad.
•
Nunca use tipos de pilas distintas a las indicadas.
Nunca mezcle distintos tipos de pilas ni utilice
pilas antiguas y nuevas. El hacer esto podría dar
lugar a roturas o fugas en las pilas, produciendo
incendios o daños.
•
No transporte ni almacene las pilas junto con
otros objetos metálicos pequeños. El hacer esto
podría dar lugar a roturas o fugas en las pilas,
produciendo incendios o daños.
•
No caliente ni trate de desmontar las pilas. Nunca
arroje las pilas al fuego ni dentro del agua. El
hacer esto podría dar lugar a roturas o fugas en
las pilas, produciendo incendios o daños.
•
En caso de una fuga del fluido interno de la pila,
limpie los restos del mismo del compartimento
de las pilas antes de introducir una nuevas. El
contacto del fluido de la pila con los ojos puede
dar lugar a daños o pérdida de visión. Si le cae
este fluido en los ojos, lávelos inmediatamente
con agua abundante. No se frote los ojos al
lavarlos. Después de lavarlos, acuda tan pronto
como pueda a un médico. El contacto del fluido
de la pila con su piel o ropa puede dar lugar a
daños o quemaduras. Al igual que antes, lave con
agua inmediatamente la zona afectada y acuda al
médico.
•
Este aparato debe estar apagado a la hora de
instalar o sustituir las pilas.
•
Extraiga las pilas si no piensa utilizar este aparato
durante un periodo de tiempo largo. El no hacerlo
puede producir fugas o roturas en las pilas, lo que
podría dar lugar a un incendio o daños. Si se llega
a producir una fuga del fluido interno de la pila,
limpie los restos del mismo del compartimento
de las pilas antes de introducir una nueva.
•
Nunca despiece una pila. El ácido que contiene
puede dañar la piel y la ropa.
8
Para los usuarios europeos
Eliminación de aparatos eléctricos y
electrónicos
(a) Nunca debe eliminar un aparato eléctrico o
electrónico junto con el resto de la basura
orgánica. Este tipo de aparatos deben ser
depositados en los “puntos limpios” creados
a tal efecto por su Ayuntamiento o por la
empresa de limpieza local.
(b) Con la correcta eliminación de los aparatos
eléctricos y electrónicos estará ayudando a
ahorrar valiosos recursos y evitará a la vez todos
los efectos negativos potenciales tanto para la
salud como para el entorno.
(c) Una eliminación incorrecta de este tipo de
aparatos junto con la basura orgánica puede
producir efectos graves en el medio ambiente y
en la salud a causa de la presencia de sustancias
potencialmente peligrosas que pueden
contener.
(d) El símbolo del cubo de basura
tachado indica la obligación de
separar los aparatos eléctricos y
electrónicos del resto de basura
orgánica a la hora de eliminarlos.
(e) Los llamados “puntos limpios” de recogida y
retirada selectiva de este tipo de productos
están disponibles para cualquier usuario final.
Para más información acerca de la eliminación
de este tipo de elementos, póngase en
contacto con el departamento correspondiente
de su Ayuntamiento, empresa de limpieza o
recogida de basuras o con el comercio en el
que adquirió este aparato.
Eliminación de pilas y/o acumuladores
(a) Nunca debe eliminar pilas y/o acumuladores
junto con el resto de la basura orgánica. Este
tipo de elementos deben ser depositados en
los “puntos limpios” creados a tal efecto por su
Ayuntamiento o por la empresa de limpieza
local.
(b) Con la correcta eliminación de las pilas y/
o acumuladores estará ayudando a ahorrar
valiosos recursos y evitará a la vez todos los
efectos negativos potenciales tanto para la
salud como para el entorno.
(c) Una eliminación incorrecta de las pilas y/o
acumuladores junto con la basura orgánica
puede producir efectos graves en el medio
ambiente y en la salud a causa de la presencia
de sustancias potencialmente peligrosas que
pueden contener.
(d) El símbolo del cubo de basura
tachado indica la obligación de
separar las pilas y/o acumuladores
del resto de basura orgánica a la
hora de eliminarlas.
Si la batería o acumulador contiene una
cantidad superior de plomo (Pb), mercurio (Hg)
y/o cadmio (Cd) que los valores especificados
en la Directiva de pilas y baterías (2006/66/EC),
aparecerán los símbolos de estas sustancias
químicas (Pb, Hg y/o Cd) debajo del símbolo
del cubo de basura tachado.
(e) Los llamados “puntos limpios” de recogida y
retirada selectiva de las pilas y/o acumuladores
están disponibles para cualquier usuario final.
Para más información acerca de la eliminación
de pilas y/o acumuladores, póngase en
contacto con el departamento correspondiente
de su Ayuntamiento, empresa de limpieza o
recogida de basuras o con el comercio en el
que las adquirió.
TASCAM DR-44WL
27

Precauciones con los equipos inalámbricos
Cumplimiento de las normas de interferencias y transmisión de radio
Modelo para el Espacio Económico
Europeo (EEE)
Este equipo cumple con el estándar armonizado de
la DIRECTIVA 1999/5/EC (R&TTE).
Etiquetado de conformidad con la
marca CE:
PRECAUCIÓN
Modificaciones o cambios no aprobados
expresamente por las autoridades responsables de la
normativa podrían invalidar la autorización al usuario
para utilizar el equipo.
PRECAUCIÓN
La autorización de dispositivos inalámbricos son
diferentes según los países o regiones. Por favor,
utilice el producto solamente en el país donde lo
adquirió.
•
Dependiendo del país, podrían existir restricciones
para el uso de la tecnología inalámbrica Wi-Fi.
Verifique la legislación y regulaciones del país o
región donde quiera utilizar la unidad antes de
hacerlo.
Requerimientos acerca de la exposición a radiaciones
Este equipo cumple con la regulación internacionalmente reconocida para los casos de exposición
humana a ondas de radio generadas por un transmisor.
Se basan en las dos condiciones siguientes:
•
Los usuarios finales e instaladores deben recibir
instrucciones para la instalación de la antena
y condiciones operativas del transmisor que
cumplan la normativa de exposición a radio
frecuencia (RF).
•
Este equipo deberá instalarse y funcionar con una
distancia mínima de 20 cm entre el emisor de
radiación y el cuerpo del usuario.
8
Declaración de cumplimiento
Modelo para el Espacio Económico
Europeo (EEE)
Este equipo cumple con la valoración EN.62311 de
equipos electrónicos y eléctricos relativa a las restricciones de exposición humana a campos electromagnéticos, el estándar armonizado de la DIRECTIVA
1999/5/EC.
DECLARACIÓN DE CONFORMIDAD
Nosotros, TEAC EUROPE
GmbH. Bahnstrasse 12, 65205
Wiesbaden-Erbenheim, Germany
declaramos bajo nuestra propia
responsabilidad que el aparato
TEAC descrito en este manual cumple con todos
los standards técnicos aplicables.
Contents
Introducción ..................................................................... 28
Elementos incluidos ...................................................... 28
Nota acerca del manual de referencia ................... 28
Precauciones de ubicación y uso ............................. 28
Precauciones con los equipos inalámbricos ........ 28
Cumplimiento de las normas de interferencias y
transmisión de radio ............................................................ 28
Requerimientos acerca de la exposición a
radiaciones ................................................................................. 28
Cuidado con la condensación ................................... 29
Limpieza de la unidad................................................... 29
Uso de la web global TEAC ......................................... 29
Nombres y funciones de las partes ......................... 29
Panel superior ..........................................................................29
Panel frontal .............................................................................. 29
Panel izquierdo ........................................................................29
Panel derecho ..........................................................................29
Panel inferior .............................................................................29
Pantalla inicial .................................................................. 30
Preparativos ...................................................................... 30
Preparación de la fuente de alimentación ............ 30
Puesta en marcha ..................................................................30
Ajuste del reloj interno .......................................................30
Apagado ......................................................................................30
Conexión de dispositivos de monitorización y
auriculares...................................................................................31
Procedimientos básicos para usar los menús ......31
Estructura de menú ............................................................. 31
Grabación ...........................................................................31
Pantalla de grabación ......................................................... 31
Ajuste del nivel de entrada .............................................. 32
Ajuste del filtro de corte de graves ............................32
Uso de la función de control de nivel ...................... 32
Grabar ............................................................................................32
Información sobre el estado de espera de
grabación .................................................................................... 32
Estructura de los menús de grabación ...................32
Reproduc. .......................................................................... 32
Reproducción de grabaciones...................................... 32
Después de mover la posición de reproducción,
se pausará la reproducción. Selección de un
fichero para reproducirlo (salto) ..................................32
Ajuste del volumen de reproducción ......................33
Conexión con un ordenador ......................................33
Intercambio de ficheros con un ordenador .........33
Desconexión de la unidad de un ordenador ...... 33
Ajustes y visualización de información .................. 33
Desactivación del altavoz interno .............................. 33
Ajustes del sistema ...............................................................33
Conexión de la unidad a un smartphone medi-
ante Wi-Fi ........................................................................... 33
Cómo conseguir la aplicación específica (DR
CONTROL) e instalarla .........................................................33
Conexión de la unidad a un smartphone
mediante Wi-Fi por primera vez .................................. 33
Conexión de la unidad a un smartphone
mediante Wi-Fi (no por primera vez)........................34
Control remoto de la unidad desde un smar t-
phone ............................................................................................34
Transferencia de ficheros de la unidad a un
smartphone ...............................................................................34
Referencia rápida para el uso de distintas fun-
ciones .................................................................................. 35
Mensajes ............................................................................ 36
Resolución de problemas ............................................36
Especificaciones técnicas ............................................ 37
Valores medios ........................................................................37
Entradas y salidas ................................................................... 37
Rendimiento audio ............................................................... 37
Tiempos de grabación ....................................................... 37
Requisitos de los ordenadores conectados ......... 38
Wi-Fi ................................................................................................ 38
General .........................................................................................38
Introducción
Felicidades y gracias por su compra de la grabadora
PCM lineal TASCAM DR-44WL.
Antes de conectar y comenzar a usar esta unidad,
dedique unos minutos a leer completamente este
manual para asegurarse de que entiende cómo
conectar y configurar correctamente esta unidad, así
como la finalidad de sus distintas funciones. Una vez
que haya leído el manual, consérvelo en un lugar
seguro para cualquier posible referencia a él en el
futuro.
Este producto cuenta con un procesador Blackfin®
fabricado por Analog Devices, Inc.
Elementos incluidos
Dentro del embalaje encontrará lo siguiente.
Tenga cuidado de no dañar estos objetos al abrir el
embalaje. Conserve el embalaje y las protecciones
por si alguna vez necesita transportar el aparato.
En el caso que falte alguno de los ítems o si
cualquiera de ellos tenga sufrido algún daño durante
el transporte, póngase en contacto con la tienda
donde ha comprado este producto.
•
Unidad principal ............................................................... × 1
•
Adaptador de corriente (GPE053B) ...................... × 1
•
tarjeta microSD con adaptador
(dentro de la unidad) .................................................... × 1
•
Cable USB (80 cm) ........................................................... × 1
•
Pilas alcalinas AA .............................................................. × 4
•
Cortavientos de peluche ............................................ × 1
•
Adaptador para soporte de micrófono..............× 1
•
Adaptador de zapata caliente ................................. × 1
•
Bolsa de transporte ........................................................ × 1
•
Manual de instrucciones (este documento)
incluyendo garantía ....................................................... × 1
Nota acerca del manual de referencia
Este manual de instrucciones explica las funciones
principales de la unidad. Vea en el manual de referencia información más detallada de las mismas.
Puede descargar el manual de instrucciones y el
de referencia desde la página web global de TEAC
(http://teac-global.com/).
TASCAM DR-44WL
28

Precauciones de ubicación y
uso
•
El rango de temperaturas seguro para el uso de
este aparato es entre 0–40° C (32–104° F).
•
Para evitar que se degrade la calidad del sonido
y/o que se produzcan averías, no instale la unidad
en los siguientes lugares.
Lugares sometidos a fuertes vibraciones o
inestables en general
Cerca de ventanas o en otras ubicaciones en
las que pueda quedar expuesto a la luz solar
directa
Cerca de radiadores o en lugares
excesivamente calurosos
Lugares extremadamente fríos
Lugares con mala ventilación o muy
húmedos
Lugares con altas concentraciones de polvo
•
Si coloca este aparato en las inmediaciones de
una etapa de potencia u otra unidad con un
gran transformador, es posible que se produzcan
zumbidos. En ese caso, aumente la separación
entre este aparato y el otro dispositivo.
•
Esta unidad puede producir irregularidades en los
colores de una TV o ruidos en los receptores de
radio cercanos. En ese caso, aleje lo posible esta
unidad de dichos receptores.
•
Esta unidad puede producir ruidos en caso
de utilizar un teléfono móvil u otro dispositivo
inalámbrico en las inmediaciones para realizar
llamadas o recibir señales. En ese caso, separe
todo lo posible esta unidad de dichos aparatos o
apáguelos.
•
Para una correcta disipación del calor generado
por esta unidad, no coloque ningún aparato
encima de ella.
•
No coloque esta unidad encima de una etapa de
potencia u otro aparato que genere calor.
Cuidado con la condensación
Si traslada la unidad de un lugar frío a uno cálido o si
la usa después de un cambio fuerte de temperatura,
puede producirse condensación de agua. Para evitar
esto o si se produce la condensación, deje la unidad
durante una o dos horas en la nueva ubicación antes
de volver a encenderla.
Nombres y funciones de las partes
Panel superior
1 Micrófono stereo interno
2 Indicador PEAK
3 Pantalla
4 Botón TRACK/INPUT
5 Botón 8/HOME
6 . Botón de retroceso rápido
7 Botón 7/9
8 Botón MENU
9 Indicador MTR
0 Botón MIXER
q Botón RECORD [0] / indicador REC
w / Botón de avance rápido
e Botón INPUT
r Botón ENTER/MARK
t Botón QUICK
y Rueda
Panel frontal
Panel izquierdo
o Ranura para tarjetas SD
p Interruptor HOLD/
a Toma /LINE OUT
s Botón OUTPUT LEVEL
d Botón Wi-Fi
Panel derecho
f Interruptor EXT IN
g Botón INPUT LEVEL
h Control de volumen INPUT LEVEL
j Puerto USB
Panel inferior
Limpieza de la unidad
Para limpiar la unidad, utilice un trapo suave y seco.
No use gasolina, alcohol u otros productos similares
ya que podría dañar su superficie.
Uso de la web global TEAC
Desde la web global de TEAC (http://teac-global.
com/) podrá descargarse este Manual de
instrucciones así como el Manual de referencia de
esta unidad
Vaya a la web global de TEAC (http://
1.
teac-global.com/).
En la sección TASCAM Downloads, haga clic en
2.
el idioma que quiera para acceder a la página
de descargas en dicho idioma.
NOTA
Si no aparece el idioma que busca, haga clic
en Other Languages.
Haga clic en el nombre de producto en la
3.
sección “Search by Model Name” para acceder a
la página de descargas de dicho producto.
Elija y descargue el Manual de instrucciones y el
4.
Manual de referencia cuando lo necesite.
u Indicador Wi-Fi
i Terminales EXT MIC/LINE IN 1/L y
2/R (XLR/TRS)
k Altavoz mono interno
l Rosca para fijación en trípode
; Tapa del compartimento de las pilas
z Enganche para correa
x Compartimento de las pilas
TASCAM DR-44WL
29

Pantalla inicial
Esta es la pantalla que estará activa normalmente
cuando la unidad esté parada.
Pantalla inicial en el modo 4 CH
Pantalla inicial en el modo MTR
1 Indicación de estado de velocidad de la
reproducción
Icono Velocidad de reproducción
Vacío
2
Indicación del estado (activado o desactivado) de la
función de control de clave
Icono Estado (activado o desactivado)
Vacío
3 Indicación del estado (activado o desac-
tivado) de la reverberación
Icono
Vacío Reverberación desactivada
4 Indicación de emisión del altavoz
Si aparece “ ”: emisión de altavoz activada
Si no aparece “ ”: emisión de altavoz desac-
tivada
5 Indicación del suministro de alimentación
phantom
Vacío : sin suministro de alimentación phantom
“ ” : con suministro de alimentación
“ ” : con suministro de alimentación
6 Indicación del estado de la fuente de
alimentación
Cuando la alimentación provenga de las pilas, el
icono de la pila indicará con barras la cantidad
de carga que queda ( , o ).
Cuando no aparezca ninguna barra en el
icono, parpadeará y, a continuación, la
Velocidad de reproducción no cambiada
1,1×–2,0×
0,5×–0,9×
No se puede cambiar la velocidad
de reproducción
Función de control de clave desactivada
Función de control de clave activada
Función de control de clave activada
(ajuste desactivado)
Estado (activado o desactivado)
Reverberación activada
(grabación con efector activado)
Efector interno activado
(estado SEND)
phantom de 48V
phantom de 24V
alimentación se apagará (pasará al estado de
espera) porque se habrán agotado las pilas.
Cuando se esté usando la alimentación
mediante bus USB o el adaptador de corriente
específico (GPE053B) que se suministra con el
producto, aparecerá .
7 Indicación del estado operativo de la
grabadora
Estos iconos indican el estado operativo de la
grabadora.
Indicador
8
9
7
,
m
/
.
8 Indicación del estado del ajuste de repro-
ducción en bucle
Durante la reproducción en bucle, se mostrará
el icono .
9 Indicador del nombre del fichero o de la
canción
Si está seleccionado el modo 4CH, aquí aparecerá
la información del nombre o la etiqueta del
fichero que se esté reproduciendo.
Cuando hay varios ficheros en el modo 4CH,
solo se muestra la parte de formato de los
nombres de fichero y el número básico de los
ficheros de grabación. Cuando se grabe un solo
fichero, aparecerá su nombre.
Si está seleccionado el modo MTR, aparecerá el
nombre de la canción abierta.
0 Estado del ajuste de los puntos IN (inicio) y
OUT (final) de la reproducción en bucle
Muestra el estado del ajuste de los puntos IN (inicio)
y OUT (final) de la reproducción en bucle.
Al ajustar el punto IN (inicio), aparecerá el icono
indicación de la posición de reproducción.
Al ajustar el punto OUT (final), aparecerá el
icono en la posición correspondiente de la
barra de indicación de la posición de reproducción.
q Indicación de la posición de reproducción
La posición de reproducción activa es mostrada
en formato de barra.
w Indicación de la guía del medidor de nivel
Se trata de una guía del medidor de nivel para ajustar
los niveles de entrada y de salida.
Aparece en la posición “-12dB” de la escala.
e Medidor de nivel
Indica el nivel de sonido de entrada o de la
reproducción.
r Indicación del estado del fichero
El estado del fichero se muestra de distintas
formas, según el tipo de fichero que se va a
reproducir.
t Indicación del tiempo transcurrido
Puede ver el tiempo transcurrido (horas:
minutos: segundos) del fichero actual.
y Indicación del tiempo restante
Puede ver el tiempo restante (horas: minutos:
segundos) del fichero actual.
u Indicación del valor de pico en decibelios
(dB)
Significado
Parada
En pausa
Reproducción
Avanzando rápidamente
Retrocediendo rápidamente
Saltando al principio del siguiente
fichero
Saltando al principio del fichero
actual o del fichero anterior
en la posición correspondiente de la barra de
: fichero estéreo
: fichero mono x 2
: no hay ningún fichero.
Indica, en decibelios, el valor máximo del nivel
de reproducción en un período de tiempo
determinado.
Preparativos
Preparación de la fuente de alimentación
Uso de pilas de tamaño AA
En el panel inferior, retire la tapa del comparti-
1.
mento de las pilas.
Introduzca 4 pilas AA con las marcas de ¥ y
2.
^ colocadas como se indica en el compartimento de las pilas.
Vuelva a colocar la tapa del compartimento de
3.
las pilas.
•
En el elemento
POWER/DISPLAY
que va a usar. Así, la unidad podrá indicar la
cantidad de carga restante y determinar con
precisión si tiene suficiente carga para funcionar
correctamente. (De forma predeterminada, el tipo
es
ALKAL
Puesta en marcha
Con al unidad apagada (en estado de espera), deslice
el interruptor HOLD/ en la dirección de
y, cuando aparezca
pantalla de arranque), suelte el interruptor.
Una vez que la unidad se haya puesto en marcha,
aparecerá la pantalla inicial.
Ajuste del reloj interno
La primera vez que ponga en marcha esta unidad (o
tras dejar la unidad sin pilas), aparecerá la pantalla
DATE/TIME
para que pueda ajustar la fecha y la hora.
Con el botón .// y la rueda, especifique la
fecha y la hora y presione el botón ENTER/MARK
para ajustarlas.
BATTERY TYPE
, ajuste el tipo de pilas
, para pilas alcalinas).
TASCAM DR-44WL
antes de la pantalla de arranque
del menú
(la
TASCAM DR-44WL
30

Apagado
Con la unidad encendida, deslice el interruptor
HOLD/ del panel izquierdo en la dirección de
y, cuando aparezca
shutting down
Pasados unos segundos, el dispositivo se apagará.
TASCAM DR-44WL
, suelte el interruptor.
Conexión de dispositivos de monitorización y auriculares
Para escuchar el sonido a través de unos auriculares,
conéctelos a la toma /LINE OUT.
Si quiere escuchar el sonido a través de un sistema
de monitorización externo (monitores autoamplificados o amplificador y altavoces), conéctelo a la
toma /LINE OUT.
Auriculares Monitores autoamplificados
o
amplificador y altavoces
Procedimientos básicos para usar los menús
Pulse el botón MENU para abrir la pantalla
1.
MENU
.
Con la rueda, elija (resalte) uno de los elementos
2.
del menú y, a continuación, pulse el botón
ENTER/MARK para ir a la pantalla de ajustes
que desee.
Utilice la rueda para elegir (resaltar) los
3.
elementos que quiera ajustar.
Pulse el botón ENTER/MARK o / para
4.
desplazar el cursor a la derecha y resaltar el
valor de ajuste.
Use la rueda para cambiar el ajuste.
5.
Para ajustar otro elemento del mismo menú,
6.
pulse el botón ENTER/MARK o . para
desplazar el cursor a la izquierda.
Repita los pasos del 3 al 6 las veces necesarias
7.
para ajustar los demás elementos.
Una vez que haya terminado, pulse el botón
8.
8/HOME para volver a la pantalla inicial.
Estructura de menú
MENU
MODE
REC SETTING Ajustes de grabación
AUTO FUNCTION
BROWSE
(solo cuando está
seleccionado el modo 4CH)
SONG
(solo cuando está
seleccionado el modo MTR)
TOOLS
REVERB
POWER/DISPLAY
SYSTEM
Selección del modo
de grabación o el de
reproducción.
Funciones prácticas
para los ficheros
grabados
Gestión de ficheros y
carpetas de la tarjeta
SD
Ajustes de otras
funciones prácticas
Ajustes de los efectos de
reverberación
Ajustes de la fuente de
alimentación y la pantalla
Ajustes del sistema de
la unidad
Grabación
Pantalla de grabación
La pantalla que se muestra a continuación aparece cuando
la unidad se encuentra en estado de espera de grabación
o cuando se está grabando.
Pantalla de grabación en el modo 4 CH
Pantalla de grabación en el modo MTR
1 Indicación del estado (activado o desac-
tivado) de la función DUAL REC (solo en el
modo 4CH)
Ninguna indicación : función DUAL REC desactivada
: función DUAL REC activada
2 Indicación del estado (activado o desac-
tivado) de la reverberación
Icono Estado (ac tivado o desactivado)
Vacío Reverberación desactivada
Reverberación activada
(grabación con efector activado)
Reverberación activada
(estado SEND)
3 Indicación del suministro de alimentación
phantom
Vacío : sin suministro de alimentación phantom
: con suministro de alimentación
phantom de 48V
: con suministro de alimentación
phantom de 24 V
4 Indicación del estado operativo de la
grabadora
Estos iconos indican el estado operativo de la
grabadora.
Indicador
09
0
5 Indicación del estado del ajuste de la
función PRE REC o Auto REC (solo en el
modo 4CH)
Cuando la función PRE REC está en ON, aparece
el icono .
Cuando la función AUTO REC está en ON,
aparece el icono .
6 Indicador del nombre del fichero o de la
canción
Aquí aparecerá el nombre que se asignará
automáticamente a los ficheros grabados.
Cuando hay varios ficheros en el modo 4CH,
solo se muestra la parte de formato de los
nombres de fichero y el número básico de los
ficheros de grabación. Cuando se grabe un solo
fichero, aparecerá su nombre.
Si está seleccionado el modo MTR, aparecerá el
nombre de la canción abierta.
7 Indicación de la guía del medidor de nivel
Se trata de una guía del medidor de nivel para
ajustar los niveles de entrada y de salida.
Aparece en la posición “−12dB” de la escala.
8 Medidor de nivel
Indica el nivel de sonido de entrada.
Cuando se grabe en el modo de mezcla de
sobregrabación, aparecerá el nivel de los sonidos
de entrada y de reproducción combinados. Se
observará la marca tg en la posición “-12dB”
de la escala como marca de guía para ajustar el
nivel de entrada.
9 Indicación del estado del fichero
El estado del fichero se muestra de distintas
formas, según el tipo de fichero que se va a
reproducir.
0 Tiempo transcurrido de grabación
Le muestra el tiempo de grabación transcurrido
de un fichero en formato de horas:minutos:segundos.
q Tiempo de grabación restante
Aquí puede ver el tiempo de grabación restante
hasta que se alcance el tamaño de fichero
máximo elegido (horas: minutos: segundos). Si en
la tarjeta SD queda menos tiempo de grabación,
aparecerá en su lugar el tiempo restante de la
tarjeta SD.
w Valor de pico en decibelios (dB)
Aparece el valor de pico del nivel de entrada en
decibelios.
Significado
Grabación en espera o en pausa
Grabación en curso
: fichero estéreo
: fichero mono x 2
TASCAM DR-44WL
31

Ajuste del nivel de entrada
Pulse el botón INPUT LEVEL del panel derecho
1.
para mostrar la pantalla de ajustes “INPUT
LEVEL” en la pantalla en un menú desplegable.
Pulse el botón TRACK/INPUT para elegir un
2.
canal cuyo nivel de entrada desee ajustar.
Utilice el control de volumen INPUT LEVEL del
3.
panel derecho para ajustar el nivel de entrada.
Si el volumen del sonido de entrada es
demasiado alto, se iluminará en rojo el
indicador PEAK del panel superior.
Se mostrará la marca tg en la posición
“−12dB” del medidor de nivel.
Ajuste el nivel de entrada de forma que los
cambios de nivel se produzcan cerca de esta
marca sin que hagan que el indicador PEAK se
ilumine en rojo.
Una vez que haya terminado, pulse el botón
4.
8/HOME para volver a la pantalla inicial.
Ajuste del filtro de corte de graves
Ajuste el filtro de corte de graves si quiere eliminar
los ruidos u otros sonidos de bajas frecuencias.
Puede usar esta función para reducir el ruido de
equipos de aire acondicionado y otros molestos
ruidos como el del viento, por ejemplo.
Pulse el botón INPUT para que aparezca la
1.
pantalla
INPUT SETTING
Pulse el botón TRACK/INPUT para elegir un
2.
canal cuyo filtro de corte de graves desee
ajustar.
Con la rueda, elija (resalte)
3.
continuación, pulse el botón ENTER/MARK
o / para que aparezcan los elementos de
ajuste en un menú desplegable.
Utilice la rueda para ajustar la frecuencia de
4.
corte del filtro de corte de graves correspon-
diente a la entrada de los micrófonos.
Valores de ajuste:
Al pulsar el botón ENTER/MARK o ., el
5.
menú desplegable desaparece y la función se
activa.
Cuanto mayor sea el número (la frecuencia), más
ancha será la banda de frecuencias graves que se
eliminará.
OFF, 40 Hz, 80 Hz
120 Hz, 220 Hz
.
LOW CUT
y, a
Uso de la función de control de nivel
Puede ajustar esta función para grabar a través de un
micro.
Pulse el botón INPUT para que aparezca la
1.
pantalla
INPUT SETTING
Pulse el botón TRACK/INPUT para elegir un
2.
canal cuya función de control de nivel desee
ajustar.
Con la rueda, elija (resalte)
3.
y, a continuación, pulse el botón ENTER/MARK
o / para que aparezcan los elementos de
ajuste en un menú desplegable.
Al usar la rueda para elegir (resaltar) la función
4.
que desea y, luego, pulsar el botón ENTER/
MARK o ., el menú desplegable desaparece
y la función se activa.
PEAK REDUCTION
Esta función se usa para disminuir automáticamente
el nivel de grabación a un nivel más adecuado
cuando el volumen de un sonido de entrada es
demasiado alto. Puede aumentar manualmente el
nivel de grabación. Esta función es muy útil para
grabar música con cambios de volumen que puedan
afectar negativamente al sonido. El nivel ajustado
se mantendrá aunque se desactive esta función
después de ajustarlo.
LIMITER
Esta función impide que aparezcan distorsiones
debidas a entradas repentinas y excesivas. Esto
resulta útil si no quiere cambiar el nivel de grabación.
En este modo, puede cambiar el nivel de grabación
manualmente incluso durante la grabación.
LEVEL CTRL
Grabar
Esta grabadora puede grabar sonidos en dos modos:
4CH y MTR.
En el modo 4CH, se pueden grabar al mismo tiempo
hasta cuatro pistas de los micrófonos internos y el
terminal de entrada externa.
En el modo MTR, se pueden grabar sonidos sobre un
fichero ya grabado, además de grabar hasta cuatro
pistas.
Pulse el botón RECORD [0] para activar la
1.
espera de grabación.
Antes de iniciar la grabación, puede consultar
los nombres de los ficheros grabados que
aparecen en la pantalla.
Pulse el botón TRACK/INPUT y elija, así, un
2.
canal para la grabación.
Pulse el botón RECORD [0].
3.
Se iniciará la grabación normal.
Pulse el botón 8/HOME para finalizar la
4.
grabación.
Si desea pausar la grabación, pulse el botón
RECORD [0]. Al volver a pulsar el botón
RECORD [0] o al pulsar el botón 7/9, se
reanudará la grabación en el mismo fichero.
Al pulsar el botón 8/HOME después de pausar
,
la grabación, se creará un fichero audio del
sonido que se grabó hasta pausar la grabación.
Información sobre el estado de espera de grabación
Esta unidad tiene un estado de espera de grabación
como el que ofrecen las grabadoras destinadas
al uso profesional. En el estado de espera, puede
realizar operaciones como, por ejemplo, configurar
los ajustes del nivel de entrada y, a continuación,
iniciar la grabación rápidamente.
En el estado de espera de grabación, el indicador
REC parpadea y aparece la pantalla de grabación.
Estructura de los menús de grabación
Puede configurar diversos ajustes con el elemento
.
REC SETTING
REC SETTING
FILE FORMAT
SAMPLE RATE Ajuste de frecuencia de
PRE REC Ajuste de la función de
DUAL REC Ajuste de la función DUAL
MS MIC Ajuste de la función del
de la pantalla
MENU
Ajuste de formato de fichero
BWF: 16/24bits,
WAV: 16/24bits,
MP3: 32–320kbps
muestreo
44,1kHz, 48kHz,
96kHz
(96kHz solo en BWF/WAV)
pre-grabación
OFF, ON
REC
MODE,
LEVEL/FORMAT
micrófono MS
MS DECODE,
SOURCE
.
Reproduc.
Reproducción de grabaciones
Con la pantalla inicial abierta y la reproducción
parada, pulse el botón 7/9 para iniciar la reproducción.
Pausa
Con la pantalla inicial abierta y una pista en
reproducción, pulse el botón 7/9 para pausar la
reproducción en la posición en la que se encuentra.
Parada
Si pulsa el botón 8/HOME con la pantalla inicial
abierta y una pista en reproducción, se pausará la
reproducción.
Si vuelve a pulsar el botón 8/HOME, se detendrá la
reproducción al principio del fichero.
Retroceso rápido y avance rápido
(búsqueda)
Con la pantalla inicial abierta y una pista detenida o
en reproducción, mantenga pulsado el botón .
o / para retroceder o avanzar rápidamente y
buscar dentro del fichero que se está reproduciendo.
Cambio de la posición de reproducción
Puede mover la posición de reproducción girando
la rueda con la pantalla inicial abierta y una pista
detenida o en reproducción.
Después de mover la posición de reproducción, se pausará la reproducción. Selección de un fichero para reproducirlo (salto)
Con la pantalla inicial abierta, pulse el botón . o
/ para elegir el fichero que quiera reproducir.
Si pulsa el botón . cuando está al principio de
un fichero, la reproducción saltará al principio del
fichero anterior.
Si pulsa el botón / cuando está al principio o
en mitad de un fichero, la reproducción saltará al
siguiente fichero.
TASCAM DR-44WL
32

Ajuste del volumen de reproducción
El volumen de emisión de sonido a través de la toma
/LINE OUT se puede ajustar con el botón
OUTPUT LEVEL (+/−) cuando está abierta la
pantalla inicial.
Conexión con un ordenador
Puede transferir ficheros audio de la tarjeta SD de la
unidad a un ordenador, y también transferir ficheros
audio de un ordenador a la unidad.
Conexión de la unidad a un ordenador por USB
Use el cable USB incluido para conectar esta
1.
unidad con un ordenador. Si está apagada,
enciéndala.
En la pantalla
2.
STORAGE
para conectar la unidad al ordenador. En la
pantalla aparecerá
Al abrir “Equipo” en Windows, esta unidad se
3.
mostrará en la pantalla del ordenador como
una unidad externa llamada “DR-44WL”.
USB SELECT
y pulse el botón ENTER/MARK
USB connected.
, elija
Intercambio de ficheros con un ordenador
Haga clic en la unidad “DR-44WL” del ordenador para
que aparezcan las carpetas “MUSIC” y “UTILITY”.
Para transferir ficheros al ordenador, abra la carpeta
“MUSIC” y arrastre los ficheros que desee hasta el
destino adonde quiera transferirlos.
Para transferir ficheros desde el ordenador, arrastre
los ficheros audio que quiera transferir del ordenador
hasta la carpeta “MUSIC”.
Desconexión de la unidad de un ordenador
Antes de desconectar el cable USB, siga estos
procedimientos para desmontar esta unidad del
ordenador.
La unidad se apagará una vez que termine su
proceso de desconexión.
Para ver cómo desmontar un dispositivo externo,
consulte el manual de instrucciones del ordenador.
Ajustes y visualización de información
Desactivación del altavoz interno
Ajuste los elementos
SPEAKER
en
OFF
MENU
.
w
TOOLS
w
En otros países, el uso de la función Wi-Fi
puede estar limitado. Antes de usarlo,
compruebe las leyes y normas de su país.
Puede usar esta unidad por control remoto con una
aplicación específica gratuita (DR CONTROL). No solo
puede realizar operaciones de control del transporte,
como reproducir ficheros y detener la reproducción:
también puede ajustar la entrada, transferir ficheros
grabados y llevar a cabo otras acciones por Wi-Fi.
Cómo conseguir la aplicación
específica (DR CONTROL) e instalarla
Conecte el smartphone a Internet.
1.
Si es un dispositivo Android, descargue e instale
2.
la aplicación específica (DR CONTROL) desde
Google Play. Si es un dispositivo iOS, descárguela e instálela desde la App Store.
Conexión de la unidad a un smartphone mediante Wi-Fi por primera vez
Puede conectar la unidad a un smartphone a través
de Wi-Fi directamente, es decir, sin necesidad de
ningún dispositivo externo, como un router o un
entorno de red Wi-Fi. Para conectarlos, solo necesita
la unidad y un smartphone.
* Mientras la unidad esté conectada al smartphone,
no podrá conectar el smartphone a ninguna red
Wi-Fi externa.
Si el dispositivo es iOS
Pulse el botón Wi-Fi hasta que parpadee el
1.
indicador Wi-Fi.
Aparecerá un mensaje desplegable en la
pantalla.
Para realizar una conexión a un nuevo smart-
2.
phone, pulse el botón ENTER/MARK.
Aparecerán en pantalla “SSID” y “Encryption key”
3.
y, luego, la unidad entrará automáticamente en
el modo WPS.
En el dispositivo iOS, elija “Ajustes” w “Wi-Fi”.
4.
Al activar la Wi-Fi en el dispositivo iOS, aparece
5.
una lista de SSID de dispositivos Wi-Fi. Elija el
SSID que se muestra en la pantalla de la unidad.
En el dispositivo iOS, aparecerá una pantalla
6.
para que introduzca una contraseña. Escriba
la clave de cifrado (Encryption key) que se
muestra en la pantalla de la unidad.
Se establecerá una conexión Wi-Fi entre la
7.
unidad y el smartphone, y el indicador Wi-Fi se
iluminará.
Si el dispositivo es Android
Pulse el botón Wi-Fi hasta que parpadee el
1.
indicador Wi-Fi.
Aparecerá un mensaje desplegable en la
pantalla.
Para realizar una conexión a un nuevo smart-
2.
phone, pulse el botón ENTER/MARK.
Ajustes del sistema
Use el menú SYSTEM para personalizar los ajustes de
uso de la unidad. También puede realizar operaciones como, por ejemplo, restaurar los ajustes y
formatear tarjetas SD.
Elija
MENU
w
1.
ENTER/MARK.
Configure los ajustes necesarios de cada
2.
función.
SYSTEM
y pulse el botón
Conexión de la unidad a un smartphone mediante Wi-Fi
PRECAUCIÓN
Este producto está diseñado para cumplir
con las leyes y normas del área de venta y
exposición escogidas.
El uso de este producto está autorizado en
los siguientes países/regiones:
Estados Unidos, Canadá, Europa (miembros
de la UE), Australia,
Nueva Zelanda, Japón
NO TA
El modo WPS es el estándar para conectar
fácilmente entre sí los dispositivos
Wi-Fi. Con los dispositivos Android, la unidad
emplea un sistema de pulsación de botones.
Aparecerán en pantalla “SSID” y “Encryption key”
3.
y, luego, la unidad entrará automáticamente en
el modo WPS.
NO TA
El modo WPS es el estándar para conectar
fácilmente entre sí los dispositivos
Wi-Fi. Con los dispositivos iOS, esta unidad
emplea el sistema de código PIN.
TASCAM DR-44WL
33

En el dispositivo Android, elija “Ajustes” w
4.
“Wi-Fi”.
Al activar la Wi-Fi en el dispositivo Android,
5.
aparece una lista de SSID de dispositivos Wi-Fi.
Elija el SSID que se muestra en la pantalla de la
unidad.
En el dispositivo Android, aparecerá una
6.
pantalla para que introduzca una contraseña.
Escriba la clave de cifrado (Encryption key) que
se muestra en la pantalla de la unidad.
Se establecerá una conexión Wi-Fi entre la
7.
unidad y el smartphone, y el indicador Wi-Fi se
iluminará.
NO TA
El funcionamiento de los dispositivos
Android que se explica aquí corresponde a
los smartphones. Si desea obtener información detallada, consulte el manual de
instrucciones de su smartphone.
Conexión de la unidad a un smartphone mediante Wi-Fi (no por primera vez)
Una vez que haya conectado la unidad a su smartphone, podrá volver a conectarlos en el futuro con
solo elegir el SSID.
Si el dispositivo es iOS
Pulse el botón Wi-Fi de la unidad hasta que
1.
parpadee el indicador Wi-Fi.
Aparecerá un mensaje desplegable en la
pantalla.
Para realizar una conexión a un smartphone
2.
antes conectado, pulse el botón 8/HOME.
El mensaje desplegable de la pantalla desapa-
3.
recerá y la unidad esperará a que se establezca
la conexión con un smartphone.
En el dispositivo iOS, elija “Ajustes” w “Wi-Fi”.
4.
Al activar la Wi-Fi en el dispositivo iOS, aparece
5.
una lista de SSID de dispositivos Wi-Fi. Elija el
SSID que se muestra en la pantalla de la unidad.
Se establecerá una conexión Wi-Fi entre la
6.
unidad y el smartphone, y el indicador Wi-Fi se
iluminará.
Si el dispositivo es Android
Pulse el botón Wi-Fi de la unidad hasta que
1.
parpadee el indicador Wi-Fi.
Aparecerá un mensaje desplegable en la
pantalla.
Para realizar una conexión a un smartphone
2.
antes conectado, pulse el botón 8/HOME.
El mensaje desplegable de la pantalla desapa-
3.
recerá y la unidad esperará a que se establezca
la conexión con un smartphone.
En el dispositivo Android, elija “Ajustes” w
4.
“Wi-Fi”.
Al activar la Wi-Fi en el dispositivo Android,
5.
aparece una lista de SSID de dispositivos Wi-Fi.
Elija el SSID que se muestra en la pantalla de la
unidad.
Se establecerá una conexión Wi-Fi entre la
6.
unidad y el smartphone, y el indicador Wi-Fi se
iluminará.
NO TA
El funcionamiento de los dispositivos
Android que se explica aquí corresponde a
los smartphones. Si desea obtener información detallada, consulte el manual de
instrucciones de su smartphone.
Control remoto de la unidad desde un smartphone
La aplicación específica (DR CONTROL) tiene la
misma pantalla que la unidad, de modo que puede
usar la unidad por control remoto mediante la
aplicación casi igual que desde la unidad en sí. Antes
de usar la aplicación “DR CONTROL”, compruebe
cómo usar la unidad. Así podrá utilizar la aplicación
sin problemas.
Cuando haya establecido la conexión Wi-Fi
1.
entre la unidad y el smartphone, inicie la
aplicación “DR CONTROL” instalada en el smartphone.
Tras iniciar la aplicación “DR CONTROL”,
2.
aparecerá la siguiente pantalla en el smart-
phone y podrá usar la unidad por control
remoto.
Para ver una explicación detallada de la aplicación “DR
CONTROL”, consulte el “Manual de referencia de DR
CONTROL”, que puede descargar desde el sitio web
global de TEAC (http://teac-global.com/).
Transferencia de ficheros de la unidad a un smartphone
Pulse el botón “Browse” de la pantalla de “DR
1.
CONTROL”.
En la pantalla “Browse”, aparecerá la lista de
2.
ficheros de la unidad. Elija un fichero que quiera
transferir.
Aparecerá una pantalla con los detalles del
3.
fichero. Pulse el botón “Copy”.
Aparecerá una pantalla para confirmar la copia
4.
de ficheros. Cuando pulse el botón “YES”, se
iniciará la transferencia de ficheros de la unidad
al smartphone.
TASCAM DR-44WL
34

Referencia rápida para el uso de distintas funciones
•
Los nombres de los botones aparecen con este formato: MENU.
•
Las instrucciones aparecen abreviadas. Por ejemplo, en la pantalla inicial, pulsar el botón MENU, elegir el menú “REC SETTING” y, después, elegir el elemento “PRE
REC” quedaría abreviado de la siguiente forma: “Pantalla inicial w MENU w “REC SETTING” w “PRE REC””.
•
En las operaciones más complejas, no mostramos todos los pasos. Para ver la información completa de cada caso, vea el Manual de referencia.
Categoría Acción deseada
Volver a pantalla inicial
Grabar
Funciones
básicas
Grabación
Otras
funciones de
grabación
Gestión de
ficheros
(solo en el
modo 4CH)
Ajuste de
unidad
Reproducir un fichero
Ajustar el volumen de reproducción
Elegir un fichero para reproducirlo
Cambiar el formato de fichero
Ajuste del filtro de corte de
graves
Ajustar manualmente el nivel
de entrada
Ajustar automáticamente el
nivel de entrada
Grabar al mismo tiempo dos ficheros
con distintos niveles de entrada.
Usar el micrófono MS
Añadir una marca durante la
grabación
Cambiar ficheros manualmente durante la grabación
Configurar los ajustes del cambio de
fichero automático
Iniciar la grabación un
momento antes de pulsar
RECORD
Verificar información del
fichero
Eliminar un fichero
Eliminar un fichero
Eliminar a la vez todos los ficheros
de una carpeta
Dividir un fichero Función de división
Ajuste de la fecha y la hora
Consultar información sobre la
unidad y la tarjeta
Cambiar el ajuste de la función de ahorro
automático de energía de la fuente de
alimentación
Cambio de ajuste de retroiluminación
Ajuste de contraste de la
pantalla
Ajuste del tipo de pila
Ajustar el valor de voltaje de la fuente
de alimentación phantom
Restauración de la unidad a sus
valores por defecto
Formatear por completo una
tarjeta SD
Ajuste de formato de nombre
de fichero
Nombre de la
función
Función de filtro de
corte de graves
Función de control
de nivel
Función DUAL REC
Función de marcado
Manual track incrementation
Automatic track
incrementation
Función PRE REC
Función de ahorro
automático de
energía
Función de restauración
Función de formateo
Procedimiento, botones que se usan y explicación
8/HOME
Vuelva a la pantalla inicial si se pierde y no sabe con seguridad lo que debe hacer.
Pantalla inicial w RECORD w RECORD
La grabación comenzará con los ajustes que se estén usando en ese momento.
Pantalla inicial w 7/9
Reproduce el fichero que se muestra (seleccionado).
Botón OUTPUT LEVEL (+/−)
Para ajustar el volumen de los auriculares, los altavoces, etc.
Pantalla inicial w .//
Si hay muchos ficheros, es práctico usar la función de búsqueda.
Pantalla inicial w MENU w “REC SETTING” w “FILE FORMAT”
Para especificar el formato de fichero que se usará de entre los formatos BWF, WAV, etc.
Pantalla inicial w INPUT w “INPUT SETTING” w “LOW CUT”
Esta función elimina el ruido y otros sonidos de bajas frecuencias. Aquí puede ajustar la frecuencia de corte.
Pantalla inicial w botón INPUT LEVEL w botón TRACK/INPUT w control de volumen INPUT
LEVEL
Para ajustar el nivel de grabación con la indicación de la guía del medidor de nivel.
Pantalla inicial w INPUT w “INPUT SETTING” w “LEVEL CTRL”
Esta función comprime solo los sonidos de mayor volumen para impedir que la grabación supere
el nivel de entrada máximo y no modifica el nivel de grabación.
Pantalla inicial w MENU w “REC SETTING” w “DUAL REC”
Para configurar los ajustes de la función DUAL REC.
Pantalla inicial w MENU w “REC SETTING” w “MS MIC”
Para configurar los ajustes del micrófono MS antes de usarlo.
Pantalla de grabación w ENTER/MARK
Esta función añade una marca al fichero que podrá usar como índice durante la reproducción.
Pantalla de grabación w /
Utilice esta función cuando quiera cambiar un fichero por otro y seguir grabando: por ejemplo,
con el intervalo que separa a las canciones.
Pantalla inicial w MENU w “AUTO FUNCTION” w “TRACK INCREMENT”
Esta función cambia automáticamente un fichero a otro con el tamaño ajustado.
Pantalla inicial w MENU w “REC SETTING” w “PRE REC”
Cuando la unidad tarda mucho en pasar del estado de espera de grabación al estado de
grabación, esta función permite a la unidad compensar el retraso.
Pantalla inicial w MENU w “BROWSE” w Rueda w QUICK w “INFORMATION”
Use esta función para consultar la fecha de grabación, el tamaño del fichero, etc.
Pantalla inicial w MENU w “BROWSE” w Rueda w QUICK w “FILE DELETE”
Puede eliminar ficheros que ya no necesite.
Pantalla inicial w QUICK w “DELETE”
Puede eliminar ficheros que ya no necesite.
Pantalla inicial w MENU w “BROWSE” w Rueda w QUICK w “ALL DELETE”
Puede eliminar a la vez todos los ficheros de una carpeta.
Pantalla inicial w QUICK w “DIVIDE”
Use esta función para dividir un fichero en dos.
Pantalla inicial w MENU w “SYSTEM” w “DATE/TIME”
Use esta función para ajustar el reloj interno, que se usa, por ejemplo, para añadir a los ficheros la
fecha de grabación registrada.
Pantalla inicial w MENU w “SYSTEM” w “INFORMATION”
Para consultar información como, por ejemplo, la versión del firmware de la unidad y el espacio
disponible en la tarjeta.
Pantalla inicial w MENU w “POWER/DISPLAY” w “AUTO PWR SAVE”
Esta función hace que la unidad se apague automáticamente cuando no se esté usando.
Pantalla inicial w MENU w “POWER/DISPLAY” w “BACKLIGHT”
Para cambiar el ajuste de retroiluminación de la pantalla.
Pantalla inicial w MENU w “POWER/DISPLAY” w “CONTRAST”
Ajusta la graduación del sombreado mostrado en la pantalla.
Pantalla inicial w MENU w “POWER/DISPLAY” w “BATTERY TYPE”
Para elegir el tipo de pila que se esté usando. Este ajuste afecta a la precisión de la indicación de
carga restante de la pila.
Pantalla inicial w MENU w “POWER/DISPLAY” w “PHANTOM VOLT”
Pantalla inicial w MENU w “SYSTEM” w “INITIALIZE”
Restablece todos los ajustes con los valores predeterminados de fábrica.
Pantalla inicial w MENU w “SYSTEM” w “MEDIA FORMAT”
Para formatear tarjetas.
Pantalla inicial w MENU w “SYSTEM” w “FILE NAME”
Aquí puede cambiar los caracteres que se usarán en los nombres de fichero asignados automáticamente.
TASCAM DR-44WL
35

Mensajes
A continuación se muestra una lista de mensajes desplegables.
Consulte este listado si aparece alguno de estos mensajes y quiere saber qué
significa o cómo resolver el problema.
Mensajes Significado y método para resolver los problemas
Battery Empty Las pilas están casi agotadas. Sustitúyalas.
Can't Divide
Card Error
Card Full
Current File MP3 Los ficheros MP3 no pueden dividirse.
Dup File Name
File Full
File Name ERR
File Not Found
File Not Found
Make Sys File
File Protected El fichero es de solo lectura y no se puede eliminar.
Format Error
Format CARD
Invalid Card
Change Card
Invalid SysFile
Make Sys File
I/O Too Short
Layer too Deep
Max File Size El fichero supera el tamaño designado.
MBR Error Init CARD
No Card
No PB File
Non-Supported
Switched To Internal
Battery
Write Timeout
Si se produce cualquier otro error, apague la unidad y vuelva a encenderla.
El punto de división seleccionado que se usó al utilizar la
función DIVIDE no es adecuado. (Está demasiado cerca del
principio o el final del fichero).
La tarjeta SD no se puede reconocer correctamente.
Sustituya la tarjeta.
No queda espacio en la tarjeta SD. Elimine ficheros que
ya no necesite o trasládelos a un ordenador para liberar
espacio.
Ya hay un fichero en la misma carpeta con el mismo
nombre que el de un fichero creado por DIVIDE. La función
DIVIDE añade “a” o “b” al final del nombre del fichero.
Antes de usar la función DIVIDE, conecte la unidad a un
ordenador y modifique el nombre del fichero.
El número total de carpetas y ficheros superó los 5000.
Elimine carpetas y/o ficheros que no necesite o trasládelos
a un ordenador.
DIVIDE hizo que el nombre de un fichero pasara a tener
más de 200caracteres. La función DIVIDE añade “a” o “b”
al final del nombre del fichero. Antes de usar la función
DIVIDE, conecte la unidad a un ordenador y edite el
nombre del fichero para que tenga menos de 198 caracteres.
El fichero no se encuentra o puede que esté dañado.
Compruebe el fichero correspondiente.
El fichero del sistema se ha perdido o dañado. Esta unidad
necesita un fichero de sistema para funcionar. Para crear un
fichero de sistema, pulse el botón ENTER/MARK mientras
se muestra este mensaje.
Puede que la tarjeta SD no esté formateada correctamente
o esté dañada. Este mensaje aparece también si la tarjeta
se formateó mediante un ordenador conectado por USB o
si se inserta en la unidad una tarjeta sin formatear.
Use siempre el dispositivo DR-44WL para formatear las
tarjetas que vaya a usar con él. Cambie la tarjeta SD o pulse
el botón ENTER/MARK mientras este mensaje aparece en
pantalla para formatear la tarjeta.
El formateo borrará todos los datos de la tarjeta SD.
Hay algo dañado o erróneo en la tarjeta SD. Sustituya la
tarjeta SD.
El fichero de sistema necesario para usar esta unidad es
inválido. Para crear un fichero de sistema, pulse el botón
ENTER/MARK mientras se muestra este mensaje.
El punto IN (inicio) y el punto OUT (final) están demasiado
cerca. Ajústelos con una separación mínima de 1 segundo
entre ellos.
No se pueden crear más de dos capas de carpetas. Dentro
de esta carpeta, no se puede crear otra carpeta.
Puede que la tarjeta SD no esté formateada correctamente
o esté dañada. Cambie la tarjeta SD o pulse el botón
ENTER/MARK mientras este mensaje aparece en pantalla
para formatear la tarjeta.
El formateo borrará todos los datos de la tarjeta SD.
No hay ninguna tarjeta SD. Introduzca una tarjeta SD
grabable.
No hay ningún fichero que pueda ser reproducido. Es
posible que el fichero esté dañado.
El fichero no está en un formato admitido. Para ver qué
formatos de fichero puede usar esta unidad, consulte
la sección “Conexión de la unidad a un ordenador ” del
Manual de referencia.
La fuente de alimentación ha cambiado de la alimentación
por bus USB a las pilas internas.
Se ha agotado el tiempo de espera de escritura en la
tarjeta SD.
Haga una copia de seguridad de los ficheros de la tarjeta
SD en un ordenador y formatee la tarjeta.
Resolución de problemas
Si la unidad no funciona correctamente, antes de solicitar una reparación,
lleve a cabo las siguientes inspecciones. Si aun después de eso sigue sin poder
solucionar el problema, póngase en contacto con el comercio en el que adquirió
la unidad o con el departamento de soporte técnico de TEAC (cuyos datos
figuran al final de este documento).
La unidad no se enciende.
•
Compruebe que las pilas no estén agotadas.
•
Compruebe que las pilas están instaladas con la orientación correcta de ¥ y
^.
•
Compruebe que el adaptador de corriente (GPE053B) que se suministra con la
unidad está conectado correctamente a la toma de electricidad y al conector
USB de la unidad.
•
Cuando utilice la alimentación por bus USB, compruebe que el cable USB esté
conectado correctamente.
•
Cuando utilice la alimentación por bus USB, compruebe que el cable USB no
está conectado a través de un hub USB.
•
Compruebe que el interruptor HOLD/ no está en la opción “HOLD”.
La unidad se apaga automáticamente.
•
Compruebe que no está activada la función de ahorro automático de energía.
(w “Ajuste de la función de ahorro automático de energía” en la sección
“Ajustes y visualización de información” del Manual de referencia).
Dado que esta unidad cumple con las normativas europeas de uso de
i
corriente en modo de espera (ErP), la función de ahorro automático de
energía se activará tanto si la está usando con pilas o con el adaptador de
corriente. Si no quiere usar esta función, ajústela a “OFF”. (El ajuste de fábrica
es “30 min”).
La unidad no funciona.
•
Compruebe que el interruptor HOLD / no está en la opción “HOLD”.
•
Compruebe que la unidad no está conectada a un ordenador mediante
un cable USB. (Si está conectada por USB, en la pantalla aparecerá “USB
connected”).
No se reconoce la tarjeta SD.
•
Compruebe que la tarjeta SD está introducida del todo.
La unidad no reproduce nada.
•
Si está tratando de reproducir un fichero WAV, compruebe que la frecuencia
de muestreo es una de las admitidas por esta unidad.
•
Si está tratando de reproducir un fichero MP3, compruebe que la velocidad de
bits sea admitida por esta unidad.
No se emite ningún sonido por el altavoz.
•
Compruebe que los auriculares no estén conectados.
•
Compruebe que “SPEAKER” no esté ajustado en “OFF”.
•
Compruebe la conexión con el sistema de monitorización.
•
Compruebe que el volumen del sistema de monitorización no esté al mínimo.
•
Compruebe que el ajuste OUTPUT LEVEL de esta unidad no esté al mínimo.
No se emite ningún sonido.
•
Revise las conexiones con el sistema de monitorización.
•
Compruebe que el volumen del sistema de monitorización no está al mínimo.
•
Compruebe que el ajuste OUTPUT LEVEL de la unidad no está al mínimo.
La unidad no graba nada.
•
Si está usando un dispositivo externo, compruebe la conexión de nuevo.
•
Compruebe de nuevo los ajustes de entrada.
•
Compruebe que el nivel de entrada no es demasiado bajo.
•
Compruebe que la tarjeta SD no está llena.
•
Compruebe que el número de ficheros no haya llegado al valor máximo que
puede usar en esta unidad.
El nivel de entrada está bajo.
•
Compruebe que el ajuste de nivel de entrada no sea demasiado bajo.
•
Compruebe que el nivel de salida de cualquier dispositivo conectado no sea
demasiado bajo.
El sonido que se graba está distorsionado.
•
Compruebe que el ajuste de nivel de entrada no esté demasiado alto.
•
Compruebe que la función de reverberación esté desactivada.
La reproducción suena antinatural.
•
Compruebe que no ha cambiado la velocidad de reproducción.
•
Compruebe que el ecualizador de reproducción esté desactivado.
TASCAM DR-44WL
36

•
Compruebe que la función de alineamiento de nivel esté desactivada.
•
Compruebe que la función de reverberación esté desactivada.
No se pueden eliminar ficheros.
•
Compruebe que no está tratando de eliminar un fichero copiado desde un
ordenador tras ser protegido contra escritura.
Los ficheros de esta unidad no aparecen en el ordenador.
•
Compruebe que la unidad está conectada al ordenador mediante su puerto
USB.
•
Compruebe que no se está usando un hub USB.
•
Compruebe que la unidad no está grabando ni en estado de espera de
grabación.
La unidad no puede conectarse a un smartphone o se detiene la
comunicación entre ellos.
•
Compruebe que el dispositivo Wi-Fi esté activado, al igual que el
Wi-Fi en sí.
•
Compruebe que la distancia entre el dispositivo Wi-Fi y la unidad no sea
demasiado grande.
Compruebe también que no haya paredes u obstáculos entre ellos.
Cuando un dispositivo Wi-Fi está en la parte trasera de la unidad, esta puede
interrumpir las comunicaciones.
Cambie la posición del dispositivo Wi-Fi y de la unidad.
•
Desactive la unidad y vuelva a conectarla de nuevo.
•
Elimine el registro “DR-44WL” del dispositivo Wi-Fi y siga los pasos de “Conexión
de la unidad a un smartphone mediante Wi-Fi”.
Especificaciones técnicas
Valores medios
Soporte de grabación
Tarjeta SD (de 64MB a 2GB), tarjeta SDHC (de 4GB a 32GB) y tarjeta SDXC (de
64GB a 128GB)
Formatos de grabación/reproducción
BWF: 44,1/48/96 kHz, 16/24 bits
WAV: 44,1/48/96 kHz, 16/24 bits
MP3: 44,1/48kHz, 32/64/96/128/192/256/320kbps
Número de canales
4canales
Modo 4CH mono : hasta 4ficheros
i
Stereo : hasta 2ficheros
Stereo (1fichero) + mono (hasta 2ficheros)
Modo MTR mono : hasta 4ficheros
i
Entradas y salidas
Toma EXT MIC/LINE IN (puede suministrar alimentación
phantom)
Conector: clavija estándar TRS XLR-3-31, φ6,3mm
Toma /LINE OUT
Conector: clavija mini stereo de φ3,5mm
Altavoz interno
0,3 W (mono)
Puerto USB
Conector: tipo micro-B
Formato: clase de almacenamiento USB 2.0 de alta velocidad
Rendimiento audio
Respuesta de frecuencia
20–20kHz +1/–3dB (de EXT IN a LINE OUT, frecuencia de muestreo de 44,1kHz, JEITA)
20-22 kHz +1/–3dB (de EXT IN a LINE OUT, frecuencia de muestreo de 48kHz, JEITA)
20-40 kHz +1/–3dB (de EXT IN a LINE OUT, frecuencia de muestreo de 96 kHz, JEITA)
Distorsión
0,05% o menos (de EXT IN a LINE OUT, frecuencia de muestreo de
44,1/48/96kHz, JEITA)
Relación señal-ruido
92dB o más (de EXT IN a LINE OUT, frecuencia de muestreo de 44,1/48/96kHz, JEITA)
Nota: La indicación “JEITA” significa que cumple la norma JEITA CP-2150.
Tiempos de grabación
Capacidad de
Formato de fichero (ajuste aplicado al grabar)
WAV/BWF de 16bits (STEREO) 44,1 kHz 6horas 44minutos
WAV/BWF de 24bits (STEREO) 96 kHz 2horas 04minutos
•
Los tiempos de grabación de esta tabla son estimaciones. El tiempo puede
variar dependiendo de la tarjeta SD, SDHC o SDXC que utilice.
•
Los tiempos de grabación de esta tabla no son tiempos de grabación
continuos, sino los tiempos de grabación totales que se pueden alcanzar con
las tarjetas SD, SDHC y SDXC.
•
Si se graba en mono en formato WAV, el tiempo de grabación máximo es el
doble de las cifras anteriores.
•
Si se graba en DUAL REC en formato WAV/BWF o con la grabación de
4canales, el tiempo de grabación máximo es la mitad de las cifras anteriores.
tarjeta SDHC
4 GB
TASCAM DR-44WL
37

Requisitos de los ordenadores conectados
Consulte la información más reciente sobre los sistemas operativos que se
admiten en el sitio mundial de TEAC (http://teac-global.com/).
Sistemas operativos admitidos
Windows : Windows XP, Windows Vista, Windows 7 y
Macintosh : Mac OS X 10.2 o posterior
Windows 8 (incluido 8.1)
Wi-Fi
Estándar inalámbrico
Conforme a IEEE 802.11b/g/n (solo 2,4GHz)
Modo de comunicación inalámbrica
Punto de acceso sencillo (PA limitado)
Seguridad
WPA2-PSK (compatible con WPS2.0)
General
Fuente de alimentación
4 pilas AA (alcalinas o NiMH)
Alimentación por bus USB desde un ordenador
Adaptador de corriente específico (se suministra con la unidad el GPE053B)
Consumo
2,5 W (máximo)
Tiempo operativo con pilas (funcionamiento continuo)
•
Usando pilas alcalinas (EVOLTA)
Formato
Grabación en WAV de
2canales, 44,1kHz, 16bits
•
Con pilas NiMH (eneloop)
Formato
Grabación en WAV de
2canales, 44,1kHz, 16bits
NO TA
Si se usa la fuente de alimentación phantom, el tiempo de funcionamiento puede acortarse en función del micrófono que utilice.
Dimensiones
79×162,2×42,5 mm (anchura×altura×profundidad)
Peso
346 g/251 g (con y sin pilas)
Rango de temperaturas de funcionamiento
0°C–40°C
Tiempo de
funcionam.
Unas 16 horas
Tiempo de
funcionam.
Unas 12 horas
Nota
Cuando se elige la entrada
MIC
(no se usa phantom)
Nota
Cuando se elige la entrada
MIC
(no se usa phantom)
•
Las ilustraciones de este manual pueden variar con respecto a las del producto
real.
•
Con el fin de mejorar el producto, las especificaciones y el aspecto exterior
pueden cambiarse sin previo aviso.
•
En el Manual de referencia puede encontrar una completa tabla de
especificaciones técnicas.
TASCAM DR-44WL
38

Benutzerhandbuch
Pb, Hg, Cd
Wichtige Sicherheitshinweise
1 Lesen Sie diese Anleitung.
2 Bewahren Sie diese Anleitung gut auf und
geben Sie das Gerät nur mit dieser Anleitung
weiter.
3 Beachten Sie alle Warnhinweise.
4 Befolgen Sie alle Anweisungen. Benutzen Sie
das Gerät nur zu dem Zweck und auf die Weise,
wie in dieser Anleitung beschrieben.
5 Betreiben Sie dieses Gerät nicht in unmittel-
barer Nähe von Wasser.
6 Reinigen Sie dieses Gerät nur mit einem
trockenen Tuch.
7 Versperren Sie niemals vorhandene Lüftungs-
öffnungen. Stellen Sie das Gerät immer nach
den Anweisungen des Herstellers auf.
8 Stellen Sie das Gerät nicht in der Nähe von
Hitze abstrahlenden Geräten (Heizlüfter, Öfen,
Verstärker usw.) auf.
9 Unterbrechen Sie niemals den Schutzleiter
des Netzsteckers und kleben Sie niemals den
Schutzkontakt zu. Wenn der mitgelieferte
Netzstecker nicht in Ihre Steckdose passt,
ziehen Sie einen Elektrofachmann zu Rate.
10 Sorgen Sie dafür, dass das Netzkabel nicht
gedehnt, gequetscht oder geknickt werden
kann – insbesondere am Stecker und am
Netzkabelausgang des Geräts – und verlegen
Sie es so, dass man nicht darüber stolpern kann.
11 Verwenden Sie nur Zubehör oder Zubehörteile,
die der Hersteller empfiehlt.
12 Verwenden Sie nur
Wagen, Ständer, Stative,
Halter oder Tische,
die vom Hersteller
empfohlen oder mit dem
Gerät verkauft werden.
Wenn Sie einen Wagen verwenden, bewegen
Sie ihn vorsichtig, so dass er nicht umstürzen
und Sie verletzen kann.
13 Ziehen Sie den Netzstecker bei Gewitter oder
wenn Sie das Gerät längere Zeit nicht benutzen.
14 Lassen Sie Wartungsarbeiten und Repara-
turen nur vom qualifizierten Fachpersonal des
Kundendienstes ausführen. Bringen Sie das
Gerät zum Kundendienst, wenn es Regen oder
Feuchtigkeit ausgesetzt war, wenn Flüssigkeit
oder Fremdkörper hinein gelangt sind, wenn es
heruntergefallen ist oder nicht normal funktio-
niert oder wenn das Netzkabel beschädigt ist.
•
Benutzen Sie das Gerät nicht mehr, bis es repariert
wurde.
•
Stellen Sie das Gerät in der Nähe einer gut
erreichbaren Steckdose auf. Es muss jederzeit
möglich sein, den Netzstecker zu ziehen, um das
Gerät vom Stromnetz zu trennen.
•
Zum Schutz vor Hörschäden: Denken Sie immer
daran, dass hohe Lautstärkepegel Ihr Gehör
schädigen können.
WARNUNG
Zur Vermeidung möglicher Hörschäden sollten
Sie sich hohen Schallpegeln nicht über längere
Zeitspannen aussetzen.
VORSICHT
•
Stellen Sie das Gerät niemals so auf, dass es nass
werden kann.
•
Stellen Sie niemals mit Flüssigkeit gefüllte
Behälter (Vasen, Kaffeetassen usw.) auf dieses
Gerät.
•
Stellen Sie dieses Gerät nicht an einem räumlich
beengten Ort ohne Luftzirkulation auf.
Vorsichtsmaßnahmen beim Umgang
mit Batterien
In diesem Produkt kommen Batterien/Akkus zum
Einsatz. Unsachgemäßer Umgang mit Batterien/
Akkus kann das Austreten von Säure, Explosion der
Batterien/Akkus oder andere Probleme zur Folge
haben. Befolgen Sie immer die hier aufgeführten
Vorsichtsmaßnahmen beim Umgang mit Batterien/
Akkus.
•
Versuchen Sie nicht, Batterien aufzuladen, die
nicht wiederaufladbar sind. Die Batterien könnten
sonst explodieren oder auslaufen und dadurch
Feuer und/oder Verletzungen hervorrufen.
•
Achten Sie beim Einlegen von Batterien auf die
richtige Polarität: Der Pluspol jeder Batterie muss
zur jeweiligen Plusmarkierung im Batteriefach
(+) weisen. Falsches Einlegen kann dazu führen,
dass die Batterien explodieren oder auslaufen
und dadurch Feuer und/oder Verletzungen oder
Schäden am Gerät hervorrufen.
•
Wenn Sie die Knopfzelle lagern oder entsorgen
wollen, decken Sie die Kontakte mit Klebeband
ab. Auf diese Weise verhindern sie, dass sie
an anderen Batterien oder metallischen
Gegenständen kurzgeschlossen wird.
•
Beachten Sie die Entsorgungshinweise auf
den Batterien sowie die örtlichen Gesetze und
Vorschriften. Werfen Sie Batterien niemals in den
Hausmüll.
•
Verwenden Sie keine andere Batterien als
angegeben. Verwenden Sie niemals neue
Batterien zusammen mit alten. Verwenden Sie
nur Batterien des gleichen Typs. Die Batterien
könnten sonst explodieren oder auslaufen und
dadurch Feuer, Verletzungen und/oder Schäden
am Gerät hervorrufen.
•
Transportieren oder lagern Sie Batterien
nicht zusammen mit metallenen Halsketten,
Haarnadeln oder ähnlichen Gegenständen aus
Metall. Andernfalls kann es zu einem Kurzschluss
kommen, was möglicherweise dazu führt, dass
die Batterien sich überhitzen, sich entzünden,
auslaufen oder explodieren.
•
Nehmen Sie Batterien nicht auseinander und
erhitzen Sie sie nicht. Werfen Sie Batterien nicht
ins Feuer und halten Sie sie fern von Wasser und
anderen Flüssigkeiten. Die Batterien könnten
sonst explodieren oder auslaufen und dadurch
Feuer, Verletzungen und/oder Schäden am Gerät
hervorrufen.
•
Sollte eine Batterie ausgelaufen sein, reinigen
Sie das Batteriefach bzw. die Halterung von
Rückständen, bevor Sie neue Batterien einlegen.
Wenn Batteriesäure ins Auge gelangt, kann
dies zum Verlust des Augenlichts führen. Sollte
Batteriesäure ins Auge gelangt sein, spülen Sie
das Auge ohne zu reiben mit reichlich klarem
Wasser aus, und suchen Sie anschließend sofort
einen Augenarzt auf. Batteriesäure auf Haut oder
Kleidung kann Verätzungen her vorrufen. Waschen
Sie die betroffenen Stellen mit klarem Wasser ab
und suchen Sie dann sofort einen Arzt auf.
•
Bevor Sie Batterien/Akkus wechseln, schalten Sie
das Gerät aus.
•
Nehmen Sie die Batterien heraus, wenn Sie das
Gerät längere Zeit nicht benutzen. Die Batterien
könnten sonst explodieren oder auslaufen und
dadurch Feuer, Verletzungen und/oder Schäden
am Gerät hervorrufen. Sollte eine Batterie
ausgelaufen sein, reinigen Sie das Batteriefach
bzw. die Halterung von Rückständen, bevor Sie
neue Batterien einlegen.
•
Nehmen Sie Batterien niemals auseinander. Die
Batteriesäure im Inneren kann Verätzungen auf
Haut oder Kleidung hervorrufen.
Angaben zur Umweltverträglichkeit
und zur Entsorgung
•
Wenn ein Symbol einer
durchgestri chenen Mülltonne auf einem
Produkt, der Verpackung
und/oder der begleitenden
Dokumentation angebracht
ist, unterliegt dieses Produkt den europäischen
Richtlinien
2002/96/EC und/oder 2006/66/EC sowie
nationalen Gesetzen zur Umsetzung dieser
Richtlinien.
•
Richtlinien und Gesetze schreiben vor, dass
Elektro- und Elektronik-Altgeräte sowie Batterien
und Akkus nicht in den Hausmüll (Restmüll)
gelangen dürfen. Um die fachgerechte
Entsorgung, Aufbereitung und Wiederverwertung
sicherzustellen, sind Sie verpflichtet, Altgeräte
und entleerte Batterien/Akkus über staatlich dafür
vorgesehene Stellen zu entsorgen.
•
Durch die ordnungsgemäße Entsorgung solcher
Geräte und Batterien/Akkus leisten Sie einen
Beitrag zur Einsparung wertvoller Rohstoffe und
verhindern potenziell schädliche Auswirkungen
auf die menschliche Gesundheit und die Umwelt,
die durch falsche Abfallentsorgung entstehen
können. Die Entsorgung ist für Sie kostenlos.
•
Enthalten Batterien/Akkus
mehr als die in der Richtlinie
festgelegte Menge an
Blei (Pb), Quecksilber (Hg)
oder Cadmium (Cd), so ist
zusätzlich zur Mülltonne die
entsprechende chemische
Abkürzung angegeben.
•
Weitere Informationen zur Wertstoffsammlung
und Wiederverwertung von Alt geräten
und Batterien/Akkus erhalten Sie bei Ihrer
Stadt verwaltung, dem für Sie zuständigen
Abfall ent sor gungs unternehmen oder der
Verkaufsstelle, bei der Sie das Produkt erworben
haben.
Angaben zum Stromverbrauch
Dieses Gerät verbraucht auch dann eine geringe
Menge Strom, wenn es mit dem Stromnetz
verbunden und ausgeschaltet ist.
Hinweise für Geräte mit Funkübertragung
Konformität des Funksenders und Interferenzen
EU-Modell (Europäische Union)
Dieses Gerät entspricht der harmonisierten Norm
der DIRECTIVE 1999/5/EC (R&TTE).
Konformitätslabel
CE-Label:
WARNUNG
Änderungen oder Modifikationen, die nicht
ausdrück lich von der Konformität zertifizierenden
Stelle genehmigt sind, können zum Erlöschen der
Betriebserlaubnis führen.
ACHTUNG
Die Betriebserlaubnis für Geräte mit Funkübertragung unterliegt landesspezifischen Regelungen.
Verwenden Sie das Gerät bitte nur in dem Land, in
dem Sie es erworben haben.
•
Die Verwendung der Bluetooth-Funktechnologie
unterliegt möglicherweise landesspezifischen
Ein schrän kungen.
TASCAM DR-44WL
39

Beachten Sie vor der Inbetriebnahme die Gesetze
und Vorschriften des Landes, in dem Sie das Gerät
betreiben möchten.
Vorschrift zur Strahlungsbelastung
Dieses Gerät entspricht den international
anerkannten Regularien zur Verträglichkeit von
Funkstrahlung beim Menschen.
Basierend auf folgenden Bedingungen:
•
Zur Einhaltung der RF-Strahlungskonformität
müssen Endnutzern und Installationsfachleuten
Anleitungen zur Antenneninstallation und den
Betriebsbedingun gen des Senders zu Verfügung
stehen.
•
Der Abstand zwischen Sender und Ihrem
Körper sollte bei der Installation und im Betrieb
mindestens 20cm betragen.
8
Konformitätserklärung
EU-Modell (Europäische Union)
Dieses Gerät entspricht EN.62311 – Bewertung von
elektrischen und elektronischen Einrichtungen
in Bezug auf Begrenzungen der Exposition von
Personen in elektromagnetischen Feldern – harmonisierte Norm der DIRECTIVE 1999/5/EC.
Wir, TEAC Europe GmbH,
Bahnstrasse 12, 65205 WiesbadenErbenheim, Deutschland, erklären
eigenverantwortlich, dass das
in diesem Handbuch beschriebene Produkt die
entsprechenden technischen Standards erfüllt.
Konformitätserklärung
Contents
Hinweise für Geräte mit Funkübertragung .......... 39
Konformität des Funksenders und
Interferenzen ............................................................................39
Vorschrift zur Strahlungsbelastung ........................... 39
Bevor Sie beginnen ........................................................ 40
Auspacken/Lieferumfang ........................................... 40
Anmerkung zum Referenzhandbuch ..................... 40
Ergänzende Sicherheitshinweise zur
Aufstellung .........................................................................41
Kondensation vermeiden.............................................41
Das Gerät reinigen ..........................................................41
Die globale TEAC-Website nutzen ............................41
Die Bedienelemente und ihre Funktionen ............41
Geräteoberseite mit Bedienfeld ................................... 41
Gerätevorderseite .................................................................. 41
Linke Geräteseite .................................................................... 41
Rechte Geräteseite ................................................................ 41
Geräteunterseite ..................................................................... 41
Hauptseite ......................................................................... 42
Vorbereitende Schritte ................................................. 42
Die Stromversorgung vorbereiten .............................42
Den Recorder einschalten ................................................42
Datum und Uhrzeit der eingebauten Uhr
einstellen .....................................................................................42
Den Recorder ausschalten ...............................................43
Lautsprecher oder Kopfhörer anschließen ...........43
Grundsätze für die Ver wendung des Menüs ....... 43
Aufbau des Menüs für die Wiedergabe-
Einstellungen ............................................................................ 43
Aufnahme .......................................................................... 43
Die Aufnahmeseite ............................................................... 43
Den Eingangspegel anpassen ......................................44
Trittschallfilter ...........................................................................44
Die automatische Pegelanpassung nutzen .........44
Aufnehmen ................................................................................44
Über den Aufnahmebereitschaftsmodus .............44
Aufbau des Menüs für Aufnahmen ...........................44
Wiedergabe ...................................................................... 44
Aufnahmen wiedergeben ...............................................44
Nach dem Ändern der Wiedergabeposition wird
die Wiedergabe vorrübergehend angehalten.
Eine Datei mit den Sprungtasten zur Wiedergabe
auswählen ..................................................................................44
Die Wiedergabelautstärke anpassen ........................45
Eine Verbindung mit einem Computer
herstellen ........................................................................... 45
Dateien mit einem Computer austauschen .........45
Die Verbindung des Geräts mit dem Computer
trennen .........................................................................................45
Systemeinstellungen und Dateiinformationen.. 45
Den eingebauten Lautsprecher ausschalten ...... 45
Systemeinstellungen ...........................................................45
Über WLAN mit einem Smartphone verbinden . 45
Die zugehörige Anwendung (DR CONTROL)
herunterladen und installieren .....................................45
Über WLAN zum ersten Mal mit einem
Smartphone verbinden ..................................................... 45
Über WLAN mit einem Smartphone verbinden
(zweites Mal und nachfolgend) ................................... 46
Den Recorder von einem Smartphone aus
fernsteuern .................................................................................46
Dateien vom Recorder auf ein Smartphone
übertragen ................................................................................. 46
Kurzreferenz für häufig verwendete
Funktionen ........................................................................ 47
Meldungen ........................................................................ 48
Fehlerbehebung ............................................................. 48
Technische Daten ........................................................... 49
Allgemein ....................................................................................49
Eingänge und Ausgänge ..................................................49
Leistungsdaten Audio.........................................................49
Aufnahmezeit ........................................................................... 49
Systemanforderungen Computer .............................. 50
Wi-Fi ................................................................................................50
Stromversorgung und sonstige Daten ....................50
Bevor Sie beginnen
Vielen Dank, dass Sie sich für den tragbaren
Linear-PCM/MP3-Recorder DR-44WL von Tascam
entschieden haben.
Bevor Sie das Gerät benutzen, lesen Sie sich dieses
Handbuch bitte aufmerksam durch. Nur so ist
sichergestellt, dass Sie das Gerät ordnungsgemäß
anschließen und bedienen. Heben Sie dieses
Handbuch nach dem Durchlesen gut auf, weil es
zum Gerät gehört. Außerdem können Sie so bei
künftigen Fragen jederzeit darauf zurückgreifen.
Dieses Produkt ist mit einem Blackfin®-Prozessor
von Analog Devices, Inc. ausgestattet.
Auspacken/Lieferumfang
Zum Lieferumfang dieses Produkts gehören die
unten aufgeführten Bestandteile.
Achten Sie beim Öffnen der Verpackung darauf, dass
Sie nichts beschädigen. Bewahren Sie das Verpackungsmaterial für einen eventuellen zukünftigen
Transport auf.
Sollte etwas fehlen oder auf dem Transport
beschädigt worden sein, wenden Sie sich bitte
umgehend an Ihren Händler.
•
DR-44WL ............................................................................... × 1
•
Wechselstromadapter (GPE053B) ........................ × 1
•
Micro-SD-Karte mit Adapter (bereits eingelegt)
•
USB-Kabel (80 cm) .......................................................... × 1
•
Alkaline-Batterien des Typs AA ............................... × 4
•
Fell-Windschutz ................................................................ × 1
•
Adapter für Mikrofonständer .................................... × 1
•
Blitzschuh-Adapter ......................................................... × 1
•
Transporttasche ................................................................ × 1
•
Benutzerhandbuch (das vorliegende Dokument)
Garantiehinweis ................................................................ × 1
× 1
Anmerkung zum Referenzhandbuch
Dieses Handbuch erklärt die wichtigsten Funktionen
des Geräts. Eine vollständige Beschreibung aller
Funktionen stellt das Referenzhandbuch bereit.
Links zur digitalen Version dieses Benutzerhandbuchs und des Referenzhandbuchs finden Sie auf
der globalen TEAC-Website (http://teac-global.com/)
oder auf der deutschen Website (http://tascam.de/).
TASCAM DR-44WL
40

Ergänzende Sicherheitshinweise zur Aufstellung
•
Der zulässige Betriebstemperaturbereich für
diesen Recorder liegt zwischen 0 °C und 40 °C.
•
Stellen Sie das Gerät nicht an den im Folgenden
bezeichneten Orten auf. Andernfalls kann es zu
Fehlfunktionen kommen.
Orte, die starken Erschütterungen ausgesetzt
o
sind,
an Orten mit direkter Sonneneinstrahlung (z.
o
B. Fenster),
in der Nähe von Heizgeräten oder an
o
anderen Orten, an denen hohe Temperaturen herrschen,
wenn die Temperatur unter dem Gefrier-
o
punkt liegt,
Orte mit schlechter Belüftung oder hoher
o
Luftfeuchte,
Orte mit hoher Staubkonzentration.
o
•
Brummen kann auftreten, wenn sich ein
Leistungsverstärker oder anderes Gerät mit
großem Transformator in der Nähe des Recorders
befindet. Versuchen Sie in einem solchen Fall
den Abstand zwischen dem Recorder und
dem anderen Gerät zu vergrößern oder die
Ausrichtung beider Geräte zueinander zu
verändern.
•
Auf einem Fernsehgerät können
Farbabweichungen auftreten und in einem
Radiogerät können Geräusche hörbar werden,
wenn der Recorder in deren Nähe betrieben wird.
Vergrößern Sie in einem solchen Fall den Abstand
zum Fernseher bzw. Radiogerät.
•
Wenn ein Mobiltelefon oder anderes
Drahtlosgerät in der Nähe betrieben wird,
können während eines Anrufs oder während der
Datenübertragung Geräusche auf dem Recorder
auftreten. Versuchen Sie in einem solchen Fall
den Abstand zwischen dem Recorder und dem
anderen Gerät zu vergrößern oder schalten Sie
das andere Gerät aus.
•
Legen Sie keine Gegenstände auf das Gerät,
um eine ausreichende Wärmeabfuhr zu
gewährleisten.
•
Stellen Sie das Gerät nicht auf einen
Leistungsverstärker oder andere Hitze erzeugende
Geräte.
Die Bedienelemente und ihre Funktionen
Geräteoberseite mit Bedienfeld
1 Eingebautes Stereomikrofon
2 PEAK-Lämpchen
3 Display
4 TRACK/INPUT-Taste
5 8/HOME-Taste
6 . Zurückspulen-Taste
7 7/9-Taste
8 MENU-Taste
9 MTR-Lämpchen
0 MIXER-Taste
q RECORD [0]-Taste / REC-Lämpchen
w / Vorspulen-Taste
e INPUT-Taste
r ENTER/MARK-Taste
t QUICK-Taste
y Steuerrad
Linke Geräteseite
o SD-Kartenschacht
p HOLD/ -Schalter
a /LINE OUT-Buchse
s OUTPUT LEVEL-Taste
d Wi-Fi-Taste (WLAN)
Rechte Geräteseite
f EXT IN-Schalter
g INPUT LEVEL-Taste
h INPUT LEVEL-Regler
j USB-Anschluss
Geräteunterseite
Kondensation vermeiden
Wenn Sie das Gerät aus einer kalten Umgebung in
eine warme Umgebung bringen, besteht die Gefahr,
dass sich Kondenswasser bildet. Kondenswasser im
Geräteinneren kann Fehlfunktionen hervorrufen. Um
dies zu vermeiden, lassen Sie das Gerät ein bis zwei
Stunden stehen, bevor Sie es einschalten.
Das Gerät reinigen
Verwenden Sie zum Reinigen des Recorders ein
trockenes, weiches Tuch. Verwenden Sie zum
Reinigen niemals getränkte Reinigungstücher auf
chemischer Basis, Verdünner, Alkohol oder andere
chemische Substanzen. Diese können die Oberfläche
des Geräts angreifen oder Verfärbungen hervorrufen.
Die globale TEAC-Website nutzen
Links zur digitalen Version dieses Benutzerhandbuchs und des Referenzhandbuchs finden Sie auf
der globalen TEAC-Website (http://teac-global.com/).
Wählen Sie dort im Bereich TACAM Downloads die
gewünschte Sprache aus, um die entsprechende
Downloadseite aufzurufen.
Gerätevorderseite
u Wi-Fi-Lämpchen (WLAN)
i EXT MIC/LINE IN 1/L und 2/R Buchsen
(XLR/TRS)
k Integrierter Monolautsprecher
l Stativgewinde
; Batteriefachabdeckung
z Halterung für Trageschlaufe
x Batteriefach
TASCAM DR-44WL
41

Hauptseite
Diese Seite wird normalerweise bei gestopptem
Audiotransport angezeigt.
Hauptseite im 4CH-Modus
Hauptseite im MTR-Modus
1 Statusanzeige der Wiedergabege-
schwindigkeit
Symbol Wiedergabegeschwindigkeit
Leer
2
Statusanzeige der Schlüsselsteuerung
Symbol Status
Leer
3 Statusanzeige von Reverb
Symbol Status
Leer
4
Statusanzeige der Lautsprecherausgabe
eingeblendet : Lautsprecherausgabe
ausgeblendet : Lautsprecherausgabe
5
Statusanzeige der Phantomspeisung
Leer : Keine Phantomspeisung
6
Statusanzeige der Stromversorgung
Beim Batteriebetrieb wird im Batteriesymbol die
verbleibende Batterieversorgung in Form von
Balken angezeigt ( , , ).
Wenn im Batteriesymbol kein Balken mehr
angezeigt wird, blinkt und das Gerät wird
wegen entladener Batterie ausgeschaltet
(Bereitschaftszustand).
Wiedergabegeschwindigkeit nicht
geändert
1,1× – 2,0×
0,5× – 0,9×
Wiedergabegeschwindigkeit nicht
änderbar
Schlüsselsteuerung ausgeschaltet
Schlüsselsteuerung eingeschaltet
Schlüsselsteuerung eingeschaltet
(Einstellung deaktiviert)
Reverb ausgeschaltet
Reverb eingeschaltet
(Aufnahme mit eingeschaltetem
Effektor)
Reverb eingeschaltet
(SEND-Status)
eingeschaltet
ausgeschaltet
: 48 V Phantomspeisung
: 24 V Phantomspeisung
Wenn das Gerät über den mitgelieferten
Wechselstromadapter (GPE053B) oder die
USB-Verbindung mit Strom versorgt wird, wird
angezeigt.
7 Statusanzeige des Audiotransports
Diese Symbole zeigen den aktuellen Betriebszustand während der Aufnahme an.
Symbol Bedeutung
8
9
7
,
m
/
.
Gestoppt
Pause
Wiedergabe
Vorspulen
Zurückspulen
Sprung zum Anfang der nächsten
Datei
Sprung zum Anfang der aktuellen
oder der vorherigen Datei
8 Statusanzeige der Loop-Wiedergabe-
einstellung
Während der Loop-Wiedergabe wird das
Symbol angezeigt.
9 Anzeige des Dateinamens-/Liedtitels
Im 4CH-Modus erscheinen hier der Dateiname
oder die Dateiinformationen der aktuell wiedergegebenen Datei.
Wenn im 4CH-Modus mehrere Dateien
abgespielt werden, werden nur die Formatdaten der Dateinamen und die Nummer der
Aufnahmedateien angezeigt. Bei der Aufnahme
einer einzelnen Datei wird deren Name
angezeigt.
Im MTR-Modus wird der Name eines geöffneten
Titels angezeigt.
0 Einstellungszustand von IN- und
OUT-Punkt der Loop-Wiedergabe
Hier werden der Beginn (IN) und das Ende (OUT)
der Loop-Wiedergabe angezeigt.
Wenn der Beginn (IN) eingestellt wird, wird
das Symbol an der entsprechenden Stelle
auf der Anzeigeleiste der Wiedergabeposition
angezeigt.
Wenn das Ende (OUT) eingestellt wird, wird
das Symbol an der entsprechenden Stelle
auf der Anzeigeleiste der Wiedergabeposition
angezeigt.
q Wiedergabepositionsanzeige
Die aktuelle Wiedergabeposition können Sie
anhand dieses Balkens abschätzen.
w Pegelanzeigenhilfsmarkierung
Die Pegelanzeigenhilfsmarkierung dient der
Anpassung von Ein- und Ausgangspegel.
Sie wird im Bereich um „-12 dB“ auf der Leiste
angezeigt.
e Pegelanzeige
Zeigt den Pegel der eingegebenen bzw.
wiedergegebenen Geräusche an.
r Dateistatusanzeige
Die Anzeige des Dateistatus unterscheidet sich
je nach wiederzugebendem Dateityp.
: Stereodatei
: Monodatei x 2
: Keine Datei vorhanden.
t Anzeige der verstrichenen Wiederga-
bezeit
Zeigt die verstrichene Wiedergabezeit der
aktuellen Datei im Format Stunden : Minuten :
Sekunden an.
y Anzeige der verbleibenden Wiederga-
bezeit
Zeigt die verbleibende Wiedergabezeit der
aktuellen Datei im Format Stunden : Minuten :
Sekunden an.
u Spitzenpegel in Dezibel (dB)
Zeigt den Spitzenwert des Wiedergabepegels
in Dezibel in einem bestimmten Zeitraum an.
Vorbereitende Schritte
Die Stromversorgung vorbereiten
Betrieb mit AA-Batterien
Nehmen Sie an der Geräteunterseite die Batte-
1.
riefachabdeckung ab.
Legen Sie vier Batterien des Typs AA ein. Achten
2.
Sie dabei auf die Markierungen für die richtige
Polarität im Batteriefach (¥ und ^).
Bringen Sie die Batteriefachabdeckung wieder an.
3.
•
Wählen Sie im Menü
unter
BATTERY TYPE
Batterietyp aus, damit das Gerät die
Batteriestandsanzeige und die für den Betrieb
erforderliche Restkapazität korrekt berechnen
kann. (Die Voreinstellung für den Batterietyp ist
ALKAL
für Alkaline-Batterien.)
Den Recorder einschalten
Wenn der Recorder ausgeschaltet (im Bereitschaftsstatus) ist, schieben Sie den HOLD/
-Schalter in die Position und wenn
DR-44WL
Sie den Schalter los.
Sobald der Recorder betriebsbereit ist, erscheint auf
dem Display die Hauptseite.
Datum und Uhrzeit der eingebauten Uhr einstellen
Wenn Sie den Recorder zum ersten Mal einschalten
(oder wenn längere Zeit keine Batterien eingelegt
waren), erscheint zuerst die
auf der Sie Datum und Uhrzeit einstellen können.
Stellen Sie Datum und Uhrzeit mit den Tasten
.// und dem Steuerrad ein, und drücken Sie
ENTER/MARK, um sie festzulegen.
POWER/DISPLAY
den verwendeten
(Startbildschirm) angezeigt wird, lassen
DATE/TIME
TASCAM
-Seite,
TASCAM DR-44WL
42

Den Recorder ausschalten
Während das Gerät eingeschaltet ist, schieben Sie
den HOLD/ -Schalter in die Position , und
wenn
TASCAM DR-44WL shutting
down
angezeigt wird, lassen Sie den Schalter los.
Das Gerät wird nach wenigen Sekunden ausgeschaltet.
Lautsprecher oder Kopfhörer anschließen
Um mit einem Kopfhörer abzuhören, verbinden Sie
diesen mit dem Anschluss /LINE OUT.
Um über eine externe Monitoranlage (Aktivlautsprecher oder Stereoanlage) abzuhören, verbinden
Sie diese mit dem Anschluss /LINE OUT.
Kopfhörer Aktivlautsprecher
oder
Verstärker mit Lautsprechern
Grundsätze für die Verwendung des Menüs
Drücken Sie die Taste MENU, um das
1.
aufzurufen.
Wählen (markieren) Sie mit dem Steuerrad den
2.
gewünschten Eintrag und drücken Sie dann die
Taste ENTER/MARK, um auf die entsprechende
Einstellungsseite zu gelangen.
Wählen (markieren) Sie mit dem Steuerrad das
3.
einzustellende Element.
Drücken Sie die Taste ENTER/MARK oder /
4.
um den Cursor nach rechts zu bewegen und
die Einstellung zu markieren.
Ändern Sie die Einstellung mit dem Steuerrad.
5.
Um auf derselben Menüseite einen anderen
6.
Punkt einzustellen, drücken Sie die Taste
ENTER/MARK oder ., um den Cursor nach
links zu bewegen.
Um weitere Einstellungen vorzunehmen,
7.
wiederholen Sie die Schritte 3. bis 6..
Um nach den Einstellungen zur Hauptseite
8.
zurückzukehren, drücken Sie die Taste
8/HOME.
MENU
Aufbau des Menüs für die Wiedergabe-Einstellungen
MENU
MODE
REC SETTING
AUTO FUNCTION
BROWSE
(nur im 4CH-Modus)
SONG
(nur im MTR-Modus)
TOOLS
REVERB
POWER/DISPLAY
SYSTEM
Aufnahme- und
Wiedergabemodus
auswählen
Aufnahmeeinstellungen
festlegen
Nützliche
Funktionen für
Aufnahmedateien
Dateien und Ordner
auf der SD-Karte
handhaben
Weitere nützliche
Funktionen einstellen
Reverb-Effekte
einstellen
Stromversorgung
und Display
einstellen
Systemeinstellungen des
Geräts
Aufnahme
Die Aufnahmeseite
Der nachfolgende Bildschirm wird angezeigt, wenn sich
das Gerät im Aufnahmebereitschaftszustand befindet
oder während der Aufnahme.
Aufnahmeseite im 4CH-Modus
Aufnahmeseite im MTR-Modus
1 Statusanzeige der Funktion DUAL REC
(nur 4CH-Modus)
Keine Anzeige : Funktion DUAL REC ausge-
: Funktion DUAL REC einge-
schaltet
schaltet
2 Statusanzeige von Reverb
Symbol Status
Leer Reverb ausgeschaltet
Reverb eingeschaltet
(Aufnahme mit eingeschaltetem
Effektor)
Reverb eingeschaltet
(SEND-Status)
3 Statusanzeige der Phantomspeisung
Leer : Keine Phantomspeisung
: 48 V Phantomspeisung
: 24 V Phantomspeisung
4 Statusanzeige des Audiotransports
Diese Symbole zeigen den aktuellen Betriebszustand während der Aufnahme an.
Symbol Bedeutung
09
0
5
Statusanzeige der Funktion PRE REC
Aufnahmebereitschaft oder
Aufnahme auf Pause
Aufnahme aktiv
oder Auto REC (nur 4CH-Modus)
Wenn die Funktion PRE REC auf ON gestellt ist,
wird angezeigt.
Wenn die Funktion AUTO REC auf ON gestellt
ist, wird angezeigt.
6 Anzeige des Dateinamens-/Liedtitels
Hier erscheint der automatisch vergebene
Name der Aufnahmedatei.
Wenn im 4CH-Modus mehrere Dateien
abgespielt werden, werden nur die Formatdaten der Dateinamen und die Nummer der
Aufnahmedateien angezeigt. Bei der Aufnahme
einer einzelnen Datei wird deren Name
angezeigt.
Im MTR-Modus wird der Name eines geöffneten
Titels angezeigt.
7 Anzeige der Pegelanzeigenhilfsmar-
kierung
Die Pegelanzeigenhilfsmarkierung dient der
Anpassung von Ein- und Ausgangspegel.
Sie wird im Bereich um „-12 dB“ auf der Leiste
angezeigt.
8 Pegelanzeige
Zeigt den Pegel der eingegebenen Geräusche
an.
Während der Aufnahme im Overdub-Modus
zeigen sie den Summenpegel aus Eingangsund Wiedergabesignal an. Die Markierung
tg wird auf der Leiste an der Position „-12
dB“ als Hilfsmarkierung für die Eingangspegelanpassung angezeigt.
9 Dateistatusanzeige
Die Anzeige des Dateistatus unterscheidet sich
je nach wiederzugebendem Dateityp.
: Stereodatei
: Monodatei x 2
0 Verstrichene Aufnahmezeit
Die verstrichene Aufnahmezeit einer Aufnahmedatei wird im Format Stunden : Minuten :
Sekunden angezeigt.
q Verbleibende Aufnahmezeit
Hier wird die verbleibende Aufnahmezeit bis
zum Erreichen der ausgewählten maximalen
Dateigröße im Format Stunden : Minuten :
Sekunden dargestellt. Wenn auf der SD-Karte
weniger verbleibende Aufnahmezeit verfügbar
ist, wird diese stattdessen angezeigt.
w Spitzenpegel in Dezibel (dB)
Der Spitzenwert des Eingangspegels wird in
Dezibel angezeigt.
TASCAM DR-44WL
43

Den Eingangspegel anpassen
Drücken Sie auf der rechten Geräteseite die
1.
Taste INPUT LEVEL, um die Einstellungsseite
„INPUT LEVEL“ auf dem Display einzublenden.
Drücken Sie die Taste TRACK/INPUT, um einen
2.
Kanal auszuwählen, für den der Eingangspegel
eingestellt werden soll.
Um den Eingangspegel anzupassen,
3.
verwenden Sie das INPUT LEVEL-Regler an der
rechten Geräteseite.
Wenn das Eingangssignal zu laut ist, leuchtet an
der Geräteoberseite das PEAK-Lämpchen rot
auf.
Die Markierung tg wird auf der Pegelanzeige
an der Position „-12 dB“ angezeigt.
Stellen Sie den Eingangspegel so ein, dass sich
der Pegel bei der Markierung ändert, ohne dass
das PEAK-Lämpchen rot aufleuchtet.
Um nach den Einstellungen zur Hauptseite
4.
zurückzukehren, drücken Sie die Taste
8/HOME.
Trittschallfilter
Nutzen Sie den Trittschallfilter, um tieffrequente
Anteile im Aufnahmesignal zu unterdrücken. Es
hilft Ihnen beispielsweise dabei, Rumpeln, Windgeräusche etc. zu dämpfen.
Drücken Sie die Taste INPUT, um die Seite
1.
INPUT SETTING
anzuzeigen.
Drücken Sie die Taste TRACK/INPUT, um einen
2.
Kanal auszuwählen, für den der Trittschallfilter
eingestellt werden soll.
Mit dem Steuerrad wählen (markieren) Sie
3.
LOW CUT
MARK oder /, um Einstellungspunkte
einzublenden.
Mit dem Steuerrad stellen Sie die Grenzfre-
4.
quenz des Trittschallfilters für die Mikrofoneingabe ein.
Einstellwerte: OFF, 40 Hz, 80 Hz,
Durch Drücken der Taste ENTER/MARK oder
5.
. wird das Menü ausgeblendet und die
Funktion wird aktiviert.
Bei höheren Zahlen (Frequenzen) können kürzere
Frequenzen über einen weiteren Bereich geschnitten
werden.
und drücken Sie die Taste ENTER/
auf dem Display
120 Hz, 220 Hz
Die automatische Pegelanpassung nutzen
Für die Aufnahme mit einem Mikrofon können Sie
die automatische Pegelanpassung nutzen.
Drücken Sie die Taste INPUT, um die Seite
1.
INPUT SETTING
anzuzeigen.
auf dem Display
Drücken Sie die Taste TRACK/INPUT, um einen
2.
Kanal auszuwählen, für den die automatische
Pegelanpassung eingestellt werden soll.
Mit dem Steuerrad wählen (markieren) Sie
3.
LEVEL CTRL
die Taste ENTER/MARK oder / um Einstell-
punkte einzublenden.
Bei Verwendung des Steuerrades zum
4.
Auswählen der gewünschten Funktion und
anschließendes Drücken der Taste ENTER/
MARK oder . wird das Menü ausgeblendet
und die Funktion aktiviert.
PEAK REDUCTION (automatische Pegelabsenkung)
Diese Funktion senkt den Aufnahmepegel automatisch, wenn ein Eingangssignal zu laut ist. Der
Aufnahmepegel kann manuell erhöht werden. Diese
Option ist nützlich bei Musikaufnahmen mit starken
Lautstärkeschwankungen, die zur Übersteuerung
führen können. Auch wenn diese Funktion nach der
Einstellung ausgeschaltet wird, bleibt der eingestellte Pegel erhalten.
LIMITER
Diese Funktion verhindert Verzerrungen aufgrund
von plötzlichen und zu intensiven Eingangssignalen. Auch diese Einstellung ist für die Aufnahme
von Livemusik und anderen Ereignissen mit hohen
Lautstärkeschwankungen geeignet.
In diesem Modus kann der Aufnahmepegel sogar
während der Aufnahme manuell geändert werden.
aus und drücken Sie dann
Aufnehmen
Dieser Recorder bietet zwei Aufnahme modi: 4CH
und MTR.
Im 4CH-Modus können über die integrierten Mikrofone
und die externen Eingangsanschlüsse bis zu vier Titel
gleichzeitig aufgenommen werden.
Im MTR-Modus kann eine vorhandene Aufnahmedatei mit einer neuen Aufnahme überschrieben
werden und es können bis zu vier Titel aufgenommen werden.
Drücken Sie die Taste RECORD [0]. Der
1.
Recorder geht in Aufnahmebereitschaft.
Die Namen der Aufnahmedateien können
vor der Aufnahme auf dem Display überprüft
werden.
Um einen Aufnahmekanal auszuwählen,
2.
drücken Sie die Taste TRACK/INPUT.
Drücken Sie die Taste RECORD [0].
3.
Die normale Aufnahme beginnt.
Um die Aufnahme zu beenden, drücken Sie die
4.
Taste 8/HOME.
Um die Aufnahme vorübergehend anzuhalten,
drücken Sie die Taste RECORD [0]. Durch
erneutes Drücken der Taste RECORD [0]
oder der Taste 7/9 wird die Aufnahme in
derselben Datei fortgesetzt.
Wenn die Aufnahme vorübergehend
angehalten wurde und dann die Taste
8/HOME gedrückt wird, wird eine Audiodatei
der Geräusche bis zu dem Punkt erstellt, an
dem die Aufnahme vorübergehend angehalten
wurde.
Über den Aufnahmebereitschaftsmodus
Dieses Gerät können Sie wie einen professionellen
Recorder auf Aufnahmebereitschaft schalten. Im
Aufnahmebereitschaftsmodus kann beispielsweise
der Eingangspegel eingestellt werden. Danach kann
unverzüglich mit der Aufnahme begonnen werden.
Im Aufnahmebereitschaftsmodus blinkt das
REC-Lämpchen und die Aufnahmeseite erscheint
auf dem Display.
Aufbau des Menüs für Aufnahmen
Über
REC SETTING
verschiedene Einstellungen vorgenommen werden.
REC SETTING
FILE FORMAT Aufnahmedateiformat
SAMPLE RATE Abtastrate der Aufnahme
PRE REC Vorgezogene Aufnahme
DUAL REC Funktion DUAL REC
MS MIC MS Mikrofon-Funktion
im
MENU
können
BWF: 16/24 Bit
WAV: 16/24 Bit,
MP3: 32 - 320 kbit/s
44,1 kHz, 48 kHz,
96 kHz
(96 kHz nur bei BWF/WAV)
ein/aus
OFF, ON
einstellen
MODE,
LEVEL/FORMAT
einstellen
MS DECODE,
SOURCE
Wiedergabe
Aufnahmen wiedergeben
Um die Wiedergabe zu starten, drücken Sie auf der
Hauptseite die Taste 7/9.
Die Wiedergabe vorübergehend anhalten
Um die Wiedergabe an der aktuellen Position
vorübergehend anzuhalten (Pause), drücken Sie die
Taste 7/9, während die Hauptseite angezeigt
wird.
Die Wiedergabe stoppen
Durch Drücken der Taste 8/HOME, während
die Hauptseite angezeigt und ein Titel wiedergegeben wird, wird die Wiedergabe vorübergehend
angehalten.
Bei erneutem Drücken der Taste 8/HOME wird die
Wiedergabe am Anfang der Datei angehalten.
Zurückspulen und Vorspulen (Suchen)
Um eine gerade wiedergegebene Datei zurückoder vorzuspulen oder zu durchsuchen, halten Sie
die Taste . oder / gedrückt, während die
Hauptseite angezeigt und ein Titel gestoppt ist oder
wiedergegeben wird.
Die Wiedergabeposition ändern
Durch Drehen des Steuerrads kann die Wiedergabeposition geändert werden, während die
Hauptseite angezeigt und ein Titel gestoppt ist oder
wiedergegeben wird.
Nach dem Ändern der Wiedergabeposition wird die Wiedergabe
vorrübergehend angehalten.
Eine Datei mit den Sprungtasten
zur Wiedergabe auswählen
Wählen Sie auf der Hauptseite mit den Tasten .
oder / die Datei aus, die Sie wiedergeben wollen.
Wenn am Anfang einer Datei die Taste . gedrückt
wird, springt die Wiedergabe an den Anfang der
vorherigen Datei.
Wenn am Anfang oder in der Mitte einer wiedergegebenen Datei die Taste / gedrückt wird, springt
die Wiedergabe zur nächsten Datei.
TASCAM DR-44WL
44

Die Wiedergabelautstärke anpassen
Die Lautstärke der Wiedergabe über die
/LINE OUT-Buchse kann mit der Taste OUTPUT
LEVEL (+/−) angepasst werden, während die Hauptseite angezeigt wird.
Eine Verbindung mit einem Computer herstellen
Sie können Audiodateien von der SD-Karte im
Recorder auf einen Computer übertragen und
umgekehrt Dateien vom Computer auf den Recorder
übertragen.
Über USB mit einem Computer verbinden
Verbinden Sie den Recorder mithilfe des beilie-
1.
genden USB-Kabels mit Ihrem Computer. Falls
der Recorder ausgeschaltet ist, schalten Sie ihn
ein.
Die Seite USB SELECT erscheint. Wählen Sie den
2.
Eintrag STORAGE und drücken Sie die Taste
ENTER/MARK, um die Verbindung herzustellen.
Auf dem Display erscheint der Hinweis USB
connected.
Unter Windows hat dieses Gerät im Verzeichnis
3.
„Computer“ als externes Gerät die Bezeichnung
„DR-44WL“.
Dateien mit einem Computer austauschen
Klicken Sie auf dem Computer auf das Laufwerk
„DR-44WL“, um die Ordner „MUSIC“ und „UTILITY“
anzuzeigen.
Um Dateien auf den Computer zu übertragen,
öffnen Sie den Ordner „MUSIC“ und ziehen Sie die
zu übertragenden Dateien in den gewünschten
Zielordner auf dem Computer.
Um Dateien auf den Recorder zu übertragen, ziehen
Sie die gewünschten Audiodateien vom Computer
in den Ordner „MUSIC“.
Die Verbindung des Geräts mit dem Computer trennen
Bevor Sie das USB-Kabel herausziehen, befolgen Sie
das übliche Verfahren Ihres Computers zum sicheren
Entfernen von Wechseldatenträgern.
Der Recorder fährt herunter und schaltet
anschließend ab.
Wie Sie einen Wechseldatenträger sicher entfernen,
erfahren Sie in der Hilfe Ihres Betriebssystems.
Systemeinstellungen und Dateiinformationen
Den eingebauten Lautsprecher ausschalten
Stellen Sie die Menüpunkte
SPEAKER
auf
Systemeinstellungen
Die Systemeinstellungen des Geräts können im
Menü SYSTEM angepasst werden. Hier können
Sie außerdem Einstellungen zurücksetzen und die
SD-Speicherkarte formatieren.
Wählen Sie
1.
Sie die Taste ENTER/MARK.
Nehmen Sie für jede Funktion die erforderlichen
2.
Einstellungen vor.
MENU
OFF
.
w
MENU
w
SYSTEM
TOOLS
w
und drücken
Über WLAN mit einem Smartphone verbinden
VORSICHT
Dieses Produkt wurde in Konformität mit den
an Vertriebs- und Auslageorten geltenden
Regeln und Bestimmungen entwickelt.
Dieses Produkt ist in den folgenden Ländern
bzw. Regionen zur Verwendung zugelassen.
Vereinigte Staaten, Kanada, Europa
(EU-Mitgliedsstaaten), Australien,
Neuseeland, Japan
In Ländern, die hier nicht aufgeführt sind,
ist die Verwendung der WLAN-Funktion
möglicherweise eingeschränkt. Vor der
Verwendung überprüfen Sie die Gesetze und
Bestimmungen des jeweiligen Landes.
Dieser Recorder kann mit der mitgelieferten zugehörigen Anwendung (DR CONTROL) per Fernsteuerung
bedient werden. Zusätzlich zu den Steuerungsvorgängen wie Wiedergabe und Stopp können Sie über
WLAN den Eingangspegel anpassen, Aufnahmedateien übertragen und vieles mehr.
Die zugehörige Anwendung (DR CONTROL) herunterladen und installieren
Stellen Sie mit Ihrem Smartphone eine Internet-
1.
verbindung her.
Wenn Sie ein Android-Gerät besitzen, laden Sie
2.
die Anwendung (DR CONTROL) über Google
Play herunter und installieren Sie sie. Wenn Sie
ein iOS-Gerät besitzen, führen Sie das Herunterladen und die Installation über den App Store
aus.
Über WLAN zum ersten Mal mit einem Smartphone verbinden
Sie können den Recorder direkt per WLAN mit einem
Smartphone verbinden. Dazu sind keine externen
Geräte wie Router und kein WLAN-Netzwerk erforderlich. Zum Herstellen der Verbindung benötigen
Sie nur den Recorder und Ihr Smartphone.
* Wenn eine Verbindung zwischen Recorder und
Smartphone hergestellt wird, kann das Smartphone nicht mit einem externen WLAN-Netzwerk
verbunden werden.
Mit einem iOS-Gerät verbinden
Drücken Sie die Wi-Fi-Taste, sodass das Wi-Fi-
1.
Lämpchen blinkt.
Eine Meldung erscheint auf dem Display.
Sie möchten eine Verbindung zu einem neuen
2.
Smartphone herstellen, drücken Sie dafür die
Taste ENTER/MARK.
Auf dem Display werden „SSID“ und „Encryption
3.
key“ angezeigt. Dann geht das Gerät automa-
tisch in den WPS-Modus über.
HINWEIS
WPS (Wi-Fi Protected Setup) ist der Standard
für den einfachen Aufbau einer Verbindung
zwischen WLAN-fähigen Geräten. Für das
Verbinden mit Android-Geräten bietet der
Recorder Drucktasten.
Wählen Sie auf Ihrem iOS-Gerät „Einstellungen“
4.
w „Wi-Fi“.
Wenn Sie die WLAN-Funktion auf Ihrem
5.
iOS-Gerät aktivieren, wird eine SSID-Liste
angezeigt. Wählen Sie den SSID, der auf dem
Display des Recorders angezeigt wird.
Auf dem iOS-Gerät wird ein Bildschirm zur
6.
Passworteingabe angezeigt. Geben Sie den
Kodierungsschlüssel („Encryption key“) ein, der
auf dem Display des Recorders angezeigt wird.
Zwischen dem Recorder und Ihrem Smart-
7.
phone wird eine WLAN-Verbindung hergestellt
und das Wi-Fi-Lämpchen leuchtet auf.
TASCAM DR-44WL
45

Mit einem Android-Gerät verbinden
Drücken Sie die Wi-Fi-Taste, sodass das Wi-Fi-
1.
Lämpchen blinkt.
Eine Meldung erscheint auf dem Display.
Sie möchten eine Verbindung zu einem neuen
2.
Smartphone herstellen, drücken Sie dafür die
Taste ENTER/MARK.
Auf dem Display werden „SSID“ und „Encryption
3.
key“ angezeigt. Dann geht das Gerät automa-
tisch in den WPS-Modus über.
HINWEIS
WPS (Wi-Fi Protected Setup) ist der Standard
für den einfachen Aufbau einer Verbindung
zwischen WLAN-fähigen Geräten. Für
das Verbinden mit iOS-Geräten bietet der
Recorder ein PIN-Code-System.
Wählen Sie auf Ihrem Android-Gerät „Einstel-
4.
lungen“ w „Wi-Fi“.
Wenn Sie die WLAN-Funktion auf Ihrem
5.
Android-Gerät aktivieren, wird eine SSID-Liste
angezeigt. Wählen Sie den SSID, der auf dem
Display des Recorders angezeigt wird.
Auf dem Android-Gerät wird ein Bildschirm zur
6.
Passworteingabe angezeigt. Geben Sie den
Kodierungsschlüssel („Encryption key“) ein, der
auf dem Display des Recorders angezeigt wird.
Zwischen dem Recorder und Ihrem Smart-
7.
phone wird eine WLAN-Verbindung hergestellt
und das Wi-Fi-Lämpchen leuchtet auf.
HINWEIS
Die oben beschriebene Vorgehensweise
für Android-Geräte bezieht sich auf Smartphones. Weitere Informationen finden Sie im
Handbuch Ihres Smartphones.
Über WLAN mit einem Smartphone verbinden (zweites Mal
und nachfolgend)
Wenn der Recorder einmal mit Ihrem Smartphone verbunden war, können Sie ihn in Zukunft
ganz einfach wieder verbinden, indem Sie SSID
auswählen.
Mit einem iOS-Gerät verbinden
Drücken Sie am Recorder die Wi-Fi-Taste,
1.
sodass das Wi-Fi-Lämpchen blinkt.
Eine Meldung erscheint auf dem Display.
Sie möchten eine Verbindung zu einem zuvor
2.
verbundenen Smartphone herstellen, drücken
Sie dafür die Taste 8/HOME.
Die Meldung auf dem Display des Recorders
3.
wird ausgeblendet und der Recorder wartet auf
die Verbindung mit dem Smartphone.
Wählen Sie auf Ihrem iOS-Gerät „Einstellungen“
4.
w „Wi-Fi“.
Wenn Sie die WLAN-Funktion auf Ihrem
5.
iOS-Gerät aktivieren, wird eine SSID-Liste
angezeigt. Wählen Sie den SSID, der auf dem
Display des Recorders angezeigt wird.
Zwischen dem Recorder und Ihrem Smart-
6.
phone wird eine WLAN-Verbindung hergestellt
und das Wi-Fi-Lämpchen leuchtet auf.
Mit einem Android-Gerät verbinden
Drücken Sie am Recorder die Wi-Fi-Taste,
1.
sodass das Wi-Fi-Lämpchen blinkt.
Eine Meldung erscheint auf dem Display.
Sie möchten eine Verbindung zu einem zuvor
2.
verbundenen Smartphone herstellen, drücken
Sie dafür die Taste 8/HOME.
angezeigt. Wählen Sie den SSID, der auf dem
Display des Recorders angezeigt wird.
Zwischen dem Recorder und Ihrem Smart-
6.
phone wird eine WLAN-Verbindung hergestellt
und das Wi-Fi-Lämpchen leuchtet auf.
HINWEIS
Die oben beschriebene Vorgehensweise
für Android-Geräte bezieht sich auf Smartphones. Weitere Informationen finden Sie im
Handbuch Ihres Smartphones.
Den Recorder von einem Smartphone aus fernsteuern
Da die Displayanzeige der entsprechenden
Anwendung (DR CONTROL) dem Display des
Recorders entspricht, können Sie diesen mit der
Anwendung fernsteuern und bemerken dabei
kaum einen Unterschied zur direkten Bedienung
auf dem Recorder selbst. Bevor Sie die Anwendung
„DR CONTROL“ verwenden, sollten Sie wissen, wie
der Recorder bedient wird. Dadurch vermeiden Sie
Probleme bei der Verwendung der Anwendung.
Bei bestehender WLAN-Verbindung zwischen
1.
dem Recorder und Ihrem Smartphone starten
Sie die auf dem Smartphone installierte
Anwendung „DR CONTROL“.
Nach dem Starten der Anwendung „DR
2.
CONTROL“ wird der folgende Bildschirm auf
Ihrem Smartphone angezeigt und Sie können
den Recorder nun per Fernsteuerung bedienen.
Eine detaillierte Beschreibung der Anwendung „DR
CONTROL“ finden Sie im „DR CONTROL Referenzhandbuch“, das auf der internationalen Webseite von
TEAC (http://teac-global.com/) zum Herunterladen
zur Verfügung steht.
Dateien vom Recorder auf ein Smartphone übertragen
Drücken Sie auf dem Bildschirm von „DR
1.
CONTROL“ die Taste „Browse“.
Auf dem Bildschirm „Browse“ wird die Dateiliste
2.
des Recorders angezeigt. Wählen Sie eine Datei
für die Übertragung aus.
Ein Bildschirm mit den Dateiinformationen wird
3.
angezeigt. Drücken Sie die Taste „Copy“.
Ein Bestätigungsbildschirm für das Kopieren
4.
der Dateien wird angezeigt. Durch Drücken der
Taste „YES“ beginnt die Dateiübertragung vom
Recorder auf das Smartphone.
TASCAM DR-44WL
46
Die Meldung auf dem Display des Recorders
3.
wird ausgeblendet und der Recorder wartet auf
die Verbindung mit dem Smartphone.
Wählen Sie auf Ihrem Android-Gerät „Einstel-
4.
lungen“ w „Wi-Fi“.
Wenn Sie die WLAN-Funktion auf Ihrem
5.
Android-Gerät aktivieren, wird eine SSID-Liste

Kurzreferenz für häufig verwendete Funktionen
•
Tasten auf dem Gerät sind wie folgt dargestellt: MENU.
•
Anweisungen sind in Kurzform aufgeführt. Beispiel: Drücken Sie auf der Hauptseite die Taste MENU, wählen Sie „REC SETTING“ und anschließend „PRE REC“ aus.
Daraus wird: Hauptseite w MENU w
•
Komplexe Bedienungsvorgänge sind verkürzt dargestellt. Genaueres zu den erforderlichen Bedienschritten entnehmen Sie bitte dem Referenzhandbuch.
Kategorie Gewünschte Aktion
Zur Hauptseite zurückkehren
Aufnehmen
Basisfunktionen
Eine Datei wiedergeben
Die Wiedergabelautstärke
anpassen
Wählen Sie eine Datei für
die Wiedergabe aus.
Das Aufnahmedateiformat
ändern
Trittschallfilter Trittschallfilterfunktion
Den Eingangspegel
manuell anpassen
Aufnahme
Den Eingangspegel
automatisch anpassen
lassen
Gleichzeitiges Aufnehmen von
zwei Dateien mit unterschiedlichen
Aufnahmepegeln
MS-Mikrofon verwenden
Während der Aufnahme
eine Marke anbringen
Dateien während der
Aufnahme manuell
Weitere Aufnahmefunktionen
Dateifunktionen
(nur im
4CH-Modus)
wechseln
Die Einstellungen für den
automatischen Dateiwechsel
konfigurieren
Die Aufnahme kurz vor dem
Drücken der RECORD-Taste
starten lassen
Dateiinformationen
anzeigen
Die aktuell ausgewählte
Datei löschen
Die aktuell ausgewählte
Datei löschen
Alle in einem Ordner enthaltenen
Dateien gleichzeitig löschen
Eine Datei teilen Teilenfunktion
Datum und Uhrzeit
einstellen
Informationen über das
Gerät und die Speicherkarte
überprüfen
Einstellungen der
Stromsparfunktion für die
Stromversorgung ändern
Die Hintergrundbeleuchtung
einstellen
Geräteeinstellungen
Den Displaykontrast
einstellen
Den Batterietyp wählen
Den Spannungswert der
Phantomspeisung einstellen
Das Gerät auf die Werkseinstellungen
zurücksetzen
Eine SD-Karte vollständig
formatieren
Das Dateinamenformat
wählen
REC SETTING
Bezeichnung der
Funktion
Automatische Pegelkontrolle
Funktion DUAL REC
Markierungsfunktion
Manuelles Erzeugen
eines neuen Titelanfangs
Automatisches
Erzeugen eines neuen
Titelanfangs
PRE REC
Stromsparfunktion
Startfunktion
Formatierungsfunktion
w
PRE REC
.
Bedienschritte, verwendete Tasten und Erläuterungen
8/HOME
Mit dieser Taste können Sie jederzeit zur Hauptseite zurückkehren.
Hauptseite w RECORD w RECORD
Die Aufnahme startet mit den aktuellen Einstellungen.
Hauptseite w 7/9
Die angezeigte (ausgewählte) Datei wird wiedergegeben.
OUTPUT LEVEL (+/-)-Taste
Die Lautstärke auf dem Kopfhörer oder angeschlossenen Lautsprechern wird angepasst.
Hauptseite w .//
Die Funktion zum Durchsuchen (Browse) ist bei einer großen Anzahl an Dateien nützlich.
Hauptseite w MENU w
REC SETTING
w
FILE FORMAT
Wählen Sie für die Aufnahmen ein Dateiformat, wie BWF oder WAV etc., aus.
Hauptseite w INPUT w
INPUT SETTING
w
LOW CUT
Diese Funktion unterdrückt tieffrequente Anteile im Aufnahmesignal. Wählen Sie die gewünschte Grenzfrequenz.
Hauptseite w Taste INPUT LEVEL w Taste TRACK/INPUT w INPUT LEVEL-Lautstärke
Stellen Sie den Aufnahmepegel unter Verwendung der Pegelanzeigenführungsanzeige ein.
Hauptseite w INPUT w
Diese Funktion komprimiert nur Pegelspitzen, um Aufnahmen über dem maximalen Eingangspegel zu vermeiden. Der Aufnahmepegel wird nicht verändert.
Hauptseite w MENU w
INPUT SETTING
REC SETTING
w
w
LEVEL CTRL
DUAL REC
Konfigurieren Sie die Einstellungen für die Funktion DUAL REC.
Hauptseite w MENU w
REC SETTING
w
MS MIC
Konfigurieren Sie vor der Verwendung des MS-Mikrofons dessen Einstellungen.
Aufnahmeseite w ENTER/MARK
Mit dieser Funktion bringen Sie eine Marke an einer Datei an, die Sie während der Wiedergabe ansteuern können.
Aufnahmeseite w /
Mit dieser Funktion können Sie von einer Datei zu einer anderen wechseln und die Aufnahme
fortsetzen.
Hauptseite w MENU w
Diese Funktion wechselt automatisch von einer Datei zu einer anderen Datei mit der eingestellten
Größe.
Hauptseite w MENU w
Diese Funktion kann eine Verzögerung des Recorders beim Wechsel von der Aufnahmebereitschaft zur Aufnahme kompensieren.
Hauptseite w MENU w
AUTO FUNCTION
REC SETTING
BROWSE
w Steuerrad w QUICK w
w
w
TRACK INCREMENT
PRE REC
INFORMATION
Nutzen Sie diese Funktion, um das Datum einer Aufnahme, die Dateigröße etc. zu überprüfen.
Hauptseite w MENU w
BROWSE
w Steuerrad w QUICK w
FILE DELETE
Sie können Dateien löschen, die Sie nicht mehr benötigen.
Hauptseite w QUICK w
DELETE
Sie können Dateien löschen, die Sie nicht mehr benötigen.
Hauptseite w MENU w
BROWSE
w Steuerrad w QUICK w
ALL DELETE
Sie können alle in einem Ordner enthaltenen Dateien gleichzeitig löschen.
Hauptseite w QUICK w
DIVIDE
Mit dieser Funktion können Sie eine Datei teilen, so dass zwei Dateien entstehen.
Hauptseite w MENU w
SYSTEM
w
DATE/TIME
Mit dieser Funktion können Sie die integrierte Uhr einstellen, anhand der z. B. die Aufnahmezeit von Dateien angegeben wird.
Hauptseite w MENU w
Diese Funktion überprüft die Firmwareversion des Geräts und den verbleibenden Speicherplatz
auf der Karte.
Hauptseite w MENU w
SYSTEM
POWER/DISPLAY
w
INFORMATION
w
AUTO PWR SAVE
Diese Funktion schaltet das Gerät automatisch aus, wenn es nicht benutzt wird.
Hauptseite w MENU w
POWER/DISPLAY
w
BACKLIGHT
Ändert die Hintergrundbeleuchtung des Displays.
Hauptseite w MENU w
POWER/DISPLAY
w
CONTRAST
Stellt die Schattierungsstufe des Displays ein.
Hauptseite w MENU w
POWER/DISPLAY
w
BATTERY TYPE
Wählt den zu verwendenden Batterietyp. Diese Einstellung beeinflusst die Genauigkeit der Batteriestandsanzeige.
Hauptseite w MENU w
Hauptseite w MENU w
POWER/DISPLAY
SYSTEM w INITIALIZE
w
PHANTOM VOLT
Setzt alle Einstellungen auf die Werkseinstellungen zurück.
Hauptseite w MENU w
SYSTEM w MEDIA FORMAT
Diese Funktion formatiert Speicherkarten.
Hauptseite w MENU w
SYSTEM w FILE NAME
In den automatisch zugewiesenen Dateinamen verwendete Zeichen können geändert werden.
TASCAM DR-44WL
47

Meldungen
Nachfolgend finden Sie eine Übersicht von Meldungen.
Wenn eine dieser Meldungen angezeigt wird, finden Sie hier deren Bedeutung
und die entsprechende Abhilfemaßnahme.
Displaymeldung Bedeutung und Abhilfemaßnahme
Battery Empty
Can't Divide
Card Error
Card Full
Current File MP3 MP3-Dateien können nicht geteilt werden.
Dup File Name
File Full
File Name ERR
File Not Found
File Not Found
Make Sys File
File Protected
Format Error
Format CARD
Invalid Card
Change Card
Invalid SysFile
Make Sys File
I/O Too Short
Layer too Deep
Max File Size Die Datei überschreitet die vorgegebene Dateigröße.
MBR Error Init CARD
Die Batterien sind nahezu entladen. Legen Sie neue
Batterien oder geladene Akkus ein.
Die Datei kann an der durch die DIVIDE-Funktion gewählten Stelle
nicht geteilt werden. (Die gewählte Position befindet sich zu nahe
am Anfang oder Ende der Datei.)
Die SD-Karte konnte nicht ordnungsgemäß eingelesen
werden. Tauschen Sie die Karte aus.
Es ist kein Speicherplatz mehr auf der SD-Karte vorhanden.
Löschen Sie nicht mehr benötigte Dateien auf der Karte oder
kopieren Sie diese auf einen Computer, um neuen Speicherplatz
bereitzustellen.
Die durch die DIVIDE-Funktion erstellte Datei trägt
denselben Namen wie eine im selben Ordner bereits
vorhandene Datei. Beim Teilen einer Datei wird dem
Dateinamen die Zeichenfolge „a“ bzw. „b“ angehängt.
Bevor Sie die DIVIDE-Funktion nutzen können, müssen Sie
den Recorder mit einem Computer verbinden und den
Dateinamen ändern.
Die Gesamtzahl von Ordnern und Dateien überschreitet
5000. Löschen Sie nicht mehr benötigte Ordner und
Dateien auf der Karte oder kopieren Sie sie auf Ihren
Computer.
Durch die Funktion DIVIDE weist ein Dateiname mehr
als 200 Zeichen auf. Beim Teilen einer Datei wird dem
Dateinamen die Zeichenfolge „a“ bzw. „b“ angehängt.
Bevor Sie die DIVIDE-Funktion nutzen können, müssen
Sie den Recorder mit einem Computer verbinden und
den Dateinamen so bearbeiten, dass er weniger als 198
Zeichen enthält.
Die Datei kann nicht gefunden werden oder ist beschädigt.
Überprüfen Sie die entsprechende Datei.
Keine Systemdatei vorhanden. Zum ordnungsgemäßen
Betrieb benötigt der Recorder eine Systemdatei. Um eine
Systemdatei zu erstellen, drücken Sie die Taste ENTER/
MARK, während diese Meldung angezeigt wird.
Die Datei ist schreibgeschützt und kann nicht gelöscht
werden.
Die SD-Karte ist nicht ordnungsgemäß formatiert oder
beschädigt. Diese Meldung erscheint ebenfalls, wenn Sie
die Karte über eine USB-Verbindung mit einem Computer
formatiert haben, oder wenn Sie eine nicht formatierte
Karte einlegen.
Karten, die Sie in diesem Recorder verwenden wollen,
müssen immer mit einem DR-44WL formatiert werden.
Tauschen Sie die SD-Karte aus, oder drücken Sie die Taste
ENTER/MARK, wenn diese Meldung erscheint, um die
Karte zu formatieren.
Durch das Formatieren werden alle auf der SD-Karte
enthaltenen Daten gelöscht.
Es ist ein unbekanntes Problem mit der SD-Karte aufgetreten. Tauschen Sie die SD-Karte aus.
Die für den Betrieb des Recorders benötigte Systemdatei
ist ungültig. Um eine neue Systemdatei zu erstellen,
drücken Sie die Taste ENTER/MARK, während diese
Meldung angezeigt wird.
Der IN-Punkt (Beginn) und der OUT-Punkt (Ende) liegen
zu nah beieinander. Setzen Sie den IN- und OUT-Punkt
so, dass der zeitliche Abstand mindestens eine Sekunde
beträgt.
Es können nur Ordner auf zwei Verzeichnisebenen erstellt
werden. In diesem Ordner kann kein neuer Ordner erstellt
werden.
Die SD-Karte ist nicht ordnungsgemäß formatiert oder
beschädigt. Tauschen Sie die SD-Karte aus, oder drücken Sie
die Taste ENTER/MARK, wenn diese Meldung erscheint,
um die Karte zu formatieren.
Durch das Formatieren werden alle auf der SD-Karte
enthaltenen Daten gelöscht.
Displaymeldung Bedeutung und Abhilfemaßnahme
No Card
No PB File
Non-Supported
Switched To Internal
Battery
Write Timeout
Falls weitere Meldungen erscheinen, schalten Sie den Recorder aus und starten
ihn neu.
Es ist keine SD-Karte eingeführt. Legen Sie eine
beschreibbare SD-Karte ein.
Es wurde keine Datei gefunden, die wiedergegeben
werden kann. Möglicherweise ist die ausgewählte Datei
beschädigt.
Das Dateiformat wird nicht unterstützt. Hinweise zu den
von diesem Gerät unterstützten Dateiformaten finden
Sie im Referenzhandbuch unter „Den Recorder mit einem
Computer verbinden“.
Die Stromversorgung ist von der USB-Verbindung zu den
internen Akkus übergegangen.
Beim Schreiben auf die SD-Karte ist eine Zeitüberschreitung aufgetreten.
Sichern Sie die auf der SD-Karte gespeicherten Dateien auf
Ihrem Computer, und formatieren Sie die Karte.
Fehlerbehebung
Wenn das Gerät nicht ordnungsgemäß funktioniert, führen Sie folgende Überprüfungen
durch, bevor Sie es zur Reparatur einschicken. Wenn Sie das Problem damit nicht beheben
konnten, wenden Sie sich bitte an Ihren Fachhändler oder an ein Tascam-Servicecenter
(siehe Ende dieses Dokuments).
Das Gerät lässt sich nicht einschalten.
•
Vergewissern Sie sich, dass die Batterien/Akkus noch genügend Kapazität
haben.
•
Stellen Sie sicher, dass die Batterien richtig herum (¥ und ^) eingelegt sind.
•
Falls Sie den optionalen Wechselstromadapter GPE053B verwenden: Ist dieser
richtig an der Steckdose und am USB-Anschluss des Recorders angeschlossen.
•
Wenn der Recorder über die USB-Verbindung mit Strom versorgt werden
soll, stellen Sie sicher, dass das USB-Kabel richtig mit dem Gerät und dem
Computer verbunden ist.
•
Wenn der Recorder über die USB-Verbindung mit Strom versorgt werden soll,
stellen Sie sicher, dass das USB-Kabel nicht mit einem USB-Hub verbunden ist.
•
Stellen Sie sicher, dass der HOLD/ -Schalter nicht auf HOLD gestellt ist.
Der Recorder schaltet automatisch aus.
•
Stellen Sie sicher, dass die Stromsparfunktion nicht eingeschaltet ist. (w „Die
automatische Stromsparfunktion konfigurieren“ im Referenzhandbuch unter
„Systemeinstellungen und Dateiinformationen“.
Entsprechend den Anforderungen der europäischen Ökodesign-Richtlinie
i
(ErP) arbeitet die Stromsparfunktion unabhängig davon, ob das Gerät mit
einem Wechselstromadapter oder mit Batterien/Akkus betrieben wird.
Wenn Sie die Stromsparfunktion nicht nutzen wollen, schalten Sie sie aus
(OFF). (In der Voreinstellung schaltet das Gerät nach 30 Minuten aus.)
Das Gerät reagiert nicht.
•
Stellen Sie sicher, dass der HOLD / -Schalter nicht auf HOLD gestellt ist.
•
Stellen Sie sicher, dass gerade keine USB-Verbindung mit einem Computer
besteht. (Auf dem Display wird „USB connected“ angezeigt.)
Die SD-Karte wird nicht erkannt.
•
Vergewissern Sie sich, dass die SD-Karte ordnungsgemäß eingelegt ist.
Das Gerät führt die Wiedergabe nicht aus.
•
Wenn Sie versuchen, eine WAV-Datei wiederzugeben, stellen Sie sicher, dass
die Abtastrate von diesem Recorder unterstützt wird.
•
Wenn Sie versuchen, eine MP3-Datei wiederzugeben, stellen Sie sicher, dass
die Bitrate von diesem Recorder unterstützt wird.
Keine Tonausgabe über den Lautsprecher.
•
Vergewissern Sie sich, dass die Kopfhörer nicht angeschlossen sind.
•
Vergewissern Sie sich, dass „SPEAKER“ nicht auf OFF gestellt ist.
•
Überprüfen Sie die Kabelverbindung zu Ihrer Abhöranlage.
•
Vergewissern Sie sich, dass die Lautstärke an Ihrer Abhöranlage aufgedreht ist.
•
Vergewissern Sie sich, dass die OUTPUT LEVEL-Einstellung an Ihrem Recorder
aufgedreht ist.
Keine Tonausgabe.
•
Überprüfen Sie die Kabelverbindung zu Ihrer Abhöranlage.
•
Stellen Sie sicher, dass die Lautstärke an Ihrer Abhöranlage aufgedreht ist.
•
Stellen Sie sicher, dass die OUTPUT LEVEL-Einstellung an Ihrem Recorder
aufgedreht ist.
TASCAM DR-44WL
48

Das Gerät führt keine Aufnahme aus.
•
Wenn Sie von einem externen Gerät aufnehmen, überprüfen Sie die
Kabelverbindung.
•
Überprüfen Sie, ob der Eingang richtig konfiguriert ist.
•
Vergewissern Sie sich, dass der Eingangspegel ausreichend hoch ist.
•
Vergewissern Sie sich, dass die SD-Karte nicht voll ist.
•
Vergewissern Sie sich, dass die maximale Zahl von Dateien, die der Recorder
handhaben kann, nicht überschritten wurde.
Der Eingangspegel ist zu gering.
•
Vergewissern Sie sich, dass der Eingangspegel ausreichend hoch eingestellt
ist.
•
Vergewissern Sie sich, dass der Ausgangspegel einer externen Quelle
ausreichend hoch ist.
Aufgenommene Geräusche sind verzerrt.
•
Vergewissern Sie sich, dass der Eingangspegel nicht zu hoch eingestellt ist.
•
Vergewissern Sie sich, dass die Reverb-Funktion ausgeschaltet ist.
Das Wiedergabesignal klingt unnatürlich.
•
Vergewissern Sie sich, dass die Wiedergabegeschwindigkeit nicht geändert
wurde.
•
Vergewissern Sie sich, dass der Wiedergabe-Equalizer ausgeschaltet ist.
•
Vergewissern Sie sich, dass die Pegelabgleich-Funktion ausgeschaltet ist.
•
Vergewissern Sie sich, dass die Reverb-Funktion ausgeschaltet ist.
Dateien können nicht gelöscht werden.
•
Überprüfen Sie, ob die Datei nicht vielleicht schreibgeschützt ist, nachdem sie
von einem Computer auf den Recorder kopiert wurde.
Die Aufnahmedateien erscheinen nicht auf dem Computer.
•
Vergewissern Sie sich, dass eine funktionierende USB-Verbindung mit dem
Computer besteht.
•
Stellen Sie sicher, dass kein USB-Hub verwendet wird.
•
Vergewissern Sie sich, dass gerade keine Aufnahme läuft und sich das Gerät
auch nicht in Aufnahmebereitschaft befindet.
Das Gerät kann nicht mit einem Smartphone verbunden werden
oder die Kommunikation zwischen den beiden Geräten wird
unterbrochen.
•
Vergewissern Sie sich, dass das WLAN-Gerät eingeschaltet ist und dass Wi-Fi
(WLAN) eingeschaltet ist.
•
Vergewissern Sie sich, dass der Abstand zwischen dem WLAN-Gerät und dem
Recorder nicht zu groß ist.
Stellen Sie zudem sicher, dass zwischen den Geräten keine Wände oder
andere Hindernisse liegen.
Wenn sich das WLAN-Gerät auf der Rückseite des Recorders befindet,
unterbricht möglicherweise der Recorder selbst die Kommunikation.
Ändern Sie die Position des WLAN-Geräts und des Recorders.
•
Schalten Sie den Recorder aus und dann wieder ein.
•
Löschen Sie die Registrierung des WLAN-Geräts auf dem „DR-44WL“ und führen
Sie die unter „Über WLAN mit einem Smartphone verbinden“ beschriebenen
Schritte aus.
Technische Daten
Allgemein
Aufnahmemedien
SD-Karte (64 MB - 2 GB), SDHC-Karte (4 GB - 32 GB), SDXC-Karte
(64 GB - 128 GB)
Aufnahme- und Wiedergabeformate
BWF: 44,1/48/96 kHz, 16/24 Bit
WAV: 44,1/48/96 kHz, 16/24 Bit
MP3: 44,1/48 kHz, 32/64/96/128/192/256/320 kbit/s
Anzahl der Kanäle
4 Kanäle
4CH-Modus Mono : Bis zu 4 Dateien
i
Stereo : Bis zu 2 Dateien
Stereo (1 Datei) + Mono (bis zu 2 Dateien)
MTR-Modus Mono : Bis zu 4 Dateien
i
Eingänge und Ausgänge
EXT MIC/LINE IN-Buchse (für Phantomspeisung geeignet)
Anschlusstyp: XLR-3-31, TRS-Standardbuchse φ6,3 mm
/LINE OUT-Buchse
Anschlusstyp: Mini-Stereoklinkenbuchse φ3,5 mm
Eingebauter Lautsprecher
0,3 W (mono)
USB-Anschluss
Anschlusstyp: Micro-B
Format: USB 2.0 High-Speed, Mass Storage Class
Leistungsdaten Audio
Frequenzbereich
20-20 kHz +1/-3 dB (Lineeingang bis Lineausgang, 44,1 kHz Abtastrate, JEITA)
20-22 kHz +1/-3 dB (Lineeingang bis Lineausgang, 48 kHz Abtastrate, JEITA)
20-40 kHz +1/-3 dB (Lineeingang bis Lineausgang, 96 kHz Abtastrate, JEITA)
Verzerrung
0,05% oder weniger (Lineeingang bis Lineausgang, 44,1/48/96 kHz Abtastrate, JEITA)
Fremdspannungsabstand
92 dB oder höher (Lineeingang bis Lineausgang, 44,1/48/96 kHz Abtastrate, JEITA)
Hinweis: JEITA mit JEITA CP-2150 kompatibel
Aufnahmezeit
Speicherplatz der
Dateiformat (Einstellung während Aufnahme)
WAV/BWF 16 Bit (Stereo) 44,1 kHz 6 Stunden, 44 Minuten
WAV/BWF 24 Bit (Stereo) 96 kHz 2 Stunden, 04 Minuten
•
Die angegebenen Zeiten sind Näherungswerte. Die Zeiten können je nach
verwendeter Speicherkarte abweichen.
•
Die angegebenen Zeiten stehen nicht durchgängig für eine Aufnahme zur
Verfügung, sondern geben die gesamte Aufnahmezeit auf der jeweiligen
Karte an.
•
Bei Mono-Aufnahmen im WAV-Format entspricht die maximale Aufnahmezeit
dem Doppelten der oben genannten Werte.
•
Bei DUAL REC-Aufnahmen im WAV/BWF-Format oder bei Vierkanalaufnahmen
entspricht die maximale Aufnahmezeit der Hälfte der oben genannten Werte.
SDHC-Karte
4 GB
TASCAM DR-44WL
49

Systemanforderungen Computer
Aktualisierte Hinweise zur Kompatibilität mit verschiedenen Betriebssystemen
finden Sie gegebenenfalls auf der Website von TEAC Global (http://teac-global.
com/).
Unterstützte Betriebssysteme
Windows : Windows XP, Windows Vista, Windows 7,
Macintosh : Mac OS X 10.2 oder höher
Windows 8 (einschließlich 8.1)
Wi-Fi
Drahtlosstandard
Konform mit IEEE 802.11b/g/n (nur 2,4 GHz)
Drahtloskommunikationsmodus
Einfacher Zugriffspunkt (AP) (beschränkter AP)
Sicherheit
WPA2-PSK (WPS2.0-gestützt)
Stromversorgung und sonstige Daten
Stromversorgung
Vier Alkaline-Batterien oder NiMH-Akkus ( Typ AA)
USB-Verbindung mit einem Computer
Spezieller Wechselstromadapter (GPE053B, im Lieferumfang enthalten)
Leistungsaufnahme
2,5 W (maximal)
Lebensdauer der Batterien (Dauerbetrieb)
•
Alkaline-Batterien (EVOLTA)
Aufnahmeformat
Zweikanalaufnahmen in
WAV, 44,1 kHz, 16 Bit
•
NiMH-Akkus (Eneloop)
Aufnahmeformat
Zweikanalaufnahmen in
WAV, 44,1 kHz, 16 Bit
HINWEIS
Bei Phantomspeisung kann die Betriebszeit je nach verwendetem Mikrofontyp
verkürzt werden.
Abmessungen
79 × 162,2 × 42,5 mm (B × H × T)
Gewicht
346 g/251 g (mit Akkus/ohne Akkus)
Betriebstemperaturbereich
0 °C–40 °C
Betriebs-zeit
(ca.)
Ca. 16 Stunden
Betriebs-zeit
(ca.)
Ca. 12 Stunden
Bedingungen
MIC-Eingang ausgewählt
(Keine Phantomspeisung)
Bedingungen
MIC-Eingang ausgewählt
(Keine Phantomspeisung)
•
Abbildungen können teilweise vom tatsächlichen Erscheinungsbild des
Produkts abweichen.
•
Änderungen an Konstruktion und technischen Daten vorbehalten.
•
Detaillierte technische Daten siehe Referenzhandbuch.
TASCAM DR-44WL
50

Manuale di istruzioni
Pb, Hg, Cd
IMPORTANTI ISTRUZIONI DI
SICUREZZA
1 Leggere le seguenti istruzioni.
2 Conservare queste istruzioni.
3 Prestare attenzione agli avvertimenti.
4 Seguire tutte le istruzioni.
5 Non usare l’apparecchio vicino all’acqua.
6 Pulire solo con un panno asciutto.
7 Non bloccare le aperture per la ventilazione.
Installare secondo le istruzioni del costruttore.
8 Non installare l’apparecchio vicino a fonti di
calore come radiatori, regolatori di calore, stufe
o altri apparecchi che producono calore (inclusi
gli amplificatori).
9 Non eliminare la spina polarizzata di sicurezza
o la spina di messa a terra. La spina polarizzata
ha due lame, una più larga dell’altra. Una spina
di messa a terra ha due lame e una terza punta
di messa terra. La lama larga o la terza punta
sono fornite per la vostra sicurezza. Se la spina
fornita non è adatta al tipo di presa, consultate
un elettricista per sostituire la presa obsoleta.
10 Non calpestare o strattonare il cordone di
alimentazione, in modo particolare vicino alla
spina e alla presa a cui è collegato l’apparecchio
e dal punto in cui esce dall’apparecchio.
11 Usare solamente attacchi/accessori specificati
dal costruttore.
12 Usare solo carrello,
supporto, treppiede,
mensola o tavola
specificata dal
costruttore o venduto
insieme all’apparecchio. Quando viene usato un
carrello, prestare attenzione quando si sposta la
combinazione carrello/apparato per evitare
cadute da sopra.
13 Scollegare questo apparato durante temporali o
quando non viene utilizzato per lunghi periodi
di tempo.
14 Rivolgersi solo a personale qualificato. La
riparazione è richiesta quando l’apparecchio è
stato danneggiato in qualunque modo, come
nel caso che il cordone dell’alimentazione o la
spina siano stati danneggiati, l’apparecchio sia
stato esposto a pioggia o umidità, non funzioni
correttamente o sia stato lasciato cadere.
•
Questo apparecchio porta corrente elettrica non
operativa dalla presa di rete mentre il suo
interruttore POWER o STANDBY/ON non è in
posizione ON.
•
La presa di rete è utilizzata come dispositivo di
sconnessione e deve rimanere sempre operativo.
•
Si deve usare cautela quando si usano gli
auricolari o le cuffie con il prodotto, perché un
eccesso di pressione sonora (volume) negli
auricolari o nelle cuffie può causare la perdita
dell’udito.
•
Se si verificano problemi con questo prodotto,
contattare TEAC per un invio al servizio di
assistenza. Non usare il prodotto fino a quando
non è stato riparato.
ATTENZIONE
Per evitare possibili danni all’udito, non ascoltare
ad alto volume per lunghi periodi di tempo.
CAUTELA
•
Non esporre questo apparecchio a gocciolamenti
o schizzi.
•
Non appoggiare alcun contenitore o vaso pieno
d’acqua sopra l’apparecchio.
•
Non installare questo apparecchio in spazi ristretti
come una libreria o ambienti simili.
•
Questo apparecchio dovrebbe essere collocato
sufficientemente vicino alla presa AC in modo da
poter facilmente afferrare la spina del cordone di
alimentazione in qualsiasi momento.
•
Se il prodotto utilizza batterie (incluso un pacco
batterie o batterie installate), non dovrebbero
essere esposte alla luce solare, fuoco o calore
eccessivo.
•
Cautela per i prodotti che utilizzano batterie al
litio sostituibili: vi è pericolo di esplosione se la
batteria viene sostituita con una di tipo scorretto.
Sostituire solo con tipo uguale o equivalente.
CAUTELA SULLE BATTERIE
•
Questo prodotto utilizza batterie. L’uso improprio
delle batterie può causare perdita, rottura o
altri problemi. Attenersi sempre alle seguenti
precauzioni quando si utilizzano batterie.
•
Non ricaricare batterie non ricaricabili. Le batterie
potrebbero rompersi o avere delle perdite,
causando incendi o lesioni.
•
Durante l’installazione di batterie, prestare
attenzione alle indicazioni di polarità
(orientamento più/meno (+/-)) e installarle
correttamente nel vano batterie come indicato.
Se si mettono al contrario potrebbe causare la
rottura delle batterie o perdita, causando incendi,
lesioni o macchie attorno.
•
Quando si conservano o si smaltiscono batterie,
isolare i loro terminali con nastro isolante o simile
per impedire il contatto con altre batterie o
oggetti metallici.
•
Quando si gettano batterie usate, seguire le
istruzioni indicate per lo smaltimento delle
batterie e le leggi locali sullo smaltimento.
•
Non usare batterie diverse da quelle specificate.
Non mescolare e usare batterie vecchie e nuove
o tipi diversi di batterie. Le batterie potrebbero
rompersi o avere delle perdite, causando incendi,
lesioni o macchie attorno.
•
Non trasportare o conservare le batterie insieme
con oggetti metallici di piccole dimensioni. Le
batterie potrebbero cortocircuitare, causando
perdite, rotture o altri problemi.
•
Non riscaldare o smontare le batterie. Non
metterle nel fuoco o nell’acqua. Le batterie
potrebbero rompersi o avere delle perdite,
causando incendi, lesioni o macchie attorno.
•
Se le batterie perdono acido, eliminare il liquido
nel vano della batteria prima di inserire batterie
nuove. Se il liquido entra in un occhio, potrebbe
causare la perdita della vista. Se il liquido dovesse
entrare in un occhio, lavarlo accuratamente
con acqua pulita senza strofinare l’occhio e
poi consultare immediatamente un medico.
Se il liquido viene a contatto con il corpo di
una persona o con i vestiti, potrebbe causare
lesioni cutanee o ustioni. Se questo dovesse
accadere, lavare con acqua pulita e consultare
immediatamente un medico.
•
L’unità deve essere spenta quando si installano e
sostituiscono le batterie.
•
Rimuovere le batterie se non si prevede di
usare l’unità per un lungo tempo. Le batterie
potrebbero rompersi o avere delle perdite,
causando incendi, lesioni o macchie attorno. Se le
batterie perdono acido, eliminare i liquidi sul vano
batterie prima di inserire batterie nuove.
•
Non smontare una batteria. L’acido all’interno
della batteria potrebbe danneggiare la pelle o gli
indumenti.
8
Per gli utenti europei
Smaltimento di apparecchiature
elettriche ed elettroniche
(a) Tutte le apparecchiature elettriche ed elettro-
niche devono essere smaltite separatamente
dai rifiuti urbani mediante impianti di raccolta
specifici designati dal governo o dalle autorità
locali.
(b) Lo smaltimento in modo corretto delle
apparecchiature elettriche ed elettroniche
contribuisce a risparmiare preziose risorse ed
evitare potenziali effetti negativi sulla salute
umana e l’ambiente.
(c) Lo smaltimento non corretto di apparecchiature
può avere gravi conseguenze sull’ambiente
e sulla salute umana come risultato della
presenza di sostanze pericolose nelle apparecchiature elettriche ed elettroniche.
(d) Il simbolo barrato della pattumiera
indica che le apparecchiature
elettriche ed elettroniche devono
essere raccolte e smaltite separatamente dai rifiuti domestici.
(e) I sistemi di raccolta sono a dispo-
sizione degli utenti finali. Per informazioni più
dettagliate sullo smaltimento delle vecchie
apparecchiature elettriche ed elettroniche,
contattare il comune, il servizio di smaltimento
rifiuti o il negozio dove è stato acquistato
l’apparecchio.
Smaltimento di batterie e/o
accumulatori
(a) I rifiuti di batterie e/o accumulatori devono
essere smaltiti separatamente dai rifiuti urbani
mediante impianti di raccolta designati dalle
autorità statali o locali.
(b) Lo smaltimento corretto dei rifiuti di batterie
e/o accumulatori contribuisce a risparmiare
preziose risorse ed evitare potenziali effetti
negativi sulla salute umana e l’ambiente.
(c) Lo smaltimento improprio dei rifiuti di batterie
e/o accumulatori può avere gravi conseguenze
sull’ambiente e sulla salute umana a causa della
presenza di sostanze pericolose in essi.
(d) Il simbolo RAEE, che mostra un
bidone sbarrato indica che le
batterie e/o accumulatori devono
essere raccolti e smaltiti separatamente dai rifiuti domestici.
Se una batteria o accumulatore
contiene più i valori specificati di piombo (Pb),
mercurio (Hg), e/o di cadmio (Cd) come definito
nella direttiva sulle batterie (2006/66/CE), i
simboli chimici di questi elementi saranno
indicati sotto il simbolo RAEE.
(e) Centri di raccolta sono disponibili per gli utenti
finali. Per informazioni più dettagliate circa lo
smaltimento dei rifiuti di batterie e/o accumulatori, si prega di contattare il comune, il servizio
di smaltimento rifiuti o il negozio dove sono
stati acquistati.
TASCAM DR-44WL
51

Precauzioni per gli apparecchi wireless
Conformità del trasmettitore radio e delle interferenze
Modello SEE (Spazio economico
europeo)
Questa apparecchiatura è conforme alle norme
armonizzate della direttiva 1999/5/CE (R&TTE).
Etichettatura di conformità
Marcatura CE:
CAUTELA
Cambiamenti o modifiche non espressamente
approvati dalla parte responsabile per la conformità
potrebbero invalidare il diritto dell'utente a utilizzare
l'apparecchiatura.
CAUTELA
L’autorizzazione di dispositivi wireless è diversa da
paese a paese. Si prega di utilizzare solo nel paese in
cui è stato acquistato il prodotto.
•
A seconda del paese, potrebbero esistere
restrizioni all’uso della tecnologia senza fili
Bluetooth.
Verificare le leggi e i regolamenti del paese o della
regione in cui si desidera utilizzare l’unità prima
dell’uso.
Requisiti di esposizione alle radiazioni
Questa apparecchiatura è conforme alla regolamentazione riconosciuto a livello internazionale
relativamente all’esposizione umana alle onde radio
generate dal trasmettitore.
Sulla base delle seguenti due condizioni:
•
Gli utenti finali e gli installatori devono essere
forniti di istruzioni di installazione dell’antenna
e le condizioni di esercizio del trasmettitore per
soddisfare i requisiti richiesti.
•
Questa apparecchiatura deve essere installata e
utilizzata a una distanza minima di 20 cm tra il
radiatore e il proprio corpo.
8
Dichiarazione di conformità
Modello SEE modello (Spazio
economico europeo)
Questa apparecchiatura è conforme EN.62311;
valutazione degli apparecchi elettronici ed elettrici
in relazione ai limiti di esposizione umana ai campi
elettromagnetici; norma armonizzata dalla direttiva
1999/5/CE.
DICHIARAZIONE DI CONFORMITÀ
Noi, TEAC EUROPE GmbH.
Bahnstrasse 12, 65205 WiesbadenErbenheim, Germania dichiariamo
sotto la nostra responsabilità, che
il prodotto TEAC descritto in questo manuale è
conforme ai corrispondenti standard tecnici.
Contents
Introduzione ..................................................................... 52
Included items ................................................................. 52
Nota sul manuale di riferimento ............................... 52
Precauzioni per gli apparecchi wireless ................ 52
Conformità del trasmettitore radio e delle
interferenze................................................................................52
Requisiti di esposizione alle radiazioni ....................52
Precauzioni per il posizionamento e l’uso ............ 53
Attenzione alla condensa ............................................53
Pulizia dell’unità .............................................................. 53
Uso del sito TEAC Global .............................................. 53
Nomi e funzioni dei componenti ............................. 53
Pannello superiore ................................................................ 53
Pannello frontale ....................................................................53
Pannello laterale sinistro ................................................... 53
Pannello laterale destro ..................................................... 53
Pannello inferiore ...................................................................53
Schermata principale .................................................... 53
Preparazione dell’alimentazione .................................54
Avvio dell’unità ........................................................................54
Impostazione dell’orologio incorporato ................ 54
Spegnimento ............................................................................55
Collegamento di dispositivi di monitoraggio e
cuffie .............................................................................................. 55
Procedure operative di base per i menu ............... 55
Struttura del menu ...............................................................55
Registrazione ................................................................... 55
Schermata di registrazione .............................................55
Regolazione manuale del livello in ingresso .......55
Impostazioni del filtro passa-alto ................................56
Uso della funzione di controllo del livello ............. 56
Registrare .................................................................................... 56
Informazioni sullo stato di attesa della
registrazione .............................................................................56
Struttura del menu di registrazione ..........................56
Riproduzione .................................................................... 56
Riproduzione delle registrazioni ..................................56
Una volta spostata la posizione di riproduzione,
la riproduzione rimane in pausa. Selezione di un
file da riprodurre (saltare) ................................................. 56
Regolare il volume di riproduzione ........................... 56
Collegamento a un computer ................................... 56
Scambio di file con un computer ................................ 57
Scollegamento dell’unità dal computer .................57
Visualizzazione impostazioni e informazioni...... 57
Spegnere l’altoparlante incorporato .........................57
Impostazioni di sistema ..................................................... 57
Connettere l’unità a uno smartphone tramite
Wi-Fi ..................................................................................... 57
Come ottenere e installare l’applicazione
dedicata
(DR CONTROL) .........................................................................57
Connettere l’unità a uno smartphone tramite
Wi-Fi per la prima volta ...................................................... 57
Connettere l’unità a uno smartphone tramite
Wi-Fi (seconda volta e successive) .............................58
Controllo remoto dell’unità attraverso uno
smartphone ...............................................................................58
Trasferimento di file dall’unità ad uno smart-
phone ............................................................................................58
Riferimento rapido per l’utilizzo delle varie
funzioni ............................................................................... 59
Messaggi ............................................................................ 60
Risoluzione dei problemi ............................................60
Specifiche ...........................................................................61
Dati .................................................................................................. 61
Ingressi e uscite ....................................................................... 61
Prestazioni audio .................................................................... 61
Tempi di registrazione ........................................................ 61
Requisiti per i computer collegati ...............................62
Wi-Fi ................................................................................................ 62
Informazioni generali .......................................................... 62
Introduzione
Grazie per aver acquistato il TASCAM DR-44WL Linear
PCM Recorder.
Prima di collegare e utilizzare questo apparecchio, si
prega di leggere questo manuale per essere sicuri di
capire come impostarlo e collegarlo correttamente,
nonché capire il funzionamento delle sue molte
funzioni utili. Dopo la lettura di questo manuale, si
prega di conservarlo in un luogo sicuro per future
consultazioni.
Il presente prodotto dispone di un processore
Blackfin® creato da Analog Devices, Inc.
Included items
This product includes the following items.
Take care when opening the package to avoid
damaging the items. Keep the packing materials for
transportation in the future.
Please contact the store where you purchased this
unit if any of these items are missing or have been
damaged during transportation.
•
Main unit ............................................................................... × 1
•
AC adapter (GPE053B) .................................................. × 1
•
microSD card with adapter (in the unit)............× 1
•
USB cable (80 cm) ........................................................... × 1
•
Batterie alcaline AA......................................................... × 4
•
Fur windscreen ..................................................................× 1
•
Mic stand adapter ........................................................... × 1
•
Hot shoe adapter ............................................................. × 1
•
Soft case ................................................................................ × 1
•
Owner’s Manual (this document)
including warranty ......................................................... × 1
Nota sul manuale di riferimento
Il presente manuale illustra le funzioni principali di
questa unità. Si prega di consultare il manuale di
riferimento per le informazioni su tutte le funzioni
dell’unità.
È possibile scaricare questo manuale di istruzioni e
il manuale di riferimento dal sito TEAC Global Site
(http://teac-global.com/).
TASCAM DR-44WL
52

Precauzioni per il posizionamento e l’uso
•
La temperatura dell’ambiente deve essere
compresa tra 0 e 40 °C .
•
Non installare questa unità nei seguenti luoghi.
In caso contrario si potrebbe degradare la qualità
del suono e/o causare malfunzionamenti.
Luoghi con forti vibrazioni
In prossimità di finestre o altri luoghi esposti
alla luce diretta del sole
Nei pressi di caloriferi o in altri luoghi estre-
mamente caldi
Luoghi molto freddi
Luoghi con cattiva ventilazione o alta
umidità
Luoghi molto polverosi
•
Se l’unità è collocata nei pressi di un amplificatore
di potenza o altro dispositivo con un grande
trasformatore, potrebbe verificarsi ronzio. Se ciò si
verifica, aumentare la distanza tra l’unità e l’altro
dispositivo.
•
Questa unità può causare irregolarità di colore
su uno schermo TV o rumore in una radio, se
utilizzato nelle sue vicinanze. In questo caso,
spostare l’unità.
•
Questa unità può produrre rumore se si utilizza
un telefono cellulare o altri dispositivi wireless
nelle vicinanze per effettuare chiamate o inviare
o ricevere segnali. In questo caso, aumentare la
distanza tra l’unità e quei dispositivi o disattivarli.
•
Per una buona dissipazione del calore, non
collocare nulla sopra questa unità.
•
Non posizionare l’unità su di un amplificatore di
potenza o un altro dispositivo che genera calore.
Attenzione alla condensa
Se l’unità viene spostata da un ambiente freddo a
uno caldo o usata dopo un improvviso sbalzo di
temperatura, vi è il rischio di condensa; il vapore
nell’aria potrebbe condensarsi sul meccanismo
interno, rendendo impossibile un corretto funzionamento. Per prevenire questo, o se questo accade,
lasciare riposare l’unità per una o due ore alla nuova
temperatura ambiente prima di usarla.
Pulizia dell’unità
Usare un panno morbido e asciutto per pulire l’unità.
Non pulire con panni imbevuti di sostanze chimiche,
solventi, alcol o altri agenti chimici. Ciò potrebbe
danneggiare la superficie o causare scolorimento.
Nomi e funzioni dei componenti
Pannello superiore
1 Microfono stereo incorporato
2 Indicatore PEAK
3 Display
4 Pulsante TRACK/INPUT
5 Pulsante 8/HOME
6 . Pulsante di riavvolgimento
rapido
7 Pulsante 7/9
8 Pulsante MENU
9 Indicatore MTR
0 Pulsante MIXER
q Pulsante RECORD [0] / Indicatore REC
w / Pulsante di avanzamento rapido
e Pulsante INPUT
r Pulsante ENTER/MARK
t Pulsante QUICK
y Ruota
Pannello frontale
Pannello laterale destro
f Interruttore EXT IN
g Pulsante INPUT LEVEL
h Volume INPUT LEVEL
j Porta USB
Pannello inferiore
k Altoparlante mono incorporato
l Attacco filettato per treppiede
; Coperchio del vano batteria
z Attacco del cinturino
x Vano batteria
Uso del sito TEAC Global
È possibile scaricare questo manuale di istruzioni e
il manuale di riferimento necessari per questa unità
dal sito TEAC Global (http://teac-global.com/).
Visitare il sito TEAC Global (http://teac-global.
1.
com/).
Nella sezione TASCAM Download, selezionare
2.
la lingua desiderata per aprire la pagina di
download per la lingua scelta.
NOTA
Se la lingua desiderata non viene visualizzata, cliccare su Other Languages.
Cliccare sul nome del prodotto nella sezione
3.
“Ricerca per nome del modello” per aprire la
pagina Download del prodotto.
Selezionare e scaricare il Manuale di istruzioni e
4.
il manuale di riferimento necessari.
u Indicatore Wi-Fi
i Morsetti EXT MIC/LINE IN 1/L e 2/R
(XLR/TRS)
Pannello laterale sinistro
o Slot scheda SD
p Interruttore HOLD/
a Jack /LINE OUT
s Pulsante OUTPUT LEVEL
d Pulsante Wi-Fi
Schermata principale
Questa è la schermata che viene normalmente
visualizzata quando l’unità è ferma.
Schermata principale in modalità 4 CH
TASCAM DR-44WL
53

Schermata principale in modalità MTR
1 Visualizzazione della velocità di ripro-
duzione
Icona Velocità di riproduzione
Nessuna Velocità di riproduzione invariata
1,1× – 2,0×
0,5× – 0,9×
La velocità di riproduzione non
può essere modificata
2 Visualizzazione stato acceso/spento
della funzione di controllo a chiave
Icona Stato acceso/spento
Nessuna
Funzione di controllo a chiave
spenta
Funzione di controllo a chiave
accesa
Funzione di controllo a chiave
accesa
(impostazione disattivata)
3 Visualizzare lo stato di attivazione/
disattivazione riverbero
Icona Stato acceso/spento
Nessuna Disattivazione riverbero
Attivazione riverbero
(registrazione con attuatore
acceso)
Attivazione riverbero
(stato SEND)
4 Visualizzazione uscita altoparlante
visualizzato: Uscita altoparlante accesa
non visualizzato: Uscita altoparlante spenta
5 Display alimentazione phantom
Nessuna : Nessuna alimentazione phantom
: Alimentazione phantom 48 V attiva
: Alimentazione phantom 24 V attiva
6 Visualizzazione dello stato dell’ali-
mentazione
Quando l’unità è alimentata a batteria, l’icona
della batteria indica la quantità di carica
rimanente sotto forma di barre ( , , ).
Quando sull’icona non viene visualizzata alcuna
barra, il simbolo lampeggia e in seguito il
dispositivo si spegne (passa in standby) perché
le batterie sono scariche.
Quando si utilizza l’alimentatore CA dedicato
(GPE053B) in dotazione con il prodotto oppure
l’alimentazione USB, viene visualizzato il
simbolo, .
7 Visualizzazione dello stato di funzion-
amento del registratore
Questa icona indica lo stato di funzionamento
del registratore.
Indicatore Significato
8
9
7
,
m
/
.
Fermo
In pausa
Riproduzione
Avanzamento veloce
Riavvolgimento veloce
Passaggio diretto all’inizio del file
successivo
Passaggio diretto all’inizio del file
corrente o del file precedente
8 Visualizzazione delle impostazioni
delle riproduzione ciclica
Durante la riproduzione ciclica viene visualizzata l’icona .
9 Visualizzazione del nome del file o del
brano
Quando si seleziona la modalità 4CH, viene
visualizzato il titolo oppure le informazioni del
tag del file in riproduzione.
In presenza di vari file in modalità 4CH, vengono
visualizzati solo la parte formattata dei nomi
del file e il numero di base dei file registrati.
Quando si registra un solo file, viene visualizzato
il suo titolo.
Quando si seleziona la modalità MTR, viene
visualizzato il titolo di un brano aperto.
0 Stato delle impostazioni dei punti
di inizio (IN) e fine (OUT) della riproduzione ciclica
Visualizza lo stato delle impostazioni del punto
iniziale (IN) e di quello finale (OUT) della riproduzione ciclica.
Quando si imposta il punto iniziale (IN), viene
visualizzata l’icona
nella posizione corrispondente nella barra della
posizione di riproduzione.
Quando si imposta il punto finale (OUT), viene
visualizzata l’icona
nella posizione corrispondente nella barra della
posizione di riproduzione.
q Visualizzazione della posizione di
riproduzione
La posizione di riproduzione corrente è indicata
da una barra.
w Visualizzazione del riferimento del
misuratore di livello
È un riferimento del misuratore di livello, per
regolare i livelli di ingresso e di uscita.
Viene visualizzato in corrispondenza della
posizione “-12 dB” sulla scala.
e Misuratore di livello
Indica il livello del segnale audio in ingresso o in
riproduzione.
r Visualizzazione dello stato dei file
Lo stato del file viene visualizzato in vari modi, a
seconda del tipo di file da riprodurre.
: File stereo
: File mono x 2
: Non sono presenti file.
t Visualizzazione del tempo trascorso
Indica il tempo trascorso (ore : minuti : secondi)
del file corrente.
y
Visualizzazione del tempo rimanente
Indica il tempo rimanente (ore : minuti :
secondi) del file corrente.
u Valore di picco in decibel (dB)
Mostra il valore massimo, in decibel, del livello
di riproduzione in un determinato periodo di
tempo.
Preparativi
Preparazione dell’alimentazione
Utilizzando batterie AA
Togliere il coperchio del vano batterie, nel
1.
pannello inferiore.
Installare quattro batterie AA rispettando la
2.
polarità (simboli ¥ e ^ come riportati nel
vano batterie).
Riposizionare il coperchio del vano batterie.
3.
Impostare il tipo di batterie da utilizzare nella
voce
BATTERY TYPE
DISPLAY
sione la quantità di energia rimanente e permettere
all’unità di determinare la carica disponibile per il
corretto funzionamento (per impostazione predefinita, questa opzione è impostata su
batterie alcaline).
in modo da visualizzare con preci-
del menu
POWER/
ALKAL
per le
Avvio dell’unità
Quando l’unità è spenta (in standby), far scorrere
l’interruttore HOLD/ nella direzione ;
quando viene visualizzata l’indicazione
DR-44WL
ruttore.
La schermata principale appare quando l’unità si
avvia.
(schermata di avvio), rilasciare l’inter-
TASCAM
Impostazione dell’orologio incorporato
Quando l’unità viene avviata per la prima volta (o
dopo che è rimasta senza batterie), viene visualizzata
la schermata
di avvio, per consentire l’impostazione della data e
dell’ora.
Utilizzare il pulsante .// e la ruota per
immettere la data e l’ora, quindi premere il pulsante
ENTER/MARK per confermarle.
DATE/TIME
prima della schermata
TASCAM DR-44WL
54

Spegnimento
Mentre l’unità è accesa, far scorrere l’interruttore
HOLD/ , sul pannello laterale sinistro, nella
direzione ; quando viene visualizzato il testo
TASCAM DR-44WL shutting down
rilasciare l’interruttore.
L’alimentazione si interrompe entro alcuni secondi.
Collegamento di dispositivi di monitoraggio e cuffie
Per ascoltare l’audio con le cuffie, collegarle al jack
/LINE OUT.
Per ascoltare l’audio tramite un sistema di monitoraggio esterno (monitor attivi o amplificatore e
altoparlanti), collegarlo al jack /LINE OUT.
Cuffie Monitor attivi
amplificatore e altoparlanti
o
Procedure operative di base per i menu
Premere il pulsante MENU per accedere alla
1.
schermata
Usare la ruota per selezionare (evidenziare) una
2.
delle voci del menu, quindi premere il pulsante
ENTER/MARK per passare alla schermata delle
impostazioni desiderata.
Usare la ruota per selezionare (evidenziare) una
3.
voce da impostare.
Premere i pulsanti ENTER/MARK o / per
4.
spostare il cursore verso destra ed evidenziare il
valore dell’impostazione.
Usare la ruota per modificare l’impostazione.
5.
Se si desidera impostare un’altra voce nello
6.
stesso menu, premere il pulsante ENTER/
MARK o il pulsante . per spostare il cursore
verso sinistra.
Se necessario, ripetere i passaggi da 3. a 6. per
7.
selezionare altre voci.
Al termine, premere il pulsante 8/HOME per
8.
tornare alla schermata principale.
MENU
.
Struttura del menu
MENU
MODE
REC SETTING
AUTO FUNCTION
BROWSE
(solo quando è selezionata la
modalità 4CH)
SONG
(solo quando è selezionata la
modalità MTR)
TOOLS
REVERB
POWER/DISPLAY
SYSTEM
Selezione della
modalità di
registrazione o di
riproduzione
Impostazioni di
registrazione
Funzioni utili per i
file registrati
Esplorazione di
file e cartelle sulla
scheda SD
Impostazione di
altre funzioni utili
Impostazione
degli effetti di
riverbero
Impostare l’alimentazione e il
display
Impostazioni di
sistema dell’unità
Registrazione
Schermata di registrazione
La schermata seguente viene visualizzata quando
l’unità è in stato di attesa di registrazione o mentre è
in corso la registrazione.
Schermata di registrazione in modalità 4 CH
Schermata di registrazione in modalità MTR
1 Visualizzazione stato acceso/spento
della funzione DUAL REC (solo
modalità 4CH)
Nessuna indicazione
2 Visualizzare lo stato di attivazione/
disattivazione riverbero
Icona Stato acceso/spento
Nessuna Disattivazione riverbero
: Funzione DUAL REC spenta
: Funzione DUAL REC accesa
Attivazione riverbero
(registrazione con attuatore acceso)
Attivazione riverbero
(stato SEND)
3 Display alimentazione phantom
Nessuna : Nessuna alimentazione phantom
: Alimentazione phantom 48 V attiva
: Alimentazione phantom 24 V attiva
4 Visualizzazione dello stato di funzion-
amento del registratore
Questa icona indica lo stato di funzionamento
del registratore.
Indicatore Significato
09
0
Registrazione in attesa o in pausa
Registrazione in corso
5 Visualizzazione dello stato di
impostazione della funzione PRE REC
o Auto REC (solo modalità 4CH)
Quando la funzione PRE REC è in stato ON,
viene visualizzata l’icona .
Quando la funzione AUTO REC è in stato ON,
viene visualizzata l’icona .
6 Visualizzazione del nome del file o del
brano
Il nome del file che verrà automaticamente
assegnato al file registrato viene visualizzato
qui.
In presenza di vari file in modalità 4CH, vengono
visualizzati solo la parte formattata dei nomi
del file e il numero di base dei file registrati.
Quando si registra un solo file, viene visualizzato
il suo titolo.
Quando si seleziona la modalità MTR, viene
visualizzato il titolo di un brano aperto.
7 Visualizzazione del riferimento del
misuratore di livello
È un riferimento del misuratore di livello, per
regolare i livelli di ingresso e di uscita.
Viene visualizzato in corrispondenza della
posizione “−12 dB” sulla scala.
8 Misuratore di livello
Indica il livello del segnale audio in ingresso.
Quando si registra in modalità di mix in sovrain-
cisione viene visualizzato il livello del segnale in
ingresso mixato e dei suoni riprodotti. Il simbolo
tg è visibile nella posizione corrispondente
a “-12 dB” sulla scala, come riferimento per la
regolazione del livello in ingresso.
9 Visualizzazione dello stato dei file
Lo stato del file viene visualizzato in vari modi, a
seconda del tipo di file da riprodurre.
: File stereo
: File mono x 2
0 Tempo di registrazione trascorso
Viene visualizzato il tempo di registrazione
trascorso nel formato ore : minuti : secondi.
q Tempo di registrazione rimanente
Viene visualizzato il tempo di registrazione
rimanente fino al raggiungimento della dimensione massima del file selezionato, nel formato
ore : minuti : secondi. Se il tempo di registrazione rimanente sulla scheda SD è minore, verrà
invece visualizzato quest’ultimo.
w Valore di picco in decibel (dB)
Viene visualizzato il valore di picco del segnale
in ingresso, in decibel.
TASCAM DR-44WL
55

Regolazione manuale del livello
in ingresso
Premere il pulsante INPUT LEVEL sul
1.
pannello destro per mostrare la schermata di
impostazione “INPUT LEVEL” a comparsa sul
display.
Premere il pulsante TRACK/INPUT per selezi-
2.
onare un canale per il quale regolare il livello in
ingresso.
Usare il controllo del volume INPUT LEVEL sul
3.
pannello laterale destro per regolare il livello in
ingresso.
Se il segnale in ingresso è troppo forte, l’indi-
catore PEAK, nel pannello superiore, si illumina
in rosso.
Sul misuratore di livello è visibile il simbolo
tg nella posizione “-12 dB”.
Impostare il livello di registrazione in prossimità
di questo simbolo evitando che l’indicatore
PEAK si illumini in rosso.
Al termine, premere il pulsante 8/HOME per
4.
tornare alla schermata principale.
Impostazioni del filtro
passa-alto
Impostare il filtro passa-alto per eliminare il rumore
o altri suoni a bassa frequenza. Questa funzione si
può usare, ad esempio, per ridurre il rumore dell’aria
condizionata e sgradevoli rumori causati dal vento.
Premere il pulsante INPUT per visualizzare la
1.
schermata
Premere il pulsante TRACK/INPUT per selezi-
2.
onare un canale per il quale impostare il filtro
passa-alto.
Usare la ruota per selezionare (evidenziare) la
3.
voce
ENTER/MARK o il pulsante / per visual-
izzare gli elementi da impostare in un riquadro
a comparsa.
Usare la ruota per impostare la frequenza di
4.
taglio del filtro passa-alto per l’ingresso del
microfono.
Valori di impostazione:
OFF, 40 Hz, 80 Hz, 120Hz, 220 Hz
Premendo il pulsante ENTER/MARK o il
5.
pulsante . il riquadro a comparsa si chiude
e la funzione viene abilitata.
All’aumentare del valore numerico (e quindi della
frequenza) si possono “tagliare” le frequenze basse in
una fascia più grande.
INPUT SETTING
LOW CUT
, quindi premere il pulsante
sul display.
Uso della funzione di controllo del livello
È possibile impostare la funzione di controllo del
livello per la registrazione attraverso un microfono.
TASCAM DR-44WL
56
Premere il pulsante INPUT per visualizzare la
1.
schermata
Premere il pulsante TRACK/INPUT per
2.
selezionare un canale per il quale impostare la
funzione di controllo del livello.
Usare la ruota per selezionare (evidenziare)
3.
la voce
pulsante ENTER/MARK o il pulsante / per
visualizzare gli elementi da impostare in un
riquadro a comparsa.
Usando la ruota per selezionare (evidenziare) la
4.
funzione desiderata e premendo poi il pulsante
ENTER/MARK o il pulsante . il riquadro a
comparsa si chiude e la funzione viene abilitata.
PEAK REDUCTION
Questa funzione si utilizza per abbassare automaticamente il livello di registrazione a un livello più
appropriato quando il segnale in ingresso è troppo
alto. È possibile aumentare il livello di registrazione manualmente. Questa funzione è utile per la
registrazione di musica con variazioni di volume che
influenzano negativamente il suono. Se la funzione
viene disattivata dopo averla impostata, il livello
scelto viene conservato.
LIMITER
Questa funzione evita la distorsione causata da un
segnale in ingresso improvviso ed eccessivo. Questo
è utile quando non si desidera modificare il livello di
registrazione.
In questa modalità è possibile modificare il livello
di registrazione manualmente, anche durante la
registrazione.
INPUT SETTING
LEVEL CTRL
, quindi premere il
sul display.
Registrare
Il registratore consente di registrare i suoni in due
modalità: 4CH e MTR.
In modalità 4CH, si possono registrare fino a quattro
tracce contemporaneamente attraverso il microfono
incorporato e il terminale di ingresso esterno.
In modalità MTR si possono registrare suoni su un
file già registrato, oltre a registrare un massimo di
quattro tracce.
Premere il pulsante RECORD [0] per passare
1.
allo stato di attesa della registrazione.
È possibile controllare i nomi dei file registrati
visualizzati sul display prima di avviare la
registrazione.
Premere il pulsante TRACK/INPUT per selezi-
2.
onare un canale per la registrazione.
Premere il pulsante RECORD [0].
3.
Si avvia la registrazione normale.
Premere il pulsante 8/HOME per concludere
4.
la registrazione.
Per mettere in pausa la registrazione, premere
il pulsante RECORD [0]. Se si preme nuovamente il pulsante RECORD [0] o si preme il
pulsante 7/9, la registrazione sugli stessi file
riprende.
Se si preme il pulsante 8/HOME dopo aver
messo in pausa la registrazione, viene creato un
file audio del suono registrato fino alla pausa.
Informazioni sullo stato di attesa della registrazione
Questa unità dispone di una funzione di attesa della
registrazione, come i registratori professionali. Nello
stato di attesa si possono eseguire operazioni come
la configurazione delle impostazioni del livello di
ingresso per poi riavviare rapidamente la registrazione.
In stato di attesa della registrazione, l’indicatore
REC lampeggia e vine visualizzata la schermata di
registrazione.
Struttura del menu di registrazione
È possibile configurare varie impostazioni utilizzando la voce
MENU
REC SETTING
.
nella schermata
REC SETTING
FILE FORMAT
SAMPLE RATE
PRE REC
DUAL REC
MS MIC
Impostazione del formato dei
file
BWF: 16/24 bit
WAV: 16/24 bit,
MP3: 32 - 320 kbps
Impostazione della frequenza
di campionamento
44,1 kHz, 48 kHz, 96 kHz
(96 kHz solo per file BWF/
WAV )
Impostazione della funzione di
preregistrazione
OFF, ON
Imposta la funzione DUAL
REC
MODE, LEVEL/FORMAT
Impostazione della funzione
MS per il microfono
MS DECODE, SOURCE
Riproduzione
Riproduzione delle registrazioni
Quando la schermata principale è aperta e la
riproduzione è ferma, premere il pulsante 7/9 per
avviare la riproduzione.
Mettere in pausa
Quando la schermata principale è aperta e una
traccia è in riproduzione, premere il pulsante 7/9
per mettere in pausa la riproduzione nella posizione
corrente.
Arresto
Premendo il pulsante 8/HOME mentre la
schermata principale è aperta e una traccia è in
riproduzione, si mette in pausa la riproduzione.
Se si preme di nuovo il pulsante 8/HOME, la riproduzione si arresta all’inizio del file.
Riavvolgimento e avanzamento veloce
(ricerca)
Mentre la schermata principale è aperta e una traccia
è ferma o in riproduzione, tenere premuto il pulsante
. o / per riavvolgere o avanzare velocemente e
cercare il file in riproduzione.
Spostamento della posizione di riproduzione
È possibile spostare la posizione di riproduzione
agendo sulla ruota mentre la schermata principale è
aperta e una traccia è ferma o in riproduzione.
Una volta spostata la posizione di riproduzione, la riproduzione rimane in pausa. Selezione di un file da riprodurre (saltare)
Mentre la schermata principale è aperta, premere
il pulsante . o / per selezionare il file da
riprodurre.
Premendo il pulsante . all’inizio della riproduzione di un file si salta all’inizio del file precedente.
Premendo il pulsante / all’inizio della riproduzione o durante la stessa, si passa al file successivo.
Regolare il volume di riproduzione
Il volume dell’audio in uscita attraverso il jack
/LINE OUT si può regolare utilizzando il pulsante
OUTPUT LEVEL (+/−) mentre la schermata
principale è aperta.

Collegamento a un computer
È possibile trasferire i file audio dalla scheda SD
inserita nell’unità a un computer e dal computer
verso l’unità.
Collegamento dell’unità a un computer tramite un
cavo USB
Usare il cavo USB in dotazione per collegare
1.
l’unità a un computer. Se l’alimentazione è
disinserita, inserirla.
Nella schermata
2.
STORAGE
MARK per collegare l’unità al computer.
Sul display viene visualizzato il testo
connected
Accedendo alle risorse del computer, in
3.
Windows, l’unità viene visualizzata sullo
schermo del computer come un disco esterno
denominato “DR-44WL”.
USB SELECT
e premere il pulsante ENTER/
.
, selezionare
USB
Scambio di file con un computer
Fare clic sull’unità “DR-44WL” sul computer per visualizzare le cartelle “MUSIC” e “UTILITY”.
Per trasferire i file sul computer, aprire la cartella
“MUSIC” e trascinare i file sulla destinazione desiderata.
Per trasferire i file dal computer, trascinare i file audio
desiderati dal computer alla cartella “MUSIC”.
Scollegamento dell’unità dal computer
Prima di scollegare il cavo USB, seguire la procedura
corretta per la rimozione dell’unità dal computer.
L’alimentazione si interrompe dopo che l’unità ha
completato lo spegnimento.
Consultare il manuale di istruzioni del computer per
le istruzioni su come scollegare correttamente un
volume esterno.
Visualizzazione impostazioni e informazioni
CONTROL). Oltre a trasferire le operazioni di controllo
come la riproduzione e l’arresto, è anche possibile
regolare il segnale in ingresso, trasferire i file registrati
e altro ancora, tramite Wi-Fi.
Come ottenere e installare l’applicazione dedicata (DR CONTROL)
Connettersi a Internet con uno smartphone.
1.
Se si tratta di un dispositivo Android, scaricare e
2.
installare l’applicazione dedicata (DR CONTROL)
da Google Play Store. Se è un dispositivo iOS,
scaricarla e installarla dall’App Store.
Connettere l’unità a uno smartphone tramite Wi-Fi per la prima
volta
È possibile connettere l’unità a uno smartphone
direttamente tramite Wi-Fi. Non sono quindi
necessari dispositivi esterni (come un router) né un
ambiente di rete Wi-Fi. Per stabilire la connessione,
basta avere l’unità e uno smartphone.
* Durante la connessione dell’unità allo smartphone,
non è possibile connettere lo smartphone a una
rete Wi-Fi esterna.
Se si utilizza un dispositivo iOS
Premere il pulsante Wi-Fi fino a quando l’indi-
1.
catore Wi-Fi lampeggia.
Sul display viene visualizzato un messaggio a
comparsa.
Verrà effettuata una connessione ad un nuovo
2.
smartphone, quindi premere il pulsante
ENTER/MARK.
Sul dispositivo iOS, selezionare “Impostazioni”
4.
w “Wi-Fi”.
Quando si attiva la connessione Wi-Fi sul
5.
dispositivo iOS, viene visualizzato un elenco di
SSID dei dispositivi Wi-Fi. Selezionare l’identificatore SSID visualizzato sul display dell’unità.
Sul dispositivo iOS viene visualizzata una
6.
schermata in cui si chiede di immettere la
password. Immettere la chiave di crittografia
visualizzata sul display dell’unità.
Viene stabilita una connessione Wi-Fi tra l’unità
7.
e lo smartphone e l’indicatore Wi-Fi si illumina.
Spegnere l’altoparlante incorporato
Impostare le voci
SPEAKER
su
MENU
OFF
.
w
TOOLS
w
Impostazioni di sistema
Utilizzare il menu SYSTEM per personalizzare
le impostazioni per l’utilizzo dell’unità. È anche
possibile eseguire operazioni come l’inizializzazione
delle impostazioni e la formattazione delle schede
SD.
Selezionare
1.
pulsante ENTER/MARK.
Configurare le impostazioni necessarie per
2.
ciascuna funzione.
MENU
w
SYSTEM
e premere il
Connettere l’unità a uno smartphone tramite Wi-Fi
ATTENZIONE
Il presente prodotto è stato progettato in
conformità alle normative in materia di
vendita.
Il presente prodotto viene utilizzato nei
seguenti Paesi/aree geografiche.
Stati Uniti, Canada, Europa (Stati membri
dell’UE), Australia, Nuova Zelanda,
Giappone
Nei Paesi non menzionati in precedenza,
l’uso della funzione Wi-Fi è limitato. Prima
dell’uso, controllare le normative del Paese.
È possibile controllare l’unità con il telecomando,
attraverso un’applicazione dedicata gratuita (DR
Sul display vengono visualizzate le stringhe
3.
“SSID” e “Encryption key”, dopodiché l’unità
passa automaticamente alla modalità WPS.
NO TA
La modalità WPS è lo standard per
connettere in modo semplice i dispositivi
Wi-Fi. L’unità utilizza pulsanti per i dispositivi
Android.
Se si utilizza un dispositivo Android
Premere il pulsante Wi-Fi fino a quando l’indi-
1.
catore Wi-Fi lampeggia.
Sul display viene visualizzato un messaggio a
comparsa.
Verrà effettuata una connessione ad un nuovo
2.
smartphone, quindi premere il pulsante
ENTER/MARK.
Sul display vengono visualizzate le stringhe
3.
“SSID” e “Encryption key”, dopodiché l’unità
passa automaticamente alla modalità WPS.
TASCAM DR-44WL
57

NO TA
La modalità WPS è lo standard per
connettere in modo semplice i dispositivi
Wi-Fi. Questa unità utilizza il sistema di
codice PIN per dispositivi iOS.
Sul dispositivo Android, selezionare
4.
“Impostazioni” w “Wi-Fi”.
Quando si attiva la connessione Wi-Fi sul
5.
dispositivo Android, viene visualizzato un
elenco di SSID dei dispositivi Wi-Fi. Selezionare
l’identificatore SSID visualizzato sul display
dell’unità.
Verrà effettuata una connessione ad uno smart-
2.
phone previamente connesso, quindi premere
il pulsante 8/HOME.
Il messaggio a comparsa sul display scompare e
3.
l’unità rimane in attesa della connessione a uno
smartphone.
Sul dispositivo iOS, selezionare “Impostazioni”
4.
w “Wi-Fi”.
Quando si attiva la connessione Wi-Fi sul
5.
dispositivo iOS, viene visualizzato un elenco di
SSID dei dispositivi Wi-Fi. Selezionare l’identificatore SSID visualizzato sul display dell’unità.
Viene stabilita una connessione Wi-Fi tra l’unità
6.
e lo smartphone e l’indicatore Wi-Fi si illumina.
Se si utilizza un dispositivo Android
Premere il pulsante Wi-Fi sull’unità fino a
1.
quando l’indicatore Wi-Fi lampeggia.
Sul display viene visualizzato un messaggio a
comparsa.
Verrà effettuata una connessione ad uno smart-
2.
phone previamente connesso, quindi premere
il pulsante 8/HOME.
Controllo remoto dell’unità attraverso uno smartphone
Poiché l’applicazione dedicata (DR CONTROL) ha
lo stesso schermo dell’unità, è possibile utilizzare
l’apparecchio a distanza con l’applicazione quasi allo
stesso modo di come lo si controllerebbe dall’unità.
Prima di utilizzare l’applicazione “DR CONTROL”,
confermare il modo in cui utilizzare l’unità. Così sarà
possibile utilizzare l’applicazione senza problemi.
Dopo aver stabilito la connessione Wi-Fi tra
1.
l’unità e lo smartphone, avviare l’applicazione
“DR CONTROL” installata sullo smartphone.
Dopo aver avviato l’applicazione “DR CONTROL”
2.
sullo smartphone verrà visualizzata la seguente
schermata e sarà possibile di utilizzare l’unità
con il telecomando.
Per una spiegazione dettagliata delle caratteristiche dell’applicazione “DR CONTROL” consultare
il manuale di riferimento intitolato “DR CONTROL
Reference Manual”, che si può scaricare dal sito di
TEAC Global (http://teac-global.com/).
Sul dispositivo Android viene visualizzata una
6.
schermata in cui si chiede di immettere la
password. Immettere la chiave di crittografia
visualizzata sul display dell’unità.
Viene stabilita una connessione Wi-Fi tra l’unità
7.
e lo smartphone e l’indicatore Wi-Fi si illumina.
NO TA
Le operazioni da svolgere per i dispositivi
Android descritte in precedenza si riferiscono
agli smartphone. Per i dettagli, consultare il
manuale per l’uso dello smartphone.
Connettere l’unità a uno smartphone tramite Wi-Fi (seconda
volta e successive)
Dopo aver connesso l’unità allo smartphone, sarà
possibile riconnetterla di nuovo in futuro semplicemente selezionando l’identificatore SSID.
Se si utilizza un dispositivo iOS
Premere il pulsante Wi-Fi sull’unità fino a
1.
quando l’indicatore Wi-Fi lampeggia.
Sul display viene visualizzato un messaggio a
comparsa.
Il messaggio a comparsa sul display scompare e
3.
l’unità rimane in attesa della connessione a uno
smartphone.
Sul dispositivo Android, selezionare
4.
“Impostazioni” w “Wi-Fi”.
Quando si attiva la connessione Wi-Fi sul
5.
dispositivo Android, viene visualizzato un
elenco di SSID dei dispositivi Wi-Fi. Selezionare
l’identificatore SSID visualizzato sul display
dell’unità.
Viene stabilita una connessione Wi-Fi tra l’unità
6.
e lo smartphone e l’indicatore Wi-Fi si illumina.
NO TA
Le operazioni da svolgere per i dispositivi
Android riportate in precedenza si riferiscono
agli smartphone. Per i dettagli, consultare il
manuale per l’uso dello smartphone.
Trasferimento di file dall’unità ad uno smartphone
Premere il pulsante “Browse” nella schermata “DR
1.
CONTROL”.
Nella schermata “Browse” viene visualizzato
2.
l’elenco dei file dell’unità. Selezionare un file da
trasferire.
Viene visualizzata una schermata con i dettagli
3.
del file. Premere il pulsante “Copy”.
Viene visualizzata una schermata di conferma
4.
della copia del file. Premendo il pulsante “YES”,
si avvia il trasferimento di file dall’unità allo
smartphone.
TASCAM DR-44WL
58

Riferimento rapido per l’utilizzo delle varie funzioni
I nomi dei pulsanti vengono visualizzati come segue: MENU.
Le istruzioni sono abbreviate. Ad esempio, il messaggio “Nella schermata principale, premere il pulsante MENU, selezionare il menu “REC SETTING”, quindi scegliere la
voce “PRE REC”” diventa: “Schermata principale w MENU w
Non tutti i singoli passaggi vengono illustrati per le operazioni complesse. Per le procedure dettagliate, consultare il manuale di riferimento.
Categoria Azione desiderata
Tornare alla schermata
principale
Nome della funzione
Registrare
Funzioni di
base
Riprodurre un file
Regolare il volume di riproduzione
Selezionare un file da riprodurre
Modificare il formato di file
Registrazione
Impostazioni del filtro
passa-alto
Regolare il livello di ingresso
manualmente
Regolare automaticamente
il livello di ingresso
Registrare contemporaneamente due file a livelli di
ingresso diversi
Funzione filtro
passa-alto
Funzione di
controllo del
livello
Funzione DUAL
REC
Utilizzare il microfono MS
Altre funzioni
di registrazione
Operazioni sui
file
(solo in
modalità 4CH)
Aggiungere un marcatore
durante la registrazione
Passare da un file all’altro
manualmente durante la
registrazione
Configurare le impostazioni
per passaggio automatico da
un file all’altro
Iniziare a registrare poco
prima di premere RECORD
Controllare le informazioni
sul file
Cancellare un file
Cancellare un file
Eliminare tutti i file in una
cartella allo stesso tempo
Dividere un file
Funzione di
marcatura
Incremento
manuale della
traccia
Incremento
automatico della
traccia
Funzione PRE REC
Funzione di
divisione
Impostare la data e l’ora
Controllare le informazioni
relative all’unità e alla
scheda
Impostazioni
dell’unità
Modificare l’impostazione
della funzione automatica
di risparmio energetico per
l’alimentazione
Cambiare l’impostazione
della retroilluminazione
Regolare il contrasto del
display
Funzione
automatica
di risparmio
energetico
Impostare il tipo di batteria
Impostare il valore di tensione
dell’alimentazione phantom
Ripristinare l’unità alle
impostazioni predefinite
Formattare completamente
una scheda SD
Impostare il formato del
nome file
Funzione di inizializzazione
Funzione di
formattazione
REC SETTING
w
PRE REC
”
Procedure, pulsanti utilizzati e spiegazione
8/HOME
Tornare alla schermata principale, se non si è sicuri su come procedere.
Schermata principale w RECORD w RECORD
La registrazione inizierà con le impostazioni correnti.
Schermata principale w 7/9
Riprodurre il file visualizzato (selezionato).
Pulsante OUTPUT LEVEL (+/-)
Regolare il volume delle cuffie, degli altoparlanti e così via.
Schermata principale w .//
La funzione che consente di sfogliare è comoda quando i file sono molti.
Schermata principale w MENU w
REC SETTING
w
FILE FORMAT
Specificare un formato di file utilizzato per la registrazione, tra BWF, WAV e così via.
Schermata principale w INPUT w
INPUT SETTING
w
LOW CUT
Questa funzione rimuove il rumore e altri suoni a bassa frequenza. Impostare la frequenza di taglio.
Schermata principale w pulsante INPUT LEVEL w pulsante TRACK/INPUT w cursore INPUT
LEVEL
Regolare il livello di registrazione seguendo il riferimento del misuratore di livello.
Schermata principale w INPUT w
Questa funzione comprime solo i suoni forti, per evitare sovraccarichi, senza modificare il livello di
registrazione.
Schermata principale w MENU w
INPUT SETTING
REC SETTING
w
w
LEVEL CTRL
DUAL REC
Configurare le impostazioni per la funzione DUAL REC.
Schermata principale w MENU w
REC SETTING
w
MS MIC
Configurare le impostazioni per il microfono MS prima di utilizzarlo.
Schermata di registrazione w ENTER/MARK
Questa funzione consente di aggiungere un marcatore che può essere utilizzato come indice durante
la riproduzione.
Schermata di registrazione w /
Questa funzione permette di passare da un file a un altro continuando a registrare, ad esempio come
con l’intervallo tra i brani.
Schermata principale w MENU w
Questa funzione consente di passare automaticamente da un file a un altro avente le dimensioni
impostate.
Schermata principale w MENU w
Se il passaggio dalla registrazione in standby alla registrazione attiva è lento, questa funzione consente
all’unità di compensare il ritardo.
Schermata principale w MENU w
AUTO FUNCTION
REC SETTING
BROWSE
w Ruota w QUICK w
w
w
TRACK INCREMENT
PRE REC
INFORMATION
Questa funzione permette di controllare la data di registrazione e le dimensioni del file e così via.
Schermata principale w MENU w
BROWSE
w Ruota w QUICK w
FILE DELETE
È possibile eliminare i file non necessari.
Schermata principale w QUICK w
DELETE
È possibile eliminare i file non necessari.
Schermata principale w MENU w
BROWSE
w Ruota w QUICK w
ALL DELETE
È possibile eliminare tutti i file in una cartella allo stesso tempo.
Schermata principale w QUICK w
DIVIDE
Usare questa funzione per dividere in due un file.
Schermata principale w MENU w
Questa funzione permette di regolare l’orologio interno, utilizzato per scopi come l’aggiunta della
data di registrazione ai file.
Schermata principale w MENU w
Questa funzione permette di controllare informazioni come la versione del firmware dell’unità e la
quantità di spazio rimanente sulla scheda.
Schermata principale w MENU w
SYSTEM
SYSTEM
POWER/DISPLAY
w
DATE/TIME
w
INFORMATION
w
AUTO PWR SAVE
Questa funzione consente di spegnere automaticamente l’unità quando non viene utilizzata.
Schermata principale w MENU w
POWER/DISPLAY
w
BACKLIGHT
Modificare le impostazioni di retroilluminazione.
Schermata principale w MENU w
POWER/DISPLAY
w
CONTRAST
Imposta la gradazione di ombreggiatura visualizzata sul display.
Schermata principale w MENU w
Selezionare il tipo di batteria in uso. Questa impostazione influisce sulla visualizzazione della carica
residua della batteria.
Schermata principale w MENU w
Schermata principale w MENU w
POWER/DISPLAY
POWER/DISPLAY
SYSTEM
w
w
w
INITIALIZE
BATTERY TYPE
PHANTOM VOLT
Consente di ripristina tutte le impostazioni ai valori predefiniti.
Schermata principale w MENU w
SYSTEM
w
MEDIA FORMAT
Consente di formattare le schede.
Schermata principale w MENU w
SYSTEM
w
FILE NAME
Si possono modificare i caratteri utilizzati nei nomi dei file assegnati automaticamente.
TASCAM DR-44WL
59

Messaggi
Di seguito è riportato un elenco di messaggi a comparsa.
Consultare l’elenco se viene visualizzato uno di questi messaggi, per conoscerne il
significato o determinare un metodo per affrontare il problema.
Messaggio Significato e metodo per risolvere il problema
Battery Empty Le batterie sono quasi scariche. Sostituire le batterie.
Can’t Divide
Card Error
Card Full
Current File MP3 I file MP3 non possono essere divisi.
Dup File Name
File Full
File Name ERR
File Not Found
File Not Found
Make Sys File
File Protected Il file è di sola lettura e non può essere eliminato.
Format Error
Format CARD
Invalid Card
Change Card
Invalid SysFile
Make Sys File
I/O Too Short
Layer too Deep
Max File Size Le dimensioni del file sono superiori a quelle consentite.
MBR Error Init
CARD
No Card
No PB File
Non-Supported
Switched To
Internal Battery
Write Timeout
Se si verifica qualsiasi altro errore, spegnere l’unità e riavviarla.
Il punto di divisione selezionato utilizzato quando è stata
eseguita la funzione DIVIDE non è appropriato (è troppo
vicino all’inizio o alla fine del file).
Impossibile riconoscere la scheda SD correttamente. Sostituire la scheda.
La scheda SD non ha più spazio disponibile. Cancellare i file
non necessari o spostarli su un computer per liberare spazio.
Nella stessa cartella esiste un file con lo stesso nome di quello
creato con la funzione DIVIDE. La funzione DIVIDE aggiunge
il suffisso “a” o “b” alla fine del nome del file. Prima di usare la
funzione DIVIDE, collegare l’unità a un computer e modificare
il nome del file.
Il numero totale di cartelle e file è superiore a 5.000. Eliminare
le cartelle e i file non necessari o spostarli su un computer.
La funzione DIVIDE ha assegnato a un file un nome che
supera i 200 caratteri. La funzione DIVIDE aggiunge il suffisso
“a” o “b” alla fine del nome del file. Prima di usare la funzione
DIVIDE, collegare l’unità a un computer e modificare il nome
del file in modo che abbia meno di 198 caratteri.
Impossibile trovare il file oppure il file potrebbe essere
danneggiato. Controllare il file corrispondente.
Il file di sistema è mancante. Questa unità per funzionare
richiede un file di sistema. Mentre viene visualizzato questo
messaggio, premere il pulsante ENTER/MARK per creare un
file di sistema.
La scheda SD non è formattata correttamente oppure
potrebbe essere danneggiata. Questo messaggio viene
visualizzato anche se la scheda è stata formattata con un
computer collegato via USB e se si inserisce nell’unità una
scheda non formattata.
Usare sempre l’unità DR-44WL per formattare le schede da
utilizzare con questa unità. Sostituire la scheda SD o premere
il pulsante ENTER/MARK mentre questo messaggio è
visualizzato per formattarla.
La formattazione cancellerà tutti i dati presenti sulla scheda
SD.
La scheda SD non funziona correttamente. Sostituire la
scheda SD.
Il file di sistema necessario al funzionamento di questa unità
non è valido. Mentre viene visualizzato questo messaggio,
premere il pulsante ENTER/MARK per creare un nuovo file
di sistema.
I punti IN (inizio) e OUT (fine) sono troppo vicini. Impostarli ad
almeno 1 secondo.
Le cartelle possono essere create solo con un massimo di due
strati. Non è possibile creare una nuova cartella all’interno di
questa cartella.
La scheda SD non è formattata correttamente oppure
potrebbe essere danneggiata. Sostituire la scheda SD
o premere il pulsante ENTER/MARK mentre questo
messaggio è visualizzato per formattarla.
La formattazione cancellerà tutti i dati presenti sulla scheda
SD.
Nessuna scheda SD impostata. Inserire una scheda SD
registrabile.
Nessun file che possa essere riprodotto. Il file potrebbe essere
danneggiato.
Il formato del file non è supportato. Consultare la sezione
“Collegamento dell’unità a un computer” nel manuale di
riferimento, per informazioni sui formati di file utilizzabili con
l’unità.
L’alimentazione è stata commutata da USB alle batterie
interne.
Il tempo di scrittura sulla scheda SD è scaduto.
Eseguire il backup dei file presenti nella scheda SD su un
computer, quindi formattare la scheda SD.
Risoluzione dei problemi
Se l’unità non funziona correttamente, eseguire le seguenti verifiche prima
di richiedere un intervento di riparazione. Se queste misure non risolvono il
problema, rivolgersi al negozio presso il quale è stata acquistata l’unità oppure al
supporto clienti TEAC (i dettagli sono riportati alla fine del presente documento).
L’unità non si accende.
Verificare che le batterie non siano scariche.
Verificare che le batterie siano installate rispettando la polarità, con i simboli ¥ e
^ nell’orientamento corretto.
Verificare che l’alimentatore CA (GPE053B) in dotazione con l’unità sia collegato
correttamente alla presa e al connettore USB dell’unità.
Quando si utilizza l’alimentazione del bus USB, verificare che il cavo USB sia
collegato saldamente.
Se si utilizza l’alimentazione del bus USB, verificare che il cavo non sia collegato
tramite un hub USB.
Verificare che l’interruttore HOLD/ non sia in posizione HOLD.
L’unità si spegne automaticamente.
Verificare che la funzione automatica di risparmio energetico non sia attiva. (w
“Impostazione della funzione automatica di risparmio energetico” nella sezione
“Visualizzazione impostazioni e informazioni” del manuale di riferimento)
Questa unità è conforme alle normative europee sull’alimentazione in
i
standby (ERP), quindi la funzione automatica di risparmio energetico
si attiva indipendentemente dal fatto che l’unità venga alimentata da
un alimentatore o da batterie. Se non si desidera utilizzare la funzione
automatica di risparmio energetico, impostarla su “OFF” (l’impostazione
predefinita è “30min”).
L’unità non funziona.
Verificare che l’interruttore HOLD / non sia in posizione HOLD.
Verificare che l’unità non sia collegata a un computer tramite un cavo USB (sul
display è visibile il testo “USB connected”).
La scheda SD non viene riconosciuta.
Verificare che la scheda SD sia inserita completamente.
L’unità non riproduce i brani.
Se si sta tentando di riprodurre un file WAV, verificare che la frequenza di campionamento sia supportata dall’unità.
Se si sta tentando di riprodurre un file MP3, verificare che il bit rate sia supportato
da questa unità.
Nessun suono viene emesso dal diffusore.
Verificare che le cuffie non siano collegate.
Verificare che “SPEAKER” non sia impostato su “OFF”.
Verificare il collegamento al sistema di monitoraggio.
Verificare che il volume del sistema di monitoraggio non sia al minimo.
Verificare che l’impostazione OUTPUT LEVEL dell’unità non sia al minimo.
Non viene emesso nessun suono.
Controllare il collegamento al sistema di monitoraggio.
Verificare che il volume del sistema di monitoraggio non sia al minimo.
Verificare che l’impostazione OUTPUT LEVEL dell’unità non sia al minimo.
L’unità non registra.
Se si utilizza un dispositivo esterno, controllare nuovamente il collegamento.
Ricontrollare le impostazioni di ingresso.
Verificare che il livello in ingresso non sia troppo basso.
Verificare che la scheda SD non sia piena.
Verificare che non sia stato raggiunto il numero massimo di file che l’unità può
gestire.
Il livello in ingresso è basso.
Verificare che l’impostazione del livello di ingresso non sia troppo bassa.
Verificare che il livello di uscita di ogni dispositivo collegato non sia troppo basso.
Il suono registrato è distorto.
Verificare che l’impostazione del livello di ingresso non sia troppo alto.
Verificare che la funzione riverbero sia disattivata.
L’audio di riproduzione è innaturale.
Verificare che la velocità di riproduzione non sia stata modificata.
Verificare che l’equalizzatore in riproduzione sia spento.
TASCAM DR-44WL
60

Verificare che la funzione di allineamento del livello sia disabilitata.
Verificare che la funzione riverbero sia disattivata.
Non si riesce a eliminare i file.
Verificare che il file che si sta tentando di cancellare non sia stato copiato da un
computer dopo essere stato protetto da scrittura.
I file di questa unità non vengono visualizzati sul computer.
Verificare che l’unità sia collegata al computer tramite la sua porta USB.
Verificare che non sia in uso un hub USB.
Verificare che l’unità non sia in registrazione o in stato di attesa di registrazione.
L’unità non può essere connessa ad uno smartphone oppure la
comunicazione reciproca si arresta.
Verificare che il dispositivo Wi-Fi sia acceso e che il Wi-Fi sia attivato.
Verificare che la distanza tra il dispositivo Wi-Fi e l’unità non sia eccessiva.
Verificare inoltre che non vi siano pareti o ostacoli tra essi.
Se un dispositivo Wi-Fi si trova sulla parte posteriore di questa unità, l’unità stessa
potrebbe interrompere le comunicazioni.
Cambiare le posizioni del dispositivo Wi-Fi e dell’unità.
Spegnere l’unità, quindi riaccenderla.
Eliminare la registrazione di “DR-44WL” del dispositivo Wi-Fi e attenersi alle
procedure di “Connessione dell’unità ad uno smartphone tramite Wi-Fi”.
Specifiche
Dati
Supporti di registrazione
Scheda SD (64 MB - 2 GB), scheda SDHC (4 GB - 32 GB),
scheda SDXC (64 GB - 128 GB)
Formati di registrazione/riproduzione
BWF : 44,1/48/96 kHz, 16/24 bit
WAV : 44,1/48/96 kHz, 16/24 bit
MP3 : 44,1/48 kHz, 32/64/96/128/192/256/320 kbps
Numero di canali
4 canali
Modalità 4CH mono : Fino a 4 file
i
Stereo : Fino a 2 file
Stereo (1 file) + mono (fino a 2 file)
Modalità MTR mono : Fino a 4 file
i
Ingressi e uscite
Jack EXT MIC/LINE IN
(in grado di fornire alimentazione phantom)
Connettore: XLR-3-31, jack standard φ6,3 mm TRS
Jack /LINE OUT
Connettore: jack stereo mini φ3,5 mm
Altoparlante incorporato
0,3 W (mono)
Porta USB
Connettore: Tipo Micro-B
Formato: Unità di memoria di massa USB 2.0 ad alta velocità, classe
Prestazioni audio
Risposta in frequenza
20-20 kHz +1/-3 dB (da EXT IN a LINE OUT, frequenza di campionamento 44,1 kHz, JEITA)
20-22 kHz +1/-3 dB (da EXT IN a LINE OUT, frequenza di campionamento 48 kHz, JEITA)
20-40 kHz +1/-3 dB (da EXT IN a LINE OUT, frequenza di campionamento 96 kHz, JEITA)
Distorsione
0,05% o inferiore (da EXT IN a LINE OUT, frequenza di campionamento
44,1/48/96 kHz, JEITA)
Rapporto S/N
92 dB o superiore (da EXT IN a LINE OUT, frequenza di campionamento
44,1/48/96 kHz, JEITA)
Nota: JEITA indica la conformità allo standard JEITA CP-2150
Tempi di registrazione
Formato file
(impostazione durante la registrazione)
WAV/BWF 16 bit (STEREO) 44,1 kHz 6 ore e 44 minuti
WAV/BWF 24 bit (STEREO) 96 kHz 2 ore e 04 minuti
I tempi di registrazione riportati sono stime. I tempi possono variare a seconda
della scheda SD, SDHC e SDXC in uso.
I tempi di registrazione indicati non sono tempi di registrazione continua; rappresentano piuttosto i tempi di registrazione totali possibili per le schede SD, SDHC e
SDXC.
Se si registra in mono, in formato WAV, il tempo di registrazione massimo sarà
uguale al doppio dei valori di cui sopra.
Se si registra in modalità DUAL REC, in formato WAV/BWF o su 4 canali, il tempo di
registrazione massimo sarà uguale alla metà dei valori di cui sopra.
Capacità della
scheda SDHC
4 GB
TASCAM DR-44WL
61

Requisiti per i computer collegati
Visitare il sito di TEAC Global (http://teac-global.com/) per le informazioni
aggiornate sui sistemi operativi supportati.
Sistemi operativi supportati
Windows: Windows XP, Windows Vista, Windows 7,
Windows 8 (compreso 8.1)
Mac: Mac OS X 10.2 o versioni successive
Wi-Fi
Standard wireless
Conforme a IEEE 802.11b/g/n (solo 2,4 GHz)
Modalità di comunicazione wireless
Access point semplice (AP limitato)
Protezione
WPA2-PSK (WPS2.0 supportato)
Informazioni generali
Alimentazione
4 batterie AA (alcaline o NiMH)
Alimentazione bus USB da un computer
Alimentatore CA dedicato (GPE053B in dotazione con l’unità)
Consumo
2,5 W (massimo)
Autonomia della batteria (funzionamento continuo)
Con batterie alcaline (EVOLTA)
Formato Autonomia
Registrato in WAV 2ch, 44,1
kHz, 16 bit
Con batterie NiMH (eneloop)
Formato Autonomia
Registrato in WAV 2ch, 44,1
kHz, 16 bit
NO TA
Quando si utilizza l’alimentazione phantom, l’autonomia può essere
minore, a seconda del microfono utilizzato.
Circa 16 ore
Circa 12 ore
Dimensioni
79 × 162,2 × 42,5mm (L × A × P)
Peso
346g/251g (batterie incluse / batterie non incluse)
Temperatura di esercizio
0 °C – 40 °C
Nota
Quando si seleziona l’ingresso
MIC
(l’alimentazione phantom
non è utilizzata)
Nota
Quando si seleziona l’ingresso
MIC
(l’alimentazione phantom
non è utilizzata)
Le illustrazioni presenti in questo manuale potrebbero presentare differenze
rispetto al prodotto reale.
Le specifiche e l’aspetto esterno possono essere modificati senza preavviso per
migliorare il prodotto.
Le specifiche dettagliate sono disponibili nel manuale di riferimento.
TASCAM DR-44WL
62

取扱説明書
安全にお使いいただくために
製品を安全に正しくお使いいただき、あなたや他の人々への危害や財産への損害を
未然に防止するために、以下の注意事項をよくお読みください。
以下の内容を無視して誤った取り扱いをすると、人が死亡ま
警告
V
P
ACアダプ
ターの電源
プラグをコ
ンセントか
ら抜く
=
禁止
N
指示
Y
分解禁止
V
P
ACアダプ
ターの電源
プラグをコ
ンセントか
ら抜く
N
指示
=
禁止
O
禁止
V
注意
たは重傷を負う可能性が想定される内容を示しています。
万一、異常が起きたら
煙が出たり、変なにおいや音がするときは
機器の内部に異物や水などが入ったときは
この機器を落としたり、カバーを破損したときは
すぐに機器本体の電源を切り、必ずACアダプターの電源プラグをコンセ
ントから抜いてください。異常状態のまま使用すると、火災・感電の原
因となります。
販売店またはティアック修理センター(巻末に記載)に修理をご依頼く
ださい。
ACアダプターのコードを傷つけない
ACアダプターのコードの上に重い物をのせたり、コードを壁や棚との間
に挟み込んだり、本機の下敷きにしない
ACアダプターのコードを加工したり、無理に曲げたり、ねじったり、引
っ張ったり、熱器具に近づけて加熱したりしない
コードが傷んだまま使用すると火災・感電の原因となります。
万一、ACアダプターのコードが破損したら(芯線の露出、断線など)、
販売店またはティアック修理センター(巻末に記載)をご依頼ください。
別売のACアダプターや電源コードを他の機器に使用しない
故障、火災、感電の原因となります。
交流100ボルト以外の電圧で使用しない
この機器を使用できるのは日本国内のみです。表示された電源電圧(交
流100ボルト)以外の電圧で使用しないでください。また、船舶などの
直流(DC)電源には接続しないでください。火災・感電の原因となります。
この機器の隙間などから内部に金属類や燃えやすい物などを差し込んだ
り、落としたりしない
火災・感電の原因となります。
航空機の離着陸時には使用しない
航空機の運航の安全に支障を及ぼす恐れがあるため、離着陸時の使用は
航空法令により制限されていますので、離着陸時は本機の電源をお切り
ください。
ACアダプターの電源プラグにほこりをためない
ACアダプターの電源プラグとコンセントの間にゴミやほこりが付着する
と、火災・感電の原因となります。定期的(年1回くらい)にACアダプタ
ーの電源プラグを抜いて、乾いた布でゴミやほこりを取り除いてください。
この機器のカバーは絶対に外さない
カバーを外す、または改造すると、火災・感電の原因となります。
内部の点検・修理は販売店またはティアック修理センター(巻末に記載)
にご依頼ください。
この機器を改造しない
火災・感電の原因となります。
以下の内容を無視して誤った取り扱いをすると、人が傷害を
負う可能性が想定される内容および物的損害のみの発生が想
注意
定される内容を示しています。
移動させる場合は、電源をオフ(スタンバイ状態)にし、必ずACアダプ
ターの電源プラグをコンセントから抜き、外部の接続コードを外す
コードが傷つき、火災・感電の原因や、引っ掛けてけがの原因になるこ
とがあります。
旅行などで長期間この機器を使用しないときやお手入れの際は、安全の
ため必ずACアダプターの電源プラグをコンセントから抜く
通電状態の放置やお手入れは、漏電や感電の原因となることがあります。
オーディオ機器を接続する場合は、各々の機器の取扱説明書をよく読み、
電源を切り、説明にしたがって接続する
また、接続は指定のコードを使用する
電源を入れる前には、音量を最小にする
突然大きな音が出て、聴力障害などの原因となることがあります。また、
モニター機器などを破損する原因となることがあります。
この機器はコンセントの近くに設置し、ACアダプターの電源プラグは簡
単に手が届くようにする
異常が起きた場合は、すぐにACアダプターの電源プラグをコンセントか
ら抜いて、完全に電源が切れるようにしてください。
この機器には、付属の専用ACアダプターや電源コードを使用する
それ以外の物を使用すると、故障、火災、感電の原因となります。
ぐらついた台の上や傾いた所など不安定な場所に置かない
湿気やほこりの多い場所に置かない。風呂、シャワー室では使用しない
調理台や加湿器のそばなど油煙や湯気が当たる場所に置かない
火災・感電やけがの原因となることがあります。
ACアダプターの電源プラグを抜くときは、ACアダプターの電源コード
を引っ張らない
コードが傷つき、火災・感電の原因となることがあります。
必ずプラグを持って抜いてください。
濡れた手でACアダプターの電源プラグを抜き差ししない
感電の原因となることがあります。
5年に1度は、機器内部の掃除を販売店またはティアック修理センター(巻
末に記載)にご相談ください。
内部にほこりがたまったまま、長い間掃除をしないと火災や故障の原因
となることがあります。特に、湿気の多くなる梅雨期の前に行うと、よ
り効果的です。なお、掃除費用については、ご相談ください。
電池の取り扱いについて
本機は、電池を使用しています。誤って使用すると、発熱、発火、液漏れなどを避
けるため、以下の注意事項を必ず守ってください。
乾電池に関する警告
警告
V
乾電池は絶対に充電しない
=
破裂、液漏れにより、火災・けがの原因となります。
禁止
電池に関する警告
警告
V
電池を入れるときは、極性表示(プラスとマイナスの向き)に注意し、
電池ケースに表示されている通りに正しく入れる
間違えると電池の破裂、液漏れにより、火災・けがや周囲を汚損する原
因となることがあります。
N
長時間使用しないときは電池を取り出しておく
強制
液が漏れて火災・けが、周囲を汚損する原因となることがあります。も
し液が漏れた場合は、電池ケースに付いた液をよく拭き取ってから新し
い電池を入れてください。また、万一漏れた液が身体に付いたときは、
水でよく洗い流してください。
指定以外の電池は使用しない
新しい電池と古い電池、または種類の違う電池を混ぜて使用しない
破裂、液漏れにより、火災・けがや周囲を汚損することがあります。
=
炎天下の車内や暖房器具のそばなど、温度が高くなるところで保管しな
禁止
い
本体の変形によるショートや発火、故障、電池の劣化の原因となります。
電池に関する注意
注意
V
金属製の小物類と一緒に携帯、保管しない
=
ショートして液漏れや破裂などの原因となることがあります。
禁止
分解しない
Y
電池内の酸性物質により、皮膚や衣服を損傷する恐れがあります。
分解禁止
保管や廃棄をする場合は、他の電池や金属の物と接触しないようにテー
プなどで端子を絶縁してください。
V
使い終わった電池は、電池に記載された廃棄方法、もしくは各市町村の
注意
廃棄方法にしたがって捨ててください。
ここに記載されております製品に関する情報、諸データは、あくまで一例
を示すものであり、これらに関します第三者の知的財産権、およびその他
の権利に対して、権利侵害がないことの保証を示すものではございません。
従いまして、上記第三者の知的財産権の侵害の責任、またはこれらの製品
の使用により発生する責任につきましては、弊社はその責を負いかねます
のでご了承ください。
第三者の著作物は、個人として楽しむなどのほかは、著作権法上権利者に
無断で使用できません。装置の適正使用をお願いします。
弊社では、お客様による権利侵害行為につき一切の責任を負担致しません。
TASCAM DR-44WL
63

電波に関する注意
機器認定について
本製品には、電波法に基づく省電力データ通信
システムの無線局として、工事設計認証を受け
た無線設備を内蔵しています。
無線設備名:211-140505
次の事項を行った場合、法律で罰せられること
があります。
本製品を分解、または改造すること
0
本製品の認証ラベルをはがすこと
0
Wi-Fi機器使用上の注意事項
この機器の使用周波数帯では、電子レンジなど
の産業・化学・医療用機器のほか工場の製造ラ
インなどで使用されている移動体識別用の構内
無線局(免許を要する無線局)および特定小電
力無線局(免許を要しない無線局)ならびにア
マチュア無線局(免許を要する無線局)が運用
されています。
この機器を使用する前に、近くで移動体識
1.
別用の構内無線局および特定小電力無線局
ならびにアマチュア無線局が運用されてい
ないことを確認してください。
万一、この機器から移動体識別用の構内無
2.
線局に対して有害な電波干渉の事例が発生
した場合には、すみやかに場所を変更する
か、または電波の使用を停止してください。
その他、この機器から移動体識別用の特定
3.
小電力無線局あるいはアマチュア無線局に
対して有害な電波干渉の事例が発生した場
合など何かお困りのことが起きたときは、
タスカム カスタマーサポートまでお問い
合わせください。
本機は、2.4GHz帯を使用する無線機器です。
変調方式としてDSSS/OFDM変調方式を採用
し、与干渉距離は40m以下です。
TASCAM DR-44WL
64
目次
安全にお使いいただくために ........................ 63
電池の取り扱いについて ................................63
はじめに ...........................................................64
本製品の構成 ................................................... 64
設置上の注意 ................................................... 64
結露について ................................................... 65
製品のお手入れ................................................65
ユーザー登録について .................................... 65
アフターサービス ............................................65
各部各種の名称................................................65
トップパネル ................................................ 65
フロントパネル ............................................ 65
左サイドパネル ............................................ 65
右サイドパネル ............................................ 65
ボトムパネル ................................................ 65
ホーム画面 ....................................................... 66
電源の準備 ....................................................66
電源をオンにする.........................................66
内蔵時計の設定 ............................................ 66
電源をオフにする.........................................67
モニター用機器を接続する .........................67
基本的なメニューの操作方法 ........................ 67
メニューの構成 ............................................ 67
録音 ................................................................... 67
録音画面 ........................................................ 67
入力レベルを調節する ................................. 68
ローカットフィルターを設定する..............68
レベルコントロール機能を使う ................. 68
録音する ........................................................ 68
録音待機状態について ................................. 68
録音メニューの構成 .....................................68
再生 ................................................................... 68
再生する ........................................................ 68
再生位置を移動後は、一時停止状態に
なります。再生するファイルを選択する
(スキップ) ....................................................68
再生の音量を調節する ................................. 68
パソコンと接続する ........................................ 69
パソコンへファイルを取り出す、
パソコンからファイルを取り込む..............69
パソコンとの接続を解除する ..................... 69
各種設定および情報表示 ................................69
内蔵スピーカーをオフにする ..................... 69
環境設定(SYSTEM) ................................ 69
本体とスマートフォンをWi-Fiで接続する ... 69
専用アプリケーション(DR CONTROL)
の入手・インストール方法 .........................69
本機とスマートフォンをはじめて
Wi-Fi接続する ..............................................69
本機とスマートフォンを
Wi-Fi接続する場合(2回目以降) ...............70
スマートフォンからの本機の
リモート操作 ................................................ 70
本機からスマートフォンへの
ファイル転送 ................................................ 70
こんなことをするには .................................... 71
メッセージ ....................................................... 72
トラブルシューティング ................................72
仕様 ................................................................... 73
定格 ................................................................73
入出力 ............................................................ 73
オーディオ性能 ............................................ 73
録音時間 ........................................................ 73
接続するパソコンの動作条件 ..................... 73
Wi-Fi .............................................................. 73
一般 ................................................................73
はじめに
この た びは、TASCAM DR-44WLを お買い 上
げいただきまして、誠にありがとうございます。
ご使用になる前に、この取扱説明書をよくお読
みになり、正しい取り扱い方法をご理解いただ
いた上で、末永くご愛用くださいますようお願
い申しあげます。お読みになったあとは、いつ
でも見られるところに保管してください。
取扱説明書(本書)では、本機の各機能につい
て解説しています。各機能の詳細については、
リファレンスマニュアルをご覧ください。
また取扱説明書およびリファレンスマニュア
ル は、TASCAMの ウ ェ ブ サ イ ト(http://
tascam.jp/)からダウンロードすることがで
きます。
本製品はアナログ・デバイセズ社製16/32ビッ
トBlackfin®組み込みプロセッサを搭載し製品
のデジタル信号処理と制御を行っています。
このBlackfin®プロセッサを搭載することによ
り製品の高性能化・省電力化を実現しています。
本製品の構成
本製品の構成は、以下の通りです。
梱包箱と梱包材は、後日輸送するときのため
に保管しておいてください。
付属品が不足している場合や輸送中の損傷が見
られる場合は、タスカムカスタマーサポート(巻
末に記載)までご連絡ください。
本体 x1
0
ACアダプター(GPE053B) x1
0
アダプター付きmicroSD
0
メモリーカード(本体差し込み済) x1
USBケーブル x1
0
単3形アルカリ乾電池 x4
0
ウィンドスクリーン x1
0
マイクスタンドアダプター x1
0
ホットシューアダプター x1
0
ソフトケース x1
0
取扱説明書(本書、保証書付き)x1
0
注意
本機には必ず、付属の専用ACアダプター
(GPE053B)をご使用ください。また、付
属のACアダプターを他の機器に使用しない
でください。故障、火災、感電の原因とな
ります。
設置上の注意
動作保証温度は、摂氏0度〜 40度です。
0
次のような場所に設置しないでください。
0
音質劣化の原因、または故障の原因となり
ます。
振動の多い場所
窓際などの直射日光が当たる場所
暖房器具のそばなど極端に温度が高い場所
極端に温度が低い場所
湿気の多い場所や風通しが悪い場所
ほこりの多い場所
直接雨などの水が当たる場所
パワーアンプなど熱を発生する機器の上に
0
本機を置かないでください。
本機の近くにパワーアンプなどの大型トラ
0
ンスを持つ機器がある場合にハム(うな
り)が発生することがあります。この場合は、
本機を遠ざけるか方向を変えてください。
テレビやラジオの近くで本機を動作させる
0
とテレビ画面に色むらが出る、またはラジ
オから雑音が出ることがあります。この場

合は、本機を遠ざけて使用してください。
携帯電話などの無線機器を本機の近くで使
0
用すると、着信時や発信時、通話時に本機
から雑音が出ることがあります。この場
合は、それらの機器を本機から遠ざけるか、
もしくは電源を切ってください。
各部各種の名称
トップパネル
左サイドパネル
結露について
本機を寒い場所から暖かい場所へ移動したとき
や、寒い部屋を暖めた直後など、気温が急激に
変化すると結露を生じることがあります。結露
したときは、約1 〜 2時間放置してから電源を
入れてお使いください。
製品のお手入れ
製品の汚れは、柔らかい乾いた布で拭いてくだ
さい。化学ぞうきん、ベンジン、シンナー、ア
ルコールなどで拭かないでください。表面を傷
める、または色落ちさせる原因となります。
ユーザー登録について
TASCAMのウェブサイトにて、オンラインで
のユーザー登録をお願いいたします。
http://tascam.jp/support/registration/
アフターサービス
この製品には、保証書が添付(裏表紙に記
0
載)されています。大切に保管してください。
万が一販売店印の捺印やご購入日の記載が
無い場合は、無料修理保証の対象外になり
ますので、ご購入時のレシートなどご購入
店・ご購入日が確認できるものを一緒に保
管してください。
保証期間はお買い上げ日より1年です。保証
0
期間中は、保証書に記載の無料修理規定に
よりティアック修理センター(巻末に記載)
が修理いたします。
保証期間経過後、または保証書を提示され
0
ない場合の修理については、お買い上げの
販売店またはティアック修理センター(巻
末に記載)にご相談ください。修理によっ
て機能を維持できる場合は、お客様のご要
望により有料修理いたします。
万一、故障が発生した場合は使用を中止し、
0
お買い上げの販売店またはティアック修理
センター(巻末に記載)までご連絡ください。
修理を依頼される場合は、次の内容をお知
らせください。
なお、本機の故障、もしくは不具合により
発生した付随的損害(録音内容などの補償)
の責については、ご容赦ください。
本機を使ったシステム内の記録メディアな
どの記憶内容を消失した場合の修復に関し
ては、補償を含めて当社は責任を負いかね
ます。
型名、型番(DR-44WL)
i
製造番号(Serial No.)
i
故障の症状(できるだけ詳しく)
i
お買い上げ年月日
i
お買い上げ販売店名
i
お問い合わせ先については、巻末をご参照
0
ください。
当社は、この製品の補修用性能部分(製品
0
の機能を維持するために必要な部品)を製
造打ち切り後8年間保有しています。
本機を廃棄する場合に必要となる収集費な
0
どの費用は、お客様のご負担になります。
1内蔵ステレオマイク
2PEAKインジケーター
3ディスプレー
4TRACK/INPUTボタン
58/HOMEボタン
6.ボタン
77/9ボタン
8MENUボタン
9MTRインジケーター
0MIXERボタン
qRECORD[0]ボタン/RECインジ
ケーター
w/ボタン
eINPUTボタン
rENTER/MARKボタン
tQUICKボタン
yホイール
フロントパネル
uWi-Fiインジケーター
iEXTMIC/LINEIN1/L / 2/R端子
(XLR / TRS)
oSDカードスロット
pHOLD / スイッチ
a /LINEOUT端子
sOUTPUTLEVELボタン
dWi-Fiボタン
右サイドパネル
fEXTINスイッチ
gINPUTLEVELボタン
hINPUTLEVELボリューム
jUSB端子
ボトムパネル
k内蔵モノラルスピーカー
l三脚取り付け用穴(1 / 4インチ)
;電池ケース蓋
zストラップホルダー
x電池ケース
TASCAM DR-44WL
65

ホーム画面
停止中に表示される最も標準的な画面です。
[4CHモード時のホーム画面]
[MTRモード時のホーム画面画面]
1再生速度の状態表示
アイコン 再生速度
表示なし 再生スピード変更なし
1.1 〜 2.0倍
0.5 〜 0.9倍
再生スピードの変更ができない
とき
2キーコントロール機能のオン/オフ状
況表示
アイコン オン/オフ状態
表示なし キーコントロール機能オフ
キーコントロール機能オン
キーコントロール機能オン
(設定無効状態)
3リバーブのオン/オフ状況表示
アイコン オン/オフ状態
表示なし リバーブオフ
リバーブオン(掛け録り状態)
リバーブオン(SEND状態)
4スピーカー出力表示
“ ” 表示あり:スピーカー出力オン
“ ” 表示なし:スピーカー出力オフ
5ファントム電源表示
表示なし:ファントム電源供給なし
“ ” :ファントム電源48V供給状態
“ ” :ファントム電源24V供給状態
6電源供給の状態表示
電池供給時は、電池残量に応じて目盛りが
表示されます(“ ”、“ ”、“ ”)。
目盛り表示がなくなると “ ” が点滅し、
電池切れのためにまもなく電源がオフ(ス
タンバイ状態)になります。
付属の専用ACアダプター(GPE053B)使
用時およびUSBバスパワー供給時は、 “ ”
を表示します。
7レコーダーの動作状態表示
レコーダーの動作状況をアイコン表示しま
す。
表示 内容
停止中
8
一時停止中
9
再生中
7
早送り中
,
早戻し中
m
次のファイルの先頭にスキップ
/
現在または手前のファイルの先頭に
.
スキップ
8ループ再生の設定状態表示
ループ再生中は、 “ ” アイコンを表示し
ます。
9ファイル名/ソング名表示
4CHモード時は、再生中のファイル名また
はタグ情報を表示します。
4CHモード時の複数ファイルの場合は、ファ
イル名の形式部分と録音ファイルの基本番
号のみを表示します。単独ファイルの場合
はファイル名を表示します。
MTRモード時は、オープンされているソン
グ名を表示します。
0ループ再生のIN点(始点)、OUT点(終
点)の設定状況
ループ再生のIN点(始点)/ OUT点(終点)
の設定状況を表示します。
IN点(始点)を設定すると、再生位置表示バー
上の該当位置に “ ” アイコンが表示されま
す。
OUT点(終点)を設定すると、再生位置表
示バー上の該当位置に “ ” アイコンが表示
されます。
q再生位置表示
現在の再生位置をバー表示します。
wレベルメーターガイド表示
入力/出力レベル調節の目安となるレベル
メーターガイドです。
目盛りの-12dBの位置に表示しています。
eレベルメーター
入力音または再生音のレベルを表示します。
rファイル状態表示
再生されるファイルにより表記が変わりま
す。
“ ” :ステレオファイル状態
“ ” :モノラルファイル x2状態
“ ” :ファイルなし
t経過時間表示
現在のファイルの経過時間(時:分:秒)
を表示します。
y残量時間表示
現在のファイルの残量時間(時:分:秒)
を表示します。
uピーク値のデシベル(dB)表示
一定時間ごとに、その期間の再生レベルの
最大値を、デシベル表示します。
準備
電源の準備
単3形電池で使用する
ボトムパネルの電池ケース蓋を取り外しま
1.
す。
電池ケース内の¥と^の表示に合わせて、
2.
単3形電池を4本セットします。
電池ケース蓋を取り付けます。
3.
電池の残量表示や正常動作に必要な最低残
0
量の識別を正しく行うために、 “POWER/
DISPLAY” メニューの “BATTERY TYPE”
項目で、使用する電池の種類を設定してく
ださい(初期値: “ALKAL” アルカリ乾電池)。
電源をオンにする
電源がオフ(スタンバイ状態)時に、左サイド
パネルのHOLD / スイッチを 方
向にスライドし、 “TASCAM DR-44WL” (起動
画面)が表示されたら離します。
本機が起動してホーム画面が表示されます。
内蔵時計の設定
初回(またはしばらく電池を外しておいた後)
の電源投入時には、起動画面が表示される前に、
日時を設定する “DATE/TIME” 画面が表示され
ます。
. / /ボタンとホイールを使って日時を
設定し、ENTER/MARKボタンを押して確定
します。
TASCAM DR-44WL
66

電源をオフにする
電源オン時に、左サイドパネルのHOLD /
スイッチを 方向にスライドし、
“TASCAM DR-44WL shutting down” と表示
されたら離します。
数秒後、電源がオフになります。
モニター用機器を接続する
ヘッドホンで聴く場合は、 /LINE OUT端子
にヘッドホンを接続してください。
外部モニターシステム(パワードモニタース
ピーカーまたはアンプとスピーカー)で聴く場
合は、 /LINE OUT端子に外部モニターシス
テムを接続してください。
ヘッドホン パワードモニタースピーカー
または
アンプとスピーカー
基本的なメニューの操作方法
MENUボタンを押して、 “MENU” 画面を
1.
表示します。
ホイールを使ってメニュー項目を選択(反
2.
転表示)し、ENTER/MARKボタンを押
すと各種設定画面に移動します。
ホイールを使って設定する項目を選択(反
3.
転表示)します。
ENTER/MARKボタンまたは/ボタン
4.
を押すと、設定内容にカーソルが移動(右
に移動)します(反転表示)。
ホイールを使って、設定を変更します。
5.
同じメニュー内で別の項目を設定する場合
6.
は、ENTER/MARKボタンまたは.ボ
タンを押します(左に移動)。
必要に応じて、3. 〜 6.を繰り返し、各項
7.
目を設定します。
設定が終了したら、8/HOMEボタンを押
8.
して、ホーム画面に戻ってください。
メニューの構成
MENU
MODE
REC SETTING 録音の設定
AUTO FUNCTION
BROWSE
(4CHモード時のみ)
SONG
(MTRモード時のみ)
TOOLS
REVERB
POWER/DISPLAY
SYSTEM 本体環境の設定
録音/再生モード選
択
録音ファイルに対す
る便利機能
SDカード内のファ
イル、フォルダーの
操作
その他、便利機能の
設定
リバーブエフェクト
の設定
電源とディスプレー
の設定
録音
録音画面
録音待機中または録音中は、以下の録音画面を
表示します。
[4CHモード時の録音画面]
[MTRモード時の録音画面]
1DUALREC機能のオン/オフ状況表
示(4CHモードのみ)
表示なし:DUAL REC機能オフ
“ ”:DUAL REC機能オン
2リバーブのオン/オフ状況表示
アイコン オン/オフ状態
表示なし リバーブオフ
3ファントム電源表示
表示なし:ファントム電源供給なし
“ ”:ファントム電源48V供給状態
“ ”:ファントム電源24V供給状態
リバーブオン(掛け録り状態)
リバーブオン(SEND状態)
4レコーダー動作状態表示
レコーダーの動作状況をアイコン表示しま
す。
表示 内容
録音待機中または録音一時停止中
09
録音中
0
5プリレック機能またはオートレック機
能の設定状態表示(4CHモードのみ)
プリレック機能が “ON” の場合は、 “ ”
アイコンが表示されます。
オートレック機能が “ON” の場合は、 “ ”
アイコンが表示されます。
6ファイル名/ソング名表示
録音するファイルに自動的に付けられる
ファイル名を表示します。
4CHモード時の複数ファイルの場合は、ファ
イル名の形式部分と録音ファイルの基本番
号のみを表示します。単独ファイルの場合
はファイル名を表示します。
MTRモード時は、オープンされているソン
グ名を表示します。
7レベルメーターガイド表示
入力/出力レベル調節の目安となるレベル
メーターガイドです。
目盛りの -12dBの位置に表示しています。
8レベルメーター
入力音のレベルを表示します。
オーバーダビング・ミックスモード録音中
は、入力音と再生音をミックスしたレベル
を表示します。目盛りには、-12dBの位置
に入力レベル調整時の目印となる“tg”
マークがあります。
9ファイル状態表示
録音されるファイルにより表記が変わりま
す。
“ ” :ステレオファイル状態
“ ” :モノラルファイル x2状態
0録音経過時間
録音ファイルの経過時間(時:分:秒)を
表示します。
q録音残時間
設定した最大ファイルサイズに対する残時
間(時:分:秒)を表示します。ただし、
SDカードの残り時間の方が少ない場合はそ
ちらを表示します。
wピーク値のデシベル(dB)表示
入力レベルのピーク値をデシベル表示しま
す。
TASCAM DR-44WL
67

入力レベルを調節する
右サイドパネルのINPUT LEVELボタ
1.
ンを押して、ディスプレーに “INPUT
LEVEL” 設定画面をポップアップ表示させ
ます。
TRACK/INPUTボタンを押して、入力レ
2.
ベルを調節するチャンネルを選択します。
右サイドパネルのINPUT LEVELボ
3.
リュームを使って、入力レベルを調節しま
す。
入力音が大きすぎる場合は、トップパネル
のPEAKインジケーターが赤く点灯します。
レベルメーターには、-12dBの位置に
“tg” の目印が付いています。
この目印を中心にレベルが変化し、かつ
PEAKインジケーターが赤く点灯しないよ
うに入力レベルを設定してください。
設定が終了したら、8/HOMEボタンを押
4.
して、ホーム画面に戻ってください。
ローカットフィルターを設定する
低域の雑音などをカットしたい場合は、ロー
カットフィルターを設定します。空調ノイズや
⽿障りな風切音などを低減することができます。
INPUTボタンを押して、ディスプレーに
1.
“INPUT SETTING” 設定画面を表示します
TRACK/INPUTボタンを押して、ロー
2.
カットフィルターを設定するチャンネルを
選択します。
ホイールを使って “LOW CUT” を選択(反
3.
転表示)し、ENTER/MARKボタンまた
/ボタンを押すと、設定項目をポップ
アップ表示します。
ホイールを使ってマイク入力時のローカッ
4.
トフィルターのカットオフ周波数を設定し
ます。
設定値: “OFF” 、 “40Hz” 、 “80Hz” 、
“120Hz” 、 “220Hz”
ENTER/MARKボタンまた.ボタンを
5.
押すと、ポップアップ表示が消えて機能が
有効になります。
数字(周波数)が大きくなるほど、広い帯域の
低音をカットできます。
レベルコントロール機能を使う
マイク入力時の録音レベルコントロール機能を
設定します。
INPUTボタンを押して、ディスプレーに
1.
“INPUT SETTING” 設定画面を表示します
TRACK/INPUTボタンを押して、レベル
2.
コントロール機能を設定するチャンネルを
選択します。
ホイールを使って “LEVEL CTRL” を選択
3.
(反転表示)し、ENTER/MARKボタンま
た/ボタンを押して設定項目をポップ
アップ表示します。
ホイールを使って任意の機能を選択(反
4.
転表示)し、ENTER/MARKボタンま
た.ボタンを押すと、ポップアップ表示
が消えて機能が有効になります。
PEAKREDUCTION(ピークリダクション)
入力音が大きすぎたときに、録音レベルを適度
なレベルまで自動で下げる機能です。録音レベ
ルを上げたいときは、手動で行います。音量が
上下すると聴きにくい、音楽録音に適していま
す。設定後にオフにしても、設定したレベルは
保持されます。
LIMITER(リミッター)
突発的な過大入力による歪みを防ぐ機能です。
録音レベルを変化させたくない場合に適してい
ます。
このモードでは、録音中でも手動で録音レベル
を変更することができます。
録音する
本機は、4CHモードとMTRモ ード の2種類 の
モードでの録音ができます。
4CHモードは、内蔵マイクと外部入力端子か
ら最大4トラックの同時録音が可能です。
MTRモードは、最大4トラックの録音にくわ
え、すでに録音されたファイルに対して重ねて
録音することが可能です。
RECORD [0] ボタンを押して、録音待
1.
機状態にします。
ディスプレーに録音ファイル名が表示され
ますので、録音を開始する前に確認するこ
とができます。
TRACK/INPUTボタンを押して、録音す
2.
るチャンネルを選択します
RECORD [0] ボタンを押します。
3.
通常の録音が始まります。
録音を終了するには、8/HOMEボタンを
4.
押します。
録音を一時停止するには、RECORD [0]
ボタンを押します。再度RECORD [0]
ボタンを押す、または7/9ボタンを押す
と、同じファイルに続きが録音されます。
一時停止後に8/HOMEボタンを押すと、
一時停止までを録音したオーディオファイ
ルが作成されます。
録音待機状態について
本機は業務用録音機と同じように、録音待機状
態があります。この状態で入力レベル設定など
を行い、その後録音動作に移るようになってい
ます。
録音待機状態では、RECインジケーターが点
滅し、録音画面が表示されます。
録音メニューの構成
“MENU” 画面の “REC SETTING” 項目でさま
ざまな設定が行えます。
REC SETTING
FILE FORMAT ファイル形式の設定
BWF:16/24bit
WAV:16/24bit,
MP3:32k 〜 320kbps
SAMPLE RATE
PRE REC プリレックの設定
DUAL REC DUAL REC機能の設定
MS MIC MSマイク機能の設定
サンプリング周波数の
設定
44.1kHz, 48kHz,
96kHz
(96kHzはBWF/WAV
のみ)
OFF, ON
MODE,
LEVEL/FORMAT
MS DECODE,
SOURCE
再生
再生する
ホーム画面で停止中に7/9ボタンを押すと、
再生を始めます。
一時停止する
ホーム画面で再生中に7/9ボタンを押すと、
その位置で再生を停止します。
停止する
ホーム画面で再生中に8/HOMEボタンを押す
と一時停止状態となります。
再度、8/HOMEボタンを押すとファイルの先
頭で停止状態となります。
早戻し/早送りをする(サーチ)
ホーム画面で停止中または再生中に.ボタン
/ /ボタンを押し続けると、早戻し/早送
りサーチ再生を行います。
再生位置を移動する
ホーム画面で停止中または一時停止中にホイー
ルを回して、再生位置を移動することができま
す。
再生位置を移動後は、一時停止状態 になります。再生するファイルを選 択する(スキップ)
ホーム画面で、.ボタン/ /ボタンを押
して再生したいファイルを選択します。
ファイルの先頭で.ボタンを押すと1つ前の
ファイルの先頭にスキップします。
ファイルの先頭または途中で/ボタンを押す
と、次のファイルへスキップします。
再生の音量を調節する
/LONEOUT端子から出力される音量を、
ホーム画面表示中にOUTPUTLEVEL(+ /
−)ボタンを使って調節します。
TASCAM DR-44WL
68

パソコンと接続する
本機のSDカードの中の音声ファイルをパソコ
ンに取り出したり、パソコンの中の音声ファイ
ルを本機に取り込んだりすることができます。
パソコンとUSB接続する
本機をパソコンと付属のUSB ケーブルで
1.
接続します。電源がオフの場合は、オンに
してください。
“USB SELECT” 画面で、 “STORAGE”
2.
を選択しENTER/MARKボタンを押
すと本機がパソコンに接続され、 “USB
connected” が表示されます。
《コンピュータ》を開くと、パソコンのディ
3.
スプレー上に本機が《DR-44WL》という
ボリュームラベルの外部ドライブとして表
示されます。
パソコンへファイルを取り出す、パ ソコンからファイルを取り込む
パソコンのディスプレー上の《DR-44WL》ド
ライブをクリックすると、《MUSIC》フォル
ダーと《UTILITY》フォルダーが表示されます。
パソコンへファイルを取り出す場合は、
《MUSIC》フォルダーを開き、パソコンに取
り出したいファイルを任意の場所にドラッグ&
ドロップします。
パソコンからファイルを取り込む場合は、パソ
コンの任意の音声ファイルを《MUSIC》フォ
ルダーにドラッグ&ドロップします。
パソコンとの接続を解除する
パソコンから本機を正しい手順で切り離してか
ら、USBケーブルを外します。
シャットダウン処理が実行されたあとに、電源
がオフになります。
パソコン側での接続解除方法については、パソ
コンの取扱説明書をご覧ください。
各種設定および情報表示
内蔵スピーカーをオフにする
“MENU” w “TOOLS” w “SPEAKER” 項 目
を “OFF” に設定します。
環境設定(SYSTEM)
本機を快適に使うためのさまざまな設定、初期
化やSDカードのフォーマットなどを行います。
“MENU” w “SYSTEM” メニュー項目を
1.
選択し、ENTER/MARKボタンを押します。
各機能の項目で、必要な設定を行います。
2.
本体とスマートフォンをWi-Fi で接続する
注意
本製品は、販売地域での法令および規制に
準拠するように設計されており、必要に応
じた表示がされています。本製品は、以下
の国/地域での使用が承認されています。
アメリカ合衆国、カナダ、欧州(EU加盟国)、
オーストラリア、ニュージーランド、日本
上記以外の国々では、無線機能の使用が制
限されている場合があります。使用する前
に、その国の法令を必ずご確認ください。
無料の専用アプリケーション(DR CONTROL)
を使って、本体を遠隔操作することができます。
再生、停止などのトランスポートコントロール
だけでなく、入力レベルの調整や録音したファ
イルの転送などもWi-Fi経由で行うことができ
ます。
専用アプリケーション(DR
CONTROL)の入手・インスト ー
ル方法
スマートフォンをインターネットに接続し
1.
てください。
Android端末の場合はGoogle Playから、
2.
iOS端末の場合はApp Storeから専用アプ
リケーション(DR CONTROL)を検索し、
ダウンロードおよびインストールを実施し
てください。
本機とスマートフォンをはじめて Wi-Fi接続する
本機とスマートフォンのWi-Fi接続では1対1
での接続となりますので、ルーターなどの外部
機器、およびWi-Fiネットワーク環境は必要あ
りません。本機とスマートフォンだけで接続を
行うことができます。
本機とスマートフォンをWi-Fi接続中、ス
※
マートフォンを外部のWi-Fiネットワークに
接続することはできません。
iOS端末の場合
本機のWi-Fiボタンを押して、Wi-Fiインジ
1.
ケーターを点滅させます。
ディスプレーにポップアップメッセージが
表示されます。
新規に接続を行うスマートフォンと接続を
2.
するので、ENTER/MARKボタンを押し
ます。
メモ
WPSモードは、無線LAN機器同士の接続
を簡単に行うための規格です。本機では、
Android端末用にプッシュボタン式を採用
しています。
iOS端末の《設定》w《Wi-Fi》を選択します。
4.
iOS端末のWi-FiをオンにするとWi-Fi機器
5.
のSSID一覧が表示されますので、本機の
ディスプレーに表示されているSSIDを選
択してください。
iOS端末にパスワード入力画面が表示され
6.
ますので、本機のディスプレーに表示され
ている暗号キーを入力します。
本機とスマートフォンとのWi-Fi接続が確
7.
立され、本機のWi-Fiインジケーターが点
灯になります。
Android端末の場合
本機のWi-Fiボタンを押して、Wi-Fiインジ
1.
ケーターを点滅させます。
ディスプレーにポップアップメッセージが
表示されます。
新規に接続を行うスマートフォンと接続を
2.
するので、ENTER/MARKボタンを押し
ます。
ディスプレーに「SSID」と「暗号キー」
3.
が表示され、本機が自動的にWPSモード
になります。
TASCAM DR-44WL
69

ディスプレーに「SSID」と「暗号キー」
3.
が表示され、本機が自動的にWPSモード
になります。
メモ
WPSモードは、無線LAN機器同士の接続を
簡単に行うための規格です。本機では、iOS
端末用にPINコード式を採用しています。
Android端末の《設定》w《Wi-Fi》を選
4.
択します。
Android端末のWi-FiをオンにするとWi-Fi
5.
機器のSSID一覧が表示されますので、本
機のディスプレーに表示されているSSID
を選択してください。
本機とスマートフォンをWi-Fi接続 する場合(2回目以降)
一度接続を行った本機とスマートフォンにおい
ては、2回目以降はSSIDを選択するだけで接
続することができます。
iOS端末の場合
本機のWi-Fiボタンを押して、Wi-Fiインジ
1.
ケーターを点滅させます。
ディスプレーにポップアップメッセージが
表示されます。
一度接続を行ったスマートフォンと接続を
2.
するので、8/HOMEボタンを押します。
ディスプレーのポップアップメッセージが
3.
消え、スマートフォンとの接続待ち状態に
なります。
iOS端末の《設定》w《Wi-Fi》を選択します。
4.
iOS端末のWi-FiをオンにするとWi-Fi機器
5.
のSSID一覧が表示されますので、本機の
ディスプレーに表示されているSSIDを選
択してください。
本機とスマートフォンとのWi-Fi接続が確
6.
立され、本機のWi-Fiインジケーターが点
灯になります。
Android端末の場合
本機のWi-Fiボタンを押して、Wi-Fiインジ
1.
ケーターを点滅させます。
ディスプレーにポップアップメッセージが
表示されます。
一度接続を行ったスマートフォンと接続を
2.
するので、8/HOMEボタンを押します。
スマートフォンからの本機のリモー ト操作
専用アプリケーション(DR CONTROL)は、
本機と同じ表示画面となっており、ほぼ同じ操
作で遠隔操作が可能です。本機の操作方法をご
確認の上《DRCONTROL》アプリケーショ
ンをお使いいただくと、スムーズに操作するこ
とができます。
本機とスマートフォンとのWi-Fi接続が完
1.
了したら、スマートフォンにインストール
済の《DRCONTROL》アプリケーショ
ンを起動してください。
《DRCONTROL》アプリケーションを起
2.
動させると以下のような画面がスマート
フォンに表示され、本機のリモート操作を
行うことができます。
《DRCONTROL》アプリケーションの詳細な
説明 は、TASCAMの ウ ェ ブ サ イ ト(http://
tascam.jp/)からダウンロードすることがで
きる「DR CONTROL リファ レ ンスマ ニュ
アル」をご参照ください。
本機からスマートフォンへのファイ ル転送
《DRCONTROL》 画面上の《Browse》
1.
ボタンを押してください。
《Browse》画面に本機のファイル一覧が
2.
表示されますので、転送したいファイルを
選択してください。
ファイル詳細画面が表示されますので、
3.
《Copy》ボタンを押してください。
ファイルのコピー確認画面が表示されます
4.
ので、《YES》ボタンを押すと本機からス
マートフォンへのファイル転送が開始され
ます。
Android端末にパスワード入力画面が表示
6.
されますので、本機のディスプレーに表示
されている暗号キーを入力します。
本機とスマートフォンとのWi-Fi接続が確
7.
立され、本機のWi-Fiインジケーターが点
灯になります。
メモ
上記のAndroid端末の操作説明は、スマート
フォンの設定例です。詳しくは、お使いのス
マートフォンの取扱説明書をご覧ください。
TASCAM DR-44WL
70
ディスプレーのポップアップメッセージが
3.
消え、スマートフォンとの接続待ち状態に
なります。
Android端末の《設定》w《Wi-Fi》を選
4.
択します。
Android端末のWi-FiをオンにするとWi-Fi
5.
機器のSSID一覧が表示されますので本機
のディスプレーに表示されているSSIDを
選択してください。
本機とスマートフォンとのWi-Fi接続が確
6.
立され、本機のWi-Fiインジケーターが点
灯になります。
メモ
上記のAndroid端末の操作説明は、スマート
フォンの設定例です。詳しくは、お使いのス
マートフォンの取扱説明書をご覧ください。

こんなことをするには
ボタン名称は、MENUのように表記します。
0
「ホーム画面からMENUボタンを押して、 “REC SETTING” メニューを選択し “PRE REC” 項目を選択する」という操作を「ホーム画面 w MENU
0
w “REC SETTING” w “PRE REC”」のように表記します。
複雑な操作の場合は、全部の操作は表記されていません。詳細の操作方法は、リファレンスマニュアルを参照してください。
0
分類 こんなことをしたい 機能名称 操作方法、使用するボタン/説明
ホーム画面に戻る
録音する
基本操作
録音
録音補助
ファイル操作
(4CHモード
のみ)
本体設定
再生する
再生音量を調節する
再生するファイルを選
択する
ファイルフォーマット
を変更する
ローカットフィルター
を設定する
入力レベルを手動で調
節する
入力レベルを自動で調
節する
異なる入力レベルで同
時に2系統の録音をする
MSマイクを使う
録音中に目印(マーク)
を付ける
録音中に手動でファイ
ルを切り換える
自動ファイル切り換え
の設定をする
録音開始の少し前から
録音する
ファイルの情報を確認
する
ファイルを削除する
ファイルを削除する
フォルダー内のファイ
ルを一括で削除する
ファイルを分割する ディバイド機能
日時を設定する
本体やカードの情報を
確認する
電源のオートパワー
セーブ機能の設定を変
更する
バックライトの設定を
変更する
ディスプレーのコント
ラスト調節を変更する
電池の種類を設定する
ファントム電源の電圧
値を設定する
本体を初期設定に戻す イニシャライズ機能
SDカードをフォーマッ
トする
ファイル名の形式を設
定する
ローカットフィル
ター機能
レベルコントロール
機能
DUAL REC機能
マーク機能
マニュアルトラック
インクリメント
オートトラック
インクリメント
プリレック機能
オートパワーセーブ
機能
フォーマット機能
8/HOME
操作に迷ったらホーム画面に戻ってください。
ホーム画面 w RECORD w RECORD
設定した内容での録音を行います。
ホーム画面 w 7/9
表示(選択)されているファイルを再生します。
OUTPUTLEVEL(+ /−)ボタン
ヘッドホン、スピーカーなどの音量を調節します。
ホーム画面 w . / /
ファイル数が多い場合は、ブラウズ機能を使うと便利です。
ホーム画面 w MENU w “REC SETTING” w “FILE FORMAT”
BWF形式またはWAV形式など、録音するファイル形式を指定します。
ホーム画面 w INPUT w “INPUT SETTING” w “LOW CUT”
低音のノイズなどを排除する機能です。周波数を選択してください。
ホーム画面 w INPUTLEVELボタン w TRACK/INPUTボタン w INPUTLEVEL
ボリューム
レベルメーターガイド表示を目安に録音レベルを調節してください。
ホーム画面 w INPUT w “INPUT SETTING” w “LEVEL CTRL”
録音レベルの変更はせず、大きい音だけ圧縮してレベルオーバーを防ぐ機能です。
ホーム画面 w MENU w “REC SETTING” w “DUAL REC”
DUAL REC機能の設定を行います。
ホーム画面 w MENU w “REC SETTING” w “MS MIC”
MSマイクを使う場合に、MSマイクの設定を行います。
録音画面 w ENTER/MARK
再生時の目印となるマークをファイルに付ける機能です。
録音画面 w /
曲の変わり目など、違うファイルに切り換えて録音継続したい場合に操作してください。
ホーム画面 w MENU w “AUTO FUNCTION” w “TRACK INCREMENT”
設定したサイズごとに自動的に異なるファイルに切り換える機能です。
ホーム画面 w MENU w “REC SETTING” w “PRE REC”
録音待機状態から録音状態に移るのが遅れた場合に遅れを補完する機能です。
ホーム画面 w MENU w “BROWSE” w ホイール w QUICK w “INFORMATION”
録音された日付やファイルサイズなどを確認することができます。
ホーム画面 w MENU w “BROWSE” w ホイール w QUICK w “FILE DELETE”
不要なファイルを削除できます。
ホーム画面 w QUICK w “DELETE”
不要なファイルを削除できます。
ホーム画面 w MENU w “BROWSE” w ホイール w QUICK w “ALL DELETE”
フォルダー内にある全てのファイルを一括で削除できます。
ホーム画面 w QUICK w “DIVIDE”
1つのファイルを2つのファイルに分割する機能です。
ホーム画面 w MENU w “SYSTEM” w “DATE/TIME”
ファイルに書き込まれる録音日付などに使われる内蔵時計を設定します。
ホーム画面 w MENU w “SYSTEM” w “INFORMATION”
本体ファームウェアのバージョンや、カードの残り容量などを確認できます。
ホーム画面 w MENU w “POWER/DISPLAY” w “AUTO PWR SAVE”
無操作時に自動で電源をオフにする機能です。
ホーム画面 w MENU w “POWER/DISPLAY” w “BACKLIGHT”
ディスプレーのバックライトに関する設定をします。
ホーム画面 w MENU w “POWER/DISPLAY” w “CONTRAST”
ディスプレーの表示の濃淡を設定します。
ホーム画面 w MENU w “POWER/DISPLAY” w “BATTERY TYPE”
使用している電池の種類を選択します。残量表示の正確性に影響します。
ホーム画面 w MENU w “POWER/DISPLAY” w “PHANTOM VOLT”
ホーム画面 w MENU w “SYSTEM” w “INITIALIZE”
全ての設定を工場出荷時に戻します。
ホーム画面 w MENU w “SYSTEM” w “MEDIA FORMAT”
カード初期化機能です。
ホーム画面 w MENU w “SYSTEM” w “FILE NAME”
自動で付与されるファイル名の文字を変更できます。
TASCAM DR-44WL
71

メッセージ
以下にポップアップメッセージの一覧表を示します。
DR-44WLでは、状況に応じてポップアップメッセージが表示されます
が、それぞれのメッセージの内容を知りたいとき、および対処方法を知
りたいときにこの表をご覧ください。
メッセージ 内容と対処方法
Battery Empty 電池の残量がありません。電池を交換してください。
Can't Divide
Card Error
Card Full
Current File MP3 MP3ファイルの分割はできません。
Dup File Name
File Full
File Name ERR
File Not Found
File Not Found
Make Sys File
File Protected 読み取り専用ファイルのため、削除できません。
Format Error
Format CARD
Invalid Card
Change Card
Invalid SysFile
Make Sys File
I/O Too Short
Layer too Deep
Max File Size ファイルのサイズが指定のサイズを超えました。
MBR Error Init
CARD
No Card
No PB File
Non-Supported
Switched To
Internal Battery
TASCAM DR-44WL
72
DIVIDE実行時に分割位置が適切でありません。(フ
ァイルの先頭、ファイルの最後)
SDカードを正常に認識できません。カードを交換
してください。
SDカードの残容量がありません。不要なファイル
を削除するかパソコンへ移動してください。
DIVIDEにより作成されるファイルと同じファイル
名のファイルが同じフォルダー内にすでに存在し
ます。DIVIDEを行うとファイル名の末尾に「a」
または「b」が追加されます。DIVIDEを行う前に
パソコンと接続し、ファイル名を変更してください。
フォルダーとファイルの総数が制限値(5000個)
を超えました。不要なフォルダーやファイルを削
除するかパソコンへ移動してください。
DIVIDEによりファイル名の文字数が200文字を
超えました。DIVIDEを行うとファイル名の末尾に
「a」または「b」が追加されます。DIVIDEを行う
前にパソコンと接続し、198文字以下のファイル
名に変更してください。
ファイルが見つからないか、ファイルが壊れている
可能性があります。対象のファイルを確認してくだ
さい。
本機を使用するために必要なシステムファイルが
ありません。このメッセージが表示されている状
態でENTER/MARKボタンを押すと、システムフ
ァイルが作られます。
SDカードが正常にフォーマットされていないか、
SDカードが壊れている可能性があります。このメ
ッセージは、USB接続したパソコンでフォーマッ
トした場合や未フォーマットのカードを挿入した
場合にも表示されます。
フォーマットは、必ずDR-44WL本体で行ってく
ださい。SDカードを交換するか、このメッセージ
が表示されている状態でENTER/MARKボタンを
押すと、フォーマットが実行されます。
フォーマットが実行されるとSDカード内のデータ
は、全て消去されます。
SDカードが正常でない可能性があります。SDカー
ドを交換してください。
本機を使用するために必要なシステムファイルが
正常でありません。このメッセージが表示されて
いる状態でENTER/MARKボタンを押すと、新し
いシステムファイルが作られます。
IN点(始点)とOUT点(終点)の間隔が短すぎます。
1秒以上空けて設定してください。
フォルダーは、2階層までです。このフォルダー内
に新たなフォルダーを作成することはできません。
SDカードが正常にフォーマットされていないか、
SDカードが壊れている可能性があります。SDカー
ドを交換するか、このメッセージが表示されている
状態でENTER/MARKボタンを押すと、フォーマ
ットが実行されます。
フォーマットが実行されるとSDカード内のデータ
は、全て消去されます。
SDカードがセットされていません。録音可能な
SDカードを挿入してください。
再生可能なファイルがありません。ファイルが壊
れている可能性があります。
ファイル形式がサポート対象外です。取り扱い可
能なファイル形式については、リファレンスマニ
ュアルの「パソコンと接続する」をご覧ください。
電源供給がUSBバスパワーから内部電池に切り替
わりました。
メッセージ 内容と対処方法
Write Timeout
その他のエラーが出た場合は、本体の電源を入れ直してください。
SDカードへの書き込みが間に合いませんでした。
ファイルをパソコンへバックアップの上、フォー
マットを実行してください。
トラブルシューティング
本機の動作がおかしいときは、修理を依頼する前にもう一度、下記の点
検を行ってください。それでも改善しないときは、お買い上げ店または
ティアック修理センター(巻末に記載)にご連絡ください。
電源が入らない。
電池が消耗していませんか?
0
電池の¥、^を間違ってセットしていませんか?
0
付属の専用ACアダプター(GPE053B)の電源プラグおよびUSBコ
0
ネクターがしっかりと差し込まれていますか?
USBバスパワー接続しているときに、USBケーブルがしっかりと差
0
し込まれていますか?
USBバスパワー接続しているときに、USBハブを使用していませんか?
0
HOLD / スイッチが「HOLD」にセットされていませんか?
0
電源が自動的に切れてしまう。
オートパワーセーブ機能が設定されていませんか?(wリファレン
0
スマニュアルの「各種設定および情報表示」の「電源のオートパワー
セーブ機能の設定」)
本機は欧州待機時電力規制(ErP)に対応しているため、ACアダ
i
プター・電池使用時にかかわらずオートパワーセーブ機能が動作
します。オートパワーセーブ機能を使用したくないときは「OFF」
に設定してください(工場出荷時には「30分」に設定されています)。
本体で操作できない。
HOLD / スイッチが「HOLD」にセットされていませんか?
0
USB接続(USB Connected)になっていませんか?
0
SDカードを認識しない。
SDカードがしっかりと挿入されているか確認してください。
0
再生できない。
WAVファイルの場合は、本機が対応しているサンプリング周波数で
0
あるかどうかを確認してください。
MP3ファイルの場合は、本機が対応しているビットレートであるか
0
どうかを確認してください。
スピーカーから音が出ない。
ヘッドホンをつないでいませんか?
0
“SPEAKER” 項目が “OFF” になっていませんか?
0
モニターシステムは、きちんと接続されていますか?
0
モニターシステムの音量が最小になっていませんか?
0
本機の出力レベル設定が最小になっていませんか?
0
音が出ない。
モニターシステムは、きちんと接続されていますか?
0
モニターシステムの音量が最小になっていませんか?
0
本機の出力レベル設定が最小になっていませんか?
0
録音できない。
接続をもう一度確認してください。
0
入力設定をもう一度確認してください。
0
入力レベルが低くなっていませんか?
0
SDカード容量がいっぱいになっていませんか?
0
ファイル数が最大数に達していませんか?
0
入力レベルが低い。
入力レベル設定が低くなっていませんか?
0
接続した外部機器の出力レベルが低くなっていませんか?
0
録音しようとする音が歪んで聴こえる。
入力レベルの設定が大きすぎませんか?
0
リバーブがかかっていませんか?
0
再生音が不自然に聴こえる。
再生のスピードを変えていませんか?
0
再生イコライザーがかかっていませんか?
0
レベルアライン機能が有効になっていませんか?
0
リバーブがかかっていませんか?
0

ファイルが消去できない。
パソコンで読み取り専用に設定したファイルをコピーしたものを消去
0
しようとしていませんか?
パソコン上に本機のファイルが表示されない。
本機がUSB端子経由でパソコンに接続されていますか?
0
USBハブを使っていませんか?
0
本機が録音中、または録音待機中になっていませんか?
0
接続ができない、あるいは、通信が途切れる。
Wi-Fi機器の電源が入っているか、Wi-Fiがオンになっているか確認し
0
てください。
Wi-Fi機器との距離が離れすぎていませんか?
0
あるいは、間に壁や障害物などでさえぎられていませんか?
Wi-Fi機器が本体の後面側にある場合、本機自身でさえぎっているこ
とも考えられます。
Wi-Fi機器や本機の位置を変えてください。
本機の電源を切り、再度本機の電源をオンにしてください。
0
Wi-Fi機器の「DR-44WL」の登録を解除し「Wi-Fi機器との接続を行
0
う」の操作を行ってください。
仕様
定格
記録メディア
SDカ ー ド(64MB 〜 2GB)、SDHCカ ー ド(4GB 〜 32GB)、
SDXCカード(64GB 〜 128GB)
録音再生フォーマット
BWF :44.1k/48k/96kHz、16/24ビット
WAV :44.1k/48k/96kHz、16/24ビット
MP3 : 44.1k/48kHz、32k/64k/96k/128k/192k/256k/3
チャンネル数
4チャンネル
ステレオ :最大2ファイル
ステレオ(1ファイル)+モノ(最大2ファイル)
入出力
EXTMIC/LINEIN端子(ファントム電源対応)
コネクター: XLR-3-31、φ6.3mm(1/4”)TRS標準ジャック
/LINEOUT端子
コネクター:φ3.5mm(1/8”)ステレオミニジャック
内蔵スピーカー
0.3W(モノラル)
USB端子
コネクター :Micro-Bタイプ
フォーマット:USB2.0 HIGH SPEED マスストレージクラス
オーディオ性能
周波数特性
20-20kHz +1/-3dB(EXT IN to LINE OUT, Fs44.1kHz, JEITA)
20-22kHz +1/-3dB(EXT IN to LINE OUT, Fs48kHz, JEITA)
20-40kHz +1/-3dB(EXT IN to LINE OUT, Fs96kHz. JEITA)
歪率
0.05%以下(EXT IN to LINE OUT, Fs44.1k/48k/96kHz、JEITA)
S/N比
92dB以上(EXT IN to LINE OUT, Fs44.1k/48k/96kHz, JEITA)
20kbps
4CHモード モノ :最大4ファイル
i
MTRモード モノ :最大4ファイル
i
録音時間
ファイルフォーマット(録音時の設定)
WAV / BWF 16ビット(STEREO) 44.1kHz 6時間44分
WAV / BWF 24ビット(STEREO) 96kHz 2時間04分
上記録音時間は目安です。ご使用のSD / SDHC / SDXCカードに
0
より異なる場合があります。
上記録音時間は連続録音時間ではなく、SD / SDHC / SDXCカー
0
ドに可能な録音合計時間です。
WAV形式のMONO録音の場合は、上記録音時間の約2倍の時間とな
0
ります。
WAV / BWF形式のDUAL REC録音 / 4チャンネル録音の場合は、
0
上記録音時間の約半分の時間となります。
SDHCカード容量
4GB
接続するパソコンの動作条件
最新の対応OS状況については、TASCAMのウェブサイト(http://
tascam.jp/)ご確認ください。
サポートOS
Windows : Windows XP、Windows Vista、Windows 7、
Macintosh :Mac OS X 10.2以上
Windows 8(8.1を含む)
Wi-Fi
無線規格
IEEE 802.11b/g/n準拠(2.4GHzのみ)
無線通信モード
簡易アクセスポイント(Limited AP)
セキュリティー
WPA2-PSK(WPS2.0対応)
一般
電源
単3形電池4本(アルカリ乾電池またはニッケル水素電池)
パソコンからのUSBバスパワー
専用ACアダプター(GPE053B、付属)
消費電力
2.5W(最大時)
電池持続時間(連続使用時)
アルカリ乾電池(EVOLTA)使用時
0
フォーマット 持続時間 備考
2ch WAV、44.1kHz、
16bitで録音
ニッケル水素電池(eneloop)使用時
0
フォーマット 持続時間 備考
2ch WAV、44.1kHz、
16bitで録音
メモ
ファントム電源を使用時には、ご使用になるマイクにより持続時間が
短くなる場合があります。
約16時間
約12時間
外形寸法
79 x 162.2 x 42.5mm(幅 x 高さ x 奥行き)
質量
346g / 251g(電池を含む/電池を含まず)
動作温度
0 〜 40℃
MIC入力選択
(ファントム未使用)時
MIC入力選択
(ファントム未使用)時
注)JEITA:JEITA CP-2150準拠
取扱説明書のイラストが一部製品と異なる場合があります。
0
製品の改善により、仕様および外観が予告なく変更することがあります。
0
詳細仕様は、リファレンスマニュアルに掲載しています。
0
TASCAM DR-44WL
73

〒206-8530 東京都多摩市落合1-47
この製品の取り扱いなどに関するお問い合わせは
タスカムカスタマーサポート 〒206-8530 東京都多摩市落合1-47
0570-000-809
一般電話・公衆電話からは市内通話料金でご利用いただけます。
受付時間は、10:00 〜 12:00 / 13:00 〜 17:00 です。(土・日・祝日・弊社指定休日を除く)
ナビダイヤルがご利用いただけない場合
0
電話:042-356-9137 / FAX:042-356-9185
故障・修理や保守についてのお問い合わせは
ティアック修理センター 〒358-0026 埼玉県入間市小谷田858
0570-000-501
一般電話・公衆電話からは市内通話料金でご利用いただけます。
受付時間は、9:30 〜 17:00です。(日・祝日・弊社指定休日を除く)
ナビダイヤルがご利用いただけない場合
0
電話:04-2901-1033 / FAX:04-2901-1036
■ 住所や電話番号は、予告なく変更する場合があります。あらかじめご了承ください。
TASCAM DR-44WL
74

✂
WARRANTY
< In the United States >
This warranty gives you specific legal rights and you may also have other
rights which vary from state to state. This warranty is only valid within the
country the unit was originally purchased.
WHAT IS AND IS NOT COVERED
Except as specified below, this warranty covers all defects in materials
and workmanship in this product. The following are not covered by the
warranty:
1. Damage to or deterioration of the external cabinet.
2. Damages resulting from accident, misuse, abuse or neglect.
3. Damage resulting from failure to perform basic daily
maintenance and/or calibration or otherwise resulting from
failure to follow instructions contained in your owner’s
manual.
4. Damage occurring during shipment of the product. (Claims
must be presented to the carrier)
5. Damage resulting from repair or attempted repair by anyone
other than TEAC or an authorized TASCAM service station.
6. Damage resulting from causes other than product defects,
including lack of technical skill, competence, or experience of
the user.
7. Damage to any unit which has been altered or on which the
serial number has been defaced, modified or is missing.
WHO MAY ENFORCE THE WARRANTY
This warranty may be enforced only by the original purchaser.
LENGTH OF WARRANTY
All parts except heads and disk drives are warranted for one (1) year from
the date of original purchase. Heads and disk drives are warranted to ninety
(90) days from date of original purchase. Labor is warranted for ninety (90)
days from date of original purchase.
WHAT WE WILL PAY FOR
We will pay all labor and material expenses for items covered by the
warranty. Payment of shipping charges is discussed in the next section of
this warranty.
HOW YOU CAN GET WARRANTY SERVICE
Your unit must be serviced by an authorized TASCAM service station in the
United States. (This warranty is not enforceable outside the U.S.) If you
are unable to locate an authorized TASCAM service station in your area,
please contact us. We either will refer you to an authorized service station
or instruct you to return the unit to the factory. Whenever warranty service
is required, you must present a copy of the original dated sales receipt from
an Authorized TASCAM Dealer.
You must pay any shipping charges if it is necessary to ship the product to service.
However, if the necessary repairs are covered by the warranty, we will pay return
surface shipping charges to any destination within the United States.
LIMITATION OF IMPLIED WARRANTIES
Any implied warranties, INCLUDING WARRANTIES OF MERCHANTABILITY
AND FITNESS FOR A PARTICULAR PURPOSE, are limited in duration to the
length of this warranty.
/保証書
EXCLUSION OF DAMAGES
TEAC’s liability for any defective product is limited to repair or replacement of
the product, at TEAC’s option. TEAC shall not be liable for:
1.
Damages based upon inconvenience, loss of use of the product,
loss of time interrupted operation or commercial loss; or
2. Any other damages, whether incidental, consequential or
otherwise.
Some states do not allow limitations on how long an implied warranty lasts
and/or do not allow the exclusion or limitation of incidental or consequential
damages, so the above limitations and exclusions may not apply to you.
To locate an Authorized Service Center in Your Area
CALL 1-800-447-8322
< Europe >
This product is subject to the legal warranty regulations of the country of
purchase. In case of a defect or a problem, please contact the dealer where
you bought the product.
Ce produit est sujet aux réglementations concernant la garantie légale
dans le pays d’achat. En cas de défaut ou de problème, veuillez contacter le
revendeur chez qui vous avez acheté le produit.
Dieses Gerät unterliegt den gesetzlichen Gewährleistungsbestimmungen
des Landes, in dem es erworben wurde. Bitte wenden Sie sich im
Gewährleistungsfall an den Händler, bei dem sie das Gerät erworben haben.
Questo apparecchio è conforme alle norme sulla garanzia vigenti nel
rispettivo Paese in cui esso è stato acquistato. Si prega di rivolgersi al proprio
commerciante, presso il quale è stato acquistato l’apparecchio, nel caso in
cui si voglia richiedere una prestazione in garanzia.
Las condiciones de garantía de este aparato están sujetas a las disposiciones
legales sobre garantía del país en el que ha sido adquirido. En caso de garantía,
debe dirigirse al establecimiento donde adquirió el aparato.
<日本>
無料修理規定(持ち込み修理)
1.
取扱説明書、本体貼付ラベルなどの注意書きにした
がった正常な使用状態で保証期間内に故障が発生し
た場合には、ティアック修理センターが無料修理い
たします。
2.
保証期間内に故障して無料修理を受ける場合は、本
書をご提示の上、ティアック修理センターまたはお
買い上げの販売店に修理をご依頼ください。商品を
送付していただく場合の送付方法については、事前
にティアック修理センターにお問い合わせください。
3.
ご転居、ご贈答品などでお買い上げの販売店に修理
をご依頼になれない場合は、ティアック修理セン
ターにご連絡ください。
4.
次の場合には、保証期間内でも有料修理となります。
(1) ご使用上の誤りおよび不当な修理や改造による
故障および損傷
(2) お買い上げ後の輸送・移動・落下などによる故
障および損傷
(3) 火災、地震、水害、落雷、その他の天災地変、
公害や異常電圧による故障および損傷
(4) 接続している他の機器に起因する故障および損
傷
(5) 業務上の長時間使用など、特に苛酷な条件下に
おいて使用された場合の故障および損傷
(6)メンテナンス
(7)本書の提示がない場合
(8) 本書にお買い上げ年月日、お客様名、販売店名(印)
の記入のない場合、あるいは字句を書き換えられた
場合
5.
本書(日本語記載部)は日本国内においてのみ有効
です。
These warranty provisions in Japanese are valid only in
Japan.
6.
本書は再発行いたしませんので、紛失しないよう大
切に保管してください。
この保証書は、本書に明示した期間・条件のもと
※
において無料修理をお約束するものです。この保
証書によって保証書を発行しているもの(保証責
任者)、およびそれ以外の事業者に対するお客様
の法律上の権利を制限するものではありません。
保証期間経過後の修理などについてご不明の場合
は、ティアック修理センターにお問い合わせくだ
さい。
保証期間経過後の修理、補修用性能部品の保有期
※
間についての詳細は、取扱説明書をご覧ください。
< In other countries/areas >
This warranty gives you specific legal rights, and you may also have other
rights that vary by country, state or province.
If you have a warranty claim or request, please contact the dealer where
you bought the product.
该保证书赋予了顾客特定的合法权利,并且因国家,州
或省等地域的不同,顾客可能拥有其他权利。如需申请
或要求保修,请与购买本产品的销售店进行联系。
If you require repair services for your
the dealer where the product was purchased from or the
Distributor in your country. A list of
our website at:
http://teac-global.com/
TASCAM
equipment, please contact
TASCAM
Distributors can be found on
TASCAM

WARRANTY /
Model / 型名
DR-44WL
保証書
✂
Owner’s name / お名前
Serial No. / 機番
Date of purchase / お買い上げ日
http://teac-global.com/
Memo / 修理メモ
Address / ご住所
Dealer’s name / 販売店
Dealer’s address /
住所
Printed in China
 Loading...