

Page 1
http://tascam.jp/
〒206-8530 東京都多摩市落合1-47
TEAC AMERICA, INC.
http://tascam.com/
Phone: +1-323-726-0303
1834 Gage Road, Montebello, California 90640 USA
D01292000A
TEAC MEXICO, S.A. de C.V.
http://teacmexico.net/
Phone: +52-55-5010-6000
Río Churubusco 364, Colonia Del Carmen, Delegación Coyoacán, CP 04100, México DF,
México
TEAC UK Ltd.
http://tascam.eu/
Phone: +44-8451-302511
2 Huxley Road, Surrey Research Park Guildford, GU2 7RE, United Kingdom
TEAC EUROPE GmbH
http://tascam.eu/
Phone: +49-611-71580
Bahnstrasse 12, 65205 Wiesbaden-Erbenheim, Germany
TEAC SALES & TRADING(SHENZHEN) CO., LTD
Phone: +86-755-88311561~2
Room 817, Block A, Hailrun Complex, 6021 Shennan Blvd., Futian District, Shenzhen
518040, China
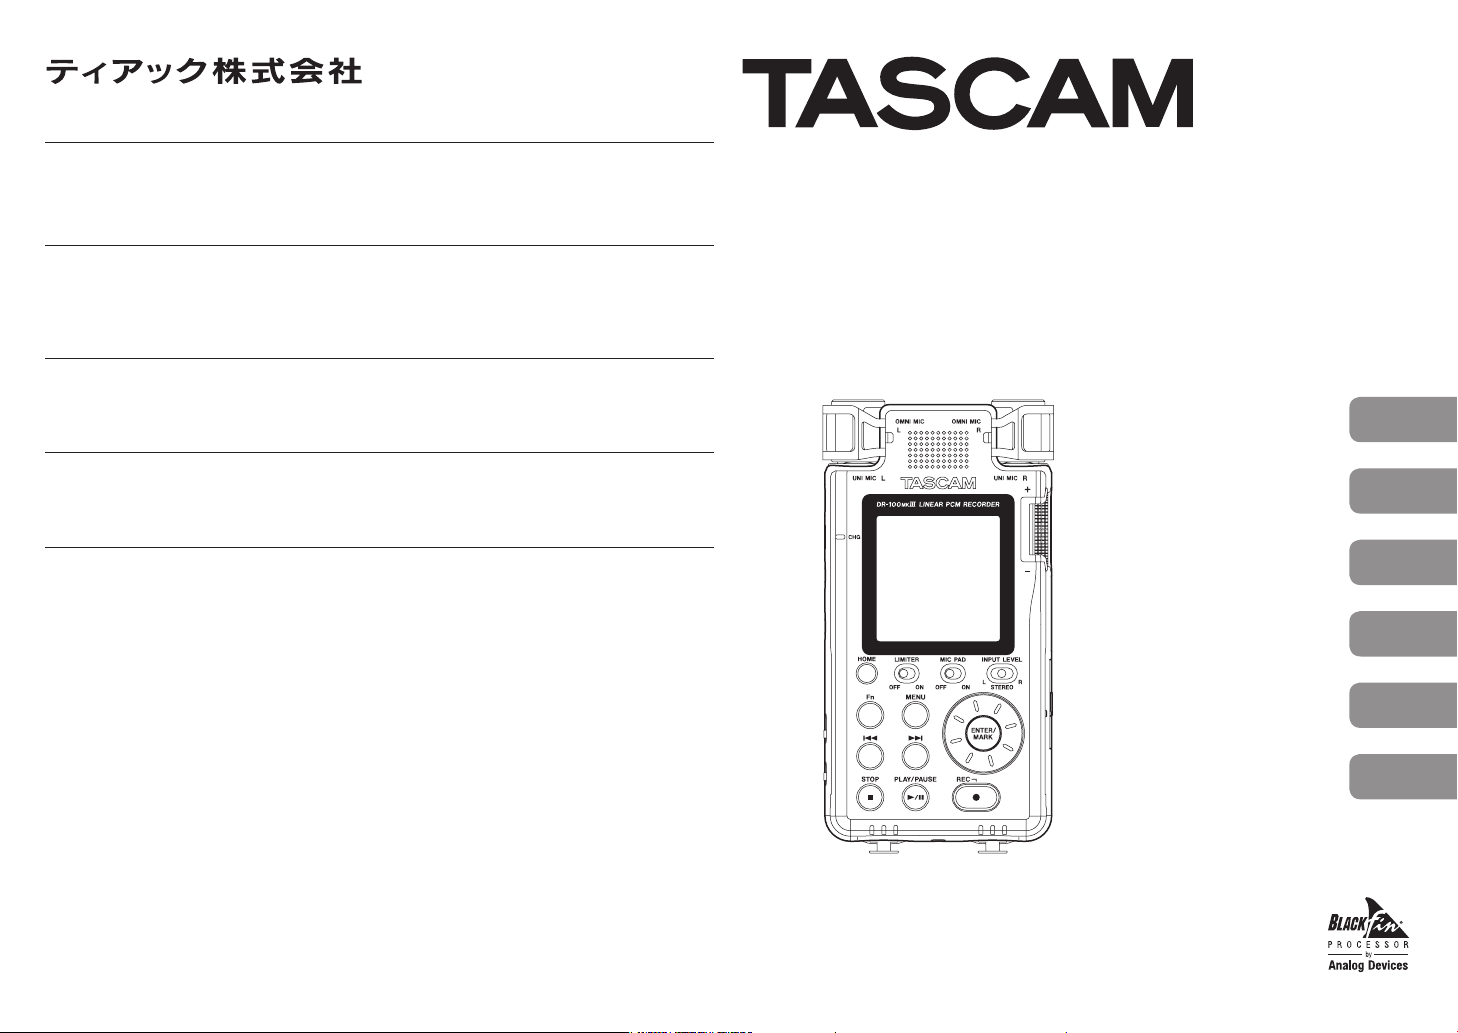
DR-100
Linear PCM Recorder
)
OWNER'S MANUAL
MODE D’EMPLOI
MANUAL DEL USUARIO
BEDIENUNGSANLEITUNG
MANUALE DI ISTRUZIONI
#
取扱説明書
ENGLISH
FRANÇAIS
ESPAÑOL
DEUTSCH
ITALIANO
日本語
Page 2

• TASCAM is a trademark of TEAC CORPORATION, registered in the U.S. and other
countries.
• SDXC Logo is a trademark of SD-3C, LLC.
• MPEG Layer-3 audio coding technology licensed from Fraunhofer IIS and Thomson.
• Supply of this product does not convey a license nor imply any right to distribute MPEG
Layer-3 compliant content created with this product in revenue-generating broadcast
systems (terrestrial, satellite, cable and/or other distribution channels), streaming
applications (via Internet, intranets and/or other networks), other content distribution
systems (pay-audio or audio-on-demand applications and the like) or on physical media
(compact discs, digital versatile discs, semiconductor chips, hard drives, memory cards
and the like). An independent license for such use is required. For details, please visit
http://mp3licensing.com.
• Blackfin® and the Blackfin logo are registered trademarks of Analog Devices, Inc.
• Other company names, product names and logos in this document are the trademarks
or registered trademarks of their respective owners.
TASCAM DR-100MKIII
2
Page 3
Owner’s Manual
IMPORTANT SAFETY
PRECAUTIONS
For U.S.A.
INFORMATION TO THE USER
This equipment has been tested and found to
comply with the limits for a Class B digital device,
pursuant to Part 15 of the FCC Rules. These limits are
designed to provide reasonable protection against
harmful interference in a residential installation. This
equipment generates, uses, and can radiate radio
frequency energy and, if not installed and used in
accordance with the instruction manual, may cause
harmful interference to radio communications.
However, there is no guarantee that interference will
not occur in a particular installation. If this equipment
does cause harmful interference to radio or television
reception, which can be determined by turning the
equipment off and on, the user is encouraged to try
to correct the interference by one or more of the
following measures.
a) Reorient or relocate the receiving antenna.
b) Increase the separation between the equipment
and receiver.
c) Connect the equipment into an outlet on a circuit
different from that to which the receiver is connected.
d) Consult the dealer or an experienced radio/TV
technician for help.
CAUTION
Changes or modifications to this equipment not
expressly approved by TEAC CORPORATION for
compliance could void the user’s authority to operate
this equipment.
For Canada
THIS CLASS B DIGITAL APPARATUS COMPLIES WITH
CANADIAN ICES-003.
CET APPAREIL NUMERIQUE DE LA CLASSE B EST
CONFORME A LA NORME NMB-003 DU CANADA.
This product complies with the
European Directives request and the
other Commission Regulations.
Declaration of Conformity
Responsible party: TEAC AMERICA, INC.
Address: 1834 Gage Road, Montebello,
California, U.S.A.
Telephone number: 1-323-726-0303
This device complies with Part 15 of the FCC Rules.
Operation is subject to the following two conditions:
(1) this device may not cause harmful interference,
and (2) this device must accept any interference
received, including interference that may cause
undesired operation.
IMPORTANT SAFETY INSTRUCTIONS
1 Read these instructions.
2 Keep these instructions.
3 Heed all warnings.
4 Follow all instructions.
5 Do not use this apparatus near water.
6 Clean only with dry cloth.
7 Do not block any ventilation openings. Install in
accordance with the manufacturer’s instructions.
8 Do not install near any heat sources such as
radiators, heat registers, stoves, or other apparatus
(including amplifiers) that produce heat.
9 Do not defeat the safety purpose of the polarized
or grounding-type plug. A polarized plug has two
blades with one wider than the other. A grounding
type plug has two blades and a third grounding
prong. The wide blade or the third prong are
provided for your safety. If the provided plug does
not fit into your outlet, consult an electrician for
replacement of the obsolete outlet.
10 Protect the power cord from being walked on
or pinched particularly at plugs, convenience
receptacles, and the point where they exit from
the apparatus.
11 Only use attachments/accessories specified by the
manufacturer.
12 Use only with the cart,
stand, tripod, bracket,
or table specified by the
manufacturer, or sold with
the apparatus. When a cart
is used, use caution when
moving the cart/apparatus combination to avoid
injury from tip-over.
13 Unplug this apparatus during lightning storms or
when unused for long periods of time.
14 Refer all servicing to qualified service personnel.
Servicing is required when the apparatus has
been damaged in any way, such as power-supply
cord or plug is damaged, liquid has been spilled
or objects have fallen into the apparatus, the
apparatus has been exposed to rain or moisture,
does not operate normally, or has been dropped.
•
The apparatus draws nominal non-operating power
from the AC outlet with its POWER or STANDBY/ON
switch not in the ON position.
•
The mains plug is used as the disconnect device, the
disconnect device shall remain readily operable.
•
Caution should be taken when using earphones or
headphones with the product because excessive
sound pressure (volume) from earphones or
headphones can cause hearing loss.
•
If you are experiencing problems with this product,
contact TEAC for a service referral. Do not use the
product until it has been repaired.
CAUTION
•
Do not expose this apparatus to drips or splashes.
•
Do not place any objects filled with liquids, such as
vases, on the apparatus.
•
Do not install this apparatus in a confined space
such as a book case or similar unit.
•
The apparatus should be located close enough to
the AC outlet so that you can easily grasp the power
cord plug at any time.
•
If the product uses batteries (including a battery
pack or installed batteries), they should not be
exposed to sunshine, fire or excessive heat.
•
CAUTION for products that use replaceable lithium
batteries: there is danger of explosion if a battery is
replaced with an incorrect type of battery. Replace
only with the same or equivalent type.
Cautions about rechargeable batteries
This product uses rechargeable batteries. Misuse of
batteries could cause a leak, rupture or other trouble.
Always abide by the following precautions when using
batteries.
•
If a rechargeable battery leaks, do not touch the
leaking fluid with a bare hand. Please consult with
TEAC Corporation if a battery fluid leak occurs.
•
Battery fluid in an eye could result in loss of vision. If
fluid enters an eye, wash the eye immediately with
clean water. Do not rub the eye when washing.
Consult a physician soon after washing. Battery fluid
on the body or clothing could cause injuries or burns
on the skin. Wash with clean water immediately and
then consult a physician.
•
Do not use any AC adaptor other than the model
designated for use with this unit. Always use the
designated AC adaptor when operating the unit
or recharging the battery with a household AC
power source. Use of an AC adaptor other than
the designated one could lead to overheating and
cause injury, burns, fires or stains, as well as battery
ruptures and battery fluid leaks.
•
Do not put a battery into a fire or leave it or recharge
it near a fire, under the sun or in other hot conditions.
•
Do not disassemble a battery. Doing so could cause
electric shock. Please contact the shop where you
bought the product or TEAC Corporation if you want
to have a battery inspected or repaired. When you
want to dispose of the product, please follow the
instruction in the Owner's Manual to remove the
batteries and recycle the equipment properly.
CAUTIONS ABOUT BATTERIES
This product uses batteries. Misuse of batteries could
cause a leak, rupture or other trouble. Always abide by
the following precautions when using batteries.
•
Never recharge non-rechargeable batteries. The
batteries could rupture or leak, causing fire or injury.
•
When installing batteries, pay attention to
the polarity indications (plus/minus (¥/^)
orientation), and install them correctly in the
battery compartment as indicated. Putting them in
backward could make the batteries rupture or leak,
causing fire, injury or stains around them.
•
When you store or dispose batteries, isolate their
terminals with insulation tape or something like that
to prevent them from contacting other batteries or
metallic objects.
•
When throwing used batteries away, follow the
disposal instructions indicated on the batteries and
the local disposal laws.
•
Do not use batteries other than those specified. Do
not mix and use new and old batteries or different
types of batteries together. The batteries could
rupture or leak, causing fire, injury or stains around
them.
•
Do not carry or store batteries together with small
metal objects. The batteries could short, causing
leak, rupture or other trouble.
•
Do not heat or disassemble batteries. Do not put
them in fire or water. Batteries could rupture or leak,
causing fire, injury or stains around them.
•
If the battery fluid leaks, wipe away any fluid on
the battery case before inserting new batteries. If
the battery fluid gets in an eye, it could cause loss
of eyesight. If fluid does enter an eye, wash it out
thoroughly with clean water without rubbing the
eye and then consult a doctor immediately. If the
fluid gets on a person’s body or clothing, it could
cause skin injuries or burns. If this should happen,
wash it off with clean water and then consult a
doctor immediately.
TASCAM DR-100MKIII
3
Page 4
•
Pb, Hg, Cd
The unit power should be off when you install and
replace batteries.
•
Remove the batteries if you do not plan to use the
unit for a long time. Batteries could rupture or leak,
causing fire, injury or stains around them. If the
battery fluid leaks, wipe away any fluid on the battery
compartment before inserting new batteries.
•
Do not disassemble a battery. The acid inside the
battery could harm skin or clothing.
8
For European Customers
Disposal of electrical and electronic
equipment
(a) All electrical and electronic equipment should
be disposed of separately from the municipal
waste stream via designated collection facilities
appointed by the government or the local authorities.
(b) By disposing of the electrical and electronic
equipment correctly, you will help save valuable
resources and prevent any potential negative
effects on human health and the environment.
(c) Improper disposal of waste equipment can have
serious effects on the environment and human
health as a result of the presence of hazardous
substances in electrical and electronic equipment.
(d) The crossed out wheeled dust bin
symbol indicates that electrical
and electronic equipment must be
collected and disposed of separately
from household waste.
(e) The return and collection systems
are available to the end users. For more detailed
information about disposal of old electrical and
electronic equipment, please contact your city
office, waste disposal service or the shop where
you purchased the equipment.
Disposal of batteries and/or
accumulators
(a) Waste batteries and/or accumulators should
be disposed of separately from the municipal
waste stream via designated collection facilities
appointed by the government or the local authorities.
(b) By disposing of waste batteries and/or accumu-
lators correctly, you will help save valuable
resources and prevent any potential negative
effects on human health and the environment.
(c) Improper disposal of waste batteries and/or
accumulators can have serious effects on the
environment and human health as a result of the
presence of hazardous substances in batteries
and/or accumulators.
(d) The crossed out wheeled dust bin
symbol indicates that batteries and/or
accumulators must be collected and
disposed of separately from household
waste.
If the battery or accumulator contains
more than the specified values of lead (Pb),
mercury (Hg), and/or cadmium (Cd) defined
in the Battery Directive (2006/66/EC), then the
chemical symbols for lead (Pb), mercury (Hg) and/
or cadmium (Cd) will be indicated beneath the
crossed out wheeled dust bin symbol.
(e) The return and collection systems are available to
the end users. For more detailed information about
disposal of waste batteries and/or accumulators,
please contact your city office, waste disposal
service or the shop where you purchased them.
TASCAM DR-100MKIII
4
Page 5
Contents
Li-ion
IMPORTANT SAFETY INSTRUCTIONS .............................3
Included items ........................................................................5
Recycling lithium-ion rechargeable batteries ........... 5
Removing the built-in battery ............................................. 5
Note about the Reference Manual ................................. 5
About SD cards .......................................................................6
Precautions for use ...................................................................... 6
Precautions for placement and use ...............................6
Beware of condensation .....................................................6
Cleaning the unit ...................................................................6
Using the TEAC Global Site ................................................6
User registration .................................................................... 6
Names of parts ........................................................................6
Top .......................................................................................................... 6
Front ...................................................................................................... 6
Rear panel .......................................................................................... 6
Left side ............................................................................................... 6
Right side ............................................................................................ 7
Bottom ................................................................................................. 7
Basic functions ........................................................................7
Home Screen overview ............................................................ 7
Basic menu operation procedures .................................... 7
Preparation ..............................................................................8
Powering the unit ......................................................................... 8
Inserting SD cards ......................................................................... 8
HOLD function for preventing accidental operation
8
Turning the unit on ...................................................................... 8
Turning the unit off (putting it in standby) ................. 8
Selecting the language ............................................................ 8
Setting the date and time ....................................................... 9
Formatting (initializing) SD cards ...................................9
Recording .................................................................................9
Adjusting input levels ................................................................ 9
Playing recordings ............................................................. 10
Deleting files ........................................................................ 10
Connecting with a computer ......................................... 10
Quick reference for using various functions.............11
Menu list ..................................................................................13
Function menu list ............................................................. 14
Message list ............................................................................15
Troubleshooting ................................................................. 16
Specifications ....................................................................... 16
General ..............................................................................................16
Inputs and outputs ....................................................................16
Audio performance ................................................................... 17
Recording times (in hours: minutes) ..............................17
Other ................................................................................................... 17
Information is given about products in this manual
only for the purpose of example and does not indicate
any guarantees against infringements of third-party
intellectual property rights and other rights related
to them. TEAC Corporation will bear no responsibility
for infringements on third-party intellectual property
rights or other liabilities that occur as a result of the use
of this product.
Properties copyrighted by third parties cannot be
used for any purpose other than personal enjoyment
and the like without the permission of the right
holders recognized by copyright law. Always use this
equipment properly.
TEAC Corporation will bear no responsibility for rights
infringements committed by users of this product.
In consideration of the remote possibility that data
could be lost or damaged due to accidental erasure
or malfunction of this unit, for example, we highly
recommend that you back up important recordings
to a computer or other storage device.
Thank you very much for purchasing the TASCAM
DR-100MKIII Linear PCM Recorder.
Before using this unit, read this Owner's Manual
carefully so that you will be able to use it correctly and
enjoy working with it for many years. After you have
finished reading this manual, please keep it in a safe
place for future reference.
You can also download this Owner's Manual from the
TEAC Global Site (http://teac-global.com/).
This product has a Blackfin® 16/32-bit embedded
processor made by Analog Devices, Inc. This
processor controls the unit's digital signal processing.
Inclusion of this Blackfin® processor in the product
increases its performance and reduces its power
consumption.
Included items
This product includes the following items.
Keep the box and packing materials for transportation
in the future.
Please contact TASCAM Customer Support (see back
cover) if any of these items are missing or have been
damaged during transportation.
•
Main unit ................................................................ × 1
•
Digital input conversion cable .................× 1
•
Owner’s Manual (this document)
including warranty .......................................... × 1
Recycling lithium-ion rechargeable batteries
This unit uses a built-in rechargeable lithium-ion battery.
When you no longer need a battery, take it to a shop
that participates in rechargeable battery recycling rather
than throwing it away in order to preserve precious
resources.
If you are uncertain, please contact TASCAM customer
support (see back cover).
CAUTION
Never disassemble the product other than when
•
preparing it for disposal.
Contact a TEAC service center (see back cover)
•
for rechargeable battery replacement.
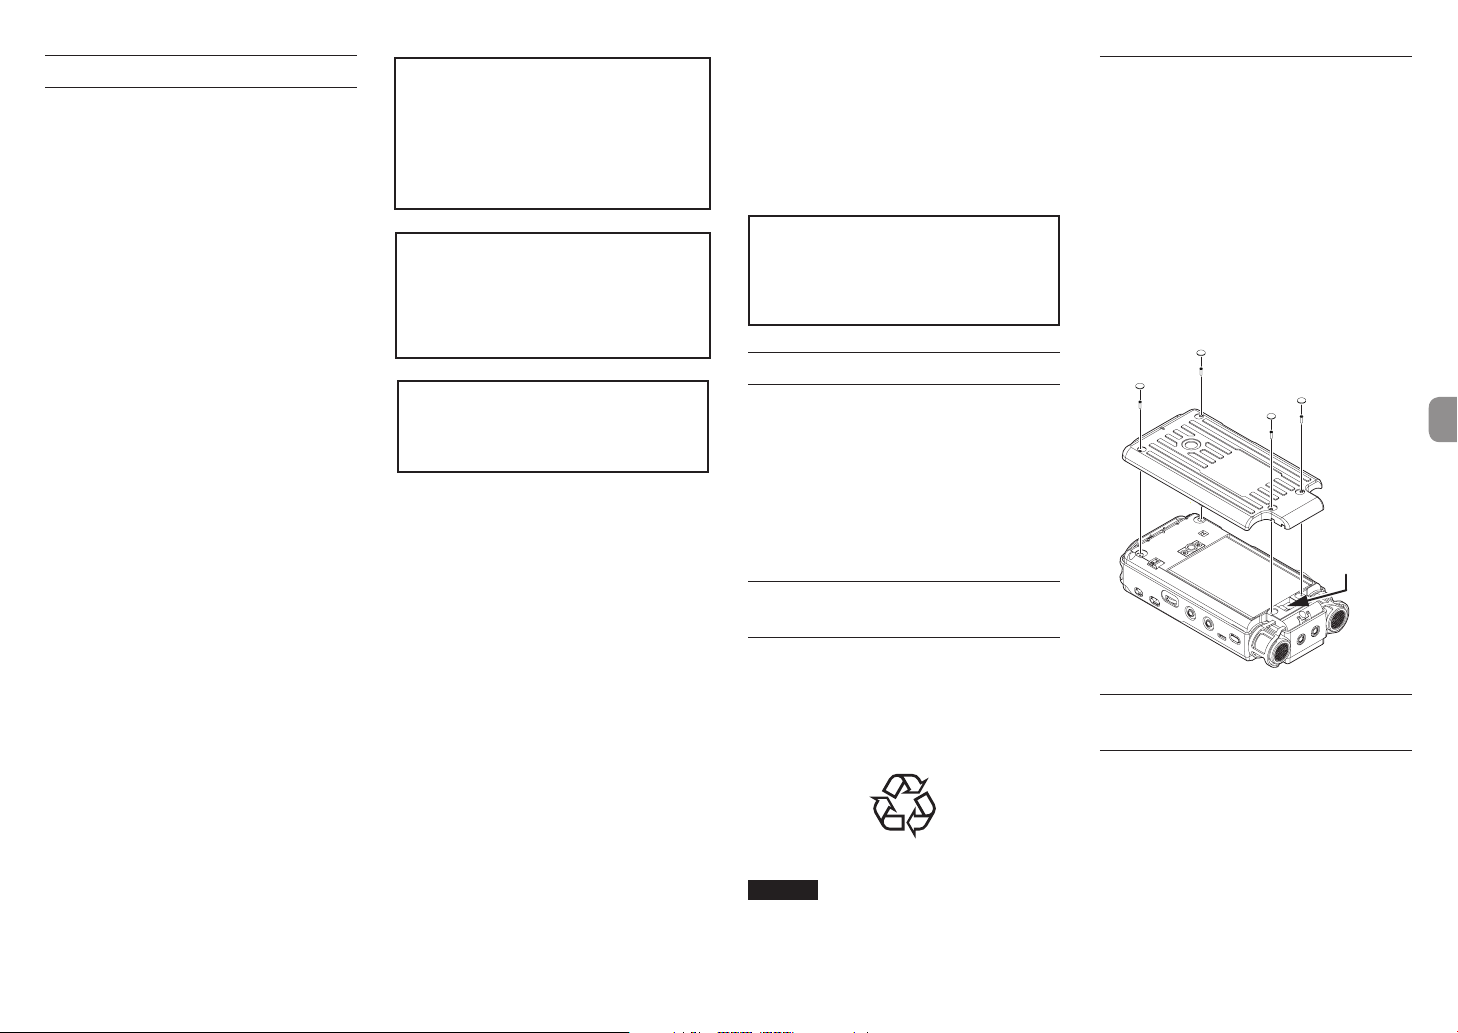
Removing the built-in battery
Before removing the built-in battery, turn the unit on
and drain the battery until the unit completely stops
operating.
•
When draining the built-in battery, disconnect the
external power supply, remove the AA batteries, and
set the POWER/DISPLAY screen AUTO PWR SAVE item
to OFF.
•
To disassemble this unit, you will need to prepare a
Phillips head screwdriver (#0).
Remove the rubber feet on the bottom of the unit.
1.
Remove the 4 screws that were covered by the
2.
rubber feet.
Remove the bottom panel.
3.
Disconnect the battery from the connector and
4.
remove it.
Connector
Note about the Reference Manual
This Owner’s Manual explains the main functions of this
unit. Please see the Reference Manual for information
about all the unit’s functions.
You can also download this Owner’s Manual and the
Reference Manual from the TEAC Global Site (http://
teac-global.com/).
TASCAM DR-100MKIII
5
Page 6
About SD cards
This unit uses SD cards for recording and playback.
It can use 64MB–2GB SD cards, 4–32GB SDHC cards and
48–128GB SDXC cards.
A list of SD cards that have been confirmed for use
with this unit can be found on the TEAC Global Site
(http://teac-global.com/). You can also contact TASCAM
customer support for information.
Precautions for use
SD cards are delicate media. In order to avoid damaging
SD cards, please take the following precautions when
handling them.
•
Do not leave them in extremely hot or cold places.
•
Do not leave them in extremely humid places.
•
Do not let them get wet.
•
Do not put things on top of them or twist them.
•
Do not hit them.
•
Do not remove or insert them during recording,
playback, data transmission or other SD card access.
•
When transporting them, put them into cases, for
example.
Precautions for placement and use
•
The environmental temperature operating range of
this unit is 0–40°C (32–104°F).
•
Do not install this unit in the following types of
locations. Doing so could make the sound quality
worse or cause malfunction.
Places with significant vibrations or that are
otherwise unstable
Places exposed to direct sunlight for extended
periods of time
Near heating equipment or other extremely hot
places
Extremely cold places
Places with bad ventilation or high humidity
Very dusty locations
Places exposed directly to rain or other water
•
If this unit is placed near a power amplifier or other
device with a large transformer, it could cause a hum.
If this occurs, increase the distance between this unit
and the other device.
•
This unit could cause color irregularities on a TV
screen or noise from a radio if used nearby. If this
occurs, use this unit farther away.
•
This unit might produce noise if a mobile phone or
other wireless device is used nearby to make calls or
to send or receive signals. If this occurs, increase the
TASCAM DR-100MKIII
6
distance between this unit and those devices or turn
them off.
•
To enable good heat dissipation, do not place
anything on top of the unit.
•
Do not place this unit on top of a power amplifier or
other device that generates heat.
Beware of condensation
Condensation could occur if the unit is moved from a
cold place to a warm place, it is used immediately after
a cold room has been heated or it is otherwise exposed
to a sudden temperature change. To prevent this, or if
this occurs, let the unit sit for one or two hours at the
new room temperature before using it.
Cleaning the unit
To clean the unit, wipe it gently with a soft dry cloth. Do
not wipe with chemical cleaning cloths, thinner, alcohol
or other chemical agents. Doing so could damage the
surface or cause discoloration.
Using the TEAC Global Site
You can download this Owner’s Manual and the
Reference Manual necessary for this unit from the TEAC
Global Site (http://teac-global.com/).
Open the TEAC Global Site (http://teac-global.
1.
com/).
In the TASCAM Downloads section, click the
2.
desired language to open the Downloads website
page for that language.
NOTE
If the desired language does not appear, click
Other Languages.
Click the product name in the “Search by Model
3.
Name” section to open the Downloads page for
that product.
Select and download the Owner’s Manual and the
4.
Reference Manual that are needed.
User registration
Customers in the USA, please visit the TASCAM website
(http://tascam.com/) to register as a user online.
Names of parts
CAUTION
When connecting and using plugs from
headphones and other external devices, do not
apply excessive force to the plugs. In particular,
be careful not to apply too much force when
using a standard to mini plug adapter. Doing so
could damage the equipment.
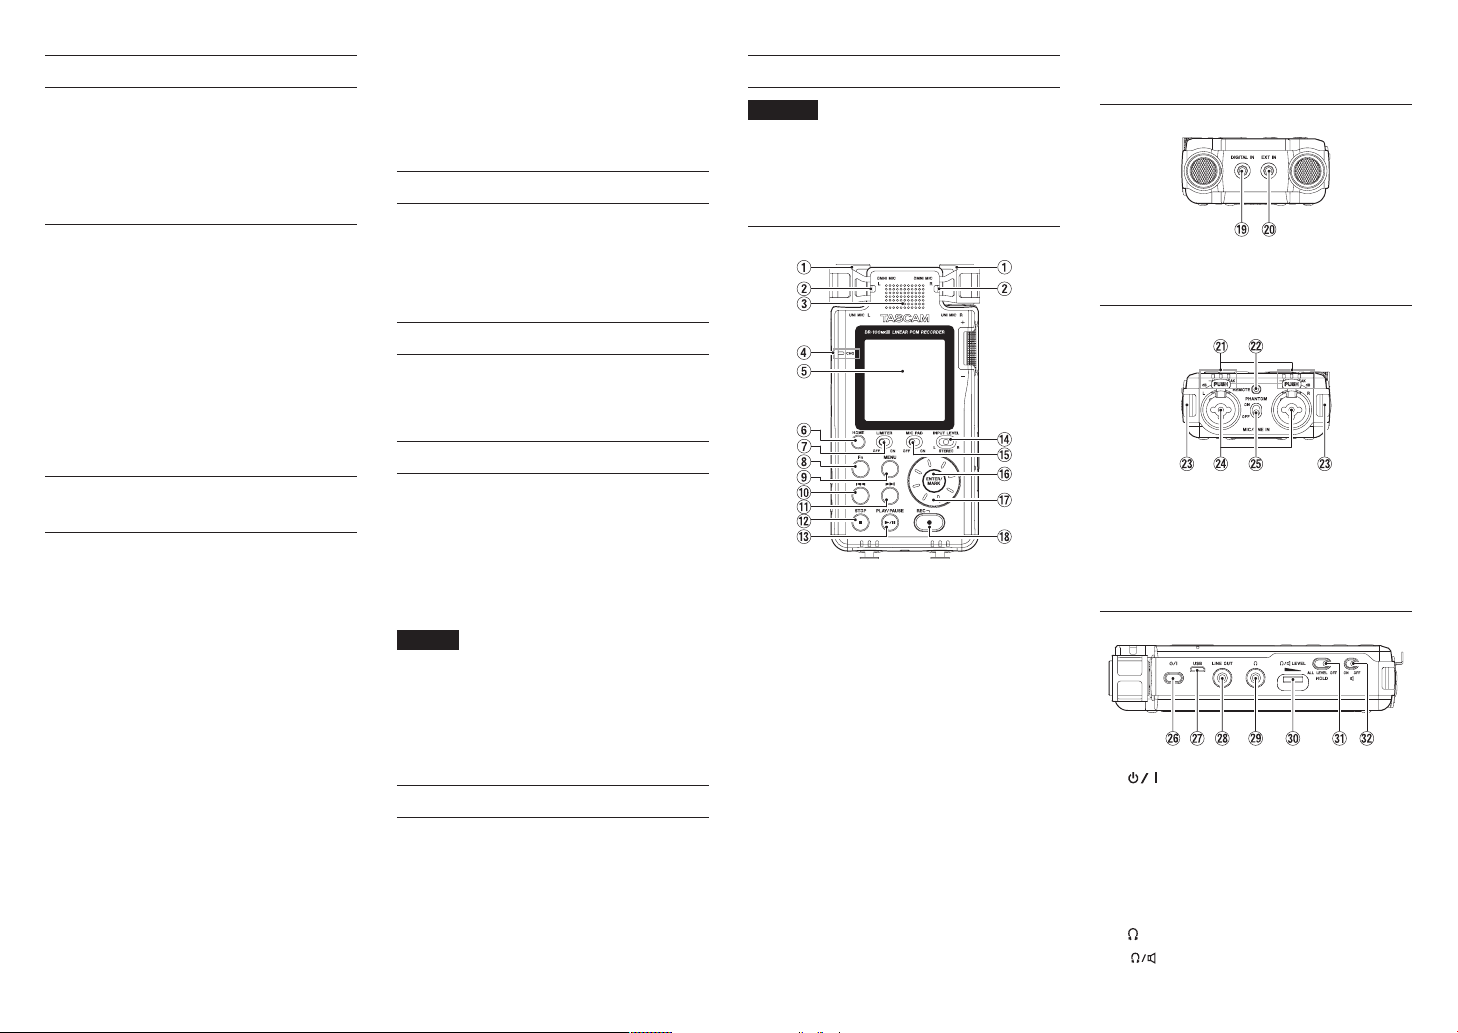
Top
1 UNI MIC L/R (built-in directional stereo mic)
2 OMNI MIC L/R (built-in omnidirectional stereo
mic)
3 Built-in speaker (mono)
4 CHG (charge) indicator
5 Display
6 HOME button
7 LIMITER switch
8 Fn button
9 MENU button
0 . button
q / button
w STOP [8] button
e PLAY/PAUSE [7/9] button
r INPUT LEVEL selection switch
t MIC PAD switch
y ENTER/MARK button
u Wheel
i REC [0] button/REC indicator
Front
o DIGITAL IN connector
p EXT IN connector
Rear panel
a Level indicator
s REMOTE jack
d Strap attachments
f MIC/LINE IN L/R jacks (XLR/TRS)
g PHANTOM switch
Left side
h (power) button
j USB port
This is a Micro-B USB port.
Using a cable that complies with USB standards,
you can connect the unit to a computer as a mass
storage device or use an AC adapter to supply
power.
k LINE OUT jack
l (headphone) jack
; (headphone/speaker) LEVEL volume
Page 7
z HOLD switch
x (speaker) switch
Right side
c Battery compartment (AA batteries)
v SD card slot
b Input level knob
Bottom
n Tripod mounting threads (1/4-inch)
m REC indicator
Basic functions
Home Screen overview
Stopped/playing
Recording/recording standby
1 Input source
2 Input channel indicator
3 Low cut filter status
4 Phantom power supply status
5 Power supply status
6 File format
7 Playback speed/loop playback status
8 Transport status (stopped/playing)
9 Loop playback IN/OUT point indicators
0 Level meters
q Playback folder name
w Playback file name
e Playback time/remaining playback time
r Playback position
t Peak value in decibels (dB)
y Recording format
u Recording function information
Select a setting value.
i Transport status (recording standby/
recording)
o Level meters
4.
Use the wheel to change the setting, and press the
ENTER/MARK button to confirm it.
p Recording folder name
a Recording file name
s Recording time/remaining recording time
d Recording position
f Peak recording level in decibels (dB)
g Input levels
Basic menu operation procedures
Open the MENU Screen.
1.
Press the MENU button.
Select a menu item.
2.
Use the wheel to select the item, and press the
ENTER/MARK button to show the settings.
Select a setting item.
3.
Use the wheel to select the item, and press the
ENTER/MARK button to show the setting values.
NOTE
If the setting values are only ON and OFF, you
•
can switch them without selecting from a list.
Press the . button to return to the previous
•
screen.
NOTE
Press the . button to cancel an operation.
•
Press the HOME button to return to the Home
•
Screen.
TASCAM DR-100MKIII
7
Page 8
Preparation
Powering the unit
8
Using the built-in battery
Charge it before using the unit the first time after
purchase and after it has not been used for a long time.
•
Charging the built-in battery
Charge the built-in battery by using a TASCAM
PS-P520E AC adapter (sold separately) or by using a
USB cable (Type A Micro B) to connect the USB port
on the unit to a computer.
The unit can be used while the battery is charging.
AC outlet
Micro B
USB plug
You can check the recharging status of the built-in
batteries with the color of the CHG (charge)
indicator.
Lit orange: charging
Lit green: charging complete
TASCAM PS-P520E (sold separately)
8
Using AA batteries
Slide the battery compartment cover toward the
1.
bottom of the unit to open it.
Install 2 AA batteries with their ¥ and ^ marks
2.
as shown in the battery compartment.
Close the battery compartment cover.
3.
•
Set the type of batteries used in order to allow
the unit to accurately show the amount of power
remaining and determine whether enough power is
available for proper operation. (By default, this is set
to alkaline batteries.) (See “Quick reference for using
various functions” on page 11.)
Inserting SD cards
Open the SD slot cover.
1.
Insert an SD Card into the slot as shown in the
2.
illustration until it clicks into place.
Close the SD card slot cover.
3.
HOLD function for preventing accidental operation
You can slide the HOLD switch to LEVEL or ALL to
enable the hold function that prevents accidental
operation.
ALL: operations of the input level knob and all
buttons are ignored
LEVEL: Operations of the input level knob are
ignored
OFF: hold function is off
Turning the unit on
Confirm that the HOLD switch is set to OFF, and press
down the (power) button until the screen appears.
The Home Screen appears after the unit starts up.
Turning the unit off (putting it in standby)
Press the (power) button until the screen becomes
blank.
NOTE
You cannot turn the unit off (put it in standby)
•
when it is recording or in recording standby.
The automatic power saving function will turn
•
the power off when the unit is stopped. (See
“Quick reference for using various functions” on
page 11.)
Selecting the language
The first time you turn the unit on after purchasing
it, the LANGUAGE screen will open. You can set the
language used on this screen.
LCD screen (LANGUAGE screen)
Turn the wheel to move the cursor and select the
1.
language.
Options
ENGLISH: use English
日本語 : use Japanese
FRANÇAIS: use French
ESPAÑOL: use Spanish
DEUTSCH: use German
ITALIANO: use Italian
After making the selection, press the ENTER/
2.
MARK button to confirm it.
NOTE
You can change this setting with the SYSTEM
screen LANGUAGE item. (See “Quick reference for
using various functions” on page 11.)
TASCAM DR-100MKIII
8
CAUTION
SD cards that meet SD, SDHC or SDXC standards
•
can be used with this unit.
A list of SD cards that have been confirmed to
•
work with this unit can be found on the TEAC
Global Site (http://teac-global.com/).
Page 9
Setting the date and time
The first time you turn the unit on after purchasing it
and whenever the date and time has been reset, the
DATE/TIME screen where you can set the date and time
will open.
Turn the wheel to move the cursor to the item
1.
(year/month/day/hour/minute/second) you want
to set, and press the ENTER/MARK button.
Turn the wheel to change the value, and press the
2.
ENTER/MARK button.
Turn the wheel to move the cursor to OK, and press
3.
the ENTER/MARK button to confirm the setting.
NOTE
You can also change the date and time setting from
the menu. (See “Quick reference for using various
functions” on page 11.)
Formatting (initializing) SD cards
The following message appears if an unformatted card
is installed in the unit when it is turned on.
Press the ENTER/MARK button to format the card.
CAUTION
Formatting will erase all the data on the SD
card.
Backup data to a computer before formatting
the card.
NOTE
You can also use the SYSTEM screen MEDIA
FORMAT item to format a card. (See “Quick
reference for using various functions” on page
11.)
Recording
With this unit, you can record audio with even better
quality by changing the recording format and sampling
frequency, as well as setting the various functions,
including the limiter, level control and low-cut filter.
Here, we explain recording using UNI MIC L/R (default
setting).
Please see the Reference Manual for explanations of the
other functions.
Start recording standby.
1.
Press the REC [0] button to start recording
standby. The REC indicator will blink.
Adjust the input level.
2.
The input level can be adjusted even when in
recording standby or recording. (See “Adjusting
input levels” on page 9.)
Start recording.
3.
Press the REC [0] button when in recording
standby to start recording. The REC indicator will
stop blinking and stay lit.
Stop recording.
4.
Press the STOP [8] button again to stop
recording.
NOTE
Press the REC [0] button during recording to
•
pause recording.
Press the REC [0] button again to restart
•
recording.
Adjusting input levels
Before starting recording, the input levels must be
adjusted to suitable levels in order to prevent distortion
of input signals that are too loud and to prevent input
signals from being so quiet that they are masked by
noise.
8
Setting suitable input levels
Set the INPUT LEVEL selection switch to STEREO.
While watching the level meters, use the input level
knob to adjust the input level to around −12 dB.
Adjust the levels so they are as high as possible without
causing the PEAK level indicators to light when the
loudest sounds (peak levels) are input.
Level indicators
If the PEAK level indicators still light even when the
input levels are lowered as much as possible, set the
MIC PAD switch to ON and adjust again.
If the PEAK level indicators still light even after doing
this, try changing the distances and angles between the
microphones and the sound sources.
TASCAM DR-100MKIII
9
Page 10
Playing recordings
8
Starting playback
Press the PLAY/PAUSE [7/9] button to start
playback.
8
Pausing playback
Press the PLAY/PAUSE [7/9] or STOP [8] button
to pause playback.
NOTE
Press the PLAY/PAUSE [7/9] button again to
resume playback.
8
Stopping playback
Press the STOP [8] button when paused to return to
the beginning of the file.
8
Searching backward and forward
When the Home Screen is open and a track is playing
back or stopped, press and hold the . or /
button to search forward or backward.
Release the button to stop again or resume playback.
8
Selecting files (skipping)
When stopped or playing back, press the . button
to skip to the previous file, or press the / button to
skip to the next file.
8
Listening with the built-in speaker
Set the (speaker) switch to ON.
8
Listening with headphones
Connect headphones to the (headphone) jack.
NOTE
When headphones are connected, the built-in
speaker will not output sound even when the
(speaker) switch is set to ON.
8
Adjusting the volume
Use the LEVEL control to adjust the volume
output from the built-in speaker and headphones.
Deleting files
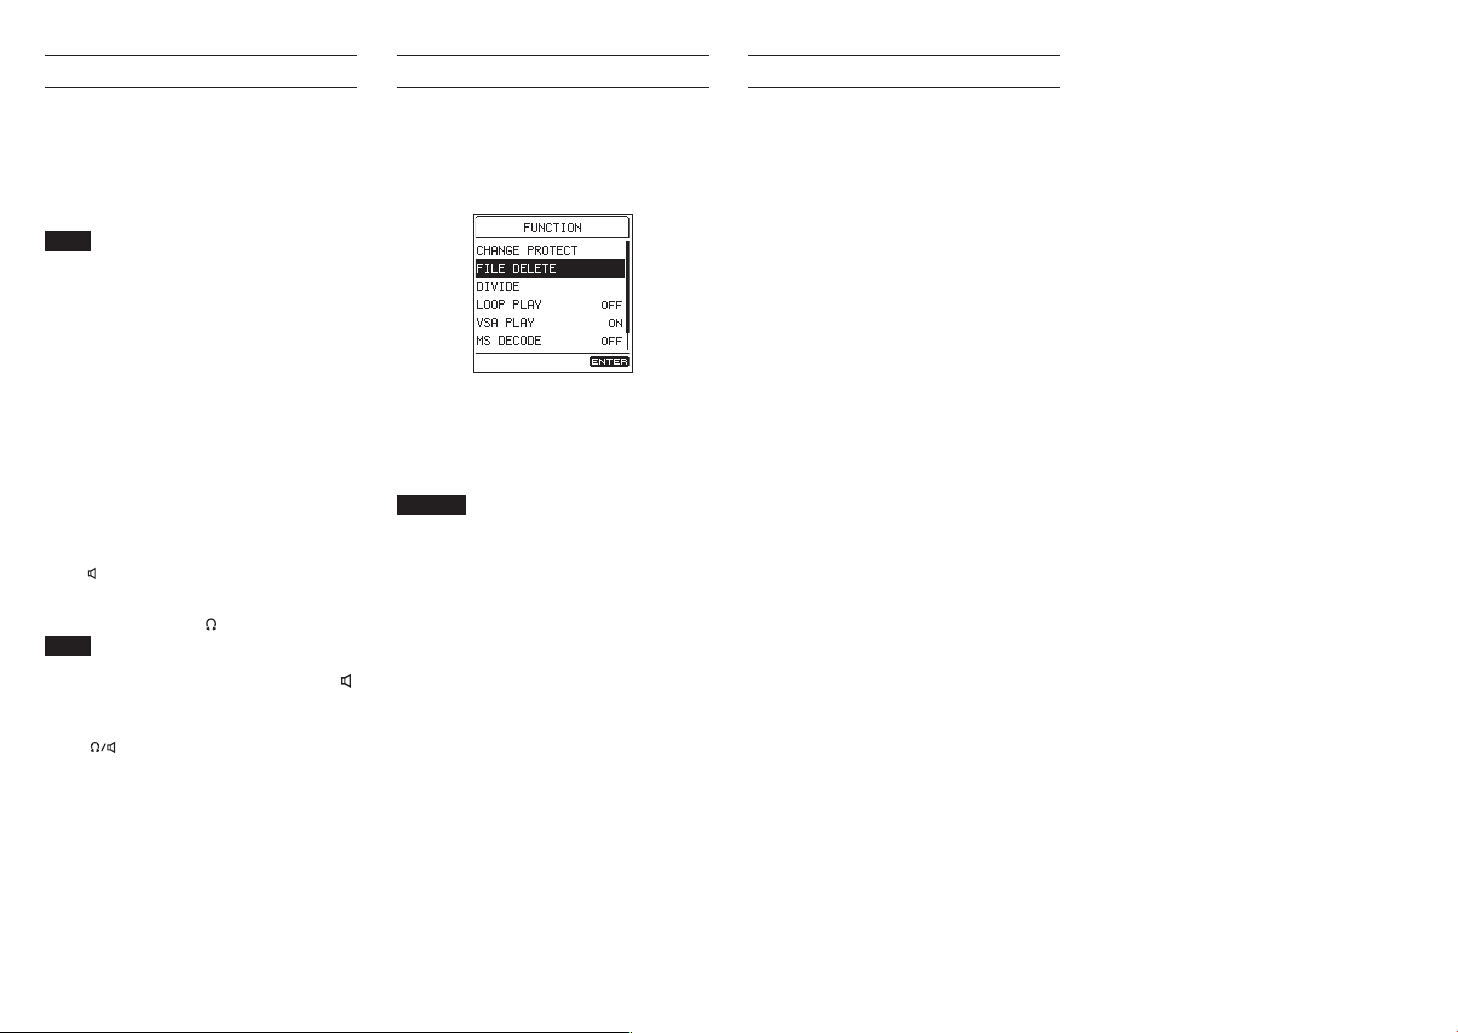
Follow these steps to delete a recorded audio file.
Open the Function Screen
1.
Press the Fn button.
Select the delete function.
2.
Use the wheel to select FILE DELETE, and press
the ENTER/MARK button.
Execute deletion.
3.
Use the wheel to select YES, and press the ENTER/
MARK button to delete the file and return to the
Home Screen.
To cancel, select NO, and press the ENTER/MARK
button to return to the FUNCTION Screen.
CAUTION
Be aware that file deletion cannot be undone.
Connecting with a computer
You can transfer audio files on the SD card in the unit
to a computer, as well as transfer audio files from the
computer to the unit.
8
Connecting with a computer using
USB
Connect the USB cable.
1.
If the unit is off (in standby), turn it on.
Activate the connection
2.
Select the SYSTEM screen USB STORAGE item, and
press the ENTER/MARK button.
MENU
w SYSTEM w USB STORAGE
Use the wheel to select YES, and press
the ENTER/MARK button to activate the
connection.
To cancel, select NO, and press the ENTER/
MARK button.
This unit appears on the computer as an external
3.
drive named “DR-100MKIII” (if the card has been
formatted by this unit).
8
Exchanging files with a computer
After following the instructions in the previous section,
click the “DR-100MKIII” drive on the computer screen to
show the “MUSIC” and “UTILITY” folders.
To transfer files to the computer, open the “MUSIC”
folder and drag and drop the desired files to destinations of your choice.
To transfer files from the computer, drag and drop the
desired audio files on the computer to the “MUSIC”
folder.
8
Disconnecting from a computer
Use the proper procedures on the computer to
unmount this unit. Then, press the ENTER/MARK
button on the unit to return to the Home Screen.
See the computer’s operation manual for instructions
about how to unmount an external volume.
TASCAM DR-100MKIII
10
Page 11
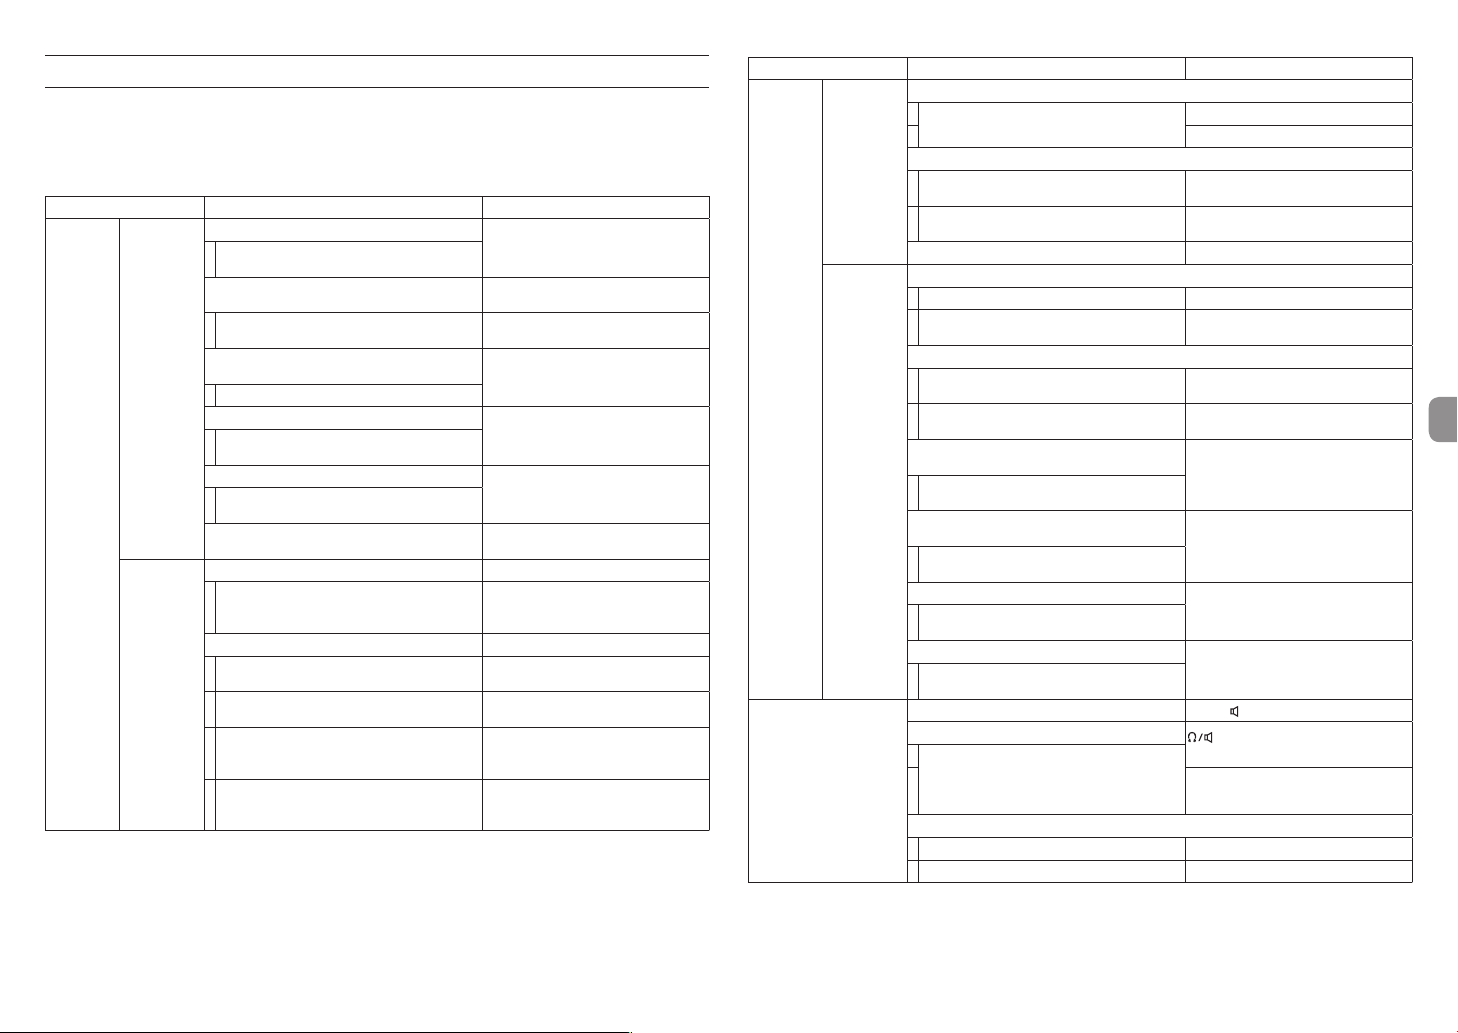
Quick reference for using various functions
•
Button names are shown like this: MENU.
•
The following menu operations assume that the Home Screen is open before starting. Instructions are abbreviated.
For example, "Press the MENU button, select the menu item, and then select the setting item" becomes "MENU
w menu item w setting item".
•
For function details, see the Reference Manual.
Category Desired action/explanation Procedures, buttons used
Recording
Input settings
Input level
Select input sources
You can select the input source as you like and
according to the application.
Use a condenser mic that requires phantom
power supply
You can set the phantom power voltage.
Use a small condenser mic that requires plug-in
power supply
The unit can supply plug-in power.
Use mid-side microphones
The unit can convert mid-side format stereo
mic signals into ordinary stereo signals.
Air-conditioning or other noise is bothersome
The low-cut filter can reduce noise from
air-conditioners and other sources.
Record in mono
Adjust the input level Input level knob
If you want to adjust the left and right input
levels separately, set the INPUT LEVEL
selection switch to L or R.
Record without distortion
The meters are still peeking even though the
input level knob is turned all the way down.
Avoid distortion when signals that are too loud
are input suddenly. (Limiter function)
Automatically adjust the recording level in
response to the input sound. (Automatic level
mode)
Automatically reduce the input level in
response to the maximum level of the input
sound. (Peak reduction mode)
MENU w I/O SETTING w SOURCE
Turn the PHANTOM switch ON
MENU w I/O SETTING w
PHANTOM VOLT
MENU w I/O SETTING w
PLUG IN POWER
MENU w I/O SETTING w
MS DECODE
MENU w I/O SETTING w
LOW CUT
MENU w REC SETTING w
FILE TYPE
INPUT LEVEL selection switch
Turn the MIC PAD switch ON
Turn the LIMITER switch ON
MENU w I/O SETTING w
LEVEL CONTROL w AUTO LEVEL
MENU w I/O SETTING w
LEVEL CONTROL w PEAK REDUCTION
Category Desired action/explanation Procedures, buttons used
Set the recording audio quality
MENU w REC SETTING w FORMAT
MENU w REC SETTING w SAMPLE
MENU w I/O SETTING w
A/D FILTER
MENU w I/O SETTING w
DUAL ADC
/ while recording
MENU w REC SETTING w
FILE INC
Fn w DIVIDE w DIVIDE
Fn w DIVIDE w MARK DIVIDE
MENU w REC SETTING w
AUTO REC w MODE w LEVEL
MENU w REC SETTING w
PRE REC
MENU w REC SETTING w
DUAL REC w MODE w LEVEL
MENU w REC SETTING w
DUAL REC w MODE w FORMAT
(headphone/speaker) LEVEL
volume
MENU w I/O SETTING w
OUTPUT ATT w PHONES
.//
Basic settings
Recording
Other
functions
Playing recordings
You can set the recording audio quality as you
like and according to the application.
Record with even higher quality
Change the ADC audio quality.
Improve the S/N performance.
Change where recording files are saved MENU w BROWSE
Create a new file while continuing to record (file incrementing function)
Manually increment files
Automatically increment files at set time
intervals
Divide the recorded file that is selected
Divide a file manually
(File division function)
Divide at all mark positions.
(Mark division function)
Start recording automatically (Automatic
recording function)
The unit can start recording when it detects an
input signal level.
Record without losing the first sound at the
being of a file (Pre-recording function)
The unit can record up to two seconds before
recording is triggered.
Record a backup
The unit can record a backup at a level 12dB
lower than the set recording level.
Simultaneously record WAV and MP3 files
The unit can simultaneously record WAV and
MP3 files.
Listen to playback through the built-in speaker Set the (speaker) switch to ON
Adjust the headphone/speaker volume
They volume might differ depending on the
headphones used.
Set this according to the headphones you are
using.
Change the playback file
Select a file before or after
Select from a list MENU w BROWSE
TASCAM DR-100MKIII
11
Page 12
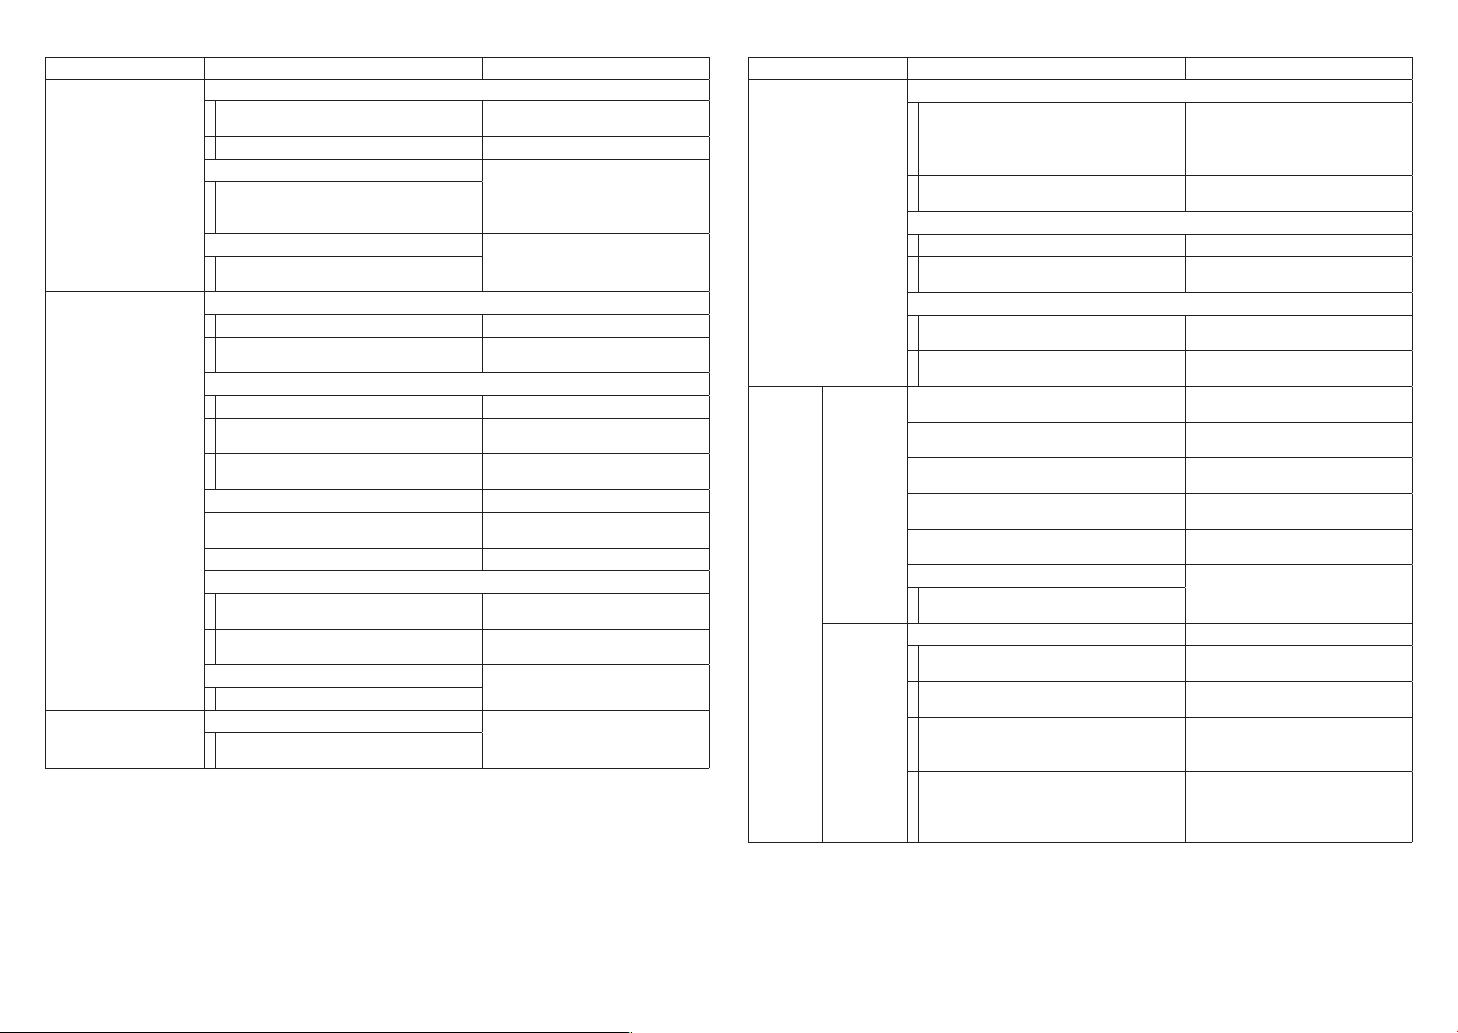
Category Desired action/explanation Procedures, buttons used
Change the playback position
Playing recordings
Files
Marks
Change the playback position while
outputting sound.
Move without outputting sound. Wheel
Repeat playback
The unit can continuously repeat playback
of a single file or an interval. (Loop playback
function)
Change playback speed
The unit can play files slowly or quickly. (VSA
playback function)
Save a file
Save the selected file Fn w CHANGE PROTECT
Select a file and save it
Delete a file
Delete a selected file Fn w FILE DELETE
Select a file and delete it
Delete all files at the same time
Create a folder MENU w BROWSE w NEW FOLDER
Delete a folder
Change the file name format MENU w SYSTEM w FILE NAME
Reset the file number
Reset the file number immediately
Reset the file number each time a new folder
is created
Connect to a computer and transfer audio files
You can use this unit as USB mass storage.
Add marks manually
You can add marks manually when recording
or playing back (but not when stopped).
Press and hold .//
Fn w LOOP PLAY
Fn w VSA PLAY
MENU w BROWSE w Fn w
CHANGE PROTECT
MENU w BROWSE w Fn w
FILE DELETE
MENU w BROWSE w Fn w
ALL FILES DELETE
MENU w BROWSE w Fn w
FOLDER DELETE
MENU w SYSTEM w
FILE No.RESET w RESET
MENU w SYSTEM w
FILE No.RESET w ON
MENU w SYSTEM w USB STORAGE
ENTER/MARK when recording or
playing back
Category Desired action/explanation Procedures, buttons used
Add marks automatically to a recording
Add when the set level is exceeded (LEVEL).
Marks
Settings
Display
System
Add when the set time is reached (TIME).
Add when a digital input track division is
detected (DIGITAL).
Add when a level indicator PEAK lights.
Move to a mark position
Move to a mark position. ENTER/MARK + .//
Select the mark to move to.
Delete a mark
When stopped, move to a mark position and
press the ENTER/MARK button to delete it.
Delete all marks in a file at the same time.
Turn off the backlight
Change the display brightness
Adjust the contrast
Turn off the level and REC indicators
Change the peak level and hold
Clear held peak levels
This works only when the peak hold function
mode is set to HOLD.
View various types of information
You can view information about the SD card.
You can check the firmware version.
You can view information about files.
You can view settings used while recording.
If the XRI data recording function is turned ON,
settings used during recording will be saved
with the file.
MENU w MARK SETTING w
AUTO MARK w MODE
MENU w MARK SETTING w
PEAK MARK
MENU w MARK SETTING w
MARK SKIP
ENTER/MARK
MENU w BROWSE w Fn w
CLR ALL MARKS
MENU w POWER/DISPLAY w
BACKLIGHT
MENU w POWER/DISPLAY w
BRIGHTNESS
MENU w POWER/DISPLAY w
CONTRAST
MENU w POWER/DISPLAY w
INDICATORS
MENU w POWER/DISPLAY w
PEAK LEVEL
When the Home Screen is open, press
and hold Fn
MENU w SYSTEM w INFORMATION
w CARD
MENU w SYSTEM w INFORMATION
w FIRMWARE
MENU w SYSTEM w INFORMATION
w FILE
Fn w FILE INFORMATION
Fn w FILE INFORMATION
MENU w REC SETTING w XRI
TASCAM DR-100MKIII
12
Page 13
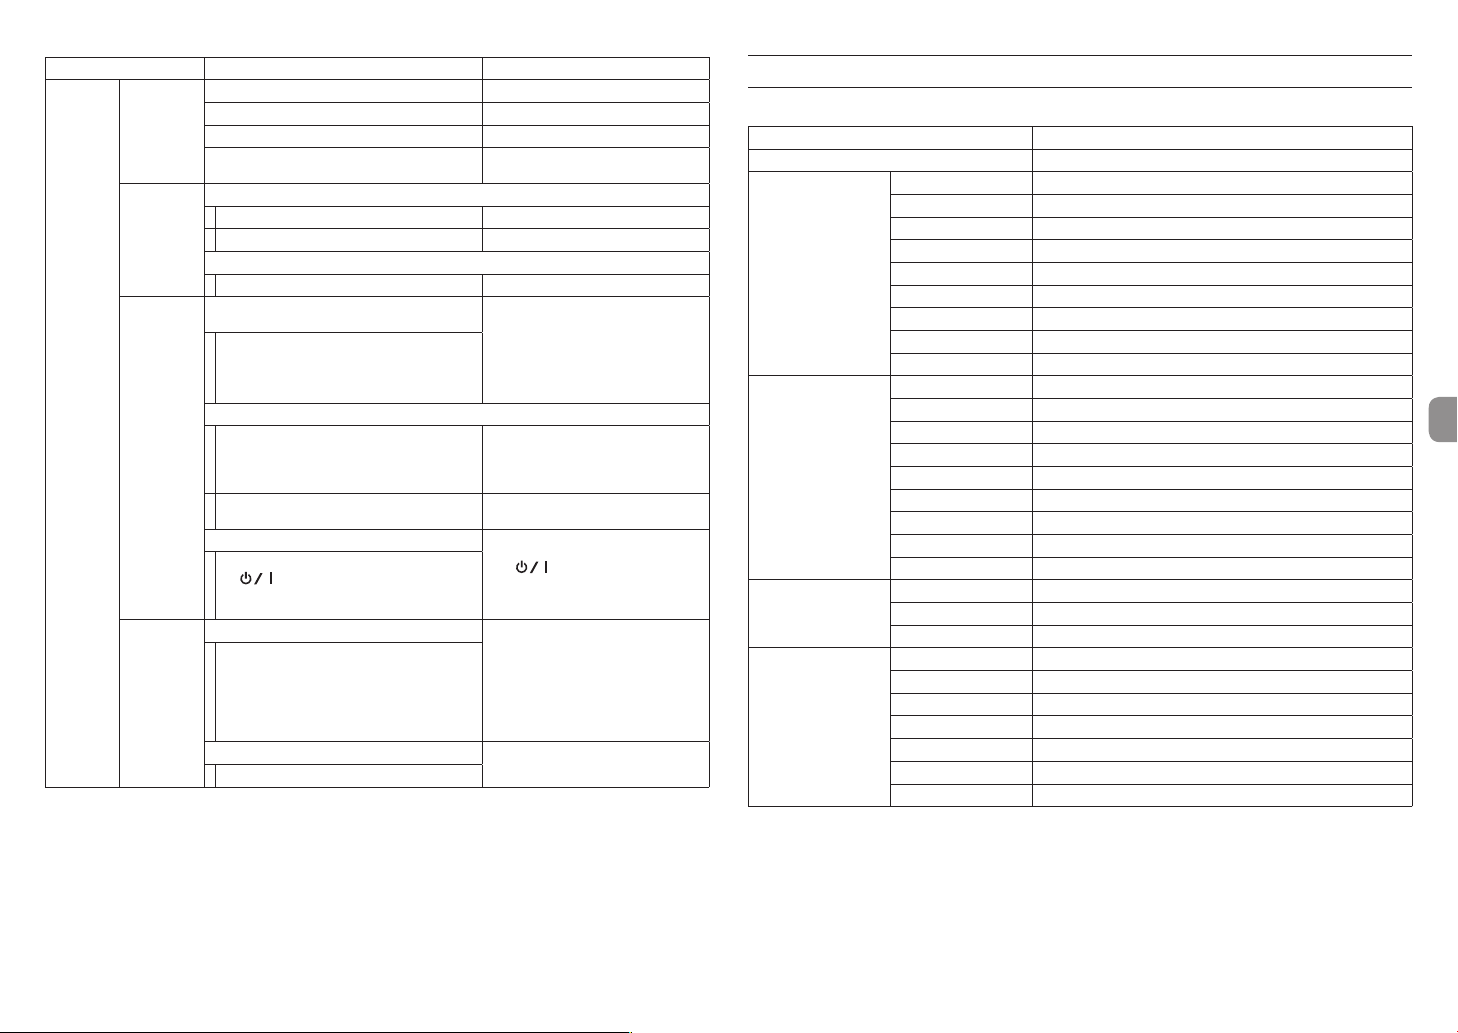
Category Desired action/explanation Procedures, buttons used
Change date and time MENU w SYSTEM w DATE/TIME
System
Operation
Settings
Power
Other
functions
Set the language MENU w SYSTEM w LANGUAGE
Restore factory default settings MENU w SYSTEM w INITIALIZE
Format an SD card
Prevent accidental operation
Disable input level operations. HOLD w LEVEL
Disable the input level knob and all buttons. HOLD w ALL
Operate the the unit remotely
Set the remote control used. MENU w SYSTEM w REMOTE
Turn the power off automatically (Automatic
power saving function)
Prevent batteries from being drained when
the unit is left unused.
The unit will not turn off automatically during
recording or playback.
Use the unit for extended amounts of time
Continuous operation for an extended amount
of time is possible by using both the built-in
battery and AA batteries. Set whether to use
the built-in battery or the AA batteries first.
Set the type of AA batteries used to allow the
unit to show the remaining charge accurately.
Starting recording immediately
When the unit is off (in standby mode), press
the (power) button while pressing and
holding the REC button to turn it on and start
recording immediately.
Prepare for synchronization with a video file
The unit can automatically generate a tone
signal when beginning and ending recordings.
By having the unit record this tone signal and
the camera record its output sound, synchronizing during video editing can be made
easier.
Input signals to a camera
The line output level can be attenuated 30 dB.
MENU w SYSTEM w
MEDIA FORMAT
MENU w POWER/DISPLAY w
AUTO PWR SAVE
MENU w POWER/DISPLAY w
BATTERY w PRIORITY
MENU w POWER/DISPLAY w
BATTERY w AA TYPE
Press (power) while pressing and
holding REC
MENU w REC SETTING w
AUTO TONE
MENU w I/O SETTING w
OUTPUT ATT w LINE
Menu list
Press the MENU button to open the MENU Screen.
Menu item Function
BROWSE
REC SETTING
I/O SETTING
MARK SETTING
POWER/DISPLAY
FORMAT
SAMPLE
FILE TYPE
XRI
DUAL REC
FILE INC
AUTO REC
PRE REC
AUTO TONE
SOURCE
A/D FILTER
DUAL ADC
PHANTOM VOLT
PLUG IN POWER
LOW CUT
LEVEL CONTROL
MS DECODE
OUTPUT ATT
AUTO MARK
PEAK MARK
MARK SKIP
AUTO PWR SAVE
BATTERY
BACKLIGHT
BRIGHTNESS
CONTRAST
INDICATORS
PEAK LEVEL
Work with files and folders on the SD card
Set the recording file format
Set the sampling frequency
Set the file type
Turn XRI data recording on/off
Set dual recording function
Set the recording time interval for automatically incrementing files
Set the auto-recording function
Set the pre-recording function
Set the auto tone function
Set the input source
Set the A/D converter filter
Turn on/off this function that improves S/N performance
Set the phantom power voltage
Turn plug-in power on/off
Set the low-cut filter
Set the level control function
Set the mid-side decoding function
Set the output attenuator function
Set the automatic mark function
Turn the peak mark function on/off
Set the mark skip mode
Set the automatic power saving function
Makes settings related to the built-in and replaceable batteries
Set how long the backlight stays on
Set the backlight brightness
Adjust the contrast
Turn indicators on/off
Set the level meter peak hold function
TASCAM DR-100MKIII
13
Page 14
Menu item Function
Shows a variety of information.
Set the date and time
Set the file name format.
Reset the file number
Make connected remote control settings
Set the language shown on the display
Restore factory default settings
Format the SD card
Switch to USB mass storage device mode
SYSTEM
INFORMATION
DATE/TIME
FILE NAME
FILE No.RESET
REMOTE
LANGUAGE
INITIALIZE
MEDIA FORMAT
USB STORAGE
Function menu list
•
When the Home Screen is open and the unit is stopped, paused, playing back, or in recording standby, press the Fn
button to open the FUNCTION screen.
The function shown depends on the state of the unit when the Fn button is pressed.
Menu item Function
CHANGE PROTECT
FILE DELETE
Stopped, paused or
playing back
Recording standby
•
When a file or folder is selected on the Browse Screen, press the Fn button to open the FOLDER MENU or FILE MENU
screen.
Menu item Function
File selected on Browse
Screen
File not selected on
Browse Screen
DIVIDE
LOOP PLAY
VSA PLAY
MS DECODE
FILE INFORMATION
LOW CUT
LEVEL CONTROL
MS DECODE
FILE INFORMATION
FILE DELETE
CHANGE PROTECT
CLR ALL MARKS
ALL FILES DELETE
FOLDER DELETE
Change protection for the selected file
Delete the selected file
Divide the selected file
Make loop playback settings
Make VSA playback settings
Set the mid-side decoding function
Show file information for the selected file
Set the low-cut filter
Set the level control function
Set the mid-side decoding function
Show file information for the selected file
Delete the selected file
Change the protection status of the selected file
Delete all marks in the selected file
Delete all files in the selected folder
Delete the selected folder
TASCAM DR-100MKIII
14
Page 15
Message list
The following is a list of the pop-up messages.
Refer to this list if one of these pop-up messages appears on the DR-100MKIII
and you want to check the meaning or determine a proper response.
Message Meaning and response
ALL HOLD on
LEVEL HOLD on
Battery empty
Battery low
No card
Card protected
Card error
Card full
Format error
Format card
Invalid card
Change card
MBR error
Init card
Write error
REC continue
Card slow
Check BOF MARK
Invalid sys file
Make sys file
No sys file
Make sys file
The input level knob and all buttons have been
disabled by the HOLD switch.
The input level knob has been disabled by the
HOLD switch.
Recharge the built-in battery or replace the
removable batteries.
Load an SD card.
Move the write-protection switch to the unlocked
position in order to record or erase data on the SD
card.
The SD card was not recognized.
Change the SD card.
The SD card has no remaining space.
The SD card is not formatted properly or the card is
broken.
Press the ENTER/MARK button to start formatting.
Formatting will erase all the data on the SD card.
Something might be wrong with the SD card.
Change the SD card.
The SD card is not formatted properly or the card is
broken.
Press the ENTER/MARK button to start formatting.
Formatting will erase all the data on the SD card. If
formatting is not possible, change the SD card.
Writing to the SD card timed out. This has caused
audio to be interrupted and noise to occur.
A BOF mark is added at the point when audio was
interrupted.
SD card writing performance has become worse.
A BOF mark has been added at the point when
audio was interrupted because writing to the SD
card timed out.
Check the audio around the BOF mark.
Execute the erase format function or change the SD
card.
The system file required to operate this unit is
invalid.
Press the ENTER/MARK button to create a system
file.
The system file is missing. This unit requires a system
file for operation.
Press the ENTER/MARK button to create a system
file.
Message Meaning and response
Non-supported
File full
File not found
Can't delete
File protected
Can't divide
File too short
Can't divide
Current file MP3
Can't divide
Dup file name
Can't divide
No mark
Can't divide
Short interval
Can't divide
No file
Can't divide
File name err
MARK full
Can't delete
Not empty
No XRI data
Can't MARK
File protected
Can't MARK
File length
Digital-In
Unlock
Digital-In
Lock
DIN sample
Unmatch
I/O too short
Please see the Reference Manual for file formats
that this unit can use.
Recording is not possible because the total number
of folders and files would exceed the limit of 5000.
A file cannot be found or a file might be damaged.
Please check that file.
Remove protection from a file before trying to
delete it.
The file is too short, so it cannot be divided.
MP3 files cannot be divided.
The divide function would cause the file name to
be the same as that of an existing file in the same
folder.
Use a computer to change the file name.
Files that do not have marks cannot be divided with
this function.
Mark division will not work when the interval
between marks is two seconds or less.
There is no audio file.
Division is not possible because the file name
would exceed the limit of 200 characters.
Use a computer to change the file name.
The number of marks has reached the limit of 99.
You cannot delete a folder that contains files.
Delete all the files in the folder and try again.
No XRI data has been saved in the file. Turn the
XRI data recording function ON before starting
recording.
XRI data cannot be saved when recording MP3 files.
Marks cannot be added because the file is
protected from writing.
Remove protection from a file if you want to add
marks to it.
Marks cannot be added because the file is too short.
Nothing is connected to the digital input (DIGITAL
IN) connector or the signal is not being input
correctly.
Check the digital connection.
Digital input has been properly detected.
The digital input sampling frequency does not
match the recording setting.
The IN and OUT points are too close together. Set
them with at least 1 second between them.
Message Meaning and response
The internal temperature has risen while using the
Thermal Alert
Connect USB PWR
Thermal Alert
If any other error occurs, turn the unit off and restart it.
built-in battery and/or AA batteries.
Continued use is possible by supplying power with
a USB connection.
The internal temperature has risen.
The system will shut down automatically.
TASCAM DR-100MKIII
15
Page 16

Troubleshooting
If you are having trouble with the operation of this unit, please check the
following before seeking repair. If these measures do not solve the problem,
please contact the store where you bought the unit or TEAC customer support
(see back page).
8
The unit will not turn on.
•
Confirm that the built-in battery has enough charge or that the replaceable
batteries are installed correctly.
•
Confirm that the TASCAM PS-P520E AC adapter (sold separately) power
plug and the USB connector are securely connected. The unit might not
operate properly through a USB hub.
•
Confirm that the HOLD switch is set to OFF.
8
The unit turns off automatically.
•
Confirm that the automatic power saving function is disabled.
Since this unit complies with the European Standby Power Regulations
i
(ErP), the automatic power saving function operates regardless of
whether the unit is being powered by an AC adapter or batteries. If you
do not want to use the automatic power saving function, set it to OFF.
(The factory default setting is 30min.)
8
The CHG indicator alternately lights orange and
green.
•
Proper charging might not be possible in a location that is too hot or too
cold. Charging is possible when the temperature is between 0−30°C.
8
The remaining charge of the built-in battery is not
shown accurately
•
The remaining charge of the built-in battery might not be shown accurately
when the unit is purchased. Discharge and charge the battery completely
once to enable the unit to relearn the remaining battery charge and show
it accurately.
8
The unit does not function.
•
Confirm that the HOLD switch is set to OFF.
•
The unit will not function when in USB storage mode.
•
If operation becomes abnormal, press and hold the (power) button
for at least 10 seconds while holding down the STOP [8] button. This will
force the unit to turn off.
8
The SD card is not recognized.
•
Confirm that the SD card is inserted completely.
8
No sound is output.
•
Confirm the unit headphone/speaker output level.
•
Check the monitoring system connections and volume level.
•
No sound is output from the speaker in the following conditions.
The (speaker) switch is set to OFF
i
The unit is recording or in recording standby
i
Headphones are connected
i
8
Recording is not possible.
•
Confirm that the the SD card has enough open space.
•
Recording becomes impossible when the total number of files reaches
5000.
8
The input sound is extremely quiet or loud.
•
Check input level settings.
•
Check the output levels of connected external equipment.
8
The output sounds unnatural.
•
Check the playback speed (VSA playback function).
•
Confirm that the level control function is not on.
8
I cannot erase a file.
•
A protected (read only) file cannot be erased.
8
This unit’s files do not appear on the computer.
•
Confirm that the unit is properly connected to the computer using its USB
port. The unit might not operate properly if connected through a USB hub.
•
Confirm that the unit is in USB storage mode.
8
The wrong language was set accidentally.
•
After pressing the (power) button to turn the unit off, press the
(power) button while pressing and holding the MENU button.
The language selection menu will appear, and you will be able to select the
language.
Specifications
General
8
Recording media
SD card (64 MB−2 GB)
SDHC card (4 GB−32 GB)
SDXC card (48 GB−128GB)
8
Recording/playback formats
WAV (BWF):
MP3: 44.1/48kHz, 128/192/256/320kbps
8
Number of channels
2 channels (stereo)
Inputs and outputs
8
MIC/LINE IN jacks (XLR support phantom power)
Connectors: XLR-3-31, 6.3mm (1/4") standard TRS jacks
8
EXT IN jack (can provide plug-in power)
Connector: 3.5mm (1/8”) stereo mini jack
8
DIGITAL IN connector
Connector: 3.5mm (1/8”) TRS jack
8
LINE OUT jack
Connector: 3.5mm (1/8”) stereo mini jack
8
Connector: 3.5mm (1/8”) stereo mini jack
8
Built-in speaker
0.4W (mono)
8
USB port
Connector type: Micro-B
Format: USB 2.0 HIGH SPEED mass storage class
8
REMOTE jack
Connector: 2.5mm (3/32”) TRS jack
44.1/48/88.2/96/176.4/192kHz, 16/24-bit
(headphone) jack
TASCAM DR-100MKIII
16
Page 17

Audio performance
8
Frequency response
MIC/LINE IN (MIC, PAD On) to LINE OUT
MIC/LINE IN (LINE) to LINE OUT
EXT IN (MIC, PAD On) to LINE OUT
EXT IN (LINE) to LINE OUT
20Hz−20kHz +0.5dB/−1dB (44.1/48kHz sampling frequency, JEITA)
20Hz−40kHz +0.5dB/−2dB (88.2/96kHz sampling frequency, JEITA)
20Hz−80kHz +0.5/−4dB (176.4kHz/192kHz sampling frequency, JEITA)
8
Distortion
MIC/LINE IN (MIC, PAD On) to LINE OUT
MIC/LINE IN (LINE, +20dBu Input) to LINE OUT
EXT IN (MIC, PAD On) to LINE OUT
EXT IN (LINE) to LINE OUT
0.007% or less
(44.1/48/88.2/96/176.4/192kHz sampling frequency, JEITA)
8
S/N ratio
MIC/LINE IN (MIC, PAD On) to LINE OUT
MIC/LINE IN (LINE) to LINE OUT
EXT IN (MIC, PAD On) to LINE OUT
EXT IN (LINE) to LINE OUT
102 dB or more
(44.1/48/88.2/96/176.4/192kHz sampling frequency, JEITA)
8
Equivalent input noise (EIN)
124 dBu or lower
Note: based on JEITA CP-2150
Recording times (in hours: minutes)
File format (recording setting) 4GB SDHC card
320kbps MP3 (stereo)
16-bit WAV (stereo) 6:17
24-bit WAV (stereo) 96kHz 1:55
24-bit WAV (stereo) 192kHz 00:57
•
The recording times above are theoretical values and might differ
depending on the SD/SDHC/SDXC card in use.
•
The recording times shown above are not continuous recording times, but
rather they are the total possible recording times for the SD/SDHC/SDXC
card.
•
If recorded in mono, maximum recording times will be about double those
above.
•
If using dual recording, maximum recording times will be about half those
above.
44.1kHz
27:46
Other
8
Power
Built-in lithium-ion rechargeable battery
2 AA batteries (alkaline, NiMH or lithium-ion)
USB bus power from a computer
AC adapter (TASCAM PS-P520E, sold separately)
External battery pack (TASCAM BP-6AA, sold separately)
8
Power consumption
7.5 W (maximum)
8
Battery operation time (continuous operation)
•
Using built-in (lithium-ion rechargeable) battery
Use conditions Operation time
UNI MIC (built-in directional mic) input
Phantom power unused
STEREO WAV (BWF)/44.1kHz
16-bit recording
MIC/LINE IN jack/mic input
Phantom power used (+48V, 3mA×2 load)
STEREO WAV (BWF)/44.1kHz
16-bit recording
•
Using alkaline batteries (EVOLTA)
Use conditions Operation time
UNI MIC (built-in directional mic) input
Phantom power unused
STEREO WAV (BWF)/44.1kHz
16-bit recording
MIC/LINE IN jack/mic input
Phantom power used (+48V, 3mA×2 load)
STEREO WAV (BWF)/44.1kHz
16-bit recording
•
Using NiMH batteries (eneloop)
Use conditions Operation time
UNI MIC (built-in directional mic) input
Phantom power unused
STEREO WAV (BWF)/44.1kHz
16-bit recording
MIC/LINE IN jack/mic input
Phantom power used (+48V, 3mA×2 load)
STEREO WAV (BWF)/44.1kHz
16-bit recording
About 12 hours
About 6 hours
About 2.75 hours
About 1 hours
About 3.5 hours
About 2.25 hours
•
Using lithium-ion batteries (Energizer Ultimate Lithium)
Use conditions Operation time
UNI MIC (built-in directional mic) input
Phantom power unused
STEREO WAV (BWF)/44.1kHz
16-bit recording
MIC/LINE IN jack/mic input
Phantom power used (+48V, 3mA×2 load)
STEREO WAV (BWF)/44.1kHz
16-bit recording
NOTE
When using phantom power, the operation time might be reduced
depending on the mic being used.
8
Charging time (when unit off)
•
By USB: about 10 hours
•
Using PS-P520E: about 4.5 hours
8
Dimensions
80 x 155.7 x 35 mm (width × height × depth, excluding protrusions)
8
Weight
425 g/375 g (including batteries/not including batteries)
8
Operating temperature range
0°C–40°C (32°F–104°F)
•
Illustrations in this manual might differ in part from the actual product.
•
Specifications and external appearance might be changed without
notification to improve the product.
•
Detailed specifications are provided in the Reference Manual.
About 7 hours
About 3.5 hours
TASCAM DR-100MKIII
17
Page 18

TASCAM DR-100MKIII
18
Page 19
Mode d'emploi
PRÉCAUTIONS DE SÉCURITÉ
IMPORTANTES
Pour le Canada
THIS CLASS B DIGITAL APPARATUS COMPLIES WITH
CANADIAN ICES-003.
CET APPAREIL NUMÉRIQUE DE LA CLASSE B EST
CONFORME À LA NORME NMB-003 DU CANADA.
Ce produit est conforme aux
directives européennes et aux autres
réglementations de la Commission
européenne.
INSTRUCTIONS DE SÉCURITÉ IMPORTANTES
1 Lisez ces instructions.
2 Conservez ces instructions.
3 Tenez compte de tous les avertissements.
4 Suivez toutes les instructions.
5 N'utilisez pas cet appareil avec de l'eau à proximité.
6 Ne nettoyez l'appareil qu'avec un chiffon sec.
7 Ne bloquez aucune ouverture de ventilation.
Installez-le conformément aux instructions du
fabricant.
8 Ne l'installez pas près de sources de chaleur telles
que des radiateurs, bouches de chauffage, poêles
ou autres appareils (y compris des amplificateurs)
dégageant de la chaleur.
9 Ne neutralisez pas la fonction de sécurité de la
fiche polarisée ou de terre. Une fiche polarisée
a deux broches, l'une plus large que l'autre.
Une fiche de terre a deux broches identiques et
une troisième broche pour la mise à la terre. La
broche plus large ou la troisième broche servent
à votre sécurité. Si la fiche fournie n'entre pas
dans votre prise, consultez un électricien pour le
remplacement de la prise obsolète.
10 Évitez de marcher sur le cordon d'alimentation et
de le pincer, en particulier au niveau des fiches, des
prises secteur, et du point de sortie de l'appareil.
11 N'utilisez que des fixations/accessoires spécifiés
par le fabricant.
12 Utilisez-le uniquement
avec des chariots, socles,
trépieds, supports ou tables
spécifiés par le fabricant ou
vendus avec l'appareil. Si
un chariot est utilisé, faites
attention à ne pas être blessé par un renversement
lors du déplacement de l'ensemble chariot/
appareil.
13 Débranchez cet appareil en cas d'orage ou de non
utilisation prolongée.
14 Confiez toute réparation à des techniciens
de maintenance qualifiés. Une réparation est
nécessaire si l'appareil a été endommagé d'une
quelconque façon, par exemple si le cordon ou
la fiche d'alimentation est endommagé, si du
liquide a été renversé sur l'appareil ou si des objets
sont tombés dedans, si l'appareil a été exposé
à la pluie ou à l'humidité, s'il ne fonctionne pas
normalement, ou s'il est tombé.
L’appareil tire un courant nominal de veille de la
•
prise secteur quand son interrupteur POWER ou
STANDBY/ON n’est pas en position ON.
La fiche secteur est utilisée comme dispositif de
•
déconnexion et doit donc toujours rester disponible.
Des précautions doivent être prises en cas
•
d'utilisation d'écouteurs ou d'un casque avec le
produit car une pression sonore excessive (volume
trop fort) dans les écouteurs ou dans le casque peut
causer une perte auditive.
Si vous rencontrez des problèmes avec ce produit,
•
contactez TEAC pour une assistance technique.
N'utilisez pas le produit tant qu'il n'a pas été réparé.
ATTENTION
N'exposez pas cet appareil aux gouttes ni aux
•
éclaboussures.
Ne placez pas d'objet rempli de liquide sur l'appareil,
•
comme par exemple un vase.
N’installez pas cet appareil dans un espace confiné
•
comme une bibliothèque ou un meuble similaire.
L’appareil doit être placé suffisamment près de
•
la prise de courant pour que vous puissiez à tout
moment attraper facilement la fiche du cordon
d'alimentation.
Si le produit utilise des piles/batteries (y compris
•
un pack de batteries ou des batteries fixes), elles ne
doivent pas être exposées au soleil, au feu ou à une
chaleur excessive.
PRÉCAUTION pour les produits qui utilisent des
•
batteries remplaçables au lithium: remplacer une
batterie par un modèle incorrect entraîne un risque
d'explosion. Remplacez-les uniquement par un type
identique ou équivalent.
Précautions concernant les batteries
rechargeables
Ce produit utilise des batteries rechargeables. Le
mauvais usage des batteries peut provoquer une fuite,
une rupture ou d'autres problèmes. Respectez toujours
les précautions suivantes pour l'emploi de batteries.
Si une batterie rechargeable coule, ne touchez pas
•
le fluide qui fuit à main nue. Veuillez consulter TEAC
Corporation en cas de fuite d'une batterie.
Le contact du liquide d'une batterie avec les
•
yeux peut entraîner une perte de la vision. Si cela
arrive, rincez immédiatement l'œil à l'eau claire.
Ne frottez pas l'œil durant le rinçage. Consultez un
médecin dès la fin du rinçage. Le contact du liquide
de batterie avec le corps ou les vêtements peut
entraîner des blessures ou des brûlures cutanées.
Rincez immédiatement à l'eau claire puis consultez
un médecin.
N'utilisez aucun autre adaptateur secteur que le
•
modèle conçu pour l'emploi avec cette unité.
Utilisez toujours l'adaptateur secteur prévu pour
faire fonctionner l'unité ou recharger les batteries
avec une source d'alimentation secteur domestique.
Utiliser un adaptateur secteur autre que celui
prévu peut entraîner une surchauffe et causer des
blessures, brûlures, incendies ou dégâts, ainsi que
des ruptures des batteries et l'écoulement de leur
liquide.
Ne placez pas la batterie dans un feu, ne la laissez
•
pas et ne la rechargez pas près d'un feu, au soleil ou
dans tout autre condition de chaleur élevée.
Ne démontez pas une pile. Cela pourrait entraîner
•
un choc électrique. Veuillez contactez le magasin
dans lequel vous avez acheté le produit ou TEAC
Corporation si vous voulez faire inspecter ou réparer
une batterie. Quand vous voudrez vous débarrasser
du produit, veuillez suivre les instructions du
mode d'emploi pour retirer la batterie et recycler
correctement cet équipement.
TASCAM DR-100MKIII
19
Page 20
PRÉCAUTIONS CONCERNANT LES PILES
Pb, Hg, Cd
Ce produit utilise des piles. Le mauvais usage des piles
peut provoquer une fuite, une rupture ou d'autres
problèmes. Respectez toujours les précautions suivantes
pour l'emploi de piles.
Ne rechargez jamais des piles non rechargeables. Les
•
piles peuvent se rompre ou fuir, risquant de causer
un incendie ou des blessures.
Lors de l’installation des piles, faites attention aux
•
indications de polarité (orientation plus/moins
(¥/^)) et installez-les correctement dans le
compartiment des piles comme indiqué. Les installer
à l’envers peut entraîner la rupture ou la fuite des
piles, source d’incendie, de blessure ou de dégât
autour d’elles.
Quand vous rangez ou jetez des piles, isolez leurs
•
bornes avec de l'adhésif isolant ou avec un matériau
équivalent pour leur éviter d'entrer en contact avec
d'autres piles ou des objets métalliques.
Lorsque vous jetez les piles usagées, suivez les
•
instructions de mise au rebut indiquées sur les piles
et les lois locales sur l’enlèvement des ordures.
N'utilisez pas d'autres piles que celles spécifiées.
•
N'utilisez pas en même temps des piles neuves et
usagées, ni des types de piles différents. Les piles
peuvent se rompre ou fuir, risquant de causer un
incendie, des blessures ou des dégâts autour d’elles.
Ne transportez pas et ne conservez pas des piles en
•
même temps que de petits objets métalliques. Les
piles peuvent entrer en court-circuit, provoquant
une fuite, une rupture ou d'autres problèmes.
Ne chauffez et ne démontez pas les piles. Ne les jetez
•
pas dans un feu ou dans de l’eau. Les piles peuvent
se rompre ou fuir, risquant de causer un incendie,
des blessures ou des dégâts autour d’elles.
Si le liquide de la pile s’échappe, essuyez tout liquide
•
répandu dans le boîtier des piles avant d’insérer de
nouvelles piles. Si le liquide d’une pile touche un œil,
il peut entraîner une perte de la vue. Dans ce cas,
rincez abondamment à l’eau claire sans frotter l’œil et
consultez immédiatement un médecin. Si le liquide
touche le corps ou les vêtements d’une personne, il
peut entraîner des blessures ou brûlures cutanées.
Si cela se produit, rincez abondamment à l’eau claire
puis consultez immédiatement un médecin.
L’alimentation de l’unité doit être coupée quand
•
vous installez ou remplacez des piles.
Retirez les piles si vous envisagez de ne pas utiliser
•
l’unité durant une période prolongée. Les piles
peuvent se rompre ou fuir, risquant de causer un
incendie, des blessures ou des dégâts autour d’elles.
Si le liquide de la pile s’échappe, essuyez tout liquide
répandu dans le boîtier des piles avant d’insérer de
nouvelles piles.
Ne démontez pas une pile. L'acide qu'elle contient
•
peut entraîner des blessures cutanées ou des
dommages aux vêtements.
8
Pour les consommateurs européens
Mise au rebut des équipements
électriques et électroniques
(a) Tous les équipements électriques et électroniques
doivent être traités séparément de la collecte
municipale d'ordures ménagères dans des points
de collecte désignés par le gouvernement ou les
autorités locales.
(b) En vous débarrassant correctement des
équipements électriques et électroniques, vous
contribuerez à la sauvegarde de précieuses
ressources et à la prévention de potentiels effets
négatifs sur la santé humaine et l'environnement.
(c) Le traitement incorrect des déchets d'équipements
électriques et électroniques peut avoir des effets
graves sur l'environnement et la santé humaine en
raison de la présence de substances dangereuses
dans les équipements.
(d) Le symbole de poubelle sur roues
barrée d'une croix, indique que
les équipements électriques et
électroniques doivent être collectés
et traités séparément des déchets
ménagers.
(e) Des systèmes de retour et de collecte sont
disponibles pour l'utilisateur final. Pour des
informations plus détaillées sur la mise au
rebut des vieux équipements électriques et
électroniques, veuillez contacter votre mairie, le
service d'ordures ménagères ou le magasin dans
lequel vous avez acheté l'équipement.
Mise au rebut des piles et/ou
accumulateurs
(a) Les piles et/ou accumulateurs hors d'usage
doivent être traités séparément de la collecte
municipale d'ordures ménagères dans des points
de collecte désignés par le gouvernement ou les
autorités locales.
(b) En vous débarrassant correctement des piles et/
ou accumulateurs hors d'usage, vous contribuerez
à la sauvegarde de précieuses ressources et à la
prévention de potentiels effets négatifs sur la santé
humaine et l'environnement.
(c) Le traitement incorrect des piles et/ou
accumulateurs hors d'usage peut avoir des effets
graves sur l'environnement et la santé humaine en
raison de la présence de substances dangereuses.
(d) Le symbole de poubelle sur roues
barrée d'une croix, indique que les
piles et/ou accumulateurs doivent être
collectés et traités séparément des
déchets ménagers.
Si la pile ou l'accumulateur contient
plus que les valeurs de plomb (Pb), mercure (Hg)
et/ou cadmium (Cd) spécifiées dans la directive
sur les piles (2006/66/CE), alors les symboles
chimiques de ces éléments seront indiqués sous le
symbole de poubelle sur roues barrée d'une croix.
(e) Des systèmes de retour et de collecte sont
disponibles pour l'utilisateur final. Pour des
informations plus détaillées sur la mise au rebut
des piles et/ou accumulateurs, veuillez contacter
votre mairie, le service d'ordures ménagères ou le
magasin dans lequel vous les avez achetés.
TASCAM DR-100MKIII
20
Page 21

Sommaire
Li-ion
INSTRUCTIONS DE SÉCURITÉ IMPORTANTES.............19
Éléments fournis .................................................................. 21
Recyclage des batteries rechargeables lithium-ion
Retrait de la batterie intégrée ..............................................21
Note à propos du manuel de référence ......................21
À propos des cartes SD...................................................... 22
Précautions d'emploi ................................................................22
Précautions concernant l'emplacement et l'emploi
Attention à la condensation ............................................ 22
Nettoyage de l'unité ........................................................... 22
Utilisation du site mondial TEAC ....................................22
Enregistrement de l'utilisateur ....................................... 22
Nom des parties ................................................................... 22
Face supérieure .............................................................................22
Face avant ........................................................................................22
Face arrière.......................................................................................22
Face latérale gauche ..................................................................22
Face latérale droite......................................................................23
Face inférieure ...............................................................................23
Fonctions de base ............................................................... 23
Présentation de l'écran d'accueil .......................................23
Procédures d'emploi de base du menu ........................23
Préparation ............................................................................ 24
Alimentation de l'unité ............................................................24
Insertion des cartes SD ............................................................24
Fonction de verrouillage HOLD pour éviter les
manipulations accidentelles .................................................24
Allumage de l'unité ....................................................................24
Extinction de l'unité
(mise en veille)...............................................................................24
Sélection de la langue ..............................................................24
Réglage de la date et de l'heure ........................................25
Formatage (initialisation) des cartes SD ......................25
Enregistrement .....................................................................25
Réglage des niveaux d'entrée .............................................25
Lecture des enregistrements .......................................... 26
Suppression de fichiers ..................................................... 26
Branchement à un ordinateur ........................................ 26
Référence rapide pour l'emploi de diverses
fonctions ................................................................................. 27
Liste des menus ................................................................... 29
Liste des options du menu Fonction ............................ 30
Liste des messages.............................................................. 31
Guide de dépannage ......................................................... 32
Caractéristiques techniques ............................................ 32
Caractéristiques générales .....................................................32
Entrées et sorties ..........................................................................32
Performances audio ...................................................................33
Durées d'enregistrement (en heures : minutes) .......33
Autres ..................................................................................................33
... 21
.. 22
Information is given about products in this manual
only for the purpose of example and does not indicate
any guarantees against infringements of third-party
intellectual property rights and other rights related
to them. TEAC Corporation will bear no responsibility
for infringements on third-party intellectual property
rights or other liabilities that occur as a result of the use
of this product.
Properties copyrighted by third parties cannot be
used for any purpose other than personal enjoyment
and the like without the permission of the right
holders recognized by copyright law. Always use this
equipment properly.
TEAC Corporation will bear no responsibility for rights
infringements committed by users of this product.
In consideration of the remote possibility that data
could be lost or damaged due to accidental erasure
or malfunction of this unit, for example, we highly
recommend that you back up important recordings
to a computer or other storage device.
Merci beaucoup d'avoir choisi l'enregistreur PCM linéaire
DR-100MKIII TASCAM.
Avant d'utiliser cette unité, lisez attentivement ce
mode d'emploi pour pouvoir l'utiliser correctement et
apprécier de travailler avec elle durant de nombreuses
années. Une fois la lecture de ce mode d'emploi
terminée, veillez à le conserver en lieu sûr pour
référence ultérieure.
Vous pouvez aussi télécharger ce mode d'emploi depuis
le site mondial de TEAC (http://teac-global.com/).
Ce produit est équipé d'un microprocesseur Blackfin®
16/32bits d'Analog Devices, Inc. Ce processeur
contrôle le traitement numérique du signal de l'unité.
L'incorporation de ce microprocesseur Blackfin®
améliore les performances et réduit la consommation d'énergie.
Éléments fournis
Ce produit est livré avec les éléments suivants.
Conservez la boîte et les matériaux d'emballage pour
de futurs transports.
Si un élément quelconque est manquant ou a été
endommagé durant le transport, veuillez contacter le
service clientèle TASCAM (voir au dos de couverture).
Unité principale .....................................................................× 1
•
Câble de conversion d'entrée numérique ............× 1
•
Mode d'emploi (ce document)
•
incluant la garantie ..............................................................× 1
Recyclage des batteries
rechargeables lithium-ion
Cette unité utilise une batterie lithium-ion rechargeable
intégrée.
Afin de préserver de précieuses ressources, lorsque
vous n'avez plus besoin d'une batterie, rapportez-la à
un magasin qui participe au recyclage des batteries
rechargeable plutôt que de la jeter aux ordures .
En cas de doute, veuillez contacter l'assistance clientèle
TASCAM (voir au dos de la couverture).
ATTENTION
•
Ne démontez jamais le produit sauf afin de le
préparer en vue de son élimination.
•
Contactez un service après-vente TEAC (voir au
dos de la couverture) pour le remplacement de
la batterie rechargeable.
Retrait de la batterie intégrée
Avant de retirer la batterie intégrée, mettez l'unité sous
tension et videz la batterie jusqu'à ce que l'unité s'arrête
complètement de fonctionner.
Pour vider la batterie intégrée, débranchez
•
l'alimentation externe, retirez les pilesAA, et réglez
le paramètre AUTO-EXTINCT. de l'écran ALIM./
AFFICHAGE sur NON.
Pour démonter cette unité, il vous faut un tournevis
•
cruciforme (n°0).
1.
Retirez les pieds en caoutchouc sous l'unité.
2.
Retirez les 4vis qui étaient couvertes par les pieds
en caoutchouc.
3.
Déposez le panneau inférieur.
4.
Débranchez la batterie du connecteur et retirez-la.
Connecteur
Note à propos du manuel de référence
Ce mode d'emploi explique les principales fonctions de
cette unité. Veuillez consulter le manuel de référence
pour des informations sur toutes les fonctions de l'unité.
Vous pouvez aussi télécharger ce mode d'emploi et le
manuel de référence depuis le site mondial de TEAC
(http://teac-global.com/).
TASCAM DR-100MKIII
21
Page 22
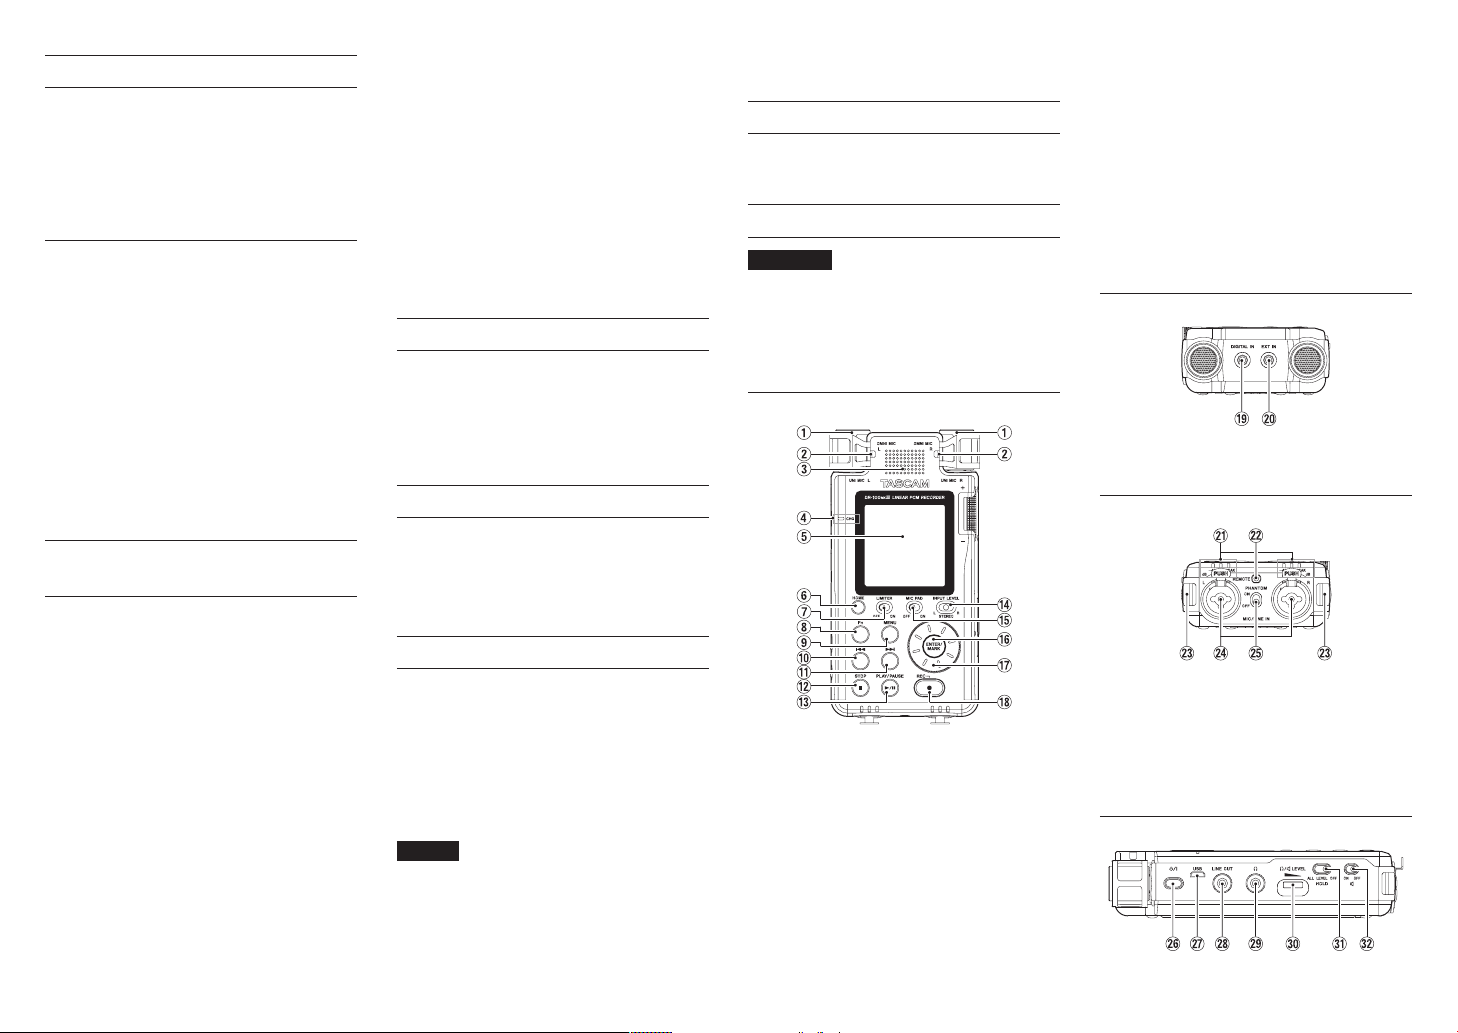
À propos des cartes SD
Cette unité utilise des cartes SD pour l'enregistrement
et la lecture.
Des cartes SD de 64Mo – 2Go, SDHC de 4 – 32Go et
SDXC de 48 – 128Go peuvent être utilisées.
Vous trouverez une liste des cartes SD dont l'utilisation
a été testée avec cette unité sur le site mondial de TEAC
(http://teac-global.com/). Vous pouvez aussi contacter
l'assistance clientèle TASCAM pour plus d'informations.
Précautions d'emploi
Les cartes SD sont des supports fragiles. Pour éviter
de les endommager, veuillez prendre les précautions
suivantes quand vous les manipulez.
Ne les laissez pas dans des endroits extrêmement
•
chauds ou froids.
Ne les laissez pas dans des endroits extrêmement
•
humides.
Ne les mouillez pas.
•
Ne placez rien sur elles et ne les tordez pas.
•
Ne les heurtez pas.
•
Ne les retirez et ne les insérez pas durant
•
l'enregistrement, la lecture, la transmission de
données ou un autre accès à la carte SD.
Pour les transporter, rangez-les par exemple dans un
•
boîtier.
Précautions concernant l'emplacement et l'emploi
La plage de température de fonctionnement de
•
cette unité est de 0-40°C.
Ne placez pas cette unité dans les types
•
d'emplacement suivants. Cela pourrait dégrader
la qualité sonore ou causer des mauvais
fonctionnements.
Lieux sujets à des vibrations importantes ou
globalement instables
Lieux exposés au soleil de façon prolongée
Près d'équipements de chauffage ou autres
lieux extrêmement chauds
Lieux extrêmement froids
Lieux mal ventilés ou très humides
Lieux très poussiéreux
Emplacements exposés directement à la pluie
ou à l'eau
Si cette unité est placée près d'un amplificateur
•
de puissance ou d'un autre appareil à gros
transformateur, cela peut entraîner un ronflement.
Dans ce cas, augmentez la distance séparant cette
unité de l'autre appareil.
Si on l'utilise à proximité d'un récepteur de
•
télévision ou de radio, cette unité peut entraîner des
irrégularités de couleur ou des parasites. Si cela se
produit, éloignez l'unité.
Cette unité peut produire des parasites si un
•
téléphone mobile ou autre appareil sans fil est utilisé
à proximité pour passer des appels ou envoyer ou
recevoir des signaux. Dans ce cas, augmentez la
distance entre cette unité et les autres appareils ou
éteignez-les.
Pour permettre une bonne dispersion thermique, ne
•
placez rien sur le dessus de l'unité.
Ne placez pas cette unité sur un amplificateur de
•
puissance ou un autre appareil générant de la
chaleur.
Attention à la condensation
De la condensation peut se produire si l'unité est
déplacée d'un endroit froid à un endroit chaud, est
utilisée dans une pièce qui vient d'être chauffée ou
soumise à des changements brutaux de température.
Pour empêcher cela ou si cela se produit, laissez l’unité
une ou deux heures à la température de la nouvelle
pièce avant de l'utiliser.
Nettoyage de l'unité
Pour nettoyer l'unité, essuyez-la délicatement avec un
chiffon sec et doux. Ne l'essuyez pas avec des lingettes
de nettoyage contenant des produits chimiques,
du diluant, de l'alcool ou d'autres agents chimiques.
Cela pourrait endommager la surface ou causer une
décoloration.
Utilisation du site mondial TEAC
Vous pouvez télécharger depuis le site mondial TEAC
(http://teac-global.com/) ce mode d'emploi et le
manuel de référence nécessaire à cette unité.
1.
Allez sur le site mondial TEAC (http://teac-global.
com/).
2.
Dans la section TASCAM Downloads
(téléchargements TASCAM), cliquez sur la langue
souhaitée afin d'ouvrir la page de téléchargement
du site web pour cette langue.
NOTE
Si la langue désirée n'apparaît pas, cliquez sur
Other Languages (autres langues).
3.
Cliquez sur le nom du produit dans la section
«Produits» et ouvrez la page «Liens et
téléchargements» de ce produit.
4.
Sélectionnez et téléchargez le mode d'emploi et le
manuel de référence nécessaires.
Enregistrement de l'utilisateur
Si vous êtes client aux USA, veuillez vous enregistrer en
ligne comme utilisateur sur le site web TASCAM (http://
tascam.com/)
Nom des parties
ATTENTION
Lors de la connexion et de l'utilisation de fiches
de casques et d'autres appareils externes,
n'appliquez pas de force excessive sur celles-ci.
En particulier, veillez à ne pas appliquer une
trop grande force si vous utilisez un adaptateur
jack standard/mini-jack. Cela pourrait
endommager l'équipement.
Face supérieure
1 UNI MIC L/R (micros stéréo directionnels
intégrés)
2 OMNI MIC L/R (micros stéréo
omnidirectionnels intégrés)
3 Haut-parleur intégré (mono)
4 Témoin CHG (charge)
5 Écran
6 Touche HOME
7 Commutateur LIMITER
8 Touche Fn
9 Touche MENU
0 Touche .
q Touche /
w Touche STOP [8]
e Touche PLAY/PAUSE [7/9]
r Sélecteur INPUT LEVEL
t Commutateur MIC PAD
y Touche ENTER/MARK
u Molette
i Touche REC [0]/voyant REC
Face avant
o Connecteur DIGITAL IN
p Connecteur EXT IN
Face arrière
a Indicateur de niveau
s Prise REMOTE
d Attaches de dragonne
f Prises MIC/LINE IN L/R (XLR/jack TRS)
g Interrupteur PHANTOM d'alimentation
fantôme
Face latérale gauche
TASCAM DR-100MKIII
22
Page 23
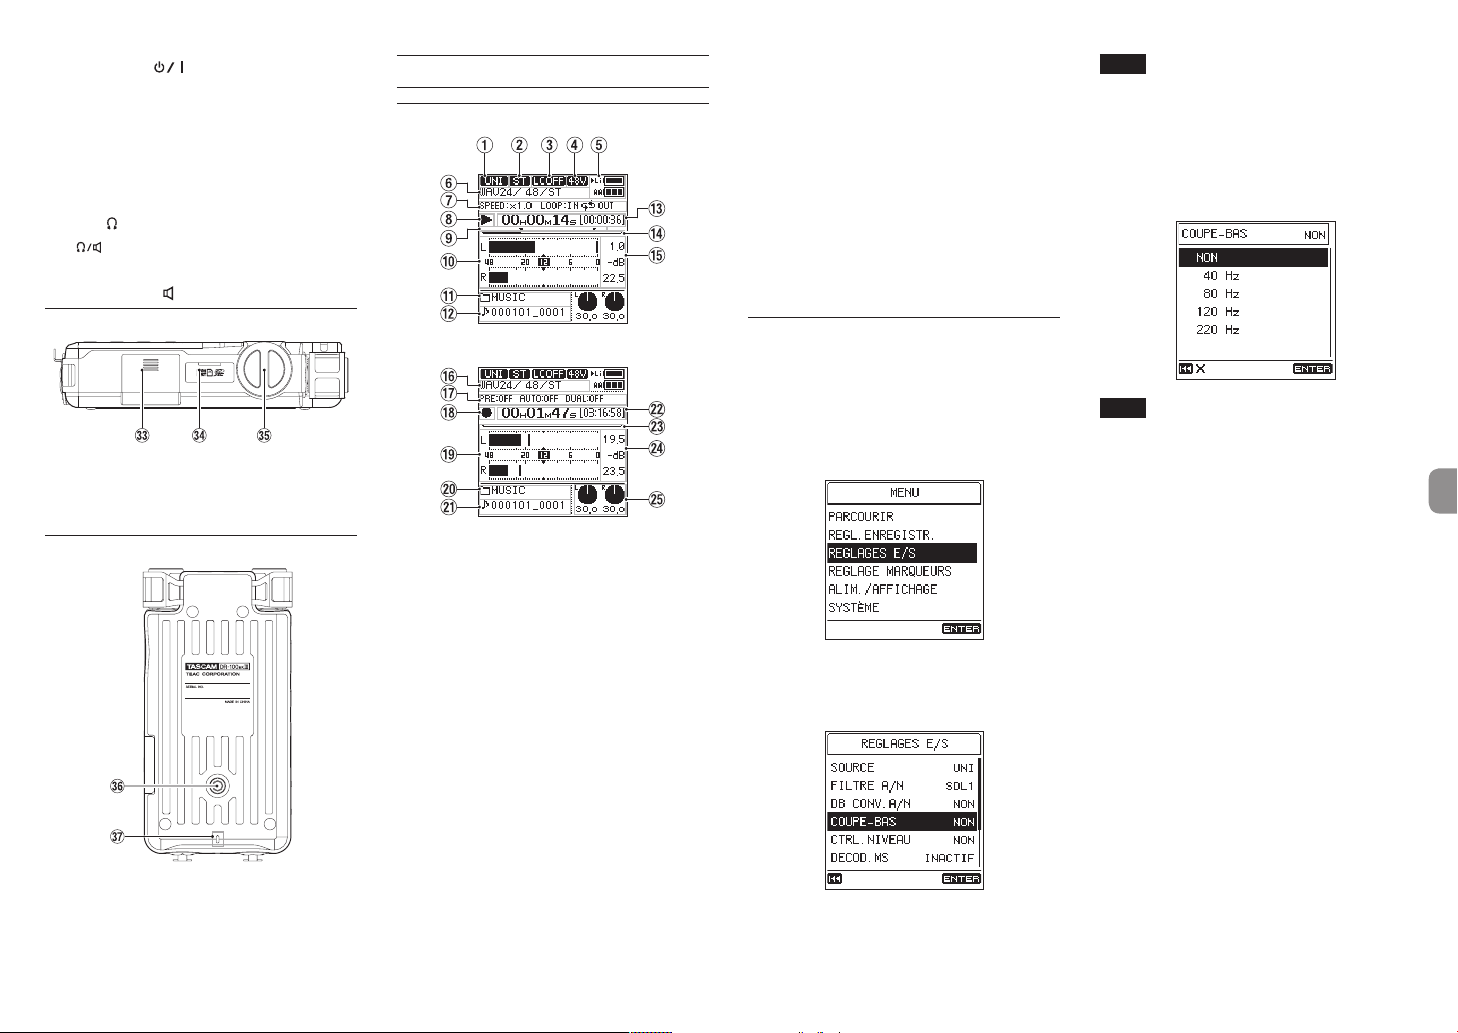
h Interrupteur (alimentation)
j Port USB
C'est un port USB micro-B.
À l'aide d'un câble conforme aux normes USB, vous
pouvez brancher l'unité à un ordinateur en tant que
périphérique de stockage de masse ou utiliser un
adaptateur secteur pour l'alimenter.
k Prise LINE OUT
l Prise (casque)
; LEVEL (volume casque/haut-parleur)
z Commutateur HOLD
x Commutateur (haut-parleur)
Face latérale droite
c Compartiment des piles (piles AA)
v Lecteur de carte SD
b Bouton de niveau d'entrée
Face inférieure
n
Filetage de montage sur trépied (1/4 de pouce)
m Voyant REC
Fonctions de base
Présentation de l'écran d'accueil
À l'arrêt/en lecture
En enregistrement/armement d'enregistrement
1 Source d'entrée
2 Indicateur de canal d’entrée
3 Statut de filtre coupe-bas
4 Statut d’alimentation fantôme
5 Statut d'alimentation
6 Format de fichier
7 Statut de vitesse de lecture/lecture en boucle
8 Statut du transport (arrêt/lecture)
9 Indicateurs de début/fin de boucle
(points IN/OUT)
0 Indicateurs de niveau
q Nom du dossier lu
w Nom du fichier lu
e Durée de lecture/temps de lecture restant
r Position de lecture
t Valeur crête en décibels (dB)
y Format d'enregistrement
u Informations sur la fonction d'enregistrement
i Statut du transport
(armement d'enregistrement/enregistrement)
o Indicateurs de niveau
p Nom du dossier d'enregistrement
a Nom du fichier d'enregistrement
s Durée d'enregistrement/temps
d'enregistrement restant
d Position d'enregistrement
f Niveau crête d'enregistrement en décibels
(dB)
g Niveaux d'entrée
Procédures d'emploi de base du menu
1.
Ouvrez l'écran MENU.
Pressez la touche MENU.
2.
Sélectionnez une option de menu.
Avec la molette, sélectionnez l'option et pressez
la touche ENTER/MARK pour afficher les
paramètres.
3.
Sélectionnez un paramètre de réglage.
Avec la molette, sélectionnez le paramètre et
pressez la touche ENTER/MARK pour afficher les
réglages.
NOTE
•
Si un paramètre ne peut avoir pour valeur que
ON ou OFF, vous pouvez changer celle-ci sans la
sélectionner dans une liste.
•
Pressez la touche . pour revenir à l'écran
précédent.
4.
Sélectionnez une valeur de réglage.
Utilisez la molette pour changer le réglage, et
pressez la touche ENTER/MARK pour le valider.
NOTE
•
Pressez la touche . pour interrompre une
opération.
•
Pressez la touche HOME pour revenir à l'écran
d'accueil.
TASCAM DR-100MKIII
23
Page 24

Préparation
Alimentation de l'unité
8
Emploi avec la batterie intégrée
Chargez-la avant d'utiliser l'unité pour la première
fois après l'achat ou si elle n'a pas été utilisée depuis
longtemps.
Charge de la batterie intégrée
•
Chargez la batterie intégrée au moyen d'un
adaptateur secteur PS-P520E TASCAM (vendu
séparément) ou un câble USB (type A - micro B)
reliant le port USB de l'unité à un ordinateur.
L'unité peut être utilisée pendant que la batterie se
charge.
Prise secteur
Fiche USB
micro B
Vous pouvez vérifier le niveau de recharge de la
batterie intégrée à l'aide de la couleur affichée par le
témoin CHG (charge).
Allumé en orange: charge en cours
Allumé en vert: charge terminée
PS-P520E TASCAM (vendu séparément)
8
Emploi avec des piles AA
1.
Faites glisser le capot du compartiment des piles
vers le bas de l'unité pour l'ouvrir.
2.
Installez 2pilesAA avec leurs repères ¥ et ^
comme indiqué dans le compartiment.
3.
Fermez le compartiment des piles.
Indiquez le type des piles utilisées afin que l'unité
•
affiche correctement l'autonomie restante et puisse
déterminer si la charge est suffisante pour un bon
fonctionnement (par défaut, l'unité est réglée pour
l'emploi de piles alcalines) (voir «Référence rapide
pour l’emploi de diverses fonctions» en page 27).
Insertion des cartes SD
1.
Ouvrez le capot du lecteur de carte SD.
2.
Insérez une carte SD dans la fente comme illustré
jusqu'à ce qu'elle clique en place.
3.
Fermez le capot du lecteur de carte SD.
ATTENTION
•
Les cartes SD aux normes SD, SDHC ou SDXC
peuvent être utilisées avec cette unité.
•
Vous trouverez une liste des cartes SD ayant été
testées avec cette unité sur le site mondial de
TEAC (http://teac-global.com/).
Fonction de verrouillage HOLD pour éviter les manipulations accidentelles
Vous pouvez faire glisser le sélecteur HOLD sur LEVEL
ou ALL pour activer la fonction de verrouillage des
touches qui évite les manipulations accidentelles.
ALL: le bouton de niveau d'entrée et toutes les
touches sont désactivées
LEVEL: le bouton de niveau d'entrée est désactivé
OFF: la fonction de verrouillage est désactivée
Allumage de l'unité
Vérifiez que le sélecteur HOLD est réglé sur OFF, et
maintenez pressé l'interrupteur (alimentation)
jusqu'à ce qu'un affichage apparaisse.
L’écran d’accueil apparaît une fois que l’unité a démarré.
Extinction de l'unité (mise en veille)
Maintenez pressé l'interrupteur (alimentation)
jusqu'à ce que l'écran cesse tout affichage.
NOTE
•
Vous ne pouvez pas éteindre (mettre en veille)
l'unité alors qu'elle est en enregistrement ou
armée pour l'enregistrement.
•
La fonction d'économie automatique d'énergie
coupera l'alimentation si l'unité reste à l'arrêt
(voir «Référence rapide pour l’emploi de
diverses fonctions» en page 27).
Sélection de la langue
La première fois que vous allumez l'unité après l'avoir
achetée, l'écran MODE (langue) s'ouvre. Vous pouvez
choisir la langue utilisée pour l'affichage à l'écran.
Écran LCD (écran LANGUE)
1.
Tournez la molette pour déplacer le curseur et
sélectionner la langue.
Options
ENGLISH: anglais
日本語: japonais
FRANÇAIS: français
ESPAÑOL: espagnol
DEUTSCH: allemand
ITALIANO: italien
2.
Une fois la sélection faite, pressez la touche
ENTER/MARK pour la valider.
NOTE
Vous pouvez changer ce réglage avec le
paramètre MODE de l'écran SYSTEME (voir
«Référence rapide pour l’emploi de diverses
fonctions» en page 27).
TASCAM DR-100MKIII
24
Page 25
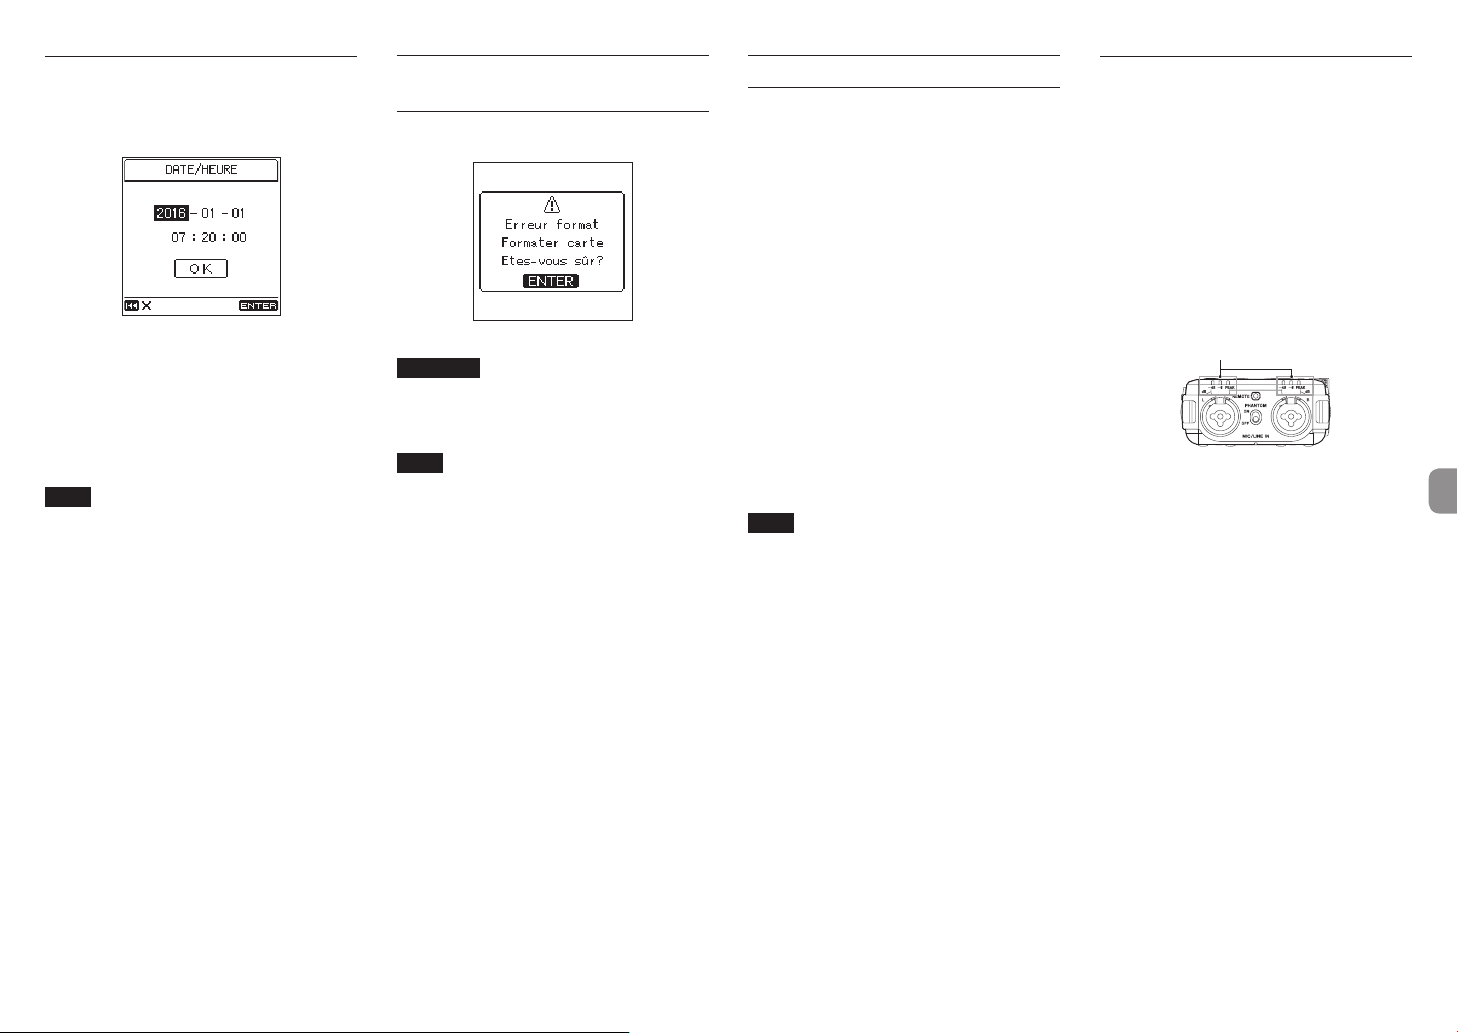
Réglage de la date et de l'heure
La première fois que vous allumez l'unité après l'avoir
achetée et chaque fois que la date et l'heure ont été
réinitialisées, l'écran DATE/HEURE dans lequel vous
pouvez régler la date et l'heure s'ouvre.
1.
Tournez la molette pour amener le curseur sur la
valeur (année/mois/jour/heure/minute/seconde)
que vous souhaitez régler et pressez la touche
ENTER/MARK.
2.
Tournez la molette pour changer la valeur et
pressez la touche ENTER/MARK.
3.
Tournez la molette pour amener le curseur sur OK,
et pressez la touche ENTER/MARK pour valider le
réglage.
NOTE
Vous pouvez également changer la date et l'heure
depuis le menu (voir «Référence rapide pour l’emploi
de diverses fonctions» en page 27).
Formatage (initialisation) des cartes SD
Le message suivant apparaît si une carte non formatée
est installée dans l'unité quand celle-ci est allumée.
Pressez la touche ENTER/MARK pour formater la carte.
ATTENTION
Le formatage effacera toutes les données de la
carte SD.
Sauvegardez sur un ordinateur les données que
la carte contient avant de la formater.
NOTE
Vous pouvez aussi utiliser l'option FORMATAGE de
l'écran SYSTEME pour formater une carte (voir
«Référence rapide pour l’emploi de diverses
fonctions» en page 27).
Enregistrement
Grâce à cette unité, vous pouvez enregistrer du son avec
une qualité encore supérieure en changeant le format
d'enregistrement et la fréquence d'échantillonnage,
ainsi qu'en réglant les diverses fonctions telles que
limiteur, commande de niveau et filtre coupe-bas. Ici,
nous expliquerons l'enregistrement au moyen des
micros directionnels intégrés (UNI MIC L/R) (réglage
par défaut).
Veuillez consulter le manuel de référence pour des
explications des autres fonctions.
1.
Armez l'enregistrement.
Pressez la touche REC [0] pour armer
l'enregistrement. Le voyant REC clignotera.
2.
Réglez le niveau d'entrée.
Le niveau d'entrée peut être réglé même pendant
l'enregistrement ou quand celui-ci est armé (voir
«Réglage des niveaux d’entrée» en page 25).
3.
Lancez l'enregistrement.
Pressez la touche REC [0] quand l'enregistrement
est armé pour le lancer. Le voyant REC cesse de
clignoter et s'allume fixement.
4.
Stoppez l'enregistrement.
Pressez à nouveau la touche STOP [8] pour
arrêter l'enregistrement.
NOTE
•
Pressez la touche REC [0] durant
l'enregistrement pour passer en pause
d'enregistrement
•
Pressez à nouveau la touche REC [0] pour
reprendre l'enregistrement
Réglage des niveaux d'entrée
Avant de lancer l'enregistrement, les niveaux d'entrée
doivent être réglés de façon convenable pour éviter la
distorsion des signaux trop forts tout en empêchant
que les signaux entrants ne soient trop faibles et donc
masqués par le bruit.
8
Réglage de niveaux d'entrée
convenables
Réglez le sélecteur INPUT LEVEL sur STEREO. En
surveillant les indicateurs de niveau, réglez le niveau
d’entrée aux alentours de -12 dB au moyen du bouton
de niveau d’entrée.
Réglez les niveaux aussi haut que possible sans que
les sons les plus forts (niveau crête) pouvant entrer ne
fassent s'allumer les indicateurs de niveau PEAK.
Indicateurs de niveau
Si les indicateurs de niveau PEAK s'allument encore
alors que les niveaux d'entrée ont été ramenés au
minimum, réglez le commutateur d'atténuateur MIC
PAD sur ON et refaites le réglage.
Si les indicateurs de niveau PEAK continuent de
s'allumer après avoir fait cela, essayez de changer les
distances et les angles des microphones par rapport
aux sources sonores.
TASCAM DR-100MKIII
25
Page 26
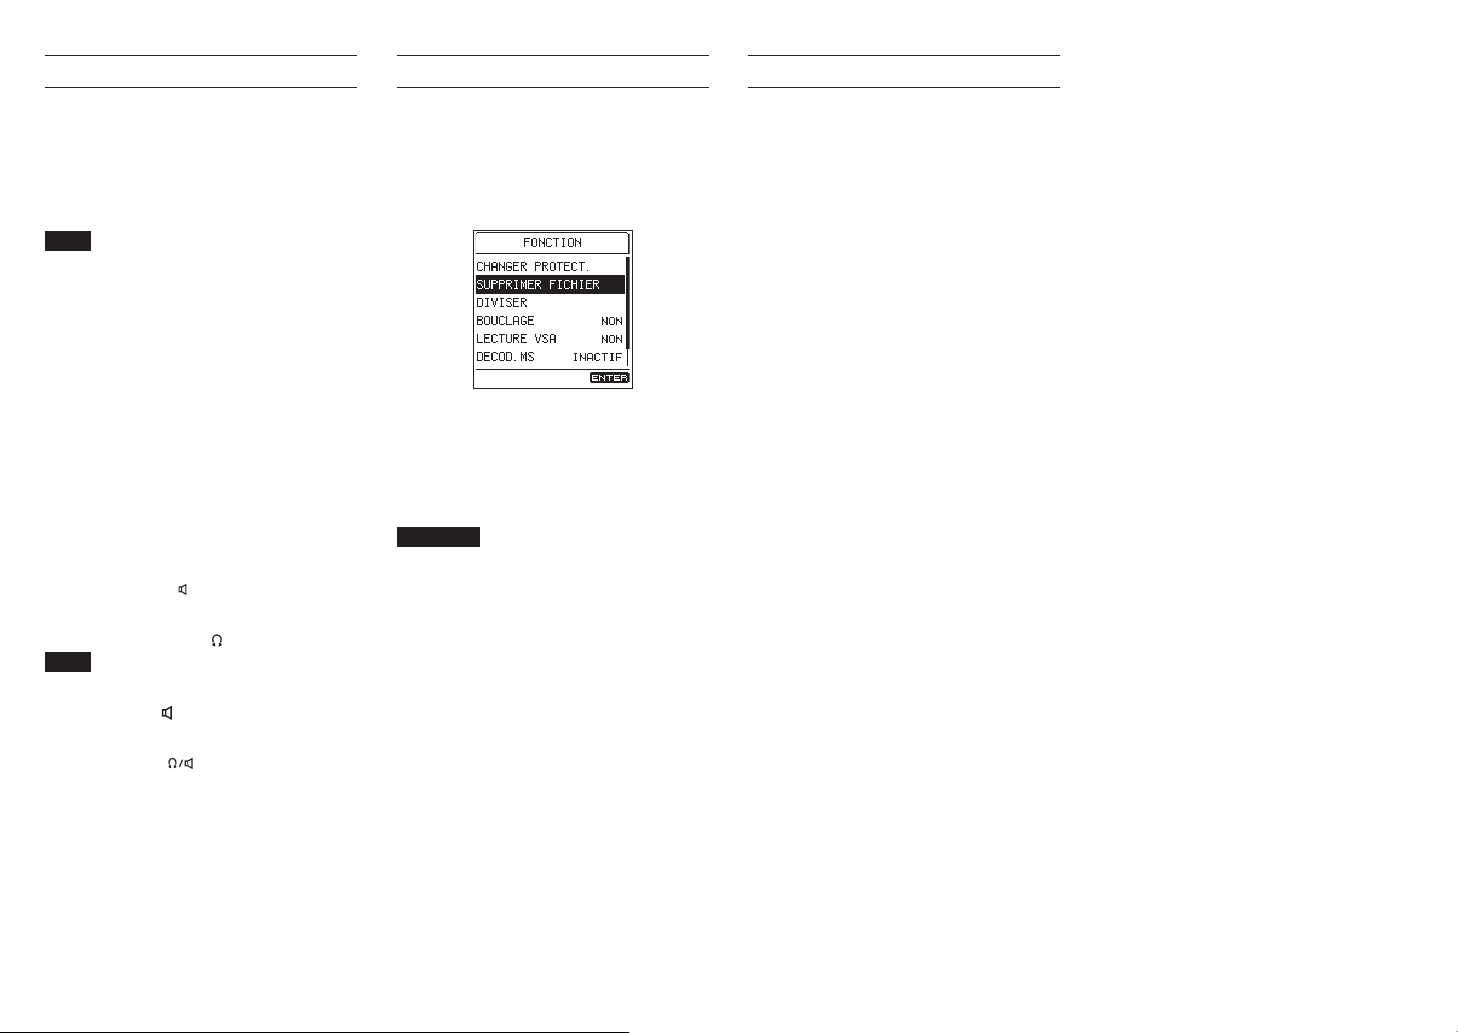
Lecture des enregistrements
8
Lancement de la lecture
Pressez la touche PLAY/PAUSE [7/9] pour lancer la
lecture.
8
Mise en pause de la lecture
Pressez la touche PLAY/PAUSE [7/9] ou STOP [8]
pour mettre en pause la lecture.
NOTE
Pressez à nouveau la touche PLAY/PAUSE
[7/9] pour reprendre la lecture.
8
Arrêt de la lecture
Pressez la touche STOP [8] alors que la lecture est en
pause pour revenir au début du fichier.
8
Recherche arrière et avant
Avec l'écran d'accueil ouvert et une piste en lecture ou
à l'arrêt, pressez et maintenez la touche . ou /
pour une recherche vers l'arrière ou l'avant.
Relâchez la touche pour retrouver le statut antérieur, à
savoir l'arrêt ou la reprise de lecture.
8
Sélection (saut) des fichiers
A l'arrêt ou en lecture, pressez la touche . pour
sauter au fichier précédent, ou la touche / pour
sauter au fichier suivant.
8
Écoute par le haut-parleur intégré
Réglez le commutateur (haut-parleur) sur ON.
8
Écoute au casque
Branchez un casque à la prise (casque).
NOTE
Lorsque le casque est branché, le haut-parleur
intégré ne produit plus de son même si son
commutateur est réglé sur ON.
8
Réglage du volume
Utilisez la commande LEVEL pour régler le volume
de sortie par le haut-parleur intégré et le casque.
Suppression de fichiers
Suivez ces étapes pour supprimer un fichier audio
enregistré.
1.
Ouvrez l'écran FONCTION.
Pressez la touche Fn.
2.
Sélectionnez la fonction de suppression de fichier.
Avec la molette, sélectionnez SUPPRIMER FICHIER
et pressez la touche ENTER/MARK.
3.
Exécutez la suppression.
Avec la molette, sélectionnez OUI, et pressez la
touche ENTER/MARK pour supprimer le fichier et
revenir à l'écran d'accueil.
Pour au contraire annuler, sélectionnez NON, puis
pressez la touche ENTER/MARK pour revenir à
l'écran FONCTION.
ATTENTION
Sachez qu'un fichier supprimé ne peut pas être
récupéré.
Branchement à un ordinateur
Vous pouvez transférer des fichiers audio de la carte SD
de l'unité vers un ordinateur, ainsi qu'en sens inverse.
8
Branchement à un ordinateur par
USB
1.
Branchez le câble USB
Si l'unité est éteinte (en veille), allumez-la.
2.
Activez la connexion.
Sélectionnez le paramètre STOCKAGE USB de
l'écran SYSTEME et pressez la touche ENTER/
MARK.
MENU
w SYSTEME w STOCKAGE USB
Avec la molette, sélectionnez OUI et pressez
la touche ENTER/MARK pour activer la
connexion.
Pour au contraire annuler, sélectionnez NON, et
pressez la touche ENTER/MARK.
3.
Cette unité apparaît sur l'ordinateur comme un
lecteur externe intitulé «DR-100MKIII» (si la carte a
été formatée par cette unité).
8
Échange de fichiers avec un
ordinateur
Après avoir suivi les instructions de la section
précédente, cliquez sur le lecteur «DR-100MKIII»
dans l'écran de l'ordinateur pour afficher les dossiers
«MUSIC» et «UTILITY».
Pour transférer des fichiers dans l'ordinateur, ouvrez le
dossier «MUSIC» et faites glisser les fichiers désirés pour
les déposer sur les destinations de votre choix.
Pour transférer des fichiers depuis l'ordinateur, faites
glisser les fichiers audio désirés de votre ordinateur et
déposez-les sur le dossier «MUSIC».
8
Déconnexion d'un ordinateur
Utilisez les procédures appropriées à l'ordinateur
pour démonter cette unité. Ensuite, pressez la touche
ENTER/MARK pour revenir à l'écran d'accueil.
Voir le mode d'emploi de l'ordinateur pour des
instructions sur la façon de démonter un volume
externe.
TASCAM DR-100MKIII
26
Page 27
Référence rapide pour l'emploi de diverses fonctions
Les noms des touches sont indiqués comme ceci: MENU.
•
Les opérations de menu suivantes supposent que vous partez de l'écran d'accueil. Les instructions sont abrégées.
•
Par exemple, «pressez la touche MENU, sélectionnez l'option de menu, puis sélectionnez le paramètre de réglage»
devient «MENU w option de menu w paramètre de réglage».
Pour des détails sur les fonctions, consultez le manuel de référence.
•
Catégorie Action souhaitée/explication Procédures, touches utilisées
Enregistrement
Réglages
d'entrée
Niveau
d'entrée
Sélectionner les sources d'entrée
Vous pouvez sélectionner la source d'entrée
comme vous le souhaitez et selon l'application.
Utiliser un micro électrostatique nécessitant une
alimentation fantôme
Vous pouvez régler la tension de l'alimentation
fantôme.
Utiliser un petit micro électrostatique nécessitant
une alimentation par la prise (PIP)
Cette unité peut fournir une alimentation PIP
(Plug-In Power) par la prise.
Utiliser des microphones MS (Mid-Side)
L'unité peut convertir les signaux de micro
stéréo au format Mid/Side en signaux stéréo
ordinaires.
Un bruit de climatisation ou autre est gênant
Le filtre coupe-bas peut réduire le bruit des
climatiseurs ou d'autres sources.
Enregistrer en mono
Régler le niveau d'entrée Bouton de niveau d'entrée
Si vous voulez régler séparément les niveaux
d'entrée gauche et droit, réglez le sélecteur
INPUT LEVEL sur L (gauche) ou R (droite).
Vous pouvez utiliser la fonction de contrôle
de niveau pour automatiquement ajuster le
niveau d'entrée en fonction du son entrant.
Enregistrer sans distorsion
Les indicateurs de niveau continuent
d'indiquer une saturation alors que le bouton
de niveau d'entrée est totalement abaissé.
Éviter la distorsion quand des signaux trop
forts entrent soudainement (fonction limiteur).
Régler automatiquement le niveau
d'enregistrement en fonction du son entrant
(mode de niveau automatique).
Réduire automatiquement le niveau d'entrée
en fonction du niveau maximal du son entrant
(mode de réduction de crête).
MENU w REGLAGES E/S w
SOURCE
Réglez le commutateur PHANTOM sur
ON
MENU w REGLAGES E/S w ALM.
FANTOME
MENU w REGLAGES E/S w
ALIMENT.PIP
MENU w REGLAGES E/S w
DECOD.MS
MENU w REGLAGES E/S w
COUPE-BAS
MENU w REGL.ENREGISTR. w
TYPE FICH.
Sélecteur INPUT LEVEL
MENU w REGLAGES E/S w CTRL.
NIVEAU
Réglez le commutateur MIC PAD sur
ON
Réglez le commutateur LIMITER sur
ON
MENU w REGLAGES E/S w CTRL.
NIVEAU w NIVEAU AUTO
MENU w REGLAGES E/S w CTRL.
NIVEAU w REDUC.CRETE
Catégorie Action souhaitée/explication Procédures, touches utilisées
Régler la qualité audio de l'enregistrement
MENU w REGL.ENREGISTR. w
CANAL
MENU w REGL.ENREGISTR. w
FRQ.ECHANT.
MENU w REGLAGES E/S w
FILTRE A/N
MENU w REGLAGES E/S w DB
CONV.A/N
MENU w PARCOURIR
/ pendant l'enregistrement
MENU w REGL.ENREGISTR. w
CREAT.FICH.
Fn w DIVISER w DIVISER
Fn w DIVISER w DIVISER AUX
MARQ.
MENU w REGL.ENREGISTR. w
ENREG.AUTO. w MODE w NIVEAU
MENU w REGL.ENREGISTR. w
PRE-ENREGIS.
MENU w REGL.ENREGISTR. w
DB.ENR. w MODE w NIVEAU
MENU w REGL.ENREGISTR. w
DB.ENR. w MODE w CANAL
Réglez le commutateur (haut-parleur)
sur ON.
Volume (casque/haut-parleur)
LEVEL
MENU w REGLAGES E/S w
ATTENUAT.SORTIE w CASQUE
.//
Réglages de
base
Enregistrement
Autres
fonctions
Lecture des
enregistrements
Vous pouvez choisir la qualité audio
d'enregistrement que vous souhaitez en
fonction de l'application.
Enregistrer avec une qualité encore supérieure
Changer la qualité audio du convertisseur A/N
(filtre A/N).
Améliorer le rapport S/B (double conversion
A/N).
Changer d'emplacement de sauvegarde des
fichiers d'enregistrement
Créer un nouveau fichier en cours d'enregistrement (incrémentation de fichier)
Incrémenter manuellement les fichiers.
Incrémenter automatiquement les fichiers à
intervalles de temps donnés.
Diviser le fichier enregistré qui est sélectionné
Diviser manuellement un fichier
(fonction de division de fichier).
Diviser sur tous les marqueurs
(fonction de division aux marqueurs).
Lancer automatiquement l'enregistrement
(fonction enregistrement automatique)
L'unité peut lancer l'enregistrement quand elle
détecte un signal entrant de niveau suffisant.
Enregistrer sans perdre de son au début d'un
fichier (fonction pré-enregistrement)
L'unité peut enregistrer jusqu'à deux secondes
de son précédant le déclenchement de
l'enregistrement.
Enregistrer une copie de secours
L'unité peut enregistrer une copie de secours à
12dB en dessous du niveau d'enregistrement
fixé.
Enregistrer simultanément des fichiers WAV et
MP3
L'unité peut simultanément enregistrer des
fichiers WAV et MP3.
Écouter la lecture au travers du haut-parleur
intégré
Régler le volume du casque/haut-parleur
Le volume peut varier en fonction du casque
utilisé.
Régler ce paramètre en fonction du casque
que vous employez.
Changer de fichier de lecture
Sélectionner un fichier précédent ou suivant.
Sélectionner dans une liste. MENU w PARCOURIR
TASCAM DR-100MKIII
27
Page 28
Catégorie Action souhaitée/explication Procédures, touches utilisées
Changer la position de lecture
Lecture des
enregistrements
Fichiers
Marqueurs
Changer la position de lecture tout en
produisant du son.
Se déplacer sans produire de son. Molette
Lecture en boucle
L'unité peut continuellement répéter la lecture
d'un même fichier ou d'un intervalle (fonction
de lecture en boucle).
Changer la vitesse de lecture
L'unité peut lire les fichiers plus lentement ou
plus rapidement (fonction de lecture VSA).
Sauvegarder un fichier
Sauvegarder le fichier sélectionné. Fn w CHANGER PROTECT.
Sélectionner un fichier et le sauvegarder.
Supprimer un fichier
Supprimer le fichier sélectionné. Fn w SUPPRIMER FICHIER
Sélectionner un fichier et le supprimer.
Supprimer d'un coup tous les fichiers.
Créer un dossier
Supprimer un dossier
Changer le format de nom de fichier
Réinitialiser le numéro de fichier
Réinitialiser immédiatement le numéro de
fichier.
Réinitialiser le numéro de fichier chaque fois
qu'un nouveau dossier est créé.
Se connecter à un ordinateur et transférer des
fichiers audio
Vous pouvez utiliser cette unité comme
support de stockage de masse USB.
Ajouter manuellement des marqueurs
Vous pouvez ajouter manuellement des
marqueurs durant l'enregistrement ou la
lecture (mais pas à l'arrêt).
Pressez et maintenez .//
Fn w BOUCLAGE
Fn w LECTURE VSA
MENU w PARCOURIR w Fn w
CHANGER PROTECT.
MENU w PARCOURIR w Fn w
SUPPRIMER FICHIER
MENU w PARCOURIR w Fn w
SUPPR.TOUT FICH.
MENU w PARCOURIR w NOUVEAU
DOSSIER
MENU w PARCOURIR w Fn w
SUPPRIMER DOSSIER
MENU w SYSTEME w NOM
FICHIER
MENU w SYSTEME w MODIFIER
w INIT.
MENU w SYSTEME w MODIFIER
w OUI
MENU w SYSTEME w STOCKAGE
USB
ENTER/MARK lors de l'enregistrement
ou de la lecture
Catégorie Action souhaitée/explication Procédures, touches utilisées
Ajouter automatiquement des marqueurs à un enregistrement
Ajouter quand le niveau fixé est dépassé
(NIVEAU).
Marqueurs
Réglages
Écran
Système
Ajouter quand l'intervalle de temps fixé est
atteint (TEMPS).
Ajouter quand une division de piste est
détectée en entrée numérique (NUMÉRIQUE).
Ajouter quand un indicateur de crête PEAK
s'allume.
Se déplacer jusqu'à un marqueur
Se déplacer jusqu'à un marqueur. ENTER/MARK + .//
Sélectionner le marqueur à rejoindre.
Supprimer un marqueur
À l’arrêt, accédez à la position d’un marqueur
et pressez la touche ENTER/MARK pour le
supprimer.
Supprimer d'un coup tous les marqueurs d'un
fichier.
Éteindre le rétroéclairage
Changer la luminosité de l'écran
Régler le contraste
Désactiver les voyants de niveau et REC
Changer le niveau crête et son maintien
Effacer les niveaux crête maintenus
Cela ne fonctionne que si le mode de maintien
de crête est réglé sur Maintien.
Afficher divers types d'information
Afficher des informations sur la carte SD.
Afficher la version du firmware.
Afficher des informations sur les fichiers.
Afficher les réglages d'enregistrement.
Si la fonction d'enregistrement de données
XRI est activée (OUI), les réglages employés
pour l'enregistrement sont sauvegardés avec
le fichier.
MENU w REGLAGE MARQUEURS w
MARQ.AUTO w MODE
MENU w REGLAGE MARQUEURS w
MARQ.CRETES
MENU w REGLAGE MARQUEURS w
SAUT AU MARQ.
ENTER/MARK
MENU w PARCOURIR w Fn w
EFFACER TS MARQ.
MENU w ALIM./AFFICHAGE w
RETROECLAIR.
MENU w ALIM./AFFICHAGE w
LUMINOSITE
MENU w ALIM./AFFICHAGE w
CONTRASTE
MENU w ALIM./AFFICHAGE w
VOYANTS
MENU w ALIM./AFFICHAGE w
NIVEAU CRETE
Quand l'écran d'accueil est ouvert,
pressez et maintenez Fn.
MENU w SYSTEME w
INFORMATIONS w CARTE
MENU w SYSTEME w
INFORMATIONS w FIRMWARE
MENU w SYSTEME w
INFORMATIONS w FICHIER
Fn w INFOS FICHIER
Fn w INFOS FICHIER
MENU w REGL.ENREGISTR. w
XRI
TASCAM DR-100MKIII
28
Page 29
Catégorie Action souhaitée/explication Procédures, touches utilisées
Changer la date et l'heure MENU w SYSTEME w DATE/HEURE
Système
Opérations
Réglages
Alimentation
Autres
fonctions
Choisir la langue MENU w SYSTEME w MODE
Restaurer les réglages d'usine par défaut
Formater une carte SD MENU w SYSTEME w FORMATAGE
Empêcher tout opération involontaire
Désactiver les changements de niveau
d'entrée.
Désactiver le bouton de niveau d'entrée et
toutes les touches.
Télécommander l'unité
Choisir la télécommande.
Extinction automatique (fonction d'économie
automatique d'énergie)
Empêcher la décharge des piles lorsque l'unité
n'est pas utilisée.
L'unité ne s'éteindra pas automatiquement
durant l'enregistrement ou la lecture.
Utiliser l'unité de façon prolongée
Un fonctionnement continu sur une longue
période est possible en utilisant à la fois la
batterie intégrée et des piles AA. Choisir
d'utiliser en premier la batterie intégrée ou les
piles AA.
Indiquer le type de piles AA utilisées pour un
affichage précis de la charge restante.
Lancer immédiatement l'enregistrement
Quand l’unité est éteinte (en veille), pressez
l’interrupteur (alimentation) en
maintenant pressée la touche REC pour
l’allumer avec lancement immédiat de
l’enregistrement.
Préparer la synchronisation avec un fichier vidéo
L'unité peut automatiquement ajouter
une tonalité au début et à la fin des
enregistrements. La synchronisation lors du
montage vidéo peut être simplifiée si cette
unité et la caméra enregistrent toutes deux
cette tonalité.
Envoyer les signaux à une caméra
Le niveau de sortie ligne peut être atténué de
30dB.
MENU w SYSTEME w
INITIALISER
HOLD w LEVEL
HOLD w ALL
MENU w SYSTEME w
TELECOMMANDE
MENU w ALIM./AFFICHAGE w
AUTO-EXTINCT.
MENU w ALIM./AFFICHAGE w
PILES w PRIORITE
MENU w ALIM./AFFICHAGE w
PILES w TYPE PILES
Pressez (alimentation) en
maintenant pressée REC
MENU w REGL.ENREGISTR. w
TONAL.AUTO.
MENU w REGLAGES E/S w
ATTENUAT.SORTIE w LIGNE
Liste des menus
Pressez la touche MENU pour ouvrir l'écran MENU.
Option de menu Fonction
PARCOURIR
REGL.ENREGISTR.
REGLAGES E/S
REGLAGE MARQUEURS
ALIM./AFFICHAGE
CANAL
FRQ.ECHANT.
TYPE FICH.
XRI
DB.ENR.
CREAT.FICH.
ENREG.AUTO.
PRE-ENREGIS.
TONAL.AUTO.
SOURCE
FILTRE A/N
DB CONV.A/N
ALM.FANTOME
ALIMENT.PIP
COUPE-BAS
CTRL.NIVEAU
DECOD.MS
ATTENUAT.SORTIE
MARQ.AUTO.
MARQ.CRETES
SAUT AU MARQ.
AUTO-EXTINCT.
PILES
RETROECLAIR.
LUMINOSITE
CONTRASTE
VOYANTS
NIVEAU CRETE
Travailler avec les fichiers et dossiers de la carte SD
Régler le format du fichier d'enregistrement.
Régler la fréquence d'échantillonnage.
Choisir le type de fichier
Activer/désactiver l'enregistrement des données XRI
Régler la fonction de double enregistrement
Régler l'intervalle de temps au bout duquel l'enregistrement
bascule automatiquement sur un nouveau fichier
Régler la fonction d'enregistrement automatique
Régler la fonction de pré-enregistrement
Régler la fonction de tonalité automatique
Choisir la source d'entrée
Régler le filtre du convertisseur A/N
Activer/désactiver cette fonction qui améliore le rapport S/B
Régler la tension de l'alimentation fantôme
Activer/désactiver l'alimentation PIP (plug-in) par la prise
Régler le filtre coupe-bas
Régler la fonction de contrôle de niveau
Régler la fonction de décodage Mid/Side
Régler la fonction d'atténuation de sortie
Régler la fonction de marquage automatique
Activer/désactiver la fonction de marquage automatique des crêtes
Régler le mode de saut par type de marqueur
Régler la fonction d'économie automatique d'énergie
Faire les réglages relatifs à la batterie intégrée et aux piles
Régler la durée du rétroéclairage
Régler la luminosité du rétroéclairage
Régler le contraste
Activer/désactiver les voyants
Régler le maintien d'affichage des crêtes dans les indicateurs de
niveau
TASCAM DR-100MKIII
29
Page 30
Option de menu Fonction
Afficher diverses informations
Régler la date et l'heure
Choisir le format de nom de fichier
Réinitialiser le numéro de fichier
Faire les réglages pour la télécommande connectée
Choisir la langue d'affichage à l'écran
Restaurer les réglages d'usine par défaut
Formater la carte SD
Passer en mode périphérique de stockage de masse USB
SYSTEME
INFORMATIONS
DATE/HEURE
NOM FICHIER
MODIFIER
TELECOMMANDE
MODE
INITIALISER
FORMATAGE
STOCKAGE USB
Liste des options du menu Fonction
Quand l'écran d'accueil est ouvert et que l'unité est à l'arrêt, en pause, en lecture ou armée pour l'enregistrement,
•
pressez la touche Fn pour ouvrir l'écran FONCTION.
La fonction affichée dépend des conditions dans lesquelles se trouve l'unité au moment où on presse la touche Fn.
Option de menu Fonction
CHANGER PROTECT.
SUPPRIMER FICHIER
Àl'arrêt, en pause ou
en lecture
Armement pour
l'enregistrement
Lorsqu'un fichier ou dossier est sélectionné en écran PARCOURIR, pressez la touche Fn pour ouvrir l'écran MENU
•
DOSSIER ou MENU FICHIER.
Option de menu Fonction
Fichier sélectionné en
écran PARCOURIR
Fichier non sélectionné
en écran PARCOURIR
DIVISER
BOUCLAGE
LECTURE VSA
DECOD.MS
INFOS FICHIER
COUPE-BAS
CTRL.NIVEAU
DECOD.MS
INFOS FICHIER
SUPPRIMER FICHIER
CHANGER PROTECT.
EFFACER TS MARQ.
SUPPR.TOUT FICH.
SUPPRIMER DOSSIER
Changer la protection du fichier sélectionné
Supprimer le fichier sélectionné
Diviser le fichier sélectionné
Faire les réglages de lecture en boucle
Faire les réglages de lecture VSA
Régler la fonction de décodage Mid/Side
Afficher les informations concernant le fichier sélectionné
Régler le filtre coupe-bas
Régler la fonction de contrôle de niveau
Régler la fonction de décodage Mid/Side
Afficher les informations concernant le fichier sélectionné
Supprimer le fichier sélectionné
Changer le statut de protection du fichier sélectionné
Supprimer tous les marqueurs du fichier sélectionné
Supprimer tous les fichiers du dossier sélectionné
Supprimer le dossier sélectionné
TASCAM DR-100MKIII
30
Page 31

Liste des messages
Voici une liste des messages qui peuvent apparaître.
Référez-vous à cette liste si un de ces messages apparaît sur le DR-100MKIII et
si vous voulez en connaître la signification ou choisir une réponse appropriée.
Message Signification et réponse
Verrouillage
ALL HOLD
Verrouillage
LEVEL HOLD
Batterie vide
Charge faible
0 CARTE
CARTE protégée
Erreur CARTE
CARTE pleine
Erreur CANAL
Formater CARTE
CARTE invalide
Changer de CARTE
Erreur MBR
Initialis.CARTE
Erreur écriture
Enreg.continue
CARTE lente
Vérif.marq.BOF
Le bouton de niveau d'entrée et toutes les touches
ont été désactivés par le commutateur HOLD.
Le bouton de niveau d'entrée a été désactivé par le
commutateur HOLD.
Recharger la batterie intégrée ou remplacer les
piles.
Insérer une carte SD.
Ramener le commutateur de protection de la
carte contre l'écriture sur la position permettant
d'enregistrer ou d'effacer des données sur la carte
SD.
La carte SD n'a pas élé reconnue.
Changer de carte SD.
La carte SD n'a plus d'espace libre.
La carte SD n'est pas correctement formatée ou
bien la carte est endommagée.
Presser la touche ENTER/MARK pour lancer le
formatage.
Le formatage effacera toutes les données de la carte
SD.
Il y a quelque chose d'anormal concernant la carte
SD.
Changer de carte SD.
La carte SD n'est pas correctement formatée ou
bien la carte est endommagée.
Presser la touche ENTER/MARK pour lancer le
formatage.
Le formatage effacera toutes les données de la
carte SD. Si le formatage n'est pas possible, changer
de carte SD.
Le temps dévolu à l'écriture sur la carte SD est
dépassé. Cela a entraîné l'interruption du son et la
production de bruit.
Un marqueur BOF est ajouté à l'endroit où le son a
été interrompu.
Les performances d'écriture sur la carte SD se sont
dégradées.
Un marqueur BOF a été ajouté à l'endroit où le son
a été interrompu pour cause de dépassement du
temps dévolu à l'écriture sur la carte.
Contrôler le son aux alentours du marqueur BOF.
Exécuter la fonction de formatage avec effacement
ou changer la carte SD.
Message Signification et réponse
Le fichier système requis pour faire fonctionner
SYSTÈME invalide
Créer SYSTÈME
Pas de SYSTÈME
Créer SYSTÈME
NON accepté
FICHIER plein
FICHIER absent
Suppr.imposs.
FICHIER protégé
DIVISION imposs.
Fich.trop court
DIVISION imposs.
FICHIER MP3
DIVISION imposs.
Doublon de NOM
DIVISION imposs.
Pas de marqueur
DIVISION imposs.
Interval.court
DIVISION imposs.
Pas de FICHIER
DIVISION imposs.
Err.NOM FICHIER
MARQUEURS
TOUS utilisés
Suppr.imposs.
NON vide
Pas de données
XRI
cette unité n'est pas valable.
Presser la touche ENTER/MARK pour créer un
nouveau fichier système.
Le fichier système est manquant. Cette unité
nécessite un fichier système pour fonctionner.
Presser la touche ENTER/MARK pour créer un
nouveau fichier système.
Veuillez rechercher dans le manuel de référence les
formats de fichier que peut utiliser cette unité.
L'enregistrement n'est pas possible car le nombre
total de dossiers et de fichiers dépasserait la limite
de 5000.
Un fichier n'a pu être trouvé ou est peut-être
endommagé.
Veuillez vérifier ce fichier.
Annuler la protection d'un fichier avant d'essayer de
le supprimer.
Le fichier est trop court et ne peut donc être divisé.
Les fichiers MP3 ne peuvent pas être divisés.
La fonction de division générerait un nom de fichier
déjà porté par un fichier existant dans le même
dossier.
Utiliser un ordinateur pour changer le nom du
fichier.
Les fichiers qui n'ont pas de marqueur ne peuvent
pas être divisés au moyen de cette fonction.
La division au marqueur ne fonctionnera pas si
l'intervalle séparant les marqueurs ne dépasse pas
deux secondes.
Il n'y a pas de fichier audio.
La division n'est pas possible car le nom de fichier
dépasserait la limite de 200caractères.
Utiliser un ordinateur pour changer le nom du
fichier.
Le nombre total de marqueurs a atteint la limite de
99.
Vous ne pouvez pas supprimer un dossier
contenant des fichiers.
Supprimer tous les fichiers dans le dossier et
réessayer.
Aucune donnée XRI n'a été sauvegardée dans le
fichier. Activer la fonction d'enregistrement des
données XRI avant de lancer l'enregistrement.
Les données XRI ne peuvent pas être sauvegardées
lors de l'enregistrement de fichiers MP3.
Message Signification et réponse
Le fichier étant protégé contre l'écriture, aucun
Marquage imposs.
FICHIER protégé
Marquage imposs.
Fich.trop court
Déverrouillage
D’entrée numér.
Reverrouillage
D’entrée numér.
Fréq.échantill.
différente
I/O trop proches
Alerte thermique
Brancher alm.USB
Alerte thermique
Si une autre erreur survient, éteignez l'unité et rallumez-la.
marqueur ne peut y être ajouté.
Supprimer la protection d'un fichier auquel vous
voulez ajouter les marqueurs.
Le fichier est trop court pour y ajouter des
marqueurs.
Rien n'est branché au connecteur d'entrée
numérique (DIGITAL IN) ou le signal n'est pas
correctement reçu.
Vérifier la connexion numérique.
L'entrée numérique a été correctement détectée.
La fréquence d'échantillonnage de l'entrée
numérique ne correspond pas au réglage
d'enregistrement.
Les points IN et OUT sont trop proches l'un de
l'autre. Laisser au moins 1 seconde d'écart entre
eux.
La température interne a augmenté pendant
l'utilisation de la batterie intégrée et/ou des piles
AA.
L'utilisation peut se poursuivre avec une
alimentation par connexion USB..
La température interne a augmenté.
Le système va automatiquement s'éteindre..
TASCAM DR-100MKIII
31
Page 32

Guide de dépannage
Si vous avez des problèmes de fonctionnement avec cette unité, veuillez voir
ce qui suit avant de solliciter une réparation. Si ces mesures ne résolvent pas
le problème, veuillez contacter le magasin auprès duquel vous avez acheté
l'unité ou l'assistance clientèle TEAC (voir au dos de la couverture).
8
L'unité ne s'allume pas.
Vérifiez que la batterie intégrée est suffisamment chargée ou que les piles
•
sont bien installées.
Vérifiez que l'adaptateur secteur PS-P520E TASCAM (vendu séparément)
•
et le connecteur USB sont bien connectés. L'unité peut ne pas fonctionner
correctement au travers d'un concentrateur (hub) USB.
Vérifiez que le commutateur HOLD est en position OFF.
•
8
L'unité s'éteint automatiquement.
Vérifiez que la fonction d'économie automatique d'énergie est désactivée.
•
Comme cette unité se conforme à la directive européenne ERP sur
i
l'alimentation en veille, la fonction d'économie automatique d'énergie
fonctionne, que l'unité soit alimentée par un adaptateur secteur ou
par des piles. Si vous ne désirez pas utiliser la fonction d'économie
automatique d'énergie, réglez-la sur NON (le réglage d'usine par défaut
est de 30min).
8
Le voyant CHG s'allume alternativement en orange et
en vert.
Une recharge correcte peut ne pas être possible si le lieu est trop chaud
•
ou trop froid. La recharge est possible quand la température est comprise
entre 0 et 30°C.
8
L'indication de charge de la batterie intégrée n'est
pas précise.
La charge de la batterie intégrée peut ne pas être affichée avec précision
•
quand l'unité est neuve. Déchargez et rechargez complètement la batterie
pour permettre à l'unité de refaire l'apprentissage de la charge de la
batterie et l'afficher avec précision.
8
L'unité ne fonctionne pas.
Vérifiez que le commutateur HOLD est en position OFF.
•
L'unité ne fonctionnera pas en mode de stockage USB.
•
Si le fonctionnement devient anormal, maintenez pressée la touche
•
(alimentation) durant au moins 10 secondes tout en maintenant pressée la
touche STOP [8]. Cela forcera l'unité à s'éteindre.
8
La carte SD n'est pas reconnue.
Vérifiez que la carte SD est complètement insérée.
•
8
Aucun son n'est produit.
Vérifiez le niveau de sortie casque/haut-parleur.
•
Vérifiez les branchements au système d'écoute et le niveau de volume.
•
Aucun son ne sort par le haut-parleur dans les conditions suivantes.
•
Le commutateur (haut-parleur) est réglé sur OFF
i
L'unité enregistre ou est armée pour l'enregistrement.
i
Un casque est connecté
i
8
L'enregistrement est impossible.
Vérifiez qu'il y a encore assez d'espace libre sur la carte SD.
•
L'enregistrement devient impossible si le nombre total de fichiers atteint
•
5000.
8
Le son entrant est trop fort ou trop faible.
Vérifiez les réglages de niveau d'entrée.
•
Vérifiez les niveaux de sortie de l'équipement externe connecté.
•
8
Le son produit ne semble pas naturel.
Vérifiez la vitesse de lecture (fonction de lecture VSA).
•
Vérifiez que la fonction de contrôle de niveau n'est pas activée.
•
8
Je ne peux pas effacer un fichier.
Un fichier protégé (en lecture seule) ne peut pas être effacé.
•
8
Les fichiers de cette unité n'apparaissent pas sur
l'ordinateur.
Vérifiez que l'unité est bien connectée à l'ordinateur à l'aide de son port
•
USB. L'unité peut ne pas fonctionner correctement si elle est branchée au
travers d'un concentrateur (hub) USB.
Vérifiez que l'unité est en mode de stockage USB.
•
8
La mauvaise langue d’affichage a été
accidentellement choisie.
Après avoir pressé la touche (alimentation) pour éteindre l’unité,
•
pressez la touche (alimentation) tout en maintenant pressée la
touche MENU.
Le menu de sélection de langue apparaîtra, et vous pourrez choisir la
langue.
Caractéristiques techniques
Caractéristiques générales
8
Supports d'enregistrement
Carte SD (64Mo – 2Go)
Carte SDHC (4Go – 32Go)
Carte SDXC (48Go – 128Go)
8
Formats d'enregistrement/lecture
BWF:
44,1/48/88,2/96/176,4/192kHz, 16/24bits
MP3: 44,1/48kHz, 128/192/256/320kbit/s
8
Nombre de canaux
2 canaux (stéréo)
Entrées et sorties
8
Prises MIC/LINE IN (XLR avec alimentation fantôme)
Connecteurs: XLR-3-31, jack 6,35 mm 3 points (TRS) standard
8
Prise EXT IN
(peut fournir une alimentation PIP ou «plug-in»)
Connecteur: mini-jack 3,5mm stéréo
8
Prise DIGITAL IN
Connecteur: mini-jack 3,5mm 3points (TRS)
8
Prise LINE OUT
Connecteur: mini-jack 3,5mm stéréo
8
Prise (casque)
Connecteur: mini-jack 3,5mm stéréo
8
Haut-parleur intégré
0,4W (mono)
8
Port USB
Type de connecteur: micro-B
Format: USB 2.0 HIGH SPEED, classe de périphériques de stockage de
masse
8
Prise REMOTE
Connecteur: mini-jack jack 2,5mm 3points (TRS)
TASCAM DR-100MKIII
32
Page 33

Performances audio
8
Réponse en fréquence
MIC/LINE IN (MIC PAD On) vers LINE OUT
MIC/LINE IN (LINE) vers LINE OUT
EXT IN (MIC PAD On) vers LINE OUT
EXT IN (LINE) vers LINE OUT
20Hz - 20kHz, +0,5dB/-1dB
(fréquence d'échantillonnage 44,1/48kHz, JEITA)
20Hz - 40kHz, +0,5dB/-2dB
(fréquence d'échantillonnage 88,2/96kHz, JEITA)
20Hz - 80kHz, +0,5dB/-4dB
(fréquence d'échantillonnage 176,4/192kHz, JEITA)
8
Distorsion
MIC/LINE IN (MIC PAD On) vers LINE OUT
MIC/LINE IN (LINE, entrée +20 dB) vers LINE OUT
EXT IN (MIC PAD On) vers LINE OUT
EXT IN (LINE) vers LINE OUT
0,007% ou moins
(F.é. 44,1/48/88,2/96/176,4/192kHz, JEITA)
8
Rapport signal/bruit
MIC/LINE IN (MIC PAD On) vers LINE OUT
MIC/LINE IN (LINE) vers LINE OUT
EXT IN (MIC PAD On) vers LINE OUT
EXT IN (LINE) vers LINE OUT
102dB ou plus
(F.é. 44,1/48/88,2/96/176,4/192kHz, JEITA)
8
Bruit rapporté à l'entrée
124 dBu ou moins
Remarque: selon JEITA CP-2150
Durées d'enregistrement (en heures : minutes)
Format de fichier (réglage d'enregistrement) Carte SDHC 4 Go
MP3 à 320kbit/s (stéréo)
WAV 16bits (stéréo) 6:17
WAV 24bits (stéréo) 96kHz 1:55
WAV 24bits (stéréo) 192kHz 00:57
Les durées d'enregistrement ci-dessus sont des valeurs théoriques qui
•
peuvent varier en fonction de la carte SD/SDHC/SDXC utilisée.
Les durées d'enregistrement indiquées ci-dessus ne sont pas des données
•
d'enregistrement en continu mais le total pouvant être obtenu en
additionnant les durées d'enregistrement sur la carte SD/SDHC/SDXC.
En enregistrement mono, les durées maximales seront d'environ le double
•
de celles indiquées ci-dessus.
En double enregistrement, les durées d'enregistrement maximales seront
•
d'environ la moitié de celles indiquées ci-dessus.
44,1kHz
27:46
Autres
8
Alimentation
Batterie rechargeable lithium-ion intégrée
2 piles ou batteries AA (alcalines, NiMH ou lithium-ion)
Alimentation par le bus USB d'un ordinateur
Adaptateur secteur (PS-P520E TASCAM, vendu séparément)
Pack de piles/batteries externe (BP-6AA TASCAM, vendu séparément)
8
Consommation électrique
7.5 W (maximum)
8
Autonomie des piles/batteries (en fonctionnement
continu)
Avec la batterie intégrée (lithium-ion, rechargeable)
•
Conditions d'utilisation Autonomie
Entrée par les micros directionnels intégrés UNI MIC
Alimentation fantôme désactivée
WAV stéréo (BWF)/44,1kHz
Enregistrement sur 16bits
Entrée micro/prise MIC/LINE IN
Alimentation fantôme utilisée (+48V, 3mA x 2)
WAV stéréo (BWF)/44,1kHz
Enregistrement sur 16bits
Avec des piles alcalines (EVOLTA)
•
Conditions d'utilisation Autonomie
Entrée par les micros directionnels intégrés UNI MIC
Alimentation fantôme désactivée
WAV stéréo (BWF)/44,1 kHz
Enregistrement sur 16bits
Entrée micro/prise MIC/LINE IN
Alimentation fantôme utilisée (+48V, 3mA x 2)
WAV stéréo (BWF)/44,1kHz
Enregistrement sur 16bits
Avec des batteries NiMH (eneloop)
•
Conditions d'utilisation Autonomie
Entrée par les micros directionnels intégrés UNI MIC
Alimentation fantôme désactivée
WAV stéréo (BWF)/44,1 kHz
Enregistrement sur 16bits
Entrée micro/prise MIC/LINE IN
Alimentation fantôme utilisée (+48V, 3mA x 2)
WAV stéréo (BWF)/44,1kHz
Enregistrement sur 16bits
Environ 12 heures
Environ 6 heures
Environ 2 heures
45 minutes
Environ 1 heures
Environ 3 heures
30 minutes
Environ 2 heures
15 minutes
Avec des piles lithium-ion (Energizer Ultimate Lithium)
•
Conditions d'utilisation Autonomie
Entrée par les micros directionnels intégrés UNI MIC
Alimentation fantôme désactivée
WAV stéréo (BWF)/44,1kHz
Enregistrement sur 16bits
Entrée micro/prise MIC/LINE IN
Alimentation fantôme utilisée (+48V, 3mA x 2)
WAV stéréo (BWF)/44,1kHz
Enregistrement sur 16bits
NOTE
Si vous utilisez l'alimentation fantôme, l'autonomie peut être réduite
en fonction du microphone utilisé.
8
Durée de la recharge (avec l'unité éteinte)
Par USB: environ 10 heures
•
Avec le PS-P520E: environ 4 heures 30 minutes
•
8
Dimensions
80 x 155,7 x 35 mm (largeur × hauteur × profondeur, sauf parties saillantes)
8
Poids
425 g/375 g (avec piles/sans piles)
8
Plage de température de fonctionnement
0°C–40°C
Les illustrations de ce mode d'emploi peuvent partiellement différer du
•
produit réel.
Caractéristiques et aspect externe peuvent être changés sans préavis en
•
vue d'améliorer le produit.
Des caractéristiques détaillées sont fournies dans le manuel de référence.
•
Environ 7 heures
Environ 3 heures
30 minutes
TASCAM DR-100MKIII
33
Page 34

TASCAM DR-100MKIII
34
Page 35

Bedienungsanleitung
Pb, Hg, Cd
Wichtige Sicherheitshinweise
• Diese Anleitung ist Teil des Geräts.
Bewahren Sie sie gut auf und geben Sie das
Gerät nur mit dieser Anleitung weiter.
• Lesen Sie diese Anleitung, um das Gerät
fehlerfrei nutzen zu können und sich vor
eventuellen Restgefahren zu schützen.
• Beachten Sie alle Warnhinweise. Neben
den hier aufgeführten allgemeinen
Sicherheitshinweisen sind möglicherweise
weitere Warnungen an entsprechenden
Stellen dieses Handbuchs aufgeführt.
• Lassen Sie Wartungsarbeiten und
Reparaturen nur von einem Tascam-Servicecenter ausführen. Bringen Sie das Gerät
zu einem Tascam-Servicecenter, wenn es
Regen oder Feuchtigkeit ausgesetzt war,
wenn Flüssigkeit oder Fremdkörper hinein
gelangt sind, wenn es heruntergefallen ist
oder nicht normal funktioniert oder wenn
Batteriesäure ausgetreten ist. Benutzen Sie
das Gerät nicht mehr, bis es repariert wurde.
Bestimmungsgemäße Verwendung
Das Gerät ist für die Verwendung in trockenen
Räumen (nicht unter freiem Himmel)
ausgelegt. Benutzen Sie es nur zu dem Zweck
und auf die Weise, wie in dieser Anleitung
beschrieben.
V
WARNUNG
Kurzschluss oder Brand
• Wenn das Gerät raucht oder einen unge wöhnlichen Geruch verströmt, entfernen Sie
die Batterien/Akkus und bringen Sie es zu
einem Tascam-Servicecenter.
• Stellen Sie das Gerät immer so auf, dass
es nicht nass werden kann. Setzen Sie das
Gerät niemals Regen, hoher Luftfeuchte
oder anderen Flüssigkeiten aus.
• Stellen Sie keine mit Flüssigkeit gefüllten
Behälter (Vasen, Kaffeetassen usw.) auf das
Gerät.
• Reinigen Sie das Gerät nur mit einem
trockenen Tuch.
Überhitzung
• Versperren Sie niemals vorhandene Lüftungs
öffnungen.
• Stellen Sie das Gerät nicht in der Nähe von
Hitze abstrahlenden Geräten (Heizlüfter,
Öfen, Verstärker usw.) auf.
• Stellen Sie dieses Gerät nicht an einem
räumlich beengten Ort ohne Luftzirkulation
auf.
Falsches Zubehör
• Verwenden Sie nur
Zubehör oder Zube hörteile,
die der Hersteller empfiehlt.
• Verwenden Sie nur Wagen,
Ständer, Stative, Halter oder Tische, die vom
Hersteller em pfohlen oder mit dem Gerät
verkauft werden.
VORSICHT
Hörschäden
Denken Sie immer daran: Hohe Lautstärkepegel können schon nach kurzer Zeit Ihr
Gehör schädigen.
Schutz vor Personen- und Sachschäden durch
Batterien/Akkus
In diesem Produkt kommen Batterien/Akkus
zum Einsatz. Unsachgemäßer Umgang mit
Batterien/Akkus kann dazu führen, dass Säure
austritt, die Batterien/Akkus explodieren oder
in Brand geraten oder andere Personen- und
Sachschäden auftreten. Befolgen Sie immer die
hier aufgeführten Vorsichtsmaßnahmen beim
Umgang mit Batterien/Akkus.
• Werfen Sie Batterien/Akkus nicht ins Feuer,
erhitzen Sie sie nicht und schützen Sie sie
vor direkter Sonneneinstrahlung.
• Nehmen Sie Batterien/Akkus nicht
auseinander. Werfen Sie Batterien/Akkus
nicht ins Feuer und halten Sie sie fern von
Wasser und anderen Flüssigkeiten.
• Versuchen Sie nicht, Batterien aufzuladen,
die nicht wiederaufladbar sind.
• Wenn das Gerät einen fest eingebauten,
wiederaufladbaren Akku enthält, laden Sie
diesen nur mit dem dafür vorgesehenen
Wechselstrom adapter.
• Verwenden Sie keine andere Batterien/
Akkus als angegeben. Verwenden Sie
nur Batterien/Akkus des gleichen Typs.
Verwenden Sie keine neue Batterien/Akkus
zusammen mit alten.
• Schalten Sie das Gerät immer aus, bevor Sie
Batterien/Akkus einlegen.
• Achten Sie beim Einlegen der Batterien/
Akkus auf die richtige Polarität: Der Pluspol
muss auf die jeweilige Plus markierung im
Batteriefach (+) ausgerichtet sein.
• Nehmen Sie die Batterien/Akkus heraus,
wenn Sie das Gerät längere Zeit nicht
benutzen.
• Transportieren oder lagern Sie Batterien/
Akkus nicht zusammen mit metallenen
Halsketten, Haarnadeln oder ähnlichen
Gegenständen aus Metall.
• Wenn Batterien/Akkus ausgelaufen sind,
wischen Sie austretende Säure vorsichtig
aus dem Batteriefach, bevor Sie neue
Batterien/Akkus einlegen. Berühren Sie die
austretende Säure keinesfalls mit bloßer
Haut. Verätzungsgefahr! Batteriesäure, die
in die Augen gelangt, kann zum Erblinden
führen. Waschen Sie das betroffene Auge
sofort mit viel sauberem Wasser aus (nicht
reiben) und wenden Sie sich umgehend
an einen Arzt oder ein Krankenhaus.
Batteriesäure auf Haut oder Kleidung
kann Verätzungen hervorrufen. Auch hier
gilt: Sofort mit reichlich klarem Wasser
abwaschen und umgehend einen Arzt
aufsuchen.
• Wenn Sie Batterien/Akkus entsorgen,
beachten Sie die Entsorgungshinweise auf
den Batterien/Akkus sowie die örtlichen
Gesetze und Vorschriften. Werfen Sie
Batterien/Akkus niemals in den Hausmüll.
Dieses Produkt entspricht den
geltenden EU-Richtlinien sowie
den nationalen Gesetzen zur
Umsetzung dieser Richtlinien.
Angaben zur Umweltverträglichkeit und zur
Entsorgung
Entsorgung von Altgeräten und Batterien
Wenn ein Symbol einer
durchgestri chenen Mülltonne
auf einem Produkt, der
Verpackung und/oder der
begleitenden Dokumentation
angebracht ist, unterliegt dieses
Produkt den europäischen Richtlinien
2012/19/EU und/oder 2006/66/EG sowie
nationalen Gesetzen zur Umsetzung dieser
Richtlinien.
Richtlinien und Gesetze schreiben vor,
dass Elektro- und Elektronik-Altgeräte
sowie Batterien und Akkus nicht in den
Hausmüll (Restmüll) gelangen dürfen. Um
die fachgerechte Entsorgung, Aufbereitung und Wiederverwertung sicherzustellen, sind Sie verpflichtet, Altgeräte und
entleerte Batterien/Akkus über staatlich
dafür vorgesehene Stellen zu entsorgen.
Durch die ordnungsgemäße Entsorgung
solcher Geräte und Batterien/Akkus leisten
Sie einen Beitrag zur Einsparung wertvoller
Rohstoffe und verhindern potenziell
schädliche Auswirkungen auf die
menschliche Gesundheit und die Umwelt,
die durch falsche Abfallentsorgung
entstehen können. Die Entsorgung ist für
Sie kostenlos.
Enthalten Batterien/Akkus
mehr als die in der Richtlinie
festgelegte Menge an Blei (Pb),
Quecksilber (Hg) oder Cadmium
(Cd), so ist zusätzlich zur
Mülltonne die entsprechende
chemische Abkürzung angegeben.
Weitere Informationen zur Wertstoffsammlung und Wiederverwertung von
Alt geräten und Batterien/Akkus erhalten
Sie bei Ihrer Stadt verwaltung, dem für
Sie zuständigen Abfall ent sor gungsunternehmen oder der Verkaufsstelle, bei
der Sie das Produkt erworben haben.
TASCAM DR-100MKIII
35
Page 36

Wichtige Informationen
Informationen zur elektromagnetischen
Verträglichkeit
Dieses Gerät wurde auf die Einhaltung
der Grenzwerte gemäß der EMV-Richtlinie
2014/30/EU der Europäischen Gemeinschaft hin geprüft. Diese Grenzwerte
stellen einen angemessenen Schutz gegen
schädliche Funkstörungen innerhalb
von Wohngebäuden sicher. Dieses Gerät
arbeitet mit Hochfrequenz energie, die
ausgestrahlt werden kann, und kann bei
unsachgemäßer, nicht der Anleitung des
Herstellers entsprechenden Installation
und Verwendung Störungen des Rundfunkempfangs verursachen. Es gibt jedoch
keine Garantie, dass in einer bestimmten
Installation keine Störungen auftreten.
Falls das Gerät nachweislich Störungen des
Radio- oder Fernsehempfangs verursacht,
was sich durch Aus- und Einschalten des
Geräts überprüfen lässt, ergreifen Sie eine
oder mehrere der folgenden Maßnahmen:
• Richten Sie die Empfangsantenne
neu aus, oder stellen Sie sie an einem
anderen Ort auf.
• Vergrößern Sie den Abstand zwischen
dem Gerät und dem Empfänger.
• Schließen Sie das Gerät an eine
Steckdose an, die mit einem anderen
Stromkreis verbunden ist als die
Steckdose des Emp fängers.
• Wenden Sie sich an Ihren Händler oder
einen Fachmann für Rundfunk- und
Fernsehtechnik.
Wichtiger Hinweis
Änderungen oder Modifikationen am
Gerät, die nicht ausdrücklich von der
TEAC Corporation geprüft und genehmigt
worden sind, können zum Erlöschen der
Betriebserlaubnis führen.
Informationen in diesem Handbuch über
Produkte dienen nur als Beispiele und
sind keine Gewähr für die Nichtverletzung
von Rechten an geistigem Eigentum
Dritter und anderen damit verbundenen
Rechten. TEAC Corporation übernimmt
keine Verantwortung für Verletzungen von
Rechten an geistigem Eigentum Dritter
oder andere Verpflichtungen, die durch die
Benutzung dieses Produkts entstehen.
Gemäß Urheberrechtsgesetz darf urheberrechtlich geschütztes Material Dritter außer
für den persönlichen Genuss und ähnliche
Nutzung nicht ohne die Erlaubnis der
Rechteinhaber verwendet werden. Nutzen
Sie den Recorder immer entsprechend.
TEAC Corporation übernimmt keine
Verantwortung für Rechtsverletzungen
durch Nutzer dieses Produkts.
Unter Berücksichtigung der entfernten
Möglichkeit, dass Daten verloren gehen
oder durch versehentliches Löschen oder
Fehlfunktion des Geräts beschädigt werden
könnten, raten wir dringend dazu, wichtige
Aufnahmen auf einem Computer oder
anderen Speichergerät zu sichern.
Für die digitale Signalverarbeitung nutzt
dieses Produkt einen 16-/32-Bit-Blackfin®Prozessor von Analog Devices, Inc.
Die Verwendung des Blackfin-Prozessors
sorgt für höhere Leistung bei niedrigerem
Energieverbrauch.
Inhalt
Wichtige Sicherheitshinweise .............................51
Wichtige Informationen ........................................52
Hinweis zum Referenzhandbuch .......................53
Auspacken/Lieferumfang .....................................53
Hinweise zu SD-Karten ..........................................53
Vorsichtsmaßnahmen beim Umgang mit
SD-Karten .............................................................. 53
Ergänzende Sicherheitshinweise zur
Aufstellung ................................................................. 53
Kondensation vermeiden ................................53
Den Recorder reinigen .....................................53
Informationen auf unserer Website finden ...53
Die Produktbestandteile und ihre
Funktionen .................................................................54
Geräteoberseite ..................................................54
Gerätevorderseite...............................................54
Geräterückseite ...................................................54
Linke Geräteseite ................................................54
Rechte Geräteseite .............................................54
Geräteunterseite .................................................54
Basisfunktionen ........................................................55
Die Hauptseite auf dem Display ...................55
Grundsätze für die Verwendung des
Menüs ......................................................................55
Vorbereitende Schritte ..........................................56
Stromversorgung des Recorders ..................56
Eine SD-Karte einlegen ....................................56
Die Bedienfeldsperre nutzen .........................56
Den Recorder einschalten ...............................56
Den Recorder ausschalten (Standby) ..........56
Die Sprache der Benutzer oberfläche
wählen ....................................................................56
Datum und Uhrzeit einstellen .......................57
Eine SD-Karte formatieren
(für den Gebrauch vorbereiten) .........................57
Aufnehmen ................................................................57
Den Eingangspegel anpassen .......................57
Aufnahmen wiedergeben ....................................58
Dateien löschen ........................................................58
Mit einem Computer verbinden ........................58
Kurzreferenz für häufig verwendete
Funktionen .................................................................59
Aufnehmen ...........................................................59
Wiedergeben........................................................60
Dateien ...................................................................60
Marken ....................................................................60
Verschiedene Einstellungen und
Informationen ......................................................61
Das Menü im Überblick ......................................... 62
Das FUNKTIONEN-Menü im Überblick ............63
Das Kontextmenü des Dateimanagers im
Überblick .....................................................................63
Den eingebauten Lithium-Ionen-Akku
entsorgen....................................................................63
Den eingebauten Lithium-Ionen-Akku
ausbauen ...............................................................63
Displaymeldungen ..................................................64
Fehlerbehebung ......................................................65
Technische Daten ....................................................65
Allgemeine Daten ...............................................65
Eingänge und Ausgänge .................................65
Leistungsdaten Audio .......................................66
Ungefähre Aufnahmezeit in
Stunden:Minuten ................................................66
Stromversorgung und sonstige Daten .......66
Maßzeichnung .....................................................66
36
TASCAM DR-100MKIII
Page 37

Vielen Dank, dass Sie sich für den tragbaren
Digital recorder DR-100MKIII von Tascam
entschieden haben.
Bevor Sie das Gerät benutzen, lesen Sie sich
dieses Handbuch bitte aufmerksam durch.
Nur so ist sichergestellt, dass Sie den Recorder
richtig bedienen und viele Jahre Freude daran
haben. Bewahren Sie dieses Handbuch gut auf,
und geben Sie es immer zusammen mit dem
Recorder weiter, da es zum Gerät gehört.
Hinweis zum Referenzhandbuch
Dieses Handbuch erklärt die wichtigsten
Funktionen des Geräts. Eine vollständige
Beschreibung aller Funktionen stellt das
Referenzhandbuch bereit.
Links zur digitalen Version dieses Benutzerhandbuchs und des Referenzhandbuchs
finden Sie auf der globalen TEAC-Website
(http://teac-global.com/) oder direkt auf der
deutschen Website
(http://tascam.de/).
Auspacken/Lieferumfang
Zum Lieferumfang dieses Produkts gehören
die unten aufgeführten Bestandteile.
Bewahren Sie das Verpackungsmaterial für
einen eventuellen zukünftigen Transport auf.
Sollte etwas fehlen oder auf dem Transport
beschädigt worden sein, wenden Sie sich bitte
umgehend an Ihren Händler.
• DR-100MKIII ............................................................ 1
• Adapterkabel für den Digitaleingang ........... 1
• Benutzerhandbuch (das vorliegende
Dokument) einschließlich Garantiehinweis ... 1
Hinweise zu SD-Karten
Für die Aufnahme und Wiedergabe nutzt
dieses Gerät SD-Karten.
Es werden SD-Karten mit einer Speicherkapazität von 64 MB bis 2 GB, SDHC-Karten von 4
GB bis 32 GB sowie SDXC-Karten von 48 GB bis
128 GB unterstützt.
Eine Liste der mit dem Recorder erfolgreich
getesteten Speicherkarten finden Sie auf der
TEAC Global Site (http://teac-global.com/)
oder direkt auf der deutschen Website (http://
tascam.de/). Oder wenden Sie sich an den
Tascam-Kundendienst.
Vorsichtsmaßnahmen beim Umgang mit SD-Karten
SD-Karten sind empfindliche Speichermedien.
Um Beschädigungen zu vermeiden, beachten
Sie bitte die folgenden Vorsichtsmaßnahmen
beim Umgang mit diesen.
• Setzen Sie sie keinen extremen
Temperaturen aus.
• Halten Sie sie von Orten mit extremer
Luftfeuchtigkeit fern.
• Verhindern Sie den Kontakt der Karte mit
Flüssigkeiten.
• Stellen oder legen Sie keine Gegenstände
darauf, und verbiegen Sie sie nicht.
• Setzen Sie sie keinen starken
Erschütterungen aus.
• Wechseln Sie sie nicht während der
Aufnahme, Wiedergabe, Datenübertragung
oder eines anderen Schreib-/Lesezugriffs.
• Verwenden Sie eine Schutzhülle, wenn Sie
die Karte transportieren.
Ergänzende Sicherheitshinweise zur Aufstellung
• Der zulässige Betriebstemperaturbereich
für diesen Recorder liegt zwischen 0 °C und
40 °C.
• Stellen Sie das Gerät nicht an den im
Folgenden bezeichneten Orten auf.
Andernfalls könnte sich die Klangqualität
und/oder es könnten Fehlfunktionen
auftreten.
– Orte, die starken Erschütterungen
ausgesetzt sind oder die instabil sind,
– Orte mit direkter Sonneneinstrahlung
(z.B.Fenster),
– in der Nähe von Heizgeräten oder
an anderen Orten, an denen hohe
Temperaturen herrschen,
– wenn die Temperatur unter dem
Gefrierpunkt liegt,
– Orte mit schlechter Belüftung oder hoher
Luftfeuchte,
– Orte mit hoher Staubkonzentration,
– Orte, die Regen oder Feuchtigkeit
ausgesetzt sein können.
• Brummen kann auftreten, wenn sich ein
Leistungs -verstärker oder anderes Gerät
mit großem Transformator in der Nähe
des Recorders befindet. Versuchen Sie in
einem solchen Fall den Abstand zwischen
dem Recorder und dem anderen Gerät zu
vergrößern oder die Ausrichtung beider
Geräte zueinander zu verändern.
• Auf einem Fernsehgerät können
Farbabweichungen auftreten und in einem
Radiogerät können Geräusche hörbar
werden, wenn der Recorder in deren Nähe
betrieben wird. Vergrößern Sie in einem
solchen Fall den Abstand zum Fernseher
bzw. Radiogerät.
• Wenn ein Mobiltelefon oder anderes
Drahtlosgerät in der Nähe betrieben
wird, können während eines Anrufs oder
während der Datenübertragung Geräusche
auf dem Recorder auftreten. Versuchen Sie
in einem solchen Fall den Abstand zwischen
dem Recorder und dem anderen Gerät zu
vergrößern oder schalten Sie das andere
Gerät aus.
• Legen Sie keine Gegenstände auf das Gerät,
um eine ausreichende Wärmeabfuhr zu
gewährleisten.
• Stellen Sie das Gerät nicht auf einen
Leistungsverstärker oder andere Hitze
erzeugende Geräte.
Kondensation vermeiden
Wenn Sie das Gerät aus einer kalten
Umgebung in eine warme Umgebung
bringen, in einem schnell beheizbaren Raum
einsetzen oder anderen plötzlichen Temperaturschwankungen aussetzen, besteht die
Gefahr, dass sich Kondenswasser bildet. Um
dies zu vermeiden, lassen Sie das Gerät ein bis
zwei Stunden stehen, bevor Sie es einschalten.
Den Recorder reinigen
Verwenden Sie zum Reinigen des Recorders
ein trockenes, weiches Tuch. Verwenden Sie
zum Reinigen niemals getränkte Reinigungstücher auf chemischer Basis, Verdünner,
Alkohol oder andere chemische Substanzen.
Diese können die Oberfläche des Geräts
angreifen oder Verfärbungen hervorrufen.
Informationen auf unserer Website finden
Wenn Sie diese Bedienungsanleitung oder das
Referenzhandbuch in einer anderen Sprache
benötigen, können Sie es von unserer Website
herunterladen.
1. Rufen Sie die Website TEAC Global unter
http://teac-global.com auf.
2. Klicken Sie unter Tascam im Bereich
Downloads auf die gewünschte Sprache,
um die in dieser Sprache verfügbaren
Downloads anzuzeigen.
Sollte die gewünschte Sprache nicht
angezeigt werden, klicken Sie auf „Other
Languages“.
3. Wählen Sie im Bereich „Search by Model
Name“ den Namen des gewünschten
Produkts, um die verfügbaren Downloads
anzuzeigen.
4. Laden Sie das benötigte Dokument
herunter.
TASCAM DR-100MKIII
37
Page 38

Die Produktbestandteile und ihre Funktionen
Wichtig
Wenn Sie an den Recorder andere Geräte
anschließen, seien Sie vorsichtig und üben
Sie keine übermäßige Kraft auf die Stecker
aus. Seien Sie insbesondere vorsichtig, wenn
Sie Adapter von Standard- auf Miniklinke
verwenden, da diese durch Hebelwirkung das
Gerät schädigen können.
Geräteoberseite
9 Taste MENU
0 Sprungtaste links .
q Sprungtaste rechts /
w Stopptaste (STOP (8))
e Wiedergabetaste (PLAY/PAUSE (7/9))
r Schalter für den Eingangspegelregler
(INPUT LEVEL L/STEREO/R)
t Schalter für Pegelabsenkung (MIC PAD)
y Taste ENTER/MARK
u Rad
i Aufnahmetaste mit Lämpchen (REC (0))
Gerätevorderseite
o Digitaleingang (DIGITAL IN)
p Zusatzeingang (EXT IN)
Linke Geräteseite
h Ein-/Ausschalter ( )
j USB-Anschluss (Micro-B-Buchse)
Indem Sie ein geeignetes USB-Kabel
verwenden, können Sie den Recorder wie ein
Massenspeichergerät mit einem Computer
verbinden oder mithilfe eines Wechselstromadapters mit Strom versorgen.
k Line-Ausgang (LINE OUT)
l Kopfhöreranschluss ( )
; Pegelregler für Kopfhörer/Lautsprecher
( LEVEL)
z Schalter für Bedienfeldsperre
(HOLD ALL/LEVEL/OFF)
x Schalter für den eingebauten
Lautsprecher
( ON/OFF)
Geräteunterseite
n Stativgewinde (¼ Zoll)
m Statusanzeige für die Aufnahme (REC)
1 Eingebautes gerichtetes Stereomikrofon
(UNI MIC L/R)
2 Eingebautes ungerichtetes Stereomik-
rofon
(OMNI MIC L/R)
3 Eingebauter Mono-Lautsprecher
4 Ladestandsanzeige (CHG)
5 Display
6 Taste HOME
7 Schalter LIMITER
8 Funktionentaste (Fn)
38
TASCAM DR-100MKIII
Geräterückseite
a Pegelanzeigen
s Fernbedienungsanschluss (REMOTE)
d Gurthalterungen
f Kombi-Eingangsbuchsen, XLR/TRS
(MIC/LINE IN (L/R))
g Schalter für Phantomspeisung
(PHANTOM)
Rechte Geräteseite
c Batteriefach (AA-Batterien)
v SD-Kartenschacht
b Eingangspegelregler
Page 39

Basisfunktionen
Die Hauptseite auf dem Display
Gestoppt oder Wiedergabe
Aufnahme oder Aufnahmebereitschaft
1 Eingangsquelle
2 Aufnahmemodus
3 Status des Trittschallfilters
4 Status der Phantomspeisung
5 Status der Stromversorgung
6 Dateiformat
7 Status der Wiedergabegeschwindigkeit
und Loop-Wiedergabe
8 Status des Audiotransports
(Wiedergabe/Pause/Stop)
9 Markierungen der Loop-Wiedergabe
(IN- und OUT-Punkt)
0 Pegelanzeigen
(Eingangs-/ Wieder gabepegel)
q Name des aktuellen Ordners
w Name der aktuellen Datei
e Verstrichene/verbleibende Wieder-
gabezeit
r Wiedergabeposition
t Spitzenpegel in Dezibel (dB)
y Aufnahmeformat
u Informationen zu den Aufnahme-
funktionen
i Status des Audiotransports
(Aufnahmebereitschaft/Aufnahme)
o Pegelanzeigen
(Eingangs-/Aufnahmepegel)
p Name des aktuellen Ordners
a Dateiname der Aufnahme
s Verstrichene/verbleibende Aufnah-
mezeit
d Aufnahmeposition
f Spitzenpegel der Aufnahme in Dezibel (dB)
g Einstellungen der Eingangspegelregler
Grundsätze für die Verwendung des Menüs
1. Um das Menü aufzurufen, drücken Sie die
Taste MENU.
2. Wählen Sie mit dem Rad einen
Menüpunkt, und drücken Sie die Taste
ENTER/MARK.
Die zugehörigen Einstellungen erscheinen.
3. Wählen Sie mit dem Rad die gewünschte
Einstellung, und drücken Sie ENTER/MARK.
Die verfügbaren Werte oder Optionen
erscheinen.
4. Wählen Sie mit dem Rad einen Wert oder
eine Option, und drücken Sie erneut
ENTER/MARK, um zu bestätigen.
Anmerkung
• Um einen Vorgang abzubrechen, drücken
Sie die Sprungtaste links ..
• Um zur Hauptseite zurückzukehren, drücken
Sie HOME.
Anmerkung
Wenn EIN und AUS die einzig verfügbaren Optionen sind, wechseln Sie direkt
zwischen diesen beiden, und müssen nicht
aus einer Liste wählen.
TASCAM DR-100MKIII
39
Page 40

Vorbereitende Schritte
Dieser Abschnitt erklärt, wie Sie den Recorder
für den Gebrauch vorbereiten.
Stromversorgung des Recorders
VORSICHT
Beachten Sie die Sicherheitshinweise für den
Umgang mit Batterien auf Seite 35.
8 Umgang mit dem eingebauten
Lithium-Ionen-Akku
Laden Sie den Akku, bevor Sie den
Recorder zum ersten Mal einschalten, und
wenn Sie den Recorder längere Zeit nicht
benutzt haben.
1. Um den Akku zu laden, verwenden Sie
den separat erhältlichen Wechselstromadapter Tascam PS-P520E oder ein
USB-Kabel mit Micro-B-Stecker an einem
USB-Ladegerät oder am USB-Anschluss
eines Computers.
Während dem Laden können Sie den
Recorder bereits benutzen.
Netzsteckdose
USB-Stecker
(Micro-B)
2. Den Ladezustand überprüfen Sie anhand
der Farbe der Ladestandsanzeige (CHG).
Orange: Lädt
Grün: Vollständig geladen
8 Betrieb mit AA-Batterien
1. Öffnen Sie das Batteriefach, indem Sie die
Abdeckung in Pfeilrichtung schieben.
2. Legen Sie zwei Batterien des Typs AA ein.
TASCAM PS-P520E
(optionales Zubehör)
Achten Sie dabei auf die Markierungen für
die richtige Polarität im Batteriefach (¥
und ^).
3. Schließen Sie die Batteriefachabdeckung.
4. Wählen Sie im Menü (STROMVERS/DISPLAY,
BATTERIE, AA-TYP), ob Sie Alkaline-Batterien
(ALKALI), NiMH-Akkus (Ni-MH) oder Lithium-Batterien (LITHIUM) verwenden.
Dadurch ist das Gerät in der Lage, die
Batteriestandsanzeige und die für den
Betrieb erforderliche Restkapazität korrekt
zu berechnen. Die Voreinstellung ist ALKALI
für Alkaline-Batterien. (Siehe „Kurzreferenz
für häufig verwendete Funktionen“ auf
Seite 42.)
Eine SD-Karte einlegen
1. Öffnen Sie die Kartenschachtabdeckung
auf der rechten Geräteseite.
2. Führen Sie die Karte wie in der Abbildung
gezeigt in den Kartenschacht ein, bis sie
mit einem Klicken einrastet.
3. Schließen Sie die Kartenschachtabdeckung.
Anmerkung
• Der Recorder akzeptiert einfache SD-Karten
sowie SDHC- und SDXC-Karten.
• Eine Liste der mit dem Recorder erfolgreich
getesteten Speicherkarten finden Sie auf der
deutschsprachigen Tascam-Website (http://
tascam.de/).
Die Bedienfeldsperre nutzen
Mit dem Schalter HOLD können Sie das
unbeabsichtigte Betätigen von Bedienelementen verhindern. Er hat drei mögliche
Stellungen:
ALL
Der Eingangspegelregler und alle Tasten
sind gesperrt.
LEVEL
Der Eingangspegelregler ist gesperrt.
OFF
Die Bedienfeldsperre ist ausgeschaltet
Den Recorder einschalten
1. Vergewissern Sie sich, dass der Schalter
HOLD auf OFF steht.
2. Halten Sie den Ein-/Ausschalter ( ) so
lange gedrückt, bis die Begrüßungsseite
auf dem Display erscheint:
Sobald auf dem Display die Hauptseite
erscheint, ist der Recorder betriebsbereit.
Den Recorder ausschalten (Standby)
Halten Sie den Ein-/Ausschalter ( ) so
lange gedrückt, bis das Display erlischt.
Anmerkung
• Während der Aufnahme oder Aufnahmebereitschaft lässt sich der Recorder nicht
ausschalten.
• Bei gestopptem Audiotransport schaltet die
Stromsparfunktion den Recorder nach einer
Weile aus. (Siehe „Kurzreferenz für häufig
verwendete Funktionen“ auf Seite 42.)
Die Sprache der Benutzeroberfläche wählen
Wenn Sie den Recorder nach dem Kauf
zum ersten Mal einschalten, erscheint die
Menüseite SPRACHE. Hier können Sie die
Menüsprache auswählen.
Die Menüseite SPRACHE
1. Wählen Sie die gewünschte Sprache mit
dem Rad aus.
Auswahlmöglichkeiten:
ENGLISH
日本語
FRANÇAIS
ESPAÑOL
DEUTSCH
ITALIANO
2. Drücken Sie anschließend die Taste
ENTER/MARK, um die Einstellung zu
übernehmen.
Anmerkung
Sie können diese Einstellung jederzeit im
Menü unter SYSTEM, SPRACHE ändern.
(Siehe „Kurzreferenz für häufig verwendete
Funktionen“ auf Seite 42.)
Menüsprache Englisch
Menüsprache Japanisch
Menüsprache Französisch
Menüsprache Spanisch
Menüsprache Deutsch
Menüsprache Italienisch
40
TASCAM DR-100MKIII
Page 41

Datum und Uhrzeit einstellen
Wenn Sie den Recorder nach dem Kauf zum
ersten Mal einschalten und immer dann, wenn
Datum und Uhrzeit zurückgesetzt wurden,
erscheint die Menüseite DATUM/ZEIT. Hier
können Sie Datum und Uhrzeit einstellen.
1. Wählen Sie mit dem Rad das jeweilige
Feld (Jahr, Monat, Tag, Stunde Minute,
Sekunde), und drücken Sie die Taste
ENTER/MARK.
2. Ändern Sie den Wert mit dem Rad, und
drücken Sie ENTER/MARK.
3. Wenn Sie fertig sind, wählen Sie mit
dem Rad das Feld OK aus, und drücken
Sie ENTER/MARK, um die Einstellung zu
übernehmen.
Anmerkung
Datum und Uhrzeit können Sie auch
jederzeit über das Menü einstellen. (Siehe
„Kurzreferenz für häufig verwendete
Funktionen“ auf Seite 42.)
Eine SD-Karte formatieren (für den Gebrauch vorbereiten)
Wenn sich eine unformatierte oder vom
Recorder nicht lesbare Speicherkarte im
Recorder befindet, erscheint beim Einschalten
der folgende Dialog:
Drücken Sie ENTER/MARK, um die Karte zu
formatieren.
Wichtig
Durch das Formatieren werden alle auf der
Karte enthaltenen Daten gelöscht. Sichern Sie
die auf der Karte gespeicherten Dateien auf
einem Computer, bevor Sie die Karte formatieren.
Anmerkung
Sie können auch den Befehl KARTE FORMATIEREN auf der Menüseite SYSTEM nutzen, um
die eingelegte Speicherkarte zu formatieren.
(Siehe „Kurzreferenz für häufig verwendete
Funktionen“ auf Seite 42.)
Aufnehmen
Im Folgenden erklären wir, wie Sie eine
einfache Aufnahme mit Hilfe des eingebauten
gerichteten Stereomikrofons (UNI MIC L/R,
Voreinstellung) erstellen.
Sie können auch das Aufnahmeformat und
die Abtast rate ändern, um eine noch bessere
Aufnahmequalität oder längere Aufnahmezeiten zu ermöglichen. Darüber hinaus stehen
Ihnen Limiter, automatische Pegelanpassung,
Trittschaltfilter und andere Funktionen zur
Verfügung.
Eine vollständige Beschreibung aller
Funktionen finden Sie im Referenzhandbuch.
1. Auf Aufnahmebereitschaft schalten.
Drücken Sie die Taste REC (0), um den
Recorder in Aufnahmebereitschaft zu
versetzen. Das REC-Lämpchen beginnt zu
blinken.
2. Den Eingangspegel anpassen.
Den Eingangspegel können Sie während
der Aufnahmebereitschaft oder während
der Aufnahme ändern. (Siehe „Den
Eingangspegel anpassen“ weiter unten.
3. Die Aufnahme starten.
Drücken Sie erneut die Taste REC (0), um
aus der Aufnahmebereitschaft heraus die
Aufnahme zu starten. Das REC-Lämpchen
leuchtet nun stetig.
4. Die Aufnahme beenden.
Um die Aufnahme zu beenden, drücken Sie
die Taste STOP (8).
Anmerkung
• Um die Aufnahme vorübergehend
anzuhalten, drücken Sie die Taste REC (0).
Um die Aufnahme fortzusetzen, drücken Sie
noch einmal REC (0).
• Um die Aufnahme zu beenden, drücken Sie
STOP (8).
Den Eingangspegel anpassen
Bevor Sie mit der Aufnahme beginnen, müssen
Sie den Eingangspegel so anpassen, dass
Übersteuerungen vermieden und Rauschen
möglichst gering gehalten wird.
1. Stellen Sie den Schalter INPUT LEVEL auf
STEREO.
Sie legen damit fest, dass der Eingangspegelregler beide Kanäle gleichzeitig
beeinflusst.
2. Achten Sie auf die Pegelanzeigen
während Sie mit dem LEVEL-Regler den
Pegel auf ungefähr –12 dB einstellen.
Die PEAK-Lämpchen sollten jedoch
während der lautesten Passagen nicht
aufleuchten.
Um den Pegel für den linken und
rechten Kanal unabhängig voneinander
anzupassen, stellen Sie den Schalter INPUT
LEVEL auf L beziehungsweise R.
Pegelanzeigen
3. Wenn die PEAK-Lämpchen noch
aufleuchten, obwohl Sie den Pegel auf
seinen minimalen Wert eingestellt haben,
stellen Sie den Schalter MIC PAD (Pegelabsenkung) auf ON.
Sollte auch das nicht ausreichen, versuchen Sie
den Abstand und/oder Einfallswinkel zwischen
Mikrofon und Klangquelle zu vergrößern.
TASCAM DR-100MKIII
41
Page 42

Aufnahmen wiedergeben
8 Die Wiedergabe starten
Drücken Sie die Taste PLAY/PAUSE (7/9), um
das aufgenommene Material wiederzugeben.
8 Die Wiedergabe vorübergehend anhalten
Drücken Sie die Taste PLAY/PAUSE (7/9) oder
STOP (8), um die Aufnahme vorübergehend
anzuhalten.
Um die Wiedergabe fortzusetzen, drücken Sie
erneut PLAY/PAUSE (7/9).
8 Den Audiotransport stoppen und an den
Anfang der Datei zurückkehren
– Während der Wiedergabepause:
– Drücken Sie die Taste STOP (8)
– Während der Wiedergabe:
Drücken Sie zweimal STOP (8)
8 Rückwärts und vorwärts suchen
Um das Audiomaterial mit erhöhter Geschwindigkeit rückwärts oder vorwärts zu durchsuchen, halten Sie auf der Hauptseite während
der Wiedergabe oder bei gestopptem Audiotransport die Sprungtaste links . beziehungsweise rechts / gedrückt.
Sobald Sie die Taste loslassen, wird die
Wiedergabe fortgesetzt oder sie stoppt wieder.
8 Eine Datei mit den Sprungtasten
auswählen
Bei gestopptem Audiotransport oder während
der Wiedergabe:
• Drücken Sie die Sprungtaste links ., um
zur vorhergehenden Datei zu springen.
• Drücken Sie die Sprungtaste rechts /, um
zur nächsten Datei zu springen.
8 Wiedergabe über den eingebauten
Lautsprecher
Stellen Sie den Schalter mit dem Lautsprechersymbol
( ) auf ON.
8 Wiedergabe über Kopfhörer
Schließen Sie einen Stereokopfhörer an die
Buchse mit dem Kopfhörersymbol ( ) an.
Anmerkung
Sobald Sie einen Kopfhörer anschließen, wird
der eingebaute Lautsprecher unabhängig von
der Stellung des Schalters stummgeschaltet.
8 Die Lautstärke anpassen
Nutzen Sie den Regler LEVEL, um den
Pegel des eingebauten Lautsprechers und des
Kopfhörerausgangs einzustellen.
Dateien löschen
Wichtig
Bedenken Sie, dass sich eine gelöschte Datei
nicht wiederherstellen lässt.
Um eine Audiodatei zu löschen, führen Sie die
folgenden Schritte aus:
1. Die Menüseite FUNKTIONEN aufrufen.
Drücken Sie die Taste Fn.
2. Den Löschbefehl auswählen.
Wählen Sie mit dem Rad den Eintrag DATEI
LÖSCHEN, und drücken Sie ENTER/MARK.
3. Die Datei löschen.
Wählen Sie mit dem Rad JA, und drücken
Sie ENTER/MARK. Die Datei wird gelöscht
und die Hauptseite erscheint wieder.
Um die Datei nicht zu löschen: Wählen Sie
stattdessen NEIN, und drücken Sie ENTER/
MARK. Daraufhin erscheint wieder die
Menüseite FUNKTIONEN.
Mit einem Computer verbinden
Sie können Audiodateien von der Speicherkarte auf einen Computer übertragen und
umgekehrt Dateien vom Computer auf die
eingelegte Karte übertragen.
8 Die Verbindung mit dem Computer
herstellen
1. Schließen Sie das USB-Kabel an.
Falls der Recorder ausgeschaltet ist,
schalten Sie ihn ein.
2. Aktivieren Sie die USB-Verbindung
Wählen Sie auf der Menüseite SYSTEM den
Eintrag USB-DATENTRANSFER, und drücken Sie
ENTER/MARK.
Ein Dialog erscheint.
3. Wählen Sie JA, und drücken Sie ENTER/
MARK, um die Verbindung zu aktivieren.
Auf dem Computer erscheint der
Recorder als Wechseldatenträger mit der
Bezeichnung „DR-100MKIII“ (sofern die
Speicherkarte auf diesem Recorder formatiert wurde).
8 Dateien mit einem Computer
austauschen
1. Sobald die USB-Datenverbindung
besteht, klicken Sie auf dem Computer
auf das Symbol des Wechseldatenträgers
„DR-100MKIII“, um die Ordner MUSIC und
UTILITY anzuzeigen.
2. Um Dateien auf den Computer zu
übertragen, öffnen Sie den Ordner
MUSIC, und ziehen Sie die zu übertragenden Dateien auf das gewünschte
Kopierziel auf dem Computer.
3. Um Dateien auf den Recorder zu
übertragen, ziehen Sie die Audiodateien
vom Computer in den Ordner MUSIC auf
der Speicherkarte des Recorders.
8 Die Verbindung mit dem Computer
trennen
Bevor Sie das USB-Kabel herausziehen,
befolgen Sie das übliche Verfahren Ihres
Computers zum sicheren Entfernen von
Wechseldatenträgern. Drücken Sie dann die
Taste ENTER/MARK auf dem Recorder, um zur
Hauptseite zurückzukehren.
Wie Sie einen Wechseldatenträger sicher
entfernen, erfahren Sie in der Hilfe Ihres
Betriebssystems.
Kurzreferenz für häufig
verwendete Funktionen
Die folgenden Seiten dienen als Kurzreferenz
für häufig verwendete Funktionen.
• Tasten oder Schalter auf dem Gerät sind wie
folgt dargestellt: MENU.
• Die folgenden Anweisungen setzen voraus,
dass die Hauptseite auf dem Display
angezeigt wird. Anweisungen sind in
Kurzform aufgeführt.
Beispiel: MENU w STROMVERS/DISPLAY w
KONTRAST bedeutet:
„Drücken Sie auf der Hauptseite die Taste
MENU, wählen Sie STROMVERS/DISPLAY und
anschließend den Eintrag KONTRAST“.
• Einzelheiten zu den erforderlichen
Bedienschritten entnehmen Sie bitte dem
Referenzhandbuch.
42
TASCAM DR-100MKIII
Page 43

Aufnehmen
Kategorie Gewünschte Aktion/Erklärung Bedienschritte, verwendete Tasten
Einstellungen für die
Eingänge
Eingangspegel
Eine Eingangsquelle auswählen
Sie können unter verschiedenen Eingangsquellen
die für Ihre Anwendung geeignete auswählen.
Ein Mikrofon verwenden, das Phantomspeisung benötigt
Die Spannung der Phantomspeisung wählen
Ein Kleinmikrofon verwenden, das Stromversorgung
erfordert
Der Recorder kann Kleinmikrofone mit Strom
versorgen.
Das MS-Mikrofonformat nutzen
Der Recorder kann Mikrofonsignale im Mitte/
Seite-Format in ein gewöhnliches Stereosignal
umwandeln.
Störende Geräusche im Tieftonbereich reduzieren
Das eingebaute Tiefenlter kann unerwünschte
Signalanteile dämpfen, wie sie etwa von Klimaanlagen oder Trittschall hervorgerufen werden.
Eine Monoaufnahme erstellen
Den Eingangspegel anpassen
Wenn Sie den Eingangspegel für den linken und
rechten Kanal unabhängig voneinander anpassen
wollen, stellen Sie den Schalter
INPUT LEVEL
auf L
oder R.
Die Pegelanzeigen leuchten auch dann noch rot auf,
wenn der Eingangspegelregler auf dem kleinsten
Wert steht.
Sie können die automatische Pegelanpassung
nutzen, um den Eingangspegel abhängig vom
Eingangssignal automatisch anzupassen.
Den Pegel automatisch anpassen
Verzerrungen durch plötzlich eintreende hohe
Signalanteile sollen verhindert werden.
Den Eingangspegel abhängig vom Eingangs signal
automatisch anpassen.
Pegelspitzen im Eingangssignal automatisch
verringern.
MENU
w E/A-EINSTELLUNGEN w QUELLE
Stellen Sie den Schalter PHANTOM auf
ON
MENU
w
E/A-EINSTELLUNGEN
MENU
STROM F KLEINMIK
MENU
MS-DECODER
MENU
TIEFENFILTER
MENU
DATEITYP
w
PHANT.SPANNG
w E/A-EINSTELLUNGEN w
w E/A-EINSTELLUNGEN w
w E/A-EINSTELLUNGEN w
w AUFNAHME-EINSTEL. w
Eingangspegelregler
Schalter
INPUT LEVEL
Stellen Sie den Schalter
ON
MENU
w E/A-EINSTELLUNGEN w
PEGELANPASS.w AUTOPEGEL
Stellen Sie den Schalter
ON
MENU
w E/A-EINSTELLUNGEN w
PEGELANPASS.
MENU
PEGELANPASS.
w
w E/A-EINSTELLUNGEN w
w
MIC PAD
LIMITER
AUTOPEGEL
SPITZENABSENKUNG
auf
auf
Kategorie Gewünschte Aktion/Erklärung Bedienschritte, verwendete Tasten
Grundeinstellungen
Die Audioqualität der Aufnahme festlegen
Sie können unter verschiedenen Aufnahmeformaten und Abtastraten die für Ihre Anwendung
geeignete auswählen und damit die Aufnahmequalität festlegen.
MENU
w AUFNAHME-EINSTEL. w FORMAT
MENU
w AUFNAHME-EINSTEL. w
ABTASTRATE
In noch besserer Qualität aufnehmen
Weitere
Funktionen
Ändern Sie die Audioqualität des Analog/ DigitalWandlers.
Den Signal-/Rauschabstand verbessern.
Einen bestimmten Ordner als Speicherort festlegen
Die Aufnahme ohne Unterbrechung mit einer neuen Datei fortsetzen
Von Hand
Automatisch in einem bestimmten zeitlichen
Intervall
MENU
w E/A-EINSTELLUNGEN w
A/D-FILTER
MENU
w E/A-EINSTELLUNGEN w
DUAL-ADC
MENU
w DATEIMANAGER
/
drücken während der Aufnahme
MENU w
DATEI TEILEN
AUFNAHME-EINSTEL.
w
Die ausgewählte Datei teilen
Von Hand
An allen Stellen, an denen sich Marken benden
Fn w
Fn w
TEILEN
TEILEN
w
w
TEILEN
MIT MARKEN
Die Aufnahme automatisch starten lassen
Die Aufnahme soll beginnen, sobald der Recorder
ein analoges Eingangssignal erkennt.
Die Aufnahme soll beginnen, sobald der Recorder
ein digitales Eingangssignal erkennt.
Beim Aufnehmen den Einsatz nicht mehr verpassen
Der Recorder zeichnet das Eingangssignal bis zu
MENU w
AUTO-AUFN.
MENU w
AUTO-AUFN.
MENU w
VGZ. AUFN.
AUFNAHME-EINSTEL.
w
MODUS
w
PEGEL
AUFNAHME-EINSTEL.
w
MODUS
w
DIGITAL
AUFNAHME-EINSTEL.
w
w
w
zwei Sekunden vor dem Starten der Aufnahme mit
auf.
Eine Sicherheitsaufnahme erstellen
Der Recorder kann parallel eine Zweitaufnahme mit
MENU w
DUAL-AUFN.
AUFNAHME-EINSTEL.
w
MODUS
w
PEGEL
w
12 dB niedrigerem Pegel aufzeichnen.
Aufnahmen zugleich im WAV- und MP3-Format erstellen
Der Recorder kann Aufnahmen zugleich im WAV-
MENU w
DUAL-AUFN.
AUFNAHME-EINSTEL.
w
MODUS
w
FORMAT
w
und MP3-Format erstellen.
TASCAM DR-100MKIII
43
Page 44

Wiedergeben
Gewünschte Aktion/Erklärung Bedienschritte, verwendete Tasten
Aufnahmen über den eingebauten Lautsprecher abhören
Den Ausgangspegel des Kopfhörer- und Lautsprechersignals anpassen
Stellen Sie den Schalter mit dem
Lautsprechersymbol ( ) auf
Nutzen Sie den Regler
ON
LEVEL
Der Pegel kann je nach verwendetem Kopfhörer unterschiedlich
sein.
Wählen Sie eine für Ihren Kopfhörer geeignete Einstellung.
MENU
w E/A-EINSTELLUNGEN w
AUSGANGSABSENKUNG
w
KOPFHÖRER
Eine Datei für die Wiedergabe auswählen
Die vorhergehende oder nächste Datei auswählen
Aus einer Liste auswählen
.//
MENU
w DATEIMANAGER
Eine andere Stelle in der Datei ansteuern
Springen Sie hörbar in zeitlichen Intervallen durch die Datei.
Halten Sie die Taste . oder /
gedrückt
Bewegen Sie sich unhörbar durch die Datei (während der
Rad
Wiedergabe, Pause oder bei gestopptem Transport).
Wiederholt wiedergeben
Fn
w LOOP-WIEDERG
Der Recorder kann eine einzelne Datei oder einen Abschnitt
wiederholt wiedergeben.
Die Wiedergabegeschwindigkeit ändern
Fn
w VSA-WIEDERG.
Der Recorder kann Dateien langsamer oder schneller
wiedergeben.
Dateien
Gewünschte Aktion/Erklärung Bedienschritte, verwendete Tasten
Eine Datei schützen
Die ausgewählte Datei schützen
Eine Datei auswählen und schützen
Eine Datei löschen
Die aktuelle Datei löschen
Eine Datei auswählen und löschen
Alle Dateien gleichzeitig löschen
Einen neuen Ordner erstellen
Fn
w SCHREIBSCHUTZ
MENU
w DATEIMANAGER w
Fn
w SCHREIBSCHUTZ
Fn
w DATEI LÖSCHEN
MENU
w DATEIMANAGER w
Fn
w DATEI LÖSCHEN
MENU
w DATEIMANAGER w
Fn
w ALLE DAT. LÖSCHEN
MENU
w DATEIMANAGER w
ORDNER ERSTELLEN
Gewünschte Aktion/Erklärung Bedienschritte, verwendete Tasten
Einen Ordner löschen
Das Dateinamenformat ändern
MENU
w DATEIMANAGER w
Fn
w ORDNER LÖSCHEN
MENU
w SYSTEM w DATEINAMEN
Den Dateizähler zurücksetzen
Den Dateizähler sofort zurücksetzen
Den Dateizähler jedes Mal zurücksetzen, wenn ein neuer Ordner
erstellt wird
Mit einem Computer verbinden und Audiodateien übertragen
MENU
w SYSTEM w DATEIZÄHLER w
RÜCKSETZEN
MENU
w
SYSTEM w DATEIZÄHLER w EIN
MENU
w SYSTEM w USB-DATENTRANSFER
Den Recorder wie ein USB-Massenspeichergerät nutzen
Marken
Gewünschte Aktion/Erklärung Bedienschritte, verwendete Tasten
Marken manuell setzen
Sie können Marken während der Aufnahme oder Wiedergabe
setzen, nicht jedoch, bei gestopptem Audio transport.
Marken während der Aufnahme automatisch setzen
Marken setzen, wenn ein bestimmter Pegel überschritten wird.
Marken setzen, wenn eine bestimmte Zeit verstrichen ist.
Marken setzen, wenn der Recorder eine Titelmarke in einem
digitalen Eingangssignal erkennt.
Marken setzen, wenn eine Übersteuerungsanzeige (
PEAK
aueuchtet.
Eine Marke ansteuern
Sie können Marken einzeln ansteuern.
Wählen Sie den Markentyp aus, den Sie ansteuern wollen.
Eine Marke löschen
Wählen Sie die Marke bei gestopptem Audiotransport aus, und
drücken Sie
ENTER/MARK
, um sie zu löschen.
Alle in einer Datei enthaltenen Marken gleichzeitig löschen.
)
ENTER/MARK
während der Aufnahme
oder Wiedergabe
MENU
w MARKEN w AUTO-MARKEN w
MODUS
w
PEGEL
MENU
w MARKEN w AUTO-MARKEN w
MODUS
w
ZEIT
MENU
w MARKEN w AUTO-MARKEN w
MODUS
w
DIGITAL
MENU
w MARKEN w SPITZE
ENTER/MARK +
MENU
ENTER/MARK
MENU
Fn
w ALLE MARKEN LÖSCH
./
w MARKEN w SPRUNG ZU
w DATEIMANAGER w
/
44
TASCAM DR-100MKIII
Page 45

Verschiedene Einstellungen und Informationen
Kategorie Gewünschte Aktion/Erklärung Bedienschritte, verwendete Tasten
Display
Informationen
System
Bedienung
Die Hintergrundbeleuchtung ausschalten
Die Helligkeit des Displays anpassen
Den Kontrast des Displays anpassen
Die Pegelanzeigen und
REC
-Lämpchen deaktivieren
Die Anzeige von Pegelspitzen anpassen
Die angezeigten Pegelspitzen zurücksetzen
Dies funktioniert nur, wenn PEGESPITZEN HALTEN
aktiviert ist.
Verschiedene Informationen anzeigen
Sie können sich Informationen über die SD-Karte
anzeigen lassen.
Sie können sich die Firmwareversion anzeigen
lassen.
Sie können sich Informationen über Dateien
anzeigen lassen.
Sie können sich Einstellungen anzeigen lassen, die
für die Aufnahme verwendet wurden.
Festlegen, ob XRI-Daten in der Aufnahmedatei
gespeichert werden oder nicht.
Datum und Uhrzeit ändern
Die Sprache der Benutzeroberäche wählen
Den Recorder auf die Werkseinstellungen zurücksetzen
Eine SD-Karte formatieren
Vor versehentlicher Fehlbedienung schützen
Sie können verhindern, dass der Eingangspegel
verstellt wird.
Sie können den Eingangspegelregler und alle
Tasten sperren.
Den Recorder fernsteuern
Wählen Sie die verwendete Fernbedienung.
MENU
w
STROMVERS/DISPLAY
MENU
HELLIGKEIT
MENU
KONTRAST
MENU
ANZEIGEN
MENU
PEGELSPITZEN
w
BELEUCHTUNG
w STROMVERS/DISPLAY w
w STROMVERS/DISPLAY w
w STROMVERS/DISPLAY w
w STROMVERS/DISPLAY w
Halten Sie auf der Hauptseite die Taste
Fn
etwas länger gedrückt
MENU
w SYSTEM w INFORMATION w
KARTE
MENU
w SYSTEM w INFORMATION w
FIRMWARE
MENU
w SYSTEM w INFORMATION w
DATEI
oder
Fn
w DATEI-INFO
Fn
w DATEI-INFO w XRI
MENU
w AUFNAHME-EINSTEL. w XRI
MENU
w SYSTEM w DATUM/ZEIT
MENU
w SYSTEM w SPRACHE
MENU
w SYSTEM w ZURÜCKSETZEN
MENU
w SYSTEM w KARTE FORMATIEREN
Stellen Sie den Schalter
LEVEL
Stellen Sie den Schalter
MENU
w SYSTEM w FERNBEDIENUNG
HOLD
HOLD
auf
auf
ALL
Kategorie Gewünschte Aktion/Erklärung Bedienschritte, verwendete Tasten
Stromversorgung
Die Stromsparfunktion nutzen
Schützen Sie Batterien/Akkus vor dem Entladen,
MENU
w STROMVERS/DISPLAY w
AUTO-STROMSP.
wenn das Gerät nicht genutzt wird.
Während der Aufnahme oder Wiedergabe schaltet
sich der Recorder nicht aus.
Den Recorder besonders lange nutzen
Indem er sowohl den Lithium-Ionen-Akku als auch
AA-Batterien verwendet, ermöglicht der Recorder
MENU
w STROMVERS/DISPLAY w
BATTERIE
w
PRIORITÄT
einen besonders langen netzunabhängigen Betrieb.
Wählen Sie, ob zuerst der eingebaute Akku oder die
AA-Batterien/Akkus verwendet werden sollen.
Wählen Sie, welchen Typ AA-Zellen Sie verwenden,
damit der Recorder die Rest kapazität korrekt
MENU
w STROMVERS/DISPLAY w
BATTERIE
w
AA-TYP
berechnet.
Die Aufnahme sofort starten
Wenn der Recorder ausgeschaltet ist, und Sie halten
Halten Sie während dem Einschalten
die Taste
REC
gedrückt
Sie die Taste REC gedrückt, während Sie den
Recorder einschalten, beginnt sofort die Aufnahme.
Weitere
Funktionen
Für die Synchronisation mit Videomaterial vorbereiten
Der Recorder kann am Anfang und Ende einer
MENU
w AUFNAHME-EINSTEL. w
KLAPPENSIG.
Aufnahme automatisch einen Signalton (ein
Klappensignal) erzeugen. Indem Sie den Recorder
dieses Klappensignal und die Kamera das Ausgangssignal des Recorders aufzeichnen lassen, wird
die spätere Synchronisation beim Schneiden des
Videos vereinfacht.
Den Pegel des Line-Ausgangs absenken.
Dies kann erforderlich sein, wenn Sie das Ausgangs-
MENU
w E/A-EINSTELLUNGEN w
AUSG.ABSENKUNG
w
LINE
signal beispielsweise an eine Kamera weiterleiten.
Der Pegel des Line-Ausgangs lässt sich um maximal
30 dB absenken.
TASCAM DR-100MKIII
45
Page 46

Das Menü im Überblick
Um das Menü aufzurufen, drücken Sie die Taste MENU.
Menüeintrag Bedeutung/Funktion
DATEIMANAGER
AUFNAHME-EINSTEL. DATEITYP
ABTASTRATE
KANÄLE
XRI
DUAL-AUFN.
DATEI TEILEN
AUTO-AUFN.
VGZ. AUFN.
KLAPPENSIG.
E/A-EINSTELLUNGEN QUELLE
A/D-FILTER
DUAL-ADC
PHANT.SPANNG
STROM F KLEINMIK
TIEFENFILTER
PEGELANPASS.
MS-DECODER
AUSG.ABSENKUNG
MARKEN AUTO-MARKEN
PEAK-MARKEN
SPRUNG ZU
STROMVERS/DISPLAY AUTO-STROMSP.
BATTERIE
BELEUCHTUNG
HELLIGKEIT
KONTRAST
ANZEIGEN
PEGELSPITZEN
Mit Dateien und Ordnern auf der Speicherkarte arbeiten
Dateityp der Aufnahme
Abtastrate der Aufnahme
Einstellungen für Aufnahmekanäle
Aufzeichnen von Aufnahmeinformationen ein/aus
Einstellungen für die Dual-Aufnahme
Zeitintervall, nach dem die Aufnahme mit einer neuen Datei
fortgesetzt werden soll
Einstellungen für die Auto-Aufnahme
Einstellungen für die vorgezogene Aufnahme
Einstellungen für das automatische Klappensignal
Eingangsquelle auswählen
Einstellungen für das Filter des A/D-Wandlers
Diese Funktion verbessert den Signal-/Rauschabstand und
kann hier ein-/ausgeschaltet werden
Die Spannung der Phantomspeisung wählen
Stromversorgung für Kleinmikrofone ein/aus
Einstellungen für das Tiefenlter
Einstellungen für die automatische Pegelanpassung
MS-Dekoder ein/aus
Pegelwert, um den das Ausgangssignal abgesenkt wird
Einstellungen für das automatische Setzen von Marken
Schaltet das Setzen von Marken bei Übersteuerung ein/aus
Markentyp, der mit den Sprungtasten aufgesucht wird
Einstellungen für das automatisches Stromsparen
Einstellungen für den eingebauten Akku und die austauschba-
ren Batterien
Zeit bis zur Abschaltung der Hintergrundbeleuchtung
Helligkeit der Hintergrundbeleuchtung
Kontrast der Displaydarstellung
Anzeigelämpchen ein/aus
Einstellungen für das Halten von Pegelspitzen
Menüeintrag Bedeutung/Funktion
SYSTEM INFORMATION
DATUM/ZEIT
DATEINAMEN
DATEIZÄHLER
FERNBEDIENUNG
SPRACHE
ZURÜCKSETZEN
KARTE FORMATIEREN
USB-DATENTRANSFER
Verschiedene Informationen anzeigen
Datum und Uhrzeit einstellen
Das Format des Dateinamens festlegen
Den Dateizähler zurücksetzen
Einstellungen für die Fernbedienung
Die Sprache der Benutzeroberäche auswählen
Den Recorder auf die Werkseinstellungen zurücksetzen
Die Speicherkarte formatieren
In den USB-Datentransfermodus umschalten
46
TASCAM DR-100MKIII
Page 47

Das FUNKTIONEN-Menü im Überblick
Li-ion
Wenn die Hauptseite angezeigt wird, können Sie die Taste Fn drücken, um auf verschiedene
Funktionen zuzugreifen. Das funktioniert in jedem Transportstatus, außer während der Aufnahme.
Welche Funktionen angezeigt werden, hängt vom Status des Recorders beim Drücken der Taste ab.
Menüeintrag Bedeutung/Funktion
Gestoppt, Pause oder
Wiedergabe
Aufnahmebereitschaft
SCHREIBSCHUTZ
DATEI LÖSCHEN
TEILEN
LOOP-WIEDERG
VSA-WIEDERG.
MS-DECODER
DATEI-INFO
TIEFENFILTER
PEGELANPASS.
MS-DECODER
Schreibschutz für die ausgewählte Datei ein/aus
Die ausgewählte Datei löschen
Die ausgewählte Datei teilen
Einstellungen für die wiederholte Wiedergabe
Einstellungen für langsamere oder schnellere Wiedergabe
MS-Dekoder ein/aus
Informationen zur ausgewählten Datei anzeigen
Einstellungen für das Tiefenlter
Einstellungen für die automatische Pegelanpassung
MS-Dekoder ein/aus
Das Kontextmenü des Dateimanagers im Überblick
Wenn Sie im Dateimanager eine Datei oder einen Ordner ausgewählt haben und die Taste Fn
drücken, erscheint ein Kontextmenü für Dateien beziehungsweise Ordner.
Menüeintrag Bedeutung/Funktion
Im Dateimanager
wurde eine Datei
ausgewählt
Im Dateimanager
wurde ein Ordner
ausgewählt
DATEI-INFO
DATEI LÖSCHEN
SCHREIBSCHUTZ
ALLE MARKEN LÖSCH
ALLE DAT. LÖSCHEN
ORDNER LÖSCHEN
Informationen zur ausgewählten Datei anzeigen
Die ausgewählte Datei löschen
Schreibschutz für die ausgewählte Datei ein/aus
Alle Marken innerhalb der ausgewählten Datei löschen
Alle Dateien im aktuellen Ordner löschen
Den ausgewählten Ordner löschen
Den eingebauten Lithium-Ionen-Akku entsorgen
Dieses Gerät nutzt einen wiederaufladbaren Lithium- Ionen-Akku. Wenn Sie einen
Akku nicht mehr benötigen, werfen Sie ihn nicht weg. Bringen Sie ihn stattdessen zum
Fachhandel oder zu einer Entsorgungsstelle, damit die wertvollen Rohstoffe zurückgewonnen werden können.
Wenn Sie unsicher sind, wenden Sie sich an den Tascam- Kundendienst (siehe Rückseite
dieses Handbuchs).
Wichtig
• Zerlegen Sie das Produkt nur dann, wenn Sie es für die Entsorgung vorbereiten.
• Wenn der Akku ausgetauscht werden muss, wenden Sie sich an ein Tascam-Servicecenter.
Den eingebauten Lithium-Ionen-Akku ausbauen
Bevor Sie den eingebauten Akku entfernen, muss er vollständig entladen sein. Um das Gehäuse des
Recorders öffnen zu können, benötigen Sie einen Kreuzschlitz-Schraubendreher (Phillips, Größe 0).
1. Entfernen Sie den Wechselstromadapter und die AA-Batterien, und schalten Sie die
Stromsparfunktion aus (Menüseite STROMVERS/DISPLAY, STROMSPAREN, AUS).
2. Schalten Sie den Recorder ein und lassen Sie ihn laufen, bis er sich von selbst ausschaltet.
3. Entfernen Sie die Gummifüße auf der Geräteunterseite.
4. Entfernen Sie die vier Schrauben, die sich unterhalb der Gummifüße befinden.
5. Entfernen Sie die untere Gehäuseabdeckung.
6. Ziehen Sie den Anschlussstecker des Akkus heraus, und nehmen Sie den Akku heraus.
Anschlussstecker
TASCAM DR-100MKIII
47
Page 48

Displaymeldungen
Im Folgenden finden Sie eine Liste der Meldungen, die auf dem
Display des Recorders angezeigt werden können.
Sollte also einmal eine dieser Meldungen erscheinen, können
Sie sich anhand dieser Liste über die Bedeutung der Meldung
informieren und gegebenenfalls Abhilfe schaffen.
Meldung Bedeutung und Abhilfe
Gerät gesperrt
Pegel gesperrt
Batterie leer
Batterie schwach
KeineKarte
Karte geschützt
Kartenfehler
Karte voll
Formatfehler
Karte formatier.
Karte ungültig
Karte wechseln
MBR-Fehler
Karte initialis.
Schreibfehler
Aufn. fortges.
Der Eingangspegelregler und alle Tasten wurden
mithilfe des Schalters
HOLD
gesperrt.
Der Eingangspegelregler wurde mithilfe des
Schalters
HOLD
gesperrt.
Laden Sie den eingebauten Akku auf oder
ersetzen Sie die AA-Batterien.
Legen Sie eine Speicherkarte ein.
Um Daten aufzeichnen oder löschen zu können,
schieben Sie den Schreibschutz-Schalter der
Speicherkarte in die Stellung UNLOCK.
Die Speicherkarte wird nicht erkannt.
Tauschen Sie die Karte aus.
Es ist kein Speicherplatz mehr auf der SD-Karte
vorhanden.
Die SD-Karte ist nicht ordnungsgemäß formatiert
oder beschädigt.
Drücken Sie
ENTER/MARK
, um die Karte zu
formatieren.
Durch das Formatieren werden alle auf der Karte
enthaltenen Daten gelöscht.
Es ist ein unbekanntes Problem mit der SD-Karte
aufgetreten.
Tauschen Sie die Karte aus.
Die SD-Karte ist nicht ordnungsgemäß formatiert
oder beschädigt.
Drücken Sie
ENTER/MARK
, um die Karte zu
formatieren.
Durch das Formatieren werden alle auf der Karte
enthaltenen Daten gelöscht. Wenn das Formatieren nicht möglich ist, tauschen Sie die Karte aus.
Beim Schreiben auf die SD-Karte ist eine Zeitüberschreitung aufgetreten. Die Aufnahme wurde
fortgesetzt, jedoch sind möglicherweise Aussetzer
oder Geräusche entstanden.
An der Problemstelle hat der Recorder eine
BOF-Marke eingefügt.
Meldung Bedeutung und Abhilfe
Karte langsam
BOF-Mark. prüfen
Die Schreibleistung der Karte hat sich verschlechtert.
Durch die Zeitüberschreitung wurde das Audiomaterial unterbrochen. An der Stelle der Unterbrechung hat der Recorder eine BOF-Marke eingefügt.
Überprüfen Sie das Audiomaterial im Bereich der
BOF-Marke.
Formatieren Sie die Speicherkarte mit dem
Recorder oder tauschen Sie sie aus.
Sys-D. ungültig
Sys-D. erstellen
Die für den Betrieb des Recorders benötigte
Systemdatei ist ungültig.
Drücken Sie
ENTER/MARK
Systemdatei zu erstellen.
Sys-Datei fehlt
Sys-D. erstellen
Keine Systemdatei vorhanden. Zum ordnungsgemäßen Betrieb benötigt der Recorder eine
Systemdatei.
Drücken Sie
ENTER/MARK
Systemdatei zu erstellen.
Nicht unterst.
Hinweise zu den Dateiformaten, die dieser
Recorder unterstützt, nden Sie im Referenzhandbuch.
Max Anz. Dateien
Aufnehmen nicht möglich. Die Gesamtzahl von
Ordnern und Dateien würde die maximal
zulässige Zahl von 5000 überschreiten.
Datei nicht gef.
Eine Datei kann nicht gefunden werden oder ist
möglicherweise beschädigt.
Prüfen Sie die Datei.
Löschen n. mögl.
Datei geschützt
Teilen n. mögl.
Datei zu kurz
Teilen n. mögl.
Datei ist MP3
Teilen n. mögl.
Name vorhanden
Heben Sie den Schreibschutz der Datei auf, bevor
Sie versuchen diese zu löschen.
Die Datei ist zu kurz und lässt sich deshalb nicht
teilen.
MP3-Dateien können nicht geteilt werden.
Durch das Teilen würde ein Dateiname entstehen,
der im selben Ordner bereits vorhanden ist.
Ändern Sie den Dateinamen mithilfe eines
Computers.
Teilen n. mögl.
Keine Marke
Teilen n. mögl.
Abschn. zu kurz
Dateien, die keine Marken enthalten, können auf
diese Weise nicht geteilt werden.
Das Teilen mittels Marken funktioniert nicht, wenn
Marken einen zeitlichen Abstand von zwei
Sekunden oder weniger haben.
Teilen n. mögl.
KeineDatei
Es ist keine Audiodatei vorhanden.
, um eine neue
, um eine neue
Meldung Bedeutung und Abhilfe
Teilen n. mögl.
Fehler Dateiname
Die Datei kann nicht geteilt werden, weil der
dabei entstehende Dateiname mehr als 200
Zeichen umfassen würden.
Ändern Sie den Dateinamen mithilfe eines
Computers.
Max Anz. Marken
Die Anzahl der Marken hat die zulässige Grenze
von 99 erreicht.
Löschen n. mögl.
Ordner n. leer
Sie können keine Ordner löschen, die Dateien
enthalten.
Löschen Sie alle Dateien im Ordner, und versuchen Sie es noch einmal.
Keine XRI-Daten
Die Datei enthält keine XRI-Daten. Aktivieren Sie
das Aufzeichnen von XRI-Daten, bevor Sie mit
einer Aufnahme beginnen.
Wenn Sie im MP3-Format aufnehmen, kann der
Recorder keine XRI-Daten aufzeichnen.
Nicht möglich
Datei geschützt
Die Datei ist schreibgeschützt. Es können keine
Marken hinzugefügt werden.
Heben Sie den Schreibschutz der Datei auf, wenn
Sie Marken hinzufügen wollen.
Nicht möglich
Datei zu kurz
Digitaleingang
Nicht synchron
Die Datei ist zu kurz, um Marken hinzuzufügen.
Am Digitaleingang (
DIGITAL IN
) ist nichts
angeschlossen, oder das Signal wird nicht korrekt
empfangen.
Überprüfen Sie die Digitalverbindung.
Digitaleingang
Synchron
Digitaleingang
Falsche Abtastr.
Abschn. zu kurz
Das Signal am Digitaleingang wird korrekt
erkannt.
Die Abtastrate am Digitaleingang stimmt nicht
mit der Einstellung für die Aufnahme überein.
Der IN- und OUT-Punkt der Loop-Wiedergabe
liegen zu nah beieinander. Setzen Sie IN- und
OUT-Punkt so, dass der zeitliche Abstand mindestens eine Sekunde beträgt.
Übertemperatur!
USB-Strom anschl
Der Recorder ist im Batteriebetrieb zu heiß
geworden. Sie können den recorder weiter
nutzen, wenn Sie ihn über den USB-Anschluss mit
Strom versorgen.
Übertemperatur!
Der Recorder ist zu heiß geworden und schaltet
sich zum Schutz automatisch aus.
Falls eine andere Meldung erscheint, schalten Sie den Recorder
aus und starten ihn neu.
48
TASCAM DR-100MKIII
Page 49

Fehlerbehebung
Sollten Sie bei der Benutzung dieses Recorders auf Schwierigkeiten stoßen, probieren Sie bitte zunächst die folgenden
Lösungsvorschläge aus, bevor Sie ihn zur Reparatur einliefern.
Wenn Sie das Problem damit nicht beheben konnten, wenden Sie
sich bitte an Ihren Fachhändler oder an ein Tascam-Servicecenter.
8 Das Gerät lässt sich nicht einschalten.
• Überprüfen Sie, ob der eingebaute Akku ausreichend geladen
ist oder die AA-Batterien/Akkus richtig eingelegt sind.
• Falls Sie den optionalen Wechselstromadapter Tascam
PS-P520E verwenden: Ist dessen USB-Stecker richtig
angeschlossen und liefert die Steckdose Netzstrom?
Schließen Sie den Recorder nicht an einen USB-Hub an, da
er sonst möglicherweise nicht ordnungsgemäß funktioniert.
• Vergewissern Sie sich, dass der Schalter HOLD auf OFF
gestellt ist.
8 Der Recorder schaltet sich selbst aus.
Möglicherweise ist die automatische Stromsparfunktion
aktiviert.
Entsprechend den Anforderungen der europäischen Ökodesign-Richtlinie (ErP) arbeitet die Stromsparfunktion unabhängig
davon, ob das Gerät mit einem Wechselstrom adapter oder
mit Batterien/Akkus betrieben wird. Wenn Sie die Stromsparfunktion nicht nutzen wollen, schalten Sie sie aus (AUS). (In der
Voreinstellung schaltet sich das Gerät nach 30Minuten aus.)
8 Das CHG-Lämpchen blinkt orange/grün
Möglicherweise ist es zu kalt oder zu warm, um den
eingebauten Akku zu laden. Laden Sie den Akku bei einer
Umgebungstemperatur zwischen 0°C und 30 °C.
8 Die Restkapazität des eingebauten Akkus wird ungenau
angezeigt
Wenn Sie den Recorder nach dem Kauf zum ersten Mal
einschalten, wird die Restkapazität des eingebauten Akkus
möglicherweise ungenau angezeigt. Entladen und laden Sie
den Akku einmal vollständig. Dadurch lernt der Recorder die
Ladekapazität neu und stellt sie fortan korrekt dar.
8 Das Gerät reagiert nicht.
• Vergewissern Sie sich, dass der Schalter HOLD auf OFF
gestellt ist.
• Der Recorder reagiert nicht, wenn eine
USB-Datenverbindung besteht.
• Wenn sich der Recorder nicht wie erwartet verhält, halten
Sie den Ein-/Ausschalter ( ) mindestens zehn Sekunden
lang gedrückt, während Sie zugleich die Stopptaste (8)
gedrückt halten. Damit wird das Gerät zwangsausgeschaltet.
Schalten Sie es danach wieder ein.
8 Die Speicherkarte wird nicht erkannt.
• Vergewissern Sie sich, dass die Karte ordnungsgemäß
eingelegt ist.
• Möglicherweise ist die Karte defekt. Versuchen Sie es mit
einer anderen.
8 Es wird kein Ton ausgegeben.
• Überprüfen die Einstellung des Ausgangspegels und
der Pegelabsenkung im Menü (E/A-EINSTELLUNGEN,
AUSGANGSABSENKUNG).
• Falls Sie eine Abhöranlage verwenden, prüfen Sie die
Kabelverbindung und die Lautstärkeeinstellung.
• In folgenden Situationen wird über den Lautsprecher kein
Ton ausgegeben:
i Wenn der Lautsprecher ausgeschaltet ist (Schalter in
Stellung OFF),
i während der Aufnahme oder Aufnahmebereitschaft,
i wenn Kopfhörer angeschlossen sind.
8 Aufnehmen ist nicht möglich.
• Vergewissern Sie sich, dass noch genügend Platz auf der
Speicherkarte ist.
• Aufnehmen ist nicht möglich, wenn die Gesamtzahl von
5000 Ordnern und Dateien erreicht ist.
8 Das Eingangssignal ist extrem leise oder laut.
• Überprüfen Sie die Einstellungen für den Eingangspegel.
• Überprüfen Sie den Ausgangspegel einer externen Quelle.
8 Das Wiedergabesignal klingt unnatürlich.
• Überprüfen Sie die Einstellung der variablen Wiedergabegeschwindigkeit (VSA).
• Vergewissern Sie sich, dass die automatische
Pegelanpassung ausgeschaltet ist.
8 Eine Datei lässt sich nicht löschen.
Schreibgeschützte Dateien lassen sich nicht löschen.
Entfernen Sie den Schreibschutz.
8 Die Aufnahmedateien erscheinen nicht auf dem Computer.
• Vergewissern Sie sich, dass eine funktionierende
USB-Verbindung mit dem Computer besteht. Schließen
Sie den Recorder nicht an einen USB-Hub an, da er sonst
möglicherweise nicht ordnungsgemäß funktioniert.
• Vergewissern Sie sich, dass auf dem Recorder der
USB-Datentransfer aktiviert ist.
8 Versehentlich wurde die falsche Menüsprache gewählt
Schalten Sie den Recorder aus, indem Sie den Ein-/
Ausschalter ( )drücken. Halten Sie anschließend die Taste
MENU gedrückt, und drücken Sie dann zusätzlich den Ein-/
Ausschalter ( ), um den Recorder einzuschalten. Wählen
Sie die gewünschte Sprache aus dem erscheinenden Menü.
Technische Daten
Allgemeine Daten
8 Aufnahmemedien
SD-Karte (64 MB – 2 GB)
SDHC-Karte (4–32 GB)
SDXC-Karte (48–128 GB)
8 Aufnahme- und Wiedergabeformate
WAV (BWF): Abtastrate 44,1/48/88,2/96/176,4/192 kHz;
Auflösung 16/24 Bit
MP3: Abtastrate 44,1/48 kHz; Bitrate 128/192/256/320 Kbit/s
8 Anzahl der Kanäle/Audiospuren
2 Eingangskanäle, 2×2 Spuren (Dual-Aufnahme)
Eingänge und Ausgänge
8 Mikrofon-/Lineeingang (MIC/LINE IN, XLR mit zuschaltbarer
Phantomspeisung)
Anschlusstyp: Kombibuchse XLR-3-31 / 6,3-mm-Klinkenbuchse (3-polig)
8 Zusatzeingang (EXT IN, mit Stromversorgung für
Kleinmikrofone)
Anschlusstyp: 3,5-mm-Stereoklinkenbuchse
8 Digitaleingang (DIGITAL IN)
Anschlusstyp: Mikroklinkenbuchse, 3,5 mm, 3-polig
8 Line-Ausgang (LINE OUT)
Anschlusstyp: 3,5-mm-Stereoklinkenbuchse
8 Kopfhöreranschluss
Anschlusstyp: 3,5-mm-Stereoklinkenbuchse
8 Eingebauter Lautsprecher
0,4 W (mono)
8 USB-Anschluss
Anschlusstyp: Micro-B-Buchse
Format: USB 2.0 High-Speed, Mass Storage Class
8 Fernbedienungsanschluss (REMOTE)
Anschlusstyp: Mikroklinkenbuchse, 2,5 mm, 3-polig
TASCAM DR-100MKIII
49
Page 50

Leistungsdaten Audio
8 Frequenzbereich
Mikrofonsignal an MIC/LINE IN oder EXT IN, PAD ON oder
Line-Signal an MIC/LINE IN oder EXT IN
bis Line-Ausgang
20 Hz − 20 kHz +0,5 dB / −1 dB (Fs 44,1/48 kHz, JEITA)
20 Hz − 40 kHz +0,5 dB / −2 dB (Fs 88,2/96 kHz, JEITA)
20 Hz − 80 kHz +0,5 dB / −4 dB (Fs 176,4/192 kHz, JEITA)
8 Verzerrung
Mikrofonsignal an MIC/LINE IN oder EXT IN, PAD ON oder
Line-Signal an MIC/LINE IN oder EXT IN
bis Line-Ausgang
0,007 % oder weniger
(Fs 44,1/48/88,2/96/176,4/192 kHz, JEITA)
8 Fremdspannungsabstand
Mikrofonsignal an MIC/LINE IN oder EXT IN, PAD ON oder
Line-Signal an MIC/LINE IN oder EXT IN
bis Line-Ausgang
102 dB oder mehr
(Fs 44,1/48/88,2/96/176,4/192 kHz, JEITA)
8 Äquivalentes Eingangsrauschen (EIN)
124 dBu oder weniger
Anmerkung: Angaben entsprechend JEITA-Standard CP-2150
Ungefähre Aufnahmezeit in Stunden:Minuten
Dateiformat der Aufnahme SDHC-Karte, 4 GB
MP3, 320 Kbit/s, Stereo, 44,1kHz
WAV, 16 Bit, Stereo, 44,1kHz 6:17
WAV, 24 Bit, Stereo, 96kHz 1:55
WAV, 24 Bit, Stereo, 192kHz 00:57
• Die angegebenen Zeiten sind theoretische Werte. Sie können
ja nach verwendeter Speicherkarte abweichen.
• Die angegebenen Zeiten stehen nicht durchgängig für
eine Aufnahme zur Verfügung, sondern geben die gesamte
Aufnahmezeit auf der jeweiligen Karte an.
• Bei Monoaufnahmen verdoppelt sich die jeweilige
Aufnahmezeit ungefähr.
• Bei der Dualaufnahme halbiert sich die jeweilige Aufnahmezeit
ungefähr.
27:46
Stromversorgung und sonstige Daten
8 Stromversorgung
– Eingebauter wiederaufladbarer Lithium-Akku
– 2 AA-Zellen (Alkaline-Batterien, NiMH-Akkus oder
Lithium-Batterien)
– USB-Verbindung mit einem Computer
– Wechselstromadapter (Tascam PS-P520E, als Zubehör
erhältlich)
– Batteriepack (Tascam BP-6AA, als Zubehör erhältlich)
8 Leistungsaufnahme
7.5 W (maximal)
8 Betriebszeit mit Batterien/Akkus
(Dauerbetrieb, in Stunden:Minuten)
Bedingungen Einge-
bauter
Li-IonenAkku
Aufnahme über
eingebautes
gerichtetes
Stereo mikrofon
WAV (BWF) 44,1
kHz, 16 Bit, stereo
Phantomspeisung
aus
Aufnahme über
MIC/LINE IN
Buchsen
WAV (BWF) 44,1
kHz, 16 Bit, stereo
Phantomspeisung
ein (48 V, 2× 3 mA)
Anmerkung
Bei Nutzung der Phantomspeisung verringert sich die Betriebszeit je nach verwendetem Mikrofon.
8 Ungefähre Ladezeit (Gerät ausgeschaltet, Stunden:Minuten)
• Über USB: 10:00
• Über PS-P520E (optionales Zubehör): 4:30
8 Abmessungen (B × H × T)
80 mm × 156 mm × 35 mm (ohne hervorstehende Teile)
8 Gewicht
425 g / 375 g (mit bzw. ohne Batterien)
AlkalineBatterien
(Evolta)
NiMHAkkus
(Eneloop)
LithiumBatterien
(Energizer
Ultimate
Lithium)
12:00 2:45 3:30 7:00
6:00 1:00 2:15 3:30
8 Zulässiger Betriebstemperaturbereich
0–40 °C
50
TASCAM DR-100MKIII
Page 51

Manual de instrucciones
PRECAUCIONES IMPORTANTES
DE SEGURIDAD
Para EE.UU.
PARA EL USUARIO
Se ha verificado que este aparato cumple con los
límites establecidos para las unidades digitales de
clase B, de acuerdo a lo indicado en la sección 15
de las normas FCC. Esos límites han sido diseñados
para ofrecer una protección razonable contra
las interferencias molestas en una instalación no
profesional. Este aparato genera, usa y puede irradiar
energía de radiofrecuencias y, si no es instalado y
usado de acuerdo a este manual de instrucciones,
puede producir interferencias molestas en las
comunicaciones de radio. No obstante, tampoco
hay garantías de que no se produzcan ese tipo
de interferencias en una instalación concreta. Si
este aparato produce interferencias molestas en la
recepción de la radio o TV (lo que puede determinar
encendiendo y apagando el aparato), el usuario será
el responsable de tratar de corregirlas usando una o
más de las siguientes medidas.
a) Reorientar o reubicar la antena receptora.
b) Aumentar la separación entre este aparato y el
receptor.
c) Conectar este aparato a una salida de corriente o
regleta diferente a la que esté conectado el receptor.
d) Consultar a su distribuidor o a un técnico
especialista en radio/TV para que le ayuden.
PRECAUCIÓN
Cualquier cambio o modificación en este aparato
no aprobado expresamente y por escrito por TEAC
CORPORATION podrá anular la autorización del
usuario a usar dicho aparato.
Para Canadá
ESTE APARATO DIGITAL DE CLASE B CUMPLE CON LA
NORMATIVA CANADIENSE ICES-003.
CET APPAREIL NUMERIQUE DE LA CLASSE B EST
CONFORME A LA NORME NMB-003 DU CANADA.
Este producto cumple con todas las
DIrectivas europeas aplicables así
como con otras regulaciones de la
Comisión.
Declaración de Conformidad
Responsable: TEAC AMERICA, INC.
Dirección: 1834 Gage Road, Montebello,
California, U.S.A.
Teléfono: 1-323-726-0303
Este dispositivo cumple con lo indicado en la
sección 15 de las normas FCC y su funcionamiento
está sujeto a las dos condiciones siguientes: (1) este
aparato no debe producir interferencias molestas, y
(2) este aparato debe aceptar cualquier interferencia
que reciba, incluso aquellas que produzcan un
funcionamiento no deseado.
INSTRUCCIONES IMPORTANTES DE SEGURIDAD
1 Lea estas instrucciones.
2 Conserve estas instrucciones.
3 Cumpla con lo indicado en los avisos.
4 Siga todas las instrucciones.
5 No utilice este aparato cerca del agua.
6 Límpielo solo con un trapo seco.
7 No bloquee ninguna de las ranuras de ventilación.
Instale este aparato de acuerdo con las
instrucciones del fabricante.
8 No instale este aparato cerca de fuentes de
calor como radiadores, calentadores, hornos u
otros aparatos (incluyendo amplificadores) que
produzcan calor.
9 No elimine el sistema de seguridad que supone
el enchufe polarizado o con toma de tierra. Un
enchufe polarizado tiene dos bornes, uno más
ancho que el otro. Uno con toma de tierra tiene
dos bornes iguales y una tercera lámina para la
conexión a tierra. El borne ancho o la lámina se
incluyen para su seguridad. Si el enchufe que
venga con la unidad no encaja en su salida de
corriente, haga que un electricista cambie su salida
anticuada.
10 Evite que el cable de corriente quede de forma que
pueda ser pisado o quedar retorcido o aplastado,
especialmente en los enchufes, receptáculos o en
el punto en el que salen del aparato.
11 Use solo accesorios / complementos especificados
por el fabricante.
12 Utilice este aparato solo con
un soporte, trípode o
bastidor especificado por el
fabricante o que se venda
con el propio aparato.
Cuando utilice un bastidor
con ruedas, tenga cuidado al mover la
combinación de aparato/bastidor para evitar que
vuelque y puedan producirse daños.
13 Desconecte este aparato de la corriente durante
las tormentas eléctricas o cuando no lo vaya a usar
durante un periodo de tiempo largo.
14 Dirija cualquier posible reparación solo al servicio
técnico oficial. Este aparato deberá ser reparado si
se ha dañado de alguna forma, como por ejemplo
si el cable de corriente o el enchufe están rotos, si
ha sido derramado algún líquido sobre la unidad
o algún objeto ha sido introducido en ella, si
el aparato ha quedado expuesto a la lluvia o la
humedad, si no funciona normalmente o si se le
ha caído al suelo en algún momento.
•
Este aparato recibe corriente nominal no operativa
de la salida de corriente AC aun cuando su
interruptor POWER o STANDBY/ON no esté en la
posición ON.
•
Dado que el cable de alimentación es el sistema de
desconexión de esta unidad debe ubicarla de forma
que siempre pueda acceder a él.
•
Tenga cuidado al usar auriculares de cualquier tipo
con este aparato dado que una presión sonora
excesiva en los auriculares puede producirle daños
auditivos.
•
Si detecta cualquier tipo de problema mientras
utiliza este aparato, póngase en contacto con TEAC
para informar de ello y hacer que la unidad sea
revisada o reparada. No utilice de nuevo la unidad
hasta que no haya sido verificada/reparada.
PRECAUCIÓN
•
No permita que este aparato quede expuesto a
salpicaduras de ningún tipo.
•
No coloque objetos que contengan líquidos, como
jarrones, encima de este aparato.
•
No instale este aparato encastrado en una librería o
mueble similar.
•
El aparato debe estar colocado lo suficientemente
cerca de la salida de corriente como para poder
acceder al enchufe en cualquier momento.
•
Si este aparato utiliza pilas (incluyendo baterías fijas
o recambiables), no permita que queden expuestas
a la luz solar, fuego o un nivel excesivo de calor.
•
ATENCIÓN con los productos que utilicen baterías
de litio recambiables: existe el riesgo de explosión
en caso de sustituir la batería por otra de un tipo
incorrecto. Sustitúyala solo por una idéntica o de
tipo equivalente.
Precauciones acerca de las pilas
recargables
Este aparato utiliza pilas recargables. Un mal uso de
las mismas puede dar lugar a fugas, roturas y otros
problemas. Tenga en cuenta siempre las precauciones
siguientes al usar este tipo de pilas.
•
En caso de fuga en una pila recargable, nunca toque
el fluido de la fuga con la mano desnuda. En caso de
ese tipo de fugas, póngase en contacto con TEAC
Corporation.
•
El contacto del fluido de la pila con los ojos puede
dar lugar a daños o pérdida de visión. Si le cae este
fluido en los ojos, lávelos inmediatamente con agua
abundante. No se frote los ojos al lavarlos. Después
de lavarlos, acuda tan pronto como pueda a un
médico. El contacto del fluido de la pila con su piel
o ropas puede dar lugar a daños o quemaduras. Al
igual que antes, lave con agua inmediatamente la
zona afectada y acuda al médico.
•
No utilice ningún tipo de adaptador de corriente
distinto al modelo indicado para esta unidad. Utilice
siempre este adaptador cuando vaya a recargar las
pilas o utilizar este aparato conectado a una salida
de corriente normal. El uso de un adaptador distintos
puede hacer que la unidad se recaliente y dar lugar
a incendios, daños o averías, así como a la rotura o
fugas en las pilas.
•
Nunca arroje las pilas al fuego ni las recargue o deje
cerca de una llama, expuestas directamente al sol o
en entornos muy calientes.
•
Nunca trate de desmontar las pilas. El hacerlo puede
dar lugar a una descarga eléctrica. Si quiere reparar
o comprobar si su batería funciona correctamente,
póngase en contacto con el comercio en el que
adquirió esta unidad o con TEAC. A la hora de
deshacerse de este producto, siga las instrucciones
específicas de extracción de las pilas y reciclaje de las
mismas.
PRECAUCIONES GENERALES ACERCA DE
LAS PILAS
Este aparato utiliza pilas. Un mal uso de las mismas
puede dar lugar a fugas, roturas y otros problemas.
Tenga en cuenta siempre las precauciones siguientes al
usar las pilas.
•
Nunca trate de recargar pilas no recargables. Las
pilas podrían romperse o tener fugas, dando lugar a
daños o incendios.
•
A la hora de instalar la pilas, ponga mucha atención
a las indicaciones de polaridad (símbolos (¥/^
más/menos) e instálelas correctamente dentro
TASCAM DR-100MKIII
51
Page 52

del compartimento para las pilas siguiendo las
Pb, Hg, Cd
indicaciones. El colocar las pilas al revés puede dar
lugar a roturas o fugas en las pilas, lo que podría
producir averías, incendios o daños.
•
A la hora de almacenar las pilas o deshacerse de
ellas, aísle sus terminaciones con cinta aislante o
algún producto/objeto que evite que puedan entrar
en contacto con otras pilas u objetos metálicos..
•
A la hora de deshacerse de las pilas, siga las
instrucciones de eliminación indicadas en las propias
pilas o que estén en vigor en su ciudad.
•
Los niños pequeños pueden llegar a tragarse por
error las pilas de litio de tipo botón, lo que es muy
peligroso. Por este motivo, mantenga tanto las pilas
como el mando a distancia lejos del alcance de los
niños. En el caso de que algún niño se traque una
pila, acuda inmediatamente a un médico.
•
Nunca use tipos de pilas distintas a las indicadas.
Nunca mezcle distintos tipos de pilas ni utilice pilas
antiguas y nuevas. El hacer esto podría dar lugar a
roturas o fugas en las pilas, produciendo incendios o
daños.
•
Nunca transporte ni almacene pilas junto con
objetos metálicos pequeños. Las pilas se pueden
romper, puede haber fugas u otros problemas.
•
No caliente ni trate de desmontar las pilas. Nunca
arroje las pilas al fuego ni dentro del agua. El hacer
esto podría dar lugar a roturas o fugas en las pilas,
produciendo incendios o daños.
•
En caso de una fuga del fluido interno de la pila,
limpie los restos del mismo del compartimento de
las pilas antes de introducir una nuevas. El contacto
del fluido de la pila con los ojos puede dar lugar a
daños o pérdida de visión. Si le cae este fluido en los
ojos, lávelos inmediatamente con agua abundante.
No se frote los ojos al lavarlos. Después de lavarlos,
acuda tan pronto como pueda a un médico. El
contacto del fluido de la pila con su piel o ropas
puede dar lugar a daños o quemaduras. Al igual
que antes, lave con agua inmediatamente la zona
afectada y acuda al médico.
•
Extraiga las pilas si no piensa utilizar este aparato
durante un periodo de tiempo largo. El no hacerlo
puede producir fugas o roturas en las pilas, lo que
podría dar lugar a un incendio o daños. Si se llega a
producir una fuga del fluido interno de la pila, limpie
los restos del mismo del compartimento de las pilas
antes de introducir una nuevas.
•
Nunca trate de desmontar las pilas. El ácido que
contienen puede dañar su piel o la ropa.
8
Para los usuarios europeos
Eliminación de aparatos eléctricos y
electrónicos
(a) Nunca debe eliminar un aparato eléctrico o
electrónico junto con el resto de la basura
orgánica. Este tipo de aparatos deben ser
depositados en los “puntos limpios” creados a tal
efecto por su Ayuntamiento o por la empresa de
limpieza local.
(b) Con la correcta eliminación de los aparatos
eléctricos y electrónicos estará ayudando a ahorrar
valiosos recursos y evitará a la vez todos los efectos
negativos potenciales tanto para la salud como
para el entorno.
(c) Una eliminación incorrecta de este tipo de
aparatos junto con la basura orgánica puede
producir efectos graves en el medio ambiente y
en la salud a causa de la presencia de sustancias
potencialmente peligrosas que pueden contener.
(d) El símbolo del cubo de basura
tachado indica la obligación de
separar los aparatos eléctricos y
electrónicos del resto de basura
orgánica a la hora de eliminarlos.
(e) Los llamados “puntos limpios” de
recogida y retirada selectiva de este
tipo de productos están disponibles para cualquier
usuario final. Para más información acerca de la
eliminación de este tipo de elementos, póngase en
contacto con el departamento correspondiente de
su Ayuntamiento, empresa de limpieza o recogida
de basuras o con el comercio en el que adquirió
este aparato.
Eliminación de pilas y/o acumuladores
(a) Nunca debe eliminar pilas y/o acumuladores junto
con el resto de la basura orgánica. Este tipo de
elementos deben ser depositados en los “puntos
limpios” creados a tal efecto por su Ayuntamiento
o por la empresa de limpieza local.
(b) Con la correcta eliminación de las pilas y/o
acumuladores estará ayudando a ahorrar valiosos
recursos y evitará a la vez todos los efectos
negativos potenciales tanto para la salud como
para el entorno.
(c) Una eliminación incorrecta de las pilas y/o
acumuladores junto con la basura orgánica puede
producir efectos graves en el medio ambiente y en
la salud a causa de la presencia de sustancias
potencialmente peligrosas que pueden contener.
(d) El símbolo del cubo de basura
tachado indica la obligación de
separar las pilas y/o acumuladores
del resto de basura orgánica a la hora
de eliminarlas.
Si la batería o acumulador contiene
una cantidad superior de plomo (Pb),
mercurio (Hg) y/o cadmio (Cd) que los valores
especificados en la Directiva de pilas y baterías
(2006/66/EC), aparecerán los símbolos de estas
sustancias químicas (Pb, Hg y/o Cd) debajo del
símbolo del cubo de basura tachado.
(e) Los llamados “puntos limpios” de recogida y
retirada selectiva de las pilas y/o acumuladores
están disponibles para cualquier usuario final.
Para más información acerca de la eliminación
de pilas y/o acumuladores, póngase en contacto
con el departamento correspondiente de su
Ayuntamiento, empresa de limpieza o recogida de
basuras o con el comercio en el que las adquirió.
52
TASCAM DR-100MKIII
Page 53

Contents
Li-ion
INSTRUCCIONES IMPORTANTES DE SEGURIDAD ... 51
Elementos incluidos .......................................................... 53
Reciclaje de la pila de ion de litio ................................. 53
Extracción de la pila incluida ..............................................53
Nota acerca del Manual de referencia........................ 53
Acerca de las tarjetas SD .................................................. 54
Precauciones de uso .................................................................54
Precauciones relativas a la ubicación y uso ............. 54
Cuidado con la condensación .......................................54
Limpieza de la unidad....................................................... 54
Uso de la web global TEAC ............................................. 54
Registro del producto .......................................................54
Nombres y funciones de las partes ............................. 54
Panel superior ...............................................................................54
Panel frontal ...................................................................................54
Panel trasero ..................................................................................54
Panel lateral izquierdo .............................................................54
Panel lateral derecho ................................................................55
Panel inferior ..................................................................................55
Funciones básicas ............................................................... 55
Resumen de la pantalla inicial ............................................ 55
Procesos operativos básicos de menú .........................55
Preparativos .......................................................................... 56
Alimentación de la unidad ...................................................56
Inserción de tarjetas SD ..........................................................56
Función HOLD para evitar usos accidentales...........56
Encendido de la unidad .........................................................56
Apagado de la unidad (modo standby) ......................56
Selección del idioma ................................................................56
Ajuste de la fecha y la hora ...................................................57
Formateo (inicialización) de tarjetas SD .................... 57
Grabación .............................................................................. 57
Ajuste de los niveles de entrada .......................................57
Reproducción de grabaciones ......................................58
Supresión de ficheros .......................................................58
Conexión con un ordenador ..........................................58
Referencia rápida para usar distintas funciones .... 59
Listado de menú ................................................................. 61
Listado de funciones de menú ......................................62
Listado de mensajes ..........................................................63
Resolución de problemas ................................................64
Especificaciones técnicas ................................................ 64
General ............................................................................................. 64
Entradas y salidas ....................................................................... 64
Rendimiento audio ....................................................................65
Duración de las grabaciones (en horas: minutos)
Otros ....................................................................................................65
..65
La información que aparece sobre distintos productos
en este manual solo se incluye a modo de ejemplo
y no supone ninguna garantía de protección ante
infracciones de los derechos de propiedad intelectual
de terceros, así como otros derechos. TEAC Corporation
no asume ninguna responsabilidad por posibles
infracciones de estos derechos o cualquier tipo de
responsabilidad por el uso de este aparato.
Está prohibido el uso de productos sobre los cuales
no tenga usted los derechos legales correspondientes
a excepción de su uso para disfrute personal, salvo
que disponga de la autorización expresa y por escrito
de los propietarios legales del copyright. Utilice
siempre este aparato con cautela.
TEAC Corporation no acepta ninguna responsabilidad
por posibles infracciones de derechos realizadas
usando este aparato.
Para prevenir el improbable caso de una pérdida de
datos o daños debidos a un borrado accidental o
avería de esta unidad, le recomendamos que haga
una copia de seguridad de sus grabaciones más
importantes en un ordenador o en otro dispositivo
de almacenamiento.
Felicidades y gracias por la compra de su nueva
grabadora PCM lineal TASCAM DR-100MKIII.
Antes de empezar a usar la unidad, lea completamente
este manual para asegurarse de que comprende los
procedimientos operativos y poder sacar así el máximo
partido posible a las funciones. Esperamos que disfrute
con esta unidad durante mucho años.
Conserve este manual para cualquier referencia en
el futuro. También puede descargarse una copia en
formato digital desde nuestra página web (http://
tascam.com/).
Este producto contiene un procesador Blackfin® de
16/32 bits fabricado por Analog Devices, Inc. Este
procesador controla el proceso digital de señal de
esta unidad.
La inclusión de este procesador Blackfin® en este
aparato aumenta su rendimiento y reduce su
consumo eléctrico.
Elementos incluidos
Dentro del embalaje encontrará lo siguiente.
Tenga cuidado de no dañar estos objetos al abrir el
embalaje. Conserve el embalaje y las protecciones por
si alguna vez necesita transportar el aparato.
Póngase en contacto con el Departamento de soporte
técnico de TASCAM (vea contraportada) si echa en
falta alguno de los elementos siguientes o si observa
que alguno de ellos ha resultado dañado durante el
transporte.
•
Unidad principal ................................................× 1
•
Cable conversor de entrada digital .......× 1
•
Manual de instrucciones (este documento)
incluyendo garantía ........................................ × 1
Reciclaje de la pila de ion de litio
Esta unidad utiliza una pila de ion de litio. Le rogamos
que cuando ya no la necesite la deposite en un
contenedor para reciclaje de pilas o que la entregue en
un comercio que se ocupe de esta recogida y reciclaje.
Si tiene algún tipo de duda al respecto, póngase en
contacto con el Departamento de soporte técnico de
TASCAM (vea contraportada).
CUIDADO
Nunca desmonte este aparato a excepción de
•
cuando vaya a deshacerse finalmente de él.
Si necesita sustituir la pila recargable, póngase
•
en contacto con un Departamento de soporte
técnico de TASCAM (vea contraportada).
Extracción de la pila incluida
Antes de extraer la pila interna, deje encendida la
unidad hasta que la pila se agote completamente y la
unidad deje de funcionar.
•
Cuando vaya a descargar la pila, desconecte la
fuente de alimentación externa, extraiga las pilas
AA y ajuste a OFF el elemento AHORRO ENERG. de la
pantalla AlIM./PANTALLA.
•
Para desmontar la unidad necesitará un
destornillador de estrella o Phillips (#0).
Quite las patas de goma del panel inferior.
1.
Quite los 4 tornillos que estaban cubiertos por las
2.
patas de goma.
Retire el panel inferior.
3.
Desconecte la pila del conector y extráigala.
4.
Conector
Nota acerca del Manual de referencia
Este Manual de instrucciones le explica las funciones
principales de esta unidad. Vea el Manual de referencia
para información más detallada sobre cada función.
También puede descargarse este Manual de
instrucciones y el de referencia desde la página web
global de TEAC (http:// teac-global.com/).
TASCAM DR-100MKIII
53
Page 54

Acerca de las tarjetas SD
Esta unidad utiliza tarjetas SD para la grabación y
reproducción. Puede usar tarjetas SD con un tamaño
entre 64 MB - 2 GB, tarjetas SDHC entre 4 y 32 GB y
tarjetas SDXC entre 48 – 128 GB.
En la página web de TASCAM (http://tascam.com/)
podrá encontrar un listado con las tarjetas SD que
han sido verificadas en esta unidad. Si necesita más
información, póngase en contacto con el departamento
de soporte técnico de TASCAM.
Precauciones de uso
Las tarjetas SD son soportes delicados. De cara a evitar
daños en la tarjeta o en la ranura para las mismas, tenga
en cuenta las siguientes precauciones a la hora de usarlas.
•
No las deje en lugares extremadamente fríos o cálidos.
•
No las deje en lugares con elevados niveles de humedad
•
No permita que se mojen ni se humedezcan.
•
No coloque objetos encima de ellas ni las doble.
•
No las golpee.
•
No introduzca ni extraiga una tarjeta SD durante la
grabación, reproducción, transferencia de datos o
en cualquier otra operación en la que la unidad esté
accediendo a la tarjeta.
•
Transpórtelas siempre dentro de sus carcasas.
Precauciones relativas a la ubicación y uso
•
El rango de temperaturas seguro para el uso de este
aparato es entre 0° y 40° C (32° y 104° F).
•
Para evitar que se degrade la calidad del sonido y/o
que se produzcan averías, no instale la unidad en los
siguientes lugares.
Lugares sometidos a fuertes vibraciones o
inestables en general
Cerca de ventanas o en otras ubicaciones en las
que pueda quedar expuesto a la luz solar directa
Cerca de radiadores o en lugares excesivamente
calurosos
Lugares extremadamente fríos
Lugares con mala ventilación o muy húmedos
Lugares con mucho polvo
Lugares en los que pueda quedar expuesta a la
lluvia o al agua
•
Puede detectar zumbidos si utiliza una etapa
de potencia u otro dispositivo que tenga un
gran transformador cerca de esta unidad. En ese
caso, trate de separar estas unidades y cambie la
orientación.
•
Pueden aparecer cambios de color en la TV o ruidos
en las emisiones de radio cuando utilice estos aparatos
TASCAM DR-100MKIII
54
cerca de esta unidad. En ese caso, trate de separar al
máximo la TV/radio afectada de esta unidad.
•
Si utiliza un teléfono móvil u otro dispositivo
inalámbrico cerca de esta unidad, es posible
que escuche ruidos durante las llamadas o la
transferencia de datos. En ese caso como en los
anteriores, trate de separar al máximo los dispositivos
afectados o apáguelos.
•
De cara a conseguir una correcta disipación del calor,
no coloque nada encima de este aparato.
•
Evite instalar este aparato encima de cualquier
dispositivo eléctrico que genere calor, tal como
puede ser una etapa de potencia.
Cuidado con la condensación
Si traslada la unidad de un lugar frío a uno cálido o si
la usa después de un cambio fuerte de temperatura,
.
puede producirse condensación de agua; el vapor de
agua puede condensarse en el mecanismo interno,
haciendo que no funcione correctamente. Para evitar
esto o si se produce la condensación, deje la unidad
durante una o dos horas a la nueva temperatura
ambiente antes de usarla de nuevo.
Limpieza de la unidad
Para limpiar la unidad, utilice un trapo suave y seco. No
use gasolina, alcohol u otros productos similares ya que
podría dañar su superficie.
Uso de la web global TEAC
Desde la web global de TEAC (http://teac-global.com/)
podrá descargarse el Manual de instrucciones completo
de esta unidad.
Vaya a la web global de TEAC (http://teac-global.com/).
1.
En la sección TASCAM Downloads, haga clic en
2.
el idioma que quiera para acceder a la página de
descargas en dicho idioma.
NOTA
Si no aparece el idioma que busca, haga clic en
Other Languages.
Haga clic en el nombre de producto en la sección
3.
“Search by Model Name” para acceder a la página
de descargas de dicho producto.
Elija y descargue el Manual de instrucciones
4.
cuando lo necesite.
Registro del producto
Si usted ha adquirido este aparato en los Estados
Unidos, visite la página web de TASCAM (http://tascam.
com/) para registrarse como un usuario online.
Nombres y funciones de las partes
CUIDADO
A la hora de conectar y usar clavijas de
auriculares y otros dispositivos externos,
no aplique una fuerza excesiva sobre ellos.
En concreto, tenga cuidado de no aplicar
demasiada fuerza al usar un adaptador de
clavija standard a mini ya que podría producir
daños en el equipo.
Panel superior
1 UNI MIC L/R (micro stereo direccional interno)
2 OMNI MIC L/R (micro stereo omnidireccional
stereo)
3 Altavoz interno (mono)
4 Indicador CHG (carga)
5 Pantalla
6 Botón HOME
7 Interruptor LIMITER
8 Botón Fn
9 Botón MENU
0 Botón.
q Botón/
w Botón STOP [8]
e Botón PLAY/PAUSE [7/9]
r Selector INPUT LEVEL
t Interruptor MIC PAD
y Botón ENTER/MARK
u Rueda
i Botón REC [0] /indicador REC
Panel frontal
o Conector DIGITAL IN
p Conector EXT IN
Panel trasero
a Indicador de nivel
s Toma CTRL REMOTO
d Fijaciones para bandolera
f Tomas MIC/LINE IN L/R (XLR/TRS)
g Interruptor PHANTOM
Panel lateral izquierdo
h Botón (power)
j Puerto USB
Este es un puerto USB micro-B.
Por medio de un cable que cumpla con los standards
USB podrá conectar esta unidad a un ordenador
para usarlo como un dispositivo de almacenamiento
o podrá conectar un adaptador de corriente.
k Toma LINE OUT
Page 55

l Toma (auriculares)
; Volumen (auriculares/altavoz) LEVEL
z Interruptor HOLD
x Interruptor (altavoz)
Panel lateral derecho
c Compartimento de las pilas (pilas AA)
v Ranura para tarjeta SD
b Mando de nivel de entrada
Panel inferior
Funciones básicas
Resumen de la pantalla inicial
Parado/en reproducción
Elija un valor de ajuste.
i Estado de transporte (espera/grabación)
o Medidores de nivel
p Nombre de carpeta de grabación
4.
Use la rueda para cambiar el ajuste y pulse el
botón ENTER/MARK para confirmarlo.
a Nombre de fichero de grabación
s Tiempo de grabación/tiempo restante
d Posición de grabación
f Nivel de picos de grabación en decibelios (dB)
g Niveles de entrada
Procesos operativos básicos de menú
Abra la pantalla MENU.
1.
Pulse el botón MENU.
Elija un elemento de menú.
2.
Use la rueda para elegir el elemento y pulse el
botón ENTER/MARK para ver los ajustes.
NO TA
Pulse el botón . si quiere cancelar una
•
operación.
Pulse el botón HOME para volver a la pantalla
•
inicial.
n Casquillo para trípode (6,3 mm)
m Indicador REC
Grabación/espera de grabación
1 Fuente de entrada
2 Indicador de canal de entrada
3 Estado de filtro de corte de graves
4 Estado de alimentación fantasma
5 Estado de fuente de alimentación
6 Formato de fichero
7 Estado de bucle/velocidad de reproducción
8 Estado de transporte (parada/reproducción)
9 Indicadores de puntos IN/OUT de bucle
0 Medidores de nivel
q Nombre de carpeta de reproducción
w Nombre de fichero de reproducción
e Tiempo de reproducción/tiempo restante
r Posición de reproducción
t Valor de pico en decibelios (dB)
y Formato de grabación
u Información de función de grabación
Elija un elemento de ajuste.
3.
Use la rueda para elegir el elemento y pulse el
botón ENTER/MARK para ver sus valores.
NO TA
Si los valores de ajuste posibles son solo ON y
•
OFF podrá cambiar entre ellos sin tener que
elegirlos en una lista.
Pulse el botón . para volver a la pantalla
•
anterior.
TASCAM DR-100MKIII
55
Page 56

Preparativos
Alimentación de la unidad
8
Uso de la pila interna
Cargue la pila antes de usar esta unidad por primera vez
y cuando la haya dejado sin usar durante un periodo de
tiempo largo.
•
Carga de la pila interna
Cargue la pila interna usando un adaptador de
corriente TASCAM PS-P520E (opcional) o usando un
cable USB (tipo A Micro B) para conectar el puerto
USB de la unidad a un ordenador.
Puede seguir usando la unidad mientras la pila está
siendo cargada.
Salida de corriente
Clavija USB
Micro B
Puede comprobar el estado de recarga de la pila
interna con el color del piloto CHG (carga).
Naranja: pila en carga
Verde: pila carga
TASCAM PS-P520E (opcional)
8
Uso de unas pilas AA
Deslice hacia la parte inferior la tapa del
1.
compartimento de las pilas para abrirla.
Introduzca 2 pilas AA respetando las marcas de
2.
polaridad ¥ y ^ que verá en el compartimento.
Cierre la tapa del compartimento.
3.
•
Ajuste el tipo de pila para que aparezca indicado
el cálculo preciso de carga disponible y sepa si es
suficiente para un funcionamiento correcto. (Por
defecto, esto está ajustado a pilas alcalinas). (Vea
“Referencia rápida para usar distintas funciones” en
pág. 59).
Inserción de tarjetas SD
Abra la tapa de la ranura de tarjeta SD.
1.
Introduzca una tarjeta SD en la ranura tal como le
2.
mostramos en la siguiente ilustración y empuje
hasta que haga clic en su posición.
Cierre la tapa de la ranura de tarjeta SD.
3.
Función HOLD para evitar usos accidentales
Puede colocar el interruptor HOLD en LEVEL o ALL
para activar la función de protección que evitará usos
accidentales de este aparato.
ALL: cualquier uso del mando de nivel de entrada y
de todos los botones será ignorado
LEVEL: cualquier uso del mando de nivel de entrada
será ignorado
OFF: función de protección desactivada
Encendido de la unidad
Compruebe que el interruptor HOLD esté ajustado a
OFF y pulse el botón (power) hasta que aparezca
la siguiente pantalla..
Aparecerá la pantalla inicial después del arranque.
Apagado de la unidad (modo standby)
Pulse el botón (power) hasta que la pantalla
quede en blanco.
NO TA
No puede apagar la unidad (dejarla en standby)
•
durante la grabación o espera.
La función de ahorro de energía hará que la
•
unidad se apague cuando esté detenida durante
un tiempo determinado. (Vea “Referencia
rápida para usar distintas funciones” en pág.
59).
Selección del idioma
La primera vez que ponga en marcha la unidad
después de comprarla, aparecerá la pantalla IDIOMA. En
ella podrá elegir el idioma usado para los mensaje en
pantalla.
Pantalla LCD (pantalla IDIOMA)
Gire la rueda para desplazar el cursor y elegir el
1.
idioma.
Opciones
ENGLISH: inglés
日本語 : japonés
FRANÇAIS: francés
ESPAÑOL: español
DEUTSCH: alemán
ITALIANO: italiano
Tras realizar su elección, pulse el botón ENTER/
2.
MARK para confirmarlo.
NO TA
Puede cambiar este ajuste con el elemento
IDIOMA de la pantalla SISTEMA. (Vea “Referencia
rápida para usar distintas funciones” en pág.
59).
TASCAM DR-100MKIII
56
CUIDADO
En esta unidad puede usar tarjetas SD que
•
cumplan con los standards SD, SDHC o SDXC.
En la página web global de TEAC (http://
•
teac-global.com/) podrá encontrar un listado
con las tarjetas SD que han sido verificadas en
esta unidad.
Page 57

Ajuste de la fecha y la hora
La primera vez que ponga en marcha la unidad después
de comprarla y en cualquier momento en que la fecha y
la hora haya sido reajustada, podrá ajustar estos valores
en la pantalla FECHA/HORA que se abrirá.
Gire la rueda para desplazar el cursor al elemento
1.
a ajustar (año/mes/día/hora/minuto/segundo) y
pulse el botón ENTER/MARK.
Gire la rueda para cambiar el valor y pulse el botón
2.
ENTER/MARK.
Gire la rueda para desplazar el cursor hasta OK y
3.
pulse el botón ENTER/MARK para confirmar el
ajuste.
NO TA
También puede cambiar el ajuste de fecha y
hora desde el menú. (Vea “Referencia rápida
para usar distintas funciones” en pág. 59).
Formateo (inicialización) de tarjetas SD
Si ha introducido una tarjeta no formateada en la
unidad y la enciende, aparecerá el siguiente mensaje.
Pulse el botón ENTER/MARK para formatear la tarjeta.
CUIDADO
El proceso de formateo borrará todos los datos
existentes en la tarjeta SD.
Realice una copia de seguridad en un ordenador
de los datos existentes en la tarjeta antes de
formatearla.
NO TA
También puede usar el elemento FORMATO
SOP. de la pantalla SISTEMA para formatear
la tarjeta. (Vea “Referencia rápida para usar
distintas funciones” en pág. 59).
Grabación
Con esta unidad puede grabar audio con una calidad
aún mejor, con solo cambiar el formato de grabación
y la frecuencia de muestreo, así como ajustando sus
distintas funciones como el limitador, control de nivel
y filtro de corte de graves. Ahora vamos a explicarle la
grabación usando UNI MIC L/R (valor por defecto).
Consulte el Manual de referencia para ver explicaciones
más detalladas de estas funciones.
Active la espera de grabación.
1.
Pulse el botón REC [0] para activar la espera de
grabación. El piloto REC parpadeará.
Ajuste el nivel de entrada.
2.
Puede ajustar el nivel de entrada incluso durante la
espera y la grabación. (Vea “Ajuste de los niveles de
entrada” en pág. 57).
Ponga en marcha la grabación.
3.
Pulse el botón REC [0] durante el modo de
espera para poner en marcha la grabación. El piloto
REC dejará de parpadear y quedará iluminado fijo.
Detenga la grabación.
4.
Pulse el botón STOP [8] para detener la
grabación.
NO TA
Pulse el botón REC [0] durante la grabación
•
para activar la pausa.
Pulse de nuevo el botón REC [0] para seguir
•
con la grabación.
Ajuste de los niveles de entrada
Antes de empezar a grabar debería ajustar los niveles
de entrada a un nivel adecuado de cara a evitar
la distorsión de las señales de entrada que sean
demasiado potentes y para evitar la entrada de señales
muy débiles que queden enmascaradas por el ruido.
8
Ajuste de niveles de entrada
adecuados
Ajuste el selector INPUT LEVEL a STEREO.
Mientras controla los medidores de nivel, use el mando
de nivel de entrada para ajustar el nivel de entrada a un
valor aproximado de −12 dB.
Ajuste los niveles de forma que sean lo más altos
posibles pero sin que hagan que los pilotos PEAK
se iluminen cuando sean recibidos los sonidos más
potentes (picos de nivel).
Indicadores de nivel
Si los pilotos PEAK siguen iluminados incluso después
de reducir el nivel de entrada todo lo posible, ajuste el
interruptor MIC PAD a ON y vuelva a realizar el ajuste
de niveles.
Si los pilotos PEAK siguen iluminados incluso después
de hacer lo anterior, pruebe a separarse más de la
fuente del sonido o a cambiar el ángulo entre el
micrófono y la fuente.
TASCAM DR-100MKIII
57
Page 58

Reproducción de grabaciones
8
Inicio de reproducción
Pulse el botón PLAY/PAUSE [7/9] para poner en
marcha la reproducción.
8
Pausa de reproducción
Pulse el botón PLAY/PAUSE [7/9] o STOP [8] para
activar la pausa de la reproducción.
NO TA
Pulse de nuevo el botón PLAY/PAUSE [7/9]
para continuar con la reproducción.
8
Parada de reproducción
Pulse el botón STOP [8] con la unidad en pausa para
volver al principio del fichero.
8
Rebobinado y avance rápido
Con la pantalla inicial activa y una pista en reproducción
o parada, mantenga pulsado el botón . o / para
realizar un rebobinado o avance rápido.
Deje de pulsar el botón para detener la unidad o volver
a la reproducción de nuevo.
8
Selección de ficheros (salto)
Con la unidad parada o en reproducción, pulse el botón
. para pasar al fichero anterior, o pulse el botón
/ para pasar al siguiente fichero.
8
Escucha con el altavoz interno
Coloque el interruptor (altavoz) en ON.
8
Escucha con auriculares
Conecte unos auriculares a la toma (auriculares).
NO TA
Cuando tenga unos auriculares conectado,
el altavoz interno no emitirá ningún sonido
incluso aunque el interruptor (altavoz) esté
ajustado a ON.
8
Ajuste del volumen
Use el control LEVEL para ajustar el nivel de
volumen emitido por el altavoz interno y por los
auriculares.
Supresión de ficheros
Siga estos pasos para eliminar un fichero audio grabado.
Acceda a la pantalla FUNCION
1.
Pulse el botón Fn.
Elija la función de supresión.
2.
Use la rueda para elegir SUPR.FICHERO y pulse el
botón ENTER/MARK.
Ejecute el borrado.
3.
Use la rueda para elegir SI y pulse el botón
ENTER/MARK para eliminar el fichero y volver a la
pantalla inicial.
Para cancelar el proceso, elija NO y pulse el botón
ENTER/MARK para volver a la pantalla FUNCION.
CUIDADO
Tenga en cuenta que no puede anular el
borrado del fichero.
Conexión con un ordenador
Puede transferir ficheros audio desde la tarjeta SD de
esta unidad a un ordenador, así como también transferir
ficheros audio desde el ordenador a esta unidad.
8
Conexión con un ordenador vía USB
Conecte el cable USB.
1.
Si la unidad está apagada (standby), enciéndala.
Active la conexión
2.
Elija el elemento ALMAC.USB de la pantalla
SISTEMA y pulse el botón ENTER/MARK.
MENU
w SISTEMA w ALMAC.USB
Use la rueda para elegir SI y pulse el botón
ENTER/MARK para activar la conexión.
Para cancelar la función, elija NO y pulse el
botón ENTER/MARK.
Esta unidad aparecerá en el ordenador como un
3.
disco externo con el nombre “DR-100MKIII” (si la
tarjeta ha sido formateada en esta unidad).
8
Intercambio de ficheros con un
ordenador
Después de seguir los pasos de la sección anterior,
haga clic en la unidad “DR-100MKIII” de la pantalla del
ordenador para que aparezcan las carpetas “MUSIC” y
“UTILITY”.
Para transferir ficheros al ordenador, abra la carpeta
“MUSIC” y arrastre los ficheros que quiera hasta el
destino elegido.
Para transferir ficheros desde el ordenador, arrastre
los ficheros audio que quiera desde el ordenador a la
carpeta “MUSIC”.
8
Desconexión del ordenador
Utilice los procedimientos correctos para desinstalar
de forma segura esta unidad. Después, pulse el botón
ENTER/MARK de la unidad para volver a la pantalla
inicial.
Para más información acerca de cómo desinstalar un
dispositivo externo, vea el manual de instrucciones de
su ordenador.
TASCAM DR-100MKIII
58
Page 59

Referencia rápida para usar distintas funciones
•
Los nombres de los botones aparecerán de la siguiente forma: MENU.
•
Para las siguientes operaciones de menú asumimos que tiene la pantalla inicial activa antes de empezar. Todas las
instrucciones aparece abreviadas. Por ejemplo, "Pulse el botón MENU, elija el elemento de menú y después elija el
elemento de ajuste" aparecerá como "MENU w elemento de menú w elemento de ajuste".
•
Para ver todos los detalles de las distintas funciones, consulte el Manual de referencia.
Categoría Acción/explicación Pasos a seguir, botones a usar
Grabación
Ajustes de
entrada
Nivel de
entrada
Selección de fuentes de entrada
Elija la fuente de entrada que quiera y la que
sea más adecuada a la aplicación.
Uso de un micro condensador que requiera una
fuente de alimentación fantasma
Puede ajustar el voltaje de la alimentación
fantasma.
Uso de un pequeño micro condensador que
requiera una fuente de plug-in power
Esta unidad puede suministrar plug-in power.
Uso de micros centro-laterales (M-S)
Esta unidad puede convertir las señales de
micro stereo M-S en señales stereo normales.
Ruidos o murmullos en las inmediaciones
El filtro de corte de graves puede reducir este
tipo de ruidos.
Grabación en mono
Ajuste del nivel de entrada Mando de nivel de entrada
Si quiere ajustar los niveles de las entradas
izquierda y derecha por separado, ajuste el
selector INPUT LEVEL a L o R.
Puede usar la función de control de nivel para
ajustar de forma automática el nivel de entrada
en respuesta a la señal audio.
Grabación sin distorsión
Los medidores siguen marcando picos aunque
el mando de nivel de entrada está al mínimo.
(MIC PAD)
Evite la distorsión cuando sean recibidas
señales muy potentes. (Limitador)
Ajuste automático del nivel de grabación
como respuesta al sonido de entrada. (Modo
de nivel automático)
Reducción automática del nivel de entrada
como respuesta al nivel máximo del sonido de
entrada. (Modo de reducción de picos)
MENU w AJUSTE E/S w FUENTE
Cambie el interruptor PHANTOM a ON
MENU w AJUSTE E/S w VOL.
FANTASMA
MENU w AJUSTE E/S w PLUG IN
POWER
MENU w AJUSTE E/S w CODIF.
MS
MENU w AJUSTE E/S w CORTE
GRAVES
MENU w AJUSTES GRABACION w
TIPO FICH.
Selector INPUT LEVEL
MENU w AJUSTE E/S w CONTR.
NIVEL
Cambie el interruptor MIC PAD a ON
Cambie el interruptor LIMITER a ON
MENU w AJUSTE E/S w NIVEL
AUTO
MENU w AJUSTE E/S w REDUCC.
PICOS
Categoría Acción/explicación Pasos a seguir, botones a usar
Ajuste de la calidad audio de la grabación
MENU w AJUSTES GRABACION w
FORMATO
MENU w AJUSTES GRABACION w
FR.MUESTREO
MENU w AJUSTE E/S w FILTRO
A/D
MENU w AJUSTE E/S w ADC
DUAL
/ durante la grabación
MENU w AJUSTES GRABACION w
AUMENTO FICH.
Fn w DIVISION w DIVISION
Fn w DIVISION w DIV.EN MARCA
MENU w AJUSTES GRABACION w
GRABAC.AUTO w MODO w NIVEL
MENU w AJUSTES GRABACION w
PRE GRABAC.
MENU w AJUSTES GRABACION w
GR.DUAL w MODO w NIVEL
MENU w AJUSTES GRABACION w
GR.DUAL w MODO w FORMATO
Cambie el interruptor (altavoz) a ON
Volumen (auriculares/altavoz)
LEVEL
MENU w AJUSTE E/S w
ATENUADOR SALIDA w AURICULARES
.//
Ajustes
básicos
Grabación
Otras
funciones
Reproducción de
grabaciones
Puede ajustar la calidad audio que quiera y la
que sea más adecuada a la aplicación.
Grabación con una calidad incluso aún mayor
Cambio de la calidad audio ADC. (FILTRO A/D)
Mejora del rendimiento S/R. (ADC DOBLE)
Cambio de la ubicación de los ficheros grabados MENU w BUSQUEDA
Creación de un nuevo fichero mientras la unidad sigue grabando (aumento de fichero)
Aumento manual de ficheros
Aumento automático de fichero a intervalos
de tiempo fijos
División del fichero audio seleccionado
División manual de un fichero
(función de división de fichero)
División en todas las posiciones de marcas.
(función de división en las marcas)
Inicio automático de la grabación (función de
grabación automática)
La unidad iniciará la grabación cuando detecte
un nivel de señal de entrada.
Grabación sin perder el sonido inicial (función de
pre-grabación)
Esta unidad puede grabar hasta los dos
segundos previos a la pulsación del botón de
grabación.
Grabación de una copia de seguridad
Esta unidad puede grabar una copia del
fichero a 12 dB por debajo del nivel de
grabación establecido.
Grabación simultánea de ficheros WAV y MP3
Esta unidad puede grabar simultáneamente
ficheros WAV y MP3.
Escucha de la reproducción a través del altavoz
interno
Ajuste del volumen de auriculares/altavoz
El volumen puede variar dependido de los
auriculares que utilice.
Ajuste este valor de acuerdo al tipo de
auriculares que esté usando.
Cambio del fichero de reproducción
Elección el fichero previo o el posterior
Elección a partir de un listado MENU w BUSQUEDA
TASCAM DR-100MKIII
59
Page 60

Categoría Acción/explicación Pasos a seguir, botones a usar
Cambio de la posición de reproducción
Reproducción de
grabaciones
Ficheros
Marcas
Cambio de la posición de reproducción
durante la emisión de sonido.
Desplazamiento sin emisión de sonido. Rueda
Reproducción repetida
La unidad puede repetir la reproducción de
forma continua de un único fichero o de un
intervalo. (función de reproducción en bucle)
Cambio de velocidad de reproducción
Esta unidad puede reproducir los ficheros
lento o rápido. (función de reproducción VSA)
Almacenamiento de un fichero
Almacenamiento del fichero seleccionado Fn w CAMBIA PROTECC.
Selección de un fichero y almacenamiento
Supresión de un fichero
Supresión del fichero seleccionado Fn w SUPR.FICHERO
Selección de un fichero y supresión
Supresión simultánea de todos los ficheros
Creación de una carpeta
Supresión de una carpeta
Cambio del formato de nombre de fichero
Reinicio del número de fichero
Reinicio inmediato del número de fichero
Reinicio del número de fichero cada vez que
sea creada una nueva carpeta
Conexión a un ordenador y transferencia de
ficheros audio
Puede usar esta unidad como un dispositivo
de almacenamiento USB.
Adición manual de marcas
Puede añadir marcas manualmente durante
la grabación o reproducción (pero no con la
unidad parada).
Mantenga pulsado .//
Fn w BUCLE REPR.
Fn w REPR.VSA
MENU w BUSQUEDA w Fn w
CAMBIA PROTEC.
MENU w BUSQUEDA w Fn w
SUPR.FICHERO
MENU w BUSQUEDA w Fn w
BORRA TODOS FICH.
MENU w BUSQUEDA w NUEVA
CARPETA
MENU w BUSQUEDA w Fn w
BORRA CARPETA
MENU w SISTEMA w NOMBRE
FICH.
MENU w SISTEMA w RESET Nº
FICH w RESET
MENU w SISTEMA w RESET Nº
FICH w ON
MENU w SISTEMA w ALMAC.USB
ENTER/MARK durante la grabación o
reproducción
Categoría Acción/explicación Pasos a seguir, botones a usar
Adición automática de marcas a una grabación
Adición cuando es superado un nivel de
entrada (LEVEL).
Marcas
Ajustes
Pantalla
Sistema
Adición cuando es superado un tiempo
establecido (TIME).
Adición cuando es detectada una división
digital de pista (DIGITAL).
Adición cuando se ilumina el piloto de nivel
PEAK.
Desplazamiento a una posición de marca
Desplazamiento a una posición de marca. ENTER/MARK + .//
Selección de la marca destino del
desplazamiento.
Supresión de una marca
Con la unidad parada desplácese hasta una
marca y pulse ENTER/MARK para eliminarla.
Supresión simultánea de todas las marcas
existentes en un fichero.
Desactivación de la retroiluminación
Cambio del brillo de la pantalla
Ajuste del contraste
Desactivación de los pilotos REC y de nivel
Cambio del nivel de picos y mantenimiento
Borrado de los niveles de picos mantenidos
Esto solo será operativo cuando el modo de
la función de mantenimiento de picos esté
ajustado a HOLD.
Visualización de distintos tipos de información
Información relativa a la tarjeta SD. MENU w SISTEMA w TARJETA
Comprobación de la versión de firmware. MENU w SISTEMA w FIRMWARE
Información relativa a los ficheros.
Comprobación de los ajustes usados durante
la grabación.
Si la función de grabación de datos XRI está
ajustada a ON, los ajustes usados durante la
grabación serán almacenados con el fichero.
MENU w AJUSTE MARCAS w
MARCAS AUTO w MODO
MENU w AJUSTE MARCAS w
MARCA PICOS
MENU w AJUSTE MARCAS w
SALTA MARCA
ENTER/MARK
MENU w BUSQUEDA w Fn w
BORRA TODAS MARC.
MENU w ALIM./PANTALLA w
RETROILUM.
MENU w ALIM./PANTALLA w
BRILLO
MENU w ALIM./PANTALLA w
CONTRASTE
MENU w ALIM./PANTALLA w
INDICADORES
MENU w ALIM./PANTALLA w
NIVEL PICOS
Con la pantalla inicial activa, mantenga
pulsado Fn
MENU w SISTEMA w
INFORMACION w FICHERO
Fn w INFORM.FICHERO
Fn w INFORM.FICHERO
MENU w AJUSTES GRABACION w
XRI
TASCAM DR-100MKIII
60
Page 61

Categoría Acción/explicación Pasos a seguir, botones a usar
Cambio de la fecha y la hora MENU w SISTEMA w FECHA/HORA
Sistema
Uso
Ajustes
Aliment.
Otras
funciones
Ajuste de idioma MENU w SISTEMA w IDIOMA
Restauración de los valores de fábrica MENU w SISTEMA w INICIALIZ.
Formateo de una tarjeta SD
Evitar un uso accidental
Desactivación del mando de nivel de entrada. HOLD w LEVEL
Desactivación el mando de nivel de entrada y
todos los botones.
Uso remoto de la unidad
Ajusta el control remoto usado.
Apagado automático de la unidad (función de
ahorro de energía)
Evita que las pilas se gasten cuando no utilice
la unidad.
La unidad nunca se apagará automáticamente
durante la reproducción o grabación.
Uso de la unidad durante periodos de tiempo prolongados
Es posible usar la unidad durante un periodo
de tiempo largo usando la pila interna y las
pilas AA. Ajuste si quiere usar primero la pila
interna o las pilas AA.
Ajuste del tipo de pilas AA usadas de cara
a que la unidad indique su carga restante
correctamente.
Inicio inmediato de la grabación
Con la unidad apagada (modo standby), pulse
el botón (power) mientras mantiene
pulsado el botón REC para encender la unidad
y que comience a grabar inmediatamente.
Preparativos para la sincronización con un
fichero de vídeo
Esta unidad puede generar automáticamente
una señal de tono al iniciar y terminar las
grabaciones. SI la unidad graba esta señal de
tono y la cámara graba su sonido de salida,
será más fácil la sincronización durante la
edición del vídeo.
Envío de señales a una cámara
El nivel de la salida de línea puede ser
atenuado en 30 dB.
MENU w SISTEMA w FORMATO
SOP.
HOLD w ALL
MENU w SISTEMA w CTRL
REMOTO
MENU w ALIM./PANTALLA w
AHORRO ENERG.
MENU w ALIM./PANTALLA w
PILAS w PRIORIDAD
MENU w ALIM./PANTALLA w
PILAS w TIPO AA
Pulse (power) mientras mantiene
pulsado REC
MENU w AJUSTES GRABACION w
TONO AUTOM.
MENU w AJUSTE E/S w
ATENUADOR SALIDA w LINEA
Listado de menú
Pulse el botón MENU para acceder a la pantalla MENU.
Elemento de menú Función
BUSQUEDA
AJUSTES GRABACION
AJUSTE E/S
AJUSTE MARCAS
ALIM./PANTALLA
FORMATO
FR.MUESTREO
TIPO FICH.
XRI
GR.DUAL
AUMENTO FICH.
GRABAC.AUTO
PRE GRABAC.
TONO AUTOM.
FUENTE
FILTRO A/D
ADC DUAL
VOL.FANTASMA
PLUG IN POWER
CORTE GRAVES
CONTR.NIVEL
CODIF.MS
ATENUADOR SALIDA
MARCAS AUTO
MARCA PICOS
SALTA MARCA
AHORRO ENERG.
PILAS
RETROILUM.
BRILLO
CONTRASTE
INDICADORES
NIVEL PICOS
Gestión de los ficheros y carpetas de la tarjeta SD
Ajuste del formato del fichero de grabación
Ajuste de la frecuencia de muestreo
Ajustes de tipo de fichero
Activación/desactivación de la grabación de datos XRI
Ajuste de la función de grabación dual
Ajuste del intervalo de tiempo de grabación para el aumento
automático de fichero
Ajusta la función de grabación automática
Ajusta la función de pre-grabación
Ajusta la función de tono automático
Ajusta la fuente de entrada
Ajusta el filtro de conversión A/D
Activación/desactivación de una función que mejora el
rendimiento señal-ruido
Ajusta el voltaje de la alimentación fantasma
Activación/desactivación del plug-in power
Ajusta el filtro de corte de graves
Ajusta la función de control de nivel
Ajusta la función de descodificación centro-lateral (MS)
Ajusta la función de atenuación de salida
Ajusta la función de marcación automática
Activa/desactiva la función de marcación en los picos de nivel
Ajusta el modo de salto a las marcas
Ajusta la función de ahorro de energía
Ajustes relacionados con la pila interna y las sustituibles
Ajusta el tiempo durante el que está activa la retroiluminación
Ajusta el nivel de brillo de la retroiluminación
Ajusta el contraste
Activación/desactivación de los indicadores
Ajusta la función de mantenimiento del nivel de picos en los
medidores
TASCAM DR-100MKIII
61
Page 62

Elemento de menú Función
Visualiza distintos tipos de información.
Ajuste de la fecha y la hora
Ajuste del formato del nombre de fichero.
Reinicio del número de fichero
Ajustes para el control remoto conectado
Ajusta el idioma de comunicación en pantalla
Restauración de los valores de fábrica
Formateo de la tarjeta SD
Activa el modo de dispositivo de almacenamiento USB
SISTEMA
INFORMACION
FECHA/HORA
NOMBRE FICH.
RESET Nº FICH
CTRL REMOTO
IDIOMA
INICIALIZ.
FORMATO SOP.
ALMAC.USB
Listado de funciones de menú
•
Con la pantalla inicial activa y la unidad parada, en pausa, reproducción o espera de grabación, pulse el botón Fn
para acceder a la pantalla FUNCION.
La función que aparezca dependerá del estado de la unidad cuando pulse el botón Fn.
Elemento de menú Función
CAMBIA PROTECC.
SUPR.FICHERO
Parada, en pausa o
reproducción
Espera de grabación
•
Cuando haya seleccionado un fichero o carpeta en la pantalla BUSQUEDA, pulse el botón Fn para acceder a la
pantalla MENU CARPETA o MENU FICHERO.
Elemento de menú Función
Fichero seleccionado en
la pantalla BUSQUEDA
Fichero NO seleccionado
en la pantalla BUSQUEDA
DIVISION
BUCLE REPR.
REPR.VSA
CODIF.MS
INFORM.FICHERO
CORTE GRAVES
CONTR.NIVEL
CODIF.MS
INFORM.FICHERO
SUPR.FICHERO
CAMBIA PROTECC.
BORRA TODAS MARC.
BORRA TODOS FICH.
BORRA CARPETA
Cambia la protección del fichero seleccionado
Supresión del fichero seleccionado
División del fichero seleccionado
Ajustes de bucle de reproducción
Ajustes de reproducción VSA
Ajuste de la función de descodificación centro-lateral (MS)
Muestra información del fichero seleccionado
Ajuste del filtro de corte de graves
Ajuste de la función de control de nivel
Ajuste de la función de descodificación centro-lateral (MS)
Muestra información del fichero seleccionado
Supresión del fichero seleccionado
Cambia el estado de protección del fichero seleccionado
Elimina todas las marcas del fichero seleccionado
Elimina todos los ficheros de la carpeta seleccionada
Suprime la carpeta seleccionada
TASCAM DR-100MKIII
62
Page 63

Listado de mensajes
A continuación puede ver un listado de los mensajes que pueden aparecer en
el DR-100MKIII en determinados casos. Consulte esta lista si se encuentra con
alguno de estos mensajes para saber lo que significan y cómo actuar.
Mensaje Significado y respuesta
Interrup.ALL
HOLD activo
Interrup.LEVEL
HOLD activo
Bat.sin carga
Batería baja
Falta SD
Tarjeta protegida
Error tarjeta
Tjt a tope
Error formateo
Formatear tjt
Tjt inválida
Cambie la tjt
Error MBR tjt SD
Inicializar tjt
Error almac.
sigue grabación
Tjt muy lenta
compruebe M.BOF
El mando de nivel de entrada y todos los botones
han sido desactivados con el interruptor HOLD.
El mando de nivel de entrada ha sido desactivado
con el interruptor HOLD.
Recargue la pila interna y/o cambie las pilas
recambiables.
Introduzca una tarjeta SD.
Desbloquee la tarjeta para poder grabar o borrar
datos en ella.
La tarjeta no ha sido reconocida. Sustitúyala por
otra.
No queda suficiente espacio en la tarjeta.
El formateo de la tarjeta es anormal o la tarjeta está
dañada.
Pulse el botón ENTER/MARK para ejecutar el
formateo.
El formateo borra todos los datos existentes en la
tarjeta.
Algo parece estar mal en la tarjeta. Sustitúyala.
El formateo de la tarjeta es anormal o la tarjeta está
dañada.
Pulse el botón ENTER/MARK para ejecutar el
formateo.
El formateo borra todos los datos existentes en
la tarjeta. Si no es posible formatear la tarjeta,
sustitúyala.
Time out en la grabación en la tarjeta. Esto hace
que la señal audio se interrumpa y se produzcan
ruidos.
Será añadida una marca BOF en el punto en el que
el audio haya sido interrumpido.
El rendimiento de grabación de la tarjeta SD ha
comenzado a empeorar.
Será añadida una marca BOF en el punto en el que
el audio haya sido interrumpido debido al time out
en la tarjeta.
Compruebe la señal audio existente alrededor de la
marca BOF.
Ejecute la función de formateo completo o cambie
la tarjeta SD.
Mensaje Significado y respuesta
El fichero de sistema necesario para que la unidad
Fich sist invál.
Crear fich sist.
Sin fich sistema
Crear fich sist.
No admitido
Tope fichero
Fichero no.
Impos.borrar
Fichero protegido
Impos.dividir
Fich.muy corto
Impos.dividir
Fichero MP3
Impos.dividir
Nombre fch dupl
Impos.dividir
No hay marcas
Impos.dividir
Intervalo corto
Impos.dividir
Falta fichero
Impos.dividir
Error nombre fch
Máximo de
marcas
Impos.borrar
no está vacío
No hay datos
XRI
Fich.protegido
Impos.marcar
funcione es inválido.
Pulse el botón ENTER/MARK para crear
automáticamente un fichero de sistema.
El fichero de sistema se ha dañado. Esta unidad
requiere un fichero de sistema para funcionar.
Pulse el botón ENTER/MARK para crear
automáticamente un fichero de sistema.
Vea en el Manual de referencia los formatos de
fichero que puede usar esta unidad.
La grabación no es posible porque el número total
de carpetas y ficheros superaría el límite de 5.000.
El fichero no puede ser localizado o puede que esté
dañado. Compruebe el fichero en cuestión.
Elimine la protección del fichero antes de intentar
eliminarlo.
El fichero es demasiado corto, por lo que no puede
ser dividido.
Los ficheros MP3 no pueden ser divididos.
La función DIVISION haría que el nombre del fichero
fuese el mismo que el de uno ya existente en la
misma carpeta.
Use un ordenador para cambiar el nombre del
fichero.
Los ficheros que no contengan marcas no pueden
ser divididos usando esta función.
La división por marcas no funcionará cuando
el intervalo entre las marcas sea inferior a dos
segundos.
No hay ningún fichero audio.
La función DIVISION haría que el nombre del fichero
sobrepasase los 200 caracteres.
Use un ordenador para cambiar el nombre del
fichero.
El número de marcas ha llegado al máximo de 99.
No puede eliminar una carpeta que contiene
ficheros. Elimine primero todos los ficheros de la
carpeta y vuelva a intentarlo.
No hay ningún dato XRI almacenado en el fichero.
Active la función de grabación de datos XRI antes
de iniciar la grabación.
No pueden ser almacenados datos XRI al grabar
ficheros MP3.
No pueden ser añadidas marcas porque el fichero
está protegido contra la grabación.
Si quiere añadir marcas al fichero, primero elimine la
protección.
Mensaje Significado y respuesta
Fichero corto
Impos.marcar
Desincronizac.
entrada dig.
Sincronización
entrada dig.
Desajuste
muestreo dig.
Intervalo puntos E/
S muy corto
Recalentamiento
Conecte alim. USB
Recalentamiento
Si aparece cualquier otro tipo de error, apague la unidad y vuelva a encenderla.
No pueden ser añadidas marcas porque el fichero
es demasiado corto.
No hay nada conectado a la toma de entrada digital
(DIGITAL IN) o las señales no están siendo recibidas
correctamente.
Compruebe la conexión digital.
La entrada digital ha sido detectada correctamente.
La frecuencia de muestreo de la entrada digital no
coincide con el ajuste de grabación.
Los puntos IN y OUT están demasiado cerca.
Ajústelos con al menos una separación de 1
segundo entre ellos.
La temperatura del interior del aparato se ha
elevado mucho mientras usa la unidad con la pila
interna y/o pilas AA.
Puede seguir usando la unidad pero con
alimentación vía USB.
La temperatura del interior del aparato se ha
elevado mucho.
La unidad se apagará automáticamente.
TASCAM DR-100MKIII
63
Page 64

Resolución de problemas
Si observa algún problema al utilizar esta unidad, pruebe estos consejos
antes de llevar el aparato al servicio técnico. Si estas medidas no solucionan el
problema, póngase en contacto con el comercio en el que adquirió la unidad
o con el servicio técnico TEAC más cercano (vea contraportada).
8
La unidad no se enciende.
•
Confirme que la pila interna está suficientemente cargada y que ha
instalado correctamente las pilas recambiables.
•
Confirme que el adaptador (TASCAM PS-P520: opcional) está conectado
firmemente a la toma USB de la unidad y a la salida de corriente. Esta
unidad no funcionará correctamente conectada a través de un hub USB.
•
Confirme que el interruptor HOLD esté ajustado a la posición OFF.
8
La unidad se apaga automáticamente.
•
Confirme que está desactivada la función de ahorro de energía.
Dado que esta unidad cumple con las Normas europeas de ahorro de
i
energía (ErP), la función de ahorro de energía se activa tanto si la unidad
está funcionando conectada a un adaptador como si la usa a pilas. Si no
quiere usar esta función de ahorro de energía, ajústela a OFF (El valor de
fábrica es 30min).
8
El piloto CHG se ilumina de forma alternativa en color
naranja y verde.
•
No será posible una carga adecuada en lugares demasiado calientes o fríos.
El rango seguro de carga es con temperaturas entre 0−30° C.
8
La carga restante de la pila interna no es visualizada
correctamente
•
Esto puede ocurrir justo después de comprar la unidad. Descargue
totalmente y vuelva a cargar por completo la pila para que la unidad
detecte correctamente su carga.
8
La unidad no funciona.
•
Confirme que el interruptor HOLD esté ajustado a la posición OFF.
•
La unidad no funcionará cuando esté en el modo de almacenamiento USB.
•
Si la unidad empieza a funcionar de forma anormal, mantenga pulsado el
botón (power) durante al menos 10 segundos mientras mantiene
pulsado el botón STOP [8]. Esto forzará a que la unidad se apague.
8
La tarjeta SD no es reconocida.
•
Compruebe que la tarjeta SD esté totalmente introducida.
8
No hay salida de sonido.
•
Compruebe el nivel de salida de auriculares/altavoz de la unidad.
•
Compruebe las conexiones con el sistema de monitorización y su nivel de
volumen.
•
En los casos siguientes, no será emitido sonido por el altavoz.
Cuando el interruptor (altavoz) esté ajustado a OFF
i
Durante la grabación o espera de grabación
i
Si tiene unos auriculares conectados
i
8
No es posible la grabación.
•
Compruebe que queda suficientemente espacio libre en la tarjeta SD.
•
No será posible seguir grabando cuando el número total de ficheros llegue
al límite de 5.000.
8
El sonido de entrada es extremadamente silencioso o
demasiado potente.
•
Compruebe los ajustes de nivel de entrada.
•
Compruebe los niveles de salida de los dispositivos externos que tenga
conectados.
8
La reproducción suena artificial.
•
Compruebe que no ha sido modificada la velocidad de reproducción
(función de reproducción VSA).
•
Compruebe que no ha activado la función de control de nivel.
8
No puedo borrar un fichero.
•
No podrá borrar un fichero protegido (solo de lectura).
8
Esta unidad no aparece en el ordenador.
•
Confirme que la unidad esté correctamente conectada al ordenador
a través de su puerto USB. Esta unidad no funcionará correctamente
conectada a través de un hub USB.
•
Compruebe que la unidad esté en el modo de almacenamiento USB.
8
Ha configurado por accidente otro idioma para la
unidad.
•
Después de pulsar el botón (power) para apagar la unidad, pulse el
botón (power) mientras mantiene pulsado el botón MENU.
Aparecerá entonces de nuevo la pantalla de selección de idioma y podrá
elegir correctamente el idioma que quiera.
Especificaciones técnicas
General
8
Soportes de grabación
Tarjeta SD (64 MB−2 GB)
Tarjeta SDHC (4 GB−32 GB)
Tarjeta SDXC (48 GB−128GB)
8
Formato de grabación/reproducción
WAV (BWF):
MP3: 44.1/48 kHz, 128/192/256/320 kbps
8
Número de canales
2 canales (stereo)
Entradas y salidas
8
Tomas MIC/LINE IN (XLR admiten alimentación
fantasma)
Conectores: XLR-3-31, TRS standard de 6.3 mm (1/4")
8
Toma EXT IN (puede ofrecer plug-in power)
Conector: conector mini stereo de 3.5 mm (1/8”)
8
Toma DIGITAL IN
Conector: TRS de 3.5 mm (1/8”)
8
Toma LINE OUT
Conector: conector mini stereo de 3.5 mm (1/8”)
8
Toma (auriculares)
Conector: conector mini stereo de 3.5 mm (1/8”)
8
Altavoz interno
0.5 W (mono)
8
Puerto USB
Tipo de conector: Micro-B
Formato: USB 2.0 HIGH SPEED mass storage class
8
Toma CTRL REMOTO
Conector: TRS de 2.5 mm (3/32”)
44.1/48/88.2/96/176.4/192 kHz, 16/24 bits
TASCAM DR-100MKIII
64
Page 65

Rendimiento audio
8
Respuesta de frecuencia
MIC/LINE IN (MIC, PAD activo) a LINE OUT
MIC/LINE IN (LINE) a LINE OUT
EXT IN (MIC, PAD activo) a LINE OUT
EXT IN (LINE) a LINE OUT
20 Hz−20 kHz +0.5/−1 dB (44.1/48 kHz frec. muestreo, JEITA)
20 Hz−40 kHz +0.5/−2 dB (88.2/96 kHz frec. muestreo, JEITA)
20 Hz−80 kHz +0.5/−4 dB (176.4/192 kHz frec. muestreo, JEITA)
8
Distorsión
MIC/LINE IN (MIC, PAD activo) a LINE OUT
MIC/LINE IN (LINE, +20 dBu entrada) a LINE OUT
EXT IN (MIC, PAD activo) a LINE OUT
EXT IN (LINE) a LINE OUT
0.007% o inferior
(44.1/48/88.2/96/176.4/192 kHz frec. muestreo, JEITA)
8
Relación señal-ruido
MIC/LINE IN (MIC, PAD activo) a LINE OUT
MIC/LINE IN (LINE) a LINE OUT
EXT IN (MIC, PAD activo) a LINE OUT
EXT IN (LINE) a LINE OUT
102 dB o superior
(44.1/48/88.2/96/176.4/192 kHz frec. muestreo, JEITA)
8
Ruido de entrada equivalente (EIN)
124 dBu o inferior
Nota: de acuerdo a JEITA CP-2150
Duración de las grabaciones (en horas: minutos)
Formato fichero (ajuste de grabación) Tarjeta SDHC 4 GB
320 kbps MP3 (stereo)
16 bits WAV (stereo) 6:17
24 bits WAV (stereo) 96kHz 1:55
24 bits WAV (stereo) 192kHz 00:57
•
Los tiempos de grabación mostrados aquí son estimaciones. Pueden variar
dependiendo de la tarjeta SD/SDHC/SDXC concreta que esté usando.
•
Los tiempos de grabación anteriores no son tiempos de grabación
continuos, sino los tiempos de grabación totales posibles para la tarjeta SD/
SDHC/SDXC.
•
En las grabaciones en mono, los tiempos de grabación máximos serán
aproximadamente el doble de los indicados en la tabla.
•
Si usa la grabación dual, los tiempos de grabación máximos serán
aproximadamente de la mitad de los indicados arriba.
44.1 kHz
27:46
Otros
8
Alimentación
Pila recargable de ion de litio interna
2 pilas AA (alcalina, NiMH o ion de litio)
Alimentación por bus USB desde un ordenador
Adaptador de corriente (TASCAM PS-P520E, opcional)
Pack de batería externo (TASCAM BP-6AA, opcional)
8
Consumo
7.5 W (máximo)
8
Duración de la batería (funcionamiento continuo)
•
Pila interna (recargable, ion de litio)
Condiciones de uso Tiempo
Entrada UNI MIC (micro direccional interno)
Alimentación fantasma no usada
STEREO WAV (BWF)/44.1 kHz
Grabación a 16 bits
Entrada toma/micro MIC/LINE IN
Alimentación fantasma usada (+48V, 3mA×2 carga)
STEREO WAV (BWF)/44.1 kHz
Grabación a 16 bits
•
Pilas alcalinas (EVOLTA)
Condiciones de uso Tiempo
Entrada UNI MIC (micro direccional interno)
Alimentación fantasma no usada
STEREO WAV (BWF)/44.1 kHz
Grabación a 16 bits
Entrada toma/micro MIC/LINE IN
Alimentación fantasma usada (+48V, 3mA×2 carga)
STEREO WAV (BWF)/44.1 kHz
Grabación a 16 bits
•
Pilas NiMH (eneloop)
Condiciones de uso Tiempo
Entrada UNI MIC (micro direccional interno)
Alimentación fantasma no usada
STEREO WAV (BWF)/44.1 kHz
Grabación a 16 bits
Entrada toma/micro MIC/LINE IN
Alimentación fantasma usada (+48V, 3mA×2 carga)
STEREO WAV (BWF)/44.1 kHz
Grabación a 16 bits
Aprox. 12 horas
Aprox. 6 horas
Aprox. 2 horas
Aprox. 1 horas
Aprox. 3 horas
Aprox. 2 horas
45 minutos
30 minutos
15 minutos
•
Pilas de ion de litio (Energizer Ultimate Lithium)
Condiciones de uso Tiempo
Entrada UNI MIC (micro direccional interno)
Alimentación fantasma no usada
STEREO WAV (BWF)/44.1 kHz
Grabación a 16 bits
Entrada toma/micro MIC/LINE IN
Alimentación fantasma usada (+48V, 3mA×2 carga)
STEREO WAV (BWF)/44.1 kHz
Grabación a 16 bits
NO TA
Cuando use la alimentación fantasma, el tiempo de funcionamiento
es posible que se reduzca algo con respecto a estos datos
dependiendo del micro que esté usando.
8
Tiempo de recarga (con la unidad apagada)
•
Vía USB: unas 10 horas
•
Usando el PS-P520E: unas 4 horas 30 minutos
8
Dimensiones
80 x 155.7 x 35 mm (longitud × altura × profundidad, excluyendo salientes)
8
Peso
425 g/375 g (incluyendo pilas/excluyendo pilas)
8
Rango de temperaturas de funcionamiento
0°–40° C (32°–104° F)
•
Las ilustraciones y otras imágenes mostradas aquí pueden variar con
respecto a las del aparato real.
•
De cara a mejoras en el producto, tanto las especificaciones como el
aspecto exterior están sujetos a cambios sin previo aviso.
•
En el Manual de referencia encontrará más detalles sobre las
especificaciones técnicas.
Aprox. 7 horas
Aprox. 3 horas
30 minutos
TASCAM DR-100MKIII
65
Page 66

TASCAM DR-100MKIII
66
Page 67

Manuale di istruzioni
IMPORTANTI NORME DI
SICUREZZA
For U.S.A.
INFORMATION TO THE USER
This equipment has been tested and found to
comply with the limits for a Class B digital device,
pursuant to Part 15 of the FCC Rules. These limits are
designed to provide reasonable protection against
harmful interference in a residential installation. This
equipment generates, uses, and can radiate radio
frequency energy and, if not installed and used in
accordance with the instruction manual, may cause
harmful interference to radio communications.
However, there is no guarantee that interference will
not occur in a particular installation. If this equipment
does cause harmful interference to radio or television
reception, which can be determined by turning the
equipment off and on, the user is encouraged to try
to correct the interference by one or more of the
following measures.
a) Reorient or relocate the receiving antenna.
b) Increase the separation between the equipment
and receiver.
c) Connect the equipment into an outlet on a circuit
different from that to which the receiver is connected.
d) Consult the dealer or an experienced radio/TV
technician for help.
CAUTION
Changes or modifications to this equipment not
expressly approved by TEAC CORPORATION for
compliance could void the user’s authority to operate
this equipment.
For Canada
THIS CLASS B DIGITAL APPARATUS COMPLIES WITH
CANADIAN ICES-003.
CET APPAREIL NUMERIQUE DE LA CLASSE B EST
CONFORME A LA NORME NMB-003 DU CANADA.
Questo prodotto è conforme con la
richiesta di direttive europee e gli altri
regolamenti della commissione.
Dichiarazione di conformità
Parte responsabile: TEAC AMERICA, INC.
Indirizzo: 1834 Gage Road, Montebello,
California, U.S.A.
Numero di telefono: 1-323-726-0303
Questo dispositivo è conforme alla Parte 15 delle
norme FCC. Il funzionamento è soggetto alle seguenti
due condizioni: (1) questo dispositivo può non
causare interferenze dannose e (2) questo dispositivo
deve accettare qualsiasi interferenza ricevuta, incluse
le interferenze che potrebbero comprometterne il
funzionamento.
IMPORTANTI ISTRUZIONI DI SICUREZZA
1 Leggere le seguenti istruzioni.
2 Conservare queste istruzioni.
3 Prestare attenzione agli avvertimenti.
4 Seguire tutte le istruzioni.
5 Non usare l’apparecchio vicino all’acqua.
6 Pulire solo con un panno asciutto.
7 Non bloccare le aperture per la ventilazione.
Installare secondo le istruzioni del costruttore.
8 Non installare l’apparecchio vicino a fonti di calore
come radiatori, regolatori di calore, stufe o altri
apparecchi che producono calore (inclusi gli
amplificatori).
9 Non eliminare la spina polarizzata di sicurezza o la
spina di messa a terra. La spina polarizzata ha due
lame, una più larga dell’altra. Una spina di messa
a terra ha due lame e una terza punta di messa
terra. La lama larga o la terza punta sono fornite
per la vostra sicurezza. Se la spina fornita non è
adatta al tipo di presa, consultate un elettricista per
sostituire la presa obsoleta.
10 Non calpestare o strattonare il cordone di alimen-
tazione, in modo particolare vicino alla spina e alla
presa a cui è collegato l’apparecchio e dal punto in
cui esce dall’apparecchio.
11 Usare solamente attacchi/accessori specificati dal
costruttore.
12 Usare solo un carrello, un treppiede o una tavola
specificata dal costruttore o venduto insieme
all’apparecchio. Quando viene usato un carrello,
prestare attenzione quando si sposta la combinazione carrello/apparato per evitare cadute da
sopra.
13 Scollegare questo apparato durante temporali o
quando non viene utilizzato per lunghi periodi di
tempo.
14 Rivolgersi solo a personale
qualificato. La riparazione è
richiesta quando l’apparecchio è stato danneggiato
in qualunque modo, come
nel caso che il cordone
dell’alimentazione o la spina siano stati danneggiati, l’apparecchio sia stato esposto a pioggia o
umidità, non funzioni correttamente o sia stato
lasciato cadere.
•
Questo apparecchio porta corrente elettrica non
operativa dalla presa di rete mentre il suo interruttore
POWER o STANDBY/ON non è in posizione ON.
•
La presa di rete è utilizzata come dispositivo di
sconnessione, il dispositivo di sconnessione deve
restare sempre operativo
•
Si deve usare cautela quando si usano gli auricolari
o le cuffie con il prodotto, perché un eccesso di
pressione sonora (volume) negli auricolari o nelle
cuffie può causare la perdita dell’udito.
•
Se si verificano problemi con questo prodotto,
contattare TEAC per una riparazione. Non utilizzare il
prodotto fino a quando non è stato riparato.
CAUTELA
•
Non esporre questo apparecchio a gocciolamenti o
schizzi.
•
Non appoggiare alcun contenitore o vaso pieno
d’acqua sopra l’apparecchio.
•
Non installare questo apparecchio in spazi ristretti
come una libreria o ambienti simili.
•
Questo apparecchio dovrebbe essere collocato
sufficientemente vicino alla presa AC in modo da
poter facilmente afferrare la spina del cordone di
alimentazione in qualsiasi momento.
•
Se il prodotto utilizza batterie (incluso un pacco
batterie o batterie installate), non dovrebbero essere
esposte alla luce solare, fuoco o calore eccessivo.
•
CAUTELA per i prodotti che utilizzano batterie al litio
sostituibili: vi è pericolo di esplosione se la batteria
viene sostituita con una di tipo scorretto. Sostituire
solo con tipo uguale o equivalente..
Cautela nell'uso delle batterie ricaricabili
Questo prodotto utilizza batterie ricaricabili. L’uso
improprio delle batterie potrebbe causare perdite,
rotture o altri problemi. Seguire sempre le seguenti
precauzioni quando si usano le batterie.
•
Se una batteria ricaricabile ha perdite, non toccare
il liquido con le mani nude. Si prega di consultare
TEAC Corporation se si verifica una perdita di liquido
dalla batteria.
•
Il liquido della batteria in un occhio potrebbe
causare la perdita della vista. Se il liquido entra in un
occhio, lavare l’occhio immediatamente con acqua
pulita. Non strofinare gli occhi quando si lavano.
Consultare un medico subito dopo il lavaggio. Il
liquido della batteria sul corpo o sui vestiti può
causare lesioni o ustioni sulla pelle. Lavare con acqua
pulita immediatamente e poi consultare un medico.
•
Non utilizzare un adattatore AC diverso il modello
designato per l’uso con questa unità. Usare sempre
l’adattatore AC designato quando si utilizza l’unità
o la ricarica della batteria con una sorgente di
alimentazione AC. L’utilizzo di un adattatore AC
diverso da quello designato potrebbe portare a
surriscaldamento e causare lesioni, ustioni, incendi o
macchie, così come rotture della batteria e perdita di
liquido dalla batteria.
•
Non mettere la batteria nel fuoco o lasciare o
ricaricare la batteria vicino al fuoco, sotto il sole o in
altre condizioni di caldo.
•
Non smontare una batteria. Ciò potrebbe provocare
scosse elettriche. Si prega di contattare il negozio
dove è stato acquistato il prodotto o TEAC
Corporation se si vuole ispezionare una batteria o
ripararla. Quando si vuole smaltire il prodotto, si
prega di seguire le istruzioni nel manuale di istruzioni
per rimuovere le batterie e riciclare l’apparecchiatura
in modo corretto.
CAUTELA NELL’USO DELLE BATTERIE
Questo prodotto utilizza batterie. L’uso non corretto
delle batterie potrebbe causare perdite di liquido,
rotture o altri problemi. Seguire sempre le seguenti
precauzioni quando si usano batterie.
•
Mai ricaricare batterie non ricaricabili. Le batterie
potrebbero rompersi o perdere liquido, causando
esplosioni e danni.
•
Quando si installano le batterie, fare attenzione alla
polarità più/meno (+/–) e installarle correttamente
nel vano delle batterie come indicato. Inserendole
al contrario potrebbero rompersi o perdere liquido,
causando esplosioni, lesioni o macchie attorno.
•
Quando si conservano o si smaltiscono le batterie
usate, isolare i terminali con nastro adesivo o affine
per prevenire che vengano a contatto con altre
batterie o parti metalliche.
•
Quando si smaltiscono le batterie usate, seguire le
istruzioni indicate sulle batterie e le locali disposizioni
di legge sul loro smaltimento.
•
Non usare batterie diverse da quelle specificate.
Non mettere assieme batterie vecchie e nuove o tipi
differenti di batterie. Le batterie potrebbero rompersi
o perdere liquido, causando esplosioni, lesioni o
macchie attorno.
•
Non trasportare o conservare le batterie assieme
a piccoli oggetti metallici. Le batterie potrebbe
andare in corto, causando perdite, esplosioni e altri
problemi.
TASCAM DR-100MKIII
67
Page 68

•
Pb, Hg, Cd
Non riscaldare o smontare le batterie. Non gettarle
nel fuoco o nell’acqua. Le batterie potrebbero
rompersi o perdere liquido, causando esplosioni,
lesioni o macchie attorno.
•
Se il liquido della pila fuoriesce, pulire bene il vano
delle batterie prime di inserire quelle nuove. Se
il liquido della pila penetra negli occhi, potrebbe
causare la perdita della vista. Se il liquido della
pila penetra negli occhi, sciacquare subito con
abbondante acqua pulita senza strofinare l’occhio e
consultare immediatamente un medico.
•
L’unità dovrebbe essere spenta quando si inseriscono
e sostituiscono le batterie.
•
Rimuovere le batterie se non si prevede di utilizzare
l’unità per un lungo periodo di tempo. Le batterie
potrebbero rompersi o perdere liquido, causando
esplosioni, lesioni o macchie. Se il liquido delle
batterie fuoriesce, rimuovere il fluido sul vano
batteria prima di inserire nuove batterie.
•
Non smontare una batteria. L’acido all’interno della
batteria potrebbe danneggiare la pelle o gli abiti.
8
Per gli utenti europei
Smaltimento di apparecchiature
elettriche ed elettroniche
(a) Tutte le apparecchiature elettriche ed elettroniche
devono essere smaltite separatamente dai rifiuti
urbani mediante impianti di raccolta specifici
designati dal governo o dalle autorità locali.
(b) Lo smaltimento in modo corretto delle apparec-
chiature elettriche ed elettroniche contribuisce a
risparmiare preziose risorse ed evitare potenziali
effetti negativi sulla salute umana e l’ambiente.
(c) Lo smaltimento non corretto di apparecchiature
può avere gravi conseguenze sull’ambiente e
sulla salute umana come risultato della presenza
di sostanze pericolose nelle apparecchiature
elettriche ed elettroniche.
(d) Il simbolo barrato della pattumiera
indica che le apparecchiature elettriche
ed elettroniche devono essere raccolte
e smaltite separatamente dai rifiuti
domestici.
(e) I sistemi di raccolta sono a disposizione
degli utenti finali. Per informazioni più dettagliate
sullo smaltimento delle vecchie apparecchiature
elettriche ed elettroniche, contattare il comune, il
servizio di smaltimento rifiuti o il negozio dove è
stato acquistato l’apparecchio.
Smaltimento di batterie e/o
accumulatori
(a) I rifiuti di batterie e/o accumulatori devono essere
smaltiti separatamente dai rifiuti urbani mediante
impianti di raccolta designati dalle autorità statali o
locali.
(b) Lo smaltimento corretto dei rifiuti di batterie e/o
accumulatori contribuisce a risparmiare preziose
risorse ed evitare potenziali effetti negativi sulla
salute umana e l’ambiente.
(c) Lo smaltimento improprio dei rifiuti di batterie
e/o accumulatori può avere gravi conseguenze
sull’ambiente e sulla salute umana a causa della
presenza di sostanze pericolose in essi.
(d) Il simbolo RAEE, che mostra un bidone della
spazzatura sbarrato, indica che le batterie e/o
accumulatori devono essere raccolti e smaltiti
separatamente dai rifiuti domestici.
Se una batteria o accumulatore
contiene più i valori specificati di
piombo (Pb), mercurio (Hg), e/o di
cadmio (Cd) come definito nella
direttiva sulle batterie (2006/66/CE),
i simboli chimici di questi elementi
saranno indicati sotto il simbolo RAEE.
(e) Centri di raccolta sono disponibili per gli utenti
finali. Per informazioni più dettagliate circa lo
smaltimento dei rifiuti di batterie e/o accumulatori, si prega di contattare il comune, il servizio
di smaltimento rifiuti o il negozio dove sono stati
acquistati.
TASCAM DR-100MKIII
68
Page 69

Indice dei contenuti
Li-ion
IMPORTANTI ISTRUZIONI DI SICUREZZA......................67
Accessori inclusi ...........................................................................69
Riciclaggio delle batterie ricaricabili agli ioni di litio
Rimozione della batteria integrata ..................................69
Nota sul manuale di riferimento .......................................69
A proposito di card SD .............................................................70
Precauzioni per l’uso .................................................................70
Precauzioni per il posizionamento e l’uso .................. 70
Attenzione alla condensa ......................................................70
Pulizia dell’unità ...........................................................................70
Uso del sito TEAC Global Site ..............................................70
Registrazione utente ................................................................70
Nomi delle parti ...........................................................................70
Pannello superiore .....................................................................70
Pannello frontale .........................................................................70
Pannello posteriore ...................................................................70
Lato sinistro ..................................................................................... 70
Lato destro ...................................................................................... 71
Fondo .................................................................................................71
Funzioni di base ...........................................................................71
Panoramica della schermata principale ...................... 71
Procedure operative di base dei menu ........................71
Preparativi ........................................................................................72
Accendere l’unità ........................................................................72
Inserimento di card SD ............................................................72
Funzione HOLD per impedire l’azionamento accidentale
Accensione dell’unità ...............................................................72
Spegnimento dell’unità (metterla in standby) ........72
Selezione della lingua ..............................................................72
Impostare la data e l’ora .........................................................73
Formattazione (inizializzazione) della card SD ........73
Registrazione .................................................................................73
Regolazione dei livelli di ingresso ....................................73
Riproduzione delle registrazioni .......................................74
Eliminazione di file ..................................................................... 74
Collegamento a un computer ............................................74
Guida rapida all’utilizzo di varie funzioni .................... 75
Elenco dei menu .........................................................................77
Lista delle funzioni del menu..............................................78
Elenco dei messaggi .................................................................79
Risoluzione dei problemi .......................................................80
Specifiche ........................................................................................80
Generali .............................................................................................80
Ingressi e uscite ............................................................................80
Prestazioni audio ......................................................................... 81
Tempi di registrazione (in ore: minuti) ..........................81
Altro .....................................................................................................81
..69
..72
Le informazioni sui prodotti in questo manuale sono
fornite al solo scopo esemplificativo e non indicano
alcuna garanzia contro le violazioni dei diritti di
proprietà intellettuale di terze parti e di altri diritti
connessi. TEAC Corporation non si assume alcuna
responsabilità per le violazioni sui diritti di proprietà
intellettuale di terzi o altre passività che si verificano a
seguito dell’uso di questo prodotto.
Le proprietà protette da copyright da parte di terzi
non possono essere usate per scopi diversi dall’utilizzo personale e simili, senza il permesso dei titolari
dei diritti riconosciuti dalla legge sul copyright. Usare
sempre questo apparecchio in conformità.
TEAC Corporation non si assume alcuna responsabilità per le violazioni dei diritti commessi da utenti di
questo prodotto.
In considerazione della remota possibilità che i dati
possano andare persi o venire danneggiati a causa
di cancellazioni accidentali o malfunzionamento di
questa unità, si consiglia vivamente di eseguire il
backup delle registrazioni importanti su un computer
o un altro dispositivo di memorizzazione.
Grazie per aver acquistato il registratore PCM lineare
TASCAM DR-100MKIII.
Prima di usare questa unità, leggere attentamente questo
manuale per usarlo correttamente e goderne per molti
anni. Dopo aver terminato la lettura di questo manuale,
si prega di conservarlo in un luogo sicuro per future
consultazioni.
È possibile scaricare questo manuale dal sito TEAC Global
Site
(http://teac-global.com/).
Questo prodotto ha un processore Blackfin® 16/32
bit realizzato da Analog Devices, Inc. Questo è un
processore di segnale digitale (DSP).
L’inclusione di questo processore Blackfin® nel
prodotto aumenta le prestazioni e riduce il consumo
di energia.
Accessori inclusi
Questo prodotto include i seguenti articoli.
Conservare i materiali di imballaggio per il trasporto in
futuro.
Si prega di contattare l’assistenza clienti TASCAM (vedi
retro copertina) se uno di questi articoli manca o è stato
danneggiato durante il trasporto.
•
Unità principale ................................................. × 1
•
Cavo di conversione Ingresso digitale .× 1
•
Manuale di istruzioni (questo documento) compresa
la garanzia ............................................................. × 1
Riciclaggio delle batterie
ricaricabili agli ioni di litio
Questa unità utilizza una batteria agli ioni di litio ricaricabile incorporata.
Al termine di utilizzo della batteria, portarla in un
negozio che effettua il riciclaggio ricaricabile delle
batterie invece di buttarla via, al fine di preservare
risorse preziose. In caso di dubbi, si prega di contattare
l’assistenza clienti TASCAM (vedi retro di copertina).
CAUTELA
Non smontare il prodotto se non quando lo si
•
prepara per lo smaltimento.
Contattare un centro di assistenza TEAC (vedi
•
retro di copertina) per la sostituzione della
batteria ricaricabile.
Rimozione della batteria integrata
Prima di rimuovere la batteria integrata, accendere
l’unità e scaricare la batteria fino a quando l’unità si
arresta completamente.
•
Quando si scarica la batteria incorporata, scollegare
l’alimentatore esterno, rimuovere le batterie AA e
impostare la voce RISP.ENERG. della schermata
ALIM/DISPLAY su SPENTO.
•
Per smontare questa unità, è necessario usare un
cacciavite a croce (#0).
Rimuovere i piedini in gomma sul fondo dell’unità.
1.
Rimuovere le 4 viti sotto ai piedini in gomma.
2.
Rimuovere il pannello inferiore.
3.
Scollegare la batteria dal connettore e rimuoverla.
4.
Connettore
Nota sul manuale di riferimento
Questo manuale illustra le principali funzioni di questa
unità. Si prega di consultare il manuale di riferimento
per informazioni su tutte le funzioni dell’unità.
È possibile scaricare il manuale di istruzioni e il
manuale di riferimento dal sito TEAC Global Site (http://
teac-global.com/).
TASCAM DR-100MKIII
69
Page 70

A proposito di card SD
Questa unità usa card SD per la registrazione e la riproduzione.
È possibile utilizzare SD da 64MB–2GB, SDHC da 4–32GB
e SDXC da 48–128GB.
Una lista di card SD testate per l’uso con questa unità
può essere trovata sul sito TEAC globale (http://
teac-global.com/). È inoltre possibile contattare l’assistenza clienti TASCAM per informazioni.
Precauzioni per l’uso
Le card SD sono supporti delicati. Al fine di evitare di
danneggiarle, si prega di osservare le seguenti precauzioni quando le si maneggiano.
•
Non lasciarle in luoghi estremamente caldi o freddi.
•
Non lasciarle in luoghi estremamente umidi.
•
Non lasciare che si bagnino.
•
Non mettere cose su di esse o torcerle.
•
Non colpirle.
•
Non rimuoverle o inserirle durante la registrazione, la
riproduzione, la trasmissione dei dati o altro accesso
alla card SD.
•
Durante il trasporto, metterle nella custodia.
Precauzioni per il posizionamento e l’uso
•
Il range di temperatura ambiente di questa unità è
0-40 °C.
•
Non installare questa unità nei seguenti luoghi. Ciò
potrebbe degradare la qualità del suono e/o causare
malfunzionamenti.
Luoghi con forti vibrazioni
In prossimità di finestre o altri luoghi esposti alla
luce diretta del sole
Nei pressi di caloriferi o altri luoghi estrema-
mente caldi
Luoghi estremamente freddi
Luoghi con cattiva ventilazione o alta umidità
Luoghi molto polverosi
Luoghi esposti alla pioggia o acqua
•
Se l’unità è installata in prossimità di un amplificatore
di potenza o altro dispositivo con un grande
trasformatore, potrebbe produrre ronzio. Se ciò si
verifica, aumentare la distanza tra l’unità e l’altro
dispositivo.
•
Questa unità potrebbe causare irregolarità di
colore su uno schermo TV o rumore in una radio, se
utilizzata nelle vicinanze. In questo caso, allontanare
l’unità.
•
Questa unità può produrre rumore, se si utilizza
un telefono cellulare o altro dispositivo wireless
vicino per effettuare chiamate o inviare o ricevere
messaggi. Se ciò si verifica, aumentare la distanza tra
l’unità e tali dispositivi o spegnerli.
•
Per abilitare la buona dissipazione di calore, non
appoggiare nulla sulla parte superiore dell’unità.
•
Non collocare l’unità sopra un amplificatore di
potenza o altro dispositivo che genera calore.
Attenzione alla condensa
Se l’unità viene spostata da un luogo freddo a uno
caldo, viene utilizzata subito dopo che una stanza
fredda viene riscaldata o subisce un improvviso cambio
di temperatura, potrebbe verificarsi condensa. Per
prevenire questo o se questo accade, lasciare riposare
l’unità per una o due ore alla temperatura ambiente
prima di usarla.
Pulizia dell’unità
Usare un panno morbido e asciutto per pulire l’unità.
Non pulire con panni imbevuti di sostanze chimiche,
solventi, alcool o altri agenti chimici. Ciò potrebbe
danneggiare la superficie o causare scolorimento.
Uso del sito TEAC Global Site
È possibile scaricare questo manuale di istruzioni e il
manuale di riferimento necessari per questa unità dal
sito TEAC globale Site (http://teac-global.com/).
Aprire il sito TEAC Global Site (http://teac-global.
5.
com/).
Nella sezione TASCAM Download, cliccare la lingua
6.
desiderata per aprire la pagina di download per la
lingua.
NOTA
Se la lingua desiderata non viene visualizzata,
cliccare su Other Languages.
Cliccare sul nome del prodotto in “Search by
7.
Model Name” per aprire la pagina Download per il
prodotto.
Selezionare e scaricare il manuale di istruzioni e il
8.
manuale di riferimento necessari.
Registrazione utente
I clienti negli Stati Uniti sono pregati di visitare il sito
TASCAM (http://tascam.com/) per registrarsi come
utenti online.
Nomi delle parti
CAUTELA
Durante il collegamento e l’utilizzo di spine di
cuffie e altri dispositivi esterni, non applicare
una forza eccessiva. In particolare, fare
attenzione a non applicare una forza eccessiva
quando si utilizza un adattatore da standard a
mini spina. Ciò potrebbe danneggiare l’apparecchiatura.
Pannello superiore
1 UNI MIC L/R (microfono stereo direzionale
incorporato)
2 OMNI MIC L/R (microfono stereo omnidire-
zionale incorporato)
3 Altoparlante incorporato (mono)
4 Indicatore CHG (charge)
5 Display
6 Pulsante HOME
7 Interruttore LIMITER
8 Pulsante Fn
9 Pulsante MENU
0 Pulsante.
q Pulsante/
w Pulsante STOP [8]
e Pulsante PLAY/PAUSE [7/9]
r Interruttore di selezione INPUT LEVEL
t Interruttore MIC PAD
y Pulsante ENTER/MARK
u Ruota
i Pulsante REC [0] / Indicatore REC
Pannello frontale
o Connettore DIGITAL IN
p Connettore EXT IN
Pannello posteriore
a Indicatore di livello
s Presa REMOTE
d Attacchi della cinghia
f Prese MIC/LINE IN L/R (XLR/TRS)
g Interruttore PHANTOM
Lato sinistro
h Pulsante (alimentazione)
j Porta USB
Si tratta di una porta USB Micro-B.
Utilizzando un cavo conforme agli standard USB,
è possibile collegare l’unità a un computer come
dispositivo di memorizzazione di massa o utilizzare
un adattatore AC per fornire alimentazione.
k Presa LINE OUT
TASCAM DR-100MKIII
70
Page 71

l Presa (cuffie)
; Volume (cuffie/altoparlante) LEVEL
z Interruttore HOLD
x Interruttore (altoparlante)
Lato destro
c Vano batterie (batterie AA)
v Alloggiamento per card SD
b Manopola del livello di ingresso
Fondo
n Filettatura per il montaggio di un treppiede
(1/4 di pollice)
m Indicatore REC
Funzioni di base
Panoramica della schermata principale
Fermo/in riproduzione
Registrazione/attesa di registrazione
1 Sorgente di ingresso
2 Indicatore del canale di ingresso
3 Stato del filtro taglio basso
4 Stato di alimentazione Phantom
5 Stato dell’alimentazione
6 Formato del file
7 Stato della riproduzione/riproduzione
ripetuta
8 Stato del trasporto (fermo/in riproduzione)
9 Indicatori del ciclo di riproduzione in/out
0 Indicatori di livello
q Nome della cartella di riproduzione
w Nome del file di riproduzione
e Tempo di riproduzione/tempo residuo di
riproduzione
r Posizione della riproduzione
t Valore di picco in decibel (dB)
y Formato di registrazione
u Informazioni funzione di registrazione
i Stato del trasporto (attesa di registrazione/
registrazione)
o Indicatori di livello
p Nome della cartella di registrazione
a Nome del file di registrazione
s Tempo di registrazione/tempo rimanente di
registrazione
d Posizione della registrazione
f Livello di registrazione di picco in decibel (dB)
g Livelli d’ingresso
Procedure operative di base dei menu
Aprire la schermata MENU.
1.
Premere il pulsante MENU.
Selezionare una voce di menu.
2.
Usare la ruota per selezionare la voce e premere il
pulsante ENTER/MARK per mostrare le impostazioni.
Selezionare una voce di impostazione.
3.
Usare la ruota per selezionare la voce e premere
il pulsante ENTER/MARK per mostrare i valori di
impostazione.
NO TA
Se i valori di impostazione sono solo ON e OFF, è
•
possibile passare da uno all’altro senza selezio-
narli da un elenco.
Premere il pulsante . per tornare alla
•
schermata precedente.
Selezionare un valore di impostazione.
4.
Usare la ruota per cambiare l’impostazione e
premere il pulsante ENTER/MARK per confermarla.
NO TA
Premere il pulsante . per annullare un’ope-
•
razione.
Premere il pulsante HOME per tornare alla
•
schermata iniziale.
TASCAM DR-100MKIII
71
Page 72

Preparativi
Accendere l’unità
8
Utilizzando la batteria incorporata
Caricare la batteria prima di usare l’unità per la prima
volta dopo l’acquisto e dopo che non è stata usata per
un lungo periodo.
•
Carica della batteria incorporata
Caricare la batteria incorporata utilizzando un
alimentatore TASCAM PS-P520E AC (venduto separatamente) o utilizzando un cavo USB (tipo A Micro B)
per collegare la porta USB dell’unità a un computer.
L’unità può essere utilizzata mentre la batteria è in
carica.
Presa di corrente
Micro B
Spina USB
È possibile controllare lo stato di carica della batteria
incorporata tramite il colore dell’indicatore CHG
(charge).
8
Utilizzando batterie AA
Far scorrere il coperchio del vano batteria verso la
1.
parte inferiore dell’unità per aprirlo.
Installare 2 batterie AA con i simboli¥ e ^ come
2.
indicato nel vano batterie.
Chiudere il coperchio del vano batteria.
3.
TASCAM PS-P520E (venduto separatamente)
Arancione: in carica
Verde chiaro: carica completa
•
Impostare il tipo di batterie utilizzate per consentire
all’unità di mostrare con precisione la quantità di
carica residua e determinare se la carica è sufficiente
per il corretto funzionamento (per impostazione
predefinita, questo è impostato su batterie alcaline).
(Vedere “Guida rapida all’utilizzo di varie funzioni” a
pagina 75).
Inserimento di card SD
Aprire il coperchio dell’alloggiamento SD.
1.
Inserire una card SD nell’alloggiamento , come
2.
mostrato in figura fino a quando non scatta.
Chiudere il coperchio dell’alloggiamento della card
3.
SD.
CAUTELA
Possono essere utilizzate con questo unità card
•
SD che soddisfano gli standard SD, SDHC o
SDXC.
Una lista di card SD testate per lavorare con
•
questa unità può essere trovato sul sito TEAC
Global Site (http://teac-global.com/).
Funzione HOLD per impedire l’azionamento accidentale
È possibile far scorrere l’interruttore HOLD su LEVEL o
ALL per abilitare la funzione che impedisce il funziona-
mento accidentale.
ALL: le operazioni della manopola del livello di
ingresso e tutti i pulsanti vengono ignorati
LEVEL: le operazioni della manopola del livello di
ingresso vengono ignorate
OFF: la funzione è spenta
Accensione dell’unità
Verificare che l’interruttore HOLD sia impostato su
OFF e premere il pulsante (alimentazione) fino a
quando appare la schermata.
La schermata principale appare dopo che l’unità si è
avviata.
Spegnimento dell’unità (metterla in standby)
Premere il pulsante (alimentazione) fino a quando
lo schermo diventa bianco.
NO TA
Non si può spegnere l’unità (metterla in
•
standby) quando si sta registrando o in attesa
di registrazione.
La funzione automatica di risparmio energetico
•
si accende quando l’unità è ferma (vedere
“Guida rapida all’utilizzo di varie funzioni” a
pagina 75).
Selezione della lingua
La prima volta che si accende l’unità dopo l’acquisto,
si aprirà la schermata LINGUA. È possibile impostare la
lingua utilizzata in questa schermata.
Schermata LCD (schermata LINGUA)
Girare la ruota per spostare il cursore e selezionare
1.
la lingua.
Opzioni
ENGLISH: Inglese
日本語 : Giapponese
FRANÇAIS: Francese
ESPAÑOL: Spagnolo
DEUTSCH: Tedesco
ITALIANO: Italiano
Dopo aver effettuato la selezione premere il
2.
pulsante ENTER/MARK per confermare.
NO TA
È possibile modificare questa impostazione con
la voce LINGUA nella schermata SISTEMA (vedere
“Guida rapida all’utilizzo di varie funzioni” a
pagina 75).
TASCAM DR-100MKIII
72
Page 73

Impostare la data e l’ora
La prima volta che si accende l’unità dopo l’acquisto
e ogni volta che la data e l’ora vengono ripristinate,
si aprirà la schermata DATA/TEMPO in cui è possibile
impostare la data e l’ora.
Girare la ruota per spostare il cursore sulla voce
1.
(anno/mese/giorno/ora/minuti/secondi) che si
desidera impostare e premere il pulsante ENTER/
MARK.
Girare la ruota per cambiare il valore e premere il
2.
pulsante ENTER/MARK.
Girare la ruota per spostare il cursore OK e premere
3.
il pulsante ENTER/MARK per confermare l’impo-
stazione.
NO TA
È inoltre possibile modificare la data e l’ora dal menu
(vedere “Guida rapida all’utilizzo di varie funzioni” a
pagina 75).
Formattazione (inizializzazione) della card SD
Il seguente messaggio viene visualizzato se una card
non formattata è installata quando l’unità viene accesa.
Premere il pulsante ENTER/MARK formattare la card.
CAUTELA
La formattazione cancellerà tutti i dati presenti
sulla card SD.
Fare il backup dei dati su un computer prima di
formattare la card.
NO TA
È inoltre possibile utilizzare la voce FORMATO
della schermata SISTEMA per formattare una
card (vedere “Guida rapida all’utilizzo di varie
funzioni” a pagina 75).
Registrazione
Con questa unità, è possibile registrare l’audio con
una qualità ancora migliore, cambiando il formato di
registrazione e frequenza di campionamento, così come
l’impostazione delle varie funzioni, tra cui il limitatore,
controllo di livello e filtro low-cut. Qui, spieghiamo la
registrazione utilizzando UNI MIC L/R (impostazione
predefinita).
Si prega di consultare il manuale di riferimento per le
spiegazioni delle altre funzioni.
Avviare l’attesa di registrazione.
1.
Premere il pulsante REC [0] per avviare l’attesa di
registrazione. L’indicatore REC lampeggia.
Regolare il livello di ingresso.
2.
Il livello di ingresso può essere regolato anche
quando è in modalità attesa di registrazione o
registrazione (vedere “Regolazione dei livelli di
ingresso” a pagina 73).
Avviare la registrazione.
3.
Premere il pulsante REC [0] in attesa di registrazione per avviare la registrazione. L’indicatore REC
smette di lampeggiare e rimane acceso.
Interrompere la registrazione.
4.
Premere di nuovo il pulsante STOP [8] per
fermare la registrazione.
NO TA
Premere il pulsante REC [0] durante la registra-
•
zione per mettere in pausa la registrazione.
Premere il pulsante REC [0] di nuovo per
•
riavviare la registrazione.
Regolazione dei livelli di ingresso
Prima di iniziare la registrazione, i livelli di ingresso
devono essere regolati a livelli adeguati al fine di evitare
distorsioni sui segnali di ingresso troppo forti e per
prevenire che i segnali di ingresso siano talmente bassi
da essere mascherati dal rumore di fondo.
8
Impostazione dei livelli di ingresso in
modo opportuno
Impostare l’interruttore di selezione INPUT LEVEL su
STEREO.
Mentre si guardano i misuratori di livello, ruotare la
manopola del livello di ingresso per regolare il livello di
ingresso a circa −12 dB.
Regolare i livelli in modo che siano più in alto possibile
senza causare l’accensione degli indicatori di livello
PEAK con i suoni più forti (livelli di picco) in ingresso.
Indicatori di livello
Se gli indicatori di livello PEAK si illuminano ancora
anche quando i livelli di ingresso vengono abbassati per
quanto possibile, impostare l’interruttore MIC PAD su
ON e regolare di nuovo.
Se gli indicatori di livello PEAK si illuminano ancora,
anche dopo aver fatto questo, provare a cambiare la
distanze e gli angoli tra i microfoni e le sorgenti sonore.
TASCAM DR-100MKIII
73
Page 74

Riproduzione delle registrazioni
8
Avvio della riproduzione
Premere il pulsante PLAY/PAUSE [7/9] per avviare la
riproduzione.
8
Mettere in pausa la riproduzione
Premere il pulsante PLAY/PAUSE [7/9] o STOP [8]
per mettere in pausa la registrazione.
NO TA
Premere il pulsante PLAY/PAUSE [7/9] di
nuovo per riprendere la riproduzione.
8
Interruzione della riproduzione
Premere il pulsante STOP [8] in pausa per tornare
all’inizio del file.
8
Ricerca indietro e in avanti
Quando la schermata principale è aperta e una traccia
è in riproduzione o ferma, tenere premuto il pulsante
. o / per la ricerca in avanti o indietro.
Rilasciare il pulsante per fermare di nuovo o riprendere
la riproduzione.
8
Selezione dei file (salto)
Da fermo o in riproduzione premere il pulsante .
per passare al file precedente, oppure premere il
pulsante / per passare al file successivo.
8
Ascolto con l’altoparlante
incorporato
Impostare l’interruttore (altoparlante) su ON.
8
Ascolto con le cuffie
Collegare le cuffie alla presa (cuffie).
NO TA
Quando sono collegate le cuffie, l’altoparlante
incorporato non manderà il suono in uscita
anche quando l’interruttore è impostato su ON
(altoparlante).
8
Regolazione del volume
Usare il controllo LEVEL per regolare il volume di
uscita dall’altoparlante incorporato o le cuffie.
Eliminazione di file
Seguire questa procedura per eliminare un file audio
registrato.
Aprire la schermata Function
1.
Premere il pulsante Fn.
Selezionare la funzione di eliminazione.
2.
Usare la ruota per selezionare ELIMINA FILE
SEL. e premere il pulsante ENTER/MARK.
Eseguire la cancellazione.
3.
Usare la ruota per selezionare SI’ e premere il
pulsante ENTER/MARK per eliminare il file e
tornare alla schermata principale.
Per annullare, selezionare NO e premere il pulsante
ENTER/MARK per tornare alla schermata
FUNZIONE.
CAUTELA
Attenzione! La cancellazione dei file non può
essere annullata.
Collegamento a un computer
È possibile trasferire i file audio dalla card SD dell’unità
a un computer, così come i file audio dal computer
all’unità.
8
Collegamento con un computer
tramite USB
Collegare il cavo USB.
1.
Se l’unità è spenta (in standby), accenderla.
Attivare la connessione.
2.
Selezionare la voce SALV.USB della schermata
SISTEMA e premere il pulsante ENTER/MARK.
MENU
w SISTEMA w SALV.USB
Usare la ruota per selezionare SI’ e premere il
pulsante ENTER/MARK per attivare la connessione.
Per annullare, selezionare NO e premere il
pulsante ENTER/MARK.
Questa unità appare sul computer come un disco
3.
esterno denominato “DR-100MKII” (se la card è
stata formattata da questa unità).
8
Scambio di file con un computer
Dopo aver seguito le istruzioni nella sezione precedente,
fare clic su “DR-100MKIII” sullo schermo del computer
per visualizzare le cartelle “MUSIC” e “UTILITY”.
Per trasferire i file sul computer, aprire la cartella “MUSIC”
e trascinare i file desiderati alle destinazioni.
Per trasferire i file dal computer, trascinare e rilasciare i
file audio desiderati nella cartella “MUSIC”.
8
Disconnessione da un computer
Utilizzare le procedure corrette sul computer per
smontare questa unità. Quindi premere il pulsante
ENTER/MARK dell’unità per tornare alla schermata
principale.
Vedere il manuale di istruzioni del computer per le
istruzioni su come smontare un volume esterno.
TASCAM DR-100MKIII
74
Page 75

Guida rapida all’utilizzo di varie funzioni
•
I nomi dei pulsanti sono mostrati in questo modo: MENU.
•
Le seguenti operazioni di menu presuppongono che la schermata principale sia aperta prima di iniziare. Le istruzioni
sono abbreviate. Per esempio, "Premere il pulsante MENU, selezionare la voce di menu, quindi selezionare la voce di
impostazione" diventa "MENU w voce di menu w voce di impostazione".
•
Per i dettagli delle funzioni, consultare il manuale di riferimento.
Categoria Azione desiderata/spiegazione Procedure, pulsanti utilizzati
Registrazione
Impostazioni
di ingresso
Livello di
ingresso
Selezionare le sorgenti di ingresso
È possibile selezionare la sorgente di ingresso
a piacere e in base all’applicazione.
Utilizzare un microfono a condensatore che
richiede l’alimentazione phantom
È possibile impostare la tensione di alimentazione phantom.
Utilizzare un piccolo microfono a condensatore
che richiede l’alimentazione plug-in
L’unità è in grado di fornire alimentazione
plug-in.
Utilizzare microfoni mid-side
L’unità è in grado di convertire i segnali microfonici stereo in formato mid-side in segnali
stereo normali.
Aria condizionata o altri rumori fastidiosi
Il filtro low-cut è in grado di ridurre il rumore di
condizionatori d’aria ed altre sorgenti.
Registrazione in mono
Regolare il livello di ingresso Manopola del livello di ingresso
Se si desidera regolare i livelli di sinistra e
destra di ingresso separatamente, impostare
l’interruttore INPUT LEVEL interruttore di
selezione su L o R.
Registrare senza distorsioni
I misuratori appaiono ancora anche se la
manopola del livello di ingresso è abbassata
fino in fondo
Evitare distorsioni quando i segnali troppo forti
vengono immessi improvvisamente (funzione
Limiter)
Regolare automaticamente il livello di registrazione in risposta al suono in ingresso (modalità
di livello automatico)
Ridurre automaticamente il livello di ingresso
in risposta al livello massimo del suono in
ingresso (modalità di riduzione Peak)
MENU w IMP.I/O w SORGENTE
Attivare l’interruttore PHANTOM su
ON
MENU w IMP.I/O w PHANTOM
VOLT
MENU w IMP.I/O w ALIM.PRESA
MENU w IMP.I/O w DECOD.MS
MENU w IMP.I/O w PASSA ALTO
MENU w IMPOSTAZIONE REG. w
CANALI REC
INPUT LEVEL interruttore di selezione
Attivare l’interruttore MIC PAD su ON
Attivare l’interruttore LIMITER su ON
MENU w IMP.I/O w CONTR.LIV.
w LIV.AUTO
MENU w IMP.I/O w CONTR.LIV.
w RID.PICCO
Categoria Azione desiderata/spiegazione Procedure, pulsanti utilizzati
Impostare la qualità audio di registrazione
MENU w IMPOSTAZIONE REG. w
FORMATO
MENU w IMPOSTAZIONE REG. w
CAMPIONE
MENU w BROWSE
/ durante la registrazione
MENU w IMPOSTAZIONE REG. w
INC.TRACCIA
Fn w DIVIDI FILE w DIVIDI
Fn w DIVIDI FILE w DIVIDI
SUI MARC.
MENU w IMPOSTAZIONE REG.
w REG.AUTO w MODALITA’ w
LIVELLO
MENU w IMPOSTAZIONE REG. w
REG.PRE
MENU w IMPOSTAZIONE REG.
w DUAL REC w MODALITA’ w
LIVELLO
MENU w IMPOSTAZIONE REG.
w DUAL REC w MODALITA’ w
FORMATO
Impostare l’interruttore (altoparlante)
su ON
Volume (cuffia/altoparlante)
LEVEL
MENU w IMP.I/O w ATT USCITA
w CUFFIE
.//
Impostazioni
di base
Registrazione
Altre funzioni
Riproduzione delle registrazioni
È possibile impostare la qualità di registrazione
audio a piacere e in base all’applicazione.
Registrazione con qualità ancora superiore
Cambiare la qualità audio ADC MENU w IMP.I/O w FILTRO A/D
Migliorare le prestazioni S/N MENU w IMP.I/O w DUAL ADC
Cambiare dove i file di registrazione vengono
salvati
Creare un nuovo file mentre si continua a registrare (funzione di incremento file)
Incrementare il file manualmente
Incrementare automaticamente i file a inter-
valli di tempo fissi
Dividere il file registrato selezionato
Dividere un file manualmente
(funzione di divisione file)
Dividere in tutte le posizioni dei marcatori
(funzione di divisione marcatore)
Avviare la registrazione automaticamente
(funzione di registrazione automatica)
L’unità può iniziare a registrare quando rileva
un livello di segnale in ingresso.
Registrare senza perdere il primo inizio di un file
(funzione di pre-registrazione)
L’unità può registrare fino a due secondi prima
che la registrazione venga attivata.
Registrazione di backup
L’unità può registrare un backup a 12dB di
livello inferiore rispetto al livello di registrazione impostato.
Registrare file WAV e MP3 contemporaneamente
L’unità può registrare simultaneamente file
WAV e MP3.
Ascoltare la riproduzione attraverso l’altoparlante
incorporato
Regolare il volume delle cuffie/altoparlante
Il volume potrebbe differire a seconda delle
cuffie utilizzate.
Impostare questo secondo le cuffie che si sta
utilizzando.
Cambiare il file di riproduzione
Selezionare un file prima o dopo
Selezionare da un elenco MENU w BROWSE
TASCAM DR-100MKIII
75
Page 76

Categoria Azione desiderata/spiegazione Procedure, pulsanti utilizzati
Cambiare la posizione di riproduzione
Riproduzione delle registrazioni
File
Marcatori
Cambiare la posizione di riproduzione durante
l’emissione del suono.
Muoversi senza emettere suono. Ruota
Ripetizione della riproduzione
L’unità può ripetere continuamente la riproduzione di un singolo file o un intervallo (funzione
di riproduzione ripetuta)
Cambiare la velocità di riproduzione
L’unità è in grado di riprodurre file lentamente
o velocemente (funzione di riproduzione VSA)
Salvare un file
Salvare il file selezionato Fn w CAMBIA PROTEZ.
Selezionare un file e salvarlo
Eliminazione di un file
Eliminare un file selezionato Fn w ELIMINA FILE SEL.
Selezionare un file ed eliminarlo
Eliminare tutti i file allo stesso tempo
Creare una cartella
Eliminazione di una cartella
Modificare il formato del nome del file MENU w SISTEMA w FILE
Ripristinare il numero di file
Ripristinare immediatamente il numero di file
Ripristinare il numero di file ogni volta che
viene creata una nuova cartella
Collegare a un computer e trasferire i file audio
È possibile utilizzare questa unità come
memoria di massa USB.
Aggiungere marcatori manualmente
È possibile aggiungere manualmente i
marcatori durante la registrazione o la riproduzione (ma non da fermo).
Tenere premuto .//
Fn w RIPR.RIP.
Fn w RIPR.VSA
MENU w BROWSE w Fn w
CAMBIA PROTEZ.
MENU w BROWSE w Fn w
ELIMINA FILE SEL.
MENU w BROWSE w Fn w
ELIM.TUTTI FILE
MENU w BROWSE w Nuova
cartella
MENU w BROWSE w Fn w
ELIM.CARTELLA
MENU w SISTEMA w AZZERA
N.FILE w RESET
MENU w SISTEMA w AZZERA
N.FILE w ON
MENU w SISTEMA w SALV.USB
ENTER/MARK durante la registrazione
o la riproduzione
Categoria Azione desiderata/spiegazione Procedure, pulsanti utilizzati
Aggiungere automaticamente i marcatori a una registrazione
Aggiungere quando il livello impostato viene
superato (LEVEL).
Marcatori
Impostazioni
Display
Sistema
Aggiungere quando il tempo impostato viene
raggiunto (TIME).
Aggiungere quando viene rilevata una
divisione della traccia di ingresso digitale
(DIGITAL).
Aggiungere quando un indicatore di livello
PEAK si accende.
Spostarsi in una posizione di un marcatore
Spostarsi su un marcatore. ENTER/MARK + .//
Selezionare il marcatore su cui trasferirsi.
Eliminare un marcatore
Quando l’unità è ferma, spostarsi su un
marcatore e premere il pulsante ENTER/MARK
per eliminarlo.
Eliminare tutti i marcatori in un file contemporaneamente.
Spegnere la retroilluminazione
Cambiare la luminosità del display
Regolare il contrasto
Spegnere gli indicatori di livello e REC
Modificare il livello di picco e HOLD
Cancellare i livelli di picco
Questo funziona solo quando la modalità di
funzione Peak Hold è impostato su HOLD.
Visualizzare vari tipi di informazioni
È possibile visualizzare le informazioni relative
alla card SD.
È possibile controllare la versione del firmware.
È possibile visualizzare le informazioni sui file.
È possibile visualizzare le impostazioni
utilizzate durante la registrazione.
Se la funzione di registrazione dei dati XRI è
accesa, le impostazioni utilizzate durante la
registrazione verranno salvate con il file.
MENU w IMPO.MARCAT. w MARC.
AUTO w MODAL.
MENU w IMPO.MARCAT. w MARC.
PICCO
MENU w IMPO.MARCAT. w SALTO
MARC.
ENTER/MARK
MENU w BROWSE w Fn w
ELIM.TUTTI MARC.
MENU w ALIM/DISPLAY w
RETROILL.
MENU w ALIM/DISPLAY w
LUMINOSITA’
MENU w ALIM/DISPLAY w
CONTRASTO
MENU w ALIM/DISPLAY w
INDICATORI
MENU w ALIM/DISPLAY w LIV.
PICCO
Quando la schermata principale è
aperta, tenere premuto Fn
MENU w SISTEMA w INFORMA-
ZIONIw CARD
MENU w SISTEMA w INFORMA-
ZIONIw FIRMWARE
MENU w SISTEMA w INFORMA-
ZIONIw FILE
Fn w INFORM.SU FILE
Fn w INFORM.SU FILE
MENU w IMPOSTAZIONE REG. w
XRI
TASCAM DR-100MKIII
76
Page 77

Categoria Azione desiderata/spiegazione Procedure, pulsanti utilizzati
Modificare data e ora MENU w SISTEMA w DATA/TEMPO
Impostare la lingua MENU w SISTEMA w LINGUA
Ripristinare le impostazioni predefinite di
fabbrica
Formattare una card SD MENU w SISTEMA w FORMATTAZ.
Prevenire operazioni accidentali
Disabilitare le operazioni di livello di ingresso. HOLD w LEVEL
Disabilitare la manopola del livello di ingresso
e tutti i pulsanti.
Far funzionare l’unità in modalità remota
Impostare il telecomando utilizzato. MENU w SISTEMA w REMOTO
Attivare lo spegnimento automatico (funzione di
risparmio energetico automatico)
Impedire che le batterie si scarichino quando
l’unità viene lasciata inutilizzata.
L’unità non si spegne automaticamente
durante la registrazione o la riproduzione.
Utilizzare l’unità per periodi di tempo prolungati
Il funzionamento continuo per un lungo
periodo di tempo è possibile utilizzando sia la
batteria integrata che le batterie AA. Impostare
se utilizzare la batteria incorporata o le batterie
AA per prime.
Impostare il tipo di batterie AA utilizzate
per consentire all’unità di mostrare la carica
rimanente in modo accurato.
Far partire immediatamente la registrazione
Quando l’unità è spenta (in modalità standby),
premere il pulsante (alimentazione)
tenendo premuto il pulsante REC per accenderlo e iniziare a registrare immediatamente.
Preparare la sincronizzazione con un file video
L’unità può generare automaticamente un
tono quando iniziano e terminano le registrazioni. Avendo l’unità che registra questo tono e
il suono in uscita della fotocamera, la sincronizzazione durante il montaggio video può essere
resa più facile.
Segnali di ingresso di una macchina fotografica
Il livello di uscita di linea può essere attenuato
di 30 dB.
MENU w SISTEMA w INIZIA-
LIZZAZ.
HOLD w ALL
MENU w ALIM/DISPLAY w RISP.
ENERG.
MENU w ALIM/DISPLAY w
BATTERIA w PRIORITA’
MENU w ALIM/DISPLAY w
BATTERIA w TIPO AA
Premere il pulsante (alimentazione) tenendo premuto il pulsante
REC
MENU w IMPOSTAZIONE REG. w
TONO AUTO
MENU w IMP.I/O w ATT USCITA
w LINEA
Impostazioni
Sistema
Operazioni
Alimentazione
Altere
funzioni
Elenco dei menu
Premere il pulsante MENU per aprire la schermata MENU.
Voce di menu Funzione
BROWSE
IMPOSTAZIONE REG.
IMP.I/O
IMPO.MARCAT.
ALIM/DISPLAY
FORMATO
CAMPIONE
CANALI REC
XRI
DUAL REC
INC.TRACCIA
REG.AUTO
REG.PRE
TONO AUTO
SORGENTE
FILTRO A/D
DUAL ADC
PHANTOM VOLT
ALIM.PRESA
PASSA ALTO
CONTR.LIV.
DECOD.MS
ATT USCITA
MARC.AUTO
MARC.PICCO
SALTO MARC.
RISP.ENERG.
BATTERIA
RETROILL.
LUMINOSITA’
CONTRASTO
INDICATORI
LIV.PICCO
Lavorare con i file e le cartelle della card SD
Impostare il formato del file di registrazione
Impostare la frequenza di campionamento
Imposta il tipo di file
Attivare/disattivare la registrazione dei dati XRI
Impostare la funzione di registrazione duale
Impostare l’intervallo di tempo di registrazione per incrementare
automaticamente i file
Impostare la funzione di auto-registrazione
Impostare la funzione di pre-registrazione
Impostare la funzione tono auto
Impostare la sorgente di ingresso
Impostare il filtro del convertitore A/D
Attivare/disattivare questa funzione che migliora le prestazioni S/N
Impostare la tensione di alimentazione phantom
Accendere/spegnere l’alimentazione plug-in
Impostare il filtro low-cut
Impostare la funzione di controllo del livello
Impostare la funzione di decodifica Mid-Side
Impostare la funzione di attenuatore sull’uscita
Impostare la funzione automatica di marcatore
Attivare/disattivare la funzione peak marker
Impostare la modalità di salto marcatore
Impostare la funzione automatica di risparmio energetico
Effettuare impostazioni relative alla batteria incorporata e le
batterie sostituibili
Imposta il tempo della retroilluminazione
Impostare la luminosità della retroilluminazione
Regolare il contrasto
Accendere e spegnere gli indicatori
Impostare la funzione peak hold dei misuratore di livello
TASCAM DR-100MKIII
77
Page 78

Voce di menu Funzione
Mostra varie informazioni.
Impostare la data e l’ora
Impostare il formato del nome del file.
Ripristinare il numero di file
Effettuare le impostazioni del telecomando collegato
Impostare la lingua visualizzata sul display
Ripristinare le impostazioni predefinite di fabbrica
Formattare la card SD
Passa alla modalità dispositivo di archiviazione di massa USB
SISTEMA
INFORMAZIONI
DATA/TEMPO
FILE
AZZERA N.FILE
REMOTO
LINGUA
INIZIALIZZAZ.
FORMATTAZ.
SALV.USB
Lista delle funzioni del menu
•
Quando la schermata principale è aperta e l’unità è ferma, in pausa, in riproduzione o in attesa di registrazione
premere il pulsante Fn per aprire la schermata FUNZIONE.
La funzione mostrata dipende dallo stato dell’unità quando viene premuto il pulsante Fn.
Voce di menu Funzione
CAMBIA PROTEZ.
ELIMINA FILE SEL.
Fermo, in pausa o in
riproduzione
Attesa di registrazione
•
Quando un file o una cartella è selezionato nella schermata BROWSE premere il pulsante Fn per aprire la schermata
MENU CARTELLA o MENU FILE.
Voce di menu Funzione
File selezionato nella
schermata BROWSE
File non selezionato nella
schermata BROWSE
DIVIDI FILE
RIPR.RIP.
RIPR.VSA
DECOD.MS
INFORM.SU FILE
PASSA ALTO
CONTR.LIV.
DECOD.MS
INFORM.SU FILE
ELIMINA FILE SEL.
CAMBIA PROTEZ.
ELIM.TUTTI MARC.
ELIM.TUTTI FILE
ELIM.CARTELLA
Modifica la protezione del file selezionato
Elimina il file selezionato
Divide il file selezionato
Effettua le impostazioni di riproduzione ciclica
Effettua le impostazioni di riproduzione VSA
Imposta la funzione di decodifica Mid-Side
Mostra informazioni per il file selezionato
Imposta il filtro low-cut
Imposta la funzione di controllo del livello
Imposta la funzione di decodifica Mid-Side
Mostra informazioni per il file selezionato
Elimina il file selezionato
Modifica lo stato di protezione del file selezionato
Elimina tutti i marcatori nel file selezionato
Elimina tutti i file nella cartella selezionata
Elimina la cartella selezionata
TASCAM DR-100MKIII
78
Page 79

Elenco dei messaggi
Di seguito è riportato un elenco dei messaggi a comparsa.
Fare riferimento a questo elenco se uno di questi messaggi appare sul
DR-100MKII e si desidera controllare il significato o determinare una risposta
adeguata.
Messaggio Significato e risposta
MANT.TUTTO
MANT.LIV.acc.
Batteria scarica
Batteria bassa
Nessuna card
Card protetta
Errore card
Card piena
Errore formatt.
Formatta card
Card non valida
Cambia card
Errore MBR
Inizializza card
Errore scrittura
REG.continua
Card lenta
Conf.BOF MARC.
La manopola del livello di ingresso e tutti i pulsanti
sono state disattivati tramite l’interruttore HOLD.
La manopola del livello di ingresso è stato disabilitata tramite l’interruttore HOLD.
Ricaricare la batteria incorporata o sostituire le
batterie rimovibili.
Caricare una card SD.
Portare l’interruttore di protezione da scrittura nella
posizione di sblocco per registrare o cancellare i
dati della card SD.
La card SD non è stata riconosciuta.
Cambiare la card SD.
La card SD non ha spazio rimanente.
La card SD non è formattata correttamente o è
danneggiata.
Premere il pulsante ENTER/MARK per avviare la
formattazione.
La formattazione cancellerà tutti i dati presenti sulla
card SD.
Qualcosa potrebbe essere successo nella card SD.
Cambiare la card SD.
La card SD non è formattata correttamente o è
danneggiata.
Premere il pulsante ENTER/MARK per avviare la
formattazione.
La formattazione cancellerà tutti i dati presenti
sulla card SD. Se la formattazione non è possibile,
cambiare la card SD.
La scrittura della card SD è scaduta. Questo ha
causato l’interruzione dell’audio e rumore.
Un indicatore BOF viene aggiunto nel punto in cui
l’audio è stato interrotto.
Le prestazioni di scrittura sulla card SD sono
peggiorate.
Un indicatore BOF è stato aggiunto nel punto in
cui l’audio è stato interrotto perché la scrittura nella
card SD è scaduta.
Controllare l’audio intorno al marcatura BOF.
Eseguire la funzione di formattazione con cancella-
zione o cambiare la card SD.
Messaggio Significato e risposta
Il file di sistema necessario per attivare l’unità non è
File sys non va.
Crea file sys
File sys non tr.
Crea file sys
Non supportato
File pieno
File non trovato
Imposs.elim.
File protetto
Imposs.dividere
File troppo corto
Imposs.dividere
File MP3 corr.
Imposs.dividere
File duplicato
Imposs.dividere
Nessun marcatore
Imposs.dividere
Intervallo breve
Imposs.dividere
Ness.File
Imposs.dividere
Errore nome file
MARCAT.Pieno
Imposs.elim.
Non vuoto
Nessun dato XRI
Imposs.MARCAT.
File protetto
valido.
Premere il pulsante ENTER/MARK per creare un file
system.
Il file system è mancante. Questa unità richiede un
file di sistema per il funzionamento.
Premere il pulsante ENTER/MARK per creare un file
system.
Si prega di consultare il Manuale di riferimento per i
formati di file che questa unità può utilizzare.
La registrazione non è possibile perché il numero
totale di cartelle e file supera il limite di 5000.
Un file non può essere trovato o un file potrebbe
essere danneggiato.
Si prega di verificare il file.
Rimuovere la protezione da un file prima di tentare
di eliminarlo.
Il file è troppo corto, quindi non può essere diviso.
I file MP3 non possono essere divisi.
La funzione di divisione causerebbe la creazione
di un file con un nome già esistente nella stessa
cartella.
Utilizzare un computer per cambiare il nome del
file.
I file che non hanno marcatori non possono essere
divisi con questa funzione.
La divisione Mark non funziona quando l’intervallo
tra i marcatori è inferiore a due secondi.
Non vi è alcun file audio.
La divisione non è possibile perché il nome del file
supera il limite di 200 caratteri.
Utilizzare un computer per cambiare il nome del
file.
Il numero di marcatori ha raggiunto il limite di 99.
Non è possibile eliminare una cartella che contiene
i file.
Eliminare tutti i file nella cartella e riprovare.
Nessun dato XRI è stato salvato nel file. Attivare la
funzione di registrazione dei dati XRI su ON prima di
iniziare la registrazione.
I dati XRI non possono essere salvati durante la
registrazione di file MP3.
I marcatori non possono essere aggiunti perché il
file è protetto da scrittura.
Rimuovere la protezione da un file, se si desidera
aggiungere marcatori ad esso.
Messaggio Significato e risposta
Imposs.MARCAT.
Lunghezza file
Ing.digitale
Sganciato
Ing.digitale
Agganciato
Campione DIN
Non corrisp.
I/O troppo breve
Allarme Termico
Coll.Alim.USB
Allarme Termico
Se si è verificato un altro errore, spegnere l’unità e riavviarla.
I marcatori non possono essere aggiunti perché il
file è troppo corto.
Nulla è collegato al connettore di ingresso digitale
(DIGITAL IN) o il segnale non viene immesso
correttamente.
Controllare il collegamento digitale.
L’ingresso digitale è stato correttamente rilevato.
La frequenza di campionamento di ingresso digitale
non corrisponde all’impostazione di registrazione.
I punti di IN e OUT sono troppo vicini. Impostarli
con almeno 1 secondo tra di loro.
La temperatura interna è aumentata durante l'uso della
batteria incorporata e/o delle batterie AA.
L'uso continuato è possibile alimentando tramite una
connessione USB.
La temperatura interna è aumentata.
Il sistema si arresterà automaticamente.
TASCAM DR-100MKIII
79
Page 80

Risoluzione dei problemi
Se si verificano problemi con questa unità, provare quanto segue prima di
richiedere la riparazione. Se queste misure non risolvono il problema, si prega
di contattare il negozio dove si è acquistato l’unità o il supporto clienti TEAC
(vedi retro).
8
L’unità non si accende.
•
Verificare che la batteria incorporata abbia sufficiente carica o che le
batterie sostituibili siano installati correttamente.
•
Verificare che l’alimentatore TASCAM PS-P520E AC (venduto separatamente)
e il cavo di alimentazione e il connettore USB siano collegati saldamente.
L’unità potrebbe non funzionare correttamente tramite un hub USB.
•
Verificare che l’interruttore HOLD sia impostato su OFF.
8
L’unità si spegne automaticamente.
•
Verificare che la funzione automatica di risparmio energetico sia disattivata.
Poiché questa unità è conforme alle normative europee di energia in
i
standby (ERP), la funzione automatica di risparmio energetico funziona
indipendentemente dal fatto che l’unità venga alimentata da un alimentatore o da batterie. Se non si desidera utilizzare la funzione automatica
di risparmio energetico, impostarla su OFF (l’impostazione predefinita è
30min).
8
L’indicatore CHG si illumina alternativamente in
arancione e verde.
•
La corretta ricarica potrebbe non essere possibile in una posizione che è
troppo calda o troppo fredda. La carica è possibile quando la temperatura
è compresa tra 0−30°C.
8
La carica residua della batteria incorporata non viene
visualizzata con precisione
•
La carica residua della batteria incorporata potrebbe non essere visualizzata
con precisione quando l’unità viene acquistata. Scaricare e caricare la
batteria completamente una volta per consentire all’unità di rilevare di
nuovo la carica residua della batteria e visualizzarla con precisione.
8
L’unità non funziona.
•
Verificare che l’interruttore HOLD sia impostato su OFF.
•
L’unità non funziona in modalità di memorizzazione USB.
•
Se il funzionamento diventa anormale, tenere premuto il pulsante
(alimentazione) per almeno 10 secondi mentre si tiene premuto il pulsante
STOP [8]. Questo forzerà l’unità a spegnersi.
8
La card SD non viene riconosciuta.
•
Assicurarsi che la card SD sia inserita completamente.
8
Nessun suono in uscita.
•
Verificare il livello di uscita cuffia/altoparlante dell’unità.
•
Controllare i collegamenti del sistema di monitoraggio e il livello del
volume.
•
Nessun suono viene emesso dal diffusore nelle seguenti condizioni.
L’interruttore (altoparlante) è su OFF
i
L’unità è in registrazione o in attesa di registrazione
i
Le cuffie sono collegate
i
8
La registrazione non è possibile.
•
Verificare che la card SD abbia abbastanza spazio.
•
La registrazione diventa impossibile quando il numero totale di file
raggiunge 5000.
8
Il suono in ingresso è estremamente silenzioso o
troppo alto.
•
Controllare le impostazioni del livello di ingresso.
•
Controllare i livelli di uscita del dispositivo esterno collegato.
8
L’uscita audio sembra innaturale.
•
Controllare la velocità di riproduzione (funzione di riproduzione VSA).
•
Verificare che la funzione di controllo del livello non sia attiva.
8
Non è possibile cancellare un file.
•
Un file protetto (di sola lettura) non può essere cancellato.
8
I file di questa unità non vengono visualizzati sul
computer.
•
Verificare che l’unità sia collegata correttamente al computer tramite la
porta USB. L’unità potrebbe non funzionare correttamente se collegata
tramite un hub USB.
•
Verificare che l’unità sia in modalità di memorizzazione USB.
8
È stata impostata per errore la lingua errata.
•
Dopo aver premuto il pulsante (alimentazione) per spegnere l’unità,
premere il pulsante (alimentazione) mentre si tiene premuto il
pulsante MENU.
•
Apparirà il menu di selezione della lingua e si sarà in grado di selezionare la
lingua.
Specifiche
Generali
8
Supporti di registrazione
SD card (64 MB−2 GB)
SDHC card (4 GB−32 GB)
SDXC card (48 GB−128GB)
8
Registrazione/formati di riproduzione
WAV (BWF):
MP3: 44.1/48kHz, 128/192/256/320kbps
8
Numero di canali
2 canali (stereo)
Ingressi e uscite
8
Prese MIC/LINE IN (XLR con supporto alimentazione
phantom)
Connettori: prese standard TRS XLR-3-31, 6,3 mm (1/4")
8
Presa EXT IN (in grado di fornire alimentazione
plug-in)
Connettore: mini presa stereo 3,5 mm (1/8”)
8
Connettore DIGITAL IN
Connettore: presa TRS 3,5 mm (1/8”)
8
Presa LINE OUT
Connettore: mini presa stereo 3,5 mm (1/8”)
8
Presa (cuffie)
Connettore: mini presa stereo 3,5 mm (1/8”)
8
Altoparlante incorporato
0,4 W (mono)
8
Porta USB
Connettore tipo: Micro-B
Formato: USB 2.0 HIGH SPEED mass storage class
8
Presa REMOTE
Connettore: presa TRS 2,5mm (3/32”)
44.1/48/88.2/96/176.4/192kHz, 16/24 bit
TASCAM DR-100MKIII
80
Page 81

Prestazioni audio
8
Risposta in frequenza
MIC/LINE IN (MIC, PAD On) su LINE OUT
MIC/LINE IN (LINE) su LINE OUT
EXT IN (MIC, PAD On) su LINE OUT
EXT IN (LINE) su LINE OUT
20Hz−20kHz +0.5dB/−1dB
(frequenza di campionamento 44.1/48kHz, JEITA)
20Hz−40kHz +0.5dB/−2dB
(frequenza di campionamento 88.2/96kHz, JEITA)
20Hz−80kHz +0.5dB/−4dB
(frequenza di campionamento 176.4kHz/192kHz, JEITA)
8
Distorsione
MIC/LINE IN (MIC, PAD On) su LINE OUT
MIC/LINE IN (LINE, +20dBu Input) su LINE OUT
EXT IN (MIC, PAD On) su LINE OUT
EXT IN (LINE) su LINE OUT
0,007% o meno
(frequenza di campionamento 44.1/48/88.2/96/176.4/192kHz, JEITA)
8
Rapporto S/N
MIC/LINE IN (MIC, PAD On) su LINE OUT
MIC/LINE IN (LINE) su LINE OUT
EXT IN (MIC, PAD On) su LINE OUT
EXT IN (LINE) su LINE OUT
102 dB o più
(frequenza di campionamento 44.1/48/88.2/96/176.4/192kHz, JEITA)
8
Equivalent Input Noise (EIN)
124 dBu o meno
Nota: basato su JEITA CP-2150
Tempi di registrazione (in ore: minuti)
Formato file (impostazione di registrazione) 4GB SDHC card
320kbps MP3 (stereo)
16 bit WAV (stereo) 6:17
24 bit WAV (stereo) 96kHz 1:55
24 bit WAV (stereo) 192kHz 00:57
•
I tempi di registrazione di cui sopra sono valori teorici e potrebbero variare
a seconda della card SD/SDHC/SDXC in uso.
•
I tempi di registrazione mostrati sopra non sono tempi di registrazione
continui, ma piuttosto sono i tempi di registrazione possibili totali per le
card SD/SDHC/SDXC.
•
Se si registra in mono, i tempi di registrazione massimi saranno circa il
doppio di quelli sopra.
•
Se si utilizza la registrazione duale, i tempi di registrazione massimi saranno
circa la metà di quelli di cui sopra.
44.1kHz
27:46
Altro
8
Alimentazione
Batteria incorporata ricaricabile agli ioni di litio
2 batterie AA (alcaline, NiMH o agli ioni di litio)
Alimentazione dal bus USB di un computer
Adattatore AC (TASCAM PS-P520E, venduto separatamente)
Pacco batteria esterno (TASCAM BP-6AA, venduto separatamente)
8
Consumo
7.5 W (massimo)
8
Tempo di funzionamento della batteria
(funzionamento continuo)
•
Utilizzando la batteria incorporata (ricaricabile agli ioni di litio)
Condizioni di utilizzo
UNI MIC (microfono incorporato direzionale) di ingresso
Alimentazione phantom non utilizzata
WAV stereo (BWF) /44.1kHz
Registrazione a 16 bit
MIC/LINE IN presa/ingresso microfonico
Alimentazione phantom utilizzata (+48V, 3mA×2 carico)
STEREO WAV (BWF)/44.1kHz
Registrazione a 16 bit
•
Utilizzando batterie alcaline (EVOLTA)
Condizioni di utilizzo
UNI MIC (microfono incorporato direzionale) di ingresso
Alimentazione phantom non utilizzata
WAV stereo (BWF) /44.1kHz
Registrazione a 16 bit
MIC/LINE IN presa/ingresso microfonico
Alimentazione phantom utilizzata (+48V, 3mA×2 carico)
STEREO WAV (BWF)/44.1kHz
Registrazione a 16 bit
•
Utilizzando batterie NiMH (eneloop)
Condizioni di utilizzo
UNI MIC (microfono incorporato direzionale) di ingresso
Alimentazione phantom non utilizzata
WAV stereo (BWF) /44.1kHz
Registrazione a 16 bit
Tempo di
funzionamento
Tempo di
funzionamento
Tempo di
funzionamento
Circa 12 ore
Circa 6 ore
Circa 2 ore
45 minuti
Circa 1 ore
Circa 3 ore
30 minuti
MIC/LINE IN presa/ingresso microfonico
Alimentazione phantom utilizzata (+48V, 3mA×2 carico)
STEREO WAV (BWF)/44.1kHz
Registrazione a 16 bit
•
Utilizzando batterie agli ioni di litio (Energizer Ultimate Lithium)
Condizioni di utilizzo
UNI MIC (microfono incorporato direzionale) di ingresso
Alimentazione phantom non utilizzata
WAV stereo (BWF) /44.1kHz
Registrazione a 16 bit
MIC/LINE IN presa/ingresso microfonico
Alimentazione phantom utilizzata (+48V, 3mA×2 carico)
STEREO WAV (BWF)/44.1kHz
Registrazione a 16 bit
NO TA
Quando si utilizza l’alimentazione phantom, il tempo di funzionamento potrebbe essere ridotto a seconda del microfono in uso.
8
Tempo di ricarica (unità spenta)
•
Tramite USB: circa 10 ore
•
Utilizzando PS-P520E: circa 4 ore 30 minuti
8
Dimensioni
80 x 155,7 x 35 mm (larghezza × altezza × profondità, sporgenze escluse)
8
Peso
425 g / 375 g (batterie incluse/batterie escluse)
8
Temperatura di esercizio
0°C–40°C
•
Le illustrazioni in questo manuale potrebbero differire in parte dal prodotto
reale.
•
Disegno e aspetto esterno possono essere modificati senza preavviso per
migliorare il prodotto.
•
Le specifiche dettagliate sono disponibili nel manuale di riferimento.
Circa 2 ore
15 minuti
Tempo di
funzionamento
Circa 7 ore
Circa 3 ore
30 minuti
TASCAM DR-100MKIII
81
Page 82

TASCAM DR-100MKIII
82
Page 83

取扱説明書
安全にお使いいただくために
製品を安全に正しくお使いいただき、あなたや他の人々へ
の危害や財産への損害を未然に防止するために、以下の注
意事項をよくお読みください。
以下の内容を無視して誤った取り扱
いをすると、人が死亡または重傷を
警告
V
P
ACアダプ
ターの電源
プラグをコ
ンセントか
ら抜く
N
指示
=
禁止
負う可能性が想定される内容を示し
ています。
万一、異常が起きたら
煙が出たり、変なにおいや音がするときは
機器の内部に異物や水などが入ったときは
この機器を落としたり、カバーを破損したと
きは
すぐに機器本体の電源を切り、必ずACアダプ
ターの電源プラグをコンセントから抜いてく
ださい。異常状態のまま使用すると、火災・
感電の原因となります。
販売店またはティアック修理センター(巻末
に記載)に修理をご依頼ください。
ACアダプターの電源プラグにほこりをためな
い
ACアダプターの電源プラグとコンセントの間
にゴミやほこりが付着すると、火災・感電の
原因となります。定期的(年1回くらい)に
ACアダプターの電源プラグを抜いて、乾いた
布でゴミやほこりを取り除いてください。
ACアダプターのコードを傷つけない
ACアダプターのコードの上に重い物を載せ
たり、コードを壁や棚との間に挟み込んだり、
本機の下敷きにしない
ACアダプターのコードを加工したり、無理に
曲げたり、ねじったり、引っ張ったり、熱器
具に近づけて加熱したりしない
コードが傷んだまま使用すると火災・感電の
原因となります。
万一、ACアダプターのコードが破損したら(芯
線の露出、断線など)、販売店またはティアッ
ク修理センター(巻末に記載)をご依頼くだ
さい。
別売のACアダプターや電源コードを他の機器
に使用しない
故障、火災、感電の原因となります。
交流100ボルト以外の電圧で使用しない
この機器を使用できるのは日本国内のみです。
表示された電源電圧(交流100ボルト)以外
の電圧で使用しないでください。また、船舶
などの
直流(DC)電源には接続しないでくだ
さい。火災・感電の原因となります。
この機器の隙間などから内部に金属類や燃え
やすい物などを差し込んだり、落としたりし
ない
火災・感電の原因となります。
航空機の離着陸時には使用しない
航空機の運航の安全に支障を及ぼす恐れがあ
るため、離着陸時の使用は航空法令により制
限されていますので、離着陸時は本機の電源
をお切りください。
以下の内容を無視して誤った取り扱
いをすると、人が死亡または重傷を
警告
V
Y
分解禁止
V
P
ACアダプ
ターの電源
プラグをコ
ンセントか
ら抜く
N
指示
=
禁止
=
禁止
O
禁止
負う可能性が想定される内容を示し
ています。
この機器のカバーは絶対に外さない
カバーを外す、または改造すると、火災・感
電の原因となります。
内部の点検・修理は販売店またはティアック
修理センター(巻末に記載)にご依頼ください。
この機器を改造しない
火災・感電の原因となります。
以下の内容を無視して誤った取り扱
いをすると、人が傷害を負う可能性
が想定される内容および物的損害の
注意
みの発生が想定される内容を示して
います。
移動させる場合は、電源をオフ(スタンバイ
状態)にし、必ずACアダプターの電源プラグ
をコンセントから抜き、外部の接続コードを
外す
コードが傷つき、火災・感電の原因や、引っ掛
けてけがの原因になることがあります。
旅行などで長期間この機器を使用しないときや
お手入れの際は、安全のため必ずACアダプター
の電源プラグをコンセントから抜く
通電状態の放置やお手入れは、漏電や感電の
原因となることがあります。
オーディオ機器を接続する場合は、各々の機
器の取扱説明書をよく読み、電源を切り、説
明にしたがって接続する
また、接続は指定のコードを使用する
電源を入れる前には、音量を最小にする
突然大きな音が出て、聴力障害などの原因とな
ることがあります。また、モニター機器などを
破損する原因となることがあります。
この機器はコンセントの近くに設置し、ACア
ダプターの電源プラグは簡単に手が届くよう
にする
異常が起きた場合は、すぐにACアダプターの
電源プラグをコンセントから抜いて、完全に
電源が切れるようにしてください。
この機器には、別売の専用ACアダプターや電
源コードを使用する
それ以外の物を使用すると、故障、火災、感
電の原因となります。
ぐらついた台の上や傾いた所など不安定な場
所に置かない
湿気やほこりの多い場所に置かない。風呂、
シャワー室では使用しない
調理台や加湿器のそばなど油煙や湯気が当た
る場所に置かない
火災・感電やけがの原因となることがありま
す。
ACアダプターの電源プラグを抜くときは、AC
アダプターの電源コードを引っ張らない
コードが傷つき、火災・感電の原因となるこ
とがあります。
必ずプラグを持って抜いてください。
濡れた手でACアダプターの電源プラグを抜き
差ししない
感電の原因となることがあります。
以下の内容を無視して誤った取り扱
いをすると、人が傷害を負う可能性
が想定される内容および物的損害の
注意
V
V
注意
みの発生が想定される内容を示して
います。
5年に1度は、機器内部の掃除を販売店または
ティアック修理センター(巻末に記載)にご
相談ください。
内部にほこりがたまったまま、長い間掃除を
しないと火災や故障の原因となることがあり
ます。特に、湿気の多くなる梅雨期の前に行
うと、より効果的です。なお、掃除費用につ
いては、ご相談ください。
充電式電池の取り扱いについて
本製品は、内蔵バッテリーにリチウムイオン充電
池を使用しています。誤って使用すると、発熱、
発火、液漏れなどの恐れがあり、それを避けるた
め、以下の注意事項を必ず守ってください。
充電式電池に関する警告
警告
V
充電式電池の液が漏れたときは、素手で液を
さわらない
液漏れが発生したときは、ティアック修理セ
ンター(巻末に記載)にご相談ください。
液が目に入ったときには失明の恐れがあります
N
ので、目をこすらずにすぐにきれいな水で洗っ
指示
たあと、ただちに医師にご相談ください。
液が体や衣服に付いたときは皮膚のけが・やけ
どの原因になるので、きれいな水で洗い流した
あと、ただちに医師にご相談ください。
指定以外のACアダプターとUSBケーブルを
使用しない
家庭用AC電源で使用するときや充電を行うと
きは、必ず指定のACアダプターとUSBケー
ブルを使用してください。 指定以外の物を使
用すると過熱により、けが・やけど・火災・
=
汚損や電池の破裂、液漏れの原因になります。
禁止
火の中に入れたり、火のそばや炎天下などで
充電したり、放置したりしない
電池の破裂、液漏れにより、火災・けがや周囲
を汚損する原因となることがあります。
分解しない
感電の原因になります。充電式電池の交換・
点検・修理は、お買い上げの販売店またはティ
Y
アック修理センター(巻末に記載)にご依頼
ください。ただし、廃棄時には取扱説明書の
分解禁止
手順にしたがって内蔵の電池を取り外してリ
サイクルにご協力ください。
単3形電池の取り扱いについて
本機は、単3形電池を使用しています。誤って使用すると、
発熱、発火、液漏れなどを避けるため、以下の注意事項を
必ず守ってください。
単3形乾電池に関する警告
警告
V
単3形乾電池は絶対に充電しない
=
破裂、液漏れにより、火災・けがの原因とな
ります。
禁止
単3形電池に関する警告
警告
V
単3形電池を入れるときは、極性表示(プラス
とマイナスの向き)に注意し、電池ケースに
表示されている通りに正しく入れる
N
間違えると電池の破裂、液漏れにより、火災・
強制
けがや周囲を汚損する原因となることがあり
ます。
長時間使用しないときは単3形電池を取り出し
ておく
液が漏れて火災・けが、周囲を汚損する原因
となることがあります。もし液が漏れた場合
N
は、電池ケースに付いた液をよく拭き取っ
強制
てから新しい電池を入れてください。また、
万一漏れた液が身体に付いたときは、水でよ
く洗い流してください。
指定以外の単3形電池は使用しない
新しい電池と古い電池、または種類の違う単3
形電池を混ぜて使用しない
破裂、液漏れにより、火災・けがや周囲を汚
損することがあります。
炎天下の車内や暖房器具のそばなど、温度が
=
高くなる所で保管しない
本体の変形によるショートや発火、故障、電池
禁止
の劣化の原因となります。
電源を入れたまま長時間、直接触れて使用し
ない
本機の温度の高い部分に長時間、直接触れて
いると低温やけどの原因になります。
単3形電池に関する注意
注意
V
金属製の小物類と一緒に携帯、保管しない
ショートして液漏れや破裂などの原因となる
ことがあります。
=
電池を熱したり、火または水に投げ入れたり
禁止
しない
電池の破裂、液漏れにより、火災・けがや周
囲を汚損する原因となることがあります。
分解しない
Y
電池内の酸性物質により、皮膚や衣服を損傷
する恐れがあります。
分解禁止
保管や廃棄をする場合は、他の電池や金属の
物と接触しないようにテープなどで端子を絶
縁してください。
V
使い終わった電池は、電池に記載された廃棄
注意
方法、もしくは各市町村の廃棄方法にしたが
って捨ててください。
TASCAM DR-100MKIII
83
Page 84

目次
Li-ion
安全にお使いいただくために .............................3
リファレンスマニュアルについて......................4
本製品の構成 ........................................................4
リチウムイオン充電池のリサイクル ..................4
内蔵バッテリーの取り外し方 ..........................4
SDカードについて ..............................................5
取り扱い上の注意 .............................................5
設置上の注意 ........................................................5
結露について ........................................................5
製品のお手入れ ....................................................5
ユーザー登録について .........................................5
アフターサービス.................................................5
各部の名称 ............................................................5
トップパネル .....................................................5
フロントパネル .................................................6
リアパネル .........................................................6
左サイドパネル .................................................6
右サイドパネル .................................................6
ボトムパネル .....................................................6
基本操作 ................................................................6
ホーム画面について..........................................6
メニューの基本的な操作方法 ..........................6
準備 ........................................................................7
電源の準備 .........................................................7
SDカードを挿入する .......................................7
誤操作を防止するホールド機能 ......................7
電源をオンにする .............................................7
電源をオフ(スタンバイ状態)にする ...........7
言語を選択する .................................................8
日時を設定する .................................................8
SDカードをフォーマット(初期化)する ........8
録音する ................................................................8
入力レベルを調節する ......................................9
再生する ................................................................9
ファイルを消去する .............................................9
パソコンと接続する .............................................9
こんなことをするには ......................................10
メニューリスト .................................................12
ファンクションメニューリスト ......................13
メッセージ一覧 .................................................14
トラブルシューティング ..................................15
仕様 .....................................................................15
定格 ..................................................................15
入出力 ..............................................................15
オーディオ性能 ..............................................16
録音時間 ..........................................................16
一般 ..................................................................16
ここに記載されております製品に関する情報、諸デ
ータは、あくまで一例を示すものであり、これらに
関します第三者の知的財産権、およびその他の権利
に対して、権利侵害がないことの保証を示すもので
はございません。従いまして、上記第三者の知的財
産権の侵害の責任、またはこれらの製品の使用によ
り発生する責任につきましては、弊社はその責を負
いかねますのでご了承ください。
第三者の著作物は、個人として楽しむなどのほかは、
著作権法上権利者に無断で使用できません。装置の
適正使用をお願いします。
弊社では、お客様による権利侵害行為につき一切の
責任を負担致しません。
万一の誤消去や本機の故障などによるデータの消
滅や破損に備え、大切な録音内容をパソコンなど
にバックアップすることをおすすめします。
こ の たび は、TASCAM Linear PCM Recorder
DR-100MKIIIをお買い上げいただきまして、誠に
ありがとうございます。
ご使用になる前に、この取扱説明書をよくお読み
になり、正しい取り扱い方法をご理解いただいた
上で、末永くご愛用くださいますようお願い申し
上げます。お読みになったあとは、いつでも見ら
れる所に保管してください。
また取扱説明書は、TASCAMのウェブサイト
(http://tascam.jp/)からダウンロードするこ
とができます。
本製品はアナログ・デバイセズ社製16/32ビッ
ト Blackfin®組み込みプロセッサを搭載し製品
のデジタル信号処理と制御を行っています。
このBlackfin®プロセッサを搭載することによ
り製品の高性能化・省電力化を実現しています。
リファレンスマニュアルについて
取扱説明書(本書)では、本機の基本機能につい
て解説しています。全ての機能の詳細については、
リファレンスマニュアルをご覧ください。
リファレンスマニュアルは、TASCAMのウェブ
サイト(http://tascam.jp/)からダウンロード
することができます。
本製品の構成
本製品の構成は、以下の通りです。
梱包箱と梱包材は、後日輸送するときのために保
管しておいてください。
付属品が不足している場合や輸送中の損傷が見ら
れる場合は、タスカムカスタマーサポート(巻末
に記載)までご連絡ください。
本体 x1
0
デジタル入力変換ケーブル x1
0
取扱説明書(本書、保証書付き)x1
0
リチウムイオン充電池のリサイク ル
本機には、内蔵バッテリーとしてリチウムイオン
充電池を使用しています。
不要になった電池は、貴重な資源を守るために廃
棄しないで充電式電池リサイクル協力店へお持ち
ください。
ご不明な場合は、弊社のタスカム カスタマーサ
ポート(巻末に記載)までお問い合わせください。
注意
製品を廃棄するとき以外は、絶対に本体を分解
i
しないでください。
充電式電池の交換は、ティアック修理センター
i
(巻末に記載)に依頼してください。
内蔵バッテリーの取り外し方
内蔵バッテリーを取り外す場合は、電源をオンに
しても動作しなくなるまで内蔵バッテリーを放電
させてください。
内蔵バッテリーを放電させるときは、外部電
0
源と単3形電池を外し、 電源/画面設定 画面の
自動電源オフ 項目を 無効 に設定してください。
本機を分解するには、プラスドライバー(#0)
0
が必要です。
ボトムパネルのゴム足を剥がす。
1.
ゴム足を剥がした場所のネジ(4箇所)を外す。
2.
ボトムパネルを外す。
3.
バッテリーからのコネクターを外してから、
4.
バッテリーを外す。
コネクター
84
TASCAM DR-100MKIII
Page 85

SDカードについて
本機では、SDカードを使って録音や再生を行い
ます。
使用 できる カード は、64MB ~ 2GBのSDカー
ド、4GB ~ 32GBのSDHCカ ー ド、 お よ び
48GB ~ 128GBのSDXCカードです。
TASCAMのウェブサイト(http://tascam.jp/)
には、当社で動作確認済みのSDカードのリスト
が掲載されていますので、ご参照ください。もし
くは、タスカム カスタマーサポートまでお問い
合わせください。
取り扱い上の注意
SDカードは、精密にできています。SDカードの
破損を防ぐため、取り扱いに当たって以下の点を
ご注意ください。
極端に温度の高い、あるいは低い場所に放置し
0
ないこと。
極端に湿度の高い場所に放置しないこと。
0
濡らさないこと。
0
上に物を乗せたり、ねじ曲げたりしないこと。
0
衝撃を与えないこと。
0
録音、再生状態やデータ転送などSDカードに
0
アクセス中に抜き差しはしないこと。
持ち運ぶ際、メモリーカードケースなどに入れ
0
て運ぶこと。
設置上の注意
動作保証温度は、摂氏0度~ 40度です。
0
次のような場所に設置しないでください。音質
0
悪化の原因、または故障の原因となります。
振動の多い場所や不安定な場所
長時間直射日光が当たる場所
暖房機器のそばなど極端に温度が高い場所
極端に温度の低い場所
湿気の多い場所や風通しが悪い場所
ほこりの多い場所
直接雨などの水が当たる場所
本機の近くにパワーアンプなどの大型トランス
0
を持つ機器がある場合にハム(うなり)を誘導
することがあります。この場合は、この機器と
の間隔や方向を変えてください。
テレビやラジオの近くで本機を動作させると、
0
テレビ画面に色むらが出る、またはラジオから
雑音が出ることがあります。この場合は、本機
を遠ざけて使用してください。
携帯電話などの無線機器を本機の近くで使用す
0
ると、着信時や発信時、通話時に本機から雑音
が出ることがあります。この場合は、それらの
機器を本機から遠ざけるか、もしくは電源を
切ってください。
放熱をよくするために、本機の上には物を置か
0
ないでください。
パワーアンプなど熱を発生する機器の上に本機
0
を置かないでください。
結露について
本機を寒い場所から暖かい場所へ移動したときや、
寒い部屋を暖めた直後など、気温が急激に変化す
ると結露を生じることがあります。結露したとき
は、約1 ~ 2時間放置してから電源を入れてお使
いください。
製品のお手入れ
製品の汚れは、柔らかい乾いた布で拭いてくださ
い。化学ぞうきん、ベンジン、シンナー、アルコー
ルなどで拭かないでください。表面を傷める、ま
たは色落ちさせる原因となります。
ユーザー登録について
TASCAM のウェブサイトにて、オンラインでの
ユーザー登録をお願い致します。
http://tascam.jp/support/registration/
アフターサービス
この製品には、保証書が添付(巻末に記載)さ
0
れています。大切に保管してください。万一、
販売店印の捺印やご購入日の記載がない場合は、
無料修理保証の対象外になりますので、ご購入
時のレシートなどご購入店・ご購入日が確認で
きるものを一緒に保管してください。
保証期間は、お買い上げ日より1年です。保証
0
期間中は、記載内容によりティアック修理セン
ター(巻末に記載)が修理いたします。
保証期間経過後、または保証書を提示されない
0
場合の修理については、お買い上げの販売店ま
たはティアック修理センター(巻末に記載)に
ご相談ください。修理によって機能を維持でき
る場合は、お客様のご要望により有料修理いた
します。
万一、故障が発生した場合は使用を中止し、お
0
買い上げの販売店またはティアック修理セン
ター(巻末に記載)までご連絡ください。
修理を依頼される場合は、次の内容をお知らせ
ください。
なお、本機の故障、もしくは不具合により発生
した付随的損害(録音内容などの補償)の責に
ついては、ご容赦ください。
本機を使ったシステム内の記録メディアなどの
記録内容を消失した場合の修復に関しては、補
償を含めて当社は責任を負いかねます。
型名、型番(DR-100MKIII)
i
製造番号(Serial No.)
i
故障の症状(できるだけ詳しく)
i
お買い上げ年月日
i
お買い上げ販売店名
i
お問い合わせ先については、巻末をご参照くだ
0
さい。
本機を廃棄する場合に必要となる収集費などの
0
費用は、お客様のご負担になります。
各部の名称
注意
ヘッドホンや外部機器のプラグを接続するとき
や使用中には、プラグに無理な力を加えないで
ください。特に標準wミニ変換プラグを使う
場合は思わぬ力が加わり、機器を破損してしま
う恐れがありますのでご注意ください。
トップパネル
1UNIMICL / R(内蔵指向性ステレオ
マイク)
2OMNIMIC L / R(内蔵無指向性ステ
レオマイク)
3内蔵スピーカー(モノラル)
4CHG(チャージ)インジケーター
5ディスプレー
6HOMEボタン
7LIMITERスイッチ
8Fnボタン
9MENUボタン
0.ボタン
q / ボタン
wSTOP[8]ボタン
ePLAY/PAUSE[7/9]ボタン
TASCAM DR-100MKIII
85
Page 86

rINPUTLEVEL選択スイッチ
tMICPADスイッチ
yENTER/MARKボタン
uホイール
iREC[0] ボタン/ RECインジケー
ター
フロントパネル
oDIGITALIN端子
pEXTIN端子
リアパネル
aレベルインジケーター
sREMOTE端子
dストラップホルダー
fMIC/ LINE IN L / R端 子(XLR /
TRS)
gPHANTOMスイッチ
左サイドパネル
h (電源)ボタン
jUSB端子
Micro-BタイプのUSBポートです。
USB規格に準拠したケーブルを使用し、パソ
コンとのマスストレージ接続やACアダプター
による給電ができます。
kLINEOUT端子
l (ヘッドホン)端子
; (ヘッドホン/スピーカー)LEVEL
ボリューム
zHOLDスイッチ
x (スピーカー)スイッチ
右サイドパネル
c電池ケース(単3形電池)
vSDカードスロット
b入力レベルノブ
ボトムパネル
n三脚取り付け用穴(1 / 4インチ)
mRECインジケーター
基本操作
ホーム画面について
[停止中/再生中]
[録音待機中/録音中]
1入力ソース表示
2入力チャンネル表示
3ローカットフィルター状態表示
4ファントム電源供給の状態表示
5電源供給の状態表示
6ファイル形式状態表示
7再生速度/ループ再生状態表示
8トランスポートの状態表示(停止中/再
生中)
9ループ再生のIN点/ OUT点表示
0レベルメーター表示
q再生フォルダー名表示
w再生ファイル名表示
e再生時間表示/再生残時間表示
r再生位置表示
tピーク値のデシベル(dB)表示
y録音フォーマット表示
u各種録音機能状態表示
iトランスポートの状態表示(録音待機中
/録音中)
oレベルメーター表示
p録音フォルダー名表示
a録音ファイル名表示
s録音時間表示/録音可能時間表示
d録音位置表示
f録音レベルのピーク値のデシベル(dB)
表示
g入力レベル表示
メニューの基本的な操作方法
メニュー画面を表示する
1.
MENUボタンを押します。
メニュー項目を選ぶ
2.
ホイールを使って項目を選択し、ENTER/
MARKボタンを押すと各種設定項目を表示
します。
設定項目を選ぶ
3.
ホイールを使って項目を選択し、ENTER/
MARKボタンを押すと各項目の設定値を表
示します。
TASCAM DR-100MKIII
86
Page 87

メモ
設定値がオン/オフ切り換えのみの場合は、設
i
定値を選択せずに変更することができます。
前の画面に戻るには、.ボタンを押してくだ
i
さい。
設定値を選ぶ
4.
ホイールを使って設定を変更し、ENTER/
MARKボタンを押して確定します。
メモ
操作を中止するには、.ボタンを押してくだ
i
さい。
ホーム画面に戻るには、HONEボタンを押し
i
てください。
準備
電源の準備
内蔵バッテリーで使用する
お買い上げ後、はじめて使用するときや長期間使
用しなかったときは、充電をしてからご使用くだ
さい。
内蔵バッテリーを充電するには
0
別 売 の 専 用ACア ダプ タ ー(TASCAM PSP520E)、または本機のUSB端子とパソコンを
USBケーブル(Type A - Micro B)で接続し、
内蔵バッテリーを充電してください。
充電中も本体の使用は可能です。
ACコンセント
Micro B
USBプラグ
内蔵バッテリーの充電状況は、CHG(チャージ)
インジケーターの点灯状態で確認することがで
きます。
オレンジ色に点灯 :充電中
緑色に点灯 :充電完了
単3形電池で使用する
電池ケースのカバーをボトムパネル側に引い
1.
てから、カバーを開きます。
電池ケース内の¥と^の表示に合わせて、
2.
単3形電池を2本セットします。
電池ケースのカバーを閉めます。
3.
TASCAM PS-P520E(別売)
電池の残量表示や正常動作に必要な最低残量の
0
識別を正しく行うために、使用する電池の種類
を設定してください(初期値:アルカリ乾電池)。
(→ 90ページ「こんなことをするには」)
SDカードを挿入する
SDカードスロットのカバーを開きます。
1.
SDカードを図の方向にカチッと音がするま
2.
で差し込みます。
SDカードスロットのカバーを閉めます。
3.
注意
使用で き るSDカ ー ド は、SD/SDHC/SDXC
i
規格に対応したカードです。
TASCAMの ウ ェ ブ サ イ ト(http://tascam.
i
jp/)には、当社で動作確認済みのSDカードの
リストが掲載されています。
誤操作を防止するホールド機能
HOLDスイッチを「LEVEL」または「ALL」に
するとホールド状態になり、誤操作を防止できま
す。
ALL : 入力レベルノブ操作と全てのボタン
LEVEL:入力レベルノブ操作を無視
OFF :ホールド機能オフ
操作を無視
電源をオンにする
HOLDスイッチが「OFF」であることを確認し、
(電源)ボタンを画面が表示されるまで押し
続けてください。
本機が起動してホーム画面が表示されます。
電源をオフ(スタンバイ状態)にする
(電源)ボタンを押し、画面が消えるまで押
し続けます。
メモ
録音待機中/録音中は、電源をオフ(スタンバ
i
イ状態)にすることはできません。
停止中はオートパワーセーブ機能(自動電源制
i
御機能)が働き、電源がオフ(スタンバイ状態)
になります。(→ 90ページ「こんなことを
するには」)
TASCAM DR-100MKIII
87
Page 88

言語を選択する
お買い上げ後、はじめて電源をオンにしたとき、
メニューやメッセージに使用する言語を設定する
言語選択 画面が表示されます。
ホイールを回してカーソルを移動し、言語を
1.
選択します。
選択肢
ENGLISH :英語で表示
日本語 :日本語で表示
FRANÇAIS :フランス語で表示
ESPAÑOL :スペイン語語で表示
DEUTSCH :ドイツ語で表示
ITALIANO :イタリア語で表示
選択が完了したら、ENTER/MARKボタン
2.
を押して確定します。
メモ
システム設定 画面の 言語選択 項目でも、再設
定できます。(→ 90ページ「こんなことを
するには」)
日時を設定する
お買い上げ後、はじめて電源をオンにしたとき、
日時設定がリセットされているとき、日時を設定
する 日時設定 画面が表示されます。
ホイールを回してカーソルを設定する「年」
1.
/「月」/「日」/「時」/「分」/「秒」
に移動し、ENTER/MARKボタンを押します。
ホイールを回して値を変更し、ENTER/
2.
MARKボタンを押します。
ホイールを回してカーソルを「 OK 」に合わせ、
3.
ENTER/MARKボタンを押すと確定します。
メモ
日時設定は、メニューからも変更できます。(→
90ページ「こんなことをするには」)
SDカードをフォーマット(初期 化)する
電源をオンしたとき、フォーマットされていない
カードが挿入されていると以下のようなメッセー
ジが表示されます。
ENTER/MARKボタンを押して、フォーマット
を実行してください。
注意
フォーマットするとSDカードの全てのデータ
が消去されます。
データをパソコンにバックアップしてから
フォーマットを実行してください。
メモ
システム設定 画面の カード初期化 項目でも、
フォーマットを実行できます。(→ 90ペ ー
ジ「こんなことをするには」)
録音する
本機では、録音フォーマットやサンプリング周波
数、リミッターやレベルコントロール、ローカッ
トフィルターなどの機能を設定して、より良い音
質で録音できます。ここでは、UNIMICL / R(初
期値)を使った録音について説明します。
その他の機能の説明は、リファレンスマニュアル
をご覧ください。
録音待機状態にする
1.
REC [0] ボタンを押すとRECインジケー
ターが点滅し、録音待機状態になります。
入力レベルを調節する
2.
録音待機中および録音中は、入力レベルを調
節することができます。(→ 89ペ ージ「入
力レベルを調節する」)
録音を開始する
3.
録音待機中にREC [0] ボタンを押すとREC
インジケーターが点灯に切り換わり、録音を
開始します。
録音を終了する
4.
STOP [8] ボタンを押すと、録音を終了し
ます。
メモ
録音中にREC [0] ボタンを押すと、録音が一
i
時停止します。
録音を再開する場合は、再度REC [0] ボタン
i
を押します。
TASCAM DR-100MKIII
88
Page 89

入力レベルを調節する
入力音が大きすぎて歪んだり、または小さすぎて
ノイズに埋もれてしまったりするのを避けるため
に、録音を開始する前に入力レベルを適切なレベ
ルに調節する必要があります。
適切なレベルに調節する
INPUTLEVLE選択スイッチを「STEREO」に
します。
レベルメーターを見ながら−12dBを目安に、入
力レベルノブを回して入力レベルを調節します。
入力音が最も大きいレベル(ピークレベル)であ
るときにレベルインジケーターの「PEAK」が点
灯しない範囲で、できるだけ大きなレベルに調節
します。
レベルインジケーター
入力レベルをいっぱいに下げてもレベルインジ
ケーターの「PEAK」が点灯する場合は、MIC
PADスイッチを「ON」にして調節し直してくだ
さい。
それでもレベルインジケーターの「PEAK」が点
灯する場合は、マイクと音源との距離や向きを調
節してみてください。
再生する
再生する
PLAY/PAUSE[7/9] ボタンを押すと、再生
を開始します。
一時停止する
再生中にPLAY/PAUSE[7/9] ボタンまたは
STOP [8] ボタンを押すと、一時停止します。
メモ
再度PLAY/PAUSE[7/9] ボタンを押すと、
再生を継続します。
停止する
一時停止中にSTOP [8] ボタンを押すと、ファ
イルの先頭に戻ります。
早戻し/早送りする(サーチ)
ホーム画面で停止中または再生中に.ボタンま
たは/ボタンを押し続けると、早戻し/早送り
サーチ再生を行います。
ボタンから手を離すと、停止または再生を継続し
ます。
ファイルを選択する(スキップ)
停止中または再生中に.ボタンを押すと1つ前、
/ボタンを押すと次のファイルへ移動します。
内蔵スピーカーで聴く
(スピーカー)スイッチを「ON」にします。
ヘッドホンで聴く
(ヘッドホン)端子にヘッドホンを接続します。
メモ
ヘッドホンを接続したとき、 (スピーカー)
スイッチが「ON」でも内蔵スピーカーからは
音は出ません。
音量を調節する
内蔵スピーカーまたはヘッドホンから出力される
音量は、 LEVELボリュームを使って調節し
ます。
ファイルを消去する
録音したオーディオファイルを消去します。
ファンクション画面を表示する
1.
Fnボタンを押します。
消去を選ぶ
2.
ホイールを使って ファイル消去 項目を選択
し、ENTER/MARKボタンを押します。
消去を実行する
3.
ホイールを使って「 はい 」を選択し、
ENTER/MARKボタンを押すと消去が実行
され、ホーム画面に戻ります。
中止する場合は「 いいえ 」を選択し、
ENTER/MARKボタンを押すと 各種機能 画
面に戻ります。
注意
消去したファイルは、元に戻せませんのでご注
意ください。
パソコンと接続する
本機のSDカードの中のオーディオファイルをパ
ソコンに取り出したり、パソコンの中のオーディ
オファイルを本機に取り込んだりすることができ
ます。
パソコンとUSB接続する
USBケーブルで接続する
1.
電源がオフ(スタンバイ状態)のときは、オ
ンにしてください。
接続する
2.
システム設定 画面の USBストレージ 項目を
選択し、ENTER/MARKボタンを押します。
MENU
w システム設定 w USBストレージ
ホイールで「 はい 」を選択し、 ENTER/
MARKボタンを押すと接続します。
中止する場合は「 いいえ 」を選択し、
ENTER/MARKボタンを押します。
パソコンのディスプレー上に本機が“DR-
3.
100MKIII”(本機でフォーマットした場合)
というボリュームラベルの外部ドライブとし
て表示されます。
パソコンへファイルを取り出す、パソコン
からファイルを取り込む
前項目で表示された“DR-100MKIII”ドライ
ブをクリックすると、“MUSIC”フォルダーと
“UTILITY”フォルダーが表示されます。
パソコンへファイルを取り出す場合は、
“MUSIC”フォルダーを開き、パソコンに取り出
したいファイルを任意の場所にドラッグ&ドロッ
プします。
パソコンからファイルを取り込む場合は、パソコ
ンの任意のオーディオファイルを“MUSIC”フォ
ルダーにドラッグ&ドロップします。
パソコンとの接続を解除する
パソコンから本機を正しい手順で切り離し、本機
のENTER/MARKボタンを押すとホーム画面に
戻ります。
パソコン側での接続解除方法については、パソコ
ンの取扱説明書をご覧ください。
TASCAM DR-100MKIII
89
Page 90

こんなことをするには
ボタン名称は、MENUのように表記します。
0
メニュー操作については、ホーム画面が表示されていることを前提として説明します。また、「MENU
0
ボタンを押し、メニュー項目を選択し、設定項目を選択する」を「MENU w メニュー項目 w 設定項
目」のように表記します。
機能の詳細は、リファレンスマニュアルを参照してください。
0
分類 こんなことをしたい/説明 操作方法、使用するボタン
録音する
入力設定
入力レベル
入力ソースを選択する
お好みや用途に応じて入力ソースを選択
することができます。
ファントム電源の供給が必要なコンデンサ
マイクを使う
ファントム電源の電圧を設定することが
できます。
電源の供給が必要な小型のコンデンサマイ
ク(プラグインパワー型コンデンサマイク)
を使う
プラグインパワーを供給することができ
ます。
MSマイクを使う
MS方式のステレオマイクの信号を通常
のステレオ信号に変換します。
空調ノイズなどが気になる
ローカットフィルターを使うことで空調
ノイズなどを低減することができます。
モノラル録音する
入力レベルを調節する 入力レベルノブ
入力レベルを左右個別に調節したいとき
は、INPUTLEVEL選択スイッチを「L」
または「R」に合わせてください。
音が歪まないように録音する
入力レベルノブを絞り切ってもメーター
が振り切ってしまう。
突発的な過大入力音による歪みを避ける。
(リミッター機能)
入力音に応じて自動的に録音レベルを調
節する。(オートレベルモード)
入力音の最大レベルに応じて入力レベル
を自動的に下げる。(ピークリダクション
モード)
MENU w 入出力設定 w
入力ソース
PHANTOMスイッチを「ON」に
する
MENU w 入出力設定 w
ファントム電圧
MENU w 入出力設定 w
プラグインパワー
MENU w 入出力設定 w
MSデコード
MENU w 入出力設定 w
ローカット
MENU w 録音設定 w
ファイル形式
INPUTLEVEL選択スイッチ
MICPADスイッチを「ON」にす
る
LIMITERスイッチを「ON」にす
る
MENU w 入出力設定 w RECレベ
ル制御 w オートレベル
MENU w 入出力設定 w RECレベ
ル制御 w ピークリダクション
分類 こんなことをしたい/説明 操作方法、使用するボタン
録音品質を選択する
MENU w 録音設定 w
フォーマット
MENU w 録音設定 w サンプル
MENU w 入出力設定 w
A/D フィルタ
MENU w 入出力設定 w
デュアルADC
MENU w 録音設定 w
自動分割
Fn w 分割 w 分割
Fn w 分割 w マーク分割
MENU w 録音設定 w オート
レック w モード w レベル
MENU w 録音設定 w
プリレック
MENU w 録音設定 w デュアル
w モード w レベル
MENU w 録音設定 w デュアル
w モード w フォーマット
(スピーカー)スイッチを「ON」
にする
(ヘッドホン/スピーカー)
LEVELボリューム
MENU w 入出力設定 w
出力アッテネータ w ヘッドホン
. / /
録音する
再生する
基本設定
その他
お好みや用途に合わせて録音の音質を選
ぶことができます。
更に高品質で録音するために
ADCの音質を変える。
S/N性能をより良くする。
録音ファイルの保存先を変更する MENU w ファイルブラウザ
録音中に新規ファイルに切り換えて録音を継続する(ファイルインクリメント
機能)
手動でファイルをインクリメントする 録音中に/
一定時間間隔で自動的にファイルをイン
クリメントする
録音済みの選択したファイルを分割する
手動でファイルを分割する。
(ファイル分割機能)
マークを付けた位置で一括分割する。
(マーク分割機能)
録音を自動で開始する(オートレック機能)
入力信号のレベルを検出して録音を開始
させることができます。
ファイルの先頭の音が欠けないように録音
する(プリレック機能)
最大2秒手前から録音することができま
す。
バックアップ録音する
設定した録音レベルより12dB低いレベ
ルでバックアップ録音することができま
す。
WAVとMP3を同時に録る
WAVファイルとMP3を同時に録音する
ことができます。
スピーカーで再生音を聴く
ヘッドホン、スピーカーの音量を調節する
ヘッドホンによって聴こえ方(音量)が
異なる場合があります。
ご自分のヘッドホンに合わせてください。
再生ファイルを変更する
前後のファイルを選ぶ
一覧から選ぶ MENU w ファイルブラウザ
TASCAM DR-100MKIII
90
Page 91

分類 こんなことをしたい/説明 操作方法、使用するボタン
再生位置を移動する
再生する
ファイル
マーク
音を出しながら位置を移動する。
音を出さずに移動する。 ホイール
繰り返し再生する
1つのファイルまたは一区間を繰り返し
再生することができます。(ループ再生機
能)
再生速度を変更する
ゆっくり再生する、または速く再生させ
ることができます。(VSA再生機能)
ファイルを保護する
選択されているファイルを保護する Fn w プロテクト変更
ファイルを選んで保護する
ファイルを消去する
選択されているファイルを消去 Fn w ファイル消去
ファイルを選択して消去
ファイルを一括消去
フォルダーを作る
フォルダーを消去する
ファイル名の形式を変える
ファイル番号をリセットする
ファイル番号をすぐにリセットする
新しくフォルダーを作成するごとにファ
イル番号をリセットする
パソコンと接続してオーディオファイルを
移動する
本機をUSBマスストレージとして使うこ
とができます。
手動でマークを付ける
録音中または再生中に手動でマークを付
けることができます(停止中は付けられ
ません)。
. / /(押し続ける)
Fn w ループ再生
Fn w 可変速再生(VSA)
MENU w ファイルブラウザ w
Fn w プロテクト変更
MENU w ファイルブラウザ w
Fn w ファイル消去
MENU w ファイルブラウザ w
Fn w 全ファイル消去
MENU w ファイルブラウザ w
新しいフォルダ
MENU w ファイルブラウザ w
Fn w フォルダ消去
MENU w システム設定 w
ファイル名形式
MENU w システム設定 w
番号リセット w リセット
MENU w システム設定 w
番号リセット w オン
MENU w システム設定 w
USBストレージ
録音中または再生中にENTER/
MARK
分類 こんなことをしたい/説明 操作方法、使用するボタン
録音中に自動でマークを付ける
設定したレベルを超えたときに付ける
(LEVEL)。
マーク
設定
表示
システム
設定した録音時間に到達したときに付け
る(TIME)。
デジタル入力のトラックの区切りを検出
したときに付ける(DIGITAL)。
レベルインジケーターの「PEAK」 点灯
時に付ける。
マークの位置に移動する
マークの位置に移動する。 ENTER/MARK+. / /
移動するマークを選ぶ。
マークを消す
停止状態でマーク位置に移動し、
ENTER/MARKボタンを押すとそのマー
クを消すことができます。
ファイルごとにマークを一括消去するこ
とができます。
バックライトを消す
ディスプレーの明るさを変える
コントラストを調節する
レベルインジケーターやRECインジケー
ターを消す
ピークレベルを変更する/ホールドする
ホールドされたピークレベルをクリアする
ピークホールド機能の動作モードが「
HOLD 」であるときのみ有効な機能です。
各種情報を見る
SDカードの情報を見ることができます。
ファームウェアバージョンを見ることが
できます。
ファイルの情報を見ることができます。
録音時の設定を見ることができます。
XRIデータ記録機能を「 ON 」にしておく
と、録音時の設定を記録します。
MENU w マーク設定 w
オートマーク w モード
MENU w マーク設定 w
ピークマーク
MENU w マーク設定 w
スキップ対象
ENTER/MARK
MENU w ファイルブラウザ w
Fn w 全マーク消去
MENU w 電源/画面設定 w
バックライト
MENU w 電源/画面設定 w
明るさ
MENU w 電源/画面設定 w
コントラスト
MENU w 電源/画面設定 w
LED
MENU w 電源/画面設定 w
ピークレベル
ホーム画面表示中にFn(押し続け
る)
MENU w システム設定 w
情報表示 w カード
MENU w システム設定 w
情報表示 w ファームウェア
MENU w システム設定 w
情報表示 w ファイル
Fn w ファイル情報
Fn w ファイル情報
MENU w 録音設定 w XRI
TASCAM DR-100MKIII
91
Page 92

分類 こんなことをしたい/説明 操作方法、使用するボタン
MENU w システム設定 w
日時設定
MENU w システム設定 w
言語選択
MENU w システム設定 w
設定初期化
MENU w システム設定 w
カード初期化
HOLD w 「ALL」
MENU w システム設定 w
リモート設定
MENU w 電源/画面設定 w
自動電源オフ
MENU w 電源/画面設定 w
バッテリー w 優先使用
MENU w 電源/画面設定 w
バッテリー w 単3タイプ
REC(押しながら)+
(電源)ボタン
MENU w 録音設定 w
オートトーン
MENU w 入出力設定 w
出力アッテネータ w ライン
設定
システム
操作
電源
その他
日時を変更する
言語選択をする
工場出荷時の設定に戻す
SDカードを初期化する
誤操作を防ぐ
入力レベルの操作を無効にする。 HOLD w 「LEVEL」
入力レベルノブと全てのボタンの操作を
無効にする。
遠隔操作する
使用するリモコンを設定します。
自動で電源をオフする(オートパワーセー
ブ機能)
放置したままにして電池がなくなってし
まうことを防ぎます。
録音中や再生中は自動でオフされません。
長時間動作させる
内蔵バッテリーと単3形電池を両方使用
すると長時間の連続動作が可能になりま
す。内蔵バッテリーと単3形電池のどち
らを優先的に使用するか設定してくださ
い。
残容量を正確に表示するため、使用する
単3形電池の種類を設定してください。
すぐに録音を開始する
電源がオフ(スタンバイ状態)のときに
RECボタンを押しながら (電源)
ボタンを押すと、電源がオンになるとと
もに録音を開始します。
動画ファイルとの位置合わせの準備
録音開始または開始・終了時に自動でトー
ン信号を発音させることができます。こ
のトーン信号を本機で録音するとともに
出力音声をカメラで録音することにより、
動画編集において位置合わせを容易に行
うことができます。
カメラに信号を入力する
ライン出力レベルを30dB減衰すること
ができます。
メニューリスト
MENUボタンを押すと、 MENU 画面が表示されます。
メニュー項目 機能
ファイルブラウザ
録音設定
入出力設定
マーク設定
電源/画面設定
フォーマット
サンプル
ファイル形式
XRI
デュアル
自動分割
オートレック
プリレック
オートトーン
入力ソース
A/D フィルタ
デュアルADC
ファントム電圧
プラグインパワー
ローカット
RECレベル制御
MSデコード
出力アッテネータ
オートマーク
ピークマーク
スキップ対象
自動電源オフ
バッテリー
バックライト
明るさ
コントラスト
LED
ピークレベル
SDカード内のファイル、フォルダー操作
録音ファイルフォーマットの設定
サンプリング周波数の設定
ファイルタイプの設定
XRIデータ記録機能のオン/オフ設定
デュアル録音機能の設定
一定時間間隔で自動的にファイルを更新する録音時間の設
定
オートレック機能の設定
プリレック機能の設定
オートトーン機能の設定
入力ソースの設定
A/Dコンバーターのフィルターの設定
S/N性能を向上する機能のオン/オフ設定
ファントム電源の電圧値の設定
プラグインパワーのオン/オフ設定
ローカットフィルターの設定
レベルコントロール機能の設定
MSデコード機能の設定
出力アッテネーター機能の設定
オートマーク機能の設定
ピークマーク機能のオン/オフ設定
マークスキップモードの設定
オートパワーセーブ機能の設定
内蔵バッテリーおよび電池に関する設定
バックライトの点灯時間設定
バックライトの明るさ設定
コントラスト調節
インジケーターのオン/オフ設定
レベルメーターのピークホールド機能を設定
TASCAM DR-100MKIII
92
Page 93

メニュー項目 機能
各種情報の表示
日付の設定
ファイル名の形式の設定
ファイル番号の初期化
接続するリモコンの設定
ディスプレーに表示する言語の設定
工場出荷時の設定に戻す
SDカードの初期化
USBマスストレージモードへの切り換え
システム設定
情報表示
日時設定
ファイル名形式
番号リセット
リモート設定
言語選択
設定初期化
カード初期化
USBストレージ
ファンクションメニューリスト
ホーム画面で停止中/一時停止中/再生中、および録音待機中にFnボタンを押すと、 各種機能 画面が
0
表示されます。
Fnボタンを押したときの本機の状態で、表示される機能が異なります。
メニュー項目 機能
プロテクト変更
ファイル消去
停止中/一時停止中/
再生中
録音待機中
ブラウズ画面のフォルダーまたはファイルを選択中にFnボタンを押すと、 フォルダメニュー 画面また
0
は ファイルメニュー 画面が表示されます。
メニュー項目 機能
ブラウズ画面ファイル
選択中
ブラウズ画面フォル
ダー選択中
分割
ループ再生
可変速再生(VSA)
MSデコード
ファイル情報
ローカット
RECレベル制御
MSデコード
ファイル情報
ファイル消去
プロテクト変更
全マーク消去
全ファイル消去
フォルダ消去
選択中のファイルのプロテクト変更
選択中のファイルを消去
選択中のファイルを分割
ループ再生の設定
VSA再生の設定
MSデコード機能の設定
選択中のファイルのファイル情報を表示
ローカットフィルターの設定
レベルコントロール機能の設定
MSデコード機能の設定
選択したファイルのファイル情報を表示
選択したファイルを消去
選択したファイルのプロテクトの変更
選択したファイルに付いているマークを全て消去
選択したフォルダー内のファイルを全て消去
選択したフォルダーを消去
TASCAM DR-100MKIII
93
Page 94

メッセージ一覧
以下にポップアップメッセージの一覧表を示します。
DR-100MKIIIでは、状況に応じてポップアップメッセージが表示さ
れますが、それぞれのメッセージの内容を知りたいとき、および対処
方法を知りたいときにこの表をご覧ください。
メッセージ 内容と対処方法
ボタンが
ホールド状態です
LEVELが
ホールド状態です
電池が空になりました
電池容量不足
カードがありません
書き込み禁止に
されています
カードエラー
カード容量の上限です
フォーマットエラー
フォーマットします
SDカードエラー
カードを変えてください
MBRエラー
カードを初期化します
書き込みエラー
録音継続します
HOLDスイッチにより入力レベルノブと
ボタンの操作が無効化されています。
HOLDスイッチにより入力レベルノブの
操作が無効化されています。
内蔵バッテリーを充電するか、電池を交換
してください。
SDカードをセットしてください。
録音や消去を行う場合は、SDカードのラ
イトプロテクト(書き込み防止)スイッチ
を解除してください。
SDカードを認識できません。
SDカードを交換してください。
SDカードの残容量がありません。
SDカードが正常にフォーマットされてい
ないか、SDカードが壊れている可能性が
あります。
ENTER/MARKボタンを押すと、フォー
マットを実行します。
フォーマットを実行すると、SDカード内
のデータは全て消去されます。
SDカードが正常でない可能性がありま
す。
SDカードを交換してください。
SDカードが正常にフォーマットされてい
ないか、SDカードが壊れている可能性が
あります。
ENTER/MARKボタンを押すと、フォー
マットを実行します。
フォーマットを実行すると、SDカード内
のデータは全て消去されます。フォーマッ
トが実行できない場合は、SDカードを交
換してください。
SDカードへの書き込みが間に合いません
でした。これにより音声が不連続になり、
ノイズが発生します。
この不連続点には、BOFマークが付けら
れます。
メッセージ 内容と対処方法
SDカードへの書き込み性能が低下してい
ます。
SDカードへの書き込みが間に合わず、発
カード速度低下
BOFマーク要確認
不正システムファイル
再作成します
システムファイルを再作
成します
対象外ファイル
ファイル数の上限です
ファイルがありません
プロテクト状態の為
消去できません
分割できません
ファイルが短すぎます
MP3ファイルは
分割できません
同名ファイルがあり
分割できません
マークが無い為
分割できません
マーク間隔が短すぎて分
割できません
ファイルが無いので分割
できません
ファイル名が不正な為
分割できません
マーク数制限に到達
生した不連続点にはBOFマークが付いて
います。
BOFマーク付近の音声を確認してくださ
い。
イレースフォーマットを実行するか、SD
カードを交換してください。
本機を使用するために必要なシステムファ
イルが正常でありません。
ENTER/MARKボタンを押して、システ
ムファイルを作成してください。
本機を使用するために必要なシステムファ
イルがありません。
ENTER/MARKボタンを押して、システ
ムファイルを作成してください。
取り扱い可能なファイル形式については、
リファレンスマニュアルをご覧ください。
フォルダーとファイルの総数が制限値
(5000個)を超えるため、録音できません。
ファイルが見つからないか、ファイルが壊
れている可能性があります。
対象のファイルを確認してください。
消去する場合は、ファイルのプロテクトを
解除してください。
ファイルが短すぎて分割できません。
MP3ファイルの分割はできません。
ディバイドにより作成されるファイルと同
じファイル名のファイルが同じフォルダー
内にすでに存在します。
パソコンでファイル名を変更してくださ
い。
マーク分割は、マークが存在しないファイ
ルでは実行できません。
マーク分割は、マークの間隔が2秒以内の
場所があると実行できません。
オーディオファイルがありません。
分割するとファイル名の文字数の制限値
(200文字)を超えるため実行できません。
パソコンでファイル名を変更してくださ
い。
マーク数が制限値(99個)に達しました。
メッセージ 内容と対処方法
ファイルを含むフォルダーを消去すること
フォルダが空でないので
消去できません
XRIデータがありません
プロテクト状態の為マー
ク編集できません
ファイルが短すぎてマー
ク編集できません
デジタル入力が
アンロック状態です
デジタル入力が
ロックしました
デジタル入力の
サンプルが一致しません
I/O間隔が短すぎます
温度注意
USBを接続してください
動作範囲外温度
その他のエラーが出た場合は、本体の電源を入れ直してください。
はできません。
フォルダーに含まれるファイルを全て消去
してから再度実行してください。
XRIデータが記録されていません。録音を
開始する前にXRIデータ記録機能をオンに
してください。
MP3ファイルとして録音するときには、
XRIデータは記録されません。
ファイルが書き込み禁止であるためマーク
を付けることができません。
マークを設定したい場合は、ファイルのプ
ロテクトを解除してください。
ファイルが短すぎてマークを付けることが
できません。
デジタル入力(DIGITALIN端子)に接続
されていないか、正しく信号が入力されて
いません。
デジタル接続を確認してください。
デジタル入力が正しく検出されました。
デジタル入力のサンプリング周波数が録音
設定と一致しません。
IN点(始点)とOUT点(終点)の間隔が
短すぎます。1秒以上空けて設定してくだ
さい。
内蔵バッテリー/単3形電池を使用してい
る状態で内部温度が上昇しています。
USB接続で電源を供給すると継続使用で
きます。
内部温度が上昇しています。
自動的にシステムをシャットダウンしま
す。
TASCAM DR-100MKIII
94
Page 95

トラブルシューティング
本機の動作がおかしいときは、修理を依頼する前にもう一度、下記の
確認を行ってください。それでも改善しないときは、お買い上げ店ま
たはティアック修理センター(巻末に記載)にご連絡ください。
電源が入らない。
内蔵バッテリーが十分充電されているか、または電池が正しくセッ
0
トされているか確認してください。
別売の専用ACアダプター(TASCAM PS-P520E)の電源プラグ、
0
およびUSBコネクターがしっかりと差し込まれているか確認して
ください。USBハブを経由すると正しく動作しない場合があります。
HOLDスイッチが「OFF」になっていることを確認してください。
0
電源が自動的に切れてしまう。
オートパワーセーブ機能が設定されていないか確認してください。
0
本機は欧州待機時電力規制(ErP)に対応しているため、ACア
i
ダプター・電池使用時にかかわらずオートパワーセーブ機能が
動作します。オートパワーセーブ機能を使用したくないときは
「OFF」に設定してください(工場出荷時には「30分」に設定
されています)。
CHGインジケーターのオレンジと緑のインジケーターが交
互に点灯し続ける。
温度の高い場所や低い場所では、正しく充電できない場合がありま
0
す。充電動作ができる温度(室温0℃以上30℃以下)で充電して
ください。
内蔵バッテリーの残量が正しく表示されない
ご購入当初は、バッテリー残量が正しく表示されない場合がありま
0
す。一度フル放電およびフル充電を行っていただくと、バッテリー
残量の学習機能が更新され、正しく表示されます。
本体で操作できない。
HOLDスイッチが「OFF」になっているか確認してください。
0
USBストレージモード時は操作できません。
0
動作がおかしくなったときには、STOPボタンを押しながら
0
(電源)ボタンを10秒以上押し続けてください。強制的に電源を
オフ(スタンバイ状態)にします。
SDカードを認識しない。
SDカードがしっかりと挿入されているか確認してください。
0
音が出ない。
本機のヘッドホン/スピーカー出力レベルを確認してください。
0
モニターシステムの接続、およびモニターシステム側の音量を確認
0
してください。
以下のとき、スピーカーから音は出ません。
0
(スピーカー)スイッチが「OFF」
i
録音待機中または録音中
i
ヘッドホン使用時
i
録音できない。
SDカードに十分な空き容量があることを確認してください。
0
ファイル総数が5000ファイルに達すると録音できなくなります。
0
入力音が非常に小さい、もしくは非常に大きい。
入力レベルの設定を確認してください。
0
接続した外部機器の出力レベルを確認してください。
0
出力音が不自然に聴こえる。
再生スピード(VSA再生機能)を確認してください。
0
レベルコントロール機能がオンになっていないか確認してくださ
0
い。
ファイルが消去できない。
プロテクト(読み取り専用)されているファイルは、消去できません。
0
パソコン上に本機のファイルが表示されない。
本機がUSB端子経由でパソコンに正しく接続されているか確認し
0
てください。USBハブ経由で接続すると、正しく動作しない場合
があります。
本機がUSBストレージモードになっているか確認してください。
0
言語を間違えて設定してしまった。
(電源)ボタンを押して電源をオフにした後、MENUボタン
0
を押しながら (電源)ボタンを押してください。
言語選択メニューが表示され、言語の選択が可能となります。
仕様
定格
記録メディア
SDカード(64MB ~ 2GB)
SDHCカード(4GB ~ 32GB)
SDXCカード(48GB ~ 128GB)
録音再生フォーマット
WAV(BWF) :
MP3 : 44.1k/48kHz、
チャンネル数
2チャンネル(ステレオ)
入出力
MIC/LINEIN端子(XLRのみファントム電源対応)
コネクター:XLR-3-31、φ6.3mm(1/4”)TRS標準ジャック
EXTIN端子(プラグインパワー対応)
コネクター:φ3.5mm(1/8”)ステレオミニジャック
DIGITALIN端子
コネクター:φ3.5mm(1/8”)TRSジャック
LINEOUT端子
コネクター:φ3.5mm(1/8”)ステレオミニジャック
(ヘッドホン)端子
コネクター:φ3.5mm(1/8”)ステレオミニジャック
内蔵スピーカー
0.4W(モノラル)
USB端子
コネクター:micro-Bタイプ
フォーマット: USB2.0 HIGH SPEED マスストレージクラス
REMOTE端子
コネクター:φ2.5mm(3/32”)TRSジャック
44.1k/48k/88.2k/96k/176.4k/192kHz、
16/24ビット
128k/192k/256k/320kbps
TASCAM DR-100MKIII
95
Page 96

オーディオ性能
周波数特性
MIC/LINE IN(MIC、PAD On)to LINE OUT
MIC/LINE IN(LINE)to LINE OUT
EXT IN(MIC、PAD On)to LINE OUT
EXT IN(LINE)to LINE OUT
20Hz-20kHz +0.5dB/−1dB
(Fs=44.1kHz/48kHz、JEITA)
20Hz-40kHz +0.5dB/−2dB
(Fs=88.2kHz/96kHz、JEITA)
20Hz-80kHz +0.5/−4dB
(Fs=176.4kHz/192kHz、JEITA)
歪率
MIC/LINE IN(MIC、PAD On)to LINE OUT
MIC/LINE IN(LINE、+20dBu 入力)to LINE OUT
EXT IN(MIC、PAD On)to LINE OUT
EXT IN(LINE)to LINE OUT
0.007%以下
(Fs=44.1k/48k/88.2k/96k/176.4k/192kHz、JEITA)
S/N比
MIC/LINE IN(MIC、PAD On)to LINE OUT
MIC/LINE IN(LINE)to LINE OUT
EXT IN(MIC、PAD On)to LINE OUT
EXT IN(LINE)to LINE OUT
102dB以上
(Fs=44.1k/48k/88.2k/96k/176.4k/192kHz、JEITA)
等価入力雑音
124dBu以下
注)JEITA:JEITA CP-2150準拠
録音時間
ファイルフォーマット(録音時の設定)
MP3 320kbps(ステレオ)
WAV 16ビット(ステレオ) 6時間17分
WAV 24ビット(ステレオ) 96kHz 1時間55分
WAV 24ビット(ステレオ) 192kHz 57分
上記録音時間は理論値であり、ご使用のSD / SDHC / SDXCカー
0
ドにより異なる場合があります。
上記録音時間は連続録音時間ではなく、SD / SDHC / SDXCカー
0
ドに可能な録音合計時間です。
モノラル録音の場合は、上記録音時間の約2倍の時間となります。
0
デュアル録音の場合は、上記録音時間の約半分の時間となります。
0
44.1kHz
SDHCカード容量
(4GB)
27時間46分
一般
電源
内蔵リチウムイオン充電池
単3形電池2本
(アルカリ乾電池、ニッケル水素電池またはリチウム乾電池)
パソコンからのUSBバスパワー
専用ACアダプター
(TASCAM PS-P520E、別売)
専用外付けバッテリーパック
(TASCAM BP-6AA、別売)
消費電力
7.5W(最大時)
電池持続時間(連続使用時)
内蔵バッテリー(リチウムイオン充電池)使用時
0
使用条件 持続時間
UNI MIC(内蔵指向性マイク)入力
ファントム電源未使用
STEREO WAV(BWF)/ 44.1kHz
16bitで録音
MIC/LINE IN端子/マイク入力
ファントム電源使用時(+48V、負荷:3mA x2)
STEREO WAV(BWF)/ 44.1kHz
16bitで録音
アルカリ乾電池(EVOLTA)使用時
0
使用条件 持続時間
UNI MIC(内蔵指向性マイク)入力
ファントム電源未使用
STEREO WAV(BWF)/ 44.1kHz
16bitで録音
MIC/LINE IN端子/マイク入力
ファントム電源使用時(+48V、負荷:3mA x2)
STEREO WAV(BWF)/ 44.1kHz
16bitで録音
ニッケル水素電池(eneloop)使用時
0
使用条件 持続時間
UNI MIC(内蔵指向性マイク)入力
ファントム電源未使用
STEREO WAV(BWF)/ 44.1kHz
16bitで録音
MIC/LINE IN端子/マイク入力
ファントム電源使用時(+48V、負荷:3mA x2)
STEREO WAV(BWF)/ 44.1kHz
16bitで録音
約12時間
約6時間
約2時間45分
約1時間
約3時間30分
約2時間15分
リチウム乾電池(Energizer ULTIMATE LITHIUM)使用時
0
使用条件 持続時間
UNI MIC(内蔵指向性マイク)入力
ファントム電源未使用
STEREO WAV(BWF)/ 44.1kHz
16bitで録音
MIC/LINE IN端子/マイク入力
ファントム電源使用時(+48V、負荷:3mA x2)
STEREO WAV(BWF)/ 44.1kHz
16bitで録音
メモ
ファントム電源を使用時には、ご使用になるマイクにより持続時間
が短くなる場合があります。
約7時間
約3時間30分
充電時間(電源オフ時)
USB入力時 :約10時間
0
PS-P520E使用時 :約4.5時間
0
外形寸法
80 x 155.7 x 35mm(幅 x 高さ x 奥行き、突起部を含まず)
質量
425g / 375g(電池を含む/電池を含まず)
動作温度
0 ~ 40℃
取扱説明書のイラストが一部製品と異なる場合があります。
0
製品の改善により、仕様および外観が予告なく変更することがあり
0
ます。
詳細仕様は、リファレンスマニュアルに掲載しています。
0
TASCAM DR-100MKIII
96
Page 97

TASCAM DR-100MKIII
97
Page 98

〒206-8530 東京都多摩市落合1-47
この製品の取り扱いなどに関するお問い合わせは
タスカムカスタマーサポート 〒206-8530 東京都多摩市落合1-47
0570-000-809
一般電話・公衆電話からは市内通話料金でご利用いただけます。
受付時間は、10:00 ~ 12:00 / 13:00 ~ 17:00 です。(土・日・祝日・弊社指定休日を除く)
ナビダイヤルがご利用いただけない場合
0
電話:042-356-9137 / FAX:042-356-9185
故障・修理や保守についてのお問い合わせは
ティアック修理センター 〒358-0026 埼玉県入間市小谷田858
0570-000-501
一般電話・公衆電話からは市内通話料金でご利用いただけます。
受付時間は、9:30 ~ 17:00です。(土・日・祝日・弊社指定休日を除く)
ナビダイヤルがご利用いただけない場合
0
電話:04-2901-1033 / FAX:04-2901-1036
■ 住所や電話番号は、予告なく変更する場合があります。あらかじめご了承ください。
リファレンスマニュアルに関して
取扱説明書(本書)では、本機の各機能について解説しています。各機能の詳細については、
リファレンスマニュアルをご覧ください。
リファレンスマニュアルは、TASCAMのウェブサイト(http://tascam.jp/)からダウンロー
ドすることができます。
TASCAM DR-100MKIII
98
Page 99

✂
WARRANTY
/保証書
< In the United States >
This warranty gives you specic legal rights and you may also have other rights which vary from state to state. This warranty is only valid within the country the unit
was originally purchased.
WHAT IS AND IS NOT COVERED
Except as specied below, this warranty covers all defects in materials and workmanship in this product. The following are not covered by the warranty:
1. Damage to or deterioration of the external cabinet.
2. Damages resulting from accident, misuse, abuse or neglect.
3. Damage resulting from failure to perform basic daily maintenance and/or calibration or otherwise resulting from failure to follow
instructions contained in your owner’s manual.
4. Damage occurring during shipment of the product. (Claims must be presented to the carrier)
5. Damage resulting from repair or attempted repair by anyone other than TEAC or an authorized TASCAM service station.
6. Damage resulting from causes other than product defects, including lack of technical skill, competence, or experience of the user.
7. Damage to any unit which has been altered or on which the serial number has been defaced, modied or is missing.
WHO MAY ENFORCE THE WARRANTY
This warranty may be enforced only by the original purchaser.
LENGTH OF WARRANTY
All parts except heads and disk drives are warranted for one (1) year from the date of original purchase. Heads and disk drives are warranted to ninety (90) days from
date of original purchase. Labor is warranted for ninety (90) days from date of original purchase.
WHAT WE WILL PAY FOR
We will pay all labor and material expenses for items covered by the warranty. Payment of shipping charges is discussed in the next section of this warranty.
HOW YOU CAN GET WARRANTY SERVICE
Your unit must be serviced by an authorized TASCAM service station in the United States. (This warranty is not enforceable outside the U.S.) If you are unable to
locate an authorized TASCAM service station in your area, please contact us. We either will refer you to an authorized service station or instruct you to return the unit
to the factory. Whenever warranty service is required, you must present a copy of the original dated sales receipt from an Authorized TASCAM Dealer.
You must pay any shipping charges if it is necessary to ship the product to service. However, if the necessary repairs are covered by the warranty, we will pay return surface shipping
charges to any destination within the United States.
LIMITATION OF IMPLIED WARRANTIES
Any implied warranties, INCLUDING WARRANTIES OF MERCHANTABILITY AND FITNESS FOR A PARTICULAR PURPOSE, are limited in duration to the length of this
warranty.
EXCLUSION OF DAMAGES
TEAC’s liability for any defective product is limited to repair or replacement of the product, at TEAC’s option. TEAC shall not be liable for:
1.
Damages based upon inconvenience, loss of use of the product,
2. Any other damages, whether incidental, consequential or otherwise.
Some states do not allow limitations on how long an implied warranty lasts and/or do not allow the exclusion or limitation of incidental or consequential damages, so the
above limitations and exclusions may not apply to you.
To locate an Authorized Service Center in Your Area
CALL 1-800-447-8322
< Europe >
This product is subject to the legal warranty regulations of the country of purchase. In case of a defect or a problem, please contact the dealer where you bought the
product.
Ce produit est sujet aux réglementations concernant la garantie légale dans le pays d’achat. En cas de défaut ou de problème, veuillez contacter le revendeur chez
qui vous avez acheté le produit.
Dieses Gerät unterliegt den gesetzlichen Gewährleistungsbestimmungen des Landes, in dem es erworben wurde. Bitte wenden Sie sich im Gewährleistungsfall an
den Händler, bei dem sie das Gerät erworben haben.
Questo apparecchio è conforme alle norme sulla garanzia vigenti nel rispettivo Paese in cui esso è stato acquistato. Si prega di rivolgersi al proprio commerciante,
presso il quale è stato acquistato l’apparecchio, nel caso in cui si voglia richiedere una prestazione in garanzia.
Las condiciones de garantía de este aparato están sujetas a las disposiciones legales sobre garantía del país en el que ha sido adquirido. En caso de garantía, debe dirigirse al
establecimiento donde adquirió el aparato.
loss of time interrupted operation or commercial loss; or
<日本>
無料修理規定(持ち込み修理)
1.
取扱説明書、本体貼付ラベルなどの注意書きにしたがった正常な使用状態で保証期間内に故障が発生した場合には、
ティアック修理センターが無料修理いたします。
2.
本体の保証期間は、お買い上げの日から1年です。
3.
保証期間内に故障して無料修理を受ける場合は、本書をご提示の上、ティアック修理センターまたはお買い上げの販
売店に修理をご依頼ください。商品を送付していただく場合の送付方法については、事前にティアック修理センター
にお問い合わせください。
4.
ご転居、ご贈答品などでお買い上げの販売店に修理をご依頼になれない場合は、ティアック修理センターにご連絡
ください。
5.
次の場合には、保証期間内でも有料修理となります。
(1) ご使用上の誤りおよび不当な修理や改造による故障および損傷
(2) お買い上げ後の輸送・移動・落下などによる故障および損傷
(3) 火災、地震、水害、落雷、その他の天災地変、公害や異常電圧による故障および損傷
(4) 接続している他の機器に起因する故障および損傷
(5) 業務上の長時間使用など、特に苛酷な条件下において使用された場合の故障および損傷
(6)メンテナンス
(7)本書の提示がない場合
(8 ) 本書にお買い上げ年月日、お客様名、販売店名(印)の記入のない場合、あるいは字句を書き換えられた場合
6.
本書(日本語記載部)は日本国内においてのみ有効です。
These warranty provisions in Japanese are valid only in Japan.
7.
本書は再発行いたしませんので、紛失しないよう大切に保管してください。
この保証書は、本書に明示した期間・条件のもとにおいて無料修理をお約束するものです。この保証書によって
※
保証書を発行しているもの(保証責任者)、およびそれ以外の事業者に対するお客様の法律上の権利を制限するも
のではありません。保証期間経過後の修理などについてご不明の場合は、ティアック修理センターにお問い合わ
せください。
< In other countries/areas >
This warranty gives you specic legal rights, and you may also have other rights that vary by country, state or province.
If you have a warranty claim or request, please contact the dealer where you bought the product.
该保证书赋予了顾客特定的合法权利,并且因国家,州或省等地域的不同,顾客可能拥有其他权利。如需申请或要求保修,
请与购买本产品的销售店进行联系。
If you require repair services for your
country. A list of
TASCAM
TASCAM
Distributors can be found on our website at:
equipment, please contact the dealer where the product was purchased from or the
http://teac-global.com/
TASCAM
Distributor in your
Page 100

WARRANTY /
保証書
✂
Model / 型名
DR-100)#
Serial No. / 機番
Date of purchase / お買い上げ日
http://teac-global.com/
Memo / 修理メモ
Owner’s name / お名前
Address / ご住所
Dealer’s name / 販売店
Dealer’s address /
住所
お客様にご記入いただいた保証書の控えは、保証期間内のサービス活動およびその後の安全点検活動のために記載内容を利用させていただく場合がございますので、ご了承ください。
〒206-8530 東京都多摩市落合1-47
ティアック修理センター
〒 358-0026 埼玉県入間市小谷田 858
電話:0570-000-501 / 04-2901-1033
 Loading...