

Page 1
User’s Manual
NOVA System
Page 2

Page 3
1 Read these instructions.
2 Keep these instructions.
3 Heed all warnings.
4 Follow all instructions.
5 Do not use this apparatus near water.
6 Clean only with dry cloth.
7 Do not block any ventilation openings. Install in accordance
with the manufacturer's instructions.
8 Do not install near any heat sources such as radiators, heat
registers, stoves, or other apparatus (including amplifiers)
that produce heat.
9 Do not defeat the safety purpose of the polarized or
grounding-type plug. A polarized plug has two blades with
one wider than the other. A grounding type plug has two
blades and a third grounding prong. The wide blade or the
third prong are provided for your safety. If the provided plug
does not fit into your outlet, consult an electrician for
replacement of the obsolete outlet.
10 Protect the power cord from being walked on or pinched
particularly at plugs, convenience receptacles, and the point
where they exit from the apparatus.
11 Only use attachments/accessories specified by the
manufacturer.
12 Use only with the cart, stand, tripod, bracket, or
table specified by the manufacturer, or sold with the
apparatus. When a cart is used, use caution when
moving the cart/apparatus combination to avoid
injury from tip-over.
13 Unplug this apparatus during lightning storms or when
unused for long periods of time.
14 Refer all servicing to qualified service personnel. Servicing
is required when the apparatus has been damaged in any
way, such as power-supply cord or plug is damaged, liquid
has been spilled or objects have fallen into the apparatus,
the apparatus has been exposed to rain or moisture, does
not operate normally, or has been dropped.
• This equipment should be installed near the socket
outlet and disconnection of the device should be easily
accessible.
• To completely disconnect from AC mains, disconnect the
power supply cord from the AC receptacle.
• The mains plug of the power supply shall remain readily
operable.
• Do not install in a confined space.
• Do not open the unit – risk of electric shock inside.
Caution:
You are cautioned that any change or modifications not
expressly approved in this manual could void your authority to
operate this equipment.
Service
• There are no user-serviceable parts inside.
• All service must be performed by qualified personnel.
Warning!
• To reduce the risk of fire or electric shock, do not expose
this apparatus to rain or moisture and objects filled with
liquids, such as vases, should not be placed on this
apparatus.
• This apparatus must be earthed.
• Use a three wire grounding type line cord like the one
supplied with the product.
• Be advised that different operating voltages require the use
of different types of line cord and attachment plugs.
• Check the voltage in your area and use the correct type.
See table below:
Voltage Line plug according to standard
110-125V UL817 and CSA C22.2 no 42.
220-230V CEE 7 page VII, SR section
107-2-D1/IEC 83 page C4.
240V BS 1363 of 1984.
Specification for 13A fused
plugs and switched and
unswitched socket outlets.
The lightning flash with an arrowhead symbol within
an equilateral triangle is intended to alert the user to
the presence of uninsulated “dangerous voltage”
within the product's enclosure that may be of sufficient
magnitude to constitute a risk of electric shock to persons.
The exclamation point within an equilateral triangle is
intended to alert the user to the presence of important
operating and maintenance (servicing) instructions in
the literature accompanying the product.
IMPORTANT SAFETY INSTRUCTIONS
a
Page 4

EMC/EMI
This equipment has been tested and found to comply
with the limits for a Class B Digital device, pursuant to
part 15 of the FCC rules.
These limits are designed to provide reasonable
protection against harmful interference in residential
installations. This equipment generates, uses and can
radiate radio frequency energy and, if not installed and
used in accordance with the instructions, may cause
harmful interference to radio communications. However,
there is no guarantee that interference will not occur in a
particular installation. If this equipment does cause
harmful interference to radio or television reception,
which can be determined by turning the equipment off
and on. The user is encouraged to try to correct the
interference by one or more of the following measures:
• Reorient or relocate the receiving antenna.
• Increase the separation between the equipment and
receiver.
• Connect the equipment into an outlet on a circuit
different from that to which the receiver is connected.
• Consult the dealer or an experienced radio/TV
technician for help.
For Customers in Canada:
This Class B digital apparatus complies with Canadian
ICES-003.
Cet appareil numérique de la classe B est conforme à la
norme NMB-003 du Canada.
Certificate of Conformity
TC Electronic A/S, Sindalsvej 34, 8240
Risskov, Denmark, hereby declares on own
responsibility that the following product:
NOVA System
- Effects Processor for electric guitars
that is covered by this certificate and
marked with CE-label conforms with
following standards:
EN 60065 Safety requirements for mains
(IEC 60065) operated electronic and
related apparatus for household
and similar general use
EN 55103-1 Product family standard for
audio,video, audio-visual and
entertainment lighting control
apparatus for professional
use. Part 1: Emission.
EN 55103-2 Product family standard for
audio, video, audio-visual and
entertainment lighting control
apparatus for professional
use. Part 2: Immunity.
With reference to regulations in following
directives:
73/23/EEC, 89/336/EEC
Issued in Risskov, January 2008
Mads Peter Lübeck
Chief Executive Officer
EMC / EMI & CERTIFICATE OF CONFORMITY
b
Page 5

TC Electronic, Sindalsvej 34, DK-8240 Risskov – info@tcelectronic.com Manual revision 1.2 – SW – V 1.10
Prod. No: E60508712
English Version
INTRODUCTION
Safety Instructions . . . . . . . . . . . . . . . . . . . . . .a
EMC/EMI & Certificate of Conformity . . . . . . . .b
Table of contents . . . . . . . . . . . . . . . . . . . . . . .3
Introduction . . . . . . . . . . . . . . . . . . . . . . . . . . . .5
OPERATION
NOVA System – Front panel . . . . . . . . . . . . . .6
Operation . . . . . . . . . . . . . . . . . . . . . . . . . . . . .7
NOVA System – Rear panel . . . . . . . . . . . . . . .9
SETUPS
Basic Setup . . . . . . . . . . . . . . . . . . . . . . . . . .10
NOVA System in a an effects loop . . . . . . . . .11
MENUS
Routing . . . . . . . . . . . . . . . . . . . . . . . . . . . . . .12
Levels . . . . . . . . . . . . . . . . . . . . . . . . . . . . . . .14
Boost Function . . . . . . . . . . . . . . . . . . . . . . . .15
Pedals . . . . . . . . . . . . . . . . . . . . . . . . . . . . . . .16
Utility . . . . . . . . . . . . . . . . . . . . . . . . . . . . . . . .18
The Tuner . . . . . . . . . . . . . . . . . . . . . . . . . . . .20
MIDI . . . . . . . . . . . . . . . . . . . . . . . . . . . . . . . .21
Recall . . . . . . . . . . . . . . . . . . . . . . . . . . . . . . .24
Edit . . . . . . . . . . . . . . . . . . . . . . . . . . . . . . . . .24
Store . . . . . . . . . . . . . . . . . . . . . . . . . . . . . . . .25
Delete . . . . . . . . . . . . . . . . . . . . . . . . . . . . . . .25
EFFECTS
Drive
Overdrive . . . . . . . . . . . . . . . . . . . . . . . . . . . .26
Distortion . . . . . . . . . . . . . . . . . . . . . . . . . . . .26
Compression
Sustaining . . . . . . . . . . . . . . . . . . . . . . . . . . . .27
Percussive . . . . . . . . . . . . . . . . . . . . . . . . . . .28
Advanced . . . . . . . . . . . . . . . . . . . . . . . . . . . .28
EQ and Noise Gate
EQ . . . . . . . . . . . . . . . . . . . . . . . . . . . . . . . . .29
Noise Gate . . . . . . . . . . . . . . . . . . . . . . . . . . .29
Modulation - Mod
Phaser . . . . . . . . . . . . . . . . . . . . . . . . . . . . . .31
Tremolo . . . . . . . . . . . . . . . . . . . . . . . . . . . . . .32
Panner . . . . . . . . . . . . . . . . . . . . . . . . . . . . . .33
Chorus . . . . . . . . . . . . . . . . . . . . . . . . . . . . . .34
Flanger . . . . . . . . . . . . . . . . . . . . . . . . . . . . . .35
Vibrato . . . . . . . . . . . . . . . . . . . . . . . . . . . . . .36
Modulation - Pitch
Detune . . . . . . . . . . . . . . . . . . . . . . . . . . . . . .37
Whammy . . . . . . . . . . . . . . . . . . . . . . . . . . . .37
Octaver . . . . . . . . . . . . . . . . . . . . . . . . . . . . . .38
Pitch Shifter . . . . . . . . . . . . . . . . . . . . . . . . . .39
Intelligent Pitch Shifter . . . . . . . . . . . . . . . . . .40
Delay Types
Common Delay Parameters . . . . . . . . . . . . . .41
Clean . . . . . . . . . . . . . . . . . . . . . . . . . . . . . . .42
Analog . . . . . . . . . . . . . . . . . . . . . . . . . . . . . .42
Tape . . . . . . . . . . . . . . . . . . . . . . . . . . . . . . . .42
Dynamic . . . . . . . . . . . . . . . . . . . . . . . . . . . . .42
PingPong . . . . . . . . . . . . . . . . . . . . . . . . . . . .42
Dual . . . . . . . . . . . . . . . . . . . . . . . . . . . . . . . .43
Spillover . . . . . . . . . . . . . . . . . . . . . . . . . . . . .43
Reverb Types
Common Reverb Parameters . . . . . . . . . . . . .44
Spring . . . . . . . . . . . . . . . . . . . . . . . . . . . . . . .44
Hall . . . . . . . . . . . . . . . . . . . . . . . . . . . . . . . . .44
Room . . . . . . . . . . . . . . . . . . . . . . . . . . . . . . .44
Plate . . . . . . . . . . . . . . . . . . . . . . . . . . . . . . . .44
APPENDIX
Technical Specifications . . . . . . . . . . . . . . . . .46
TABLE OF CONTENTS
3
Page 6

Page 7

INTRODUCTION
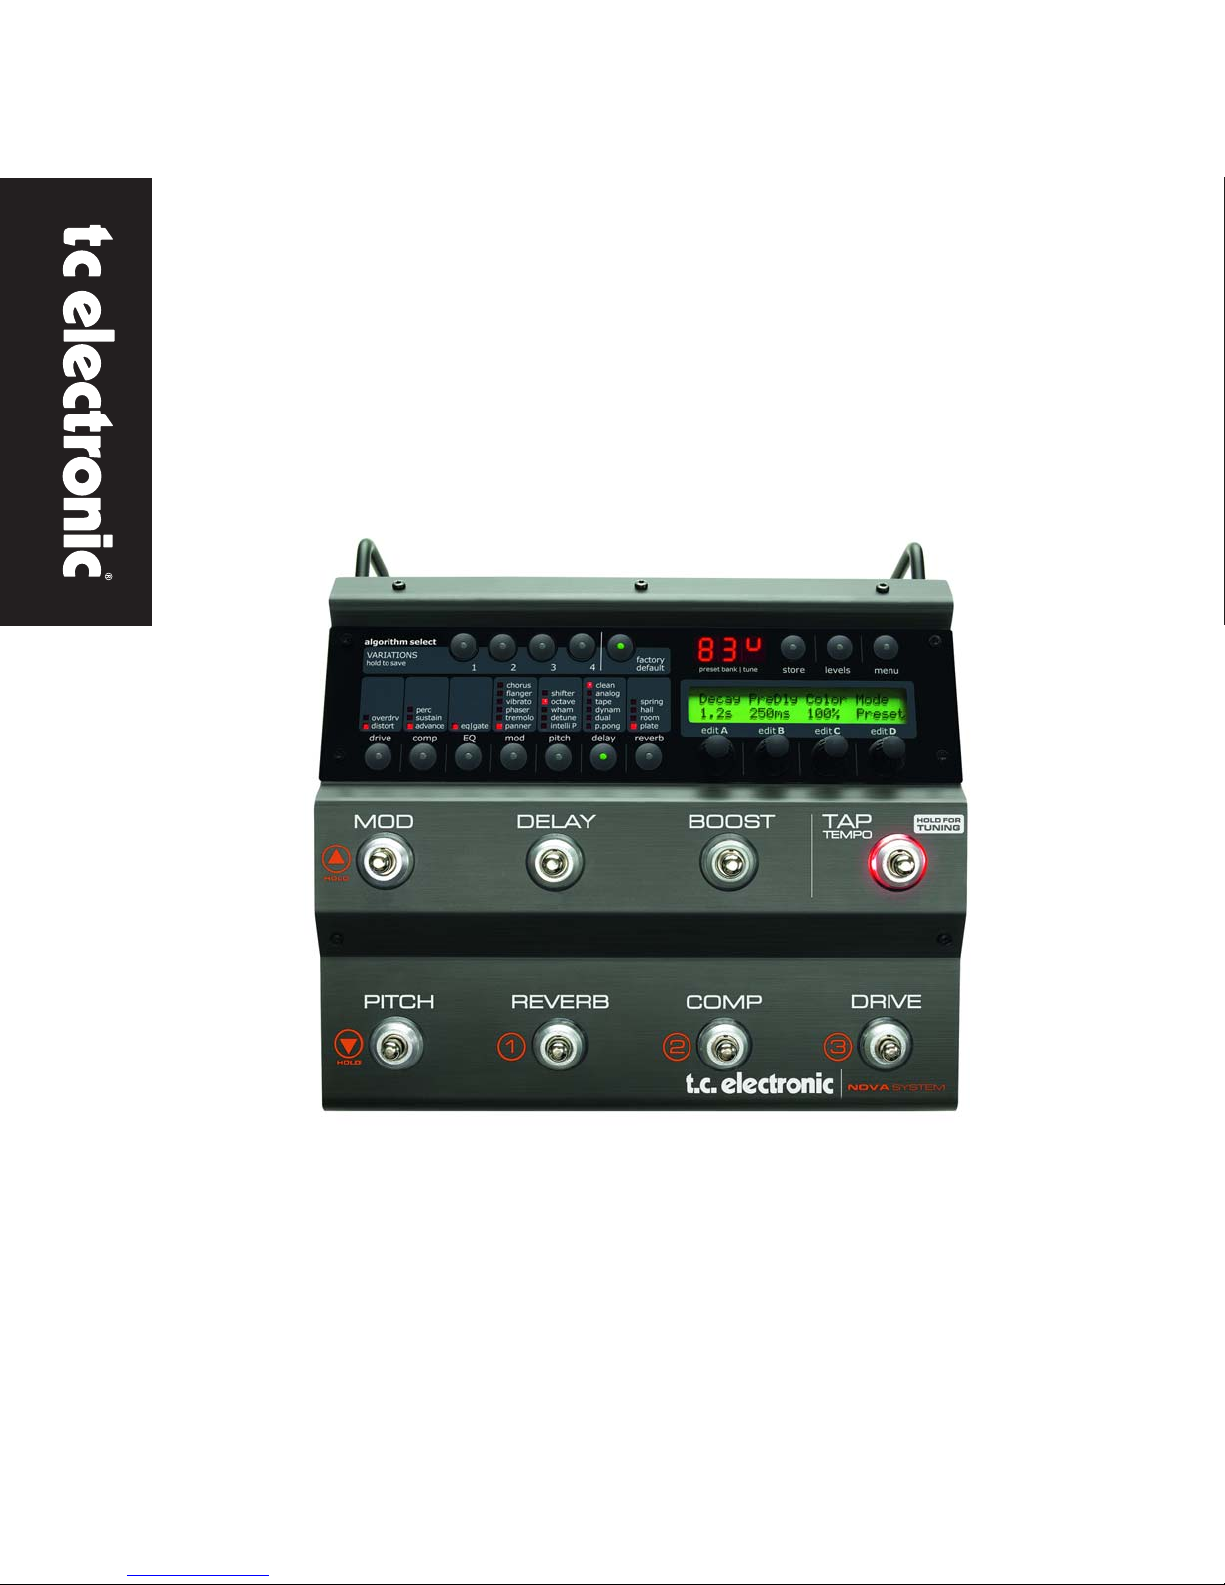
NOVA System - All-in-One Extravaganza
The Audible Choice
NOVA System is the complete, floor-based effects solution for the dedicated guitar player who knows quality when he
sees it. Its unique inclusion of an all-analog distortion/overdrive section under preset and expression control makes it the
perfect choice whether you want to trim down your rack setup, step up from your pedal patchwork or simply just want the
ultimate combination of operational simplicity and audio superiority.
Add to this an array of effects taken straight from the king of floor-based processors; G-System and you have top-notch
compression, EQ, noise gate, modulation, pitch, delay and reverb right at your feet. All you need is a guitar and an amp
and you’re good to go – first class.
Genuine, Analog Drive Circuit
What makes NOVA System so remarkably different is the NDT™ - NOVA Drive Technology - a unique, new drive and
distortion circuit that gets you the best of both worlds: World-class analog distortion and overdrive with digital control. This
is the real deal – no modeling. While the NDT™ is 100% analog and physically separated from the digital effects, its
control potmeters are digital. This way you can tweak, store and recall as many drive settings as you want - you can even
hook up an expression pedal and control the amount of distortion in real-time. Its wide gain range covers your every need
from light breakup to heavy distortion.
Features
• All-analog overdrive and distortion under preset and
expression control.
• 6 effect blocks taken straight from G-System:
- Compression
- EQ + Noise Gate
- Modulation
- Pitch
- Delay
- Reverb
• 30 factory and 60 user presets
• Two footswitch layouts: preset and pedal
• Hi-Z and balanced input + balanced stereo outputs
• Optional G-Switch for added control
The current manual revision number is found at the bottom of page 3.
Latest manual revision can always be downloaded via www.tcelectronic.com.
To seek additional information and support please visit TC Support interactive
that also can be accessed via www.tcelectronic.com
5
Top-notch Effects
Equipped with TC branded quality effects from delays
and reverbs to compressor, EQ and modulation, NOVA
System is the obvious all-in-one solution for any guitarist
who wants setup simplicity without sacrificing tonal
fidelity. All neatly programmable and storable in 60 user
presets. Its 30 factory presets give you a demonstration
of just what this unit provides; great sound quality and an
immense versatility of effects combinations – all
designed to get you started right out of the box.
Page 8
OVERVIEW
6
Page 9
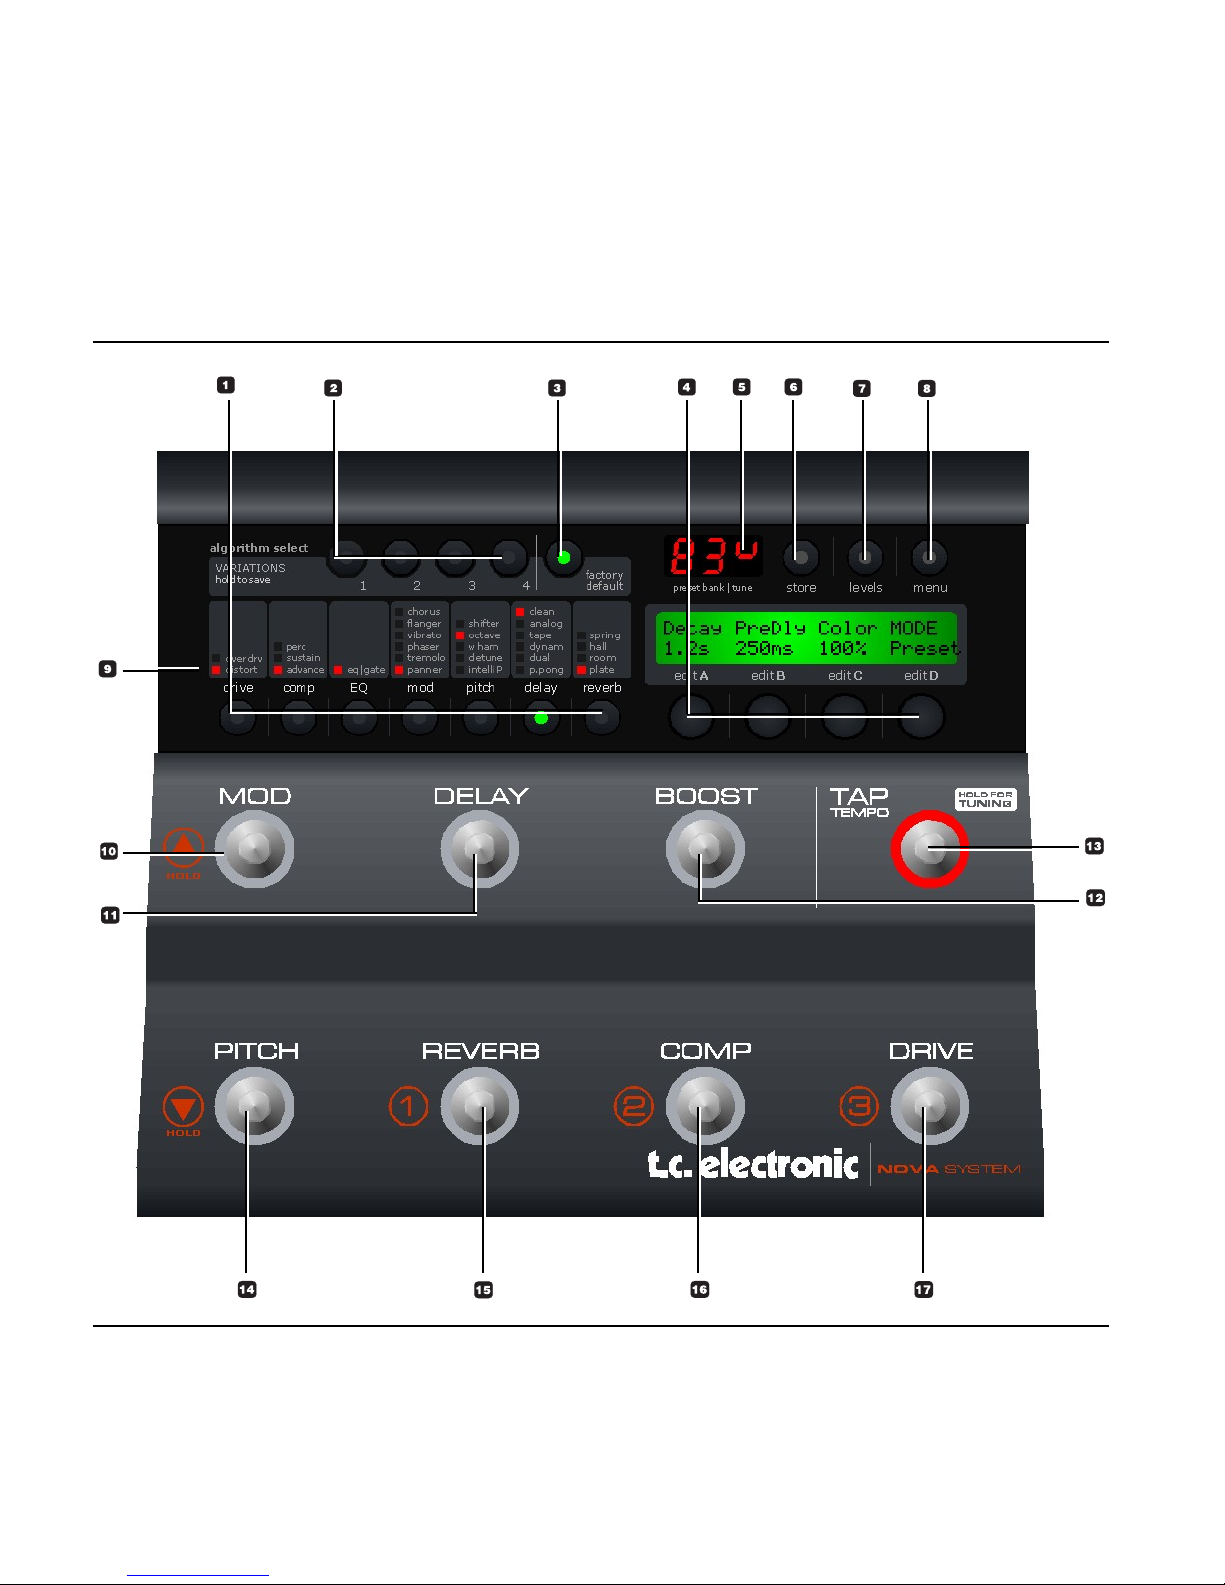
1 - Effects edit / Select buttons
Press once to enter edit mode for the current effect.
Press again to toggle between the different effect types.
Press and hold to exit the effects edit mode without
saving.
2 - Variations
For each selected effect type, 4 instant variations can be
stored. When creating new presets this function makes is
very easy to combine your favorite reverbs with your
favorite compression settings etc.
Example:
- Press COMP edit to enter the compression block.
- Edit the compression settings using encoders A-D.
- Now press and hold VARIATION key #1 to save this
compression setting as one of your favorites. Note
that the preset is not stored at this point, you have
simply set up a favorite compression setting.
- Recall a different preset using the preset keys where
you would like to apply this compression.
- Press COMP followed by VARIATION key #1.
- Your favorite compression setting #1 is now recalled
into the current preset.
The V
ARIATION key LEDs:
When a VARIATION key LED is lit you have previously
stored a variation with that key.
T
o delete a variation:
Press and hold “FACTORY DEFAULT” while pressing
one of the VARIATION keys 1-4. This will delete the
variation stored with that key.
3 - Factory Default
TC Electronic has predefined factory default settings for
each algorithm. Press FACTORY DEFAULT to recall the
default settings for the currently selected algorithm.
Example:
Assume that you have a very nice preset with a nice
7
OPERATION
combination of compression, EQ, mod and maybe delay
settings. However, you feel that you have edited the
reverb parameters to a point where you find yourself a bit
lost. - What would TC Electronic suggest?
- We assume that you are in reverb edit, thus the
REVERB EDIT LED is lit.
- Press FACTORY DEFAULT.
Note that there is a factory default setting for each
effect sub-type.
4 - Edit A to D
EDIT encoders A to D is used to adjust parameters.
5 - Tuner Indications
In Tuner mode this section of the display indicates
whether the input note is above or below correct pitch.
6 - Store
Storing a preset can be done in two ways. We call them
“Quick store” and “Normal store”. “Quick store” is
typically used when you have made changes to a preset
and want to store the preset with the same name at the
same location. “Normal store” is used if you want to
change preset location and maybe the name as well.
Quick store
- press and hold STORE for 2 seconds. The
preset is now stored at the current location.
If you are trying to store a factory preset using
“Quick store”, you will automatically be directed to
“Normal store” mode.
Normal S
tore - press STORE once:
Now the following controls are available:
- Encoder A selects preset location
- Encoder B selects preset name characters
Page 10

- Encoder C changes characters
- Encoder D selects recall, delete or store mode
When selections are made press STORE to confirm.
7 - Levels
Output levels can be set for each preset. All other
parameters in the levels menu are “global” parameters
and do not change with presets.
All preset parameters are marked with a “P” in the
right side of the display.
8 - MENU button
Press to enter the following menus:
- Routing
- Pedal
- Modifiers
- MIDI
- Utility
The menus are described in later chapters of this
manual.
9 - Effect status LEDs
The LEDs indicate which effect is selected in each block.
10 - MOD
On/off switch for the modulation block.
Secondary function
:
Press and hold to increase preset bank.
11 - DELAY
On/off switch for the Delay block.
12 - BOOST
On/off switch for the Boost function. different boost levels
can be set for individual presets from 0 to 10 dB.
13 - TAP (Tempo) & Hold for TUNING
This switch has two functions.
T
ap Tempo:
By tapping the switch you enter the global tempo for
NOVA System. This tempo can be used for delay and
modulation effects.
T
uning:
Press and hold to enter Tuner mode. Per default the
outputs are muted when in Tuner mode, but via the
Tuner menu chose between setting the “Tuner Out” to
mute or on. The Tuner parameters are automatically
accessible when Tuner mode is accessed.
14 - PITCH
On/off switch for the Pitch block.
Secondary function
:
Press and hold to decrease preset.
15 - REVERB or PRESET 1
In Pedal mode this switch acts as an on/off switch for the
Reverb.
In Preset mode you may press this switch to recall preset
#1 in the current bank.
16 - COMP or PRESET 2
In Pedal mode this switch acts as an on/off switch for the
Compressor.
In Preset mode you may press this switch to recall preset
#2 in the current bank.
17 - DRIVE or PRESET 3
In Pedal mode this switch act as an on/off switch for the
Drive section. In Preset mode you may press this switch
to recall preset #3 in the current bank.
OPERATION
8
Page 11
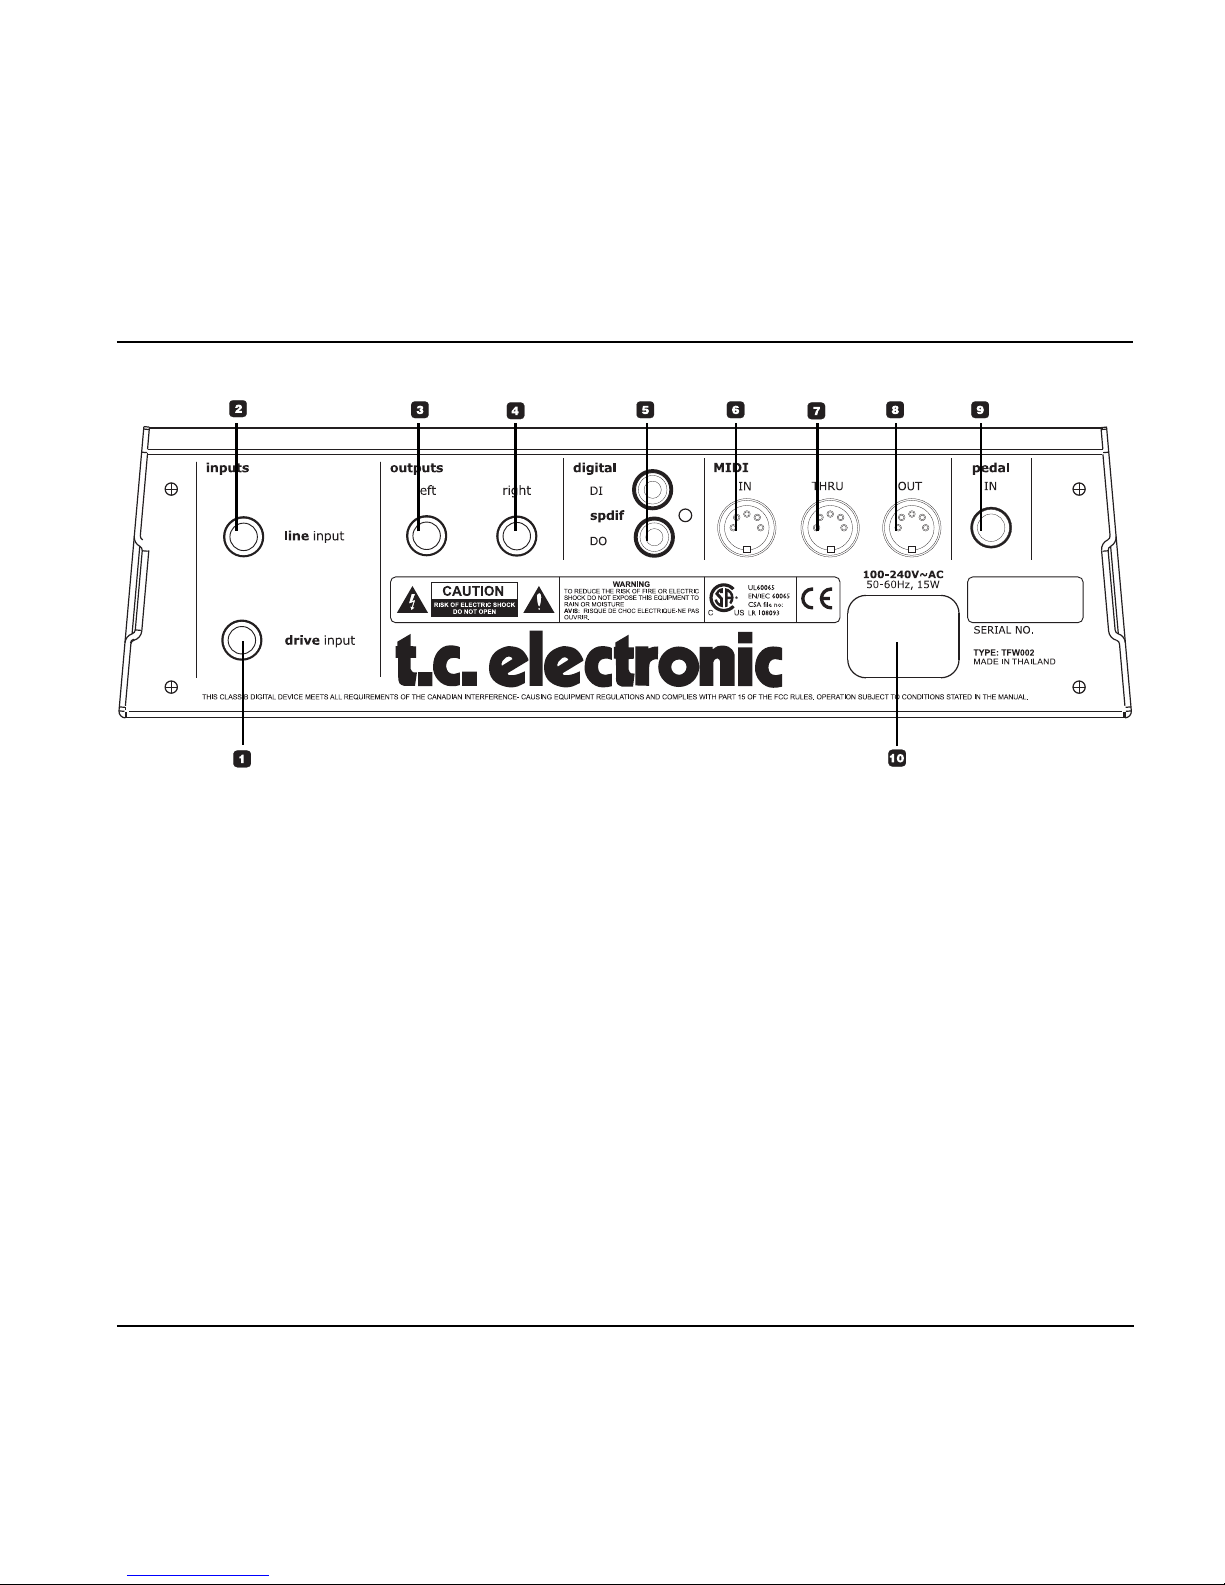
9
1 - Drive Input
Input for guitar. Use this input to utilize the programmable
analog drive section of NOVA System.
Connection type: 1/4” jack.
2 - Line Input
In case you want to use the NOVA System in an effects
loop of an amp, the “Effects Loop Send” should be
connected to the NOVA System Line In. Then the NOVA
System pre-amp section is bypassed and you use the
preamp section of your amp for drive.
3/4 - Balanced Outputs
Balanced outputs on 1/4” TRS jack. Use the left output if
you do not play in stereo and connect to a single amp.
5 - Digital I/O - S/PDIF
Sends and receives digital audio to S/PDIF standards on
standard RCA connectors.
REAR PANEL VIEW
6 / 7 / 8 - MIDI In / Thru / Out
Standard MIDI interface.
9 - Pedal In
Several types of external pedals can be connected and
used to control parameters.
- Connect a G-Switch for preset change and thereby
utilize all 8 switches on NOVA System as effects
bypass switches.
- Connect an expression or a volume pedal to control
e.g. volume.
For perfect response when using an expression or a
volume pedal, the pedal must be calibrated. This is
done via the pedal menu.
- Via the pedal menu you can set up what parameter
the expression/volume pedal should control.
10 - Power In
The switchmode power-supply accepts from 100 to 240
VAC.
Page 12
10
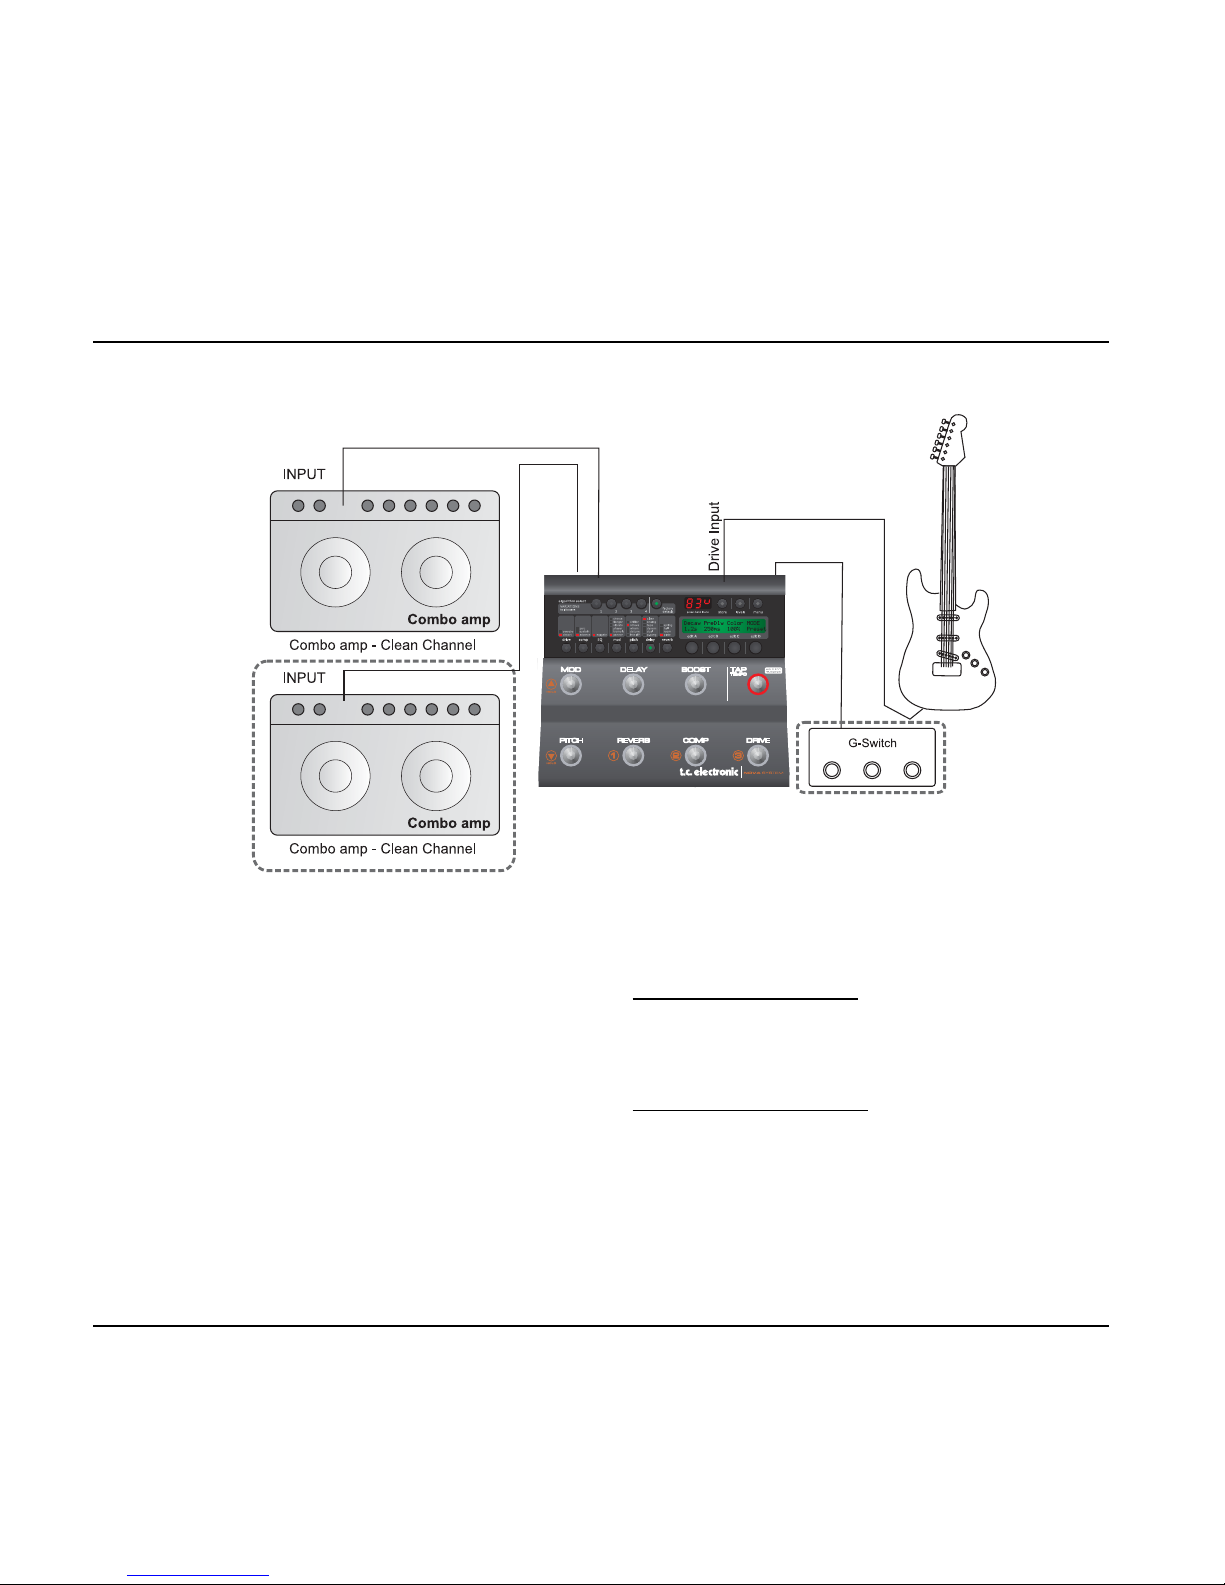
TYPICAL SETUPS
Basic setup
This is a typical basic setup combining NOVA System
with one combo amp (or two for stereo) running a clean
channel. All effects and overdrive/distortion are
generated by NOVA System. A G-Switch (optional) is
connected and the NOVA System is then automatically in
stomp mode. Presets are then recalled using the GSwitch.
Connections
• Connect your guitar to the NOVA System’s Drive
input
• Connect Left output to a guitar amp running a clean
channel
• Connect the right output to a second guitar amp for
stereo (optional)
• Connect G-Switch (optional) to the pedal input
pedal input
Basic settings
• Set input sensitivity via the Levels menu
W
ith a G-Switch connected:
• Activate/deactivate effect blocks pressing the effects
switches
• Change presets using G-Switch
W
ith no G-Switch connected:
• Select the Footswitch parameter in the Utility menu
and select Pedal (stomp) or Preset mode
• Select preset - if in preset mode
• Activate/deactivate effect blocks pressing the effects
switches
Page 13
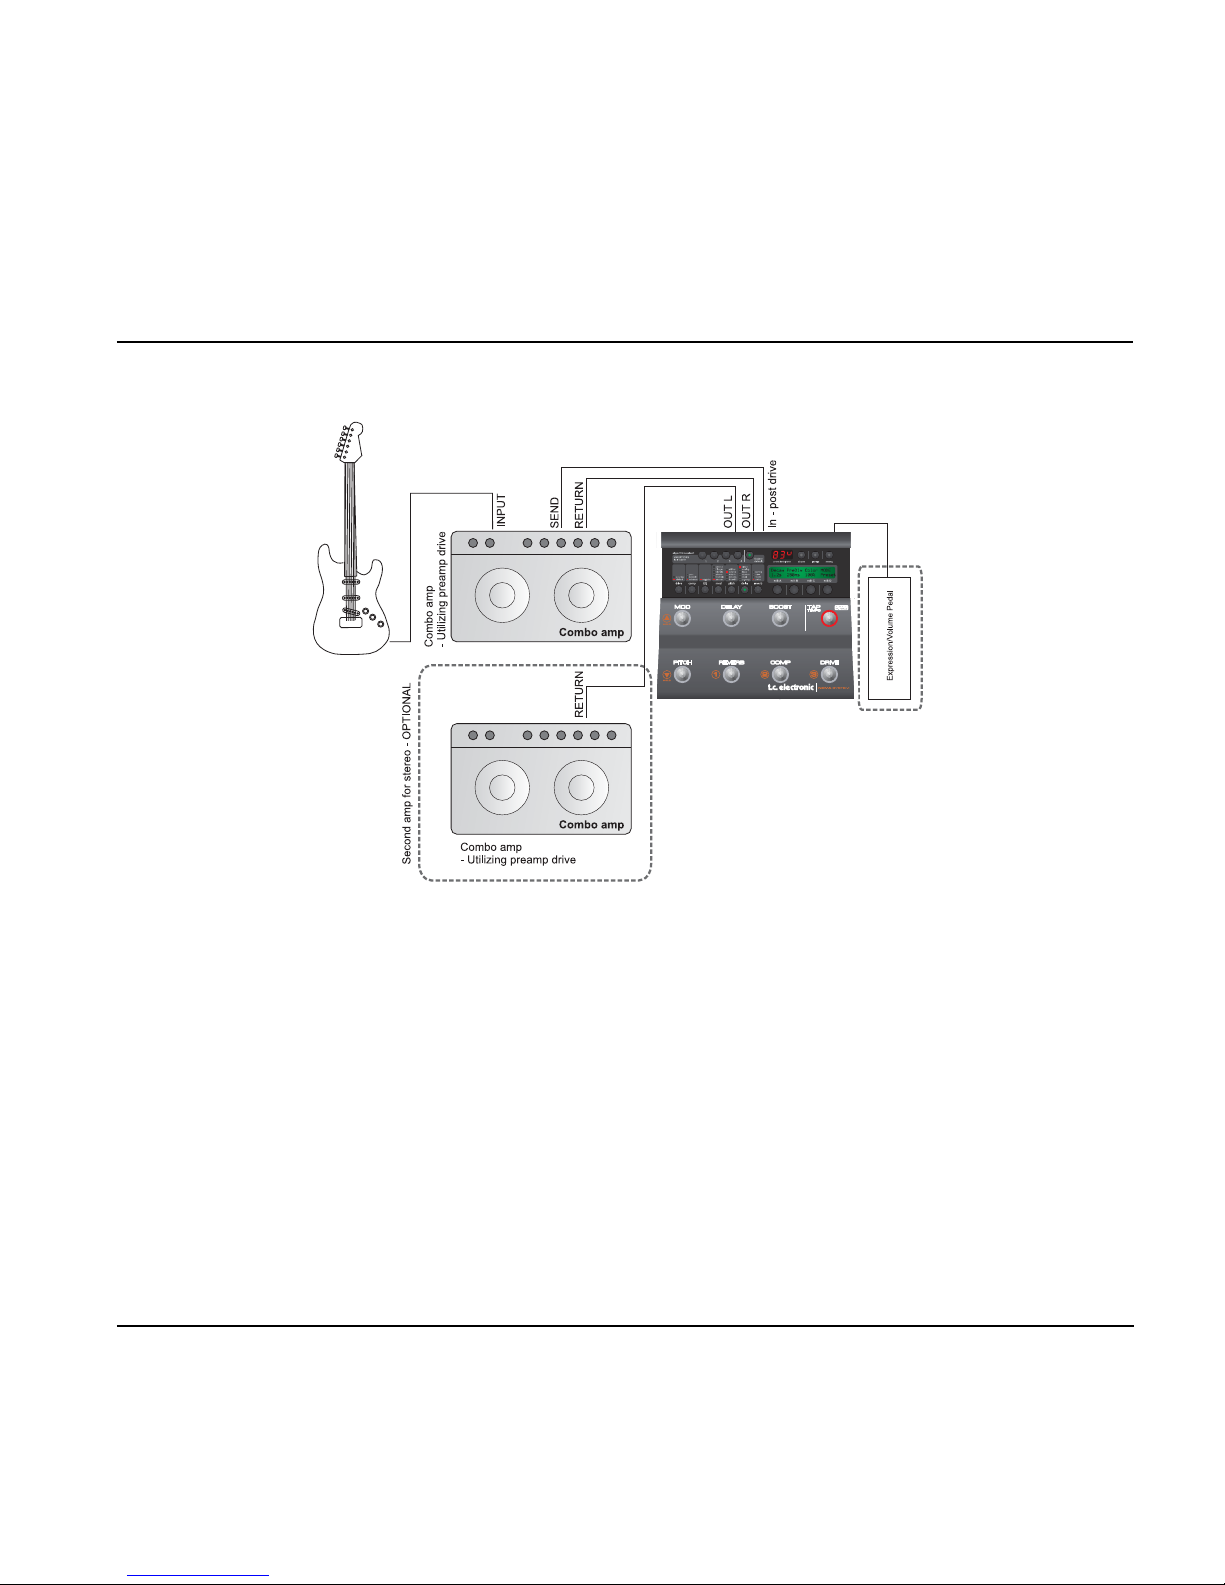
11
Basic settings
• Set input sensitivity via the Levels menu according to
the highest pedal level
• Select the Footswitch parameter in the Utility menu
and select Pedal (stomp) or Preset mode
• Select preset (if in preset mode)
• Activate/deactivate effect blocks pressing the effects
switches.
• Calibrate the expression pedal via the pedals menu
• Assign parameters to the expression pedal via the
Pedal menu
In this setup we use the preamp section of your combo
amp to generate the drive. We use the Line input on the
NOVA System and thereby bypass the NOVA Systems
drive section. An expression pedal is connected to pedal
in for real-time control of e.g. volume.
Connections
• Connect guitar to the input of the combo amp.
• Connect the effects loop “send” of the amp to NOVA
Systems Line input.
• Connect left output to the effects loop return (=power
amp in) of your amp. For a stereo setup connect the
NOVA System right output to the effects loop return
(power amp in) of the other amp.
• Connect an expression pedal to the NOVA System
Pedal in.
NOVA System in an effects loop
TYPICAL SETUPS
Page 14

MENU - ROUTING
12
Serial
The Serial routing connects all effect blocks “in a straight line”. This means that each effect block affects the following
effect(s).
If a delay with a long delay time is used in combination with a reverb, you may find the added reverb on the delay
repeats disturbing. In that case, use either the Semi Parallel or Parallel routing.
Routing
NOVA System has three ways of routing the chain of effects: Serial, Semi Parallel and Parallel.
Basics
• Press MENU
• Select Routing using encoder D
• Press MENU to confirm
• Set values using encoders A, B and C
• Change pages using encoder D
• Confirm by pressing MENU
• Exit by pressing MENU again
Page 15
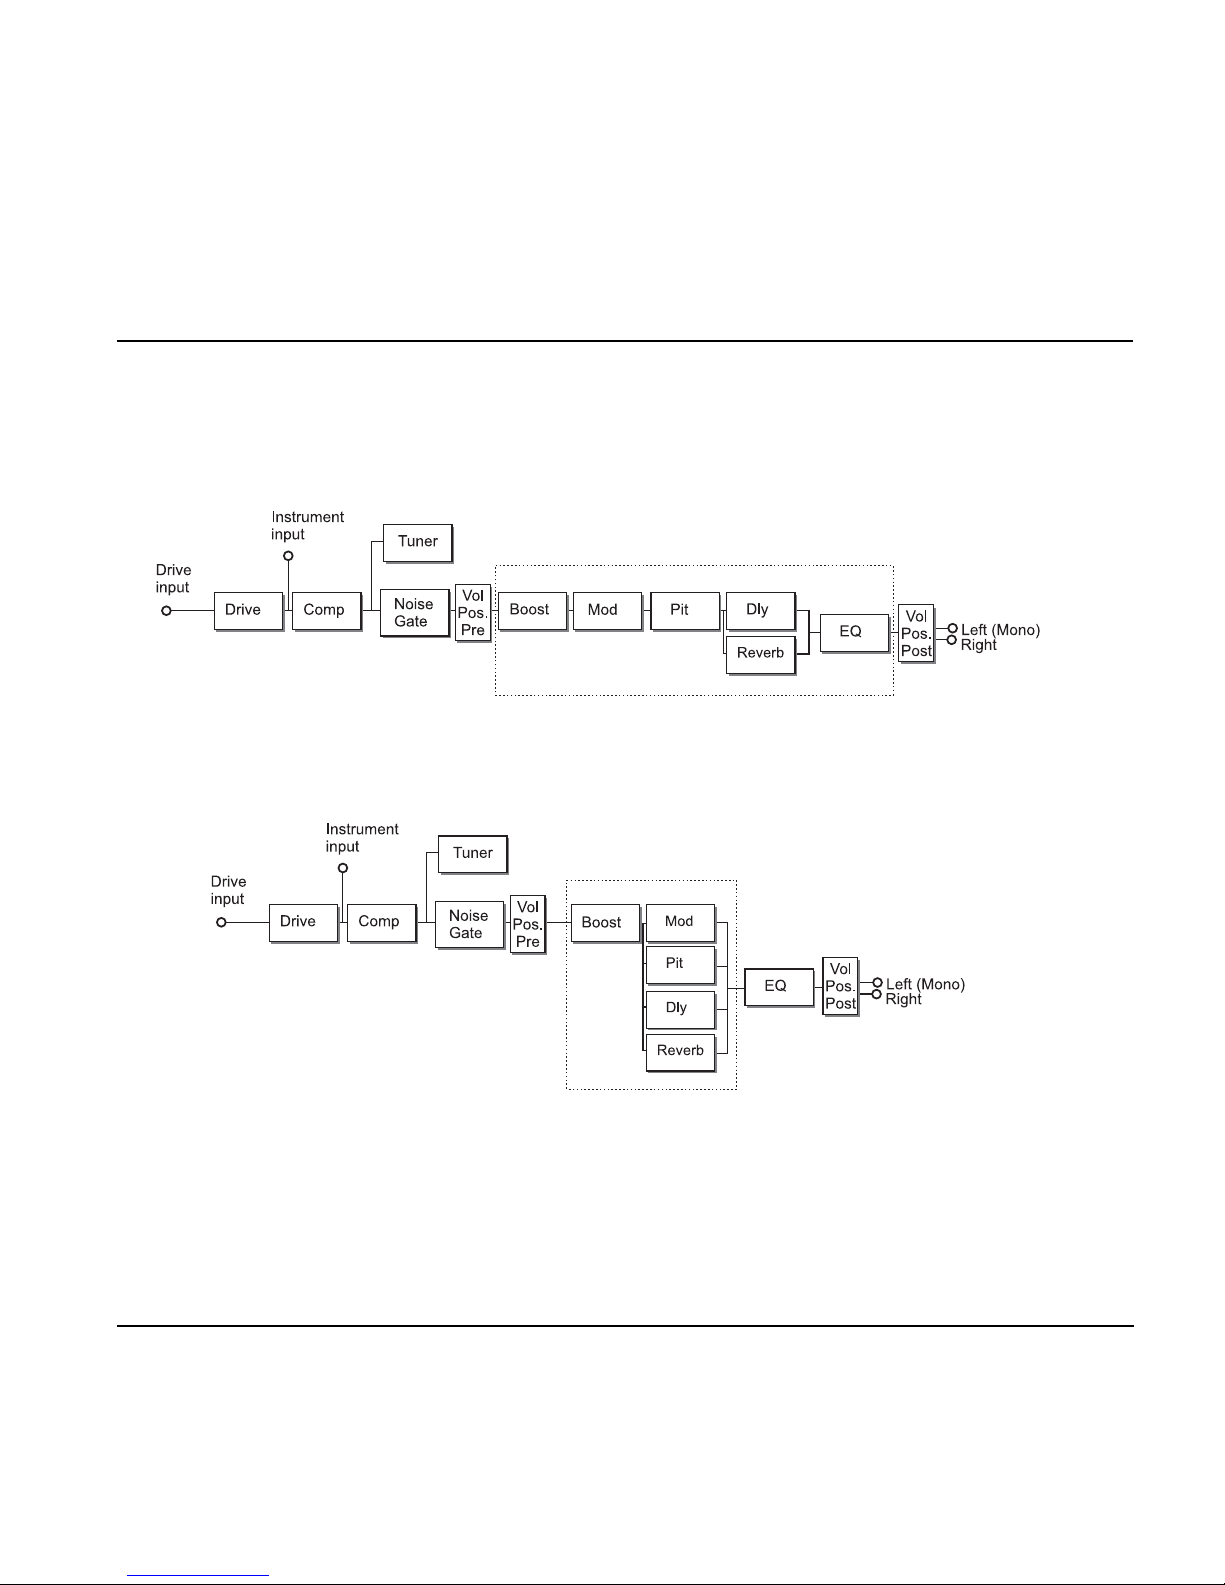
MENU - ROUTING
13
Semi Parallel
The Semi Parallel routing connects most effect blocks serially, but the reverb and delay blocks are now connected in
parallel. Consequently, the delay and reverb effects do not affect each other. This means that no reverb is added to the
delay repeats.
Parallel
In the Parallel routing, the same signal is fed to the input of the modulation, delay and reverb sections, and therefore
these effects will not affect each other.
Page 16

14
MENU - LEVELS
Levels menu
Basics
• Press LEVELS to access
• Set values using encoders A, B and C
• Change pages using encoder D
Where nothing else is stated the range of the level
parameters is -100 dB to 0 dB.
Volume
Range: -100 dB to 0 dB
Level control that can be positioned either pre or post
effects processing. The position of the volume control is
set by the Position parameter (see also routing
schematic).
Input Gain
Range: 0 dB to 24 dB
Guitars have different output levels. So has pedals you
may have placed before the NOVA System. This is how
you set the correct gain.
• Switch on any pedal in your signal chain that is
placed prior to NOVA System and may boost the
signal
• Strum your guitar as hard as you do when you play
• Adjust the line gain until the “0” appears:
• Then back off a few dB:
• The correct gain is now set and you have unity gain
through NOVA System.
Clipping indication
If you change the input gain considerably, e.g. by
switching to a different guitar or changing levels on a
pedal placed before the NOVA System, the input of the
NOVA System may be clipping. This is indicated by the
small dot in the far rightmost side of the numeric display:
Left Output & Right Output
Range: -100 dB to 0 dB
Individual level control for left and right outputs. These
levels can be set per preset.
Input
Range: Drive or Line
Selects the input. Select “Drive” if you have connected
your guitar to the Drive input and want to utilize the
NOVA Systems Drive effect block.
Select “Line” if you have connected your guitar to the
Line input. (see also routing schematic).
Volume Position
The Volume parameter is typically controlled by an
expression pedal. If you connect an expression pedal to
the pedal input the pedal will control this parameter per
default.
The Volume Position parameter defines where the
volume is controlled. The options are:
Pre:
The volume is controlled right after the Drive section
and before the effects. This allows for effects such as
Delay and Reverb to “hang”, even if you lower the level
using an expression pedal.
Post:
The volume is controlled after the effects. This
means that the volume of the entire signal, including
effects, is controlled.
Page 17

15
Advanced
Range: On or Off
Select “on” to gain access to the following “advanced”
level parameters. Once you are in advanced mode you
no longer benefit from automatic “unity gain” calculations
described on the previous page under the Input Gain
section. On the other hand you will have full control of
the level parameters.
Boost Max
Range: 0 to 10 dB
This setting determines the max range of the boost
function. As 0 dBFS is the max level in the digital domain
digital “boost” is done by attenuating the general level
and releasing this attenuation when boost is required.
If you use the Advanced mode and
the boost function,
the Output Range parameter can be adjusted to ensure
unity gain through the unit.
If you select advanced mode but never use the Boost
function at all, set the Boost Max parameter to 0 dB.
Output Range
Options: 2 dBu, 8 dBu, 14 dBu or 20 dBu
Which output setting to select depends on the set InGain.
The higher the InGain is set, the lower the Output Range
parameter should be set.
Input Src (Input Source)
Range: Analog or Digital
The default setting is analog. This setting enables the
analog inputs on the rear panel.
If you intend to connect digital equipment to the S/PDIF
input, the Input parameter must be set to “Digital”.
Note that the output signal is always present on both
analog outputs and on S/PDIF out as well.
Digital InGain
Use this parameter to gain the signal present on the
digital input. Adjust a low volumes and use a setting a
MENU - LEVELS
few dB lower than the point where digital clipping occurs.
This will ensure best signal to noise ratio.
Dither
Range: Off, 20 bit, 16 bit or 8 bit
NOVA System’s digital output operates at a bit depth of
24. If you are feeding the NOVA System digital outputs to
a digital device with a lower bit-depth, the dither
parameter must be set according to the receiving device.
Check the manual of this device to find the correct
setting.
Boost
Wouldn’t it be nice if you could just hit a single switch
and boost the entire signal for a few important phrases?
With the NOVA System boost function it is easy. Via the
Levels Advanced menu a max boost level between 0 and
10 dB is set. Within the Boost max level you can set up a
boost level for individual presets.
- press LEVELS to access the levels menu
- select “Advanced” and set this parameter to “on”
- scroll to BoostMax and set your boost max level
- then exit the menu and select the preset you want to
set up a boost level on.
- press DRIVE and set the boost level within the Boost
Max range.
Additional parameters for the Boost function:
Boost Lock:
Range: On or Off
When Boost Lock is set to “on”, you are able to boost the
amount of dB specified by the Boost Max. parameter on
ALL presets. The Boost Lock parameter is found in the
Utility menu.
BOOST FUNCTION
Page 18

16
MENU - PEDAL
Pedals menu
Basics
• Press MENU to access
• Select Pedal using encoder D
• Press MENU to confirm
• Set values using encoders A, B and C
• Change pages using encoder D
• Confirm selection by pressing MENU if <menu>
flashes in the right side of the display
• Exit by pressing MENU again
For external control of certain parameters you can
connect an expression pedal.
In this menu you assign which parameters to assign,
calibrate NOVA System to the connected expression
pedal and also dial in a response curve using the min,
mid and max parameters.
Parameters marked with “P”
Some of the parameters in this menu are global
parameters and some are saved at preset level.
Parameters saved with each preset are marked with “p”
in the right side of the display.
Example:
Connecting Expression pedals
Depending on the type of expression pedal used, the
pedal should be connected using either a regular mono
1/4" TS-TS cable or a stereo 1/4" TRS to TRS cable.
Mono
Stereo
If you are not sure which type to use, you may have to
try both types. NOVA System measures the signal on
your expression pedals output connector. Therefore only
one cable should be used per expression pedal.
Map Parameter
Assigning parameters to the pedal connected to the
“Pedal Input”
• Go to Pedal menu pressing MENU several times
• Select a parameter to control from the list
• Press MENU to confirm
• Set Min Mid Max
Min - Mid - Max
Range: 0-100%
These settings determine the parameter response
according to an expression pedal connected to the Pedal
input. Values can be set for both the minimum, mid and
maximum position of the pedal.
Boost Level:
The boost level can be set for each preset within the
range of the Max Boost parameter. This range is set in
the Levels menu.
Page 19

17
MENU - PEDAL
Master
If an expression pedal is connected to the pedal input
and a preset is recalled, NOVA System can be set up to
respond to either the current position of an expression
pedal or to the value stored with the preset.
Preset:
The parameter value stored as part of the preset
applies – regardless of the current position of the
expression pedal.
Pedal:
The position of the expression pedal is identified
at the moment of preset change, and the value stored as
part of the preset is discarded.
Type
Select between either Expression or G-Switch depending
in the type of switch you have connected to the Pedal
input. Expression pedals must be calibrated (see below).
When a G-Switch is connected and selected as pedal
type the G-Switch is used to change presets and all 8
switches on the NOVA System are used as “stomp
on/off” switches.
Calibrating to an expression pedal
In order to secure the best performance of your
expression pedal, NOVA System must be calibrated to
this pedal. Follow this step by step guide.
• Make sure that you have connected your pedal to the
pedal connector on the rear panel
• Select “Calibrate from the Pedal Menu
• Press MENU
• The LCD now reads
• Place your pedal in minimum position (“Heel down”)
and press MENU
• The LCD now reads
• Place your pedal in maximum position (Toe down)
and press MENU
• The LCD reads: “CALIBRATION DONE”
Page 20

18
MENU - UTILITY
Utility
Basics
• Press MENU to access
• Select Utility using encoder D
• Press MENU to confirm
• Set values using encoders A, B and C
• Change pages using encoder D
FX Mute
The FX Mute parameter determines how the Reverb and
Delay effects should behave when changing between
presets and when bypassing one of these effects.
Sof
t:
Delay and Reverbs will “ring out”
Delays have true spillover, meaning that if you e.g. have
a long delay time and the FX Mute parameter is set to
“Soft” the delays will continue even if you change to a
preset that holds completely different delay settings.
Reverbs can also spill over at preset change but will use
the settings in the new preset.
Hard:
Delay and Reverbs will mute.
Tap Master
A preset holds both a subdivision parameter that relates
to the global tapped tempo and also a fixed delay time.
The tap tempo master parameter defines how NOVA
System responds to the global tapped tempo at preset
change.
Preset:
With Tap Master in Preset mode the delay repeats will
play according to the delay time stored with the preset.
As soon as you tap, maybe to make a slight correction,
the tapped tempo plays according to the set subdivision.
Global:
With Tap Master in Global mode the current tapped
global tempo and the set sub-division applies instantly at
preset change.
Boost Lock
Range: On or Off
When Boost Lock is set to “on” you will be able to boost
the amount of dB specified by the Boost Max. parameter
on ALL presets.
EQ Lock
Range: On/off
When EQ is locked the current EQ will be used on ALL
presets.
Routing Lock
Range: On/off
If you always use the same routing you may prefer to
lock the current routing.
FactoryLck (Factory Bank Lock)
Range: On/off
NOVA System comes with a selection of factory presets
to show the many different sounds and effects you can
create with NOVA System. However, as you begin you
create you own bank of presets you may prefer not to be
able to select factory sounds in a live situation. In that
case set Factory Bank Lock to “on”. You will then NOT
scroll through factory banks when you use the bank
up/bank down functions.
SpeakerSim (Speaker Simulator Filter)
Range: On/Off
With the NOVA System speaker simulator you are able to
emulate the attenuation of high-end frequencies that
naturally occurs when playing through guitar-speaker
cabinets.
Use the speaker simulators ”on” option when you
connect the NOVA System outputs directly to recording
inputs of an audio interface (e.g. TC Konnekt), or when
plugging directly into a mixer.
Page 21

19
MENU - UTILITY
The NOVA System EQ section is not available
when SpeakerSim is invoked.
Always set the SpeakerSim parameter to “off” when
plugging the NOVA System outputs into a regular
guitar amplifier. Otherwise you will have both a
speaker and a filter emulating a speaker at the
same time. With this combination you will most
likely find your gear sounding dull.
Footswitch
Range: Pedal or Preset
Pedal mode
:
In pedal mode all footswitches act as effects on/off
switches (+Tap tempo). Pretty much as a you would use
eight regular stomp box pedals. However, it is still
possible to change both preset banks and presets when
in this mode.
Changing preset
s:
- press and hold one of the three preset switches.
Changing banks
:
- press and hold one of the two left-most buttons (MOD
or PITCH). The three preset buttons and the MOD
and PITCH switches will blink indicating that you are
in bank select mode.
- Now either tap MOD or PITCH to step through preset
banks one at a time or hold on of the switched to
scroll up/down.
Preset mode (default setting)
:
In preset mode you recall presets by pressing one of the
three preset switches. Preset banks are selected as
described in the paragraph “changing banks”.
Pedal mode - with G-Switch connected
:
With a G-Switch connected to Pedal In on the rear panel,
this switch can be used to recall presets. This way you
can use all seven effects on/off switches for effects
bypass and use the G-Switch for instant preset recall.
We think this is the “best of both worlds”.
The G-Switch must be selected as pedal type in the
pedals menu.
View Angle
Adjust to get the best display viewing angle.
Clear System
Clear system will set NOVA System back to factory
default settings. - Press MENU to execute and confirm.
Page 22

20
Basics
• To activate the Tuner, press and hold the TAP
TEMPO switch
• Set values using encoders A, B and C
• Change pages using encoder D
• Press any footswitch to exit.
In Tuner mode the following parameters can be set.
Tuner Out
Mute
:
Output is muted when in tuner mode.
On:
Output is not muted when in tuner mode.
Tuner Ref
Range: 420 to 460 Hz
This parameter sets the general tuner reference. Default
setting is 440 Hz.
Example - tuning a guit
ar:
• Press and hold the footswitch in the lower right corner
until Tuner mode is accessed.
• Play e.g. the A string. Let ring.
If the note is within +/- 100 cent around “A” the tuner will
recognize the note A and indicate whether the pitch of
the note is too low, too high or in tune.
Too high
Too low
In tune
THE TUNER
Page 23

21
MIDI
MIDI Setup menu
Navigation
• Press MENU to enter menu
• Select MIDI Setup menu using Encoder D
• Press MENU to enter
• Change page using encoder D
• Change parameters using encoder C
MIDI Channel
Range: Off, 1 to 16 or Omni
When Omni is selected, the NOVA System receives MIDI
information on all channels. When set to “Off”, the NOVA
System does not respond to any incoming MIDI data.
Program Change In
Range: On/Off
Determines whether the NOVA System should respond
to incoming MIDI program changes or not.
Program Change Out
Range: Off/On
This parameter and the Prg. Map parameter concern the
MIDI program change information sent on MIDI out when
a preset is recalled on NOVA System.
Of
f: No program changes are sent on MIDI out.
On: Program changes are sent on MIDI out when presets
are recalled.
PrgMap - Program Map
The Program Map function allows you to map an
incoming MIDI program change from an external MIDI
device to recall any preset.
In the following example incoming MIDI program change
#1 will recall preset #2 in Factory bank #0.
Factory presets are labeled “F” and User presets are
labeled 00-1 to 20-3.
The PrgMap settings also apply on MIDI out. So if we
look at the example above. Recalling preset number #2
in factory bank #0 will send program change #1 on MIDI
out.
Prg. Map Reset
Press MENU to reset the Program Map.
SysEx ID
Range: 0 to 126 - ALL
Sets the NOVA System’s SysEx ID for identification in
larger MIDI setups.
Dump System*
For a complete system backup, press MENU. All the
NOVA System’s basic settings and all User presets are
sent via MIDI as a MIDI Data Dump.
Dump Bank*
The entire User bank is sent via MIDI as a MIDI Data
Dump when “Execute Dump” is performed.
How to Dump via MIDI – Step by Step:
• Connect the NOVA System’s MIDI Out to the MIDI In
of a MIDI sequencing device.
Page 24

22
• Set your sequencer to record on all MIDI channels
(“Omni”) and start recording.
• Set the NOVA System to dump either all data
(System) or User Bank (see above) and press
ENTER.
*A computer with a standard MPU 401 MIDI interface is
recommended and tested for best results.
MIDI Clock
With this function enabled you can receive a MIDI clock
from an external MIDI unit and thereby enter the global
tempo this way instead of tapping the tempo.
MIDI
Page 25

23
MIDI CC menu
This menu allows for external MIDI control of effects
on/off, tap tempo function and real-time control of the
parameter assigned to the expression pedal.
Basics
• Press MENU
• Select MIDI CC and press MENU
• Select parameters using encoder D
• Set MIDI CC values using encoder A, B or C
MIDI CCs
For each function you can set a MIDI Cc (control
change) number. This is the number the external device
must address followed by a value to control the
parameter.
Controllable parameters:
Parameter
Menu Name Values
Tap Tempo Tap Tempo : Off, MIDI CC 0 to 127
Drive DRV Off/On : Off, MIDI CC 0 to 127
Compressor CMP Off/On : Off, MIDI CC 0 to 127
Noise Gate NG Off/On : Off, MIDI CC 0 to 127
EQ EQ Off/On : Off, MIDI CC 0 to 127
Boost BST Off/On : Off, MIDI CC 0 to 127
Modulation MOD Off/On : Off, MIDI CC 0 to 127
Pitch PIT Off/On : Off, MIDI CC 0 to 127
Delay DLY Off/On : Off, MIDI CC 0 to 127
Reverb REV Off/On : Off, MIDI CC 0 to 127
Expr. pedal Exp Pedal : Off, MIDI CC 0 to 127
MIDI
Page 26

Recall
Recalling presets are done in slightly different ways
depending on whether you are in Preset or Pedal mode.
In Preset mode
Presets are recalled pressing the switches marked 1, 2,
or 3.
To increase the preset bank number, press and hold the
switch in the upper left corner:
To decrease the preset bank number; press and hold the
switch in the lower left corner:
In Pedal mode
Presets are still recalled using switches marked 1, 2 or 3.
However in this mode you must press and hold the
switches for about 0.5 second.
Preset banks are still selected as described above.
Edit
As soon as one of the seven EFFECTS EDIT switches are
pressed NOVA System is in edit mode.
In Edit mode you have several options:
Selecting ef
fects: Press one of the EFFECTS EDIT buttons
to enter edit mode.
Example: Drive selected
Press several times to select the desired effects algorithm.
Enable/Disable effect: Though you may be editing an
effect, the effect block may not be active. Effects are
enabled/disabled by pressing the corresponding EFFECT
switch.
Exit edit mode without storing changes
: If you want exit edit
mode without storing your changes this can be done in two
ways. Either press MENU, or press and hold the EFFECTS
EDIT button of the effect you are currently editing.
A dot in the numeric display (see illustration below),
indicates that the current preset has been edited.
RECALL - EDIT
24
Page 27

Store
A preset can be stored in two ways. We call them “Quick
store” and “Normal store”. “Quick store” is typically used
when you have made changes to a preset and want to
store the preset with the same name at the same
location. “Normal store” is used if you want to change
preset location and maybe the name as well.
Quick store
- press and hold STORE for 2 seconds. The
preset is now stored at the current location with the same
name.
If you are trying to store a factory
preset using
“Quick store”, you will automatically be directed to
“Normal store” mode.
Normal S
tore
- press STORE once:
Now the following controls are available:
- Encoder A selects preset location
- Encoder B selects preset name characters
- Encoder C changes characters
- Encoder D selects recall, delete or store mode
When selections are made press STORE to confirm.
Delete
Presets in the User bank can also be deleted for
“cleaning up”.
- Press STORE once
- Select DELETE using Encoder D
- Press STORE to confirm
That’s it!
STORE - DELETE
25
Page 28

26
Overdrive
The NOVA System overdrive emulates the classic
overdrive originally only in found tube amps. The
range goes from slightly warm and subtle overdrive
to high gain for screaming leads.
Gain
Gain sets the amount of overdrive. Lower settings give a
slightly fatter yet still “clean” sound. Medium settings
provides nice crunch and higher gain settings provides
singing overdrive as known from cranked up tube amps.
Tone
Sets the amount of high-end frequencies.
Level
General level for the drive effect.
Boost Level
Range: 0 to 10 dB
Sets the amount of boost for the effect. This level is
limited by level set by the Boost Max parameter found in
the levels menu.
Distortion
The nature of distortion compared to overdrive is
more fat and aggressive with slightly less tone
definition and dynamics. It allows for full and
massive chords and fluent compressed leads.
Gain
Gain sets the amount of distortion. From the fat and
beefy to the screaming more compressed.
Tone
Sets the amount of high-end frequencies.
Level
General level for the distortion effect.
Boost Level
Range: 0 to 10 dB
Sets the amount of boost for the effect. This level is
limited by level set by the Boost Max parameter found in
the levels menu.
EFFECTS - DRIVE
NOVA Drive Technology - a unique, new drive and distortion circuit that gets you the best of both worlds: World-class
analog distortion and overdrive with digital control. This is the real deal – no modeling. While the NDT™ is 100% analog
and physically separated from the digital effects, its control potmeters are digital. This way you can tweak, store and recall
as many drive settings as you want - you can even hook up an expression pedal and control the amount of distortion in
real-time. Its wide gain range covers your every need from light breakup to heavy distortion.
Page 29

27
Compressor
Introduction
A compressor is used to control the dynamic content of a
signal. It can be used both for leveling out the signal’s
dynamics (thereby letting your guitar sound stand out
clearer) and also for more radical, very recognizable
effects.
NOVA System offers three types of compression.
Advanced for full access to all compression parameters
and sustaining
Illustration – Basic Compression
As this illustration shows, the output signal is attenuated
relative to the set ratio when the input signal exceeds the
threshold point. The attack parameter specifies how fast
the attenuation is achieved. The Level parameter allows
you to manually compensate for the perceived level
difference resulting from compression.
NOVA System compressors
Editing compressor parameters:
• Press COMP
• Change pages using encoder D
• Adjust parameters using encoders A-C
Advanced Type
This type offers full control over all compression
parameters.
Threshold
Range: -30 dB to 0 dB
When the signal exceeds the set threshold point, the
compressor is activated. The signal’s level above this
threshold point is processed according to the settings of
the Ratio, Attack and Release parameters (see below).
Ratio
Range: Off, 1.12:1 to Infinite:1
This parameter determines how hard the signal is
compressed.
Example:
With a Ratio setting of 2:1, an input signal with
4 dB above threshold is reduced to only 2 dB on the
output. The “infinite” setting gives you a limiter function.
Attack
Range: 0.3 ms to 140 ms
The attack time is the response time of the compressor.
The shorter the Attack time, the sooner the compressor
will reach the specified ratio after the signal rises above
the threshold point.
Release
Range: 50 to 2000 ms
The release time is the time it takes for the compressor
to release the gain reduction of the signal after the Input
signal drops below the threshold point again.
EFFECTS - COMPRESSOR
Page 30

28
Level
Range: - dB to +12 dB
Depending on you compression settings you may prefer
to lower the output level of the compression block by a
few dB. Use the compressor Level parameter to do so.
Sustaining and Percussive Types
The Sustaining and Percussive Types hold fewer handles
than the Advanced mode. Individually tuned these types
allow you two easily setup commonly used compression
styles.
Use the Sust
aining type to achieve the subtle
compression settings that will give you plenty of sustain
without “smashing” the sound too hard.
Use the Percussive type
to obtain the hard, obvious and
easy recognizable compression often achieved with
classic stomp box compressors
Though tuned differently the two types hold common
parameters.
Drive
Range: 1 to 20
A combination of Threshold and Ratio parameters that
sets the compression amount. Though auto make-up
gain is applied you may need to adjust the level slightly
using the Gain parameter when extreme settings are
used.
Response
Range: 1 to 10
Sets the time it takes for the Compressor to release the
compression. The lower setting the more you will hear
the compression.
Level
Range: -12 to +12 dB
Depending on the settings of Drive and Response
parameters you may need to adjust the Level.
EFFECTS - COMPRESSOR
Page 31

29
EFFECTS - EQ & NOISE GATE
EQ
NOVA System features a 3 band EQ that can be set
either for individual presets or as an overall EQ for the
entire unit.
Editing EQ and Noise Gate parameters:
• Press EQ to enter EQ/Gate edit mode
• Change pages using encoder D
• Adjust parameters using encoders A-C
• Noise Gate parameters are located after EQ
parameters
For each of the three bands, the following parameters
are available:
Freq
Range: 41 Hz to 20 kHz
This parameter sets the center frequency of the
frequency range that you want to attenuate or boost.
Gain
Range: -12 dB to +12 dB
Use this parameter to attenuate or boost the frequency
range selected with the Freq(uency) parameter.
Width
Range: 0.3 to 1.6 octaves
This parameter sets the width of the frequency range
around the frequency specified by the freq(uency)
parameter.
Noise Gate
A Noise Gate is generally used to attenuate the signal
when no signal is present and thus attenuate the hiss,
hum and other noise you might have on your system. Of
course a Noise Gate is not the solution to any noise
problem. You should try to avoid the noise in the first
place. Problems with noise can be introduced by a
number of different things. In a guitar signal chain the
typical problems are; poor cables, poorly shielded
pickups, power supplies placed close to signal cables
and other pedals.
There will, however, always be a certain amount of noise
in any setup. The Noise Gate can help you attenuate the
noise when you are not playing. Be careful when setting
Threshold and Release parameters. A too high Threshold
setting will result in e.g. not “opening” the Gate. A too
slow Release time will result in cutting your attack.
The Noise Gate parameters are placed in the EQ block
after the EQ parameters.
• Press and hold the EQ button to select between Line
and Drive inputs.
• Be sure that “Gate” is set to “on”
• Scroll past the EQ pages until the following two
screens with Noise Gate parameters appear.
Page 32

30
EFFECTS - EQ & NOISE GATE
Mode
Range. Hard or Soft
General overall mode that determines how fast the Noise
Gate should attenuate/dampen the signal when below
Threshold.
Threshold
Range: -60 dB to 0 dB
The threshold point determines at what point the Noise
Gate should start attenuating the signal.
To set this parameter; set the Damp parameter to e.g. 50
dB. Then start turning up the Threshold value from -60
dB to the point where desired dampening is actually
achieved. This little experiment will of course require that
the Damp parameter is set different from 0 dB - as 0 dB
means: no damping.
Damp
Range: 0 dB to 90 dB
This parameter determines how hard the signal should
be attenuated when below the set Threshold. You could
argue that a max dampening would be appropriate
always, but you would also like to have a smooth
transition between the “gated/attenuated” stage and the
“open” stage. The more dB that must be released the
more obvious the Noise Gate might seam.
Release
Range: 0 dB/sec to 200 dB/sec
The Release parameter determines how fast the signal is
released when the Input signal rises above the Threshold
point. As a rule of thumb this setting should be set fairly
high.
Page 33

31
Phaser
The electronic phasing effect is created by splitting an
audio signal into two paths. One path treats the signal
with an all-pass filter, which preserves the amplitude of
the original signal and alters the phase. The amount of
change in phase depends on the frequency. When
signals from the two paths are mixed, the frequencies
that are out of phase will cancel each other out, creating
the phaser’s characteristic notches.
Speed
Range: 0.050 Hz to 20 Hz
Sets the speed of the effect.
Tempo
Range: Disable, 1 to 1/32T (T=Triplet & D=Dotted)
When set to any value between 1 and 1/32T, the NOVA
System’s Global Tempo is subdivided according to this
setting. When set to “Ignore”, the speed set by the Speed
parameter is used instead.
The Tap Master parameter – located in the Utility
menu – specifies whether the Global tempo or the
tempo set by the Speed parameter in each preset
should be used at preset change.
Depth
Range: 0 to 100%
The Depth parameter specifies the intensity of the effect.
The value represents the amplitude of the modulating
waveform.
Range
Range: Low or High
The Range parameter determines whether the phasing is
focused on the low- or the high-end frequencies.
Fb – FeedBack
Range: -100 to +100%
This parameter controls the amount of feed back in the
Phaser. Negative values inverse the phase of the signal
that is fed back to the algorithm’s Input.
Mix
Range: 0 to 100%
This parameter sets the relationship between the dry
signal and the level of the effect in this Effect Block.
EFFECTS - PHASER
Page 34

Tremolo
A tremolo is basically a change of the signal level
controlled by an LFO. The NOVA System offers
variations of this effect; ranging from soft and smooth to
hard and aggressive.
Speed
Range: 0.050 Hz to 20 Hz
This parameter sets the speed of the effect.
Tempo
Range: Disable, 1 to 1/32T (T=Triplet & D=Dotted). When
set to any value between 1 and 1/32T, the NOVA
System’s Global Tempo is subdivided according to this
setting. When set to “Ignore”, the speed set by the Speed
parameter is used instead.
Depth
Range: 0 to 100%
The Depth parameter specifies the intensity of the effect.
The value represents the amplitude of the modulating
waveform.
Type
Range: Soft or Hard (Sine or Square)
Two waveforms are available as modulation sources for
the tremolo effect. Setting this parameter to hard results
in a steeper effect. Listen and choose the appropriate
option.
Soft
Hard
Width
Pulsewidth
Range: 0 to 100%
If you set this parameter e.g. to 20% with a Type setting
of Hard, the waveform will be on for 80% of one period.
With a Type setting of Soft, a 50% setting would yield a
full sine wave, whilst 0% and 100% would yield a crestto-peak and peak-to crest curve, respectively.
Hi-Cut
Range: 20 Hz to 20 kHz
This parameter attenuates the high frequencies of the
Tremolo effect. Use the hi-cut filter to create a less
dominant tremolo effect without changing the effect’s
depth.
EFFECTS - TREMOLO
32
Page 35

33
EFFECTS - PANNER
Panner
Introduction
The Panner simply pans the signal between the left and
the right channel. Use this for extreme stereo perspective
effects.
Speed
Range: 0.050 Hz to 20 Hz
Sets the speed of the effect.
Tempo
Range: Ignore, 2 to 1/32T (T=Triplet & D=Dotted)
When set to any value between 2 and 1/32T, the NOVA
System’s Global Tempo is subdivided according to this
setting. When set to “Ignore”, the speed set by the Speed
parameter is used instead.
The Tap Master parameter – located in the Utility
menu – specifies whether the Global tempo or the
tempo set by the Speed parameter in each preset
should be used at preset change.
Depth
Range: 0 to 100%
When you set this parameter to 100%, the signal will
sweep fully from the left to right. You will find, however,
that for most applications, a more subtle setting is more
appropriate, as it blends more elegantly with the overall
sound.
Page 36

Chorus
The NOVA System Chorus offers a full range of
parameters allowing you to create from simple classic
chorus sounds to the more exotic types.
The basic idea of a chorus effect is to split the signal and
pitch modulate one of the signals slightly, then mix the
two signals again.
Speed
Range: 0.050 Hz to 20 Hz
This parameter sets the speed of the effect.
Tempo
Range: Disable, 1 to 1/32T (T=Triplet & D=Dotted)
When set to any value between 2 and 1/32T, the NOVA
System’s Global Tempo is subdivided according to this
setting. When set to “Ignore”, the speed set by the Speed
parameter is used instead.
The Tap Master parameter – located in the Utility
menu – specifies whether the Global tempo or the
tempo set by the Speed parameter in each preset
should be used at preset change.
Depth
Range: 0 to 100%
The Depth parameter specifies the intensity of the effect.
The value represents the amplitude of the modulating
waveform.
Hi-Cut
Range: 20 Hz to 20 kHz
This parameter reduces the high-end frequencies in the
Chorus effect. Try using this parameter if you feel the
Chorus effect is too dominant in your sound and turning
down the Mix or Out level doesn’t give you the
dampening of the Chorus effect you are looking for.
Cho Dl – Chorus Delay
Range: 0 to 50 ms
As described earlier, a Chorus/Flanger is basically a
Delay being modulated by an LFO. This parameter
allows you to change the length of that Delay.
A typical Chorus uses Delays at approximately 10 ms,
while a Flanger uses Delays at around 0.8 ms.
Mix
Range: 0 to 100%
This parameter sets the relationship between the dry
signal and the level of the effect in this Effect Block.
EFFECTS - CHORUS
34
Page 37

Flanger – Introduction
The Flanger belongs to the same “family” of modulation
effects as the Chorus effect. The signal is split, and one
of the signals is pitch modulated.
The characteristic “flanging” sound occurs when part of
the signal is slightly delayed and fed back to the input of
the effect algorithm. Experiment with the Feedback
parameter to get a feeling for the achievable effects.
Speed
Range: 0.050 Hz to 20 Hz
This parameter sets the speed of the effect.
Tempo
Range: Disable, 1 to 1/32T (T= Triplet & D= Dotted)
When set to any value between 2 and 1/32T, the NOVA
System’s Global Tempo is subdivided according to this
setting. When set to “Ignore”, the speed set by the Speed
parameter is used instead.
The Tap Master parameter – located in the Utility
menu – specifies whether the Global tempo or the
tempo set by the Speed parameter in each preset
should be used at preset change.
Depth
Range: 0 to 100%
The Depth parameter specifies the intensity of the effect.
The value represents the amplitude of the modulating
waveform.
Hi-Cut
Range: 20 Hz to 20 kHz
This parameter reduces the high-end frequencies in the
Flanger effect. Try using this parameter if you feel the
Flanger effect is too dominant in your sound and turning
down the Mix or Out level doesn’t give you the
dampening of the Flanger effect you are looking for.
FeedB – Feedback
Range: -100 to 100
This parameter controls the amount of Feedback
(Resonance) of the short modulated delay that causes
the Flanging effect. When the Feedback is set too high
(above approximately 90% to 95%), this might introduce
internal Feedback, resulting in a squealing noise that in
most cases is unwanted in flanging effects. Be aware of
this side-effect when experimenting at high volumes.
Negative values inverse the phase of the signal that is
fed back to the algorithm’s Input.
FB Cut – Feedback hi-cut
Range: 20Hz to 20kHz
A parameter that can attenuate the high-end frequencies
of the resonance created with the Feedback parameter.
Fla Dl – Flanger Delay
Range: 0 to 50 ms
Typically, Delay values around 0.8 ms are used for
Flanging effects, whereas Chorus effects occur with
Delay times around 10ms. You are free, however, to
choose Delay times from 0 to 50ms.
Mix
Range: 0 to 100%
This parameter sets the relationship between the dry
signal and the level of the effect in this Effect Block.
EFFECTS - FLANGER
35
Page 38

Vibrato
The vibrato effect modulates the pitch of the incoming
signal. The result is similar to the vibrato technique used
by vocalists. In contrast to a chorus or flanger effect, no
direct signal is combined with the pitch-modulated signal.
Speed
Range: 0.050 Hz to 20 Hz
Sets the speed of the effect.
Tempo
Range: Disable, 1 to 1/32T (T= Triplet & D= Dotted).
When set to any value between 2 and 1/32T, the NOVA
System’s global tempo is subdivided according to this
setting. When se to “Ignore”, the speed set by the speed
parameter is used instead.
The Tap Master parameter – located in the Utility
menu – specifies whether the Global tempo or the
tempo set by the speed parameter in each preset
should be used at preset change.
Depth
Range: 0 to 100%
The Depth parameter specifies the intensity of the effect.
The value represents the amplitude of the modulating
waveform.
Hi-Cut
Range: 20 Hz to 17.8 kHz / off
This parameter reduces the high-end frequencies in the
vibrato effect. Try using this parameter if you feel the
effect is too dominant.
EFFECTS - VIBRATO
36
Page 39

37
Detune
The detune effect is – to some extent – similar to a
chorus: The source signal is split and a specified amount
of the signal is detuned by an adjustable amount of cents
(100 Cent = 1 semitone). The main difference between
the detune effect and the chorus effect is that the detune
amount does not change: the modulating pitch is
specified as an offset to the original pitch.
The detune effect comprises two voices. If you think your
sound is simply too direct and clean, try a setting with
only a few cent off, on both voices – e.g. +2 cent on
voice 1 and -3 cent on voice 2.
Voice 1
Range: -100 to 100
This parameter determines the pitch offset of the first
voice in the Detune block.
Voice 2
Range: -100 to 100
This parameter determines the pitch offset of the second
Voice in the Detune block.
Delay 1
Range: 0 to 50 ms
This parameter specifies the delay of Voice 1.
Delay 2
Range: 0 to 50 ms
This parameter specifies the delay of Voice 2.
Mix
Range: 0 to 100%
This parameter sets the relationship between the dry
signal and the level of the effect in this Effect Block.
Whammy
The Whammy effect allows you to control the pitch of an
added voice with an external Expression pedal.
For Factory presets including the Whammy effect, the
Expression pedal connected to the Pedal Input
automatically controls the Pitch parameter, i.e. it acts as
a Whammy Pedal.
Pitch
Range: 0 to 100%
This parameter sets the amount of pitch shift relative to
the Range setting. A connected pedal adjusts this
parameter.
Dir – Direction
Range: Up – Down
This parameter determines whether the attached
Expression pedal should increase or decrease pitch
when moved in either direction.
Per default, pitch is up when the pedal is at “toe down
position”, i.e. this is the “Up” position.
Range
Range: 1-Oct/2-Oct
This parameter sets the range of the pitching effect.
Select 2-Oct for an extreme and 1-Oct for the more
commonly used, subtle Whammy effect.
EFFECTS - PITCH
Page 40

38
EFFECTS - PITCH
Octaver
The Octaver gives you an additional voice with a fixed
pitch distance of either one or two octaves above or
below the Input note.
Dir - Direction
Range: Up or Down
This parameter sets whether the added voice should be
above or below the input note.
Range
Range: 1 or 2 octaves
This parameter sets the interval of the added voice. Use
the Direct parameter to determine whether the added
voice should be above or below the Input signal.
Mix
Range: 0 to 100%
This parameter sets the relationship between the dry
signal and the level of the effect in this Effect Block.
Page 41

39
Pitch Shifter
The NOVA System’s Pitch Shifter gives you two voices,
each with a fixed pitch distance to the input note. The
maximum range for this effect is +/- one octave. The
signal processing within the NOVA System is so fast that
you will never notice any “searching” for notes as with
many older pitch shifting units or octaver stomp boxes.
Voice 1
Range: -1200 to 1200 Cent
This parameter specifies the pitch of the first voice. As
100 Cent equal 1 semitone, you can select any interval
between one octave below the Input pitch to one octave
above it.
Voice 2
Range: -1200 to 1200 Cent
This parameter specifies the pitch of the second voice.
As 100 cent equal 1 semitone, you can select any
interval between one octave below the Input pitch to one
octave above it.
Pan 1
Range: -50 to 50
This parameter sets the stereo position of the first voice.
Pan 2
Range: -50 to 50
This parameter sets the stereo position of the second
voice.
Delay 1
Range: 0 to 350ms
This parameter sets the delay time for the first voice.
Delay 2
Range: 0 to 350ms
This parameter sets the delay time for the second voice.
FB1
Range: 0 to 100%
This parameter determines how often the first voice will
be repeated by the delay.
FB2
Range: 0 to 100%
This parameter determines how often the second voice
will be repeated by the delay.
Mix
Range: 0 to 100%
This parameter sets the relationship between the dry
signal and the level of the effect in this effect block.
OutLev
Range: -100 to 0 dB
This parameter sets the output level for each of the
voices.
EFFECTS - PITCH SHIFTER
Page 42

Intelligent Pitch Shifter
The NOVA System Intelligent pitch-shifter is a 2 voice
pitch-shifter that allows you to play harmonies within a
variety of scales in any key. The range of the voices
range from minus 13 scale-steps below to 13 scales
steps above which equals +/- one octave plus a diatonic
sixth.
Key
To allow the intelligent pitch-shifter to generate the
correct voices it is necessary to enter which key you are
playing in. Keys are listed as: C, C#, D , D#, E, F, F#, G,
G#, A, A#, and B.
Scale
With the scale parameter you set the type of scale you
intend to play. NOVA System covers the following scalestypes:
Label Full name Scale steps
Ionian Ionian 1,2,3,4,5,6,7
Dorian Dorian 1,2,b3,4,5,6,b7
Phrygi Phrygian 1,b2,b3,4,5,b6,b7
Lydian Lydian 1,2,3,#4,5,6,7
Mixoly Mixolydian 1,2,3,4,5,6,b7
Aeolia Aeolian 1,2,b3,4,5,b6,b7
Locria Locrian 1,b2,b3,4,b5,b6,b7
PntMin Pentatonic minor 1,b3,4,5,b7
PntMaj Pentatonic major 1,2,3,5,6
Blues Blues 1,b3,4,b5,5,b7
DimWhl Diminished whole 1,2,b3,4,b5,b6,6,7
Whole Wholetone 1,2,3,#4,#5,b7
HrmMin Harmonic minor 1,2,b3,4,5,b6,7
Voice 1-2
Range: -13 to Unison to 13
The intelligent pitch-shifter can add two voices within the
selected scale. The pitch-shifter automatically calculates
the correct interval according to the played note, selected
scale type and key.
Level 1-2
Range: -100 to 0 dB
Sets the individual levels of the two voices.
Pan Position 1-2
Range: -/+50
Controls the panning position of each of the two voices.
0 is center position. By panning the voices you can
achieve a very wide spread sound.
Delay 1-2
Delay range: 0-50ms
To a get at natural sounding result is it obvious to
simulate that no two guitarist would play notes precisely
at the same time. To simulate this you can delay the
harmony voices slightly. Just 10-20ms of delay will give
in a smooth and natural sounding result.
Mix
Range: 0 to 100%
Sets the overall mix between the dry and processed
signal.
OutLev – Out Level
Range: -100 to 0 dB
This parameter sets the overall output level of this effect.
EFFECTS - PITCH
40
Page 43

41
EFFECTS - DELAY
Delay – Introduction
The NOVA System offers not only standard delay types
but also a few new ones. We believe that the following
types should cover all your delay needs:
• Clean
• Analog
• Tape
• Ping Pong
• Dynamic Delay
• Dual Delay
All delays feature true “spillover” – meaning the repeats
of the delay can ring out when you change presets.
The tempo of the delay can be defined in relation to a
Global tempo, which can be tied to an incoming MIDI
clock.
Common Parameters – Delay
The following parameters are identical for all delay types.
Parameters specific to certain delays are described in
the relevant sections.
Delay Time
Range: 0 to 1800 ms
This parameter sets the time between the delay repeats.
This is also known as the “length” of the delay.
Tempo
Range: Disable, 1 to 1/32T (T= Triplet & D= Dotted)
When set to any value between 2 and 1/32T, the NOVA
System’s global tempo is subdivided according to this
setting. When set to “Ignore”, the speed set by the Speed
parameter is used instead.
The Tap Master parameter – located in the Utility
menu – specifies whether the Global tempo or the
tempo set by the Speed parameter in each preset
should be used at preset change.
Fb – Feedback
Range: 0 to 100%
This parameter sets the amount of feedback from the
output of the effect back to its input. Use the Feedback
parameter to set how many repeats of the signal you
would like to have.
Please use high settings with extreme caution.
Due to the spillover feature of the NOVA System,
there is no way to immediately cut off the delay
when you get an internal feedback at settings above
100%. If you do get internal feedback, either switch to a
different delay type or to a different preset that uses the
delay, two times in succession.
LoCut – Feedback LoCut
Range: 20 Hz to 20 kHz
Use this parameter to attenuate the frequencies below a
given frequency.
As with the Feedback Hi-Cut parameter, the delays may
blend in more nicely with the overall sound if you “thin
out” the effect at the low end.
HiCut – Feedback Hi-Cut
Range: 20 Hz to 20 kHz
With digital technology, every delay can be a precise
reproduction of the Input signal. But especially with long
delay times, this is not always desirable, as these pristine
delays may disturb the original signal and result in a
“washed-out” sound. To compensate for this, use the hicut filter, thereby emulating analog or tape style delay
units. The Feedback Hi-Cut parameter attenuates the
frequencies over the set frequency, resulting in a more
“analog” sound that in many cases that will blend in
better with the overall sound.
Mix
Range: 0 to 100%
This parameter sets the relationship between the dry
signal and the level of the effect in this effect block.
Page 44

EFFECTS - DELAY
42
Clean
The Clean Delay effect is the most simple and basic
delay type in the NOVA System. It comprises a single
delay line with all the common parameters.
All Common Parameters
Please refer to the section “Delay – Introduction” for a
description of this Delay’s parameters.
Analog
This delay simulates analog style delays, including the
clipping sound that occurs when the feedback parameter
is yanked past the 100% point. Try experimenting with a
high feedback level combined with high and low cut
filters.
In addition to the “common” parameters described in
the introduction of the delay section, this delay has
the following parameters:
Drive
Range: 0 to 24 dB
Use this parameter to simulate the slight deterioration of
the delay repeats due to clipping.
Ta p e
This delay includes the “Drive” parameter that can be
used to add the saturation to the delay repeats often
associated with Tape delays.
In addition to the “common” parameters described in
the introduction of the delay section, this delay has
the following parameters:
Drive
Range: 0 to 24 dB
The higher you set the Drive parameter, the more
distorted the repeats become. The “drive” simulated by
this effect has a very “analog” feel.
Ping Pong
The Ping Pong delay causes the delay to alternate
between the left and right channels, resulting a very nice
stereo feel. Use the Width parameter to determine how
“stereo” you want this effect to be.
In addition to the “common” parameters described in
the introduction of the delay section, this delay has
the following parameters:
Width
Range: 0 to 100%
The Width parameter determines how far the left and
right repetitions should spread from the center.
Dynamic Delay
The Dynamic Delay is a feature that was initially
introduced in the well-recognized TC 2290. It allows the
dynamics of the Input level to actively alter the delay
output level, which leaves the source signal clear and
undisturbed while you play. The Dynamic Delay
delicately complements your performance.
Use the Sense parameter to determine when the delays
should re-surface. Use the Offset parameter to widen the
stereo image.
In addition to the “common” parameters described in
the introduction of the delay section, this delay has
the following parameters:
Offset
Range: 0 to 200
This parameter offsets the delay repeats in the right
channel only. For a “wide” stereo effect, the delay in the
two channels should not occur at exactly the same time.
For a “wide” effect, a few milliseconds should do the
trick. Using more than that will give you anything from a
generous slap-back effect on the repeats to more
extreme effects.
Page 45

43
EFFECTS - DELAY
FX Mute - Spill-over
The FX Mute parameter determines how the Reverb and
Delay effects should behave when changing between
presets and when bypassing one of these effects.
The FX Mute parameter is found in the utility menu.
Sof
t:
Delay and Reverbs will “ring out”
Delays have true spillover, meaning that if you e.g. have
a long delay time and the FX Mute parameter is set to
“Soft” the delays will continue even if you change to a
preset that holds completely different delay settings.
Reverbs can also spill over at preset change but will use
the settings in the new preset.
Hard:
Delay and Reverbs will mute.
Sense – Sensitivity
Range: -50 to 0 dB
The sensitivity parameter determines how soon the delay
repeats should become audible in relation to the Input
signal level. This parameter acts a threshold between
your guitar signal and the delay repeats.
Damp
Range: 0 to 100 dB
As explained in the introduction, the Dynamic Delay
attenuates the delay repeats level based on the present
Input. The Damp parameter sets the amount of
attenuation.
Rel – Release
Range: 20 to 1000 ms
Determines how fast the attenuation of the delay repeats
is released.
Dual Delay
This true Dual Delay lets you set two independent delay
taps, each with its own Tempo parameter, High and Low
cut, as well as a “Pan” parameter.
In addition to the “common” parameters described in
the introduction of the delay section, this delay has
the following parameters:
Pan1 & Pan2
Range: 50L to 50R
Sets the panning position of the delay repeats for delay
lines 1 and 2.
Page 46

EFFECTS - REVERB
44
Common Reverb Parameters
Decay
Range: 0.1 to 20 seconds
The Decay parameter determines the length of the
Reverb Diffuse Field. The length is defined as the time it
takes for the Diffuse Field to decay approximately by 60
dB.
PreDly – Pre Delay
Range: 0 to 100 ms
This parameter defines a short Delay placed between the
direct signal and the reverb diffuse field. Use pre delay to
keep the source material clear and undisturbed from the
reverb diffuse field arriving shortly after.
Shape
Range: Round, Square, Curved
The shape of the simulated room is of great importance
to the reverb characteristics. Try the various shapes.
Size
Range: Small, Medium or Large
Though the decay time can be altered from 0.1 to 20
seconds on all reverb types, selecting a predefined
(room) size may get you closer to the sound you desire.
To achieve a natural sounding emulation of a big room
with long decay, select “Large”. Use the medium and
small settings accordingly for simulations of smaller
rooms. Again: - building the perfect guitar sound is not
always about doing the most obvious. You may find cool
settings by swimming against the stream.
Hi Col & Lo Col – (High Color/Low Color)
Hi Color range: Wool, Warm, Real, Clear, Bright, Crisp
and Glass.
Reverb Types
The NOVA System features four different reverb classics.
All types have the same editable parameters, but the
reverbs’ characteristics vary.
Spring
The Spring algorithm is designed to reproduce the sound
of old spring reverbs, such as the ones used in vintage
guitar amps.
Hall
The Hall algorithm simulates a rather large hall and
preserves the natural characteristics of the source
material. Excellent when you strive for a discrete reverb
with medium to long decay times.
Room
The Living Room type simulates a relatively small, well
furnished room. In such a room, many reflections are
absorbed by soft materials, and the source signal is
reflected and sustained mainly from the walls.
Plate
Before the digital era, either reverberating springs or
large metallic plates were used to create reverb effects.
Plate reverbs sound diffuse and bright. They can be used
to make the processed signal “stand out”, rather than
blend naturally.
These brief introductions should only give you a hint in
terms of choosing the right one for a given application.
Take some time to listen to the different types,
experiment and don’t be afraid to be innovative!
Page 47

45
EFFECTS - REVERB
Lo Color range:
Thick, Round, Real, Light, Tight, Thin, NoBass
These parameters give you six variations of the reverb’s
low and high frequency ranges.
The two Color parameters can really change the
characteristics and style of the reverb – from “dark” and
“ambient” to “crisp” and “bright”.
Hi Lev & Lo Lev – (High Level/Low Level)
Range: -25 to 25
Use the Hi Lev and Lo Lev parameters to emphasize or
attenuate the selected Hi and Lo Color types.
Early
Range: -100 to 0 dB
This parameter sets the level of the reverb’s initial
reflections (early reflections).
RevLev – Reverb Level
Range: -100 to 0 dB
This parameter sets the level of the reverb’s diffuse field.
Diff – Diffuse
Range: -25 to 25
With this parameter, you can fine-tune the density of the
reverb’s diffuse field. It is set automatically when you
select a decay time and allows you to reduce flutter in
the diffuse field to an absolute minimum.
Mix
Range: 0 to 100%
This parameter sets the relationship between the dry
signal and the level of the effect in this effect block.
Page 48

TECHNICAL SPECIFICATIONS
46
Digital Inputs and Outputs
Connectors:
Formats:
Sample Rates:
Analog Inputs
Connectors, balanced:
Impedance - Balanced/Unbalanced
Line Input Level @ 0 dBFS:
Line Sensitivity @ 12 dB headroom:
Drive Input Level @ 0 dBFS:
Drive Sensitivity @ 12 dB headroom:
THD:
Crosstalk:
A to D Conversion:
Analog Outputs
D to A Conversion:
D to A Delay:
Connectors, balanced:
Output Impedance:
Max. Output Level
(Balanced/Unbalanced):
Output Range:
Dynamic Range:
THD:
Frequency Response:
EMC
Complies with:
Safety
Certified to:
Environment
Operating Temperature:
Storage Temperature:
Humidity:
Control Interface
MIDI:
Pedal:
Supplementary
Display:
Dimensions:
Weight:
Mains Voltage:
Power Consumption:
Warranty Parts and labor:
RCA Phono (S/PDIF)
S/PDIF (24 bit), EIAJ CP-340, IEC 958
44.1 kHz, 48 kHz
¼"phone jack
Line: 21/13 kOhm
24 dBu to 0 dBu
12 dBu to -12 dBu
18 dBu to -6 dBu
6 dBu to -18 dBu
< -100 dB (0,001 %) @ 1 kHz
<-85 dB, 20 Hz to 20 kHz
24 bit, 128 x oversampling bitstream
24 bit, 128 x oversampling bitstream
0.63/0.68 ms @ S.R.= 48/44.1 kHz
¼"phone jack
40 Ohm
20 dBu/14 dBu, R-load = 1200 Ohm
20 dBu / 14 dBu / 8 dBu / 2 dBu
> 104 dB, 20 Hz to 20 kHz
<-98 dB (0.0013 %) @ 1 kHz
+0/-0.3 dB, 20 Hz to 20 kHz
EN 55103-1 and EN 55103-2
FCC part 15, Class B, CISPR 22, Class B
IEC 65, EN 60065, UL6500 and CSA E60065
CSA FILE #LR108093
32° F to 122° F (0° C to 50° C)
-22° F to 167° F (-30° C to 70° C)
Max. 90 % non-condensing
In/Out/Thru: 5 Pin DIN
1/4" phone jack
24x 2 character LCD
11.2" x 3.5" x x 10.25" (284 x89 x 267 mm)
4.1 lb. (1.85 kg)
100 to 240 VAC, 50 to 60 Hz (auto-select)
<15 W
1 year
Due to continuous development, these specifications
are subject to change without notice.
 Loading...