

Tascam US-1x2HR User manual

US-1x2HR
USB Audio Interface
REFERENCE MANUAL
D01386220A
Before connecting this unit to a computer, you must download and install dedicated software on the computer.

Contents
1 – Introduction ....................................................................... 3
Features .......................................................................................................3
Conventions used in this manual.......................................................3
Trademarks .................................................................................................3
2 - Names and Functions of Parts ........................................... 4
Front panel .................................................................................................4
Rear panel ...................................................................................................4
3 – Installation ......................................................................... 5
System requirements .............................................................................5
Windows .................................................................................................5
Mac ........................................................................................................... 5
Apple iOS devices ...............................................................................5
Supported audio drivers ................................................................... 5
Installing the dedicated software ...................................................... 6
Installing the Windows dedicated software ..............................6
Installing the Mac dedicated software ........................................ 7
Working with Gatekeeper ................................................................7
Uninstalling the dedicated software ................................................8
Uninstalling the Windows dedicated software ........................ 8
Uninstalling the Mac dedicated software ..................................8
4 – Preparation ......................................................................... 9
Connecting the power ...........................................................................9
When using a computer (Windows/Mac) ................................... 9
When using an iOS device ...............................................................9
Connecting other equipment .............................................................9
Connecting with a computer ....................................................... 10
Connecting with iOS devices ....................................................... 10
Audio connections ........................................................................... 10
Using direct monitoring ..................................................................... 11
9 – Specifications ................................................................... 19
General ..................................................................................................... 19
Input/output ratings ............................................................................ 19
Analog inputs .................................................................................... 19
Analog outputs ................................................................................. 19
Control input/output ratings ....................................................... 19
Audio performance .............................................................................. 19
Computer system requirements ..................................................... 20
Windows .............................................................................................. 20
Mac ........................................................................................................ 20
iOS device ........................................................................................... 20
Supported audio drivers ................................................................ 20
Other ......................................................................................................... 20
Dimensional drawings ........................................................................ 21
Block diagram ........................................................................................ 21
5 – Using the Settings Panel .................................................12
Opening the Settings Panel .............................................................. 12
Windows .............................................................................................. 12
Mac ........................................................................................................ 12
Settings Panel overview ..................................................................... 12
Notification function ........................................................................... 13
Checking software and firmware versions .................................. 13
Automatic software and firmware update function ................ 14
6 – Application Guide ............................................................ 15
DAW software.........................................................................................15
Bundled DAW software .................................................................. 15
Other DAW software ....................................................................... 15
Windows .................................................................................................. 15
macOS ....................................................................................................... 15
iOS .............................................................................................................. 15
7 – Standalone Mode ............................................................. 16
Overview .................................................................................................. 16
Settings in standalone mode ........................................................... 16
Settings Panel settings ................................................................... 16
8 – Troubleshooting ...............................................................17
2 TASCAM US-1x2HR

1 – Introduction
Features
o Support for high resolution formats up to 24-bit/192kHz
o XLR mic and standard TRS jack inputs
o Ultra-HDDA (High Definition Discrete Architecture) mic
preamp with clear, natural sound quality and super-low noise
o Capable of providing +48V phantom power
o Support for direct input of guitars, basses and similar
instruments
o RCA stereo line inputs
o RCA stereo line and headphone outputs
o Direct monitoring function allows input monitoring with low
latency
o Loopback function that supports stereo/mono switching of
inputs and outputs (on Windows/Mac)
o USB Type-C port (USB 2.0 standard)
o Support for operation on USB bus power
o US-HR Settings Panel control software has a simple,
functional design and enables making unit settings
o High-performance driver can be set to minimal buffer
sizes and enables recording setups with super-low latency
(Windows)
o Angled design provides excellent usability on a desktop
o Valuable bundled software
o Connect with iOS devices including iPad
Note about computer operation
If you are unsure about anything related to the basic operation
of a computer when it is mentioned in an explanation in this
manual, please refer to the computer operation manual.
To use this unit with a computer, dedicated software must be
installed on the computer.
For details about software installation, see“Installing the
dedicated software” on page 6.
Conventions used in this manual
In this manual, we use the following conventions:
o Information shown on a computer display is written like this:
“OK”.
o References to “iOS” in this document also include “iPad OS”.
o As necessary, additional information is provided under TIP,
NOTE and CAUTION headings.
TIP
These are tips about how to use the unit.
NOTE
These provide additional explanations and describe special
cases.
ATTENTION
Failure to follow these instructions could result in damage to
equipment or lost data, for example.
V
CAUTION
Failure to follow these instructions could result in injury.
Trademarks
o TASCAM is a registered trademark of TEAC Corporation.
o Microsoft and Windows are either registered trademarks or
trademarks of Microsoft Corporation in the United States
and/or other countries.
o Apple, Mac, macOS, iOS, iPadOS, iPad and iPod touch are
trademarks of Apple Inc. in the United States and other
countries.
o Lightning is a trademark of Apple Inc.
o App Store is a service mark of Apple Inc.
o IOS is a trademark or registered trademark of Cisco in the U.S.
and other countries and is used under license.
o ASIO is a trademark of Steinberg Media Technologies GmbH.
o Other company names, product names and logos in this
document are the trademarks or registered trademarks of
their respective owners.
TASCAM US-1x2HR 3
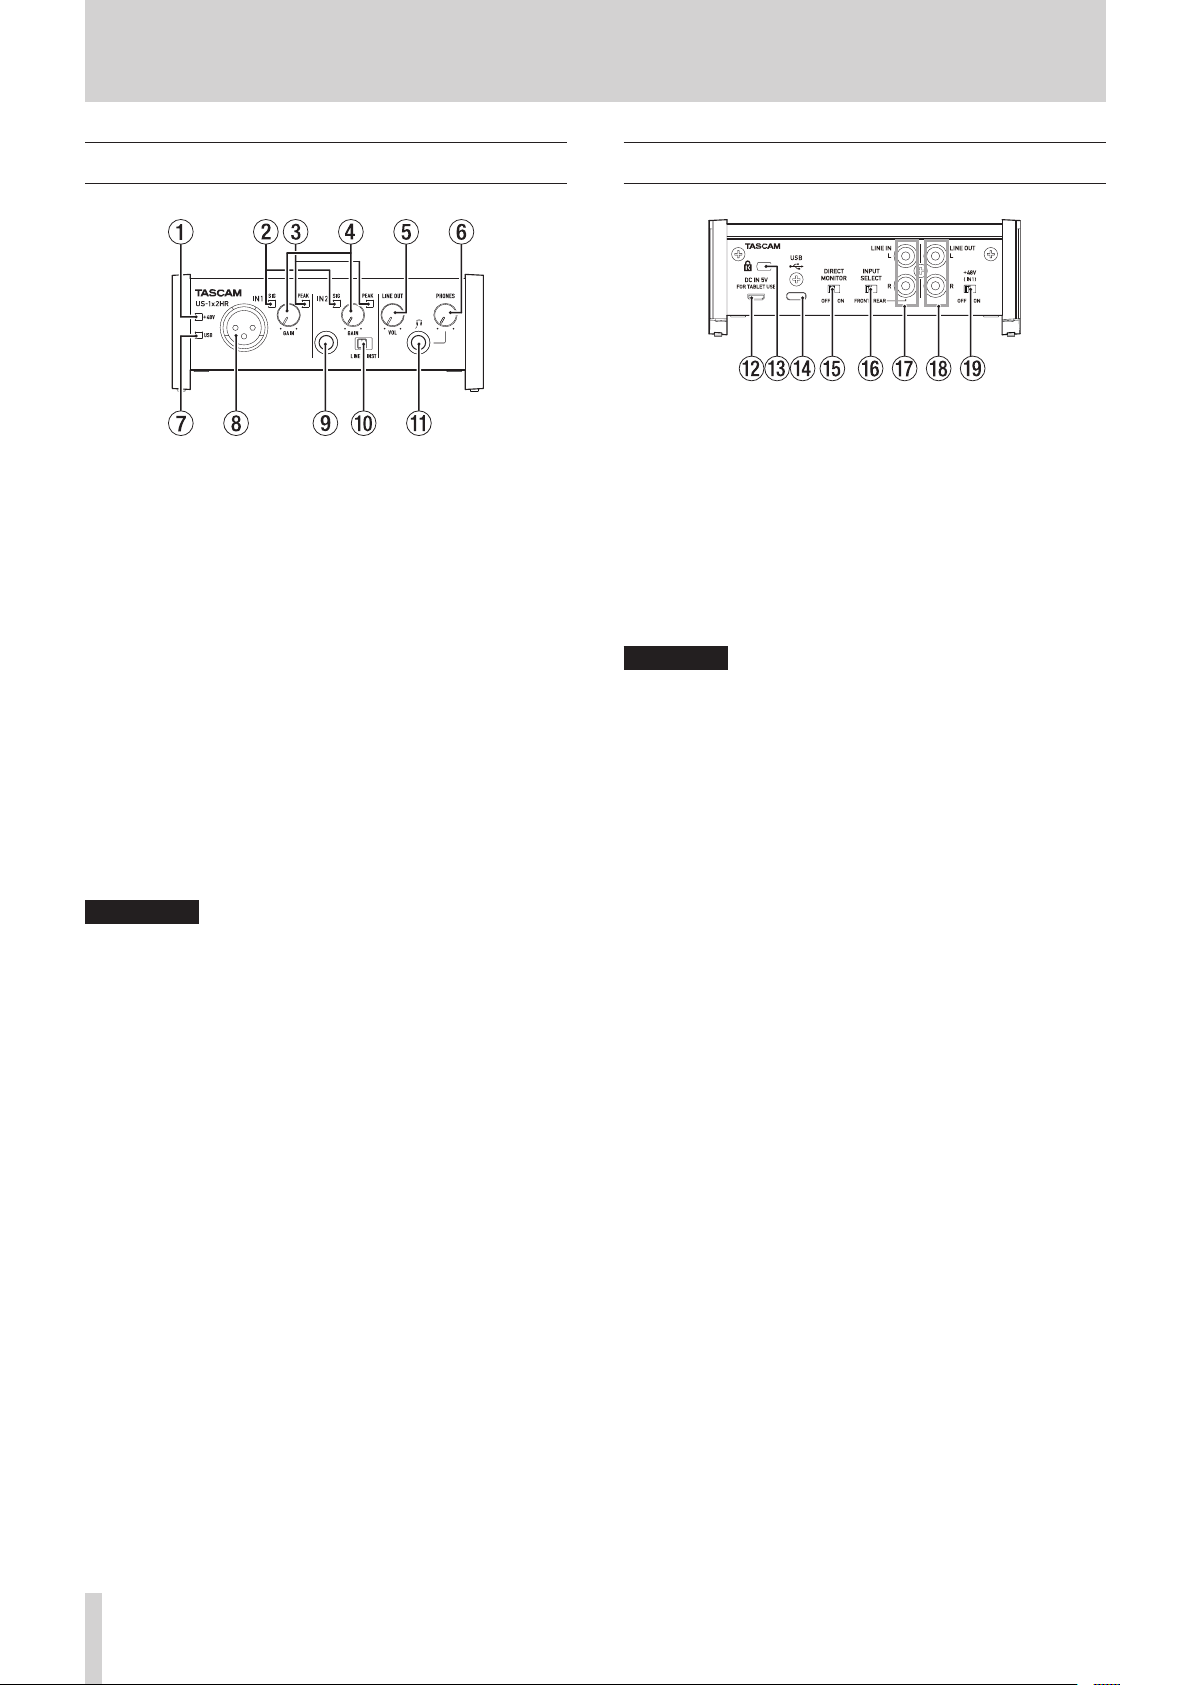
2 - Names and Functions of Parts
Front panel
1 PHANTOM indicator
The indicator lights when the phantom power switch (o) of
the rear panel is set to “ON”.
2 SIG indicators
The SIG indicators light green when signals (of at least
−32 dBFS) are input through the IN1/IN2/LINE IN L-R jacks
(8/9/u).
3 PEAK indicators
The PEAK indicators light red when signals that are about to
distort (−1 dBFS or higher) are input through the IN1/IN2/
LINE IN L-R jacks (8/9/u).
4 GAIN knobs
Use to adjust the input levels of the IN1/IN2 jacks (8/9).
5 LINE OUT knob
Use to adjust the output level of the LINE OUT L and R (i)
jacks on the back of the unit.
6 PHONES knob
Use to adjust the output level of the PHONES jack (q).
V
CAUTION
Before connecting headphones, minimize the volume with
the PHONES knob. Failure to do so could result in a sudden
loud noise that could harm hearing, for example.
7 USB indicator
This lights when the USB connection is working.
8 IN1 jack
This mic level XLR jack is a balanced input jack.
9 IN2 jack
This input jack is a standard TRS jack.
Use the LINE/INST switch (0) on the front of the unit to
enable balanced line (LINE) input or unbalanced (INST) input
for the standard TRS jack.
0 LINE/INST switch
Set according to the IN2 jack (9) input sources.
Set to LINE when connecting electronic instruments, audio
devices and similar equipment. Set to INST when connecting
a guitar, bass or other equipment with high output
impedance.
q PHONES jack
Use this standard stereo jack to connect stereo headphones.
This jack outputs the same signal of the rear panel as the LINE
OUT L–R jacks(i).
Use an adapter to connect headphones with a mini plug.
Rear panel
w DC IN 5V connector (Micro USB type)
When connected to an iOS device or other equipment that
cannot power this unit, you must use a USB power adapter,
mobile battery or other power supply. See “When using an
iOS device” on page 9 for details.
e Kensington Security Slot
r USB port
This is a USB Type-C port.
Use a USB cable to connect the unit to a computer or an iOS
device.
ATTENTION
i When using this unit while connected to a computer, it will
receive power from the computer’s USB port. Depending
on the computer, the USB port might not be able to supply
enough power to operate the unit. In this case, connect and
use a dedicated AC adapter.
i When connected to a USB 3.0 port, it will function in High
Speed mode equivalent to USB 2.0 (480 Mbps maximum).
i After waking a computer from suspend (sleep) mode, if the
unit does not operate properly, turn it off and turn it on again
or disconnect and reconnect the USB cable.
t DIRECT MONITOR switch
Turning this switch ON enables the Settings Panel Monitor
Balance slider and input monitoring without delay (direct
monitoring). (see “Using direct monitoring” on page 11)
y INPUT SELECT switch
Set according to the input sources.
Set to FRONT when connecting to IN1/IN2 jacks (8/9) of the
front panel. Set to REAR when connecting to LINE IN L-R jacks
(u) of the rear panel.
u LINE IN L-R jacks
These RCA pin jacks are analog line inputs.
i LINE OUT L-R jacks
These RCA pin jacks are analog line outputs.
o Phantom power switch
Use this switch to provide +48V phantom power to the IN1
jack (8).
4 TASCAM US-1x2HR

3 – Installation
System requirements
Check the TEAC Global Site (https://teac-global.com/) for the
latest information about supported operating systems.
Windows
Supported operating systems
Windows 10 32-bit
Windows 10 64-bit
Windows 8.1 32-bit
Windows 8.1 64-bit
Windows 7*
Windows 7 32-bit SP1 or later
Windows 7 64-bit SP1 or later
* Operation has been confirmed with the final version of
Windows 7.
Computer hardware requirements
Windows computer with a USB 2.0 (or higher) port
CPU/processor speed
2 GHz or faster dual core processor (x86)
Memory
2 GB or more
Apple iOS devices
Supported operating systems
iPadOS13
iOS13
iOS12
iOS11
Supported audio drivers
Windows
ASIO2.0, WDM
Mac
Core Audio
iOS device
Core Audio
ATTENTION
Operation of this unit was confirmed using standard
computers that meet the above requirements. This does not
guarantee operation with all computers that meet the above
requirements.
Even computers that meet the same system requirements
might have processing capabilities that differ according to
their settings and other operating conditions.
NOTE
Since noise could occur depending on the computer system
used, we recommend selecting “High performance” for
“Plugged in” on the Power Options Control Panel page.
Mac
Supported operating systems
macOS Catalina (10.15)
macOS Mojave (10.14 or later)
macOS High Sierra (10.13 or later)
Computer hardware requirements
Mac with a USB 2.0 (or higher) port
CPU/processor speed
2 GHz or faster dual core processor
Memory
2 GB or more
TASCAM US-1x2HR 5
3 – Installation
Installing the dedicated software
To use this unit, a dedicated software must be installed on a
computer.
The dedicated software might be updated at any time.
Download the latest software for the operating system you are
using from the TEAC Global Site (https://teac-global.com/).
o When you install the dedicated software on a Windows
computer, the Windows driver and the Settings Panel
application will be installed.
o When you install the dedicated software on a Mac, only the
Mac Settings Panel application will be installed. The standard
OS driver will be used.
o With an iOS device, the standard OS driver will be used, so
there is no need to install any.
ATTENTION
Before starting to install software, quit other applications.
Installing the Windows dedicated
software
ATTENTION
i Complete installation of the Windows dedicated software on
the computer before connecting the unit to it with the USB
cable.
i If you connected the unit to the computer using the USB
cable before installing the Windows dedicated software
and the “Found New Hardware Wizard” launched, close the
Wizard and disconnect the USB cable.
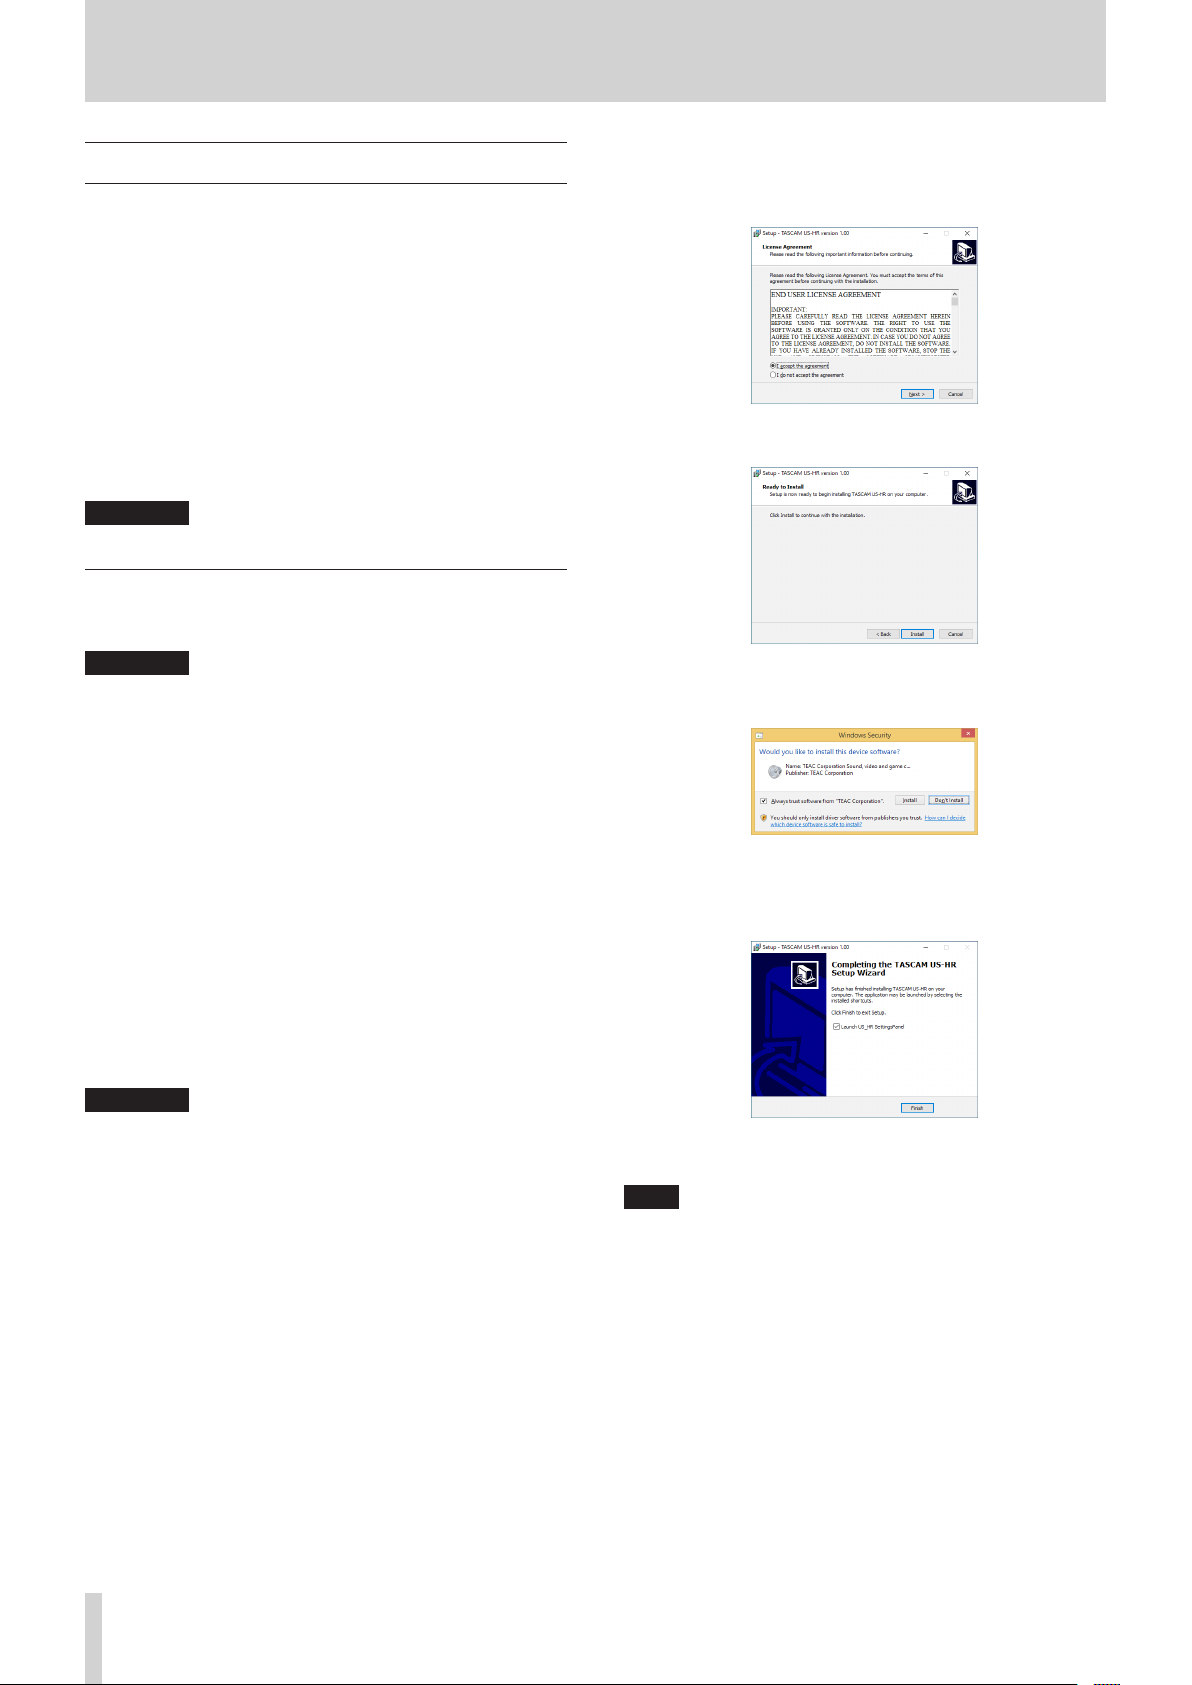
5. Read the contents of the License Agreement, and select
“I accept the agreement” if you agree to the terms.
Then, click the “Next” button.
6. Next, click the “Install” button.
7. Next, click the “Install” button to start installation (Windows
8.1/Windows 7).
Windows dedicated software installation
procedures
1. Download the latest Windows dedicated software from the
TEAC Global Site (https://teac-global.com/) and save it on
the computer to be used with the unit.
2. Uncompress the saved software (zip file) on the computer
desktop or another location.
3. Double-click the “TASCAM_US-HR_Installer_x.xx.exe”
file in the folder that appears after uncompression to
automatically launch the installation software.
ATTENTION
If you open a zip file without decompressing it and
doubleclick the “TASCAM_US-HR_Installer_x.xx.exe” file
in the folder that opens, installation will not start. Rightclick the zip file and select “Extract All”, for example, to
decompress it and then try again.
4. When a “Security Warning” or “User Account Control”
screen appears, click the “Yes ” button.
8. The following screen appears when installation has
completed.
Click the “Finish” button.
The installer will quit and the Windows Settings Panel will
launch.
NOTE
The first time you connect the unit by USB to the computer
after installing the software, installation of the device driver
will be executed. Some time might be necessary before
the unit is recognized because Windows Update will be
automatically searched at this time.
If the unit is still not recognized after a while, open the
software installation screen from the notification area at
the bottom right of the computer display, and click “Skip
obtaining driver software from Windows Update” to stop the
search.
6 TASCAM US-1x2HR
3 – Installation
Installing the Mac dedicated software
NOTE
i Install the Mac dedicated software on the computer before
connecting the unit to it with the USB cable.
i Depending on the Gatekeeper setting, a warning message
might appear during installation. Please see “Working with
Gatekeeper” on page 7 for information about Gatekeeper.
Mac dedicated software installation
procedures
1. Download the latest Mac dedicated software for the
operating system you are using from the TEAC Global Site
(https://teac-global.com/) and save it on the computer to
be used with the unit.
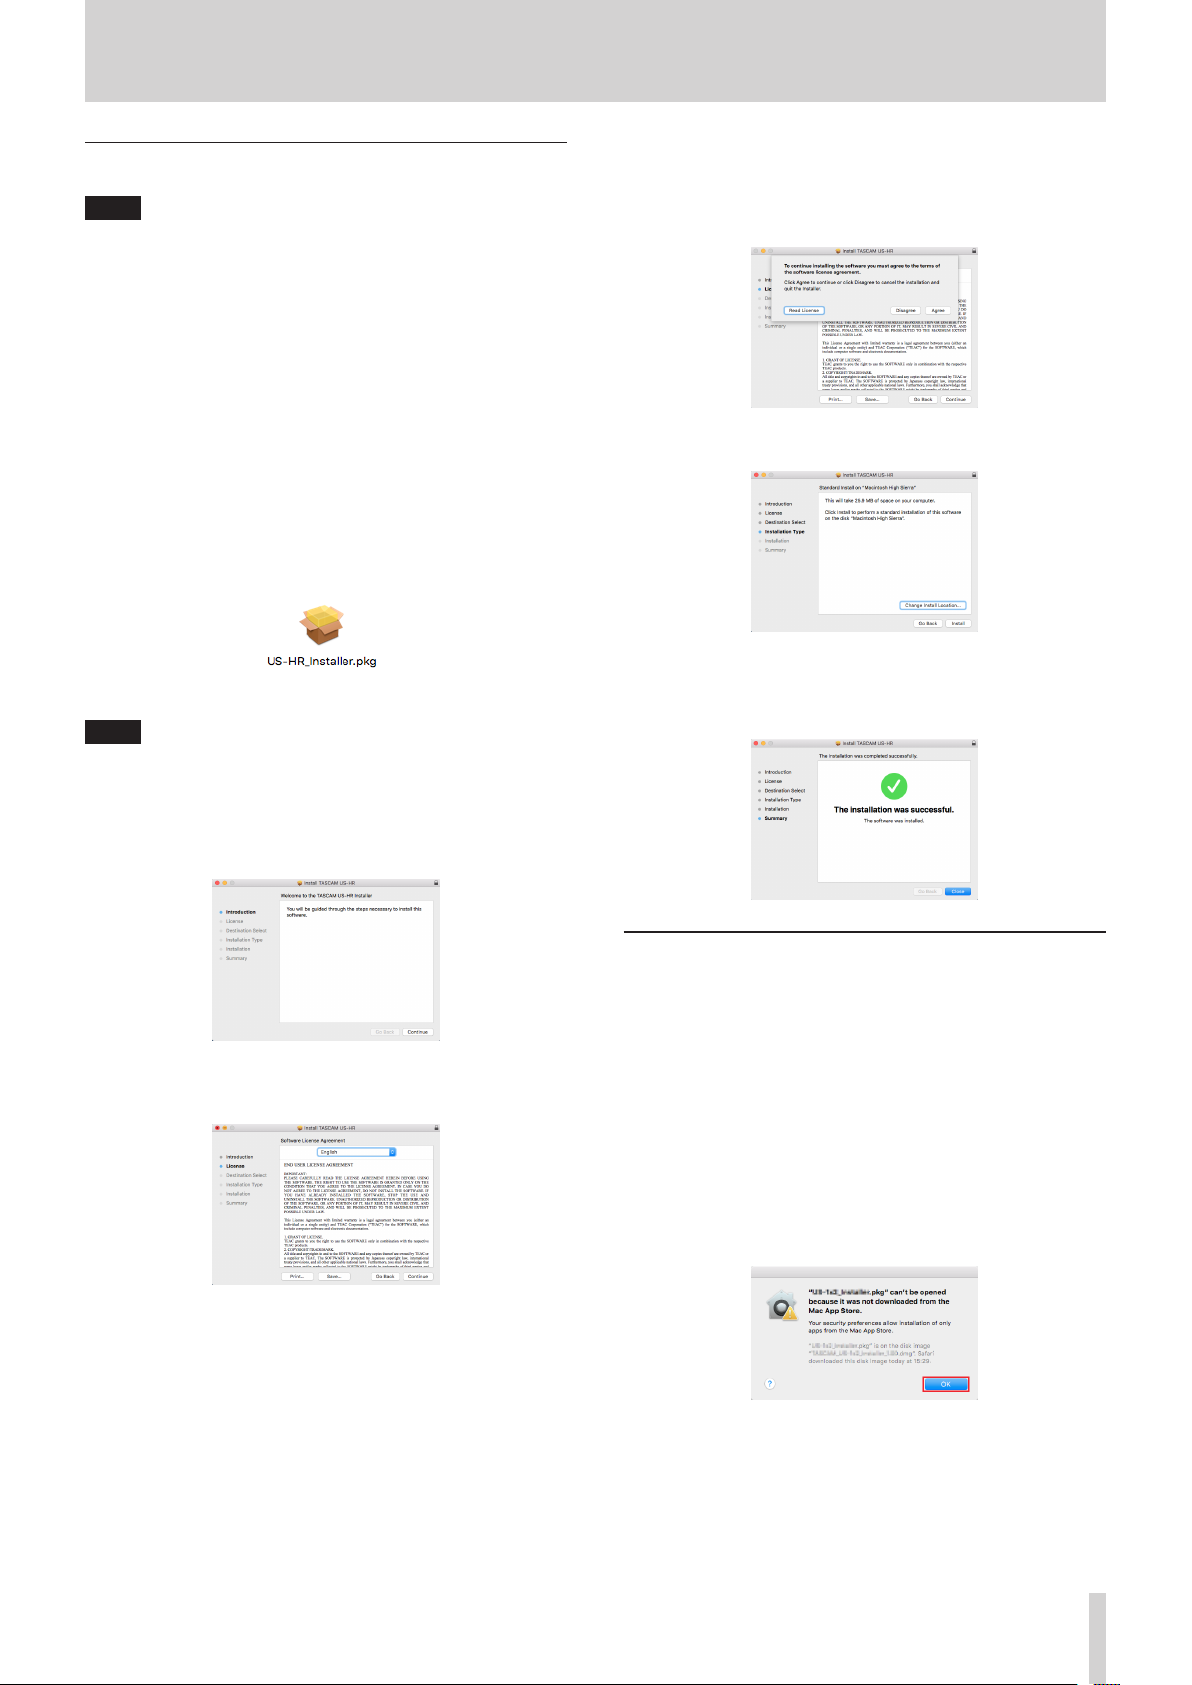
2. Double-click “US-HR_Installer_x.xx.dmg”, which is the
saved disk image file for the Mac dedicated software, and
double-click “US-HR_Installer.pkg” inside the folder that
opens.
NOTE
Depending on the computer’s settings, the downloaded zip
file might not have been uncompressed automatically. In this
case, uncompress the zip file first and then double-click the
disk image file.
3. When the installer starts, click the “Continue” button.
5. Click the “Read License” button and check the contents
of the Software License Agreement. If you agree to the
contents of the license, click “Agre e”.
Then, click the “Next” button.
6. Next, click the “Install” button to start installation.
7. The following screen appears when installation has
completed.
Click the “Close” button.
4. Next, select the desired language and click the “Continue”
button.
Working with Gatekeeper
When using macOS, depending on the Gatekeeper security
function setting, a warning message might appear during
installation.
The solution depends on the warning message shown.
See the following explanations for details.
When the Gatekeeper setting is “Allow
applications downloaded from: the Mac App
Store”
The following security warning might be shown:
“‘US-HR_Installer.pkg’ can’t be opened because it was not
downloaded from the Mac App Store.”
In this case, click the “OK” button to close the message. Then,
control-click (or right-click) the file and click “Open” in the
menu.
TASCAM US-1x2HR 7
 Loading...