

Tascam US-1800 User Manual

US-1800
USB2.0 Audio/MIDI Interface
D01127720A
OWNER'S MANUAL
2 TASCAM US-1800
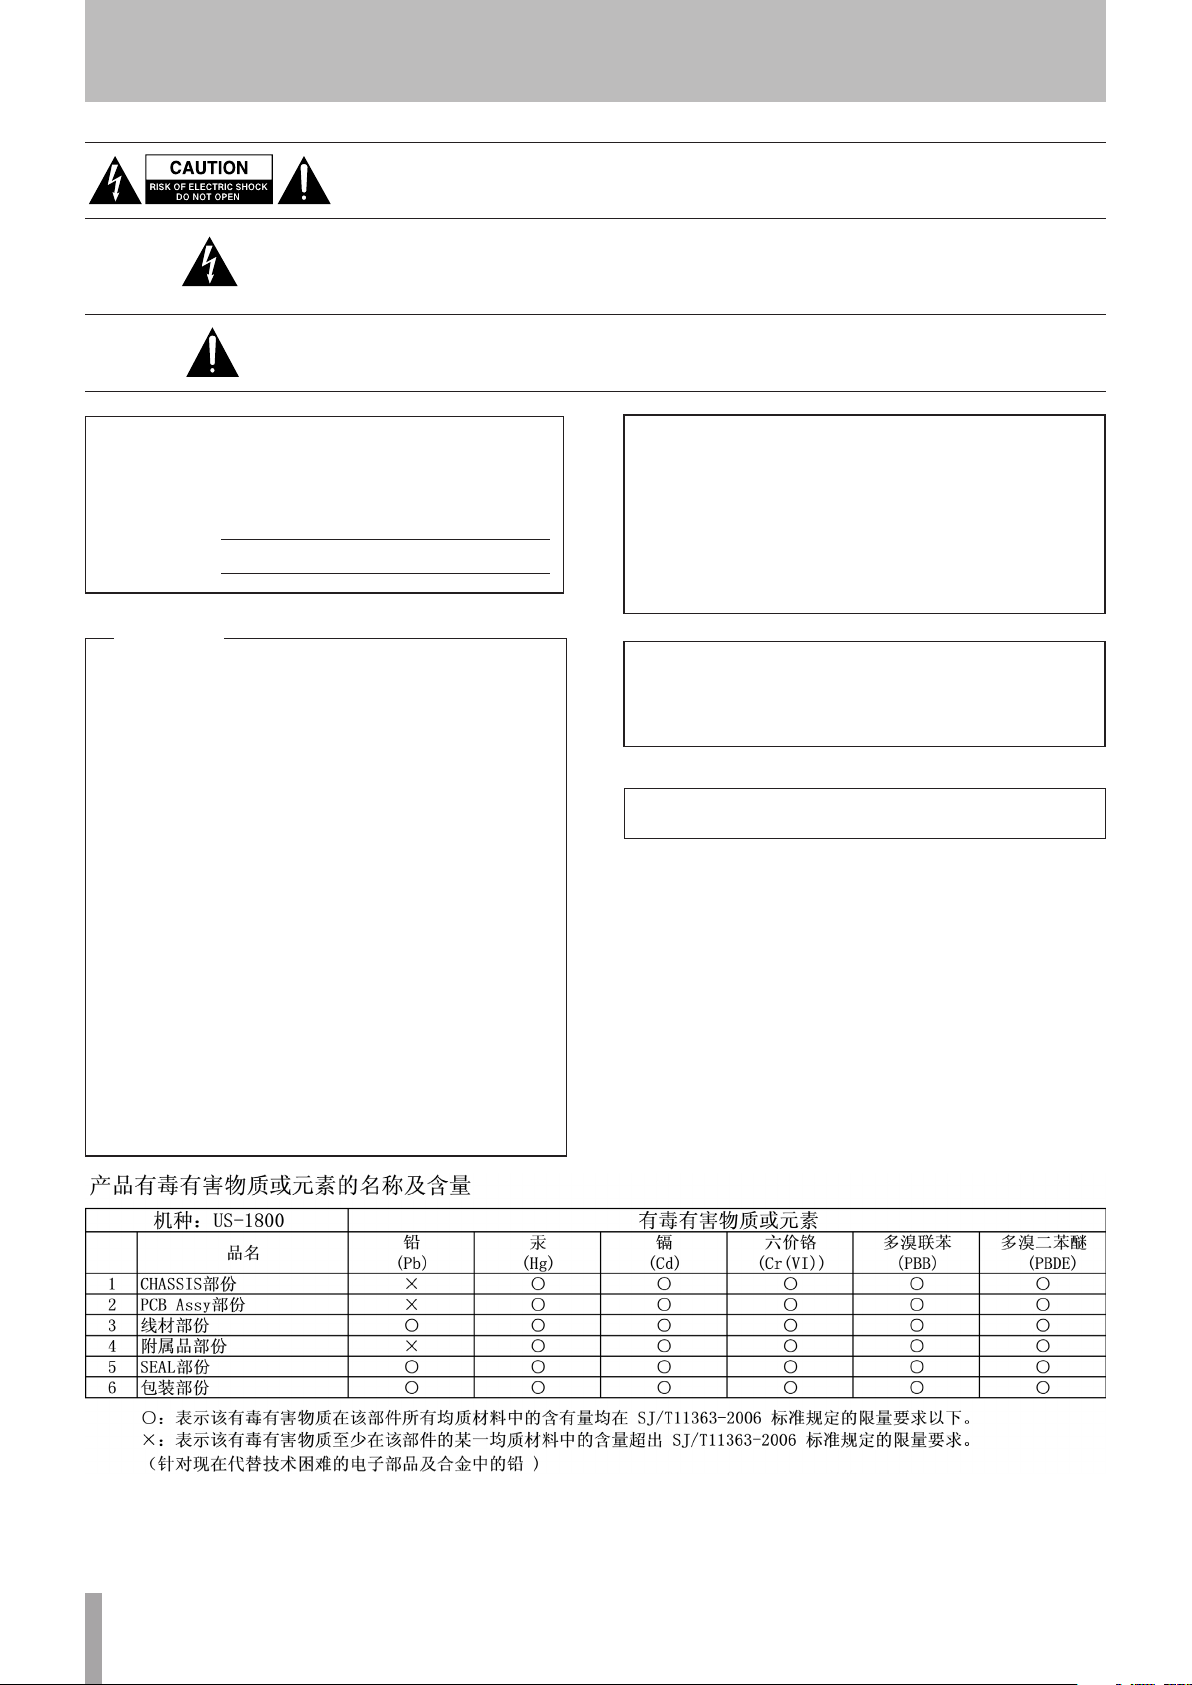
IMPORTANT SAFETY INSTRUCTIONS
CAUTION: TO REDUCE THE RISK OF ELECTRIC SHOCK, DO NOT REMOVE COVER (OR
BACK). NO USER-SERVICEABLE PARTS INSIDE. REFER SERVICING TO QUALIFIED SERVICE
PERSONNEL.
The lightning flash with arrowhead symbol, within equilateral triangle, is intended to
alert the user to the presence of uninsulated “dangerous voltage” within the product’s
enclosure that may be of sufficient magnitude to constitute a risk of electric shock to
persons.
The exclamation point within an equilateral triangle is intended to alert the user to
the presence of important operating and maintenance (servicing) instructions in the
literature accompanying the appliance.
This appliance has a serial number located on the rear
panel. Please record the model number and serial number
and retain them for your records.
Model number
Serial number
For U.S.A.
TO THE USER
This equipment has been tested and found to comply
with the limits for a Class A digital device, pursuant to Part
15 of the FCC Rules. These limits are designed to provide
reasonable protection against harmful interference when
the equipment is operated in a commercial environment.
This equipment generates, uses, and can radiate radio
fr equ enc y en ergy and, if not installed and use d in
accordance with the inst ru ction manual, may cause
harmful interference to radio communications.
Operation of this equipment in a residential area is likely
to cause harmful interference in which case the user
will be required to correct the interference at his own
expense.
CAUTION
Changes or modifications to this equipment not expressly
approved by TEAC CORPORATION for compliance could
void the user's authority to operate this equipment.
WARNING: TO PREVENT FIRE
OR SHOCK HAZARD, DO NOT
EXPOSE THIS
APPLIANCE TO RAIN OR
MOISTURE.
CE Marking Information
a) Applicable electromagnetic environment: E4
b) Peak inrush current: 0.6 A
In North America use only on 120V supply.
TASCAM US-1800 3
IMPORTANT SAFETY INSTRUCTIONS
1 Read these instructions.
2 Keep these instructions.
3 Heed all warnings.
4 Follow all instructions.
5 Do not use this apparatus near water.
6 Clean only with dry cloth.
7 Do not block any ventilation openings. Install in
accordance with the manufacturer's instructions.
8 Do not install near any heat sources such as radiators,
heat registers, stoves, or other apparatus (including
ampliers) that produce heat.
9 Do not defeat the safety purpose of the polarized
or grounding-type plug. A polarized plug has two
blades with one wider than the other. A grounding
type plug has two blades and a third grounding
pro n g. The w ide bla d e or t he thir d prong ar e
provided for your safety. If the provided plug does
not fit into your outlet, consult an electrician for
replacement of the obsolete outlet.
10 Pro tect the po wer cord from being walk ed on
or pinche d partic u larly at plu g s, co nven ience
receptacles, and the point where they exit from the
apparatus.
Do not expose this apparatus to drips or splashes.
•
Do not place any objects filled with liquids, such as
•
vases, on the apparatus.
Do not install this apparatus in a confined space such
•
as a book case or similar unit.
The apparatus draws nominal non-operating power
•
from the AC outlet with its POWER or STANDBY/ON
switch not in the ON position.
The apparatus should be located close enough to the
•
AC outlet so that you can easily grasp the power cord
plug at any time.
The mains plug is used as the disconnect device, the
•
disconnect device shall remain readily operable.
Caution should be taken when using earphones or
•
headphones with the pro duc t because excessive
sound pressure (volume) from earphones or headphones can cause hearing loss.
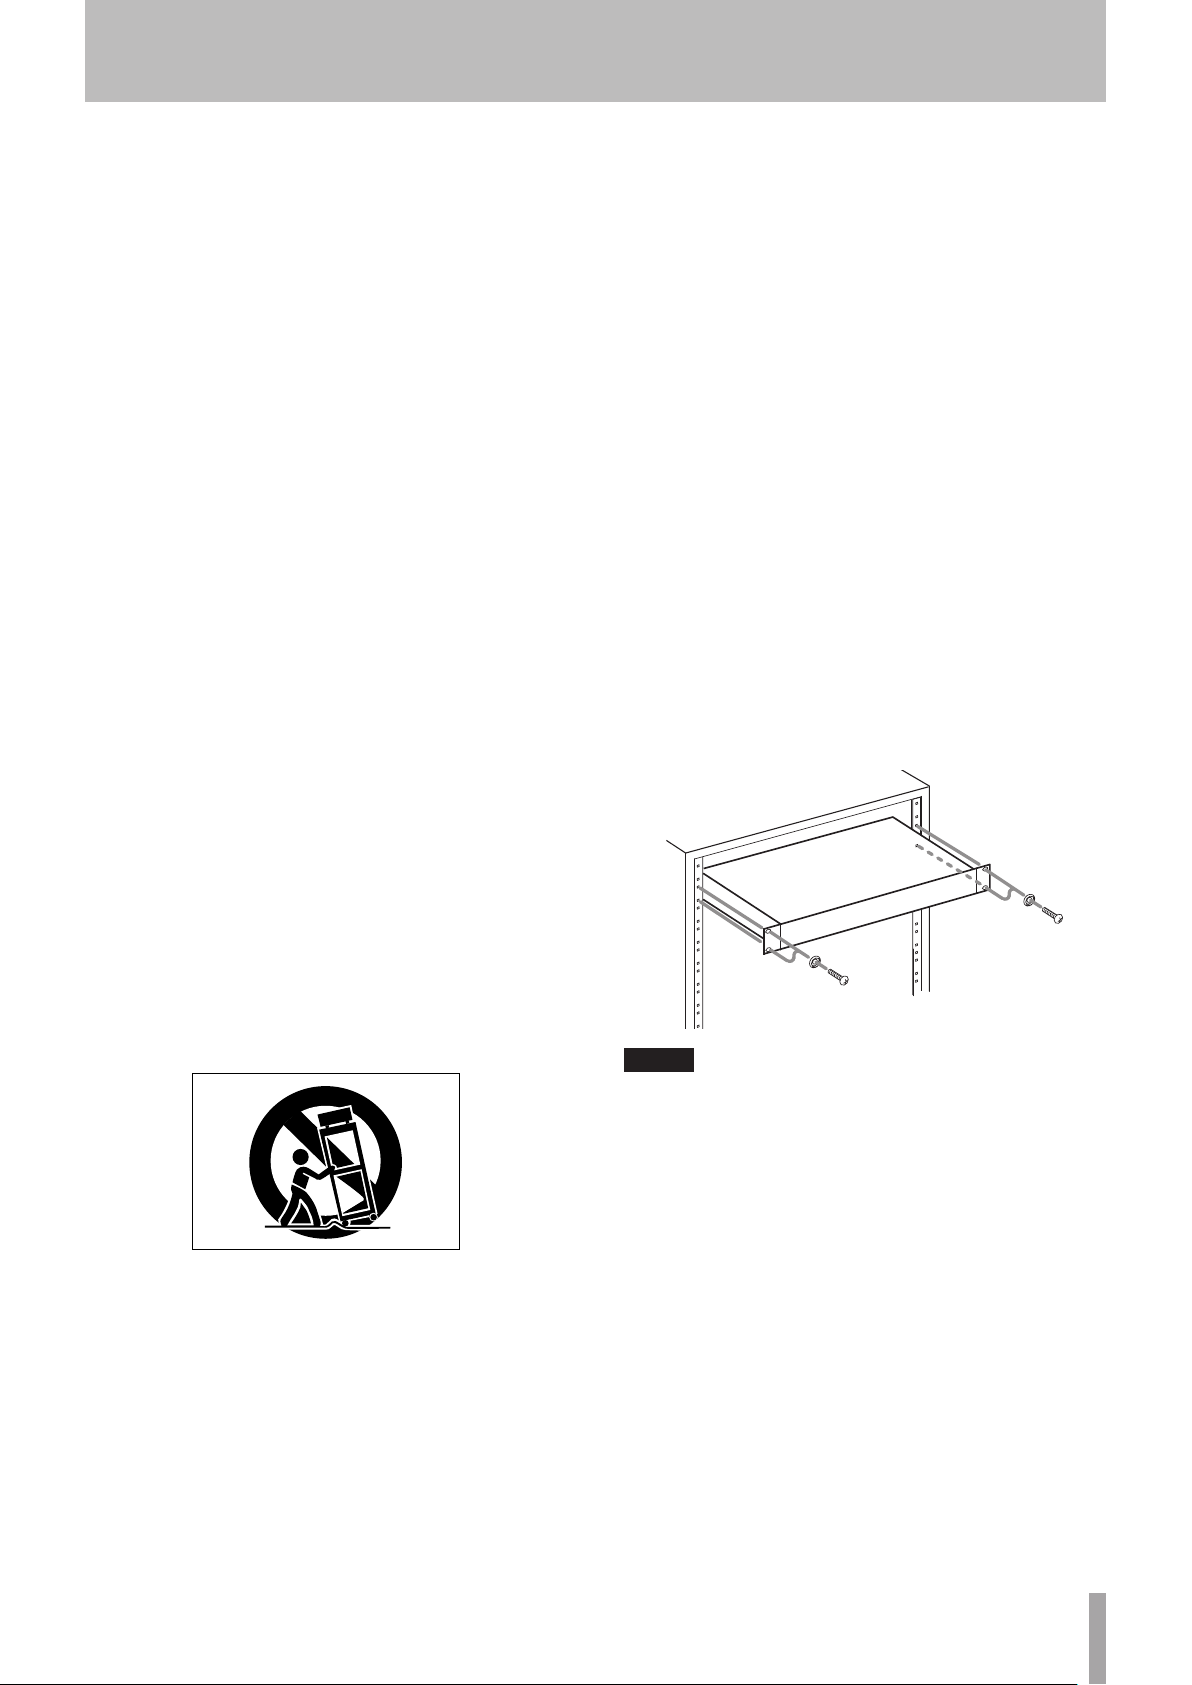
RACK-MOUNTING THE UNIT
ª
Use the supplied rack-mounting kit to mount the unit in a
standard 19-inch rack, as shown below.
Remove the feet of the unit before mounting.
11 Only use attachments/accessories specified by the
manufacturer.
12 Use only with the car t, stand, tripod, bracket, or
table specied by the manufacturer, or sold with the
apparatus. When a cart is used, use caution when
moving the cart/apparatus combination to avoid
injury from tip-over.
13 Unplug this apparatus during lightning storms or
when unused for long periods of time.
14 Refer all servicing to qualified service personnel.
Servicing is required when the apparatus has been
damaged in any way, such as power-supply cord or
plug is damaged, liquid has been spilled or objects
have fallen into the apparatus, the apparatus has
been exposed to rain or moisture, does not operate
normally, or has been dropped.
NOTE
Leave 1U of space above the unit for ventilation.
•
Allow at least 10 cm (4 in) at the rear of the unit for
•
ventilation.

4 TASCAM US-1800
Contents
1 − Introduction ...............................................5
Overview ................................................................................. 5
Main features ......................................................................... 5
Included items ...................................................................... 5
About this manual ............................................................... 5
Trademarks ............................................................................. 6
Precautions and notes for placement and use .......... 6
Beware of condensation .................................................... 6
Cleaning the unit.................................................................. 6
2 − Names and Functions of Parts ..................7
Front panel ............................................................................. 7
Rear panel ............................................................................... 8
3 − Installation .................................................9
System requirements .......................................................... 9
Windows ........................................................................... 9
Mac OS X .......................................................................... 9
Connecting the power ....................................................... 9
Installing the driver ............................................................. 9
Installing the driver for Windows ..........................10
Installing the driver for Mac OS X ..........................11
Uninstalling the driver ............................................... 11
Frequently asked installation questions and
answers (FAQ) ..............................................................11
Settings on your computer ............................................11
Installing Cubase LE 5 ....................................................... 11
4 − US-1800 Control panel settings ............ 12
Overview ...............................................................................12
Control panel settings ...................................................... 12
Audio Performance ....................................................12
Sample Clock Source .................................................12
Digital Output Format ............................................... 12
Digital Output Channels ...........................................12
5 − Connections ............................................ 13
External device connection example .........................13
USB connections ................................................................14
Audio connections ............................................................14
Mic ....................................................................................14
Guitar ............................................................................... 14
Analog connections with keyboards, drum
machines, sound modules and cassette,
MiniDisc and CD players, etc. .................................. 14
Digital connections with sound modules and
MiniDisc and CD players, etc. ................................. 14
Monitor speakers .........................................................14
Headphones ................................................................. 14
MIDI connections ............................................................... 14
6 – Application Guide ................................... 15
Cubase LE 5 ..........................................................................15
Windows XP and Windows Media Player .................. 15
Windows Vista/Windows 7 and Windows Media
Player ......................................................................................15
Mac OS X and iTunes.........................................................16
Simultaneous use with multiple clients ..................... 16
7 – MIDI implementation chart .................... 17
8 – Troubleshooting ...................................... 18
9 – Specifications .......................................... 20
Input/output ratings .........................................................20
Analog audio input/output .................................... 20
Digital audio input/output ......................................20
Control input/output ........................................................ 20
Audio performance ........................................................... 20
Computer requirements ..................................................20
Windows ......................................................................... 20
Macintosh ......................................................................21
General...................................................................................21
Dimensional drawings .....................................................22
Block diagram ......................................................................23

TASCAM US-1800 5
1 − Introduction
Thank you for your purchase of the TASCAM US-1800
USB2.0 Audio/MIDI Interface.
Before connecting and using the unit, please take time to
read this manual thoroughly to ensure you understand
how to properly set up and connect the unit, as well as
the operation of its many useful and convenient functions.
After you have finished reading this manual, please keep
it in a safe place for future reference.
You can also download the Owner's Manual from the
TASCAM web site (http://www.tascam.com).
Overview
The unit is a USB-based audio interface designed for use
with Digital Audio Workstation (DAW) software, such as
Cubase LE 5. It provides abundant analog and digital
inputs and outputs, and 16-channel MIDI inputs and
outputs. It is the ideal companion to any computer-based
digital recording setup.
Main features
Audio interface with 16 inputs and 4 outputs
•
24-bit/96-kHz audio
•
12 balanced analog inputs include 8 XLR for mics and 4
•
line
S/PDIF digital input
•
+48V phantom power can be provided (to 8 mic inputs)
•
Outputs include 4 balanced line, a balanced pair for
•
monitors, digital and headphone
S/PDIF or AES/EBU selectable digital output
•
MIDI IN/OUT
•
Direct monitoring function allows input monitoring
•
without latency
In addition to a monitor level control, independent
•
level control is possible for the signals input from a
computer by USB and through the unit’s input jacks
Can be used with multiple software clients at the same
•
time even if some use ASIO and other use WDM for
audio control
USB 2.0 High speed (480 MHz) compatible
•
Cubase LE 5 included
•
A note about computer operation
If you are unsure about how to perform basic computer
operations appearing in this manual, please refer to the
owner’s manual that came with your computer.
Included items
The included items are listed below.
Take care when opening the package not to damage the
items. Keep the package materials for transportation in
the future.
Please contact the store where you purchased this unit
if any of these items are missing or have been damaged
during transportation.
Main unit• ........................................................................................ 1
AC adaptor (TASCAM PS-1225L)• ............................................ 1
Power cord set for AC adaptor• ............................................... 1
USB cable• ....................................................................................... 1
CD-ROM •
DVD-ROM (Cubase LE 5)• ........................................................... 1
Cubase LE 5 Quick Start Guide• ............................................... 1
A rack-mounting screw kit• ....................................................... 1
A warranty card• ...........................................................................1
Owner's manual (this manual)• ............................................... 1
CAUTION
Always use the included TASCAM PS-1225L AC adaptor and
its power cord with this unit because they match the unit’s
power requirements. Moreover, you should never use the
included AC adaptor and its power cord with other devices.
Incorrect use could cause malfunction, re or electric shock.
(
containing driver) ...................................................... 1
About this manual
In this manual, we use the following conventions:
The names of keys and controls are given in the
•
following bold typeface: PHONES
Characters that appear on a computer display are given
•
in the following light typeface: OK
Additional information is introduced in the styles
•
below when needed:
TIP
Useful hints when using the unit.
NOTE
Explanation of actions in special situation and supplement.
CAUTION
Instructions that should be followed to avoid injury, damage
to the unit or other equipment, and loss of data.

6 TASCAM US-1800
1 − Introduction
Trademarks
TASCAM is a trademark of TEAC Corporation, registered
•
in the U.S. and other countries.
Microsoft, Windows, Windows Vista, Windows 7, and
•
Windows Media Player are either registered trademarks
or trademarks of Microsoft Corporation in the United
States and/or other countries.
Apple, Macintosh, Mac OS, Mac OS X and iTunes are
•
trademarks of Apple Inc., registered in the U.S. and
other countries.
Pentium and Intel are trademarks of Intel Corporation
•
in the U.S. and/or other countries.
AMD Athlon is a trademark of Advanced Micro Devices,
•
Inc.
Cubase is a registered trademark of Steinberg Media
•
Technologies GmbH. ASIO is a trademark of Steinberg
Media Technologies GmbH.
Other company names and product names in this
•
document are the trademarks or registered trademarks
of their respective owners.
Cleaning the unit
To clean the unit, wipe it gently with a soft dry cloth. Do
not wipe with chemical cleaning cloths, benzene, paint
thinner, ethyl alcohol or other chemical agents to clean
the unit as they could damage the surface.
Precautions and notes for placement and use
The operating temperature should be between 5°C and
•
35°C (41°F and 95°F).
Do not install in the following types of places. Doing
•
so could degrade the sound quality and/or cause
malfunctions.
Places with significant vibrations or that are
•
otherwise unstable
Near windows or other places exposed to direct
•
sunlight
Near heaters or other extremely hot places
•
Extremely cold places
•
Places with bad ventilation or high humidity
•
Very dusty locations
•
Make sure that the unit is mounted in a level position
•
for correct operation.
Do not place any object on the unit for heat dissipation.
•
Avoid installing this unit on top of any heat-generating
•
electrical device such as a power amplifier.
Beware of condensation
If the unit is moved from a cold to a warm place, or used
after a sudden temperature change, there is a danger of
condensation; vapor in the air could condense on the
internal mechanism, making correct operation impossible.
To prevent this, or if this occurs, let the unit sit for one or
two hours at the new room temperature before using.
TASCAM US-1800 7
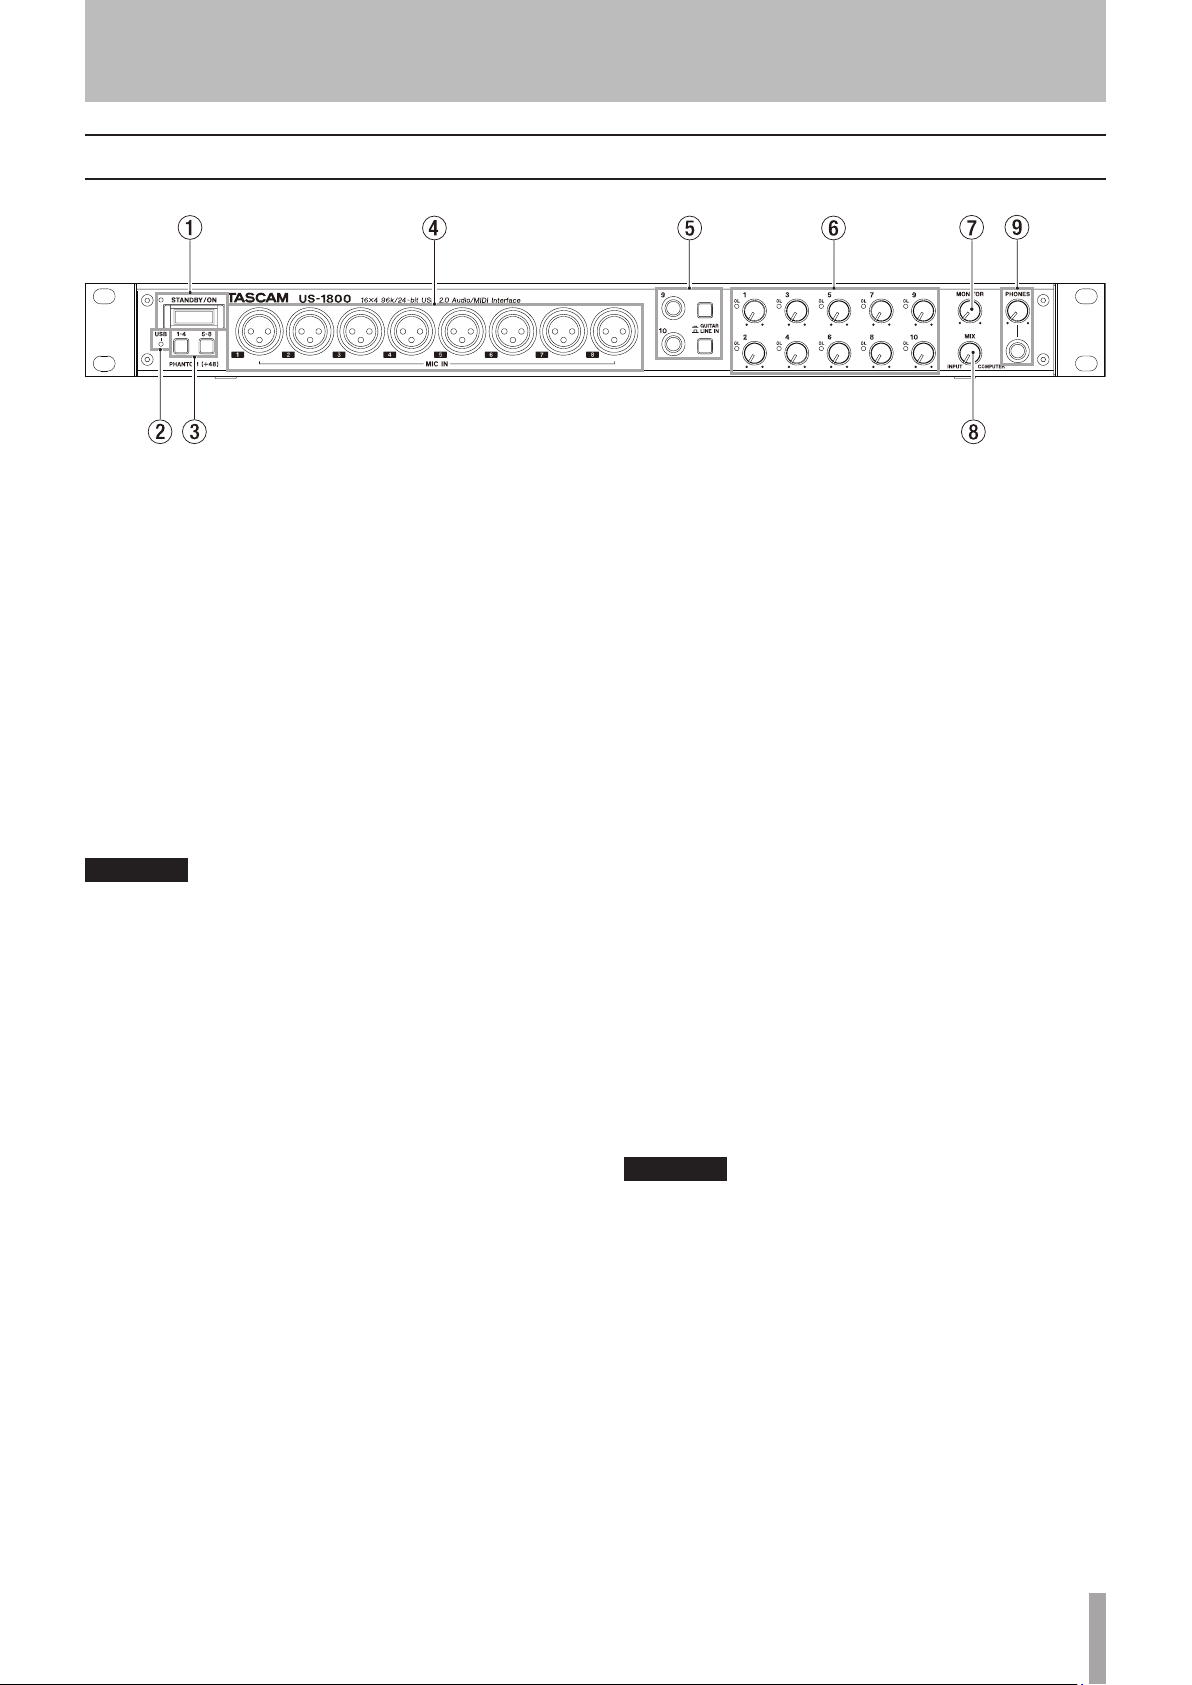
Front panel
2 − Names and Functions of Parts
1STANDBY/ON switch, indicator
Use this switch to turn the power ON and to put the
unit in standby. When ON, the STANDBY/ON indicator
lights green.
2 USB indicator
Lights up orange to indicate a valid USB connection to
the host computer.
3 PHANTOM switches
Use these switches to set whether or not +48 V
phantom power is provided to the MIC IN jacks (1-4,
5-8).
Each switch controls four input channels. Phantom
power is on when the button is pushed in.
CAUTION
Before turning these switches ON or OFF, turn the output
•
volume down using the PHONES and MONITOR knobs.
Depending on the mic, loud noises might be produced
and damage could be caused to equipment and people’s
hearing.
Do not connect or disconnect a mic with an input when its
•
switch is ON.
Turn a switch ON only when connecting a condenser
•
microphone that requires phantom power.
Do not supply phantom power to an unbalanced dynamic
•
microphone.
Some ribbon mics can be damaged by phantom power. If
•
unsure, do not supply phantom power to a ribbon mic.
4 MIC IN (balanced) jacks
These are XLR balanced analog mic input jacks. Use
the Gain knobs to adjust the input gain level.
(1: GND, 2: HOT, 3: COLD)
5 GUITAR (unbalanced)/LINE IN (balanced) jacks and
switches
These jacks (9-10) are standard TRS analog input jacks.
When the switch is pressed in, the corresponding jack
functions as an unbalanced guitar input (GUITAR).
When the switch is out, the corresponding jack
functions as a balanced input (LINE IN). Use the
corresponding gain knobs to set the gains of the
inputs.
(Tip: HOT, Ring: COLD, Sleeve: GND)
6 Gain knobs and OL indicators (1-10)
Adjust the gain level for Inputs (1-10) individually. The
adjustable range is from –2 dBu to –58 dBu for Mic
Inputs (1-8), from +4 dBu to –42 dBu for Line Inputs
(9-10), and from –6dBV to –52dBV for Guitar Inputs
(9-10).
The OL (overload) indicators light when an input signal
is close to distortion (when –2 dBFS is exceeded).
7 MONITOR knob
Adjusts the level of signals output from the MONITOR
L/R jacks on the rear panel.
8 MIX knob
Controls the balance of the signal sources being
output from the PHONES jack and the MONITOR L/
R jacks. With this knob turned to the far left, the unit
will output the signal input from the MIC IN (1-8) jacks
and LINE IN (9-14) jacks. With this knob turned to the
far right, the unit will output the signal received from
the computer via USB.
9PHONES jack and knob
Use this standard stereo phone jack to connect stereo
headphones. This jack outputs the same signal that is
output from the MONITOR L/R jacks.
Use the PHONES knob to adjust the headphones
output level.
CAUTION
Turn the PHONES knob to the minimum volume before
connecting headphones. Failure to do so could cause sudden
loud noises and damage hearing, for example.
8 TASCAM US-1800
2 − Names and Functions of Parts
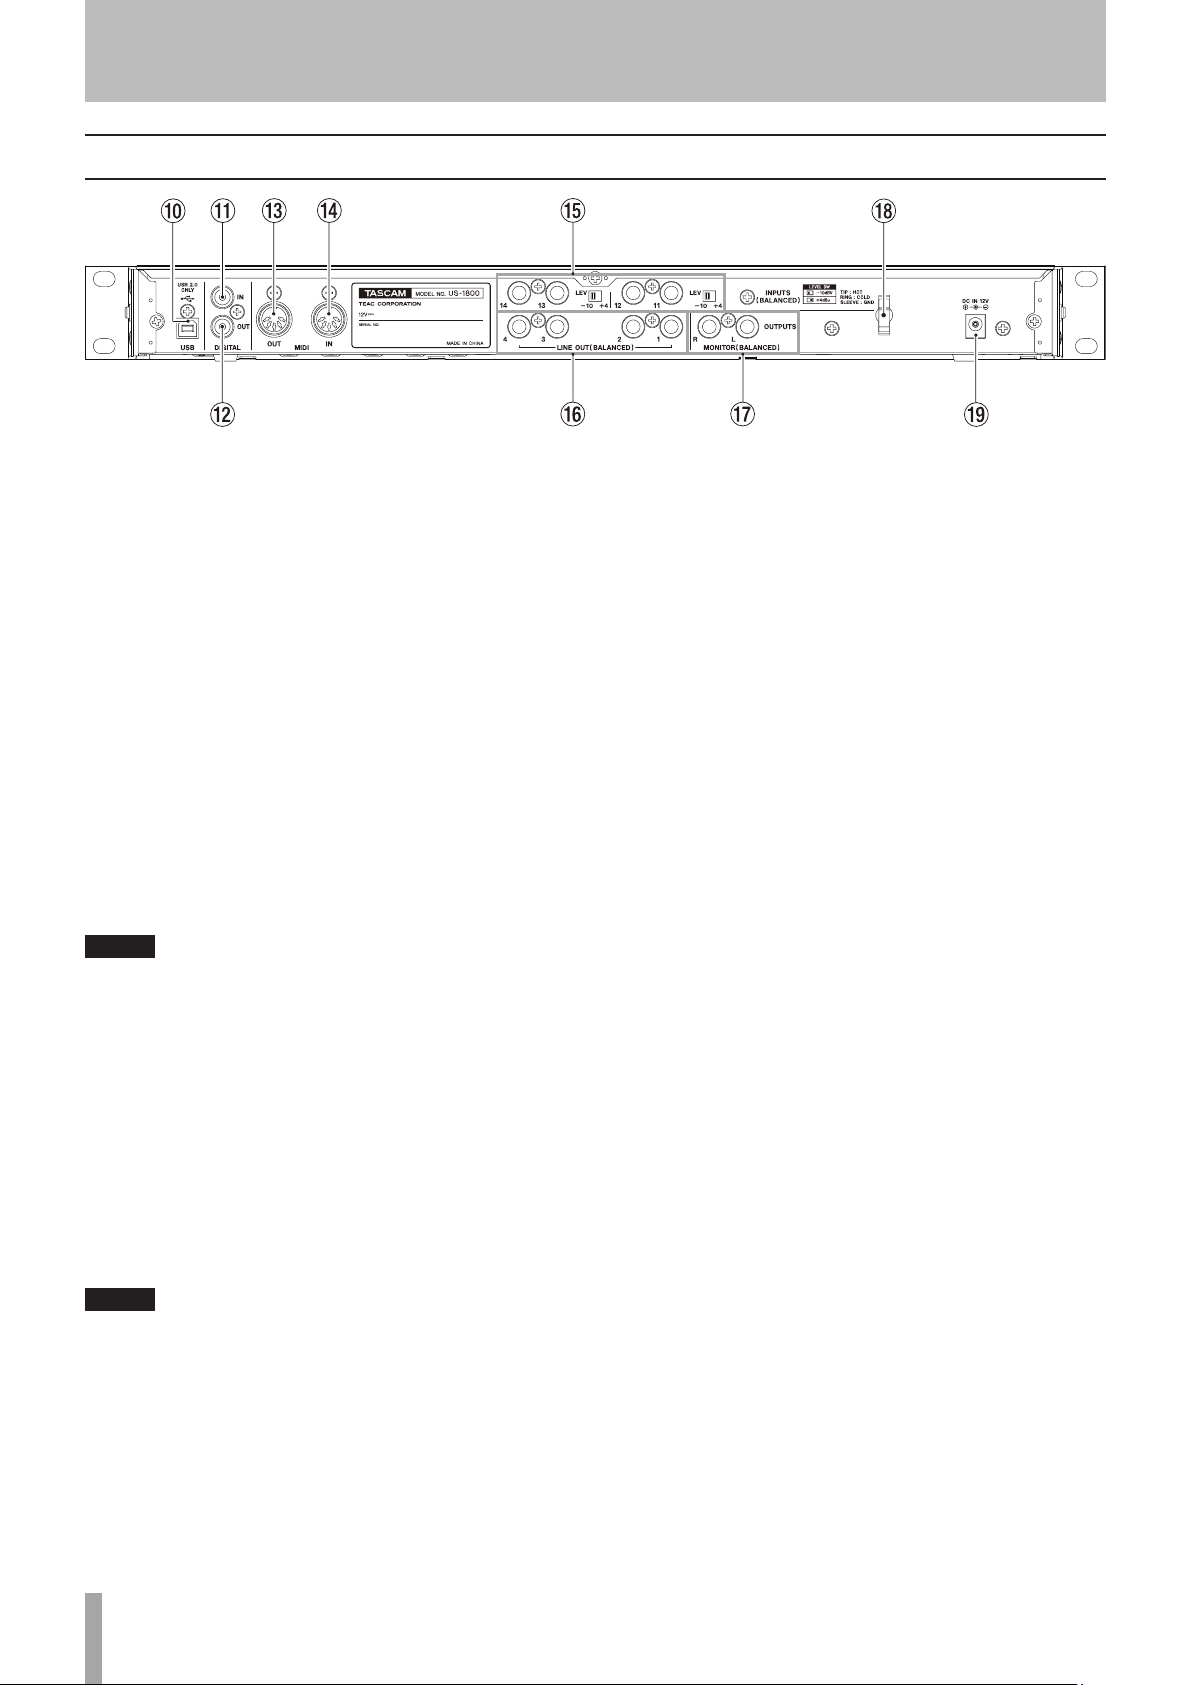
Rear panel
0USB port
Use the included USB cable to connect the unit to a
computer.
(Only compatible with USB 2.0.)
q DIGITAL IN (coaxial) jack
This coaxial digital input jack is compatible with the
IEC60958-3 (S/PDIF) standard.
wDIGITAL OUT (coaxial) jack
This coaxial digital output jack is compatible with
the IEC60958-3 (S/PDIF) and AES3-2003 (AES/EBU)
standards. This jack outputs the same signals as LINE
OUTPUTS 1/2 or LINE OUTPUTS 3/4. Set this using the
control panel. The digital signal format can also be set
using the control panel.
NOTE
This unit’s DIGITAL IN and OUT jacks can input and output
signals at 24-bit/96 kHz.
eMIDI OUT connector
This standard 5-pin DIN connector can be used to
output MIDI signals.
rMIDI IN connector
This standard 5-pin DIN connector can be used to
input MIDI signals.
tINPUTS (BALANCED) jacks and LEV switches
INPUTS (11-14) are standard TRS balanced input jacks.
Use the LEV switches to set the nominal level to either
–10 dBV (−10) or +4 dBu (+4).
yLINE OUT (BALANCED) jacks (1-4)
These standard TRS jacks are balanced analog line
output jacks. The nominal output level is +4 dBu. These
jacks output signals sent from a computer to the unit
by USB. Use the audio application on the computer to
set which signals to output. Connect these outputs to
an external mixer, recorder or other device.
(Tip: HOT, Ring: COLD, Sleeve: GND)
uMONITOR (BALANCED) jacks (L/R)
These standard TRS jacks are balanced analog jacks
that output the monitoring signals. These can output
both a mono mix of signals from the unit inputs
(1-14) and the signals output from the computer for
monitoring. Use the MIX knob on the front panel
to adjust the balance of these two sources. Use the
MONITOR knob on the front panel to adjust the output
level.
Connect these jacks to monitor speakers, for example.
(Tip: HOT, Ring: COLD, Sleeve: GND)
iCord holder
Loop the cord of the included TASCAM PS-1225L
AC adaptor here to prevent the plug from being
disconnected accidentally.
oDC IN 12V jack
Connect the included TASCAM PS-1225L AC adaptor
to this Jack.
NOTE
The gain of these jacks cannot be adjusted.
 Loading...