

Page 1
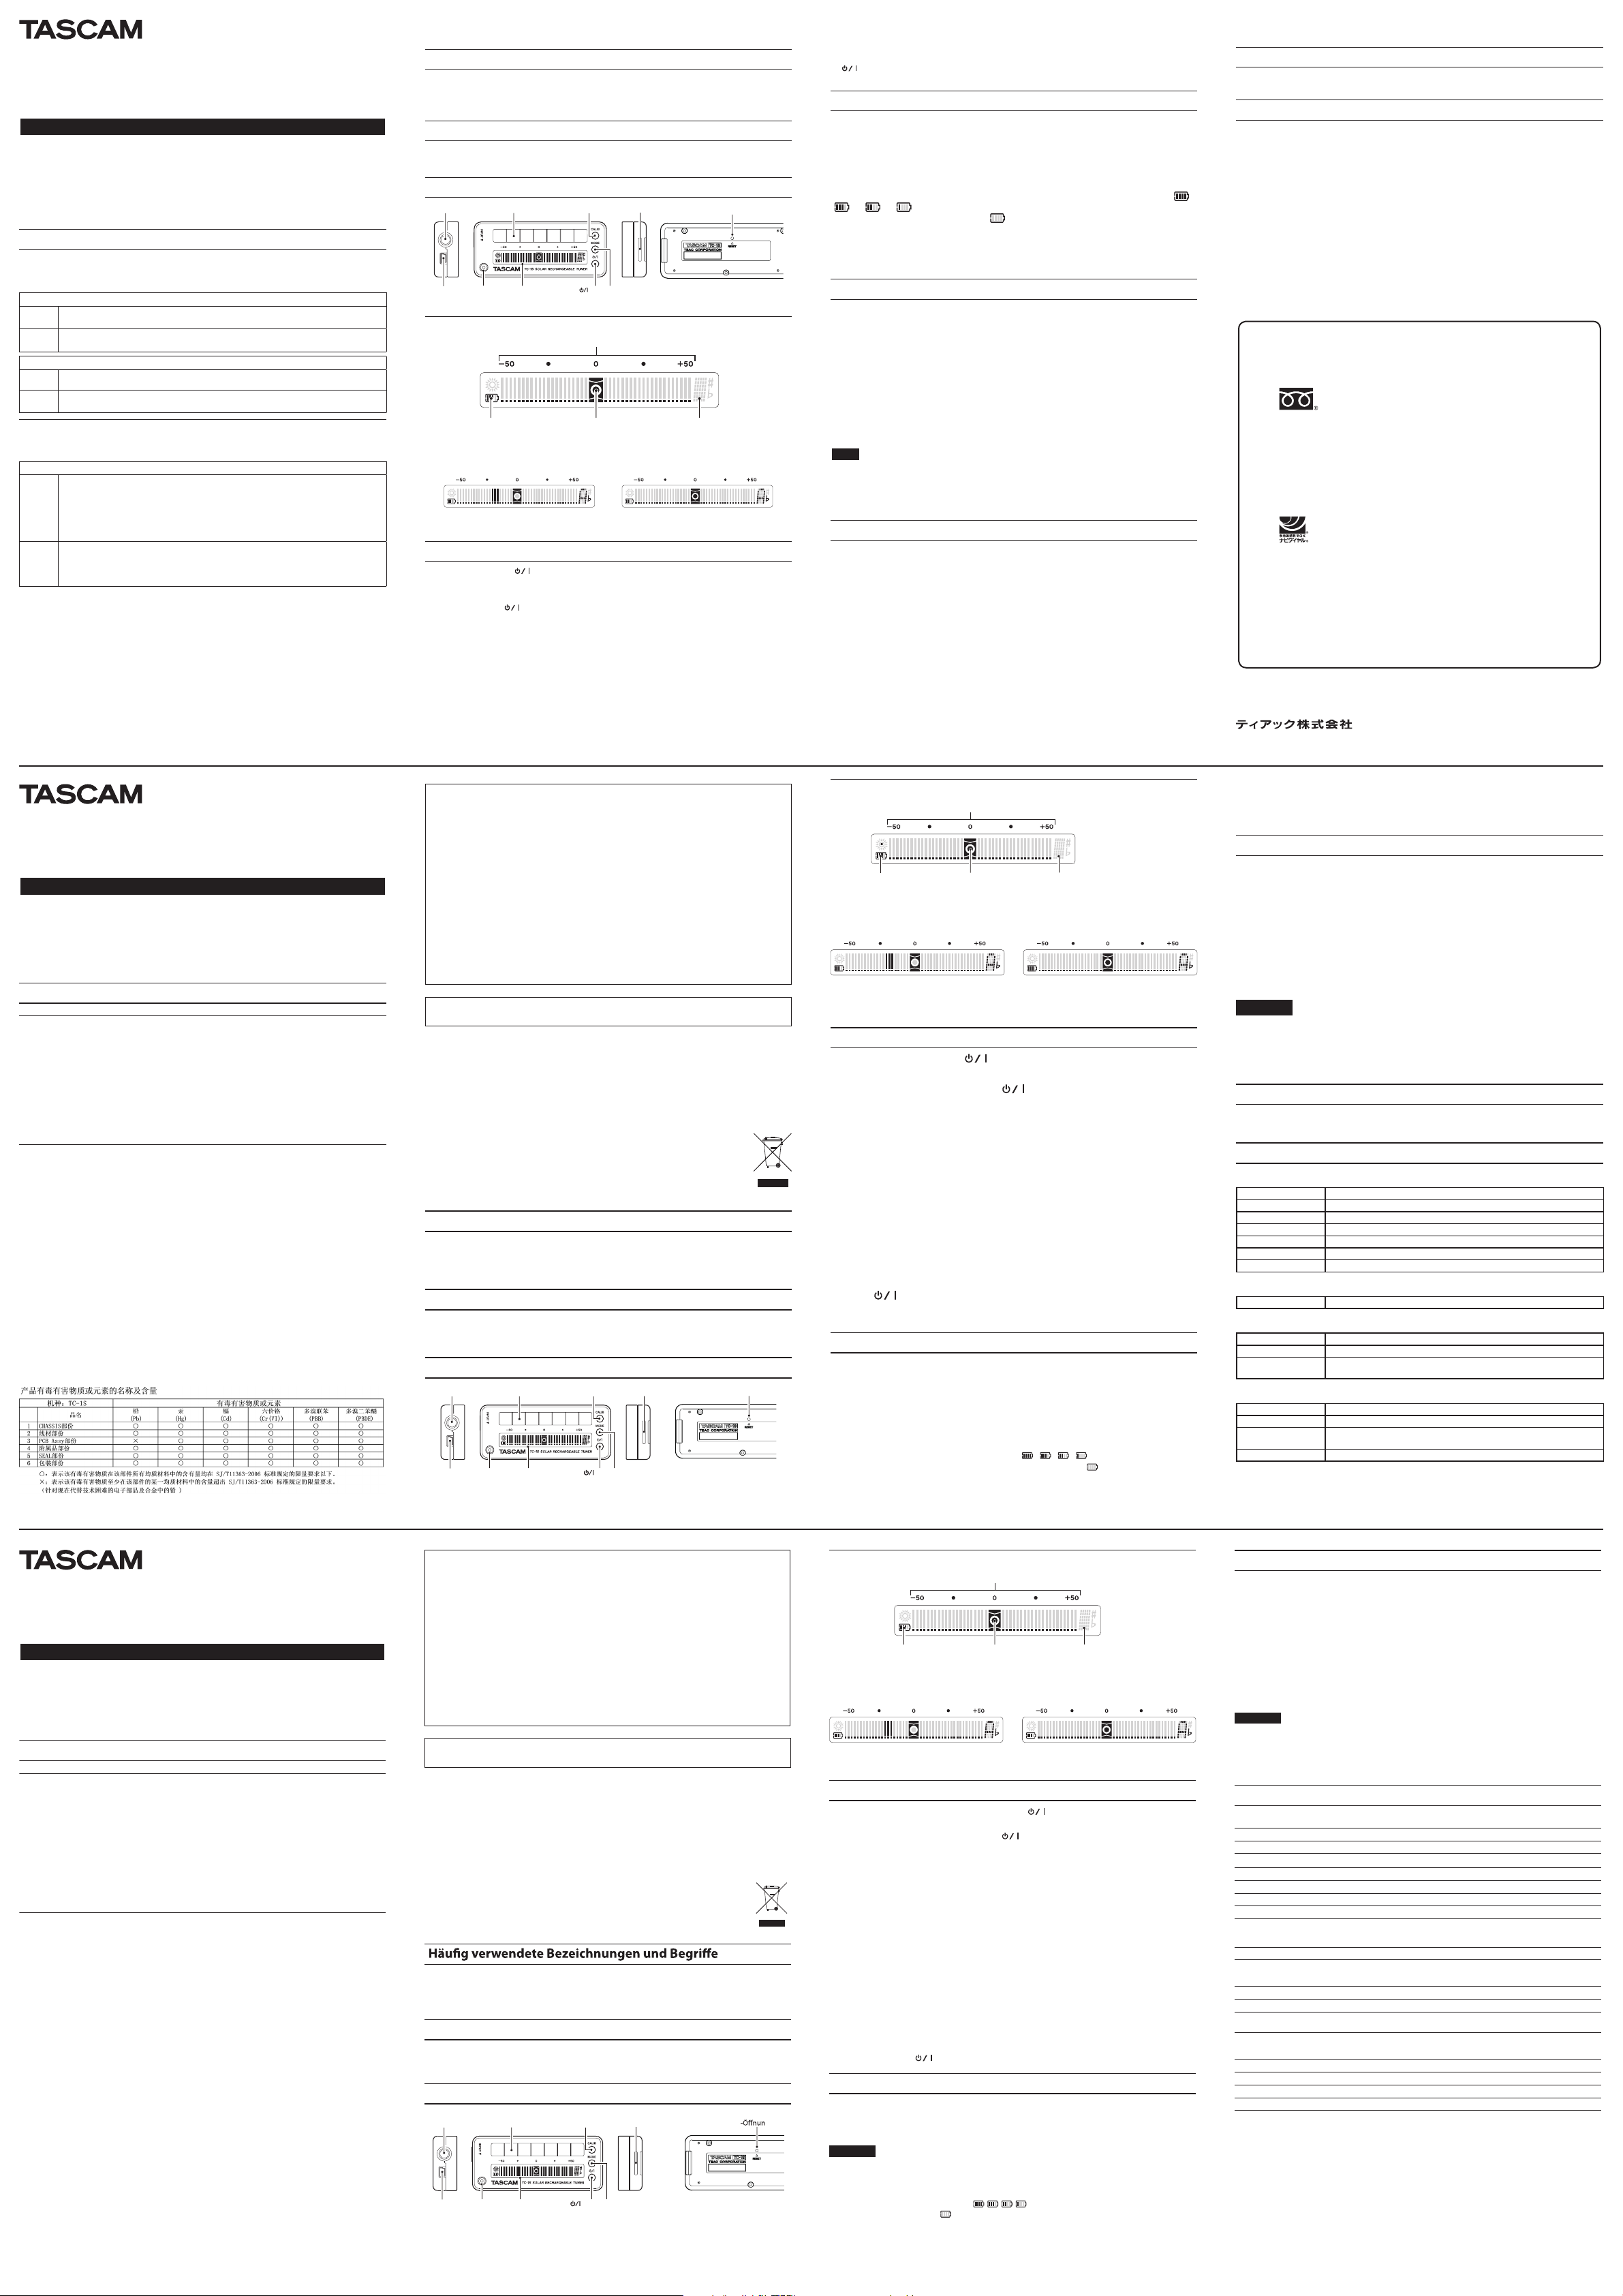
INPUT jack
Solar panel CALIB key
Strap holder
USB jack Built-in mic Bar meter
key MODE key
内蔵マイク
RESET hole
Battery icon
Tuning indication segments (and range in cents)
Pitch guide circle
7x5 segment display (with #, â indicators)
D01129500A
CALIBキー
MODEキー
内蔵マイク
USB端子
INPUT端子 ソーラーパネル
バーメーター
ストラップ ホルダー
キー
RESET用ホール
電池アイコン
ピッチガイドサーク ル
7x5セグディス プレー(♯,♭表示付)
目盛り(セント)
Bedienungsanleitung
TC-1S
Solar-Stimmgerät
Vielen Dank, dass Sie sich für das Solar-Stimmgerät TC-1S von Tascam entschieden haben.
Bevor Sie das Gerät anschließen und benutzen, empfehlen wir Ihnen, diese Anleitung aufmerksam
durchzulesen. Nur so ist sichergestellt, dass Sie verstehen, wie man das Produkt korrekt verkabelt und
einrichtet, und wie man auf seine Funktionen zugreift. Bewahren Sie diese Anleitung gut auf, und geben Sie
sie immer zusammen mit dem Produkt weiter, da sie zum Produkt gehört.
Eine digitale Version steht auf unserer Website (http://www.tascam.de) zum Download bereit.
Wichtige Hinweise zu Ihrer Sicherheit
Sicherheitshinweise zu auadbaren Batterien (Akkus)
In diesem Produkt kommt ein Akku zum Einsatz. Befolgen Sie die hier aufgeführten Vorsichtsmaßnahmen,
um das Erhitzen, Brennen oder Auslaufen des Akkus oder andere Probleme durch Fehlgebrauch zu
vermeiden.
• Wenn Flüssigkeit aus dem Akku austritt, berühren Sie diese nicht mit bloßen Händen. Wenden Sie sich
an ein Tascam-Servicecenter, wenn ein Akku undicht ist. Batteriesäure, die in die Augen gelangt, kann
zum Erblinden führen. Waschen Sie das betroene Auge sofort mit viel sauberem Wasser aus (nicht
reiben) und wenden Sie sich umgehend an einen Arzt oder ein Krankenhaus. Batteriesäure auf Haut oder
Kleidung kann Verätzungen hervorrufen. Auch hier gilt: Sofort mit reichlich klarem Wasser abwaschen
und umgehend einen Arzt aufsuchen.
• Nehmen Sie Akkus niemals auseinander. Es könnte zu einem Kurzschluss und in der Folge zu einem
Lichtbogen kommen, der zu Verbrennungen und zum Erblinden führen kann. Wenn der Akku überprüft
oder ausgetauscht werden muss, wenden Sie sich bitte an Ihren Fachhändler oder an ein TascamServicecenter.
Weitere Vo rsichtsmaßnahmen
• Stellen Sie das Gerät nicht an den im Folgenden bezeichneten Orten auf. Fehlfunktionen oder Schäden
könnten die Folge sein.
• Orte, die erheblichen Erschütterungen ausgesetzt oder anderweitig instabil sind,
• in der Nähe von Fenstern oder anderen Or ten, die direkter Sonneneinstrahlung ausgesetzt sind,
• in der Nähe von Heizkörpern oder anderen Orten mit starker Hitzeeinwirkung,
• Orte, die besonders niedrigen Temperaturen ausgesetzt sind,
• unzureichend belüftete Orte oder Orte mit hoher Luftfeuchtigkeit,
• Orte mit hoher Staubkonzentration,
• Orte, an denen das Gerät nass werden kann.
• Stellen Sie das Gerät nicht auf ein anderes, Wärme abgebendes Gerät (z. B. einen Verstärker).
• Lassen Sie das Gerät nicht an einem Gurt oder einer anderen Befestigung pendeln.
• Tauchen Sie das Gerät nicht ins Wasser.
• Wenn Sie das Gerät aus einer kalten Umgebung in eine warme Umgebung bringen, besteht die Gefahr,
dass sich Kondenswasser bildet. Kondenswasser im Geräteinneren kann Fehlfunktionen hervorrufen.
Um dies zu vermeiden, lassen Sie das Gerät ein bis zwei Stunden im wärmeren Raum stehen, bevor Sie
es einschalten.
• Reinigen Sie dieses Produkt mit einem trockenen, weichen Tuch. Reinigen Sie das Gerät nicht mit
chemisch imprägnierten Tüchern oder Mitteln wie Reinigungsbenzin, Verdünner und Alkohol. Diese
könnten die Oberäche des Gehäuses beschädigen.
•
WARNUNG für Produkte mit austauschbaren Lithiumakkus: Es besteht die Gefahr einer Explosion, wenn
der Akku durch einen falschen Typ ersetzt wird. Ersetzen Sie eine solche Akkus immer durch den gleichen
oder gleichwertigen Typ.
Informationen zur elektromagnetischen Verträglichkeit
Dieses Gerät wurde auf die Einhaltung der Grenzwerte gemäß der EMV-Richtlinie 2004/108/EG der
Europäischen Gemeinschaft hin geprüft. Diese Grenzwerte gewährleisten einen angemessenen Schutz
vor schädlichen Störungen im
Wohnbereich. Dieses Gerät erzeugt und nutzt Energie im Funkfrequenzbereich und kann solche
ausstrahlen. Wenn es nicht in Übereinstimmung mit den Anweisungen der Dokumentation installiert
und betrieben wird, kann es Störungen im Rundfunkbetrieb verursachen. Grundsätzlich sind Störungen
jedoch bei keiner Installation völlig ausgeschlossen. Sollte dieses Gerät Störungen des Rundfunk- und
Fernsehempfangs verursachen, was sich durch Ein- und Ausschalten des Geräts überprüfen lässt, so
kann der Benutzer versuchen, die Störungen durch eine oder mehrere der folgenden Maßnahmen zu
beseitigen:
a) Richten Sie Ihre Empfangsantenne neu aus, oder stellen Sie sie an einem anderen Ort auf.
b) b) Vergrößern Sie den Abstand z wischen dem Gerät und dem Empfänger.
c) Schließen Sie das Gerät und den Empfänger an unterschiedliche Stromkreise an.
d) Wenden Sie sich an Ihren Fachhändler oder an einen Radio-/Fe rnsehtechniker.
Wichtig
Durch Änderungen oder Modikationen, die die TEAC Corporation nicht ausdrücklich genehmigt hat,
kann der Benutzer die Berechtigung zum Betrieb dieses Gerätes verlieren.
Dieses Digitalgerät der Klasse B entspricht dem kanadischen Standard ICES-003.
Cet appareil numérique de la classe B est conforme à la norme NMB-003 du Canada.
ª Für Kunden in Europa
Entsorgung von Altgeräten und Batterien
a) Wenn ein Symbol einer durchgestrichenen Mülltonne auf einem Produkt, der Verpackung und/oder der
begleitenden Dokumentation angebracht ist, unterliegt dieses Produkt den europäischen Richtlinien
2002/96/EC und/oder 2006/66/EC sowie nationalen Gesetzen zur Umsetzung dieser Richtlinien.
b) Richtlinien und Gesetze schreiben vor, dass Elektro- und Elektronik-Altgeräte sowie Batterien und Akkus
nicht in den Hausmüll (Restmüll) gelangen dürfen. Um die fachgerechte Entsorgung, Aufbereitung und
Wiederverwertung sicherzustellen, sind Sie verpichtet, Altgeräte und entleerte Batterien/Akkus über
staatlich dafür vorgesehene Stellen zu entsorgen.
c) Durch die ordnungsgemäße Entsorgung solcher Geräte und Batterien/Akkus leisten Sie
einen Beitrag zur Einsparung wertvoller Rohstoe und verhindern potenziell schädliche
Auswirkungen auf die menschliche Gesundheit und die Umwelt, die durch falsche
Abfallentsorgung entstehen können. Die Entsorgung ist für Sie kostenlos.
d) We itere Informationen zur Wertstosammlung und Wiederverwertung von Altgeräten und
Batterien/Akkus erhalten Sie bei Ihrer Stadtverwaltung, dem für Sie zuständigen
Abfallentsorgungsunternehmen oder der Verkaufsstelle, bei der Sie das Produkt erworben
haben.
Wir verwenden in dieser Anleitung die folgenden Konventionen:
•
Tasten, Buchsen und andere Bedienelemente an diesem und anderen Geräten kennzeichnen wir wie folgt
mit fett gesetzten Großbuchstaben: CALIB-Taste.
•
Text auf dem Display kennzeichnen wir durch das folgende Schriftbild:
M
Rechte an geistigem Eigentum
• Tascam ist eine in den USA und anderen Ländern eingetragene Marke der TEAC Corporation.
• Andere in diesem Dokument genannte Firmenbezeichnungen und Produktnamen sind als Marken bzw.
eingetragenen Marken das Eigentum ihrer jeweiligen Inhaber.
Bedienelemente und Anschlüsse
Balkenanzeige
Batteriesymbol
Balkensegmente (und Bereich in Cent)
Intonations
p
unkt
Notenanzeige (mit Symbolen #, â)
Die Balkenanzeige beim Stimmen
Balken links der Mitte zeigen an, dass die Stimmung zu tief ist. Balken rechts der Mitte zeigen an, dass
die Stimmung zu hoch ist. Je mehr Balken angezeigt werden, desto ungenauer ist die Stimmung (in der
Betriebsart M). Sobald die Stimmung korrekt ist, erscheint in der Mitte der Intonationspunkt.
Verstimmt
(Sieben Schritte (2,5 x 7 = 17,5 Cent) tiefer als Aâ)
Gestimmt
(Erkannter Ton ist in Stimmung zu Aâ)
Das Stimmgerät in der Praxis
• Um das Stimmgerät einzuschalten, halten Sie die Taste gedrückt. Sobald es eingeschaltet ist,
halten Sie die MODE-Taste gedrückt, um die Betriebsart zu wählen. Die Einstellung ändert sich durch
jedes weitere Drücken der MODE-Taste. Zugleich erscheint die Abkürzung der jeweiligen Betriebsart auf
der Notenanzeige rechts. Drücken Sie die Taste
, um die Betriebsart festzulegen und das
Stimmgerät zu aktivieren.
N
(Nadel): Die Bezeichnung des erkannten Tons erscheint hier ebenfalls als Großbuchstabe auf der
Notenanzeige. Die Abweichung vom Sollton wird durch drei Balken dargestellt, wobei der mittlere
Balken den tatsächlichen Wert der Abweichung wiedergibt.
S
(Stroboskopeekt): Die Bezeichnung des erkannten Tons erscheint hier ebenfalls als Großbuchstabe
auf der Notenanzeige, und ein simuliertes Strobe zeigt die Abweichung vom Sollton an. Erscheint
eine Bewegung nach rechts, ist der erkannte Ton zu hoch. Bei einer Bewegung nach links ist der
erkannte Ton zu niedrig. Die Bewegung ist umso schneller, je stärker der erkannte Ton abweicht. Sie
stoppt, sobald der Sollton erreicht ist.
F
(Fein): Hier erscheint die Bezeichnung des erkannten Tons als Kleinbuchstabe auf der Notenanzeige,
und die Balkenanzeige ist genauer (±20 Cent, wobei jeder Balken 1 Cent repräsentiert).
M
(Balkenanzeige): Die Bezeichnung des erkannten Tons erscheint als Großbuchstabe auf der
Notenanzeige, und die Balkenanzeige gibt die Abweichung vom Sollton wieder (mehr als ±50 Cent
und −50 Cent bis +50 Cent, wobei jeder Balken 2,5 Cent repräsentiert).
• Wenn Sie das Stimmgerät kalibrieren wollen, halten Sie die CALIB-Taste gedrückt. Wählen Sie die
Frequenz des Kammertons a' im Bereich von 437–446 Hz in Schritten von 1 Hz.
• Auf der Notenanzeige wird die letzte Stelle der Frequenz dargestellt. Zwischen 437 Hz und 439
Hz wird zudem das Symbol „â“ und zwischen 441 Hz und 446 Hz das Symbol „#“ angezeigt. In der
Standardeinstellung 440 Hz wird keines der Symbole angezeigt.
Jedes weitere Drücken der CALIB-Taste erhöht die Einstellung um 1 Hz. Beim höchsten Wert (446 Hz)
angelangt, springt die Einstellung wieder zurück auf 437 Hz.
Durch gleichzeitiges Drücken der Tasten CALIB und MODE setzen Sie die Einstellung auf 440 Hz zurück
(den Standardwert).
Drücken Sie die Taste
, um die Frequenz festzulegen und zur Stimmfunktion zurückzukehren.
Stromversorgung
Eingebauter Lithium-Akku
Das Solarmodul in diesem Stimmgerät lädt den eingebauten Akku auf, wenn es Licht ausgesetzt ist. Darüber
hinaus können Sie den Akku auch über eine USB-Verbindung mit einem Computer auaden. Während des
Ladens über die USB-Verbindung ist das Batteriesymbol sichtbar.
VORSICHT
Das Solarmodul ist für künstliches Licht ausgelegt. Um den eingebauten Akku nicht zu überlasten, vermeiden
Sie es, das Stimmgerät lange Zeit direktem Sonnenlicht auszusetzen.
Anzeige der verbleibenden Ladekapazität
Das Batteriesymbol gibt Auskunft über die verbleibende Kapazität des Akkus. Je mehr Balken zu sehen sind,
desto mehr Kapazität ist noch vorhanden (
, , , ).
Wenn ein leeres Batteriesymbol (
) angezeigt wird, schaltet sich das Gerät automatisch aus.
Stromsparfunktion
Das Stimmgerät verfügt über eine Stromsparfunktion. Wenn fünf Minuten lang keine Taste gedrückt wurde,
schaltet es sich automatisch aus. Die Ladefunktion durch das Solarmodul wird dadurch nicht beeinträchtigt.
Weitere Merkmale
INPUT-Buchse
An die INPUT-Klinkenbuchse können Sie eine elektrische Gitarre/Bassgitarre oder ein Mikrofon anschließen.
Dabei wird das eingebaute Mikrofon abgeschaltet.
USB-Anschluss
Diese USB-Buchse des Typs Mini-B ist nur für das Auaden des Akkus ausgelegt. Sie kann nicht für die
Steuerung des Geräts oder zum Speichern von Einstellungen verwendet werden. Sie müssen zunächst die
Gummihülle entfernen, um an die Buchse zu gelangen.
Gummihülle
Diese Gummihülle ist abnehmbar.
Trageschlaufe
Dieses Gerät wird mit einer Trageschlaufe geliefert, die auch für Schlüssel verwendet werden kann. Sie ist an
einer Öse auf der rechten Seite des Geräts befestigt.
VORSICHT
Wenn Sie die Trageschlaufe erneut befestigen, achten Sie darauf, dass sie sich nicht lösen und auch nicht
beschädigt werden kann.
RESET-Önung
Wenn das Stimmgerät nicht wie vorgesehen funktioniert, können Sie es zurücksetzen, indem Sie durch diese
Önung mit einer aufgebogenen Büroklammer oder einem dünnen Nagel die Rücksetztaste betätigen.
Technische Daten
Funktionen
Stimmung Gleichstuge Stimmung (12 Töne)
Erkennungsbereich A0 (27,5 Hz) – C8 (4186,010006 Hz)
Notenbezeichnungen
C, C#, D, Eâ, E, F, F#, G, G#, A, Bâ, B
BetriebsartenNadel, Strobe, Fein, Balkenanzeige
Kalibrierungsbereich 437–446 Hz in 1-Hz-Schritten
Erkennungsgenauigkeit 1 Cent (bei A = 440 Hz)
Eingebautes Mikrofon Kugelcharakteristik, mono
Eingang
INPUT-Buchse 6,3-mm-Monoklinkenbuchse
Stromversorgung
Ersatz-Ladeanschluss USB (Mini-B-Buchse, nur für Ladezwecke)
Stromspeicher Mangan-Lithium-Akku
Betriebszeit des Akkus im
Dauerbetrieb
Rund 6 Stunden (Note A beständig am Eingang; tatsächliche Zeit abhängig
von Umgebungsbedingungen)
Sonstige
Abmessungen 96 mm x 40 mm x 18 mm (Breite x Höhe x Tiefe, ohne Gummihülle)
Gewicht 0,051 kg (Stimmgerät ohne Zubehör)
Betriebstemperaturbereich 5–35 °C
Mitgeliefertes Zubehör: Trageschlaufe, diese Bedienungsanleitung, Garantieinformation
Ansicht bei abgenommener Gummihülle
RESET g
INPUT-Buchse
Solarmodul CALIB-Taste
Öse für Trageriemen
USB-Buchse Mikrofon Balkenanzeige
-Taste MODE-Taste
TC-1S
Solar Rechargeable Tuner
取扱説明書
このたびは、TASCAM Solar Rechargeable Tuner TC-1Sをお買いあげいただ きまして、誠に
ありがとうございます。
ご使用になる 前に、この取扱説明書をよくお読みになり、正しい取り扱い方法をご理解いただいた
うえで、末永く ご愛用くださいますようお願い申しあげます。お読みになったあと は、いつでも見
られるところに保管してください。
また取扱説明書は、TASCAMのウェブサイト(http://www.tascam.jp/)からダウンロードするこ
とができます。
安全にお使いいただくために
この取扱説明 書の表示は、製品を安全に正しくお使いいただき、あなたや他の人々への危害や財産
への損害を未 然に防止するために、いろいろな絵表示をしています。その表示と意 味は、次のよう
になっています。内容をよく理解してから本文をお読みください。
表示の意味
á
á
絵表示の例
充電式電池の取り扱いについて
本製品は、充電式電池を使用してい ます。発熱、発火、液漏れなどを避けるため、以下の注意事項
を必ず守ってください。
á
その他の注意
º
≠ 窓際などの直射日光が当たる場所。 ≠ ホコリの多い場所。
≠ 暖房器具のそばなど極端に温度が高い場所。 ≠ 直接雨などの水が当たる場所。
º
º
º
º
この表示を無視して、誤った取扱いをすると、人が死亡または重傷を負う可能性が想定
警告
される内容を示しています。
この表示を無視して、誤った取扱いをすると、人が傷害を負う可能性が想定される内容お
注意
よび物的損害のみの発生が想定される内容を示しています。
△ 記号は注意(警告を含む)を促す内容があることを告げるものです。
á
è
記号は禁止の行為であることを告げるものです。
í
図の中に具体的な禁止内容(左図の場合は分解禁止)が描かれています。
警告(充電式電池に関する警告)
充電式電池の液が漏れたときは、素手で液をさわらないでください。
液漏れが発生した時には、ティアック修理センターにご相談ください。
液が目に入った時には失明の恐れがありますので、目をこすらずにすぐにきれいな水で
洗ったあと、ただちに医師にご相談ください。
ó
液が体や衣服に付いた時は、皮膚の怪我・やけどの原因になるのできれいな水で洗い流
したあと、ただちに医師にご相談ください。
分解しないでください。
感電の原因になります。充電式電池の点検・修理は、お買い上げの販売店またはティア
ック修理センターにご依頼ください。ただし廃棄時には、取扱説明書記載の指示に従っ
è
てリサイクルにご協力ください。
次のような場所に設置しないてください。故障の原因となります。
振動の多い場所。 ≠ 湿気の多い場所や風通しが悪い場所。
≠
極端に温度が低い場所。
≠
パワーアンプなど熱を発生する機器の上に本製品を置かないでください。
ストラップなどを持って振り回さないでください。
本製品を水没させないでください。
本製品を寒い場所から暖かい場所へ移動したときや、寒い部屋を暖めた直後など、気温が急激に
変化すると結露を生じることがあります。結露したときは、約1 〜 2時間放置した後、電源を入
れてお使いください。
製品の汚れは、柔らかい布でからぶきしてください。化学ぞうきん、ベンジン、シンナー、アル
º
コールなどで拭かないでください。表面を痛めたり色落ちさせる原因となります。
本書の表記
本書では、以下のような表記を使います。
本機および外部機器のキー/端子などを「CALIBキー」 のように太字で表記します。
º
ディスプレーに表示される文字を“M”のように“__”で括って表記します。
º
商標に関して
TASCAMおよびタスカムは、ティアック株式会社の登録商標です。
º
その他、記載されている会社名、製品名、ロゴマークは各社の商標または登録商標です。
º
各部の名称
[ゴムカバーを外した状態]
バーメーター部
チューニングメーター表示時
チューニングが低いと左に、高いと右にバーを表示します。バーが多いほどずれています。
チューニングが合うとピッチガイドサークル(中央の○)が点灯します。
チューニングが合っていないとき チューニングが合ったとき
[Aõ より7段階(2.5x7=17.5セント)低いとき] [Aõ に合ったとき]
チューナー
チューナーを使うには、 キーを長押しし、電源を入れます。
チューナー表示時に、MODEキーを長押しするとチューナーの動作モードを設定できます。
º
MODEキーを押す毎にモードが変化します。このときモードの略称が、7x5セグディスプレー
に表示されます。 キーを押すと、モードを設定してチューナーに戻ります。
”(ニードル=針)モード:音名を7x5セグディスプレーに大文字で表示し、ずれ量をその
≠ “N
位置と前後の、あわせて3本のバーで表示します。
”(ストロボアニメーション)モード:音名を7x5セグディスプレーに大文字で表示し、
≠ “S
メーターはバーが音程が高い場合は右へ、低い場合は左へ流れるようにアニメーション表示
します。早く動いているときほどずれており、チューニングが合うと静止します。
”(ファイン=精密)モード:7x5セグディスプレーには音名を小文字で表示し、メーター
≠ “F
を高い精度で表示します(−20セント〜 +20セント。1セント/バー)。
”(メーター)モード:音名を7x5セグディスプレーに大文字で表示し、メーターにずれを
≠ “M
表示します。(−50セント未満、−50セント〜 +50セント、+50セント超。2.5セント/バー)
チューナー表示時に、CALIBキーを長押しするとキャリブレーションモードになります。A(ラ)
º
の基準周波数を437 〜 446Hzの範囲で1Hz刻みで設定できます。7x5セグティスプレー には
周波数の下一桁が数値で表示され、437 〜 439Hzのときは“õ”、441 〜 446Hzのときは“ã”
を表示し、440(初期値)のときは“ãõ”は表示されません。
CALIBキ ーを 押す 毎に 設定 値が1Hzず つ高 くな りま す。446Hzのときこのキー を押 すと、
437Hzになります。
キーを押すと、値の設定をしてチューナーに戻ります。
このモードのときにCALIBキーとMODEキーを同時に押すと、440Hz(初期値)になります。
電源
電池
本機は、ソーラ ーパネル を内蔵しており、 電灯の下 で充電 が可能で す。また、USB端子にUSBmini Bのケーブルを使って充電することもできます。
USB充電中は、電池アイコンが点灯します。
太陽光の下で充電する場合は、長時間放置しないでください。
電池残量警告
電池残 量は、電池ア イコンで確 認できます。 電池残量に 応じて、目盛 りが表示さ れます(“ ”、
“ ”、“ ”、“ ”)。
目盛り表示がなくなるとアイコンが消灯(“ ”)し、電池切れのために電源がスタンバイ状態にな
ります。
オートオフ
本機は、オートオフ機能を持っており、最後のボタン操作から5分(固定)が経過すると自動的にス
タンバイ状態になります。
その他
INPUT端子
ギターからの出力や外部マイクをINPUT端子に接続して使うことができます。このとき内蔵マイク
は、使えなくなります。
USB端子
USB端子は、充電専用のmini-Bジャックです。この端子で本機をコントロールしたり、バックアッ
プを取ったりすることはできません。この端子を使う場合には、ゴムカバーを外す必要があります。
ゴムカバー
ゴムカバーは、取り外し可能です。
ストラップ(キーホルダー)
本機には、ストラップ(キーホルダー) が付属しています。本機右側のストラップホルダーに取り
付けてあります。
注意
取り付け直すときは、ストラップが外れたり、切れたりしないようにきちんと取り付けて
ください。
RESET用ホール
本機の動作が おかしくなったとき、クリップの先端など細長い棒などをこの穴に差し込んで、内部
にあるリセットボタンを押します。ボタンを押すと再起動します。
仕様
定格
音律 :12平均律
測定範囲 :A0(27.5Hz)〜 C8(4186.010006Hz)
音名 :C、C
チューニングモード :ニードル、ストロボ、ファイン、メーターの4モード
キャリブレーション範囲 :437 〜 446 Hz、1Hz単位
測定精度 :1セント以下(A=440Hz基準)
内蔵マイク :無指向性、モノラル
入出力定格
INPUT端子 :6.3mm(1/4”)モノラル標準ジャック
その他
予備充電用端子 :USB mini-Bタイプ(電源のみ)
一般
電源 :充電式マンガンリチウム電池
電池持続時間 :約6時間(A音連続入力時、使用状況により変動することがあります。)
外形寸法 :96 x 40 x 18mm(幅 x 高さ x 奥行き、ゴムカバーなし)
質量 :51g(ケース等を除く本体)
、D、Eõ、E、F、Fã、G、Gã、A、Bõ、B
ã
動作温度 :5 〜 35℃
付属品 :ストラップ(キーホルダー)、取扱説明書(本書)、保証書
ユーザー登録について
TASCAMのウェブ サイト(http://www.tascam.jp/)にて、オンラインでのユーザー登録をお願
いいたします。
アフターサービス
この製品には、保証書を別途添付しております。保証書は、大切に保管してください。
º
保証期間は、お買い上げ日より1年です。保証期間中は、記載内容によりティアック修理センタ
º
ーが修理いたします。その他の詳細につきましては、保証書をご参照ください。
保証期間経過後、または保証書を提示されない場合の修理などについては、お買い上げの販売店
º
またはティアック修理センターにご相談ください。修理によって機能を維持できる場合は、お客
さまのご要望により有料修理いたします。
万一、故障が発生した場合は使用を中止し、お買い上げ店またはティアック修理センターまでご
º
連絡ください。修理を依頼される場合は、次の内容をお知らせください。
型名、型番(TC-1S)
≠
≠ 製造番号(Serial No.)
≠ 故障の症状(できるだけ詳しく)
当社は、この製品の補修用性能部分(製品の機能を維持するために必要な部品)を製造打ち切り
º
後8年間保有しています。
本機を廃棄する場合に必要となる収集費などの費用は、お客様のご負担になります。
º
本製品は、マンガンリチウム電池を内蔵しています。廃棄する場合は、お住まいの各市町村の指
º
示に従って廃棄してください。
お買い上げ年月日
≠
お買い上げ販売店名
≠
この製品の取り扱いなどに関するお問い合わせは
タスカム カスタマーサポートまでご連絡ください。お問い合わせ受付時間は、土・日・祝日・
弊社休業日を除く10:00 〜 12:00 / 13:00 〜 17:00です。
タスカムカスタマーサポート
0120-152-854
携帯電話・PHS・IP電話などからはフリーダイヤルをご利用いただけませんので、通常の電
話番号(下記)にお掛けください。
〒 206-8530 東京都多摩市落合 1-47
電話:042-356-9137 / FAX:042-356-9185
故障・修理や保守についてのお問い合わせは
修理センターまでご連絡ください。
お問い合わせ受付時間は、土・日・祝日・弊社休業日を除く9:30 〜 17:00です。
ティアック修理センター
〒 358-0026 埼玉県入間市小谷田 858
一般電話・公衆電話からは市内通話料金でご利用いただけます。
0570-000-501
ナビダイヤルは全国どこからお掛けになっても市内通話料金でご利用いただけます。
PHS・IP電話などからはナビダイヤルをご利用いただけませんので、通常の電話番号(下記)
にお掛けください。
新電電各 社をご利用の場合は、「0570」がナ ビダイヤルとして正しく認識されず、「現在、
この電話番号は使われておりません」などのメッセージが流れることがあります。
このような場合は、ご契約の新電電各社へお問い合わせいただくか、通常の電話番号(下記)
にお掛けください。
電話:04-2901-1033 / FAX:04-2901-1036
■ 住所や電話番号は, 予告なく変更する場合があります。あらかじめご了承ください。
〒206-8530 東京都多摩市落合1-47
TC-1S
Solar Rechargeable Tuner
OWNER'S MANUAL
Thank you for your purchase of the TASCAM TC-1S Solar Rechargeable Tuner.
Before connecting and using the unit, please take time to read this manual thoroughly to ensure you
understand how to properly set up and connect the unit, as well as the operation of its many useful and
convenient functions. After you have finished reading this manual, please keep it in a safe place for future
reference.
You can also download the Owner’s Manual from the TASCAM web site (http://www.tascam.com).
IMPORTANT SAFETY INSTRUCTIONS
Cautions about Rechargeable Battery
This product uses a rechargeable battery. In order to prevent misuse, which could cause heat, fire, battery
fluid leakage or other problems, observe the following precautions.
If fluid should leak from the rechargeable battery, do not touch it with bare hands. If a leak occurs,
•
contact a TASCAM Service Center. If the battery fluid gets in an eye, it could cause loss of eyesight. If fluid
does enter an eye, wash it out thoroughly with clean water without rubbing the eye and then consult a
doctor immediately. If the fluid gets on a person’s body or clothing, it could cause skin injuries or burns. If
this should happen, wash it off with clean water and then consult a doctor immediately.
Do not disassemble the battery. Doing so could cause electric shock. For inspection and repair of the
•
rechargeable battery, please request service from the store where you bought the product or a TASCAM
service center.
Other cautions
Do not install the unit in the following types of places. Doing so could cause malfunctions.
•
Places with significant vibrations or that are otherwise unstable
•
Near windows or other places exposed to direct sunlight
•
Near heaters or other extremely hot places
•
Extremely cold places
•
Places with bad ventilation or high humidity
•
Very dusty locations
•
Locations exposed directly to rain or other water
•
Avoid installing this unit on top of any heat-generating electrical device such as a power amplifier.
•
Do not swing the unit by a strap or other attachment.
•
Do not submerge the unit in water.
•
If the unit is moved from a cold to a warm place, or used after a sudden temperature change, there is
•
a danger of condensation; vapor in the air could condense on the internal mechanism, making correct
operation impossible. To prevent this, or if this occurs, let the unit sit for one or two hours at the new
room temperature before using.
Use a dry soft cloth to wipe the unit clean. Do not clean the unit with a chemically treated cloth or
•
substances such as benzene, thinner and alcohol because they might cause damage to the surface of the
unit.
CAUTION for products that use replaceable lithium batteries: there is danger of explosion if a battery is
•
replaced with an incorrect type of battery. Replace only with the same or equivalent type.
FOR U.S.A.
TO THE USER
This equipment has been tested and found to comply with the limits for a Class B digital device, pursuant
to Part 15 of the FCC Rules. These limits are designed to provide reasonable protection against harmful
interference in a residential installation. This equipment generates, uses, and can radiate radio frequency
energy and, if not installed and used in accordance with the instruction manual, may cause harmful
interference to radio communications. However, there is no guarantee that interference will not occur in a
particular installation. If this equipment does cause harmful interference to radio or television reception,
which can be determined by turning the equipment off and on, the user is encouraged to try to correct
the interference by one or more of the following measures.
a) Reorient or relocate the receiving antenna.
b) Increase the separation between the equipment and receiver.
c) Connect the equipment into an outlet on a circuit different from that to which the receiver is
connected.
d) Consult the dealer or an experienced radio/TV technician for help.
CAUTION
Changes or modifications to this equipment not expressly approved by TEAC CORPORATION for
compliance could void the user's authority to operate this equipment.
THIS CLASS B DIGITAL APPARATUS COMPLIES WITH CANADIAN ICES-003.
CET APPAREIL NUMÉRIQUE DE LA CLASSE B EST CONFORME À LA NORME NMB-003 DU CANADA.
For European Customers
ª
Disposal of electrical and electronic equipment
(a) All electrical and electronic equipment should be disposed of separately from the municipal waste
stream via collection facilities designated by the government or local authorities.
(b) By disposing of electrical and electronic equipment correctly, you will help save valuable resources and
prevent any potential negative effects on human health and the environment.
(c) Improper disposal of waste electrical and electronic equipment can have serious effects on the
environment and human health because of the presence of hazardous substances in the equipment.
(d) The Wasete Electrical and Electronic Equipment (WEEE) symbol, which shows a wheeled
bin that has been crossed out, indicates that electrical and electronic equipment must be
collected and disposed of separately from household waste.
(e) Return and collection systems are available to end users. For more detailed information
about the disposal of old electrical and electronic equipment, please contact your city office,
waste disposal service or the shop where you purchased the equipment.
Conventions used in this manual
The following conventions are used in this manual.
Keys, jacks and other parts of this unit and other equipment are indicated in a bold font like this: • CALIB
key.
Characters that appear on the display are shown like this:
•
M
Trademarks
TASCAM is a trademark of TEAC Corporation, registered in the U.S. and other countries.
•
Other company names and product names in this document are the trademarks or registered trademarks
•
of their respective owners.
Names of parts
Appearance when the rubber cover is removed
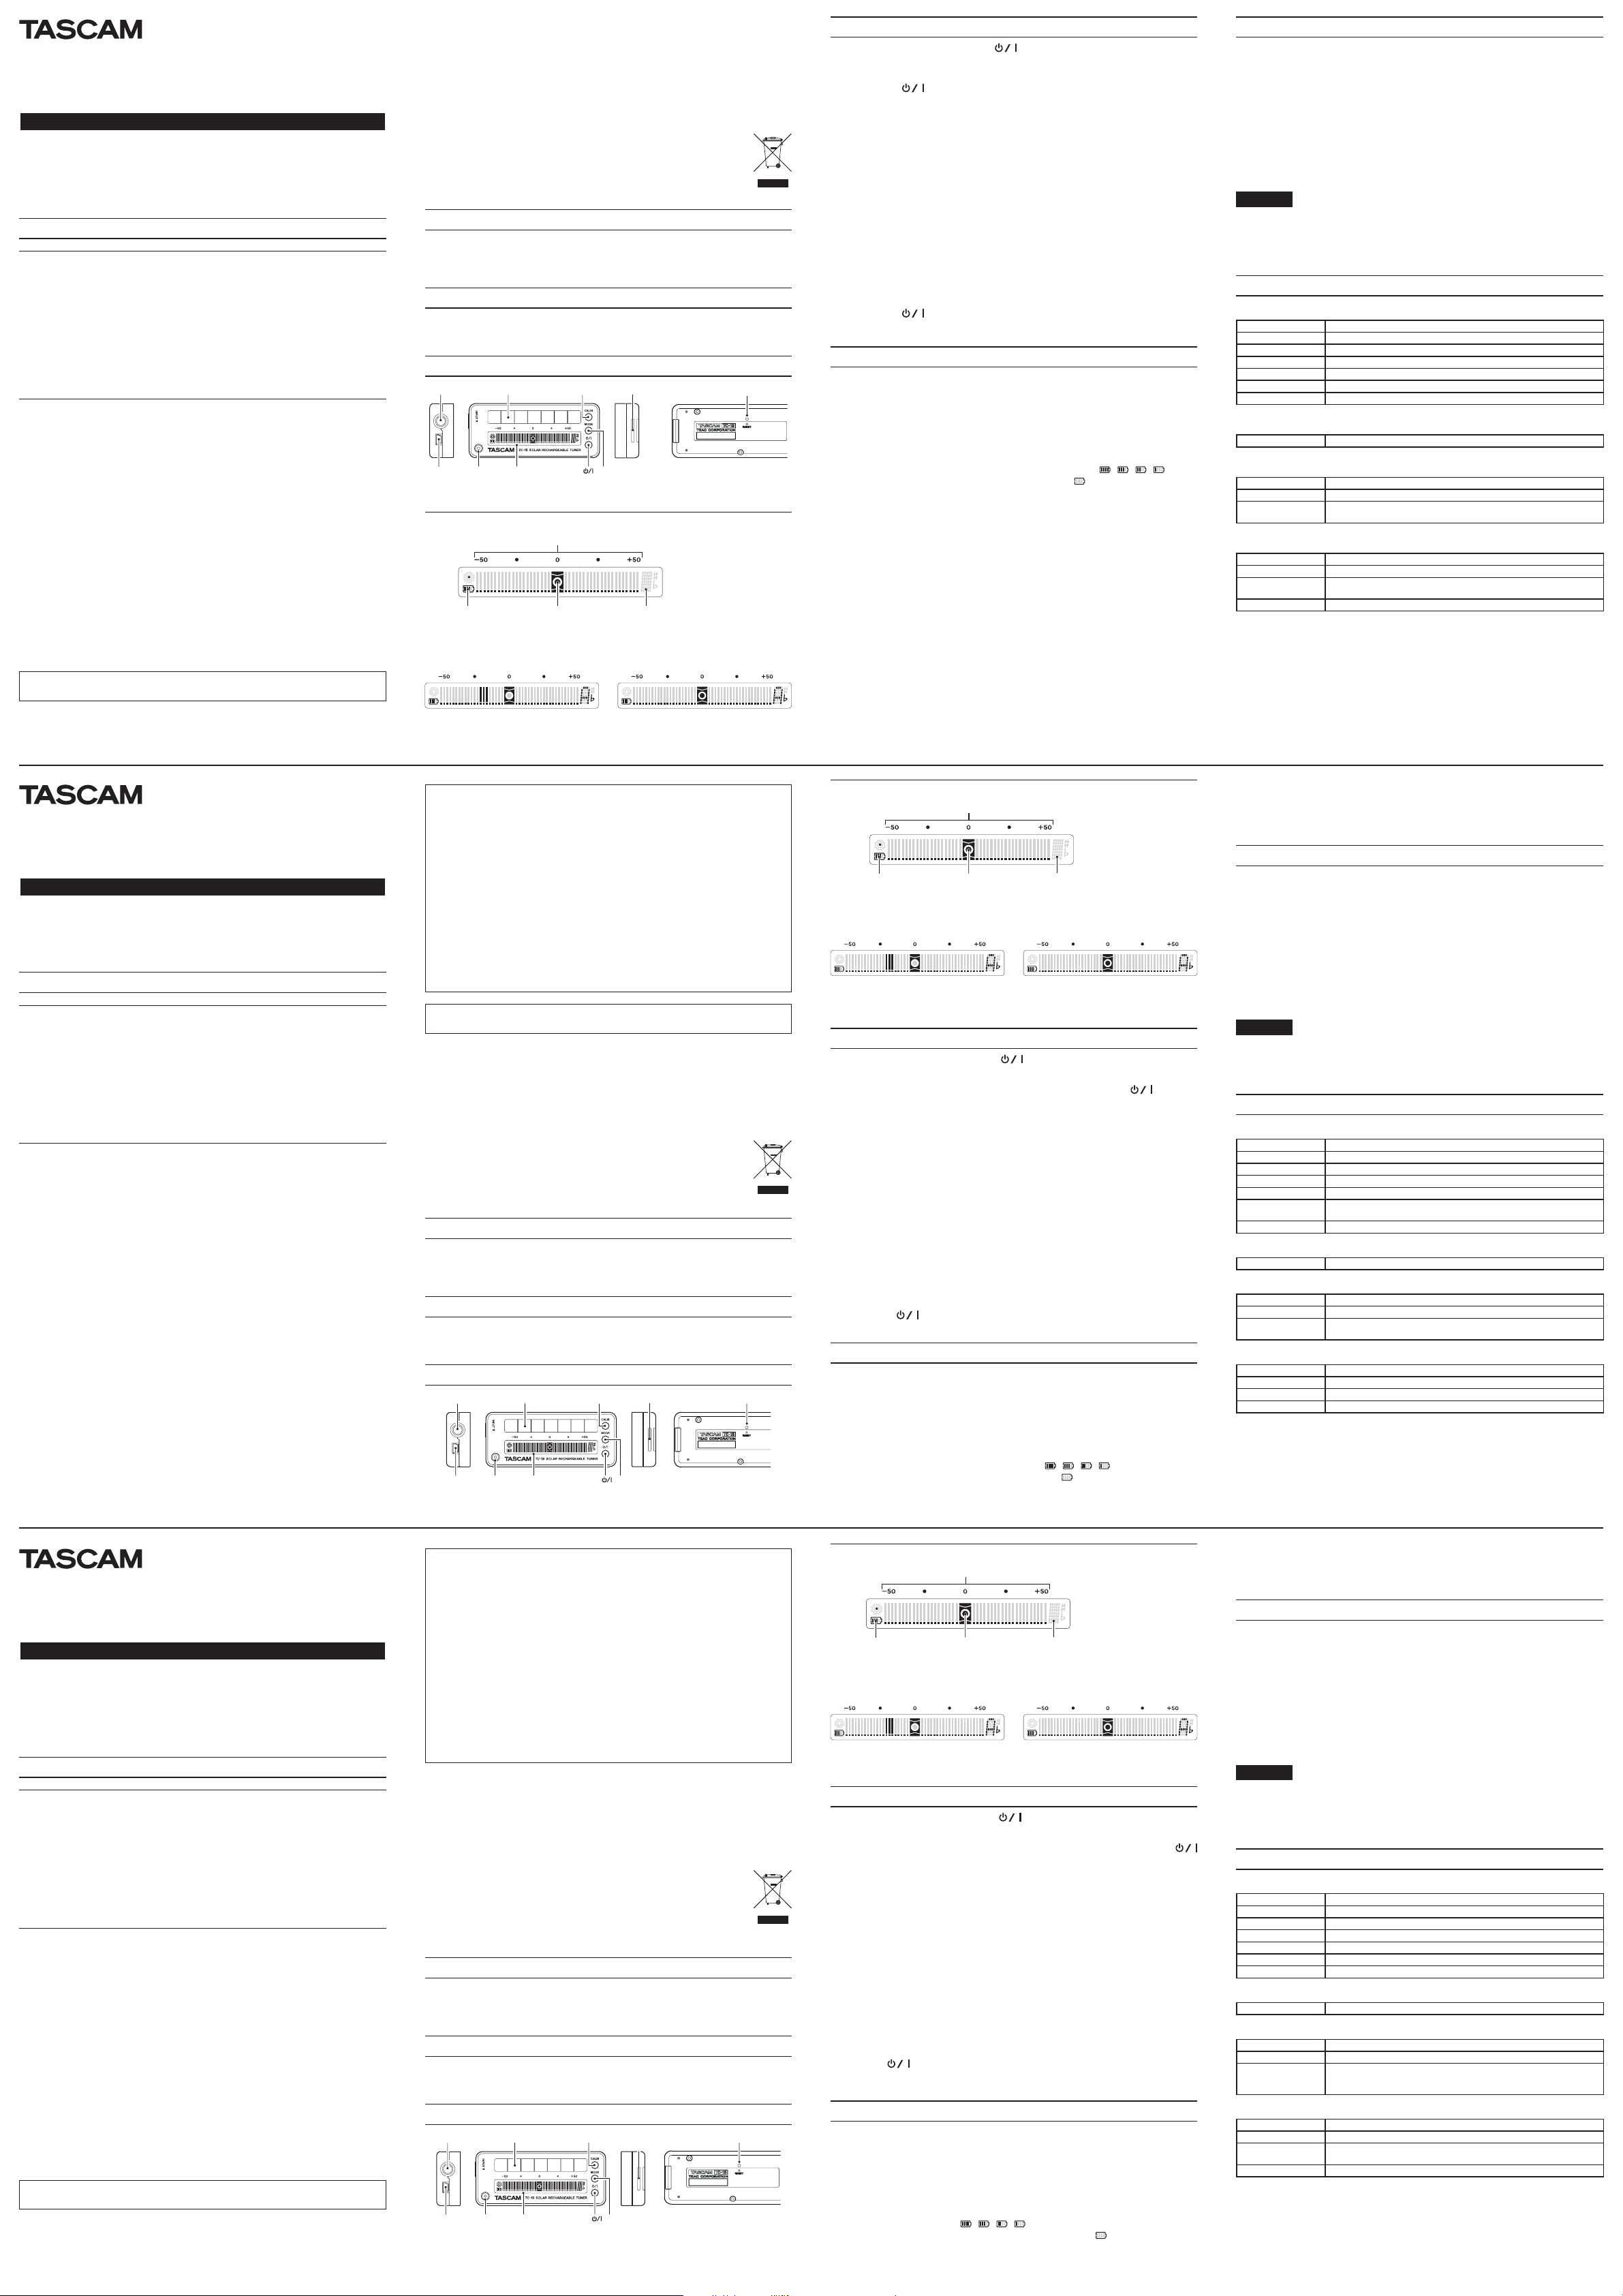
Bar Meter Section
Display when tuning meter active
Bars appear to the left when the pitch is too low and to the right when the pitch is too high. The number of
bars increases as the pitch becomes more inaccurate (in meter mode). When the tuning is accurate, the pitch
guide circle in the center lights.
Out of tune
(Seven steps (2.5 x 7 = 17.5 cents) below Aâ)
In tune
(Input sound is the desired pitch of Aâ)
Tuner
To use this function, press and hold the key to turn the power on.
When the tuner is shown, press and hold the • MODE key to set the tuner operation mode. The mode
changes each time you press the MODE key. Each time you do so, the abbreviation for the current mode
is shown on the 7x5 segment display. Press the key to set the mode and activate the tuner.
N
(needle) mode: The note name is shown on the 7x5 segment display as a capital letter, and the
•
amount of detuning is shown by three bars, including a bar at the position of the input pitch and one
each to the left and right of it.
S
(animated strobe) mode: The note name is shown on the 7x5 segment display as a capital letter,
•
and an animated strobe is shown flowing to the right if the pitch is too high and to the left if the pitch
is too low. The more out of tune the input sound is, the faster the animated strobe moves. The strobe
stops when the input sound is in tune.
F
(fine) mode: The note name is shown on the 7x5 segment display as a lower case, and the meter is
•
more precise (±20 cents with each bar equal to 1 cent).
M
(meter) mode: The note name is shown on the 7x5 segment display as a capital letter, and the
•
meter shows how inaccurate the tuning is (more than ±50 cents, −50 cents to +50 cents with each
bar representing 2.5 cents)
When the tuner is displayed, press and hold the • CALIB key to activate the calibration mode. Set the
standard frequency of A (la) in a range between 437–446 Hz in 1 Hz increments.
The 7x5 segment display shows the last digit of the frequency. When set to between 437 and 439 Hz
•
“â” appears, and when set to between 441 and 446 Hz “#”appears. When set to 440 (the default value)
neither “#” nor “â” is shown.
Each time you press the CALIB key, the setting increases by 1 Hz. If you press this key when the setting is
446 Hz, however, it will jump to 437 Hz.
Press the key to set the value and reactivate the tuner.
During calibration, press the CALIB and MODE keys at the same time to set the calibration to 440 Hz (the
default value).
Power
Built-in battery
This unit’s solar panel can recharge the built-in battery when it is exposed to light. Moreover, it can be
recharged by connecting a USB Mini-B cable to the USB port. When charging from the USB port, the battery
icon is lit.
This solar panel is designed for recharging in artificial light. When recharging in direct sunlight, do not leave
the unit for long periods of time.
Remaining battery charge indication
You can check the battery icon to confirm the remaining battery charge. The number of bars shown in the
battery icon depends on the remaining battery charge (“ ”, “ ”, “ ”, “ ”).
When the battery icon shows no bars and the battery icon appears empty (“ ”), the unit will switch to
standby because of insufficient power.
Automatic standby function
To conserve power, this unit has an automatic standby function. Five minutes (this interval is not adjustable)
after the last time any button is pushed, the unit automatically turns off the display and the inputs. The solar
panel continues to charge the battery even when other parts of the unit are off.
Other features
INPUT jack
You can connect the output of a guitar or an external mic to the INPUT jack and use the connected device
with the unit. The built-in mic is disabled when the INPUT jack is in use.
USB port
The Mini-B USB port is specifically for charging the unit. This port cannot be used to control the unit or to
save settings. You must remove the rubber cover to use this port.
Rubber cover
This rubber cover can be removed.
Strap
This unit comes with a strap that can also be used with keys. It is attached to the strap holder on the right
side of the unit.
CAUTION
When reattaching the strap, take care to be sure that it is attached properly to prevent it from becoming
detached or cut.
RESET hole
If the unit is operating abnormally, push the end of a paperclip, long fine rod or similar item into this hole to
press the system reset button inside the unit. This resets the unit’s system and restarts the unit.
Product Registration
Customers in the USA, please register your product online at tascam.com.
Click on “Product Registration” on the bottom of the homepage.
Specifications
Functions
Tuning 12 tone equal temperament
Detection range A0 (27.5 Hz) – C8 (4186.010006 Hz)
Note names C, C#, D, Eâ, E, F, F#, G, G#, A, Bâ, B
Tuning modes Needle, strobe, fine, meter (4 total)
Calibration range 437 – 446 Hz, 1 Hz intervals
Detection accuracy Within 1 cent (at A = 440 Hz)
Built-in mic Omnidirectional, mono
Inputs
INPUT jack 6.3-mm (1/4”) standard mono jack
Power
Backup recharging port Mini-B type USB (for power only)
Battery Manganese lithium (rechargeable)
Continuous battery
operation time
General
External dimensions 96 x 40 x 18 mm (width x height x depth, excluding rubber cover)
Weight 51 g (main unit not including case and other accessories)
Operating temperature
range
Included accessories: Strap, Owner’s Manual (this document), warranty
About 6 hours (with “A” pitch continuously input; actual time depends on
operation conditions)
5–35º C
Page 2
Presa INPUT
Pannello solareTasto CALIB
Porta cinghia
Porta USB Mic. internoMisuratore a barre
Tasto MODE
Tasto
Foro di RESET
Icona della pila
Segmenti di indicazione dell’accordatura (e intervallo in cents)
Guida della nota
Display a 7x5 segmenti (con indicatori #, â)
Toma INPUT
Panel solar Tecla CALIB
Fijación para
bandolera
Toma USB
Micro internoMedidor de barras
Te cla
Tecla MODE
Agujero RESET
Icono de pila
Segmentos de indicación de anación (y rango en cents)
Círculo de tono
Pantalla de 7x5 segmentos (con indicadores #, â)
TC-1S
Prise INPUT
Panneau solaireTouche CALIB Attache de dragonne
Prise USB Micro intégréIndicateur
à barres
Touche MODE
To uche
Orice de réinitialisation (RESET)
Icône de batterie
Segments indiquant l’accordage (et la plage en centièmes)
Cercle de guide de hauteur
Achage 7x5 segments (avec indicateurs #, â)
Accordeur rechargeable solaire
MODE D'EMPLOI
Merci d'avoir acheté l'accordeur rechargeable solaire TC-1S de TASCAM.
Avant de connecter et d’utiliser l’appareil, veuillez prendre le temps de lire ce manuel en totalité pour bien
comprendre comment correctement l’installer et le brancher, ainsi que comment employer ses nombreuses
fonctions pratiques et utiles. Une fois la lecture de ce mode d'emploi terminée, veillez à le conserver en lieu
sûr pour référence ultérieure.
Vous pouvez aussi télécharger le mode d'emploi depuis le site internet TASCAM (http://www.tascam.com).
INSTRUCTIONS DE SÉCURITÉ IMPORTANTES
Précautions concernant la batterie rechargeable
Ce produit utilise une batterie rechargeable. Pour éviter toute mauvaise utilisation pouvant causer une
surchauffe, un incendie, une fuite du liquide de batterie ou d'autres problèmes, respectez les précautions
suivantes.
Si la batterie rechargeable coule, ne touchez pas le fluide qui fuit à main nue. Veuillez consulter un
•
service après-vente TASCAM en cas de fuite de la batterie. Si le liquide d’une pile touche un œil, il
peut entraîner une perte de la vue. Dans ce cas, rincez abondamment à l’eau claire sans frotter l’œil et
consultez immédiatement un médecin. Si le liquide touche le corps ou les vêtements d’une personne, il
peut entraîner des blessures ou brûlures cutanées. Si cela se produit, rincez abondamment à l’eau claire
puis consultez immédiatement un médecin.
Ne démontez pas la batterie. Cela pourrait entraîner un choc électrique. Pour l'inspection et la réparation
•
de la batterie rechargeable, veuillez demander une intervention auprès du magasin dans lequel vous
avez acheté le produit ou d'un service après-vente TASCAM.
Autres précautions
N'installez pas l'unité dans les types de lieu suivants. Cela pourrait produire un mauvais fonctionnement.
•
Lieux sujets à des vibrations significatives ou globalement instables
•
Près de fenêtres ou dans des endroits exposés directement au soleil
•
Près de chauffages ou dans des lieux extrêmement chauds
•
Lieux extrêmement froids
•
Lieux mal ventilés ou très humides
•
Lieux très poussiéreux
•
Emplacements exposés directement à la pluie ou à l'eau
•
Évitez d’installer cet appareil au dessus d’un dispositif électrique produisant de la chaleur comme un
•
amplificateur de puissance.
Ne balancez pas l'unité au bout d'une dragonne ou d'une autre fixation.
•
Ne plongez pas l'unité dans l'eau.
•
Si l'unité est déplacée d’un endroit froid à un endroit chaud, ou utilisée après un changement soudain de
•
température, il existe un danger de condensation ; la vapeur de l'air peut se condenser sur le mécanisme
interne, empêchant le bon fonctionnement. Pour empêcher cela ou si cela se produit, laissez l’appareil
une ou deux heures à la température de la nouvelle pièce avant de l'utiliser.
Essuyez l'appareil avec un chiffon sec et doux pour le nettoyer. Ne le nettoyez pas avec une lingette
•
imbibée de produit chimique ou des substances telles que benzène, diluant ou alcool car elles peuvent
endommager la surface de l'appareil.
PRÉCAUTION pour les produits qui utilisent des batteries remplaçables au lithium : remplacer une batterie
•
par un modèle incorrect entraîne un risque d'explosion. Remplacez-les uniquement par un type identique
ou équivalent.
THIS CLASS B DIGITAL APPARATUS COMPLIES WITH CANADIAN ICES-003.
CET APPAREIL NUMÉRIQUE DE LA CLASSE B EST CONFORME À LA NORME NMB-003 DU CANADA.
Pour les consommateurs européens
ª
Mise au rebut des équipements électriques et électroniques
(a) Tout équipement électrique et électronique doit être traité séparément de la collecte d'ordures
ménagères municipales dans des points de collecte désignés par le gouvernement ou les autorités
locales.
(b) En vous débarrassant correctement des équipements électriques et électroniques, vous contribuerez à la
sauvegarde de précieuses ressources et à la prévention de potentiels effets négatifs sur la santé humaine
et l'environnement.
(c) Le traitement incorrect des déchets d'équipements électriques et électroniques peut avoir des effets
graves sur l'environnement et la santé humaine car ils contiennent des substances dangereuses.
(d) Le symbole de déchets d'équipements électriques et électroniques (DEEE), qui représente
une poubelle à roulettes barrée d'une croix, indique que l'équipement électrique et
électronique doit être collecté et traité séparément des déchets ménagers.
(e) Des systèmes de retour et de collecte sont disponibles pour l'utilisateur final. Pour des
informations plus détaillées sur la mise au rebut des vieux équipements électriques et
électroniques, veuillez contacter votre mairie, le service d'ordures ménagères ou le magasin
auprès duquel vous avez acquis l'équipement.
Conventions employées dans ce mode d'emploi
Les conventions suivantes sont employées dans ce mode d'emploi.
Les touches, prises et autres parties de cet appareil et des appareils externes sont indiquées en gras
•
comme ceci : touche CALIB.
Les caractères qui apparaissent à l'écran sont représentés comme ceci :
•
M
Marques commerciales
TASCAM est une marque commerciale de TEAC Corporation, déposée aux U.S.A. et dans d'autres pays.
•
Les autres noms de société et de produit présents dans ce document sont des marques commerciales ou
•
déposées de leurs détenteurs respectifs.
Nom des parties
Aspect quand la protection en caoutchouc est retirée.
Section de l'indicateur à barres
Affichage quand l'indicateur d'accordage est activé
Des barres apparaissent sur la gauche quand la hauteur est trop basse et sur la droite quand elle est trop
haute. Le nombre de barres est d'autant plus grand que la hauteur est inexacte (en mode de mesure). Quand
l'accordage est correct, le cercle de guide de hauteur s'allume au centre.
Désaccordé
(7 pas (2,5 x 7 = 17,5 centièmes) sous le laâ)
Accordé
(le son entrant est à la hauteur laâ désirée)
Accordeur
Pour utiliser cette fonction, maintenez la touche pour mettre sous tension.
Quand l'accordeur s'affiche, pressez et maintenez la touche • MODE pour choisir le mode de
fonctionnement de l'accordeur. Le mode change chaque fois que vous appuyez sur la touche MODE.
Chaque fois que vous le faites, l'abréviation du mode actuel apparaît dans l'affichage à 7x5 segments.
Pressez la touche pour choisir le mode et activer l'accordeur.
Mode
N
(needle ou aiguille) : le nom de la note est indiqué dans l'affichage 7x5 segments sous forme
•
d'une lettre majuscule, et l'ampleur du désaccord est représentée par trois barres dont la centrale
correspond à la hauteur du son entrant.
Mode
S
(stroboscope animé) : le nom de la note est indiqué dans l'affichage 7x5 segments sous forme
•
d'une lettre majuscule, et un stroboscope animé apparaît en mouvement vers la droite si la hauteur
est trop haute et vers la gauche si la hauteur est trop basse. Plus le son entrant est loin de la hauteur
exacte et plus rapide est le mouvement. Le stroboscope s'arrête quand le son entrant est accordé.
Mode
F
(fin) : le nom de la note est indiqué dans l'affichage 7x5 segments sous forme d'une lettre
•
minuscule, et l'indicateur est plus précis (±20 centièmes, chaque barre équivalent à 1 centième).
Mode
M
(mesure) : le nom de la note est indiqué dans l’affichage 7x5 segments sous forme d’une
•
lettre majuscule (A=la, B=si, C=do, D=ré, E=mi, F=fa et G=sol) et l’indicateur à barres indique
l’inexactitude de l’accordage (au delà de ±50 centièmes, -50 centièmes à +50 centièmes, chaque
barre représentant alors 2,5 centièmes)
Quand l'accordeur s'affiche, pressez et maintenez la touche • CALIB pour activer le mode de calibrage du
diapason. Réglez la fréquence standard du A (la) dans une plage allant de 437 à 446 Hz par paliers de
1 Hz.
L'affichage 7x5 segments donne le dernier chiffre de la fréquence. Pour un réglage entre 437 et 439 Hz, “• â”
apparaît et pour un réglage entre 441 et 446 Hz, “#” apparaît. Avec un réglage à 440 (la valeur par défaut),
ni “#” ni “â” ne s'affichent.
Chaque fois que vous pressez la touche CALIB, le réglage augmente d'1 Hz. Si vous pressez cette touche
quand le réglage est à 446 Hz, ce dernier redescend à 437 Hz.
Pressez la touche pour entériner la valeur et réactiver l'accordeur.
Durant le calibrage, pressez en même temps les touches CALIB et MODE pour ramener le diapason de
référence à 440 Hz (la valeur par défaut).
Alimentation
Batterie intégrée
Le panneau solaire de cette unité peut recharger la batterie intégrée quand il est exposé à la lumière. En
outre, la recharge peut se faire au moyen d’un câble USB de type mini-B branché au port USB. Lors de la
recharge par le port USB, l’icône de batterie est allumée.
Ce panneau solaire est conçu pour une recharge en lumière artificielle. Si vous rechargez au soleil, ne laissez
pas l’unité trop longtemps exposée.
Indication de charge restant dans la batterie
Vous pouvez vérifier l'icône de batterie pour contrôler la charge restant dans celle-ci. Le nombre de barres
affichées dans l'icône de batterie dépend de la charge restant dans la batterie (“ ”, “ ”, “ ”, “ ”).
Quand l'icône de batterie n'affiche plus de barre et apparaît donc vide (“ ”), l'unité passe en veille pour
cause d'alimentation insuffisante.
Fonction de veille automatique
Pour économiser de l'énergie, cette unité a une fonction de veille automatique. Cinq minutes (cette
temporisation n'est pas réglable) après la dernière action sur une quelconque touche, l'unité coupe
automatiquement l'affichage et les entrées. Le panneau solaire continue de charger la batterie même
lorsque les autres parties de l'unité sont désactivées.
Autres caractéristiques
Prise INPUT (entrée)
Vous pouvez brancher la sortie d'une guitare ou d'un micro externe à la prise INPUT et utiliser l'appareil
connecté avec l'unité. Le micro intégré est désactivé quand la prise INPUT est utilisée.
Port USB
Le port USB au format mini-B est spécifiquement destiné à charger l'unité. Ce port ne peut pas être utilisé
pour contrôler l'unité ou pour sauvegarder des réglages. Vous devez retirer la protection en caoutchouc
pour utiliser ce port.
Protection en caoutchouc
Cette protection en caoutchouc peut être retirée.
Dragonne
Cette unité est livré avec une dragonne qui peut aussi être utilisée avec les touches. Elle se monte sur
l'attache de dragonne sur le côté droit de l'unité.
ATTENTION
Lorsque vous attachez la dragonne, veillez à le faire correctement pour éviter qu'elle ne se détache ou se coupe.
Orifice de réinitialisation (RESET)
Si l’unité ne fonctionne pas normalement, enfoncez l’extrémité d’un trombone, d’une longue tige fine ou
similaire dans cet orifice pour presser le bouton de réinitialisation du système placé à l’intérieur. Cela réinitialise
le système et fait redémarrer l’unité.
Caractéristiques techniques
Fonctions
Accordage Tempérament égal à 12 demi-tons
Plage de détection A0/la0 (27,5 Hz) – C8/do8 (4186,010006 Hz)
Nom des notes C, C#, D, Eâ, E, F, F#, G, G#, A, Bâ, B (do, do#, ré, miâ, mi, fa, fa#, sol, sol#, la, siâ, si)
Modes d'accordage Aiguille, stroboscope, fin, mesure, (4 au total)
Plage du diapason 437 – 446 Hz, par intervalles de 1 Hz
Précision de détection Moins d’un centième (pour la = 440 Hz)
Micro intégré Omnidirectionnel, mono
Entrée
Prise IN PUT Jack 6,35 mm mono standard
Alimentation
Port de recharge USB type mini-B (pour l'alimentation uniquement)
Batterie Lithium-manganèse (rechargeable)
Autonomie de la batterie
en continu
Générales
Dimensions externes 96 x 40 x 18 mm (largeur x hauteur x profondeur, hors protection caoutchouc)
Poids 51 g (unité principale sans boîtier ni autres accessoires)
Plage de température de
fonctionnement
Accessoires fournis Dragonne, mode d'emploi (ce document), garantie
Environ 6 heures (avec l'entrée continue d'une hauteur "la" ; la durée réelle
dépend des conditions de fonctionnement)
5 – 35º C
TC-1S
Accordatore ricaricabile solare
MANUALE DI ISTRUZIONI
Grazie per aver acquistato l’accordatore ricaricabile solare TASCAM TC-1S. Prima di collegare e usare l’unità,
si prega di leggere a fondo questo manuale per poter capire in modo corretto come collegare l’unità,
così come tutte le operazioni e le molte utili funzioni. Dopo la lettura di questo manuale, si consiglia di
conservarlo in un luogo sicuro per futuri riferimenti.
Il manuale di istruzioni è scaricabile anche dal sito TASCAM (www.tascam.com).
IMPORTANTI NORME DI SICUREZZA
Precauzioni per la pila ricaricabile
Questo prodotto utilizza una pila ricaricabile. Al fine di evitare abusi, che potrebbe provocare calore, incendi,
perdite di liquido della pila o altri problemi, osservare le seguenti precauzioni.
Se il liquido dovesse fuoriuscire dalla pila ricaricabile, non toccare a mani nude. Se si verifica una perdita,
•
contattare un centro assistenza TASCAM. Se il liquido della pila entra in un occhio, potrebbe causare la
perdita della vista. Se il liquido dovesse entrare un occhio, lavare abbondantemente con acqua pulita
senza strofinare gli occhi e poi consultare immediatamente un medico. Se il liquido tocca il corpo di una
persona o l’abbigliamento, potrebbe causare lesioni cutanee o bruciature. Se questo dovesse accadere,
lavare con acqua pulita e quindi consultare immediatamente un medico.
Non smontare la pila. Ciò potrebbe causare scosse elettriche. Per l’ispezione e la riparazione della pila
•
ricaricabile, si prega di rivolgersi al negozio dove si è acquistato il prodotto o un centro di assistenza
TASCAM.
Altre precauzioni
Non installare nei seguenti luoghi per non causare malfunzionamenti..
•
Luoghi instabili o soggetti a forti vibrazioni
•
Vicino a finestre o luoghi esposti a luce solare diretta
•
Vicino a stufe o luoghi estremamente caldi
•
Luoghi estremamente freddi
•
Luoghi poco ventilati o con eccessiva umidità
•
Luoghi molto polverosi
•
Luoghi esposti alla pioggia o dove c’è acqua
•
Evitare di collocare l’unità sopra apparecchi elettrici che generano calore come amplificatori di potenza.
•
Non far oscillare l’unità tenendola per la cinghia o altro attacco• .
Non immergere l’unità nell’acqua.
•
Se l’unità viene spostata da un luogo freddo a uno caldo o usata dopo un improvviso sbalzo di
•
temperatura, può verificarsi la creazione di condensa; il vapore nell’aria potrebbe condensarsi sul
meccanismo interno, rendendo le operazioni impossibili. Per prevenire la condensa o per eliminarla in
caso si verifichi, lasciare l’unità per una o due ore alla nuova temperatura ambiente prima di usarla.
Pulire l’unità con un panno asciutto e morbido. Non pulire usando panni imbevuti di sostanze chimiche,
•
benzene, diluenti, alcol etilico perché potrebbero danneggiare la superficie dell’unità.
ATTENZIONE per i prodotti che utilizzano pile al litio sostituibile: vi è pericolo di esplosione se la pila viene
•
sostituita con un tipo non corretto di pila. Sostituire solo con lo stesso tipo o equivalente.
FOR U.S.A.
TO THE USER
This equipment has been tested and found to comply with the limits for a Class B digital device, pursuant
to Part 15 of the FCC Rules. These limits are designed to provide reasonable protection against harmful
interference in a residential installation. This equipment generates, uses, and can radiate radio frequency
energy and, if not installed and used in accordance with the instruction manual, may cause harmful
interference to radio communications. However, there is no guarantee that interference will not occur in a
particular installation. If this equipment does cause harmful interference to radio or television reception,
which can be determined by turning the equipment off and on, the user is encouraged to try to correct
the interference by one or more of the following measures.
a) Reorient or relocate the receiving antenna.
b) Increase the separation between the equipment and receiver.
c) Connect the equipment into an outlet on a circuit different from that to which the receiver is
connected.
d) Consult the dealer or an experienced radio/TV technician for help.
CAUTION
Changes or modifications to this equipment not expressly approved by TEAC CORPORATION for
compliance could void the user's authority to operate this equipment.
THIS CLASS B DIGITAL APPARATUS COMPLIES WITH CANADIAN ICES-003.
CET APPAREIL NUMÉRIQUE DE LA CLASSE B EST CONFORME À LA NORME NMB-003 DU CANADA.
Per gli utenti europei
ª
Smaltimento delle apparecchiature elettriche ed elettroniche
(a) Tutte le apparecchiature elettriche ed elettroniche devono essere smaltite separatamente dai rifiuti
urbani mediante impianti di raccolta designati dal governo o dalle autorità locali.
(b) Con lo smaltimento corretto di apparecchiature elettriche ed elettroniche, si contribuisce a risparmiare
preziose risorse ed evitare potenziali effetti negativi sulla salute umana e l’ambiente.
(c) Gli impianti di smaltimento improprio di rifiuti elettrici ed elettronici possono avere gravi conseguenze
sull’ambiente e sulla salute umana a causa della presenza di sostanze pericolose nelle apparecchiature.
(d) Il simbolo RAEE (Rifiuti Apparecchiature Elettriche ed Elettroniche), che mostra un bidone
con ruote barrato, indica che le apparecchiature elettriche ed elettroniche devono essere
raccolte e smaltite separatamente dai rifiuti domestici.
(e) I centri di raccolta sono disponibili per gli utenti finali. Per informazioni più dettagliate
circa lo smaltimento delle vecchie apparecchiature elettriche ed elettroniche, contattare il
negozio dove è stato acquistato l’apparecchio o l’autorità locale.
Convenzioni usate in questo manuale
In questo manuale vengono utilizzate le seguenti convenzioni.
Tasti, prese e altre parti di questa unità e altre attrezzature sono indicati in grassetto in questo modo: tasto
•
CALIB.
I caratteri che appaiono sul display vengono visualizzati in questo modo:
•
M
Marchi di fabbrica
TASCAM è un marchio di fabbrica di TEAC Corporation, registrato in USA e altri Paesi.
•
Gli altri nomi d’azienda, i marchi di fabbrica non registrati e quelli registrati citati nel presente documento
•
sono di proprietà dei rispettivi titolari.
Nomi delle parti
Aspetto quando il coperchio di gomma viene rimosso
Sezione misuratore a barre
Display durante l’accordatura in funzione
Le barre appaiono a sinistra quando la nota è troppo bassa, a destra quando la nota è troppo alta. Il numero
di barre aumenta man mano che il tono è fuori accordatura (in modalità Meter). Quando l’accordatura viene
raggiunta, il cerchio guida della nota al centro si accende.
Non accordato
(Sette passi (2.5 x 7 = 17.5 cents) sotto Aâ)
Accordato
(Il suono in ingresso è un perfetto Aâ)
Accordatore
Per usare questa funzione, tenere premuto il tasto per accendere l’unità.
Quando viene visualizzato l’accordatore, tenere premuto il tasto • MODE per impostare la modalità
operativa. La modalità cambia ogni volta che si preme il tasto MODE. Ogni volta che si fa questo, la sigla
della modalità corrente viene visualizzata sul display a 7x5 segmenti. Premere il tasto per
impostare la modalità e attivare l’accordatore.
N
modalità Needle (ago): il nome della nota viene visualizzato sul display a 7x5 segmenti con
•
una lettera maiuscola e la quantità di stonatura viene indicata da tre barre, inclusa una barra in
corrispondenza della posizione della nota di ingresso e una ciascuna a sinistra e a destra di essa.
S
modalità Strobe (lampeggio animato): il nome della nota viene visualizzato sul display a 7x5
•
segmenti con una lettera maiuscola mentre un’animazione scorre verso destra se la nota è troppo alta
e verso sinistra se la nota è troppo bassa. Meno il suono in ingresso è accordato, più velocemente si
muove l’animazione. L’animazione si ferma quando il suono in ingresso è accordato.
F
modalità fine (Fine): il nome della nota viene visualizzato sul display a 7x5 segmenti in minuscolo e
•
il misuratore è più preciso (± 20 cents con ogni barra equivalente a 1 cent).
M
modalità Meter (misuratore): il nome della nota viene visualizzato sul display a 7x5 segmenti con
•
una lettera maiuscola e il misuratore mostra quanto l’intonazione è imprecisa (oltre ± 50 cents, da -50
cents a 50 cents con ogni barra che rappresenta 2,5 cents
Quando viene visualizzato l’accordatore, tenere premuto il tasto • CALIB per attivare la modalità di
calibrazione. Impostare la frequenza standard della nota A (La) in un intervallo compreso tra 437-446 Hz
con incrementi di 1 Hz.
I l display a 7x5 segmenti mostra l’ultima cifra della frequenza. Quando è impostato fra 437 e 439 Hz
•
appare “â” e quando è impostato fra 441 e 446 Hz appare “#”. Quando è impostato a 440 (valore di
default) non vengono mostrati né “#” né “â”.
Ogni volta che si preme il tasto CALIB, l’impostazione aumenta di 1 Hz. Se si preme questo tasto, quando
l’impostazione è 446 hertz, comunque, passerà a 437 Hz.
Premere il tasto per impostare il valore e riattivare l’accordatore.
Durante la calibrazione, premere i tasti CALIB e MODE insieme per impostare 440 Hz (valore predefinito).
Alimentazione
Pila incorporata
Il pannello solare di questa unità può ricaricare la pila interna quando viene esposto alla luce. Inoltre, può
essere ricaricata collegando un cavo USB Mini-B alla porta USB. Quando si carica dalla porta USB, l’icona
della pila è accesa.
Questo pannello solare è progettato per la ricarica con luce artificiale. Quando la ricarica avviene con la luce
diretta del sole, non esporre l’apparecchio per lunghi periodi di tempo.
Indicazione di carica residua della pila
È possibile controllare l’icona della pila per confermare la carica residua della pila. Il numero di barre
mostrate nell’icona della pila indica la carica residua della pila (“ ”, “ ”, “ ”, “ ”).
Quando l’icona della pila non mostra alcuna barra e l’icona è vuota (“ ”), l’unità passa alla modalità standby
per carica insufficiente.
Funzione automatica di standby
Per risparmiare energia, questa unità dispone di una funzione automatica di standby. Cinque minuti (questo
intervallo non è regolabile) dopo l’ultima volta che si è premuto un tasto, l’unità spegne automaticamente
il display e gli ingressi. Il pannello solare continua a caricare la pila anche quando altre parti dell’unità sono
spente.
Altre caratteristiche
Presa INPUT
È possibile collegare l’uscita di una chitarra o un microfono esterno alla presa INPUT e utilizzare il dispositivo
collegato con l’unità. Il microfono incorporato è disattivato quando è in uso la presa INPUT.
Porta USB
La porta USB Mini-B è specificatamente dedicata a ricaricare l’unità. Questa porta non può essere utilizzata
per controllare l’unità o per salvare le impostazioni. È necessario rimuovere il coperchio di gomma per
utilizzare questa porta.
Coperchio in gomma
Questa coperchio in gomma può essere rimosso.
Cinghia
Questa unità viene fornita con una cinghia che può essere utilizzata anche con i tasti. È legata al porta
cinghia sul lato destro dell’unità.
CAUTELA
Quando si riattacca la cinghia, assicurarsi che sia attaccata correttamente per evitare che si stacchi.
Foro di RESET
Se l’unità funziona in modo anomalo, spingere il pulsante di Reset in fondo a questo foro con la punta di una
graffetta o un oggetto simile. Questo riporta il sistema alla configurazione iniziale e riavvia l’unità.
Specifiche
Funzioni
Accordatura 12 semitoni temperamento equabile
Intervallo di rilevamento A0 (27,5 Hz) – C8 (4186,010006 Hz)
Nomi delle note C, C#, D, Eâ, E, F, F#, G, G#, A, Bâ, B
Modalità accordatore Needle, Strobe, Fine, Meter (in totale 4)
Intervallo di calibrazione 437 – 446 Hz, a intervalli di 1 Hz
Accuratezza del
rilevamento
Microfono incorporato Omnidirezionale, mono
Ingressi
INPUT Presa 6,3-mm (1/4”) standard mono
Alimentazione
Porta per la ricarica USB tipo Mini-B (solo per alimentazione)
Pila Litio manganese (ricaricabile)
Operatività continua
della pila
Generali
Dimensioni esterne 96 x 40 x 18 mm (Profondità x altezza x larghezza, escluso coperchio in gomma)
Peso 51 g (unità principale non è inclusa la giurisprudenza, e altri accessori)
Temperatura di esercizio 5–35º C
Accessori inclusi Cinghia, manuale di istruzioni (questo documento), garanzia
Entro 1 cent (con A = 440 Hz)
Circa 6 ore (con la nota “A” continuamente in ingresso; il tempo effettivo dipende
dalle condizioni di funzionamento)
TC-1S
Anador solar recargable
MANUAL DE INSTRUCCIONES
Felicidades y gracias por su compra del afinador solar recargable TASCAM TC-1S.
Antes de conectar y empezar a usar esta unidad, dedique unos minutos a leer este manual completamente
para asegurarse de que comprende cómo conectar y configurar correctamente la unidad, así como el
manejo de sus distintas funciones. Una vez que haya leído este manual, consérvelo en un lugar seguro para
cualquier referencia en el futuro.
También puede descargarse este manual de instrucciones desde la página web de TASCAM (http://www.
tascam.com).
INSTRUCCIONES IMPORTANTES DE SEGURIDAD
Precauciones relativas a la pila recargable
Este aparato utiliza una pila recargable. De cara a evitar un uso incorrecto, que podría dar lugar a
recalentamientos, incendios, fugas del electrolito u otros problemas, tenga en cuenta estas precauciones.
En caso de fuga del líquido interno (electrolito) de la pila recargable, nunca lo toque con las manos
•
desnudas. En ese caso, póngase en contacto con el servicio técnico TASCAM. Si ese fluido entra en
contacto con sus ojos, puede resultar seriamente afectado e incluso producirle ceguera. En ese caso,
lávese inmediatamente los ojos con agua abundante SIN FROTARSE los ojos y vaya a un médico de
inmediato. En caso de que el fluido entre en contacto con la piel o la ropa, puede sufrir heridas o
quemaduras. En ese caso, lávese inmediatamente con agua y vaya a un médico de inmediato.
No trate de desmontar la pila. El hacerlo puede dar lugar a una descarga eléctrica. Para cualquier revisión
•
o reparación de la pila recargable, póngase en contacto con el comercio en el que adquirió la unidad o
con el servicio técnico de TASCAM.
Otras precauciones
No instale este aparato en los siguientes entornos. El hacerlo puede dar lugar a averías.
•
Lugares sujetos a fuertes vibraciones o inestables
•
Cerca de ventanas u otras ubicaciones expuestas directamente a la luz solar
•
Cerca de calentadores u otros lugares excesivamente calientes
•
En lugares extremadamente fríos
•
Lugares con una mala ventilación o un elevado nivel de humedad
•
Lugares con elevadas concentraciones de polvo
•
Lugares que puedan quedar expuestos directamente a la lluvia u otras fuentes de agua
•
Evite instalar este aparato encima de cualquier dispositivo eléctrico que genere calor, como puede ser
•
una etapa de potencia.
No deje esta unidad colgando de la bandolera, una cuerda u otro elemento similar.
•
No sumerja esta unidad en ningún tipo de líquido.
•
Si traslada esta unidad desde un lugar frío a uno cálido, o si la usa después de un brusco cambio de
•
temperatura, existe el riesgo de que se produzca condensación; el vapor del aire puede condensarse en
los mecanismos internos, haciendo que este aparato no funcione correctamente. Para evitar esto, deje la
unidad durante una o dos horas en la sala en la que la vaya a usar antes de empezar a usarla realmente.
Utilice un trapo suave y seco para limpiar esta unidad. No la limpie con trapos tratados con sustancias
•
químicas ni con ningún tipo de líquido como bencina o disolvente, dado que podrían producirse daños
en la superficie de la unidad.
PRECAUCION para productos que usen pilas de litio recambiables: existe el riesgo de explosión en caso de
•
que sustituya la pila por otra de tipo incorrecto. Sustituya la pila solo por otra igual o de tipo equivalente.
ESTE APARATO DIGITAL DE CLASE B CUMPLE CON LA NORMA CANADIENSE ICES-003.
CET APPAREIL NUMÉRIQUE DE LA CLASSE B EST CONFORME À LA NORME NMB-003 DU CANADA.
PARA LOS EE.UU.
PARA EL USUARIO
Se ha verifcado que esta unidad cumple con los límites de los aparatos digitales de clase B, de acuerdo
a la sección 15 de las normativas FCC. Estos límites han sido diseñados para ofrecer una protección
razonable contra las interferencias molestas que se pueden producir cuando se usa este aparato en un
entorno no-profesional. Este aparato genera, utiliza y puede irradiar energía de radiofrecuencia y, si no es
instalado y usado de acuerdo al manual de instrucciones, puede producir interferencias molestas en las
comunicaciones de radio. No obstante, no existen garantías de que no se produzca interferencias en una
instalación concreta. Si este aparato produce interferencias molestas en la recepción de radio o TV (lo cual
puede ser determinado fácilmente apagando y encendiendo este aparato), el usuario será el responsable
de tratar de corregir dichas interferencias adoptando una o más de las medidas siguientes..
a) Reorientar o re ubicar la antena receptora.
b) Aumentar la separación entre este aparato y el receptor.
c) Conectar este aparato a una salida o circuito distinto al que esté conectado el receptor.
d) Solicitar ayuda adicional al distribuidor o a un técnico especialista en radio/TV.
CUIDADO
Cualquier cambio o modifcación realizado en este aparato y que no haya sido aprobado de forma expresa
y por escrito por TEAC CORPORATION puede anular la autorización del usuario a usar este aparato.
Para los usuarios de la Unión Europea
ª
Eliminación de aparatos eléctricos y electrónicos
(a) Cualquier aparato eléctrico/electrónico debe ser eliminado separado del resto de basura orgánica y
únicamente en los “puntos limpios” especificados por el Ayuntamiento/empresa de limpieza.
(b) Con la eliminación correcta de este tipo de aparatos estará ayudando a conservar recursos muy valiosos
y a evitar los posibles efectos negativos en la salud y en el medio ambiente.
(c) La eliminación incorrecta de este tipo de aparatos puede producir efectos muy dañinos en el medio
ambiente y en la salud producidos por las sustancias peligrosas que pueden contener.
(d) El símbolo de Eliminación de Aparatos Eléctricos y Electrónicos ( WEEE en inglés),
identificado por un cubo de basura tachado, indica que este tipo de aparatos debe ser
eliminado de forma totalmente independiente con respecto a la basura orgánica.
(e) Existen “puntos limpios” a disposición del usuario final para la eliminación de este tipo de
aparatos. Si necesita más información acerca de la forma de eliminar aparatos eléctricos
y electrónicos antiguos, póngase en contacto con su Ayuntamiento, con la empresa de
limpieza correspondiente o con el comercio en el que adquirió ese aparato.
Acerca de este manual
En este manual utilizaremos los siguientes convencionalismos.
Cuando hagamos referencia a una tecla, conector u otras partes de esta unidad o de otros equipos,
•
utilizaremos el siguiente formato en negrita: tecla CALIB.
Cuando hagamos referencia a mensajes que aparecen en la pantalla, usaremos este otro formato:
•
M
Derechos de propiedad intelectual
TASCAM es una marca comercial de TEAC Corporation, registrada en los Estados Unidos y en otros países.
•
Los nombres de otras empresas, productos y logos que figuran en este documento son marcas
•
comerciales o marcas registradas de sus respectivos propietarios.
Nombre de las partes
Aspecto cuando haya quitado el
recubrimiento de goma
Zona de barra de medidores
Indicación cuando el medidor de afinación esté activo
Aparecen barras a la izquierda cuando el tono esté bajo (bemolado) y a la derecha cuando esté demasiado
alto (sostenido). El número de las barras aumentará conforme más incorrecto esté el tono. Cuando la
afinación sea la correcta se iluminará el círculo central.
Desafinado
(7 pasos (2.5 x 7 = 17.5 cents) por debajo de Aâ)
Afinado
(La entrada es el tono Aâ deseado)
Afinador
Para usar esta función, mantenga pulsada la tecla para encender la unidad.
Cuando aparezca el afinador, mantenga pulsada la tecla • MODE para acceder a la opción de cambio del
modo de funcionamiento del afinador. El modo cambiará cada vez que pulse la tecla MODE. Con cada
pulsación, en la pantalla de 7x5 segmentos aparecerá la abreviatura del modo activo. Pulse la tecla
para activar ese modo y el afinador.
Modo
N
(aguja): El nombre de la nota aparece en la pantalla de 7x5 segmentos en mayúsculas y la
•
cantidad de desafinación es mostrada por tres barras, incluyendo una en la posición del tono de
entrada y una a cada lado.
Modo
S
(estrobo dinámico): El nombre de la nota aparece en la pantalla de 7x5 segmentos en
•
mayúsculas y aparece un estrobo dinámico fluyendo a la derecha si el tono es demasiado alto
(sostenido) y a la izquierda si está demasiado bajo (bemolado). Cuanto más desafinado esté el sonido
de entrada, más rápido se moverá el estrobo. El estrobo se detendrá cuando el sonido esté afinado.
Modo
F
(preciso): El nombre de la nota aparece en la pantalla de 7x5 segmentos en minúsculas y el
•
medidor es mucho más preciso (±20 cents y aquí cada una de las barras representa 1 cent).
Modo
M
(medidor): El nombre de la nota aparece en la pantalla de 7x5 segmentos en mayúsculas y el
•
medidor le indica la imprecisión de la afinación (±50 cents, de −50 cents a +50 cents en donde cada
barra representa 2.5 cents)
Con el afinador activo, mantenga pulsada la tecla • CALIB para activar el modo de calibración. Ajuste allí la
frecuencia standard del A (la) en el rango entre 437–446 Hz en pasos de 1 Hz.
En la pantalla de 7x5 segmentos aparecerá el último dígito de la frecuencia. Cuando la ajuste entre 437 y
•
439 Hz, aparecerá “â” mientras que cuando la ajuste entre 441 y 446 Hz aparecerá “#”. Cuando el ajuste sea
440 (valor por defecto) no aparecerá ninguno de los dos símbolos.
Cada vez que pulse la tecla CALIB el ajuste aumentará en 1 Hz. No obstante, si vuelve a pulsar esta tecla
cuando el ajuste sea 446 Hz, la frecuencia saltará directamente a 437 Hz.
Pulse la tecla para fijar ese valor y volver a activar el afinador.
Durante la calibración, pulse a la vez las teclas CALIB y MODE para volver a fijar el valor de calibración a
440 Hz (el valor por defecto).
Alimentación
Pila interna
El panel solar de esta unidad puede recargar la pila interna cuando la deje expuesta a la luz. Además,
también puede recargarla conectando un cable USB mini B a un puerto USB. Durante la carga desde el
puerto USB, el icono de batería estará iluminado.
Este panel solar ha sido diseñado para la recarga con luz artificial. Cuando realice la recarga directamente
con la luz solar, tenga cuidado de no dejar la unidad en ese entorno durante demasiado tiempo.
Indicación de carga restante de la pila
Compruebe con el icono de la pila la carga restante. El número de barras que aparezcan dentro del icono de
la pila le indicará la carga que queda (“ ”, “ ”, “ ”, “ ”).
Cuando dentro del icono de la pila no aparezca ninguna barra y quede vacío (“ ”), la unidad activará el
modo de espera (standby) debido a que no habrá suficiente corriente para funcionar.
Función automática de espera (standby)
Para conservar la carga de la pila, esta unidad dispone de una función automática de espera. Cinco minutos
(este valor no es ajustable) tras el último uso de cualquiera de sus botones, la unidad desactivará la pantalla
y las entradas. El panel solar seguirá cargando la pila aunque el resto de funciones estén desactivadas.
Otras funciones
Toma INPUT
Puede conectar la salida de una guitarra o de un micro externo a esta entrada INPUT y usar ese dispositivo
conectado con esta unidad. El micro interno quedará desactivado cuando utilice esta toma INPUT.
Puerto USB
El puerto USB mini B ha sido incluido específicamente para recargar la unidad. No puede usar este puerto
para controlar la unidad o almacenar sus ajustes. Quite el protector de goma para usar este puerto.
Protector de goma
Este protector o recubrimiento de goma es extraíble.
Bandolera
Esta unidad incluye una bandolera; puede usar las funciones de la unidad con esta bandolera colocada.
Coloque esta bandolera en la fijación del panel derecho de la unidad.
CUIDADO
A la hora de instalar o recolocar la bandolera, asegúrese de que quede fijada correctamente para evitar que
se le pueda desenganchar el afinador o que se pueda partir la bandolera.
Agujero RESET
Si esta unidad se comporta de forma extraña, pulse en el botón que está dentro de este agujero con la punta
de un clip, de un bolígrafo o algo similar. Esto producirá un reset del sistema y reiniciará la unidad.
Especificaciones técnicas
Funciones
Afinación Temperamento igual de 12 notas
Rango de detección A0 (27.5 Hz) – C8 (4186.010006 Hz)
Nombre de notas C, C#, D, Eâ, E, F, F#, G, G#, A, Bâ, B
Modos de afinación Aguja, estrobo dinámico, preciso, medidor (4 en total)
Rango de calibración 437 – 446 Hz, intervalos de 1 Hz
Precisión de detección Inferior a 1 cent (a A = 440 Hz)
Micro interno Omnidireccional, mono
Entradas
Toma INPUT Clavija mono standard de 6.3 mm (1/4”)
Alimentación
Puerto de recarga USB de tipo mini B (solo para recarga de la pila)
Pila Litio (recargable)
Tiempo de
funcionamiento
continuo a pilas
General
Dimensiones externas 96 x 40 x 18 mm (ancho x alto x profundo, excluyendo protector de goma)
Peso 51 g (unidad principal, sin incluir protector y otros accesorios)
Rango de temperaturas
operativas
Accesorios incluidos Bandolera, Manual de instrucciones (este documento), Garantía
TEAC CORPO RATION
Phone: +81-42-356-9143
1-47 Ochiai, Tama-shi, Tokyo 206-8530 Japan Printed in China
Unas 6 horas (con entrada continua de un tono “A”; el tiempo actual depende de
las condiciones operativas)
5–35º C
 Loading...