

Page 1
FireWire Control Surface Expander
D00748600B
OWNER’S MANUAL
Ü
The lightning flash with arrowhead symbol, within an equilateral triangle, is intended to alert
ÿ
Ÿ
This appliance has a serial number
located on the rear panel. Please record
the model number and serial number
and retain them for your records.
Model number
Serial number
the user to the presence of uninsulated “dangerous voltage” within the product’s enclosure
that may be of sufficient magnitude to constitute a risk of electric shock to persons.
The exclamation point within an equilateral triangle is intended to alert the user to the presence of important operating and maintenance (servicing) instructions in the literature
accompanying the appliance.
CAUTION: TO REDUCE THE RISK OF ELECTRIC SHOCK, DO NOT
REMOVE COVER (OR BACK). NO USER-SERVICEABLE PARTS
INSIDE. REFER SERVICING TO QUALIFIED SERVICE PERSONNEL.
WARNING: TO PREVENT FIRE OR SHOCK
HAZARD, DO NOT EXPOSE THIS
APPLIANCE TO RAIN OR MOISTURE.
Page 2

Page 3

IMPORTANT SAFETY INSTRUCTIONS
1 Read these instructions.
2 Keep these instructions.
3 Head all warnings.
4 Follow all instructions.
5 Do not use this apparatus near water.
6 Clean only with dry cloth.
7 Do not block any ventilation openings. Install in
accordance with the manufacturer’s instructions.
8 Do not install near any heat sources such as radi-
ators, heat registers, stoves, or other apparatus
(including amplifiers) that produce heat.
9 Do not defeat the safety purpose of the polarized
or grounding-type plug. A polarized plug has
two blades with one wider than the other.
Grounding type plug has two blades and a third
grounding prong. The wide blade or the third
prong are provided for your safety. If the provided plug does not fit into your outlet, consult
an electrician for replacement of the obsolete
outlet.
10 Protect the power cord from being walked on or
pinched, particularly at plugs, convenience
receptacles, and the point where they exit from
the apparatus.
11 Only use attachments/accessories specified by
the manufacturer.
12 Use only with the cart, stand, tripod, bracket, or
table specified by the manufacturer or sold with
the apparatus. When a cart is used, use caution
when moving the cart/apparatus combination to
avoid injury from tip-over.
13 Unplug this apparatus during lightning storms or
when unused for long periods of time.
14 Refer all serving to qualified service personnel.
Servicing is required when the apparatus has
been damaged in any way, such as power-supply
cord or plug is damaged, liquid has been spilled
or objects have fallen into the apparatus, the
apparatus has been exposed to rain or moisture,
does not operate normally, or has been dropped.
● Do not expose this apparatus to drips or
splashes.
● Do not place any objects filled with liquids, such
as vases, on the apparatus.
● Do not install this apparatus in a confined space
such as a book case or similar unit.
● The apparatus draws nominal non-operating
power from the AC outlet with its POWER
switch in the off position.
TASCAM FE-8 Owner’s Manual 3
Page 4
IMPORTANT SAFETY PRECAUTIONS
IMPORTANT (for U.K. Customers)
DO NOT cut off the mains plug from this equipment.
If the plug fitted is not suitable for the power points in your home
or the cable is too short to reach a power point, then obtain an
appropriate safety approved extension lead or consult your dealer.
If nonetheless the mains plug is cut off, remove the fuse
dispose of the plug immediately, to avoid a possible shock hazard
by inadvertent connection to the mains supply.
If this product is not provided with a mains plug, or one has to be
fitted, then follow the instructions given below:
IMPORTANT: The wires in this mains lead are coloured in
accordance with the following code:
GREEN-AND-YELLOW : EARTH
BLUE : NEUTRAL
BROWN : LIVE
WARNING: This apparatus must be earthed.
As the colours of the wires in the mains lead of this apparatus may
not correspond with the coloured markings identifying the
terminals in your plug proceed as follows:
The wire which is coloured GREEN-and-YELLOW must be
connected to the terminal in the plug which is marked by the letter
E or by the safety earth symbol ç or coloured GREEN or
GREEN-and-YELLOW.
and
For U.S.A
TO THE USER
This equipment has been tested and found to
comply with the limits for a Class A digital device,
pursuant to Part 15 of the FCC Rules. These
limits are designed to provide reasonable
protection against harmful interference when the
equipment is operated in a commercial
environment. This equipment generates, uses,
and can radiate radio frequency energy and, if
not installed and used in accordance with the
instruction manual, may cause harmful
interference to radio communications.
Operation of this equipment in a residental area
is likely to cause harmful interference in which
case the user will be required to correct the
interference at his own expense.
CAUTION
Changes or modifications to this equipment not
expressly approved by TEAC CORPORATION
for compliance could void the user’s authority to
operate this equipment.
The wire which is coloured BLUE must be connected to the
terminal which is marked with the letter N or coloured BLACK.
The wire which is coloured BROWN must be connected to the
terminal which is marked with the letter L or coloured RED.
When replacing the fuse only a correctly rated approved type
should be used and be sure to re-fit the fuse cover.
IF IN DOUBT — CONSULT A COMPETENT ELECTRICIAN.
For the consumers in Europe
WARNING
This is a Class A product. In a domestic environment,
this product may cause radio interference in which
case the user may be required to take adequate
measures.
Pour les utilisateurs en Europe
AVERTISSEMENT
Il s’agit d’un produit de Classe A. Dans un environnement domestique, cet appareil peut provoquer des interférences radio, dans ce cas l’utilisateur peut être
amené à prendre des mesures appropriées.
Für Kunden in Europa
Warnung
Dies is eine Einrichtung, welche die Funk-Entstörung
nach Klasse A besitzt. Diese Einrichtung kann im
Wohnbereich Funkstörungen versursachen ; in diesem Fall kann vom Betrieber verlang werden, angemessene Maßnahmen durchzuführen und dafür
aufzukommen.
4 TASCAM FE-8 Owner’s Manual
Page 5

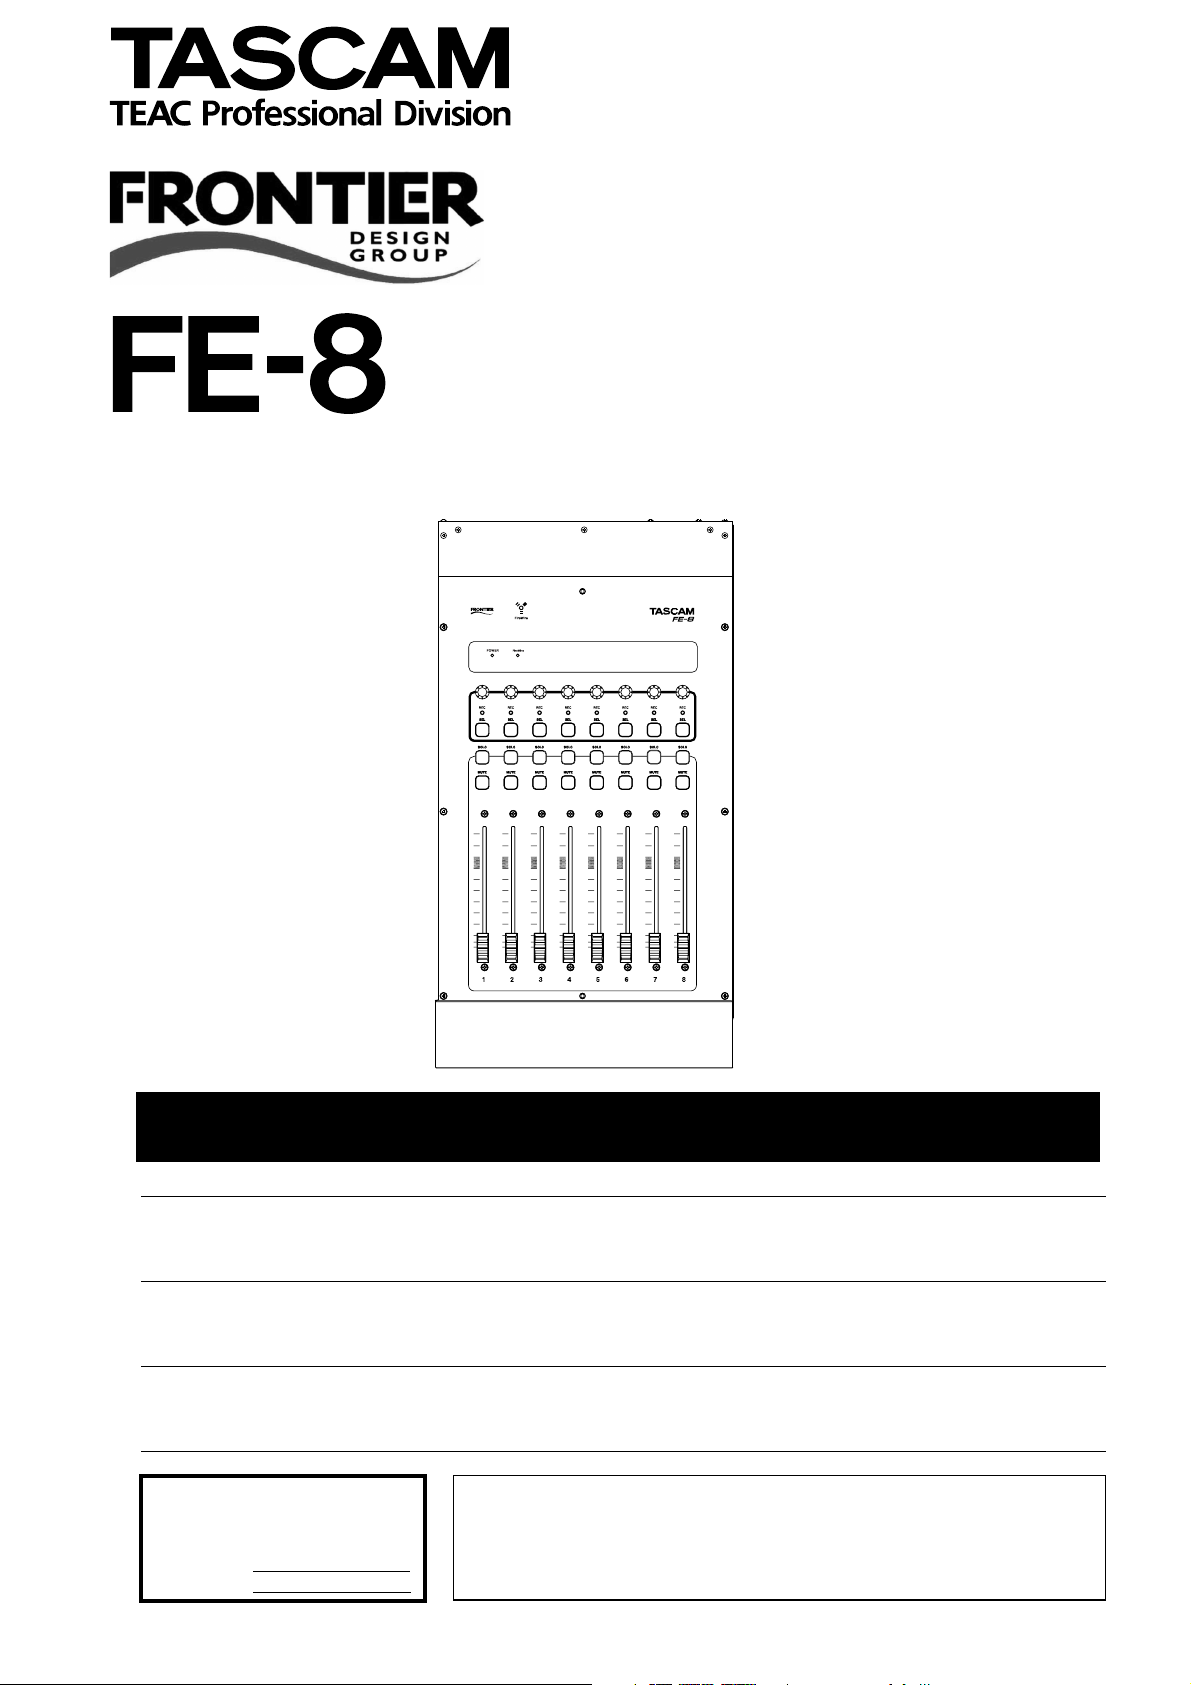
1 – Introduction and installation
Thank you for purchasing the TASCAM FE-8 fader
expansion unit. This is designed to be used with the
TASCAM FW-1884 unit, and adds another eight control channels, including motorized faders, to the FW-
1884.
Copyright, etc.
Windows, Windows XP, and Windows 2000 are
trademarks of Microsoft Corporation.
Macintosh, MacOS, MacOS X and FireWire™ are
trademarks of Apple Computer.
Environmental considerations
The FE-8 can be operated in most environments, but
we suggest that you keep the environmental conditions within the following limits:
Updating the software
The FE-8 does not require its own driver software.
Instead, the FE-8 is recognized by the FW-1884’s
driver.
Download the version of the FW-1884 software
which supports the FE-8 expansion from the
TASCAM Web site.
1 First, uninstall the existing driver software
(Windows and Mac OS X). The method to do
this varies, according to the operating system
you are using. See the instructions below.
There is no need to uninstall the Mac OS 9
software as the new installation overwrites the
old settings.
It is possible to add up to 15 FE-8 units to the FW1884, making a total of 128 channels.
Each FE-8 requires its own AC power source, but
does not require its own IEEE 1394 (FireWire) connection to the computer (see below for details).
All other trademarks are the property of their respective holders.
Ambient temperature between 5°C and 35°C (41°F
to 95°F).
2 Next, install the new drivers and software, fol-
lowing the instructions in the FW-1884 Setup
Guide (“Installation (Windows 2000 and Win-
dows XP)” on page 7, “Installation (Mac OS
9.2)” on page 9 and “Installation (Mac OS X
10.2.4 and above)” on page 10).
NOTE
You cannot use the Windows New Hardware Wizard
described in “Installation using the Windows New Hardware Wizard:” on page 8 until the FE-8 has been
installed and connected as described below.
Windows uninstall
To uninstall the software under all versions of Windows which support the FW-1884, use the
Add/
Macintosh OS X uninstall
On the disc or inside the disk image (.dmg) of the
original FW-1884 software, there is a package (series
of Installer instructions) called
Open this package and uninstall all the old FW-1884
drivers, etc.
FW-1884 Remover.pkg.
Remove Programs
icon in the Control Panel to uninstall
the FW-1884 driver and software.
Reboot your computer if instructed to do so.
Reboot the computer if instructed to do so.
NOTE
You will need an Administrator name and password to
perform this operation.
TASCAM FE-8 5
Page 6

2 – Physical installation
WARNING
Before undertaking this procedure, make sure the FW1884 is turned off, and disconnected from the AC power
supply and computer. The FE-8 should also be disconnected from the AC power supply.
1 Decide on which side of the FW-1884 you will
be using the FE-8. Remove that end cheek
from the FW-1884 (the illustration below
shows the left end cheek).
WARNING
The FE-8 is designed to be used with the FW-1884 only
as described in the instructions here. Only use it in this
way, as there is a danger of electric shock under other
conditions (that is, when standing apart from the FW1884 or other FE-8 units).
When the end cheeks are removed from the FW-1884,
some sharp metal edges are exposed. Take suitable precautions not to cut yourself on these edges while fitting
the FE-8.
Remove the two screws retaining the end
cheek, and keep them in a safe place.
2 Now lift the end cheek up slightly before
removing it (the illustration here shows a
cross-section through the left end cheek.
2
1
3 Fix the end cheek to the side of the FE-8.
Locate the three retaining lugs on the end
cheek to the three holes on the side of the
FE-8.
4 When the lugs are seated in the holes, push the
end cheek down into place.
1
2
5 Replace the two screws removed at the start of
this procedure.
6 TASCAM FE-8
Page 7

2 – Physical installation–Updating the software
6 There is no physical connection between the
FW-1884 and the FE8. Instead, you should use
the special supplied mounting pad, into which
the feet of both the FW-1844 and FE-8 fit, and
which secures the units firmly in the correct
location relative to each another.
If you are adding more than one FE-8 unit to your
FW-1884 setup, you should use the mounting pads to
link the FE-8 units, and replace the end cheek(s) only
on the units at the end(s) of the line.
7 To connect the FE-8 and FW-1884, connect
one end of the IEEE 1394 cable supplied with
the FE-8 to either
panel of the FE-8, and the other end to the
unused
FireWire port on the rear panel of the
FW-1884.
FireWire port on the rear
Unlike (for example) SCSI connections, you do
not need to terminate the chain, and there is
no need to number devices or set IDs, etc.
Either
FireWire port of the FW-1884 may be
used for connecting the FW-1884 to the computer or FE-8 units, and either port of the FE8 may be used for connection to the FW-1884
or other FE-8 units.
8 Connect the FW-1884 to the host computer.
9 Connect the AC power cords to all the units,
and switch on the units. We suggest switching
on the units starting with the unit furthest
from the computer, and moving in to the FW-
1884.
NOTE
You can use the FE-8 only in conjunction with an FW1884 unit. It cannot be used by itself with a computer.
You should either use the cable supplied with the FW1884 or the FE-8 (preferred) or a IEEE 1394 cable of
equivalent quality when making connections. Cheap
cables may not meet the interface specifications and
may cause device malfunctions.
AC power supply
To host computer
Power switches
AC power supply
TASCAM FE-8 7
Page 8

3 – Software and the FE-8
Each FE-8 unit in your system provides an additional
virtual MIDI port, through which controller information is passed to the DAW application, and status
information (fader position, indicator status, etc.) is
passed back from the DAW to the FE-8.
One such virtual MIDI channel is provided per unit.
If you have many FE-8 units connected, it may be
difficult for you to keep track of them in the DAW
application, and so the Control Panel for the FW-
1884 includes tools to help you manage (rename,
reorder, etc.) the units.
Any FE-8 units connected to the FW-1884 will show
on the equipment list on the Macintosh versions of
the software (this feature is not part of the Windows
version).
Notice also the
in all versions of the software, as explained below.
FE-8 tab at the top of the Control Panel
Naming the FE-8 units
If you have more than one FE-8 unit in your system,
it may be difficult for you to keep track of the different units when they are connected together.
When an FE-8 is first discovered by the system, it is
identified with a letter-number string, which probably won’t mean too much to you in the future.
The FE-8 tab in the Control Panel allows you to
rename the units to something more meaningful.
Here, they are labeled as
want to label them with numbers, or according to the
tracks they will control, etc.
Select a unit in the list and double-click the name to
begin editing.
Click
Apply when finished naming all units or Revert if
you want to discard all changes.
These names are echoed system-wide and are
reflected in all applications using the FE-8 unit.
Note the
this button, the
that is highlighted in the list flashes. This can be useful if you forget in which order the FE-8 units have
been arranged.
Identify button at lower left. When you press
FireWire indicator on the FE-8 unit
Left and Right, but you may
Re-ordering the FE-8 units
For convenience, you don’t have to keep the list of
FE-8 units in the order they were discovered by the
system.
8 TASCAM FE-8
Highlight a unit in the list above, and click the Move
or Move Dn (move down) button to re-order the unit
Up
in the list.
Page 9

4 – Specifications, etc
Power and physical specifications
Power Requirement 100V AC, 50-60Hz
120V AC, 60Hz
230V AC, 50Hz
240V AC, 50Hz
Power Consumption 20 W
Peak inrush current 15 A
Applicable electromagnetic environment E4
Dimensions (W xHxD) 260 x 133 x 478 (mm) 10.25 x 5.2 x 18.9 (in.)
Weight 5 kg (11 lbs.)
Supplied accessories IEEE 1394 cable, mounting pad (sheet joint), AC power cable
133mm (5.2")
260mm (10.2")
478mm (18.9")
TASCAM FE-8 9
Page 10

Notes
10 TASCAM FE-8
Page 11

Page 12

FE-8
TEAC CORPORATION
Phone: +81-422-52-5082 www.tascam.com
3-7-3, Nakacho, Musashino-shi, Tokyo 180-8550, Japan
TEAC AMERICA, INC.
Phone: +1-323-726-0303 www.tascam.com
7733 Telegraph Road, Montebello, California 90640
TEAC CANADA LTD.
Phone: +1905-890-8008 Facsimile: +1905-890-9888 www.tascam.com
5939 Wallace Street, Mississauga, Ontario L4Z 1Z8, Canada
TEAC MEXICO, S.A. De C.V
Phone: +52-555-581-5500 www.tascam.com
Campesinos No. 184, Colonia Granjes Esmeralda, Delegaacion Iztapalapa CP 09810, Mexico DF
TEAC UK LIMITED
Phone: +44-1923-438880 www.tascam.co.uk
5 Marlin House, Croxley Business Park, Watford, Hertfordshire. WD1 8TE, U.K.
TEAC DEUTSCHLAND GmbH
Phone: +49-611-71580 www.tascam.de
Bahnstrasse 12, 65205 Wiesbaden-Erbenheim, Germany
TEAC FRANCE S. A.
Phone: +33-1-42-37-01-02 www.tascam.fr
17 Rue Alexis-de-Tocqueville, CE 005 92182 Antony Cedex, France
TEAC AUSTRALIA PTY.,LTD. A.B.N. 80 005 408 462
Phone: +61-3-9672-2400 Facsimile: +61-3-9672-2249 www.tascam.com.au
280 William Street, Port Melbourne, Victoria 3000, Australia
TEAC ITALIANA S.p.A.
Phone: +39-02-66010500 www.teac.it
Via C. Cantù 11, 20092 Cinisello Balsamo, Milano, Italy
Printed in China
 Loading...