

Page 1

TASCAM CD-R624W
Packing List
The following items should be present in your CD-R624W bundle:
- TEAC 6x24 external CD-R drive (CD-R56S/614)
- Adaptec PCI SCSI Card
- SCSI Cable
- SCSI Terminator
- CD-R624W software CD-ROM
- CD Stomper w/ CD Stomper CD-ROM and CD Labels
- (2) Blank TEAC CD-R media
- TEAC 6x24 Installation Guide
- CD-R624 QuickStart Guide (That’d be this book.)
Be sure to go into the Red Roaster-E folder; Red Roaster-D installs
the program in German, and Red Roaster-F installs the program in
French.
To install Adaptec EZ CD Creator, run the set-up file for EZ CD
Creator. To access it, go inside the English Folder, to the Disk 1
Folder. There will be a program called “Setup.exe” in that folder.
Cdr624w\English\Disk 1\Setup.exe
There are folders in the root directory for Dutch, German, French,
Italian, and Spanish for EZ CD Creator. (If you want to exercise your
foreign languages, be my guest.)
To install Xing AudioCatalyst, run the set-up file for Audio
Catalyst. It is located in the root directory of the CD-R624W disc,
entitled “AudioCatalyst Installer”.
Installing the CD-R624W Bundle
A hardware installation booklet has been included with this package;
look to it for installation of the SCSI card and CD-Recorder. Also, if
you are new to installing software on your PC, be aware that you will
probably have to restart the computer in between each installation.
To install the software, make sure your SCSI card and CD-Recorder
are already connected. Insert the CD-R624W disc into your CD-ROM
or CD-R drive.
To install SEK’D Red Roaster, run the set-up file for Red
Roaster. To access it, go inside the Software Folder, to the Install
Folder, to the Red Roaster-E folder. There will be a program called
“Setup” in that folder.
Cdr624w\Software\Install\Red Roaster-E\Setup
Cdr624w\AudioCatalyst Installer
Introduction to CDR Technology
CDR (Compact Disc Recordable) media can store up to 74 minutes of
stereo audio, or up to 650 megabytes of data. CDR media can only
be written on once, so the CDR authoring software allows you to
design your CD completely before you burn it. Since the CD must
contain a directory of what is on it, and since that directory is on the
write once media also, all of the information must be burned to the CD
at the same time. Recording the information to the CD is done in a
Session.
While audio CD players will only recognize the first session on the
CD, many CD-ROMs will read multiple sessions. A CD with more than
one session is called a Multi-Session CD. So, if the first session of a
data CD only contained 200 megabytes of data, you could record
another session after it which could contain close to 450 megabytes.
Page 2
(It won’t be quite that big because of the extra space taken by the
new directory.) Remember though, older CD-ROMs may not search
for extra sessions.
With your CD-R624W package, you have software capable of
recording either data or audio CDs. Here’s a brief description of the
capabilities of each format:
Audio CD - This is the standard CD format you can use in your audio
CD player. You can have up to 99 tracks of audio. The audio tracks
must be recorded in stereo at the CD standard of 16bit, 44.1kHz.
Audio players will not search for multiple sessions, so everything for
the audio player must be burned in the first session of the disc.
SEK’D Red Roaster is provided on your software CD so you can
record, edit and process your audio, then assemble and burn your
masterpiece to a CD.
Red Roaster Tutorial:
Set-up & Acquiring Audio
There are two movies on the CD-R624W that will walk you through
many of the features of Red Roaster. If you look in the CD-R624W
CD-ROM, you’ll find a folder labeled AVI_Movies. That has the two
short videos. However, we are still providing this tutorial to help you
through your first session, step-by-step.
ISO-9660 - Originally specified for DOS CD-ROM use, the ISO9660 now has multiple variations for DOS, Windows 95/98, and
Macintosh. While more features are available in the later Windows
95/98, the original DOS format will be compatible with machines
without Windows 95/98. Since most Macintosh computers can read
Windows CDs, this is also a great way to store cross platform material
such as JPEGs, HTML, or even word process, spreadsheet, or
graphic files. Adaptec EZ CD Creator is provided on your software
CD so you can assemble data CDs to back up your important
computer data, or assemble your own multimedia CDs.
So to review, CDs can either be written as an audio CD or data CD.
Each time information is written to the CD, it records the directory and
the target material all in one session. Audio CD players will only
recognize the first session, but if you wanted to write multiple data
sessions to a CD, most CD-ROMs will read them.
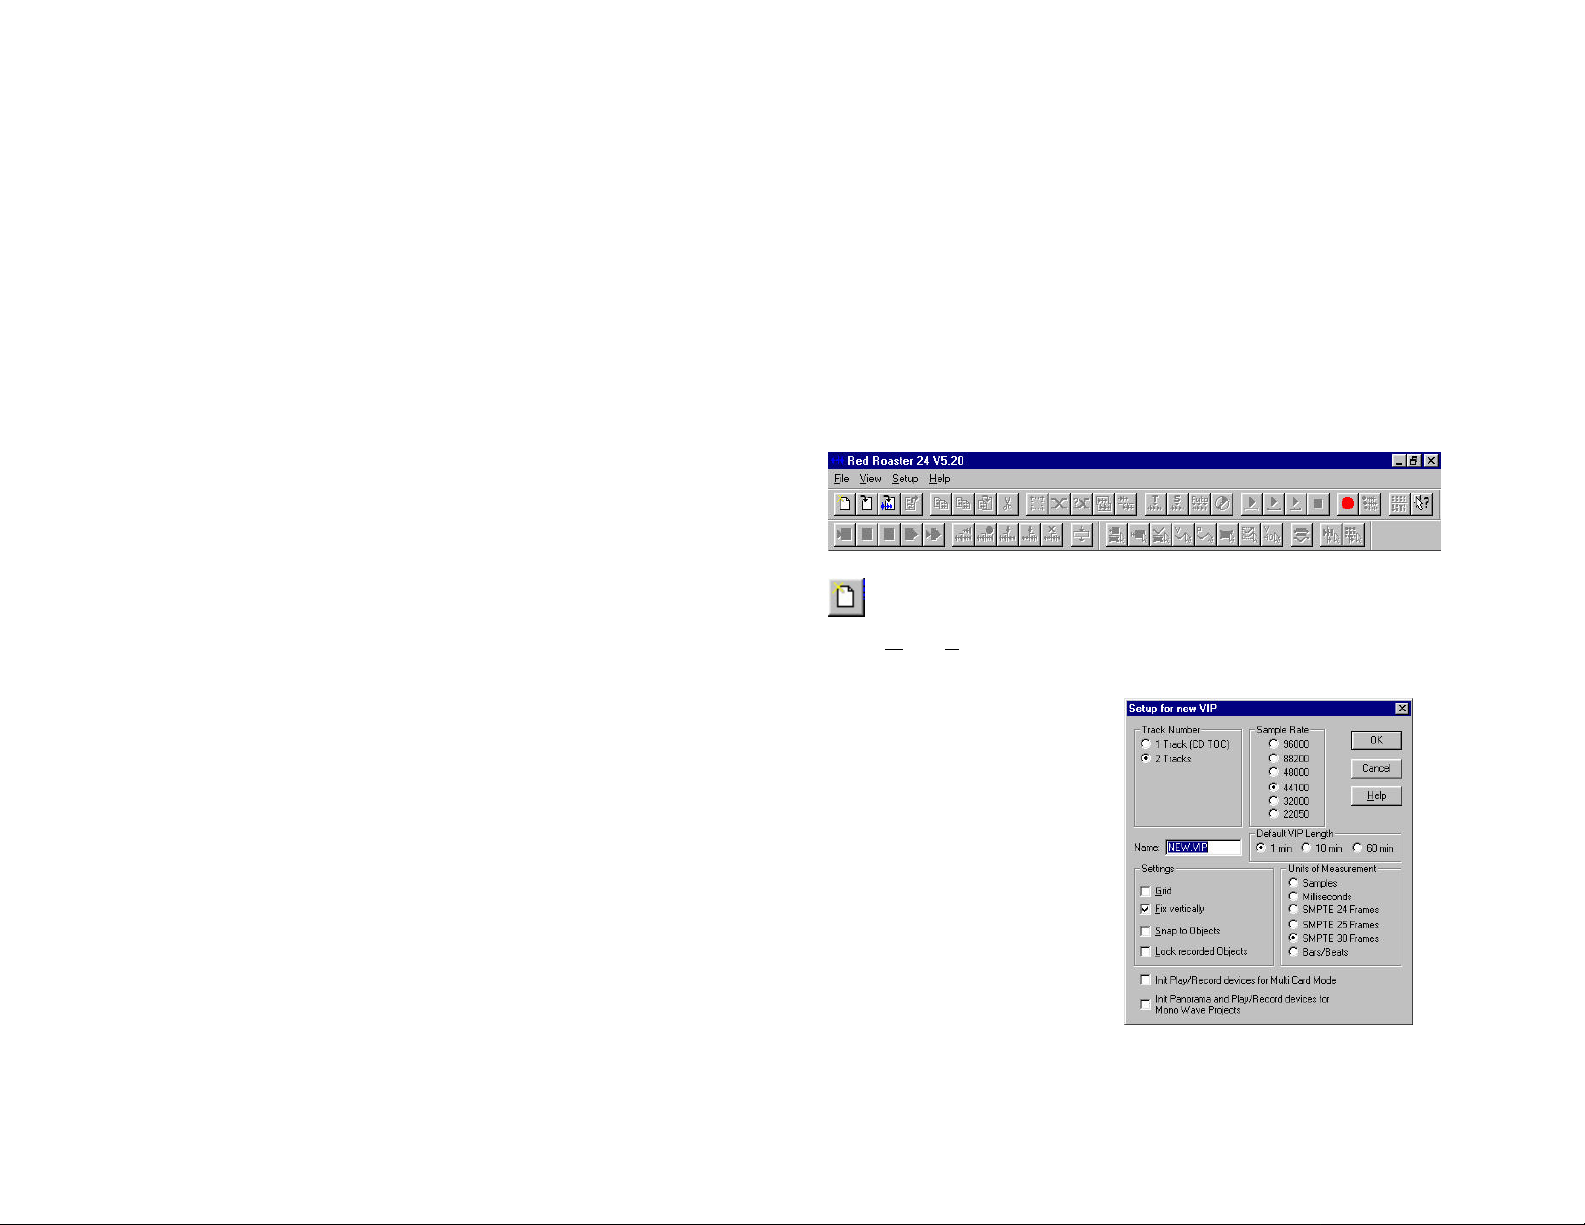
When you first start up your program, you will see the toolbars,
but no track layout yet. The first thing you need to do is create
a VIP ( VI rtual P roject). To do that, click on the first button. A set-up
menu will appear.
The main functions we need to
focus on here are the number
of tracks, sample rate, and the
name of the VIP. Here, we
want to make sure we are set to
a sample rate of 44.1kHz
(shown as 41000 in the menu)
since we’re planning to record
to a CD. Also, be sure to give
the project a name you’ll
remember.
A word about the Tracks
setting: It is important to know
Page 3
that “tracks” are actually stereo tracks, not mono. So, if you select 1
track, then you are getting stereo. Selecting 2 tracks gives you 2
stereo tracks, making more detailed editing easier, but reducing the
track viewable height size once we get to the editing screen.
Typically, I use the “2 Tracks” setting to give me more flexibility when
fading from one track to the next.
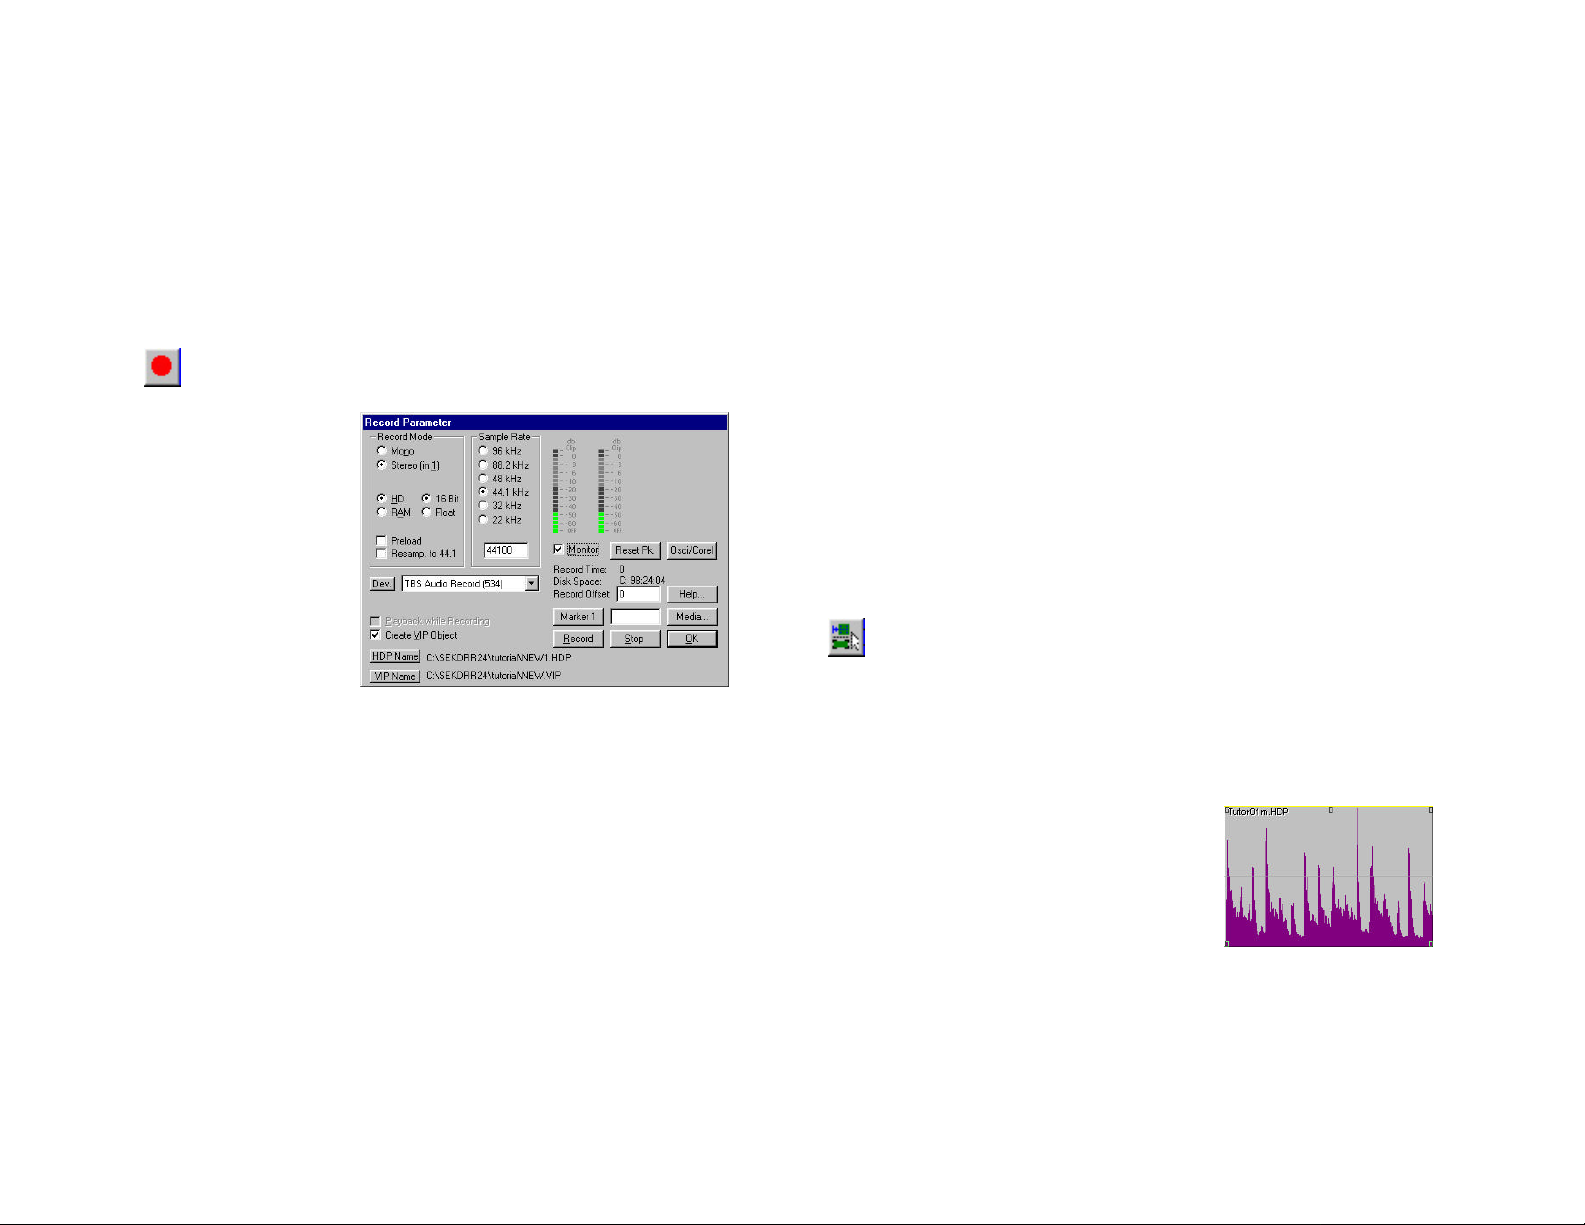
Once you’ve set up your VIP, it’s time to record some audio.
To do this, click on the record button in the top tool bar.
This is where you will
want to monitor your
input levels. Click on
the button labeled
“Monitor” (located
underneath the level
meters) to hear what is
coming into your
sound card input, and
to view the levels on
the monitor level.
This screen gives you more options to customize your recording
setup, although most of the settings should work fine as is.
If you have multiple sound cards in your PC, you will need to select
which card the input is coming from. On the left side of this menu just
below center is the sound card selector. Make sure it has the correct
sound card input.
To start recording, click on Record. To stop, click on Stop. When
you stop, Red Roaster will show you a screen where you can decide
if you want to keep the recording, or delete it and do it again. If you
like it, click on “Yes”. If you want to do it again, click on “Delete” and
record again.
The Recording screen will remain there in case you want to record
more tracks. This is handy for importing many individual tracks in the
same sitting. If you want to record more tracks, click record and you’re
recording again. If you’re done, click “OK”.
Once you’ve recorded your audio, the display shows the audio clips
in the track screens. Now that your audio is in the VIP, it’s time to start
editing the audio. But before we do that, let’s do the right thing and
save where we’re at. It’s good advice for any kind of work on the
computer. Save frequently and often.
Editing/Processing
Now that we have our waveforms on the screen, let’s do some basic
editing and processing. We’re only going to get into the basic editing
here... the SEK’D Red Roaster manual will take your through the
advanced stuff.
The first thing you’ll want to do is select Universal Mode for the
cursor. This button gives you different editing functions
depending on where you click on the audio. If you click in the top half
of the track, you are moving the play/record cursor and selecting
regions of audio to manipulate. If you click on the bottom of the
audio, you can select the entire block of audio and move it wherever
you wish.
Very basic edits can be made simply by
selecting the block of audio by clicking in
the bottom half of the audio block. Five
handles appear in the corners and top of
the audio block.
The handles at the bottom of the block move the starting/ending
point of the audio. This is a good way to get rid of dead space before
and after the tracks.
Page 4

Fade ins and outs are adjusted with the top left and right handles.
Drag the handles inward over the audio to create a fade. If you want
to edit the type of cross fade, click on the Crossfade editor in the
toolbar.
Volume adjustments over the entire block are made with the top
center handle.
For simple EQ and compression, the mixer section can provide quick
and painless solutions. Type “M” to get to the mixer section. The
layout is fairly straight forward, arranging everything in the familiar
mixer setting.
For more advanced mastering processors, look under the Effects
menu. There you will find multiband compressors, a stereo
enhancer, and more. For these to be available, you may have to
select the block of audio. Some effects cannot be applied to a freely
selected region.
Authoring the CD
Once you have your audio sounding the way you want it, you’re
ready to start assembling your CD. Since the audio is all laid out in a
linear fashion for the CD, all we need to do is drop in the track IDs and
index IDs.
ID markers. The top number identifies the track number, and the
bottom number identifies the index number within that track.
(Professional CD players can usually find additional Index markers,
which can be useful for sound effect CDs, or for marking particular
parts of audio passages for quick reference.)
Dropping ID’s in theVIP is really as simple as placing
the cursor where you want the ID and clicking on the
type of ID. (Remember, you place the cursor by clicking in the top
half of the audio blocks.) There are separate buttons for Track ID and
Sub-Index ID. There is also an Auto ID function which will place IDs at
the beginning of each block of audio.
When the IDs are placed, they appear as a tick mark just above the
editing screen. There are two rows of numbers which will identify the
To move the ID markers, simply click on the tick mark and drag it
where ever you wish. To remove ID markers, click on the ID marker
and press Delete. If you add or remove markers in between two other
established markers, the numbers will update.
Recording the Audio CD
Now you have your audio edited and processed, and your track
numbers are all marked. To make a CD out of this, just press
Page 5

the Make CD button. A menu will appear with a number of options.
There are two ways to burn your CD. “On The Fly” means Red
Roaster will process everything from your edit screen in real time.
This includes crossfades, effects, EQ, and so on. “Generate a
completely new file” actually creates a disc image on your hard drive
before it will burn the CD. In other words, it processes everything
and stores that final result
on your hard drive, and
then records to the CD
from the image. Either
way, it is important to
realize that your original
data is untouched by
either of these options.
Your original source
audio is not going to be
overwritten or altered.
There are advantages and disadvantages to each type, depending
on the speed of your CPU and the complexity of your project.
Burning on the fly saves you a step, but obviously requires more
processing horsepower from your computer. If your computer
cannot support “Burn on the fly” for your CD, that can be
compensated for by slowing the burn speed down to 4x or 2x.
EZ CD Creator Tutorial
Quick Navigational Tips
Using EZ CD Creator is quite simple, and the EZ CD Creator Wizard
can walk you through assembling a Data CD without a hitch.
However, the data window itself can use a bit of explanation. This
screen is useful if you need to re-order your files. For everything
else, use the CD Creator Wizard to walk you through the process.
Generating the disc image, then burning from the image offers the
most reliable option, however extra time is needed to create the
image first. The older the computer, the more likely you will need to
burn a disc image first, or slow the burn speed down to give the
computer more time to process the information.
Once the computer has finished, you’re done! Go ahead and put the
disc into the CD player of your choice, and listen to your new
masterpiece. You’re on CD!
The top two frames are for browsing your hard drive, and the bottom
two represent the CD you are assembling. You can select data from
the top frame, and drag it down to the bottom frame. Files can easily
be rearranged in the bottom frame to your liking.
When the CD is arranged, go ahead and press the Create CD
button, or select “Create CD” from the File menu. You will be
prompted to select the write speed, and whether you want to run a
test burn, actually burn the CD, or both.
Page 6

For the first few CDs you
make, we highly
recommend doing test
burns first. Depending on
what your source data is
coming from, the drive may
not be fast enough to
support 6x burns. This can
be even further
complicated if your drive is
“fragmented,” meaning the
data is not in a continuous
block on the drive. (This
happens frequently when
the drive is nearing
capacity.) So just to be
safe, run the test before burning for a little while until you are sure the
system will run properly.
If your system is having trouble keeping up with the drive, read the
“Troubleshooting Underruns” section at the end of this Guide.
AudioCatalyst Tutorial
What is MP3?
MP3 has created quite a buzz, but what is it really? MP3 is a
compression format for storing audio with excellent fidelity, yet only
taking approximately 9% of the data space. MP3 is short for MPEG
(Moving Picture Expert Group) type 1, layer 3. If you’re curious about
other types of MPEG compression, you can find their web site at:
http://drogo.cselt.stet.it/mpeg/
What MP3 offers is a way to distribute your music much easier.
Currently, the main uses for MP3 are for personal players (walkmantype units) and for internet distribution of audio. You can use MP3 to
put a clip of your band on the internet, or even to exchange musical
ideas with someone else via email.
AudioCatalyst is an MP3 encoder/player. It can encode regular WAV
files to MP3. If you already burned your audio to a CD, you can also
use AudioCatalyst to encode files directly from the audio CD.
Encoding Options
There are a good deal of options when creating MP3 files. There are
different data rates, CBR vs VBR, and mono vs stereo. For your first
time, try doing 128kbps, CBR and stereo. That is the typical layout,
and the most compatible. For reference, the terms are defined
below.
data rate - Data rate simply defines how much throughput the MP3
file will take. The data rate most people use is 128kbps (kilobytes per
second), but it can vary from 32kbps up to 320kbps. The higher the
data rate, the higher the quality.
Page 7

CBR vs VBR - In order to capture different sounds with true clarity,
some sounds can take less space... other sounds are more
demanding. CBR (Constant Bit Rate) was the original spec designed
for MP3, and is compatible with virtually all MP3 players. VBR
(Variable Bit Rate) basically adjusts the amount of data used to
encode the sound according to what is needed. VBR typically
sounds better, but older MP3 players may not be able to use it.
mono vs stereo - This is pretty self explanatory, but it is important
to realize that a stereo signal does not necessarily take twice as much
space as a mono signal. (Ain’t compression skwewy?)
If you want to encode a track from a CD, the initial screen should
default to the CD-ROM drive. Put the CD you wish to pull audio from
in the CD-ROM drive. Then, check the boxes at the left of the track
number(s) you want encoded and push the Grab button in the top
toolbar.
Once your file is encoded, it can be found in MP3 format in the
AudioCatalyst Folder. It will probably appear with the original name of
the file, plus the .mp3 suffix. So, track 3 from an audio CD would
appear as “Track 3.mp3”, and a WAV file called “Pat’s Smash Hit.wav”
will now be called “Pat’s Smash Hit.mp3”.
Encoding MP3 Files
To select a WAV file to encode, start up AudioCatalyst, go to the File
menu, and select Encode Files. You will be prompted to select the
WAV file you want to encode as MP3.
Playing MP3 Files
Playing MP3 files is as easy as assembling your playlist. There is a
separate player application called Xing MP3 Player. Boot up that
program, and select the files you want to listen to. Click on the Open
Files button on the right, and load in the files you want. Remember,
you will probably have to go to the AudioCatalyst folder to find those
MP3 files you just made.
Page 8

Troubleshooting
Underruns
Let’s start with a basic understanding of what’s involved. Here are a
few terms you will need to understand to navigate the world of data
transfer:
Access Time - How long does it take from the time the computer
asks a drive for data until the drive starts spitting it out? This is usually
measured in ms (milliseconds).
So it is with hard drives. If everything is streamlined, then the data will
flow quickly. If the drive has to search for all the parts continuously,
the data flow suffers.
One suggestion may be to optimize your source drive. That will put
each file in one continuous data stream. You can do this with a
multitude of applications, such as Norton Utilities.
Another solution is to create a disc image which will write (in one
continuous data stream) all of the information for the CD to a disk
drive, including the directories. This sometimes is necessary for
slower hard disks to operate with faster CD burn speeds.
Throughput (AKA Transfer Rate) - Once the drive finds the
information, how fast can it transmit the data? This is usually
measured in MB/sec (megabytes per second).
Fragmented or Optimized - Is the information on the drive
written in one continuous data stream, or is it broken up into several
pieces around the drive? If the data is in one continuous stream, it is
optimized. If the data is broken up, then it is fragmented.
Once you understand the previous terms, then we’re ready to
troubleshoot. Let’s first understand the relationship between all of
these.
Think of a disk drive as a book. If you are reading a book from page
one to the end, you can read a certain number of words per minute.
When you read a newspaper and the story on page B1 is continued
on page B14, you are spending time looking for the continuation of
the story. Even worse is a Choose-Your-Own-Adventure book. With
these, you can only read a few paragraphs before you have to find
the next part. This slows you down considerably.
Of course, one other solution is just to reduce the recording speed
of the CD-Recorder. Some source disks may just be too slow for
higher speed recording (i.e. Zip, old 44meg SyQuest, etc.) Also, if
you’re just making one quick CD, it may be faster to simply record the
CD at 4x, 2x, or 1x instead of defragmenting the drive, then burning
the CD at 6x.
Other problems
I am getting nothing but loud static out of Red Roaster. -
Red Roaster uses an advanced “Floating Bit” processing algorithm
which some rudimentary sound cards can’t handle. You probably
need to switch the program over to standard 16 bit processing.
With your VIP open, go to the File menu and drag down to
Preferences. A menu will pop up to the side of the file menu; drag
over to Internal Precision and select 16 bit Integer. That should
solve your problem.
Page 9

The CD-R drive is not identified by the program. - The first
thing to check when the program is not identifying the drive is to
see if your computer is identifying it:
The drive is not recording to the blank CDs. - There could
be several causes for this:
1) Place the CD-R624W disc in the CD-R drive so it will have
something to pop up with.
2) Go under “My Computer”, and see if the CD-R drive pops up.
(It will probably be drive D: or drive E: if you have one hard drive
and a CD-ROM drive.) If the drive does not show up, then the
computer itself is not seeing the drive:
A) Make sure your cables are securely connected, and that the
SCSI terminator is also in place. If you have other SCSI
devices in the chain, make sure they have different SCSI IDs
than the CD-R drive has. For troubleshooting purposes, it
may be wise to disconnect the other devices for now to
ensure your SCSI cabling length is not too long, and that the
other IDs aren’t interfering. Remember to shut your
computer down before changing SCSI IDs or disconnecting
SCSI devices.
B) Try restarting your computer with the CD-R drive on. (It must
be on at boot-up, or it may not get added to the list properly.
3) If the drive is operating properly as a CD-ROM, but not as a CDR, then check the Device Manager to make sure the SCSI card
is properly installed.
1) Make sure the disc you are using is a regular CD-R media. CDRW discs are not compatible with this drive. “For Music Only”
CDs may also cause problems, as they are designed for use
with consumer component CD-Recorders.
2) Make sure the CD-R media is on the list of approved media of
this drive. We have tested many types of CD-R media, and the
results are posted on our web site at http://www.tascam.com.
The list is kept on the site so it may be kept as up to date as
possible.
3) While the CD-Recorder is recording, make sure the CD-R drive
is not agitated. (If you write as vigorously as I do, even writing
the jewel case insert on the same table as the CD-Recorder is
on could shake the unit enough.) CD Recording requires
much more stability than reading. When reading a CD, players
can take several passes at the data stream if the tracking is lost.
However, CD-Recorders do not have this luxury. They are
recording the information on the CD, and need to do so
precisely the first time.
The system is testing too slow for 6x recording speeds. -
Chances are there is more processing going on than just your CD
authoring software.
I cannot extract audio from my CD-ROM. - If you are trying to
extract audio from an audio CD or trying to copy from CD to CD,
your CD-ROM must be capable of these functions. (Not all CDROMs can do that.) If necessary, the 6x24 drive is capable of most
of these types of functions, so you may use the CD-R drive to
extract to your hard drive, then burn back to the CD.
1) If your computer has a lot of applications running in the
background, this can substantially slow the efficiency of your
system. (Common culprits are likely to be anti-virus software,
screen savers, or advanced network applications.) These can
be temporarily disabled to dedicate more processing
horsepower to the CD authoring software.
Page 10

2) In recent years, large disk drives have become more and more
affordable, but often the drives many stores advertise are quite
slow. If the drive is too slow, then you’ll have to try optimizing
your drive.
3) In Red Roaster, if you are burning the disc “On The Fly”, that
means the program is processing your file while it is burning it.
Fades, EQ, compression... everything. Of course, we don’t
want to take out the processing we worked so hard to perfect,
so it may be best to create an image to burn from if you are
planning on making multiple copies of the CD. If not, it may be
best to simply slow the CD-Recording process down. See the
section on Underruns at the beginning of this troubleshooting
section.
SEK’D Red Roaster is running in another language! - You
probably installed the program in something other than English.
Delete the folder called Sekdrr24 from your C: drive, and reinstall it.
This time, make sure you go to:
Cdr624w\Software\Install\ Red Roaster-E \Setup.
This will install Red Roaster in English. (Red Roaster-D installs in
German, Red Roaster-F installs in French.)
Technical Support
If you are still experiencing problems with the unit after reading the
previous troubleshooting section, you can check for more up to date
FAQ documents at TASCAM’s web site at:
http://www.tascam.com
or contact TASCAM Technical Support at:
(323) 726-0303
custser@teac.com
 Loading...