

Page 1
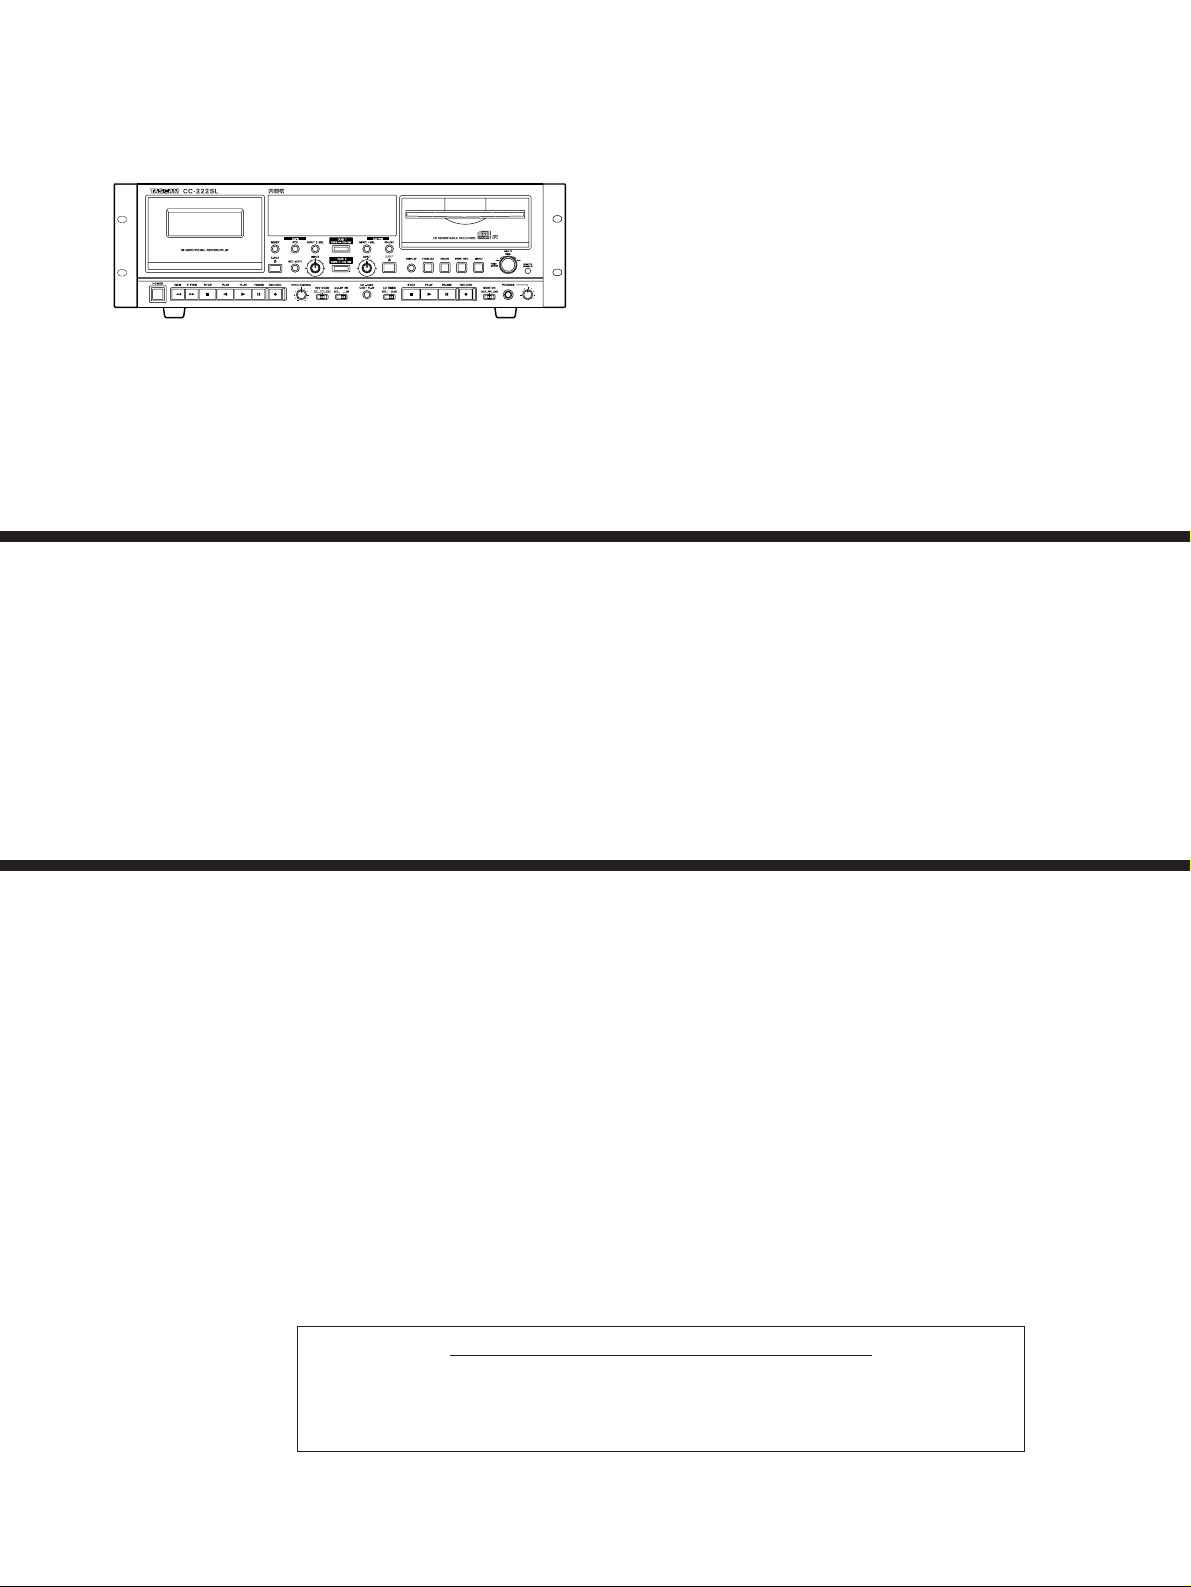
CCCC--222222SSLL
CD Recorder/Cassette Deck
Effective : May, 2007
S-0161
CONTENTS
1. SAFETY INFORMATION・・・・・・・・・・・・・・・・・・・・・・・・・・・・・・・2
2. Specifications
・・・・・・・・・・・・・・・・・・・・・・・・・・・・・・・・・・・・・・・・・・・・
3
3. Test Mode
・・・・・・・・・・・・・・・・・・・・・・・・・・・・・・・・・・・・・・・・・・・・・・・・
5
4. Checks (CD-RW Section)
・・・・・・・・・・・・・・・・・・・・・・・・・・・・・・
7
5. Adjustment and Checks (Cassette Section)
・・・・・・・・・
9
6. Precautions when handling CD-W224SL (Thin Drive) 14
7. Exploded Views and Parts List
・・・・・・・・・・・・・・・・・・・・・・・
15
8. PC Boards and Parts List
・・・・・・・・・・・・・・・・・・・・・・・・・・・・・
20
9. Included Accessories
・・・・・・・・・・・・・・・・・・・・・・・・・・・・・・・・・・
28
目次
1.SAFETYINFORMATION
・・・・・・・・・・・・・・・・・・・・・・・・・・・・・
2
2.仕様
・・・・・・・・・・・・・・・・・・・・・・・・・・・・・・・・・・・・・・・・・・・・・・・・・・・・・
3
3.テストモード
・・・・・・・・・・・・・・・・・・・・・・・・・・・・・・・・・・・・・・・・・・・・
5
4.確認(CD-RW部)
・・・・・・・・・・・・・・・・・・・・・・・・・・・・・・・・・・・・・・
7
5.調整と確認(カセット部)
・・・・・・・・・・・・・・・・・・・・・・・・・・・・・・
9
6.CD-W224SL(薄型ドライブ)取り扱い上の注意
・・・・・・
14
7.分解図とパーツリスト
・・・・・・・・・・・・・・・・・・・・・・・・・・・・・・・・
15
8.基板図とパーツリスト
・・・・・・・・・・・・・・・・・・・・・・・・・・・・・・・・
20
9.付属品
・・・・・・・・・・・・・・・・・・・・・・・・・・・・・・・・・・・・・・・・・・・・・・・・・
28
SERVICE MANUAL
»
INSTRUCTIONS FOR SERVICE PERSONNEL
BEFORE RETURNING APPLIANCE TO THE CUSTOMER, MAKE LEAKAGE-CURRENT OR RESISTANCE MEASUREMENTS TO DETERMINE THAT EXPOSED
PARTS ARE ACCEPTABLY INSULATED FROM THE SUPPLY CIRCUIT.
Page 2
−2−
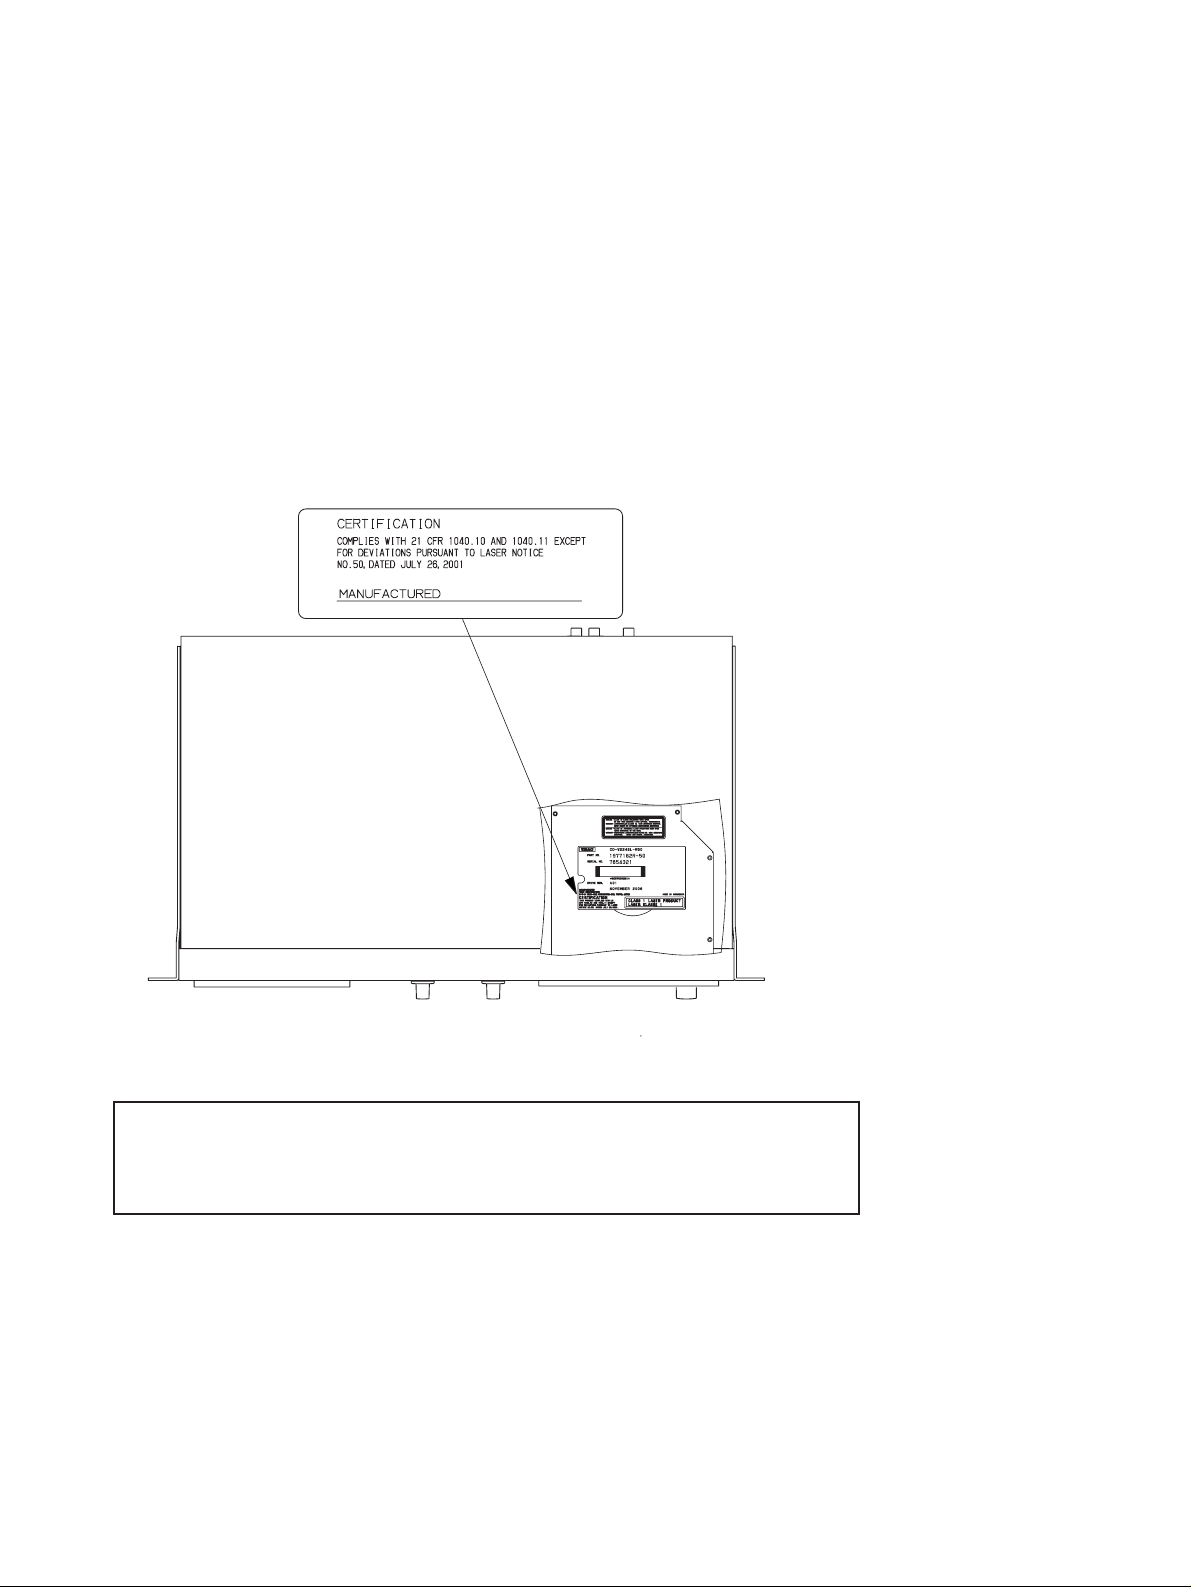
1. SAFETY INFORMATION
TASCAM CC-222SL
This product has been designed and manufactured according to FDA regulations "title 21, CFR, chapter 1, subchapter J, based on
the Radiation Control for Health and Safety Act of 1968", and is classified as a class 1 laser product. There is no hazardous invisible laser radiation during operation because invisible laser radiation emitted inside of this product is completely confined in the
protective housings.
The label required in this regulation is shown 1.
●
CAUTION
USE OF CONTROLS OR ADJUSTMENT OR PERFORMANCE OF PROCEDURES OTHER THAN THOSE SPECIFIED HEREIN MAY
RESULT IN HAZARDOUS RADIATION EXPOSURE.
Type : HOP-6201T
Optical pickup: Manufacturer : Hitachi Media Electronics Co,Ltd
Laser output : Less than 75 mW on the objective lens(record)
Wavelength : 777 to 787 nm
1
For USA
Page 3

−3−
2. Specifications
仕様
TASCAM CC-222SL
CD recorder section
Recording media type: CD-R, CD-R-DA
CD-RW, CD-RW-DA
Recording resolution: 16-bit linear
Recording sampling
frequency: 44.1 kHz
Frequency response: 20 Hz - 20 kHz (playback ±0.8 dB,
recording ±1.0 dB)
S/N ratio: 92 dB (playback), 88 dB (recording)
Dynamic range: 92 dB (playback), 88 dB (recording)
Total harmonic distortion: < 0.006 % (playback),
< 0.01 % (recording)
Channel separation: 80 dB (playback : 1 kHz),
75 dB (recording : 1 kHz)
Wow & flutter: Unmeasurable (< 0.001 %)
LINE INPUTS 1: Unbalanced RCA
Nominal input level: -10 dBV (6dBV - 16dB)
Maximum input level: +6 dBV
Input impedance: 50 kΩ
LINE OUTPUTS 1: Unbalanced RCA
Nominal output level: -10 dBV (FS-16dB)
Maximum output level: +6 dBV
Ouput impedance: 600 Ω
DIGITAL INPUT
Sampling rate: 32KHz 〜 48KHz
COAXIAL: RCA pin, IEC60958 TYPE II
OPTICAL: TOSLINK, IEC60958 TYPE II
DIGITAL OUTPUT:
COAXIAL: RCA pin, IEC60958 TYPE II
OPTICAL: TOSLINK, IEC60958 TYPE II
Cassette recorder section
Number of channels: 4-track,2-channel stereo
Heads: Record/playback x1(rotary reverse),
erase x 1
Type of tape: Compact Cassette C-60, C-90
(Type I (normal),
Type II (high-position/chrome)
-recording and playback; Type IV
(metal)-playback only)
Tape speed: 4.76 cm/s (1 7/8 ips)
Motor: DC servo motor (x 1)
Wow and flutter: 0.19% (W. RMS)
Frequency response : 50Hz ― 12.5kHz ±3dB
(overall) (high position)
50Hz ― 10kHz ±3dB (normal)
Signal-to-noise ratio: 45 dB (Dolby NR off)
Fast winding time: About 120 seconds (C-60)
CDレコーダー部
記録ディスク: CD-R、CD-R-DA
CD-RW、CD-RW-DA
量子化ビット数: 16bitリニア
録音サンプリング周波数: 44.1kHz
周波数特性: 20Hz〜 20kHz(再生時:± 0.8dB
記録時:±1.0dB,)
S/N比: 92dB以上
(再生時)、88dB以上(記録時)
ダイナミックレンジ: 92dB以上
(再生時)、88dB以上(記録時)
歪率: 0.006% 以下
(再生時)
0.01% 以下 (記録時)
チャンネルセパレーション: 80dB以上(再生時,1KHz)
75dB以上(記録時,1kHz)
ワウフラッター: 測定限界以下(0.001%以下)
LINEINPUTS1: RCAピン(不平衡)
基準入力レベル: − 10dBV(6dBV− 16dB)
最大入力レベル: + 6dBV
入力インピーダンス: 50kΩ
LINEOUTPUTS1: RCAピン(不平衡)
基準出力レベル: − 10dBV(FS− 16dB)
最大出力レベル: + 6dBV
出力インピーダンス: 600Ω
DIGITALINPUT
対応サンプリングレート: 32KHz〜 48KHz
COAXIAL: RCAピン、IEC-60958TypeII
OPTICAL: TOSLINK、IEC-60958TypeII
DIGITALOUTPUT:
COAXIAL: RCAピン、IEC-60958TypeII
OPTICAL: TOSLINK、IEC-60958TypeII
カセットレコーダー部
トラック方式: 4トラック、2チャンネルステレオ
ヘッド構成: 録音/再生ヘッドX1(,回転リバース式)
消去ヘッド X1
使用テープ: C‐60〜 C‐90カセットテープ
(メタルテープは再生のみ)
テープ速度: 4,76cm/sec
モーター: DCサーボモーター× 1
ワウ・フラッター: 0.19%(W.RMS)
周波数特性(総合): ノーマル: 50〜 10kHz± 3dB
ハイポジション: 50〜 12.5kHz± 3dB
S/N比: 45dB(ドルビーOFF)
早巻時間: 約120秒(C‐60テープ)
Page 4

−4−
TASCAM CC-222SL
LINE INPUTS 2: Unbalanced RCA
Nominal input level: 0.28V (-11 dBV)
Input impedance: 50 kΩ
LINE OUTPUTS 2: Unbalanced RCA
Nominal output level: 0.46V (ミ6.7 dBV)
Load impedance: 50 kΩ
Phono input and headphones
RIAA PHONO INPUT: Unbalanced RCA (with ground)
Cartridge type: MM (moving magnet)
Input signal level: 5.6mV
Input impedance: 50 kΩ
Signal-to-noise ratio: 60 dB
PHONES: 6 mm (1/4) stereo
Output level: 10 mW + 10 mW (into 32 Ω)
General specifications
Voltage requirements: USA/Canada 120 VAC, 60 Hz
U.K./Europe 230 VAC, 50 Hz
Australia 240 VAC, 50 Hz
KOR 120/230 VAC,60 Hz
Taiwan 120 VAC, 60 Hz
Power consumption: 33 W
Applicable electromagnetic
environment: E4
Peak inrush current: 1.1 A
Dimensions w x h x d: 483 x 140 x 295 (mm)
19 x 5.4 x 11.6 (in)
Weight: 6.9 kg (15.2 lbs)
Operating temperature: 5°C to 35°C (41°F to 95°F)
Accessories
Remote control unit:(RC-222SL) x 1
Rack mounting screw kit x 1
Dry Battery: UM-3(2PxED)
* Improvements may result in specifications or feature changes
without notice.
* Dolby noise reduction manufactured underlicense from Dolby
Laboratories Licensing Corporation.
*DOLBY and the double-D ∂ symbol aretrademarks of
DolbyLaboratories Licensing Corporation.
LINEINPUTS2: RCAピン
基準入力レベル: 0.28V(− 11dBV)
入力インピーダンス: 50kΩ
LINEOUTPUTS2: RCAピン
基準出力レベル: 0.46V(− 6.7dBV)
負荷インピーダンス: 50kΩ
PHONOアンプ部
MMカートリッジ
入力感度: 5.6mV
入力インピーダンス: 50kΩ
S/N比: 60dB
ヘッドホン出力: 6φステレオ
10mW+ 10mW、32Ω負荷
一般
電源: 100VAC,50− 60Hz
消費電力: 22W
外形寸法: 483× 140× 295mm(幅×高さ×奥行き)
質量: 6.9.kg
使用環境 5°Cto35°C
付属品
RC‐222SLリモートコントロールユニット
ラックマウントビスキット(ビス× 4、ワッシャー× 4)
バッテリー UM-3(2P
xED)
*仕様および外観は改善のため予告なく変更することがあります。
*ドルビーノイズリダクションは、ドルビーラボラトリーズライセ
ンシングコーポレーションからの実施権に基づき製造されていま
す。
*ドルビー、DOLBY及び(∂)はドルビーラボラトリーズ
ライセンシングコーポレーションの登録商標です。
Dimensionaldrawing寸法図
483
466
435
27015 10
57.2
140
132.5
Page 5

−5−
3.Test Mode
テストモード
TASCAM CC-222SL
2-1. How to enter test mode
1. Turn power on while pressing and holding the INPUT 1 SEL +
INPUT 2 SEL keys simultaneously. Continue to hold down the
keys until "Welcom" is displayed.
The display will show "Welcome" and the front MPU version number, and the test mode is initiated.
2. Turn power off to exit from the test mode.
2-2. Checks in test mode
2-2-1. Front key check
1. Press the PLAY (CD-RW) key to enter the front key check
mode.(To abort the front key check, press the INPUT 1 SEL
key.)
2. The display shows the name of each key to be checked; press
the corresponding key.
When the check result of the key is OK, the display shows
another key name. When the result is No Good, the display
continues to show the same key name.
3. When all of the keys have been checked, the display shows
"
REV 1WAY" Follow this instruction by checking the REV
MODE slide switch operation.
4. Next, follow the instruction by checking the TIMER PLAY
slide switch operation.
5. The display finally shows "
DIAL 45" Check the MULTI
DIAL so that the displayed figure increases when the dial is
rotated clockwise and decreases when it is rotated counterclockwise.
6. Press the PLAY (CD-RW) key to exit from the front key check
mode and return to the front MPU Version number display
mode.
2-2-2. Display check
1. Press the DISPLAY key to enter the display check mode.
2. Press DISPLAY key a few times and ensure that each press
lights the display blocks one after another.
3. When all the indicators are lit, press the DISPLAY key to exit
from the display check mode and return to the front MPU
Version number display mode.
2-2-3. Initializin of EEPROM
1. To initialize EEPROM, which hold menu setting, press the
ERASE key when the microcomputer version number display
mode
2. When the initialization is complete and factory default,"
EEP-
ROM OK" is displayed.
3. Press the INPUT SEL 1 key again to return to the front MPU
Version number display mode.
2-2-4. CD-RW drive unit Version No. display
1. When the INPUT 1 SEL key is pressed, the display shows the
firmware version number of CD-RW drive unit.
2. Press the INPUT 1 SEL key again to return to the front MPU
Version number display mode.
2-1.テストモードの入り方
1. INPUT1SELキー+ INPUT2SELキーを押しながら、
電源をONする。キーは"Welcom"が表示し始めるまで押し
続けてください。
"Welcome"表示後、フロントマイコンのバージョン No.が
表示されテストモードに入る。
2. テストモードを終了するには、電源をOFFする。
2-2.テストモードでのチェック
2-2-1.フロントキーチェック
1. PLAY(CD-RW)キーを押し、フロントキーチェックモード
に入る。(フロントキーチェックを中止する場合は、INPUT
1SELキーを押す)
2. 表示部にチェックするキーの名称が表示されるので、そのキ
ーを押す。チェックOKなら次のキーの名称が表示され、NG
なら表示は変化しない。
3. 一通りキーの確認が終了すると、ディスプレイにREV
1WAYと表示されので、指示通りスライドスイッチREV
MODEを動かす。
4. 次に、スライドスイッチTIMERPLAYを指示通り動かす。
5. TIMERPLAYの確認が終了すると、ディスプレイに
DIAL 45と表示される。MULTIDIALを回し、表示の
数字が右回しで増加、左回しで減少することを確認する。
6. PLAY(CD-RW)キーを押すと、フロントキーチェックモー
ドを終了してフロントマイコンのバージョン No.表示に戻
る。
2-2-2.ディスプレイチェック
1. DISPLAYキーを押すと、ディスプレイチェックモードに入
る。
2. DISPLAYキーを押すたびに、表示部がブロックごとに点灯
することを確認する。
3. 確認終了後、DISPLAYキーを押すと、ディスプレイチェッ
クモードを終了してフロントマイコンのバージョン No.表示
に戻る。
2-2-3.EEPROMのイニシャライズ
1. メニュー設定記憶用EEPROMを初期化する場合は、バージ
ョン No.表示状態からERASEキーを押す。
2. EEPROM OKと表示され、工場出荷時の状態に初期化
される。
3. 再度ERASEキーを押すとフロントマイコンのバージョン
No.表示に戻る。
2-2-4.CD-RWドライブのバージョン表示
1. INPUT1SELキーを押すとCD-RWドライブのファームウ
ェアのバージョンを表示する。
2. 再度INPUT1SELキーを押すとフロントマイコンのバージ
ョン No.表示に戻る。
Page 6

−6−
TASCAM CC-222SL
2-2-5.SYS microcomputer Version No. display
1. Press the PAUSE key and the system microcomputer version
number is displayed.
2. Press the PAUSE key again to return to the front MPU version
display mode.
2-2-6. Total recording time display
1. When the REC (CD-RW) key is pressed, the display shows the
time in which the pickup outputs the recording power (in the
unit of hour).
2. Press the REC (CD-RW) key again to return to the front MPU
Version number display mode.
2-2-7.Clearing total recording time
1. Hold down the REC key and press and hold down the ERASE
key.
2. Continue to hold down both keys for 7-8 seconds and the
total recording time is cleared. When releasing the keys, the
front MPU version is displayed again.
2-2-8.Updating DRIVE and SYS firmwares
(You need discs containing DRIVE or SYS updating data.)
1. When the front MPU version number is displayed, press these
four keys at the same time: TAPE-REC, TAPE-RESET, CDREC, and CD-MENU.
"
SET F/W DISC" is displayed.
2. Insert the updater disc on the tray and push the tray closed.
(The OPEN/CLOSE key is not available at this stage.)
When the tray closes, "
F/W UP TOC-R" is displayed and
updating data is read in from the disc. When data is fully
loaded, the new and old version numbers are displayed.
Example: "
S0100->0102" (current firmware version no.
shown at left)
3. Press the REC key and the updating process starts. (Pressing
the STOP key opens the tray and switches the unit back to the
front MPU version number display mode.)
Upon completion of the updating, "
F/W-UPDATE" changes
to "
F/W-COMPLETE" and the tray automatically opens.
4. Take out the disc, gently push the tray closed, and then
switch off the power.
2-2-5.SYSマイコンのバージョン表示
1. PAUSEキーを押すとSYSマイコンのバージョンを表示す
る。
2. 再度PAUSEキーを押すとフロントマイコンのバージョン
No.表示に戻る。
2-2-6.記録積算時間表示
1. REC(CD-RW)キーを押すと、ピックアップが記録
POWERを出力した積算時間を表示する。(単位: hour)
2. 再度REC(CD-RW)キーを押すとフロントマイコンのバー
ジョン No.表示に戻る。
2-2-7.記録積算時間のクリア
1. RECキーを押しながら、ERASEキーを押す。
2. 7〜8秒押し続けると積算時間がクリアされ、キーを離すとフ
ロントマイコンのバージョン No.表示に戻る。
2-2-8.DRIVEおよび SYSのファームウェアーの
アップデート方法
(DRIVEあるいは SYSのアップデートデータを書いたDISCを
準備する。)
[操作手順]
1. フロントマイコンのバージョン No.表示状態において、以下
の4つのキーを同時に押す。(TAPE-RECキー、TAPERESETキー、CD-RECキー、CD-MENUキー)
SET F/W DISCを表示する。
2. アップデート用DISCを挿入する。(EJECTキーは使用不可)。
DISCが挿入されると、F/W UP TOC-Rと表示して、
DISCからデータを読み込む。 読み込み終了すると新旧のバ
ージョンを表示する。
例:S0100->0102(左が現在のfirmware)
3:RECキーを押すと、アップデートを開始する。(STOPキ
ーを押すとDISCを排出して、フロントマイコンのバージョ
ン No.表示に戻る。)
F/W-UPDATEを表示し、アップデートを開始する。
終了するとF/W-COMPLETEを表示してDISCを排出
する。
4 電源をOFFする。
Page 7

−7−
TASCAM CC-222SL
4.Checks (CD-RW Section)
確認 (CD-RW部)
3-1. Playback performance 再生系
Mode : PLAY
Measurement point : LINE OUT 1 0 dBV=1 V
No
.ITEM
項目
TEST DISC
テストディスク
PLAYBACK SIGNAL
再生信号
SPECIFICATION
規格
REMARKS
備考
1.
Playback level
再生レベル
MCD-111
Track 2
1 KHz, 0dB
2.0 ± 0.4 Vrms
2.
Playback frequency
responce
再生周波数特性
MCD-111
Track 3-6
20 Hz-20 KHz, 0dB
0 ± 1.0 dB
reference: 1KHz
1KHz基準
3.
Playback distortion
再生歪率
MCD-111
Track 2
1 KHz, 0dB 0.006 % or less 20 KHz LPF
4.
Playback SN ratio
再生SN比
MCD-111
Track 7
- ∞ dB
92 dB or better 20 KHz LPF + IEC-A
5.
Playback channel
separation
再生チャンネル
セパレーション
MCD-111
Track 8,10
1 KHz, 0dB 80 dB or better IEC-A
6.
Enphasis effect
エンファシス効果
MCD-111
Track 13
16 KHz, - 20 dB
- 14 dBV ± 0.8 dB
Page 8

−8−
TASCAM CC-222SL
3-2. Monitor performance モニター系
Mode : REC Monitor
Input terminal : LINE IN 1
Measurement point : LINE OUT 1 0 dBV=1 V
No
ITEM
項目
ITEM
項目
SPECIFICATION
規格
REMARKS
備考
1.
Record level
録音レベル
1 KHz, -6 dB - 6 dBV
By pressing the INPUT 1 SEL key, select "LINE1".
Adjust the level by turning the INPUT (CD-RW) control.
Once done,keep adjustment unchanged untill all the necessary
measurements have been made.
INPUT1SELキーで"LINE1"を選択する。
INPUT(CD-RW)つまみを回して、レベルを調整する。
調整後は全ての測定が終わるまでこの状態にしておく。
2.
Monitor frequency
responce
モニター周波数特性
20 Hz-20 KHz, -6 dB
±1.0 dB.
reference: 1KHz
1KHz基準
3.
Metet check
メーター確認
1 KHz, +5.5 dB 0 ± 1 dB
Check the meter level.
メーター表示を確認する。
4.
Monitor distortion
モニター歪率
1 KHz, +5.0 dB 0.01 % or better 20 kHz LPF
5.
Monitor SN ratio
モニターSN比
88 dB or better
Ratio of output level at +5.5 dBV input to noise level
+ 5.5dBV入力時の出力レベルとノイズレベルとの比
20 kHz LPF + IEC-A
6.
Monitor channel
separation
モニターチャンネル
セパレーション
L(R)ch: 1 KHz, +5.5 dBV
R(L)ch: No signal .
1 KHz, 0dB
Ratio of Lch output level to Rch output level
Lch出力とRch出力の比
IEC-A
Lch: 10 KHz, +5.5dBV .
Rch: No signal .
1 KHz, 0dB
Page 9
−9−
5. Adjustment and Checks (Cassette Section)
調整と確認(カセット部)
TASCAM CC-222SL
4-1. MECHANICAL ADJUSTMENT
4-1-1. Tape speed
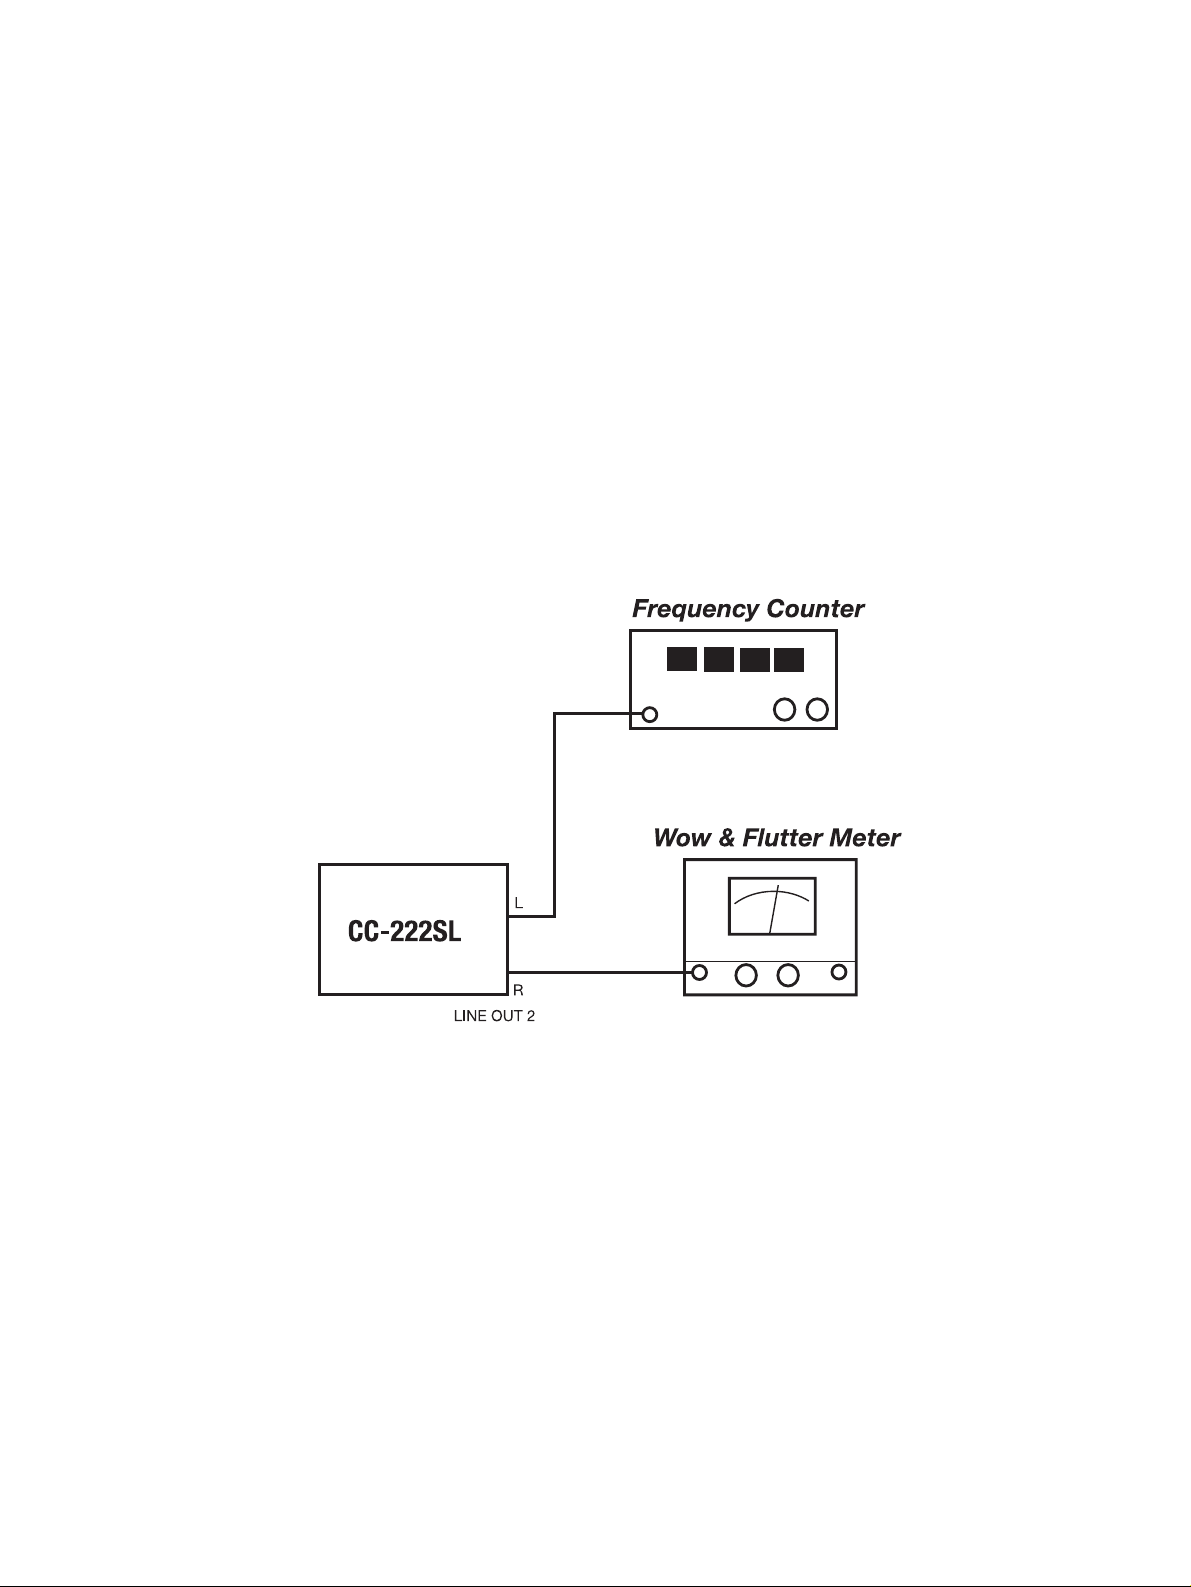
1. Connect a frequency counter to the deck as shown in Fig. 4-1.
2. Load a MTT-111N test tape and play in FWD direction the
begining of the test tape.
3. Adjust the variable resistor VR31 on the MAIN PCB (Fig.4-2).
4-1-2. Wow and flutter
1. Connect a wow-and-flutter meter to the deck as shown in
Fig. 4-1.
2. Load and play a MTT-111N test tape.
3. Check that the readings on the wow-and-flutter meter is with
in 0.19 % (WRMS).
4-1-3. Pitch control
Play back the test tape MTT-111N, turn the PITCH CONTROL
knob to the maximum and minimum positions so that the tape
speed variations are as follows:
Standard : ± 10 % or more (2640 Hz or less, 3360 Hz or more)
4-1.機構部の調整
4-1-1.テープ速度
1.Fig.4-1のように周波数カウンターを接続する。
2.テストテープMTT-111Nの巻き始め部をFWD方向で
再生する。
3.周波数値が3000Hz± 10HzになるようにMAIN
PCBのVR31(Fig.4-2)を調整する。
4-1-2.ワウフラッタ
1.Fig.4-1のようにワウフラッタメーターを接続する。
2.テストテープMTT-111Nを再生する。
3.ワウフラッタ値が0.19%(WRMS)以内であること。
4-1-3.ピッチコントロール確認
テストテープMTT-111N を再生し、PITCH CONTROL を
最大、最小に回したとき、可変幅が± 10%以上(MAX:
3360Hz以上、MIN:2640Hz以下)あること。
Fig. 4-1
Page 10

−10−
TASCAM CC-222SL
4-2. ELECTRICAL ADJUSTMENT AND CHECKS
4-2-1. Precautions
1. Before performing adjustments and checks clean and demagnetizethe entire tape path.
2. In general, adjustments and checks are made in the order of
Lch then Rch. Double REF. Nos. indicate Lch /Rch.
(Example ; R11/R21)
3. 0 dBu is referenced to 0.775 V.
4. The AC voltmeter used in the procedures must have an input
impedance of 1 MΩ or more.
5. Unless specified otherwise, adjustments and checks are mede
in FWD direction.
4-2-2. Adjustment and check locations
4-2.アンプ部の調整と確認
4-2-1.注意
1.アンプ部の調整・確認の前に、テープ走行系の消磁と
清掃を行ってください。
2.特に指定のない限り、調整はLch、Rchの順序で行って
ください。尚、R11/R21のように記されている回路番
号はLch/Rchを示します。
3.0dBu= 0.775Vで表記しています。
4.測定に使用するレベル計は、入力インピーダンス1M
Ω以上のものとしてください。
5.特に指定のない場合、調整および確認はFWD方向で行
ってください。
4-2-2.調整および測定箇所
Fig. 4-2 Adjustment and check location
Page 11

−11−
TASCAM CC-222SL
4-2-3. Playback performance 再生系
Mode: PLAY
Measurement point: LINE OUT 2
DOLBY NR switch: OFF
No
ITEM
項目
SETTING
設定
TEST TAPE
テストテープ
ADJUSTMENT
調整
MEASUREMANT
測定
REMARKS
備考
1.
REC/PLAY
head azimuth
録/再ヘッド
アジマス
Connection : Fig. 4-4
Check/adjust in FWD,
REV respectively
FWD,REVそれぞれ
実施
MTT-25702
(12.5 kHz)
Azimuth screws
of R/P head (Fig.4-6)
録/再ヘッドのア
ジマス調整ネジ
Max. output at
L & Rch
L&R最大出力
Phase: with in
45°
(Fig. 4-7)
2.
Specified output
level
規定出力レベル
Connection : Fig. 4-3
FWD PLAY
MTT-150 VR11/VR21
- 4.5 dBu ± 0.1 dB
3.
Playback frequency
response
再生周波数特性
Connection : Fig. 4-3 MTT-25702 Check only
250 Hz-10 kHz: ±3 dB
10-12.5 kHz: ± 4 dB
4.
Playback SN ratio
再生SN比
Connection : Fig. 4-3 MTT-15000 Check only 46 dB min.
Rtio of ref. level to
noise level
規定出力レベルと
の比
REV PLAY MTT-150 Check
- 4.5 dBu ± 2 dB
Fig. 4-3 Basic test setup
Page 12

−12−
TASCAM CC-222SL
4-2-4. Recording performance 録音系
Mode: REC/PLAY(unless otherwise specified 特に指示のある場合を除く)
Signal input: LINE IN 2
Measurement point: LINE OUT 2(unless otherwise specified
特に指示のある場合を除く) MTT-5514 or MTT-5513 : for NORMAL
DOLBY NR switch: OFF(unless otherwise specified
特に指示のある場合を除く) MTT-5564 or MTT-5563 : for CrO2
No
ITEM
項目
SETTING
設定
INPUT SIGNAL
入力信号
ADJUSTMENT調整MEASUREMANT
測定
REMARKS
備考
1.
Reference level set
基準レベルセット
Connection : Fig. 4-3
Tape : MTT-5514
Mode : REC PAUSE
400 Hz/-9 dBu INPUT control - 4.5 dBu
After adjusting, do
not move (Specific
position)
調整後はINPUT
controlを動かさな
いこと(規定位置)
2.
MPX filter
MPXフィルター
Connection : Fig. 4-3
Tape : MTT-5514
19 kHz/-9 dBu L101/L201 30 dB min.
Ratio of ref. level to
signal
規定出力レベルとの
比
3.
Bias OSC
バイアス発振器
Connection : Fig. 4-5
Tape : MTT-5514
Mode : REC
No signal
無信号
L301
P302-1:
85 KHz ± 3 kHz
4.
Record bias
録音バイアス
Connection : Fig. 4-3
Tape : MTT-5514
DOLBY NR : ON
250 Hz/-41 dBu,
10 kHz/-41 dBu
R13/R23
Nearly equal level at
both frequencies
両周波数の出力レベル
がほぼ等しくなるよう
に調整
5.
Record level
adjustment
録音レベル調整
Connection : Fig. 4-3
Tape : MTT-5514
400 Hz/-12 dBu R12/R22
- 7.5 dBu ± 1 dB
6.
Record level
check
録音レベル確認
Connection : Fig. 4-3
Tape : MTT-5564
400 Hz/-9 dBu Check only
- 4.5 dB ± 2 dB
7.
Total harmonic
distortion
総合歪率
Connection : Fig. 4-3
Tape : MTT-5514
Tape : MTT-5564
400 Hz/-9 dBu Check only 2.5 % or less
8.
Overall frequency
response
総合周波数特性
Connection : Fig. 4-3
Tape : MTT-5514
Tape : MTT-5564
DOLBY NR : ON
125 Hz 〜 12.5 kHz/
-42 dBu
Check only
125 Hz-10 kHz: ± 3 dB
10-12.5kHz: ± 5 dB
9.
Overall SN ratio
総合SN比
Connection : Fig. 4-3
Tape : MTT-5514
Tape : MTT-5564
No signal
無信号
Check only
NORMAL : 46 dB min.
CrO2 : 46 dB min.
Ratio of ref. level to
noise level
規定出力レベルとの
比
Page 13

−13−
TASCAM CC-222SL
No
ITEM
項目
SETTING
設定
INPUT SIGNAL
入力信号
ADJUSTMENT調整MEASUREMANT
測定
REMARKS
備考
10.
Erase efficiency
消去率
Connection : Fig. 4-3
(1 kHz B.P.F. in)
Tape : MTT-5564
1 kHz/+1 dBu
Check only 65 dB min.
11.
REC MUTE
function
RECMUTE効果
Connection : Fig. 4-3
(1 kHz B.P.F. in)
Tape : MTT-5564
1 kHz/+1 dBu
Check only 55 dB min.
12.
Channel
separation
チャンネル
セパレーション
Connection : Fig. 4-3
(1 kHz B.P.F. in)
Tape : MTT-5564
L ch : 1 kHz/-9 dBu
R ch : No signal .
Check only 30 dB min.
Find the difference between the 1 kHz recorded portion and the
erased portion.
1kHz録音部分とそれを消去した部分との出力レベルの比
Find the difference between the 1 kHz recorded portion and the
"REC MUTE" portion.
1kHz録音部分とRECMUTE部分との出力レベルの比
Find the difference between the 1 kHz recorded portion (L ch) and
the no signal portion (R ch).
1kHz録音部分(Lch)と無信号録音部分(Rch)との出力
レベルの比
Fig. 4-4 Test setup for azimuth check
Fig. 4-5 Test setup for bias OSC adjustment
Fig. 4-6 Azimuth screw location
Fig. 4-7 Confirming phase relationship
Page 14

−14−
6. Precautions when handling CD-W224SL (Thin Drive)
CD-W224SL(薄型ドライブ)取り扱い上の注意
TASCAM CC-222SL
N
ote the following when handling CD-W224SL (thin
drive).
1. Portions you can hold by hand during removal and
mounting operations
Perform the removal and mounting operations by holding the
grayed portions shown below. It is prohibited to hold other
areas than the grayed ones.
2. Tightening torque limitations during mounting opera-
tions
Note that the screws will be stripped when tightening them
beyond the torque limits.
2-1 When mounting the drive
At lateral 2 points M2*3 1.5kg.cm and below
2-2 When mounting the PCB
At rear 3 points M2*8 1.5kg.cm and below
CD-W224SL(薄型ドライブ)を取り扱う場合は、
下記に注意してください。
1. 取り外し、取り付け時の手持ち可能な範囲
取り付け、取り外しの場合は
下図に指示したグレー部分
を持って作業してください。グレー部分以外を持つことは
禁止されています。
2. 取り付け時のねじの締め付けトルクの制限
トルク制限を超えて締めた場合は、ねじが利かなくなりま
すので注意してください。
2-1ドライブ取り付け
側面2箇所 M2*31.5Kg.cm以下
2-2PCB取り付け
後部3箇所 M2*81.5Kgcm以下
2-1. M2*3
最大締め付けトルク 1.5Kg.cm
MAX IMUMTIGHTEING TORQUE 1.5Kg.cm
2-1. M2*3
最大締め付けトルク 1.5Kg.cm
MAX IMUMTIGHTEING TORQUE 1.5Kg.cm
1. グレー部分以外は手持ち禁止範囲(表裏共通)
NO TOUCH EREA(BOTH SIDE)
WITHOUT GRAY EREA
2-2. M2*8
最大締め付けトルク 1.5Kg.cm
MAX IMUMTIGHTEING TORQUE 1.5Kg.cm
25
10
70
6
Page 15

7. Exploded Views and Parts List
Exploded View-1
−15−
分解図とパーツリスト
TASCAM CC-222SL
Page 16

Exploded View-1
REF.NO. PARTSNO. DESCRIPTION REMARKS
1-1 3M0026600H RACK MOUNTING 102MK2 G
1-2 3M0026010B BONNET CC-222 G
1-3 £ Y00308600A AC INLET ASSY,222MK3
1-4 E01175100A HARN ASSY,40P IDE CDRW G
1-5 M02567000A PANEL,REAR 222MK3 S G
1-5 M02567093A PANEL,REAR ETC 222MK3 S G
1-6 3E017240G GND TERMINAL G
1-7 E95266710A PCB ASSY,OUTPUT 222M3S G..........................................PCB ASSY,GATHER B (Refer to page 21)
1-8 E95265900B PCB ASSY,INPUT VR 222MK3 G .......................................PCB ASSY,GATHER A (Refer to page 20)
1-9 3M0120200A BRACKET,INPUT VR CC-222 G
1-10 3M0120100A LINKAGE,INPUT KNOBCC-222G
1-11 3M0120001A HEAT SINK CC222MK3 G
1-12 E95267001A PCB ASSY,POWER JPN 222M3 .........................................PCB ASSY,GATHER C (Refer to page 22)
1-12 E95267040A PCB ASSY,POWER AUS 222M3.........................................PCB ASSY,GATHER C (Refer to page 22)
1-12 E95267050A PCB ASSY,POWER EUR 222M3.........................................PCB ASSY,GATHER C (Refer to page 22)
1-12 E95267093A PCB ASSY,POWER EX 222M3 ..........................................PCB ASSY,GATHER C (Refer to page 22)
1-13 E95267100A PCB ASSY,REG 222M3......................................................PCB ASSY,GATHER C (Refer to page 22)
1-14 M01335100A BUTTON,POWER CD-RW402 G
1-15 3M0120800A LINKAGE,POWER CC-222 G
1-16 £E01175800B TRANS,CC222MK3 G
1-17 E95246060A PCB ASSY,SYS 222MK3S G ..............................................Refer to page 23
1-18 3M0128000B PLATE,SHIELD TRANS G
1-19 3M0120600D BEACKET,PT CC-222MK3 G
1-20 E95265800B PCB ASSY,MAIN 222MK3 .................................................PCB ASSY,GATHER A (Refer to page 20)
1-21 3E0170800A FFC 8P P=1.25 WIRE G
1-22 M02557900A DRIVE ASSY,CD-W224SL G
1J77182R50 CD-W224SL-R50
SOFTWARE SPEC,AV CDW224SL
1-23 M02556200A BRACKET,DRV 222MK3 G
1-24 M02307700A BRACKET,DRIVE 222MK3 G
1-25 M02307500A BRACKET,LEFT 222MK3 G
1-26 M02307600B BRACKET,RIGHT 222MK3 G
1-27 E95266810A PCB ASSY,V-SELECT 222M3S G .......................................PCB ASSY,GATHER B (Refer to page 21)
1-28 3M0109510B MAIN CHASSIS CC-222 G
1-29 3M0127000B CUSHION 9*10*40 G
1-30 3M001950 FOOT,21MM G
1-31 M02303500A MECH ASSY,RP CMAL2Z213C G
1-32 3M0029900B BRACKET,EJECT A W-780R G
1-33 3M0029800B HOOK,EJECT A W-780R G
1-34 3M0010600A TORSION SPRING,EJECT G
1-35 3M0119300A BUTTON,EJECT CC-222 G
1-36 M02567700A BUTTON,MAIN KEY 222M3 S G
1-37 E95266510A PCB ASSY,KEY 222M3S G ................................................PCB ASSY,GATHER B (Refer to page 21)
1-38 E95266610A PCB ASSY,P-CON 222M3S G ............................................PCB ASSY,GATHER B (Refer to page 21)
1-39 E95266410A PCB ASSY,SW 222M3S G .................................................PCB ASSY,GATHER B (Refer to page 21)
1-40 E95266310A PCB ASSY,FRONT 222M3S G ............................................PCB ASSY,GATHER B (Refer to page 21)
1-41 3E0170900A FFC 12P P=1.25 WIRE G
1-42 E95266100B PCB ASSY,MONITOR 222MK3 G .......................................PCB ASSY,GATHER A (Refer to page 20)
−16−
TASCAM CC-222SL
Page 17

Exploded View-1
REF.NO. PARTSNO. DESCRIPTION REMARKS
1-43 3M0120500C BRACKET,PHONEJACKCC-222 G
1-44 E95266000B PCB ASSY,PHONE 222MK3 G............................................PCB ASSY,GATHER A (Refer to page 20)
1-45 3M0011200A DAMPER,(SD-385)
1-46 M02558300A PANEL,FRONT 222MK3S G
1-47 3M0134900A BADGE TASCAM SILVER G
1-48 M02551900A PLATE,REFLECT S-LINE G
1-49 3M0118800A RING,POWER CC-222 G
1-50 3M0118900A BUTTON,KEY1 CC-222 G
1-51 M01898700A KNOB,VOLUME BLK AD-600 G
1-52 3M0062710A RTNG RING-C,U1.0 G
1-53 M02603001A KNOB,VR A N61/N65 G
1-54 3M0119400A BUTTON,KEY2 CC-222 G
1-55 3M0089800A KNOB D15 JOG RW800B G
1-56 3M0107910A DOOR LID CD-A630 G
1-57 3M0026500B WINDOW,LID AD500 G
1-58 3M0011100A CASE,LEAD W-780R G
1-59 3M0010400A TORSION SPRING,CASE I G
1-60 3M0119100A WINDOW,FL CC-222 G
1-61 M02556300A PANEL,CD CC222MK3 S G
1-62 E95267210A PCB ASSY,REG A 222M3S G ............................................PCB ASSY,GATHER C (Refer to page 22)
1-63 E95267310A PCB ASSY,REG B 222M3S G .............................................PCB ASSY,GATHER C (Refer to page 22)
1-64 E95267410A PCB ASSY,REG C 222M3S G .............................................PCB ASSY,GATHER C (Refer to page 22
1-65 3M0096900A NUT,M7
1-66 3M0123800A NUT,M12
1-67 E95307900A PCB ASSY,SLIM G ............................................................Refer to page 24
1-68 M02567800A SPACER,SS1-3L G
1-69 B00173808A SCREW,BPA 2*8 FZC G
1-70 B00174006A SCREW,BPA 3*6 FZC G
1-71 B00197612A SCREW,PPSU 3*12 FZB G
1-72 3M002020 FIBER WSHR,3X8X0.3T BLK
1-73 B00197606A SCREW,PPSU 3*6 FZB G
1-74 B00198608A SCREW,BPS 3*8 FZB G
1-75 B00170608A SCREW,VPCR 3*8 FZB G
1-76 B00199706A SCREW,BPB 3*6 FZB G
1-77 B00199708A SCREW,BPB 3*8 FZB G
1-78 3M0123900A PLAIN WASHER M12
1-79 3M0096800A PLAIN WASHER M7
1-80 B00197806A SCREW,PPSU 3*6 FZC G
1-81 B00198706A SCREW,BPS 4*6 FZB G
1-82 B00199108A SCREW,BPÇo 2.6*8 FZB G
1-83 B00199406A SCREW,BPB 3*6 FZC G
1-84 B00199008A SCREW,BPP 3*8 FZC G
1-85 B00198204A SCREW,BPS 2.6*4 FZC G
1-86 B00247300A SCREW,PPSP 4*1.3FZC G
1-87 B00208908A SCREW,PPPU 3*8 FZB G
1-88 B00298803A SCREW,BPAA 2*3 FZC G
1-89 B00198306A SCREW,BPS 3*6 FZC G
−17−
TASCAM CC-222SL
Page 18

Exploded View-2
−18−
TASCAM CC-222SL
●The parts with no referrence number in the exploded
views are not supplied.
●分解図に部番のない部品は供給できません。
Page 19

Exploded View-2
REF.NO. PARTSNO. DESCRIPTION REMARKS
2- 1 9A08686200 MTR MAIN BLK
2- 2 9A08687000 F/R BELT
2- 3 9A08781500 ASSY F/W FR25Y-11
2- 4 9A08752100 ASSY F/W FR25A-11
2- 5 9A08686500 MAIN BELT
2- 6 9A08686300 PCB CONTROL BLK
2- 7 9A08686400 CLUTCH ASSY BLK
2- 8 9A08686900 ROLLER PINCH BLK L
2- 9 9A08686800 ROLLER PINCH BLK R
2- 10 9A08686100 PLATE HD BLK
−19−
TASCAM CC-222SL
Page 20

−20−
TASCAM CC-222SL
GATHER A PCB ASSY ( PCB MAIN, PCB INPUT VR, PCB PHONE, PCB MONITOR )
8. PC Boards and Parts List
基板図とパーツリスト
Page 21

−21−
TASCAM CC-222SL
GATHER B PCB ASSY ( PCB FRONT, PCB SW, PCB KEY, PCB P-CON, PCB OUTPUT, PCB V-SELECT )
Page 22

−22−
TASCAM CC-222SL
GATHER C PCB ASSY ( PCB POWER, PCB REG, PCB REG A, PCB REG B, PCB REG C )
Page 23

−23−
TASCAM CC-222SL
SYS PCB ASSY
SIDE A
SIDE B
Page 24

−24−
TASCAM CC-222SL
GATHER SLIM PCB
SIDE A
SIDE B
Page 25

GATHER PCBA,(A)222MK3 G
REF.NO. PARTSNO. DESCRIPTION
E95267500B GATHER PCBA,(A)222MK3 G
PCB,MAIN 222MK3
PCB,INPUT VR 222MK3 G
PCB,PHONE 222MK3 G
PCB,MONITOR 222MK3 G
PCB,MAIN 222MK3
D101,D201 S0067021 DIODE,1SS133 T-77 G
D301 S0067021 DIODE,1SS133 T-77 G
D302 3S002051 ZDI,MT6J5.6B T-77 G
D303 S0067021 DIODE,1SS133 T-77 G
G5-G6 3E0043600A WIRE,#22UL1007 BLK 50MM G
J1 3E016090 JACK RCA4P RJ1073-09-03 G
J3 3E017520 JACK, RJ-1106A-09-03E1B G
L101,L201 3E003730G FILTER, MPX LPF FXD2 G
L102,L202 3E003740G FILTER,BIAS TRAP 85KHZ G
L103,L203 3E003690G COIL, #7159 8.2MH G
L301 3E0042800B TRANS, BIAS OSC 85KHZ G
L302,L303 3E003711G COIL, 10UH EC24-100K-T2 G
P303 E0119770 CONNECTOR,B 6B-PH-K-S G
P304 E0119920 CONNECTOR,B 6B-PH-K-R G
P305 E0119770 CONNECTOR,B 6B-PH-K-S G
P306 E0119750 CONNECTOR,B 4B-PH-K-S G
P307 E0119760 CONNECTOR,B 5B-PH-K-S G
P308 3E016140 CONNECT 08FE-BT-VK-N G
P309 E0119830 CONNECTOR,B12B-PH-K-S G
P310 3E010420G CONNE PLUG B10B-PHKS(LF)G
P312 E0119740 CONNECTOR,B 3B-PH-K-S G
P313 3E014770G CONNEC,PLG B3BPH RED(LF)G
Q101,Q201 S0065482 TR,2SC1815-GR(TPE2.F) GZO
Q103,Q203 3S000412G 2SC2240GR(F) G
Q104,Q204 S0069222 TRANSISTOR,DTC124ESATP G
Q106,Q206 S0069222 TRANSISTOR,DTC124ESATP G
Q107,Q207 S0069222 TRANSISTOR,DTC124ESATP G
Q301 3S000412G 2SC2240GR(F) G
Q302,Q303 S0065482 TR,2SC1815-GR(TPE2.F) GZO
Q304,Q305 S0066842 TRANSISTOR,2SA1015GR-T G
Q307,Q308 S0069222 TRANSISTOR,DTC124ESATP G
Q310,Q311 S0069232 TRANSISTOR,DTA124ESATP G
Q312,Q313 S0069222 TRANSISTOR,DTC124ESATP G
Q314-Q318 S0069232 TRANSISTOR,DTA124ESATP G
Q319 S0069222 TRANSISTOR,DTC124ESATP G
Q320-Q323 S0069222 TRANSISTOR,DTC124ESATP G
Q324,Q325 S0069232 TRANSISTOR,DTA124ESATP G
Q326 S0069222 TRANSISTOR,DTC124ESATP G
Q327,Q328 S0069232 TRANSISTOR,DTA124ESATP G
Q329 S0069222 TRANSISTOR,DTC124ESATP G
Q330 S0069232 TRANSISTOR,DTA124ESATP G
Q331 S0065482 TR,2SC1815-GR(TPE2.F) GZO
Q332 S0069232 TRANSISTOR,DTA124ESATP G
Q333 S0069222 TRANSISTOR,DTC124ESATP G
Q501 S0065482 TR,2SC1815-GR(TPE2.F) GZO
U301 3S000280G IC, UPC4570C-A G
U302 S0061754 IC,HA12134AFEL-E G
U303 S0064550 IC,NJM4558D G
GATHER PCBA,(A)222MK3 G
REF.NO. PARTSNO. DESCRIPTION
U304 3S000430 IC, BU4066BC G
U306 S0064550 IC,NJM4558D G
U307,U308 3S004640G IC TC74HC4052AP(F) G
U309 S0064550 IC,NJM4558D G
U310 3S000430 IC, BU4066BC G
U311 S0064550 IC,NJM4558D G
U312 S0064550 IC,NJM4558D G
U313 3S004630G IC NJM2041D-#ZZZB G
U314,U315 3S003350G IC,TC74HC595AP(F,M) G
U316 S0064550 IC,NJM4558D G
U317 3S000430 IC, BU4066BC G
U318 S0064550 IC,NJM4558D G
U319 3S000430 IC, BU4066BC G
U320 S0064550 IC,NJM4558D G
U321 S0064550 IC,NJM4558D G
U501 S0068644 IC,NJM4558M-TE3(8P) G
VR11,VR21 3R004590 VR SEMI-FIXEDRH0615-10KBG
VR12,VR22 3R004600 VR SEMI-FIXED RH0615-22KG
VR13,VR23 3R004620 VR SEMI-FIXEDRH0615-100KG
VR31 3R004560 VR SEMI-FIXED RH0615-1K
GNDA 3E0043200A TERMINAL, EARTH PLATE B G
P301+P302 3E0170000A WIRE ASSY,6P HEAD G
G1-G2 3E0143300A WIRE,#28UL1007BLK 100MM G
H1-H2 3E0176100A WIRE,#28UL1007 BLK 80MM G
G3-G4 3E0176900A WIRE,#28UL1007BLK 120MM G
PCB,INPUT VR 222MK3 G
J701 3E016160 PHONEJACK JY6317A-02030 G
Q803,Q903 3S000731 TR, 2SD2144S TP G
R815,R915 3R022800 RSN 1/2WS HK 33 J P=10 G
U701 3S004640G IC TC74HC4052AP(F) G
U702,U703 S0064550 IC,NJM4558D G
U704 3S000840 IC, BA4560 G
VR32 VR33 3R007980 VR RK09L12B0C0Y(50KA X2)G
VR701 3R007950 VAR R,RK09K12AW/C50KA*2 G
J304 3E0170300A WIRE ASSY,6P VR RED G
J305 3E0170400A WIRE ASSY,6P VR G
P701+P708 3E0170500A WIRE ASSY,10P PHONE G
P705 3E0170600A WIRE ASSY,5P SW G
FG 3E0172500A WIRE ASSY,PHONE GND G
FGA 3E0176200A WIRE ASSY,PHONE GND B G
PCB,MONITOR 222MK3 G
SW701 3E014570 SW,SLIDE TKR-0023/474-G
−25−
TASCAM CC-222SL
Page 26

GATHER PCBA,(B)222M3S G
REF.NO. PARTSNO. DESCRIPTION
E95267610A GATHER PCBA,(B)222M3S G
E95267640A GATHER PCBA,B EX 222M3S G
PCB,FRONT 222M3
PCB,SW 222M3
PCB,KEY 222MK3
PCB,P-CON 222MK3
PCB,OUTPUT 222MK3
PCB,V-SELECT 222MK3
PCB,FRONT 222M3
Q501,Q502 3S000320 TR, 2SB1237TV2Q G
Q503,Q504 S0069232 TRANSISTOR,DTA124ESATP G
Q505-Q508 S0069222 TRANSISTOR,DTC124ESATP G
SW501-518 3E016100 TACT SW SKHVBBD010 G
C509 C510 C0058472 CC,YE 50V 0.1UFMTPG
EN501 E0122620 ENCODER,EC11B15244 G
FL501 E00657500B FL HNA-16LM21 G
FL501 3M0119200A HOLDER,FL L G
FL501 3M0120900A HOLDER,FL R G
P501 E0130793 CONNECT,006207332012000+G
P502 E0130783 CONNECT,006207332008000+G
P504 3E007910G CONNEC,B9B-PH-SM4-TB(LF)G
P505 3E0170100A WIRE ASSY,6P CONTROL G
P506 E0101964 CONNECTOR,B7B-PH-SM4(LF) G
P507 3E0171100A WIRE ASSY 3P KEY G
U501 S00711300A IC,CXP82060-165Q 222MK3S G
U502 3S033104 IC,BR93L46RF-W G
U503 E0062220 RMCN RCVR RPM6938-V4 G
U503 3M0119700A LENS,SENSOR CC-222 G
U504 S0031624 IC,TC7S14FU G
X501 3E016130 RESONATOR CSTLS16M0X51B0G
FG1 3E0175700B WIRE ASSY,FRONT GND A G
FG2,FG4 3E0175800B WIRE ASSY,FRONT GND B G
FG3,FG5 3E0175900B WIRE ASSY,FRONT GND C G
D501 S0071811 DI,1N4003-F TAPINGW=52 G
PCB,SW 222M3
SW526 3E016100 TACT SW SKHVBBD010 G
SW527 3E014570 SW,SLIDE TKR-0023/474-G
SW528-529 3E014560 SW,SLIDE TKR-0022/473-G
PCB,KEY 222MK3
SW519-525 3E016100 TACT SW SKHVBBD010 G
PCB,P-CON 222MK3
VR501 3R007650 VR RK11K113003R(5KB) G
PCB,OUTPUT 222MK3
D701-D703 S0067021 DIODE,1SS133 T-77 G
Q701 S0069222 TRANSISTOR,DTC124ESATP G
Q702 S0069232 TRANSISTOR,DTA124ESATP G
Q801,Q901 3S000731 TR, 2SD2144S TP G
Q802,Q902 3S000731 TR, 2SD2144S TP G
J702 3E016090 JACK RCA4P RJ1073-09-03 G
P702 E0119760 CONNECTOR,B 5B-PH-K-S G
GATHER PCBA,(B)222M3S G
REF.NO. PARTSNO. DESCRIPTION
P704 E01213800A HARN ASSY,12P OUTPUT M3 G
P901 E01174900A HARN ASSY,7P BUFFER1 G
P911 E0119800 CONNECTOR,B 9B-PH-K-S G
U901 S0063914 IC,TC74HCT08AF(EL.F) G
U911 S0067644 IC,SN74LV541ANS G
BT1 M01510100A BRACKET,PCB-A G
J312 E01213600B HARN ASSY,3P AMP-IN G
J313 E01213700B HARN ASSY,3P AMP-OUT G
U322 S0068644 IC,NJM4558M-TE3(8P) G
E90266800B PCB,V-SELECT 222MK3
S01 £ E0124180 V SEL,SDKGA40602 G
A E01175500A HARN ASSY,V-SELECT-A G
B E01175600A HARN ASSY,V-SELECT-B G
C E01175700A HARN ASSY,V-SELECT-C G
−26−
TASCAM CC-222SL
Page 27

GATHER PCBA,C JPN 222M3S G
REF.NO. PARTSNO. DESCRIPTION
E95267710A GATHER PCBA,C JPN 222M3S G
E95267760A GATHER PCBA,C AUS 222M3S G
E95267770A GATHER PCBA,C EUR 222M3S G
E95267780A GATHER PCBA,C EX 222M3S G
PCB,POWER 222M3
PCB,REG 222M3
PCB,REG A 222M3
PCB,REG B 222M3
PCB,REG C 222M3
PCB,POWER 222M3
C01 £ 3C021530 CE,35V 4700UF M 105 G
C05 £ 3C000702 CE,35V 100 UF M TP G
C06 £ C0061592 CQ,100V0.010UFJMYLARTPG
C07 £ 3C021300 CE,16V 10000UF M SH 105 G
C08,C09 £ C0058472 CC,YE 50V 0.1UFMTPG
C1 £ E0122630 SPK KILLER,CS12-F2GA472MYAS G
C10 £ 3C000702 CE,35V 100 UF M TP G
C12 £ C0061592 CQ,100V0.010UFJMYLARTPG
C13,C14 £ 3C021260 CE,16V 1000UF M SH 105 G
C22 £ 3C000722 CE, 63V 100UF M TP G
C25 £ 3C000432 CE, 50V 22 UF M TP G
C29 £ C0051702 CE,16V 100UFMTPG
C30 £ C0061592 CQ,100V0.010UFJMYLARTPG
D01-D04 £ S0071811 DI,1N4003-F TAPINGW=52 G
D05-D08 £ 3S003540 DI,IN5404-M22 G
D09-D12 £ S0071811 DI,1N4003-F TAPINGW=52 G
D13 £ S0071811 DI,1N4003-F TAPINGW=52 G
D15,D16 £ S0071811 DI,1N4003-F TAPINGW=52 G
D17 3S001751 ZDI,MTZJ33B T-77 G
D18 3S000681 ZDI, MTZJ5.1B T-77 G
D19-D21 £ S0071811 DI,1N4003-F TAPINGW=52 G
D22 3S002061 ZDI,MTZJ6.8B T-77 G
D23 S0067021 DIODE,1SS133 T-77 G
D25 S0071801 ZDI,MTZJ12B T-77 G
D26-D28 S0067021 DIODE,1SS133 T-77 G
D29£ S0071811 DI,1N4003-F TAPINGW=52 G
D30 3S004171 ZDI MTZ J 9.1B T-77 G
D31,D32 S0067021 DIODE,1SS133 T-77 G
F1 £ E0117400 FUSE,T2A250V 3721200041 G
GND 3E0043200A TERMINAL, EARTH PLATE B G
GND1 3E0043200A TERMINAL, EARTH PLATE B G
J02 3E0170200A WIRE ASSY,5P ROWER G
J04,J05 3E0171400A WIRE ASSY 9P POWER G
L51 £ 3E004290G COIL,1MH1.5AFKOB160MH16 G
P01 E01344500A HARN ASSY,4P PWR CDRW-S G
P03 E0119740 CONNECTOR,B 3B-PH-K-S G
P07 E0102430 CONNECTOR,B2B-EH(LF)(SN) G
P1 £ E0112450 CONNECTOR,B2P3VH(LF)(SN) G
P2 £ 3E039330G CONNECT,A3963WV2-5P-A G
P13 E0102530 CONNECTOR,B12B-EH(LF.SN)G
P51 £ E0112450 CONNECTOR,B2P3VH(LF)(SN) G
Q2 S0065482 TR,2SC1815-GR(TPE2.F) GZO
Q3 3S001560 TR, 2SB1238TV2-Q G
Q3 3E0186910A TUBE,SU-SRT 2.0*11MM-G
GATHER PCBA,C JPN 222M3S G
REF.NO. PARTSNO. DESCRIPTION
Q4 S0065482 TR,2SC1815-GR(TPE2.F) GZO
Q5 S0066842 TRANSISTOR,2SA1015GR-T G
Q6 S0065482 TR,2SC1815-GR(TPE2.F) GZO
SW1 £ E0138340 SW,SDDLD1177U-TK G
PCB,REG 222M3
Q1 £ 3S004920G 2SB1375(F,M)
PCB,REG A 222M3
U01 £ S0061760 IC,BA50DD0T G
PCB,REG B 222M3
U03 £ 3S004820G IC TA7807S(Q) G
U04 £ 3S004830G IC TA79007S(Q) G
PCB,REG C 222M3
U02 £ S0066610 IC,NJM7812FA G
−27−
TASCAM CC-222SL
Page 28

PCB ASSY,SYS 222M3S G
REF.NO. PARTSNO. DESCRIPTION
E95246060A PCB ASSY,SYS 222M3S G
PCB,SYS RW900 G
U601 S0064984 IC,BA033FP-E2SMT TAPING G
U603 S0060143 IC,SCF5249VM140
U604 S0063964 IC,PQ1M185M2SPQ G
U605 S0064994 IC,BR24C04FVW-E2 G
U607 S00712900A IC,ROM ASSY SYS 222MK3S G
U607 D00965500A SOFTWARE SPEC,SYS 222MK3S
U607 S0059093 IC,S29AL008D70TFI020 G
U608 S0046854 IC,SN74LV541APWR G
U609 S0046854 IC,SN74LV541APWR G
U610 S0046814 IC,SN74LV245APWR G
U611 S0046814 IC,SN74LV245APWR G
U612 S0051154 IC,SN74LV138APW G
U620 S0063974 IC,AK4113VF G
U621 S0063984 IC,AK4121VF G
U622 S0048794 IC,SN74LV157ANSR G
U623 S0037894 IC,SN74LV04APWR G
U624 S0046854 IC,SN74LV541APWR G
U626 S0065004 IC,SN74LV125APWR G
U629 S0065014 IC,SN74LVC2GU04DCKR G
U630 S0020444 IC,SN74LV00APWR G
U801 S0047403 IC,BA05FP G
U850 S0065024 IC,BD46285G G
X601 E0122794 RESONATOR,MIN35AT22.5792 G
D701 S0022094 DIODE,1SS355
D702 S0022094 DIODE,1SS355
D850 S0022094 DIODE,1SS355
D851 S0022094 DIODE,1SS355
RA609 R0017404 RES ARRAY,1/16W 4*33 J G
RA610 R0017404 RES ARRAY,1/16W 4*33 J G
RA611 R0017404 RES ARRAY,1/16W 4*33 J G
RA612 R0017404 RES ARRAY,1/16W 4*33 J G
RA617 R0017404 RES ARRAY,1/16W 4*33 J G
P801 E0101954 CONNECTOR,B6B-PH-SM4(LF) G
U602 S0065024 IC,BD46285G G
U606 S0055053 IC,M12L64164A-7T-G
U802 S0063994 IC,AK4528VF G
U803 S0064634 IC,NJM4580V-TE2 G
U805 S0064634 IC,NJM4580V-TE2 G
U905 S0064634 IC,NJM4580V-TE2 G
D703 S0022094 DIODE,1SS355
D830 S0022094 DIODE,1SS355
D831 S0022094 DIODE,1SS355
D832 S0022094 DIODE,1SS355
D833 S0022094 DIODE,1SS355
D930 S0022094 DIODE,1SS355
D931 S0022094 DIODE,1SS355
D932 S0022094 DIODE,1SS355
D933 S0022094 DIODE,1SS355
Q702 S0065074 TRANSISTOR,DTC124EUA TP G
Q850 S0065074 TRANSISTOR,DTC124EUA TP G
Q851 S0065074 TRANSISTOR,DTC124EUA TP G
PCB ASSY,SYS 222M3S G
REF.NO. PARTSNO. DESCRIPTION
RA601 R0157474 RES ARRAY,47 OHM*40603G
RA602 R0157474 RES ARRAY,47 OHM*40603G
RA603 R0157484 RES ARRAY,4.7K OHM*40603G
U627 E0130730 OPT CONN,GP1FAV51TK0F GZ0
U628 E0134440 OPT CONN,GP1FAV51RK0F G
J620 E0123160 JACK,RJ-1060A-31-0341A G
L601 E0122640 FILTER,DSS6NB32A471Q91A G
L602 E0122640 FILTER,DSS6NB32A471Q91A G
P601 E0102430 CONNECTOR,B2B-EH(LF)(SN) G
P605 E0133570 CONNECTOR,SCM40R G
P767 E0119750 CONNECTOR,B 4B-PH-K-S G
P778 E0119760 CONNECTOR,B 5B-PH-K-S G
P803 E0119920 CONNECTOR,B 6B-PH-K-R G
P811 E0119800 CONNECTOR,B 9B-PH-K-S G
GATHER PCBA,SLIM G
REF.NO. PARTSNO. DESCRIPTION
E95307800A GATHER PCBA,SLIM G
PCB,SLIM G
P1 E0104604 CONNECTOR,KX14-50K5D1 G
P2 E0123220 CONNECTOR,3675P40VUAO G
P3 E0102450 CONNECTOR,B4B-EH(LF)(SN)G
J1 E0124030 PIN,2211S-03G G
J1-MASTER E0126550 SHORT PLUG,2.54MM6.00PENG
WIRE SECTION
REF.NO. PARTSNO. DESCRIPTION
DECK+CHA 3E0172100A WIRE ASSY MECH GND G
OUT+SYS E01174800A HARN ASSY,5P OUTPUT SYS G
PWR+SYS E01174500A HARN ASSY,3P PWR SYS G
OUT+SYS E01175000A HARN ASSY,9P BUFFER2 G
PWR+SYS E01174600A HARN ASSY,2P PWR SYS G
MAIN+SYS E01174700A HARN ASSY,4P INPUT SYS G
E01175300B HARN ASSY,2P AC-INLET G
E01175400A HARN ASSY,EARTH-INLET G
FR+MAIN 3E0170800A FFC 8P P=1.25 WIRE G
FR+DECK 3E0170900A FFC 12P P=1.25 WIRE G
SYS+CDRW E01175100A HARN ASSY,40P IDE CDRW G
−28−
TASCAM CC-222SL
Page 29

Included Accessories
REF.NO. PARTSNO. DESCRIPTION REMARKS
D00964301A OWNERS MNL,(J)222MK3S G [J]
D00964320A OWNERS MNL,(E)222MK3S G [Except J]
D00964380A OWNERS MNL,(G)222MK3S G [E]
D00964381A OWNERS MNL,(F)222MK3S G [E]
D00964382A OWNERS MNL,(I)222MK3S G [E]
D00964383A OWNERS MNL,(S)222MK3S G [E]
D00995700A SHEET,CD-R/RW GUIDE SL G [J]
D00995300A OUTLINE MNL,QSG J 222SL G [J]
3M0028300A ASSY,RACK MOUNT SCREW KIT
SCREW,BPA M5X12 (NI)
WASHER-FIBER(BLK)
£ 3E014140 POWER CORD,DM-G [J]
£ 3E014160 POWER CORD,EUR-G [E,K]
£ 3E014180 POWER CORD,AUS [A]
£ 3E039940 POWER CORD,TM G [TM]
£ 3E014170 POWER CORD,UK [UK]
£ 3E014150 POWER CORD,UL-G [US/C]
E01345600A RMT CONT,RC-222SL G
3E003660 BATTERY, UM-3 (2P X ED) G
−29−
TASCAM CC-222SL
9. Included Accessories
付属品
NOTES
●
PC boards shown are viewed from parts side.
●
Parts marked with * require longer delivery time.
●
The parts with no reference number or no parts number in the exploded
views are not supplied.
●
As regards the resistors and capacitors, refer to the circuit diagrams contained in this manual.
●
£ Parts marked with this sign are safety critical components. They must
be replaced with identical components - refer to the appropriate parts list
and ensure exact replacement.
ºParts of [ ] mark can be used only with the version designated.
[ J ] : JAPAN [ US/C ] : U.S.A./CANADA [ K ] : KOREA [ E ] : EUROPE
[ UK ] : U.K. [ A ] : AUSTRALIA [TM] : TAIWAN
注 意
●
プリント基板図は部品面を示しています。
●
*印の部品は納期が若干かかります。
あらかじめご了承ください。
●
分解図に部番のない部品および品番のない部品は供給できませ
ん。
●
標準の抵抗、コンデンサーは省略してあります。
回路図を参照してください。
●
£印は安全重要部品です。
交換する時は必ず指定の部品を使用してください。
●
仕向先
[ J ] : JAPAN [ US/C ] : U.S.A./CANADA [ K ] : KOREA [ E ] : EUROPE
[ UK ] : U.K. [ A ] : AUSTRALIA [TM] : TAIWAN
 Loading...