

Page 1
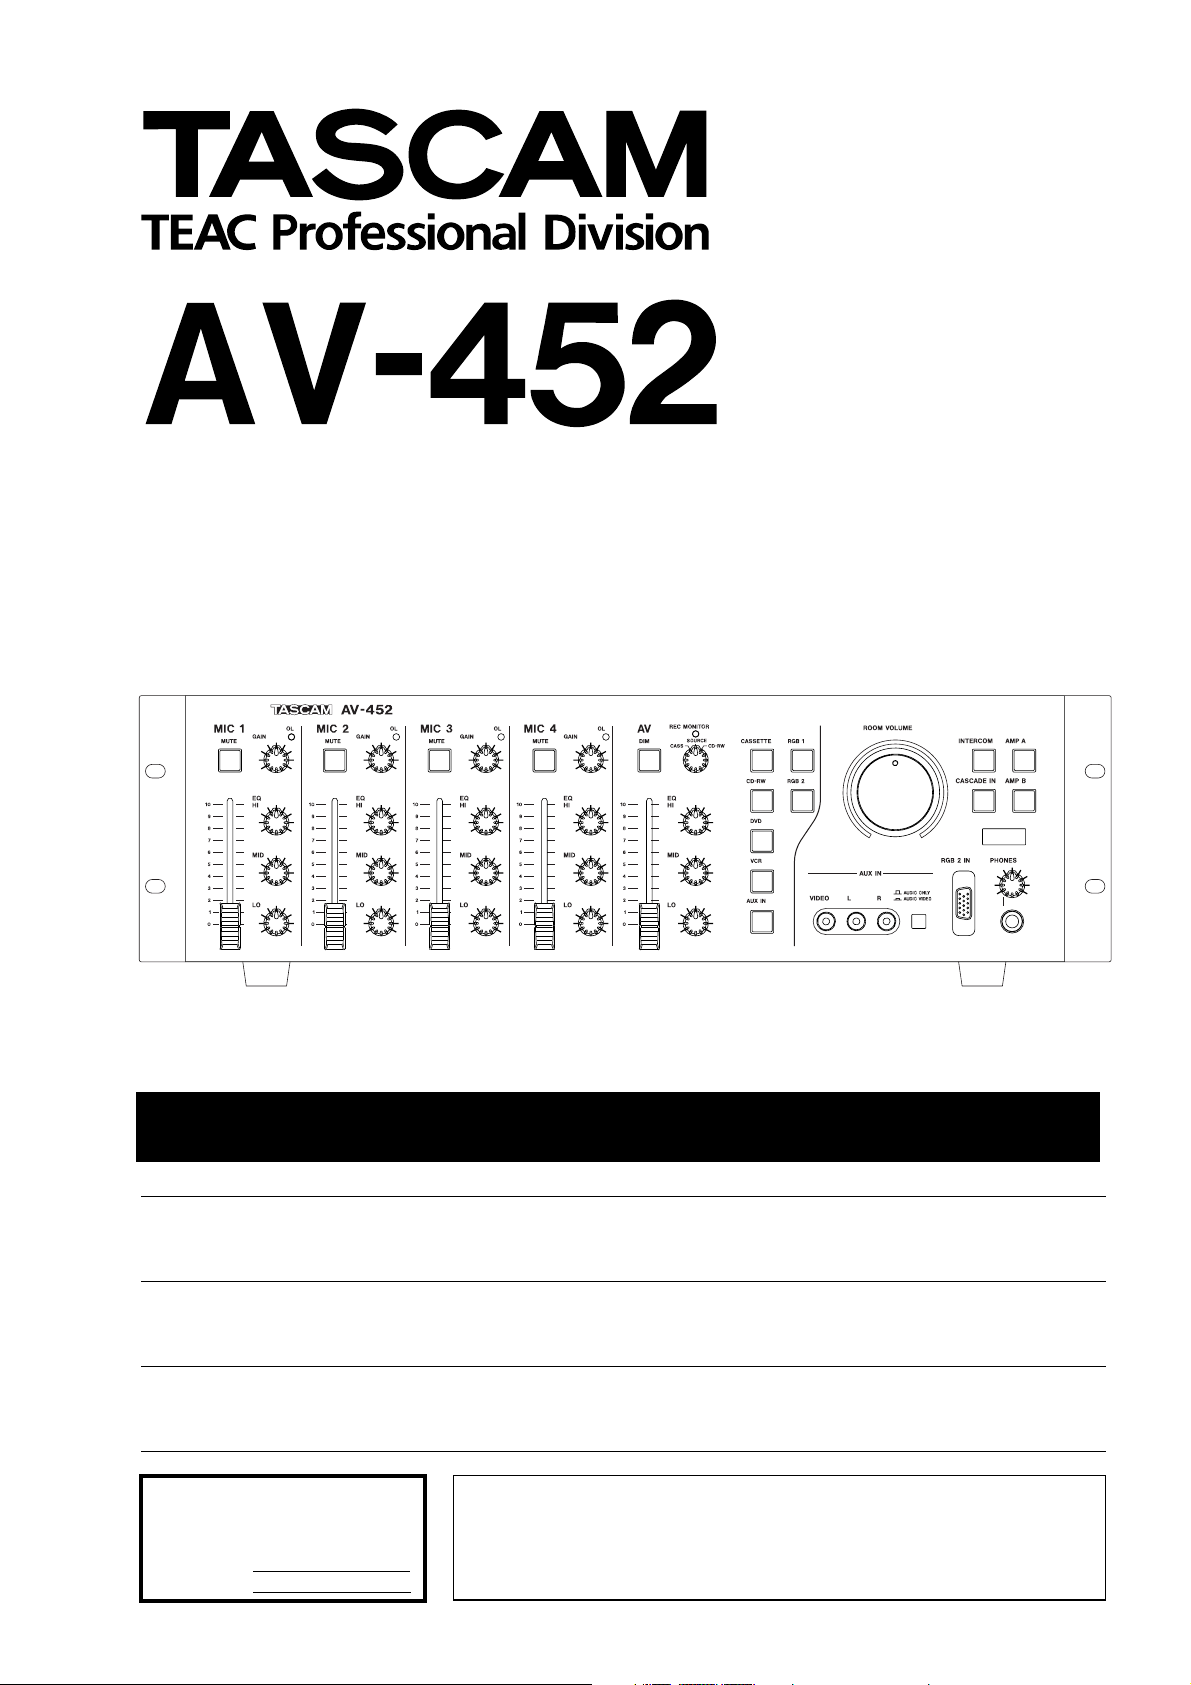
IEEE 1394 Interface
Powered Mixer
D00788500B
INSTALLATION & SUPPORT GUIDE
Ü
The lightning flash with arrowhead symbol, within an equilateral triangle, is intended to alert
ÿ
Ÿ
This appliance has a serial number
located on the rear panel. Please record
the model number and serial number
and retain them for your records.
Model number
Serial number
the user to the presence of uninsulated “dangerous voltage” within the product’s enclosure
that may be of sufficient magnitude to constitute a risk of electric shock to persons.
The exclamation point within an equilateral triangle is intended to alert the user to the presence of important operating and maintenance (servicing) instructions in the literature
accompanying the appliance.
CAUTION: TO REDUCE THE RISK OF ELECTRIC SHOCK, DO NOT
REMOVE COVER (OR BACK). NO USER-SERVICEABLE PARTS
INSIDE. REFER SERVICING TO QUALIFIED SERVICE PERSONNEL.
WARNING: TO PREVENT FIRE OR SHOCK
HAZARD, DO NOT EXPOSE THIS
APPLIANCE TO RAIN OR MOISTURE.
Page 2

IMPORTANT SAFETY INSTRUCTIONS
1 Read these instructions.
2 Keep these instructions.
3 Head all warnings.
4 Follow all instructions.
5 Do not use this apparatus near water.
6 Clean only with dry cloth.
7 Do not block any ventilation openings. Install in
accordance with the manufacturer’s instructions.
8 Do not install near any heat sources such as radi-
ators, heat registers, stoves, or other apparatus
(including amplifiers) that produce heat.
9 Do not defeat the safety purpose of the polarized
or grounding-type plug. A polarized plug has
two blades with one wider than the other.
Grounding type plug has two blades and a third
grounding prong. The wide blade or the third
prong are provided for your safety. If the provided plug does not fit into your outlet, consult
an electrician for replacement of the obsolete
outlet.
10 Protect the power cord from being walked on or
pinched, particularly at plugs, convenience
receptacles, and the point where they exit from
the apparatus.
11 Only use attachments/accessories specified by
the manufacturer.
12 Use only with the cart, stand, tripod, bracket, or
table specified by the manufacturer or sold with
the apparatus. When a cart is used, use caution
when moving the cart/apparatus combination to
avoid injury from tip-over.
13 Unplug this apparatus during lightning storms or
when unused for long periods of time.
14 Refer all serving to qualified service personnel.
Servicing is required when the apparatus has
been damaged in any way, such as power-supply
cord or plug is damaged, liquid has been spilled
or objects have fallen into the apparatus, the
apparatus has been exposed to rain or moisture,
does not operate normally, or has been dropped.
● Do not expose this apparatus to drips or
splashes.
● Do not place any objects filled with liquids, such
as vases, on the apparatus.
● Do not install this apparatus in a confined space
such as a book case or similar unit.
● The apparatus draws nominal non-operating
power from the AC outlet with its POWER
switch in the off position.
2 TASCAM AV-452 Installation & Support Guide
Page 3

IMPORTANT SAFETY PRECAUTIONS
IMPORTANT (for U.K. Customers)
DO NOT cut off the mains plug from this equipment.
If the plug fitted is not suitable for the power points in your home
or the cable is too short to reach a power point, then obtain an
appropriate safety approved extension lead or consult your dealer.
If nonetheless the mains plug is cut off, remove the fuse
dispose of the plug
by inadvertent connection to the mains supply.
If this product is not provided with a mains plug, or one has to be
fitted, then follow the instructions given below:
IMPORTANT: The wires in this mains lead are coloured in
accordance with the following code:
GREEN-AND-YELLOW : EARTH
BLUE : NEUTRAL
BROWN : LIVE
WARNING: This apparatus must be earthed.
As the colours of the wires in the mains lead of this apparatus may
not correspond with the coloured markings identifying the
terminals in your plug proceed as follows:
The wire which is coloured GREEN-and-YELLOW must be
connected to the terminal in the plug which is marked by the letter
E or by the safety earth symbol ç or coloured GREEN or
GREEN-and-YELLOW.
immediately, to avoid a possible shock hazard
and
For U.S.A
TO THE USER
This equipment has been tested and found to
comply with the limits for a Class A digital device,
pursuant to Part 15 of the FCC Rules. These
limits are designed to provide reasonable
protection against harmful interference when the
equipment is operated in a commercial
environment. This equipment generates, uses,
and can radiate radio frequency energy and, if
not installed and used in accordance with the
instruction manual, may cause harmful
interference to radio communications.
Operation of this equipment in a residental area
is likely to cause harmful interference in which
case the user will be required to correct the
interference at his own expense.
CAUTION
Changes or modifications to this equipment not
expressly approved by TEAC CORPORATION
for compliance could void the user’s authority to
operate this equipment.
The wire which is coloured BLUE must be connected to the
terminal which is marked with the letter N or coloured BLACK.
The wire which is coloured BROWN must be connected to the
terminal which is marked with the letter L or coloured RED.
When replacing the fuse only a correctly rated approved type
should be used and be sure to re-fit the fuse cover.
IF IN DOUBT — CONSULT A COMPETENT ELECTRICIAN.
For the consumers in Europe
WARNING
This is a Class A product. In a domestic environment,
this product may cause radio interference in which
case the user may be required to take adequate
measures.
Pour les utilisateurs en Europe
AVERTISSEMENT
Il s’agit d’un produit de Classe A. Dans un environnement domestique, cet appareil peut provoquer des interférences radio, dans ce cas l’utilisateur peut être
amené à prendre des mesures appropriées.
Für Kunden in Europa
Warnung
Dies is eine Einrichtung, welche die Funk-Entstörung
nach Klasse A besitzt. Diese Einrichtung kann im
Wohnbereich Funkstörungen versursachen ; in diesem Fall kann vom Betrieber verlang werden, angemessene Maßnahmen durchzuführen und dafür
aufzukommen.
TASCAM AV-452 Installation & Support Guide 3
Page 4

Table of Contents
1 – Introduction
“AV installation” features ......................................................................5
About this manual ..................................................................................5
How the manual is organized................................................................6
2 – General installation notes
Physical installation ................................................................................7
Power supply...........................................................................................7
3 – Front panel features
Microphone channels..............................................................................8
AV control and selection section................................................................... 8
Main control section ...............................................................................9
4 – Remote control unit features
Learning command codes.......................................................................11
5 – Rear panel connections
Video connections...................................................................................12
AV audio and microphone connections ................................................13
“Master” audio connections...................................................................14
External control connectors ...................................................................15
6 – Customization and settings
LEARN IR (switch 1) ........................................................................................ 16
CASCADE (switch 2)........................................................................................ 17
SPEAKER OUT (switch 3) ................................................................................ 17
MIC HPF (switch 4).......................................................................................... 17
INTERCOM GATE (switch 5) ........................................................................... 17
AV DUCKER (switch 6).................................................................................... 17
7 – External control
AV-452 serial protocol ............................................................................18
Serial port pinouts.......................................................................................... 18
Relay control port ...................................................................................19
IR “blaster”...................................................................................................... 19
RELAY CONTROL pinouts............................................................................... 19
8 – Specifications and block diagram
Video specifications ................................................................................20
AV audio and microphone specifications..............................................20
Master section specifications .................................................................21
Audio performance .................................................................................21
Power and physical specifications .........................................................22
Dimensional drawing..............................................................................22
Block diagram..........................................................................................23
4 TASCAM AV-452 Installation & Support Guide
Page 5

1 – Introduction
The TASCAM AV-452 coordinates the audio/visual
needs for presenters of all levels. Functionally, the
AV-452 serves as a microphone mixer, A/V receiver,
and power amplifier into one compact unit. The control surface is elegant and intuitive.
Audio: Four microphone inputs (with phantom
power) offer plenty of inputs for multiple presenters,
or multiple speaking positions. Up to two audio and
three audio/visual components can be connected to
the A/V channel, with simple switching control. A
3-band EQ is available on each channel to enhance
the individual sounds as needed.
Video: The AV-452 will perform video switching
between three A/V components, offering a single
video feed for projectors or monitors with limited in-
“AV installation” features
Special additional features of the AV-452 relevant to
fixed installation:
• Microphones can be connected using either XLRtype connectors or using a barrier strip and can be
phantom powered, allowing the use of miniature
condenser or PZM (boundary field) microphones.
• Switchable 80 Hz bass roll-off to eliminate lowfrequency rumble.
• Microphone insert loop for parametric EQ, compresser/limiter/gate, etc.
• AV signal dimmer to allow manual voiceovers, etc.
• Automatic AV ducker with adjustable ratio and
threshold settings.
• A CV (constant voltage) paging system can be connected (12V, 24V or 70V) to the rear panel. A level
puts. Switching is done in parallel, and video switching is handled for composite and S-Video inputs.
Control: The RC-452 universal learning remote is
included with the AV-452, allowing the presenter to
operate all the key equipment with a single remote.
The RC-452 will control the AV-452, and can learn
commands for projector power, and transport commands for up to four components.
The AV-452 itself also can learn IR commands, to integrate projector/monitor switching with the AV-452
internal switching. This IR command set can be
transmitted with an IR “blaster” (not included) to the
37-pin ‘D’-sub
control port" on page 18 for details).
control and defeatable noise gate are provided for
optimal settings.
• A building alarm system can be connected to the
EMG input. When the alarm sounds, the AV-452
will mute local audio, and switch the CV paging
input on.
• The speaker and line output have independent
mono switches for use in single-zone or multi-zone
systems.
• Cascade input can be configured to combine the
input as a submixer, or operate as "room cascade",
allowing the AV-452 to become a drone amp.
• Dedicated unbalanced
together with balanced
connection with other equipment.
• Serial (RS-232) and relay (37-pin D-sub) connectors allow for control of the unit by other devices.
RELAY CONTROL port (see "Relay
MEETING OUT jacks,
LINE OUT jacks allow for
About this manual
This manual is intended for use by those designing,
installing and supporting the AV system including
the AV-452. It is not necessary for the everyday user
of the equipment to read this manual.
The user should refer to the single-sheet Operation
Guide for a quick reference on how to operate the
unit. However, a brief guide to the front panel, and
remote control unit is given here, and this also provides some information which can be used when introducing the operation of the unit to its users.
We suggest that the Operation Guide is kept close to
the AV-452, and the spaces on this sheet are filled in,
for a written record of the permanent connections
made between the AV-452 and other equipment.
Note that controls and connectors on the unit and the
remote control unit are written in this typeface:
OUTPUT
ferred to by a number, corresponding to the numbers
in the diagrams "Front panel features" on page 8,
"Remote control unit features" on page 10 and "Rear
panel connections" on page 12. In these cases, a feature of the main unit is numbered like this:
feature of the remote control unit like this:
Controls and connectors on other units are written in
this way: REC IN.
TASCAM AV-452 Installation & Support Guide 5
. Sometimes a control or connector is re-
LINE
1, and a
2.
Page 6

1 – Introduction
How the manual is organized
The different sections of the manual are as follows:
1, “Introduction” (page 5) This introduction
to the AV-452.
2, “General installation notes” (page 7)
As the title suggests, this includes general notes on
the physical and electrical installation requirements
for the AV-452.
3, “Front panel features” (page 8) As well
as a list of the front panel controls and features, this
section provides details on the operation of the AV-
452. Read this section to obtain an overview of the
way in which the AV-452 works.
4, “Remote control unit features” (page
10)
This provides a list of the features and functions
available using the RC-452 remote control unit, as
well as details on how to program the RC-452 to
learn and replay the command codes of other units.
5, “Rear panel connections” (page 12)
This lists the connections to and from the AV-452.
6, “Customization and settings” (page
16)
The AV-452 can be customized for the individual installations in a number of ways, using the rear
panel switches, etc. This section describes the way in
which this customization can be carried out, including the way in which the AV-452 can learn the IR
codes necessary to control external devices.
7, “External control” (page 18) The AV-452
can be controlled by an external serial controller, and
this section lists the control codes available for control, status, and query. Additionally, relay control and
tally indicator connectors are provided. Details of
these are given in this section.
8, “Specifications and block diagram”
(page 20) Performance figures, dimensional draw-
ings and a block diagram of the AV-452.
6 TASCAM AV-452 Installation & Support Guide
Page 7
2 – General installation notes
These notes provide you with information about the
installation of the AV-452.
The packing should contain (in addition to this
manual):
•The User’s Guide—a single sheet containing oper-
ating instructions
• A power cord with a 3-pin plug suitable for your
region
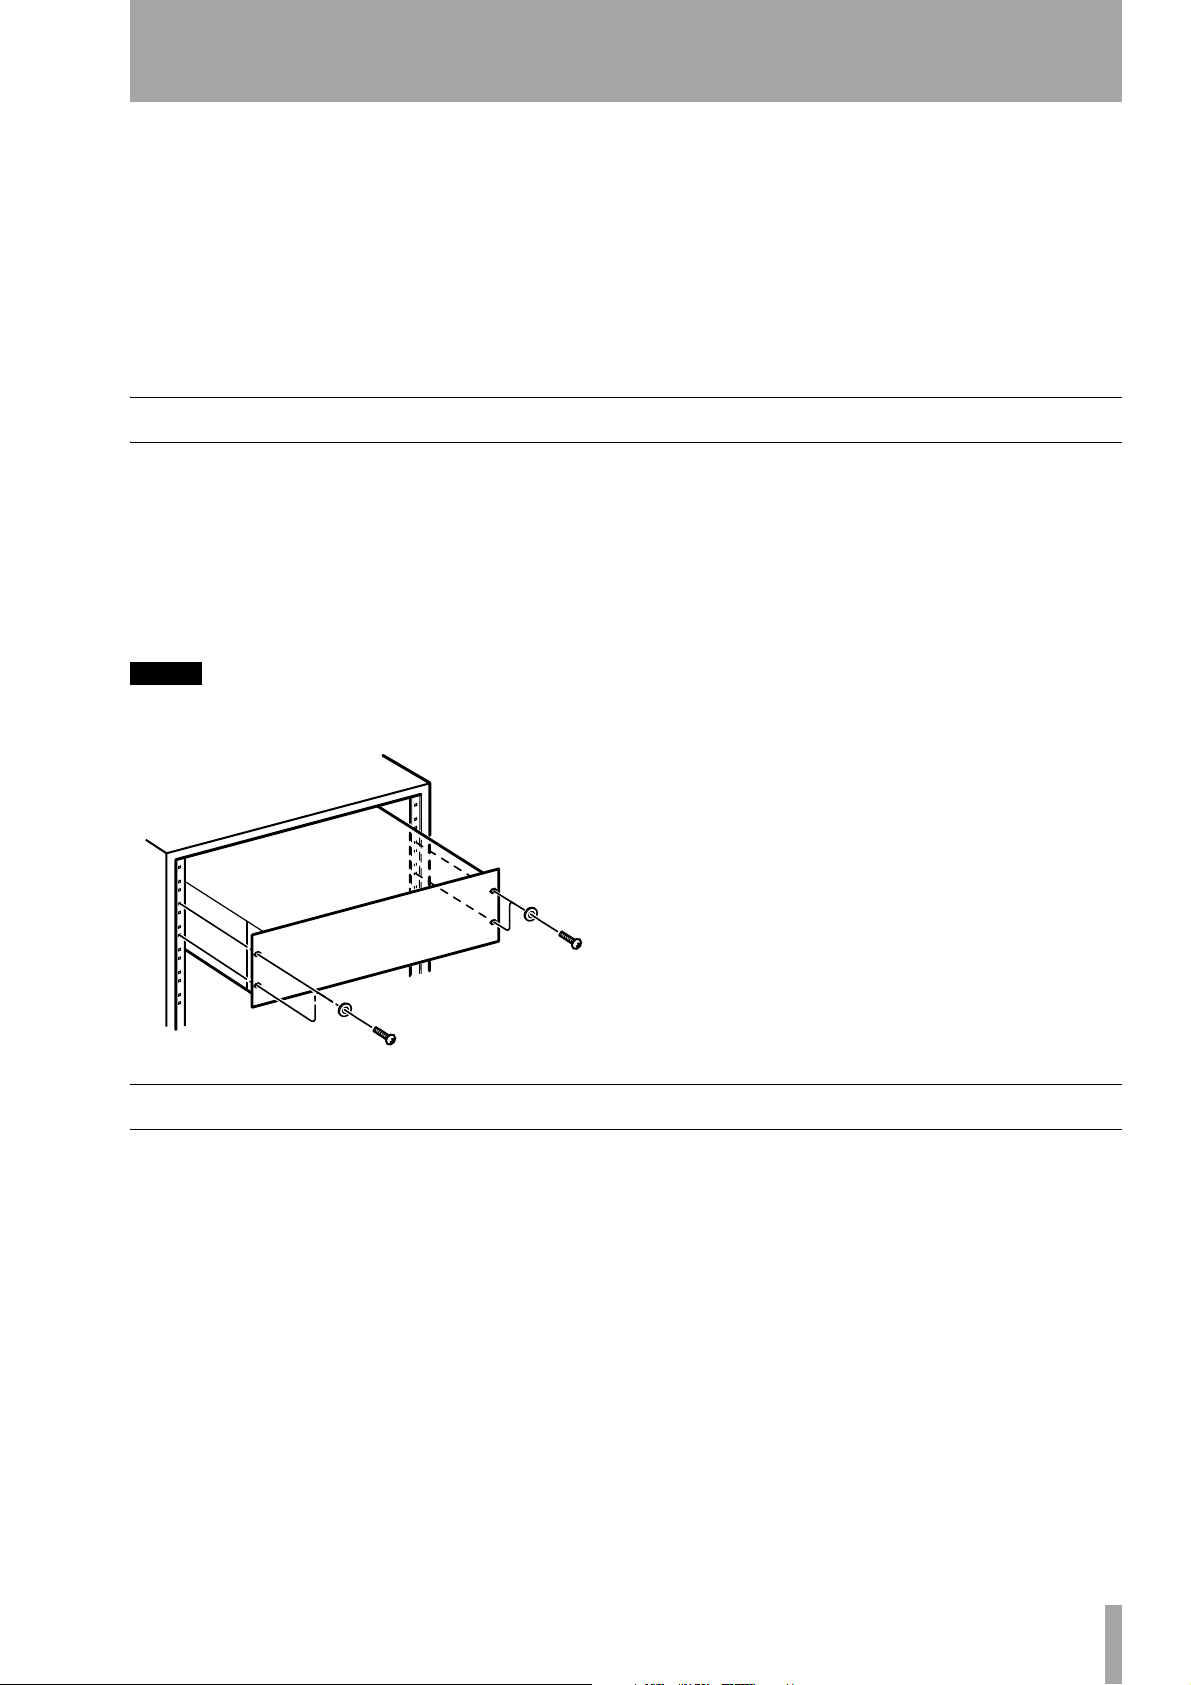
Physical installation
The unit can be fitted in any standard 19" rack, using
the mounting kit (screws and washers) provided. No
rear support is needed.
3U of rack space is required for the unit itself. Since
the AV-452 incorporates power amplifiers, it is
strongly recommended that at least 1U of space is
left above the unit to avoid overheating.
NOTE
Do not install this apparatus in a confined space such as
a book case or similar unit.
• A rack mounting kit consisting of four screws and
four washers
• The RC-452 remote control unit
• Two AAA batteries for use in the RC-452 remote
control unit
• Warranty card
Contact your TASCAM dealer or distributor if any of
these items is missing.
For the same reason, adequate space for ventilation
should be left at the front and rear of the unit. In any
case, the space at the rear of the unit should be sufficient to accommodate the audio and video connectors plugged into the AV-452.
Since many of the functions of the unit are set using
small preset controls (trimmer pots, DIP switches,
etc.) on the rear panel, we suggest that you ensure
you have clear visual access to the rear panel, or that
you make these settings before final installation in
the rack.
Power supply
The AV-452 can use an AC power supply as marked
on the rear panel. Do not use any other voltage of
power supply, as this may result in damage.
The unit should be properly grounded (earthed).
The power switch is located on the rear panel to prevent the user from accidentally turning power off
during a presentation. If you want to turn the system
on and off routinely, you may consider using a power
switch for the outlets, or using a centrally-switched
power distribution system.
TASCAM AV-452 Installation & Support Guide 7
Page 8
3 – Front panel features
A brief guide to the front panel features of the AV452, with a little more technical detail than in the Op-
eration Guide.
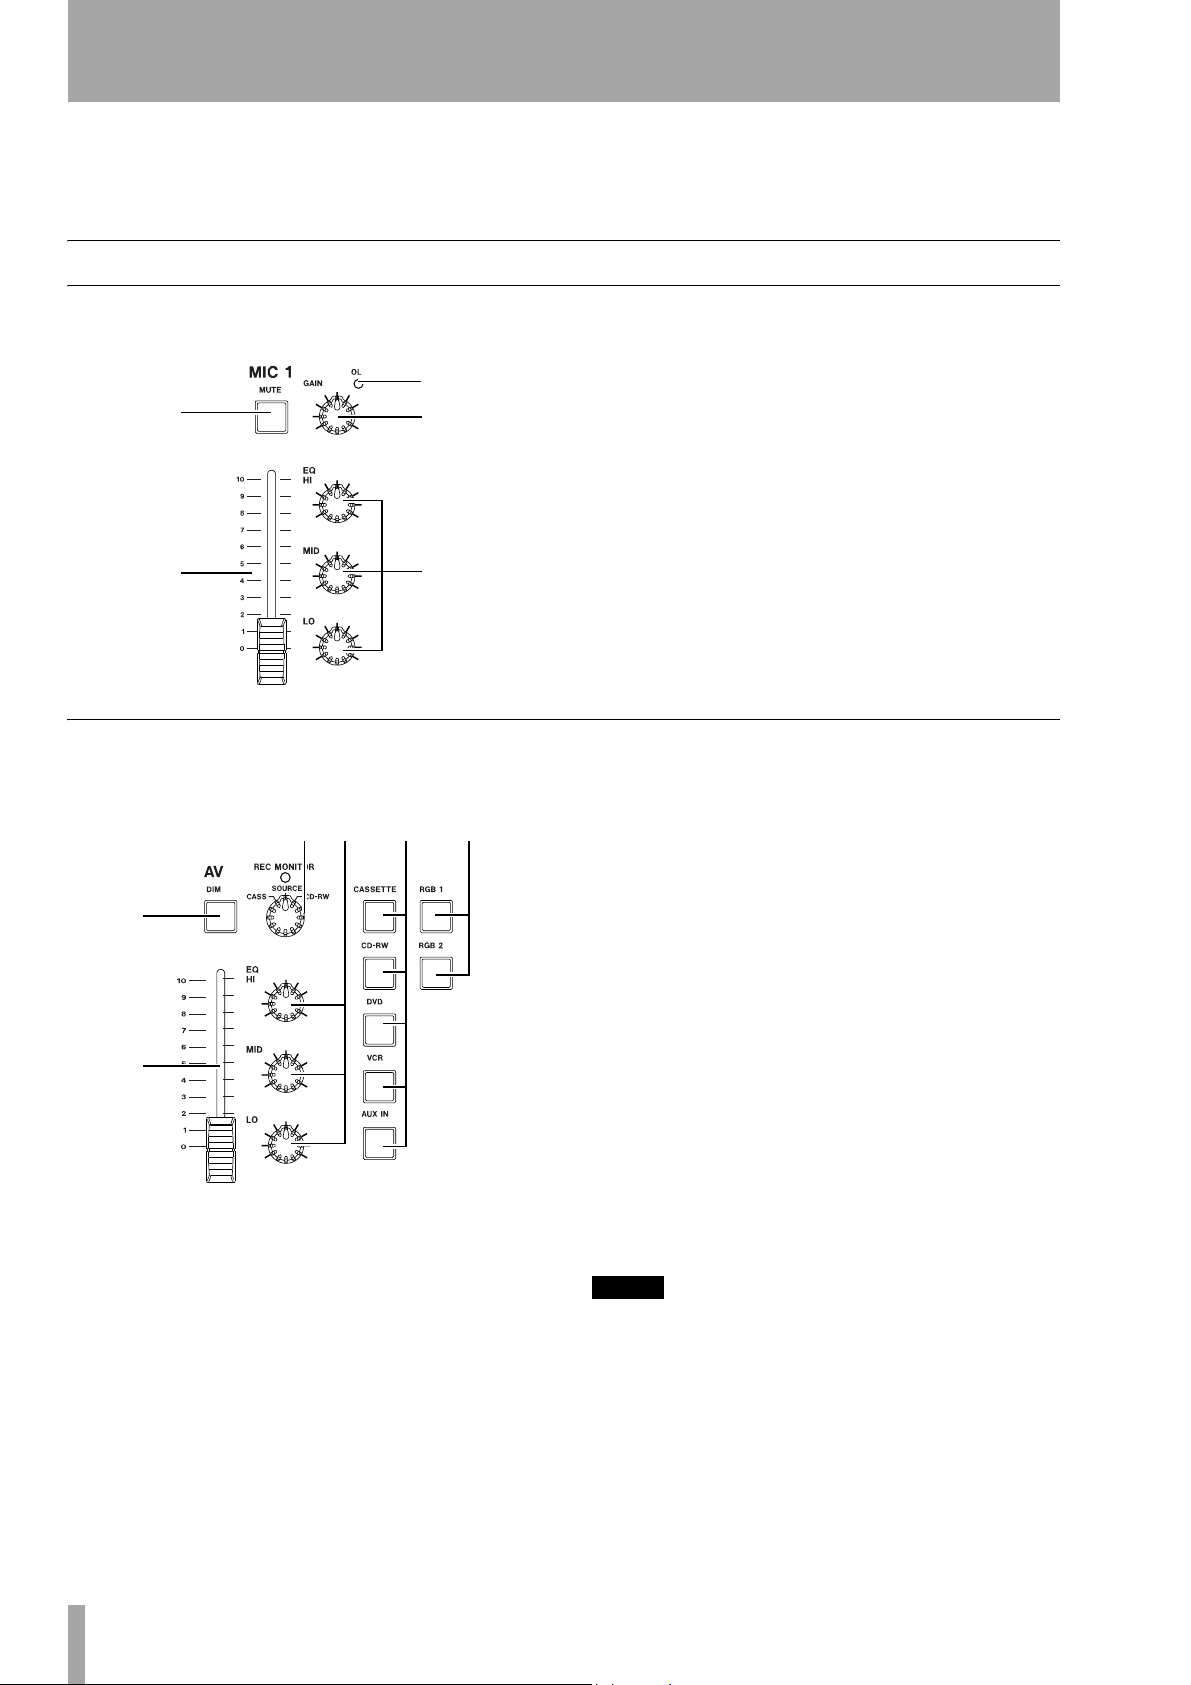
Microphone channels
Each of the four microphone channels is identically
equipped.
3
1
2
4
5
It can be used as a quick reference guide for everyday
operation, or to form the basis for an introductory explanation to the users of the equipment.
1 MUTE key This latching key lights when the
mic input channel is muted.
2 Fader The unity gain for this fader is at the 7
mark.
3 OL indicator Lights at 10 dB above the nom-
inal clipping level.
4 GAIN control Provides 33 dB of control to
adjust the mic level appropriately.
5 EQ section 3 bands, each providing ±10 dB
at the following frequencies (optimized for voice):
HI: 8 kHz (shelving)
MID: 2.5 kHz (peaking)
LO: 250 Hz (shelving)
AV control and selection section
This section is used to select the appropriate AV
source, and control the sound.
89 A B
6
7
6 DIM key This latching key is used to attenuate
the AV source signal by 20 dB. It lights when dimming is active.
7 Fader The unity gain for this fader, which is
used to control the level of the selected AV signal, is
at the maximum level.
8 REC MONITOR control/indicator De-
spite the name, this control and indicator acts a
record source selector.
•In the
SOURCE position, the output of the signal
selected using the AV selector keys is fed to the
inputs of all connected equipment (except the
source unit, to avoid signal loops). For example, if
the cassette is selected, the cassette output is fed to
the CD-RW and VCR inputs. The indicator lights.
•In the
•In the
CASS position, the cassette output is fed to
the CD-RW and VCR inputs, regardless of the AV
selector keys.
CD-RW position, the CD-RW output is fed to
the cassette and VCR inputs, regardless of the AV
selector keys.
9 EQ section 3 bands, each providing ±10 dB
at the following frequencies:
HI: 12 kHz (shelving)
MID: 2.5 kHz (peaking)
LO: 100 Hz (shelving)
A AV source selector keys Only one of
these latching keys can be active (lit) at a time. Used
to select the AV source.
NOTE
If the
REC MONITOR
are the same, the source output is muted, to avoid a
feedback loop.
Also note that if an audio-only source has been selected
(
CASSETTE, CD-RW
ONLY
setting), the last-selected video source will be
output through the video connectors.
selection and the selection here
or
AUX IN
on the
AUDIO
8 TASCAM AV-452 Installation & Support Guide
Page 9

3 – Front panel features
B Video input selector keys Only one of
these latching keys (
(lit) at a time. They are used to select the input source
for an external projector.
RGB 1 and RGB 2) can be active
Main control section
This section contains controls related to the overall
system.
FG H I J K
C
NOTE
These
RGB 1
ing of the composite video or S-Video outputs connected to the AV-452. They allow centralized control of
a projector or display forming part of the AV system
containing the AV-452. See "LEARN IR (switch 1)" on
page 16 for details.
and
RGB 2
keys do not affect the switch-
rear panel is fed to the stereo bus. This signal is not
affected by the
ROOM VOLUME control.
H IR SENSOR This window is used to receive
the commands from the supplied wireless remote
control unit.
I AMP A and AMP B keys The AV-452 can
operate in mono mode, with each amplifier driving a
separate speaker, in which case, these will act as
room control keys.
Alternatively, it can be operated in stereo mode, in
which case, these keys turn the stereo channels on
and off individually.
D
E
C ROOM VOLUME control This is used to
adjust the levels from the speaker outputs as well as
from the line level outputs. The indicator on this control lights when power is supplied to the AV-452.
It is motorized, meaning that it will reflect changes
made from the RC-452 remote control unit (
E).
D AUX inputs This set of three RCA jacks is
used to connect a composite video signal and/or the
left and right components of a stereo audio signal.
E AUX selector switch This determines
whether audio and video are enabled together at the
AUX jacks (switch pushed in), or audio only (switch
in the out position).
F CASCADE key When this key is active (lit),
the input to the
to the stereo bus (preswitch determines whether this input replaces the
input signals or is summed with them (see ("CASCADE (switch 2)" on page 17).
CASCADE inputs (rear panel) is fed
ROOM VOLUME). A rear panel
G INTERCOM key When this key is lit, the
signal received at the
INTERCOM connection on the
NOTE
These keys do not turn the amplifiers on and off—they
simply mute the signal to the speakers.
The mono/stereo setting for the line outputs is made
using the dedicated switch on the rear panel
for the speaker outputs using the DIP switches
e and
i.
J PHONES level and jack Connect a stan-
dard pair of stereo headphones to this 1/4" jack.
Adjust the volume with the PHONES level control
ROOM CONTROL).
(pre-
NOTE
Remove the headphones from the jack when turning
the AV-452 on or off, to avoid possible damage from
“thumps”.
K RGB 2 input Connect one end of a VGA
standard 15-pin D-sub (analog) cable to this connector and the other end to a personal computer. The
signal is passed through to the
tor on the rear panel.
NOTE
The AV-452 is not provided with an “RGB 1” input or
output. This numbering system refers to any projector
or video display unit connected to the AV-452.
RGB 2 THRU connec-
TASCAM AV-452 Installation & Support Guide 9
Page 10

4 – Remote control unit features
The RC-452 remote control unit is designed for control of not only the AV-452, but up to four additional
connected units (marked as
RW
and DVD).
A total of 36 keys in total can be programmed (as described later in this section).
When using the RC-452 with the AV-452 or any
other unit, make sure:
• There is a clear unobstructed path between the
remote control unit and the remote sensor on the
unit being controlled.
• The remote control unit is located within 5 m
(15 ft.) of the unit being controlled, and is pointing
at approximately right angles (±30°) to the front
panel.
The RC-452 should be maintained in the same way
as a consumer control unit. When changing the
batteries:
CASSETTE, VCR, CD-
should note that if the batteries are removed for an
extended period of time, data loss will occur, and the
codes must then be re-learned.
12
A
3
4
B
C
5
6
7
D
E
8
9
• Always make sure that both batteries are replaced
together. Do not mix old and new batteries.
• Do not mix batteries of different types.
• Always make sure that the batteries are located
with the correct polarity (the positive terminals of
the batteries should match the
the battery compartment, and the negative terminals should match the
• If you are not going to use the remote control unit
for an extended period of time, remove the batteries. Old batteries can leak, casing damage to the
remote control unit.
• Always dispose of used batteries in the way recommended by your local garbage disposal authorities.
NOTE
The
CASSETTE
programmed at the factory to control the TASCAM CC222 unit. However, they may be programmed to control
other units. The names of these keys and other keys
which may be programmed are enclosed [in brackets] in
the list below. See "Learning command codes" on
page 11 for details of how to do learn other units’ commands
When the batteries are changed in the RC-452, the programmed codes are typically retained. However, you
and
– markings).
CD-RW
+ markings inside
keys of the RC-452 are
1 SET key and indicator Used when learn-
ing commands for other units (as described below)
2 [TV/PROJECTOR power keys] One
programmable key (
jector on, and the other (
it into standby or off mode.
ON) is used to put the TV or pro-
OFF/STD-BY) is used to put
3 AMP A and AMB B keys These keys du-
plicate the function of the
I).
(
AMP keys on the AV-452
4 AV selector keys These keys duplicate the
function of the audio and video keys on the AV-452
A and B).
(
5 MUTE keys These keys duplicate the func-
tion of the microphone
1).
(
MUTE keys on the AV-452
6 [CASSETTE keys] Use these programma-
ble keys to control a cassette deck (pre-programmed
for the TASCAM CC-222 when the unit is shipped).
7 [VCR keys] Use these programmable keys to
control a videocassette recorder.
8 [CD-RW keys] Use these programmable
keys to control a CD recorder (pre-programmed to
control the TASCAM CC-222 when the unit is
shipped)
10 TASCAM AV-452 Installation & Support Guide
Page 11

4 – Remote control unit features
9 [DVD keys] Use these programmable keys to
control a DVD player.
A ICOM key This key duplicates the function of
the
INTERCOM key on the AV-452 (G).
B CASCADE IN key This key duplicates the
functions of the
CASCADE key on the AV-452 (F).
Learning command codes
The RC-452’s design allows it to be used for the control of up to five devices in addition to the AV-452:
projector or display (
sette recorder (
VCR), CD recorder (CD-RW), and DVD player
(
(
DVD).
Of course, the devices and functions that you program for them do not have to match absolutely with
those marked on the AV-452 and RC-452, but it
makes sense to map the target units to the RC-452’s
labels.
To teach remote control commands from another
remote control unit to the RC-452:
1 Make sure that both the RC-452 and the other
equipment’s remote control unit have batteries installed, and place them on a flat surface,
about 2–3 cm (about an inch) apart, facing
each other.
TV/PROJECTOR), audio cas-
CASSETTE), videocassette recorder
2-3 cm (1")
C AV DIM key This key duplicates the func-
tions of the AV
DIM key on the AV-452 (6).
D LEARN key Use this key when learning the
commands for other units (see below).
E VOL + and – keys These keys operate the
ROOM VOLUME control (C).
4 On the RC-452, press the key which will be
mapped to the other equipment’s function.
SET indicator 1 of the RC-452 starts
The
flashing rapidly to show that learning is
started.
5 On the other equipment’s remote control unit,
press the key to be learned. The RC-452’s
indicator
steadily for a short time, goes out briefly once
and then lights steadily to show that the command has been learned.
1 stops flashing rapidly and lights
SET
• If the RC-452’s SET indicator goes out
briefly three times and then lights steadily, it
means that the learning command has not
been properly learned.
• If the RC-452’s SET indicator goes out
briefly six times and then lights steadily, it
means that the RC-452’s memory is full, and
no more commands can be learned.
RC-452
Other equipment's
remote control unit
2 On the RC-452, press and hold the SET key 1
and then press the
these keys. The
LEARN key D. Release
SET indicator lights steadily.
3 Within 10 seconds of the previous step, press
the , key of the RC-452’s
three times.
The
SET indicator 1 of the RC-452 flashes as
you press it and remains lit to show the unit is
now in learning mode.
VCR section 7
6 Repeat steps 4 and 5 until all appropriate
commands have been learned.
7 To exit the learning mode, press the RC-452’s
LEARN key D. The SET indicator goes out (it
also goes out if no keys are pressed on the RC452 for about 10 seconds).
NOTE
The RC-452 can learn and store up to 36 different commands.
The angle and distance between the two remote control units affects the difficulty of the learning process.
The RC-452 may not be able to learn some units’ commands which use long IR codes for transmission.
TASCAM AV-452 Installation & Support Guide 11
Page 12

5 – Rear panel connections
3
5
6
0
1
3
5
6
6
8
9
This section provides detailed information on the rear
panel connectors, as well as some notes on installation and connection of other units.
"Master" audio
Video connections
connections
ON
2
Video connections
Basic specifications and performance figures are provided later in the manual.
AV audio & microphone
connections
External control connectors
All video connections on the AV-452 switch in parallel. There is no conversion between composite and
S-Video signals. In some designs, you may need to
connect both video formats to the source decks.
This also means that the AV-452 is standard-independent and can accept NTSC, PAL or SECAM format
video with no configuration needed.
In addition to these connectors, remember that there
is an additional
D.
panel
AUX video connector on the front
LMN O
NOTE
All connectors on the rear panel are labeled relative to
the AV-452. In other words, a connector labeled
the AV-452 should be connected to one marked
IN
OUT
on
on
another piece of equipment.
L RGB2 THRU connector This 15-pin D-
sub connector echoes the signal input at the front
panel input
K.
M DVD IN connectors This pair of connec-
tors is used to connect the video output of a DVD
player to the AV-452.
N VCR IN and OUT connectors Connect
the video output of a videocassette recorder to the
VCR IN, and the video input of the VCR to the VCR
OUT.
O MONITOR OUT connectors Link these
connectors to the appropriate input of a TV, monitor
or projector.
12 TASCAM AV-452 Installation & Support Guide
Page 13

AV audio and microphone connections
5 – Rear panel connections
NOTE
The AV-452 is supplied with several sets of shorting
plugs for the unused RCA input connectors. Remove
these when making connections to these terminals, and
leave them in place when these terminals are unused.
This will help to improve the audio performance of the
system.
In addition to the connections listed here, there is
also a pair of
NOTE
All XLR-type connectors are wired with pin 1 to ground,
pin 2 hot, and pin 3 cold.
AUX audio inputs Don the front panel.
PQ R S
S CASSETTE OUT and IN connectors
These pairs of connectors feed the inputs of a cassette recorder (
from the cassette recorder (
OUT) and accept the output signals
IN).
T MIC GRP INSERT connector This TRS
1/4" connector is used to pass the summed microphone signals through a dynamics processor (limiter,
gate, etc.) or a graphic or parametric EQ unit, etc.
The connector is wired with tip = send, ring = return,
sleeve = ground).
U PHANTOM POWER switch Use this
switch to provide +48V phantom power to condenser
microphones. All four microphone inputs are activated with the same switch.
Do not use dynamic microphones connected with an
unbalanced connection or high-impedance microphones, with phantom power turned on.
NOTE
To avoid possible damage to microphones, always connect microphones, turn down the
control, and turn the speakers off using the
AMP B
or off.
keys, before switching the phantom power on
ROOM VOLUME
AMP A
and
TU V
P DVD IN connectors This pair of connec-
tors accepts the audio outputs of a DVD player.
Q VCR OUT and IN connectors These
pairs of connectors feed the audio inputs of a videocassette recorder (
from the VCR (
OUT) and accept the output signals
IN).
R CD-RW OUT and IN connectors These
pairs of connectors feed the inputs of a CD recorder
(
OUT) and accept the output signals from the CD re-
corder (
IN).
V MIC 1 through 4 connections Micro-
phones can be connected using the XLR connectors.
In permanent installations where wires are being run
through walls, the bare wires can be connected to the
barrier strip instead.
Do not connect microphones via the XLR and barrier
strip connections of the same microphone channel
(though it is possible to connect some microphones
via the XLR connectors and some via the barrier
strip).
Always make sure that polarity is observed consistently throughout the installation, in order to avoid
phase reversal problems.
TASCAM AV-452 Installation & Support Guide 13
Page 14

5 – Rear panel connections
“Master” audio connections
WX Y
5
6
4
7
3
8
2
9
1
0
Zabcde
These connections relate to the audio functions of the
AV-452 which play a “master” role in the setup and
operation of the unit.
W CASCADE INPUT connectors These
balanced XLR connectors accept balanced signals
from another AV-452 (or similar unit). These input
signals are selected using the front panel
F and are pre-ROOM VOLUME.
key
Depending on the position of the rear panel DIP
switch ("CASCADE (switch 2)" on page 17), the
cascade input signal can sum with the AV-452 audio,
or can replace it.
X LINE OUTPUT connectors These bal-
anced XLR connectors output the post-
VOLUME
mix (to another AV-452 unit or power
amplifier).
Y MEETING OUT connectors These un-
balanced RCA jacks outputs the pre-
VOLUME
mix.
One use for this facility is to connect a recorder to
log the proceedings of meetings, etc.
Z SPEAKER OUTPUT A and B
connectors Connect speakers to these binding
post terminals. Take care to observe polarity to avoid
out-of-phase problems.
The speakers attached to these terminals can be
switched individually using the selector keys on the
front panel
I.
CASCADE
ROOM
ROOM
ON DIP
1
3
2
5
4
6
The impedance of the speaker system connected to
each channel should be between 4 Ω and 16 Ω.
WARNING
Use of speakers with impedances outside these limits
may result in damage to the speakers and/or the AV-
452.
Also note that the AV-452 should not be operated in
bridged mono mode.
Depending on the DIP switch setting ("SPEAKER
OUT (switch 3)" on page 17), and the
mode switch
e, the AV-452 may be configured as a
LINE OUTPUT
dual mono amplifier, or as a stereo amplifier.
In the latter case, channel A corresponds to the left
channel, and channel B to the right channel.
a EMG IN and GND connectors Use these
barrier strip connectors to attach a 5 Vrms emergency
signal cable.
When this signal is activated, the AV-452 will cut the
signals from the
LINE OUTPUT X and SPEAKER
Z terminals and all front panel indicators flash.
b INTERCOM connectors (CV IN) Use
these connectors to attach the cables from a constant
voltage (CV) intercom system.
Before connecting the AV-452 to such an intercom
system, confirm the voltage used by the intercom
system. The AV-452 can work with intercoms using
12, 24 or 70 volts. When the speaker signal arrives at
the AV-452, it is converted by the AV-452 into a line
level signal, where it is added to the line and speaker
outputs (but not to the
MEETING OUT or PHONES).
14 TASCAM AV-452 Installation & Support Guide
Page 15

5 – Rear panel connections
Note the following levels and input impedances, corresponding to the different connectors on the barrier
strip:
Connector Level, input impedance
70V
24V
12V
70 V, 40 k
24 V, 12 k
12 V, 4.7 k
Ω
Ω
Ω
The level of the intercom signal is set as explained
below, and a squelch circuit is also available
d. The
intercom signal is enabled and disabled using the
front panel
INTERCOM key G.
c AV DUCKER RATIO and THRESH
controls
ducking facility is enabled using the DIP switches
(see "Customization and settings" on page 16). If this
facility is not enabled, these controls have no effect.
If this is enabled, the amount by which the currentlyselected AV signal is ducked is set between –6 and
–20 dB, depending on the position of the
trimmer pot. Turn this pot clockwise to increase the
amount that the AV signal is dimmed.
These trimmer pots are used if the AV
RATIO
THRESH trimmer pot adjusts the threshold level
The
of the microphone signal at which the ducking facility operates. Turn this pot clockwise to increase this
trigger level.
d LEVEL and GATE THRESH controls
These two trimmer pots are used with the
INTERCOM signals input at b.
The
LEVEL control adjusts the level of the intercom
signal fed to the mix (post-
ROOM LEVEL). Turn this
clockwise to increase the level of the signal.
The
GATE THRESH squelch control is used to con-
trol the threshold of a noise gate, which opens when
the level of the intercom signal exceeds this level.
This allows an otherwise slightly noisy intercom to
be connected without interfering with the other
signals.
e LINE OUTPUT mode switch This switch
allows the line output
mono line sources, driving auxiliary amplifiers, etc.
in two locations, or it allows it to act as a stereo amplifier, driving another stereo unit.
X of the AV-452 to act as two
External control connectors
There are two D-sub connectors, used for external
control of the AV-452.
The details relating to these connectors are described
in "External control" on page 18.
f
hi
g
f RS-232 serial port This female 9-pin D-
sub port accepts and receives serial signals, allowing
the AV-452 to be controlled by a serial device. See
5
6
4
ON DIP
7
3
8
2
9
1
1
3
2
5
4
0
6
the document Serial Protocol Reference (available on
request from your TASCAM dealer or distributor) for
full details of the format and content of the serial
commands and messages.
NOTE
Although the connector is marked
RS-232
, it can be
used for RS-422 and RS-485 serial data interchange as
well as for RS-232 format data.
g RELAY CONTROL connector This
female 37-pin D-sub connector accepts commands
and transmits tally signals. It also can be used to connect a wired IR “blaster “ transmitter for the control
of other devices, such as a video projector or monitor.
h SERIAL ADDRESS selector Use this to
select the serial address (
when controlling it using RS-485 commands.
0 through 9) of the AV-452
i CUSTOMIZE DIP switches See the fol-
lowing section for the meanings of these configuration switches.
TASCAM AV-452 Installation & Support Guide 15
Page 16

6 – Customization and settings
The customization and settings of the AV-452 are
These switches are as follows:
made using a set of six DIP switches.
Switch Function Up position Down position
1
2
3
4
5
6
Learn IR codes(
Cascade mode (
Speaker outputs (
LEARN IR
CASCADE
SPK OUT
Microphone high-pass filter (
Intercom gate function (
AV ducking facility (
INT GATE
AV DUCKER
)
)Exclusive (
) Mono (
MIC HPF
)
)
)
ON OFF
EXC
) Summed (
MON
)Stereo (
ON OFF
ON OFF
ON OFF
ST
SUM
)
These are explained here:
LEARN IR (switch 1)
This function allows the AV-452 to learn the IR codes
for direct control of a monitor, video projector, etc.
allowing the external video source for the video display unit to be selected using the AV selection keys
as well as the
RGB 1 and RGB 2 keys.
This allows the video signal of different devices to be
hooked up directly to the monitor and switched together with the audio from one control surface (the
AV-452 or the RC-452).
An external IR “blaster” (not supplied) must be connected to the AV-452 for control of the video display
unit.
Learning the external IR commands In the
following explanation, we assume that the AV equipment is hooked up to a multi-input video display
device in the following way:
Video
Audio
VGA 1
Video display
Here we are programming the
DVD key on the AV-
452 to switch the video monitor to the S-Video input.
1 Make sure the power to the AV-452 is OFF.
2 Set the LEARN IR switch (switch 1) to ON.
3 Turn ON the AV-452. The AMP A, AMP B,
INTERCOM and CASCADE keys on the front
panel flash to show the unit is in IR learn
mode.
4 Press the DVD key on the AV-452 front panel.
It starts to flash.
5 Point the video display device’s remote control
unit at the AV-452’s
the key which enables the S-Video input on the
remote control unit of the video display device.
IR SENSOR H and press
• If a valid IR code is received and stored, the
DVD key stops flashing.
• If the IR code is not received and stored cor-
rectly, the
DVD key continues to flash.
)
(RGB 1)
VCR IN
VCR
DVD player
Camcorder
VGA 2
RGB 2 THRU
AV-452
DVD IN
Composite 1
VCR OUT
AUX IN
AUX OUT
Composite 2
DVD OUT
RGB 2
S-Video
Not shown here is the IR blaster device, connected to
the relay control
g connector of the AV-452 and
pointing at the video monitor’s IR receiver.
16 TASCAM AV-452 Installation & Support Guide
NOTE
The AV-452 only supports the NEC type IR command
specification. If the key continues to flash, and you are
sure that the source change command has been transmitted, the video display device may not conform to the
NEC ITR command specification.
6 Press another AV selection key (for example,
RGB 1 key) and the corresponding input
the
key on the video remote control unit of the
video display device to learn this command.
7 When you have finished programming these
commands, set the
OFF.
to
The AV-452 resets itself and starts normal
operation.
LEARN IR switch (switch 1)
Page 17

CASCADE (switch 2)
This switch determines the use of the audio signals
received at the
CASCADE key F is activated.
the
In the
EXC (exclusive) setting, the input cascade
CASCADE IN connectors W when
signal replaces the direct input signals at both the
LINE OUTPUT Xand SPEAKER OUT Z terminals.
In the
SUM setting, the cascaded signal is summed
(pre
ROOM LEVEL) with the direct input signals
from the
terminals (as well as the
PHONES J).
LINE OUTPUT Xand SPEAKER OUT Z
MEETING OUT Y and
SPEAKER OUT (switch 3)
This switch determines whether the signal sent to the
SPEAKER OUT Z terminals is the same from both
speakers (left and right summed) (
it is a stereo signal (
ST).
If the mono option is chosen, it is possible to use the
AV-452 to control the sound fed to either or both of
MON) or whether
6 – Customization and settings
NOTE
Remember that this only applies to audio signals. You
cannot cascade video signals using the AV-452.
The cascade and intercom Note also that
when the switch is set to the
the CV intercom input is disabled. The front panel
INTERCOM key G will not light if the switch is set
EXC. Also, when the switch is in this position,
to
pressing the
INTERCOM key will cause the key to
flash briefly, indicating that the intercom input is
disabled.
two rooms, switchable using the
e
I.
LINE
.
front panel
NOTE
This switch setting only affects the speaker outputs. It
does not affect the
switched between mono and stereo with a dedicated
switch
EXC (exclusive) setting,
AMP keys on the
outputs X, which are
MIC HPF (switch 4)
This switch enables or disables an 80 Hz high-pass
filter added to the summed microphone signals.
INTERCOM GATE (switch 5)
This switch enables or disables the intercom squelch
circuit (noise gate).
AV DUCKER (switch 6)
This switch enables or disables the AV ducking
circuit.
Use this filter to cut out wind noise, floor rumble, etc.
from microphones which are located in less than
acoustically perfect environments.
When this switch is in the OFF position, the GATE
THRESH
trimmer pot d has no effect.
When this switch is in the OFF position, neither of
AV DUCKER trimmer pots: the RATIO or
the
THRESH c controls, has any effect.
TASCAM AV-452 Installation & Support Guide 17
Page 18

7 – External control
The AV-452 can be controlled from other units in two
ways.
The first is a serial protocol, as used by many AV
controller vendors. This allows a number of AV-452
units to be controlled from a personal computer, as
well as by these dedicated controllers.
The second is by using the relay connector, allowing
a number of external relay controls and tally indicators to be connected to the AV-452.
AV-452 serial protocol
NOTE
A separate document “AV-452 Serial Control Protocol”,
providing details on the implementation of the serial
control, is available on request from your TASCAM
dealer or distributor. If you are implementing the serial
protocol, you may choose to provide your “back-room”
systems integration team with the separate document,
and to keep a copy to hand for troubleshooting on site.
The serial port can operate as a RS-232, RS-422 or
RS-485 port (as determined by the controller or
Serial port pinouts
RS-232 RS-422 RS-485
PC).The AV-452 is fitted with a standard 9-pin D-sub
serial port, as well as a rotary address selector switch
h, allowing it to take an ID from 0 through 9.
This allows a number of AV-452 units to be chained
together and controlled from a single source.
NOTE
Only set the serial address with the power to the AV-452
turned off as the AV-452 will only recognize the setting
at power-on.
Tx-
Tx-
GND Rx-
Pin 2: Rx- Data
Pin 3: TX- Data
Pin 5: Ground
GND Rx-
Tx+
Rx+
Pin 2: Rx- Data
Pin 3: Tx- Data
Pin 5: Ground
Pin 6: Rx+ Data
Pin 7: Tx+ Data
The diagrams above show the AV-452 rear panel connector. Any cable connectors will accordingly be
mirror images of the above.
The transmission speed is always 9,600 bps, with a
character length of 8 bits, and no parity. The command spacing is >25 ms.
Relay control port
There is also a 37-pin D-sub connector gwhich may
be used for relay control of the AV-452 and connecting tally indicators.
The following should be taken into account when
connecting external equipment to the AV-452 using
this port:
TxRx-
GND
TxRx+
Pin 2: TxRx- Data
Pin 3: TxRx- Data
Pin 5: Ground
Pin 6: TxRx+ Data
Pin 7: TxRx + Data
The RS-422 and RS-485 implementations follow
standard specifications.
The RS-232 operation is a modification of the RS422 port, operating at 0 to 4.5 V, rather than ±9 V. It
should work with most older control systems and
PCs, but if you have problems with using this protocol, try using the controller with RS-422, if possible,
to remedy the situation.
The relay outputs are low when active, and must be
low for at least 50 ms.
The maximum current is 20 mA, and the maximum
voltage is 30 V.
The tally indicator outputs are open collector.
18 TASCAM AV-452 Installation & Support Guide
Page 19

7 – External control
IR “blaster”
Note that pin 21 (and pin 2, +5V) may be connected
to an IR “blaster” device, which can be used to relay
command codes from the AV-452 to an external monitor or projector, etc.
The procedure for learning these command signals is
described in "LEARN IR (switch 1)" on page 16.
RELAY CONTROL pinouts
Pin # Signal Meaning Pin # Signal Meaning
1 GND GND 20 NC
2 +5V +5V (50 mA maximum) 21 IR OUTPUT Connect the wired IR remote device
3 MIC 1 MUTE Turns the MIC 1 MUTE on and off 22 MIC 1 MUTE Tally
4 MIC 2 MUTE Turns the MIC 2 MUTE on and off 23 MIC 2 MUTE Tally
5 MIC 3 MUTE Turns the MIC 3 MUTE on and off 24 MIC 3 MUTE Tally
6 MIC 4 MUTE Turns the MIC 4 MUTE on and off 25 MIC 4 MUTE Tally
7 A/V DIM Turns the AV DIM on and off 26 A/V DIM Tally
8 CASSETTE Selects Cassette as the AV source 27 CASSETTE Tally
9 RGB 1 Selects RGB 1 as the Projector or RGB monitor source 28 CD-RW Tally
10 RGB 2 Selects RGB 2 as the Projector or RGB monitor source 29 DVD Tally
11 CD-RW Selects CD-RW as the AV source 30 VCR Tally
12 DVD Selects DVD as the AV source 31 AUX IN Tally
13 VCR Selects VCR as the AV source 32 RGB 1 Tally
14 AUX IN Selects AUX IN as the AV source 33 RGB 2 Tally
15 AMP A Turns the AMP A output on and off 34 AMP A Tally
16 AMP B Turns the AMP B output on and off 35 AMP B Tally
17 INTERCOM Activates the INTERCOM input 36 INTERCOM Tally
18 CASCADE Activates the CASCADE input 37 VOLUME DOWN Volume down
19 VOLUME UP Volume up
An IR blaster that has been found to work well with
the AV-452 is the Xantech 283M IR emitter. Please
consult your TASCAM distributor for up-to-date details of other suitable units that can be used with your
AV- 4 5 2 .
+5V
RELAY CONTROL
D-SUB 37P
+5V
1k
1k
10k
+5V
10k
2.2 NF
ULN2803AP
N
GND
GND
NC
+5V
IR OUTPUT
MIC 1 MUTE C
MIC 1 MUTE T
MIC 2 MUTE C
AV-452
1
20
2
21
3
22
4
R
IR Blaster
TASCAM AV-452 Installation & Support Guide 19
Page 20

8 – Specifications and block diagram
Video specifications
Composite inputs All composite inputs are
through RCA jacks.
AUX IN
VCR IN
DVD IN
75Ω, 1 Vp-p
75Ω, 1 Vp-p
75Ω, 1 Vp-p
S-Video inputs All S-Video inputs are through 4-
pin mini-DIN connectors.
VCR IN
DVD IN
75Ω, 1 Vp-p
75Ω, 1 Vp-p
AV audio and microphone specifications
AV audio inputs All inputs are made through
RCA pin jacks (unbalanced).
CASSETTE
CD-RW
VCR
DVD
AUX IN
AV audio outputs All outputs are made through
RCA pin jacks (unbalanced).
CASSETTE
CD-RW
VCR
Input impedance, 47 kΩ, Nominal input level -10 dBV
(–7.8 dBu)
Input impedance, 47 kΩ, Nominal input level –10 dBV
(–7.8 dBu)
Input impedance, 47 kΩ, Nominal input level –10 dBV
(–7.8 dBu)
Input impedance, 47 kΩ, Nominal input level –10 dBV
(–7.8 dBu)
Input impedance, 47 kΩ, Nominal input level –10 dBV
(–7.8 dBu)
Output impedance, 100Ω, Output level –10 dBV
(–7.8 dBu) (nominal), +10.8 dBV (+13 dBu)
(maximum)
Output impedance, 100Ω, Output level –10 dBV
(–7.8 dBu) (nominal), +10.8 dBV (+13 dBu)
(maximum)
Output impedance, 100Ω, Output level –10 dBV
(–7.8 dBu) (nominal), +10.8 dBV (+13 dBu)
(maximum)
Composite outputs All composite outputs are
through RCA jacks.
VCR OUT
MONITOR OUT75Ω,
75Ω, 1 Vp-p
1 Vp-p
S-Video outputs All S-Video outputs are
through 4-pin mini-DIN connectors.
VCR OUT
MONITOR OUT75Ω,
75Ω, 1 Vp-p
1 Vp-p
RGB 2 connections
RGB 2 IN
RGB 2 THRU
15-pin D-sub female
15-pin D-sub female
Microphone group insert Made through TRS
1/4" jack:
Send (tip) Output impedance 100Ω, nominal level –10 dBV
(–7.8 dBu), maximum level +15 dBV (+17.2 dBu)
Return (sleeve) Input impedance 10 k
(–7.8 dBu), 21 dB headroom
Ω
, nominal level –10 dBV
Microphone inputs The following figures apply
to connections made via the XLR connectors and the
barrier strips.
Input impedance 2.2 k
Input level
Phantom power +48 V (global for 4 channels)
OL
indicator
HPF Global for 4 channels, switchable @ 80 Hz
Ω
–60 dBu (
(
Lights at 10 dB above nominal level
3
GAIN
GAIN
4at maximum) to –27 dBu
at minimum)
20 TASCAM AV-452 Installation & Support Guide
Page 21

Master section specifications
8 – Specifications and block diagram
CASCADE INPUTS
LINE OUTPUT
MEETING OUT
INTERCOM
EMG IN
Balanced (XLR -type connectors
Input impedance 10 k
+4 dBu
Balanced XLR-type connectors
Output impedance 100
output level +4 dBu, maximum output
level +23 dBu
Unbalanced RCA connectors
Output impedance 100
output level –10 dBV (–7.8 dBu),
maximum output level +15 dBV
(+17.2 dBu)
Barrier strip
70 V, 40 k
5 V r.m.s.
Audio performance
Frequency
response
THD
(nominal level,
1 kHz)
Noise level
(DIN Audio+A)
Crosstalk 60dB, L/R at 1kHz
Speaker
outputs
20Hz to 20kHz +1.0/–2.0dB, MIC IN to INSERT SEND
20Hz to 20kHz +1.0/–2.0dB, LINE IN to LINE OUTPUT
20Hz to 20kHz +1.0/–2.0dB, LINE IN to MEETING OUTPUT
20Hz to 20kHz +1.0/–2.0dB, LINE IN to OUTPUT (to LINE sources)
50Hz to 20kHz +1.0/–2.0dB, LINE IN to PHONES OUTPUT
0.07%, MIC IN to LINE OUTPUT (GAIN: MIN, DIN AUDIO)
0.03%, LINE IN to LINE OUTPUT (DIN AUDIO)
0.03%, LINE IN to OUTPUT (to LINE sources) (DIN AUDIO)
0.03%, LINE IN to MEETING OUTPUT (DIN AUDIO)
MIC IN
LINE IN
(DIN Audio)
65dB, Input channels at 1kHz
Noise level (DIN Audio +A): 4 mV (ROOM VOLUME at max, MIC faders at min, inputs shorted); 1.2 mV (ROOM VOLUME minimum
Signal-to-noise ratio (DIN Audio+A):70 dB (output of 50 W)
(GAIN: MAX, EIN, 150ohm terminated) –110dBu, MIC IN to INSERT SEND
–72 dBV (–70dBu), LINE IN to LINE OUTPUT
–72 dBV (–70dBu), LINE IN to OUTPUT (to LINE sources)
–72 dBV (–70dBu), LINE IN to MEETING OUTPUT
–70 dBV (–68dBu), LINE IN to PHONES OUTPUT
Ω
, input level
Ω
, nominal
Ω
, nominal
Ω,
24 V, 12 kΩ or 12 V, 4.7 k
Phones
Connector 1/4" stereo jack
Maximum output
power
100 mW + 100 mW (68
Ω
) control at maximum
Speaker outputs
Connector Binding posts
Load impedance 8
Rated output power 80 W + 80 W (1 kHz, 1%, 8Ω)
Maximum output power 100 W +100 W (EIA, JAITA)
Ω
Ω
TASCAM AV-452 Installation & Support Guide 21
Page 22

8 – Specifications and block diagram
Power and physical specifications
Power requirement 100V AC, 50-60Hz
120V AC, 60Hz
230V AC, 50Hz
240V AC, 50Hz
Power consumption 125 W
Peak inrush current 16 A
Applicable electromagnetic environment E4
Dimensions (W xHxD)
Weight 11.3 kg (24.9 lbs)
Supplied accessories RC-452 remote control unit
Dimensional drawing
482 x 144 x 371(mm) 19.0 x 5.7 x 14.6 (in)
2 x AAA dry cell batteries
Power cord
Rack mounting kit
20mm
(0.8")
482mm (19.0")
465mm (18.3")
436mm (17.2")
355mm
330m (13.0")
21mm
(0.8")
57mm (2.2")
144mm (5.7")
132mm (5.2")
(0.5")
12mm
64mm
(2.5")
230mm (9.1")
22 TASCAM AV-452 Installation & Support Guide
36mm
(1.4")
Page 23

Block diagram
8 – Specifications and block diagram
TASCAM AV-452 Installation & Support Guide 23
Page 24

AV-452
TEAC CORPORATION
Phone: +81-422-52-5082 www.tascam.com
3-7-3, Nakacho, Musashino-shi, Tokyo 180-8550, Japan
TEAC AMERICA, INC.
Phone: +1-323-726-0303 www.tascam.com
7733 Telegraph Road, Montebello, California 90640
TEAC CANADA LTD.
Phone: +1905-890-8008 Facsimile: +1905-890-9888 www.tascam.com
5939 Wallace Street, Mississauga, Ontario L4Z 1Z8, Canada
TEAC MEXICO, S.A. De C.V
Phone: +52-555-581-5500 www.tascam.com
Campesinos No. 184, Colonia Granjes Esmeralda, Delegaacion Iztapalapa CP 09810, Mexico DF
TEAC UK LIMITED
Phone: +44-1923-438880 www.tascam.co.uk
5 Marlin House, Croxley Business Park, Watford, Hertfordshire. WD1 8TE, U.K.
TEAC EUROPE GmbH
Phone: +49-611-71580 www.tascam.de
Bahnstrasse 12, 65205 Wiesbaden-Erbenheim, Germany
TEAC FRANCE S. A.
Phone: +33-1-42-37-01-02 www.tascam.fr
17 Rue Alexis-de-Tocqueville, CE 005 92182 Antony Cedex, France
TEAC AUSTRALIA PTY.,LTD. A.B.N. 80 005 408 462
Phone: +61-3-9672-2400 Facsimile: +61-3-9672-2249 www.tascam.com.au
280 William Street, Port Melbourne, Victoria 3000, Australia
TEAC ITALIANA S.p.A.
Phone: +39-02-66010500 www.teac.it
Via C. Cantù 11, 20092 Cinisello Balsamo, Milano, Italy
Printed in China
 Loading...