

Tascam 202-Mk4 Owners Manual

D00935220B
»
202MK%^
Double Auto Reverse Cassette Deck
OWNER'S MANUAL
IMPORTANT SAFETY PRECAUTIONS
2 TASCAM 202MKIV
CAUT ION : TO R EDUCE THE RIS K OF EL ECTRIC SHOCK, D O NOT
REMOVE COVER (OR BACK). NO USER-SERVICEABLE PARTS INSIDE.
REFER SERVICING TO QUALIFIED SERVICE PERSONNEL.
The lightning flash with arrowhead symbol, within equilateral triangle, is
intended to alert the user to the presence of uninsulated “dangerous voltage” within the product’s enclosure that may be of sufficient magnitude to
constitute a risk of electric shock to persons.
The exclamation point within an equilateral triangle is intended to alert the
user to the presence of important operating and maintenance (servicing)
instructions in the literature accompanying the appliance.
This appliance has a serial numbe r locate d o n t he rea r p anel.
Please record the model number
and s eria l nu m ber a n d re tai n
them for your records.
Model number
Serial number
WARNING: TO PREVENT FIRE OR
SHOCK HAZARD, DO NOT EXPOSE
For U.S.A.
TO THE USER
This equipment has been tested and found
to comply with the limits for a Class B digital
de vic e, p urs uan t to Part 15 of the F CC
Rules. These limits are designed to provide
re a s onab l e pr otec t ion agains t h armf u l
interference in a residential installation. This
equipment generates, uses, and can radiate
radio frequency energy and, if not installed
and used in accordance with the instruction
manual, may cause harmful interference to
radio communications.
H o w e v e r, t h e r e is no g u a r a n t e e th a t
interfe rence will not o ccur in a parti cular
installation. If this equipment does cause
harmful interference to radio or television
re ception, w hich can be de ter min ed b y
turning the equipment off and on, the user is
encouraged to try to correct the interference
by one or more of the following measures.
a) Reori e n t o r re l o c a t e th e re c e i v i n g
antenna.
b) Increas e the separati on b etween th e
equipment and receiver.
c) Connect the equipment into an outlet on
a circuit different from that to which the
receiver is connected.
d) Co ns ul t t he de aler or an experienced
radio/TV technician for help.
THIS APPLIANCE TO RAIN OR
MOISTURE.
CAUTION:
Changes or modifications to this equipment
n o t e x p r e s s l y a p p r o v e d b y T E A C
CORPORATION fo r co m p l i a n c e c o u l d
vo id the use r' s authority to opera te this
equipment.

IMPORTANT SAFETY INSTRUCTIONS
TASCAM 202MKIV 3
1 Read these instructions.
2 Keep these instructions.
3 Heed all warnings.
4 Follow all instructions.
5 Do not use this apparatus near water.
6 Clean only with dry cloth.
7 Do not block any ventilation openings. Install
in acc o rdan c e with t h e ma nuf a ctur e r's
instructions.
8 Do not install near any heat sources such
as radiators, heat registers, stoves, or other
apparatus (including a mplifiers) that p ro duce heat.
9 Do not def eat the safety pur pose o f th e
polarized or grounding-type plug. A polarized plug ha s t wo blad es wi th one wi de r
than the other. A grounding type plug has
two blades and a third grounding prong. The
wide blade or the third prong are provided
for your safety. If the provided plug does not
fit into your outlet, consult an electrician for
replacement of the obsolete outlet.
10 Protect the power cord from being walked
on or pinched particularly at plugs, convenien ce recepta cl es, and the poi nt wh ere
they exit from the apparatus.
11 Only use attachments/accessories specified
by the manufacturer.
12 Use only with the cart, stand, tripod, brack-
et, or table specified by the manufacturer,
or sold with the apparatus. When a cart is
used, use caution when moving the cart/
apparatus combination to avoid injury from
tip-over.
14 Refer all servicing to qualified service per-
sonnel. Servicing is required when the apparatus has been damaged in any way, such
as power-supply cord or plug is damaged,
liquid has been spilled or objects have fallen
into the apparatus, the apparatus has been
exposed to rain or moisture, does not operate normally, or has been dropped.
• Do not expose this apparatus to drips or
splashes.
• Do not place any objects filled with liquids,
such as vases, on the apparatus.
• Do not install this apparatus in a confined
space such as a book case or similar unit.
• The apparatus draws nominal non-operating
power from the AC outlet with its POWER
switch in the off position.
• The apparatus should be located close
enough to the AC outlet so that you can
easily grasp the power cord plug at any
time.
• An apparatus with Class I construction shall
be connected to an AC outlet with a protective grounding connection.
• Batteries (battery pack or batteries
installed) shall not be exposed to excessive
heat such as sunshine, fire or the like.
13 U nplu g this a p para tus dur i ng ligh tnin g
storms or when unused for long periods of
time.

Contents
1 − Introduction ......................... 5
Supplied accessories .................... 5
Rack-mounting the unit ............... 5
About this manual ....................... 5
Precautions and notes for
placement and use ................... 6
About cassette tapes ................... 6
Cassette tapes that you should not
Automatic tape type detection
Tape slack ..........................................7
Accidental erasure prevention
Maintenance .....................................7
Connections .................................. 8
use..........................................6
function .................................7
tabs ........................................7
Cleaning the heads ................................ 7
2 − Features of the 202MKIV .....9
Front panel .................................... 9
Rear panel ................................... 10
Display ......................................... 11
3 − Playback ..............................12
Playback 1 (either TAPE 1 or
TAPE 2) .................................... 12
Playback 2 (either TAPE 1 or
TAPE 2) .................................... 13
Continuous playback ................. 14
Blank scan ................................... 14
Song search ................................. 15
Intro check .................................. 16
Recording silence ....................... 19
To create a blank of more than 4
seconds long .............................. 19
To create a blank of less than 4 seconds
long ............................................. 19
Mic mixing recording ................. 19
Adjusting mix recording level .......20
Continuous recording ................ 20
Parallel recording ....................... 21
Dubbing (from TAPE 1 to
TAPE 2) .................................... 22
Editing during dubbing (only at
normal speed) ........................ 23
Synchro reverse dubbing (from
TAPE 1 to TAPE 2).................... 23
Timer playback ........................... 24
Playback ..........................................24
Timer-controlled recording ...........25
Connections ....................................25
5 − Reference and
specifications .................... 26
Troubleshooting ......................... 26
Specifications ............................. 27
Dimensional drawing ................. 27
4 − Recording ........................... 17
Recording (either TAPE 1 or
TAPE 2) .................................... 17
To erase recordings .................... 18
Quick record start ...................... 18
To stop recording temporarily ........... 18
4 TASCAM 202MKIV

TASCAM 202MKIV 5
1 − Introduction
Thank you for your purchase of the TASCAM
202MKIV Double Auto Reverse Cassette Deck.
Before connecting and using the unit, please take
time to read this manual thoroughly to ensure you
understand how to properly set up and connect the
202MKIV, as well as the operation of its many useful and convenient functions. After you have finished
reading this manual, please keep it in a safe place for
future reference.
Dolby NR
Dolby NR is designed to reduce tape hiss, a noise
introduced during the recording and playback processes. This cassette deck is equipped with Dolby B-type
Noise Reduction.
Supplied accessories
In addition to this manual, the 202MKIV has been
packed with the following:
• A rack-mounting screw kit (screws and washers) ...1
A warranty card ......................................................1
•
The Dolby NR system affects both recording and
playback quality. In playback, be sure to set the
DOLBY NR switch to the same position used when
the recording was made.
Manufactured under license from Dolby Laboratories.
HX Pro headroom extension originated by Bang and
Olufsen.
Dolby, HX Pro, and the double-D symbol are trademarks of Dolby Laboratories.
ontact your TASCAM supplier if any of these items
C
are missing.
Rack-mounting the unit
If you are mounting the unit in a rack, leave 1U of
space above it and 4 inch (10 cm) or more of space at
the rear.
Use the rack-mounting kit to mount the unit in a standard 19-inch equipment rack, as shown in this section.
Remove the feet of the unit before mounting.
About this manual
In this manual, we use the following conventions:
The names of keys and controls are given in the fol-
•
lowing typeface:
The alphanumeric portion of the display shows a
•
message, this is shown in the following typeface:
CP01.
If a preset indicator in the display (i.e. one which
•
cannot change, but is either on or off) is shown,
this is shown as follows:
EJECT.
PARALLEL.

6 TASCAM 202MKIV
1 − Introduction
NOTE
CAUTION
Precautions and notes for placement and use
The 202MKIV may be used in most areas, but to
maintain top performance, and prolong operating life,
observe the following notes, precautions and environmental conditions:
Avoid exposing it to extremes of temperature and
•
humidity and avoid mechanical shocks and vibration.
Keep the unit away from strong magnetic fields
•
(TV sets, computer monitors, large electric motors,
etc.).
The nominal temperature should be between 5°C
•
and 35°C (41°F and 95°F).
Relative humidity should be 30 to 90 percent.
•
As the unit may become hot during operation,
•
always leave sufficient space above the unit for
ventilation. Do not install this unit in a confined
space such as a bookcase, and do not put anything
on top of the unit.
Avoid installing this unit on top of any heat-gener-
•
ating electrical device such as a power amplifier.
Make sure that the unit is mounted in a level posi-
•
tion for correct operation.
About cassette tapes
•
Do not open the sealed cabinet as this might result
in damage to the circuitry or electrical shocks. If
a foreign object should get inside the unit, contact
your supplier or service agency.
•
When removing the power plug from the wall outlet, always pull directory on the plug, never yank
the cord.
•
The voltage selector on the rear panel is only
available on units for the North American market.
Please set this to match your local supply. If you
are in any doubt in this matter, consult an electrician
When transporting the unit, always use the
original packing materials. For this reason, we
strongly recommend that you save all the packi
ng materia ls that cam e wit h the 202 MKI V,
in case you need to transport it in the future.
In addition, when transporting the unit, you
should tape the cassette decks closed, using an
adhesive tape that will not spoil the finish of
the unit.
Do not open the cassette or pull the tape out of
•
the cassette.
Do not touch the tape surface.
•
Do not use or store the tape in a humid or dusty
•
place.
Cassette tapes that you should not use
Poor performance, errors, or malfunctions may result
if you use any of the tapes described below. Some of
these tapes may also cause tape clog problems that can
damage the tape transport mechanism.
Cassettes that are imperfectly shaped
Do not use a deformed cassette or one that has unstable tape movement or makes a strange sound during
fast-forward or rewind.
Keep the tape away from any magnetic sources,
•
such as speakers or TVs, otherwise noise may be
produced during playback or important recordi
ngs may be erased.
Long play tapes
Do not use C-120 or longer tapes. These tapes are very
thin and can easily stretch or get tangled in the tape
transport mechanism.
Endless tapes
Do not use these tapes because they can easily get
tangled in the tape transport mechanism.
TASCAM 202MKIV 7
1 − Introduction
Metal
(
Type IV
)
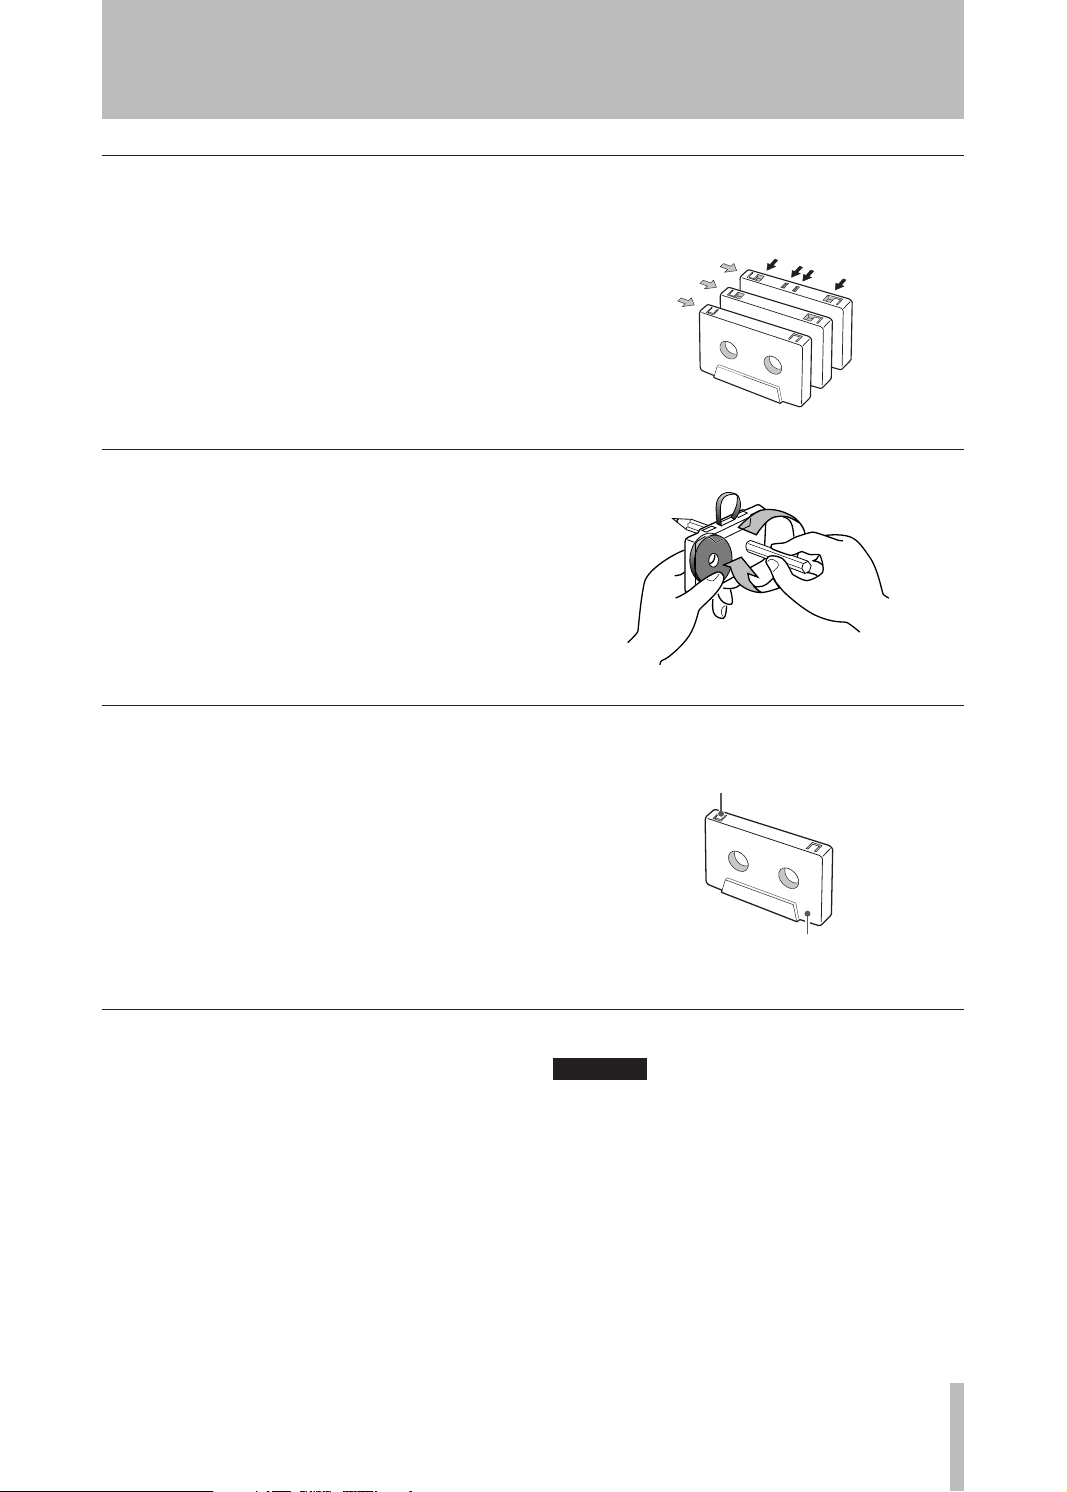
Automatic tape type detection holes
CrO
2
(
Type
II
)
Normal
(
Type
I
)
CAUTION
Automatic tape type detection function
This cassette deck can detect what type of tape is
being used based on the detection holes in the cassette
shell. Be sure to use cassettes with detection holes.
With this cassette deck, you can play back normal
(Type I), chrome (Type II) and metal (Type IV) tapes.
For recording, use normal (Type I) or chrome (Type
II) tapes.
Each deck (TAPE 1 and TAPE 2) is equipped with its
own auto tape type detection function, so you can use
Tape slack
Slack can cause the tape to get tangled in the capstan
or other rotating parts. To prevent this, take up all tape
slack using a pencil or the like inserted into the reel
hole.
different types of tape at the same time.
Accidental erasure prevention tabs
Tabs on top of the cassette shell allow you to prevent
important recordings from being erased by mistake.
There are two tabs on each cassette shell: one for side
“A” and the other for side “B”.
Once these tabs have been removed using a screwdriver or the like, there is absolutely no chance of the
recording function being activated.
To record on a cassette whose tab has been broken off,
stick a piece of adhesive tape over the hole. Be careful
not to block the tape type detection holes.
Maintenance
If the surface of the deck becomes soiled, wipe it
clean with a dry, soft cloth. To remove stubborn dirt,
wipe with a cloth slightly moistened with a solution
of mild detergent and water, then moisten a cloth with
water, wring it well, and rub over the surface.
Do not allow the deck to remain in contact with rubber or vinyl products for a long period of time, as
these could damage the surface finish.
Never use volatile cleaners like thinners, benzine or
alcohol because they will damage the surface finish.
Accidental erasure prevention
tab for side “A”
Side “A”
For safety, always unplug the power cord be-
fore performing any maintenance.
Cleaning the heads
ª
If the head section gets dirty, the recording quality will
deteriorate, resulting in degraded playback sound or
“drops” in sound. Also, if the tape transport path gets
dirty, the tape may get entangled in the rotating parts.
It is therefore recommended that the heads, pinch rollers and capstans be cleaned regularly at intervals of
10-hour use with a cotton swab moistened with a commercially available, appropriate cleaning liquid.
8 TASCAM 202MKIV
1 − Introduction
CAUTION
NOTE
NOTE
LL RR
PLAYREC
TAPE
NOTE
Do not make a rec ording or p lay back tap e
when the tape transport path is wet with cleani
ng liquid, as this could cause the tape to jam or
clog.
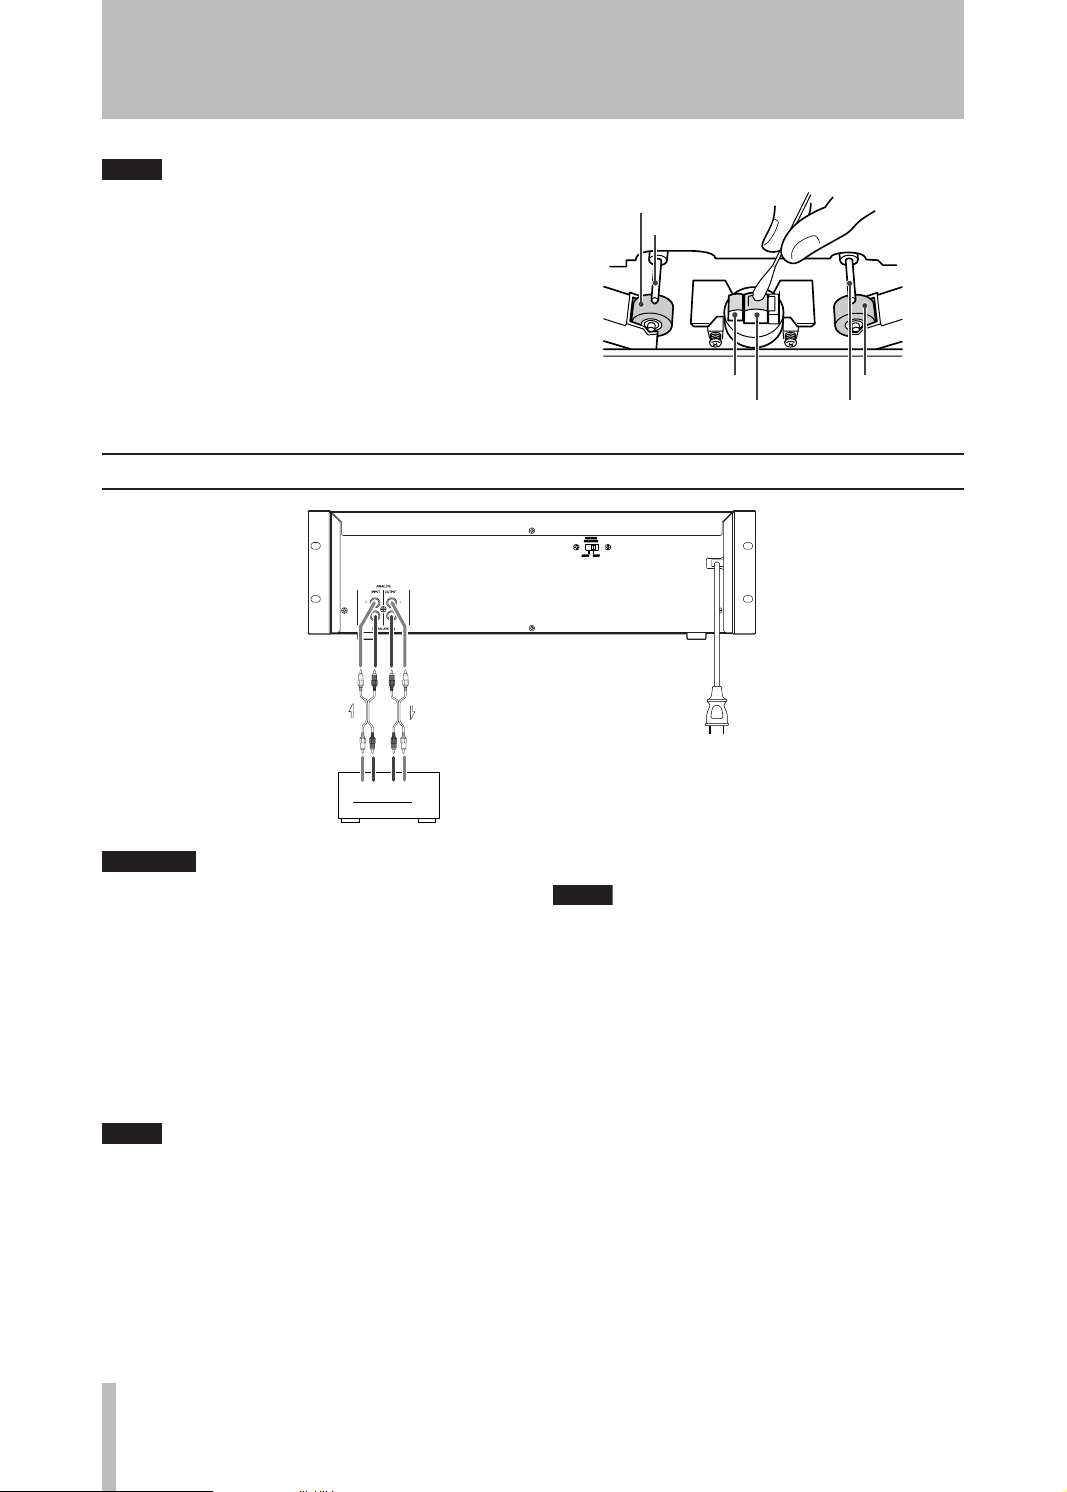
Connections
Pinch roller
Capstan
Erase head
Record/playback head
Pinch roller
Capstan
Plug the power cord into an AC outlet only after
•
having made all other connections.
Read the instructions of each component you
•
intend to use with this unit.
Use the supplied RCA cables to make connections
between this unit and your amplifier. Make sure to
connect:
White plug to White jack (L: left channel)
Red plug to Red jack (R: right channel)
Plugs must be firmly inserted into the corre-
sponding jacks. Do not bundle the RC A cables
to gethe r wi th t he p ow er c ord and speaker
cables. Doing so will degrade sound quality or
generate noise.
Plug this AC power cord into an AC wall socket.
Hold the power plug when plugging or unplug-
•
ging the power cord. Never pull or yank on the
power cord.
•
Unplug the power cord when you are not going
to use the unit for some time.
TASCAM 202MKIV 9
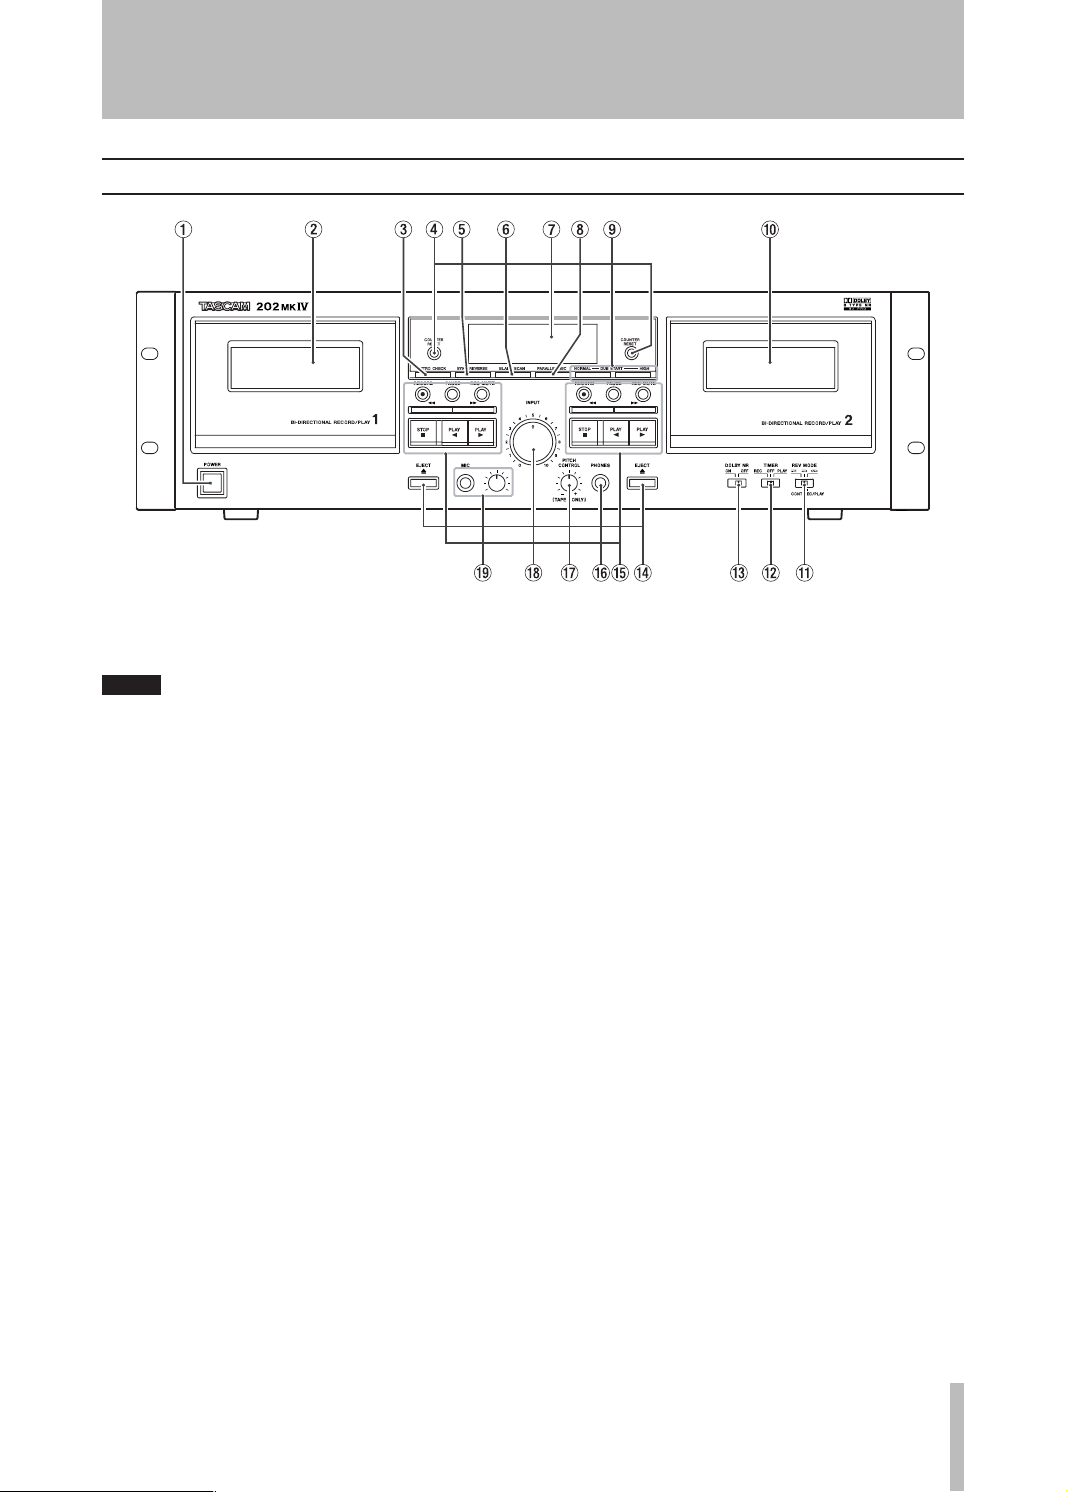
Front panel
NOTE
2 − Features of the 202MKIV
1Power switch
This switch toggles the unit on/off.
The equipment draws nominal non-operating
power f rom the AC outl et wi th its POW ER
switch in the OFF position.
2TAPE 1 compartment
3INTRO CHECK key
Pressing this key allows you to identify recorded
segments by listening to the first 15 seconds of each
segment.
4
COUNTER RESET keys
Pressing these keys reset the tape counter readings
for TAPE 1 and TAPE 2, respectively.
Synchro reverse key (SYNC REV)
5
Pressing this key activates the synchro reverse dub-
ing function.
b
BLANK SCAN key
6
This key toggles Blank Scan on/off.
Display
7
This shows tape counters, level meters, etc.
Parallel record key (PARALLEL REC)
8
This key lets you simultaneously record on both
decks.
Dubbing start key (DUB START)
9
This key is used when copying the contents of a
tape from TAPE 1 to TAPE 2, either at normal or
high speed.
TAPE 2 compartment
0
qReverse mode switch (REV MODE)
This switch is used to switch between reverse
modes.
TIMER switch
w
This switch is provided for use with a commercially
available audio timer, to allow timer controlled
recording or playback.
N
ormally, leave this switch to the
e
DOLBY NR switch
This switch toggles the Dolby Noise Reduction sys-
em on/off. In playback you need to set this switch
t
to the same position as when the recording was
made.
r
EJECT keys
Pressing these keys opens the TAPE 1 and TAPE 2
compartments.
Tape transport control keys
t
RECORD
Pressing this key shifts the corresponding deck to
record-pause mode.
PAUSE
Pressing this key temporarily stops playback or
recording.
Recording mute (REC MUTE)
This key is for creating the 4-second blank space
needed for proper operation of the Computomatic
Program Search (CPS) function.
OFF position.
 Loading...