

Page 1
What’s in this guide? Getting started Making calls Using the phone book In-call features Video conferencing
D14224.03 US ER GUID E TANDBERG T 1—NOVEMBER 2 008
User Guide
TANDBERG T1
www.tandberg.com
1
Page 2

What’s in this guide?
What’s in this guide? Getting started Making calls Using the phone book In-call features Video conferencing
What’s in this user guide?
Getting started
Waking up the system ........................................................4
The TRC5 remote control ................................................... 5
Navigating in the menus ..................................................... 7
If there is no menu shown... .............................................7
Entering text in text fields ................................................... 8
What happens when you press a number key? ............... 8
Using the number keys in text fields ................................ 8
Special characters ..........................................................8
Screen layout ..................................................................... 9
Adding wallpaper to your screen ..................................... 9
Making calls
Making calls by dialing the number .................................. 11
When someone is calling.................................................. 11
Terminating an ongoing call .............................................. 11
Making calls using phone book ........................................ 12
Method 1: ..................................................................... 12
Method 2: ..................................................................... 12
Making calls using the recent calls list .............................. 13
The icons used ............................................................. 13
Phone book usage
Quick search by letters .................................................. 16
Adding new contacts to the phone book .......................... 17
Adding an entry from recent calls or the phone book .... 17
Adding an entry manually to My contacts ...................... 17
Editing existing entries in the phone book ........................ 18
In-call features
Best view—Face recognition ............................................ 20
Using Best view ............................................................ 20
Where to find it ..............................................................20
Running a presentation .................................................... 21
Video conferencing
About video conferencing ................................................ 23
Who becomes the host? ............................................... 23
Calling more than one ...................................................... 24
Basic phone book features .............................................. 15
Opening the phone book .............................................. 15
Navigating in the phone book ........................................ 15
Calling an entry in the phone book ................................ 15
Searching in the phone book ........................................... 16
Entering text in the search field...................................... 16
D14224.03 US ER GUID E TANDBERG T 1—NOVEMBER 2 008
2
Page 3

What’s in this guide? Getting started Making calls Using the phone book In-call features Video conferencing
Getting started
D14224.03 US ER GUID E TANDBERG T 1—NOVEMBER 2 008
Chapter 1
Getting started
3
Page 4

What’s in this guide? Getting started Making calls Using the phone book In-call features Video conferencing
Getting started
Waking up the system
After wake-up, the screen will typically look like this:
To make a call you need to wake up the system from standby.
However, if someone calls you, the system will wake up by itself.
• To wake up the system just pick up the remote control or press any
key. You may have to point the remote control towards the system
to make it discover you.
• The system will now show the welcome screen, which contains
the main menu and it will display the main camera image in the
background.
• The IP number (whenever applicable) and the system name are
displayed in the upper left corner.
• The IP number is the dial-in number of your system.
• The screen will also indicate if there are any calls you have missed.
The IP number of your system is
the dial-in number of your system.
alice.wonderland@mycompany.com
Date and time of
day.
Softkeys (described on the following pages).
Should the system fail to respond to the remote control or to incoming
calls, make sure that:
D14224.03 US ER GUID E TANDBERG T 1—NOVEMBER 2 008
• The system is connected to line voltage
• The remote control has working batteries
• The internal cables, such as the monitor cable and/or the camera
cables are properly connected, cf. the installation sheet.
4
Page 5
What’s in this guide? Getting started Making calls Using the phone book In-call features Video conferencing
Getting started
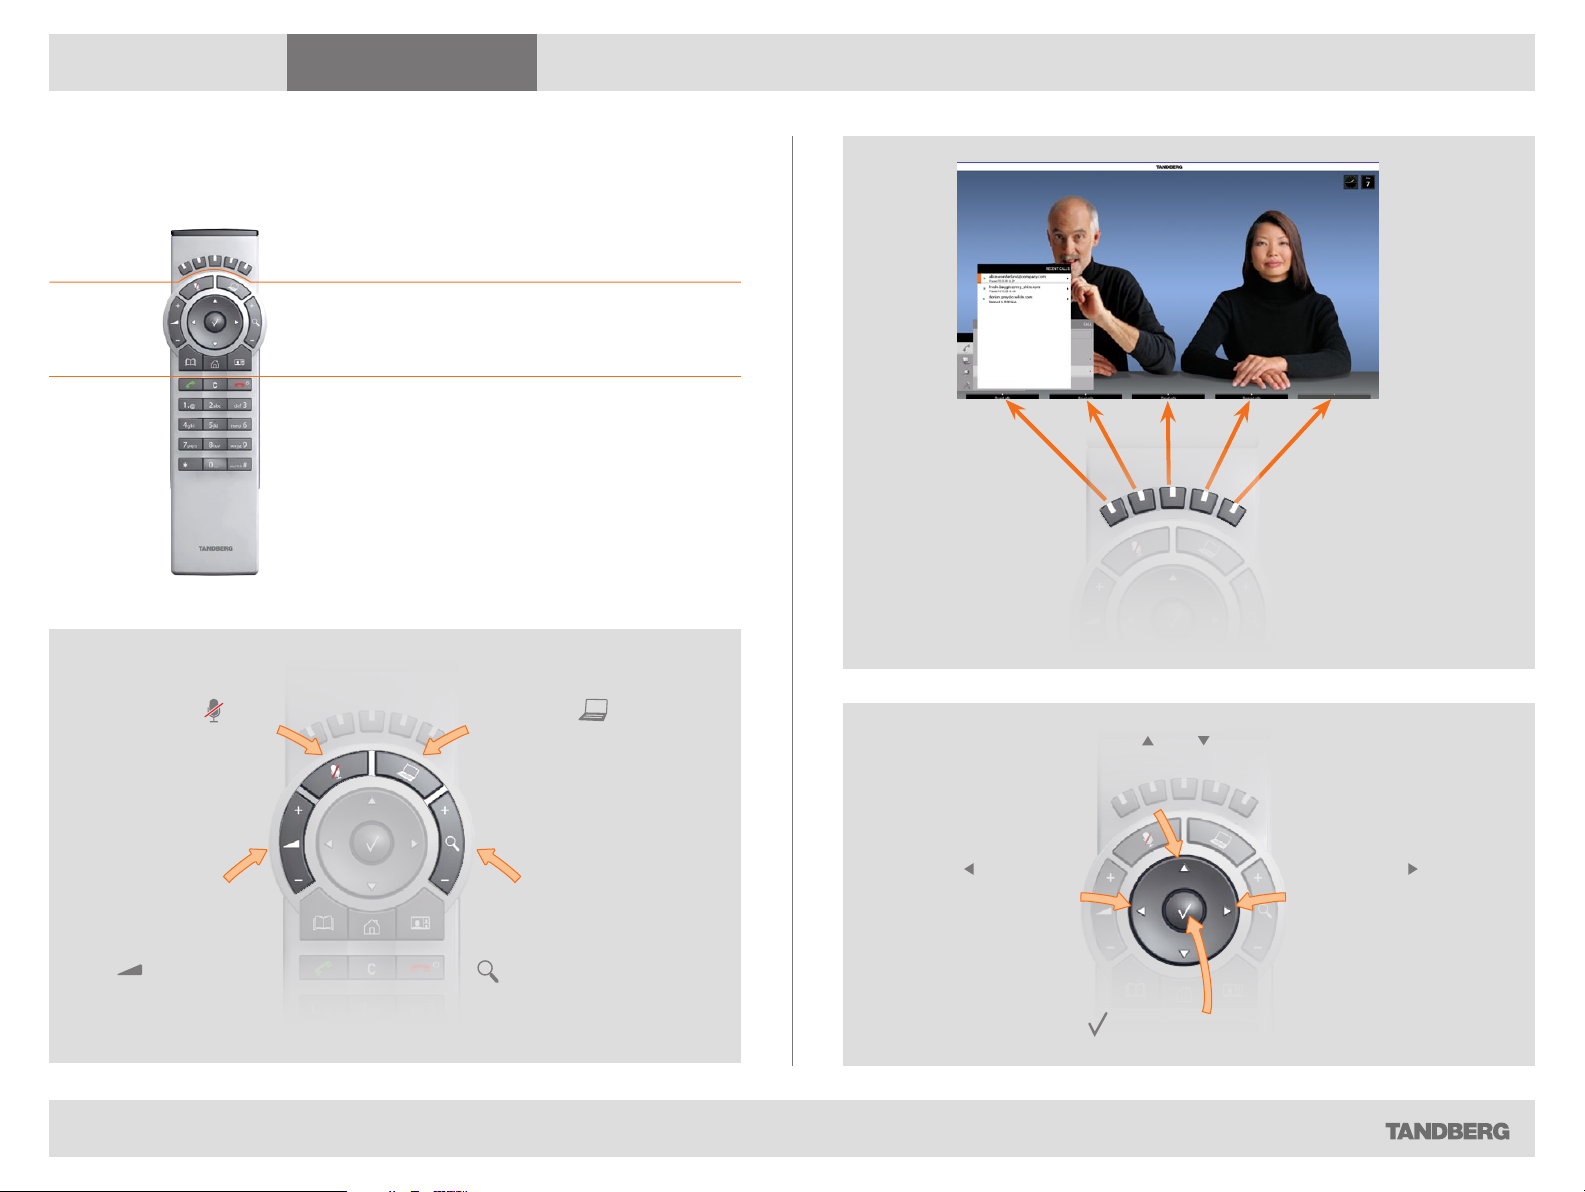
The TRC5 remote control
The functio n keys in the upper part of the
remote control reflects the softkeys on screen...
... and the middle part of the remote control is
used to handle the video part of the call
... while the lower part of the remote control
resembles very much the keypad of a cell phone.
FUNCTION KEYS:
Each key reflects a
soft key on screen
and represents
shortcuts and
advanced
functions.
MICROPHONE:
Press the
to toggle the
microphones
on/off.
VOLUME: Press
the + or – on the
key to adjust
the volume.
D14224.03 US ER GUID E TANDBERG T 1—NOVEMBER 2 008
key
PRESENTATION:
Press the
to show/hide a
presentation.
ZOOM: Press
the + or – on the
key to zoom the
camera in and out.
key
ARROW UP/DOWN: Use the and arrow keys to navigate in the
menu and to move the camera (pan, tilt) when the menu on screen is not
displayed.
ARROW LEFT:
Press the
key to go one step
back in the menu or
to move to the left in
a text field.
OK/SELECT: Press the
5
arrow
key to confirm your choice or selection.
ARROW RIGHT:
Press the arrow
key to expand
the selected
menu item or to
move to the right
in a text field.
Page 6
What’s in this guide? Getting started Making calls Using the phone book In-call features Video conferencing
Getting started
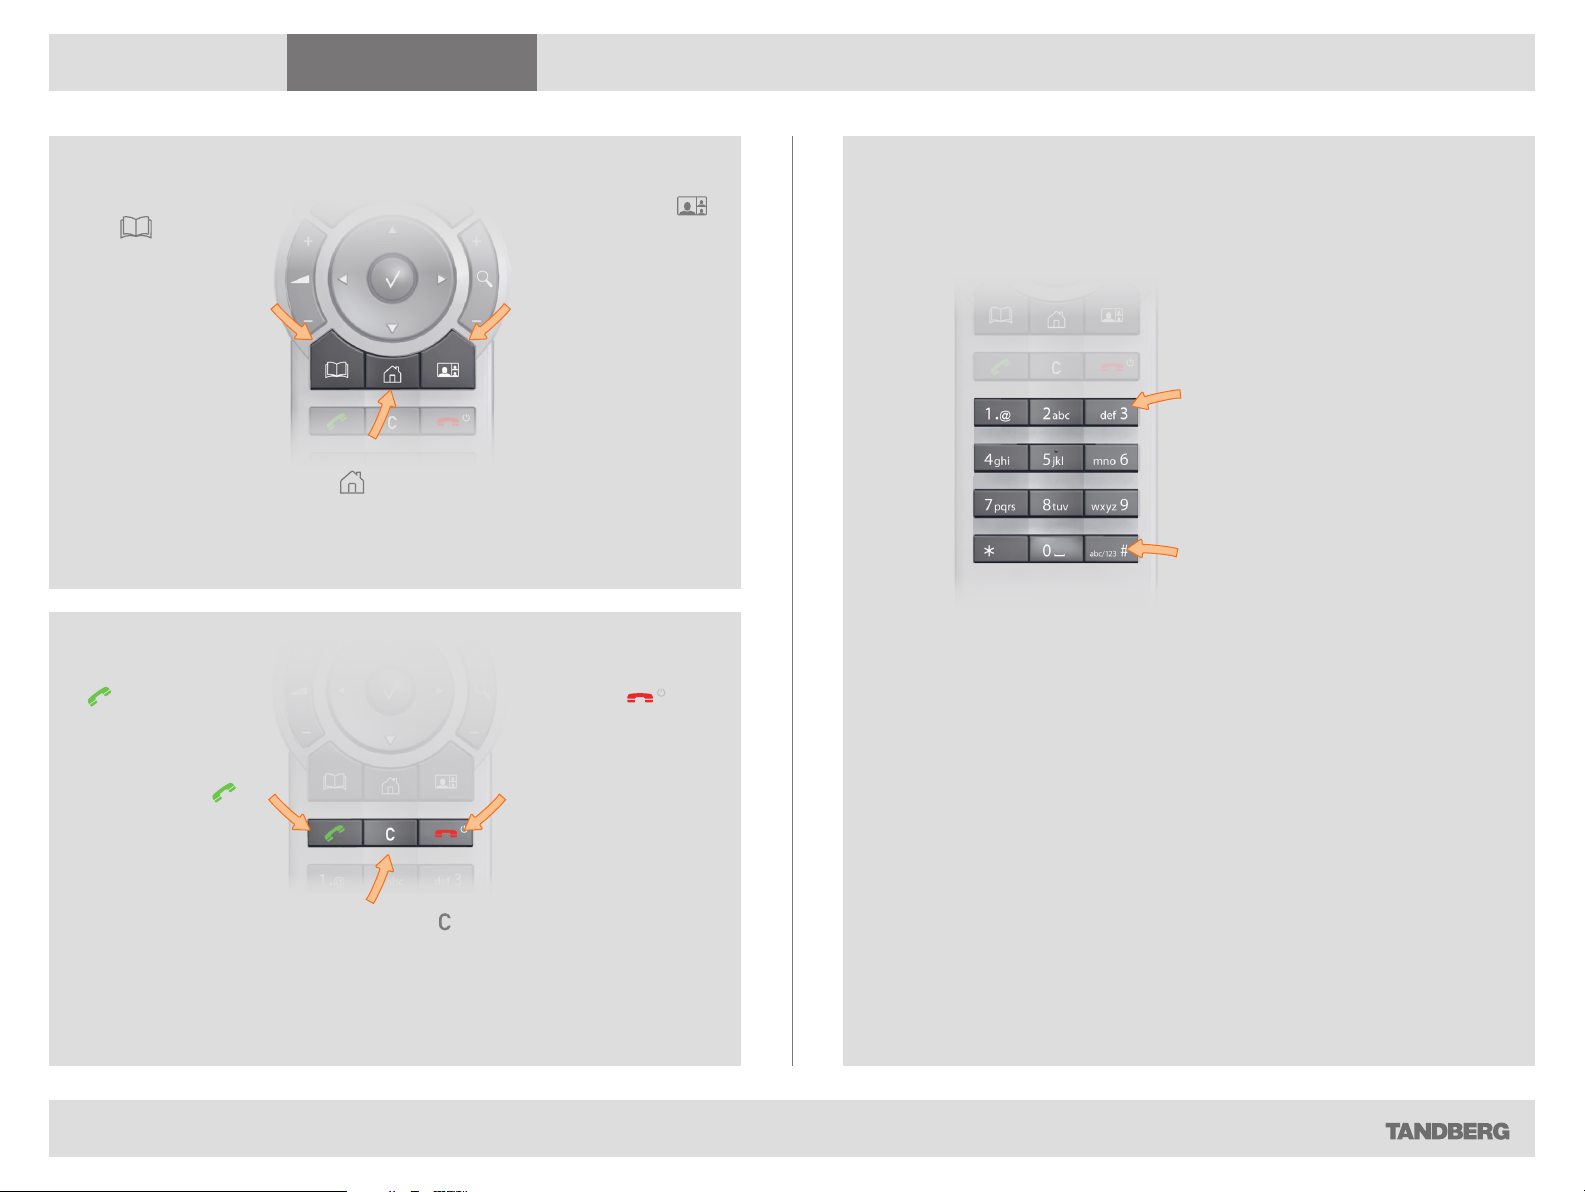
PHONE BOOK: Press
the
key to display
the phone book.
CALL: Press the
key to display
the Recent calls
menu. Select one
or more contacts
and press the
key to initiate the
call.
HOME: Press
key to go
the
back to the Home
menu.
LAYOUT: Press the
key to display the
Layout menu, then
select a view in the
menu.
END CALL / STANDBY:
Press the
key
to end a call
or—when idle—to go
into standby mode.
Alphanumeric keypad: Use the keypad in the same way
as you would use a cell phone.
0-9, a-z, period (.), @,
space, *: Press a key
repeatedly to toggle
between the options
displayed on each key.
abc/123 #: Press the #
key to toggle between
lower case characters
and numbers.
CLEAR: Press the
remove characters in a text
field.
D14224.03 US ER GUID E TANDBERG T 1—NOVEMBER 2 008
key to
6
Page 7
What’s in this guide? Getting started Making calls Using the phone book In-call features Video conferencing
Getting started
Navigating in the menus
Your TANDBERG T1 is operated by means of the remote control. All you
need to know to get started are a few basic navigation principles.
• Press the
• The
used to navigate in the menus.
• When the system shows the
hide the menu. To bring it back, press the home key ( ) again.
• In an input field pressing
of the cursor position.
The element
currently selected
is indicated by an
orange rectangle.
Use the vertical
aRRow keys to
navigate up and
down in a menu.
home key ( ) to show the home menu.
aRRow keys in the center of the upper part of the remote control are
home menu only, pressing hom e key ( ) will
cancel will delete characters/numbers to the left
Press the key to produce the home
menu on the screen.
The little
triangle
indicates that
a submenu is
available.
Example showing a submenu produced by pressing the right
The little triangle
indicates that
there are further
submenus available.
Use the right
key or to show this
Use the left aR Row key to
collapse the menu expansion,
i.e. to go back one level.
Use the home key ( ) to exit all
menus and return to showing
the home menu only.
aRRow key.
aRRow
submenu.
If there is no menu shown...
Wake up the system by lifting the remote control and press the key to
produce the home menu.
D14224.03 US ER GUID E TANDBERG T 1—NOVEMBER 2 008
Context sensitive
softkeys corresponding
to the function keys of the
remote control.
Softkeys not used in a
given context are shown
ghosted.
7
Page 8
What’s in this guide? Getting started Making calls Using the phone book In-call features Video conferencing
Getting started
Entering text in text fields
Some menu fields expect text information to be entered. Apart from the
need to enter the number or identity of the person you want to call, you will
also—among other things—need this ability to search and maintain your list
of contacts in the phone book.
What happens when you press a number key?
• Pressing a number key outside calls will cause the call menu to be shown.
• When the cursor is positioned inside an entry field expecting text entries,
the system automatically switches to text mode (ABC). Entering letters is
similar to as on a cell phone—see right.
• When the cursor is positioned inside an entry field requiring number
entries, the system automatically switches to number mode (123) allowing
numbers to be dialed with the number keys as usual.
Using the number keys in text fields
Whenever text entries are expected by the system, a small abc or
ABC appears in the right lower corner of the entry field. For entry fields
expecting numbers, 123 will appear instead. In text mode, entries from the
number keys are automatically interpreted as text entries in the same way
as on a cell phone.
Guidelines:
• Press the key that corresponds to the required letter as many times as
needed to produce that letter
• Switch between lower case (abc) and upper case (ABC) letters with the
# a/A key
• Switch between text mode (abc) and number mode (123) by keeping
the # abc/123 key depressed for more than a second
• To insert space, press the 0 _ key
• To insert the @ sign, press the 1-key twice, while the keypad is in text
mode
• To insert the . sign, press the
number mode
• To write digits and numbers in a text input field, repeatedly press the
corresponding key until the digit appears.
.-key once, while the keypad is in
*
D14224.03 US ER GUID E TANDBERG T 1—NOVEMBER 2 008
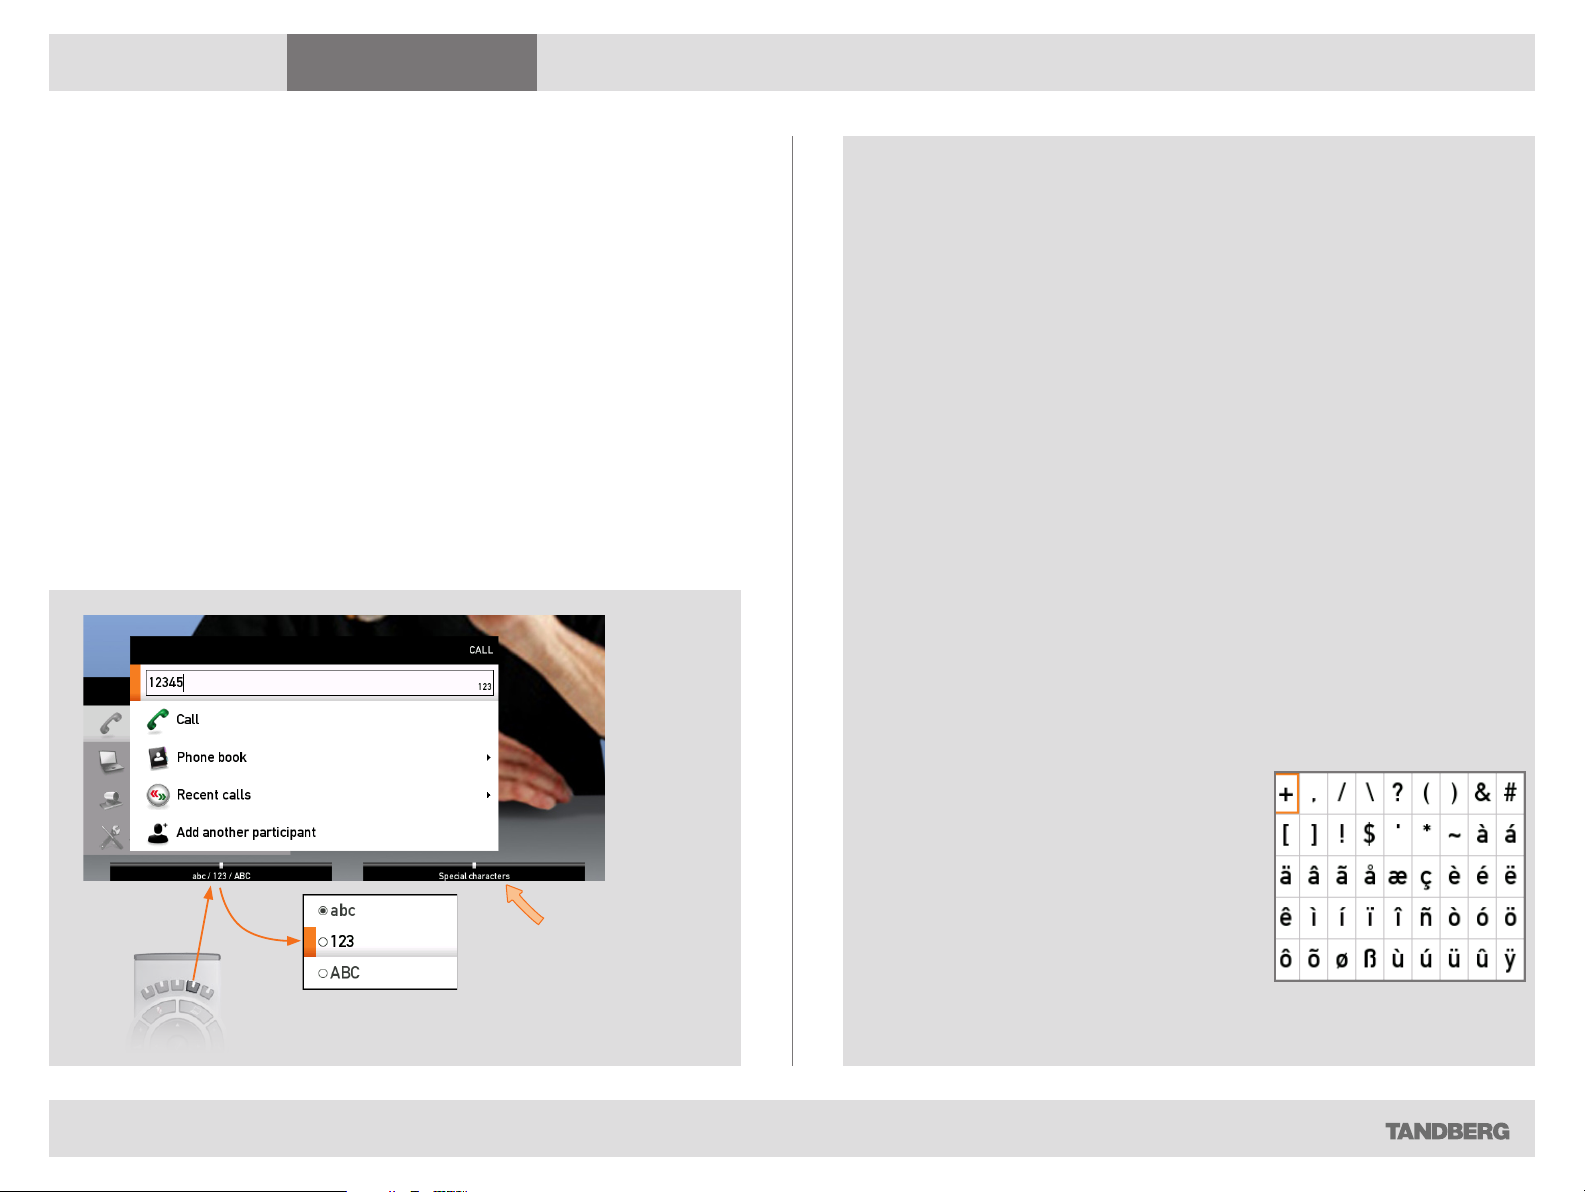
Special characters
Special characters
Sometimes you will need to make use of
special characters, e.g. when entering names
in My contacts.
Whenever it is likely that special characters
are needed, a softkey (see the left Fig.) giving
you access to the special characters menu
will be displayed.
8
Page 9

What’s in this guide? Getting started Making calls Using the phone book In-call features Video conferencing
Getting started
Screen layout
The layout of the screen can be changed as shown to the right.
• To produce display options screen, press the
• Use the
the alternative you want to use
• Note that you may, or may not, include selfview (i.e. the outgoing video
signal from your own system)
• You set whether to include selfview or not by means of the left-most
softkey.
aRRow keys to move between the alternatives and use to select
Adding wallpaper to your screen
In the home menu, navigate
down to Settings and
press the key.
layout ( ) key
In the setti ngs
submenu
navigate down
to Wallpaper.
Press again.
Layout control outside a call is limited to the choice between showing
selfview and showing a wallpaper...
Layout control used during a call gives you more possibilities...
Select between the
options available
and press the
to leave the menu
putting your choice
into effect.
D14224.03 US ER GUID E TANDBERG T 1—NOVEMBER 2 008
key
9
Page 10

What’s in this guide? Getting started Making calls Using the phone book In-call features Video conferencing
Making calls
D14224.03 US ER GUID E TANDBERG T 1—NOVEMBER 2 008
Chapter 2
Making calls
10
Page 11

What’s in this guide? Getting started Making calls Using the phone book In-call features Video conferencing
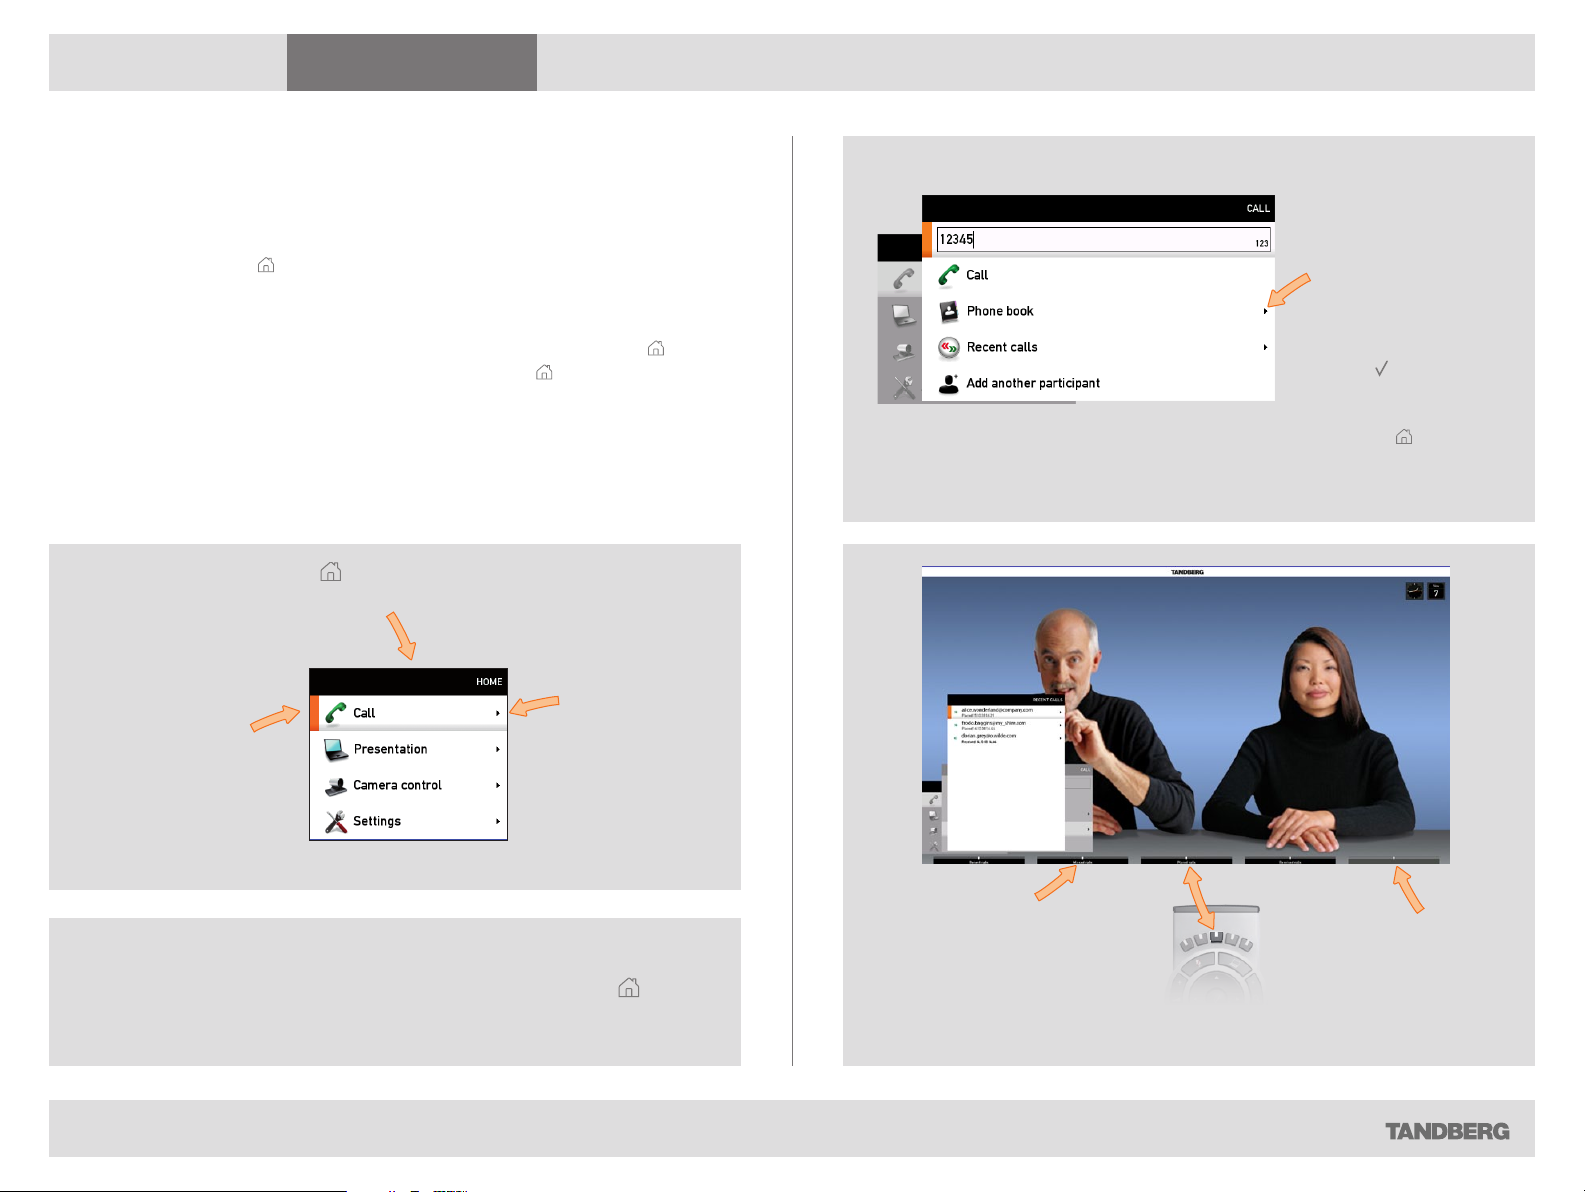
Making calls
Making calls by dialing the number
Observe that the term “number” has a wide definition here; you may use
the procedure outlined on this page to call people by their alphanumeric
address as well, for example:
“alice.wonderland@mycompany.com”
Press the
menu, if needed. Position the cursor
at Call and press to produce the
submenu.
key to produce the call
When someone is calling
Respond to an incoming call by pressing the key on the remote control to
accept it, or press the key to reject it.
Press the
key on
the remote
control to
answer an
incoming call
Press the
key on
the remote
control to
reject an
incoming call
Terminating an ongoing call
Terminating an ongoing call is similar to terminating calls on a cell phone—
just press the key on the remote control.
Key in the “number” to call. If needed, switch to alphanumeric
setting by means of the abc/123/ABC softkey.
Press the softkey Special characters to access non-standard
characters, if needed. See
more on this.
Press
D14224.03 US ER GUID E TANDBERG T 1—NOVEMBER 2 008
to start calling.
Special characters on page 8 for
Press the
key on the remote
control to terminate
an ongoing call
11
Page 12

What’s in this guide? Getting started Making calls Using the phone book In-call features Video conferencing
Making calls
Making calls using phone book
Making use of the phone book is time saving and prevents you from
inadvertently calling the wrong number.
The entries, often referred to as contacts, are sorted alphabetically.
Method 1:
Press the
Phone
book
key…
… to show the phone book.
Method 2:
Press the
if needed. Position the cursor at Call and
press to produce the submenu…
...then navigate down
to Phone book
and press to display
the phone book.
key to produce the call menu,
If you know your way, navigate down to the folder required and
press
keys to locate whom to call and press to place the call.
Alternatively, you may search for an entry in the phone book.
This is described in the section Phone book usage.
D14224.03 US ER GUID E TANDBERG T 1—NOVEMBER 2 008
to produce the contents of that folder. Use the aRRow
12
If you know your way, navigate down
to the folder required and press
produce the contents of that folder.
Use the aRRow keys to locate whom
to call and press to place the call.
Alternatively, you may search for
an entry in the phone book. This is
described in the section Phone book
usage.
to
Page 13

What’s in this guide? Getting started Making calls Using the phone book In-call features Video conferencing
Making calls
Making calls using the recent calls list
If you have called somebody, or somebody has called you, this will be listed
in the list of recent calls.
To gain access to the
control.
You may also copy entries in the recent calls list to your phone book—see
Using the phone book for details.
Recent calls list, just press the key on the remote
The icons used
The icon is used to denote calls made by you.
The icon
The icon
D14224.03 US ER GUID E TANDBERG T 1—NOVEMBER 2 008
is used to denote calls received.
is used to denote missed calls.
Select what type of recent calls to show; All recent calls, just the
missed calls, just the placed calls or just the received calls, by means
of the softkeys.
13
Page 14

What’s in this guide? Getting started Making calls Using the phone book In-call features Video conferencing
Using the phone book
D14224.03 US ER GUID E TANDBERG T 1—NOVEMBER 2 008
Chapter 3
Phone book usage
14
Page 15

What’s in this guide? Getting started Making calls Using the phone book In-call features Video conferencing
Using the phone book
Basic phone book features
Your TANDBERG T1 contains a phone book functionality, which is very
similar to what you find in a mobile phone.
It contains a section in which you can add your own list of contacts, and
most corporate solutions will also include a corporate phone list.
This latter list is normally installed and maintained from remote by your
system administrator through a management system like the TANDBERG
Management Suite (TMS), which is available separately.
You cannot edit the corporate list yourself, but you may add entries to My
Contacts. These may be edited ad libitum.
Navigating in the phone book
• Basic navigation in the phone book is done in the usual way.
• When positioned at a line with a small folder icon in front, press the right
aRRow key to produce the contents of this folder. Repeat, if needed, if there
are more levels.
• Whenever you are at a lower level, use the left
back.
aRRow key to move one level
Opening the phone book:
Press the phone book key…
This will cause the
phone book menu to open…
Calling an entry in the phone book
Once an entry is located, just press the key to place the call.
Need to search for an entry in the phone book? See Searching in the
phone book on the next page.
D14224.03 US ER GUID E TANDBERG T 1—NOVEMBER 2 008
The phone book typically contains your own My contacts and a
corporate phone book.
In My contacts you may enter your own contacts.
15
Page 16

What’s in this guide? Getting started Making calls Using the phone book In-call features Video conferencing
Using the phone book
Searching in the phone book
While the My contacts may contain up to 200 entries, the entire phone
book (which may include server based corporate directories) can be
virtually unlimited in size. Consequently, using the arrow keys as the only
navigation device can easily become a cumbersome task. What to do?
Enter Quick Search by Letters. Whenever you are inside the phone book
navigating in the list of entries, the numerical keypad automatically switches
from 123 mode to ABC mode. To locate a specific entry, just type in the first
letter as with a cell phone. The system will then display all matches. Add
more letters to refine your search. The search will be done within the folder
your cursor at present is located and inside any subfolders within this folder.
Entering text in the search field
Example: How do I write Alice 123 in the Search input field in the phone
book?
Do as follows:
1. Press the 2-key once to get an A
2. Press the #-key once to switch between upper and lower case letters
3. Press the 5-key three times to get an l
4. Press the 4-key three times to get an
5. Press the 2-key three times to get a c
6. Press the 3-key twice to get an e
7. Press the 0-key once to get space
8. Press the 1-key three times to get a 1
9. Press the 2-key four times to get a 2
10. Press the 3-key four times to get a 3.
i
Quick search by letters
To search for an entry in the phone book, navigate to where you assume
the entry resides. Any search will be done within the folder your cursor at
present is located and inside any subfolders within this folder.
If in doubt, remain at the top level (called root in computer terminology)
and do your search from there.
Just type the letter (or switch to
digits) and the Search field will be activated immediately. The phone book
will then look something like this:
The search will begin immediately. Add more letters to narrow and refine
your search.
Example: Keying in da, will return entries like Dave Olson and David
Jones, but also John Dahl and Vittorio Dalmazzino. There is no case
sensitivity here.
How to open the phone book is described Basic phone book
features, which can be found on the previous page.
123 mode by pressing the # key to key in
D14224.03 US ER GUID E TANDBERG T 1—NOVEMBER 2 008
16
Page 17

What’s in this guide? Getting started Making calls Using the phone book In-call features Video conferencing
Using the phone book
Adding new contacts to the phone book
New contacts can be added to My contacts only. Other entries must be
entered by you system administrator.
Adding an entry from recent calls or the phone book
While you are inside the phone book or the list of recent calls, navigate to
the entry you would like to copy to My contacts and press the key or the
Right aRRow key to show the optio ns menu:
Adding an entry manually to My contacts:
Open the phone book by pressing the key on the remote control.
Navigate to My contacts:
Press the key to show the contents of My contacts. A softkey named
New contact will now appear along the bottom line of the display:
Press the corresponding functio n key on the remote
control to enter the Edit dialog box.
Navigate down to Copy to my contacts and press the
edit dialog box. This is similar to when entering a new contact manually
(see right for details), but in this case the name and “number” of the
copied contact has been filled in already by the system. If you want to edit
the information entered you may do so. Remember to save before leaving
the menu.
How to open the phone book is described Basic phone book
features, which can be found two pages back.
D14224.03 US ER GUID E TANDBERG T 1—NOVEMBER 2 008
key to open the
17
Enter name and “number” of the new contact. After you have entered this
information, the Save field will no longer appear ghosted and you may
navigate down to this field and press the key to save your new entry.
Alternatively, navigate down to Cancel and press the
dialog box without saving the new entry.
key to exit the
Page 18

What’s in this guide? Getting started Making calls Using the phone book In-call features Video conferencing
Using the phone book
Editing existing entries in the phone book
You may edit and delete entries in My contacts any time. Since updates
in the corporate phone book(s) made by your system administrator will not
affect My contacts, you may have to use this feature from time to time
when corporate phone book changes are made.
Editing entries in the phone book
Open the phone book. Since only entries in My contacts may be subject
to editing, navigate to My contacts and press the key to open it.
Navigate to the entry to edit and press the
that now appears, navigate to Edit and press the key to open for editing
of the entry.
You will now see a dialog box similar to this:
in which the name and “number” of the entry selected for editing has
already been inserted.
Edit as required and navigate down to Save and press the
changes into effect.
key again. In the submenu
key to put the
D14224.03 US ER GUID E TANDBERG T 1—NOVEMBER 2 008
18
Page 19

What’s in this guide? Getting started Making calls Using the phone book In-call features Video conferencingVideo conferencing
In-call features
D14224.03 US ER GUID E TANDBERG T 1—NOVEMBER 2 008
Chapter 4
In-call features
19
Page 20

What’s in this guide? Getting started Making calls Using the phone book In-call features Video conferencingVideo conferencing
In-call features
BestView—Face recognition
The TANDBERG T1 is capable of doing face recognition.
The face recognition system aims to search for faces in order to optimize
the picture frame, and is therefore called BestView. Once a face or group of
faces has been detected camera zoom and camera angle will be changed
accordingly to obtain an optimal representation on the screen.
Kindly observe the following:
• The Best view feature is still a preview feature.
• The Best view optimization process may take up to 5 seconds.
• The detection of faces works better when people look towards the camera.
• The area from the eyebrows down to just below the lips should be
uncovered.
• Beard is normally not a problem.
Using Best view
1. Press the key on the remote control to display the Layout menu.
Select Selfview to be shown as required
2. Press the
select Camera control
key on the remote control to display the Home menu and
Where to find it:
The Best view feature
is found in the Camera
control menu
Best v iew (b eta) Exi t
Use this
softkey to exit
Best view
3. In the Camera control menu, locate the Best view button at the bottom of
the screen
4. Press the corresponding Function key on the remote control to start the
Best view optimization process. Look towards the camera for about five
seconds
5. The system will now look for faces and adjust the zoom and camera angle
to obtain a best fit.
D14224.03 US ER GUID E TANDBERG T 1—NOVEMBER 2 008
20
Page 21

What’s in this guide? Getting started Making calls Using the phone book In-call features Video conferencingVideo conferencing
In-call features
Running a presentation
The presentation functionality in the system enables you to show other
available video sources in addition to your main camera.
This is perfect for meetings where you would like to share a PowerPoint
presentation, for example.
After you have connected your presentation source you may have to
configure your source to make it supply a signal to your video system.
The ability to do such presentations requires the optional Natural Presenter
Package. If in doubt consult your administrator.
Do as follows:
Connect your
presentation
source(s) to the
I/O panel on the
codec, located in
the base module
Press the
Presentation
mode key on the
remote control
D14224.03 US ER GUID E TANDBERG T 1—NOVEMBER 2 008
To specify which source to serve for the presentation select it as shown
here. Note that the name of each source can be changed, consult your
administrator for details on this.
21
Page 22

What’s in this guide? Getting started Making calls Using the phone book In-call features Video conferencing
Video conferencing
D14224.03 US ER GUID E TANDBERG T 1—NOVEMBER 2 008
Chapter 5
Video conferencing
22
Page 23

What’s in this guide? Getting started Making calls Using the phone book In-call features Video conferencing
Video conferencing
About video conferencing
A video call involving more than two participants is called a video conference
or a MultiSite call. You will then make use of the optional built-in MultiSite
(MS) functionality of your TANDBERG T1.
Observe that the infrastructure of your video network may contain external
Multi Conference Units (MCU). These are devices dedicated to handle
several simultaneous video conferences, each with many participants.
Consult your system administrator for information on how to utilize external
MCUs, if applicable.
Who becomes the host?
The host of a video conference is the endpoint to which all the others are
connected. In other words, the one who initiated the conference.
If two systems both supporting MultiSite have established their own video
conference independent of the other and one of these two call the other,
cascading will take place. This means that you may have more participants
in total than a single system supports. In this case, the host will be the one
calling the other.
The host has the right to terminate the connection to any of the participants.
The participants cannot control any of the others, but may disconnect
themselves from the meeting at all times.
D14224.03 US ER GUID E TANDBERG T 1—NOVEMBER 2 008
If you are the one
who initiated
the video conference,
you are considered to be
the host by the system.
23
Page 24

What’s in this guide? Getting started Making calls Using the phone book In-call features Video conferencing
Video conferencing
Calling more than one
Any point-to–point video call (i.e. a call involving two parties only) may be
expanded to include additional participants. The call is then becoming a
video conference.
Any ongoing video call can be expanded into a video conference by adding
more participants at any moment.
Alternatively, you may set up a list of whom to call before you actually call
them and then call them all in one go.
Example:
The below screenshot shows two entries made before any calls are
placed. For units equipped with multisite capabilities, up to 3 participants
can be called simultaneously if no external MCUs are used.
After you have entered the participants, press the the
calls.
Any of these may, of course, be fetched from the phone book in the usual
manner.
key to place the
D14224.03 US ER GUID E TANDBERG T 1—NOVEMBER 2 008
24
Page 25

U.S. HEADQUARTERS
TANDBERG
1212 Avenue of the Americas
24th Floor
New York, NY 10036
Telephone: +1 212 692 6500
Fax: +1 212 692 6501
Video: +1 212 692 6535
E-mail: tandberg@tandberg.com
Copyright © TANDBERG 2008. All rights reserved.
INTELLECTUAL PROPERTY RIGHTS
The TANDBERG T1 video endpoint covered by this User Guide is protected
under copyright, patent, and other intellectual property rights of various
jurisdictions. Any applicable software licenses and any limited warranty are
located in the License Information section of the corresponding version of
the TANDBERG Administrator Guide for this product.
EUROPEAN HEADQUARTERS
TANDBERG
Philip Pedersens vei 20
1366 Lysaker
Norway
Telephone: +47 67 125 125
Fax: +47 67 125 234
Video: +47 67 126 126
E-mail: tandberg@tandberg.com
 Loading...