

Page 1

D14489.01—JULY 2009
1
Softwa re version TC2.0
JULY 2009
TANDBERG Quick Set C20/C20plus
Administrator Guide
Page 2

D14489.01—JULY 2009
2
Quick Set C20/C20plus
Administrator Guide
Contents Introduct ion Getting s tarted About the m enus Advance d settings Setting s Librar y Cameras Append ices Contact us
Chapter 0 : ToC - Hidden
Text Anchor
Contents
The top menu bar and the entries in the Table
of Contents are all hyperlinks, just click on
them to go to the topic.
We recommend you visit the TANDBERG
web site regularly for updated versions of this
guide. Go to: http://www.tandberg.com/docs
Table of Contents
Introdu ction
Intellect ual Proper ty Righ ts ...........................................................5
Trademark .....................................................................................5
Disclai mer .....................................................................................5
Patent Inform ation .........................................................................5
Copyrigh t Notice ...........................................................................5
Safety Ins tructions ........................................................................ 6
Environme ntal Issu es ....................................................................7
Gettin g star ted
Assembl e your system ..................................................................9
Power switch............................................................................. 9
The LED in fro nt of the codec ...................................................9
The physic al interf ace of Code c C20 ..........................................10
The physic al interf ace, pin-ou t shemes ...................................... 11
Using the Re mote Control ........................................................... 12
Initial co nfiguratio ns .................................................................... 14
Waking up the s ystem .............................................................14
Verify IP ad dress set tings ........................................................ 14
If you need to set a s tatic IP addre ss ...................................... 14
Adding the sys tem to the netwo rk .......................................... 15
Verify you r settings .................................................................. 15
Adjusting th e date and time s ettings .......................................15
Setting a me nu password ....................................................... 16
Monitors ...................................................................................... 17
Connecting the monito r .......................................................... 17
Dual moni tors .......................................................................... 17
About th e menus
The Home me nu ......................................................................... 19
The Setti ngs menu ......................................................................19
The Advanc ed menu ...................................................................19
The Advanc ed sett ings
The Advanc ed menus ................................................................. 21
How to change a va lue............................................................ 21
Descrip tion of each se tting ..................................................... 21
The searc h function ality ..........................................................22
How to change th e password .................................................23
The Advanc ed sett ings libr ary
Descrip tion of the Advan ced config uration set tings .................... 25
The Exp eriment al menu ..........................................................36
Camera s
The Precis ionHD 1080p 4x /12x camera ..................................... 38
Video ou tput formats .............................................................. 40
DIP switch set tings for vi deo outpu t formats ...................... 40
Line volta ge freque ncy ........................................................40
Append ices
General r oom guide lines .............................................................42
The physic al conditions .......................................................... 42
The room eq uipment............................................................... 42
Environme ntal cons ideration s .................................................42
The audio q uality .....................................................................43
Natural co mmunication ...........................................................43
The dista nce betwe en the table a nd the vide o system ...........44
The came ra .............................................................................44
The microp hone ......................................................................44
Sharing a P C presentation ......................................................45
Other pre sentation s ources .................................................... 45
TANDBERG Remote Con trol TRC5 .............................................46
Password prote ction ...................................................................47
Setting th e codec adm inistrator pa ssword ............................. 47
Setting th e menu password .................................................... 47
The web inter face ....................................................................... 48
Password prote ction of the web i nterfac e ............................... 48
The system in fo page .............................................................. 48
The Upgra de softwa re page ...................................................49
The Advanc ed configu ration page .......................................... 50
The Advanc ed configu ration, sea rch functi onality .................. 51
The Wallpaper page ................................................................52
The Call pag e .......................................................................... 53
The SSL Cer tificate s page ......................................................54
The XML file s page .................................................................. 55
The Logs pag e ........................................................................ 56
The Add rele ase key page ....................................................... 57
What’s in
this guide?
Page 3

D14489.01—JULY 2009
3
Quick Set C20/C20plus
Administrator Guide
Contents Introduct ion Getting s tarted About the m enus Advance d settings Setting s Librar y Cameras Append ices Contact us
Contents
Suppor ted RFCs in SIP ...............................................................58
Current RFCs and draf ts suppor ted in SIP ............................. 58
Media cap abilitie s suppor ted in SIP ........................................ 58
CE Declar ation for Cod ec C20 .................................................... 59
China RoHS t able ....................................................................... 60
Dimensi ons Codec C20 .............................................................. 61
Precisio nHD 1080p cam era dimensions ..................................... 62
Technical spe cificatio ns ..............................................................63
Page 4

D14489.01—JULY 2009
4
Quick Set C20/C20plus
Administrator Guide
Contents Introduct ion Getting s tarted About the m enus Advance d settings Setting s Librar y Cameras Append ices Contact us
Introduction
Introduction
Chapter 1
Thank you fo r choosing TANDB ERG!
Your TANDBERG Codec C20 has b een
designe d to give you many ye ars of safe,
reliable o peration.
How to read th is docume nt
You will find that som e places info rmation
has been c opied from ot her chapters (but
adapted, whe n needed ) to let you have al l
the relevant i nformatio n there and th en.
This help s eliminati ng the need to re ad
through lon g sections b efore you can e ven
think of get ting star ted.
Our main ob jective wi th this user gu ide is
to address you r goals and n eeds. Plea se
let us know how we ll we succe eded !
We recommend you visit th e TANDBERG
web site regu larly for up dated versi ons of
the manual.
Go to: http://w ww.tandberg.c om/doc s
In this chapter...
Explai ns the menu sy stem:
Intellect ual proper ty rig hts
Trademark
Disclai mer
Patent inform ation
Copyrigh t notice
Safety ins tructions
Environme ntal issu es
Page 5

D14489.01—JULY 2009
5
Quick Set C20/C20plus
Administrator Guide
Contents Introduct ion Getting s tarted About the m enus Advance d settings Setting s Librar y Cameras Append ices Contact us
Introduction
Intellectual Property Rights
This Admin istrator Gui de and the Prod ucts to which i t relates con tain
informati on that is proprietar y to TANDBERG and its lic ensors.
Informatio n regarding the Products is found on the p age entitle d
License A greement s and Patent Info rmation.
This Admin istrator Gui de may be repro duced in its e ntirety,
includin g all copyr ight and intel lectual p ropert y notices, i n limited
quantitie s in conne ction with th e use of the Produ cts. Except for
the limited exc eption set for th in the prev ious sente nce, no par t of
this Admini strator Guid e may be reprod uced, stored i n a retrieval
system, or tran smitted, in a ny form, or by any m eans, ele ctronical ly,
mechani cally, by photocopy ing, or other wise, wit hout the pri or writte n
permiss ion of TANDBERG. Re quests for such permi ssion sho uld be
addresse d to tandber g@ta ndberg.com.
Trademark
TANDBERG® is a registered trade mark bel onging to Tandberg ASA.
Other trad emarks us ed in this doc ument are th e proper ty of their
respecti ve holder s.
COPYRIGH T © 2009, TANDBERG
All rights r eserve d.
Philip Pede rsens vei 20
1366 Lysaker, Norway
Tel: +47 67 125 125 Fa x: +47 67 125 234
E-mail: ta ndberg @tand berg.com
Disclaimer
The spec ifications fo r the Products and the infor mation in thi s
documen t are subjec t to change at an y time, withou t notice, by
TANDBERG.
Every ef fort ha s been made to su pply comp lete and accu rate
informati on in this Admi nistrator Guide, however, TANDBERG
assumes n o respons ibility o r liabili ty for any er rors or inac curacies t hat
may appea r in this docum ent.
INTELLECTUAL PROPERTY R IGHTS
The Produc ts that are covered by this Admi nistrator Gui de are
protected und er copyri ght, patent, and oth er intelle ctual prop erty
rights of var ious juris dictions. A ny applic able sof tware lice nses and
any limited wa rranty a re located in th e Licens e Informatio n section in
this TANDBERG Cod ec C20 Adminis trator Guide.
This Produ ct is
COPYRIGH T © 2009, TANDBERG
All rights r eserve d.
Patent Information
The produc ts descri bed in this ma nual are cov ered by one or mo re of
the followin g patents:
US6,584,077 US5,838,664 US5,600,646
US5,003,532 US5,768,263 US5,991,277
US7,034,860 US7,010,119 EP019 53201
US6.731.334 GB1338127
Other paten ts pending.
Please vi ew www.tandberg.com/tan dberg_ pm.jsp for an u pdated
list
Copyright Notice
The produc t that is covere d by this Admin istrator Gui de is protected
under copy right, patent, and other intel lectual p ropert y rights of
various ju risdicti ons. This pro duct is Copy right © 200 9, Tandberg
Telecom AS. All ri ghts reser ved. This p roduct inc ludes copy righted
softwa re license d from other s.
A documen t describ ing the copyr ight notices and the terms and
conditio ns of use can be f ound at: http: //www.tandb erg.com/d ocs
Navigate to Use r manuals > TANDBE RG Codec C20 Co pyright an d
License I nformatio n to download the p df.
IMPORTANT: USE OF THIS PRO DUCT IS SUBJ ECT IN ALL CASES
TO THE COPYRIG HT RIGHTS AN D THE TERMS A ND CONDITI ONS
OF USE REFERR ED TO ABOVE. USE OF THI S PRODUCT
CONSTITU TES AGREEMENT TO SUC H TERMS AND CO NDITION S.
Page 6

D14489.01—JULY 2009
6
Quick Set C20/C20plus
Administrator Guide
Contents Introduct ion Getting s tarted About the m enus Advance d settings Setting s Librar y Cameras Append ices Contact us
Introduction
IMPOR TANT!
Do not cover up th e opening s for ventilati on in the
front and re ar side of the c odec. Cold a ir goes in
with the coo ling fans at th e rear side a nd warm air
is blown out at t he front sid e.
There sho uld always be a d istance of m inimum
0.26 ft (8 c m) free sp ace in both the front side and
the rear sid e of the Codec C20.
WARNIN G!
If the Codec C20 is mounted wi th the front side or
rear side d own, make sure th ere is suf ficient fre e
space to allow fo r ventilatio n.
Safety Instructions
For your protec tion pleas e read these s afety
instructi ons compl etely before yo u connect t he
equipme nt to the power sou rce. Carefu lly obser ve
all warnin gs, precau tions and in structions both on
the appara tus and in the se operatin g instruct ions.
Retain this m anual for f uture refere nce.
Water and Mo isture
Do not opera te the apparatus under or n ear water –
for example n ear a bathtub, k itchen sink , or laundr y
tub, in a wet basem ent, near a swimming poo l or in
other area s with high hu midity.
s Never install jac ks for commu nication c ables
in wet locations unles s the jack is sp ecifical ly
designe d for wet locati ons.
s Do not touch the produ ct with wet han ds.
Cleani ng
Unplug the a pparatus f rom commun ication li nes,
mains power-ou tlet or any powe r source befo re
cleanin g or polishing. Do not use li quid clea ners
or aerosol c leaner s. Use a lint-free cl oth lightly
moistened with water for cl eaning the exterior of
the appara tus.
Ventilat ion
Do not block a ny of the ventila tion openi ngs of the
apparatu s. Never cover th e slots and openings with
a cloth or other m aterial. Neve r install th e apparatu s
near heat s ources su ch as radiator s, heat regi sters,
stoves, or other a pparatus ( includi ng amplifi ers)
that produc e heat.
Do not place th e product in d irect sun light or clo se
to a surfac e directly heated by the sun.
Lightn ing
Never use thi s apparatu s, or connec t/disco nnect
communi cation cab les or power c ables during
lightning s torms.
Dust
Do not opera te the apparatus in areas wi th high
concentr ation of dust.
Vibrat ion
Do not opera te the apparatus in areas wi th
vibration o r place it on a n unstabl e surfac e.
Power Conn ection a nd Hazar dous
Voltage
The produc t may have haz ardous vol tage insid e.
s Never attempt to ope n this produc t, or any
periphe rals conn ected to the pro duct, where
this action re quires a too l.
s This product sh ould always b e powered fro m
an earthed power out let.
s Never connect at tached p ower supply c ord to
other produ cts.
s In case any part s of the product h as visual
damage neve r attempt to co nnect mai n power,
or any other power source, before consul ting
servi ce person nel
s The plug conne cting the powe r cord to the
product /power supp ly serv es as the main
disconnect device for this equi pment. The
power cord mu st always be ea sily acce ssible.
s Route the power cord so a s to avoid it bein g
walked on or pi nched by item s placed up on or
against it. Pay p articu lar attenti on to the plugs,
receptac les and the po int where th e cord exits
from the app aratus.
s Do not tug the power cord.
s If the provided plu g does not fit in to your outlet,
consult a n electri cian.
s Never install ca bles, or any p eripher als, withou t
first unplu gging the device from i ts power
source.
s Always use the power s upply (AC –DC ada pter)
provided w ith this produ ct.
s Replace only wi th power supp ly (AC– DC
adapter) spe cified by TANDBERG.
s Never connect at tached p ower supply ( AC–DC
adapter) to othe r products.
Servi cing
s Do not attempt to ser vice the ap paratus
yourself a s opening o r removing c overs may
expose you to da ngerous voltages or oth er
hazard s, and will voi d the warrant y. Refer all
servi cing to quali fied ser vice per sonnel.
s Unplug the apparatus from its p ower source
and refer se rvici ng to qualifie d personn el under
the followin g conditio ns:
s If the power cord or plu g is damage d or
frayed.
s If liquid has bee n spilled i nto the appara tus.
s If objects have fall en into the app aratus.
s If the apparatus ha s been expo sed to rain
or moisture
s If the apparatus ha s been subj ected to
excessive s hock by bein g dropped.
s If the cabinet has b een dama ged.
s If the apparatus se ems to be overh eated.
s If the apparatus em its smoke or a bnormal
odor.
s If the apparatus fa ils to operate in
accordan ce with the op erating instruction s.
Access ories
Use only acc essori es speci fied by the
manufact urer, or sold with the a pparatus.
Commun ication L ines
Do not use com municati on equipm ent to repor t a
gas leak in t he vicinit y of the leak .
FCC rules 15B , acc. to Cla ss A limit s
Class A dig ital devic e, pursuan t to part 15 of the
FCC Rules ( For the US onl y)
NOTE: This e quipment h as been tes ted and found
to comply with the limits for a Class A digita l device,
pursuan t to part 15 of the FCC Rule s. These li mits
are desig ned to provide re asonab le protection
against ha rmful inte rferen ce when the e quipmen t
is operated i n a commerc ial enviro nment. This
equipme nt generate s, uses and c an radiate rad io
frequen cy energy a nd, if not insta lled and us ed in
accordan ce with the in struction m anual, may c ause
harmful i nterfere nce to radio communica tions.
Operatio n of this equip ment in a res idential a rea is
likely to caus e harmful i nterfer ence in whi ch case
the user wil l be require d to correct th e interfe rence
at his own expe nse.
Minimum
0.26ft ( 8cm)
Minimum
0.26ft ( 8cm)
Warm air
goes out
Cold air go es
in with the
cooling fa ns
Air outAir in
! !
Mounted er roneous
with the fron t side down
Mounted er roneous
with the rea r side down
NOTE! This w ill not allow fo r enough ve ntilation
through the c odec.
Page 7

D14489.01—JULY 2009
7
Quick Set C20/C20plus
Administrator Guide
Contents Introduct ion Getting s tarted About the m enus Advance d settings Setting s Librar y Cameras Append ices Contact us
Introduction
Environmental Issues
Thank you fo r buying a pro duct whic h contribu tes
to a reduction i n pollutio n, and thereby h elps save
the environ ment. Our pro ducts redu ce the need fo r
travel and tra nsport a nd thereby re duce poll ution.
Our produc ts have eithe r none or few co nsumable
parts ( chemica ls, toner, gas, pape r).
TANDBERG ’s Environ mental Po licy
Environme ntal steward ship is impo rtant to
TANDBERG’s culture. As a glo bal compa ny with
strong cor porate value s, TANDBERG is comm itted
to following in ternation al environ mental le gislation
and desig ning techn ologies th at help com panies,
individ uals and co mmunitie s creativel y address
environm ental cha llenges.
TANDBERG’s environmen tal objec tives are to:
s Develop product s that reduce e nergy
consumpti on, CO2 emiss ions, and tra ffic
congesti on
s Provide products a nd serv ices that im prove
qualit y of life for our cu stomers
s Produce product s that can be re cycled or
dispose d of safely at the e nd of produc t life
s Comply with all re levant env ironmenta l
legislat ion.
Digita l User Gui des
TANDBERG is pleased to announ ce that we have
replace d the printed ve rsions of ou r user guid es
with digit al version s availabl e on the TANDBERG
web site: http ://www.tandb erg.com/docs. The
environm ental ben efits of this are s ignifica nt. The
user guid es can still b e printed lo cally, wheneve r
needed.
Europe an Envir onmenta l Direct ives
As a manufacturer of ele ctrical a nd electro nic
equipme nt TANDBERG is resp onsible fo r
complia nce with the re quireme nts in the Europ ean
Directive s 2002/9 6/EC ( WEEE - Waste Elec trical
and Electr onic Equipm ent) and 20 02/95/ EC
(RoHS ).
The prima ry aim of th e WEEE Directi ve and RoHS
Directive i s to reduce the i mpact of disp osal of
electri cal and ele ctronic eq uipment at end-of-life.
The WEEE Dire ctive aims to re duce the am ount
of waste elect rical and e lectroni c equipme nt sent
for dispos al to landfill o r inciner ation by requi ring
producer s to arrange f or collec tion and recycling.
The RoHS Di rective ban s the use of cer tain he avy
metals and b rominated fl ame retarda nts to reduce
the environ mental im pact of WEEE whi ch is in
landfill o r incinera ted.
TANDBERG has impl emented ne cessary proce ss
changes to c omply with t he Europea n WEEE
Directive ( 2002/ 96/EC ) and the European RoHS
Directive ( 2002/ 95/EC ).
Waste Han dling
In order to avoid th e dissemi nation of ha zardous
substanc es in our env ironment a nd to diminis h the
pressure o n natural re sources, we e ncourage yo u
to use the appro priate recyc ling systems in your
area. Tho se systems wil l reuse or rec ycle most
of the materia ls of your end of life equipm ent in a
sound way.
TANDBERG produc ts put on the mar ket after
August 200 5 are marked w ith a crosse d-out
wheelie b in symbol th at invites you to use
those take- back systems.
Please co ntact your lo cal suppl ier, the regional
waste admini stration or v isit our web p age http://
www.tandbe rg.com/re cycling if yo u need more
informati on on the coll ection and r ecycling sy stem
in your area.
Informa tion for R ecyclers
As part of c omplian ce with the Euro pean
WEEE Directive, TANDBERG provid es recyclin g
informati on on request for all ty pes of new
equipme nt put on the ma rket in Europe a fter
August 13th 2005.
Please co ntact TANDBERG and p rovide the
following d etails for th e product for w hich you
would like to rec eive recycl ing information:
s Model number of TANDB ERG product
s Your compa ny’s name
s Contact name
s Address
s Telephon e number
s E-mail.
Page 8

D14489.01—JULY 2009
8
Quick Set C20/C20plus
Administrator Guide
Contents Introduct ion Getting s tarted About the m enus Advance d settings Setting s Librar y Cameras Append ices Contact us
Getting/started
Getting started
Chapter 2
This chapte r introduces you to the
codec, the re mote control an d the initia l
configurations to get you up a nd going.
This guid e has been di vided into s everal
chapters, a ll of which prov ide dif ferent
informati on. You can access th e chapters
directly by c licking o n the menu bar a t the
top of this page.
In this chapter...
Explai ns the menu sy stem:
Assembl e the system
The physic al interf ace
Using the rem ote control
Initial co nfiguratio ns
Waking up the s ystem
The IP addre ss settin gs
Static IP add ress setti ngs
Add the system to the n etwork
Verify you r settings
Adjust the tim e and date set tings
Setting a me nu password
Connecting the monito r
About mon itors
Page 9

D14489.01—JULY 2009
9
Quick Set C20/C20plus
Administrator Guide
Contents Introduct ion Getting s tarted About the m enus Advance d settings Setting s Librar y Cameras Append ices Contact us
Getting/started
!
Assemble your system
The illust ration shows yo u the basic se tup when co nnecting the
monitor, PC, camera, m icrophon e, loudspe akers (i f applica ble), L AN
and line vol tage to the TANDBERG Co dec C20.
CAUTION ! In order to be ab le to use the system f or video ca lls, all
orange co lored socke ts must be con nected.
Power switch
The power switch (push b utton) i s located on the rear side.
s Push the button to boot u p the codec.
s Push and hold the bu tton for 1 sec ond to shut dow n the codec.
s Push and hold the bu tton for 7 sec onds to force a sh ut down of
the codec.
The LED in front of the codec
The LED in fro nt of the codec i ndicates th e status of the co dec.
s When the LED is OFF the c odec is Of f.
s The LED flashes g reen duri ng the boot up and shut down of th e
codec.
s The LED pulses gr een when th e infrared ( IR) p ort is acti vated. This
will occur when the rem ote control is in u se.
s The LED is steady g reen when t he codec is O n, in Standby m ode
or in Presen tation mode.
s When the LED is red this indicates an Error ha s occurre d.
The code c must be switc hed off an d disconne cted from the
line voltag e whenever connecti ng or disco nnecting ot her
equipme nt.
HDMI HDMI
Page 10

D14489.01—JULY 2009
10
Quick Set C20/C20plus
Administrator Guide
Contents Introduct ion Getting s tarted About the m enus Advance d settings Setting s Librar y Cameras Append ices Contact us
Getting/started
Micropho ne 1–2
2 x mini jack
3,5 mm
Audio
input
2 x RCA
Audio
output
2 x RCA
Cooling
fan
Network
RJ45
USB (for
future use )
Camera
control por t
RS-232
PC input
DVI-I
input
Cooling
fan
Camera
HDMI
input
Main
monitor
HDMI 1
output
Second
monitor
HDMI 2
output
Power
socket
Power
switch
Kensington
lock
Microphone 1–2
Mini-Jac k 3.5mm, 4-pole connector. Conne ct the micro phone to Mic
1, which is the main c onnector.
Audio input
RCA sockets, mu xed to mono. Used wh en conne cting to PC and
externa l playback de vices, suc h as VCR’s or DVD players .
Audio output
RCA sockets, mon o. Used when c onnectin g to a local lou dspeake r
system.
Network connector
Ethernet in terface, 1 × 10Mb /100Mb/1Gigabi t Ethernet L AN (RJ -45
Jack) inter face.
USB
USB device, fo r future use.
Camera Control port
Camera Co ntrol (RS -232) port for p ower and cam era contro l (pan,
tilt, zoom) u sing the VISCA™* protocol. Th e Pin No. 4 on the Cam era
Control por t provide s 12 V DC / 1 A to the main came ra.
DVI-I input for PC
DVI-I socket, di gital /analog vi deo input f or PC presen tations.
s DVI-D
s DVI-A (Analog RG B / VGA)
s DVI-A Analog component/YPbPr
HDMI input for camera
HDMI socket, d igital vid eo input fo r camera.
HDMI output for the main monitor
HDMI socket, d igital vid eo and audio output for the main moni tor.
HDMI output for the second monitor
HDMI socket, d igital vid eo output fo r the secon d monitor.
Power socket
The power so cket accepts +12V / 5A (max ) from the ex ternal
adapter.
The exter nal adapter a ccepts 100/ 240V 50/60Hz and the max imal
load is 75W.
Power switch
Power switch to tur n the power on /off. Press a nd hold for 1 se cond
to shut down the s ystem. Press a nd hold for 7 se conds to force a
shut down of th e system.
Kensington lock
The Kensin gton lock may b e used to prevent t he codec to be m oved
from its plac e or to prevent the ft.
*VISCA™ is a tradem ark of Sony Corpor ation
The physical interface of Codec C20
The TANDBERG Qui ck Set C20 deli vers the abs olute quali ty of 1080p vid eo in a simpl e-to-depl oy, easy-to-
manage an d easy-to-use sys tem. The illu stration be low shows the re ar panel of th e TANDBERG Codec C20.
The main co nnectors a re highlig hted in orang e.
Page 11

D14489.01—JULY 2009
11
Quick Set C20/C20plus
Administrator Guide
Contents Introduct ion Getting s tarted About the m enus Advance d settings Setting s Librar y Cameras Append ices Contact us
Getting/started
Pin: 19 17 3 1
Pin: 18 16 4 2
HDMI pin -out
Exter nal view of socket
DVI-I pi n-out
Exter nal view of socket
RCA pin- out
Exter nal view of socket
GNDSignal
1 ---------- 1
2 ---------- 2
3 ---------- 3
6 ---------- 6
Wiring di agram
standard c able
RJ-4 5 Connec tor pin- out
TOP
FRONT
1 8
1 8
RS232 9 pi n D-SU B pin-o ut
Exter nal view of socket
1 5
6 9
The physical interface, pin-out shemes
This page gi ves an over view of the pi n-out schemes.
HDMI Pin- out
Pin Assign ment Pin Ass ignmen t
1 T.M.D.S. Data 2+ 11 T.M.D.S. Cloc k Shield
2 T.M.D.S. Data 2 Shiel d 12 T.M.D.S . Clock–
3 T.M.D.S. Data 2 – 13 CEC
4 T.M.D.S. Data 1 14 Rese rved (N.C. on devic e)
5 T.M.D.S. Data 1 Shiel d 15 S CL
6 T.M.D.S. Data 1 – 16 SDA
7 T.M.D.S. Data 0 17 DDC /CEC Ground
8 T.M.D.S. Data 0 Shiel d 18 + 5 V Power (max 50 mA )
9 T.M.D.S. Data 0– 19 Hot Pl ug Detect
10 T.M.D.S. Clock+
Pin-out—TANDBERG camera cable
Signal n ame RJ-45 pin D-SUB p in
+12V DC 1 Twisted pair 4
GND 2 5
RX 3 Twisted pair 2
TX 6 3
NC 4 Tw isted pair 1
NC 5 6
GND 7 Twisted pair 5
+12V DC 8 4
Pin-out—VISCA™ camera control
RJ11, 8 pins shielded m odular j ack
Pin Signa l name
8 +12V (presen ce 2.8mA current sou rce when
connec ted in daisy chain )
7 GND
6 TXD (out)
5 NC (no connect )
4 NC (no connect )
3 RXD (in)
2 GND
1 +12V
Audio connectors
Jack Mic i nput RCA line in put RCA line out put
Connec tor pin out Ti p = Hot
Ring 1 = Cold
Ring 2 = Mic. c ontrol
Shield = G ND
Pin = Signa l
Shield = G ND
Pin = Signa l
Shield = G ND
Signal t ype Balanc ed Unbalance d Unbalan ced
Connec tor (codec) Mini Jack 3.5mm Fema le RCA/phono Female RCA /phono
Input imp edance 1.5k Ohm/le g 18k Ohm
Output im pedance 100 Ohm
Maxim um input level -18.3dBu +/-2dB 9.0d Bu +/-2dB
Maxim um output level 8.2dBu +/-2dB
Phantom pow er 12V +/-1V
Phantom pow er resistor pin ”tip” 1.7k Ohm
Phantom pow er resistor pin ”rin g 1” 1.7k Ohm
Frequen cy response 20Hz-20kHz +/-1dB 20Hz-20kHz +/-1dB 20Hz-20kHz +/-1dB
Signal to No ise Ratio -85dB -95dB -95dB
Microp hone, 3. 5 mm Mini- Jack, 4 p ole
Mic rophone c ontrol
Ground Audio– H ot
Audio– C old
Page 12

D14489.01—JULY 2009
12
Quick Set C20/C20plus
Administrator Guide
Contents Introduct ion Getting s tarted About the m enus Advance d settings Setting s Librar y Cameras Append ices Contact us
Getting/started
Using the Remote Control
The funct ions keys
in the upper p art of
the remote cont rol
reflects the s oft keys
on screen.
... and the middle
part of the remote
control is us ed to
handle the v ideo
part of the c all.
... while the lower
part of the remote
control res embles
very muc h the
keypad of a mobi le
phone
HOME: Pre ss the
Home key to go back
to the main men u.
PHONE BOOK: P ress
the Phone Bo ok key to
display the l ocal phon e
book.
LAYOUT: Press the Layout
key to display the l ayout
menu, then select a vie w
in the menu.
Batteries
Make sure the re mote control h as
working ba tteries ( 4 x AAA b atterie s).
ARROW UP/D OWN: Use
the up and down
arrow keys to navi gate in
the menu.
ARROW LEF T: Press
the left arrow key
to go one step bac k
in the menu or to
move to the left i n a
text field.
ARROW RIGH T: Press
the right arrow key
to expand the se lected
menu item or to move
to the right in a tex t
field.
FUNCTION K EYS: Each key reflects
a soft key on sc reen and re presents
shortcu ts and advan ced functions.
MICROPHON E: Press the
Micropho ne key to toggle
the microph ones on /off.
VOLUME: Pres s
the + or – on the
Volume key to adjust
the codec vo lume.
PRESENTATION: Press the
Presentat ion key to show/ hide
a presenta tion.
ZOOM: Pres s
the + or – on the Zoo m
key to zoom the came ra
in and out.
OK/SELECT: Pres s the OK/
Select key to co nfirm your
choice or s election.
Page 13
D14489.01—JULY 2009
13
Quick Set C20/C20plus
Administrator Guide
Contents Introduct ion Getting s tarted About the m enus Advance d settings Setting s Librar y Cameras Append ices Contact us
Getting/started
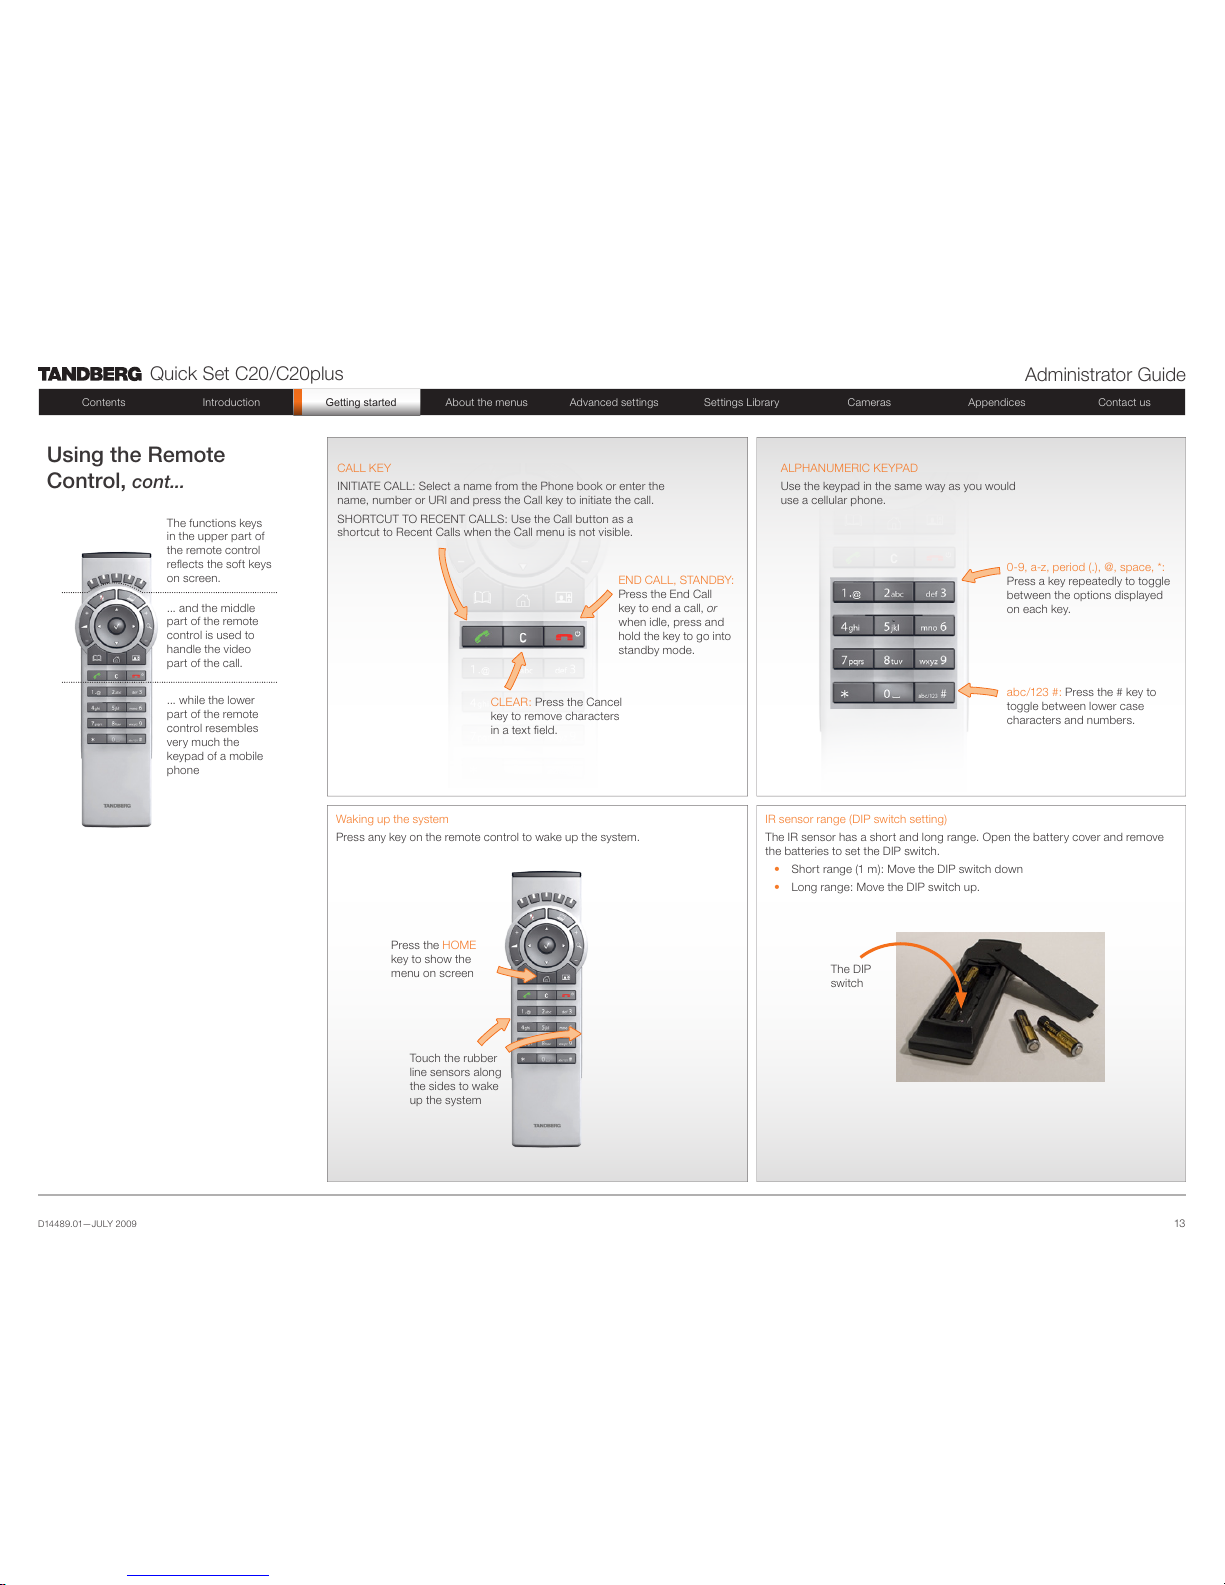
Waking up the s ystem
Press any key on th e remote contro l to wake up the system.
IR sensor ra nge (DI P switch sett ing)
The IR sens or has a shor t and long r ange. Ope n the batter y cover and re move
the batteries to set the DIP sw itch.
s Short range (1 m ): Move the DIP switch down
s Long range: Move th e DIP switch up.
ALPHANUM ERIC KEY PAD
Use the keypad i n the same way as yo u would
use a cellu lar phone.
Using the Remote
Control, cont...
The funct ions keys
in the upper p art of
the remote cont rol
reflects the s oft keys
on screen.
... and the middle
part of the remote
control is us ed to
handle the v ideo
part of the c all.
... while the lower
part of the remote
control res embles
very muc h the
keypad of a mobi le
phone
Touch the rubber
line senso rs along
the sides to wake
up the system
Press the HO ME
key to show the
menu on scre en
The DIP
switch
abc/123 #: Press the # key to
toggle bet ween lower case
characters and numb ers.
0-9, a-z, period (. ), @, space, *:
Press a key repe atedly to toggl e
between t he options displayed
on each key.
CALL KEY
INITIATE CALL: Sel ect a name f rom the Phone b ook or enter th e
name, numb er or URI and p ress the Cal l key to initiate the ca ll.
SHORTCUT TO RECEN T CALLS: Use th e Call but ton as a
shortcu t to Recent Cal ls when the Call menu is not v isible.
CLEAR : Press the Ca ncel
key to remove char acters
in a text field.
END CALL, STANDBY:
Press the End C all
key to end a call, or
when idle, p ress and
hold the key to go into
standby mod e.
Page 14
D14489.01—JULY 2009
14
Quick Set C20/C20plus
Administrator Guide
Contents Introduct ion Getting s tarted About the m enus Advance d settings Setting s Librar y Cameras Append ices Contact us
Getting/started
Waking up the system
If no menu on sc reen, pres s Home ( ) on the remote control to show
the menu on sc reen.
If the system do es not show any m enu on scre en:
1. Make sure the m onitor has be en turned on
2. Make sure the remote control has the bat teries in stalled
3. Make sure the c odec has be en turne d on
4. If the system h as just bee n turned on, wa it a few minute s to allow the
system to star tup
1
3
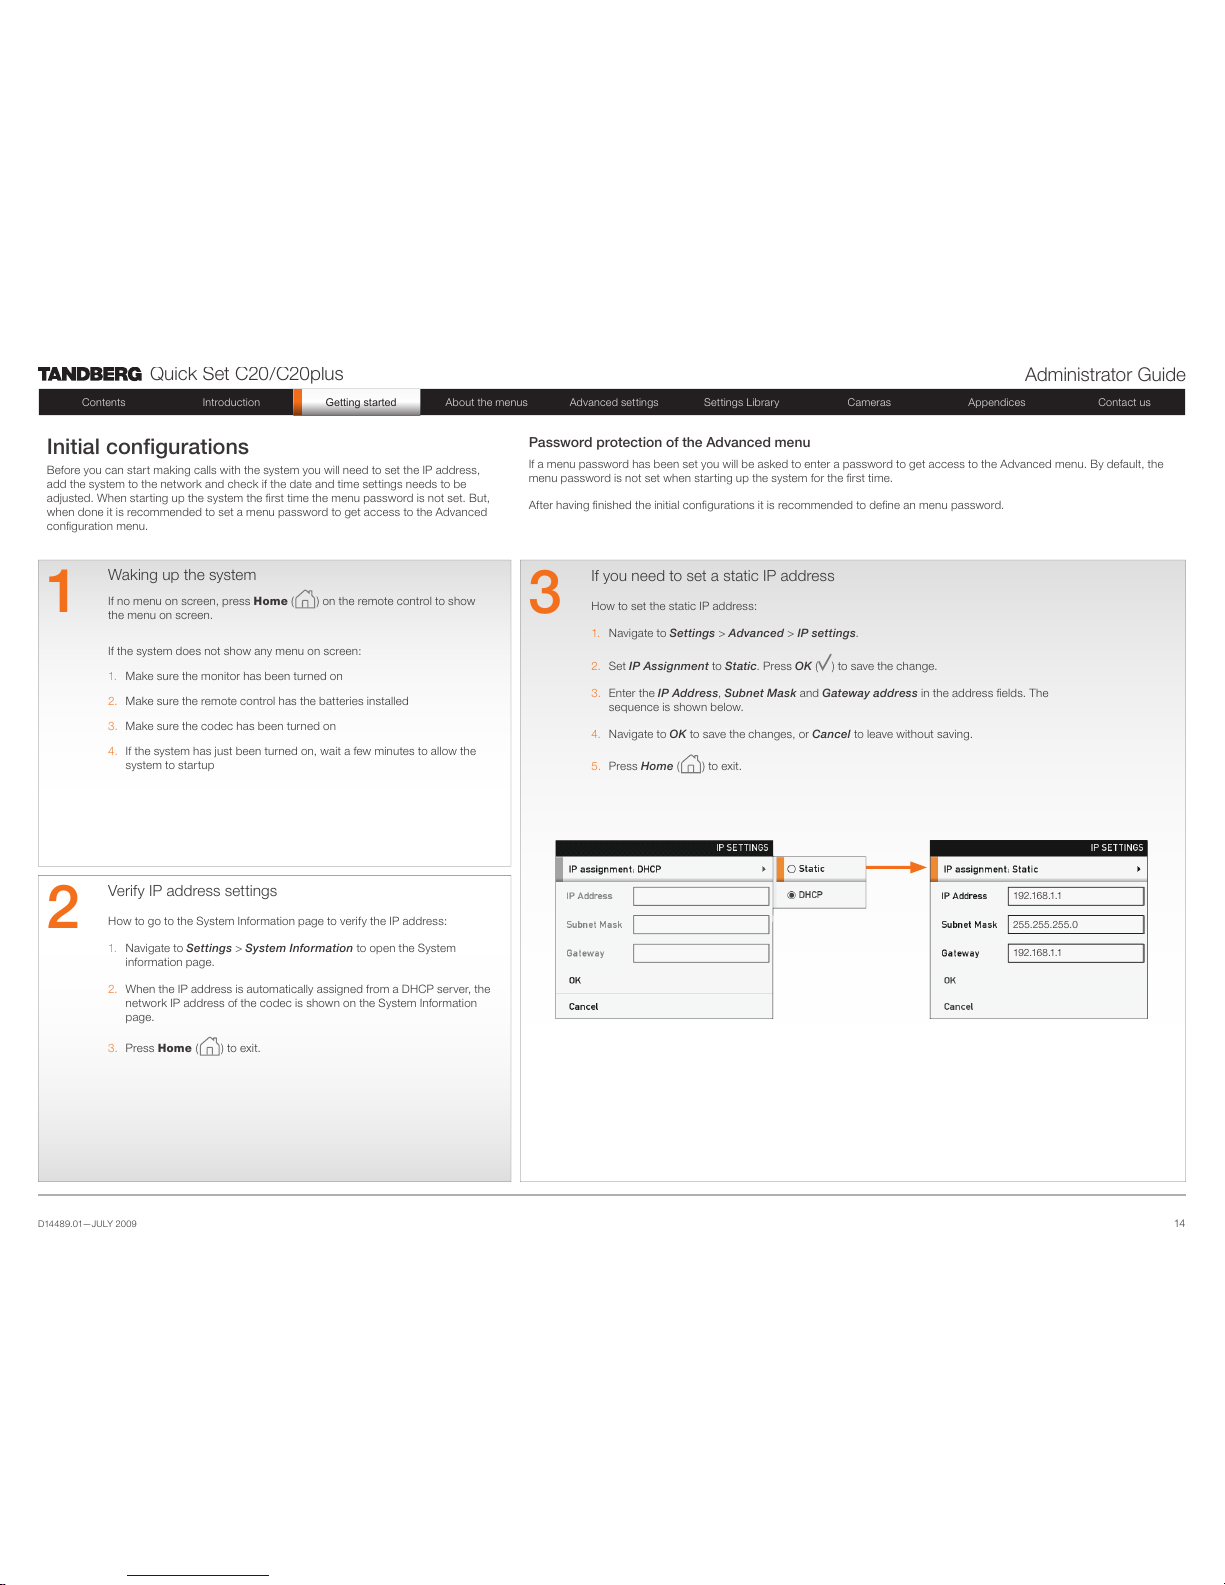
If you need to set a static IP address
How to set the stati c IP address :
1. Navigate to Set tings > A dvance d > IP setti ngs.
2. Set IP As signme nt to Static. Press OK ( ) to save the chan ge.
3. Enter the IP Add ress, Sub net Mas k and Gatewa y addres s in the addre ss fields. T he
sequenc e is shown be low.
4. Navigate to OK to save th e changes, o r Cance l to leave without saving.
5. Press Hom e ( ) to exi t.
Verify IP address settings
How to go to the System I nformatio n page to verif y the IP addre ss:
1. Navigate to Set tings > S ystem In formati on to open the System
informati on page.
2. When th e IP addres s is automatic ally assi gned from a DHCP serve r, the
network IP a ddress of th e codec is sh own on the Syste m Informati on
page.
3. Press Hom e ( ) to exi t.
2
Initial configurations
Before you ca n start ma king calls with the syste m you will nee d to set the IP addr ess,
add the system to th e network a nd check if th e date and time s ettings ne eds to be
adjusted. Wh en star ting up the syste m the first tim e the menu pas sword is not set. Bu t,
when done i t is recomm ended to set a me nu password to g et access to th e Advanced
configuration menu.
Password protection of the Advanced menu
If a menu pas sword has bee n set you will b e asked to enter a pa ssword to get acc ess to the Adva nced menu. B y default, the
menu password is not set wh en start ing up the syste m for the first tim e.
After havi ng finishe d the initial configurations it is rec ommende d to define an me nu password.
192.168.1.1
255.255.255.0
192.168.1.1
Page 15

D14489.01—JULY 2009
15
Quick Set C20/C20plus
Administrator Guide
Contents Introduct ion Getting s tarted About the m enus Advance d settings Setting s Librar y Cameras Append ices Contact us
Getting/started
firstna me.lastname @company.com
4 5
Adding the system to the network
Your service p rovider sh ould have prov ided you wit h the information you need to
get online.
s For H.323 type of communication, t his will inc lude such th ings as syste m
name, H.323 alia s, gatekeepe r address, e tc.
s For SIP type of com municatio n, similar t ype of infor mation wil l be suppli ed.
s For networks adm inistrated th rough TMS ( TANDBERG Manag ement Sui te),
your TMS administrator wi ll be able to as sist you whe n configuri ng.
The H.323 and SIP p rofiles are c onfigured f rom the Advan ced configu rations
menu:
Navigate to Set tings > Ad vanced > Ad vanced c onfigur ation and ma ke a search
for H323 or SIP, or select H323 > Profile 1 or S IP > Profile 1 from the menu
s Expand the item s in need of mod ification a nd enter the in formation s upplied by
your ser vice provi der.
Verify your settings
We strongly re commend th at you verif y the setti ngs by inspe cting the Sy stem
Informatio n list.
You do this by access ing the Syste m Informatio n in the same way a s you did
when you ver ified you IP ad dress set ting.
1. Navigate to Set tings > S ystem In formati on
2. Verif y the previo us configur ations.
s If you successf ully regis tered to a Gatekee per the Status will show
Regist ered. If the reg istration fa iled the Sta tus will show N ot registered.
s If you successf ully regis tered to a SIP ser ver the Sta tus will show
Regist ered. If the reg istration fa iled the Sta tus will show N ot registered.
3. Press Home ( ) to exit.
6
Adjusting the date and time settings
Verify the d ate and time to se e if the date and time setting s need to be adjusted.
The date and ti me is located i n the upper r ight corn er on scree n.
How to adjust the d ate and time set tings:
1. Navigate to Set tings > D ate and ti me
2. When S et date an d time is set to Au to there will be an automati c update of
the date and tim e settings. I f you want to manu ally adjus t the date and tim e
settings, s elect Ma nual an d enter the Day, Month, Year and T ime. After
having adju sted the set tings manu ally you can s et the Set da te and time
back to Auto for a utomatic upd ate.
3. Select th e appropri ate Time zon e from the list of G MT time zone s.
4. Selec t the appropr iate Date fo rmat from th e list.
5. Select th e appropr iate Time format from th e list.
6. Press Home ( ) to exit.
Configure th e H.323 Profile in the
Advanced c onfigurati on menu
Configure th e SIP Profile in th e
Advanced c onfigurati on menu
ADVANCED CO NFIGUR ATION
ADVANCED CO NFIGUR ATION
Page 16

D14489.01—JULY 2009
16
Quick Set C20/C20plus
Administrator Guide
Contents Introduct ion Getting s tarted About the m enus Advance d settings Setting s Librar y Cameras Append ices Contact us
Getting/started
7
Setting a menu password
It is highly recommen ded to define a pa ssword to acce ss the Advan ced
menus. Cha nging the se setting s may affec t the behavi or of the system an d
should be d one by the system a dministra tor.
NOTE! Whe n you define or change a pas sword make sure yo u save a copy of
the password i n a safe place.
How to set the menu password
Navigate to Set tings > A dvance d > Change p asswor d
1. On the remote co ntrol, press t he # key to toggle bet ween lower o r upper
case char acters and n umbers : abc/AB C/123
2. Enter the p assword. The p assword you e nter is hidde n, as each cha racter
is replace d with a star ( *).
3. Navigate to Save to s ave the chang es, or Canc el to leave wit hout savin g.
4. Press Ho me ( ) to exit.
Page 17

D14489.01—JULY 2009
17
Quick Set C20/C20plus
Administrator Guide
Contents Introduct ion Getting s tarted About the m enus Advance d settings Setting s Librar y Cameras Append ices Contact us
Getting/started
The video outputs at Codec C20
Monitors
Connecting the monitor
The monitor can be conn ected to vide o output HD MI 1 (default) or
HDMI 2*.
The defaul t resoluti on for HDMI is 1280x720@ 60Hz.
Connecting to HDMI 1
When conn ecting the m onitor to HDMI 1, which i s the defaul t video
output on Co dec C20, the men u, icons and oth er inform ation on
screen ( OSD - on scre en display ) will be dis played on this m onitor.
Connecting to HDMI 2*
When conn ecting the m onitor to HDMI 2* o utput on Co dec C20
the OSD is not dis played on sc reen. The OS D can be moved to thi s
output.
NOTE! The re is no audio o n HDMI 2.
Key sequence for moving the OSD
If you have moved th e monitor from one HDMI out put to the other, and
the menu and o ther inform ation does n ot show on scre en, you must
move the OSD to the ou tput in use.
Check whi ch conne ctor the monito r is connec ted to, and run the
following key s equenc e on the remote co ntrol.
s Disconnect * # * # 0 x # ( where x is ou tput 2)
Exampl e 1: Set HDMI 1 as the OS D output:
– * – # – * – # – 0 – 1 – #
Exampl e 2: Set HDMI 2 as th e OSD output :
– * – # – * – # – 0 – 2 – #
Dual monitors
NOTE! Requ ires the Dual Display o ption.
When run ning a dual mo nitor setup, con nect the ma in monitor to
video out put HDMI 1 an d the second m onitor to vide o output HD MI 2
on Codec C20.
Dual monitor configuration
Go to the Advanc ed configu ration menu to s et the monitor to du al:
1. Navigate to Set tings > A dvance d > Advance d configu ration >
Video > Mo nitors
2. Set the Mo nitors to Dual.
3. Press Home ( ) to exit.
HDMI 1
(the defau lt connec tor
for the main mo nitor)
HDMI 2*
* Use of HDMI 2 re quires the Dual Di splay option.
Page 18

D14489.01—JULY 2009
18
Quick Set C20/C20plus
Administrator Guide
Contents Introduct ion Getting s tarted About the m enus Advance d settings Setting s Librar y Cameras Append ices Contact us
About/the/menus
About the menus
Chapter 3
In this chapter...
Explai ns the menu sy stem:
The Home me nu
The Setti ng menu
The Advanc ed menu
Page 19

D14489.01—JULY 2009
19
Quick Set C20/C20plus
Administrator Guide
Contents Introduct ion Getting s tarted About the m enus Advance d settings Setting s Librar y Cameras Append ices Contact us
About/the/menus
About the menus
The menu pa th to the Advance d configura tion
menu:
1. The Home me nu
2. The Set tings menu
3. The Advanc ed menu
4. The Adva nced config uration me nu
The user documentation structure
s The Administrato r Guide expl ains all set tings
found in the Ad vanced a nd Advanc ed
configur ation me nus.
s The User Guide ex plains how to ma ke use
of the video sy stem, which i ncludes m aking
calls and ex plainin g about the se ttings fou nd
in the Home me nu, Sett ings menu a nd
the Progr ammabl e softbu ttons f rom the
Advance d menu.
Navigating in the menus
Use the remote co ntrol to naviga te in the menus :
s Use the arrows down /up to select a menu item
s Use the arrow right to ex pand the sel ection
s Use the arrow left to go one step back
Changing a value
s Select a value fr om a drop down li st and pres s
the OK button to save, or press th e left arr ow to
leave witho ut saving.
s Enter a value/tex t in a value /text fiel d. Press
Save to save the cha nge or Canc el to leave
without sa ving.
Download th e TANDBERG Quick S et C20/
C20plus Use r Guide fro m the web site.
Go to: http://w ww.tandberg.c om/doc s
The Home menu
The Home me nu is expla ined in the TANDBER G Quick Set C20 /C20plu s User Guid e.
s Call: Menu for m aking ca lls.
s Presentat ion: Sele ct a presen tation sour ce.
s Camera cont rol: Cont rol the came ra setting s.
s Settings : Configure th e system.
The Settings menu
The Set tings menu is explained in the TANDBERG Q uick Set C20 /C20plus U ser Guide.
s Layout: Select screen layout, includ ing self view.
s Main source: Select the main vid eo source.
s Call setti ngs: Con figure the def ault bit rate an d auto answer s ettings.
s Language : Select the preferred m enu langu age.
s Date and time : Configure d ate and time set tings.
s Sounds and alerts : Select a r ing tone, the ri ng tone volume and key tone.
s Wallpaper : Select th e background p icture on sc reen
s System Infor mation : See an over view of the sys tem configur ations
s Advanced: Configure the ad vanced se ttings.
s Restart : Select th is option to rest art the sys tem.
The Advanced menu
NOTE! The Ad vanced me nu can be pas sword protecte d.
s Programma ble softbutto ns: User defined sof t-buttons for s electing m ain video source,
camera pr esets or spe ed dial.
s IP settings : Lets you confi gure the IP set tings.
s Advanced con figurat ion: Lets you c onfigure the s ystem setti ngs.
s Change pas sword: Let s you change th e menu password.
Page 20

D14489.01—JULY 2009
20
Quick Set C20/C20plus
Administrator Guide
Contents Introduct ion Getting s tarted About the m enus Advance d settings Setting s Librar y Cameras Append ices Contact us
Advanced/settings
The Advanced settings
Chapter 4
In this chapter...
Explai ns the menu sy stem:
The Advanc ed menus
Password prote ction of the
Advanced m enu
How to change a va lue
Descrip tion of each se tting
The searc h function ality
How to change th e password
Page 21

D14489.01—JULY 2009
21
Quick Set C20/C20plus
Administrator Guide
Contents Introduct ion Getting s tarted About the m enus Advance d settings Setting s Librar y Cameras Append ices Contact us
Advanced/settings
The Advanced menus
Changes i n the Advanced menus set tings may
affect th e behavio r of the system and s hould be
configure d by the system adm inistrator.
How to change a value
s Select a value fr om a drop down li st and pres s
the OK button to save, or press th e left arr ow to
leave witho ut saving.
s Enter a value/tex t in a value /text fiel d. Press
Save to save the cha nge or Canc el to leave
without sa ving.
Description of each setting
Each of the set tings in the Ad vanced co nfiguratio n
menu is expl ained in the Settings l ibrary s ection.
Press the Se tting s librar y in the menu on top of
the page to go to this s ection.
If the Advanc ed menu is pa ssword
protected, ty pe in the pas sword and pre ss
OK to proceed or Cancel to go ba ck to
the Settin gs menu.
Page 22

D14489.01—JULY 2009
22
Quick Set C20/C20plus
Administrator Guide
Contents Introduct ion Getting s tarted About the m enus Advance d settings Setting s Librar y Cameras Append ices Contact us
Advanced/settings
The Advanced
configuration menu
The Advanc ed configu ration menu contains a ll the
system setti ngs, inclu ded the IP set tings which also
are availab le in the Advan ced menu.
The search functionality
On the remote co ntrol, press t he # key to toggle
between l ower or uppe r case char acters and
numbers : abc/A BC/123
When sea rching for wor ds like “H323”, “SIP” or
“key”, all settings w ith these ch aracters i n the name
will be liste d.
s Search: Enter th e as many char acters as
needed u ntil the setti ng you are sea rching for
displays in t he list.
s Refine the search : Add or remove c haracter s
until you get th e desired re sult.
s Clear: Remove all c haracter s to return to the
main view.
Search
Enter the as ma ny characters as neede d, until the set ting you are searching fo r displays i n the list.
Exampl e 1: Search for “si p” to see all the SIP s ettings.
Exampl e 2: Search fo r H323. In this cas e it is suffi cient to enter “ h3” to display a ll the H323 setti ngs.
firstna me.lastname @company.co m
192.168.10.1
firstna me.lastname @company.co m
192.168.10.1
Page 23

D14489.01—JULY 2009
23
Quick Set C20/C20plus
Administrator Guide
Contents Introduct ion Getting s tarted About the m enus Advance d settings Setting s Librar y Cameras Append ices Contact us
Advanced/settings
The Advanced menu
How to change the password
If a menu pas sword has bee n set you will b e asked
to enter a passwo rd to get acces s to the Advance d
menu.
When turn ing on the cod ec for the firs t time, the
password is n ot set.
!
When you defi ne or chang e a password
make sure you save a copy of the pas sword
in a safe plac e.
Set a new password
1. On the remote co ntrol, press t he # key
to toggle betw een lower or u pper case
characters and numb ers: abc /ABC/123
2. Enter the p assword. The p assword you
enter is hidd en, and eac h character i s
replace d with a star ( *).
3. Press Save to save the change s, or
Cancel to leave withou t saving.
4. Press Ho me ( ) to ex it.
If the Advanc ed menu is pa ssword
protected, ty pe in the pas sword and pre ss
OK to proceed or Cancel to go ba ck to
the Settin gs menu.
Page 24

D14489.01—JULY 2009
24
Quick Set C20/C20plus
Administrator Guide
Contents Introduct ion Getting s tarted About the m enus Advance d settings Setting s Librar y Cameras Append ices Contact us
Settings/library
In this chapter...
Th e Audio sett ings
Th e Camera set tings
Th e Conferen ce setting s
Th e H323 profile set tings
Th e Network settings
Th e Network Servic es
Th e Phoneboo k Serve r
Th e Provisioning settin gs
Th e Serial po rt setti ngs
Th e SIP profile set tings
Th e Standby set tings
Th e System unit s ettings
Th e Time settings
Th e Video set tings
E xperime ntal sett ings
Chapter 5
The Advanced settings library
This chapte r gives a deta iled des cription of
each sett ing in the Adva nced config uration
menu.
The Advanc ed configu ration defin es the
system setti ngs and are s tructured i n a
hierarch y, making up a datab ase of system
settings.
Stay up to da te
We recommend you visit th e TANDBERG
web site regu larly for a n updated ver sion of
this guide.
Go to: http: //www.tandb erg.com/d ocs
Page 25

D14489.01—JULY 2009
25
Quick Set C20/C20plus
Administrator Guide
Contents Introduct ion Getting s tarted About the m enus Advance d settings Setting s Librar y Cameras Append ices Contact us
Settings/library
xConfiguration Audio SoundsAndAlerts KeyTones Mode: < On/Off >
Determin es whether o r not the system s hould prod uce a sound eve ry time a key o n the remote cont rol is
pressed.
On: The re will be a sou nd indicato r when pres sing keys on the re mote control.
Off: Th e remote contro l Key Tones is switched off.
Exampl e: xCon figuration Aud io Sounds And Alerts Key Tones Mod e: Off
xConfiguration Audio SoundsAndAlerts RingVolume: <0..100>
Sets the ring to ne volume [0-100] for an i ncoming c all in steps of 0.5d B from -34.5dB to 15dB. Volume 0 =
Off.
Exampl e: xCon figuration Aud io Sounds And Alerts Rin gVolume: 50
xConfiguration Audio SoundsAndAlerts RingTone: <Marbles/ IceCr ystal s/Polaris /Alert/
Discrete/Fa ntasy/Jazz /Nor dic/ Echo/ Rhyt hmic>
Defines the r ingtone for i ncoming c alls.
Range: S elect a tone f rom the list of ri ngtones.
Exampl e: xCon figuration Aud io Sounds And Alerts Rin gTone: Jazz
xConfiguration Audio Volume : <0..100>
Sets the volum e level [0 -100] on the loudsp eaker outp ut in steps of 0.5dB f rom -34.5dB to 15dB. Volume 0
= Off.
Exampl e: xCon figuration Aud io Volume: 70
xConfiguration Cameras Camera [1..1] Backlight: <O n/O ff>
Backlig ht compensates for ligh ts shining d irectly at th e camera ( usually s un from the wi ndow) to avoid a too
dark imag e.
On: Turn backli ght compe nsation on.
Off: Turn back light com pensatio n off.
Exampl e: xCon figuration Ca mera s Came ra 1 Backlight: Off
Description of the Advanced configuration settings
In the followi ng pages you w ill find a list of t he Advance d configuration settin gs, sorte d in alphab etical
order. The exampl es shows ei ther the defa ult value or a n example of a va lue.
xConfiguration Cameras Camera [1..1] Brightness Mode: <Auto /Manual>
The came ra can adjus t the bright ness of imag e automatica lly, or it can be set m anually u sing the Br ightness
Level config uration.
Auto: The ca mera autom atically ad justs brig htness level.
Manual : Set bright ness level m anually w ith the Brig htness Leve l configura tion.
Exampl e: xCon figuration Ca mera s Came ra 1 Brightness Mode: Auto
xConfiguration Cameras Camera [1..1] Brightness Level: <1..31>
Set a Bright ness Level fo r the camer a. Require s the Brightn ess Mode to b e set to manual.
Range: 1-31
Exampl e: xCon figuration Ca mera s Came ra 1 Brightness Level: 1
xConfiguration Cameras Camera [1..1] Flip: < On/ Off /Auto>
Controls vertical o rientatio n of the camera image.
On: Whe n set to On the vide o on scree n is flipped.
Off: Se t to Off to disp lay the video on screen th e normal way.
Auto: Automati cally flip s the image if the camera i s mounted ups ide down.
Exampl e: xCon figuration Ca mera s Came ra 1 Flip: Off
xConfiguration Cameras Camera [1..1] Focus Mode: <Auto /Ma nual>
The came ra can adjus t focus autom atically, or it ca n be set manu ally.
Auto: When m oving the ca mera, autofoc us is trigge red for the new camera po sition. Af ter a few secon ds it is
turned of f to prevent con tinuous foc us adjustments.
Manual : Manual ad justment of focus.
Exampl e: xCon figuration Ca mera s Came ra 1 Focus Mod e: Auto
xConfiguration Cameras Camera [1..1] Gamma Mode: <Au to/Manual >
Gamma cor rection mo de control. G amma desc ribes the n onlinea r relations hip betwe en image pi xels and
monitor bri ghtness.
Auto: The ca mera dec ides whic h gamma tab le to use.
Manual : Can be used i n severe ligh t conditio ns. Select g amma tabl e by setting th e Gamma Leve l
configuration.
Exampl e: xCon figuration Ca mera s Came ra 1 Gam ma M ode: Auto
xConfiguration Cameras Camera [1..1] Gamma Level : <0..7>
Select ga mma corre ction tab le. Useful in d ifficul t lighting c onditions w here the br ightness c onfigurati on does
not provide s atisfactor y results. R equires th e Gamma Mo de to be set to Manua l.
Range: 0 -7
Exampl e: xCon figuration Ca mera s Came ra 1 Gam ma L evel: 0
All specifications a re subjec t to change wit hout notice.
We recommend you visit th e TANDBERG web site reg ularly fo r an updated ve rsion of this g uide.
Go to: http://w ww.tandberg.c om/doc s
Page 26

D14489.01—JULY 2009
26
Quick Set C20/C20plus
Administrator Guide
Contents Introduct ion Getting s tarted About the m enus Advance d settings Setting s Librar y Cameras Append ices Contact us
Settings/library
xConfiguration Cameras Camera [1..1] IrSensor: <On /Off>
Controls the I R sensor on th e front of the ca mera.
On: Enab le the IR sens or on the camera.
Off: Di sable the IR sensor on th e camera.
Exampl e: xCon figuration Ca mera s Came ra 1 IrSensor: On
xConfiguration Cameras Camera [1..1] Mirror: <On /Of f/Auto >
Controls ho rizontal or ientatio n of the camer a image.
On: Mirror the image f rom the came ra. Self view will n ow be like look ing in the mir ror.
Off: No rmal mode.
Auto: Mirro r the image if th e camera is mounted ups ide down.
Exampl e: xCon figuration Ca mera s Came ra 1 Mirror: Off
xConfiguration Cameras Camera [1..1] Whitebalance Mode: <Auto /Manual>
The came ra can adjus t whitebal ance autom atically, or it ca n be set manually using t he Whiteba lance Level
configuration.
Auto: The ca mera conti nuously a djusts the wh itebalan ce.
Manual : Use the White balance L evel configu ration to contr ol the whiteb alance in th e camera.
Exampl e: xCon figuration Ca mera s Came ra 1 Whitebala nce Mode: Auto
xConfiguration Cameras Camera [1..1] Whitebalance Level: <1..16>
Set a Whiteba lance Leve l for the came ra. Requi res the White balance M ode to be set to manual.
Range: 1-16
Exampl e: xCon figuration Ca mera s Came ra 1 Whitebala nce Level: 1
xConfiguration Conference [1..1] AutoAnswer Delay: < 0..50 >
Defines how l ong (in se conds) a n incomin g call has to wai t before it is an swered autom atically by t he
system. Requ ires the Autoa nswer Mode to be e nabled.
Range: 0 -50 secon ds
Exampl e: xCon figuration Confere nce 1 AutoAn swer Dela y: 0
xConfiguration Conference [1..1] AutoAnswer Mode: < On/Off >
The Autoans wer settin g determine s whether a n incomin g call is put th rough automa tically or m anually.
On: The sy stem will autom atically a nswer all in coming ca lls.
Off: All incomin g call must b e answered ma nually by pr essing the OK key or the gree n Call key on the
remote contro l.
Exampl e: xCon figuration Confere nce 1 AutoAn swer Mo de: Off
xConfiguration Conference [1..1] AutoAnswer Mute: < On/ Off >
The Autoans wer Mute sett ing determi nes whethe r the microp hone is mute d when an inc oming cal l is
automatica lly answer ed.
On: The in coming ca ll will be mu ted when auto maticall y answered.
Off: Th e incomin g call will n ot be muted.
Exampl e: xCon figuration Confere nce 1 AutoAn swer Mute: Off
xConfiguration Conference [1..1] DefaultCall Protocol: < H323/SIP>
Specif y the defau lt call protoc ol to be used wh en placing c alls from th e system. The c all protocol c an also
be defined d irectly for e ach call wh en settin g up a call.
H.323: Sele ct H.323 to ensure tha t calls are se t up as a H.323 calls.
SIP: Selec t SIP to ensure tha t calls are se t up as a SIP calls.
Exampl e: xCon figuration Confere nce 1 DefaultCall Protocol: H323
xConfiguration Conference [1..1] DefaultCall Rate : <64..6000>
Specif y the defau lt call rate to be us ed when pl acing call s from the syste m. The call ra te can also be d efined
directly fo r each call w hen setti ng up a call.
Range: 6 4-600 0 kbps
Exampl e: xCon figuration Confere nce 1 DefaultCall Rate: 768
xConfiguration Conference [1..1] DoNotDisturb Mode: < On/ Off>
The Do Not Di sturb sett ing determi nes whethe r or not there s hould be an a lert on i ncoming c alls.
On: Set to On w hen you do not wan t any aler t to incoming c alls. The c alling side will rece ive a busy sig nal
when try ing to call the c odec.
Off: Se t to Off whe n you want inco ming calls to b e alerte d. This is the de fault sett ing.
Exampl e: xCon figuration Confere nce 1 DoNotDistu rb Mode: Off
xConfiguration Conference [1..1] Encryption Mode: <Off/BestEffor t>
BestEffo rt: The s ystem will us e encry ption when ever possi ble. If the far e nd system supp orts encryptio n
(AES-128), the call will b e encry pted. If not, the ca ll will proc eed withou t encry ption. A padlo ck with the tex t
“Encry ption On” dis plays on scre en, for a few sec onds, when t he confere nce star ts.
Off: Th e system will n ot use encr yption.
Exampl e: xCon figuration Confere nce 1 Encr yption Mo de: BestEffort
Page 27

D14489.01—JULY 2009
27
Quick Set C20/C20plus
Administrator Guide
Contents Introduct ion Getting s tarted About the m enus Advance d settings Setting s Librar y Cameras Append ices Contact us
Settings/library
xConfiguration Conference [1..1] FarEndControl Mode: <On/Off>
Lets you contro l if the remote si de (far end ) shoul d be allowed to se lect your vi deo sourc es and contr ol your
local cam era (pa n, tilt, zoom) .
On: Set to On w hen you want the t he far end to be ab le to select yo ur video s ources and c ontrol your
local cam era (pa n, tilt, zoom) . You will still be abl e to control your c amera and s elect you r video sou rces as
normal.
Off: Wh en set to Of f the far end ca n not acces s any of the featu res above on you r system.
Exampl e: xCon figuration Confere nce 1 FarEnd Control Mode: On
xConfiguration H323 Profile [1..1] Authentication LoginName: <S: 0, 5 0>
The system se nds the Auth enticatio n Login Name a nd the Authe ntication Pa ssword to a H.323 Gateke eper
for authent ication. Th e authentic ation is a one way a uthentic ation from the codec to the H.323 Gatekeeper,
i.e. the system is authenticated to th e gatekeepe r. If the H.323 Gatekeepe r indicates t hat no authentication
is require d, the system wil l still try to re gister. Requires t he H.323 Gatekeep er Authentication Mo de to be
enabled.
Format: String with a ma ximum of 50 c haracter s.
Exampl e: xCon figuration H323 Profile 1 Authentication Log inna me: “”
xConfiguration H323 Profile [1..1] Authentication Mode : <On /Off>
On: If the H.323 G atekeeper Authentica tion Mode is s et to On and a H.323 Gateke eper ind icates
that it requi res authen tication, th e system will tr y to authenti cate itself to th e gatekeepe r. Requires the
Authentic ation ID and Au thenticat ion Password to b e defined on both the codec a nd the Gatekee per.
Off: If th e H.323 Gatekeep er Authenti cation Mod e is set to Off the system will n ot try to authe nticate itse lf to
a H.323 Gatekeep er, but will still tr y a normal re gistratio n.
Exampl e: xCon figuration H323 Profile 1 Authentication Mod e: Off
xConfiguration H323 Profile [1..1] Authentication Password: < S: 0, 50 >
The system se nds the Auth enticatio n Login Name a nd the Authe ntication Pa ssword to a H.323 Gateke eper
for authent ication. Th e authentic ation is a one way a uthentic ation from the codec to the H.323 Gatekeeper,
i.e. the system is authenticated to th e gatekeepe r. If the H.323 Gatekeepe r indicates t hat no authentication
is require d, the system wil l still try to re gister. Requires t he H.323 Gatekeep er Authentication Mo de to be
enabled.
Format: String with a ma ximum of 50 c haracter s.
Exampl e: xCon figuration H323 Profile 1 Authentication Pass word:
xConfiguration H323 Profile [1..1] CallSetup Mode: < Direct/G atekeeper>
The H.323 Call Se tup Mode defi nes whethe r to use a Gatekee per or Dire ct callin g when esta blishin g H323
calls.
Direct: A n IP-addres s must be use d when dial ling in orde r to make the H323 cal l.
Gatekeepe r: The system w ill use a Gateke eper to make a H.323 c all. When se lecting th is option the H 323
Profile Gateke eper Addre ss and H323 Profi le Gatekeep er Discove ry setti ngs must al so be configu red.
NOTE! Dire ct H.323 calls c an be made even t hough the H.323 Ca ll Setup Mod e is set to Gatekee per.
Exampl e: xCon figuration H323 Profile 1 CallSetup Mod e: Gatekeepe r
xConfiguration H323 Profile [1..1] Gatekeeper Address : <S : 0, 64>
Specifie s the IP addre ss of the Gateke eper. Requires t he H.323 Call Setu p Mode to be set to Gate keeper
and the Gateke eper Dis covery to be s et to Manual.
Format: String with a ma ximum of 6 4 character s.
Exampl e: xCon figuration H323 Profile 1 Gatekee per Add ress: “10.47.1.58”
xConfiguration H323 Profile [1..1] Gatekeeper Discovery: <Manual /Auto>
Determin es how the system s hall regi ster to a H.323 Gatekee per.
Manual : The system w ill use a specific Gatekee per iden tified by the Gate keeper’s IP-addr ess.
Auto: The sys tem will autom atically tr y to registe r to any availabl e Gatekeepe r. If a Gatekeeper re sponds
to the reques t sent from the c odec with in 30 secon ds this spe cific Gatekee per will b e used. This re quires
that the Gateke eper is in au to discover y mode as wel l. If no Gatekee per respo nds, the system w ill not use a
Gatekeepe r for makin g H.323 calls and h ence an IP-ad dress mus t be specifi ed manually.
Exampl e: xCon figuration H323 Profile 1 Gatekee per Discover y: Manua l
xConfiguration H323 Profile [1..1] H323Alias E164: <S : 0, 30 >
The H.323 Alia s E.16 4 defines the a ddress of th e system, according to the numb ering plan implem ented
in the H.323 Gatekee per. The E.164 alias is equivale nt to a telephon e number, someti mes combi ned with
access co des. Exa mple: “9 047615901”, “550092 ”
Format: Co mpact stri ng with a ma ximum of 30 ch aracters. Val id characte rs are 0– 9, * and #.
Exampl e: xCon figuration H323 Profile 1 H323Alias E164: “”
xConfiguration H323 Profile [1..1] H323Alias ID: < S: 0, 49 >
Lets you spec ify the H.323 A lias ID whic h is used to add ress the syste m on a H.323 Gatekeeper and wil l be
displayed i n the call lis ts. Examp le: “name.s urname @com pany.com”, “My H.323 Alias ID”
Format: String with a ma ximum of 49 c haracter s
Exampl e: xCon figuration H323 Profile 1 H323Alias ID: “”
xConfiguration H323 Profile [1..1] PortAllocation: < Dynami c/S tatic >
The H.323 Port A llocatio n setting af fects the H .245 port numbers used fo r H.323 call sig nalling.
Dynamic : The system will alloc ate which ports to use whe n opening a TCP c onnecti on. The reas on for doing
this is to avoid usi ng the same p orts for su bsequen t calls, as so me firewalls c onsider th is as a sign of at tack.
When Dyn amic is sel ected, the H.323 po rts used a re from 11000 to 20999. Once 209 99 is reach ed they
restar t again at 11000. For RTP and RTCP me dia data, th e system is usin g UDP por ts in the range 2326 to
2487. Each media channel is u sing two adj acent por ts, ie 2330 and 23 31 for RTP and RTCP res pectivel y.
The por ts are automati cally sel ected by the sys tem within the g iven rang e. Firewall adm inistrator s should not
try to dedu ce which po rts are use d when, as the a llocatio n schema wi thin the men tioned ran ge may chang e
without an y furthe r notice.
Static: When set to Static t he ports a re given with in a static pre defined ra nge [5555 –65 55].
Exampl e: xCon figuration H323 Profile 1 PortAllocation: Dy na mic
Page 28

D14489.01—JULY 2009
28
Quick Set C20/C20plus
Administrator Guide
Contents Introduct ion Getting s tarted About the m enus Advance d settings Setting s Librar y Cameras Append ices Contact us
Settings/library
xConfiguration Network [1..1] Assignment: < Static/D HCP>
Defines wh ether to use DHCP or Static IP a ssignme nt.
Static: T he IP Addres s, Subnet Mas k and Defau lt Gateway for the sy stem must be sp ecified i n the
respecti ve address fi elds.
DHCP: The sys tem adresse s are automatically as sigend by the D HCP ser ver.
Changes to th is setting r equires a re start of th e codec.
Exampl e: xCon figuration Netw ork 1 Assignm ent: DHCP
xConfiguration Network [1..1] DNS Domain Name: <S: 0, 64>
DNS Domai n Name is the de fault doma in name suf fix whic h is added to unq ualified n ames.
Exampl e: If the DNS D omain Nam e is “company.com” and th e name to look up is “MyVi deoSyste m”, this will
result in th e DNS looku p “MyVide oSystem.com pany.com”.
Format: String with a ma ximum of 6 4 character s.
Exampl e: xCon figuration Netw ork 1 DNS Dom ain Nam e: “compa ny.com”
xConfiguration Network [1..1] DNS Server [1..5] Address: < S: 0, 64 >
Defines the n etwork ad dresses fo r DNS ser vers. Up to 5 addre sses may be s pecifie d. If the networ k
addresse s are unkn own, please c ontact your a dministr ator or Interne t Servi ce Provider.
Format: String with a ma ximum of 6 4 character s.
Exampl e: xCon figuration Netw ork 1 DNS Serve r [1..5] Address: “”
xConfiguration Network [1..1] IEEE8021X AnonymousIdentity: < S: 0, 64>
The 802.1X Anonymous ID strin g is to be used as u nencr ypted identi ty with E AP type s that suppo rt
differ ent tunnel ed identit y, like EAP-PEA P and EAP-TTLS . If set, the anony mous ID will b e used for the i nitial
(unenc rypted ) EAP Ide ntity Req uest.
Format: String with a ma ximum of 6 4 character s.
Exampl e: xCon figuration Netw ork 1 IEEE8021X Anony mou sIdentity: “”
xConfiguration Network [1..1] IEEE8021X Eap Md5: <On/Off>
Message-Diges t algorit h 5. Is a Challen ge Handsh ake Authenti cation Protoc ol that relie s on a shared secret.
MD5 is a Weak se curity. EAP - E xtens ible Authe ntication Proto col. MD5 - Mes sage Digest Algor ithm 5.
On: The E AP-MD5 protoc ol is enabl ed. Defaul t mode is On.
Off: Th e EAP-MD5 p rotocol is dis abled.
Exampl e: xCon figuration Netw ork 1 IEEE8021X Eap Md5: On
xConfiguration Network [1..1] IEEE8021X Eap Peap: <O n/O ff>
Protected Transpor t Layer Se curity. Devel oped by Microsoft, Cis co and RSA Security. Authe nticates L AN
clients wi thout the ne ed for clien t certifi cates. EA P - Extens ible Authe ntication Protocol. PEAP - Pr otected
Extens ible Authe ntication Pr otocol.
On: The E AP-PEAP p rotocol is ena bled. Defa ult mode is O n.
Off: Th e EAP-PE AP protocol is d isabled.
Exampl e: xCon figuration Netw ork 1 IEEE8021X Eap Peap: On
xConfiguration Network [1..1] IEEE8021X Eap Ttls: <O n/Off>
Tunneled Transpor t Layer Security. Develo ped by Funk Sof tware and Certic om. Usually s uppor ted by
Agere Syste ms, Proxim and Avaya. Authentic ates LAN c lients with out the nee d for client c ertific ates. EAP -
Extens ible Authe ntication Pr otocol. TT LS - Tunneled Transpor t Layer Sec urity.
On: The E AP-TTLS protoco l is enable d. Default mo de is On.
Off: Th e EAP-TTLS proto col is disabled.
Exampl e: xCon figuration Netw ork 1 IEEE8021X Eap Ttls: On
xConfiguration Network [1..1] IEEE8021X Identity: < S: 0, 64 >
The 802.1X Identity is the use r name nee ded for 802.1X authentication.
Format: String with a ma ximum of 6 4 character s.
Exampl e: xCon figuration Netw ork 1 IEEE8021X Identity: “”
xConfiguration Network [1..1] IEEE8021X Mode: <On /Of f>
The system may b e connec ted to an IEEE 802.1X LAN network wi th a port-bas ed networ k access c ontrol
that is used to provide authe nticated net work access for Ether net networ ks.
On: The 8 02.1X au thenticat ion is enab led.
Off: Th e 802.1X authenti cation is dis abled. Def ault mode is Off.
Exampl e: xCon figuration Netw ork 1 IEEE8021X Mode: Off
xConfiguration Network [1..1] IEEE8021X Password: <S: 0, 32 >
The 802.1X Password is the password n eeded for 8 02.1X a uthentic ation.
Format: String with a ma ximum of 32 c haracter s.
Exampl e: xCon figuration Netw ork 1 IEEE8021X Password: “***”
xConfiguration Network [1..1] IPv4 Address: < S: 0, 64 >
Defines the S tatic IP addr ess for the sys tem. Only app licable i f Static IP as signment i s chosen.
Format: Co mpact stri ng with a ma ximum of 64 ch aracters.
Exampl e: xCon figuration Netw ork 1 IPv4 Address: “10.47.5.100”
xConfiguration Network [1..1] IPv4 Gateway: <S: 0, 64>
Defines the I P default ga teway. Only applic able if Stat ic IP assign ment is cho sen.
Format: Co mpact stri ng with a ma ximum of 64 ch aracters.
Exampl e: xCon figuration Netw ork 1 IPv4 Gateway: “10.47.5.100”
Page 29

D14489.01—JULY 2009
29
Quick Set C20/C20plus
Administrator Guide
Contents Introduct ion Getting s tarted About the m enus Advance d settings Setting s Librar y Cameras Append ices Contact us
Settings/library
xConfiguration Network [1..1] IPv4 SubnetMask: <S: 0, 6 4>
Defines the I P subnet mas k. Only app licable i f Static IP as signmen t is chosen.
Format: Co mpact stri ng with a ma ximum of 64 ch aracters.
Exampl e: xCon figuration Netw ork 1 IPv4 Subnet Mask: “255.255.255.0”
xConfiguration Network [1..1] IPv4 QoS Mode: < Off/Dif fser v>
Defines wh ether IP Dif fser v QoS shou ld be used. T he QoS (Q uality of S ervic e) is a metho d which
handles the priori ty of audio, vi deo and dat a in the networ k. The QoS s ettings mu st be suppo rted by the
infrastr ucture. Dif fSer v (Dif ferenti ated Serv ices) i s a computer n etworki ng architec ture that spe cifies a
simple, scalable an d coarse- grained m echanis m for class ifyin g, managing n etwork tra ffic and pro viding
QoS prior ities on mo dern IP net works.
Off: Wh en set to Of f no QoS metho d is used.
Diffs erv: Se lect Dif fser v and then go to th e Diffs erv sub -menus (A udio, Data, Sig nalling a nd Video ) to
configure th ese setti ngs.
Exampl e: xCon figuration Netw ork 1 IPv4 QoS Mode: diffser v
xConfiguration Network [1..1] IPv4 QoS Diffser v Audio: <0..6 3>
The Dif fServ A udio setti ng is used to defi ne which pr iority A udio packets s hould have in a n IP networ k.
Enter a prior ity, which ran ges from 0 to 63 fo r the packets. Th e higher th e number, the highe r the prior ity.
These pr iorities m ight be over ridden wh en packets are leaving the n etwork co ntrolled by th e local net work
administr ator.
Audio: A rec ommend ed value is Di ffSer v Code Poi nt (DSCP ) is AF41, which equals the valu e 34. If in doubt,
contact you r network a dministra tor.
Exampl e: xCon figuration Netw ork 1 IPv4 QoS Diffserv Audio: 0
xConfiguration Network [1..1] IPv4 QoS Diffser v Data : <0.. 63>
The Dif fServ D ata settin g is used to defin e which pri ority Da ta packets sho uld have in an IP n etwork.
Enter a prior ity, which ran ges from 0 to 63 fo r the packets. Th e higher th e number, the highe r the prior ity.
These pr iorities m ight be over ridden wh en packets are leaving the n etwork co ntrolled by th e local net work
administr ator.
Data: A rec ommende d value is Di ffSer v Code Poin t (DSCP) A F23, which equ als the value 22. If in doubt,
contact you r network a dministra tor.
Exampl e: xCon figuration Netw ork 1 IPv4 QoS Diffserv Data: 0
xConfiguration Network [1..1] IPv4 QoS Diffser v Signalling: < 0..63 >
The Dif fServ S ignalli ng setting i s used to define w hich prio rity Sig nalling pa ckets shoul d have in an IP
network. E nter a prior ity, which rang es from 0 to 63 for the packets. The higher the n umber, the highe r the
priorit y. These prio rities mi ght be overri dden whe n packets are le aving the net work cont rolled by the lo cal
network ad ministrato r.
Signalli ng: A reco mmende d value is Dif fSer v Code Point ( DSCP) AF31 which equals the va lue 26. If in dou bt,
contact you r network a dministra tor.
Exampl e: xCon figuration Netw ork 1 IPv4 QoS Diffserv Signallin g: 0
xConfiguration Network [1..1] IPv4 QoS Diffser v Video : <0..63>
The Dif fServ V ideo set ting is used to d efine whic h priorit y Video pa ckets shoul d have in an IP net work.
Enter a prior ity, which ran ges from 0 to 63 fo r the packets. Th e higher th e number, the highe r the prior ity.
These pr iorities m ight be over ridden wh en packets are leaving the n etwork co ntrolled by th e local net work
administr ator.
Video: A r ecommen ded value is DiffS erv Cod e Point (DSC P) AF41, which equals the val ue 34. If in doubt,
contact you r network a dministra tor.
Exampl e: xCon figuration Netw ork 1 IPv4 QoS Diffserv Video: 0
xConfiguration Network [1..1] MTU: <400..1500>
Set the ether net MTU ( Maxim um Transmissio n Unit).
Range: 40 0-1500
Exampl e: xCon figuration Netw ork 1 MTU: 1500
xConfiguration Network [1..1] Speed: <Auto/10half/10full /100half/100full/1000 full>
Set the ether net link spe ed.
Auto: Autone gotiate link sp eed.
10half: Force l ink to 10Mbps half-d uplex.
10full: Forc e link to 10Mbps ful l-duplex.
100half: For ce link to 100Mbps h alf-dupl ex.
100full: Fo rce link to 100Mb ps full-du plex.
1000full : Force link to 1Gbps f ull-dupl ex.
Exampl e: xCon figuration Netw ork 1 Speed: Auto
xConfiguration Network [1..1] Traf ficControl Mode: <On /Of f>
Configure h ow video pac kets transmi ssion spe ed shall be c ontrolle d.
On: Transmit vi deo packets a t maximu m 20Mbps.
Off: Transmi t video pac kets at link spe ed.
Exampl e: xCon figuration Netw ork 1 TrafficControl: On
xConfiguration NetworkServices H323 Mode: < On/ Off >
Determin es whether t he system should be able to pl ace and rec eive H.323 call s.
On: Set to On to en able the possibilit y to place and r eceive H.323 calls.This is the defau lt settin g.
Off: Se t to Off to disa ble the poss ibilit y to place and re ceive H.323 cal ls.
NOTE! Chan ges in this setting req uires the co dec to be resta rted.
Exampl e: xCon figuration Netw orkServices H 323 Mode: On
xConfiguration NetworkServices HTTP Mode: < On /Off>
HTTP is a p rotocol for transferrin g web-page s for system man agement, d iagnostic s and software uplo ads.
On: The HTTP protoc ol is enabl ed.
Page 30

D14489.01—JULY 2009
30
Quick Set C20/C20plus
Administrator Guide
Contents Introduct ion Getting s tarted About the m enus Advance d settings Setting s Librar y Cameras Append ices Contact us
Settings/library
Off: Th e HTTP p rotocol is disabled.
Exampl e: xCon figuration Netw orkServices H TTP Mode: On
xConfiguration NetworkServices HTTPS Mode: < On /Off>
HTTPS is a We b protocol that e ncryp ts and decr ypts user p age reque sts as well as th e pages that a re
returned by th e Web serve r.
On: The HTTPS protoc ol is enabl ed.
Off: Th e HTTPS p rotocol is dis abled.
Exampl e: xCon figuration Netw orkServices H TTPS Mode: On
xConfiguration NetworkServices NTP Address: < S: 0, 6 4>
Enter the NTP Ad dress to defin e the networ k time protoco l server a ddress. Th is addres s will be used i f NTP
Mode is set to Ma nual, or if set to Au to and no addre ss is suppl ied by a DHCP se rver.
Format: String with a ma ximum of 6 4 character s.
Exampl e: xCon figuration Netw orkServices N TP Addr ess: “1.tandb erg.pool.ntp.org”
xConfiguration NetworkServices NTP Mode: <Auto/ Manual >
The Netwo rk Time Protoc ol (NTP ) is used to syn chronize the ti me of the system to a reference tim e serve r.
The time se rver wil l subseque ntly be que ried ever y 24th hour for time up dates. The tim e will be dis played
on the top of the scr een. The sys tem will use th e time to timestamp messa ges trans mitted to Gatekeepers
or Border C ontroller s requiring H.235 authentication. T he system will u se the time to tim estamp me ssages
transmit ted to Gatekeep ers or Bord er Control lers that re quires H.235 au thentica tion. It is also u sed for
timestam ping Place d Calls, Mis sed Calls and Receive d Calls.
Auto: The sys tem will use th e NTP ser ver, by which addres s is suppli ed from the DH CP serve r in the
network. I f no DHCP ser ver is use d, or the DHCP se rver doe s not provide th e system with a N TP serve r
address, th e system will u se the static de fined NTP se rver add ress spe cified by the us er.
Manual : The system w ill always use t he static defi ned NTP ser ver addre ss speci fied by the use r.
Exampl e: xCon figuration Netw orkServices N TP Mode: Ma nual
xConfiguration NetworkServices SIP Mode: <On/ Off>
Determin es whether t he system should be able to pl ace and rec eive SIP cal ls.
On: Set to On to en able the po ssibilit y to place and receive SIP c alls.This is the def ault setti ng.
Off: Se t to Off to disa ble the poss ibilit y to place and re ceive SIP ca lls.
NOTE! Chan ges in this setting req uires the co dec to be resta rted.
Exampl e: xCon figuration Netw orkServices SIP Mod e: On
xConfiguration NetworkServices SNMP CommunityName: <S: 0, 50>
Enter the nam e of the Networ k Servi ces SNMP C ommunit y. SNMP Communi ty name s are used to
authentic ate SNMP requ ests. SNMP re quests mu st have a ‘passwor d’ (case se nsitive ) in order to rece ive a
response f rom the SNMP A gent in the co dec. The def ault passwo rd is “public”. If you have th e TANDBERG
Managem ent Suite ( TMS) you m ust make sure th e same SNM P Communi ty is config ured there too. No te!
The SNMP Co mmunit y password is c ase sensi tive.
Format: String with a ma ximum of 50 c haracter s.
Exampl e: xCon figuration Netw orkServices S NMP Com mu nityNa me: “public”
xConfiguration NetworkServices SNMP Host [1..3] Address: < S: 0, 64>
Enter the IP add ress of up to thre e SNMP Managers. All tr aps will the n be sent to the hos ts listed.
The system’s SNMP Age nt (in the c odec) re sponds to req uests from S NMP Manag ers (a PC pr ogram etc.).
SNMP Traps are gen erated by the SNMP Agent to infor m the SNMP Ma nager abo ut impor tant events. C an
be used to sen d event created m essage s to the SNMP age nt about di fferent e vents like: sy stem reboot,
system dial ing, system dis connect ing, MCU call, p acket loss etc. Traps can be sent to multi ple SNMP Trap
Hosts.
Format: String with a ma ximum of 6 4 character s.
Exampl e: xCon figuration Netw orkServices S NMP Host 1 Ad dress: “”
xConfiguration NetworkServices SNMP Mode: < Off /ReadOnly/ReadWrite>
SNMP (Simple Net work Manag ement Protoc ol) is use d in networ k managem ent systems to mo nitor
network-attached dev ices (ro uters, ser vers, switc hes, proje ctors, etc) for c ondition s that warra nt
administr ative attenti on. SNMP exp oses mana gement dat a in the form of va riables o n the manage d
systems, whi ch descri be the system c onfiguration. These variables c an then be qu eried ( set to ReadOnly)
and someti mes set (se t to ReadWrite ) by managing applica tions.
Off: Se t to Off whe n you want to disab le the SNMP n etwork se rvice.
ReadOnl y: Set to Read Only when y ou want to enabl e the SNMP net work ser vice for q ueries o nly.
ReadWrite : Set to ReadO nly when yo u want to enabl e the SNMP net work ser vice for bot h queries and
command s.
Exampl e: xCon figuration Netw orkServices S NMP Mo de: ReadWrite
xConfiguration NetworkServices SNMP SystemContact: < S: 0, 5 0>
Enter the nam e of the Networ k Servi ces SNMP S ystem Contac t.
Format: String with a ma ximum of 50 c haracter s.
Exampl e: xCon figuration Netw orkServices S NMP Sy stemContact: “”
xConfiguration NetworkServices SNMP SystemLocation: < S: 0, 5 0>
Enter the nam e of the Networ k Servi ces SNMP S ystem Locati on.
Format: String with a ma ximum of 50 c haracter s.
Exampl e: xCon figuration Netw orkServices S NMP Sy stemL ocation: “”
xConfiguration NetworkServices Telnet Mode: <On /Of f>
Telnet is a network p rotocol use d on the Interne t or local ar ea networ k (LA N) conn ections.
On: The Telnet pr otocol is ena bled.
Off: Th e Telnet protocol is di sabled. T his is the defa ult factor y setting.
Exampl e: xCon figuration Netw orkServices T elnet Mode: Off
Page 31

D14489.01—JULY 2009
31
Quick Set C20/C20plus
Administrator Guide
Contents Introduct ion Getting s tarted About the m enus Advance d settings Setting s Librar y Cameras Append ices Contact us
Settings/library
xConfiguration Phonebook Server [1..1] ID: < S: 0, 64 >
Enter a name for the externa l phoneb ook. Addres ses the spe cific phon ebook.
Format: String with a ma ximum of 6 4 character s.
Exampl e: xCon figuration Phone book Ser ver 1 ID: “default”
xConfiguration Phonebook Server [1..1] URL: <S: 0, 255 >
Enter the addr ess (UR L) to the extern al phoneb ook ser ver. Addresses th e specific p honebo ok serve r.
Format: String with a ma ximum of 255 c haracters.
Exampl e: xCon figuration Phone book Ser ver 1 UR L: “http://tms.co mpa ny.com/tm s/
public/extern al/phonebook/phone book.asmx”
xConfiguration Provisioning ExternalManager Address: < S: 0, 64 >
If an Exte rnal Man ager addre ss and a path is c onfigured, th e system will p ost an HT TP messag e to this
address w hen star ting up. When r eceivin g this HTTP posting th e Extern al Manage r (typi cally a management
system) ca n return con figuration s/comm ands to the uni t as a result. If th e DHCP Option 242 is retu rned in
the DHCP res ponse from th e DHCP ser ver the syste m will interp ret this as the E xterna l Manage r address to
use.
Format: String with a ma ximum of 6 4 character s.
Exampl e: xCon figuration Pro visioning Exte rnal Man ager Add ress: “”
xConfiguration Provisioning ExternalManager Path : <S : 0, 255>
If an Exte rnal Man ager addre ss and a path is c onfigured, th e system will p ost an HT TP messag e to this
address w hen star ting up. When r eceivin g this HTTP posting th e Extern al Manage r (typi cally a management
system) ca n return con figuration s/comm ands to the uni t as a result. If th e DHCP Option 242 is retu rned in
the DHCP res ponse from th e DHCP ser ver the syste m will interp ret this as the E xterna l Manage r address to
use. The exam ple shows how a p ath to an Exte rnal Manager/Ma nagement system may loo k like.
Format: String with a ma ximum of 255 c haracters.
Exampl e: xCon figuration Pro visioning Exte rnal Man ager Path: “tms/public/exter nal/
man ageme nt/SystemM anage mentSer vice.asmx”
xConfiguration Provisioning ExternalManager Protocol: < HTTP/ HTTPS>
Determin es whether o r not to use secu re managem ent.
HTTP: Se t to HTTP to dis able secu re manage ment. Requi res HTT P to be enable d in the Netwo rk Serv ices
HTTP Mo de setting.
HTTPS : Set to HTT PS to enable se cure manag ement. Req uires HT TPS to be enab led in the Network
Servi ces HTTPS Mode set ting.
Exampl e: xCon figuration Pro visioning Exte rnal Man ager Protocol: http
xConfiguration Provisioning Mode : <Of f/ TMS>
Provides th e possibil ity of mana ging the cod ec (end point) by usi ng an exter nal manag er/manag ement
system.
Off: Th e system will n ot try to regis ter to any manag ement syste m.
TMS: If set to TM S the system wil l try to regis ter with a TMS s erver as d escrib ed in Provisi oning
Exter nalManag er settin gs. TMS is sho rt for TANDBERG M anageme nt System. Ple ase contac t your
TANDBERG repres entative for m ore informa tion.
Exampl e: xCon figuration Pro visioning Mode: T MS
xConfiguration SerialPort BaudRate: < 9600/19200/38400 /115200>
Specif y the baud rate ( bps) on the COM por t (data por t). Th e default val ue is 38400.
Other defa ult param eters for the CO M port ar e: Parit y: None Data bits: 8 Stop bits: 1 Flow c ontrol: No ne.
Valid inputs fo r baud rate: 9 600, 19200, 38400, 115200
Exampl e: xCon figuration Seria lPort BaudR ate: 38400
xConfiguration SerialPort LoginRequired: < On/ Off >
The Seri al Login set ting determ ines wheth er or not ther e should be a l ogin when c onnectin g to the COM
port (d ata port ).
On: Login i s required w hen conn ecting to the CO M port (d ata port ).
Off: Th e user can a ccess the C OM port ( data por t) withou t any login.
Exampl e: xCon figuration Seria lPort Login Requi red: Off
xConfiguration SIP Profile [1..1] Authentication [1..1] LoginName: < S: 0, 50>
This is the us er name par t of the cred entials us ed to authenticate towards the SIP proxy.
Format: String with a ma ximum of 50 c haracter s.
Exampl e: xCon figuration SIP Profile 1 Authe ntication 1 LoginN ame: “”
xConfiguration SIP Profile [1..1] Authentication [1..1] Password: <S: 0, 50 >
This is the pa ssword par t of the crede ntials use d to authentic ate towards the SIP p roxy.
Format: String with a ma ximum of 50 c haracter s.
Exampl e: xCon figuration SIP Profile 1 Authe ntication 1 Password:
xConfiguration SIP Profile [1..1] DefaultTransport: < UDP/ TCP/TLS/Au to>
Select th e transpor t protocol to be u sed over the L AN.
UDP: The syste m will always u se UDP as the de fault trans port me thod.
TCP: The system wi ll always use TCP as the default tr anspor t method.
TLS: The sy stem will alw ays use TLS as the d efault tra nsport m ethod. For TLS c onnectio ns a SIP CA-list
can be uplo aded usin g the web inter face. If no su ch CA-list is avai lable on th e system then an onymous D iffie
Hellman w ill be used.
Auto: The sys tem will tr y to connect us ing transp ort protoc ols in the foll owing orde r: TLS, TCP, UDP.
Exampl e: xCon figuration SIP Profile 1 Defau ltTransport: Auto
xConfiguration SIP Profile [1..1] Outbound : <O n/O ff>
The clien t initiated co nnectio ns mechan ism for firewal l traversal, c onnecti on reuse and r edundan cy. The
Page 32

D14489.01—JULY 2009
32
Quick Set C20/C20plus
Administrator Guide
Contents Introduct ion Getting s tarted About the m enus Advance d settings Setting s Librar y Cameras Append ices Contact us
Settings/library
current ve rsion sup ports ht tp://tools.ietf.org/ht ml/draf t-ietf-sip -outboun d-20.
On: Set up mu ltiple ou tbound con nections to s ervers i n the Proxy Add ress list.
Off: Co nnect to the si ngle proxy configure d first in Proxy A ddress lis t.
Exampl e: xCon figuration SIP Profile 1 Out boun d: Off
xConfiguration SIP Profile [1..1] Proxy [1..4] Address: < S: 0, 25 5>
The Proxy Ad dress is the m anually c onfigured address for th e outbound p roxy. It is possib le to use a full y
qualifie d domain na me, or an IP addr ess. The def ault por t is 5060 for TCP a nd UDP but an other one ca n be
provided. If O utbound i s enabled, m ultiple prox ies can be a ddresse d.
Format: Co mpact stri ng with a ma ximum of 255 cha racters.
Exampl e: xCon figuration SIP Profile 1 Prox y 1 Add ress: “”
xConfiguration SIP Profile [1..1] Proxy [1..4] Discovery: <Auto /Manual>
Manual : When Man ual is sele cted, the manu ally confi gured SIP Prox y addres s will be used
Auto: When Auto is selecte d, the SIP Proxy a ddress is ob tained us ing Dynam ic Host Confi guration Protocol
(DHCP ).
Exampl e: xCon figuration SIP Profile 1 Prox y 1 Discover y: Manua l
xConfiguration SIP Profile [1..1] Type: <Standard /Alcatel/Avaya/C isco/ Micro soft /Nor tel/
Experimental /Si emens >
Enables S IP extensio ns and spe cial behav iour for a ven dor or provid er
Standard : Should b e used whe n registeri ng to standar d SIP proxy like O penSer.
Alcatel : Must be use d when regi stering to a Alcatel-Lucent OmniPCX En terprise R7 o r later.
Avaya: Must be u sed when re gistered to a Avaya Co mmunica tion Manag er.
Cisco: Mu st be used wh en registe ring to a Cisco C allManag er versio n 5 or later.
Microsof t: Must be u sed when re gisterin g to a Microsof t LCS or OCS ser ver.
Nortel : Must be use d when reg istering to a No rtel MCS 5100 or MCS 5200 PBX .
Exper imental : Can be use d if auto is not working Note ! This mode i s for testing pu rposes on ly.
Exampl e: xCon figuration SIP Profile 1 T ype: Sta ndar d
xConfiguration SIP Profile [1..1] URI: < S: 0, 255>
The SIP URI or number is us ed to addres s the system. Thi s is the URI that i s registere d and used by the
SIP serv ices to route in bound cal ls to the system. A Un iform Reso urce Ident ifier (U RI) is a compact strin g of
characters used to identify or na me a resourc e.
Format: Co mpact stri ng with a ma ximum of 255 cha racters.
Exampl e: xCon figuration SIP Profile 1 UR I: “sip:name @ex ample.com”
xConfiguration Standby BootAction: < None /Pre set1/Pr eset2 /Pres et3/ Preset4 /Pre set5/
Preset6 /Preset7/Preset8/Preset9/ Preset10/Pres et11/Preset12/ Preset 13/Pres et14/Pre set15/
RestoreCameraPosition /DefaultCameraPosition>
Decide wh at the system is g oing to do on boot.
None: No ac tion.
Preset 1..15: Activate the sel ected pres et.
RestoreCa meraPosi tion: Set th e camera to the p osition it h ad before the l ast boot.
DefaultC ameraPos ition: Set t he camera to th e factory d efault pos ition.
Exampl e: xCon figuration Sta ndb y BootAction: DefaultCam eraPosition
xConfiguration Standby Control : <On/O ff>
Determin e whether the s ystem shoul d go into stand by mode or not.
On: Enter st andby mode w hen the Sta ndby Delay ha s timed out. Re quires the S tandby Del ay to be set to an
appropri ate value.
Off: Not e ntering st andby mode.
Exampl e: xCon figuration Sta ndb y Control: On
xConfiguration Standby Delay: <1..48 0>
Define how lo ng (in minu tes) the sys tem shall be i n idle mode b efore it goes i nto standby mo de. Require s the
Standby Co ntrol to be enab led.
Range: 1-480 s econds
Exampl e: xCon figuration Sta ndb y Delay: 10
xConfiguration Standby WakeupAction : <None/ Preset1/Preset2/Preset3 /Preset4/
Preset5 /Preset6/ Prese t7/Prese t8/Preset9 /Preset10/ Preset11/Preset12/Pr eset13/ Preset14/
Preset15/ Restor eCamer aPositio n/D efaultCameraPo sition >
Decide wh at the system is g oing to do whe n leaving st andby mode.
None: No ac tion.
Preset 1..15: Activate the sel ected pres et.
RestoreCa meraPosi tion: Set th e camera to the p osition it h ad before ente ring stan dby.
DefaultC ameraPos ition: Set t he camera to th e factory d efault pos ition.
Exampl e: xCon figuration Sta ndb y WakeupA ction: RestoreCame raPosition
xConfiguration SystemUnit CallLogging Mode : {#{#On/O ff>
Enables /disab les loggi ng of calls re ceived or p laced by the sys tem. The call l ogs may then b e viewed vi a the
GUI or using t he xHistor y command.
On: Enab le logging.
Off: Di sable log ging.
Exampl e: xCon figuration Sy stemUnit CallLo gging Mod e: On
xConfiguration SystemUnit IrSensor Mode: <On /Of f/Auto>
The System U nit IR Senso r setting d etermine s whether the i nfrared re ceiver on t he codec sh ould be ena bled
or not. The IR se nsor LED is located in the fro nt of the codec and flicker s when an ir si gnal is rec eived from
the remote cont rol.
Page 33

D14489.01—JULY 2009
33
Quick Set C20/C20plus
Administrator Guide
Contents Introduct ion Getting s tarted About the m enus Advance d settings Setting s Librar y Cameras Append ices Contact us
Settings/library
On: Set to On to en able the IR se nsor on the c odec.
Off: Se t to Off to disa ble the IR sen sor on the cod ec.
Auto: The sys tem will autom atically d isable the I R sensor on th e codec if th e IR sensor at c amera is enabled.
Other wise the IR se nsor on the co dec will be e nabled.
Exampl e: xCon figuration Sy stemUnit IrSen sor Mode: On
xConfiguration SystemUnit MenuLanguage : <Ch inese /English/ French /Ger man/Italien/
Japanes e/Korean /Nor wegian /Por tuges e/Russian/Spanish /Swedish>
The setti ng is used to sel ect the lan guage for the G UI.
Exampl e: xCon figuration Sy stemUnit Me nuLan guage: En glish
xConfiguration SystemUnit Name : <S : 0, 50>
Enter a System N ame to define a na me of the system u nit. If the H.323 Ali as ID is config ured on the sys tem
then this ID wi ll be used in stead of the syste m name. The system name wil l be displaye d:
* When the co dec is actin g as an SNMP Age nt
* Towards a DHCP ser ver
Format: String with a ma ximum of 50 c haracter s.
Exampl e: xCon figuration Sy stemUnit Na me: “Meeting Roo m Nam e”
xConfiguration Time DateFormat: <DD_ MM_YY/ MM_DD_YY/Y Y_MM_ DD>
Specifie s the date form at.
DD_MM _YY: The date Januar y 30th 20 09 will be dis played: 3 0.01.09
MM_DD _YY: The date Januar y 30th 2009 will be dis played: 01.30.09
YY_MM_ DD: The d ate Januar y 30th 200 9 will be disp layed: 09.01.30
Exampl e: xCon figuration Tim e DateForm at: DD_MM _YY
xConfiguration Time TimeFormat : <24H /12H>
Specifie s the time for mat.
24H: Set the time fo rmat to 24 hours.
12H: Set the time for mat to 12 hours (AM/ PM).
Exampl e: xCon figuration Tim e TimeFor mat: 24H
xConfiguration Time Zone: <G MT-12: 00 (I nternational Date L ine West) /GMT-11:00 (Mi dway
Island, Samoa) /GMT-10:0 0 (Hawa ii)/ GMT-09 :00 (Alas ka)/ GMT-08 :0 0 (Pacific Time (US &
Canada ) Tijuana)/GMT-07:00 ( Arizon a)/ GMT-07:00 (Moun tain Time ( US & Canada) )/GMT-07:00
(Chihu ahua, L a Paz, Ma zatlan )/GMT-06: 00 ( Centra l America)/ GMT-06 :00 (Saskatchewan )/
GMT-06:00 ( Guada lajara , Mexico City, Monterrey)/GMT-06:00 ( Centr al Time ( US & Canada )) /
GMT-05: 00 ( Indian a (Eas t)) /GMT-05 :0 0 (Bogota, Lima, Quito )/G MT-05: 00 ( Easter n Time
(US & Can ada) )/GM T-04: 30 (Ca racas )/GMT-04: 00 (La Paz) /GMT-04 :0 0 (Santiago)/GMT-
04: 00 (Atl antic Time (Canada)) /GMT-03:30 (New foundland) /GMT-03 :0 0 (Buenos Aire s,
Georgetown)/ GMT-03 :00 (Gree nland )/GMT-03: 00 (Brasilia)/ GMT-02 :00 ( Mid-Atlantic )/GMT-
01:00 ( Cape Verd e Is.) /GMT-01: 00 (A zores )/GM T (Casablanca , Monrovia)/ GMT (Greenwich
Mean Time : D ublin, Edinburgh, Lisbon, Lon don) /GMT+01: 00 ( West Centr al Afric a)/
GMT+01: 00 (Am sterdam, Berlin, B ern, Rome, Stockholm, Vienna)/ GMT+01: 00 (B russels,
Copenhagen, Madrid, Paris )/GMT+01:0 0 (Sa rajevo, Skopj e, Warsaw, Zagreb) /GMT+01: 00
(Belgrade, Br atislava , Budapes t, Ljubljana, Prague)/GMT+02 :00 (Ha rare, Pretoria)/GMT+02: 00
(Jerus alem) /GMT+ 02: 00 (Athens, Ist anbul, Minsk)/ GMT+02 :0 0 (Helsinki, Kyiv, Riga , Sofia,
Tallinn, Vilniu s)/ GMT+02 :0 0 (Cair o)/ GMT+02 :0 0 (Bucharest )/GMT+03:00 ( Nair obi)/GMT+03: 00
(Kuwait, Riyadh )/GMT+03 :00 ( Moscow, St . Petersburg, Volgograd) /GMT+0 3: 00 (B aghdad )/
GMT+03 :30 ( Tehran) /GMT+04: 00 (Ab u Dhabi, Mu scat) /GMT+04: 00 (B aku, Tbilisi, Yerevan) /
GMT+04 :30 ( Kabul )/G MT+05 :00 ( Islamabad, Karachi, Tashkent )/G MT+05 :00 ( Ekaterinburg )/
GMT+05 :30 ( Chennai, Kolkata , Mumbai, New Delhi )/GM T+05: 45 ( Kathman du)/ GMT+06: 00
(Sri Jayawardene pura) /GMT+ 06: 00 (Astana , Dhaka )/GMT+06 :00 ( Almat y, Novosibirs k)/
GMT+06 :30 (Rangoon) /GMT+07: 00 ( Bangkok, Hanoi, Jak arta )/G MT+07:0 0 (Krasnoyar sk)/
GMT+08 :0 0 (Per th)/GMT+08: 00 (Taipei )/G MT+08 :00 ( Kuala L umpur, Singapore) /GMT+08: 00
(Beij ing, Chong qing, Hong Kong, Urumqi)/ GMT+08 :0 0 (Irkutsk, Ulaan Bataar)/GMT+09: 00
(Osaka, Sapporo, Tokyo)/ GMT+09: 00 (Seoul) /GMT+0 9: 00 (Yakutsk)/ GMT+09:30 (Da rwin )/
GMT+09 :30 (Adelaide)/GMT+10:00 (Guam, Port M oresby) /GMT+10: 00 ( Brisba ne)/ GMT+10:0 0
(Vlad ivostok) /GMT+10: 00 ( Hobar t)/ GMT+10:00 (Canberra, M elbourne, Sydney) /GMT+11:00
(Magadan, Solo mon Is., New Caledonia)/ GMT+12:00 ( Fiji, Ka mchatka , Marshall Is. )/
GMT+12:00 ( Auckla nd, Wellington)/ GMT+13:0 0 (Nuku alofa) >
Specifie s the time zone w here the syste m is located, using Window s time zone de scription fo rmat.
Exampl e: xCon figuration Tim e Zone: “GMT (Gree nwich Mea n Time : Du blin,
Edin burgh, Lisbo n, London)”
xConfiguration Video DefaultPresentationSource : <1..2>
Define whi ch video in put source s hall be use d as the defau lt present ation sourc e (e.g. when you p ress the
Presentat ion key on the rem ote control) .
Exampl e: xCon figuration Video Defau ltPresentationSource: 2
xConfiguration Video Encoder Threshold60fps: <0..6 000 >
If the bandw idth used fo r transmit ting vide o is above or equ al to this thres hold, the syste m will sele ct the
highest v ideo reso lution pos sible whi le maintai ning 60 fps. I f below this th reshold, th e system will se lect the
highest v ideo reso lution pos sible whi le maintai ning 30f ps.
NOTE: This s etting wil l only appl y when the vi deo input s ource to be tran smitted is a 6 0fps sou rce, and the
selected v ideo inpu t is configu red for motion.
Range: 0 -600 0 kbps
Exampl e: xCon figuration Video E ncoder Th reshold60fps: 2000
xConfiguration Video Input DVI [2 ] Type: <Au toDetect /Digital /AnalogRGB >
The offic ial DVI stand ard suppo rts both dig ital and an alog sign als. In most c ases the def ault AutoDete ct
setting ca n detect whe ther the sig nal is anal og RGB or digi tal. However, in some ra re cases when DVI-I
cables a re used (the se cable s can carr y both the an alog and digital sign als) this d etection mi ght fail. Thi s
setting ma kes it poss ible to overri de the AutoDete ct and sele ct the corr ect DVI vide o input.
This sett ing should a lso be used i f the video i nput on the DVI c onnector i s an analog c omponen t (YPbPr)
type sig nal. This is u sed by some ca meras ( Sony EVI- HD1) and DVD/B lu-ray playe rs. Since it i s not possib le
to auto detect the d iffere nce betwe en Analo gRGB and An alogYPbPr, the Analo g YPbPr set ting has to be
Page 34

D14489.01—JULY 2009
34
Quick Set C20/C20plus
Administrator Guide
Contents Introduct ion Getting s tarted About the m enus Advance d settings Setting s Librar y Cameras Append ices Contact us
Settings/library
selected i f this is to be use d.
AutoDetect : Set to AutoDetec t to automatica lly detect if t he signal is a nalog RGB o r digital.
Digital : Set to Digit al to force the DVI video inpu t to Digital wh en using DVI -I cables w ith both anal og and
digital pi ns and AutoDe tect fails.
AnalogR GB: Set to Ana logRGB to forc e the DVI vide o input to Ana logRGB wh en using DVI- I cables w ith
both analo g and digita l pins and Au toDetect fail s.
Exampl e: xCon figuration Video In put DVI 2 Ty pe: AutoDetect
xConfiguration Video Input Source [1..2] CameraControl Mode: < On/ Off >
Determin es whether o r not the came ra control ( pan/t ilt/zoom ) should b e enabled for the speci fic video in put
source.
On: Set to On to en able cam era control fo r the camer a.
Off: Se t to Off to disa ble camera control for th e camera.
Exampl e: xCon figuration Video In put Source 1 Ca meraControl Mo de: On
xConfiguration Video Input Source [1..2] CameraControl CameraId : <1..1>
Select th e ID of the came ra (Not co nfigurabl e on Codec C20 ).
Exampl e: xCon figuration Video In put Source 1 Ca meraControl Ca meraId: 1
xConfiguration Video Input Source [1] Connector : <HD MI>
Select wh ich vide o input con nector to be acti ve on video i nput sourc e 1.
HDMI: Se lect HDMI w hen you want to us e the HDMI con nector as in put (Not c onfigurab le on Code c C20)
Exampl e: xCon figuration Video In put Source 1 Con nector: HDMI
xConfiguration Video Input Source [2] Connector: <DVI >
Select wh ich vide o input con nector to be acti ve on video i nput sourc e 2.
DVI: Sele ct DVI when yo u want to use the DVI co nnector as i nput (N ot configura ble on Code c C20)
Exampl e: xCon figuration Video In put Source 2 Con nector: DVI
xConfiguration Video Input Source [1] Name: < S: 0, 5 0>
Enter the nam e of the video i nput sourc e 1, which for Codec C20 g enerall y will be the m ain camer a.
Format: String with a ma ximum of 50 c haracter s.
Exampl e: xCon figuration Video In put Source 1 Na me: “Came ra”
xConfiguration Video Input Source [2] Name: < S: 0, 50 >
Enter the nam e of the video i nput sourc e 2, which for Cod ec C20 gener ally will b e a PC.
Format: String with a ma ximum of 50 c haracter s.
Exampl e: xCon figuration Video In put Source 2 Na me: “PC”
xConfiguration Video Input Source [1..2] Quality: < Motion /Sharpnes s>
When enc oding and transmitt ing video at a s pecific ba ndwidth th ere will be a tr adeoff b etween hi gh
resoluti on and high f ramerate. For s ome vide o sources it i s more impor tant to tran smit high f ramerate tha n
high resol ution and v ice versa. T he Quali ty settin g specifi es whether to g ive priori ty to high fr ame rate or to
high resol ution for a gi ven source. Ad dresses the selecte d video inp ut connec tor.
Motion: Pr ioritizes f ramerate ove r resoluti on (30 fps of 60fp s dependi ng on the Thre shold6 0fps confi guration.
Used when th ere is a need f or higher f rame rates, t ypicall y when a larg e number of p artici pants are pre sent
or when the re is a lot of motion i n the picture. M ost camer a inputs wil l be configur ed to motion.
Sharpne ss: Give s the highe st possibl e resoluti on. Used whe n you want the hi ghest qua lity of deta iled
images an d graphic s, typica lly from PC’s or othe r presenta tion source s.
Exampl e: xCon figuration Video In put Source 1 HDM I 1 Quality: Motion
xConfiguration Video Layout ScaleToFrame: < Manual /Maintain AspectRatio /
StretchToFit>
Defines wh at to do if the asp ect ratio of a vi deo input s ource doesn’t match the aspe ct ratio of the
corresp onding ima ge frame in a c ompositi on. For example if you have a 4: 3 input sour ce (like XGA ) to be
displayed o n a 16:9 output ( like HD720).
Manual : If the dif ference in a spect rati o between t he video in put source a nd the targe t image fram e is less
than the Sca leToFrameThrshold configur ation (in p ercent) , the image is st retched to fit. Unl ess the system
will maint ain the orig inal aspe ct ratio.
Maintain AspectR atio: Will m aintain th e aspect ra tio of the input s ource, and fil l in black in th e rest of the
frame (l etter boxin g or pillar b oxing).
StretchToFit: Will stretch ( horizont ally or ver tically ) the input s ource to fit into the i mage fram e.
Exampl e: xCon figuration Video Lay out ScaleToFram e: Maintain Asp ectRatio
xConfiguration Video Layout ScaleToFrameTreshold : <0..100>
Only appl icable if t he ScaleToFrame configu ration is set to ma nual. If the di fferen ce in aspec t ratio betwe en
the video input sourc e and the target image fra me is less than the ScaleToFrameThrshold c onfigurati on (in
percent), the image is stretched to fit. Un less the syste m will main tain the ori ginal asp ect ratio.
Exampl e: xCon figuration Video Lay out ScaleToFram eTreshold: 5
xConfiguration Video Layout Scaling: < On/ Off >
Defines wh ether the system should au tomatical ly adjust as pect ratio fo r images or f rames wh en it differs
between t he image and t he frame it is to be placed in.
On: Let the sy stem automati cally adju st aspec t ratio.
Off: Do n ot do any aspe ct ratio cha nges automatically.
Exampl e: xCon figuration Video Lay out Scaling: On
xConfiguration Video MainVideoSource: <Camera/ PC>
Define whi ch video in put source s hall be use d as the main v ideo sourc e, i.e. the source to be tr ansmitted
when in a cal l.
Camera : Select the camera in put (HD MI) to be use d as the main v ideo sourc e.
PC: Sele ct the PC inpu t (DVI) to b e used as the ma in video s ource.
Page 35

D14489.01—JULY 2009
35
Quick Set C20/C20plus
Administrator Guide
Contents Introduct ion Getting s tarted About the m enus Advance d settings Setting s Librar y Cameras Append ices Contact us
Settings/library
Exampl e: xCon figuration Video M ainVideoSource: Ca mera
xConfiguration Video Monitors : <Single/ Dual >
The code c can be used w ith more tha n one monitor a nd this sett ing lets you set th e codec’s monitor l ayout
mode to Singl e or Dual.
Single: T he same layo ut is shown on all monitor s.
Dual: T he layout is dis tributed o n two monitor s.
Exampl e: xCon figuration Video Mo nitors: Single
xConfiguration Video OSD Mode: <On /Of f>
The Vide o OSD (On Sc reen Disp lay) Mode l ets you define w hether or not g raphica l informati on and icons on
screen sh ould be displayed.
On: Set to On to di splay the on sc reen menu s, icons and i ndicators ( microp hone on/ off, encr yption on /off ).
Off: Se t to Off to hide th e on screen m enus, icon s and indic ators (mic rophone on /off, encryption on /off ).
Exampl e: xCon figuration Video OSD Mo de: On
xConfiguration Video OSD Output : <1..2>
The Vide o OSD (On Sc reen Disp lay) Outp ut lets you defin e which mon itor should d isplay the o n screen
menus, info rmation an d icons. By default the OSD o utput is dis played on the first monitor.
If you have a single monitor an d you cannot se e any OSD on the m onitor: If the OS D output has b een set to
the second m onitor and th e second mo nitor is not co nnected, the n you cannot s ee any menu s, informatio n
or icons on th e screen. To move the OSD ou tput to the first m onitor press the followi ng shor tcut seque nce
on the remote co ntrol. Press th e Disconn ect key followe d by: * # * # 0 x # (where x i s output 1 or 2 ).
Exampl e: xCon figuration Video OSD O utput: 1
xConfiguration Video Output HDMI [1..2] MonitorRole: < First /Se cond>
The monitor role descr ibes what v ideo stre am will be sh own on the moni tor connec ted to the output
connecto r. Applicable on ly if the mon itor configur ation is set to du al.
First: Sh ow main vide o stream.
Second : Show prese ntation vi deo stream.
Exampl e: xCon figuration Video O utput HDMI 1 MonitorRole: First
xConfiguration Video Output HDMI [1..2] Resolution: < Auto/640_ 480_60/ 800_600_6 0/10
24_768_ 60/1280_1024_60/1280_720_60 /1920_1080_60 /1280_768 _60/1360_768_ 60/1366_768_
60/1600_1200_60/1920_1200_60 >
Select th e preferred r esolutio n for the moni tor connecte d to HDMI vide o output. This will force th e selected
resoluti on on the moni tor.
Auto: The sys tem will autom atically tr y to set the opti mal resolu tion base d on negotiati on with the co nnected
monitor.
Range: 6 40x480@ 60p, 800x600 @60p, 1024x768@60 p, 1280x1024@6 0p, 1280x720@60p,
1920x1080@6 0p, 1280x768@60p, 1360x768@ 60p, 1366x768@ 60p, 1600x1200@ 60p, 1920x1200@ 60p
Exampl e: xCon figuration Video O utput HDMI 1 Resolution: 1920_1080_60
xConfiguration Video Output SecondMonitor PresentationOnly: <On /Of f>
Determin e if the system sh all show pre sentation o nly on the se cond moni tor in a dual-mo nitor setup.
On: Force s the secon d monitor to be used for prese ntation onl y in a dual-mo nitor setup.
Off: Th e system will a utomatically selec t what to show on th e second mo nitor.
Exampl e: xCon figuration Video O utput Second Monitor PresentationOn ly: Off
xConfiguration Video Selfview : <On/Off>
The Vide o Selfv iew settin g determin es whether o r not the main v ideo sourc e (self view) s hould be dis played
on screen.
On: Set to On w hen you want se lfview to be displayed o n screen.
Off: Se t to Off whe n you do not want se lfview to b e displayed o n screen.
Exampl e: xCon figuration Video Selfv iew: On
xConfiguration Video WallPaper: < None /Growing/ Summersky /Custom>
The Vide o Wallpape r setting de termines w hether or not a b ackground p icture shou ld be displ ayed on
screen wh en idle.
None: Set to N one if you do not wa nt a wallpap er to be displa yed on scree n.
Summers ky, Growing : Select the w allpape r to be displaye d on screen.
Custom: Th e custom wallp aper is upl oaded fro m the web inter face. Ope n a web browser a nd enter the IP
address of th e codec. Select “Wall paper” f rom the menu on to p of the scree n. Browse for the fil e and press
the “Uploa d” button. Toggle on ce betwee n “None” and “C ustom” wallpa per to make the c hange take ef fect.
See the App endices s ection for f urthe r details ab out the web inte rface.
Exampl e: xCon figuration Video Wallp aper: Sum mer sky
Page 36

D14489.01—JULY 2009
36
Quick Set C20/C20plus
Administrator Guide
Contents Introduct ion Getting s tarted About the m enus Advance d settings Setting s Librar y Cameras Append ices Contact us
Settings/library
The Experimental menu
The Advanc ed configu ration menu has an option c alled E xperime ntal. The se ttings wi thin this men u can be
used ‘as is’ and wi ll not be docu mented.
NOTE! The E xperim ental menu WILL chan ge.
We recommend you visit th e TANDBERG web site reg ularly fo r updated ver sions of the ma nual.
Go to: http://w ww.tandberg.c om/doc s
Page 37

D14489.01—JULY 2009
37
Quick Set C20/C20plus
Administrator Guide
Contents Introduct ion Getting s tarted About the m enus Advance d settings Setting s Librar y Cameras Append ices Contact us
Cameras
Cameras
Chapter 8
Your TANDBERG camera ha s been
designe d to give you many ye ars of safe,
reliable o peration.
The TANDBERG Qui ck Set is avail able in
two versio ns:
s TANDBERG Quick Set C20 com es with
Precisio nHD 1080p 4x zoom
s TANDBERG Quick Set C20p lus comes
with Precis ionHD 1080p 12x zoom
In this chapter...
Explai ns the menu sy stem:
The Precis ionHD 1080p 4x /12x
camera
Video ou tput formats
DIP switch set tings for vi deo
output for mats
Line volta ge freque ncy
Page 38

D14489.01—JULY 2009
38
Quick Set C20/C20plus
Administrator Guide
Contents Introduct ion Getting s tarted About the m enus Advance d settings Setting s Librar y Cameras Append ices Contact us
Cameras
The PrecisionHD 1080p 4x/12x
camera
The TANDBERG Qui ck Set is avail able in two ve rsions :
s The TANDBERG Quick Set C20 is delivere d with a Preci sionHD
1080p 4x zoom with 1080 p30 maxi mum resol ution.
s The TANDBERG Quick Set C20plus is de livered wi th a
Precisio nHD 1080p 12x zoom with 1080 p60 maximum
resoluti on.
Video ou t. For vide o signals, c onnect f rom the vide o out on the
camera to the v ideo in on th e codec.
Power and ca mera cont rol. For p ower in and ca mera contro l,
connect f rom the came ra control & p ower on the cam era to
the Camera p ort on the c odec. Whe n the camer a is used with
TANDBERG codec s, power will b e supplied through the Ca mera
Control ca ble. When us ed with non-TANDBERG Cod ecs, you may
have to connec t power sepa rately.
HDMI and HD– SDI
s HDMI is the main vid eo source w hen conne cted to Code c C20.
Maximum resoluti on is 1080p60 w ith Precis ionHD 1080p 12x
and 1080p30 w ith Precisi onHD 1080p 4x.
s HD–SDI is a se condar y video s ource. The ma ximum re solutio n
is 1080p30.
Kensington lock
The Kensin gton lock may b e used to prevent t he camera to b e
moved from its p lace or to preve nt theft.
The
green LED
is continuo usly
illumina ted when powe r
is On, but it fli ckers when
receivi ng signal s from
the remote cont rol.
Power Supply
Camera Co ntrol HDMI V ideo Out
Not Used
The lens ho od is detach able.
We recommend that you
mount it to preve nt stray light
from distur bing your v ideo
experie nce.
Just snap i t on gently.
The orang e LED illumi nates while i n a
call and fli ckers when t here is an
incoming c all.
Kensington l ock
HD-SDI*Extra c amera*
* Not suppo rted with Codec C20
Page 39

D14489.01—JULY 2009
39
Quick Set C20/C20plus
Administrator Guide
Contents Introduct ion Getting s tarted About the m enus Advance d settings Setting s Librar y Cameras Append ices Contact us
Cameras
Power suppl y connecti on is NOT
needed w hen the cam era is used
with a TANDBERG Cod ec.
VISCA™ is a trademar k of Sony Corporati on
The PrecisionHD 1080p 4x/12x
camera, cont...
The HDMI cable
The HDMI ca ble deliv ered with the c amera is 5 m eters.
Maximum length is 15 meter w ith a categor y 2 cer tified
good qual ity HDMI c able.
Connect t he camera c ontrol cab le, RJ45 to RS-232.
Visca™ protocol is su pporte d.
Connect f rom the HDMI H D Video ou t on the
camera to HD MI 1 In on the Cod ec.
Page 40

D14489.01—JULY 2009
40
Quick Set C20/C20plus
Administrator Guide
Contents Introduct ion Getting s tarted About the m enus Advance d settings Setting s Librar y Cameras Append ices Contact us
Cameras
The PrecisionHD 1080p 4x/12x
camera, cont...
Video output formats
The TANDBERG Qui ck Set is avail able in two ve rsions :
s The TANDBERG Quick Set C20 is delivere d with a Preci sionHD
1080p 4x zoom with 1080 p30 maxi mum resol ution.
s The TANDBERG Quick Set C20plus is de livered wi th a
Precisio nHD 1080p 12x zoom with 1080 p60 maximum reso lution.
This section descr ibes how to set th e DIP switche s 1–5 to configur e
the TANDBERG Preci sionHD 1080p c amera for d iffere nt video ou tput
formats.
DIP switch settings for video output formats
The vide o output for mat for the cam era is set by DIP s witches. Th e
DIP switche s are found on th e bottom side o f the camera .
The defaul t setting is Auto. When usin g HDMI, the vi deo output f ormat
is automatic ally detec ted. See the tab le to the right.
s Maximum res olution for H DMI is 1080p6 0 for Precisi onHD 1080p
12x and 1080p30 for Pre cisionH D 1080p 4x
s Maximum res olution for H D-SDI is 1080p 30.
Line voltage frequency
The came ra will autom atically d etect the line vo ltage fre quency wh en it
is 50 or 60 Hz. Yo u may set the vid eo output fo rmat to a specific value
(use the DI P switches ) to override th e auto frequ ency detect ion, if a
differ ent line volt age frequ ency is an iss ue.
DIP Switc h table for video fo rmats
1 2 3 4 5 HDMI HD- SDI
0 0 0 0 0 Auto
0 0 0 0 1 1920x1080p25 1920x1080p25
0 0 0 1 0 1920x1080p30 1920x1080p30
0 0 0 1 1 1920x1080p50 * 1280x720p50 *
0 0 1 0 0 1920x1080p60 * 1280x720p60 *
0 0 1 0 1 1280x720p25 1280x720p25
0 0 1 1 0 1280x720p30 1280x720p30
0 0 1 1 1 1280x720p50 * 1280x720p50 *
0 1 0 0 0 1280x720p60 * 1280x720p60 *
0 1 0 0 1 Softwa re control
The DIP sw itch
1
0
The table s hows the dif ferent set tings avai lable for the H DMI and
the HD-SDI o utputs.
Auto: Ca mera negoti ates format ove r HDMI. HD- SDI tracks HD MI
and defaul ts to 1080p30 in abs ence of HDM I sync.
Software : For more on the Software control setting, read about
video mode selections in the TANDBERG Prec isionHD 1080 p User
Guide.
* Do not appl y to the PrecisionHD 108 0p 4x camera
Bottom side of the TANDBERG
Precisio nHD 1080p cam era
Page 41

D14489.01—JULY 2009
41
Quick Set C20/C20plus
Administrator Guide
Contents Introduct ion Getting s tarted About the m enus Advance d settings Setting s Librar y Cameras Append ices Contact us
Appendices
Appendices
Chapter 7
In this chapter...
Explai ns the menu sy stem:
General r oom guide lines
The remote co ntrol
The code c password
The menu pa ssword
The web inter face
The suppo rted RFCs in S IP
The CE decl aration
The RoHS ta ble
The code c dimensio ns
The came ra dimensi ons
The techni cal spec ification
Page 42

D14489.01—JULY 2009
42
Quick Set C20/C20plus
Administrator Guide
Contents Introduct ion Getting s tarted About the m enus Advance d settings Setting s Librar y Cameras Append ices Contact us
Appendices
General room guidelines
The physical conditions
When building a v ideo meeting room, or using an existing room f or
video me etings there a re a few guide lines to cons ider.
Lighting
s The illum ination should be distribute d evenl y in the room to obtain
low contras t
s The ideal light in tensity is a li ttle hi gher th an in a n ordina ry me eting
room. Typically, the luminous intensit y should be 800–1400Lux,
measure d at the table w ith an incid ent light me ter
Seating area and table
s The seating area and table s hould be non -shiny and no n-patter ned
s The seating area should all ow all par ticipants to se e the monitor
Walls
s The color of the wall should be in good contras t to skin tonality
Light bl ue is a co mplemen tary c olor to sk in tonality, it gives a good
contrast a nd is common ly used
s Acoustically reflective surface s ( such as g lass or concrete) sho uld
be covered wi th curta ins or soun d treatment
Audio
s The Noi se Floor (the sum of all the noise sources) should be less
than max 3 5dBA
s The reverberati on time shou ld be 0,3 to 0,5 secon ds
Ventilation
s The require ments for venti lation i s as i n an ordinar y meet ing room.
Do not cover up the openings for ventilation in the front and rear
side of the codec. Consult the speci fications for the monitor for
data abou t the ene rgy cons umption. T he TANDBERG Codec C2 0
together with the TANDBER G Precisio nHD 1080p camera has the
following s pecifica tions:
s Max rating – 45 Watts
s Normal operat ion – 39 Watts
s Keep in mind the Noise Floor (s ee Audio )
s Velocity creates noise, there fore keep velo city of air l ow
The room equipment
When p lacing a nd usin g the r oom equ ipment there are a few
recomme ndations a nd guideli nes to consi der.
The microphone
s Place the microp hone so that all par ticipants h ave eye contac t with
the micro phone w hen usi ng the sy stem. The micropho ne must not
be hidden behind obstacles like laptop, projector or other equipment
placed on th e table.
s Place the microphone away from noisy equipm ent like co mputer
and projector fans, power o utlets or sim ilar arrangements on the
table. T he mic rophone will p ick up noise from th ese ar rangem ents
quite strongly. Avoid noise from paper rustling and tapping with
fingers on the table.
Guidelines when using two microphones
Normall y a si ngle microphone should suffi ce to se rve all the p artici pants.
However, if thi s is no t the c ase you will ne ed to u se two micropho nes.
You must then m ake sure they are space d suffici ently apart to avoid
that the sound of the first microphone suffe rs from interfere nce from the
second microphone. As a r ule of thumb, the second micropho ne should
be placed three times or longer away from a parti cipant compared
to the microph one closest to that p artici pant. This is the case for all
partic ipants. If yo u can not f ulfill this requirem ent yo u wil l prob ably not
need the s econd mi crophone in the first place. Inste ad inspe ct the site
to ensure that all participa nts have eye contact with the microp hone
when usin g the system.
The camera
s The camera should be able to “see” all par ticipants in the room. Use
the pan, tilt an d zoom feature s to adjust the p icture.
The PC
s Make sure that any PC’s placed on the table do not cover the
micropho nes as this will reduce th e audio qua lity at the fa r end
Position of the system
s Position the vide o syste m in such a way that all pa rticip ants
attendin g the meeting a re visibl e to the far end.
s If appropria te, the far end sho uld be a ble to se e peopl e enteri ng or
leaving th e room
Other peripherals
s Arrange all t he perip herals so that the ch air pers on can re ach each
of them to point, change the display, DVD, and still be fully visible on
screen wh ile carr y out the tas k
Environmental considerations
This sectio n ex plains how to carry out basi c adjustment s a nd s imple
tests to ensu re that you s end and r eceive th e best po ssible im age and
audio quality whe n using your sy stem.
Iris control and lighting
By defaul t the system c amera wil l use an automatic iris to compens ate
for changes in lighting. In additio n to this feature, you may furth er
assist the sys tem to maintain the be st possib le image qual ity by paying
special attention to environ mental lighting and background colors as
describ ed below.
Remembe r the system will send l ive im ages of both yourself and your
immediate s urroundi ngs.
s Avoid d irect su nlight on the subje ct matte r i.e. yourse lf, the
background or onto the camera lens as t his will c reate har sh
contrasts
s Avoid placing the seatings in front of a window with natu ral daylight,
as this will m ake the faces of p eople ver y dark
s If light levels are too low you may need to consider using ar tificia l
lighting. As described above, d irect i lluminati on of t he subj ect
matter and c amera le ns should be avoided
s When u sing artifi cial lighti ng, d aylight type la mps will produce the
most effe ctive resu lts. Avoid colo red lightin g
s Indirect lig ht from s haded s ources o r reflecte d light from pal e walls
often prod uces excell ent resul ts
s Avoid harsh side li ghting or str ong light fr om above. Stron g sunlight
from a window or skyli ght may put part or all of the subject mat ter in
shadow or ca use silhou etting
Partici pant
MIC1 MIC2
X
3X
Page 43

D14489.01—JULY 2009
43
Quick Set C20/C20plus
Administrator Guide
Contents Introduct ion Getting s tarted About the m enus Advance d settings Setting s Librar y Cameras Append ices Contact us
Appendices
The audio quality
To keep the high qual ity audio, ma ke sure there i s
free sight to th e speaker m odule
s There should be f ree sight b etween the ears
of the parti cipants an d the system speaker
module
s Participant s itting too fa r away from the vi deo
system may not have t he same aud io qualit y as
the others.
Natural communication
Making eye c ontact wit h the far end pa rticipants
will improve th e natural co mmunica tion betwe en
the peopl e
s Adjust the camer a view (us ing zoom in /out) to
allow the par ticipa nts to be shown in f ull size
on screen, a nd to keep eye cont act with eac h
other at the sa me eye level
s If the particip ants are sit ting too clos e to
the monitor th e camera wi ll “look dow n” at
the parti cipants. Th is may not give a g ood
presenta tion of the par ticipan ts at the far end.
The far end p artici pants
The best audio quality to all participants
Making eye contact
All par ticipants w ill experi ence the sa me audio
qualit y when they have f ree sight f rom the ears
to the speaker s.
Speaker s
Eye height
Ear heigh t
The line of fr ee sight
The pictu re (TANDBERG Pro file) ser ves as
an illustr ation to exempl ify the co ntent.
The pictu re (TANDBERG Pro file) ser ves as
an illustr ation to exempl ify the co ntent.
HD Camera
Monitor
The far end p artici pants
Page 44

D14489.01—JULY 2009
44
Quick Set C20/C20plus
Administrator Guide
Contents Introduct ion Getting s tarted About the m enus Advance d settings Setting s Librar y Cameras Append ices Contact us
Appendices
Video sys tem
The distance between the table and the video system
s Consult the use r document ation for the monitor to find the
distance to th e table to allow all part icipants to se e a clear pic ture
on screen.
The camera
The Quic k Set C20 is shipp ed with TANDBERG Pre cisionH D 1080p 4x
zoom or TANDBERG Pre cisionHD 1080 p 12x zoom.
s Make sure all par ticipants a re covered wi thin the cam era angle.
The max imum zoom ou t for TANDBERG Preci sionHD 1080p
camera is 72°.
s Adjust the camer a view (us ing zoom in /out) to allow t he
partic ipants to be show n in full size o n screen, an d to keep eye
contact wi th each other a t the same eye le vel
s The camera sho uld capture a ll parti cipants in th e room
s If the particip ants are sit ting too clos e to the monitor the c amera
will “look d own” at the par ticipant s. This may not gi ve a good
presenta tion of the par ticipan ts at the far end.
The microphone
The Quic k Set C20 is shipp ed with one m icrophon e. Optional, yo u can
connect t wo microph ones. See th e Genera l room guide lines se ction
for how to positi on the microphones.
s Place the microph one near by the meeting p artici pants.
s The microphon e must not be hidden behi nd obstacl es like laptop,
projector o r other equipment plac ed on the tab le.
s Place the microph one away from no isy equipm ent like com puter
and projec tor fans, power o utlets or sim ilar arrangemen ts on the
table. The m icrophon e will pick u p noise from th ese arra ngements
quite strong ly.
s Avoid unnecess ary noi se like paper r ustling and tapping w ith
fingers on the table.
Remote
control
Camera view
- with max zo om
out
Adjust the camera view
Press the Zoo m +/– button on the
remote contro l to adjust the pi cture
on screen.
Adjust the ca mera view to a llow the
partic ipants to have eye co ntact with
each other at t he same eye leve l.
Micropho ne
Page 45

D14489.01—JULY 2009
45
Quick Set C20/C20plus
Administrator Guide
Contents Introduct ion Getting s tarted About the m enus Advance d settings Setting s Librar y Cameras Append ices Contact us
Appendices
PC
Sharing a PC presentation
General r ecommendations for t he team coll aboration r ooms, team
meeting roo ms and show room floor are d escrib ed on the previous
page.
Dual video stream
With dual v ideo strea m you can view t wo diffe rent live vi deo streams
simultaneously, the mai n video an d one additio nal sourc e. This coul d
for example b e both a PC prese ntation and the person w ho gives the
presenta tion.
If one of the vid eo systems do es not support Dual V ideo Stre am, no
second vi deo strea m will be esta blished a nd the PC pres entation w ill
be shown as th e main vide o.
Sharing the presentation
1. Make sure the PC d o not cover any of th e micropho nes as this w ill
reduce the a udio quali ty at the far e nd
2. Locate th e DVI cable an d connect th e PC to the vide o system
3. When pres sing the Pre sentation b utton on the re mote control th e
default pre sentatio n source is ac tivated.
The DVI/ VGA input i s complia nt with VESA E xtended D isplay
Identific ation Data ( EDID) a nd will be abl e to notify th e PC of the
suppor ted output fo rmats.
Troubleshooting if the presentation does not show
s On most PC’s you must press a special key c ombinati on to switch
the PC image f rom the PC scre en to the vide o screen
s Make sure the conne ctor used for P C presenta tion is configured as
the default p resentat ion source.
Go to: Home > Se ttings > Advanced > A dvanced c onfiguration >
Video > De faultPresentat ionSour ce (for Co dec C20 the defa ult
value is 2, whic h refers to the DVI co nnector)
s Make sure your PC is set to ac tivate your VGA ou tput
Other presentation sources
You can also conne ct other pre sentation sources li ke:
s DVD
s Document cam era
Shows the PC presentation
and the participants
The screen layout
Press the La yout button on the
remote contro l to select a su itable
layout on screen.
The defaul t layout whe n showing
a PC present ation is des igned to
allow the par ticipa nts to keep eye
contact wi th each other d uring the
presenta tion.
Page 46

D14489.01—JULY 2009
46
Quick Set C20/C20plus
Administrator Guide
Contents Introduct ion Getting s tarted About the m enus Advance d settings Setting s Librar y Cameras Append ices Contact us
Appendices
TANDBERG Remote Control TRC5
Micropho ne: Press t he key to toggle the micro phones on/off.
Volume: Pres s the + or – on the key to adjust the codec
volume.
Mute: Pres s the – on the key to mute the volume
during an i ncoming c all.
OK/Sel ect: Pres s the key to confir m your choic e or selec tion.
Phone book : Press the key to dis play the loc al Phone book.
Home: Pre ss the key to key to s how the menu on s creen.
Call: Usi ng the key:
INITIATE A CALL: Sel ect a name f rom the Phone b ook or enter th e
name, numb er or URI and p ress the Cal l key to initiate the ca ll.
SHORTCUT TO RECEN T CALLS: Use th e Call key as a sho rtcut to
Recent Ca lls when the C all menu is n ot visible.
Clear: Pre ss the key to remove characters in a tex t field.
Function keys : Represe nts shor tcuts and adva nced
function s. Each key refle cts a soft key on s creen.
Presentat ion: Pres s the key to show /hide a pre sentation.
Zoom: Pres s the + or – on the key to zoom th e camera in
and out.
Arrows:
s Up/Down: U se the and arrow keys to navigate in th e
menu.
s Arrow Right: Pre ss the arrow key to expan d the selec ted
menu item or to move to the right in a tex t field.
s Arr ow Left: Pre ss the arrow key to go one s tep back in
the menu or to move to th e left in a tex t field.
Layout: Pre ss the key to display the Layou t menu, then
select a vi ew in the menu.
End call /Stand by: Press the key to end a call, or when
idle, press a nd hold the key to go i nto standby mo de.
Alphanu meric keyp ad: Use the key pad in the sam e way as you
would use a ce llular ph one.
s 0-9, a-z, per iod (.), @, sp ace, *: Press a key re peatedly to
toggle bet ween the optio ns displaye d on each key.
s abc /123 #: Press the # key to toggle b etween tou ch tones
mode (lo ng press ), lower cas e characte rs and numb ers.
Waking up the s ystem
Grab the rem ote control and m ake sure your h and
touches the r ubber lin e sensors g oing alon g both
sides of the re mote control.
or: Touch any key on the rem ote control.
IR transmi tter range ( DIP switch setting)
The IR trans mitter ha s a short and long rang e. Open the bat tery
cover and rem ove the batter ies to set the DI P switch.
s Shor t range (1 m ): Move the DIP s witch down.
s Long er range : Move the DIP swi tch up.
Page 47

D14489.01—JULY 2009
47
Quick Set C20/C20plus
Administrator Guide
Contents Introduct ion Getting s tarted About the m enus Advance d settings Setting s Librar y Cameras Append ices Contact us
Appendices
Setting the codec administrator password
Do the follow ing to define the a dministra tor password on t he codec :
1. Connect to th e codec thro ugh the net work, using a c ommand
line inter face (ss h, telnet or sc p)
2. Login to the codec with u ser name ( admin) a nd no passwo rd.
3. Run the follow ing API comm and and ente r a password :
xCom man d System Unit Adm inPasswor d Set
Password: “****”
4. The pas sword format is a s tring with 0 –255 characters.
5. Reboot the c odec.
Login to the codec
s You can logi n to the codec wi th the user na me and pas sword,
either fro m a web inter face or from a c ommand li ne interface.
You will need to enter b oth the user na me and pass word.
s The u ser name is a dmin, and ca nnot be chan ged.
How to deactivate the administrator password
1. Connect to th e codec thro ugh the net work, using a c ommand
line inter face (ss h, telnet or sc p).
2. Login to the codec with t he require d user name ( admin ) and
password.
3. Run the follow ing API comm and with a bl ank passwo rd:
xCom man d System Unit Adm inPasswor d Set
Password: ““
4. Reboot th e codec.
Setting the menu password
Do the follow ing to define a pas sword for the Ad vanced me nus:
1. Open the me nu on scree n and go to: Hom e > Setti ngs >
Advance d > Chang e passwo rd.
2. The pa ssword is a stri ng with 0 –255 characte rs.
3. Enter the password and pres s Save.
Login to the Advanced menu
When a pass word is set, the pas sword is requ ired to get acc ess to
the Advance d menu on sc reen.
How to change the menu password
1. To change the passwo rd, go to: Home > S etting s > Advanc ed
> Change p asswor d in the menu.
2. Enter the n ew password in t he Set pas sword me nu.
3. Press Save to save the new password.
How to deactivate the menu password
1. To change the passwo rd, go to: Home > S etting s > Advanc ed
> Change p asswor d in the menu.
2. Leave the tex t field emp ty in the Set p asswor d menu.
3. Press Save to save the blank pa ssword. This w ill deactivate the
menu password.
Password protection
The system ca n be passwor d protected in t wo
ways:
s The c odec can b e password prote cted with
an adminis trator passwo rd. If the code c is
password prote cted a user na me and pas sword
is require d to logon to the cod ec.
s The Ad vanced me nus can be password
protected wit h a menu passw ord.
NOTE! Whe n a new password h as been de fined
make sure you save a copy of the pas sword in a
safe place.
Contact you r TANDBERG repres entative if you h ave
forgotten th e password.
Page 48

D14489.01—JULY 2009
48
Quick Set C20/C20plus
Administrator Guide
Contents Introduct ion Getting s tarted About the m enus Advance d settings Setting s Librar y Cameras Append ices Contact us
Appendices
The system info page
The web interface
The web inter face all ows for remote ad ministrati on
of the system.
Open a web bro wser and ente r the IP addre ss of
the codec. Fro m this page you have the followin g
menu option s:
s 3YSTEMI NFO
s Upgrade soft ware
s Adva nced config uration
s Wallp aper
s Call
s Uplo ad certi ficates
s XML fi les
s Logs
s Add re lease key
Password protection of the web
interface
If the codec i s password pro tected with an
administr ator password a u ser name a nd password
will be requ ired to get acc ess to the code c from
the web inter face. Read m ore about p assword
protection of th e codec in th e previous p age.
Interactive m enus
Click on the m enu items
to access the p ages. Each
web page is de scribed i n
the followin g pages.
Static infor mation
Gives infor mation ab out
system name, s oftware
version, IP a ddress an d
product t ype.
Page 49

D14489.01—JULY 2009
49
Quick Set C20/C20plus
Administrator Guide
Contents Introduct ion Getting s tarted About the m enus Advance d settings Setting s Librar y Cameras Append ices Contact us
Appendices
The Upgrade software page
The web interface, cont...
The web inter face all ows for remote ad ministrati on
of the system.
Open a web bro wser and ente r the IP addre ss of
the codec. Fro m this page you have the followin g
menu option s:
s Syste m info
s 5PGRA DESOFT WARE
s Adva nced config uration
s Wallp aper
s Call
s Uplo ad certi ficates
s XML fi les
s Logs
s Add re lease key
How to upgrade th e softwa re on the code c:
1. Contact you r TANDBERG repres entative to obta in the sof tware
upgrade fil e.
2. Click B rowse... a nd locate the u pgrade file ( .PKG)
3. Click the Up grade bu tton to star t the instal lation.
4. Leave the sys tem to allow the ins tallatio n process to co mplete.
You can follow the progress on thi s page. When th e upgrade
is succes sfully co mpleted a me ssage wil l appear. The upg rade
process t akes a few minu tes.
Page 50

D14489.01—JULY 2009
50
Quick Set C20/C20plus
Administrator Guide
Contents Introduct ion Getting s tarted About the m enus Advance d settings Setting s Librar y Cameras Append ices Contact us
Appendices
The Advanced configuration page
The web interface, cont...
The web inter face all ows for remote ad ministrati on
of the system.
Open a web bro wser and ente r the IP addre ss of
the codec. Fro m this page you have the followin g
menu option s:
s Syste m info
s Upgrade soft ware
s !DVANC EDCONlGU RATION
s Wallp aper
s Call
s Uplo ad certi ficates
s XML fi les
s Logs
s Add re lease key
The Advanc ed configu ration defin es
the system set tings and a re structure d
in a hierarc hy, making up a data base
of system sett ings.
Stay up to da te
The Advanc ed configu ration are
subject to ch ange with out notice. To
stay up to date che ck our web pag e
for the last ve rsion of the do cument.
Go to: http: //www.tandb erg.com/
docs
Expand ed view
Edit a value : To change a value, click
on the value to se e the expand ed view
as shown above.
Save: Clic k the OK button to save th e
new value.
Cancel : When you wan t to leave
without sa ving, click C ancel.
Page 51

D14489.01—JULY 2009
51
Quick Set C20/C20plus
Administrator Guide
Contents Introduct ion Getting s tarted About the m enus Advance d settings Setting s Librar y Cameras Append ices Contact us
Appendices
The Advanced configuration, search functionality
The web interface, cont...
The web inter face all ows for remote ad ministrati on
of the system.
Open a web bro wser and ente r the IP addre ss of
the codec. Fro m this page you have the followin g
menu option s:
s Syste m info
s Upgrade soft ware
s !DVANC EDCONlGU RATION
s Wallp aper
s Call
s Uplo ad certi ficates
s XML fi les
s Logs
s Add re lease key
The sear ch funct ionalit y
When sea rching for wor ds like H323 or SIP, all
settings b eginnin g with these wo rds, includ ed
all settin gs below in th e hierarchy, will show in
the list.
Search : Enter as many ch aracters a s needed
to get the desi red result a nd click the S earch
button to init iate the searc h.
Clear: Cli ck the Clea r button to retu rn to the
main view.
Page 52

D14489.01—JULY 2009
52
Quick Set C20/C20plus
Administrator Guide
Contents Introduct ion Getting s tarted About the m enus Advance d settings Setting s Librar y Cameras Append ices Contact us
Appendices
The Wallpaper page
How to upload a cu stom wallpap er to the code c and configu re the
codec to make u se of it:
1. Click the Br owse... bu tton to locate the w allpape r file (.PNG)
2. Click th e Upload b utton to upload the file to the cod ec and
refresh the w eb page to see th e wallpape r you just upl oaded.
3. Go to: Advan ced configuration page and se arch for
Wallpap er. From the drop down list, select Cus tom. The new
wallpape r should now s how on the mon itor which is c onnected
to the codec.
If the new wallp aper doe s not show on the m onitor conn ected to
the codec, you m ay have to toggle on ce betwee n Wallpape r: None
and Custo m to make the chan ge take eff ect.
The web interface, cont...
The web inter face all ows for remote ad ministrati on
of the system.
Open a web bro wser and ente r the IP addre ss of
the codec. Fro m this page you have the followin g
menu option s:
s Syste m info
s Upgrade soft ware
s Adva nced config uration
s Wallpap er
s Call
s Uplo ad certi ficates
s XML fi les
s Logs
s Add re lease key
Page 53

D14489.01—JULY 2009
53
Quick Set C20/C20plus
Administrator Guide
Contents Introduct ion Getting s tarted About the m enus Advance d settings Setting s Librar y Cameras Append ices Contact us
Appendices
The Call page
The web interface, cont...
The web inter face all ows for remote ad ministrati on
of the system.
Open a web bro wser and ente r the IP addre ss of
the codec. Fro m this page you have the followin g
menu option s:
s Syste m info
s Upgrade soft ware
s Adva nced config uration
s Wallp aper
s Call
s Uplo ad certi ficates
s XML fi les
s Logs
s Add re lease key
Hang up
Press the Ha ng up
button to end th e call.
Dial
Enter the numb er or
address a nd press
the Dial bu tton to dial.
NOTE! No stat us information is shown on the page dur ing the call.
Page 54

D14489.01—JULY 2009
54
Quick Set C20/C20plus
Administrator Guide
Contents Introduct ion Getting s tarted About the m enus Advance d settings Setting s Librar y Cameras Append ices Contact us
Appendices
The SSL Certificates page
About certificates
To install a cert ificate, you will n eed:
s HT TPS cer tificate ( .PEM for mat)
s ROOT ce rtificate ( .PE M format)
s Priv ate key ( .PEM format)
s Pass phrase (optional )
How to upload the certificate
1. Contact you r system administrator to obta in the requir ed files (.PEM
format).
2. Click B rowse... a nd locate the c ertific ate files (.PEM )
3. Enter the Pas sphra se (optio nal).
4. Click the U pload bu tton to instal l the certificates to the co dec.
The web interface, cont...
The web inter face all ows for remote ad ministrati on
of the system.
Open a web bro wser and ente r the IP addre ss of
the codec. Fro m this page you have the followin g
menu option s:
s Syste m info
s Upgrade soft ware
s Adva nced config uration
s Wallp aper
s Call
s 5PLOA DCERTIl CATES
s XML fi les
s Logs
s Add re lease key
Page 55

D14489.01—JULY 2009
55
Quick Set C20/C20plus
Administrator Guide
Contents Introduct ion Getting s tarted About the m enus Advance d settings Setting s Librar y Cameras Append ices Contact us
Appendices
The XML files page
Configu ration
The Config uration file g ives an over view of the sys tem settin gs, which
are control led from the Ad vanced co nfiguratio n menu or from the API.
The config uration com mands are s tructured i n a hierarc hy, making up a
database of s ystem setti ngs.
Status
The status i nformation i s structure d in a hiera rchy, making up a dat abase
constantl y being updated by the system to re flect system a nd proces s
changes .
Comman d
The Comma nd file give s an overvi ew of the comma nds availa ble to instruct
the system to per form an ac tion and are i ssued fro m the API. A Comma nd
type com mand is usu ally followe d by a set of param eters to spec ify how the
given actio n is to be executed.
Directo ry
The Direc tory file wi ll be descr ibed later.
Valuespa ce
The Valuesp ace gives a n overvie w of all the availa ble value s paces.
Docume ntation
The Docum entation file will be de scribed l ater.
The web interface, cont...
The web inter face all ows for remote ad ministrati on
of the system.
Open a web bro wser and ente r the IP addre ss of
the codec. Fro m this page you have the followin g
menu option s:
s Syste m info
s Upgrade soft ware
s Adva nced config uration
s Wallp aper
s Call
s Uplo ad certi ficates
s 8-,lLE S
s Logs
s Add re lease key
Page 56

D14489.01—JULY 2009
56
Quick Set C20/C20plus
Administrator Guide
Contents Introduct ion Getting s tarted About the m enus Advance d settings Setting s Librar y Cameras Append ices Contact us
Appendices
The web interface, cont...
The web inter face all ows for remote ad ministrati on
of the system.
Open a web bro wser and ente r the IP addre ss of
the codec. Fro m this page you have the followin g
menu option s:
s Syste m info
s Upgrade soft ware
s Adva nced config uration
s Wallp aper
s Call
s Uplo ad certi ficates
s XML fi les
s ,OGS
s Add re lease key
The Logs page
The log files
The log file s are TANDBERG spe cific debu g
files whic h may be requi red by TANDBERG
in the need of te chnical s upport.
Historica l log files
Time stam ped histori cal log file s. Click on a fil e and follow th e
instructi ons in the dia log box to save the a pplicatio n file.
Current lo g files
Time stam ped event log files. Clic k on a text file to vie w the file or foll ow
the instruc tions in the dialog box to save a n applicati on file.
Page 57

D14489.01—JULY 2009
57
Quick Set C20/C20plus
Administrator Guide
Contents Introduct ion Getting s tarted About the m enus Advance d settings Setting s Librar y Cameras Append ices Contact us
Appendices
The Add release key page
The web interface, cont...
The web inter face all ows for remote ad ministrati on
of the system.
Open a web bro wser and ente r the IP addre ss of
the codec. Fro m this page you have the followin g
menu option s:
s Syste m info
s Upgrade soft ware
s Adva nced config uration
s Wallp aper
s Call
s Uplo ad certi ficates
s XML fi les
s Logs
s !DDRELE ASEKEY
Add
Enter the rele ase key and
press the Ad d button.
The release key
Contact you r TANDBERG repres entative to obta in the rele ase key.
Page 58

D14489.01—JULY 2009
58
Quick Set C20/C20plus
Administrator Guide
Contents Introduct ion Getting s tarted About the m enus Advance d settings Setting s Librar y Cameras Append ices Contact us
Appendices
Supported RFCs in SIP
The RFC ( Request fo r Comments ) serie s contains technica l and
organiza tional doc uments abo ut the Intern et, includi ng the techni cal
specific ations and p olicy docu ments prod uced by the Inte rnet
Enginee ring Task Force ( IETF) .
Current RFCs and drafts supported in SIP
s RFC 1889 RTP: A Transp ort Protoco l for Real-tim e Applica tions
s RFC 2190 RTP Payload Format for H.263 Video S treams
s RFC 2327 SDP: S ession De scriptio n Protocol
s RFC 239 6 Uniform Re source Id entifiers ( URI ): Gener ic Synta x
s RFC 2429 RTP Paylo ad Format for th e 1998 Version of ITU -T Rec.
H.263 Video (H.263+)
s RFC 2617 Digest Authenticati on
s RFC 2782 DNS RR for specif ying the l ocation of se rvice s (DNS
SRV)
s RFC 2833 R TP Payload for DTM F Digits, Telepho ny Tones and
Telephony Signals
s RFC 2976 The SIP I NFO Method
s RFC 3016 RTP Paylo ad Format for M PEG-4 Audio /Vi sual Strea ms
s RFC 30 47 RTP Payload Format for ITU-T Recomm endation
G.722.1
s RFC 3261 SIP: Se ssion Ini tiation Protoc ol
s RFC 3262 Re liabili ty of Provisi onal Resp onses in SIP
s RFC 3263 Lo cating SIP Servers
s RFC 3264 A n Offer/Answer Mod el with SDP
s RFC 3311 UPDATE method
s RFC 33 61 DHCP Option for S IP Serve rs
s RFC 3420 Inte rnet Medi a Type message /sipfra g
s RFC 3515 Refer method
s RFC 355 0 RTP: A Transport Protocol for Rea l-Time Applic ations
s RFC 3581 Sy mmetric Re sponse Ro uting
s RFC 36 05 RTCP attrib ute in SDP
s RFC 3711 The Secure Real -time Transport P rotocol (S RTP)
s RFC 38 40 Indicati ng User Agen t Capabili ties in SIP
s RFC 38 90 A Transport I ndepend ent Bandw idth Modifier for SDP
s RFC 38 91 The SIP “Repl aces” Header
s RFC 38 92 Referred -By Mecha nism
s RFC 39 60 Early M edia
s RFC 39 84 RTP Payload Format for H.264 V ideo
s RFC 4028 Session Ti mers in SIP
s RFC 4145 TCP-Based Medi a Transport in th e SDP
s RFC 456 8 SDP:Sec urity De scriptio ns for Media S treams
s RFC 4574 The Sess ion Descr iption Protoco l (SDP) L abel Attr ibute
s RFC 4582 The Binar y Floor C ontrol Protoco l
s RFC 458 5 Extended RTP Profile f or RTCP-Based Fe edback
s RFC 4587 RT P Payload Form at for H.261 Vide o Streams
s RFC 4629 RTP Payload For mat for ITU-T Rec. H.263 V ideo
s RFC 5168 XML Sche ma for Media C ontrol
s RFC 4796 The SD P Content Att ribute
s RFC 458 3 SDP Format fo r BFCP Strea ms
s RFC 558 9: SIP Call C ontrol Transfer
s draf t-ietf-av t-rtp-h264-rc do-02
s draf t-ietf-av t-rtp-rf c3984bis- 06
s draf t-ietf-sip -outboun d-20: Manag ing Client Initiated Co nnection s
Media capabilities supported in SIP
The audio a nd video me dia capa bilities s upporte d in SIP are the s ame
as for H.323.
Page 59

D14489.01—JULY 2009
59
Quick Set C20/C20plus
Administrator Guide
Contents Introduct ion Getting s tarted About the m enus Advance d settings Setting s Librar y Cameras Append ices Contact us
Appendices
CE Declaration for Codec C20
For an offic ial, signe d version of th is docume nt, or details r egarding d ocument ation from
the technic al constr uction file, p lease cont act TANDBERG.
EC Declar ation of conformit y
MANUFACTURER : TANDBERG Telecom AS
PRODUCT NAM E: TANDBERG Code c C20
TYPE NUM BER: T TC7-18
DESCRIPTIO N: Vide o Confere ncing Equip ment
DIRECTIVES :
This equi pment com plies with.
LVD 2006/95 /EC
EMC 2004/108/ EC
HARMONI ZED STANDARDS:
Applied i n order to veri fy comp liance wi th
directive s.
EN 60950-1:2006
EN 55022 (200 6)
EN 55024 (1998) + A1 (2001) + A2 (2003 )
EN 61000-3-2 (20 06)
EN 61000-3-3 (1995) + A1 (2001) + A2 ( 2005)
TEST REPORTS an d
CERTIFICATES ISSUED BY:
Repor ts/Ce rtificate s No.:
LVD (Nemko AS ) 121905
EMC (Ne mko AS) E09 659.00
TECHNICAL C ONSTRUCTIO N FILE NO.: 14508
YEAR WHI CH THE CE-MAR K WAS AFFIXED : 2009
Page 60

D14489.01—JULY 2009
60
Quick Set C20/C20plus
Administrator Guide
Contents Introduct ion Getting s tarted About the m enus Advance d settings Setting s Librar y Cameras Append ices Contact us
Appendices
China RoHS table
This produ ct compli es with the Ch ineese Ro HS.
Page 61

D14489.01—JULY 2009
61
Quick Set C20/C20plus
Administrator Guide
Contents Introduct ion Getting s tarted About the m enus Advance d settings Setting s Librar y Cameras Append ices Contact us
Appendices
Dimensions Codec C20
Dimensi ons in mm.
00,093
52,721
00,9
00,72
59,611
00,03
Page 62

D14489.01—JULY 2009
62
Quick Set C20/C20plus
Administrator Guide
Contents Introduct ion Getting s tarted About the m enus Advance d settings Setting s Librar y Cameras Append ices Contact us
Appendices
220,0
105,0
20,5
105,9
(eye centre)
32,2
148,1
114,6
ø
82,0
ø
79,6
2,5
2,5
62,4
125,4
142,0 4,4
63,0
190,0
14,0
34,5
191,0
106,3°
PrecisionHD 1080p camera dimensions
Dimensi ons in mm.
Page 63

D14489.01—JULY 2009
63
Quick Set C20/C20plus
Administrator Guide
Contents Introduct ion Getting s tarted About the m enus Advance d settings Setting s Librar y Cameras Append ices Contact us
Appendices
Technical specifications
SET DELIVERED COMPL ETE WITH:
Codec C20, Prec isionHD 1080 p 4x or 12x camera,
Perform ance Mic 20, re mote control, ca bles and
power suppl y
BANDWIDTH
s H.323/ SIP up to 6 Mbps point-to-point
FIREWALL TRAVERSAL
s TANDBERG E xpressway™ Technolo gy
s H.460.18, H.460.19 Firewall Traversal
VIDEO STANDARDS
s H.261, H.263, H.263+, H.264
VIDEO FEATURES
s Native 16:9 Wides creen
s Adva nced Screen Layouts
s Intel ligent Vi deo Manag ement
s Loca l Auto Layout
VIDEO INPUTS (2 INPUTS )
1 X HDMI INPUT, SUPPORT ED FORMATS:
1920 x 1080@60, 59.94 Hz (1080 p60)
1920 x 1080@50 Hz (1080p 50)
1920 x 1080@30, 29.97 Hz (1080p3 0)
1920 x 1080@25 Hz (1080p25)
1920 x 1080@24, 23.97 Hz (1080p24)
1280 x 720@60, 59.94 Hz (720p 60)
1280 x 720@50 Hz (720p5 0)
720 x 480@ 60, 59.94 Hz (480 p60)
640 x 480 @60 Hz (4 80p60 )
1600 x 1200@50, 6 0 Hz (UXGA )
1280 x 1024@60, 75 Hz (SXGA)
1024 x 768@60, 70, 75, 85 Hz (XGA)
800 x 600 @56, 60, 72, 75, 85 Hz (SVGA)
1920 x 1200@50, 60 Hz ( WUXGA)
1680 x 1050@6 0 Hz (WSXGA+)
1440 X 900@ 60 Hz (W XGA+)
1280 x 768@60 Hz ( WXGA)
1 X DVI-I INPUT, SUPPORTED FORMATS:
Analog ( VGA):
1920 x 1080@60 Hz (1080 p)
1280 x 720@60 Hz (720p )
1600 x 1200@6 0 Hz (UXGA )
1280 x 1024@60, 75 Hz (SXGA)
1280 x 960@ 60 Hz
1024 x 768@60, 70, 75, 85 Hz (XGA)
1920 x 1200@50 Hz (W UXGA)
1680 x 1050@6 0 Hz (WSXGA+)
1440 x 900@ 60 Hz (W XGA+)
1280 x 800@ 60 Hz (W XGA)
1280 x 768@60 Hz ( WXGA)
Digital ( DVI-D ):
Same as HDM I, ref. above.
Extend ed Display Identific ation Data ( EDID)
VIDEO OUTPUTS (2 OUTPUTS )
2 X HDMI OUTPU T, SUPPORTED FORMATS:
1920 x 1080@60 Hz (1080 p60)
1280 x 720@60 Hz (720p 60)
1600 x 1200@6 0 Hz (UXGA )
1280 x 1024@60 Hz (SXGA)
1024 x 768@60 Hz (XG A)
800 x 600 @60 Hz (SVGA)
640 x 480 @60 Hz ( VGA)
1920 x 1200@60Hz ( WUXGA )
1360 x 768@60 H z
1366 x 768@60 H z
1280 x 768@60 Hz ( WXGA)
VESA Monitor Pow er Manage ment
LIVE VIDEO RESOLUTIONS ( ENCODE/ DECODE)
176 x 144 @30 fps (QCIF )
352 x 288@3 0 fps (CIF )
512 x 288@ 30 fps (w288 p)
576 x 448@30 f ps (448p )
768 x 448@ 30 fps (w448 p)
704 x 576@30 fp s (4CIF)
1024 x 576@30 fps (w576p)
640 x 480 @30 fps ( VGA)
800 x 600 @30 fps (SVGA)
1024 x 768@30 fps ( XGA)
1280 x 1024@30 fps (SXGA )
1280 x 720@30 fps ( 720p30)
1920 x 1080@30 fps (1080p30) *
1280 x 768@30 fps ( WXGA )
1440 x 900@ 30 fps (W XGA+)
1680 x 1050@30 f ps (WSXGA +)
1600 x 1200@3 0 fps (UXGA )
512 x 288@ 60 fps (w28 8p60)**
768 x 448@ 60 fps (w448 p60) **
1024 x 576@60 fps (w576p6 0)**
1280 x 720@60 fp s (720p60 )**
AUDIO STANDARDS
s G.711, G.722, G.722.1, 64 bit & 128 bit MPEG4
AAC-LD
AUDIO FEATURES
s CD- Qualit y 20KHz Mon o
s 1 x Acou stic Echo Can celler
s Autom atic Gain Co ntrol (AGC)
s Autom atic Noise Re duction
s Active Lip Synch ronizatio n
AUDIO INPUTS (4 INPUTS )
s 2 x Microphone, 4 pin M iniJack
s 2 x RCA /Phono ( mixed to mon o)
AUDIO OUTPUTS (3 OUTPUTS )
s 2 x RCA /Phono ( dual mon o)
s 1 x HDMI, d igital, ma in audio
DUAL STREAM
s H.239 ( H.323) dua l stream
s BFCP ( SIP) dua l stream
s Supp ort res olutions u p to WXGA (1280 x 768)
PROTOCOLS
s H.323
s SIP
EMBEDDED ENCRYP TION
s H.323/ SIP point-to-po int
s Standards-ba sed: H.235 v 2 & v3 and AES
s Autom atic key gener ation and exch ange
s Supp orted in D ual Stream
IP NETWORK FEATURES
s DNS lo okup for se rvice c onfigurati on
s Dif ferenti ated Serv ices (Q oS)
s IP ada ptive bandw idth manag ement ( includin g
flow control )
s Auto gate keeper di scovery
s Dyn amic playou t and lip-sy nc buffe ring
s H.245 DTMF tone s in H.323
s Date an d Time supp ort via N TP
s Packet Lo ss based Downspeed ing
s URI D ialing
s TCP/IP
s DHCP
s 802.1x network authen tication
SECURITY FEATURES
s Man agement v ia HTTPS and SSH
s IP Adm inistratio n Password
s Men u Administr ation Passwor d
s Dis able IP ser vices
s Net work Setti ngs protecti on
NETWORK INTER FACES
s 1 x L AN/Eth ernet ( RJ-45) 10/100/1000 M bit
OTHER INTERFACES
s USB ho st for future u sage
PRECISIONHD 1080P 12X CAMERA
s 1/3” CMO S
s 12 x zoom
s +15°/-25° tilt, +/- 90° pa n
s 43.5° ver tical fiel d of view
s 72° hori zontal field o f view
s Focu s distance 0.3 m–infi nity
s 1920 x 1080 pixels pr ogressi ve @ 60fps
Page 64

D14489.01—JULY 2009
64
Quick Set C20/C20plus
Administrator Guide
Contents Introduct ion Getting s tarted About the m enus Advance d settings Setting s Librar y Cameras Append ices Contact us
Appendices
APPROVALS
s Dire ctive 2006 /95/ EC (Low-Voltag e Directive )
— Standard E N 60950-1
s Dire ctive 2004 /108/EC (EM C Directive ) —
Standard E N 55022, Class B — Sta ndard EN
55024 — Standard EN 61000 -3-2/-3-3
s App roved accord ing to UL 60950 -1 and CAN/
CSA-C2 2.2 No. 60 950-1-07
s Com plies with FCC15B Class A
DIMENSIONS OF CODEC C20
s Leng th: 15.35”/39.0cm
s Hei ght: 1.18”/3.0 cm
s Dept h: 5.0”/12.7cm
s Weigh t: 4.0lbs/1.8kg
All spec ification s subject to c hange with out notice,
system spec ifics may var y.
All image s in these mate rials ar e for repres entationa l
purpose s only, actual pro ducts may dif fer.
TANDBERG and Ex pressway are re gistere d
tradema rks or trade marks of TANDBERG i n the U.S.
and other co untries.
All other tr ademar ks are prope rty of th eir respe ctive
owners.
MTBF PRODUCT RELIABILI TY/MTBF
The predi cted reli abilit y is express ed in the exp ected
random Me an Time Bet ween Fail ures (M TBF) for the
electro nic compo nents base d on the Power On H ours:
Power On Hou rs (POH ) > 69 000 hours
Useful Li fe Cycle > 6 yea rs
ISO 9001 cer tificate is avai lable up on request
July 2009
HTTP, HTTPS
s Rem ote control and o n-screen m enu system
DIRECTORY SERVICES
s Supp ort for Lo cal directo ries (My Contacts )
s Cor porate Dire ctory
s Unli mited entri es using Se rver di rectory
suppor ting LDAP and H. 350
s Unli mited numb er for Corp orate directo ry
(through T MS)
s 200 nu mber loc al director y
s Rec eived Call s
s Plac ed Calls
s Missed Calls wi th Date and Tim e
POWER
s Auto-s ensing powe r supply
s 100– 240 VAC, 50/60 Hz
s 45 wat ts max. for codec and ma in camera
OPERATING TEMPERATURE AND HUMIDIT Y
s 0° C to 35° C (32 ° F to 95° F) ambie nt
temperatu re
s 10% to 90% R elative Hum idity ( RH)
STORAGE AND TRANS PORT TEMPERATURE
s -20° C to 60° C (- 4° F to 140° F) at RH 10–90 %
(non-c ondensi ng)
s Other formats su pported (configu rable throu gh
Dip-switch):
s 1920x1080@ 60fp s (HDMI o nly)
s 1920x1080@ 50fps ( HDMI only)
s 1920x1080@ 30fps
s 1920x1080@ 25fps
s 1280x720@ 60fps
s 1280x720@5 0fps
s 1280x720@30fps
s 1280x720@25fp s
s Autom atic or manua l focus/brightn ess/w hite
balance
s Far-end camera cont rol
s Dua l HDMI and HD -SDI outpu t
s Upsi de-down m ounting with automatic fli pping
of picture
PRECISIONHD 1080P 4X CAMERA
s 1/3” CMO S
s 4 x zoom
s +15°/-25° tilt, +/- 90° pa n
s 43.5° ver tical fiel d of view
s 72° hori zontal field o f view
s Focu s distance 0.3 m–infi nity
s 1920 x 1080 pixels pr ogressi ve @ 30fps
s Other formats su pported (configu rable throu gh
Dip-switch):
s 1920x1080@ 30fps
s 1920x1080@ 25fps
s 1280x720@30fps
s 1280x720@25fp s
s Autom atic or manua l focus/brightn ess/w hite
balance
s Far-end camera cont rol
s Dua l HDMI and HD -SDI outpu t
s Upsi de-down m ounting with automatic fli pping
of picture
SYSTEM MANAGEMENT
s Supp ort for th e TANDBERG Manage ment Suite
s Total manag ement via e mbedde d SNMP,
Telnet, SSH, XML, SOAP
s Rem ote software upload : via web ser ver, SCP,
* require s Premium Resolu tion option
** requir es Premium Resol ution option and Qu ick Set C20plus
Page 65

D14489.01—JULY 2009
65
Quick Set C20/C20plus
Administrator Guide
Contents Introduct ion Getting s tarted About the m enus Advance d settings Setting s Librar y Cameras Append ices Contact us
Contact/us
U.S. HEADQUARTERS
TANDBERG
1212 Ave nue of the Ame ricas
24th Floor
New York, NY 10036
Telephone: +1 212 692 6500
Fax: +1 212 692 6501
Video: +1 212 692 6535
E-mail: ta ndberg @tand berg.com
EUROPEA N HEADQUA RTERS
TANDBERG
Philip Pede rsens vei 20
1366 Lysaker
Norway
Telephone: + 47 67 125 125
Fax: +47 67 125 234
Video: + 47 67 126 126
E-mail: ta ndberg @tand berg.com
 Loading...