


1

SAFETY INSTRUCTIONS
SAFETY INFORMATION
Caution:
- To reduce the risk of electric shock, do not remove Cover (or
back)
- No user-serviceable parts inside.
- Refer servicing to qualified service personnel.
This lightning flash with arrowhead symbol, within an equilateral
triangle is intended to alert the user to the presence of uninstalled
“dangerous voltage” within the product’s enclosure that may be of
sufficient magnitude to constitute a risk of electric shock to
persons.
The exclamation point within an equilateral triangle is intended to
alert the user to the presence of important operating and
maintenance (servicing) instructions in the literature
accompanying the appliance.
IMPORTANT
CAUTION: READ THIS BEFORE OPERATING YOUR UNIT.
1. READ AND FOLLOW INSTRUCTIONS: All the safety and operation instructions should be read before the product is
operated. Follow all operation instructions within this manual.
2. RETAIN INSTRUCTIONS: The safety and operation instructions should be retained for future reference.
3. HEED WARNINGS: Comply with all warnings on the product and in the operation instructions.
4. CLEANING: Unplug this product from the wall outlet before cleaning. Do not use liquid cleaners or aerosol cleaners. Use a
damp cloth for cleaning.
5. GROUNDING or POLARIZATION: This product may be equipped with a polarized alternating current line plug (a plug
having one pin wider than the other). This plug will fit into the power outlet only one way. This is a safety feature. If you are
unable to insert the plug fully into the outlet, try reversing the plug. If the plug should still fail to fit, contact your electricians
since it is likely you have an out of sate wall socket. Never force the plug into the socket.
6. OVERLOADING: Do not overload wall outlets or extension cords as this can result in the risk
of fire or electric shock. Overloaded AC outlets, extension cords, frayed power cables, damaged
or cracked wire insulation, and broken plugs are dangerous. They may result in electric shock
or fire hazard. Periodically examine the power cable - if its appearance indicates damage or
deteriorated receptacles have it replaced by your service technician.
7. POWER SOURCES: This product should be operated only from the type of power source
indicated on the rear panel label. If you are not sure of the type of power supply to your home,
consult your product dealer or local power company. For products intend to be operated from battery power, or other sources,
refer to the operation instructions. Do not overload the wall outlets, extension cords, or integral convenience receptacles as
this can result in a risk of fire or electric shock.
8. ACCESSORIES: Do not place this product on an unstable surface or support. The product may fall,
causing serious injury to a child or adult as well as serious damage to the product. Any mounting of
the product should follow the manufacture’s instructions and use a mounting accessory
recommended by the manufacturer. A product and cart combination should be moved with care.
Quick stops, excessive force, and uneven surfaces may cause the product and cart combination to
overturn.
9. POWER-CORD PROTECTION: The power supply cables should be routed so that they are not likely
to be walked on or pinched by items placed upon or against them, paying particular attention to
cables at plugs and the point where they exit from the product.
10. ATTACHMENTS: Do not use unauthorized attachments as they may cause faults with the unit.
11. CONDITIONS REQUIREING SERVICE: Unplug this product from the wall outlet and refer servicing to qualified service
personnel under the following conditions.
a) If the unit exhibits sudden unusual operation.
b) If liquid has been spilled, or objects have fallen into the product.
c) If the product has been exposed to rain or water.
d) If the product does not operate normally by following the operation instructions, adjusting only those controls that are
covered by the operation instructions. (NOTE: improper adjustment of oth er controls may result in damage and will
often require extensive work by a qualified technician to restore the product to its normal operation).
e) If the product has been dropped or damaged in any way.
f) If the product exhibits a distinct change in performance.
2
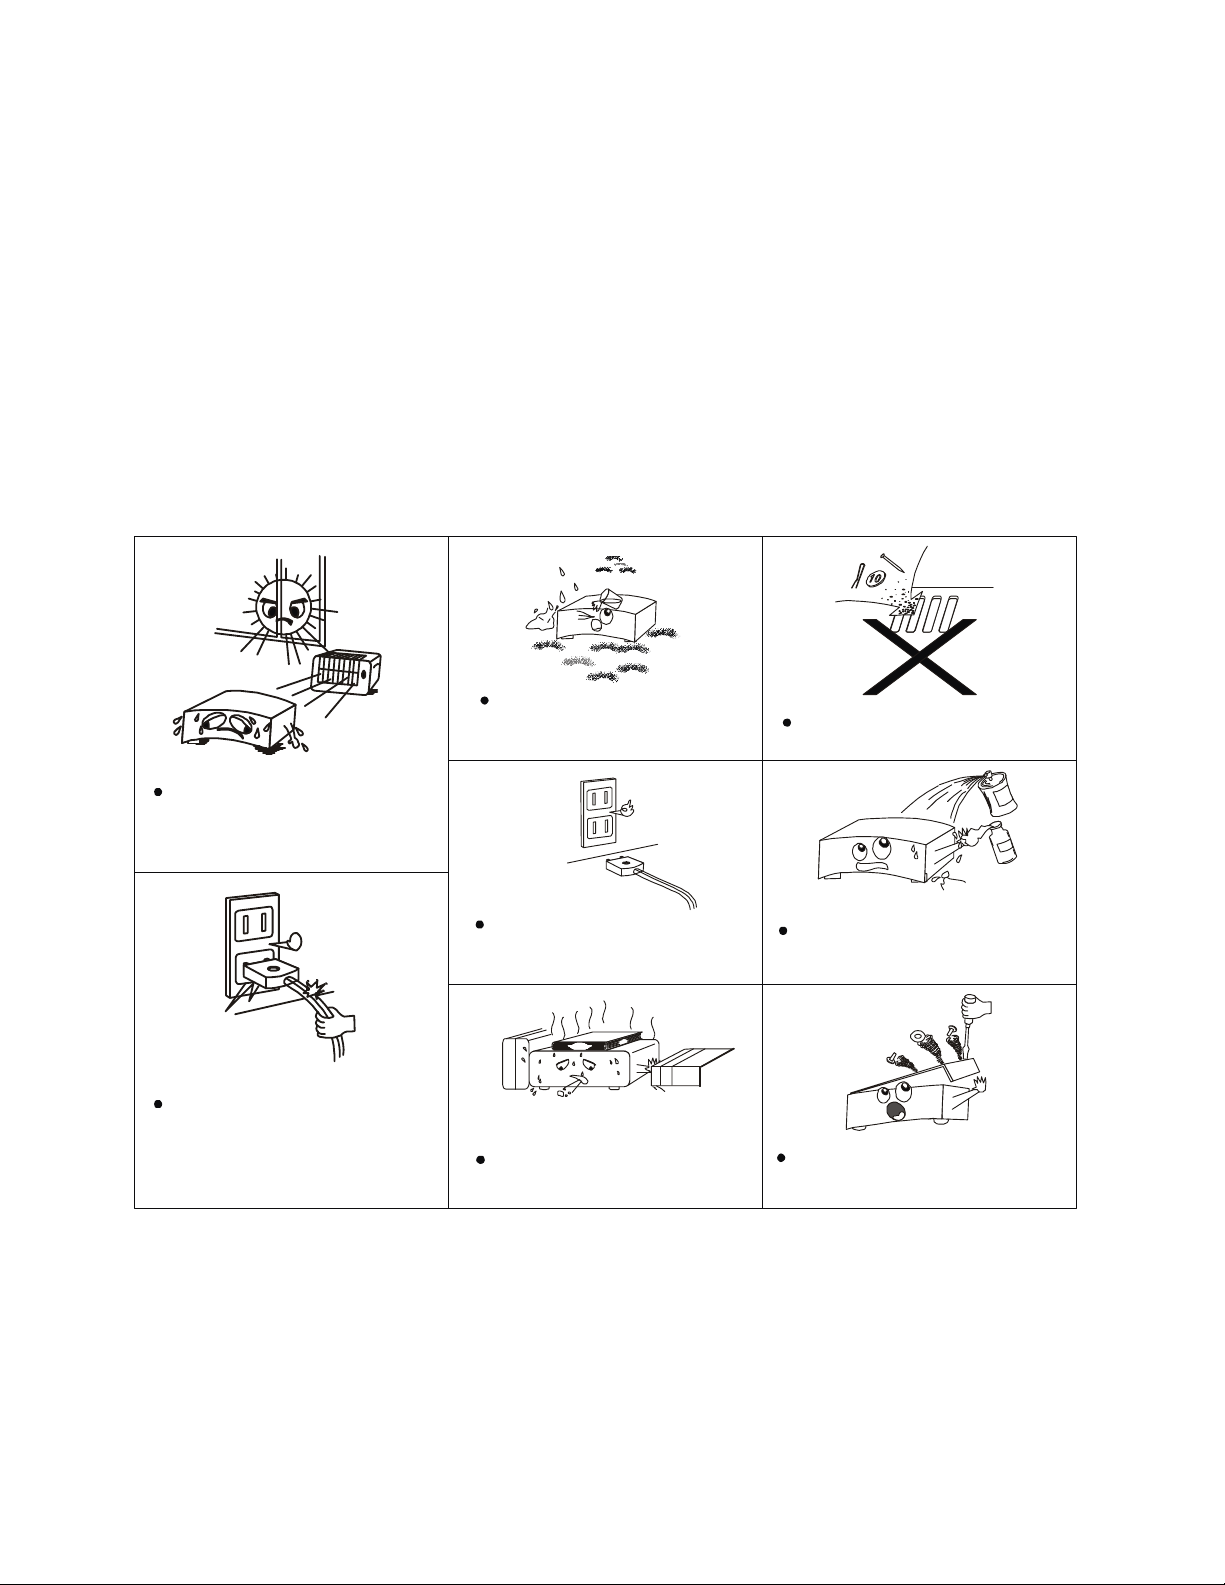
Avoid hig h temper atures
Keep t he set free from moisture.
Do no t obstruct the ven tilatio n
* (For sets wit h vent ilation holes)
Do not let fo reign ob jects in the set.
13. SERVICING: Do not attempt to service this product yourself as opening or removing covers may expose you to dangerous
voltage and may damage precisi on components. Refer all servicing to qualified service personnel.
14. LIGHTNING: For added protection during a lightning storm, or when it is left unattended and unused for long period of time,
unplug it from the wall outlet and disconnect the antenna or cable system. This will prevent damage to the product due to
lightning and power line surges.
15. REPLACEMENT PARTS: Should replacement parts be required, have the service technicians verify that the replacement
parts he uses have the same safety characteristics as the original parts. Use of unauthorized replacements parts can cause
fire or electric shock.
16. SAFETY CHECK: Upon completion of any service or repairs to this product, ask the service technician to perform safety
checks recommended by the manufacturer to determine that the product is in a safe operating condition.
17. HEAT DISPERSAL: Leave enough of space between the top, back and sides of the unit and the wall or other electrical
components. The slots and openings in the cabinet are provided for ventilation and to ensure reliable operation of the unit
and to protect it from overheating, and these openings must not be blocked or covered under no circumstances. The
openings should never be blocked by placing the product on a bed, sofa, rug or other similar surfaces. This product should
not be placed i n a built-in installation such as bookcase or rack unless proper ventilation is provided or the manufacturer’s
instructions have been adhered to.
18. NOTES ON ENVIRONMENTAL PROTECTION: At the end of its useful life, this product must not be disposed of with regular
household waste but must be returned to a collection point for the recycling of electric and electronic equipment. The symbol
on the product, user’s manual and packaging, point this out. The materials can be reused in accordance to their markings.
Through re-use, recycling of raw materi als, or other form of recycling of old products, you are making and important
contribution to the protection of our environment. Your local administrative office can advice you of the responsible waste
disposal point.
NOTES ON USE:
water,and dust.
All ow for suffi cient heat dispersion
whe n inst alled on a rack.
Unp lug the power c ord when not
using th e set for long peri od s of
time
Han dle th e power cord c arefully.
Hol d the plug w hen un plugg ing the
co rd.
holes
Do not let insecticides,benzene,and
thinner come in contac t wit h the set .
Never disassem ble or modify t he set
in an y way.
NOTES ON INSTALLATION
Your System Fidelity SA-300SE should be placed on a firm, level surface. Avoid placing it in direct sunlight or near sources of heat
and damp. Always allow adequate ventilation and don’t pl ace it on a soft surface like a carpet. Don’t place it in an enclosed
position such a bookcase or cabinet that may impede the air-flow through the ventilation holes. The unit shall not be exposed to
dripping or splashing and that no objects filled with liquids, such as vases, shall be placed on the unit.
3

REMOTE CONTROLLER
By using the provided remote control unit, the amplifier can
be controlled from your li stening position. To use the remote
control unit, point it at the REMOTE SENSOR window of the
receiver.
Notes:
- Even if the remote control unit is operated within the
effective range, remote control operation may be impossible
if there are any obstacles between the unit and the remote
control.
- If the remote control unit is operated near other appliance
which generate infrared rays, or if other remote control
devices using infrared rays are used near the unit, it may
operate incorrectly.
- The power is turned on/off (standby) by pressing the
POWER button on the remote control unit in standby mode.
Precautions concerning batteries
-Be sure to insert the batteries with correct positive+ and
negative – polarities.
- Use batteries of the same type. Never use different types of
batteries together.
- Rechargeable and non-rechargeable batteries can be used.
Refer to the precautions on their labels.
- When the remote control unit is not to be used for a long
time (more than a month), remove the batteries from the
remote control unit to prevent them from leaking. If they leak,
wipe away the liquid inside the battery compartment and
replace the batteries with new ones.
- Do not heat or disassemble batteries and never dispose of
old batteries by throwing them in a fire.
REMOTE CONTROL OPERATION RANGE
Use the remote control unit within a range of about 6
meters (20 feet) and the angles of up to 30 degrees aiming at
the remote sensor.
NOTE: Direct sunlight or very bright ambient lighting may
affect the operating range and angle for the remote control
set.
BATTERY INSTALLATION
1. Remove the battery compartment cover.
2. Insert two “AAA” dry batteries.
Make sure that the batteries are inserted with their
positive “+” and negative “-” poles positioned correctly.
3. Close the cover until it clicks.
If the distance required between the remote control unit
and main unit decreases, the batteries are exhausted. In
this case, replace the batteries with new on
4

FRONT PANEL
1. STAND-BY BUTTON
2. VOLUME CONTROL KNOB
3. REMOTE SENSOR
4. SPEAKERS A BUTTON
5. SPEAKERS B BUTTON
6. CD INPUT BUTTON
7. TUNER INPUT BUTTON
8. LINE INPUT BUTTON
9. LINE INPUT BUTTON
10. LINE INPUT BUTTON
REAR PANEL
1. LINE (RCA) AUDIO INPUTS
2. POWERED SUBWOOFER OUTPUT
3. SPEAKERS A TERMINALS
4. SPEAKERS B TERMINALS
5. ON-OFF SWITCH
6. FUSE BOX
7. POWER CORD TERMINAL
5

CONNECTING THE SPEAKERS AND AUDIO SOURCES (CD, TUNER, DVD etc.)
Be sure to connect the polarities of the speaker system and the speaker termi nals correctly (+ to +, - to -).
When make the connection, please refer to the connection diagram. Make sure that all the units are switched off during any
connection. The RCA sockets on your SA-300SE are color coded for your convenience. Red and white are RIGHT and LEFT audio
respectively.
Use high quality RCA-interconn ect and speaker cables for optimum performance and reliability. Ensure that all cables and sockets
are not damaged in any way and all sockets are firmly pushed home.
QUICK START
1. Connect the speakers to the speaker terminal and sources to the relevant terminals and rear input sockets on the back
panel of the unit.
2. Plug in the AC power cord.
3. Press the POWER switch on the back panel of the unit, and then press stand-by power switch on the front panel (or
remote controller) to turn on the amplifier.
4. Press the required input selector. And enjoy.
6

FUNCTION AND OPERATION
TECHNICAL SPECIFICATIONS*
Turn ON/OFF the unit
1. Connect the power cord to the rated AC socket. Press the POWER ON/OFF switch (on the rear panel), the unit has been turned
into stand-by mode.
2. Press the STANDBY button (1/ front panel or remote controll) to turn on the unit. Press the STANDBY button again to turn off
the unit.
Input function selection
After the unit having been turned on, press the source input button to choose the your desired input signal source. For example,
CD button selects the CD (or other line-level source) connected to the CD sockets as the active input, TUNER button for the
connected tuner and so on. Blue LED indicator at every button indicates which input source is active.
Release the source button at your desired input source, during this procedure, we advice the volume to be decreased. Please note,
that SA-300SE doesn’t have a built in phono stage and corresponding input socket. If you wish to connect a turntable to the
amplifier, you should use some of the commercially available phono preamp-stages, which can be connected to any of the line
input sockets. Contact your dealer about the suitable phono stages for your amplifier.
Speakers selection
After the unit having been turned on, press the Speakers A button, to select the main speakers. If you have connected additional
pair of speakers, you can choose to listen to the main pair, the additional pair (speakers B) or both. The blue LED indicator will
indicate which option is in use. Please use speakers with an impedance of minimum 4 ohms or more.
Remote control handset
The remote control handset handles all the functions of the SA-300SE and performs the same functions as the buttons labeled
the same on the front panel. The extra added feature is the possibility to switch off the blue light ring around the volume control
knob, if you desire so. When a command on the remote control is hit, a LED indicator on the remote handset will blink, indicating
that the remote controller is sending a signal to the unit.
General
When you’ll connect the amplifier into your system for the first time, please note that as with most high quality electronic units,
it will require the burn-in time of few dozens of hours, until the full sound performance will be achieved. Due to our task for the
maximum sound quality of this amplifier, we have omitted all filters and tone controls, which are on the signal path and which can
affect the sound. If you wish to enhance the bass reproduction of your speakers set, you can use any commercially available
active (powered) subwoofer with a RCS output, which should be directly connected to the corresponding SUB OUT socket on the
rear panel.
Rated Power Output:
Dynamic peak power: 135W per channel / 4 ohms
80W per channel / 8 ohms
Frequency response: 2Hz - 200kHz (-3dB) at 15W
2Hz – 200kHz (-3dB) at maximum power
Signal to noise ratio: >90dB at 1W
>105dB at 60W
General
Power Requirements: AC220V-240V ~ 50Hz
Power Consumption: 400 Watts
Dimensions (mm): 435 (W) x 355(D) x 100 (H)
Weight: 3.8Kg
*Design and specifications are subject to change without notice.
75W per channel / 4 ohms at THD 1%
60W per channel / 4 ohms at THD 0.015% and 20Hz-20kHz
43W per channel / 8 ohms at THD 1%
35W per channel / 8 ohms at THD 0.008% and 20Hz-20kHz
7
 Loading...