

Page 1
Rebuilding your Transmission
If you still have transmission in your Samurai,
chances are very good that it makes a little noise in
at least one of the forward gears... You have a few
choices. You can try and find a dealer money. Our
kit was purchased from Petroworks.
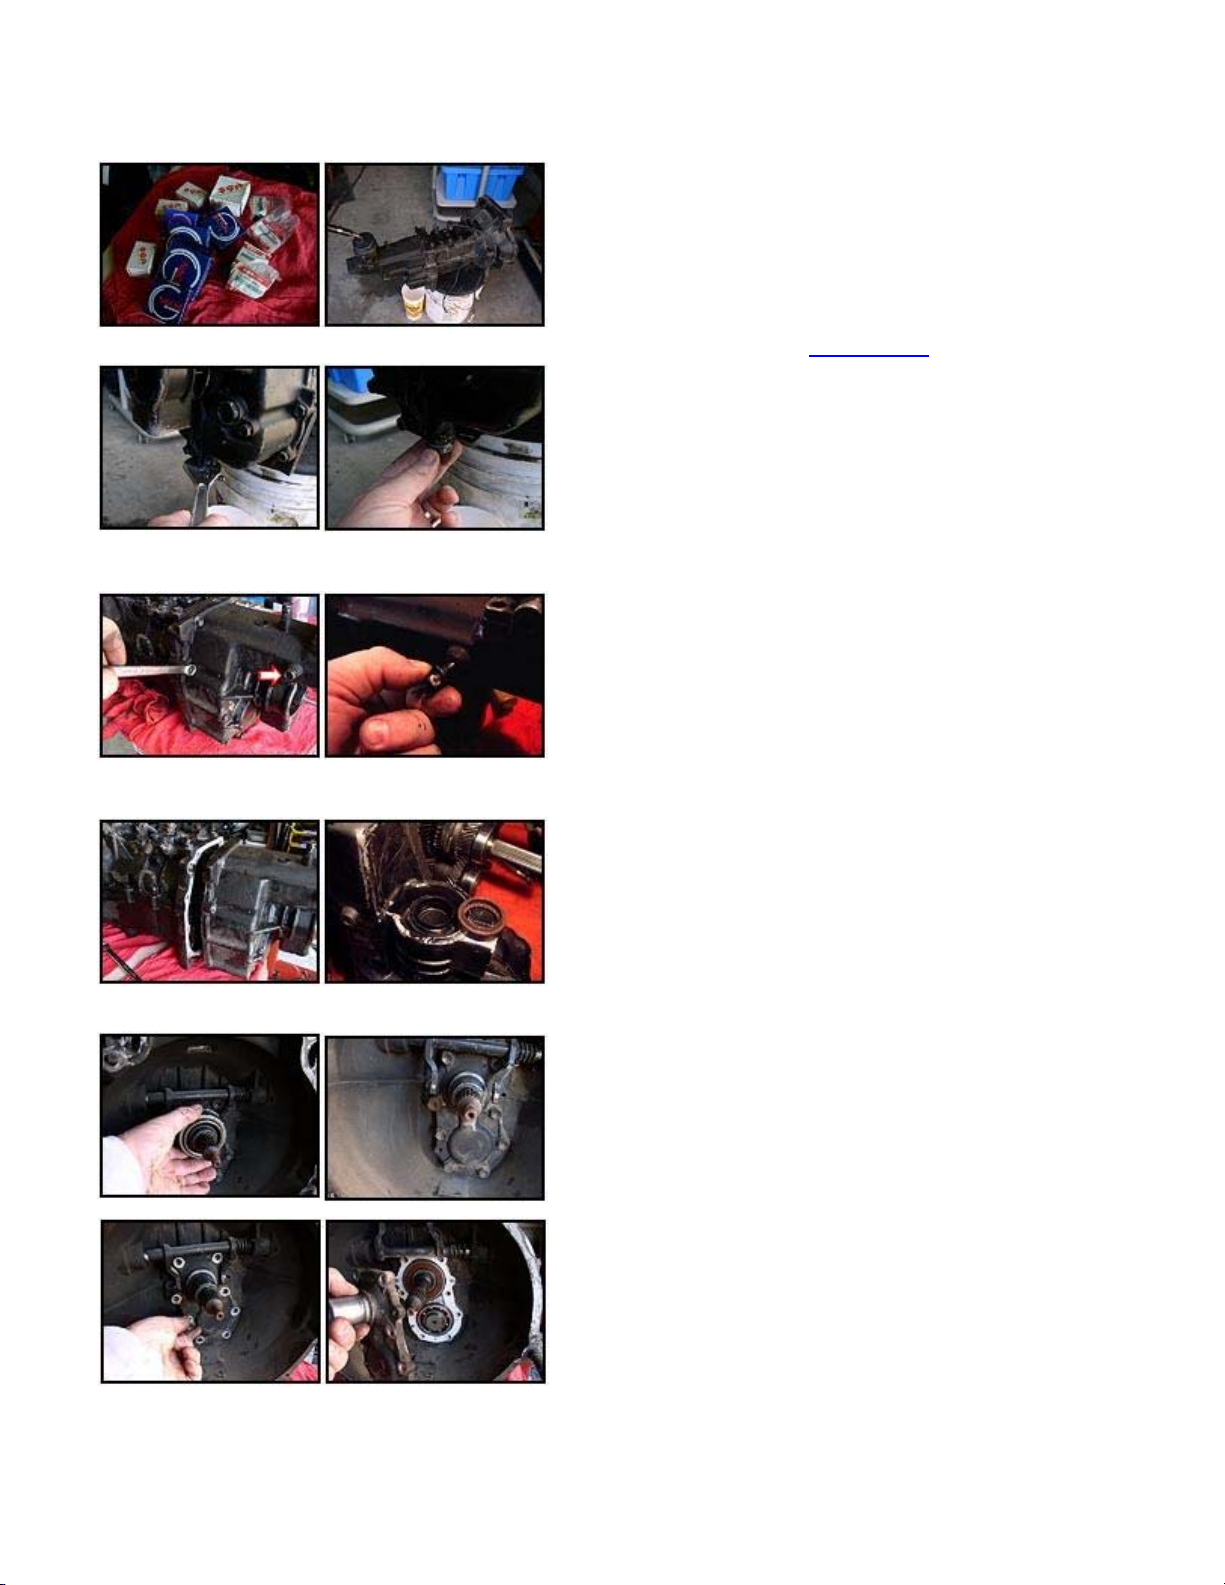
Everything starts with simply draining the oil. Check
the oil as it comes out for metal shavings or flakes.
Large metal chunks could be a bad thing depending
on where they came from. If the shifter locator pin
has broken off in the past it will eventually end up
down here in the bottom of the case. If it got
wedged in the gearing on the way down, then you
may have more to replace than you planned on.
Next it's time to go inside to check out the condition
of the components. To do that you can start at the
back and remove all the bolts holding the tail
housing to the main section. Don't forget to remove
the reverse shift rim bolt. You can see the arrow
pointing at it in the photo on the left. When you
remove it you will notice that it looks pretty
unique... Don't lose it, we will talk more about this later.
Separate the tail shaft housing (extension case)
from the main section and turn it up on end. Here
you see the tail shaft seal. You should take this
time to replace it and then clean out the case. Then
set it aside for later.
Next we go to the front of the transmission and remove
the clutch release bearing. Now you can see the 8
bolts that hold the input shaft bearing retainer in place.
You will also note that even when the bolts have been
removed, it is very difficult to remove the retainer.
There are three small bolt holes that look unused,
these will help. Use 3 conventional 6mm bolts to 'pop'
the retainer from its home.
Page 2

Here is the input shaft seal. It is the other seal that
needs to be replaced during a rebuild. Replace it and
then set it aside and turn your attention back to the
case.
Next we remove all the bolts holding the upper and
lower cases together.
Removing the upper case reveals the main shaft
assembly. This can now be lifted easily from the case
and set aside for now.
Back at the lower case, you can easily remove the
reverse gear shaft and idler gear. Set it aside. Next
we turn our attention to the countershaft.
Using a bearing puller, remove the countershaft
rear bearing. This is the first of three bearings you
will replace on the countershaft.
Being careful not to damage the gear teeth, remove
the countershaft 5th gear and the countershaft
reverse gear. They both just slide off of the
countershaft.
Now we go to the opposite end of the countershaft
and remove the c-clip from the end of the
countershaft, and the large c-clip that surrounds the
countershaft front bearing.
The factory service manual says to press out the countershaft using a
hydraulic press. I accomplished the same thing using a brass drift and a
small sledge hammer. Do not use the hammer by itself, you WILL
damage the countershaft and you run the risk of cracking the case if you
miss...
Page 3

You can see the progress at the other end as the
other bearing slides out. Be careful as the bearings
leave the casting, do not damage the gear as it
enters the race.
Using the bearing puller again, remove the bearing
without damaging the gear behind it.
You can then pull the countershaft up and out of the
lower case. Then remove the remaining bearing
with the bearing puller and then reverse what you
just did. Install new bearings and reassemble the
countershaft and reinstall it in the lower case. Set
the whole assembly aside and turn your attention to
the main shaft again.
When you first look at the main shaft, it may appear
very daunting. But as long as you have a large
workbench where you can lay everything out in
order (and you have your Factory Service Manual
handy) it's not really tough. This is actually two
shafts. The main shaft has the input shaft at one
end. You can see it being carefully removed in the
photo to the right. The high-speed synchronizer ring may be loose on the end of the input shaft
when you separate the shafts, be sure to keep the parts in order. We will come back to this
later.
On the end of the main shaft (where the input shaft
had been) you will find a needle bearing. This is
unlike the larger bearings you have already
replaced because there are no ball bearings in it.
This kind of bearing is for close quarters, looking
more like a sleeve, it uses long cylindrical bearings
that ride on a larger surface. Set this aside, keeping
the components in a line to insure the right order of assembly.
Remove the circlip, and pull the third gear,
synchonizer low speed hub and needle bearing off
all at once. You can keep them together to make it
easier, but remember to replace the needle bearing
with a new one from the rebuild kit. Set it face down
on the workbench in its place in the order.
Page 4

Starting at the other end of the main shaft, carefully
remove each bearing, and its set of gears and put
them in line on the table.
There are circlips along the way that retain each
gear set, so don't force anything until you have
checked for one of these suckers.
Your rebuild kit should include all of the main
bearings as well as the needle bearings, so
remember to swap in the new components as you
go.
As you (carefully) pull the main shaft assembly
apart, you will notice three (3) ball bearings in the
mix. Don't lose these. Also, don't try to remove a
component if there is a ball holding the component
in place. Carefully remove the ball and place it in
the assembly order.
Once the shaft has been disassembled, go back
through the parts you have removed and make sure
you replace all of the bearings with new
components that look identical.
For a reminder of the order, take a look at this. The main bearings will
need to be pressed back into place, so be careful not to lose track of the
ball bearings shown above.
Then reassemble the shaft in the reverse order that
you took it apart. This is where keeping everything
in order makes the difference.
Page 5

The needle bearings should slide easily with no
obstructions. And don't forget the circlips as you go.
Remember the input shaft we set aside earlier?
You will need to replace the bearing on the end of
the input shaft. Use a bearing puller for removal
and then press the new bearing into its place. Then
slide the input shaft back onto the main shaft over
the new needle bearing.
As you carefully place the main/input shaft back
into place, be sure to notice the circlips on the main
bearings. These ride in a slot that will keep the
bearing race from moving after assembly. Make
sure everything rotates smoothly.
Bolt the upper case back into place and torque to
factory specs. Put the idle gear/ reverse gear shaft
back into place.
Bolt the extension case back into place and don't
forget the reverse shift rim bolt that we pointed out
earlier. Then we concentrate on the shift tower.
The shifter locating bolt is a commonly replaced
item, as it is very prone to wear. There are two
different sizes based on the model year of your
transmission. You can see an example of each
shifter to the right. The shifter on the left of the
photo is a newer model, as it has the wider slot to
accept a larger locating pin. On the right, you can
see an older model that has also been outfitted with a new poly shifter 'sheet'. These
replacement shifter sheets are available from many of the aftermarket distributors. Planning
ahead, we got this one from North Coast Offroad during the ZookiMelt last year.
Page 6

Here you can see the shifter tower after a cleanup
and lube. A new locating bolt has been installed
and because this is an older model shifter tower,
we used the shifter handle with the new shifter
sheet described above.
If your shift tower needs to be replaced, maybe the threads for the
locating bolt are stripped out - or you have an older model and would like
to take advantage of the larger diameter locating bolt of the newer
model, you can get a complete tower kit from Hawk Strictly Suzuki.
Here we finally close up the case by replacing the
input shaft housing.
Finally a new clutch release bearing (aka - the
throwout bearing) tops off the input shaft.
Remember to replace the pilot bearing in your
flywheel also, or you may experience a situation
where the vehicle still wants to move with the clutch
depressed. Sometimes it's the little things that get
you!
Important things to note here...
Every rebuild kit is not created equal, make sure you are getting all of the seals and
bearings to do the job right the first time.
If you experience problems shifting smoothly from one gear to another while the drivetrain
is in motion, the synchronizer rings may be worn out. These are not usually sold as a part of
a rebuild kit. You may have to ask your distributor for them separately.
And last but not least, everyone is not mechanically inclined. So if you think you may need
help with this, get help first. Nobody likes having to fish through a box of transmission parts
from an unfinished job.
 Loading...