

Page 1

Page 2

Table of Contents
Table of Co nt en ts .. .. .. .. .. .. .. ........... ... ... ... ... ... ... ... ... ... ... ... ... ... ... ... ... ... .. .. .. .. .. .. .. .. .. .. .. .1
Sa fety In struction ............. ........... ............. ............. ............. ............. ........... ............2
Ov ervie w (C on tro ls an d Conn ect io ns)
Base assembl y inst ruction ....... ... ....... ....... ....... ... .... ... ....... ....... ....... ... ....... ....... ....... ....... ... ..8
Re mo te Co nt ro l. ......... .. .. .. .. .. .. .. ....... .. .. .. .. .. .. .. ....... ... .. .. .. .. .. .. .. ....... .. .. .. .. .. .. .. ....... ... .. 12
Ch annel Se lection ......... ....... ......... ......... ......... ......... ......... ....... ......... ......... ......... ..15
Ch annel Re turn..... ......... ........... ........... ........... ......... ........... ........... ........... ......... ...16
Po wer on /o ff .. .. .. .. .. .. ......... ... ... ... .. .. .. .. .. .. .. .. .. .. ......... ... ... ... .. .. .. .. .. .. .. .. .. .. ......... ... ... ... 17
Se le ct Vi ewing So ur ce .. .. ....... .. .. .. .. .. ....... .. .. .. .. .. ....... .. .. .. .. .. ....... .. .. .. .. .. ....... .. .. .. .. ....17
PICTURE Me nu ........ ... ....... ... .......... ... ....... ... .......... ... ....... ... ... ....... ... ....... ... ... ....... ... .........1 8
Menu...................................................................................................................19
SO UND
APPLIC ATIONS Menu. ....... ....... ....... ... ....... ....... ....... ... .... ... ....... ....... ....... ... ....... ....... ....... ... ...2 1
PREFER ENC ES
SE TU P M en u...... .. .. .. .. ....... .. .. .. .. .. ..... ... .. .. .. .. ....... .. .. .. .. .. ..... ... .. .. .. .. ....... .. .. .. .. .. ..... ... .. 25
ME DIA Op tio ns .. ... ... ... ........... ... ... ... ... ........... ... ... ... ... ... ........ ... ... ... ... ... ........... ... ... ... ... ...26
Tr ou bleshoo ti ng .. .. .. .. .. ....... .. .. .. .. .. .. .. ....... .. .. .. .. .. .. .. ....... .. .. .. .. .. .. .. ....... .. .. .. .. .. .. .. ....... .3 1
Specificati on s. .. .. .. .. .. .. .. .. .. .. .. .. .. .. ............ .. .. .. .. .. .. .. .. .. .. .. .. .. .. .. .. .......... .. .. .. .. .. .. .. .. .. .. 32
Menu.. ... .... ... ....... ....... ....... ... ....... ....... ....... ....... ... ....... ....... ....... ... .... ... ....... ..24
.. ..... ... .. ... ..... ..... ... .. ... ..... ..... ... .. ... ..... ..... ... ..... ....6
1
Page 3
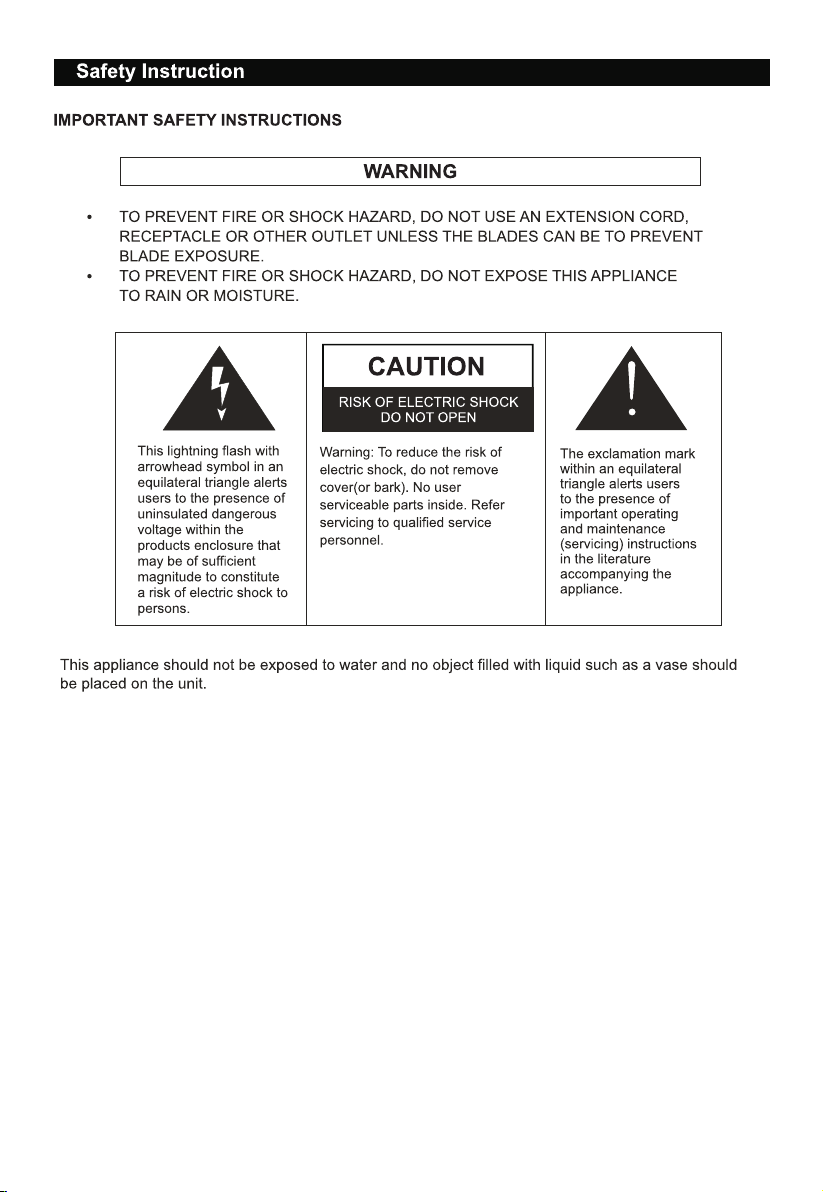
CAUTIO N
·Danger o f exp losion if incorr ect ly replac ed.
·Replac e wit h only equi valent ty pe of batte ry.
·Do not exp ose b attery to d irect sun light or an y oth er source o f heat.
·Ensure p rop er dispos al of used ba tteries .
·Where th e MAI NS plug or an a pplianc e coupler i s use d as the disc onnect de vice, the d isc onnect
device s hal l remain re adily ope rable.
·To reduce th e ris k of electr ic shock, d o not perfo rm an y servici ng other th an what is me nti oned in
the oper ati ng man ual .
·There ar e no us er-serv iceable p arts insi de th e TV; do n ot open the T V cas ing.
LED SCRE EN
Althou gh th e LED scree n is made wit h high prec isi on techno logy and 99 .99% or mor e of th e pixels ar e
eff ect ive, blac k dots may ap pea r or bri ght p oints of li ght(red ,bl ue or gr een ) may appea r constan tly o n
the LED sc ree n. Thi s is a struct ural prop ert y of the LED sc reen and is n ot a ma lfun cti on. If the su rface of
the LED pa nel c racks, do n ot touch it u ntil you ha ve un plugged t he AC power co rd. Other wis e electri c
shock ma y res ult. Do not t hrow anyt hing at the T V set. The LED pa nel m ay break fr om the impa ct and
cause se rio us injury.
batter ies a re
2
Page 4
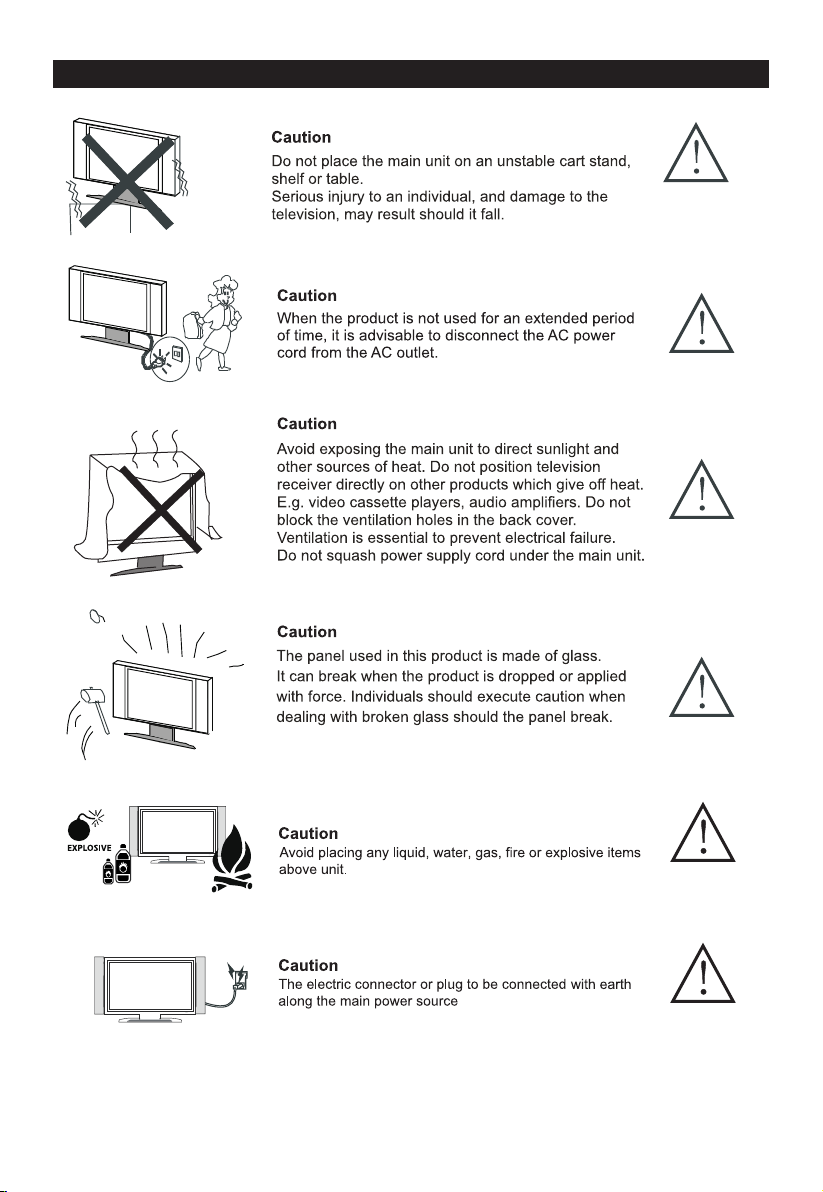
Safety Instruction
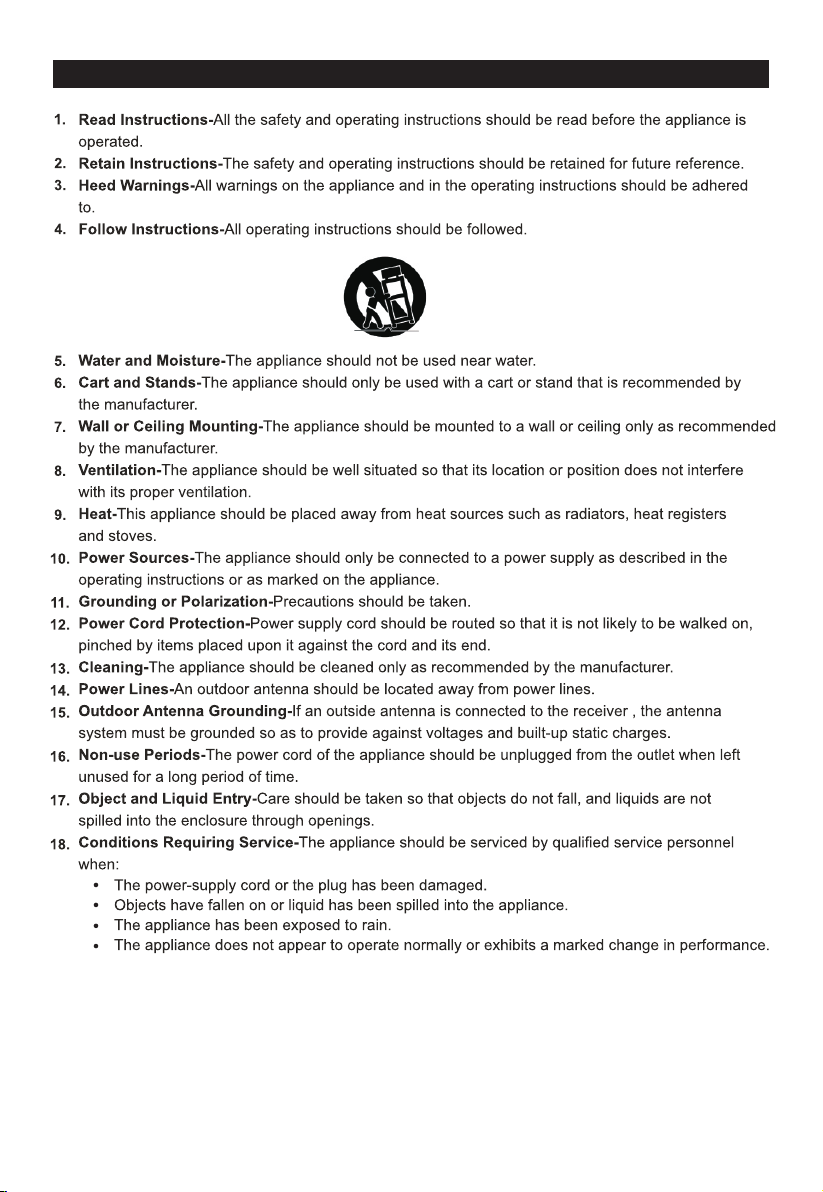
19. The ventilat ion s hould not be impede d by co vering the ventil ati on opening with ite ms, s uch as
newspapers, ta ble -cloths,curta ins ,etc.
No naked flam e sou rce s, such as lighted ca ndl es, should be place d on th e apparatus.
The appa rat us shall be connect ed to m ains socket outle t wit h a protective eart hin g con nection.
The appl ian ce coupler regard a s dis connection devi ce, t he di sconnect dev ice s hal l remain readi ly
operable.
3
Page 5

Safety Instruction
4
Page 6
Safety Instruction
5
Page 7
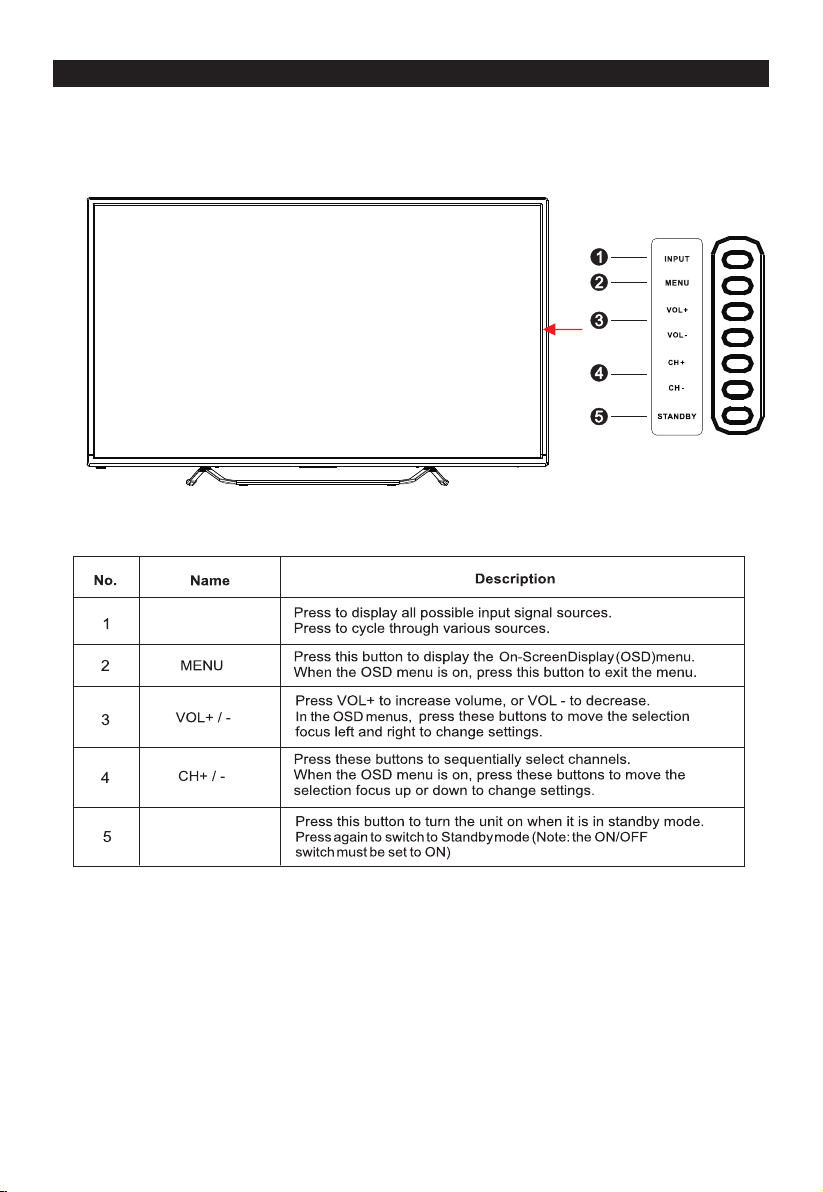
Overview (Controls and Connections)
INPUT
STAN DBY
6
Page 8
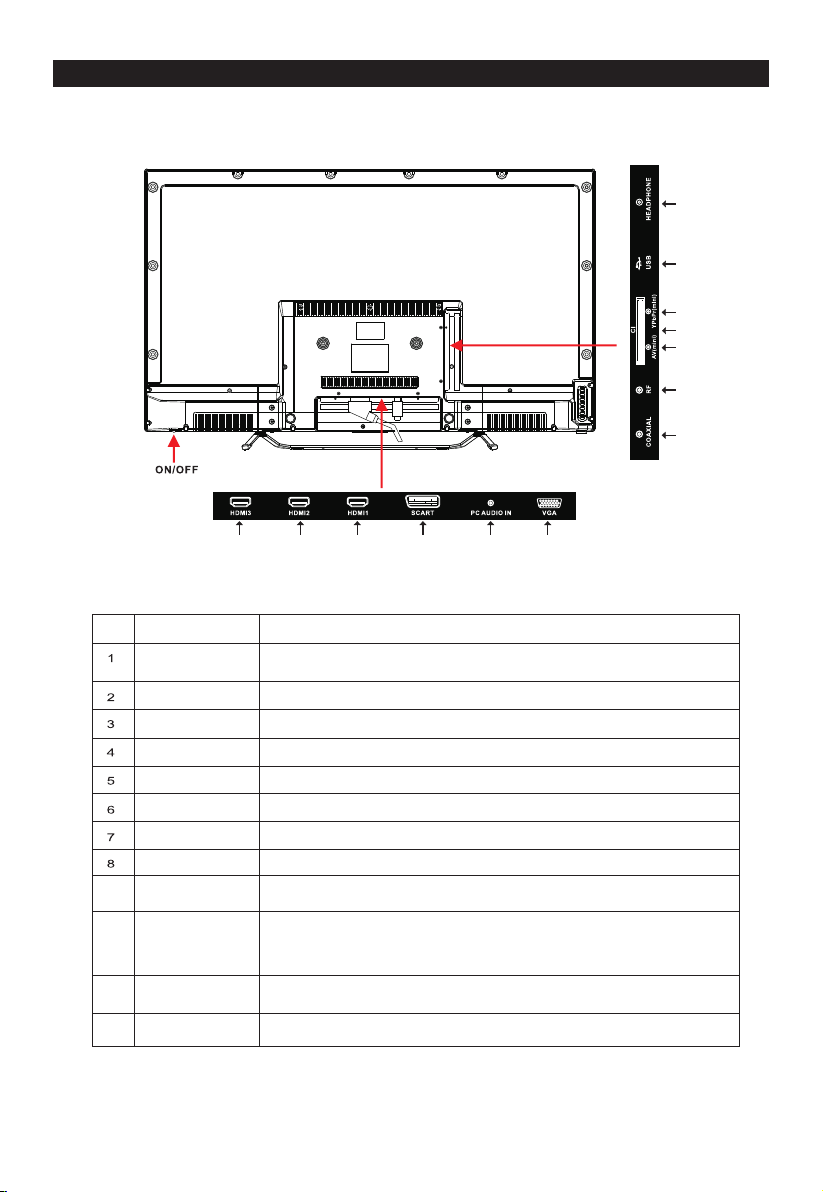
Overview (Controls and Connections)
Rear Panel
12
1 1
3
8 9 10 11
6 7
5
421
9
10
11
12
NameNo.
HDMI
SCART
PC AUDIO IN
VGA
COAXIA L
RF
AV IN
CI
YPbPr
USB
HEADPHONE
ON/OFF
Description
High Defini tion Multime dia Interfac e for digital vi deo and audio
connectio n to HDMI enable d devices.
Connectin g for SCART signal.
Connect PC au dio output of yo ur personal co mputer.
Connect the P C VGA signal outp ut of your perso nal computer.
Connect the S PDIF receive r.
Connect to an tenna or to wall p late antenna c onnection.
Audio/vid eo input inter face.
Used to inser t the CI card.
Connect com posite Vi deo output of yo ur AV devices h ere.
The Multi-M edia files wil l be played, whe n the memory sto rage
is connecte d to the USB slot on t he rear side of th e TV.
(Supports o nly PHOTO &MUSIC&MOV E file formats )
Audio outpu t to headphone s.
Tur n on or off TV set.
7
Page 9
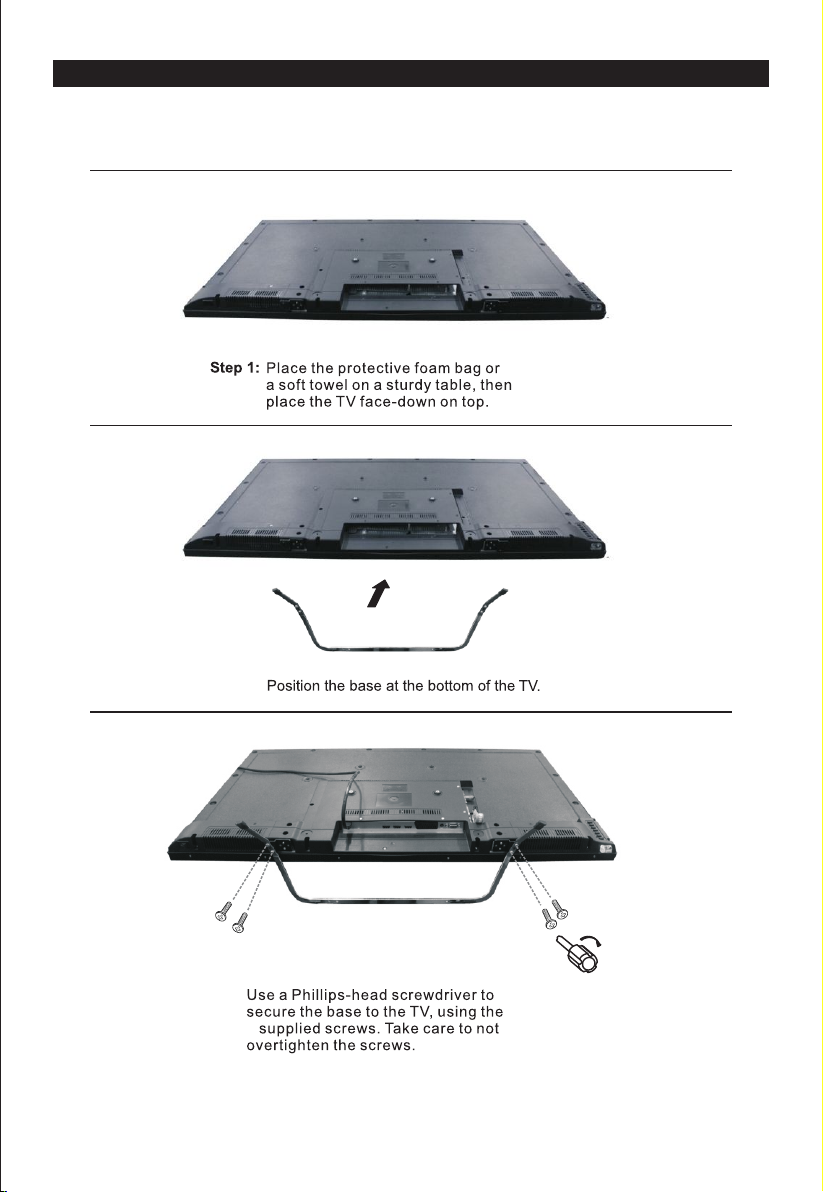
Base Assembly Instruction
NOTE: You will need a Phillips head (crosshead) screwdriver and a sturdy bench or table area
assembly of the base.(to complete the two person assembly )
Step 2:
Step 3:
4
Note: The screws will be in accessories bag in the carton box.
8
Page 10
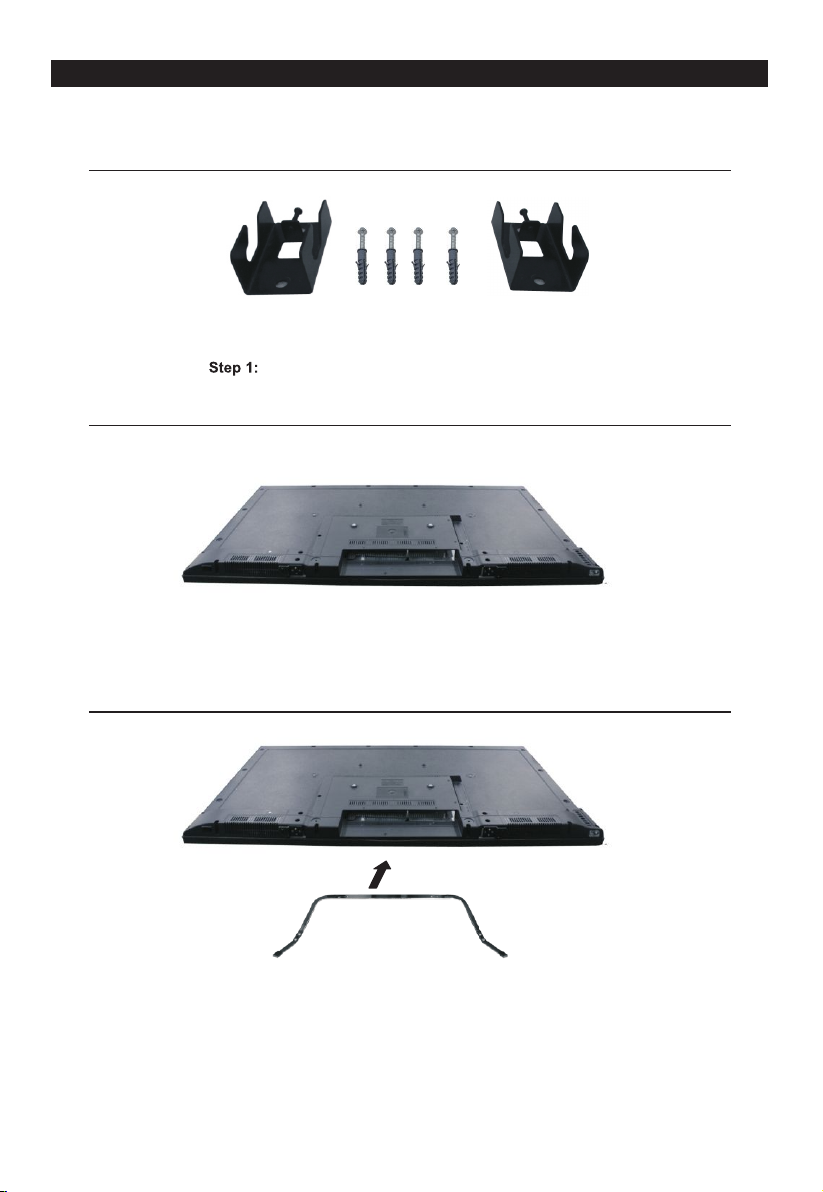
Base Assembly Instruction
Wall mount assembly manual:
As picture show, setup 4pcs screw with metal on the wall.
Step 2:
Use TV on the flatwise
Step 3:
Use wall mount to setup with screw as picture show
9
Page 11

Base Assembly Instruction
4
Hold that 2pcs screw on TV
Use 2 parts as picture show
Step 5:
Step 6:
Use mat as picture show
10
Page 12

Base Assembly Instruction
Step7:
Use metal as picture show
11
Page 13

Remote Control
3
4
7
6
12
15 16
14
18
19
20
22
25
24
23
26
33
31
32
34
37
38
39
Press repeatedly to toggle between the two channels.
NICAM /A2
5
9
Switch between NICAM audio modes in Analog TV mode ,
and DTV Audio Language.
8
Press repeatedly to toggle between options.
13
Change between picture mode settings.
17
DISPLAY
Displays the system state information set by the active user.
FREEZE
Static frame the projected image function.
21
29
28
27
30
35
36
40
42
MEDIA
41
View media content of the connected USB device.
TEXT
Open or close the text display.
OK
OK
Use the coloured buttons to select the options shown on screen.
12
Page 14

Remote Control
3
HOLD
Hold the current page and prevent against being
updated. Press to fast forward in storage mode.
4
7
6
12
15 16
14
18
19
20
22
25
24
23
26
33
31
32
34
37
38
39
5
9
8
13
INDEX
Press to skip the backward in storage mode and also
press this key to ask for the list of main TV letter
broadcast page number..
30.
17
31.
32.
S.TITLE
Open teletext subtitle.
21
29
28
27
35
40
42
33.
34.
35.
30
36
41
FAV
Open sto rag e channel
13
Page 15

Remote Control
Remote Control Battery Replacement
1
-
AAA
2
+
+
AAA
-
3
14
Page 16

Channel Selection
Watching tel evision progra ms
Connect the power cord, press button to power on the television, then press
the SOURCE button to select TV channel mode to watch television programs.
1. For program numbers 0-9:
Press the program's number.
2.If you want to select program number
10-199 from:Press ”-” button first,
and input the channel number, e.g.
select channel 12.
Scrolli ng through chann els
Use the "CH+/CH-" buttons on the TV or on the remote control to
scroll through channels in sequence.
1
12
15
Page 17

Channel Return
Channel return
Press" " button to return to the
previously selected program.
Volume control
Use the "VOL+/VOL-" buttons on the TV or on
the remote control to adjust the volume.
MUTE func tion
Press MUTE button to turn off the sound.
Press the button again or press the volume
control button of the television panel or the
remote control for audio recovery.
Informa tion display
Press DISPLAY but ton o f the r emo te co ntr ol,
then it will display the current program number,
current input mode and other relevant information.
16
13
Page 18

Power On/Off
1. Connect the TV to power source using power cord.
When the power indicator is red , the TV is in standby mode. Now press the button on
remote Control or button on front panel to turn on the TV. The power indicator should
turn green.
3. To switch the TV b ack t o sta ndb y mod e, ju st pr ess P OWE R but ton o n the r emo te co ntr ol
or the POWER button on front panel. Now the indicator will be red.
4. If unused for a long time in standby mode, please disconnect the power cord from the
wall outlet.
Note: The TV set can turn off automatically after 10 minutes while there is no signal input.
Select Viewing Source
Press SOURCE button to display the input source list.
Press / to highlight the input source and press OK button to confirm.
Press EXIT button to hide the On-Screen menu, or it will disappear after seconds.
Note:Please make sure the connection for your choice is available
17
Page 19

PICTURE Menu
“ ”
“ ”
“ ”
“ ”
“ ”
“ ”
“ ”
Contr ast Booster
Press button to select Contrast Booster.
“ ”
Press button to select Off and On.
“ ”
Press OK button to enter the Colour Temperature menu..
“ ”
Press button to select, Cool, Normal, Warm .
“ ”
Press MENU button to return to the previous menu.
“ ”
Adjus ting the DNR
Press button to OK the menu and press button to select among: Off,
“ ”
Low, Middle and High.
“ ”
18
Page 20

SOUND Menu
“ ”
“ ”
“ ”
(“Standard”,“Music”,
“ “
Movie”, User”)that are preset at the
factory.
“ ”
“ ”
Music: Em phasizes music over voices.
User: User defined.
User settings for SOUND( Treble)Bass,
Your s et ha s sev era l set tin g whi ch al low y ou to c ont rol S OUN D qua lit y.
1, Press key to select a sound item.
2, Press key to decrease of increase the value of a sound item.
“ ”
“ ”
Bass: Pre ss but ton to a djus t the
balance of TV.
Tre ble: P ress b utto n to adj ust th e
tre ble of TV.
“ ”
“ ”
“ ”
“ ”
Surround
Press key to select “Surround”.
“ ”
Press key to select “On”or“Off”.
“ ”
AVL
Press key to select “Auto Volume”option.
“ ”
Press key to select “On”or“Off”.
“ ”
19
Page 21

SOUND Menu
Digit al Audio O utput
Press “ ” button to select among PCM, Auto, Off.
Reset
Recall the default setting.
20
Page 22

APPLICATIONS Menu
APPLICATIONS
APPLICATIONS
APPLICATIONS
“ ”
Channel
Press ▲/▼ button to select Channel, and then press ENTER button to play
the channel selected. The menu will appear as follows:
Key Description:
CH button: Press CH+ or CH- to turn the page.
RED button: Press this button to modify the channel number.
GREEN button: Press this button to move down the channel.
YELLOW button: Press this button to the order to restore the default channel.
GREEN button: Press this button to delete the channel selected.
0-9 button: Press these buttons to jump to the appropriate channel by inputting
different channel number.
21
Page 23

APPLICATIONS Menu
Press ▲/▼ button to select Channel Options, and then press ENTER button to the
channel List menu. The menu will appear as follows:
Key Description:
CH button: Press CH+ or CH- to turn the page.
RED button: Press this button to set the favorites channels.
GREEN button: Press this button to lock the channel.
YELLOW button: Press this button to skip the channel, if the channels already skipped,
press YELLOW button again will cancel skip.
Country
Press ▲/▼ button to select Country, and then press ◄/►button to select which area
you stay.
DTV Type
Press ▲/▼ button to select DTV Type, then press ◄/► button to select.
(Available DTV Type: Cable, Terr est ria l)
Auto Tuning
Press ▲/▼ button to select Auto Tuning, and then press ENTER button to enter
(When the System Lock is on, please input the PIN code to unlock).
Select to open the auto searching page, and press Enter button to start the scan.
Note: Only channels with sufficient signal strength willtuned in; check your antenna
if channels are missingafter Auto Tuning.
ATV Manual Tuni ng
Press ▲/▼ button to select ATV Manual Tuni ng, a nd th en pr ess E NTE R but ton t o sta rt
the scan.
DTV Manual Tuning
Press ▲/▼ button to select DTV Manual Tuning, and then press ENTER button to start
the scan.
Common Interface
Press ▲/▼ button to select Common Interface, and then press ENTER button to
display the CI slot Information.
22
Page 24

APPLICATIONS Menu
DTV Settings
Press ▲/▼ button to select DTV Settings, and then press ENTER button to enter.
Then will appear as follows :
Programme Timers
Press ▲/▼ button to select Programme ,and then press ENTER button to enter.
Then will appear as follows :
Press the OK key to enter the reservation recording / viewing time setting
Guide
Press ▲/▼ button to select Guide, and then press ENTER button to enter.
Then will appear as follows :
23
Page 25

PREFERENCES Menu
PREFERENCES
The picture is for a reference only; the actual item is the standard.
Press MENU button to display the main menu.
Press ▲/▼ button to select PREFERENCES in the main menu, and then press ENTER
or ► to enter.
1.Press ▲/▼ button to select the option that you want to adjust in the PREFERENCES
menu, then press ENTER to enter.
2.Press ◄/►button to adjust or press ▲/▼button to select.
3.After finishing your adjustment, press MENU button to save and return back to the
previous menu and press EXIT button to exit the entire menu.
Menu Language
Press ▲/▼ button to select Menu Language, then press ENTER or ► button to enter the
sub menu, then press ▲/▼ button to select, then press ENTER or ► button to confirm.
Teletext Language
Press ▲/▼ button to select Teletext Language, then press ENTER or ► button to enter
the sub menu, then press ▲/▼ button to select, then press ENTER or ► button to confirm.
Key Lock
Press ▲/▼ button to select Key Lock, then press ENTER button to enter and press ◄/►
button to select ON or OFF.
PC Settings
Press ▲/▼ button to select PC Settings, then press ENTER to enter the sub menu, Then
Press ► to enter, then press ENTER or ► to confirm. (When the PC signal is connected).
PIN Setting
Press ▲/▼ button to select PIN Setting, then press ENTER button to enter the sub menu,
and than you can set a password.
Parental Control
Press ▲/▼ button to select Parental Control, then press ENTER or ► button to enter
the sub menu. Then press ▲/▼ button to select Rate (From4-17, or None). Then press
ENTER or ► button to confirm.
24
Page 26

SETUP Menu
SETUP
The picture is for a reference only; the actual item is the standard.
Press MENU button to display the main menu.
Press ▲/▼ button to select Setup in the main menu, then press ENTER to enter.
1.Press ▲/▼ button to select the option that you want to adjust in the Setup menu, then
press ENTER or ► button to enter.
2.Press ◄/►button to adjust or press ▲/▼button to select.
3.After finishing your adjustment, press MENU button to save and return back to the
previous menu and press EXIT button to exit the entire menu.
OSD Timer
Press ▲/▼ button to select OSD Timer, and then Press ◄/►button to select. (Avai lab le
OSD Timer: 10 S, 20 S, 30S, 40S, 50S, 60S, off), then press ENTER button to confirm.
Cinema
Press ▲/▼ button to select Cinema, and then Press ◄/►button to select. (Available
Cinema: Auto, 4x3, Wide, Super Live), then press ENTER button to confirm.
Blue Screen
Press ▲/▼ button to select Blue Screen, then press ◄/► to select On or Off. Then
press ENTER to confirm.
Sleep Timer
Press ▲/▼ button to select Sleep Timer, and then Press ◄/►button to select.
(Available Sleep Timer: 00:15, 00:30, 01:00, 01:30, 02:00, off ), th en pr ess E NTE R
button to confirm.
Location
Press ▲/▼ button to select Location, and then Press ◄/►button to select Home or
Store, then press ENTER button to confirm.
Quick Setup
Press ▲/▼ button to select Quick Setup, and then Press then press ENTER button to
enter the sub menu, enter the password if locked, and then you can quickly make some
basic settings of the TV.
Reset TV
Press ▲/▼ button to select Reset TV, and then press ENTER to enter the sub menu,
enter the password if locked, and then you can restore factory settings.
25
Page 27

MEDIA Options
,BMP
M4A
MKV, MP4, AVI
26
Page 28

MEDIA Options
The picture is for a reference only; the actual item is the standard.
Note: Before operation MEDIA menu, Plug in USB device or memory card, then press
SOURCE button to set the Source to Media.
Press ▲/▼ button to select MEDIA in t he So urc e Men u, an d the n pre ss EN TER o r ►
to enter. You can also enter the Media by pressing MEDIA button on the remote control.
1.Press ▲/▼ button to select the option that you want to adjust in the Media menu, then
press ENTER or ► button to enter.
2.Press ◄/►button to adjust or press ▲/▼button to select.
3.After finishing your adjustment, press MENU button to save and return back to the
previous menu and press EXIT button to exit the entire menu.
27
Page 29

MEDIA Options
The picture is for a reference only; the actual item is the standard.
Press ◄/►button to select Music in the main menu, and then press ENTER button to enter.
Press EXIT button to return back to the previous menu.
Press ▲/▼ to select the photos, press ENTER or ►║ button to view.
You ca n see t he in for mat ion o f the c urr ent p lay ing p hot o aft er pr ess I NFO b utt on, t hen
press ►║button to play or pause, you can see the playing state in the right.
Then press ▲/▼or ◄/► button to ratite the picture.
Notes: Other menu and description are the same as that for Movie menu.
Movie
The picture is for a reference only; the actual item is the standard.
Press ◄/►button to select Movie in the main menu, then press ENTER button to enter.
Press EXIT button to return back to the previous menu.
28
Page 30

MEDIA Options
Press ▲/▼button to select the folder that you want to view.
Press ENTER button to select the sub folder.
Press ENTER button or ►║ button to play,
Press ■ button or EXIT button to stop playing.
Press the ◄ button to return back to previous page.
You ca n see t he in for mat ion o f the c urr ent p lay ing m edi a at th e fir st fl ew se con d or af ter
press DISPLAY but ton .
Music
The picture is for a reference only; the actual item is the standard.
Press ◄/►button to select Music in the main menu, and then press ENTER button to enter.
Press EXIT button to return back to the previous menu.
Press ▲/▼button to select the sonny you want to listen, and then press ENTER or ►║
or ► button to play.
Press ◄ button to return back to the previous menu.
You ca n see t he in for mat ion o f the c urr ent p lay ing s onn y at th e lef t of th e men u.
29
Page 31

MEDIA Options
Setup
The picture is for a reference only; the actual item is the standard.
Press ◄/►button t o select Set up in the main m enu, and the n press ENTE R
butto n to enter.
Press EX IT button to r eturn back t o the previo us menu.
Press ▲/▼button to select the option, and then Press ◄/► button to select Disk.
30
Page 32
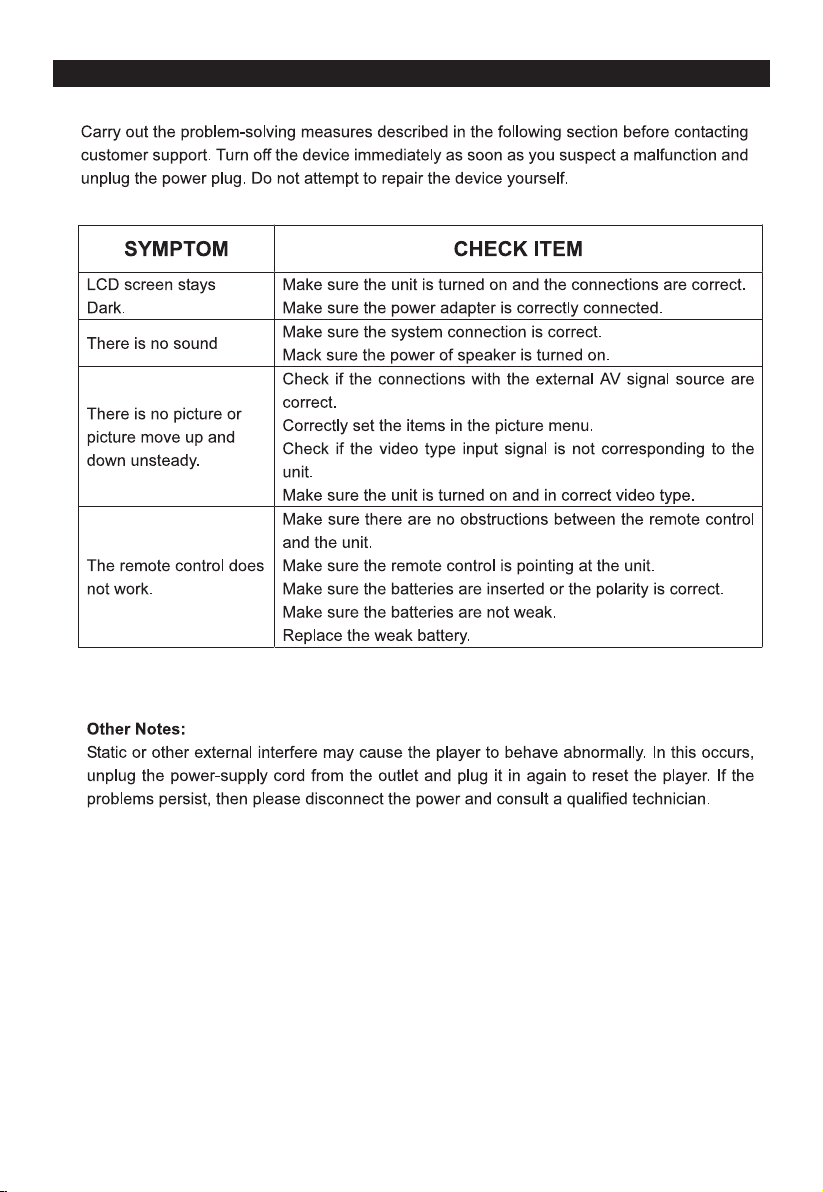
Troubleshooting
31
Page 33

Specifications
Produc t Mode l
Aspect R atio
Displa y Reso lution
Color
Bright ness
Contra st
Analog
Power Su pply
Power Co nsum ption
Extern al Siz e
Net Weight
Gross Weight
Inputs
Output s
Includ ed Acce ssories
(Note: S pec ifcatio ns to chang e without n oti ce,the pr oducts ar e subject t o mat erial obj ect, the po wer
of inter pre tation be longs to ou r company )
STV-LC4 2T91 0FL
16:9
1920(H )x10 80(V)pi xels
16.77m illi ons
300cd/ m
(Typica l)
PAL. SECAM.B /G.D /K
AC 100-2 40V,50/60 Hz
W
1040mm (L)X 160mm(W )x64 0mm (H)
KG
KG
HDMI con nect orx3
VGA Inp ut x1
Vid eo Input x1
VGA-Au dio In X 1
YPbPr In put x1
USB x1
SCART x1
Headph one x1
User Man ual x1
Remote c ontr ol x1
WAR RANT Y x1
batter y x2
2
32
Page 34

Specifications
Produc t Mode l
Aspect R atio
Displa y Reso lution
Color
Bright ness
Contra st
Analog
Power Su pply
Power Co nsum ption
Extern al Siz e
Net Weight
Gross Weight
Inputs
Output s
Includ ed Acce ssories
(Note: S pec ifcatio ns to chang e without n oti ce,the pr oducts ar e subject t o mat erial obj ect, the po wer
of inter pre tation be longs to ou r company )
STV-LC4 0T91 0FL
16:9
1920(H )x10 80(V)pi xels
16.77m illi ons
300cd/ m
(Typica l)
PAL. SECAM.B /G.D /K
AC 100-2 40V,50/60 Hz
W
995mm( L)X1 60mm(W) x605 mm( H)
KG
KG
HDMI con nect orx3
VGA Inp ut x1
Vid eo Input x1
VGA-Au dio In X 1
YPbPr In put x1
USB x1
SCART x1
Headph one x1
User Man ual x1
Remote c ontr ol x1
WAR RANT Y x1
batter y x2
2
33
Page 35

www.supra.ru
 Loading...