

Page 1
O W N E R ’ S G U I D E
Winch-In-A-Bag™ 2000 LB 907 kg
CAUTION
!
READ AND UNDERSTAND THIS GUIDE BEFORE
12 Volt DC Electric Winch
INSTALLATION AND OPERATION.
Superwinch, Inc.
Winch Drive
Putnam, CT 06260
U.S.A.
Tel: (860) 928-7787
Fax: (860) 963-0811
e-mail: info@superwinch.com
www.superwinch.com
Unit D, Union Mine Road
Tel: 44 (0) 1822 619222
Fax: 44 (0) 1822 615204
e-mail: sales@superwinch.net
Superwinch, Inc.
Pitts Cleave Ind Est
Tavistock, Devon
PL19 OPW England
www.superwinch.com
Throughout this manual, you will find notations with the following headings:
DANGER
!
WARNING
!
CAUTION
!
The following symbols on the product and in the Owner's manual are used:
Read Owner's
Manual
Note: Indicates additional information in the installation and operation procedures of your winch.
Correct installation of your winch is a requirement for proper operation.
Please Note: Winch is designed primarily for intermittent applications. This winch is not designed to
be used in industrial or hoisting applications and Superwinch do
such use.
87-17442 Rev - 5/09/09
Indicates an imminently hazardous situation which, if not avoided,
will result in death or serious injury.
Indicates a
could result in death or serious injury.
Indicates a potentially hazardous situation which, if not avoided,
may result in minor or moderate injury. This notation is also used
to alert against unsafe practices.
Always Use
Handsaver
potentially hazardous situation which, if not avoided,
Keep clear of winch,
wire rope and hook
while operating
Never use winch
to lift or move
people
es not warrant it to be suitable for
Never use
winch to hold
loads in place
1
Page 2

ALWAYS USE THE
HANDSAVER
guiding the
rope in
Figu re 2
out
or
when
wire
(See
Figure
2).
NEVER HOOK THE WIRE ROPE
BACK ONTO ITSELF because you
could damage the wire rope.
Use a nylon strap (Figure 3).
winch.
13. Your winch is not intended for
overhead hoisting operations.
14.
AVOID CONTINUOUS PULLS
FROM EXTREME ANGLES as this
will cause the wire rope to pile
up on one end of the drum
(Figure 5). This can jam the wire
rope in the winch, causing damage to the rope or the winch.
Right
W
rong
Right
G E N E R A L S A F E T Y
I N F O R M AT I O N
Your winch is a very powerful
machine. If used unsafely or
improperly, there is a possibility
that property damage or personal
injury could result.
WARNING
!
tion and operation of the winch and
prevention of personal injury and
property damage ultimately rests
with you, the operator. There is
no substitute for the use of good
judgement and caution in operating
a winch.
WARNING
!
the winch stalls.
The responsibility
for safe installa-
The wire rope
may break before
ALWAYS STAND CLEAR OF STRAPS,
4.
WIRE
ROPE, HOOK AND WINCH. IN THE
UNLIKELY EVENT OF ANY COMPONENT FAILURE IT‘S BEST TO BE
OUT OF HARM‘S WAY.
5. INSPECT WIRE ROPE, STRAPS AND
EQUIPMENT FREQUENTLY.
STRAP OR WIRE ROPE WITH BROKEN
A FRAYED
STRANDS SHOULD BE REPLACED
IMMEDIATELY.
Always replace wire rope with
the manufacturer‘s identical
replacement part (S ee Replacement
Parts List).
Periodically check the winch
installation to ensure that all
bolts are tight.
6.
USE HEAVY LEATHER GLOVES
when handling wire rope. DO
NOT LET WIRE ROPE SLIDE
THROUGH YOUR HANDS.
10.
7. NEVER WINCH WITH LESS THAN 5
Figure 5
15. NEVER OBSCURE THE WARNING
INSTRUCTION LABELS.
16. Always operate winch with an
unobstructed view of the winching operation.
17. Equipment such as tackle,
straps, etc.
winching
periodically
that
should be sized
task and should
inspected
could reduce
their strength.
be
damage
for
hooks,
the
to
18.
NEVER RELEASE FREESPOOL
CLUTCH WHEN THERE IS A
LOAD
ON THE WINCH.
1. Maximum working load capacity
is on the wire rope layer closest
to the drum. DO NOT OVERLOAD. DO NOT ATTEMPT PROLONGED PULLS AT HEAVY
LOADS. Overloads can damage
the winch and/or the wire rope
and create unsafe operating conditions.
The vehicle engine should be
running during winch operation. If considerable winching is
performed with the engine off,
the battery may be too weak to
restart the engine.
2.
AFTER READING AND UNDERSTANDING THIS MANUAL, LEARN
TURNS of wire rope AROUND THE
WINCH DRUM since the wire rope
end fastener may NOT withstand
a
full load.
KEEP CLEAR OF WINCH,
8.
WIRE ROPE AND HOOK WHEN
OR
TAUT STRAP
OPERATING WINCH.
Never put your finger
through the hook. If
your finger should
become trapped in
lose
could
your finger.
the hook, you
9. Keep Hands away from PINCH
POINTS (Figure 1).
Wrong
Figure 3
Right
11. It is a good idea to lay a heavy
blanket or jacket over the wire
rope near the hook end when
pulling heavy loads (Figure 4). If
a wire rope failure should occur,
the cloth will act as a damper
and help prevent the rope from
whipping.
TO USE YOUR WINCH.
19.
After installing the winch,
practice using it so you
will be
familiar with it
when the need arises.
3. DO NOT “move” your vehicle to
assist the winch in pulling the
load. The combination of the
winch and vehicle pulling together could overload the wire rope
Figure 1
Figu r e 4
12.
NEVER USE YOUR
WINCH FOR LIFTING
MOVING
OR
PEOPLE.
NEVER WORK ON OR AROUND
THE WINCH DRUM WHEN
IS
UNDER LOAD.
20. DO NOT OPERATE WINCH
UNDER THE INFLUENCE OF DRUGS,
ALCOHOL OR
MEDICATION.
WINCH
WHEN
and the winch.
2 3
rong
W
Page 3

21 . ALWAYS DISCONNECT WINCH
POWER LEADS TO BATTERY
BEFORE WORKING IN OR
AROUND THE WINCH DRUM so
that the winch cannot be turned
on accidentally.
22. When moving a load, slowly
take up the wire rope slack until
it becomes taut. Stop, recheck
all winching connections. Be
sure the hook is properly seated.
If a nylon sling is used, check the
attachment to the load.
23. When using your winch to move
a load, place the v
ehicle transmission in neutral, set vehicle
brake, and chock all wheels.
24. DO NOT USE THE WINCH TO
HOLD LOADS IN PLACE.
Use other means of
securing loads such
as tie down straps.
25. USE ONLY FACTORY APPROVED
SWITCHES, REMOTE CONTROLS
AND ACCESSORIES. Use of nonfactory approved components
may cause injury or property
damage and could void your
warranty.
26. DO NOT MACHINE OR WELD
ANY PART OF THE WINCH. Such
terations may weaken the
al
structural integrity of the winch
and could void your warranty.
27 . DO NOT CONNECT WINCH TO
EITHER 110V AC HOUSE CURRENT OR 220V MAINS AS WINCH
BURNOUT OR FATAL SHOCK
MAY OCCUR.
28.
NEVER
allow
shock loads to be
applied to winch or wire rope.
29.
Use caution when pulling or
lowering
a load up down
or
a
ramp or incline. Keep people,
pets and property clear of the
path of the load.
4
I N S TA L L A T I O N
Correct installation of your winch is
required for proper ope
WARNING
!
the wire rope in the under
Improper mounting
your winch and void
Note: When installing winch, your installation may vary slightly from the instructions and diagrams that follow, depending upon your vehicle, winch mounting
or structure support. Always take time to
assess your situation and plan your pull.
Step (1)
Unpack all components near the
vehicle with the battery to be used
for the winch.
Batteries contain
WARNING
!
gasses which are
flammable and explosive. Wear eye
protection during installation and
remove all metal jewelry. Do not lean
over battery while making connections.
Step (2)
The winch electrical hookup is simple.
!
Insert the yellow connector on the
han
d held remote to the yellow connector
on the winch. Insert the gray connector
on the handheld remote to the gray
connector on the battery jumper cable or
the permanent battery cable connection.
Note: The permanent battery cable
connection should be installed prior to
use of winch. Attach the circuit breaker
directly to battery end of the permanent
battery connection (RED) and then
attached the RED wire from the circuit
breaker directly to the battery positive
terminal.
wire from the permanent battery
Connect the Black coded
connection to the battery negative
terminal.
electrical tape to prevent short circu ts.
Wrap the Circuit Breaker with
(See Figure 6).
ration.
This winch MUST
be mounted
wind direction.
could damage
your warranty.
with
i
WARNING
!
the Switch MUST
NOT interfere with safe operation of
the vehicle and winch. Wiring MUST
NOT come in contact with any moving
parts or sharp edges, such as engine,
winch drum, wire rope, straps,
suspension, brakes, exhaust or steering.
Figure 6
The location of
Circuit Brea
ker
If using the temporary battery jumper
connection; attach the RED connector
to the positive terminal on the battery
and attach the BLACK connector to the
negative terminal on the battery.
7
(See Figure ).
CAUTION
!
The wire MUST BE
vehicle to make sure it does not get
caught under the vehicle during
winching. DISCONNECT the battery
jumper from the battery when not
in use.
Figure 7
Step (3)
Secure 4’ tree-saver strap through
tow hook, chassis frame or similar
structure of the vehicle. Make sure
routed over the
that the strap will not come in con-
tact with any sharp or hot edges or
objects. Feed shackle through loop
on both ends of strap. Attach shackle
to winch mount plate. (See Figure 8).
DO NOT use strap in a “Choker” manner such that it loops back onto itself.
shackle
Figure 8
WARNING
!
DO NOT use a pulley
product.
this
block to double line
Step (4)
Pull and turn the clutch knob to the
” position as shown in Figure
“Free
9
If there is a load on the wire rope, the
clut
ch knob may not pull out easily.
DO NOT FOR
CE THE CLUTCH KNOB.
Release tension on the clutch by jogging
out
some of the wire rope. Release the
clutch
and pull out the wire rope and
extend to anchor point or load.
Always use the supplied hand saver
to hold the hook when spooling the
rope in or out. Check that there are at
least five (5) turns of wire rope left
on the drum. Re-engage the drum by
returning the clutch knob to the
“Engaged” position. (See Figure 9).
.
5
Page 4
CAUTION
!
winching. NEVER engage clutch knob
while drum is turning.
Figure 9
Clutch must be fully
engaged before
1
2
Engaged
1
2
Dis-engaged
Step (5)
Secure 6’ tree-saver strap around
load,
another vehicle, solid structure or anchor
point. Make sure that the strap will not
come in contact with any sharp or hot
edges or objects. Attach the winch hook
through loop on both ends of strap.
(See Figure 10). DO NOT use strap in a
“Choker” manner such that it loops
back onto itself.
I N T E R M I T T E N T D U T Y
An electric winch is like any other
motor driven power tool such as
an electric drill or saw. The electric
motor should not be allowed to
become excessively hot. Normal
precautions will extend the life of
your motor. Keep the duration of
pulls as short as possible.
If the end of the motor becomes
uncom
fortably hot to touch,stop
winching and allow the motor to cool
down. For further information and
complete warranty, visit our website
www.superwinch.com
R E P L A C E M E N T P A R T S L I ST
Figure 10
Step (6)
Power the winch in briefly and then
back out to make sure it is funtioning
properly. The system is now ready to
winch.
If the winch
CAUTION
!
motor stalls
DO NOT continue to apply powe
CAUTION
!
immediately after the winching
is complete to prevent accidental
operation of the winch during
system disassembly. Repack: Always
take time to properly disassemble
winch system and time to repack the
winch inside the storage bag.
Disconnect the
gray connectors
6
r.
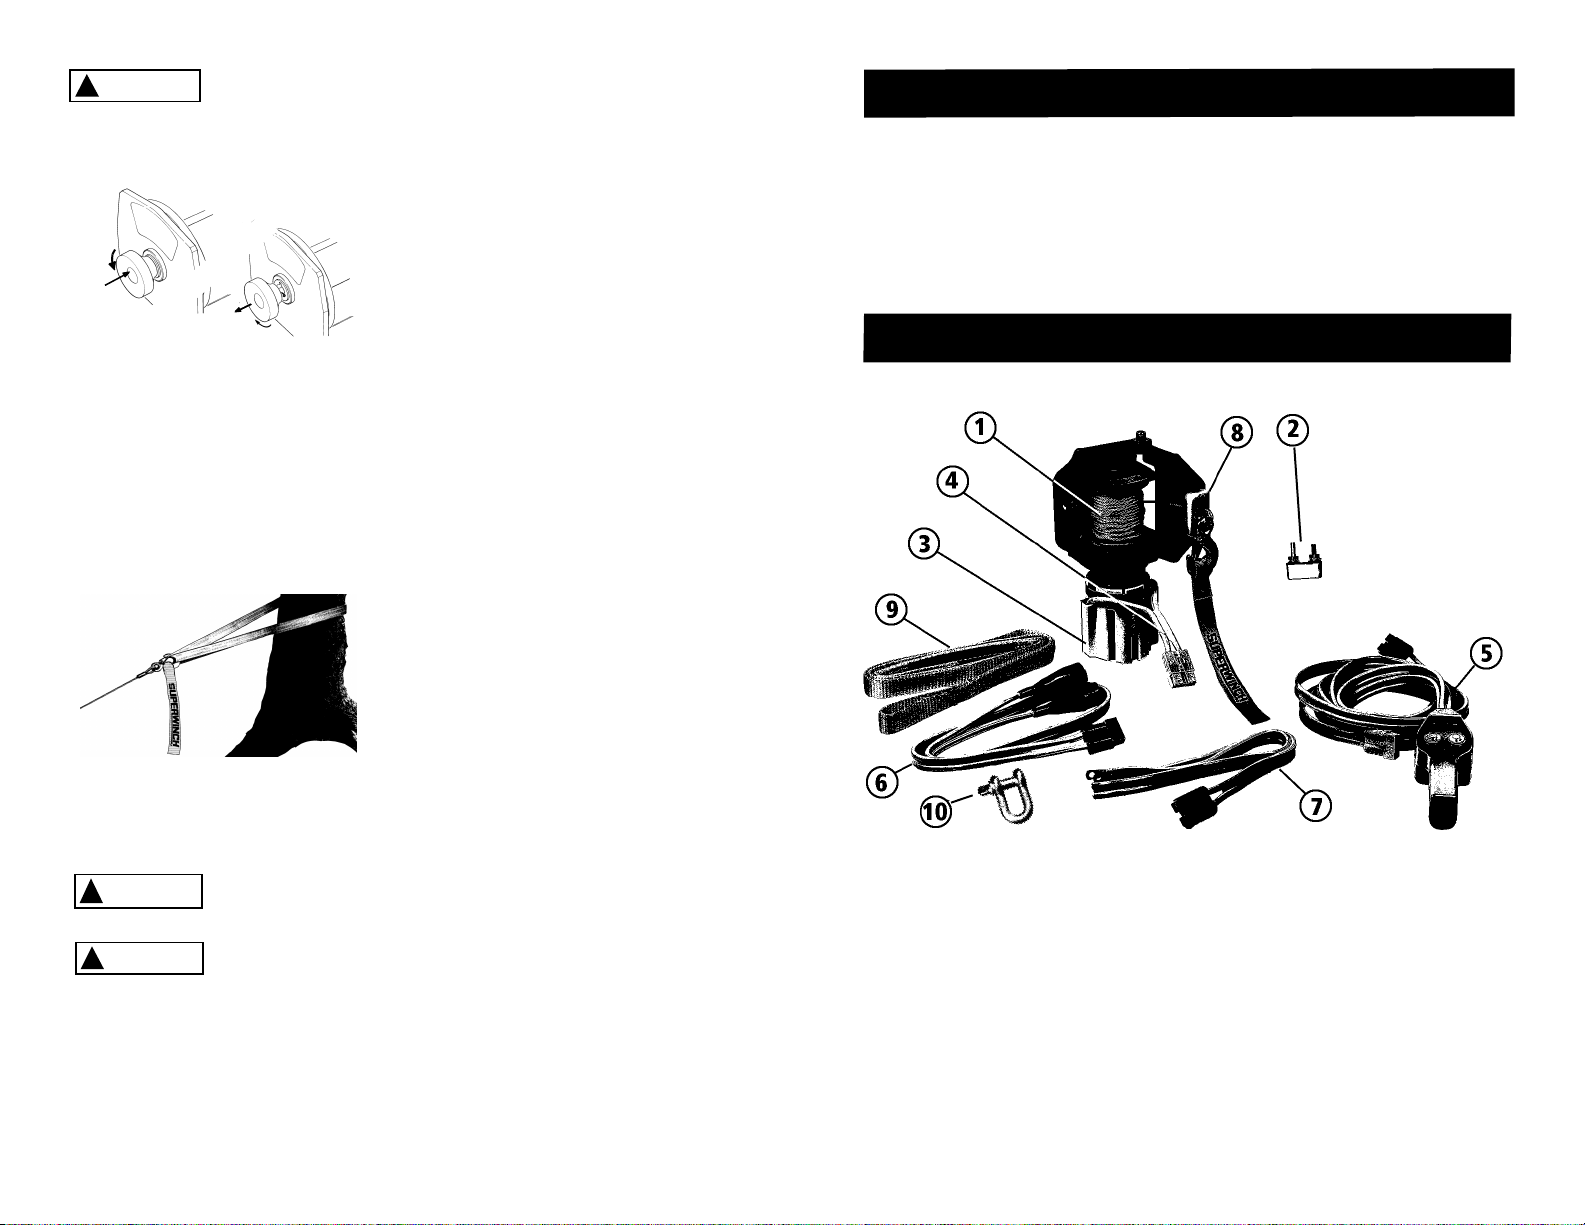
Reference No. Description Part Number
1 Wire Rope Assy2 Circuit Breaker Kit 87-10799
3 Motor Protector-WIAB 87-24532
4 Leadwire Assy-Motor-WIAB 87-24533
5 Remote Control-Handheld-WIAB 87-24534
6 Leadwire Assy-Jumper-WIAB
7 Leadwire Assy-Battery Direct-WIAB
8 Hawse-Teflon-WIAB-Pair
9 Str
10 Bow-Shackle-Pair ½” 2302285
ap-Tree-Saver 1” x 8’ 2302284
5/32 x 50 with permanent attached hook 1 535C
2202897
2202898
2202899
7
Page 5

G U I D E D E L ' U T I L I S A T E U
Treuil électrique 2 000 lb 907 kg
12 volts c.c. Winch-ln-A-Bag
ATTENTION
!
LISEZ ET COMPRENEZ BIEN CE GUIDE AVANT
L'INSTALLATION ET L'UTILISATION.
Superwinch, Inc.
Winch Drive
Putnam, CT 06260
É.-U.
Tél. : (860)928-7787
Téléc. : (860) 963-0811
Courriel : info@superwinch.com
www.superwinch.com
Tout au long de ce guide, vous rencontrerez les mentions suivantes :
DANGER
!
AVERTISSEMENT
!
ATTENTION
!
Les symboles suivants sont employés sur le produit et dans le Guide :
Indique une situation dangereuse imminente qui, si elle n'est pas évitée,
entraînerait la mort ou des blessures graves.
Indique une situation dangereuse potentielle qui, si elle n'est pas évitée,
pourrait entraîner la mort ou des blessures graves.
Indique une situation dangereuse potentielle qui, si elle n'est pas évitée,
pourrait entraîner des blessures mineures ou modérées. Cet avis sert
également à mettre en garde contre les pratiques dangereuses.
MC
Unit D, Union Mine Road
Tél. : 44(0) 1822 619222
Téléc. : 44(0) 1822 615204
Courriel : sales@superwinch.net
Superwinch, Inc.
Pitts Cleave Ind Est
Tavistock, Devon
PL19 0PW Angleterre
www.superwinch.com
.
Consultez le
Guide de
l'utilisateur
Remarque : Indique des renseignements supplémentaires concernant l'installation et l'utilisation de votre treuil.
L'installation adéquate de votre treuil est essentielle à son bon fonctionnement.
Veuillez noter : Ce treuil est principalement conçu pour un service intermittent. Il n'est pas destiné aux
applications industrielles ni au hissage; Superwinch ne garantit pas qu'il soit approprié pour ces utilisations.
Utilisez
toujours les
protège-mains
Tenez-vous éloigné
du treuil, du câble
métallique et du
crochet pendant
l'emploi
N'utilisez jamais
le treuil pour
soulever ou
déplacer une
personne
N'tilisez jamais
le treuil pour
maintenir une
charge en place
8
Page 6

É
CU RIT
É
S
SECRITE
GÉNÉRALE
Votre treuil est une machine très
puissante. Lorsqu'employé de façon
dangereuse ou inappropriée, il est
possible que des dommages matériels
ou corporels en résultent.
AVERTISSEMENT
!
En tant qu'utilisateur, vous êtes
ultimement responsable de
l'installation et de l'emploi sécuritaires
du treuil, ainsi que de la prévention des
dommages matériels et corporels. Rien
ne peut remplacer le jugement
judicieux et la prudence lors de
l'utilisation d'un treuil.
AVERTISSEMENT
!
Le câble
rompre avant que
1. La charge nominale maximale concerne
la couche du câble métallique située le
plus près du tambour. NE
SURCHARGEZ PAS. NE TENTEZ PAS
DE TIRER UNE CHARGE LOURDE
PENDANT UNE DURÉE PROLONGÉE.
Toute surcharge pourrait endommager
le treuil et/ou le câble métallique et
engendrer des conditions d'utilisation
dangereuses.
Le moteur du véhicule doit
fonctionner pendant l'utilisation du
treuil. En cas d'utilisation importante
du treuil pendant que le moteur est
éteint, la batterie pourrait devenir trop
faible pour redémarrer le moteur.
2. APRÈS AVOIR LU ET BIEN
COMPRIS CE GUIDE,
FAMILIARISEZ-VOUS AVEC LE
FONCTIONNEMENT DE VOTRE
TREUIL.
métallique
Après avoir installé le treuil,
exercez-vous à l'utiliser afin d'être
familier avec son fonctionnement
lorsque le besoin s'en fera sentir.
9
pourrait se
le treuil ne cale.
3. NE «DÉPLACEZ» PAS votre véhicule afin
d'aider le treuil à tirer sur la charge. La
combinaison du treuil et du véhicule tirant
ensemble pourrait surcharger le câble
métallique et le treuil.
4. TENEZ-VOUS TOUJOURS ÉLOIGNÉ DES
SANGLES, DU CÂBLE MÉTALLIQUE, DU
CROCHET ET DU TREUIL. DANS LE CAS
PEU PROBABLE QU'UNE COMPOSANTE
CONNAISSE UNE DÉFAILLANCE, IL EST
PRÉFÉRABLE D'ÊTRE HORS
D'ATTEINTE.
5. EXAMINEZ FRÉQUEMMENT LE CÂBLE
MÉTALLIQUE, LES SANGLES ET
L'ÉQUIPEMENT. UNE SANGLE
EFFILOCHÉE OU UN CÂBLE
MÉTALLIQUE PRÉSENTANT DES FILS
BRISÉS DOIT ÊTRE IMMÉDIATEMENT
REMPLACÉ(E).
Remplacez toujours le câble métallique par
une pièce identique du fabricant (voir Liste
des pièces de rechange).
Inspectez périodiquement
l'installation du treuil pour vérifier que
tous les boulons sont bien serrés.
6. PORTEZ DES GANTS DE CUIR ÉPAIS
pour manipuler le câble métallique. NE
LAISSEZ PAS LE CÂBLE MÉTALLIQUE
GLISSER ENTRE VOS MAINS.
7. N'UTILISEZ JAMAIS LE TREUIL
lorsque le câble métallique FAIT MOINS
DE 5 TOURS AUTOUR DU TAMBOUR,
car l'attache d'extémité du câble
métallique pourrait NE PAS résister à
une pleine charge.
8. TENEZ-VOUS ÉLOIGNÉ DU TREUIL ET
DE LA SANGLE OU DU CÂBLE
MÉTALLIQUE ET DU
CROCHET TENDUS
LORSQUE VOUS UTILISEZ
LE TREUIL. Ne placez jamais vos doigts
dans le crochet. Si votre doigt restait
coincé, il pourrait être arraché.
9. Tenez vos mains éloignées des
POINTS DE PINCEMENT (Figure 1).
Point de pincement
AVERTISSEMENT
!
UTILISEZ TOUJOURS LES PROTÈGEMAINS pour guider le câble métallique lors
de l'enroulement ou du déroulement (voir
Figure 2).
Figure 2
10. NE FIXEZ JAMAIS LE CROCHET
SUR LE CÂBLE MÉTALLIQUE, ce
qui pourrait endommager ce dernier.
Utilisez une sangle de nylon (Figure
3).
Incorrect
Figure 3
11. Il est judicieux de poser une
Tenir les mains
éloignées
Correct
couverture ou une veste épaisse sur
le câble métallique, près du crochet,
lorsque vous tirez une charge lourde
(Figure 4). En cas de défaillance du
câble métallique, le tissu servira
d'amortisseur et empêchera le câble
d'agir comme un fouet.
12. N'UTILISEZ JAMAIS
VOTRE TREUIL POUR
SOULEVER OU
DÉPLACER UNE
PERSONNE.
13. Votre treuil n'est pas conçu pour
soulever les charges à la verticale.
14. ÉVITEZ DE TIRER DE FAÇON
CONTINUE DEPUIS UN ANGLE
EXTRÊME, ce qui amènerait le câble
métallique à s'entasser à une extrémité
du tambour (Figure 5). Ceci pourrait
coincer le câble métallique dans le treuil,
endommageant ainsi le câble ou le
Incorrect
Figure 5
NE CACHEZ JAMAIS
15.
D'AVERTISSEMENT ET
16. Utilisez toujours le treuil avec une vue
LES ÉTIQUETTES
D'INSTRUCTION.
treuil.
Correct
10
Page 7

21. DÉBRANCHEZ TOUJOURS LES
FILS D'ALIMENTATION RELIANT
LE TREUIL À LA BATTERIE AVANT
DE TRAVAILLER SUR LE
TAMBOUR DU TREUIL OU À
PROXIMITÉ pour éviter que le treuil
ne soit accidentellement mis en
marche.
22. Lorsque vous déplacez une charge,
raidissez lentement les sangles et le
câble métallique jusqu'à ce que ce
dernier se tende. Arrêtez et vérifiez
de nouveau les raccordements.
Assurez-vous que le crochet est
solidement fixé. Si vous employez
une sangle de nylon, vérifiez qu'elle
est bien accrochée à la charge.
23. Lorsque vous utilisez votre treuil
pour déplacer une charge, mettez la
transmission du véhicule
au point mort, actionnez le
frein et calez chaque roue.
24. N'UTILISEZ PAS LE
TREUIL POUR MAINTENIR UNE
CHARGE EN PLACE. Employez
d'autres moyens d'attacher la
charge, p. ex. des sangles d'attache.
25. N'EMPLOYEZ QUE DES
INTERRUPTEURS,
TÉLÉCOMMANDES ET
ACCESSOIRES D'ORIGINE.
L'utilisation de composantes qui ne
sont pas d'origine pourrait entraîner
des blessures ou des dommages
matériels et annuler votre garantie.
26. N'USINEZ NI NE SOUDEZ
QUELQUE PARTIE DU TREUIL
QUE CE SOIT. De telles
modifications pourraient affaiblir
l'intégrité structurale du treuil et
annuler votre garantie.
27. NE BRANCHEZ LE TREUIL NI AU
COURANT DOMESTIQUE 110 V
C.A., NI AU RÉSEAU ÉLECTRIQUE
220 V, CAR LES CIRCUITS DU
TREUIL POURRAIENT GRILLER
OU UN CHOC ÉLECTRIQUE
MORTEL POURRAIT SURVENIR.
28. NE LAISSEZ JAMAIS une charge
11
dynamique être appliquée au treuil ou
au câble métallique.
29.
Usez de prudence lorsque vous tirez
ou descendez une charge le long
d'une rampe ou d'un plan incliné.
Tenez les personnes, animaux
domestiques et objets éloignés de la
trajectoire de la charge.
INS TA LLATI ON
L'installation adéquate de votre treuil est
essentielle à son bon fonctionnement.
!
AVERTISSEMENT
installé
avec le câble métalliqueen position
d'enroulement inférieur. Une installation
incorrecte pourrait endommager votre
treuil et annuler votre garantie.
Remarque : Lorsque vous installez le
treuil, il se peut que votre installation soit
légèrement différente des instructions et
diagrammes suivants, selon votre véhicule,
le montage du treuil et la structure de
support. Prenez toujours le temps
d'évaluer votre situation et de planifier
chaque utilisation.
Étape (1)
Désemballez chaque composante près du
véhicule dont la batterie servira à actionner
le treuil.
!
AVERTISSEMENT
Les batteries renferment des gaz
inflammables et explosifs. Portez des
lunettes de sécurité pendant l'installation et
retirez tout bijou métallique. Ne vous
penchez pas au-dessus de la batterie
pendant que vous effectuez les
branchements.
Étape (2)
Le branchement électrique du treuil est
simple. Insérez le connecteur jaune de la
télécommande manuelle dans le
connecteur jaune du treuil. Insérez le
connecteur gris de la télécommande
manuelle dans le connecteur gris du câble
de démarrage de la batterie ou du collier de
raccord de câble permanent.
Remarque : Le collier de raccord de câble
Ce treuil DOIT être
permanent devrait être installé avant
l'utilisation du treuil. Branchez le
disjoncteur directement sur l'extrémité
batterie du collier de raccord permanent
(ROUGE), puis branchez le fil ROUGE du
disjoncteur directement sur la borne
positive de la batterie. Branchez le fil noir
du collier de raccord permanent sur la
borne négative de la batterie. Enveloppez
le disjoncteur de ruban électrique afin de
prévenir les courts-circuits. (Voir Figure
!
AVERTISSEMENT
NE DOIT
PAS interférer avec le fonctionnement
L'emplacement
de
l'interrupteur
6.)
sécuritaire du véhicule et du treuil. Les fils
NE DOIVENT PAS entrer en contact avec
une pièce mobile ni avec des rebords
coupants, p. ex. moteur, tambour de
treuil, câble métallique, sangles,
suspension, freins, pot d'échappement ou
groupe de direction.
Branchements électriques
permanents
Gris
Noir
Figure 6
Batterie
Disjoncteur
Jaune
gRou e
Si vous temployez un branchemen
temporaire eà l'aide de câbles d
démarra nnecteurge, branchez le co
ROUGE sur la borne positive de la
batterie et le connecteur NOIR sur la
borne négative de la batterie.
(Voir Figure
!
7.)
AVERTISSEMENT
Le câble DOIT ÊTRE placé au-dessus du
véhicule pour éviter qu'il ne se retrouve
coincé sous celui-ci lors de l'utilisation.
DÉBRANCHEZ les câbles de démarrage
de la batterie lorsque le treuil n'est pas en
service.
Branchements électriques
temporaires
Noir
Figure 7
Batterie
Gris
g
Rou
e
Jaune
Étape (3)
Fixez une sangl
d'arbre de 4 e de protection
pieds au crochet de dépannage, au cadre de
châssis ou à une autre structure semblable
du véhicule. Assurez-vous que la sangle
n'entrera en contact avec aucun rebord ni
objet chaud ou acéré. Glissez un maillon
d'attache sur chaque extrémité de la sangle.
Ancrez le maillo n à la plaque de fixation du
treuil
œud coulant avec la sangle.
n
treuilFigure 8.) NE FORMEZ PAS un . (Voir
maillon
Figure 8
!
AVERTISSEMENT
N'EMPLOYEZ PAS une poulie p
our
utiliser ce produit en ligne double.
Étape (4)
Tirez le bouton d'embrayage et tournez-le à la
12
Page 8

p
ATTENTION
e
3
Protège-moteur-WIAB
87-24532
4 5 Fils-Moteur-WIAB
Télécommande manuelle-WIAB
Fils-Câbles démarrage-WIAB
Aussières-Téflon-WIAB-Paire
2302284
2302285
!
L'embrayage doit être embrayé à fond
avant la mise en marche du treuil.
N'ACTIONNEZ JAMAIS le bouton
d'embrayage pendant que le tambour
tourne.
Figure 9
Désengagé
SERVICE INTERMITTENT
Le treuil électrique est identique à tout autre outil
motorisé, p. ex. une perceuse ou une scie
électrique. Le moteur électrique ne doit jamais
devenir excessivement chaud. Grâce aux
précautions standard, vous pourrez prolonger la
durée du moteur. Réduisez au minimum la durée
des utilisations.
Si toutefois le moteur devenant trop
chaud au toucher, mettez le treuil hors
fonction et laissez refroidir le moteur.
Pour obtenir des renseignements
supplémentaires et une garantie
complète, visitez notre site Web au
www.su
erwinch.com
Engagé
Étape (5)
Fixez une sangle de protection d'arbre
de 6 pieds autour de la charge, à un
autre véhicule, à une structure solide ou
à un point d'ancrage. Assurez-vous que
la sangle n'entrera en contact avec
aucun rebord ni objet chaud ou acéré.
Placez le crochet du treuil à travers la
boucle située à chaque extrémité de la
sangle. (Voir Figure 10.) NE FORMEZ
PAS un nœud coulant avec la sangle.
Figure 10
Étape (6)
Mettez bri èvement le treuil en fonction
pour enro uler puis dérouler un peu le
câble afin de vous assurer qu'il
fonctionne adéquatement. Le système
est maintenant prêt à l'emploi.
ATTENTION
!
cale, METTEZ-LE
ATTENTION
!
Débranchez les connecteurs gris dès
que vous avez fini d'utiliser le treuil
afin d'éviter toute mise en fonction.
accidentelle du treuil pendant que vous
désass
Réemballage : Prenez toujours
de désassembler correctement
de le réemballer dans le sac de rangement.
13
emblez le système.
hors tension.
Si le moteur
du treuil
le temps
le treuil et
LISTE DES PIÈCES DE RECHANGE
No de référence Description N
1
2
Câble métallique
Trousse disjoncteur
5/32 x 50 avec crochet permanent 1535C
87-10799
o
de pièc
87-24533
87-24534
10
6
7
8
9
Fils-Direct batterie-WIAB
Sangle protect. arbre 1 po x 8 pi
Maillons-Paire ½ po
87-24535
87-24536
87-24537
14
Page 9

GUÍA DEL PROPIETARIO
Winch-ln-A-Bag™ 2000 lb (907 kg)
PRECAUCIÓN
!
Cabrestante eléctrico de 12 V CC
LEA Y ENTIENDA ESTA GUÍA ANTES
DE LA INSTALACIÓN Y LA OPERACIÓN.
Superwinch, Inc.
Winch Drive Putnam, CT 06260 U.S.A.
Tel.: (860) 928-7787 Fax: (860) 963-0811
Correo electrónico: info@superwinch.com
www.superwinch.com
Superwinch, Inc.
Unit D, Union Mine Road
Pitts Cleave Ind Est
Tavistock, Devon PL19 0PW
England
Tel.: 44 (0) 1822 619222
Fax: 44 (0) 1822 615204
Correo electrónico: sales@superwinch.net
En todo este manual, encontrará notas con los siguientes encabezados:
PELIGRO
!
ADVERTENCIA
!
PRECAUCIÓN
!
Se utilizan los símbolos siguientes en el producto y en el Manual del Propietario:
Indica una situación inminentemente peligrosa, que si no se evita,
causará la
Indica una situación potencialmente peligrosa, que si no se evita,
causará la muerte o lesiones graves.
Indica una situación potencialmente peligrosa, que si no se evita,
causará lesiones leves a moderadas. Esta notación se utiliza
también para poner sobre aviso ante la presencia de prácticas
inseguras.
muerte o lesiones graves
Lea el Manual
del Propietario
Nota: Indica información adicional sobre los procedimientos de instalación y operación de su cabrestante.
Para que su cabrestante funcione de manera correcta se lo debe instalar de manera correcta.
Nota: El cabrestante está diseñado principalmente para aplicaciones intermitentes. Este cabrestante no está
disenado para aplicaciones industriales ni de izado y Superwinch no garantiza que el peoducto sea
apropiado para un uso como tal.
Use siempre el
protector de las
manos
Durante la operación
mantenga la distancia
con el cable y el gancho
del cabrestante
Nunca use el
cabrestante para
elevar o transportar
personas
Nunca use el
cabrestante para
sujetar cargas en
posición
15
Page 10

EVITE REALIZAR TIROS CONTINUOS
INFORMACIÓN GENERAL
DE SEGURIDAD
Su cabrestante es una máquina
muy potente. Si se la usa de manera
insegura o indebida, pueden
producirse daños materiales o
personales.
ADVERTENCIA
!
operación seguras del cabrestante y la
prevención de lesiones personales y
daños materiales radica en última
instancia en usted, el operador.
Al operar un cabrestante no hay
sustituto para el uso del buen juicio y l
a precaución.
ADVERTENCIA
!
antes de que el cabrestante se detenga.
1. La máxima capacidad de carga de
trabajo se encuentra en la capa de
cable de acero más cercana al tambor.
NO EXCEDA LA CARGA PERMISIBLE.
NO INTENTE REALIZAR TIROS
PROLONGADOS BAJO CARGAS
PESADAS. La sobrecarga puede
dañar el cabrestante y/o el cable de
acero y así crear condiciones de
operación riesgosas.
El motor del vehículo debe estar
encendido mientras el cabrestante
está en funcionamiento. Si se hace
funcionar el cabrestante de manera
considerable con el motor apagado,
es posible que la batería no tenga la
fuerza suficiente para volver a
encender el motor.
DESPUÉS DE LEER Y COMPREN-
2.
DER ESTE MANUAL, APRENDA
A USAR SU CABRESTANTE.
Después de instalar el cabrestante, realice prácticas
de uso para familiarizarse con el equipo y
estar preparado para
cuando surja la necesidad.
3. NO “mueva” su vehículo para ayudar
al cabrestante a tirar de la carga. La
combinación del cabrestante y su
vehículo tirando juntos puede sobrec argar el cable de acero y el
cabrestante.
La responsabilidad
de la instalación y
El cable de acero
se puede romper
COLÓQUESE SIEMPRE LEJOS DE
4.
LAS CORREAS, DEL CABLE DE ACERO,
DEL GANCHO Y DEL CABRESTANTE.
EN EL REMOTO CASO DE QUE FALLE
ALGÚN COMPONENTE ES MEJOR
ENCON-TRARSE FUERA DEL PELIGRO.
INSPECCIONE FRECUENTEMENTE
5
.
EL CABLE DE ACERO, LAS
CORREAS Y EL EQUIPO. UNA
CORREA DESHILADA O UN CABLE
DE ACERO CON FIBRAS ROTAS
DEBERÁ CAMBIARSE INMEDIATAMENTE.
Siempre cambie el cable de acero
con la pieza de repuesto idéntica del
fabricante (consulte la Lista de Partes de
Repuesto). Controle periódicamente la
instalación del cabrestante para asegurarse
de que todos los tornillos estén apretados.
.
USE LOS GUANTES DE CUERO
6
GRUESOS al trabajar con el cable de
acero. NO DEJE QUE EL CABLE DE
ACERO SE DESLICE POR SUS MANOS.
NUNCA USE EL CABRESTANTE CON
7.
MENOS DE 5 VUELTAS DE CABLE DE
ACERO EN EL TAMBOR ya que es
posible que el cierre del extremo del cable
de acero NO soporte una carga completa.
ALÉJESE DEL CABRESTANTE, DE LA
8.
CORREA O DEL CABLE DE ACERO BAJO
TENSIÓN Y DEL GANCHO
AL OPERAR EL CABRESTANTE.
Nunca coloque su dedo a
través del gancho. Si su dedo
llegase a quedar atrapado en el gancho,
usted podría perder su dedo.
Mantenga las manos alejadas de los
9.
PUNTOS DE
ADVERTENCIA
!
APLASTAMIENTO
(Figura 1).
Figura 1
Mantenga las manos
alejadas de los
ADVERTENCIA
PUNTOS DE
APLASTAMENTO
Al guiar el cable de acero
hacia adentro o hacia afuera
USE SIEMPRE EL
PROTECTOR DE MANOS (Ver la Figura 2).
Figura 2
NUNCA ENGANCHE EL CABLE DE
10.
ACERO EN SÍ MISMO porque podría
dañar el cable de acero mismo. Use
una correa de nailon (Figura 3).
Erróneo
Figura 3
Al tirar de cargas pesadas, se recomienda
11.
colocar un paño pesado o una funda s
obre el cable de acero cerca del extremo
con gancho (Figura 4). De producirse la
ruptura del cable de acero, el paño
actuará como un amortiguador y
ayudará a evitar que el cable de
acero dé un latigazo.
Figura 4
NUNCA USE EL CABRESTANTE PARA
12.
ELEVAR O TRANSPORTAR PERSONAS.
El cabrestante no fue diseñado para
13.
operaciones de izado.
Correcto
14.
DESDE ÁNGULOS EXTREMOS, ya que
esto hará que el cable de acero se enrolle
más en un extremo del tambor (Figura 5).
Esto puede atascar el cable de acero en
el cabrestante y provocar daños en el
cable mismo o en el cabrestante.
rong
W
Erróneo
Figura 5
NUNCA OCULTE LAS ETIQUETAS
15.
CON INSTRUCCIONES DE ADVERTENCIA.
16.
Opere siempre el cabrestante con una
vista completa de la operación de tiro.
17.
Los equipos como poleas, ganchos,
correas, etc. debe tener el tamaño
adecuado para la capacidad de tiro
y deben ser inspeccionados
periódicamente para detectar daños
que puedan reducir su capacidad de
carga.
NUNCA SUELTE EL EMBRAGUE PARA
18.
ENROLLADO MANUAL CUANDO HAYA
UNA CARGA EN EL CABRESTANTE.
NUNCA TRABAJE SOBRE O CERCA
19.
DEL TAMBOR DEL CABRESTANTE
CUANDO EL CABRESTANTE ESTÉ
BAJO CARGA.
NO OPERE EL CABRESTANTE CUANDO
20.
USTED SE ENCUENTRE BAJO LA
INFLUENCIA DE DROGAS, ALCOHOL
O MEDICAMENTOS.
Right
Correcto
16 17
Correcto
Page 11

SIEMPRE DESCONECTE LOS
21.
CABLES ELÉCTRICOS DEL
CABRESTANTE A LA BATERÍA
ANTES DE TRABAJAR SOBRE O
CERCA DEL TAMBOR DEL
CABRESTANTE de manera que el
cabrestante no se pueda activar
accidentalmente.
Al mover una carga, lentamente
22.
tire de las correas y del cable de
acero flojo hasta que quede tirante.
Pare, vuelva a verificar todas las
conexiones del cabrestante.
Cerciórese de que el gancho esté
debidamente asentado. Si se utiliza
un estrobo de nailon, controle su
acoplamiento a la carga.
Cuando utilice su cabrestante para
23.
mover una carga, coloque la transmisión
de su vehículo en neutro, active el
freno de mano del vehículo y coloque
calzos en todas las ruedas.
NO USE EL CABRESTANTE PARA
24.
SOSTENER CARGAS.
Use otro método para
asegurar cargas, como
por ejemplo las correas
de amarre.
SÓLO USE INTERRUPTORES,
25.
CONTROLES REMOTOS Y
ACCESORIOS APROBADOS POR
EL FABRICANTE. El uso de
componentes no aprobados por el
fabricante puede resultar en lesiones
o daños a la propiedad y puede anular
su garantía.
NO TRABAJE O SUELDE NINGUNA
26.
PARTE DEL CABRESTANTE. Una
modificación así puede debilitar la
integridad estructural del cabrestante
y puede anular su garantía.
NO CONECTE EL CABRESTANTE
27.
A CORRIENTE DOMÉSTICA DE
110 V NI DE 220 V, YA QUE EL
CABRESTANTE SE QUEMARÁ O
PODRÁ PRODUCIRSE UNA
DESCARGA ELÉCTRICA FATAL.
28.
NUNCA permita que se apliquen
cargas de impacto al cabrestante o al
cable de acero.
Tenga suma precaución al tirar
29.
de, o bajar, una carga en una
rampa o terreno inclinado.
Mantenga a personas, mascotas
y objetos alejados de la trayectoria
de la carga.
18
INSTALACIÓN
Para que su cabrestante funcione de
manera correcta se lo debe instalar
de manera adecuada.
Este cabrestante se
ADVERTENCIA
!
DEBE montar de
manera que el cable de acero se enrolle
desde la parte inferior del tambor. El montaje
erróneo puede dañar su cabrestante y anular
su garantía.
Nota: Al instalar el cabrestante, su instalación
puede variar levemente respecto de las
instrucciones y diagramas a continuación,
dependiendo de su vehículo, del montaje
del cabrestante o de la estructura de apoyo.
Siempre dedique tiempo para evaluar su
situación y planificar el tiro.
Paso (1)
Desempaque todos los componentes cerca
del vehículo con la batería que se utilizará
para el cabrestante.
Las baterías contienen
ADVERTENCIA
!
gases, que son
inflamables y explosivos. Durante la instalación,
use protección ocular y quítese las joyas
metálicas. No se incline sobre la batería al
realizar conexiones.
Paso (2)
La conexión eléctrica del cabrestante es
sencilla. Introduzca el conector amarillo
del control remoto manual en el conector
amarillo del cabrestante. Introduzca el
conector gris del control remoto manual en
el conector gris del cable de conexión en
puente de la batería o en la conexión
permanente del cable de la batería.
Nota: Se recomienda realizar la conexión
permanente del cable de la batería antes
de usar el cabrestante. Conecte el interruptor
automático directamente al extremo de
batería de la conexión permanente de la
batería (ROJO) y después conecte el
alambre ROJO del interruptor automático
al borne positivo de la batería. Conecte el
alambre codificado negro de la conexión
permanente de la batería al terminal negativo
de la batería. Forre el interruptor automático
con cinta aislante para prevenir cortocircuitos.
(Ver la figura 6).
La ubicación del
ADVERTENCIA
!
interruptor NO DEBERÁ
interferir con la operación segura del
vehículo y del cabrestante. El cableado
NO DEBERÁ hacer contacto con parte
móvil alguna ni con bordes filosos, tales
como el motor, el tambor del cabrestante,
el cable de acero, las correas, la suspensión,
los frenos, el escape ni la dirección.
Figura 6
Si se utiliza la conexión en puente temporal
de la batería, acople el conector ROJO al
terminal positivo en la batería y acople el
conector NEGRO al borne negativo de la
batería. (Ver la figura 7).
Conexiones del
!
PRECAUCIÓN
cableado eléctrico
Conexiones del cableado
eléctrico permanente
GRIS
NEGO
Interruptor automático
ROJO
Batería
kerCircuit Brea
AMARILLO
temporal El alambre DEBERÁ pasarse
sobre el vehículo para asegurarse de
que no quede atrapado debajo del
vehículo durante el uso del cabrestante.
DESCONECTE la conexión en puente
de la batería cuando no esté en uso.
Conexiones del cableado
eléctrico temporal
NEGRO
Figura 7
Paso (3)
Fije la correa de 4 pies protectora de árboles
a través del gancho de remolcado, del
bastidor del chasis o de una estructura
similar del vehículo. Cerciórese de que la
correa no haga contacto con ningún objeto
GRIS
ROJO
Batería
AMARILLO
o borde filoso o caliente. Pase el grillete a
través del bucle en ambos extremos de la
correa. Enganche el grillete a la placa de
montaje del cabrestante
NO use la correa en forma de “nudo
deslizante” de manera que se enrolle en
sí misma .
Grillete
shackle
Figura 8
ADVERTENCIA
!
. (Ver la figura 8).
NO use un polipasto para duplicar la
capacidad de este producto.
Paso (4)
Realice el tiro y gire la perilla del embrague
hasta la posición "Free" (Libre) según se
indica en la figura 9. Si hay carga aplicada
en el cable de acero, la perilla del embrague
quizá no gire tan fácilmente. NO FUERCE
LA PERILLA DEL EMBRAGUE. Para soltar
la tensión en el embrague, suelte gradualmente
una longitud de cable de acero. Suelte el
en el punto de anclaje o la carga. Use siempre
el protector de manos suministrado para sostener
el gancho al enrollar o desenrollar el cable.
Cerciórese de que queden al menos cinco (5)
vueltas de cable de acero en el tambor. Vuelva
a activar el tambor girando la perilla del
embrague a la posición “Engaged” (Activado).
(Ver la figura 9).
19
Page 12

El embrague debe
PRECAUCIÓN
!
estar completamente
activado antes de poner en marcha el
cabrestante. NUNCA active la perilla del
embrague mientras esté girando el tambor.
1
2
Activado
Engaged
Figura 9
Paso (5)
Sujete la correa de 6 pies para protección
de árboles en la carga, en otro vehículo,
estructura sólida o punto de anclaje.
Cerciórese de que la correa no haga contacto
con ningún objeto o borde filoso o caliente.
Pase el gancho del cabrestante a través del
bucle en ambos extremos de la correa.
(Ver la figura 10). NO use la correa en forma
de “nudo deslizante” de manera que se enrolle
en sí misma.
1
2
Desactivado
Dis-engaged
SERVICIO INTERMITENTE
Un cabrestante eléctrico es como cualquier
otra herramienta eléctrica activada por
motor como un taladro eléctrico o una
sierra eléctrica. No se debe permitir que
un motor se caliente demasiado.
La aplicación de precauciones normales
prolongará la vida útil de su motor.
Asegúrese de que la duración de las
operaciones de tiro sea lo más corta posible.
LISTA DE PARTES DE REPUESTO
Si el motor parece muy caliente al tacto,
detenga el proceso y deje que el motor
se enfríe. Si desea más información y
llenar su formulario de garantía, visite
nuestra página Web en
www.superwinch.com
Figura 10
Paso (6)
Encienda brevemente el cabrestante y
después apáguelo para cerciorarse de que
esté funcionando correctamente. El sistema
ya está listo para realizar la operación de tiro.
Si el motor del
PRECAUCIÓN
!
cabrestante se detiene,
NO siga aplicando alimentación eléctrica.
Desconecte
PRECAUCIÓN
!
inmediatamente los
conectores grises al terminar la operación
de tiro a fin de prevenir el accionamiento
accidental del cabrestante durante el
desensamblaje del sistema.
Reempaquetado: Siempre dedique tiempo
para desensamblar debidamente el
sistema de cabrestante y el tiempo para
reempaquetar el cabrestante en la bolsa
de almacenamiento.
20
Núm. de referencia Descripción Número de parte
1
2
3
4
5
6
7
8
9
10
Conjunto de cable de acero de
Conjunto de circuito automático
Protector de motor WIAB
Arnés de conductores de motor WIAB
Control remoto manual WIAB
Arnés de conductores de conexión en puente WIAB
Arnés de conductores de conexión directa a batería WIAB
Par Hawse de teflón WIAB
Correa de protección para árboles de 1" x 8'
Par de grilletes en arco V2
5/32” x 50’ con gancho acoplado 1535C
87-10799
87-24532
87-24533
87-24534
2202897
2202898
2202899
2302284
2302285
21
 Loading...