

Superwinch SAC1000 User Manual
G A R A N T I A LIMIT É E
Garantie limitée à vie SUPERWINCH
(Esta garantía es aplicable para compras a partir del 1/7/07)
GARANTIE : LIMITÉE À VIE POUR LES COMPOSANTS MÉCANIQUES; LIMITÉE D'UN (1) AN POUR LES COMPOSANTS ÉLECTRIQUES
Superwinch, Inc. (« Vendeur » ou « Superwinch ») garantit à l'acheteur au détail original seulement (« Acheteur ») que tous les composants mécaniques de tous les
modèles de treuil S3000 SUPERWINCH®
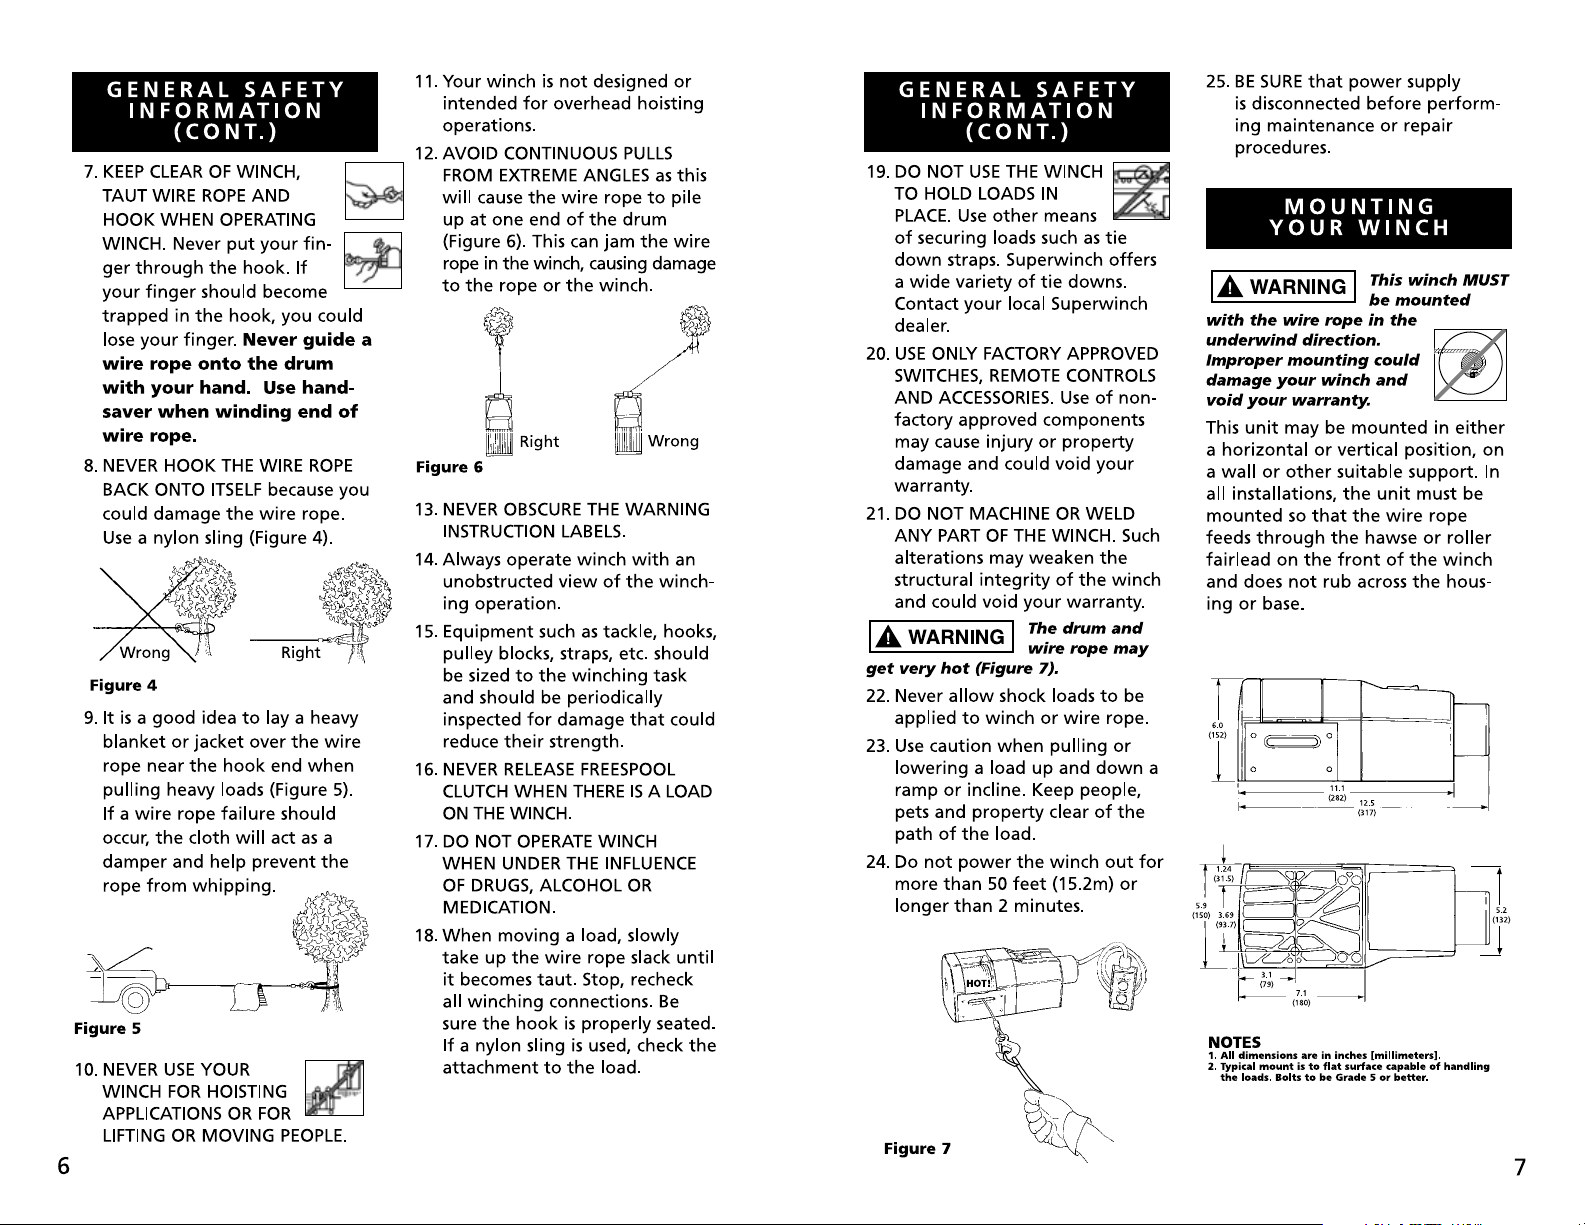
vable du nouveau Produit pendant la durée de vie du treuil et les composants électriques seront libres de défauts de matériaux et de main d'œuvre pendant un (1)
an de la date d'achat prouvable. Tout Produit qui, de l'avis de Superwinch s'avère défectueux sera réparé ou remplac
pour l'Acheteur suite à la conformité de l'Acheteur avec ces procédures. Le Vendeur ou son Agent autorisé peut facturer tous frais raisonnables pour les pièces et la
main d'œuvre pour les réparations non couvertes par cette Garantie limitée. Les garanties indiquées dans ce document sont exclusives et remplacent toutes autres
garanties, orales
PROCÉDURE DE GARANTIE LIMITÉE
L'enregistrement en ligne de votre produit et de l'information de dépannage utile se trouvent à www.superwinch.com. En contactant le Vendeur, l'Acheteur
postera, expédiera ou livrera de quelqu'autre façon au Vendeur à l'adresse indiquée plus bas ou à un centre de service autorisé de l'usine : (1) le Produit; (2) une
description écrite du problème; (3) le nom de l'Acheteur, son adresse et son numéro
livrez de toute autre façon le Produit, l'information requise et les copies au Vendeur, à frais d'affranchissement ou d'expédition prépayés.
LIMITES ET EXCLUSIONS
La réparation et/ou le remplacement du Produit est à la seule discrétion et est le seul recours de l'Acheteur. Cette garantie ne s'applique pas aux défauts de tout
Produit causés par : (1) l'usure normale; (2) une non conformité à toutes instructions d'installation, d'opération ou de maintenance fournies par Superwinch y compris, mais sans s'y limiter, soumettre le Produit à des charges dépassan
particulier ainsi que le numéro de modèle; (3) l'utilisation commerciale ou industrielle; (4) l'altération ou la modification par des parties autres que Superwinch; (5) la
mauvaise utilisation, l'abus, la négligence, les accidents, les forces majeures ou le terrorisme; ou (6) d'autres causes hors du contr
du Produit par Superwinch à son distributeur autorisé. Si tout modèle ou échantillon a été montré à l'Acheteur, un tel modèle ou échantillon a été utilisé à des fins
d'illustration seulement et ne sera pas considéré comme une garantie que le Produit sera conforme à l'échantillon ou au modèle.
DANS LA PLEINE MESURE PERMISE PAR LA LOI APPLICABLE, CE QUI SUIT EST
(1) Toutes les garanties quant au fil et cordon synthétique, vendu seul ou utilisé dans ou incorporé dans tout produit.
(2) Toutes les garanties quant au fini du Produit.
(3) Toutes les garanties d'adaptabilité à un besoin particulier.
(4) Toutes les garanties de commerciabilité.
(5) Toutes les réclamations de dommages consécutifs ou indirects, y compris les domma
Certains états ou juridictions ne permettent pas de limites ou d'exclusions de transactions pour les clients et ces limites ou exclusions pourraient ne pas s'appliquer
à l'Acheteur. La garantie donne à l'Acheteur des droits juridiques précis et il pourrait y en avoir d'autres. Si une garantie est considérée appliquée à ce Prod
sera limitée à une période d'un (1) an de la date prouvable d'achat du nouveau Produit. AUCUN agent, concessionnaire, distributeur ou employé du Vendeur n'est
autorisé à apporter des modifications à cette garantie et aucune déclaration de ce genre, orale ou écrite ne liera le Vendeur.
QUESTIONS
Toutes questions portant sur la conformité des garanties fournies dans ce document peuvent être adressées par écrit à Superwinch Inc. ou à Superwinch, Ltd. aux
adresses indiquées plus bas.
ou écrite
indiqués plus haut (« Produits ») seront libres de défauts de matériaux et de main d'œuvre à partir de la date d'achat prou-
é à la seule discrétion de Superwinch sans frais
s, expresses ou implicites.
de téléphone; et (4) une copie du reçu de vente original. Postez, expédiez ou
t la charge indiquée dans le Manuel du propriétaire ou dans les instructions pour le Produit en
ôle de Superwinch après la livraison
PAR
LA PRÉSENTE EXCLUS ET RÉFUTÉ :
ges provoqués par ou durant le retrait ou la réinstallation du produit..
uit, elle
O W N E R ’ S M A N U A L
INSTALLATION • OPERATION • MAINTENANCE
SAFETY PRECAUTIONS • REPAIR PARTS
SAC1000
AC Electric Winch
CAUTION
!
READ AND UNDERSTAND THIS MANUAL BEFORE INSTALLATION
AND OPERATION OF YOUR SUPERWINCH PRODUCT.
.CLL ,hcniwrepuS daoR eniM noinU
evirD hcniW tsE dnI evaelC sttiP
06260 TC ,mantuP WPO 91 LP noveD ,kcotsivaT
.A.S.U U.K.
7877-829 )068( .leT 101416 2281 )0( 44+ .leT
1180-369 )068( xaF Fax +44 (0) 1822 615204
.dtL ,hcniwrepuS
.dtL ,hcniwrepuS.CLL ,hcniwrepuS
daoR eniM noinUevirD hcniW
tsE dnI evaelC sttiP06260 TC ,mantuP
WPO 91 LP noveD ,kcotsivaT.A.S.U
U.K.7877-829 )068( .leT
101416 2281 )0( 44+ .leT1180-369 )068( xaF
Fa
superwinch.com
89-12881 Rev - 1/4/10
x +44 (0) 1822 615204

I N S TA L L AT I O N
WARNING
!
doors or in a corrosive or explosive
environment.
MINIMUM ELECTRICAL
REQUIREMENTS
The three-prong plug must be plugged
into a 115 Volt, AC grounded outlet
equipped with a ground fault interrupter (GFI). Do not plug into an
ungrounded outlet by using a three
prong adapter. Make sure that the
power supply cords and reversing switch
are positioned so that the moving load
will not damage them. Unplug the
winch when not in use. Electrical storms
or line surges can cause premature failure of the internal bridge rectifier.
WARNING
!
winch could result in a fatal
electric shock.
Step (1)
Install mounting kit or structural support
for winch.
Step (2)
Mount the winch to the mount that you
have designed.
Mounting bolts supplied are the correct
length for use with up to a 1/4" (6.3mm)
thick plate.
WARNING
!
any strength grade weaker than
grade 5.
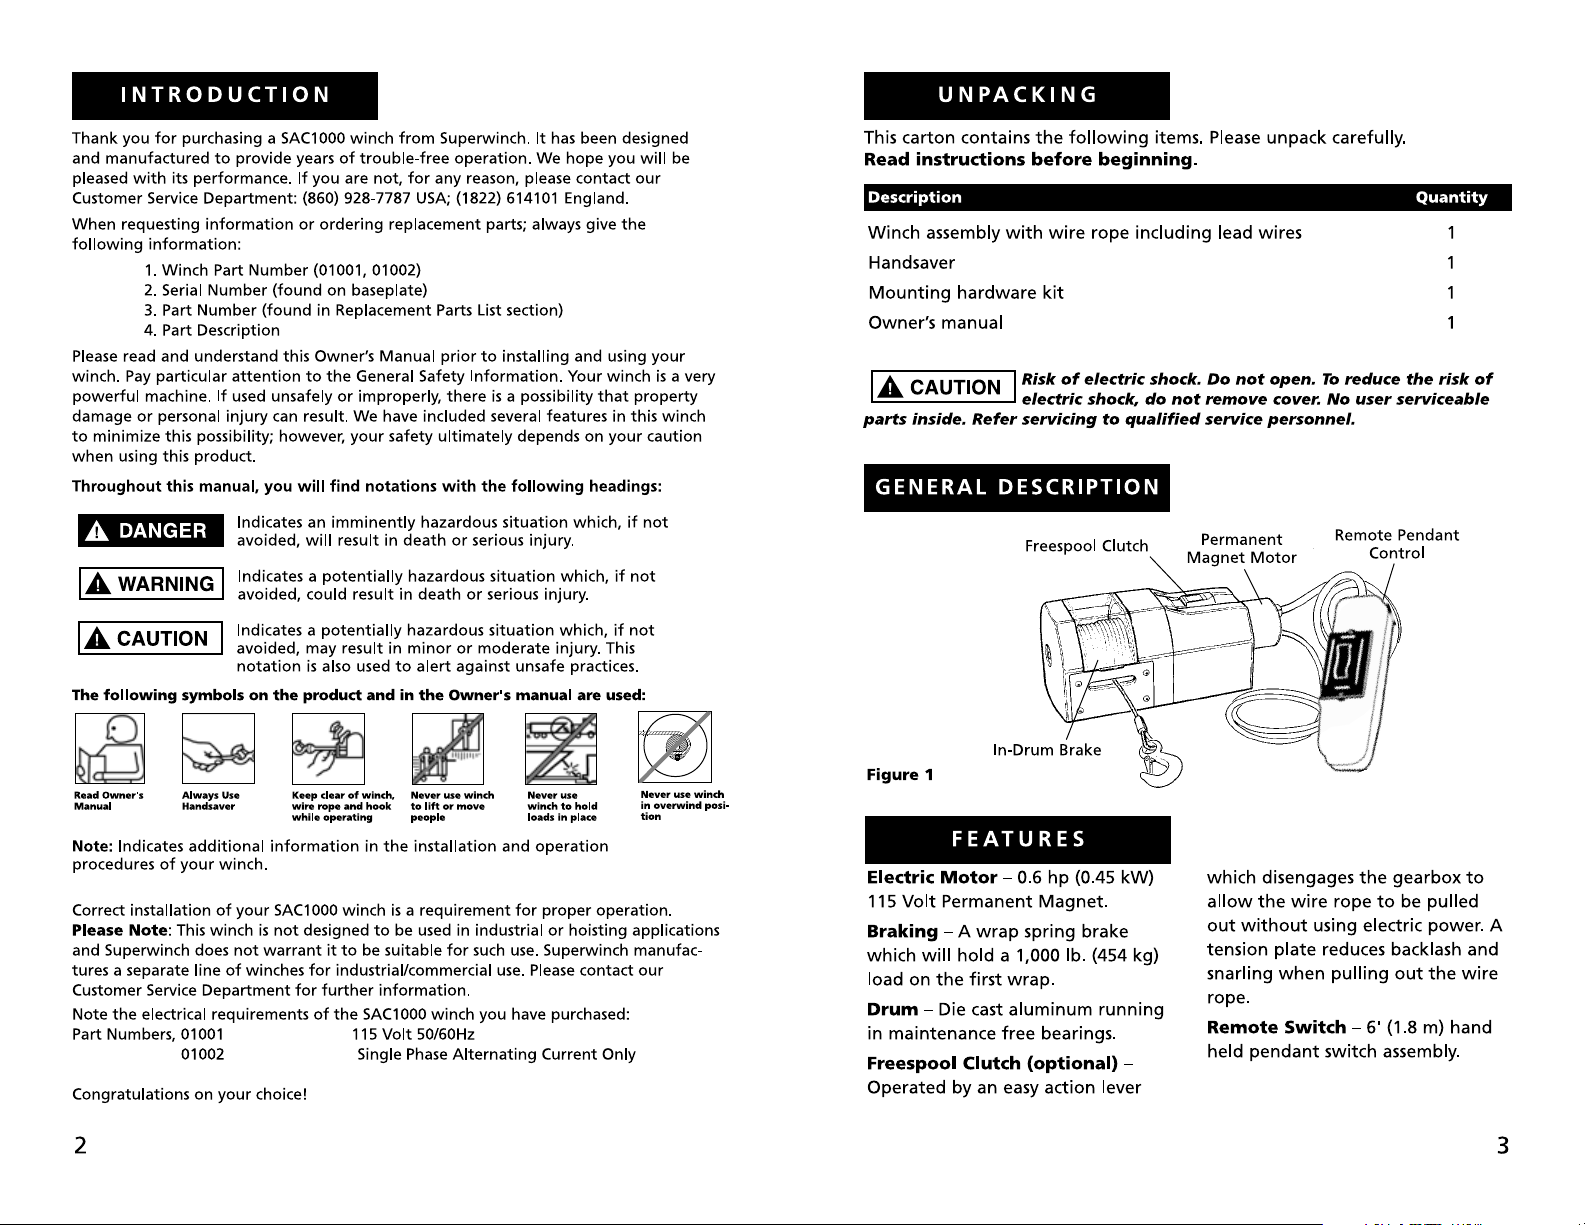
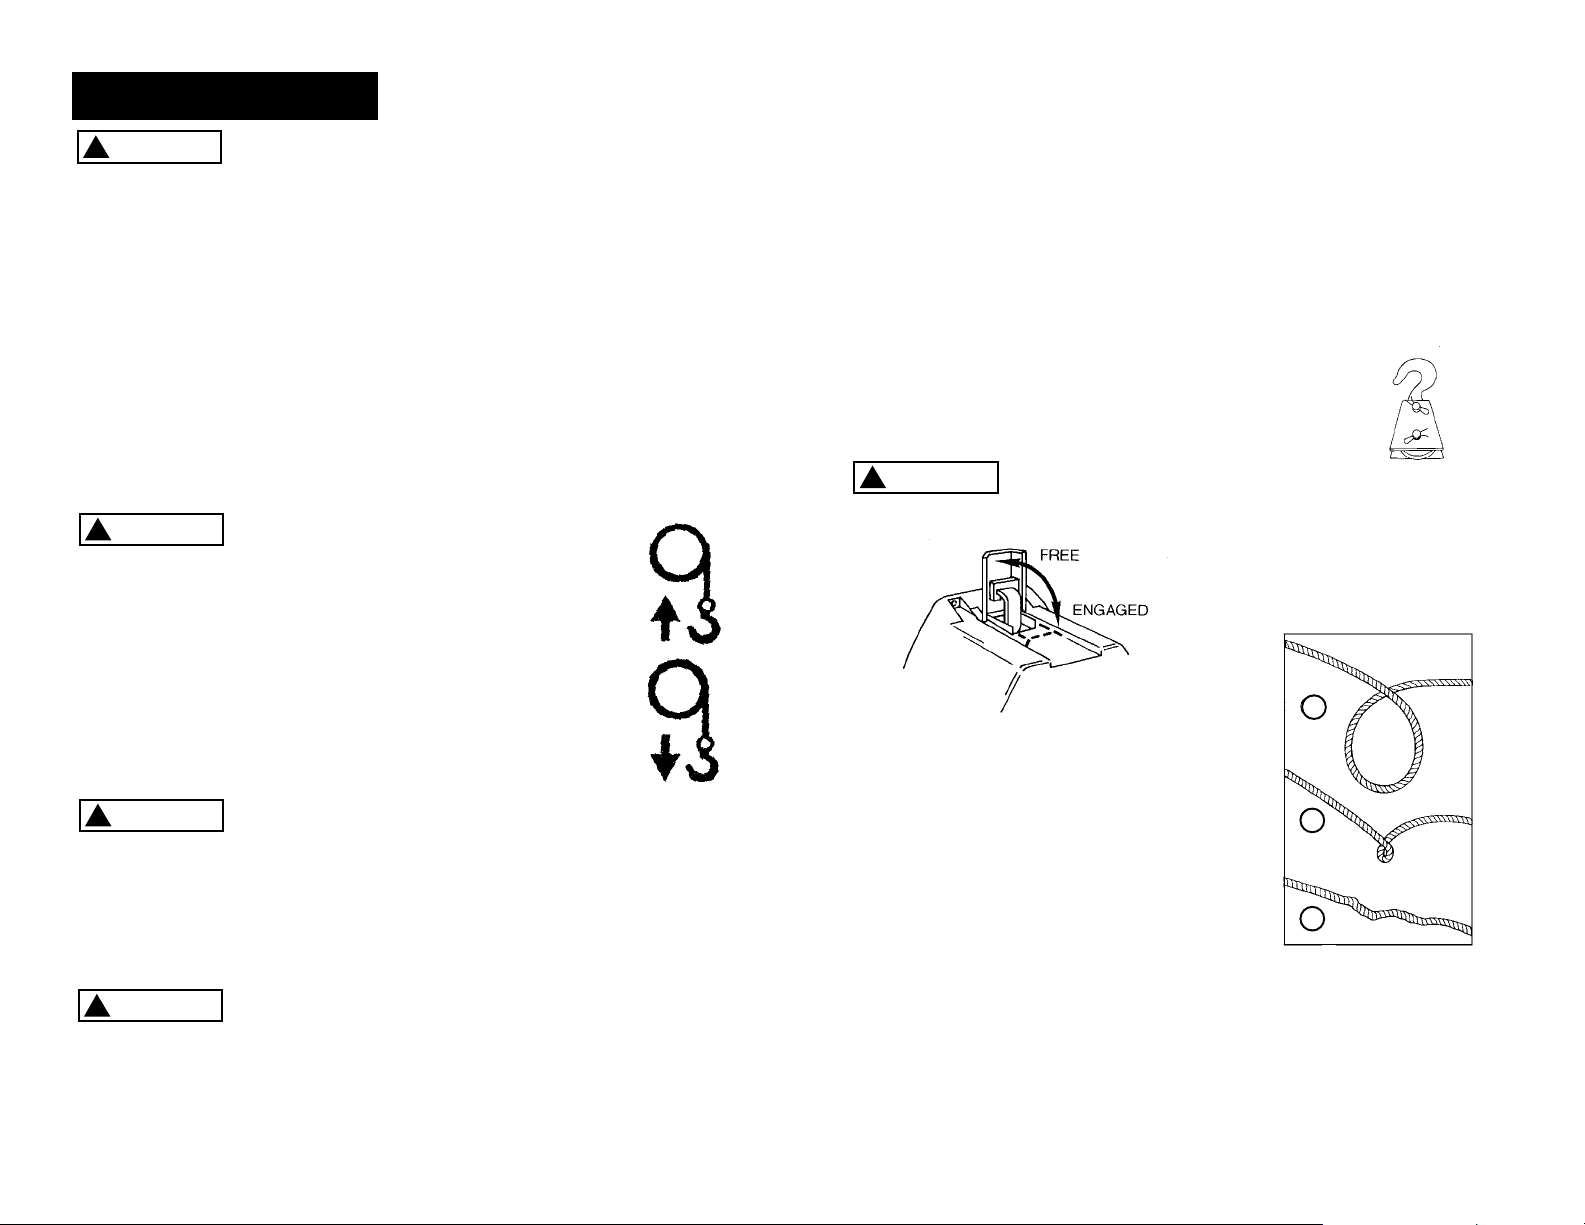
Step (3)
Lift the freespool clutch lever to the
“Free” position. Pull several feet of wire
rope off the drum. Return the clutch
lever back to the “Engaged” position.
CAUTION
!
be kept free of dirt and moisture
to ensure safe operation.
DO NOT operate
this winch out-
Failure to
ground this
Do not
substitute
The switch
assembly must
8
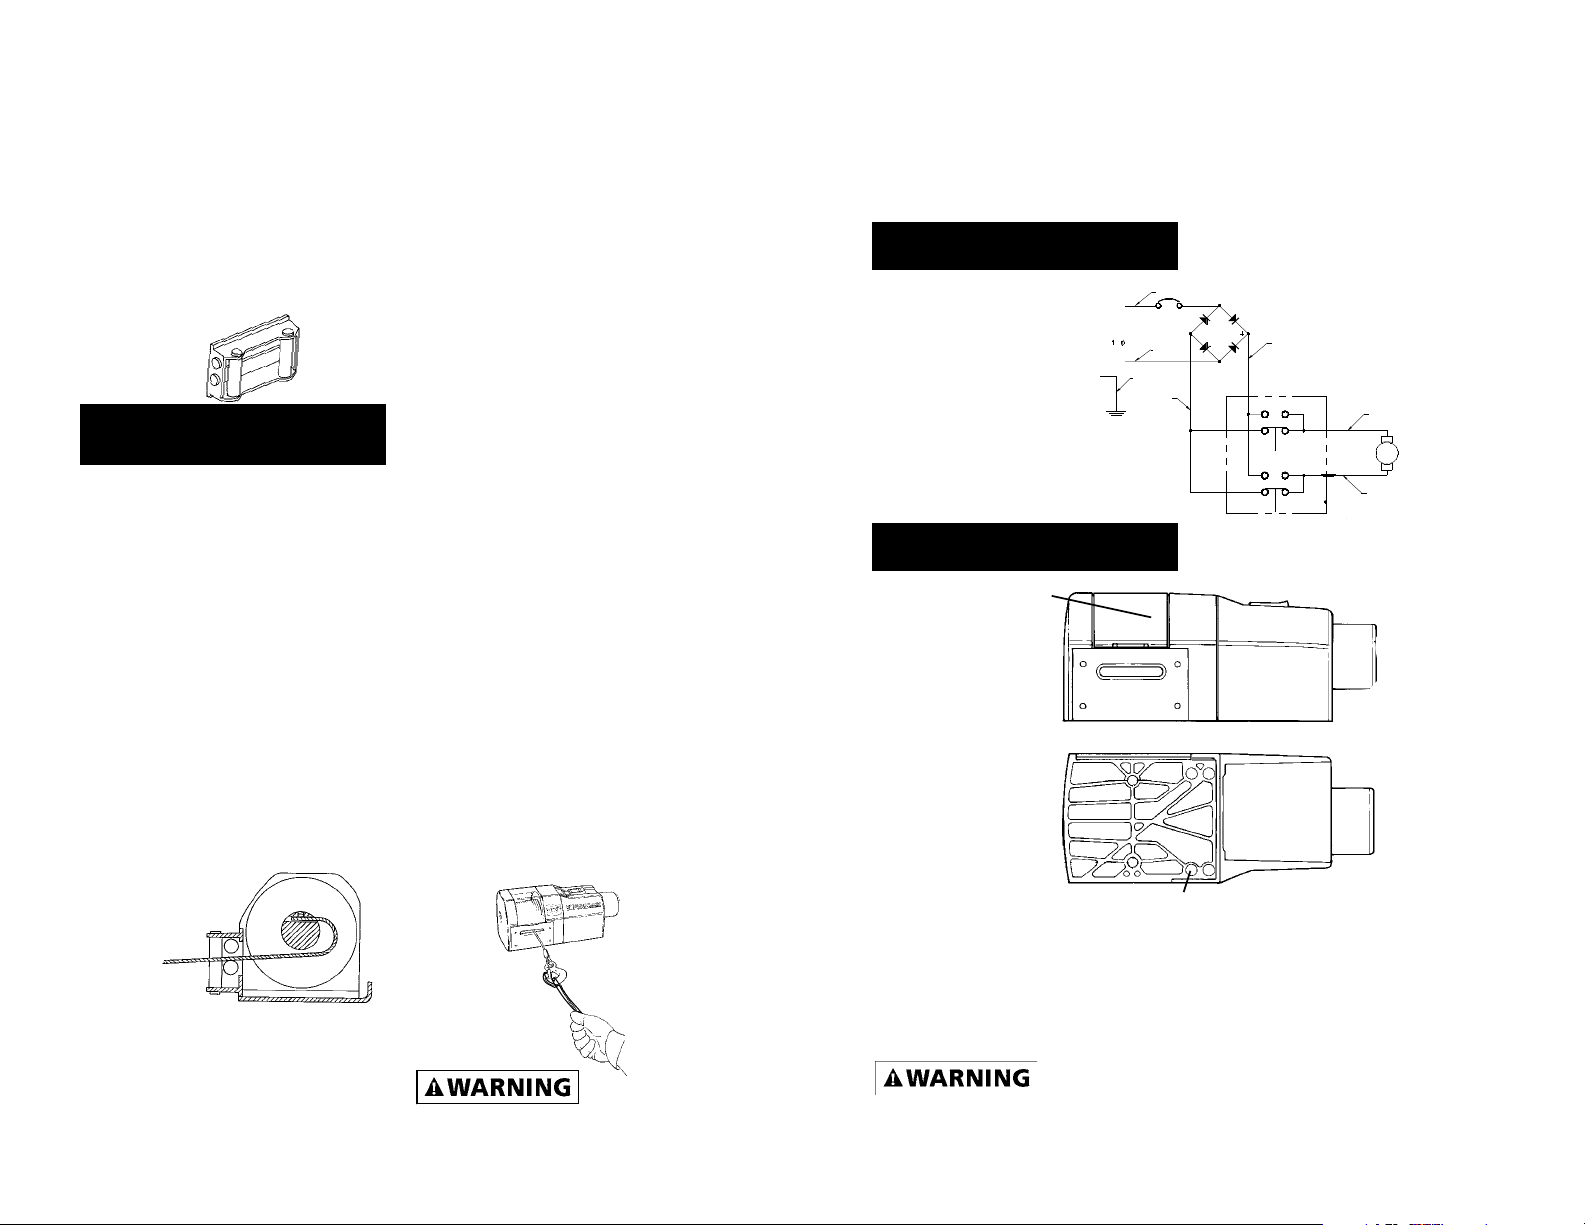
OPERATION
This unit is activated via the switch
at the end of the six foot cord. To
remove wire rope from the winch,
depress the “Rope Out” direction. The load
will stop without coasting when the
switch is released. To pull a load or
spool wire rope onto the drum,
depress the “Rope In” direction. ee Figure 9
for winch marking
designed to pull 1,000 pounds in single
line for 20 seconds “On” time on the
wire rope layer closest to the drum.
Attempts to pull more than this
weight or exceed the duty cycle may
cause damage to the winch or wire
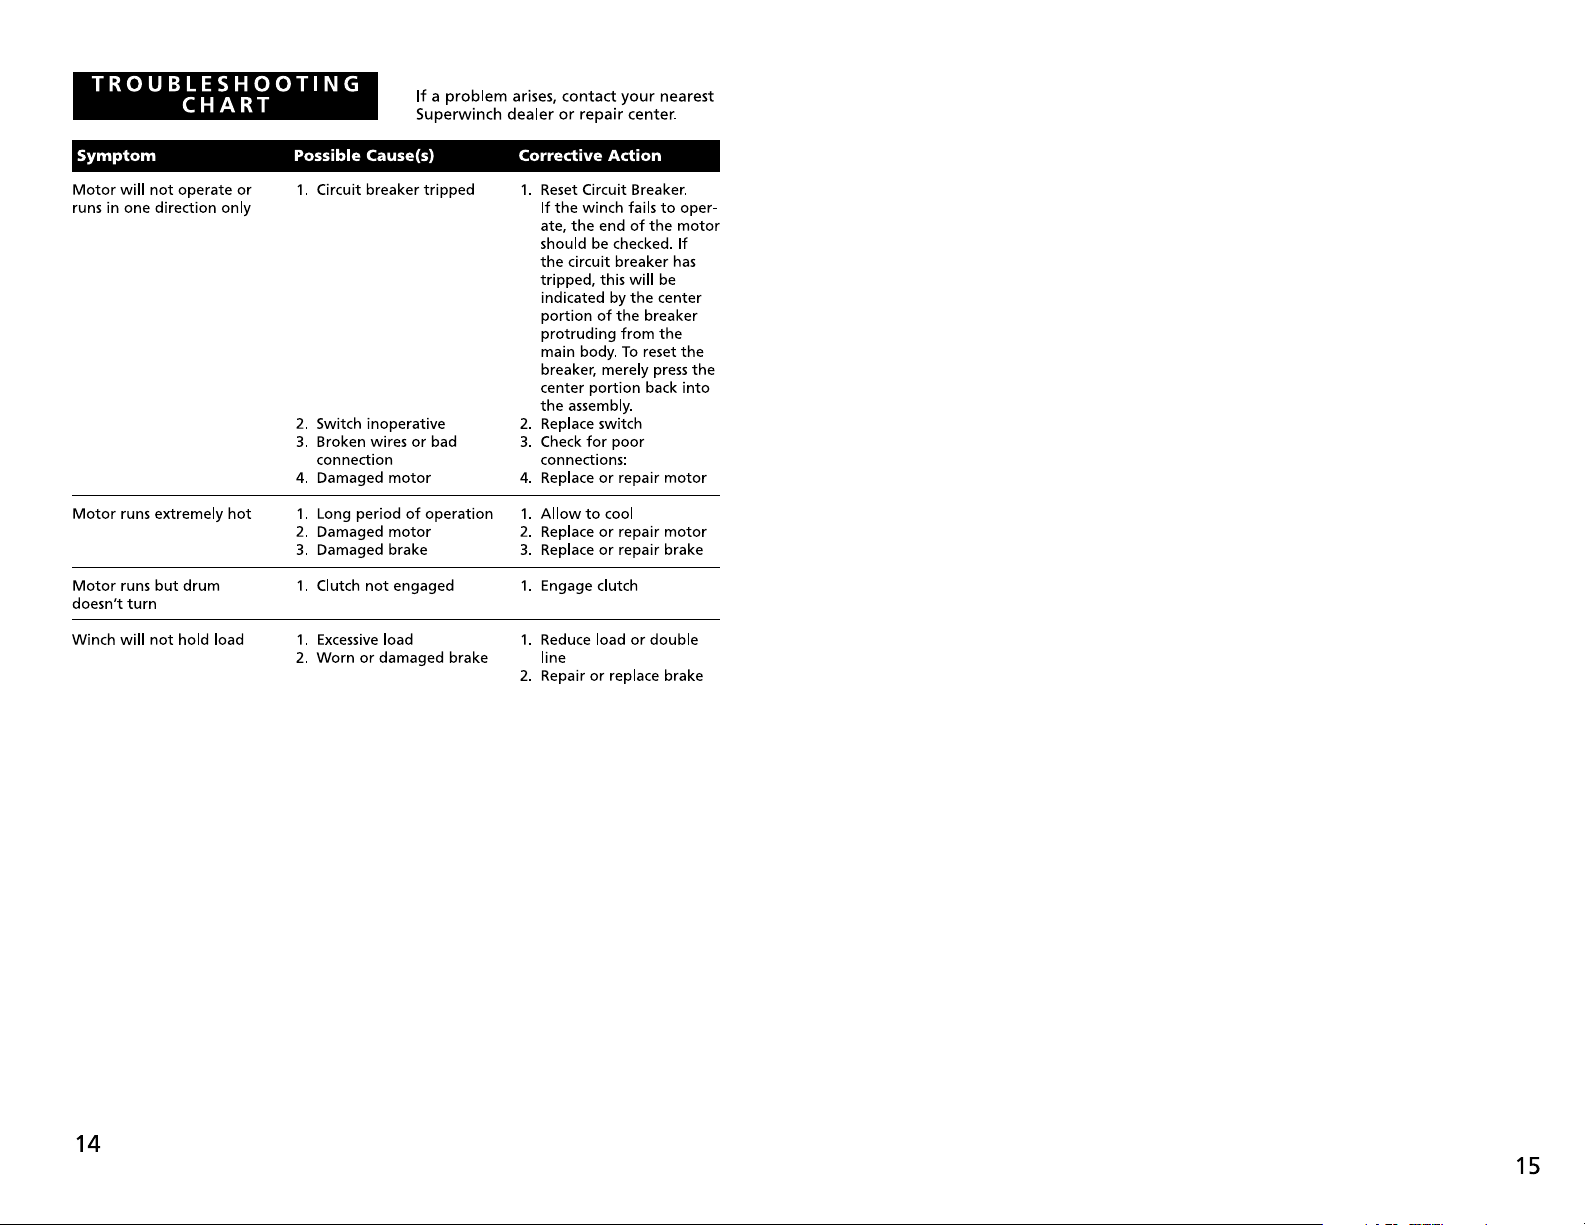
rope and could cause the circuit breaker to trip, and the winch will not operate. (See “Trouble Shooting”.)
Maintain a minimum of five wraps
of wire rope around the winch drum
before attempting any pulls.
s.Your winch is
s
ROPE IN
Figu
e 9
r
ROPE OUT
PULLING OUT THE WIRE ROPE
A part of your winch that will require
periodic attention and eventural replacement
is the wire rope. Inspect the wire rope
frequently.
If fraying exists, replace the wire rope at once.
Your winch uses galvanized aircraft type 7 x 19
cable. Always replace the wire rope with
Superwich replacement rope. Because all rope
is subject to wear, it is excluded from our
warranty.
The wire rope has been installed on
your winch under minimal load at the
factory. The wire rope must be
respooled onto the drum under load
so that the outer layers will not draw
down into the inner ones thereby
damaging the wire rope.
Lift the clutch lever to the “Free“ position as shown in
a load on the wire rope, the clutch
lever may no
FORCE THE CLUTCH LEVER. Release
tension on the wire rope by jogging
out some of the wire rope. Release
the clutch and pull out the wire rope
and secure to anchor or load. Check
that there are at least five (5) turns of
wire rope left on the drum. Reengage the drum by returning the
clutch lever to the “Engaged” position (see Figure 16).
WARNING
!
position and locked before
winching
Figure 16
Figure 16. If there is
t turn easily. DO NOT
Lever must be in
the “Engaged”
.
TIPS FOR EXTENDING THE LIFE OF
YOUR WINCH
1. KEEP A TIGHTLY WOUND WIRE
ROPE DRUM. Do not allow the
wire rope to become loosely
wound. A loosely-wound spool
allows a wire rope under load to
work its way down into the layers
of wire rope on the drum. When
this happens, the wire rope may
become wedged within the body
of the windings damaging the
wire rope. To prevent this problem, keep the wire ro
pe tightly
and evenly wound on the drum
at all times. A good practice is to
rewind the wire rope under tension after
each use.
2
. DO NOT ALLOW WINCH MOTOR
TO OVERHEAT. Remember, the
winch is for intermittent use only.
During long or heavy pulls the
motor will get hot. At 1,000 lb.
(454 kg) allow motor to cool after
20 seconds of “On” time. At loads
less than 500 lb. (227 kg) allow to
cool after 2 minutes of “
3
. USE A PULLEY BLOCK FOR HEAVY
On” time.
LOADS. To maximize winch and
wire rope life, use a pulley block
to double line heavier loads
(Figure 17).
Figure 17
4. The pull required to start a load
moving is often much greater
than the pull required to keep it
moving. AVOID FREQUENT STOPS
AND STARTS during pull.
5. PREVENT KINKS BEFORE THEY
OCCUR.
a
b
c
Figure 18
a. This is the start of a kink. At
this time, the wire rope should
be straightened.
b. The wire rope was pulled and
the loop has tightened to a
kink. The wire rope is now permanently damaged and must
be replaced.
9
G
c. Kinking causes the wire strands
under the greatest tension to
break and thus reduces the
load capacity of the wire rope.
The wire rope must be replaced.
6. EQUIPPING
THE WINCH WITH A
ROLLER FAIRLEAD will substantially
reduce wear on the wire rope
during angle pulls (Figure 19).
The rollers eliminate heavy rubbing and abrasion to the wire rope.
Figure 19
M A I N T E N A N C E
A N D REPA I R S
Periodically check tightness of
mounting bolts and electrical connections. Remove any dirt or corrosion that may have accumulated on
the electrical connections.
Repair should be done by
Authorized Superwinch Repair
Centers ONLY. Do not attempt to
disassemble the gearbox.
Disassembly will void warranty.
LUBRICATION
The gearbox and drum bearing are
permanently lubricated with a high
performance gear lube.
tion is necessary (after repair or
disassembly) only use Shell Alvenia
EP2 or equivalent.
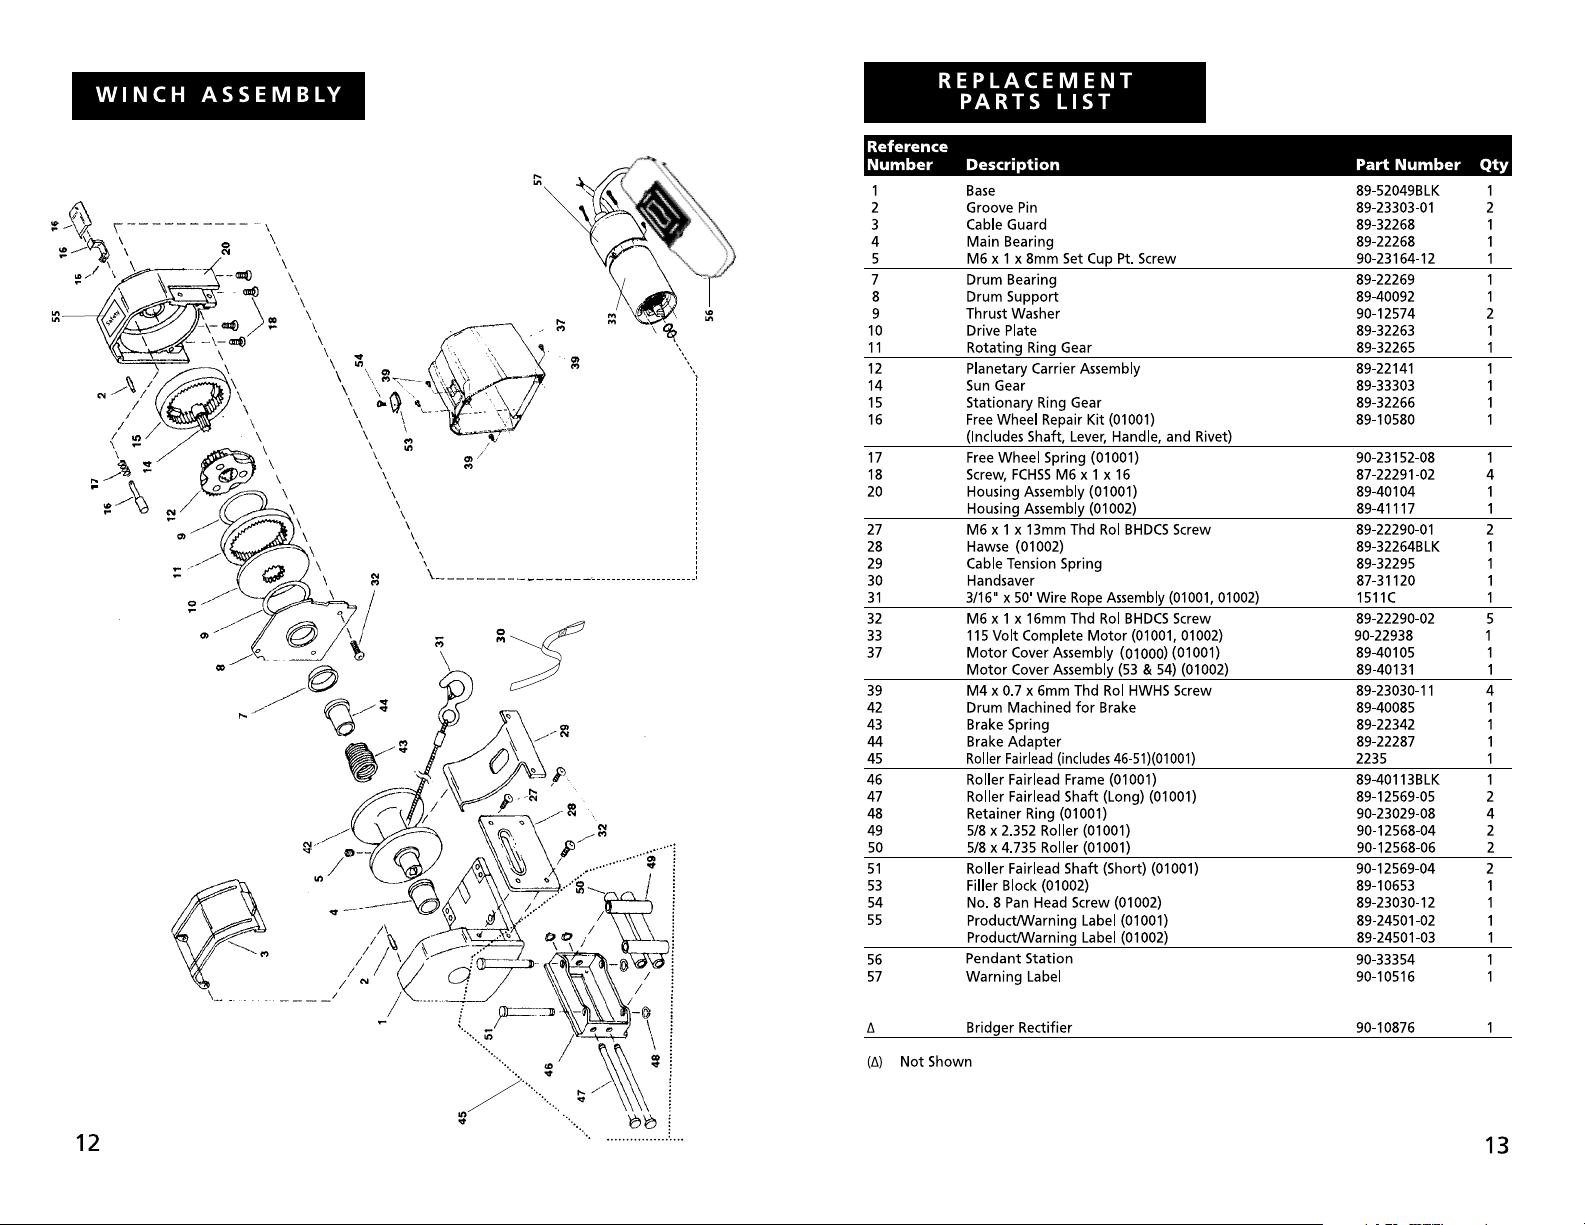
REPLACING THE WIRE ROPE
If relubrica-
cal replacement part (see
Replacement Parts list). Pass attaching end of wire rope through the
fairlead (if equipped) an
d attach it
to the drum. When inserting the
wire rope into the drum, insert it
into the correct end of the hole
provided (Figure 20). Tighten the set
screw securely.
It is important that the wire rope be
wound tightly onto the drum. A
good way to do this is to attach the
wire rope hook to a load and winch
it in.
BRAKE OPERA
TION
Your SAC1000 winch has a wrap
spring brake that stops and holds
loads up to 1,000 lb
s. (454 kg).
When powering the winch in, the
brake is disengaged and does not
become activated until the motor is
turned off and the load tries to pull
the wire rope off the drum. When
the winch is powered out, as in
releasing a load, the brake is
engaged and the motor must over
power the brake drag to rotate the
drum. Therefore, it is normal for the
winch to operate faster in one
direction than the other. Th
e brake
is designed for the wire rope to be
used in the underwind position
only. DO NOT OVERWIND. Powering
against the brake will cause heat to
build up in the drum and may transfer heat to the wire rope (Figure
21). DO NOT POWER OUT FOR
MORE THAN 50 FEET (15.2m) OR 2
When wire rope is removed from
the drum, as in bringing the hook
to the load, the freewheel feature
of the winch sho
uld be used.
EL ECT RIC AL SCHE MAT IC
L (L1)
L
115V
50 / 60 Hz
N (L2)
N
GRN
(GR
TORQUE S PECIF ICATIONS
Drum
Support
Plate
Screws
#27
#32
(Roller Fairlead)
Hawse
Screws
BLU
ORA
BLK (BRN)
7A
(3A)
WHT
WHT
BLU
#27
#32
RED
SWITCHES SHOWN IN
OFF POSITION
ROPE IN
CABLE IN
CABLE OUT
ROPE OUT
WHT
MOTOR
BLK
GRN
(GRN/YEL)
Motor Screws
MINUTES.
Base Screws
ni bl 54-04eswaH
Note: The hawse or roller fairlead frame
holds the tension plate in place, and consequentially is under tension.
To remove a hawse or roller fairlead frame,
the wire rope must be removed to release
tension. The (#32) two lower screws must be
removed prior to the upper (#27) two screws.
To install a hawse or roller fairlead frame,
the upper (#27) two screws must be inserted
and tightened prior to the lower (#32) two
screws. Reattach the wire rope after installation.
Figure 20
Never substitute a heavier or lighter
wire rope. Never use rope made of
any other material other than wire.
Always replace damaged wire
rope with manufacturer’s identi-
Figure 21
get very hot.
HOT!
The drum and
wire rope may
TORQUE SPECIFICATIONS
Drum Support 40-45 lb in
Plate Screws
(Roller Fairlead) Screws
Base Screws 90-100 lb in
Over torquing
could damage
your winch and void your warranty.
10 11
 Loading...