

OWNER’S GUIDE
LT2000 2000 LB 907 kg
12 Volt DC Electric Winch
READ AND UNDERSTAND THIS GUIDE BEFORE
INSTALLATION AND OPERATION.
87-10991 Rev - 8/3/07
Superwinch, Inc.
Winch Drive
Putnam, CT 06260
U.S.A.
Tel: (860) 928-7787
Fax: (860) 963-0811
e-mail: info@superwinch.com
www.superwinch.com
Superwinch, Inc.
Unit D, Union Mine Road
Pitts Cleave Ind Est
Tavistock, Devon
PL19 OPW England
Tel: 44 (0) 1822 619222
Fax: 44 (0) 1822 615204
e-mail: sales@superwinch.net
www.superwinch.com
Throughout this manual, you will find notations with the following headings:
Indicates an imminently hazardous situation which, if not avoided,
will result in death or serious injury.
Indicates a potentially hazardous situation which, if not avoided,
could result in death or serious injury.
Indicates a potentially hazardous situation which, if not avoided,
may result in minor or moderate injury. This notation is also used
to alert against unsafe practices.
The following symbols on the product and in the Owner's manual are used:
Note: Indicates additional information in the installation and operation procedures of your winch.
Correct installation of your winch is a requirement for proper operation.
Please Note: Winch is designed primarily for intermittent applications. This winch is not designed to
be used in industrial or hoisting applications and Superwinch does not warrant it to be suitable for
such use.
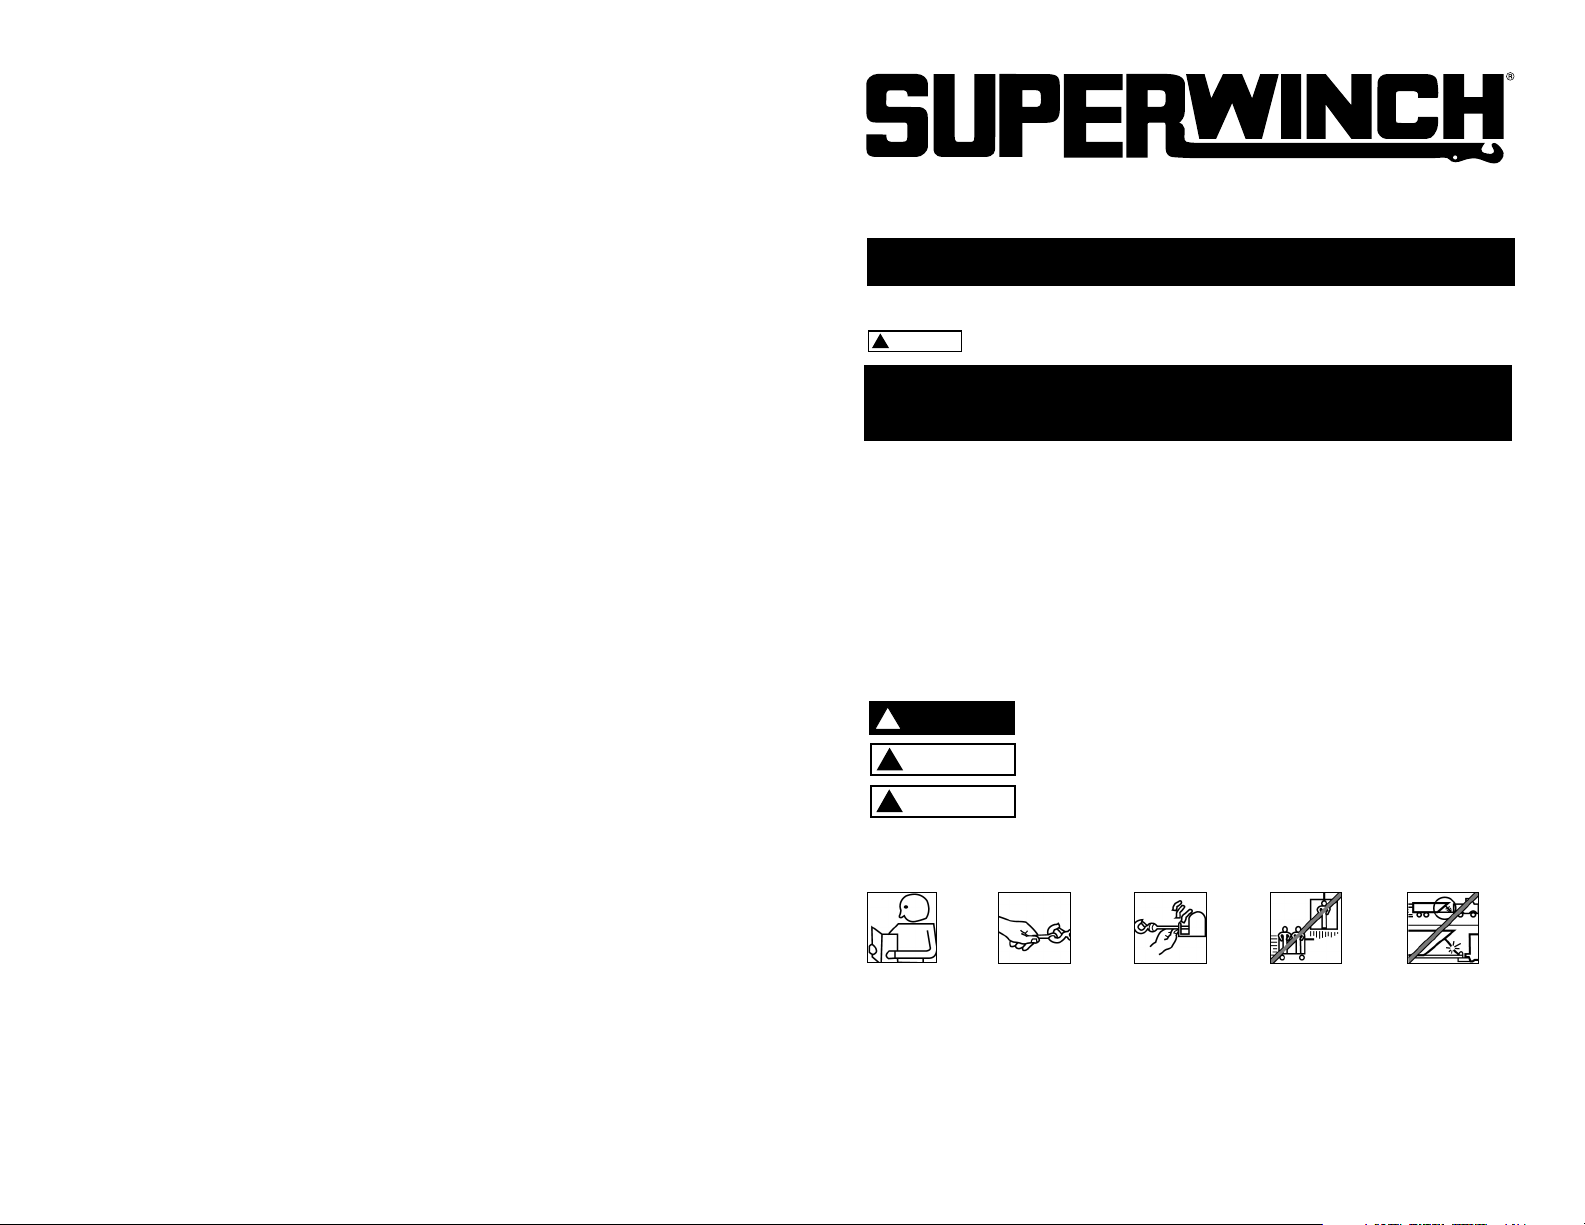
Read Owner's
Manual
Always Use
Handsaver
Keep clear of winch,
wire rope and hook
while operating
Never use winch
to lift or move
people
Never use
winch to hold
loads in place
CAUTION
!
1
DANGER
!
WARNING
!
CAUTION
!
Your winch is a very powerful
machine. If used unsafely or
improperly, there is a possibility
that property damage or personal
injury could result.
The responsibility
for safe installation and operation of the winch and
prevention of personal injury and
property damage ultimately rests
with you, the operator. There is
no substitute for the use of good
judgement and caution in operating
a winch.
The wire rope
may break before
the winch stalls. For heavy loads, use
a pulley block to reduce the load on
the wire rope.
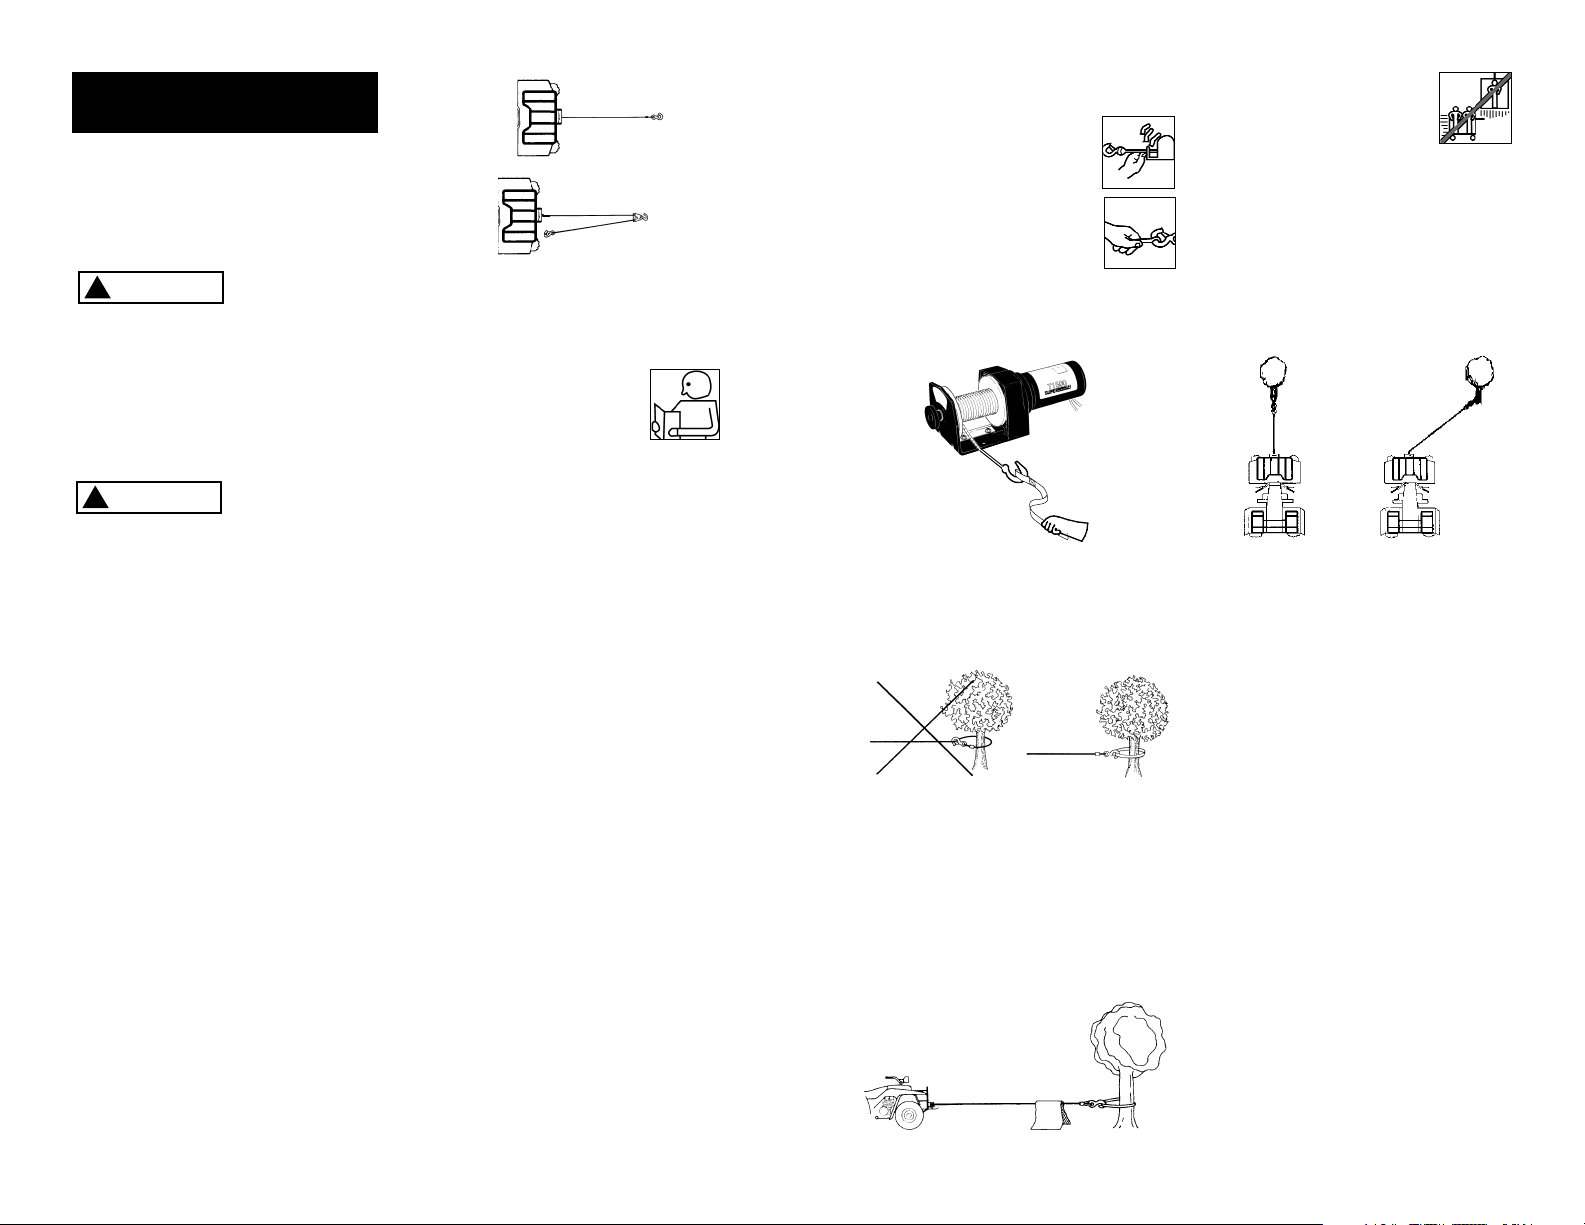
1. Maximum working load capacity
is on the wire rope layer closest
to the drum. DO NOT OVERLOAD. DO NOT ATTEMPT PROLONGED PULLS AT HEAVY
LOADS. Overloads can damage
the winch and/or the wire rope
and create unsafe operating conditions. FOR LOADS OVER 1,000
POUNDS (454 kg), WE RECOMMEND THE USE OF THE OPTIONAL PULLEY BLOCK TO DOUBLE
LINE THE WIRE ROPE (Figure2).
This reduces the load on the
winch and the strain on the wire
rope by approximately 50%.
Attach hook to load bearing part.
The vehicle engine should be
running during winch operation. If considerable winching is
performed with the engine off,
the battery may be too weak to
restart the engine.
2. AFTER READING AND UNDERSTANDING THIS MANUAL, LEARN
TO USE YOUR WINCH.
After installing the winch,
practice using it so you
will be familiar with it
when the need arises.
3. DO NOT “move” your vehicle to
assist the winch in pulling the
load. The combination of the
winch and vehicle pulling together could overload the wire rope
and the winch.
4. ALWAYS STAND CLEAR OF WIRE
ROPE, HOOK AND WINCH. IN THE
UNLIKELY EVENT OF ANY COMPONENT FAILURE IT‘S BEST TO BE
OUT OF HARM‘S WAY.
5. INSPECT WIRE ROPE AND EQUIPMENT FREQUENTLY. A FRAYED
WIRE ROPE WITH BROKEN
STRANDS SHOULD BE
REPLACED IMMEDIATELY.
Always replace wire rope with
the manufacturer‘s identical
replacement part (see
Replacement Parts List).
Periodically check the winch
installation to ensure that all
bolts are tight.
6. USE HEAVY LEATHER GLOVES
when handling wire rope. DO
NOT LET WIRE ROPE SLIDE
THROUGH YOUR HANDS.
7. NEVER WINCH WITH LESS THAN 5
TURNS of wire rope AROUND THE
WINCH DRUM since the wire rope
end fastener may NOT withstand
full load.
WARNING
!
WARNING
!
GENERAL SAFETY
INFORMATION
Figure 2
Double Line
Single Line
2
3
8. KEEP CLEAR OF WINCH, TAUT
WIRE ROPE AND HOOK WHEN
OPERATING WINCH.
Never put your finger
through the hook. If
your finger should
become trapped in
the hook, you could
lose your finger.
ALWAYS USE THE
HANDSAVER when guiding the
wire rope in or out (See Figure
3).
9. NEVER HOOK THE WIRE ROPE
BACK ONTO ITSELF because you
could damage the wire rope.
Use a nylon sling (Figure 4).
10. It is a good idea to lay a heavy
blanket or jacket over the wire
rope near the hook end when
pulling heavy loads (Figure 5). If
a wire rope failure should occur,
the cloth will act as a damper
and help prevent the rope from
whipping.
11. NEVER USE YOUR
WINCH FOR LIFTING OR
MOVING PEOPLE.
12. Your winch is not intended for
overhead hoisting operations.
13. AVOID CONTINUOUS PULLS
FROM EXTREME ANGLES as this
will cause the wire rope to pile
up on one end of the drum
(Figure 6). This can jam the wire
rope in the winch, causing damage to the rope or the winch.
14. NEVER OBSCURE THE WARNING
INSTRUCTION LABELS.
15. Always operate winch with an
unobstructed view of the winching operation.
16. Equipment such as tackle,
hooks, pulley blocks, straps, etc.
should be sized to the winching
task and should be periodically
inspected for damage that
could reduce their strength.
17. NEVER RELEASE FREESPOOL
CLUTCH WHEN THERE IS A
LOAD ON THE WINCH.
18. NEVER WORK ON OR AROUND
THE WINCH DRUM WHEN
WINCH IS UNDER LOAD.
19. DO NOT OPERATE WINCH
WHEN UNDER THE INFLUENCE
OF DRUGS, ALCOHOL OR
MEDICATION.
Wrong Right
Figure 4
Figure 5
Figure 3
Figure 6
Right
Wrong
Use the supplied hardware and
Brackets to mount the handlebar
Switch. Mount the solenoid close to
the battery, in the storage box, under
the seat or on the frame.
The location of
the Switch MUST
not interfere with safe operation of
the vehicle. Wiring MUST NOT come
in contact with any moving parts or
sharp edges, such as engine, suspension, brakes, exaust, or steering.
Route the red wire from the handlebar Switch to the ignition switch
and connect to the wire that is
powered when ignition is in the ON
position ONLY.
Route the two wires from the solenoid to the motor. Route the two
wires from the solenoid to the battery. Attach the circuit breaker to the
end of the red wire. Wrap the circuit
breaker with electrical tape to prevent accidental short circuits.
Apply several layers of electrical
tape where wiring may come into
contact with sharp metal parts of
the vehicle to prevent insulation
abrasion or cutting.
Attach the short circuit breaker wire
to the battery positive terminal and
reattach the terminal to the battery.
Connect the remaining black solenoid wire to the battery negative terminal and connect the terminal to
the battery.
Step (5)
Pull and turn (see Figure 8) the
freespool clutch knob to the “Free”
position. Pull several feet of wire
rope off the drum. Return the clutch
knob back to the “Engaged” position. Activate the winch in Cable Out
momentarily to check drum rotation
direction. If the drum rotates in the
wrong direction, recheck your wiring.
FREESPOOL OPERATION
Pull and turn the clutch knob to the
“Free ” position as shown in Figure
8. If there is a load on the wire rope,
the clutch knob may not pull out
easily. DO NOT FORCE THE CLUTCH
KNOB. Release tension on the clutch
by jogging out some of the wire
rope. Release the clutch and pull out
the wire rope and secure to anchor
or load. Check that there are at least
five (5) turns of wire rope left on the
drum. Re-engage the drum by
returning the clutch knob to the
“Engaged” position. (See Figure 8).
4
5
20. ALWAYS DISCONNECT WINCH
POWER LEADS TO BATTERY
BEFORE WORKING IN OR
AROUND THE WINCH DRUM so
that the winch cannot be turned
on accidentally.
21. When moving a load, slowly
take up the wire rope slack until
it becomes taut. Stop, recheck
all winching connections. Be
sure the hook is properly seated.
If a nylon sling is used, check the
attachment to the load.
22. When using your winch to move
a load, place the vehicle transmission in neutral, set vehicle
brake, and chock all wheels.
23. DO NOT USE THE WINCH TO
HOLD LOADS IN PLACE.
Use other means of
securing loads such
as tie down straps.
24. USE ONLY FACTORY APPROVED
SWITCHES, REMOTE CONTROLS
AND ACCESSORIES. Use of nonfactory approved components
may cause injury or property
damage and could void your
warranty.
25. DO NOT MACHINE OR WELD
ANY PART OF THE WINCH. Such
alterations may weaken the
structural integrity of the winch
and could void your warranty.
26. DO NOT CONNECT WINCH TO
EITHER 110V AC HOUSE CURRENT OR 220V MAINS AS WINCH
BURNOUT OR FATAL SHOCK
MAY OCCUR.
27. Never allow shock loads to be
applied to winch or wire rope.
28. Use caution when pulling or
lowering a load up and down a
ramp or incline. Keep people,
pets and property clear of the
path of the load.
Correct installation of your winch is
required for proper operation.
This winch MUST
be mounted
with the wire rope in the underwind direction. Improper mounting
could damage your winch and void
your warranty.
Step (1)
Install mounting kit or structural
support for winch.
Step (2)
Mount the winch to the mounting
kit base plate or to the mount that
you have designed. Typical mount is
to a flat surface capable of handling the loads.
The M8 x 1.25 x 30mm mounting
bolts supplied are the correct length
for use with a 1/4" (6.3mm) thick
mounting plate.
Do not
substitute
any strength grade weaker than
ISO grade 4.6
Step (3)
Disconnect the vehicle battery leads.
Batteries contain
gasses which are
flammable and explosive. Wear eye
protection during installation and
remove all metal jewelry. Do not
lean over battery while making
connections.
Step (4)
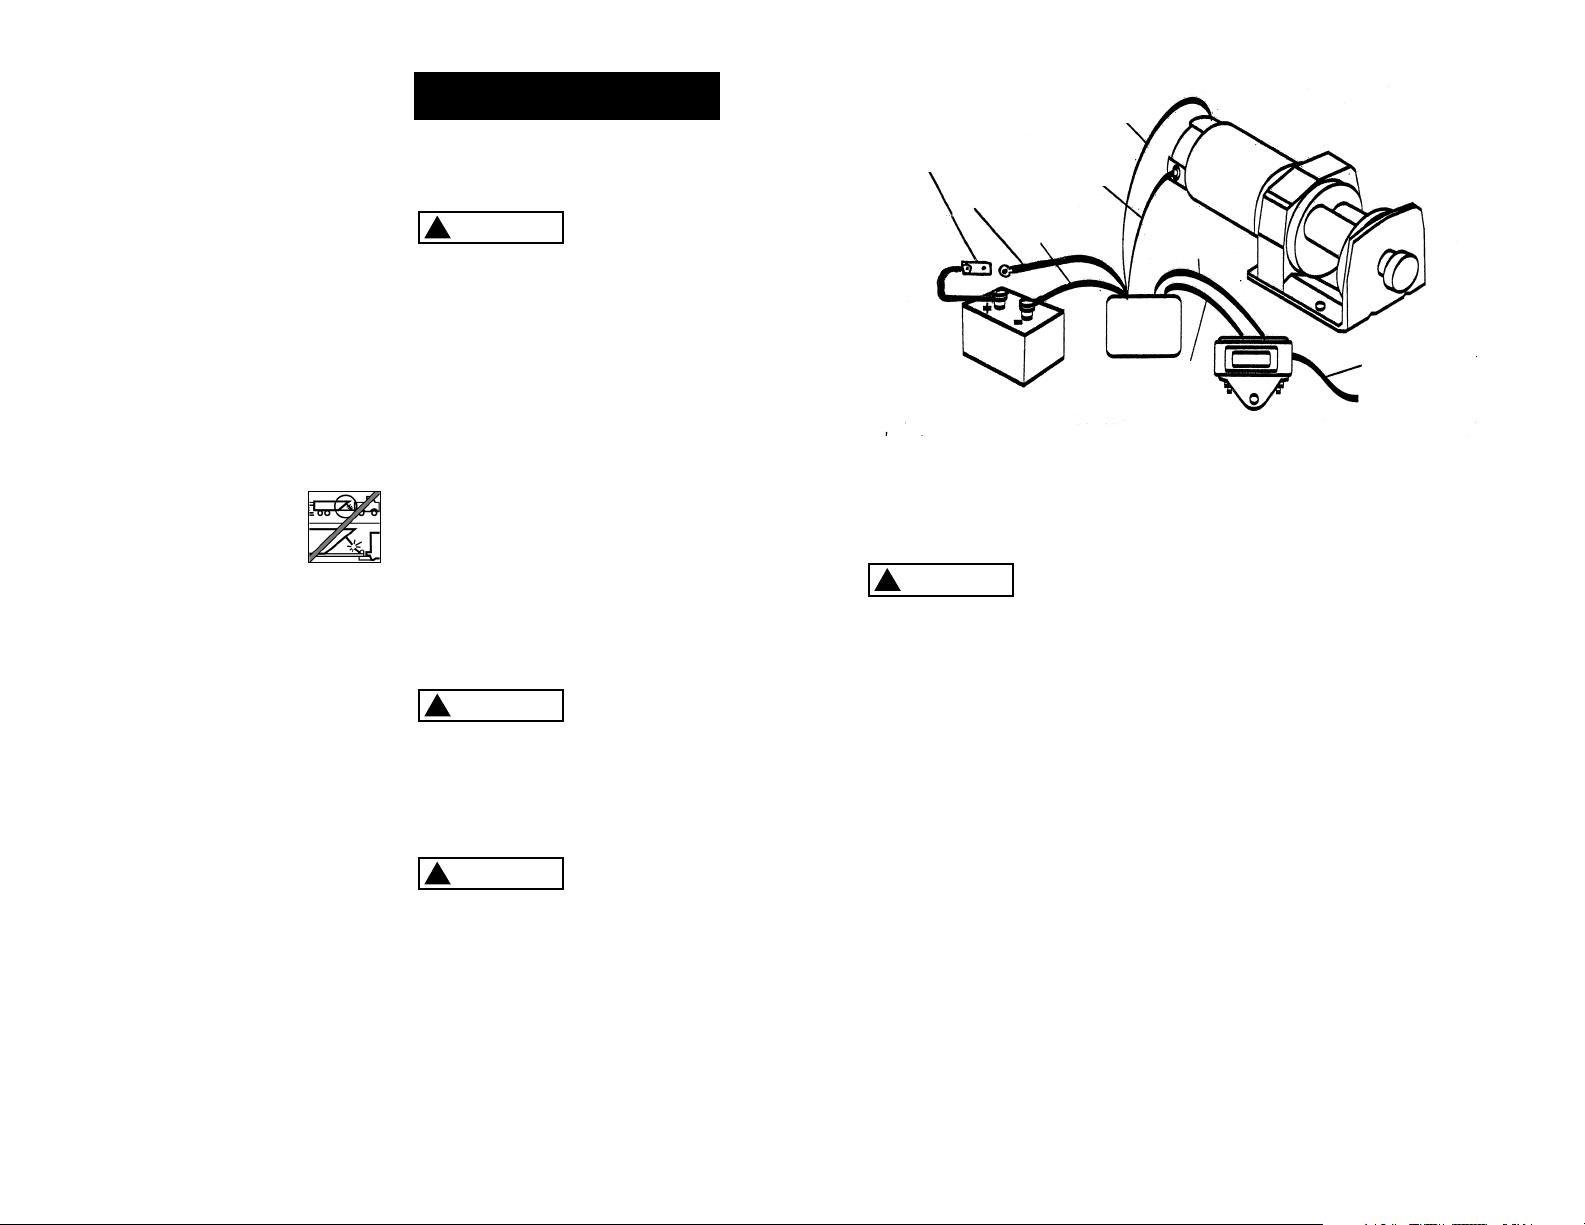
Refer to Figure 7 for wiring
diagram.
WARNING
!
WARNING
!
WARNING
!
WARNING
!
INSTALLATION
Circuit
Breaker
(with - .25m
Red Wire)
Short
RED
(.5 m)
Short
Black
(.5 m)
Long
BLACK
(1.8 m)
Long
RED
(1.8 m)
Red
Terminal
White
Terminal
Solenoid
Battery (12V DC)
BLACK
GREEN
Rocker Switch
RED
+ Ignition Switch
Figure 7

Clutch must be
fully engaged
before winching. Never engage
clutch knob while drum is turning.
If the winch
motor stalls,
do not continue to apply power.
An electric winch is like any other
motor driven power tool such as an
electric drill or saw. The electric
motor should not be allowed to
become excessively hot. Normal
precautions will extend the life of
your motor. Keep the duration of
pulls as short as possible. If the end
of the motor becomes uncomfortably hot to touch, stop winch-
ing and allow the motor to cool
down.
For further information and complete warranty, visit our website
www.superwinch.com.
CAUTION
INTERMITTENT DUTY
Figure 8
Engaged
Free
MANUAL DEL PROPIETARIO
LT2000 907 kg
Cabrestante eléctrico de12 Voltios CD
LEA Y ENTIENDA ESTE MANUAL ANTES
DE INSTALAR Y OPERAR SU PRODUCTO SUPERWINCH.
Superwinch, Inc.
Winch Drive
Putnam, CT 06260
EE.UU.
Tel: (860) 928-7787
Fax: (860) 963-0811
e-mail: info@superwinch.com
www.superwinch.com
Superwinch, Inc.
Unit D, Union Mine Road
Pitts Cleave Ind Est
Tavistock, Devon
PL19 OPW England
Tel: 44 (0) 1822 619222
Fax: 44 (0) 1822 615204
e-mail: sales@superwinch.net
www.superwinch.com
Se usan los siguientes símbolos en el producto y en el Manual del Propietario:
Nota: Indica información adicional en los procedimientos de instalación y
operación de su cabrestante.
La instalación correcta de su cabrestante es un requisito para su operación correcta.
Por favor tome nota: El cabrestante está diseñado principalmente para aplicaciones
intermitentes. Este cabrestante está diseñado para tirar y arrastrar y no está diseñado su
uso en aplicaciones de grúa, y Superwinch no garantiza que sea idóneo para tal uso.
PRECAUCION
!
En este manual, encontrará notas con los títulos siguientes:
Indica una situación de peligro inminente que, de no evitarse, dará
como resultado muerte o lesiones graves.
Indica una situación de peligro potencial que, de no evitarse,
podría dar como resultado muerte o lesiones graves.
Indica una situación de peligro potencial que, de no evitarse,
puededar como resultado lesiones leves o moderadas. Esta nota
se utiliza también para alertarle sobre prácticas inseguras.
PELIGRO
!
ADVERTENCIA
!
PRECAUCION
!
Leer el Manual
del Propietario
Siempre use la
barra protectora
para manos
Manténgase alejado
del cabrestante, el
cable de alambre y
el gancho durante
la operación
Nunca use el
cabrestante para
levantar o mover
personas
Nunca use el
cabrestante para
sostener cargas
7
6
!
CAUTION
!

8. MANTÉNGASE ALEJADO DEL
CABRESTANTE, CABLE DE
ALAMBRE TENSO Y
DEL GANCHO CUANDO ESTÉ OPERANDO
EL CABRESTANTE.
Nunca atraviese el
gancho con los dedos.
Si su dedo queda atrapado en el gancho,
podría perderlo. SIEMPRE USE LA BARRE PROTECTORA PARA MANOS cuando guíe
el cable de alambre hacia adentro o hacia afuera (vea la Fig. 3).
9. NUNCA ENGANCHE EL CABLE
DE ALAMBRE SOBRE SÍ MISMO
porque podría dañar el cable de
alambre. Use una eslinga de
nilón (Figura 4).
10. Es una buena idea poner una
frazada pesada o abrigo sobre el
cable de alambre cerca del
extremo del gancho al tirar de
cargas pesadas (Figura 5). En el
caso de que el cable de alambre
falle, la tela actuará como atenuador para evitar que el cable
de alambre latiguee.
11. NUNCA USE SU
CABRESTANTE PARA LEVANTAR O MOVER GENTE.
12. Su cabrestante no está
pensado para operaciones de
izado por encima.
13. EVITE TIRAR CONTINUAMENTE
DESDE ÁNGULOS EXTREMOS, ya
que esto causará que el cable de
alambre se apile en un extremo
del tambor (Fig. 6). Esto puede
atorar el cable de alambre en el
cabrestante dañando tanto el
cable de alambre como el
cabrestante.
14. NUNCA TAPE LAS ETIQUETAS
DE ADVERTENCIA NI DE
INSTRUCCIONES.
15. Siempre opere el cabrestante
con una vista sin obstrucciones
de la operación de tiro.
16. Los equipos como aparejos,
ganchos, bloques de poleas,
tirantes, etc., deben ser del
tamaño de la tarea de tiro y
debe inspeccionar periódicamente que no tengan daños
que puedan reducir su resistencia.
17. NUNCA SUELTE EL EMBRAGUE
DE CARRETE LIBRE CON UNA
CARGA EN EL CABRESTANTE.
18. NUNCA TRABAJE EN EL TAMBOR O A SU ALREDEDOR CUANDO EL CABRESTANTE TENGA
UNA CARGA.
19. NO OPERE EL CABRESTANTE
CUANDO ESTÉ BAJO LA INFLUENCIA DE DROGAS, ALCOHOL
O MEDICAMENTOS.
Su cabrestante es una máquina
muy poderosa. Trátelo con respeto,
úselo con precaución y siempre siga
estos lineamientos de seguridad.
La responsabili-
dad de la instalación y operación segura del
cabrestante y la prevención de
lesiones personales y daños a la
propiedad corresponde en últimas a
usted, el operador. No existe sustituto para el buen juicio y la cautela al
operar un cabrestante.
El cable de
alambre puede
romperse antes de que el
cabrestante entre en pérdida. Para
cargas pesadas, use un bloque de
poleas para reducir la carga sobre el
cable de alambre.
1. La capacidad máxima de trabajo
es en la capa de cable de alambre
más cercana al tambor. NO
SOBRECARGUE. NO INTENTE
TIRAR DE CARGAS GRANDES POR
TIEMPO PROLONGADO. Las
sobrecargas pueden dañar el
cabrestante y/o el cable y crear
condiciones inseguras de
operación. PARA CARGAS MAYORES DE 454 KILOGRAMOS. (1000
lb.), RECOMENDAMOS EL USO
DEL BLOQUE DE POLEAS
OPCIONAL PARA DUPLICAR EL DE
CABLE ALAMBRE (Fig. 2). Esto
reduce la carga sobre el
cabrestante y el esfuerzo del
cable de alambre en un 50%
aproximadamente. Sujete el gancho a la pieza que soporta la
carga. El motor del vehículo debe
estar funcionando durante la
operación del cabrestante. Si se
llevan a cabo tiros extendidos con
el motor apagado, se puede bajar
la batería y será difícil arrancar el
motor de nuevo.
2. DESPUÉS DE LEER Y ENTENDER
ESTE MANUAL, APRENDA A USAR
SU CABRESTANTE. Después de
instalar el cabrestante, practique
usándolo para que esté
familiari-zado con su
operación cuando surja
la necesidad de usarlo.
3. NO «mueva» su vehículo para ayudar al cabrestante a
tirar de la carga. La combinación
del cabrestante y el vehículo
tirando a la vez puede sobrecargar el cable de alambre y el
cabrestante.
4. MANTÉNGASE SIEMPRE LEJOS DEL
CABLE DE ALAMBRE, EL GANCHO
Y EL CABRESTANTE. EN EL REMOTO CASO DE FALLA DE
CUALQUIER COMPONENTE, ES
MEJOR ESTAR LEJOS DEL PELIGRO.
5. INSPECCIONE FRECUENTEMENTE
EL CABLE DE ALAMBRE Y EL
EQUIPO. UN CABLE DE ALAM-
BRE DESHILACHADO CON
HILOS ROTOS DEBE REEMPLAZARSE INMEDIATAMENTE.
Siempre reemplace el cable de
alambre con la pieza de repuesto
del fabricante idéntica (vea la lista
de piezas de repuesto). Revise
periódicamente la instalación del
cabrestante para asegurarse de
que los tornillos estén firmes.
6. USE GUANTES DE CUERO PESADO
cuando maneje el cable de alambre. NO DEJE QUE EL CABLE DE
ALAMBRE SE DESLICE ENTRE SUS
MANOS.
7. NUNCA USE EL CABRESTANTE
CON MENOS DE 5 VUELTAS de
cable de alambre EN EL TAMBOR
DEL CABRESTANTE, ya que es
posible que el cable de alambre y
su sujeción NO resistan la carga
completa.
8 9
ADVERTENCIA
!
ADVERTENCIA
!
INFORMACIÓN GENERAL
DE SEGURIDAD
Figura 2
Línea Doble
Línea Sencilla
Incorrecto Correcto
Figura 4
Figura 5
Figura 3
Figura 6
Correcto
Incorrecto

Use las abrazaderas y accesorios suministrados para montar el Interruptor de
manubrio. Monte el solenoide cerca de
la batería, en la caja de almacenamiento, debajo del asiento o en el chasis.
La ubicación
del interruptor NO DEBE interferir con la
operación segura del vehículo. El
cableado NO DEBE estar en contacto con piezas en movimiento o
bordes filosos, tales como el
motor, la suspensión, los frenos,
el caño de escape o la dirección.
Lleve el cable rojo del Interruptor de
manubrio al interruptor de encendido
y conéctelo al cable que está energizado SOLAMENTE cuando el interruptor
de encendido está en la posición de
ENCENDIDO.
Lleve los dos cables del solenoide al
motor. Lleve los dos cables del solenoide la batería. Conecte el cortacircuitos al extremo del cable rojo. Utilice
cinta eléctrica en el cortacircuitos para
evitar cortocircuitos accidentales.
Aplique varias capas de cinta eléctrica
donde el cableado pueda entrar en
contacto con partes filosas del vehículo, para evitar rayar o cortar el aislamiento.
Conecte el cable corto del cortacircuitos al terminal positivo de la
batería y reconecte el terminal a la
batería. Conecte el cable negro del
solenoide que queda al terminal negativo de la batería y conecte el terminal
a la batería.
Paso (5)
Tire y gire (vea la Figura 8) la perilla del
embrague del carrete libre a la posición
«Free» (Libre). Tire de varios centímetros de cable de alambre del tambor.
Vuelva a poner la perilla del embrague
en la posición de «Engaged» (
Engranado). Active momentáneamente
el cabrestante en sacar cable para verificar la dirección de giro del tambor. Si
el tambor gira en la dirección incorrecta, vuelva a verificar su cableado.
OPERACIÓN DEL CARRETE LIBRE
Tire y gire la perilla del embrague a la
posición «Free» (Libre) como se muestra en la Fig. 8. Si hay una carga en el
cable de alambre, es posible que no
pueda tirar fácilmente de la perilla del
embrague.
NO FUERCE LA PERILLA DEL
EMBRAGUE. Suelte la tensión del
embrague sacando un poco de cable
de alambre. Suelte el embrague y tire
del cable de alambre y asegúrelo para
anclar la carga. Verifique que queden
por lo menos cinco (5) vueltas de cable
de alambre en el tambor. Vuelva a
engranar el tambor devolviendo la
perilla a la posición «Engranado» (Vea
la Fig. 8)
20. SIEMPRE DESCONECTE LOS CABLES
DE CORRIENTE DE LA BATERÍA
ANTES DE TRABAJAR EN EL TAMBOR
DEL CABRESTANTE O A SU ALREDEDOR, para que no se pueda encender el cabrestante accidentalmente.
21. Cuando mueva una carga, recoja el
exceso de cable de alambre con
cuidado hasta que éste esté tenso.
Deténgase, vuelva a verificar todas
las conexiones de tiro. Asegúrese de
que el gancho esté bien asentado. Si
se usa una eslinga de nilón, revise la
sujeción a la carga.
22. Cuando use su cabrestante para
mover una carga, coloque la transmisión de su vehículo en neutral,
ponga el freno de mano y bloquee
todas las ruedas.
23. NO USE EL CABRESTANTE PARA
RETENER CARGAS EN UN
SÓLO SITIO. Use otros
medios para asegurar cargas, como tirantes para
atar.
24. SOLAMENTE USE LOS INTERRUPTORES, CONTROLES REMOTOS Y
ACCESORIOS APROBADOS POR EL
FABRICANTE. El uso de componentes
no aprobados por el fabricante
puede causar lesiones, daños a la
propiedad y puede anular su garantía.
25. NO MAQUINE NI SUELDE NINGUNA
PIEZA DEL CABRESTANTE. Tales
alteraciones pueden debilitar la integridad estructural del cabrestante y
pueden anular la garantía.
26. NO CONECTE EL CABRESTANTE A LA
CORRIENTE RESIDENCIAL DE 110VCA
O DE 220VCA, YA QUE SE PUEDE
QUEMAR EL CABRESTANTE Y
¡RECIBIR UN CHOQUE ELÉCTRICO
FATAL!
27. Nunca permita que se apliquen cargas de choque al cabrestante o al
cable de alambre.
28. Tenga precaución cuando tire de
una carga o la baje por una rampa o
pendiente. Mantenga a la gente,
mascotas y bienes lejos del camino
de la carga.
Se requiere que su cabrestante esté bien
instalado para funcionar correctamente.
Este
cabrestante
DEBE montarse con el cable de
alambre en la posición de arrollado por debajo. Si lo monta incorrectamente dañará su cabrestante
y anulará su garantía.
Paso (1)
Instale el juego de montaje o el soporte
estructural para el cabrestante.
Paso (2)
Monte el cabrestante en la placa base del
juego de montaje o al montaje que usted
haya diseñado. El montaje típico es en
una superficie plana capaz de soportar
las cargas.
Los tornillos de montaje M8 x 1.25 x 30
mm incluidos tienen la longitud correcta
para usarse con la placa de montaje de
6.3 mm (1/4") de espesor.
No sustituya
con ningún
grado de resistencia más debíl
que la norma ISO Grado 4.6
Paso (3)
Desconecte los cables de la batería del
vehículo.
Las baterías
contienen
gases inflamables y explosivos.
Use protección para los ojos
durante la instalación y quítese
toda joyería metálica. No se
incline sobre la batería al hacer
conexiones.
Paso (4)
Consulte en la Figura 7 el diagrama
de cableado.
ADVERTENCIA
!
ADVERTENCIA
!
ADVERTENCIA
!
ADVERTENCIA
!
10
INSTALACIÓN
Cortacircuitos
(Con .25 m
de Cable
Rojo)
Rojo
Corto
(.5 m)
Negro
Corto
(.5 m)
Negro
Largo
(1.8 m)
Rojo
Largo
(1.8 m)
Terminal
Rojo
Terminal
Blanco
Solenoide
Batería (12 V CD)
NEGRO
VERDE
Interruptor
Oscilante
ROJO
+Interruptor de
Encendido
Figura 7
11

El embrague
debe estar
totalmente engranado antes de
tirar. Nunca engrane la perilla
mientras el tambor esté girando.
Si el motor del
cabrestante
entra en pérdida, no continúe
aplicando la corriente.
Un cabrestante eléctrico es como
cualquier otra herramienta eléctrica
con motor, tales como una sierra o
taladro eléctrico. No se debe permitir que se caliente excesivamente el
motor. Las precauciones normales
ampliarán la vida de su motor.
Procure que la duración de los
tirones sea lo más corta posible. Si
es incómodo tocar el extremo
del motor por su calentamiento,
pare el cabrestante y permita que el
motor se enfríe.
Para más información y una garantía completa, visite nuestro sitio
Web: www.superwinch.com.
12
Figura 8
Engranado
Libre
PRECAUCION
!
SERVICIO
INTERMITENTE
PRECAUCION
!
13
MODE D‘EMPLOI
LT2000 907 kg
Treuil électrique de
12 Volts DC
LISEZ ET COMPRENEZ CE MODE D‘EMPLOI AVANT DI‘INSTALLER
ET DE FAIRE FONCTIONNER.
Superwinch, Inc.
Winch Drive
Putnam, CT 06260
États-Unis
Tél: (860) 928-7787
Fax: (860) 963-0811
e-mail: info@superwinch.com
www.superwinch.com
Superwinch, Inc.
Unit D, Union Mine Road
Pitts Cleave Ind Est
Tavistock, Devon
PL19 OPW England
Tél: 44 (0) 1822 619222
Fax: 44 (0) 1822 615204
e-mail: sales@superwinch.net
www.superwinch.com
Dans tout ce manuel, vous trouverez des notations comportant les titres suivants :
Indique une situation dangereuse imminente qui, si elle n'est pas
évitée, entraînera la mort ou des blessures graves.
Indique une situation potentiellement dangereuse qui, si elle
n'est pas évitée,entraînera la mort ou des blessures graves.
Indique une situation potentiellement dangereuse qui, si elle
n'est pas évitée, peut entraîner des blessures légères ou moyennes.
Cette notation est également utilisée pour alerter contre les pratiques non sécuritaires.
Les symboles suivants sont utilisés sur le produit et dans le manuel de l'opérateur :
N.B. Indique des renseignements supplémentaires pour l'installation et les procédures de fonctionnement de votre treuil.
Une installation correcte de votre treuil est requise pour qu’il fonctionne correctement.
NOTA BENE : Le treuil est conçu principalement pour des utilisations intermittentes installation. Ce
treuil n’est pas conçu pour être utilisé dans des applications industrielles ou de levage et
Superwinch ne garantit pas son aptitude à une telle utilisation.
ATTENTION
!
AVERTISSEMENT
!
ATTENTION
!
DANGER
!
Lisez le manuel
de l'opérateur
Toujours utiliser
la barre protègemains
Restez éloigné du
treuil, du câble et
du crochet durant
le fonctionnement
N'utilisez jamais
le treuil pour lever
ou déplacer des
personnes
Ne jamais utiliser
le treuil pour retenir
des charges en place

8. TENEZ-VOUS À L’ÉCART DU
TREUIL, DU CÂBLE SOUS TENSION
ET DU CROCHET
LORSQUE LE TREUIL
EST EN MARCHE. Ne
mettez jamais les
doigts dans le crochet.
Vous pourriez perdre
votre doigt au cas où il
serait pris dans le crochet. UTILISEZ TOUJOURS LA
BARRE PROTÈGE-MAINS lorsque
vous guidez l’entrée et la sortie
du câble. (Voir la Fig. 3.)
9. N’ACCROCHEZ JAMAIS LE CÂBLE
SUR LUI-MÊME, car cela pourrait
endommager le câble. Utilisez
une élingue en nylon (Fig. 4).
10. C’est une bonne idée de placer
une couverture lourde ou une
veste par dessus le câble près de
l’extrémité où se trouve le crochet
en cas de traction de charges lourdes (Fig. 5). Si le câble métallique
se brisait, le tissu servirait de tampon et aiderait à empêcher le fouettement du câble. Pour une protection complémentaire, soulevez
le capot du véhicule.
11. N’UTILISEZ JAMAIS
VOTRE TREUIL POUR
SOULEVER OU
DÉPLACER DES
PERSONNES.
12. Votre treuil n’est pas destiné aux
opérations de levage en surplomb.
13. ÉVITEZ LES TREUILLAGES CONTINUS EFFECTUÉS À DES ANGLES
EXTRÊMES car ils enrouleront le
câble sur un côté du tambour (Fig.
6). Ceci peut coincer le câble dans
le treuil et endommager le câble
ou le treuil.
14. NE CACHEZ JAMAIS LES
ÉTIQUETTES D'AVERTISSEMENT ET
DE CONSIGNES.
15. Ayez toujours une vue dégagée
de l'opération de treuillage
lorsque vous faites fonctionner
votre treuil.
16. Tout matériel tel que poulies,
crochets, palans, lanières, etc.
doit être de taille adaptée à la
tâche de treuillage et doit être
inspecté périodiquement pour
tout dommage pouvant nuire à
sa robustesse.
17. NE RELÂCHEZ JAMAIS L'EMBRAYAGE DE BOBINAGE LIBRE
SI LE CÂBLE EST SOUS CHARGE.
18. NE TRAVAILLEZ JAMAIS SUR LE
TAMBOUR DU TREUIL OU À
PROXIMITÉ DE CELUI-CI LORSQUE
LE TREUIL EST SOUS CHARGE.
Votre treuil est une machine
puissante. S’il est utilisé sans précautions ou utilisé incorrectement,
il est possible que des dommages
matériaux ou des blessures corporelles en résultent.
.La respons-
abilité d'une
installation et d'une utilisation sécuritaires du treuil ainsi que la prévention des blessures et des dommages
à la propriété repose en fait sur
vous, l'opérateur. Rien ne peut remplacer le bon jugement et la prudence dans l'utilisation du treuil.
Le
câble
métallique
peut se casser avant que le moteur
du treuil ne cale. Pour les charges
lourdes, utilisez un palan pour
réduire la charge sur le
câble
métallique
.
1. La capacité de charge de travail maxi-
male se trouve sur la couche de câble
métallique située le plus près du tambour. NE SURCHARGEZ PAS LE
TREUIL. N’ESSAYEZ PAS DES TRACTIONS PROLONGÉES AVEC DES
CHARGES LOURDES. Les surcharges
peuvent endommager le treuil et/ou
le câble métallique et créer des conditions de fonctionnement dangereuses. POUR TOUTE CHARGE
SUPÉRIEURE À 454 KILOS (1000
LIVRES), NOUS VOUS CONSEILLONS
D’UTILISER LE PALAN FACULTATIF
AFIN D’AVOIR UNE LIGNE DOUBLE
DE CÂBLE MÉTALLIQUE (Fig. 2).Ceci
réduit d’environ 50% la charge sur
le treuil et le stress sur le câble
métallique. Attachez le crochet à
une partie porteuse. Le moteur du
véhicule doit tourner pendant
l’opération de treuillage.
Si vous effectuez beaucoup de
treuillage sans faire tourner le
moteur, il est possible que la batterie soit trop affaiblie pour faire
redémarrer le moteur.
2. APRÈS AVOIR LU ET COMPRIS CE
MANUEL, APPRENEZ À UTILISER
VOTRE TREUIL. Une fois votre
treuil installé, exercez-vous à son
utilisation pour vous familiariser
avec le fonctionnement de la
machine en cas de besoin.
3. NE FAITES PAS “bouger” votre
véhicule pour aider le treuil à tirer
la charge. La traction combinée du
treuil et du véhicule peut surcharger le câble métallique et le treuil.
4. TENEZ-VOUS TOUJOURS À L’ÉCART
DU CÂBLE, DU CROCHET ET DU
TREUIL. DANS LE CAS PEU PROBABLE D’UNE RUPTURE DE COMPOSANT, IL VAUT MIEUX ÊTRE
LOIN DU DANGER.
5. INSPECTEZ FRÉQUEMMENT LE
CÂBLE ET LE MATÉRIEL. REM-
PLACEZ IMMÉDIATEMENT TOUT
CÂBLE EFFILOCHÉ AVEC DES
TORONS CASSÉS. Remplacez tou-
jours le câble par un câble de remplacement identique en provenance du fabricant. (Voir la liste de
pièces de rechange.) Contrôlez
périodiquement l’installation du
treuil pour vous assurer que tous
les boulons sont bien serrés.
6. PORTEZ DES GANTS EN CUIR ÉPAIS
lorsque vous manipulez le câble
métallique. NE LAISSEZ PAS GLISSER LE CÂBLE MÉTALLIQUE DANS
LES MAINS.
7. NE TREUILLEZ JAMAIS AVEC
MOINS DE 5 TOURS de câble
EMBOBINÉ AUTOUR DU TAMBOUR puisqu’il peut arriver que
l’attache à l’extrémité du câble NE
supporte PAS la charge totale.
AVERTISSEMENT
!
AVERTISSEMENT
!
14 15
INFORMATIONS
GÉNÉRALES DE SÉCURITÉ
Figura 2
Línea Doble
Línea Sencilla
Incorrect Correct
Figure 4
Figure 5
Figure 3
Figure 6
Correct
Incorrect

16
19. NE FAITES PAS FONCTIONNER LE
TREUIL LORSQUE VOUS ÊTES
SOUS L'INFLUENCE DE DROGUES,
D'ALCOOL OU DE MÉDICAMENTS.
20. DÉCONNECTEZ TOUJOURS LES
FILS CONDUCTEURS DU TREUIL
MENANT À LA BATTERIE AVANT
TOUT TRAVAIL SUR LE TAMBOUR
DU TREUIL OU À PROXIMITÉ DE
CELUI-CI de manière à éviter que
le treuil ne soit mis en marche par
mégarde.
21. Lorsque vous déplacez une charge,
reprenez doucement tout jeu du
câble jusqu’à ce que celui-ci soit
tendu. Arrêtez le treuil et vérifiez
encore une fois toutes les connexions de treuillage. Assurez-vous
que l’assise du crochet est correcte.
En cas d’utilisation d’une élingue
en nylon, contrôlez qu’elle est
bien attachée à la charge.
22. Lorsque vous utilisez votre treuil
pour déplacer une charge, placez
la transmission du véhicule au
point mort, mettez le frein à main
et calez toutes les roues.
23. N'UTILISEZ PAS LE TREUIL POUR
MAINTENIR LES CHARGES EN
PLACE. Utilisez d'autres
moyens tels que des
lanières de retenue pour
maintenir les charges.
24. UTILISEZ UNIQUEMENT COMMUTATEURS, COMMANDES À DISTANCE ET ACCESSOIRES
APPROUVÉS PAR LE FABRICANT.
L'utilisation de composants non
approuvés par le fabricant pourrait provoquer des blessures ou
des dommages matériels et pourrait annuler votre garantie.
25. N'USINEZ PAS ET NE SOUDEZ
AUCUNE DES PIÈCES DU TREUIL.
De telles altérations peuvent
affaiblir l'intégrité structurelle du
treuil et pourraient annuler la
garantie.
26. NE BRANCHEZ PAS LE TREUIL À
UNE ALIMENTATION EN PUISSANCE RÉSIDENTIELLE DE 110
VOLTS AC OU À UN SECTEUR DE
220 VOLTS ; CELA POURRAIT
PROVOQUER LA SURCHAUFFE DU
TREUIL OU UN CHOC ÉLECTRIQUE
MORTEL.
27. Interdisez toujours l’application
de charges par à-coups au treuil
ou au câble.
28. Faites très attention lorsque vous
tirez une charge et que vous la
faites monter ou descendre le
long d’une rampe ou d’une pente.
Gardez les individus, les animaux
et vos biens matériels à distance
du chemin suivi par la charge.
Votre treuil doit être installé
correctement afin d’en assurer
le bon fonctionnement.
Ce treuil
DOIT être
monté avec le câble de traction orienté dans le sens d’embobinage par le
dessous. Un montage incorrect pourrait endommager votre treuil et
annuler votre garantie.
Étape (1)
Installez le kit de montage ou le support de structure destiné au treuil.
INSTALLATION
AVERTISSEMENT
!
Étape (2)
Montez le treuil sur la plaque de base du
kit de montage ou sur le support que
vous avez conçu. Typiquement, le montage se fait sur une surface plane capable de supporter les charges.
Les boulons de montage M8 x 1,25 x 30
mm qui sont fournis sont de la longueur
requise pour emploi avec une plaque de
montage de 1/4 po. (6,3 mm) d’épaisseur.
Ne sub-
stituez pas
de boulon de force inférieure au calibre ISO 4.6
Étape (3)
Déconnectez les fils conducteurs de la
batterie.
Les batter-
ies contiennent des gaz inflammables et
explosifs. Portez des lunettes de protection pendant l’installation et
enlevez tous vos bijoux en métal. Ne
vous penchez pas par dessus la batterie lorsque vous établissez les connexions.
Étape (4)
Référez-vous à la Figure 7 pour le diagramme électrique.
Utilisez la visserie fournie et les fixations
pour monter le commutateur de guidon.
Montez le solénoïde près de la batterie,
dans la boîte de rangement, sous le siège
ou sur le châssis.
L'emplacement du commutateur NE
DOIT pas entraver le fonctionnement
sécuritaire du véhicule. Le câblage NE
DOIT PAS entrer en contact avec les
pièces mobiles ou les bords tranchants, comme un moteur, une suspension, des freins, un échappement
ou le voyant.
Acheminez le fil rouge venant du commutateur du guidon au commutateur d'allumage et branchez au fil alimenté
lorsque l'allumage est en position « ON »
(marche) SEULEMENT.
Acheminez les deux fils du solénoïde au
moteur. Acheminez les deux fils du
solénoïde à la batterie. Installez le disjoncteur à l'extrémité du fil rouge. Enroulez le
disjoncteur au ruban électrique pour
éviter tout tout court-circuit accidentel.
Appliquez plusieurs épaisseurs de ruban
d'électricien à l'endroit où le câblage
pourrait entrer en contact avec les pièces
de métal tranchantes du véhicule pour
empêcher l'abrasion d'isolant ou la coupe.
Installez le fil court du disjoncteur à la
borne positive de la batterie et refixez la
borne à la batterie.
Connectez le fil noir restant de solénoïde à
la borne négative de la batterie, puis connectez la borne à la batterie.
Disjoncteur
(avec fil
rouge ,25 m)
Court
rouge
(0,5 m)
Court
noir
(0,5 m)
Long
noir
(1,8 m)
Long
rouge
(1,8 m)
Borne
rouge
Borne
blanche
Solénoïde
Batterie (12V c.c.)
NOIR
VERT
Commutateur à
bascule
ROUGE
+ Commutateur
d'allumage
Figure 7
AVERTISSEMENT
!
AVERTISSEMENT
!
AVERTISSEMENT
!
17

Étape (5)
Tirez sur la poignée d’embrayage de
bobinage libre et tournez-la (voir la
Fig. 8) à la position “Libre”. Enlevez
quelques mètres de câble du tambour. Remettez la poignée d’embrayage à la position “engagée”.
Activez momentanément le treuil en
mode sortie de câble pour contrôler
la direction de rotation du tambour.
Si le tambour tourne dans le mauvais sens, revoyez vos fils.
FONCTIONNEMENT DU
BOBINAGE LIBRE
Tirez sur la poignée d'embrayage et
tournez-la en position "Libre" de la
manière indiquée à la Figure 8. S'il
y a une charge sur le câble, il est
possible qu'il soit difficile de
déplacer la poignée d'embrayage.
NE FORCEZ PAS LA POIGNÉE D'EMBRAYAGE. Relâchez la tension de
l'embrayage en faisant jouer un
peu de câble. Relâchez l'embrayage, déroulez du câble en le
tirant et attachez-le à une ancre ou
à la charge. Vérifiez qu'il reste un
minimum de cinq (5) tours de câble
sur le tambour. Engagez à nouveau
le tambour en remettant la
poignée d'embrayage en position
"engagée". (Voir la Fig. 8.)
L’embrayage
doit être complètement engagé avant le treuillage. N’engagez jamais la poignée
d’embrayage lorsque le tambour
tourne.
SI LE MOTEUR
CALE, NE CON
TINUEZ PAS À APPLIQUER LE COURANT.
Un treuil électrique est comme tout
autre outil à moteur tel qu'une scie
ou une perceuse électrique. Il ne
faut pas laisser le moteur électrique
surchauffer. Des précautions normales prolongeront la durée de vie
de votre moteur. Gardez les durées
de traction aussi courtes que possible. Si l'extrémité du moteur
devient trop chaude pour le
toucher confortablement,
arrêtez le treuillage et laissez le
moteur refroidir.
Pour plus d'information et la garantie
complète, visitez notre site Web à
www.superwinch.com
.
ATTENTION
!
ATTENTION
!
Figure 8
Engagé
Libre
18
FONCTIONNEMENT
INTERMITTENT
 Loading...