


*+ # i
Superwinch LLC.
359 Lake Road
Dayville, CT 06241, USA
tel: 1.860.928.7787
fax: 1.860.963.0811
info@superwinch.com
www.superwinch.com
Superwinch LTD.
Union Mine Road
Tavistock, Devon PL19 0NS
England
tel: +44 (0) 1822 614101
fax: + 44 (0) 1822 615204
sales@superwinch.net
98-17449 Rev - 01/24/2012
OWNER’S MANUAL
READ AND UNDERSTAND THIS MANUAL BEFORE
INSTALLATION AND OPERATION OF YOUR
SUPERWINCH PRODUCT
CAUTION
!
TM
WIRELESS REMOTE CONTROL
1
SPANISH
WARNING
!
CERTUS WIRELESS REMOTE SYSTEM – CONSUMER VERSION
Read and understand the manual thoroughly before installing or
using the radio remote control.
General Information
The system operates on a frequency of 433MHZ and utilizes frequency modulation generally known
as FM technology. While an FM signal is much less susceptible to electrical interference than an
AM signal, there can never be total protection against outside interference. Interference can result
from the turning on and o of electronic equipment and can come from proximity to industrial
equipment and types of computer equipment. The greatest range will be achieved if the receiver is
not enclosed in metal.
SAFETY PRECAUTIONS
The responsibility for safe installation and operation of this system ultimately rests
with you, the operator. Read and understand all safety precautions and operating
instructions before installing and operating the system. Careless system operation can
result in serious injury and/or property damage.
Throughout this manual, you will nd notations with the following headings:
Indicates an imminently hazardous situation which, if not
avoided, will result in death or serious injury.
Indicates a potentially hazardous situation which, if not
avoided, could result in death or serious injury.
Indicates a potentially hazardous situation which, if not
avoided, may result in minor or moderate injury. This
notation is also used to alert against unsafe practices.
CAUTION
!
DANGER
!
Read Owner's
Manual
Note: Indicates additional information in the installation and operation procedures of
your wireless remote control.
The following symbols on the product and in the Owners manual are used:
WARNING
!
2
Improper installation or improper use of the remote unit by the user
could result in injury or destruction of property. Keep this manual for
future reference.
SPANISH
Misuse or abuse of this equipment could result in injury to the user or others
and/or damage to property.
The control will be brought to a stop if:
1. the red power button is activated
2. system encounters the same frequency from an outside source
3. ve minutes go by since the last transmission
These safety features are engineered into
the system to protect personnel and
equipment and should never be changed,
taken out or bypassed.
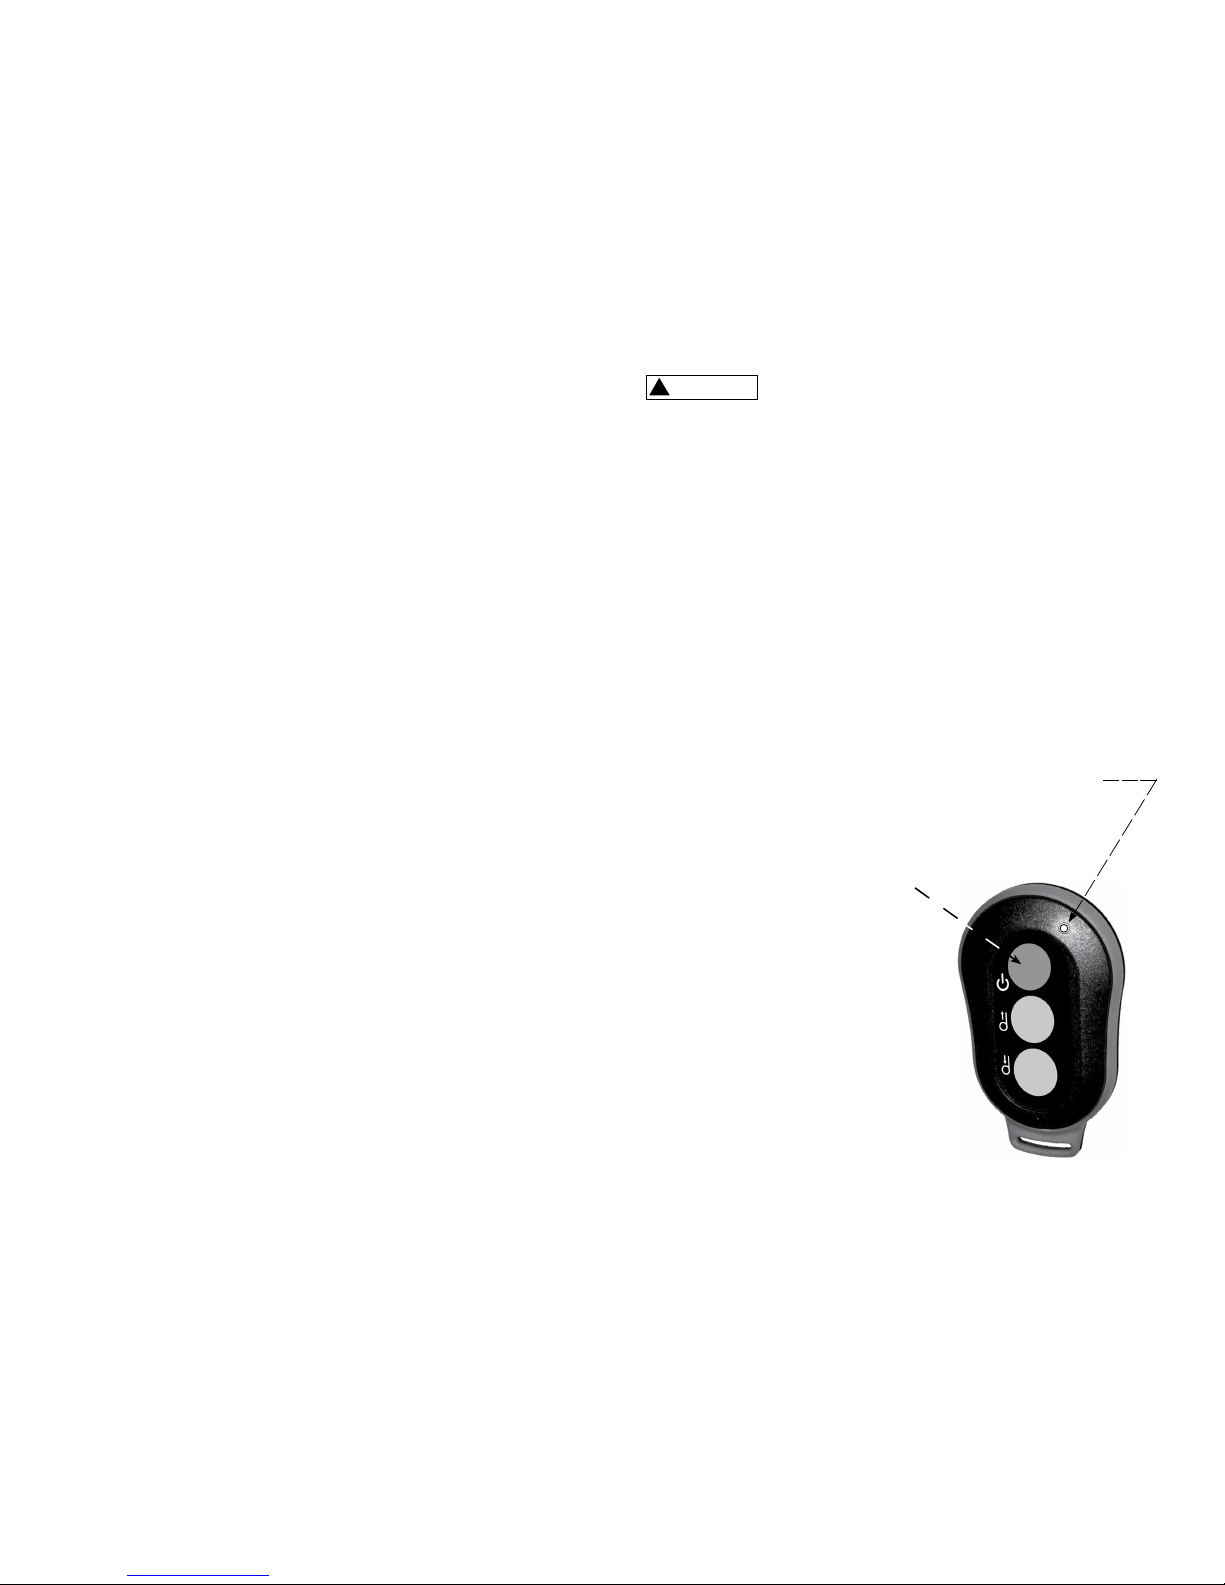
If an emergency situation arises immediately
press the red power button on the transmitter
see (Fig. 1)
1. Never leave the transmitter unattended.
2. The transmitter is only to be used where there is a clear view of the operating
machinery.
3. Do not use more than one transmitter for one receiver box. If you own or
purchase a backup transmitter it is important to stow the second transmitter
securely. When the system is rst put into use, the backup unit should be tested
then have its battery removed and the unit should be stored in a secure place
to avoid accidental operation, which may result in serious injury or death.
4. Both the transmitter housing and buttons should be checked on a regular
basis and, if damaged, the transmitter should be taken out of use.
5. In an emergency situation, pressing the red stop button should immediately
activate the stop relay in the receiver. Remove power to the machine.
3
Fig. 1
LED 1
Power Button
SPANISH
!
AVERTISSEMENT
SPANISH
Programming the Transmitter
Note: Transmitters supplied with the unit are pre-programmed at the factory -
DO NOT RE-PROGRAM THEM.
Should a new transmitter be purchased it will require programming.
To program, follow the instructions below:
NOTE: Each of the three (3) buttons needs to be programmed individually
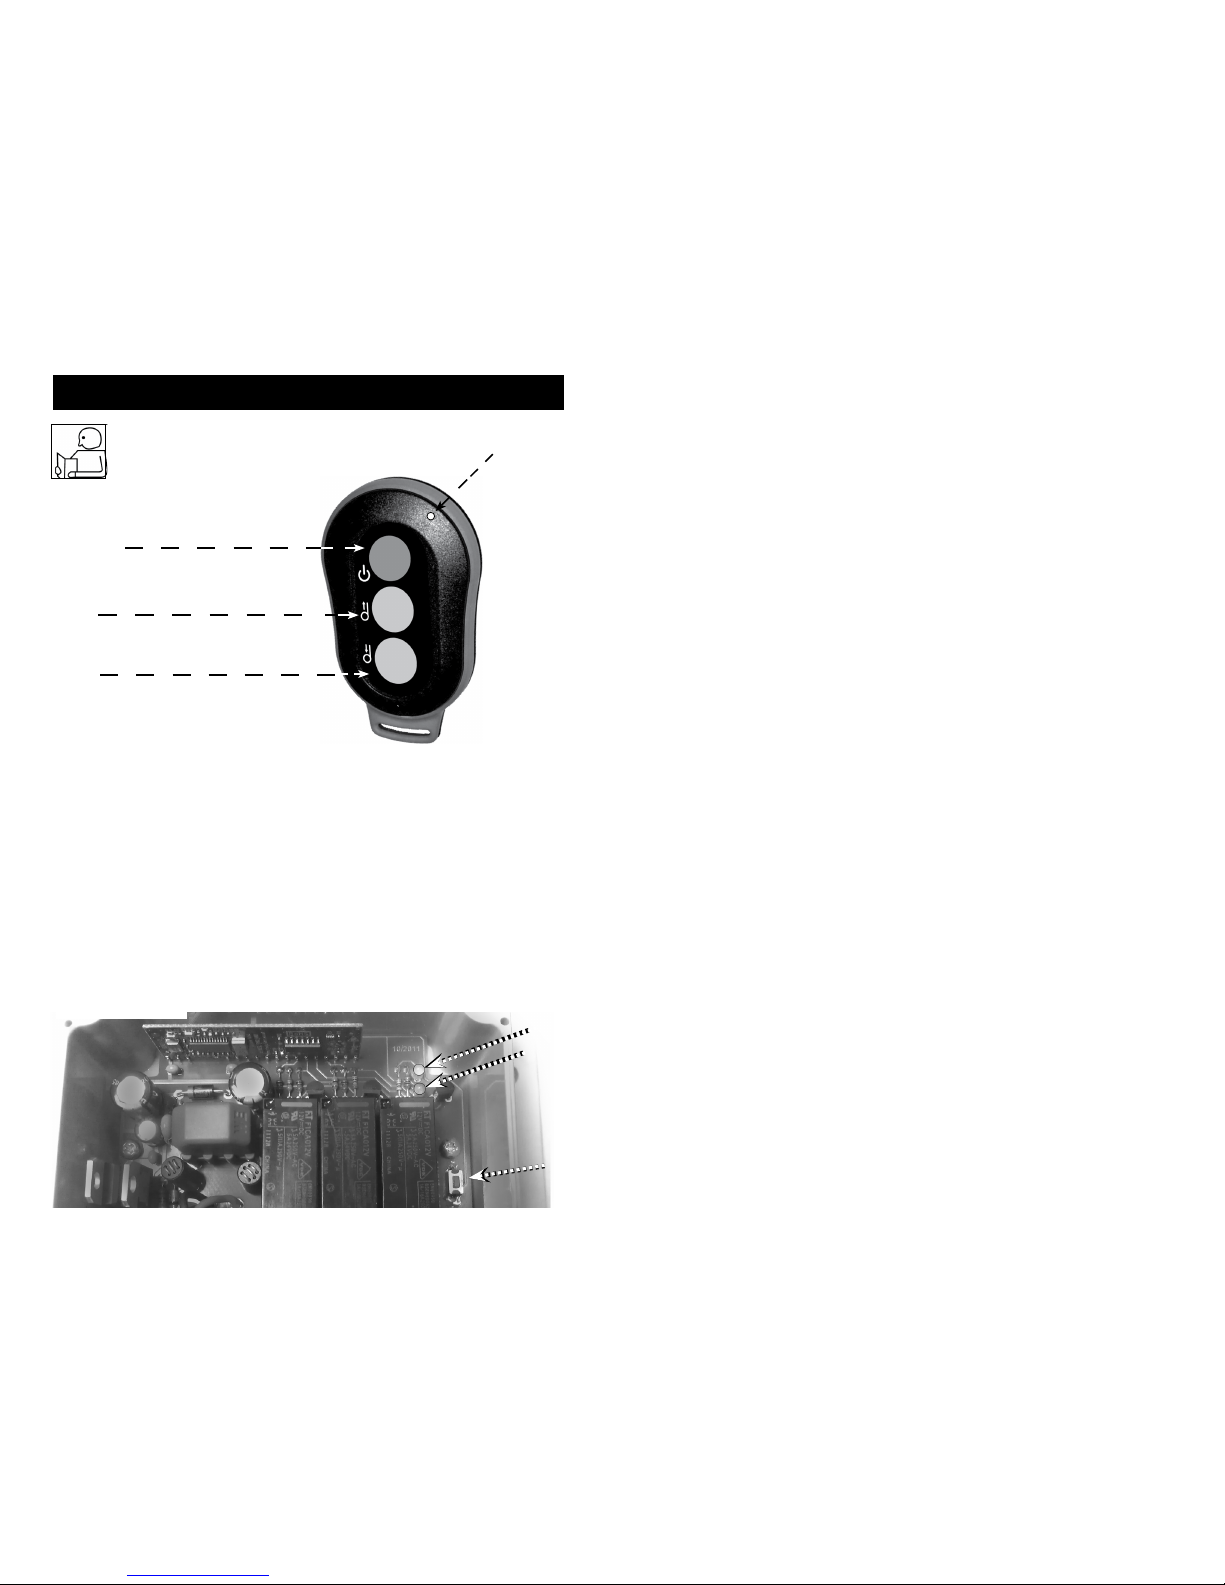
OPERATION INSTRUCTIONS
RED
Power
Button
Green
Button
1
Green
Button
2
LED 1
(Fig. 2)
Front of Transmitter
Green LED
Red LED
Program Green Button 1:
• Press the learn button (See Fig.3 below) 1 time.
Wait for the red LED on receiver to ash 1 time.
• Press green button 1 on the transmitter and release.
• Re-press green button 1 on the transmitter.
The red LED on receiver will now ash to indicate that learning is complete for
green button 1.
Learn
Button
(Fig.3)
4

The transmitter has one red LED light, see (Fig. 2) which glows when any one
of the buttons is depressed; this shows the receiver is sending a signal to the
receiver.
1. To use the wireless system, the operator rst activates the system by pressing
the red power button on the transmitter; a green LED on the receiver will
glow as the system is now in operational mode and ready for use.
2. To deactivate the wireless system, press the red power button and the green
LED on the receiver turns o as the system is now in standby mode.
3. The power button always has priority and will override all buttons so that it
will put the system into standby mode.
4. If the system is idle for 5 minutes or longer, the system will deactivate and go
into standby mode and will need to be activated prior to use.
Program Red Power Button:
• Press the learn button 1 time
Wait for the red LED on receiver to ash 1 time
• Press the learn button 1 more time
Wait for the red LED on receiver to ash 2 times
• Press the learn button 1 more time
Wait for the red LED on receiver to ash 3 times
• Press the red button on the transmitter and release
• Re-press the red button on the transmitter
The red LED on receiver will now ash to indicate that learning is complete for
the red button
Your transmitter is now programmed and ready for use
Program Green Button 2:
• Press the learn button 1 time
Wait for the red LED on receiver to ash 1 time
• Press the learn button 1 more time
Wait for the red LED on receiver to ash 2 times
• Press green button 2 on the transmitter and release
• Re-press green button 2 on the transmitter
The red LED on receiver will now ash to indicate that learning is complete
for green button 2
5
SPANISH

The folowing funtions are built into the system :
1. Standby mode:
When hooked up to the supply voltage, the system is in standby mode
2. Operational mode:
When the system is in operational mode, the green LED on the receiver will
glow and the system is now ready for use.
3. Automatic stop with frequency interference:
The system will automatically move to standby mode when another
transmitter with the same frequency is detected.
Battery
To change the battery, open the back of the transmitter by removing the two
(2) small screws. After removing the cover, carefully remove the old battery and
replace it with a new CR2450 3 volt coin cell battery. Before installing the new
battery insure that the connector is free from corrosion. Corrosion can
be easily removed using a small sti brush. After the new battery has been
installed, replace the cover carefully by means of the two small screws.
After changing the battery make sure the rubber
seal on the transmitter is in place correctly or the sealing of the unit cannot
be guaranteed. Used batteries should be disposed of according to national
regulations.
CAUTION
!
The transmitter and receiver utilize an internal antenna. This antenna cannot be
shortened, moved or otherwise altered. Alteration will void warranty and may
cause erratic operation.
For safety reasons the receiver also moves to standby mode when more than 5
minutes has elapsed between signals from transmitter to receiver.
The green LED is on when the receiver is on and functional. The red LED ashes
when a button on the transmitter is being pressed.
The receiver works with 3 relays, 2 for direction and 1 for on/o. The relays
switch the current to the proper switch output
6
SPANISH

Do not attempt to install wiring when the battery is connected.
Do not lean over battery while making connections.
Automotive batteries contain ammable and explosive gases. Wear eye
protection during installation and remove all metal jewellery.
7
Ensure that the wiring harness does not interfere or come in
contact with any hot or moving engine, suspension, steering,
braking or exhaust parts.
CAUTION
!
INSTALLATION INSTRUCTIONS
Step 1
Disconnect the battery before beginning installation.
Step 2
Locate a place to mount the Wireless Control unit. Under dash, console, or inside
wall of a box trailer would be typical locations. The unit can be mounted in any
orientation inside the vehicle or trailer. The unit can be mounted by either
cable ties or four (4) self-tapping screws.
Step 3
Connect the white weather pack connector end of the harness to the mating
white weather pack connector on the wireless receiver module. see ( Fig. 4)
Step 4.
For P/N 06705
A. Connect the winch plug end to your Talon winch socket.
For P/N 06707 (See Fig.5)
A. Connect the black wire ring terminal from the harness assembly to
the black (-) stud of the solenoid.
C. Connect the red wire ring terminal from the harness assembly to the
red (+) stud of the solenoid.
D. Use one of the two supplied quick splice connectors to splice the
blue wire from the harness assembly into the black wire from the
handlebar rocker switch.
E. Use the second quick splice connector to splice the yellow wire from
the harness assembly into the green wire from the handlebar rocker
switch.
from the Winch to the Receiver
DANGER
!
Fig. 4
SPANISH
Step 5. Install battery that came with your control (see battery section)
For P/N 06709:
A. Connect the winch plug end to your S-Series winch socket.

After mounting and wiring is complete, test the operation of the system to be
sure that the winch is operating in the proper direction utilizing the transmitter.
If not, troubleshoot.
1. Press the red power button on the transmitter to activate the system.
2. Check to see that the operation of the transmitter corresponds to the opera
tion of the winch.
3. Check the power function. After pressing the red power button, the winch
should not be able to be controlled by the transmitter.
4. If the checks are nished and everything is functional, the system is opera
tional.
Check to ensure that the ground and positive leads from
the battery are disconnected before performing any
electrical work.
OPERATION TEST
WARNING
!
(Fig. 5)
BLACK Wire
from
Harness
Assembly
RED Wire
from
Harness
Assembly
GREEN Wire from
handle bar switch
(green wire passes
through connector)
Splice Connector
Splice Connector
YELLOW Wire from
Harness Assembly
(closed o side of
connector used)
BLACK Wire from
handle bar switch
(black wire passes
through connector)
BLUE Wire from
Harness Assembly
(closed o side of
connector used)
8
SPANISH

9
MAINTENANCE
Depending on use, the batteries in the remote transmitter will need
replacement after a period of time.
No other regular maintenance is required.
Receiver shows no
reaction after supply
current has been
connected and Green
LED does not light up
when power button
on transmitter is pressed
Receiver shows no
reaction after current
is supplied and button
on transmitter is pressed
Green LED is on but Red
LED does not light up
when Green button 1 or
2 is pressed
Receiver can be taken
out of standby mode
but quickly shuts down
again
System does not have
enough eective range
Supply current not
available /
Connections reversed
Transmitter not
programed correctly to
receiver
Another source is
transmitting on the same
frequency
Receiver mounted
incorrectly /
Receiver surrounded in
metal /
Weak battery
TROUBLESHOOTING
Check polarity /
Test current
into receiver /
Turn on main
power.
Re-program transmitter
(see page 4-5)
Deactivate other
transmitter
See Mounting instructions
Change battery
Problem Possible Cause Solution
SPANISH
System does not operate
in the proper direction
Harness wired
incorrectly
Verify connections per
installation instructions

Frequency FM 433 MHz
Voltage 12-24 Volt DC
No signal current 12V 25mA, 24v 35mA
Max. operating voltage 24VDC
Antenna Internal wire
LED Ready mode Green
LED Signal Red
Dimension 5.1” x 2.8” x 2.0” (130mm x 70mm x 50mm)
Ingress Protection IP67
Operational Temperature -4° F to 122° F (-20° C to + 50° C)
Technical Data - Receiver
Technical Data - Transmitter
Frequency FM 433 MHZ
Number of Functions 2, plus Power function
Antenna Multilayer Chip
LED Light for transmission Red
Dimensions
3.3” x 2.1”x .07” (84mm x 53mm x 18mm)
Ingress Protection Level IP66
Operational Temperature -4° F to 122° F (-20° C to + 50° C)
10
SPANISH

NOTICE:
This device complies with part 15 of the FCC Rules [and with RSS-210 of
Industry Canada].
Operation is subject to the following two conditions:
(1) this device may not cause harmful interference, and
(2) this device must accept any interference received, including
interference that may cause undesired operation.
NOTICE:
Changes or modications made to this equipment not expressly
approved by, SUPERWINCH LLC, may void the FCC authorization to
operate this equipment.
NOTE:
This equipment has been tested and found to comply with the limits for
a Class A digital device, pursuant to Part 15 of the FCC Rules. These limits
are designed to provide reasonable protection against harmful interference when the equipment is operated in a commercial environment.
This equipment generates, uses, and can radiate radio frequency energy
and, if not installed and used in accordance with the instruction manual,
may cause harmful interference to radio communications. Operation of
this equipment in a residential area is likely to cause harmful interference in which case the user will be required to correct the interference
at his own expense.
NOTICE:
This Class (A) digital apparatus complies with Canadian ICES-003
Radio frequency radiation exposure information:
This radiated output power of the device is far below the FCC radio
frequency exposure limits. Nevertheless, the device shall be used in such
a manner that the potential for human contact during normal operation
is minimized
11
SPANISH

MEMBER
12
SPANISH

Superwinch LLC.
359 Lake Road
Dayville, CT 06241, USA
tel: 1.860.928.7787
fax: 1.860.963.0811
info@superwinch.com
www.superwinch.com
Superwinch LTD.
Union Mine Road
Tavistock, Devon PL19 0NS
England
tel: +44 (0) 1822 614101
fax: + 44 (0) 1822 615204
sales@superwinch.net
98-17449 Rev - 01/24/2012
MANUEL DU PROPRIETAIRE
LIRE ET COMPRENDRE CE MANUEL AVANT INSTAL-
LATION ET L’OPERATION DE VOTRE PRODUIT DE
SUPERWINCH
TM
TELECOMMANDE SANS FIL
MEMBER
24
13
!
PRUDENCE

NOTIFICATION:
Cet appareil se conforme à la partie 15 des Règles de FCC [et avec RSS210 de Canada d’Industrie].
L’opération est assujetti au suivre deux conditions :
(1) cet appareil ne peut pas causer l’intervention nuisible, et
(2) cet appareil doit accepter n’importe quelle intervention reçue, y com
pris interference that may cause undesired operation.
NOTIFICATION:
Les changements ou les modications ont fait à cet équipement
pas expressément Approuvé par, SUPERWINCH LLC, peut annuler
l’autorisation de FCC pour fonctionner cet équipement.
NOTE:
Cet équipement a été essayé et a été trouvé pour se conformer aux
limites pour Une Classe UN appareil numérique, conformément à Partie
15 des Règles de FCC. Ces limites sont conçues pour fournir raisonnable la protection contre l’intervention nuisible quand l’équipement
est fonctionné s un environnement commercial. Cet équipement produit, les usages,et peut rayonner l’énergie de radiofréquence et, si pas
installé et utilisé conformément au manuel d’utilisation, peut causer
nuisible L’intervention pour transmettre par radio des communications. L’opération de cet équipement dans un le secteur résidentiel va en
toute probabilité causer l’intervention nuisible dans laquelle reconnaît
l’utilisateur sera Exigé corriger l’intervention à sa propre dépense.
NOTIFICATION:
Cette Classe (UN) l’appareil numérique se conforme AUX GLACES
canadiennes-003
Transmettre par radio les informations d’exposition de rayonnement
de fréquence :
Ceci a rayonné le pouvoir de production de l’appareil est éloigné au
dessous des limites d’exposition de radiofréquence de FCC. Néanmoins,
l’appareil sera en utilisé une telle manière que le potentiel pour le contact humain pendant l’opération normale est minimisée
CERTUS ELOIGNE SYSTEME SANS FIL – VERSION DE CONSOMMATEUR
Lire et comprendre le manuel à fond avant d’installer ou utiliser la
télécommande de radio.
Informations générales
Le système fonctionne sur une fréquence de 433 MHz et utilise la modulation de fréquence
généralement connu comme la technologie de FM. Pendant qu’un signal de FM est beaucoup
moins susceptible à l’intervention électrique qu’un SUIS le signal, il ne peut jamais y avoir la
protection totale contre l’intervention extérieure. L’intervention peut résulter de l’allume et de
d’équipement électronique et peut venir de la proximité à l’équipement et des types industriels
d’équipementinformatique. La plus grande gamme sera atteinte si le récepteur n’est pas enclos
dans le métal.
SECURITE PRECAUTIONS
La responsabilité pour l’installation et l’opération sûre de ce système se repose nalement avec vous, l’opérateur. Lire et comprendre toutes les précautions et les instructions opérantes avant d’installer et fonctionner le système. L’opération négligente de
système peut avoir pour résultat les dommages de propriété de et/ou de blessure
sérieux.
A travers ce manuel, vous trouverez des notations avec les en-têtes suivants :
A travers ce manuel, vous trouverez des notations avec les
en-têtes suivants :
Indique une situation potentiellement hasardeuse qui, si
pas évité, pourrait avoir pour résultat la mort ou la blessure
sérieuse.
Indique une situation potentiellement hasardeuse qui, si pas
évité, peut avoir pour résultat le mineur ou
modère la blessure. Cette notation est aussi utilisée pour
alerter contre les pratiques dangereuses.
DANGER
!
Read Owner's
Manual
Note : Indique des informations supplémentaires dans les procédures d’installation
et opération de votre télécommande sans l.
Les symboles suivants sur le produit et dans les Propriétaires que le manuel est utilisé :
L’installation déplacée ou usage déplacé de l’unité éloignée par
l’utilisateur pourrait avoir pour résultat la blessure ou la destruction
de propriété. Garder ce manuel pour la référence future.
LES LECTEURS
PROPRIETAIRES
MANUEL
!
AVERTISSEMENT
!
PRUDENCE
!
AVERTISSEMENT
23
14

Fréquence FM 433 MHz
Tension 12-24 Volt DC
Aucun courant de signal 12V 25mA, 24v 35mA
Max. la tension d’opperating 24VDC
Antenne Fil interne
LA LED mode Prêt Vert
Signal de LED Rouge
Dimension 5.1” x 2.8” x 2.0” (130mm x 70mm x 50mm)
Protection d’entrée IP67
La température nivelle -4° F to 122° F (-20° C to + 50° C)
Les Données techniques - le Récepteur
Les Données techniques - l’Emetteur
Fréquence FM 433 MHZ
Le nombre de Fonctions 2, plus la fonction de Pouvoir
Antenne Puce multicouche
Le Voyant LED pour la transmission Rouge
Dimensions
3.3” x 2.1”x .07” (84mm x 53mm x 18mm)
Le Niveau de Protection d’entrée IP66
Température opérationnelle -4° F to 122° F (-20° C to + 50° C)
Employer improprement ou l’abus de cet équipement pourrait avoir pour résultat la blessure à l’utilisateur ou d’autres les dommages de et/ou à la propriété.
Le contrôle sera amené à un arrêt si :
1. Le bouton d’alimentation rouge est activé
2. Le système rencontre la même fréquence d’une source extérieure
3. cinq minutes vont par depuis la dernière transmission
Ces mesures de sécurité sont organisées
dans le système pour protéger le personnel
et l’équipement et nedevrait jamais être changé,
a sorti ou sauté.
Si une situation d’urgence se présente tout de suite
appuie le bouton d’alimentation rouge sur l’émetteur voit
(la g. 1)
1. Ne jamais partir l’émetteur indépendant.
2. L’émetteur est seulement être utilisé où il y a une vue claire de la machinerie
opérante.
3.
Ne pas utiliser plus qu’un émetteur pour une boîte de récepteur. Si vous possédez
ou achetez un émetteur de sauvegarde c’est important de ranger le deuxième
émetteur assurément. Quand le système est premièrement mis dans l’usage, l’
unité de sauvegarde devrait être alors essayée a sa pile enlevée et l’unité devrait
être em magasinée dans un lieu assuré pour éviter l’opération accidentelle, qui
peut avoir pour résultat la blessure ou la mort sérieuse.
4. Le logement d’émetteur et les boutons devraient être régulièrement vériés et,
si endommagé, l’émetteur devrait être sorti d’usage.
5. Dans une situation d’urgence, appuyant le bouton d’arrêt rouge devrait activer
tout de suite le relais d’arrêt dans le récepteur. Enlever le pouvoir à la machine.
Fig. 1
LED 1
Bouton d’alimentation
!
AVERTISSEMENT
22 15

ENTRETIEN
Dépendre de l’usage, les piles dans l’émetteur éloigné auront besoin du
remplacement après une période de temps.
Aucun autre entretien régulier est exigé.
Le récepteur montre non
la réaction après la provision
le courant a été
connecté et Vert
LA LED n’allume pas en haut
quand le bouton
d’alimentation
sur l’émetteur est appuyé
Le récepteur ne montre
pas de réaction après
le courant
est fourni et boutonner
sur l’émetteur est appuyé
LED verte est sur mais la
LED Rouge n’allume pas
en haut
quand le bouton Vert
1 ou 2 sont appuyés
Le récepteur peut être
sorti de mode Veille mais
ferme rapidement encore
Le système n’a pas la
gamme assez ecace
Fournir le courant pas
disponible /
Les connexions ont
renversé
L’émetteur n’a pas programmé correctement à
reciver.
Une autre source
transmet sur la même
fréquence
Le récepteur a monté inexactement/le Récepteur
a entouré dans le métal/
la pile Faible
DEPANNAGE
Vérier la polarité /
le courant de Test dans
le récepteur /
Allume le pouvoir
principal.
Reprogramment l’émetteur
(voit la page 4-5)
Inactiver l’autre émetteur
Voir que les instructions
Montere Changent la pile
Problème Cause possible Solution
Le système ne fonctionne pas dans la direction correcte
Le harnais a télégraphié
inexactement
Vérier correctement
par les instructions
d’installation.
21
Programmer l’Emetteur
Note: Les émetteurs fournis avec l’unité sont préprogramment à l’usine le PAS LES REPROGRAMME.
Devoir un nouvel émetteur est acheté l’exigera la programmation. Pour
programmer, suit les instructions au dessous :
NOTE: Chacun du trois (3) les boutons ont besoin d’être individuellement
programmé
INSTRUCTIONS D’OPERATION
Rouge
Bouton
d’alimentation
Bouton
vert
1
Bouton
vert
2
LED 1
(Fig. 2)
Le devant d’Emetteur
Vert LED
Rouge LED
Programmer le Bouton Vert 1:
• Appuyer l’apprendre le bouton (Voit Figue. 3 au dessous) 1 fois. Attendre la LED
rouge sur le récepteur pour clignoter 1 fois.
• Le bouton vert de presse 1 sur l’émetteur et relâche.
• Réprimer le bouton vert 1 sur l’émetteur.
La LED rouge sur le récepteur clignotera maintenant pour indiquer que l’érudition est
complète pour le bouton vert 1.
Apprendre le
Bouton
(Fig.3)
16

L’émetteur a un voyant LED, voir (la g. 2) les voyants LED en haut quand
n’importe quels un des boutons sont déprimés ; ceci montre au récepteur envoie un signal au récepteur.
1. Utiliser le système sans l, l’opérateur active premièrement le système en
appuyant le bouton d’alimentation rouge sur l’émetteur ; une LED verte sur le
récepteur luira comme le système est maintenant dans le mode opérationnel
et prêt pour l’usage.
2. Inactiver le système sans l, appuyer le bouton d’alimentation rouge et la LED
verte sur les virages de récepteur loin comme le système est maintenant dans
le mode Veille.
3. Le bouton d’alimentation toujours a la priorité et annulera tous les boutons
pour qu’il mettra le système dans le mode Veille.
4. Si le système est inoccupé pour 5 minutes ou plus long, le système inactivera
aller si a mis dans le mode Veille et aura besoin d’être activé avant l’usage.
Programmer le Bouton d’alimentation Rouge :
• Appuyer l’apprendre le bouton Attend 1 fois la LED rouge sur le récepteur
pour clignoter 1 fois
• Appuie l’apprend le bouton
1 plus de temps Attend la LED rouge sur le récepteur pour clignoter 2 fois
• Appuie l’apprend le bouton 1 plus de temps Attend
la LED rouge sur le récepteur pour clignoter 3 fois
• Appuie le bouton rouge sur l’émetteur et le relâchement
• Réprime le bouton rouge sur l’émetteur La LED rouge sur le récepteur
clignotera maintenant pour indiquer que l’érudition est complète pour le
bouton rouge
Votre émetteur est maintenant programmé et prêt pour
l’usage
Programmer le Bouton Vert 2:
• Appuyer l’apprendre le bouton 1 fois
Attendre la LED rouge sur le récepteur pour clignoter 1 fois
• Appuie l’apprend le bouton 1 plus de temps Attend la LED
rouge sur le récepteur pour clignoter 2 fois
• le bouton vert de presse 2 sur l’émetteur et le relâchement
• Réprime le bouton vert 2 sur l’émetteur La LED rouge sur le récepteur
clignotera maintenant pour indiquer que l’érudition est
complète pour le bouton vert 2
17
Après avoir monté et télégraphier est complet, essayer l’opération du système pour être sûre que le treuil fonctionne dans la direction correcte qui
utilise l’émetteur. Si ne pas dépanner.
1. Appuyer le bouton d’alimentation rouge sur l’émetteur pour activer
le système.
2. Le contrôle pour voir que l’opération de l’émetteur correspond à l’opération
du treuil.
3. Vérier la fonction de pouvoir. Après avoir appuyé le bouton d’alimentation
rouge, le treuil ne devrait pas pouvoir être contrôlé par l’émetteur.
4. Si les contrôles sont nis et tout est fonctionnel, le système est opérationnel.
20
Le contrôle pour garantir que le sol et les avances positifs de
la pile sont débranchés avant de n’importe lequel exécuter electrical work.
TEST D’OPERATION
(Fig. 5)
Le Fil
NOIR
d’Exploite
Assemblée
Le Fil ROUGE
d’Exploite Assemblée
Le Fil VERT du
commutateur
de barre de poignée
(le l vert passe
par le connecteur)
Episser
le Connecteur
Episser
le Connecteu
Le Fil JAUNE
d’Exploite Assemblée (a fermé
côté au public de connecteur
utilisé)
Le Fil NOIR
du commutateur de
barre de poignée (les
passes de l noires
par le connecteur)
Le Fil BLEU
d’Exploite Assemblée
(a fermé côté au public
de connecteur utilisé)
!
AVERTISSEMENT

Les fonctions suivantes sont intégrées dans le système :
1. Mode Veille :
Quand a fait un duplex entre la tension de provision, le système est dans le
mode Veille
2. Mode opérationnel :
Dans le sytem opérationnel les relais de commutation peuvent être établis
par déprimer le bouton rouge sur l’émetteur. Dans le mode opérationnel, la
LED verte est allumée.
3. L’arrêt automatique avec l’intervention de fréquence :
Le sytem peut transférer automatiquement au mode Veille quand un autre
émetteur avec la même fréquence estdétecté.
Pile
Pour changer la pile, ouvrir le dos de l’émetteur en enlevant le deux (2) les
petites vis. Après avoir enlevé la couverture, soigneusement enlever la vieille
pile et le remplace avec un nouveau CR2450 3 batterie de pièce de volt. Avant
d’installer la nouvelle pile assure que le connecteur est libre de la corrosion. La
corrosion peut être enlevée utilisant facilement une petite brosse raide. Après
que la nouvelle pile a été installée, remplace la couverture soigneusement au
moyen des deux petites vis.
!
L’émetteur et le récepteur utilisent une antenne interne. Cette antenne ne peut
pas être raccourcie, déplacé ou autrement changé. Le changement annulera la
garantie et peut causer
Pour la sécurité raisonne le récepteur transfère aussi au mode Veille quand plus
de 5 minutes sont passées entre les signaux de l’émetteur au récepteur.
DANGER
!
Après avoir changé la pile assure s’il vous plaît que le
cachet de caoutchouc sur l’émetteur est à sa place correctement ou le sceller
de l’unité ne peut pas être garanti. Les piles
utilisées devraient être liquidé selon les règlements nationaux.
Le récepteur
La LED verte est sur quand le système est sur et fonctionnel. La LED rouge
clignote quand un bouton sur l’émetteur est appuyé. Le récepteur travaille avec
3 relais, 2 pour la direction et 1 pour le marche/arrêt. Les relais changent le courant à la production de commutateur correcte
18
!
PRUDENCE
Ne pas se pencher sur la pile en faisant des connexions. Les
piles automotrices contiennent des gaz inammables et explosifs. Porter la protection oculaire pendant l’installation et enlever tous les bijoux métalliques.
Ne pas tenter d’installer l’installation électrique quand la
pile est connectée. Ne pas se pencher sur Garantir que le harnais d’installation
électrique n’interfère pas ou entre le contact avec le moteur chaud ou
en mouvement, la suspension, la direction, freinant ou les parties d’échappement.
INSTRUCTIONS D’INSTALLATION
Etape 1
Débrancher la pile avant de commencer l’installation.
Etape 2
Localiser un lieu pour monter l’organe de commande sans l. En dessous précipiter, la console, ou le mur d’intérieur d’une caravane de boîte serait des emplacements typiques. L’unité peut être montée dans n’importe quelle orientation,
dans le véhicule ou dans la caravane. L’unité peut être montée par ou câble des
attaches ou quatre (4) les vis soi-tapant.
Etape 3
Connecter la n de connecteur de tas météorologique blanche du harnais à
l’accoupler le connecteur de tas météorologique blanc sur le module de récepteur
sans l. voit (la g. 4)
Etape 4
Pour P/N 06705:
1. Connecter la n de bouchon de treuil à votre douille de treuil de Grie.
Pour P/N 06707: (See Fig.5)
1. Connecter le terminal noir d’anneau de l de l’assemblée de harnais au
clou de (-) noir du solénoïde.
2. Connecter le terminal rouge d’anneau de l de l’assemblée de harnais au
clou de (+) rouge du solénoïde.
3. Utiliser un des deux connecteurs d’épissure rapides fournis pour épisser le
l bleu de l’assemblée de harnais dans le l noir de l’interrupteur à bascule
de guidon.
4. Utiliser un des deux connecteurs d’épissure rapides fournis pour épisser le
l bleu de l’assemblée de harnais dans le l noir de l’interrupteur à bascule
de guidon
Pour P/N 06709:
1.
Connecter la n de bouchon de treuil à la douille de treuil de S-COLLECTION.
Etape 5. Installer la pile qui a été fourni avec votre contrôle (voit la section de pile)
le rom le Treuil au Récepteur
Fig. 4
!
PRUDENCE
19
!
 Loading...