


THORN
User Manual
Introduction
Congratulation for the purchasing of the THORN Player. The high integration reduces the device weight and the dimensions and the use is comfortable. The big display with TFT technology o!ers clear and sharp information and the USB 2.0 High Speed interface make easier the data transfer operation from/to the computer. The EM820 MP3 Player has built-in a Li-Polymer battery rechargeable by computer USB port. By the microphone inside it is possible to record voice messages and play them directly with the device or by computer.
Before using this product, please read this manual and
retain the instruction for future reference.
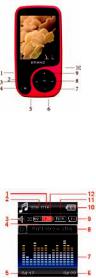
Description
Here below you will "nd a product description
1. Power ON/OFF
2. Play [ ] / Pause [ ]
3. Previous [ ] / Backward [ ]
4.Menu
5.Earphone Connector
6.USB Connector
7.VOL Ð (Decrease the Volume)
8. Next [ ] / Forward [ ]
9.VOL +(Increase the Volume)
10.MICRO SD Card Slot
1. Display
Here below you will "nd a display description
1. Total Number of Songs
2. Current Song Location
3. Volume
4. File Format
5. Elapsed Time
6. Total Time
7. EQ Animation
8. Song Name
9. Repeat Mode
10. Battery Life
11. EQ Mode
12. Play Rate
1

2. Use
2.1 Power ON/OFF
The MP3 player has built-in a rechargeable battery. At the "rst use we suggest to recharge the battery for a long period (around 8 hours). To recharge the battery please connect the MP3 player to USB computer port. Powering On:.
1. Turn on On/O! button to On position Powering O!:
1. Hold the Play [ ] / Pause [ ] key until the power-o! animation begins
2. Then, turn the On/O! button to O! position.
2.2 Recharge the Player
The player can be recharged by the priveded USB cable by connecting to the PC. During charging, an icon on the right will show.
You should "rst turn on you PC, and then connect the player to the PC throught the USB cable. The player should be fully charged in 2 to 3 hours.
2
3. Main Menu
After powering on the MP3 player, you can see the main menu with 9 submenus (optional), which allow you to select di!erent functions and options.
By using the [ ] or [ ] buttons, you can select the desire option, and then press M button to con"rm the selection.
To access at the main menu while you are inside any of these submenus, press and hold MENU [M] switch for a few seconds. (Short pressing the MENU [M] switch usually opens the submenu option of each submenus)
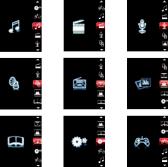
The available options are:
3

Music: Select this option to play song. Movie: Select this option to play AMV video.
Record: Select this option to record voice messages by the microphone inside.
Play: Select this option to play recorded voice message.
Radio: Select this option to use the FM radio. Text: Select this option to read text.
Games: Select this option to play game.
Picture: Select this option to browse and see photos.
Setting: Select this option to access at system setup.
3.1 Music Mode
The music player option allows playing songs. To activate this option please follow here below instruction:
1.Power ON the MP3 Player, the screen will display the main menu
2.By using [ ] or [ ] buttons, select MUSIC PLAY option then press [M] button.
3. |
Press |
PLAY [ |
] |
button |
to start |
to play |
the |
4
"rst song available.
4. Press and hold M key to return to previous menu.
3.1.1 Key Function at Music Mode
During the song play it is possible to activate the following controls.
PLAY [Ź ]: Press the play [ ] to start to play a song. Press the play button again to pause the song. To restart to play the song press play button again.
Hold the play button for longer time will
eventually turn o! the player |
|
|
REW & FFWD [ |
] Press [ |
] or [ ] to select the |
previous or the next song. |
|
|
Press and Hold the [ ] or [ |
] buttons to rewind |
|
or fast forward the song.
Volume (VOL+ and VOL-): Press [VOL+] button to increase the volume and press [VOL-] button to decrease the volume.
3.1.2 Music Mode
By short pressing the MENU [M] button, you can enter into each submenus. Press [ ] or [ ] to choose, and then press MENU [M] key to con"rm each submenus. Use the same technique to navigate inside each of the submenus.
5
In both modes (playing mode and stop mode) you can "nd the following submenus:
Now playing All songs Album Artists
Genre: Dance Music, Pop, Symphony, Unknown Genre
Local folder Create playlist Setting
-Repeat: Normal, Repeat one, Folder, Repeat folder, Repeat all, Random, Intro
-Equalizer: Natural, Rock, Pop, Classic, Soft, Jazz,
DBB
-Tempo rate: ASS speed set, FFREV speed set
-Replay mode
-Bookmark: Bookmark select, Bookmark delete, Bookmark add, Exit
Delete "le Delete all
3.2 Movie
The Movie MODE allows to play movies in AMV Format. To activate this option please follow here below
6

instruction:
1. Power ON the MP3 Player, the screen will display the main menu.
2. By using [ ] or [ ] buttons, select Movie option then press PLAY
[M] button. |
|
3. Press PLAY [ |
] button to |
start to play the "rst movie available. Note:The Movie Player only plays AMV "les, you need conversion from other "le format in order to
watch the movie you like.
3.2.1 Key Function at Movie Mode
During the song play it is possible to activate the
following controls. |
|
PLAY [Ź ]: Press the PLAY [ |
] to start to play |
a movie. Press the play button again to pause the movie. To restart to play the movie press play button again.
Hold the play button for longer time will
eventually turn o! the player |
|
||
REW & FFWD [ |
] |
Press [ |
] or [ ] to select |
the previous or the next movie. |
|
||
Press and Hold the [ |
] or [ |
] buttons to rewind |
|
7
or fast forward the movie.
Volume (VOL+ and VOL-): Press [VOL+] button to increase the volume and press [VOL-] button to decrease the volume.
3.2.2 AMV Submenu
By short pressing the MENU [M] button, you can "nd the following AMV submenus. Press [ ] or [ ]to choose, and then press MENU [M] key to con"rm each submenus. Use the same technique to navigate inside each of the submenus.
Now playing Local Folder:
Under this directory, you can choose to go up a folder level by pressing MENU [M] to con"rm. And then you can choose the folder you want to play
Repeat Delete File:
Delete speci"c video you want. Delete All:
Delete all videos using this option.
3.3 Record (Voice messages recorder)
This option allows to record voice messages by using the microphone inside. To record voice message, please follow here below instruction:
1. Power ON the MP3 Player, the screen will
8
display the main menu.
2. By using [ |
] or [ ] buttons, select RECORD |
option then press PLAY [M] button. |
|
3. Press PLAY [ |
] button |
to start to recording.
4. You can listen to your wav "le under the VOICE submenu.
During recording, Press the PLAY [ ] to start recording. Press the play button again to pause recording. Hold the PLAY
[ ] / M button for longer time will eventually stop recording.
By short pressing the MENU [M] button, you can "nd the LOCAL FOLDER and REC TYPE. Press [ ] or [ ] to choose, and then press MENU [M] key to con"rm each submenus. Use the same technique to navigate inside each of the submenus.
1.Under the LOCAL FOLDER submenu, you can choose to go up a folder level by pressing [M] to con"rm. And then you can choose the folder you want to play
2.Under the REC format submenu, you can
choose the recording format including
9

ACT/MP3/WAV/WMA .
3.4 Play (Voice Messages Player)
The play option allows to play the voice messages recorded by the MP3 Player. To activate this option, please follow here below instruction:
1.Power ON the MP3 Player, the screen will display the main menu.
2.By using [ ] or [ ] buttons, select VOICE option then press PLAY [M] button.
3.Press PLAY [ ] button to start to play the "rst recording available.
3.4.1 Key Function at PLAY Mode
During the recording play it is possible to activate the following controls.
PLAY [Ź ]: Press the PLAY
[] to start to play a recording.
Press the play button again to pause the recording. To restart to play the recording press play button again.
Hold the play button for longer time will eventually turn o! the player
REW & FFWD [ ] Press [ ] or [ ] to select the previous or the next recording.
10
Press and Hold the [ ] or [ ] buttons to rewind or fast forward the recording.
Volume (VOL+ and VOL-): Press [VOL+] button to increase the volume and press [VOL-] button to decrease the volume.
3.4.2 PLAY Submenu
By short pressing the MENU [M] button, you can "nd the following music submenus. Press [ ] and [ ] to choose, and then press MENU [M] key to con"rm each submenus. Use the same technique to navigate inside each of the submenus.
Local Folder:
Under this directory, you can choose to go up a folder level by pressing MENU [M] to con"rm. And then you can choose the folder you want to play
Setting:
-Repeat: Normal, Repeat one, Folfer, Repeat folder, Repeat all, Random, Intro
-Tempo rate: You can alter the Tempo Rate of the
Song.
-Replay
Delete File:
Delete speci"c voice "le you want.
Delete All:
Delete all voice "les using this option.
11
3.5 FM (FM Radio)
When the FM Radio mode is activated it is possible to hear radio programs.
This option allows us to enjoy FM radio programs. To use it, please follow here below instruction:
1. Power ON the MP3 Player, the screen will display the main menu
2. By using [ ] or [ ] buttons, select FM option
then press [M] button to con"rm. |
|
3. If there are preset channels, press PLAY [ |
] |
button to play the "rst channel, press again for the next channel.
3.5.1 FM Submenu
By short pressing the MENU [M] button, you can "nd the following FM submenus. Press [ ] and [ ] to choose, and then press MENU [M]key to con"rm each submenus. Use the same technique to navigate inside each of the submenus.
Here below you will "nd the FM radio option list. SAVE: Select this option to save radio channels DELETE: Select this option to delete radio
channels.
DELETE ALL: Select this option to delete all radio
12

channels.
AUTO SEARCH: Select this option to start auto-searching for radio channels.
NORMAL BAND: Select this option to activate normal FM band.
3.5.2 Automatic Search
To scan automatically all the available channels, please follow here below instruction:
1.When the FM Mode is activated, press MENU [M] button to select AUTO SEARCH option.
2.Press [M] button to start the automatic search. The MP3 Player will store the "rst 20 radio programs available.
3.5.3 Manual Search and Storing Channels
To scan manually the frequencies please follow here below instruction:
1. When the FM Mode is activated, long pressing the [ ] or [ ] buttons to start auto scanning. Scanning stops as an available channel is found.
2. By short pressing the [ ] or [ ] buttons to step-up scanning.
3.Press MENU [M] button to select SAVE option.
4.Press PLAY [ ] and this speci"c channel will
13
be saved as the last channel
5. Repeat the step from 1 to 4 for each desired radio program by keeping in mind that the MP3 Player has 20 memory positions.
3.5.4 FM Radio Record (REC)
To record FM radio program please follow here below instruction:
1.When the FM Radio Mode is activated, press MENU [M] button to select FINE REC option.
2.Press PLAY [ ] button to start the recording.
3.Press PLAY [ ] button to pause the recording and press it again to restart the recording.
4.To stop and save the recording, long press [M] button, will return to FM mode.
3.6E-BooK
The Ebook option allows reading text "le. To activate this option please follow here below instruction:
1. Power ON the MP3 Player, the screen will display the main menu.
2. By using the [ |
] or [ ] buttons select E-book, |
and then press [M] button to con"rm |
|
3. Use [ ] or [ |
] buttons to choose the "le |
4. Press PLAY [ |
] button to start reading the |
"le |
|
14

3.6.1 E-Book Submenu
By short pressing the MENU [M] button, you can "nd the following music submenus. Press [ ] or [ ] to choose, and then press [M] key to con"rm each submenus. Use the same technique to navigate inside each of the submenus.
Before you open any "le, if you press M, it will appears the following submenu:
Local Folder:
Under this directory, you can choose to go up a folder level by pressing MENU [M] to con"rm. And then you can choose to folder you want to play
Play Set:
You can choose between manual play and auto play. For auto play, you can set the playing time from 1 to 10 seconds for each page of the E-book.
Delete File:
Delete speci"c text "le you want. Delete All:
Delete all text "les using this option.
While reading, if you press and hold M, you can select from:
- Bookmark select
15

-Bookmark delete
-Bookmark add
3.7PHOTO
The Photo option allows browsing JPG "le. To activate this option please follow here below instruction:
1. Power ON the MP3 Player, the screen will display the main menu.
2. By using the [ ] or [ ] buttons select PHOTO, and then press [M] button to con"rm
3. Use [ |
] or [ |
] buttons to choose the "le |
4. Press PLAY [ |
] button to start browsing the "le |
|
3.7.1 |
PHOTO Submenu |
|
By short pressing the MENU [M] button, you can "nd the following music submenus. Press [ ] or [ ] to choose, and then press [M] key to con"rm each submenus. Use the same technique to navigate inside each of the submenus.
Local Folder:
Under this directory, you can choose to go up a folder level by pressing PLAY [ ] to con"rm. And then you can choose to folder you want to play
Play Set:
16
You can choose between manual play and auto play. For auto play, you can set the playing time from 1 to 10 seconds for each picture.
Delete File:
Delete speci"c photo "le you want. Delete All:
Delete all Photos using this option.
3.8 GAMES
The GAMES option allows playing games. To activate this option please follow here below instruction:
1.Power ON the MP3 Player, the screen will display the main menu.
2.By using the [ ] or [ ] buttons to select GAMES, and then press [M] button to enter the GAME MENU.
Inside the game menu, there is one game for you to use Russia Brick .and then press [M] button to con"rm
3.9Setting
The SETTING option allows to access to MP3 Player setup system. To access at system setup please follow here below instruction:
1. Power ON the MP3 player, button, the screen
17
will display the main menu.
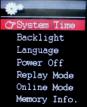
2. By using the [ ] or [ ] select SYSTEM option then press [M] button to enter the SYSTEM MENU.
3. By using the [ ] or [ ] select the system setup parameter and press MENU [M] button.
The parameters available in the setup system are: Clock: This option allows setting of the system
date and time.
LCD set: This option allows setting the brightness, darkly and black screen of the LCD panel.
Language: This option allows setting the Language of the User Interface.
Power O!: This option allows setting the o! time and sleep time.
Replay mode: Online mode:
Memory Info: This option allows checking the memory usage.
Firmware Ver: This option allows checking the "rmware version.
Firmware Upg: This option allows to upgrade the "rmware.
3.9.1 Clock
This option allows setting of the system date
and time. The upper case display the date in Year :
18
Month : Day Format, and the lower case display the Time in Hour : Minute : Second format. To change the Date and time, please follow here below instruction:
1. Under the SYSTEM MENU, choose SYSTEM TIME
by pressing [ |
] or [ |
] and press [M] to con"rm |
2. Press [VOL+] and [VOL-] to choose the |
||
parameter you want to adjust |
||
3. press [ |
] or [ |
] to change the value. Press |
MENU [M] to con"rm. |
|
|
3.9.2 Power O! Set |
||
This option allows setting the o! time and sleep time. By setting O! Time, it is possible to enable (30s, 60s, 90s and 120s) or disable the power management features to automatically shut down your player if it is not used. By setting Sleep Time, it is possible to set power o! the unit after a speci"ed time (30s, 60s, 90s, 120s) from the moment you con"rm about this selection.
To modify this parameter please follow here below instruction:
1. Under the SYSTEM MENU, choose POWER OFF by pressing [ ] or [ ] and press PLAY [ ].
2. By using the [ ] or [ ] buttons, select OFF TIME or SLEEP TIME and press [M] button.
3. Choose the desired OFF TIME or SLEEP TIME and press [M] to con"rm.
Memory info
19

the percentage present the percentage between used space and total space.
20

Size |
76*39*8MM |
|
|
|
|
Weight |
36.5g |
|
|
|
|
Screen |
Full color display, 1.8 inch screen, 262K color |
||||
Comaputer connection |
High-speed USB 2.0 |
FS |
Flash disk |
|
|
Build-in memory |
512MB.1GB, 2GB,4GB ,8GB |
|
|
||
Supply power |
The longest playing time is 10hours |
|
|||
REC |
Sample ratio |
|
8KHz |
|
|
|
Recording format |
|
WAV(64K bps) |
||
|
|
|
|
ACT(8K bps) |
|
|
Recording time |
|
35hours |
ACT |
|
|
|
|
|
128M Flash |
|
MP3 WMA ASF |
The biggest |
|
(L)10mW |
(R) |
|
|
outputting ratio |
|
10mW(32Ohm) |
||
|
MP3 bit rate |
|
8K bps – 320K bps |
||
|
WMA |
ASF bit rate |
|
5K bps – 384K bps |
|
|
Frequency corresponding |
20Hz-20KHz |
|||
|
SNR |
|
|
85dB |
|
|
|
|
|
<+_0.05 |
|
FM radio |
Frequency scope |
|
76 MHz-90MHz/ |
||
|
|
|
|
87MHz-108MHz |
|
|
Radio stations |
|
20+20 |
|
|
|
The biggest output |
|
(L) 10mW +(R) |
||
|
rate of earphone |
|
10mW (320) |
||
|
SNR |
|
|
45dB |
|
Music format |
MP1 |
MP2 MP3 |
WMA |
WAV APE |
|
Temperature |
-5 to 40 degree centigrade |
|
|
||
Multi languages |
Traditional Chinese, English, simple Chinese, |
||||
|
German, French, Italian and Spanish etc |
|
|||
Operation system |
Windows98/SE/ME/2K/XP |
Mac OS 10 |
|
||
|
Linux 2.4.2 |
|
|
|
|
Notice: You will not informed if the production design
21

Warranty conditions
-The warranty of this product is for 2 years since the purchase date.
-The warranty will exclude breakdowns caused by bad use of the product, wrong installation or installation in not desirable places for a proper maintenance of the product, rips, updates of the products that are not the supplied by the brand, pieces wore away for its use or for not domestic or inappropriate use. Also are excluded breakdowns caused for manipulations of the products by people or companies alien to our company.
-For any request regarding the warranty terms, the purchase receipt must be attached.
22

THORN Manual de instrucciones
Introducci—n
Enhorabuena por haber adquirido el Reproductor THORN Su elevada integraci—n reduce el peso del dispositivo y sus dimensiones, haciendo que sea muy f‡cil de utilizar. La gran pantalla con tecnolog’a TFT ofrece una informaci—n clara y n’tida y la interfaz USB 2.0 Alta Velocidad facilita las operaciones de transferencia al ordenador y viceversa. El Reproductor EM820 MP3 cuenta con una bater’a recargable a travŽs del puerto USB de su ordenador. A travŽs del micr—fono integrado, se pueden grabar mensajes de voz y reproducirlos directamente en el dispositivo o en el ordenador.
Antes de utilizar este producto, lea este manual y conserve las instrucciones para futuras consultas.

Descripción
Abajo encontrará una descripción del producto
1. |
Interruptor de |
encendido |
ON/OFF |
|
|
2. |
Play [ ] / Pause [ |
] |
3. |
Anterior [ ] / Rebobinar [ ] |
|
4.Menú
5.Conexión de Auriculares
6.Conexión USB
7.VOL – (Bajar el Volumen)
8. Siguiente [ ] / Avanzar [ ]
9.VOL + (Subir el Volumen)
10.Entrada tarjeta MICRO SD
1. Pantalla
Abajo encontrará una descripción de la pantalla
1.Número Total de Canciones
2.Localización de la Canción Actual
3.Volumen
4.Formato del Fichero
5.Tiempo Transcurrido
6.Tiempo Total
7.Animación EQ
8.Nombre de la Canción
9.Modo Repetición
10.Batería restante
11.Modo EQ
12.Índice de Reproducción
1

2. Utilización
2.1 Interruptor de encendido ON/OFF
El reproductor MP3 cuenta con una batería recargable. Antes de la primera utilización, se recomienda cargar la batería durante un largo periodo de tiempo (en torno a 8 horas). Para cargar la batería, conecte el reproductor MP3 al puerto USB de su ordenador.
Encender:
Apagar:
1. Mantener pulsada la tecla Play [ ] / Pause [ ] hasta que comience la animación que precede al apagado
2.2 Cargar el Reproductor
El reproductor se puede cargar a través del cable USB suministrado, conectándolo al PC. Mientras se esté cargando, se encenderá un indicador en la parte
derecha. Primero debe encender |
|
su PC y, luego, conectar el |
|
reproductor al PC a través del cable |
|
USB. El reproductor se habrá |
|
cargado por completo al cabo de 2 |
|
o 3 horas. |
|
3. Menú Principal |
|
Al encender el reproductor |
|
MP3, aparecerá el menú principal con |
submenús |
2

(opcional), que le permitir‡ seleccionar diferentes funciones y opciones.
Utilizando los botones [ ] o [ ], puede seleccionar la opci—n deseada y a continuaci—n pulsar el bot—n M para con"rmar su selecci—n.
Para acceder al menœ principal cuando estŽ dentro de uno de esos submenœs, pulse y mantenga pulsada la tecla MENò [M] durante unos segundos. (Pulsando brevemente la tecla MENò [M] se abre el submenœ de opciones de cada submenœ).
Las opciones disponibles son:
Mœsica: Seleccione esta opci—n para reproducir mœsica.
V’deo: Seleccione esta opci—n para reproducir
v’deo AMV.
Grabaci—n: Seleccione esta opci—n para grabar mensajes de voz a travŽs del micr—fono interno.
Play: Seleccione esta opci—n para reproducir mensajes de voz.
3
 Loading...