


 Loading...
IBIZA
User Manual

1
2
3

4
Table of Contents
1 Caution & Safety Guide: ......................................................................................................................... |
6 |
|||
2 |
Introduction ............................................................................................................................................... |
7 |
||
|
2.1 |
PACKAGE CONTENTS ............................................................................................................................. |
7 |
|
|
2.2 |
MINIMUM SYSTEM REQUIREMENTS....................................................................................................... |
8 |
|
3 |
2.3 |
FEATURES & SPECIFICATIONS ................................................................................................................ |
9 |
|
Precautions ................................................................................................................................................ |
9 |
|||
4 |
Product Overview ................................................................................................................................. |
10 |
||
5 |
Basic Operation ..................................................................................................................................... |
11 |
||
|
5.1 |
POWER ON/OFF ................................................................................................................................. |
11 |
|
|
5.2 |
RESETTING THE DEVICE ....................................................................................................................... |
11 |
|
|
5.3 |
BATTERY .............................................................................................................................................. |
11 |
|
|
5.3.1 |
Battery Level Indicator ........................................................................................................ |
11 |
|
|
5.3.2 |
Charging Procedure ............................................................................................................. |
12 |
|
|
5.4 |
CONNECTING WITH YOUR COMPUTER ............................................................................................... |
13 |
|
|
5.4.1 |
USB Connected Mode .......................................................................................................... |
13 |
|
6 |
5.4.2 |
Safe Removal ......................................................................................................................... |
13 |
|
Operating Modes .................................................................................................................................. |
15 |
|||
|
6.1 |
MUSIC.................................................................................................................................................. |
15 |
|
|
6.1.1 |
Browse and Select / Delete Music ..................................................................................... |
15 |
|
|
6.1.2 |
Play / Pause Music ................................................................................................................ |
16 |
|
|
6.1.3 |
Adjusting Volume ................................................................................................................. |
16 |
|
|
6.1.4 |
Fast Forward / Fast Rewind Music .................................................................................... |
16 |
|
|
6.1.5 |
Next / Previous Track ........................................................................................................... |
16 |
|
|
6.1.6 |
Browse Song Lyrics ............................................................................................................... |
16 |
|
|
6.1.7 |
Music Setup ............................................................................................................................ |
16 |
|
|
6.2 |
MOVIE ................................................................................................................................................. |
17 |
|
|
6.2.1 |
Fast Forward / Fast Rewind Video .................................................................................... |
18 |
|
|
6.3 |
RECORD ............................................................................................................................................... |
18 |
|
|
6.3.1 |
REC Setup ................................................................................................................................ |
19 |
|
|
6.4 |
RADIO .................................................................................................................................................. |
20 |
|
|
6.5 |
PICTURE ............................................................................................................................................... |
21 |
|
|
6.6 |
PEDOMETER......................................................................................................................................... |
22 |
|
|
6.7 |
SETTINGS ............................................................................................................................................. |
23 |
|
|
6.7.1 |
Clock Setup ............................................................................................................................. |
23 |
|
|
6.7.2 |
LCD Setup ............................................................................................................................... |
23 |
|
|
6.7.3 |
Power Off ................................................................................................................................ |
24 |
|
|
6.7.4 |
System info ............................................................................................................................. |
24 |
|
|
6.8 |
BROWSER............................................................................................................................................. |
25 |
|
7 |
AMV Converter Software.................................................................................................................... |
25 |
||
|
7.1 |
AMV CONVERTER INSTALLATION ...................................................................................................... |
25 |
|
8 |
7.2 |
USING THE AMV CONVERTER ............................................................................................................ |
26 |
|
Formatting Storage Memory ............................................................................................................ |
28 |
|||
9 |
Support |
..................................................................................................................................................... |
28 |
|
10 |
Troubleshooting ................................................................................................................................ |
29 |
||
11 |
Technical .................................................................................................................Specifications |
30 |
||
5

1 Caution & Safety Guide:
Symbol Definitions
DANGER - Indicates an imminently hazardous situation, which, if not avoided, will result in death or serious injury. This symbol appears only in the most extreme situations. WARNING - Indicates a potentially hazardous situation which could result in death or serious injury.
CAUTION - Indicates a potentially hazardous situation, which, if not avoided, may result in minor/moderate injury or product/property/damage. It also warns against unsafe practices
The lightning flash with arrowhead symbol, within an equilateral triangle is intended to alert the user to the presence of insulated Ôdangerous voltageÕ within the productÕs enclosure that may be of sufficient magnitude to constitute a risk of electric shock to persons.
WARNING: TO REDUCE THE RISK OF ELECTRIC SHOCK DO NOT REMOVE COVER (OR BACK), NO USER SERVICEABLE PARTS INSIDE REFER SERVICING TO QUALIFIED SERVICE PERSONNEL
The exclamation point within an equilateral triangle is intended to alert the user to the presence of important operating and maintenance (servicing) instructions in the literature accompanying the appliance.
READ ALL INSTRUCTIONS BEFORE USE
Always follow basic safety precautions when using this speaker system with iPod/iPhone dock, especially when children are present.
SAFETY INSTRUCTIONS
1)Read this Instruction Manual before you attempt to connect or operate the appliance.
2)Keep these instructions in good condition. Heed all warnings. Follow all instructions.
3)Save this Instruction Manual for future reference.
4)The apparatus shall not be exposed to dripping or splashing and no objects filled with liquids, such as vases, shall be placed on the product. Dry location use only.
5)No naked flame source, such as candles, should be placed on the product.
6)Children should be supervised to ensure that they do not play with the appliance.
7)Ventilation should not be impeded by covering the ventilation openings.
8)Ensure that the unit is plugged into an AC 220-240V 50Hz power outlet. Using higher voltage may cause the unit to malfunction or even fire catching. Turn off the unit before unplugging it from power source to completely switch it off.
9)Do not plug/ unplug the power plug into/from an electrical outlet with wet hands.
10)If the power plug does not fit into your outlet, do not force the plug into an electrical socket if it does not fit.
11)Only use accessories, which are specified by the manufacturer.
12)Use replacement parts, which are specified by the manufacturer.
13)Install the unit in accordance with the manufacturerÕs instructions.
14)Place the unit where there is good ventilation. Place the system on a flat, hard and
6
stable surface. Do not expose to temperatures above 40¡C. Allow at least 10 cm clearance from the rear and the top of the unit and 5 cm from each side.
15)Press the playerÕs buttons gently. Pressing them too hard can damage the player.
16)Dispose of used batteries in an environmental-responsible manner.
17)Always ensure that the product is unplugged from the electrical outlet before moving or cleaning. Clean it with dry cloth only.
18)Unplug the product during lightning, storms or when it will not be used for long periods of time.
19)This product has no user-serviceable parts. Do not attempt to repair this product yourself. Only qualified service personnel should perform servicing. Take the product to the electronics repair shop of your choice for inspection and repair.
20)NEVER let anyone, especially children, push anything into holes, slots or any other openings in the unitÕs casing as this could result in a fatal electric shock.
21)DonÕt mount this product on a wall or ceiling.
22)Do not place the unit near TVs, speakers and other objects that generate strong magnetic fields.
23)This unit is for indoor use only.
24)Do not leave the unit unattended when it is in use.
NOTE: when the system is switched to standby mode, it is still consuming some power. To disconnect the system completely, remove the AC power plug from the wall outlet.
2 Introduction
Thank you for purchasing the IBIZA 4GB Multimedia Player with Micro SD/TF Card Slot. This is a portable digital audio video player and voice recorder Ð complete with an integrated microphone allowing the creation of voice memos and recording lectures/speeches. It is capable of high-quality playback of both MP3 and WMA digital audio files.
ItÕs stylish, lightweight and compact size allows you to take it anywhere you go while itÕs slim but rugged design, ensures durability and stable operation. With a 1.8-inch 65K fullcolour TFT display, you can view all your favourite digital photos and videos* on the go. A built-in FM radio receiver allows you to listen to your favourite FM radio channels as well. It can also act as a USB storage device (ÒFlash DiskÓ) thereby allowing you to store other data files on the player.
*Requires conversion to suitable video format.
2.1 Package Contents
Carefully unpack and remove the contents. If any of the following items are missing or damaged, contact the store you purchased the device from.
x Earphones
7
xUSB Cable
xUser Guide
xWarranty card
2.2Minimum System Requirements
xComputer:
IBM PC/AT or compatible computer preinstalled with the following Windows operating systems. Windows XP Home Edition (Service Pack 2 or later)/ Windows XP professional (Service Pack 2 or later)/Windows XP Media Center Edition (Service Pack 2 or later)/Windows XP Media Center Edition 2004 (Service Pack 2 or later)/Windows XP Media Center Edition 2005 (Service Pack 2 or later)/ Windows Vista Home Basic/Windows Vista Home Premium/Windows Vista Business/Windows Vista Ultimate/ Windows 7
Not supported by 64 bit version OS.
Not supported by OSs other than above.
xCPU: Pentium III 733 MHz or higher (For Windows Vista, Pentium III 800 MHz or higher)
xRAM: 128 MB or more (For Windows XP, 256 MB or more; for Windows Vista, 512 MB or more)
xHard Disk Drive: 240 MB or more of available space (1.5 GB or more is recommended). More space may be required depending on the version of the operating system. Additional space is required for storing music, video and photo data.
xDisplay: 800 × 600 pixels (or higher) (recommended 1024 × 768 or higher), High Color (16 bit) (or higher)
x (Image Converter may not operate properly at color settings at or below 256 colors.)
x Sound board
x USB port (Hi-Speed USB is recommended)
xWhen converting AVI, RM, RMVB, WMV and AMV format videos, it is required to have AMV Converter installed to your PC.
xThe operation for every computer may not be same even if they meet the above System Requirements.
xNot supported by the following environments:
Personally constructed PCs or operating systems / An environment that is an upgrade of the original manufacturer-installed operating system / Multi-boot environment / Multi-monitor environment / Macintosh
xSupported Operating Systems
o Windows XP / Vista / 7
oMAC OS 9.2 or above* x USB port
* Included video conversion software not supported on MAC.
8
2.3Features & Specifications
x1.8-inch(Diagonal) 65K full-colour TFT display (160X128 pixel)
xMusic playback function (Supports MP3 and WMA format)
xVideo playback function (Support AMV format, and conversion software included in Player)*
xJPEG and BMP picture file viewing with slideshow function
xBuilt-in FM tuner
xVoice recording with built-in microphone WAV
xSport pedometer support
xMicro SD/TF card slot support external memory expanded (up to 16GB)
xLanguage support: multi languages;
xBuilt-in rechargeable 3.7V Li-Polymer battery, supports up to 3 hours video or 15 hours music playback.
x7 EQ effect
xEnergy-saving settings: auto-backlight off, auto-power off
x USB 2.0 High-speed, compatible with USB1.1
xSimple plug and play operation on Windows, MAC
xDimensions: 63×39×17mm (W*H*D)
*Requires conversion to compatible AMV format that is playable on player. (Conversion software (AMV Converter) used to convert source video file in AVI, RM, RMVB, WMV and AMV format to compatible AMV format supported by mutimedia Player. The software included in Player)
**Included video conversion software not supported on MAC OS.
3 Precautions
This Installation and User Guide contains important safety measures and correct operational information. Please read all of the information in this Installation and User Guide carefully before using the device. Please operate player correctly as instructed in the Installation and User Guide.
xBefore charging for the first time, or recharging, to ensure best battery life, please turn this unit off. The player can be recharged while on but this practice is not recommended.
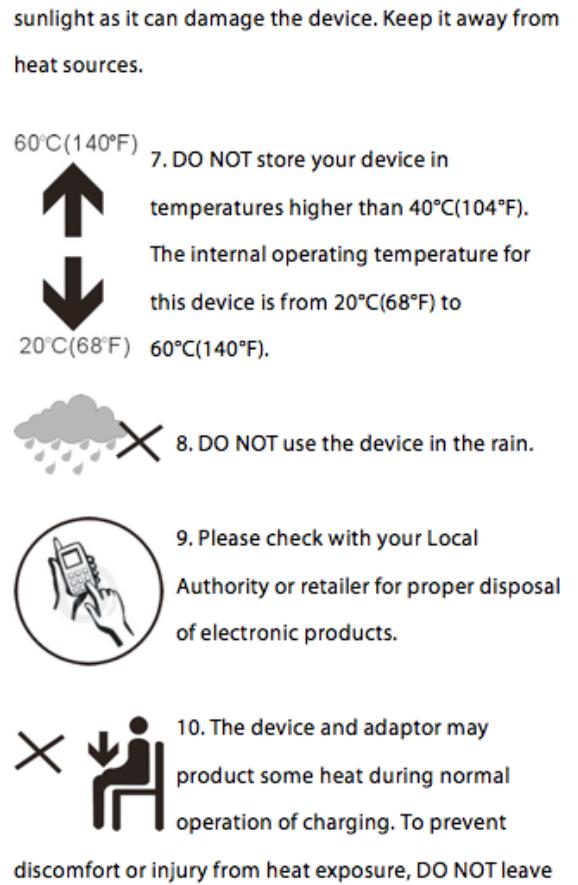
xDo not place the player in high temperatures (over 40oC), humidity or dusty environments, especially not in a car with windows closed in extremely warm or extremely cold weather. Do not expose the display to intense sunlight for prolonged periods
xDo not drop the player as this will cause damage to unit.
9
xDo not apply force to the TFT screen or scratch with pointed objects as this can damage the screen leading to abnormally operation.
xWhen using your earphones to listen to music, select a suitable volume, turn down the volume level or stop use if you feel tingling in or around your ears. Prolonged listening at excessively high volume can permanently damage your hearing. It is advisable to keep the volume at a moderate level.
xDo not disconnect the USB cable from your computer abruptly when formatting, uploading or downloading is still in progress.
x Do not dismantle the player as there are no user serviceable parts inside. x Do not use alcohol, thinner or benzene to clean the surface of the player.
xDo not use the player while driving or operating devices which could bring injury to others.
4 Product Overview
10

Front View
LCD Screen
Ò Vol + Ó |
Volume + volume increase |
|
Ò Vol – Ó |
Volume Ð volume decrease |
|
Ò Ó |
Power ON / Power OFF |
|
Confirm / play and pause |
||
|
||
Ò ŹŹI Ó |
Next / Press and hold - Fast forward |
|
Ò IŻŻ Ó |
Previous / Press and hold - Fast backward |
|
Side View |
|
|
Ò Menu Ó |
Short press - Exit to upper menu |
|
Press and hold - Exit to main menu |
||
|
||
Reset Button |
|
|
Bottom View |
|
|
Micro SD/TF Card Slot; |
|
|
USB Port/Charge |
|
|
3.5mm Earphone Port |
|
5 Basic Operation
5.1 Power On/Off
To power on, press and hold the Ò Ó button for about 2 seconds.
To power off, press and hold the Ò Ó button for about 2 seconds.
5.2 Resetting the Device
If the MP3/ video /voice recorder stops responding or doesnÕt work correctly, please power it off and after two seconds, power on again. The unit should reset and resume normal operation as long as the unit has remaining battery power.
5.3 Battery
5.3.1 Battery Level Indicator
This player adopts built-in high capacity Li-ion rechargeable batteries. The charge level status of the battery in the unit can be easily determined by referring to the Battery Level Indicator icon as shown below. The Battery Level Indicator also shows the charging process and status when the unit is being charged. While charging, the battery will repeatedly display 1 bar and then sequentially increase to four bars before repeating from 1 to 4 bars again. When battery charge is complete, 4 bars will be displayed on the Battery Level Indicator.
11

The playback time can vary depending on many different factors such as volume, backlight activity and usage. The player has the option to apply power saving features to help minimise the power usage so that your battery will last longer before requiring a recharge. Please refer to the operation mode: ÒSettingsÓ section of this manual for more details on setting the power saving features.
5.3.2 Charging Procedure
If the battery charge is low, the battery level indicator will display a red empty frame and the ÒLow BatteryÓ icon will be displayed. Please turn the player off and use the included USB cable to charge the battery from a computer.
Note: You can also charge this unit using any USB power adaptor. Always verify the adapter output voltage matches the specification of this unit. Unplug the adaptor when not in use to preserve adaptor life. USB charging is your best option if you are unsure of your adapters compatibility with this unit.
When you attach the player to your computer a ÒConnected to PCÓ image will appear. Please refer to the ÒConnecting with computerÓ section of this manual for instructions on how to safely remove the player from the operating system. Once connected to a powered USB port, you will observe the charge progress animation display as shown below. Once the player is fully charged, the battery electricity will show a full battery image and is ready for maximum operation.
The player requires approximately 3 hours to fully charge or recharge the battery.
Warning:
1.Before charging for the first time, or recharging, to ensure best battery life, please turn the unit off. The player can be recharged while on but this practice is not recommended.
2.Charge the player overnight prior to first use
12

Important: For Windows XP OS, the unit can be operated while charging. Keep the player connected to the USB port but remove the player from the Operating System. Please refer to section Ò5.4.2 Safe RemovalÓ on page 11 for more information.
5.4 Connecting with Your Computer
5.4.1 USB Connected Mode
This player has a high-speed USB 2.0 port which is compatible with Windows XP, Vista, 7 ; MAC OS 9.2 and over.
Several seconds after connecting to a powered USB port on your PC (or MAC), the player will display ÒUSB connected modeÓ with the following image:
Once the player has been successfully connected to your computer, you can access the base memory on the MP3 player (and if you have installed a micro SD/TF card, memory in this card as well) and transfer files.
Load the Windows Explorer (or the equivalent drive/file location utility in MAC) on your computer. Next, locate the MP3/4 player drives which will be labelled ÒIBIZA4GBÓ and if populated ÒMicro SD/TF CardÓ
Note: Do not remove the USB cable connection between the player and your computer before the player is safely removed from your computer system. Doing so can corrupt the files on the player or even damage the flash memory. Please refer to section Ò5.4.2 Safe RemovalÓ to follow for more information.
5.4.2 Safe Removal
To ensure that no data is lost when removing the player from your computer, please do not unplug the player prior to Òsafely removingÓ it. The following is proper methods to follow for removal of the MP3/4 device.
Safe Removal in Windows XP
13
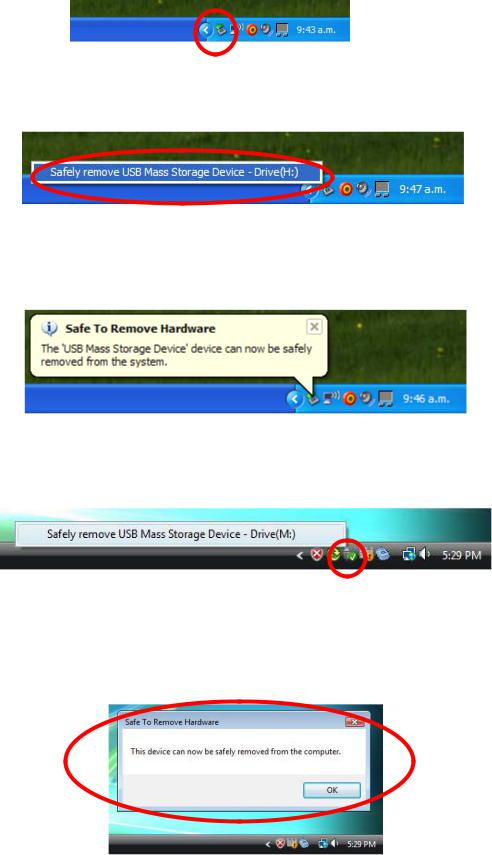
When the player is connected to your Computer, an icon similar to the one shown below will appear in the status bar on the right bottom of the Windows XP Desktop. This icon allows the safe-removal of portable devices.
Simply left-click on the icon, then select ÒUSB Mass Storage DeviceÓ from the list that appears.
The device is now ready for safe-removal. A Òballoon boxÓ will appear indicating that the device may now be safely unplugged. If Windows fails to remove the device you will be informed. Please ensure that you are not busy copying to/from the player and that all ÒWindowsÓ are closed to allow safe-removal of the player.
Safe Removal in Windows Vista and 7
When the player is connected to your Computer, an icon similar to the one shown below will appear. This icon allows the safe-removal of portable devices. Simply left-click on the icon, then select ÒUSB Mass Storage DeviceÓ from the list that appears.
Windows will then prepare the device for safe-removal and attempt to remove the device. A dialog box will appear indicating that the device may now be safely unplugged. If Windows fails to remove the device you will be informed. Please ensure that you are not busy copying to/from the player and that all ÒWindowsÓ are closed to allow safe-removal of the player.
14

Safe Removal in MAC OS
When the player is connected to your MAC computer, two drive icons labelled ÒIBIZA4GBÓ and ÒMicro SD/TF CardÓ will appear on the desktop. Respectively click on this two drive icons and select from the drop-down menu the ÒEject IBIZA4GBÓ, ÒEject Micro SD/TF CardÓ option. Once the two drive icons both disappear the player is safe to remove from your computer.
6 Operating Modes
6.1
On the main menu, select the ÒMusicÓ option using the Ò Ó or Ò
 Ó keys and then press Ò
 Ó to enter music playback mode.
To return to the main menu from the Music mode screen shown above, long press the ÒMenuÓ key repeatedly until main menu is once again displayed.
6.1.1 Browse and Select / Delete Music
From the Òmusic playback modeÓ screen, press Ò Ó to pause playing and short press ÒMenuÓ key. Then Music files operation mode will be shown. You can select the memory from ÒLocal folderÓ or ÒCard folderÓ which you would like to browse, or delete files.
15

Select Music: Press Ò Ó to enter ÒLocal folder Òor ÒCard folderÓ. Browse files or folders using the Ò
 Ó or Ò
 Ó keys, Press Ò
 Ó to select a file or enter a folder. When in a subfolder, press ÒMenuÓ to return to the upper folder.
Delect Music: Press Ò Ó to enter ÒDelete file Ò. Browse files or folders using the Ò
 Ó or Ò
 Ó keys, Press Ò
 Ó to delect a file. Using the Ò
 Ó or Ò
 Ó keys to select ÒNoÓ or ÒYesÓ, and Press Ò
 Ó to confirm.
Delect all Music: Press Ò Ó to select ÒDelete all Ò. Using the Ò
 Ó or Ò
 Ó keys to select ÒNoÓ or ÒYesÓ, and Press Ò
 Ó to confirm.
6.1.2 Play / Pause Music
Press the Ò Ó key to pause / resume playback of audio.
6.1.3 Adjusting Volume
Press Ò+Ó or Ò-Ó keys to increase or reduce the volume respectively.
6.1.4 Fast Forward / Fast Rewind Music
When an audio file is playing, you can fast forward or fast rewind it by pressing and holding the Ò Ó to fast forward or Ò
 Ó to fast rewind.
6.1.5 Next / Previous Track
Briefly press the Ò Ó or Ò
 Ó keys to skip to the previous or next audio track respectively while playing audio files.
6.1.6 Browse Song Lyrics
When music playing, long press ÒMenuÓ key. Song Lyrics will be shown if song lyrics file is saved in the folder.
6.1.7 Music Setup
From the Òmusic playback modeÓ screen, press Ò Ó to play music. When music playing, short press ÒMenuÓ key. Then enter to music settting.
16

1.Repeat Mode:
Repeat Mode |
Mode/Function |
Normal |
Play music one by one in order |
Repeat One |
Repeat a single song |
Folder |
Stop after playing all the songs in a selected subfolder |
Repeat Folder |
Repeat all songs in a selected subfolder |
Repeat all |
Repeat all songs |
Random |
Play music randomly |
Intro |
Play the first 10 seconds of all songs |
Under ÒFolderÓ and ÒRepeat FolderÓ mode, the unit will recognize the songs in root folders first and play them once or repeat them continuously by default. To play music files located in other subfolders, simply select the file using the ÒFile Explorer functioningÓ. Doing so will then allow you to play all compatible music files present in this folder.
2.Equalizer Select:
Normal, Rock, Pop, Classic, Soft, Jazz, and DBB are supported. Use the Ò Ó or Ò
 Ó keys to scroll and view all the EQ options. The selected EQ option will automatically be activated, but it will not be saved to memory. If you wish to permanently use a selected EQ mode, please press Ò
 Ó to save the selected EQ option to memory.
Note: This player does not support playback of music while simultaneously viewing photos.
Note: Lower frequencies (60, 300) will primarily affect bass and the higher frequencies (1K, 3K and 6K) will affect the treble level.
6.2 Movie
Select ÒVideoÓ in the main menu using the Ò Ó or Ò
 Ó keys and then press Ò
 Ó to enter video playback mode.
17

Then press ÒMenuÓ key to select the memory from ÒLocal folderÓ or ÒCard folderÓ which you would like to browse, delete or Repeat files.
Use the Ò Ó or Ò
 Ó keys to browse through the available video files and Ò
 Ó key to select a file or folder. Press the Ò
 Ó key to Play / Pause the currently playing video; Press the Ò+Ó or Ò-Ò keys to adjust the volume.
6.2.1 Fast Forward / Fast Rewind Video
When a video is playing, you can fast forward or fast rewind the video, by pressing and holding the Ò Ó or Ò
 Ó keys.
6.3 Record
Select ÒRecordÓ in main menu using the Ò Ó or Ò
 Ó keys and then press Ò
 Ó to enter the voice recording mode where the recording mode screen below will be shown.
18

Press Ò Ó to start recording and press ÒMenuÓ to stop and save the recorded file. When a recording is in progress, you can pause the recording by pressing Ò
 Ó, to resume press the Ò
 Ó key again. Repeat the above steps to start a new recording session.
The recorded files are stored in the ÒRECORDÓ folder of base ÒFLASHÓ memory by default. To listen to recorded files, simply select the file you desire to listen to from the Music play mode. Please refer to section Ò6.1.1 indicated on page 13 for more information.
If the screen displays ÒFull SpaceÓ, it indicates that there is no space for new recordings. Please delete other files to create more free space for storing new recordings.
6.3.1 REC Setup
Before starting a recording session in the MIC REC mode, Press ÒMenuÓ key to display ÒRecordÓ Setting options: Local folder, Card folder and REC Type.
To store recorded files in Local floder: Select local folder as stored folder for recording files. Press Ò Ó to enter Local folder (or subfolder), and press ÒMenuÓ to return MIC REC mode. Then the recorded files will be stored in the Ò Local folderÓ
To store recorded files in Card folder: Select card folder as stored folder for recording files. Press Ò Ó to enter Card folder (or subfolder), and press ÒMenuÓ to return MIC REC mode. Then the recorded files will be stored in the Ò Card folderÓ
REC type: Select one of the four options and press Ò Ó to confirm and ÒMenuÓ to return to ÒRecord SettingÓ menu.
High quality (256K BPS): Better recording quality (using higher bit rate) but larger file size. Low quality (32K BPS): Poorer recording quality (using lower bit rate) but smaller file size.
19
Note: When recording, you may wish to disconnect your earphones to improve the recording quality.
6.4 Radio
Select ÒFMÓ in main menu using Ò Ó or Ò
 Ó keys and then press Ò
 Ó to enter the FM radio mode.
Then you can manually scan the radio frequencies for radio stations by pressing the Ò Ó and Ò
 Ó keys. If press and hold Ò
 Ó and Ò
 Ó keys, fast sanning will start.
From the FM mode screen, Press ÒMenuÓ key to display the FM submenu, FM submenu includes the setup options: Save, Record, Delete, Delete all, Auto Search,Exit.
20
Save: To Save an FM channel, from the FM submenu, select ÒSaveÓ and press Ò Ó to save the preset channel; A total of 20 radio stations can be stored in memory.
Record: To record the FM programme selected, from the FM submenu, select ÒRecordÓ and press Ò Ó to record the preset FM programme; the recorded files are stored in the ÒFMRECORDÓ folder of base ÒFLASHÓ memory by default. Please refer to section Ò6.3.1 Rec(ord) SetupÓ indicated on page 17 for more information.
Delete: To remove a preset FM channel, from the FM submenu, select ÒDeleteÓ and press Ò Ó to delete the preset channel;
Delete all: To remove all of FM channel saved, from the FM submenu, select ÒDelete all Ó and press Ò Ó to delete all of FM channel saved;
Auto Search:
Select ÒautoÓ from the FM submenu and press Ò Ó to confirm, It will automatically scan for available FM channels and save them automatically. After auto scan is complete, press Ò
 Ó to select / browse through the saved channels.
Note: In FM mode, the earphone is used as an antenna. Please ensure that the earphone is attached securely to the player before using the FM Radio function.
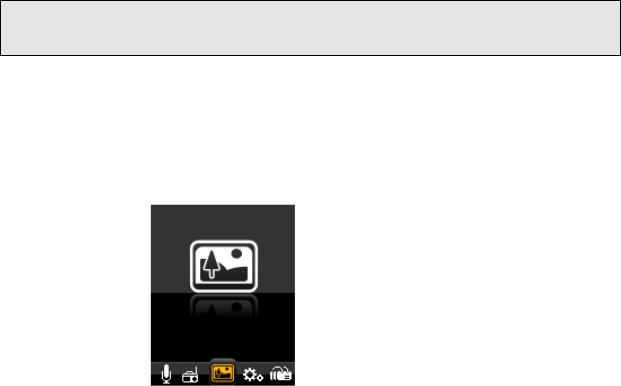
6.5 Picture
Select the ÒPhotoÓ option from the main menu using the Ò Ó or Ò
 Ó keys then press Ò
 Ó to enter the photo browser mode. press ÒMenuÓ key to select the memory from ÒLocal folderÓ or ÒCard folderÓ which you would like to browse,.
Use the Ò Ó or Ò
 Ó keys to browse through the available photo files and Ò
 Ó key to select a file or folder. Once a photo file is selected, it will be displayed in full screen mode.
Press the Ò Ó or Ò
 Ó keys to view either the next or previous photo.
Photo setting
21

In the photo browser mode, Press ÒMenuÓ key to display the Photo submenu. Then select the memory from ÒLocal folderÓ or ÒCard folderÓ which you would like to browse, or delete files and Playback set.
Select Playback set and press the Ò Ó key to enter. You can choose Manual play or Auto play. Press the Ò
 Ó key to activate the photo Auto play function. Once this function is activated the player will play through the photos present in the currently selected folder. While the photo slideshow function is active.
You can adjust the slideshow time. There are 9 selectable time periods ( 2, 3, 4, 5, 6, 7, 8, 9, 10 seconds) to choose the photo slideshow period.
6.6 Pedometer
Select ÒPedometer Ó from the main menu using the Ò Ó or Ò
 Ó keys and then press Ò
 Ó to enter the Pedometer mode.
22

Press Ò |
Ó the selectÒON/Off Ó |
Press Ò |
Ó the entry ÒONÓ |
Press Ò |
/ Ó the select ÒPedometer Ó |
Press Ò |
Ó to start Pedometer |
Press Ò M Ó to back on one level or sub menu , Long press return the main menu. Before using the entryÒsettingÓ---ÒHeighÓÑÒ weightÓ Ñ ÒStep LengthÓ setting.
6.7 Settings
Select ÒSettingsÓ in the main menu using the Ò Ó or Ò
 Ó keys and then press Ò
 Ó to enter the settings mode.
6.7.1 Clock Setup
Select ÒClockÓ in the settings mode using the Ò Ó or Ò
 Ó keys and then press Ò
 Ó to enter the Clock settings mode. using Ò+Ó or Ò-Ò keys to select the time which need adjust, and then use the Ò
 Ó or Ò
 Ó to adjust the time. press Ò
 Ó to confirm the adjustment.
6.7.2 LCD Setup
Dark mode: Setup the backlight time of the TFT screen. The selected time will determine how long the backlight stays ON each time the control keys are used and before it is turned off to conserve power. If the selected time is 0, it will keep screen backlight permanently on before it is turned off.
23

6.7.3 Power Off
The auto power off feature is a useful feature to help conserve power when not in use for a set period of time. When you select this option, the unit will automatically power off the unit after the selected time frame.
There are 20 selectable options: OFF, 10, 200 seconds to choose from for the auto power off time. The tiem 0 option if selected will disable the auto power off function. The other time length options, when selected, will determine the idle time which needs to elapse before the unit will auto power off to conserve power.
If a unit is powered off automatically by the auto power off function after the idle time, users can restart this unit, by pressing and holding Ò Ó key for 2 seconds to turn the unit back on.
6.7.4 System info
1) Memory Info: This displays Memory capacity.
24

Flash Memory |
Card memory |
Note: Card memory would not been shown if no Micro SD/TF Card installed.
2)Firmware verdion. (only for supplier operation purpose)
6.8Browser
Select ÒBrowserÓ in the main menu using the Ò Ó or Ò
 Ó keys and then press Ò
 Ó to enter the Browser mode. Then select the memory of ÒLocal folderÓ or ÒCard FolderÓ which you want to browse.
Browser is a media manager mode which displays all supported media files stored on the player in folder structure view for quick and convenient access. The biggest advantage of using this mode is that it is possible to select music, photo, or video files without having to first select the correct mode from the main menu. The player will determine the media file type and automatically setup the correct mode to play the selected file.
7 AMV Converter Software
7.1 AMV Converter Installation
This video conversion software can convert video files from avi, rm, wmv and amv into a compatible AMV video format for the player. This application is provided in the Player.
25

Note: This software only works on Windows XP/Vista/7 OS.
1.Turn on your computer, After your version of Windows¨ has loaded, connect your player with your computer. Then you can find the AMV Converter driver in your PC driver list.
2.In AMVConverter driver, please select Ò Setup.exe Ó file and double click it to start installation.
3.Click ÒNextÓ to continue.
4.Click ÒInstallÓ to continue.
5.Click ÒFinishÓ to finish the installation. The AMV Converter wizard  ÒamvtransformÓ will appear on your desktop.
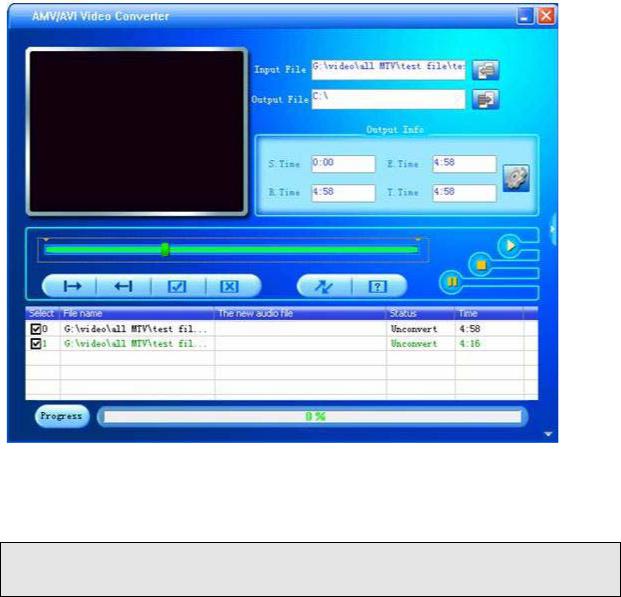
7.2 Using the AMV Converter
1.Turn on your computer. After Windows¨ has loaded; double click the wizard  on your desktop to start AMV convert software.
26
2.Click Ò Ó input file button to add a source video file and configure the conversion settings.
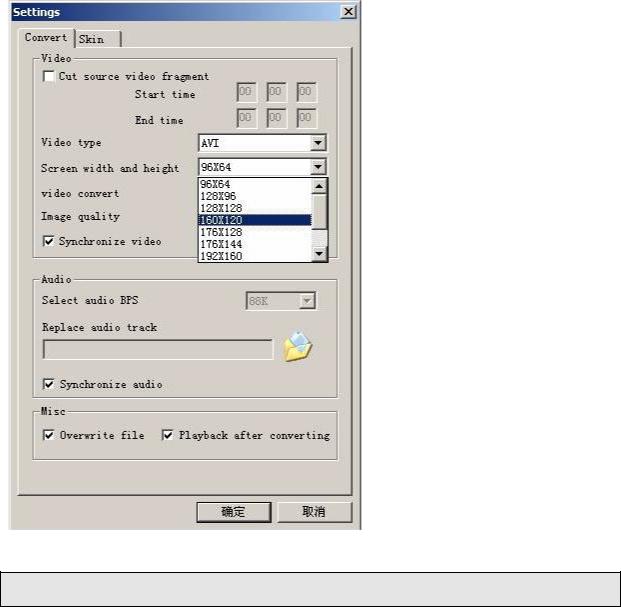
3.Click Ò  Ó button to setup the option parameters as desired and click ÒConfirmÓ to save the conversion entry.
Note: Please always select Ò160 x 120Ó as the resolution which is compatible with this unit.
4.Repeat step 2-3 to add more conversion entries.
5.Once all required conversion entries have been entered as listed in the main window
view, click on the Ò Ó button to begin the conversion process. During the conversion, the process column will indicate the conversion progress status.
27
6. Once the software has finished converting all the video files, locate the converted file(s) and copy them onto the player. You can now playback the converted video files on the player.
Note: It is highly recommended that you close all other CPU intensive applications while converting videos as they could interfere with the video conversion process.
8 Formatting Storage Memory
This unit internal memory storage require formatting, please ensure that the formatting options are set to format using either the FAT or FAT32 system. You may re-format the player at any time to restore a valid file system. All recent versions of Microsoft Windows support the FAT and FAT32 file systems.
9 Support
Should you encounter problems with the installation or usage of this device, please follow these steps:
1.Read the Installation and User Guide again carefully
2.Check the “Troubleshooting” section of this User Guide
3.Try restarting the unit by powering the unit OFF and ON
28
10 Troubleshooting
If you are having problems with this product, please refer to this troubleshooting section before contacting the store you purchased the device from:
Problem |
Possible causes and solutions |
Unit does not turn ON |
Recharge the player battery then press and hold |
|
the Power On/Off key for 2 seconds to turn on the |
|
player. |
The player does not respond to |
Press and hold the Power On/Off key for 2 |
any key presses |
seconds to turn on the player. |
The screen is blank and control |
The unit may be powered off. Press and hold |
doesnÕt respond when pressed |
Power On/Off key for 2 seconds to turn on the |
|
player. |
Player is unable to play the |
The selected media file may be corrupted or of a |
selected media file |
format not supported by the player. |
|
|
No audio when media file is played |
Confirm the volume is not set to Ò0Ó level. Check |
|
that the earphone is securely connected to the |
|
playerÕs earphone jack. Check that the earphone |
|
is not faulty |
Music files only play for the first 10 |
Check that the music setting ÒRepeat ModeÓ is not |
seconds even though the audio |
set to ÒIntroÓ mode. |
files are much longer |
|
Files loaded on player cannot be |
Ensure that the files is placed in a directory no |
found when viewed on player |
deeper than 3 subfolders deep as the player will |
|
only recognise files in subfolders up to 3 levels |
|
deep only. |
The Player is not detected when |
Check and ensure that the USB cable is securely |
connected to a PC |
attached to the player and also to the PC. |
|
|
The player does not voice |
Check that there is enough free memory. |
recordings |
|
The unit powers off automatically |
This could be due to low battery power, please |
and does not start again even after |
recharge the unit. |
the unit has been restarted |
|
The unit powers off automatically |
This is due to the Auto power off function which |
even though battery power level is |
is a feature of the device. Please refer to section |
not low |
Ò6.7.3 Auto Power OffÓ indicated on page 23 for |
|
more information. |
29
Loading...