


TAB107QCBT
Tablet PC
Android 4.2
User Manual
Tablet of Contents
Specifications………………………………………………………………….1 What’s Inside The box………………………………………………………….1 Tablet Parts…………………………………………………………..…………2 Getting started…………………………………………………………………3 How to use TF card ………………………………………………………..……7
How to connect with computer………………………………………………..8 Connection to Internet………………………………………..………………..9 Camera………………………………………………………………………….11 Trouble Shooting…………………………………………...………………….12
Specifications
Display: 10.1 inch 1024X600 Capacitive multi-touch screen CPU: A31S Quad-Core A7 1.2GHZ
RAM: 1GB DDR III
GPU SGX544
Internal Storage: 8 GB
Expansion Memory: Micro SD card up to 32GB (not supplied) Built-In Wireless: 802.11b/g/n
Bluetooth
TV Port: mini HDMI 1.4
Micro USB 2.0 / OTG
Front camera 0,3 Mpixels
Rear Camera 2 Mpixels
Battery 6000 Mah
AC Adapter: DC 5V-2A
Operating System: Android 4.2.2 “Jelly Bean”
Made in China
What’s Inside The box
Tablet – 1pc
Power Adapter -1pc
USB Cable-1pc
OTG Cable-1pc
Instruction manual - 1pc
Warranty card 1pc
1
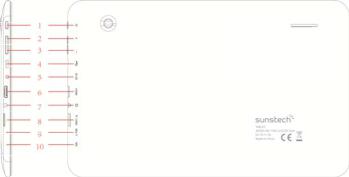
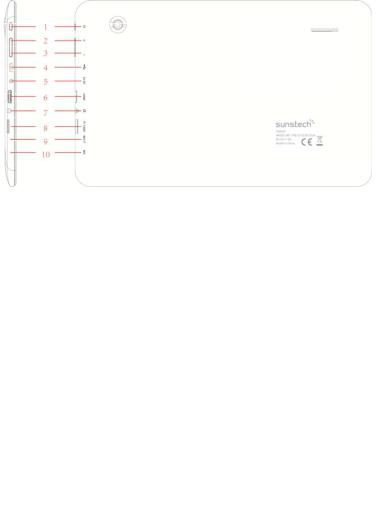
Tablet Part
Name |
function |
|
|
1--Power |
Keep pressed to turn on/off the tablet; shortly |
|
press to activate standby |
|
|
2--VOL+ |
Press the button to increase the volume |
|
|
3--VOL- |
press the button to decrease the volume. |
|
|
4—Micro USB OTG |
PC connection/peripheral connection through |
Port |
OTG cable (for example keyboard, USB |
|
device)/battery charge through the supplied |
|
adaptor |
|
|
5--Power jack(DC in – |
Connect to a 5V output adaptor as included in |
Put) |
the accessories |
|
|
6--TV HD output |
Mini HDMI TV output to connect an external |
|
screen. |
|
|
7--Earphone jack |
Connect earphone to this standard 3.5mm jack |
|
|
8--Micro SD input |
Insert a micro SD card (up to 32GB) |
9 Reset button |
Push Reset Button to restore the unit. |
|
|
2

Getting Started
Battery Charging
The tablet has a built-in rechargeable Li-polymer battery.
1.To charge the unit, connect the AC power adapter to the micro USB / Jack on the right side of the tablet.
2.The battery icon shows the battery status and charging status
3. The tablet can be used even if the battery is being charged.
the above icons indicate the different level of electricity left in the battery
4.Do not replace of battery without authorization, or the battery explode.
5.Recharge the unit for at least half hour if it has been idle for long time and fails to start itself.
6.Regularly recharge it at least once a month
7.Between 5°- 40° is the optimum temperature for recharging the battery or the battery performance may slightly deteriorate
Disposal
The battery might contain the polluting material, please give it to the official recycling-station before disposal of the tablet pc, and do not litter.
3

Power ON/OFF
ON:
press the  button for continuous 5 seconds until the tablet turns “ON”. OFF:
1.Press the  button for continuous 5 seconds and it will appear 2.Select OK to power off the tablet
Screen Lock
This feature locks the screen, at the same time turn OFF the screen’s backlight after a few seconds.
Screen locks when:
1.System is idle.
2.Manually activate it by pressing the Power button once. Screen unlock :
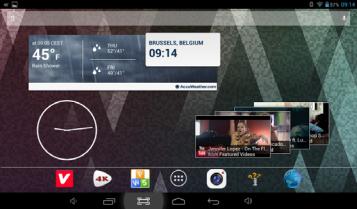
Home screen
The Home screen will look similar to the picture below. It is actually five screens, each of which can have a different layout of icons. To switch between screens, simply slide your finger left or right across the display.
The status bar and navigation buttons are always visible, no matter which Home screen you can currently viewing.
4
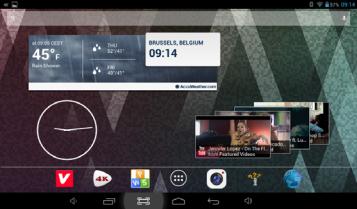
The Desktop contains shortcuts to your most-used applications and widgets Touch the screen icon to quickly search the World Wide Web using Google.
The  icon will launch the Application menu.
The status bar displays system information, such as current time, wireless connectivity and battery.
Touch to Expand the status bar for more detailed information.
The  button moves back one step to the previous menu/page.
The  buttons returns immediately to the Android desktop.
The  button display a menu of recently opened applications.
Settings Menu
The settings menu allows you to adjust Tablet system configuration.
5

To change settings:
1. Touch the "Settings" |
menu icon on the Application menu.The |
Settings menu will open.
2.Guide your finger up or down the left side of the screen to scroll through the list of available categories.
3.Touch a category title to view further options on the right side of the screen.
Wi-Fi - Connect to /disconnect from wireless networks, view connection status Bluetooth: To connect or disconnect from devices to send photos / music… Data usage - Enable / disable mobile data, view current usage, set mobile data limit (note: this function is available only on devices supplied with 3G card) Sound - Change volume, touch sound, screen lock sounds etc
Display - Change brightness, wallpaper, sleep settings, font size etc Storage - Manage NAND and Micro SD card, view available capacity etc Battery - See battery status and powered-on time
Apps - Manage applications, running services etc Accounts - Manage accounts etc
Location services - Change approximate location detection, improve search results
Security - Change screen lock type, encryption, password, credential storage etc
Language & input Select language, add to the dictionary, edit on-screen keyboard settings, vocal search, etc
Backup & reset - Backup & restore data, perform factory reset, etc Date & time - Set date, time zone, time, clock format etc
Accessibility - Set up large text, auto-rotate screen, speak password etc Developer options - Advanced functions for Android developers - debugging, HDCP check etc
About tablet - Information about your Android device
6

How to Use TF card
1.Insert the TF card into the TF card slot. Gently push TF card into slot until it clicks into place.
2.A prompt will be seen on the screen saying “ Preparing SD card “
Removing TF card
1.Close all applications and documents which have been opened from the TF card.
2.Select “Setting” and find “ Storage” then click “Unmount SD card”.
3.A prompt will be seen on the screen saying “ SD card safe to remove”
4.Gently press the TF card to remove and pull out the TF card.
Note: Insert the TF card in correct position, otherwise it will damage the card
and the slot.
7

Software Keyboard
The tablet has a software keyboard which automatically pop up when you tap the place on screen where text or number are to be entered.
Touch Screen
The touch screen responds to finger touch.
Note: Do not place any object on the touch screen because it may damage or crush the screen.
Single Click: single click one icon to choose the icon or option you want. Long Press: press and hold one icon to make appear a menu related to the executed function (if available).
Drag: drag on the screen and you can move between magic cube sides or drag the application icons into the shortcut bar.
How to connect with computer
Note: Turn on your Tablet before connect the Tablet to PC by USB cable.
1Use USB cable to connect MID with computer. System will notice USB connected on bottom of screen.
2Press USB connected on the top bar, then click Turn on USB storage, click OK.
3. Then the USB connection has been successfully.
8

Connection to Internet
Wireless:
1Select “ Settings”
2Select “Wi-Fi” and slide OFF to ON status.
3All detected wireless networks in the area will be listed, Click to select
desired wireless connection.
4Enter WEP key or network key if necessary.
5Once connected to a wireless network, settings will be saved
6 Wireless icon will appear on the taskbar when connected successfully. Note: when the tablet detects the same wireless network in the future, the device will connect automatically to the network
Web Browsing
Connect to the internet and launch the browser.
9

Connection to Bluetooth
1- Select “Settings”
2- Select “Bluetooth” and slide OFF to ON status.
3-All detected Bluetooth device in the area will be listed, tap to select the device connection.
4- When your select the device must enter code and permission key if necessary to pairing.
5-On the other device must accept the permissions to connect between them.
6- Now, your can sent photos / Music…
10

Camera
Tap the icon |
to enter camera mode and the interface is shown as |
follows: |
|
1. Tap the icon |
in the middle to take photo |
2. Move the icon |
on bottom and you can switch camera mode |
to camera recording mode. |
|
3. Tap the icon |
on the top left to see the previous picture and you |
can also delete, share or set it as the wallpaper. Click the return button to exit the camera interface.
11
Trouble Shooting
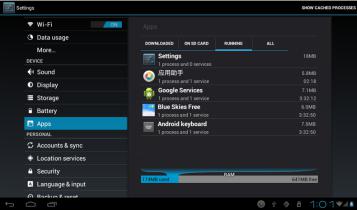
Close Application
All running applications take up system memory and will slow down the systems response. Please shut down all idle applications to free memory and get the system speed back to normal.
To close the application, click the icon  on the shortcut bar to enter
the system configuration interface. Select the Application → Running services and the interface is shown as follows:
Tap the application you want to close. A pop-up window will be displayed. Tap “Stop” to close that application.
Mandatory Power off
1.Press and hold the power button for 5 seconds and the device will be powered off.
2.Press the reset button on the back and the device will be forced to be powered off.
12
Restore Default Setting
If you want to reset the factory setting and erase all materials, please press
Settings →Backup & Reset →Factory data reset.
** Warning: A factory data reset will delete your data, configuration of the system and applications that you have installed.
**Please use this function carefully.
-Recovery mode Function. TAB107QCBT
How to enter in recovery mode.
Please follow these steps.
1-To enter in the recovery mode first you should power off the device,
Then long-press the “ON-OFF” key and “VOL --” Key at the same time until the Android doll has appeared, pls try it.
2-With “vol –“ key select “wipe data / factory reset” then press “Power” and then select “Yes delete all user data”with the “vol-“ key.
3-Then press “power” again. The unit will then begin the recovery mode.
4- When it finishes select “reboot system now” press the “power "button and the unit will re-start itself. (this process may last for a few minutes)
13
How to download the software using the unit.
IMPORTANT: When you download the software, all data will be deleted as photos, videos and Apps that you have been installed.
Do not interrupt this process please make sure the battery is fully charged.
Please, follow these steps.
1- Open browser and search and open this link: www.sunstech.es/download/
2- Select the model of the tablet that you have and download the software.(This software is installed In the INTERNAL SD).
3- When it finished the download, select the App " update " in your unit.
4-Select "Local Update", "download".
5-Select the software / Download and wait until the process is finished.
14

Warranty conditions
-The warranty of this product is for 2 years since the purchase date.
-The warranty will exclude breakdowns caused by bad use of the product, wrong installation or installation in not desirable places for a proper maintenance of the product, rips, updates of the products that are not the supplied by the brand, pieces wore away for its use or for not domestic or inappropriate use. Also are excluded breakdowns caused for manipulations of the products by people or companies alien to our company.
-For any request regarding the warranty terms, the purchase receipt must be attached.
Correct disposal of this Product
(Waste Electrical & Electronic Equipment(WEEE)
Your product is designed and manufactured with high quality materials and
components which can be recycled and reused.
This symbol means that electrical and electronic equipment, at their endof-life should be disposed of separately from your household waste.
Please dispose of this equipment at your local community waste collection/recycling centre.
In the European Union there are separate collection systems for used electrical and electronic products.Please help us to conserve the environment we live in!

1. DO NOT place objects on top of the device, as objects may scratch the device.
2.DO NOT expose the device to dirty
or
dusty environments.
3.DO NOT place the device on an uneven
or unstable surface.
4.DO NOT insert any foreign objects into the device.
5.DO NOT expose the device to strong magnetic or electrical field.
6. DO NOT expose the device to direct

sunlight as it can damage the device. Keep it away from heat sources.
7. DO NOT store your device in temperatures higher than 40°C(104°F). The internal operating temperature for this device is from 20°C(68°F) to 60°C(140°F).
8.DO NOT use the device in the rain.
9.Please check with your Local Authority or retailer for proper disposal of electronic products.
10.The device and adaptor may
product some heat during normal operation of charging. To prevent
discomfort or injury from heat exposure, DO NOT leave

the device on your lap.
11. POWER INPUT RATING: Refer to the rating label on the device and be sure that the power adaptor complies with
the rating. Only use accessories specified by the manufacturer.
12. Clean the device with a soft cloth. If needed, dampen the cloth slightly
before cleaning. Never use abrasives or cleaning solutions.
13. Always power off the device to install or remove external devices that do not support hot-plug.
14. Disconnect the device from an
electrical outlet and power off before cleaning the device.
15.DO NOT disassemble the device. Only a certified service technician should perform repair.
16.The device has apertures to disperse heat. DO NOT block the device ventilation, the device may become hot and malfunction as a result.
17.Risk of explosion if battery replaced by an incorrect type. Dispose of used batteries according to the instruction.

18. PLUGGABLE EQUIPMENT: the
socket-outlet shall be installed near
the equipment and shall be easily
accessible.
TAB107QCBT
Tablet PC
Android 4.2
Manual de usuario
Índice |
|
Especificaciones......................................................................................................... |
1 |
Contenido de la caja................................................................................................. |
1 |
Partes de la tablet...................................................................................................... |
2 |
Comenzar..................................................................................................................... |
3 |
Como usar la tarjeta TF............................................................................................ |
7 |
Como conectar con el ordenador........................................................................ |
9 |
Conexión a Internet................................................................................................ |
10 |
Cámara........................................................................................................................ |
12 |
Resolución de problemas ..................................................................................... |
12 |
Especificaciones
Pantalla: Pantalla multitáctil capacitiva de 10,1 pulgadas 1024X600 CPU: A31S Quad-Core A7 1.2GHZ
RAM: 1GB DDR III
GPU SGX544
Almacenamiento interno: 8 GB
Memoria de expansión: Tarjeta Micro SD de hasta 32 GB (no incluida) Wireless incorporado: 802.11b/g/n
Bluetooth
Puerto para TV: mini HDMI 1.4
Micro USB 2.0 / OTG
Cámara frontal de 0,3 megapíxeles
Cámara trasera 2 Mpixels
Batería 6000 Mah
Adaptador de CA: DC 5V-2A
Sistema operativo: Android 4.2.2 “Jelly Bean”
Hecho en China
Contenido de la caja
Tablet - 1 uni.
Adaptador de corriente - 1 uni.
Cable USB - 1 uni.
Cable OTG - 1 uni.
Manual de instrucciones - 1 uni.
Tarjeta de garantía - 1 uni.
1
Partes de la tablet
|
Nombre |
Función |
|
|
|
|
|
1-- |
Alimentación |
Mantenga pulsado para encender/apagar la tablet; pulse |
|
|
|
|
brevemente para activar el modo de espera |
|
|
|
|
2-- VOL + |
|
Pulse el botón para aumentar el volumen |
|
3-- VOL- |
|
pulse el botón para reducir el volumen. |
|
4-- Puerto Micro USB |
Conexión de PC/conexión periférica mediante el |
||
OTG |
|
|
cable OTG (por ejemplo, teclado, dispositivo |
|
|
|
USB)/cargador de batería mediante el adaptador |
|
|
|
suministrado |
5-- |
Enchufe |
de |
Conecte a un adaptador de salida de 5V como se |
alimentación |
(entrada |
incluye en los accesorios |
|
de CC) |
|
|
|
|
|
|
|
6-- |
Salida de TV HD |
Salida de la Mini HDMI de TV para conectar una |
|
|
|
|
pantalla externa |
7-- |
Clavija |
para |
Conecte el auricular a esta toma estándar de 3,5 |
auriculares |
|
mm |
|
|
|
|
|
2
8-- |
Entrada micro SD |
Introducir una tarjeta micro SD (hasta 32 GB) |
|
|
|
9 |
Botón |
Pulse el botón Restablecimiento para restaurar la unidad. |
restablecimiento |
|
|
|
|
|
Comenzar
Carga de la batería
La tablet tiene una batería recargable de polímero-litio incorporada.
1.Para cargar, conecte el adaptador de corriente CA a la toma micro USB en el lado derecha de la tablet.
2.El icono de la batería muestra el estado de la batería y el estado de la carga
3.La tablet puede usarse incluso cuando se está cargando la batería. los iconos de arriba indican el nivel de energía que le queda a la batería
4.No sustituir la batería sin autorización. Podría existir riesgo de explosión.
5.Recargue la unidad por lo menos media hora, si ha estado sin usarse durante un largo período de tiempo y no se enciende.
3
 Loading...