

Page 1

MULTI-FOOD GRINDER
Accessory for use with
®
Planetary Mixmaster
Instruction & Recipe Booklet
Power Drive
MX0600
Page 2

Contents
Heading
Sunbeam’s Safety Precautions 1
Features of your Multi-Food Grinder 2
Attachments for your Multi-Food Grinder 4
Using your Multi-Food Grinder 5
Sub Heading
Storing your Multi-Food Grinder 6
Body copy with not indent applied.
Handy Hints for Mincing 7
• Bullet copy Bullet copy Bullet copy
Handy Hints for Sausage Making 8
Bullet copy Bullet copy Bullet copy
Care and Cleaning 9
Bullet copy Bullet copy
Recipes 10
1 scoop ice cream – any flavour
2 tablespoons topping
Important instructions –
retain for future use.
Page 3

Sunbeam’s Safety Precautions
SAFETY PRECAUTIONS FOR YOUR
SUNBEAM MULTI-FOOD GRINDER.
• Always use extreme care when handling the
blade and discs.
• Unplug from power outlet when not in use,
before putting on or taking off attachments,
and before cleaning.
• Only use the pusher that is supplied with
this Multi-Food Grinder.
• Do not put your fingers or any utensil into
the feeder chute.
• Do not contact moving parts at all times.
Sunbeam is very safety conscious when
designing and manufacturing consumer
products, but it is essential that the product
user also exercise care when using an
electrical appliance. Listed below are
precautions which are essential for the safe
use of an electrical appliance:
• Read carefully and save all the instructions
provided with an appliance.
• Always turn the power off at the power outlet
before you insert or remove a plug. Remove
by grasping the plug - do not pull on the
cord.
• Turn the power off and remove the plug
when the appliance is not in use and
before cleaning.
• Do not use your appliance with an extension
cord unless this cord has been checked
and tested by a qualified technician or
service person.
• Always use your appliance from a power
outlet of the voltage (A.C. only) marked
on the appliance.
• This appliance is not intended for use by
persons (including children) with reduced
physical, sensory or mental capabilities,
or lack of experience and knowledge,
unless they have been given supervision or
instruction concerning use of the appliance
by a person responsible for their safety.
• Children should be supervised to ensure that
they do not play with the appliance.
• The temperature of accessible surfaces may
be high when the appliance is operating.
• Do not put hot meat into the Multi-Food
Grinder.
• All discs and attachments should be
removed with care before cleaning.
• Only use the attachments and accessories
provided and recommended by Sunbeam.
• Do not overload the Multi-Food Grinder.
• Do not operate for more than 1 minute
at a time while mincing heavy loads.
This does not apply to any of the recipes in
this booklet.
• Never leave an appliance unattended while
in use.
• Do not use an appliance for any purpose
other than its intended use.
• Do not place an appliance on or near a hot
gas flame, electric element or on a heated
oven.
• Do not place on top of any other appliance.
• Do not let the power cord of an appliance
hang over the edge of a table or bench top
or touch any hot surface.
• Do not operate any electrical appliance with
a damaged cord or after the appliance has
been damaged in any manner. If damage
is suspected, return the appliance to the
nearest Sunbeam Appointed Service Centre
for examination, repair or adjustment.
• For additional protection, Sunbeam
recommend the use of a residual current
device (RCD) with a tripping current not
exceeding 30mA in the electrical circuit
supplying power to your appliances.
• Do not immerse the appliance in water
or any other liquid unless recommended.
• Appliances are not intended to be operated
by means of an external timer or separate
remote control system.
• This appliance is intended to be used in
household and similar applications such
as: staff kitchen areas in shops, offices and
other working environments; farm houses; by
clients in hotels, motels and other residential
type environments; bed and breakfast type
environments.
If you have any concerns regarding the performance and use of your appliance,
please visit www.sunbeam.com.au or contact the Sunbeam Consumer Service Line.
Ensure the above safety precautions are understood.
1
Page 4

Features of your Multi-Food
Grinder attachment
Mincing screw
Blade
Mincing discs
(Fine, Medium and Coarse)
Fastening dial
Locks the mincing discs and sausage
firmly into place. Use the spanner to
ensure it is firmly screwed onto the
chute.
Spanner
Sausage attachment
2
Page 5
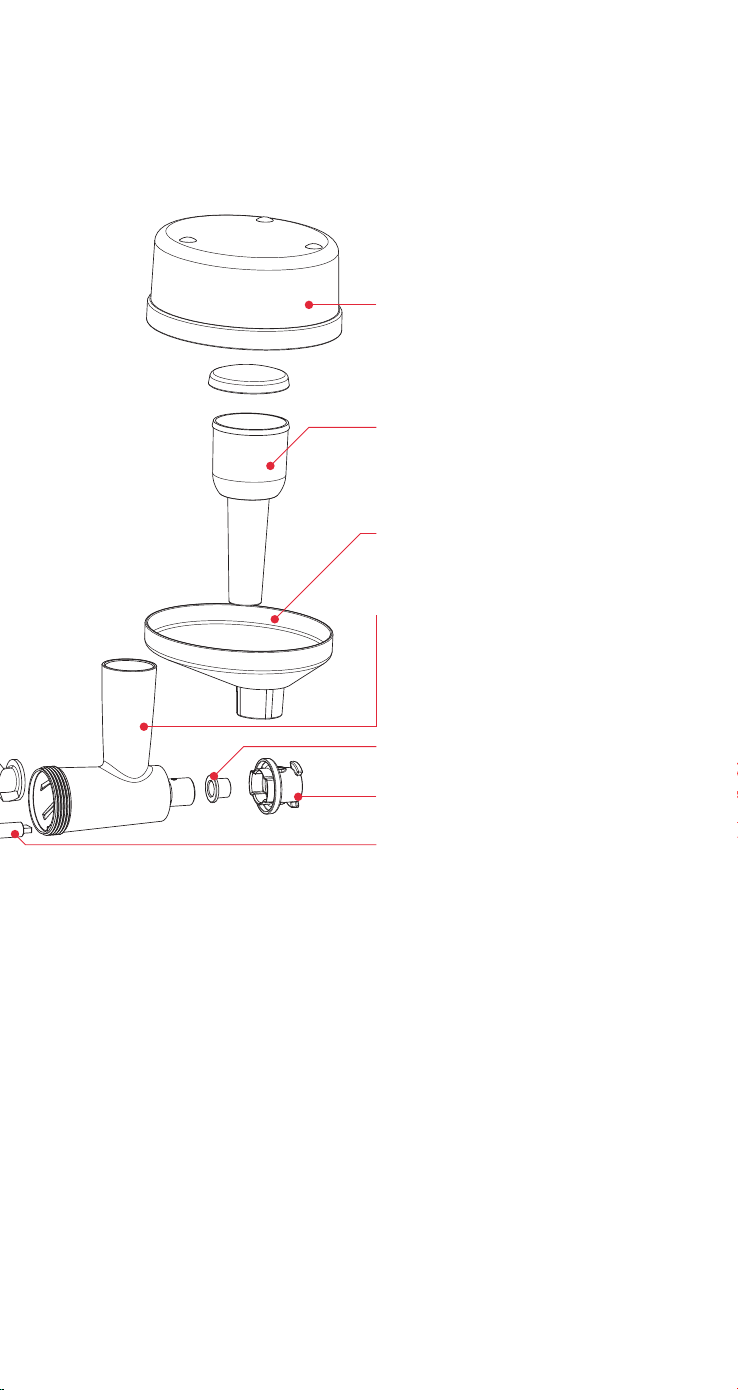
Food catcher
Place underneath chute for mince and
sausage collection. Also doubles as a
storage unit to store attachments – use the
feeder tray as the lid.
Food pusher
Guides meat safely through the chute to
hit the mincing screw, for superior mincing
results.
Feeder tray
Use the Feeder Tray to hold food ready for
mincing.
Chute
The chute houses the mincing screw and
blade. Use the food pusher to direct food
through the chute to the mincing screw and
blade.
Bushing
Accessory connector
Scroll axis
3
Page 6

Attachments for your
Multi-Food Grinder
Fine disc
Medium disc
Coarse disc
Sausage making attachment
(Thin nozzle)
Feeder tray
Food catcher
Spanner
4
Page 7

Using your Multi-Food Grinder
Before using your Multi-Food Grinder
Attachment
Wash all attachments in warm soapy water
using a mild detergent. Dry each part
thoroughly before use.
Before you assemble the Multi-Food Grinder
attachment ensure that the power cord is
unplugged.
NOTE: All attachments must be firmly in
place before using the appliance. Ensure
that the mincing screw and blade are firmly
in place inside the Multi-Food Grinder body
and the mincer discs are secured with the
fastening dial.
Fitting and using the mincing discs
1. Place the mincer body, facing you on a
level, dry surface.
2. Fit the mincing screw inside the chute.
3. Fit the blade over the mincing screw
ensuring that the flat/smooth side of the
blade faces the mincing screw, away from
the mincing disc.
4. Fit the disc (depending on the type of
mince your require, this will either be a
fine, medium or coarse disc).
5. The fastening dial then fits over the disc
and screws into place. Do not tighten this
fastening dial yet as it will be harder to
lock into the mincer body. See Fig 1.
6. Align chute into the Multi-Food Grinder
body, using arrows as a guide. Insert the
grinder into the power drive. Turn the
grinder in an anti-clockwise position and
lock into place securely. The mixer head
should be lowered and not in an upright
position.
7. Once the Multi-Food Grinder attachment
is in place, tighten the fastening dial
using the spanner to ensure all elements
are securely in place. See figure 2.
8. Place the food catcher underneath the
fastening dial for mince collection and
the feeder tray on top of the Multi-Food
Grinder chute. See figure 2. Turn the
speed dial clockwise to commencing
grinding. Operate at speeds no greater
than 7. Refer to the mixer manual for
further operating instructions.
Figure 2
Figure 1
9. Place prepared meat in feeder tray. Plug
the power cord into a 230-240V AC power
outlet and turn the power ‘ON’.
NOTE: Do not use excessive force to push
meat through the mincing chute as it could
damage the appliance.
CAUTION: Do not use anything else apart
from the pusher supplied with this MultiFood Grinder to push meat through the
chute. NEVER use your hands/fingers to
push meat through the chute.
5
Page 8

Storing your Multi-Food Grinder
The Sunbeam Multi-Food Grinder was
designed so that all attachments can be
stored in two unique storage components.
1. Attachments can be stored inside the food
pusher as shown below:
6
Page 9

Handy Hints for Mincing
• Remove all large pieces of fat from meat
before mincing.
• For fatty cuts of meat we recommend that
you cut meat into 5cm cubes. For lean
cuts of meat; cut into strips approximately
15cm long and 5cm thick or into cubes.
• Remove any bones from meat as this may
damage the mincer.
• To make sure that all meat has come
through mincing, place a 20cm sheet
of crushed baking paper into the mincer
after the last piece of meat. This will push
through any remaining meat and will not
damage the mincer.
• If changing mincing discs or changing to
another attachment, always ensure that
any meat that is around the fastening
dial or blade is removed. This will ensure
that all parts will reassemble and operate
correctly.
• Minced meat should be used within 1-2
days. Freeze uncooked mince that will not
be used within this time frame.
• Mince can be frozen for 2-3 months
• Thaw mince in refrigerator overnight,
DO NOT refreeze uncooked meat.
• When cooking mince it needs to be
cooked thoroughly. Mince that has been
used for hamburgers or meat patties
should be cooked until well done.
7
Page 10

Handy Hints for Sausage
Making
• Salt is an important component of
sausage making. It is responsible
for the control of growth of microorganisms. It also aids in dissolving
the myosin (protein) out of the
muscle fibres which then acts as
a glue to bind the meat together.
• Freshly made sausages are
better when allowed to sit in the
refrigerator for a minimum of 12
hours and for up to 24 hours.
• Fresh sausages are highly perishable
products as they do not contain
the preservatives that are present
in most store-bought sausages.
They should be cooked within 2-3
days of being made or frozen.
• Ideally, sausages should contain
up to 30% fat content to provide
a tender and moist product.
• Sausages should be thoroughly
cooked to kill all microbes. Internal
temperatures must reach 70-75°c.
• Intentional piercing of sausage skin
releases much needed moisture but
prevents the sausage from possibly
splitting and being disfigured.
• Thing to look for when making
sausages:
• Choose good quality ingredients
• Fat to meat ratio (30:70)
• Spices and seasoning should
be combined in amounts that
compliment the type of meat in
the sausage.
• Casings can be purchased from the
butcher that have supplied you with
your fresh meat. If preserved in salt,
it should be soaked in lukewarm
water for up to 30 minutes before
use. Flush skins with cold water to
expel excess salt.
• Unused fresh casings must be
drained, covered with salt and
frozen.
• Sausages should be stored in an air
tight container or sealed with cling
film in the refrigerator.
• A good way to make sure that all the
sausage mince has come through
the mincer is to break up 1-2 slices
of bread and push though mincer,
this will force any remaining mixture
into the casing.
• Gentle cooking over medium heat
prevents interior from boiling which
in turn bursts the skin, leaking out
moisture and flavour. This then
produces a hard textured product.
8
Page 11

Care and Cleaning
When you have completed mincing,
unplug the Multi-Food Grinder from
the power outlet.
Ensure that all accessories and
attachments are washed thoroughly
with hot, soapy water.
To remove meat that is stuck in the
fine and medium discs, align the holes
of the mincing disc with the cleaning
disc. Push the cleaning disc into the
mincing disc. As shown in figure 1.
Any meat stuck in the mincing disc
will be pushed out. Any remaining
meat that is still in the mincing disc
should be washed off using a soft
sponge and hot soapy water.
To remove foods from the coarse disc,
rinse disc under cold, running water to
force meat from holes. Any remaining
meat stuck on the mincing disc should
be washed off using a soft sponge and
hot soapy water.
Ensure that all attachments and discs
are dried thoroughly before storing. If
discs are not dried, rust may occur on
the discs.
Tip: To store mincing discs, we
recommend rubbing a little vegetable
oil on the outside of the discs.
Warning: Take care in washing all
attachment components to ensure
that there is no food particles left in/
around the mincing discs, sausage/
kebbe making attachments, blade and
mincing screw. We do not recommend
dishwashing any of the mincing
attachments.
Figure 1
9
Page 12

Recipes
Bolognaise Serves 6
1kg topside steak, diced into 5cm
cubes
2 tablespoons olive oil
1 medium onion, chopped finely
1 clove garlic, crushed
2 teaspoons dried basil
280g tomato paste
1 x 800g can peeled chopped
tomatoes
2 cups water
Salt and pepper
1. Assemble Multi-Food Grinder with
the blade and medium disc.
2. Turn Multi-Food Grinder on and
slowly add beef pieces into the
chute using the food pusher.
Reserve and set aside.
3. Heat oil in a large pan over medium
high heat, add onion and garlic and
cook 2-3 minutes or until onion has
softened.
4. Add dried basil and mince; cook,
stirring frequently, for 4-5 minutes
or until mince is brown and crumbly.
5. Stir in tomato paste and cook for 1
minute; add chopped tomatoes and
water and bring to the boil. Reduce
heat to medium, cover and simmer
20 minutes or until mixture has
reduced and thickened.
Quick Lasagne Serves 8-10
1 quantity bolognaise mixture
375g large instant lasagne sheets
500g blend grated mozzarella, cheddar
and parmesan cheese
350g fresh ricotta
1. Preheat oven to 200°c
2. Lightly grease a 40cm x 22cm
(approx) size deep baking dish.
Spoon enough meat sauce on
base to just cover. Place a layer
of lasagne sheets to cover base.
3. Spoon about one third of the
remaining meat sauce over the
lasagne sheets to cover well.
Sprinkle about one third of the
blended cheese only over the meat.
Place another layer of lasagne
sheets on top.
4. Spoon another one third meat
sauce over the lasagne sheets then
spoon the fresh ricotta over the
meat sauce. Top with more lasagne
sheets. Repeat with the remaining
meat sauce and another one third of
the cheese. Top with the last layer of
lasagne sheets and sprinkle with the
remaining cheese.
5. Loosely cover lasagne with
aluminium foil and bake for 40
minutes. Remove foil and bake,
uncovered, for a further 20 minutes
or until the top is golden and the
lasagne sheets are cooked. To test,
place a small sharp knife through
the lasagne, if soft the sheets are
cooked.
10
Page 13

Recipes continued
Sang Choi Bow Serves 4 as an entrée
You will need approximately 400g of
chicken breast for this recipe. Pork
can be substituted in this recipe. We
recommend using the medium disc.
3 green onions
1 tablespoon peanut oil
1 clove garlic, crushed
½ teaspoon grated fresh ginger
6 fresh shiitake mushrooms, chopped
finely
350g chicken mince
4 lettuce leaves, to serve
2 teaspoons sesame seeds, toasted
Sauce
1 tablespoon shao hsing wine
1 tablespoon light soy sauce
1 tablespoon oyster sauce
1 tablespoon hoisin sauce
1 teaspoon sesame oil
1 teaspoon white sugar
1. Assemble Multi-Food Grinder with
the blade and medium disc.
2. Turn Multi-Food Grinder on and
slowly add chicken pieces into
the chute using the food pusher.
Reserve and set aside.
3. Separate white and greens parts
of onions. Finely chop the white
parts and thinly slice the green.
Keep separate and set aside.
4. Heat oil in a wok over high heat,
add garlic, ginger, mushrooms
and white parts of green onions
and cook stirring frequently for
1 minute.
5. Add chicken mince and cook 3-4
minutes or until golden and crumbly.
6. Combine sauce ingredients in a
separate bowl, mix well. Pour into
chicken mince and stir-fry 3 minutes
or until chicken mince is cooked
and sauce has thickened. Stir
through green parts of green onions.
7. Spoon into lettuce cups, sprinkle
with sesame seeds and serve
immediately.
Tip: Shoa Hsing wine, oyster sauce,
hoisin sauce and sesame oil are all
available in Asian supermarkets.
Red Curry Paste Makes approx 1 cup
2 teaspoons shrimp paste
16 – 20 dried long red chillies
2 teaspoons salt
2 tablespoons chopped galangal
4 tablespoons chopped lemongrass
6 kaffir lime leaves, stems removed
and sliced thinly
2 teaspoons scraped and chopped
coriander root
¼ cup chopped red shallots
1
⁄3 cup chopped fresh garlic
1. Preheat a grill on High. Wrap
shrimp paste in aluminium foil and
place onto a baking tray. Grill 1-2
minutes and turn over and repeat.
Alternatively place onto a hot
barbeque hot plate and cook 1-2
minutes each side. Remove and set
aside to cool.
2. Remove stalks and seeds from
chillies; place in a bowl. Pour over
boiling water to cover and soak for
20 minutes or until softened. Drain
chillies and roughly chop. Place
chillies into a bowl with remaining
ingredients; mix well.
3. Assemble Multi-Food Grinder with
the blade and fine disc.
4. Turn Multi-Food Grinder on and
slowly add paste ingredients into the
chute using the food pusher. Repeat
once or twice more depending on
the fineness of paste you require.
5. Store paste in an airtight container
for up to 3 days. Alternatively, freeze
for up to 6 months.
11
Page 14

Recipes continued
Thai Chicken Red Curry Serves 4
1 tablespoon vegetable oil
1 onion, cut into thin wedges
1 portion home made red curry paste
1 x 400ml can coconut milk
2 teaspoons sugar
1 tablespoon fish sauce
750g chicken breast fillet, sliced
thinly
1 red capsicum, deseeded and sliced
230g can bamboo shoots, drained
100g sugar snap peas
Coriander leaves, to serve
1. Heat oil in a wok over high heat,
add onion and cook 1-2 minutes,
stirring frequently or until softened.
2. Add red curry paste and cook 1
minute. Reduce heat to medium and
stir in coconut milk, sugar and fish
sauce.
3. Add chicken and capsicum and
simmer for about 3 minutes or until
chicken is just cooked. Stir through
bamboo shoots and sugar snap peas
and simmer a further 1-2 minutes.
4. Serve hot with steamed jasmine rice
and fresh coriander leaves.
Tip: If using store bought curry paste
use 2-3 tablespoons to taste.
Matt’s Meatballs Serves 6-8
1.3kg lean beef
2
⁄3 cup packaged breadcrumbs
3 eggs
2 tablespoons Worcestershire sauce
2 teaspoons dried sweet basil
1 teaspoon dried oregano
2 cloves garlic, crushed
salt and pepper
2 tablespoons olive oil
Sauce
1 onion, sliced
2 cloves garlic, crushed
2 tablespoons tomato paste
1 green capsicum, sliced
1 red capsicum, sliced
1 litre bottled tomato sauce
1. Assemble Multi-Food Grinder with
the blade and fine disc.
2. Turn the mixer on and increase
speed progressively and slowly add
beef pieces into the chute using the
food pusher.
3. Combine meatball ingredients; roll
into balls slightly smaller than golf
balls.
4. Heat half of the oil in a frying
pan over a medium heat. Cook
meatballs, in batches, until browned
all over. Remove from pan.
5. Heat remaining oil in frying pan;
cook onions and garlic, stirring,
until the onions are translucent.
Add tomato paste and cook for
about 1-2 minutes or until fragrant.
Add capsicums; cook, stirring
occasionally, until tender. Add sauce
and cook for 10 minutes. Reduce
heat; add meatballs and cook,
covered, for a further 10 minutes
or until the meatballs are cooked
through.
6. Serve in long crusty bread rolls as
a sub sandwich or with pasta.
12
Page 15

12 Month Warranty
This Sunbeam product is covered by a 12 month replacement
or repair warranty, which is in addition to your rights under
the Australian Consumer Law (if your product was purchased
in Australia) or New Zealand Consumer Guarantees Act
(if your product was purchased in New Zealand).
Should you experience any difficulties with
your product during the warranty period, please
contact our customer service line for advice on
1300 881 861 in Australia, or 0800 786 232
in New Zealand.
Alternatively, you can send a written claim to
Sunbeam to:
Australia
Units 5 & 6, 13 Lord Street
Botany NSW 2019 Australia
New Zealand
Level 6, Building 5, Central Park
660-670 Great South Road
Greenlane, Auckland
Upon receipt of your claim, Sunbeam will seek
to resolve your difficulties or, if the product
is defective, advise you on how to obtain a
replacement or refund.
To assist us in managing warranty claims, we
recommend you register your product as soon
as practicable after purchase by creating a
MySunbeam account on our website and send
a copy of your original receipt to Sunbeam.
In order to make a claim under our warranty,
you must have the original proof of purchase
documentation for the product and present it
when requested .
Should your product develop any defect within
12 months of purchase because of faulty
materials or workmanship, we will replace or
repair it, at our discretion, free of charge.
A product presented for repair may be replaced
by a refurbished product of the same type
rather than being repaired. Refurbished parts
may be used to repair the product.
Our replacement or repair warranty only applies
where a defect arises as a result of faulty
material or workmanship during the warranty
period. Your warranty does not cover misuse or
negligent handling (including damage caused
by failing to use the product in accordance with
this instruction booklet), accidental damage, or
normal wear and tear.
Your warranty does not:
• cover freight or any other costs incurred
in making a claim, consumable items,
accessories that by their nature and limited
lifespan require periodic renewal (such as
filters and seals) or any consequential loss
or damage; or
• cover damage caused by:
- power surges, power dips, voltage supply
problems, or use of the product on incorrect
voltage;
- servicing or modification of the product other
than by Sunbeam or an authorised Sunbeam
service centre;
- use of the product with other accessories,
attachments, product supplies, parts or
devices that do not conform to Sunbeam
specifications; or
- exposure of the product to abnormally
corrosive conditions; or
• extend beyond 3 months if the product is
used in commercial, industrial, educational
or rental applications.
The benefits given to you by our warranty are in
addition to other rights and remedies under law in
relation to the product.
In Australia our goods come with guarantees that
cannot be excluded under the Australian Consumer
Law. You are entitled to a replacement or refund
for a major failure and for compensation for any
other foreseeable loss or damage. You are also
entitled to have the goods repaired or replaced if
the goods fail to be of acceptable quality and the
failure does not amount to a major failure.
Our goods also come with guarantees that cannot
be excluded under the New Zealand Consumer
Guarantees Act.
If your warranty claim is not accepted, we
will inform you and if requested to do so by
you, repair the product provided you pay the
usual charges for such repair. You will also be
responsible for all freight and other costs.
Should your product require repair or service
after the warranty period, contact your nearest
Sunbeam service centre. For a complete list
of Sunbeam’s service centres, visit our website
or call our customer service line for advice on
1300 881 861 in Australia,
or 0800 786 232 in New Zealand.
Page 16

Need help with your appliance?
Contact our customer service team or visit
our website for information and tips on
getting the most from your appliance.
In Australia
Visit www.sunbeam.com.au
Or call 1300 881 861
In New Zealand
Visit www.sunbeam.co.nz
Or call 0800 786 232
is a registered trade mark.
‘Cafe Series’ logo and words are registered trade marks of
Sunbeam Corporation.
Made in China. Designed and engineered in Australia.
Due to minor changes in design or otherwise, the product
may differ from the one shown in this leaflet.
© Copyright.
ABN 45 000 006 771
Units 5 & 6, 13 Lord Street
Botany NSW 2019 Australia
Level 6, Building 5, Central Park
660-670 Great South Road
Greenlane, Auckland
New Zealand
Sunbeam Corporation is a division of GUD Holdings Ltd.
Sunbeam Corporation Limited 2015.
12/15
 Loading...