

Page 1
STAINLESS STEEL
PASTA CUTTER SET
Accessory for use with
®
Planetary Mixmaster
Instruction & Recipe Booklet
Power Drive
MX0200
Page 2

Contents
Heading
Sunbeam’s Safety Precautions 1
Attaching your Stainless Steel Pasta Cutters 2
Using your Stainless Steel Pasta Cutters 3
Care and Cleaning 4
Sub Heading
Recipes 5
Body copy with not indent applied.
• Bullet copy Bullet copy Bullet copy
Bullet copy Bullet copy Bullet copy
Bullet copy Bullet copy
1 scoop ice cream – any flavour
2 tablespoons topping
Important instructions –
retain for future use.
Page 3

Sunbeam’s Safety Precautions
SAFETY PRECAUTIONS FOR WHEN
USING YOUR STAINLESS STEEL PASTA
CUTTERS ATTACHMENT WITH YOUR
PLANETARY MIXMASTER
DRIVE.
• Never remove beater, Scrapemaster
spatula beater, whisk, dough hook or pasta
roller when the appliance is in operation.
• Ensure fingers are kept well away from
moving beater, Scrapemaster
beater, whisk, dough hook or pasta
accessory.
Sunbeam are very safety conscious when
designing and manufacturing consumer
products, but it is essential that the product
user also exercise care when using an
electrical appliance. Listed below are
precautions which are essential for the safe
use of an electrical appliance:
• Read carefully and save all the
instructions provided with an appliance.
• Always turn the power off at the power
outlet before you insert or remove a plug.
Remove by grasping the plug - do not pull
on the cord.
• Turn the power off and remove the plug
when the appliance is not in use and
before cleaning.
• Do not use your appliance with an
extension cord unless this cord has
been checked and tested by a qualified
technician or service person.
• Always use your appliance from a power
outlet of the voltage (A.C. only) marked
on the appliance.
• This appliance is not intended for use by
young children or infirm persons unless
they have been adequately supervised by
a responsible adult to ensure that they can
use the appliance safely.
• Young children should be supervised to
ensure that they do not play with the
appliance.
®
POWER
™
spatula
™
• Do not unlock or remove the pasta roller
attachment from the Planetary Mixmaster
Power Drive whilst in use.
• Never tilt back the head of the Planetary
Mixmaster
appliance is in operation.
• When using extremely heavy loads the
appliance should not be operated for more
than one and a half minutes. This does
not apply to the recipes detailed in this
booklet.
• Ensure long hair is tied back and young
children are not near the bowl.
• Never leave an appliance unattended
while in use.
• Do not use an appliance for any purpose
other than its intended use.
• Do not place an appliance on or near a hot
gas flame, electric element or on a heated
oven. Do not place on top of any other
appliance.
• Do not let the power cord of an appliance
hang over the edge of a table or bench top
or touch any hot surface.
• Do not operate any electrical appliance
with a damaged cord or after the
appliance has been damaged in any
manner. If damage is suspected, return
the appliance to the nearest Sunbeam
Appointed Service Centre for examination,
repair or adjustment.
• For additional protection, Sunbeam
recommend the use of a residual current
device (RCD) with a tripping current not
exceeding 30mA in the electrical circuit
supplying power to your appliances.
• Do not immerse the appliance in water or
any other liquid unless recommended.
• This appliance is intended to be used in
household and similar applications such
as: staff kitchen areas in shops, offices
and other working environments; farm
houses; by clients in hotels, motels and
other residential type environments; bed
and breakfast type environments.
®
Bench Mixer whilst the
If you have any concerns regarding the performance and use of your appliance,
please visit www.sunbeam.com.au or contact the Sunbeam Consumer Service Line.
Ensure the above safety precautions are understood.
1
Page 4
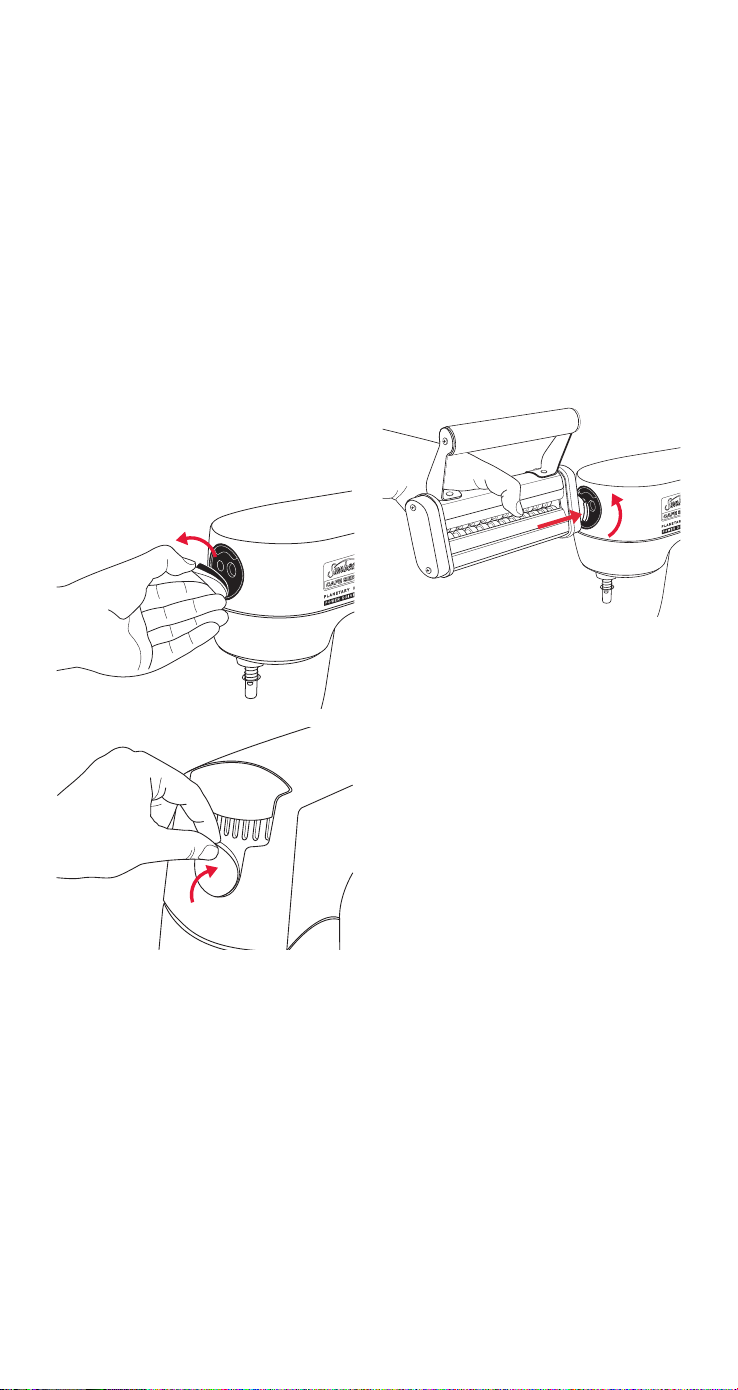
Attaching your Stainless Steel
Pasta Cutters
Before attaching your Stainless
Steel Pasta Roller to your Planetary
Mixmaster
packaging material and promotional
labels or tags. Do not immerse the
roller into water or liquid, wipe down
with a soft cloth.
1. Unplug stand mixer.
2. Turn mixer OFF.
3. Remove Power Drive Cover and store
in the storage location at the back of
the mixer head.
®
Power Drive, remove any
4. Select Pasta Cutters. Insert
accessory into power drive with
the feeder roller positioned at the
top. Turn roller in an anti-clockwise
position to lock into place.
5. Please refer to instructions for the
Cafe Series
Power Drive on using your bench
mixer.
®
Planetary Mixmaster®
2
Page 5

Using your Stainless Steel
Pasta Cutters
1. Lightly flour your pre-rolled sheets
of pasta. Cut the pasta into
manageable lengths into (30-40cm).
Gently direct the pasta to the pasta
cutter and place a hand beneath the
accessory to catch the pasta once
cut. Place cut pasta on a lightly
floured baking tray. Repeat with
remaining dough.
Storage of Fresh Pasta
Pasta can be dried and stored once
rolled. Hang pasta strips over pasta
rack or clean broom handle covered
with cling wrap and propped between
two chairs. Dry at least 3 hours;
store in airtight container at room
temperature up to 4 days.
3
Page 6

Care and Cleaning
Do not immerse the Pasta Cutters in
water or liquid. Do not place in the
dishwasher.
Use a dry brush to brush away dried
dough after use.
Note: The Pasta Roller is designed to
be used with pasta dough. Do not cut
or roll other food with this product.
4
Page 7

Recipes
Whole Grain Pasta Dough
1 cup plain flour
1 cup whole grain flour
2 eggs, lightly beaten
¼ cup olive oil
¼ cup water
1. Place flours in the mixing bowl.
Using the dough hook attachment
mix on Speed 1 for 15 seconds or
until combined.
2. Add remaining ingredients to the
bowl. Continue to mix on Speed
2 until dough forms a ball about
2 minutes. The dough should be
smooth and soft. If sticky add
a tablespoon of flour at a time.
Continue to knead the dough for a
further 1 minute on Speed 2.
3. Remove dough from bowl. Wrap
in cling wrap and refrigerate for
at least 1 hour. Roll into desired
shape.
Traditional Pasta Dough
2 cups plain flour
2 large eggs, lightly beaten
3 tablespoons water
1 tablespoon olive oil
1. Place ingredients in mixing bowl in
listed order. Using the dough hook
attachment mix on Speed 1 for 2
minutes or until combined. The
dough should be smooth and soft. If
sticky add a tablespoon of flour at a
time. Continue to knead the dough
for a further 1 minute.
2. Remove dough from bowl. Wrap
in cling wrap and refrigerate for
at least 1 hour. Roll into desired
shape.
Variation: Herb Pasta - Add ¼ cup of
your favourite chopped herbs at step
one.
5
Page 8

Recipes continued
Roasted Capsicum Pasta Dough
200g chargrilled red capsicum,
drained
2 ½ cups plain flour
1 teaspoon olive oil
1 teaspoon salt
2 eggs, lightly beaten
1 egg yolk, lightly beaten
1. Place capsicum in the bowl of a
food processor. Process until a
smooth paste.
2. Place all ingredients, including
capsicum, in mixing bowl in listed
order. Using the dough hook
attachment mix on Speed 1 for 2
minutes or until combined. If sticky
add a tablespoon of flour at a time.
Continue to knead the dough for a
further 1 minute.
3. Remove dough from bowl. Wrap
in cling wrap and refrigerate for
at least 1 hour. Roll into desired
shape.
Spinach Pasta Dough
The drier the spinach the better the
pasta dough will be.
200g frozen spinach, defrosted, well
drained
2 ½ cups plain flour
1 teaspoons salt
2 large eggs, lightly beaten
1 egg yolk, lightly beaten
1. Place spinach in the bowl of a food
processor. Process until a smooth
paste.
2. Place all ingredients, including
spinach, in mixing bowl in listed
order. Using the dough hook
attachment mix on Speed 1 for 2
minutes or until combined. If sticky
add a tablespoon of flour at a time.
Continue to knead the dough for a
further 1 minute.
3. Remove dough from bowl. Wrap
in plastic wrap and refrigerate for
at least 1 hour. Roll into desired
shape.
6
Page 9

Recipes continued
Pumpkin Pasta Dough
2 ¼ cups plain flour
¹⁄³ cup cooked pumpkin, pureed
1 teaspoon olive oil
1 teaspoon salt
2 eggs, lightly beaten
1. Place all ingredients in mixing bowl
in listed order. Using the dough
hook attachment mix on Speed 1
for 2 minutes or until combined.
If sticky add a tablespoon of flour at
a time. Continue to knead the dough
for a further 1 minute.
2. Remove dough from bowl. Wrap
in cling wrap and refrigerate for
at least 1 hour. Roll into desired
shape.
Kale, Ricotta and Parmesan Spaghetti
Serves: 3-4
1 quantity wholegrain spaghetti
1 tablespoon olive oil
1 clove garlic, crushed
1 onion, finely chopped
3 cups kale, finely chopped
1 cup ricotta cheese
½ cup pistachio nuts, chopped
¹⁄³ cup grated parmesan cheese
2 teaspoons lemon zest
Salt and freshly ground black pepper,
to taste
1. Fill a large saucepan with water, and
bring to the boil.
2. Heat oil in a large frypan over
medium-high heat. Add garlic and
onion and cook until softened.
Add kale and cook for 2-3 minutes.
Remove from heat.
3. Stir through ricotta cheese,
pistachio, parmesan cheese and
lemon zest. Season to taste with salt
and pepper.
4. Place wholegrain spaghetti in boiling
water. Cook for 3-4 minutes or until
just tender. Drain.
5. Place drained spaghetti into sauce
and toss to combine. Season to
taste with salt and pepper. Serve.
7
Page 10

Recipes continued
Lemon, Garlic, Chilli and Mint Spaghetti
This recipe is also great with the
addition of clams.
Serves: 3-4
1 quantity wholegrain spaghetti
2 tablespoons olive oil
6 cloves garlic, crushed
2 onions, finely chopped
3 long red chillis, seeds removed,
finely chopped
2 tablespoons lemon juice
1 tablespoon lemon zest
1 cup finely sliced fresh mint
1 teaspoon chilli flakes
Salt and freshly ground black pepper,
to taste
Olive oil, to garnish
1. Fill a large saucepan with water and
bring to the boil.
2. Heat oil in a large frypan over
medium-high heat. Add garlic and
onions. Cook for 4-5 minutes or
until beginning to colour. Add fresh
chilli, lemon juice and zest and cook
for a further 1 minute. Set aside.
3. Place spaghetti in boiling water.
Cook for 3-4 minutes or until just
tender. Reserve 2-3 tablespoons of
pasta water. Drain.
4. Place drained spaghetti and
reserved liquid into sauce and toss
to combine. Add mint and chilli
flakes. Season to taste with salt and
pepper. Drizzle with olive oil. Serve.
White Wine Clam and Mussel Spaghetti
Serves: 3-4
1 quantity traditional spaghetti
2 tablespoons olive oil
3 cloves garlic, crushed
2 onions, finely chopped
¼ cup tomato paste
1 cup white wine
¼ cup vermouth
2 x 400g cans cherry tomatoes
500g clams, cleaned, beards removed
500g small black mussels, cleaned,
beards removed
¼ cup chopped fresh flat-leaf parsley
Salt and freshly ground black pepper,
to taste
1. Fill a large saucepan with water and
bring to the boil.
2. Heat oil in a large saucepan over
medium heat. Add garlic and onion,
cook for 3-4 minutes or until tender.
Add tomato paste and cook for a
further 2 minutes. Add wine and
vermouth, cooking until reduced by
half.
3. Add cherry tomatoes to the pan
and cook for 10 minutes or until
thickened.
4. Add clams and mussels to the pan.
Cover. Cook for 3-4 minutes or until
all the shells are open. Discard any
that remain closed.
5. Place spaghetti in boiling water.
Cook for 3-4 minutes or until just
tender. Reserve 2-3 tablespoons of
pasta water. Drain. Set aside.
6. Toss spaghetti and reserved pasta
liquid in the sauce. Season to taste
with salt and pepper. Garnish with
parsley. Serve.
8
Page 11

Pumpkin, Walnut, Rocket and Burnt
Butter Tagliatelle
Serves: 3-4
1 quantity pumpkin tagliatelle
500g butternut pumpkin, peeled, cut
into 2cm cubes
2 tablespoons olive oil
120g butter, cubed
½ cup walnuts, halved
200g rocket
Salt and freshly ground black pepper,
to taste
1. Preheat oven to 180C. Line a baking
tray with baking paper.
2. Spread pumpkin over prepared
baking tray and drizzle with oil.
Bake for 30 minutes or until soft
and golden brown.
3. Fill a large saucepan with water,
bring to the boil.
4. Place tagliatelle in boiling water.
Cook for 3-4 minutes or until just
tender. Drain. Set aside.
5. Melt butter in a medium frypan over
medium heat. Allow butter to foam
and turn a light golden colour.
Add walnuts. Cook walnuts for a
further 30 seconds before removing
from the heat.
6. In a large bowl combine pumpkin,
tagliatelle, walnut mixture and
rocket. Season to taste with salt and
pepper. Serve.
Slow Cooked Spiced Lamb with Mint and
Tagliatelle
Serves: 4-6
1 quantity traditional tagliatelle
1 tablespoon cumin seeds
1 tablespoon fennel seeds
2 teaspoons chilli flakes
2 tablespoons olive oil
1kg lamb shoulder, bone removed
6 cloves garlic, crushed
2 onions, chopped
1 bulb fennel, cut into 1cm dice
2 tablespoons harissa
½ teaspoon smoked paprika
2 cups beef stock
2 x 400g can crushed tomatoes
200g cherry tomatoes, halved
6 long green onions, finely sliced
½ cup finely chopped fresh mint
Salt and freshly ground black pepper,
to taste
1. Heat a frypan over medium heat.
Add fennel and cumin. Cook for 1
minute or until fragrant.
2. In a mortar and pestle crush cumin,
fennel and chilli flakes until a fine
powder.
3. Heat oil in a medium saucepan over
high heat. Add lamb and cook for 3
minutes on each side or until a deep
dark golden brown. Remove from
pan and set aside.
4. Lower heat to medium. Add garlic,
onions and fennel. Cook for 3-4
minutes or until tender. Add spice
mixture, paprika and harissa, cook
for 3-4 minutes.
5. Return lamb to the pan. Add stock,
crushed tomatoes and cherry
tomatoes. Lower heat to mediumlow. Simmer for 1- 1 ½ hours or
until lamb is falling apart and sauce
has thickened. Season to taste with
salt and pepper. Gently tear the
meat into small pieces.
9
Page 12

Recipes continued
6. Fill a large saucepan with water, and
bring to the boil.
7. Place tagliatelle in boiling water.
Cook for 3-4 minutes or until just
tender. Drain. Set aside.
8. Toss tagliatelle through the lamb
mixture. Season to taste with salt
and pepper. Garnish with green
onions and mint.
Tagliatelle with Spinach, Mascarpone
and Parmesan
Serves: 3-4
1 quantity spinach tagliatelle
1 tablespoon olive oil
30g butter
2 cloves garlic, crushed
1 onion, finely chopped
½ teaspoon grated nutmeg
150g baby spinach leaves
½ cup thickened cream
150g mascarpone cheese
1 cup grated parmesan cheese
1 teaspoon lemon zest
Salt and freshly ground black pepper,
to taste
1. Heat oil and butter in a medium
saucepan over medium heat. Add
onion and cook for 3-4 minutes
or until tender. Add nutmeg and
spinach. Stir until spinach has
wilted and halved in size.
2. Add cream, mascarpone, parmesan
and lemon zest to the pan. Bring to
a simmer. Set aside.
3. Fill a large saucepan with water, and
bring to the boil.
4. Place tagliatelle in boiling water.
Cook for 3-4 minutes or until just
tender. Drain. Set aside.
5. Toss tagliatelle through spinach
mixture. Season to taste with salt
and pepper. Serve.
10
Page 13

Recipes continued
Wild Mushroom, Goats Cheese,
Tagliatelle with Truffle Oil
Serves: 3-4
1 quantity of traditional tagliatelle
40g butter
1 clove garlic, crushed
300g shitake mushrooms, quartered
300g portabella mushrooms, sliced
¾ cup white wine
½ cup thickened cream
150g goat’s cheese, crumbled
1 tablespoon truffle oil
Salt and freshly ground black pepper,
to taste
Fresh tarragon, to garnish
1. Melt butter in a large frypan over
medium heat. Add garlic and
mushrooms. Cook for 4-5 minutes or
until mushrooms are softened and
dark in colour.
2. Add white wine and allow to reduce
by half. Add cream and bring sauce
to a simmer for 2 minutes. Set
aside.
3. Fill a large saucepan with water and
bring to the boil
4. Place tagliatelle in boiling water.
Cook for 3-4 minutes or until just
tender. Reserve 2-3 tablespoons of
pasta water. Drain. Set aside.
5. Toss pasta through the mushroom
mixture with reserved liquid. Season
to taste with salt and pepper.
Gently fold through goat’s cheese
and truffle oil. Garnish with fresh
tarragon, if desired. Serve.
11
Page 14

Notes
Page 15

12 Month Warranty
This Sunbeam product is covered by a 12 month replacement
or repair warranty, which is in addition to your rights under
the Australian Consumer Law (if your product was purchased
in Australia) or New Zealand Consumer Guarantees Act
(if your product was purchased in New Zealand).
Should you experience any difficulties with
your product during the warranty period, please
contact our customer service line for advice on
1300 881 861 in Australia, or 0800 786 232
in New Zealand.
Alternatively, you can send a written claim to
Sunbeam to:
Australia
Units 5 & 6, 13 Lord Street
Botany NSW 2019 Australia
New Zealand
Level 6, Building 5, Central Park
660-670 Great South Road
Greenlane, Auckland
Upon receipt of your claim, Sunbeam will seek
to resolve your difficulties or, if the product
is defective, advise you on how to obtain a
replacement or refund.
To assist us in managing warranty claims, we
recommend you register your product as soon
as practicable after purchase by creating a
MySunbeam account on our website and send
a copy of your original receipt to Sunbeam.
In order to make a claim under our warranty,
you must have the original proof of purchase
documentation for the product and present it
when requested .
Should your product develop any defect within
12 months of purchase because of faulty
materials or workmanship, we will replace or
repair it, at our discretion, free of charge.
A product presented for repair may be replaced
by a refurbished product of the same type
rather than being repaired. Refurbished parts
may be used to repair the product.
Our replacement or repair warranty only applies
where a defect arises as a result of faulty
material or workmanship during the warranty
period. Your warranty does not cover misuse or
negligent handling (including damage caused
by failing to use the product in accordance with
this instruction booklet), accidental damage, or
normal wear and tear.
Your warranty does not:
• cover freight or any other costs incurred
in making a claim, consumable items,
accessories that by their nature and limited
lifespan require periodic renewal (such as
filters and seals) or any consequential loss
or damage; or
• cover damage caused by:
- power surges, power dips, voltage supply
problems, or use of the product on incorrect
voltage;
- servicing or modification of the product other
than by Sunbeam or an authorised Sunbeam
service centre;
- use of the product with other accessories,
attachments, product supplies, parts or
devices that do not conform to Sunbeam
specifications; or
- exposure of the product to abnormally
corrosive conditions; or
• extend beyond 3 months if the product is
used in commercial, industrial, educational
or rental applications.
The benefits given to you by our warranty are in
addition to other rights and remedies under law in
relation to the product.
In Australia our goods come with guarantees that
cannot be excluded under the Australian Consumer
Law. You are entitled to a replacement or refund
for a major failure and for compensation for any
other foreseeable loss or damage. You are also
entitled to have the goods repaired or replaced if
the goods fail to be of acceptable quality and the
failure does not amount to a major failure.
Our goods also come with guarantees that cannot
be excluded under the New Zealand Consumer
Guarantees Act.
If your warranty claim is not accepted, we
will inform you and if requested to do so by
you, repair the product provided you pay the
usual charges for such repair. You will also be
responsible for all freight and other costs.
Should your product require repair or service
after the warranty period, contact your nearest
Sunbeam service centre. For a complete list
of Sunbeam’s service centres, visit our website
or call our customer service line for advice on
1300 881 861 in Australia,
or 0800 786 232 in New Zealand.
Page 16

Need help with your appliance?
Contact our customer service team or visit
our website for information and tips on
getting the most from your appliance.
In Australia
Visit www.sunbeam.com.au
Or call 1300 881 861
In New Zealand
Visit www.sunbeam.co.nz
Or call 0800 786 232
is a registered trademark.
‘Cafe Series’ logo and words are registered trademarks of
Sunbeam Corporation.
‘Mixmaster’ is a registered trademark of Sunbeam
Corporation.
‘Scapemaster’ is a trademark of Sunbeam Corporation.
Made in China. Designed and engineered in Australia.
Due to minor changes in design or otherwise, the product
may differ from the one shown in this leaflet.
© Copyright.
ABN 45 000 006 771
Units 5 & 6, 13 Lord Street
Botany NSW 2019 Australia
Level 6, Building 5, Central Park
660-670 Great South Road
Greenlane, Auckland
New Zealand
Sunbeam Corporation is a division of GUD Holdings Ltd.
Sunbeam Corporation Limited 2014.
1/14
 Loading...