

Sunbeam Ellise SP6000 MASTER SERIES User Manual
Ellise®
Stainless Steel
Pot & Steamer
User Guide
MASTER
SERIES
SP6000

Should you experience any
difficulties with your product
during the warranty period,
please contact our customer
service line for advice on 1300
881 861 in Australia, or 0800
786 232 in New Zealand.
Replacement
Australia
www.sunbeam.com.au
1300 881 861
Units 5 & 6,
13 Lord Street,
Botany NSW 2019
Australia
New Zealand
www.sunbeam.com.nz
0800 786 232
Unit 3, Building D,
26 Vestey Drive,
Mt Wellington
Auckland
New Zealand
Important instructions –
retain for future use.
Contents
Sunbeam’s safety precautions 1
Features of your Sunbeam Ellise Pot & Steamer 2
Temperature settings 4
Using your Ellise cookware 5
Cooking with your Ellise Pot & Steamer 6
Stainless steel cooking surface 7
Care and Cleaning 8
Recipes 9

1
If you have any concerns regarding the performance and use of your appliance,
please visit www.sunbeam.com.au or contact the Sunbeam Consumer Service Line.
Ensure the above safety precautions are understood.
Sunbeam’s Safety Precautions
SAFETY PRECAUTIONS FOR YOUR ELLISE
COOKWARE
• Use your Ellise cookware at least 200mm away
from walls and curtains
• Do not spill or immerse the control probe in
water.
• Use only with the control probe provided.
• If using a plastic spatula do not leave in cooking
vessel when hot.
• Avoid using on metal surfaces eg sink, hotplate.
• Remove the control probe before cleaning the
cooking vessel.
• After cleaning the cooking vessel ensure that the
control probe inlet area is completely dry before
using again.
• The handles on the lid and vessel may become
hot during use – oven mitts may be required.
Sunbeam is very safety conscious when designing
and manufacturing consumer products, but it is
essential that the product user also exercise care
when using an electrical appliance. Listed below are
precautions which are essential for the safe use of
an electrical appliance:
• Read carefully and save all the instructions
provided with an appliance.
• Always turn the power off at the power outlet
before you insert or remove a plug. Remove by
grasping the plug - do not pull on the cord.
• Turn the power off and remove the plug when the
appliance is not in use and before cleaning.
• Do not use your appliance with an extension cord
unless this cord has been checked and tested by
a qualified technician or service person.
• Always use your appliance from a power outlet of
the voltage (A.C. only) marked on the appliance.
• This appliance is not intended for use by persons
(including children) with reduced physical,
sensory or mental capabilities, or lack of
experience and knowledge, unless they have
been given supervision or instruction concerning
use of the appliance by a person responsible for
their safety.
• Children should be supervised to ensure that they
do not play with the appliance.
• The temperature of accessible surfaces may be
high when the appliance is operating and may be
subject to residual heat after use.
• Never leave an appliance unattended while in
use.
• Using this appliance for purpose other than which
it is intended may result in injury from misuse.
• Do not place an appliance on or near a hot gas
flame, electric element or on a heated oven.
• Do not place on top of any other appliance.
• Do not let the power cord of an appliance hang
over the edge of a table or bench top or touch any
hot surface.
• Do not operate any electrical appliance with a
damaged cord or after the appliance has been
damaged in any manner. If damage is suspected,
return the appliance to the nearest Sunbeam
Appointed Service Centre for examination, repair
or adjustment.
• For additional protection, Sunbeam recommend
the use of a residual current device (RCD)
with a tripping current not exceeding 30mA in
the electrical circuit supplying power to your
appliances.
• Do not immerse the appliance in water or any
other liquid unless recommended.
• Appliances are not intended to be operated by
means of an external timer or separate remote
control system.
• This appliance is intended to be used in
household and similar applications such as: staff
kitchen areas in shops, offices and other working
environments; farm houses; by clients in hotels,
motels and other residential type environments;
bed and breakfast type environments.
2
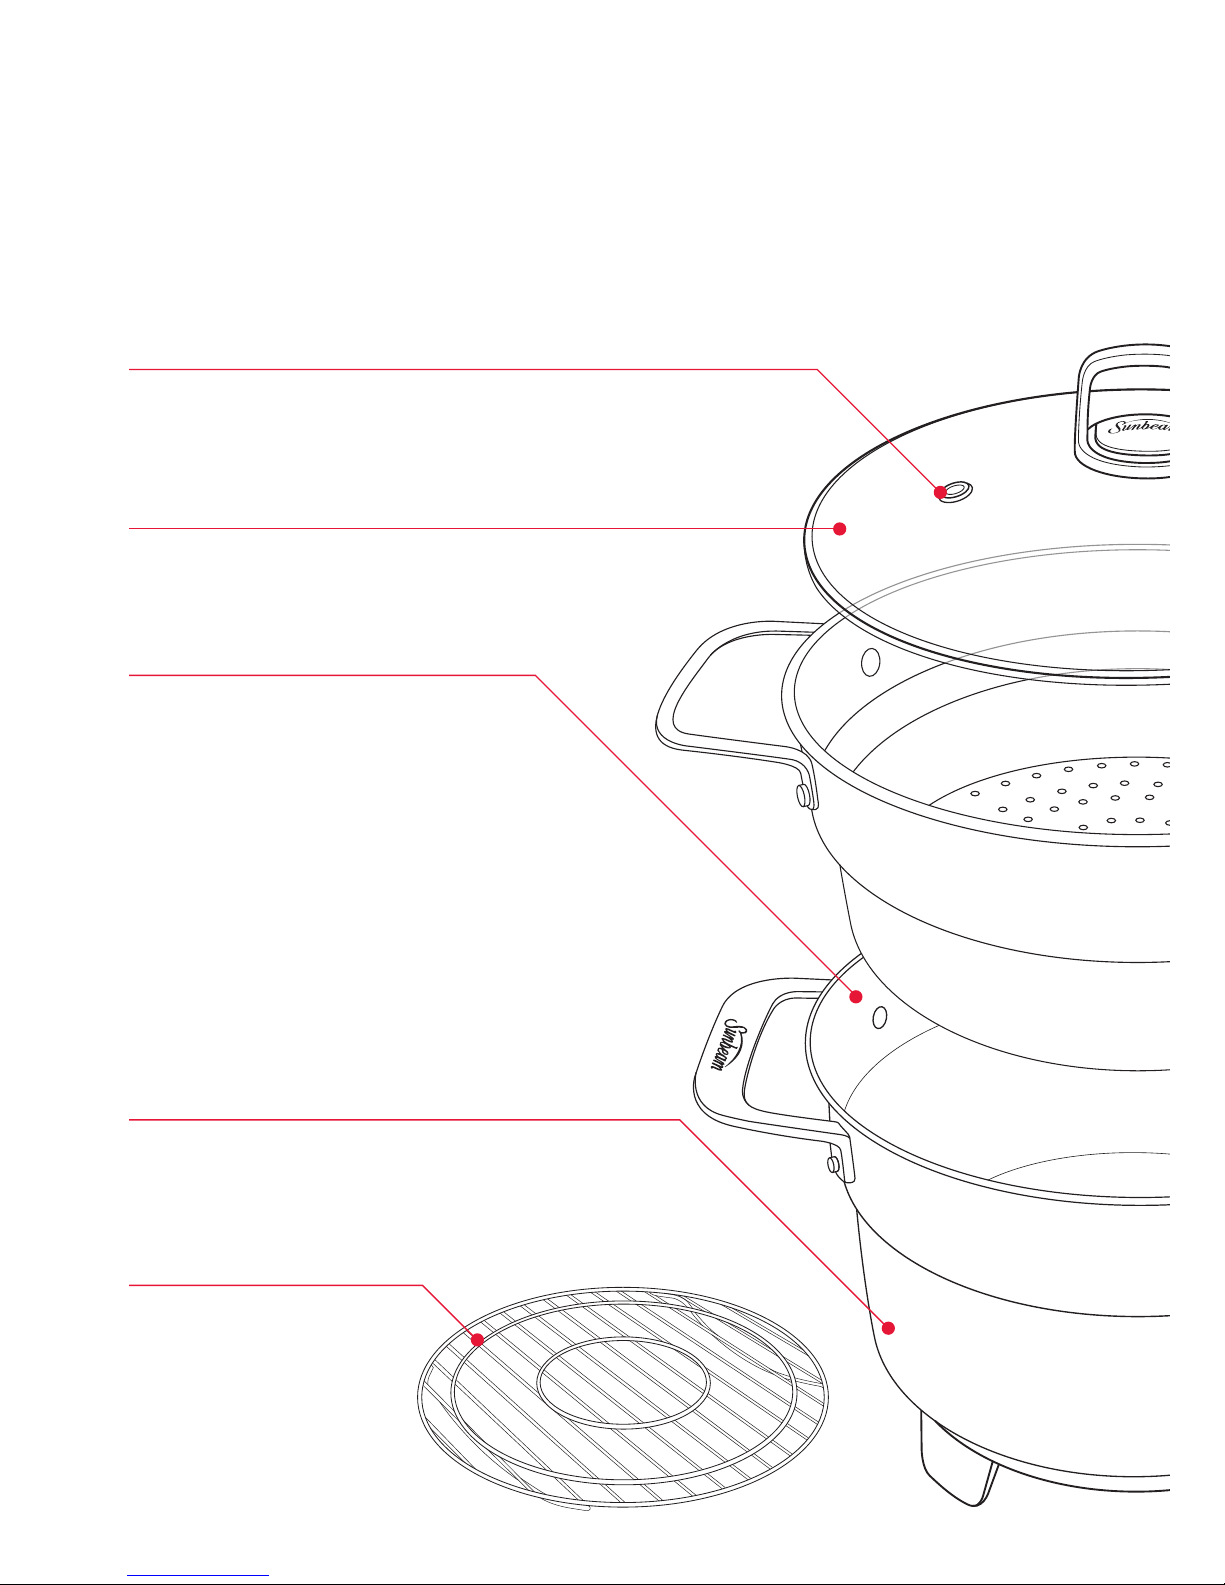
Features of your SP6000
Ellise
®
Stainless Steel Pot & Steamer
Steam Vent
Fixed steam vent controls the moisture level
during cooking.
Glass lid
Tempered glass lid enables you to monitor
your food while it cooks.
18/10 stainless steel cooking vessel
Long lasting 25 year guaranteed 18/10
Stainless Steel cooking surface.
1600 watt butterfly cast-in element
The 1600 watt butterfly element provides
even heat distribution across the entire
pan surface, preventing cooler spots.
The element is completely cast into the
aluminium base which is adhered onto the
stainless steel pan. This provides faster and
superior heat transfer and heat retention.
Insulating Base
Captures and reflects heat back onto the
cooking surface, concentrating the heat
where it is needed.
Steaming rack
Designed to be used in the
Steamer Tray to create a
2 level steamer.
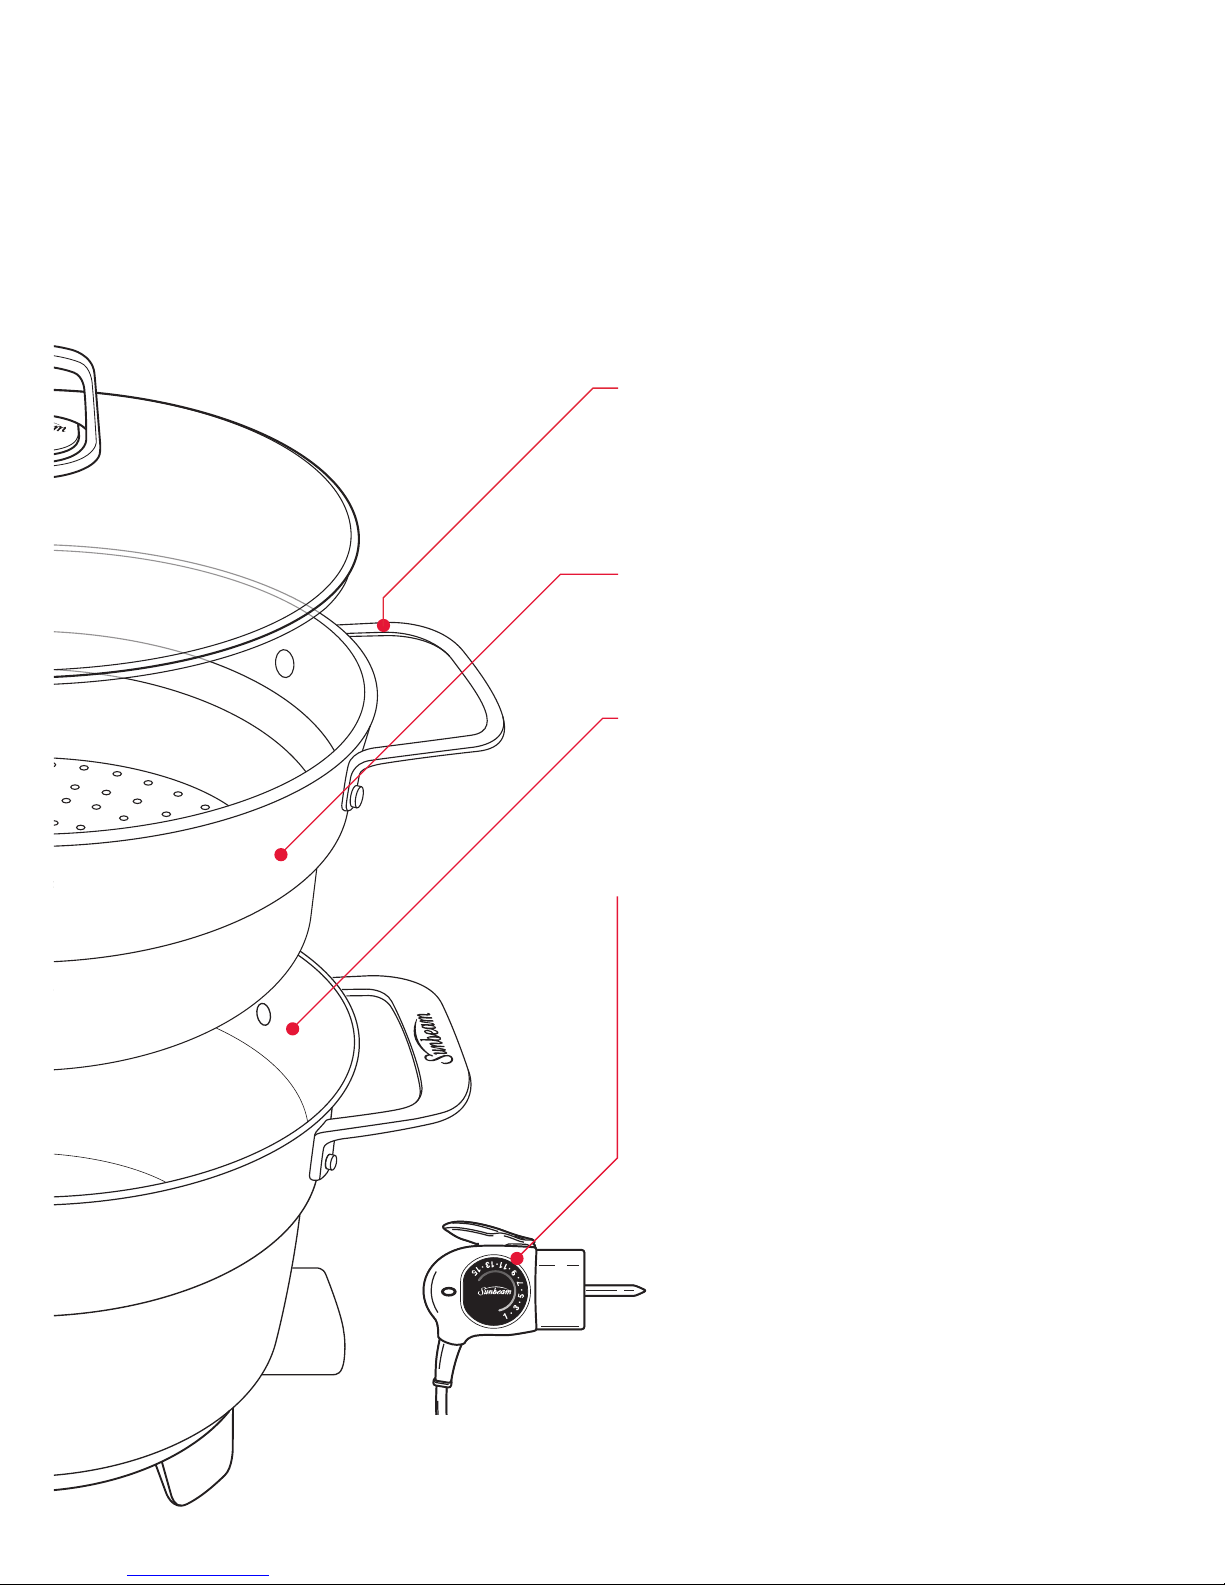
3
Ergonomic handles
Heavy duty cast, ergonomic-shaped handles
for comfortable use when cooking and when
carrying to the table for serving.
5 Litre Steamer Tray
Sits on top of the pot to steam whilst food
cooks underneath.
6 Litre Pot
Versatile high sided cooking pot used to
sauté, simmer, brown or boil and then serve
to the table.
Trigger-release heat control probe with 15 heat
settings
15 heat settings for perfect cooking control.
The probe is thermostatically controlled and
incorporates an indicator light which switches
off automatically when the temperature
selected has been reached and then cycles
on and off to indicate that the selected
temperature is being maintained.
Temperature settings of your
Ellise
®
Cookware
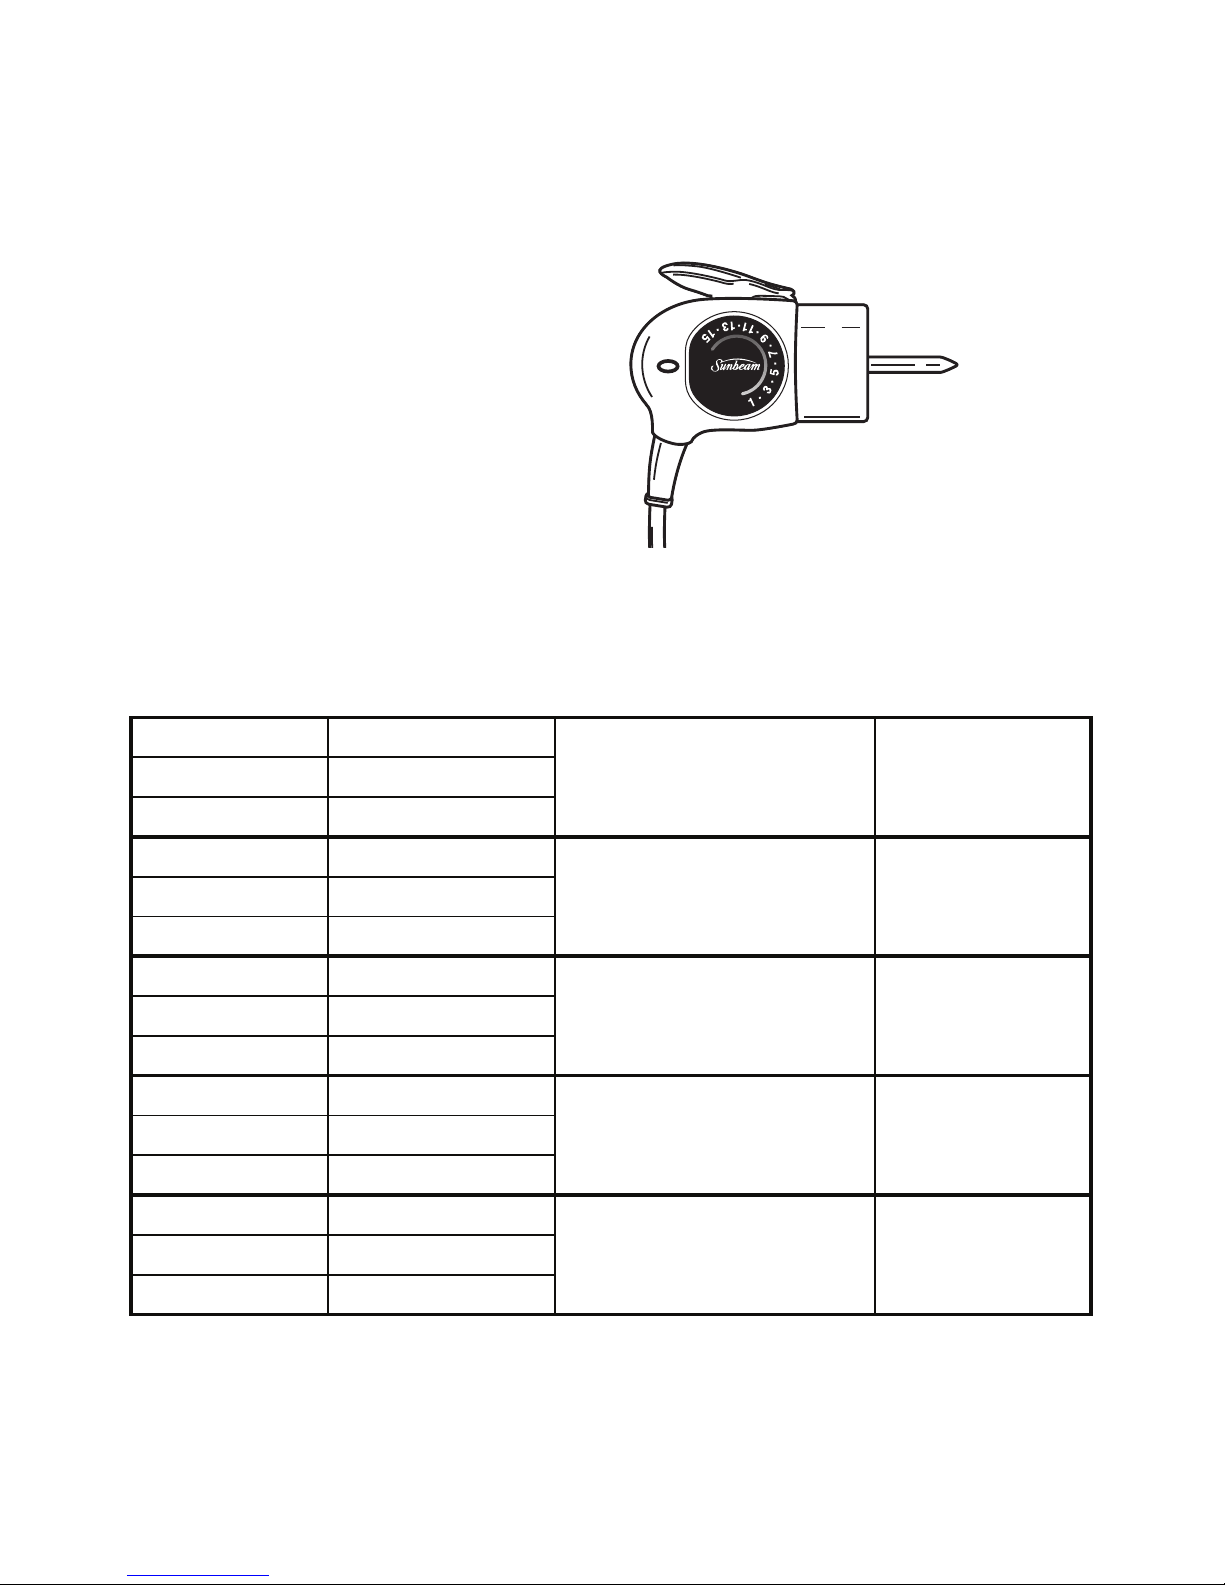
Trigger Release Control Probe
The probe is thermostatically controlled
and incorporates an indicator light which
switches off automatically when the
temperature selected has been reached
and then cycles on and off to indicate
that the selected temperature is being
maintained. The trigger release makes
removal of the probe easy.
Note: The temperature settings are a guide only and may require adjustment to suit various
foods and individual tastes. When the dial is set to a low setting, it is quite normal for food
to stop and start bubbling, as the thermostat maintains the selected temperature.
The numbers on the dial represent the following temperatures approximately.
Pre-heat your vessel on setting 12-13 then change to your desired setting.
DIAL
SETTING
CELCIUS
(approx)
KEEPING FOOD WARM
SIMMERING
TEMPERATURE
1 50°C
Keeping food warm LOW2 60°C
3 70°C
4 80°C
Simmering, slow cooking5 90°C
6 105°C
7 120°C
Boiling and steaming MEDIUM8 130°C
9 140°C
10 150°C
Shallow frying,
sauting and browning
11 160°C
12 175°C
13 190°C
Searing HIGH 14 200°C
15 210°C
4

Using your Ellise® Cookware
Before the first use: Wash in warm soapy
water, rinse thoroughly and dry your pot,
steamer and lid.
Note: We recommend 'seasoning' the pot
before use. Lightly heat the pot on setting 5
for 1 minute only, without adding oil. Turn off
the heat and remove the probe. Then rub a
small amount of oil into the cooking surface
with paper towelling.
1. Insert the Control Probe into the inlet on
the cookware.
2. Plug the cord into a 230-240V power
outlet and turn the power on.
3. Pre-heat the cookware to setting 12-13.
Then set the Control Probe Dial to the
desired temperature setting. Refer to
page 4 for the temperature guide.
The light on the control probe will illuminate.
This light will remain on until the set
temperature has been reached and then will
cycle on and off throughout cooking, as the
cooking temperature is maintained by the
thermostat.
Hint: On initial heating of the cookware, it
is recommended that the temperature be
allowed to cycle (the light glowing on and
off) several times. This will help the cooking
surface to adjust to a more accurate cooking
temperature.
Note: The cookware must only be used with
the Control Probe provided.
5

6
Cooking with your SP6000 Ellise®
Stainless Steel Pot & Steamer
Cooking
Method
Temp
Setting
Max
Capacity
Portion Method
Rice 15 5 litres water ½ cup rice
per person
to 1 cup
water
1. Bring water to the boil, add rice and
replace lid.
2. Cook for 10-12 mins until tender.
3. Reduce to lower temp if water boils
too rapidly.
Pasta 15 5 litres water 1 cup pasta
per person
to 2 cups
water
1. Bring water to the boil and add pasta.
2. Add 1-2 tbsp oil to stop pasta sticking
together.
3. Cook for 8-12 mins until tender.
4. Reduce to lower temp if water boils
too rapidly.
Boiling 15 5 litres liquid 1. Bring the liquid to the boil.
2. Add ingredients and cook until tender.
Steaming 12 2 litres water 1. Bring the liquid to the boil, reduce
temperature to 12.
2. Add ingredients to steaming basket
and place basket into saucepan.
3. Cover with lid and cook until done.
Sauté 12 - 1. Pour the required amount of oil into
the pot, and heat.
2. Add the food and stir continually with a
wooden spoon until all the food has been
browned to the desired colour.
Simmer 9 5 litres liquid 1. Bring the liquid to the boil on setting 15.
2. Reduce to setting 9 to create large
bubbles which form at a medium pace.
Roasting 12 - 1. Preheat the pot to setting 12.
2. Add the food to be roasted ensuring to
brown all sides.
3. Place lid on and cook to desired result.
Browning 12 - 1. Pre-heat the pot to setting 12.
2. Add the food to be browned to the pot,
ensuring to brown all sides to desired
colour.
 Loading...