


 Loading...
2012
Tribeca
Quick Reference Guide
Complete U.S. specifications and illustrations may not have been available at time of publication. Specifications are based on the latest product information available at time of publication. Some images shown are for illustration purposes only. Some equipment shown may be optional at
extra cost. Specific options may be available only in combination with other options. Specific combinations of equipment or features may vary
from time to time and by geographic area. Certain accessories and equipment may not be available at the time of publication.
This Quick Reference Guide applies to all Tribeca models. Therefore, some explanations may be for equipment not installed on your vehicle. Subaru of America, Inc., reserves the right to change or discontinue at any time, without notice, prices, colors, materials, equipment, accessories, specifications, models and packages without incurring any obligation to make the same or similar changes on vehicles previously sold. Colors shown may vary due to reproduction process.
For detailed operating and safety information, please consult the Owner’s Manual.
Subaru, Outback, Legacy, Forester, Impreza, WRX, WRX/STI, BOXER, SI-DRIVE, Lineartronic, XM and Sirius are registered trademarks.
All rights reserved. Contents may not be reprinted or electronically reproduced in whole or in part without prior written approval of Subaru of America, Inc.
© 2011 Subaru of America, Inc.
Table of Contents
Getting Started 
Instrument Panel 
Gauges
Personalize
Controls
While Operating 
Safety/In Case of Emergency 
Additional Information 
2 - 3
4 - 5
6 - 7
8 - 9
10 - 17
18 - 19
20 - 21
22 - 23

Remote Keyless Entry
Lock/Arm
t 1SFTT UP MPDL BMM EPPST and rear gate and activate the security alarm.
t *G BOZ PG UIF EPPST PS UIF rear gate are not fully closed, an electronic chirp will sound five times and the hazard lights will flash five times to alert you that the doors or the rear gate are not properly closed.
t 5P BDUJWBUF UIF WFIJDMF ýOEFS function, press three times (within five seconds). If you are within 30 feet of the vehicle, the horn will sound one time and the hazard lights will flash three times.
Unlock/Disarm 
t 1SFTT PODF UP VOMPDL the driver’s door.
t 1SFTT UXJDF XJUIJO ýWF seconds) to unlock all doors.
t 8IFO UIF i6OMPDL %JTBSNw button is pressed, the dome and map lights will illuminate if the dome light switch is in the middle position.
Unlocking the
Rear Gate
Press to unlock the rear gate. An electronic chirp will sound twice and the hazard lights will flash twice.
 Panic Alarm
t 1SFTT PODF BOE UIF IPSO will sound and the hazard lights will flash.
t 1SFTT BOZ CVUUPO PO UIF remote to deactivate.
Immobilizer
When the security alarm is activated, the immobilizer interrupts the starter motor to prevent an intruder from starting your vehicle without a registered key.
2
Seating
2
4 3
1
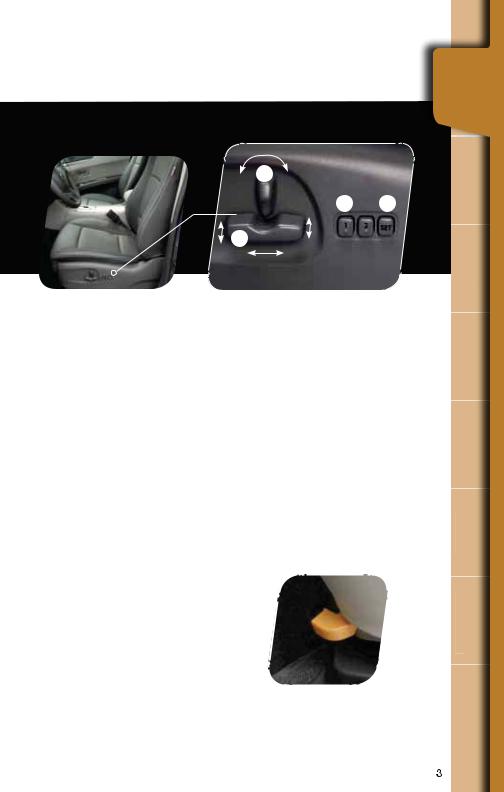
Power Driver Seat:
8-way Adjust
1.Forward/Backward, Angle and Height
Move the switch toward the front or rear to move the seat forward or backward. Pull the switch up or push down on the front of the switch to adjust the angle of the seat cushion. Pulling the switch
straight up or pushing the switch straight down will adjust the height of the entire seat cushion.
2.Seatback
Move the switch in the corresponding direction to adjust the angle of
the seatback.
Midway Stopping Feature for 2nd Row Seats
The 2nd row seats are equipped with a midway stopping feature on the
sliding mechanism. Release the midway stopping feature by pushing the lever located on the outside of the 2nd row seat forward and slide the seat.
Power Driver’s Seat:
Memory (if equipped)
You can memorize two seat positionss. To memorize seat positions:
3.1SFTT UIF i4&5w CVUUPO
4.Within five seconds after pressing thee i4&5w CVUUPO QSFTT UIF i w PS i w CVUUPO
A buzzer will sound one time to informm you that the memorizing is finished.
To move the seat to a memorized position
XJUI UIF WFIJDMF TFMFDUPS MFWFS JO i1w SL QPTJUJPO QSFTT FJUIFS UIF i w PS i w CVUUPO
The seat will move to the stored positionn.
|
Started |
Getting |
|
|
|
|
|
|
|
|
|
|
|
|
|
|
|
|
|
|
|
|
|
|
|
|
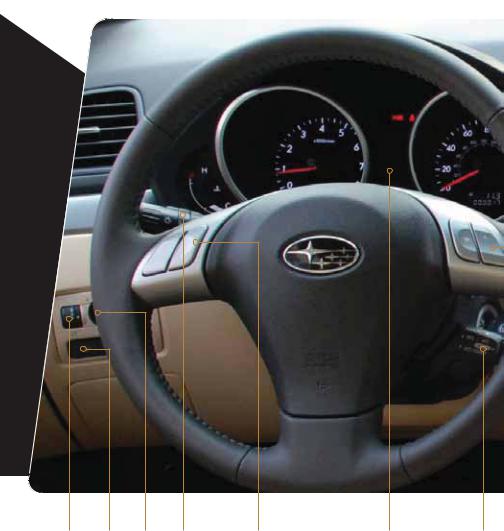
Instrument Panel
pg. 10 pg. 11 pg. 8 pg. 10 |
pg. 16 |
pg. 6-7 |
pg. 17 |
4

Instrument
Panel
pg. 16 |
pg. 11 |
pg. 12-13 pg. 14-15 |
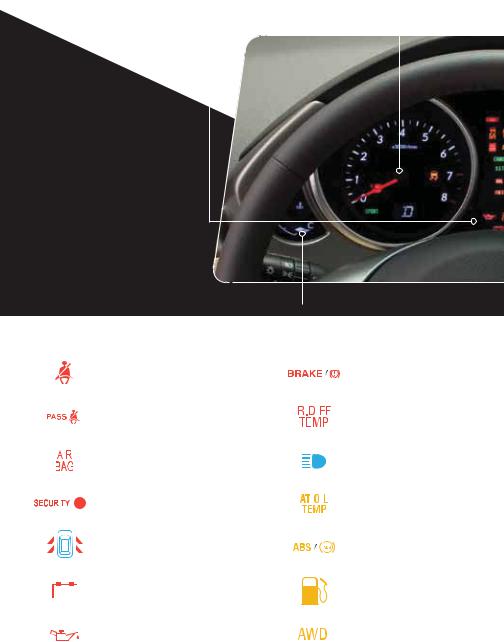
Gauges |
|
|
Immediate Attention |
|
Caution |
|
|
|
Informational |
|
|
|
|
|
|||||
Trip meter A/B selection and trip |
|
Tachometer |
|
|
|||||
|
meter reset knob |
|
|
|
|
|
|
||
Temperature Gauge
|
|
|
|
|
|
|
|
Seatbelt warning |
|
Brake system |
||
|
|
|
|
|
|
|
|
|
|
|
|
|
|
|
|
|
|
|
|
|
Front passenger |
|
|
|
Rear Differential oil |
|
|
|
|
|
|
|
|
|
|
|||
|
|
|
|
|
|
|
|
seatbelt warning |
|
temperature warning |
||
|
|
|
|
|
|
|
|
|
|
|
|
|
|
|
|
|
|
|
|
|
SRS airbag system |
|
High beam indicator light |
||
|
|
|
|
|
|
|
|
|
||||
|
|
|
|
|
|
|
|
|
||||
|
|
|
|
|
|
|
|
|
|
|
|
|
|
|
|
|
|
|
|
|
Security indicator light |
|
AT OIL TEMP warning |
||
|
|
|
|
|
|
|
|
|
||||
|
|
|
|
|
|
|
|
|
||||
|
|
|
|
|
|
|
|
|
|
|
|
|
|
|
|
|
|
|
|
|
Door open |
|
ABS warning |
||
|
|
|
|
|
|
|
|
|
|
|
|
|
|
|
|
|
|
|
|
|
|
|
|
|
|
|
|
|
|
|
|
|
|
Charge warning |
|
Low fuel |
||
|
|
|
|
|
|
|
|
|||||
|
|
|
|
|
|
|
|
|
|
|
|
|
|
|
|
|
|
|
|
|
Oil pressure warning |
|
All-Wheel Drive warning |
||
|
|
|
|
|
|
|
|
|
|
|
|
|
6

Speedometer
Trip meter and odometer
Vehicle Dynamics Control/Vehicle Dynamics Control operation
Vehicle Dynamics Control OFF
CHECK ENGINE /
Malfunction indicator
Tire pressure warning light
Front passenger frontal airbag ON
Front passenger frontal airbag OFF
Low windshield washer fluid
Gauges
Fuel Gauge
Turn signals
Front fog light indicator light (if equipped)
Headlight indicator light
Cruise Control indicator light
Cruise control set indicator light
SPORT mode
Personalize
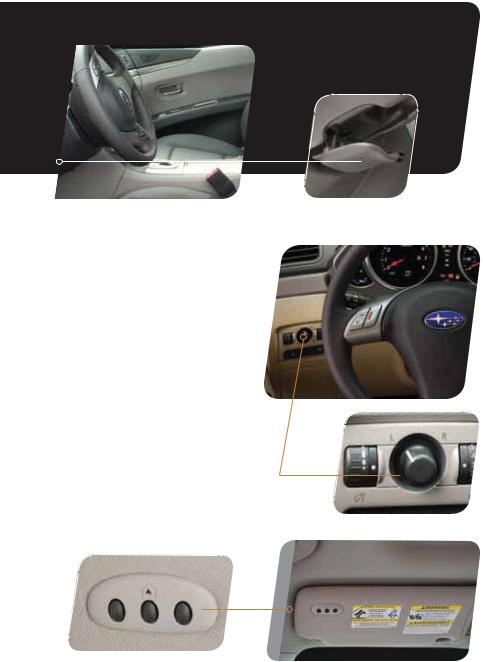
Steering Column
Push the lever down firmly to adjust the height and lengthwise position of the column. Firmly push the lever back up to lock the column in place. Do not adjust while driving.
Power Exterior Mirrors
5VSO LOPC UP UIF i-w TJEF UP BEKVTU UIF MFGU IBOE NJSSPS PS UP UIF i3w TJEF UP BEKVTU the right-hand mirror. Move the knob in the direction you want to move the mirror, then return the knob to the neutral/center position. The mirrors can also be adjusted manually.
HomeLink® (if equipped)
Three buttons on the driver’s side sun visor control indoor or outdoor devices (such as a garage door) from inside your vehicle.
8
24
1 3
Power Moonroof
(if equipped)
With the moonroof in the fully closed position, press the switch 2 to tilt the rear of the moonroof up. Press and hold the switch 1 to lower the moonroof. Press the switch 4 to fully open the moonroof. Press the switch 3 to close the moonroof. To stop the moonroof
in a midway position while opening or closing, momentarily press the switch to the 4 side or 3 side.
Rear Seat Entertainment System (if equipped)
You can enjoy watching movies or listening to music when a movie DVD or music CD is inserted into the rear seat entertainment system. You can operate the rear seat entertainment system
by the remote control. You can play a video or game when a video camera or a video machine is connected to the auxiliary input jacks, located on the left rear quarter panel across from the 3rd row seats. You can listen to audio by using the wireless headphones that are included with the system.
Personalize

Controls
Light Controls
Push up for right turn signal.
Turns on headlights, instrument panel illumination, parking lights, taillights and license plate lights.
Turns on fog lights
(if equipped).
Push down for left turn signal.
Turns on instrument panel lights, tail lights, parking lights and license plate lights.
When the dial is turned downward, illumination becomes dim. When the dial is turned upward, illumination becomes bright. When the dial is fully turned upward while the light switch is on, instrument panel illumination becomes bright.
Parking Light Switch
The switch is located on the top of the steering column. Press the switch to turn the lights on or off. This control operates the parking lights, rear side marker lights, tail lights and license plate lights when the ignition is off.
ON
OFF
10
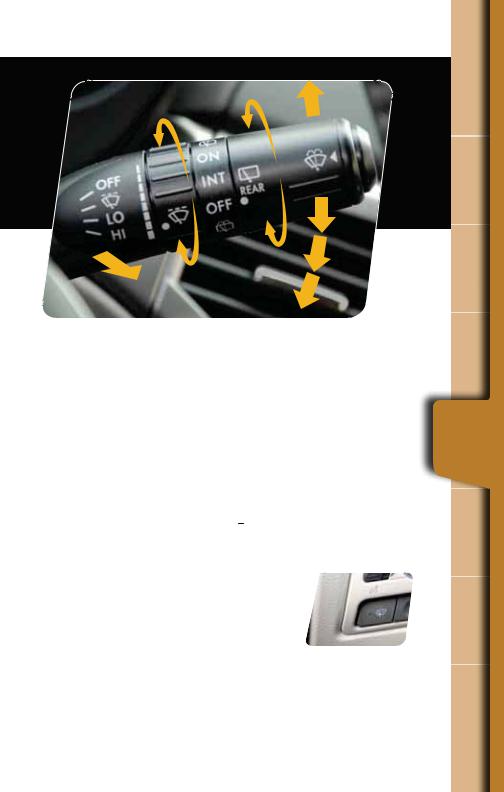
Windshield Wipers
To turn the wipers on, press the wiper control lever down one level for intermittent, two levels for low, or
three levels for high speed. Return the
MFWFS UP UIF i0''w QPTJUJPO UP TUPQ UIF wipers. For a single wipe/mist, pull the lever toward you. To spray washer fluid spray, press the washer button at the end of the wiper control lever.
To operate the rear wiper, turn the knob on the end of the control lever forward to intermittent, continuous, or wash position. Turn the end of the lever backward for wash operation when the rear wiper is not in use. When the automatic transmission is placed in reverse, the rear wiper will operate continuously even when the
SFBS XJQFS JT JO UIF i*/5w QPTJUJPO
 OFF
OFF
1 INT.
2 |
LOW |
|
3 |
HIGH |
|
Daytime Running Lights
Daytime running lights are standard on your vehicle. A reduced brightness high beam will be automatically turned on by the daytime running light system when the engine has started and the parking brake is fully released and the
MJHIU TXJUDI JT JO UIF i0''w PS i w position. You must always switch on your headlights when it’s dark outside by turning the light switch to the
i w QPTJUJPO
Windshield Wiper De-Icer
Remove the snow from your windshield before starting this system. 
To begin de-icing, push the button (the light will illuminate while in operation). The de-icing system automatically shuts off after about 15 minutes. If more time is required, push the button to reactivate the de-icer.
Controls
Controls
4
2
1
3 |
5 |
|
AUTOMATIC
CLIMATE CONTROL
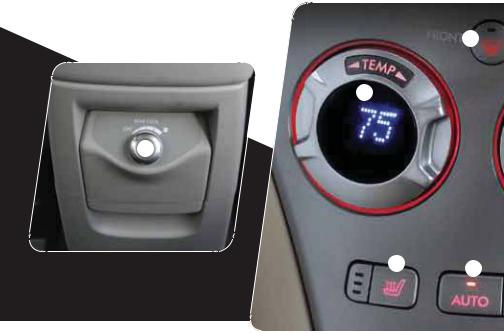
1.Rear A/C Cooling
A fan speed control dial is located on the back of the center console. Turn the dial to select one of four (0-4) fan speeds.
When the front passenger air conditioner is operating, cool air comes from vents on the ceiling. When the front passenger air conditioner is off, room temperature air comes from the vents.
2.Temperature Control
Separate temperature settings can be made for the driver’s side and passenger’s side by adjusting the dials appropriately. Turn the dial clockwise and release to increase the temperature by one degree. Turn the dial counterclockwise and release to reduce the temperature by one degree.
3.Heated Seats
The left button is for the driver’s seat and the right button is for the front passenger’s seat. To warm the seats, press the appropriate button. Adjust the temperature level by pressing the button.
Indicator lights beside the button show the temperature level. To turn off, press the button a few times until all indicator lights go off or keep the button pressed for two more seconds.
4.Defroster Button
Push the button to defrost or dehumidify the windshield and front door windows.
5.Automatic On and Off
This system automatically controls outlet air temperature, fan speed, air flow distribution, air inlet control, and air conditioner compressor operation. Press
i"650w UP BDUJWBUF 1SFTT i0''w UP UVSO PGG
12

9
7
3
10
5 |
6 |
8 |
6.Recirculated/Outside Air
Press the air inlet selection button to prevent outside air from being drawn into the passenger compartment.
Press the button again to allow outside air into the compartment. TO PREVENT WINDSHIELD FOGGING, DO NOT REMAIN IN THE RECIRCULATED MODE FOR ANY EXTENDED PERIOD OF TIME.
7.Fan Speed
Turn the fan speed control dial to select one of six fan speeds. Turn the dial clockwise to increase fan speed; turn it counterclockwise to decrease. Fan speed level is shown on the
EJTQMBZ PG UIF EJBM 1VTI UIF i"650w button to automatically change the fan speed to correspond with various temperature conditions.
8.Air Flow
1VTI UIF i.0%&w CVUUPO UP TFMFDU the desired air flow mode: ventilation, bi-level, heat or heat-defrost will
be displayed on the fan speed control dial.
9.Rear Window Defogger
To defog the rear window and exterior mirrors, press the rear window defogger button. The defogger will automatically shut off in about 15 minutes. To manually shut it off, press the button again.
10.Air Conditioning
1SFTT UIF i" $w CVUUPO UP BDUJWBUF UIF air conditioning. Press it again to turn the air conditioning off.
Controls
Controls
3 |
4 |
|
15 |
10 |
|
13 |
|
|
12 |
1 |
5 |
7 |
|
|
2 |
|
|
|
14 |
6 |
|
|
|
8 |
|
|
11 |
|
|
9 |
|
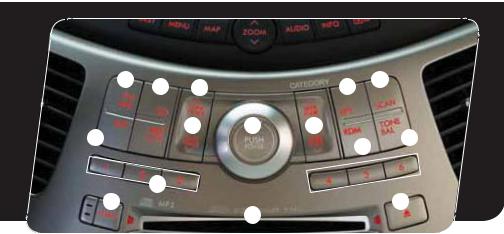
Audio Controls
Radio Functions
1.Power/Volume Control
1VTI UIF i108&3 70-w LOPC GPS PO PS off; turn the knob to control volume.
2.Bass, Treble, Balance, Fader
&BDI QSFTT PG UIF i50/& #"-w CVUUPO will cycle you through Volume, Bass, Midrange, Treble, Fade, or Balance. Use
UIF i108&3 70-w LOPC UP BEKVTU UIF desired tone or mode.
3.FM/AM
Push to choose FM1, FM2 or AM reception.
4.Tune/Track
Press the up arrow to increase the tuning frequency; press the down arrow to decrease it.
5.Seek
1SFTT UIF VQ PS EPXO BSSPX PG UIF i4&&, '-%3w CVUUPO UP QJDL VQ UIF OFYU IJHIFTU or lowest frequency.
6.Presets
You can save up to six favorite stations for each band – FM1, FM2, and AM. Select a frequency and press one of the preset buttons until a confirmation beep is heard.
7.Satellite Radio (if equipped)
You can hear satellite radio programs
CZ QSFTTJOH UIF i4"5w CVUUPO 5P SFDFJWF satellite radio service after your trial period, it is necessary to enter into a separate contract with the satellite
radio provider.
CD Player Functions
8.Load (six-disc player)
1SFTT UIF i-0"%w CVUUPO BOE BO BWBJMBCMF QPTJUJPO XJMM CMJOL 1SFTT UIF i%*4$ 4&-&$5w CVUUPO BU UIF QPTJUJPO where you want to insert a disc. When the i-0"%w JOEJDBUPS þBTIFT JOTFSU UIF EJTD
The disc will automatically be drawn in and will begin play at the first track.
14

9.Load Disc (single disc player)
Insert a disc into the slot. The CD will automatically be drawn in and will begin play at the first track.
10.Play CD (six-disc player)
1SFTT UIF i$%w CVUUPO BOE UIF EFTJSFE i%*4$ 4&-&$5w CVUUPO
(1-6) and playback will begin.
11.Eject
Press the  button to eject the disc.
12.Forward/Reverse
1SFTT UIF VQ BSSPX PG i56/& 53"$,w UP TLJQ UP UIF CFHJOOJOH of the next track; press the down arrow to skip to the beginning of the current track. Press the down arrow again to go to the previous selection.
Fast Forward/Fast Reverse
Press and hold the up arrow to fast forward. Release the button to stop. To fast reverse, press and hold the down arrow; release the button to stop.
13.Repeat
In the single disc player: Press i315w UP SFQFBU UIF DVSSFOU selection. Press again to cancel.
In the six-disc player: Press i315w UP SFQFBU UIF DVSSFOU selection. Press again to repeat all tracks in the current selected CD. Press again to cancel.
14.Random
During playback, press and hold i3%.w UP IFBS BMM EJTD TFMFDUJPOT in random order.
15.Scan
1SFTT UIF i4$"/w CVUUPO UP CFHJO previewing the first 10 seconds
of each track on the disc. Normal playback will resume after all tracks have been scanned. Press
UIF i4$"/w CVUUPO BHBJO UP TUPQ scanning and listen to the track being previewed.
To Use Your MP3/WMA Player with formatted MP3 files (without navigation system)*
Display
1SFTT UIF i"6%*0w CVUUPO GPS seconds or longer during playback to change the display to show the file title, play time, and folder title.
Page Scroll
1SFTT i"6%*0w UP TFMFDU UJUMF EJTQMBZ
Press again for less than 0.5 seconds to scroll through the title, 15 characters at a time. The display is designed to show titles for up to three pages (64 characters).
Folder Selection
1SFTT UIF VQ BSSPX PG i4&&, '-%3w UP select the next folder. Press the down arrow to go back to the first music file. Quickly press the down arrow again to go back to the previous folder.
*For vehicles equipped with the navigation system, please consult the Tribeca Navigation Owner’s Manual.
Controls
Controls
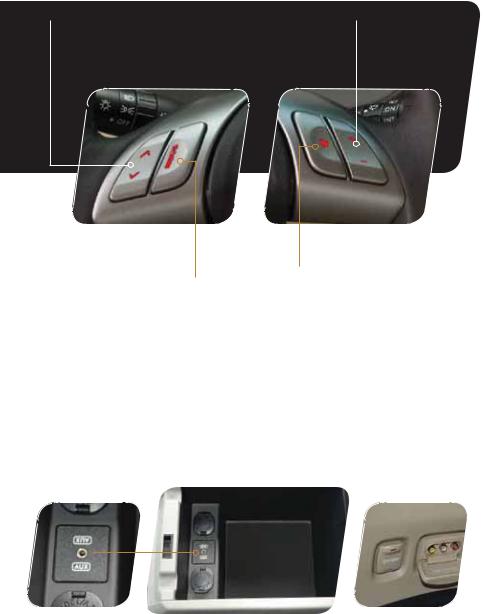
Steering Wheel Audio Controls (if equipped)
t 8JUI BOZ PG UIF SBEJP NPEFT TFMFDUFE QVTI the switch up or down to find the desired frequency. In CD mode, push the switch up or down to skip forward or back a track.
t 1SFTT UIF CVUUPO UP TFMFDU UIF desired audio mode – FM, AM, SAT, CD, AUX, MEDIA.
t 1VTI UIF TXJUDI to increase or reduce volume.
t 1SFTT UP TIVU PGG the sound.
Auxiliary Input Jack
(Inside center console) The auxiliary input jack is located inside the console box. You can connect a portable music device to the jack and hear music stored in the portable device through the vehicle speakers. When a portable music device is connected to the auxiliary input jack inside the console box, you cannot hear sound from the Rear Seat Entertainment through the audio.
Rear Seat Entertainment AUX (if equipped)
The rear seat entertainment aux is located on the driver’s side rear interior panel. When other portable devices are connected to the auxiliary input jacks and the vehicle is equipped with a Rear Seat Entertainment system, it is possible to play the sound from each device through the speakers. Each
QSFTT PG UIF i"69w PS i3&4 "69w CVUUPO changes the device selected for audio output to the next one in the sequence.
16
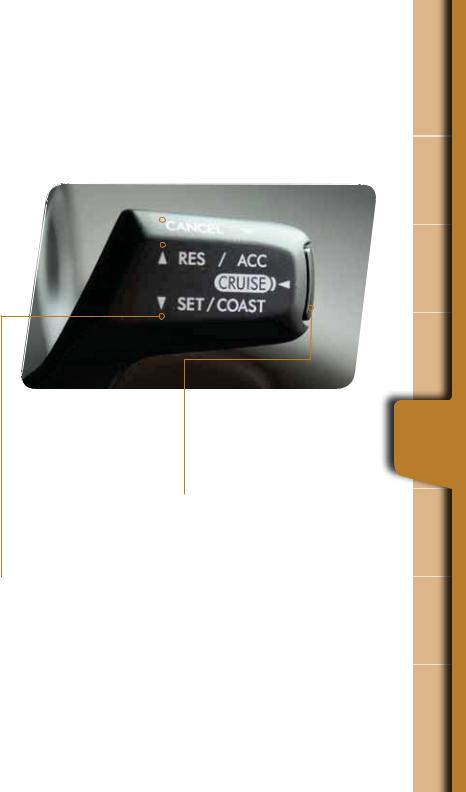
Cruise Control
t Resume |
|
t Temporary Cancel |
Push the control lever |
|
There are two ways to temporarily cancel |
VQ UP i3&4 "$$ w |
|
cruise control: depress the brake pedal or |
|
|
QVTI UIF DPOUSPM EPXOXBSE UP i$"/$&-w |
|
|
|
|
|
|
t Set 1VTI UIF NBJO i$36*4&w TXJUDI
t Shut Off
To deactivate cruise control, push the
located on the end of the control
MFWFS 5IF i$36*4&w JOEJDBUPS
NBJO i$36*4&w TXJUDI BHBJO PS XIFO the vehicle is stopped, turn the
light on the instrument panel will
JHOJUJPO TXJUDI UP UIF i"$$w PS
turn on. Press the accelerator
i-0$,w QPTJUJPO
pedal until your vehicle reaches the desired speed. Push the
DPOUSPM MFWFS EPXOXBSE UP i4&5 $0"45w BOE SFMFBTF &BTF PGG UIF accelerator pedal. Your vehicle will maintain the desired speed.
Increase speed
Push the control lever up to the i3&4 "$$w QPTJUJPO IPME VOUJM your vehicle reaches the desired speed, and release. To increase speed using the accelerator pedal, press the pedal until you reach the desired speed. Push the control
MFWFS EPXO UP UIF i4&5 $0"45w position to set the speed.
Decrease speed
.PWF UIF DPOUSPM MFWFS UP i4&5 $0"45 w IPME VOUJM ZPVS WFIJDMF TMPXT to the desired speed, and release. To decrease the speed using the brake pedal, press the pedal to release cruise control temporarily. When the speed decreases to the desired rate, push the control lever down to the i4&5 $0"45w QPTJUJPO
Controls

While Operating
Automatic Shift Mode
Ultimate Control
The automatic transmission gives you ultimate control with five forward speeds, one reverse speed, and a manual mode. Switch to the optional AT Shift mode when you need that extra boost for uphill driving.
Normal Mode
8IFO UIF TFMFDUPS MFWFS JT JO UIF i%w %SJWF position, the transmission is in normal
shift mode. The shift position indicator
JO UIF NFUFS DMVTUFS TIPXT i%w BOE UIF transmission automatically shifts into a suitable gear from 1st to 5th.
Sport Mode
Moving the selector lever left into the manual
HBUF GSPN i%w DIBOHFT UIF USBOTNJTTJPO into Sport mode. The shift position indicator
TIPXT i%w BOE UIF i41035w MJHIU JMMVNJOBUFT in the meter cluster. In the Sport mode,
the transmission automatically shifts from 1st to 5th, but shifts up at higher engine revolutions than in normal mode.
Manual Mode
.PWJOH UIF TFMFDUPS MFWFS JOUP i w PS i w makes the transmission change into Manual mode. When the selector lever is moved
UP i w UIF USBOTNJTTJPO TIJGUT JOUP UIF OFYU higher gear. When the selector lever is
NPWFE UP i w UIF USBOTNJTTJPO TIJGUT JOUP UIF next lower gear. The shift position indicator in the instrument cluster shows the selected gear position. In Manual mode, you can select your desired gear position to obtain necessary acceleration and engine braking.
.PWJOH UIF TFMFDUPS MFWFS JOUP i w XIFO UIF vehicle stops enables the vehicle to start in 2nd gear.
1
3
2
1. Upshifting:
Shift to the next higher gear (in the 1st – 5th gear range) by pushing the selector lever
UPXBSE UIF i w FOE PG UIF NBOVBM HBUF
2. Downshifting:
Shift to the next lower gear (in the 5th – 1st gear range) by pushing the selector lever
UPXBSE UIF i w FOE PG UIF NBOVBM HBUF
3. Deselect Manual Mode:
Exit Manual mode by returning the selector
MFWFS SJHIU UP UIF i%w QPTJUJPO GSPN UIF manual gate. Normal mode is now selected.
When Manual Shifting Operation
Is Possible:
Arrow-shaped lights in the instrument panel show whether an upshift is possible and whether a downshift is possible.
BOTH ARROWS ARE ON: Upshifting and downshifting are both possible.
UP ARROW ONLY IS ON: Only upshifting is possible.
DOWN ARROW ONLY IS ON: Only downshifting is possible.
18
Rear View Monitor Navigation (if equipped)
1 1
2
3
4
Vehicles with Navigation system have a rear view camera. When the selector
MFWFS JT NPWFE JOUP i3w 3FWFSTF position, the rear view is shown on the display. Camera footage is live, real time as you see it on the rear view mirror. Also, width of the vehicle and distance from the vehicle are indicated as lines in the image on the display.
1.Width of the vehicle: Oblique vertical lines
2.Approx. 6.5-10 feet from the rear bumper: Green horizontal line
3.Approx. 3 feet from the rear bumper: Yellow horizontal line
4.Approx. 1.5 feet from the rear bumper: Red horizontal line
To be safe, always check around and behind the vehicle with your eyes first before backing up. Never rely upon the rear view monitor.
Fuel Door
Lid Release
Found on the floor next to the driver’s seat. To open the fuel door lid, pull the lever up and release.
While
Operating
Safety / In Case of Emergency
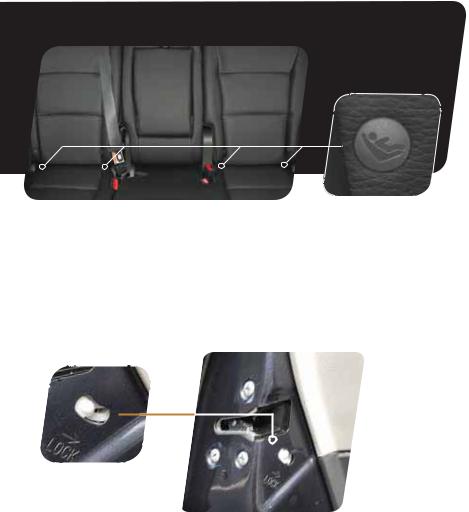
Child Restraint System
For maximum safety, first carefully read and follow the instructions from the device manufacturer to properly install the restraint system inside your vehicle. Use the appropriate seatbelts or anchorages provided in your vehicle. Please refer to your Owner’s Manual for the proper installation instructions. Children age 12 and under must be properly restrained in the rear seat at all times.
Child Safety Locks
The locks are located on the rear inside edge of the rear doors. While the lever is in the locked position, the rear doors of the vehicle cannot be opened from the inside.
20
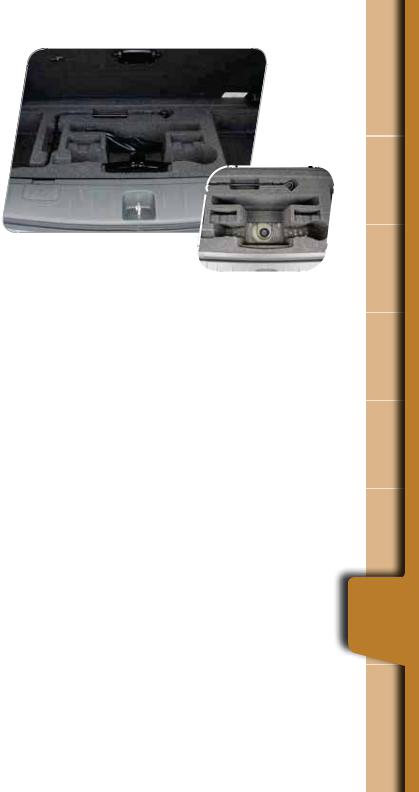
Location of Spare Tire and Jack
Your vehicle is equipped with a temporary spare tire, located under the rear of the vehicle. The jack and necessary tools to release the spare from the vehicle are located in the storage tray, under the cargo floorboard. To remove the spare tire, remove the cargo floorboard and remove the access hole plugs located on the body, then insert the tool through the access hole and turn it counterclockwise with the wheel nut wrench. Store the flat tire in the spare tire carrier.
Towing Your All-Wheel Drive Vehicle
Because all-wheel drive distributes engine power to all four wheels, improper towing will severely damage your AWD system. A flatbed truck is the only way to properly transport your AWD vehicle. If towing is necessary, it is best done by your Subaru dealer or a commercial towing service.
Subaru Roadside Assistance
Subaru Roadside Assistance is free and standard on every 2011 Subaru vehicle. Coverage is automatic; there are no forms to complete. Subaru Roadside Assistance is available anytime during the 3-year/36,000-mile Subaru Limited Warranty, whichever comes first.* A Subaru Roadside Assistance decal has been affixed to the driver’s door window.
Subaru Roadside Assistance: 1-800-261-2155
Exclusions
Specifically excluded from Subaru Roadside Assistance coverage are service requests or claims resulting from: accidents, vandalism, acts of God, violation of any laws, or vehicle modifications not recommended by the manufacturer.
*See your dealer for details
/ Safety
of Case In
Emergency
Additional Information
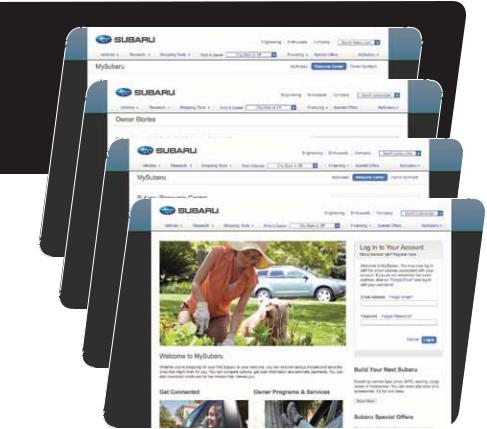
MY.SUBARU.COM
Your Subaru vehicle comes with a unique online resource that helps make your ownership experience more convenient and enjoyable. My.Subaru.com is a website that you can personalize and offers useful features and content that makes it easy for you to manage your vehicle care and enjoy all the benefits of Subaru ownership. Log on to My.Subaru.com to access features such as: automated service history, e-mail maintenance reminders, online Owner’s Manual, warranty information, maintenance schedules and much more...
Access your site today @ My.Subaru.com
22

Fuel
Use regular unleaded gasoline with an octane rating of 87 AKI or higher.
Fuel Capacity
t 64 HBM MJUFST *NQ HBM
t 8IFO UIF MPX GVFM JOEJDBUPS MJHIU JT EJTQMBZFE PO UIF JOTUSVNFOU panel, approximately 2.6 U.S. gallons of fuel remain.
t *G ZPV IBWF SFDFOUMZ GVFMFE ZPVS WFIJDMF UIF DIFDL |
|
engine light on the instrument panel may stay on due |
|
to a missing or loose fuel filler cap (the cap should be |
|
tightened until a click is heard). |
|
Engine Oil
Use only the following oils:
|
t *-4"$ (' PS (' XIJDI DBO CF JEFOUJýFE XJUI UIF |
|
|
ILSAC certification mark (Starburst mark). |
|
|
t 0S "1* DMBTTJýDBUJPO 4/ PS 4. XJUI UIF XPSET |
|
|
i&/&3(: $0/4&37*/(w |
|
Engine Oil Capacity
t 64 RU MJUFST *NQ RU
Information |
Additional |

Notes
24
Subaru Delivery Checklist
Owner Information
VEHICLE ID #
DELIVERY DATE
OWNER NAME
OWNER NAME
Owner Resources & Warranty
Present the Subaru Owner’s Manual & Quick Reference Guide (detailed review in “Operation & Controls” section)
Review Subaru Roadside Assistance, Owner Cards & Provide Toll-Free Number 1-800-261-2155
Explain 3/36 BASIC Warranty / 5/60 Powertrain Warranty / Explain Wear Items & Adjustments / PZEV (if applicable) / Review Rust Perforation Warranty / Tire Warranty
Review Service & Maintenance Schedules & Terms Explain Normal vs. Extreme Schedules (if applicable)
Review New Owner’s MY.SUBARU.COM Website
Review The Subaru Mastercard Program from CHASE & Explain The Card Benefits
Explain Dealership’s New Owner Follow Up Procedure
Customer Signature
Introduce The Subaru Service Advisor & Provide Their Business Card
Explain Dealership Service Appointment Scheduling & Early Morning Service Drop Off Procedures
Review Dealership Parts Department Location & Hours
Vehicle Condition
Exterior Condition Approval (New Owner indicates exterior of vehicle is clean & undamaged)
Interior Condition Approval (New Owner indicates interior of vehicle is clean & undamaged)
Operational Condition Approval (New Owner has driven vehicle & approves it is ready
for delivery)
NEW OWNER SIGNATURE
SALES CONSULTANT SIGNATURE
SALES MANAGER SIGNATURE
Fold back and remove this checklist from the QRG. Place
this completed checklist in the deal jacket for future reference. Additional copies of this checklist
can be made by photocopying.

Operation & Controls
Please use & reference the SUBARU OWNER’S MANUAL
& QUICK REFERENCE GUIDE
OPERATION & CONTROLS
Review Master & Valet Keys
Show Keyless Entry, Alarm System
& Remote Start (if equipped)
Show Hood & Gas Door Releases
REAR & SIDE
Show Yellow Caps & Explain Checking & Filling of Vehicle Fluids
Show Fuel Filler Door & Gas Cap Operation
Show Location of Both Fuse Boxes
|
|
Show Trunk Release & Valet Feature |
Explain AWD Towing |
(sedans only) |
Requirements & Limitations |
|
|
Show Spare Tire, Tools & Jack Location |
Show LATCH System & Tethers |
Explain Temporary Spare Tire |
Show Child Safety Lock Operation |
Usage & Limitations |
|
|
|
INTERIOR |
|
Explain Operation of Automatic Transmission & Review Sport and Manual Modes
Show All Weather Package - Heated Front Seats, Windshield Wiper De-Icer & Heated Side Mirrors (if equipped)
Show Tilt Steering Column & Telescopic Feature (if equipped)
Explain the Subaru Advanced Frontal Airbag System (SRS), Front Seat Side Pelvis/Torso Airbags (SRS) & Side-Curtain Airbags (SRS)
Show Seatbelt & Head Restraint Functions
DRIVER CONTROLS & OPERATION
Show Power Windows, Door Locks & Side-View Mirror Operation
Explain Cruise Control & Power Moonroof Operation (if equipped)
Show Headlights, Daytime Running Lights, Parking Lights, Hazard Lights & Fog Lights (if equipped)
Show Interior Lighting, Map Light & Clock
Show Front & Rear Wiper & Washer Controls
Review Instrument Panel Gauges & Warning Lights
Explain Tire Pressure Monitoring System Light
Show Audio System, Station Presets, Tone, Balance & Fade Controls
Show GPS Navigation System (if equipped)
Show Climate Control System Including Front & Rear Defrosters
Show & Explain Operation of VDC Control Switch
Explain Operation of Other Vehicle Options, Equipment, or Genuine Subaru Accessories Not Referenced Above Where Applicable
Subaru of America, Inc., Subaru Plaza, P.O. Box 6000, Cherry Hill, NJ 08034-6000
MSA5B1206A
Issued July 2011
Printed in USA 10/11

2012
Consumer Electronics/ Bluetooth® & Audio Technology
Quick Reference Guide
Loading...