

Manuale di Istruzione
I
Version 1.1
Operation Manual
E

SLEDGE by Studiologic® 3
I
Manuale di Istruzione
ITALIANO
Informazioni di sicurezza
Importanti informazioni di sicurezza
Leggi attentamente il manuale. Esso contiene tutte le informazioni di cui hai bisogno per utilizzare questo strumento.
Segui le istruzioni nel manuale. La garanzia verrà annullata
qualora venissero eettuati interventi non autorizzati al prodotto.
Possono essere utilizzati solo accessori specicati dal costruttore. Usa lo strumento solo come indicato in questo manuale.
PERICOLO!
Rischio di scossa elettrica.
Non aprire lo chassis. Non ci sono parti riparabili o sostituibili
dall‘utente all‘interno. Lo strumento può essere aperto solo da
riparatori qualicati.
Informazioni principali
Prima di connettere lo strumento all‘alimentazione di rete,
vericare che questa sia adeguata all‘alimentatore fornito, che
può essere alimentato con 100 - 240V. Utilizzare il cavo di rete
fornito nella confezione. Non utilizzare un cavo rovinato in
qualche sua parte.
Umidità
Al ne di ridurre rischi di incendio o di scossa elettrica, non
esporre lo strumento alla pioggia o all‘umidità. Non
lasciare mai contenitori con liquidi sullo strumento. Non
usare lo strumento vicino all‘acqua, piscina, vasca, posti
bagnati.
Se lo strumento viene spostato da un posto freddo ad una
stanza calda, si potrebbe formare della condensa all‘interno.
Per evitare danni, attendere che lo strumento raggiunga la
temperatura della stanza prima di accenderlo.
Installazione
Usa sempre un supporto stabile dove posizionare la tastiera,
facendo attenzione al suo peso e alle sue dimensioni.
Pulizia / Manutenzione
Non usare mai detergenti abrasivi che potrebbero danneggiare la supercie. Raccomandiamo l‘uso di un panno in microbra, leggermente umido.
Imballo
Conserva tutti gli elementi dell‘imballo ed usali se devi
trasportare lo strumento al centro di assistenza.
4
SLEDGE by Studiologic®

Indice
Informazioni di sicurezza
Il tuo nuovo SLEDGE
Pannello di controllo/ Vista posteriore
Prima di utilizzare SLEDGE
Collegamenti
Selezione suoni / Variations
Funzioni
4
6
7
7
8
10
10
10
10
11
11
11
11
12
13
14
15
16
Ruote
Master Volume
Mode Trigger
Mode Mono
Selezione suono
10‘HOLD
Store
Exit
Category Search
Arpeggiator
MIDI
Global
Panel
Modulation/Glide
Oscillatori / Mixer / Noise
Filtro
Eetti
Dichiarazioni
Appendice
17
17
18
19
19
19
19
20
21
22
23
23
LFO1/LFO2/WHEEL
Glide
Oscillatore 1
Oscillatore 2
Oscillatore 3
Mixer
Noise
Filtro
Inviluppo del ltro
Invilupoo dell‘amplicatore
Eect 1
Eect 2
MIDI Implementation Chart
Speciche tecniche
Speciche pedali
I
SLEDGE by Studiologic® 5

SLEDGE by Studiologic®
6
Il tuo nuovo SLEDGE
La ringraziamo molto per aver scelto lo Sledge, uno strumento “State-of-the-Art” progettato dalla
Studiologic in collaborazione con la rinomata ditta Waldorf. Lo Sledge è facile da usare, grazie al
pannello di controllo completo con comandi ad accesso diretto, e ore un perfetto tocco della
tastiera, reso possibile dalla tecnologia Fatar. Si consiglia di leggere l‘intero manuale con atten-
zione per sfruttare appieno tutte le funzioni del vostro Sledge. Questo manuale vuole essere una
guida veloce e rapida per aiutare l‘utente a capire lo strumento e tutti i relativi controlli e non una
descrizione generica della struttura dei sintetizzatori e delle relative tecniche di sintesi sonora.
Ulteriori informazioni saranno rese disponibili sui siti web delle Studiologic, così come qualsiasi
aggiornamento del rmware o di funzioni speciche.
SLEDGE è stato ideato e progettatto dal team Studiologic
come un‘emozionante sda, per creare uno strumento allo
stato dell‘arte dal punto di vista della tecnologia, con un look
vintage e funzioni totalmente dirette. Grazie alla collabora
zione con Axel Hartmann il sogno è diventato realtà.
SLEDGE ore la tecnologia del tocco della Fatar: la famosa
tastiera TP9S. SLEDGE pesa appena 8,3 kg ed è quindi vera-
mente portabile.
Il motore di generazione è stato sviluppato su speciche
STUDIOLOGIC , in cooperazione con il famoso Waldorf team,
orendo lo stato dell‘arte nella creazione di una generazione
virtuale analogica di caratteristiche sonore uniche.
Un completo set di controlli permette di modicare qualsiasi
parametro del suono, con la stessa immediatezza e precisio-
ne che si possono ritrovare nei sintetizzatori analogici di rife-
rimento. In aggiunta a questa caratteristica, tutti i parametri
possono essere ricevuti e inviati via MIDI/USB, per un control-
lo totale dello strumento o per controllare dallo strumento
unità esterne o applicazioni VST
Tutte le connessioni si trovano in una posizione molto ac-
cessibile, sulla parte sinstra dello strumento, permettendo
all‘utente di collegare tutti i cavi in modo facile, chiaro ed
adabile. Le connessioni includono le uscite Audio e Head-
phones, così come le porte MIDI e USB.
SLEDGE
Cavo di alimenazione
Manuale d‘uso e/o CD
Concezione e Design
Synth action
Sound engine
Pannello di controllo
Connessioni
L‘ i m b a l l o i n c l u d e

SLEDGE by Studiologic® 7
I
Pannello di controllo / Connessioni
Connessioni
MODULATION OSC1 OSC2 OSC3 MIXER FILTER
On/O
AMPLIFIER
Pitch & Mod Master
Volu me
MODE
GLIDE NOISE EFFECT 1
AC I N
240-100V
EFFECT 2
Slezione suoni- STORE
ARP - MIDI - GLOBAL
funzione PANEL
Indicazione delle funzioni nel
manuale
Tutti i pulsanti operativi sono indicati in grassetto corsivo (es.
On/O).
VISTA DALL‘ALTO
VISTA POSTERIORE

Before using the SLEDGE
Power connection
Sustain / Expression pedal
Audio output
Headphones
Volume
Usate il cavo di alimentazione in dotazione per collegare lo
Sledge alla rete elettrica. Accendete lo strumento mediante
l‘apposito pulsante posto sul retro dello stumento.
Collegate i pedali (opzionali) PS-100 o VFP 1 alla presa denominata Hold. Alla presa denominata Expression potete collegare il pedale Studiologic VP 27, disponibile come opzione.
Collegate le uscite Audio Left/Right a due ingressi del vostro
mixer o sistema di amplicazione audio.
Plug in your stereo headphones in the dedicated output (if
needed).
Quando suonate lo strumento dopo l‘accensione, raccomandiamo di tenere il conrtollo di volume a metà corsa circa, per
mantenere un margine di aggiustamento (inferiore e supe
riore) mentre suonate.. Le regolazioni del controllo agiscono
sia sulle uscite Audio, sia sulla eventuale cua collegata.
USB
ATTENZIONE:
Per evitare danni all‘udito, evitate di suonare a volumi elevati
per troppo tempo.
NOTA:
Per prevenire evenuali rumori all‘accensione e spegnimento
dello strumento, raccomandiamo di tenere a zero (0) il volume Master dello Sledge e possibilmente anche il volume del
mixer audio dell‘impianto di amplicazione.
Per trasmettere e ricevere dati dalla presa USB, collegate lo
strumento mediante un cavo USB standard. Alla prima accensione dello strumento, esso verrà automaticamente riconosciuto dal vostro Computer ed il relativo driver sarà installato
automaticamente dal sistema operativo (class compliant).
8
SLEDGE by Studiologic®

Connections
MIDI / USB
• MIDI In, MIDI Out
• USB
Pedali
• Expression, Hold
Output / Headphones
• Left, Right
Inserire un cavo jack in uscita Right / Mono (se si decide di avere un output di miscelazione Mono) o 2 cavi separati in entrambe le prese jack di uscita dedicati, se è possibile utilizzare un
canale stereo del mixer esterno o analoghe apparecchiature
audio (un collegamento stereo è sempre consigliato). In alternativa è possible collegare una cua tramite l’uscita dedicata.
Attenzione: si prega di essere sicuri che il volume di uscita (principale) e soprattutto il volume del mixer esterno sia impostato su 0, in
modo da evitare ogni possibile interferenza audio quando lo strumento viene acceso o spento. Lo strumento è dotato di un circuito di
anti-disturbi audio che protegge l’uscita quando lo strumento viene
acceso o spento, ma in certe condizioni tale protezione potrebbe non
essere suciente, quindi si consiglia di evitare qualsiasi rischio, mantenendo i volumi esterni al minimo / zero durante l’accensione e lo
spegnimento.
Si può collegare un pedale sustain alla presa 1 / Hold (PS-100
or VFP1) e/o un apposito pedale di espressione alla presa 2 /
Expression (VP 27).
Il pedale di espressione può essere programmato a controllare le seguenti funzioni: Volume, Filter Cuto o Modulation.
Vedi la relativa sezione: Global, a pag. 39
Audio Output / Headphones
Pedali
Hold/Expression
positivo esterno Midi e/o controllare lo Sledge da qualsiasi
dispositivo MIDI esterno, per la trasmissione di tutti i dati relativi (note, cambiamenti di programma, ecc). La presa USB
(Universal Serial Buss) permette anche il collegamento a dispositivi esterni (cioè Computers) anche per aggiornamenti
del rmware . Per tutti i dettagli di dati MIDI, consultare la tabella d’implementazione MIDI alla ne del presente manuale.
MIDI / USBLe connessioni MIDI permettono di controllare qualsiasi dis-
I
SLEDGE by Studiologic® 9

SLEDGE by Studiologic®
10
Ruote / Master Volume / Mode
Le 2 ruote sul lato sinistro degli strumenti sono i più popolari
controlli in tempo reale; il Pitch Bend (a sinistra) permette di
controllare in modo continuo l’intonazione (accordatura) del
suono in modo uniforme e con un intervallo che può essere
selezionato nella sezione GLOBAL (vedere il capitolo relativo).
Il comando Modulation può controllare una serie di parametri
che possono essere selezionati dal controllo di destinazione
relativo della sezione di modulazione, come viene spiegato
nel paragrafo apposito.
Questo controllo regola il livello di uscita dello strumento ed
anche il volume delle cue; si consiglia di inserire il controllo
del volume a 0 prima di accendere lo strumento ed in gene-
rale di impostare il volume ad un livello medio (circa 64) per
lasciare un margine di alcuni valori, per aumentare il volume
quando necessario.
Questa funzione permette di decidere se tutti i parametri
di ltro e inviluppo vengono ripetuti ad ogni nuova nota o
solo quando si suona „staccato“ (rilasciando le dita dai tasti
tra una nota suonata e le successive), una caratteristica molto
utile per la massima espressione musicale. Oltre a questo, se
la modalità Single è selezionata e la funzione Glide è attivata,
il relativo eetto Glide potrà essere ottenuto solo se si suona
in modo „legato“ (senza passare da zero-tasti nel corso di una
scala o arpeggio), funzione che consente un ulteriore espres-
sività musicale in tempo reale.
Questa funzione seleziona la modalità “monofonica” per qual-
siasi suono selezionato, che di conseguenza rende attivo non
più di una (1) nota contemporaneamente: la funzione stan-
dard predenita alloca ed esegue l‘ultima nota suonata sulla
tastiera, indipendentemente dalla sua posizione (priorità di
tempo)
Ruote di espressione
Master Volume
Mode Trigger
Mode Mono
RUOTE
• Modulation
• Pitch
Master Volume MODE
• Trigger
• Mono
SLEDGE by Studiologic® 11
I
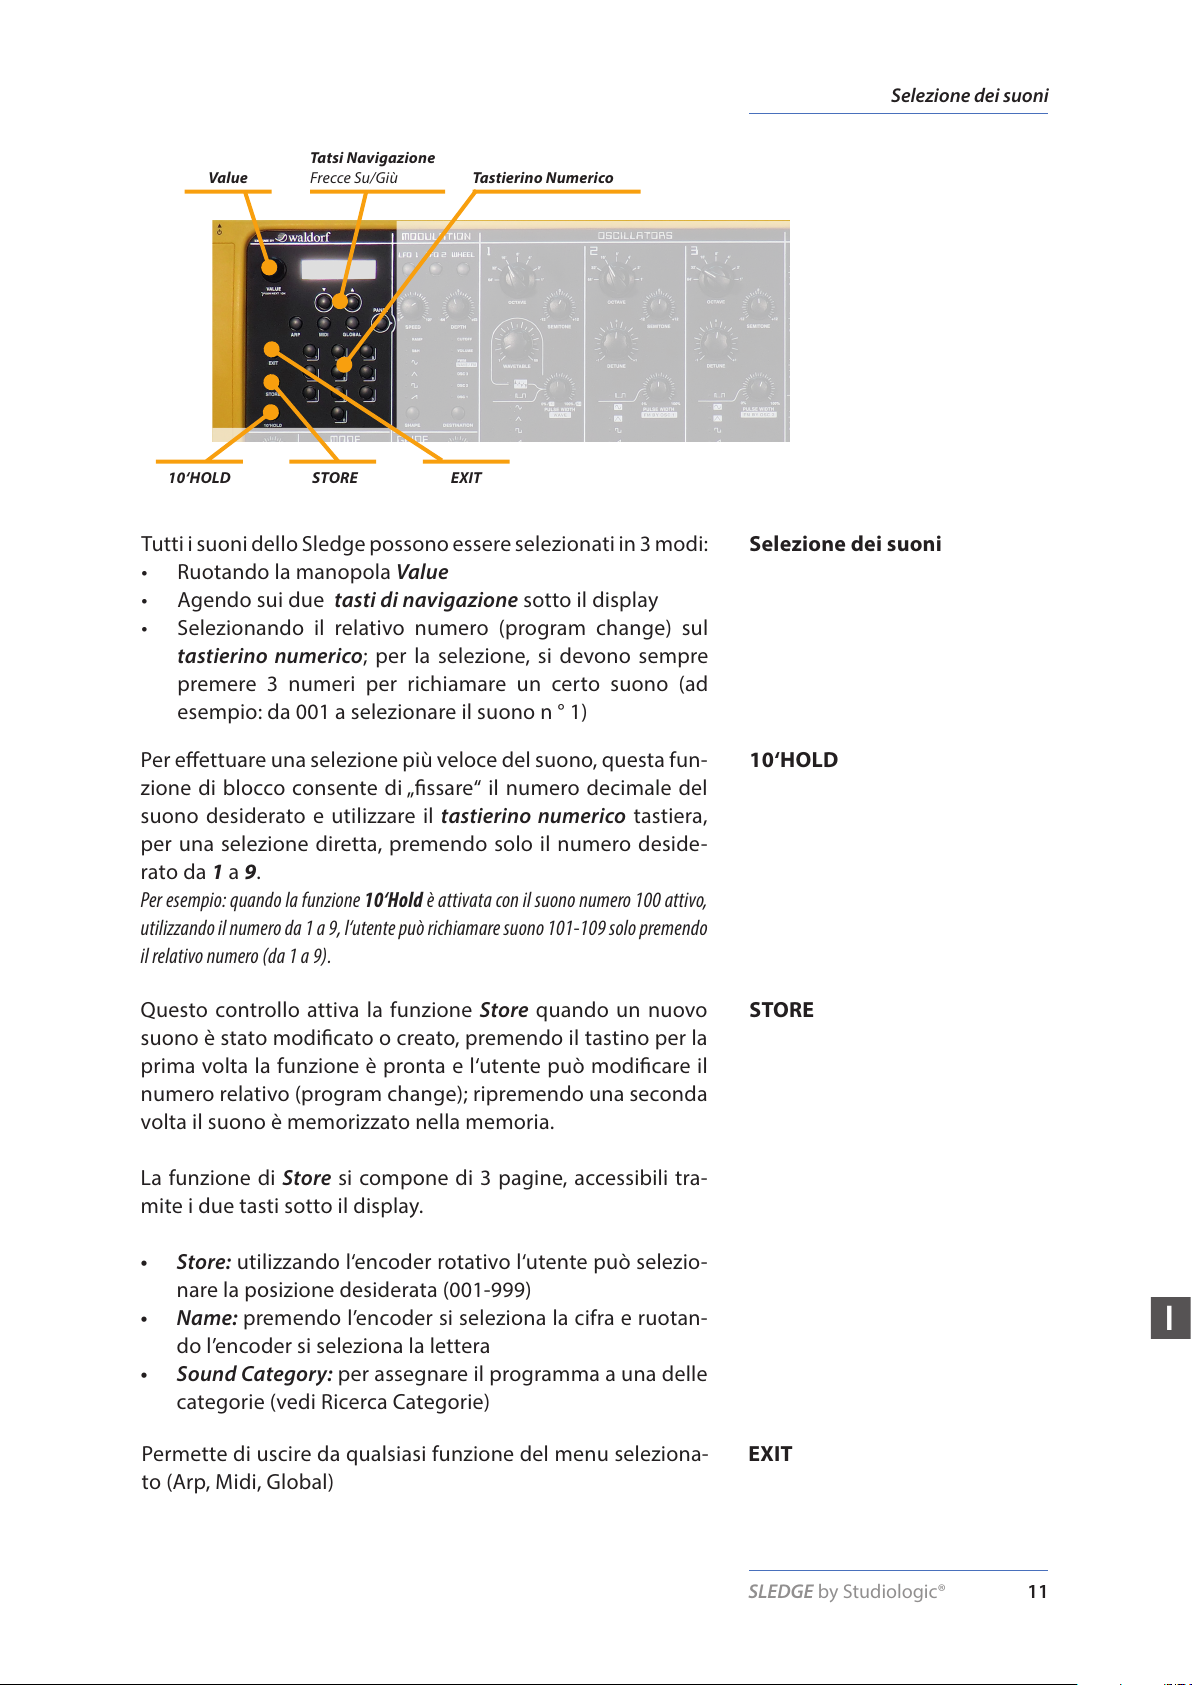
Tutti i suoni dello Sledge possono essere selezionati in 3 modi:
• Ruotando la manopola Val ue
• Agendo sui due tasti di navigazione sotto il display
• Selezionando il relativo numero (program change) sul
tastierino numerico; per la selezione, si devono sempre
premere 3 numeri per richiamare un certo suono (ad
esempio: da 001 a selezionare il suono n ° 1)
Per eettuare una selezione più veloce del suono, questa fun-
zione di blocco consente di „ssare“ il numero decimale del
suono desiderato e utilizzare il tastierino numerico tastiera,
per una selezione diretta, premendo solo il numero deside-
rato da 1 a 9.
Per esempio: quando la funzione 10‘Hold è attivata con il suono numero 100 attivo,
utilizzando il numero da 1 a 9, l‘utente può richiamare suono 101-109 solo premendo
il relativo numero (da 1 a 9).
Permette di uscire da qualsiasi funzione del menu seleziona-
to (Arp, Midi, Global)
Questo controllo attiva la funzione Store quando un nuovo
suono è stato modicato o creato, premendo il tastino per la
prima volta la funzione è pronta e l‘utente può modicare il
numero relativo (program change); ripremendo una seconda
volta il suono è memorizzato nella memoria.
La funzione di Store si compone di 3 pagine, accessibili tra-
mite i due tasti sotto il display.
• Store: utilizzando l‘encoder rotativo l‘utente può selezio-
nare la posizione desiderata (001-999)
• Name: premendo l’encoder si seleziona la cifra e ruotan-
do l’encoder si seleziona la lettera
• Sound Category: per assegnare il programma a una delle
categorie (vedi Ricerca Categorie)
Selezione dei suoni
10‘HOLD
EXIT
STORE
Selezione dei suoni
Val ue
EXIT10‘HOLD STORE
Tat s i N a vi g az i o ne
Frecce Su/Giù Tastierino Numerico
SLEDGE by Studiologic®
12
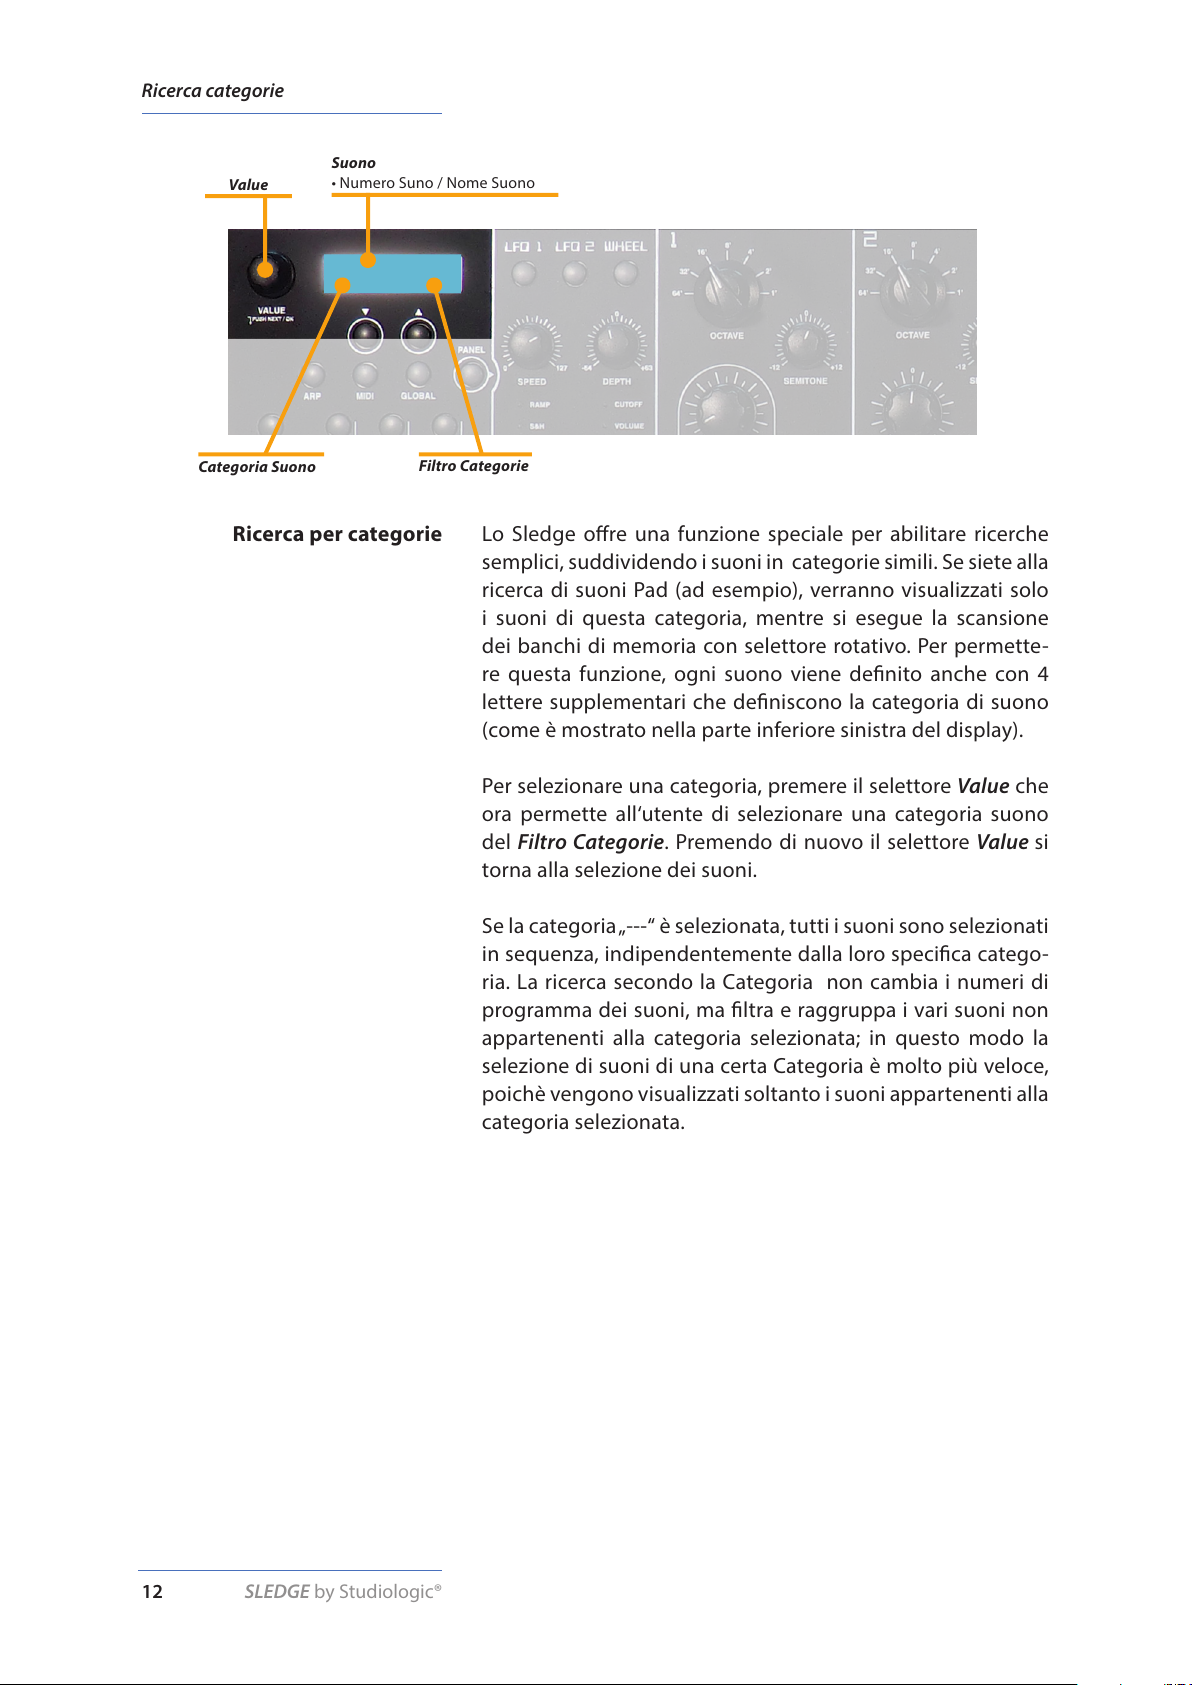
Ricerca categorie
Suono
• Numero Suno / Nome Suono
Categoria Suono
Filtro Categorie
Lo Sledge ore una funzione speciale per abilitare ricerche
semplici, suddividendo i suoni in categorie simili. Se siete alla
ricerca di suoni Pad (ad esempio), verranno visualizzati solo
i suoni di questa categoria, mentre si esegue la scansione
dei banchi di memoria con selettore rotativo. Per permette-
re questa funzione, ogni suono viene denito anche con 4
lettere supplementari che deniscono la categoria di suono
(come è mostrato nella parte inferiore sinistra del display).
Per selezionare una categoria, premere il selettore Value che
ora permette all‘utente di selezionare una categoria suono
del Filtro Categorie. Premendo di nuovo il selettore Value si
torna alla selezione dei suoni.
Se la categoria „---“ è selezionata, tutti i suoni sono selezionati
in sequenza, indipendentemente dalla loro specica catego-
ria. La ricerca secondo la Categoria non cambia i numeri di
programma dei suoni, ma ltra e raggruppa i vari suoni non
appartenenti alla categoria selezionata; in questo modo la
selezione di suoni di una certa Categoria è molto più veloce,
poichè vengono visualizzati soltanto i suoni appartenenti alla
categoria selezionata.
Ricerca per categorie
Val ue
SLEDGE by Studiologic® 13
I
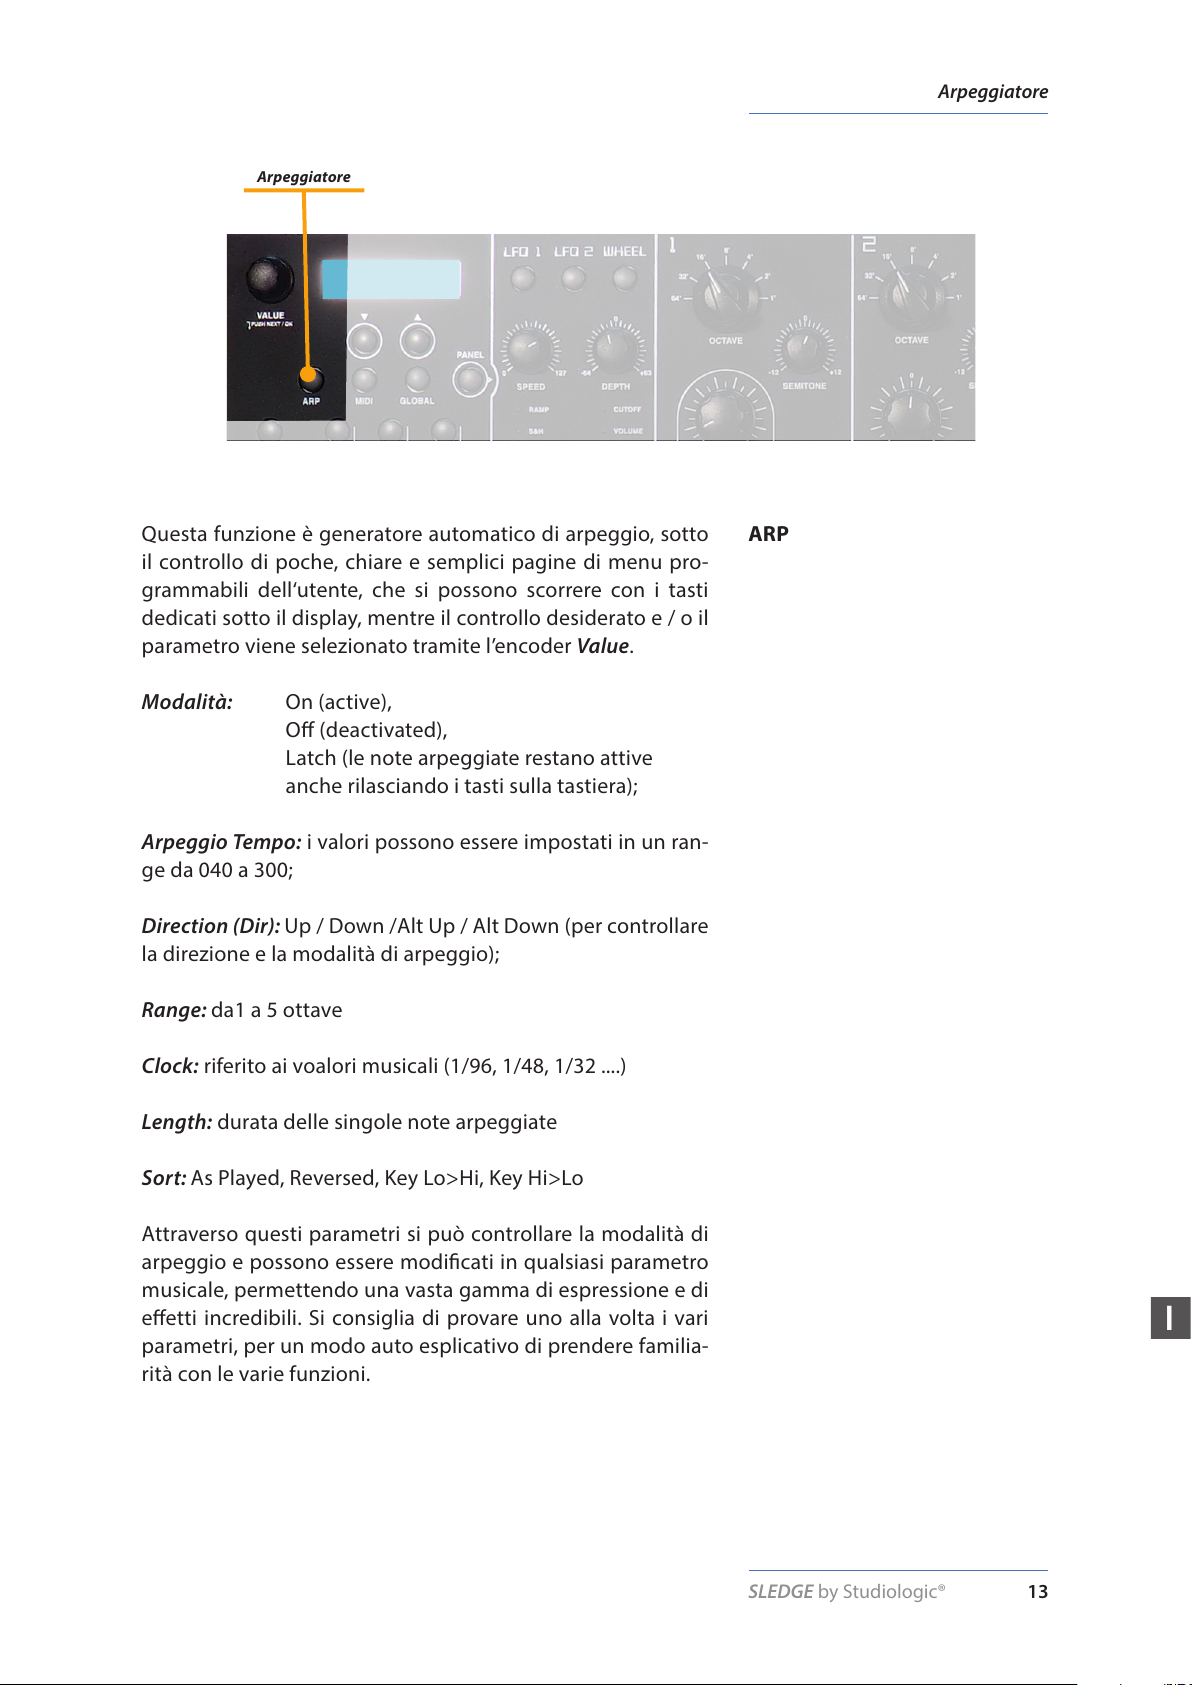
Arpeggiatore
Questa funzione è generatore automatico di arpeggio, sotto
il controllo di poche, chiare e semplici pagine di menu pro-
grammabili dell‘utente, che si possono scorrere con i tasti
dedicati sotto il display, mentre il controllo desiderato e / o il
parametro viene selezionato tramite l’encoder Value.
Modalità: On (active),
O (deactivated),
Latch (le note arpeggiate restano attive
anche rilasciando i tasti sulla tastiera);
Arpeggio Tempo: i valori possono essere impostati in un ran-
ge da 040 a 300;
Direction (Dir): Up / Down /Alt Up / Alt Down (per controllare
la direzione e la modalità di arpeggio);
Range: da1 a 5 ottave
Clock: riferito ai voalori musicali (1/96, 1/48, 1/32 ....)
Length: durata delle singole note arpeggiate
Sort: As Played, Reversed, Key Lo>Hi, Key Hi>Lo
Attraverso questi parametri si può controllare la modalità di
arpeggio e possono essere modicati in qualsiasi parametro
musicale, permettendo una vasta gamma di espressione e di
eetti incredibili. Si consiglia di provare uno alla volta i vari
parametri, per un modo auto esplicativo di prendere familia-
rità con le varie funzioni.
ARP
Arpeggiatore
SLEDGE by Studiologic®
14
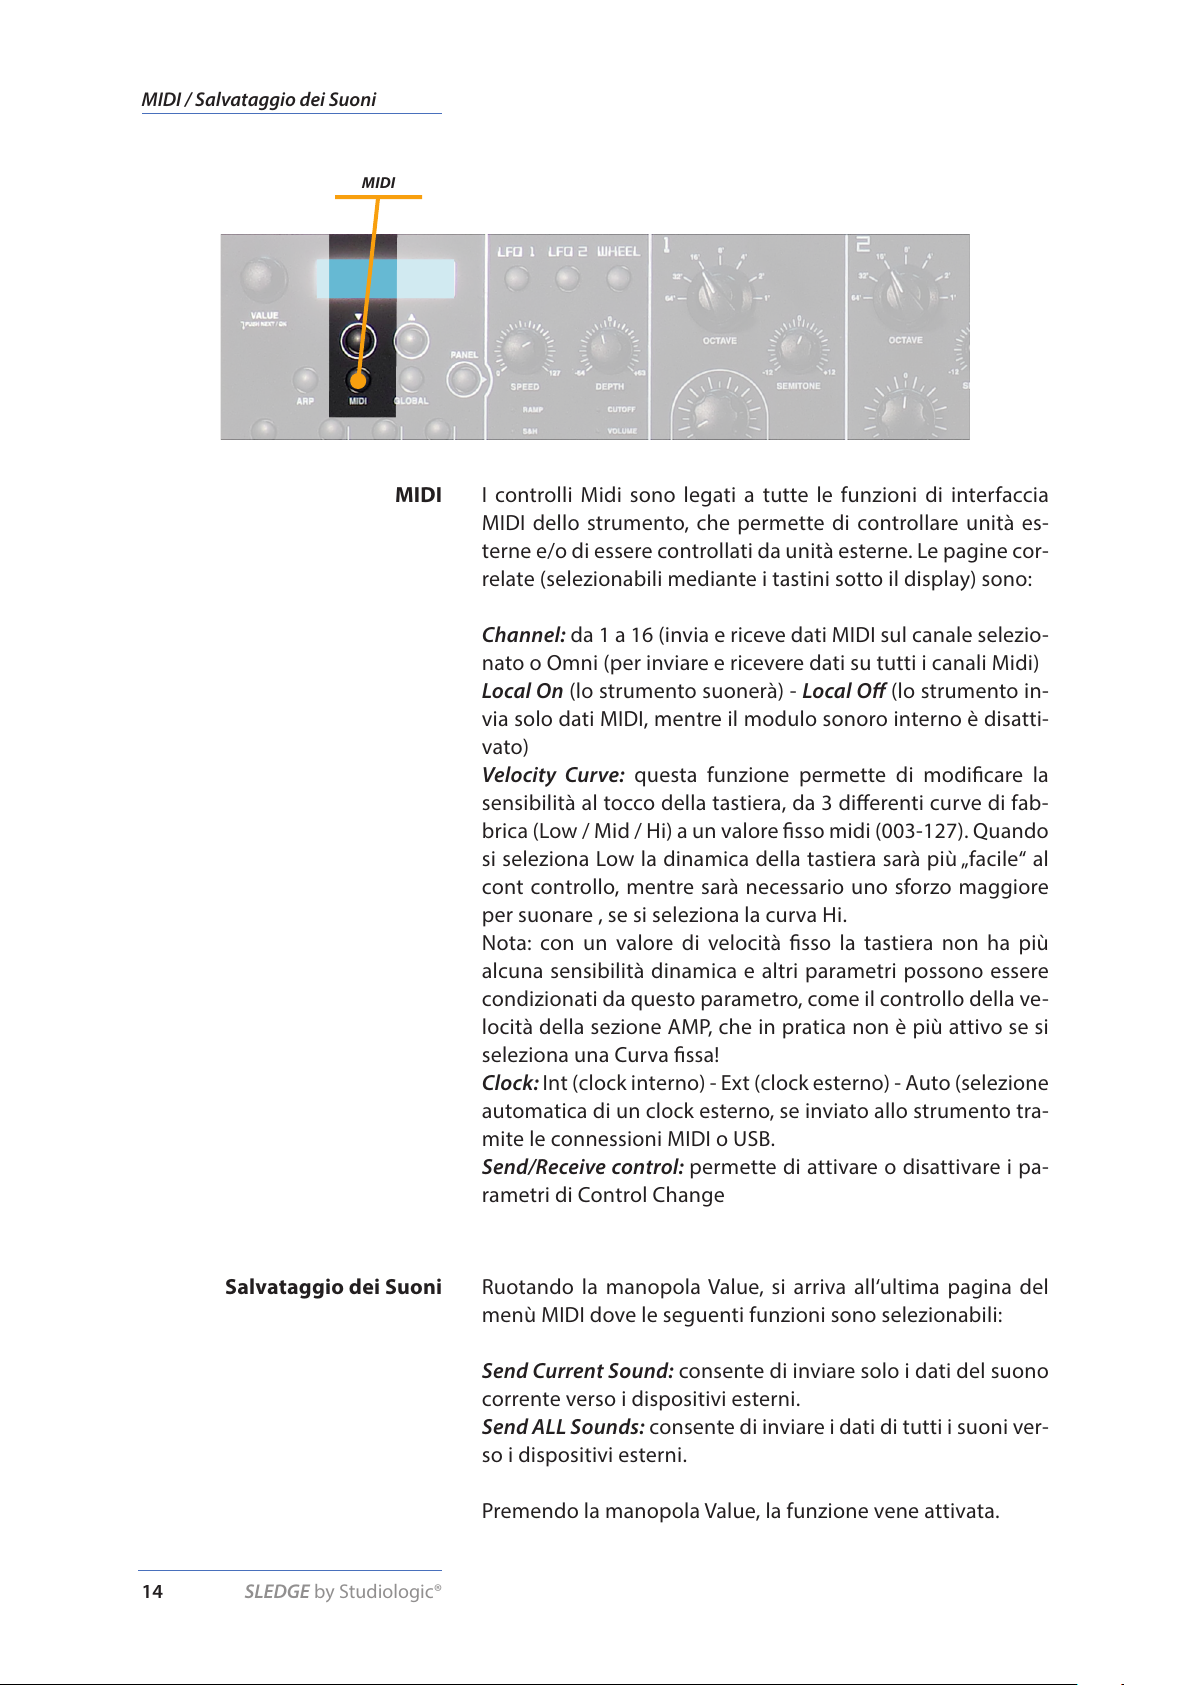
MIDI / Salvataggio dei Suoni
Ruotando la manopola Value, si arriva all‘ultima pagina del
menù MIDI dove le seguenti funzioni sono selezionabili:
Send Current Sound: consente di inviare solo i dati del suono
corrente verso i dispositivi esterni.
Send ALL Sounds: consente di inviare i dati di tutti i suoni ver-
so i dispositivi esterni.
Premendo la manopola Value, la funzione vene attivata.
MIDI
Salvataggio dei Suoni
MIDI
I controlli Midi sono legati a tutte le funzioni di interfaccia
MIDI dello strumento, che permette di controllare unità es-
terne e/o di essere controllati da unità esterne. Le pagine cor-
relate (selezionabili mediante i tastini sotto il display) sono:
Channel: da 1 a 16 (invia e riceve dati MIDI sul canale selezio-
nato o Omni (per inviare e ricevere dati su tutti i canali Midi)
Local On (lo strumento suonerà) - Local O (lo strumento in-
via solo dati MIDI, mentre il modulo sonoro interno è disatti-
vato)
Velocity Curve: questa funzione permette di modicare la
sensibilità al tocco della tastiera, da 3 dierenti curve di fab-
brica (Low / Mid / Hi) a un valore sso midi (003-127). Quando
si seleziona Low la dinamica della tastiera sarà più „facile“ al
cont controllo, mentre sarà necessario uno sforzo maggiore
per suonare , se si seleziona la curva Hi.
Nota: con un valore di velocità sso la tastiera non ha più
alcuna sensibilità dinamica e altri parametri possono essere
condizionati da questo parametro, come il controllo della ve-
locità della sezione AMP, che in pratica non è più attivo se si
seleziona una Curva ssa!
Clock: Int (clock interno) - Ext (clock esterno) - Auto (selezione
automatica di un clock esterno, se inviato allo strumento tra-
mite le connessioni MIDI o USB.
Send/Receive control: permette di attivare o disattivare i pa-
rametri di Control Change
SLEDGE by Studiologic® 15
I
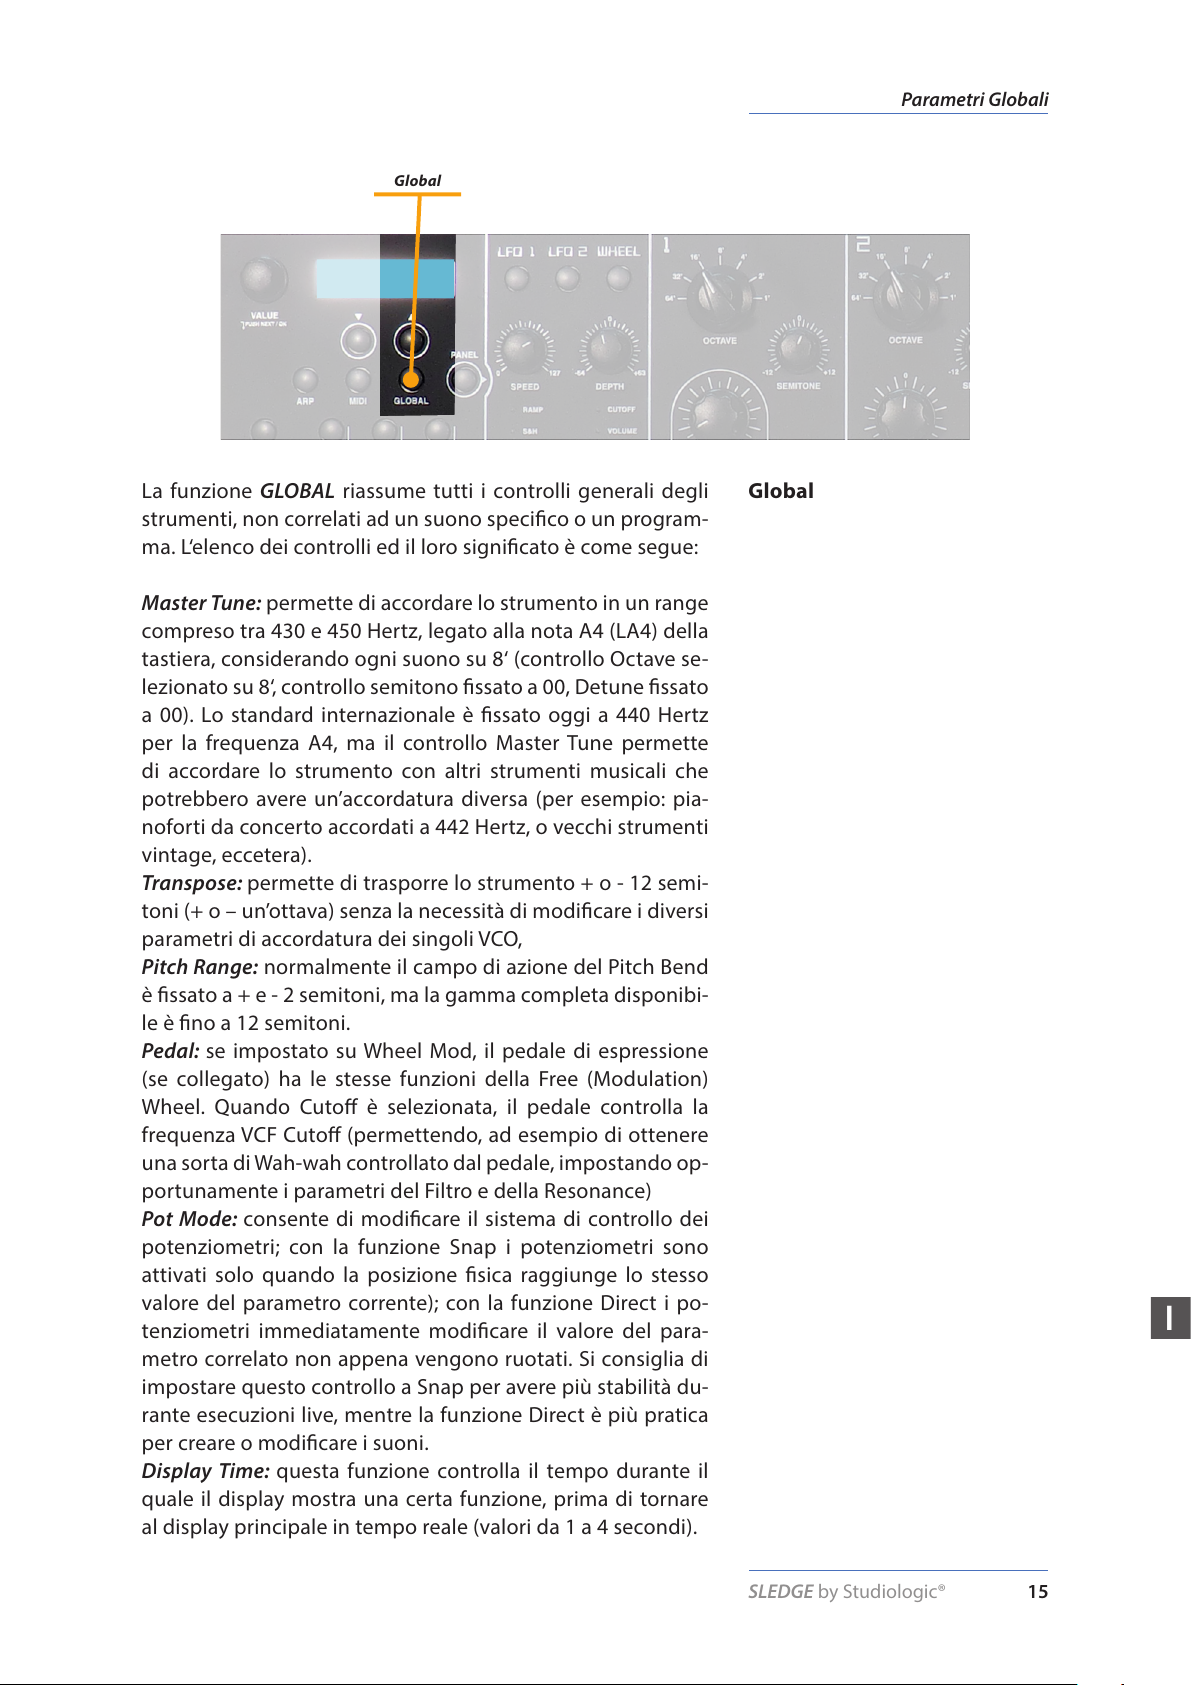
Parametri Globali
La funzione GLOBAL riassume tutti i controlli generali degli
strumenti, non correlati ad un suono specico o un program-
ma. L‘elenco dei controlli ed il loro signicato è come segue:
Master Tune: permette di accordare lo strumento in un range
compreso tra 430 e 450 Hertz, legato alla nota A4 (LA4) della
tastiera, considerando ogni suono su 8‘ (controllo Octave se-
lezionato su 8‘, controllo semitono ssato a 00, Detune ssato
a 00). Lo standard internazionale è ssato oggi a 440 Hertz
per la frequenza A4, ma il controllo Master Tune permette
di accordare lo strumento con altri strumenti musicali che
potrebbero avere un’accordatura diversa (per esempio: pia-
noforti da concerto accordati a 442 Hertz, o vecchi strumenti
vintage, eccetera).
Tra nsp ose: permette di trasporre lo strumento + o - 12 semi-
toni (+ o – un’ottava) senza la necessità di modicare i diversi
parametri di accordatura dei singoli VCO,
Pitch Range: normalmente il campo di azione del Pitch Bend
è ssato a + e - 2 semitoni, ma la gamma completa disponibi-
le è no a 12 semitoni.
Pedal: se impostato su Wheel Mod, il pedale di espressione
(se collegato) ha le stesse funzioni della Free (Modulation)
Wheel. Quando Cuto è selezionata, il pedale controlla la
frequenza VCF Cuto (permettendo, ad esempio di ottenere
una sorta di Wah-wah controllato dal pedale, impostando op-
portunamente i parametri del Filtro e della Resonance)
Pot Mode: consente di modicare il sistema di controllo dei
potenziometri; con la funzione Snap i potenziometri sono
attivati solo quando la posizione sica raggiunge lo stesso
valore del parametro corrente); con la funzione Direct i po-
tenziometri immediatamente modicare il valore del para-
metro correlato non appena vengono ruotati. Si consiglia di
impostare questo controllo a Snap per avere più stabilità du-
rante esecuzioni live, mentre la funzione Direct è più pratica
per creare o modicare i suoni.
Display Time: questa funzione controlla il tempo durante il
quale il display mostra una certa funzione, prima di tornare
al display principale in tempo reale (valori da 1 a 4 secondi).
Global
Global
SLEDGE by Studiologic®
16
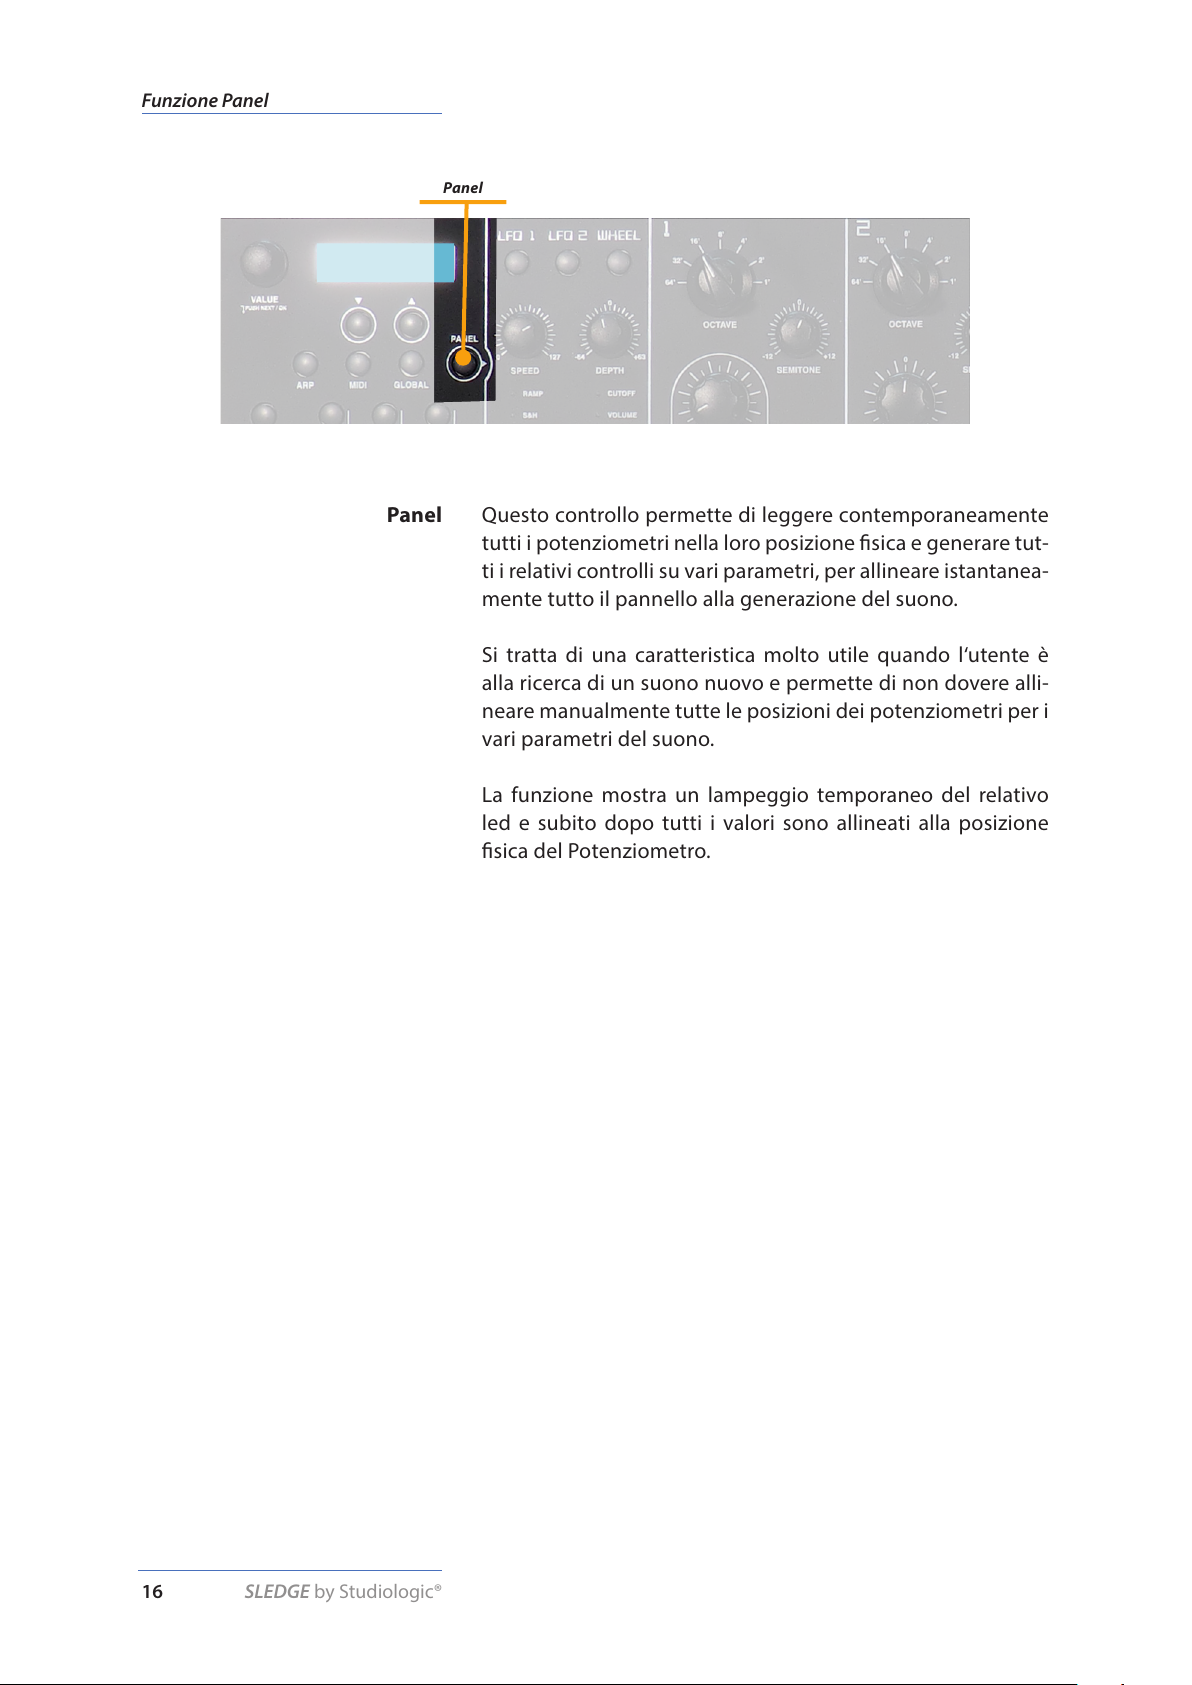
Funzione Panel
Questo controllo permette di leggere contemporaneamente
tutti i potenziometri nella loro posizione sica e generare tut-
ti i relativi controlli su vari parametri, per allineare istantanea-
mente tutto il pannello alla generazione del suono.
Si tratta di una caratteristica molto utile quando l‘utente è
alla ricerca di un suono nuovo e permette di non dovere alli-
neare manualmente tutte le posizioni dei potenziometri per i
vari parametri del suono.
La funzione mostra un lampeggio temporaneo del relativo
led e subito dopo tutti i valori sono allineati alla posizione
sica del Potenziometro.
Panel
Panel

SLEDGE by Studiologic® 17
I
Modulation / Glide
Shape: l‘utente può selezionare la forma d’onda modulante,
dal dente di sega (sawtooth) al generatore casuale (random).
Un‘onda sinusoidale o un triangolo sono generalmente utiliz-
zati per ottenere eetti simmetrici (come Vibrato o Tremolo)
mentre le altre forme sono selezionati dal gusto dell‘utente o
particolari obiettivi di ricerca del suono. I controlli di velocità
e profondità agiscono rispettivamente sui relativi parametri.
Destination: seleziona quali parametri si vogliono fare mo-
dulare dagli LFO, che hanno controlli separati per tutti i pa-
rametri (velocità, profondità e destinazione) e che possono
essere selezionati dai rispettivi pulsanti di selezione.
Selezionando OSC nella sezione Destination, si può ottenere una modulazione di fre-
quenza dell‘oscillatore selezionato, con la seguente sequenza: OSC1 - OSC 1 +2 - OSC
1 +2 +3 - OSC 2 +3 - OSC 3. Dopo questa sequenza, che permette la maggior parte
delle combinazioni necessarie, la funzione può essere inviata a tutti gli altri para-
metri (PWM-VOLUME-CUTOFF) semplicemente premendo il tasto di destinazione no
all’accensione del Led relativo al comando desiderato.
Mod. Wheel: la ruota di modulazione è sotto controllo
dell‘utente e, selezionando la destinazione relativa, si può as-
segnare al parametro desiderato e viene assegnato. Si prega
di notare che le funzioni selezionate per il controllo Modu-
lation è generalmente assegnato anche all’After Touch della
tastiera, che si otteniene premendo i tasti con una pressione
maggiore, dopo aver suonato le note desiderate
LFO1/LFO2/WHEEL
GLIDE
MODULATION
LFO1, LFO2, WHEEL
GLIDE
ON/OFF, RATE
Glide: abilita o disabilita l‘eetto Glide, che può essere de-
scritto ad un passaggio di frequenza continuo, da una nota
all‘altra. Si prega di notare che la funzione Glide controlla tutti
gli oscillatori ed il relativo controllo consente di modicarne
i tempi di transizione (da una nota all’altra). Come spiegato,
quando la funzione „Single“ è selezionata nella zona di Mode,
l‘eetto Glide viene applicato solo sulle note suonate in modo
„legato”, automatismo che permette una performance molto
utile in tempo reale, specie per esecuzioni soliste.
Questo eetto può essere creato su strumenti a corda (es: Violoni, Bassi Fretlees,
Tromboni a Coulisse ecc.). Si tratta di un eetto molto comune sui sintetizzatori e uti-
lizzato in tutti gli stili musicali.

SLEDGE by Studiologic®
18
Oscillatore 1
Octave: il range va da 64 a 1‘ (7 ottave), si noti che l’altezza
standard di un pianoforte è riferita a 8‘ e questo signica che,
impostando il controllo relativo alla posizione centrale, un ta-
sto qualsiasi della tastiera suona con la stessa frequenza che
suonerebbe su pianoforte standard (nota: la tastiera dello Sledge va
da da C2 a C7 mentre il Pianoforte tradizionale va da A0 a C8)
Semitone: permette di cambiare il semitono di base (+ e + 12
semitoni = 2 ottave)
Wavet able: questa funzione unica, permette di selezionare un
certo numero di forme d‘onda di tipo diverso e vario conte-
nuto armonico, permettendo di ottenere sonorità normal-
mente non ottenibile dalle tipicche forme d‘onda analogiche.
Sono disponibili 66 forma d‘onda. Quando un Wavetable
viene selezionato (con il tasto Shape), il potenziometro Wave
permette di modicare continuamente il punto di partenza,
per ottenere sfumature quasi innite e dierenti contenuti
armonici. Lo stesso potenziometro è utilizzato anche per con-
trollare la larghezza percentuale dell’impulso (duty cicle) se la
relativa forma d’onda è selezionata.
Tutte le altre forme d‘onda sono in genere associate a sintetizzatori ana-
logici d‘epoca; Nota: il parametro non necessariamente imposta solo una
forma d‘onda, ma anche un modello specico di oscillatore che potrebbe
produrre un certo numero di forme d‘onda in funzione di altre impostazio-
ni. Un buon esempio di questo comportamento è la forma Pulse.
Una forma d‘onda impulsiva (Pulse) contiene alcuni armonici secondo la
sua larghezza ed è normalmente priva di tutte le armoniche multiple del
rapporto tra fronte positivo e negativo: ad esempio, un impulso avente un
duty cicle del 25% (1/4) non avrà le armoniche 4a, 8a , 16a, 32a ecc
Questa forma d‘onda armonica produce normalmente un suono molto ric-
co e metallico. Se si seleziona questa forma d’onda, la sezione sezione LFO
può essere destinata a modulare la larghezza dell‘impulso (PWM = Pulse
Width Modulation) con grande variazione di spettro armonico..
• Un‘onda a dente di sega (Sawtooth) ha tutte le armoniche, in grandezza
decrescente
• Il triangolo (Triangle) è costituita essenzialmente da armoniche dispari
con ampiezze molto basse, mentre l‘onda Square dispone di tutte le ar-
moniche dispari con contenuto molto ricco (e può essere ottenuto anche
impostando la larghezza di impulso al 50%)
• Sine consiste solo della frequenza fondamentale e pertanto solo non ha
armoniche.
OSC1
OSC1
OCTAVE, SEMITONE, WAVETABLE, PULSE WITH, WAVEFORM

SLEDGE by Studiologic® 19
I
Osc 2 / Osc3 / Mixer / Noise
Queste 2 sezioni sono sostanzialmente identiche all’OSC 1
con le seguenti dierenze:
Detune: il relativo controllo permette di “stonare” un po ‚gli
oscillatori, rispetto a OSC 1 (che non ha alcun controllo de-
tune). Questo permette di creare suoni molto ricchi, con una sorta di eetto „cho-
rus“, più o meno evidente a seconda della quantità Detune
Wavef orm: l‘OSC 2 e 3 generano solo forme d’onda sse e non
consentono la generazione di Waves.
FM: entrambi gli oscillatori 2 e 3 possono essere modulati
dall‘oscillatore precedente (vedi indicazioni pannello fronta-
le) per ottenere reali suoni di sintesi FM, come sarà spiegato
separatamente.
OSC 2 Sync to Oscillator 3: quando questa funzione è abilitata,
Osc2 viene controllato da Osc3. Ogni volta che Osc3 inizia un
nuovo ciclo, invia un segnale di trigger Osc2, costringendolo
a riavviare la sua forma d‘onda. Come risultato, si ottengono eetti sonori
molto interessanti, specialmente quando entrambi gli oscillatori hanno impostazioni
diverse tra loro. Il ricorso alla modulazione supplementare LFO o utilizzando il Pitch
Bend aggiungerà ulteriori sfumature e/o movimento al suono.
I tre Oscillatori ed il generatore di rumore (Noise) sono con-
trollati dalla sezione Mixer, che contiene i relativi interruttori
On/O ed i controlli di volume separati. Come suggerimento
generale, si consiglia di non impostare mai i volumi al mas-
simo livello, per la creazione di un certo suono, in modo da
avere sempre un certo margine di nel caso si desideri un mi-
gliore equilibrio (come suggerito anche per il controllo del
volume Master). Si prega di notare che, sia i VCO (con un livello di volume
proprio) sia il generatore di rumore (noise) saranno poi inviati alla sezione Filter di
andare e Amplier, mentre un oscillatore che è destinato ad essere un modulatore
FM può essere lasciato O ed il suo eetto (modulante) sarà attivo per l‘oscillatore di
destinazione. Ad esempio, se l‘OSC 2 è ON, l’OSC 1 modula il OSC 2 come un parametro
FM anche se è disattivato.
Il Noise Generator permette di aggiungere al suono un certo
livello di rumore bianco (con spettro armonico ricco) o rosa
(con un opportuno ltraggio).
OSC2 / OSC 3
MIXER / NOISE
OSC2 OSC3 MIXER NOISE

SLEDGE by Studiologic®
20
Type: quando un tipo Low-Pass viene selezionato, tutte le frequen-
ze al di sopra della frequenza di taglio vengono smorzate/ltrate.
Quando un tipo passa alto è selezionata, tutte le frequenze al di
sotto della frequenza di taglio vengono ltrate. Quando un tipo
passa banda è selezionato, solo le frequenze nell’intorno della fre-
quenza di taglio vengono fatte passare.
Nota: si può aggiungere più movimento al suono modulando la frequenza di taglio attraverso
la sezione LFO, i parametri di inviluppo o il parametro Keytrack del ltro. Con un valore di 64
e un valore di risonanza 114, il ltro oscilla a circa 440Hz. Il parametro Tuning è scalato in
semitoni: quando il parametro Keytrack è impostato su circa +100%, il ltro si muove in fre-
quenza su una scala temperata, cioè segue le note suonate in tastiera con lo stesso intervallo
(suonando un’ottava più alta, il ltro si sposta di un’ottava verso gli acuti)
Slope: (24dB/12dB) la pendenza a 24dB permette di creare suoni
con un tipico carattere acustico molto ltrato; la pendenza 12 dB
crea risultati più graduali. Questo avviene con tutti i tipi di ltro,
perciò selezionando BP a 24dB o BP a 12dB, l’eetto del ltraggio è
più o meno evidente.
Cuto: ccontrolla la frequenza di taglio del ltro LP (passa basso) e
HP (passa alto) e la frequenza centrale per la banda passante, quan-
do si seleziona il ltro BP (passa banda).
Resonance: controlla l‘enfasi delle frequenze intorno al punto
di taglio. Con valori bassi, ad esempio nell‘intervallo da 0 a 80, si
può controllare la brillantezza al suono. A valori più alti di 80 ...
113 il suono diventa più nasale, alla frequenza di taglio. Quando
l‘impostazione viene portata a valori superiori a 113, il ltro inizia
ad auto-oscillare, generando un‘onda sinusoidale pura.
Keytrack: questo parametro controlla la posizione del ltro relativo
alla tastiera: per i valori di circa 100, la frequenza del ltro generale
seguirà le ottave della tastiera; ad esempio, un ltro passa basso
impostato intorno a 200 Hz mentre si suona un C2, si sposta a circa
400 Hz quando si riproduce un C3, eccetera
Drive: determina la quantità di saturazione (distorsione) che viene
aggiunto al segnale, all‘ingresso del ltro. L‘aumento del valore au-
menta la distorsione e la ricchezza armonica del suono.
FILTRO
FILTER FILTER ENVELOPE
Filtro

CUTOFF
SUS FREQ
Inviluppo del ltro
RELEASE
KEY ON
ATTACK
DECAY SUSTAIN
KEY OFF
Attack: determina il tempo che impiega il ltro per raggiungere la
massima frequenza di taglio, che è determinata anche da altri parametri (rif: cuto, tracking, amount ecc).
Decay: controlla il tempo che il ltro impiega per raggiungere il
livello di Sustain (frequenza del ltro quando si tengono premuti i
tasti sulla tastiera, dopo la fase di decay)
Sustain: frequenza che il ltro raggiunge e mantiene (dopo il De-
cay).
Release: tempo per raggiungere la frequenza nale, quando i tasti
vengono rilasciati.
Nota: ricordiamo che tutti questi controlli vengono modicati da altri
parametri, come ad esempio il ltro (di partenza), la frequenza e il
controllo: ad esempio, mantenendo il taglio del Filtro vicino al minimo
(10 Hz) e l‘importo vicino al massimo (63 ) permetterà al generatore
di inviluppo del ltro di lavorare su tutta la gamma , con un risultato
massimo in termini di cambiamento di carattere del suono durante
l’inviluppo del suono.
TIME
INVILUPPO
Amount: determina la quantità di controllo che l‘ADSR ha sulla frequenza del ltro e la risposta. Maggiore è il valore, più evidente è
l‘eetto ottenuto, controllato dalla sezione ADSR. Questo controllo
è bi direzionale e può essere impostato a valori positivi (00/63), il
più usato per tipici suoni analogici, e per valori negativi (00/-64) per
ottenere inviluppi inversi.
SLEDGE by Studiologic® 21
I

SLEDGE by Studiologic®
22
AMPLIFIER ENVELOPE
AMPLITUDE
TIME
KEY ON
KEY OFF
ATTACK
SUS LEVEL
DECAY SUSTAIN
RELEASE
Questa sezione ha una funzione simile alla sezione precedente
(Filter), ha eetto sul volume del suono e non ha alcun eetto fre-
quenza del ltro. In generale, il ltro può controllare gran parte
del timbro del suono e questa sezione può essere impostata con
parametri semplici, ma è possibile utilizzare questi controlli per
avere l’inviluppo desiderato anche nel caso in cui venga scelto di
non avere una inviluppo del ltro (per esempio, lascia la quantità
del ltro 00). I parametri hanno la medesima funzione di quelli del
ltro, con la dierenza che appare sull‘asse verticale l‘ampiezza del
suono e non la frequenza del ltro stesso.
Nota: con attacco veloce e rilascio molto breve (vicino a 0) si possono generare rumori
(clicks) evidenti durante l‘attacco e il rilascio, che in alcuni casi sono una caratteristica
desiderata, ma può che ssere eliminata selezionando valori poco diversi da zero (ad
esempio: Attack e Release 10).
Velocity: controlla quanto la dinamica della tastiera controlla il vo-
lume delle note, anche a seconda della curva di velocità selezionata
(vedi sezione MIDI). Per valori prossimi allo 0, anche suonando forte
non si avrà alcun eetto sul suono, per valori maggiori o massimi
(127) la dinamica della tastiera avrà il massimo eetto sul volume
del suono, aumentando l‘espressività dell‘esecuzione.
Nota: Il controllo della velocità ha inuenza sulla risposta dinamica dell‘amplicatore
e permette di avere una sorta di controllo anche sulla ampiezza del suono e non solo
sulla frequenza del ltro e controllo ADSR. Questo parametro rende il suono più es-
pressivo, con un controllo molto facile sulla risposta dinamica.
Attenzione: per rendere attivo e controllabile questo parametro, as-
sicurarsi che la sensibilità della tastiera non sia impostata su „Fixed“
(parametro Velocity Curve della Sezione Midi) altrimenti non avrà
alcun eetto sul suono.
Inviluppo
Inviluppo dell‘amplicatore

SLEDGE by Studiologic® 23
I
EFFECT 1
EFFECT 2
Chorus: questo eetto caldo e ricco viene generato utilizzan-
do algoritmi che creano copie del segnale di ingresso, mesco-
landole al segnale di uscita. Il risultato è come un insieme di
più suoni simultanei, come un coro di voci unisone, da cui il
nome di Chorus. Il detuning è generato da un LFO interno che
può essere controllato in frequenza e profondità dai relativi
potenziometri della sezione, presenti sul pannello frontale.
Phaser: è una combinazione di diversi „ltri“ che lavorano in
parallelo. Questo genera un eetto con picchi di frequenza
equidistanti e varie risonanze. Il risultato è un segnale forte-
mente colorato e caratterizzato. I due potenziometri con-
trollano Rate (velocità) e la profondità (Detph) dell‘eetto.
Flanger: molto simile al Chorus, è dotato di un circuito di
retroazione più evidente, per alimentare la parte posteriore
del segnale generato nel post-processore. Questo genera una
più profonda stonatura apparente del segnale. Con imposta-
zioni estreme si può sentire una risonanza molto evidente.
Delay: : questo è un eetto produce echi del segnale di in-
gresso, la lunghezza può essere modicata in modo continuo
tramite il relativo controllo, mentre il numero delle ripetizioni
è controllato dal parametro Depth.
Reverb: questo eetto è probabilmente l‘eetto più ampia-
mente usato nella produzione di musica e da sempre viene
utilizzato per aggiungere un ambiente realistico e un calore
particolare al suono, specie nel caso di strumenti digitali.
Vengono utilizzati algoritmi matematici complessi per simu-
lare l’eetto di un riverbero naturale. In questo caso, non si
intende simulare un ambiente naturale, ma aggiunge profon-
dità dimensionale ed espressiva alla sintesi del suono Sledge.
I due potenziometri permettono di controllare il livello di
questi eetti ed il tempo, sia per l‘eetto Delay (tempo che
intercorre tra due ripetizioni) e Reverb (durata dell‘eetto di
riverbero, che può anche essere inteso come supercie della
camera e la diusione in un parametro semplice mista).
EFFETTO 1
EFFETTO 2
Eetto 1/Eetto 2

24
SLEDGE by Studiologic®

Dichiarazioni
Tut i i pro dotti St udi olo gic so no costruiti at ten tament e, calibrat i,
testati, e sono soggetti a garanzia. Danni causati da trasporto non conforme, montaggio o errata manutenzione, non sono coperti da questa
garanzia. Per eventuali informazioni rivolgersi al proprio negoziante e/o
al distributore di zona.
FATAR srl
Zona Ind.le Squartabue
62019 Recanati MC Italy
dichiara che questo prodotto è conforme alle Direttive Europee:
2004/108//EC EMC Directive
DIN EN 55013 EMC radio disturbance of sound, TV and
associated equipment
DIN EN 55020 EMC immunity of sound, TV and
associated equipment
Recanati, 20. 05. 2012 Marco Ragni, Chief Executive Ocer
Questa dichiarazione diventa non valida nel caso di modiche non
autorizzate.
Garanzia
Conformità CE
Questo prodotto è costruito secondo le direttive 2002/95/EC.
L‘adozione delle direttive EG 2003/108/EG è volta a prevenire e limitare il usso di riuti di apparecchiature destinati alle discariche,
attraverso politiche di riuso e riciclaggio degli apparecchi e dei loro
componenti (WEEE). Aiutaci a mantenere il mondo pulito.
Per garantire il massimo della qualità, i prodotti Studiologic sono
sempre progettati allo stato dell‘arte, per questo sono consentite,
senza preavviso: modiche, migliorie variazioni. Speciche tecniche
e di aspetto possono essere diverse da quanto indicato in questo
manuale.
Tutti i marchi usati in questo manuale appartengono ai rispettivi
proprietari.
Nessuna parte di questo manuale può essere riprodotta o trasmessa
in ogni forma senza il consenso del proprietrio del Copyright:
Conformità RoHS
RoHS
compliant
2002/95/EC
Disposizioni / WEEE
Stato dell‘arte
Marchi
Copyright
I
FATAR Srl
Zona Ind.le Squartabue
62019 Recanati, Italia
SLEDGE by Studiologic® 25


SLEDGE by Studiologic® 27
E
ENGLISH
Operation Manual

Safety Instructions
Important Safety Instructions
Please read the entire manual. It contains all the information
you need to use this unit.
Please follow the instructions in the manual. The warranty will
be void if unauthorized work is carried out on the instrument.
Only accessories that are specied by the manufacturer should
be used with this unit. Use the unit only as specied in this manual
DANGER!
Risk of electric shock. Do not open the chassis. There are no
user serviceable parts inside.
The unit should only be serviced by qualied service sta
Mains
Before connecting the unit to the main power, please check if
the it is suitable for the instrument. The unit can be powered
with 100 – 240VAC, using the included power cord.
Humidity
To reduce the risk of re or electric shock, do not expose the
unit to rain or moisture. Never place containers with liquid on
the unit. Do not use the unit near water, swimming pool, bathtub or wet basement. If the unit is moved from a cold place to a
warm room, condensation may occur inside. To avoid damage
please allow the unit to reach room temperature before switching on.
Installation
Always use a stable rack to place the keyboard on. Please be
aware of its size and weight.
Cleaning / Maintenance
Never use any abrasive detergent, which may damage the
surface. We recommend a slightly moist micro-bre cloth.
Packaging
Please keep all packaging and use it to protect the keyboard
when transporting, eg if servicing is required.
28
SLEDGE by Studiologic®

Index
Safety Instructions
Yo u r n e w S L E D G E
How functions are shown in this manual
Control panel / Back View
Before using the SLEDGE
Connections
Sound Select / Variations
Functions
28
30
31
31
32
33
34
34
34
34
35
35
35
35
36
37
38
39
40
Wheels
Master Volume
Mode Trigger
Mode Mono
Sound Selection
10‘HOLD
Store
Exit
Category Search
Arpeggiator
MIDI
Global
Panel
Modulation/Glide
Oscillators / Mixer / Noise
Filter
Eects
Declarations
Appendix
41
41
42
43
43
43
43
44
45
46
47
47
LFO1/LFO2/WHEEL
Glide
Oscillator 1
Oscillator 2
Oscillator 3
Mixer
Noise
Filter
Filter Envelope
Amplier Envelope
Eect 1
Eect 2
MIDI Implementation Chart
Technical specications
Pedal specications
Dimensions
E
SLEDGE by Studiologic® 29

SLEDGE by Studiologic®
30
Your new SLEDGE
Thank you very much for choosing the SLEDGE. You have obtained a state-of-the-art keyboard
made by the renowned manufacturer Studiologic in cooperation with Waldorf. The SLEDGE is easy
to operate, thanks to the real-time complete control panel, and oers a perfect keyboard touch.
We recommend that you read the entire manual carefully to take full advantage of all the functions
of your SLEDGE. This manual is intended to be an easy, fast and quick guide that should help the
user to understand the instrument and all related controls, rather than a general description of
the synthesizer’s structure and related sound synthesis techniques. Additional information will be
made available on the Studiologic web sites, as well as any upgrade might be available.
An overview of the SLEDGE:
The SLEDGE concept has been devloped by the Studiologic
design team as a challenging goal to create the best solution
for all musicians and music lovers searching for a powerfull
sound heart in a unique design and vintage look. Thanks to
the cooperation with Axel Hartmann the dream become real.
The SLEDGE oers the touch technology by Fatar: the key-
board TP9S. The SLEDGE weighs just 8,3 kg and is therefore
very portable.
The sound engine has been developed, under STUDIOLOGIC
specications, in cooperation with the very well known Wal-
dorf design team, oering the state of the art in virtual ana-
log modelling.
A complete set of controls allows to access and modify any
parameter of the sound engine with the same direct ap-
proach you can nd in the best professional vintage analogue
synthesizer. In addition to this, all parameters can be sent and
recived via MIDI/USB for total remote control of the instru-
ment as well as to control external MIDI devices or VST apps.
All connections are placed in a very accessible position, on
the left side of the instrument, allowing the user to connect
the instrument in a fast, clear and reliable way. Connections
include Audio out and Headphones, as well as MIDI and USB
ports.
SLEDGE
Power Chord
Operation Manual (CD)
Concept and Design
Synth action
Sound engine
Real-time Control Panel
Connections
Delivery includes

SLEDGE by Studiologic® 31
E
Control Panel / Connections
Connections
MODULATION OSC1 OSC2 OSC3 MIXER FILTER
On/O
AMPLIFIER
Pitch & Mod
Wheels
Master
Volu me
MODE
GLIDE NOISE EFFECT 1
AC I N
240-100V
EFFECT 2
Sound selection - STORE
ARP - MIDI - GLOBAL
PANEL Function
How functions are shown in
this manual
All operation buttons are marked in bold italic in this manual
(example: On/O).
TOP VIEW
BACK VIEW

Before using the SLEDGE
Power connection
Sustain / Expression pedal
Audio output
Headphones
Volume
Use the power chord to connect the instrument to the power
socket. Switch the unit on by using the power switch near to
the power plug on the back of the instrument.
Connect the (optional) sustain pedal PS-100 or VFP 1 at the
socket which is labelled Hold. At the socket labelled Expression, you can plug in the Studiologic pedal VP 27, which is also
available as an option.
Connect the audio outputs Left and Right with the inputs of
your mixing desk or amplier.
Plug in your stereo headphones in the dedicated output (if
needed).
When you use the instrument for the rst time, we recommend you to turn the Volume knob on the Output section
to not more than half way between 0 and Full. While you are
playing you can adjust the volume as you choose. Adjusting
the Volume knob eects all audio out and headphone outputs at the same time.
USB
CAUTION:
To prevent hearing damage you should – as with all audio
devices – avoid using the instrument at high volume for long
periods.
NOTE:
To prevent possible damages to the speaker system, we
strongly reccomand to keep the external mixer or amplier
volume and the SLEDGE Master Volume at ZERO/MIN when
turning the instrument ON or OFF.
For data transmission via USB, connect the instrument to your
computer with a USB cable. The rst time you switch the instrument on, it will be recognized by your computer automatically and the appropriate driver will be installed by the OS
(class compliant).
32
SLEDGE by Studiologic®

Connections
MIDI / USB
• MIDI In, MIDI Out
• USB
Pedals
• Expression, Hold
Output / Headphones
• Left, Right
You can either connect a good headphones set to the dedicated output and insert one jack cable in the Output Right/Mono
(if you decide to have a Mono output mixing) or 2 separate jack
cables in both dedicated Output plugs, if you can use a Stereo
channel on your external mixer or audio equipment (a stereo
connection is always suggested). Note: please be sure that the
output volume (main) or the channel (track) volume of the
external mixer is set to 0, in order to avoid any possible audio
interference when the instrument is turned On or O; there is
an anti-audio noise circuit that is protecting the output when
the instrument is switched On or O, but under some condition this protection could not be sucient, so we suggest to
avoid any risk by keeping the external volumes down to zero.
You can connect a compatible Switch pedal to Pedal 1 / Hold
(PS-100 or VFP1) and/or a dedicated Volume / Expression Pedal to the dedicated Pedal 2 /Expression (VP 27).
The Expression pedal can be assigned to control the following functions: Volume, Filter Cuto or Modulation. See the
related Global Section at pag. 39
Audio Output / Headphones
Pedals
Hold/Expression
Device and/or control the SLEDGE from any external MIDI
device, for all related data transmission (notes, program
changes etc.) The USB (Universal Serial Port) also allows the
connection to external devices (i.e. Computers) and updates
of the rmware are also accessible via USB. For all Midi data
details, please refer to the Midi Implementation Chart at the
end of the present manual.
MIDI / USBThe MIDI connections allow to control any external Midi
E
SLEDGE by Studiologic® 33

SLEDGE by Studiologic®
34
Wheels / Master Volume / Mode
The 2 wheels on the left side of the instruments are the most
popular real-time controls, used since the early Analogue
Synthesizer time; they allow to control both the Pitch Ben-
ding of the sound in a smooth way (left wheel) with an inter-
val that can be selected in the GLOBAL section (see related
chapter) while the second Mod (Modulation) wheel can con-
trol a number of dierent parameters that can be selected by
the related Destination control of the Modulation section, as
it is explained in the apposite paragraph.
This control is related to the Output level of the instrument
and also to the Headphones volume; we suggest to put the
Volume control at 0 before switching the instrument On or
O and to set the volume at a mid level (approx 64) in order to
leave some values for increasing the volume if/when needed.
This function allows to decide if all Filter and/or Envelope pa-
rameters are repeated at any new note or only when playing
“staccato” (releasing the ngers from the keys between a pla-
yed note/chord and the next one). This is a very useful feature
for maximum musical expression. In addition to this, if Single
Mode is selected and the Glide function is activated, the re-
lated Glide eect will be obtained only if playing “legato” (no
zero-notes during a scale or arpeggio) allowing a further mu-
sical real-time expression.
This function enables the “mono” playing mode for any se-
lected sound, that become a monophonic sound, conse-
quently no more than one (1) note at the time is played by
the internal sound module, despite the number of key actu-
ally played on the keyboard; the standard default function
plays the last note played on the keyboard, regardless its po-
sition (time priority)
Wheels
Master Volume
Mode Trigger
Mode Mono
WHEELS
• Modulation
• Pitch
Master Volume MODE
• Trigger
• Mono

SLEDGE by Studiologic® 35
E
All sounds / programs can be selected in 3 ways:
• By rotating the Val ue dial;
• Using the 2 Navigation tabs under the display;
• Selecting the related program change on the numerical
key pad; please note that 3 numbers should always be
selected to recall a certain sound (for instance: 001 to se-
lect sound n°1).
In order to make a sound selection faster (in real time per-
formances) the 10‘HOLD function allow to “x” the decimal
number of the desired sound and use the 10 key pad number
for a direct selection using only 1 button at the time: for in-
stance, activating 10 hold when the sound 100 is active, by
using the number from 1 to 9 the user can recall sound 101 to
109 only pressing the related number (from 1 to 9)
Allows to exit (escape) from any of the selected menu func-
tion (Arp, Midi, Global)
This control activates the Store function when a new sound
has been edited or created; pressing the Store the rst time
the function is ready and the user could change the related
number (program change); at the second Store selection the
related sound is stored in the memory. The Store function
consists of 3 pages, accessible thru the two Navigation but-
tons below the display.
• Store program to: by using the Va lue encoder the user can
select the position (001-999);
• Name: the push function selects the digit and the Valu e
encoder select the letter;
• Sound Category: to assign the program to one of the Cate-
gories (See Category Search).
Sound Selection
10‘HOLD
EXIT
STORE
Sound Selection
Val ue
EXIT10‘HOLD STORE
Navigation tabs
Up/Down arrows Key Pad

SLEDGE by Studiologic®
36
Category Search
Sound
• Sound Number / Sound Name
Sound Category
Category Filter
The Sledge oers a special function to enable easy searches
for sounds of same categories. If you’re searching for pad
sounds, only these sounds will be displayed as you scan the
storage banks with the Selection dial. To accomplish this each
sound contains 4 extra digits in the sound name to dene its
sound category (as it is shown in the left lower part of the
display).
To select a sound Category, press the Value knob until you feel
a mechanical “click” and the dial will now allow the user to se-
lect a sound category; when a sound category is selected (for
instance: Bass) all bass sound will be selected by the rotating
encoder and/or the other related controls, making a certain
sound search and selection much easier and faster
If the category “---” is selected, all sounds are selected in
sequence, regardless their specic category. The Catego-
ry Search doesn’t change any program numbers. It only l-
ters out all patches not belonging to the selected category.
Scrolling through patches with this function is much faster
because only patches belonging to the selected category are
visible.
Category Search
Val ue

SLEDGE by Studiologic® 37
E
Arpeggiator
This function is a real-time automatic arpeggio generator,
under control of few, clear and simple user’s programmable
menu pages, that can be scrolled by the dedicated buttons
under the display while the desired control and/or parameter
is selected by rotating the Value encoder.
Mode: On (active)
O (deactivated)
Latch (the arpeggio notes are kept active also relea-
sing the keys on the keyboard)
Arpeggio Tempo: the values can be set from 040 to 300
Direction (Dir): Up / Down /Alt Up / Alt Down (to control the
arpeggio direction and mode)
Range: from 1 to 5 octaves
Clock: value reerred to musical value (1/96, 1/48, 1/32 ....)
Length: duration of the single arpeggiated note
Sort: As Played, Reversed, Key Lo>Hi, Key Hi>Lo
Thru these controls the Arpeggio mode can be modied in
almost any musical parameter, allowing a wide range of ex-
pression and incredible eects. We suggest to try the various
parameters one at the time, since this practice would be a
self-explaining way of getting familiar with all controls and
possibilities.
ARP
Arpeggiator

SLEDGE by Studiologic®
38
MIDI / Sound Backup
The Midi controls are related to all Midi Interface functions of
the Sledge, allowing it to control external units and/or to be
controlled by external units. The related pages (scrolled by
the navigation tabs under the display) are:
Channel: from 1 to 16 (the Sledge will send and receive Midi
data on the selected channel, or Omni (the Sledge will send
and receive data on all Midi channels)
Local: On (the instrument will play) – O (the instrument will
only send Midi data, while the internal sound module is de-
activated)
Velocity Cur ve: this function allows to modify the touch sen-
sitivity of the keyboard, from 3 dierent factory curves (Low/
Mid/Hi) to a xed midi value (from 003 to 127). When selec-
ting Low the keyboard feeling will be “easier” to control, while
it will require more eort to play if selected to Hi. Note: with
a xed velocity value the keyboard has no more any dynamic
sensitivity and some other parameter could be eected by
this condition, such as the Velocity control of the AMP sec-
tion, that would no more be active if a xed velocity is se-
lected !
Clock: Int (internal clock) – Ext (external clock) – Auto (auto-
matic selection of an external clock if sent to the instrument’s
Midi/serial input.
Send / Receive Control: allow to activate or deactivate the
Control Change parameters both for the In and Out, separa-
tely.
By rotating the Value Dial, in the MIDI last page, you can se-
lect between the functions:
Send Current Sound: it allows to send only the current sound
data to the external devices.
Send ALL Sounds: it allows to send all the sounds data to the
external devices.
By pushing the Value Dial, the selected function is activated.
MIDI
Sound Backup
MIDI

SLEDGE by Studiologic® 39
E
Global Parameters
The Global function summarizes all general controls of the
instruments, not related to a specic sound or program. The
list of controls and their meaning is as it follows:
Master tune: it allows to tune the instrument in a range bet-
ween 430 and 450 Hertz, related to the standard A4 of the
keyboard, considering any sound on 8’ (Octave control in the
middle, referred as 8’ – pitch – Semitone control set at 00 –
Detune set at 00). The international standard refers to 440
Hertz for the A4 frequency, but sometimes the Master Tune
control allows to tune the instrument with other musical
instruments, possibly having a dierent pitch (for instance:
concert pianos tuned at 442 Hertz or old vintage instruments
tuned at lower pitches)
Tra nsp ose: allows to transpose the instrument + or – 12 semi-
tones (+ or – one octave) without the need of modifying the
separate VCO tuning parameters,
Bend Range: normally the Pitch Bend range is set at + and
– 2 semitones; the complete available range is up to 12 se-
mitones.
Pedal: when set to Mod Wheel the expression pedal (if con-
nected) has the same functions of the Modulation Wheel.
When Cuto is selected, the Pedal controls the VCF Cuto
frequency (for instance: setting the resonance to a mid-range
level, a kind of Wah-wah eect is controlled by the pedal)
Pot Mode: it allows to change the potentiometers handling
from Snap (the potentiometers are activated when the physi-
cal position reaches the same value of the current parameter)
to Direct (the potentiometers immediately change the value
of the related parameter). We suggest to set this control to
Snap, for a more stable live-use, or to Direct for a faster edi-
ting.
Display Time: this function controls the time of the display
showing a certain function, before going back to the main
display real-time page (values from 1 to 4 seconds)
Global
Global

SLEDGE by Studiologic®
40
Panel Function
This control allows to read at once all potentiometers physi-
cal position and generate all related controls on the various
parameters, to instantly align the sound generation to the
control panel.
It is a very useful feature when the user is looking for a new
sound and he does not want to manually align all potentio-
meters position to the sound parameters.
The function shows a temporary blinking of the related Led,
and soon after all values are aligned to the potentiometer’s
physical position.
This function is not needed for all buttons selections, since
their are all temporary switches without a stable physical po-
sition and the related lights (led) do always show the current/
correct selected function and/or control.
Panel
Panel

SLEDGE by Studiologic® 41
E
Modulation / Glide
Shape: by using the Shape button, the user can select the
related shape of the Modulating waveform, from the Saw-
tooth to the Random generator; please note the a sine wave
or a triangle is generally used for obtaining symmetrical ef-
fects (such as Vibrato or Tremolo) while the other shapes are
selected by the user’s taste or sound research targets. The
Speed and Depth controls do eect the related parameters.
Destination: this button selects the parameters that the user
wants to be modulated by the LFO. The 2 LFO’s do have sepa-
rate controls and all parameters (speed, depth and destinati-
on) can be set separately.
The OSC destination allows to obtain a frequency modula-
tion of the selected oscillator, with the following sequence:
OSC1 - OSC 1+2 – OSC 1+2+3 – OSC 2+3 – OSC 3. After this
sequence, that allows most of the needed combinations, the
destination can be sent to all other parameters (PWM-VOLU-
ME-CUTOFF) by simply pressing the Destination button.
Mod. Wheel: the Modulation wheel is under a total user’s
control and, selecting the related destination, all kind of mo-
dulations can be assigned. Please note that the functions, se-
lected for the Modulation control, is also generally assigned
to the After-touch function of the keyboard, obtained by
pressing the keys with an extra force, after playing any note.
LFO1/LFO2/WHEEL
GLIDE
MODULATION
LFO1, LFO2, WHEEL
GLIDE
ON/OFF, RATE
The Glide On/O button enables or disables the related ef-
fect, that can be described ad a continuous gliding from one
note to another. This eect can be created on fretless strin-
ged instruments or some brass instruments (e.g. trombone).
It is very common on synthesizers and used throughout all
music styles. Please note that Glide aects the pitch of all
oscillators and the Rate potentiometer allows to control the
related timing. As explained, when the function “Single” is
selected in the Mode area, the Glide eect is applied only on
notes played “legato”, allowing a very useful real time perfor-
mance for solos.

SLEDGE by Studiologic®
42
Oscillator 1
Octave: the range is from 64’ to 1’ (7 octaves); please note
that the standard range for a piano is 8’ and this means that,
by setting the related control to the middle position, any key
played on the keyboard will play with the same frequency of
a standard piano (the Sledge keyboard is from C2 to C7 while
the standard 88 notes piano range is from A0 to C8)
Semitone: it allows to change the basic semitone (+ and + 12
semitones = 2 octaves)
Wavet able: this unique function, allows to select a number of
waveforms of dierent kind and harmonic content, allowing
many dierent sounds normally not obtainable by the typi-
cal analogue waveforms. 66 dierent waveform are available
and a more complete description of their harmonic content
will be made available separately.
When a Wavetable is selected (by the Shape button) the re-
lated Potentiometer allows to continuosly modify the star-
ting point, allowing to obtain almost innite nuances and
dierent harmonic contents. The same potentiometer (as it
is shown by the clear front panel labelling) is used to control
the Pulse Width, if a pulse shape is selected.
All other waveforms are typically associated to vintage analogue synthe-
sizers; note: the parameter doesn’t necessarily set only one waveform, but
sets a specic oscillator model that could produce a number of waveforms
depending on other settings. A good example for this behaviour is the
Pulse shape.
A Pulse waveform contains certain harmonic partials according to its width
and it is normally lacking all the harmonics multiple of its duty cicle: as an
example, a pulse having a duty cicle of 25% (1/4) will not have the 4th, 8ve,
16th, 32th harmonic etc. This waveform normally produces a hollow / me-
tallic sound. If the Pulse waveform is selected, the parameters Pulse width
and PWM (LFO section) are used to change the pulse width of the wave-
form. Furthermore, the modulation destinations PWM has a consequent
functionality, depending on which oscillator is set to Pulse.
• A Sawtooth wave has all the harmonics of the fundamental frequency in
descending magnitude
• The triangle mainly consists of the odd harmonics with very low magnitu-
des, while the Square wave has all odd harmonics (and it can be obtained
by also setting the Pulse width to 50%)
• Sine consists of the fundamental frequency only and consequently it has
no harmonics at all.
OSC1
OSC1
OCTAVE, SEMITONE, WAVETABLE, PULSE WITH, WAVEFORM

SLEDGE by Studiologic® 43
E
Osc 2 / Osc3 / Mixer / Noise
The function of these 2 sections are mostly the same of the
OSC 1 with the following dierences:
Detune: the related control allows to slightly detune the os-
cillators, as compared to OSC 1 (that has no detune control).
This allows to create rich textures, with a kind of “chorus” ef-
fect, more or less evident according to the Detune amount.
Shape: the OSC 2 and the OSC 3 do not allow the Wave func-
tion of OSC 1, while they allow to choose all other shapes.
FM: both oscillators 2 & 3 can be modulated by the previous
oscillator (see front panel indications) in order to obtain real
FM synthesis sounds, as will be explained separately in future
documents.
OSC 2 Sync to Oscillator 3: when this function is enabled, Os-
cillator 2 acts as a slave controlled by Oscillator 3: each time
Oscillator 3 starts a new cycle, it sends a trigger signal to Os-
cillator 2, forcing it to restart its waveform cycle. As a result,
very interesting sound eects may be generated, especially
when both oscillators are operating at dierent pitch settings.
Using additional pitch modulation by LFO or Pitch bend will
add further nuances and/or movement to sync sounds.
The 3 Oscillators and the Noise Generator are controlled by
the Mixer section, that contains the related On/O switches
and separate volume controls. As a general suggestion, we
normally mention to set the Volumes not at maximum level,
creating a certain sound-program, in order to always have
some margin of level in case a better balance is required (as
also suggested for the Master Volume control). Please note
that the setting to On a VCO output (with a proper volume le-
vel) will make that oscillator and/or noise going thru the Filter
and Enveloper sections, while an oscillator that is set to be an
FM modulator can be left O, while its eect will be active to
the destination Oscillator. As an example, if the OSC 2 is ON,
the OSC 1 will modulate the OSC 2 as an FM parameter even if
it is set to O. The Noise Generator allow to add to the sound
a certain level of White (brighter) or Pink (mellower) noise.
OSC2 / OSC 3
MIXER / NOISE
OSC2 OSC3 MIXER NOISE

SLEDGE by Studiologic®
44
Type: when a low pass type is selected via the Type parameter, all
frequencies above the cuto frequency are damped. When a high
pass type is selected, all frequencies below the cuto frequency are
damped. When a band pass type is selected, only frequencies near
the cuto setting will be passed through.
Note: more movement can be added to the sound by modulating
the cuto frequency via the LFOs, the envelopes or the Keytrack
parameter of the lter. At a value of 64 and a Resonance value
of 114, the lter oscillates with 440Hz, which is equal to A4 (the
Comb+ type oscillates one octave higher). Tuning is scaled in semi-
tone steps. When Keytrack is set to approx +100%, the lter can be
played in a tempered scale.
Slope: 24dB/12dB: the 24dB allows to create sounds with a typi-
cal audible ltered character; the 12dB slope creates softer results.
BP 24dB / BP 12dB Band Pass remove frequencies both below and
above the cuto point. As a result, the sound character gets thin-
ner. Use these lter types when programming eect and percus-
sion-like sounds. HP 24dB / HP 12dB High Pass are useful to thin out
a sound’s bass frequencies. This may also give interesting results in
conjunction with cuto frequency modulation.
Cuto: controls the frequency for the low pass and high pass lters
and the central frequency for the band pass and notch lter
Resonance: controls the emphasis of the frequencies around the
cuto point. Use lower values in the range of 0…80 to give more
brilliance to the sound. At higher values of 80…113 the sound gets
the typical lter character with a strong boost around the cuto
frequency. When the setting is raised to values above 113, the lter
starts to self-oscillate, generating a pure sine wave. This feature can
be used to create analog-style eects and percussion-like electro-
nic toms, kicks, zaps etc.
Keytrack: this parameter controls the lter position related to the
keyboard: for values around 100, the lter general frequency will
follow the keyboard octaves; a low pass lter set around 200 Hz
when playing a C2, will move to approx 400 Hz when playing a C3.
Drive: determines the amount of saturation that is added to the
signal, at the input of the Filter. Increasing the value will bring in
more and more distortion, suitable for harder lead sounds and ef-
fects.
FILTER
FILTER FILTER ENVELOPE
Filter

CUTOFF
SUS FREQ
Filter envelope
RELEASE
KEY ON
ATTACK
DECAY SUSTAIN
KEY OFF
Attack: determines the time to reach the maximum lter cut o fre-
quency, that is also determined by other parameters (ref: amount).
Decay: controls the time to reach the Sustain level (frequency of
the lter when the played key is kept pressed (on the keyboard)
Sustain: frequency that the Filter reaches and maintain (after the
Decay) keeping the played key
Release: time to reach the nal frequency, when the key of the key-
board is released
Note: remind that all these controls are modied by other parame-
ters, such as the Filter (starting) frequency and the Amount control:
as an example, keeping the Filter Cuto close to minimum (10 Hz)
and the Amount close to Maximum (+63) will allow the Filter Envelope to work on the entire Filter Range, with a maximum result in
terms of Sound character change during the envelope.
TIME
FILTER ENVELOPE
Amount: it determines the amount of control that the ADSR has on
the Filter frequency and response. The Higher is the Amount, the
more evident is the Filter sweep eect, controlled by the ADSR section. This control is by-directional and can be set to positive values
(00/+63), the most used for typical analogue sounds, to negative
values (00/-64) to obtain reverse Filter envelopes.
SLEDGE by Studiologic® 45
E

SLEDGE by Studiologic®
46
AMPLIFIER ENVELOPE
AMPLITUDE
TIME
KEY ON
KEY OFF
ATTACK
SUS LEVEL
DECAY SUSTAIN
RELEASE
This section has no eect on the frequency of the lter, while it
controls the amplitude (volume) of the sound. In general, the lter
may control large part of the timbre of the sound and consequent-
ly this section can be set with simple parameters. It is also possible
to set the desired envelope in the case that it is chosen not to have
a lter envelope (for instance, leave the amount of the lter at 00).
The parameters have the same function as those of the lter, with
the dierence that appears on the vertical axis the amplitude of the
sound and not the frequency of the lter itself.
Note: with fast attack and release very short (close to 0) you can hear evident clicks
during the attack and release, and in some cases the desired characteristic, but
can be eliminated by selecting values slightly dierent from zero (eg: Attack and
Release 10 ).
Velocity: controls how much the dynamics of the keyboard controls
the volume of the notes, also depending on the selected velocity
curve (in the Midi, page 2). For values close to 0, playing hard will
have no eect on the sound; for values greater or maximum (127)
the dynamics of the keyboard will have the greatest eect on the
volume of sound, increasing the expressiveness of the execution.
Note: the Velocity control has also inuence on the Amplier dynamic response
and it allows to have a kind of control also on the amplitude of the sound and
not only on the Filter frequency and related ADSR control of it. This parameter
makes the sound more expressive, with a very easy control on the overall dynamic
response.
Attention: To make this control useful and active, be sure that the
keyboard sensitivity is not set to “Fixed” (Velocity Curve parameter
of the Midi Section) otherwise it will not have any audible eect on
the sound.
AMPLIFIER ENVELOPE
Amplier envelope

SLEDGE by Studiologic® 47
E
EFFECT 1
EFFECT 2
Chorus: this warm and rich eect is generated by using Comb
lters that creates slightly detuned copies of the input signal
and mix it into the output signal. The result sounds like an
ensemble of several simultaneous sounds, like a choir as op-
posed to a single voice; hence the name Chorus. The
detuning is generated by an internal LFO that can be control-
led in Rate and Depth by the related potentiometers of the
front panel.
Phaser: is a combination of several „allpass“ lters working
in parallel. This generates an eect with equally spaced fre-
quency peaks or troughs. The result is a strongly colorized
signal. The two potentiometers are controlling both the Rate
(speed) and Depth (amount) of the eect.
Flanger: very similar to the Chorus eect, it features a more
evident feedback circuitry to feed the generated signal back
into the comb lter. This generates a deeper detuning and co-
lorizes the signal. With extreme settings you can hear a very
characteristic whistling sound.
Delay: this is an eect produces echoes of the input signal;
the length can be changed without clicks or pitch changes an
this allows to experiment with dierent values without get-
ting bad side eects.
Reverb: this eect is probably the most widely used eect in
music production; it is used to add a realistic ambience to cle-
an and dry audio recorded in a studio andvery complicated
mathematical algorithms are needed to simulate the comple-
xity of a natural reverb. The instrument’s reverb eects don’t
intend to simulate a perfect natural room, rather they are an
addition to Sledge’s sound synthesis to make it more three (3)
dimensional and expressive.
The two potentiometers allow to control the level of this Ef-
fects (sometimes mentioned as Dry/Wet mix) and the Time,
for both the Delay eect (time between two repetitions) and
Reverb (duration of the reverb eect, that can also be inten-
ded as room size and diusion in a simple mixed parameter).
EFFECT 1
EFFECT 2
Eect 1/Eect 2

48
SLEDGE by Studiologic®

Declarations
Every product from Studiologic by Fatar has been carefully manufactured, calibrated and tested, and carries a warranty. Damage caused by
incorrect transport, mounting or handling is not covered by this warranty. For any further informations please refer exlusively to your dealer
and/or local distributor.
This product complies with the European Directives:
2004/108//EC EMC Directive
DIN EN 55013 EMC radio disturbance of sound, TV and
associated equipment
DIN EN 55020 EMC immunity of sound, TV and
associated equipment
Recanati, 20. 05. 2012 Marco Ragni, Chief Executive Ocer
This declaration becomes invalid if the device is modied without approval.
This equipment has been tested and found to comply with the limits for a
Class B digital device, pursuant to Part 15 of the FCC Rules. These limits are
designed to provide reasonable protection against harmful interference in a
residential installation.
This equipment generates, uses, and can radiate radio frequency energy and, if not installed and used in accordance with the instructions, may
cause harmful interference to radio communications. However, there is no
guarantee that interference will not occur in a particular installation. If this
equipment does cause harmful interference to radio or television reception,
which can be determined by turning the equipment o and on, the user is
encouraged to try to correct the interference by one or more of the following
measures:
• Reorient or relocate the receiving antenna.
• Increase the separation between the equipment and receiver.
• Connect the equipment into an outlet on a circuit dierent from that to
which the receiver is connected.
• Consult the dealer or an experienced radio/TV technician for help.
Unauthorized changes or modication to this system can void the user’s
authority to operate this equipment.
Warranty
CE-Conformity
FCC-Regulation
This product is manufactured according to the 2002/95/EC directive.
The purpose of this EG Directive 2003/108/EG is, as a rst priority, the
prevention of waste electrical and electronic equipment (WEEE), and
in addition, the reuse, recycling and other forms of recovery of such
wastes so as to reduce the disposal of waste. Please help to keep our
environment clean.
To ensure maximum quality all Studiologic by Fatar devices are always
engineered to be state-of-the-art products, therefore updates, modications and improvements are made without prior notice. Technical
specication and product appearance may vary from this manual.
All trademarks used in this manual belong to their respective owners.
No part of this manual may be reproduced or transmitted in any form
or by any means without prior consent of the copyright owner:
FATAR Srl
Zona Ind.le Squartabue
62019 Recanati, Italia
RoHS-Conformity
RoHS
compliant
2002/95/EC
Disposal / WEEE
State of the art
Trademarks
Copyright
E
SLEDGE by Studiologic® 49


NUMA Compact by Studiologic® 51
Appendix
Appendix

Appendix
MIDI Implementation Chart
Studiologic SLEDGE
Basic information Transmitted Recognized
MIDI channels 1 - 16 1 - 16
Note numbers 0 - 127 0 - 127
Program change 0 -127 0 - 127
Bank select no LSB
MIDI Mode single ch / omni single ch / omni
Note-On velocity yes yes
Note-O velocity no no
Aftertouch yes (channel) yes (channel)
Pitch Bend yes yes
MIDI CC Transmitted Recognized
1 Modulation yes yes
7 Volume yes yes
11 Expression yes yes
64 Sustain yes yes
System Exclusive Transmitted Recognized
Control Panel All pots and swit-
ches are trasmitted
via Midi & Usb (if
enabled in Midi page)
All pots and switches are recognized
via Midi & Usb (if
enabled in Midi page
xx = Value (00 - 7F)
A complete implemenation chart of all midi controls related to the trasmitted and
received data for all panel potentiometers and switches will be published in ocial
Studiologic sites as well as any additional information could be available
52
SLEDGE by Studiologic®

Appendix
Studiologic SLEDGE
Keyboard Number of Keys 61
Type Synth action (TP9S)
Velocity Curves Fixed, Low, Mid, High
Sound Engine Polyphony 16 (max)
Memory locations 999
Eects
Processor
Display backlight LCD 2 x16 digits
Connections Audio Out Left/Right, 6,3mm phone jack
Power AC Input:100-240V
Weight 8,3kg | 18.3lbs
E1 Chorus, Phaser, Flanger
E2 Delay, Reverb
Headphones 6,3mm stereo phone jack
MIDI In - Out
USB USB to Host (MIDI)
Hold Pedal 6,3mm mono jack
Expression Pedal 6,3mm stereo jack
(opt: studiologic VP27)
Speciche Tecniche
Specications
Sustain Pedal (Studiologic PS100 / VFP1)
Single momentary switch. The Numa Compact select the
polarity at power on.
Volume / E xpression Pedal (Studiologic VP27)
Linear continuous controller (potentiometer).
Speciche dei pedali
Pedals Specications
I
SLEDGE by Studiologic® 53
 Loading...