


SL88 GRAND
SL88 STUDIO
SL73 STUDIO
Operation Manual |
E |
Manuale di Istruzione |
I |
Bedienungsanleitung |
D |
Mode d’emploi |
F |
Rev 20171222

ENGLISH
SL88 GRAND
SL88 STUDIO
SL73 STUDIO
Operation Manual |
E |
SL Controllers by Studiologic® |
3 |
Safety Instructions
Important Safety Instructions
Please read the entire manual. It contains all the information you need to use this unit.
Please follow the instructions in this manual. The warranty will be void if unauthorized work is carried out on the instrument. Only accessories specified by the manufacturer should be used with this unit. Use the unit only as specified in this manual.
DANGER!
Risk of electric shock. Do not open the chassis. There are no user serviceable parts inside.
The unit should only be serviced by qualified service staff.
Humidity
To reduce the risk of fire or electric shock, do not expose the unit to rain or moisture. Never place containers with liquid on the unit. Do not use the unit near water, swimming pool, bathtub or wet basement. If the unit is moved from a cold place to a warm room, condensation may occur inside. To avoid damage please allow the unit to reach room temperature before switching on.
Installation
Always use a stable rack or surface to place the keyboard on.
Please be aware of its size and weight.
Cleaning / Maintenance
Never use any abrasive detergent, which may damage the surface. We recommend a slightly moist micro-fibre cloth.
Packaging
Please keep all packaging and use it to protect the instrument when transporting or if servicing is required.
Mains
Before connecting the unit to the main power supply, please check if the power supply is suitable for the instrument. The unit can be powered with 100 – 240VAC, using the included power supply/adapter.
4 SL Controllers by Studiologic®

Safety Instructions |
4 |
Your new SL |
6 |
|
6 |
|
6 |
|
7 |
Power - Input & Connection |
8 |
|
8 |
|
8 |
|
8 |
Control Panel |
9 |
|
9 |
Setup parameters |
10 |
|
10 |
|
12 |
|
13 |
|
14 |
Global settings |
15 |
Firmware management |
17 |
|
17 |
Declarations |
18 |
Appendix |
67 |
|
69 |
|
69 |
Index
Keyboard
Zones
Delivery includes
Working explanation
Power connections
Inputs
MIDI IN/OUT
USB
Control panel
Programmable Sticks
HOME Display
Program Selection & Edit
Programmable Groups
Zone Edit
Programmable Sticks
GLOBAL/SYSTEM
Firmware upgrade
SL Editor
Specifications
Dimension
E
SL Controllers by Studiologic® |
5 |

Your new SL
Thank you very much for choosing the SL. You have obtained a state-of-the-art professional instrument made by the renowned manufacturer Studiologic. The SL is easy to operate, thanks to the large colour display, the main Encoder with navigation controls plus built in click and it offers a perfect keyboard touch. We recommend that you read the entire manual carefully to take full advantage of all the functions of your SL. This manual is intended to be an easy, fast, Quick Guide that should help the user to understand the instrument and all mind related controls, rather than a general description of the complete structure and detailed editing, also made more flexible and user’s friendly by the computer Editor that will be downloadable from our official sites.
Let us start with an overview of the functions of the SL.
Keyboard The SL Controllers offer the latest innovative technology by Fatar: the sophisticated Hammer Action Keyboard with 3 contacts per key and Aftertouch. Therefore the SL Controllers are very portable, yet it offers the realistic grand piano touch for which Fatar is famous.
Zones The keyboard can be divided into 4 programmable zones. You can define each zone‘s keyboard range and select at which velocity level it will send its MIDI data, together with a wide range of settings and controls.
Each zone can be assigned to a different port and the new programmable Sticks can control different MIDI parameters for each zone.
Delivery includes SL88 Grand / SL88 Studio / SL73 Studio
AC power adaptor
VFP1-10 / PS100 pedal
Operation Manual (CD Rom)
6 SL Controllers by Studiologic®

Your new SL
MIDI OUT 1 |
MIDI IN |
USB
PEDALS
MIDI OUT 2
4 |
3 |
2 |
1 |
|
|
|
|
|
|
|
|
|
|
|
|
|
|
|
|
|
OUT |
|
|
|
|
|
|
||||
GLOBAL / SYSTEM: |
|
|
|
|
|
|
|
|
|||||
PANIC |
--- |
|
|
|
|
|
|
|
|
|
|
|
|
MAIN TRASPOSE |
+00 |
|
|
|
|
|
|
|
|
|
|
|
|
|
--- |
|
|
|
|
P001 |
SL 88 STUDIO |
|
|
||||
RESTORE |
|
|
|
|
|
|
|
|
|
|
|
|
|
STICK CALIBRATION |
--- |
|
|
|
|
GROUP |
SAGA SETUP |
|
|
||||
|
|
|
|
|
|
|
|
||||||
VERSION: |
V--- |
|
|
INSTRUMENT |
1 |
INSTRUMENT |
2 |
||||||
|
|
|
|
|
|
SOUND |
A0 / F#2 |
SOUND |
G3 / Db4 |
||||
|
|
|
|
|
|
VOL 122 |
VOL 096 |
||||||
|
|
|
|
|
|
INSTRUMENT |
3 |
INSTRUMENT |
4 |
||||
|
|
|
HOME |
|
SOUND |
B7 / C8 |
SOUND |
A0 / F#2 |
|||||
|
|
|
|
|
|
VOL 101 |
VOL 124 |
||||||
IN/OUT
P001 SL 88 STUDIO
|
|
|
|
|
|
|
|
|
|
|
|
|
|
||||
STORE |
UNDER: |
|
P001 |
|
|
|
|
|
|||||||||
NAME: |
|
|
|
|
SL 88 |
|
STUDIO |
|
|
|
|
|
|
|
|||
ZONE |
EDIT: |
|
|
|
|
|
|
|
|
|
|
|
|
|
|
|
|
|
|
|
|
|
1 |
2 |
3 |
4 |
|
|
|
|
|
|
|||
MERGE |
|
SOURCE: |
OFF |
|
|
|
|
|
|
|
|
|
|||||
MERGE |
|
DEST.: |
|
USB OUT |
|
|
|
|
|
|
|||||||
MERGE |
|
FILTER: |
SYS OFF - ALL |
|
|
|
|
|
|
||||||||
|
|
|
|
|
|
|
|
|
|
|
|
|
|
|
|
|
|
|
|
|
|
|
|
|
|
|
|
|
|
|
|
|
|
|
|
|
|
|
|
|
|
|
|
|
|
|
|
|
|
|
|
|
|
|
|
|
|
|
|
|
|
|
|
|
|
|
|
|
|
|
|
|
|
|
|
|
|
|
|
|
|
|
|
|
|
|
|
|
|
HOME
YOUR PROJECTS |
E |
|||
|
|
|
|
|
Library |
Groups |
|
||
|
|
|
|
|
|
|
|
|
|
|
|
|
|
|
GROUP 12
PROGRAM xxx
SL Controllers by Studiologic® |
7 |

Power - Inputs & Connections
Power - Inputs & Connections
Pedals connections |
USB Port |
Power |
|||
1-2 switch, 3 continuous, |
MIDI In/Out, USB to HOST |
9V - 1A |
|||
4 multi function |
|
|
|
|
|
|
|
|
|
|
|
|
|
|
|
|
|
|
|
|
|
|
|
|
|
|
|
|
|
|
MIDI |
|
|
Power On/Off |
|
In, Out1, Out2 |
|
|
|
||
All connections are placed in the back of the instrumen, for an easier access and protection:
Power connection Insert the adapter plug into the back socket of the instrument and turn the instrument on, by moving the related switch to the 1 position (1=ON, 0= OFF).
CAUTION:
Be sure that the adapter is the original one (included in the box) or a suitable/compatible one with the correct voltage and power (9V – 1A, positive pin + at centre).
Inputs Assignable pedals connections:
•2 switches
•1 continuous
•1 multi functions
You can connect compatible Switch pedals (for the related functions) to Pedal 1 and 2, a dedicated Volume/Expression Pedal to the Pedal 3 input and one of the compatible pedals in the special multi plug 4.
Midi IN/OUT The MIDI connections allow to control any external Midi Device and/or connect the SL to other external MIDI devices, for all related data transmission (notes, program changes etc.)
USB The USB (Universal Serial Buss) also allows the connection to external devices (i.e. Computers) to updates the firmware or estabilish a MIDI connection (IN/OUT).
When the SL is connected to a computer via USB, you can also use the SL Editor to set all SL parameters in a very fast and direct way, including controls not avaiable in the internal SL editing structure (i.e.: the Keyboard Balance function, that allows to change the velocity sensitivity of each individual key and balance black and white keys, with a single control.
8 SL Controllers by Studiologic®
Control Panel
Control Panel
Main buttons
IN
Colour Display
OUT
HOME
Encoder
Data input (rotating)
Navigation controls (left/right/up/down)
Click (ENTER)
|
|
Programmable Sticks |
|||
Stick 2 |
|
|
|
|
|
|
|
|
|
|
|
Auto-centering |
|
|
|
|
|
|
|
|
|
|
|
on X axis |
|
|
|
|
Stick 3 |
|
|
|
|
|
|
Stick 1 |
|
|
|
|
Free (not auto- |
|
|||||
|
|
|
|
||
Auto-centering |
|
|
|
|
centering) |
|
|||||
on both X/Y |
|
|
|
|
|
axes |
|
|
|
|
|
|
|
|
|
|
|
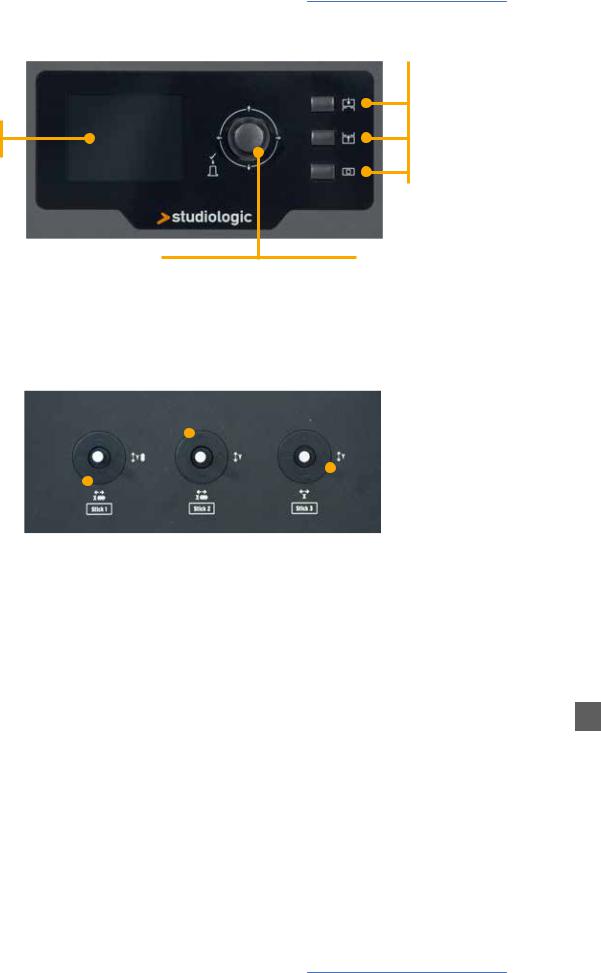
The new SL Control Panel is a concentrate of technology and user‘s friendly layout; it consists of:
•1 Large colour display (TFT - LCD 320 x 240);
•1 Rotating encoder with 1 built in click (enter) and 4 positional switches (up/down/left/right);
•3 Main buttons: Home (back to main view) - In & Out buttons (to navigate within all pages);
•3 Programmable Sticks.
All Edit Pages can be selected in the same way (up/down with the Encoder‘s positional switches, IN or OUT) you can use one hand to select all available pages and parameters, with instant access to all features; ones the selected function is reached, you can change its value by rotating the Encoder (to the left = decrease / to the right = increase).
E
SL Controllers by Studiologic® |
9 |
Setup parameters
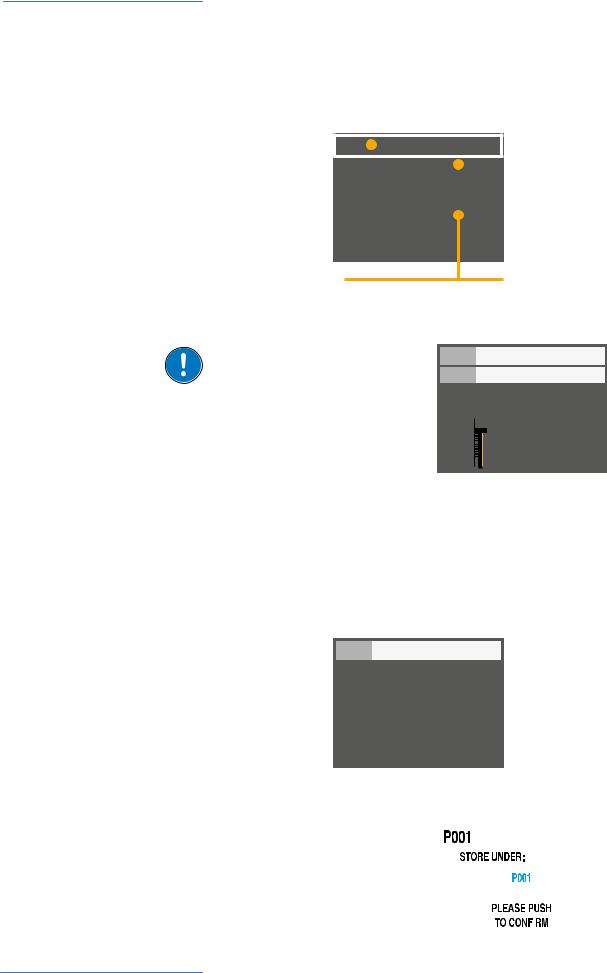
HOME Display The SL main page (HOME) is a very clear and complete picture of the main functions, as it follows:
Program |
GROUP |
(i.e. 001 NAME) |
the related GROUP of the selected program |
the selected Program |
(-------- if no GROUPS are selected) |
|
|
|
|
|
|
|
|
|
|
P001 |
|
SL 88 STUDIO |
|
|
|
||
|
|
|
|
|
||||
|
|
|
|
|
|
|
|
|
|
GROUP |
SAGA SETUP |
|
|
|
|||
|
|
|
||||||
|
|
|
|
|
||
INSTRUMENT |
1 |
INSTRUMENT |
2 |
|||
SOUND |
A0 / F#2 |
|
SOUND |
G3 / Db4 |
||
VOL 122 |
|
VOL 096 |
||||
|
|
|
|
|
||
INSTRUMENT |
3 |
|
INSTRUMENT |
4 |
||
SOUND |
B7 / C8 |
|
SOUND |
A0 / F#2 |
||
VOL 101 |
|
VOL 124 |
||||
ZONES (color coded)
active Zones and main parameters (Volume, Keyboard range)
By rotating the encoder, when a ZONE is selected, you can immediately control the Volume (000-127).
P001 SL 88 STUDIO
GROUP SAGA SETUP
|
|
|
|
|
|
|
||
INSTRUMENT |
1 |
INSTRUMENT |
2 |
|||||
SOUND |
|
|
|
SOUND |
|
|
||
VOL 122 |
|
|
A0 / F#2 |
|
VOL 096 |
G3 / Db4 |
||
|
|
|
|
|
|
|
|
|
|
|
|
|
|
|
|
||
INSTRUMENT |
97 |
3 |
|
INSTRUMENT |
4 |
|||
|
|
|
|
|
|
|
||
SOUND |
|
|
SOUND |
|
|
|||
|
|
|
|
|
|
|||
VOL 101 |
|
|
B7 / C8 |
|
VOL 124 |
A0 / F#2 |
||
|
|
|
|
|
|
|
|
|
Program Selection & Edit To select a Program, you can either rotate the Encoder (direct selection) or Click the Encoder, rotate to select and Click to confirm.
When a Program is selected (by moving the cursor to the top area of the display) pressing IN you enter in Program Edit.
P001 SL 88 STUDIO
|
|
|
|
|
|
|
STORE UNDER: |
|
P001 |
||||
NAME: |
|
SL 88 STUDIO |
||||
ZONE EDIT: |
|
1 |
2 |
3 |
4 |
|
MERGE SOURCE: |
|
OFF |
|
|
|
|
MERGE DEST.: |
|
USB OUT |
||||
MERGE FILTER: |
|
SYS OFF - ALL |
||||
The following parameters are avaible: |
|
|
|
||
STORE UNDER |
|
|
|
|
|
|
|
SL 88 STUDIO |
|||
To select the position where |
|
|
|||
|
|
|
|
|
|
you want to store the current |
|
|
|
|
|
|
|
|
|
|
|
Program. |
|
|
|
|
|
|
|
|
|
|
|
|
|
|
|
|
|
|
|
|
|
|
|
|
|
|
|
|
|
|
|
|
|
|
|
10 SL Controllers by Studiologic®
Setup parameters
NAME |
Program Edit |
To name the current Program, by using the Encoder posi- |
|
tional commands (left/right – up/down) and clicking when |
|
the desired |
letter/number |
is selected. You can either move the cursor to the letters/numbers area and select them by clicking the encoder, or rotate the encoder to select the letters and numbers.
ZONE EDIT
(refer to the related chapter at page 29).
MERGE SOURCE
To select the source (MIDI IN or USB) to be merged to the DESTINATION.
MERGE DESTINATION
To select the destination of all merged MIDI data.
MERGE FILTER
To filter (cut out) some MIDI message when merging SOURCE to DESTINATION.
E
|
|
|
|
|
|
|
|
|
|
|
|
SL Controllers by Studiologic® |
11 |
|
Setup parameters
Programmable GROUPS The SL offers a special function to organize your Programs in Groups, in order to list in the same Group various Programs, corresponding to a specific task, song or project. The same Program can be associated to more Groups, allowing to optimize the internal memory and avoid duplicating Programs, if they can be used for more projects.
To select or program a Group, wivthin the 12 avaiable ones, press the main Encoder down or up until the Group section is selected, then scroll the various Groups with the Encoder; when a Group is selected, only the Programs of the selected Group will be shown, in the sequence stored in the Group.
NOTE
It is always possible to skip the Groups selection, by setting the Groups to the empty position, shown on the display as GROUP --------
P001 SL 88 STUDIO
GROUP --------
|
INSTRUMENT |
1 |
|
INSTRUMENT |
2 |
|
||
|
SOUND |
A0 / F#2 |
|
SOUND |
G3 / Db4 |
|
||
|
VOL 122 |
|
VOL 096 |
|
||||
|
|
|
|
|
|
|
||
|
INSTRUMENT |
3 |
|
INSTRUMENT |
4 |
|
||
|
SOUND |
B7 / C8 |
|
SOUND |
A0 / F#2 |
|
||
|
VOL 101 |
|
VOL 124 |
|
||||
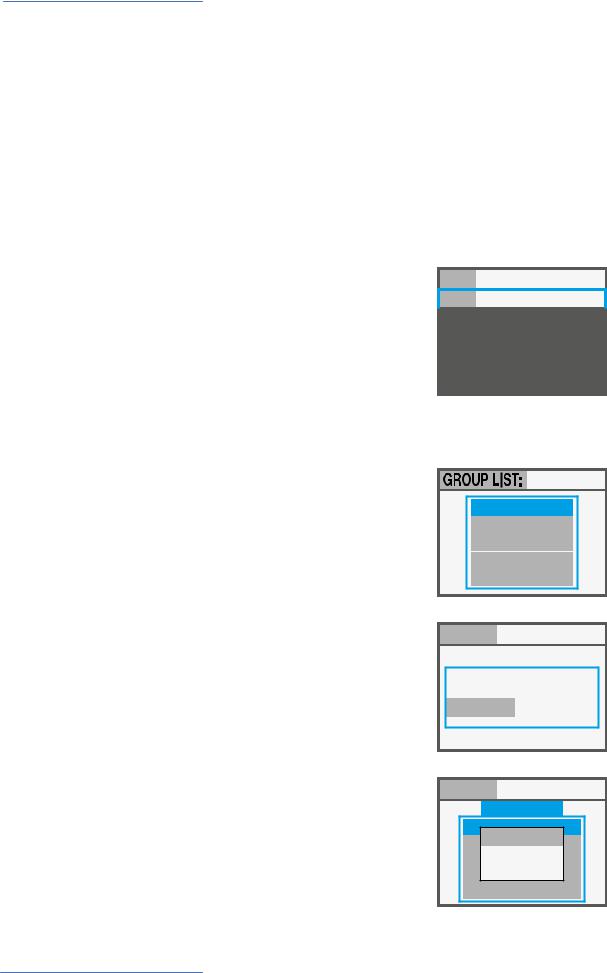
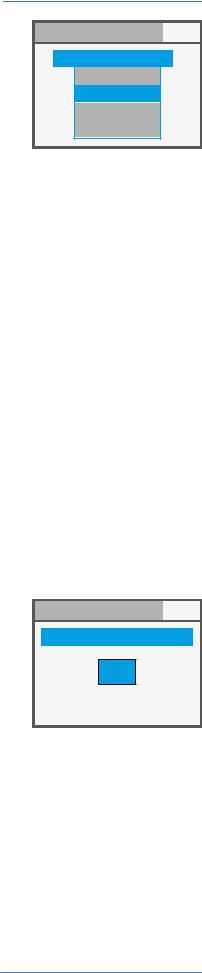
How to create a new Group or edit existing one
Press the IN button when the Group section is selected and then choose a Group within the list, moving the Encoder down or up.
Press IN to enter in the GROUP EDIT page.
Now you can edit the Group name and the associated Programs.
To edit the associated Programs, select PROGRAM LIST and press IN.
To add or change a Program to the Group, scroll them with the Encoder and click on it to open the popup menù that allows to MOVE UP, MOVE DOWN or DELETE a Program within the 30 assignable ones.
BEAT - LESS
ROAD - STONES
HAPPY
BIRTHDAY
THE BOSS
GROUP: THE BOSS
NAME: |
THE BOSS |
PROGRAM LIST
GROUP: THE BOSS
PROGRAM LIST:
002 CONCERT GRAND MOVE UP
003 RHODX MARK I
MOVE DOWN 007 JAZZ SETUP 022DELETEPIANO + ORGAN
009 SYNTH SETUP
12 SL Controllers by Studiologic®
Setup parameters
To enter in Zone Edit, press the IN button when one of the |
Zone Edit |
Zones is selected; you can still select another Zone by using |
|
the left/right Encoder’s controls. From the list of parameters, |
|
you can either press IN, rotate the Encoder or move the cursor |
|
to the right to enable the parameter‘s modification. |
|
 SL 88 STUDIO
|
|
|
|
|
|
|
|
|
|
|
|
|
|
|
|
|
|
|
|
|
|
|
|
|
|
|
|
|
|
|
|
|
|
|
|
|
|
|
|
|
|
|
|
|
|
|
|
|
|
|
|
|
|
|
|
|
|
|
|
|
|
|
|
|
|
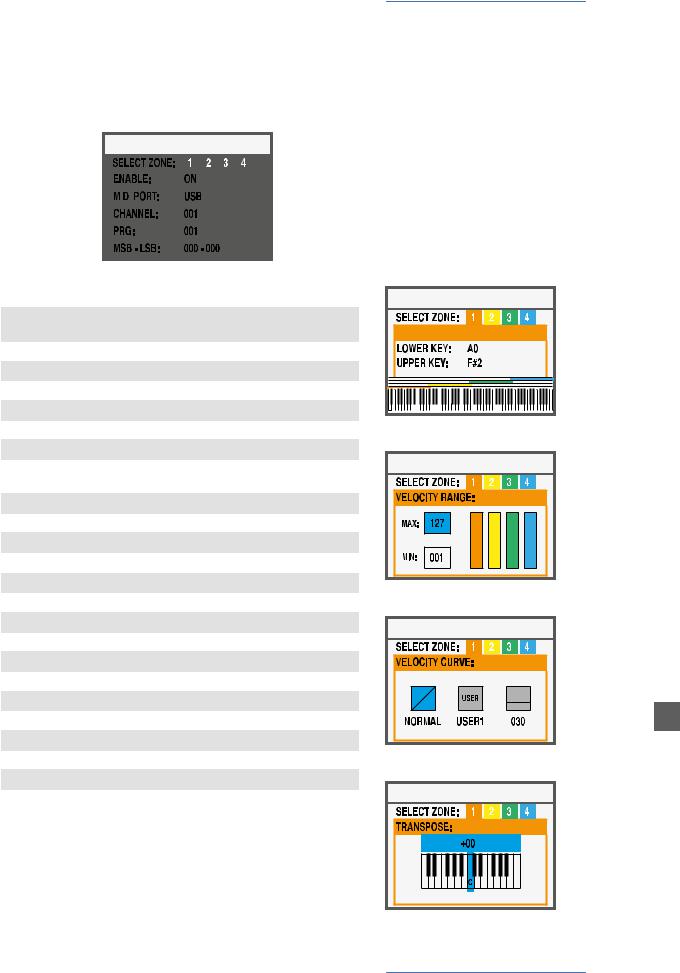
ENABLE |
to enable or disable the selected zone |
||||||||||
1 |
MIDI PORT |
to select the related OUT port within the |
||||||||||
|
|
|
|
avaible ones (USB, MIDI 1, MIDI 2) |
||||||||
Page |
CHANNEL |
001 - 016 |
|
|
|
|
|
|
||||
|
|
|
|
|
|
|
||||||
|
PROGRAM |
001 - 128 |
|
|
|
|
|
|
||||
|
MSB - LSB |
000 - 127 (for both) |
||||||||||
|
|
|
|
|
|
|
|
|
|
|
|
|
|
VOLUME |
000 - 127 |
|
|
|
|
|
|
||||
2 |
KEY RANGE 1 |
A0 - C8 |
||||||||||
VELOCITY RANGE 2 |
000 - 127 |
|
|
|
|
|
|
|||||
Page |
|
|
|
|
|
|
||||||
VELOCITY CURVE 3 |
SOFT/NORMAL/HARD, USER(1-6), |
|||||||||||
|
|
|
|
|
FIXED (VALUE 001-127) |
|||||||
|
AFTERTOUCH |
OFF/ON |
||||||||||
|
TRANSPOSE 4 |
-12 / +12 SEMITONES |
||||||||||
3 |
OCTAVE |
-3 / +3 |
|
|
|
|
|
|
||||
|
|
|
|
|
|
|
|
|
|
|
|
|
Page |
PEDAL 1 |
(selectable functions) |
||||||||||
|
||||||||||||
|
PEDAL 2 |
(selectable functions) |
||||||||||
|
PEDAL 3 |
(selectable functions) |
||||||||||
|
|
|
|
|
|
|
|
|
|
|
|
|
|
PEDAL 4* |
(special functions) |
||||||||||
4 |
STICK 1 X |
(selectable functions) |
||||||||||
|
|
|
|
|
|
|
|
|
|
|
|
|
Page |
STICK 1 Y |
(selectable functions) |
||||||||||
|
||||||||||||
|
STICK 2 X |
(selectable functions) |
||||||||||
|
STICK 2 Y |
(selectable functions) |
||||||||||
|
|
|
|
|
|
|
|
|
|
|
|
|
|
STICK 3 X |
(selectable functions) |
||||||||||
5 |
STICK 3 Y |
(selectable functions) |
||||||||||
Page |
INSTRUMENT NAME |
|
|
|
|
|
|
|
|
|||
|
SOUND NAME |
|
|
|
|
|
|
|
|
|||
|
|
|
|
|
|
|
|
|
|
|
|
|
*Pedal 4 can be programmed to control all available parameters (switch and continuous) but it can also be set to be connected with special multi-pedals (SLP3-D, NTP, etc.) allowing to have up to three pedals in one plug. A typical application is a triple piano pedal, where two pedals can control the Soft and Sostenuto functions, while the third pedal can control a half-pedaling Damper function.
 SL 88 STUDIO
KEYRANGE: |
1 KEY RANGE
 SL 88 STUDIO
2 VELOCITY RANGE
 SL 88 STUDIO
3 VELOCITY CURVE
 SL 88 STUDIO
4 TRANSPOSE
E
SL Controllers by Studiologic® |
13 |
Setup parameters
Zone Edit
P001 SL 88 STUDIO
GROUP SAGA SETUP
|
|
|
|
|
||
INSTRUMENT |
1 |
INSTRUMENT |
2 |
|||
SOUND |
A0 / F#2 |
|
SOUND |
G3 / Db4 |
||
VOL 122 |
|
VOL 096 |
||||
|
|
|
|
|
||
INSTRUMENT |
3 |
|
INSTRUMENT |
4 |
||
SOUND |
B7 / C8 |
|
SOUND |
A0 / F#2 |
||
VOL 101 |
|
VOL 124 |
||||
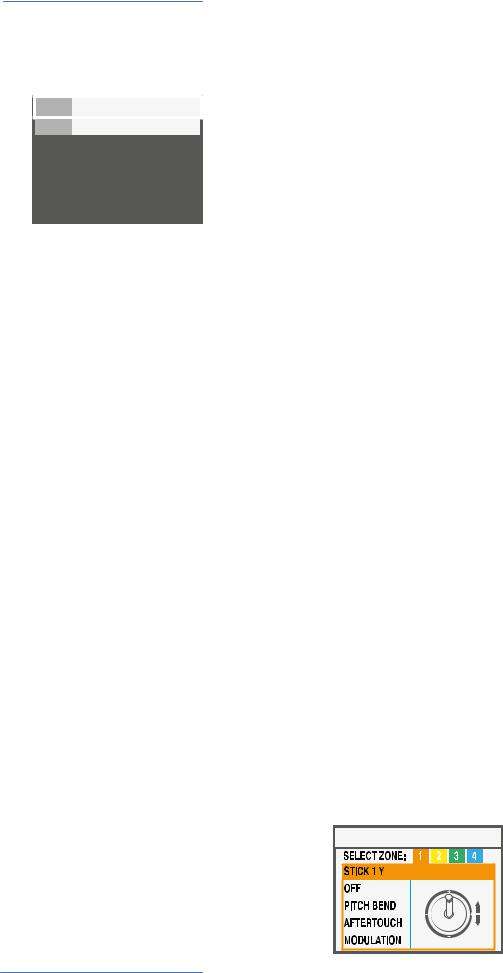
Programmable Sticks
If you assign one of the special multi-pedals to a Zone, the other Zones can only be set to OFF or to the same kind of pedal (all other functions are shown in grey).
A Zone can be have 3 states: ON/OFF/Standby.
To enable or disable a Zone press IN and set it ON or OFF; if a Zone is OFF the display will only show a colored background. Clicking the Encoder, you can set the Zone in Standby and the display will show it in grey.
(The picture shows Zone 1 ON, Zone 2 Standby, Zones 3 and 4 OFF).
Please note that you can also set all parameters of a disabled Zone (in the Program) in order to be ready to enable it at any time, with all pre-programmed parameters for that particular Program.
The 3 Sticks on the left side of the instruments are programmable real-time controls:
•Stick 1 has springs in both the vertical and horizontal axes and it goes back to zero automatically; a typical setting for such kind of control is for Pitch Bending functions;
•Stick 2 has a spring only on the horizontal axis and it goes back to center on that side; a typical setting for such king of control is for Modulation or Filter cutoff, when controlling any kind of virtual Synthesizer;
•Stick 3 is totally free and it keeps the position where you move it, on both X and Y axes, allowing to control any parameter that needs to stay stable where it is set.
How to program the sticks
Once you have selected a Zone, by clicking the IN button you enter in EDIT MODE and you can scroll with the Encoder’s vertical switches thru all the programming pages, until you find the page related to the Sticks programming.
Select one of the sticks, press IN again and enter in the programming page, where all available Stick’s functions are listed, for both the horizontal and vertical axes.
 SL 88 STUDIO
14 SL Controllers by Studiologic®

Global settings
In the HOME page, press OUT button to enter in the GLOBAL/ GLOBAL / SYSTEM SYSTEM page. (NOTE: to go back to the main display press
HOME).
GLOBAL / SYSTEM: V 1.6.0
|
|
MAIN TRASPOSE |
+00 |
PANIC |
|
RESTORE |
|
STICK CALIBRATION |
PED 1/2 (EXT) |
PROGRAMS +/- |
|
COMMON CHANNEL |
16 |
The following controls are available:
MAIN TRANSPOSE
Selecting this function and rotating the ENCODER, all enabled ZONES can be transposed in a range or -12 and +12 semitones, with a single control.
GLOBAL / SYSTEM: V 1.6.0
GLOBAL TRANSPOSE:
+00
C |
PANIC
In case of pending notes or controls (coming from the external devices, connected to the instrument) pressing this command the “ALL NOTES OFF” message is sent to all devices, to restore the normal function;
RESTORE
This function restores all initial settings of the instrument; please note that all your programming will be restored and consequently this function should be activated only in case of real need, saving all your programs before restoring the unit.
STICKS CALIBRATION
In the first page the 3 sticks icons are blue and you can verify the actual range by moving them all the way along the four sides, reaching to the edges of the related area.
To calibrate a stick, press it (click): the area will become yellow; now move the stick along the four sides, reaching accurately the four edges of the control area, repeating the movement at least 2-3 times
Once the point 2 is made, click again on the stick: the area will become green, to confirm that the calibration is done.
GLOBAL / SYSTEM:
STICKS CALIBRATION:
|
|
|
|
|
|
|
STICK 1 |
STICK 2 |
STICK 3 |
||||
|
|
|
|
|
|
|
|
|
|
|
|
|
|
STICKS CALIBRATION:
|
|
|
|
|
STICK 1 |
STICK 2 |
STICK 3 |
E
SL Controllers by Studiologic® |
15 |
Global settings
GLOBAL / SYSTEM: V 1.6.0
PEDAL PRG +/-
OFF
PED1 +
PED1 -
PED2 +
GLOBAL / SYSTEM: V 1.6.0
COMMON CHANNEL:
016
PROGRAM +/-
This function allows to increment or decrement the current SL Program, using single-switch pedals connected to the Ped 1 or Ped 2 sockets; the available settings are:
•OFF: function disabled
•PED1 + pressing a pedal connected to PED1 will increment the current Program a step ahead (i.e from Program 001 to
002and so on);
•PED1 – pressing a pedal connected to PED1 will decrement the current Program a step below (i.e from Program 002 to
001and so on);
•PED2 + pressing a pedal connected to PED2 will increment the current Program a step ahead (i.e from Program 001 to
002and so on);
•PED2 – pressing a pedal connected to PED2 will decrement the current Program a step below (i.e from Program 002 to
001and so on);
•PED1/2 +/- two pedals connected to PED1 and PED2 will allow to increment or decrement the current Program;
•PED1/2 EXT with this setting the SL will send and receive the Data Increment and Data Decrement controls via USB in, allowing to control the main Programs from computer software applications enabled to make this function.
NOTE: when one of the PED 1/2 Global functions are activated, the related pedal setting of each Program are overwritten by the Program -/+ function and the ZONE programming will be shown in a grey color; setting to OFF the related Global pedal functions will re-enable the original Zone setting of the pedals.
COMMON CHANNEL
As COMMON is intended a MIDI channel that allows to send or receive generic controls from and to the SL, not directly related to a single Zone; the function that needs a Common Channel (set to one of the available 16 MIDI channels) is the Program +/-.
The COMMON Channel selection includes the these values:
•OFF: no Common channel messages enabled;
•01/16: selected Common Channel (the most used setting is the MIDI CH 16);
16 SL Controllers by Studiologic®

|
Firmware management |
|
|
The SL firmware does not normally need any update, unless a |
Firmware upgrade |
new official Firmware Version will be made available by Stu- |
|
diologic. The procedure to update the firmware (intended |
|
as the main features, parameters and/or improvements of |
|
the operating system) and the dedicated software to update |
|
your SL will be published on our Sites with all related descrip- |
|
tions and instructions. |
|
To enter in Upgrade Mode, turn the instrument ON keeping |
|
the IN button pressed. |
|
The SL Editor is a dedicated Software Applications, that will |
SL Editor |
be downloadable from our Official Sites; it will allow to edit all |
|
avaiable SL parameters with a very intuitive and interactive |
|
user‘s interface. When the SL is connected to the computer |
|
(via USB) and the SL Editor is open, the communication is set |
|
in real time and all editings are transmitted to the SL directly, |
|
with no need of any offline action. |
|
The images below are examples of the many avaible features. |
|
MAIN PAGE |
ORGANIZE |
E
KEY BALANCE |
SL CURVES |
SL Controllers by Studiologic® |
17 |

Declarations
Warranty |
Every product from Studiologic by Fatar has been carefully manufac- |
|
|
tured, calibrated and tested, and carries a warranty. Damage caused |
|
|
by incorrect transport, mounting or handling is not covered by this |
|
|
warranty. Compensation amounting to more than the price of the |
|
|
device is excluded. For any further informations please refer exlusi- |
|
|
vely to your dealer and/or local distributor. This is based on general |
|
|
terms and condition of the local distributor / FATAR srl, Italy. |
|
CE-Conformity |
FATAR srl |
|
|
Zona Ind.le Squartabue |
|
|
62019 Recanati MC Italy |
|
|
declares that this product complies with the European Directives: |
|
|
2004/108//EC |
EMC Directive |
|
DIN EN 55013 |
EMC radio disturbance of sound, TV and |
|
|
associated equipment |
|
DIN EN 55020 |
EMC immunity of sound, TV and |
|
|
associated equipment |
|
Recanati, 20. 05. 2015 Marco Ragni, Chief Executive Officer |
|
|
This declaration becomes invalid if the device is modified without |
|
|
approval. |
|
RoHS-Conformity |
This product is manufactured according to the 2002/95/EC directive. |
|
RoHS |
|
|
compliant |
|
|
2002/95/EC |
|
|
Disposal / WEEE |
The purpose of this EC Directive 2003/108/EC is, as a first priority, the |
|
|
prevention of waste electrical and electronic equipment (WEEE), and |
|
|
in addition, the reuse, recycling and other forms of recovery of such |
|
|
wastes so as to reduce the disposal of waste. Please help to keep our |
|
|
environment clean. |
|
State of the art |
To ensure maximum quality all Studiologic by Fatar devices are al- |
|
|
ways engineered to be state-of-the-art products, therefore updates, |
|
|
modifications and improvements are made without prior notice. |
|
|
Technical specification and product appearance may vary from this |
|
|
manual. |
|
Trademarks |
All trademarks used in this manual belong to their respective owners. |
|
Copyright |
No part of this manual may be reproduced or transmitted in any form |
|
|
or by any means without prior consent of the copyright owner: |
|
FATAR Srl
Zona Ind.le Squartabue
62019 Recanati, Italia
18 SL Controllers by Studiologic®

ITALIANO
SL88 GRAND
SL88 STUDIO
SL73 STUDIO
Manuale di Istruzione |
I |
SL Controllers by Studiologic® |
19 |

Informazioni di sicurezza
Importanti Istruzioni di Sicurezza
Si prega di leggere l‘intero manuale. Esso contiene tutte le informazioni di cui si ha bisogno per usare questa unità.
Si prega di seguire le istruzioni riportate nel manuale. La garanzia sarà annullata se operazioni non autorizzate verranno svolte sull‘unità.
Solo gli accessori specificati dal fabbricante devono essere utilizzati con questa unità. Utilizzare l‘unità solo come specificato in questo manuale.
PERICOLO!
Rischio di scosse elettriche.
Non aprire l‘unità. Non ci sono parti riparabili dall‘utente. L‘unità deve essere riparata solo dal personale di assistenza tecnica.
Umidità
Per ridurre il rischio di incendi o scosse elettriche, non esporre l‘unità a pioggia o umidità. Non posizionare contenitori con liquidi sull‘unità. Non utilizzare l‘unità vicino all‘acqua, ad esempio piscina, vasca da bagno o in cantina umida.
Se l‘unità viene spostata da un luogo freddo in una camera calda, della condensa può verificarsi all‘interno. Per evitare danni si prega di consentire all’unità di raggiungere la temperatura ambiente prima di accenderla.
Installazione
Utilizzare sempre un supporto stabile per posizionare la tastiera. Si prega di essere consapevoli della sua dimensione e peso.
Pulizia / Manutenzione
Non utilizzare detergenti abrasivi, che possano danneggiare la superficie. Si consiglia un panno in microfibra leggermente umido.
Imballaggio
Si prega di conservare tutti gli imballaggi e usarli per proteggere la tastiera per il trasporto, ad esempio se è necessaria la manutenzione.
Importante
Prima di collegare l‘unità alla rete elettrica, si prega di controllare se l‘alimentazione è adatta per lo strumento. L‘unità può essere alimentata con 100-240VAC, usando l‘alimentatore adatto fornito nella confezione.
20 SL Controllers by Studiologic®
|
|
|
Indice |
Informazioni di sicurezza |
20 |
|
|
|
|
||
La tua nuova SL |
22 |
Tastiera |
|
|
22 |
Zone |
|
|
22 |
Nell‘imballo |
|
|
23 |
Spiegazione del funzionamento |
|
Alimentazione - Ingressi & Connessioni |
24 |
Alimentazione |
|
|
24 |
Ingressi |
|
|
24 |
MIDI IN/OUT |
|
|
24 |
USB |
|
Pannello di controllo |
25 |
Pannello di controllo |
|
|
25 |
Stick programmabili |
|
Parametri di setup |
26 |
HOME Display |
|
|
26 |
Program Selection & Edit |
|
|
28 |
Group programmabili |
|
|
29 |
Zone Edit |
|
|
30 |
Stick programabili |
|
Impostazioni globali |
31 |
GLOBAL/SYSTEM |
|
Gestione del Firmware |
33 |
Aggiornamento Firmware |
|
|
33 |
SL Editor |
|
Dichiarazioni |
34 |
|
|
Appendix |
67 |
Specifiche |
|
|
69 |
||
|
69 |
Dimensioni |
|
I
SL Controllers by Studiologic® |
21 |
 Loading...