


numastage
Version 1.0
Operation Manual |
|
E |
Manuale di Istruzione |
|
I |

ENGLISH
numastage
Operation Manual |
|
E |
NUMA Stage by Studiologic® 3

Safety Instructions
Important Safety Instructions
Please read the entire manual. It contains all the information you need to use this unit.
Please follow the instructions in the manual. The warranty will be void if unauthorized work is carried out on the instrument Only accessories that are specified by the manufacturer should be used with this unit. Use the unit only as specified in this manual.
DANGER!
Risk of electric shock.
Do not open the chassis. There are no user serviceable parts inside. The unit should only be serviced by qualified service staff.
Mains
The unit can be powered with 100 – 240VAC. The unit is secured by a 250V 500mA F type fuse. Replace the fuse with one of the same type and value.
This unit must be earthed.
Do not use a damaged power cord.
Humidity
To reduce the risk of fire or electric shock, do not expose the unit to rain or moisture. Never place containers with liquid on the unit. Do not use the unit near water, eg swimming pool, bathtub or wet basement.
If the unit is moved from a cold place to a warm room, condensation may occur inside. To avoid damage please allow the unit to reach room temperature before switching on.
Installation
Always use a stable rack to place the keyboard on. Please be aware of its size and weight.
Cleaning / Maintenance
Never use any abrasive detergent, which may damage the surface. We recommend a slightly moist micro-fibre cloth.
Packaging
Please keep all packaging, and use it to protect the keyboard when transporting, eg if servicing is required.
4 NUMA Stage by Studiologic®

|
|
|
Table of contents |
Safety Instructions |
4 |
|
|
|
|
||
Your new NUMA Stage |
6 |
|
|
How functions are shown in this manual |
7 |
|
|
Control panel / Connections |
7 |
|
|
Before using the NUMA Stage |
8 |
|
|
Presets / Sounds |
9 |
Demo songs |
|
|
9 |
Preset recall |
|
|
9 |
Sound engine / Sound selection |
|
|
9 |
EQ / Volume |
|
|
9 |
Transpose |
|
|
9 |
Pitch Wheel |
|
Layer / Split |
10 |
Layer |
|
|
10 |
Split |
|
|
10 |
Split / layer level |
|
|
10 |
Split point |
|
|
10 |
Octave Upper / Lower |
|
|
11 |
Hold |
|
|
11 |
Expression |
|
Effects |
12 |
Effect selection |
|
|
12 |
Effect assign to splits / layer |
|
|
12 |
Free Wheel |
|
Strings Resonance |
13 |
Strings Res |
|
|
13 |
Strings Res setting |
|
Velocity |
14 |
Velocity |
|
Autoset function |
15 |
Autoset |
|
Global functions |
16 |
Fatar Touch |
|
|
16 |
Store presets |
|
|
17 |
Restore factory presets |
|
|
17 |
Panic, Master Tune, System |
|
MIDI Module and functions |
18 |
MIDI connection |
|
|
18 |
Masterkeyboard funct.: A/B zones |
|
|
19 |
Sound selection, Effects control |
|
|
20 |
Record of adjustments |
|
|
20 |
Master Tune |
|
Troubleshooting |
21 |
|
|
Declarations |
23 |
|
|
Appendix |
|
MIDI Implementation Chart |
|
|
|
Specifications / dimensions |
|
|
|
Preset list / copy sheet |
|
E
NUMA Stage by Studiologic® 5

Your new NUMA Stage
Thank you very much for choosing the NUMA Stage. You have obtained a state-of-the-art keyboard made by the renowned manufacturer Studiologic.
The NUMA Stage is easy to operate, and offers a perfect keyboard touch. We recommend that you read the entire manual carefully to take full advantage of all the functions of your new NUMA Stage.
An overview of the functions of the NUMA Stage:
Hammer action keyboard |
The NUMA Stage offers the latest innovative technology by |
|
Fatar: The sophisticated hammer action keyboard TP/100LR |
|
with triple switch sensor. The NUMA Stage weights 13 kg and |
|
is therefore portable, yet it offers the realistic piano touch for |
|
which Fatar is famous. You will love the touch and sound of |
|
your NUMA Stage. |
Internal Sounds |
You can immediately start playing the 12 selected high |
|
quality sounds, which have been carefully sampled. Expe- |
|
rienced keyboard players and musicians selected those |
|
sounds and were involved in the design of the straightfor- |
|
ward operation of NUMA Stage. Therefore NUMA Stage is |
|
your perfect partner on stage, in the studio or at home - re- |
|
gardless which kind of music you are performing. 128 voice |
|
polyphony is available to add depth and expression to your |
|
Music. It is possible to combine two sounds by layering or |
|
splitting the keyboard, and add the built-in modulation and |
|
reverb effects. |
Masterkeyboard functions |
The masterkeyboard functions of the NUMA Stage allow you |
|
to control other MIDI devices, with two separate Midi Zones |
|
(A-lower, B-upper) that can be played in single, layer or split |
|
mode. Select the sounds of external instruments or modules |
|
and adjust the levels directly from your NUMA Stage without |
|
the need of routing through other devices. |
Audio connections |
As well as the stereo audio output, the NUMA Stage has two |
|
additional headphone outs. This is ideal for music schools and |
|
late-night jam sessions without disturbing the neighbours. |
|
Plug your mp3-player or MIDI sound module into the audio |
|
input of the instrument Mix external audio devices directly |
|
with the sounds inside the NUMA Stage. |
Interactive NUMA |
The integrated USB port allows your NUMA Stage to connect |
USB <> Computer |
to your computer. You can use a USB and MIDI out for MIDI |
|
data transmission. In addition, updates of the firmware or the |
|
sound library are accessible via USB. |
Delivery includes |
NUMA Stage |
|
Power chord |
|
Sustain pedal VFP-1 |
|
Music stand |
|
CDOperation manual |
6 NUMA Stage by Studiologic®

|
Control panel / Connections |
|
|
All operation buttons are marked in bold italic in this manual |
How functions are shown in |
(eg On/Off). |
this manual |
If you have to press two buttons at the same time, it is indicated by & (eg Split & Bass 2). You can either press both buttons at the same time, or press and hold one button while pressing the other button.
Key combinations with Function are always marked red in this manual. First press and hold Function while pressing the other button (eg Function & Transpose).
Values in the display of the NUMA Stage are marked bold (eg P01).
To adjust the values, use the Value+/- buttons under the display. To make the value change in steps of 10 rather than 1, press and hold Value +/- below the display for a few seconds.
You will find tips and further information in text passages marked by the Studiologic logo.
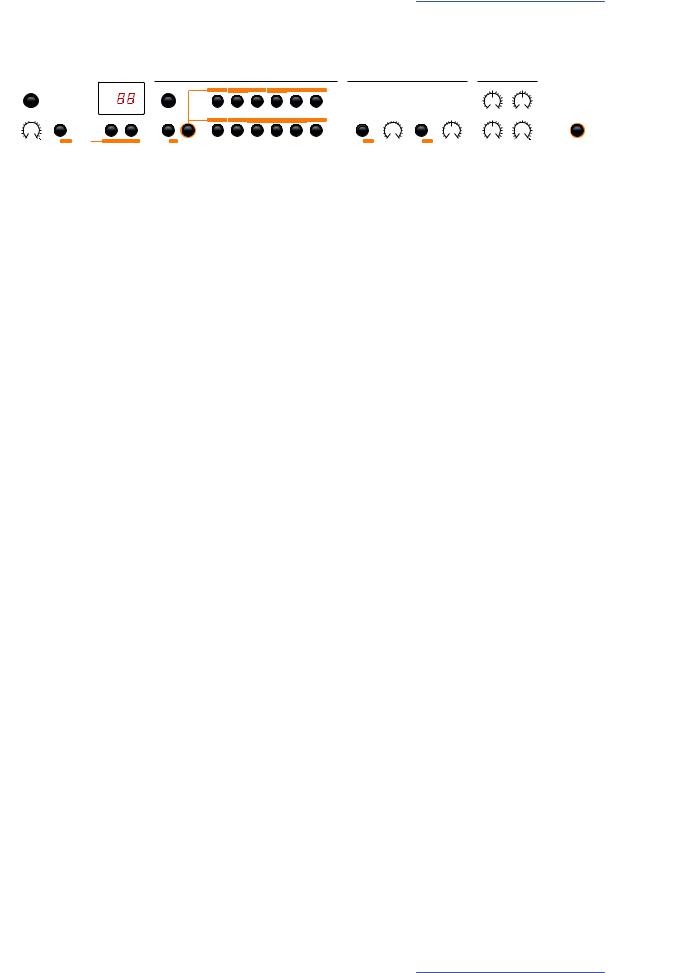
Control panel
Display - Value +/- buttons |
|
Sound Bank |
|
|
|
|
|
Output |
|
|
|||||
Value adjustment |
|
|
Sound, split and system configuration |
|
EQ and Volume adjustment |
||||||||||
|
MIDI Module |
|
|
|
Sound Bank |
|
|
|
|
Effects |
|
Output |
|
|
|
|
|
|
[ D e m o ] |
|
|
|
|
|
|
Modulation |
Reverb |
|
0 |
0 |
|
|
|
|
Transpose |
Octave Lower Octave Upper |
Master Tune |
Velocity |
Strings Res |
|
|
|
|
|
|
||
|
Program Change |
|
|
|
|
|
|
|
|
|
|
|
|
|
|
|
Bank Select LSB |
|
|
|
|
|
|
|
|
Chorus |
|
|
|
|
|
On / Off |
Bank Select MSB |
|
On / Off |
Concert Grand Stage Grand |
E Piano |
2 |
E Piano 3 |
Clavi |
Phaser |
Room |
Min |
Bass |
Treble |
Max |
|
Channel |
|
Rotary |
Hall |
|
|
||||||||||
|
|
|
|
|
|
|
|
|
|
|
|
|
|||
|
Octave |
|
|
Panic |
Hold |
Expression |
Wheel |
System |
Store |
|
50% |
|
0 |
|
|
|
|
|
Tremolo |
Delay |
|
|
|
|
|||||||
Volume |
EDIT Zone |
A-Lower B-Upper |
Split Point Function |
Pad 1 |
Pad 2 |
Organ 1 |
Organ 2 |
Bass 1 |
Bass 2 |
Select Assign Min Amount |
Max Select Assign Dry Mix Wet |
Lower Balance Upper |
Volume |
|
|
MIDI Module |
|
|
|
|
|
|
|
Effects |
|
|
Fatar Touch |
|
|||
Masterkeyboard functions |
|
|
|
|
|
|
Modulation / reverb effects |
Create your own velocity curve |
|||||||
Connections / Back view
Fuse |
USB port |
Hold - Expression pedal |
Audio out L/R |
500mA, F, 250V |
MIDI I/O and software updates |
Sockets for pedal connection |
2x 6,3mm mono jack |
o |
|
|
|
I |
|
|
|
Mains - Power |
MIDI In-Out-Thru |
Headphone out 1/2 |
Stereo audio in - Level |
100V to 240V |
MIDI send/receive |
2x 6,3mm stereo jack |
3,5mm stereo jack |
E
NUMA Stage by Studiologic® 7
Before using the NUMA Stage
Power connection Use the power chord supplied with the instrument to connect it to the power socket. Switch the unit on by using the power button near to the power socket.
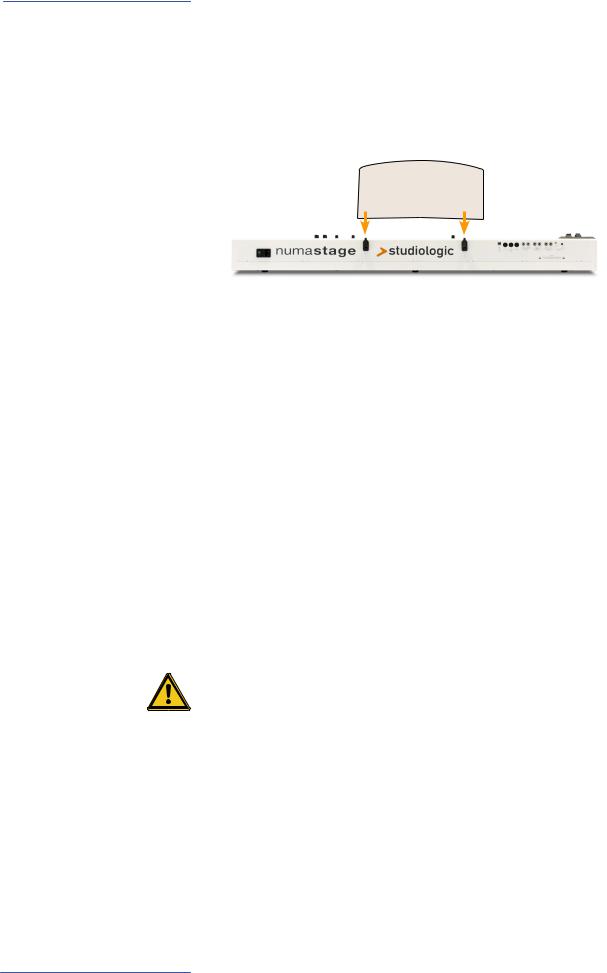
Music stand The music stand supplied can be attached to the brackets on the back of the unit.
Sustain / Expression pedal Connect the sustain pedal VFP 1 supplied with the unit at the socket which is labelled Hold.
At the socket labelled Expression, you can plug in the Studiologic pedal VP 25, which is available as an option.
Note: If you would like to attach other pedals, please refer to the required specifications..
Audio output Connect the audio outputs Left and Right with the inputs of your mixing desk or amplifier etc.
Headphones Plug in your headphone(s) at one of the headphone outputs. You can use up to two headphones at the same time.
Volume When you use the instrument for the first time, we recommend you to turn the Volume knob on the Output section to not more than half way between 0 and Full. While you are playing you can adjust the volume as you choose. Adjusting the Volume knob effects all audio and headphone outputs at the same time.
CAUTION:
To prevent hearing damage you should – as with all audio devices – avoid using the instrument at high volume for long periods.
Audio input You can plug in external audio devices, such as mp3-players for playback or MIDI sound modules, at the audio input. The Level knob near the jack on the back of the instrument is for adjusting the input level.
USB For data transmission via USB, connect the instrument to your computer with a USB cable. The first time you switch it on, the instrument will be recognized by your computer automatically and the appropriate driver will be installed by the OS (class compliant).
8 NUMA Stage by Studiologic®

|
|
|
|
|
|
|
|
|
|
|
Presets / Sounds |
|
Pitch |
On/Off - Demo |
|
|
Sound Bank |
|
|
Bass / Treble |
|
||||
• Picth bend of ±2 semi tones |
• Sound engine on/off |
|
• Direct access to the 12 |
• EQ: Cut / boost of low and |
||||||||
|
• Play Demo-songs |
|
|
internal sounds |
|
high frequencies |
||||||
|
|
|
|
Sound Bank |
|
|
|
|
Output |
|
||
|
|
[ D e m o] |
Transpose |
Octave Lower |
Octave Upper Master Tune |
Velocity |
Strings Res |
|
0 |
0 |
|
|
|
|
|
|
|
|
|||||||
|
Change |
|
|
|
|
|
|
|
|
|
|
|
|
ect LSB |
|
|
|
|
|
|
|
|
|
|
|
|
ect MSB |
|
|
Stage Grand |
E |
Piano 2 |
E Piano 3 |
Clavi |
Min |
Bass |
Treble |
Max |
|
|
|
|
|
|
|||||||
|
Value |
|
|
Hold |
|
Wheel |
System |
Store |
|
0 |
|
|
|
A-Lower B-Upper |
Split Point |
Pad 1 |
Pad 2 |
Organ 1 |
Organ 2 |
Bass 1 |
Bass 2 |
Wet Lower Balance Upper |
|
Fatar Touch |
|
Display - Value +/- |
Function |
|
|
Transpose |
|
|
Volume |
|
|
|||
• Preset recall |
• in combination with Demo |
|
• Transposition of the key- |
• Sound level |
|
|||||||
|
and Transpose |
|
|
board to other tunes |
|
|
|
|
||||
Press and hold Demo for a few seconds to play the demo |
|
Demo songs |
|
|
||||||||
songs. They will start automatically and DEM is shown in the |
|
|
|
|
|
|
||||||
display. Use Value +/- to play the next or previous demo song. |
|
|
|
|
|
|
||||||
By pressing Demo again you quit the demo mode. |
|
|
|
|
|
|
|
|
|
|||
As long as the instrument displays P followed by a two digit number (eg P05) you can recall any preset by pressing Value +/-. There are 24 factory presets available (P01 – P24).
The sound engine can be activated or deactivated using the On/Off button.
To select a sound, use the 12 labelled buttons. The button of the selected sound lights up.
Preset recall
Sound engine / Sound selection
To adjust the sound of the instrument to the environment, |
EQ / Volume |
you can cut or boost low and high frequencies using the Bass |
|
and Treble knobs in the Output section. Set the sound level |
|
with the Volume knob. |
|
If you have to play in a different key, you can simplify this task |
Transpose |
by transposing the keyboard (eg: from F plus one semitone |
|
to F sharp). |
|
To transpose in steps of a semi-tone, press Function & |
|
Transpose. Use Value +/- to change the transposition. If no |
|
transposition is used, 0 will be displayed. Adjustments of -6 |
|
to 5 semi-tones can be processed, to cover the entire range. |
|
Press Function again to keep the adjustment and quit |
|
transposition mode. The Transposition setting will be kept |
|
until the instrument power is switched off. |
|
To temporarely vary the pitch while playing by ±2 semitones, |
Pitch wheel |
use the Pitch wheel on the left. The wheel is self centering |
|
and will go back to its center position after being released (ie, |
|
no pitch applied). |
|
E
NUMA Stage by Studiologic® 9

Layer / Split
Display - Value +/-
• Display and adjustment of Split point / Octave
Octave Lower - Upper
• Octave of Layer 1/2 or lower and upper split zone
|
MIDI Module |
|
|
|
|
Sound Bank |
|
|
|
|
|
|
|
|
[ D e m o] |
Transpose |
Octave Lower |
Octave Upper |
Master Tune |
Velocity |
Strings Res |
|
Program Change |
|
|
|
|
|
|
|
|
|
|
Bank Select LSB |
|
|
|
|
|
|
|
|
|
On / Off |
Bank Select MSB |
|
|
On / Off |
Concert Grand |
Stage |
Piano 1 |
E |
Piano 3 |
Clavi |
Channel |
|
|
||||||||
|
|
|
|
|
|
|
|
|
|
|
|
Octave |
|
|
|
Panic |
Hold |
Expression |
|
System |
Store |
Volume |
EDIT Zone |
A-Lower |
B-Upper |
Point |
Pad 1 |
Pad 2 |
Organ 1 |
Organ 2 |
Bass 1 |
Bass 2 |
Split - Point |
|
Function |
|
Sound Bank |
|
Balance |
• Split mode on/off |
• in combination with Octave |
|
• Layer sound selection |
• Relative level of Layer 1/2 |
||
• Split point definition |
Lower - Upper and Point |
|
|
|
and split zones |
|
Layer To play two sounds at the same time over the whole keyboard, press both corresponding sound selection buttons at the same time (eg Stage Grand & Pad 2).
Split Playing two sounds in different keyboard zones is called Split mode. Press Split to activate this function and the button will light up. For the upper split zone the last selected sound is automatically used. If you want to change the sound for the upper split zone just press the corresponding button (eg Stage Grand). To change the sound for the lower split zone, press Split and the corresponding sound select button at the same time (e.g. Split & Bass 1). If you want to quit the split mode and use all 88 keys to play the same sound, press
Split again. Please note: that the same Split point will also be activated on the Midi Zones (Lower to left / Upper to right)
Split / Layer level Use the Balance knob of the Output section to adjust the relative level of layer 1 to 2 or the lower to upper split zone.
Split point To adjust the split point, press Function & Point. The display shows the actual selected split point. Using the keyboard (or Value +/-), select the highest note for the lower split zone.
Press Function again to keep the adjustment and quit the split point mode.
Octave Lower / You can select the octave transposition for both layer and Octave Upper split zones independently. Use Function & Octave Lower to make adjustments for the lower split zone / layer 2 and Func-
tion & Octave Upper for the upper split zone / layer 1.
No octave transposition is indicated by 0 in the display. Available values are -3 to 3 an. That means that adjustments of ±3 octaves are possible.
Press Function again to keep the adjustment and quit the octave lower / upper mode.
10 NUMA Stage by Studiologic®
Layer / Split
Display - Value +/-
• Display and adjustment of Hold / Expression
MIDI Module
Program Change
Bank Select LSB
Bank Select MSB
On / Off
Channel
Octave
 Volume
  EDIT Zone A-Lower B-Upper
Function |
|
Hold - Expression |
• in combination with Hold |
|
• Pedal assign to Layer and |
and Expression |
|
Split zone |
Press Function & Hold to choose to which zone (split or layer) |
Hold |
||
the sustain pedal should be applied. The display will show |
|
||
you the following options, which you select using Value +/-: |
|
||
|
|
|
|
Display / Option |
Hold applies to |
|
|
|
|
|
|
U-L (Upper/Lower) |
both split zones / layer |
|
|
U (Upper) |
upper split zone / layer 1 |
|
|
L (Lower) |
lower split zone / layer 2 |
|
|
Press Function again to keep the adjustment and quit the |
|
||
hold mode. |
|
|
|
Tip: This function is very useful if you would like to play in split mode, with |
|
||
a piano sound with sustain in the upper zone, and a walking Bass without |
|
||
sustain in the lower split zone. |
|
||
Press Function & Expression to choose to which zone (split |
Expression |
||
or layer) the expression pedal shall be applied. The display |
|
||
will show you the following options, which you select using |
|
||
Value +/-: |
|
|
|
|
|
|
|
Display / Option |
Expression applies to |
|
|
|
|
|
|
U-L (Upper/Lower) |
both split zones / layer |
|
|
U (Upper) |
upper split zone / layer 1 |
|
|
L (Lower) |
lower split zone / layer 2 |
|
|
Press Function again to keep the adjustment and quit the expression mode.
Tip: This function is very useful if you would like to play in layer mode, eg with a piano sound and a pad sound. The volume of the pad sound can be then controlled with the expression pedal.
E
NUMA Stage by Studiologic® 11

Effects
Free |
|
Display - Value +/- |
||||||||||||||||||||||||||||
• Modulation speed |
|
• Display and adjustment of |
||||||||||||||||||||||||||||
• Vibrato |
|
Effect assigns |
||||||||||||||||||||||||||||
|
|
|
|
|
|
|
|
|
|
|
|
|
|
|
|
|
|
|
|
|
|
|
|
|
|
|
|
|
|
|
|
|
|
|
|
|
|
|
|
|
|
|
|
|
|
|
|
|
|
|
|
|
|
|
|
|
|
|
|
|
|
|
|
|
|
|
|
|
|
|
|
|
|
|
|
|
|
|
|
|
|
|
|
|
|
|
|
|
|
|
|
|
|
|
|
|
|
|
|
|
|
|
|
|
|
|
|
|
|
|
|
|
|
|
|
|
|
|
|
|
|
|
|
|
|
|
|
|
|
|
|
|
|
|
|
|
|
|
|
|
|
|
|
|
|
|
|
|
|
|
|
|
|
|
|
|
|
|
|
|
|
|
|
|
|
|
|
|
|
|
|
|
|
|
|
|
|
|
|
|
|
|
|
|
|
|
|
|
|
|
|
|
|
|
|
|
|
|
|
|
|
|
|
|
|
|
|
|
|
|
|
|
|
|
|
|
|
|
|
|
|
|
|
|
|
|
|
|
|
|
|
|
|
|
|
|
|
|
|
|
|
|
|
|
|
|
|
A-Lower B-Upper
Function |
|
Free Wheel |
• in combination with Effect- Assign |
• Wheel function |
|
• in combination with Free Wheel |
selection |
|
Amount / Mix
•Intensity of Modulation
•Reverb mix (dry/wet)
Effects |
|
|
|
Output |
|
|
Modulation |
|
Reverb |
0 |
|
|
0 |
|
|
|
|
|
||
Chorus |
|
|
|
|
|
|
Phaser |
Room |
Min |
Bass |
Max |
Min |
Treble Max |
Rotary |
Hall |
50% |
0 |
|
|
|
Tremolo |
Delay |
|
|
|
||
|
|
|
|
|
||
|
|
Lower |
Balance |
Upper |
|
Volume |
Select - Assign
•Effect selection
•Effect assigns
Effect selection |
To select a Modulation or Reverb effect, step through the |
||
|
algorithms by tapping the corresponding Select button. The |
||
|
selected effect is indicated by LED. If no LED is lit up, no effect |
||
|
is active. Both effect machines can be used independently at |
||
|
the same time. |
|
|
|
Use the Amount or Mix knob to adjust the intensity or the |
||
|
effect mix. |
|
|
Effect assign for |
In Split or Layer |
mode you can choose if an effect is |
|
Splits / Layer |
applied to just one or both sounds. Press and hold Function |
||
|
while selecting the appropriate Assign button at the same |
||
|
time. The display will show the following options from which |
||
|
you make a selection, using Value +/-: |
||
|
|
|
|
|
Display / Option |
|
Effect applies to |
|
|
|
|
|
U-L (Upper/Lower) |
|
both split zones / layer |
|
U (Upper) |
|
upper split zone / layer 1 |
|
L (Lower) |
|
lower split zone / layer 2 |
|
Press Function again to keep the adjustment and quit the |
||
|
effects assign mode. |
||
|
Tip: This function is very useful if you would like to play in split mode an |
||
|
Organ sound with Rotary effect at the upper zone and a Bass at the lower |
||
|
split zone, which obviously should not have this effect. The assignment |
||
|
can be individually adjusted for both effect machines. Independent of the |
||
|
actual status of the effect machines (selected effect or off), adjustments |
||
|
can be made. |
|
|
Free Wheel |
The Free wheel can either send the modulation data defined |
||
|
by the MIDI standard (Vibrato) or control a second parameter |
||
|
of the internal processed modulation effect, namely the |
||
modulation speed.
To access the settings press Function & Free Wheel. The display shows both options Modulation and Effect between which you can choose using Value +/-. To adjust the modulation speed with the Free wheel, choose Effect.
Press Function again to store the adjustment and quit the free wheel mode.
12 NUMA Stage by Studiologic®
Strings Resonance
Display - Value +/- |
|
Strings Res |
|
• Display and value adjust- |
• Strings Res setting |
||
ments |
|
|
|
|
MIDI Module |
|
|
|
Program Change |
|
|
|
Bank Select LSB |
|
|
On / Off |
Bank Select MSB |
|
|
Channel |
|
|
|
|
|
|
|
|
Octave |
|
|
Volume |
EDIT Zone |
A-Lower |
B-Upper |
|
Function |
|
|
|
• in combination with Strings Res |
||
The String Resonance Modelling includes 3 natural effects: |
Strings Res |
Strings Resonance: this effect has been analyzed and repro- |
|
duced by the Studiologic Lab‘s team and implemented with |
|
many improvements, that allow to have a very warm and na- |
|
tural effect (as compared to many other instruments) with a |
|
wider frequency response and a very realistic sound. The ef- |
|
fect reproduces the resonance of all strings, when the Dam- |
|
per pedal is pressed, creating a kind of very typical acoustic |
|
reverberation of all strings and their harmonics. |
|
Sympathetic Resonance: playing a key on an acoustic piano |
|
allows the damper of that particular note to be released, and |
|
it also lets the string/s of that key play and resonate. As a |
|
consequence, even when only one key is kept pressed, any |
|
other key played on the keyboard can resonate, if there are |
|
harmonics positioned in the same frequency range. In other |
|
words, a very subtle but evident partial string resonance can |
|
be heard also when the Damper pedal is not pressed and |
|
few keys are played. Numa Stage also reproduces this natural |
|
acoustic effect. |
|
Soundboard resonance: acoustic pianos (and in particular |
|
the grand pianos) are very reactive structures, that resonate |
|
with the played notes (as well as with external sound sour- |
|
ces) even without activating the damper pedal (also due to |
|
the top octvave strings, normally without any damper). This |
|
“soundboard resonance” is so evident that a piano tuner |
|
needs to artificially stop all other strings (with felt of clothes) |
|
when tuning the instrument. The Numa Stage also reprodu- |
|
ces this natural effect, that completes the Strings Resonance |
|
Modelling. |
|
To access the settings press Function & Strings Res. the dis- |
Strings Res setting |
play shows the current level, from Off to 10, and the amount |
|
of all 3 above described Strings Resonance effects can be |
|
controlled according to your taste (suggested levels: 3-4) |
|
Note: when a Modulation Effect is selected (e.g. Chorus etc) |
|
the Strings Resonance is automatically set to Off, in order to |
|
avoid any over post-processing of the selected sound. |
|
E
NUMA Stage by Studiologic® 13

Velocity
Display - Value +/-
• Display and value adjustments
Velocity
• Velocity curve settings
MIDI Module
Program Change
Bank Select LSB
Bank Select MSB
On / Off
Channel
Octave
 Volume
  EDIT Zone A-Lower B-Upper
Function
• in combination with Velocity
Velocity The velocity defines the touch sensitivity of the keyboard. On the NUMA Stage you can choose from 5 different velocity curves. Enter the velocity mode by pressing Function & Velocity. The display indicates the different curves as Ft, L, M, H and Fixed Use Value +/- to select the appropriate velocity.
When you enter in the Fixed velocity area, by pressing the Value + after the H velociy, all MIDI values are displayed and selectable, starting from 001 to the maximum value of 127, using Value +/-.
Press Function again to keep the adjustment and quit the velocity mode, or press Value - to go back to the other Velocities.
The curves have the following characteristics:
Curve |
Dynamic range |
|
|
Application |
|||
Ft (Fatar |
Adjustments to your |
|
|
Please refer to the Global |
|||
Touch) |
touch and equipment. |
|
|
functions pages. |
|||
L (Low) |
|
|
|
|
|
|
A soft touch of the key |
|
|
|
|
|
|
||
|
|
|
|
|
|
|
results in a relatively loud |
|
|
|
|
|
|
|
sound; an easy touch for all |
|
pp |
ff |
|||||
|
playing styles. |
||||||
M (Mid) |
|
|
|
|
|
|
A touch sensitivity referred |
|
|
|
|
|
|
|
to a standard Normal curve, |
|
|
|
|
|
|
|
both for Piano and all other |
|
|
|
|
|
|
|
sounds, with full dynamic |
|
pp |
ff |
|||||
|
control over the entire |
||||||
|
|
|
|
|
|
|
range. |
|
|
|
|
|
|
|
|
H (High) |
|
|
|
|
|
|
The dynamic range is always |
|
|
|
|
|
|
|
complete and it is possible |
|
|
pp |
ff |
|
to play very soft, while for |
||
|
|
|
louder parts more force |
||||
|
|
|
|
|
|
|
(velocity) is needed. |
|
|
|
|
|
|
|
|
F (Fixed) |
|
|
|
|
|
|
Regardless of the force |
|
|
|
|
|
|
|
applied to a key, always |
|
|
|
|
|
|
|
the same loudness value is |
|
|
pp |
|
|
ff |
|
|
|
|
|
|
|
|
|
generated both internally |
|
|
|
|
|
|
|
and via Midi. |
|
|
|
|
|
|
|
|
14 NUMA Stage by Studiologic®

Autoset function
|
MIDI Module |
|
|
|
|
|
Sound Bank |
|
|
|
|
|
Effects |
|
|
|
|
Output |
|
|
||
|
|
|
|
[ D e m o] |
|
|
|
|
|
|
|
Modulation |
|
|
Reverb |
|
0 |
|
|
0 |
|
|
|
|
|
|
|
Transpose |
Octave Lower |
Octave Upper |
Master Tune |
Velocity |
Strings Res |
|
|
|
|
|
|
|
|
|
|
|
|
|
Program Change |
|
|
|
|
|
|
|
|
|
|
|
|
|
|
|
|
|
|
|
|
|
|
Bank Select LSB |
|
|
|
|
|
|
|
|
|
|
Chorus |
|
|
|
|
|
|
|
|
|
|
On / Off |
Bank Select MSB |
|
|
On / Off |
|
Concert Grand |
Stage Grand |
E Piano 1 |
E Piano 2 |
E Piano 3 |
Clavi |
Phaser |
|
|
Room |
|
Min |
Bass |
Max |
Min |
Treble |
Max |
|
Channel |
|
|
|
|
|
|
|
|
|
|
Rotary |
|
|
Hall |
50% |
|
0 |
|
|
|
|
|
Octave |
Preset |
/ Value |
|
|
Panic |
Hold |
Expression |
Free Wheel |
System |
Store |
Tremolo |
|
|
Delay |
|
|
|
|
|
||
|
|
|
|
|
|
|
|
|
|
|
|
|
|
|||||||||
Volume |
EDIT Zone |
A-Lower |
B-Upper |
Split Point |
Function |
Pad 1 |
Pad 2 |
Organ 1 |
Organ 2 |
Bass 1 |
Bass 2 |
Select Assign |
Min Amount |
Max |
Select Assign |
Dry Mix Wet |
Lower |
Balance |
Upper |
|
Volume |
Fatar Touch |
In order to make the live performance very easy, without the |
Autoset |
need of using the powerful preset programming, the instru- |
|
ment has an easy Auto set functions that automatically me- |
|
morizes the effect (and related parameters) selected for each |
|
sound, recalling it simply when selecting the sound. |
|
In other words, the instrument memorizes the effect that you |
|
have choosen and edited (with the parameter accessed by |
|
the Free Wheel) making the live performance easy and effec- |
|
tive. |
|
As an example, if you are playing with the Stage Grand sound |
|
you will probably not use any effect, while you will normal- |
|
ly associate a Phaser effect with the E.Piano 1 (the typical |
|
Rhodes sound). Since the instrument automatically records |
|
your selections, when selecting the Grand Piano sound the |
|
Phaser (choosed for the E.Piano 1) will be automatically tur- |
|
ned off, avoiding the need of any other programming. The |
|
same result will be obtained for each sound and the selected |
|
effect (for instance: Rotary with the Organs, Chorus with a |
|
Pad sound etc) of any combination of your choice. |
|
The Free Wheel controls different parameters, according to |
|
the selected Modulation Effect: as an example, it controls the |
|
speed of the Tremolo, the feedback and speed of the Phaser |
|
and the Slow/Fast control of the Rotary. |
|
This function, in addition to the Auto Set function described |
|
above, makes the live performance even more effective and |
|
totally user’s friendly. |
|
E
NUMA Stage by Studiologic® 15

Global functions
Display - Value +/-
• Display and value adjustments
MIDI Module
Program Change
Bank Select LSB
Bank Select MSB
On / Off
Channel
Octave
|
|
|
|
|
|
|
|
|
|
|
|
|
|
|
|
|
|
|
|
|
|
|
|
|
|
|
|
|
|
Volume |
EDIT Zone |
|
|
A-Lower |
|
B-Upper |
|
|
|
|
|
|
|
|
|
|
|
|
|
|
|
|
|
|
|
|
Fatar |
||
Function |
|
Store |
|
Fatar Touch |
• in combination with Store |
• Storage of presets |
• Create your own velocity |
||
|
|
|
curve |
|
Fatar Touch |
With the unique Fatar Touch feature you can create your own |
|
|
personal velocity curve and adjust the NUMA Stage to your |
|
|
playing style, with a feature not found in any other intrument. |
|
|
Press Fatar Touch: start playing on the keyboard and NUMA |
|
|
Stage learns your playing range and style. You have approx |
|
|
1 minute time to play, with any possible dynamic expressi- |
|
|
on, allowing the system to adjust the velocity curve to your |
|
|
playing characteristics. If you like to stop the process ear- |
|
|
lier, just press Fatar Touch again. The display shows alter- |
|
|
nating Y and N. Now you can check your personal velocity |
|
|
curve by playing the keyboard again. If you are happy with |
|
|
the result and you like to store this curve, press Value– (Y). |
|
|
To cancel the store process and discard the curve, press |
|
|
Value+ (N). |
|
Store presets |
To store your settings and adjustments permanently in a |
|
|
preset, press Function & Store. Use Value +/- to select one |
|
|
of the 50 preset locations P01 to P50 which are shown in the |
|
|
display. |
|
|
Press Function again. Now the display shows alternating Y |
|
|
and N. To confirm storage press Value– (Y). The following |
|
|
parameters will be stored in the preset: |
|
|
|
|
|
Sound(s) |
Pedal-assigns |
|
Layer |
Effect(s) - Mix / Amount |
|
Split |
Effect assign(s) |
|
Split/Layer-Balance |
Free Wheel |
|
Split point |
Velocity curve |
|
Octave Upper / Lower |
Fixed Velocity value |
To cancel store press Value+ (N).
Note: The presets P01 to P24 are factory presets which you can overwrite.
16 NUMA Stage by Studiologic®

Global functions
Display - Value +/- |
|
Function |
Master Tune |
|
• Display and value adjust- |
• in combination with Panic, |
• Tune the NUMA Stage to |
||
ments |
|
|
Master Tune and System |
other instruments |
|
MIDI Module |
|
|
|
|
Program Change |
|
|
|
|
Bank Select LSB |
|
|
|
On / Off |
Bank Select MSB |
|
|
|
Channel |
|
|
|
|
|
|
|
|
|
|
Octave |
|
|
|
Volume |
EDIT Zone |
A-Lower |
B-Upper |
|
|
|
Panic |
|
System |
|
|
• Stop all attached MIDI |
• Displays firmware version |
|
|
|
devices to play |
• Updates via USB |
|
If you like to restore the factory presets, turn the instrument |
Restore factory presets |
off, then press and hold the three buttons Function & Panic |
|
& Store while switching the instrument on again. The display |
|
now shows FAC. After releasing the three buttons the factory |
|
presets are restored. |
|
Warning: This function will irrevocably delete and overwrite |
|
all prior stored settings of the preset numbers P01 to P24 |
|
(your user presets) and your Fatar Touch velocity curve with |
|
the original factory settings! |
|
If something unexpected occurs, eg hanging MIDI notes, |
Panic |
press Function & Panic to send MIDI Controller 123 (all |
|
notes off) on all 16 MIDI channels. This command stops |
|
all connected sound modules, and the instrument itself, from |
|
playing any sounds. The display briefly shows PAN. |
|
Press Function & Master Tune to tune your instrument to |
Master Tune |
other instruments. Values from -99 to 99 cent (hundredth of |
|
a semi-tone) are available. The values are displayed and can |
|
be adjusted using Value +/-. |
|
Press Function again to keep the adjustment and quit the |
|
master tune mode. The Master Tune setting will be kept until |
|
the instrument‘s power is switched off. |
|
Note: The NUMA Stage offers the fantastic possibility to tune other MIDI |
|
sound expanders congruent to the tuning of the instrument! |
|
By presssing Function & System the instrument displays its |
System |
firmware version. Updates of the firmware and the sound |
|
library are accessible via USB. |
|
To update the firmware or sound library, press and hold Sys- |
|
tem while switching on the instrument. The display shows |
|
SYS. |
|
Now you can transfer all internal data using the |
|
computer software available for download from our website. |
|
After successful data transmission restart the instrument by |
|
switching the power off and on again. |
|
E
NUMA Stage by Studiologic® 17
 Loading...