

SL88 GRAND
SL88 STUDIO
SL73 STUDIO
Rev 20171222
Operation Manual
Manuale di Istruzione
Bedienungsanleitung
Mode d’emploi
E
I
D
F

ENGLISH
SL88 GRAND
SL88 STUDIO
SL73 STUDIO
Operation Manual
E
SL Controllers by Studiologic®
3
Safety Instructions
Important Safety Instructions
Please read the entire manual. It contains all the information
you need to use this unit.
Please follow the instructions in this manual. The warranty will
be void if unauthorized work is carried out on the instrument.
Only accessories specied by the manufacturer should be used
with this unit. Use the unit only as specied in this manual.
DANGER!
Risk of electric shock. Do not open the chassis. There are no
user serviceable parts inside.
The unit should only be serviced by qualied service sta.
Humidity
To reduce the risk of re or electric shock, do not expose the
unit to rain or moisture. Never place containers with liquid on
the unit. Do not use the unit near water, swimming pool, bathtub or wet basement. If the unit is moved from a cold place
to a warm room, condensation may occur inside. To avoid damage please allow the unit to reach room temperature before
switching on.
Installation
Always use a stable rack or surface to place the keyboard on.
Please be aware of its size and weight.
Cleaning / Maintenance
Never use any abrasive detergent, which may damage the
surface. We recommend a slightly moist micro-bre cloth.
Packaging
Please keep all packaging and use it to protect the instrument
when transporting or if servicing is required.
Mains
Before connecting the unit to the main power supply, please
check if the power supply is suitable for the instrument. The
unit can be powered with 100 – 240VAC, using the included
power supply/adapter.
SL Controllers by Studiologic®
4

Index
Safety Instructions
Your new SL
Power - Input & Connection
Control Panel
Setup parameters
Global settings
4
6
6
6
7
8
8
8
8
9
9
10
10
12
13
14
15
Keyboard
Zones
Delivery includes
Working explanation
Power connections
Inputs
MIDI IN/OUT
USB
Control panel
Programmable Sticks
HOME Display
Program Selection & Edit
Programmable Groups
Zone Edit
Programmable Sticks
GLOBAL/SYSTEM
Firmware management
Declarations
Appendix
17
17
18
67
69
69
Firmware upgrade
SL Editor
Specications
Dimension
E
SL Controllers by Studiologic®
5

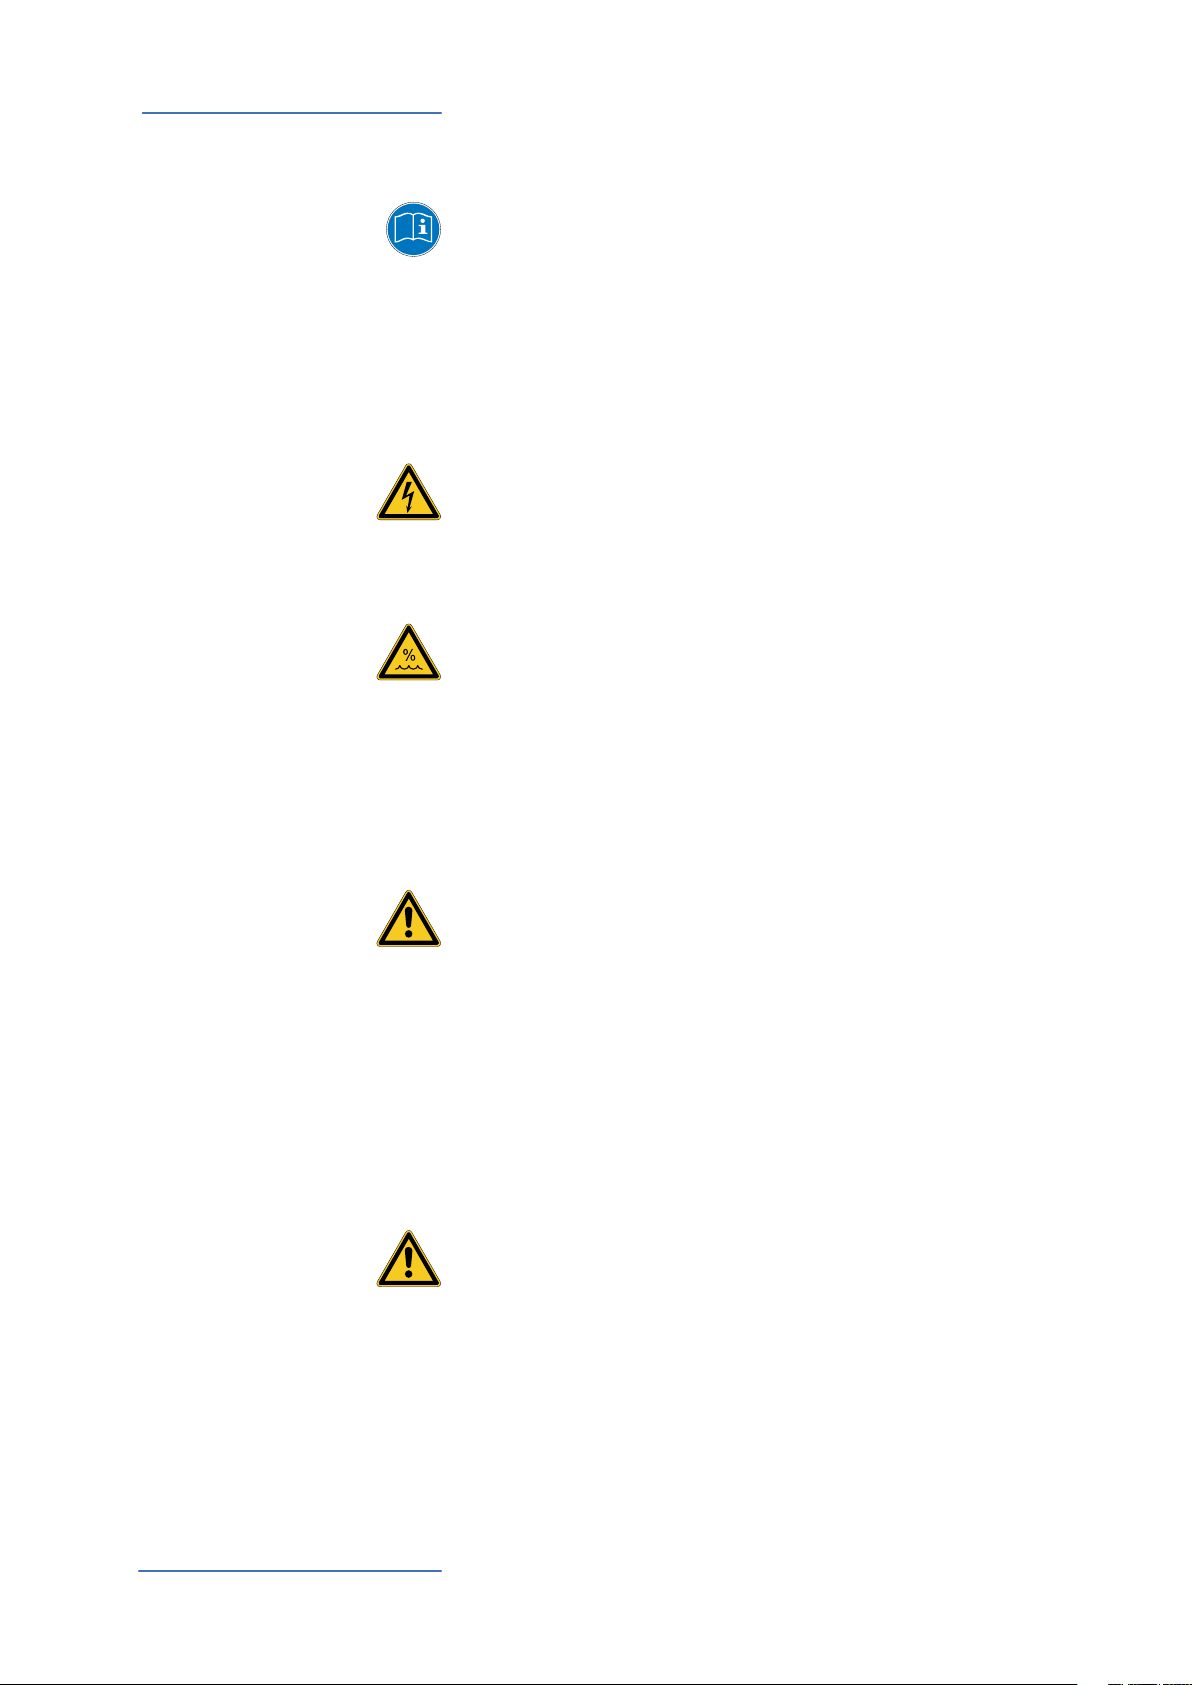
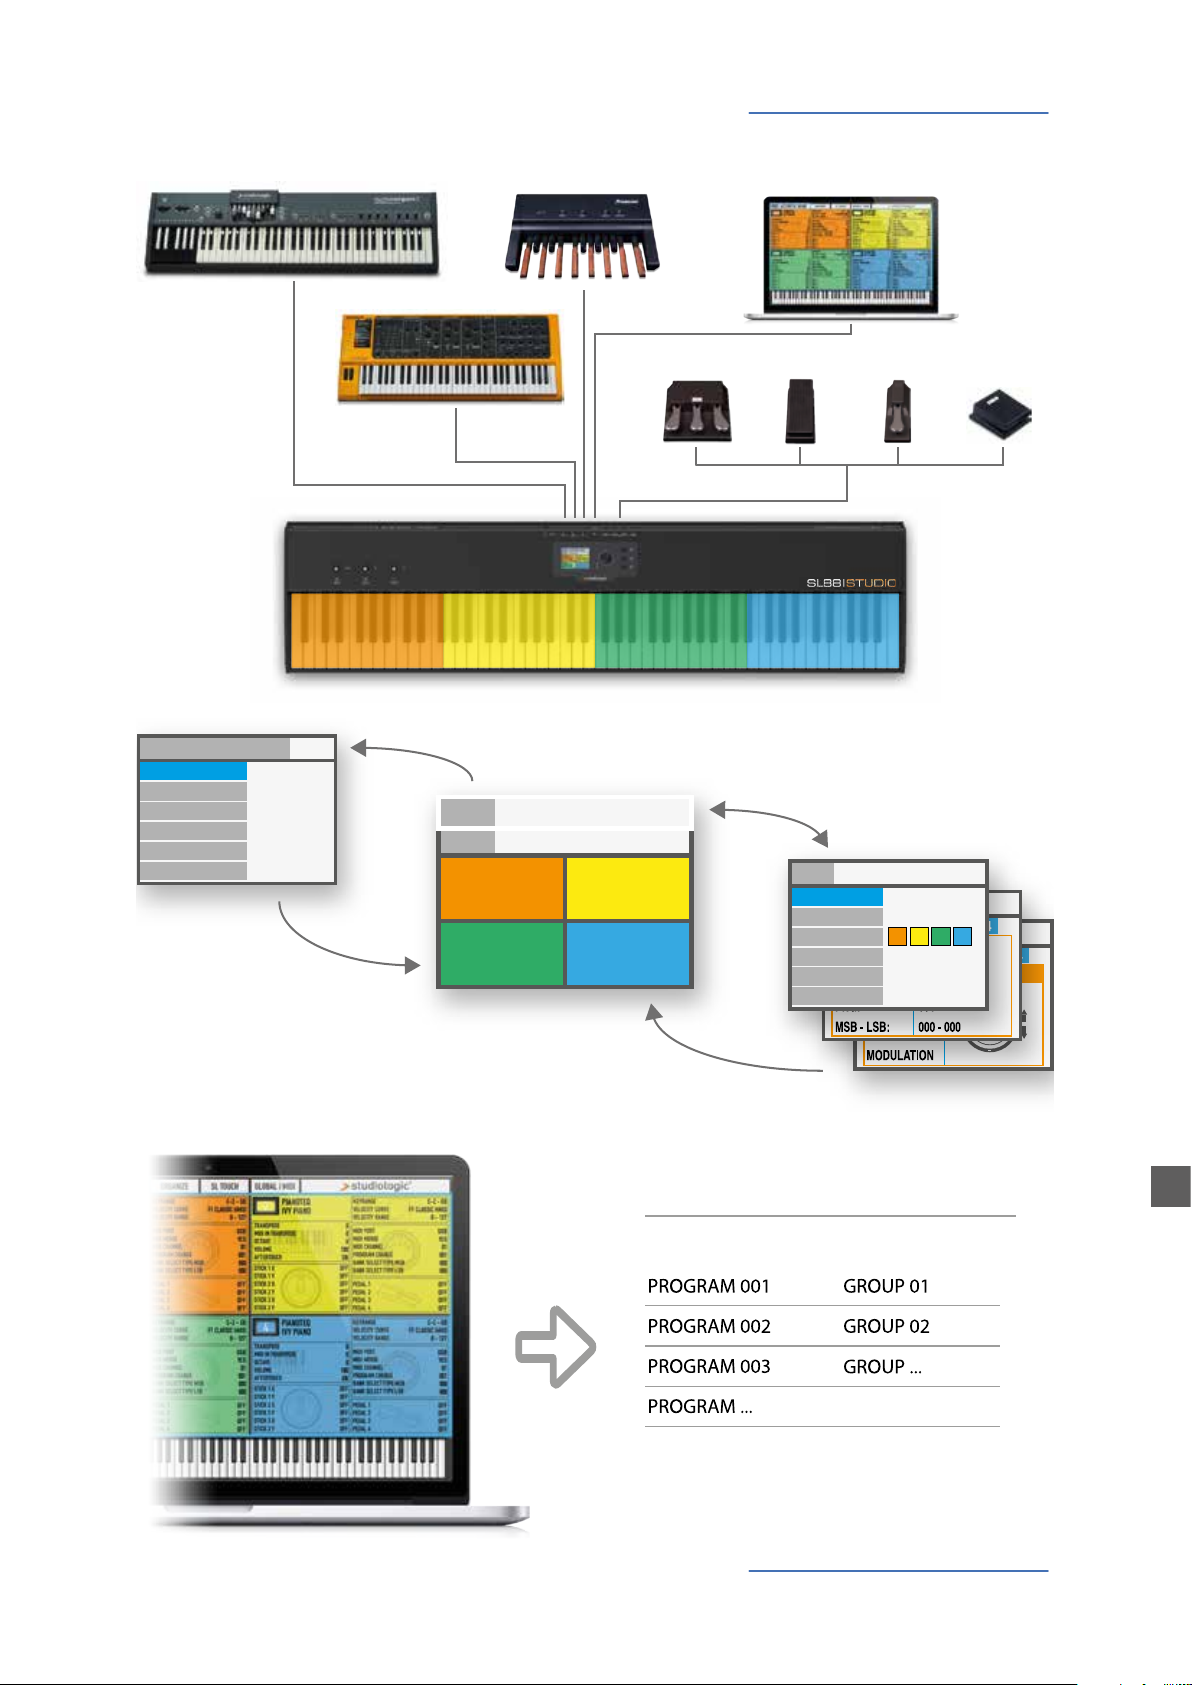
Your new SL
Thank you very much for choosing the SL. You have obtained a state-of-the-art professional
instrument made by the renowned manufacturer Studiologic. The SL is easy to operate, thanks to
the large colour display, the main Encoder with navigation controls plus built in click and it oers
a perfect keyboard touch. We recommend that you read the entire manual carefully to take full
advantage of all the functions of your SL. This manual is intended to be an easy, fast, Quick Guide
that should help the user to understand the instrument and all mind related controls, rather than
a general description of the complete structure and detailed editing, also made more exible and
user’s friendly by the computer Editor that will be downloadable from our ocial sites.
Let us start with an overview of the functions of the SL.
Keyboard The SL Controllers oer the latest innovative technology by
Fatar: the sophisticated Hammer Action Keyboard with 3
contacts per key and Aftertouch. Therefore the SL Controllers
are very portable, yet it oers the realistic grand piano touch
for which Fatar is famous.
Zones The keyboard can be divided into 4 programmable zones.
You can dene each zone‘s keyboard range and select at
which velocity level it will send its MIDI data, together with a
wide range of settings and controls.
Each zone can be assigned to a dierent port and the new
programmable Sticks can control dierent MIDI parameters
for each zone.
Delivery includes SL88 Grand / SL88 Studio / SL73 Studio
AC power adaptor
VFP1-10 / PS100 pedal
Operation Manual (CD Rom)
SL Controllers by Studiologic®
6
P001 SL 88 STUDIO
GLOBAL / SYSTEM:
P001 SL 88 STUDIO
Your new SL
MIDI OUT 1
PANIC
MAIN TRASPOSE
RESTORE
STICK CALIBRATION
VERSION:
-- +00
---
---
V---
HOME
MIDI OUT 2
OUT
GROUP SAGA SETUP
INSTRUMENT
SOUND
VOL 122
INSTRUMENT 3
SOUND
VOL 101
A0 / F#2
B7 / C8
MIDI IN
1
INSTRUMENT 2
SOUND
VOL 096
INSTRUMENT 4
SOUND
VOL 124
PEDALS
4 3 2 1
IN/OUT
G3 / Db4
A0 / F#2
STORE UNDER:
NAME:
ZONE EDIT:
MERGE SOURCE:
MERGE DEST.:
MERGE FILTER:
P001
SL 88 STUDIO
1
OFF
USB OUT
SYS OFF - ALL
USB
2 3 4
HOME
YOUR PROJECTS
Library Groups
GROUP 12
PROGRAM xxx
SL Controllers by Studiologic®
E
7
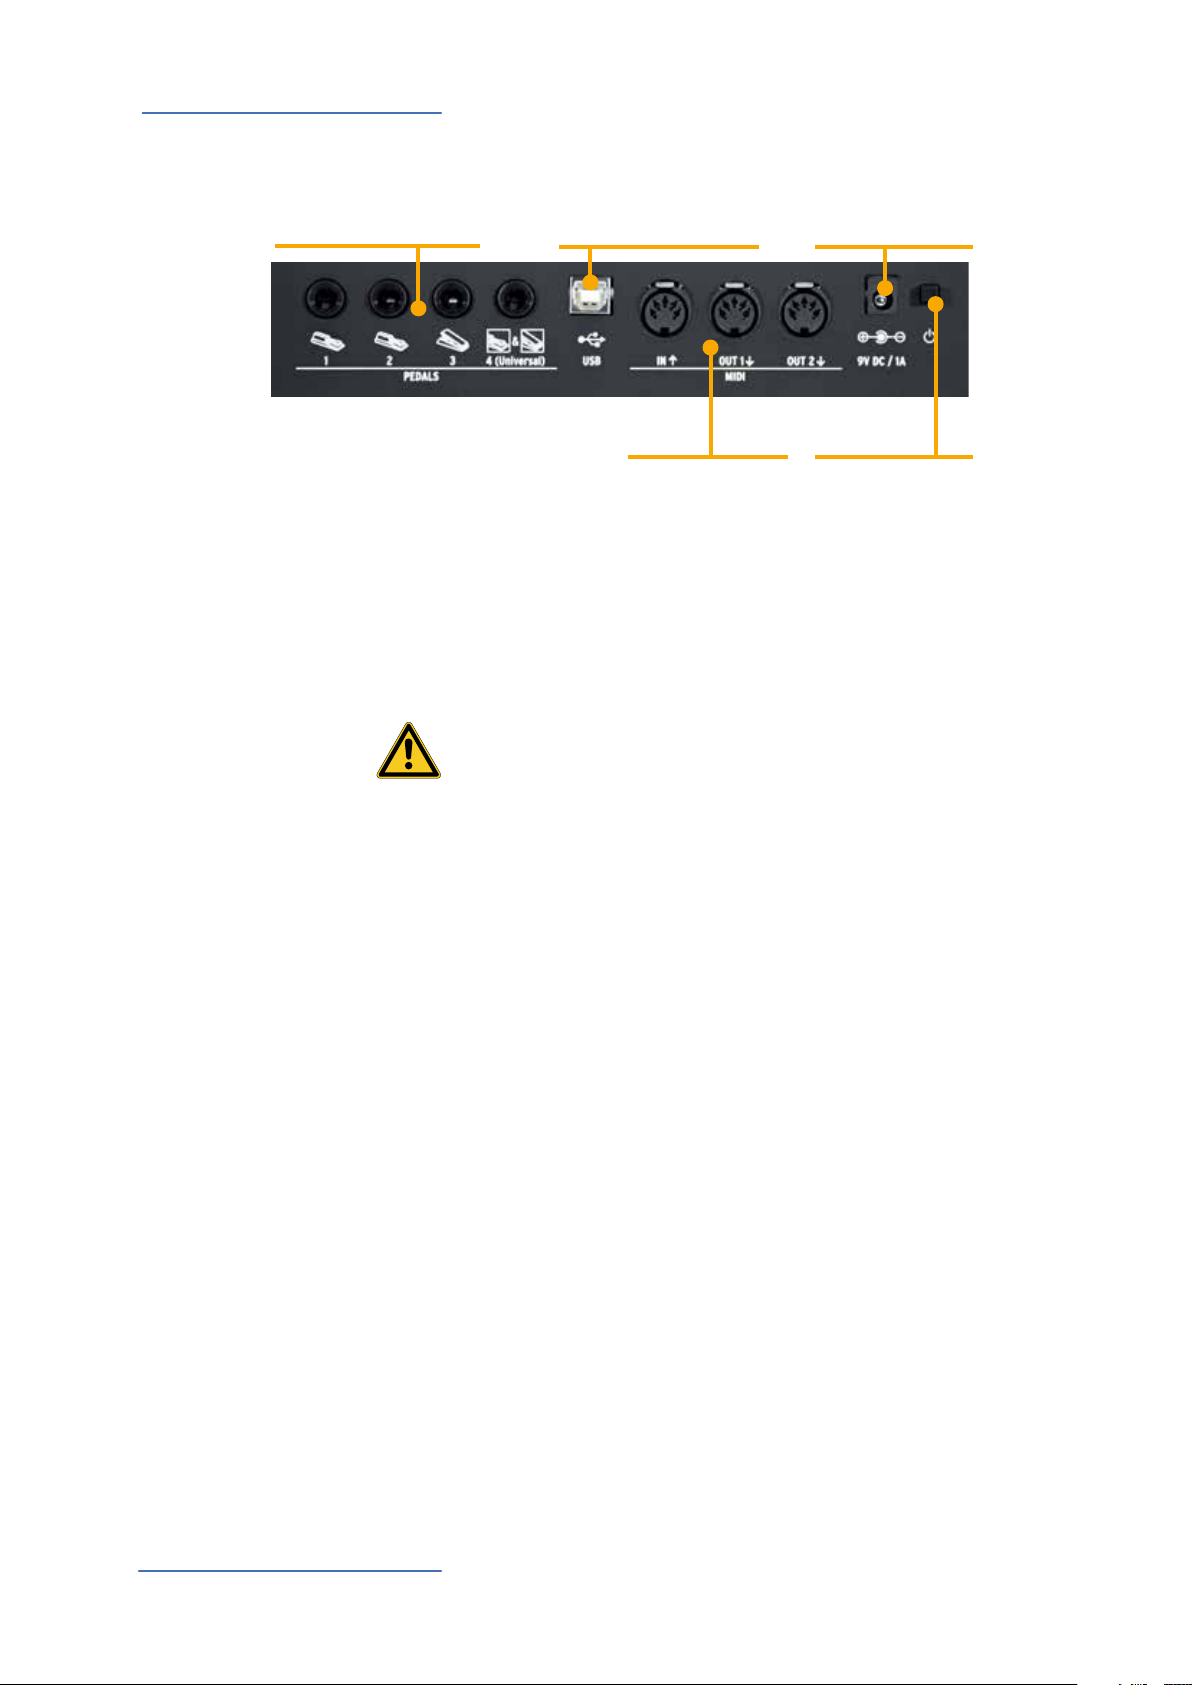
Power - Inputs & Connections
Power - Inputs & Connections
Pedals connections
1-2 switch, 3 continuous,
4 multi function
USB Port
MIDI In/Out, USB to HOST
MIDI
In, Out1, Out2
Power
9V - 1A
Power On/O
All connections are placed in the back of the instrumen, for an easier access and protection:
Power connection
Insert the adapter plug into the back socket of the instrument
and turn the instrument on, by moving the related switch to
the 1 position (1=ON, 0= OFF).
CAUTION:
Be sure that the adapter is the original one (included in the
box) or a suitable/compatible one with the correct voltage
and power (9V – 1A, positive pin + at centre).
Inputs
Midi IN/OUT
USB
Assignable pedals connections:
• 2 switches
• 1 continuous
• 1 multi functions
You can connect compatible Switch pedals (for the related
functions) to Pedal 1 and 2, a dedicated Volume/Expression
Pedal to the Pedal 3 input and one of the compatible pedals
in the special multi plug 4.
The MIDI connections allow to control any external Midi Device and/or connect the SL to other external MIDI devices, for
all related data transmission (notes, program changes etc.)
The USB (Universal Serial Buss) also allows the connection to
external devices (i.e. Computers) to updates the rmware or
estabilish a MIDI connection (IN/OUT).
When the SL is connected to a computer via USB, you can also
use the SL Editor to set all SL parameters in a very fast and
direct way, including controls not avaiable in the internal SL
editing structure (i.e.: the Keyboard Balance function, that allows to change the velocity sensitivity of each individual key
and balance black and white keys, with a single control.
SL Controllers by Studiologic®
8
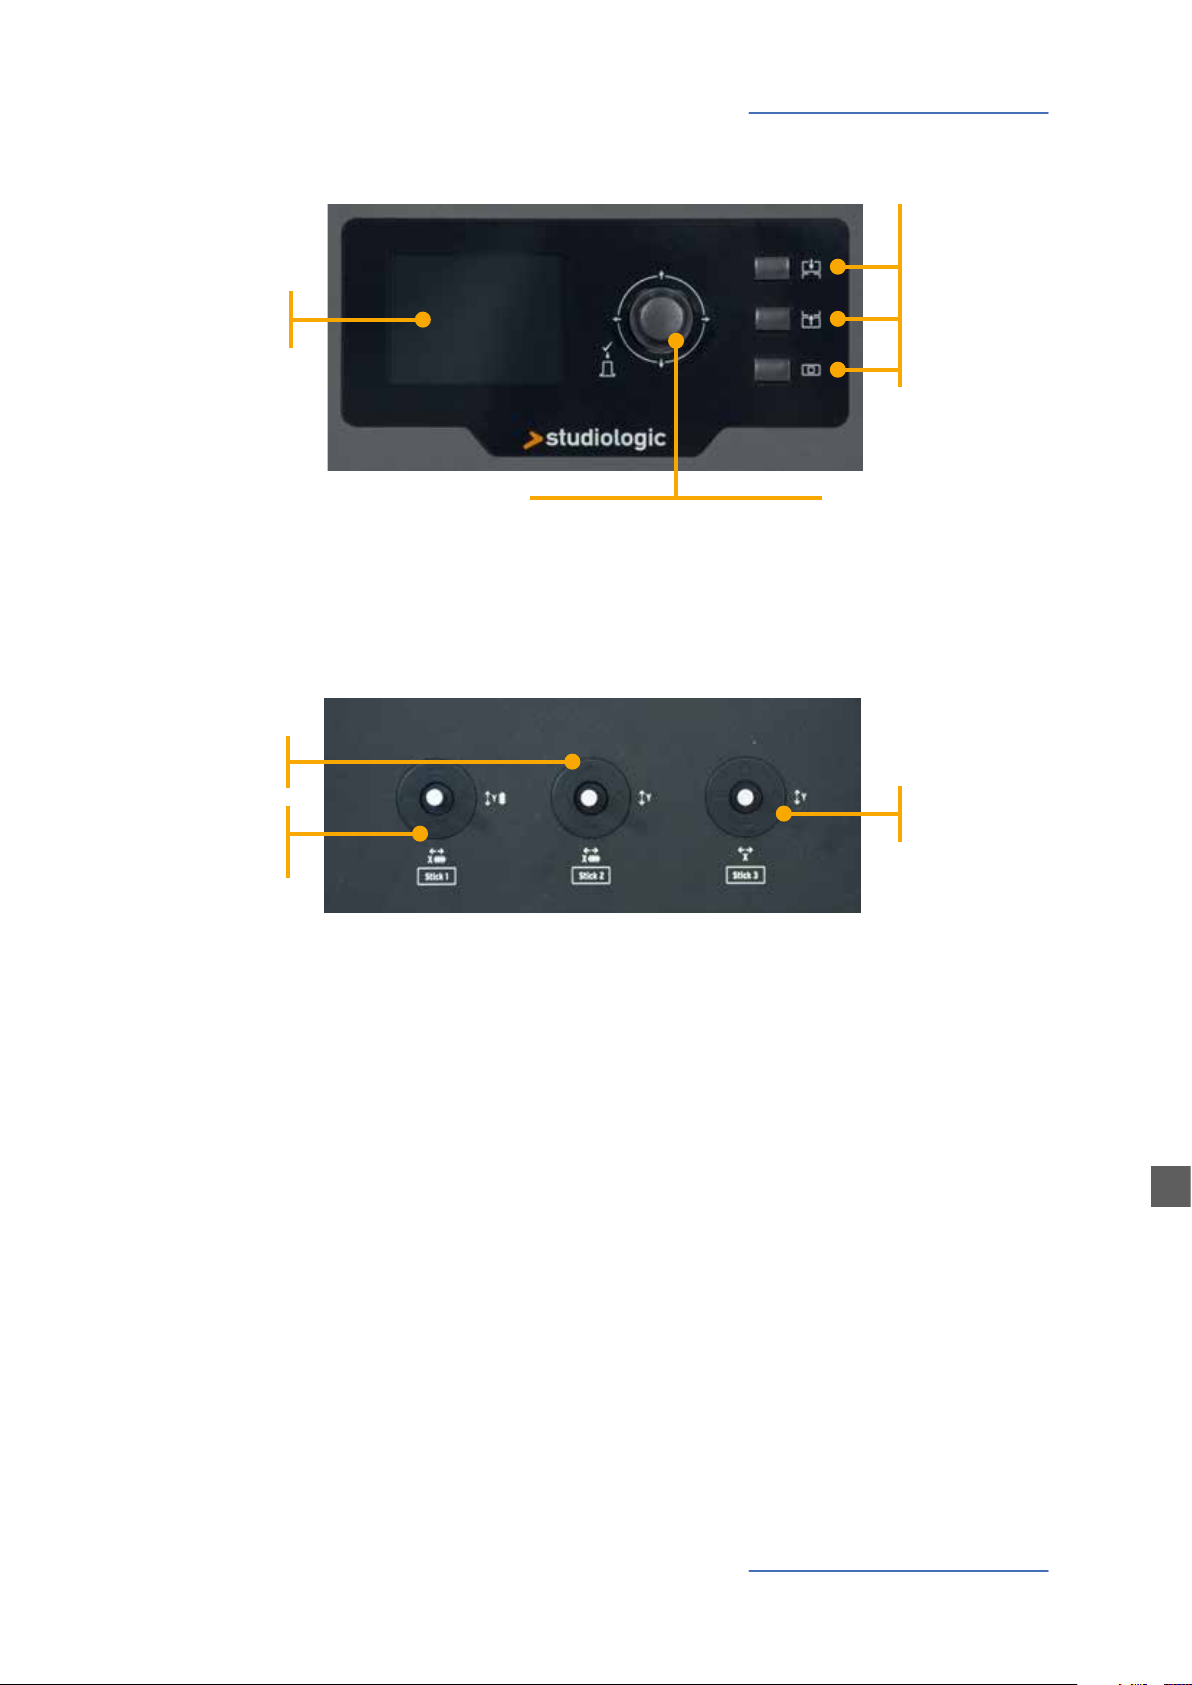
Control Panel
Control Panel
Main buttons
IN
Colour Display
Stick 2
Auto-centering
on X axis
Stick 1
Auto-centering
on both X/Y
axes
OUT
HOME
Encoder
Data input (rotating)
Navigation controls (left/right/up/down)
Click (ENTER)
Programmable Sticks
Stick 3
Free (not autocentering)
The new SL Control Panel is a concentrate of technology and user‘s friendly layout; it consists of:
• 1 Large colour display (TFT - LCD 320 x 240);
• 1 Rotating encoder with 1 built in click (enter) and 4 positional switches (up/down/left/right);
• 3 Main buttons: Home (back to main view) - In & Out buttons (to navigate within all pages);
• 3 Programmable Sticks.
All Edit Pages can be selected in the same way (up/down with the Encoder‘s positional switches,
IN or OUT) you can use one hand to select all available pages and parameters, with instant access
to all features; ones the selected function is reached, you can change its value by rotating the Encoder (to the left = decrease / to the right = increase).
SL Controllers by Studiologic®
9
E

Setup parameters
P001 SL 88 STUDIO
P001 SL 88 STUDIO
P001 SL 88 STUDIO
SL 88 STUDIO
HOME Display
The SL main page (HOME) is a very clear and complete picture of the main functions, as it follows:
Program
(i.e. 001 NAME)
the selected Program
GROUP SAGA SETUP
INSTRUMENT
SOUND
VOL 122
INSTRUMENT 3
SOUND
VOL 101
ZONES (color coded)
active Zones and main parameters
(Volume, Keyboard range)
GROUP
the related GROUP of the selected program
(-------- if no GROUPS are selected)
1
INSTRUMENT 2
SOUND
VOL 096
A0 / F#2
B7 / C8
INSTRUMENT 4
SOUND
VOL 124
G3 / Db4
A0 / F#2
By rotating the encoder,
when a ZONE is selected, you
can immediately control the
Volume (000-127).
GROUP SAGA SETUP
1
A0 / F#2
97
B7 / C8
INSTRUMENT 2
SOUND
VOL 096
INSTRUMENT 4
SOUND
VOL 124
INSTRUMENT
SOUND
VOL 122
INSTRUMENT 3
SOUND
VOL 101
G3 / Db4
A0 / F#2
Program Selection & Edit To select a Program, you can either rotate the Encoder (direct
selection) or Click the Encoder, rotate to select and Click to
conrm.
When a Program is selected (by moving the cursor to the top
area of the display) pressing IN you enter in Program Edit.
STORE UNDER:
NAME:
ZONE EDIT:
MERGE SOURCE:
MERGE DEST.:
MERGE FILTER:
P001
SL 88 STUDIO
2 3 4
1
OFF
USB OUT
SYS OFF - ALL
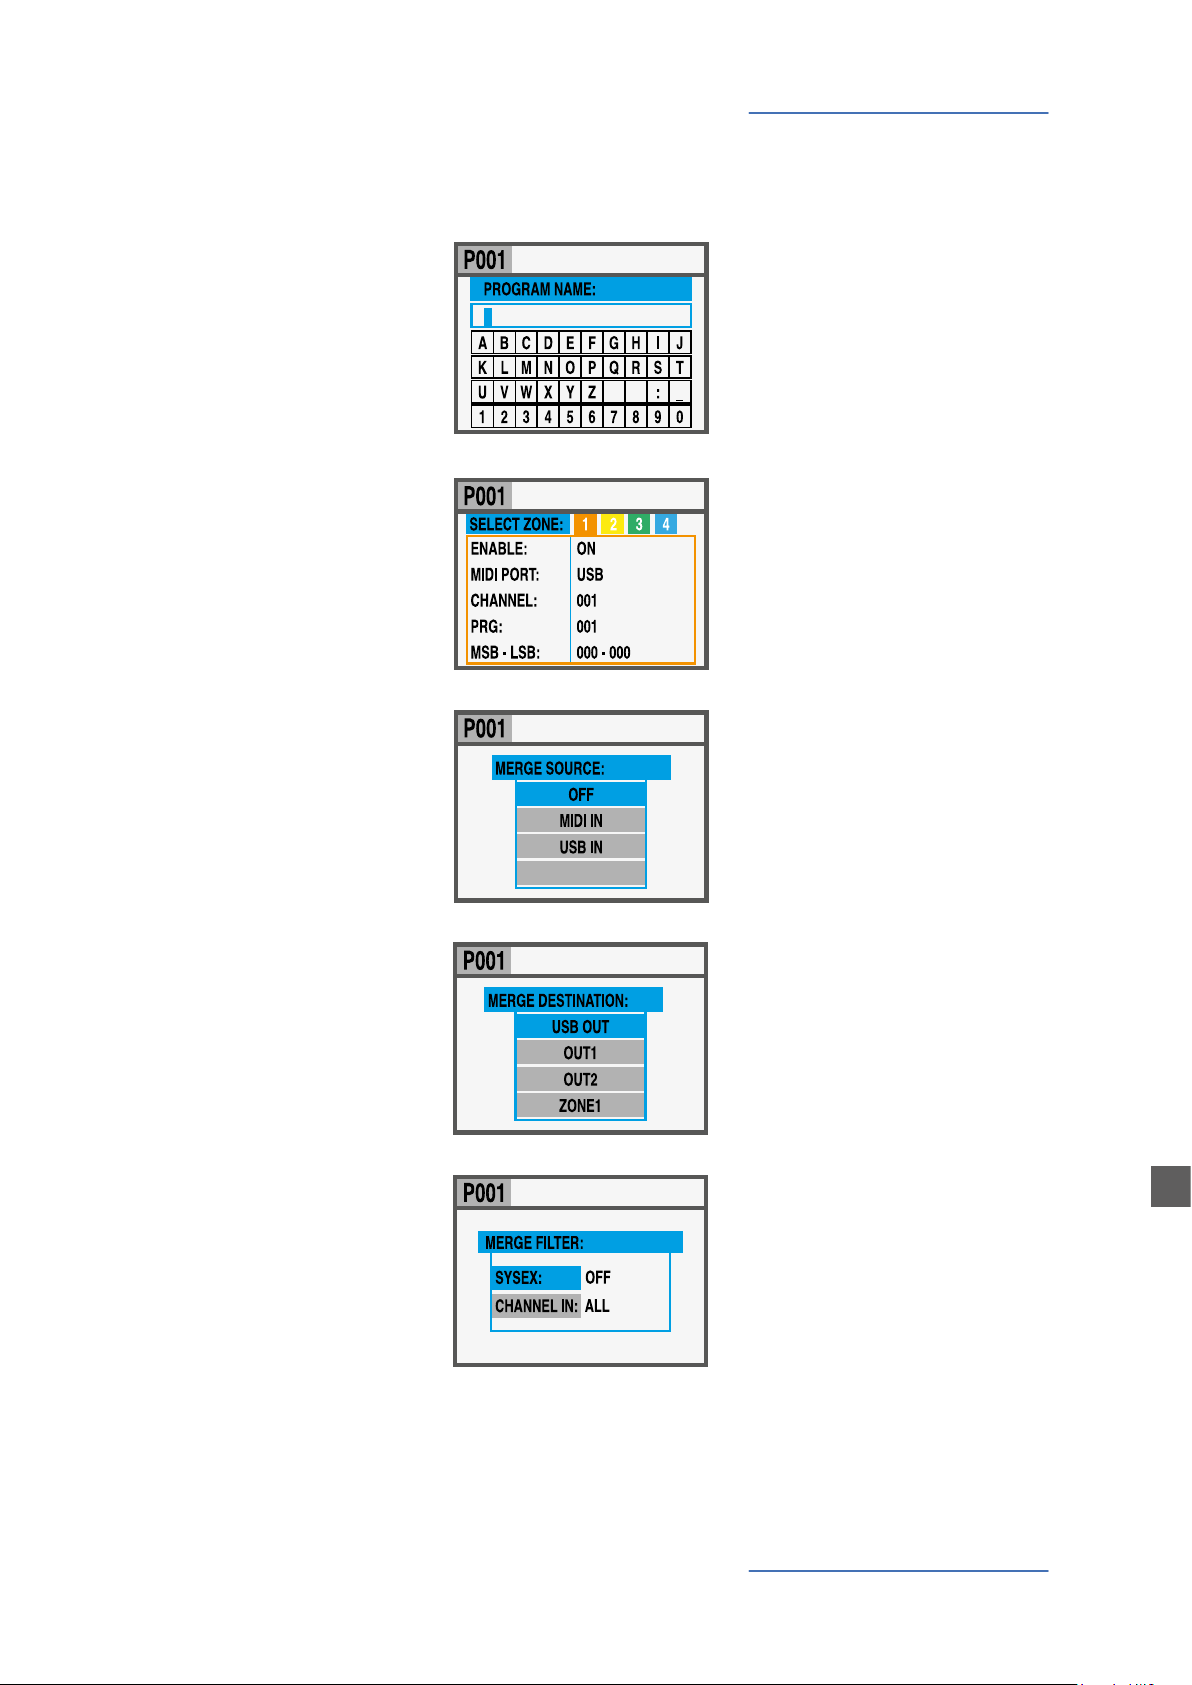
The following parameters are avaible:
STORE UNDER
To select the position where
you want to store the current
Program.
SL Controllers by Studiologic®
10
Setup parameters
SL 88 STUDIO
SL 88 STUDIO
SL 88 STUDIO
SL 88 STUDIO
SL 88 STUDIO
NAME
To name the current Program, by using the Encoder positional commands (left/right – up/down) and clicking when
the desired letter/number
is selected. You can either
move the cursor to the letters/numbers area and select
them by clicking the encoder,
or rotate the encoder to select the letters and numbers.
ZONE EDIT
(refer to the related chapter
at page 29).
MERGE SOURCE
To select the source (MIDI IN
or USB) to be merged to the
DESTINATION.
SL 88 STUDIO_ _ _
-
Program Edit
MERGE DESTINATION
To select the destination of
all merged MIDI data.
MERGE FILTER
To lter (cut out) some MIDI
message when merging
SOURCE to DESTINATION.
E
SL Controllers by Studiologic®
11
Setup parameters
GROUP:
THE BOSS
GROUP: THE BOSS
P001 SL 88 STUDIO
Programmable GROUPS
The SL oers a special function to organize your Programs in
Groups, in order to list in the same Group various Programs,
corresponding to a specic task, song or project. The same
Program can be associated to more Groups, allowing to optimize the internal memory and avoid duplicating Programs, if
they can be used for more projects.
To select or program a Group, wivthin the 12 avaiable ones,
press the main Encoder down or up until the Group section
is selected, then scroll the various Groups with the Encoder;
when a Group is selected, only the Programs of the selected
Group will be shown, in the sequence stored in the Group.
NOTE
It is always possible to skip
--------
the Groups selection, by setting the Groups to the empty
position, shown on the
display as GROUP --------
GROUP
INSTRUMENT
SOUND
VOL 122
INSTRUMENT 3
SOUND
VOL 101
A0 / F#2
B7 / C8
1
INSTRUMENT 2
SOUND
VOL 096
INSTRUMENT 4
SOUND
VOL 124
G3 / Db4
A0 / F#2
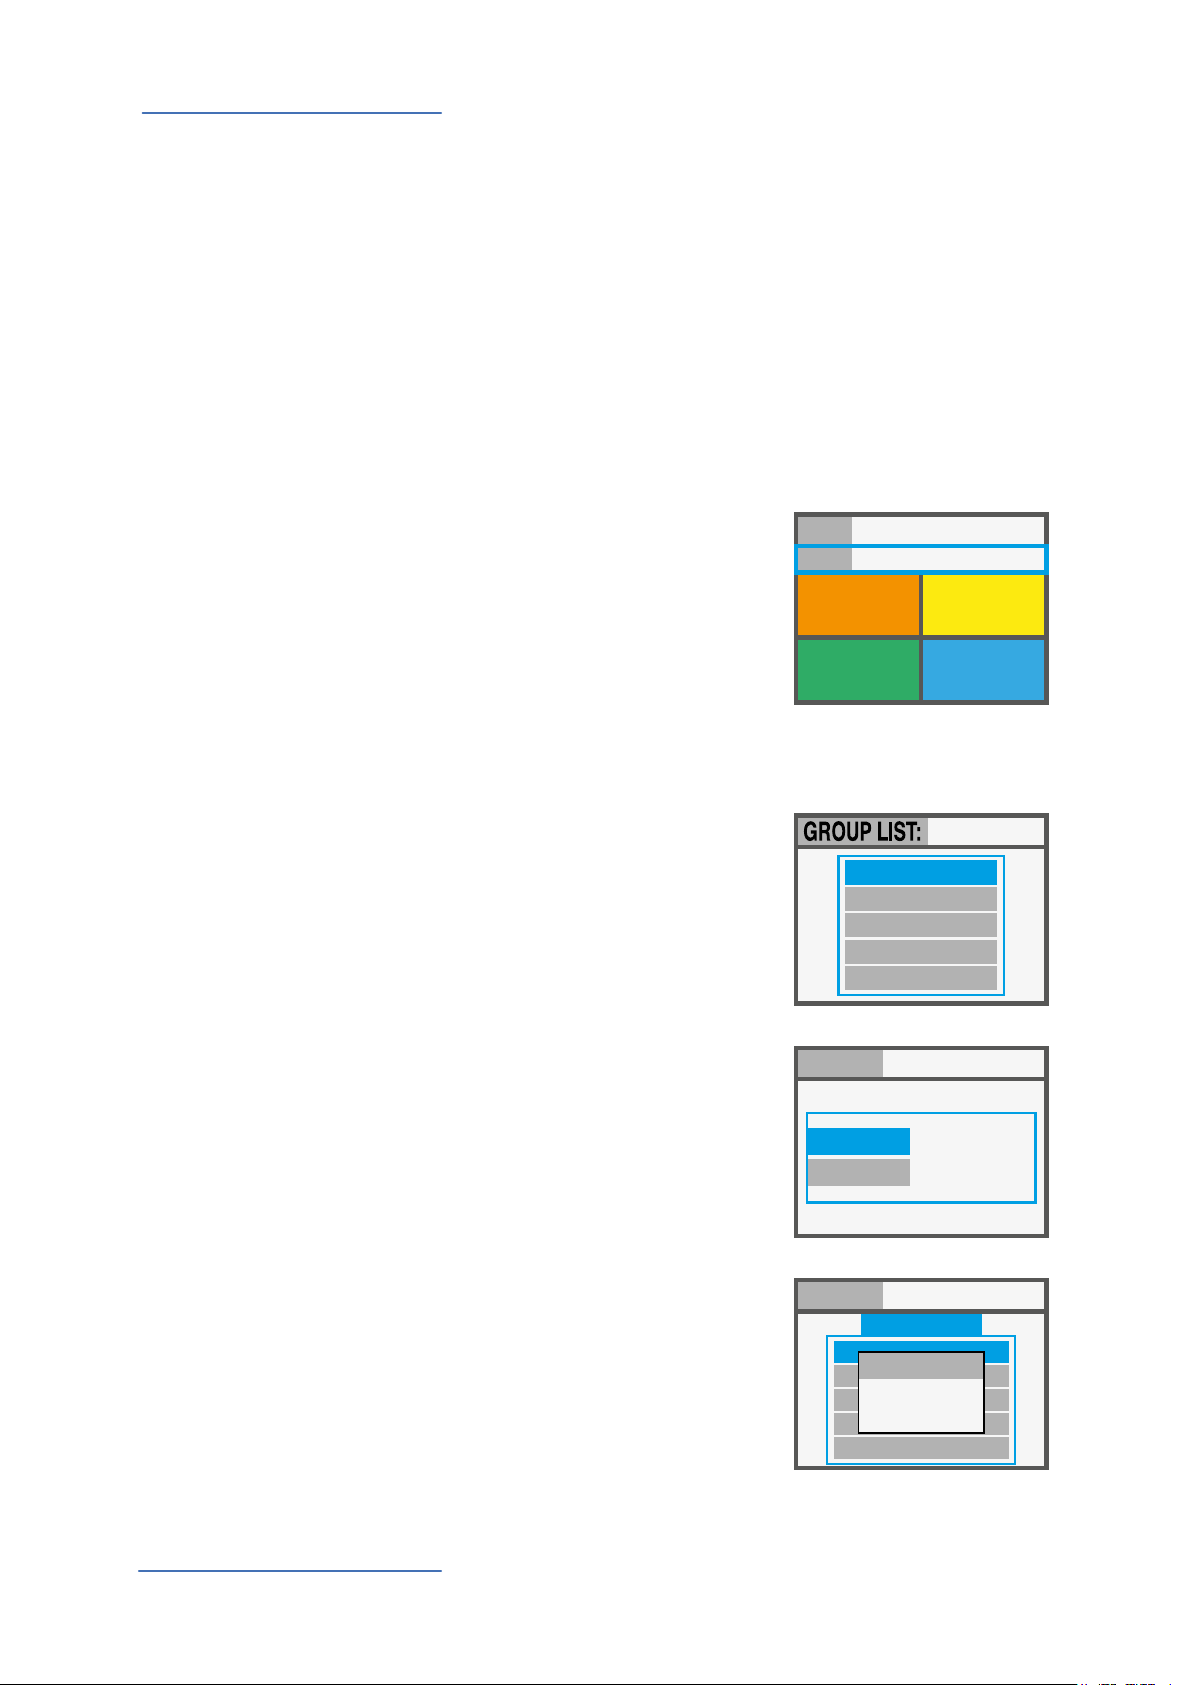
How to create a new Group or edit existing one
Press the IN button when the
Group section is selected and
then choose a Group within
the list, moving the Encoder
down or up.
Press IN to enter in the
GROUP EDIT page.
BEAT - LESS
ROAD - STONES
HAPPY
BIRTHDAY
THE BOSS
Now you can edit the Group
name and the associated
Programs.
To edit the associated
Programs, select PROGRAM
NAME:
PROGRAM LIST
THE BOSS
LIST and press IN.
To add or change a Program
to the Group, scroll them with
the Encoder and click on it to
open the popup menù that
allows to MOVE UP, MOVE
DOWN or DELETE a Program
within the 30 assignable
PROGRAM LIST:
002 CONCERT GRAND
MOVE UP
003 RHODX MARK I
MOVE DOWN
007 JAZZ SETUP
DELETE
022 PIANO + ORGAN
009 SYNTH SETUP
ones.
SL Controllers by Studiologic®
12
Setup parameters
SL 88 STUDIO
SL 88 STUDIO
SL 88 STUDIO
SL 88 STUDIO
SL 88 STUDIO
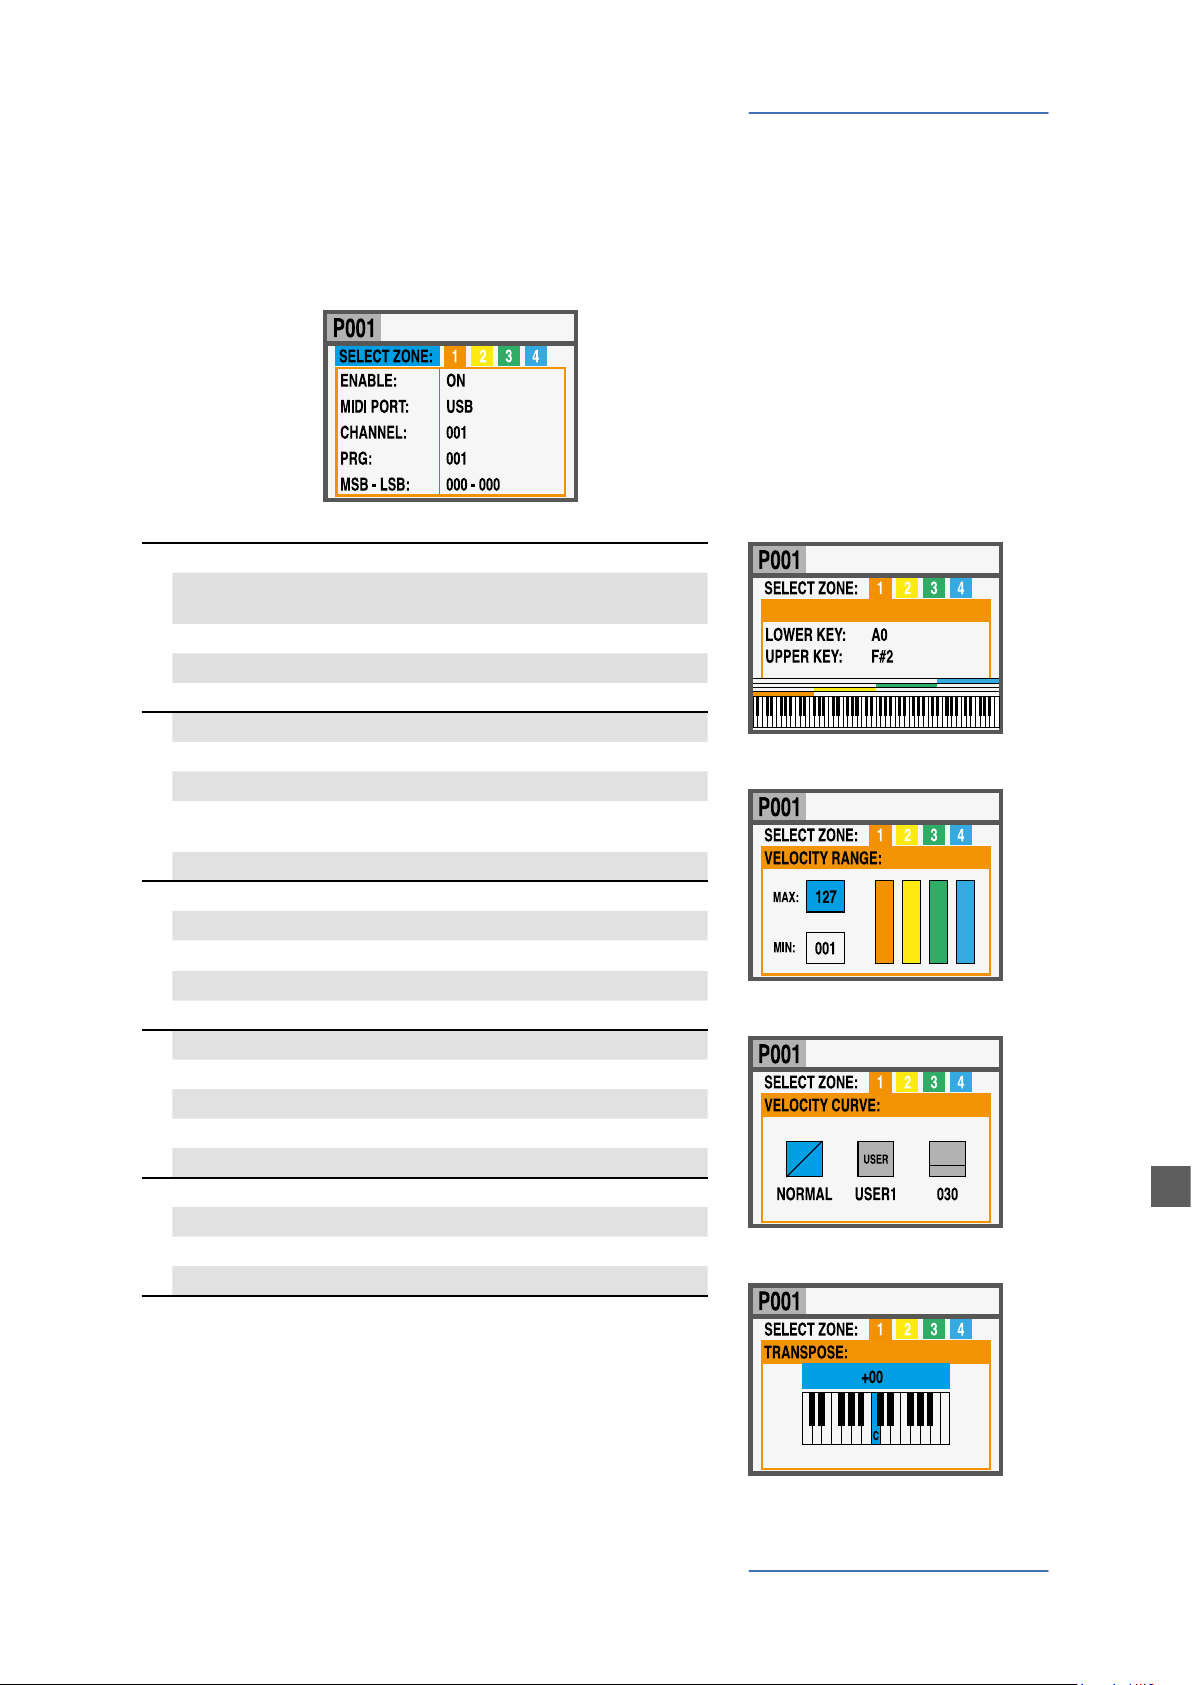
To enter in Zone Edit, press the IN button when one of the
Zones is selected; you can still select another Zone by using
the left/right Encoder’s controls. From the list of parameters,
you can either press IN, rotate the Encoder or move the cursor
to the right to enable the parameter‘s modication.
Page 1
VELOCITY RANGE
VELOCITY CURVE
Page 2
Page 3
Page 4
INSTRUMENT NAME
Page 5
SOUND NAME
ENABLE
MIDI PORT
CHANNEL
PROGRAM
MSB - LSB
VOLUME
KEY RANGE
AFTERTOUCH
TRANSPOSE
OCTAVE
PEDAL 1
PEDAL 2
PEDAL 3
PEDAL 4*
STICK 1 X
STICK 1 Y
STICK 2 X
STICK 2 Y
STICK 3 X
STICK 3 Y
to enable or disable the selected zone
to select the related OUT port within the
avaible ones (USB, MIDI 1, MIDI 2)
001 - 016
001 - 128
000 - 127 (for both)
000 - 127
A0 - C8
000 - 127
SOFT/NORMAL/HARD, USER(1-6),
FIXED (VALUE 001-127)
OFF/ON
-12 / +12 SEMITONES
-3 / +3
(selectable functions)
(selectable functions)
(selectable functions)
(special functions)
(selectable functions)
(selectable functions)
(selectable functions)
(selectable functions)
(selectable functions)
(selectable functions)
Zone Edit
KEYRANGE:
KEY RANGE
VELOCITY RANGE
E
VELOCITY CURVE
*Pedal 4 can be programmed to control all available parameters (switch and continuous) but it can also be set to be connected with special multi-pedals (SLP3-D, NTP, etc.) allowing
to have up to three pedals in one plug. A typical application
is a triple piano pedal, where two pedals can control the Soft
and Sostenuto functions, while the third pedal can control a
half-pedaling Damper function.
TRANSPOSE
SL Controllers by Studiologic®
13

Setup parameters
SL 88 STUDIO
P001 SL 88 STUDIO
GROUP SAGA SETUP
INSTRUMENT
SOUND
VOL 122
INSTRUMENT 3
SOUND
VOL 101
A0 / F#2
Zone Edit If you assign one of the special multi-pedals to a Zone, the
1
INSTRUMENT 2
INSTRUMENT 2
SOUND
SOUND
VOL 096
VOL 096
INSTRUMENT 4
3 4
SOUND
VOL 124
B7 / C8
G3 / Db4
G3 / Db4
A0 / F#2
other Zones can only be set to OFF or to the same kind of
pedal (all other functions are shown in grey).
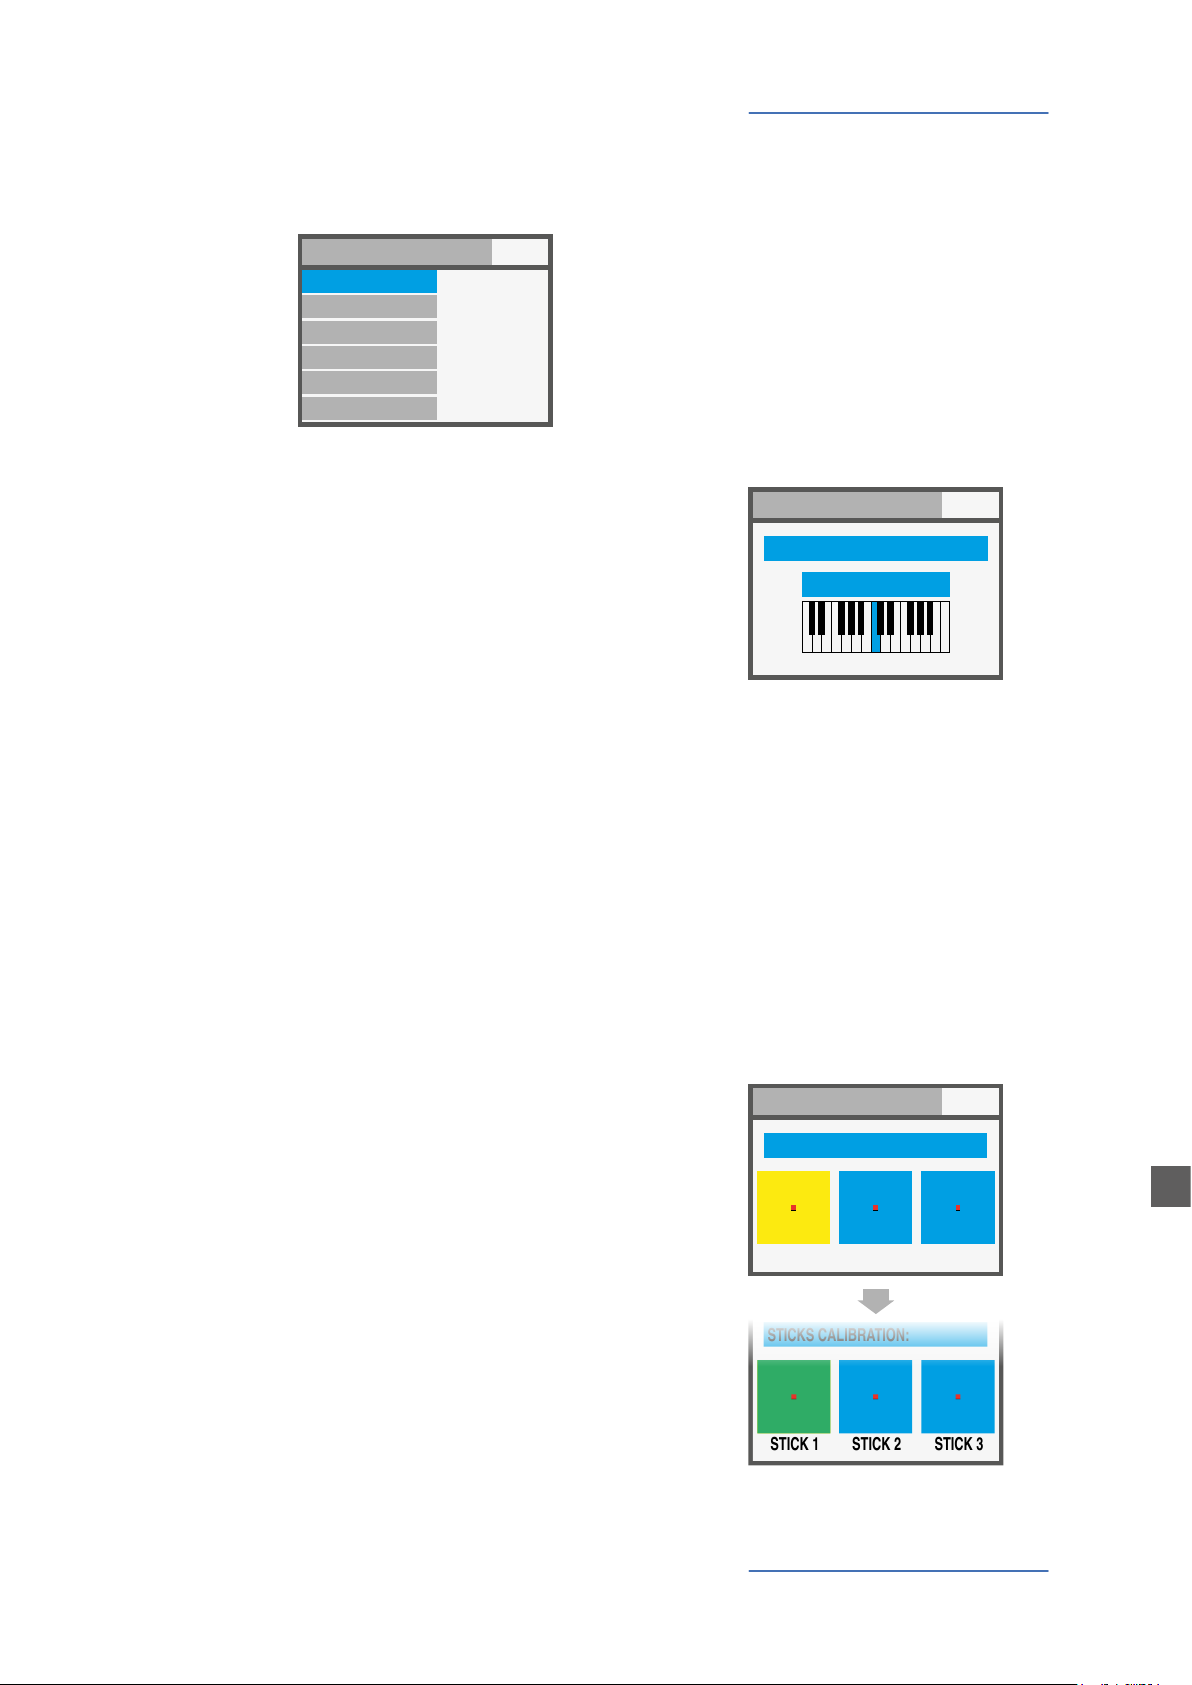
A Zone can be have 3 states: ON/OFF/Standby.
To enable or disable a Zone press IN and set it ON or OFF; if a
Zone is OFF the display will only show a colored background.
Clicking the Encoder, you can set the Zone in Standby and
the display will show it in grey.
(The picture shows Zone 1 ON, Zone 2 Standby, Zones 3 and
4 OFF).
Please note that you can also set all parameters of a disabled
Zone (in the Program) in order to be ready to enable it at any
time, with all pre-programmed parameters for that particular
Program.
Programmable Sticks
The 3 Sticks on the left side of the instruments are programmable real-time controls:
• Stick 1 has springs in both the vertical and horizontal axes
and it goes back to zero automatically; a typical setting for
such kind of control is for Pitch Bending functions;
• Stick 2 has a spring only on the horizontal axis and it goes
back to center on that side; a typical setting for such king of
control is for Modulation or Filter cuto, when controlling
any kind of virtual Synthesizer;
• Stick 3 is totally free and it keeps the position where you
move it, on both X and Y axes, allowing to control any parameter that needs to stay stable where it is set.
How to program the sticks
Once you have selected a Zone, by clicking the IN button you
enter in EDIT MODE and you can scroll with the Encoder’s vertical switches thru all the programming pages, until you nd
the page related to the Sticks programming.
SL Controllers by Studiologic®
14
Select one of the sticks, press IN again and enter in the programming page, where all available Stick’s functions are listed, for both the horizontal and vertical axes.
SYSTEM page. (NOTE: to go back to the main display press
GLOBAL / SYSTEM:
GLOBAL / SYSTEM:
GLOBAL / SYSTEM:
GLOBAL / SYSTEM:
STICKS CALIBRATION:
STICK 1 STICK 2 STICK 3
HOME).
V 1.6.0
MAIN TRASPOSE
PANIC
RESTORE
STICK CALIBRATION
COMMON CHANNEL
+00
PED 1/2 (EXT) PROGRAMS +/ 16
The following controls are available:
Global settings
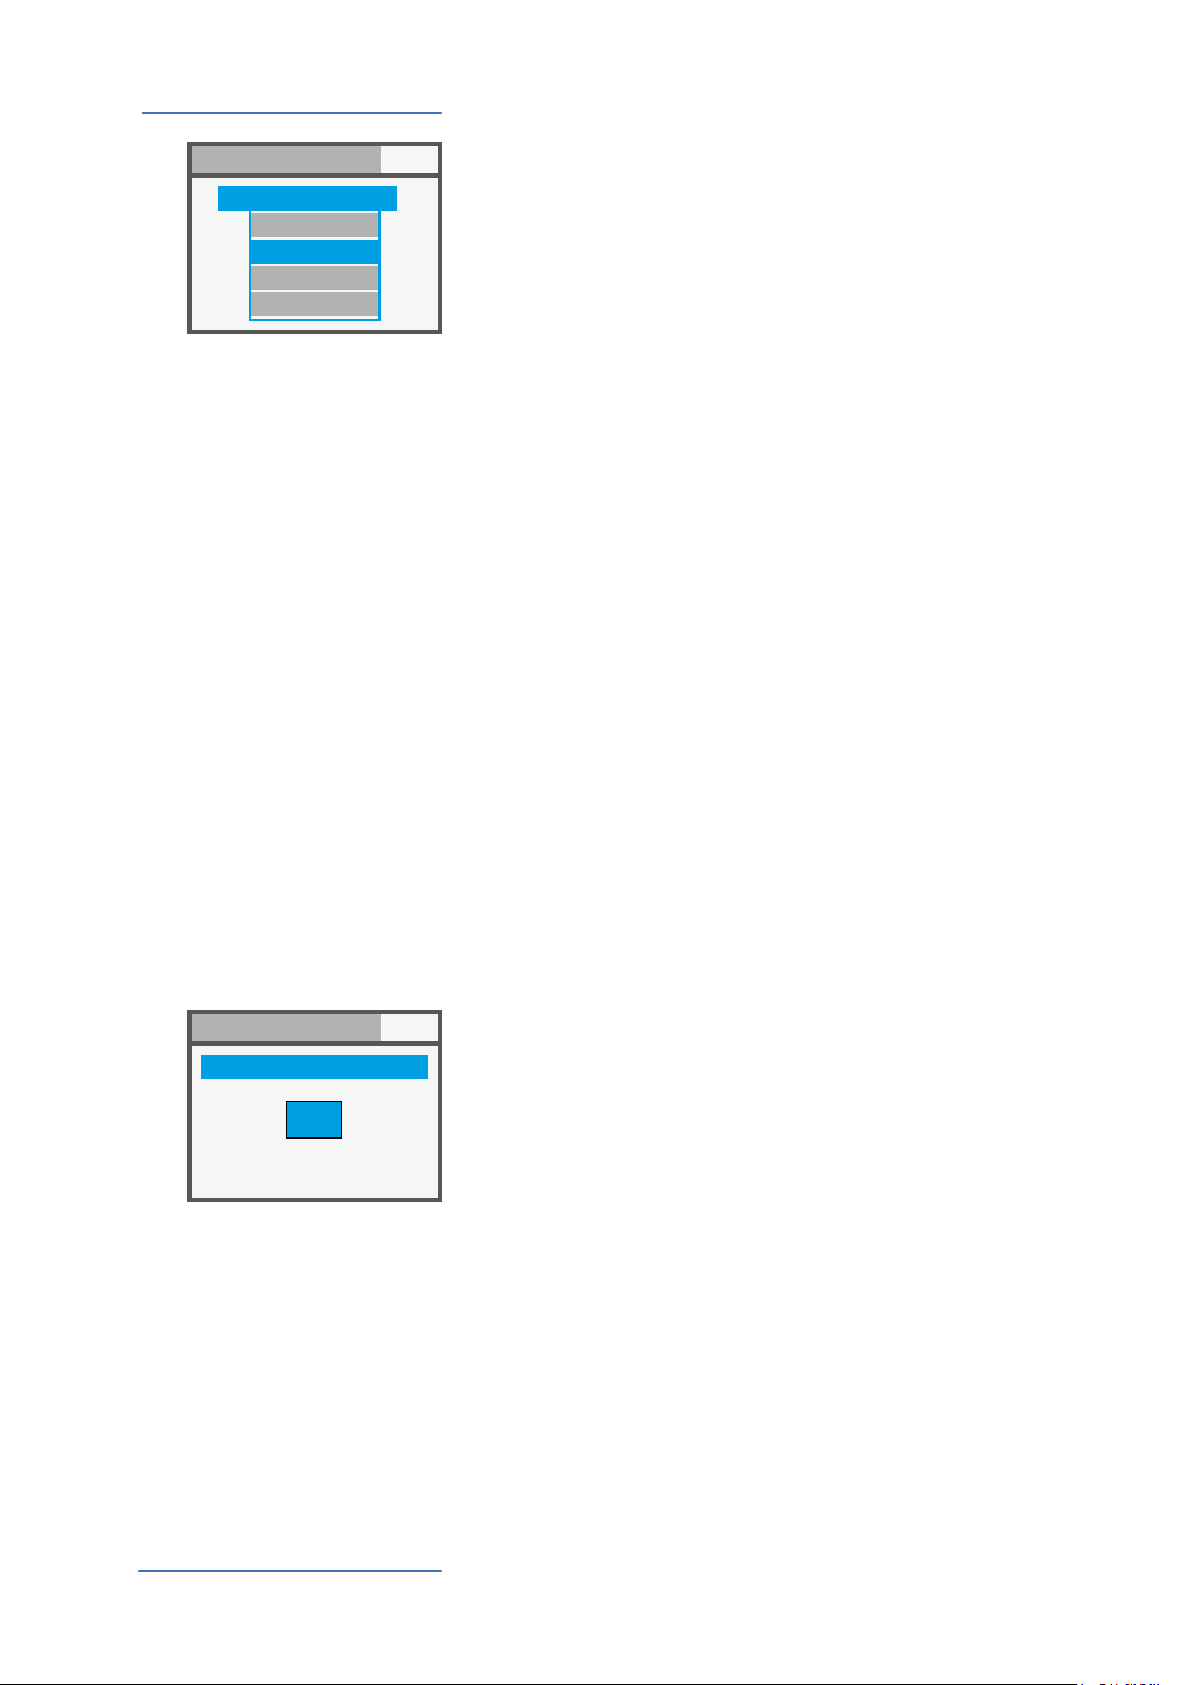
GLOBAL / SYSTEM In the HOME page, press OUT button to enter in the GLOBAL/
MAIN TRANSPOSE
Selecting this function and rotating the ENCODER, all enabled
ZONES can be transposed in a range or -12 and +12 semitones, with a single control.
PANIC
In case of pending notes or controls (coming from the external devices, connected to the instrument) pressing this command the “ALL NOTES OFF” message is sent to all devices, to
restore the normal function;
RESTORE
This function restores all initial settings of the instrument;
please note that all your programming will be restored and
consequently this function should be activated only in case
of real need, saving all your programs before restoring the
unit.
V 1.6.0
GLOBAL TRANSPOSE:
+00
C
STICKS CALIBRATION
In the rst page the 3 sticks icons are blue and you can verify
the actual range by moving them all the way along the four
sides, reaching to the edges of the related area.
To calibrate a stick, press it (click): the area will become yellow; now move the stick along the four sides, reaching accurately the four edges of the control area, repeating the movement at least 2-3 times
Once the point 2 is made, click again on the stick: the area will
become green, to conrm that the calibration is done.
STICKS CALIBRATION:
STICK 1 STICK 2 STICK 3
SL Controllers by Studiologic®
E
15
Global settings
GLOBAL / SYSTEM:
GLOBAL / SYSTEM:
PEDAL PRG +/-
OFF
PED1 +
PED1 -
PED2 +
V 1.6.0
PROGRAM +/-
This function allows to increment or decrement the current
SL Program, using single-switch pedals connected to the Ped
1 or Ped 2 sockets; the available settings are:
• OFF: function disabled
• PED1 + pressing a pedal connected to PED1 will increment
the current Program a step ahead (i.e from Program 001 to
002 and so on);
• PED1 – pressing a pedal connected to PED1 will decrement
the current Program a step below (i.e from Program 002 to
001 and so on);
• PED2 + pressing a pedal connected to PED2 will increment
the current Program a step ahead (i.e from Program 001 to
002 and so on);
• PED2 – pressing a pedal connected to PED2 will decrement
the current Program a step below (i.e from Program 002 to
001 and so on);
• PED1/2 +/- two pedals connected to PED1 and PED2 will
allow to increment or decrement the current Program;
• PED1/2 EXT with this setting the SL will send and receive
the Data Increment and Data Decrement controls via USB in,
allowing to control the main Programs from computer
software applications enabled to make this function.
COMMON CHANNEL:
016
V 1.6.0
NOTE: when one of the PED 1/2 Global functions are activated, the related pedal setting of each Program are overwritten by the Program -/+ function and the ZONE programming
will be shown in a grey color; setting to OFF the related Global pedal functions will re-enable the original Zone setting of
the pedals.
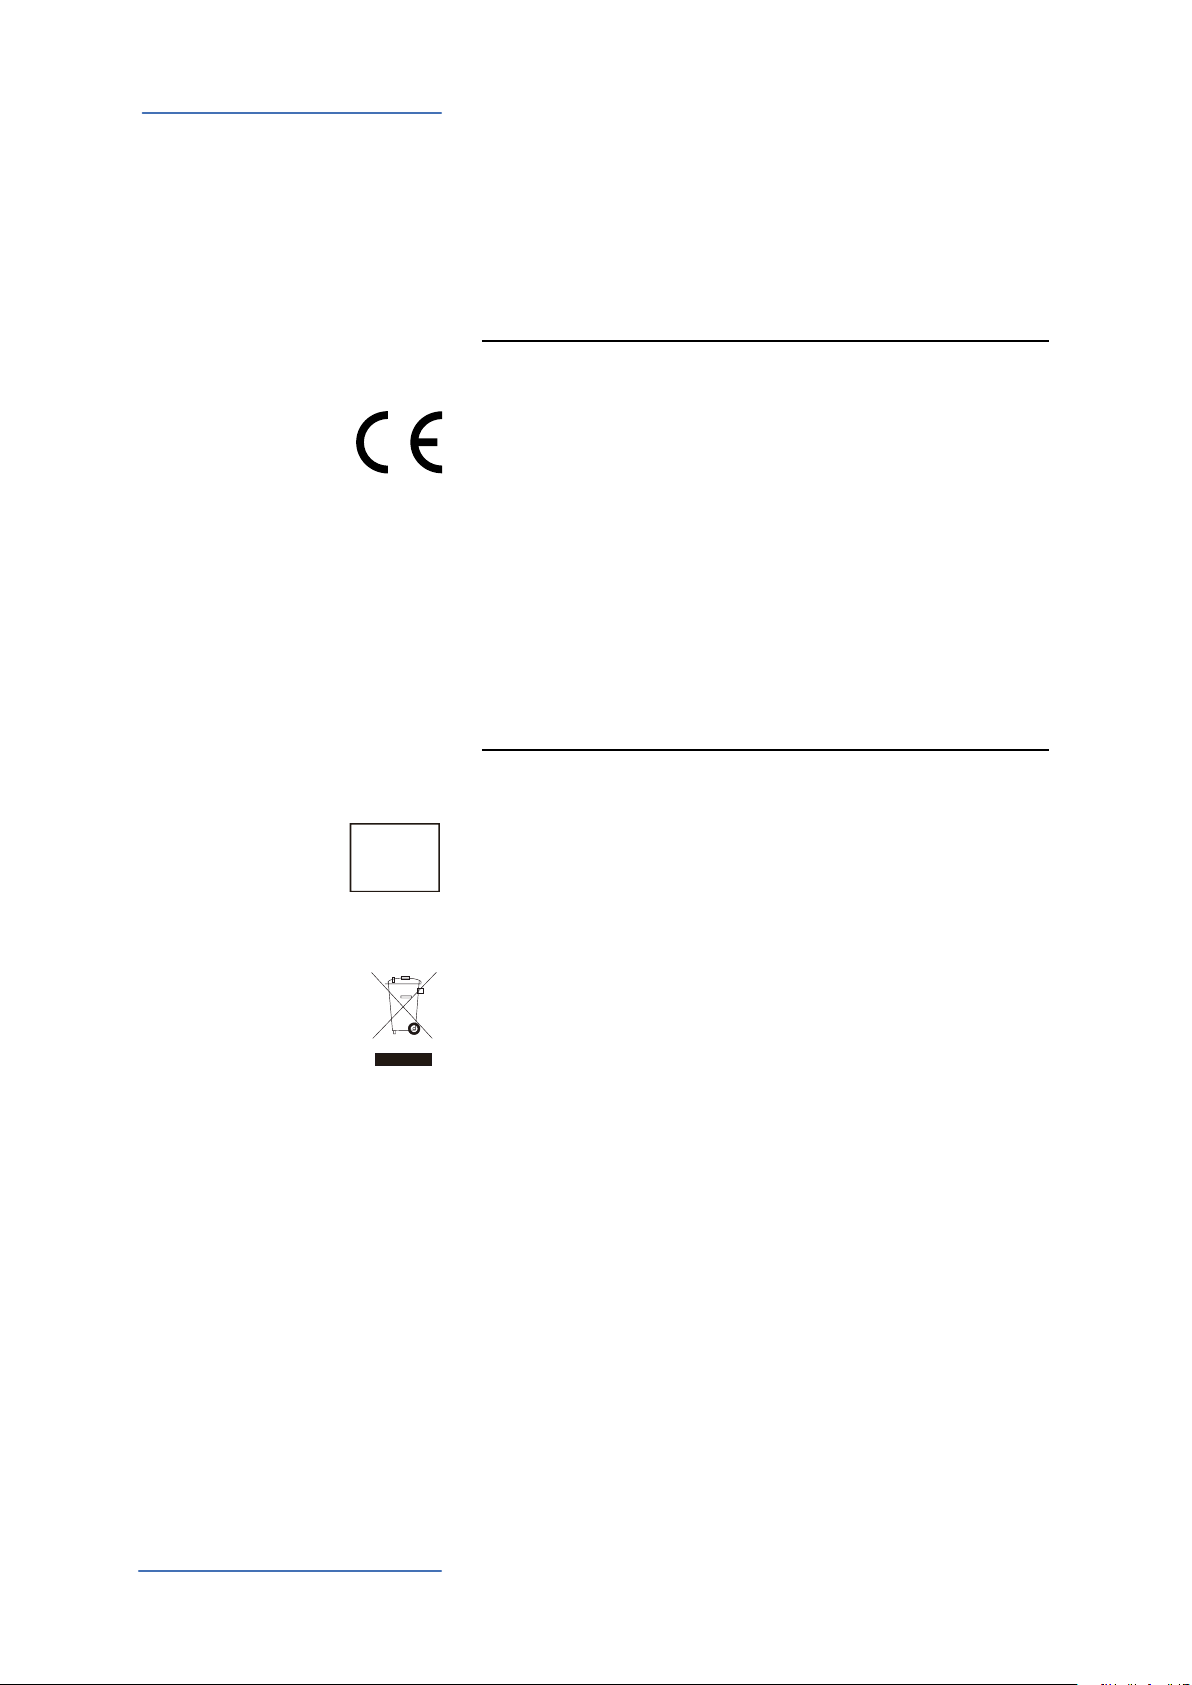
COMMON CHANNEL
As COMMON is intended a MIDI channel that allows to send
or receive generic controls from and to the SL, not directly
related to a single Zone; the function that needs a Common
Channel (set to one of the available 16 MIDI channels) is the
Program +/-.
The COMMON Channel selection includes the these values:
• OFF: no Common channel messages enabled;
• 01/16: selected Common Channel (the most used setting is
the MIDI CH 16);
SL Controllers by Studiologic®
16

new ocial Firmware Version will be made available by Studiologic. The procedure to update the rmware (intended
as the main features, parameters and/or improvements of
the operating system) and the dedicated software to update
your SL will be published on our Sites with all related descriptions and instructions.
To enter in Upgrade Mode, turn the instrument ON keeping
the IN button pressed.
be downloadable from our Ocial Sites; it will allow to edit all
avaiable SL parameters with a very intuitive and interactive
user‘s interface. When the SL is connected to the computer
(via USB) and the SL Editor is open, the communication is set
in real time and all editings are transmitted to the SL directly,
with no need of any oine action.
The images below are examples of the many avaible features.
Firmware management
Firmware upgradeThe SL rmware does not normally need any update, unless a
SL EditorThe SL Editor is a dedicated Software Applications, that will
MAIN PAGE ORGANIZE
KEY BALANCE SL CURVES
SL Controllers by Studiologic®
E
17
Declarations
Warranty
CE-Conformity
Every product from Studiologic by Fatar has been carefully manufactured, calibrated and tested, and carries a warranty. Damage caused
by incorrect transport, mounting or handling is not covered by this
warranty. Compensation amounting to more than the price of the
device is excluded. For any further informations please refer exlusively to your dealer and/or local distributor. This is based on general
terms and condition of the local distributor / FATAR srl, Italy.
FATAR srl
Zona Ind.le Squartabue
62019 Recanati MC Italy
declares that this product complies with the European Directives:
2004/108//EC EMC Directive
DIN EN 55013 EMC radio disturbance of sound, TV and
associated equipment
DIN EN 55020 EMC immunity of sound, TV and
associated equipment
Recanati, 20. 05. 2015 Marco Ragni, Chief Executive Ocer
This declaration becomes invalid if the device is modied without
approval.
RoHS-Conformity
RoHS
compliant
2002/95/EC
Disposal / WEEE
State of the art
Trademarks
Copyright
This product is manufactured according to the 2002/95/EC directive.
The purpose of this EC Directive 2003/108/EC is, as a rst priority, the
prevention of waste electrical and electronic equipment (WEEE), and
in addition, the reuse, recycling and other forms of recovery of such
wastes so as to reduce the disposal of waste. Please help to keep our
environment clean.
To ensure maximum quality all Studiologic by Fatar devices are always engineered to be state-of-the-art products, therefore updates,
modications and improvements are made without prior notice.
Technical specication and product appearance may vary from this
manual.
All trademarks used in this manual belong to their respective owners.
No part of this manual may be reproduced or transmitted in any form
or by any means without prior consent of the copyright owner:
SL Controllers by Studiologic®
18
FATAR Srl
Zona Ind.le Squartabue
62019 Recanati, Italia

ITALIANO
SL88 GRAND
SL88 STUDIO
SL73 STUDIO
Manuale di Istruzione
I
SL Controllers by Studiologic®
19
Informazioni di sicurezza
Importanti Istruzioni di Sicurezza
Si prega di leggere l‘intero manuale. Esso contiene tutte le informazioni di cui si ha bisogno per usare questa unità.
Si prega di seguire le istruzioni riportate nel manuale. La
garanzia sarà annullata se operazioni non autorizzate verranno
svolte sull‘unità.
Solo gli accessori specicati dal fabbricante devono essere
utilizzati con questa unità. Utilizzare l‘unità solo come
specicato in questo manuale.
PERICOLO!
Rischio di scosse elettriche.
Non aprire l‘unità. Non ci sono parti riparabili dall‘utente.
L‘unità deve essere riparata solo dal personale di assistenza
tecnica.
Umidità
Per ridurre il rischio di incendi o scosse elettriche, non esporre
l‘unità a pioggia o umidità. Non posizionare contenitori con liquidi sull‘unità. Non utilizzare l‘unità vicino all‘acqua, ad esempio piscina, vasca da bagno o in cantina umida.
Se l‘unità viene spostata da un luogo freddo in una camera calda, della condensa può vericarsi all‘interno. Per evitare danni
si prega di consentire all’unità di raggiungere la temperatura
ambiente prima di accenderla.
Installazione
Utilizzare sempre un supporto stabile per posizionare la tastiera. Si prega di essere consapevoli della sua dimensione e peso.
Pulizia / Manutenzione
Non utilizzare detergenti abrasivi, che possano danneggiare
la supercie. Si consiglia un panno in microbra leggermente
umido.
Imballaggio
Si prega di conservare tutti gli imballaggi e usarli per proteggere la tastiera per il trasporto, ad esempio se è necessaria la
manutenzione.
Importante
Prima di collegare l‘unità alla rete elettrica, si prega di controllare se l‘alimentazione è adatta per lo strumento. L‘unità
può essere alimentata con 100-240VAC, usando l‘alimentatore
adatto fornito nella confezione.
SL Controllers by Studiologic®
20

Indice
Informazioni di sicurezza
La tua nuova SL
Alimentazione - Ingressi & Connessioni
Pannello di controllo
Parametri di setup
Impostazioni globali
20
22
22
22
23
24
24
24
24
25
25
26
26
28
29
30
31
Tastiera
Zone
Nell‘imballo
Spiegazione del funzionamento
Alimentazione
Ingressi
MIDI IN/OUT
USB
Pannello di controllo
Stick programmabili
HOME Display
Program Selection & Edit
Group programmabili
Zone Edit
Stick programabili
GLOBAL/SYSTEM
Gestione del Firmware
Dichiarazioni
Appendix
33
33
34
67
69
69
Aggiornamento Firmware
SL Editor
Speciche
Dimensioni
I
SL Controllers by Studiologic®
21

La tua nuova SL
Grazie per avere scelto la SL. Avete acquistato uno strumento progettato allo stato dell’arte, prodotto dalla rinomata azienda Studiologic. La SL è facile da utilizzare, grazie al grande display a
colori, l’Encoder principale con controlli integrati di navigazione e click di attuazione e ore una
tastiera dal tocco professionale. Raccomandiamo di leggere attentamente tutto il manuale per
potere utilizzare tutte le funzione della vostra SL. Questo manuale vuole essere una guida rapida
per aiutare l’utilizzatore a capire lo strumento ed i suoi controlli, piuttosto che una descrizione
generale della struttura e delle programmazioni di dettaglio, rese più essibili e facili anche grazie
al Software Editor per computer, che potrà essere scaricato dal nostro sito.
Iniziamo con una vista generale delle funzioni della SL.
Tastiera I Controller SL orono la più recente innovazione tecnologica
della Fatar: la sosticata tastiera Hammer Action TP/100
con 3 contatti per tasto e Aftertouch. Inoltre i Controller SL
sono facilmente portatili, pur orendo un tocco pianistico
realistico, per il quale Fatar è famosa.
Zone La tastiera può essere suddivisa in 4 Zone programmabili. Po-
tete denire per ogni zona la porzione di tastiera e selezionare con quale curva dinamica verranno inviati i dati MIDI,
insieme ad una vasta gamma di regolazioni e controlli.
Ogni zone può essere inviata ad una porta di uscita diversa
ed i nuovi Sticks programmabili possono controllare diversi
parametri MIDI per ogni zona.
Nell‘imballo SL88 Grand / SL88 Studio / SL73 Studio
Alimentatore
Pedale VFP1-10 / PS100
Manuale di istruzione (CD Rom)
SL Controllers by Studiologic®
22

La tua nuova SL
P001 SL 88 STUDIO
GLOBAL / SYSTEM:
P001 SL 88 STUDIO
MIDI OUT 1
PANIC
MAIN TRASPOSE
RESTORE
STICK CALIBRATION
VERSION:
-- +00
---
---
V---
HOME
MIDI OUT 2
OUT
GROUP SAGA SETUP
INSTRUMENT
SOUND
VOL 122
INSTRUMENT 3
SOUND
VOL 101
A0 / F#2
B7 / C8
MIDI IN
1
INSTRUMENT 2
SOUND
VOL 096
INSTRUMENT 4
SOUND
VOL 124
PEDALS
PEDALI
4 3 2 1
IN/OUT
G3 / Db4
A0 / F#2
STORE UNDER:
NAME:
ZONE EDIT:
MERGE SOURCE:
MERGE DEST.:
MERGE FILTER:
P001
SL 88 STUDIO
1
OFF
USB OUT
SYS OFF - ALL
USB
2 3 4
HOME
YOUR PROJECTS
Library Groups
GROUP 12
PROGRAM xxx
SL Controllers by Studiologic®
I
23

Alimentazione
Ingressi & Connessioni
Alimentazione - Ingressi & Connessioni
Connessioni pedali
1-2 switch, 3 continuo,
4 multi functione
Porta USB
MIDI In/Out, USB to HOST
MIDI
In, Out1, Out2
Alimentazione
9V - 1A
Power On/O
Tutte le connessioni sono posizionate sul retro dello strumento, per un accesso facile e protetto:
Alimentazione
Inserite l’adattatore nell’apposita presa e accendete lo strumento, posizionando l’interruttore sulla posizione 1
(1=ON – 0=OFF).
ATTENZIONE:
Assicuratevi che l’alimentatore/adattatore sia quello originale (incluso nell’imballo) o uno compatibile, con voltaggio e
amperaggio corretti (9V – 1A, pin + positivo al centro).
Ingressi
Midi IN/OUT
USB
Connessioni dei pedali programmabili:
• 2 switch
• 1 continuo
• 1 multi funzione
Potete collegare pedali compatibili di tipo Switch (per le relative funzioni) alle prese Pedal 1 e 2, un pedale di volume/
espressione alla presa 3 ed un pedale multiplo speciale (tra
quelli compatibili) alla presa 4.
Le connessioni MIDI permettono di controllare qualsiasi MIDI
device esterno o controllare la SL tramite unità MIDI esterne,
per tutti i relativi dati (note, program change ecc.)
La presa USB (Universal Serial Port) permette la connessione
con unità esterne compatibili (es: Computers) e aggiornare il
rmware via USB.
Quando la SL è collegata al computer via USB, sarà possibile
usare il Software Editor dedicato, che include anche controlli
evoluti non presenti nella interfaccia di editing della SL (ad
esempio: il Keyboard Balance, che permette di modicare la
sensibilità dinamica di ciascun tasto e bilanciare i tasti bianchi e neri con un singolo controllo.
SL Controllers by Studiologic®
24

Pannello di controllo
Control Panel
Pulsanti
principali
IN
Display a
colori
Stick 2
Auto-centrante
sull‘asse X
Stick 1
Auto-centrante
su entrambi gli
assi X/Y
OUT
HOME
Encoder
Data input (ruotando)
Controlli di navigazione (left/right/up/down)
Click (ENTER)
Stick programmabili
Stick 3
Libero (non autocentrante)
Il pannello di controllo della nuova SL è un concentrato di tecnologia e facilità di uso; consiste di:
• 1 Grande display a colori (TFT - LCD 320 x 240);
• 1 Encoder rotativo con click incorporato e 4 interruttori posizionali (up/down/left/right);
• 3 Pulsanti princilali: Home (torna alla videata principale) – IN & OUT (per navigare nelle pagine);
• 3 Stick programmabili.
Tutte le pagine di Edit possono essere navigate allo stesso modo (up/down con i comandi posizionali
dell’encoder, IN e OUT) e potete usare una sola mano per selezionare tutte le pagine ed i parametri
disponibili, con accesso istantaneo a tutte le funzioni; una volta selezionata una funzione, potete
cambiarne il valore ruotando l’Encoder (a sinistra = diminuisce / a destra= aumenta).
SL Controllers by Studiologic®
25
I

Parametri di setup
P001 SL 88 STUDIO
P001 SL 88 STUDIO
P001 SL 88 STUDIO
SL 88 STUDIO
HOME Display
La videata principale della SL (HOME) è una rappresentazione
chiara e completa dei parametri principali, come segue:
Program
(i.e. 001 NOME)
Il Program atttualmente
selezionato
GROUP SAGA SETUP
INSTRUMENT
SOUND
VOL 122
INSTRUMENT 3
SOUND
VOL 101
ZONES (color coded)
Zone attive e parametri principali
(Volume, zona di tastiera)
GROUP
il Group a cui appartiene il Program
selezionato
(-------- se nessun Group è attivo)
1
INSTRUMENT 2
SOUND
VOL 096
A0 / F#2
B7 / C8
INSTRUMENT 4
SOUND
VOL 124
G3 / Db4
A0 / F#2
Ruotando l’Encoder, quando
una Zona è selezionata, potete controllarne immediatamente il Volume (000-127).
GROUP SAGA SETUP
1
A0 / F#2
97
B7 / C8
INSTRUMENT 2
SOUND
VOL 096
INSTRUMENT 4
SOUND
VOL 124
INSTRUMENT
SOUND
VOL 122
INSTRUMENT 3
SOUND
VOL 101
G3 / Db4
A0 / F#2
Program Selection & Edit Per selezionare un Program si può ruotare l‘Encoder (selezi-
one in sequenza immediata), oppure cliccare l‘Encoder, ruotare per selezionare e cliccare per confermare.
Quando un Program è selezionato (posizionando il cursore
sulla prima riga del display) premendo IN si entra in Edit.
STORE UNDER:
NAME:
ZONE EDIT:
MERGE SOURCE:
MERGE DEST.:
MERGE FILTER:
P001
SL 88 STUDIO
2 3 4
1
OFF
USB OUT
SYS OFF - ALL
I seguenti parametri sono disponibili:
STORE UNDER
Per selezionare la posizione
in cui volete memorizzare il
Program corrente.
SL Controllers by Studiologic®
26

Parametri di setup
SL 88 STUDIO
SL 88 STUDIO
SL 88 STUDIO
SL 88 STUDIO
SL 88 STUDIO
NAME
Per nominare il Program corrente, usando i comandi posizionali dell’Encoder (left/right – up/down) e cliccando quando
la lettera/numero desiderati
sono selezionati. Potete anche muovere il cursore sulle
lettere/numeri e selezionarli
cliccando sull’Encoder, oppure ruotare l’Encoder per
selezionare lettere e numeri.
ZONE EDIT
(Fate riferimento al relativo
paragrafo a pagina 29).
MERGE SOURCE
Per selezionare la destinazione di tutti i dati MIDI miscelati da IN a OUT.
SL 88 STUDIO_ _ _
-
Program Edit
MERGE DESTINATION
Per selezionare la destinazione di tutti i dati MIDI miscelati da IN.
MERGE FILTER
Per ltrare (eliminare) alcuni
dati MIDI, quando si miscela
la SOURCE verso la
DESTINATION.
I
SL Controllers by Studiologic®
27

Parametri di setup
GROUP:
THE BOSS
GROUP: THE BOSS
P001 SL 88 STUDIO
GROUPS programmabili
La SL comprende una funzione speciale per organizzare i
Programs in Groups, permettendo di elencare in uno stesso
Groups vari Programs, corrispondenti ad uno specico progetto, canzone o situazione. Lo stesso Program può essere associato a più Groups, permettendo di ottimizzare la memoria
interna ed evitare duplicazioni di Programs, se essi possono
essere usati in più Groups.
Per selezionare o programmare un Group, tra i 12 disponibili,
usate i comandi posizionali dell’Encoder no a quando selezionate la zona Groups, poi selezionate il Group desiderato
ruotando l’Encorder; quando un Group è selezionato, solo i
Programs di quel Group saranno selezionabili, nella sequenza
programmata nel Group.
NOTA
È sempre possibile disattivare la suddivisione in Groups,
selezionato la posizione
vuota/neutra, mostrata sul
display come GROUP --------
--------
GROUP
INSTRUMENT
SOUND
VOL 122
INSTRUMENT 3
SOUND
VOL 101
A0 / F#2
B7 / C8
1
INSTRUMENT 2
SOUND
VOL 096
INSTRUMENT 4
SOUND
VOL 124
G3 / Db4
A0 / F#2
Come creare un nuovo Group o modicarne uno esistente
Premete IN quando un Group
è selezionato e poi scegliete
il Group desiderato, nella lista, usando la funzione up/
down dell’Encoder.
Premete IN per entrare nella
pagina GROUP EDIT.
BEAT - LESS
ROAD - STONES
HAPPY
BIRTHDAY
THE BOSS
Ora è possibile editare il
Group, il suo nome ed i Programs ad esso associati. Per
editare i Program associati,
selezionate PROGRAM LIST e
NAME:
PROGRAM LIST
THE BOSS
premete IN.
Per aggiungere, cambiare
o spostare un Program in
un Group, scrollare con
l‘Encoder e cliccare per aprire
il menù dove si trovano le
funzioni MOVE UP, MOVE
DOWN o DELETE all‘interno
PROGRAM LIST:
002 CONCERT GRAND
MOVE UP
003 RHODX MARK I
MOVE DOWN
007 JAZZ SETUP
DELETE
022 PIANO + ORGAN
009 SYNTH SETUP
dei 30 Programs asociabili.
SL Controllers by Studiologic®
28

Parametri di setup
SL 88 STUDIO
SL 88 STUDIO
SL 88 STUDIO
SL 88 STUDIO
SL 88 STUDIO
Per entrare in Edit, premete IN quando una delle ZONE è selezionata. Una volta entrati nella funzione Edit da una ZONA,
è possibile selezionarne un’altra, utilizzando i comandi left/
right dell’Encoder. Una volta visualizzata la lista dei parametri,
si può premere IN, ruotare direttamente l‘Encoder o spostare
a destra il cursore per accedere al paramentro da modicare.
Pagina 1
VELOCITY RANGE
VELOCITY CURVE
Pagina 2
Pagina 3
Pagina 4
INSTRUMENT NAME
Pagina 5
SOUND NAME
ENABLE
MIDI PORT
CHANNEL
PROGRAM
MSB - LSB
VOLUME
KEY RANGE
AFTERTOUCH
TRANSPOSE
OCTAVE
PEDAL 1
PEDAL 2
PEDAL 3
PEDAL 4*
STICK 1 X
STICK 1 Y
STICK 2 X
STICK 2 Y
STICK 3 X
STICK 3 Y
per abilitare o disabilitare la ZONA
selezionata
per selezionare la porta OUT, tra le opzioni disponibili (USB, MIDI 1, MIDI 2)
001 - 016
001 - 128
000 - 127 (per entrambi)
000 - 127
A0 - C8
000 - 127
SOFT/NORMAL/HARD, USER(1-6),
FIXED (VALORE 001-127)
OFF/ON
-12 / +12 SEMITONI
-3 / +3
(funzione selezionabile)
(funzione selezionabile)
(funzione selezionabile)
(funzione selezionabile)
(funzione selezionabile)
(funzione selezionabile)
(funzione selezionabile)
(funzione selezionabile)
(funzione selezionabile)
(funzione selezionabile)
Zone Edit
KEYRANGE:
KEY RANGE
VELOCITY RANGE
VELOCITY CURVE
I
*Sul Pedal 4 è possibile selezionare una qualsiasi funzione
normale (switch o continuos), oppure assegnare un pedale
multiplo speciale (SLP3-D, NTP, etc.) permettendo di controllare no a 3 pedali da un‘unica connessione. Una tipica applicazione può essere di controllare con 2 pedali le funzioni
Soft e Sostenuto e con un terzo pedale la funzione Damper
continuo (Half Pedaling = Mezzo pedale).
TRANSPOSE
SL Controllers by Studiologic®
29

Parametri di setup
SL 88 STUDIO
P001 SL 88 STUDIO
GROUP SAGA SETUP
1
INSTRUMENT
SOUND
VOL 122
INSTRUMENT 3
SOUND
VOL 101
INSTRUMENT 2
INSTRUMENT 2
SOUND
SOUND
VOL 096
VOL 096
A0 / F#2
INSTRUMENT 4
3 4
SOUND
VOL 124
B7 / C8
Stick programmabili
Zone Edit
G3 / Db4
G3 / Db4
A0 / F#2
Una Zona può avere 3 stati: ON/OFF/Stanby.
Per abilitare e disabilitare una Zona premere IN e settare ON
oppure OFF; se OFF nella zona appare solo il fondino colorato. Cliccando l‘Encoder su una Zona ON la si può temporaneamente mettere in Standby e il display la mostrerà su un fondo
grigio. (La gura a lato mostra Zona 1 ON, Zona 2 Standby,
Zone 3 e 4 OFF).
NOTA: Potete anche selezionare e programmare tutti i parametri di una ZONA anche se questa è disabilitata, per essere pronti ad abilitarla in ogni momento, con tutti i parametri
pre-programmati per il Program selezionato.
I 3 stick posti sul lato sinistro del pannello comandi sono controlli in tempo reale, programmabili:
• Stick 1 ha molle di richiamo sia sull’asse verticale, sia orizzontale e si riposiziona automaticamente al centro; un uso
tipico di questo comando è il controllo di Pitch Bending;
• Stick 2 ha molle di richiamo solo sull’asse orizzontale e
perciò si auto-centra solo sull’asse X; un uso tipico per questo controllo può essere la Modulation o il Filter Cuto, controllando alcuni tipi di sintetizzatori anche virtuali;
• Stick 3 è completamente libero e privo di molle auto-centranti sugli assi X e Y permettendo di controllare parametri
che si desidera che restino stabili.
Come programmare gli Stick
Una volta selezionata una Zona, cliccando il comando IN si
entra in EDIT MODE e si possono selezionare le varie funzioni
tramite il comando posizionale dell’Encoder, no a quando si
seleziona la pagina relativa alla programmazione degli Stick.
Selezionate uno degli Sticks, premete ancora IN ed entrate
nella pagina di programmazione, dove tutte le funzioni disponibili sono elencate, sia per l’asse X (orizzontale) sia per
l’asse Y (verticale).
SL Controllers by Studiologic®
30

GLOBAL/SYSTEM.
GLOBAL / SYSTEM:
GLOBAL / SYSTEM:
GLOBAL / SYSTEM:
GLOBAL / SYSTEM:
STICKS CALIBRATION:
STICK 1 STICK 2 STICK 3
(NOTA: Per tornare alla videata principale premere HOME).
V 1.6.0
MAIN TRASPOSE
PANIC
RESTORE
STICK CALIBRATION
COMMON CHANNEL
+00
PED 1/2 (EXT) PROGRAMS +/ 16
Sono disponibili i seguenti controlli:
Impostazioni globali
GLOBAL / SYSTEM Nella pagina HOME, premete OUT per entrare nella pagina
MAIN TRANSPOSE
Selezionando questa funzione e ruotando l’Encoder, tutte le
ZONE possono essere trasposte (di tonalità) in un intervallo
compreso tra -12 e +12 semitoni, con un unico controllo.
PANIC
In caso di note appese (sui moduli esterni collegati allo strumento) premete questo comando e un messaggio di “ALL
NOTES OFF” sarà inviato a tutte le unità collegate, per riportare tutto alla normalità.
RESTORE
Questa funzione riporta tutte le programmazioni allo stato
iniziale dello strumento; notate che tutti i programmi saranno resettati e perciò la funzione deve essere utilizzata solo
in caso di reale necessità, salvando le vostre programmazioni
prima di riportare tutto allo stato iniziale.
V 1.6.0
GLOBAL TRANSPOSE:
+00
C
STICKS CALIBRATION
Entrando in calibrazione dei 3 Sticks, le relative icone sul display saranno blu e potete vericare l‘attuale range di controllo, muovendoli lungo i lati e raggiungendo i quattro angoli.
Per calibrare uno stick, premetelo (cliccando): l‘area relativa
allo stick diventerà gialla; ora muovete lo stick sui quattro lati,
raggiungendo accuratamente gli angoli e ripetendo il movimento completo 2-3 volte.
Dopo avere eseguito il punto 2, premete (cliccate) ancora lo
Stick: l‘area diventerà verde, a conferma della avvenuta calibrazione.
STICKS CALIBRATION:
STICK 1 STICK 2 STICK 3
SL Controllers by Studiologic®
I
31

Impostazioni globali
GLOBAL / SYSTEM:
GLOBAL / SYSTEM:
PEDAL PRG +/-
OFF
PED1 +
PED1 -
PED2 +
V 1.6.0
PROGRAMS +/-
Questa funzione consente di incrementare o diminuire il programma SL attuale, utilizzando i pedali a singolo interruttore
collegati alle prese Ped 1 o Ped 2; le impostazioni disponibili
sono:
• OFF: la funzione è disattivata
• PED1 + premendo un pedale collegato a PED1 incrementerà
il programma corrente un passo avanti (cioè dal programma
001 a 002 e così via);
• PED1 - premendo un pedale collegato a PED1 diminuirà il
programma corrente un passo successivo (cioè dal program
ma 002 a 001 e così via);
• PED2 + premendo un pedale collegato a PED2 incrementerà
il programma corrente un passo avanti (cioè dal programma
001 a 002 e così via);
• PED2 - premendo un pedale collegato a PED2 diminuirà il
programma corrente un passo successivo (cioè dal
programma 002 a 001 e così via);
• PED1/2 +/- due pedali collegati a PED1 e PED2 consentono
di incrementare o diminuire il programma corrente di una
unità;
• PED1 / 2 ext: con questa impostazione, SL invierà e riceverà
il controllo Data increment e Data decrement via USB,
consentendo di gestire la funzione di incremento o
decremento dei PROGRAMS dalle applicazioni software del
computer abilitate per gestire queste funzioni.
COMMON CHANNEL:
016
V 1.6.0
NOTA: quando viene attivata una delle funzioni GLOBAL relative a PED 1/2, le impostazioni relative al pedale di ciascun
PROGRAM vengono scritte dalla funzione Program +/- e la
programmazione relativa alle ZONE verrà visualizzata in un
colore grigio; impostando su OFF le funzioni GLOBAL dei pedali si riattiva l‘impostazione originale delle zone dei pedali.
COMMON CHANNEL
Per COMMON si intende un canale MIDI che consente di inviare o ricevere controlli generici, non direttamente correlati
ad una singola Zona; la funzione che deve avere un canale
comune impostato (su uno dei 16 canali MIDI disponibili) è i
PROGRAM -/+.
La selezione del canale COMMON comprende i seguenti valori:
• OFF: nessun messaggio canale comune abilitato
• 01/16: canale comune selezionato (l‘impostazione più
utilizzata è il MIDI CH 16)
SL Controllers by Studiologic®
32

a meno che un nuovo Firmware uciale sia reso disponibile
da Studiologic. La procedura per aggiornare il Firmware (inteso come insieme di funzioni e parametri e/o miglioramenti
del sistema operativo) unitamente al Software di aggiornamento, saranno pubblicati sui siti uciali o autorizzati, con
le relative descrizioni e istruzioni. Per entrare in modalità Upgrade, accendete lo strumento tenendo premuto il tasto IN.
ricabile dal nostro sito Uciale; esso permetterà di editare
tutti i parametri della SL in modo diretto e intuitivo, grazie
ad un’interfaccia graca semplice e completa. Quando la SL
è collegata al Computer (via USB) ed il programma SL Editor
è attivo, la comunicazione tra Computer/Programma e SL è
diretta ed in tempo reale (real-time) e tutti i parametri di programmazioni saranno trasmessi direttamente allo strumento,
senza necessità di interventi successivi (o-line).
Gestione del Firmware
Aggiornamento FirmwareIl rmware della SL non necessita di aggiornamenti frequenti,
SL EditorIl Software SL Editor è un programma dedicato, che sarà sca-
Le seguenti immagini sono solo esempi di alcune tra le molte
funzioni disponibili.
MAIN PAGE ORGANIZE
KEY BALANCE SL CURVES
SL Controllers by Studiologic®
I
33

Dichiarazioni
Garanzia
Conformità CE
Tuti i prodotti Studiologic sono costruiti attentamente, calibrati,
testati, e sono soggetti a garanzia. Danni causati da trasporto non
conforme, montaggio o errata manutenzione, non sono coperti da
questa garanzia. Rimborsi di importo superire al valore delo strumento sono esclusi. Per eventuali informazioni rivolgersi al proprio
negoziante e/o al distributore di zona. Questo è basato su termini e
condizioni del distributore / FATAR srl, Italy.
FATAR srl
Zona Ind.le Squartabue
62019 Recanati MC Italy
dichiara che questo prodotto è conforme alle Direttive Europee:
2004/108//EC EMC Directive
DIN EN 55013 EMC radio disturbance of sound, TV and
associated equipment
DIN EN 55020 EMC immunity of sound, TV and
associated equipment
Recanati, 20. 05. 2015 Marco Ragni, Chief Executive Ocer
Questa dichiarazione diventa non valida nel caso di modiche non
autorizzate.
Conformità RoHS
RoHS
compliant
2002/95/EC
Disposizioni / WEEE
Stato dell‘arte
Marchi
Copyright
Questo prodotto è costruito secondo le direttive 2002/95/EC.
L‘adozione delle direttive EG 2003/108/EG è volta a prevenire e limitare il usso di riuti di apparecchiature destinati alle discariche,
attraverso politiche di riuso e riciclaggio degli apparecchi e dei loro
componenti (WEEE). Aiutaci a mantenere il mondo pulito.
Per garantire il massimo della qualità, i prodotti Studiologic sono
sempre progettati allo stato dell‘arte, per questo sono consentite,
senza preavviso: modiche, migliorie variazioni. Speciche tecniche
e di aspetto possono essere diverse da quanto indicato in questo
manuale.
Tutti i marchi usati in questo manuale appartengono ai rispettivi
proprietari.
Nessuna parte di questo manuale può essere riprodotta o trasmessa
in ogni forma senza il consenso del proprietrio del Copyright:
SL Controllers by Studiologic®
34
FATAR Srl
Zona Ind.le Squartabue
62019 Recanati, Italia

ENGLISH
SL88 GRAND
SL88 STUDIO
SL73 STUDIO
Bedienungsanleitung
D
SL Controllers by Studiologic®
35

Sicherheitshinweise
Wichtige Sicherheitshinweise
Lesen Sie die Bedienungsanleitung vollständig. Sie nden dort
alle Informationen, die Sie zum Einsatz des Gerätes benötigen.
Bei Fremdeingrien in das Gerät erlischt die Garantie.
Betreiben Sie das Gerät nur in Übereinstimmung mit der
Bedienungsanleitung.
Verwenden Sie nur vom Hersteller speziziertes Zubehör.
ACHTUNG!
Gefahr durch Stromschlag!
Das Gerät nicht önen. Im Inneren benden sich keine vom
Benutzer verwendbaren Teile. Reparaturarbeiten dürfen nur
von qualiziertem Fachpersonal durchgeführt werden.
Netzanschluss
Bevor Sie das Gerät mit dem Stromnetz verbinden, überprüfen
Sie bitte sorgfältig, ob die Netzspannung für das mitgelieferte Netzteil geeignet ist. Das Netzteil kann mit einer WechselSpannung von 100V bis 240V betrieben werden. Verwenden
Sie für den Anschluss an das Versorgungsnetz nur den entsprechenden Netzsteckeradapter (Klick-On).
Verwenden Sie keine defekten Netzteile oder Anschluss- leitungen.
Feuchtigkeit
Um eine Gefährdung durch Feuer oder Stromschlag auszuschließen, darf dieses Gerät weder Regen noch Feuchtigkeit
ausgesetzt werden. Auch Spritzwasser oder tropfende Flüssig- keiten dürfen nicht in das Gerät gelangen. Stellen Sie keine Gefäße mit Flüssigkeiten, z. B. Getränke oder Vasen, auf das
Gerät. Wenn das Gerät von einem kalten an einen warmen Ort
gebracht wird, kann sich im Inneren Kondensfeuchtigkeit bilden. Erst einschalten, wenn sich das Gerät auf Raumtemperatur erwärmt hat.
Montage
Achten Sie bei der Aufstellung auf eine stabile Unterlage.
Das Gerät ist schwer und sehr breit und kann leicht kippen.
Reinigung / Pflege
Verwenden Sie keine scharfen Reinigungsmittel. Am besten
eignet sich ein Mikrofasertuch, das Sie bei Bedarf leicht anfeuchten.
Hinweis zur Verpackung
Bitte bewahren Sie die Verpackung des Gerätes auf. Damit ist
Ihr Gerät beim Transport, z.B. im Service-Fall, geschützt.
SL Controllers by Studiologic®
36

Index
Sicherheitshinweise
Ihr neues SL
Stromversorgung & Anschlüsse
Bedienfeld
Kongurationsmöglichkeiten
Globale Einstellmöglichkeiten
36
38
38
38
39
40
40
40
40
41
41
42
42
44
45
46
47
Keyboard / Tastaur
Zonen
Lieferumfang
Erläuterung des Betriebs
Stromversorgung
Eingänge
MIDI IN/OUT
USB-Anschluss
Bedienfeld
Programmierbare Joysticksteuerung
HOME Display / Anzeige
Programm-Bearbeitung
Programmierbare Gruppen
Zonen-Bearbeitung
Gruppen-Bearbeitung
GLOBAL/SYSTEM
Firmware-Verwaltung
Rechtliches
Appendix
48
48
49
69
69
69
Firmware update
SL Editor
Spezikationen / Abmessungen
Abmessungen
SL Controllers by Studiologic®
D
37

Ihr neues SL
Vielen Dank, dass Sie sich für ein SL entschieden haben. Dieses Masterkeyboard gehört zur neusten
Keyboard-Generation aus dem Hause Studiologic. Dank des großen Farbdisplays ist die Bedienung
des Gerätes sehr einfach. Die zentrale Bedieneinheit, ist ein multifunktionaler Drehknopf (Encoder),
der die Navigation durch die Menüfunktionen steuert und Ihnen die perfekte Kontrolle über das
Gerät ermöglicht. Wir empfehlen Ihnen die Bedienungsanleitung vollständig durchzulesen, damit
Sie alle Funktionen des SL und deren Vorteile für sich nutzen können. Diese Bedienungsanleitung
soll Ihnen auf schnelle und einfache Weise die Bedienung Ihres Gerätes nahe bringen. Die
Verwendung der Editor-Software macht die Bedienung noch exibler und kann kostenlos auf der
Studiologic-Webseite heruntergeladen werden.
Starten wir mit einer Übersicht der Funktionen des SL.
Tastaur / Keyboard Das SL ist mit aktuellster und innovativer Fatar-Technik
ausgestattet. Die hochentwickelte TP100 Tastaur, besitzt eine
gewichtete Hammermechanik. Darüber hinaus ist das SL sehr
gut zu transportieren und überzeugt durch sein realistisches
Spielgefühl für das Fatar berühmt ist.
Zonen Das Keyboard kann in vier programmierbare Zonen unterteilt
werden. Sie können jede Zone des Keyboards denieren und
auswählen bei welchem Velocity-Wert, MIDI Daten gesendet
werden. Darüber hinaus gibt es eine große Bandbreite von
Einstell- und Kontrollmöglichkeiten.
Jede Zone kann einem bestimmten Ausgang zugeordnet
werden und die neuen, programmierbaren Joysticks können
verschiedene MIDI-Parameter für jede Zone steuern.
Lieferumfang SL88 Grand / SL88 Studio / SL73 Studio
Netzteil
Pedal VFP1-10 / PS100
Bedienungsanleitung (auf CD-ROM)
SL Controllers by Studiologic®
38

P001 SL 88 STUDIO
GLOBAL / SYSTEM:
P001 SL 88 STUDIO
Your new SL
MIDI OUT 1
PANIC
MAIN TRASPOSE
RESTORE
STICK CALIBRATION
VERSION:
-- +00
---
---
V---
HOME
MIDI OUT 2
OUT
GROUP SAGA SETUP
INSTRUMENT
SOUND
VOL 122
INSTRUMENT 3
SOUND
VOL 101
A0 / F#2
B7 / C8
MIDI IN
1
INSTRUMENT 2
SOUND
VOL 096
INSTRUMENT 4
SOUND
VOL 124
PEDALS
4 3 2 1
IN/OUT
G3 / Db4
A0 / F#2
STORE UNDER:
NAME:
ZONE EDIT:
MERGE SOURCE:
MERGE DEST.:
MERGE FILTER:
P001
SL 88 STUDIO
1
OFF
USB OUT
SYS OFF - ALL
USB
2 3 4
HOME
YOUR PROJECTS
Library Groups
GROUP 12
PROGRAM xxx
SL Controllers by Studiologic®
D
39

Stromversorgung und Anschlüsse
Stromversorgung und Anschlüsse
Pedal-Anschlüsse
1-2 Switch (Sustain), 3 Continous (Expression)
4 Universal (Sustain, Expression)
USB Anschluss
MIDI In/Out, USB-Verbindung
MIDI
In, Out1, Out2
Netzteil-Anschluss
9V - 1A
Drucktaster Ein/Aus
Zur bequemen Handhabung und zum Schutz, sind alle Anschlüsse auf der Geräte-Rückseite angebracht.
Stromanschluss
Stecken Sie den Adapter des mitgelieferten Netzteils in den
dafür vorgesehenen Geräteanschluss auf der Rückseite des
Gerätes und schalten Sie das Gerät an, in dem Sie den Drucktaster in der Position 1 einrasten lassen (1=An, 0=Aus).
ACHTUNG: Bitte verwenden Sie das mitgelieferte Originalnetzteil oder ein kompatibles Netzteil (9V-1A). Verwenden Sie
nur ein Netzteil mit den angegebenen elektrischen Daten!
Eingänge
Pedalanschlüsse:
• 2 Switch (Sustain)
• 1 Continuous (Expression)
• 1 Universal (Sustain, Expression)
Midi IN/OUT
USB
Kompatible Sustain-Pedale können an den dafür vorgesehenen Buchsen (PEDALS 1 und 2) angeschlossen werden. Die
Buchse PEDALS 3 ist für Volume/Expression Pedale vorgesehen und an PEDALS 4 (Universal Pedal-Anschluss) können
sowohl Sustain- als auch Volume/Expression Pedale angeschlossen werden.
Über die MIDI-Anschlüsse können externe MIDI-Geräte angesteuert oder das SL mit anderen MIDI-Geräten verbunden
werden. So können Daten wie z.B. Noten, Programmwechsel
oder ähnliches ausgetauscht bzw. übermittelt werden.
Mit dem USB- (Universal Serial Bus) Anschluss wird die Verbindung zu Geräten (z.B. Computer) hergestellt. Über diesen
Anschluss werden Firmware-Updates durchgeführt oder eine
MIDI-Verbindung (IN/OUT) hergestellt.
Sobald eine USB-Verbindung zu einem Computer hergestellt
ist, können Sie mit Hilfe der Software “SL Editor“ alle Parameter Ihres SL auf sehr schnelle und direkte Weise verändern
bzw. einstellen. Sogar Parameter, die über das Bedienpanel
des Gerätes selbst nicht verändert werden können. Beispiel:
die Keyboard Balance Funktion, die es ermöglicht die Velocity-Empndlichkeit jeder einzelnen Taste einzustellen oder
die Balance zwischen den weißen und schwarzen Tasten auf
schnelle und einfache Weise zu verändern.
SL Controllers by Studiologic®
40

Das Bedienfeld
Das Bedienfeld
Die Hauptwahltasten
IN
Das Farbdisplay
Joystick 2
Automatische
Zentrierung der
X-Achse
Joystick 1
Automatische
Zentrierung der
X- und Y-Achse
OUT
HOME
Der Joystick (Encoder)
Dateneingabe (Drehen)
Navigationskontrolle (rauf/runter/links/rechts)
Klick (Eingabe/Enter)
Die programmierbaren Joysticks
Joystick 3
Freie Bewegungsmöglichkeit.
Dieser Joystick
wird nicht zentriert.
Das neue SL-Bedienfeld ist auf das Wesentliche konzentriert und hat folgende Bestandteile:
• 1x Großes Farbdisplay (TFT–LCD 320 x 240)
• 1x Drehbarer Joystick (Encoder) mit Druckknopf-Funktion (Eingabe/Enter) und 4 Richtungs
funktionen (rauf/runter/links/rechts)
• 3 Hauptwahltasten: Home (Rückkehr in das Hauptmenü) IN & Out ( Navigation durch die Menüseiten)
• 3 programmierbare Joystick
Alle Menüseiten werden in gleicher Weise mit dem Joystick (Encoder) und den Hauptwahltasten
(IN & OUT) ausgewählt. Mit einer Hand erreichen Sie alle Menüseiten und Parametereinstellungen
und erhalten so den sofortigen Zugri auf alle Funktionen. Sobald der gewünschte Menüpunkt
ausgewählt ist, können Sie dessen Wert durch Drehen des Joysticks (Encoders) verändern (Linksdrehung = Der Wert wird kleiner / Rechtsdrehung = der Wert wird größer).
SL Controllers by Studiologic®
41
D

Einstellung der Parameter
P001 SL 88 STUDIO
P001 SL 88 STUDIO
P001 SL 88 STUDIO
SL 88 STUDIO
HOME Display
Die Hauptseite (HOME) des SL - Menü gibt einen vollständigen Überblick über die wichtigsten Funktionen wie folgt:
Program
(z.B. 001 NAME)
Anzeige des Namens des aktuell gewählten Programm
GROUP SAGA SETUP
INSTRUMENT
SOUND
VOL 122
INSTRUMENT 3
SOUND
VOL 101
Zonen (farblich gekennzeichnet)
Aktive Zonen und ihre wichtigsten Parameter
(Volume, Keyboard Range)
GROUP
Anzeige der Gruppe des aktuell gewählten
Programms.
(------- wenn keine Gruppe gewählt wurde)
1
INSTRUMENT 2
SOUND
VOL 096
A0 / F#2
B7 / C8
INSTRUMENT 4
SOUND
VOL 124
G3 / Db4
A0 / F#2
Sobald eine ZONE gewählt
ist, können Sie durch Drehen
des Joystick (Encoders), sofort die Lautstärke verändern
(000-127).
GROUP SAGA SETUP
1
A0 / F#2
97
B7 / C8
INSTRUMENT 2
SOUND
VOL 096
INSTRUMENT 4
SOUND
VOL 124
INSTRUMENT
SOUND
VOL 122
INSTRUMENT 3
SOUND
VOL 101
G3 / Db4
A0 / F#2
Programmbearbeitung Um ein Programm auszuwählen, können Sie den Joystick (En-
coder) entweder zum gewünschten Programm drehen (Direktanwahl), oder den Joystick (Encoder) drehen um damit
ein Programm auszuwählen und anschließend den Joystick
(Encoder) drücken um die Programmwahl zu bestätigen.
Sobald ein Programm gewählt ist (Bewegen Sie die Positionsanzeige in den oberen Bereich der Anzeige) drücken sie die
IN Auswahltaste um zur Programmbearbeitung zu gelangen.
STORE UNDER:
NAME:
ZONE EDIT:
MERGE SOURCE:
MERGE DEST.:
MERGE FILTER:
P001
SL 88 STUDIO
2 3 4
1
OFF
USB OUT
SYS OFF - ALL
Die folgenden Werte/Parameter können verändert werden:
SPEICHERN UNTER
(STORE UNDER)
Hier wählen Sie die Position aus an dem Sie das Programm abspeichern möchten.
SL Controllers by Studiologic®
42

Einstellung der Parameter
SL 88 STUDIO
SL 88 STUDIO
SL 88 STUDIO
SL 88 STUDIO
SL 88 STUDIO
PROGRAMM NAME
Um das aktuelle Programm zu benennen, bewegen Sie bitte
den Joystick (Encoder) zu dem/der gewünschten Buchstabe/
Zahl und bestätigen diesen/diese durch einen kurzen Druck
auf den Joystick (Encoder).
Sie haben zwei Möglichkeiten die Positionsmarke
(Cursor) zu positionieren.
Entweder Sie bewegen den
Joystick (Encoder) links/
rechts und rauf/runter oder
Sie drehen ihn bis zur gewünschten Position.
ZONENBEARBEITUNG
(nähere Beschreibung auf
Seite 45).
SL 88 STUDIO_ _ _
-
Programmbearbeitung
VERBINDEN EINER
EINGANGSQUELLE
Wahl der Eingangsquelle
(MIDI IN oder USB IN).
ZUWEISUNG DES MIDI
AUSGANGES
Wahl des MIDI Ausgang.
MISCH FILTER
Das Mischlter hat die Aufgabe, MIDI-Daten zu ltern,
sobald MIDI-Daten von
MIDI-Quellen mit MIDI-Empfängern zusammengeführt
werden.
D
SL Controllers by Studiologic®
43

Einstellung der Parameter
GROUP:
THE BOSS
GROUP: THE BOSS
P001 SL 88 STUDIO
Programmierbare GRUPPEN
(GROUPS)
Das SL bietet die Möglichkeit, Programme in Gruppen zusammen zu fassen. Programme einer Gruppe können zudem einer bestimmten Aufgabe, einem Song oder Projekt zugeordnet sein. Ein Programm kann mehreren Gruppen zugeordnet
sein. Dies optimiert den internen Speicher und vermeidet
mehrfach vorhandene Programme, wenn diese in mehreren
Projekten verwendet werden.
Um eine Gruppe auszuwählen oder zu programmieren,
bewegen Sie den Joystick (Encoder) nach unten oder nach
oben, bis der Menüpunkt Gruppe (GROUP) erscheint. Sobald
eine Gruppe (GROUP) ausgewählt wurde, werden nur die Programme dieser Gruppe angezeigt, sollten Sie hier Programme gespeichert haben.
HINWEIS
Es ist jederzeit möglich die
Gruppen-Auswahl zu überspringen. Wählen Sie dazu
eine leere Position. Diese
wird im Display so angezeigt:
GROUP--------
--------
GROUP
INSTRUMENT
SOUND
VOL 122
INSTRUMENT 3
SOUND
VOL 101
A0 / F#2
B7 / C8
1
INSTRUMENT 2
SOUND
VOL 096
INSTRUMENT 4
SOUND
VOL 124
G3 / Db4
A0 / F#2
Erstellen einer neuen Gruppe oder Veränderung einer bereits bestehenden Gruppe
Drücken Sie die IN Wahltaste
sobald der Gruppen (Group)
Menüpunkt ausgewählt ist.
Wählen Sie eine der aufgelisteten Gruppen indem Sie
den Joystick (Encoder) rauf
oder runter bewegen.
BEAT - LESS
ROAD - STONES
HAPPY
BIRTHDAY
THE BOSS
Drücken Sie die IN Wahltaste
um in die Gruppe bearbeiten
zu können.
Jetzt können Sie den Gruppen-Namen und die damit
verbunden Programme bearbeiten. Um die Programme
zu bearbeiten, wählen Sie
PROGRAM LIST und drücken
NAME:
PROGRAM LIST
THE BOSS
sie die Wahltaste IN.
SL Controllers by Studiologic®
44
Um ein Programm einer
Gruppe hinzu zu fügen oder
es in der Reihenfolge zu verändern, verschieben Sie es
mit dem Joystick (Encoder).
Es gibt 15 freie Programmplätze.
PROGRAM LIST:
002 CONCERT GRAND
MOVE UP
003 RHODX MARK I
MOVE DOWN
007 JAZZ SETUP
DELETE
022 PIANO + ORGAN
009 SYNTH SETUP

Einstellung der Parameter
SL 88 STUDIO
SL 88 STUDIO
SL 88 STUDIO
SL 88 STUDIO
SL 88 STUDIO
Um in die Zonenprogrammierung einer Zone zu gelangen
drücken Sie die IN Taste. Sollten Sie nach der Betätigung der
IN Taste noch die Zone wechseln wollen, bewegen Sie den
Joystick (Encoder) einfach
nach links oder rechts. Um
Parameter zu verändern, drücken Sie entweder die “IN” Taste und drehen den Joystick
(Encoder) oder bewegen den
Cursor mit dem Joystick (Encoder) nach rechts um den Parameter zu verändern.
Die veränderbaren Zoneneinstellungen nden Sie unten
aufgeführt:
ENABLE (AKTIVIEREN)
MIDI PORT
Seite 1
CHANNEL (KANAL)
PROGRAM
KEY RANGE
VELOCITY RANGE
VELOCITY CURVE
Seite 2
AFTERTOUCH
TRANSPOSE
Seite 3
Joystick 1 X
Joystick 1 Y
Seite 4
INSTRUMENT NAME
Seite 5
Joystick 2 X
Joystick 2 Y
Joystick 3 X
Joystick 3 Y
SOUND NAME
MSB - LSB
VOLUME
OCVTAVE
PEDAL 1
PEDAL 2
PEDAL 3
PEDAL 4*
Aktivieren oder deaktivieren Sie die
gewählte Zone.
Auswahl des OUT Port
(USB, MIDI 1, MIDI 2)
001 - 016
001 - 128
000 - 127 (für Beide)
000 - 127
A0 - C8
000 - 127
SOFT/NORMAL/HARD, USER(1-6),
FIXED (VALUE 001-127)
OFF/ON
-12 / +12 HALBTÖNE
-3 / +3
(wählbare Funktionen)
(wählbare Funktionen)
(wählbare Funktionen)
Spezialfunktionen
(wählbare Funktionen)
(wählbare Funktionen)
(wählbare Funktionen)
(wählbare Funktionen)
(wählbare Funktionen)
(wählbare Funktionen)
Zoneneinstellung
(Zone Edit)
KEYRANGE:
KEY RANGE
VELOCITY RANGE
VELOCITY CURVE
*der Pedal 4 Eingang kann für Sustain (switch) oder Expression/Volume (continuous) Pedale benutzt werden. Der Pedal
4 Eingang ist aber auch für spezielle Multi-Pedale (SLP3-D,
NTP etc.) geeignet, um bis zu drei Pedale an einem Anschluss
zu verwenden. Ein typisches Beispiel stellt das dreifach Klavierpedal dar, bei dem ein Pedal die Fortepedal-Funktion, ein
weiteres die Pianopedal-Funktion und das dritte Pedal die
Sostenuto-Funktion übernimmt.
TRANSPOSE
SL Controllers by Studiologic®
D
45

Einstellung der Parameter
SL 88 STUDIO
P001 SL 88 STUDIO
Zoneneinstellung
(Zone Edit)
GROUP SAGA SETUP
1
INSTRUMENT
SOUND
VOL 122
INSTRUMENT 3
SOUND
VOL 101
INSTRUMENT 2
INSTRUMENT 2
SOUND
SOUND
VOL 096
VOL 096
A0 / F#2
INSTRUMENT 4
3 4
SOUND
VOL 124
B7 / C8
G3 / Db4
G3 / Db4
A0 / F#2
Sobald Sie ein Multi-Pedal einer Zone zuweisen, kann die Pedalzuweisung der anderen Zonen nur auf AUS/OFF oder auf
die gleiche Pedalart gestellt werden, alle anderen Funktionen
werden in diesem Fall in der Farbe Grau dargestellt.
Der Status einer Zone hat drei mögliche Zustände: ON(An)/
OFF(Aus)/Standby(Bereitschaft).
Um eine Zone zu aktivieren oder zu deaktivieren drücken Sie
den Drucktaster “IN” und stellen Sie diesen auf ON(An) oder
OFF(Aus). Ist eine Zone Aus (deaktiviert) wird nur ein inhaltloser, farbiger Hintergrund dargestellt.
Durch Drücken des Joystick (Encoder) können Sie die Zone in
Standby (Bereitschaft) versetzen, daraufhin wird sie in der Farbe Grau dargestellt.
(Das Bild zeigt Zone 1, Status: AN(ON) – Zone 2, Status: Standby
(Bereitschaft) – Zone 3 und 4 Status: AUS(OFF)).
Bitte beachten Sie, dass eine deaktivierte Zone eines Programms, jederzeit wieder aktiviert werden kann. Alle vorher
gespeicherten Parameter dieser Zone bleiben erhalten.
Die programmierbaren
Joysticks
Die 3 Joysticks auf der linken Seite des Instruments sind programmierbar und reagieren in Echtzeit:
• Joystick 1 ist vertikal und horizontal gefedert und bewegt
sich automatisch in die Ausgangsstellung zurück. Ein typischer Anwendungsfall für diese Art von Steuerung ist die
Tonhöhenänderung (Pitchbending).
• Joystick 2 ist horizontal gefedert und bewegt sich nur auf
dieser Achse in die Ausgangsstellung zurück. Ein typischer
Anwendungsfall ist die Modulation oder Filter cuto für virtuelle Synthesizer.
• Joystick 3 bewegt sich frei in alle Richtungen und bleibt
in der von Ihnen gewählten Position stehen. Geeignet für
alle Anwendungen, für die eine unveränderte ControllerEinstellung benötigt wird.
Anleitung zur Programmierung der Joysticks
Sobald Sie eine Zone mit Hilfe der IN Wahltaste angewählt
haben, gelangen Sie in den EDIT MODE. Hier können Sie
mit dem Joystick (Encoder) durch Hoch- bzw. Runterbewegungen auf alle Menüseiten gelangen, bis Sie zur Menüseite
für die Joystick-Programmierung gelangen.
SL Controllers by Studiologic®
46
Wählen Sie einen der Joysticks aus, drücken Sie noch einmal
die IN Taste. So gelangen Sie zum Menüpunkt unter dem Sie
alle Funktionen nden. Sowohl für die horizontale (X-Achse),
als auch die vertikale (Y-Achse) Achse.

Grundlegende Einstellungen
GLOBAL / SYSTEM:
GLOBAL / SYSTEM:
GLOBAL / SYSTEM:
GLOBAL / SYSTEM:
STICKS CALIBRATION:
STICK 1 STICK 2 STICK 3
Drücken Sie auf der Menü-Startseite die OUT Wahltaste um auf die
GLOBAL/SYSTEM Seite zu gelangen.
V 1.6.0
MAIN TRASPOSE
PANIC
RESTORE
STICK CALIBRATION
COMMON CHANNEL
+00
PED 1/2 (EXT) PROGRAMS +/ 16
Hier nden Sie die folgenden Kontrollmöglichkeiten:
MAIN TRANSPOSE (Transposition)
Wählen Sie diese Funktion aus und drehen anschließend
den Joystick (Encoder), können Sie alle aktivierten Zonen um
-12/+12 Halbtöne mit einer einzigen Drehbewegung verändern.
PANIC (Not-Aus-Schalter)
Verwenden Sie im Fall von „hängenden“ Noten oder Kotrollbefehlen (die möglicherweise von extern angeschlossenen
Geräten gesendet werden) diesen Kontrollbefehl. Der „ALL
NOTES OFF“ Befehl wird zu allen angeschlossenen Geräten
gesendet, um wieder in den Normal-Zustand zu gelangen.
GLOBAL / SYSTEM
V 1.6.0
GLOBAL TRANSPOSE:
+00
C
RESTORE (Wiederherstellen des Ausgangszustandes)
Diese Funktion ermöglicht das Zurücksetzen aller veränderten
Kontrollwerte in den Ausgangszustand des Instruments. Bitte
beachten Sie, dass alle Einstellungen die Sie vorgenommen
haben gelöscht werden. Verwenden Sie diese Funktion nur
wenn Sie diese unbedingt benötigen. Speichern Sie vorsorglich, alle Einstellungen des Instruments auf einem externen
Gerät wie z.B. einem Computer.
STICKS CALIBRATION (Joystick Kalibrierung)
Auf der ersten Menüseite sehen Sie die 3 Joysticks in der Farbe
Blau dargestellt. Sie können den aktuellen Regelbereich überprüfen, in dem Sie jeden Joystick nach allen vier Seiten bis in
die Ecken bewegen.
Um einen Joystick zu kalibrieren, drücken sie leicht auf die betreende Achse. Der Menübereich ändert seine Farbe auf Gelb.
Bewegen Sie den Joystick nun sorgfältig nach allen vier Seiten
hin, bis in die äußersten Ecken des Regelweges.
Wiederholen Sie diesen Vorgang mindestens 2-3 mal.
Wenn Sie die Kalibrierung durchgeführt haben, drücken Sie bitte
noch einmal (leicht) auf die betreende Achse. Der Menüpunkt
ändert seine Farbe auf Grün. Dies ist die Bestätigung, dass die
Kalibrierung durchgeführt wurde und beendet ist.
STICKS CALIBRATION:
STICK 1 STICK 2 STICK 3
D
SL Controllers by Studiologic®
47

Firmware-Verwaltung
GLOBAL / SYSTEM:
GLOBAL / SYSTEM:
PEDAL PRG +/-
OFF
PED1 +
PED1 -
PED2 +
V 1.6.0
PROGRAM +/-
Diese Funktion ermöglicht das umschalten des aktuellen Programms unter der Verwendung der Pedale, die an Ped 1 oder
Ped 2 angeschlossen sind.
Die verfügbaren Einstellungen sind:
• OFF: Funktion deaktiviert
• PED1+ Drücken des Pedals das mit PED1 verbunden ist,
erhöht das aktuelle Programm um einen Schritt (d. h. Von
Programm 001 auf 002 und so weiter);
• PED1- Drücken des Pedals das mit PED1 verbunden ist, verringert das aktuelle Programm um einen Schritt (d. H. Von
Programm 002 auf 001 usw.);
• PED2+ Drücken des Pedals das mit PED2 verbunden ist,
erhöht das aktuelle Programm um einen Schritt (d. h. Von
Programm 001 auf 002 und so weiter);
• PED2- Drücken des Pedals das mit PED2 verbunden ist, verringert das aktuelle Programm um einen Schritt (d. H. Von
Programm 002 auf 001 usw.);
• PED1 / 2 +/- Beide Pedale, die mit PED1 und PED2 verbunden sind, erhöhen oder verringern das aktuelle Programms;
• PED1 / 2 EXT Mit dieser Einstellung sendet und empfängt
das SL die Steuerung für Erhöhung oder Verringerung der
Programme über USB, damit Sie diese von Computersoftwareanwendungen steuern können, die für diese Funktion
aktiviert sind.
COMMON CHANNEL:
016
V 1.6.0
HINWEIS: Wenn eine der PED 1/2 Global-Funktionen aktiviert
ist, werden die zugehörigen Pedaleinstellungen für jedes
Programm durch die Programm - / + - Funktion überschrieben und die ZONE-Programmierung wird in grauer Farbe angezeigt. Wenn Sie die zugehörigen globalen Pedalfunktionen
auf OFF stellen, wird die ursprüngliche Zoneneinstellung der
Pedale wieder aktiviert.
COMMON CHANNEL
Als COMMON ist ein MIDI-Kanal gemeint, der es erlaubt, allgemeine Steuerungen von und zur SL zu senden oder zu empfangen, die nicht direkt mit einer einzelnen Zone verbunden
sind; Die Funktion, für die ein Common Channel auf einen der
verfügbaren 16 MIDI-Kanäle eingestellt werden muss, ist das
Programm - / +
Die Auswahl COMMON Channel enthält die folgenden Werte:
• OFF: keine COMMON Kanalnachrichten warden verarbeitet;
• 01/16: gewählter Common Channel (die am häugsten verwendete Einstellung ist der MIDI CH 16);
SL Controllers by Studiologic®
48

Sollte es eine neue Firmware-Version geben, so wird diese
von Studiologic veröentlicht. Updates kann es zur Verbesserung der Steuerung, des Betriebssystems oder für die zum SL
gehörige Software geben. Alle Veröentlichungen zu diesem
Thema nden Sie auf der Studiologic-Webseite.
äche Ihres SL dar. Die Software steht für Sie auf der Studiologic-Webseite zum Download bereit. Alle SL Parameter
können intuitiv und direkt über die zentrale Bedieneinheit
verändert werden. Sobald ihr SL via USB-Anschlusskabel mit
einem Computer verbunden ist
Firmware-Verwaltung
Firmware updateIn der Regel benötigen Sie für Ihr SL kein Firmware-Update.
SL EditorDas SL Editor-Programm stellt die erweiterte Bedienober-
MAIN PAGE ORGANIZE
KEY BALANCE SL CURVES
SL Controllers by Studiologic®
D
49

Declarations
Garantie
CE-Konformität
Jedes Gerät von Studiologic® by Fatar wird einzeln geprüft und einer
vollständigen Funktionskontrolle unterzogen. Die Verwendung
ausschließlich hochwertigster Bauteile erlaubt die Gewährung von
zwei Jahren Garantie. Als Garantienachweis dient der Kaufbeleg /
Quittung. Schäden, die durch unsachgemäßen Einbau oder
unsachgemäße Behandlung entstanden sind, unterliegen nicht der
Garantie und sind daher bei Beseitigung kostenpichtig. Schadensersatzansprüche jeglicher Art, insbesondere von Folgeschäden, sind
ausgeschlossen. Eine Haftung über den Warenwert des Gerätes
hinaus ist ausgeschlossen. Es gelten die Allgemeinen Geschäftsbedingungen der Firma Synthax GmbH.
Synthax GmbH Fon: +49 (89) 97 880 38 0
Semmelweisstraße 8 Fax: +49 (89) 97 880 38 19
D-82152 Planegg Email: GmbH@synthax.de
Dieses Produkt entspricht den europäischen Richtlinien:
2004/108/EG Elektromagnetische Verträglichkeit (EMV)
DIN EN 55013 Funkstöreigenschaften von Rundfunkgeräten und
verwandten Geräten der Unterhaltungselektronik
DIN EN 55020 Störfestigkeit von Rundfunkgeräten und
verwandten Geräten der Unterhaltungselektronik
Recanati, 20.05.2015 Marco Ragni, Chief Executive Ocer
RoHS-Konformität
RoHS
compliant
2002/95/EC
Altgeräteentsorgung
Stand der Technik
Warenzeichen
Bei einer nicht von uns genehmigten Änderung des Gerätes verliert
diese Erklärung ihre Gültigkeit.
Das Produkt wurde konform zur Richtlinie 2002/95/EC gefertigt.
Nach dem Elektro- und Elektronikgesetz (EG Richtlinie 2003/108/EG)
sind Besitzer von Altgeräten gesetzlich gehalten, das Altgerät
getrennt vom Hausmüll zu entsorgen. Helfen Sie bitte mit und
leisten einen Beitrag zum Umweltschutz.
Weitere Informationen zur Entsorgung dieses Gerätes erhalten Sie
beim nächstgele.g.enen Wertstohof.
Um höchste Qualität zu gewährleisten, werden die Geräte von
Studiologic® by Fatar immer dem aktuellen Stand der Technik angepasst. Erforderliche Änderungen in Konstruktion und Schaltung
werden ohne Ankündigung vorgenommen. Technische Daten und
Erscheinungsbild können daher von der vorliegenden Bedienungsanleitung abweichen.
Alle in dieser Anleitung verwendeten Warenzeichen und eingetragenen Marken sind Eigentum der jeweiligen Inhaber.
SL Controllers by Studiologic®
50
Urheberrecht
Diese Anleitung ist urheberrechtlich geschützt. Jede Vervielfältigung bzw. jeder Nachdruck, auch auszugsweise, ist nur mit schriftlicher Genehmigung der Firma Synthax GmbH gestattet. Dies gilt
auch fürdie verwendeten Bilder und Graken.

FRANÇAIS
SL88 GRAND
SL88 STUDIO
SL73 STUDIO
Mode d’emploi
SL Controllers by Studiologic®
F
51

Consignes de sécurité
Consignes de sécurité importantes
Veuillez lire la totalité du mode d'emploi. Il contient toutes les
informations dont vous avez besoin pour utiliser cette unité.
Veuillez suivre les instructions de ce mode d'emploi. La
garantie sera caduque si des interventions non autorisées sont
eectuées sur l'instrument. Seuls des accessoires spéciés par
le fabricant doivent être utilisés avec cette unité. N'utilisez
l'unité que de la façon indiquée dans ce mode d'emploi.
DANGER!
Risque de choc électrique. N'ouvrez pas le châssis. Il n'y a aucune pièce réparable par l'utilisateur à l'intérieur.
L'unité ne doit être réparée que par un service après-vente
qualié.
Humidité
Pour réduire le risque d'incendie ou de choc électrique, n'exposez pas l'unité à la pluie ni à l'humidité. Ne placez jamais de
récipients contenant du liquide sur l'unité. N'utilisez pas l'unité
avec de l'eau à proximité, près d'une piscine, d'une baignoire
ou dans un sous-sol humide. Si l'unité est déplacée d'un endroit froid vers un endroit chaud, de la condensation peut se
former à l'intérieur. Pour éviter les dommages, veuillez laisser
l'unité atteindre la température de la pièce avant de la mettre
en service.
Installation
Utilisez toujours un rack ou un support stable pour poser le
clavier. Tenez bien compte de sa taille et de son poids.
Nettoyage et entretien
N'utilisez jamais de détergent abrasif qui pourrait endommager la surface. Nous recommandons l'emploi d'un chion en
microbres légèrement humide.
Emballage
Veuillez conserver tous les emballages et les réutiliser pour
protéger l'instrument lors du transport, par exemple si une réparation est nécessaire.
Alimentation secteur
Avant de raccorder l'unité au secteur, veuillez vérier que
la tension fournie par ce dernier est adaptée à l'instrument.
L'unité peut être alimentée par un courant alternatif de 100 240V, à l'aide de l'adaptateur secteur fourni.
SL Controllers by Studiologic®
52

Index
Consignes de sécurité
Votre nouveau SL
Alimentation - Entrée et connexions
Panneau de commandes
Paramètres de conguration
Réglages généraux
52
54
54
54
55
56
56
56
56
57
57
58
58
60
61
62
62
Clavier
Zones
L'emballage comprend
Explication du fonctionnement
Connexion électrique
Entrées
Entrée/sortie MIDI
USB
Panneau de commandes
Sticks programmables
Écran d'accueil (HOME)
Édition de programme
Groupes programmables
Édition de zone
Sticks programmables
GLOBAL/SYSTEM
La gestion du Firmware
Déclarations
Annexe
64
64
65
67
69
69
Mise à jour du rmware
SL Editor
Caractéristiques techniques
Dimensions
SL Controllers by Studiologic®
F
53

Votre nouveau SL
Merci beaucoup d'avoir choisi le SL. Vous êtes maintenant l'heureux propriétaire d'un instrument
professionnel produit par le célèbre fabricant Studiologic. Le fonctionnement du SL est simple grâce
au grand écran couleur, à son encodeur principal avec des commandes de navigation plus un clic
intégré, et il ore un toucher de clavier parfait. Nous vous recommandons de lire attentivement la
totalité du mode d'emploi pour proter pleinement de toutes les fonctions de votre SL. Ce mode
d'emploi a pour but d'être un guide simple et rapide an d'aider l'utilisateur à comprendre l'instrument
et toutes ses commandes, plutôt qu'une description générale de la structure complète et de l'édition
détaillée, rendue encore plus souple et conviviale par l'éditeur informatique téléchargeable sur nos
sites ociels.
Commençons par un aperçu des fonctions du SL.
Clavier Le SL ore la toute dernière innovation technologique de
Fatar, le clavier TP/100 à mécaniques à marteau progressives
sophistiquées avec des touches en bois (blanches) à revêtement
toucher ivoire ayant 3contacts par touche et l'aftertouch. Le
SL est donc très portable tout en orant le toucher de piano à
queue réaliste qui a fait la réputation de Fatar.
Zones Le clavier peut être divisé en 4 zones programmables.
Vous pouvez dénir la plage de clavier de chaque zone et
sélectionner le niveau de dynamique transmis par ses données
MIDI en même temps qu'un large éventail de paramètres et
commandes.
Chaque zone peut être assignée à un port diérent et les
nouveaux sticks programmables peuvent contrôler diérents
paramètres MIDI pour chaque zone.
L'emballage comprend SL88 Grand / SL88 Studio / SL73 Studio
Adaptateur secteur
Pédale VFP1-10 / PS100
Mode d'emploi (CD-ROM)
SL Controllers by Studiologic®
54

P001 SL 88 STUDIO
GLOBAL / SYSTEM:
P001 SL 88 STUDIO
Votre nouveau SL
MIDI OUT 1
PANIC
MAIN TRASPOSE
RESTORE
STICK CALIBRATION
VERSION:
-- +00
---
---
V---
HOME
MIDI OUT 2
OUT
GROUP SAGA SETUP
INSTRUMENT
SOUND
VOL 122
INSTRUMENT 3
SOUND
VOL 101
A0 / F#2
B7 / C8
MIDI IN
1
INSTRUMENT 2
SOUND
VOL 096
INSTRUMENT 4
SOUND
VOL 124
PEDALS
4 3 2 1
IN/OUT
G3 / Db4
A0 / F#2
STORE UNDER:
NAME:
ZONE EDIT:
MERGE SOURCE:
MERGE DEST.:
MERGE FILTER:
P001
SL 88 STUDIO
1
OFF
USB OUT
SYS OFF - ALL
USB
2 3 4
HOME
YOUR PROJECTS
Library Groups
GROUP 12
PROGRAM xxx
SL Controllers by Studiologic®
F
55

Alimentation - Entrées et connexions
Alimentation - Entrées et connexions
Prises pour pédale
Commutateurs (1-2), continue (3),
multifonction (4)
Port USB
Entrée/sortie MIDI, USB vers
l'hôte
MIDI
In, Out1, Out2
Alimentation
9V - 1A
Mise sous/hors tension
Toutes les connexions se trouvent à l'arrière de l'instrument, pour un accès à la fois facile et
protégé:
Connexion électrique
Insérez la che de l'adaptateur secteur dans la prise située à
l'arrière de l'instrument et allumez l'instrument, en amenant
l'interrupteur d'alimentation en position 1 (1 = ON, 0 = OFF).
ATTENTION:
Assurez-vous que l'adaptateur est bien celui d'origine (inclus
dans la boîte), ou un modèle adapté/compatible fournissant
une tension et une intensité correctes (9V - 1A, broche positive
(+) au centre).
Entrées
MIDI IN/OUT
USB
Prises pour pédales assignables:
• 2 pour pédale commutateur
• 1 pour pédale continue
• 1 universelle pour les deux types
Vous pouvez connecter des pédales commutateurs compatibles
(pour les fonctions concernées) aux prises PEDALS 1 et 2, une
pédale de volume/expression dédiée à la prise PEDALS 3 et
n'importe lequel de ces deux types de pédale dans la prise
universelle PEDALS 4.
Les prises MIDI permettent de contrôler n'importe quel appareil MIDI externe et/ou de relier le SL à d'autres appareils MIDI
externes pour tout ce qui concerne la transmission de données
(notes, changements de programme etc.).
L'USB (Universal Serial Bus) permet également la connexion à des
appareils externes (par exemple des ordinateurs) pour mettre à
jour le rmware ou établir une connexion MIDI (IN/OUT).
Lorsque le SL est connecté à un ordinateur par USB, vous pouvez
également utiliser le programme SL Editor pour régler tous
les paramètres du SL de façon rapide et directe, avec en plus
des commandes non disponibles dans la structure d'édition
interne du SL (par exemple la fonction Keyboard Balance qui
permet de changer la sensibilité à la dynamique de façon
individuelle pour chaque touche et la balance entre touches
blanches et touches noires, avec une seule commande).
SL Controllers by Studiologic®
56

Panneau de commandes
Panneau de commandes
Touches
principales
IN (entrer)
Écran couleur
Stick 2
Auto-centrage
sur l'axe des X
Stick 1
Auto-centrage
sur les axes X/Y
OUT (sortir)
HOME (accueil)
Encodeur
Saisie de données (rotation)
Commandes de navigation (gauche/droite/haut/bas)
Cliquer pour valider (ENTER)
Sticks programmables
Stick 3
Libre (pas
d'auto-centrage)
Le nouveau panneau de commande du SL est un concentré de technologie à l'agencement convivial;
il se compose de:
• 1 grand écran couleur (LCD TFT 320 x 240);
• 1 encodeur rotatif avec une fonction bouton poussoir (ENTER) et 4 commutateurs de positionnement (haut/bas/gauche/droite);
• 3 touches principales: HOME (retour à l'écran principal) – touches IN et OUT (pour naviguer
(entrer/sortir) dans toutes les pages);
• 3 sticks programmables.
Toutes les pages d'édition peuvent se sélectionner de la même façon (haut/bas avec les commutateurs
de position de l'encodeur, IN ou OUT). Vous pouvez utiliser une main pour sélectionner tous les
paramètres et pages disponibles, avec accès instantané à toutes les fonctionnalités; une fois la
fonction sélectionnée atteinte, vous pouvez changer sa valeur en tournant l'encodeur (sur la gauche
= diminution / sur la droite = augmentation).
SL Controllers by Studiologic®
57
F

Paramètres de conguration
P001 SL 88 STUDIO
P001 SL 88 STUDIO
P001 SL 88 STUDIO
SL 88 STUDIO
Écran d'accueil (HOME)
La page principale (écran d'accueil ou HOME) du SL est une
représentation complète et très claire des fonctions principales,
comme suit:
Programme
(par exemple 001 suivi du nom)
Le programme sélectionné
GROUP SAGA SETUP
INSTRUMENT
SOUND
VOL 122
INSTRUMENT 3
SOUND
VOL 101
ZONES (par couleur)
Zones actives et paramètres principaux
(volume, plage de clavier)
GROUP
Le groupe auquel appartient le programme
sélectionné (-------- si aucun groupe n'est
sélectionné)
1
INSTRUMENT 2
SOUND
VOL 096
A0 / F#2
B7 / C8
INSTRUMENT 4
SOUND
VOL 124
G3 / Db4
A0 / F#2
En tournant l'encodeur, lorsqu'une ZONE est sélectionnée,
vous pouvez immédiatement
contrôler le volume (000-127).
GROUP SAGA SETUP
1
A0 / F#2
97
B7 / C8
INSTRUMENT 2
SOUND
VOL 096
INSTRUMENT 4
SOUND
VOL 124
INSTRUMENT
SOUND
VOL 122
INSTRUMENT 3
SOUND
VOL 101
G3 / Db4
A0 / F#2
Édition de programme Pour sélectionner un programme, vous pouvez soit utiliser
l’encodeur rotatif (sélection directe) ou cliquer sur l’encodeur,
tourner pour sélectionner et cliquez de nouveau pour
conrmer.
Lorsqu'un programme est sélectionné (par déplacement du
curseur sur la zone supérieure de l'écran), presser IN vous fait
entrer dans le mode d'édition de programme.
STORE UNDER:
NAME:
ZONE EDIT:
MERGE SOURCE:
MERGE DEST.:
MERGE FILTER:
P001
SL 88 STUDIO
2 3 4
1
OFF
USB OUT
SYS OFF - ALL
Les paramètres suivants sont disponibles:
STORE UNDER
Pour sélectionner la mémoire
dans laquelle vous souhaitez
mémoriser le programme
actuel.
SL Controllers by Studiologic®
58

Paramètres de conguration
SL 88 STUDIO
SL 88 STUDIO
SL 88 STUDIO
SL 88 STUDIO
SL 88 STUDIO
PROGRAM NAME
Pour nommer le programme actuel, utilisez les commandes de
navigation de l'encodeur (gauche/droite - haut/bas) et cliquez
quand la lettre/le numéro
désiré est sélectionné. Vous
pouvez soit amener le curseur
sur les lettres/numéros et les
sélectionner en cliquant sur
l'encodeur, soit tourner l'encodeur pour sélectionner les
lettres et numéros, puis cliquer sur pour conrmer.
Édition de ZONE
(voir le chapitre correspondant en page 11).
SL 88 STUDIO_ _ _
-
Édition de programme
MERGE SOURCE
Pour sélectionner la source
(prise MIDI IN ou USB) à fusion
ner avec la DESTINATION.
MERGE DESTINATION
Pour sélectionner la destination de toutes les données
MIDI fusionnées.
MERGE FILTER
Pour ltrer (éliminer) certains
messages MIDI lors de la fusion de la SOURCE avec la
DESTINATION.
-
SL Controllers by Studiologic®
F
59

Paramètres de conguration
GROUP:
THE BOSS
GROUP: THE BOSS
P001 SL 88 STUDIO
Groupes programmables
Le SL ore une fonction spéciale pour organiser vos programmes par groupes an de ranger dans un même groupe
diérents programmes ayant en commun une tâche, un morceau ou un projet spéciques. Le même programme peut
être associé à plusieurs groupes, ce qui permet d'optimiser la
mémoire interne et d'éviter de dupliquer les programmes s'ils
doivent être utilisés dans plusieurs projets.
Pour sélectionner ou programmer un groupe, pressez les
touches haut ou bas de l'encodeur principal jusqu'à ce que la
section GROUP soit sélectionnée, puis faites déler les diérents groupes avec l'encodeur; quand un groupe est sélectionné, seuls les programmes du groupe sélectionné s'achent
dans l'ordre de leur mémorisation dans le groupe.
NOTE
Il est toujours possible de sauter la sélection des groupes
en ne sélectionnant rien pour
le groupe, ce qui s'ache à
l'écran sous la forme
GROUP --------.
--------
GROUP
INSTRUMENT
SOUND
VOL 122
INSTRUMENT 3
SOUND
VOL 101
A0 / F#2
B7 / C8
1
INSTRUMENT 2
SOUND
VOL 096
INSTRUMENT 4
SOUND
VOL 124
G3 / Db4
A0 / F#2
Comment créer un nouveau groupe ou en modier un
Pressez la touche IN quand la
section GROUP est sélectionnée puis choisissez un groupe
dans la liste avec les touches
haut ou bas de l'encodeur.
Pressez IN pour passer à la
page d'édition du groupe
(GROUP EDIT).
Vous pouvez maintenant modier le nom du groupe et les
programmes qui lui sont as
sociés. Pour modier les programmes associés à ce groupe,
sélectionnez PROGRAM LIST
(liste des programmes) et pres
sez IN.
Pour ajouter ou modier un
programme dans le groupe,
faites déler les programmes
avec l'encodeur et cliquez
sur le programme voulu pour
ouvrir une fenêtre locale qui
vous permet de faire remonter (MOVE UP), faire descendre
(MOVE DOWN) ou supprimer
(DELETE) un programme parmi les 15 qui sont assignables.
BEAT - LESS
ROAD - STONES
HAPPY
BIRTHDAY
THE BOSS
NAME:
PROGRAM LIST
002 CONCERT GRAND
003 RHODX MARK I
007 JAZZ SETUP
022 PIANO + ORGAN
009 SYNTH SETUP
THE BOSS
PROGRAM LIST:
MOVE UP
MOVE DOWN
DELETE
SL Controllers by Studiologic®
60

Paramètres de conguration
SL 88 STUDIO
SL 88 STUDIO
SL 88 STUDIO
SL 88 STUDIO
SL 88 STUDIO
Pour éditer une zone, appuyez sur le bouton IN lorsque l’une
des zones est sélectionnée; vous pouvez toujours sélectionner une autre zone en utilisant les contrôles Left/Right
de l’encodeur. Dans la liste des
paramètres, vous pouvez soit
appuyer IN, tourner l’encodeur
ou déplacer le curseur vers la
droite (Right) pour permettre
la modication du paramètre.
Les paramètres éditables sont énumérés ci-dessous:
Page1
VELOCITY RANGE
VELOCITY CURVE
Page2
Page3
Page4
INSTRUMENT NAME
Page5
SOUND NAME
ENABLE
MIDI PORT
CHANNEL
PROGRAM
MSB - LSB
VOLUME
KEY RANGE
AFTERTOUCH
TRANSPOSE
OCTAVE
PEDAL 1
PEDAL 2
PEDAL 3
PEDAL 4*
STICK 1 X
STICK 1 Y
STICK 2 X
STICK 2 Y
STICK 3 X
STICK 3 Y
Pour activer ou désactiver la zone
sélectionnée
Pour sélectionner le port de sortie parmi
les options oertes (USB, MIDI 1, MIDI 2)
Canal MIDI: 001 - 016
Programme: 001 - 128
000 - 127 (pour l'octet de poids fort MSB
et de poids faible LSB)
000 - 127
Plage de touches: A0 - C8 (la0 - do8)
Plage de dynamique: 000 - 127
Courbe de dynamique: SOFT (toucher
léger)/NORMAL/HARD (toucher dur),
USER (réglage personnel de 1 à 6),
FIXED (valeur xe de 00 à 127)
OFF/ON
Transposition: -12/+12 demi-tons
-3 / +3
(fonction sélectionnable)
(fonction sélectionnable)
(fonction sélectionnable)
(multifonction)
(fonction sélectionnable)
(fonction sélectionnable)
(fonction sélectionnable)
(fonction sélectionnable)
(fonction sélectionnable)
(fonction sélectionnable)
Nom de l’instrument
Nom du son
Édition de zone
KEYRANGE:
KEY RANGE (plage de clavier)
VELOCITY RANGE (plage de dynamique)
3
VELOCITY CURVE (courbe de dynamique)
* la Pédale 4 peut être programmée pour contrôler tous les paramètres disponibles (intermittent comme continu) mais elle
peut aussi être congurée avec des multi-pédales spéciales
(SLP3-D, NTP, etc.) permettant d’avoir jusqu’à trois pédales en
une seule prise. Une application typique est une triple pédale
de piano, où deux pédales peuvent contrôler les fonctions atténuation et Sostenuto, tandis que la troisième pédale peut
contrôler fonction de demi-étouement.
4
TRANSPOSE (transposition)
SL Controllers by Studiologic®
F
61

Paramètres de conguration
SL 88 STUDIO
P001 SL 88 STUDIO
Édition de zone
GROUP SAGA SETUP
1
INSTRUMENT
SOUND
VOL 122
INSTRUMENT 3
SOUND
VOL 101
INSTRUMENT 2
INSTRUMENT 2
SOUND
SOUND
VOL 096
VOL 096
A0 / F#2
INSTRUMENT 4
3 4
SOUND
VOL 124
B7 / C8
Sticks programmables
G3 / Db4
G3 / Db4
A0 / F#2
Si vous aectez une multi-pédales spéciaux à une zone, les
autres zones ne peuvent être réglés sur OFF ou pour le même
type de pédale (toutes les autres fonctions sont achées en
gris).
Une zone peut être 3 états: ON / OFF / Standby.
Pour activer ou désactiver une zone, pressez IN et réglez-la sur
ON ou OFF; Si une zone est OFF, l’acheur montrera seulement
un fond de couleur.
En cliquant sur l’encodeur, vous pouvez dénir la zone en
Standby et l’écran l’achera en gris.
(La photo montre la zone 1 ON, Zone 2 veille, les zones 3 et 4
OFF).
Veuillez noter que vous pouvez également régler tous les paramètres d'une zone désactivée (dans le programme) an de
la préparer pour l'activer à tout moment, avec tous les paramètres ainsi pré-programmés pour ce programme particulier.
Les 3 sticks du côté gauche de l'instrument sont des commandes en temps réel programmables:
• Le stick 1 a des ressorts sur les deux axes, vertical et ho-
rizontal, qui le ramènent automatiquement à zéro, des
conditions correspondant typiquement à une commande
de pitch bend;
• Le stick 2 n'a un ressort que sur l'axe horizontal et revient
donc au centre sur celui-ci ; des conditions qui correspondent bien à une commande de type modulation ou
ltre de coupure, pour contrôler n'importe quel genre de
synthétiseur virtuel;
• Le stick 3 est totalement libre et conserve la position dans
laquelle vous l'avez placé, sur les deux axes X et Y, vous permettant de contrôler n'importe paramètre qui doit rester
stable une fois réglé.
Comment programmer les sticks?
Une fois que vous avez sélectionné une zone, cliquer sur la
touche IN vous fait passer en mode d'édition (EDIT MODE) et
vous pouvez parcourir toutes les pages de programmation avec
les touches de navigation verticale de l'encodeur jusqu'à ce que
vous trouviez la page concernant la programmation des sticks.
SL Controllers by Studiologic®
62
Sélectionnez un des sticks, pressez à nouveau IN pour passer
en page de programmation où toutes les fonctions disponibles
pour les sticks sont répertoriées pour les deux axes, horizontal
et vertical.

Réglages généraux
GLOBAL / SYSTEM:
GLOBAL / SYSTEM:
GLOBAL / SYSTEM:
GLOBAL / SYSTEM:
STICKS CALIBRATION:
STICK 1 STICK 2 STICK 3
Dans la page d'accueil (HOME), pressez la touche OUT pour
passer en page GLOBAL/SYSTEM (réglages généraux/système).
(Note: pour revenir à l'écran d'accueil, pressez la touche HOME.)
V 1.6.0
MAIN TRASPOSE
PANIC
RESTORE
STICK CALIBRATION
COMMON CHANNEL
+00
PED 1/2 (EXT) PROGRAMS +/ 16
Les commandes suivantes sont disponibles:
MAIN TRANSPOSE
Sélectionner cette fonction et tourner l'encodeur transpose
toutes les ZONES activées dans une plage de -12 à +12 demi-tons, par cette simple commande.
GLOBAL / SYSTEM
V 1.6.0
GLOBAL TRANSPOSE:
+00
C
PANIC
En cas de notes ou de commandes bloquées (en provenance
d'appareils externes connectés à l'instrument), presser cette
commande envoie «ALL NOTES OFF» (relâchement de toutes
les notes) à tous les appareils pour rétablir un fonctionnement
normal.
RESTORE
Cette fonction rappelle tous les paramètres initiaux de l'instrument; veuillez noter que toute votre programmation sera du
coup eacée et n'activez donc cette fonction qu'en cas de besoin réel, après avoir sauvegardé tous vos programmes.
STICKS CALIBRATION
Dans la première page de cette fonction d’étalonnage des
sticks, les 3 icônes de stick sont bleues et vous pouvez vérier
leur plage réelle en les poussant à fond des quatre côtés an
d’atteindre les extrémités de leur course sur l’axe correspondant.
Pour étalonner un stick, cliquez dessus : la zone deviendra jaune ; maintenant, déplacez le stick des quatre côtés, en atteignant bien les quatre extrémités de la zone de commande, et
en répétant le mouvement au moins 2-3 fois.
STICKS CALIBRATION:
STICK 1 STICK 2 STICK 3
Une fois la procédure du point 2 eectuée, cliquez à nouveau
sur le stick : la zone deviendra verte, pour conrmer que l’étalonnage est terminé.
SL Controllers by Studiologic®
F
63

GLOBAL / SYSTEM:
GLOBAL / SYSTEM:
La gestion du Firmware
PEDAL PRG +/-
OFF
PED1 +
PED1 -
PED2 +
V 1.6.0
PROGRAM +/-
Cette fonction permet d‘incrémenter ou de décrémenter le
programme SL en cours, en utilisant des pédales à un seul
interrupteur connectées aux prises Ped 1 ou Ped 2; les paramètres disponibles sont:
• OFF: fonction désactivée
• PED1 + en appuyant sur une pédale connectée à PED1
incrémentera le programme actuel d‘un pas en avant
(c‘est-à-dire du programme 001 à 002 et ainsi de suite);
• PED1 - appuyer sur une pédale connectée à PED1
décrémente le programme actuel d‘un pas en arrière
(c‘est-à-dire du programme 002 à 001 et ainsi de suite);
• PED2 + en appuyant sur une pédale connectée à PED2
incrémentera le programme actuel d‘un pas en avant
(c‘est-à-dire du programme 001 à 002 et ainsi de suite);
• PED2 - appuyer sur une pédale connectée à PED2
décrémente le programme actuel d‘un pas en arrière
(c‘est-à-dire du programme 002 à 001 et ainsi de suite);
• PED1 / 2 +/- deux pédales connectées à PED1 et PED2
permettront d‘incrémenter ou de décrémenter le
programme en cours;
• PED1 / 2 EXT avec ce réglage, le SL enverra et recevra les
commandes Data Increment et Data Decrement par la prise
USB in, permettant de contrôler les programmes principaux
depuis les applications logicielles reconnaissant cette
fonction.
COMMON CHANNEL:
016
V 1.6.0
NOTE: lorsque l‘une des fonctions PED 1/2 est activée dans
GLOBAL, les réglages de pédale correspondants de chaque
programme sont remplacés par la fonction Program +/- et la
programmation ZONE est achée en gris; Si vous réglez sur
OFF, les fonctions pédales de la zone d‘origine des pédales
est réactivé.
COMMON CHANNEL
COMMON est un canal MIDI qui permet d‘envoyer ou de
recevoir des commandes générales depuis et vers le SL qui
ne soient pas directement liées à une seule zone; la fonction
devant avoir un canal commun réglé sur l‘un des 16 canaux
MIDI disponibles, est le programme +/-
La sélection du canal COMMON comprend les valeurs suivantes:
• OFF: aucun message de canal commun activé;
• 01/16: canal commun sélectionné (la valeur la plus
couramment utilisée est le MIDI CH 16);
SL Controllers by Studiologic®
64

La gestion du Firmware
Le rmware du SL ne nécessite normalement aucune mise à
jour, à moins qu'une nouvelle version ocielle du rmware
n'ait été publiée par Studiologic. La procédure de mise à jour du
rmware (destinée à améliorer les fonctionnalités principales,
paramètres et/ou le système d'exploitation) et le logiciel dédié
pour mettre à jour votre SL seront mis à disposition sur nos sites
avec toutes les descriptions et instructions nécessaires.
nos sites ociels qui permet de modier tous les paramètres
disponibles dans le SL au moyen d'une interface utilisateur interactive et très intuitive. Lorsque le SL est connecté à l'ordinateur (par USB) et que SL Editor est ouvert, la communication
s'eectue en temps réel et toutes les modications sont transmises directement au SL sans qu'aucune action hors ligne ne
soit nécessaire.
Les copies d'écran ci-dessous sont des exemples des nombreuses fonctionnalités disponibles.
Mise à jour du rmware
SL EditorSL Editor est une application dédiée téléchargeable depuis
Page principale Organisation (ORGANIZE)
Équilibrage des touches (KEY-BALANCE) Courbes du SL (SL-CURVES)
SL Controllers by Studiologic®
F
65

Déclarations
Garantie
Conformité CE
Chaque produit Studiologic de Fatar a été soigneusement fabriqué,
étalonné et testé, et bénécie d'une garantie. Les dommages causés
par un transport, une xation ou une manipulation incorrects ne sont
pas couverts par cette garantie. Toute indemnisation dépassant le
prix de l'appareil est exclue. Pour de plus amples informations, adressez-vous exclusivement à votre revendeur et/ou distributeur local.
Les conditions générales sont celles dictées par le distributeur local/
FATAR srl, Italie.
FATAR Srl
Zona Ind.le Squartabue
62019 Recanati MC Italie
déclare que ce produit est conforme aux directives européennes:
2004/108/CE Directive concernant la compatibilité
électromagnétique
DIN EN 55013 Perturbations radioélectriques des récepteurs de
radiodiusion et de télévision et équipements
associés
DIN EN 55020 Caractéristiques d'immunité électromagnétique
des récepteurs de radiodiusion et de télévision
et équipements associés
Recanati, 20. 05. 2015 Marco Ragni, Président-directeur général
Conformité RoHS
RoHS
compliant
2002/95/EC
Déchets/DEEE
À la pointe du progrès
Marques commerciales
Cette déclaration devient caduque si l'appareil est modié sans approbation.
Ce produit est fabriqué conformément à la directive 2002/95/CE.
L'objectif de la directive 2003/108/CE est, en priorité, la prévention
des déchets d'équipements électriques et électroniques (DEEE), et en
outre, la réutilisation, le recyclage et les autres formes de valorisation
de ces déchets an d'en réduire l'élimination. Merci de nous aider à
garder notre environnement propre.
An d'assurer une qualité maximale, tous les appareils Studiologic
de Fatar sont toujours conçus pour être à la pointe de la technologie,
donc des mises à jour, modications et améliorations sont apportées
sans avis préalable. Les caractéristiques techniques et l'aspect du produit peuvent diérer de ce qui est indiqué dans ce mode d'emploi.
Toutes les marques commerciales utilisées dans ce mode d'emploi
sont la propriété de leurs détenteurs respectifs.
SL Controllers by Studiologic®
66
Copyright
Aucune partie de ce mode d'emploi ne peut être reproduite ou transmise, sous quelque forme ou par quelque moyen que ce soit, sans
l'accord préalable du détenteur des droits d'auteur:
FATAR Srl
Zona Ind.le Squartabue
62019 Recanati, Italie

Appendix
SL88 GRAND
SL88 STUDIO
SL73 STUDIO
Appendix
SL88 Studio by Studiologic® 67

Appendix
Specications
Speciche tecniche
Caractéristiques techniques
Technische Daten
Studiologic SL
Keyboard Number of Keys 88 -73
Type Hammer action with Aftertoch
Grand: TP/40 WOOD
Studio:TP/100LR
Velocity Curves 3 default velocity curves + xed
curve with
programmable value
6 editable user’s velocity curves
Display Type Color graphic LCD - TFT
Resolution 320 x 240
User Interface Rotating Encoder 4 navigation controls +
1 function switch
Function buttons IN/OUT/HOME
Inputs 4 pedals 2 switch + 1 continuous +
1 multi
Connections MIDI In - Out1 - Out 2
USB Midi In/Out, USB to HOST
Power Supply DC IN 9V - 1A
Adapter Input:100-240V
Output: 9V-1A
Weight SL88 Grand; 20,8 Kg / 45,8 lbs
SL88 Studio: 13,7Kg | 30,2 lbs
SL73 Studio: 11,5Kg | 25,3 lbs
Dimensions
Dimensioni
Dimensions
Abmessungen
1260 mm | 49.6”
1040 mm | 41”
310 mm
12,2”
117 mm
4,6”
Design and Specications are subject to change without notice.
Il design e le speciche tecniche sono soggette a modica senza preavviso.
Design et caractéristiques techniques sont sujets à changement sans préavis.
Technische Änderungen vorbehalten.
SL Controllers by Studiologic®
68
 Loading...